

Page 1
M300 Pro GNSS Receiver User Guide
ComNav Technology
User Guide
M300PRO GNSS Receiver
2018 April
Page 2

M300 Pro GNSS Receiver User Guide
II
CONTENTS
1. Introduction .................................................................................................................................. 1
1.1 Safety Information ............................................................................................................... 1
1.2 Warning and Cautions ......................................................................................................... 1
1.3 Use and Care ....................................................................................................................... 1
1.4 Technical Assistance ............................................................................................................ 2
1.5 Your Comments ................................................................................................................... 2
2. Overview ....................................................................................................................................... 3
2.1 Receiver features ................................................................................................................. 3
2.2 Technical specifications ....................................................................................................... 3
2.3 M300Pro Basic Kit ............................................................................................................... 5
3. Setting up the receiver .................................................................................................................. 7
3.1 Guidelines............................................................................................................................ 7
3.1.1 Environmental requirements ................................................................................... 7
3.1.2 Power supply ............................................................................................................ 7
3.1.3 Mounting the antenna ............................................................................................. 7
3.1.4 M300Pro connection view ....................................................................................... 8
3.2 Front Panel .......................................................................................................................... 9
3.2.1 Button functions ....................................................................................................... 9
3.2.2 Status screens......................................................................................................... 10
3.3 Rear connectors ................................................................................................................ 11
4. Receiver configuration through a Web Browser ......................................................................... 12
4.1 Login the configuration page of M300Pro ........................................................................ 12
4.2 Checking the receiver status ............................................................................................. 13
4.3 Receiver Configuration ...................................................................................................... 14
4.3.1 General Config ........................................................................................................ 14
4.3.2 Antenna Setup ........................................................................................................ 15
4.3.3 Base setup .............................................................................................................. 15
4.3.4 Satellite Tracking .................................................................................................... 16
4.3.5 Receiver Utility ....................................................................................................... 16
4.3.6 Running Log ............................................................................................................ 17
4.3.7 Default Language .................................................................................................... 17
4.4 Satellite Information.......................................................................................................... 17
4.5 Data Record ....................................................................................................................... 18
4.5.1 Recording Config .................................................................................................... 18
4.5.2 Data Download ....................................................................................................... 20
4.6 I/O Configuration .............................................................................................................. 21
Page 3

M300 Pro GNSS Receiver User Guide
III
4.6.1 Serial Port Config .................................................................................................... 21
4.6.2 TCP/IP Config .......................................................................................................... 22
4.6.2.1 Direct connection model ..................................................................................... 23
4.6.3 NtripConfig ............................................................................................................. 23
4.7 Internet Service ................................................................................................................. 27
4.7.1 Internet Config ....................................................................................................... 27
4.7.2 Email Client............................................................................................................. 28
4.7.3 Email Alert .............................................................................................................. 28
4.8 Firmware Update .............................................................................................................. 29
4.9 User Management............................................................................................................. 30
5. Programmatic Interface .............................................................................................................. 30
5.1 Frequently used commands .............................................................................................. 31
5.2 Commands related to external devices ............................................................................. 32
5.2.1 Event marker .......................................................................................................... 32
5.2.2 PPS output .............................................................................................................. 33
5.2.3 10 MHz frequency input ......................................................................................... 34
Appendix A:Beidou Coverage and the positioning stability ......................................................... 35
Appendix B:Advantages of Beidou B3 signal ................................................................................ 37
Page 4

M300 Pro GNSS Receiver User Guide
1
1. Introduction
Thank you for choosing the M300Pro GNSS receiver.
This Getting Started Guide will provide useful information about M300Pro. It will also
guide you through your first step of using M300Pro GNSS receiver.
1.1 Safety Information
Before using the receiver, please make sure that you have read and understood this
Getting Started Guide, as well as the safety requirements.
The M300Pro has a built-in internal Lithium battery, and a damaged battery can
cause personal injury or property damage. Please obey the following regulations:
-Be sure that power off M300Pro when delivering
-Do not put the battery in water
-Do not use the damaged battery
-Do not expose the battery to fire or high temperature
-Internal battery can be replaced only at Authorized ComNav distributors.
1.2 Warning and Cautions
An absence of specific alerts does not mean that there are no safety risks involved. A
Warning or Caution information is intended to minimize the risk of personal injury
and/or damage to the equipment.
WARNING-A Warning alerts you to a potential misused or wrong setting of the equipment.
CAUTION- A Caution alerts you to a possible risk of serious injury to your person and/or damage to
the equipment.
1.3 Use and Care
The M300Pro is designed to withstand the rough environment that typically occurs in
the field. However, the M300Pro is high-precision electronic equipment and should
be treated with reasonable care.
Page 5

M300 Pro GNSS Receiver User Guide
2
1.4 Technical Assistance
If you have any question and can’t find the answer that you need in this manual,
please contact your local dealer from which you purchased the M300Pro.
Alternatively, please request technical support using the ComNav Website at:
www.comnavtech.com or technical support email: [email protected].
1.5 Your Comments
Your feedback about this Getting Started Guide will help us to improve it with future
revisions. Please email your comments to: [email protected].
Page 6

M300 Pro GNSS Receiver User Guide
3
Signal Tracking
• 496 channels with simultaneously tracked
Satellite signals
- GPS: L1 C/A code, L1/L2 P code, L2C, L5
- BeiDou: B1, B2, B3(See Appendix A)
- GLONASS: L1, L2
- Galileo: E1, E5-A, E5-B
- QZSS: Reserved
- SBAS: WAAS, EGNOS, MSAS, GAGAN
- Extended NMEA-0183 BDGGA,
GPNTR, GPCDT, GPHPR
• Observations
ComNav binary, BINEX, RTCM3.X,
compatible with major CORS software
(VRS, FKP and iMax).
Data logging
• Loop recording data function
2. Overview
This chapter will introduce the main features, technical specifications and basic kit of
M300Pro receiver.
2.1 Receiver features
The M300Pro is designed as a multi-purpose GNSS receiver for a wide range of
applications. With its powerful integration ability, the M300Pro serves as a key part
of positioning infrastructure, active geodetic network, deformation monitoring
system, machine guidance, harbor construction, land surveying, marine surveying
and in any project that accuracy and reliability matter the most.
With all communication ports and interfaces available in the front panel, the
M300Pro is ready to track all constellation signals in any mode. External GNSS
antenna design makes the receiver easy and safe to operate in various kinds of
environment.
With its advanced dynamic acquisition ability and high accurate carrier phase
algorithm, the high dynamic processing engine enhances the reliability and
consistency of survey in challenging environments for GNSS signal tracking.
The M300Pro is based on IP and ready for GNSS Cloud Computing. Easily configured
by an advanced built-in web server, the M300Pro supports all the GNSS standards
such RTCM, NTRIP, RINEX, NMEA. New and existing GNSS positioning infrastructures
(GNSS Networks and CORS) will benefit of such plug-and-play architecture. Powered
by RTK and E-RTK processing on-board for positioning and integrity monitoring, the
M300Pro is designed for professionals engaged in high-precision positioning projects.
2.2 Technical specifications
Page 7

M300 Pro GNSS Receiver User Guide
4
• Advanced multipath mitigation technology
• Low noise carrier phase measurements
with <1 mm
precision in a 1 Hz bandwidth
• High precision multiple correlates for
GNSS
pseudo range measurements
• Signal Noise Ratios reported in dB-Hz
Time Precision
• GPS+Glonass+Beidou 10ns
Positioning Specifications
• Post Processing Static
- Horizontal: 2 mm + 0.5ppm RMS
- Vertical: 4 mm +0.5 ppm RMS
• Single Baseline RTK(<30KM)
- Horizontal: 8 mm + 1 ppm RMS
- Vertical: 15 mm + 1 ppm RMS
• Network RTK
- Horizontal: 8 mm +0.5 ppm RMS
- Vertical: 15 mm + 0.5 ppm RMS
• E-RTK
- Horizontal: 0.2 m +1 ppm RMS
- Vertical: 0.4 m + 1 ppm RMS
• DGPS : 0.5 m 3D RMS
• SBAS : 1 m 3D RMS
• Standalone : 1.5 m 3D RMS
Communications
• 3 Lemo Ports
- 1 Lemo port(2 pin): power supply and
battery charging
- 2 Lemo ports(7 pin): USB UART port,
system
debugging and static data download;
RS485 Protocol
configuring and connecting with external
supports long time record
• Data logging frequency, maximum
50Hz
• Storage capacity
- 32 GB internal memory
- 1TB External memory maximum
• File format
- Rinex 3. X or 2.X or ComNav binary
format
• File log session
- Days or hours can be set by user
• Data transfer
- FTP access download directly
Physical
• Size (L x W x H): 202mm x 163mm x
75mm
• Weight: 2.4 kg
• Case: Rugged and light high
performance metal
Environmental
• Operating temperature: -40°C to
+80°C
• Storage temperature: -45°C to +85°C
• Humidity: 100% no condensation
• Water proof and dust proof: IP67,
survives the temporary
immersion to a depth of 1 m
• Shock: rugged aluminum case plus
plastic ring seal, designed to
survive a 1m drop onto concrete
Electrical
•Power consumption: 3.5W
•External power input:9.5-15 VDC,
with over-voltage protection
•Integrated 17.6Ah Li-ion battery, 30
Page 8

M300 Pro GNSS Receiver User Guide
5
device(meteorological
sensor/barograph/inclinometer)
• 1 DB9 male port
- Standard RS232 protocol
• 1 Standard USB port,
- Connect with external storage card
• 1 RJ45 LAN Ethe17rnet port (10/100M
Bit) supports
protocols HTTP, HTTPS, TCP/IP, UDP,
FTP, NTRIP
• 3 SMA male connectors
- 1 PPS output
- Event input
- Reserve for WLAN and Bluetooth
• 2 TNC connectors
- GNSS Antenna connector
- Frequency-marker oscillator input
connector
Data Format
• Correction data I/O:
- RTCM 2.x, 3.x, RTCM3.2, MSM4,
MSM5, CMR (GPS only), CMR+(GPS only)
• Positioning data outputs:
- ASCII: NMEA-0183 GSV, RMC, HDT,
VHD, GGA, GSA, ZDA,
VTG, GST, PJK, PTNL
hours continuously working
Antenna
• AT330 GNSS Geodetic Antenna
• AT500 GNSS Choke Ring Antenna
User Interface
• Button and front LCD panel
- 5 functional buttons on the left and 3
buttons on the right
- LCD panel shows the status and
setting
• ComNav M300 Pro Web Server
M300 Pro
Specifications subject to change
without notice.
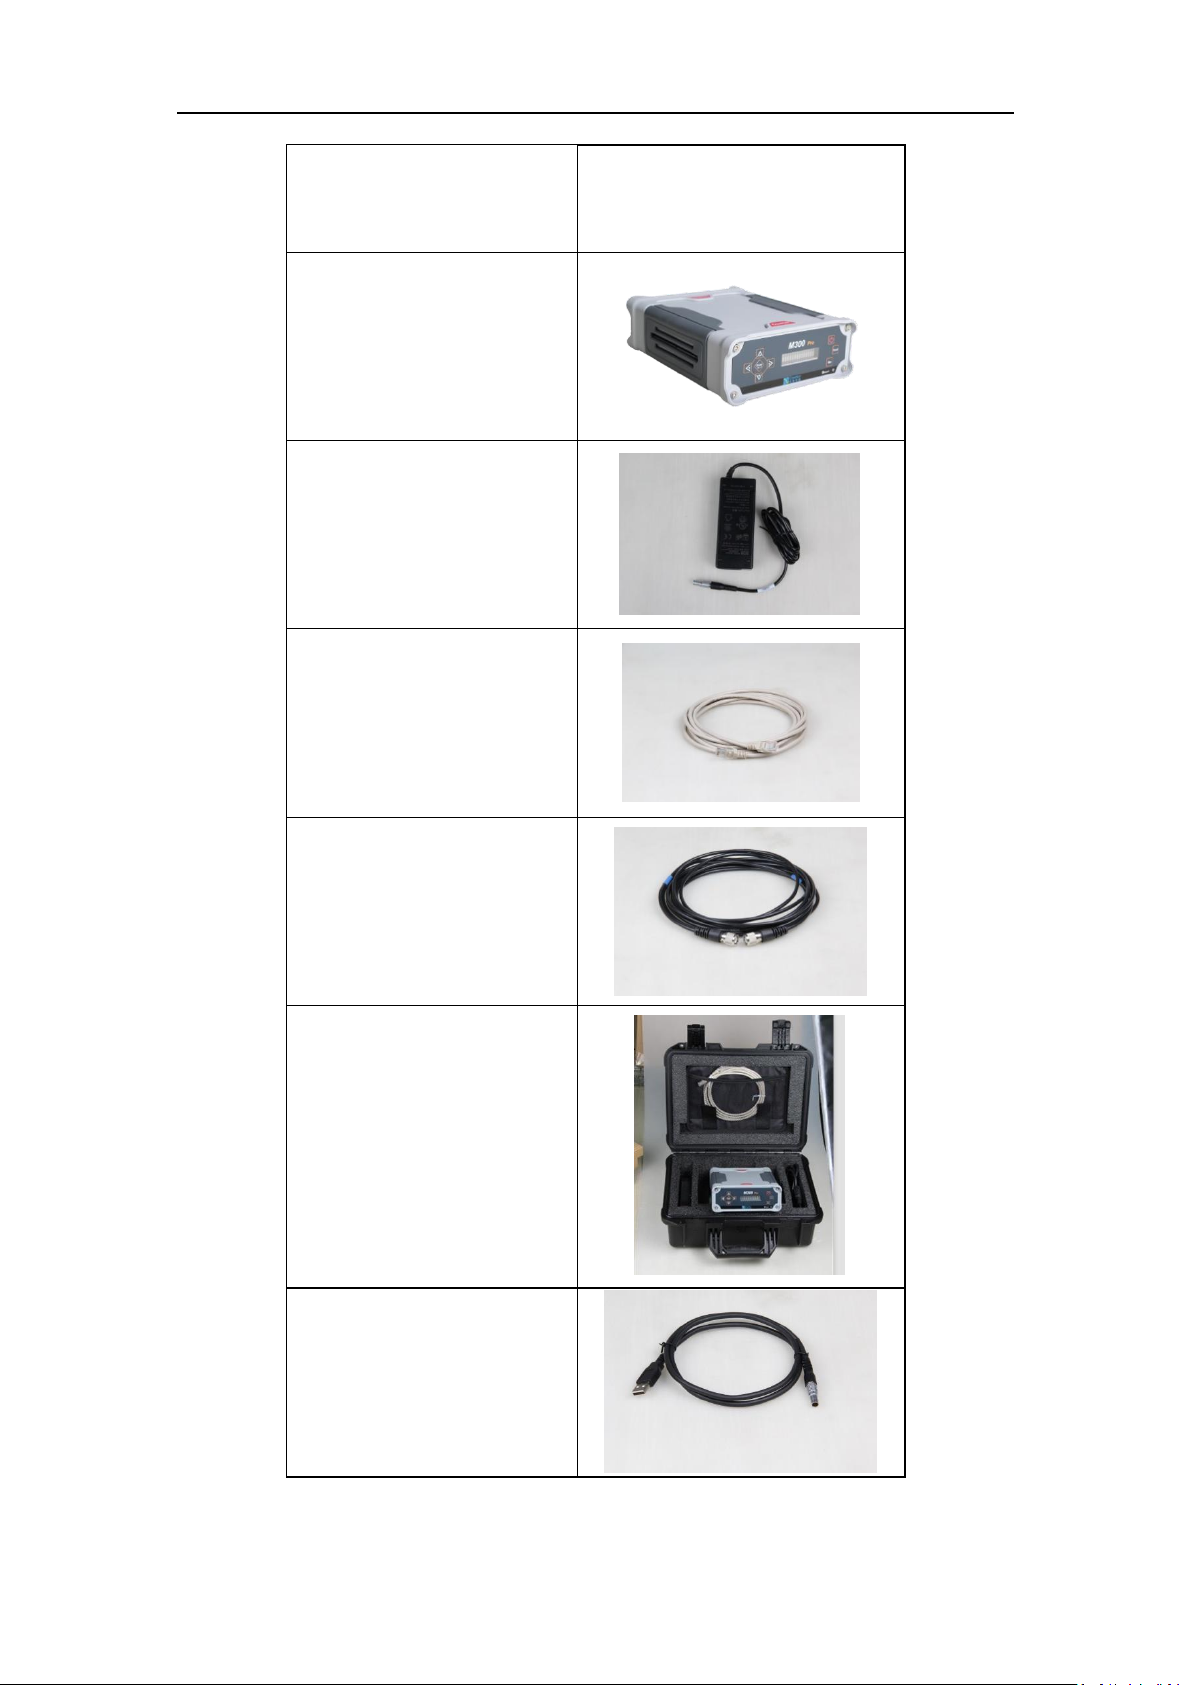
2.3 M300Pro Basic Kit
The table below provides an overview of items included in the M300Pro basic Kit.
Page 9
M300 Pro GNSS Receiver User Guide
6
Items
Picture
M300Pro GNSS Receiver
Charger
Network Cable
GNSS Antenna Cable/
Special cable can be
provided if you require
Transport Case
Lemo to USB cable
Page 10
M300 Pro GNSS Receiver User Guide
7
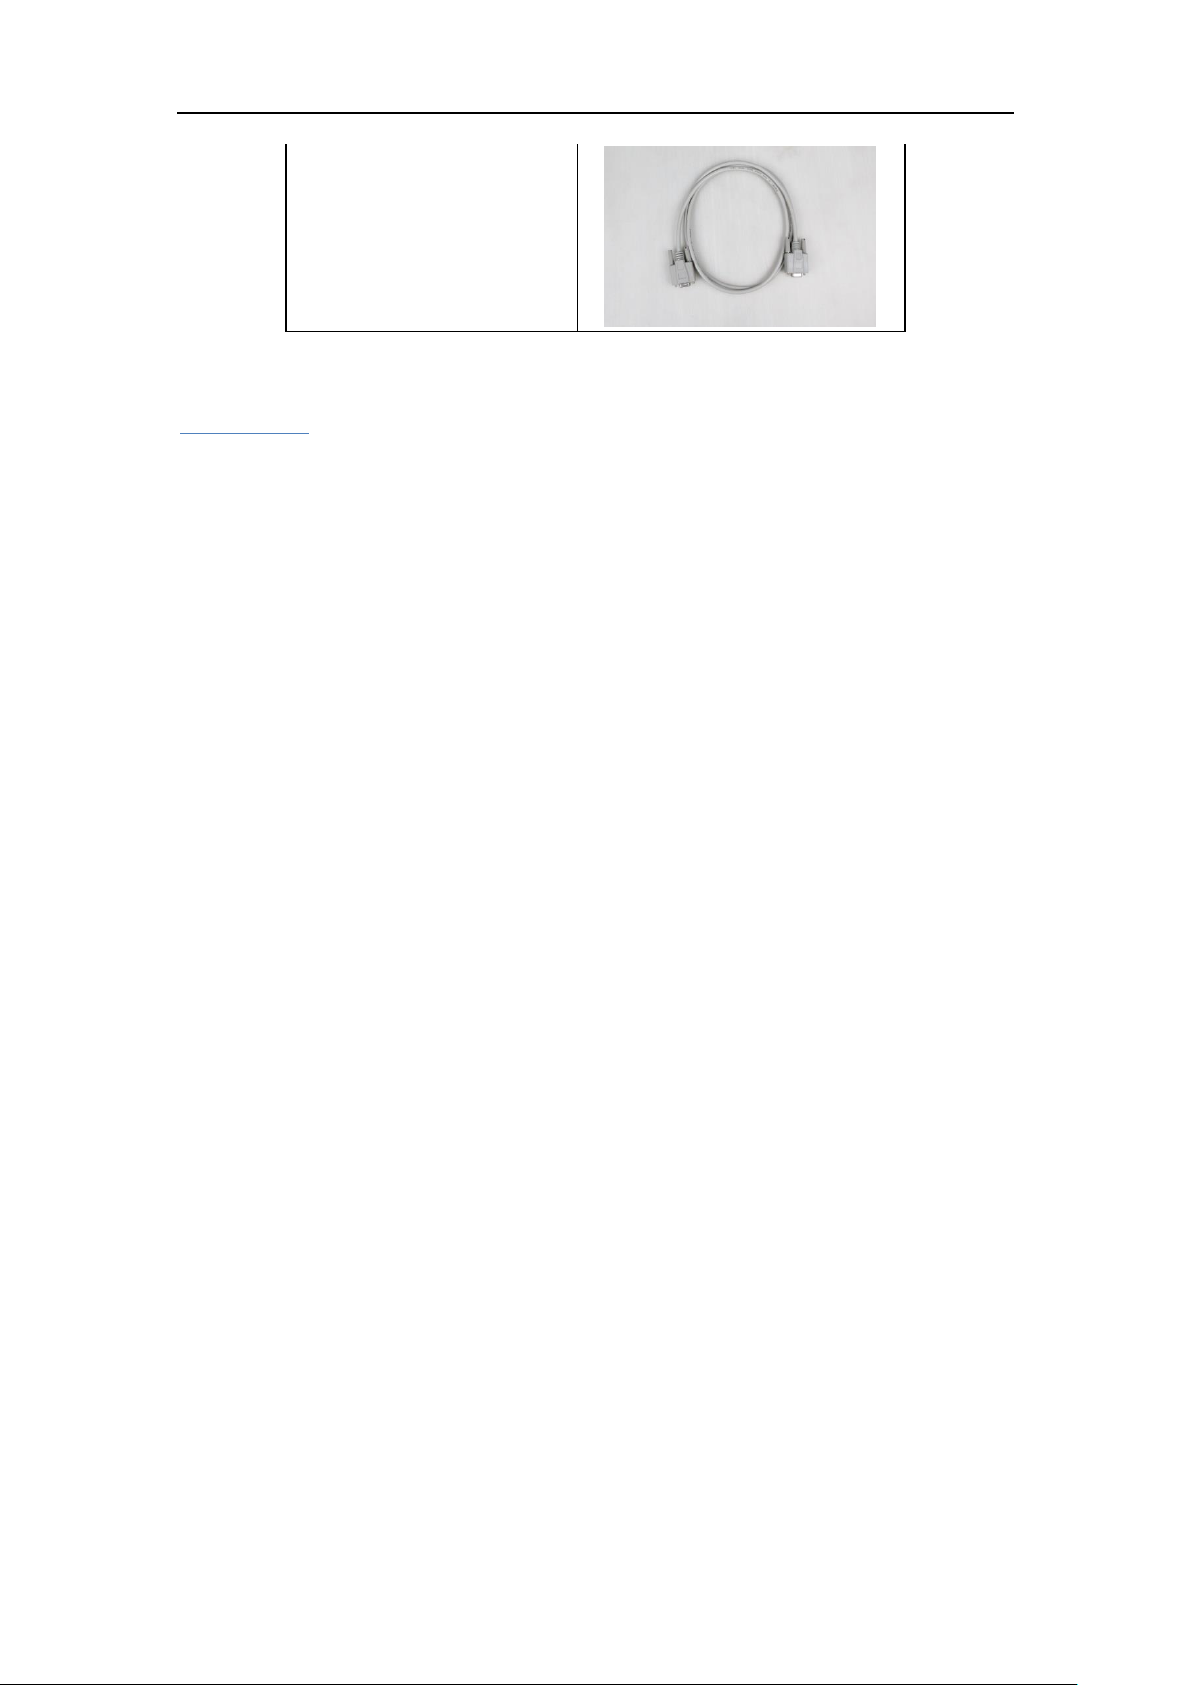
Double Female DB9 Serial
Port Cable
ComNav also supply various types of antennas, for additional introduction please see
chapter 3.1.3.
3. Setting up the receiver
3.1 Guidelines
Please follow these guidelines when setting up your receiver.
3.1.1 Environmental requirements
To keep the receiver with a reliable performance, it is better to use the receiver in
safe environmental conditions.
• Operating temperature: -40°C to +80°C
• Storage temperature: -45°C to +85°C
• Out of corrosive fluids and gases
3.1.2 Power supply
The M300Pro has a built-in internal Lithium battery, which can work for up to 16
hours. If you set M300Pro as a permanent site (reference station), a uninterruptible
power supply (UPS) is recommended to protect receivers from power surges and
power outage.
3.1.3 Mounting the antenna
Choosing the optimal location for the GNSS antenna is critical to the performance
quality of your M300Pro receiver. Poor or incorrect placement of the antenna may
impact the accuracy and reliability of observation, resulting a degraded performance
of normal operation.
Follow these guidelines to select the antenna location:
If the application is mobile / kinematic, place the antenna on a flat surface
Page 11
M300 Pro GNSS Receiver User Guide
8
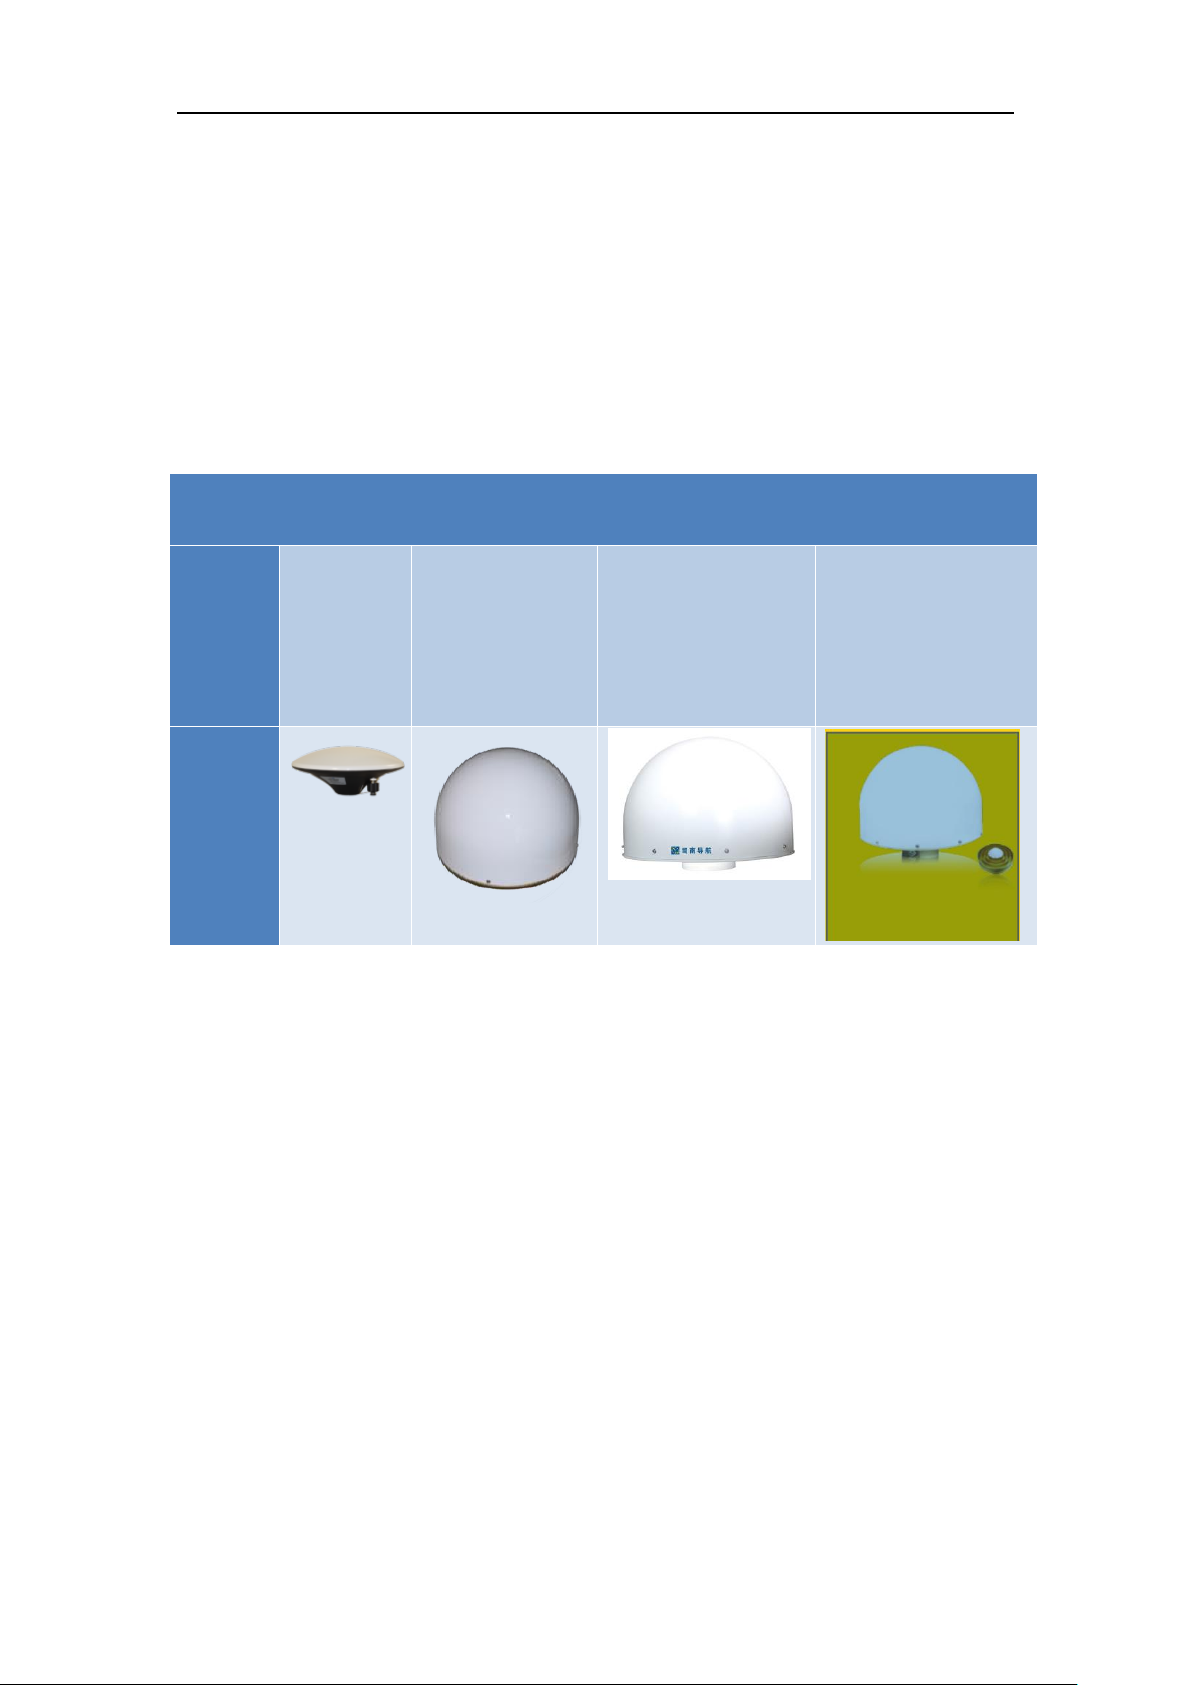
Antenna
type
AT330
AT350
AT500
AT500 3D
Descripti
on
Geodetic,
Mobile
survey,
machine
control
Mini chock ring
GNSS antenna,
mainly used as
monitoring
Chock ring antenna,
high accuracy
geodetic antenna,
CORS station
antenna
Chock ring antenna,
very high accuracy,
national CORS
reference station
antenna
Picture
along the centerline of the vehicle.
Choose an area with open view to the sky and far from metallic objects.
Avoid areas with high vibration, excessive heat, electrical interference or
strong magnetic fields.
Avoid mounting the antenna close to electrical cables, metal masts and
generally close to other antennas
AT-series antenna is recommended, if use other kinds of antenna please check the
specifications with the ComNav support team.
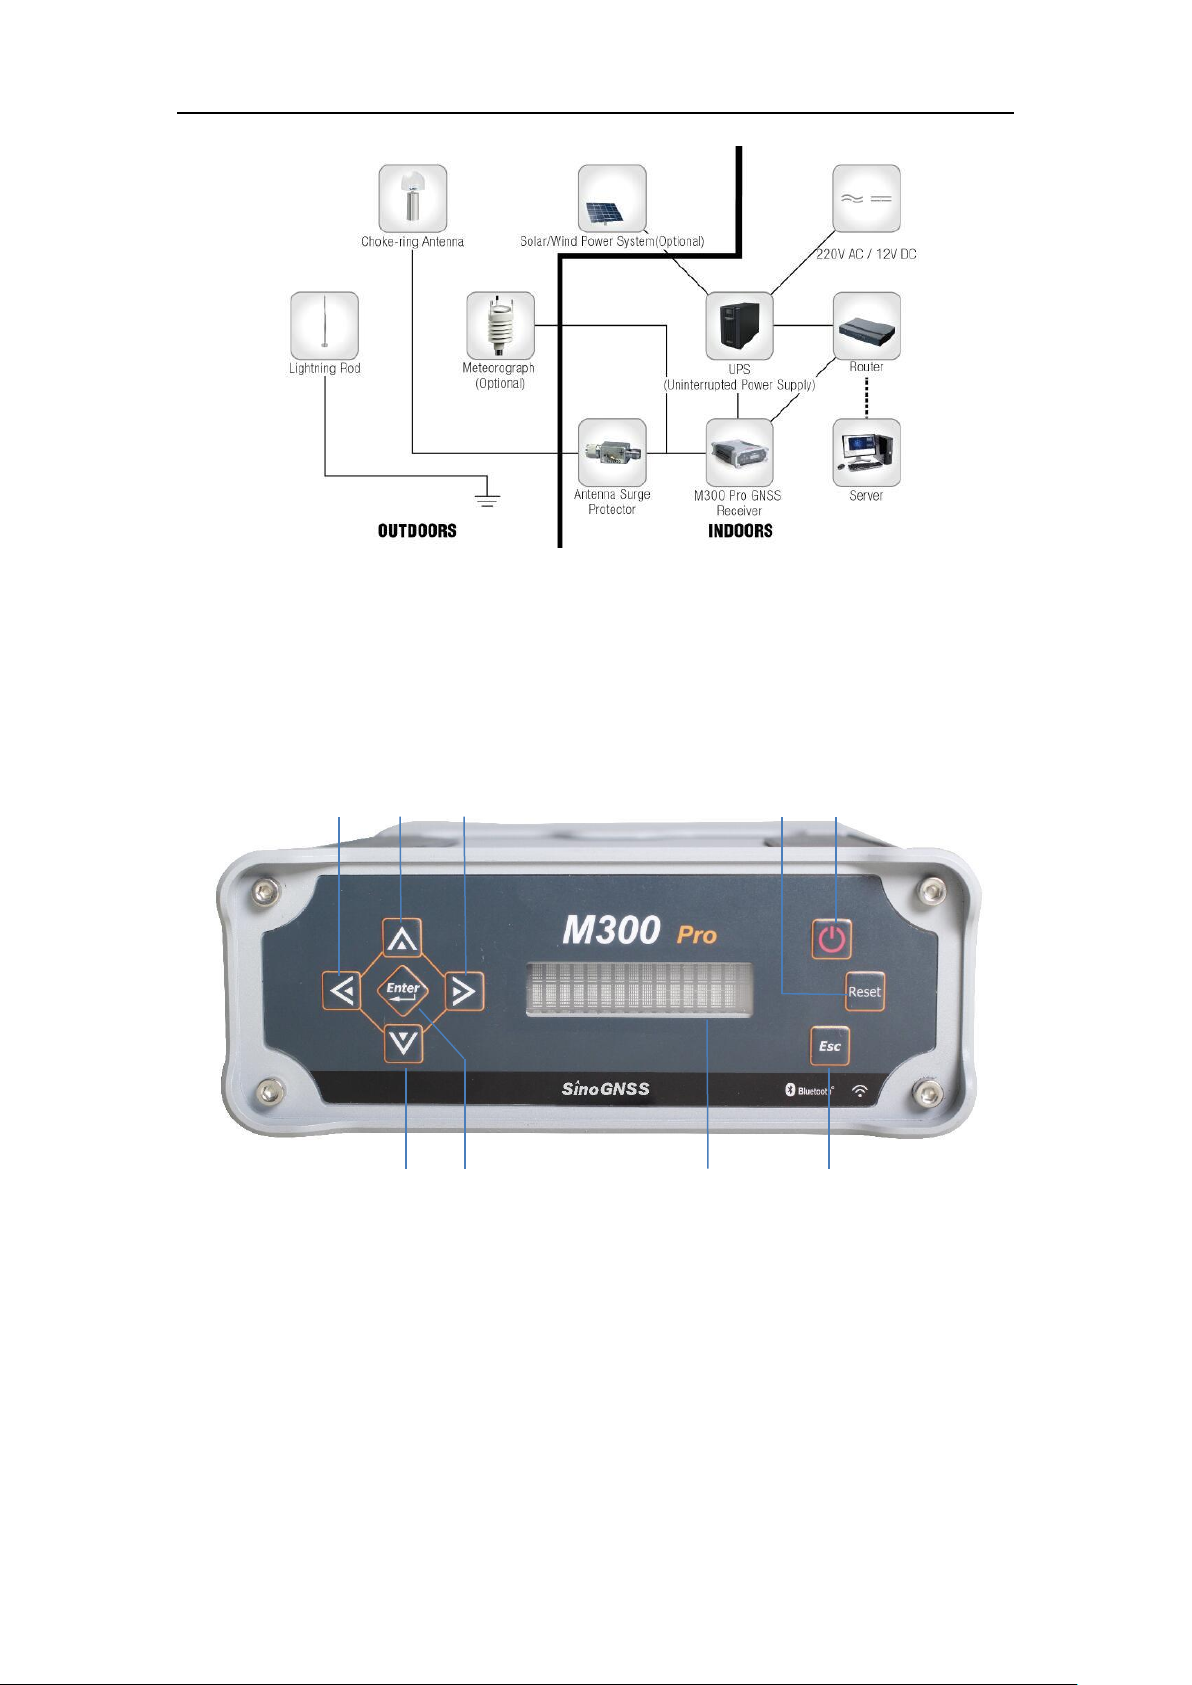
3.1.4 M300Pro connection view
M300Pro is mainly used as a CORS reference station, the below figure explains the
connection of each equipment. The GNSS antenna and lighting rod are fixed on the
ground or top of building, inner devices including the M300Pro, the power supply
and internet, are settled in the office.
Page 12
M300 Pro GNSS Receiver User Guide
9
③ ② ① ⑦ ⑧
⑨ ⑥ ⑤
④
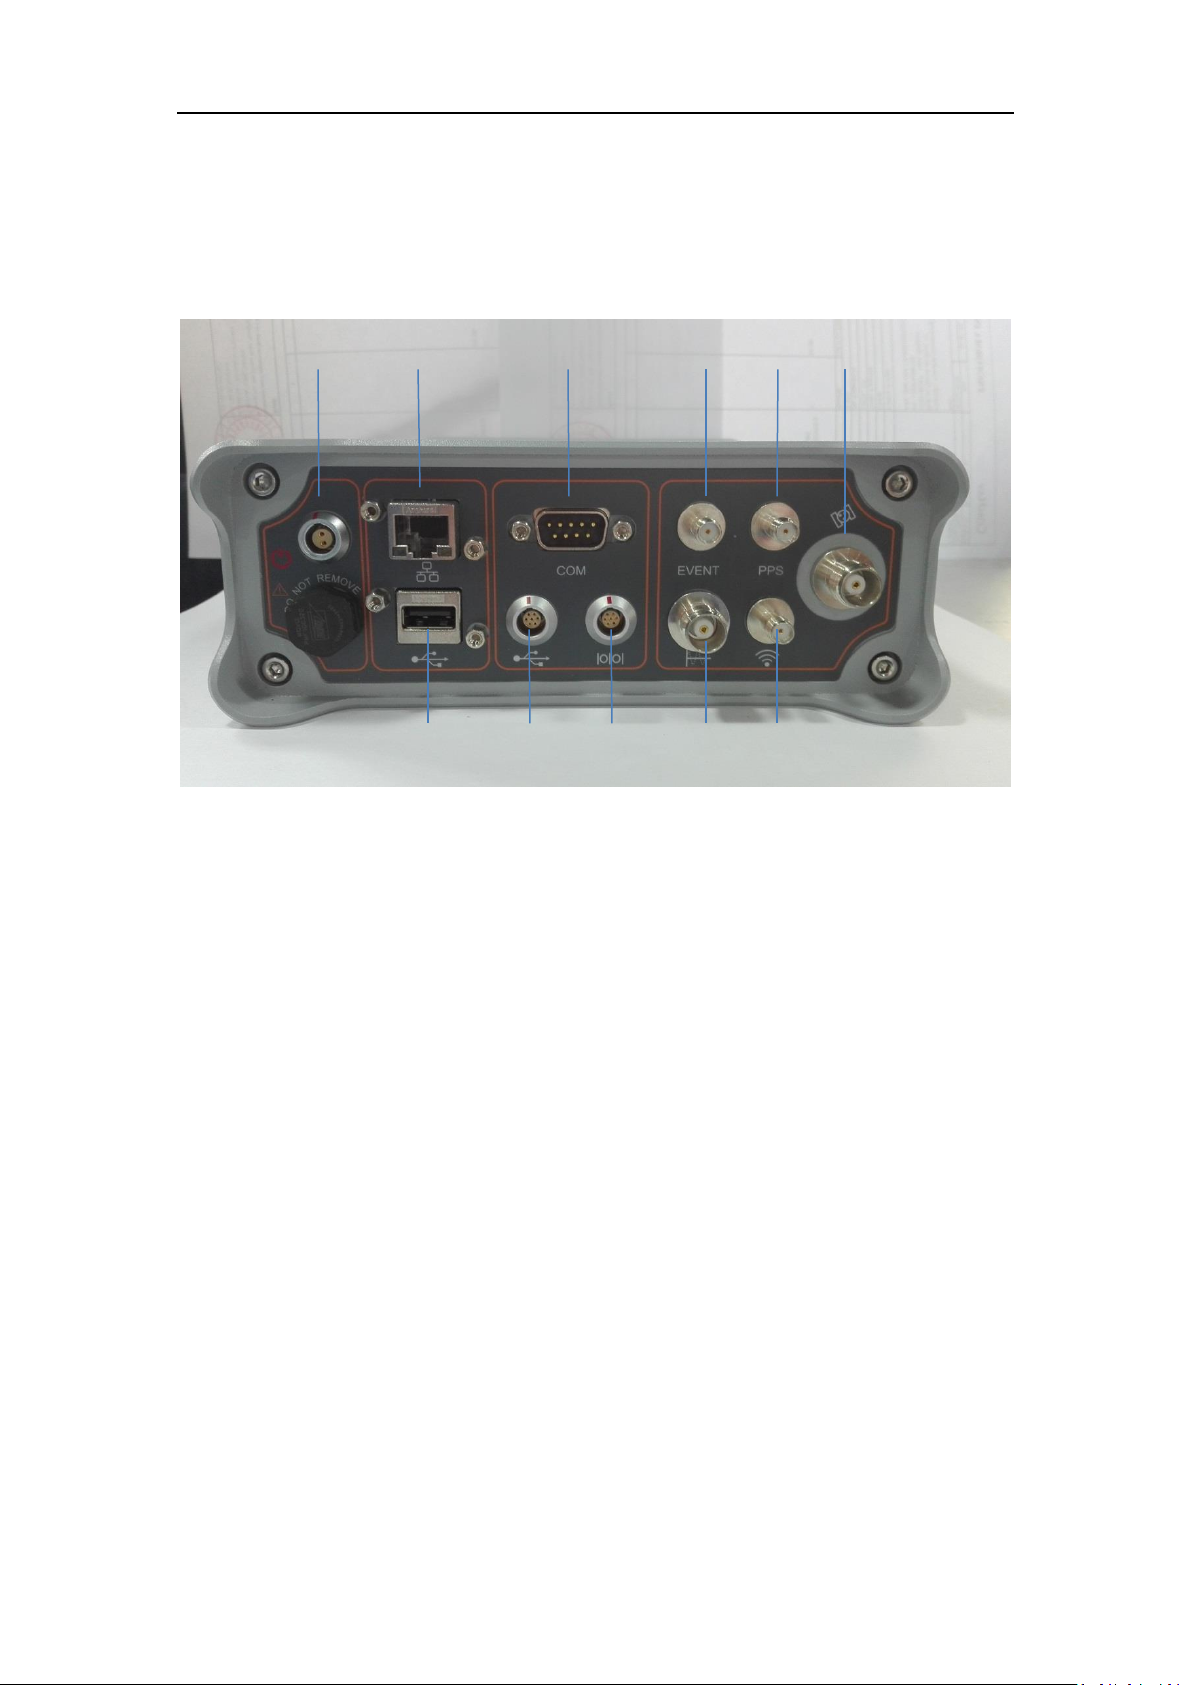
3.2 Front Panel
You can do some basic settings for receivers including IP, port, storage mode and
check the receiver status, such as the version, SN number, current position, residual
memory and power etc.
3.2.1 Button functions
①~④Direction button
Switch the page of display screen and modify settings
⑤Enter button
Press it to confirm your configuration
⑥Display Screen
Display the basic configuration information
⑦Reset button(Reserved)
Make the receiver to recover to factory default settings.
Page 13

M300 Pro GNSS Receiver User Guide
10
⑧Power button
Turn on or off the receiver
Receiver is turned on automatically when connecting with the power charger.
Without the power supply, press the power button to turn on the receiver
with screen display【M300 pro System Init…】.
To turn off the receiver, please hold power button down for 3 seconds, the
display shows【Power Off?】, press Enter button to select Yes, press Esc button
to select No.
⑨Cancel button
Cancel the modification setting.
3.2.2 Status screens
To review and change the receiver’s settings, press direction button to display status
screens. There are 13 status screens showing the following information:
Home screen: the number of satellites, the battery level and internal storage.
In power-saving mode, the display screen will go dark If non-operation for a
short time. Press any button to reactivate the screen.
Latitude and longitude
PDOP, and height values
Receiver serial number
Receiver version
Expired date
Configurable items
Receiver local IP address
Receiver default gateway
Current subnet mask
Auto IP
HTTP, FTP port
Storage setting and format SD
Default and reset settings
To change the above settings, using left and right buttons to move the cursor, up and
down buttons to change the setting.
Page 14
M300 Pro GNSS Receiver User Guide
11
⑥
⑩ ⑪ ⑨ ⑧ ⑦
⑤ ④ ③ ② ①
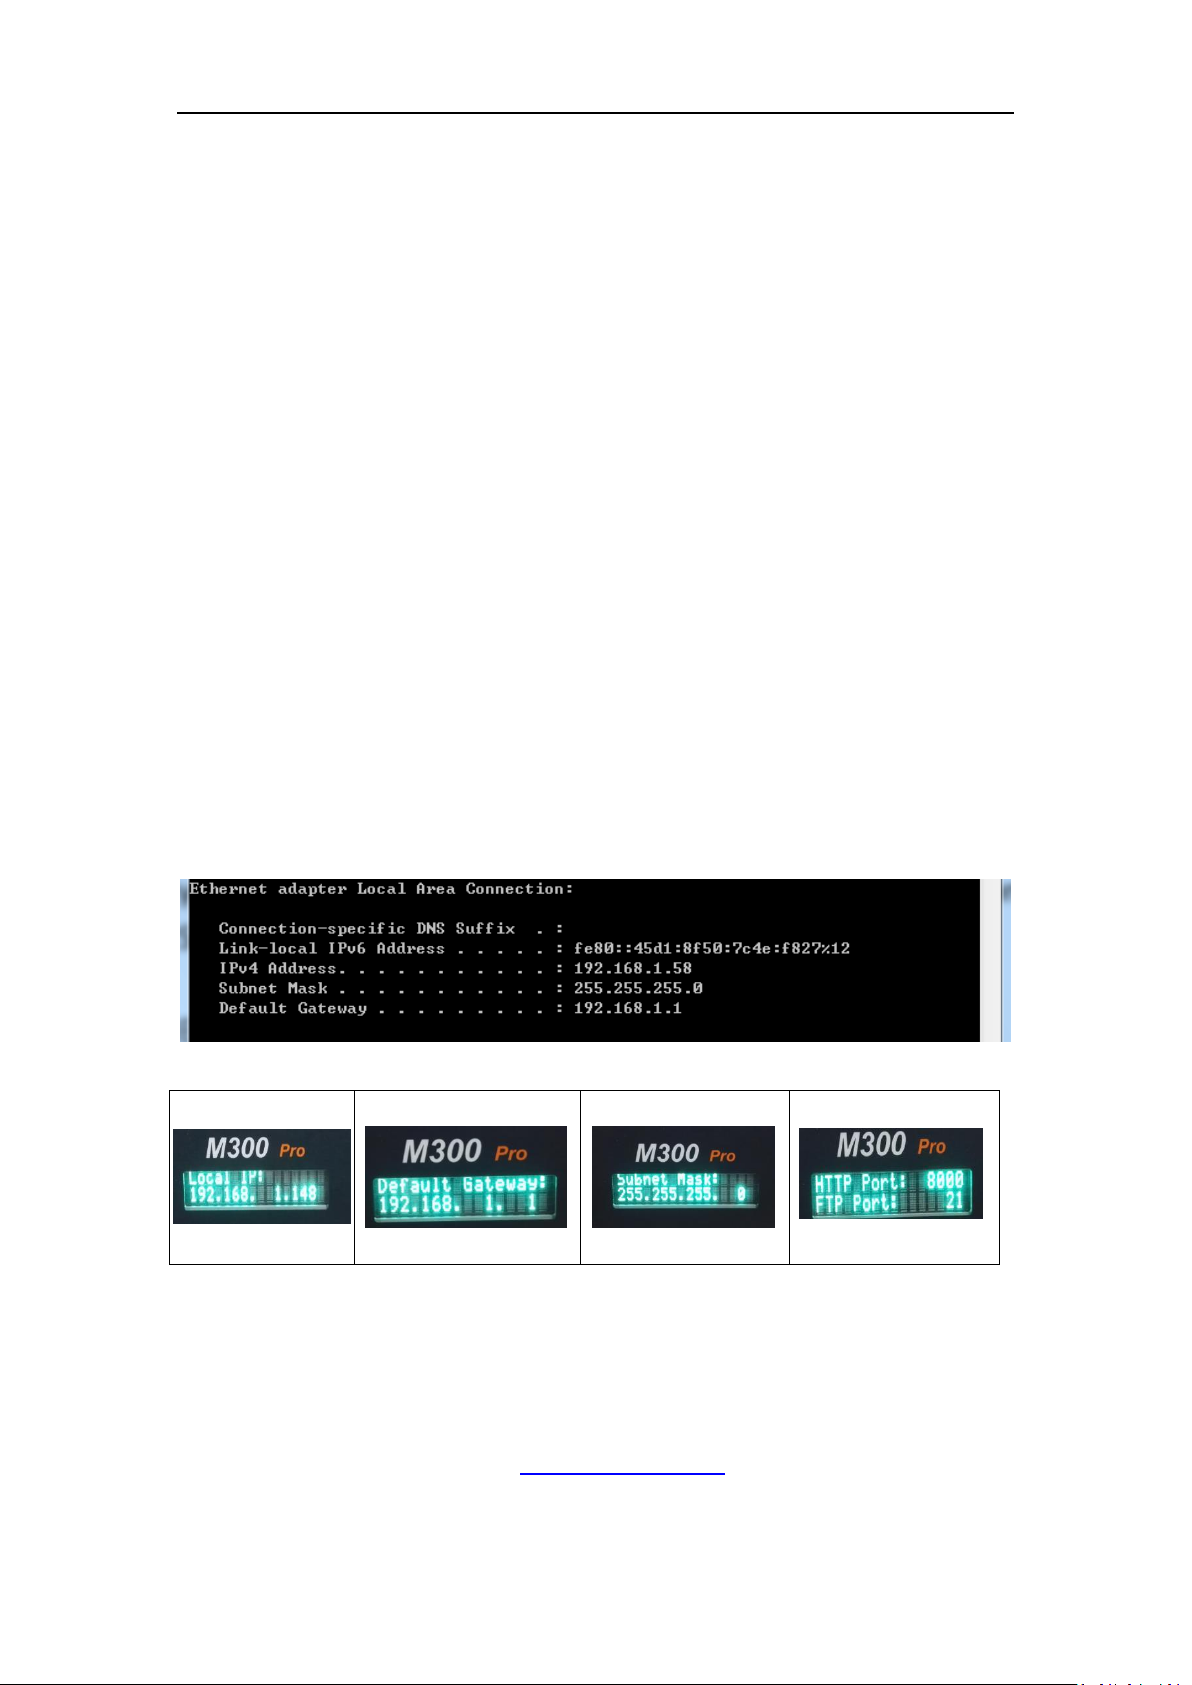
3.3 Rear connectors
All connectors are located on the back of the receiver, you can connect other
external devices through these connectors.
① Power Supply and Battery Charge Port
Port for external power supply, and internal Battery charging of the receiver
② Ethernet Port
Connect to internet
③ Com1 Port of Main Board (RS232 port)
Control the mainboard and request data from this port
④ EVENT Signal Connector
Access Event signal trigger and can be configured through a web browser
⑤ PPS Connector
Output PPS signal and can be configured through the web browser
⑥ GNSS Antenna Connector
Connect to the GNSS antenna
⑦ USB
Connect to external USB drive for external data logging
⑧ Lemo to USB Data Download Connector
Connect with PC to download raw data from the internal memory
⑨ Com2 Port of Main Board
Connect with Meteorological sensor, RS-485 communication protocol; receive and
save meteorological data in RINEX format
Page 15
M300 Pro GNSS Receiver User Guide
12
⑩ 10 MHz frequency input
10MHz external frequency input, Used for precision timing
⑪WIFI Antenna connector(Reserved)
4. Receiver configuration through a Web Browser
M300Pro has the advanced built-in web server, you can access the web setting page
and do configurations remotely. This section describes how to change receiver’s
settings through a web server.
4.1 Login the configuration page of M300Pro
The M300Pro receiver can connect to an Ethernet network through its Ethernet port.
It means that you can configure and monitor the receiver’s settings without serial
cable connection.
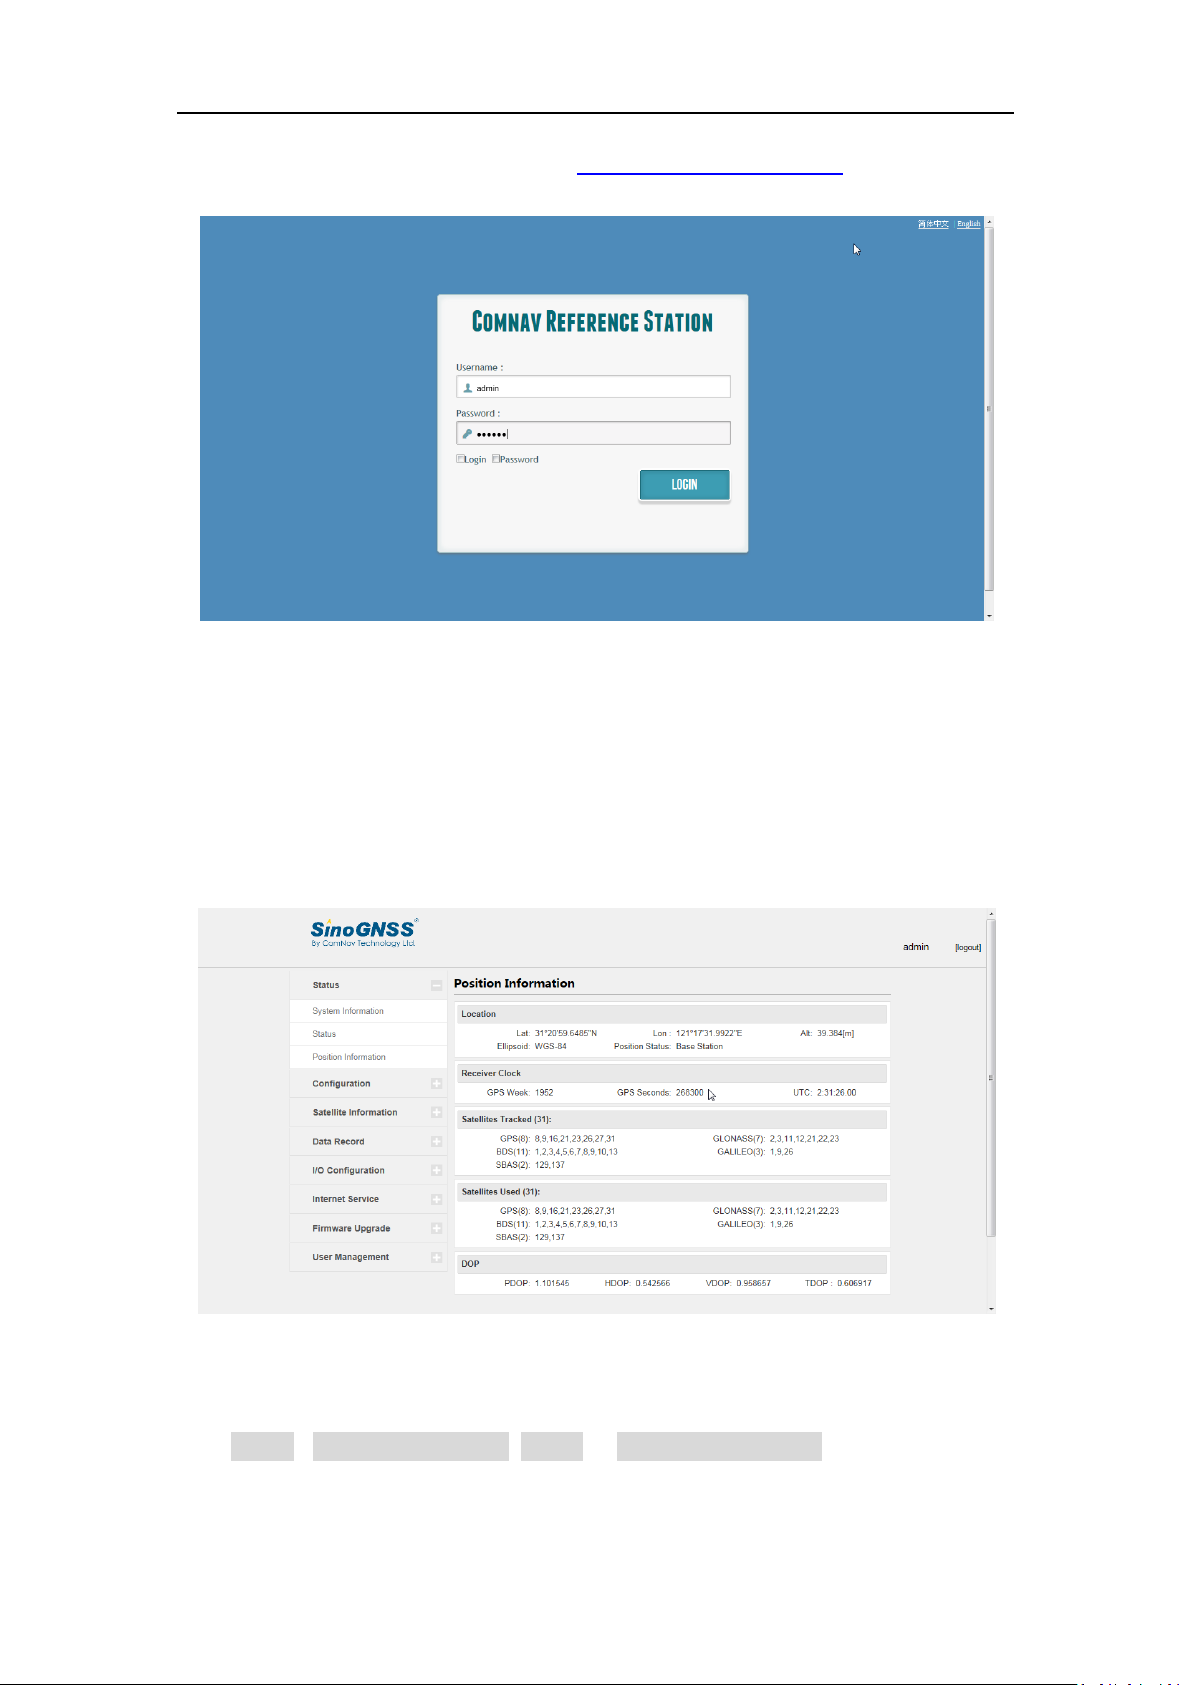
1. Firstly, make sure that the M300Pro and your computer are within the same
Local Area Network (LAN). Then change your receiver’ IP address through the
front panel based on your office computer. For example IP address in your
computer:
IP address of M300Pro:
2. Enter the IP address and HTTP port of the receiver into the address bar, you will
access the configuration page of M300Pro.The default setting for the HTTP port
is 80, which is the standard port for web servers. However, HTTP port need to be
changed in some cases.
For example, using default port 80:http://192.168.1.148
If your receiver has a port other than 80, you must enter the IP address followed by
Page 16
M300 Pro GNSS Receiver User Guide
13
port number. As example showed above: http://192.168.1.148:8000
3. Enter the default login settings to access the main page:
Username: admin
Password: admin
After accessing the main page, configuration menus are listed on the left, and
receiver’s settings on the right. Each configuration menu will be demonstrated in the
following sections.
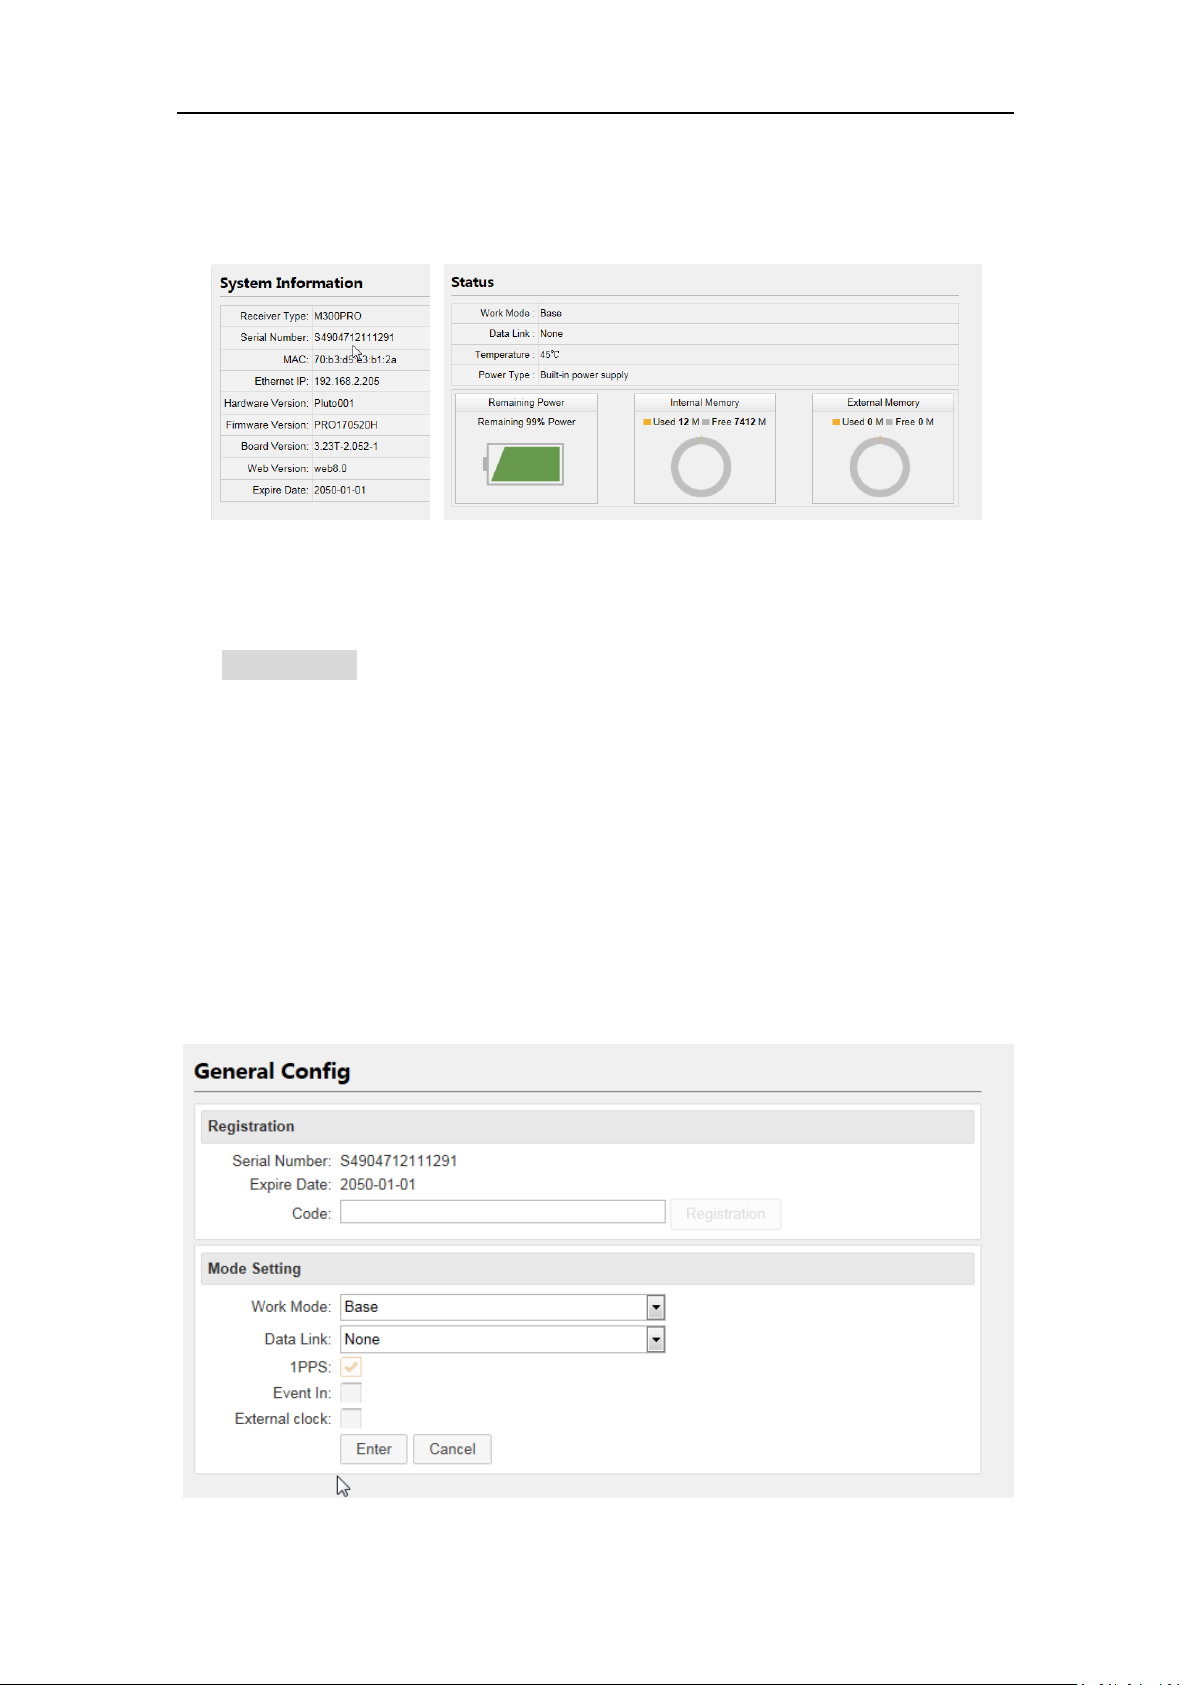
4.2 Checking the receiver status
Click Status->System Information, Status or Position information, you can check the
corresponding receiver status, including:
System information: IP address, SN, Firmware Version, Web Version etc.
Page 17
M300 Pro GNSS Receiver User Guide
14
Status: work mode (Base, Rover or Single point positioning), Disk Capacity etc.
Position Information: GNSS constellation system tracked etc.
4.3 Receiver Configuration
Use configuration menu to do basic configurations of your receiver.
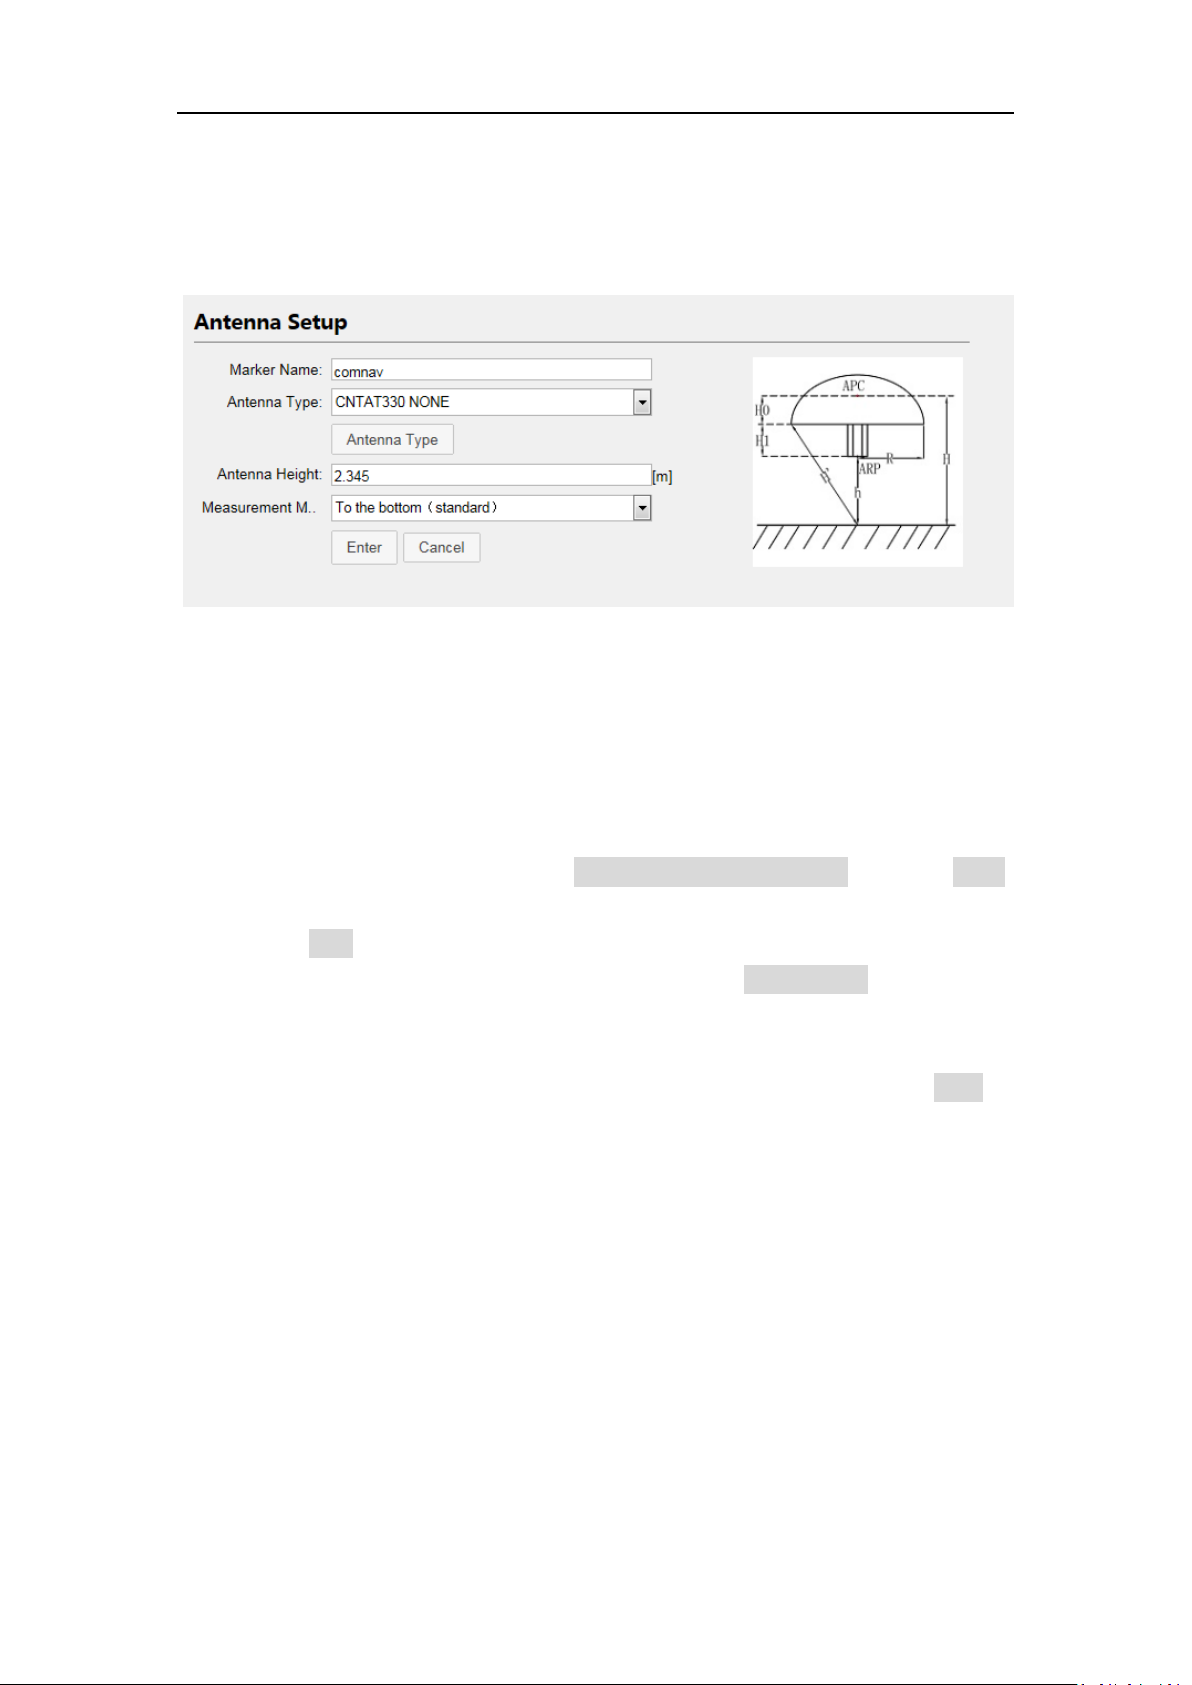
4.3.1 General Config
There are 2 work modes you can choose:
Base station: configure the receiver as a Base station, you can change its
settings in Base Setup menu
Rover: setting the receiver as a rover, and Base Setup menu is not available
for rover mode.
Also, active the external input/output as 1pps, please enable Event Marker and
External clock only when the external clock or events are connected.
Page 18
M300 Pro GNSS Receiver User Guide
15
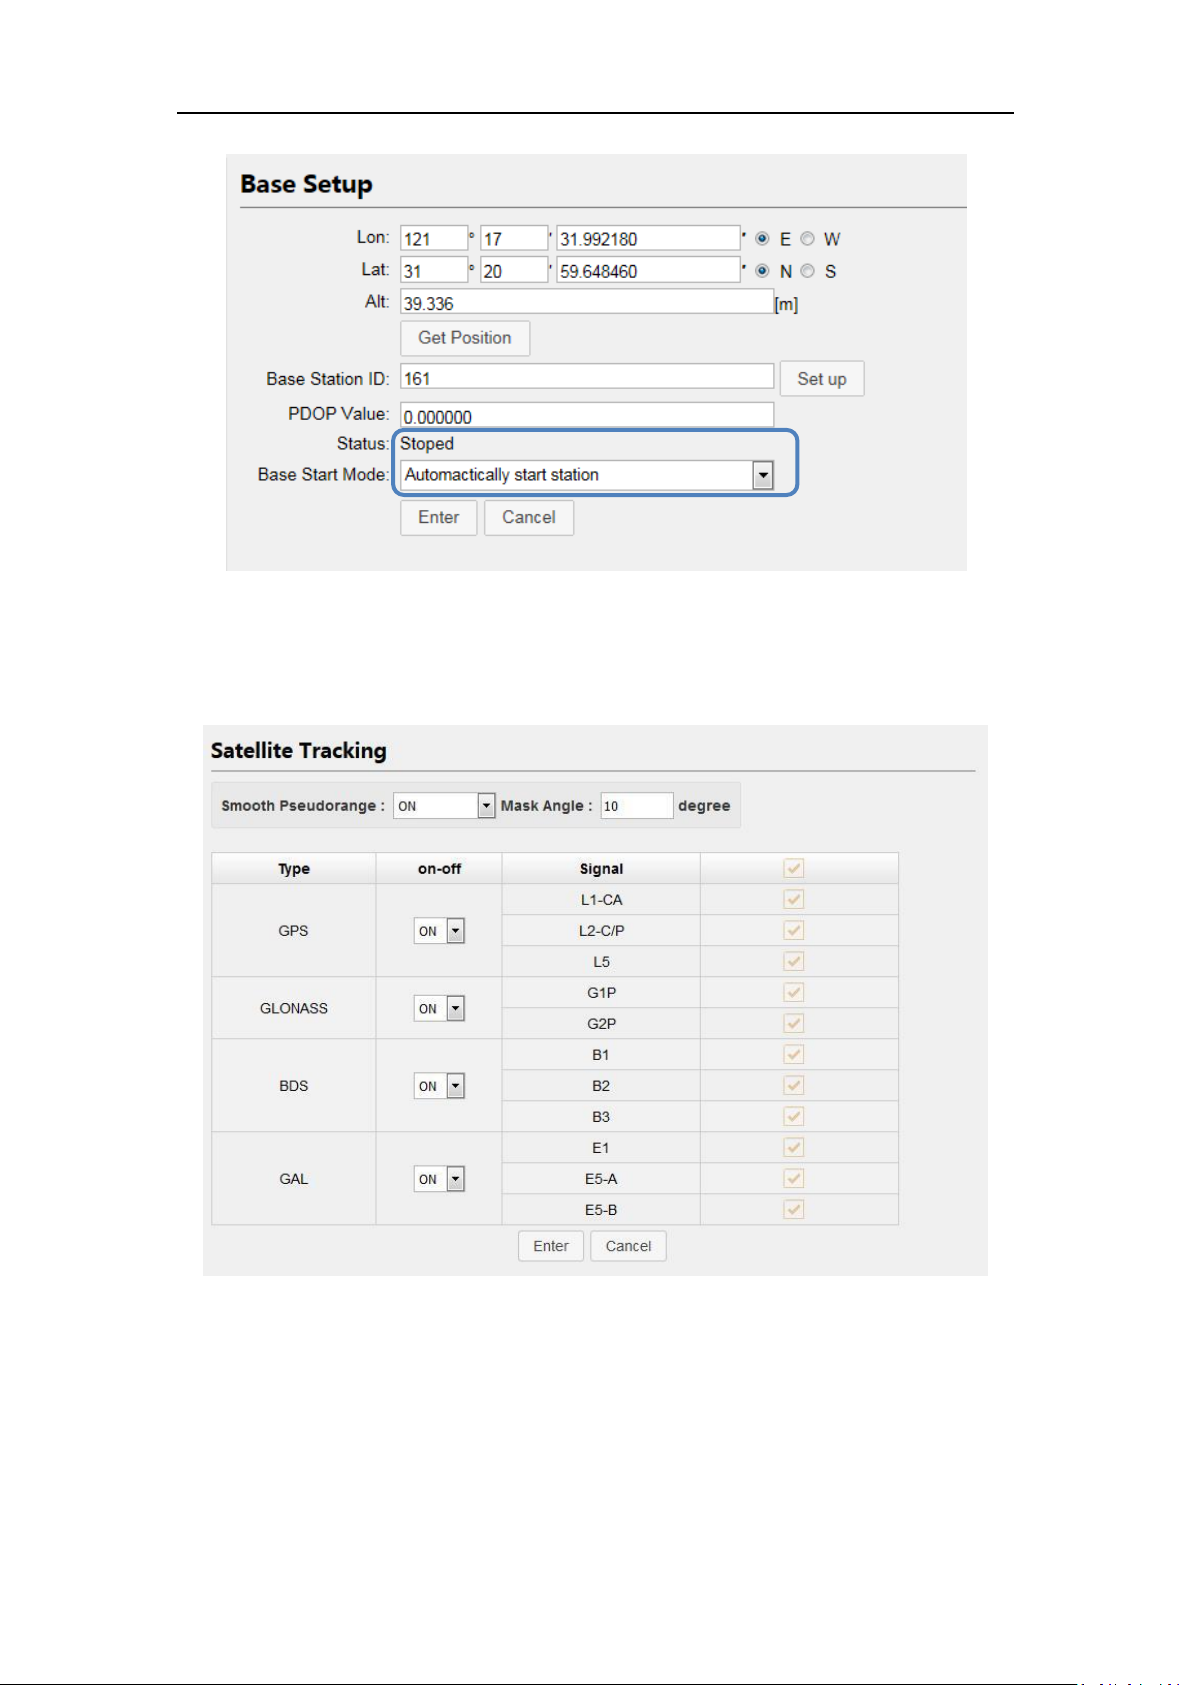
4.3.2 Antenna Setup
Enter the proper values of marker name and antenna height (height limited 0 to
6.5535m), select the antenna type and measurement method.
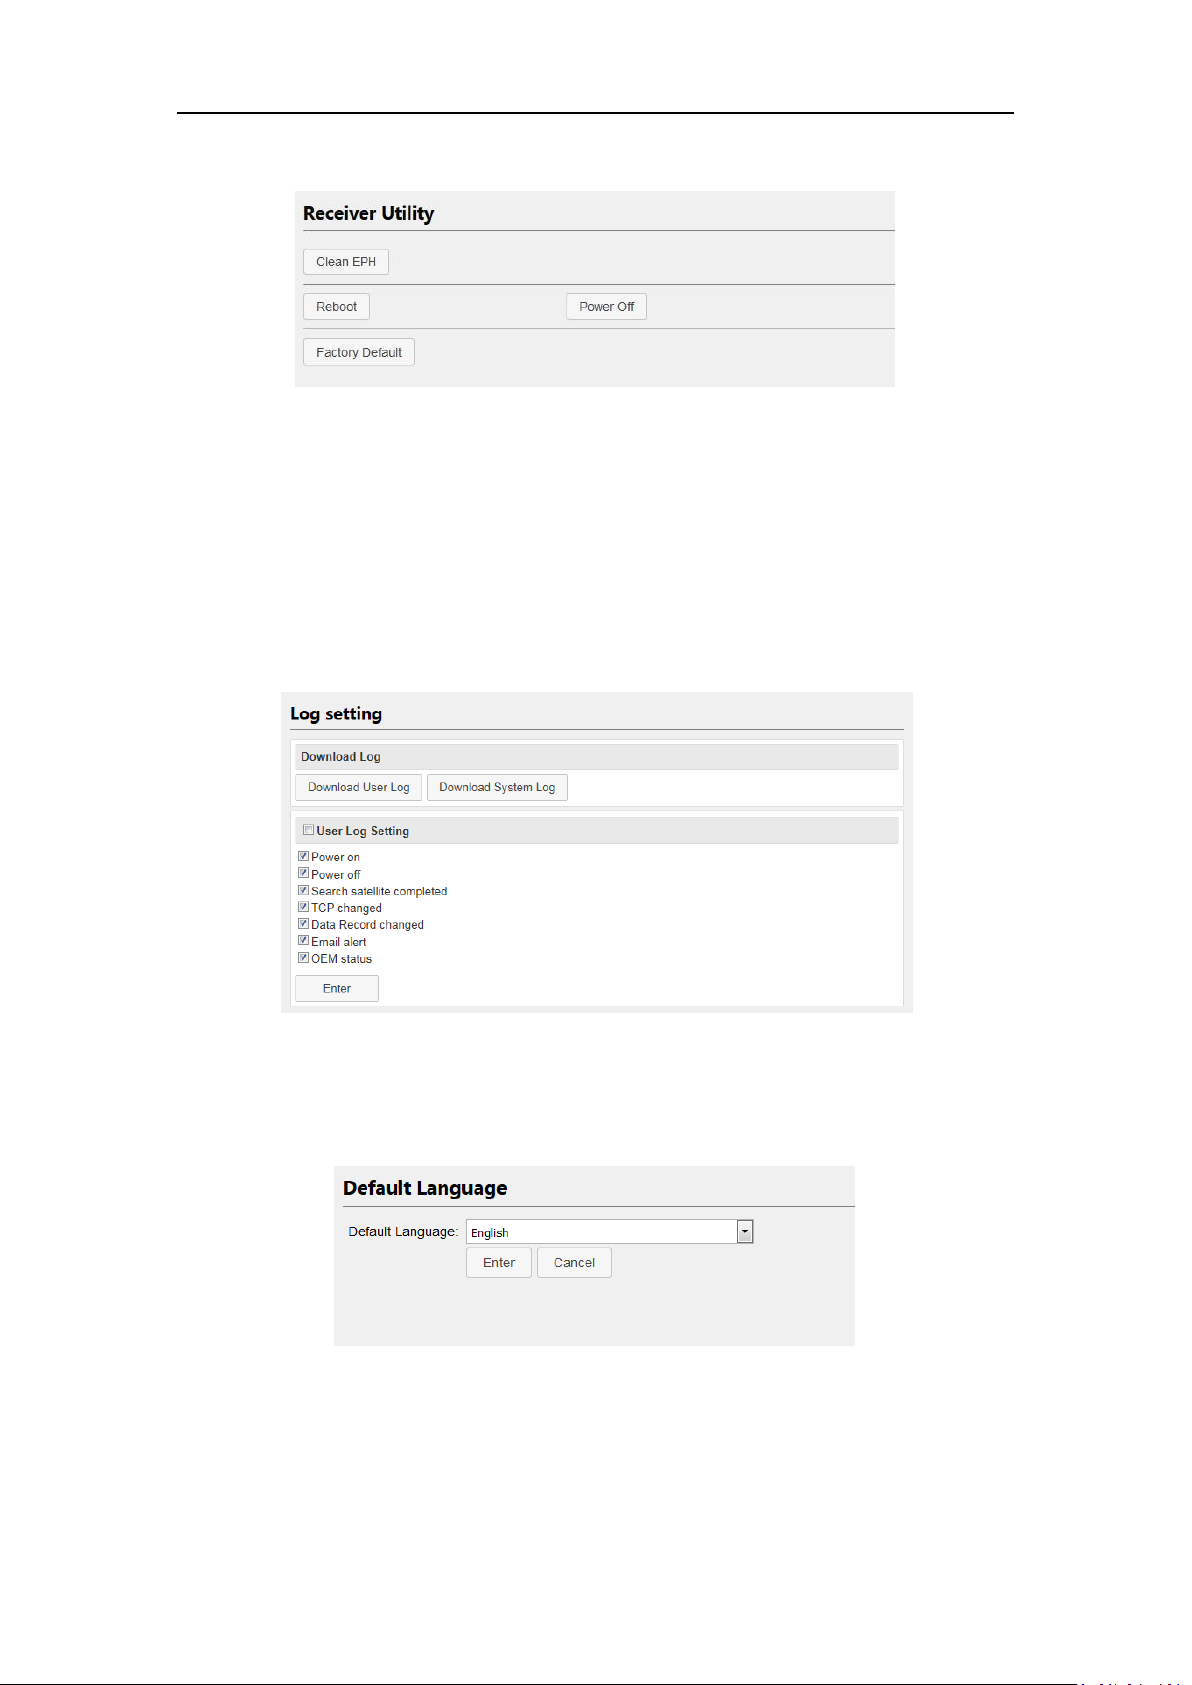
4.3.3 Base setup
After setting M300Pro in the base mode, the base setup menu is available for you.
However, you can change the base setup only when it’s on manually start station
mode with stopped status.
To configure the base station:
Change base start mode from automatically to manually -> press enter,
ensure that Base Start Mode is on manual
Press Stop to restart editing
Then input coordinates of known sites, or press Get Position button to get
coordinates of the current position
Set proper base station ID based on your project planning
Change base start mode from manually to Automatically, then click Start to
active configuration
Page 19
M300 Pro GNSS Receiver User Guide
16
4.3.4 Satellite Tracking
Select smooth pseudorange, setup the mask angle and select the types of the
tracking signal based on surveying requirements.
4.3.5 Receiver Utility
In this section, you can control M300Pro remotely, including:
Clean EPH: delete ephemeris information saved in the receiver
Reboot: Restart the receiver
Power Off: Turn off the receiver
Factory Default: recover the receiver to factory default setting
Page 20
M300 Pro GNSS Receiver User Guide
17
4.3.6 Running Log
Download user/system log to local;
User Log contains power on/off, search satellite completed, TCP changed,
data record changed, email alert, OEM status
System Log contains system warning and system info.
4.3.7 Default Language
Two language options are available: Chinese/English
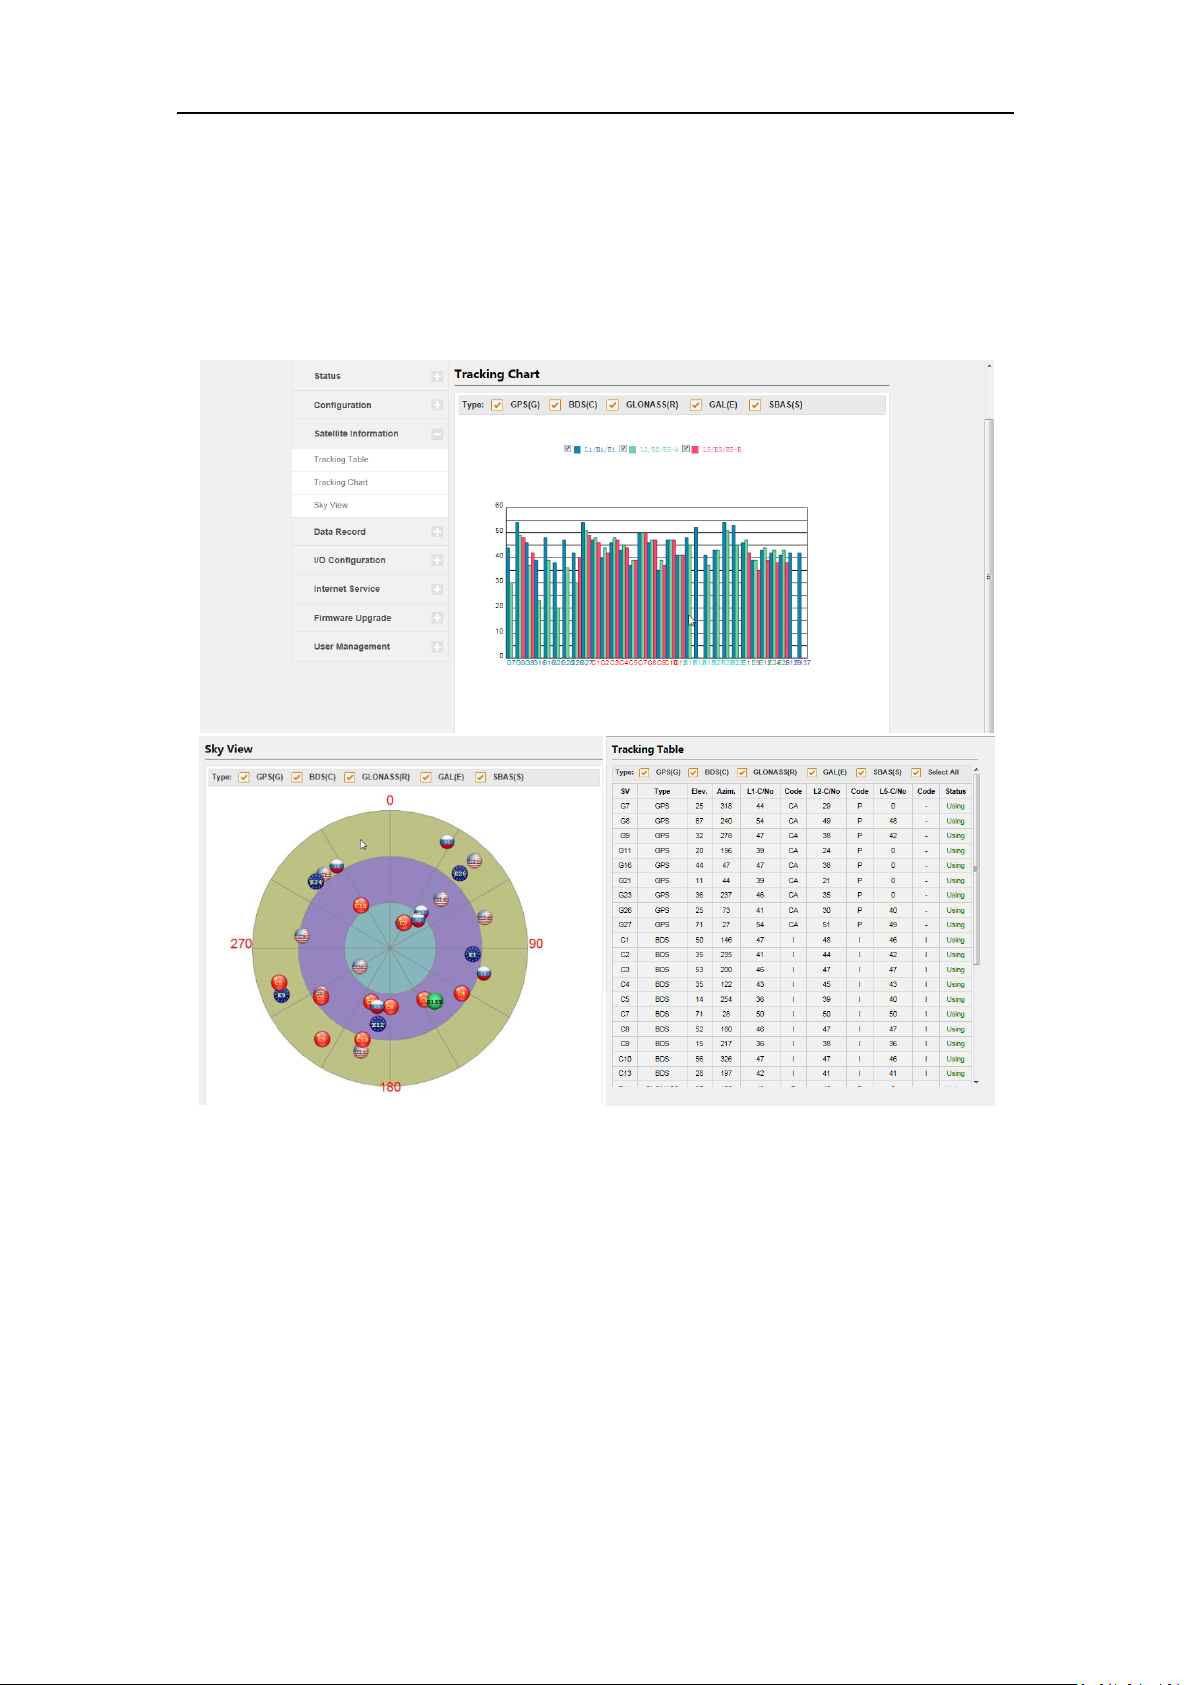
4.4 Satellite Information
Satellite information menus provide you an overall view of satellite tracking details,
Page 21
M300 Pro GNSS Receiver User Guide
18
including Tracking Table, Tracking Chat and Sky View. You can enable/disable GPS,
BDS, GLONASS, GAL and SBAS (WAAS/EGNOS/MSAS) satellites’ display without
stopping tracking status.
These displays refresh every 5 seconds, always keeping satellites information up to
date.
4.5 Data Record
Use the data record menu to set the storage mode (internal/external) for surveying
date, and download data to your office computer, especially for the remote receiver
control.
4.5.1 Recording Config
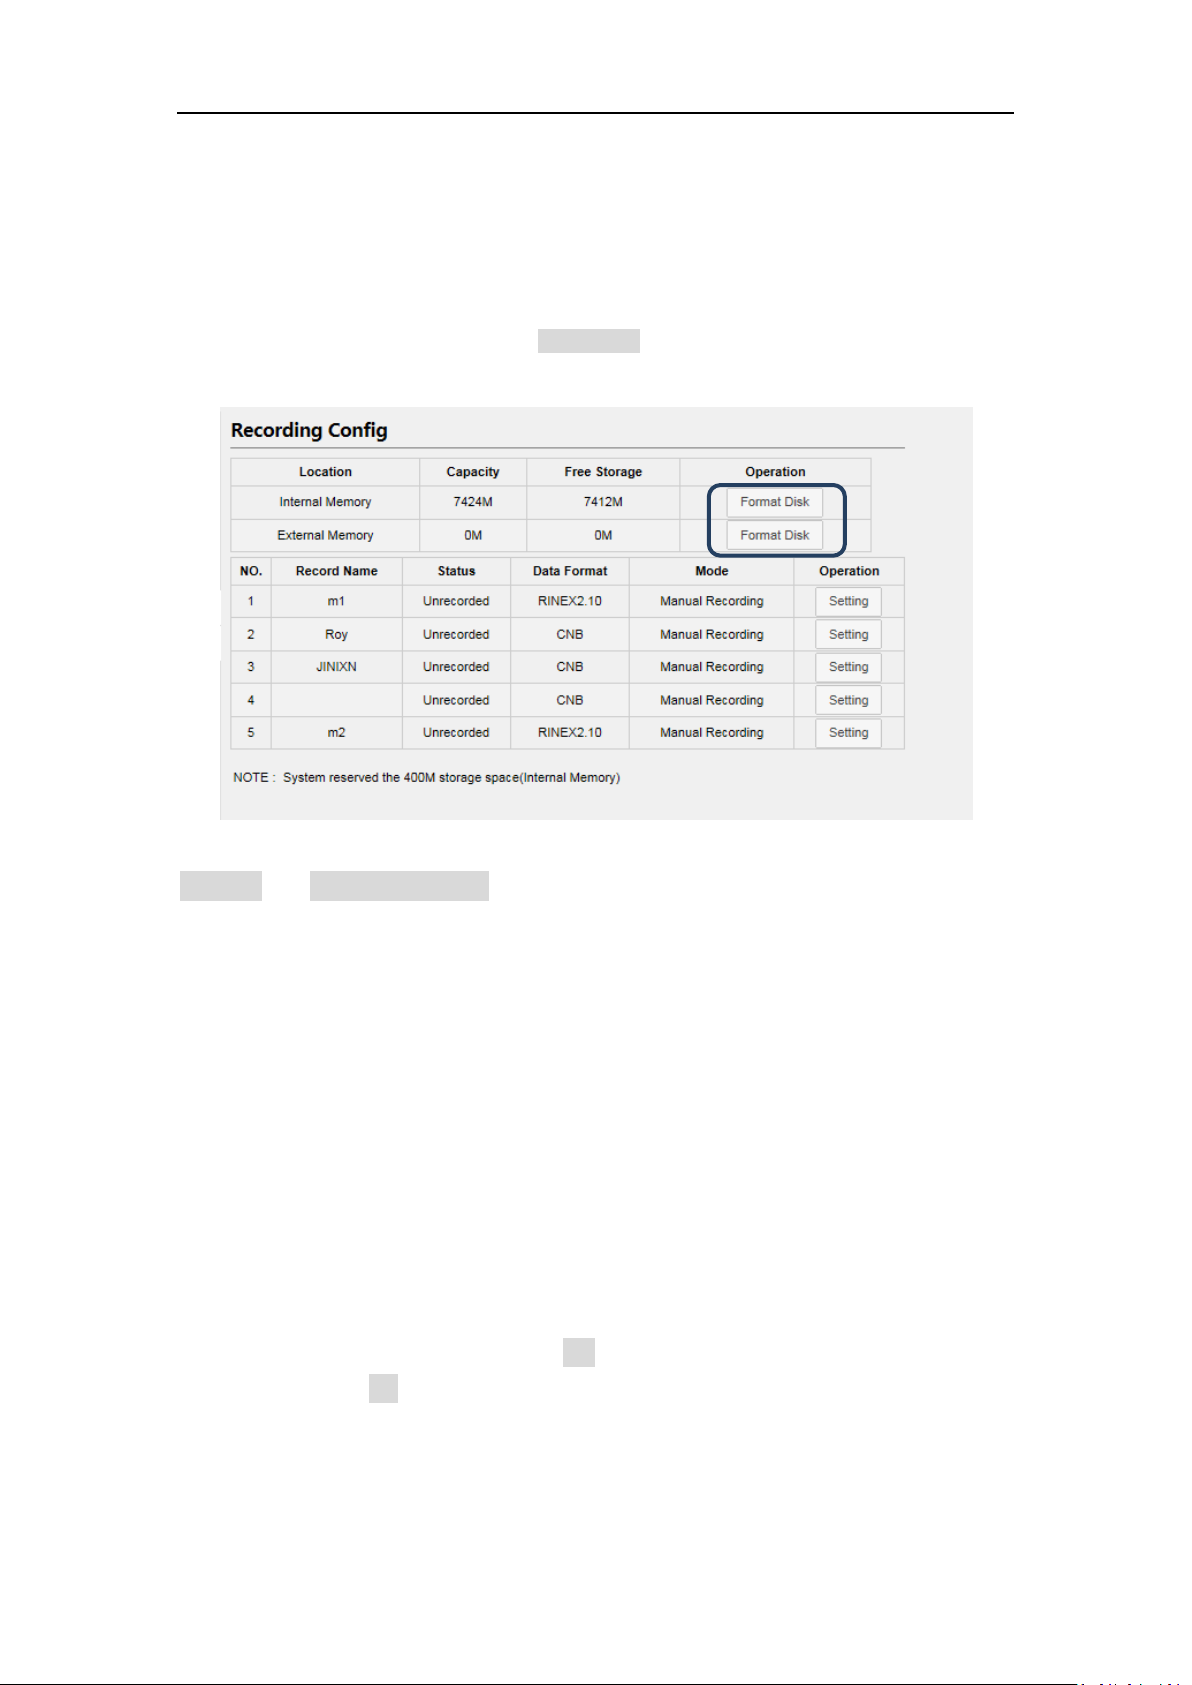
Information is showed below:
Internal Memory: 32 GB, 1 Hz sample frequency could be used for 8-month
record.
Page 22
M300 Pro GNSS Receiver User Guide
19
External Memory: If set as external memory without inserting a USB drive, it
will be prompted with a message that “please connect to an external
memory”.
Show record name, status, data format, record mode and operation in table,
click Setting button to configure the data recording settings.
CAUTION - Please be careful to click the Format Disk button. It will empty all your data files in
M300Pro.
To configure the data recording settings, please make sure that recording mode is on
manual with unrecorded status.
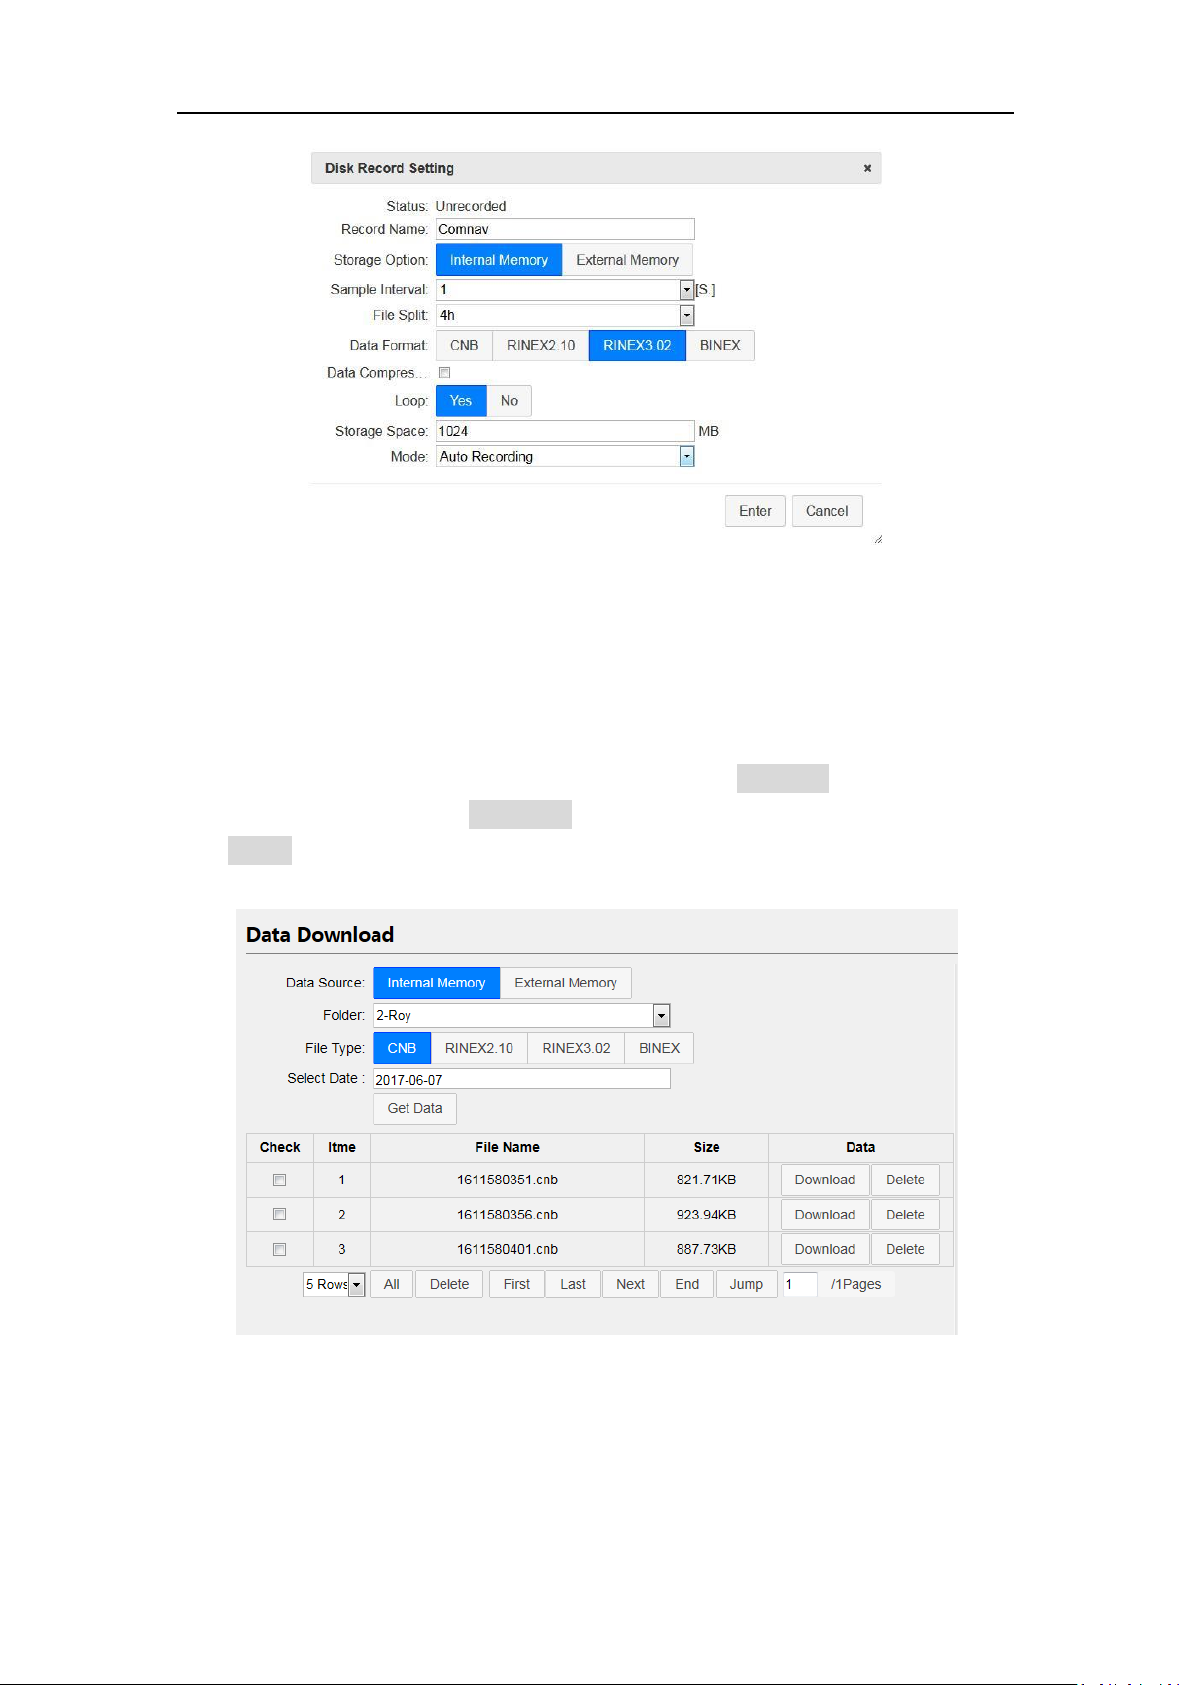
Setting options are showed below:
Record Name: Support only number or letter
Storage Option: Choose storage location to internal memory or external
memory
Sample Interval: Choose sample frequency, support0.05\0.1\0.2\0.5\1\2\5
\15\30\60 S.
File Split: Choose file split, support every 5\10\15\20\30 minutes or 1\2\4\24
hours to save a file. If you select 24 as file split, it will create two data file
when it occur to 24 o'clock (UTC Time). One is from start time to 24 o’clock,
another is from 0 o’clock to end time.
Data Format: Support CNB\BINEX\Rinex3.02\Rinex2.10(excluding BeiDou)
Loop: When storage is full, Yes means delete earliest data and store
continually, No means stop recording
Storage Space: Separate storage space in internal memory\external memory
Mode: Support manually and automatically recording mode.
Page 23
M300 Pro GNSS Receiver User Guide
20
4.5.2 Data Download
You can download internal data files through a web server, USB drive or FTP
1. Data download through a web server
Firstly, select data source (Internal or external memory), folder name, file type
(CNB\BINEX \Rinex3.02\Rinex2.10) and date. Then click Get Data, you will see data
files meet the demand. Click Download icon to download the data file you need, or
click Delete icon to delete this file.
2. Data download through a USB port
Use Lemo to USB cable to connect M300Pro with your office computer, internal
memory will be identified automatically as a removable disk. Double click to open
disk, and copy raw data files out.
Page 24
M300 Pro GNSS Receiver User Guide
21
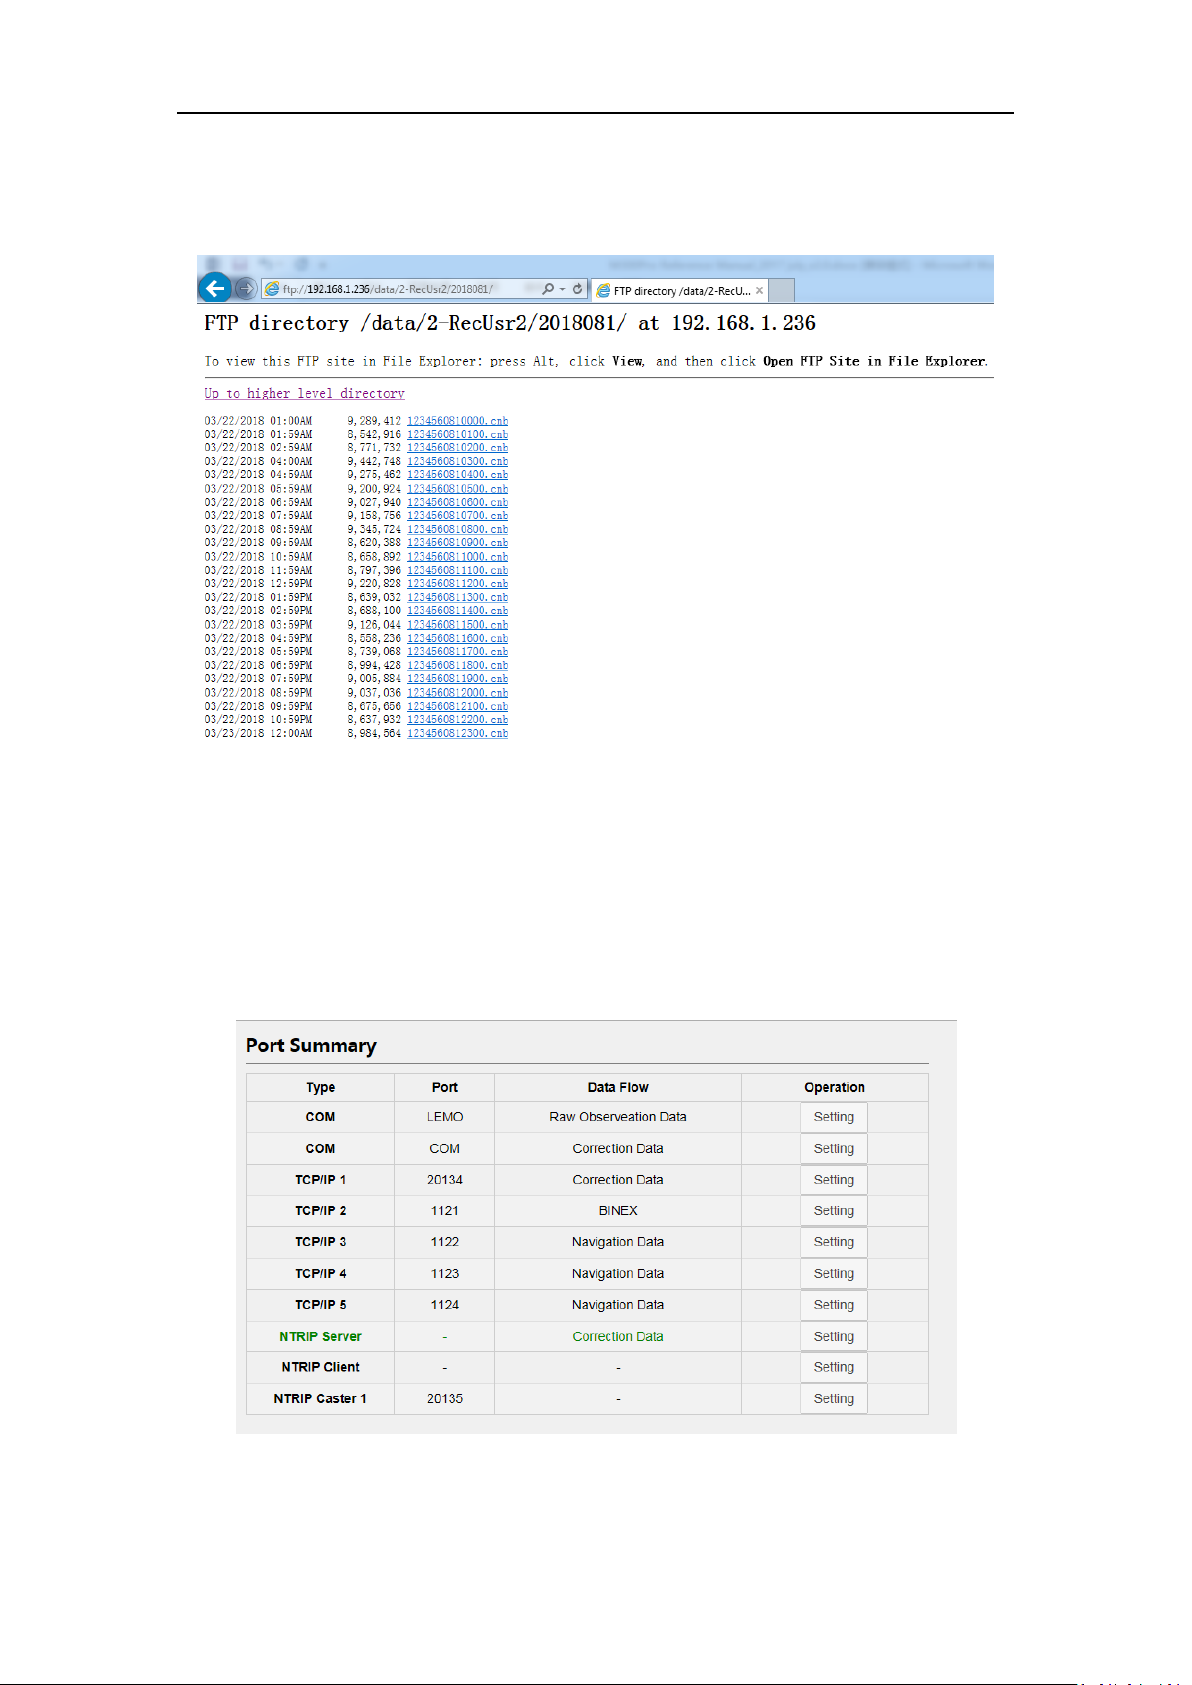
3. Data download through FTP
Input FTP address in your brewer, for example: ftp://192.168.1.236. Then download
your files.
4.6 I/O Configuration
There are two ways to transfer raw data from the M300Pro receiver to your office
computer, LAN ports or serial ports. Serial ports support RS232 (com1, DB9 port) and
RS485 (com2, Lemo port) protocol; the LAN ports support TCP and Ntrip protocol.
4.6.1 Serial Port Config
Page 25
M300 Pro GNSS Receiver User Guide
22
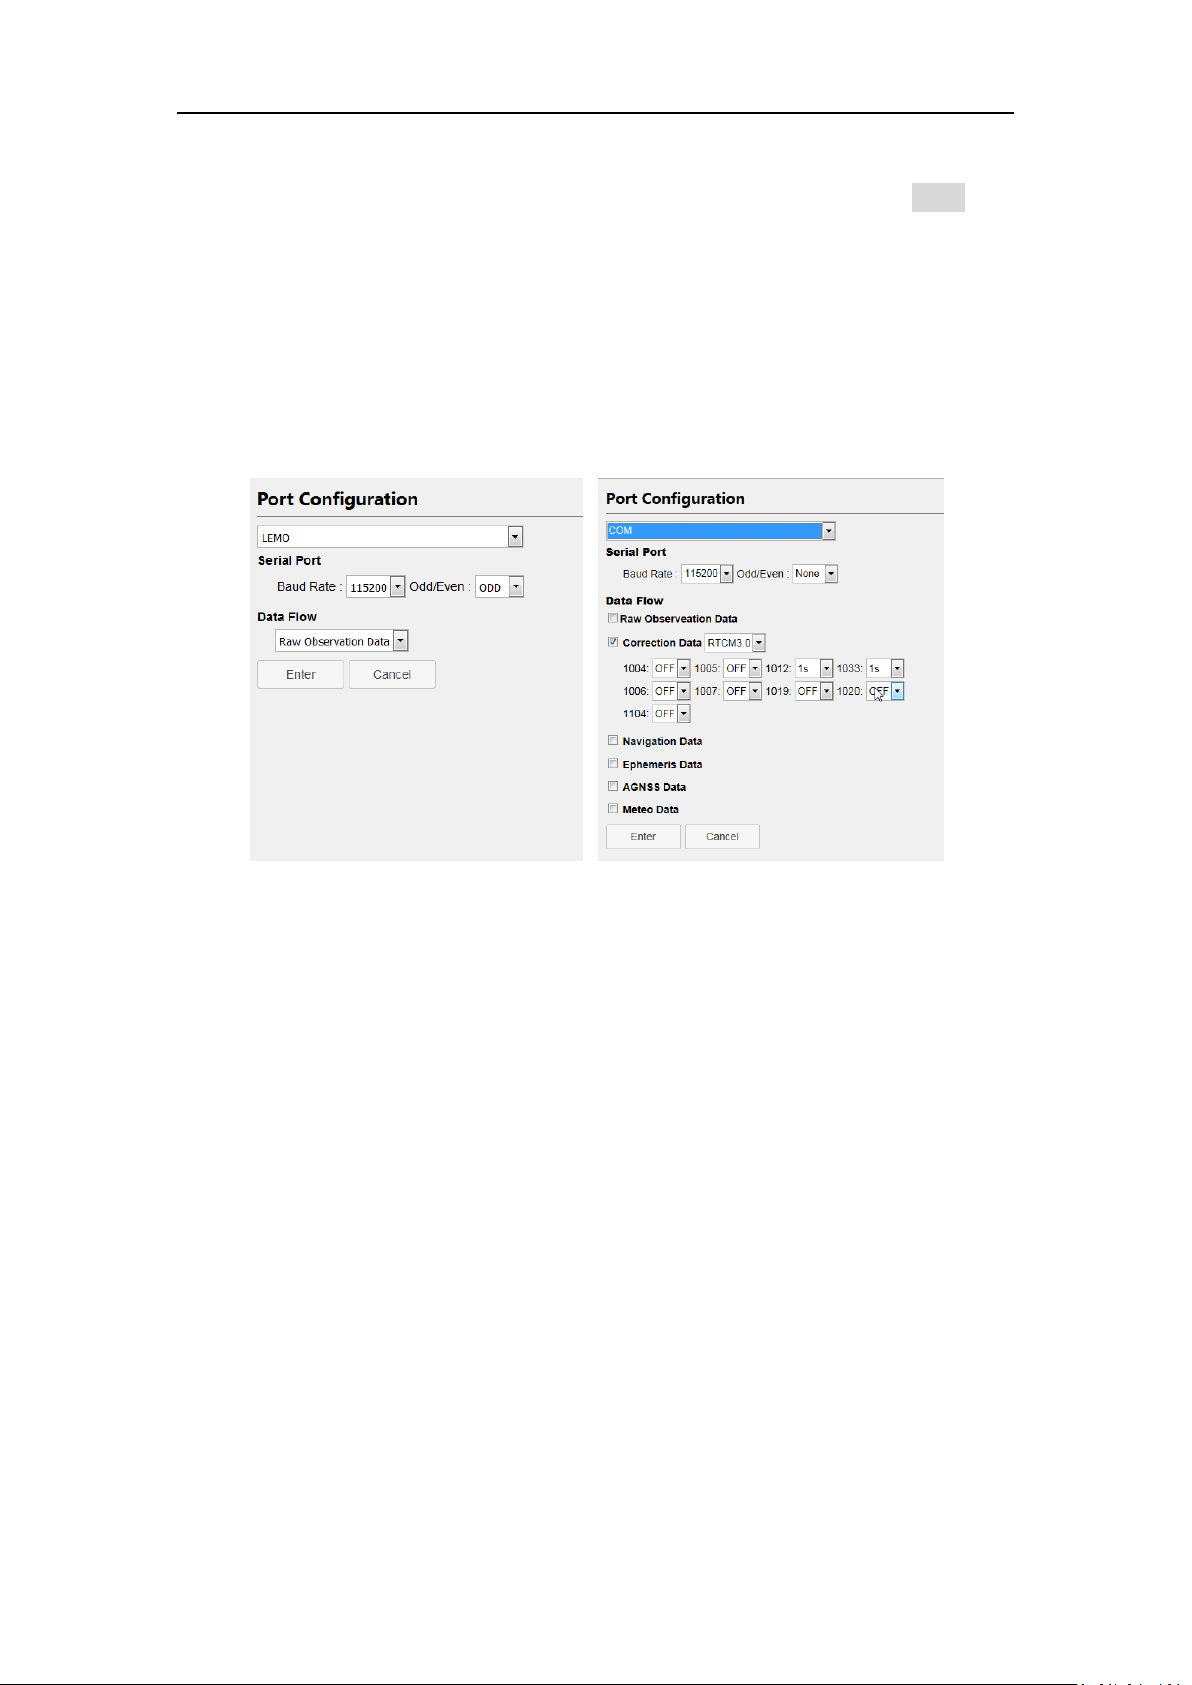
The data will output from the Lemo or COM port of the receiver when you complete
the serial port settings. Select proper baud rate and data flow, and click Enter, the
corresponding serial port will output data. The format of Data flow includes:
Raw observation data: ComNav binary format raw data
Correction data: format from RTCM
Navigation data: GPGGA and GPZDA message
Ephemeris data: Raw observation ephemeris data
AGNSS data: Assisted GNSS data
Meteo data: the data input from the meteorological sensor.
COM--- COM1, RS232 (DB9 port), Lemo—COM2, RS485 (Lemo port)
4.6.2 TCP/IP Config
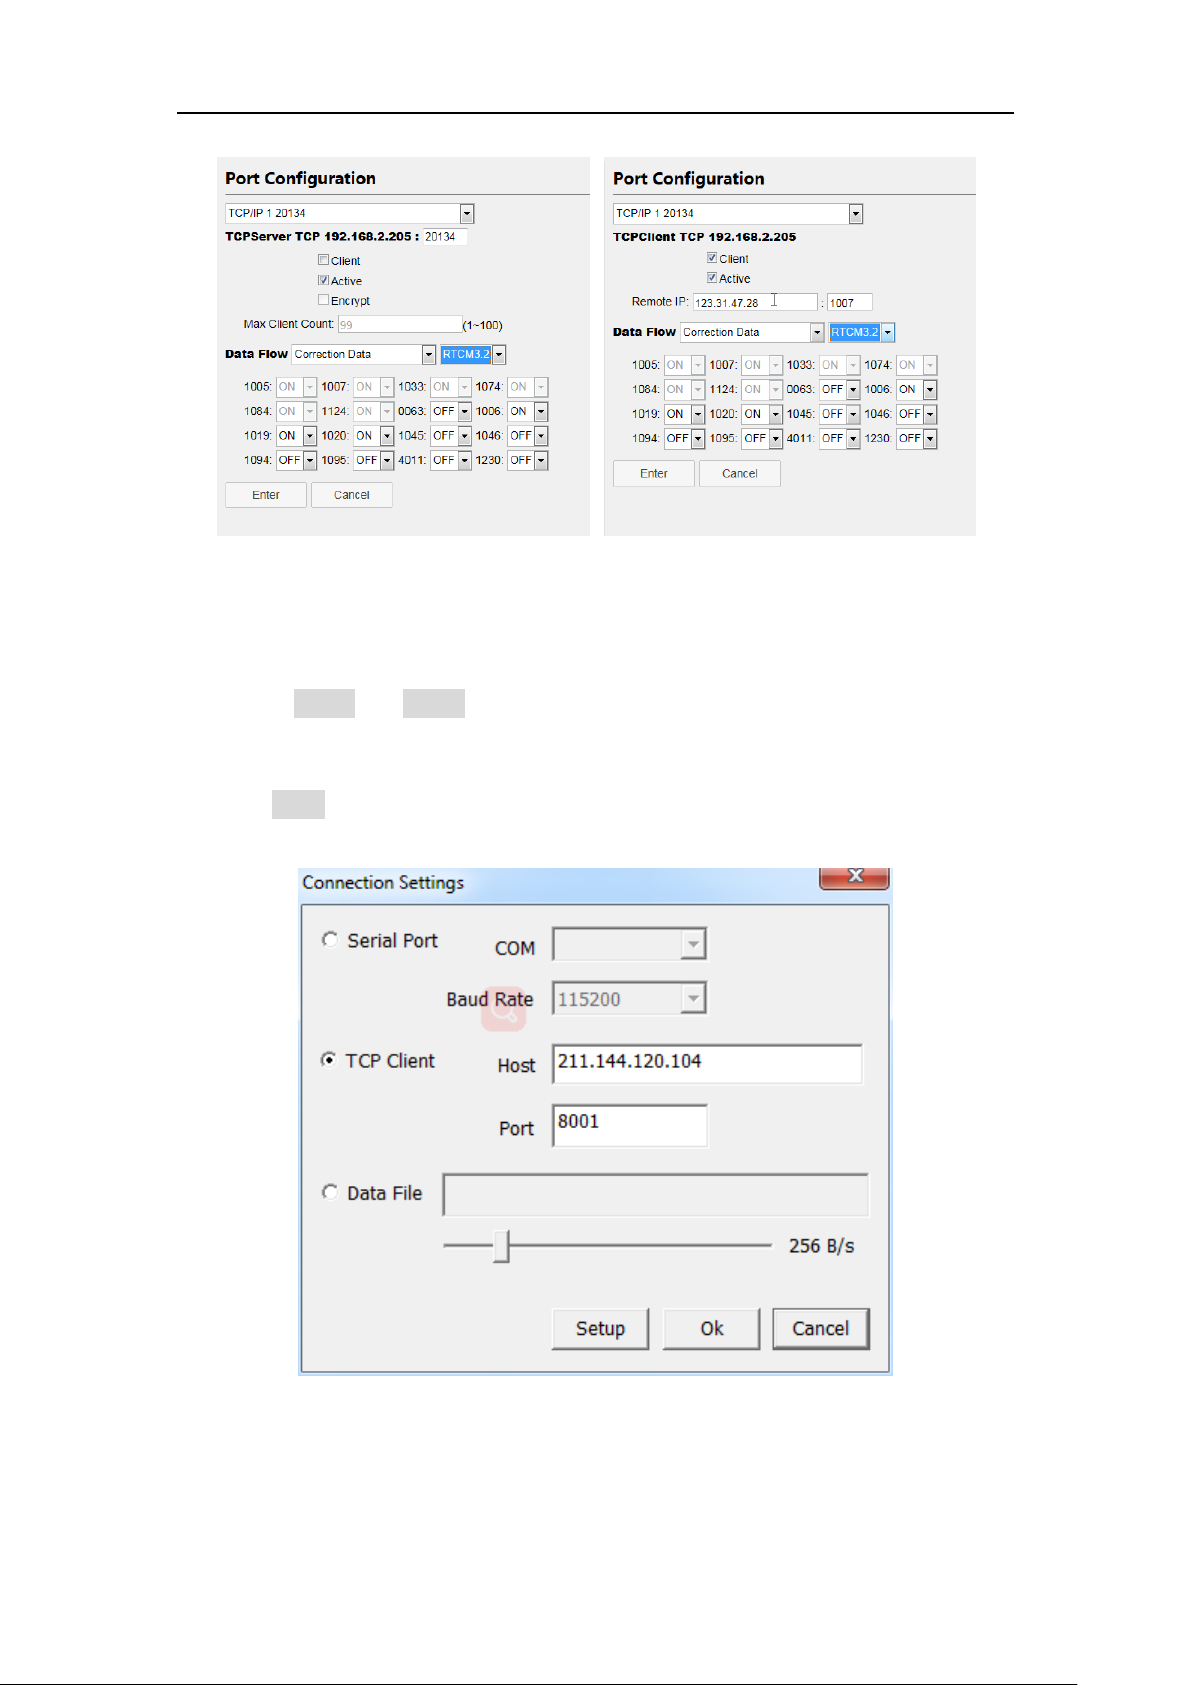
Dataflow can be transferred via the internet by using TCP Server or TCP clients.
TCP Server: Any user can receive the data through TCP Clients protocol
TCP Clients: Send data to the specified IP address and port
For data flow:
Correction data: Choose the format and the corresponding message
Navigation data: GPGGA message
Raw observation data: ComNav binary format raw data
Meteo data: the data input from the meteorological sensor.
Ephemeris data: Raw observation data compatible with Novatel
BINEX: 0x00, 0x01-01, 0x01-02, 0x01-05,0x7d-00, 0x7e-00, 0x7f-05
Raw observation data 2: Contains AGNSS data, meteo data and network data.
Page 26
M300 Pro GNSS Receiver User Guide
23
4.6.2.1 Direct connection model
The M300Pro provides a more machine friendly method for users to check and
configure receivers by TCP/IP. This function only can be used in TCP/IP1.
Enable Active and Client button
Enter TCP server port
Select Direct connection in data flow
Click Enter button
Then connect it by TCP Client in CRU software.
For programmatic commands, Please refer to 5.1 Frequently used commands.
4.6.3 NtripConfig
Page 27
M300 Pro GNSS Receiver User Guide
24
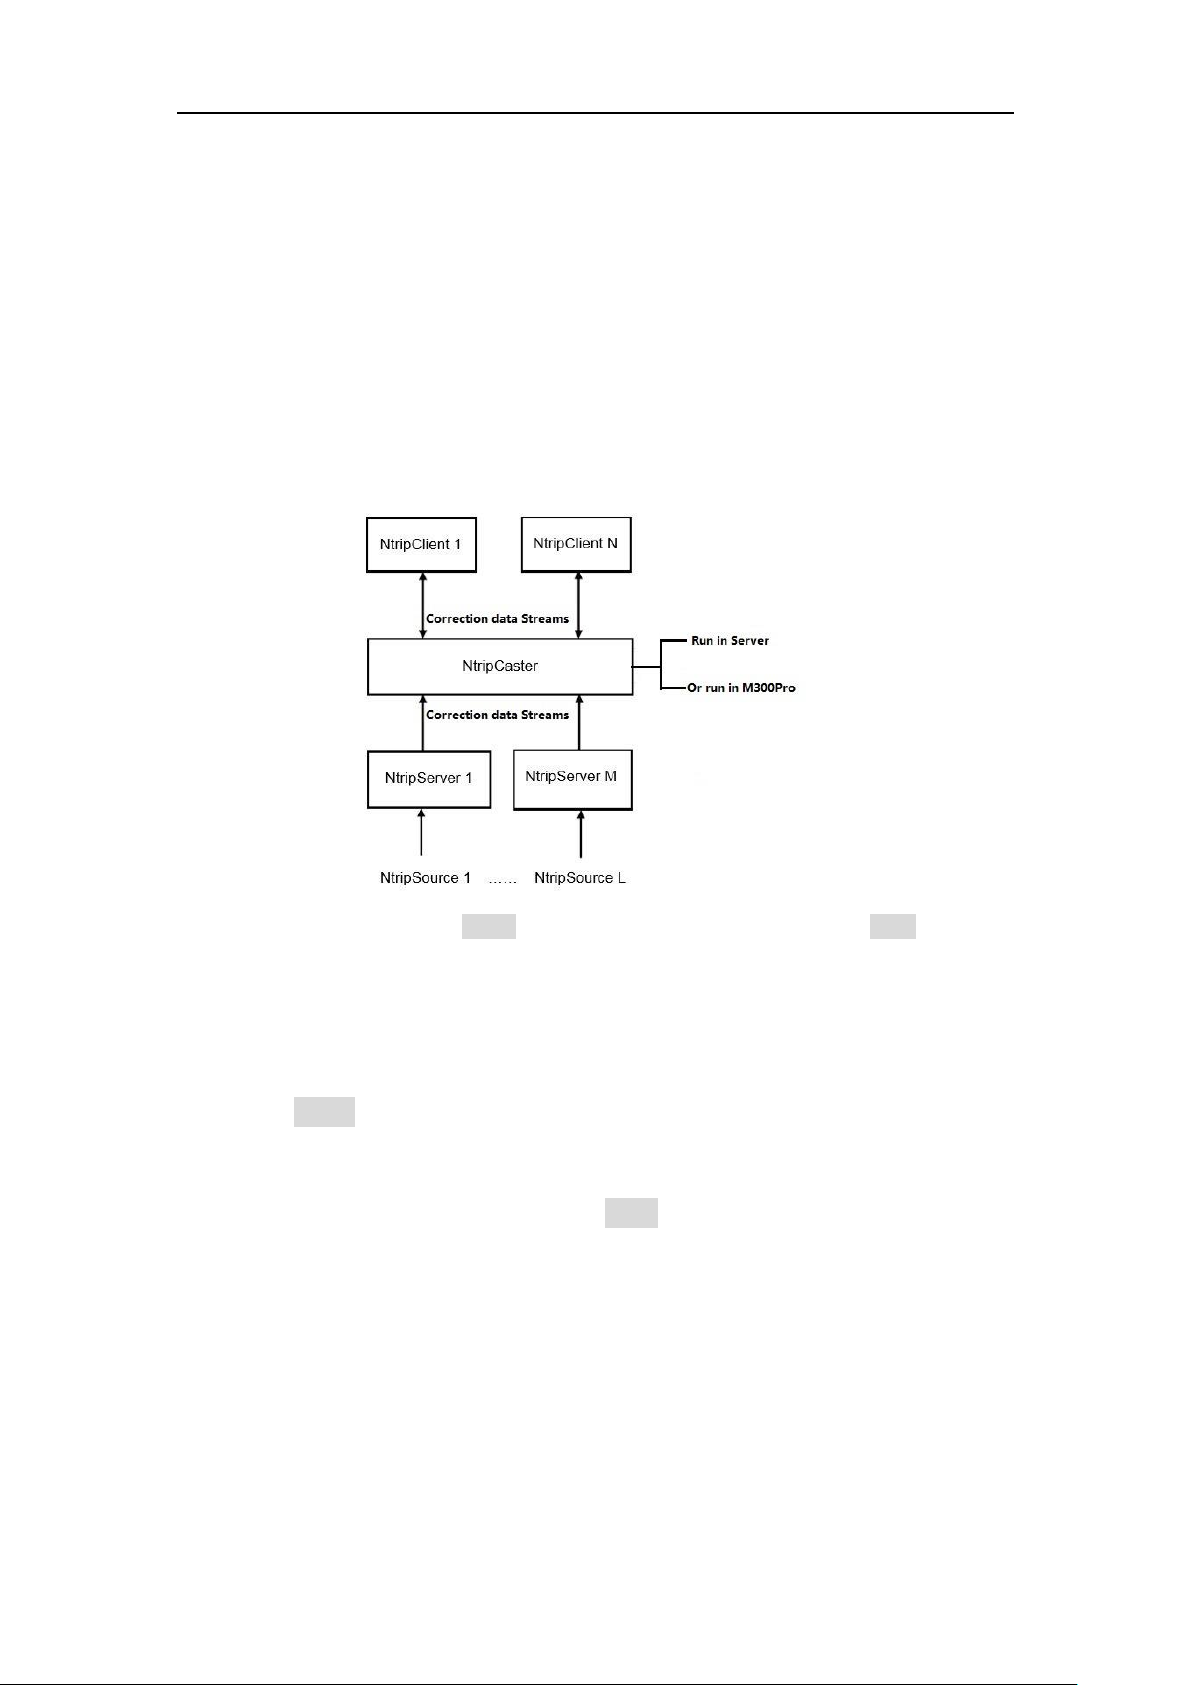
The M300Pro can support NtripClient, NtripServer and NtripCaster protocols. You can
acquire correction data from CORS through Ntrip Client protocol if setting the
receiver as a rover. It is also very easy to transmit correction data as the base station
by using NtripServer and NtripCaster protocol.
For a base station, you can broadcast correction data by using NtripServer protocol
or the data forward software (supporting NtripCaster protocol, such as SinoGNSS’s
CDC+ software) running in the server. If you have a static IP address, you can use
NtripServer and NtripCaster of M300Pro simultaneously to create a single reference
station, this mode does not need any software to support, and is very convenient for
using.
Tips: You need to uncheck all Active (Client, Server and Caster), and click Enter button to
disconnect them before you configure this interface.
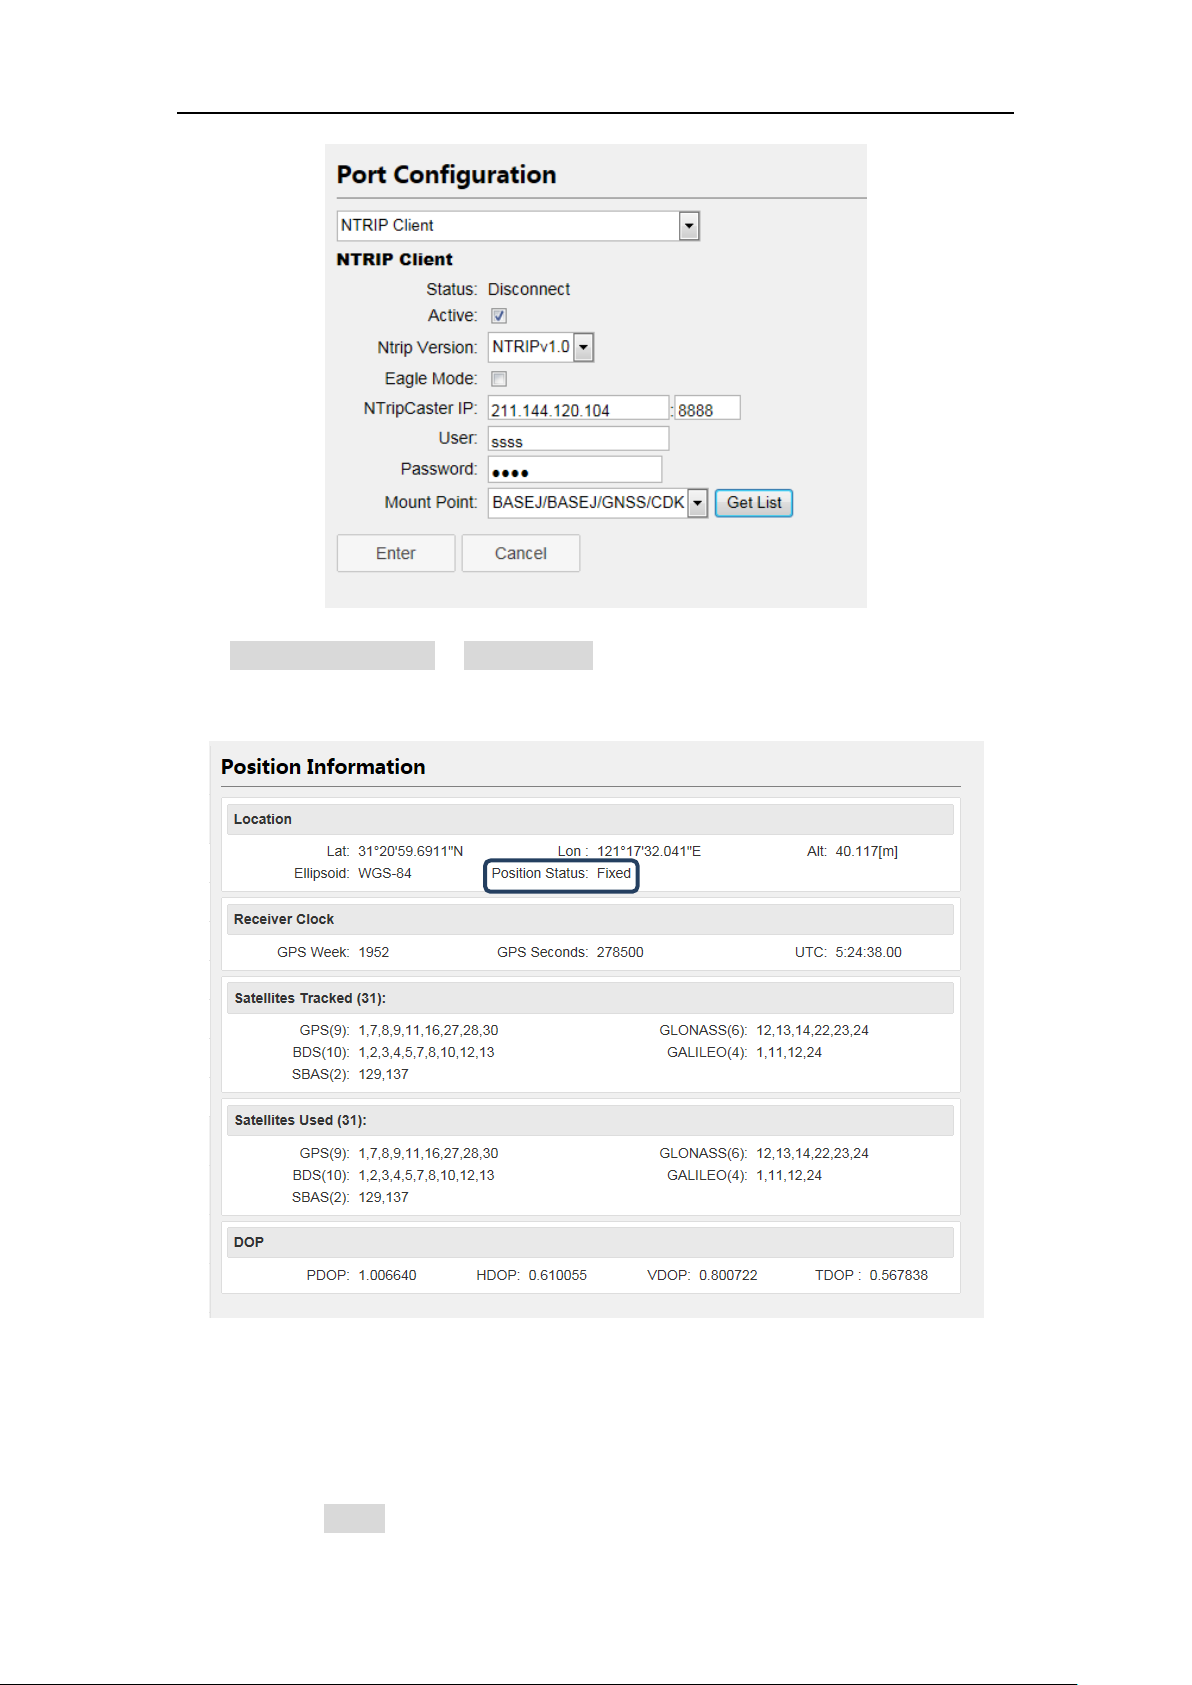
1. Ntrip Clients
Before setting the NtripClient, you should configure the receiver as Rover mode.
Enable Active button
Enter IP address, Port, User name and Password of CORS
Click Get List to acquire the Mount Point list
Choose one of mount point and click Enter button, you will receive correction
data from CORS.
Page 28
M300 Pro GNSS Receiver User Guide
25
Click position information in Status menu to check the rover’s status, and position
status should be Fixed.
2. Ntrip Server
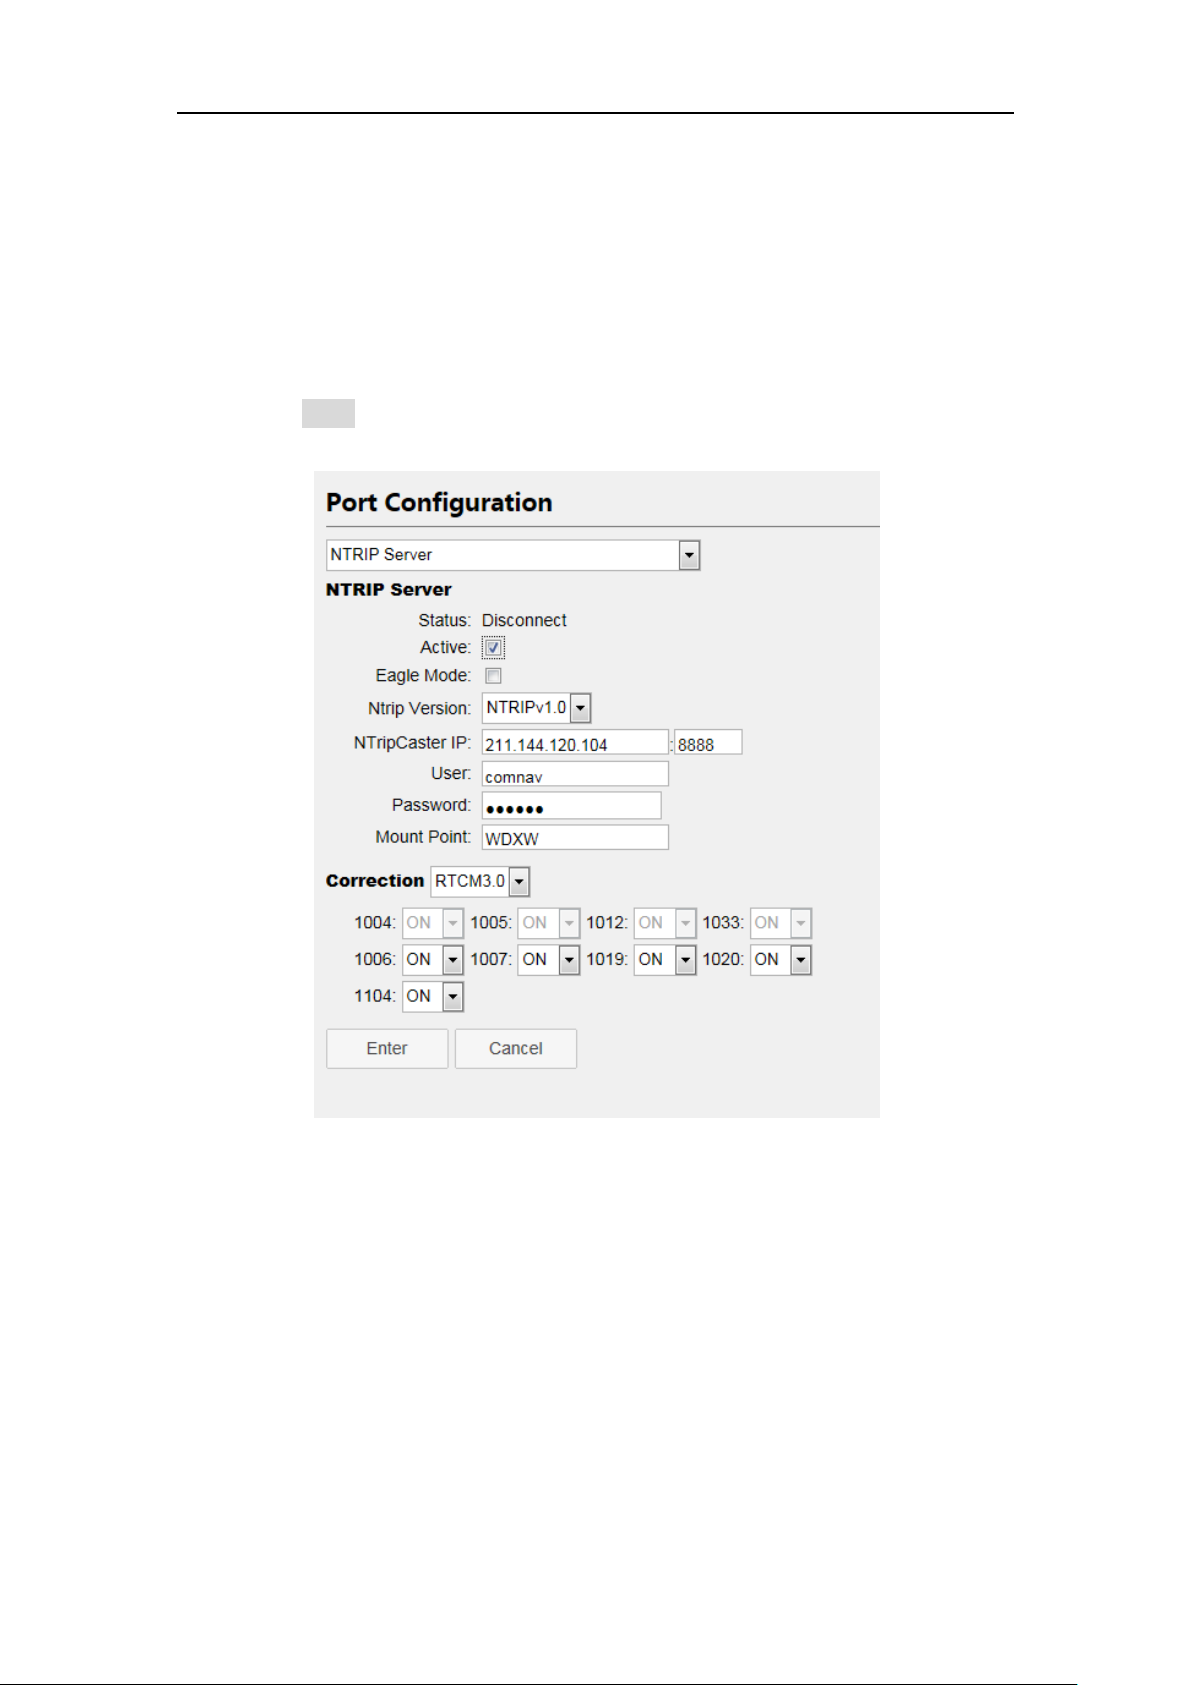
Before setting the Ntrip Server, you should configure the receiver as Base mode, also
select correction data format as RTCM3.0 or RTCM3.2 (recommended). Then start
Ntrip Server configuration:
Enable Active button
Page 29
M300 Pro GNSS Receiver User Guide
26
Enter the server IP address as NtripCaster address and NtripCaster port. As
the example showed above, our company’s server is under running:
211.144.120.104: 8888
Set custom username and password (Username and password of our server
can be anything you choose).
Mount point: Ntrip caster mount point
Correction: Choose the format and the corresponding message
Click Enter button, you will transmit the correction data to server.
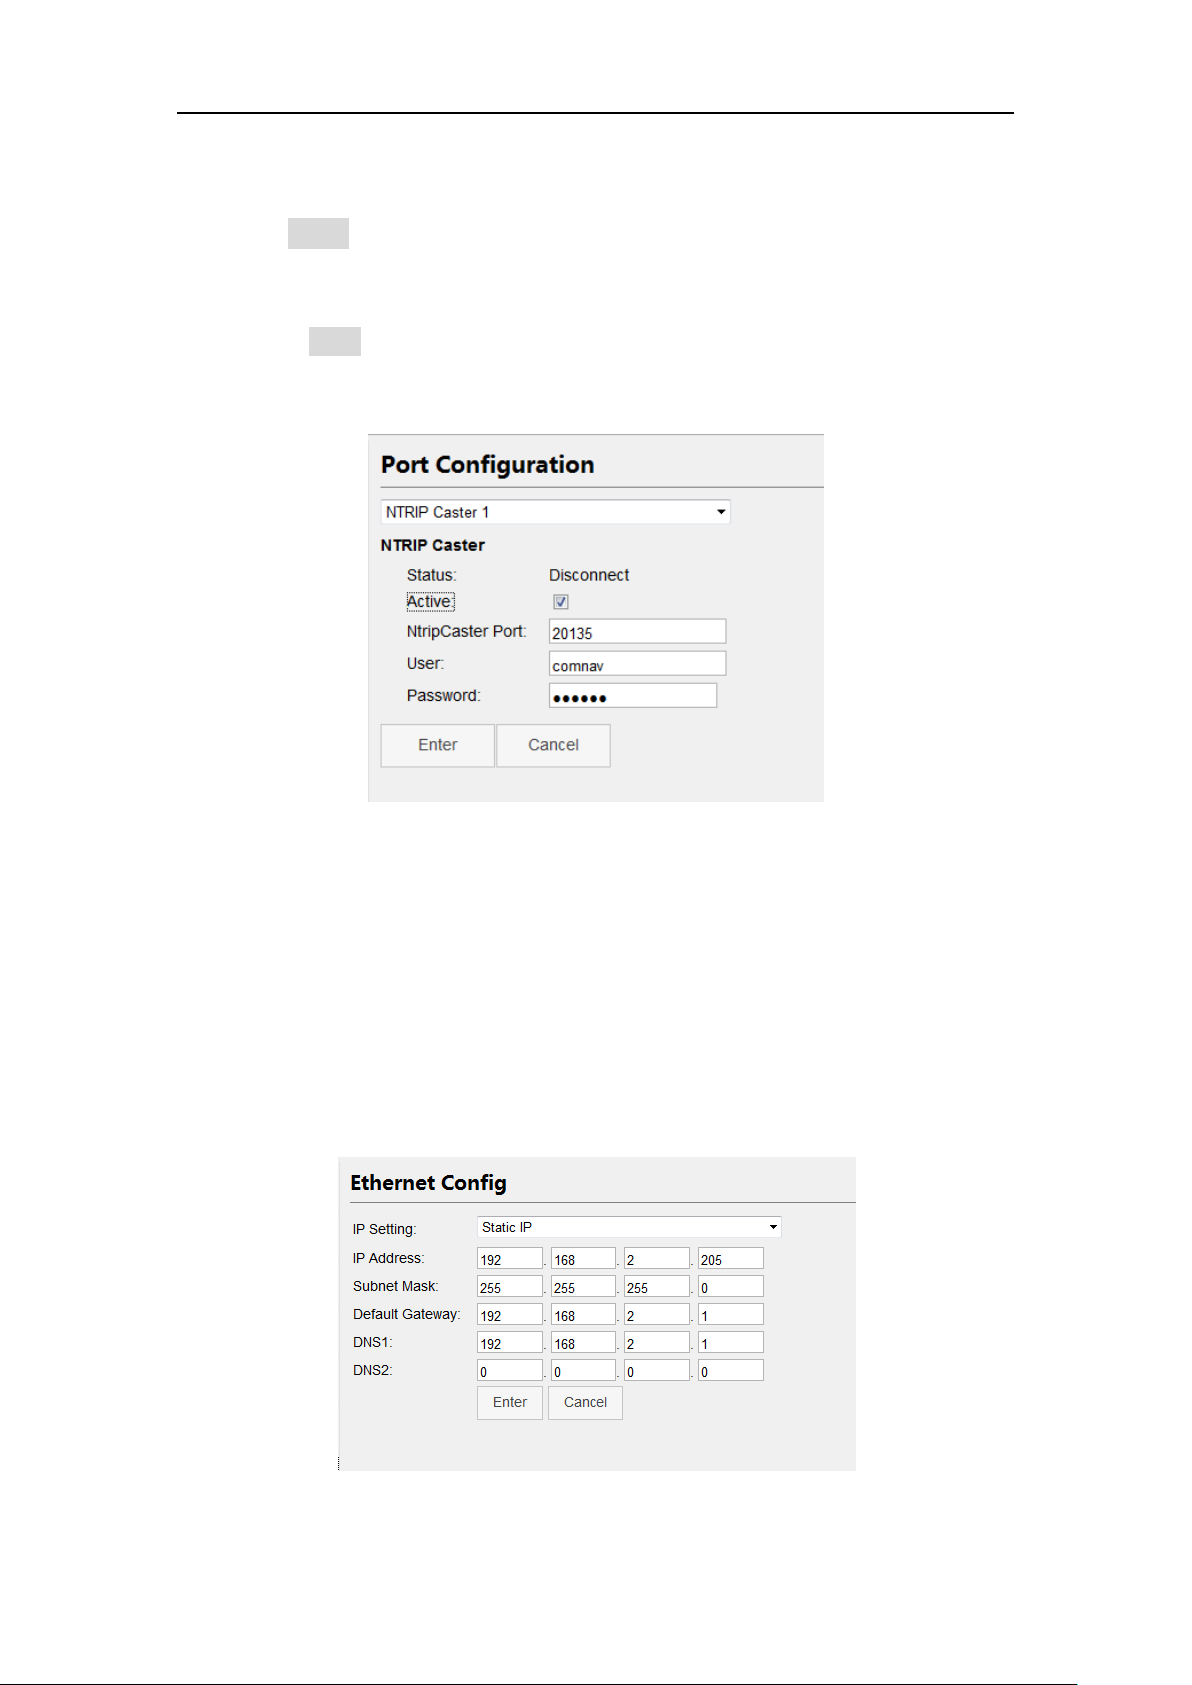
3. Ntrip Caster
M300Pro can also work as a single reference station and send correction data
through NtripCaster protocol. You need to configure both NtripServer and
NtripCaster when you use this protocol. The setting is shown below:
1. Configuration of NtripServer:
Enable Active button of NtripServer
Set the NtripCaster address and NrtipCaster port; this IP address is the same
as M300Pro IP address, and the port should be mapped by router.
Enter custom username and password
Access point: the Ntrip caster mount point
Page 30
M300 Pro GNSS Receiver User Guide
27
Press Enter to save the configuration
2. Configuration of NtripCaster:
Enable Active button of NtripCaster
Enter port, this port should be same with NtripServer
Enter Password, this password should be also same with NtripServer
Press Enter to save configuration
All configurations of NtripCaster Protocol are shown above, then you can use a rover
to get correction data.
4.7 Internet Service
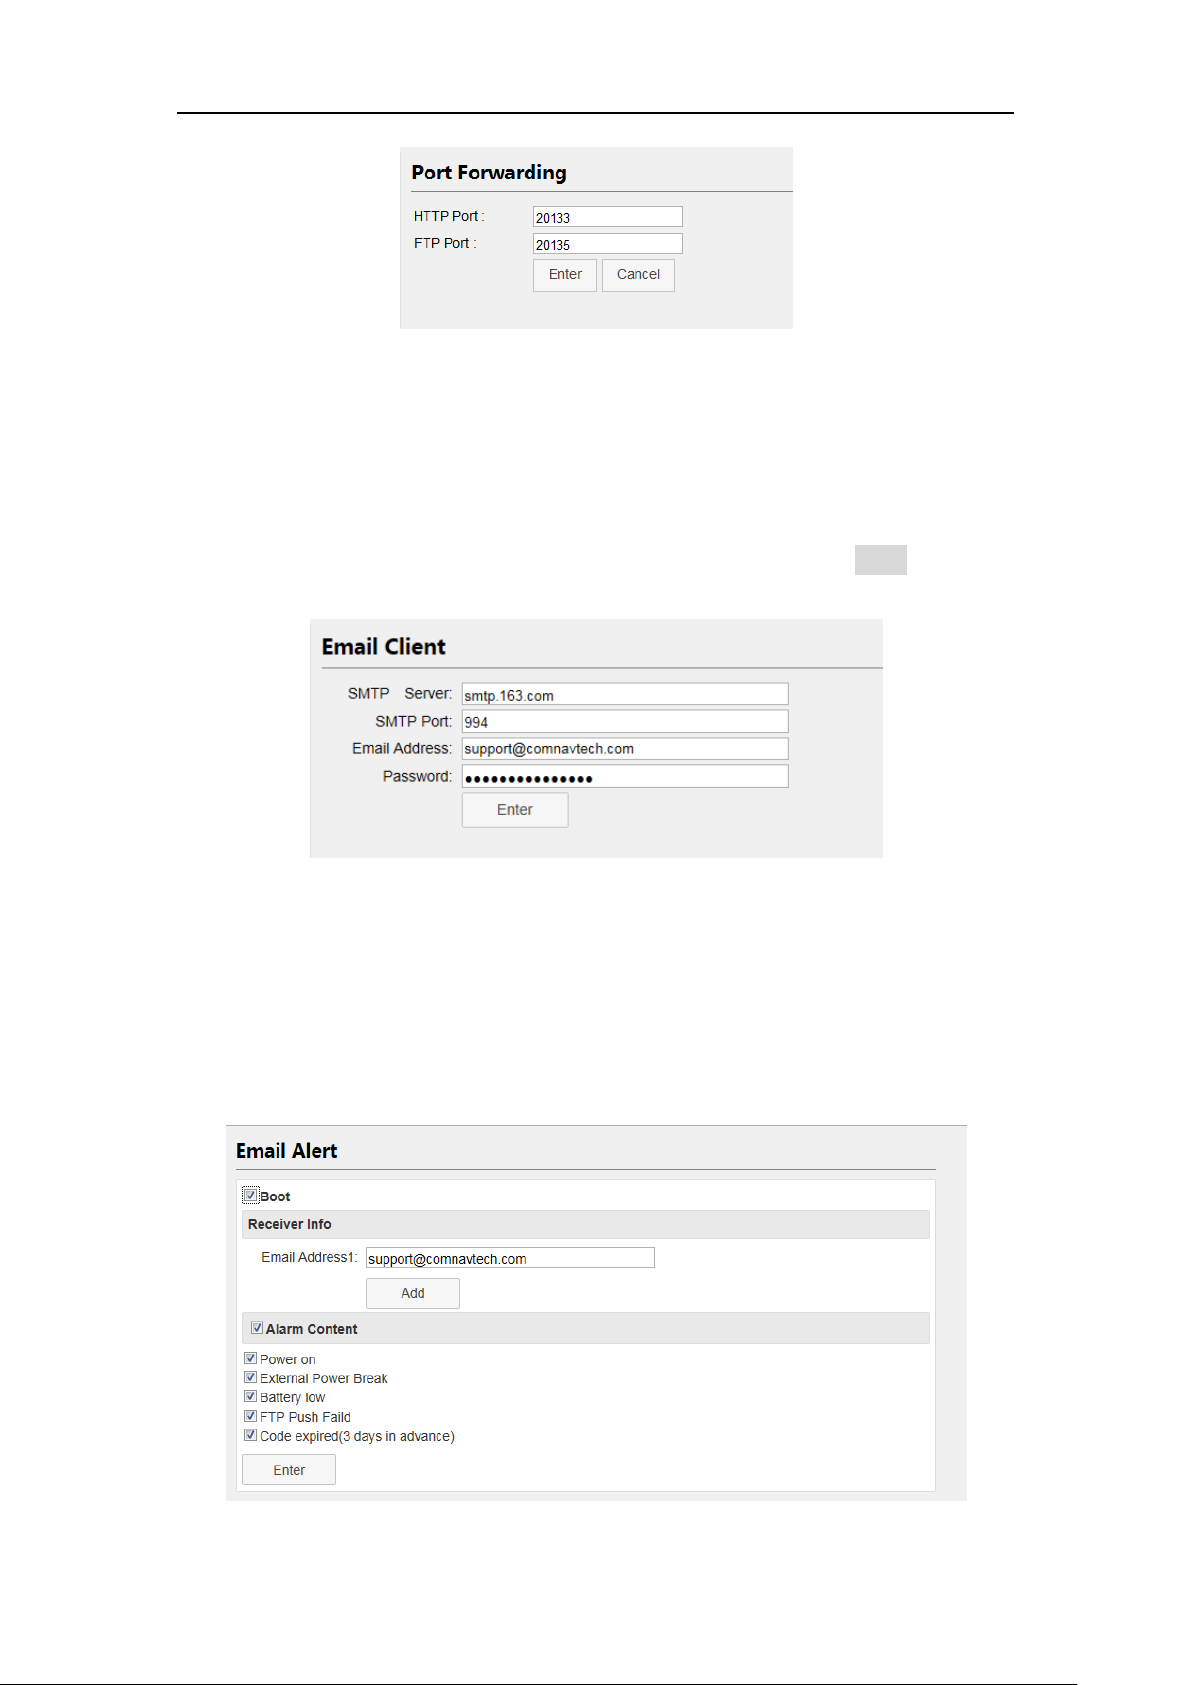
4.7.1 Internet Config
Use the Ethernet Config menu to set IP address, subnet mask, default gateway, and
the Port Forwarding to set HTTP port and FTP port of M300Pro. After changing those
settings, you need to change your computer’s IP address and relogin configuration
webpage based on the new IP address.
Page 31
M300 Pro GNSS Receiver User Guide
28
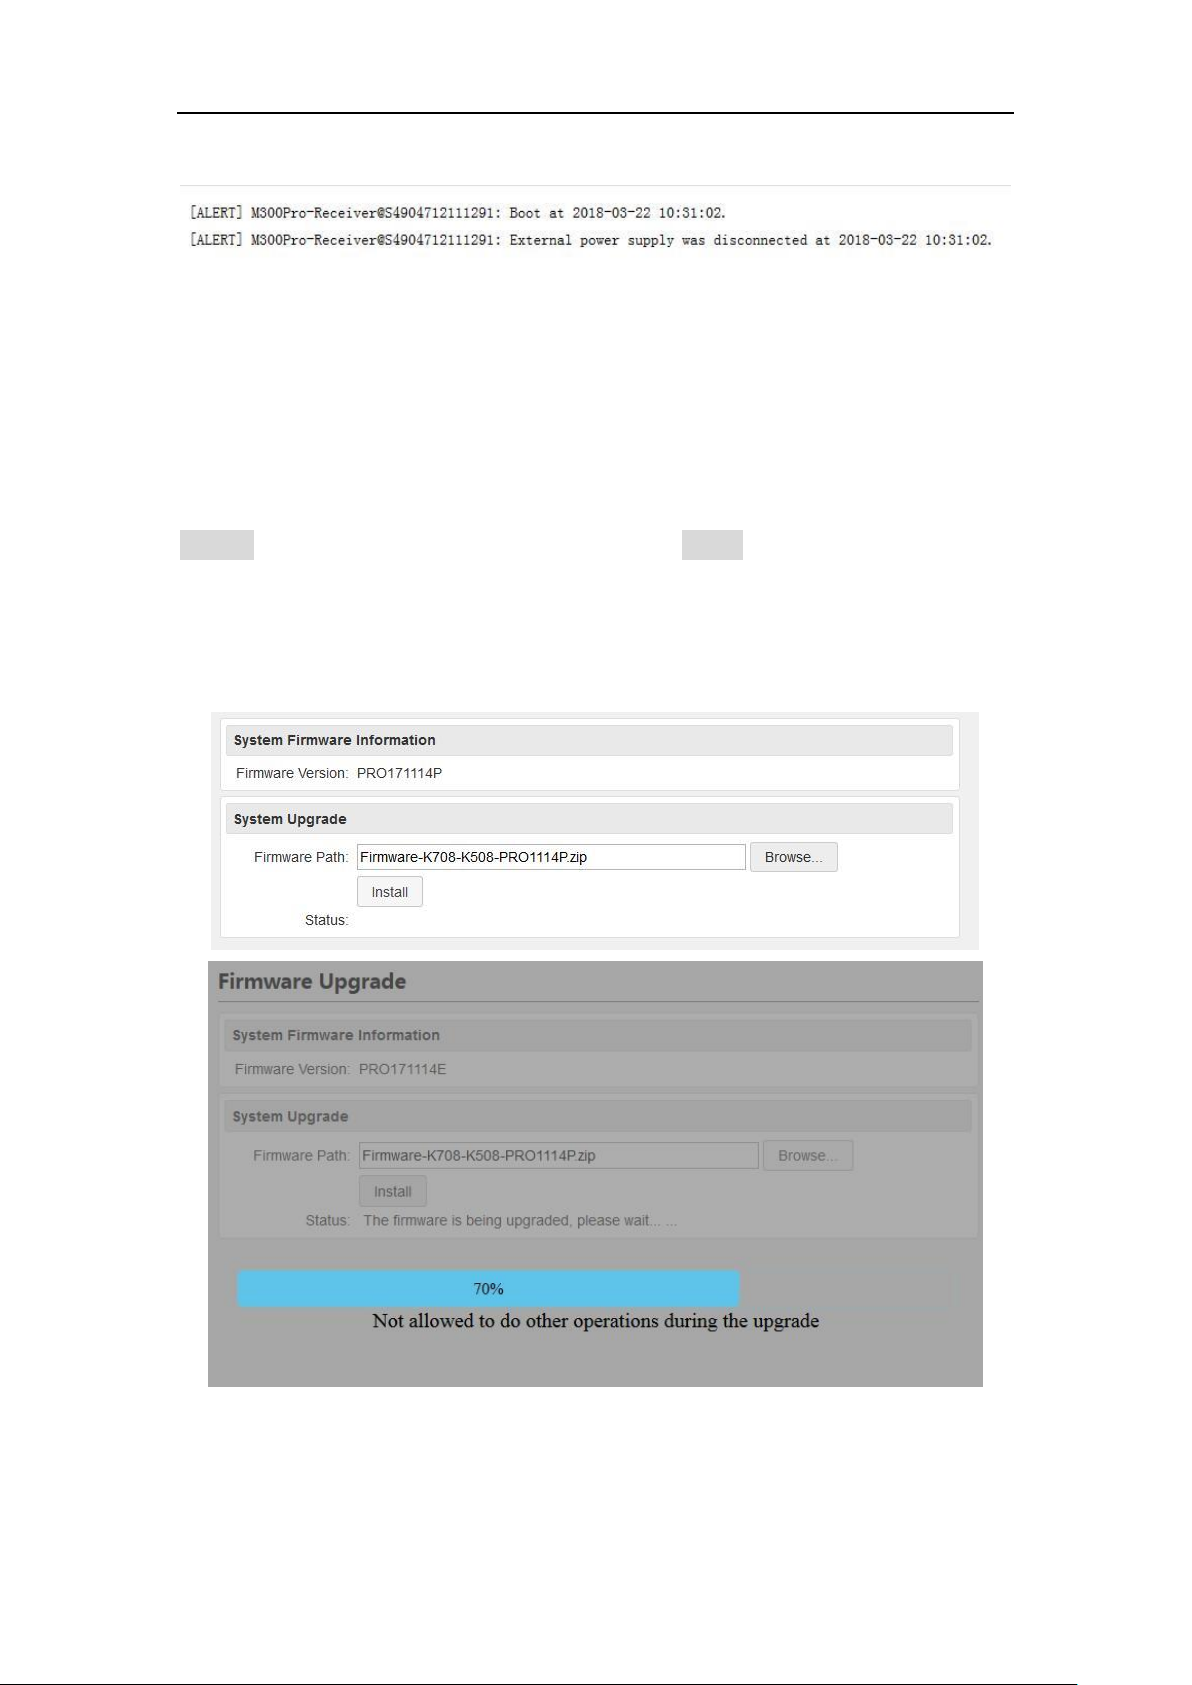
4.7.2 Email Client
Before setting a Email Client, open your mail client SMTP authorization firstly, then
set SMTP Server, SMTP Port, Email Address and password. Enable Enter button to
save configuration.
4.7.3 Email Alert
After set the Email Client, you can add no more than 3 email addresses to receive
M300Pro’s alarm, including Power on/External Power Break/Battery low/FTP Push
Failed/Code expired.
Page 32
M300 Pro GNSS Receiver User Guide
29
4.8 Firmware Update
You can update the system firmware, board firmware and front panel firmware in
this menu.
Select system, board or front panel upgrade according to your demand, then click
Browse to select the latest firmware version. Click Install, a progress bar shows 0 to
100% and status will be ”Not allowed to do other operations during the upgrade”.
When completing firmware update, the receiver will restart automatically and
information prompted below:
Page 33
M300 Pro GNSS Receiver User Guide
30
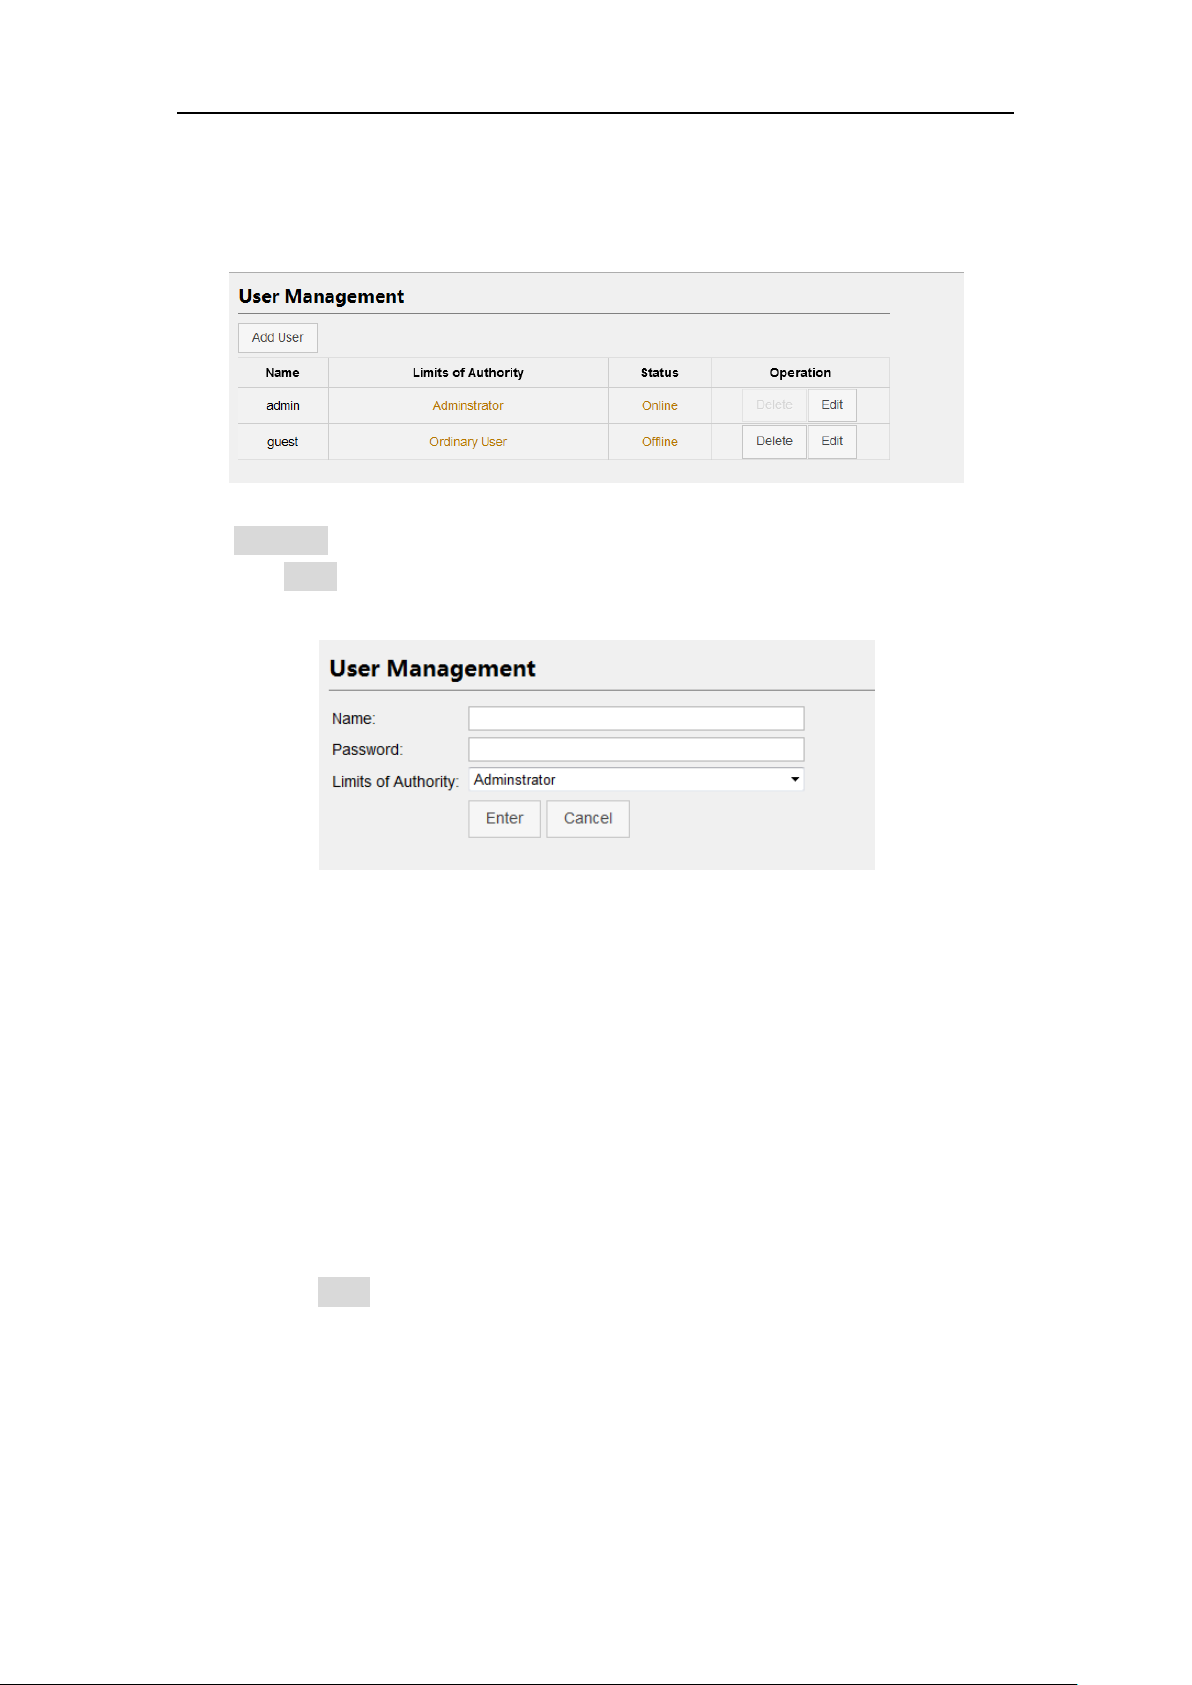
4.9 User Management
Use user management menu to add, delete users or edit limits of authority.
Click Add User button, enter the name, password, and choose limits of authority,
then click Enter, you will add a user successfully. The maximum number of user is
100.
5. Programmatic Interface
This section describes a method of controlling M300Pro receiver through
programmatic commands. It provides a more machine friendly method for users to
check and configure receivers, such as base/rover, NMEA data output. Please read
these tips before sending commands to your M300Pro receiver.
Select and send proper commands, all commands are case insensitive: Log
version=LOG VERSION
Press Enter button at the end of every command to check receivers’
feedback information or input another command
For More detailed programmatic commands, please refer to ComNav OEM
CARD REFERENCE MANUAL
WARNING-These commands are only suitable for COM1. The COM2 and COM3 are
connected to the web interface, please do not change the baud rate and the data output of
these two ports.
Page 34
M300 Pro GNSS Receiver User Guide
31
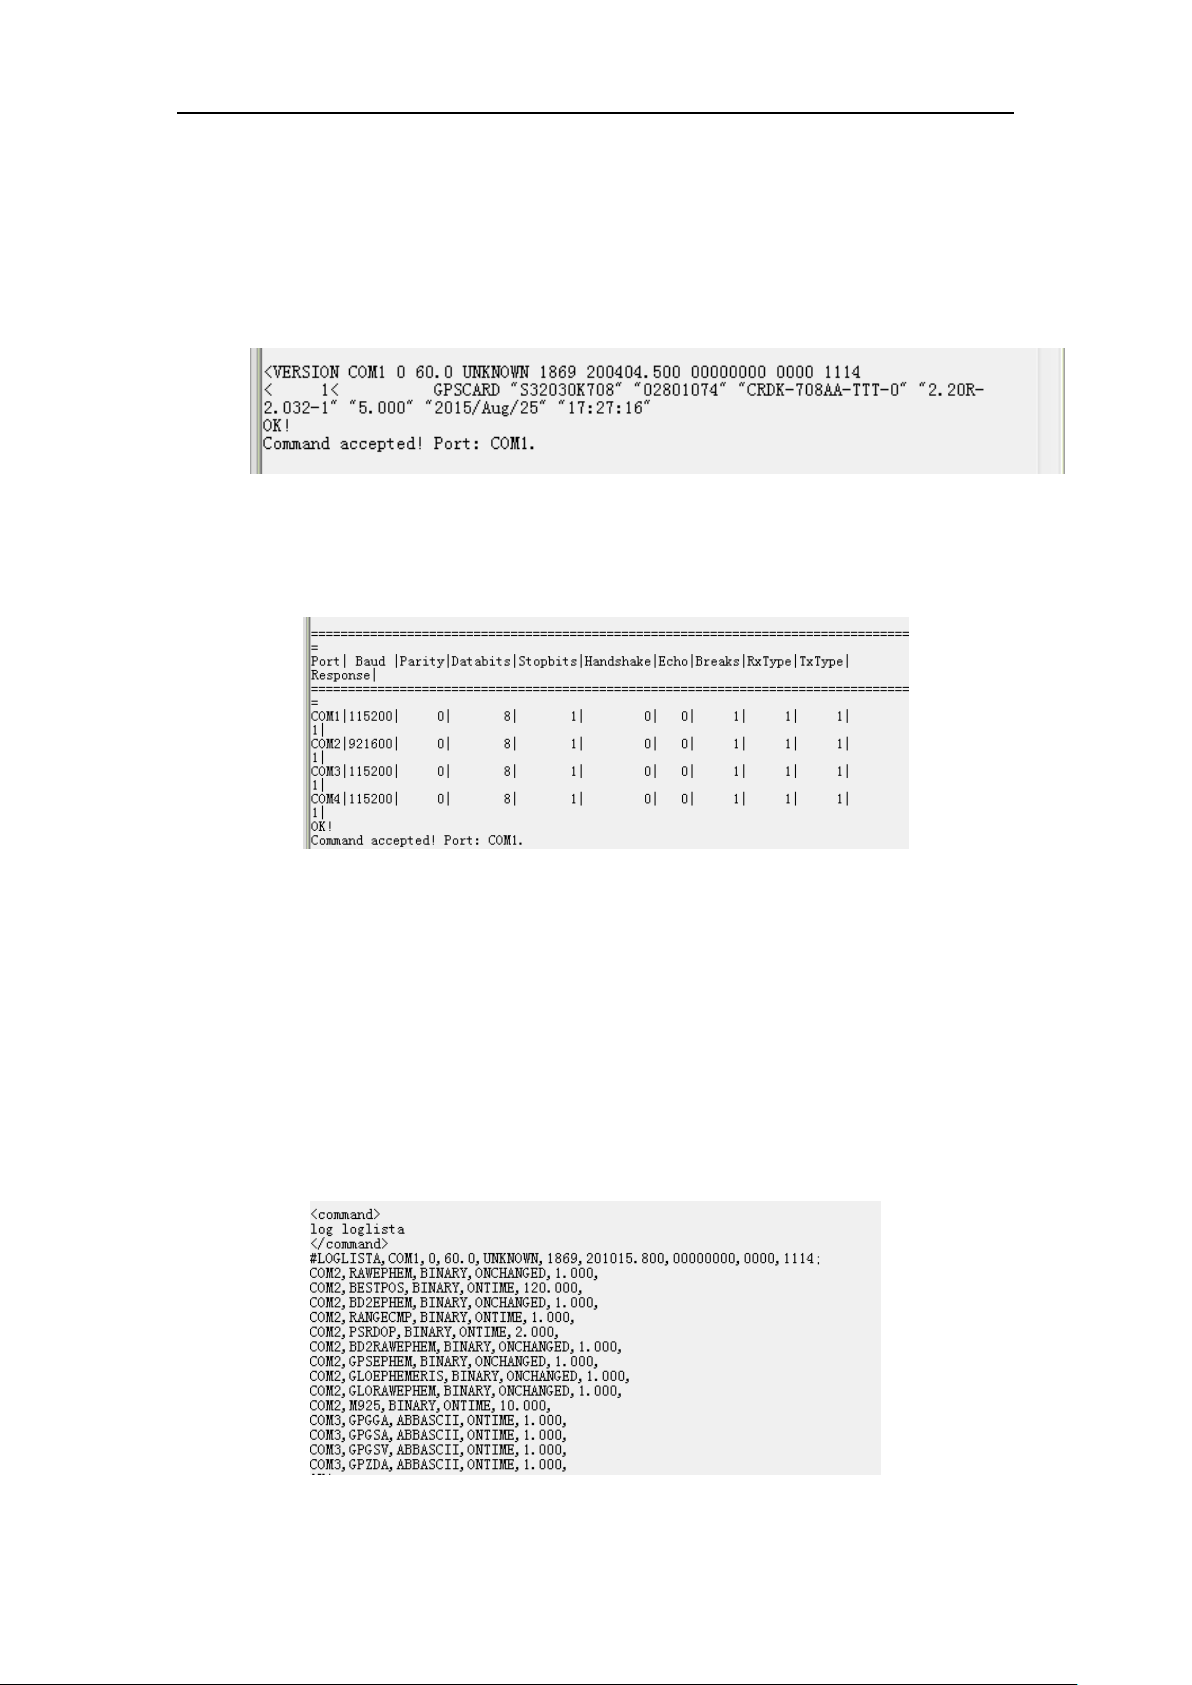
5.1 Frequently used commands
Check Version Information
log version // Version information about the board
Check Port Information
log com configa // Information of the port.
Change the serial port baud rate
com com1 9600// Change the baud rate of com1 to 9600
Check System Information
log sysconfiga //All the configuration of the system can be viewed by this
command.
Check the Output data Information
log loglista//View the output data information about all the ports.
Page 35

M300 Pro GNSS Receiver User Guide
32
Command
Description
(un)lockout bd2
(un)lockout Beidou system
(un)lockout gps
(un)lockout GPS system
(un)lockout GLONASS
(un)lockout Glonass
Unlockoutall
Unlock all GNSS system
Lockout/unlockout satellite system
NMEA data output
The serial port is for COM1, you can output any NMEA data through COM1. For
example:
log com1 gpgga ontime 1
log com1 gpgsv ontime 1
Raw data output
Log com1 rawephembonchanged //Output GPSephemeris
Log com1 glorawephembonchanged //Output Glonassephemeris
Log com1 bd2rawephemb onchanged //Output Beidouephemeris
Log com1 rangecmpbontime 1//Set com1 output cmp1 data, the frequency is 1Hz.
Unlogall com1
Base setup & Rover setup
Output/Input correction data from serial port(com1).
For base(RTCM3):
fix auto
log com1 rtcm1004b ontime1
log com1 rtcm1005b ontime5
log com1 rtcm1012b ontime1
log com1 rtcm1104b ontime1
For rover:
interfacemode com1 auto auto on
5.2 Commands related to external devices
5.2.1 Event marker
The M300pro receiver supports the event marker function. Use the command
Page 36
M300 Pro GNSS Receiver User Guide
33
MARKCONTROL to control the event functions.
Format
MARKCONTROL signal switch [polarity] [timebias [timeguard]]
Description
At present, Signal only supports mark1, and Switch supports ENABLE and DISABLE.
Polarity supports POSITIVE (positive pulse triggering) and NEGATIVE (negative pulse
triggering). Timebias and timeguard are not available currently.
Example
markcontrol mark1 enable negative 0 0
After configuration, you can save and check settings via command saveconfigand
logsysconfig.
Output Messages
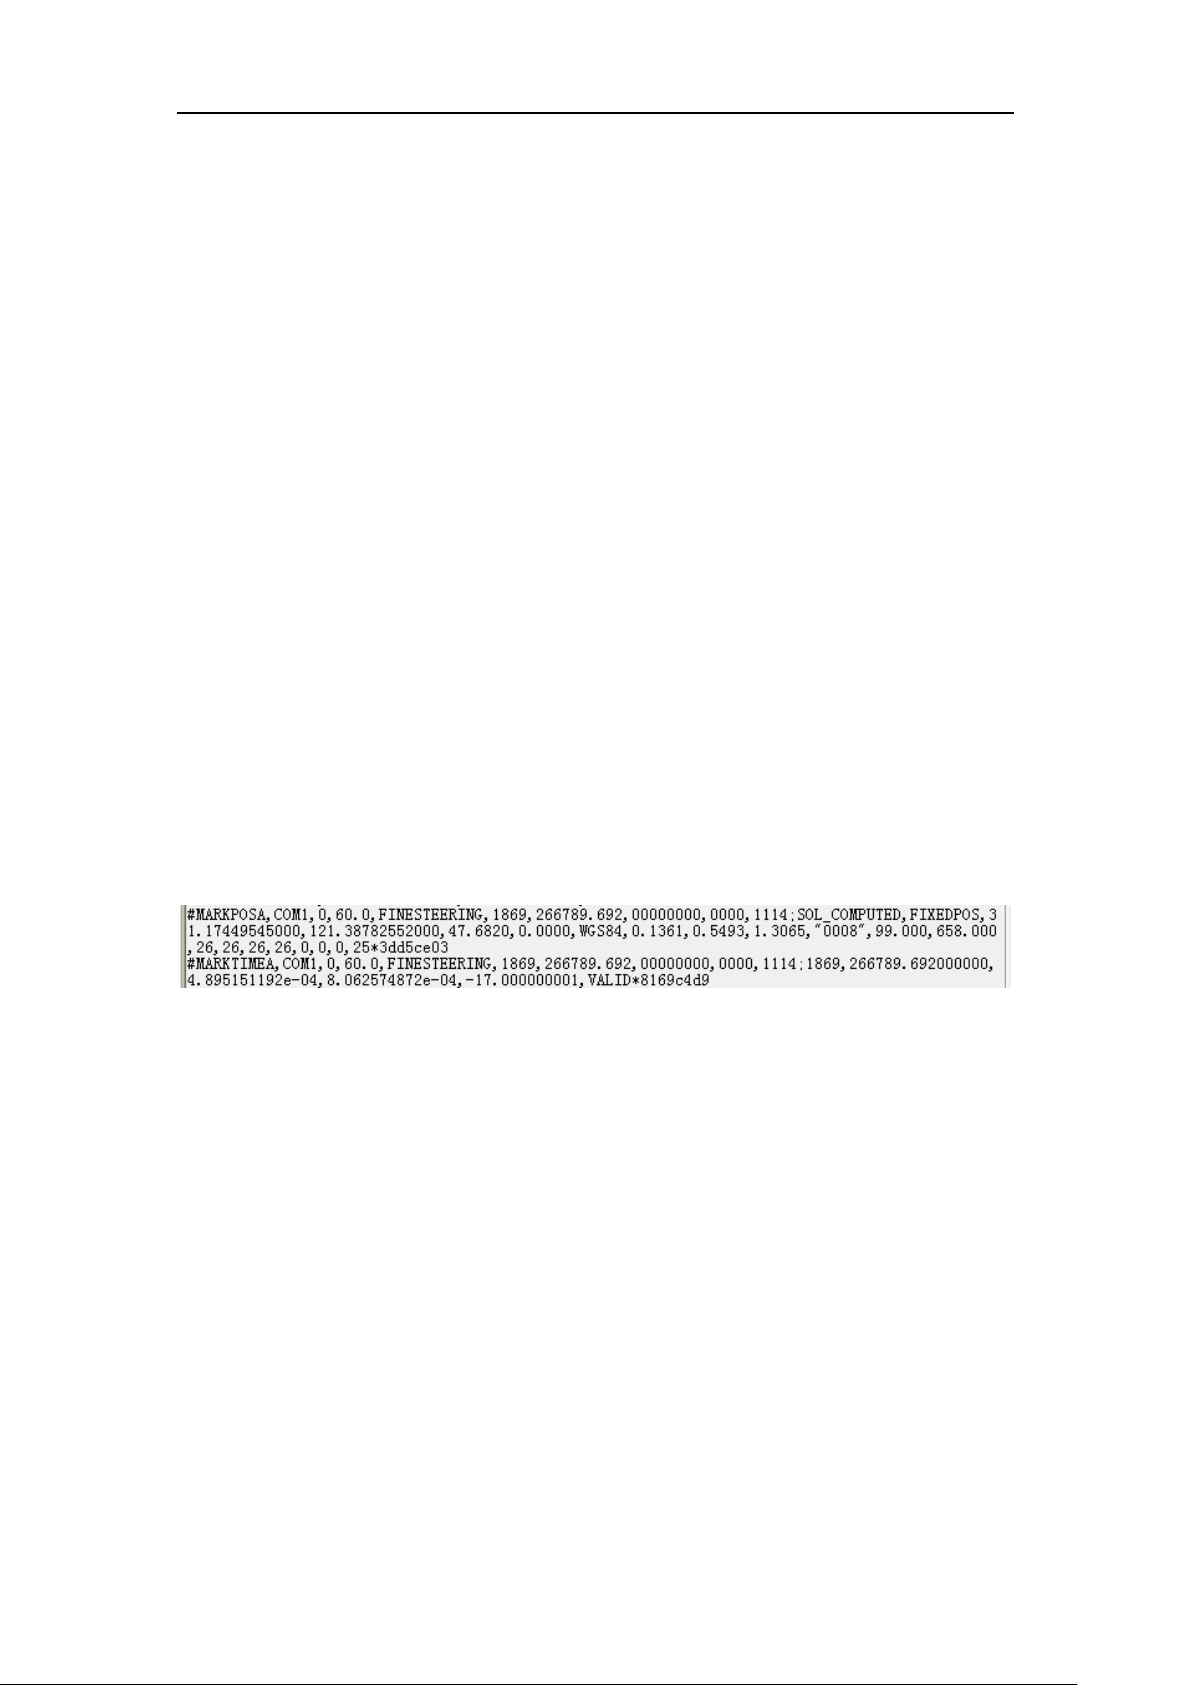
Markpos and marktime provide the position and accurate time of the event
moment.The two messages support binary and ASCII formats, so the messages
provide formats markposa, markposb, marktimea and marktimeb.
Examples
logcom1 markposaonnew
logcom1 marktimeaonnew
Once you triggered the Event signal connector,it will output the event information
from the serial port(com1).The event information(marktime&markpos) will record to
the raw data once it be triggered if you enabled the event function.
5.2.2 PPS output
The M300pro receiver supports the PPS output. Use the command PPSCONTROL to
configure the PPS output.
Format
PPSCONTROL <switch><polarity><period><pulse-width>
Description
This command can be used to set the polarity, period and pulse-width of PPS output.
Parameters
<switch>: switch ‘enable’ or ‘disable’, the switch should be set to ‘enable’, and
‘disable’ is not allowed.
<polarity>: Select ‘positive’ if with a high level pulse, and ‘negative’ mode if a low
level pulse.
<period>: fixed to 1 second
<pulse-width>: in microseconds, should be less than half of period.
Page 37

M300 Pro GNSS Receiver User Guide
34
Example
PPSCONTROL ENABLE POSITIVE 1 1000
5.2.3 10 MHz frequency input
This port is used for external clock input, and it can be an external atomic clock.
Command:
Set atom on/off // on: use the external atomic clock; off: use the internal atomic
clock.
Page 38
M300 Pro GNSS Receiver User Guide
35
Appendix A:Beidou Coverage and the positioning stability
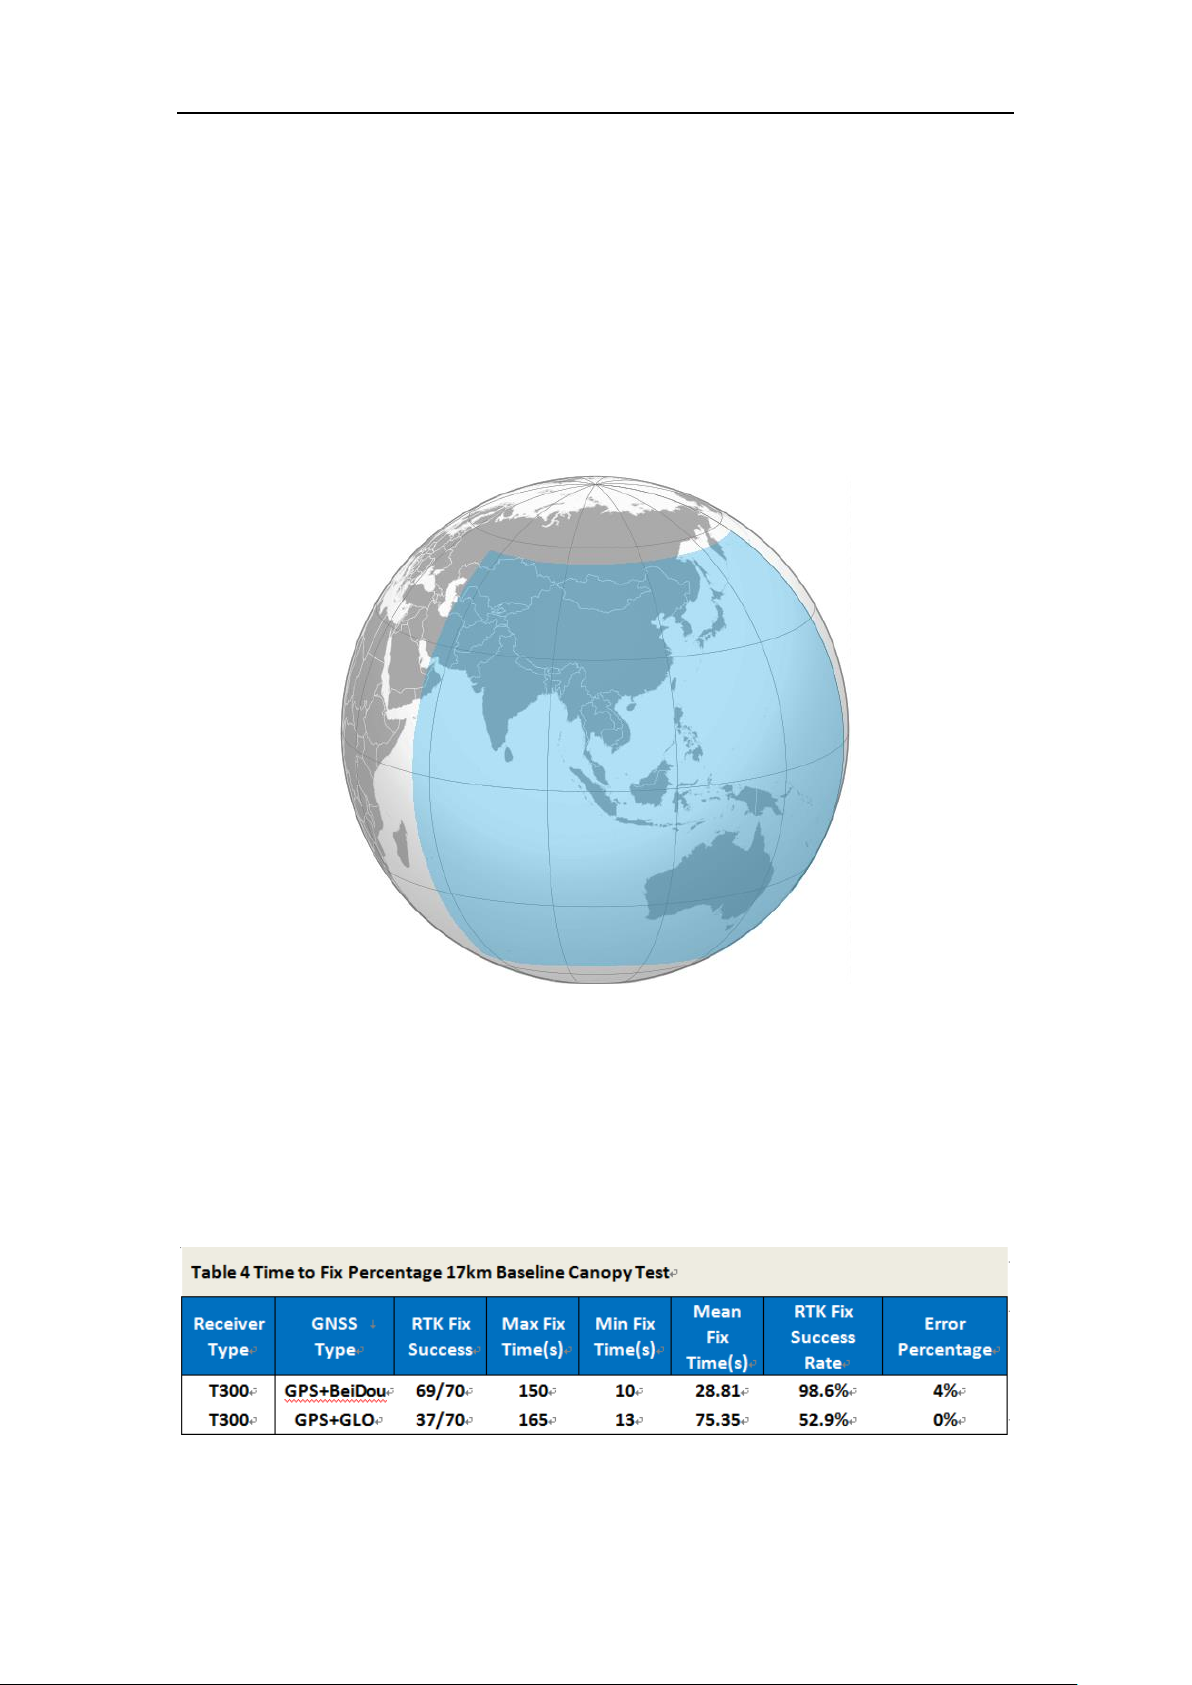
The BeiDou Navigation Satellite System(BDS) has been offering positioning services
to customers in the Asia-Pacific region since December 2012. The global service is
planned to open in 2020. All user can get 6 to 10 Beidou satellites within this area
currently, you may also receive 1 to 5 Beidou satellites if you are out off this coverage.
Current Beidou coverage are shown bellow:
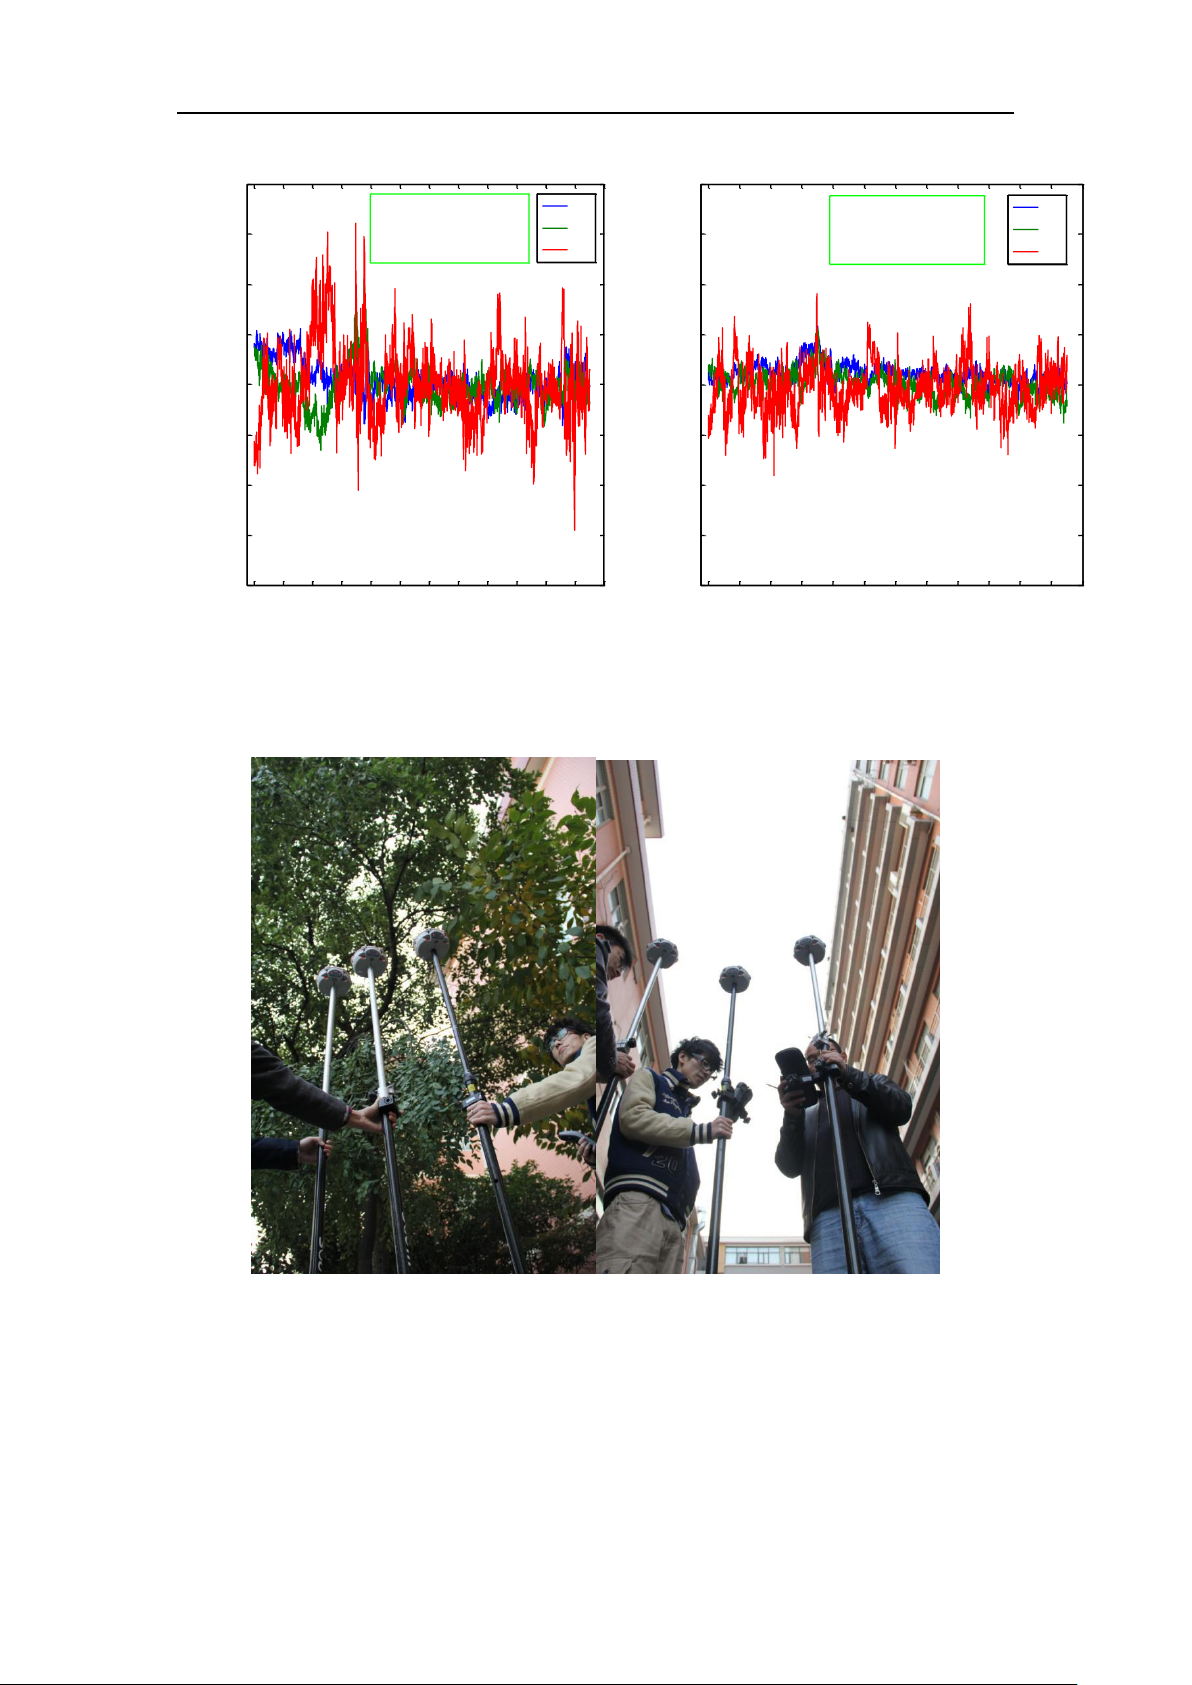
Moreover, the below figures show relatively high positioning stability of our GNSS
devices with Beidou satellites.
Page 39
M300 Pro GNSS Receiver User Guide
36
0 2 4 6 8 10 12 14 16 18 20 22 24
-0.08
-0.06
-0.04
-0.02
0.00
0.02
0.04
0.06
0.08
hour
meter
GPS + COMPASS
dE
dN
dU
0 2 4 6 8 10 12 14 16 18 20 22 24
-0.08
-0.06
-0.04
-0.02
0.00
0.02
0.04
0.06
0.08
hour
meter
GPS
dE
dN
dU
rms( dE) = 0.006m
rms( dN) = 0.005m
rms( dU) = 0.009m
rms( dE) = 0.007m
rms( dN) = 0.007m
rms( dU) = 0.015m
To improve the positioning stability, please operate receivers as the instruction
shown below:
Page 40

M300 Pro GNSS Receiver User Guide
37
Appendix B:Advantages of Beidou B3 signal
ComNav technology is a high-tech company with CORE GNSS Positioning technology,
in China. So we have a better understanding of Beidou signal, providing reliable
receivers and positioning solutions for you. ComNav declares that Beidou B3 signal is
only used for customers in China with its two advantages:
E-RTK: long baseline RTK(supper wide int solution) , which can reach 100km distance.
RTK initialization time and RTK stability: the Beidou B3 can improve the RTK fix time.
 Loading...