

Page 1
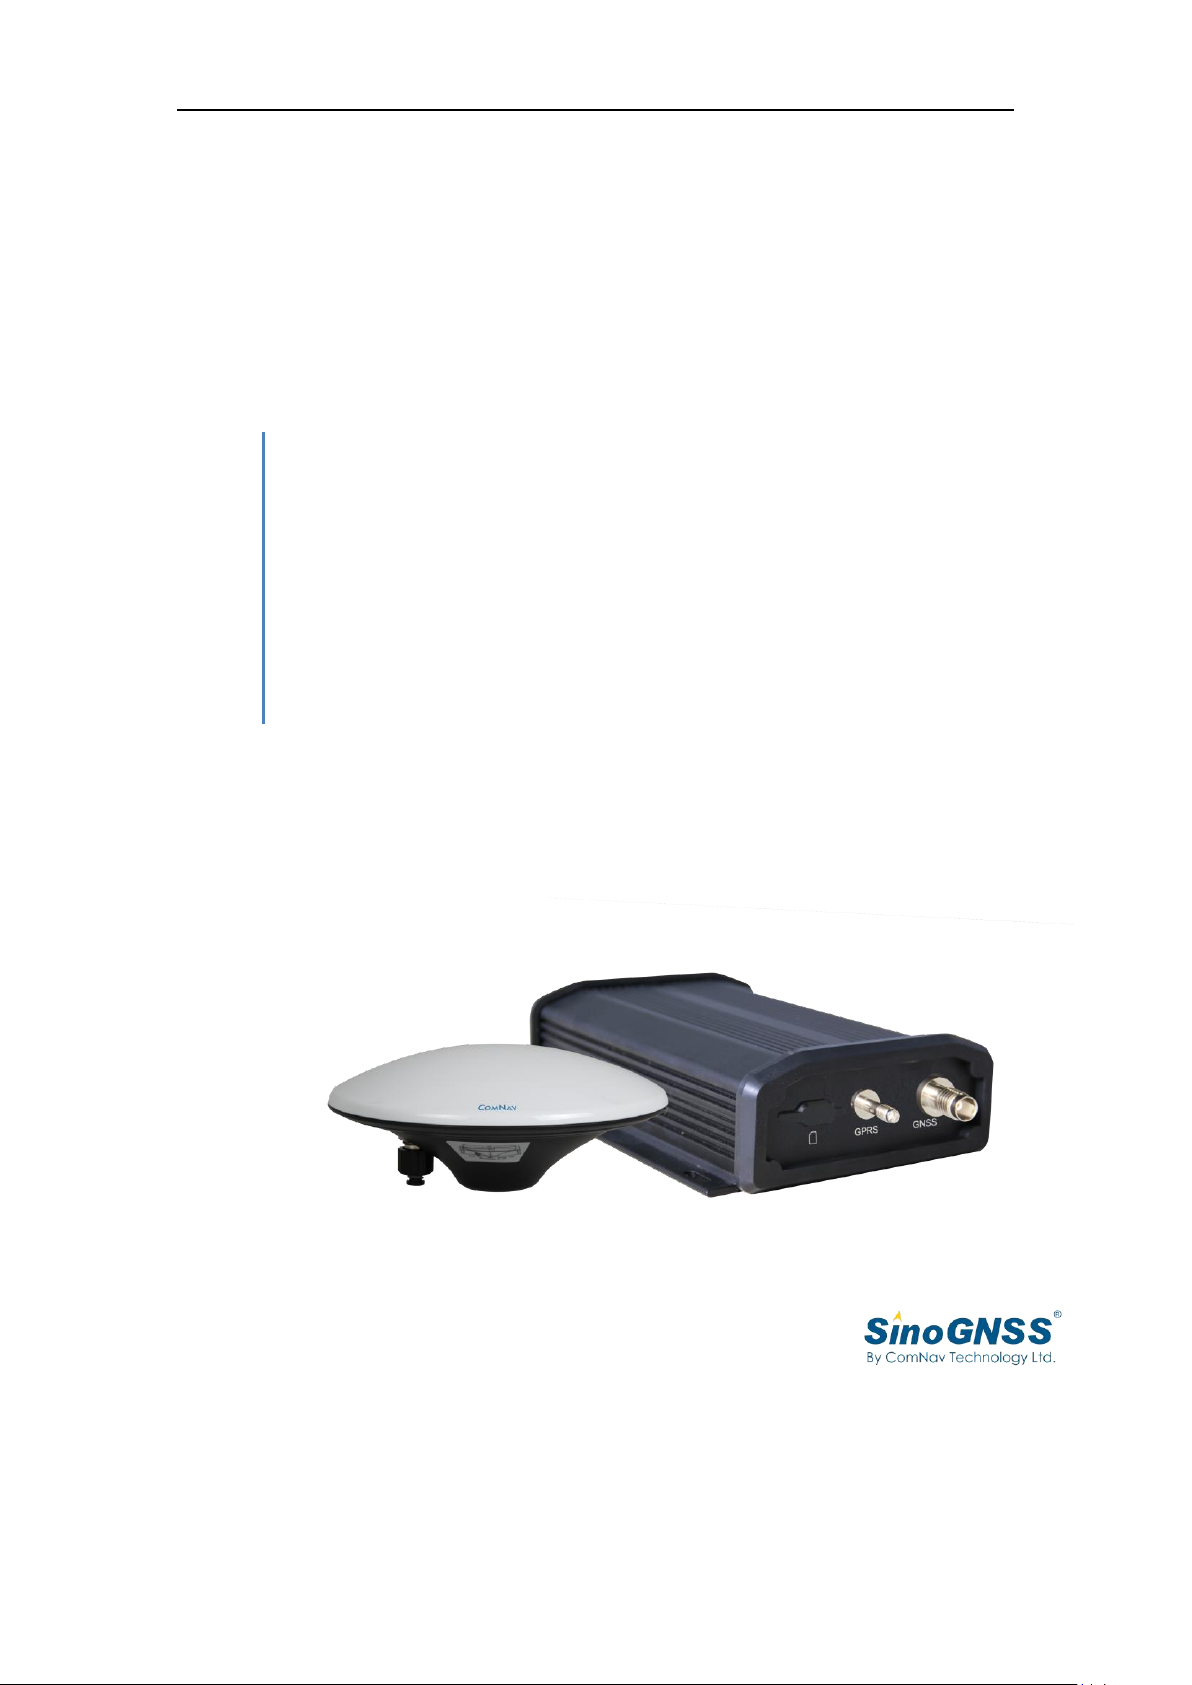
M300 Mini(G) GNSS Receiver Quick Guide
ComNav Technology
Quick Guide
M300 Mini(G) GNSS Receiver
2018 March
Page 2

M300 Mini(G) GNSS Receiver Quick Guide
Ⅰ
CONTENTS
1. Introduction .................................................................................................................................. 1
1.1 Safety Information ............................................................................................................... 1
1.2 Warning and Cautions ......................................................................................................... 1
1.3 Use and Care ....................................................................................................................... 1
1.4 Technical Assistance ............................................................................................................ 2
1.5 Your Comments ................................................................................................................... 2
2. Overview ....................................................................................................................................... 3
2.1 Package list .......................................................................................................................... 3
2.2 M300 Mini(G) enclosure receiver introduction ................................................................... 4
3. Receiver Installation ...................................................................................................................... 5
3.1 Interface introduction ......................................................................................................... 5
3.2 Installation ........................................................................................................................... 6
4. Configure M300 Mini(G) by CRU software .................................................................................... 7
4.1 Connect with GNSS receiver ................................................................................................ 7
4.2 Receiver Configuration ........................................................................................................ 9
4.3 Main information check .................................................................................................... 10
4.3.1 Satellites information ............................................................................................. 10
4.3.2 RTK status indication .............................................................................................. 11
5. Frequently Used ASCII Command ............................................................................................... 13
5.1 GPGGA Message................................................................................................................ 13
5.2 Log raw data of GNSS observations ................................................................................... 13
5.3 Satellites constellation system configuration .................................................................... 14
Page 3

M300 Mini(G) GNSS Receiver Quick Guide
1
1. Introduction
Thank you for choosing the M300 Mini(G) GNSS receiver.
This Getting Started Guide will provide useful information about M300 Mini(G). It will
also guide you through your first step of using M300 Mini(G) GNSS receiver.
1.1 Safety Information
Before using the receiver, please make sure that you have read and understood this
Getting Started Guide, as well as the safety requirements.
1.2 Warning and Cautions
An absence of specific alerts does not mean that there are no safety risks involved. A
Warning or Caution information is intended to minimize the risk of personal injury
and/or damage to the equipment.
WARNING-A Warning alerts you to a potential misused or wrong setting of the equipment.
CAUTION- A Caution alerts you to a possible risk of serious injury to your person and/or damage to
the equipment.
1.3 Use and Care
The M300 Mini(G) is designed to withstand the rough environment that typically
occurs in the field. However, the M300 Mini(G) is high-precision electronic
equipment and should be treated with reasonable care.
Page 4

2
M300_G Mini GNSS Receiver User Guide
1.4 Technical Assistance
If you have any question and can’t find the answer that you need in this manual,
please contact your local dealer from which you purchased the M300 Mini(G).
Alternatively, please request technical support using the ComNav Website
at:www.comnavtech.com or technical support email:[email protected]
1.5 Your Comments
Your feedback about this Getting Started Guide will help us to improve it with future
revisions. Please email your comments to: [email protected]
Page 5
3
M300_G Mini GNSS Receiver User Guide
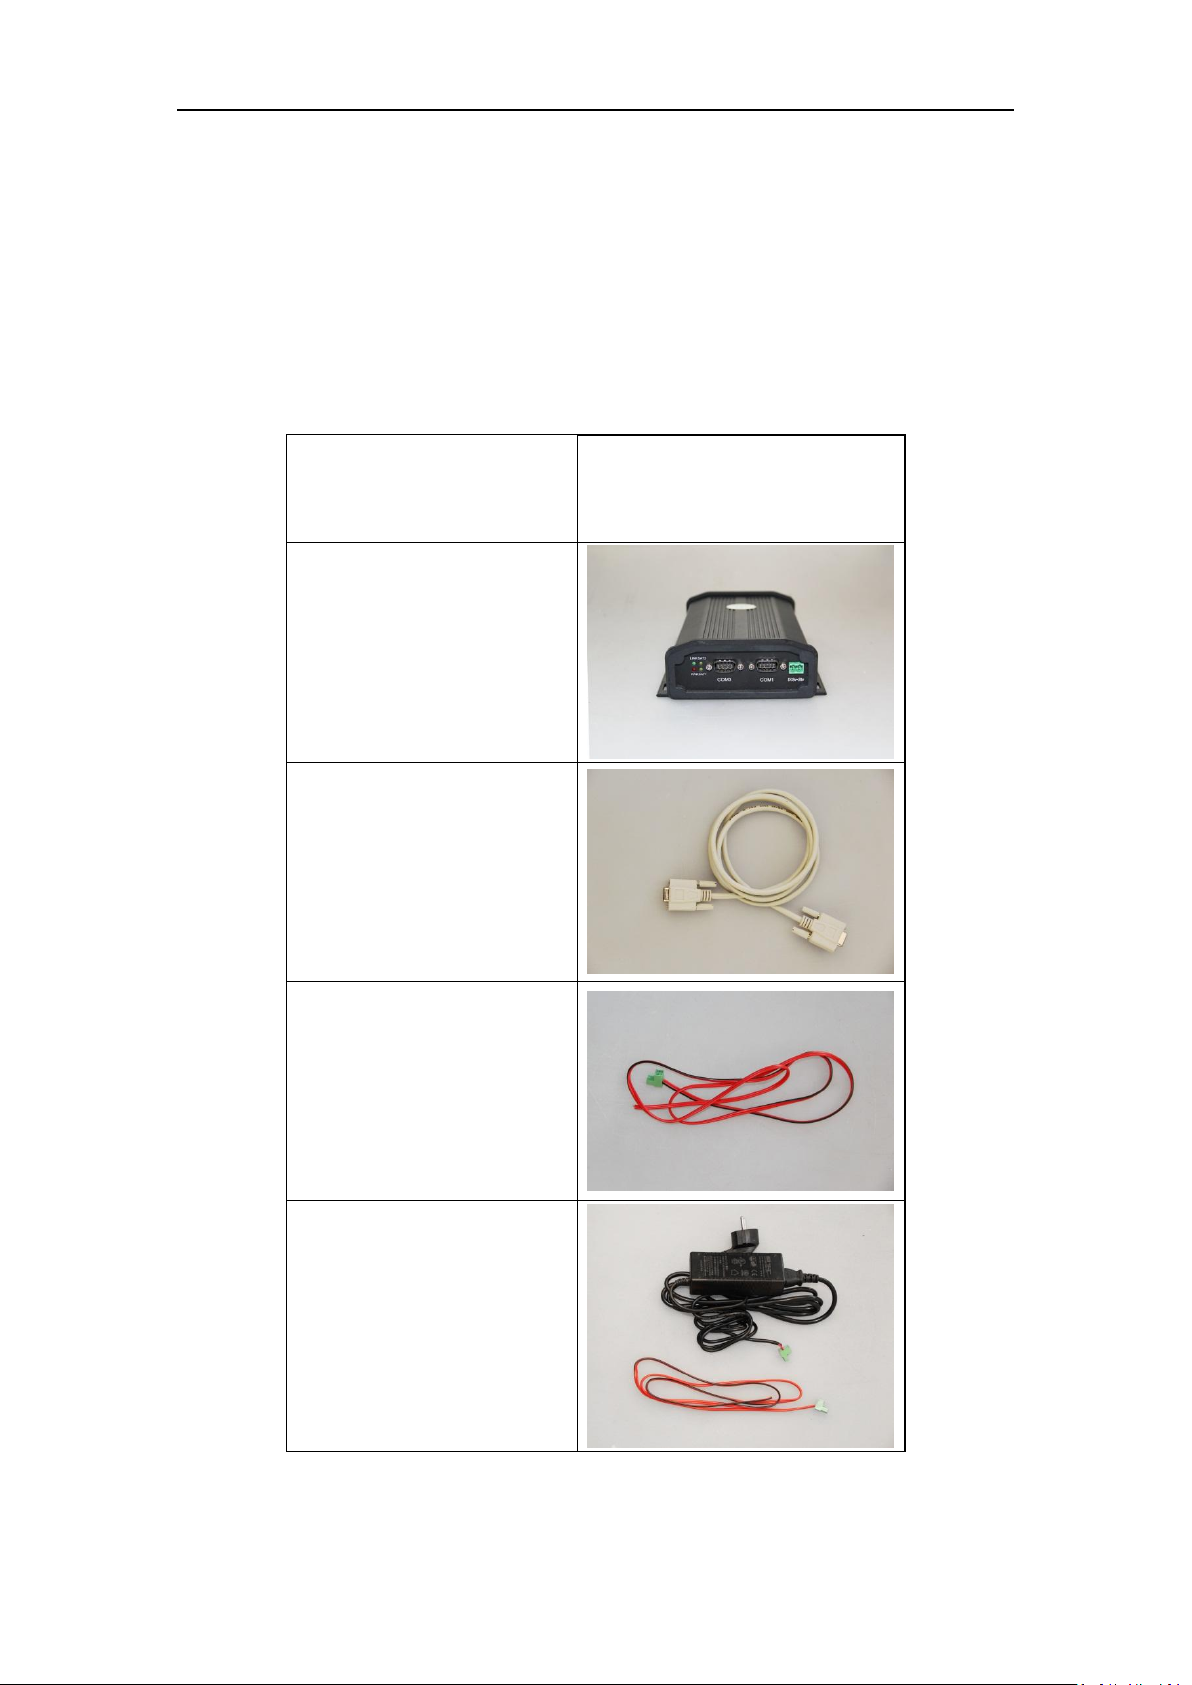
Items
Picture
M300 Mini(G) Receiver
Double female RS232 cable
1*2P-5.08 Power cable
AC adapter
2. Overview
2.1 Package list
Thanks for choosing ComNav M300 Mini(G) GNSS receiver. Please check the
evaluation package you received with the package list as following.
Page 6
4
M300_G Mini GNSS Receiver User Guide
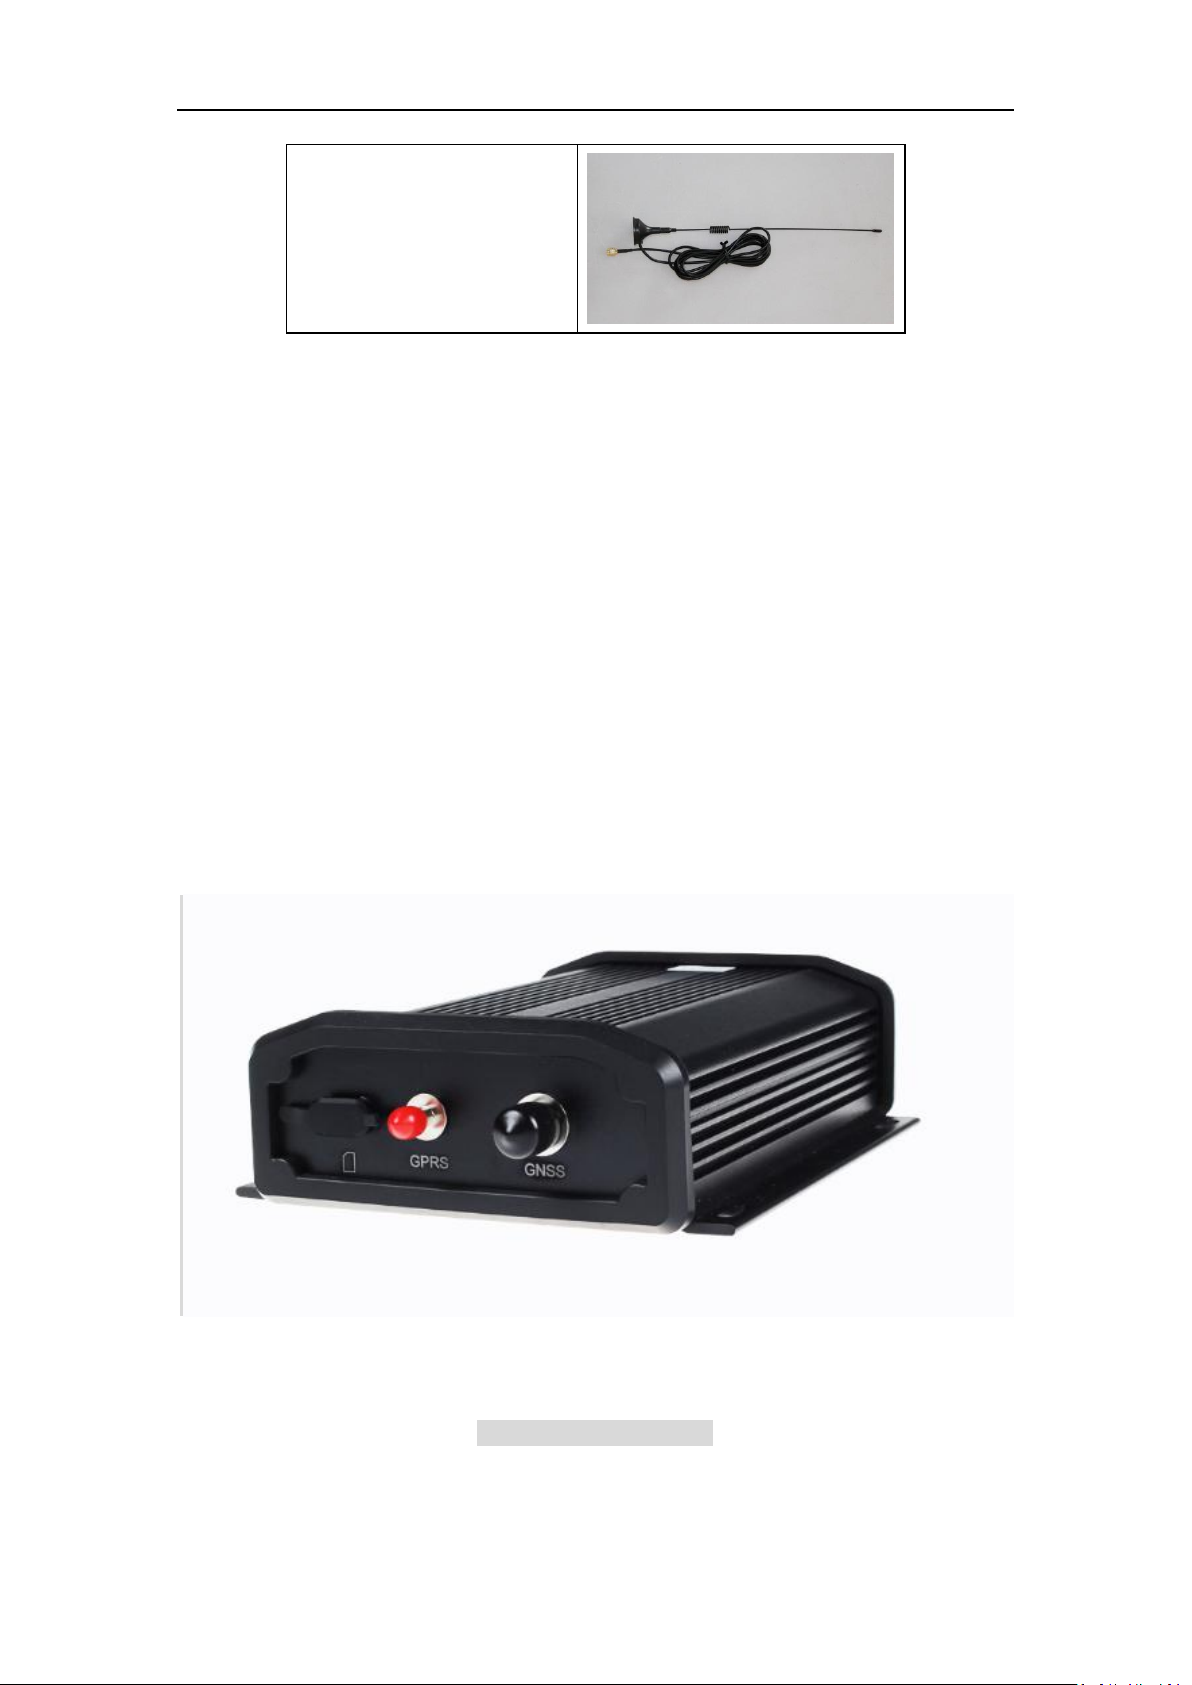
GPRS antenna
2.2 M300 Mini(G) enclosure receiver introduction
M300 Mini(G) GNSS receiver with ComNav GNSS OEM Board inside which
integrated with GPRS data link, is mainly used in high accuracy application, such as
UGV, GIS, deformation monitoring etc.
Which is also firmware upgradable to track satellite signals of upcoming
constellations. With the advanced QUANTUMTM technology, it remarkably improves
the stability and reliability of positioning accuracy in standalone and RTK modes.
With the M300 Mini (G), your GNSS solution will never be outdated in the future.
M300 Mini G GNSS receiver
Page 7
5
M300_G Mini GNSS Receiver User Guide
1
3 2 4
3. Receiver Installation
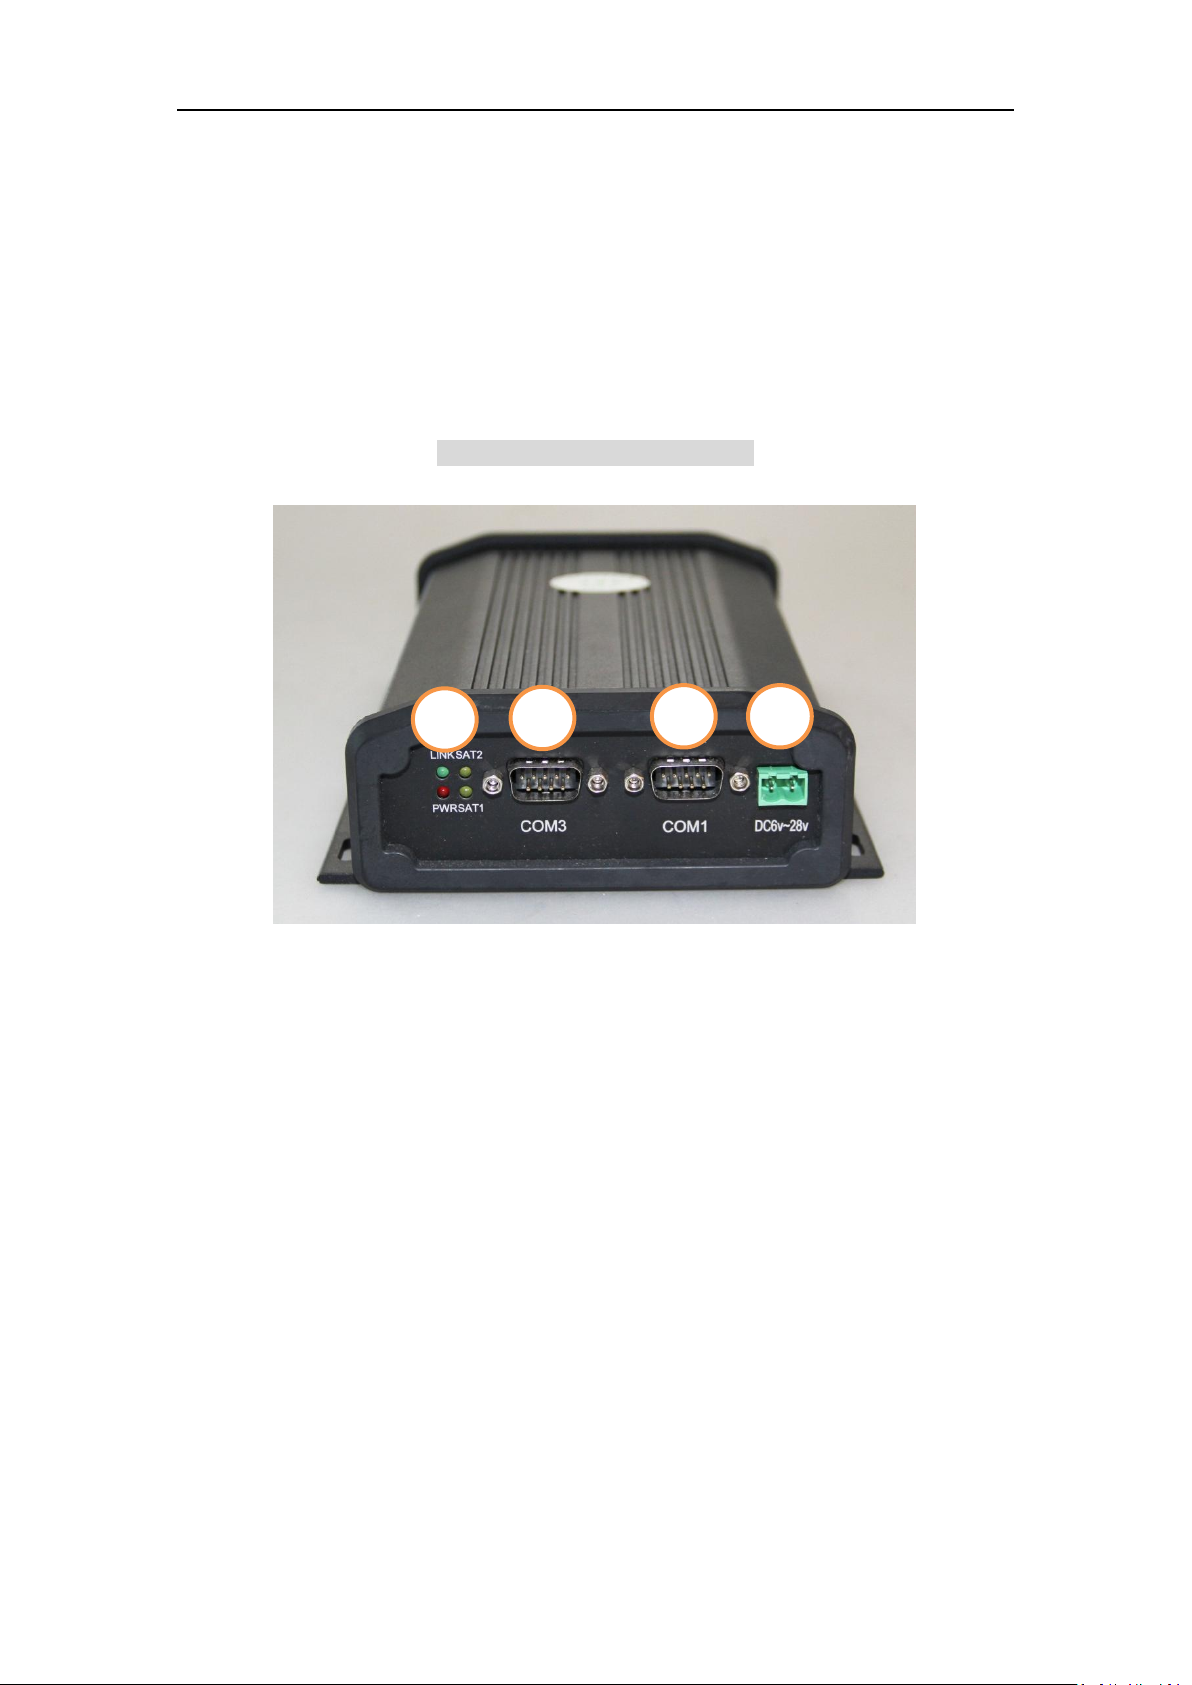
3.1 Interface introduction
Front panel of M300 Mini(G) receiver
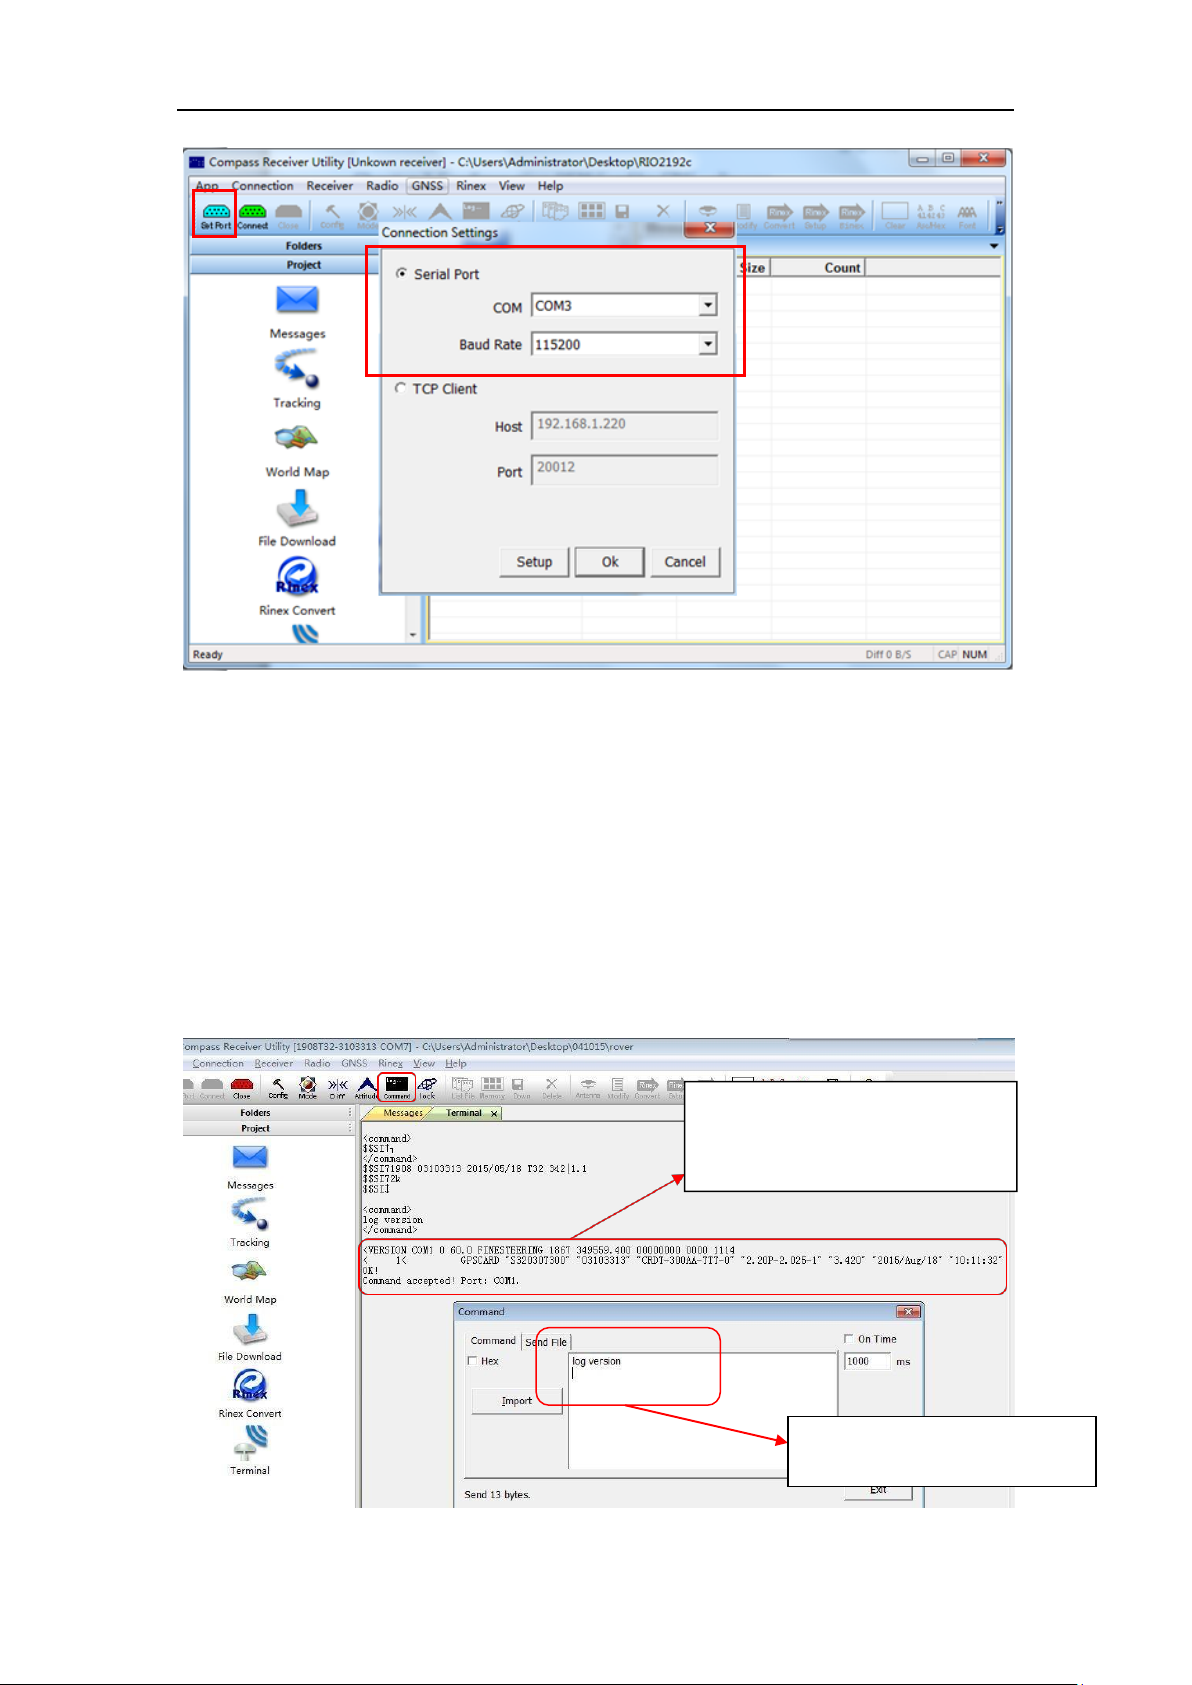
❶ 3 LEDs indicate the work status of the receiver.
PWR: power indicator. After power on, this LED will light in red color.
LINK: correction message.Flash once per second when receive correction message.
SAT1: satellites indicator. It will flash several times every 5 seconds, which means
how many satellites locked by the receiver.
SAT2: No use.
❷ COM1: serial port communication with com1 of OEM Board.
❸ COM3: serial port communication with com3 of OEM Board.
❹ DC6v~28v: power connector, voltage between 6V and 28VDC.
Page 8
6
M300_G Mini GNSS Receiver User Guide
6
5
Back panel of M300 Mini(G) receiver
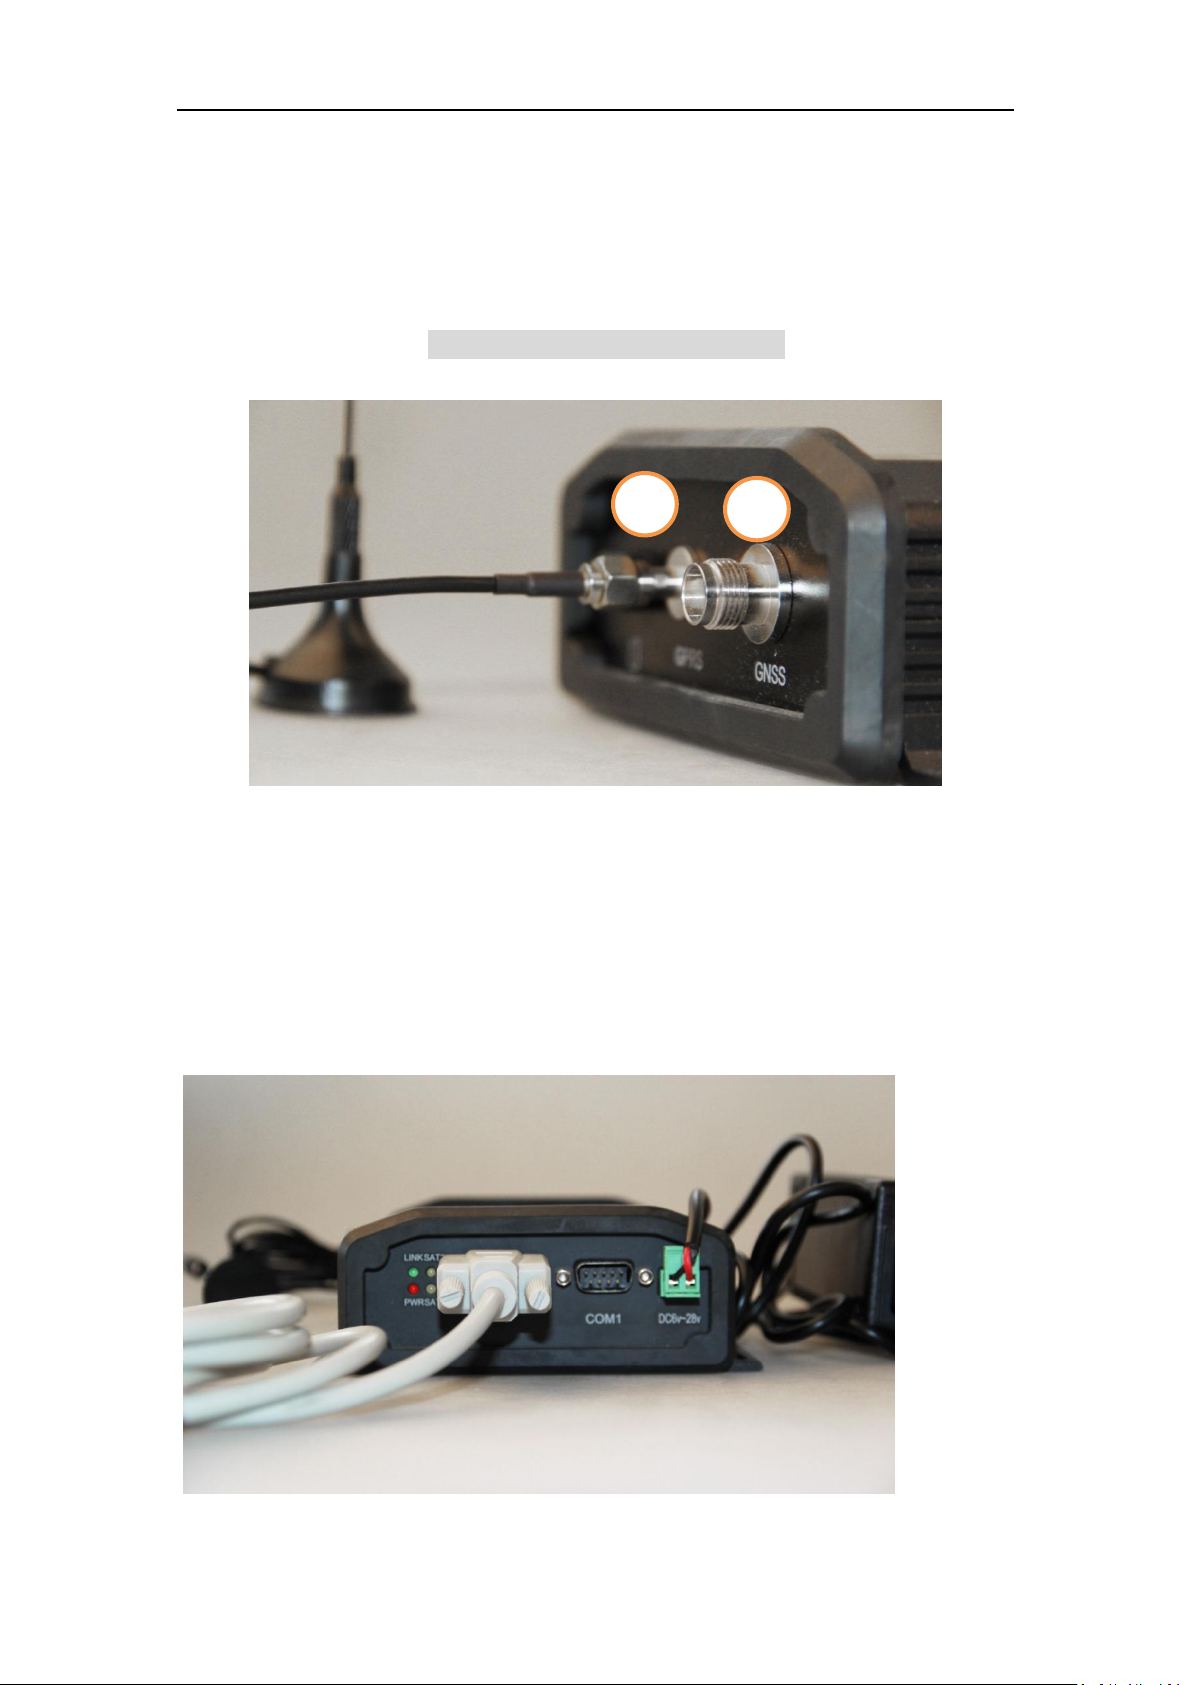
❺ GPRS: SMA GPRS antenna connector
❻ GNSS: TNC GNSS antenna connector
3.2 Installation
Connect the Power cable and data cable as below.
Page 9

7
M300_G Mini GNSS Receiver User Guide
The Installation of GNSS antenna is a very important factor affecting the performance
of receivers. It will have a great influence on the visibility of satellites and SNR, so the
antenna should be placed in open area and far away from big power electromagnetic
radiation devices.
Caution: Please take care when insert the SIM card, and GPRS antenna is necessary
for using the internet.
4. Configure M300 Mini(G) by CRU software
Compass Receiver Utility (CRU) is a windows-based Software that allows you to
access most features of the receiver without using a terminal emulator. It lets you
easily communicate with and configure the receiver via serial ports, using a PC with
Windows XP, windows 7, windows 8 or windows 10 operating system on it.
Compass Receiver Utility is available on the webpage
http://www.comnavtech.com/download.asp?bigclassid=28
4.1 Connect with GNSS receiver
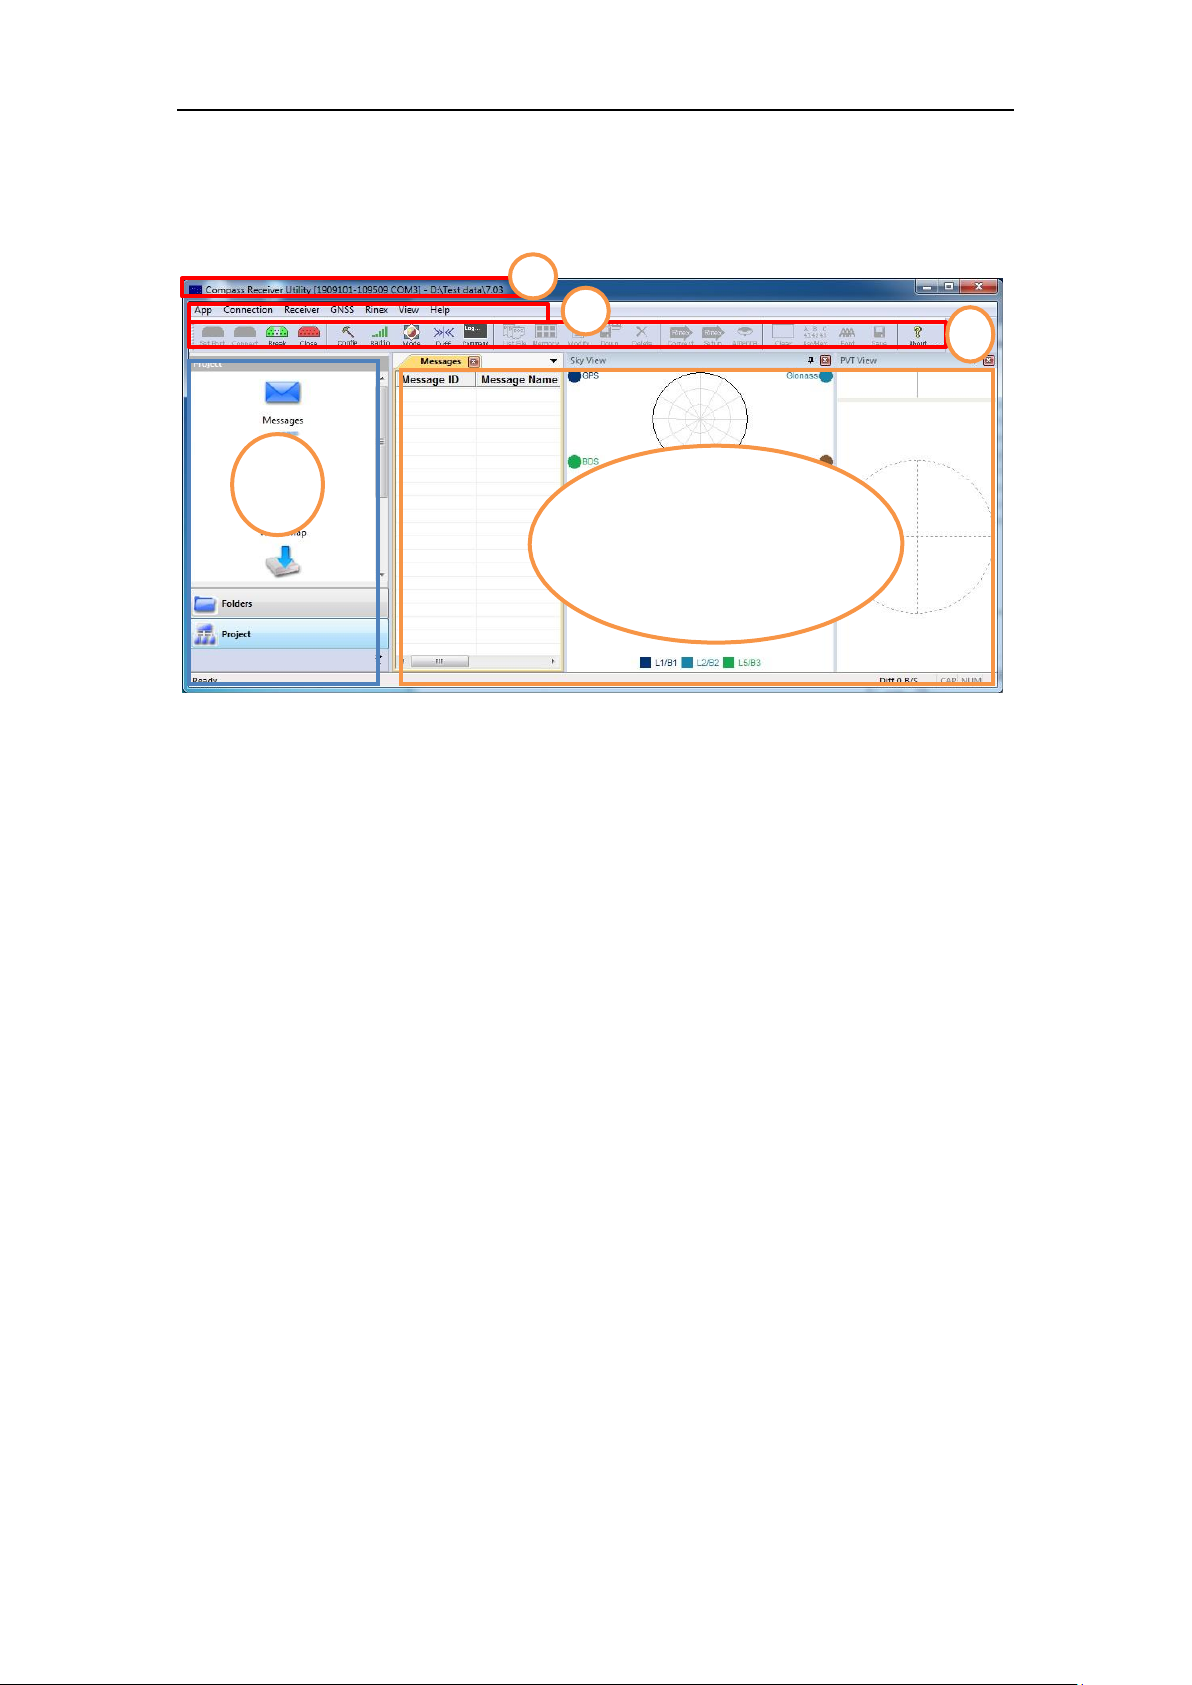
You can use serial port of PC to connect with the receiver, the default baud rate is
115200. Go to Set Port, set up the connections, and click OK .
Page 10
8
M300_G Mini GNSS Receiver User Guide
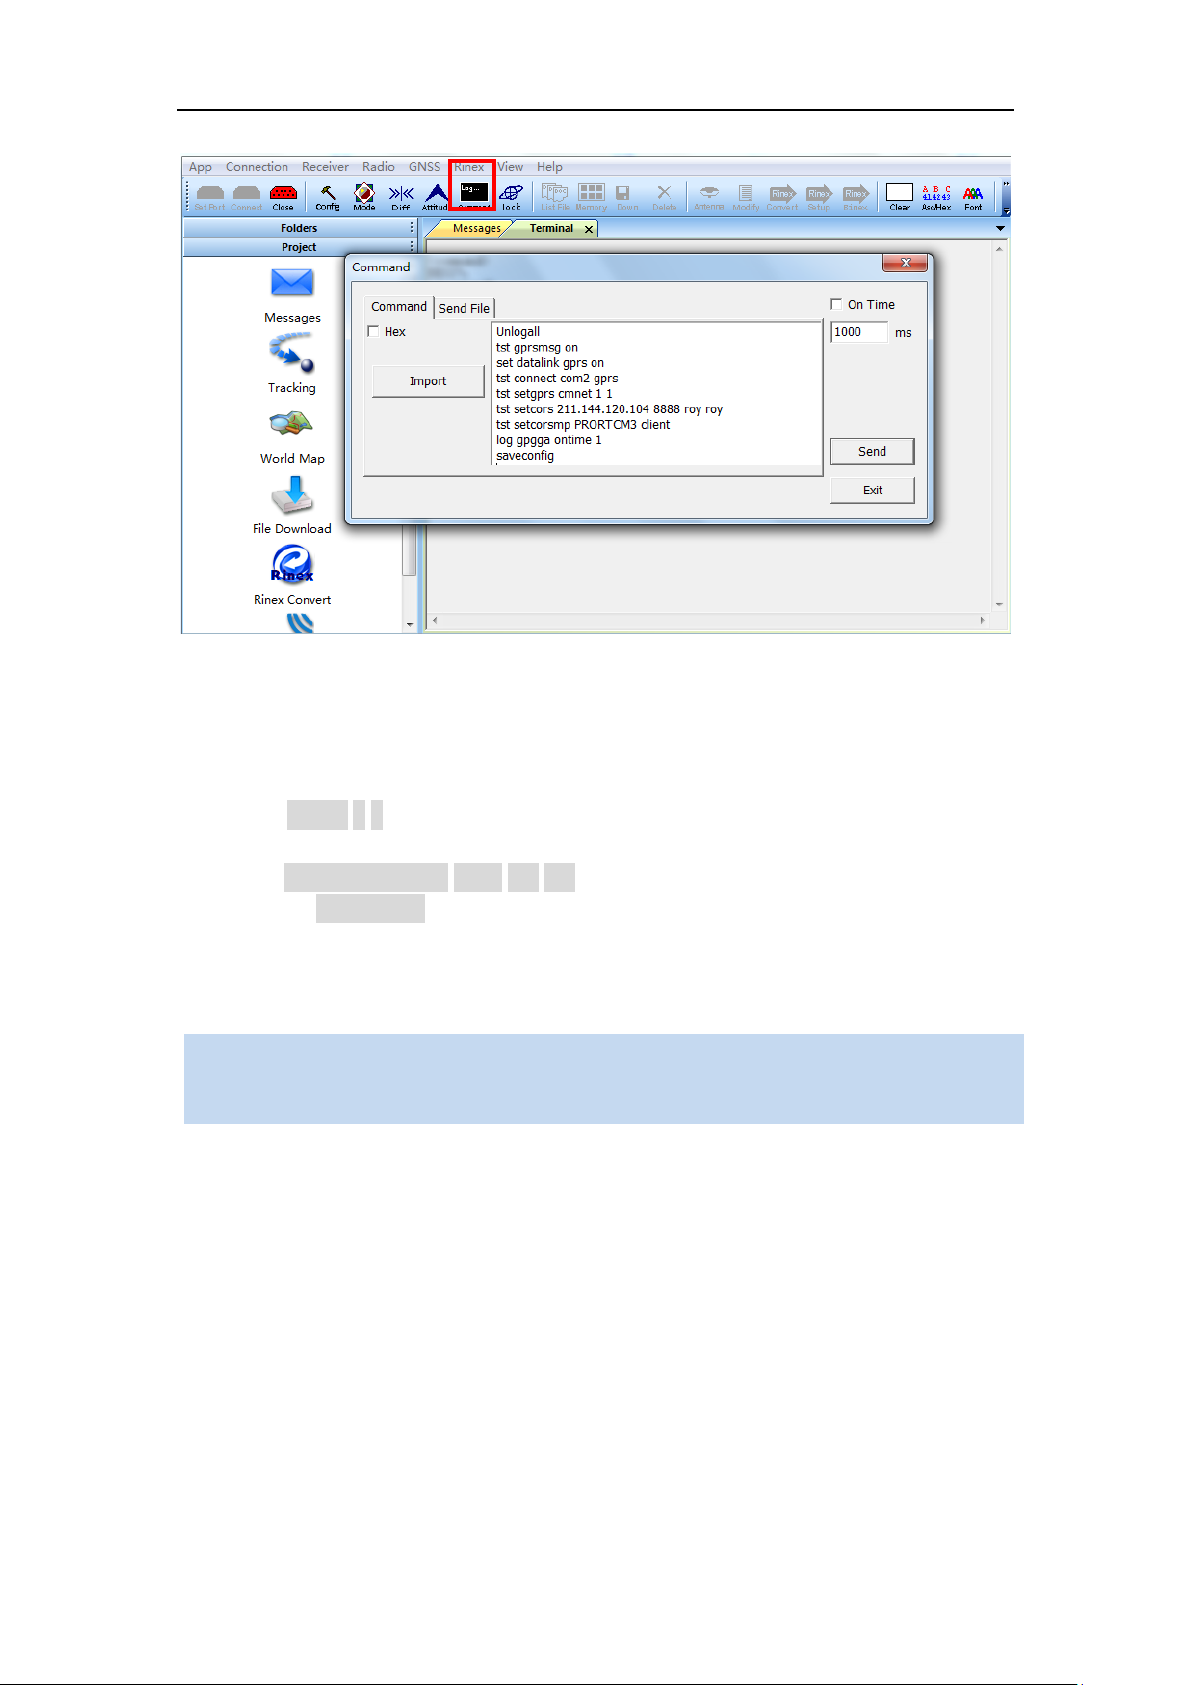
After send “log version”, if output
message like this means that
connection is success, you can do
the next step.
Make the cursor to next line on
the end of commands.
Go to “Command”, then send the command “log version”
Page 11
9
M300_G Mini GNSS Receiver User Guide
1 2 3
4
5
If it do not output the version information, you should change the baud rate to try,
the normally baud rate may changed to 38400/9200.
❶ Connection status: SN No. of receiver, the data download path. You can select
the data download path from the left function bar-> Folders, then select the folder
path.
❷ Main menu: all the operation of software menu can be found here.
❸ Shortcut bar: make it easy to access some frequently used operation.
❹ Function bar: some functions, such as data download, convert to Rinex data.
❺ Main window: show the information such as PVT view, SV sky plot view, and
hyper terminal.
4.2 Receiver Configuration
Click Command, enter the following commands, then you can get correction
message.
Page 12
10
M300_G Mini GNSS Receiver User Guide
Tips: The gray part should be written with your local information, especially APN
and Sourcetable etc. When send the commands please delete the notes after ”//”.
unlogall
tst gprsmsg on
set datalink gprs on
tst connect com2 gprs
tst setgprs cmnet 1 1 // APN Username Password
interfacemode gprs auto auto on
tst setcors 211.144.120.104 8888 roy roy // IP PORT Username Password
tst setcorsmp PRORTCM3 client // The Sourcetable which you want to use
log gpgga ontime 1 // Depends on what kinds of NMEA you want
saveconfig // It will connect automatically once you saved the configuration
After sending the commands it will connect to the Sourcetable directly with the one
you set. Wait about 2 minutes it will get the correction data, the yellow LED and blue
LED on receiver will be flashing, at the same time, you can also check the current
status through GGA.
4.3 Main information check
4.3.1 Satellites information
Page 13
11
M300_G Mini GNSS Receiver User Guide
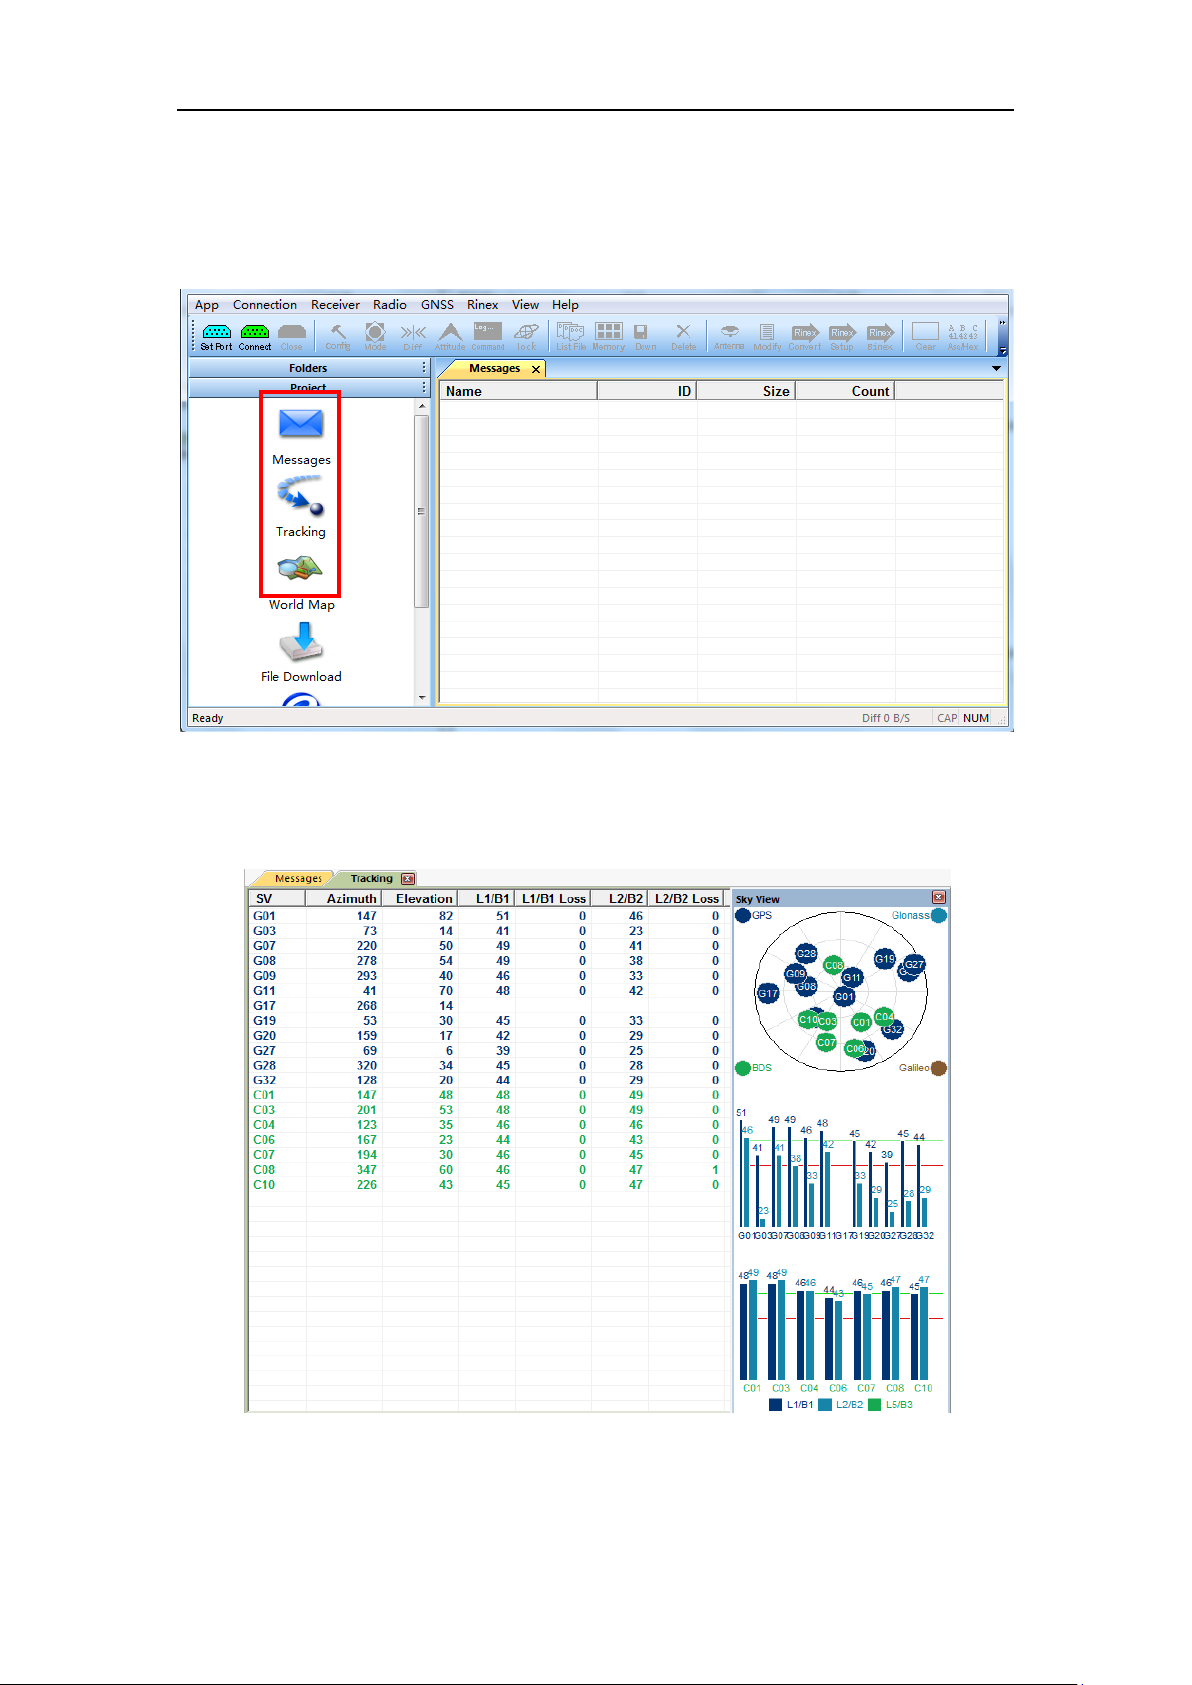
Messages shows the list of output messages by receiver, such as BESTPOSB,
BESTVELB and TIMEB information
Tracking shows satellite information, such as SNR and elevation.
Sky View: go to main menu, View-> Sky view. Click the constellation to enable or
disable the SV system.
4.3.2 RTK status indication
Page 14
12
M300_G Mini GNSS Receiver User Guide
1 2 3
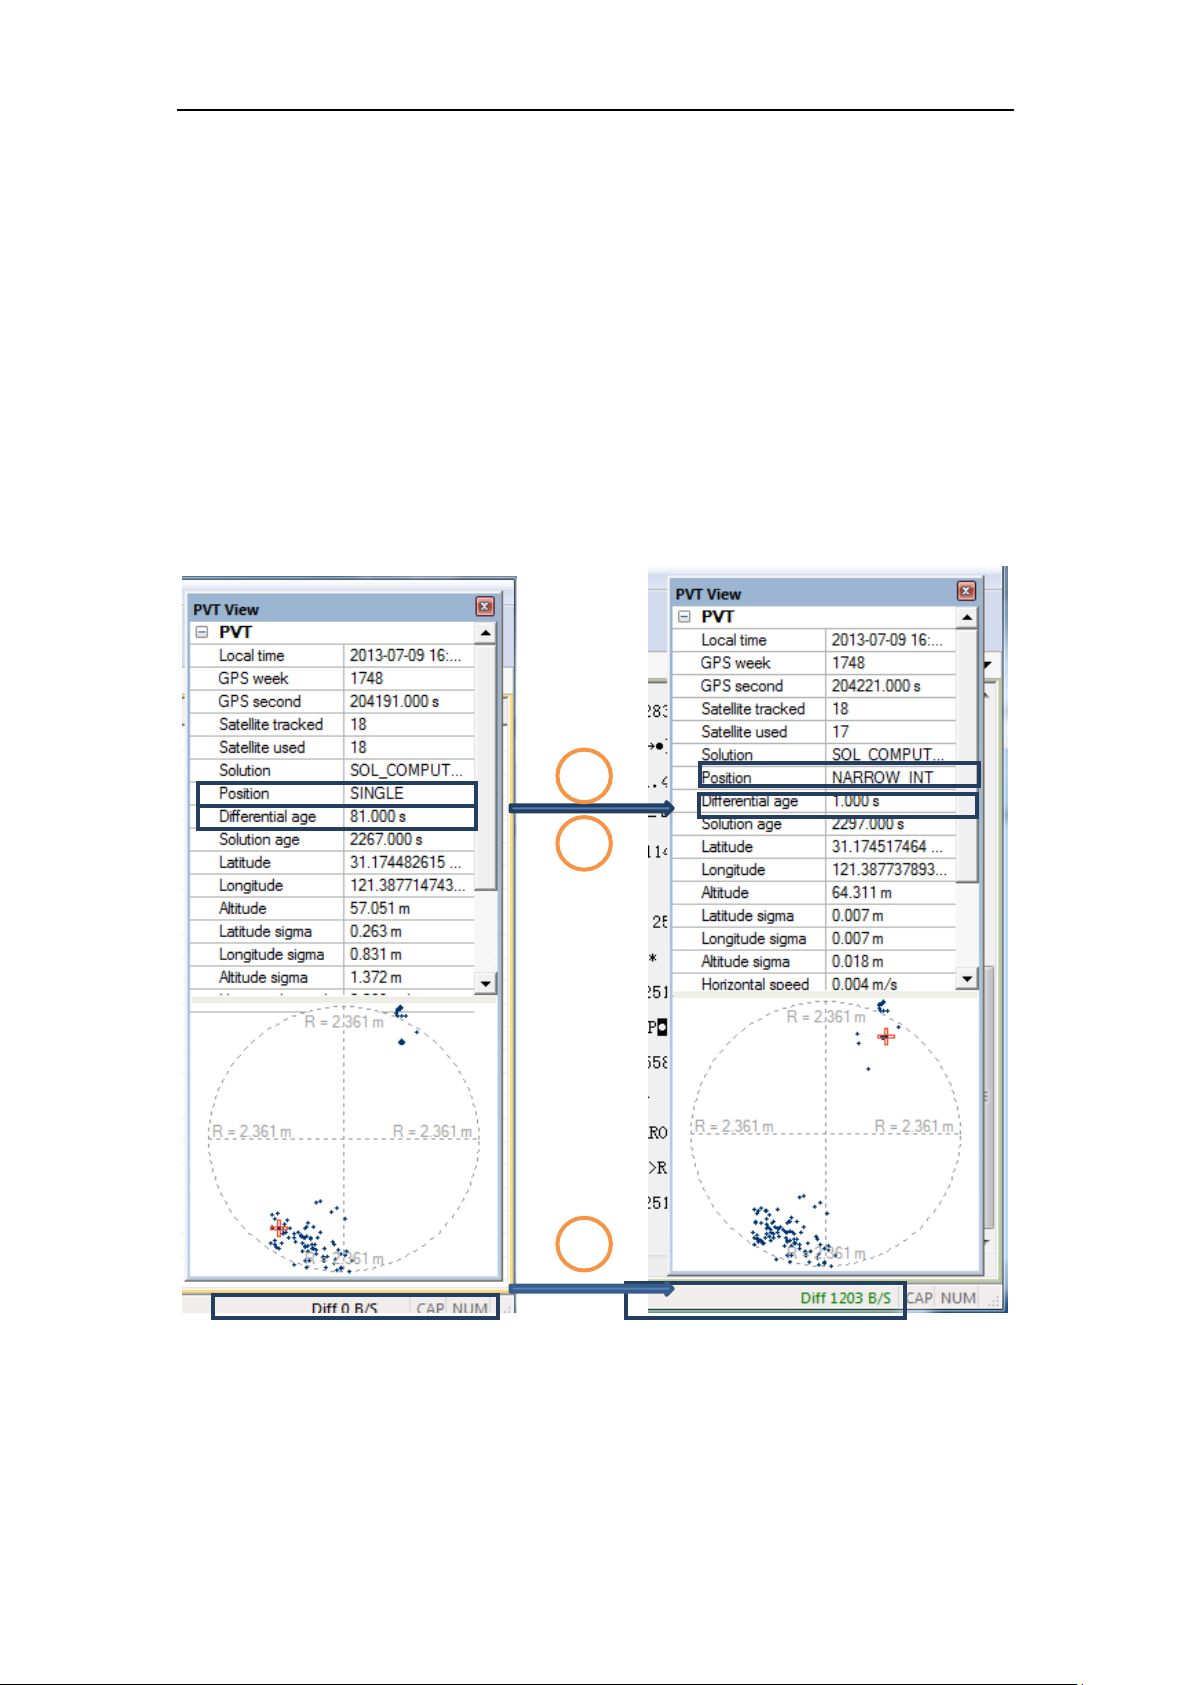
After the receiver receives correction message, the receiver will calculate the
ambiguity and turn to differential mode.
❶ Position mode: SINGLE->Narrow Float ->NARROW INT (autonomous mode->
RTK Float->RTK fixed)
❷ Differential age: 99 (No correction message), 1 (received correction message).
❸ Diff: Correction message data flow when use NTRIP function by CRU (Not SIM
card).
Page 15
13
M300_G Mini GNSS Receiver User Guide
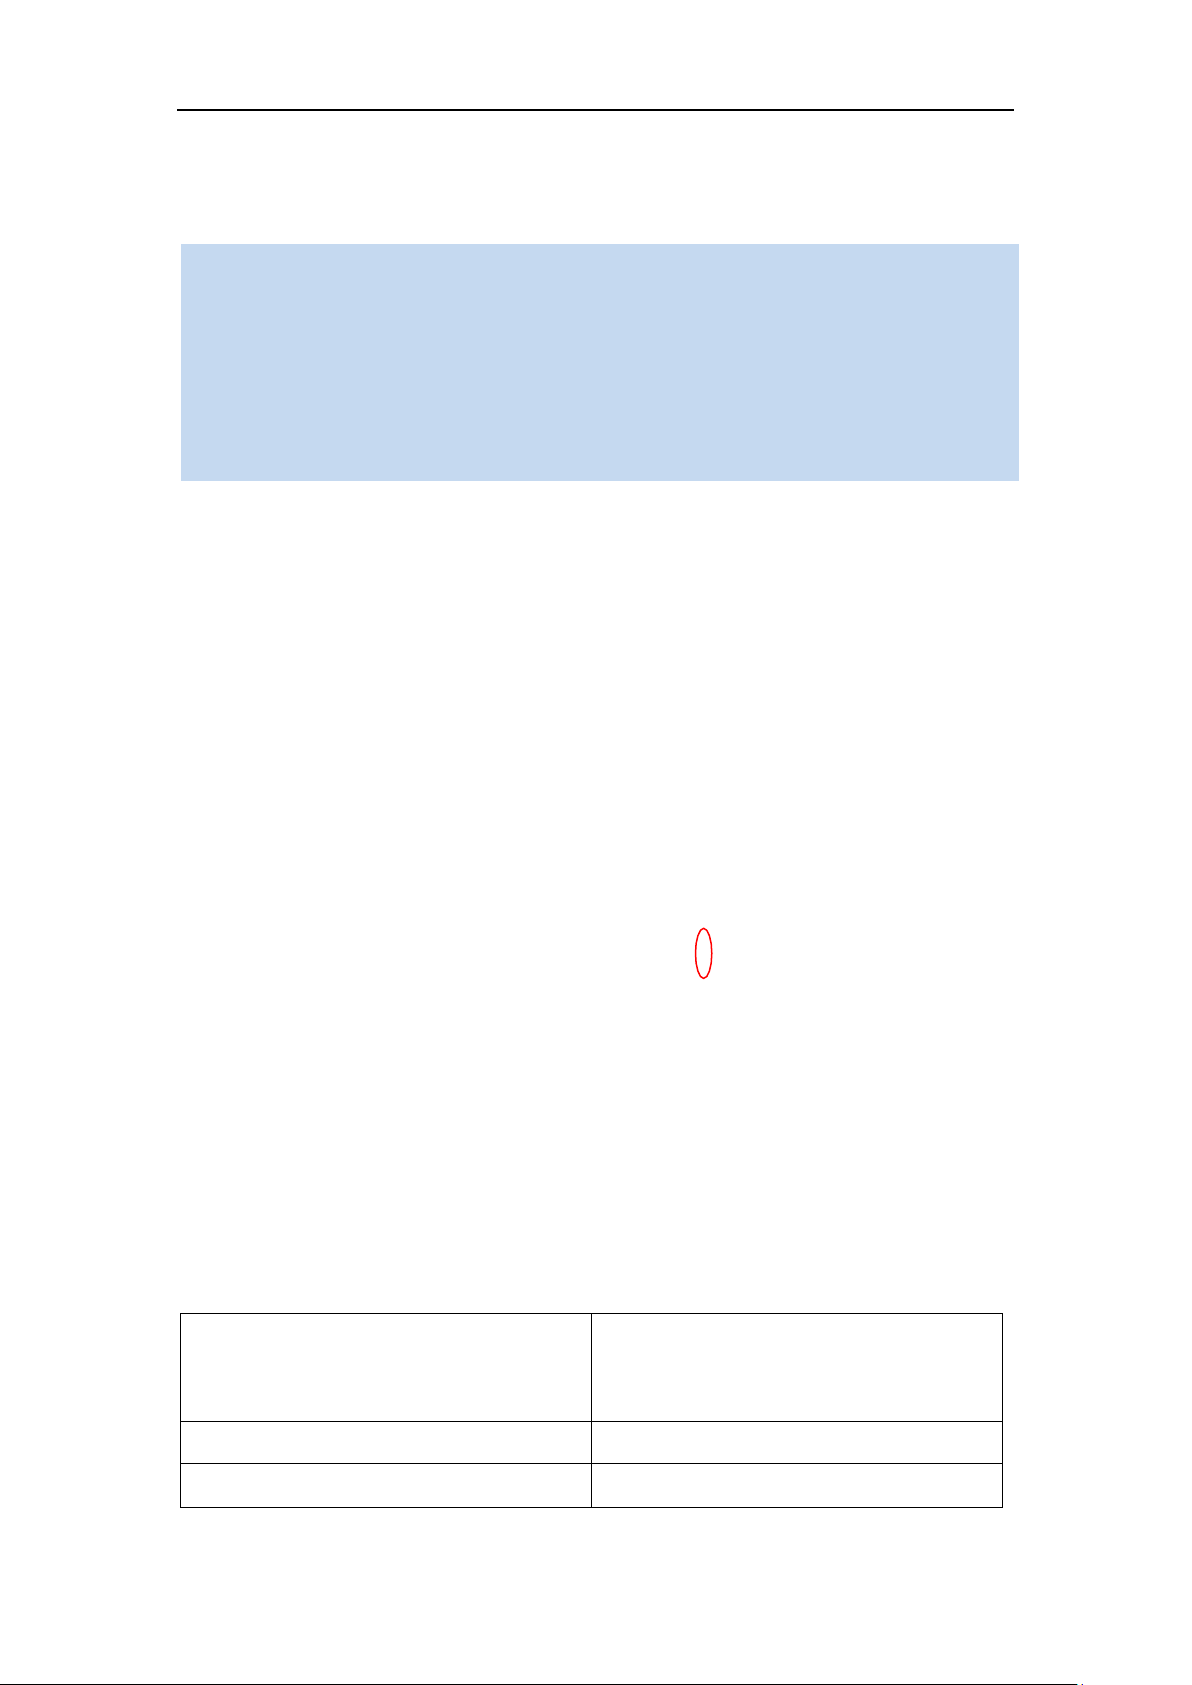
ComNav Raw data Request
command (ephemeris in
ComNav format)
ComNav Raw data Request
command (ephemeris
compiler with Novatel format)
log com1 rangecmpb ontime 1
log com1 rangecmpb ontime
log com1 rawephemb
log com1 gpsephemb
Tips:
1. All the commands send to receiver, do not distinguish between letter
case, e.g., log version=LOG VERSION.
2. After inputting every command, press Enter button to change line and
input another command.
3. For more detailed command information, please refer to
ComNav OEM CARD REFERENCE MANUAL.
5. Frequently Used ASCII Command
5.1 GPGGA Message
After M300 Mini(G) receive the correction data, It will go to the differential mode
automatically.
Send command to output GPGGA information to check the solution type:
log <port> gpgga ontime <frequency>
Frequency description: 1 (1 HZ); 2 (1 output every 2 seconds); 0.2 (5HZ).
For example:
$GPGGA,<1>,<2>,<3>,<4>,<5>,<6>,<7>,<8>,<9>,M,<10>,M,<11>,<12>*hh<CR><LF>
$GPGGA,012827.00,3110.484867,N,12123.913553,E,4,05,1.4,39.4,M,8.012,M,
2.0,0031,*6E
<6> GNSS solution type:0=Fix not available,1=GPS FIX,2=RTD,4=RTK FIXED,5=RTK
floating,6= Dead Reckong mode, 7= Manual input mode, 8= Super wide-lane
mode,9= WASS MODE
5.2 Log raw data of GNSS observations
Raw data request command: The ephemeris requests two different formats, you
can use either of them.
Page 16
14
M300_G Mini GNSS Receiver User Guide
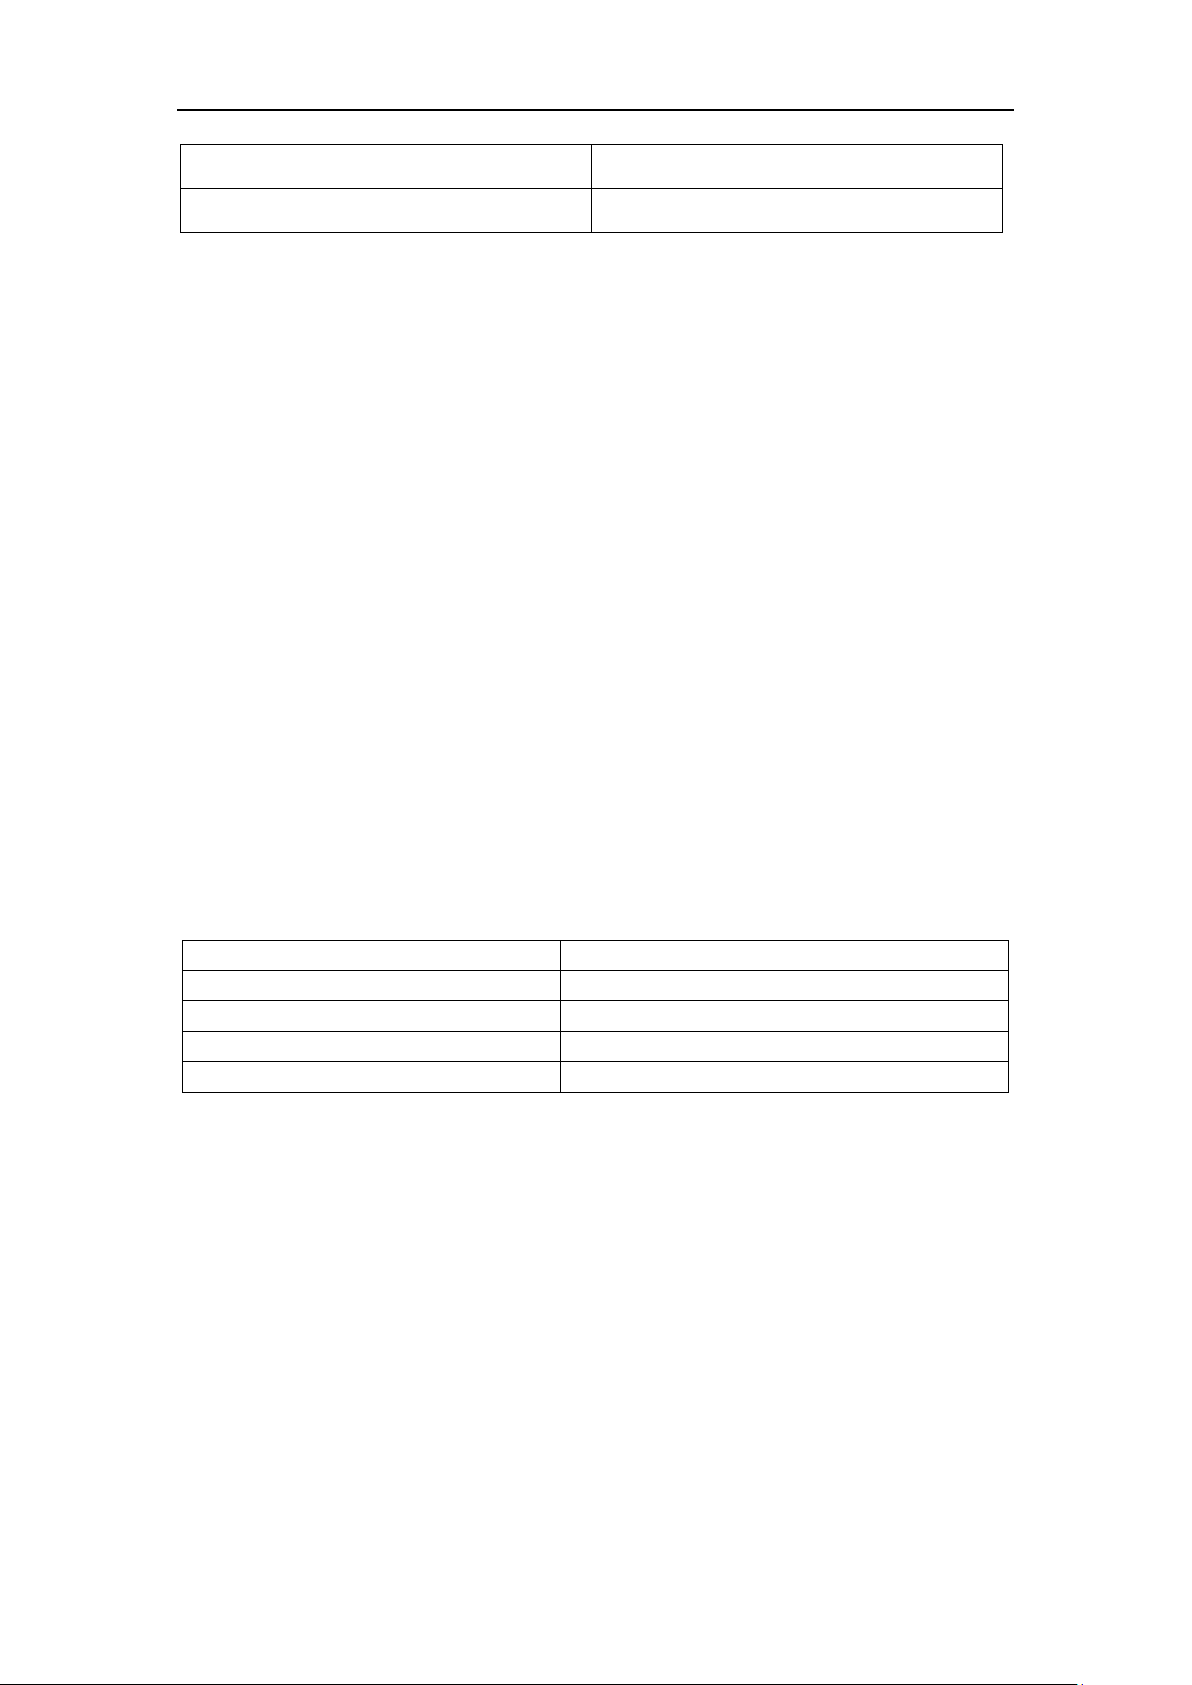
Log com1 glorawephemb
log com1 gloephemerisb
log com1 bd2rawephemb
log com1 bd2ephemb
Command
Description
lockout bd2
Lock out Beidou system
lockout gps
Lock out GPS system
lockout glonass
Lock out GLONASS
unlockoutall
Unlock all GNSS system
ecutoff 13 //Set the mask angle as 13 degree
log com1 rangecmpb ontime 1 //Set com1 output cmp1 in binary data format,
the frequency is 12 Hz
log com1 rawephemb onchange //If GPS ephemeris changed, output 1 time
log com1 bd2rawephemb onchanged //If BeiDou ephemeris changed, output 1 time
log com1 gloephemerisb onchanged //Output GLONASS ephemeris
saveconfig //Save settings to receiver, next time power on, it will auto output
1. CMP channel measurements for the currently tracked satellites.
2. The MAX out frequency is 20 Hz
Normally we use 10HZ, 5HZ, 2HZ and 1HZ; corresponding commands are 0.1, 0.2, 0.5
and 1.
After sending those commands, the raw data will output by receiver, save the data in
your PC. Use ComNav Rinex convert tools to covert the data to Rinex, then you can
analyse the data in any software.
5.3 Satellites constellation system configuration
 Loading...