

Page 1
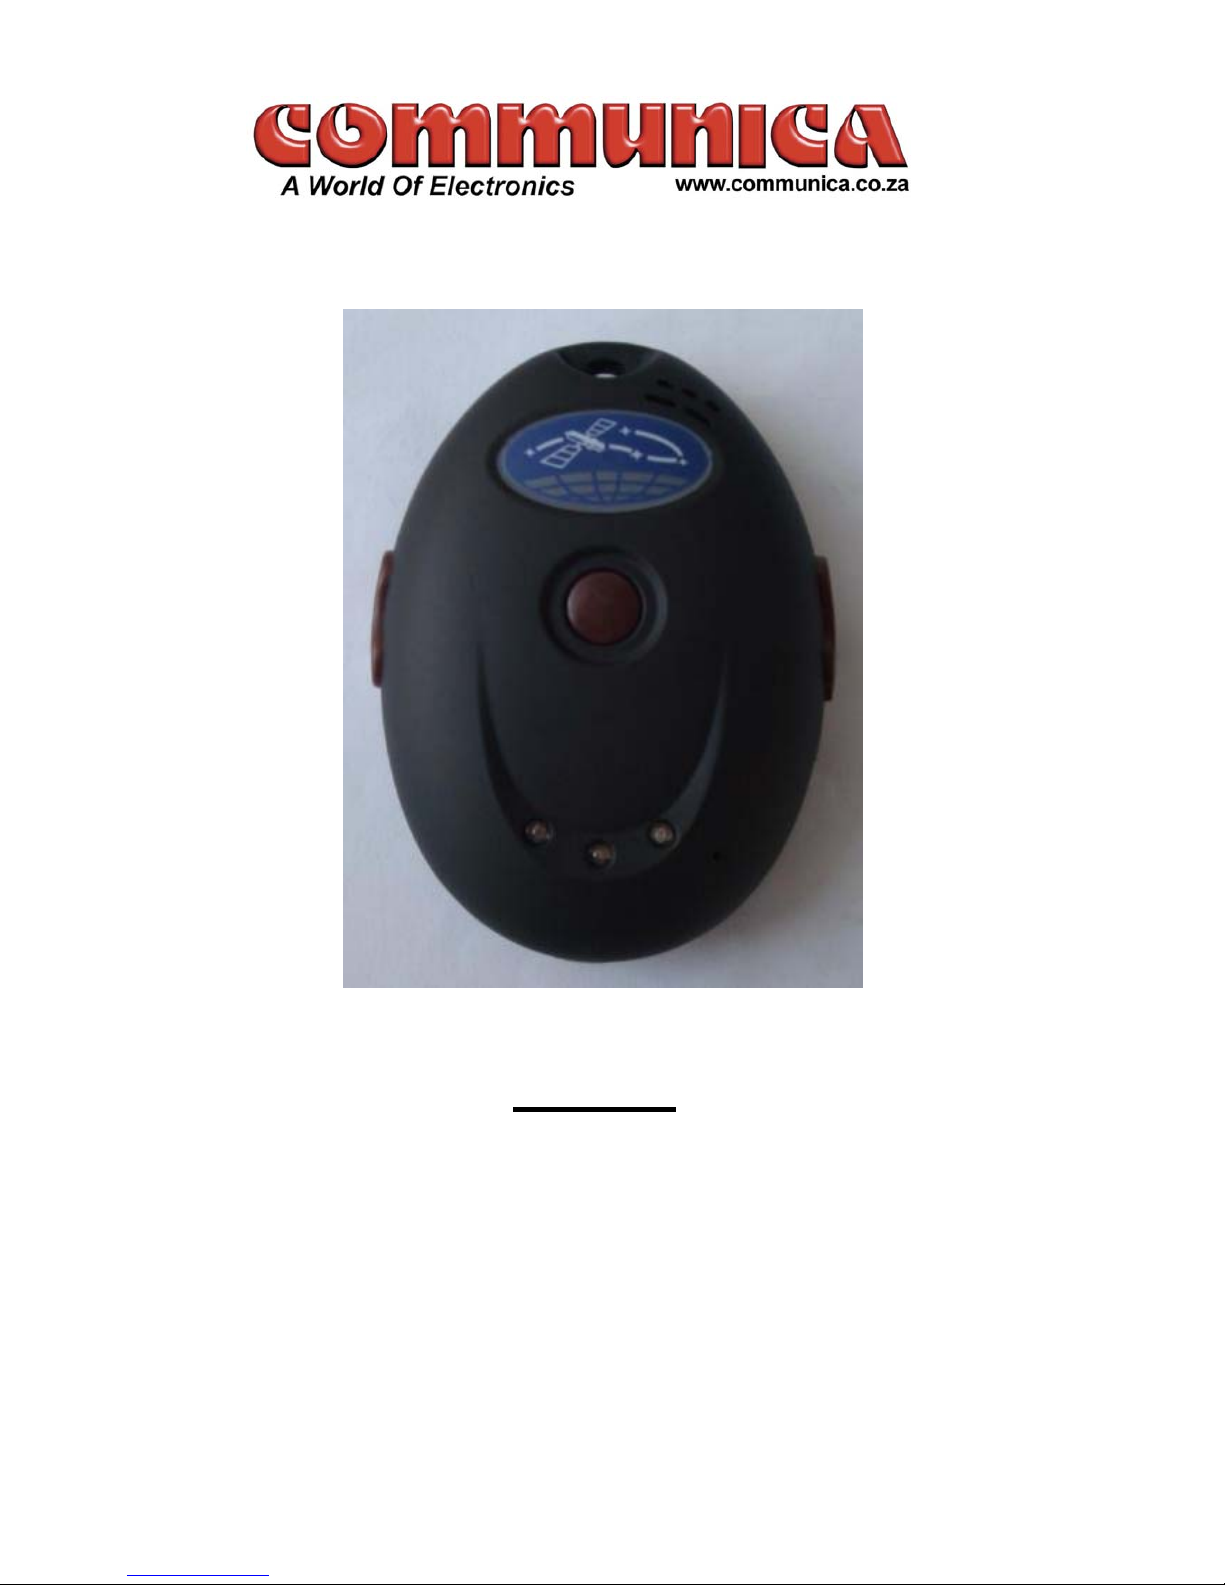
TRACKER T1007
GPS TRACKER USER MANUAL
U
Preface
Thank you for purchasing GPS Vehicle Tracker. This manual shows how to operate the device
smoothly and correctly. Make sure to read this manual carefully before using this product. Please note
that specification and information are subject to changes without prior notice in this manual. Any
change will be integrated in the l atest release. The manufacturer assumes no responsibility for any
errors or omissions in this document.
1
Page 2

Contents
1 Summary ------------------------------------------------------------------------------------------------- 2
2 Application ------------------------------------------------------------------------------------------------ 3
3 Hardware Description -------------------------------------------------------------------------------- 3
3.1 Front Face ------------------------------------------------------------------------------------ 3
3.2 Rear Face -------------------------------------------------------------------------------------- 4
3.3 Interior --------------------------------------------------------------------------------------- 4
4 Specifications ---------------------------------------------------------------------------------------- 5
5 SIM Car d Installation --- --------------------------------------------------------------- 5
6 Startup ------------------------------------------------------------------------------------- ----------- 7
7 Usage --------------------------------------------------------------------------------------------------- -- 7
8 Tr ac k Modes -------------------- --------- ----- --------- ----- --- --------- ------------------------------- 7
8.1 Initialization ---------------------------------- --------- -------- 7
8.2 Change Password ---------------------------------- --------- -------- 8
8.3 Authorization ----------------------- ----------- --------- -------- 8
8.4 Auto-Track -------- -------------------------- -- ------- -------- 9
8.5. Tlim it Functi on------ ----------------- -------- --- --------- -------- 10
8.6. GPS refurbish setting---------------------------------- --------- -------- 11
8.7 Reboot remotely---------------------------------- --------- -------- 11
8.8 Geo-fe nce ---------------------------------- --- ------ -------- 11
8.9 Move ment Aler t --------------- -------- ----------- --------- -------- 1 2
8.10 Over speed Alert ---------------------------------- --------- -------- 13
8.11 IMEI Checking ------------------------------ --------- -------- 14
8.12 Time differences setting ----------------------------------------------------------------- 15
8.13 SOS Function ------------------------- --- ----- --------- ---- ---- 15
8.14 SMSLINK ---------------------------- ----- --------- ----- ---------------------------------15
8.15 SMSONE ----------------------------------------------------------------------------16
8.16 Low Battery Alert --------------------------- --------- -------- 16
8.17 SMS Center ------------------------------ --------- -------- 16
8.18 GSM ID ------------------------------------------------------------------ 17
8.19 Motion Sensor ------------------------------ --------- -------- 17
8.20 SD Card Function ------------------------------ --------- -------- 17
8.21 Switc h on/off ------------------------------ ----- ---- -------- 18
9 Moni toring Mode ------------------------------ --------- -------- 18
10 Talking Mode ------------------------------ --------- -------- 18
11 GPRS Setting -------------------------------------------------------------------- 19
12 Cautions --------------------------------------------------------------------- 20
13 Faults & Solutions --------------------------------------------------------------------- 21
Page 3
1 Summary
Working based on existing GSM/GPRS network and GPS satellites, this product can
loc at e and m on itor an y rem ot e targets by SMS or GP RS,and gu ar d agai ns t theft of
Vehicle.
2 A pplications
l
Vehicle rental / Fleet management,etc.
l
Protect the child / the elder / the disabled / pet,etc.
l
Businessmen safety.
l
Personnel management.
l
Covert tracking.
3 Hardware Description
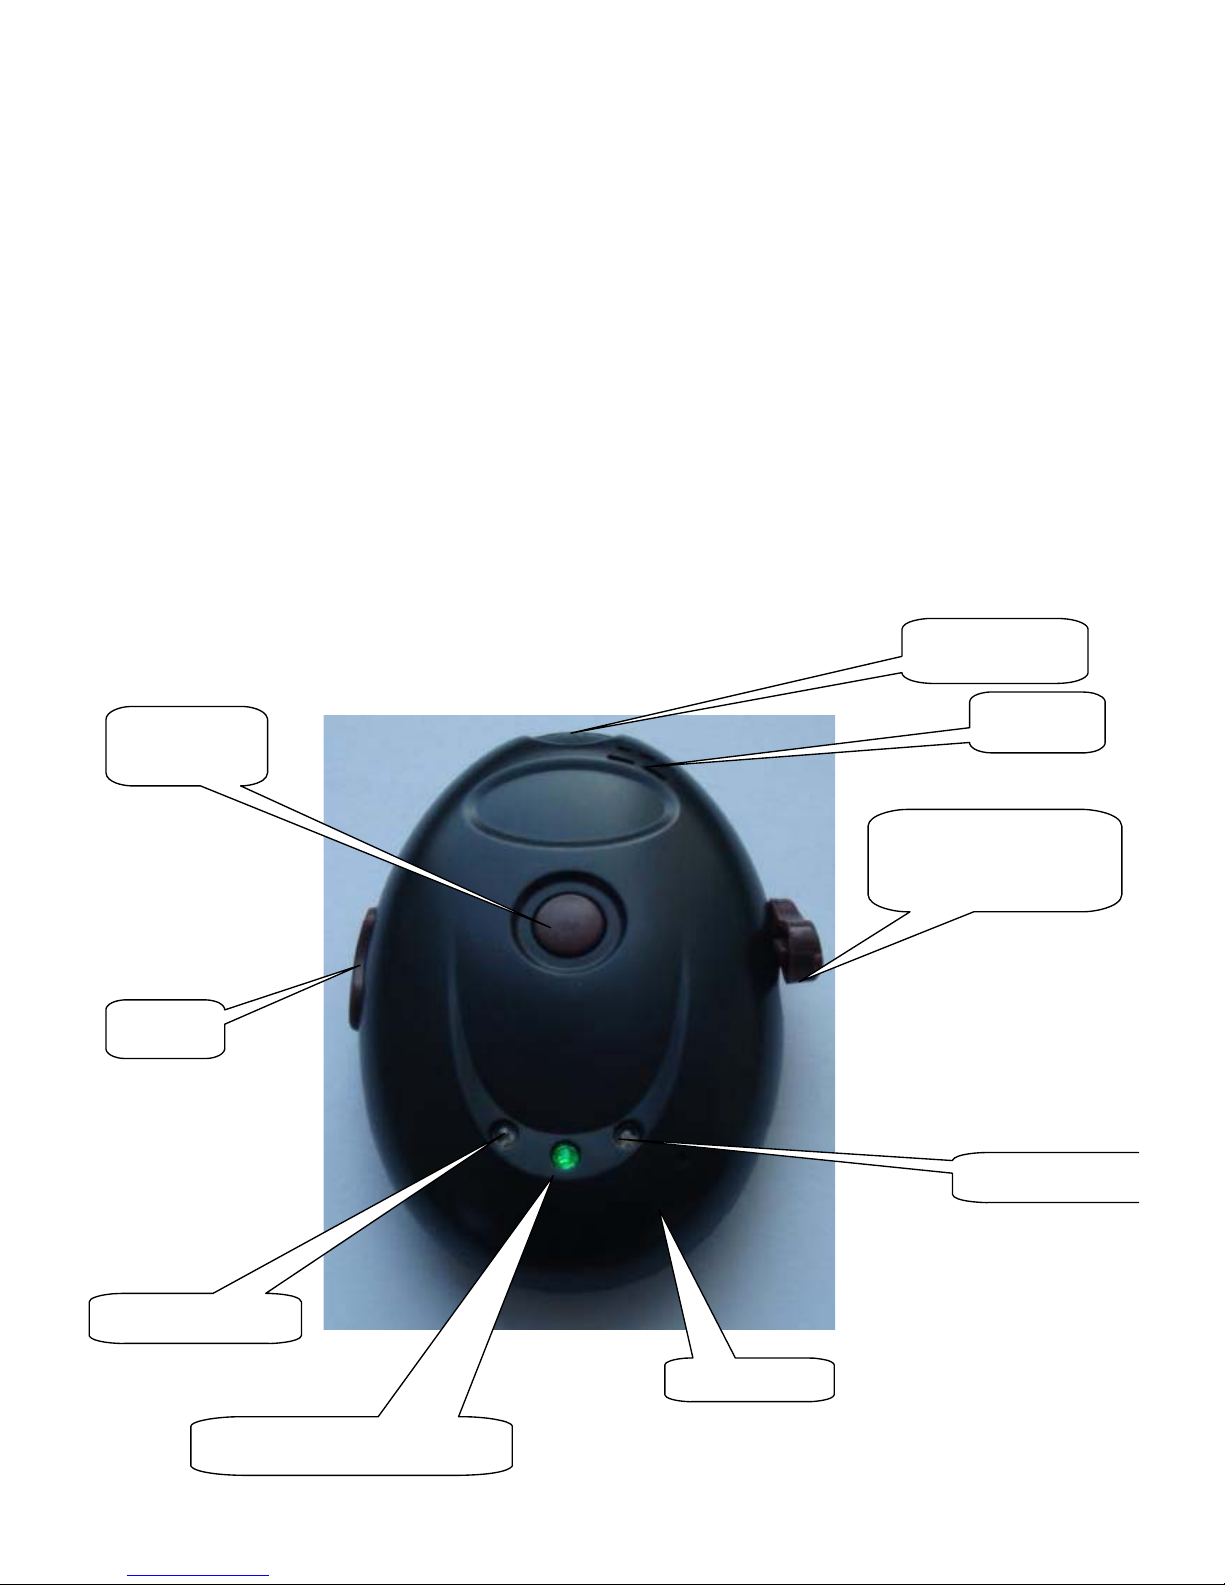
3.1 Front Face
SOS Button
Necklace holder
Speaker
USB Port,for charging
and upgrad e the firmware
For call
GPS indicator light
GSM indicator light
Microphone
Working modes indicator light
3
Page 4
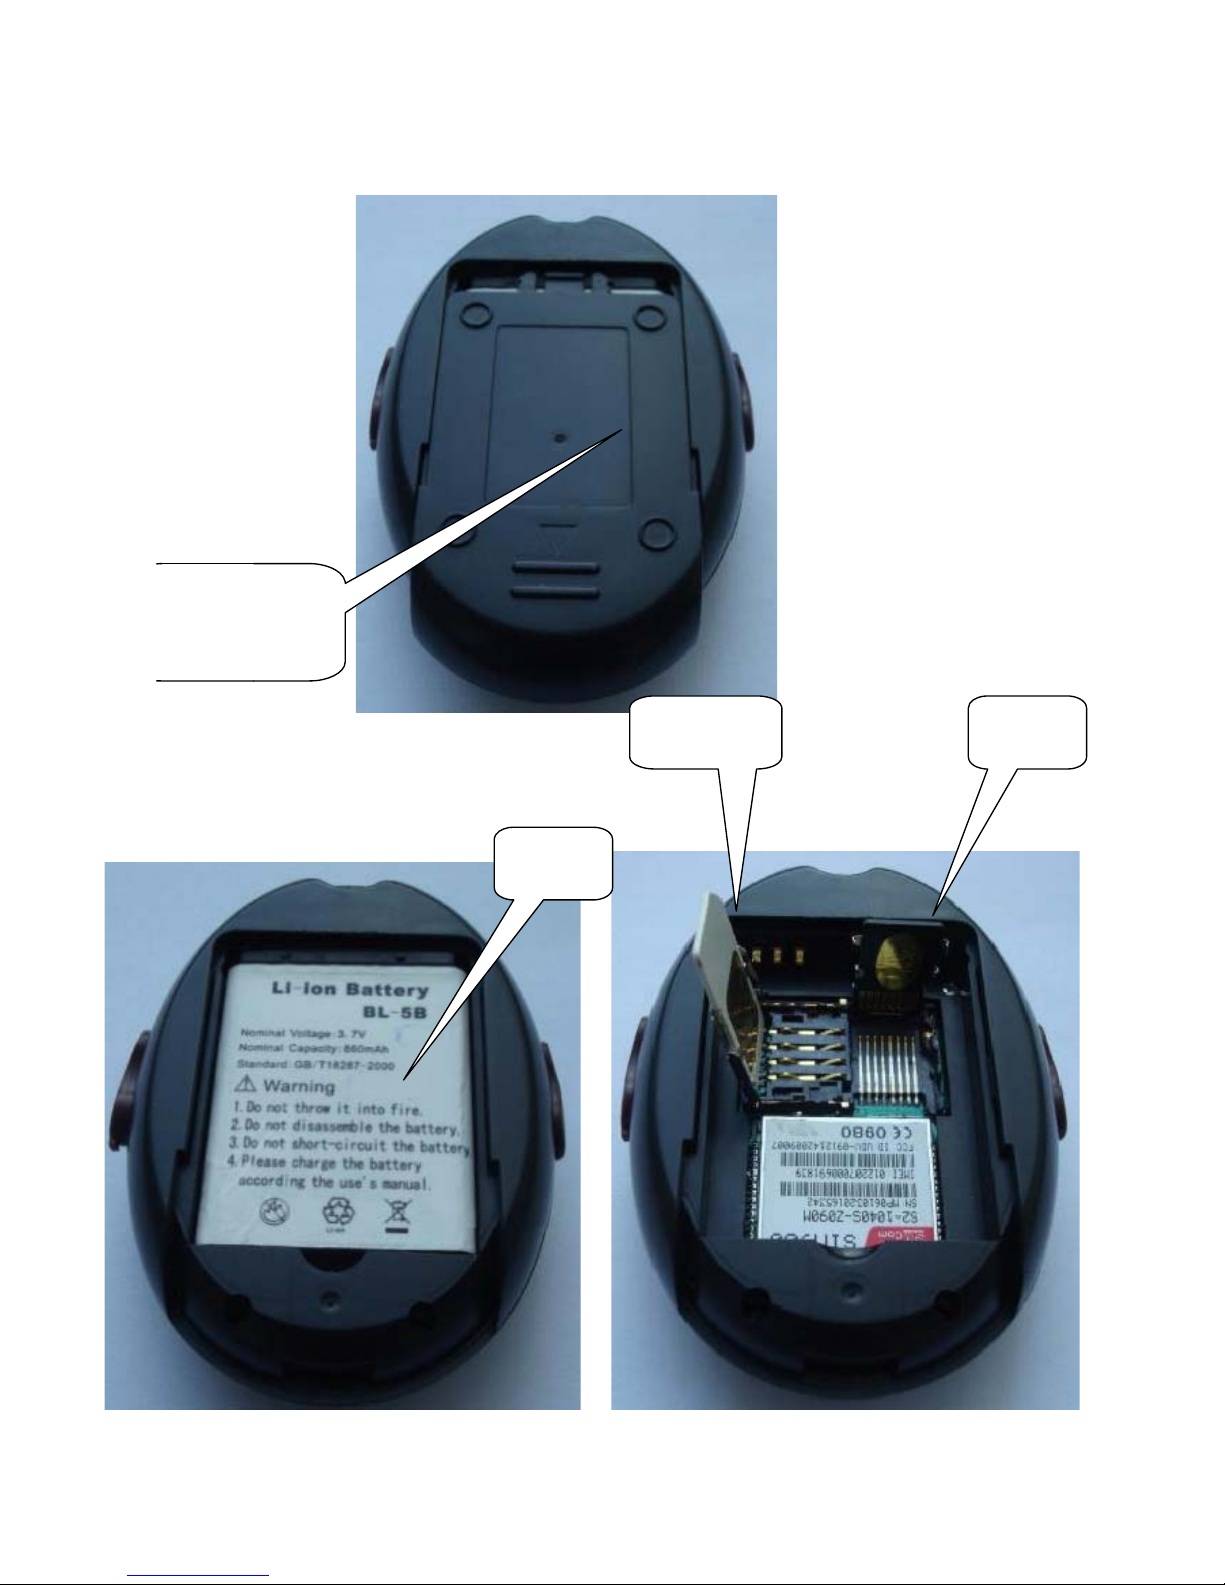
3.2 Rear Face
Battery back cover
SIM Card
SD Card
3.3 Interior
Battery
4
Page 5

4 Specs.
Content Specs.
Dim. 80MM*56MM*22MM
Weight 50g
Network GSM/GPRS
Band 850/1800/1900Mhz or 900/1800/1900Mhz
GPS chip SIRF3 chip
GSM/GPRS
module
Siemens MC55 or Siemens MC56
GPS sensitivity -159dBm
GPS accuracy 5m
Time To First Fix
Reacquisition
0.1s
Cold status 45s
Warm status 35s
Hot status 1s
Battery
DC5V input
Battery Chargeable changeable 3.7V 800mAh Li-ion battery
Standby 100hours
Storage Temp. -40°C to +85°C
Operation Temp. -20°C to +55°C
Humidity 5%--95% non-condensing
5 SIM card installation
Make sure that there is no call transf er and cal l di splay is on, and PIN code off.
Steps
1. Open the Battery back cover
2.Open the SIM card slot and SD card slot, and put one SIM card and one SD card
5
Page 6
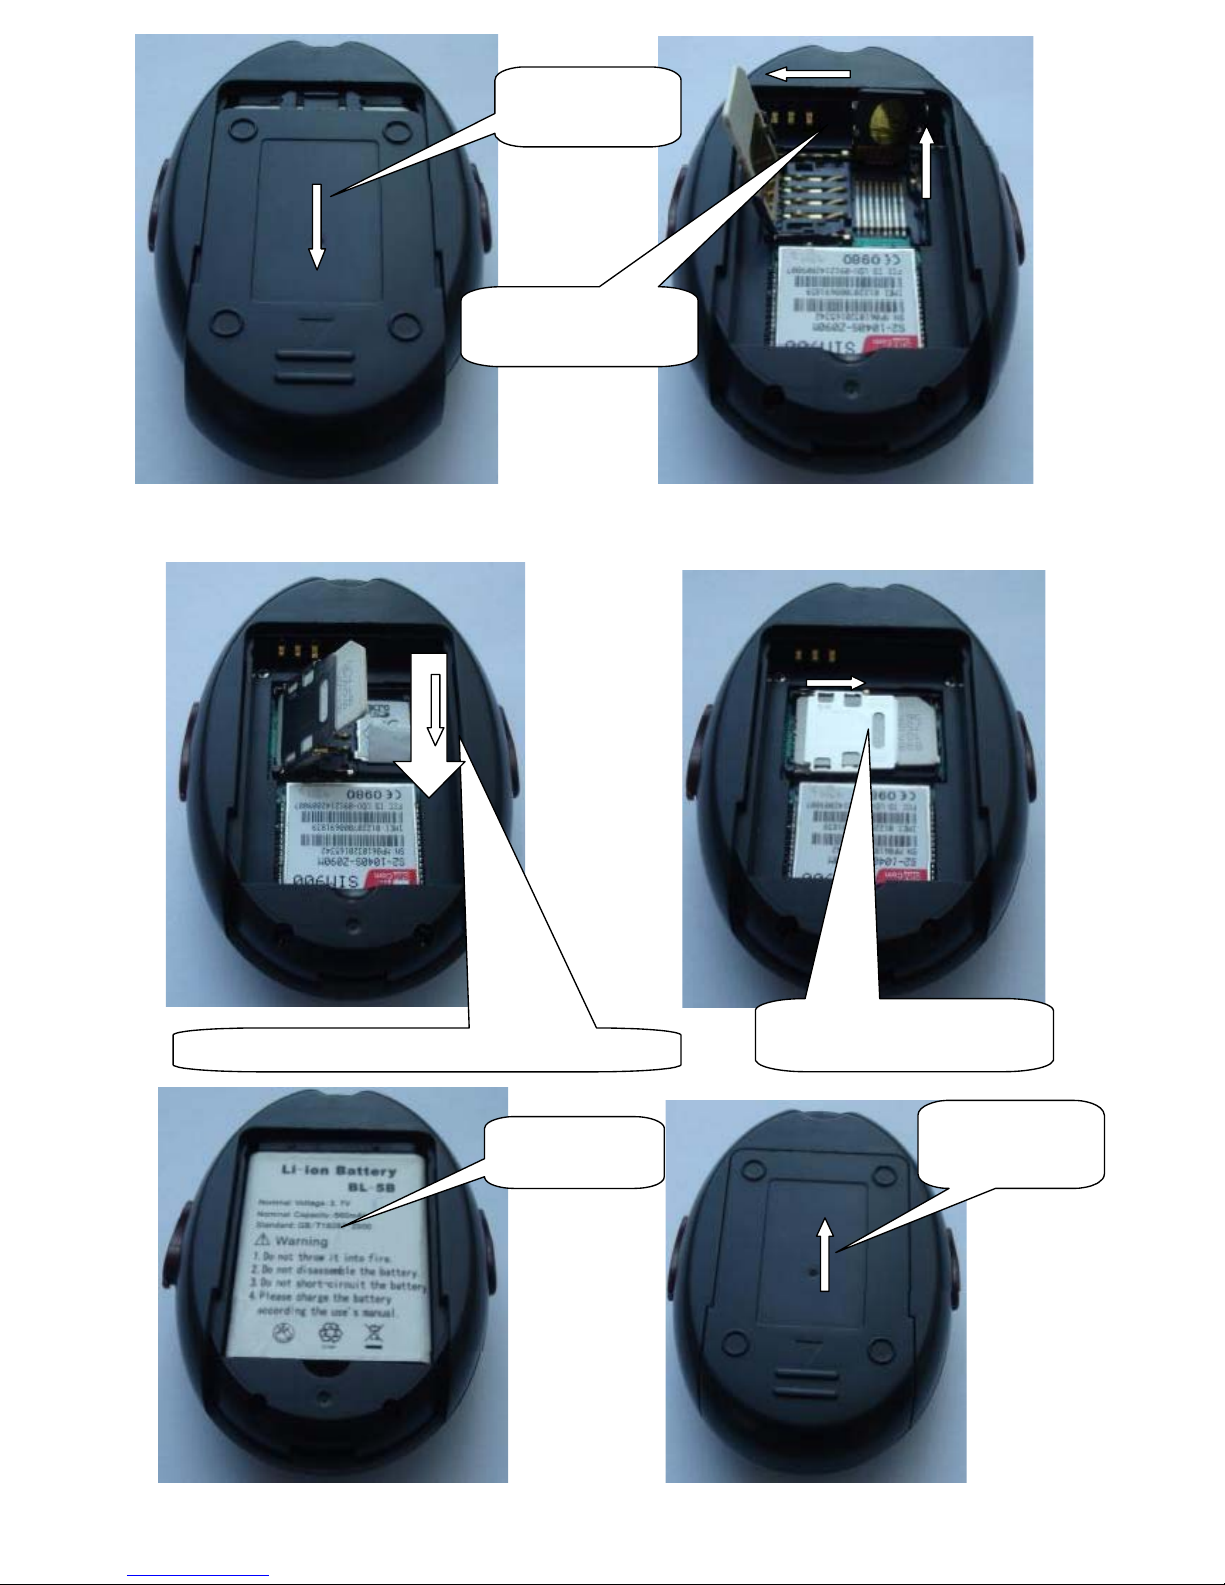
Push downwards
to open the cover
Pull leftwards and insert
the simcard
Faste n downward s ,make sure the SD card is mounted
After SD card is mounted,
Fasten the simc ard rightwards
Put the battery
Fasten t he cover
upwards
6
Page 7

6 Startup
l
Put the SIM card and SD card in place, install batteries locator will automatically
boot.
l
After startup middle green quickly ablaze, left GMS yellow colored long bright 2
seconds, rig ht of GPS blue lights for no t bright, and 20-30 secon ds in the middle
of the g reen light will shine out 1 seco nd for 3 seconds l eft GMS parade every 3
seconds, a shiny for GSM now working normally.
l
about 40 to 90 seconds later, this product will be receivi ng GPS signal s on the right
of the blue lights began bright 1 second destroy 3 seconds, when this product
blue when the light is you can play the following Settings. (note: blue lights on
time wi th the current GPS signals ab out, the cu rrent not GP S signals blue lamp will
not bright.
7 Usage
The tracker has three working modes: Tracking mode Monitor mode , Double-way
Communication mode ,Modes switch between “Tracking”, “Monitor” and “Doubleway Co mmu ni ca t io n ”.
When power on
the
tracker, the default mode is “Tracking” mode, you can send
“
monitor+password” to
switch to Monitor
mode, or
send “talk+password” to
switch
to
Double-way Communication mode, or “tracker+password” back to Tracking mode.
8 T rack Modes
8.1 Initialization
Send “begin123456” to the pr oduct, it will reply “begi n ok ” and initialize all the setti ngs.
TO:13188888888
begin123456
From:13188888888
begin ok
Page 8
8.2 Change the Password
Send SMS “password+old password+space+new password” (default password:
123456), it will reply “password ok”
TO:13188888888
password123456 888999
From:13188888888
password ok
8.3 Authorization
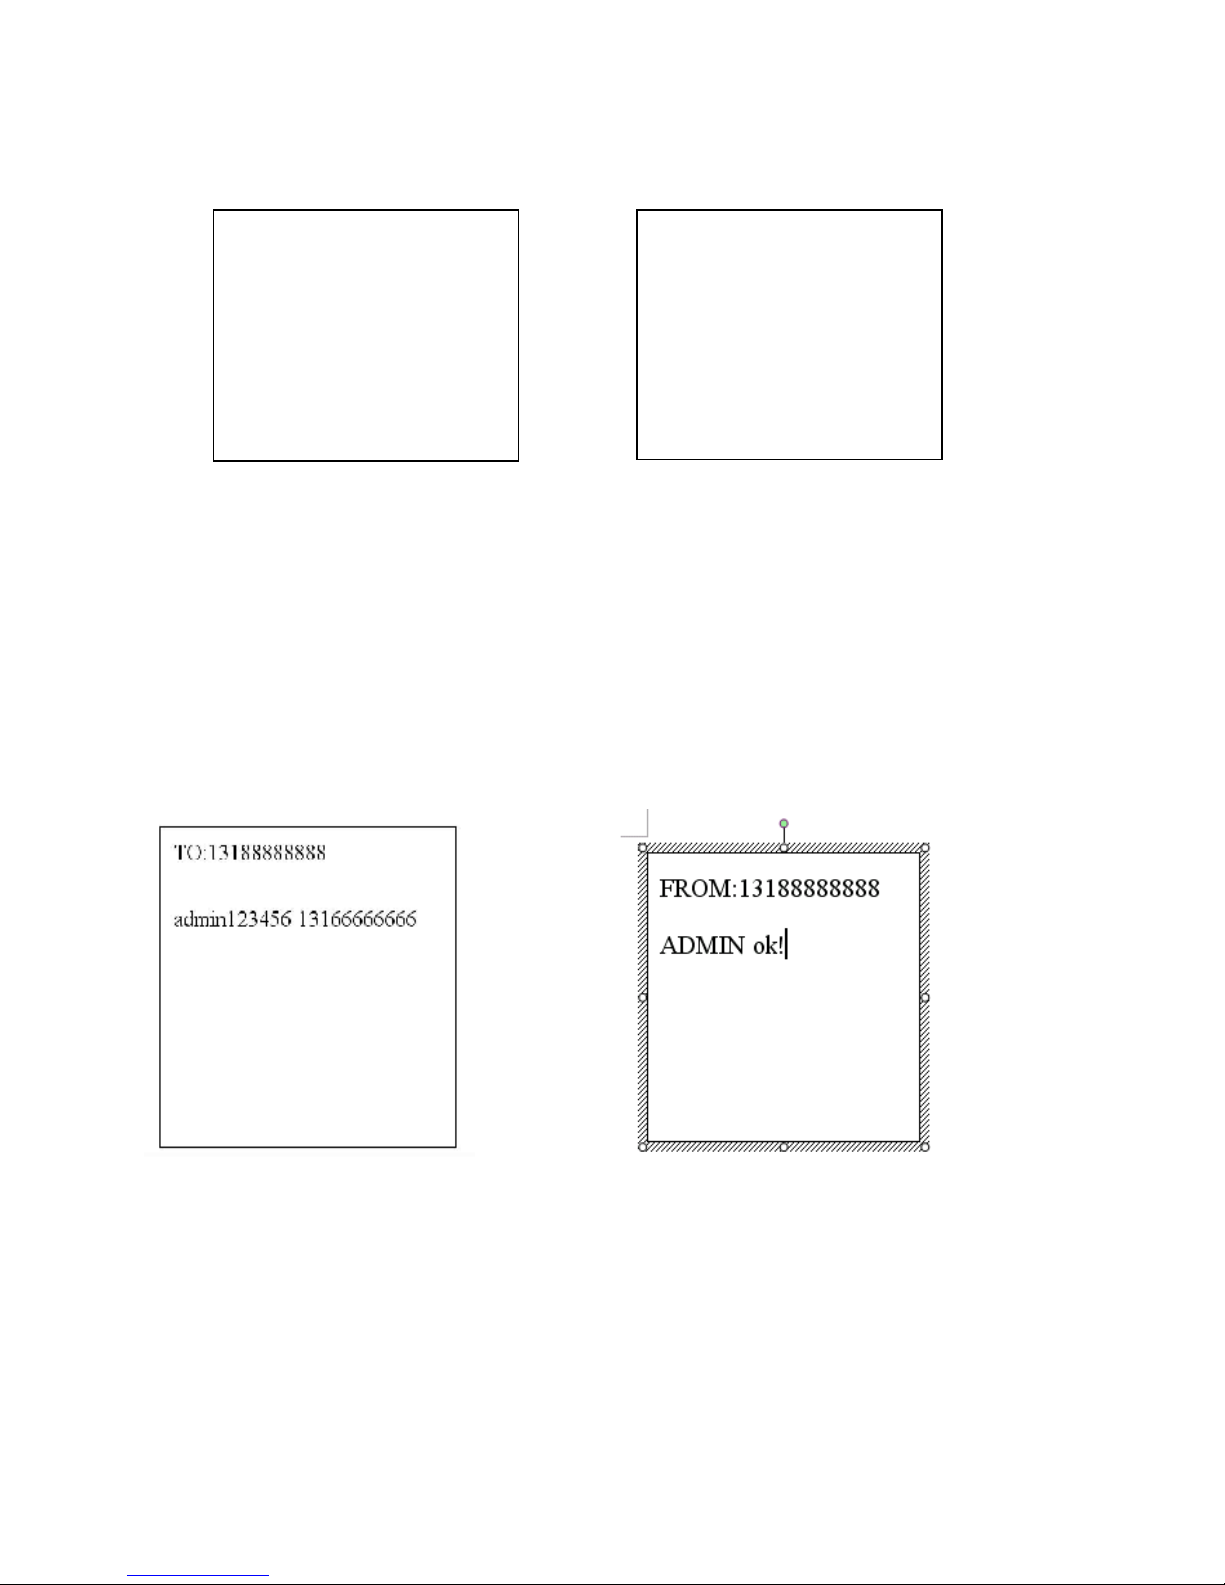
8.3.1 Send SMS “admin+ password+ space+ cell phone number “to set the first
authorized num ber, it will reply “admin ok”, The other authorized numbers should be
set
by the first authorized number .(PS: There are onl y 5 numbers abl e to be authorized)
8.3.2 Send SMS noadmin+password+space+authorized number to cancel the
authorized numb er.
8.3.3 When an authorized number send SMS or dials up the unit, it will reply as below:
Lat: 22.566901 long: 114.051258 speed: 0.00 14/08/09 06.54 F:3.85V,1,Signal:F
imei:354776031555474 05 43.5 460 01 2533 720B
Lat: 22.566901 long: 114.051258== Coordinate
Page 9

0.00 ===
speed
14/08/09 06.54==
Date&Time
F:3.85V == battery
power
1 == charging 0 means no
charging
Signal:F ==== Full GPS signal 0 means weak GPS
sign al
354776031555474==
IMEI
05=quantity of satellites ( from 3 to 12 )
43.5=Altitude
460 = MCC Mobile Country
Code
01 == MNC Mobile Network
Code
2533=
LAC Location area
code
720B= Cell ID
8.4 A uto -Track
This function is using for the user to receive SMS with Geo-info in a certain
time.
8.4.1 Set up: Send SMS t030s005n+password to the unit, it will report the Geo-info
at
30s intervals for 5 times.(s: second, m: minute, h: hour).You will receive a reply as
“t030s005n OK” if the setting is successful. The setting must be in 3 digits and at
maximum 255 in value.
9
Page 10

From:13188888888
T030s***n ok
8.4.2 S end SMS t0 30s*** n+password t o the unit, it will reply SMS he aps of times.
You will receive a reply as “t030s005n OK” ( t030s***n ok ) if the setting is successful.
8.4.3 Canc el : Se nd notn+passwor d to del ete th e “ au to track “,it will reply “notn ok”。
Remark: the interval must not be less than 30s.
TO:13188888888
Notn123456
From:13188888888
Notn ok
8.5 Tlimit Function
8.5.1 Send “tlimit123456 50” (50 to restrict send distance, 1-6000M set), reply “tlimit ok” (note:
this funct ion should coordinate w ith automatic pos itioning used togethe r). Set up this functio n
after locator to get out of setting distance will send a positioning information, such as not
ambulate won't send information, so can "province user information costs.
8.5.2 Send” tlimit123456 0 “for close distance limit function, reply” tlimit ok”.
10
Page 11

8.6 GPS-refresh setting
Send SMS “GpsAutoSearch123456 12 0”,it will reply “GpsAutoSearch ok”. The tracker will
search gps signal in 120s interval after setting this. The refreshing time is between 120-600
seconds(120<interval <600)
(note: Longer standby time for longer refreshing time and shorter standby time for shorter
refreshing time.)
8.7 Reboot remotely
When using the region GPR S signal not, causing GPRS stuck not while sending data can be
sent restart123456,locator received within 3 minutes after the restart a shutdown automatically.
8.8 Geo-fence
Set up a geo-fence for the unit to restrict its movem ent within a district. The unit will
send message to
the authorized
numbers when it mov es out of this district.
Notes: Thi s function will be invali d if the unit moves outside t he district. Yo u need to
re-set it if you want this fu ncti o n agai n.
8.8.1 Setup:Send SMS stockade+password+space+longitude,latitude;
longitude,latitude
to the unit to set the restricted district.
Remark :T he first longitude & latitude is coordinate of the top left corner of the
Geo-fence, while the second longitude & latitude is the coordi nate of the bott om right
corner. It will repl y stockade ok。
TO:13188888888
stockade123456
114.124845e,22.56718
5n;114.777888e,22.55
5666n
From:13188888888
stockade ok
11
Page 12

8.8.2 Cancel:Send SMS “nostockade+password” to deactivate this function.It will reply
“nostockade ok”。
TO:13188888888
nostockade123456
From:13188888888
nostockade ok
This function will be out of effect after the unit moves outside the district.
8.8.3 Response SMS format: stockade!+geo-info. It will alarm one ti m e in each setti ng.
From:13188888888
lat: 22.566923 long:
114.051331 speed: 0.00
28/11/10 03:33 F:4.32V,0,
Signal:F stockade
imei:359587011016261 05
41.5 460 01 2533 720B
8.9 Movement Alert
This function i s using for the owner to get alarm when the tracker moves out of a
restricted district.
8.9.1 Setup: Send SMS move+password to the unit to set the movement alert,it will
reply
move ok
TO:13188888888
move123456
From:13188888888
move ok
12
Page 13

8.9.2 Cancel: Send SMS nomove+password to deactivate the movement alert,it
will reply move ok
This functio n w ill be invalid after gettin g one movement alert
Response SMS format: :move!+geo-info. It will alarm one time in each setting.
From:13188888888
lat: 22.566923 long:
114.051331 speed: 0.00
28/11/10 03:33 F:4.32V,0,
Signal:F move
imei:359587011016261 05
41.5 460 01 2533 720B
8.10 Overspeed Alert:
This function is used to control the user’s driving speed.
8.10.1 Setup: Send SMS speed+pass word+space+ the
speed, For example: speed123456
080,it will reply” speed ok”
TO:
13188888888
speed123456 080
From: 13188888888
speed ok
13
Page 14

8.10.2 Cancel: Send S MS”nospee d+passwor d “to deacti vate the ove rspeed al ert,it will
reply” nospeed ok。”
TO:13188888888
nospeed123456
From:13188888888
nospeed ok
Response SMS format: speed+080!+Geo-info (suppose the speed is 80km/h).
The tracker will check the speed in 3 minutes interval and alarm if it is overspeed.
From:13188888888
lat: 22.566923 long:
114.051331 speed: 0.00
28/11/10 03:33 F:4.32V,0,
Signal:F speed
imei:359587011016261 05
41.5 460 01 2533 720B
Remark: It is recommended that the speed alarm is set a t not le ss th an 8 0km/ h. i n
order to make this function accurate
8.11 IMEI Checking:
Send SMS” imei+password: to the unit,it will reply imei350001122222222 ok.
TO:13188888888
imei23456
From:13188888888
imei35000112222222
2 ok
14
Page 15

8.12 Time Zone setting
Send “time zone+password + GMT time, r e p l y “time zone ok”. (Note: if GMT time is
positive, just write the number 1. If time zone is negative, have to write –1)
TO:13188888888
Time zone23456 1
TO:13188888888
Time zone23456 -1
From:13188888888
time zone ok
8.13 SOS Button
Press the SOS for 3 second, it will send “help me! + Geo-info” to all the authorized
numbers every 3 minutes. It will stop sending such a SMS when one of the
authorized number reply SMS” help me+password” to the tracker.
(note: the default software only send one SOS alert. Pls contact with our company for the
firmware with several SOS
alerts
)
8.14 SMS LINK
8.14.1
Send “smslinkone+password”, This product will reply a GOOGLE link to admin number.The
position can be checked directly for one the smartphone
Format : http://maps.google.com/maps?f=q&hl=en&q=22.567610,114.051227&speed: 0.00
12/11/10 14:36 F: 4.22V Signal:F imei:012207000691839
8.14.2
Send “smslink123456”, it will reply “s mslink OK” . The tracker will send the following SMS
format always.
15
Page 16

http://maps.google.com/maps?f=q&hl=en&q=22.567610,114.051227&speed: 0.00 12/11/10
14:36 F: 4.22V Signal:F imei:012207000691839
8.14.3
Send “smstext123456”, it will reply “smstext OK”. The tracker will reply normal SMS format
for this command
8.15 SMS ONE
Send “smsone+password”.The tracker will reply one SMS to admin number or gprs server.
The same function with real-time tracking, but no need to call just send this command
8.16 Low Battery Alert
When the battery inside is less th an 3.7 V, it will send low battery alert to admin number
8.17 SMS Ce nt er ( or appoint ed nu mber)
8.17.1 Setup: Send SMS adm insm s+pass word+s pace+c ell phone num ber to setup the
SMS center.
The tr a c ker will rep ly G eo-info & authorized numbe r to sms cent er number even if the
admin numbers call or se nd command to the tracker
8.17.2 Cancel: Send SMS noadminsms+password to cancel the SMS center.
Response SMS format: authorized number+Geo-info
Note:
◆The SMS message must in Text format, can’t be i dentified for PDU format.
◆Please use the tracker outside for the first time so that It can get gp s s ign al eas ily and
quickly
16
Page 17

8.18 GSM ID this function can be added or
deleted
for customization.)
GSM ID is in each sms or gprs data. The tracker can be found by GSM ID without
gps signal. But the customers have to ask their GSM operator for data base of the
GSM ID .
8.19 Motion
Sensor This
function is used to protect the vehicle or tracker when it
is touche d.)
8.19.1 Setup: Send shake+password+space+1-10 to the tracker to set up
this function.(1-10 means t he leve l of i n tensity)
8.19.2 Send SMS shake+password+space+1 is the least sensit i v i ty . Have to shake
the
tracker strongly to get the alert.
8.19.3 Send SMS
shake+password+space+10
is the mos t
sensitivity.
Have to
shake
the tracker slightly to get the alert
8.19.4 Cancel: Send SMS shake+password+space+0 to remove this function.
8.20 SD card function
A mini SD card can be put in the tracker’s SD card slot. The GPRS data can be saved in
the SD card if GPRS is off. It will send data to the GPRS server again if when is on.
8.20.1
Setup: Send SMS sdlog+password+space+1 to activate the sd card-saving
function
Cancel: Send SMS sdlog+password+space+0 to the tracker to deactivate this function
8.20.2
Setup: Send SMS readsd+password+space+1 to ask the tracker to send data
in the SD card to the G PRS server.
Cancel: Send SMS readsd+password+space+0 to ask the tracker to stop sending
data
in the SD card to the server.
17
Page 18

8.21 Switch on/off
8.21.1 Switch off
Press TALK button and SOS button for three seconds, the green indicator will flash
quickly until it is off.
8.21.2
Switch on
Press TALK button and SOS button for three seconds, the green indicator will flash
quickly until it is on.
9 Monitoring Mode(voice surveillance mode)
Send SMS monitor+password, the tracker replies “monitor ok” then the tracker will
get through automatically when you call and listen to it
10 Talking mode
10.1 Send “talk password”,it will reply “talk ok” When authorized numbers call to the
tracker, it will ring several tones and get through automati cally to double-communicate
10.2 Send “volume+password+60” ,it will reply “volume ok”
The volume can be set between 0 to 99 to make the volume louder or lower
10.3 Dial authorized numbers automatically
TALK button can be pressed for 3 seconds until it stops flashing quickly to
get
Help fro m the au thorized number s in emerg ency. The tracker ca n call to
the authorized numbers one by one and you can hear the calling. The tracker
will stop calling if any authorized number pic ks u p the calli ng.
10.4 Press TALK b utton for 3 seconds to c ancel the double- communicat ion or
authorized number-calling
18
Page 19

11 GPRS setting
APN(access poi nt name), IP, PORT have to be set up for gp rs functio n. Apn user, apn
password has to be set
up also
if there are . So please con tact with the gsm ope rator
for them
11.1 Set GPRS protocols
11.1.1 Set TCP protocols: Send SMS Gprsmode+password+space+0 to set up
TCP
Protocol, tracker will reply GPRSMODE ok。
(note : TCP is the default mode i n the firmware)
11.1.2 Set UDP protocols:
Gprsmode+ pass word+s pace+ 1 to s et up UDP p rot ocol, tra ck er will repl y GP RS MODE
ok。
11.2 Set IP address and por t:
Setup: adminip+password+space+IP address+space+port.
If
setup successfully,
the tracker will reply SMS “adminip ok”
Cancel: Send SMS noadminip+123456
11 .3 S et APN
Setup: Send SMS apn+password+space+specify apn content.
If setup succes sf ul , the tr acker will reply SMS “APN ok ”.
Cancel: The old APN will be invalid automatically when a new APN is
set.
11.4 Set APN’s User Name
Setup: Send SMS apnuser+123456+space+the sim card’s user name.
Send SMS apnuser+123456+space+the AP N's user name
If setup succ ess ful, the tracker wil l reply SMS “apnuser ok ”.
Cancel: Th e old APN user n ame will be i nvalid automa tically when a n ew APN uer
name is set.
19
Page 20

11.5 Set APN’s Password
Setup: apnpasswd+password+space+the sim card’s password.
If setup successful, the track er will repl y SMS “apnpassw d ok”.
Cancel: The old APN password will be invalid automatically when a new APN
pas sword is set.
11 .6 GPRS setting
The tracker will han g off the cal ling in gprs mo de wh en auth orized n umber ca lls
to the tracker, then send gprs data to the server.
GPRS Forma t explain: serial n umber, the authorized numb er, GPRMC data, GPS
signal ( F is strong L is weak), alarm information, imei , satellite numbers ,altitude,
battery power (F is full, L is weak) ,charging state( 1 charging ,0 no charging) ,byte
numbers, checksum, MCC, MNC,LAC, CELL ID
GPRS format:
100312033421,13145826175,GPRMC,033421.851,A,2234.0209,N,11403.0733,E,1.87,347.73,120310,,,A*62,F
,help me, imei:354776036842240,03,73.5,F:4.14V,0,138,46772,460,01,2533,720B
12 Cautions
Please comply with the instructions to extend the unit life:
20
Page 21
1. Keep the unit dry . Any liquid, i.e. rain, moisture, may destroy or damage the inside
circuitry.
2. Don’t use & store the unit in dusty places.
3. Don’t put the unit in overheated or overco ol e d place s .
4. Handle carefully. Don’t vibrate or shake it violently.
5. Clear the unit with a piece of dry cloth. Don’t clean in chemicals, detergent.
6. Don’t paint the unit, this may cause some foreign materials left in between the parts.
7. Don’t disassemble or refit the unit.
8. Please use the battery and charger provided by manufacturer. Using other
batteries and chargers will cause unwanted situation.
9. Don’t dismount the antenna randomly, or use other antennas. This may interfer e
the transmission, and increase the radiation as well.
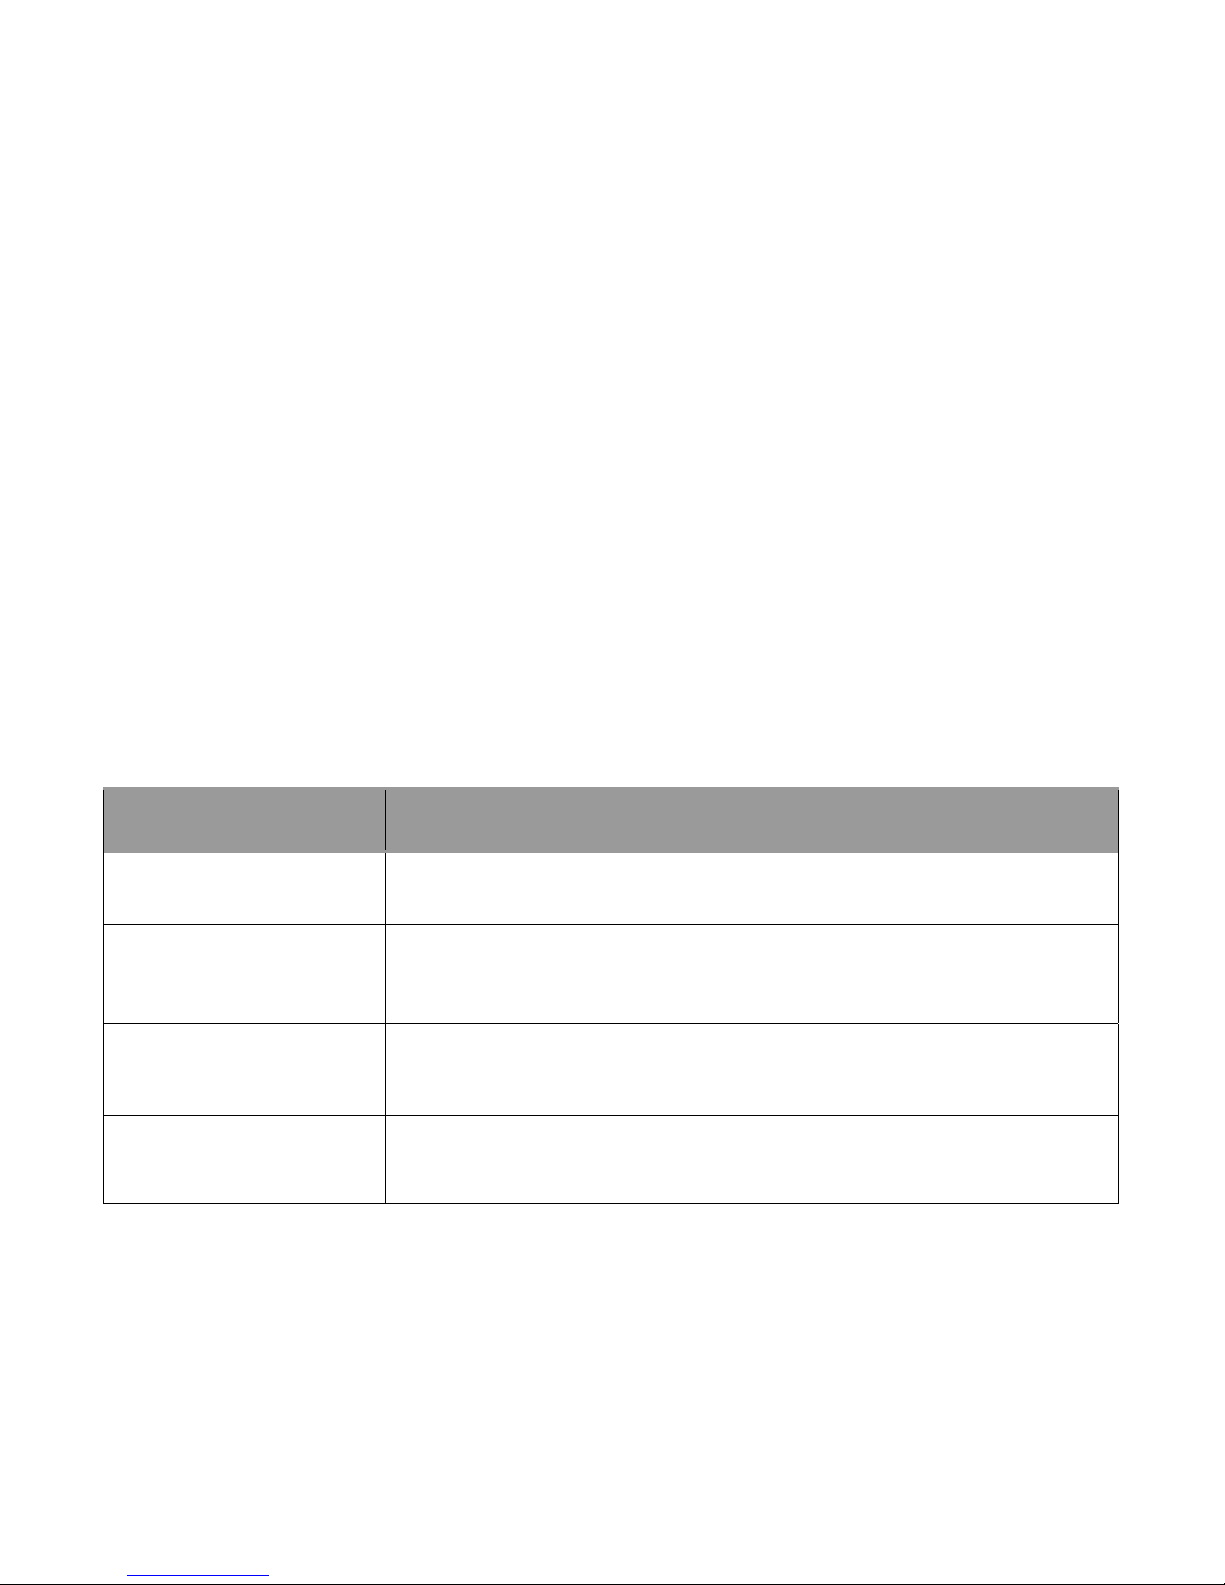
13 Faults & Solutions
Faults
Solution
Startup Fail
Check the battery and see if it is fully charged or
correctly installed.
Hang-up Fail
Check if the unit received GPS signal or not, or if the SIM card there
is calling display or not.
Monitor Fail
Check if the authorized number is setup or in the coverage
of signals.
Location report in
digits of zeros.
Don’t use it in the place beyond reach of signals. Place the
unit outdoors, especially when starting it up.
(Remark: T here are tw o wa ys for th e times of s endi ng alar m in each s et ting. one
time and heap of times, which is according to the customer’s requirements,
this product also support platform issued instructions and computer USB send
set,
its instruction set instruction with SMS instruction)
21
 Loading...