


USER'S GUIDE
STATEMENT
"This
equipment
generates
and
uses radio f requency
energy.
lf
it is
not
properly
installed
and
used
in
strict accordance
with
the
manu-
facturer's
instructions,
this
equipment
may interfere
with
radio
and
television
reception.
This
machine
has
been
tested and
found
to
comply
with
the limits
for a Class
B computing
device
peripheral
in
accordance
with the specifications
in
Subpart
J
of
Part
15
of
FCC
Rules, which are
designed
to
provide
reasonable protection
against
such
interference in a
residential
installation.
lf
you
suspect
inter-
ference,
you
can test
this
equipment
by turning
it off and
on.
lf
you
determine that there
is
interference
with
radio
or television
recep-
tion,
try one
or more
of
the
following
measures
to
correct
it:
o
reorient the receiving antenna
.
move
the computer away
from
the
receiver
o
change
the
relative
positions of
the computer
equipment
and
the
receiver
o
plug
the computer
into a
different
outlet so
that the computer
and
the
receiver are
on dif
ferent
branch
circuits.
lf
necessary, consult
your
Commodore
dealer or an experienced
radio/television
technician
for additional
suggestions.
You
may
also
wish
to consult
the
following
booklet,
which was
prepared
by
the
Federal Communications
Comm
ission :
"How
to
ldentify and
Resolve
Radio-TV Interference
Problems"
This booklet
is
available
from the
U.S., Government
Printing
Office,
Washington,
D.C. 2O4O2,
Stock
No.
004-000-00345-4."
You
should use
only the monitor
cabie
recommended
by
Commo-
dore. The cable
is specially
shielded,
in
accordance
with
the regula-
tions of the
Federal
Comminications
Commission.
Failure to use
the
apprgpriate cable
will
invalidate the
FCC
grant
of Certification,
and
may
cause harmful
radio interference.
CAUTION
lf
you
have
technical
problems
with
your
Commodore
1802 color
monitor,
especially
if
your
set
produces
only sound
with no
picture
or if
the viewing
area
shrinks
to
half
size,
unplug
the
set
and
call
your
dealer
or service
technician.
For
your
safety,
please
carefully
read
the SAFETY
PRECAUTIONS
on
pages 7 and
8
in
this
user's manual.
WARNING
DO
NOT
EXPOSE
THIS
EOUIPMENT
TO
MOISTURE.
SUCH
EX-
POSURE
COULD
CAUSE FIRE
OR
ELECTRIC
SHOCK.

CAUTION
TO PREVENT
ELECTRTC
SHOCK DO
NOT
USE THtS
(POLARIZED)
PLUG
WITH
AN
EXTENSION
CORD, RECEPTACLE
OR OTHER
OUTLET UNLESS
THE
BLADES
CAN BE
FULLY INSERTED
TO
PREVENT BLADE
EXPOSURE.
INTRODUCING
YOUR MONITOR
Your
new
Commodore 1802
color monitor
gives you
a superior
color
picture
that enhances
your
computing experience.
This moni-
tor is
simple to hook
up to
your
computer
and is easy to
adjust.
Please
read this brief
manual
carefully
before
you
try to
use
your
monitor.
The manual shows
you
how
to install
and use the
monitor
correctly. lt
also explains
how
to
use the
picture
control knobs,
which
are like
to control knobs
on
a
color TV.
Be sure to heed
any warnings
in
this manual,
and do NOT remove
the
back
cover or otherwise
attempt
to
service this monitor.
lf
you
have
problems
with
your
monitor
that
are
not
covered in this
manual.
see
your
Commodore
dealer
or a
qualif
ied
technician.
FRONT
AND SIDE VIEW
OF 1802 MONITOR
GE.mdo;l
rmr v*F
..Griss
Illlllllllllllillllllllillllll
71 71
POWER
SWITCH

SPEAKER
REAR
VIEW OF
1802
TINT
COLOR
CONTRAST
H
CARRYING
HANDLE
V.
HOLD
POSITION
CONNECTING
THE
MONITOR
TO A COMPUTER
The monitor
connection cable
connects
your
monitor to
a Commo-
dore
personal
computer. Before
you
connect
the
cable, turn off the
power
to both
your personal
computer
and the
monitor'
There
are
two different cables
that
you
can
use to connect
the
monitor
to
your
computer.
The
kind of cable
you'll
use
depends
on
your
computer.
To
find out
which
kind of
cable
you
should
use,
look
at the audio/video
con-
nector on
your
computer
(see
your
computer's
user
manual
if
you
don't
know where this
connector
ls,.
1. lf the audio/video
connector
has
EIGHT
little holes,
use
the
three-
jack
cable.
Z.
jt
tfre connector
has
FIVE
Iittle
holes,
use
the two-jack
cable'
Power
Cord

To connect
a three-jack
cable to the
rear
panel
of the monitor, fellow
these
instructions,
which
clarify the diagram:
1.
A
three-jack
cable
is supplied
with a monitor.
Use this
cable
(Parts
No.
905103-02) for 1802.
2.
Plug
the
eight
PIN
DIN
connector
(the
larger
end of the
cable)
into
the audio/video
connector
port
on
your
computer
Just
push
the
cable end in.
3.
Plug
the RCA
pin
plugs
(the
jacks)
of the
cable into
the rear ter-
minals on the
monitor.
The
jacks
are
color coded.
o
the
audio
output
jack
(WHITE)
plugs
into
the
AUDTO tN
terminal
on
the monitor.
o
the luminance
output
jack
(YELLOW)
plugs
into the
LUMA
terminal.
o
the
chroma
output,jack
(RED)
plugs
into the
CHROMA
ter-
minal.
4.
Switch the
SIGNAL
SELECTOR
to the Commodore VTDEO
posi-
tion.
Monitor's
Audio Input
Luminence Input
Chroma Input
SignalSelector
Computer's Aud io/V ideo
Connector
'1.
4.
3
vaco
f
rut
(HRoflA

To connect
a
two-jack
cable
to the
rear of
the monitor,
follow
these
steps:
1.
Plug
the
five
PIN DIN connector
(the
larger
end of
the
cable
into
the audio/video
connector
port
on
your
computer.)
Just
push
the
cable
in.
2.
Plug
the
VIDEO
lN
and
AUDIO
lN
jacks
intotheVlDEO
INPUT
and AUDIO
INPUT terminals
on the rear
of the
monitor.
3. Switch
the
SIGNAL
SELECTOR
to the
VIDEO
position.
The
SIGNAL
SELECTOR
is
a switch
on the
REAR PANEL.
After
you
follow
these
simple
steps,
your
1802 is ready
for
use as
a video monitor
for
your personal
computer.
Mon itor's
Aud io
I nput
Video
Input
Signa
I
Selector
Computer's
Aud
iolV
ideo Connector
TURNING ON
YOUR
MONITOR
When
you
finish connecting
your
monitor
according to
the
instruc-
tions,
follow
these
simple steps:
1.
Turn
on
the
monitor
by
pushing
down the
power
switch. The
POWER
INDICATOR
LIGHT
on
the front
of the monitor
shows
you
when
the
power
is
on.
Always
turn
on the
monitor
BEFORE
you
turn
on the
computer.
Later,
when
you're
ready
to
turn
the
power
off,
just
press
the
power
button
again.
The
button
will
pop
back up
and
the
power
light
will
go
out.
2.Turn
on
your
personal
computer.
You
can
tell
that
both
the
monitor
and
the
computer
are
working
correctly
when.
the
moni-
tor
displays
a
massage
like
this one,
which appears
when
you're
using
a Commodore
1802:
1.
t
3.
4.
4
^6'
tuiA
@

SMOKED
PLASTIC
PANEL
(onw€
& 8^5tC v2
sry ts
5Y5IEi
!19[
&Stc
BYrts
rRr6
a
BOADER
POWER
SWITCH
powER
rNDrcAToR
voLUME
KNoB
ehIGHTNESS
KNoB
Different
computers
display
other
opening
messages.
know
what
message
to
expect,
see
your
iomput6r,s
3. Main
Controls
You
can
adjust
Brightness
and
Volume
with
the
front
of
the
monitor
under
the
screen.
VOLUME
CONTROL
Turn
this knob
to
the
right
to increase
sound
volume
and
to the
left
to
decrease
volume.
BRIGHTNESS
CONTROL
Turn
this
knob
to
the
right
to
brighten
the
picture.
The normar
set-
ting
is
at the
center.
lf
you
don't
user
manual.
knobs
on
the
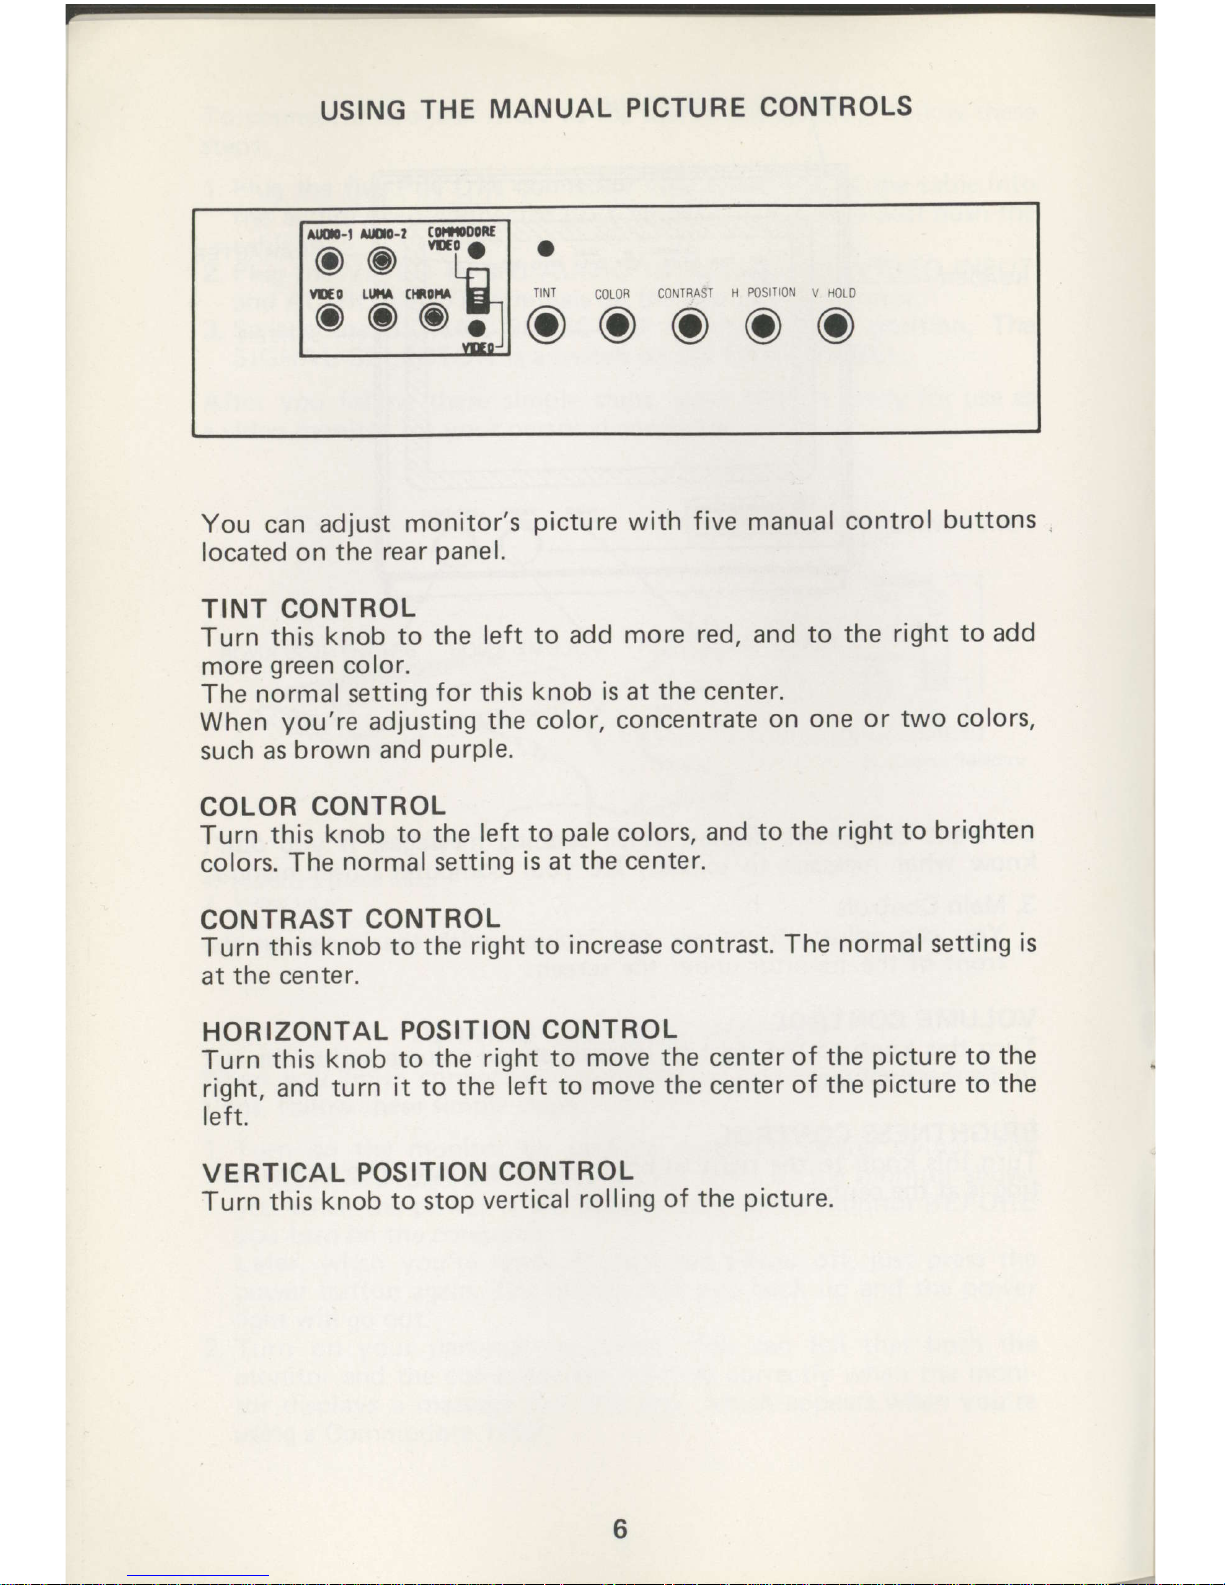
USING
THE
MANUAL
PICTURE
CONTROLS
You
can adjust
monitor's
picture
with
five
manual
control
buttons
located
on the
rear
Panel.
TINT
CONTROL
Turn
this
knob to
the
left to add
more
red,
and
to the
right to
add
more
green
color.
The
normal
setting
for this
knob is at the center.
When
you're
adjusting
the color,
concentrate
on one
or two colors,
such
as
brown and
purple.
COLOR
CONTROL
Turn
this
knob to the
left to
pale
colors,
and
to the
right to
brighten
colors.
The
normal
setting
is at
the center.
CONTRAST
CONTROL
Turn
this
knob to
the
right to
increase contrast.
The
normal setting
is
at the
center.
HORIZONTAL
POSITION
CONTROL
Turn
this
knob to the
right
to move
the centerof
the
picture
to the
right, and
turn
it to the
left
to move
the
center
of the
picture
to the
left.
VERTICAL
POSITION
CONTROL
Turn this
knob to stop
vertical
rolling
of the
picture.
Itr.-t
ltD0-f
(0ffio0ll
o@
*l:
O
6'6'6
o
TINT
COIOB
CONTBASI
H POSIIION V HOLD
ooooo

SAFETY
PRECAUTIONS
Electrical
energy
can
perform
many useful functions.
This
unit has
been
engineered
and
manufactured to assure
your personal
safety.
But improper
use
can
result
in
potential
electrical
shock or fire
hazards.
In order
not
to defeat
the safeguards incorporated
in
this
monitor, observe
the following basic
rules for
its installation
use
and
servicing.
And
also follow
all warnings
and instructions
marked on
your
video
monitor.
INSTALLATION
1.
Your
set is equipped
with
a
polarized
AC line
plug
(one
blade
of
the
plug
is wider
than the
other).
This safety feature
allows the
plug
to fit
into the
power
outlet
only one
way.
Should
you
be
unable
to insert the
plug
full into
the outlet,
try reversing
the
plug.
Should
it
still
fail
to fit,
contact
your
electrician.
2. Operate
the set only from
a
power
source an indicated
on the
set
or refer
to the
user's
manual
for
this information
lf
you
are not
sure of the type
of
power
supplied to
your
home,
consult
your
dealer or local
power
company.
3.
Overloaded AC outlets
and extension
cords are dangerous,
and
so
are frayed
power
cords and broken
plugs.
They may result
in a
shock
or
f ire
hazard.
Call
your
service technician for replacement.
4.
Do not
allow anything
to the rest or roll
over the
power
cord,
and
do not
place
the set where
power
cord
is
subject to
traff ic
or
abuse. This may
result
in a shock
or
fire hazard.
5. Do not
use this
set
near
water - for
example, near
a bathtub,
washbowl, kitchen
sink, or laundry
tub, in
a wet basement,
or
near
a
swimming
pool,
etc.
6. Sets are
provided
with ventilation
openings in
the
cabinet to
allow heat
generated
during
operation to be released.
lf these
openings are
blocked, heat
built
up
within
the set
can
cause
failures
which
may result
in a f ire hazard.
Therefore:
o
Never
block the
bottom
ventilation slots by
placing
it
on
a
bed, sofa, rug,
etc,
o
Never
place
a
set in a
"built-in"
enclosure
unless
proper
ven-
tilation is
provided;
o
Never
cover
the
openings
with
cloth
or
other
material;
o
Never
place
the
set
near
or
over a radiator
or heat register.

7.
To avoid
personal
injury:
o
Do
not
place
a set on a
slopping shelf unless
property
secured;
o
Use
only a cart stand
recommended by the
manufacturer.
o
Do
not try to
roll
a cart
with small
casters across thresholds
or
deep
pile
carpets.
o
Wall and shelf mounted
installations
should
use
factory ap-
proved
mounting
instructions.
USE
1.
Always turn the set
off
if it is necessary
to
leave the
room for
more than a short
period
of time.
Never leave a set
on when
leav-
ing
the house. A
possible
malfunction
may
result in a
fire hazard.
2.
Caution children
about dropping
or
pushing
objects
into
the set's
cabinet openings.
Some
internal
parts
carry hazardous
voltages
and
contact can
result in a f ire or
electrical shock.
3.
Unplug
the set from the
wall outlet before cleaning
the face of
the
picture
tube.
Use a slightly damp
(not
wet)
cloth.
Do
not
use
an aerosol directly on the
picture
tube since it may overspray and
cause
electrical
shock.
4. Never
add accessories
to
a set that has not been designed
for
this
purpose,
Such
additions may result in a shock hazard.
5.
For added
protection
of the set during a lightning
storm
or
when
the set
is
to
be left
unattended
for
an extended
period
of time,
unplug
it from the wall outlet. This will
prevent
possible
shock
and
f ire hazards
due
to lightning storms or
power
line
surges.
6. Do
not bring
magnetic
devices such
as
magnets or motors near
the
picture
tube. These
things have a bad
effect on the color
purity
of the
picture.
7.
Sometimes
you
may
feel static electricity when
you
touch the
surface of the
picture
tube.
Howeve,
this is normal for
any
TV
set and
is harmless to the
human body.

SERVICE
1
. Unplug
the
set f rom
the wall
outlet and refer
servicing
to
quali-
fied
service
personnel
under the following
conditions:
A. When
the
power
cord or
plug
is damaged
or frayed.
B.
lf
liquid has
been
spilled into the set
C.
lf
the
set has been
exposed
to
rain
or water.
D. lf
the set does
not
operate normally by following
the operat-
ing
instructions.
Adjust
only those
controls
that
are covered
in the
operating
instructions,
an improper adjustment
of
other
controls may result in damage
and will often
require
extensive
work by a
qualified
technician
to restore
the set
to
normal
operation.
E. lf
the
set
has been
dropped or
the cabinet has been
damaged.
F.
When the
set exhibits a distinct
change
in
performance
-
this
indicates
a need for
servicing.
G. lf
snapping or
popping
from the
set
is
continuous orfrequent
while the
set is operating. lt
is normal forsome
sets to
make
occasional
snapping
or
popping
sounds,
particularly
when be-
ing turned
on or
off.
2.
Do
not
attempt to
service this
set
yourself,
as opening
or remov-
ing
covers may expose
you
to dangerous
voltage or
other hazards.
,
Refer
all
servicing to
qualif
ied
service
personnel.
3.
when replacement
parts
are required have
the service technician
verify in writing
that the replacements
he
uses
have
the
same
safety
characteristics
as the original
parts.
Use of manufacturer's
specified replacements
can
prevent
f ire,
shock
or
other hazards.
4.
Upon
completion of
any service or repairs
to the set,
please
ask
the service technician
to
perform
the safety
check
described
in
the manufacturers'
service literature.
5.
When a video
monitor reachesthe
end of
its
useful life, improper
disposal
could result in
a
picture
tube implosion.
Ask
a
qualified
service technician
to dispose
of the
set.
Design
and specifications subject
to
change
without
notice.

 Loading...