

Page 1
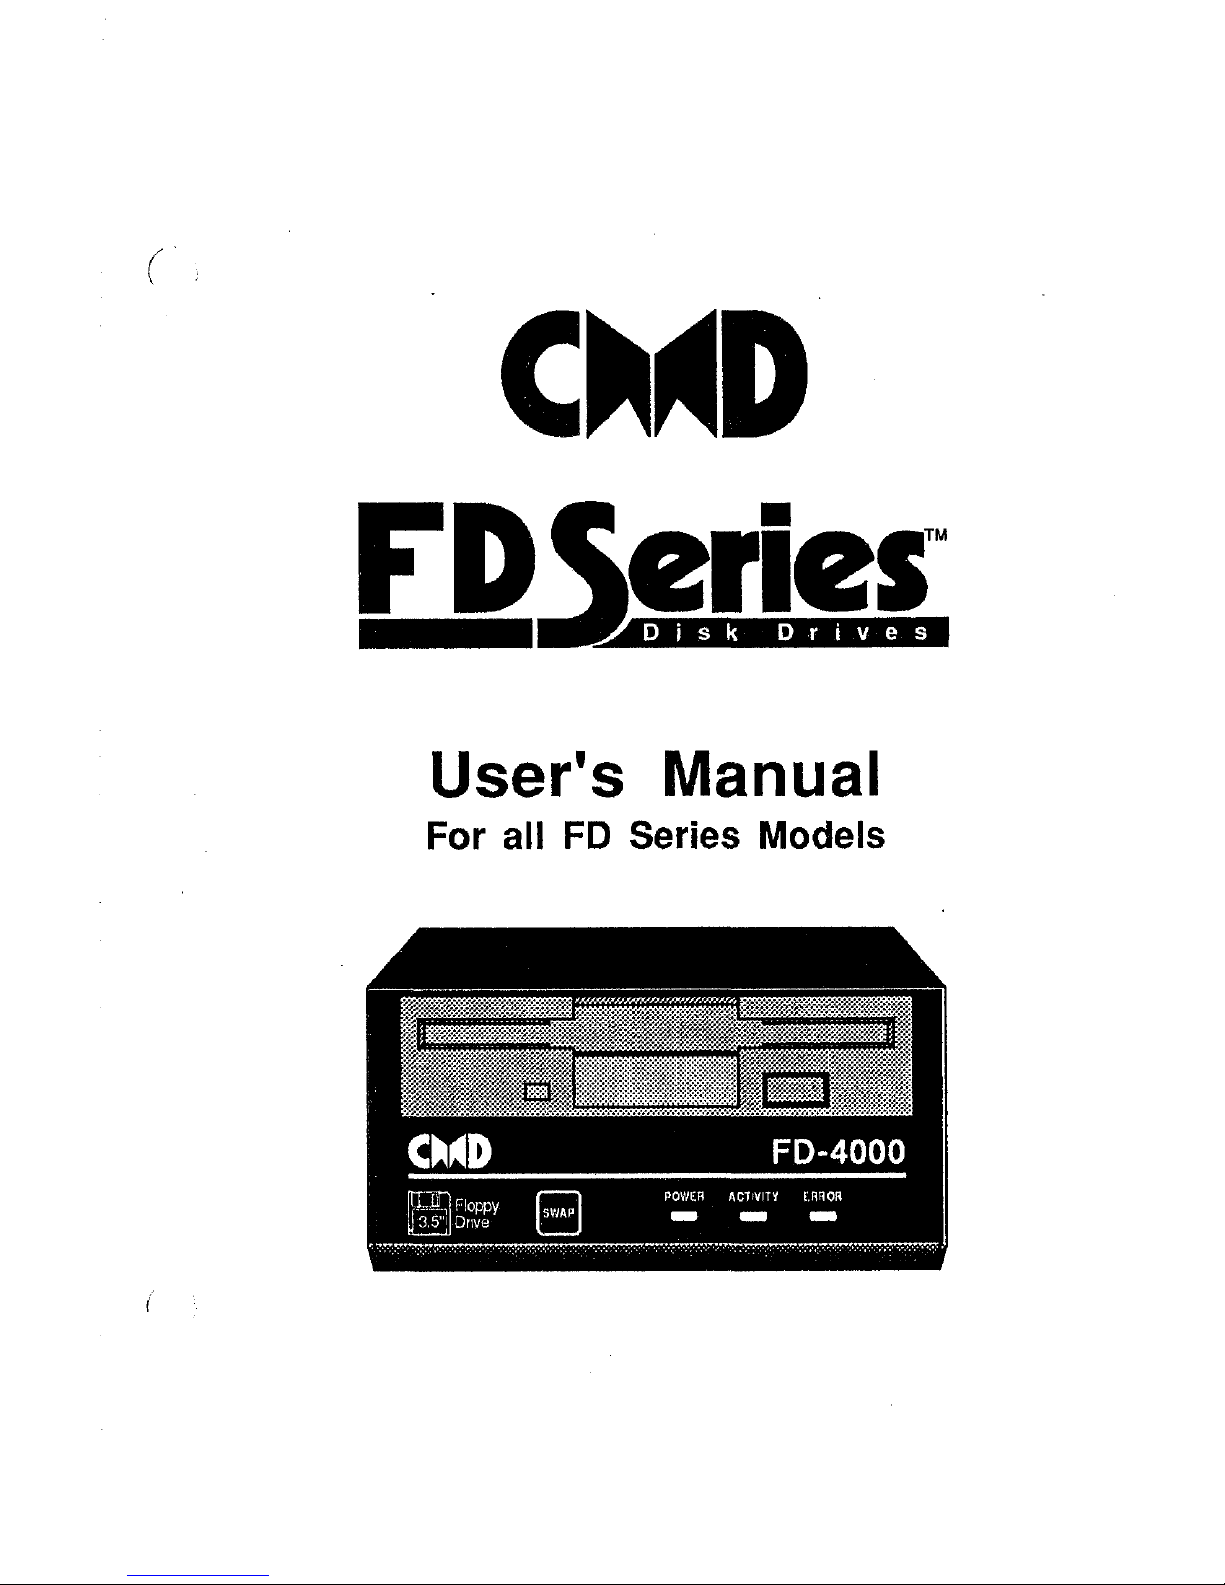
Djsk
Drives
User's Manual
For all
FD
Series Models
Page 2
Copyright Notice
Copyright © 1992
by Creative Micro Designs, Inc.
Fourth Edition, First Printing, October,
1993
All
rights reserved.
No
part
of
this document
may
be
reproduced, in
any
form
or
by
any means either manually
or
electronically without written
permission
from
Creative Micro Designs,
Inc.
The
FD
Disk Operating System (FD-DOS) is protected
under
International
and
United States Copyright Laws, and may not
be copied, in whole
or
in
part,
without
prior
written
permission from Creative Micro Designs, Inc.
JiffyDOSTM,
RAMLinkTM,
FD-2000TM, FD-4000TM,
and
HD
Series™ are
trademarks of Creative Micro Designs, Inc. Commodore 64®,
64CTM,
SX-
64™,
C-128™,
C-128-DTM,
154FM,
1541-CTM,
1541-IITM,
1571™, and
1581™
are trademarks or registered trademarks of Commodore Electronics
Limited.
Amiga™
is
a trademark of Commodore
Amiga.
GEOSTM,
GEOS
deskTopTM,
GEORAMTM,
and Berkeley Softworks™ are trademarks of
Berkeley
Softworks. CP/M®
is
a registered trademark of Digital Research
Corporation. IBM®
is
a registered trademark of International Business
Machines.
Page 3
Table of Contents
(
Section
1:
General Information
,
Introduction
................................................................................... ~ 1
Features
.........................................................................................
1
Orders
........................................................................................... 2
Technical Assistance and Information
..................................................
2
Section
2:
Getting Started
Hookup
.........................................................................................
3
Powering
Up
..................................................................................
3
Device Number
Configuration
...........................................................
4
Section
3:
Using the
FD
Before you Start
................................ , .............................................
5
Modes
of
Operation
.........................................................................
5
1581
Compatible Mode
.................................................................
5
CMD
Partition able
Mode
............................................................... 5
Formatting Disks
............................................................................
7
Disk Types
.................................................................................
7
Formatting Diskettes
....................................................................
7
Write Protecting Disks
..................................................................
8
Partitioning Disks
...........................................................................
8
Copying Software to the FD
...........................................................
10
Softwa~e
without copy-protection
..................................................
10
Copy-Protected
Software
..............................................................
11
GEOS, gateWay and Cp/M ........................................................... 12
1581
Compatible
Software
...........................................................
12
Popular Programs that work on the FD
..........................................
13
Loading and Running Programs
.......................................................
13
Changing
Partitions ....................................................................
13
Swapping Device Numbers
..........................................................
14
C-128 Autoboot Programs
...........................................................
15
Backing up Disks and Files
.............................................................
15
Real Time Clock Option
................................................................
17
Setting the RTC
........................................................................
17
Viewing the Current Time
...........................................................
17
Viewing Time and Date Stamped Directories
...................................
17
Setting the GEOS Clock from the RTC
.........................................
17
Section
4:
Using the
FD
with GEOS
Before
you Begin ...........................................................................
19
Using the FD with the GEOS Desktop ..............................................
19
Using the FD with gateWay
............................................................
21
Using
CMD_MOVE ......................................................................
24
Page 4
Table of Contents
Section
5:
Using the
FD
with
CP/M
Before you Begin ........................................................................... 25
Using Cp/M
................................................................................
26
Section
6:
Partitions and Subdirectories
Introduction .................................................................................. 27
Partitions ..................................................................................... 27
Native Mode Partitions ................................................................ 27
Emulation Mode Partitions .......................................................... 28
Native Mode Subdirectories ............................................................. 29
Section
7:
Command Reference
Command Syntax ..........................................................................
31
Command String Elements ..........................................................
31
Example command string ............................................................. 32
Paths in Command
Strings .......................................................... 32
Subdirectory Paths Using
JiffyDOS Commands ............................ 34
Sending Commands from BASIC .............................. ~ ...................... 34
The Command ChanneL .................................................................
34
Reading Disk Errors .................................................................... 36
Partition Numbers in File Names ..................................................... 37
Partition Numbers in Disk Commands ..............................................
37
Partition Commands
......................................................................
38
Creating Partitions .....................................................................
38
Creating 1581 Style Sub-partitions .............................................
38
Deleting Partitions
.....................................................................
39
Deleting 1581
Style Sub-partitions ......................................... ~ ... 39
Changing Partitions .................................................................... 39
Moving Between 1581
Style Sub-partitions ................................
.40
Formatting Partitions and Disks .................................................... 40
Formatting 1581 Style Sub-partitions ........................................
.42
Initializing Partitions
..................................................................
43
Validating Partitions ................................................................... 43
Partition directory ....................................................................... 44
Renaming Partitions ................................................................... 44
Renaming Directory Headers ......................................................... 45
Getting Partition Information ....................................................... 45
Autobooting ................................................................................. 46
Subdirectory Commands ................................................................. 47
Creating Native Mode Subdirectories .............................................. 47
. Moving Between Native Mode Subdirectories .................................
.48
Deleting Native Mode Subdirectories .......................... ; ................... 49
Viewing Directories .......................................................................
50
Pattern Matching ........................................................................ 50
Time and Date Stamped Directory Listings ......................................
51
ii
Page 5
Table of
ClOl'ltent~
File
Commands
........................................................................... ,
53
Loading Files ............................................................................
53
Saving Files ..............................................................................
54
Verifying Files ..........................................................................
55
Renaming Files ..........................................................................
56
Scratching (deleting) Files ............................................................
57
Copying Files ...........................................................................
58
Copying
files
between
drives .....................................................
58
Copying
and
Combining
files
between
partitions ..........................
58
Locking ....................................................................................
60
Relative File
Commands
................................................................
61
Opening or Creating a Relative File ...............................................
61
Positioning
to
a Specific Record ................................................... 62
Direct Access Commands ................................................................
63
The Direct Access ChanneL .........................................................
63
Block
Commands
.......................................................................
63
Allocating
and
Freeing
Blocks
...................................................
63
The
Buffer
Pointer
...................................................................
64
Reading
and
Writing
Blocks
......................................................
64
Block Execute .........................................................................
64
Memory
Commands
......................................................................
65
Reading
from
Drive
Memory
........................................................
65
Writing
to
Drive
Memory
............................................................
65
Memory
Execute
........................................................................
65
User Commands ............................................................................ 66
UO
Utility Commands ................................................................. 66
Reading
and
Writing
Blocks
......................................................... 66
User
Jump
............................................................................... 66
User Reset ...............................................................................
66
Special
Loaders
.............................................................................
67
Utility Loader ............................................................................
67
Autoboot
:I.i>ader
........................................................................
67
Special FD Commands ...................................................................
67
Software
Write
Protect ................................................................
67
Software SWAP .........................................................................
68
Getting
Diskchange
Status ...........................................................
68
RTC
Commands
...........................................................................
69
Burst Commands ...........................................................................
72
Job
Queue
Instructions ...................................................................
80
Jump Tables .................................................................................
85
iii
Page 6

Table of Contents
Appendix
A:
Utilities
About the Utility Disks ..................................................................
87
FD-TOOLS ..................................................................................
87
DISKETTE
FORMATTING
OPTIONS
.........................................
88
PARTITIONING OPTIONS .........................................................
89
SET REAL TIME CLOCK ..........................................................
92
CHANGE
DEVICE
SELECTION .................................................
92
LOG
NEW
DISK
.......................................................................
92
EXIT
FROM
PROGRAM ...........................................................
92
FCOPY .......................................................................................
93
MCOPY ......................................................................................
95
BCOPY ........................................................................................
96
Modes
......................................................................................
96
Backing
up
data ..........................................................................
96
Restoring data ............................................................................
97
1541SUB
and
1581SUB
.................................................................
97
Appendix 8: Error Codes
Command
Channel
Error Codes .......................................................
99
Appendix
C:
Disk, Partition
and
File Formats
Physical Disk Formats ..................................................................
105
Common Formats Used
in
all Partition
Types
...................................
106
1541
and
1571
Emulation Mode ......................................................
108
1581 Emulation Mode ................................................................... l10
Native Mode ................................................................................
111
File Formats ...............................................................................
115
Appendix
D:
FD
Memory
Map
CMD FD Extended Memory
Map
....................................................
118
Appendix
E:
DOS ROM
and
RTC
Install,dtion
Installation
Procedure
....................... " ...........................................
119
Warranty Information
LIMI1ED
WARRANTY
...............................................................
121
RETURN POLICy ......................................................................
122
Page 7
Section 1
General Information
Introduction
The CMD FD-2000 and FD-4000 are 3.5 inch floppy disk drives which
have been designed utilizing the latest in micro-floppy technology. While
retaining backward compatibility with Commodore 1581 formatted diskettes
(8ooK), these drives are also capable
of
utilizing high density (HD) disks for
a storage capacity
of
up to 1.6 Megabytes. The FD-4000 model can also use
the newer enhanced density (ED) diskettes for a storage capacity
of
up to 3.2
Megabytes.
In addition to emulating the standard Commodore 1581 disk format, the FD
Series drives also operate as CMD
partitionable devices. Users may create
up to a maximum
of
31
partitions (ED disk format), using a mixture
of
any
of
the supported disk/partition types. Partition types available include 1541,
1571, 1581 and
CMD
Native partitions. Both FD Series drive models
will
automatically determine
if
an inserted disk is in 1581 or CMD partitionable
format, and special commands and utilities are provided to ease formatting,
partitioning and copying.
Features
The
FD
Series drives contain a number
of
features in addition to those
considered to be necessary for the operation
of
a disk drive system. Here is a
short list
of
some
of
the features and options available:
• Compatible with Commodore
DOS
commands, GEOS, and CP/M
• Easy connection via the serial port
• Compatible with all serial modes and burst commands
• Built-in JiffyDOS compatibility
• Real Time Clock option available for time and date stamping of files
• Swap functions allow drive to become device 8 or 9
• Up to
31
separate partitions on a single disk (ED)
• 1541, 1571 and 1581 emulation partitions
• CMD Native mode partition support with true subdirectories
1
Page 8

General
Information
Orders
If
you wish to place
an
order or need general infonnation about any product
available from us, you should call Monday through Friday 10:00 AM
through 5:00
PM
Eastern.
If
at all possible, call before 3:00
PM
for fastest
service.
To
place ORDERS call:
Continental US and Canada
All others
(800) 638-3263 (Orders only)
(413) 525-0023 (Questions/support)
You may also call this number during these hours
if
you have a problem
with an order you placed with CMD.
If
you have a problem with an order
which you placed with one
of
our dealers, you should contact the dealership.
Technical Assistance
and
Information
Technical information and assistance
is
available from 10:00 AM through
5:00 PM Eastern.
If
you are calling for technical assistance with a CMD
product which you own, please have your serial number, model number, and
any other pertinent information ready. The phone number to call is:
CMD Technical Support
(413) 525-0023
If
you have programming questions, or your are in need
of
non-immediate
technical assistance or information, you should contact CMD via mail.
Alternatively, you may pose your questions in the appropriate CMD
support areas located on Q-Link (CIN/Hardware Support Group) or GEnie
(Commodore Flagship
RI).
CMD visits these areas regularly, and there are
also many other users who may be able to assist you.
Bug reports
or
compatibility problems should
be
handled via mail, as they
are rarely fixable via telephone, and usually require hard copy detailing your
system configuration, the software involved, and a method
to
repeat the
problem.
We
also enjoy hearing about any successes you have
in
using your
drive with various types
of
software. Our mailing address is:
Creative Micro Designs, Inc.
P.O. Box 646
East Longmeadow, MA 01028
Page 9
Hookup
Section 2
Getting Started
Before attempting to setup and begin using your drive, you should read this
manual.
It
may not
be
necessary for you to read
it
completely, but you
should at least browse through it and become familiar with the sections
which pertain to you and your intended use
of
the drive.
If
you have not yet removed your drive from its shipping carton, do so now.
The shipping carton should contain the drive, a power supply, a serial cable
and this manual. Place the drive
in
a well ventilated area on a level surface
close to your computer and other peripherals. Be sure to keep the shipping
carton in case you have any problems with the system and find it necessary
to return your drive for service.
Connections
You may now connect your FD to your computer by using the included
serial cable. This cable may be plugged into either
of
the connectors labeled
SERIAL on the back
of
the drive. The other end
of
this cable may
be
connected to the port labeled SERIAL on the back
of
your computer, or
if
this connection is already being used by another disk drive or printer, you
may connect it to an available serial port on one
of
these devices.
Next, connect the power supply to your drive by plugging the small DC
power plug into its connector on the back
of
the drive.
Before plugging the power supply into an
AC
power outlet, make sure that
the power switch on the drive is in the OFF (0) position. Now plug the
supply into a suitable
AC
power outlet.
Powering
Up
Your drive is now ready for use with your computer. Tum on the drive
using the power switch located on the rear panel. Please note that when
turning on your equipment, the order in which you activate each peripheral
sometimes affects the computer's ability to recognize some devices. In this
respect, your
FD
series drive may be turned on first, last, or at any point in
between without harm to itself. Therefore, use the order which you are
accustomed to, or which seems to work best for your system.
3
Page 10

Getting Started
Powerup Diagnostics
When power is applied to your FO Series drive, an internal test is perfonned
to make sure that the drive is working correctly.
If
a problem exists, the
ERROR lamp on the front panel will indicate the error.
If
this should occur,
try
restarting the drive.
If
the problem persists, contact CMO Technical
Support for assistance.
Device Number Configuration
FD Series drives are shipped with a device number setting
of
10.
This device
number can
be
changed via a four position dip switch which is accessed
though a cutout in the rear panel.
If
you wish to change the default to some
other number, make sure the drive is turned off, then use the chart below to
detennine the settings for the device number you wish to configure the drive
for. When considering what device number to use the drive as, be aware that
the SWAP button on the front panel will allow you to swap the device
number to 8 or 9 very easily for temporary requirements.
Device
Number
Switch
1
Switch 2
Switch
3
Switch
4
8
Not
Used
DOWN
DOWN
DOWN
9
Not
Used
DOWN
DOWN
UP
10
Not
Used
DOWN
UP
DOWN
11
Not
Used
DOWN
UP
UP
12
Not
Used
UP
DOWN
DOWN
13
Not
Used
UP
DOWN
UP
14
Not
Used
UP UP
DOWN
15
Not
Used
UP
UP
UP
You can use a small screwdriver, pen, etc. to move each switch to the
appropriate position.
If
your
FO
does not respond to the proper device
setting when you tum
it
on:
1. Shut the FD
off
and move each switch
up
and down a few times to
remove any oxidation that might be
on
the switch contacts.
2. Reset the switches again according to the table above, and then try
powering the drive up again.
Important:
If
you have a Xetec Super Graphix Gold printer interface, you
should not configure your
FD
as device number
14.
4
Page 11

Section 3
Using the FD
Before
you
Start
Before reading
the
following information, it is important
to
understand that
your
FD
Series drive is a
true
Commodore-compatible
disk
drive.
In
other
words, if you already
own a 1541,
1571,
1581
or other Commodore-
compatible drive,
you
already
have
the
basic
skills
and
knowledge
required
to
operate the FD. This section
shows
you
how
to
apply
the
already familiar
concepts of disk drive operation
to
the
FD,
and briefly describes
how
to
make
use
of some of
the
FD's
unique
and
advanced
features.
Modes of Operation
FD
Series drives can operate
in
two
basic
modes:
1581
C()mpatible
Mode
and
CMD
Partitionable
Mode.
Even
though
the
FD
automatically knows
which
mode
to
use
when a formatted
disk
is
inserted,
you
should
be
familiar
with
each
operating
mode
and
its
capabilities.
1581 Compatible Mode
As
the
name of this mode implies, your
FD
can
emulate a Commodore
1581
disk drive.
It
can read and write disks that were created
on
a
Commodore
1581
and
can
format
800K
disks
for
use
on a 1581.
Your
FD
responds
to
all
1581
commands
and
can
read all
1581
files
and formats
(including
GEOS
and
CP/M)
without
the
need
for conversions.
CMD Partitionable Mode
The
FD
can format disks
in
a manner that provides storage capacity and
flexibility far beyond that of
the
1581
or
any
other floppy drive.
On
disks
with a CMD
partition able format,
you
can break up
the
overall storage
space into as many as
31
segments (partitions). This concept, which is
already familiar
to
CMD
HD,
RAMLink
and RAMDrive users,
is
similar
to
dividing a large disk into a
number
of smaller disks. CMD-formatted disks
can
store 800K,
1.6
Megabytes
and
on
the
FD-4000, 3.2
Megabytes.
Each partition
on
a'disk
is
referred to by number (1-31),
has
its
own
directory, and
is
treated
as
if it
were
a separate
disk.
Your
computer
can
"see"
the
directory, files and storage area of
only
one
partition
at a time
- making
partitions ideal for keeping different programs separate
from
one another.
On
a partitionable disk,
you
will
work
in
one partition at a
time
(the current
5
Page 12
Using the FD
partition). The current partition is changed
by
sending a simple command
and has the same effect as physically swapping disks on other floppy drives.
A CMD-formatted disk must have at least
one
partition for it to be usable.
A partition can be as small as 256 blocks (64K) or as large as the entire disk
(up to 3.2 Megabytes for an
FD-4000 Enhanced-Density disk). Although the
partitioning system can handle
up
to
31
partitions on a single disk, the
number
of
partitions you can create is limited by the total storage
of
the
particular disk and the size
of
the partitions you create.
There are a number
of
good reasons for making a large capacity disk
partitionable.
Some programs may take up very little space, or may contain
a lot
of
filenames. Using partitions allows you to have separate directories
for different programs
or
types
of
programs. Partitions can also be useful for
quick backups or compatibility. There are two types
of
CMD partitions:
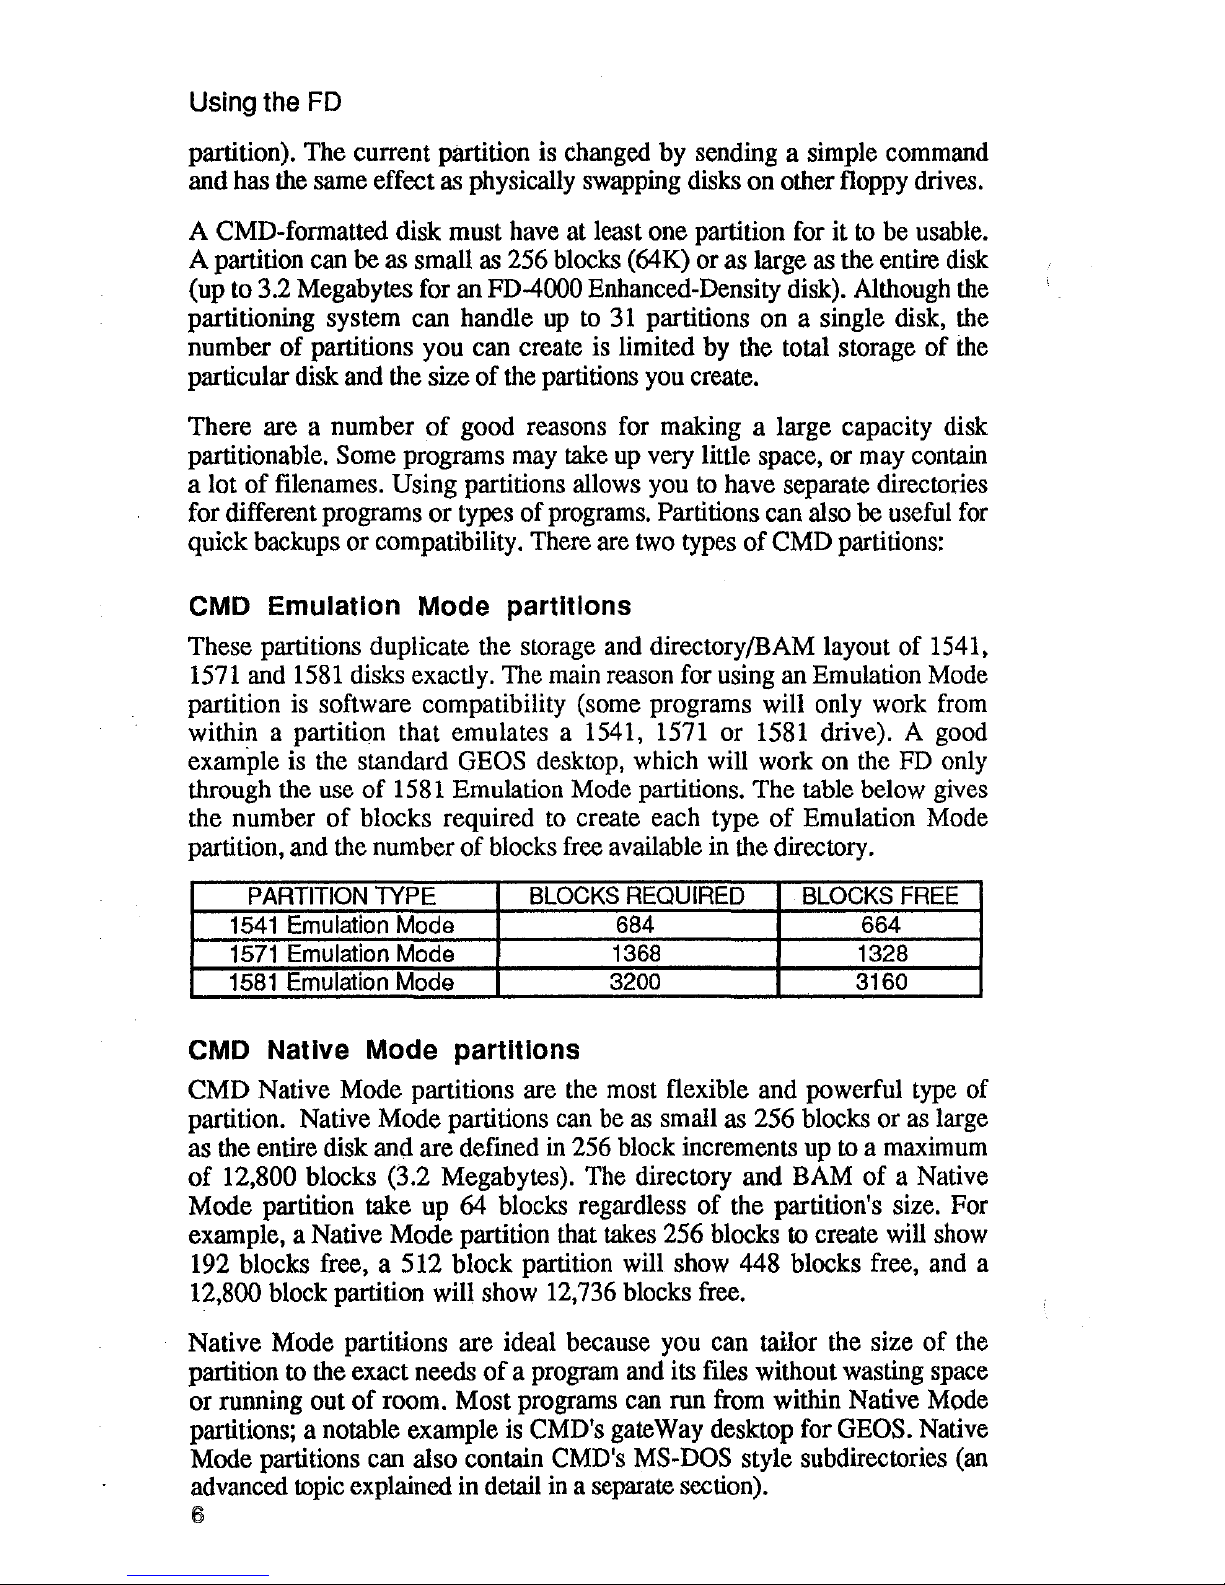
CMD Emulation Mode partitions
These partitions duplicate the storage and directory/BAM layout
of
1541,
1571 and
1581
disks exactly. The main reason for using an Emulation Mode
partition is software compatibility (some programs will only work from
within a partition that emulates a 1541, 1571
or
1581 drive). A good
example is the standard
GEOS desktop, which will work on the FD only
through the use
of
1581 Emulation Mode partitions.
The
table below gives
the number
of
blocks required to create each type
of
Emulation Mode
partition, and the number
of
blocks free available in the directory.
PARTITION
TYPE
BLOCKS
REQUIRED
BLOCKS
FREE
1541
Emulation
Mode
684
664
1571
Emulation
Mode
1368
1328
1581
Emulation Mode
3200
3160
CMD Native Mode partitions
CMD
Native Mode partitions are the most flexible and powerful type of
partition. Native Mode partitions can be as small as 256 blocks or as large
as the entire disk and
are
defined
in
256 block increments up to a maximum
of
12,800 blocks (3.2 Megabytes). The directory and BAM
of
a Native
Mode
partition take up 64 blocks regardless
of
the partition's size. For
example, a Native Mode partition that takes 256 blocks to create will show
192 blocks free, a 512 block partition will show 448 blocks free, and a
12,800 block partition will show 12,736 blocks free.
Native Mode partitions
are
ideal because you can tailor the size
of
the
partition to the exact needs
of
a program and its files without wasting space
or running out
of
room. Most programs can run from within Native Mode
partitions; a notable example is CMD's gateWay desktop for
GEOS. Native
Mode partitions can also contain CMD's
MS-DOS style subdirectories (an
advanced topic explained in detail in a separate section).
6
Page 13
Using the FD
Formatting Disks
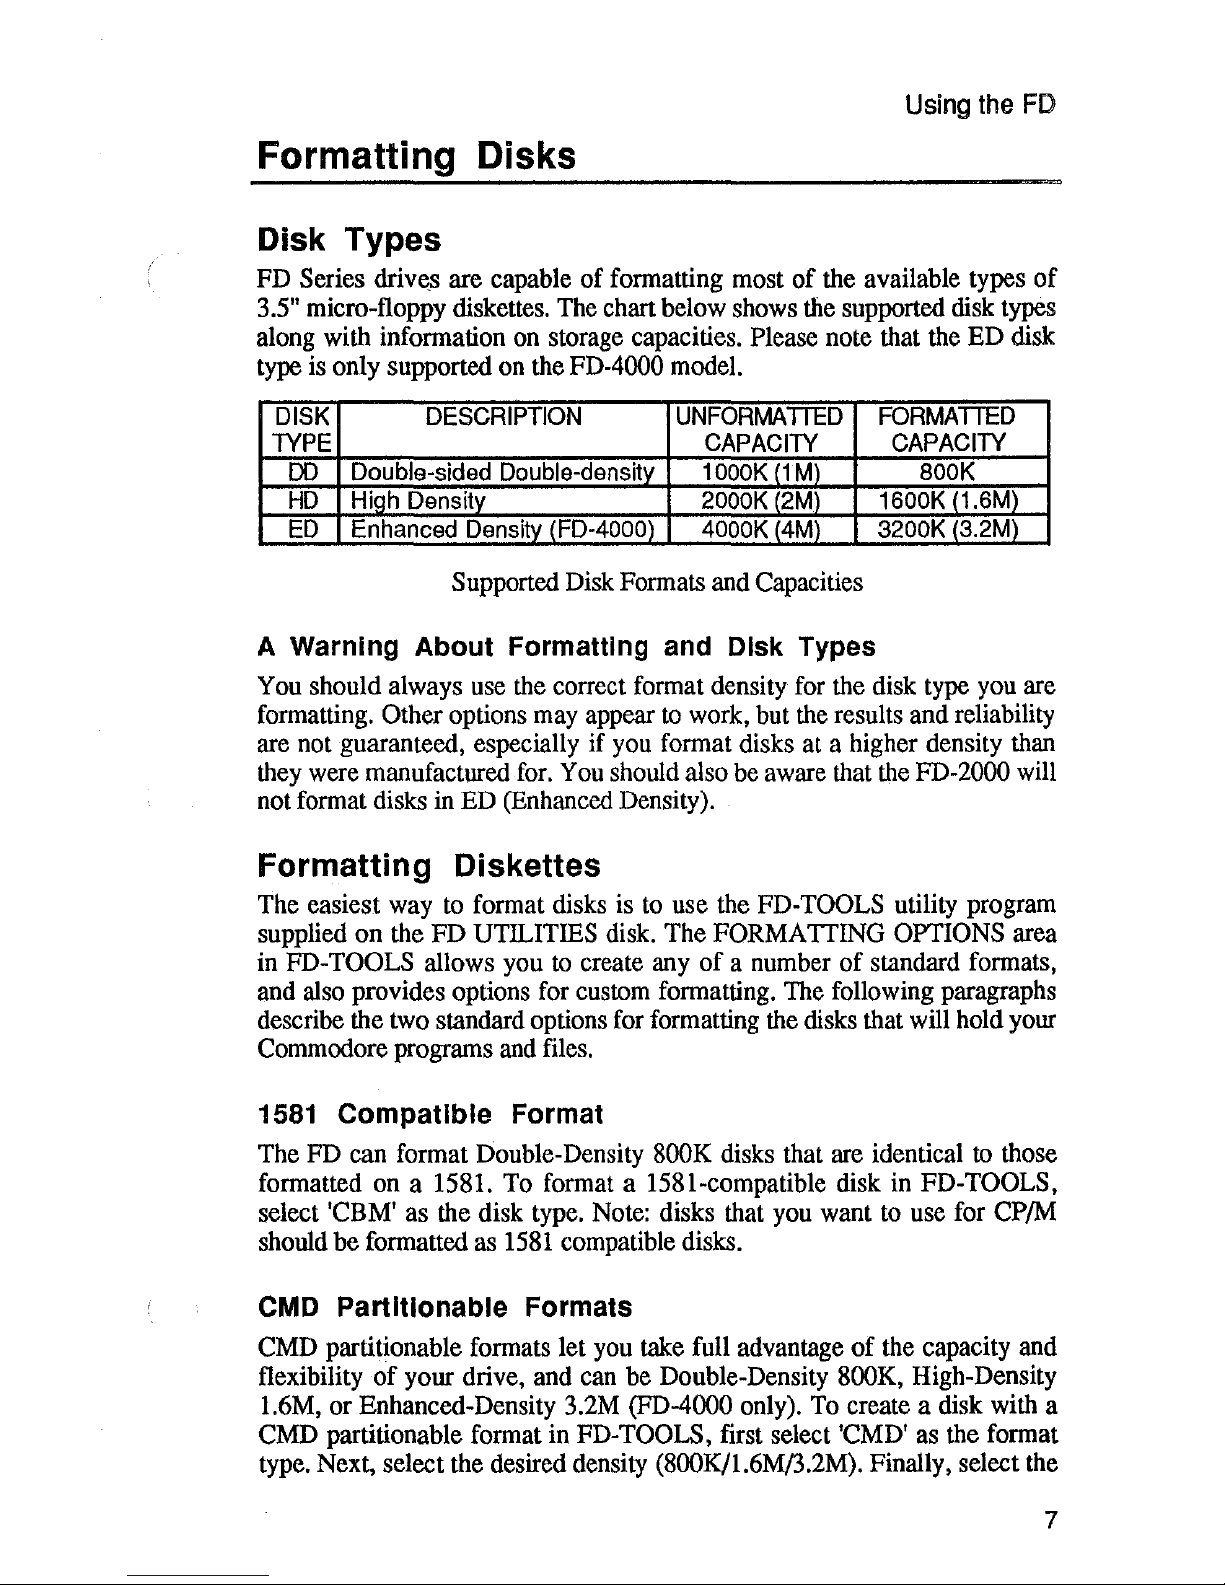
Disk Types
FD
Series
driv~s
are capable of formatting most of
the
available types of
3.5"
micro-floppy diskettes.
The
chart below
shows
the
supported
disk
types
along with information
on
storage capacities. Please note that
the
ED
disk
type
is
only supported
on
the FD-4000
model.
DISK
DESCRIPTION
UNFORMAmD
FORMATIED
TYPE
CAPACITY
CAPACITY
DO
Double-sided Double-density 1000K{1
M)
BOOK
HD
High
Density
2000K
(2M)
1600K
(1.6M)
ED
Enhanced
Density
(FD-4000)
4000K
(4M)
3200K (3.2Ml
Supported
Disk
Formats
and
Capacities
A Warning About Formatting
and
Disk
Types
You
should always
use
the
correct format density
for
the
disk
type
you
are
formatting.
Other options
may
appear
to
work,
but
the
results and reliability
are not guaranteed, especially if
you
format disks
at
a higher density
than
they
were
manufactured
for.
You
should also
be
aware
that
the
FD-2000
will
not
format disks
in
ED
(Enhanced
Density).
Formatting Diskettes
The
easiest
way
to
format disks
is
to
use the
FD-TOOLS
utility program
supplied on the FD
UTILITIES disk. The
FORMATTING
OPTIONS
area
in
FD-
TOOLS
allows
you
to
create
any
of a
number
of standard formats,
and
also
provides options
for
custom
formatting.
The
following paragraphs
describe
the
two
standard options
for
formatting
the
disks
that
will
hold
your
Commodore
programs
and
files.
1581
Compatible Format
The
FD
can format Double-Density 800K disks that
are
identical
to
those
formatted
on
a 1581.
To
format a 1581-compatible disk
in
FD-TOOLS,
select 'CBM'
as
the disk
type.
Note:
disks that
you
want
to
use
for
CP/M
should be formatted
as
1581
compatible disks.
CMD
Partltlonable Formats
CMD
partitionable formats let
you
take
full advantage of
the
capacity
and
flexibility of your drive, and
can
be
Double-Density 800K, High-Density
1.6M,
or Enhanced-Density
3.2M
(FD-4000 only).
To
create a disk
with
a
CMD
partitionable format
in
FD-TOOLS, first select
'CMD'
as
the
format
type.
Next, select the desired density
(800K/1.6M!3.2M).
Finally, select
the
7
Page 14

Using the FD
partition arrangement that you want to appear on the disk. There are three
possible choices:
NATIVE This option creates a single CMD Native Mode partition that
uses all
of
the available storage space, resulting in 3136 blocks
free on
800K disks, 6336 blocks free on 1.6M disks, and 12736
blocks free on 3.2M disks.
1581 This option creates
1581
partitions on the disk. 800K disks will
have one 1581 partition, 1.6M disks will have two, and 3.2M
disks will have four. Each
1581
partition has 3160 blocks free.
NONE This option does not create any partitions on the disk, allowing
you to create your own custom partition arrangement. Before you
can use the disk, you'll have to use the PARTITIONING
OPTIONS in FD-TOOLS to create at least one partition.
Write Protecting Disks
Your FD will detect the condition of the write protect 'window' on any disk
inserted into the drive.
If
this window
is
open, the disk is write protected,
and cannot be written to.
You open or close the write-protect window by
sliding a small plastic tab
to
the appropriate position. You can easily move
the tab by using the point of a pen or a similar instrument.
It
is important to note that the write-protect window on a 3.5" disk
functions in a manner opposite
to
that
of
the write-protect tab on a 5.25"
inch disk. That is to say, a 3.5" disk is write protected when its window is
open, while a 5.25" disk is write protected when its window is closed (writeprotect tab on).
There is also a set
of
software commands which can be issued
to
write
protect an FD disk from within your own programs. For further information
on these commands, see the Command Reference section
of
this manual.
Partitioning Disks
FD-TOOLS allows you to tailor the partitioning arrangement of CMD-
formatted disks to suit the needs
of
the particular programs that you use.
The default partitioning options (NATIVE, 1581, and
NONE) discussed
in
the previous paragraphs for CMD-formatted disks are not permanent and
may be changed at any time. By using the
PARTITIONING, OPTIONS in
FD-TOOLS, you can view a list
of
the existing partitions on a disk, delete
unwanted partitions, create new partitions, set the default partition, and
format (NEW the directory) of a partition.
Note: In
FD-TOOLS, partition sizes are always displayed in 'blocks'. Each
block is 256 bytes in size; therefore four blocks
is
equal
to
lK
of
storage.
S
Page 15

Using the FD
Viewing Partitions
The VIEW PARTITION TABLE option enables you to see a list
of
the
partitions that currently exist on a disk. The partitions are listed by their
number, name, size and type.
Setting The Default Partition
If
you have more than one partition on a CMD-formatted disk, you will
want to define the
default partition by using the CHANGE DEFAULT
PARTITION option.
The
default partition is the partition that the computer
"sees" whenever that disk is inserted in the PD.
As
an example, you might
have a disk with Partition 1 containing a database program and Partition 2
containing your wordprocessing program.
If
you use the wordprocessing
program
90%
of
the time, you would want
to
set Partition 2 as the default
partition so that
you
would automatically be
in
the wordprocessing partition
each time the disk is inserted.
In
order to use the database program, you
would issue a 'Change Partition' command after inserting the disk.
Each disk has its own default partition. Note: Whenever you create a
CMD-
formatted disk, the default partition is set
to
Partition
1.
Creating Partitions
The CREATE PARTITIONS option allows you to create one or more
partitions on a CMD-formatted disk.
For
each partition you create, you
must select a number, name, and type (1541, 1571,
1581
or Native).
If
you
choose
to
create a Native Mode partition, you will also have to specify a
size in increments
of
256 blocks.
Note:
Once you create a Native Mode partition, you cannot increase or
decrease its size without deleting the partition entirely first.
Please note that the number
of
partitions you can create is always limited by
the amount of available storage
on
a particular disk. In addition,
if
there is
little free space remaining on a disk, the type
of
partitions you can create
may also be limited (for example,
if
only 400 blocks remain, you will only
be able
to
create a 256-block Native partition).
An
INSUFFICIENT SPACE
A V AILABLE message means that you will not be able
to
create a new
partition until at least one existing partition has been deleted.
Deleting Partitions
The DELETE PARTITIONS option allows you to delete one or more
partitions on a CMD-formatted disk. When you delete a partition, it is
removed from the disk's partition table and any programs
or
data in that
partition are lost. Deleting a partition will free up space which can then
be
used in the creation
of
new partitions. Note:
If
you wish to delete all the
partitions on a disk, use the DELETE ALL
PARTITIONS option instead.
9
Page 16
Using the FD
Deleting a partition may take some time (up to
15
minutes), because any
remaining partitions located above the one being deleted must
be
moved
down to fill in the vacated space. In addition,
if
a disk error occurs while you
are deleting partitions, there is a risk that information in one
of
the
remaining partitions could
be
corrupted. Therefore, you should not delete a
partition until you have backed up all valuable data on the disk.
Formatting Partitions
The REFORMAT PARTITION option allows you to 'NEW' the directory
of
a partition on a CMD-formatted disk without destroying information
in
any
of
-the
other partitions that reside on the same disk. This can be useful
when you want to quickly 'clean out' a partition in order
to
use
it
for a
different program or set
of
meso
Copying Software
to
the
FD
Two programs are supplied that you will use almost exclusively
to
copy
programs and data files to your PD:
FCOPY is a file copy program that will copy all types
of
files (except
GEOS files) between any FD partition and any type of drive. You should
always
try to copy software
to
the FD by using FCOPY,
as
it will allow
you to place your programs and data
files into the powerfiIl and flexible
Native Mode partitions.
MCOPY is a full disk copier that makes a mirror image copy of every
sector on a disk. Because it copies a disk
by
sectors, MCOPY can only copy
between drives and partitions of the same type (i.e. between a
1541
disk
drive and a 1541 Emulation Mode partition, a 1581 drive and a 1581
partition, etc.).
MCOPY is most useful for copying programs that are
dependent upon the exact track and sector layout
of
a Commodore disk drive
to run properly.
FCOPY and MCOPY both incorporate the same menus and command keys
that make it easy
to
select the drives and partitions that you will be copying
to and from.
Software without copy-protection .
Software which is not copy-protected can almost always be installed directly
on the PD. With these programs the main concern is usually which type
of
partition
to
use. The best way is to start with a Native Mode partition, and
then copy all the
files· from the program disk to that partition by using
FCOPY. You should then try
to
run the program (see the instructions given
a few pages ahead in the section titled "Running Programs"), Note: Some
Cb
128 programs can only be loaded by autobooting after powerup or reset.
HI
Page 17
Using the FD
These types
of
programs will require you to copy the boot sector
to
your
FD partition by using FCOPY's
'COpy
C-128 BOOT SECTOR' function.
Some software, even though it contains no copy-protection, will only work
with a certain type
of
drive and should be placed in
an
Emulation Mode
partition.
Use
FCOPY and work your way 'downward', trying a 1581
partition first, then a 1571, and finally a 1541 partition.
If
the software will
still not work, all is not lost, as there may be some 'hidden' data on the
program disk which cannot be duplicated with
FCOPY. In this case, use
MCOPY to copy the entire disk to a partition
of
the same type.
If
the program still does not work, it is probably performing some very
drive specific tasks or may use an incompatible fast loader routine. Certain
fast loader routines may have
to
be disabled
in
order to get software
to
work
with the FD (a good example is the fast loader built into CMD's
Stereo
SIDplayer
software).
Multiple Disk Programs
Some programs are distributed on a number of disks. In many cases, simply
copying all the files from each
of
the disks into a single partition using
FCOPY will allow you
to
use this type
of
program on the FD. Watch out
for file names which are the same when copying these types
of
disks. These
files
mayor
may not be identical.
If
some
of
the information for a program is stored directly on the disk
without a file name, or the disk name is checked
to
determine
if
the correct
disk is being used, it will be necessary to use
MCOPY
to
copy the disks
to
partitions. However, you may only be able to use one
of
the disks in the set
inhere
is no provision in the program for sending a
C:p
(Change Partition)
command to the FD before a disk swap is required.
Other Solutions
Some software expects to find the disk directory in a certain place on the
disk. Normally this kind
of
software can be operated using an emulation
mode partition
of
the required type. It may also be possible for this software
to
be operated in a Native Mode subdirectory which has been specially
created
to
simulate the directory
ofa
1541
or
1581
disk drive. These types
of
subdirectories can be created in an empty Native Mode partition which has
the required number
of
tracks by using the
1541SUB
and
1581SUB
utilities supplied with the FD (see Appendix A for more information).
Copy-Protected Software
Normally, copy-protected software cannot be placed directly onto the FD.
You may, however, be able to copy some
of
the more mildly protected
programs by using
MCOPY.
If
a program still will not load from the FD,
you can try to copy only the data files
to
the FD with FCOPY, and then
11
Page 18

Using
the
FD
load the program initially from the usual boot disk. After the program stops
loading (and is past checking the copy-protection) you could press the
SWAP 8 switch to substitute the FD in place
of
the boot drive. Any
subsequent disk access will be directed
to
the FD.
One last method to
try
is to use a memory capture type
of
cartridge to save
the program as an unprotected file. There are also some copy utilities which
will remove protection from programs by using a parameter disk. This is
also a good method for making bootable copies
of
protected software. Be
aware that not all parameters will remove copy protection; many make exact
copies with the protection still intact.
GEOS,
ga~eWay
and CP/M
Please refer to Sections 4 and 5 for information
on
how to use the FD with
these programs.
1581 Compatible Software
Overall, the FD has proven' to be more compatible with commercial
productivity software than the 1581. This is due mainly to the FD's ability
to emulate the exact track and sector layout
of
1541
and'1571 disks through
the use
of
CMD's emulation mode partitions. FD compatibility with
1581
programs follows three general rules:
1.
Any 1541- or 1571-based program that can be successfully copied to the
1581
will work on the FD.
2.
Many programs that rely on'I541/1571-specific track and sector layouts
that do not work on the
1581
will work on the FD through the use
of
1541
and 1571 emulation mode partitions.
3. A very small number
of
programs that access the 1581 Floppy Disk
Controller chip directly, or use undocumented routines in the 1581
ROM will not work on the FD. These programs are listed below:
1581
Software Incompatibilities
1. RUN's
1581
GEOS Bootmaker. Use CMD's GeoMakeBoot instead.
2.
Big Blue Reader MS-DOS FORMAT PROGRAM (V4.0
or
earlier).
Use a later version
of
Big Blue Reader instead.
3.
1581
TOOLKIT; Use Super
81
Utilities, MCOPY,
at
FCOPY instead.
4.
MAVERICK. Use Super
81
Utilities, MCOPY, or FCOPY instead.
1:2
Page 19
Using the FD
Popular Programs that work
on
the
FD
CMD
has successfully tested
the
following programs with the
PD.
Please
note that this
is
by
no
means
a complete list -
we
have included
only
the
most popular
programs
with
the
most
appeal
to
the
majority of
PD
users.
Bible Search
from
SOGW
AP
Paperclip
TIl
Big
Blue Reader
64 & 128
V 4.0
Pocket
Series
(FD
as
data
drive)
Bobstenn
Pro
Practicalc
64
Compute's SIDplayer
Stereo
SIDplayer
CP/M Super
81
Utilities
64 & 128
Destenn
128
Super
Snapshot Cartridge
V5
Fleet Filer
64 & 128
Superbase
V3.01
Fleet System
IV
Superscript
Flexfile
128
Swiftcalc
128
gateWay
64 & 128
Sylvia Porter's Personal Finance
GEOS
64 & 128
V2.0
Word
Writer
64 & 128
Multiplan
V1.07
(FD
as
data drive)
WordPro
128
Loading
and
Running Programs
As
with
any
disk
drive,
the
method
you
use
to
load
and
run a program
will
vary according
to
the
particular program.
To
load a program
from
the
FD,
you
will use
the
same
method
as
you
did
with
your
1541,
1571
or
1581
drive (for example,
LOAD"*",8,1).
However,
you
may
have
to
perform
one
or
two
preliminary steps before
the
program
can
be
loaded
from
the
PD.
Changing Partitions
If your FD disk
has
more
than
one partition
on
it,
and
if
the
program
you
are trying
to
load is
not
in
the
currently selected partition,
you
will
have
to
change the current partition before loading
the
program.
To
change
the
current partition,
you
will
use
the
CP (Change Partition)
command.
For
example, if the
program
you
want
to
load
is
in
Partition
2,
enter
the
following
command:
OPEN
15,dv,15,"CP2":CLOSE15
JiffyDOS
users
can
instead
select
the
FD
as
the
default device
and
then
enter:
@CP2
Remember
to
substitute 'dv' with
th~
FD
device number
in
the
example
above. To verify that
you
are
in
the
correct partition after
you
have
sent
the
CP command,
you
can
view
the
current
directory
of
the
FD
by
entering:
LOAD"$",dv
LIST
JiffyDOS
users
can
instead
press
f1
to
view
the
directory.
13
Page 20
Using the FD
If
you do not remember which partitions are on a particular disk, you can
view the partition directory by entering:
LOAD"$=P",dv
LIST
JiffyDOS users can instead enter:
@$=P
You will see a list
of
the partitions on the disk showing each partition's
number and name. The list should remind you which partition the particular
program is in. The first partition in the list will always
be
the System
Partition. Please
note that the System Partition is used exclusively by the
FD to store system information and cannot be used to hold your files or
programs.
Swapping Device Numbers
Many times a program can only be loaded from device 8 or 9.
If
your FD is
normally set to another device number
(15
for example), you can still easily
load these programs by using the front panel
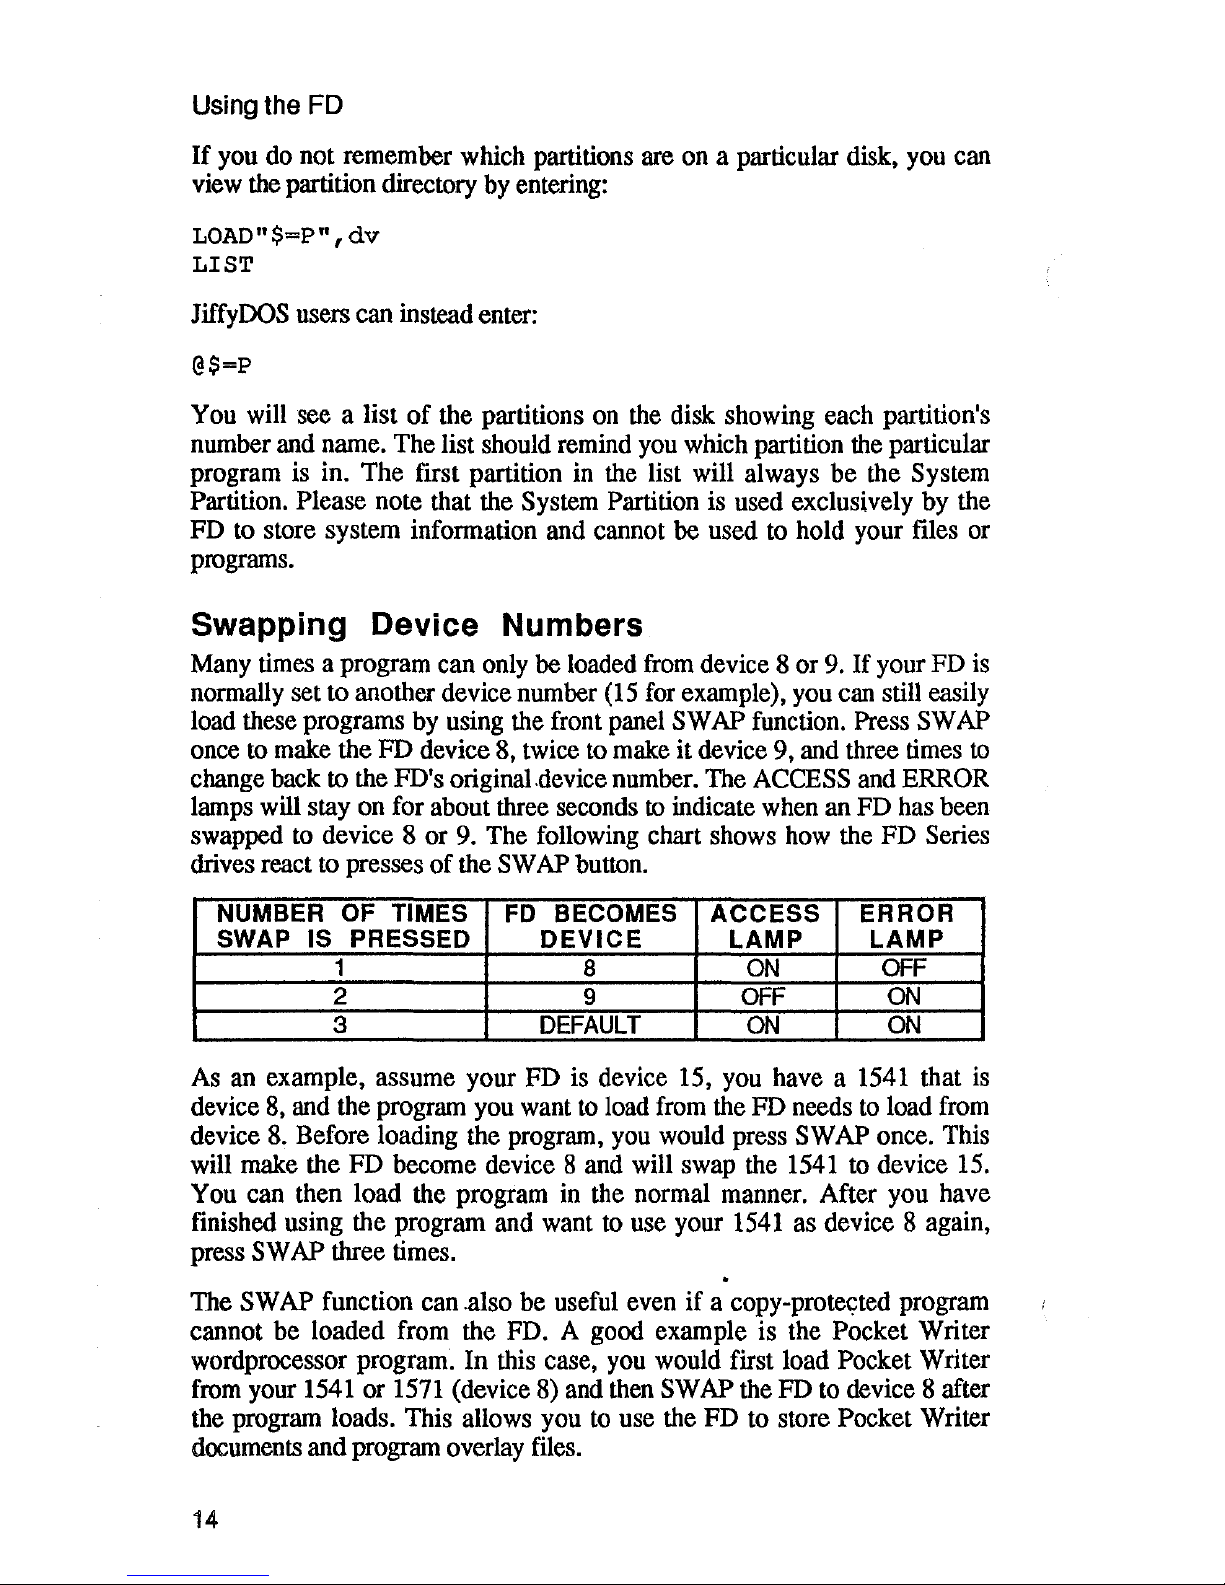
SWAP function. Press SWAP
once to make the FD device 8, twice to make it device 9, and three times to
change back to the FD's original.device number. The ACCESS and ERROR
lamps will stay on for about three seconds to indicate when an FD has been
swapped to device 8 or 9. The following chart shows how the FD
Series
drives react to presses
of
the SWAP button.
NUMBER OF TIMES
FD
BECOMES
ACCESS
ERROR
SWAP
IS
PRESSED
DEVICE
LAMP
LAMP
1
8
ON
OFF
2
9
OFF
ON
3
DEFAULT
ON
ON
As an example, assume your FD is device IS, you have a 1541 that is
device 8, and the program you want
to
load from the FD needs
to
load from
device 8. Before loading the program, you would press
SWAP once. This
will make the FD become device 8 and will swap the 1541 to device 15.
You can then load the program in the normal manner. After you have
finished using the program and want to use your 1541 as device 8 again,
press
SWAP three times.
The
SWAP function can .also be useful even if a
copy-prote~ted
program
cannot be loaded from the FD. A good example is the
Pocket Writer
wordprocessor program.
In
this case, you would first load Pocket Writer
from your 1541 or 1571 (device 8) and then
SWAP the FD to device 8 after
the program loads. This allows you
to
use the FD to store Pocket Writer
documents and program overlay files.
14
Page 21
Using the FD
SWAP can also be used even
if
you do not already have a device S
or
9 on
the serial bus. In this case, the
FD
simply becomes device S or 9 without
affecting any other devices on the bus.
Things to remember about device swapping
1. When first powering on or resetting a C-64 (or entering C-64 mode on a
C-I2S), the serial bus must be cleared before the SWAP functions can be
used. This can
be
done by performing any disk access (such as
LOAD"$",S) or by the command POKE 56576,199.
2.
When GEOS is active, the SWAP function cannot
be
used. This is
because GEOS is always controlling an active handshake with the current
drive on the serial bus. In any case, swapping device numbers after
GEOS has booted would not be recommended because GEOS assigns a
different device driver to each type
of
drive. Therefore, the proper time to
swap device numbers when using GEOS is before booting.
3.
NEVER press the SWAP button while a drive on the serial bus is being
accessed. Doing so invites the possibility
of
locking
up
your computer.
A rule-of-thumb to apply before pressing the SWAP button is to make
sure that none
of
your drive activity lights are on, and that the program
you are using is not processing data at the time. (A good time to swap
device numbers is while a program is waiting for user input).
C·128 Autoboot Programs
Certain programs for the C-128 can only be loaded by autobooting after
your computer has been turned on or reset. After turning on your computer,
you may need to perform one
or
more
of
the following steps
in
order to get
such programs to load.
1.
If
your FD is not device number
S,
press SW AP once in order to make it
deviceS.
2.
If
the program you want to load is not in the current partition, enter the
'CP' command in order to change the current partition (see Changing
Partitions above).
3.
To
load the program, type the following command and press Return:
BOOT
Backing
up
Disks
and
Files
Once you start using your FD, you will want to back up the disks and files
that you create in order to protect against their loss due to an accident or a
disk that becomes defective. In addition, CMD Hard Drive, RAMLink and
RAMDrive owners will want to use their FD to back up the data from their
15
Page 22
Using the FD
other CMD devices. There are three programs you can use to back up data:
FCOPY,
MCOPY and BCOPY. The following paragraphs give a general
explanation
of
how these programs can be used to back up data. More
detailed instructions on their use are given in Appendix
A.
FCOPY
FCOPY is useful for backing up data on a file-by-file basis. With FCOPY
you
can
copy the files you create
on
your FD to another disk drive
or
storage device (1541, 1571, 1581, CMD HD, RAMLink or RAMDrive).
If
you have the Real-Time Clock Option installed in your FD, you can use the
time
and
date stamp on files to back up only those that have been modified
since your last backup. Please note that
GEOS files cannot be copied by
FCOPY, and must
be
backed up to another disk from within GEOS or
gateWay.
MCOPY
MCOPY allows you to make a copy
of
an entire partition to another disk
drive
of
the same type.
For
example, a 1541 Emulation Mode partition can
be
copied to a 1541 disk, a 1571 partition to a
1571
disk, and a 1581
partition to a
1581
disk.
If
you own another CMD device (HD, RAMLink,
RAMDrive,
or
another FD), you can also copy the contents
of
a Native
Mode partition to another Native Mode partition that is the same size or
larger. 1541, 1571 and 1581 partitions on your FD can also be copied to
other CMD devices providing that the same type
of
partition exists on the
other device.
BCOPY
BCOPY allows you to copy an entire
FD
disk or the contents
of
selected
partitions to any other type
of
floppy disk drive (1541, 1571, 1581, or
another FD).
If
you own another CMD device (HD, RAMLink, RAMDrive,
or
another FD), you can also use BCOPY to back up that device to your
PD. The number
of
floppy disks required to back up a particular partition or
disk depends on the size
of
the partition or disk that you want to back up
and on the type
of
the backup drive.
For
example, an entire 1.6 Megabyte
FD disk can
be
backed up on ten 1541 disks, five
1571
disks, or three
1581
disks.
Because
BCOPY backs up a complete image
of
a partition
or
disk by
sectors,
it
will restore only the entire partition
or
disk when called upon
to
retrieve a backup (BCOPY cannot selectively restore individual files).
16
Page 23
Using the FD
Real Time Clock Option
The
following paragraphs describe the functions
and
benefits
of
the FD's
optional RTC (Real Time Clock) module.
Setting the RTC
When you first get your FD, you should set the
RTC
to the proper time and
date
by using the 'Set
Real
Time Clock' option
in
F D -
TOO
L S (see
Appendix A for details). Programmers should note that software commands
can
also
be
used to
set
the RTC (see the Command Reference section),
Because the RTC is battery-backed, you will not need to set
it
again unless
seasonal time changes occur (Daylight
Savings/Standard Time). The normal
life
of
the battery is from 2 to 5 years. Note: Because the battery is an
integral part
of
the
RTC
module, the entire RTC must
be
replaced when the
battery wears down
to the point where it cannot retain the proper time.
Viewing the Current Time
The
current time as kept by the RTC can be viewed by using the 'Set Real
Time
Clock' option in FD-TOOLS. Alternatively, a short BASIC program
can be run which issues the FD's 'T-RA' command:
10
OPEN15,10,15,"T-RA"
20
GET#15,A$:T$=T$+A$:IFST<>64THEN20
30
PRINT
T$:CLOSE15
As a shortcut, JiffyDOS users can issue the following command:
@"T-RA":@
Programmers:
See
the Command Reference for RTC command details.
Viewing Time and Date Stamped Directories
The
time and date stamp that the
FD
applies to files can
be
viewed by
entering the following commands:
LOAD"$=T",lO
LIST
JiffyDOS users can enter the following shortcut:
@$=T
Setting the GEOS Clock from the RTC
Whenever you boot GEOS, the RTC in your
FD
can automatically set the
GEOS clock to the proper time and date. See 'Using the
FD
with GEOS' for
detailed instructions on how to use this function.
17
Page 24
Using the
FD
(This page has been intentionally left blank)
18
Page 25
Section 4
Using the
FD
with GEOS
Before you Begin
This section will provide you with the information you need for getting
your
FD
operating under GEOS V2.0 with either the standard GEOS
desktop
or
with CMD's gateWay. We assume that you already use GEOS
and are familiar with its operation. Therefore, you should not start into this
section
if
you are booting GEOS for the very first time.
Using the FD with
the
GEOS Desktop
Under the standard GEOS V2.0 desktop (64 or 128), your FD will function
almost identically to a 1581.
In
fact, through the use
of
CONFIGURE,
you
will tell
GEOS that the FD actually is a 1581. Multiple partitions are
accessible through the use
of
the
CMD
_MOVE utility, and your FD will be
able to automatically set the GEOS clock
if
have the Real Time Clock
option installed.
Important: The FD will only work with
GEOS V2.0. It will not work
with earlier versions
of
GEOS. Contact Berkeley Softworks (GEOWorks)
if
you need to upgrade your GEOS to V2.0.
Device Numbers
GEOS utilizes devices numbered 8, 9 or 10, and uses device number
11
temporarily for drive swapping. Therefore, your FD must be set to device 8,
9 or
10 before you boot GEOS (you can use the SWAP function
if
you
wish). In addition, you should not have any drives configured as device
11.
Another note: GEOS expects devices to be consecutive. For example, on a
system with a single 1541 floppy drive attached as Drive A (device 8), your
FD should
be configured as Drive B (device 9) -
not
as
Drive C (device 10).
Formatting Disks
Since the GEOS desktop can only recognize 1581 partitions on the FD, you
should consider formatting the disks you want to use under
GEOS with
either one, two, or four 1581 partitions (on
800K, 1.6M and 3.2M disks
respectively).
Use the
FD-TOOLS
program supplied on your FD Utilities
disk to format and partition the disks you want
to
use under GEOS.
Note: Selecting the format option in GEOS will format (NEW) only the
current partition on your PD.
It
will leave any other partitions that may be
19
Page 26
Using the FD with GEOS
on
the disk untouched. However,
if
the disk you insert in your FD is
unformatted,
or
is an 800K 1581 disk, choosing the format option will
cause the disk
to
be formatted as an 800K disk. Therefore,
if
you want
to
use 1.6M or 3.2M disks under GEOS, you must format them outside
of
GEOS by using
FD-TOOLS.
Configuring the desktop
To get your FD working under GEOS, boot GEOS with your FD attached
and configured with a valid
GEOS device number (see above for proper
device number settings). When the DeskTop comes up, it is not likely that
you will see any additional drive icons associated with your FD. To get your
FD to show up on the DeskTop:
1.
Double click on the
CONFIGURE
icon. After a short pause, the
CONFIGURE
application screen will open showing three or four boxes
labeled 'Drive
A', 'Drive B', 'Drive
C'
and 'RAM expansion:'.
2. Find the first box (using A,
Band C as
the logical order) which does
not have a drive selected. This will usually
be
Drive B on a system that
has one drive besides the FD, or Drive C on a system with two drives
besides the FD.
3.
Select the 1581 option.
4.
Select
save
configuration from thefile menu.
5. Your FD is now installed and ready for use under GEOS. Select quit
from the file menu and begin using your FD.
USing Partitions
The ability
to
use more than one partition
on
an FD disk presents some
important advantages under
GEOS. In particular,
it
allows you to organize
your applications and files more efficiently.
An
individual partition can be
dedicated
to
a single application and its support files. For example, one
partition may be dedicated to geoPublishwith associated applications and
clip art. Another might contain a complete applications development
environment with another containing word processing or graphics.
In order
to
access more than one partition on the FD, you will need
to
use
the
CMD MOVE utility supplied on the FD Utilities disk. CMD MOVE is
launched
from
the desktop and allows
you
to
change the current
Fi5
partition
arid can also
be
used to copy files between partitions. Because
CMD
_MOVE
must be launched from the current FD partition, a copy
of
CMD
_MOVE and
the DeskTop should be kept in each partition that you use under
GEOS.
Complete instructions on the use
of
CMD
_MOVE
are given later in this
section.
20
Page 27
Using the
FD
with GEOS
Notes for 1581 Owners
If
you own a 1581 drive. you will
be
able
to
use your
1581
GEOS disks in
the PO
if
you wish. You should note. however. that you will not
be
able to
boot GEOS from your FD with a
1581
GEOS boot disk. See the following
paragraph for instructions on how to create a
GEOS boot disk on your FD
..
Making a Boot Disk
To place a bootable copy
of
GEOS on an FD disk. you will need a separate
utility program.
The
one
we
recommend is CMD's
geoMakeBoot.
Instructions are provided with this utility that explain the steps required to
make the actual FD boot disk. geoMakeBoot can also be used to create boot
disks or partitions for other
GEOS-compatible devices, such as the 1581.
CMD Hard Drive. RAMLink or RAMDrive.
Warning: Most other 1581
GEOS bootmaker programs, such as Maverick
and RUN's
1581
Bootmaker will not work with the FD.
Automatically Setting the GEOS Clock
If
you have the optional Real Time Clock installed in your FD, you can
automatically set the
GEOS clock
to
the proper time whenever you boot
GEOS. To do so,
use
GEOS to copy the CMDT
ime
autoexec utility from
the FD
Utilities disk onto your GEOS boot disk or partition. Then.
whenever you boot
GEOS from that disk or partition,
CMD
Time
will
automatically read the correct time and date from the FD's RTC and set the
GEOS clock accordingly.
Using the
FD
with gateWay
CMD's gateWay is a replacement desktop for GEOS that streamlines the
standard desktop functions and enables you
to
utilize the full capabilities
of
the FD under GEOS. Under gateWay, you can use both
1581
and Native
Mode partitions and can also create subdirectories within Native Mode
partitions.
With gateWay. moving between partitions on your FD is as easy as
selecting a menu item.
If
you have the Real Time Clock option installed,
gateWay will automatically set the
GEOS clock each time you boot up
Without the need for an autoexec utility.
Important:
You will need gateWay V2.5 or higher in order for you
to
use
the PO with gateWay.
If
you have an earlier version
of
gateWay. contact
CMD or your dealer for
gateWay upgrade details.
21
Page 28
Using the FD with GEOS
Device Numbers
To use your FD with gateWay, set the device number to 8, 9 or
10
(you can
use the SWAP function
if
you wish). In addition, you should not have any
drives configured as device 11.
Formatting Disks
gateWay can recognize both 1581 and Native Mode partitions on the FD.
Use the
FD-TOOLS
program supplied
on
your FD Utilities disk to format
and partition the disks you want
to
use under gateWay.
Note: Selecting the
format option in gateWay will format (NEW) only the
current partition on your FD. It will leave any other partitions that may be
on the disk untouched. However,
if
the disk you insert in your FD is
unformatted, or is an
800K 1581 disk, choosing the format option will
format the disk as 8ooK.
If
you want to use 1.6M or 3.2M disks under
gateWay, you must format them outside
of
GEOS by using
FD-TOOLS.
Installing the
FD
Device Drivers
Four new gateWay drivers are included
on
your FD Utilities disk:
FD1581,
FD1581
128,
FDNative,
FDNative
128.
The FD1581 drivers allow
you to
use 1581 Emulation partitions, while the FDNative drivers allow
you to use Native Mode partitions (only one partition type can be used at a
time). Before you can use the FD with gateWay, you will have
to
copy the
driver(s) you need from the FD Utilities disk to your gateWay boot disk.
Important: Even though you may already haveFD drivers on your gateWay
V2.5 disk, you should replace them with the ones supplied on the FD
Utilities disk. This guarantees that
you
will be using the most up-to-date
versions
of
these drivers.
To install the FD disk drivers:
1.
Make sure your
FD
is shut off or not attached
to
the serial bus.
2. Boot gateWay
from
your normal boot drive.
3.
Place a copy
of
the CBM15
81
driver on your boot disk in the position
where the FD will show up later
on
(position 1 for drive
A,
position 2
for drive B, and position 3 for drive
C).
4. Shut down gateWay, and connect and/or turn on your FD. Make sure
your FD is configured with the proper device number.
5~
Boot gateWay again from your normal boot drive. Your
FD
should
show up on the desktop
6. Insert the FD Utilities disk into your FD and copy the FD disk drivers
onto your boot disk (remove
CBM15
81
if you do not have a 1581).
7.
Shut down gateWay, then reboot and begin using your FD.
22
Page 29
Using the FD with GEOS
Changing Partitions
You can change partitions from within gateWay by using the
open
partition
option on the special menu. Another method is to close the filePad
of
an
FD
partition, which causes gateWay to display a list
of
the available
partitions on the disk (Native Mode partitions must
be'
in the root directory
for this to happen). Note:
Your PD must
be
the currently active drive in
order for you
to
change partitions.
Using Subdirectories
SUbdirectories can be created within Native Mode partitions on the
PD
by
using the gateWay document
MakeDir.
Subdirectories show up on the
filePad as a folder, and are entered by double-clicking on the folder. You exit
a subdirectory by closing the
filePad,
at
which point you are "dropped back"
to the parent directory that contains the subdirectory.
The
Bordercross
document lets you define up to 8 files that will appear
in every subdirectory
of
a Native Mode partition. This gateWay document
places up to 8 files into the off-page directory block which is automatically
appended
to
every subdirectory in a partition, thus giving access to those
files no matter which subdirectory you are in. The most often realized
benefit of this feature is to save you the time, trouble and space required
to
place a copy
of
gateWay into every subdirectory you create.
It is important to note that files can only be copied into a subdirectory from
another drive - they cannot
be
copied from another subdirectory
or
partition
on the
FD
by
using CMD_MOVE.
Making a Boot
Disk
To
make a gateWay boot disk on your FD, first copy all
of
the files on your
present
boot
disk along with a copy
of
MakeBoot
into the desired PD
partition. Next, make your FD the active drive and launch
MakeBoot
from
the PD. After
MakeBoot
finishes creating the new boot files, you will
be
able
to
shut down and reboot gateWay from your PD.
Automatically setting the GEOS Clock
If
you have the optional Real Time Clock installed in your PD, gateWay
will automatically set the
GEOS clock
to
the proper time and date whenever
you boot. Note:
You must have an
FD
disk driver file in one
of
the first
three positions on your boot disk in order for the automatic clock setting
function
to
operate.
23
Page 30
Using the FD with GEOS
Using CMD_MOVE
CMD
_MOVE
has two basic functions.
It
allows you to change partitions on
the FD (and other CMD devices) and also allows you to copy files
from
one
partition to another.
Changing Partitions
To change partitions using CMD
_MOVE:
1.
Launch the CMD
_MOVE
application.
2.
Use the DRIVE button to select the FD.
3.
Select a partition from the list and click on the OPEN button.
The program will move
to
the selected partition and quit. Make sure you
have a copy
of
the DeskTop or gateWay file in any partition you wish
to
use, or the system will prompt you
to
insert a disk containing that file.
Copying Files Between Partitions
To
use CMD
_MOVE
to copy files from one partition
to
another:
1.
Launch the CMD
_MOVE
application.
2.
Select lhe FD by using the DRIVE button.
3.
Select the source partition from the list and click'on the FILES button
to
see the files in that partition (if you don't see the files you want
eo
copy, you may click on the PDIR button to return to the partition
directory
to
select a different partition).
4.
Select the files that you wish
to
copy. You select any single file by
clicking once on its name.
Selected files are shown in reverse print.
You can de-select a selected file
by
clicking on its name once again.
You can also select or de-select a group
of
files by dragging the pointer
over the filenames while the button is depressed.
You will also see a
number
of
option icons near the bottom
of
the requestor box. These
options are (from left to right): De-select All,
Select All, Move
to
Bottom
of
List, Move to Top
of
List, Scroll Down one Page, Scroll
Up One Page, Scroll Up
one File, Scroll Down one File.
5. When you are done selecting files, click on the
OK button. Next, select
the destination partition from the list and click on the
OPEN button
to
start the copy process.
After the copy process is complete, you may repeat these steps
to
copy files
into other partitions, use the QUIT button
to
exit to the last partition
selected (the destination partition), or select a different partition
to
exit to
from the list and quit to that partition
by
using the OPEN button.
24
Page 31

Section 5
Using the FD with CP/M
Before you Begin
This section will provide
you
with the information you need for getting
your FD operating under CP/M. We assume that you already use CP/M and
are familiar with its operation. Therefore, you should not start into this
section
if
you are booting CP/M for the very first time.
What you will need
You will need the following items in order
to
use
the
FD
with CP/M:
• Commodore C128 or C128D computer
• CP/M system disk (May
1987
version or later)
Important: The FD, like
the
1581, will only work with CP/M versions
dated May 1987 or later. It will not work with earlier versions. You can
check which version you have by booting CP/M and noting the date
which appears in the sign-on message. Contact Commodore
if
you need
to upgrade
to
a later version of CP/M.
How the FD operates under CP/M
Under CP/M, your FD will operate exactly like a 1581.
In
fact, as far as the
CP/M system itself is concerned, the FD
is a 1581. Because the FD is
recognized as a 1581, you can presently use only
800K disks
in
your FD
under CP/M (1.6M and 3.2M disks will not work properly). CMD is
currently looking
to
third parties for a driver or patch that will enable the
use
of
1.6M and 3.2M disks under CP/M. Therefore, it is possible that you
will be able to use the larger formats with CP/M at a later date.
In
case you were wondering:
You
cannot use multiple 1581 partitions on
1.6M and 3.2M disks under CP/M. Although using multiple partitions is
possible on CMD Hard Drives, it cannot be done
on
the FD because CP/M
burst commands that access physical sectors on the
FD
are not translated
into corresponding logical sectors within the current partition. This was
done to facilitate a simple, future modification
of
CP/M that will allow the
use
of
the full storage
of
1.6M
and 3.2M disks.
If
you happen to own a 1581, you will be able
to
use your 1581 CP/M
disks in the FD. You can also boot CP/M from the FD by using a
1581
boot disk.
25
Page 32

Using the FD with CPIM
Using CP/M
Please read the following paragraphs before using the FD with CP/M.
Device Numbers
You must set your FD
as
device 8, 9,
10
or
11
for use under CP/M. Note:
If
you are using the FD for the first time with CP/M, you will want
to
configure it with a device number
from
9-11. This is because you will
be
booting CP/M from your usual drive which must
be
set to device 8.
Starting
up
When using CP/M for the first time with the FD, boot from your usual
drive (Le. 1571 or 1581).
Once CP/M has booted,
it
should be able
to
recognize the FD when you enter the FD's drive letter (A:, B:, C:, or D:).
Formatting Disks
Before you can use the FD
to
store CP/M files, you must format a disk by
using the
CP/M
FORMAT
program. Load the format program from a drive
other than the FD and then select the FD as the target drive. Next, insert a
disk and format it. Note: Because the FD is recognized
as a 1581
by
the
format program, you will select 'Commodore 1581' as the disk type. The
CP/M format program will format the disk with 800K storage.
Important:
DO NOT reformat a disk that has already been formatted as a
CMD Partitionable disk (see
Section 3). Use only blank unformatted
disks or disks with a 1581 Compatible format.
If
you do reformat a CMD
Partition able disk, you will not be able
to
boot CP/M from it.
Booting CP/M from the
FD
In order to boot CP/M from your FD,
you
will first need to format a boot
disk from within
CP/M (see the previous paragraph). Prior to booting
CP/M, you must make sure that your FD is configured as device number 8
(CP/M will not boot from any other device). There are two methods
of
booting CP/M depending on how your
FD
is configured:
1.
If
your FD is "hard-set" to device number 8 by means
of
the rear panel
DIP switches, you can boot CP/M
by
inserting the boot disk in the FD
and then turning on your computer or pressing the reset switch.
2.
If
you FD is hard-set to some other device number besides 8, you must
first turn on your computer and wait for the
BASIC sign on screen and
cursor to appear. You then use the
SWAP switch on the FD's front
panel to set the FD device number to 8. Next, insert the
CP/M boot
disk in the FD and enter the command
BOOT to begin loading CP/M.
26
Page 33

Section 6
Partitions and Subdirectories
Introduction
Partitions and subdirectories are two
of
the FD's most powerful features.
They allow you to effectively organize the large amount
of
storage space
available on FD disks. Although you can use your FD without having any
in-depth knowledge about partitions and subdirectories, at some point you
will most likely want to become more familiar with them in order to use
your FD most effectively. This section details the concepts behind CMD
partitions and subdirectories and describes some
of
their benefits and
possible applications. After reading this section, you should have a good
idea
of
what partitions and subdirectories are and what they
can
do for
you.
Partitions
The entire storage area
of
an
FD disk may
be
divided into a number
of
smaller areas called partilions. While this term
is
very common
to
users
of
larger computer systems,
it
may be new
to
many users of Commodore
computers. Simply stated, the use
of
partitions
on
an FD disk gives the
appearance
of
using a number of separate disks, all located within the same
physical device. In all, your FD can handle up to
31
of
these partitions. For
an
FD disk to be partitionable,
it
must be formatted
as
a
CMD
partitionable
disk.
CMD partitionable disks can be created by using FD-TOOLS, or
through the use
of
DOS
commands described in the Command Reference
section
of
this manual. Partitions are created and deleted using
FD-TOOLS.
Each partition can be one
of
two types:
Native Mode
Emulation Mode
Native Mode Partitions
Native Mode partitions allow you to take full advantage
of
the many
additional features provided by CMD's FD
DOS
(FD Disk Operating
System) while retaining full compatibility with all standard Commodore
DOS commands. This type of partition can access up
to
16 Megabytes
of
storage space, thus allowing you to create partitions which can access the
full storage
of
1.6 or 3.2 Megabyte disks. Since Native Mode partition size
is variable and may also
be
as small as 256 blocks, it allows you to use
only the amount
of
storage which you feel is required for a particular
partition. This mode
is
also the only mode which supports true
subdirectories and dynamic allocation
of
directory space. This means you can
27
Page 34

Partitions and Subdirectories
easily organize your files and continue to
add
files until no free blocks
remain in the partition.
Native mode partitions have 256 logical sectors (blocks) per logical track,
and may have from 1 to 255 total tracks.
Since the size is variable, all
header, BAM, and directory information
must
be stored on track
1.
Subdirectories have a file type
of
DIR and have a filetype value
of
6.
Emulation Mode Partitions
Emulation Mode partitions allow you
to
retain compatibility with software
programs which require the tracks and sectors
of
a disk, as well as the BAM
and directory, to
be
laid out in the same way as on a particular type
of
Commodore floppy disk drive.
For
this reason, an Emulation Mode
partition has a fixed storage capacity equal to the capacity
of
the disk drive
that it is emulating. There are three types
of
Emulation Mode partitions
available on the PD. They are:
1541
Emulation Mode
1571 Emulation Mode
1581 Emulation Mode
As the names imply, these partitions emulate Commodore's popular 1541,
1571 and 1581 disk drives. This is accomplished by utilizing the same track
and sector layout as the type
of
disk drive being emulated. The BAM and
directory areas
of
these partitions are also located in the same blocks as they
would be on the emulated drive. Even the internal
job
queue codes and
locations have been duplicated.
Other similarities (and a few beneficial
differences) have been created within the emulation mode partitions.
It
is
important to note that emulating these other disk drives fully in the areas
of
hardware and firmware mapping would have driven the cost
of
the FD
to
an
unreasonable level, and was therefore not attempted. All other aspects
of
compatibility were carefully scrutinized, and incorporated where feasible.
The following paragraphs describe each of the individual emulation modes.
1541
Emulation Mode Partitions
In 1541 Emulation Mode partitions the directory and BAM are found in the
same locations as they are on the Commodore 1541. All bytes within these
blocks have been defined identically to their counterparts on the 1541,
including the BAM bytes. This type
of
partition uses 684 blocks on an
PD
disk,
of
which 664 are free for user data or programs.
1571
Emulation Mode Partitions
1571 Emulation Mode partitions are identical to 1541 Emulation Mode
partitions with only a few differences. First, 1571 partitions have twice as
much storage capacity
as
do the 1541 partitions. This type
of
partition uses
1368 blocks
of
disk space,
of
which 1328 are free for user data or programso
28
Page 35

Partitions
and
Subdirectories
There are also a number
of
extra bytes required for the BAM
in
the header
block and on track 53. These have been allocated in the same fashion as they
are on the standard 1571 disk drive. Also, 1571 partitions are always
equivalent to the double-sided version
of
the 1571.
If
for some reason you
need to emulate a single-sided 1571 disk, the 1541 partition is fully capable
of
doing this and should be used instead.
1581
Emulation Mode Partitions
1581
Emulation Mode partitions provide emulation
of
the header, BAM, and
directory information
of
the 1581. All standard DOS commands are fully
implemented, including
1581
style partitioning commands. In order to retain
full compatibility with the 1581, the DOS initialize command initiates a
change in the current 1581 partition status, causing further accesses to be
perfonned in the root directory of the
1581
partition.
Current Partition
Partition 0 (zero) has a special meaning under FD DOS.
It
is used to
indicate the current partition (the partition
in
which is currently active). This
insures compatibility with software which issues a "0:" within filenames
or
disk commands. Before attempting
to
use most commercial software with
the FD,
it
is usually wise to fIrst select the partition you wish to use. This
will assure that any further file access will occur within that partition,
especially
if
the software does not allow you to send disk commands.
Native Mode Subdirectories
The following information is intended as an introduction to how Native
Mode subdirectories are stored on an FD disk. The commands used to create,
remove, and move around within subdirectories can be found in the
Command Reference section
of
this manual.
Native Mode subdirectories are similar in structure
to
the subdirectories used
on MS-DOS types
of
computers. When a subdirectory is created, a DIR type
file (filetype 6) is created and added to the current directory. Subdirectory
names may
be
up to
16
characters long, just as any other filename. This
"file" is initially two blocks long, and consists
of
a directory header block
and the first directory block. These blocks are always located next
to
each
pther on the same track, and if two adjacent blocks cannot
be
found, no
directory will be created.
The storage space available to subdirectories is the same as that available to
the parent directory (the directory in which the subdirectory exists). In fact,
all
of
the blocks within a Native Mode partition are shared between all
directories within that partition. This is quite different than the method used
for 1581 type subdirectories (or sub-partitions as they are referred to in this
manual). This means that
if
there are 12000 blocks free
in
the partition, this
29
Page 36

Partitions and Subdirectories
number of blocks free will be available
no
matter
which
directory
you
are
located
in.
If
a
37
block file is saved in any directory within the partition,
all directories within that partition will indicate
37
fewer
blocks.
Subdirectories may
be
created in the 'root' directory (the first or main
directory in that partition) or within another subdirectory. Placing a
subdirectory within another subdirectory is called 'nesting'. There is no
actual limit to the number of directories located
in
a partition, nor
is
there
any limit
to
how deep subdirectories
may
be nested. The only limitation
on
creating subdirectories
is
the
number of adjacent blocks located within the
partition. There are, however, some practical limitations if
you
wish to be
able
to
easily access files located
in
various subdirectories with a single
command. This is because
the
input buffer
of
the
FD
is
only
127
characters
long, therefore nesting subdirectories
too
deep could necessitate using more
than
one command string
to
access
files within a particular directory.
Also
note
that when
you
are
in
a subdirectory, it
is
not
possible
to
use
the
DOS
NEW
command
on
the
partition containing that subdirectory. This
was done to protect against accidental erasure due
to
user error. Other
protective limitations
have
been
place
on
subdirectories -
you
cannot delete a
subdirectory while there are still files located within
that
subdirectory,
and
the command for removing a subdirectory
may
only be issued
from
the
parent directory of the subdirectory
you
wish
to
delete.
These
concepts are
explained further
in
the Command Reference Section of
this
manual under
the individual subdirectory
commands.
30
Page 37

Section 7
Command Reference
Command Syntax
This section documents the commands which can be used with the PD. The
syntax for these commands is given in a standard format which should allow
you to easily recognize required and optional parameters. Examples are used
throughout to assist you in determining proper usage
of
the commands.
If
any problem should arise in determining command syntax, be sure to check
the following information.
Command String Elements
The command string is made
up
of
a number
of
elements. In the case
of
commands sent directly from BASIC, the first part
of
the command string is
usually the command itself. In the case
of
commands sent via the disk drive
command channel, the command itself
is
usually found at the beginning of a
string sent to the disk drive. The elements
of
the command string
as
used in
this manual are described below:
Literals
are characters which must be entered exactly as shown. These will
appear as plain text.
User
supplied
values are those which must be supplied by the user and
whose values and type are dependent upon the use
of
the command. These
will appear as italicized text.
Optional
parameters
and
options
are values
or
literals which need not
be
included in the command unless the user wishes to specify the option.
Often, the optional parameters will be substituted with a certain default
when left out
of
the command string. Optional parameters will appear
within [brackets].
Choice
parameters
allow
or
require you to choose from more than one
parameter to be placed within the command string. Whenever these appear
in
the syntax
of
the statement, the choices will
be
enclosed by (braces) and the
individual choices will be separated by a vertical bar character ( I
).
Only one
choice parameter may be used in a command string.
You may occasionally notice syntax in which one
or
more elements is
followed by three periods ( ...
).
This means that the parameter last shown
may
be
repeated. This will normally be discussed in more detail in the text
describing use of the command.
31
Page 38

Command Reference
Example command string
The following example illustrates the command syntax used throughout this
manual:
HEADER"partname"
[,
lid]
[,
Dn]
[{
ON
I,
}
Udv]
In this command string, HEADER is the actual command and is entered
literally. The commas (,) and the
'1',
'D', 'ON', and 'U' are literals contained
within brackets and are optional. The parameters 'partname', id, n, and dv are
user supplied variables that are always described in a table following the
command syntax. The table for this command string would look like this:
where: partname
id
n
dv
=
=
=
=
the name you wish to appear
in
the partition header
a two character id for the partition header
the partition number you wish to format
(0
or
1)
the device number
of
the FD drive
Since these parameters are all enclosed
in
brackets, they are optional.
If
you
decide to use one or more
of
the optional parameters, notice that they are
accompanied by a literal which must be included in the order shown along
with the user-supplied variable. Also notice that the 'ON' and a comma are
enclosed
in
braces and are separated by a vertical bar. This means that
if
you
want to supply the unit number, it must be preceded by either the literal
'ON' or by a comma. The full use
of
this command is shown here:
HEADER"PARTITION
1",IP1,DO,U12
Since partition (or drive) zero (0:) is assumed in BASIC 7.0 commands,
it
would also
be
possible to shorten this command
to:
HEADER"PARTITION
1",IP1,U12
Paths
in
Command Strings
You will see many commands which include a [path]. Paths specify which
CMD Native Mode subdirectory the disk operation is intended for, as in:
VERIFY" [
[n]
[path]
: ]
filename",
dv[,
sa]
Most
of
the commands used on the FD allow you to include a subdirectory
path within the command string, provided that the target file is within a
Native Mode partition. The path immediately follows the partition number
in the command string and is shown as [path]. When including one or more
subdirectories within a command string, each must be bracketed between
slash
(f)
characters, and the final slash must usually be followed
by
a colon.
For example,
if
you had a file named COPY located in a subdirectory named
UTILITIES in partition
1,
you could load this file by entering:
LOAD"1/UTILITIES/:COPY",10
32
Page 39

Command
Reference
The portion
of
this command which makes up the path is:
/UTILITIES/
If
you had nested subdirectories, and the file COPY was located in a
subdirectory named
COPIERS which in turn was located within a
subdirectory named
UTILITIES in partition
1,
you could load this file with:
LOAD"l/UTILITIES/COPIERS/:COPY",lO
The portion
of
this command which makes
up
the path is:
/UTILITIES/COPIERS/
You may be
~ble
to shorten this commal1d, depending on which directory
and partition
you are currently located in. For example, if you are already
located
within' partition
1,
and the root directory is your current directory,
you could skip the partition number in the command string:
'·'1
LOAD"/UTILITIES/COPIERS/:COPY",lO
If
your current partition is partition 1 and your current directory is
UTILITIES, you could simply enter:
LOAD"/COPIERS/:COPY",lO
If
your current partition is partition 2 but your current directory
in
partition
1 is UTILITIES, you could enter:
LOAD"l/COPIERS/:COPY",lO
If
your current partition is partition 2 but the current directory in partition 1
is
COPIERS, you could enter:
LOAD"l:COPY",lO
A syntax which allows you to begin your path
at
the root directory is
helpful when you are located within a different subdirectory in the same
partition. For example, if your current directory is
GAMES in partition
1,
and you wish to load the
COpy
program shown in the previous example,
you can begin your path with two slashes:
LOAD"//UTILITIES/COPIERS/:COPY",lO
Two slashes placed at the beginning of a subdirectory path indicates that the
path must begin
at
the root directory.
If
you are in a different partition, or
are not sure which directory is the current directory in the partition you wish
to access,
it
is usually wise to use the double-slash method. Remember
to
include the partition number
if
you are in a different partition:
LOAD"l//UTILITIES/COPIERS/:COPY",lO
33
Page 40

Command
Reference
Subdirectory Paths Using JlffyDOS Commands
If
your computer is equipped with JiffyDOS, you may use the JiffyDOS
commands to shorten the command syntax. Here are the above examples
converted to their JiffyDOS equivalents:
/"l/UTILITIES/:COPY",lO
/"l/UTILITIES/COPIERS/:COPY",lO
/"/UTILITIES/COPIERS/:COPY",lO
/"/COPIERS/:COPY",lO
///UTILITIES/COPIERS/:COPY
/l//UTILITIES/COPIERS/:COPY
You may also leave out the quotes (") and the comma and device number
by
using the JiffyDOS <CONTROL><D> function to change the default
device. The last two examples illustrate this option. You may also use any
of
the other JiffyDOS wedge commands for loading and saving programs
in
conjunction with subdirectory paths.
Sending Commands from BASIC
Most
of
the commands you send to the FD will be from BASIC. This
requires very little new knowledge since the FD accepts standard disk drive
commands. You should note that it may be desirable
to
use BASIC 2.0 or
DOS command channel commands on a C128 instead
of
using BASIC 7.0
commands. This is because BASIC 7.0 places some limitations on the use
of
partition numbers in its command syntax. Specifically, the drive number
parameter in BASIC 7.0 commands may only be represented by a zero (0) or
a one (1). Since the FD uses this number as
an
indication
of
which partition
is to be used for the particular command, and since the FD can have
up
to
31
partitions, the BAStC 7.0 commands
mayor
may not be able to access
the desired partition. Also, because
of
the way in which BASIC 7.0 sends
commands, it is not possible to include subdirectory paths within these
commands.
If
you wish to include subdirectory paths, use the BASIC 2.0 or
DOS command channel version
of
the command instead.
The Command Channel
Many
of
the commands. discussed in this section, require you to send the
command via the disk drive's command channel. Opening a channel to the
drive requires the following BASIC statement:
OPENlf,dv,sa
where:
If
dv
sa
34
= the logical file number
= the device number
of
the drive
= the secondary address
Page 41

Command
Reference
The
logical
file
number can
be
any
number
from 1 to
127.
Other
numbers
are
legal
(128-255)
but
can
cause
undesirable
side
effects.
The
device
number
is
the
current
FD
device
number.
This
is
set to
10
at
the
factory, but
can
be changed
to
any
number
from
8 to
15
by
using
the
rear
panel
DIP
switches,
or
set to 8
or 9 by
using
the
SW
AP
feature.
The
secondary
address
is
often
referred
to
as a channel.
Secondary
addresses
0
through
14
are
used
to
open
files,
whereas
secondary
address
15
(referred
to
as
the
'command
channel')
tells
the
drive
to
interpret
the
data
sent
via
this
channel
as a command.
This
example
opens
the
command
channel:
OPEN15,lO,15
The
command
channel
may
be
opened
from
within a program
or
in
'direct'
mode.
Whenever
you
enter a
command
to
be
executed
immediately,
without
preceding it
with
a line number,
it
is
considered
to
be
entered
in
BASIC's
direct
mode.
This
example
sends a command
via
the
command
channel:
OPEN15,lO,15:PRINT'15,"I":CLOSE15
This
type
of
command
may
also
be
sent
without
using
the
PRINT#:
OPEN15,lO,15,"I":CLOSE15
Some
commands
require that
parameters
be
sent
to
the
drive
via
the
CRR$
function,
and
can
be
issued
by
using
the
PRINT#
command:
OPEN15,lO,15:PRINT'15,"UO>";CHR$(lO)
:CLOSE15
The
semicolon
between
quotes
and
the
CHR$
is
optional.
Some
commands
require
numeric
variables
or
actual
numbers
as parameters,
as
shown
below:
OPEN15,lO,15:PRINT#15,"Ul";2;O;1;34:CLOSE15
OPEN15,lO,15:PRINT#15,"Ul";C;D;T;S:CLOSE15
Numbers
can
be
included
within
the
string
portion
of
the
command
as
long
as
each
is
separated
from
the
string
and
the
other
numbers
by a space:
OPEN15,lO,15:PRINT#15,"Ul
2 0 1
34":CLOSE15
In
this
case,
the
trailing quote
is
placed after
the
last
number
or
parameter
required
by
the
command.
You
may
optionally place a
colon
at
the
end
of
the
command
itself,
no
matter
which
way
the
command
is
used:
OPEN15,lO,15:PRINT#15,"Ul:";2;O;1;34:CLOSE15
OPEN15,lO,15:PRINT#15,"Ul:
2 0 1
34":CLOSE15
35
Page 42

Command Reference
Reading Disk Errors
Disk
errors
are
most
often
detected
by
reading
the
command
channel
through
the
use
of
the
GET#
or
INPUT#
commands.
INPUT#
is
the
fastest
method
of returning error information
from
the
drive,
while
GET#
is
commonly
used
for
getting non-error information.
Since
both
GET#
and
INPUT#
use
the
BASIC
input
buffer,
they
cannot
be
used
in
direct
mode.
Normally,
programs
check
for errors
immediately
after a disk operation
is
performed.
Here
is a short
program
that
reads
the
error
channel:
10
OPEN15,lO,15:INPUT#15,E,E$,T,S:CLOSE15
20
PRINTE,E$,T,S
As
you
can
see,
four
parameters are
returned.
These
are,
in
order:
the
error
number,
the
error
message,
the
track
where
the
error
occurred,
and
the
sector
where
the
error
occurred.
When
track
and
sector
information
is
not
relevant
to
a particular
error,
the
track
and
sector
variables
will
contain
zeroes.
Note:
If
you
are
using
JiffyDOS,
it
is
also
possible
to
read
the
error
channel
by
simply
pressing
the
commercial at (@)
key
and
then
<RETURN>.
There are occasions
where
it
is
more
desirable
to
obtain
error data or other
information
from
the
command channel
one
byte at a time.
In
these
instances a
program
similar
to
the
one
that
follows
could
be
employed:
10
OPEN15,lO,15
20
GET#15,E$:PRINTE$;
:IFST<>64THEN20
30
CLOSE15
In the preceding example,
we
used
the
BASIC
status variable
ST
to
determine
when
the
end
of
the
file
was
reached.
Here
is a breakdown
of
the
individual
ST
bit
values
relevant
to
serial
bus
devices.
BIT
DESCRIPTION
VALUE
7
DEVICE
NOT
PRESENT
128
6
END
OF
FILE
(EOI)
64
4
VERIFY
ERROR
16
1
TIME
OUT
ON
LISTENER
2
0
TIME
OUT
ON
TALKER
1
The
C128
provides another method of checking
for
disk errors via
two
reserved
BASIC
7.0
variables:
DS
returns
the
error
number;
DS$
returns
the
error
message.
These
variables
can
be
viewed
with a PRINT
statement:
PRINTDS,DS$
Note:
DS
and
DS$
are
usually
valid
only
after a
BASIC
7.0
disk
command.
36
Page 43

Command
Reference
Partition Numbers
in
File Names
A partition number may be specified within a filename in place
of
the drive
number.
The
drive number is the number which can precede the colon (:) in
Commodore
DOS filenames. Often, this number is not included since it is
normally used only with dual drives to determine
if
the file operation should
be
directed
to
drive 0
or
drive
1.
Whenever this drive number is left
out
of
the command, drive 0 is assumed. These rules also apply to the FD, which
instead
of
containing 1
or
2 drives, contains a disk with up to
31
partitions.
Whenever you wish to perform a command
or
file operation with the current
partition,
you
may use a 0
or
leave
out
the partition number entirely.
However,
if
your current partition is different than the partition in which
you wish to perform the file operation, you must either move to that
partition first (with the 'CP' command),
or
specify the partition number
within the filename. The following examples should help to illustrate this:
LOAD
"l:MCOPY",lO
OPEN2,lO,2,"3:TESTFILE,S,W"
Load commands may be abbreviated
if
you are using JiffyDOS:
!l:MCOPY
Note:
If
you LOAD a program from a partition other than the current one,
and that program needs to load other files located in the partition
it
came
from, the program will not
be
able to locate those files. Use the 'CP'
command to move to that partition before loading such programs.
Partition Numbers
in
Disk Commands
As described above, partition numbers may
be
used to replace the drive
number
in
filenames. Partition numbers may also
be
used in this manner
when sending disk commands. In fact, any disk command which allows
inclusion
of
a drive number (with the exception
of
direct access commands),
will also allow you to substitute a partition number
in
its place. You may
use partition numbers when formatting, copying, renaming, scratching,
validating,
and
initializing. This is a large
part
of
what makes the
FD
so
compatible with Commodore
DOS.
In the case
of
direct access commands, the current partition is assigned to the
direct access file when when that file is opened. As a result, you must use
the
'Change
Partition' command to select the desired partition before
opening a direct access file.
Once the file has been opened, all commands
sent to that direct access file
will
refer
to
the partition you were in when the
file was opened, even
if
the current partition is changed.
37
Page 44

Command Reference
Partition Commands
Many of
the
commands
used on
the
FD
are
partition related and,
among
other things,
are
used
to
format,
initialize
and
change
partitions.
Creating Partitions
Partitions
are
created by using the
FD-
TOOLS
program
supplied
with
the
PD. Use of
this
program
is
documented
in
Appendix
A.
Creating
1581
Style Sub-partitions
You can create 1581-style partitions within
1581
Emulation Mode
partitions
on
the
FD.
This
type
of partition
is
sometimes
referred
to
as
a
subdirectory
by
1581
users. Because of
the
way
these
partitions allocate
space,
we
feel
the
term
subdirectory
does
not
apply.
Since
the
FD
is
often
divided
into
partitions, and since these
1581
'subdirectories' can be placed
within
1581
Emulation
partitions,
we
call
them
1581
sub-partitions.
Certain limitations
apply
when
creating sub-partitions
that
are intended
to
store
files.
Because
of
the
way
physical
tracks
are
handled
in
Commodore's
1581
DOS,
and
because
sub-partitions
must
contain
header
and
directory
blocks,
the
minimum
size of a sub-partition
is
120
blocks.
The
starting
sector must
be
zero,
and
the
ending sector
must
be a mUltiple
of
40.
Sub-
partitions
are
not
allowed
to
begin
on,
end
on,
or
contain
within
themselves
track 40.
Here
is
the
syntax required
to
create
1581
style
sub-partitions:
OPENlf,dv,15:PRINT#lf,"/[n):partname,"CHR$(st)
CHR$(ss)CHR$(sl)CHR$(sh)",C":CLOSElf
where:
If =
the
logical
file
number
for
the
command
channel
dv
=
the
current
device
number
assigned
to
the
FD
n =
the
target
1581
Emulation
Mode
partition
partname = the
name
of
the
1581
sub-partition
name
to
be
created
st
=
the
starting
track
of
the
sub-partition
ss
=
the
starting sector
of
the
SUb-partition
sl =
the
low
byte of
the
sub-partition
size
in
sectors
sh
=
the
high byte of
the
sub-partition size
in
sectors
Example:
OPEN15,lO,15:PRINT#15,"/4:SUB1,"CHR$(1)CHR$(O)
CHR$(160)CHR$(O)
",C":CLOSE15
The preceding
example
should be
entered
as
one
line.
There
is
no
JiffyOOS
equivalent
for
this
command
since it
requires
the
use
of
the
eRR$
function.
Note: Before
you
can
use a newly-created
1581
sub-partition,
you
must
format
it.
See
'Formattin
1581
St
Ie
Sub-Partitions'
for
more
information.
38
Page 45

Command
Reference
Deleting Partitions
Partitions are deleted by using the FD-TOOLS program supplied with the
PD. Use
of
this program is documented in Appendix
A.
Deleting
1581
Style Sub-partitions
1581 style sub-partitions are handled quite differently than standard PD
partitions. You can delete a sub-partition by using the DOS
or
BASIC 7.0
SCRATCH commands. Scratching a 1581 sub-partition is no different than
scratching a file, although the consequences may be severe
if
this is done
accidentally. Any files contained within the sub-partition will be lost. See
'Scratching (deleting) Files' for the proper command syntax. Remember to
substitute the name
of
the sub-partition for the filename.
Changing Partitions
You may change from one partition
to
another by sending the 'CP' (Change
Partition) command to
the
FD via the command channel. The syntax
is:
OPENlf,dv,15:PRINT#lf,"CPn":CLOSElf
where:
If
dv
n
Example:
= the logical file number for the command channel
= the device number of the FD drive
= the partition number you wish to change to (1-31)
OPEN15,lO,15:PRINT#15,"CP4":CLOSE15
Jiffy DOS Example:
@CPl1
The 'C'<SHIFT>'P' command is a variation on the Change Partition
command which allows
it
to
be
used more easily from within BASIC
programs. A shifted 'P' is indicated by the symbol
'0'.
This command
allows you to use a character string
to
indicate the partition. The syntax is:
OPENlf,
dv,
15:PRINT#lf,
"CO"+CHR$ (n)
:CLOSElf
where: If
dv
n
Example:
= the logical file number for the command channel
= the device number
of
the FD drive
= the partition number you wish to change to (1-31)
OPEN15,lO,15:PRINT#15,
"CO"CHR$
(11)
:CLOSE15
39
Page 46

Command Reference
Moving Between 1581 Style Sub-partitions
Since the 1581 Emulation Mode partitions on the FD support 1581 style
partitioning (that is to say 'sub-partitioning'), you may use the standard
DOS commands
to
change from one 'sub-partition' to another. The syntax
is:
OPENlf,
dv,
15:
PRINT#lf,
"/
[nJ : [partname]
":
CLOSElf
where: If
dv
= the logical
me
number for the command channel
= the device number
of
the FD drive
n =
partname =
the partition number of the
1581
Emulation partition
the partition name
of
the
1581
style 'sub-partition'
If
the
1581
Emulation Mode partition is the current partition, the partition
number n may
be
left out. The 'sub-partitions' may be nested within each
other, but
to
access one which is two levels down from the currently
selected one, you will have
to issue the command twice (once with each
of
the two sub-partition names). To return to the root (main) directory of the
1581 Emulation Mode partition, issue this command without the subpartition
name. This will also occur
if
you issue an Emulation
ModeINITIALIZE command
to
the
1581
Emulation Mode partition.
Please note that
if
you exit a 1581 Emulation Mode partition with a 'CP'
command and then return to
it
later with another 'CP' command,
you
will be
placed into whichever sub-partition you were in when
you
exited.
Example
of
moving
to
a different
1581
SUb-partition:
OPEN15,10,15:PRINT#15,"/4:SUB1":CLOSE15
Example
of
moving
to
the root directory:
OPEN15,10,15:PRINT#15,"/4:":CLOSE15
Formatting Partitions
and
Disks
The standard Commodore DOS NEW command (not
to
be confused with the
BASIC NEW command) may be used
to
format partitions or whole disks
on
the
FD
from either BASIC 2.0 or BASIC 7.0. Although the FD will also
accept the
BASIC 7.0 HEADER command, this command is limited
to
either the current partition (0) or partition
1,
and cannot support the new
extensions
The
DOS NEW command may be used to delete all files from a partition.
Please note that when creating partitions with FD-TOOLS, formatting is
performed automatically.
You may wish
to
format them again, however,
to
change the header name or disk ID. When using the DOS NEW command,
the FD can accept both the long and short versions,
40
Page 47

Command
Reference
The following line shows the syntax
used
for
the BASIC 2.0 or BASIC 7.0
DOS
NEW
commando
OPENlf,
dv,
15
:PRINT#lf,
"N
en]
:partname
[,
id[,
ft] ] ..
:CLOSElf
where:
If
dv
= the logical file number
for
the
command
channel
= the current device
number
of
the
FD
drive
n =
partname
=
the partition
you
wish
to
format (0-31)
the name
you
wish
to
appear
in
the
partition header
a
two
character
id
for
the
partition
header
id
=
ft
=
format type extension
(see
chart
below)
FORMAT TYPE EXTENSIONS
EXTENSION
DENSITY
PARTITIONABLE PARTITIONS CREATED
(NONE")
DD800K
YES
SYSTEM,1
1581/NONE"
81
DD800K
NO
NONE
DD8
DD800K
YES
SYSTEM, 1 1581
HD8
HD
1.6M
YES
SYSTEM,21581""
ED8
ED
3.2M
YES
SYSTEM,
4 1581··
DDN
DD800K
YES
SYSTEM. 1 CMD
NATIVE
HDN
HD
1.6M
YES
SYSTEM. 1 CMD
NATIVE
EDN
ED
3.2M
YES
SYSTEM. 1 CMD
NATIVE
S8
YES
SEE
NOTE"··
SN
YES
SEE
NOTE"""
Notes:
*If
the
disk inserted at the time this command
is
issued
is
either
unformatted or
is
formatted
as a 1581
disk, then
the
disk will
be
formatted as
an
800K
CMD
Partitionable disk containing a system
partition plus 1
1581
emulation partition. If the disk
is
already
formatted as any of the
CMD
Partitionable formats,
then
only the
current or specified partition
will
be
formatted.
**
These extensions create multiple
1581
emulation partitions
in
sequence, starting at partition number
1.
The first partition will
receive the
name
specified
in
the format command. The names of
additional partitions created
by
these commands
will
be altered
so
that the 15th character is a space and the 16th character is the
partition number. The
ID
given
each
partition will be the same
as
the
ID
specified
in
the command (this
is
not harmful
on
the
FD).
**'"
These extensions are intended
for
use
with
disks
which
are already
formatted
as
CMD
Partitionable types, regardless of density, and
will cause a change
in
the
types of partitions that
the
disk is filled
with. The
'S8' extension will change
the
system partition and
fill
the disk with as many
1581
partitions
as
will fit, while the 'SN'
extension changes the system partition
and
creates the largest
possible
CMD
Native partition.
41
Page 48

Command
Reference
Examples
of
the
BASIC
2.0 and
BASIC
7.0
DOS
NEW
command:
OPEN15,10,15:PRlNT#15,"N:WORKDlSK,Wl":CLOSE15
OPEN15,lO,15:PRlNT#15,"N:BACKUP,BA,81":CLOSE15
OPEN15,10,15:PRlNT#15,"N:DATA,DX,HDN":CLOSE15
OPEN15,10,15:PRlNT#15,"N3:PARTlTlON
3,P3":CLOSE15
JiffyDOS
examples for using the
DOS
NEW
command:
@N:WORKDlSK,Wl
@N:BACKUP,BA,81
@"N:DATA,DX,HDN"
@"N3:PARTlTION
3,P3",lO
Please note that
you
must use the
BASIC
2.0 or BASIC
7.0
DOS
NEW
command in order
to
send
the
special extensions
for
disk formatting, since
the
BASIC
7.0 HEADER command
has
no
allowance for sending special
formatting extensions.
Use of
the
HEADER
command
will
give the same
results
as
shown
for the first entry
in
the
'Format Type Extensions' table.
The
following syntax applies
to
the
BASIC
7.0
HEADER
command:
HEADER"partname"
[,
lid]
[,Dn]
[{ONI,
}Udv]
where:
partname
==
the
name
you
wish
to
appear
in
the
partition header
il
= a
two
character
id
for
the
partition
header
n =
the
partition
number
you
wish
to
format
(0
or
1)
dv
=
the
device
number
of
the
FD
drive
Examples:
HEADER"PARTlTlON
l",lPl,Dl
ON
U12
Note:
The
DOS
NEW
and
BASIC
7.0
HEADER
commands
will
not
be
acce
ted
if issued
from
within
a Native
Mode
subdirecto
Formatting
1581
Style Sub-partitions
The
DOS
NEW
and BASIC 7.0
HEADER
commands are also used
to
format the
1581
style sub-partitions
which
may
be
created within
1581
Emulation Mode partitions.
1581
sub-partitions must
be
formatted before
they can
be
used.
Before attempting
to
format a sub-partition, you must
make
sure that
the
sub-partition
is
the
current sub-partition
within
the
1581
Emulation Mode partition that contains
it.
Do
this
by
using
the
command
outlined
in
'Moving Between
1581
Style Sub-partitions' elsewhere
in
this
section.
To
avoid formatting
the
wrong
area
on
your
drive, it
is
usually wise
to make the appropriate
1581
Emulation Mode partition
the
current
partition.
42
Page 49

Command
Reference
Initializing Partitions
The DOS INITIALIZE command is often used when a different disk is
inserted into a floppy disk drive. This ensures that the drive updates its
buffer with a copy
of
the BAM on the new disk. This function is performed
automatically by the FD, but the command has been implemented
to
retain
compatibility. Note that initializing a 1581 Emulation Mode partition
causes it to return to the root directory (ala the 1581). The syntax is:
OPENlf,dv,15:PRINT#lf,"I[n]
[:]":CLOSElf
where: If = the logical file number for the command channel
dv
= the current device number the FD drive
n
= the partition to
be
initialized
Example:
OPEN15,10,15:PRINT#15,"I3:":CLOSE15
JiffyDOS example:
@I3:
Validating Partitions
The DOS VALIDATE and BASIC 7.0 COLLECf commands check all files
in a partition to verify proper allocation
of
disk space, free any improperly
allocated blocks, and delete unclosed (splat
'*') files. You should not use
these commands on partitions that contain blocks allocated via the
BLOCKALLOCATE command, or else information may be lost. Note: Unlike
standard Commodore disk drives, the FD properly validates GEOS files. The
syntax is:
OPENlf,
dv,
15:
PRINT#lf,
"V
[n]
[: ] ":
CLOSElf
where: If
dv
n
= the logical file number for the command channel
= the device number
of
the FD drive
= the partition you wish
to
validate (0-31)
The syntax for the BASIC
7.0 COLLECT command
is:
COLLECT
[,
Dn]
[{
ON
I,
}
Udv]
where: n
dv
Examples:
= the partition you wish to validate (0 or
1)
= the device number
of
the FD drive
OPEN15,lO,15:PRINT#15,"V2:":CLOSE15
COLLECT,DO,U12
JiffyDOS example
of
the DOS V ALIDA TE command:
@V2
43
Page 50

Command Reference
Partition directory
Having multiple partitions
on
a disk necessitates having
the
ability
to
view
a directory of partitions. The partition directory
may
be
viewed while
you
are working within any partition and relates information concerning the
number, name, and type of
each
partition on the FD. This command also
contains options that allow
you
to
specify which partitions
will
be listed.
The
syntax
for this command
is
as
follows:
LOAO"$=P[:*]
[=tp)
",dv
where:
tp
= partition type - N =
native
4 =
1541
7 =
1571
8 =
1581
dv
=
the
current device
number
of
the
FD
drive
Examples:
LOAO"$=P",10
LOAO"$=P:*",10
LOAO"$=P:*=8",10
JiffyDOS
examples:
@$=P
@"$=P:*=N",10
Renaming Partitions
If
you
reformat a partition
with
the
DOS
NEW
command,
you
may
wish
to
change
its
name
in
the partition directory
as
well.
In
order
to
do
this
we
have
added
the 'Rename Partition'
command.
This
command
is
similar
to
the
DOS
command which
is
used
to
rename
fIles.
The syntax
is
as
follows:
OPENlf,
dv,
15: PRINT#lf, "R-P: newnarre=oldnarre": CLOSElf
where:
If
dv
newname
oldname
Example:
=
the
logical
file
number
=
the
current
device number
of
the
FD
drive
=
the
name
you
wish
to
assign to the partition
= the
name
of
the
partition in
the
partition
directory.
.OPEN15,10,15,"R-P:WORK=NATIVE 1":CLOSE15
JiffyOOS Examples:
@R-P:WORK=NATIVE
1
@"R-P:WORK=NATIVE
1",10
44
Page 51

Command
Reference
Renaming Directory Headers
After placing a
number
of
fIles
within a given
partition or subdirectory,
you
may
wish
to
change
the
name
that
appears
in
the
directory header (displayed
at the
top
of
the directory listing for that partition or subdirectory).
Although this could be done
by
using
the
DOS
NEW
command,
all
files
within that partition
would
be
lost
at
the
same
time.
In
order
to
allow
you
to
rename a header without
having
to
lose or
copy
all of
your
files,
the
FD
has a 'Rename
Header'
command.
The
syntax
is
as
follows:
OPENlf,
dv,
15:
PRINTUf,
"R-H
[n]
[path]
: newnarre" :
CLDSElf
where:
If
=
the
logical
file
number
dv
=
the
current device
number
of
the
FD
drive
n
=
the
partition
where
the
header
is
to
be
renamed
path
=
the
subdirectory
path
newname
=
the
new
name
for
the
specified
header
Examples:
OPEN15,lO,15,"R-H:WORK":CLOSE15
OPSN15,lO,15,"R-H3:DOWNLOADS":CLOSE15
OPEN15,lO,15,"R-Hl//ASSEM/:BUDDY64":CLOSE15
JiffyDOS
Examples:
@R-H:WORK
@"R-H//ASSEM/:BUDDY64",lO
Getting Partition Information
The
DOS
'Get Partition Info' command
has
been
created
for
the purpose of
gathering information about the current or
some
other specific partition.
This command
will
prove valuable
to
the
programmer
whose
software
must
react differently
to
partitions of various types. The partition number
for
which
the
information
is
requested
may
be
placed
into a variable
and
inserted
into the
command
as
a character string. The
syntax
for
the
G-P
command
is:
OPENlf,dv,15:PRINT#lf,"G-P"[+CHR$(n))
:CLOSElf
where:
If
dv
n
=
the
logical
file
number
for
the
command
channel
=
the
device
number
of
the
FD
drive
=
the
partition
number
(0-31)
If
the 'G-P'
command
is sent without
the
optional
character string or a value
of 255,
the
information returned will be
for
the current partition. A value of
o requests that
the
information returned
is
to
be
for
the
system partition.
Thirty bytes
(0-29)
of information concerning
the
requested partition plus a
CHR$(13) are returned over
the
drive error channel.
The
following
is
a list
of
this
information:
45
Page 52

Command
Reference
Byte 0
Byte 1
- Partition type 0 -
not
created
1
- Native
Mode
2 -
1541
Emulation Mode
3
-
1571
Emulation Mode
4
-
1581
Emulation Mode
255
- System
- Disk info: Bit 7 Disk
in
drive
(1
=
yes)
6 Formatted disk
(1
=
yes)
5 Valid format
(1
= CMD/CBM)
4
True
1581
disk
(1
= yes)
3-0 Format type:
0000
Unknown
0001
800K
0010 1.60M
0100 3.20M
0101
nOK
IBM
0110
1.44M
IBM
0111
2.88M
IBM
Byte
2 - Partition number
Bytes
3-18
- Partition name
as
displayed in
the
partition directory
Byte
19
- Starting system address of partition (high byte)
Byte
20 - Starting system address of partition (middle byte)
Byte
21
- Starting system address of partition (low byte)
Bytes 22-26 -
CHR$(O)
(reserved)
Byte
27
- Size of partition (high byte)
Byte
28
- Size of partition (middle byte)
Byte
29
- Size
of
partition
(low
byte)
Byte
30
- CHR$(13)
Note:
The
values returned in bytes
19-21
and 27-29 are specified in 512 byte
blocks. Also keep
in
mind that any currently undefined bytes may later be
used for specific purposes.
Important: To avoid problems with reading information
from
Partition
13,
the G-P command should always be sent with a trailing carriage return
(CHR$(13». The BASIC PRINT# statement will do this for you
automatically
as
long as
you
do
not
follow
it with a trailing semicolon (;).
Autobooting
It
is
possible
to
autoboot
from
the
FD
when
it
is used
with
a C128 or
128D
in
128
mode.
To
do so,
the
FD must either be configured
as
device number
8, or
you
must issue the BASIC 7.0 BOOT command.
You
must also make
sure that the current partition has a valid boot sector. The boot sector is
located at track 1, sector
0 in all partitions, including Native Mode
partitions.
46
Page 53

Command
Reference
An
interesting benefit
of
CMD Native partitions is that the boot sector is
always allocated. It is therefore never in danger of being overwritten by mes,
and cannot be freed by the DOS VALIDATE command. The following
syntax applies to the BOOT command:
I
\
BOOT[[Dn]{ONI,}[Udv]]
where: n
dv
= the partition where the file is located (0
or
1)
= the device number
of
the FD drive
The partition number for this command may only contain a zero
or
a one.
Zero is used to indicate the current partition, while one indicates partition
number
1.
This command will not accept any other partition numbers, due
to a limitation in the BASIC 7.0 command parsing routines. The structure
of
the boot sector is the same as found on standard Commodore disk drives.
Examples:
BOOT
U12
BOOT
DO,U12
Subdirectory Commands
Three new DOS commands have been added
to
allow you to create and
remove subdirectories, as well as to change the current directory. Both the
Create and Change commands use a similar syntax, while the syntax for the
Remove command has been limited to avoid problems. These commands,
like the subdirectories themselves, are very similar
to
those found in
MS-DOS.
Creating Native Mode Subdirectories
The
'Make Directory' command allows you to create Native Mode
subdirectories. This command allows you
to
use standard path syntax. Using
a path allows you to create a subdirectory in any native mode partition no
matter what your current partition or current directory may be. Here is that
syntax:
OPENlf,dv,15:PRINT#lf,"MD[n]
[path]
:name":CLOSElf
where:
If
=
the logical file number for the command channel
dv
=
the current device number
of
the FD drive
n
=
the Native Mode partition where the subdirectory is to
be created
path
=
the path to the subdirectory in
which the new
subdirectory will be created
name
=
the name
of
the new subdirectory
47
Page 54

Command Reference
The
above syntax
may
seem
slightly confusing.
so
here
are a few
guidelines
to
help
you
understand
how
this
syntax
works:
1.
The name of
the
subdirectory you
wish
to
create must always
be
separated
from
the
rest of
the
command
by
a colon
(:).
2.
If
you are creating a subdirectory within another subdirectory,
you
must specify that subdirectory within the path unless it is your
current
directory.
3.
If
subdirectories are specified within the path of
the
command
(to
the left of the colon), each subdirectory name must fall between
slash
(I) characters (only 1 slash is needed between subdirectory
names).
4. Paths normally start
at
the
current directory.
If
you
want
the
path
to start at
the
root directory (the main directory
in
that partition),
the path should begin
with
two
slashes.
5. If the subdirectory
is
to
be created
in
a partition other
than
the
partition
in
which
you
are
located, place
the
partition
number
at
the
start of
the
path
(in
front of
any
slashes).
The
following examples should
help
clarify
these
guidelines:
OPEN15,lO,15:PRINT#15,"MD:TEMP":CLOSE15
OPEN15,lO,15:PRINT#15,"MD1:TEMP":CLOSE15
OPEN15,lO,15:PRINT#15,"MD1//:TEMP":CLOSE15
OPEN15,lO,15:PRINT#15,"MD1//TEMP/:TEMP2":CLOSE15
OPEN15,lO,15:PRINT#15,"MD/TEMP/:TEMP2":CLOSE15
JiffyDOS
Examples:
@MD:TEMP
@MD1:TEMP
@MD1//:TEMP
@"MD1//TEMP/:TEMP2"
@"MD/TEMP/:TEMP2",lO
Moving Between Native Mode Subdirectories
The
'Change Directory' command allows
you
to
move
between Native
Mode
subdirectories. This command employs
the
same syntax used
in
the
'Make
Directory' command. Using a path allows
you
to
move
to
a subdirectory
anywhere
in
the currently selected Native
Mode
partition. This
command
will
also allow
you
to
change
the
currently selected directory
in
any
other
partition, but will not move
you
into that directory.
In
order
to
move
to
the
current directory of a different partition,
you
must issue a 'Change Partition'
command. The 'Change Directory'
syntax
is:
48
Page 55

Command
Reference
OPENlf,
dv,
15:
PRINT#1f,
"CD [n] {
[:
~]
I
[[path]
[:
]
subname]}":CLOSElf
where:
If
=
the
logical
file
number
for
the
command
channel
dv
=
the
current
device
number
of
the
FD
drive
n
=
the
Native
Mode
partition
where
the
subdirectory
you
wish
to
make
the
current
directory
exists
path
=
the
subdirectory
path
subname
=
the
name
of
the
subdirectory
Note that
you
can
include
the
back
arrow
immediately
after
'CD[n]'
to
move
backwards one directory (to
the
PARENT).
The
back
arrow
cannot be
combined
with
any
subdirectory
path
information.
See
the
examples
below.
It
is
not required that
you
include
the
colon
before
the
subdirectory
name,
as
long
as
the
subdirectory
name
is
preceded
by a slash.
Here
are
some
examples
of
the
Change
Directory
command:
OPEN15,10,15:PRINT#15,"CD:TEMP":CLOSE15
OPEN15,10,15:PRINT#15,"CD:II:TEMP":CLOSE:S
OPEN15,10,15:PRINT#15,"CD1//TEMP/:TEMP2":CLOSE15
OPEN15,
10,15:
PRINT#15,
"::Dl
:~":
C!..OSE1.5
OPEN15,10,15:PRINTf15,"CD/TEMP/TEMP2":CLOSE15
JiffyDOS
Examples:
@"CD:TEMP",10
@CD1//TEMP
@CD1//TEMP/TEMP2
@CD1:~
@CD/TEMP/TEMP2
Deleting Native Mode Subdirectories
The 'Remove Directory' command allows
you
to
delete Native Mode
subdirectories.
This
command
does
not
allow
the
use
of
paths
in
order
to
avoid problems with removing a subdirectory which
is
a parent of
the
directory
in
which
you
are
located. This
command
will
not
allow
you
to
delete a subdirectory
which
contains
any
files -you
must
delete
these
files
first
by
using the
DOS
SCRATCH
or
the
BASIC
7.0 equivalent. The
following
syntax
applies
to
the
'Remove
Directory'
command:
OPENlf,dv,15:PRINT#lf,"RD[n]
:subname":CLOSElf
where:
If
dv
n
subname
=
the
logical
file
number
for
the
command
channel
=
the
current
device
number
of
the
FD
drive
=
the
partition where
the
subdirectory
you
wish
to
remove
exists
=
the
name
of
the
subdirectory
you
wish
to
remove
49
Page 56

Command
Reference
Here are some examples
of
the Remove Directory command:
OPEN15,10,15:PRINT#15,"RD3:TEMP":CLOSE15
OPEN15,10,15:PRINT#15,"RD:TEMP2":CLOSE15
JiffyDOS Example:
@"RD3:TEMP",10
@RD:TEMP2
Viewing Directories
Directories may be viewed by using the following BASIC 2.0 command:
LOAD
"$",10
This command will load the current directory from your FD (assuming it is
set as device number 10). You may then issue the LIST command to view
the directory
on
your screen. You may also use a partition number for
selecting the directory to
be
loaded, as
in
the following example:
LOAD
"$2",10
Pattern Matching
Selective directories may also be loaded in the standard way, by placing a
colon ( : ) at the end
of
the partition number or path, and by using a filename
or pattern matching characters to determine which files to include in the
listing. The equals (=) sign and a filetype designator may also be included
after the filename to indicate a particular filetype. The filetype characters are:
P for program (pRG), S for sequential (SEQ), U for user (USR), R for
relative (REL), and B for subdirectory branch (DIR).
Examples:
LOAD
"$2:S*=P",10
This example will load a directory
of
all PRG files (=P) starting with
an
S
(S*) from partition number 2. You may also use the asterisk at the
beginning
of
a filename as in the following example:
LOAD
"$1/UTILS/:*E=P",10
This example will load a directory
of
all PRG files which end with an E'.
The question mark
'?"
may also be used to replace
an
unknown character in
the filename. It is also possible to use the asterisk in the middle
of
a pattern
as shown in this example:
LOAD
"$1/UTILS/:R*E=P",10
50
Page 57

Command
Reference
This pattern will match filenames like RIDE and RUE. Only one asterisk
may
be
used in the pattern. Another matching character is the question mark
which will match any character found at that position
in the filename.
LOAD
n$2:B'?RE=P",lO
This example will load a directory
of
all PRG files which are four characters
long, start with 'B' and end with 'RE'. More than one question mark may
be
used in a pattern. You may also mix question marks and an asterisk together
in apatterno
Time and Date Stamped Directory Listings
If
your
FD
is equipped with an RTC option, FD-DOS will place each file's
time and date
of
creation into the directory entry.
If
you use your FD with
GEOS
or
gateWay, all
of
your GEOS files are time and date stamped
regardless
of
whether or not you have the RTC option installed. Note:
FD-DOS and GEOS both use the same method
of
time and date stamping.
In order
to
allow you to easily view the time and date stamp, new options
have
been added for loading directories. These options allow the stamp to be
viewed, and also permit you
to
select files which were created within a
specifie.d timeframe. The syntax
for
the time and date stamped
d:ir~tory
is:
LOAD"$=T
[n)
[p:lth)
[:p:ltte.m[={
tpl
option}
[,
option)
) ) ,
dv
where:
n
=
partition number of the directory
to
be loaded
path
=
the subdirectory you wish
to
view
pattern
=
name
of
file or pattern to match
tp
=
first character
of
filetype (p, S,
R,
U or B)
option
=
one
of
the options listed below
dv
=
current device number assigned to the FD
options:
L
=
long format
N
=
do not include time and date in listing
>stamp
=
greater than or equal to
stamp
<stamp
=
less than or equal
to
stamp
stamp format: MM/DD/YY
HH:MM
xM
Although the syntax for this command may look a little complex, it is
really quite simple
to use when broken down into separate elements.
The partition number
(n) may be specified
if
desired.
If
this parameter is
omitted, the current partition will be targeted for this command.
The
filename is the name
of
a file or a standard pattern matching string. You
may use the asterisk
(:It)
to match a number
of
characters, and question
marks
(?) to match individual characters. See 'Pattern Matching' above for
examples.
51
Page 58

Command Reference
The file type (tp) is optional, but
if
specified it must
be
the first option after
the filename pattern. This may
be
a P (pRG), S (SEQ), R (REL), U (USR),
or
B (DIR).
If
you wish to view all file types, skip this option. This too is
covered
in the examples under 'Pattern Matching'.
The
options allow you to match specific times and dates (>stamp,<stamp),
and also to specify long format (L). You may also specify that the directory
entries match a certain time and date stamp, but that the directory list is not
to include these times and dates
(N). You may use as many
of
these options
as you wish, but they must
be
separated
by
commas (,).
The
'long' time format gives the full date and time:
112
"TESTFILE"
PRG
02/02/90
04.44
PM
The 'short' (default) time format gives the date and time as follows:
112
"TESTFILE"
P
02/02
04.44
P
If
the no-list (N) option is given, the directory entries will be loaded as they
would normally appear (with no time and date information included). The
reason that the no-list option was created was to allow you to use the time
and date
of
files as pattern matching criteria within programs which cannot
accept the extra time and date characters.
The
<stamp option will list all files which have a creation time and date
less than
or
equal to the time and date specified in
stamp.
The >stamp
option will list all files which have a creation time and date greater than or
equal to the time and date specified in stamp.
If
both the <stamp and >stamp options are used within the same command,
the resulting list
of
files will include files which fall between the range
of
the two time and date stamps specified.
The
stamp format must
be
entered exactly as shown. This means you must
specify the month, day, and year with two characters each and separate them
with a slash (I). The hour and minute must also be given with two
characters each in 12 hour format separated with a colon (:)
or
a period (.).
The
last
parameter must
be
AM
or
PM. The date, time and AM/PM
parameters must
be
separated by a single space. Here are a few examples:
LOAD"$=T",10
LOAD"$=T2",10
"LOAD"$=T2
:*=P",
10
LOAD"$=T2:*=P,L",10
LOAD"$=T2:*=P,L,>12/21/89
04:15
PM",10
LOAD"$=T:*=L,<12/21/89
04:15
PM",10
LOAD"$=T4:*=S,N,>12/01/89
12:01
AM,<12/31/89
12:00
PM",10
52
Page 59

Command
Reference
JiffyOOS Examples:
@"$=T",10
@"$=T2"
@$=T2:*=P
@$=T4:*=S,N,>12/01/89
12:01
AM,<12/31/89
12:00
PM
File Commands
File commands are the most commonly used commands. They include
loading and saving files, verifying, renaming, scratching, copying, and
locking files and are entered in much same manner as for other Commodore
or
compatible disk drives. Although the BASIC 2.0 versions
of
these
commands are supported in BASIC 7.0, BASIC 7.0 also contains other
commands that perform the same functions. BASIC 2.0 versions
of
these
commands allow more versatility when dealing with partitions.
Loading Files
The following synta'< can
be
used to load programs in BASIC 2.0 and
BASIC 7.0:
LOAD"
[
enj
~path;
: j
filename",
dv[,
sal
where:
n
=
is any legal partition number from 1
to
31
path
=
the subdirectory path to the file
filename
=
is any legal filename
of
up to
16
characters
dv
=
is the current device number
of
the FD drive
sa
=
is the secondary address
if
needed
To load a machine language program, a secondary address of 1 must be added
to the end
of
this command, separated
from
the device number by a
comma.
Examples:
LOAD
"2:BASEBALL",10
LOAD
"3/TERMS/:TERMBOOT",10,1
JiffyDOS examples:
/"2:BASEBALL",lO
/2:
BASEBALL
%3/TERMS/:TERMBOOT
It
is generally a good idea to use the BASIC 2.0 syntax
if
you are specifying
partitions since BASIC 7.0 will only allow access to the current (0)
partition
or
partition 1, and will not allow the use
of
subdirectory paths.
53
Page 60

Command
Reference
The
BASIC
7.0
BLOAD
command
can
be
used
to load
machine
language
or
data files into
memory.
The
DLOAD
command
is
used
primarily
to
load
BASIC
programs.
The
syntax
for
these
commands
is
shown
below.
BLOAD"
filename"
[,
Dn]
[{
ON
I,
}
Udv]
[,
Bb}
[,
Pal
DLOAD"filename"
[,Dn]
[{ONI,
}Udv]
where:
filename
=
the
name
of
the
program
to
be
loaded
n
=
the
partition
number
where
the
file
is
located (0
or
1)
dv
=
the
device
number
of
the
FD
drive
b
=
the
memory
bank
where
the
file
is
to
be
loaded
a
=
the
starting
address
of
the
file
to
be
loaded
Examples:
BLOAD"SPRITE",DO,U9,BO,P3584
DLOAD"TEST",DO
ON
U9
DLOAD"TEST2"
Saving Files
The following
syntax
can
be
used
to
save programs
in
BASIC
2.0
and
BASIC
7.0:
SAVE"
[[@]
[n]
[path]
:]
filename",
dv
where:
n
path
filename
dv
=
=
=
--
is any legal partition
number
from 1 to
31
the
subdirectory
path
where
the
file
is
to
be
saved
is
any
legal
filename
of
up
to
16
characters
is
the
current device
number
of
the
FD
drive
The '@'
symbol
shown
in
the
command
syntax
may
be
used
to
indicate
that
a
file
with
the
same
name
which
already exists should
be
replaced
with
the
new
file. This
is
called
the
'Save with Replace' option
and
if it
is
used,
it
must be
followed
by
a partition number
and a colon
(:).
Examples:
SAVE"2:BASEBALL",10
SAVE"/TERMS/:TERMBOOT",10
JiffyDOS
examples:
.~"2:
BASEBALL",
10
~/TERMS/:TERMBOOT
54
Page 61

Command
Reference
You
may
use
the BASIC 7.0
BSA
VB
and
DSAVE
commands
when
it is
your intention
to
work
with
your current partition
(0)
and
directory, or
in
the
current directory of partition
1.
BSAVE
is intended
for
files
other
than
BASIC
programs, while
DSA
VB
is
intended
for
BASIC
programs.
BSAVE"[@]filename"[,Dn]
[{ONI,}uqv]
[,Bb],Pa
TO
Pe
DSAVE"
[@]filename"[,Dn]
[{aNI,
}Udv]
where:
filename
=
the
name
of
the
file
to
be saved
n
=
the partition
number
where
the
file
is
to
be
saved
dv
=
the
device
number
of
the
FD
drive
b
=
the
memory
bank
where
the
file
is
to
be
saved
a
=
the
starting
address
of
the
file
to
be
saved
e
=
the
ending
address
of
the
file
to
be
saved
The
'@'
symbol
may
be
included
to
indicate that
the
file
being
saved
is to
replace
an
existing file
with
the
same.
This
is
called
'Save
with
Replace'.
Examples:
BSAVE"SPRITE",DO,U9,BO,P3584
DSAVE"TEST",Dl
ON
U9
DSAVE"TEST2"
Verifying Files
BASIC
2.0 and 7.0 contain commands which allow
you
to
verify if a
program has been saved properly. These commands compare
the
saved
program
with
the contents of
memory.
Keep
in
mind
that
any
change
in
the
contents of
memory
may
cause a verify
operation
to
fail.
It
is
best to
verify
a file immediately after saving
it
for
this
reason. Both versions of
BASIC
support specifying a partition
within
the
filename
portion
of
this
command
(as
described earlier). The
following
syntax
applies to
these
commands:
VERIFY" [ En]
[path]
:]
filename",
dv[,
sa]
where:
n
=
the
partition
where
the
file
is
located
path
=
the
subdirectory
path
to
the
file
you
wish
to verify
filename
=
the
name
of the file
to
be
verified
dv
=
the current
device
number
of
the
FD
drive
sa
=
secondary
address
of 1 to
verify a non-BASIC
file
Examples:
VERIFY"NEWSTATS",lO
VERIFY"l/UTILS/TERMS/:XLATOR",lO
Jiffy
DOS
example:
I "NEWSTATS",lO
55
Page 62

Command Reference
In BASIC 7.0,
the
standard
VERIFY
command
is
accepted, but
you
may
also use
the
DVERIFY
command. This
command
is
limited
to
use
with
the
current partition
(0)
or partition
1,
and
the
current subdirectory .
DVERIFY"
filename"
[,
Dn]
[{
ON
I,
}
Udv)
where:
filename
=
the
name
of
the
file
to
be
verified
n =
the
partition
where
the
file
resides
(0
or
1)
dv
=
the
device
number
of
the
FD
drive
Example:
DVERIFY"NEWSTATS",D1,U10
Renaming Files and Subdirectories
Filenames and Native
Mode
subdirectory
names
may
be
changed
by
using
either the
DOS
RENAME
or
the
BASIC
7.0
RENAME
command.
The
BASIC 7.0 version
only
supports
the
current directory within the current
partition
(0)
or partition
1.
When using either version, the partitions
specified
for
the
two
file
names
must
either
be
the
same,
or must indicate
the
same
partition.
The
syntax
for
the
DOS
RENAME
command
is:
OPENlf,
dv,
15:
PRINT#lf,
"R
[n)
[path) : newname= [ [n)
[path]
:]
filename"
:CLOSElf
where:
If
=
the
logical
file
number
for
the
command
channel
dv
=
the
current device
number
of
the
FD
drive
n
=
the
partition
where
the
file
to
be
renamed
is
located
path
=
the
subdirectory
path
to
the
file
you
want
to
rename
newname
=
the
new
name
to
be
assigned
to
the
file
filename
=
the
name
of
the
file
which
is
being
renamed
Examples:
OPEN15,10,15:PRINT#15,"R1:BOOT1=BOOT":CLOSE15
OPEN15,10,15,"R1/UTILS/:NEWT=1/UTILS/:WW":CLOSE15
JiffyDOS
Example:
@"R1:BOOT1=BOOT",10
The
BASIC
7.0
RENAME
command
syntax
is:
RENAME
[Dn,
]"
filename"TO
[On]
"newfile"
[,
Udv]
where:
n
56
filename
newfile
dv
=
the
partition
where
filename
is
located
=
the
name
of
the
file
which
is
being
renamed
=
the
new
name
to
be
assigned
to
the
file
=
the
current
device
number
of
the
FD
drive
Page 63

Command
Reference
Scratching (deleting) Files
The standard
DOS
and
BASIC
7.0
SCRATCH
commands
may
be
used
to
delete files from a partition.
As
with many
of
the other BASIC 7.0
commands,
SCRATCH
is
only
effective
with
partition numbers 0 (current)
and
1.
The standard
Commodore
DOS
SCRATCH
maybe used
in
place of
the
BASIC
7.0 version
when
necessary
and
with
BASIC
2.0.
The
following
command
syntax
covers
the
DOS
version
of
this
command:
OPENlf,dv,15:PRINT#lf,"S[n]
[path]
:filename[,
En]
[path]
:]
filename
.•. ] ":CLOSElf
where:
If
=
the
logical
file
number
for
the
command
channel
dv
=
the
current
device number
of
the
FD
drive
n
=
the
partition(s)
which
hold
the
file(s)
to
be
scratched
path
=
the
subdirectory
path(s)
to
the
file(s)
filename
=
the
name
of
the
file(s)
Multiple
files
may
be
scratched
with
this
command
which
will
accept
up
to
five
separate
filename
parameters. Different partitions
can
be
specified
with
the
separate
filenames.
The
filename
parameters
may
also
contain
wildcards
to
allow
scratching of multiple
files
within
a single partition.
Examples:
OPEN15,lO,15:PRINT#15,"Sl:JUNK,3:C?*.BAS":CLOSE15
OPEN15,lO,15,"Sl/UTILS/:CO*":CLOSE15
JiffyDOS
Examples:
@"Sl:JUNK,3:C?*.BAS",lO
@Sl/UTILS/:CO*
The
BASIC
7.0
SCRATCH
command
syntax
is:
SCRATCH"filename"
[,
DnJ [{
ON
I,
}
Udv]
where:
filename
=
the
name
of
the
file
to
be
scratched
n
=
the
partition
where
the
file
to
be
scratched
resides
dv
=
the
device
number
of
the
FD
drive
Multiple files
may
also
be scratched
with
this
command by
using
pattern
matching, although it
does
not
allow
you
to
specify multiple
file
names
as
does
the
DOS
version. Remember,
this
command
is
only
valid
for
use
with
the
current directory
in
partition
numbers
0 (current)
or
1.
57
Page 64

Command
Reference
Copying Flies
Copying is
an
important consideration
with
any
storage device. For
this
reason
the
FD
comessuppJied
with
DOS
commands
which
allows
you
to
copy mes
between
partitions.
This
function
may
also
be
accomplished
by
using
the.
FCOPY
program supplied
with
the
FD.
Another copy program
supplied
with
the FD
(MCOPY)
allows
you
to
copy
an
entire disk
to
a
similar partition
on
the
FD
and vice
versa.
For
more
information
on
the
copy
programs
included
with
the
FD,
see
Appendix
A.
Copying flies between drives
Files
may
be copied between
the
FD
and
other disk drives
using
a standard
me
copier.
Only
generic
copiers that
do
not
try
to
discover
the
drive
type
by
checking
ROM
locations
will
work
with
the
FD.
We
have
included
FCOPY
with
the
FD
to
assist
in
me copying.
FCOPY
will
work
with
all
file
types
and
all
drive
types
including
an
REU
running
under
RAMOOS.
If
you
have
JiffyDOS
installed
on
your
computer,
you
may
use
the
built-in
JiffyDOS
file-copier
with
the
FD
as
well.
Many
of
the
commercial
copy
programs
will
not
work
with
the
FD
because
they
look at specific
memory
locations
to
try
to
identify
the
drive
being
used,
or
attempt
to
write
drive
specific
code
into
the
disk
drive
to
speed
up
the
copy
process.
Copying and Combining flies between partitions
You
may
copy
files
from
one
partition
to
another
on
the
FD
by
using
the
standard
Commodore
DOS
COPY
command.
This
command
allows
you
to
place a partition number
in
front of
each
of
the
filenames specified
in
the
command.
The
syntax
for
this
command
is
as
follows:
OPENlf,
dv,
15:
PRINT#lf,
"C
[n)
[path) : newfile=
[
[n)
[path]
: ]
filename
[,
[n: ) filename
.
..
] " :
CLOSElf
where:
If
=
the
logical
file
number
for
the
command
channel
dv
=
the
current
device
number
of
the
FD
drive
n
=
the
partition
which
holds
or
is
to
receive
the
file
path
=
the
subdirectory
path(s)
where
the
file(s)
to
be
copied
or
created
is
(are)
located
newftle
=
the
name
of
the
new
file
being
created
filename
=
.
the
name
of
the
file(s)
which
is
(are)
being
copied
Up
to
five
files
may
be
combined into a
single
file
by
using
this
command,
though it
is
important
to
note
that
copying a number
of
files
into
a single
file is
only
effective
with
text
files.
If
you
use
this
command
for
copying a
single
file
from
one
file
to
another
file
in
a different partition,
you
may
use
the
same
filename
for
both
files.
58
Page 65

Command
Reference
Examples:
OPEN15,lO,15:PRINT#15,"Cl:FCOPY=3:FCOPY":CLOSE15
OPEN15,lO,15,"C:FULLSTATS=STAT1,3:STAT3":CLOSE15
OPEN15,lO,15,"C2:MCOPY=1/COPIERS/:MCOPY":CLOSE15
JiffyDOS
Examples:
@"Cl:FCOPY=3:FCOPY",lO
@"C2:MCOPY=1/COPIERS/:MCOPY"
@C:FULLSTATS=STATS1,3:STATS3
You
may
also
copy
files
from
one
partition
to
another
on
the
FD
by
using
the standard
BASIC
7.0
COPY
command.
This
command
is
limited
to
copying
files
in
the current directory of the current
partition
(0)
or partition
1.
Use
the
DOS
COpy
command
mentioned earlier if
you
want
to
copy
files
between
other partitions. The
syntax
for
this
command
is
as
follows:
COPY
[Dn, ] "filename"TO
[Dn]
"newfile"
[,
Udv]
where:
n
filename
newfile
dv
=
the
partition
which
holds
or
is
to
receive
the
file
=
the
name
of
the
file(s)
which
is
being
copied
=
the
name
of
the
fIle
being
created
=
the
current
device
number
of
the
FD
drive
If
you
use
this
command
to
copy a file
to a different
partition,
you
may
use
the
same
fIlename
for
both files. If they are
to
reside
in
the
same partition,
you
must
use
different
filenames
or
an
error
will
result.
Two
files
may
be combined into a single file
by
using
the
BASIC
7.0
CONCAT
command, although
it
is
important
to
note
that adding files
together
in
this
manner
is
only effective
with
text
files.
The
BASIC
7.0
limitation of
using
only
the
current directory of
the
current partition
(0:)
or
partition 1 applies
to
this
command.
The
syntax
is:
CONCAT
[Dn, ] "filename"TO
[Dn]
"newfile"
[,
Udv]
where:
n
filename
newfde
dv
=
the
partition
where
the
fIle
exists
=
the
name
of
the
file
which
is
being
added
=
the
name
of
the
file
being
added
to
=
the
current device
number
of
the
FD
drive
The file previously named newfile will be
replaced
by
the
newly created
combined
fIle.
The
only
way
these files
may
have
the
same
name is if
they
exist
in
different partitions.
Example:
CONCAT
"NEWNUMBERS"
TO
"ALLNUMBERS"
59
Page 66

Command Reference
Locking
and
Unlocking Flies
Files located
on
the
PD
may
be
locked
to
avoid
scmtching
them
by
accident.
Before
you
can
scratch a locked
me, it
must
first
be
unlocked.
Locking a file
sets
one of
the
bits
in
the
filetype byte
for
that file (located in
the
directory
entry
of that
file).
Files
which
have
been
locked
will
appear
in
the
directory
with
a 'less-than'
symbol
to
the
right of
the
filetype.
For
example, a file
named
JIFFYMON
which
has
been locked will appear in
the
directory
listing
as:
33
"JIFFYMON"
PRG<
It
is
also possible
to
lock Native
Mode
subdirectories and
1581
sub-
partitions.
If
a subdirectory
has
been
locked,
it
is
not possible
to
delete it
with
the
'Remove
Directory'
command
until
it
has
been
unlocked.
The
Lock
command
is
a 'toggle'
function.
Using
it
on
an
unlocked
file
will
cause
the
file
to
become
locked.
Using
it
on
a file
which
has
already
been
locked
will
unlock
that
file.
The
syntax
for
locking
and
unlocking
files
is:
OPENlf,dv,15:PRINTllf,"L[n]
[path]
:name":CLOSElf
where:
If
dv
n
path
name
==
the
logical
file
number
==
the
current
device
number
of
the
PD
drive
==
the
partition
number
in
which
the
file
exists
==
the
Native
Mode
subdirectory
path
in
which
the
file
exists
==
the
name
of
the
file
or
subdirectory
you
wish
to
lock
or
unlock
The
following
examples
illustrate
the
use
of
this
command:
OPEN15,lO,15:PRINTI15,"L:TEST":CLOSE15
OPEN15,lO,15:PRINTI15,"Ll//:TEST":CLOSE15
OPEN15,
lO,15:PRINTt15,
"L/UTILS/:TEST":CLOSE15
JiffyDOS
examples:
@L:TEST
@"Ll//:TEST"
@"L/UTILS/:TEST",lO
Note:
JiffyDOS
contains its
own
version
of
the
LOCK
command.
This
may
also
be
used
with
the
PD.
See
your
JiffyDOS
manual
for
details
on
using
this
version.
60
Page 67

Command
Reference
Relative File Commands
Relative files contain
an
index
table
to
allow
quicker access
to
a particular
portion of
the
file
called a record. Records
are
kept track of
by
a special
section of
the
relative
file
called a side
sector.
Two
different
types
of
side
sectors exist
in
the
FD:
Regular side sectors (the
type
used
in
1541
and
1571
Emulation
Mode
partitions), and super side sectors (used
in
1581
Emulation
Mode
and
Native
Mode
partitions). A relative file
with
regular
side sectors can
be
up
to
720
blocks
long,
while
a relative file
with
super
side sectors
can
fill
an
entire disk
or
partition.
Opening
or
Creating a Relative File
Relative files
can
be
opened or created
by
using
the
BASIC
2.0
OPEN
or
BASIC
7.0
DOPEN
commands.
Here
is
the
BASIC
2.0
syntax
for
opening
or creating a
new
relative
file:
OPENlf,
dv,
sa," [ en]
[path]
:]
filename
[{"
I,
L"
+CHR$
(rl)
}]
where:
If
=
the
logical
file
number
dv
=
the
current
device
number
of
the
FD
drive
sa
=
the
secondary
address
(2
through
14)
n
=
the
partition
where
the
file
exists
or
will
be
created
path
=
the
Native
Mode
subdirectory
path
to
the
file
filename
=
the
name
of
the
relative
file
rl
=
the
record
length
(only
needed
when
creating a
new
relative
file)
Examples:
OPEN2,10~2,"1/DATA/:CUSTOMERS,L"+CHR$(127)
OPEN2,
10,2,
"ADDRESS"
Here
is
the
BASIC
7.0
syntax:
DOPEN#lf,
"filename"
[,
Lrl]
[,Dn]
[,
Udv]
where:
if
=
the
logical
file
number
filename
=
the
name
ofthe relative
file
rl
=
the
record length
(only
needed
when
creating a
new
relative
file)
n
-
the partition in
which
the
file-
exists or
is
to
be
created
(only
0 or 1
is
accepted)
dv
=
the
current
device
number
of
the
FD
drive
Examples:
DOPEN#2, "CUSTOMERS", L127
,D1,
U12
DOPEN#2,"ADDRESS"
61
Page 68

Command
Reference
Positioning to a Specific Record
When
you
are
ready
to
read
or
write
a specific record, it is
necessary
to
use
either
the
DOS
POSITION command, or the BASIC 7.0 RECORD
command.
These
commands
can
also
be
used
to
create
new
records.
Here
is
the
syntax
for
the
DOS
POSITION
command:
PRINTUf,"P"+CHR$(ch)+CHR$(lr)+CHR$(lh)
[+CHR$(of)]
where:
if
ch
lr
Ih
of
Examples:
=
the
logical
file
number
for
the
command
channel
=
the
secondary
address
used
when
opening
the
relative
fIle
plus a value
of 96
=
the
low
byte
of
the
record
number
=
the
high
byte
of
the
record
number
=
the
byte
number
in
the
record
which
you
wish
to
start
reading
from
or
writing
to
(first byte if left
out)
PRINT'lS,"P"+CHR$(98)+CHR$(30)+CHR$(O)+CHR$(lO)
PRINT'lS,"P"+CHR$(98)+CHR$(30)+CHR$(O)
Here
is
the
syntax
for
the
BASIC
7.0
RECORD
command:
RECORD'lf,rn[,of]
where:
if
m
of
Examples:
=
the
logical
fIle
number
for
the
relative
fIle
=
the
record
number
you
wish
to
access
or
create
=
the
byte
number
in
the
record
which
you
wish
to
start
reading
from
or
writing
to
(first byte if left
out)
RECORDI2,30,lO
RECORD'2,30
Whenever
you
create
new
records,
use
the
PRINT#
command
to
write a
CHR$(255)
to
the
last
record.
Note:
Whenever a new
record
is
created,
an
error
will
occur in
the
drive
(number
50,
"RECORD
NOT
PRESENT").
As
with
all
Commodore
disk
drives,
this
error
can
be
ignored
when
it occurs
after a new
record
is
created.
Note:
Although
it is not necessary
to
send
the
RECORD
or POSITION
commands
twice
on
the
FD
to
avoid
data
corruption,
this
practice should
be
followed
anyway
to
avoid
problems
when
using
other
drives
with
your
program.
To
do
this, send
the
RECORD
or
POSITION
command
once
before
writing
a record
as
you
normally
would,
and
once
again
afterward.
This
will
help
to
ensure that
your
data
will
not
be
corrupted
due
to
the
flaw
which
exists
in
other
disk
drives.
62
Page 69

Command Reference
Direct Access Commands
Most direct access commands require that files
be
opened
to
both
the
command channel
and
to
a direct
access
file.
Before
using
the
commands
described
in
this
section,
you
should
be
familiar
with
the
methods required
to
open
and
access
the
command
channel
and a file
data
channel.
The Direct Access Channel
Opening
a direct
access
channel
requires
the
following
BASIC
statement:
OPENlf,dv,sa,"#[bu]
"
where:
If
dv
sa
bu
=
the
logical
file
number
(1-127)
=
the
device
number
of
the
FD
drive
=
the
secondary
address
(2-14)
=
the
drive
buffer
to
be
used
(0-29)
The drive buffer
number
is
an
optional parameter,
and
if left out,
the
drive
will
automatically
assign
the next available
buffer.
Note:
Direct
access
files
are
always
opened
to
the
current
partition
number
on
the
FD.
If
you
wish
to
open a direct access
file
to
a partition other
than
the one
you
are currently
in,
you
must
change
partitions with
the
'CP' command first.
All
further access
to
this
file
will occur
in
that
I oartition
number
even
if
vou
change oartitions
after
opening
the
file.
Block Commands
The
BLOCK
commands
allow
you
to
read,
write,
allocate, and de-allocate
the logical sectors
on
the disk.
See
Appendix C for
tables outlining
the
logical
track,
sector,
BAM
and
directory
layout
of
each
partition
type.
Allocating
and
Freeing Blocks
The
BLOCK-ALLOCA
1E
command
is
used
to
allocate a block directly or
to
determine
the
next unallocated block available.
If
you
try
to
allocate a
block
which
has
already been allocated,
you
will
find
that the track
and
sector variables of
the
error message contain
the
track
and
sector of
the
next
available block.
The
BLOCK-FREE
command
allows
you
to
free
a
block
which
is
currently allocated. The
syntax
for
these
commands
is:
PRINT#lf,"B-A:";n;t;s
PRINT#lf,"B-F:";n;tis
where:
If
n
t
s
=
the
logical
file
number
used
for
the
command
channel
=
the
partition
(always
0)
=
the
logical
track
of
the
block
to
be
allocated or
freed
=
the
logical
sector
of
the
block
to
be
allocated or
freed
63
Page 70

Command
Reference
The Buffer Pointer
The
BUFFER-POINTER
command
allows
you
to
point
to
a particular byte
within
the
disk
buffer of
the
specified
direct
access
channel.
The
syntax.
is:
PRINTflf,
"B-P"i
saipt
where:
If
sa
pt
=
the
logical
me
number
used
for
the
command
channel
=
the
secondary
address
used
for
the
direct
access
me
=
the
byte number
within
the
buffer
(0-255)
Reading
and
Writing Blocks
The
BLOCK-READ
and
BLOCK-WRITE
commands,
due
to a quirk
in
the
way
they
operate, are rarely
used.
(most
applications
use
the
'UI' or 'U2'
commands
instead).
These
commands
cannot
read or
write
an
entire
block
of
data
because
the
first byte
in
the
block
is
used
to
determine
how
many
bytes
are
to
be
read
or written.
This
allows
you
to
write
(and
later
read)
the
full
block
only
if
the
first byte contains a
value
of
255.
The
syntax.
is:
PRINT'lf,"B-R";sa;n;t;s
PRINT.lf,"B-W";sa;n;t;s
where:
If
=
the
logical
me
number
used
for
the
command
channel
sa
=
the
secondary
address
used
for
the
direct
access
flle
n
=
partition
number
(always
0)
t
=
the
logical
track
of
the
block
to
be
read
or
written
s
=
the
logical sector of
the
block
to
be
read
or
written
Block
Execute
BLOCK-EXECUTE
loads a specific block into drive
memory
and
then
executes
the
machine
language
program
contained in that
block.
Unless
the
machine
language
is relocatable,
you
should
specify
a buffer
number
when
opening
the
direct
access
channel.
The
machine
language
routine
should
also
end
with
an
RTS
if
you
wish
to
return
control
back
to
DOS.
The
syntax
is:
PRINT'lf,"B-E";sa;n;t;s
where:
If
=
the
logical
me
number
used
for
the
command
channel
sa
=
the
secondary
address
used
for
the
direct
access
me
n
=
partition
number
(always
0)
t
=
the
logical
track
where
the
~xecutable
block
is
stored
s
=
the
logical
sector
of
the
executable
block
This
example
executes a block
at
track
2,
sector 0
in
buffer
#2
($0500):
100PEN15,8,15:0PEN2,8,2,"'2"
20
PRINT'15,"B-E";2;0;2;0
30 CLOSE2:CLOSE15
64
Page 71

Command
Reference
Memory Commands
Reading from Drive Memory
MEMORY-READ
allows
you
to
read
bytes
in
FD
memory.
The
syntax
is:
PRINT#lf,"M-R"CHR$
{ml)CHR${mh)CHR$
(nb)
where:
If
ml
mh
nb
=
the
logical
file
number
used
for
the
command
channel
=
the
low
byte of
the
starting
memory
address
=
the
high
byte of
the
starting
memory
address
=
the
number of
bytes
to
be
read
(0-255;
0=256
bytes)
The
bytes
are
read
from
the
error
channel.
This
example
checks
for
an
FD:
10
OPEN15,10,15,"M-R"+CHR$(160)+CHR${254)+CHR$(6)
30
FORI=lT06:GET#15,B$:A$=A$+B$:NEXT
80
CLOSE15:IFA$="CMD
FD"THENPRINT"FD PRESENT"
Writing to Drive Memory
MEMORY-WRITE
allows
you
to
write bytes
to
FD
memory.
The
syntax
for
this
command
is:
PRINT#1f,
"M-W"CHR$
(ml)
CHR$
(mb)
CHR$
(nb)
CHR$
(d)
...
where:
If
ml
mh
nb
d
=
the
logical
file
number
used
for
the
command
channel
=
the
low
byte of
the
starting
memory
address
=
the
high
byte of
the
starting
memory
address
=
the
number
of
bytes
to
be
written
(1-120)
= the data bytes (if
more
than
one byte
is
to
be
written
use additional
CHR$
statements or a
string
variable)
This
example
illustrates
the
use
of
the
MEMORY-WRITE
command:
100PEN15,10,15:A$="ABCDEFGHIJ"
40
PRINT#15,"M-W"CHR${O)CHR${8)CHR$(10)A$:CLOSE15
Memory Execute
MEMORY-EXECUTE
starts execution of a
machine
language
program.
To
return control
to
DOS,
the program should end
with
an
RTS.
The
syntax
is:
PRINT#lf,"M-E"CHR$(ml)CHR$(mh)
where:
If
ml
mh
.=
the
logical
file
number
used
for
th~
command
channel
=
the
low
byte of
the
program
starting
address
=
the
high
byte of
the
program
starting
address
This
example
executes a program
located
at
$0800
in
drive
memory:
PRINT#15,"M-E"CHR$(O)CHR${8)
65
Page 72

Command
Reference
User Commands
UO
Utility Commands
Without
any
parameters,
UO
resets
the
user
vectors.
When
combined
with
specific parameters, it is
used
to
send
burst
commands
(described
in
detail
later
in
this
section).
Here
is
the
syntax
needed
to
reset
the
user
vectors:
PRINTttlf,
"uO"
where:
If
=
the
logical
file
number
used
for
the
command
channel
Reading and Writing Blocks with
U1
and U2
UI
and
U2
are
commands
which
read
and
write
an
entire block to/from
the
buffer related
to
a direct access channel.
These
commands are
common
replacements
for
"B-R"
and
"B-W"
and
are
used
in
the
same
basic
manner.
Please note that these
commands
access
the
partition that
was
the current
partition
when
the
direct
access
channel
was
opened.
The
syntax
is:
PRINTttlf,"Ul";sa;n;t;s
PRINTttlf,"U2";sa;n;t;s
where:
If
=
the
logical
file
number
used
for
the
command
channel
sa
=
the
secondary
address
used
for
the
direct
access
file
n
=
partition
number
(always
0)
t
=
the
logical
track
of
the
block
to
be
read or written
s
=
the
logical
sector of
the
block
to
be
read or written
User Jump Commands (U3-U8)
These
commands
perform jumps
to
certain
locations
in
drive
memory.
U3
jumps
to $0500,
U4
to
$0503,
U5
to
$0506,
U6
to
$0509,
U7
to
$050C
and
U8
to
$050F.
The syntax
is:
PRINTttlf,"Ux"
where:
If
x
=
the
logical
file
number
used
for
the
command
channel
=
the
character
of
the
desired
USER
command
(3-8)
User Reset Commands (UI &
UJ)
UI
and
UJ
reset
the
drive
to
various
degrees.
UI
performs a warm
reset
and
has a minimal
effect
on
drive variables.
UJ
performs
a cold reset, but
does
not
change
the
current
partition.
The
syntax
is:
PRINTttlf,
nul"~
PRINT#lf,
"UJ"
where:
If
66
=
the
logical
file
number
used
for
the
command
channel
Page 73

Command
Reference
Special Loaders
Utility Loader
The Utility Loader allows you to load a file that confonns to CBM Utility
Loader specifications into drive memory and execute it immediately
by
sending the name
of
the file preceded by an ampersand ('&') via the
command channel. The syntax for the utility loader is:
OPENlf,
dv,
15:
PRINT#lf,
"&
[n]
[path] : filenarre" : CIDSElf
where:
If
=
the logical file number for the command channel
dv
=
the device number
of
the FD
n
=
the partition (0-31)
path
=
the Native Mode partition subdirectory path to the file
filename
=
the name
of
the file.
Autoboot Loader
Whenever the FD is turned on
or
reset, it will search for, load, and execute a
file in the ·default partition that confonns to CBM Autoboot Loader
specifications. The Autoboot filename must be 'COPYRIGHT CMD 92'
on
CMD-formatted disks, and 'COPYRIGHT CBM 86' on
1581
compatible
disks. In order to retain 1581 compatibility, the FD will also search for the
autoboot file whenever you initialize a 1581 Emulation partition that has
bit 6
of
byte 7 in BAM block 1 set to a
1.
Note: Programs written to execute in the memory
of
other drives may
have to
be
modified to work with the FD, since the memory layout and
controller used in the FD is much different than that
of
any other drive.
Special
FD
Commands
Software Write Protect Commands
The FD allows you to enable and disable write protection
of
a disk via
software. For data security reasons, these commands cannot
be
used to
bypass the write protect shutter on the disk itself. Note: Removing and
re-
inserting a disk will cancel the 'W
-I'
write-protect command. The syntax
is:
OPENlf,
dv,
15
:PRINT#lf,
"W-x"
:CLOSElf
where:
If
dv
x
Examples:
= the logical file number
= the current device number
of
the
FD
drive
= 1 to enable WRITE PROTECT, 0 to disable
OPEN15,10,15,"W-1":CLOSE15
OPEN15,10,15,"W-O":CLOSE15
67
Page 74

Command
Reference
Software SWAP Commands
The
FD
allows
you
to
perfonn
the
front-panel
SWAP
functions
from
within
software. These commands have
been
included
to
allow
loaders
or
boot
programs
to
easily swap the FD's device
number.
Whenever
one
of
the
SWAP
commands
is
issued, it is
very
important
to
follow it
with a delay
loop,
in
order
to
avoid a
serial
bus
collision
(we
recommend a value
of
500
in
a FOR/NEXT
loop).
Note that
the
SWAP
commands
will not operate
under certain conditions, usually
when
there
is a file
open
to a serial
bus
device.
The
syntax
for
the
SWAP
commands
is:
OPENlf,dv,15:PRINT#lf,"S-x":
FORt=lT0500:NEXT:CLOSElf
where:
If
=
the
logical
file
number
dv
=
the
current
device
number
of
the
FD
drive
x
=
8
to
swap
with
device
number
8
9
to
swap
with
device
number
9
D
to return
the
FD
to
its original device
number
t
=
a
variable
to
be
used
for
the
timing
loop
Here
is a
sample
program
using
all
of
the
SWAP
commands.
This
program
assumes
that
the
FD
is
device
number
10
at
the
time
the
program
begins.
100
OPEN1S,10,lS,"S-8":FORI-1TOSOO:NEXT:CLOSE15
120
OPEN1S,8,lS,"S-9":FORI=lTOSOO:NEXT:CLOSE15
140 OPEN1S,9,lS,"S-D":FORI=lTOSOO:NEXT:CLOSE15
JiffyDOS
examples:
@S-8
@"S-9",8
Getting Diskchange Status
A
new
command
unique
to
the
FD
allows
you
to detennine if
the
disk
has
been
changed.
This
command
is
useful
to
programmers
who
may
want
to
make
sure that
you
have
not changed
disks
before beginning a
new
disk
operation.
The
syntax
for
sending
this
command
is:
OPENlf,
dv,
15
:PRINT#lf,
"G-D"
:CLOSElf
where:
If
=
the
logical
file
number
dv
=
the
current
device
number
of
the
FD
drive
After
this
command
has
been sent,
the
error buffer will contain a single
diskchange status byte
followed
by a CHR$(13).
If
the
diskchange status
byte
is
zero,
then
no
change
has
occurred.
Any
non-zero
value
indicates
that
the
disk
has
been
either
changed
or
removed.
68
Page 75

Command
Reference
After
a disk
has
been
changed,
the
diskchange
status
remains
non-zero
until
the
new
disk
is
logged in
by a command
that
accesses
the
disk.
(i.e.
Load,
Initialize,
Change
Partition,
etc.).
Example:
10
OPEN15,10,15,"G-D"
20
GET#15,A$:DC=ASC(A$+CHR$(0))
30
CLOSE15
RTC Commands
There are three
types
of
commands
available
to
read
and
set
the
optional
Real
Time
Clock
(RTC)
module.
Each
type
uses a different
data
format.
The
data
types
are
ASCII,
BCD
(binary
coded
decimal),
and
decimal.
Reading Time and Date
in
ASCII Format
The
'T-RA'
command
allows
you
to
read
the
FD's
clock
and
return
the
date
and
time
as
all
ASCII
string over
the
error
channel.
The
syntax
is
:
OPENlf,dv,15:PRINT#lf,"T-RA"
where:
If
dv
=
the
logical
file
number
=
the
device
number
of
the
FD
The
FD
error channel returns
the
date
and
time
in
the
following
format
"dow.
mo/da/yr
hr:mi:se
xM"+CHR$
(13)
where:
dow.
=
the
day
of
the
week
(4
characters
followed
by a space).
SUN.
MON.
TUBS
WED.
THUR
FRI.
SAT.
mo
=
the
month
(01-12)
m
=
the
day
yr
=
the
year
hr
=
the
hour
(01-12)
mi
=
the
minute
(00-59)
se
=
the
second
(00-59)
x
=
A or P
(denoting
AM
or
PM)
To
read
the
error channel
from
BASIC,
the
following
GET
loop
can
be
used:
10
GET#lf,A$:T$=T$+A$:IF
ST<>64
THEN
10
69
Page 76

Command Reference
Writing Time and Date in ASCII Format
The 'T-WA' command allows
you
to set the
RTC
by sending
an
ASCII
string
over
the
command
channel.
The
syntax
is
as
follows:
OPENlf,dv,
15
PRINT:/tlf,
"T-,WAdow.
mo/da/yr
hr:mi:
se-
xM"
CLOSElf
where:
If
dv
=
the
logical file
number
=
the
device
number
of
the
FD
The remaining parameters (dow.,
mo,
da,
etc.) follow the
same
format
as
described above under the 'T-RA'
command.
Note:
it is very important that
the
time
and
date
parameters
are
separated
by
the
same
number
of
spaces
and
delimiters
as
shown
above.
Also,
the
day
of
week
must
be
four
characters
long
and
followed
by
a space (see
'T-RA'
for
valid day-of-week strings).
If
these
parameters
are
not
provided
in
the
correct
manner,
the
FD
will
not
set
the
time correctly.
Reading Time and Date
in
Decimal Format
The T
-RD
command
allows
you
to
read
the
FD's clock and return
the
date
and
time
as
a series of decimal-valued bytes over
the
error channel.
This
command
provides
BASIC
(or
ML)
programmers
with a means
to
read
the
current
time
and
date
in
numeric
format
from
within a program.
The
syntax
for
the T -RD'
command
is
as
follows:
OPENlf,dv,15:PRINT#lf,"T-RD"
where:
If
dv
=
the
logical file
number
=
the
device
number
of
the
FD
After
the
'T
-RD'
command
is sent, the
error
channel
will
return
the
date
and
time
as
bytes
in
the
following
format:
70
Byte
0
Byte
1
Byte
2
Byte
3
Byte
4
ByteS
Byte
6
Byte
7
Byte
8
-
day
of
week
(OO=SUN.,
01=MON.,
etc.)
-
year
(i.e
1990=90)
-
month
(01-12)
-
day
(OI-xx)
-
hour
(01-12)
-
minute
(00-59)
-
second
(00-59)
AM/PM
flag
(OO=AM,
non-O=PM)
-
CHR$(13)
Page 77

Command
Reference
Writing Time and Date
in
Decimal Format
The
'T -WD'
command allows
you
to
set
the
FD's internal real-time clock
by
sending a series of decimal-valued
bytes
representing the current
time
over
the
command channel. The
syntax
for
this
command
is
as
follows:
OPENlf,dv,1S
PRINT:j/:lf, "T-WD"+CHR$
(by
teO)
+CHR$
(by
tel)
+
CHR$
(byte2)+CHR$
(byte3)tCHR$
(byte4)+CHR$
(byteS)
+
CHR$
(byte6)+CHR$
(byte7)
:CLOSElf
where:
If
= the
logical
file number
dv
= the device
number
of
the
FD
bytes
0-7
= The current
time
and
date represented
by
eight
decimal
bytes (format
given
under
the
'T-RD'
command).
Reading Time and Date
in
BCD
Format
The
'T-RB'
command allows
you
to
read
the FD's clock and return
the
date
.
and
time
as
a series of
BCD
bytes over
the
error channel. The
syntax
is:
OPENlf,dv,1S:PRINT#lf,"T-RB"
where:
If
= the logical
file
number
dv
= the device
number
of the
FD
The error channel will return the date and time as
BCD
bytes
in
the
following
format:
Byte
0
Byte
1
Byte
2
Byte
3
Byte
4
ByteS
Byte
6
Byte
7
Byte
8
- day of
week
(OO=SUN.,
01=MON.,
etc.)
- year
(i.e.
1990=$90)
- month
($01-$12)
-
day
($OI-xx)
- hour
($01-$12)
- minute
($00-$59)
- second
($00-$59)
- AM/PM
flag
«()()=AM,
non-O=PM)
-
$00
Writing Time and
Date
in
BCD
Format
The
'T-WB'
command allows
you
to
set the FD's internal real-time clock
by
sending a series
of
BCD bytes representing the current time over the
command channel. This command
is
normally sent
from
within a
machine-
language program. The syntax
for
this
command
is
as
follows:
"T-WB"+BCD
time
where:
BCD
time = The current time and date represented
by
eight
BCD
bytes.
(format
given
under
'T-RB)o
71
Page 78

Command Reference
Burst Commands
The PO Burst Command Instruction
Set
(FDBCIS)
emulates
the
1581
BCIS
as
closely
as
possible, although it
was
necessary
to
make
some changes
due
to
the extended capabilities of
the
FD.
The
required
syntax
is:
PRINT#lf,
"UO"+CHR$
(Byte02)
[+CHR$
(Byte03)
...
]
where:
If
=
the
logical file
number
used
for
the
command
channel
Note:
In
each of
the
following burst
commands,
Byte
00
contains
the
ASCII
value for
the
letter
"U",
while Byte
01
contains
the
ASCII value
for
"0"
(hence, bytes
00
and
01
are
the
"UO"
shown
in
the
syntax above).
Read
BYTE
BIT7
00 0
01
0
02 L
03
04
05
06
RANGE:
SWITCHES:
PROTOCOL:
BIT6 BIT5
BIT4 BIT3
BIT2
BIT1
1
0
1
0
1
0
0
1
1
0 0 0
E X S
0
0 0
DESTINATION
TRACK
DESTINATION
SECTOR
NUMBER
OF
SECTORS
NEXT
TRACK
(optional)
Logical
Format:
Dependent
on
partition type
(see
Appendix
C)
BITO
1
0
N
Physical Format:
Dependent
on
type of disk format
L -
E -
X -
S
N -
(see
Appendix
C)
Logical
Flag
(O=physical/l=logical)
Ignore
Error
(l=ignore)
Don't
Care
Side
(0
or 1 if
using
physical format)
Partition
Number
(only 0
is
supported)
Burst
Handshake
CONVENTIONS:
Before
READING
from
or
WRITING
to
a disk, it must
be
logged
in
using either
the
INQUIRE DISK or
QUERY
DISK
FORMAT
commands.
OUTPUT:
72
One
burst status
byte,
followed
by
burst data,
is
sent
for
each sector transferred.
An
error will prevent data
from
being sent unless
the
IGNORE
ERROR bit
in
byte
02
is
set
to
a value of
1.
Page 79

(
Write
BYTE
BIT7
00
0
01
0
02
L
03
04
05
06
RANGE:
SWITCHES:
PROTOCOL:
Command
Reference
BIT6
BIT5 BIT4
BIT3
BIT2
BIT1
1
0 1 0 1 0
0
1 1 0
0 0
E X
S
0 0 1
DESTINATION
TRACK
DESTINATION
SECTOR
NUMBER
OF
SECTORS
NEXT
TRACK
(optional)
Logical
Format:
Dependent
on
partition
type
(see
Appendix
C)
BITO
1
0
N
Physical
Format:
Dependent
on
type
of
disk
format
(see
Appendix
C)
L -
E -
X -
S
N -
Logical
Flag
(O=physicaVI=logical)
Ignore
Error
(l=ignore)
Don't
Care
Side
(0
or 1 if
using
physical
format)
Partition
Number
(only 0
is
supported)
Output data,
set
fast
serial in, pull clock
low,
wait
for
status byte, release clock. Repeat for
multiple
sectors.
CONVENTIONS:
Before
READING
from
or
WRITING
to a disk,
it must
INPUT:
OUTPUT:
Inquire Disk
BYTE
BIT7
00
0
01
0
02
X
SWITCHES:
PROTOCOL:
OUTPUT:
be logged
in
using
either
INQUIRE
DISK
or
QUERY
DISK
FORMAT.
Host
must
transfer burst data.
One
burst
status
byte following each
WRITE
operation.
BIT6
1
0
X
BIT5
BIT4
0
1
1
1
X
S
Don't
Care
Side
BIT3 BIT2
BIT1
0
1
0
0
0 0
0 1 0
x -
S -
N -
Partition Number (only 0
is
supported)
Burst
handshake.
BITO
1
0
N
One
burst
status
byte
following
each
INQUIRE
DISK.
73
Page 80

Command
Reference
Format
BYTE
00
01
02
03
04
05
06
07
08
09
SWITCHES:
OPTIONS:
BIT7
BIT6 BIT5
BIT4
BIT3 BIT2
BIT1
BITO
0 1 0 1
0 1 0 1
0 0
1 1
0 0
0
0
M X X
X
0
1 1
N
I D D D Z
Z Z Z
FORMAT
TYPE,
DENSITY,
SECTOR
SIZE(()Qlionall
LAST
TRACK
NUMBER
(optional)
NUMBER
OF
SECTORS
(optional)
STARTING
TRACK
(optional)
FILL
BYTE
(optional)
STARTING
SECTOR
(optional)
FORMAT
GAP
(optional)
M - Mode (O=logical format with directory and
BAM and l=physical format using optional
bytes
03-09)
X - Don't Care
N
- Partition Number (only 0 is supported)
Bytes
03 - 09 are optional and
areonly
accepted when
physical formatting is specified
(M=l). If you do not
specify values for these bytes, system default values
will be used. The following list shows the legal range
and default values for these bytes:
Byte
3 Format Type Identifier, Density, and Sector Size
Usage: I Format
ID
0 = ISO (default)
I=IBM
D - Density 000 = Double Density (default)
001 = High Density
010 = Enhanced Density
Z
- Sector Size 0000 = 128 bytes (not used)
000 1 = 256 bytes
0010 = 512 bytes (default)
0011 = 1024 bytes
0100 = 2048 bytes
0101 = 4096 bytes
0110 = 8192 bytes
Byte 4
. Last Track: 00 through 79 (default = 79)
74
Page 81

Command
Reference
Byte 5 Sectors/frack (default set according
to
sector size value in byte 3)
Double Density
16
(256 byte sector size)
10
(512 byte sector size)
5 (1024 byte sector size)
2
(2048 byte sector size)
1
(4096 byte sector size)
(8192 byte sectors will not
fit on this fonnat)
High Density 32 (256 byte sector size)
20 (512 byte sector size)
10
(1024 byte sector size)
5
(2048 byte sector size)
2
(4096 byte sector size)
1 (8192 byte sector size)
Enhanced Density 64 (256 byte sector size)
40 (512 byte sector size)
20 (1024 byte sector size)
10
(2048 byte sector size)
5
(4096 byte sector size)
2 (8192 byte sector size)
Byte 6 Starting Track
0 through
79
(default = 0)
Byte 7 Fill Byte
o through 255 (defaults: ISO=$E5, IBM=$F6)
Byte 8 Starting
Sector 1 through
63
(default =
1)
Byte 9 Format Gap 0 through 255 (default set according
to
density and
format type in byte
3)
PROTOCOL:
Double Density
35
(ISO)
80
(IBM)
High Density 100
(ISO)
108
(IBM)
Enhanced Density 100
(ISO)
108
(IBM)
Conventional.
CONVENTIONS: This command must be followed by an INQUIRE DISK
or
QUERY DISK FORMAT command
to
log in the
. partition.
OUTPUT: None.
Note: The directory header written by this command (logical format) will
contain the string 'CMD FD' for the disk name and '92' for the
10.
75
Page 82

Command Reference
Query Disk Format
BYTE
BIT7 BIT6
BIT5
BIT4
BIT3
BIT2
BIT1 BITO
00
0
1
0
1
0
1
0 1
01
0 0 1
1
0 0
0
0
02
F
X T
S 1 0 1 N
03
OFFSET
(optional
- F = 1 )
SWITCHES:
F Force
(F=1
steps head
with
offset
in
byte 3)
X -
Don't
Care
T -
Sector
Table
(f=1
sends
sector
table)
S
Side
N - Partition
Number
(only 0
is
supported)
PROTOCOL:
Burst
handshake.
CONVENTIONS:
Determines
the
physical
disk
format.
OUTPUT:
Burst status byte after logging disk, burst status byte
after compiling
MFM
format information, number of
physical sectors
per
track, logical
track
number
found
in
header, lowest logical sector number, highest logical
sector
number,
interleave value,
sector
table
(if
T=l).
Notes:
The sector table
is
a series of bytes (1,2,3,
...
) showing
the
sector
numbers of the sectors found.
Second status byte
is
from
track offset 0
unless
F=l,
then
status is
from
offset track
in
byte
03.
No
bytes follow
either status byte if
an
error
occurred.
Inquire Status
BYTE
BIT7
00
0
01
0
02
W
03
04
05
SWITCHES:
BIT6
1
0
C
W-
C -
M -
N -
BIT5
BIT4
BIT3
BIT2
Bin
BITO
0 1
0
1 0 1
1 1
0 0 0 0
M 0
1 1 0
N
NEW
STATUS
(W =
0)
NEW
OR
MASK
(M = 1)
NEW
AND
MASK
(M = 1)
Returns current status
only
if W=l, regardless
of
the
condition of
the
other
flags.
Log
in
disk
if
C=
1 and
W=O.
Write
new
AND/OR
masks
if
M=1
and
W=O.
Partition
Number
(only 0 is supported)
PROTOCOL:
Burst
handshake
ifW=1, conventional
ifW=O.
CONVENTIONS:
This
is
a method
of
reading or writing the current
status, and
changing
the
status
mask
values.
OUTPUT:
None ifW=O, burst status byte ifW=!.
76
Page 83

Command
Reference
CHGUTL Utility
BYTE
BIT7
BIT6
BITS
BIT4
BIT3
BIT2
BIT1
BITO
00
0
1
0 1
0
1 0
01
0 0 1 1
0
0 0
02
X
X
X
1
1
1 1
03
-??
UTILITY
COMMAND
AND
PARAMETERS
SWITCHES:
x - Don't Care
COMMANDS:
CHR$
(n)
Change
Device
Number
n =
new
device
number
Bn
Fast Serial
Mode
n = 0 -
fast
serial
disabled
n
= 1 -
fast
serial enabled
Hn
Head
Select
(returns
error)
n = 0 - side 0
n = 1 - side 1
I
+CHR$(ri)
Set
Cache
Dump
Interval
n
=
time
in
milliseconds/lO
Mn
Mode
Select
(returns
error)
n
= 0 - single-sided
n
= 1 -
double-sided
MR+CHR$
(a)
+CHR$
(p)
-
Memory
Read*
1
0
0
a =
high
byte
of starting
address
p =
number
of
pages
to
read
MW+CHR$
(a)
+CHR$
(p)
- MemoryWrite*
a
=
high
byte
of starting
address
p =
number
of
pages
to
read
R+CHR$
(n)
DOS
Retries
n
= retries
before
error
is
assumed)
S
+CHR$
(n)
DOS
Sector
Interleave
(ignored)
n =
sector
interleave
offset
T Test
ROM
Checksum
(ignored)
Vn
Write
Verify
switch
n = 1 -
verify
on
n = 0 -
verify
off
*Note:
Burst
MR
arid
MW
use
standard burst
protocol
(without status
byte).
77
Page 84

Command
Reference
Dump
Track Cache Buffer
BYTE
00
01
02
03
04
SWITCHES:
BIT7
BIT6
BIT5
BIT4
BIT3
BIT2
BIT1 BITO
0
1 0 1 0 1
0
1
0 0
1
1
0 0 0 0
F
S
X 1 1 1 0 1
PHYSICAL
TRACK
NUMBER
PHYSICAL
SECTOR
NUMBER(optional-
HD & ED
only)
F -
Write
Always
(F = 1 write
even
if not 'dirty')
(F = 0
write
only
if
dirty
and
ignore
bytes
3/4)
S
Side
X -
Don't
Care
Note:
Physical track
and
Side are
used
only
if F =
1.
Also,
if
byte 4 is
sent
when
using
an
HD
or ED
diskette,
it
is
used
to
set
the
starting sector
for
the
dump.
Fastload
Utility
BYTE
BIT7
00
0
01
0
02 P
03
-??
SWITCHES:
PROTOCOL:
OUlPUT:
STATUS:
78
BIT6
BIT5
BIT4
BIT3
BIT2
BIT1
BITO
1
0
1
0
1 0 1
0
1 1
0
0
0
0
X X 1
1
1 1 1
FILENAME
P -
Non-program
File Flag (P = 0 -
program
file
/
P = 1 -
non-program
file)
X -
Don't
Care
Burst
handshake.
Burst
status
byte
preceding
each
sector transferred.
In
a
program
file,
the
load
address should
be
handled
in
the
normal
manner.
OOOOOOOX
00000010
00011111
=
OK
= FILE
NOT
FOUND
=
EO!
(last
sector)
Status values
from 3 through
15
should
be
considered a
file read error. The byte after
the
EO!
indicates
the
number of data
bytes
remaining
in
the
file.
Page 85

Command
Reference
Burst Status Byte
BIT7
BIT6
BITS
BIT4
BIT3 BIT2 BIT1 BITO
M N Z Z C C C C
BIT DEFINITIONS:
M -
Mode:
0 Normal format (1581 disk with directory and
BAM or CMD-formatte<l
800K, 1.6M,3.2M)
1 Foreign Disk Format (non-default physical
format or default physical format without
directory and BAM information)
N - Partition Number (only 0 is supported)
Z - Sector Size: 00
128
or 2048 byte sector size
01
256 or 4096 byte sector size
10 512
or
8192 byte sector size
11
1024 byte sector size
C - Controller Status:
0000
OK
0001
OK
0010 Header Not Found
0011 No Data Address Mark
0100 Data Block Not Found
0101 Data CRC Error
0110 Format Error
0111 Write-Verify Error
1000 Write Protect On
1001
Header
CRC
Error
1010 Illegal Logical Block
1011
Disk Change
1100 Invalid Format
1101
FDC Hardware Error
1110 Burst Syntax Error or Illegal Job
1111
No Drive Present
79
Page 86

Command
Reference
Job Queue Instructions
The job queue buffers are special locations
used
to
pass commands
and
parameters to
the
drive
controller
for
the
purpose
of
performing
specific
disk
access
functions. The job
queue
can
be
accessed directly
by
the
programmer
if
desired.
Different
areas
are
defined
for
job
queues
in
the
FD
depending
on
which
partition
type
is
currently
being
used.
This
was
done
so
that
the
FD
could emulate
the
job
queue
locations of
the
1541,
1571,
and
1581.
In
all
cases,
the
job
codes
and
parameters
are
moved
to
the
Native
Mode
job
queue
for
actual execution.
When
writing job
queue
routines specifically
for
the
FD,
it is better
to
use
the
Native
job
queue
locations,
since
the
routines
will
then
operate
no
matter
which
type
of
partition
they
are
used
with.
Job
Queue
scanning is
performed
every
10
milliseconds
during
the
interrupt
routine.
The emulation job
queues
are
scanned first if
the
current partition
is
an
emulation
type.
Important Job Queue Memory Locations
!..1;\!;le!
Agg[e§s
Bang!
Desc[lption
JOBS
41
$0000 •
$0004
1541/1571
Job
Queues
HDRs"::".41
$0006 •
$OOOF
1541/1571
track and sector for
job
JOBS
81
$0002 •
$OOOA
1581
Job
Queues
HDRS-81
$OOOB· $001C
1581
track & sector for job
HDRS2_81
$01BC·
$01CD 1581 translated physical track & sector
SIDS_81
$01CE·
$01D6
1581
side variable for job
MJOBS
$0028 •
$0047
Native
Job
Queues
MHDRS
$2800 •
$283F
Native track
& sector for
job
in
queue
MHDRS2
$28CO·
$28FF
Native. translated physical track
& sector
MSIDS
$2840 •
$285F Native side variable for job
JOBBUF
$0300 •
$21FF
31
Job
Queue buffers (256 byes each)
TADDHI
$2860 •
$287F
Target Address (high)
TADDLO
$2880 •
$289F Target Address (low)
BLKCNT
$28AO
•
$28BF
Block count for multiple block jobs
TSIDS
$2900 •
$291F Translated side for jobs (read only)
CACHEPNT $004A •
$004B Pointer
into cache for certain jobs
CACHE $008B $008C Pointer to starting address of cache
CACHEOFF$009F
$OOBE
Page offset into cache for certain jobs
FMT_FILL $009B
Format fill byte value
80
Page 87

Command
Reference
Job Queue Command Codes
~
uN~aumue~
______
__
$80 READ
$82
CTRL_RESET
$84
MOT9R_ON
$86
MOTOR_OFF
$88
MOTORCON
$8A
MOTORCOFF
$8C STEP
]HYS
$90
WRITE
$92
DSK_IN_DRV
$94
ACTIV
_ON
$96
ACTIV
_OFF
$98
ERR_ON
$9A
ERR_OFF
$9C SID_SEL
$9E
CACHE_MOV
$AO
VERIFY
$A2
WRT_CACHE
$A4
PHYS_BUFO
$A6
BUFO_PHYS
$A8
SEEK_PHYS
Oeserl ptlon
Read
logical
block
specified
in
HDRS
using
cache.
Resets
the
disk controller and
variables.
Turns motor on, delays 500ms,
returns
'OK'
status (00).
Sets motor
to
turn off
in
10
seconds,
returns
'OK'
immediately.
Turns motor
on
and returns
'OK'
immediately.
Turns
motor
off immediately
and
returns
'OK'.
Steps
head
to
a physical track
specified
in
HDRS2.
Does
not change side select
or
attempt
to
verify position.
Formats
track
where
head
is
located
using
current
side,
density, sector size,
sectors
per track
and
starting sector. Fills
sectors
using value
in
FMT_FILL (unless
FMT_FILL contains $F5 and density
is
800K,
in
which
case track is
filled
with
data
from
cache).
Write logical block specified
in
HDRS
using
cache.
Returns
OK
if a readable
(CMD
or
CBM)
disk
is
in drive.
Turns
ACTIVITY
LED
on.
Turns
ACTIVITY
LED
off.
Turns
ERROR
LED
on.
Turns
ERROR
LED
off.
Sets side select using value
from
SIDS.
Not implemented. This routine never
worked correctly
in
the
1581.
Verifies contents of
the
entire cache
against
the
physical 'chunk' containing
the
logical block specified
in
HDRS.
Writes cache
to
disk if
marked
'dirty'.
Reads
physical sector specified in
HDRS
and
SIDS
to
buffer at $0300.
Writes buffer starting at $0300
to
physical
sector specified in
HDRS
and
SIDS.
Seeks
to
physical block specified
in
HDRS
and
SIDS
and reads header
ID.
81
Page 88

Command
Reference
$AA
READ_LOG_NQ
$AC
WRT.J.OG..:.NQ
$BO
SEEK
$B4 WRT_PHYS_NQ
$B6 WRT]ROT_ON
$B8
SEEK_LOG
$CO
BUMP
$CC
RD_LOG_ADDR
$CE
WRT_LOG_ADDR
$00
JUMP
$EO
EXEC
$EA
SET_FRMT
82
Updates CACHEPNT to point to the
address
in
the
cache
where
the
logical
block specified in
HDRS
begins. Reads
in
new
chunk if block
is
not currently in
cache.
Same as
READ
_LOG_NQ
except marks
cache
as
'dirty'.
Reads
the
first physical sector header
encountered
and
updates
controller track,
sector, side, and size variables.
Updates CACHEPNT
to
point to the
address
in
the
cache
where
the
physical
block specified
in
HDRS
and
SIDS
begins. Reads
in
new
chunk if block
is
not currently
in
cache.
Same
as
READ_PHYS_NQ except
marks
cache
as
'dirty'.
Tests write protect status and returns
$08
if write protect
is
on,
$00 if off.
Seeks
to
the
physical track, sector and side
of
the
logical block specified in
HDRS
and
reads
the
header.
Moves the head
to
physical track
O.
Identical
to
READ, but places contents of
block
at
address
pointed
to
by
TADDHI
andTADDLO.
Identical
to
WRITE, but writes contents of
address
pointed
to
by
TADDHI
and
TADDLO.
Executes
code
in
corresponding buffer.
Executes
code
in
corresponding buffer
after
motor
is
up
to
speed and the head is
on
the
physical track specified in HDRS.
Sets
the
drive into
one
of the six native
format
modes.
Call
this
job with
HDRS
track
variable set
to
the
desired format type
before issuing
FRMT_DSK
if
you wish
to
change
the
current format. (1=800K,
2=1.60M,4=3.20M, 5=ffiM
nOK,
6=IBM
1.44M,
7=IBM
2.88M)
Page 89

Command
Reference
$EC
READ_MULTI
Reads
multiple
system
blocks
(BLKCNT)
to
address
specified
in
TADDm
and
T
ADDLO
starting
with
the
systein
block
specified
in
HDRS
(high
byte
in
track,
middle
byte
in
sector) and
SIDS
(low
byte).
System
blocks are contiguous
512
byte
blocks
and
begin
with
system
block
o
located
at
physical
track
0,
sector
1,
side
O.
BLKCNT
must
be specified
in
multiples
of
the
current sector
size
divided
by
512
(Le.
multiples of 2 if
the
sector
size
is
1024).
$EE
WRT_MULTI
Writes
multiple system blocks
using
parameters
identical
to
READ_MULTI.
$FO
FRMT_DSK
Formats
entire disk using
the
currently
defined
physical
format (if
disk
is
not
a
CMD-formatted
disk)
or
fills
current
partition
using
FMT_FILL
byte.
HDRS
should contain
the
physical starting track
+
1.
A
complete
disk
format
can
be
forced
at
any
time
by
setting
HDRS2
track
and
sector
to
'PD'
and
SIDS
to
$FO.
$FC RD_PHYS_MULTI
Reads
multiple physical sectors
(BLKCNT)
to
address
specified
in
TADDHI
and
TADDLO,
starting
with
the
physical
sector specified
in
HDRS
and
SIDS.
Track
and
side
boundaries
are
automatically
incremented.
$FE
WRT_PHYS_MULTI
Similar
to
RD_PHYS_MULTI
but writes
to
physical
blocks
specified
in
HDRS
and
SIDS
using
the
data
from
the
address
pointed
to
by
TADDHI
and
TADDLO.
83
Page 90

Command Reference
Job Queue Error Codes
~
ED~
MDlm2DIf:l
B.l.f:l...
DUf:l[lgIl20
$00 OK,COK
00
No
errors
$01
00
No
errors
$02
ERMSAD
80
Missing
address
mark
in
address
field
$03
ERMSDT
80
Missing
address
mrurk
in
data
field
$04
ERNODT
80
No
data
block
found
$05
ENCRDT
80
CRC
error
in
data
field
$06
CFMTER
00
Fonnat
error
$07 ERMSSN
00
Verify
failed
$08
ERWRPT
00
Write
protect
on
$09
ERCRAD
80
CRC
error
in
address
field
$OA
Cll.-BLK
00
Illegal
block
$OB
ERDKCG
00
Disk
changed
$OC
ERINFf
00
Invalid
fonnat
$00
EREQFL
00
Equipment
check
(FDC
error)
$OE
CllJOB
00
Illegal
job
code
$OF
ERNOMD,
CDNR
00
No
media,
drive
not
ready
$20 ERSKFL
01
Seek
failed
$21
ERCDIP
00
FOC
command
in
progress
$22
ERCDNP
00
FDC
no
result
ready
$23
ERINRE
00
Number
of result bytes
mismatch
$24
EROVRN
00
Overrun
error
$25
ERCTMK
80
Control
mark
found
$26
ERWGTK
01
Wrong
track
$27
ERBDTK
01
Bad
track
$28
ERUKFT
00
Unknown
fonnat
$29
ERINCD
00
Invalid
command
$2A
ERINFD
00
Invalid
controller
$2B
ERFTID
00
Read
Track
ID
error
Recovery
code
key:
00
No
recovery
attempt
01
Move
head
to
track
0,
recalibrate
and
retry
80
Retry x
times
84
Page 91

Command
Reference
Jump Tables
The FD implements a superset
of
the 1581 jump table.
DOS
commands
(and some other important routines) are vectored through indirect addresses
stored in RAM (see the Indirect Vectored Jump Table below). Other
significant jump table entries are included
in
the non-vectored tables. Except
where noted, the function and use of each FD jump table entry
is
the same
as its
1581
counterpart. Close compatibility with the 1581 jump tables was
retained in order to facilitate the easy conversion
of
1581 drive-resident
machine language programs for use on the FD.
Indirect Vectored Jump Table
Jump
Vector
~
Address
Address
IDUMP
$FFOO
$0190
IRQJMP $FF03 $0192
NMUMP $FF06 $0194
V ALJMP $FF09 $0196
INUMP $FFOC $0198
PARJMP $FFOF $019A
MEMJMP $FF12 $019C
BLKJMP $FF15 $019E
USRJMP $FF18
$OlAO
RECJMP $FFIB $01A2
UTLJMP
$FFlE
$01A4
COPJMP $FF21 $01A6
RENJMP $FF24 $01A8
SCRJMP $FF27 $OlAA
NEWJMP $FF2A $OlAC
CERJMP $FF2D $OIAE
ATNJMP
$FF30
$OlBO
TLKJMP
$FF33 $OlB2
LSNJMP $FF36
$01B4
JBUMP
$FF39
$OlB6
XLAJMP $FF3C
$OlB8
DERJMP
$FF3F
$OlBA
Description
Main idle loop
IRQ routine
Performs a 'UI' reset
VALIDATE command
INITIALIZE command
'f
command (1581 sub-partitions)
M-R, M-W, M-E and
MD
commands
B-A, B-F,'B-R, B-W, B-EandB-P
UO,
U1,
U2
... , burst
UO>xx
REL file Record Position command
'&' Utility Loader command
COPY, CP, CD commands
RENAME, RD, R-H, R-P commands
SCRATCH, SWAP commands
NEW command
Controller error handler (enter with
error in .A, buffer number
in
X).
Exits
viaIDUMP
Serial bus A
TN
service
Serial bus TALK routine
Serial bus LISTEN routine
Controller Job Queue search, parse, and
execute routine
Controller logical-to-physical
translation routine (only remotely
similar to 1581)
DOS
error handler (enter with error
code in .A). Exits via
IDUMP
85
Page 92

Command
Reference
Non-Vectored
Jump
Table (FD
Specific)
tWn.i
GPCJMP
TIMJMP
LOCJMP
WPTJMP
CCDJMP
Jump
Address
$FF42
$FF45
$FF48
$FF4B
$FF4E
DLEJMP
$FF51
CDXJMP $FF6F
DQScrlption
G-P,
G-D
commands
T-xx
series ofRTC
commands
File LOCK
command
W
-0, W -1
write
protect
commands
Direct controller
call
(Native
Job Queue). Enter
with
job
in
.A,
buffer
number
in
.x
Reserved
for
use
by
FD·DOS
Direct controller
call
(Native
Job Queue). Enter
with
job in
.A,
buffer number in
.X.
Exit
to
CERJMP
error
handler
if
an
error
occurs
Non-Vectored
Jump
Table (1581
Compatible)
Jump
tti!.m.!!
AdduHHi
JSTJMP
$FF54
CMDJMP $FF57
ALXJMP
$FF5A
RCRJMP
$FF5D
AEDJMP
$FF60
FSDJMP
$FF63
ALBJMP
$FF66
LDKJMP
$FF69
DTCJMP
$FF6C
86
Description
Direct controller call
(1581
Job
Queue). Enter
with
job in
.A
and
buffer
number
in
.x.
Same
as
1581
JSTROBE_CONTROLLER
call.
Autoloader
routine.
Searches
for
'COPYRIGHT
CMD
92' or
'COPYRIGHT
CBM
86'
file.
Exit
from
autoloader.
Replaces
normal error
vectors.
Not implemented
on
FD
(RTS).
Enter with
carry
clear
to
disable
power-on/UJ/UI
autoload.
Enter
with
carry
set
to
enable
autoload.
Enter
with
carry
clear
to
set
fast
serial direction
IN;
Enter
with
carry
set
to
set
fast
serial
OUT.
Not
implemented
on
FD
(RTS).
Logs
disk if
disk
has
been
changed.
Dumps
track
cache
if
'dirty'.
Page 93

Appendix A
Utilities
About the Utility Disks
A number
of
utility programs created by CMD are provided with the PD.
These programs are located on the floppy disk titled PO Utilities. Be sure
to
backup this disk immediately. The following is a list
of
the programs:
FD
Utilities
PO-TOOLS
PCOPY
MCOPY
BCOPY
1541SUB
1581SUB
P01581
FD1581_128
PONative
PONative_128
CMD_MOVE
CMD_TIME
Formatting, partitioning and configuration utility
Pile copier
Whole disk/partition copier
Whole disk/partition backup program
Subdirectory creation utility
Subdirectory creation utility
gateWay 64 driver for
1581
partitions
gateWay 128 driver for
1581
partitions
gateWay 64 driver for Native partitions
gateWay 128 driver for Native partitions
Partition selector and copier for
GEOS
Clock setting autoexec for GEOS
The function and use
of
the gateWay drivers and the CMD_MOVE and
CMD_TIME utilities for
GEQS are described in Section 4. The other
utilities listed above are documented in the paragraphs that follow.
Note:
Utility programs other than the ones listed here may appear on your
disk. Normally, the titles
of
these programs will
be
self-explanatory, and
their operation will be self-documenting.
FD-TOOLS
The primary function ofFD-TOOLS is to format and partition the disks you
will be using with your
PD. It can also be used to set the optional Real
Time Clock module. FD-
TOOLS is written in
BASIC",
works in both 64
and 128 modes, and is loaded and run by entering the commands:
LOAD"FD-TOOLS",dv
RUN
Note: Substitute
dv
with the device number
of
the drive you are loading the
program from.
87
Page 94

Utilities
Whenever
PD-
TOOLS
is
run, it
will
pause
for a few
seconds
while
it
tries
to
find
an
PD
out
on
the
serial
bus.
When
it
finds
an
PD,
it
will
display
its
device
number
along
with
the
type
of disk currently in
the
drive
(Le.
CMD
1.60M,
CBM
SOOK,
etc.).
FD-TOOLS
is a menu
driven
program.
You
highlight a
menu
option
by
using
the
cursor
keys
and
then
select (execute)
the
option
by
pressing
<RETURN>.
On
screen prompts
will
instruct
you
on
how
to
select
the
various
sub-options.
Normally,
you
will
use
the
<+>
and
<->
keys
to
scroll
through
a list of choices,
the
<RETURN>
key
to select a choice,
and
the
<f->
key
to abort
an
operation
and
return
to the previous
menu.
The
main
menu
includes
the
following
options:
DISKETTE FORMATTING OPTIONS
PARTITIONING OPTIONS
SET
REAL
TIME
CLOCK
CHANGE
DEVICE SELECTION
LOG
NEW
DISK
EXIT
FROM
PROGRAM
DISKETTE FORMATTING OPTIONS
This
option
enables
you
to
format
disks
for
use
with
your
FD.
Appropriate
choices
must
be
made
regarding
format
type,
density
and
partitioning.
Type
You
have
two
basic choices
for
the
format
type:
CBM
and
CMD.
Use
<+>
and
<->
to
switch
between
the
two
choices,
and
<RETURN>
to
select
the
one
that
you
wish
to
use.
Choosing
the
CBM
option will create
an
800K
disk
with
a format identical
to
that
used
by
Commodore's
1581.
The
CMD
option
allows
you
to
format a
disk
that
can
be
partitioned
(see
Section 3
for
an
explanation
of partitions).
Density
Choosing
CMD
as
the
type
of disk
format
will require
you
to
select
the
desired
density.
For
CMD
disks,
you
can
select
Double
Density
(DD
800K),
High
Density
(HD
LOOM),
or
Enhanced
Density
(ED
3.20M)
if
you
own
an
FD-4000.
Use
<+>
and
<->
to
view
the
available choices,
and
<RETURN>
to
accept.
You
should always
be
sure
to
use
the
correct type of
disk
(DD,
HD,
ED)
for
the
density that
you
select.
88
Page 95

Utilities
Partitions
If
you are creating a disk with a CMD partitionable format, you will have
to
select a default partition arrangement. The
'I
NATIVE' option will create a
single Native Mode partition that uses all
of
the available storage on disk.
The '1581' option will create one
1581
partition on an 800K disk, two
1581
partitions on a 1.6M disk, and four 1581 partitions on a 3.2M disk. Select
'NONE'
if
you want to create your own custom partition arrangement. Use
<+> and <->
to
view the available choices, and <RETURN> to accept.
Partition Name
and
ID
If you have selected the CBM
1581
format, or a CMD partitionable format
with the
'I
NATIVE' or '1581' partition options, you will be prompted to
enter a name and ID for each partition that is
to
be
created on the disk. Each
partition name can be
up
to
16
characters long, while the partition
ID
is two
characters in length. When the partitions are created, the system will place
the partition name(s) you have specified in both the partition directory and
the directory header.
Formatting the
Disk
Just prior to beginning the actual formatting
of
the disk, FD-TOOLS will
prompt you to insert a diskette. After you have inserted the disk, press
<RETURN> to format it,
or
press
<~>
to exit without performing the
format.
It
will take approximately 80-90 seconds to format a disk, depending
upon which options you have selected.
PARTITIONING OPTIONS
This option enables you to create, delete, view and format partitions on
CMD-formatted partitionable disks. You can also select a default partition.
View Partition Table
This selection displays a list
of
the
31
partitions that can exist on a CMD-
formatted partitionable disk. The name and type
of
each partition on the disk
is given along with the number
of
blocks that it occupies. Partitions that do
not exist on a disk are listed as 'NOT IN USE'. The <+> and <-> keys will
step you through the pages in the display, and <RETURN> allows you to
exit back to the main menu.
Change Default Partition
This option allows you
to
change the default partition on CMD-formatted
disks. When you select this option, the current default partition number is
displayed, and you will
be
prompted to select a new default. Make your
selection with the <+> and <-> keys and press the
<RETURN>
key. The
program will check
to
see if the partition you select is legal.
89
Page 96

Utilities
Create Partitions
This option allows you
to
create
new
partitions on a CMD-formatted
partitionable
disk. The program will automatically default to the next
available (unused) partition. This is usually
the
best choice as it will keep
your partitions
in
order. However, if
you
wish,
you
may
select
any
partition
not yet
in
use. Use
<+>
and
<->
to
change the partition number,
and
press
the
<RETURN>
key
to
accept.
You must then select the partition
type.
Again, use <+> and <->
to
view
the available choices, and
<RETURN>
to
accept.
If
you
have
a Native Mode partition,
you
will
need to specify the partition
size. The size is adjustable in increments of 256 blocks using
<+>
and
<->
to
select, and <RETURN>
to
accept.
The last step
is
to
enter a
name
for
the
partition (16 characters maximum).
Even though the usable characters
have
been
limited
in
this program,
you
can later rename
the
partition with
the
FD
DOS
Rename Partition
command
if
necessary.
After you have entered the partition
name,
FD-TOOLS will
make
sure
you
really want
to
create the partition (press
<Y>
for
yes,
<N>
for
no).
Next,
you
will be asked whether or
not
you
want
to
create another partition (press
<Y>
or
<N».
If
you
press
<Y>,
you
will
define the parameters
for
another
new
partition in
the
same manner described above.
If
you
press
<N>,
you
will
then
be asked whether of not
you
want
to
write the
new
partition table
(the
new
partitions
you
have defined
are
not
actually created
on
the
disk until
this point). Pressing
<Y>
will actually create the partitions
on
the
disk,
while pressing
<N>
will bring
you
back
to
the
Partitioning Options
menu
without making
any
changes
to
the
partition layout on the
disk.
Note: The number of partitions
you
can
create is always limited
by
the
amount of available storage on a particular disk.
An
INSUFFICIENT
SPACE A
V
AILABLE
message
means
that
you
will not be able
to
create a
new
partition until at least
one
existing partition
has
been deleted.
Delete Partitions
This option allows
you
to
delete individual partitions
on
a CMD-formatted
partition able disk. Upon choosing this option
you
will be
shown
.the
first
partition
on
disk.
To
select the partition that you wish
to
delete,
use
the
<+>
and
<->
keys, and
then
press
<RETURN>
to
accept.
You
can
abort the
process at
this
point
by
pressing the
<f->
key.
After
you
have
selected a partition,
PD-
TOOLS
will make sure
you
really
want
to
delete the partition (press
<Y>
for
yes,
<N>
for
no).
Next,
you
will
be asked whether or not
you
want to
delete
another partition (press
<Y>
or
<N».
If
you press <Y>, you will select another partition
as
described
above.
If
you
press <N>,
you
will
then
be
asked whether or not
you
want
to
90
Page 97

Utilities
write the new partition table (the partitions you have deleted are not actually
removed from the disk until this point). Pressing <Y> will actually delete
the partitions from the disk, while pressing <N> will bring you back to the
Partitioning Options menu without making any changes to the partition
layout on the disk.
Deleting partitions can take from a few seconds to several minutes
depending on where they are located on disk. Any remaining partitions must
be
moved to fill
in
any vacated space between them, so that all the resulting
free space can reside
in
one contiguous area.
WARNING: Deleting partitions will destroy all data within the partitions
you are deleting. Also,
if
a disk error occurs while you are deleting
partitions, there is a risk that information in one
of
the remaining
partitions could
be
corrupted. Therefore, do not delete partitions without
first backing up all valuable data
on
the disk.
Delete
All
Partitions
This option allows you to quickly delete all existing partitions on a CMDformatted partitionable disk. After selecting this option, FD- TOOLS will
ask you
if
you really want to delete all the partitions on the disk. Press <Y>
to delete the partitions, or press <N>
to
return to the main menu without
altering the partition layout on the disk.
Reformat Partition
This option allows you to 'NEW' the directory
of
a partition on a CMD-
formatted partitionable disk without destroying information in any
of
the
other partitions that reside on the same disk. To select the partition that
you wish to reformat, use the <+>
and
<-> keys, and then press
<RETURN> to accept. You will then
be
prompted to enter a name (up to
16 characters) and an ID for the directory header. After you have entered this
information, FD-TOOLS will make sure you really want to reformat the
partition (press <V> for yes, <N> for no). Pressing <V> will NEW the
partition (clear the directory and BAM), while pressing <N> will bring you
back to the Partitioning Options menu.
Rename Partition
This option allows
you
to change the name
of
a partition (as it appears
in
the partition directory) on a CMD-formatted partitionable disk. To select the
partition that you wish
to
rename, use the <+> and
<~>
keys, and then press
<RETURN> to accept. You will then be prompted to enter a new partition
name (up to
16
characters). Next, FD-TOOLS will make sure you really
want to rename the partition (press <Y> for yes, <N> for no). Pressing
<V> will rename the partition in the partition directory, while pressing
<N> will bring you back
to
the Partitioning Options menu.
91
Page 98

Utilities
SET REAL TIME CLOCK
This option allows you to set the FD's optional Real Time Clock
to
the
correct time and date. The current setting
of
the RTC will be displayed on
the screen.
Use the <+> and <-> keys
to
adjust each time and date parameter
(day
of
week, month, day, year, hour, minute, second, AM/PM), and then
press <RETURN> to accept each setting. After you have entered the
AM/PM parameter, press <RETURN> again
to
actually set the Real Time
Clock in the FD,
or
press <SPACE>
to
go back and edit the time and date
again.
CHANGE DEVICE SELECTION
If
you have more than one FD attached to your system, this option allows
you to select the particular FD that you want to work with in
FD-TOOLS.
After you select this option, the device number
of
the currently selected FD
is updated and displayed near
the
top
of the screen.
LOG
NEW DISK
When you are using FD-TOOLS, you should select this option after you
insert a different disk in your FD so that the program can determine its
format type before any partitioning is done. When a new disk is logged, its
format type will
be displayed near the top
of
the screen.
EXIT FROM PROGRAM
Selecting this option returns you to BASIC.
92
Page 99

Utilities
FCOPY
This
program
was
created
by
CMD
to
fill
the
need
for a file
copier capable
of copying
any
type
of file between
any
two
drives
or
between
any
two
partitions
on
our devices.
In
addition,
FCOPY
supports Native
Mode
subdirectories,
1581
sub-partitions, and
REV's
running
under
RAMDOS.
The use of
this
program
is
mostly
self-explanatory, but
we
have
included a
breakdown of
the
functions here
in
order
to
provide
more
detail
where
necessary.
This
program
may
also
be
used
to
remove
files,
view
directories,
and
send
disk
commands.
Set Source Device (F1)
This option selects
the
disk drive that
you
wish
to
copy files from. The
device
number
and
type
of device will be
shown
on
the
display.
If
the
drive
type
is
not recognized
by
the program, question
marks
will be
shown
instead of the
actual
type.
In
the
case of
unrecognized
third
party
disk
drives,
the program will
work
regardless unless
the
DOS
in
the
particular drive
happens
to
be
highly
incompatible with standard Commodore-style
DOS
commands
and
file
handling
procedures.
Set Target Device (FS)
This option selects
the
disk drive that
you
wish
to
copy
files
to.
The
device
number
and
type
of
device
will
be
shown
on
the
display.
Set Source Partition (F3)
If the source device
is a CMD
device,
this
option
allows
you
to
select
the
partition
from
which
files
are
to
be copied.
The
partition
number,
name
and
type
will
be
displayed
in
the
source
area.
Set Target Partition (F7)
If
the
target device
is a CMD
device, this
will
allow
you
to
set the partition
to
which
files
are
to
be
copied.
The partition
number,
name
and
type
will
be
displayed
in
the
target
area.
Set Source Path (S)
If
the source device
is a CMD
device
and
the
partition
type
is
Native or
1581
Emulation, or if the source device
is
an
actual 1581, a path
for
subdirectories or sub-partitions may
be
entered
by
the user. Each
subdirectory or
sub-partition
name
must
be
separated
by a slash
(j).
Set Target Path (T)
Same function
as
Set
Source
Path, except
that
the
path
is
intended
for
the
Target
device.
93
Page 100

Utilities
Source/Target Directory
(AlB)
Allows
you
to
view
the
directory of
the
source or target
disk.
The
program
will ask
for
a search pattern
so
that
you
may
view
flies
which
match a given
name
and/or flletype.
On
CMD
devices with
an
RTC,
the
pattern
will
also
allow
the
selection
of
files
by
time
and
date.
Select Files (F)
This
option
reads
the
source
directory
into
the selection buffer after
you
have
entered a search pattern.
File
information
is
stored
in a dynamic
method,
so
if necessary,
you
will be
able
to
view
from
700
to
well
over
a thousand
files.
If
your
directory
contains
more
flies
than
can
be
viewed,
you
will
need
to
limit the selection
by
using
a pattern
which
will
match
fewer
files.
Once
you
have
entered the
flIe
selection
mode,
you
may
select
or
de-select
files
by
pressing the RETURN
key
while
the arrow
is
pointing
to
the
file. An
asterisk (*) indicates
which
files have been selected. Pressing
the
'T' key
allows
you
to
toggle
all
selections (,T' will select
all
unselected files,
and
de-select all selected
flies).
When
you
have finished, press
the
back-arrow
key
(~)
to
return
to
the
main
menu.
Reselect Files (R)
You
may,
at
any
time after selecting files, return to
the
file
selection
mode
without re-reading the
directory.
This
allows
you
to
change
your
selections
before
or
after copying
files.
Send Disk Command (@)
This
option allows
you
to
send
a disk command
to
either
the
source or
the
target drive. Important: disk
commands
do
not
follow
the
source or target
path, but
are
instead sent
to
the
current directory. Therefore, it
is
wise
to
make
sure
you
are currently in the correct partition, sub-partition, or
subdirectory before
sending
a command intended
for
a certain
area.
When
sending
commands
to
an
FD,
RAMLink,
RAMDrive or
CMD
HD
you
may
include
a partition
number
and
path
in
the
disk
command.
Begin Copying (C)
This
option starts the copying process. Only
the
files
you
have selected
using
the 'F' and/or 'R'
options
will
be
copied.
When
copying
is
complete,
an
option allows
you
to
copy
the
same
files
to
another
disk
(if
your
target
drive
is a floppy
disk
drive).
Begin Scratching (#)
This
option starts scratching
the
files
you
selected
using
the
'F' and/or 'R'
options. Please note:
flies
are
scratched
from
the
source
disk!
You
will be
asked"
ARE
YOU
SURE
(YIN)?"
before
the
scratching
operation
begins.
94
 Loading...