

Page 1
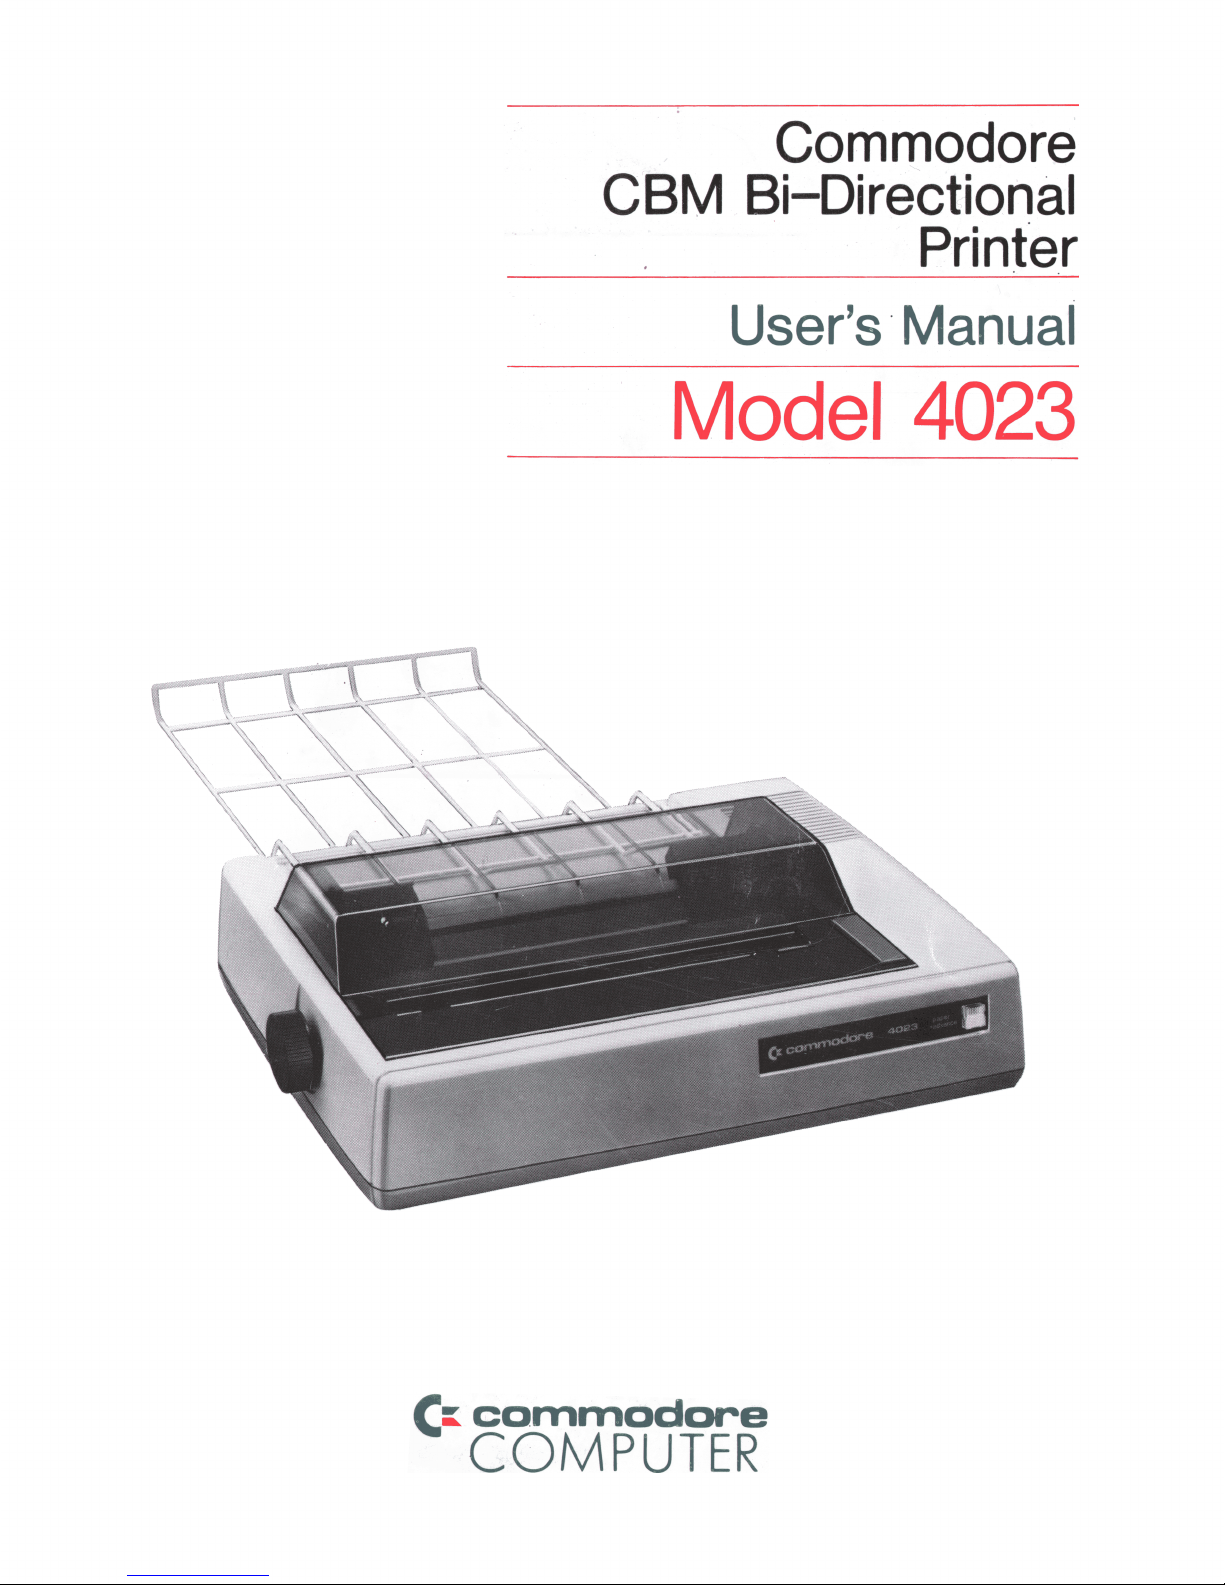
Commodore
CBM Bi-Directional
Printer
User’s Manual
Model 4023
f i c o m m o d o re
COMPUTER
Page 2

“WARNING — This equipment generates, uses, and can radiate radio frequency energy and if not installed
and used in accordance with the instructions manual, may cause interference to radio communications. It
has been tested and found to comply with the limits for a Class A computing device pursuant to Subpart J of
Part 15 of FCC Rules, which are designed to provide reasonable protection against such interference when
operated in a commercial environment. Operation of this equipment in a residential area is likely to cause
interference in which case the user at his own expense will required to take whatever measures may be
required to correct the interference.”
Page 3
Commodore
CBM Bi-Directional
___________
Printer
User’s Manual
Model 4023
Part Number 4023025
Cr
commodore
© 1983 Commodore Business Machines, Inc.
Page 4
Table Of Contents
Page No.
Section 1: GENERAL INFORMATION
...........................................................................
1
DESCRIPTION ................................................................................................................. 1
Printing Characteristics ............................................................................................ 1
IEEE-488 Interface .................................................................................................... 3
Paper Feed Mechanisms.......................................................................................... 3
Printer Ribbon Cartridge
..........................................................................................
3
Internal Microprocessor System 3
Specifications ........................................................................................................... 3
UNPACKING YOUR PRINTER ....................................................................................... 5
Section 2: PREPARING TO USE YOUR PRINTER ....................................................... 7
CONNECTING THE PRINTER TO YOUR COMPUTER
.............................................
8
PERFORMING THE POWER-ON TEST 9
INSTALLING THE PAPER .............................................................................................. 10
Loading Model 4023 ................................................................................................ 10
PERFORMING THE PRINT HEAD TEST 11
Section 3: USING YOUR PRINTER ............................................................................... 13
SPECIAL PRINTER-ASSOCIATED COMMANDS......................................................... 14
The OPEN Command 14
The CMD Command ................................................................................................ 14
The PRINT # Command
..........................................................................................
15
The CLOSE Command ............................................................................................ 15
PRINTING IN THE DIRECT MODE ............................................................................... 16
PRINTING UNDER PROGRAM CONTROL.................................................................. 17
FORMAT CONTROL ....................................................................................................... 21
Printing Data Exactly as Received: s a = 0................................................................ 21
Printing Data According to a Previously Defined Format: sa=1
..........................
22
Storing the Formatting Data: sa=2
.........................................................................
23
The Formatting Characters ..................................................................................... 23
Numeric: ............................................................................................................. 23
Alpha (String Data):
..........................................................................................
26
Skip (Blank): ...................................................................................................... 26
Literals in Format Strings ......................................................................................... 26
Setting the Number of Lines Per Page: s a= 3......................................................... 27
Enabling the Printer Diagnostic Messages: sa=4
.................................................
28
Defining a Programmable Character: sa=5
..........................................................
29
Setting Spacing Between Lines: sa=6 .................................................................... 31
Page 5

Selecting Upper or Lower Case: sa=7 .................................................................... 31
Selecting ASCI I/Graphics: sa=8 ............................................................................. 32
Suppress Diagnostic Message Printing: sa=9 ....................................................... 32
Resetting the Printer: sa=10..................................................................................... 32
SPECIAL CHARACTER FUNCTIONS
...........................................................................
33
Enhanced Characters
........
*..................................................................................... 33
Paging ........................................................................................................................ 33
Specifying Individual Upper- and Lowercase Characters
....................................
33
Reversing a Field ...................................................................................................... 35
The Carriage Return .......................................................... 35
Quotation Marks ........................................................................................................ 35
APPENDIX
SIMPLE STRING FORMATTING ........................................................................... A-2
LEADING ZEROES FORCED ................................................................................ A-4
SIGNED NUMBERS ............................................................................................... A-5
DECIMAL FRACTION SPECIFICATION
...............................................................
A-6
FIXED AND FLOATING $ FIELDS
.......................................................................
A-7
MIXED FORMAT FIELD TYPES ............................................................................. A-8
FORMATTING WITH LITERALS ........................................................................... A-9
Page 6

Page 7
Section 1
GENERAL INFORMATION
With the purchase of a Commodore CBM Printer, you have added a great deal of versatility
and convenience to the use of your Commodore Computer. You have purchased the
FRICTION/SPROCKET FEED Model 4023. While this manual contains all the information
you need to check out, connect, and operate your printer, you should also refer to other
Commodore manuals to get the most out of your computer system.
NOTE TO BUSINESS KEYBOARD USERS ONLY: If you wish to duplicate
the examples in this manual and you are using the CBM Business Keyboard
computer, you should type the BASIC command POKE 59468,12 at the
beginning of each session with your computer and printer.
DESCRIPTION
This printer is designed to operate through software control. It prints upper- and lower
case alphabetic characters, numeric characters, and all the graphic characters available
on your Commodore computer, and even a custom user-defined character. Additionally,
your printer has considerable formatting capability owing to its own internal
microprocessor system.
Printing Characteristics
Your printer employs a SHINWA print head. The wire heavy-duty jeweled head has a life
expectancy of 50 million characters. If a print head malfunction should occur, obtain
authorized technical assistance. Failure to do this may void your warranty.
- 1-
Page 8
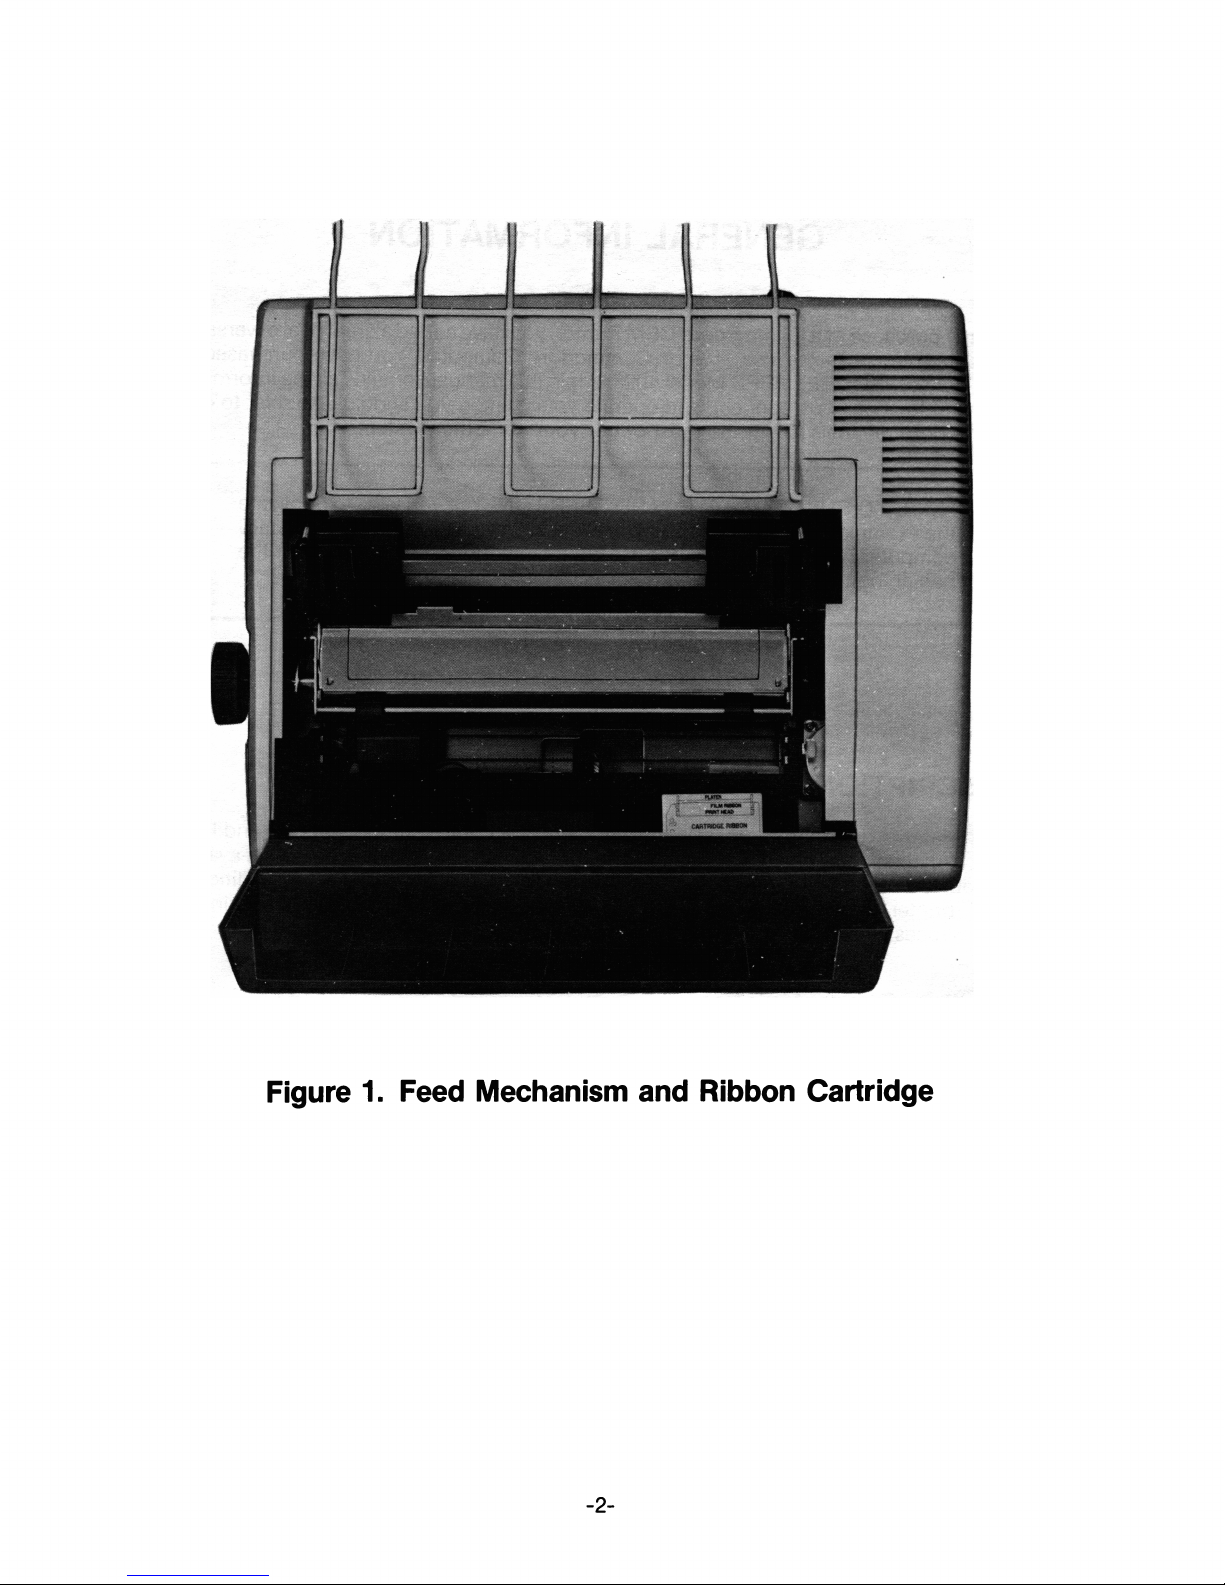
Figure 1. Feed Mechanism and Ribbon Cartridge
- 2-
Page 9
IEEE-488 Interface
This printer conforms to IEEE-488 interface requirements and may be connected directly
to your Commodore computer. The printer, designed to be used with the Commodore
CBM Floppy Disk Drive, may be daisy-chained with other IEEE-488 devices.
Paper Feed Mechanisms
The Model 4023 Printer employs FRICTION/SPROCKET feed mechanism that involves
the use of sprocket holes in the paper edges. This model is especially useful for the printing
of business forms. See Figure 1.
Normal paper without sprocket holes is useable, too.
Printer Ribbon
The printer ribbon (shown in Figure 2) is an easily-loaded cartridge.
Internal Microprocessor System
Your printer contains a microprocessor system that resets and executes a diagnostic and
initialization sequence when power is applied. In addition, it contains a random access
memory (RAM) in which you can store formatting data. Because your printer is an
“intelligent” peripheral, it uses none of your computer’s memory.
Specifications
Table 1 shows the specifications for the Model 4023 Printer.
- 3-
Page 10
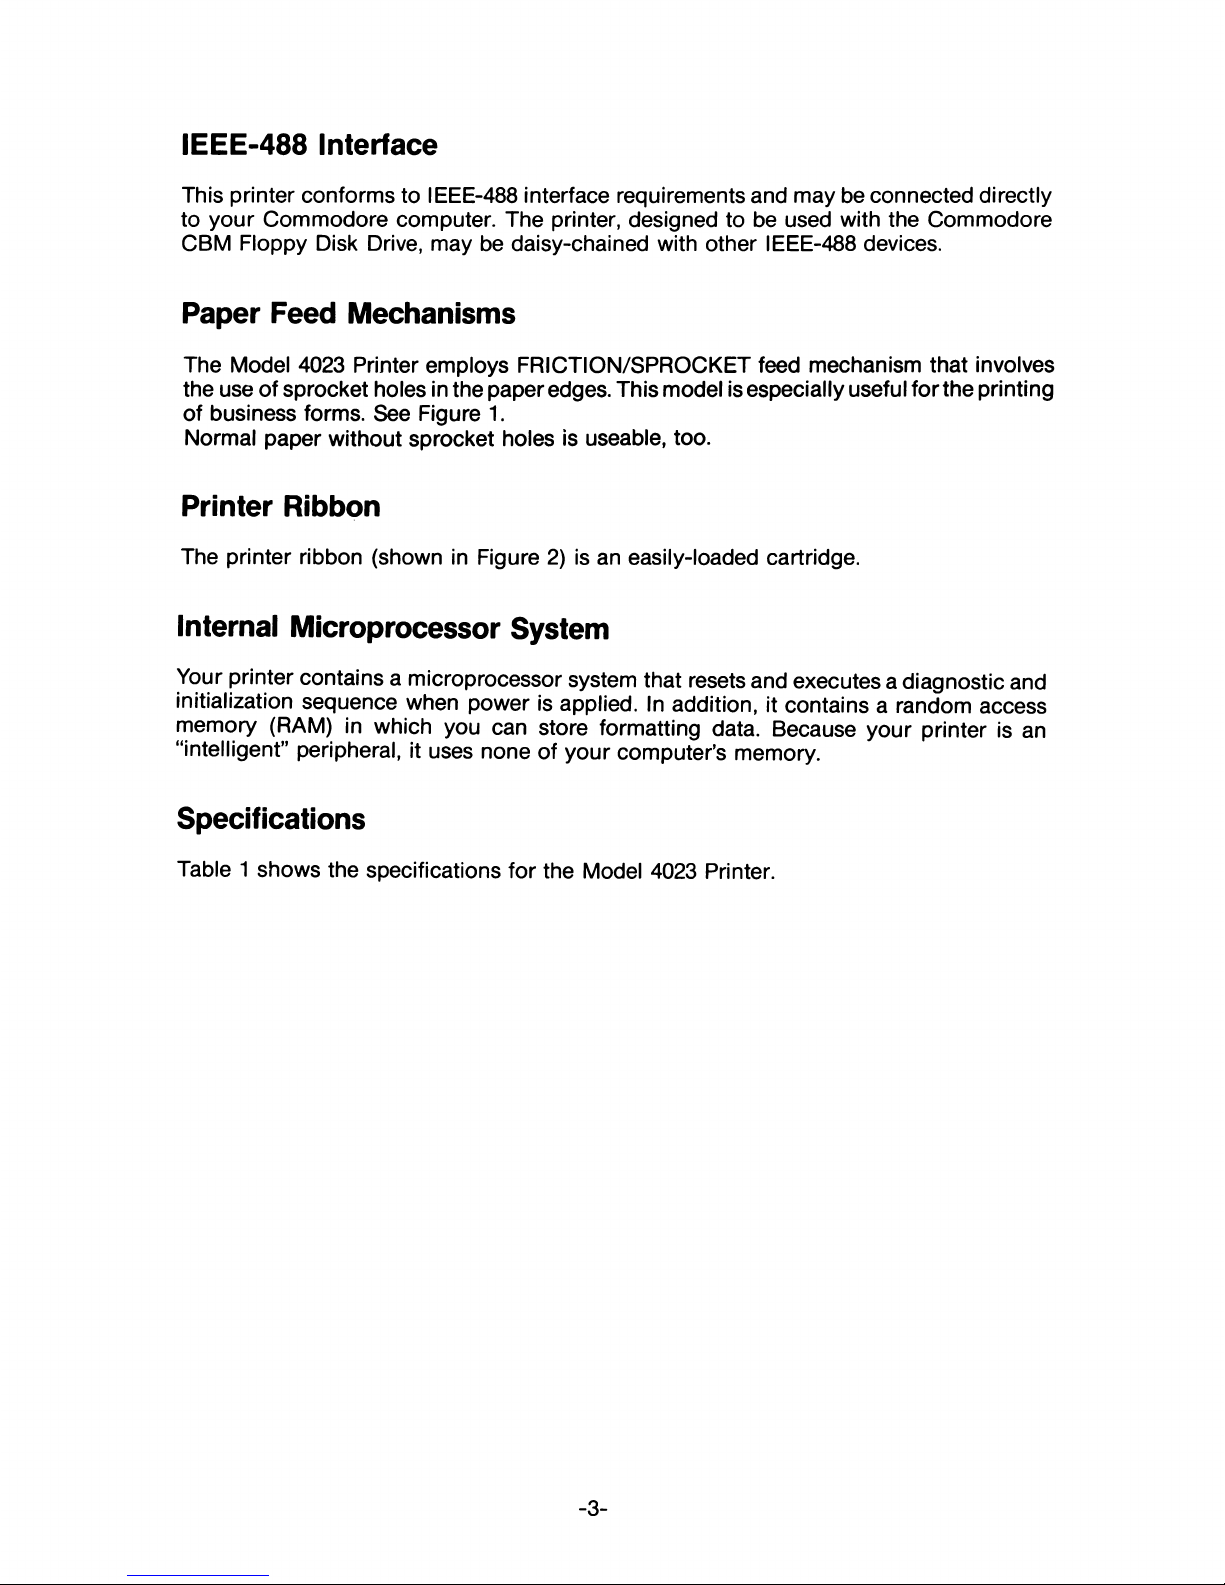
TABLE 1
Model 4023 Printer Specifications
Printing Method
Serial Impact Dot Matrix
Print Rate
45 Ipm with 80 columns printed
78 Ipm with 40 columns printed
124 Ipm with 20 columns printed
Print Direction
Bi-directional
Column Capacity
80
Character Font
8 X 8
Line Spacing
Programmable
Character Size
0.094" high, 0.08" wide
Copies
3, including original
Ribbon Type
Cartridge
Ribbon Life
1.2 X 10⁶ characters
Ribbon Cartridge
Commodore P/N 613160550
Paper Width
10" computer folded paper
Forms
7.5 + (0.5 X 2 sprocket margins)
Pin-to-pin distance: .5" longitudinally
9.5" laterally
5/32" diameter
- 4-
Page 11
UNPACKING YOUR PRINTER
Before you unpack your printer, inspect the shipping carton for signs of damage. If it
appears to be damaged, be especially careful when you inspect its contents. DON’T throw
away any of the packaging material until you have located all the contents of the carton!
The package should contain:
1. Commodore Printer, Model 4023
2. User Manual Number 4023025
3. Warranty card
4. Printer ribbon cartridge
If any of the these is missing or damaged, notify your Commodore dealer immediately.
Additionally, you must obtain the appropriate cable from your Commodore dealer to
connect your printer to your computer. See Section 2, page 8, for information about which
IEEE cable to get.
Setting up
Before starting to use your printer, you should make sure that it is in working condition.
This procedure includes checking for obstructions in the path of the printer head or paper
feed and that the printer ribbon is properly in place. Follow this procedure.
1. Lift and remove the plastic top cover to expose print head and mechanism.
2. Remove shipping screws.
Carefully lift front of printer unit and make it stands as the bottom of case be vartically
face to you and hold the unit by the one of your hand on the soft surface. Then, remove
the shipping screws with a Phillips-head screw driver. After it is removed, gently back
the unit to lay flat on a firm surface, position the printer front be face to you.
- 5-
Page 12

- 6-
Page 13
Section 2
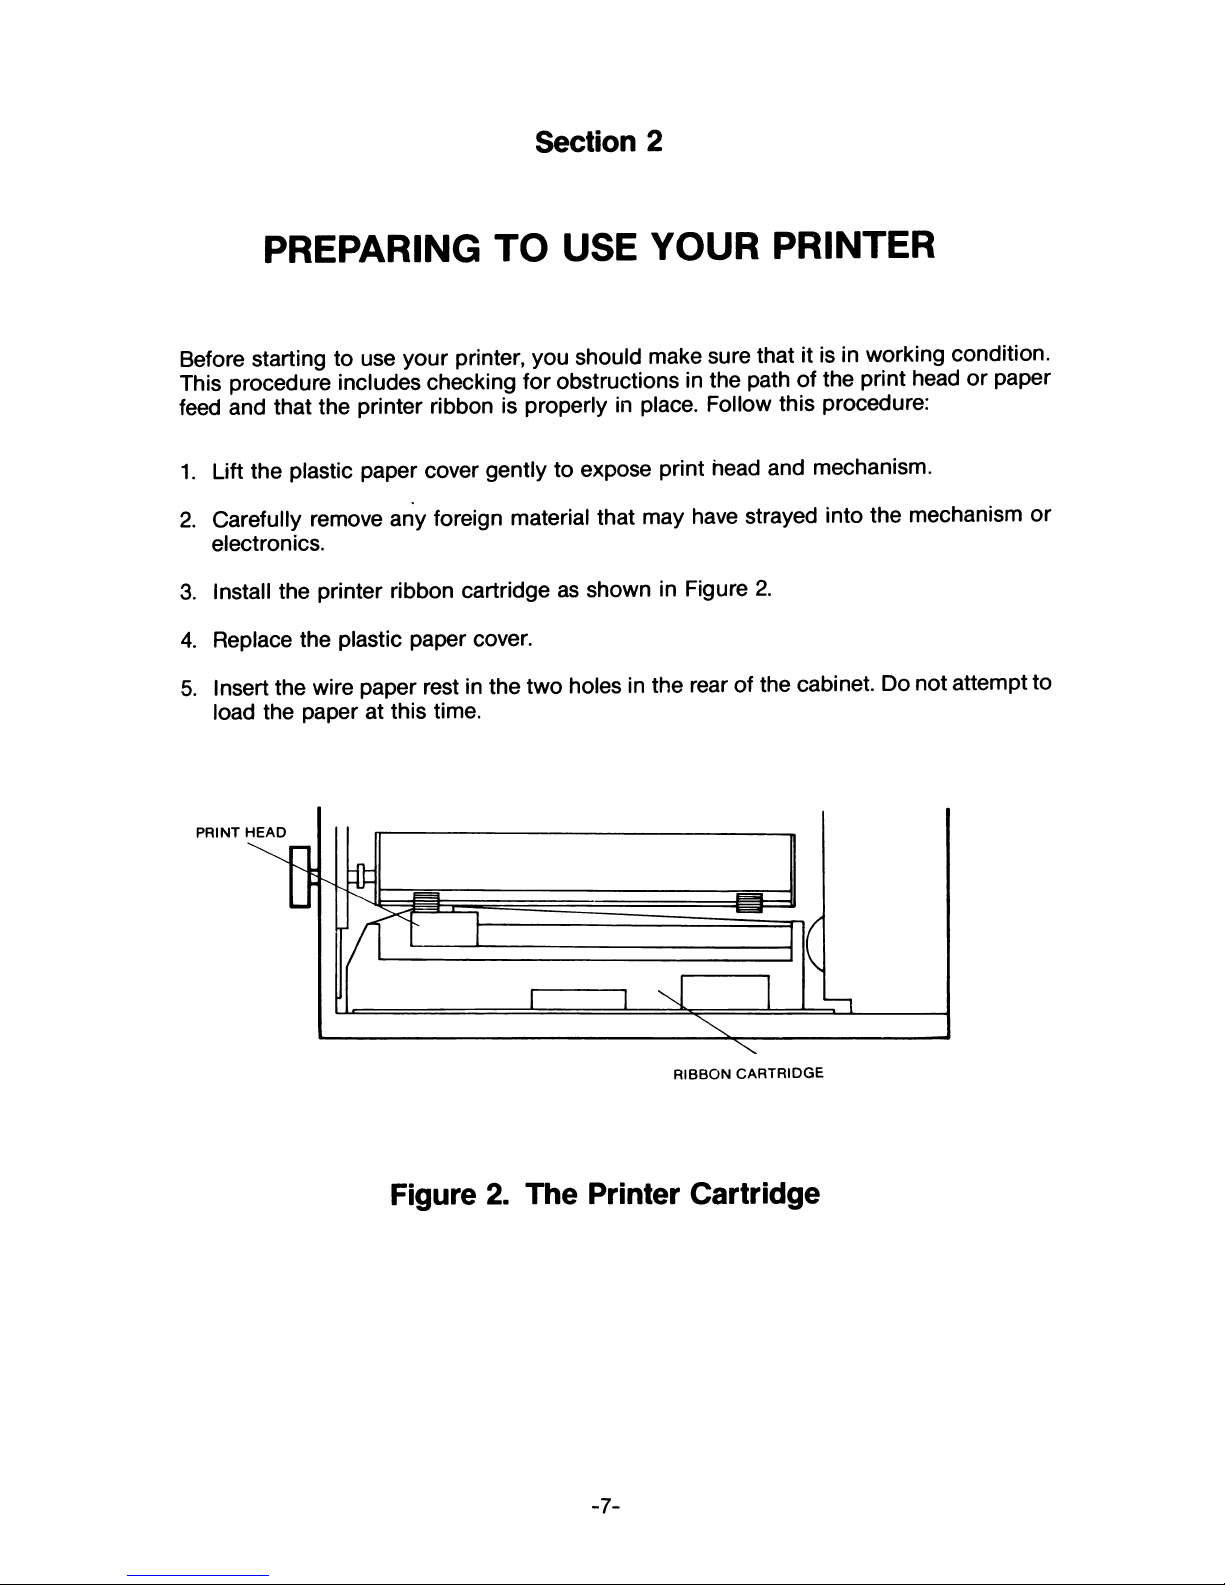
PREPARING TO USE YOUR PRINTER
Before starting to use your printer, you should make sure that it is in working condition.
This procedure includes checking for obstructions in the path of the print head or paper
feed and that the printer ribbon is properly in place. Follow this procedure:
1. Lift the plastic paper cover gently to expose print head and mechanism.
2. Carefully remove any foreign material that may have strayed into the mechanism or
electronics.
3. Install the printer ribbon cartridge as shown in Figure 2.
4. Replace the plastic paper cover.
5. Insert the wire paper rest in the two holes in the rear of the cabinet. Do not attempt to
load the paper at this time.
Figure 2. The Printer Cartridge
Page 14
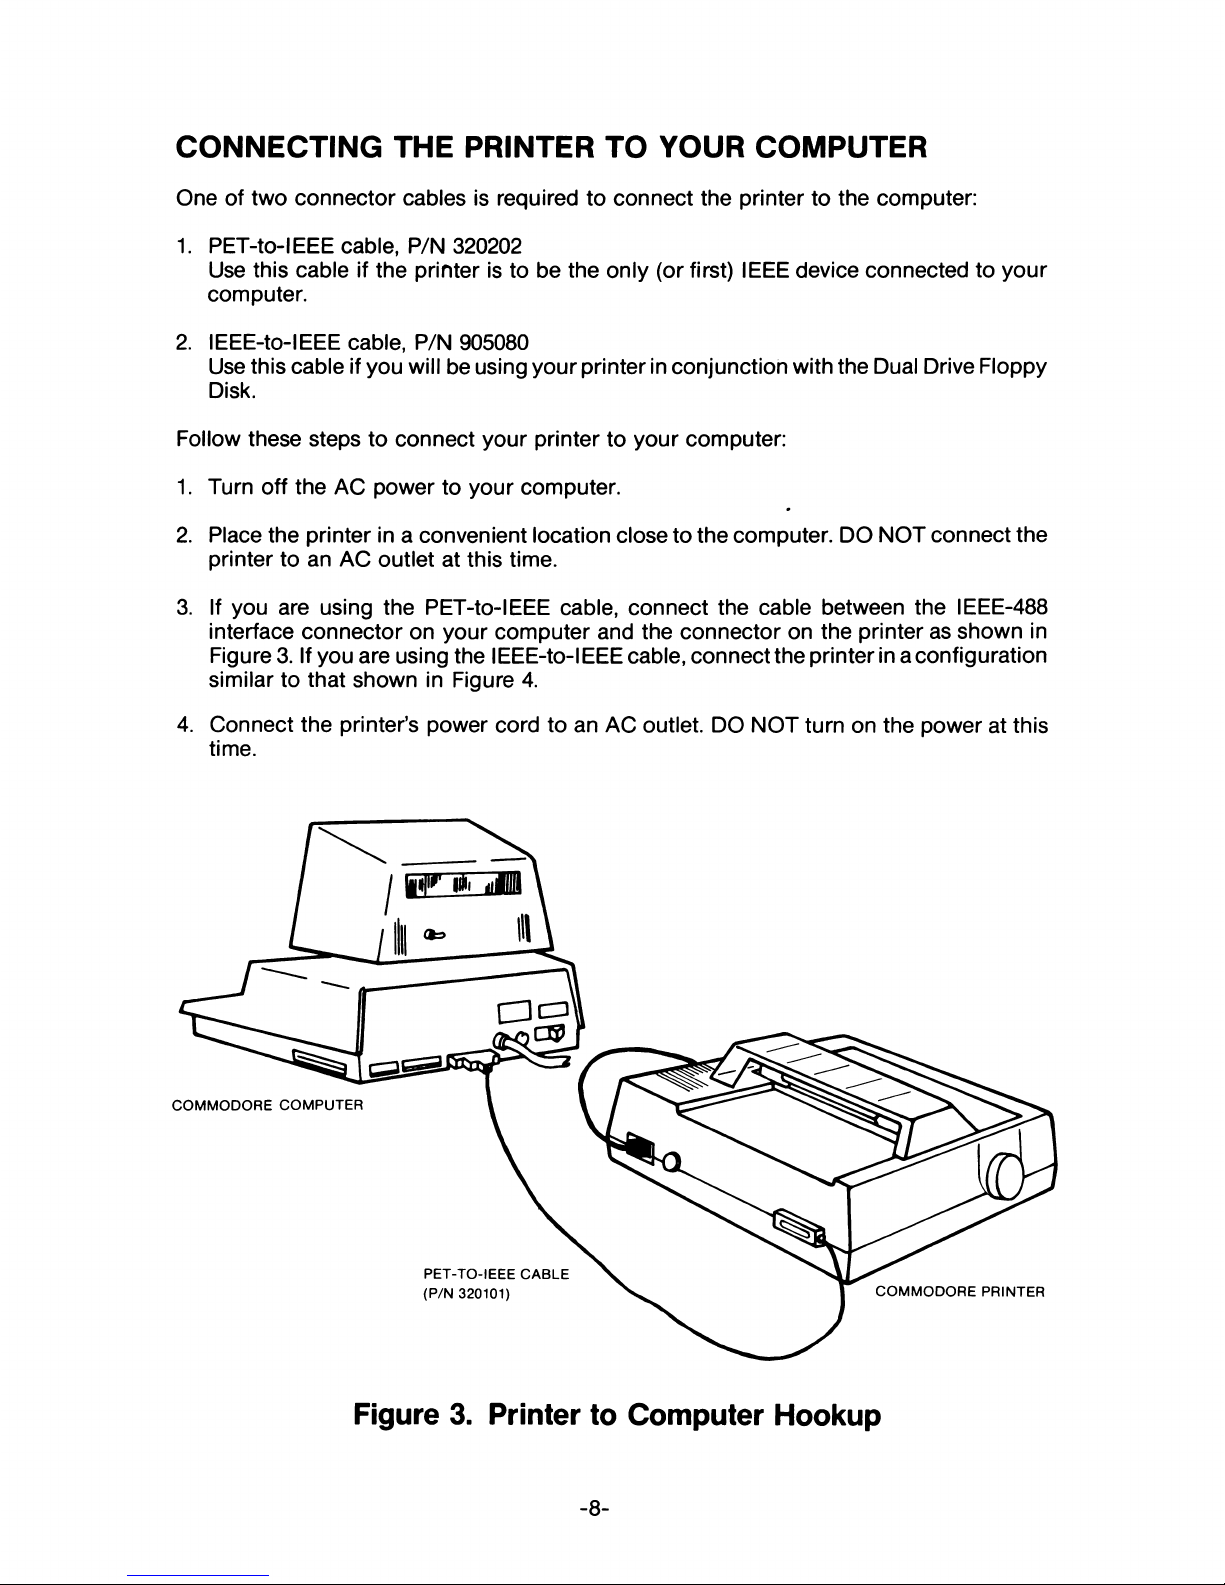
CONNECTING THE PRINTER TO YOUR COMPUTER
One of two connector cables is required to connect the printer to the computer:
1. PET-to-IEEE cable, P/N 320202
Use this cable if the printer is to be the only (or first) IEEE device connected to your
computer.
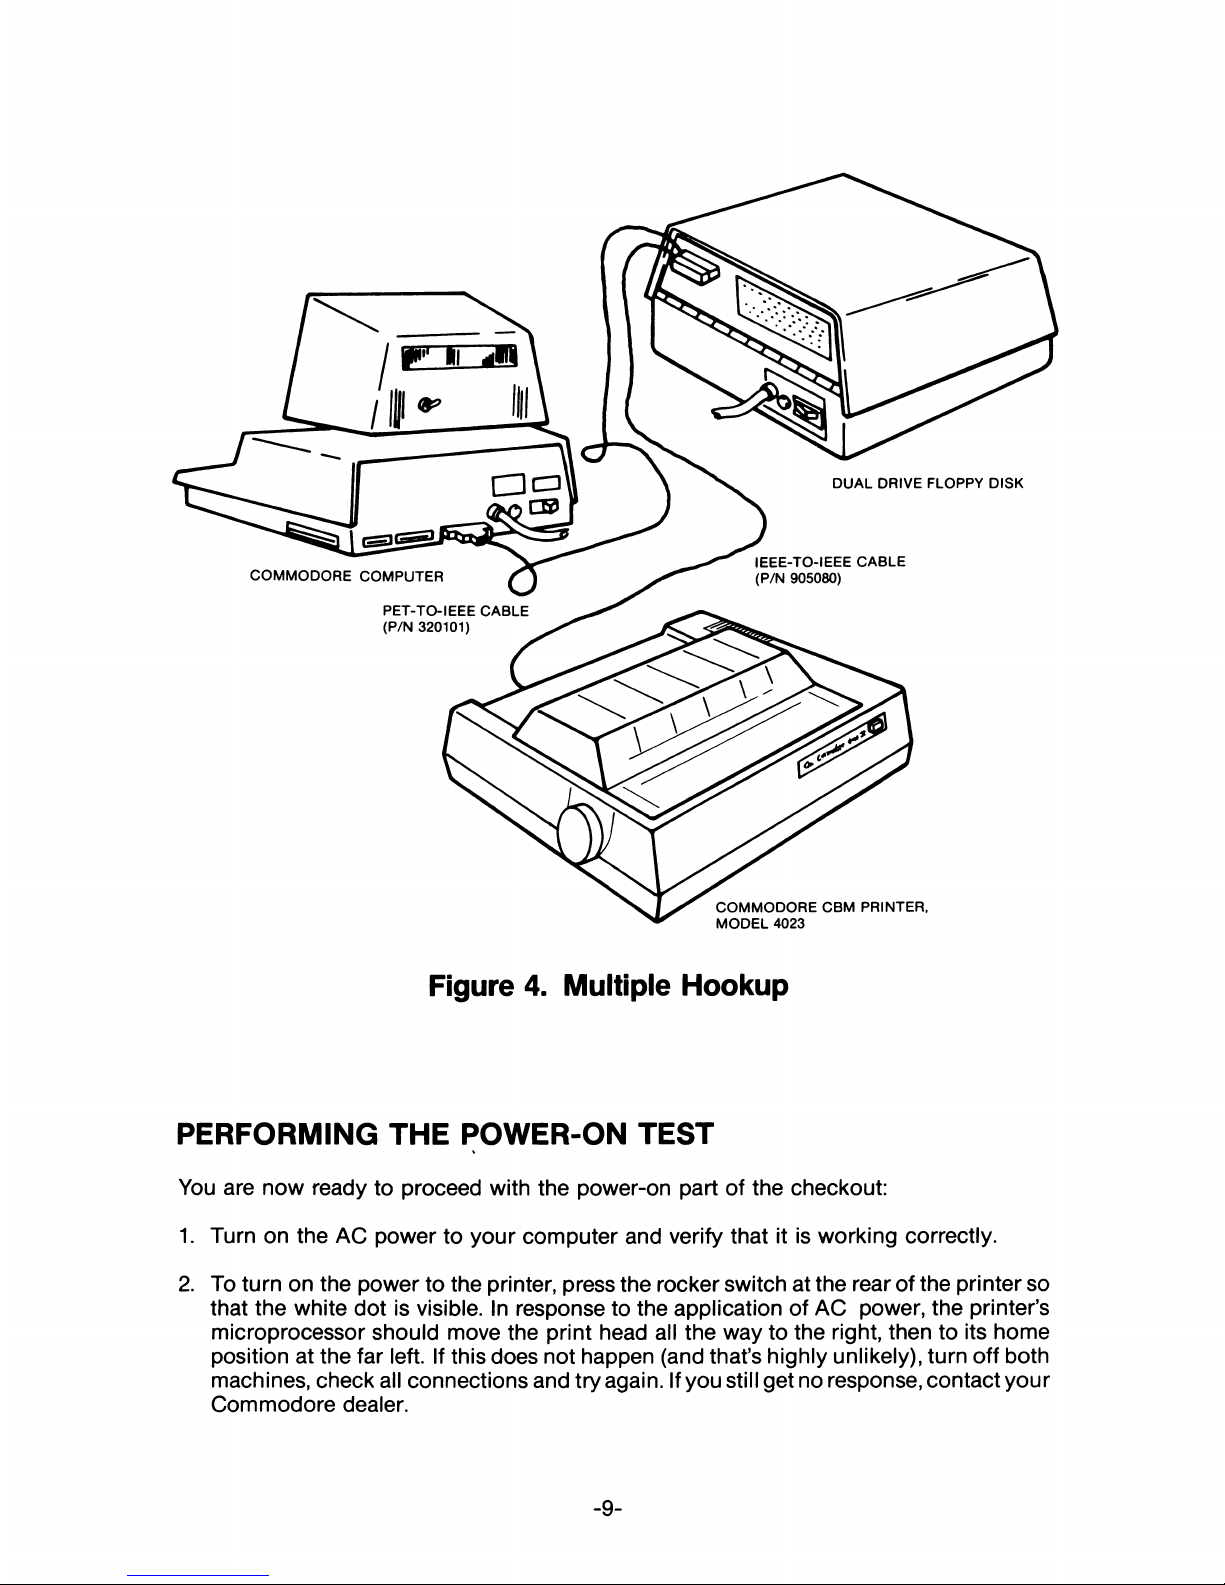
2. lEEE-to-IEEE cable, P/N 905080
Use this cable if you will be using your printer in conjunction with the Dual Drive Floppy
Disk.
Follow these steps to connect your printer to your computer:
1. Turn off the AC power to your computer.
2. Place the printer in a convenient location close to the computer. DO NOT connect the
printer to an AC outlet at this time.
3. If you are using the PET-to-IEEE cable, connect the cable between the IEEE-488
interface connector on your computer and the connector on the printer as shown in
Figure 3. If you are using the lEEE-to-IEEE cable, connect the printer in a configuration
similar to that shown in Figure 4.
4. Connect the printer’s power cord to an AC outlet. DO NOT turn on the power at this
time.
Figure 3. Printer to Computer Hookup
- 8-
Page 15
COMMODORE CBM PRINTER,
MODEL 4023
Figure 4. Multiple Hookup
PERFORMING THE POWER-ON TEST
You are now ready to proceed with the power-on part of the checkout:
1. Turn on the AC power to your computer and verify that it is working correctly.
2. To turn on the power to the printer, press the rocker switch at the rear of the printer so
that the white dot is visible. In response to the application of AC power, the printer’s
microprocessor should move the print head all the way to the right, then to its home
position at the far left. If this does not happen (and that’s highly unlikely), turn off both
machines, check all connections and try again. If you still get no response, contact your
Commodore dealer.
- 9-
Page 16
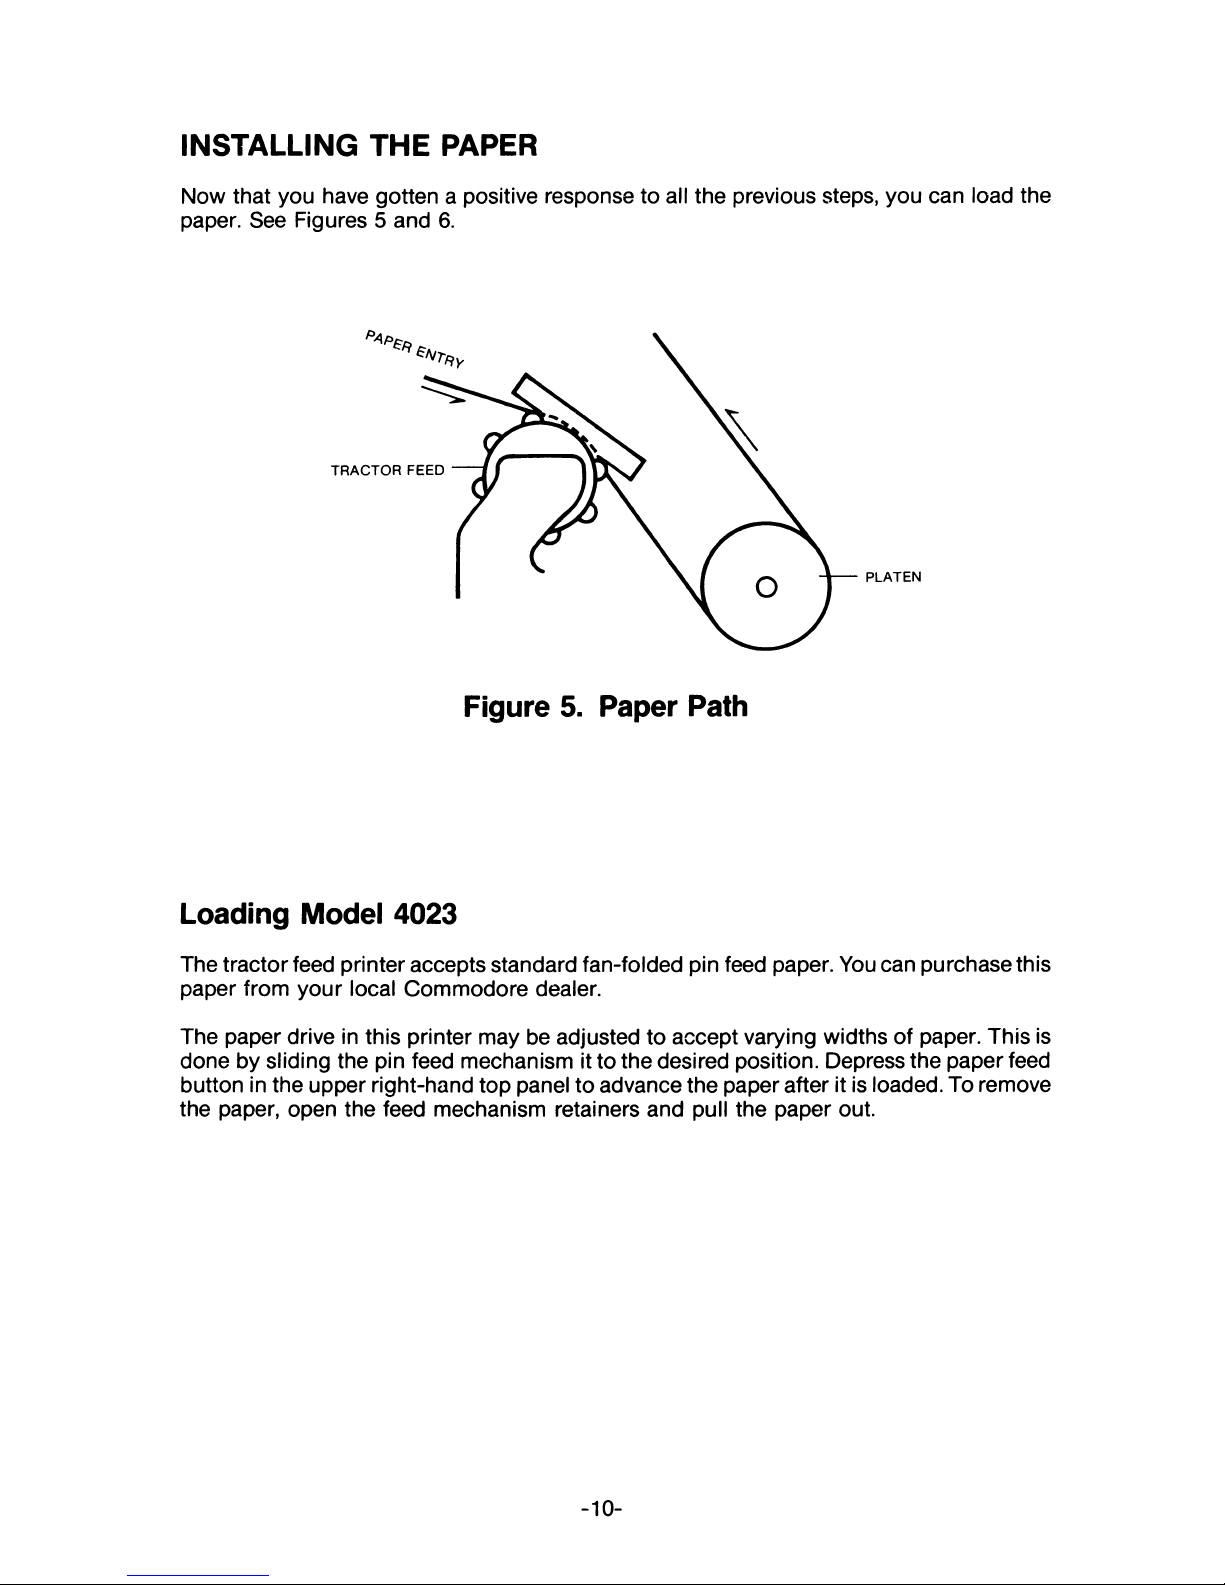
INSTALLING THE PAPER
Now that you have gotten a positive response to all the previous steps, you can load the
paper. See Figures 5 and 6.
PLATEN
Figure 5. Paper Path
Loading Model 4023
The tractor feed printer accepts standard fan-folded pin feed paper. You can purchase this
paper from your local Commodore dealer.
The paper drive in this printer may be adjusted to accept varying widths of paper. This is
done by sliding the pin feed mechanism it to the desired position. Depress the paper feed
button in the upper right-hand top panel to advance the paper after it is loaded. To remove
the paper, open the feed mechanism retainers and pull the paper out.
- 10-
Page 17
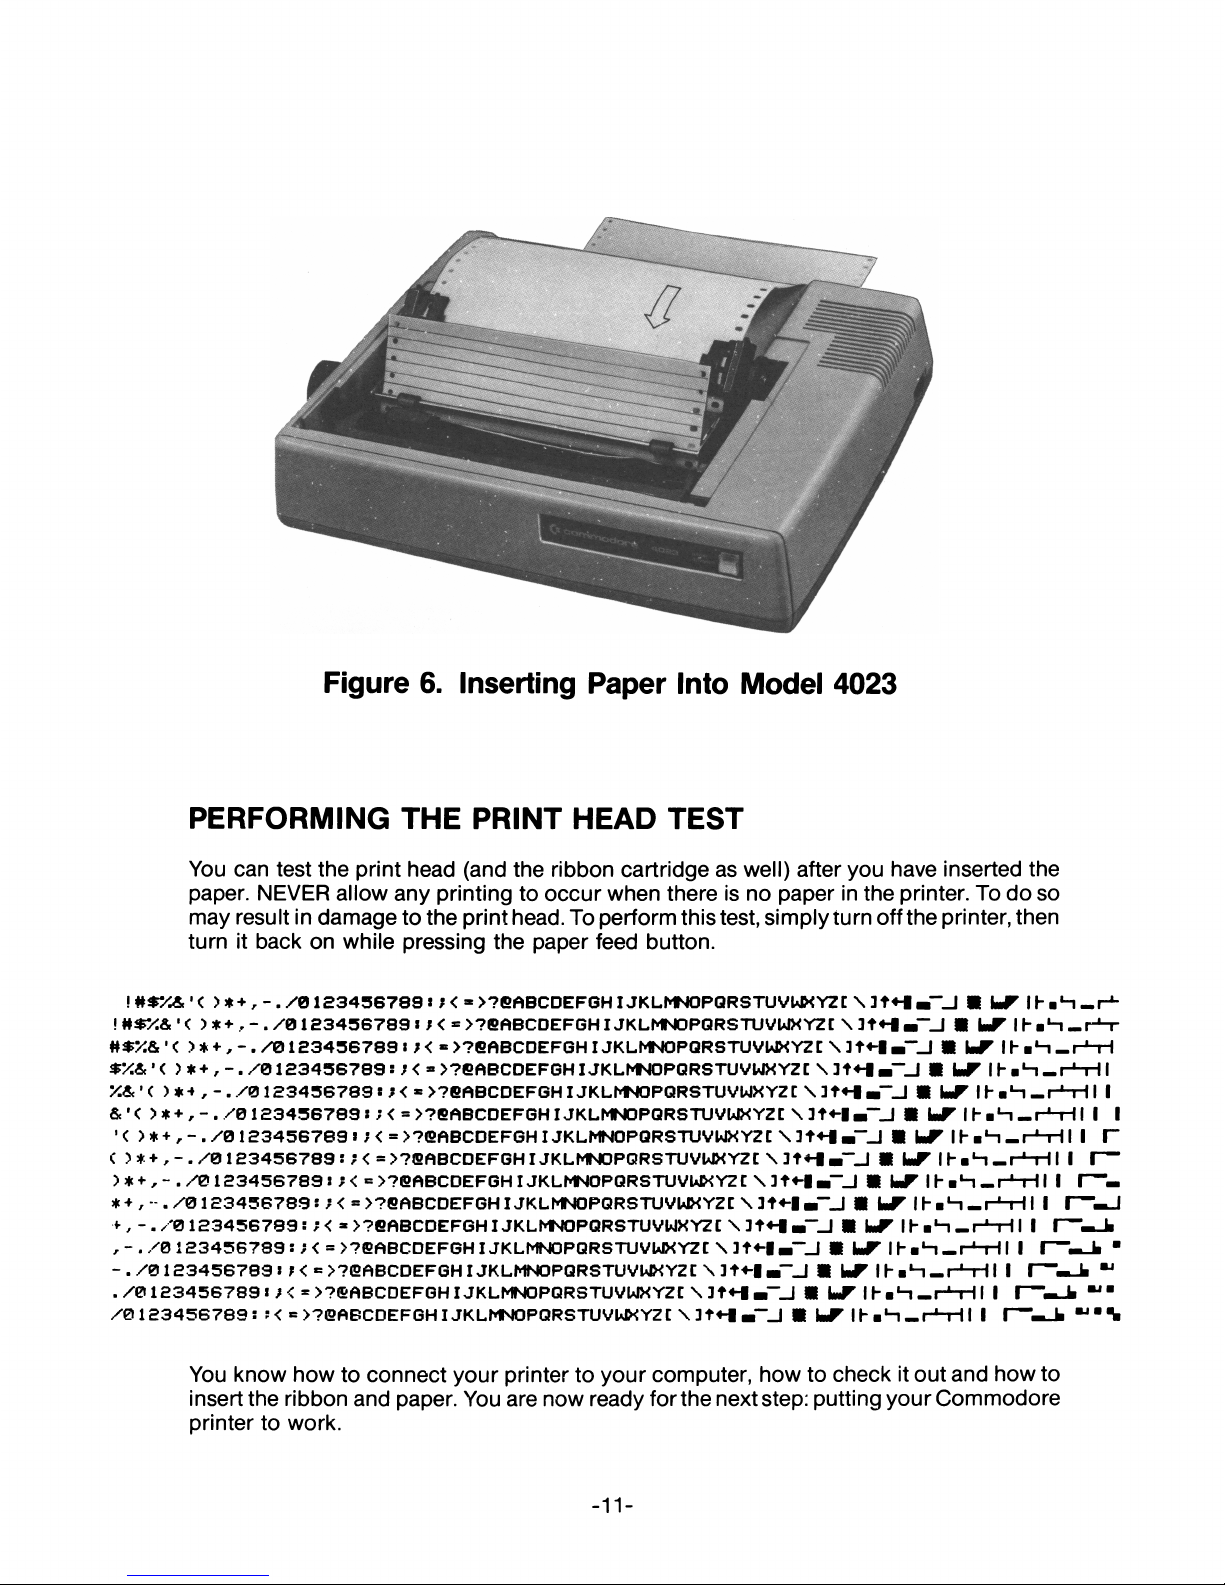
Figure 6. Inserting Paper Into Model 4023
PERFORMING THE PRINT HEAD TEST
You can test the print head (and the ribbon cartridge as well) after you have inserted the
paper. NEVER allow any printing to occur when there is no paper in the printer. To do so
may result in damage to the print head. To perform this test, simply turn off the printer, then
turn it back on while pressing the paper feed button.
!#$*&•< > *+ ,- ./ '01 £ 34 3 6 7 8 8 :; < « > ? e islBCDEFGH IJKLMNOPG RSTU VUKYZC\3t« -l b “_l 9 L F IH aL- i . . r ±-
> *+ ,-. /' 01 234 5 6 7 8 9:;< = >?eABCDEFGHIJKLM NO PQ RS TUVWXYZt\3t* - * - ~_| • L T I h ■ H «.r-*r
>* + ,-./0 12 34 36 78 9 : ; < « >?eflBCDEFGHIJK LMNO PQRSTUVWXYZC\ 3 9 V F I h b*-i _ r ‘-H
> * + , - . /0 123 45 6 78 9 : ;< * >?eftBCDEFGHIJKLMMOPGRSTUVWXYZC\3t* -| « - _J 9 imF Ih ■ *-i _ r * -r lI
>*■* , -../01234 56789 :; < * >?6ABCDEFGHIJKLMNOPQRSTUVWXYZt \ 3t« -| - -_ | 9 imF I h ■ *-| _ r*nrl I I
&•< > *+ ,- . / 0123 4 5 6 789 :;< = >?eABCDEFGHIJKLMNO PQRSTUVUlXYZC\3t< -|« -_ | ■ U F Ih a H -r ' - H ! I I
•< ) * + , - . / 01 2 3 4567 6 9 : ;<=>?eftBCDEFG H I JKLMNOPQRSTUVWXY2 t \ 3t ^ |« ” _J 9 b T I h ■‘"1 _ r * - H I I 1“
( )* +,-. /0 12 34 567 89 : ;< = >?8 ABCDEFGHIJKLMNOPQRSTUVUIXYZt \ 3t« -|« - .J 9 UF 11- ■ H _ r L-r lI I I—
>* + ,- . / 0 1 2 3 45 6 7 8 9 : t< = >?6 ABCDEFGH I JKLMNOPQRSTUVUKYZt \ 3t« -|« - J 9 imF I h aH _ r * - H I I I— -
/ 01 23 4 3 6 7 89: ;< => ?eftBCDEFGH IJKLM N OP QR STU VW X YZt\3t* - | » - _J • L F Ih ■ *-| _ rH H I I I— —J
*,-./0 123456789 : ; < * >?eABCDEFGH I JKLMNOPQRSTUVWXYZt \ 3t+-| ■ " -I 9 b T H -a '-|_ r-,-H I I I— - J i
r ~ . /0 1 23456789 s ; < = >?EABCDEFGH IJKLMNOPQRSTUVUIXYZt \ 3t«-| m ~._l B \mF IF aH _ r J-H I I I— b_k ■
-./ 0 123 4567 89 :K =>?ffiA BC DE FG H I JKLMNOPQRSTUVW XYZC\3t« - |« - .J 9 b r U -B ^ n -H - H I I I— - _ k "
. / 0 1 23 456 789 : J < = >?©ABCDEFGHI JKLMNOPQRSTUVWXYZt \ 3t« -| mi~._l 9 L T Ih a * " !_ r*-H I I I— __k “ ■
/ 0 123456789 : : < = >?<20BCDEFGH IJKLMNOPQRSTUVUKYZt \ 3t« -I m ~._l 9 b T Ih a *-| _ r* -H I I I— “■*
You know how to connect your printer to your computer, how to check it out and how to
insert the ribbon and paper. You are now ready for the next step: putting your Commodore
printer to work.
- 11-
Page 18

- 12-
Page 19

Section 3
USING YOUR PRINTER
Your printer does much more than just give you clean, fast copy. Since it has its own
internal microprocessor system, it is very versatile. In this section you will learn howto use
your printer to print out listings, program results, and graphic displays. You will learn how
to use it to format data and enhance character size. You will even be able to create your
own custom character.
Before you attempt to use your printer, make sure you know how to do the following:
1. Operate your Commodore computer.
2. Do elementary programming in BASIC.
3. Write files to and from a peripheral device such as the tape cassette recorder or the
Commodore Floppy Disk Drive.
4. Open and close files.
You should refer to your computer User Manual for this information.
This section uses certain conventions to indicate certain actions or requirements:
Example Description
dn Italicized lowercase letters in a syntax indicate that
you should enter something (a variable) in place of
the letters.
[ ] Brackets indicates optional usage.
NOTE: The commands described in this manual apply specifically to use
with the printer. Certain of the commands may follow a slightly different
general form or produce different results from those described here when
they are used for the computer or other peripheral devices. Consult the
appropriate manual for the exact usage of these commands in other
contexts.
- 13-
Page 20
SPECIAL PRINTER-ASSOCIATED COMMANDS
When want to print something on your printer, essentially what you are doing is
transferring the video screen function to the printer. A few special BASIC commands allow
you to make this transfer. Most other BASIC considerations and rules remain the same.
Always remember to press the RETURN key after you type each command.
The OPEN Command
The syntax of the OPEN command is:
OPEN Ifn, dn, [sa]
This command sets a correspondence between a file number and a physical device. The
Ifn or logical file number may be any number you choose to assign to your file from 1 to
255. It doesn’t matter which number you choose as long as you remain consistent
throughout your set of commands. The dn or device number (also known as the primary
address) refers to the device to which you wish to send the file. In the case of the printer,
the number must be 4 since that is the number assigned to it at the factory.
NOTE: If you should want to change a printer number, you can have it
changed by an authorized Commodore technician. See your Commodore
dealer about this. (You might want to have a printer’s device number
changed if you have two printers attached to your computer. You need to
refer to each of them individually: hence, the need to change one of the
device numbers.)
The sa or secondary address is somewhat of a unique concept. It alerts the printer’s
microprocessor system that formatting is to occur. Secondary addresses are thoroughly
discussed starting on page 21, under FORMAT CONTROL.
The CMD Command
The syntax of this command is:
CMD Ifn
CMD transfers control from the computer to the printer. The Ifn must be the same as that in
the OPEN statement with which it is associated. Unlike a PRINT command, the line or bus
to the receiving device is left open. The line or bus to the receiving device (in this case, the
printer) is said to be “listening.” When you give the CMD command, the printer prints
READY and the red LED in the paper feed button lights up to indicate the printer is waiting
for further commands. If you follow a CMD command with a PRINT or a LIST command,
the output is directed to the printer.
- 14-
Page 21

The PRINT # Command
The syntax of the PRINT # command is:
PRINT # Ifn, data
PRINT # works just like PRINT except that it directs output to the printer instead of the
video screen. The line to the printer is closed after printing the designated data. The line or
bus to the printer is said to be “unlistened.” Therefore, if you have used the CMD
command, it is necessary to follow it with a PRINT # command in order to close down the
connection between the printer and the computer.
NOTE: In standard Commodore BASIC, the PRINT command can be
abbreviated as a question mark (?). You may not do this with PRINT #. It
must always be typed out as PRINT #.
The CLOSE Command
The syntax of this command is:
CLOSE Ifn
You should always close a file after printing from it. You may not exceed ten open files so it
is well to make a habit of closing files when you are finished with them. This way you will
always have the maximum number of files available for use. As you shall see later, one file
may be open under several logical file numbers at one time.
Remember, since CMD does not close the line to the printer, you must always precede a
CLOSE command with PRINT # in order to properly close the file.
Example:
Right Wrong
OPEN 5, 4
PRINT#5,"HELLO THERE"
CLOSE 5
OPEN 5, 4
CMD 5,"HELLO THERE"
PRINT#5:CLOSE 5
OPEN 5.4
not CMD 5. “HELLO THERE”
CLOSE 5
- 15-
Page 22

OPEN 5,4
OPEN 5.4
CMD 5,“HELLO THERE"
not
CMD 5. "HELLO THERE”
PRINT#5,"HELLO THERE”
PRINT#5,"HELLO THERE”
CLOSE 5
PRINT#5:CLOSE 5
OPEN 5. 4
OPEN 5, 4
PRINT#5,"HELLO THERE”
not
PRINT#5,"HELLO THERE”
CMD5,"HELLO THERE”
CMD5,“HELLO THERE”
PRINT#5:CLOSE 5 CLOSE 5
Armed with these thumbnail descriptions of what the printer-related commands do, you
can now proceed to the next part of this section, which tells you how to use these
commands to control your printer. You can find more detailed information about these
commands in your computer User Manual.
PRINTING IN THE DIRECT MODE
The direct mode of communication allows you to enter printing commands at the
keyboard.
The following example shows the entire direct mode listing process of a short BASIC
program. A file containing a single BASIC statement is typed into the computer’s memory.
The file is opened, the output channel is opened, and the file is listed. After the file is listed,
the output channel is closed and the file is closed. The printer is now out of use and the
computer is ready to accept new commands.
Example:
—The screen displays: —
10?‘THIS IS A TEST’ 10?“THIS IS A TEST’
You place the data In the
computer’s memory.
OPEN 3,4
OPEN 3,4
READY.
Ydu open the file and
give it a Ifn of 3. The 4
makes the file available
to the printer.
CMD 3
CMD 3
The printer is “listening.”
LIST
LIST
REAOY.
10 PRINT'THIS IS A TEST"
The program is printed
on the printer.
The printer is “listening.”
PRINT #3
PRINT #3
READY.
READY.
Use the PR INT#
command to “unlisten”
the printer.
CLOSE 3
CLOSE 3
READY.
You close the file so that
Ifn 3 can be used for
something else.
- 16-
Page 23

PRINTING UNDER PROGRAM CONTROL
As we have seen, you can control the printer directly from the keyboard. You can also
control the printer from within a BASIC program. In the example below, this short BASIC
program is placed in the computer’s memory. (It could have been placed there from the
keyboard, a cassette tape, or a floppy disk):
10 OPEN 3,4
20 CMD 3
30 PRINTTHIS PROGRAM ILLUSTRATES PROGRAM CONTROL”
40 LIST
REMEMBER THIS: The LIST command within a program terminates
program execution. Then, when you are finished running a program, you
must type the PRINT # command to close the channel. Then type the
CLOSE command to close the file.
The RUN command is given and the resulting printout is shown here:
TH IS PROGRAM ILLUSTRATES PROGRAM CONTROL
10 OPEN 3 ,4
20 CMD 3
30 PR IN T " T H IS PROGRAM ILLUSTRATES PROGRAM CONTROL"
40 L IS T
READY.
A more sophisticated example shows a BASIC program that takes advantage of some of
your printer’s special features. The program directs the printer to generate the following:
• An enhanced heading. You will find more about this feature on page 33.
• The entire printer character set.
• A listing of the program.
Two special character functions are used in the program: the OFF/RVS key and the CRSR
Down (Cursor Down) key. You may find out more about these starting on page 33.
- 17-
Page 24

A printout of a program you place in your computer’s memory looks like this:
!0 O P E N 4 ,4
00 FOR 1=30 TO 9 5 sA $ = A *+C H R *< I> :NEXT
30 FOR 1=160 TO 2 2 3 :B *= B *+ C H R S < I>: NEXT
40 C * = "a "+ A *
50 D *=» a "-*B *
S3 E * = " H ,,+A*
70 F ^ - S P + B *
90 G *= ,,a ,,+C$
9© HS=="Sn+D*
100 P R IN T # 4 ,C H R $ < 1 ) "CBM 40 2 3 PRINTER CHARACTER SET"
110 PR IN T #4 * P R IN T#4 »PRIN TM4
120 P R IN T # 4 ,A *
130 P R IN T # 4 ,B *
140 P R IN T#4,C $
150 P R IN T # 4 ,D *
180 P R IN T # 4 ,E $
170 P R IN T # 4 ,F *
180 P R IN T # 4 ,G *
190 PR IN T # 4 „H *
20 0 CMD4
21 0 PR IN T s PR IN T s PR IN T s PR IN T 5 PR IN T
22 0 L IS T
Here is an explanation of each statement in the program.
Line No. Explanation
10 Opens the printer as a file for printing
20 Sets A$ equal to a string containing all the unshifted characters from
the keyboard
30 Sets B$ equal to a string containing all the shifted characters from the
keyboard
40 Sets C$ equal to the set of all unshifted characters printed in reverse
field
50 Sets D$ equal to the set of all shifted characters in reverse field
60-90 Each time a PRINT statement is encountered as in lines 120-190, a
Carriage Return is executed (unless a semicolon is placed at the end of
the preceding PRINT statement). Therefore, each string as in lines
160-190 must begin with a Cursor Down to reset the printer to
lowercase.
- 18-
Page 25

NOTE: The use of a Cursor Down to set to lowercase and Cursor Up to
reset to uppercase enables you to use upper- and lowercase letters on
the same line.
Printing a Cursor Down has the same effect on the printer as a POKE
59468, 14 has to the computer’s screen in that it prints the characters
following the Cursor Down in lowercase. However, after a Cursor Up or
Carriage Return is encountered, the printer will resume printing in
uppercase and graphics.
60 Sets E$ = to a Cursor Down plus A$
70 Sets F$ = to a Cursor Down plus B$
80 Sets G$ = to a Cursor Down plus C$
90 Sets H$ = to a Cursor Down plus D$
100-190 PRINT #4 indicates to the computer to print to device 4 (in this case, the
printer)
100 CHR$(1) increases the width of the printed character to twice its
original size. This line prints the title of the program in ‘enhanced
characters.’
110 Prints three Carriage Returns on the printer
120-190 Prints each of the strings constructed in lines 20 through 90 on the
printer
200 CMD4 transfers all commands which would normally be displayed on
the screen to the printer. However, if this mode is used, care must be
taken to close the file to assure proper functioning of the computer after
the printout is completed.
210 Prints 5 Carriage Returns on the printer.
220 Prints out a listing of the program.
NOTE: Printing a listing from within a program terminates the program.
Therefore, LIST should be placed at the end of the program.
- 19-
Page 26
To execute this program, simply type:
RUN
This is the result:
CBM 4023 PRINTER CHARACTER SET
! - ' < > * + , - . /0 123456789 « J< « >?©ABCDEFGHIJKLMNOPQRSTUVWXYZZ \1 U -
■ M \ J F — I I — H h ^ L \/r T 0 _ * l rXO* U
! "# *% & *< > *+, -. /0123 45 6 78 9 : ;< =>?Gabcdefgh ijK 1 mno pqrstuv wxyz+ i I
«""«¿R H-«L- i_ rH ~ ll 1 r " - ^ . V-ABCDEFGHIJKLMNOPQRSTUVWXYZC \3 t4 -
10 0 P E N 4 ,4
20 FOR I=32 TO 95 sA*=A*+CHR$< I )* NEXT
30 FOR 1 = 160 TO 223 : B$=B$+CHR#< I > * NEXT
40 c * = - a -+ A *
50 D * = " flM+B*
60 E^="H ,,+A$
70 F*=";S" *B$
00 G $-*aM+c*
30 *-0*
100 P R IN T #4,CH R *< 1 > "CBM 4023 PRINTER CHARACTER SET"
110 P R IN T # 4 :P R IN T # 4 « P R IN T # 4
120 P R IN T # 4 ,A *
130 P R IN T # 4 ,B *
140 P R IN T#4/C $
150 P R IN T # 4 ,D *
160 P R IN T # 4 ,E $
170 P R IN T # 4 ,F *
1S0 P R IN T #4 ,G *
190 P R IN T # 4 ,H *
20 0 CMD4
21 0 P R IN T:P RIN T :P R IN TS P R IN T :PR IN T
22 0 L IS T
READY.
Now, to close the channel and the file, type:
PRINT #4
CLOSE 4
- 20-
r h
Page 27
FORMAT CONTROL
Through the printer’s format control option, you can control the interpretation of data sent
to the printer. The format control option allows you to print numbers in columns, set the
number of lines per page, and perform other useful formatting tasks. To implement the
format control option, you use the third parameter of the OPEN command.
OPEN Ifn, dn, sa
As before, Ifn is the logical file number, dn in the device number (also known as the primary
address), and sa is the secondary address. It is in the secondary address position that you
enter the format control parameter.
You can enter any of the eleven secondary address in your OPEN command. These are:
0 Print data exactly as received
1 Print data according to a previously-defined format
2 Store the formatting data
3 Set the number of lines per page to be printed
4 Enable the printer format diagnostic messages
5 Define a programmable character
6 Set spacing between lines
7 Upper/Lower case
8 ASCI I/Graphics
9 Suppress diagnostic message printing
10 Reset printer
After the appropriate OPEN statement has been transmitted, a PRINT # statement is
required to transmit the secondary address information to the specified device (in this
case, your printer).
Remember, that it is possible to have as many as ten files open simultaneously. This allows
you to perform several formatting functions at one time on the data in the computer’s
memory. There are examples of the formatting capabilities described in this section in the
Appendix.
Printing Data Exactly As Received: sa=0
This secondary address is the default value. Whether or not you include it in your OPEN
statement, the printer prints data exactly as received. Up to 80 characters are printed on
each line and if the next character is not a Carriage Return, a Carriage Return is performed
automatically and the overflow characters are printed on the next line.
- 21-
Page 28

Example:
10 OPEN 5 ,4
20 P R IN T S 5 ," T H IS IS A T E S T !"
Results in:
TH IS IS A TEST!
Printing Data Accoridng to a Previously Defined Format: $a=1
A secondary address of 1 invokes the formatting features of your printer. The data to be
printed is arrayed according to a previously specified format using sa=2. If you should
transmit a string of data when sa=1 is in effect and there is no formatting data in the
printer’s memory, then the data string is printed exactly as it is received.
When formatting string data from the computer, a skip, CHR$(29), must be sent to delimit
the end of a string being edited to a field. Leading blanks are stripped off a string; therefore,
to print a blank alpha field you must transmit a shifted blank, CHR$ (160). The alpha field is
then right padded with blanks as shown below.
Example:
10 0PEN2, 4 , 2
20 OPEN1, 4 , 1
30 PR IN TS 2, "AAA AAA AAA"
40 PRIN TS 1 , "ABC“CHR$< 29 >CHR$< 1 6 0 >CHR$<2 9 ) "D EF"
50 CL0SE2:CLOSE 1
Results in:
ABC DEF
- 22-
Page 29
Storing the Formatting Data: sa=2
Perhaps the most significant feature of your printer is its ability to format data. Picture
formatting generates a simple one-to-one correspondence between the column position
of the print line and the symbol that is to appear there. Formatting allow you to left- or right-
justify columns of data, or to align numeric data on its decimal point position.
Example: 10 o p e n s , 4 ,a
SO OPEN1,4 , 1
30 P R IN T # a , " * * * .9 9 *
40 P R IN T # 1 ,. 0 5
Results in:
« .0 5
The commands in the example above transfer formatting data to the printer’s internal
memory for future print editing use. Once completed, READY and the blinking cursor
appear on the screen.
The Formatting Characters
Specification of a format is accomplished by a set of formatting characters which, when
joined, define the rules of formatting data for the printer format interpreter. The formatting
characters may be grouped into three classes:
Numeric 9,Z,$,¥,S,.,-
Alpha A
Skip (Blank)
Fields are specified by combining these formatting characters. Up to 136/250 characters
are accepted in a format string. Excess (overflow) characters are printed onto the next
print line.-Table 2 contains formatting examples.
Numeric
9 - Specifies a digit position in a numeric field. If there is no digit to print in this position,
then a blank is substituted.
Z-Also specifies a digit position in a numeric field. Unlikethe9,thischaracterforcesa0to
be printed if there is no digit available for this position. This is desirable if leading zeroes are
required in a numeric field.
- 23-
Page 30
$ - If one $ is specified, then the field is treated as a dollar amount with a fixed-sign position
as follows:
$123
$ 1 2 3 4 .0 0
If all digit positions to the left of the decimal point are $, then the number is printed as a
floating dollar sign right justified before the most significant digit.
V - Above $ sign may be replaced with ¥ sign in JIS version. The function will be same as
those described.
S - When preceding a numeric field, the sign of the number (4- or —) is to be printed in this
fixed column position.
. - Defines the position of the decimal point and is printed literally in this positin.
— Specifies a trailing sign. If the number is +, a blank is printed. A numeric field cannot
have both S and —. When this is the case, only the S will be honored.
Here are some examples of format fields:
a) Field width and decimal position specified-
99 Two-digit integer with no sign
99.999 Five-digit real type with 3 positions to right of decimal
b) Dollar sign insertion-
$99.99 Fixed dollar sign
$$$.99 Floating dollar sign
c) Leading zeros forced-
ZZZZ No decimal
ZZ.99 Decimal
d) Trailing minus-
999 — Blank is printed, if number is positive
e) Signed numbers-
s99 + or — always printed
- 24-
Page 31

Table 2 contains more examples of sample data, format fields, and the resultant editing.
FORMAT FIELD DATA EDITED RESULT
AAAAA ABC ABC
AAAAA
ABCDEFG
ABCDE
$$$$
99
$99
$9999 99
$ 99
$99.99 77 $77.00
$99.99 -77 $77.00
$99.99-
-77
$77.00-
$99.99- 77 $77.00
S$99.99 77 +$77.00
ZZZZ
77 0077
ZZ.999
77
77.000
ZZZ.99
77 077.00
999.99 77 77.00
.99
77
★ ★
.99
.001
!oo
S.999 1.5E—02 +.015
Z.999— 1.5E—02 0.015
Z.999— -1.5E—02 0.015-
Note: Above $ sign will be replaced with ¥ sign in JIS version.
TABLE 2. Formatting Examples
The printer software handles up to ten significant figures, and an exponent range ±99 on
numbers passed as data to be formatted. Exponential numbers must be normalized such
that 0<|X|<10.
- 25-
Page 32

Alpha (String Data):
The letter A represents one position of an alpha field. Within the field, leading blanks are
truncated, the field is left-justified, and it is padded to the right with blanks. Shifted blanks
CHR$(160), are not deleted if in the leading positions.
Example:
10 OPEN 2 , 4 , 2
20 OPEN 1 ,4 , 1
30 P R IN T #2, "A AA AAA"
40 P R IN T# 1 , "CBM"CHR*< 2 9 ) "CBM"CHR*< 2 9 )"CBM
50 CL0SE2:CLOSE 1
Results in:
c CB CBM
Skip (Blank):
Simply use blanks where spaces are required:
Example:
10 OPEN 2 , 4 , 2
20 OPEN 1,4,1
30 PR IN T # 2 , “AAR AAA AAA"
40 PR INT# 1 , "P E T "C H R * 29 > "PET"CHR#< 29 > "PET"
50 CL0SE2:CLO SE 1
Results in:
PET PET PET
To right justify integers, define an alpha string the length of the longest integer. Then blank
fill the left of the integer data string and right justify the number within that string.
Literals in Format Strings
Literals are characters that are to be printed exactly as they exit in the printer’s memory
rather than being used to format other data. Literals are flagged by preceding each literal in
the format string with a reverse-field ON character.
One use of literals is to create a special form at the same time you are printing data. This is
done by using the special graphics character to form vertical, horizontal, or other lines
between the fields. You can create a form while printing data, either by overprinting
graphic characters or by inserting literal characters in a format string as shown below.
- 26-
Page 33

The only limitation on literal characters in format strings is that they cannot be printed in
the reverse field mode. They are also restricted to the same character set in which data are
currently being printed.
Example:
10 0 P E N 2 ,4,2
£0 0P EN1 ,4, 1
30 P R I N T # 2 , AA AAAJ 3 * AAAAAfl) aPAAAAAfl? 11
32 A * = " “
35 F O R I =1TO 1 0 :A* = A *+C H R *<6 4 + I):
40 P R I N T # 1 ,A *CHR* <2 9)A *C HR$< 29 )A*CHR*< 29)
50 N E X T
Results in:
C A 3
l AB 3
C AB C 3
lABCO 3
t A B C D E 3
C AB CDE 3
C A BCD E 3
lA BCD E 3
C A B CD E 3
C ABC DE 3
< A )
( AB )
< A BC )
< ABC D )
< A BC DE)
< AB C D E )
< ABCDE)
< A B C D E )
< ABCDE)
< A B C D E )
?A 7
?AB 7
?ABC 7
7A BC D ?
7A BCD E?
7A BCD E 7
7A BCD E7
7A BCD E 7
7A BCD E7
7A BCD E 7
Setting the Number of Lines Per Page: sa= 3
This special secondary address allows you to vary the number of printed lines per page. In
order for this paging option to take effect, you must turn paging on with the special paging
character described on page 35. When paging is on and the paging secondary address is
not implemented, the default number of lines per page is 66 including three blank lines at
the top of the page and three blank lines at the bottom of the page.
Example:
10 OPEN 4 ,4
20 OPEN 1 ,4 ,1
30 OPEN 2 ,4 , 2
40 OPEN 3 ,4 ,3
50 A $ = ”9 99 9 9 9 9 9 9 .9 9 9 9 9 9 9 9 9 9 .9 9 9 9 9 9 9 9 "
55 P R IN T#2,A $
60 PRINT#3 ,CH R $( 6 0 )
70 P R IN T#4,C H R *< 1 4 7 )
80 FOR 1 = 1T0 99
90 P R IN T#1, I; I* l;S Q R < I ) ; It< 1 /3 )
100 NE XTI
110 P R IN T # 4 ,C H R « 19)
120 CL0SE4: CL0 SE3: CL0S E 2: CLOSE 1
-27-
Page 34
Enabling the Printer Diagnostic Messages: sa=4
When a secondary address of 4 is transmitted, the printer’s diagnostic messages appear
whenever an error occurs. When a formatting error occurs, a message is printed, the
format is dumped, and a pointer is located at the offending field. If a secondary address of 4
has NOT been transmittedl then once an error occurs, data characters are dumped directly
to the print line even if the last command was to format data.
Example:
* P E : C *
10 0PEN4,4,4:PRINT#4:CL0SE4
20 0PEN25,4,25
30 PRINT#25
40 CL0SE25
50 OPEN1,4*CMD15 LIST
READY.
Whether or not diagnostic messages are enabled, overflow of numeric fields is always
indicated by fields filled with asterisks(******). This is a nonfatal error; as in other cases, the
secondary address option is reset to zero and all data retrieved by the printer are printed
exactly as they are received.
Diagnostic Messages
*PE:L*- Lines per page out of range. An attempt was made to set the lines per page to a
value outside the range<13<linesperpage<728 via a print-to-SA 3. The
command is ignored and the previous length remains in force.
*PE:C*- Bad command. You gave the printer an invalid SA outside the range. The
command is ignored.
*PE:M*- Data-format mismatch. You gave the printer non-numeric data to print in a
numeric field. The first character printed after the error message is the
offending character.
*PE:E- Exponent error. The numeric data given to the printer to print in a numeric
field had an invalid exponent. The expected form of a number is exponential
form is: n.nnnn+ee or n.nnnn-ee. The exponent must contain a plus or minus
sign with a two digit exponent.
*PE:F‘- Bad format. The data, that was sent to SA 2 store, either contains illegal
formatting characters, or was of an unrecognizable syntax.
*PE:T*- Terminator error. The SA changed before a terminator was detected. A
terminator is defined as a carriage return (chr$(13)), a linefeed (chr$(10)), ora
carriage return line-feed sequence. Communication with the current SA must
be terminated with a terminator before attempting to “talk” to another SA.
-28-
Page 35

Defining a Programmable Character: sa=5
A secondary address of 5 allows you to create a custom character of your own. This
programmable character is initialized with this secondary address.
Suppose you wanted to program the special symbol in Commodore Business Machines’
logo, which is:
Cf
commodore
Lay out a 8x8 matrix (the same matrix as is on the print head). To the left of the matrix, write
the binary bit value of each line. Use dots, one per square to create your character. Then
add up the binary bits indicated by your dots in each column. These totals are used in the
DATA statement in your program.
Example:
128
64
32
16
8
4
2
1
28 34 65 65 54 34 0 0 ^ TOTALS
The DATA statement in your program will read:
DATA 28,34,65,65,54,34,0,0
The program shown in the printout in the next example writes the Commodore logo ten
times. It creates a string with the CHR$ value of the column totals and passes the string to
the printer with sa=5. To achieve upper- and lowercase characters, use the CRSR Up
(Cursor Up) for uppercase characters, and CRSR Down (Cursor Down) for lowercase
characters.
-29-
Page 36

Example:
10 DATA28,34,65,65,54,34,0,0
20 0PEN5,4,5
30 FOR I = 1T08s READA!A*=A*+CHR$<A): NEXT
40 PRINT#5,A*
50 0PEN4,4
60 FOR I = 1TO10
70 PRINT#4,CHR*< 1 >CHR*< 254) " DCMOMMODORE C MUS IN ESS □ E C H I N E S "
80 NEXT
90 CLOSES
100 CL0SE4
The following is a description of the program shown above:
Line No.
20
30
40
Open 5,4,5
L
Communicates to the printer what function you
executed. A secondary address of 5 indicates that you
something stored in the printer’s memory.
want
want
The device number (the printer’s)
The logical file number
The FOR NEXT loop contained in this line reads the data contained in line
10 and constructs a string A$. A$ contains the necessary information to
print the - Commodore logo.
Stores A$ in printer memory.
50 Opens the print file for printing.
60-80 Prints the Commodore logo and “Commodore Business Machines” ten
times.
PRINT#4
CHR$(1)
CHR$(254)
Cursor Up
Cursor Down
Prints to the printer
Prints ‘enhanced characters’
Prints the programmed character (the Commdore logo)
Sets the printer to uppercase
Sets the printer to lowercase
90-100 Closes the two files opened by the program.
-30-
Page 37

After typing RUN, you get this result:
C o
m m o
d
o
r~
e
B
u s-
X n <=5 s-
s.
M a
d
h
i
n a
s-
g
C o
m m o d
o
e
B
u
S- X n
e
s-
S-
M a
c=
h
Xna
s-
G
G o
m m o d o
o
B U
S-
X
n
e
s-
S.
M-a. c: hi i
n
a
s-
G
C o m m o d o
e
B U
S- 1ne s-
s-
M a
c=
h
i
n
a s-
G
C o
m m o
d
o
r~ e B
KÂ
s- X
n
o s-
s-
M a
d
l-i X
n
e
s-
G
C o m m o d o
@
B
KA
s-
X n
e
s-
s-
M a
d
hi Xna s-
G
C o
m m o
d
o
e
B
U
s- X n
o s- s- M adh
Xna
s-
G
C o m m o
d
o
o
B U
s-
X n e
s- S.
M a
d h
Xne s.
<>
C o m m o
d
o
e
B
U s- X
n
e
s-
s-
M a
d h
i
n
e
s-
G
C o m m o
d
o
e
B Lrl
s- X
n
e
s- s-
M a
d h
i
n
a s-
NOTE
Multiple programmable characters in the same line can only be made by overprinting. The
programmable character cannot be changed when a line wraps around to the next line.
Setting Spacing Between Lines: sa=6
A secondary address assignment of 6 controls the number of steps between successive
lines of print. There are 144 steps per inch, so a declared value (^127) of 18 produces eight
lines per inch.Declaired value of 72 produces lines spaced one inch apart. The default
value is 24, which produced the standard 6 lines per inch.
Example:
10 0 PEN4 ,4
£0 OPENS,4 , 6
30 FOR1=1TO1£7 STEP4
40 PRINT#6 ,C H R*<I>
50 PR INTt*4 , ■HHHHHHHHHHHHHHHHHHHHHHHHHHHHHHHHHHHHM
60 NEXT
Selecting Upper or Lower Case: sa= 7
To change the computer and the printer to all upper-case characters, you must change
location 59468 to 12 and condition the printer as indicated by the following program:
Example:
10 PO KE 3346 8, IS
20 0PEN 7 , 4 , 7 : P R IN T#7 : CL0SE7
30 0P E N 4,4
40 PR IN T #4," C B M 4 023 PRIN TER"
Result in:
cbm4 02 3 printer
-31-
Page 38

Selecting ASCII/Graphics: sa=8
To change the computer and printer back to ASCI I/graphics, you must restore location
59468 to 14 and restore the printer back to its original condition as indicated by the
following program:
Example:
10 POKE59468,14
90 0PEN8,4,8:PRINT#8:CL0SE8
30 OPEN4,4
40 PRINTH4,"CBM4023 PRINTER"
30 CL0SE4
Result in:
CBM4023 PRINTER
Suppress Diagnostic Message Printing: sa= 9
To turn off the diagonostic message printing, you will send a secondary address of 9.
Example:
*PE:M*
COMMODORE COMMODORE
10 0PEN4,4,4 s PRINT#4 s CL0SE4
20 0PEN2,4,2
30 0PEN1,4,1
40 PRINT#2,”***$.9”
50 PRINT#1,"COMMODORE M
60 CL0SE2:CLOSE 1
70 OPEN1,4SCMD1SLIST
READY.
10 0PEN4,4,4s PR INT#4s CL0SE4
15 0PEN9,4,9s PR INT#9 5 CLOSES
20 0PEN2,4,2
30 OPEN1,4,1
40 PRINT#2,”$$$$.9 M
50 PR INT#1,"COMMODORE M
60 CL0SE2SCLOSE 1
70 OPEN1,4 s CM D1s L 1ST
READY.
Resetting the Printer: sa—10
To reset the printer, you will send a secondary address of 10.
Example:
10 OPEN10,4,10
20 PRINT#10
30 CLOSE10
-32-
Page 39
SPECIAL CHARACTER FUNCTIONS
Special control characters can be used to change the mode of printing within a single line.
Table 3 contains a summary of the special control characters. The table is followed by a
brief description of each function.
Enhanced Characters
You can print any character double its width. While characters are normally printed in a
8-row by 8-column matrix, enhanced characters appear in a 8-row by 16-column matrix.
The example below shows how already enhanced characters can be enhanced.
Example:
10 0 P EN 4 ,4
£0 PR IN T #4, "H -C H R « 1 ) "E"CHR*< 1 ) "L"CHR*< 1 > “L"CHR$< 1 ) “O"
Results in:
HEL I
___ CJ
Paging
Paging must be turned on in your program by means of the code as keyboard entry shown
inTable 3. Otherwise, printing is continuous. The paging function provides for 66 lines per
page including three blank lines at the top of the page and three blank lines at the bottom.
The number of lines per page may be altered by using the secondary address 3 option.
When paging is in effect, the paging off character performs a top-of-form function.
Specifying Individual Upper- and Lowercase Characters
The printer default character set is ASCI I/Graphics when power is first applied to the
printer. Though it is not possible to display both graphics and lowercase simultaneously
on the video display screen, the printer does allow shifting between character sets on the
same line. This function is analogous to the letters/figures shift on a Teletype™.
Example:
10 0PEN4,4
20 PRINT#4,"DCMDMMODORE"
Results in:
Co mmo dor e
-33-
Page 40

TABLE 3
Special Control Character Summary
Printer function
Enhance
Unenhanced
Paging on/reset
Paging off
RVS ON
RVS OFF
Carriage return
Code ASCII
CHR$(1) SOH
CHR$(129)
CHR$(147)
CHR$(19) DC3
CHR$(18) DC2
CHR$(146)
CHR$(13) OR
Keyboard
NA
NA
SHIFT I &
CLR
HOME
OFF
RVS
SHIFT &
CLR
HOME
OFF
RVS
RETURN
Carriage return with
no line feed
CHR$(141)
Line feed
CHR$(10)
Uppercase CHR$(145)
Lowercase
CHR$(17)
Skip space CHR$(29)
Quote CHR$(34)
NA
Cursor
Up
Cursor
Down
Cursor
Right
Quote
-34-
Page 41
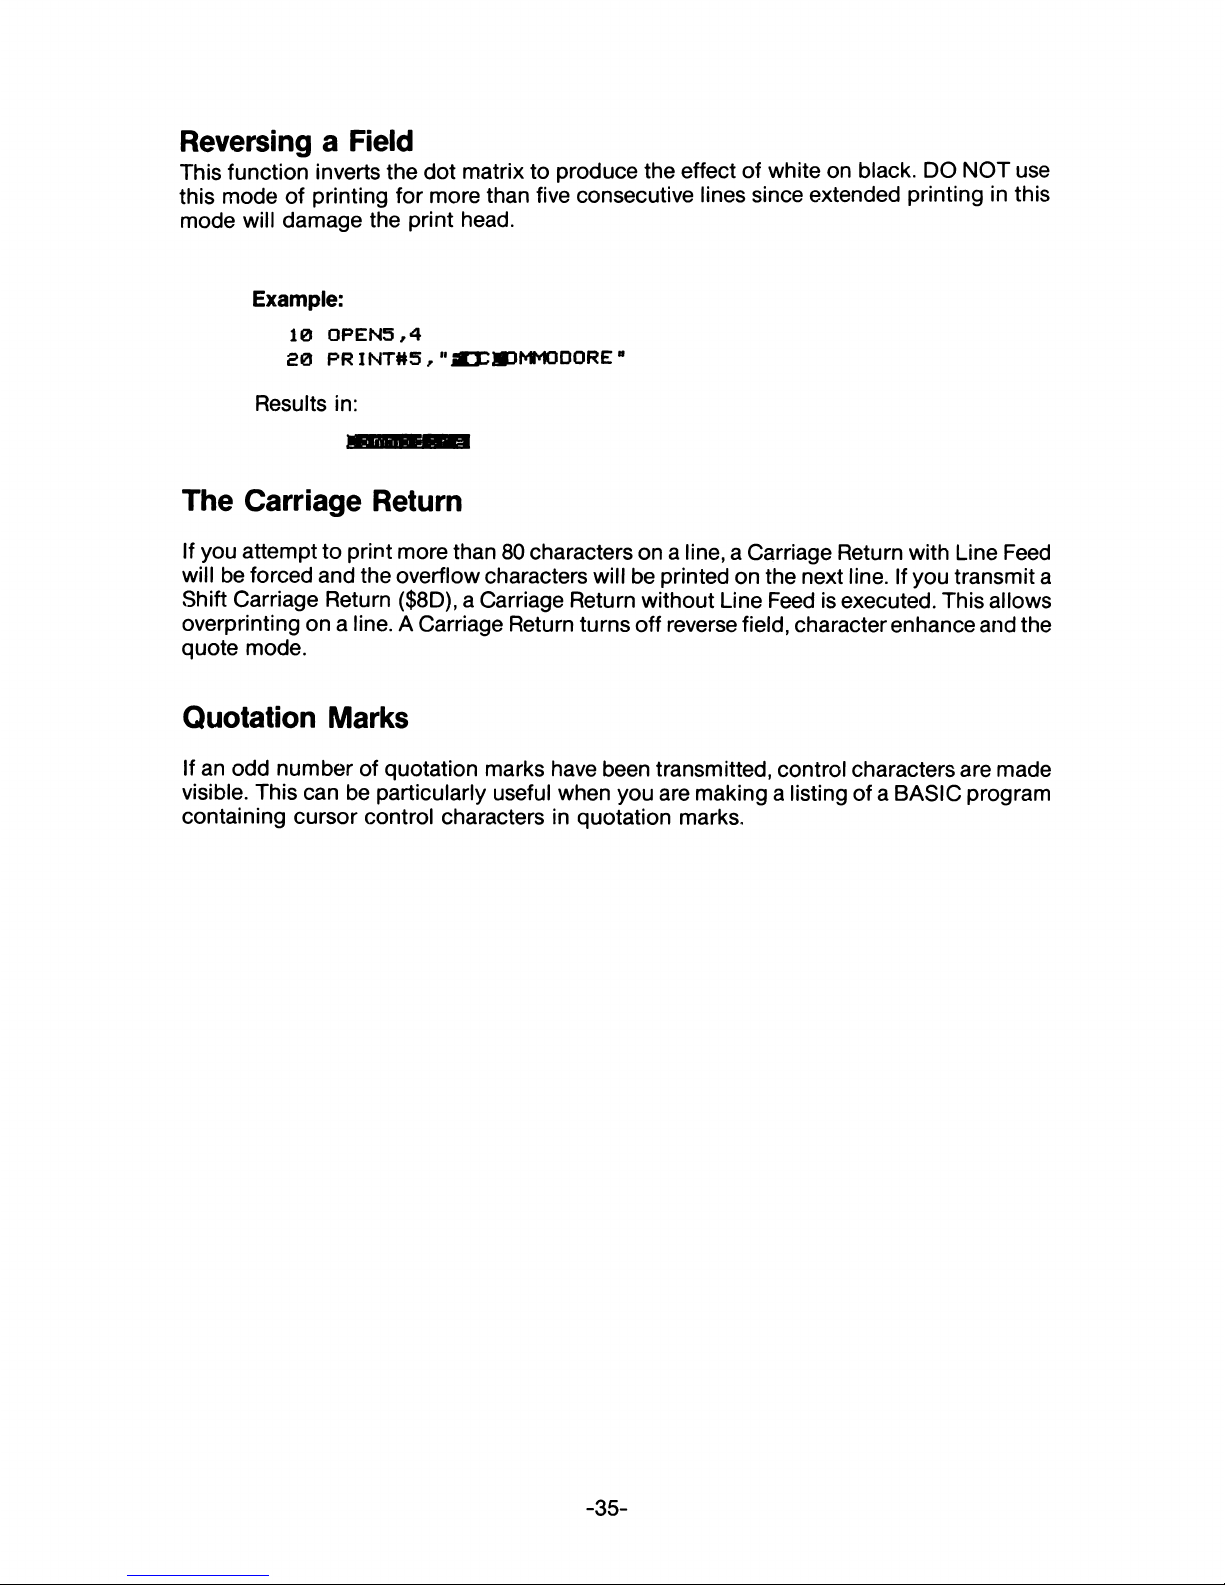
Reversing a Field
This function inverts the dot matrix to produce the effect of white on black. DO NOT use
this mode of printing for more than five consecutive lines since extended printing in this
mode will damage the print head.
Example:
10 0P E N 5,4
20 PR INT#5," «DCMDMMODORE”
Results in:
The Carriage Return
If you attempt to print more than 80 characters on a line, a Carriage Return with Line Feed
will be forced and the overflow characters will be printed on the next line. If you transmit a
«Shift Carriage Return ($8D), a Carriage Return without Line Feed is executed. This allows
overprinting on a line. A Carriage Return turns off reverse field, character enhance and the
quote mode.
Quotation Marks
If an odd number of quotation marks have been transmitted, control characters are made
visible. This can be particularly useful when you are making a listing of a BASIC program
containing cursor control characters in quotation marks.
-35-
Page 42

-36-
Page 43

APPENDIX
The programs in this appendix illustrate the many formatting capabilities of your printer.
The first program is completely annotated. In the following programs, new concepts are
commented upon.
A-1
Page 44

SIMPLE STRING FORMATTING
This program opens four files to perform four different tasks. It prints three lines: the format
string, the unformatted data string, and the formatted data string. It then lists the program.
Here is a printout from the program:
Art Art Art Art
ABC
AB AB AB AB
10
OPEN1,4
20
CPEN2,4,1
30
0PEN3/4,2
40
0PEN4,4,4
50 PRINT#4 :
REM
ENABLE
ERROR
DIAGNOSTICS
60
A$="AA AA AA
AA" : REM
FORMAT
STRING
70
B$= 11 ABC "
: REM
STRING TO BE FORMATTED
80
PRINT#1,A*
90
PR INT#1,B$
100 PRINT#3,A*
110 C*=CHR*<29>
120 PR INT#2,C$B$C$B$C$B$C$B$
130 CMD1
140 PRINT:PRINTS PRINT:PRINT
150 LIST
READY.
A-2
Page 45

An analysis of the program will help you understand how it works.
Line No. Explanation
10-40 Four logical files are opened to the printer so that the data in the computer’s
memory can be used in four different ways:
50
60
70
80
90
100
110
120
130
140
150
Logical
File No.
Secondary
Address Usage
1
0 (default)
Print data exactly as transmitted.
2
1
Format data before it is printed.
3 2 Transmit the format string.
4
4
Enable format error diagnostic messages
to be printed (if any).
Prints error messages (if any)
Defines the format string
Defines the data string
Prints the format string
Prints the unformatted data string
Transmits the format string to the printer’s memory
Skip a space
Prints the formatted data string
Transfers control from the computer to the printer
Prints four blank lines
Lists the program
A-3
Page 46

LEADING ZEROES FORCED
This program prints ten rows of numbers, each row beginning with a number one higher
than in the preceding row. In line 60, the formatting statement (which is prepared for in line
30, and transmitted in line 70) specifies leading zeroes in all fields and plus signs in the first
two fields.
+0001.
+0002. 0003.
0004
+0002. +0003. 0004.
0005
+0003.
+0004. 0005.
0006
+0004.
+0005. 0006.
0007
+0005.
+0006. 0007.
0008
+0006.
+0007. 0008.
0009
+0007. +0009. 0009.
0010
+0008.
+0009. 0010.
0011
+0009. +0010.
0011. 0012
+0010.
+0011. 0012.
0013
10 O P E N l ,4
20 0PEN£,4,1
30 0PEN3,4,2
40 OPEN 4,4,4
50 PRINT44 s RE M ENABLE ERROR DIAGN OS TICS
60 F*»"SZZZZ. SZZZZ. ZZZZ. ZZ Z Z ■
70 PRIN T#3,F*
80 FOR I * 1TO10
90 P R INTM 2 , 1,1+1,1+2,1+3
10© NEX T
110 CMD1
120 PRINT* PRINT *PRINT* PRINT
130 LIST
READY.
A-4
Page 47

SIGNED NUMBERS
As shown below, a trailing sign, when specified in a format statement, either prints a blank
fora positive number or a minus (—) for a negative number. This form is sometimes desired
by accountants.
A leading sign always prints a plus (+) or a minus (—) for the sign of the number.
If no sign is specified in the format, then no sign is printed. This works essentially like an
absolute value on the number.
1-1 l -
10 0PEN1,4
20 0PEN2,4,1
30 0PEN3,4„2
40 0PEN4,4,4
50 PRINT#4 s REM ENABLE ERROR DIAGNOSTICS
60 F$="999 S999 999-"
70 PRINT#3,F*
80 PR INT#2 ,-l/.-l/-l
90 CMD1
100 PRINTS PRINT:PRINT:PRINT
110 LIST
READY.
A-5
Page 48
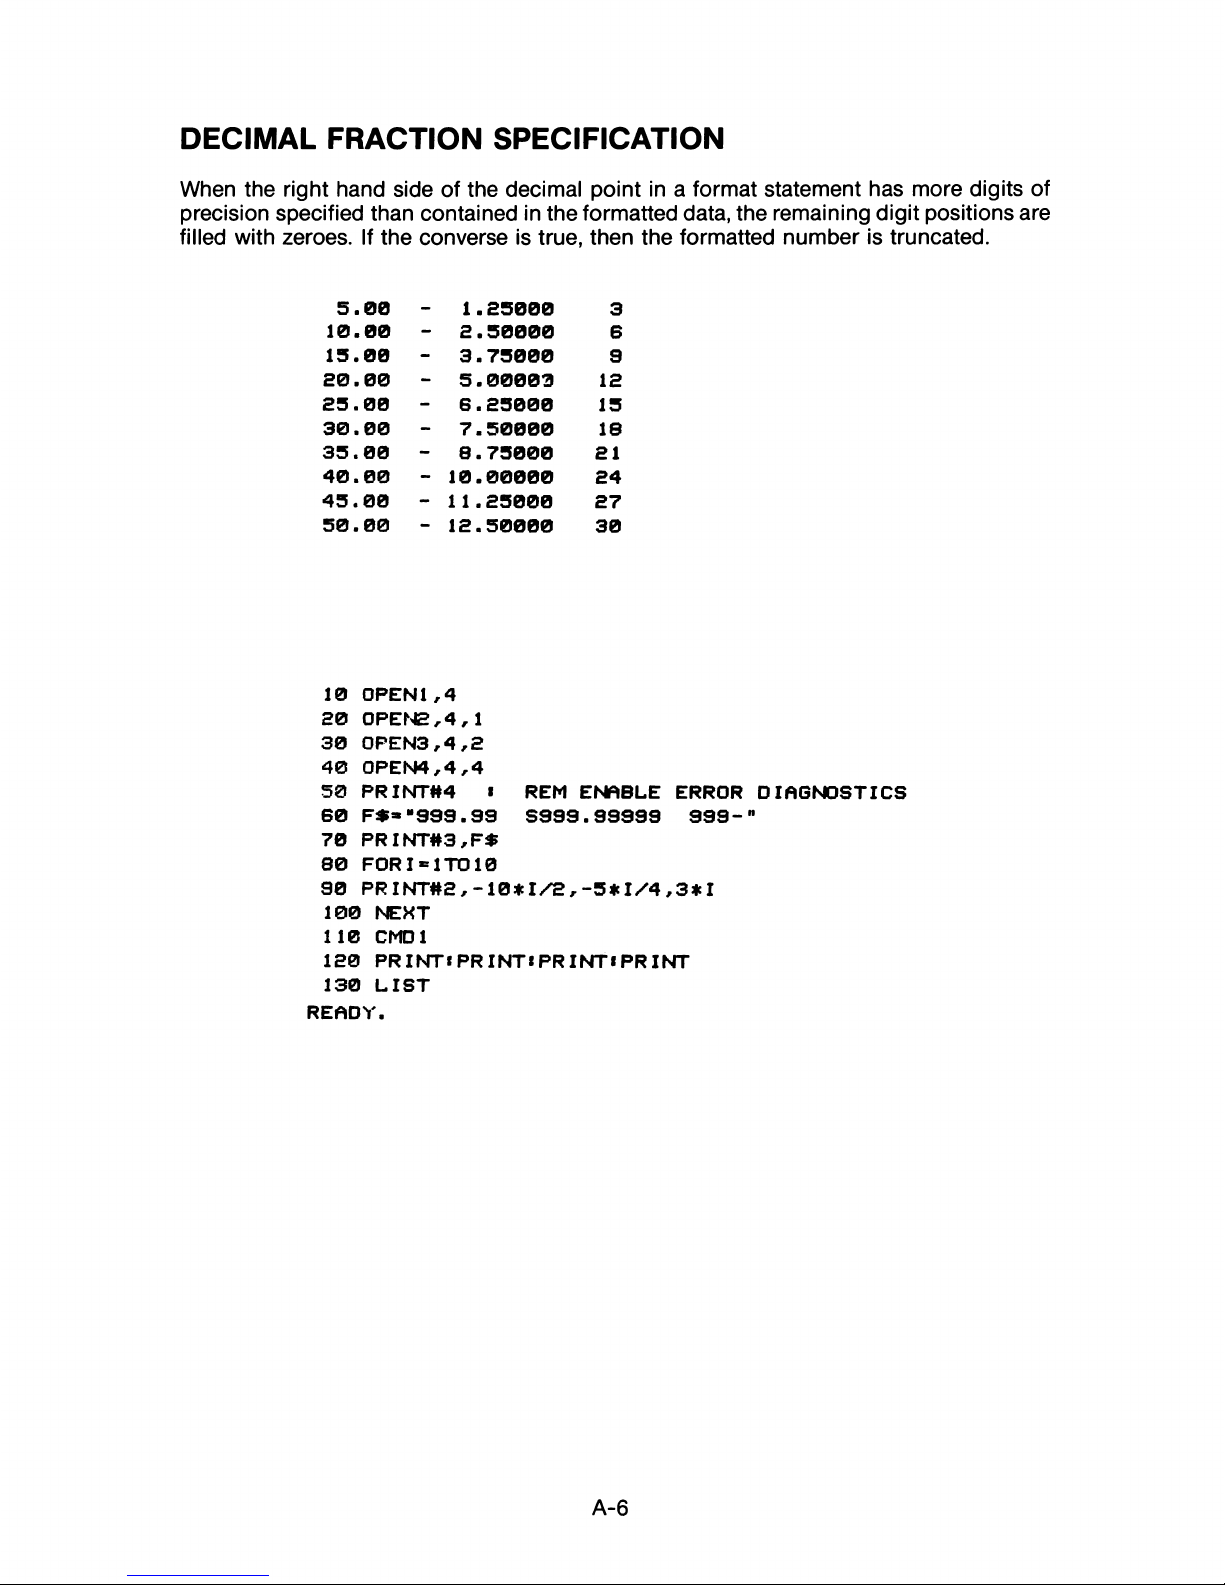
DECIMAL FRACTION SPECIFICATION
When the right hand side of the decimal point in a format statement has more digits of
precision specified than contained in the formatted data, the remaining digit positions are
filled with zeroes. If the converse is true, then the formatted number is truncated.
5.00
-
1.25000
3
10.00
-
2.50000
6
15.00
-
3.75000
9
20.00
-
5.00003
12
25.00
-
6.25000 15
30.00
-
7.50000 18
35.00
-
8.75000 21
40.00
-
10.00000
24
45.00
-
11.25000
27
50.00
-
12.50000
30
10 0PEN1,4
20 0PEN2,4,1
30 0FEN3,4,2
40 0PEN4,4,4
50 PRINT#4 i REM ENABLE ERROR DIAGNOSTICS
60 F**"999.99 S999.99999 999-"
70 PRINT#3,F$
80 FOR I *1TO10
90 PRINT#2,-10*1/2,-5#1/4,3*I
100 NEXT
110 CMOl
120 PRINT«PRINT«PRINT«PRINT
130 LIST
READY.
A-6
Page 49

FIXED AND FLOATING $ FIELDS
In fixed dollar fields the dollar sign ($) is printed in the leftmost position and leading
unused digit positions are printed as blanks.
In floating dollar fields the $ is printed immediately to the left of the most significant figure
or dicimal point. Unused digit fields to the left of the $ are printed blank.
*£7. 15 *4.27 * 8217 *.33
*80.3 1
*2.50 *
9459 *.51
*36.68
*5.46
*
2034 *.63
*42. 19 *5.75
*
2674 *.37
*72.04
*9.08 * 6973 *.24
*38.7 1 *6.03
* 6900 *.33
*86.89 *.64 * 163 *.36
*21.87
*3.61 * 5333
*.47
*38.83
*3.85 * 7464 *.76
*26.75
*6.94 *
2490
*.79
10
OPENl,4
£0 0PEN2,4,1
30 0PEN3,4,2
40 0PEN4,4,4
50 PRINT#4 : REM ENABLE ERROR DIAGONOSTICS
60 F* ="*99.99 ***.99 *99999 *.99"
70 PRINT#3,F*
80 FOR I = 1TO10
90 PRINT#2,RND< 1>*100,RND< 1)*10,RND< 1)* 10000,RND( 1>
100 NEXT
110 CMD1
180 PRINT:PRINTS PRINTS PRINT
130 LIST
READY.
A-7
Page 50
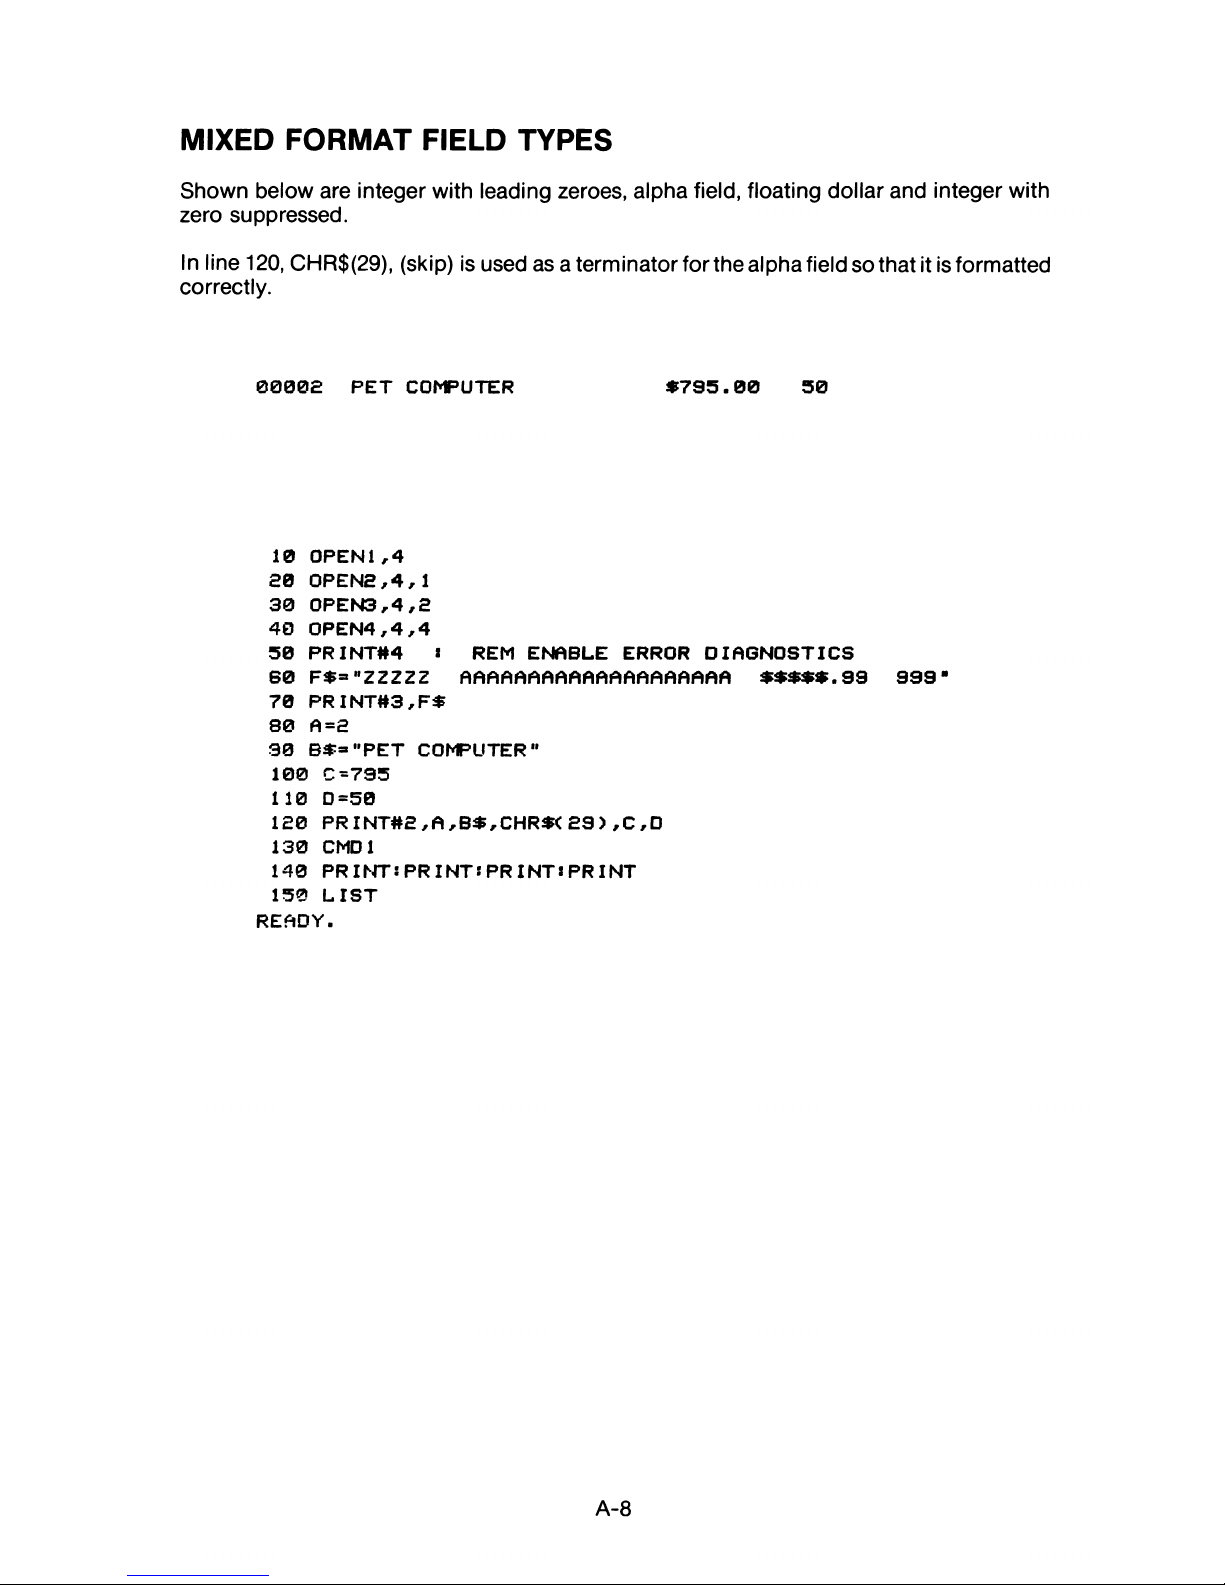
MIXED FORMAT FIELD TYPES
Shown below are integer with leading zeroes, alpha field, floating dollar and integer with
zero suppressed.
In line 120, CHR$(29), (skip) is used as a terminator for the alpha field so that it is formatted
correctly.
0000£ PET COMPUTER
»795.00 50
10 OPEN1,4
£0 OPENS,4,1
30 0PEN3„4,£
40 0PEN4,4,4
50 PRINT#4 * REM ENABLE ERROR DIAGNOSTICS
60 F»=* "ZZZZZ AAAAAAAAAAAAAAAAAAAA »»»»».99 999"
70 PRINT#3,F»
80 A=£
90 B»=”PET COMPUTER"
100 C =795
110 D -50
1S0 PR INT#£ , A ,B»,CHR»< £9 ) ,C ,D
130 CMD1
140 PRINT:PRINTS PRINT*PRINT
150 LIST
READY.
A-8
Page 51

FORMATTING WITH LITERALS
In the example below, a literal appears at the end of the printout even though the format
statement does not contain one in that position. Your printer automatically prints any literal
that appears at the beginning of the format string at the beginning and end of the printout.
05 | $ 4 75 | 03 . 106
03 | $7 46 | 06 .156
02 I
$6 94 |
01 .992
07 | $4 06 | 0 6 .46 9
09 | $4 93 | 05 .632
09 | $3 40 | 0 5 .61 0
04 | $ 284 | 00 .545
00 | $6 68 | 0 6.2 5 6
07 |
$8 92 | 07.231
01 |
$7 16 | 0 5.051
10
OPEN 1,4
20 0PEN2,4,2
30 0PEN3,4,1
40 F $ = Mai z z m $$ $ $ m z z.s s s m -
50 PRINT#2,F$
60 FOR I = 1TO10 s X=10*RND( 1>:Y=1000*RND< 1>:Z=8*RND< 1)
70 PRINT#3,X;Y;Z sNEXT
80 CMDlsLIST
READY.
A-9
Page 52

Note
Page 53

Note
Page 54

Note
Page 55

Page 56

C- c o m m o d o re
COMPUTER
Page 57

VIGTIGT
Commodore 4023 printeren med indbygget seriel IEEE interface, er en
alteVnativ udførsel af MPS 802 printeren og er som følge heraf, kompatibel
i alle funktioner, så som:
Skriftkvalitet
Hastighed
Formateringsmuligheder
o.s.v.
Der er følgende ændringer til den vedlagte MPS 802 brugervejledning:
SIDE 6: Udpakning af printeren.
Det i pkt. 2 nævnte serielt kabel, er fastmonteret på Commodore 4023
printeren og som følge heraf, findes der intet løstiiggende i emballagen.
SIDE 9: Tilslutning af printeren.
Pkt. B og C: Monter det seks-polede, grå DIN kabel fra printeren til den
serielle port på computeren. Hvis der benyttes floppydisk, forbindes
kablet til det ekstra stik bag på denne.
Selvom denne printer er monteret med et IEEE 488 interface, er dette ikke
brugbart. Undgå derfor at pålodde eller isætte nogen form for ledninger,
stik eller lign., da dette i uheldigste tilfælde vil kunne ødelægge
printeren.
 Loading...