

Page 1
fRopei^Ty
OF
TEST
£(vu(^lv^fc^/-r
User's
Manual
for
GBM
5y4-lnGh
Dual
Floppy
Disk
Drives
CBlVr
ftopp*
modw*
—*•
•'"•"'dSk
QglVI
floPPV
^eonmodere
veonwnodoPB
CBIWI
•.:•.'•
•••..•:•.•.•:•
••••••.^.
,..
•.'
; ; ; ;
Page 2
User's
Manua
for
CBM
Dual
Drive
Floppys
Model
2040-Model
4040
Model
3040-Model
8050
Appropriate
for
use
with:
Commodore
Computers
•
Series
2001 (CBM-PET)
•
Series
3000
(CBM)
•
Series
4000
(PET)
• Series
8000
(CBIVI)
Part
Number
320899
October
1980
commodore
©
1980
Commodore
Business
Machines,
Inc.
Page 3

^ Table of Contents
Page
Chapter
1
Introduction
1
General
Information
2
Description
3
Front
Panel
3
Back
Panel
3
Interior
Configuration
4
The
Diskette
5
Specifications
5
Care Of
The
2040,3040,4040
and
8050
9
CareOfThe
Diskettes
9
Unpacking
The
Disk Drive 9
Chapter
2
PreparingToUse
Your
Disk Drive 11
Connecting
The
Disk DriveToThe
Computer
11
Performing
The
Power-On
Test
12
Inserting
The
Diskette
Into
The
8050
13
liisi!fliii|j
Till!
IJiiiktiUe
liilu
Tlie
HO-IO,
ijO-lO
uml
<10'1()..Iit
The
4040
and
8050
Performance
Test
14
The
2040
and
3040
Performance
Test
17
Chapter
3
Learning
HowToUse
Your
Floppy
Disk
Drive
21
The
Block Availability Map (BAM)
22
The
Disk Operating
System
(DOS) 22
Disk
Maintenance
Commands
23
NEW
24
HEADER (BASIC
4.0
Direct Command) 25
Initialization
(2040
and
3040)
25
Initialization
(4040)
26
Initialization
(8050)
26
The
Directory
26
LOAD$
26
DIRECTORY (BASIC
4.0
Dkect
Command) . 27
Printing
The
Dhrectory
27
in
Page 4
IV
VALIDATE
28
'
COLLECT
(BASIC
4.0
Direct
Command)....
28
DUPLICATE
28
BACKUP (BASIC
4.0
Direct Command) 29
COPY
29
COPY (BASIC
4.0
Direct
Command)
31
CONCAT (BASIC
4.0
Direct Command) 31
RENAME
31
RENAME (BASIC
4.0
Direct
Command)
32
SCRATCH
32
SCRATCH (BASIC
4.0
Direct
Command)....
33
Chapter
4 BASIC
Commands
For
Data
Handling 35
BASIC
Commands
Associated
with
Floppy
Disk Drives
35
SAVE and DSAVE (Writing a Program to a
Diskette)...
36
LOAD and DLOAD (Reading a Program
from
a
Diskette)
36
VERIFY
37
OPEN
38
DOPEN
39
CLOSE
39
DCLOSE
40
Closing
The
Command
Channel
40
Closing
The
Data
Channel
41
PRINT#
41
INPUT#
42
GET#
43
RECORD#
43
Quickload Feature (BASIC 4.0) 44
Moving a Tape ProgramtoDisk 45
Chapter5
Advanced
Disk
Programming
47
Commodore DiskOperating System (DOS) 47
Disk Utility Command Set 48
BLOCK-READ
[ *
49
BLOCK-WRITE
50
BLOCK-EXECUTE 50
BUFFER-POINTER 50 ^
BLOCK-ALLOCATE
51
~
MEMORY 51
MEMORY-WRITE 51
MEMORY-READ
52
MEMORY-EXECUTE
52
USER 52
8050
Disk Zones 59
Chapter
6
Advanced
File
Handling
65
Special Open and Close Statements For Direct Access' 65
Random
Access
Example
66
To
Create
A File
66
To
AddARecord
67
To
See A
Record
68
To
Change A
Record
68
Getting The Directory of Listings 69
Page 5
VI
13
14
15
16
17
Directory
Format
0q
Sequential
Format
* ]]
Program
File
Format
61
Relative
File
Format
.!!!!!!...!!!!!!.
70
User's
Quick
Reference—Disk
Commands
87
Page 6
Ending The Program 69
Relative Files
4040,8050
69
CreatingA RelativeFile 72
ExpandingA RelativeFile 72
Accessing
A RelativeFile 73
Chapter
7
Simplifying
The
UseofCommodore
Disk-Related
Commands
77
Loading
The
DOS
Support
Program
77
Using
The
DOS
Support Symbols:> and @ 78
Loading A
Program
With
The / 78
LoadingAnd Running A ProgramWithUp Arrow 79
SpecialDOSSupport Information 79
Chapter8 Error
Messages
—Pattern
Matching
File
Names
—DiskCommands 81
Requesting Error
Messages:
Commodore Disk Drives 81
Summary Of CBMFloppy Error Messages 82
Description of DOS Error Messages 82
Pattern
Matching
85
User's Quick Reference: Disk
Commands
86
Chapter 9 Random 1.00 Program Listing 89
Chapter
10
Index
95
Figure
1
2
3
4
5
Table
1
2
3
4
5
6
7
8
9
10
11
12
List
of
Illustrations
Title
Page
Models 2040,
3040,4040,8050:
Rear View 5
Floppy
Disk
Hookup
12
Position
For
Diskette
Insertion
13
2040,3040,4040 Format: Expanded
View
of A
Single
Sector 62
8050
Format:
Expanded View of A Single Sector 63
List
of
Tables
Title
Page
Suggested Reading List 4
Specifications: Model8050 DualDriveFloppy Disk 6
Specifications: Models 2040/3040 Dual Drive Floppy Disk 7
Specifications: Model4040 Dual DriveFloppy Disk 8
Standard Jump Table 53
Block
DistributionByTrack
I 54
2040,3040
BAM
Format 55
2040,3040 Directory
Header
55
4040
BAM
Format
56
4040
Directory Header 56
8050 Directory Header Block 57
8050
BAM
Format
58
Page 7
Chapter
1
INTRODUCTION
The disk-oriented Commodore Computer System was designed around the central concept
of providingyou, the user, with largefile-handling capabilitiessupported by
BASIC
pro
gramming commandsand further simplified by DOSSupport command abbreviations.
Read the Tableof Contentsand becomeacquaintedwith the broad scopeof material
covered
in thismanual. It hasbeen
designedtoassist
you in
pursuing
an educational pro
grambyutilizing
the
computer
asan
adjunct
to the
learning
process.
That
is,
once
the
disk
driveis properlyinterfaced to a Commodore Computer,
YOU
become asimportant an ele
mentof the
system
asthe
hardware.
Your
importance,
however,ismeasured
in directrela
tionship to how
well
you understand how to effectively utilizethe hardware
arid
software.
That's why it is best to think of your computer and disk drive as only part of a system.
Grasping
andunderstanding the concept that each
individual
component actsand reactsto
signals
and
commands
from
other
devices
inthe
system
will
greatly
accelerate
your
funda
mental
grasp
of how to operate, control, and master the system.This basicconcept forms
the
basis
of this manual: teachingyou how to gainmastery of the system so that it
will
performasdesired.
Thatisthe
primary
reason
this
manualislaid
out in a
building
block
fashion: it permits you to advance as fast as
you
desire.
The first chapters discuss basichardwarefeatures and permit you, right from the start, to
become familiar with
the
disk drive by doing the performance tests which comprise the first
essential"hands
on"
experience. Then, by actually usingyour particular disk drive and
learning to carefullyfollow instructions,you can
gain
confidencein order to proceedto
more
comprehensive
subjects.
Bythe timeyou
begin
Chapter
3—Learning
HowTo
Use
Your Floppy DiskDrive-you
will
havealready used some portions of the DOSSupport system which isnot fully described
until Chapter 7. The reason for this procedure lies within the purpose of DOSSupport:
simplifying commands. It is actually easierto instruct a new user by
using
the simplified
command structure of DOS Support than attempting to explain the entire command hier
archy at an early stage.This concept of providingyou with enough essentialinformation to
complete a task, a step-by-stepdescription of the task, and meaningfulexamples is a feature
of this manual which will provide
you
with sufficient incentivetoactually complete
the
task.
Page 8
The
mannerinwhich
this
manualislaid
out
encourages
the
conceptoflearningbydoing.
Difficult
concepts
and
procedures have
been
broken
down
into
steps
that
walk
the
user
through
examples
which
provide
ample
opportunitytoexperiment
laterbyreturning
to
each
command
description. When possible,
the
command
format
has been included with
the
command description
and,
as an additional aid, a
User*s
Quick Reference has been placed in
Chapter8for
easy
access if
problems
persist.
Error
messages
are
also
presentedinChapter8where
they
canbequickly
referenced,
if
needed.
The
Error
Message discussions have
been
expandedtoinclude:
•
Howtorequest
error
messages.
•
Error
message
summary.
•
Detailed
error
message
descriptions.
For
those
users
who
have
been
reluctanttoattempt
disk programming becauseofthe
pre
sumed
degreeofdifficulty,
note
that
the
entire
disk
command
hierarchyisstructuredinthis
manual
from
least
difficulttomore
complex:
•
Commands
for
file
manipulation
and
maintenance
•
Commands
for
data
handling
• Advanced
programming
•
Advanced
hie
handling
•
Simplified
commands
Users who have attained some degree of programming skills
may
desiretobegin with
the
advanced subjects such as random access or relative files while others
maybecontent
with
just following the manual's format. In either case, this manual has been laid out to provide
the user with essentialinformation in a logicalsequence. Follow the examples,attempt the
step-by-step procedures,
and
learnbydoing.
GENERAL
INFORMATION
With
the
purchaseofyour
Commodore Dual Drive
Floppy
Disk
you
have greatly enhanced
the
computing power of
your
Commodore system.Toget
the
most
outofyour
system
you
should
study
your
computer's
user guide, and if necessary
the
BASIC manuals listed in
Table 1. You will benefit most if you first read through this entire manual, taking
note
of
those
features
that
relatetoyour
particular
floppy
as well as
those
which are
commontoall
CBM
Floppys.
The information presented in this manual is extensive and may, in some cases, present in
formation that is currently beyond your particular levelof expertise. However, by carefully
and thoughtfully studying its contents you will gain the confidence necessary to progres
sively upgrade
your
programming skills and expertise.
This manual presents discussions, descriptions, practices and procedures relating
to
the
use
and
operationofall
Commodore
5-1/4-inch Dual
Floppy
Disk Drives.
Four
models
are
discussed:
Model
2040
(DOS
1)
Model
3040
(DOS
1)
Model
4040
(D0S2)
Model
8050
(DOS
2.5)
Page 9

The
floppys
are
operationally
compatible
with
the
following
Commodore
Computers.
1.
Series
2001—16K
and
32K
—Operating With BASIC Version
3.0
2. Series
2001—PET8K—UpgradedtoBASIC Version
3.0
3. Series
3000—16K
and
32K
—Operating With BASIC Version
3.0
4. Series
4000
- PET
8K,
16K,
and
32K
- Operating With BASIC Version
4.0
5. Series
8000—32K
—Operating With BASIC Version
4.0
For
ease of reference,
the
Models
2040,
3040,4040,
and
8050
Dual Drive
Floppy
Disks will be referred to in this manual as
"the
2040",
"the
3040",
"the
4040",
and
"the
8050",
respectively. All descriptions
and
discussions are
common
unless
noted
otherwise.
DESCRIPTION
All CBM
Floppys
described in
this
manual
are
dual-drive
diskette
storage
devices.
Their
individual
primary
components
consistofread/write
controls,
drive
motor
electronics,
two
drive mechanisms,
two
read/write
heads,
and
track
positioning mechanisms. All
disk
drives
discussed in
this
manual
conformtoIEEE-488
interface
requirements.
Because
each
device
is an
"intelligent"
peripheral,
their
operation
requiresnospace in
the
computer's
memory.
This means
you
have
justasmuch
computer
memory
availabletoyouaswhen
youdonot
have
the
disks
attached.
Front
Panel
The front panel of the respective disk drive consists of an identification panel across the top;
slots in whichtoinsert two diskettes; and doors to close after inserting the diskettes. When
the door isclosed, the diskette is clamped onto the diskette spindlehub. Alsoon the front
panel are three LEDindicator lights.The one on the right iscalled the Drive0 Active Indi
cator, and lights when drive 0 is active. The LED on the left does the same for drive 1. On
the 8050, the LED in the middle is a two-color power/error indicator. It is normally green,
indicating power ON but flashes red whenevera disk error occurs. On the 2040, 3040, and
4040
the
middle
LED
is activated if
power
is appliedorremoved,
and
whenever an
error
occurs.
.
Back
Panel
The
backofeach
disk
drive
containsanIEEE-488
interface
connector.
Near
the
panel's
lower edge is
the
power ON/OFF switch. There is also a "slow blow"i^fuse,and
the
AC
power
cord.
Page 10
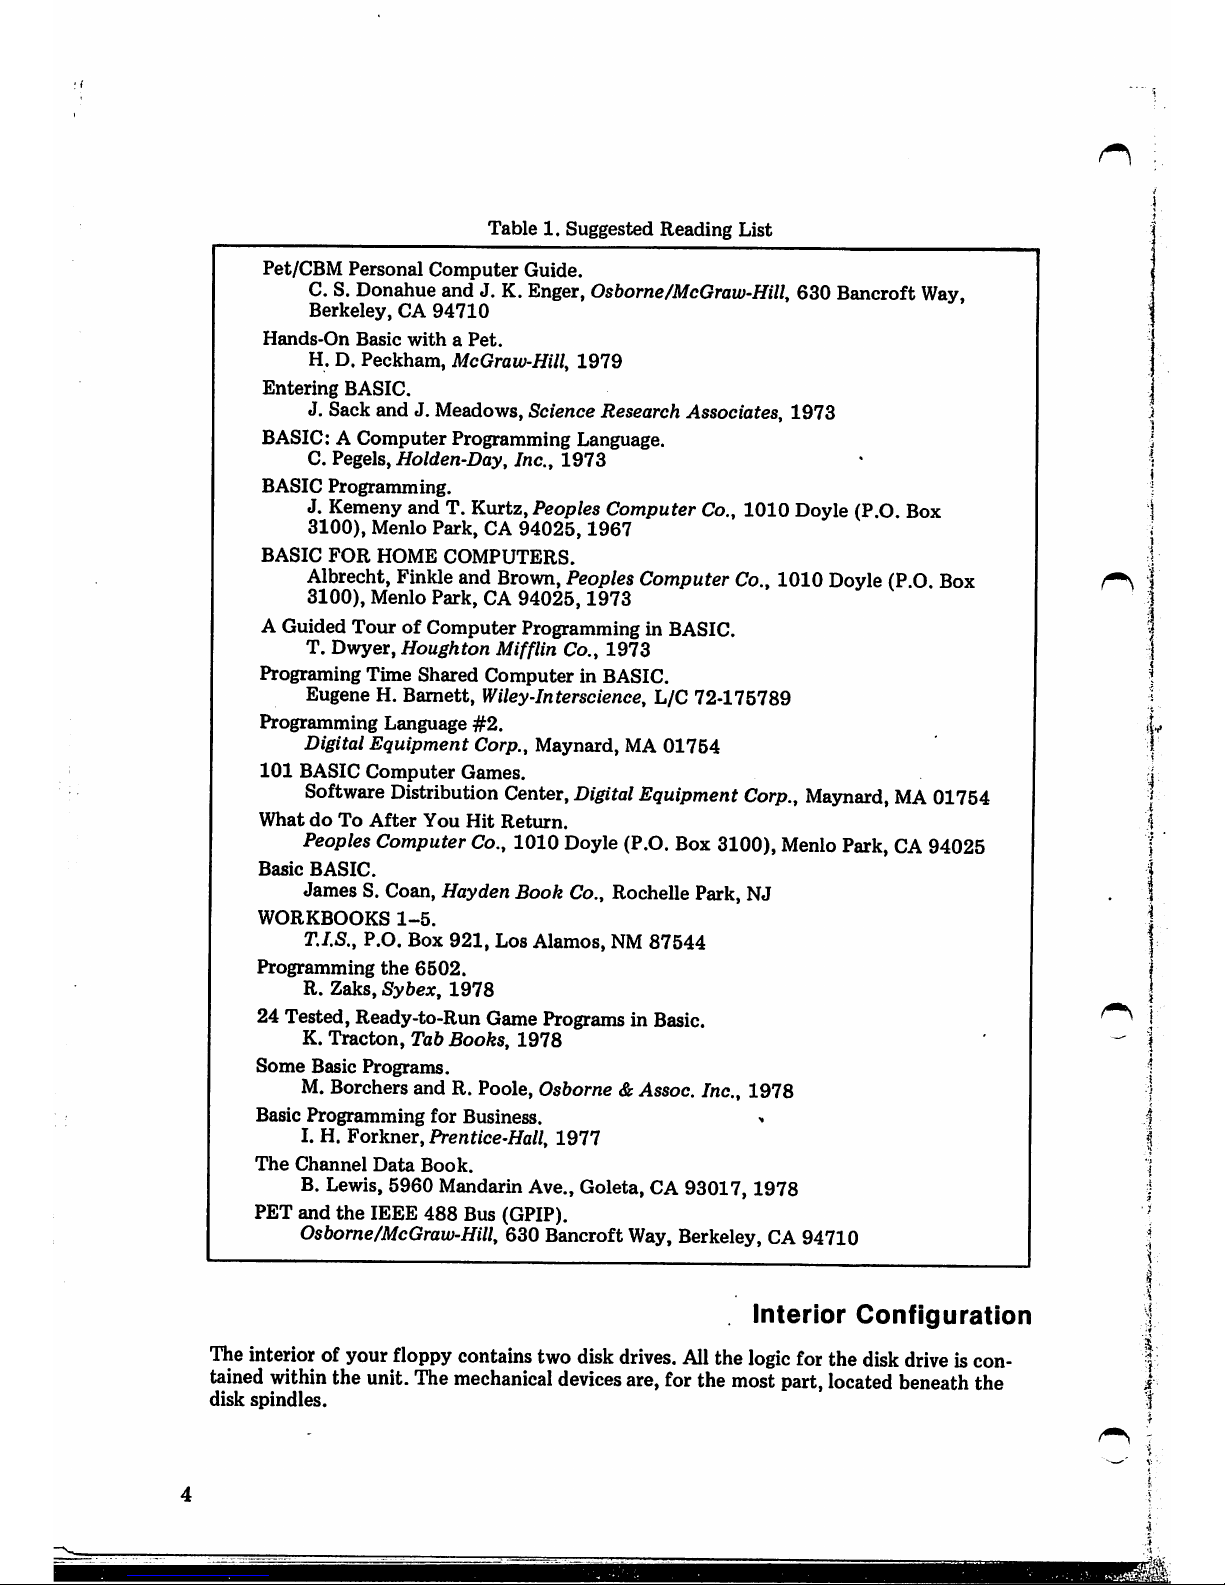
Table1.Suggested
Reading
List
Pet/CBM
Personal
Computer
Guide.
C. S. Donahue and J. K. Enger, Osborne/McGraw-Hill, 630 Bancroft Way,
Berkeley,
CA
94710
Hands-On
Basic
withaPet.
H. D. Peckham, McGraw-Hill
1979
Entering
BASIC.
J. Sack and J. Meadows, Science Research Associates,
1973
BASIC: A
Computer
Programming Language.
C. Pegels,
Holden-Day,
Inc.,
1973
BASIC
Programming.
J. Kemeny and T. Kurtz, Peoples Computer Co., 1010 Doyle (P.O. Box
3100),
Menlo Park, CA
94025,1967
BASIC
FOR
HOME
COMPUTERS.
Albrecht, Finkleand
Brown,
PeoplesComputer Co., 1010 Doyle (P.O.Box
3100), Menlo Park, CA
94025,1973
A Guided
TourofComputer Programming in BASIC.
T. Dwyer,
Houghton
Mifflin Co.,
1973
Programing Time Shared
Computer
in BASIC.
Eugene H.
Bamett,
Wiley-Interscience, L/C 72-175789
Programming Language
#2.
Digital
Equipment
Corp., Maynard, MA
01754
101
BASIC
Computer
Games.
Software
Distribution
Center,
Digital
Equipment
Corp.,
Maynard,
MA
01754
WhatdoTo
After
You
Hit
Return.
Peoples
Computer
Co.,
1010
Doyle
(P.O.
Box
3100),
Menlo
Park,
CA
94025
Basic
BASIC.
James S. Coan,Hayden Book Co., Rochelle Park, NJ
WORKBOOKS
1-5.
T.I.S., P.O. Box
921,
Los Alamos, NM
87544
Programming
the
6502.
R. Zaks,
Sybex,
1978
24 Tested, Ready-to-Run Game Programs in Basic.
K.
Tracton,
Tab Books,
1978
Some
Basic
Programs.
M. Borchers and R. Poole, Osborne &
Assoc.
Inc., 1978
Basic Programming
for
Business.
I. H.
Fotknei,
Prentice-Hall,
1977
The
Channel
Data
Book.
B. Lewis,5960 MandarinAve., Goleta, CA 93017,1978
PET and
the
IEEE
488
Bus (GPIP).
Osbome/McGraw-Hill, 630 Bancroft
Way,
Berkeley,CA 94710
Interior
Configuration
Theinterior of your floppy containstwo disk
drives.
All
the
logic
for the disk
drive
iscon
tained
within
the unit.The
mechanical
devices
are,forthe
most
part,
located
beneath
the
disk
spindles.
Page 11

The
Diskette
The diskette (also known as a minifloppy, floppy diskette, minidiskette, etc.) is similar to
the
standard
flexible
disk.
There
are
several
reputable
manufacturersofthe51/4-inch
diskettes.
You
should
make
sure
that
you
buy
diskettes
for
SOFT
SECTORED
FORMAT.
Your Commodore dealer can supply your needs.
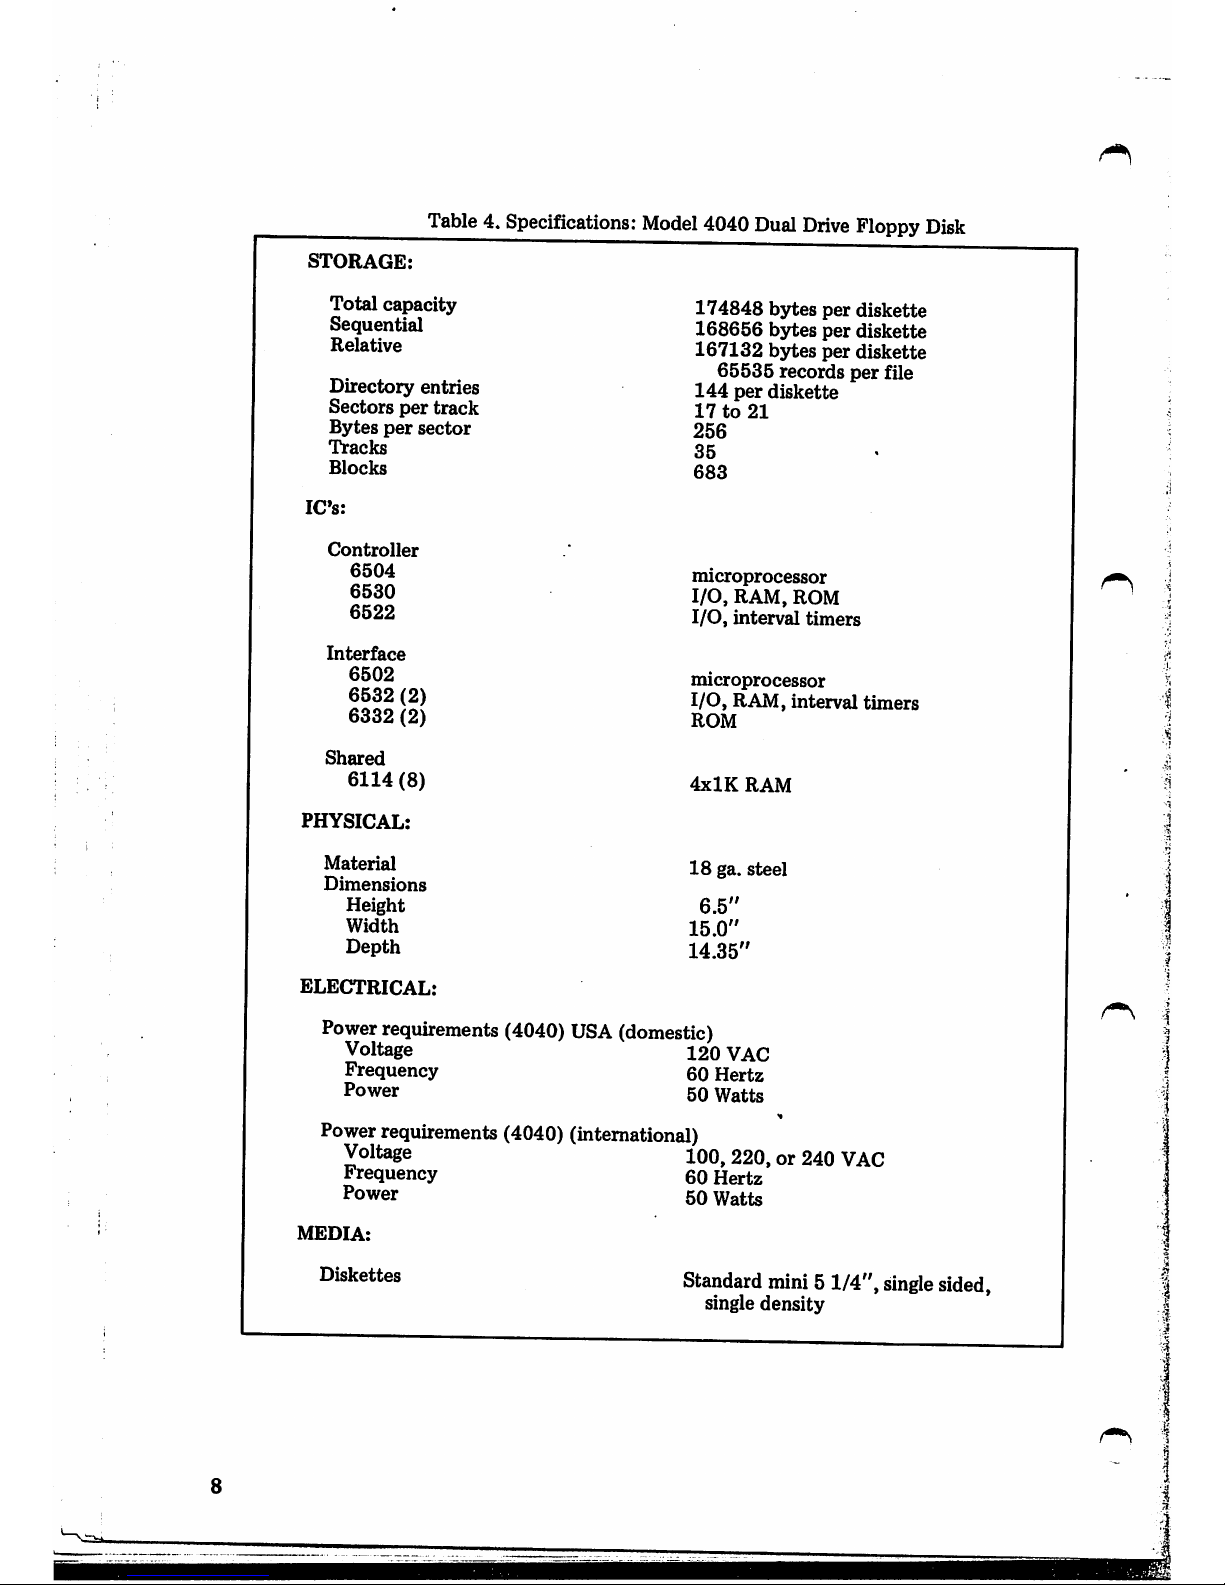
Specifications
Table 2 presents the specifications for the
8050,
Table 3
the
specifications for
the
2040
and
3040,
and
Table4the
4040.
PIGGYBACK
CONNECTION
{IEEE
PLUG
)
Figure
1 —
Models
2040,
3040,
4040,
8050:
Rear
View
ON/OFF
SWITCH
Page 12

Table2.Specifications:
Model
8050
Dual
Drive
Floppy
Disk
STORAGE:
Total
capacity
Sequential
Relative
Directory
entries
Sectors
per
track
Bytes
per
sector
Tracks
Blocks
533248
bytes
per
diskette
521208 bytes per diskette
464312 to 517398 bytes per diskette
depending
upon
file size.
182880 bytes per file
65535 records per file
224
per
diskette
23to29
256
77
2083
IC's:
Controller
6502
6530
6522
microprocessor
I/O,
RAM,
ROM
I/O,
interval
timers
Interface
6502
6532(2)
6564
(2)
microprocessor
I/O,
RAM,
interval
timers
ROM
Shared
6114
(8)
4xlK
RAM
PHYSICAL:
Material
18
ga.
steel
Dimensions
Height
Width
Depth
6.5"
15.0"
14.35"
ELECTRICAL:
Power requirements
Voltage
Frequency
Power
100,117,
220, or 240 VAC
50or60
Hertz
50
watts
MEDIA:
Diskettes
Standard
mini
5 1/4",
single
sided,
single
density
^ I
o;|
i
?
1
-1}
>'1'
i
Page 13
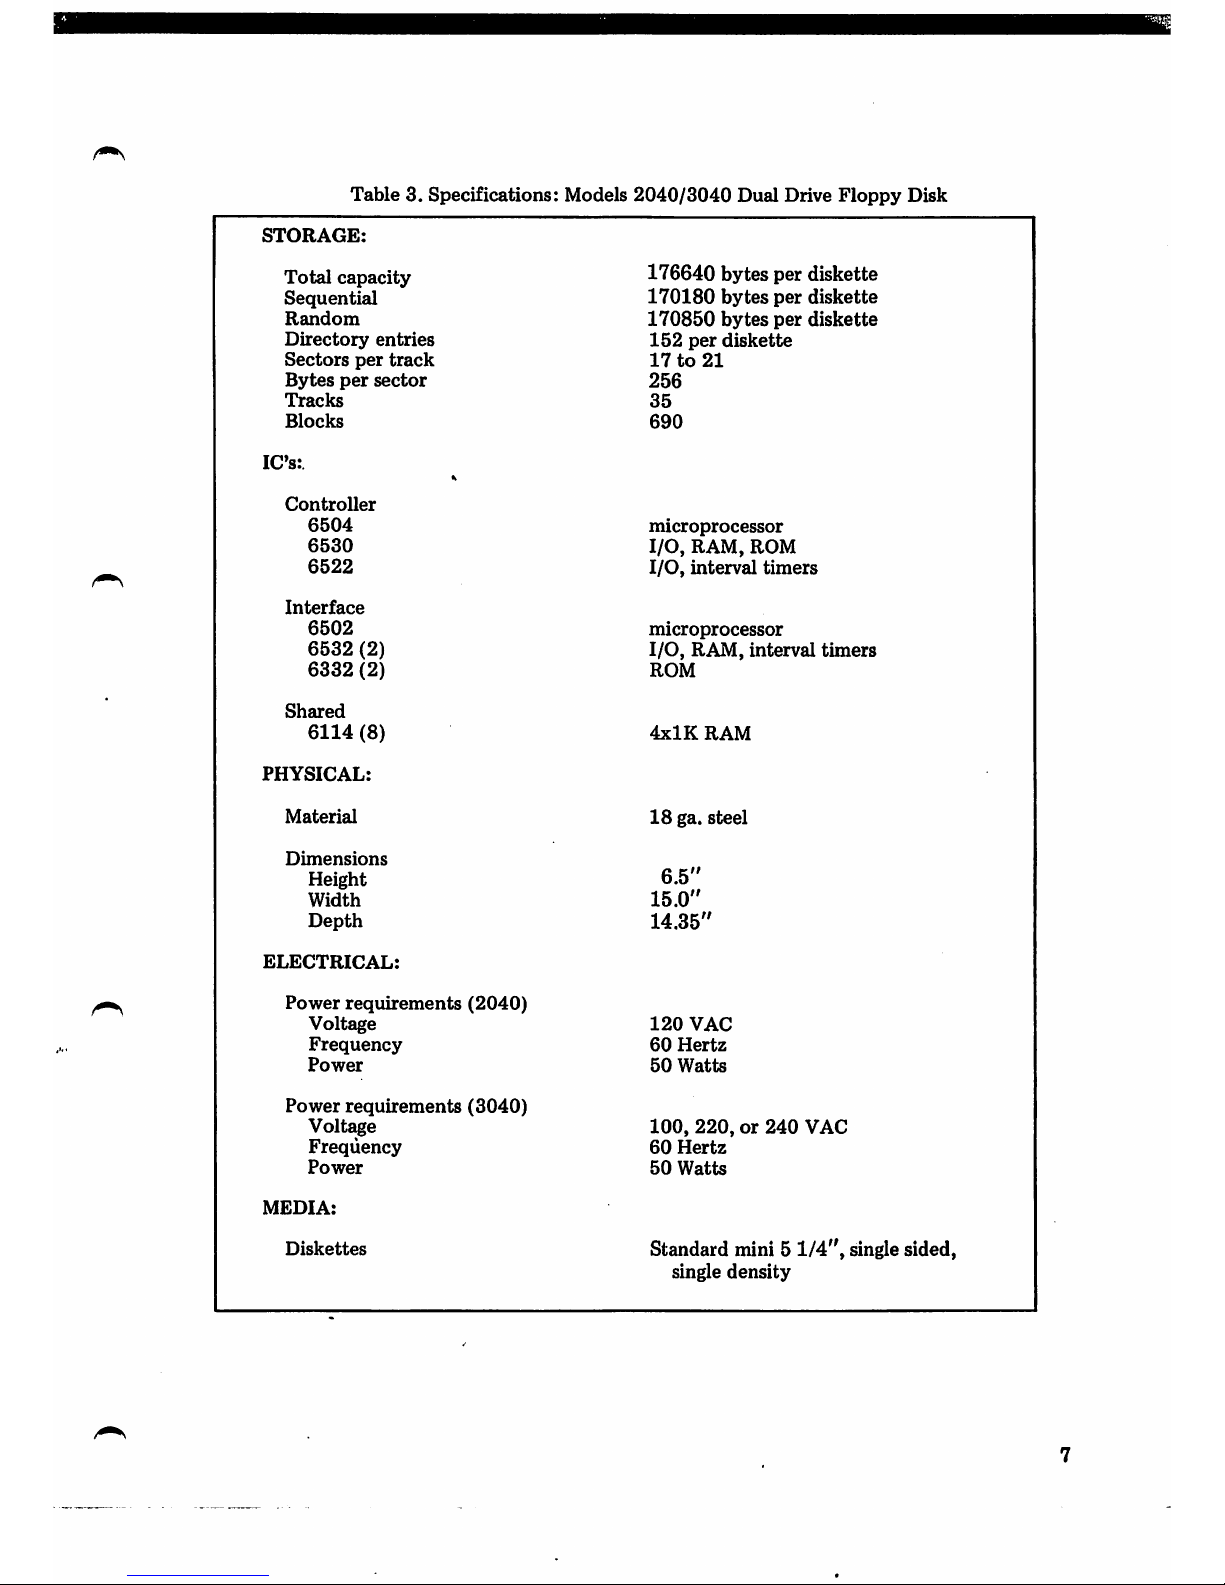
Table3.Specifications:
Models
2040/3040
Dual
Drive
Floppy
Disk
STORAGE:
Total
capacity
Sequential
Random
Directory
entries
Sectors
per
track
Bytes
per
sector
Tracks
Blocks
176640
bytes per diskette
170180
bytes
per
diskette
170850
bytes
per
diskette
152
per
diskette
17to21
256
35
690
IC's:
Controller
6504
6530
6522
microprocessor
I/O,
RAM,
ROM
I/O,
interval
timers
Interface
6502
6532
(2)
6332(2)
microprocessor
I/O,
RAM,
interval
timers
ROM
Shared
6114
(8)
4xlK
RAM
PHYSICAL:
Material
18
ga.
steel
Dimensions
Height
Width
Depth
6.5"
15.0"
14.35"
ELECTRICAL:
Power
requirements
(2040)
Voltage
Frequency
Power
120
VAC
60
Hertz
50
Watts
Power
requirements
(3040)
Voltage
Frequency
Power
100,
220,or240
VAC
60
Hertz
50
Watts
MEDIA:
Diskettes
Standard mini 5
1/4",
singlesided,
single
density
Page 14
8
CSsi.
Table4,Specifications:
Model
4040
Dual
Drive
Floppy
Disk
STORAGE:
Total
capacity
Sequential
Relative
Directory
entries
Sectors
per
track
Bytes
per
sector
Tracks
Blocks
174848
bytes
per
diskette
168656
bytes
per
diskette
167132
bytes
per
diskette
65535
records
per
file
144
per
diskette
17to21
256
35
683
IC's:
Controller
6504
6530
6522
microprocessor
I/O,
RAM,
ROM
I/O,
interval
timers
Interface
6502
6532(2)
6332(2)
microprocessor
I/O,
RAM,
interval
timers
ROM
Shared
6114(8)
4xlK
RAM
PHYSICAL:
Material
Dimensions
Height
Width
Depth
18
ga.
steel
6.5"
15.0"
14.35"
ELECTRICAL:
Power
requirements
(4040)
USA
(domestic)
Voltage
120
VAC
Frequency 60 Hertz
Power 50 Watts
Power
requirements (4040)(international)
Voltage
100,
220,or240
VAC
Frequency 60 Hertz
Power 50 Watts
MEDIA:
Diskettes
Standard
mini
51/4",
single
sided,
single
density
Page 15
CARE
OF
THE
2040,
3040,
4040
AND
8050
The
disk drive should be placedona fiat surface freeofvibration.Itis
important
that
dust
particles be
keptata minimum since a particle buildup will interfere with
optimum
opera
tion. If you should experience a hardware failure contact your Commodore dealer. Any
attempttocorrect
the
problem yourself could result in voiding
the
warranty.
CARE
OF
THE
DISKETTES
Handle diskettes with care. Follow these instructions to maintain the quality of the diskette
andtoprotect
the
integrityofthe
data:
1.
Return
the
diskettetoits
storage envelope whenever it is removed
from
the
drive.
2. Keep the diskettes away from magnetic fields. Exposure to a magnetic field can distort
the
data.
3. Never leave a diskette on
topofyour
computer or disk drive.
4. Do not write on the plasticjacket with a lead pencilor ball-pointpen.
Use
a felt tip pen
or fill
out
the
label before attaching it to
the
jacket.
5. Do
not
expose diskettes to
heat
or sunlight.
6. Do
not
touchorattempt
to clean
the
diskette surface. Abrasions will cause loss of stored
data.
7. Before applying power to the
2040,3040,
or 4040 open the drive doors and remove
diskettes.
UNPACKING
THE
DISK
DRIVE
Before unpacking
the
disk drive, inspect
the
shipping
carton
for signsofexternal damage. If
the
carton is damaged, be especially careful when inspecting its contents. Carefully remove
all packing material and
the
contents of the carton. DO NOT discard any packing material
until
you
have
made
sure
you
have
located
all
the
contentsofthe
carton!
The
carton
should
contain:
1.
Commodore
Dual
Floppy
Disk
Drive
2. User
Manual,
Number
320899
3.
Oneofthe
following TEST/DEMO diskettes:
a.
2040/3040/4040
TEST/DEMO diskette, P/N
4040037
b.
8050
TEST/DEMO diskette,
P/N
8050050
If
any
items are missing, please
contact
your
Commodore
dealer immediately.
Page 16
NOTES
10
Page 17
Chapter
^
PREPARING
TO
USE
YOUR
DISK
DRIVE
Before
startingto useyour disk
drive,
make
sureit isin
good
working
condition.Thisin
cludes
properly
connecting
it to yourcomputer,
giving
it a
power-on
and
initial
checkout
test,and
finally
the
performance
test
using
theappropriate
TEST/DEMO
diskette.
CONNECTING
THE DISK DRIVE TO
THE
COMPUTER
One
of twoconnector
cables
arerequired to interface the
floppy
to the computer.
These
cablescan be suppliedby your Commodoredealer.
1. PET-to-IEEE cable, P/N 320101
Usethis cable if the disk drive is to be the only (or first) IEEE deviceconnected to your
computer.
2. lEEE-to-IEEE cable, P/N 905080
Use
this
cable
ifyour disk
drive
isto be connected ("daisy-chained") to anotherperi
pheral
device
suchasthe
Commodore
Model
2022,orany
other
suitable
interfaced
printer.
NOTE:
Thedisk driveshould be the first peripheralattached to the computer if other de
vices
aretobe
"daisy-chained".
Follow these stepstoconnect
the
disk drivetoyour
computer:
STEP
1:
Turn
power
OFFtothe
computer.. f
STEP 2: Place
the
disk drive in a convenient location as close as possible to
the
computer.
DO
NOT
connect
the
disk
drivetoa
power
outletatthis
time.
STEP3: Connect the PET-to-IEEEcable between the IEEE-488 interface connector on the
computerand the connectoron the disk
drive.
If additionalIflEE
devices
areto
be connected, the lEEE-to-IEEE cable(s)must be used.
STEP 4: Connect the disk drive power cable to an AC outlet. DO NOT
turn
on power at
this
time.
11
Page 18
CBM
Computer
iW
PET-to-IEEE
Cable
(P/N 320101)
Printer
Floppy
Disk
lEEE-to-IEEE
Cable
(P/N 905080)
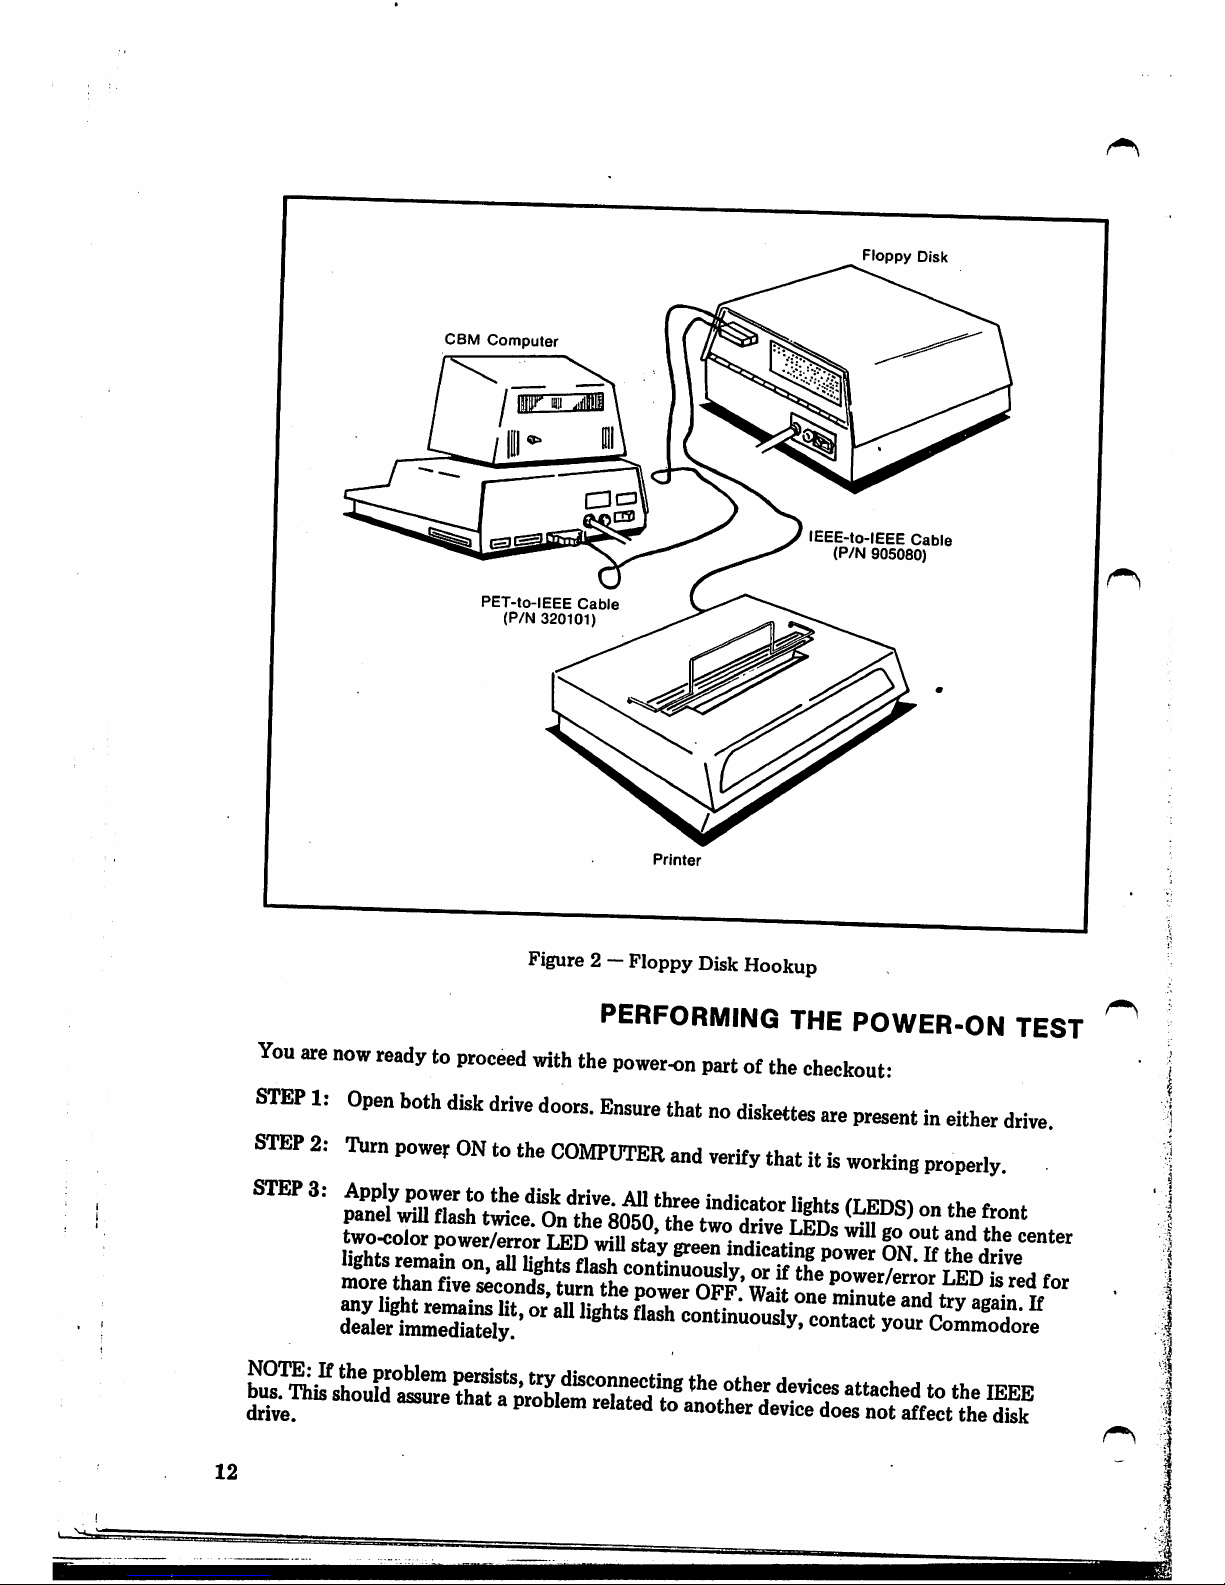
Figure
2—
Floppy
Disk
Hookup
PERFORMING
THE
POWER-ON
TEST
You
are
now
readytoproceed
witli
the
poweron
partofthe
checkout:
STEa-1:
Open
both
disk
drive
doors.
Ensure
thatnodiskettes
are
presentineither
drive.
STEP
2:
power
ONtothe
COMPUTER
and
verify
thatitis
working
properly.
12
J
Page 19
INSERTING
THE
DISKETTE
INTO
THE
8050
STEP
1:
Insert
the
diskette
into
the
slot
designated
"Drive0"and
with
the
write
protect
tab
oriented
to
the
left.
STEP 2: Once
the
diskette is in
the
slot, push gently on
the
diskette
until
you
hear a
dis*
tinct
"clock".
The diskette is now properly positioned in
the
drive.
STEP
3: Press DOWN firmly on
the
spring-loaded
doorofthe
drivetolower
the
diskette
into
the
correct
position. It is
importanttopress firmly on
the
door
in a
smooth
motiontoavoid damaging
the
diskette.
STEP
4:
To remove
the
diskette, press DOWN firmly on
the
spring-loaded
door.
This will
release
the
spring
and
raise
the
diskette.
Wlien
the
diskette
is level
with
the
open
ing, press UP on
the
door. This will release the diskette
and
push it
out
toward
the
frontofthe
drive.
The
disketteisnow
freetobe
removed
from
the
drive.
STEP
5:
DO
NOT
ATTEMPT
TO
CLOSE
THE
DOOR
WITHOUTADISKETTE
IN
PLACE.
The
doorislocked
openbya
mechanical
interlock
mechanism
associated
with
the
diskette
ejector
that
prevents
the
door
from
closing if no
diskette
has
been
loaded.
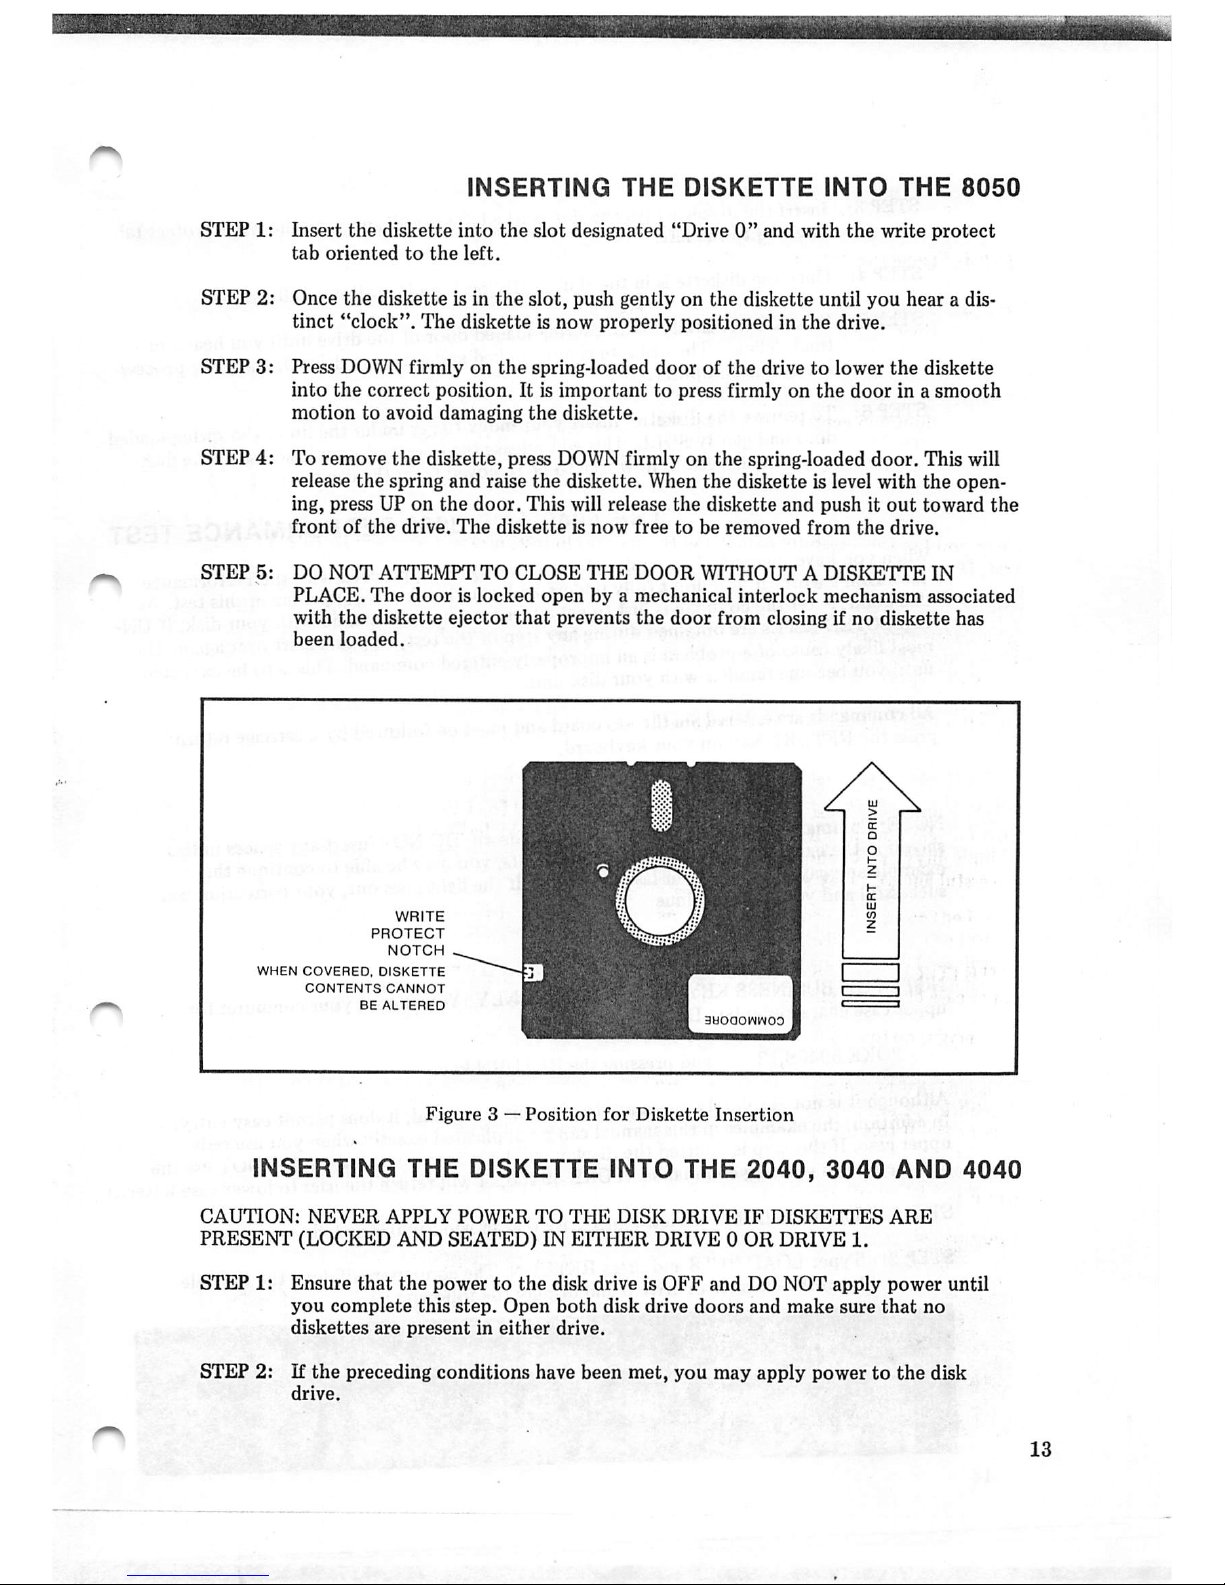
WRITE
PROTECT
NOTCH
WHEN
COVERED.
DISKETTE
CONTENTS
CANNOT
BE
ALTERED
3Hoaowwoo
Figure
3 —
Position
for
Diskette
Insertion
INSERTING
THE
DISKETTE
INTO
THE
2040,
3040
AND
4040
CAUTION:
NEVER
APPLY
POWER
TO
THE
DISK
DRIVE
IF
DISKETTES
ARE
PRESENT
(LOCKED
AND
SEATED)INEITHER
DRIVE0OR
DRIVE
1.
STEP1:Ensure
that
the
powertothe
disk drive is
OFF
and
DO
NOT
apply
power
until
you
complete
this
step.
Open
both
disk
drive
doors
and
make
sure
that
no
diskettes
are
presentineither
drive.
STEP 2: If
the
preceding conditions have been
met,
you
may
apply power to
the
disk
drive.
Page 20

»LTtedlo
°"
tab
STEP4:Once
the
disketteisin
the
slot,
gently
pushonit
untilitis
fully
seated
"
5H~~
THE
4040
AND
8050
PERFORMANCE
TEST
SX\'rrrriryl"dL'ruty
^deit^X
Performance
^
this
point,
enter
the
commaLsTu
f "haPPe»i"gtest.
At
EXPECTED
results
are
obtained
during
any
steoS'th^f
"
™-
most
likely
causeofa
problem
ran"„rnL!'^1 .
The
until
you
become
familiar
with
your
disk
unit.^
'
command.
Thisistobeexpected
press
the
RETURN
key
oVyoi^r
ke^^^
followed
byacarriage
return:
S^in
re^xirif
th7e"^»1nd1crr
H.S"™"
example
anyway.
Re^nter
younas^c^^^^^
Tf^
'he
successful
and
you
may
continue.
^
correction
was
NOTE
FOR
BUSINESS
KEYBOARD
USERS
ONLY-
Ym.
n»„
.f
upper
case
character
entry.Dothisbytyping:
"
POKE
59468,12
and
pressing
the
RETURN
key
STEP1;Insert
the
DEMO
diskette
into
drive0as
previously
instructed.
STEP2:^pe:
LOj^
"*",8
and
press
RETURN.
The
computer
will
load
the
first
file
^^ftom
the
disketteindrive0and
display
the
foUowing:
Page 21
STEP3: Type: RUN and pressRETURN.This willcausethe
DOS
Support Program to be
executed. (This program is
not
necessary for the disk unit to operate; it just
simplifies the direct mode commands.) A brief introductory descrption of
DOS
Support ispresented in Chapter 3 as it appliesto Chapter 3 operations. A de
tailed description of DOS Support is presented in Chapter 7.
STEP
4:
Insertablank
diskette
into
drive1and
type;
>N1:DEM0,99
>C1=0
This procedure formats the diskette and copys all files from drive 0 to drive 1,
thus creating a backup of the
DEMO
diskette. Remove the
DEMO
diskette from
drive 0 and returnitto its protective envelope. Remove
the
diskette from drive 1
and place it in drive 0. Close
the
door
to drive 0.
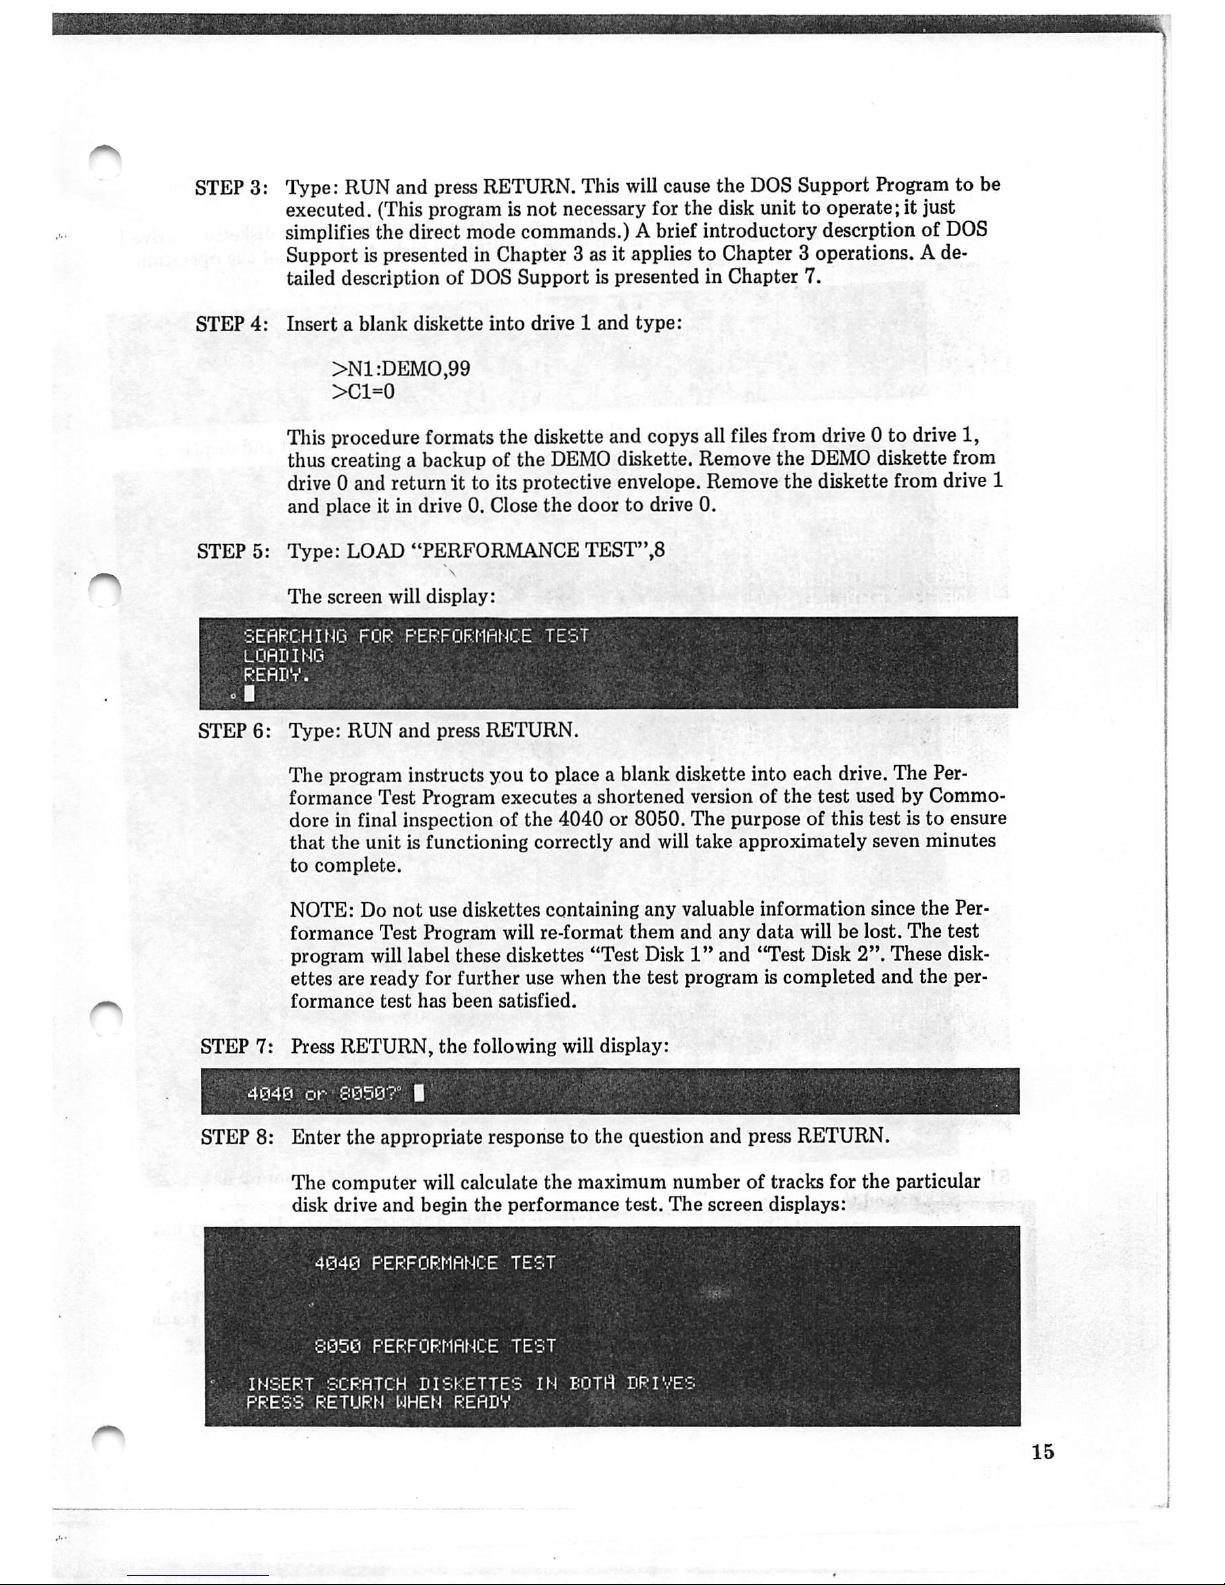
STEP 5: Type: LOAD "PERFORMANCE TEST",8
The
screen
will
display:
STEP
6:
Type:
RUN
and
press
RETURN.
The program instructs you to place a blank diskette into each drive. The Per
formance Test Program executes a shortened version of
the
test used by Commo
dore in final inspection of
the
4040or8050.
The
purpose of this test is to ensure
that
the
unit is functioning correctly and will take approximately seven minutes
to
complete.
NOTE: Do
not
use diskettes containing any valuable information since
the
Per
formance Test Program will re-format them and any data will be lost. The test
program will label these diskettes
"Test
Disk1"and
'Test
Disk
2".
These disk
ettes are ready for further use when
the
test program iscompleted and
the
per
formance
test
has
been
satisfied.
STEP 7: Press RETURN, the following will display:
STEP 8:
Enter
the
appropriate response to
the
question
and
press RETURN.
The
computer
will calculate
the
maximum number of tracks for
the
particular
disk drive
and
begin
the
performance
test.
The
screen displays:
Page 22
NEW~ei
COMMFlNri
HEW-1
COMfiRHD
OK
Ci
OK 1
00.0
00.0
in drive 1.
the
screen
displays:
®
*^^1®
operation
both
IiRIVES
PfiSS
MECHRNICRL
TEST
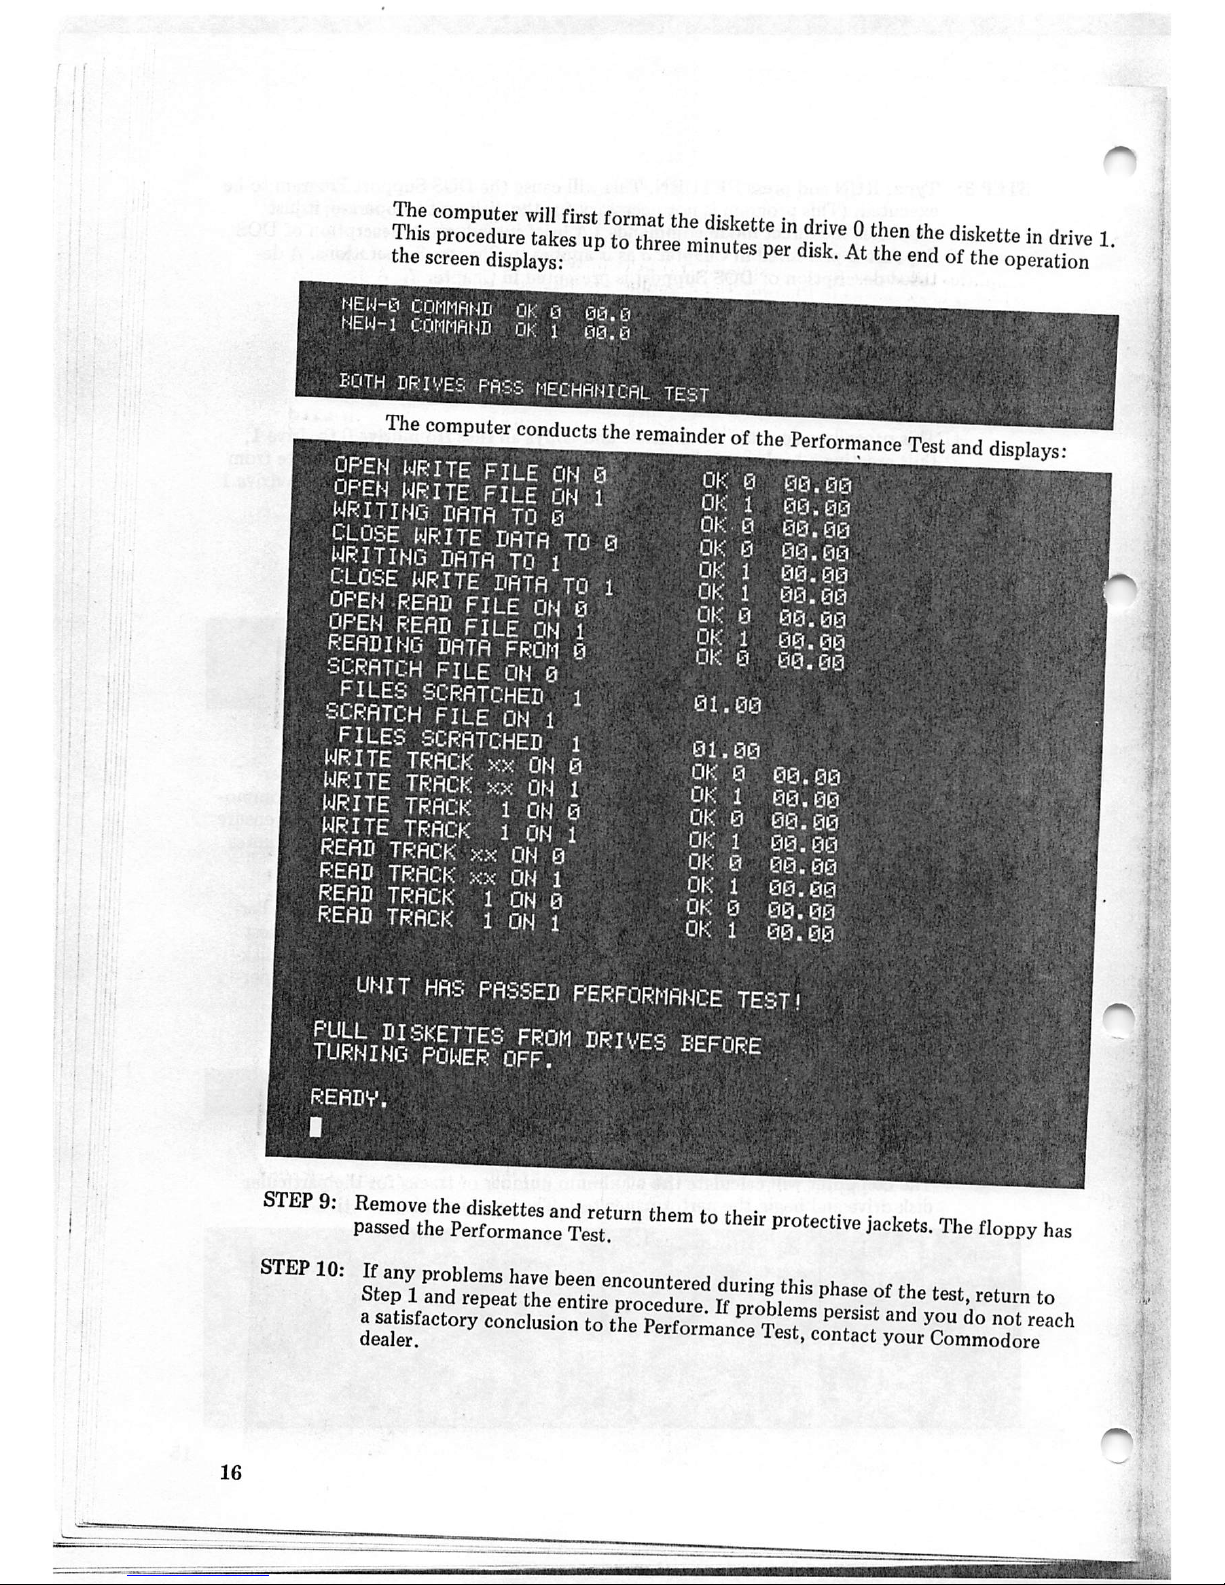
The
computer
conducts
the
remainder
of
the
Performance
Test
and
displays;
OPEN
WRITE
FILE
ON
0
UPEN
WRITE
FILE
ON
1
writing
IiflTfl
TO
0
WRITINU
DHTfl
TO
1
CLOSE
WRITE
DRTfl
TO
1
OPpj
REflD
FILE
ON
0
OPEN
REflD
FILE
nw
1
reading
DRTfl
FROM
0
SCRATCH
FILE
ON
0
FILES
SCRATCHED
1
.5=^:RATCH
file
ON
1
files
SCRATCHED
1
WRITE
TRACKxxON
0
hdJJI
ON
1
WRITE
TRACK1ON
0
WRITE
TRACK1ON
1
RERIf
TRACKxxON
0
READ
TRACK
xx
ON
1
RERD
track
1
ON
0
READ
TRACK1ON
1
OK 0
00.
00
OK 1
00,00
OK.0
00,00
OK 0
00.
00
OK 1
00.00
OK 1
00.00
OK 0
00.
00
OK 1
00.
00
OK 0
00-
00
01.00
01,00
OK 0
00.00
OK 1
00.00
OK 0
00.
00
OK 1
00.
00
OK 0
00.00
OK 1
00.00
OK 0
00.
00
OK 1
00.00
UNIT
HAS
PflSSEIi
PERFORMANCE
TEST!
TUW^IN.i'^IJ^Po^F?'''
READV,
I
P™'-«ve
jackets.
The
floppy
has
STEP
10:
^L7/-tp:a?re
P"-
test,
return
to
a
.Msfactory
conclusion
to
the
Performanr^^:tXTct'y^^^^^^^^^^^^
Page 23
THE
2040
AND
3040
PERFORMANCE
TEST
When
you
have
successfully
completed
the
Power-On
test,
proceed
with
the
Performance
Test.
Don't
worryifyou
don't
fully
understand
exactly
whatishappeninginthis
test.
At
this
point,
enter
the
commands
justtogetafeel
for
what
you
candowith
your
disk.IfUN
EXPECTED
results
are
obtained
during
any
stepofthe
test,
stop
and
start
over
again.
The
most
likely
cause
ofa
problem
isan
improperly
entered
command.
This
isto be
expected
until you become familiar with the procedure.
All
commands
entered
via
the
keyboard
mustbefollowedbacarriage
returni
Dress
the
RETURN
key.
NOTE:
Enter
the
commands
exactlyasshown.DONOT
insert
any
spaces
unless
shown
in
the
example.Ifthe
error
indicator
lights,
you
maybeabletocontinue
the
example
anyway.
Re-enter
your
last
command.Ifthe
light
goes
out,
your
correction
was
successful
and
you
may
continue.
STEP1:Insert
the
DEMO
diskette
into
drive
0 as
previously
instructed.
Insertablank
diskette into drive 1. Close both drive doors.
STEP 2: Type: OPEN1,8,15
This
command
opens
logical
file1on
device8.The
secondary
addressof15
opens
the
command
channeltothe
device.
The
screen
displays
your
entry
followed
by
READY.
NOTE
FOR
BUSINESS
KEYBOARD
USERS
ONLY:Toset
the
computer
for
upper case character entry type:
POKE59468,12 and press RETURN
Although it isnot absolutely
necessarytogive
this
command
priorto communi
cating
with
the
disk
drive,itdoes
permit
easy
entry. In addition, the
examples
in
this
manual
canbe
duplicated
exactly.
(POKE
59468,14
will
returnthe
user
to
lower case letters.)
STEP3: Type: PRINT#1,"I0"
This
command
initializes
drive0.The
initialization
procedure
places
the
magnetic
head
ofthe
drive
inthe
proper
position
above
the
diskette.
This
processisneces
sary
each
time
the
disketteisremoved
and
inserted
into
the
drive.
The
computer
displays
your
entry,
then
the
word READY.
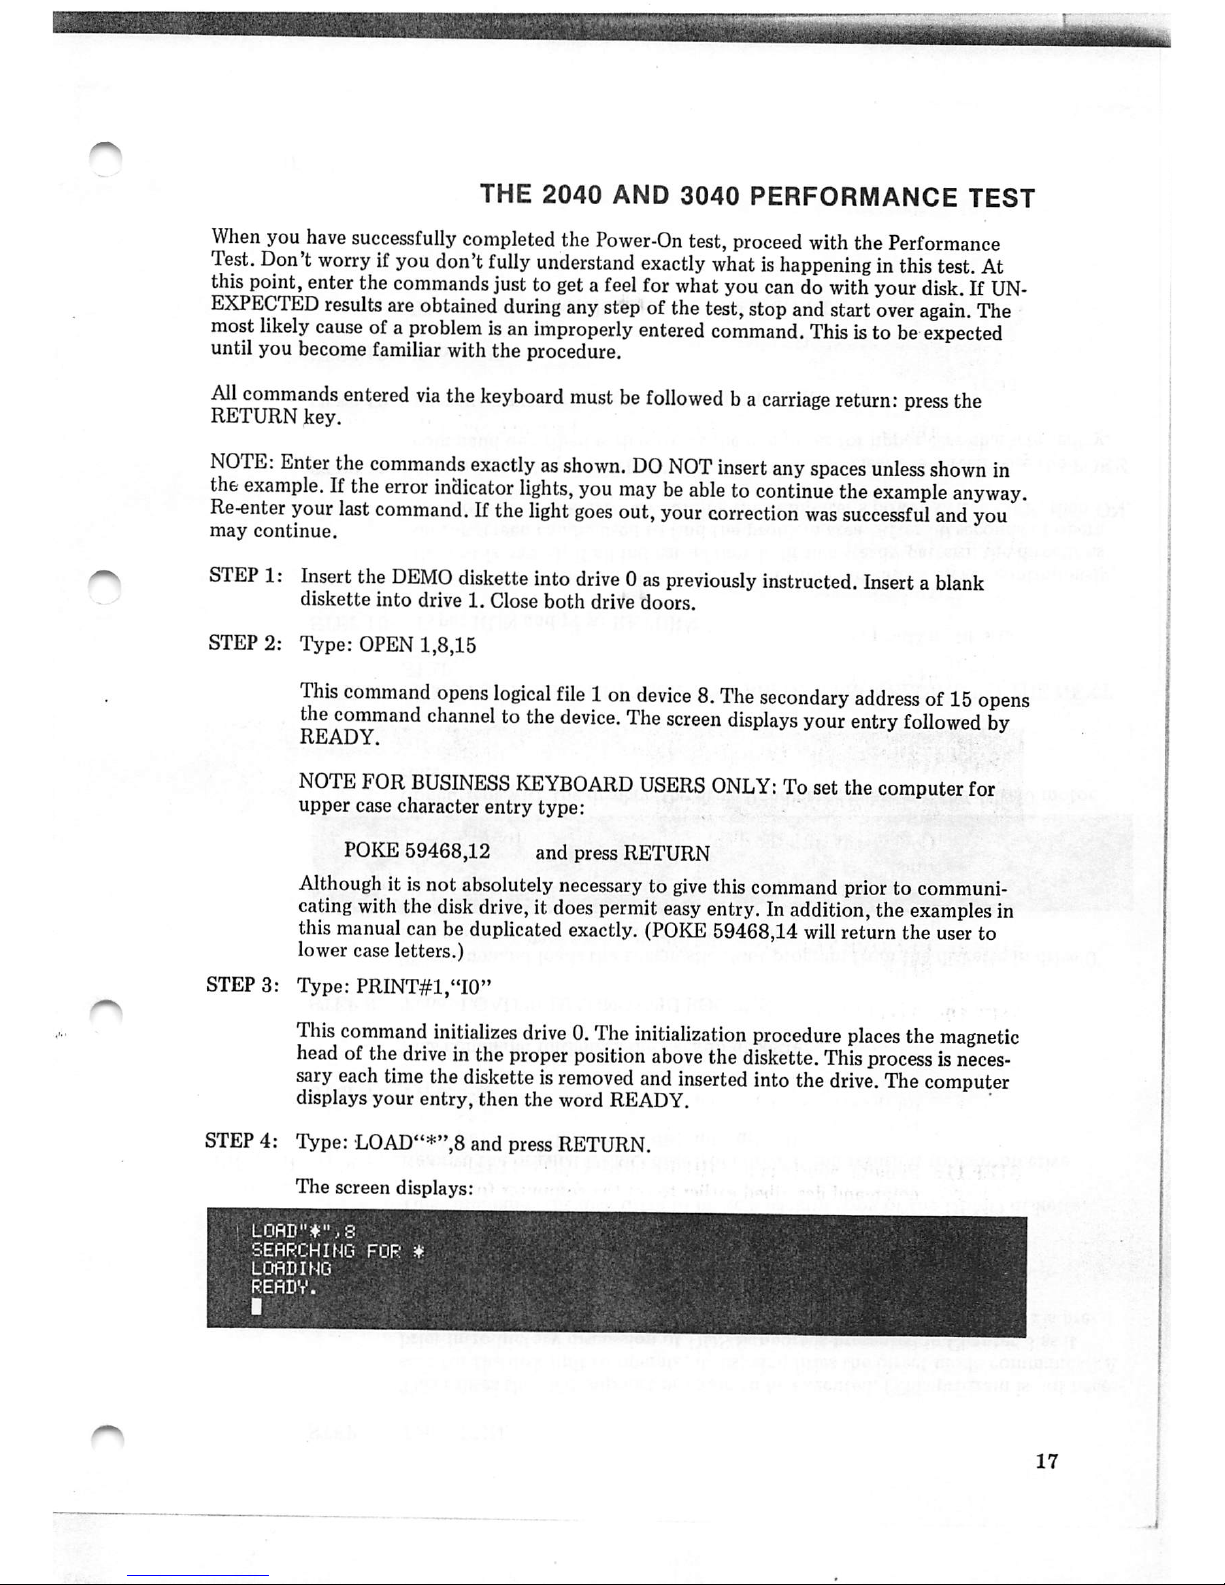
STEP 4: Type: LOAD"*",8 and press RETURN.
The
screen
displays:
Page 24
STEP
5:
Type:
RUN.
This causes
the
DOS
support
program to be executed. (This program is
not
neces
sary for
the
disk unit to operate, it just simplifies
the
direct mode commands.) A
brief
introductory
discussionofDOS
SupportispresentedinChapter
3 as it
appliestoChapter3operations.Adetailed
descriptionofDOS
Supportispre
sentedinChapter
7.
STEP
6:
Type:>D1=0
This
commands
the
disk
drivetomakeabackup
copyofthe
DEMO
diskette.
Remove
the
original
DEMO
disk
from
drive0and
returnitto
its
protective
envelope.
Insert
the
backup
disk
into
drive
0.
STEP
7:
Type:
>10
This
command
initializes
the
backup
diskette.
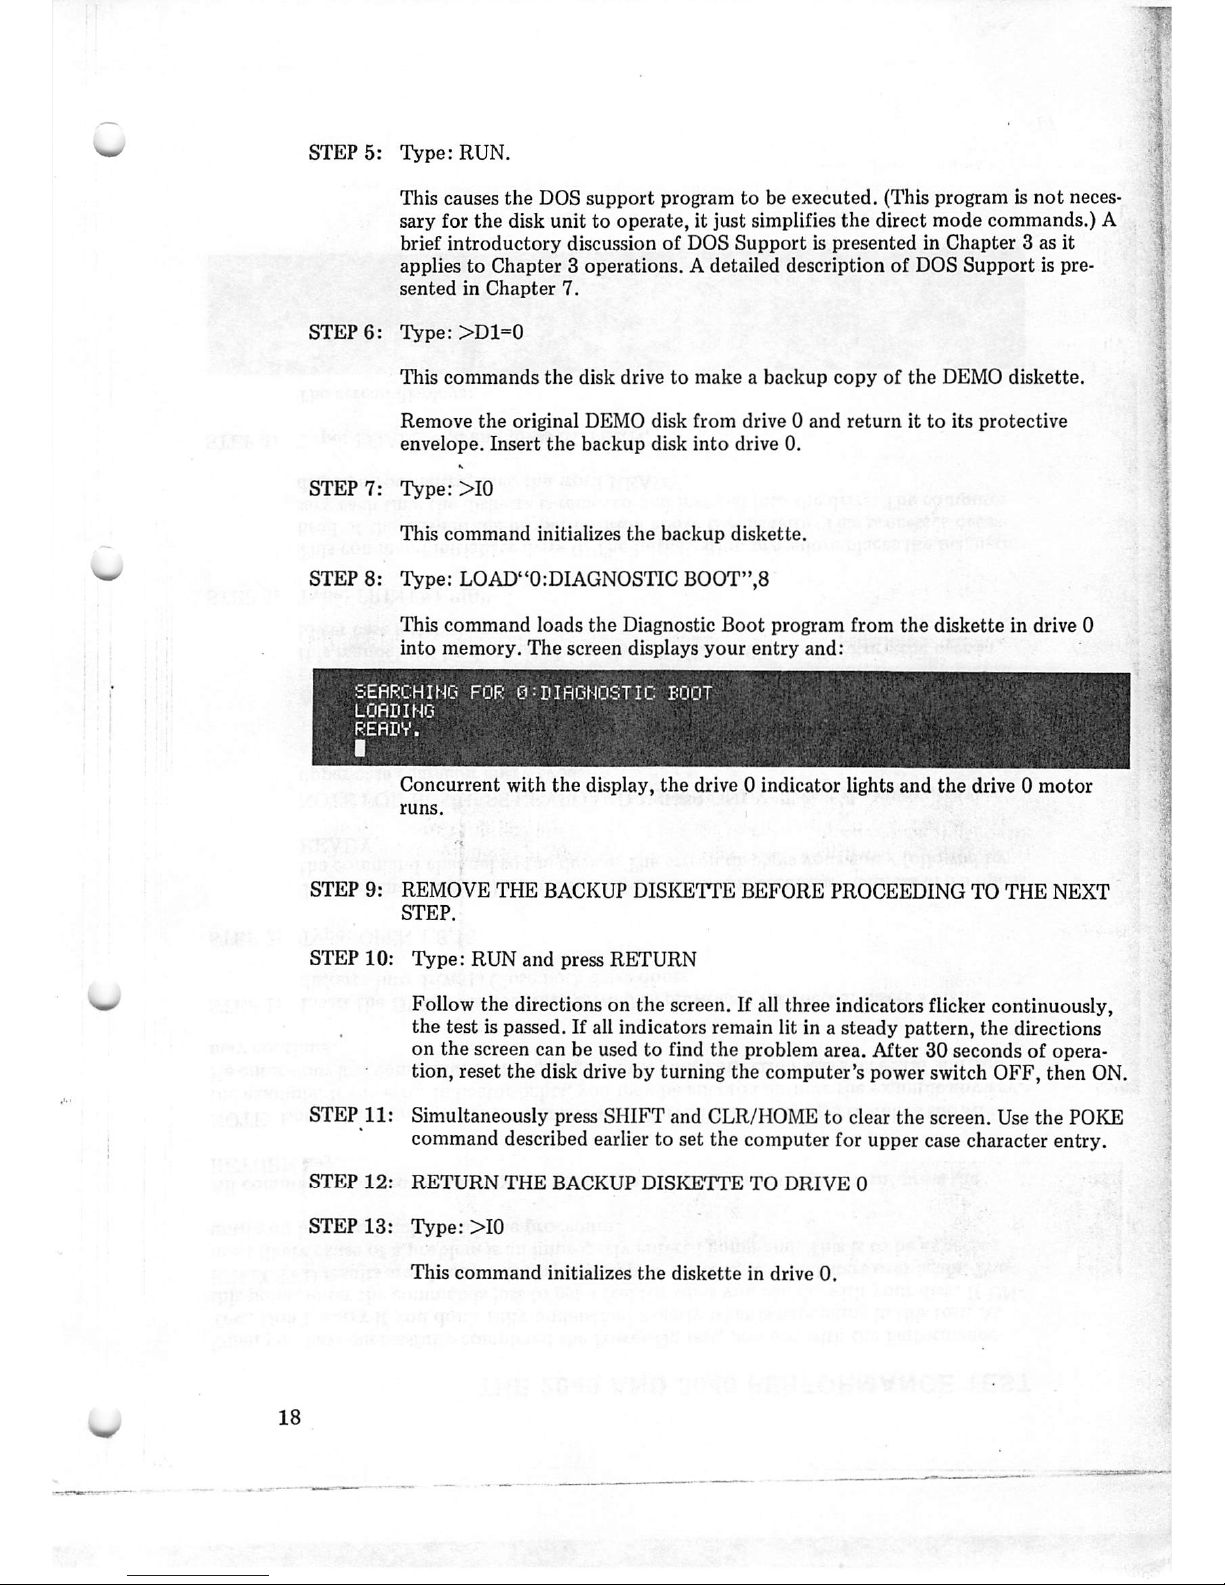
STEP 8: Type; LOAD"0:DIAGNOSTIC BOOT",8
This
command
loads
the
Diagnostic
Boot
program
from
the
diskette
in drive 0
into
memory.
The
screen displays
your
entry
and:
Concurrent
with
the
display,
the
drive 0
indicator
lights
and
the
drive 0
motor
runs.
STEP
9:
REMOVE
THE
BACKUP
DISKETTE
BEFORE
PROCEEDING
TO
THE
NEXT
STEP.
STEP
10:
Type:
RUN
and
press
RETURN
Follow the directions on the screen. If all three indicators flicker continuously,
the
test is passed. If all indicators remain lit in a steady
pattern,
the
directions
on the screen can be used to find
the
problem area. After 30 seconds of opera
tion, reset the disk drive by turning the computer's powerswitch OFF, then ON.
STEP
11:
Simultaneously press
SHIFT
and CLR/HOME to clear
the
screen. Use
the
POKE
command described earlier to set the computer for upper case character entry.
STEP
12:
RETURN
THE
BACKUP
DISKETTE
TO
DRIVE
0
STEP
13:
Type:
>10
This
command
initializes
the
disketteindrive
0.
Page 25
STEP
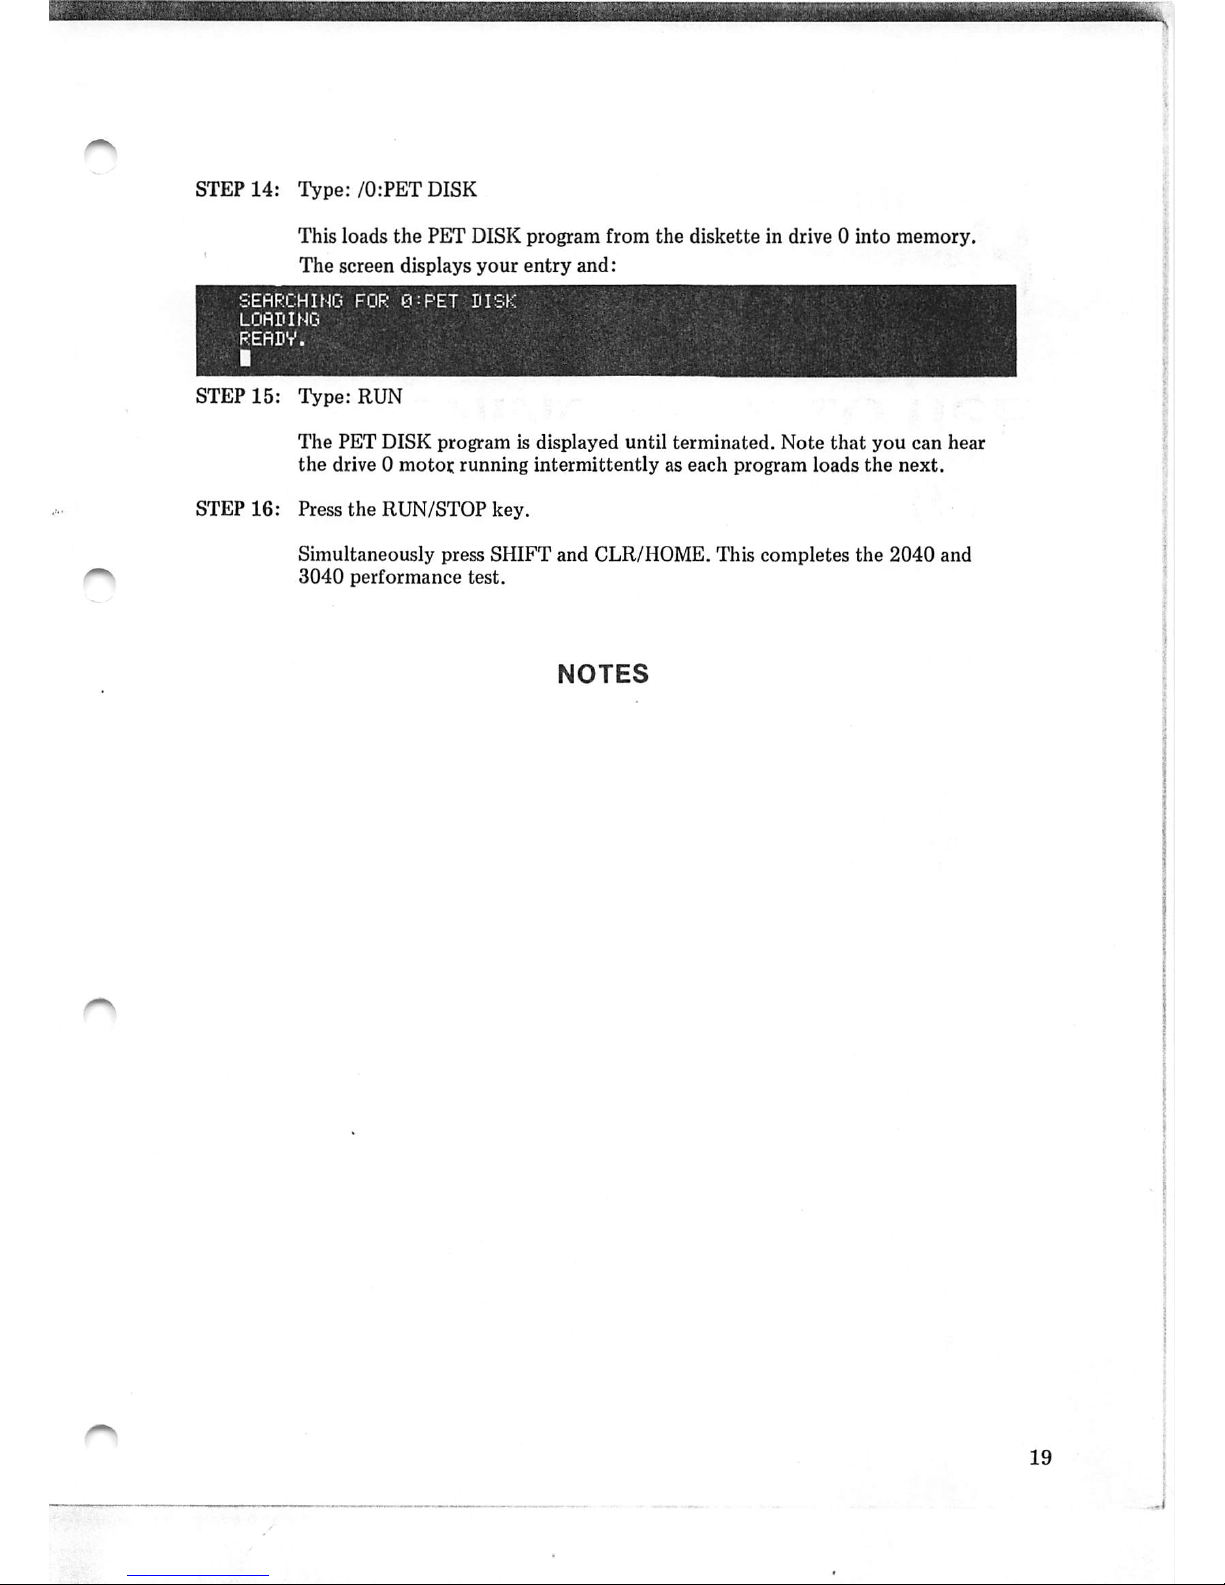
14:
Type:/0:PET
DISK
This
loads
the
PET
DISK
program
from
the
diskette
in drive 0
into
memory.
The
screen displays
your
entry
and:
STEP
15:
Type:
RUN
The
PET
DISK
programisdisplayed
until
terminated.
Note
that
you
can
hear
the
drive0motor
running
intermittentlyaseach
program
loads
the
next.
STEP
16:
Press
the
RUN/STOP
key.
Simultaneously
press
SHIFT
and
CLR/HOME. This
completes
the
2040
and
3040
performance
test.
NOTES
Page 26
Page 27
Chapter
3
LEARNING
HOW
TO
USE
YOUR
FLOPPY
DISK
DRIVE
Your
CBM
Floppy
Disk
Drive
adds
and
enhances
your
computing
power
with
added
storage
andfilehandling capability and iscontrolled directly with:
• BASIC commands entered via
the
keyboard,
• BASIC
statements
within programs,
and
• special disk commands.
In
this
chapter
you
will
learn
howtoapply
those
commands
and
statements.
This
chapter
is
organizedinsuchaway
that
the
functions
and
formatofdisk
commands
are
describedina
manner
which
permits
the
usertoperform
disk-related
tasks.
For
BASIC
4.0
users,
those
BASIC
commands
which
correspondtoeach
disk
maintenance
command
are
also
discussed.
Before
using
your floppy disk makesure you know howto:
1. operate your Commodore Computer,
2. do elementary programmingin
BASIC,
and
%
3.
open
and close files.
NOTE:
The
BASIC
statements
described
inthis
chapter
apply
specifically
to the
2040,
3040,4040,
and
8050.
Certainofthe
commands
and
statements
may
followaslightly
dif
ferent
formatorproduce
different
results
from
those
described
herein
when
they
are
used
with
the
computerorwith
other
peripherals.
Consult
the
appropriate
manual
for
the
exact
usageofthese
commands
and
statements
inother
applications.
This
chapter
will
first
acquaint
the
user
with
those
fundamental
disk
commands
that
per
form
disk
maintenance
and
file
manipulation
and
will
then
progressively
advance
toward
an
understandingofthose
BASIC
commands
used
for
data
handling.
Approachedinthis
man
ner,
the
user
will
then
have
developed
the
necessary
confidence
and
programming
skills
to
proceedtoadvanced
disk
programming
techniques.
Practice
the
disk
commands,
read
the
examples,
and
follow
the
step-by-step
illustrationsoftheir
usage.
The
understandingofthe
more
advanced
disk
programming
techniques
will
depend
to a
large
degree
upon
how
well
the
fundamentals
have
been
mastered.
21
Page 28

Tofacilitate your
understanding
and
masteryofCommodore
BASIC,
twocomputer
terms
are
stressed
inthis
Chapter:
Block
Availability
Map
(BAM)
and
Disk
Operating
System
(DOS).
Although
these
are
conventional
terms,
they
willbebriefly
discussedasthey
relate
to
Commodore
Floppy
Disk
Usage.
§ \
THE
BLOCK
AVAILABILITY
MAP
(BAM)||
The
BAM
isa
disk
memory
representation of
available
and
allocated
space
ona
disk.
When
the
system
stores
information
ona
disk,
the
BAM
willbeautomatically
referencedbythe
DOStodetermine
what
spaceisavailable
and
how
many
blocks
canbe
allocated.Ifsuffi
cient
spaceisavailabletostoreagiven
file,itwillbestored
onthe
disk
and
the
BAM
updatedtoaccount
for
the
space
allocated.
However,
ifthe
DOS
detects
thata
file
will
occupy
more
space
than
available,
anerror
message
willbegenerated.
Formattingadisk
creates
the
BAM
which
isthen
loaded
into
DOS
memory
upon
initializa
tion. The
BAM
isstored on diskette in varying locations dependingupon the driveused:
Model BAM Location
and
Memory Requured
2040,3040,4040 Track18, Sector0
128
bytes
8050
Track
38,
Sector 0
and
1
2
Blocks
As
changes
occur
to the
BAMinDOS
memory,
the
BAMondisk
will
beupdated to
reflect
these
changes.
Updates
to the
BAM
occur
whenaprogramissaved
ora
CLOSEorDCLOSE
is
performed
ona
new
RELativeorSEQuential
data
file.
Since
the
8050
hastwo
blocks
available
for the
BAM,
onlyone
block
of the
BAMisloaded
into
memory
at a
time.
When
updated, this
block
iswritten to the
disk
andthe other
block
loaded
into
memory.
This
interchange
ofinformation
between
the two
BAMs,
onein
DOS
memory
andthe otheron
disk,
enables
the
systemtomaintainarecordoffree
and
allocated
space
onthe
disk.
Thisdescription of the
BAM
can only stressthe importanceof initializationwhen
using
either
the
2040or3040.
Strict
attentiontothis basic rule will enable
the
usertobenefit
from the advantages of developmg good programming techniques as wellas to develop a
better understandingof the relationship of one elementof the systemto another.
THE
DISK
OPERATING
SYSTEM
(DOS)
The
DOSisresponsible
for
managing
information
exchange
between
the
disk
controller
and
the
computer.
The
DOS
performs
many
functions
which
are
transparent
to the
user
but
which
are
vital
to
the
operation
ofthe
system.
For
example,
the
DOS
monitors
theinput/output
(I/O)
ofthe
disksothat
channels
areproperly
assigned
andthat no
lengthy
waits
foran open
channel
occur. In addition to monitoring of disk I/O, the DOSalso usesthe channel structure to
search
the
directory andtodelete and copy files.
There is another function of DOS called DOS Support which was used during
hardwue
checkoutinChapter2.Review
the
Performance
Test
procedure
and
observe
the
special
sym
bolsof
DOS
Support
which
were
used
to duplicate and initialize the
disks
beforethesepro
cedures
were
fully
explained
to the
user.
Because
ofits
easeofuse,
DOS
Support
symbols
-
22
Page 29
were
easiertoimplement
at that pointthanattempting to
explain
the
programming
pro
cedures
they
replace.
It is
now
appropriatetobriefly
discuss
how
DOS
Support
can
enhance
and
simplify
your
knowledge
of operating your
Commodore
computer.
Thefirst
file
on the
TEST/DEMO
diskette that
comes
withyourdisk
drive
isthe
Universal
Wedge
program,
often
referred
to as
DOS
SUPPORT.
This
program,
when
loaded
into
com
puter memory, permitsthe userto enter abbreviations for manydisk commands.
For
example,
disk
commands
which
would
normallybetransmitted
to the
disk
using
the
PRINT#lfn
"commandstring"
format
maybetransmitted
via
DOS
SUPPORTbypreceding
the
command
with
> or
Typing
slash
(/)
followed
bya
program
name
and
RETURN
will
cause
DOS
SUPPORTtoload
that
program
into
memory.
Replacing
certain
disk
commands
with
DOS
Support
special
symbols
can
simplify
learning
about
your
Commodore
computer
by
providingafaster
methbdtocommunicate
virith
the
disk.
Chapter7contains
detailed
instructionsconcerningthe useof these special symbolsand their limitations.
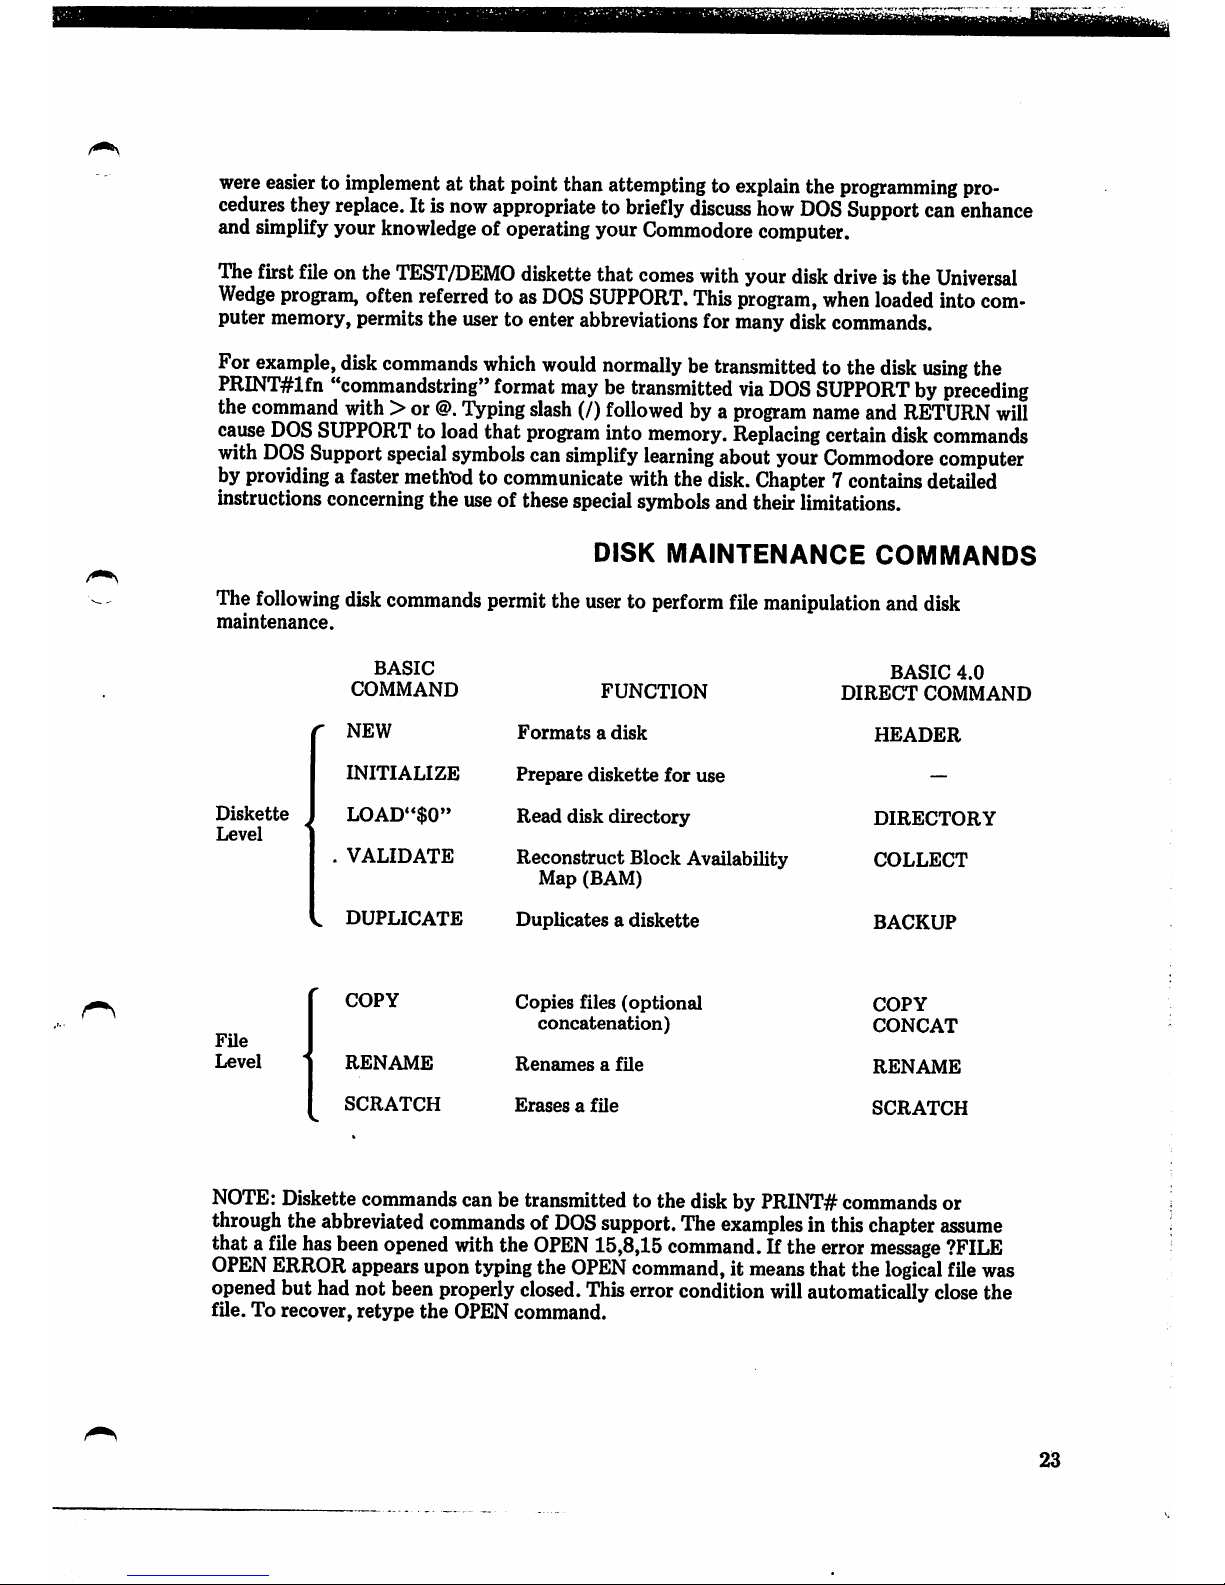
DISK
MAINTENANCE
COMMANDS
The
following
disk
commands
permit
the
usertoperform
file
manipulation
and
disk
maintenance.
BASIC
COMMAND
NEW
INITIALIZE
LOAD"$0"
.
VALIDATE
FUNCTION
Formatsadisk
Prepare
diskette
for
use
Read
disk
directory
Reconstruct
Block Availability
Map
(BAM)
BASIC
4.0
DIRECT
COMMAND
HEADER
Diskette
Level
File
Level
DUPLICATE Duplicates a
diskette
COPY
RENAME
SCRATCH
Copies
files
(optional
concatenation)
Renamesafile
Erasesafile
DIRECTORY
COLLECT
BACKUP
COPY
CONCAT
RENAME
SCRATCH
NOTE:
Diskettecommands can be transmittedto the disk by PRINT#commands or
through
the
abbreviated
conmiandsofDOS
support. The
examples
in thischapter
assume
that a
file
has
been
opened
with
the
OPEN
15,8,15
command.
If the
error
message
?FILE
OPEN
ERROR
appears
upontyping the
OPEN
command,itmeans
that the
logical
file
was
opened but had not beenproperly
closed.
Thiserrorcondition
will
automatically
close
the
file. To recover, retype
the
OPEN command.
23
Page 30
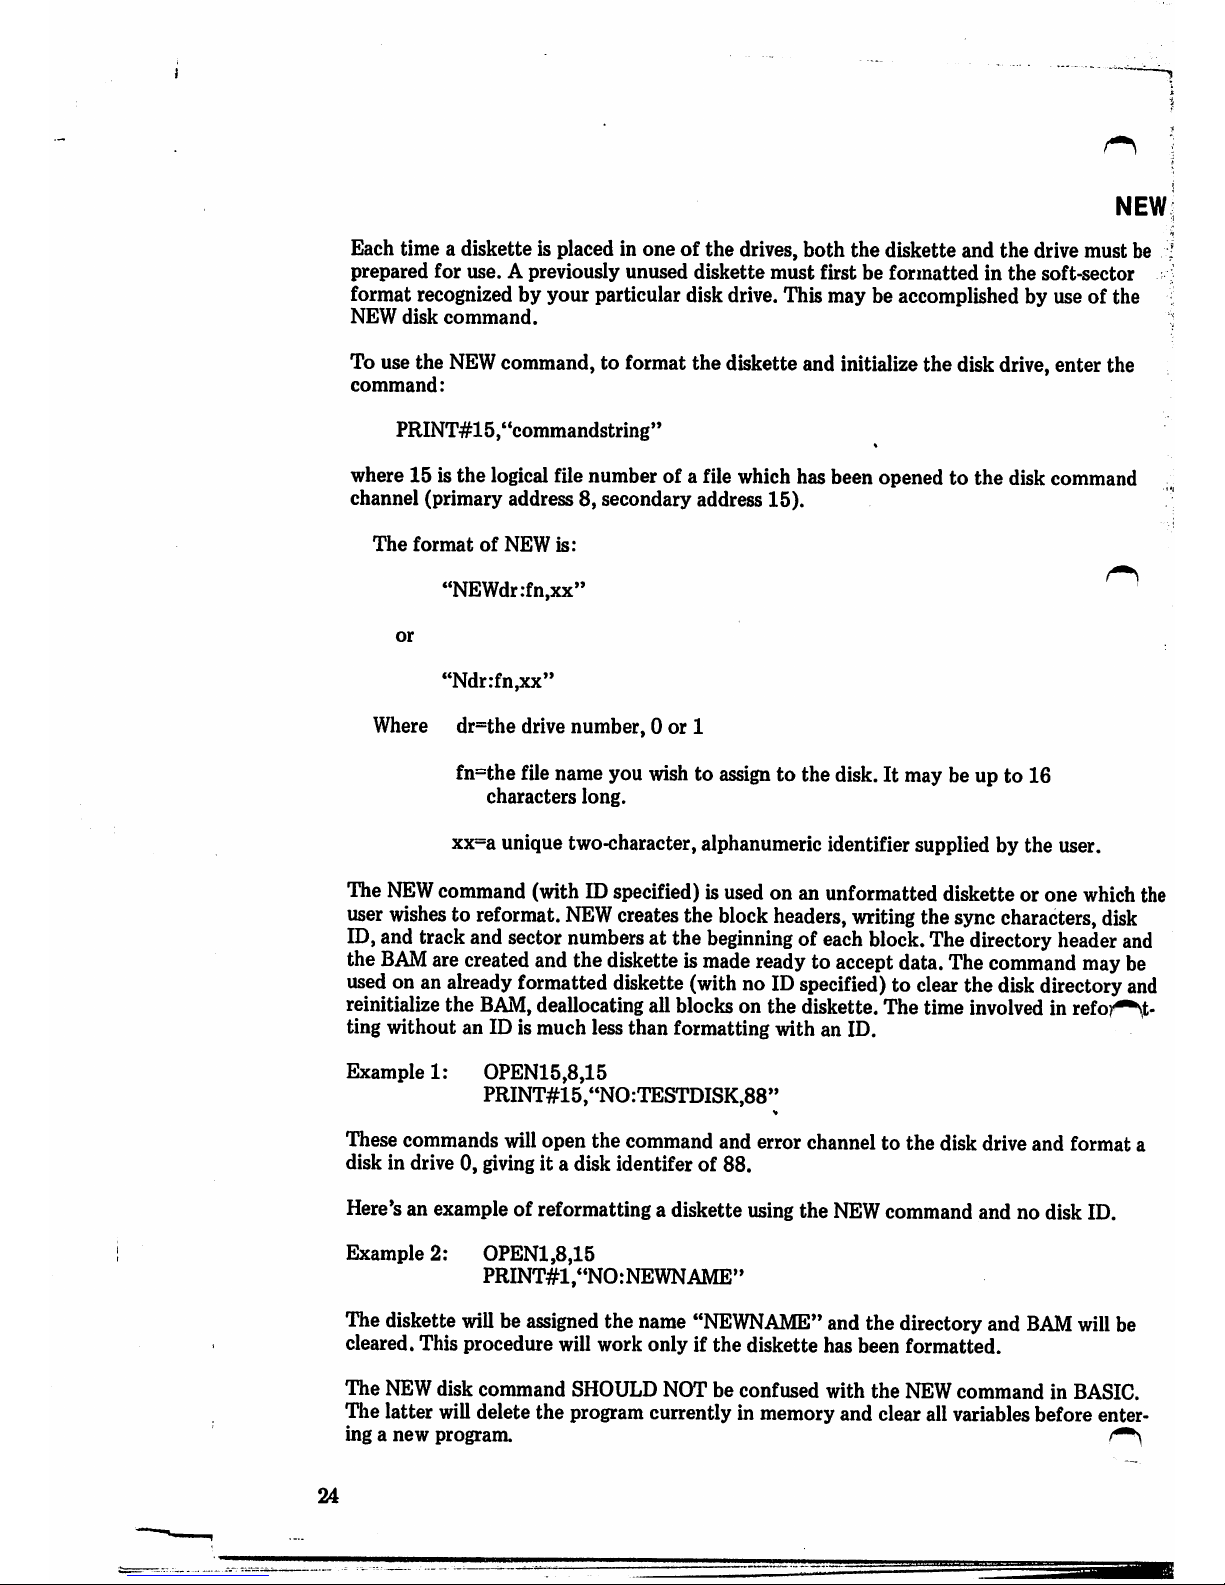
NEW
Each time a diskette is placed in one of the drives, both the diskette and the drive must be ^
prepared
for
use. A previously
unused
diskette
must
fkstbeformattedinthe
soft-sector
format recognized by your particular disk drive. This may be accomplished by use of the
NEW
disk
command.
To use the
NEW
command,to format the diskette and initializethe diskdrive,enter the
command:
PRINT#15,"commandstring"
where 15 is the logical file number of a file which has been opened to the disk command
channel (primary address 8, secondary address
15).
The
format
of
NEW
is:
"NEWdr:fn,xx"
or
"Ndr:fn,xx"
Where dr=the drive number, 0 or 1
fn=the filename you
wishtoassign
to the disk. It may be up to 16
characters
long.
xx=a unique two-character,alphanumericidentifier supplied by the user.
The NEWcommand (with ID specified) is used on an unformatted diskette or one which the
user
wishes
to reformat.
NEW
creates
the
block
headers,
writing
the
sync
characters,
disk
ID,and track and sector numbers at the
beginning
of eachblock.The directory header
and
the
BAM
arecreated and the diskette is
made
readyto acceptdata.The
command
maybe
used
on an
ahready
formatted diskette (with no IDspecified) to clearthe diskdirectory
and
reinitialize the
BAM,
deallocating all blockson the diskette.The time
involved
in refo?^\t-
ting without an ID ismuch less
than
formatting with an ID.
Example 1: OPEN15,8,15
PRINT#15,"NO:TESTDISK,88"
TTiese
commands will open the command and error channel to the disk drive and format a
disk in drive 0, givingita disk identiferof88.
Kerens
an example of reformatting a diskette using the NEWcommand and no disk ID.
Example 2:
0PEN1,8,15
PRINT#1,"N0:NEWNAME"
The diskette willbe
assigned
the name
"NEWNAME"
and the directory and
BAM
willbe
cleared. This procedure will work
onlyifthe
diskette has been formatted.
The
NEW disk command SHOULD NOT be confused with
the
NEWcommand in BASIC.
The latter willdelete the program currently in memory and clear all variables before enter-
mganew
program.
24
Page 31

HEADER
(BASIC
4.0
Direct
Command)
The
HEADER
command
has
the
same
effectasNEW
command
butisreserved
for
those
computers
using BASIC
4.0.
Since formatting destroys all
data
previously stored,
the
HEADER command has a built-in safety feature
that
queries
the
user: ARE YOU SURE? A
positive response to this question permitsformatting to take place while a negative response
aborts
the
operation.
The
formatofHEADER
command
is:
HEADER"fn",Ddr,Ixx
Where: fn=file name suppliedbyuser
but
limited to16characters.
dr=drive number, 0 or 1
xx=a unique two character alphanumeric identifier (ID) supplied by user.
(same parameters as used by NEWcommand)
Initialization
(2040
and
3040)
Whenever a diskette is inserted into either drive, for any reason, it MUSTbe initialized to
ensure
that
the
information on
the
BAM (in
the
disk memory) is
the
proper information for
the diskette currently in
the
drive. Failure to properly initialize a diskette each time it is
insertedorreinserted
into
the
drive will
resultina
DISKIDMISMATCH
ERROR
and/or
lossofdata.
Insert
the
diskette
into
drive1and
initializeasfollows:
OPEN
1,8,15
PRINT#1,"I1"
NOTE: FILE OPEN ERROR could occur if a previously opened file was addressed with a
second OPEN command. If the file is still open,
the
second OPEN command would close
the
file. If this error is displayed, retype the OPEN command and proceed.
The diskette in drive 1 isnow initialized.Do not confuse formatting and initialization.
Remember that formatting is usually a one-timeoperation and that re-formattinga disk will
destroy previously
stored
data.
The INITIALIZE command on
the
2040 and 3040 aligns
the
read/write head with track 1
on the specifieddiskette. It then movesto track 18, reads the disk label and ID, and loads
this information into
the
Disk Operating System (DOS) memory.
Sincethe 2040 and 3040 initialization function depends upon a change of ID to detect a
changeof diskette, inserting a diskette with an ID identical to one previously used may lead
to a loss of data. This happens because
the
computer will reference
the
BAMleft over from
the previous diskette. Sincethe IDsare identical the DOSassumes there has been no change
of diskette. A SAVEor DSAVEcommand may now cause new data to be written overgood
data
ahready
present on the disk because the DOS will use the old map of availablestorage
area, instead of the current one. The results are unpredictable, and the diskette may become
totally
useless.
For this reason, unique disk IDs must be used whenever possible for each
diskette.
25
Page 32

Initialization
(4040)
Tlie
4040
utilizesaDOS2software
routine
each
time
the
diskisaddressedtodetermine
if
initializationisrequired.Ifa
differentIDis
detected,
the
4040
will
automatically
initialize
the
new
disk.
Operator
initializationisnot
requiredifunique
IDs
are
assigned
each
diskette.
Initialization
(8050)
The
8050
utilizesahardware
featuretodetect
the
removalorinsertionofa
diskette,soit
is
not
necessarytoinitialize
since
this
isan
automatic
function.
THE
DIRECTORY
Confirm
that
the
newly
formatted
disk
has
the
correctIDand
disk
namebyusing
one
of
the
following
methodstolist
the
directory.
The
directory
display
includes
the
following
information:
•
Disk
name
•
Disk
ID
•
DOS
version
number
•
File
name
•
File
type
•
Numberofblocks
used
•
Pointertofirst
blockoffile
• Number of available (free) blocks
There
are
two
methods
availabletoall
users
for
listing
the
directory.
The
first
method
illus-
trates
the
listing
procedure
using
LOAD
and
the
second,
the
listing
proceduremBASIC
4.0
using
the
DIRECTORY
command.Ifusinga2040or3040,
and
have
removed
the
disks
from
the
drives
for
any
reason,
the
disks
mustbeINITIALIZED
before
attemptingtodis
play
the
directory.Ifusinga4040or8050,
initializationisnot
required-insert
the
diskette
and
continue.
This
procedure
will
destroy
any
program
currentlyincomputer
memory
when
the
directory
is
LOADed.
(Refertothe
descriptionofthe>$DOS
Support
commandinChapter7which
isa non-destructivedirectory display procedure.)
STEP1:Placeaformatted
diskindrive1.If
usinga2040or3040,
INITIALIZE
the
disk
ette
and
continue.
STEP2:Type:
L0AD'*$1",8
then
press
RETURN.
The
screen displays:
STEP 3:
Type:
LIST
The
directory
for
drive1willbedisplayed.
Substituting$0for$1in
the
format
will
display the directoryfor
drive
0.
Page 33

DIRECTORY
(BASIC
4.0
Direct
Command)
This command will display
the
directory
without
disturbing
the
contentofthe
memory.
You
may
type:
DIRECTORY DOusing
the
full word spelling
but
the
preferred
short
format
is illustrated which uses
the
first two unshifted characters followed by a shifted R.
To display
the
directory,
type:
diRdO and press RETURN.
If using upper case display, type:
DI_DO
and press RETURN.
The
_ in
this
example
represents
the
upper
case display
forashifted
R. Typing DI _ D1 will
display
the
directory for drive1.Typing DI _orDIRECTORY will display
the
directory for
both
drives if
there
is a
formatted
diskette
present in each drive. See
your
BASIC
4.0
reference manual
foracomplete
descriptionofthis
BASIC
command.
Printing
The
Directory
Quite often, it becomes convenienttoaffix a diskette directory listing directly on
the
pro
tective jacket. This permits
the
usertoscan
the
printed directory listing
without
having
to
insert
the
diskette
into
the
drivetoobtain
this information. Should
you
desiretoprint
the
directory, place
the
diskette in drive 0 and
enter
the
following commands:
LOAD
"$0",8
Loads
the
directory.
OPEN 4,4:CMD4 Opens device 4 (printer) and changes
the
primary
output
deviceto4.
LIST Prints
the
directory.
PRINT#4:CLOSE4 Returns
outputtothe
screen and closes the file.
VALIDATE
The
VALIDATE
command
traces
through
each
blockofdata
contained
in all filesonthe
diskette.Ifthis
trace
is successful, a
new
BAM is generated in
the
disk
memory
and
written
to
the
diskette.
Any
blocks
which
have
been
allocated
but
are
not
associated
with
a file
name, as in the caseof direct accessfiles will be freed for use. This will not affect relative
files created using
the
BASIC
4.0
DOPEN
command.
In additiontoreconstructing the BAM, VALIDATE deletes files from
the
directory
that
were never properly closed. If a READ error is encountered during a VALIDATE,
the
operation
aborts
and
leaves
the
disketteinits
previous
state.Ifa
VALIDATE
error
does
occur,
you
must
re-initialize
before
proceeding.
The
format
of
VALIDATE
is:
PRINT#15,"VALIDATEdr"
Where: dr=drive
number(0or
1)
27
Page 34

NOTE:
You
may
abbreviate
VALIDATEtoV.
Ifa
drive
numberisnot
specified,
the
disk-
^
ette in the last driveused during the current session is verified.
Example:
0PEN1,8,15
PRINT#1,"V0"
or
PRINT#1,"VALIDATE
0"
COLLECT (BASIC
4.0
Direct
Command)
The
COLLECT
commandinBASIC
4.0
performs
the
same
function as
VALIDATE.
Either
command will accomplish
the
following:
• Recreate a BlockAvailability Mapaccordingto validdata on disk
• Delete filesfrom the directory which were never properly closed.
(OPENedbut never CLOSEed)
The
formatofCOLLECT
is:
COLLECT
Dx
Where: x=drive
number(1or
0)
Example
1:
COLLECTDl
Verifies
drive
1
Example 2: COLLECT
Verifies
drive
0
(drive defaultsto0)
DUPLICATE
The
DUPLICATE
command formatsthe destinationdiskette and transferseach blockof in-
formation
from
the
source
diskette to thedestination diskette, thus
creating
anexact
dupli-
cate of the source diskette. Usethis procedure for one method of creatinga backup copy of
a
diskette.
Due
to the
various
formatting protocols
usedbyDOS1,DOS
2, and
DOS
2.5,thiscom
mand
may
NOTbeused
interchangeably
when
using
diskettes
preparedondifferent
disk
drives. Use the following guidetoavoid confusion:
DUPLICATE
command
may
be used on—
• a 2040 or 3040 usingdiskettes formatted on a 2040 or 3040.
• a 4040 usingdiskettes formatted on a 4040.
DUPLICATE command
may
NOT be used on—
• a 2040 or 3040 usingdiskettes formatted on a 4040.
• a 4040
using
diskettesformatted on a 2040or 3040.
To
reproduceadiskette
under
these
conditions,
use
the
COPY
ALL
DISK
pro
gram
found
onthe
TEST/DEMO
diskette
which
came
with
your
disk
drive.
28
Page 35

The
format
of
DUPLICATE
is;
PRINT#lfn,"DUPLICATEddr=sdr"
Where:
ddr^is
the
destination
diskette
(either 0or1)
sdr=is
the
source
diskette
(either 0or1)
Do
not
reverse
the
orderofthe
drive
numbers.Ifyou
do,
you
will lose all
data
and
there
is
no waytorecover
it.
Observe good practice and place a write
protect
tabonthe
diskette
containing
the
valuable
information.
This
procedure
will prevent overlaying good
information.
Example:
0PEN1,8A5
PRINT#1,"DUPLICATE0=1»
or
PRINT#1,"D0=1"
NOTE:
The
letter
D is a legal
abbreviation
for
DUPLICATE
command.
BACKUP
(BASIC
4.0
Direct
Command)
The BACKUPcommand in BASIC4.0 performs the same function as DUPLICATE.
The
format
of
BACKUP
is:
BACKUP
Dsdr
TO
Dddr.
Where: ddr=is
the
destination drive (either 0or1)
sdr=is
the
source drive (either 0or1)
Note
that
the
formatofBACKUP
differs
from
DUPLICATEinthat
the
orderofthe
drives
is
reversed.
Example: BACKUP D1 TO DO
This has exactly
the
same effect as
the
previous example given when discussing DUPLICATE
command.
For
a complete explanation of the BACKUP command, refer to
the
Commodore
BASIC
4.0
Reference
Manual.
COPY
The
COPY
command
allows
youtocopy
files
from
one
diskettetoanother,tocreate
mul
tiple
copies
(under
different
names)offilesonthe
same
diskette.
This
command
can
also be
used
to
concatenate
data
filesonthe
4040or8050.Upto
four
soiuce
files
canbecon
catenated
into
the
destination
file.Onthe
4040or8050
all
files
from
one
drive
may
be
copiedtoa
formatted
disketteinthe
other
drive.
The
COPY
command
maybeabbreviated
withaC.
COPY disk
conmiand
canbeformatted
three
ways depending
upon
application:
To
copy
a single fUe:
PRINT#lfn,"COPYddr:dfn=sdr:sfn"
29
Page 36

or ^
PRINT#lfn,"Ckldr:dfn=sdr;sfn"
To
concatenate
and
copy:
PRINT#lfn,"COPYddr:dfn=sdr:sfn,sdr:sfn
.,.
or
PRINT#lfn,"Cddr:dfn=sdr:sfn^dr:sfn
...
To copyaUfUes
on a PRINT#lfn,"COPYddr=sdr"
diskette:
or
PRINT#lfn,"Cddr=sdr»
Where:
ddr=is
the destination
drive.
Thefileisto becopiedonto the diskette in this
drive. This
maybethe
same or different from
the
source drive.
dfn=is the destination file name. This name may be either a new name or the
same as
the
old file name unless
the
ddr is
the
same as
the
sdr. If
both
files
are to exist on thesame diskette, they must have different names.
In example 1, a file is copied from the diskette in drive 1tothe diskette in drive 0. In
example2,files
from
both
drives
are
concatenated
intoafileondrive
1.In
example3,all
files
from
drive0are
copiedtodrive1.An
error
message
FILE
EXISTS
willbegenerated
in
the
disk
unit
ifa
file
to be
copied
ahready
exists
onthe
destination
drive
(drive
1in
this
example).
Example 1: PRINT#1,"C1:ACCT1=0:ACCT"
A file is copied from
the
diskette in drive 1todrive 0.
Example
2:
PRINT#1,"C1:JDATA=1:ACCT1,0:ADATA,0:BDATA"
Files from both drivesare concatenated into a file on drive1. Note that file namesshould
beshort, as the
maximum
lengthof a disk
command
stringis40 characters.
Example 3: PRINT#1,«C1=0"
All files from drive 0 are copied
to
drive 1.
Example 3 illustrates one way to upgrade from a 2040 or 3040 formatted diskettetoa 4040
format:
place
a formatted diskette in drive1 and the diskette to be upgraded in drive0 and
copy
all files
from0onto
1.
30
Page 37

COPY (BASIC
4.0
Direct Command)
The
COPY
direct
commandinBASIC
4.0
performs
the
same
functionasCOPY
disk
com
mand
and its format is
also
dependent uponapplication.
Use this formattocopy
the
contents of the entire disk:
COPYDsdrTODddr
Usethis formattocopy a singlefile:
COPY
Dsdr,"sfn" to Dddr,"dfn"
Where:
sdr=the
source
diskette
ddr=destination
diskette
fn'^^ile
name
CONCAT (BASIC 4.0 Direct Command)
The
CONCAT
direct command in
BASIC
4.0 permitsthe userto concatenate
files.
The
formatofCONCAT
is
CONCAT
Dsdr,«sfn" TO Dddr,"dfn"
where
the filenameddfn on driveddr
will
containthe contents of both dfn and sfn after
the concatenation.
For
example:
CONCATDO"YOURFILE" TOD1,"MYFILE"
^
will
resultinMYFILEondrive1containing
thedata
from
theold
MYFILE
and
from
YOURFILE.
YOURFILE
will
remainunchanged.
NOTE:
The concatenationfeature of
COPY
diskcommandand
CONCAT
direct command
are valid
only
for
DOS
2.
For
further
information
regarding
useofBASIC
COPY
and
CONCAT
commands,
refer
to
the
Commodore
BASIC
4.0
Reference Manual.
RENAME
The
RENAME
command
renamesanexisting
file.Afile
can
not
already
exist
with
the
file
name
specified
inthe
command
or the FILE
EXISTS
error
message
will
begenerated.
The
formatofRENAME
is:
PRINT#lfn,"RENAMEdr:nfn=ofn»
Where: dr=the disk drive on which the diskette is located.
nfn=the
new
nameofthe
file.
31
Page 38

ofn=the
old
nameofthe
file.
lfn=a
logical
filenumber.You
assign
thisnumberarbitrarily and it maybe any
whole
number
between1and
255.
NOTE: The letter R is a legalabbreviation for RENAME.
RENAME (BASIC
4.0
Direct
Command)
The RENAMEdirect command in BASIC4.0 performs the same function as RENAME disk
command.
The
format
is:
RENAME
Ddr,"ofn"
TO
"nfn"
NOTE:Closeany open files before usingthe
RENAME
commandsincethe disk willnot
execute
this
commandonany
active files.
For further information on the RENAMEcommand, please refer to the Commodore BASIC
4.0
Reference
Manual.
SCRATCH
The SCRATCH command erases unwanted files from
the
specified diskette and its directory.
You can eraseone file, severalfiles, or all the files on a diskette.
The
formatofSCRATCH
is:
PRINT#lfn,"Sdr:fn,dr:fn
...
dr:fn"
Where:
dristhe
disk
drivetobe
searched.
: alonemeans"last driveaccessed",with dr refers to the specified drive,where
not
used
means
"both
drives".
fnisthe
nameofthe
filetobe
erased.
To erase one file, enter the entire name of the file:
Example: PRINT#1,"S0:ACCT"
To eraseseyeralfiles with unrelated names, enter the entire name of each file to be deleted:
Example: PRINT#1,"S0:ACCT,0:CUSTOMER,0:INV"
To erase several files at one time where names have something in common, refer to the rules
in APPENDIX B concerning
pattern
matching.
Youmay
erase
all
files
on a diskette
using
pattern matching asin the following example:
Example:
PRINT#1
"SO:*"
32
n
Page 39

i
SCRATCH (BASIC
4.0
Direct
Command)
SCRATCH
direct command in
BASIC
4.0 performs the samefunction as SCRATCH disk
command.
The format is: SCRATCHDdr,"fn"
Where:
dr=drive
number
fn=filename
of
filetobe
scratched
Pattern
matching
rules
maybeused
with
this
command.Aswith
the
HEADER
command,
there
isa
built-in
safety
feature
that
queries
the
user:
ARE
YOU
SURE?Apositive
response
permits
the
file
to be
SCRATCHed
whileanegative
response
abortsthe operation.
Fora
complete
description
ofthe
SCRATCH
direct
command,
please
refertoyour
BASIC
4.0
reference
manual.
NOTES
33
Page 40

NOTES
•
34
n
Page 41

Chapter
4
BASIC
COMMANDS
FOR
DATA
HANDLING
BASIC COMMANDS ASSOCIATED WITH FLOPPY DISK DRIVES
The
BASIC
commands
described
inthischapter,
allow
the
usertocommunicate
withand
transfer
datatoand
from
the
disk
drive.
These commands are available for ALL versions of Commodore BASIC:
0PENlfn,8^,"dr:fn,t^/w" VERIFY"dr:fn",8
CLOSElfn
PRINT#lf
L0AD**dr:fn",8
GET#lfn
SAVE"dr:fn",8
INPUT#
These
commands
are
available
ONLYinBASIC
4.0:
DOPEN#lfn,"fn"
DSAVE"fn"
DCLOSE#lfn RECORD#lfn,R,B
DLOAD"fn"
Where:
lfn=logical
file
number
(any
number
between
1 and255)
fn=file name supplied by user
x=dr=disk drive number (1 or 0):
both
Dx and dr default to 0
8=device
number(8 for disk,2 for second cassette, 4 for printer)
sa=secondary
address
lf=logical file
All
upper-case
characters
shown
in formatare
essential
for the properexecution of a com
mand
and
must
betj^ed by
user.
These
commands
are
entered
via
the
keyboard
using
un-
shifted
characters
o^y.Onthe
CBM
Business
Model
they
will
appearinlower
case.
B^IC
3.0
commands
are
upward
compatible
with
BASIC
4.0
commands.
Each
command
willbedefined
along
withabrief
exampletoillustrate
their
use.Assoonasyour
dual
drive
floppy
diskisattachedtoyour
computer
and
has
passed
the
performance
test,weencourage
youtotry
the
examples and procedures.
35
Page 42

SAVE
and
DSAVE
(WritingaProgramtoa
Dislcette)
^
Ifapropamisin
computer
memory,itcanbemovedtoa
diskette
for
storage.
This
is
accomplished
with
the
SAVE
(any
Commodore
BASIC)orDSAVE
(BASIC
4.0)
commands.
transferred
w^h
the
SAVEorDSAVE
commands
are
automaticaly
designated
by
the
DOSasa
program
(PRG)
file.
Both
commands
transfer
PRO
files
from
the
computer's
memorytothe
specified
diskette.
You
must
specify
the
drive
number,
the
program
name.
Md
the
device
number.
The
device
number
will
defaulttodevice1whichisthe
tape
unit
if
ItISnot
specified.
TTie
formatofSAVE is:
SAVE"dr.fn",dn
Where:
dr=is
the
disk
drive
number.Itmustbe0or1.
fn=is
any
file
nameof16
charactersorless
you
wishtoassigntothe
filetobe
transferred
to the diskette.
Blanks
are
countedascharacters.
dn=is
the
device
numberand it must be8.
This
following
example
illustrates
creatingaone
line
program,
SAVEinciton
the
disketfp
in
drive0under
the
name
TESTPROG,
and
VERIFYing
thatitL
rfsMeX
dtek
Example:
10?'THIS
IS A TEST"
SAVE"0:TESTPROG",8
VERIFY"0:TESTPROG",8
The
DSAVE
command
performs
the
same
functionasSAVE,
butisvalid
oniv
withaCom.
modoredisltsystem and
BASIC
4.0.
The
format
is:
DSAVE"fn"Ddr
Tliis
command
wiU
saveafile
named
"fn"onthe
floppy
diskindrive0or1.The
fUe
name
"fn",
maybeany
name
of16
charactersorless.
«" ora. ine
rue
name,
LOAD
and
DLOAD
(ReadingaProgram
fromaDiskette)
IrB^clo^lS^'Sc'4S
The
LOAD
and
DLO^
commands
transfer
PRG
fUes
from
the
specified
diskettetothe
""s'specify
the
drive
number,
the
program
name,and
the
device
LO^
is^
device
number
will
defaulttounit1whichisthe
cassette
unit.
The
format
of
LOAD"dr:fn",dn
Where:
dr=is
the
drive
number
from
which
you
are
loading
data.Itmustbe0or1.
36
Page 43

fn~is
the
file name previously specified in the SAVE command and/or stored in
the
disk
directory.
dn=is
the
device
number
anditmustbe8.
The following example illustrates how a program is loaded from the diskette into the com
puter memory, then executed. To do this example, first type
NEW
and depress RETURN
key to clearyour computer's memory so that you can see that it really works. Don't con
fuse
the
NEW
commandinBASIC
with
the
NEW
disk
command
usedtoformat
your
disk.
Example
1:
LOAD*'0:TESTPROG",8
READY.
RUN
THISISA
TEST
The DLOAD command transfers performs the same function as LOAD,
but
is specifically
designed for a Commodore disk unit using BASIC4.0. The device number will default to 8
if
not
specified.
The
drive
number
will default to 0 is
not
specified.
DLOAD"fn",Ddr
A successful LOAD or DLOAD closes all open files. Therefore
you
must
give a new OPEN
commandinorder
tocontinue
communicating
with
the
disk
drive
command
and
error
channel.
The
format
of
VERIFY
command
is:
VERIFY"dr:fn",8
This
command
verifies
that
a file
named
"fn"
storedona
floppy
disk
contains
the
same
information which is stored in
the
computer's
memory. This command is
the
same as
the
VERIFY
command used with the
tape
cassette. Once again, dr refers to
the
drive number,
either
zeroorone.
Note
that
the
format
of this
command
specifies
that
the
drive
number
be
placed before the filename. The 8 at the end of this command is the devicenumber (8 for
disk, 2 for second tape cassette).
STEP 1: Writea short program and save it on a diskette in drive 1 under the name
"test"
using
the
procedure described under the section on SAVE.
NOTE: It is
important
that
the
program in memory is
not
changed in
any
way
between
the
save
and
verify
operations.
STEP 2:
Type:
VERIFY
"1:TEST",8
Once
verified,
the
screen displays:
Page 44

...
Ka
verify
error
occurs,
reSAVE
the
program
and
verifyitagain.
VERIFY may also be used in the format:
VERIFY"*",8
in
ordertoperform
verificationofthe
last
fUe
saved
without
re-typing
the
fUename.
Con-
firm by following these steps:
STEP1:Write
a short
program
and
save
it.
STEP
2: Clear
the
screen.
STEP3: Type: VERIFY 8
The
VERIFY
function
willbeperformed
comparing
the
last
file
savedtothe
content
of
memory.
OPEN
^
This
command
setsupa
correspondence
betweenalo&cal
fUe
number
and
a
on
disk.Italso
reserves
the
buffer
space
within
the
disk
unit
tor
operationsonthe
file
bemg
opened.
The
format
ofthe
complete
OPEN
command
is:
OPENlfn,dn,sa,"dr:fn,ft,mode"
Where: lfn=the logicalfile number
dn=the
device
number; in this case8
sa=the
secondary
address.Itmaybeany
number
from2to14and
maybeused
either
for
inputoroutputasspecifiedinmode.
See
note
below
dr=the
drive
number:
0 or 1
fn=the
nameofthe
file.
ft=the
fUe
type.ItmaybeSEQ
(for
sequential),
USR
(for
user),
REL
(for
rela-
tive)or
PRG
(for program).
mode
describes
how
the
channelistobeused.Itmaybeeither
READ
(R)
or
WRITE
(W).
NOTE:
Secondary
address15is
the
command
and
error
channel
and
has
speci^uses
which
are
discussedinsubsequent
chapters.
Secondary
addresses0and1are
reservedbythe
operating
systems
(BASIC
and
DOS)
for
LOADing
and
SAVEmg
programs.
Examples:
OPEN2,8,2,"0:FILE1,SEQ,WRITE
OPEN3,8,9,"l:TESTDATA,PRG,WRITE*?
OPEN8,8,8,"0:NUM,USR,READ*'
^ ^ ' ^
38
Page 45

p»,i•!.••;••
•-1
The
contentsofan
existing
file
(on
4040
and
8050
only)
maybereplacedbypreceding
the
drive
number with an at sign
(@)
in the OPENcommand.
OPEN3,8,5,"@0:JDATA,USR,WRITE''
If
the
specified
file
does
not
exist,
then
normal
OPENing
procedures
are
executed.
You
can
also
assign
someofthe
OPEN
parameters
toa
variable
nameasillustratedinthese
examples:
Example
1: FL$="0:FILEA,SEQ,READ"
OPEN1.8,14,FL$
Example 2:
FL$="0:FILEA"
0PEN1,8,14,FL$+",SEQ,WRITE"
The
preceding
methods
are
convenient
whenitis
necessarytoopen
several
channels
to the
same
file
name.
The
DOPEN
commandisavailable
onlytoBASIC
4.0
users.
When
used
with
eithera4040
or
8050,
DOPEN
maybeusedtocreate
relative
filesorsequential
filesoffixed
length.
The
formatofDOPEN
is:
DOPEN#lfn,"fn",Ddr,Lrl (,0NUdn)
(.W)
i
Where:
Ifn,fn, anddr arethe
sameasdefined
for
OPEN.
Lrldefines the recordlength asequalto rl
ONUdn
specifies
the
device
number
equaltodn
(with
default
device
being
8)
W
maybespecifiedtomean
virite
mode.
IfWisnot
specified
for
sequential
files,
the
file will be openedtoread.
DOPEN
is not available for the standard 2040 or 3040. "- "
The
CLOSE
command
closesafile
openedbythe
OPEN
command.
Its
format
is:
CLOSE
Ifn
Where:
lfn=the
logical
file
number
ofa
file
openedbythe
OPEN
command.
Always
closeafile
after
working
with
it.
You
are
not
allowedtohave
more
than
ten
open
filesmthe
computer
and
fiveinthe
disk
drives,soitisprudenttomakeahabitofclosing
filesassoonaspossible.
This
way
you
will
always
have
the
maximum
numberoffiles
avail
able
for
use.
Page 46

DOLOSE
The DOLOSE command is available only to BASIC 4.0 users. This command closes files
opened
with
the
DOPEN
command.
The
format
of DOLOSE is; It
DCLOSE#Ifn
-yf
Where:
lfn=the
logical file
numberofthe
filetobe closed.
The
DOLOSE
command
may
alsobeused in
this
format:
DOLOSE
ONUdn
Where:
dn=the
device
number of the disk unit (defaults to 8).
When
used
in this
form,
DOLOSE
command
closes
all
active
disk
files
on the
specified
unit.
The following examples illustrate some applications of DOLOSEcommand:
Example
1: DOLOSE
Close all files currently OPEN.
Example
2:
DOLOSE#5
Close only logical file 5.
CLOSING
THE
COMMAND
CHANNEL
Closingthe command channel closes all channels associated with the disk drive. No other
partof the
logical
file
environment is affected. Thatis,the computer
does
not
recognize
that
the
files
have
been
closed.
The
following
example
illustrates
asituation in
which
several
channels
are
closed
down
bya
single
CLOSE
command.
Example:
OPENl.8.15
OPEHC-!.S.2..0:FILE1.SEG..WRITE"
0PEN4.8.5."G:FILE2.SEQ.WRITE"
PRINT#:::..
"IMPORTRHT
DflTR"
PRIHT#4.."Ni:iRE
DftTfi"
OPENS,4
?FILE
OPEN
ERROR?
REFinV.
The command channel is opened.
Data Channels are opened for writing.
A channel is opened
to
the
printer by
mistake.
An
error
message is displayed on
the
screen.
Since
there
was
an error, all
logical
files
in the computerare closed, but the channels in the
diskdriveare still open. To closethe disk channels,type:
Page 47

V " -
OPENI.8,15
CLOSEl
Nowall data channelsin the diskdriveare properly closed.
CLOSING
THE
DATA
CHANNEL
"Hie
CLOSE
command
closesafile
and
the
dataorcommand
channel
assoc^jated
with
it.
Whenever
you
closeafile
opened
witha
write
channel,
the
closing
of that
file
writes
the
final
block
ofdatato the
disk
and
updates
the
disk
directory.
When
you
closeafile
opened
with a read channel, that channel is simply closed down.
NOTE:
Wheiiadriveisinitialized
with
INITIALIZE,
NEW,
DUPLICATE,orVALIDATE,
all
channels
associate
with
that
drive
are
deleted.
These
commands
should
notbeexecuted
when
thereare any
files
opensincethe
files
will'b6
disrupted.
PRINT#
The PRINT#command transmitsa diskcommand stringto the
drive.
The
formatofPRINT#
is:
PRINT#fn,"commandstring"
Where:
•
lfn«a
file
previously
opened
using
secondary
address
15
tf yy:
i'
''commandstring'-disk handling or diskfile
handling
commands.
These
disk
commands
''
are discussed in detail in Chapter 3 of this manual. '
•; ; r J;,'
'v;:
PRINT#
may
alsobeusedtotransmit
datato a
previously-opened
sequentialorrelative
file.
A
semicolon
mustbeused
asa
terminator
for
each
PRINT#
statement
when
using
BASIC
3.0 to avoidsendingextraneous line feedsto the diskette. Thesecharactersare written to
the
diskette
bythe
BASIC
PRINT#
routine
aspartofthedata
terminator.
It is
important
to
be
aware
ofthis
face
because
the
carriage
return
aloneisseen
asa
terminator
bythe
DOS.
Hie
line
feedisthen
stored
inthe
fileasthe
first
characterinthe
next
record.Toavoid
this,
use
the
following format:
•KxMi^e:7:Kmri^,''k)NESABC'';Cini$a3);
'
The
CHR$(13)
isthe
carriage
return
nectary
forthe
proper
termination ofthe
record
on
the disk.
When
thisrecordisinput, the result
willbeJONESABC
which
isthe
desired
result.
BASIC
4.0
users
do not
needtofollow
this
procedure
(though no
harmful
ieffects
will
result
firom
it). In
BASIC
4.0,any fileopenedwithIfn
less
than 128
will
automatically suppress
the
line
feed.
The following format may then be used:
PRINT#lfn,A$ -
This
will
produce
the
desired
value
of A$for the
record,
and
will
notinterfere withthe next
record.
41
Page 48

Several variables
may
be writtentothe
disk at
the
same time.
.
-V
The
format:
PRINT#lfn,A$,B$,C$
will
resultin a
single
variable
(A$+B$+C$)
being
retrieved by the input command.
The
format:
i ,
••
v."!
•;
z . ^ .
PRINT#lfn,A$CHR$(13)B$CHR$(13)C$
will
result
inthe
variables
A$,
B$,
andC$being
separatedbycarriage
returns,
and
they
may
then be input as separatevariables. ' i ' ; ; r
The
I^UT#
commandisusedtotransfer
information
fromanIEEE
device
suchasthe
disk
drive
into
computer
memory.
INPUT#isvalid
only
when
used,
ina
program
and
onl>^when
referencing a logical file
that
has been OPENedfor input.
The
format
for
INPUT#
is:
•'
INPUT#lfn,A$
or
INPUT#lfn,A
'---v:-
Where:
lfn=afile previously opened
using
secondaryaddress 15 '
A$=astringvariable
which
will
conts^
the
data
transferred.
-^ '
A'^anumeric variable which willcontain the data transferred. * ,
INPUT#mayalsobe usedto transfer
several
strings of data at one time: ' '•
V
INPUT#lfn,A$,B$,C$ ^ ' ;" ' ^
• ^
•••--;••' • i• ^.j . - ./ '
Where:
A$, B$, C$ willcontain the data transferred from the disk. '
^'
v-'-
u-
In
this
format,
the
data
strings
must
have
been
separatedbycarriage
returns
(CHR$(13))
at
the
time
they
were
writtentothe
diskinordertobe
retrieved
separately.Nosingle
string
may
contain
more
than80charactersifitisto
be INPUT. ^
>;
sir?:;
•
Example
1:
^
.v?-;-'V
• •
•.5^
2blNPUT#2,A^^^^^^^
l
:•
'
' Input the nextdataitem
which
mustbein
numeric
form
and
«««£"
the
value
•
to
variable
A.
. - :
,v?sr
\ ^^ ;
^ .. _ ^ ,
Example
2:
.
•/
'•
' . • ' • - ' ' • • •
10INPUT#8,A$
Input
the
next
data
itemasa
string
and
assignitto
variable
A$.''^^
^
' • ' • '
'--K::-"
• -'i
'fh
Page 49

Example
3;
^Uv •:
• ..;.V.1^7:iC'.'.
••;
•'J-:
:0>
.•'
••
60 INPUT#?,B,C$
•• '
V'!
^ i'
.^•'•
'CO;>•;,:i
;.
Input
the
next
two
data
items
and
assign
the
firsttonumeric
variableBand
the secondto stringvariable C$. j .
For
strings
longer
than80characters,
the
GET#
command
mustbeused.
=.
The
GET#
commandisusedtotransfer
individual
bytesofinformation
fromanIEEE
device
suchasthe
disk
drive
into
computer
memory.
GET#isvalid
only
when
usedina
pro
gram
and only whenreferencing afile that hasbeen
OPENed.
vjTie^matof
GET#'is:"
- '
g3;G^n.A$-i4; ^ ^
oW
u
....
GET#
Where:
v^fn-a
file
previously
opened
using
secondary
address
15
... '
A$=a
string
variable
which
will
contain
the
data
transferred.
. '
GET#
may
alsobeusedtotransfer
several
bytesofinformation,
whichisuseful
for
retriev
ing
strings
which
have
been
writtentothe
diskina
format
whichisunacceptable
for
the
INPUT
command
(strings
longer
than80characters).
:'lFor'example:klOAA$=""-S
20
FOR
1=1TO254
. ' 30GET#lfn,A$ ;
40
AA$=AA$+A$
L'
50NEXT < .
?•
^
resultina"
^ringoflength
254
being
ix^f^erred
from
the
disk^ogical
file
number
Ifn)
tothe
computer
memory
and
stored
inthe
variable
AA$
•••
"
trnMi""'""
Tliell^
used
piic^ioaPRIITO^INPUT#,
:
tion
the
file
pointertothe
desired
record
(and
byte)ofa
relative
file.
For
example,ifrecord
pomterisret
beyond
the
last
record
and
PRINT#isused,
the
appropriate
numberofrecords
are
geni^tedtoexpand
the
filetothe^esired
recordviv^v;-;:
^^^^
< ...
RECORD#isavailable
onlytousers
iequipped
wtli
isASIC
4.0;
The
format
is:
I^CORD#ifn,r,b
. v, ^
Where:
lfn=a
logical
file
number
ofa
file
previously
opened
with
the
DOPEN
command
r=the
desired
record
number.4maybeeitheravariable
nameorvalue,
how
ever
if r isa
variable
name,
it must
appear
enclosedinparentheses.
0<=r<=65535
b=the
byte
position
desired
within
the
record.
Byte
positioningisoptional.
l<=b<=254
43
Page 50

The
following
example
illustrates how
RECORD
commandisused
with
INPUT#:
Example:10RECORD#!,120
• H
Using
the
RECORD
commandtoselect
the
record.
20INPUT#1,A$
Input the next data itemasa string and
assign
it to
variable
A$.
A
detailed
exampleofthe
usageofthe
RECORD
command
for
relative
file
manipulation
is
foundinChapter
6.
QUICKLOAD
FEATURE
(BASIC 4.0)
This
command
featureisvalid
with
DOS2and
BASIC
4.0,
and
eithera4040or8050.
(This
command
will
also
function
properly
with
aretrofitted
2040.)
•^is
command
loads
the
first
fileonthe
diskindrive0into
memory.Toensure
thatthe
first
program
on the diskette is
accessed,
the
command
mustbethe firstdisk
command
given
afteracold
start.
STEP1: Turn the computer OFF, then ON.
STEP2:Make
surethe diskcontaining a
program
asthe first
file
isin
drive
0 and that the
drive
doorisclosed.
STEP3:Simultaneously
press
the
SHIFT
and
RUN/STOP
keys.
The
computer
will
initialize
the
diskindrive0,search
for
the
first
programonthat
disk,
and
load
it.
When
using
thisfeature the computer
will
automatically execute the
DLOAD
and
RUN
commands
and
it is
not
necessary to
enter
either
command.
•
-v'f.
,4
fr'.
•i :'f'",':
Page 51

• r > •
MOVING
A
TAPE
PROGRAM
TO
DISK
Tliis
example
illustrates a
session
with
the computer, a tape
cassette
anda
disk
drive.
The
purpose isto copy a cassette
program
to a diskette.The
program
isthen readfrom the
diskettetothe
computer's
memory
and
printed.Itis
assumed
that
the
BASIC
program
was
previously
storedonthe
cassette.
Example:
Load the file from the cassette tape to the
computer's
memory.
Createa
program
file
containing the
program
on
diskette.
Eraseeverythingfrom memory. (The
NEW
command in BASICwillclear memory; the
NEW
diskcommand
will
format a disk.)
Load
the
program back into the computer's
memory.
Run the program to verify it has been loaded.
Page 52

NOTES
46
Page 53

i/^N
Chapter
5
ADVANCED
DISK
PROGRAMMING
This
chapter
provides
detailed
information
about
DOS
structure
and
disk
utility
commands.
The
utility
commands
provide
the
programmer
with
low-level
functions
that
maybeused
for
special
applications
suchasspecial
disk
handling
routines
and
random
access
techniques.
COMMODORE
DISK
OPERATING
SYSTEM
(DOS)
l^e
DOS
file
interface
controllerisresponsible
for
managing
all
information
between
the
disk
controller
and
the
IEEE-488
bus.
Most
disk
I/Oisperformedona
pipelined
basis,
re
sultingin a faster response to a requested operation.
The
file
systemisorganizedbychannels
which
are
opened
with
the
BASIC
OPEN
state-
^
ment.
When
executed
with
the
OPEN
statement,
the
DOS
assignsaworkspacetoeach
channel
and
allocates
either
oneortwo
disk
I/O
buffer
areas.Ifeither
the
workspaceorthe
buffer
isnot
available,aNO
CHANNEL
errorisgenerated.
The
DOS
also
uses
the
channel
structure to searchthe directory,and to delete and copy files.
The
common
memory
between
the
disk
controller
and
the
file
interface
controllerisused
as
256-byte
buffer
areas.
Three
ofthe
sixteen
buffers
are
used
bythe
DOS
forthe
Block
Availability
Maps
(BAM),
variable
space,
command
channel
I/O,
and
disk
controller's
job
queue.
•^e
job
queue
isthe
vital
link
between
the
two
controllers.
Jobs
are
initiated
onthe
file
sidebyproviding
the
disk
controller
with
sector
header
and
typeofoperation
information.
The
disk
controller
seeks
the
optimum
jobandattempts execution.Anerror
condition
is
then
returnedinplaceofthe
job
command.
Ifthe
jobisunsuccessful,
the
file
side
re-enters
the
jobagiven
numberoftimes,
depending
upon
the
operation,
before
generatinganerror
message.
The
secondary
address
given
inthe
OPEN
statementisusedbyDOSasthe
channel
number.
The
number
the
user
assigns
to a
channelisonlyareference
number
thatis
usedtoaccess
the
work
areas,
andisnot
related
to the
DOS
orderingofchannels.
The
LOAD
snd
SAVE
statements
transmit
secondary
addresses
of0
and1,respectively.
The
DOS
automatically
47
Page 54

48
interprets
these
secondary
addressesasLOAD
and
SAVE
functions.
Unless
these
functions
are
desired
when
opening
files,
avoid
secondary
addressesof0
and1.The
remaining
num
bers,2through
14,
maybeusedassecondary
addressestoopenupto
five
channels
for
data.
DISK UTILITY COMMAND
SET
The
disk
utility
command
set
consists
ofthe
following
commands:
Commands
Abbreviations
General
Format
BLOCK-READ
B-R
"B-R:»ch,dr,t,s
BLOCK-WRITE
B-W
"B-W:"ch,dr,t,s
BLOCK-EXECUTE
B-E
"B-E:"ch,dr,t,s
BUFFER-POINTER
B-P
"B-P:»ch,p
BLOCK-ALLOCATE
B-A
"B-A:"dr,t,s
BLOCK-FREE
B-F
"B-F:"dr,t,s
memory-write
M-W
"M-W*
'adl/adh/nc/data
memory-read
M-R
"M.R"adl/adh
memory-execute
M-E
"M-E"adl/adh
USER
U
"Ui:parms"
Where:
ch-the
channel
numberinDOS:
identicaltothe
secondary
addressinthe
associated OPEN
statement.
dr=the drive number: 0 or 1
®
number,
the
sector
ranges
for
the
2040,
3040,4040,
and
8050
are
showninAppendix
C.
pointerposition for the bufferpointer.
adl=the low byte of the address*.
adh=the high byte of the address*.
nc=the
numberofcharacters:1through
34*.
data=the
actual
datainhexidecimal.
Thisistransmittedbyusing
the
CHR$
function,
i.e.
CHR$(1)
would
send
the
binary
equivalentofhexidecimal
ui,
(decimal
1).
i=the index to
the
User Table.
parms=the
paramc^ers
associated
with
theUcommand
(optional).
f
Page 55

The
values
usedinconjunction
with
the
memory
commands
existinthe
2040,
3040,
and
4040ashexidecimal
values
and
mustbetransmittedasCHR$(n),
wherenis
the
decimal
equivalentofthe
desired hexidecimal value.
NOTE;Ifusing
variables
the
format
must
have
only
the
commandinquotes.
For
example:
"B-R:"ch,dr,t,s correct
"B-R:ch,dr,t,s" incorrect
To
avoid
confusion,
itis
good
practicetouse
this
format
when
using
variablesorconstants.
As
implied
in the
preceding
format, these
commands
maybe
abbreviated
to the first
charac
terof
each
of the key
words.
Abbreviations
onlyare
accepted
forthose
commands
shown
in
lower
case.
The
parameters
associated
with
each
command
are
searched
for
starting
ata
colon
(:),orin
the
fourth
character
position
ifa
colonisnot
present.
The
example
follow
ing
shows
four
ways
thatthe
same
block-read
command
maybegiven.
NOTE:Ifusing
a 4040
initialize
the
disk
before
the
buffer
readorwrite.
Examples:
"BLOCK-READ:
"2,1,4,0
"B-R"2,1,4,0
"B.R"2;1;4;0
"B-READ:"2;1;4;0
Parameters
following
the
key
words
within
quotation
marks
maybeseparatedbyany
com
bination of the following characters:
Character
Name
Keyboard
Representation
Skip <cursor right>
Space Space bar
Comma
The
useofthese
characters
permits
sending
both
ASCII
strings
and
integers.
Parameters
not
within
the
confinesofquotation
marks
shouldbeseparatedbysemi
colons
(;).
Inthe
following
discussions,aPRINT#isassumedinall
examples.
BLOCK-READ
T^is
diskette
utility
command
provides
direct
accesstoany
blockona
disketteineither
disk
drive.
Usedinconjunction
with
other
block
commands,arandom
access
file
system
maybecreated
through
BASIC.
This
command
finds
the
character
pointerinthe
0-position
of
the
block.
Whenacharacterinthis
positionisaccessed
with
GET#orINPUT#,anEnd-
or-Identify
(EOI)issent.
This
terminatesanINPUT#
and
sets
the
Status
Word
(ST)to64
in
the
computer.
49
Page 56

The
format
"B-R:"ch;dr;t;sisillustratedinthe
following
example.
Example; "B-R:"5;l;18;0
Reads
the
block
from
drive1,track
18,
sector0into
channel5buffer
area.
After
using
READtotransfer
the
datatothe
buffer,
the
data
maybetransferred
to
SToK
aS)
"""
TheU1command
described
under
USERissimilartothe
BLOCK-READ
command.
BLOCK-WRITE
men
this
commandisinitiated,
the
current
buffer
pointerisusedasthe
last
character
? l'"j-
I®
t''®
new
The
buffetisthen
writtentothe
mdicated
blockonthe
diskette
and
the
buffer
pointerisleftinposition
1.
The
format
B-W:
"ch;dr;t;sisillustratedinthe
following
example.
Example:
"B-W:"7;0;35;10
Writes
channel7buffertothe
blockondrive0,track
35,
sector
10:
s'sfable
with
DOS2.This
includes
the
4040
and
all
2040/3040
retrofits.
The
BLOCK-WRITE
commandisreplacedbytheU2command
for
the
4040.
BLOCK-EXECUTE
designed
routines to
reside
on diskand be
In
w,™r f ""•
^-EisreallyaB-R
withanaddition.
The
FUe
fcterface
Controller
begins
executionofthe
contents
after
the
blockisread
intoabuffer
^Mution
mustbeterminated
withareturn
from
the
subroutine
(RTS)
instruction.
Future
system
extensionsoruser-created
functions
may
implement
this
command.
The
format
B-E:
"ch;dr;t;sisillustratedinthe
following
example.
Example:
"B-E:"6;l;l;10
Readsablock
from
drive1,track1,sector10into
channel6buffer
and
exe
cutesItscontents
begmnmg
at position0 in the buffet:
BUFFER-POINTER
""e
P?'n'e'
associated
with
the
given
channel
toa
new
value.
Thfe
is
useful
when
acceding
particular
fieldsofa
recordina
block
or,ifthe
blockisdivided
into
records,
individual
records
maybeset
for
transmittingorreceiWng
datr
The
format
B-P;"ch,pisillustratedinthe
following
example.
Example: "B-P;"2;l
buffer*^"""®'^""e
beginningofthe
data
areainthe
direct
access
50
f
o
Page 57

BLOCK-ALLOCATE
The
appropriate
BAMisupdated
inthe
DOS
memorytoreflect
the
indicated
block
as
allocated
(used).Infuture
operations,
the
DOS
skips
over
the
allocated
block
when
saving
programsorwriting
sequential
files.
The
updated
BAMiswrittentodiskette
upon
the
closure
of a write
file
or the
closure
of a direct
access
channel. X
Ifthe
block
requested
has
been
previously
allocated,
the
error
channel
indicates
the
next
available
block
(increasmg
track
and
sector
numbers)
withaNO
BLOCK
error.Ifthere
are
no
blocks
available
that
are
greaterinnumber
than
the
one
requested,
zeroes
are
displayed
as track
and
sector parameters.
The format "B-A:"dr;t;s isillustrated inthe
following
example.
Example: "B-A:"l;10;0
Requests
that
block
(sector)
0of
track
10be
flaggedasallocated
onthe
diskette
in
drive
1.
NOTE:
The
error
channel
should
alwaysbecheck
when
using
BLOCK
ALLOCATE,sothat
if
the
blockisalready
allocated,itwill
notbeoverwritten.Ifthe
blockisallocated,
the
error
message will also indicate
the
next
available block.
Example:
INPUT#15,EN,EM$,ET,ES
Reads
the
next
track
and
sector,
respectively,
intoETand
ES,
assuming
that
lfn=15
hasbeen
previously
OPENed
to thediskerrorchannel.
MEMORY
All
three
MEMORY
commands
are
byte-oriented
sothatthe
user
may
utilize
machine
language
programs.
BASIC
statements
maybeusedtoaccess
information
through
the
MEMORY
commandsbyusing
the
CHR$
function.
The
system
accepts
only
M-R,
M-W,
and
^
M-E:
neither
verbose
spelling
orthe
useofthe
colon
(:)is
permitted.
Memory-Write
This
command
provides
direct
accesstothe
DOS
memory.
Special
routines
maybedown
loadedtothe
disk
drive
through
this
command
and
then
executed
using
the
MEMORY-
EXECUTE
commandoroneofthe
USER
(U)
commands.Upto34bytes
maybedeposited
with
each
useofthe
command.
The
low
byteofthe
address
must
precede
the
high
byte
of
the
address.
The
format
"M-W:
"adl/adh/nc/dataisillustratedinthe
following
example.
Example:
"M-W:"CHR$(00)CHR$(18)CHR$(4)CHR$(32)CHR$(0)CHR$(17)CHR$(96)
Writes
fourbytesto
buffer2($1200ordecimal
4608):
51
Page 58

Memory-Read O
The
byte
pointedtoby
the
address in
the
command
string
may
be accessed
with
this
com
mand.
Variables
from
the
DOSorthe
contentsofthe
buffers
may
also be
read
with
this
command.
The
M-R
command
changes
the
contentsofthe
error
channel
sinceitis used
for
transmitting
informationtothe
computer.
The
next
GET#
from
the
error
channel
(secondary address
15)
transmits
the
byte.
An
INPUT#
should
notbeexecuted
from
the
error
channel
afteraMEMORY-READ
command
untilaDOS
command
other
than
one
of
the
MEMORY
commandsisexecuted.
The
format
"M-R:
"adl/adhisillustratedinthe
following
example.
Example:
"M-R"CHR$(128);CHR$(0)
Accesses
the
byte located at ($0080 or decimal 128):
Memory-Execute
Subroutinesinthe
DOS
memory
maybeexecuted
with
this
command.
To
returntothe
DOS,
terminate
the
subroutine
with
RTS
($60).
The
format
"M-E:
"adl/adh
is illustrated in
the
following example.
Example:
"M-E"CHR$(128);CHR$(49)
Requests
the
executionofcode
beginningat$3180.
USER
This command provides a link to
6502
machine
code
accordingtoa
jump
table pointed
to
by
the
special
USER
pointer.
RefertoTable5.The
second
characterinthis
command
is
used as an
indextothe
table.
The
ASCII character 0
through
9 or A
through0may
be used.
Zero sets
the
USER
pointertoa
standard
jump
table
that
contains
linkstospecial
routines.
The special USER commands U1 (or UA) and U2 (or UB) can be used to replace the
BLOCK-READ
and
the
BLOCK-WRITE
commands.
The
format
of
U1
is:
"Ul:"ch;dr;t;s
U1 forces
the
character
count
(buffer
pointer)to255
and
reads an
entire
block
into
memory.
This
allows
complete
accesstoall
bytesinthe
block.
The
format
of
U2
is:
"U2:"ch;dr;t;s
U2
writesabuffertoa
blockonthe
disk
without
changing
the
contentsofposition
0 as
B-Wdoes.
This
is useful
whenablockistobereadin(with
B-R)
and
updated
(B-Ptothe
field
and
PRINT#),
then
written
back
to diskette with U2.
Refer
to
the
random
access example in Chapter 6 for an application of
theU1and
U2
commands.
52
^
Page 59

^0^
Table 5.
Standard
Jump
Table
USER
DESIGNATION
ALTERNATE
USER
DESIGNATION
FUNCTION
Ul
UA
BLOCK-READ
replacement
U2
UB
BLOCK-WRITE
replacement
2040/3040
4040
8050
U3
UC
jump
to
$1300
$1300
$1300
U4
UD
jump
to
$1303
$1303
$1303
U5
UE
jump
to
$1306
$1306
$1306
U6
UP
jump
to
$D008
$1309
$1309
U7
UG
jump
to
$DOOB
$130C
$130C
U8
UH
jump
to
$DOOE
$130F
$130F
U9
UI
jump
to
$D0D5
$10F0
$10F0
U:
UJ
powerupvector
U3thru U9commands are user-defined. The locationsjumpedto are locatedin the buffer
areasofRAM
and
routines
maybewritten to
reside
thereand
downloaded
using
the
M-W
command.
Locations
D008,
DOOB,
DOOE,
and
D0D5
are
located
inthe
expansion
ROM
slot
in the 2040/3040and
USER
commands
maybe
usedtoaccessaROMorEPROM
locatedin
that position. Location
lOFO
isthe locationof the
NMI
vectorin the 4040 and8050.
53
Page 60

54
Table6.Block
Distribution By
Track
2040,
3040
Track
number
Block
or
Sector Range
Total
Ito
17
18to24
25to30
31to35
Oto
20
Oto
19
Oto
17
Oto
16
21
20
18
17
4040
Track
number
Block
or
Sector Range
Total
Ito
17
18to24
25to30
31to35
Oto
20
0to18
Oto
17
Oto
16
21
19
18
17
8050
Track
number
Block
or
Sector Range
Total
Ito
39
40to53
54to64
65to77
Oto
28
Oto
26
Oto
24
Oto
22
29
27
25
23
^The
T&S.
provided
JlAY
tSoS""'" "inWing
information
obtained
using
tlie
DIS-
Page 61

I
Table 7. 2040,
3040
BAM FORMAT
Track
18,
Se
ctor
0.
BYTE
CONTENTS
DEFINITION
0,1
2
3
4-143
18,01
1
0
Trackand sectorof firstdirectory block.
Indicates version 1
format.
Null
flag
for
future
DOS
use.
♦Bit
mapof
available
blocksfor tracks1-35.
*l=available
block
O=block
not
available
(eachbit represents one block)
Track
18,
Sec
;tor
0.
BYTE
CONTENTS
DEFINITION
144-161
Disk
name
padded
withshifted
spaces.
162-163
Disk
ID.
164-170
160
Shifted
spaces.
171-255
0
Nulls,
not
used.
Note:
ASCII
characters
may
appearinlocations
180
thru
191onsome
diskettes.
55
Page 62

Table9.4040
BAM
FORMAT
Track
18,
Sector
0.
BYTE
CONTENTS
DEFINITION
0,1
18,01
Track
and
sectoroffirst
directory
block.
2
65
ASCII
characterAindicating
4040
format.
3
0
Null
flag
for
future
DOS
use.
4-143
Bit
mapofavailable
blocks
for
tracks
1-35.
*l=avaaable
block
O=block
not
available
(each
bit
represents
one
block)
Table
10.4040
DIRECTORY
HEADER
Track
18,
Sector
0.
BYTE
CONTENTS
DEFINITION
144-161
Disk
name
padded
with
shifted
spaces.
162-163
Disk
ID.
164
160
Shifted
space.
165,166
50,65
ASCII
representation
for2AwhichisDOS
version
and
format
type.
166-167
160
Shifted
spaces.
171-255
0
Nulls,
not
used.
Note: ASCII characters may appear in locations
180
thru
191 on some diskettes.
o
Page 63

Table
11.
8050
DIRECTORY
HEADER
BLOCK
Track
39,
Se
'ctor
0.
BYTE
CONTENTS
DEFINITION
0,1
38,0
Trackand sector of first
BAM
block.
2
67
ASCII
characterCindicating
8050
format
3
0
Null flag for future DOS use.
4,5
0
Unused.
6-21
Disk
name
padded
with
shifted
spaces.
22,23
160
Shifted
spaces.
24,25
Disk
ID.
26
160
Shifted
space.
27,28
50,67
formaVl^pf
version
and
29-32
160
Shifted spaces.
33-255
0
Nulls,
not
used.
57
Page 64

58
Table
12.
8050
BAM
FORMAT
First
BAM
block:
Twck
38,
Sector
0.
BYTE
CONTENTS
definition
Track
and
sectorofsecond
BAM
block
ASCII
characterCindicating
8050
format.
Null
flag
for
future
DOS
owest
track
number
representedinthis
BAM
Highest
track
number+1in
this
BAM
block.
Numberofblocks
unusedontrack
1
Bit
map
representationofavailable
blocks
on
track
1.
11-255
_BAM
for
tracks
2-50,5bytes
per
track
Second
BAM
block:
Track
38.
Sector
3
BYTE
CONTENTS
definition
Track
and
sectoroffirst
directory
block
ASCII
characterCindicating
8050
format.
Null
flag
for
future
DOS
use
track
number
represented
this
BAM
block.
Highest
track
number+1in
this
BAM
block.
Numberofblocks
unusedontrack
51
Bit
map
representationofavailable
blocks
11-140
*BAM
for
tracks
52-77,5bytes
per
track.
141-255
Unused.
♦STRUCTURE
OF
BAM
ENTRY
FORATRACK
BYTE
0
1
2
3
4
definition
for
track
Dit
map
sectors
0-7
bit map sectors
8-15
bit mapsectors16-23
bit map sectors 24-31
l=available
O=not available
on
track
51.
Note;
"BLOCKS
FREE"
may
appearinlocations
180
thru
191onsome
diskettes!
n
Page 65

u
8050
DISK
ZONES
The
8050
disk
format
uses
a
variable
number
of
sectors
per
track
according
to
four
density
zones.
The
BAM
is
made
up
of
two
blocks
(see
BAM
structure
information).
The
first
block
represents tracks 1 thru 50 and the second, tracks 51 thru 77.
TRACK
NUMBER
OF
RANGE
SECTORS/TRACK
TOTAL
SECTORS
ZONE
BAM
AREA
1-39
29
1131
1 1
40-50
27
297
2
1
51-53
27
81
2 2
54-64
25
275
3 2
65-77
23
299
4
2
-
29
DIRECTORY
- 2
BAM
2052
BLOCKS
AVAILABLE
When
the
DOS
requires
access
to
a
BAM
block
not
currently
in
memory,
it
must
be
read
from
the
diskette.
Before
reading
in
the
other
block,
the
DOS
checks
to
see
if
changes
have
current block.If
changes
have
been
made,
the current blockiswritten to
the
diskette.
The
other
BAM
block
is
then
read
into
the
DOS
memory.
59
Page 66

60
Table
13.
DIRECTORY
FORMAT
Track 18, Sector 1 for 4040
Track 39, Sector 1 for 8050
BYTE
definition
0,1
Track
and
sectorofnext
directory
block.
2-31
*File
entry
1
34-63
♦File
entry
2
66-95
*File
entry
3
98-127
!>
*File
entry
4
130-159
*File
entry
5
162-191
*File
entry
6
194-223
♦File
entry
7
226-255
*STPFTr^rr
TT>I?/-ira
*File
entry
8
BYTE
CONTENTS
DEFINITION
0
128+type
?YPEr
«'«•
1 - SEQential
2 =
PROGram
3 =
USER
4 =
RELative
1,2
Track
and
sector
of1stdata
block.
3-18
File
name
padded
with
shifted
spaces.
19,20
block!™
sector
21
Relative
fileonly:
Record
size.
22-25
Unused.
26,27
file when OPEN®is in
28,29
Numberofblocksinfile:
low
byte,
high
byte.
n
rs.
Page 67

Table
14.
SEQUENTIAL
FORMAT
BYTE
DEFINITION
0,1
Track and sector of next sequential data block.
2-256
254 bytesof data with
carriage
returnsasrecord terminators.
Table
15.
PROGRAM
PILE
FORMAT
BYTE
DEFINITION
0,1
Track and sector of next block in program file.
2-256
254
bytesofprogram
info
storedinCBM
memory
format
(with
key
words
tokenized).End of fileismarkedby three zero bytes.
61
Page 68

62
SYNC
TRACK
SECTOR
CHECK
SUM
SECTOR
GAP!
SYNC
Index
Hole
NOTE;
Nottoscale
POINTERS TO LINK
TOGETHER ALL BLOCKS
254
BYTES
OF
DATA
CHECK
SUM
Figure42040,3040,4040
Format:
Expanded
Viewofa
Single
Sector
&ifii"nr:S
for
the
2040.
characters.
Blocks
within
the
same
file
are
linlrpH
f «
consistingof256
stored
block
pointer.
By
point
"nrtrthelocatio^
iff
hf
TT
systemtoretrieve
data
from
non-contieuous
bIork«*R
f ^
pointers
enable
the
file
triggersasearch
forTn^ZwhSf
a
related
blocks
until
the
entire
filpicjieeamki
j J j
utilizes
block
pointerstolocate
SEQ.
and
USRZutmzeThis
fo™^
A"
PRO,
35
tracks
(or
rings)
of
sectors
per
track
will
vary
(as
illustratedinTaMsRt^ f
numbered1to
77.
The
number
ference
and
recording
fre^ncy
differencesintrack
circum-
Jnd%rdirectJrThVa"r^1d"
and
occupied
storage
locationsondiskette
The
l^t
128
bvfcP^T*'®^
*
monitors
avaUable
L
Page 69

^3^
SECTOR
o
Index
Hole
POINTERS
TO
LINK
TOGETHER
ALL
BLOCKS
WITHINAFILE
NOTE:
Nottoscale
\
o
SYNC
08
IDl
ID2
TRACK
SECTOR
CHECK-
SUM
GAPl
SYNC
07
n
254
BYTES
OF
DATA
CHECK
SUM
GAP
2
Figure
5—
8050
Format:
Expanded
View
ofa
Single
Sector
Figure5illustratesanexpanded
viewofa
single
sectorona
diskette
formatted
for
the
8050.
In
additiontoother
information,
each
sector
containsadata
block
consistingof256
stored
characters.
Blocks
within
the
same
file
are
linked
togetherbymeans
ofa
two
character
block
pointer.Bypointingtothe
locationofthe
next
data
block,
block
pointers
enable
the
systemtoretrieve
data
from
non-contiguous
blocks.
Retrieving
the
first
data
block
within
a
file
triggersasearch
for
the
next
data
block
which,inturn,
utilizes
block
pointerstolocate
r^^ed
blocks
until
the
entire
fileisassembled
and
made
available
for
display.
All
PRG
SEQ, and USR files utilize this format. *
A
data
blockisaddressedbytrack
and
sector.A2040
diskette
contains35tracks
(or
rings)
numbered
1to35whilean8050
diskette
contains77tracks
numbered
1to
77.
The
number
of
sectors
per
track
will
vary
(as
illustratedinTable6)duetodifferencesintrack
circum-
ference and recording frequency.
The
80M
maintains
system
filesontracks38and39wliich
contain
the
BAM,
diskette
name,
ID,
and
file
directory.
The
BAM,
residentinthe
first
255
bytesofsectors0and
3of
toack
dS,
monitors
available
and
occupied
storage
locationsondiskette.
The
file
directory
header
bkMk,
beginningonsector
0of
track
39,
contains
the
diskette
name
andIDwithin
the
first30bytes.
63
Page 70

f9
S310N
J
Page 71

i.
Chapter
6
ADVANCED
FILE
HANDLING
In
the
preceding
chapters,
you
learned
howtomanipulate
filesonthe
disk,
and
were
shown
the
formatofcommands
usedtocreate
and
update
files.Inthis
chapter,
you
will
utilize
theseskillsin a file handlingapplicationusingrandom or relative
access.
SPECIAL
OPEN
AND
CLOSE
STATEMENTS
FOR
DIRECT
ACCESS
The
BASIC
statements(after initializing the disk):
OPEN2,8,4,"#»
or
OPEN2,8,4,"#12"
H
openachanneltoone
buffer,tobe
used
with
the
block
commands.Inthe
first
example,
the
first
available
bufferisallocatedtochannel4,The
second
exampleisan
attempttoallo
cate
buffer
12 to the
channel.
Ifthe
buffers
arenot
available,aNO
CHANNELS
errorcon
dition isgenerated. The explicit buffer allocation can be used to reservea buffer for
position dependent code as in
the
case of an EXECUTE command.
ExecuteaGET#
statementtofind
the
number
ofthe
allocated
buffer.
The
byte
trans
mittedisthe
buffer
number.Abuffer
number
may
onlybeobtained
PRIORTOany
write
or read
operationstothat
buffer.
The
CLOSE
statement
clears
the
OPENed
channel andwrites the
BAM
to the diskettethat
was
last
used
bythat
channel.Toavoid
confusion,
limit
yourselftoaccessing
one
drive
with
any
direct
access
channel.
65
Page 72

RANDOM
ACCESS
EXAMPLE
^
Since
the
BLOCK-ALLOCATE
command
returns
the
next
available
diskette
block
throuffh
t e
error
channel,itcanbeusedinthe
allocationofrecords.
This
feature
allows
creating
a
random
file
without
bemg
concerned
with
the
actual
physical
structureofthe
diskette
tessi's';-1'"
..
recordISstoredmablock,
anditis
necessarytomanage
end-of-record
pointersinBASIC
A
smaller
application
might
take
advantageofthe
B-R
and
B-W
commands.
1
'I"®
random
access
program
entitled
"Random
It
®f
"P°"
®
scheme
and
providSk
access
through
^IC
programming.
Mostofthe
programming
below
Une
2000
is
SlS;;tSdf
len-iustiffbinary
f^r^d
characte^telro?Sftric«^^^^^^
f"
''.T^ '
^paSwrh1Zt"-The^^^^^
fUename
DUPLICATE
mustbeperformed,
since
the
DOSisunabletoCOPY
without
a
To
Create
A
File
STEPl:
Insert
the
TEST/DEMO
diskindrive
0.
STEP2:^pe:
OPEN15,8.X5
and
press
RETURN
Opens
the
command
channel
and
initializes
the
diskette.
STEPS:
^pe:LOAD"0:R^OM1.00",8
and
press
RETURN
inis
command
loads
the
random
access
program.
66
Page 73

STEP
4:
Insertablank
diskette
into
drive
1.
STEP5: Type; PRINT#15,"N1:MAIUNG LIST" and press
RETURN
STEP 6: Type: RUN and press RETURN
The
screen displays:
"DO
YOU WISH
TO
CREATEAFILE"?
STEP 7: Type: Y and press RETURN
The
screen
displays:
"RANDOM
FILE
NAME"?
STEP 8: Type
the
file name: PHONE LIST and press RETURN
The
screen displays:
"KEY
FILE
DRIVE
NUMBER"?
STEP 9: Type: 1 and press RETURN
The
screen displays:
"RANDOM
FILE
NUMBER"?
STEP
10:
Type: 1 and press RETURN
The
screen displays:
"ENTER
ID OF RANDOM
DISK"?
STEP
11:
Type: CS and press RETURN
The
screen displays:
"NUMBEROFRECORDS"?
STEP
12:
Type:
10
and press RETURN
For
this example,
ten
was entered since this is
the
MAXIMUMnumber of
records the file can contain. If lessrecords are needed, specify a number less
than
ten.
The
screen
displays:
"NUMBER
OF
FIELDS
PER
RECORD"?
STEP
13:
Type:
4
and
press
RETURN
Thisisthe
number
of
'items'
each
field
contains.
The screen displays: "INPUT FIELD
NAME,
FIELD SIZE, FIELD TYPE".
TYPES: 0=BINARY, 1=NUMERIC, 2=ALEHA
FIELD
1?"
enter:
NAME,20,2
and
press RETURN
FIELD
2?"
enter: PHONE,15,2 and press RETURN
FIELD
3?"
enter: ADDRESS,40,2 and press RETURN
FIELD
4?"
enter: COMMENTS,40,2 and press RETURN
To
Add
A
Record
STEP 1:
The
screen displays: "WHOSE RECORD DO YOU WISH TO SEE?
Press
RETURN.
The
screen displays:
«****aDD
RECORD****"
NAME"?
STEP 2: Type: COMMODORE and press RETURN
The
screen
displays:
"PHONE"?
67
Page 74

STEP3:Type;
727-1130
and
press
RETURN
^
Thescreen displays: "ADDRESS"?
STEP4:TVpe:
3330
SCOTT
BLVD
SANTA
CLARA
OA.
95051
and
press
RETURN
The
screen
displays:
"COMMENTS"?
STEP5:TVpe:
MANUFACTURES
MICROCOMPUTERS
and
press
RETURN
ftillOTimN
record
do
you
WISH
TO
SEE'?
The
screen
displays:
"****ADD
RECORD****"
REtS
'I®®''®''nswe.
For
example:
smith
and
press
PHONE"?
Enter
the
phone
number:
999-356-1012
and
press
RETURN
^^P^rItURn"'"
GATOS
CA.
95030
^
PERJPH^
En'efacomment.
For
example:
MANUFACTURES
r^UiRIPHERALS
and pressRETURN
STEP
6:
"WHOSE
RECORD
DO YOU
WISH
TX)
SEE"?
The
screen
displays:
«****aDD
RECORD****"
®"'®'"'®''®®''^"ame.
For
example:
JONES
and
press
PHONE"?
Enter
the
phone
number:
999-268-1795
and
press
RETURN
^^SetuRn"'®'
SAN
JOSE
CA.
95117
cCSSS^'"
manufactures
To
See
A
Record
The
computer
displays:
"WHOSE
RECORD
DO
YOU
WISHTO<5PF'»?
Enter:
COMMODORE
and
press
RETURN
^
To
Change
A
Record
After
displaying
the
record,
the
screen
displays:
"ANY
MODS"?
STEPl:
Type:
YES
and
press
RETURN.
The
screen
displays:
"WHICH
FIELD"?
Enter
the
numberofthe
field
you
wishtochange.
68
Page 75

STEP 2: Type: 4 and press RETURN.
The
computer
displays
that
field:
US
HEADQUARTERS
STEP
3:
Press
RETURN.
The screen display asks if there are; "ANY MODS".
STEP
4: If the
record
iscorrect, type:
NO
and
press
RETURN
Getting The Directory of Listings
The screen displays:
"WHOSE
RECORDDO YOU
WISH
TO SEE"?
Type: /DIR and press RETURN
The computer displays the directory.
Ending
The
Program
Thecomputerdisplays:
"WHOSE
RECORDDOYOU
WISH
TOSEE"?
Type:
//
and
press
RETURN.
The
program
ends.
RELATIVE FILES
4040,
8050
Direct
accessofrelative
files
isa
method
that
allows
the
programmertopositiontoany
record on the disk relativeto the beginning of that file. Comparethis method to the stan
dard procedure of
having
to searcheach track and sectorfor the
desired
informationand it
becomes
apparent
that
sucharelative
handling
method
would
result
ina
great
reduction in
the amount of time required to finda specific record stored on disk.Thisreduction in the
amount of time required to locateand fetch a file through the applicationof relative file
handling
techniques
frees
the
user
from
the
major
objectiontousing
sequential
disk
files:
excessive
"look
up"
time.
Both
DOS2and
2.5
(4040
and
8050)
are
capableofhandling
relative
files
and
should
signi
ficantly
reduce
the amountof timespent retrieving disk
files.
The two maincomponentsof a relative filearethe sidesector chainof blocksand the data
blockchain. Bothare
linked
togetherthrough
forward
pointers
similar
to those
used
ina
sequential
file.
Record
sizes,
while
fixedinlength,
may
range
from
oneto 254
bytes.
The
numberofrecordsislimited
to the
capacity
of the
disk
but for
practical
purposes
should
not
exceed
65,535.
Thesidesectorsdo not contain record information, but do contain locations of the data
blocks.The recordsizedictates wherethe pointer is placed when a record numberis refer
enced
because
the
record
sizeisused
inan
algorithmtocompute
where
the
pointer
is
placed
when
a recordnumberis
given
throughthe
RECORD
command. The sidesector
also
contains a table of pointers to all of the other sidesectors within the file. In order to move
from
one
side
sectortoanother,
the
pointerisreferenced
through
the
appropriate
DOS
command,
and
the
corresponding
side
track
and
sector
read
into
memory.Byusing
the
information
contained
inthe
referenced
side
sector,
thedata
block
pointer
canbelocated
and
used
to readin the actualdata blockcontaining the record.The
relative
filedata block
69
Page 76

pointersinthe
side
sectors
aUow
the
DOStomove
from
one
recordtoanother
within
two
rfrid
Hafa"»6
requiredtofindade-
Sired
data
block
when
comparedtosequential
methods.
sectors
and
each
side
sector
may
contain
pointersto120
?«9
204
Dual
Drive
FloppySSins
182,880
bytes
(120
pomters/side
sector*6side
sectors*254
bytes/block)
which
hanno„c
tobegreater
than
the
total
storage
capacityofthat
particul^
dS ^
Table16.
RELATIVE
FILE
FORMAT
DATA
BLOCK
BYTE
0,1
2-256
SIDE SECTOR BI,OCK
BYTE
0,1
3
6,7
10,11
12,13
14,15
16-256
DEFINITION
Trackandsector of next data block.
254
bytesofdata.
Empty
records
containFF(all
binary
ftp
pnHifth
^ J
foUowedby00
(binaryaUzeros)
to
MIU
(Oof
PartiaUy
fiUed
records
are
padded
with
DEFINITION
Track
and
sectorofnext
side
sector
block.
Side
sector
number.
(0-5)
Record length.
Track
and
sectoroffirst
side
sector
(number
0)
Track
and
sectorofsecond
side
sector
(number
1)
Track
and
sectorofthird
side
sector
(number
2)
Track
and
sectoroffourth
side
sector
(number
3)
Track
and
sectoroffifth
side
sector
(number
4)
Track
and
sectorofsixth
side
sector
(number
5)
Track
and
sector
pointersto120
data
blocks.
tZanTaXK^^^^^^
generated
recorl,
from
the
pZS
current
enTof
t^f
uf
automatically
generated
bvthe
DOS
Thic
in i
record
number
will
be
necessary
toS^a
fil^r^Ldlel'^
^
"ocks
For
example,ifthe
current
sizeofthe
relatiie
recordisone
dataHtT*®
'J"®/diskette,
number
referenced
would
exnandittn1Qfi
hir^^h-
fu
data
block
long
and
the
record
70
Page 77

Spellingisa
key
featureofrelative
files
which
aidsinreducing
the
numberofdisk
read/
?ISc
o
and
retrieve
data.
Before
explaming
how
this
feature
of
UUt>2and
2.5
improves
time
utilization
efficiency,weneedtoexamine
how
I/O
channels
are utilized by relative files:
^ena
channelisopenedtoa
previously
existing
file,
the
DOS
will
position
to
the
first
record
provided
that
the
given
parameters
match
properly.
The
record
u ^
necessaryonthe
OPENifthe
fileisalreadyinexistence,
but
the
DOS
causesachecktobe
made
against
the
record
size
that
was
originally
mdeinthe
DOPEN
statement
creating
the
file.Ifthesedonot
match,
then
error
50—record
not
present—will
be generated.
The
relative
channel
requures
three
memory
buffers
from
the
system,
whereas
sequential
files
only
require
two.
Since
there
are
twelve
channelsinthe
system
and
twoofthese
are
usedindirectory
searches
and
internal
functions,
only
three
relative
channels
canbeopenatone
time.
The
highest
numberofbuffers
that
can
be
usedisten,
which
limits
the
total
numberofchannels
which
canbeopen
at
any
one
time.
Ifarecord
was
foundtobeonthe
boundary
between
two
data
blocks,
that
is,
starting
in
one
data
block
and
finishinginanother,
then
the
DOS
would
read
the
first
segmentaswell
^
any
following
recordsinthe
second
data
block.Inpractice,
the
recordsofmost
relative
across
data
blocks.
The
only
exceptions
are
record
size
1,2,127,
and
^4.
Th^e
divide
evenly
into
the
254
sizeofthe
data
block
and
spanningisunnecessary.
This
methodofspanning
has
the
advantageofrequiringnosystem
memory
overhead
aside
from
that
required
forthe
side
sector
blocks
inthe
relative
files.
Whenarecordiswritten
upon
through
the
PRINT#
statement,
the
data
blockisnot
immediately
written
outItis
only
witten out
when
the
DOS
moves
beyond
the
particular
data
blockinwhich
that
record
resides.
This
can
occur
through
successive
printingtosequential
records,orwhen
positioning to another record outside of that particular block.
^causeofthe
spanning
feature,itis
recommended
that
two
channels
notbeopentoa
rela
tive
fUeatthe
same
timeifeither
channel
willbewritingtothe
same
file.Anupdate
may
be
madeinthe
channel's
particular
memory
buffer
area,
but
the
change
may
notbemade
on
disk
until
the
DOS
moves
that
particular
data
block.
Thereisno
restrictiononthis,
how
ever,
andincertain
instances
where
the
fileisonly
read
from,itmaybeadvantageous
to
have
more
thanone
channel
open
to a
single
relative
file.
'"'t
printingtoa
recordbydetecting
tlie
EOI
signal
wiiichisgenerated
witii
each
PRINT#
statement.Ifthe
PRINT
statement
goes
over
the
maximum
record
size,
error
51-record
overflow-willbegenerated.
Any
data
overflow
willbetruncated
to fit the
num-
berofcharacters
specifiedbythe
record
size
and
the
DOS
will
positiontothe
next
record
in
sequence.Ifthe
print
statement
contains
less
characters
than
the
record
size,
the
remaining
positions
within
that
record
willbefilled
with
nulls.
Consequently,
when
positioningtoa
record
for
input
the
EOI
signalisgenerated
from
the
DOStothe
computer
when
the
last
non-zeroistransmitted.
Should
the
programmer
desiretostore
binary
information,arecord
terminator
suchascarriage
return
will
havetobe
used
and
the
record
size
increasedbyone
charactertoaccommodate
the
terminator.
While
the
DOSisgenerating
new
data
blocks
for
relative
files,
the
requested
record
number
K
comparedtothe
numberofdata
blocks
leftonthe
diskette.Ifthe
resulting
number
of
data
blocksisgreater
than
whatisleftonthe
diskette,
then
error
52-file
too
large-is
generated. ®
71
Page 78

CREATING A RELATIVE FILE
The
following
examples
apply
onlytothose
users
equipped
with
both
BASIC40and
DOS
2.Intermsofhardware,
this
meansa4000or8000
Series
PETorCBM
mustbeusedasthe
computer and a 4040 or 8050 for the disk drive.
Whenarelative
fileisopened
for
the
first
time,
the
file
shouldbeinitializedbythe
program
mertoaUow
for
faster
subsequent
access,
andtoassure
that
the
DOS
reserves
sufficient
spaceonthe
diskette
for
the
future
data.Asimple
programtoperform
such
initialization
is
illustrated
below:
HODOPEN#l,"FILEl",D0,L50
120
GOSUB
190
130 RECORD#1,100
140
GOSUB
190
150 PRINT#1,CHR$(255);
160
GOSUB
190
170
DCL0SE#1
180
END
190IFDS<20
THEN RETURN
200
PRINT DS$
210
IF DS=50 THEN RETURN
220
STOP
the
preceding
example,
line
110
createsafile
with
the
name
FILEl
andarecord
length
handling
subroutinetobe
executed.Itis
good
pro-
grammmg
practicetocheck
the
error
channel
after
each
disk-related
operation.
Line
130
posiUons
the
file
pointertorecord
number
100
which
does
not
yet
exist
The
3n»
raSn
^
^^rPret^
as
a
warmng
rather
thananerror
condition.
This
messageisnormally
expectedtooccurasa
f
'he
first
time
and
indicates
thatnoINPUT
or ur<r operation should beattempted.
Line
150
causes
record
number
100
(becauseofthe
pointer
positionedbyline
130)tobe
written.
During
this
write
operation,
the
DOS
detects
that
records1thru99do
not
akeadv
exist,
and
automatically
initializes
thembyplacing
CHR(255)inthe
first
character.
Line
170
closes
the
file
and
causes
the
spacetobe
allocatedinthe
BAM
and
file
directory.
Unes
190-220
are
the
error
subroutine.IfDSisless
than
20,noerror
condition
exists
so
1^210reTZstothp"message,'and
210
returnstothe
mam
programifthe
message
was50RECORD
NOT
PRESENT
If
r^efcrcoSt
sr"
^
EXPANDING
A
RELATIVE
FILE
^ter
the
file
has
been
initiaUzed,
data
maybewrittentothe
fUe.
Initializationofa
fUe
in
IS
ma^er
needbeperformed
only
once
when
the
fileisoriginally
created.Ifthe
user
wishestoexpandanexisting
file,
the
same
procedure
wouldbeused,
with
the
record
num
ber
(hne
130mthe
example)
changedtobe
the
new
last
record.
72
\.
M
Page 79

The
following
example,
when
with
the
disk
containing
the
file
FILEl
(with
100
records)
in
drive0,will
resultinthe
first
100
records
remaining
unchanged
and
records
containing
only CHR$(255) would be generated for records 101-200.
110 D0PEN#1,"FILEl",DO,L50
120
GOSUB
190
130
RECORD#1,200
140
GOSUB
190
150
PRINT#1,CHR$(255)
160
GOSUB
190
170
DCL0SE#1
180
END
190IFDS<20
THEN
RETURN
200
PRINT
DS$
210IFDS=50
THEN
RETURN
220
STOP
NOTE:
When
DOPENisusedonan
existing
file,
specificationofthe
record
lengthisoption
al.If specified, it mustmatchthe recordlength setat the timethe file
was
created or an
error
condition
will
result.
When
a fileisexpanded in this manner, the required sidesectors are alsocreated. Side
sectors are transparent to the usersince they are automatically generated and accessed by
the
DOS.
ACCESSING
A
RELATIVE
FILE
In order to make the relative filesystem practical,the usermust be ableto
access
the file
for
reading
and
writing
of data.Bothof
these
operations are
simplifiedbyrelative
files
and
both may usethe
RECORD
command
for positioning to the
desired
record beforethe
operation.
Towritedatato a
predetermined
record
ina
file,
a constant maybe
used
in the
positioning
(line
130)
as follows:
110 D0PEN#1,"FILEl",DO
120
GOSUB
190
130
RECORD#l,25
140
GOSUB
190
160
PRINT#1,"RECORD
25"
160
GOSUB
190
170
DCL0SE#1
180
END
190IFDS<20
THEN
RETURN
200
PRINT
DS$
210IFDS=50
THEN
RETURN
220
STOP
The resulting record would appear as follows:
1 2 3 4 5
12345678901234567890123456789012345678901234567890
^
RECORD
25*
Where
* representsa carriage return ( CHR$(13)).
73
Page 80

74
Mowing
program
Ulustrates
the
feature
which
permits
accesstoindividual
bytes
within
110
DOPEN#1,"FILE1",DO
120
GOSOB
900
130
RECORD#!,25,1
140
GOSUB
900
150 PRINT#1,"FIELD
1"
160
GOSUB
900
170
RECORD#1,25,10
180
GOSUB
900
190PRINT#1,"FIELD
2"
200
GOSUB
900
210
RECORD#1,25,30
220
GOSUB
900
230 PRINT#1,"FIELD
3"
240
GOSUB
900
250 DCL0SE#1
260
END
900IF
DS<20
THEN
RETURN
910 PRINTDS$
920
STOP
placeswithin record
25
after
the
above
exam^"
"
representation
of
the
contentsofrecord
number
12345678901234567890123456789012345678901234567890
FIELD1*FIELD
2*
PTRrnz*
Where♦representsacarriage
return{CHR$(13)).
E™
it
"s's'rsfrs
?ris;r
•i--««.
that
whileitis
possibletoposition
and
write
firsttobvteTfl^Trfh!example,
this
means
possibletofirst
write
byte20and
then
byte
1 "
^OT
d"
basic
input
statement,
the
110
DOPEN#1,"FILE1»,DO
120
GOSUB
290
130RECORD#1,25
140
GOSUB
290
150
REC0RD#1,25,1:G0SUB
290
160
INPUT#1,A$;G0SUB
290
170
RECORD#1,25,10:GOSUB
290
180
INPUT#1,B$:G0SUB
290
190
RECORD#1,25,30:GOSUB
290
200
INPUT#1,C$:G0SUB
290
210 DCL0SE#1
220
END
290IFDS<20
THEN
RETURN
300
PRINT
DS$
320
STOP
Page 81

Lines
160,180, and200
cause
the
stored
valuesondisk
to be
read
and
stored
inA$,
B$,
and
C$, respectively.
It isextremely
useful
to beableto
access
a record
which
isdetermined
during
program
operation. The following routine illustratesa procedure to query the operator for a record
number
and
data
andtowrite
the
datatothe
disk
file:
100
PRINT
*TYPE
RECORD
NUMBER
AND
DATA"
105
INPUT R,D$
110
DOPEN#1,"FILE1",DO
120
GOSUB
190
130
REC0RD#1,(R)
140
GOSUB
190
150
PRINT#1,D$
160
GOSUB
190
170
DCL0SE#1
180
END
190IFDS<20
THEN
RETURN
200
PRINT
DS$
220
STOP
Line
130
positions the file pointer to record number (R), specified by the user. Note
that
a
variable used in
the
RECORD command must be enclosed in parentheses.
Line
150
causes
the
data
storedinD$tobe
storedonthe
disk.
The RECORD command may be omitted if the file is to be accessed sequentially, which
savestime during program execution. An example of this occurs when writing a large data
base to the disk file. Assume
that
the
program has already dimensioned D$ as an array
which
contains
100
elements.
These
elements
aretobe
writtentothe
diskinrecords
num
ber 1
thru
100
of file
FILEl.
This could be accomplished with
the
following program
segment:
110
DOPEN#1,"FILE1",DO
120
GOSUB
190
130
FOR
1=1
TO
100
150
PRINT#1,D$(I)
160
GOSUB
190
165
NEXT
I
170
DCL0SE#1
180
END
190
IF
DS<20
THEN
RETURN
200
PRINT
DS$
220
STOP
Since
the
record pointer is automatically
settorecord 1 when
the
file is opened, record 1 is
the first record written. If no RECORD command is executed
the
DOS automatically posi
tionstothe
next
record
after
each PRINT. Therefore,
the
contents
of D$ will be written
to
records1thru
100ofthe
file.
For
detailed description of related BASIC commands, refertochapter 4 of this manual and
the
BASIC
4.0
reference
manual.
75
Page 82

NOTES
n
n
76
r-
Page 83

Chapter
7
SIMPLIFYING
THE
USE
OF
COMMODORE
DISK-
RELATED
COMMANDS
It has been explained
that
all disk commands
must
be preceded with
the
BASIC
PRINT#
command and enclosed in quotation marks. This is true,
but
your computer can be pro
grammed to perform these tasks as wellas how to load and run programs stored on diskette.
LOADING
THE
DOS
SUPPORT
PROGRAM
The first file on
the
TEST/DEMO diskette contains a program called UNIVERSAL
WEDGE, often referredtoas DOS SUPPORT. This program, when loaded into memory,
takes care of
the
tasks mentioned above. If
your
computer
has Commodore BASIC 4.0
you
can use
the
quick load procedure to load
the
DOS SUPPORT program.
For
those of
you
not
equipped
with
BASIC
4.0,
the
following
procedure
will
work:
Start
with
a cold
start
condition
by resetting
both
the
computer
and
disk drive
and
insert
the
TEST/DEMO
diskindrive
0.
STEP
1;
Type:
L0AD"*",8
and
press
RETURN.
The
screen
displays:
Page 84

STEP2:Type:
RUN
and
press
RETURN.
^
^is
will
cai^
the
DOS
Support
programtobe
executed.
This
program
will
re
locate
Itself
into
the
topofthe
user
memory,
whereitwill
coexist
with
programs
which
are
entered
later.
DOS
support
will
not
needtobe
reloaded
until
the
com
puterISreset.
The
following
special
symbols,
once
implemented,
will
simplify
the
entryofdisk
commands.
USING
THE
DOS
SUPPORT
SYMBOLS:
>
AND
®
Once
DOS
SUPTORTisimplemented,
preceding
dislc
commands
with
PRINT#lfnorenclos-
ISo
T ^
Trequired:
precede
the
disk
command
with
either
symbol
^y^bol
(>)orthe
at-sign
(@).
The
examplesinthis
manual
use
the
>
Examples:
>10
is
the
same
as
PRINT#1,"I0"
>S0:FILE1
is
the
same
as
PRINT#15,"S0
^J'lLEl"
The
OPEN
statementisNOT
required
beforeastatement.
^th
5
loaded
LOAD
$dr,8but
this
command
destroys
any
program
you
might
haveinmemory
\^en
you
use
the>symbol,
the
dkectoryisprinted
directlytothe
screen,
thusZSg
thedatam the computer's
memory.
pie!,ei:viiig
Examples:
>$0
means
display
the
entire
directoryofdrive
0.
>$1
:Q*
meanstodisplay
all
the
fUesondrive1that
begin
withaQ.
Ki!
SaTSUVetJSd:'"
To
stopadirectory
listmg
and
returntoBASIC,
press
RUN/STOP.
The
third
useof>isthe
requestoferror
messages.
Example:
>
jg
equivalent
to:
10 OPEN2,8,15
20
INPUT#2,A$,B$,C$,D$
30 PRINTA$,B$,C$,D$
LOADINGAPROGRAM
WITH
THE
/
Example:
/ACCT
loads
the
program
ACCT
into
the
computer's
memory.
Page 85

LOADING
AND
RUNNING
A
PROGRAM
WITH
UP
ARROW
Theuparrow
(t)
loads a program
fromadiskette
and
executes
it.
Both
diskettes are
searched
if necessary.
Example:
tJDATA
loads and runs the program JDATA.
SPECIAL
DOS
SUPPORT
INFORMATION
The
DOS
SUPPORT
program
has
certain
limitations. These
are:
1. The program must be reaccessed from
the
disk whenever resetting
the
computer.
2. DOS
Support
may
only
be used when communicating with
the
disk in direct
mode.
That
is,
they
may
NOTbeused in a
program.
3.
The
disk
directory
maybeprintedonthe
printerbygiving
these
commands:
LOAD
"$0»,8
OPEN
4,4:CMD4:LIST
PRINT#4:CL0SE
4
NOTES
79
Page 86

NOTES
n
\
80
Page 87

Chapter
8
ERROR
MESSAGES-
PATTERN
MATCHING
FILE
NAMES-
DISK
COMMANDS
REQUESTING
ERROR
MESSAGES:
COMMODORE
DISK
DRIVES
The execution of the following program displays the error on the computer screen and
resets
the
device
error
indicator:
CBM
Series
2001
CBM
Series
3000
with
BASIC
3.0
CBM
Series
8000
CBM
Series
4000
with
BASIC
4.0
where A=error message
number
B$=error message
C=track
D=sector
Page 88

82
SUMMARY
OF
CBM
FLOPPY ERROR MESSAGES
0 OK, no
error
exists.
1 Files scratched response. Not an error condition.
2-19
Unused
error
messages:
shouldbe ignored.
20 Block
header
not
found
on disk.
21
Sync
character
not
found.
22 Data block
not
present.
23
Checksum
errorindata.
24 Byte decodingerror.
25 Write-verify error.
26 Attempt to writewith writeprotect on.
27
Checksum
errorinheader.
28 Data extends into
next
block.
29
Diskidmismatch.
30 General
syntax
error.
31
Invalid
command.
32 Long line.
33
Invalid
filename.
34 No file given.
39 Command file
not
found.
50 Record
not
present.
51 Overflow in record.
52 File too large.
60 File open for write.
61 File
not
open.
62
File
not
found.
63
File
exists.
64 File type mismatch.
65
No
block.
66 Illegal track or sector.
67 Illegalsystem track or sector.
70 No channels available.
71 Directory error.
72 Diskfull or directory full.
73
Powerupmessage,orwrite
attempt
with
DOS
mismatch.
74
Drive
not
ready.
(8050
only)
DESCRIPTION OF DOS
ERROR
MESSAGES
NOTE:
Error
message
numbers
less
than20shouldbeignored
with
the
exceptionof01
which
gives
information
about
the
numberoffiles
scratched
with
the
SCRATCH
command.
20:
READ
ERROR
(block
header
not
found)
pie
disk
controUerisunabletolocate
the
headerofthe
requested
data
block,
byan
illegal
sector
number,
orthe
header
has
been
destroyed.
21:
READ
ERROR
(no
sync
character)
The
disk
controllerisunabletodetectasync
markonthe
desired
track.
Caused
by
miMlignmentofthe
read/write
head,nodisketteispresent,orunformattedorimpro
perlyseated diskette. Canalsoindicatea hardware failure.
Page 89

22:
READ
ERROR
(data block
not
present)
The diskcontroller has beenrequested to read or verifya data block that wasnot
properly
written.
This
error
message
occursinconjunction
with
the
BLOCK
commands
and
indicatesanillegal
track
and/or
sector
request.
23: READ ERROR (checksum error in data block)
This
error
message
indicates
that
there
isan
error
inoneor
more
ofthedata
bytes.
The
data has been read into the DOSmemory, but the checksum over the data isin error.
This
message
may also indicate groundingproblems.
24:
READ
ERROR
(byte
decoding
error)
The data or header has been read into the DOSmemory, but a hardware error has been
createddue to an
mvalid
bit pattern in the data byte.This
message
mayalsoindicate
grounding problems.
25:
WRITE
ERROR
(write-verify error)
This
messageisgenerated
ifthe
controller
detectsamismatch
between
the
written
data
and
the
datainthe
DOS
memory.
26:
WRITE
PROTECT
ON
This
messageisgenerated
when
the
controller
has
been
requestedtowriteadata
block
while
the
write
protect
switchisdepressed.
Typically,
thisis
causedbyusing
a diskette
with a write protect tab over
the
notch.
27: READ ERROR (checksum error in header)
The controller hasdetected an error in the header of the requested data block. The
blockhasnot beenreadinto the
DOS
memory. This
message
mayalsoindicate
ground
ing problems.
28:
WRITE ERROR (long data block)
Thecontrollerattempts to detect the syncmarkof the next headerafter writing a data
block.If the sync mark doesnot appearwithin a pre-determined time, the error
messageisgenerated.
The
erroriscaused
bya
bad
diskette
format
(the
data
extends
into the next block), or by hardware failure.
29:
DISKIDMISMATCH
This
messageisgenerated
when
the
controller
has
been
requestedtoaccessadiskette
whichhas not been initialized. The
message
can also occur if a diskette has a bad
header.
30:
SYNTAX
ERROR
(general syntax)
The
DOS
cannotinterpretthe
command
sentto the
command
channel.
Typically, this
is
caused
byan
illegal
numberoffile
names,orpatterns
are
illegally
used.
For
example,
two filenamesmayappear on the left sideof the
COPY
command.
31:
SYNTAX
ERROR
(invalid command)
The
DOS
does not recognize the command.The commandmust start in the first
position.
32:
SYNTAX
ERROR
(long line)
The
command
sent
is longer
than58characters.
33:
SYNTAX
ERROR
(invalid fUe name)
Pattern matching isinvalidlyused in the OPEN or SAVEcommand.
83
Page 90

34:
SYNTAX
ERROR
(no
fUegiven)
The file name was left out of a command or the DOS does not recognize it as such.
Typically, a colon
(:)
has been left
outofthe
command.
39: SYNTAX ERROR (invalid command)
This error may result if the command sent to command channel (secondary address
15)
is unrecognizablebythe
DOS.
50:
RECORD
NOT
PRESENT
Result of disk reading past the last record through INPUT#, or GET# commands. This
message will also occur after positioningtoa record beyond end of file in a relative
file. If the intent is to expand the file by addingthe new record (with a PRINT# com
mand),the error
message
maybe ignored.
INPUT
or GETshould not be attempted
after this error is detected without
furst
repositioning.
51:
OVERFLOW
IN
RECORD
PRINT#statement exceeds record boundary. Information is truncated. Since the car
riage
return
which
issentasa
record
terminator iscounted in the
record
size,
this
message
will
occurifthe
total
charactersinthe
record
(including
the
final
carriage
^
return)
exceeds
the
defined
size.
52:
FILE
TOO
LARGE
Record position within a relative file indicates that disk overflow willresult.
60:
WRITE
FILE
OPEN
V/
This
messageisgenerated
whenawrite
file
that
has
not
been
closedisbeing
opened
for
reading.
61:
FILE
NOT
OPEN
This
messageisgenerated
whenafileisbeing
accessed
that
has
not
been
opened
inthe
DOS.
Sometimes,inthis
case,amessage
isnot
generated;
the
requestissimply
ignored.
62:
FILE
NOT
FOUND
The requested file does
not
exist on
the
indicated drive.
63:
FILE
EXISTS
The file name of the file beingcreated already exists on the diskette.
64:
FILE
TYPE
MISMATCH ^
The
file
type
does
not
match
the
file
typeinthe
directory
entry
for
the
requested
file.
65:
NO
BLOCK
This
message
occursin conjunction with the
B-A
command.It indicatesthat the block
to be allocated has been previouslyallocated. The parameters indicate the track and
sector
available
with
the
next
highest
number.
Ifthe
parameters
are
zero
(0),
then
all
blocks higher in
number
are
in use.
66:
ILLEGAL
TRACK
AND
SECTOR
The DOShas attempted to accessa track or sector whichdoes not exist in the format
beingused.This may indicate a problem readingthe pointer to the next block.
67:
ILLEGAL
SYSTEM
TORS
Thisspecialerror
message
indicatesan illegal system track or sector.
84
Page 91

70:
NO CHANNEL (avaUable)
The
requested channel is
not
available, or all channels are in use. A maximum of five
sequential files
maybeopenedatone
time to
the
DOS. Direct access channels
may
have six
opened
files.
71:
DIR9ectory)
ERROR
The
BAM does
not
match
the
internal
count.
There
is a
probleminthe
BAM allocation
or
the
BAM has
been
overwritten
in DOS
memory.Tocorrect
this
problem,
reinitialize
the
diskettetorestore
the
BAM in
memory.
Some
active files
maybeterminated
by
the
corrective
action.
NOTE:
BAM=Block
Availability Map
72:
DISK
FULL
Either
the
blocksonthe
diskette
are
usedorthe
directoryisat
its
limitof152
entries
for
the
2040,3040,
and
4040or243
entries
for
the
8050.
DISK
FULLissent
when
two
blocks
are
available
on
the
8050toallow
the
current
filetobe
closed.
73:
DOS MISMATCH
(73,
CBM DOS
V2.5
8050)
(73,CBMDOSV2
)
for
4040
DOS 1
and
2 are
read
compatible
but
not
write
compatible.
Disks
may
be interchange
ably
read
with
either
DOS,
but
a disk
formattedonone
version
cannotbewritten
upon
with
the
other
version because
the
formatisdifferent.
This
error
is displayed whenever
an
attemptismadetowrite
uponadisk
which
has
been
formatted
m a
non-
compatible
format.(Autility
routine
is availabletoassist in converting
from
one
for
mattoanother.)
This
message
may
also
appear
after
power
up.
74:
DRIVE
NOT
READY
An
attempt
has
been
madetoaccess
the
8050
Dual Drive
Floppy
Disk
without
any
diskettes
presentineither
drive.
PATTERN
MATCHING
Pattern
matchingoffile
names
is availableonall
Commodore
floppys.
Pattern
matching
uses
^ the question mark (?)and the asterisk (*) to performoperationson
several
files
withsimi
lar
names.
The
asterisk is usedatthe
endofa stringofcharacterstoindicate
that
the
restofthe
name
is insignificant.
For
example:
FIL'*'
could
refertofiles
named
FIL
or
FILEl
or
FILEDATA
or
FILLER
or
any
other
file
name
starting
with
the
letters
FIL.
The
question
mark
may
be used
anywhere
within
the
strmgofcharacterstoindicate
that
the
character in
that
particular position should be disregarded.
For
example:
?????.SRC
could
refertofiles
named
TSTER.SRC
^ or
DIAGN.SRC
or
PROGR.SRC
but
not
SRC.FILES
85
Page 92

Both
the
characters and
the
positionofthe
characters are significant.
The
question
mark
and
asterisk
maybecombinedinmany
ways:
*J??????
doesnot makesensebecausethe question marksarein an area whichisinsignificant (be
causeofthe
asterisk).
P???FIL*
will
access
files
with
the
names
PET
FILE
or
PRGFILE-32
or
POKEFILES$$
or
any
other
files starting with P and having
FIL
in positions
5-7.
SCRATCH
withpattern matching shouldbeusedcarefully, sincemultiple
files
will
be
scratched.
LOADorDLOAD
will
load
thefirst
file
which
fitsthe pattern
matchmg.
OPEN
or
DOPEN
withpattern
matching
maybe
used
to openan
existing
file,inwhich
case
the
first
existing
file
encountered
which
fits
the
description
willbeopened.
However,
OPEN
or
^
DOPEN
should
not be
used
with
pattern
matching
when
creatinganew
fUe.
Never
use
RENAME,
SAVE,
DSAVE,orCOPY
for pattern
matching
since
an error condition
will
result, if
attempted.
USER'S
QUICK REFERENCE: DISK COMMANDS
The
user's
quick
reference
guide
will
assist
the
userinbecoming
familiar
withthe
various
commands
usedinboth
BASIC
3.0
and
BASIC
4.0,
and
with
the
DOS
SUPPORT
utility
as
well as
with
all
Commodore
disk
units.
In
ordertomake
BASIC
4.0
easiertouse,
disk
commands
have
been
incorporated
into
the
language. For example,with
BASIC
4.0:
•
DSAVE
and
DLOAD
commands
eliminate
the
needtospecify
device
number
each
time
you
store
and
retrieve
disk
files.
• Directory
display
isnowa
one-step
procedure and no
longer
interferes withthe
programinmemory.
• It is no longer necessary to write a programto read the error channel. The variable
DS$ contains the error message.
• Formatting is now a one-stepprocedure through the useof HEADER command.
CommandsinBASIC
3.0
are
upward
compatible
with
BASIC
4.0.That
is,ifyou
are
familiar
with
BASIC
3.0,
those
commands
will
still
work
onthe
Series
8000
Computer
furnished
with
BASIC
4.0. Alldiskcommands
available
on the 2040 are
upward
compatible with both
the
4040
and
8050.
86
Page 93

Table
17.
User's
Quick
Reference—Disk
Commands
BASIC
3.0
UNIVERSAL
DOS
SUPPORT
BASIC
4.0
SAVE
"dr:fn",8
SAVE"dr:fii",8
DSAVE,**fn",Ddr
(drive
defaultsto0)
LOAD"dr:fh",8
/dr:fn
(searches
both
drives)
DLOAD"fn",Ddr
(drive
defaultsto0)
LOAD"*",8
RUN
tdr:fn
DLOAD"fn",Ddr
RUN
LOAD"dr:fn",8
t*
shifted
RUN/STOP
LOAD"$0",8
UST
(destroys
memory)
>$0
(preserves
memory)
DIRECTORY
or
DKshifted
R>
(preserves
memory)
10
0PEN1,8,15
20
INPUT#l^,B$,C,D
30
printa,b$,c,d
>
return
?DS$or?DS
(DS is
numberoferror
only)
NOTE: Assume
that
0PEN1,8,15 has already been typed for all of the PRINT# com
mands in
the
following formats. Commands
may
be spelled
outorabbreviated by
the
^t
letterasillustrated.
PRINT#l,"Ix"
INITLIALIZE
>Ix
PRINT#l,"Ix"
PRINT#!,"Vdr"
VALIDATE
>Vdr
COLLECT
Ddr
PRINT#l,"Sdr:fn"
SCRATCH
>dr:fn
SCRATCH"fn",Ddr
PRINT#l,"Dddr=sdr"
DUPLICATE
>Dddr=sdr
BACKUP
Dsdr
TO
Dddr
PRINT#1
,"Cddr=sdr"
COPY
(aU
disk)
>Cddr=sdr
COPY
Dsdr
TO
Dddr
PRINT#l,"Cdr:dfn=
dr:sfn"
COPY
(single file)
>Cdr:dfn=dr:sfn
COPY
Ddr,"8fn"TO
Ddr,"dfn»'
PRINT#l,"Cdr:dfh=
dr:sfnl,dr:sfn2,...
CONCATENATE
FILES
>Cdr:dfn=dr:8fl,
dr:sfh2,...
CONCAT
Ddr,"sfn"
TO
Ddr,"dfn"
PRINT#l,"Rdr:dfn=sfn"
RENAME
FILES
>Rdr:dfn=sfn"
RENAME
Ddr,"sfn"
TO
"dfn"
PRINT#1
,"Ndr
:dnamepcx"
FORMAT
A
DISKETTE
>Ndr:dname,xx
HEADER
"dname",Ddr.Ixx
87
Page 94

NOTES
88
Page 95

Chapter
9
RANDOM
1.00
PROGRAM
LISTING
This chapter providesa complete listingof the random accessprogram described in Chapter
6 under
the
heading of Random Access Example.
REflDV.
1 REM
RRNDOtI
1.0
2 REM
SUBROUTINES
TO MflNflGE RANDOM
ACCESS
FILES
3 REM
VRRIflBLES
ARE
SET
FROM DATA OF
DESCRIPTOR
FILE
& KEV
LIST
FILES...
4 REM
...DEFINED
BV
USER
PROGRAM
5 REM
VARIABLES
SHOULD
REFLECT
DESIRED
FILE
STRUCTURE
6 REM
ALL
FUNCTIONS
ACT
UPON
THE
VARIABLES
DEFINED
BELOW
le
REM
11
REM
#***#*#*♦#*************#*
^
12
REM
^ 13 POKE1022,128:REM
TURN
DOS
SUPPORT
3.1
OFF
15
M$=CHR$:<13>:REM
FIELD
MARKER
16
SP$="
"+"":REM
SPACE
FOR
PADDING
20
C0=2:
REM
DIRECT
CHANNEL
21
Cl=3:
REM
SEQUENTIAL
CHANNEL
25
CC=15:
REM COMMAND
CHANNEL
30
D=0:
REM
CURRENT
DRIVE
#
31
T=0:
REM
CURRENT
TRACK
#
32
S=0:
REM
CURRENT
SECTOR
#
35
DD=0:
REM
DESCRIPTOR
DRIVE
#
36
RD=0:
REM RANDOM
DRIVE
#
40
ID$="":
REM RANDOM
DISK
ID
45
NR=0:
REM # RECORDS
IN
R-FILE
46
CR=0:
REM
CURRENT
RECORD #
47
FR=0:
REM
1ST
FREE
RECORD UNUSED
50
NF=0:
REM #
FIELDS
IN
RECORD
51
CF=0:
REM CURRENT
FIELD
#
55
RB=0:
REM # RECORDS
PER
BLOCK
56
RS=0:
REM RECORD
SIZE
IN
BYTES
60
NB=0:
REM #
BLOCKS
IN
R-FILE
65
E=0:
REM ERROR
FLAG,
OK
=0
66
REM
EN$,EM$,ET$,ES$,ET,ES
ERROR CHANNEL
VARIABLES^
70
EP=.5/256=
REM
INTEGER
CORRECTION
75
RS=0:
REM INDEX ARRAV
ADDRESSING
STRATEGY
76
REM
AS=0:
USE
ARRAV
INDEX;
AS=1:
T&S ARE
SET,
CR= RECORD
OFFSET
IN BLOCK
90
REM
"A"
VARIABLES
ARE TEMPORARY
95
DN=8:0PENCC,DN,CC:
REM DN=
DEVICE
NUMBER
98
GOTO2000:
REM
START
OF
USER
PROGRAM
99
REM
89
Page 96

90
100
REM
101
REM
RfiNDOM
FILE
DIMENSION ROUTINE
102
REM
1ST
SET
NR. NF & NB
103
REM
105
GOSUB150
110
IFFPJi=-lTHENRETURN
111
FP;i=-l
115
DIM FS?iCNF) :REM
FIELD
SIZE
120
DIM
FP?S<NF)
:REM
FIELD POSITION
;25
REM
FP?i<I>=
SUM
CFS^<I-0]
}|? S 2 0=
BINflRV.
1:NUMERIC.
2:flLPHa
135
DIM
FH$CNF>
:REM
FIELD
HERDING
140
DIM
F^CNF)
:REM
FIELD ARGS-fiLPHfi.BINfiRV
145
DIM
F<NF)
:REM
FIELD-flRGS-NUMERIC
146
RETURN
150
IFIT?i=-lTHENRETURN
151
IT?i=-l
155
DIM IT?i(NB)
:REM
TRACK
INDEX
ARRAV
160
DIM
IS?i<NB) .:REM
SECTOR
INDEX
ARRfiV
165
DIM
K1$<NR)
:REM
PRIMARV
KEV
VALUE
lit
SiC
=REM
RELATIVE
RECORD
LIST
PER
KEV
175
RETURN
200
REM
201
REM
UPDATE
RECORD, CR
202
REM
205
GOSUB900
210
PRINT#CC,"U1•"C0;d;T;s
215
PRINT#CC,"B-P:"C0;RP
220
F0RCF=1T0NF
225
GOSUB500
230
NEXTCF
235
PRINT#CC,"U2:"C0;D;TjS
240
GOSUB1000:IFETHEN1900
245
RETURN
300
REM
301
REM
READ
RECORD,
CR
302
REM
305
GOSUB900
310
PRINT#CC,"U1:"C0;D;T;S
315
PRINT#CC,"B-P:"C0;RP
320
GOSUB1000:IFETHEN1900
325
FORCFslTONF
330
GOSUB600
335
NEXTCF
340
RETURN
400
REM
402
REM
FIELD(CF)
OF
RECORD
CR,
SINGLE
FIELD
UPDATE
405
GOSUB900
410
PRINT#CC."U1:"C0;D;TJS
415
GOSUB1000:IFETHEN1900
420 PRINT#CC,"B-P:"C0;FP?i<CF)+RP '
425
GOSUB500
:REM
UPDATE
FIELD
430
PRINT#CC,"U2:"C0;D;T;S
435
GOSUB1000:IFETHEN1900
440
RETURN
450
REM
452
rIm
O""
"ECORD
CR,
SINGLE
FIELD
READ
455
GOSUB900
460
PRINT#CC,"U1:"C0;D;T;S
465
GOSUB1000:IFETHEN1900
470 PRINT#CC,"B-P:"C0;FPX<CF)+RP
475
GOSUB600
:REM
READ
FIELD
480
RETURN
500
REM
501
REM
UPDATE
FIELD<CF>,
B-P IS
SET
502
REM
510
IFFTJi<CF)OlTHEN520
530
PRINT#C0,A$;M$;
535
RETURN
Page 97

600
REM
601
REM READ
FIELD<CF).
B-P
IS
SET
602
REtl
610
IF
FT?i<CF)
THEN645
615
fll$=""
620
FORJ=lTOFSJi<CF)
625
GET#C0,fl$:lFfl$=""THENfl4:-CHR$<0)
630
fll$=fll4:+fl$
635
NEXT:F$<CF)=flU
640
GET#C0.flf:RETURN
645
INPUT#C0.F$(:CF>
650
IFFTX(;CF)01THEN
RETURN
655
F<CF>=VflL<:F$<CF>):
RETURN
700
REM
701
REM
ALLOCflTE
ONE
BLOCK.
T & S
=REQUESTED
TRRCK
SECTOR
702
REM
RETURNED
T & S fiRE
RLLOCflTED
VALUES
<T=18
IS
SKIPPED)
703
REM
^ 710 GOSUB800:IFETHEN1900:
REM
CHECK
T S
'^
715
PRINT#CC."B-fl:"D;T;S
720
INPUT#CC/EN.EMf.ET/ES
725
IFEN=0THENRETURN
730
IFENO65THEN1900
735IFET=1STHENTs
19:
S=0
60T0715
736
T=ET:S=ES
740
G0T0715
750
REM
751
REM
FREE
ONE BLOCK. T S = TRACK & SECTOR
752
REM
760
GOSUB800:IFETHEN1900:
REM
CHECK T & S
770
PRINT#CC."B-F:"DjT;S
780
INPUT#CC.EN.EM$,ET.ES
785
IFEN=0THENRETURN
790
GOTO1900
800
REM
mmmmmmmmmmmm-*
801
REM
CHECK
MAX
SECTOR
802
REM
810
IFT>35THEN1900
820
E=0:1FT=0THEN=40=GOTO1900
840
A3=16:IFT>30THEN880
850
A3=17:IFT>24THEN880
860
A3=19:IFT>17THEN880
870
R3=20
880
IFS>A3THEN1900
890
RETURN
900
REM
901
REM
SET RECORD'S
TRACK.
SECTOR
RECORD
POINTER
FROM
INDEX
ARRAVS
902
REM
905
D=RD
910
E=0
9151FRS=-1
THENRP=CRitiRS+1:
GOTO950
920
RP=INT<<CR-1)/'RB+EP):IFRP>NB
OR RP<0THENEN=41 =
GOTO
1900
930
T=IT?i<:RP>:S=IS:i<RP>
940
RP=INT<<<CR-1VRB-RP+EP)*RS*RB)+1
950
IFRP>254THEN
EN=41:GOTO1900
960
RETURN
1000
REM
1001
REM
INPUT
2040
ERROR
STATUS
1002
REM
1005
INPUT#CC.EN$.EM$.ET.ES
1010
EN=VAL<EN$):E=0
1015
IF
EN$="00"
THEN RETURN
1017
ET$=STR$<ET):ESf-STR$<ES)
1020IFEN^OR
IGHT$<"0 "+MID$<STR<:<EN>. 2 >. 2 >THEN
1070
1030
IF
EN=1 THEN EM$=
EJ$+"
"+EM$:
RETURN
1035
E=E+1
1040
EM$="a"+EN$+"5
"+EM$
1050
IF
EN<30
OR EN=65
THEN
EM4:=EM#+" ON
"+ET$+".
"+ES$
1060
RETURN
^
1070
EM$="aBVSTEM
NOT
RESPONDING PROPERLV"
1080
EM$=EM$+EN$+EN$+ET$+ES$
1085
E=E+1
1090
RETURN
91
Page 98

92
1100
REM
1101
REM
CREATE
DESCRIPTOR
FILE
1102
REM
input:
F$=
FILENAME
1103
REM
ID$>NR.NF/FS?J<>,FT;i<).FH$<)
1104
REM
DD=^DESCRIPTOR
FILE
DRIVE
#
1105
REM
RD=
RANDOM
DISK
DRIVE
#
1106
REM
DRIVES
MUST
BE
INITIALIZED
1109
REM
1110
RS=l:D=RD
1115
FORA0=1TONF: FP^i<A0 )
=RS:
RS=FSfi
<A0>
+RS+1:
NEXT:
RS=RS-1
1116
RB=INT<254/RS+EP>
1120
OPENC0/DN/C0."#":GOSUB1000:IFETHEN1900
1121
GOSUB1280
s
1122
PRINT#CC."B-P:"C0;l
1123
FORA0=1TORE:F0RR1=1TONF
1124
PRINT#C0.LEFT$<SP$,FS?i<A1
>);;
1126
NEXTR1.A0
1130
NB=INT <
NR/RB+EP):IF
<NR/RB-NB)*RB>=1THENNB=NB+1
1135
T=l:S=0:GOSUB150
1140
FORA0=0TONB-1-GOSUB710:IFETHEN1900
1145
IT?i<:R0)=T:IS?i<fl0>=S:GOSUB430:NEXT
1150
GOSUB710
1152
PRINT#CC,"B-P:"C0;1
1155
PRINT#C0,NR;M$;1;M$;nb;m$;rs;M$;RB;M$;NF;M$;
1160
print#cc,"b-w:"C0;d;t;s
^
1165 Af=STR$<DD>+":"+LEFT#<F$+SP4:/10)+".DESCR.U.W" ' ^
1166
OPENCl.DN.Cl.RI:
1167
GOSUB1000:IFETHEN1900
1168
PRINT#C1.
ID$;M^;T;M$;S;M$;
1170
FORA0=1TONF:
PRINT#C1
>CHR$(FS;i<A0)>;
CHR$<FT;i<A0>);FHf<A0>;
M$;=NEXT
1175
FORA0=0TONB-l:PRINT#Cl.CHR$<IT?i<:A0>);CHR$(IS?i<A0>>;
:NEXT
1180
CLOSECl:CLOSEC0:RETURN
1200
REM
1201
REM
OPEN
RELATIVE
FILE
1202
REM
INPUT:
F$=
FILENAME
1203
REM
DD= DESCRIPTOR
FILE
DRIVE #
1204
REM
RD=
RANDOM
DISK DRIVE #
1205
REM
DRIVES
MUSTBEINITIALIZED
1209
REM
1210
flf=STR$(DD>+":"+LEFTf<F$+SP«:.10)+".DESCR.U.R"
1215
OPENC1.DN.C1.R$:GOSUB1000:IFETHEN1900
1220
INPUT#C1.ID^,T,S
1225
OPENC0,DH,C0.GOSUB1000:IFETHEN1900
1226
GOSUB1280
1227
PRINT#CC/"B-R:";C0;RD;T;S:GOSUB1000:IFETHEN1900
1230
INPUT#C0.HR.FR,NB.RS/RB.NF
1235
GOSUB100:FT?i<0)=T:FS;i<0>=S
1240
FORR0=1TONF:GOSUB1298:FSX<R0)=RSC<
A$)
1245
GOSUB1298: FT?iCA0>^ASC<R$ >
1250
INPUT#C1,FH$<A0>:NEXT
1255
FORA0=0TONB-l:GOSUB1298:IT?i<A0>=ASC<A$>
1260
GOSUB1298:1S?i<A0)=ASC<A$>:
NEXT
1265
GOSUB1000:IFETHEN1900
1270
CLOSECl
1275
RETURN
1280
PRINTftCC/
"ur-
";C0;RD;
'M8.0":GOSUB1000:1FETHEN
1900
1285
PRINT#CC."B-P:";C0;162
2iI*i®''^^'^l^"f^^=f'^+fil^=
IFID^<>fl^THENEN=43:EM$a"WRONG
RAND
DISK"
:GOTO
1900
RcTURN
1298
GET#Cl.A$:IFfl$=""THENA$=CHR$<0>
1299
RETURN
1400
REM
1401
REM
CLOSE RELATIVE
FILE
1402
REM
INPUT:
VARIABLES
FROM
OPEN
SHOULDBEVALID
1409
REM
1410
PRINT#CC."E-P:"C0;1
1420
PRINT#C0.nr;m$;FR;m$;NB;M«:;R5;m$;rb;m$;NF;m$;
1430
PRINT#CC."B-W:"C0;D;FT?i<0);FS?i<0)
1440
CLOSEC0
1490
RETURN
1900
E=E+l:RETURN
Page 99

2000
INPUT-nSfilDO
VOU
WISH
TO
CREftTE
fl
FILE
IFLEFT$<R$,
1)O"V"THEN2100
2001
INPUT"WRflNDOM
FILE
NRME";Ff
2002
IHPUT"KEV
FILE
DRIVE
NUMBER";DD
2003
INPUT"RftNDOM
FILE
DRIVE
NUMBER";RD
2005
INPUT"ENTER
ID
OF RANDOM
DISK
-JMII";
ID$:
ID$=LEFT$<:iD$.2)
2006
INPUT"NUMBER
OF
RECORDS";NR
2007
INPUT"NUMBER
OF
FIELDS
PER
RECORD";NF
2010
GOSUB110
2015
PRINT"W
INPUT
FIELD
NfiME.FIELD
SIZE.FIELD
TVPE"
2016
PRINT"
TVPES:
0=BINflRV.
1=HUMERIC.
2=flLPHflW"
2019
RS=0
2020
FORI =
1TONF:
PR I NT"FIELD
";
I.
: I NPUTFH$ <H >FS?i <I >,
FT/i
<I > =
RS=FS?i
<I
>+RS+1
=NEXT
2025
fl$="I":IFDD=RDTHENflf="I"+STR$<DD>
2030
PRINTttCC.fl^
2040
GOSUB1100:IFETHEN3300
2050
0PEH4
>8.4,STR$
<DD
>+"
=
"+LEFT$
<
F$+SP$
>10
>+".KEV01.U,W"
2055
PRINT#4,0;M$;:CL0SE4
2090
GOTO2120
2100
REM OPEN
RANDOM
FILE
FOR
ACCESS
2103
INPUT")iRANDOM
FILE
NRME";F$
2105
INPUT"KEV
FILE
DRIVE
NUMBER";DD
2110
INPUT"RANDOM
FILE
DRIVE
NUMBER";RD
2120
GOSUB1200:IFETHEN3300
2140
0PEN4,8,4,STR$
C
DD)+":"+LEFT$
<
F$+SP$,10)+".KEV01>
U"
2142
INPUT#4,RR:IFRR=0THEN2147
2145
FOR
I=ITORR:
I
NPUT#4,
K1$ <
I),
RR?i< I > =NEXT
2147
CL0SE4
2150
PRINT":i»$ffili»iii»i»niiiiBAMPLE
random
ACCESS^"
2155
PRINT"TVPE
//
TO
QUITW"
2156
PRINT"<HIT
RETURN TO ADD
RECORD)"
2160
PRINT")!WIJH0SE
RECORD DO VOU"
2161
INPUT"WISH
TO
SEE
liirSRR*
2165
IFRR$="
"THEN2310
2167
IFRR$="/'/"THEN2400
2168
IFRR$="/DIR"THENGOSUB4000
=
GOTO2160
2170
FOR11=1TORR:IFK1$
<11)ORR$THENNEXT
=GOTO2300
2175
CR=RR*^<11>:
GOSUB300
2180
FORI=1TONF:PRINTI;")"FH$
<I>":".F$
<I)=
NEXT:PRINT
2185
FF=0
2190
INPUT"flNV
MODS
IMI";A$:
IFLEFT$<A$,
1)O"V"THEN2220
2195
INPUT"WHICH
FIELD";A
2200
PRINT"
"F4:(A>:PRINT"n";
:INPUTF$(fl):F<A>=VAL<F$<A>)
2210
FF=l:GOTO2190
^
2220
IFFF=0THEN2160
^ ^
2222
IFA=1THENK1$<ID=F$<A>
2225
GOSUB200
2230
GOTO2160
2300
PRINT"^RECORD
NOT
PRESENT"
2305
INPUT"DO
VOU
WISH
TO
ADD";A$:IFLEFT$<A$>1)O"V"THEN2160
2310
PRINT")S»###
ADD
RECORD
mmm"
2312
IFFR>NRTHEN2500
2315
CR=FR-FR=FR+1:RR=RR+1
2320
FORI=1TONF
=PRINTFH$
<I>;:INPUTF$
<I):F
<I)=VAL<F$
<I))=
NEXT
2330
GOSUB200
2340
Kl$<RR)=F$<l):RR/i<RR)=CR
2350
GOTO2160
2400
REM CLOSE RRND
FILE
2405
GOSUB1400
2410
0PEN4,8,4>"e"+STR$<DD>+":"+LEFTf<F$+SP$,10>+".KEV01.U,W"
2420
GOSUB1000:IFETHEN3900
2430
print#4,rr;m$;
2440
F0RI=lT0RR:PRINT#4,Kl$<n;M$;RR:«I>;M#;
:NEXT
2445
GOSUB1000:IFETHEN3900
2450
CL0SE4
2455
GOSUB1000:IFETHEN3900
2490
POKE1022,8:END:REM
TURN DOS SUPPORT
3.1
ON
2500
PRINT"THE
FILE
IS
FULL,
NO
ADDITIONAL
RECORDS
MAV
BE
ADDED"
2510
GOTO2160
^
3900
PRINTE,EM$:STOP
^ 4000 FORDI=0TONR:PRINTKU<DI>:next:RETURN
93
Page 100

' '' • i
•;*
•
94
NOTES
•• :
. " ' ' • \ '' " ' ".i i'' •L
• " • • - ' ^- . ' : -
i;;-;
• • . ^
• • • • • •
•'
rn:-^
•
.<•
• • • ,
'••
^'^v-vv
•
-•
i;,'-
.>•:
' •'.••• ••••••
• • ' ^
•.
- :S^::
••
" • - V'•- • i m'-:---
. r i-;:;
- ' •
••'••
=
"fv
•,
, < ' - w '
•'•••"•ir-iiA;-
••••V
- • • - • V - • ;•.. •
wt'r;,
; .
•I ' •
•••"
T -
• •
"
v-v
• •-•"!
•v.
..-r•...
...
;•:
:-
..r.
• • ^ ' V• J
•;v• ,
••;
ri
-iO'-;,:-
•••v .- ;
 Loading...