

Page 1
Page 2
OPERATING INSTRUCTIONS FOR YOUR C2N
CASSETTE UNIT
A COMMODORE C2N cassette unit is a device for storing and/or
recalling computer programs on ordinary cassette tapes. It can be used
for saving programs you have written and want to recall for later use. It
can also be used to read pre-recorded programs that you have
purchased.
Page 3
CASSETTE OPERATING INSTRUCTIONS FOR
YOUR COMPUTER
Important information about your cassette unit
The COMMODORE C2N cassette unit is supplied with a cord
attached. This cord connects the cassette unit to the computer. Power is
supplied from the computer to the unit through this cord. The computer
and the cassette communicate through the cord as well.
TURN OFF THE COMPUTER BEFORE CONNECTING THE
CASSETTE UNIT TO IT.
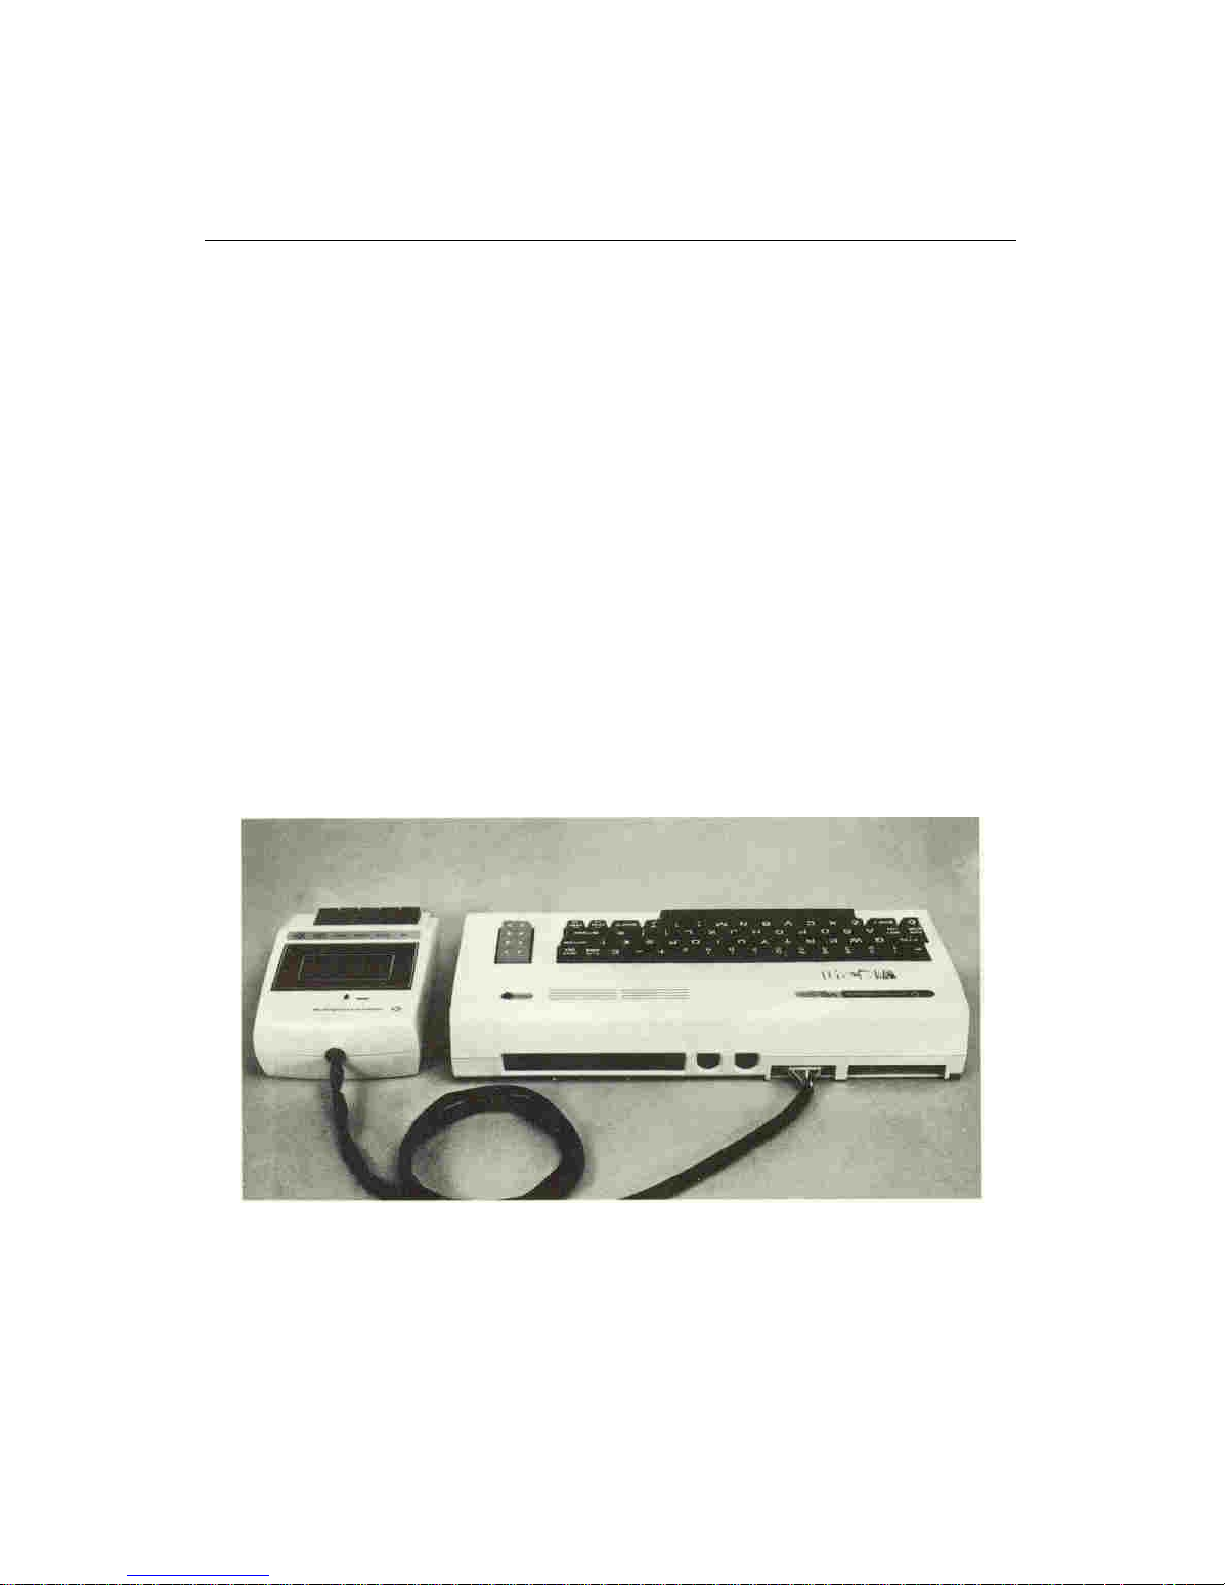
For VIC computer users
The cassette unit plugs on to a connector at the back of the
computer. See the figure below. The plug will only fit on the connector on
e way. DO NOT FORCE IT.
It is also important to keep the cassette unit at least 2 feet away
from the TV as radio emissions from the TV can interfere with the correct
operation of the cassette unit.
Page 4

FOR CBM/PET COMPUTER USERS
For CBM/PET computers, 4000 and 8000, the cassette unit plugs
on to a connector at the back of the computer.
Page 5
PRELIMINARY CHECKOUT
Before using your cassette drive unit to recall or store programs,
you should complete the preliminary checks—which are described below:
STEP 1 Turn off the computer and plug in the cassette unit.
STEP 2 Ensure that the cassette deck motor is off by checking that all of
the function keys are up. If any are not, press the STOP/EJECT
button.
STEP 3 Turn the computer on.
Page 6

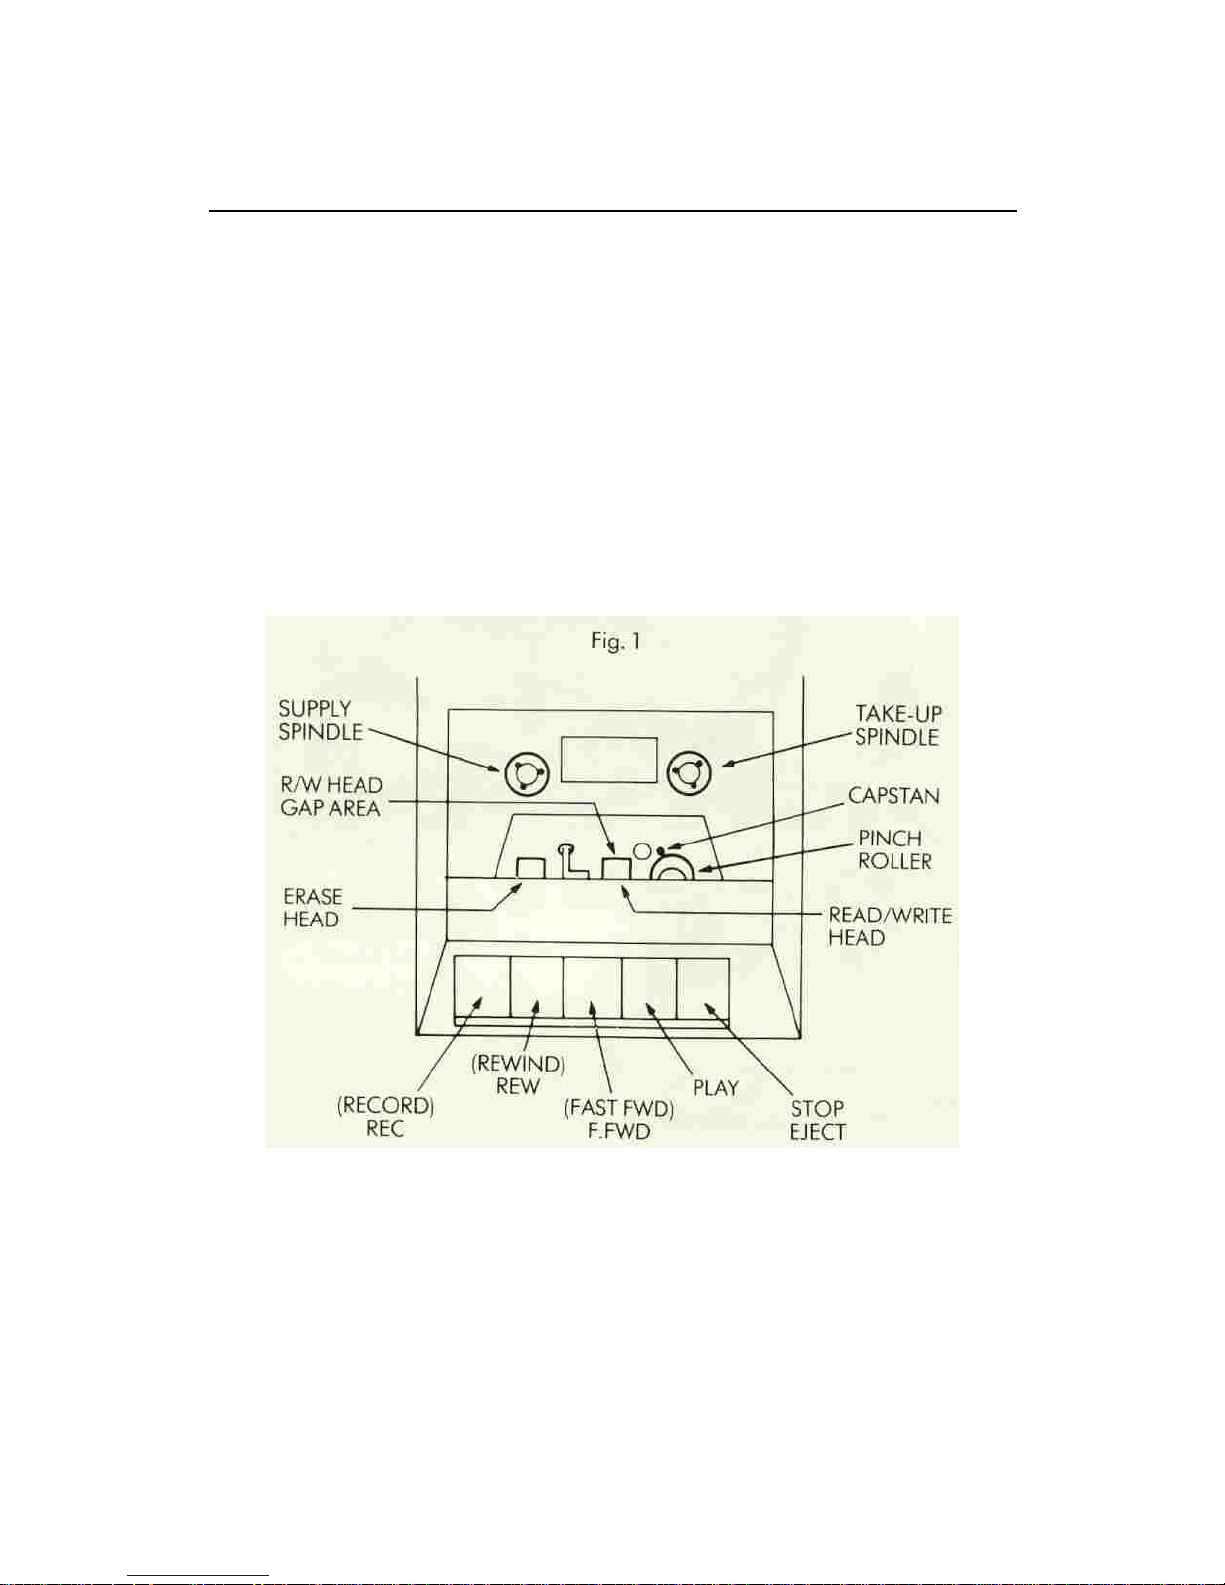
STEP 4 Press the PLAY button on the cassette unit. Look to see that, as
the button is engaged, the READ/WRITE heads move towards
the spindles and the capstan comes into contact with the pinch
roller (see Fig. 1). The take-up spindle should be moving
smoothly in a counter-clockwise direction.
STEP 5 Now press the STOP button. The heads should move back and
the spindle stop.
STEP 6 Press the REWIND button. The tape heads should remain in the
inactive position and the supply spindle should move rapidly
clockwise.
STEP 7 Press STOP again and then F.FWD. The tape heads should still
remain in the inactive position and the take-up spindle should
move rapidly counter-clockwise.
STEP 8 Press STOP once more and then GENTLY attempt to press
REC. You should feel strong mechanism resistance.
STEP 9 If all has worked properly, proceed to the operations test on the
next page. If you have encountered any difficulties with the
preliminary checkout, please turn to the last page in this manual.
Page 7

OPERATIONS TEST
To test the operation of your new cassette unit, let's write a short
program, SAVE it on to the cassette, and LOAD it back into the computer.
Obtain a blank cassette (no special cassette is required) and place
it in the cassette unit. Always press REW to ensure that you are starting at
the beginning of the tape.
NOTE: A tape with playing time of 12 to 30 minutes is of ample length.
It is not advisable to use anything longer than this, as it strains
the motor.
STEP 1 On the keyboard type: 10 PRINT”THIS IS A TEST”
STEP 2 Press <RETURN>
STEP 3 Type: SAVE”TEST”
STEP 4 Press <RETURN>
The display will show:
For VIC PRESS RECORD & PLAY ON
TAPE
For PET/CBM PRESS PLAY & RECORD ON
TAPE NO. 1
Do just that by pressing
the REC, then wile holding
this button down, pressing
PLAY until both keys lock.
The display will show: OK
For VIC SAVING TEST
For PET/CBM WRITING TEST
and then after a few
moments, the display
will show: READY
Your program has now been SAVEd. Let's verify this.
Page 8

STEP 5 Erase the memory by typing: NEW
then press <RETURN>.
The display will show: READY
STEP 6 Type: LIST
then press <RETURN>.
The display will show: READY
indicating that the memory
is blank.
STEP 7 Rewind the cassette by pressing
REW, then STOP when the tape
is at the beginning.
STEP 8 Type: LOAD”TEST”
the display will show:
for VIC PRESS PLAY ON TAPE
for PET/CBM PRESS PLAY ON TAPE NO. 1
After obeying the command,
the display will show: OK
SEARCHING FOR TEST
FOUND TEST
LOADING
READY
NOTE: If the computer displays: LOAD ERROR
try the LOAD command a
few more times, but if the message repeats, turn to the last page.
STEP 9 Type: LIST
and press <RETURN>.
Now the display will show
that the memory has received the program “TEST” by displaying
10 PRINT”THIS IS A TEST” READY
If all of the preceding steps have been successfully completed,
your cassette has been properly checked and is ready to go to work. The
commands to use the cassette are described later in this manual. NOTE:
If any of the above steps do not work, turn to the last page of this manual.
Page 9

CARE OF TAPES
Be careful to rewind all tapes to the beginning after use as this
protects the recording from abrasion and contamination. Do not store or
place any tapes near strong magnetic fields such as may occur near
loudspeakers, or large motors.
CASSETTE MAINTENANCE
The cassette uses magnetic heads to record and retrieve the
information on the cassette tapes. These heads tend to accumulate
residue and dirt from the tape as the tape moves across them. After a
period of time the accumulation lifts the tape slightly away from the heads
drastically degrading the signal from the head.
Therefore, the following procedure should be used after every 10
to 20 hours of tape playing time to ensure that your cassette continues to
read and write reliably.
Page 10

CLEANING AND DEMAGNATIZING YOUR
CASSETTE HEADS
You'll need the following tools and materials:
1. Tape head cleaner. Alcohol may be used in emergency, but is not
recommended for long term use.
NOTE: Do not use trichloroethane or any other plastic or rubber solvent.
2. Cotton swabs.
3. Tape head demagnetizer. Unit must have protective plastic or
rubber covering on the piece that comes into contact with the
tape heads so as not to scratch delicate head gap.
Page 11

FOLLOW THIS PROCEDURE
STEP 1 Turn the computer off.
STEP 2 Press STOP/EJECT to open cover, the press PLAY to
expose heads.
STEP 3 Put tape head cleaner on one side of a cotton swab.
Gently wipe the surfaces of RECORD/PLAY and erase
head (see Fig. 1).
Scrub gently. (If there is any build-up of tape oxide
particles on or around the head gap of the
RECORD/PLAY head, it is sufficient reason for
unreliable performance.)
Also clean pinch roller and other tape bearing surfaces
if tape head cleaner is suitable for this purpose (check
label).
STEP 4 Plug in demagnatizer, and activate it while it is at least one
foot away from cassette heads.
STEP 5 Slowly move demagnatizer up to RECORD/PLAY head
and around on head surface. Rate of motion should be
approximately one inch per second during this time.
STEP 6 Slowly move demagnatizer to erase head and then to all
other ferrous metal surfaces which come into proximity
with the tape.
STEP 7 Now slowly move demagnetizer away from heads. Do not
deactivate field until demagnatizer is at least two feet away
from heads.
The tape head cleaning and demagnetizing procedure is now
complete. Inspect RECORD/PLAY surface for wear. If the tape has worn a
groove on head surface more than a couple of tape thicknesses deep,
program reading performance may be poor. If so, then replacement of
tape head is indicated. (Normally few thousand hours of tape running time
have been completed before replacement is required.)
Page 12

CASSETTE OPERATION
Commands
Here are the commands that will activate your cassette drive unit.
Simply type the desire command and press <RETURN>. In the list of
commands below, NAME stands for the name that you, the user, assigns
to your program. You should select a name that will distinguish that
program from other programs (or data files) on the same tape. The name
should have a meaning to you. PROG1, PROG2, etc., are not good
choices because they are not distinctive. A program name can be no more
than 16 characters long.
SAVE”NAME”
will SAVE a program by storing it on the cassette unit.
Example: SAVE”TEST”
will SAVE the program TEST on to the cassette unit.
NOTE: Simply typing SAVE will store the program without a name
on the cassette.
LOAD”NAME”
will LOAD the program NAME from tape. All other programs on the same
tape will be ignored.
Example: LOAD”TEST”
will LOAD the program TEST from the cassette.
If load is typed, then the first program found on the cassette will be
LOADed.
VERIFY”NAME”
will VERIFY that the program which has been SAVEd has been stored
correctly.
Page 13

Example: VERIFY”TEST”
will search for and VERIFY the program named TEST on the cassette
unit.
If the computer responds OK
with READY.
then the program has been
stored correctly. If, however,
the computer responds with VERIFY ERROR
READY
then the program on the tape has not been stored properly. Re-SAVE the
program and VERIFY again. If this still fails, then the cassette is not
working properly, the tape is of poor quality or the tape head needs
cleaning.
NOTE: VERIFY can be used to skip through a tape in order to SAVE a
new program at the end of other programs. The technique to use
is described here:
When you are ready to store the new program that is in your
computer, give the command VERIFY”NAME” using the name of
the last program on the tape. The computer will search for and
VERIFY this last program on the tape bypassing all other
programs. Because the last program is not the same as the new
program currently in memory, the display will read; VERIFY
ERROR, but the tape will have advanced to the end of all the
programs on the tape. You can then SAVE your new program,
typing SAVE”NAME”, where NAME is the unique name of the new
program that is in your computer. The new program is now on the
cassette immediately after the other programs.
Page 14

FILE HANDLING
Experienced programmers may write more sophisticated programs
that use large amounts of data. This data may be stored o a file on the
cassette. The commands to handle data files are explained below.
Files of data can be written to and read from the cassette unit.
These CANNOT be LOADed like a program, but can be read from by a
program. To communicate with the cassette unit, we use the OPEN
command:
OPEN A,B,C,”NAME”
This will OPEN a logical file where NAME identifies the file and:
A is a reference integer from 1 to 255 chosen by the user. If a
program uses more than one file, each file must be a unique
reference integer.
B must be 1 for the cassette.
C specifies whether the program will WRITE to or READ from this
file, coded as follows:
if C=0 read from tape
C=1 write to tape with an End-Of-File marker to be written when the
file is CLOSED.
C=2 write to tape with an End-Of-Tape marker to be written when the
file is CLOSED.
Example: OPEN5,1,1,”TEST”
will OPEN a file named “TEST” and having a reference integer of 5. The
program will WRITE to this file on the cassette.
Page 15

If a value of 2 is chosen for C and “TEST” is chosen for the name,
this will WRITE an End-Of-Tape marker at the end of the file. If the
computer is then told to read a file which is after the file “TEST”, then
when the computer has passed TEST it will respond with: FILE NOT
FOUND ERROR and stop. Tis is because the file “TEST” tells the
computer that the tape has ended—regardless of whether it has or not—
so the computer thinks that there are no more programs on the tape.
C and NAME ma be left out if the user wishes. If NAME is not
used, the file will be OPENed without a name. When a READ instruction is
given by the computer, it will read the first file that it finds. If C is left out,
then the file will be OPENed for READ.
INPUT # A,D
will input data from the cassette and use it in the program.
A is the logical file number used in a previous OPEN statement
which specifies READ from cassette.
D is the BASIC variable to which the data from the tape will be
transmitted. If words are to be read, then D should be D$ else the
error message FILE DATA ERROR will be displayed.
Example: INPUT # 5,A$
will input string data (words) from logical file 5, data will be read
from the cassette and assigned to the variable A$.
GET # is an alternative to INPUT #. GET # will get one character
(letter) at a time. GET # can read commas, colons, etc., whereas
INPUT # cannot.
PRINT # A,D
will write data to the cassette where
A is the logical file number used in the previous OPEN statement
which specified WRITE to the cassette.
D is the BASIC variable from which the data is to be written. If the
data is words, then D$ must be used.
Example: PRINT # 5,A$
will output the string A$ to logical file 5 on the tape provided the
file has been OPENed for write. If the file was not properly
OPENed, NOT OUTPUT FILE will be displayed.
Page 16

CLOSE A
will close the file designated A, where A refers to the file number.
WARNING: If this command is not used after all the data has been written
to the cassette, some data may not be written to the
cassette.
Page 17

Here are some sample program segments which use the above
commands:
Example Program 1 – Writing Data
10 OPEN1,1,1,”TEST FILE”
20 FOR I=1 TO 10
30 PRINT#1,I
40 NEXT
50 CLOSE 1
Line 10 OPENs file 1 for WRITE as TEST FILE.
Line 20 Do everything between “FOR” & “NEXT” 10 times.
Line 30 PRINTs the variable I on to the tape.
Line 40 Goes back to line 20 for 10 times.
Line 50 CLOSEs the file.
Example Program 2 – Reading Data using INPUT
10 OPEN1,1,1,0,”TEST FILE”
20 INPUT#1,D$
30 PRINT D$
40 IF ST=0 GOTO 20
50 CLOSE 1
Line 10 OPENs the file for READ as TEST FILE.
Line 20 Reads a string from the tape.
Line 30 Prints the variable D$ on the screen.
Line 40 Checks the status of the cassette. If the tape is OK then
GOTO line 20.
Line 50 CLOSEs the file as the status is not OK – the end of file.
Example Program 3 – Reading Data using GET
10 OPEN1,1,0,”TEST FILE”
20 GET#1,D$
30 PRINT D$
40 IF ST=0 GOTO 20
50 CLOSE 1
Line 10 OPENs the file for READ as TEST FILE.
Line 20 GETs a character into D$
Line 30 Prints the character in variable D$ on the screen.
Line 40 Checks the status of the cassette. If the tape is OK then
GOTO line 20.
Line 50 CLOSEs the file as the status is not OK.
Page 18

CASSETTE DECK PROBLEMS
If you are experiencing problems with your cassette deck either
mechanically or electronically, return it to the dealer from whom it was
purchased. If the cassette deck is faulty and in warranty he will replace it
for you.
 Loading...