

Page 1
AMIGA
~
User's
Guide
570
CD-ROM Drive
Page 2

Page 3
WARNING
Installation
information
in
this
document
is
for
reference
only.
All
installation of
internal
optional
devices
or
equipment,
including
third-party
optional
devices
or
equipment,
should
be
performed
by
an
authorized
Commodore
dealer/service
center.
Also,
all
servicing
or
upgrading
of
original
or
optional
devices
or
equipment,
including
third-party
optional
devices
or
equipment,
should
be
performed
by
an
authorized
Commodore
dealer/service
center.
UNAUTHORIZED
INSTALLATION
OR
SERVICING
MAY
VOID
YOUR
WARRANTIES.
This
manual
provides a general
description
of
various
product
configurations
andfeatures
current
ly
planned
for
inclusion
in
Commodore
's
product
line.
The
configurations
and
features
described
may
not
be
available
or
othelwise
apply
to
your
particular
system. Please
consult
your
Commodore
dealer
with
any
questions.
Page 4
Copyright © 1992
by
Commodo
re Electronics
limited. All Rights
Reserved. This
document
may
not, in
whole
or
in p
art
, be
copied, photocop
ied, reproduced, translated, or
reduced
to
any electron
ic
medium
or
machine
readab
le
lorm
, with
out pri
or
consent, in
writing, fr
om
Commodore Electronics
limited
.
With
this
document, Commodore
makes
no
warranties
or rep
resentations. either
express. or imp
lie
d,
with
respect
to
the
products
d
escribed.
The
information
pre
sen
ted
herein
is being supp
lied
on
an "
AS
IS"
basis and is expr
essly
subject
to
chan
ge
without
notice. The ent
ire
risk
as
to
the
use
of
this inf
ormation
is
assumed
by
the user.
IN
NO
EVENT WILL COMMODORE BE
LIABLE
FOR
DIRE
CT, IN
DIRECT.
INCIDENTAL, OR
CONSEQUENTIAL
DAMAGES
RESULTING
FROM
ANY
CLAIM ARI
SING OUT
OF
THE INFORMATI
ON PRESENTED
HERE
IN, EV
EN
IF
IT HAS
BEEN
ADVISED
OF
THE
POSSIBILITIES
OF
SUCH
DAMAGE
S.
SOM
E STATES
DO
NOT ALLOW
THE
LIMITATION
OF
SUCH
IMPLIED
WARRANTIES OR
DAMAGES, SO
THE
ABOVE
LIMITAT
IONS
MAY
NOT
APPLY
.
Commodore
Dynamic Tot
al
Vision
is a trademark, and
Commodore
, C
DTV, and the
Commodore
logo
are
registered
tra
demark
s,
of
Commodore
Electronics
limited
.
AmigaDOS, Amiga 500, and
Workbench
are
trademarks, and Amiga
is a registered
trademark. of
Commodore-Am
iga, Inc
.
MS-DOS
is a registered
trademark
of Microsoft, Inc
.
NOTIC
E: This
dev
ice
complies
with Part
15
of
the FCC Rules
and
Standard
Cl08.8-MI983
of
the
Canadian Standards
Asso
ciation
Regulat
ions. Operation
is
subject
to
the
two
conditions
:
(1
) This
device
may
not
cause harmf
ul interference, and
(2)
th
is
device must
accept
any
interference
received including interference
that
may cau
se
undesired
operation
. If
you
suspect
this
de
vice
is
causing interference, you can
test this
device
by
turning
it
off
and on.
If
this device does
cause int
erference, the
user
is
encouraged
to
correct
the interference
by
one
of
the
following
means
:
• R
eorient
the
receiving
antenna
or
AC
plug
.
•
Change
the relative positions
of
the
computer with
respect
to
the
receiver.
•
Plug
the
computer
into
a d
ifferent
outiet
so
the
computer
and
receiver
are
on different bran
ch circuits.
CAUTION: Only
peripherals with
shiel
ded-ground
cables
(com
puter
input-output devices. terminals, printer
s.
etc
.)
certified
to
comply
with
Class B limits can be
attached
to
this device.
Operation
with
non-certi
fied
peripherals may result in commun
ica
tion
s
interference.
Changes
or
modifications
to this
device not expressly approved
by
the
party
responsible
for complia
nce could
void
the
user's
authority
to
operate
this
equipment
Your
house
AC
wall
receptacle
must
be a
three-pronged
type (AC
ground). If
it
is
not. contact
an elec
trician
to install
the
proper rec
eptacle
. If a
multi-connector
box is.
used
to
connect the
comp
uter
and
peripherals
to AC,
the
ground
must
be
common
to
all
units
.
If
necessary, the use
r s
hou
ld con
sult
the
dealer
or
an
experienced
radio-television
technician
for
additio
nal
suggestions. Th
e
user may
find the
following
book
let
prepared by
the
Federal Communications
Commission
helpful: "H
ow
to
Ident
ify
and
Reso
lve
Radio-
TV
Interference
Problem
s: This
booklet
is
available
from
the
U.S.
Government
Pri
nting
Office, Washington
, D.C.
20402
.
Sto
ck No.
004-000-00345
-4.
If
th
is
prod
uct
is being
acquired
for
or
on behalf
of
the Uni
ted
States
of
America, its
agencies
and/or instrumentalities, it
is
provided
with
RESTRICTED
RIGHTS, and
all
use. duplication, or
disclosure
with
respect
to
the incl
uded
software
and
documentation
is sub
ject
10
the
restrictions
set
forth
in
subdivis
ion
(b) (3) (ii)
of
the
Right
s in Tec
hnical
Data and
Computer
Software
clause
at
252.227-7013
of
the
DOD
FAR. Unless
otherwise
indicated. the
manufacturer/integrator
is
Commodore
Business Machine
s, Inc.,
1200
Wilson Drive,
West
Chester
, PA
19380
.
Page 5
Contents
Contents
QUICK
CO
NNECT
GUIDE ................................................... Q-1
1.
INTRODUCTI
ON ...................................................................
1-
1
S
ys
tem Requirements .....................................................
......................
1-2
Wh
at's in the B
ox
..................................................................................
1-
2
2.
INSTALLATION
....................................................
.......
.........
2-1
Attaching the
CD-ROM
Drive ............................................................ 2-1
Audio Conne
cti
ons ...
...........
......
...
...............................
...
......
................
2-3
Power Connecti
on·
...
...............................................
.....
.........................
2-6
3.
B
ASICS ................................................................................. 3-1
The Di
sc Caddy ....................................................................................
.3-1
Am
iga/
CDT
V
~odes
......
. :
.............
...................................
..................
3-2
Scree
n Saver ............................................................
.................
............
.
.3
-4
Compatibility Switch .........................
...........
......................................
.3
-5
4.
CDTV MOD
E ........................................................................ 4-1
Loa
ding a Compa
ct Disc
..................................................................... 4
-2
Emulating the Remote Controll
er .......................
...............................
4-3
Preferences
Control Screen ................
..................................................
4-6
CD
Aud
io
Control Scree
n ........................................ : ........................... 4-9
5.
AMIGA
MO
DE ...............................
...
.................................... 5-1
CD-ROM Access ..........
............................................................
............. 5
-1
Workbench
Access
.......
........................................................................
.5
-2
Shell
Acce
ss .......
........
.....................................................................
......
.5
-3
Fi
le Conversion .............
..............................................
.........................
.5-4
·
6.
EXPANSI
ON OPTIONS ..... .
..
.................................................
6-1
Page 6
QUICK
CONNECT
GUIDE
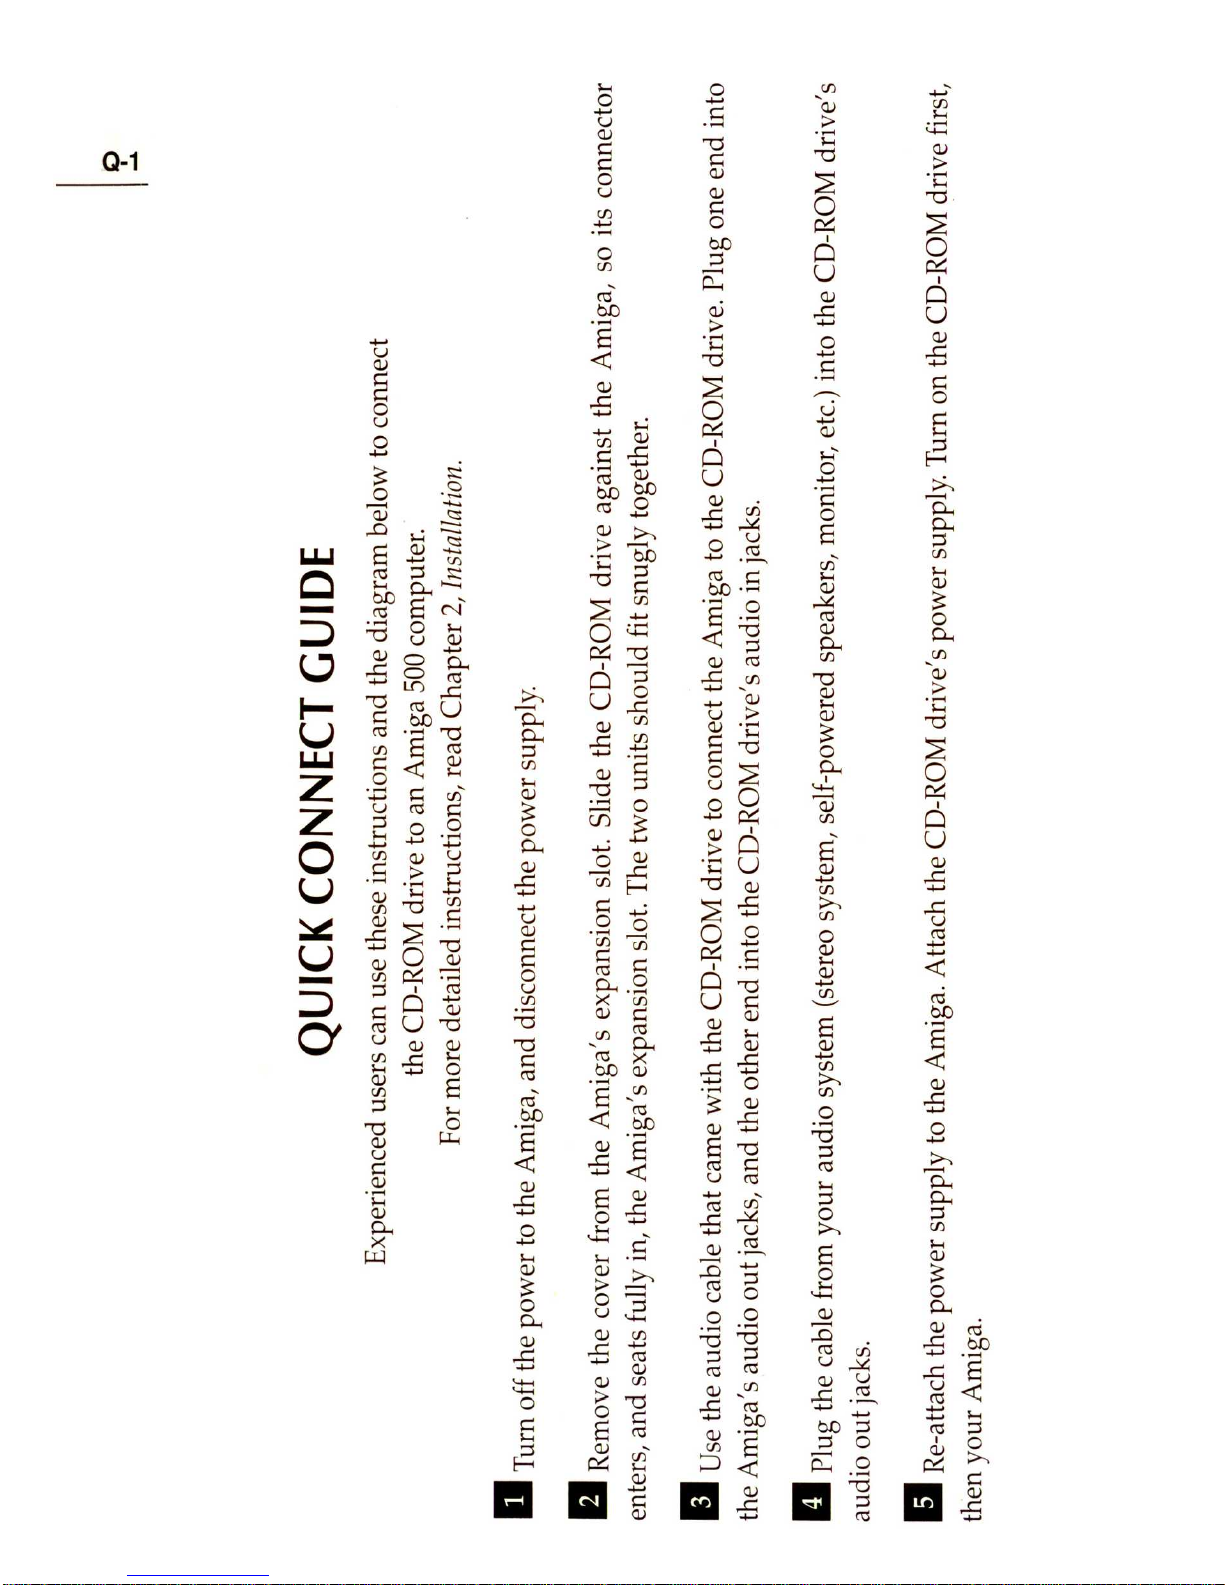
Experienced users can use these instructions and the diagram below to connect
the CD-ROM drive to an Amiga
500
computer.
For more detailed instructions, read Chapter 2,
In
s
tallation.
a Turn off the power
to
the Amiga, and disconnect the power supply.
9
~
II
Remove the cover from the Amiga's expansion slot. Slide the CD-ROM drive against the Amiga, so its connector
enters, and seats fully in, the Amiga's expansion slot. The two wuts should fit snugly together.
II
Use the audio cable that came with the CD-ROM drive to connect the Amiga to the CD-ROM drive. Plug one end into
the Amiga's audio out jacks, and the other end into the CD-ROM drive's audio in jacks.
II
Plug the cable from your audio system (stereo system, self-powered speakers, monitor, etc.) into the CD-ROM drive's
audio out jacks.
II
Re-attach the power supply
to
the Amiga. Attach the CD-ROM drive's power supply. Turn on the CD-ROM drive first,
then your Amiga.
Page 7

..
•
II
r.
Q-2
Page 8

Page 9
Chapter
1
Introduction
Introduction
1-1
Wi
th the
570
CD-ROM drive attached to your Amiga, your system will
have essentially the same capabilities as Commodore's
CDIV
®
Interactive Mul timedia Player, while retaining the flexibility and power
your Amiga has always offered you. Like the
CDIV
Player,
your
Amiga/CD
-ROM drive system will play
CDIV
titl es, as well as
CD+G, CD+MIDI, and standard audio CDs.
In addition to its
CDIV
capabilities, the CD-ROM drive can act as a
powerful peripheral
fC?r
your Amiga. With the CD-ROM drive you
will be able
to
read many of the CD-ROM reference discs currently
available, even
if
the disc was produced with another computer
platform in mind (as long
as
the disc is in the industry-standard
ISO
9660
format). Considering that each CD-ROM contains up to
600
megabytes of information on topics such as demographics, histor y,
finance and geography, the CD-ROM drive
certainl
~
is a valuable and
powerful addition to your system. \ .
Ihe
CD-ROM drive installs easily. No software installation
is
required;
the built-in software takes care of both
CDIV
and CD-ROM use. No
ex
tra hardware is needed either; when playing
CDIV
titles, you can
continue to use your Amiga's keyboard, mouse and monitor for input
and display.
If
you
want
to increase the capabilities of your system even furth
er,
the
CD-ROM drive has an internal slot for memory expansion, and a rear
slot for cartridge-based peripherals such as hard drives.
Page 10
1
-2
Introduction
System
Requirements
For
CDTV
emulation, you need
to
be using version
1.3
or
2.0
of the
Amiga opera ting system. In addition, your Amiga should have one
megabyte
(1
MB)
of chip RAM.
If
you
don't
know whether your Amiga has 1
MB
of chip RAM, do the
following:
• Type
AVAIL
in the Shell.
If
the total for chip RAM is less than
1047520,
you may not have enough chip
RAM
to
run some CDTV
applications. Contact your Commodore dealer about adding more
RAM or reallocating the memory you have.
What's
in
the
Box
In addition to this manual, the following items should be in the CD-
ROM drive box:
• the CD-ROM drive
• a power supply unit with attached power cables
• a stereo audio cable
• warranty information.
You
may also have received an application CD in the disc caddy.
If
so, refer
to
its accompanying documentation for directions on using
the disc.
Page 11
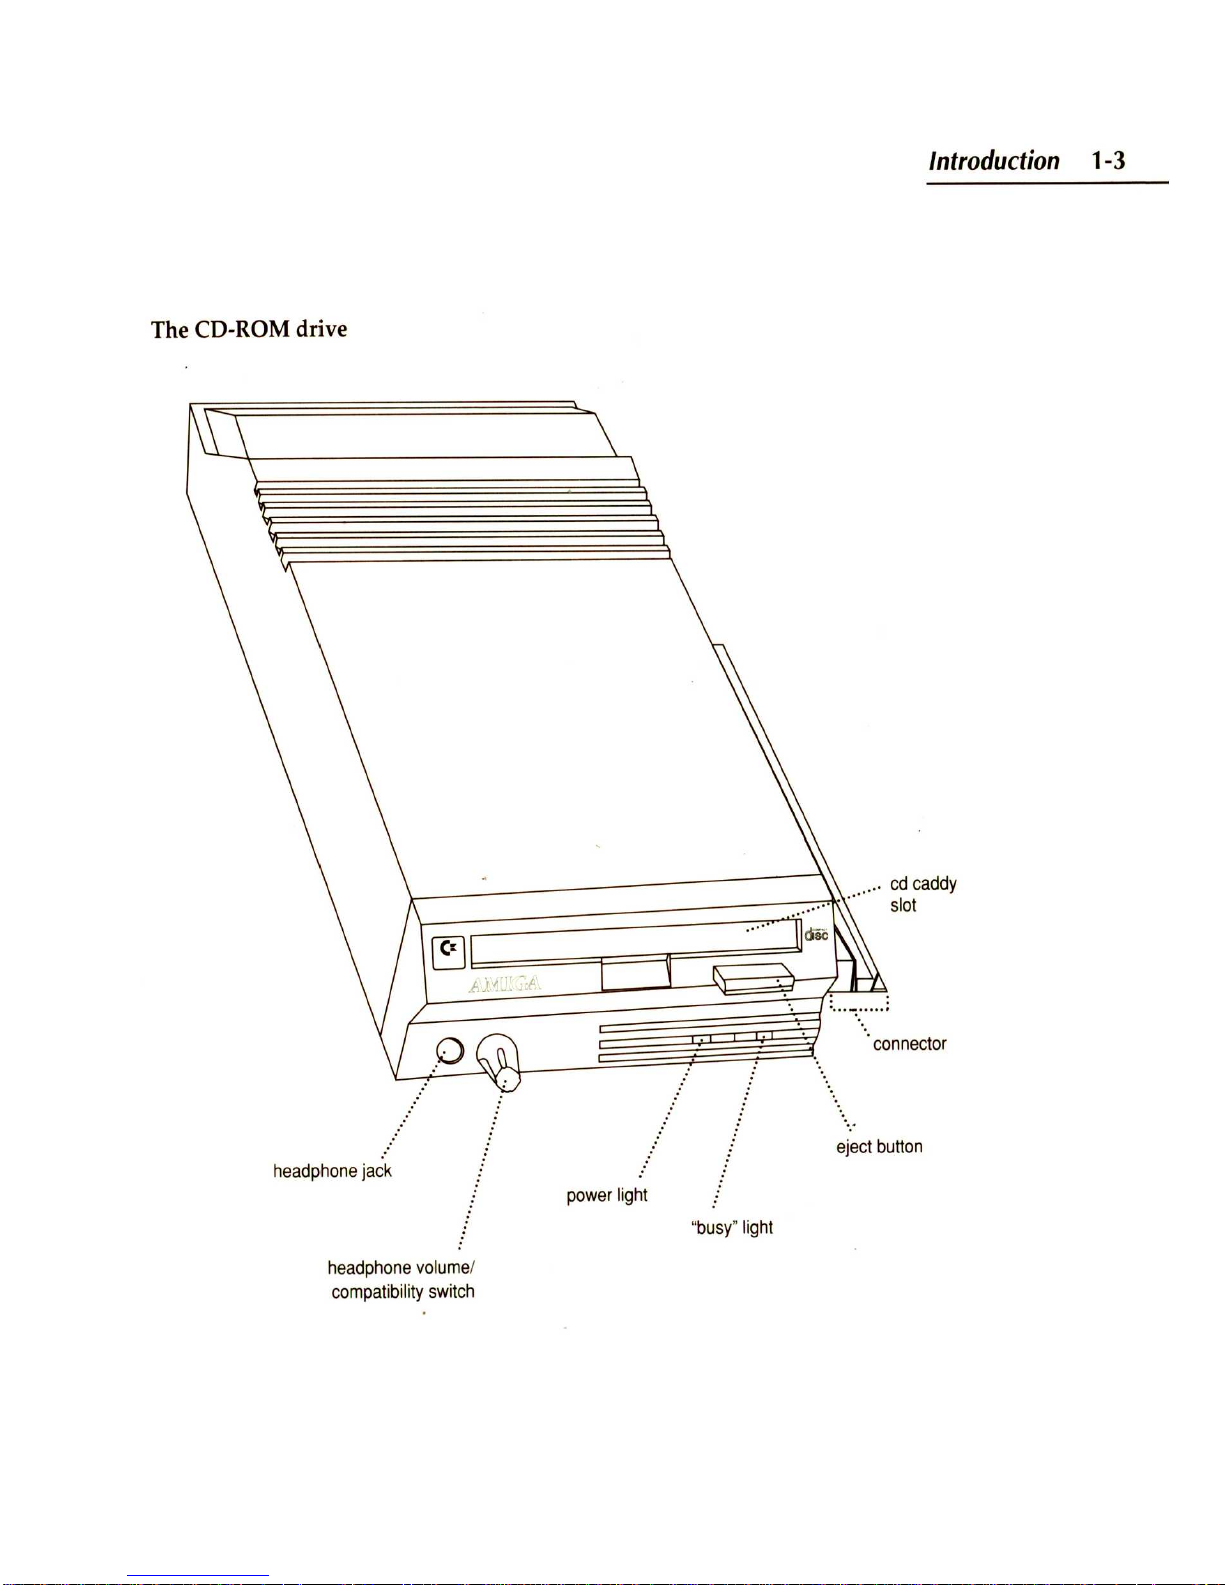
Introduction 1-3
The CD-
ROM driv
e
.....
cd
caddy
\-:=:-;::===========;;::4
::~· ·
slot
headphone
jack
headphone
volume
/
compatibility
switch
power
light
eject button
"
busy" ligh
t
Page 12

Page 13
Chapter
2
Installation
In
sta
llation
2
-1
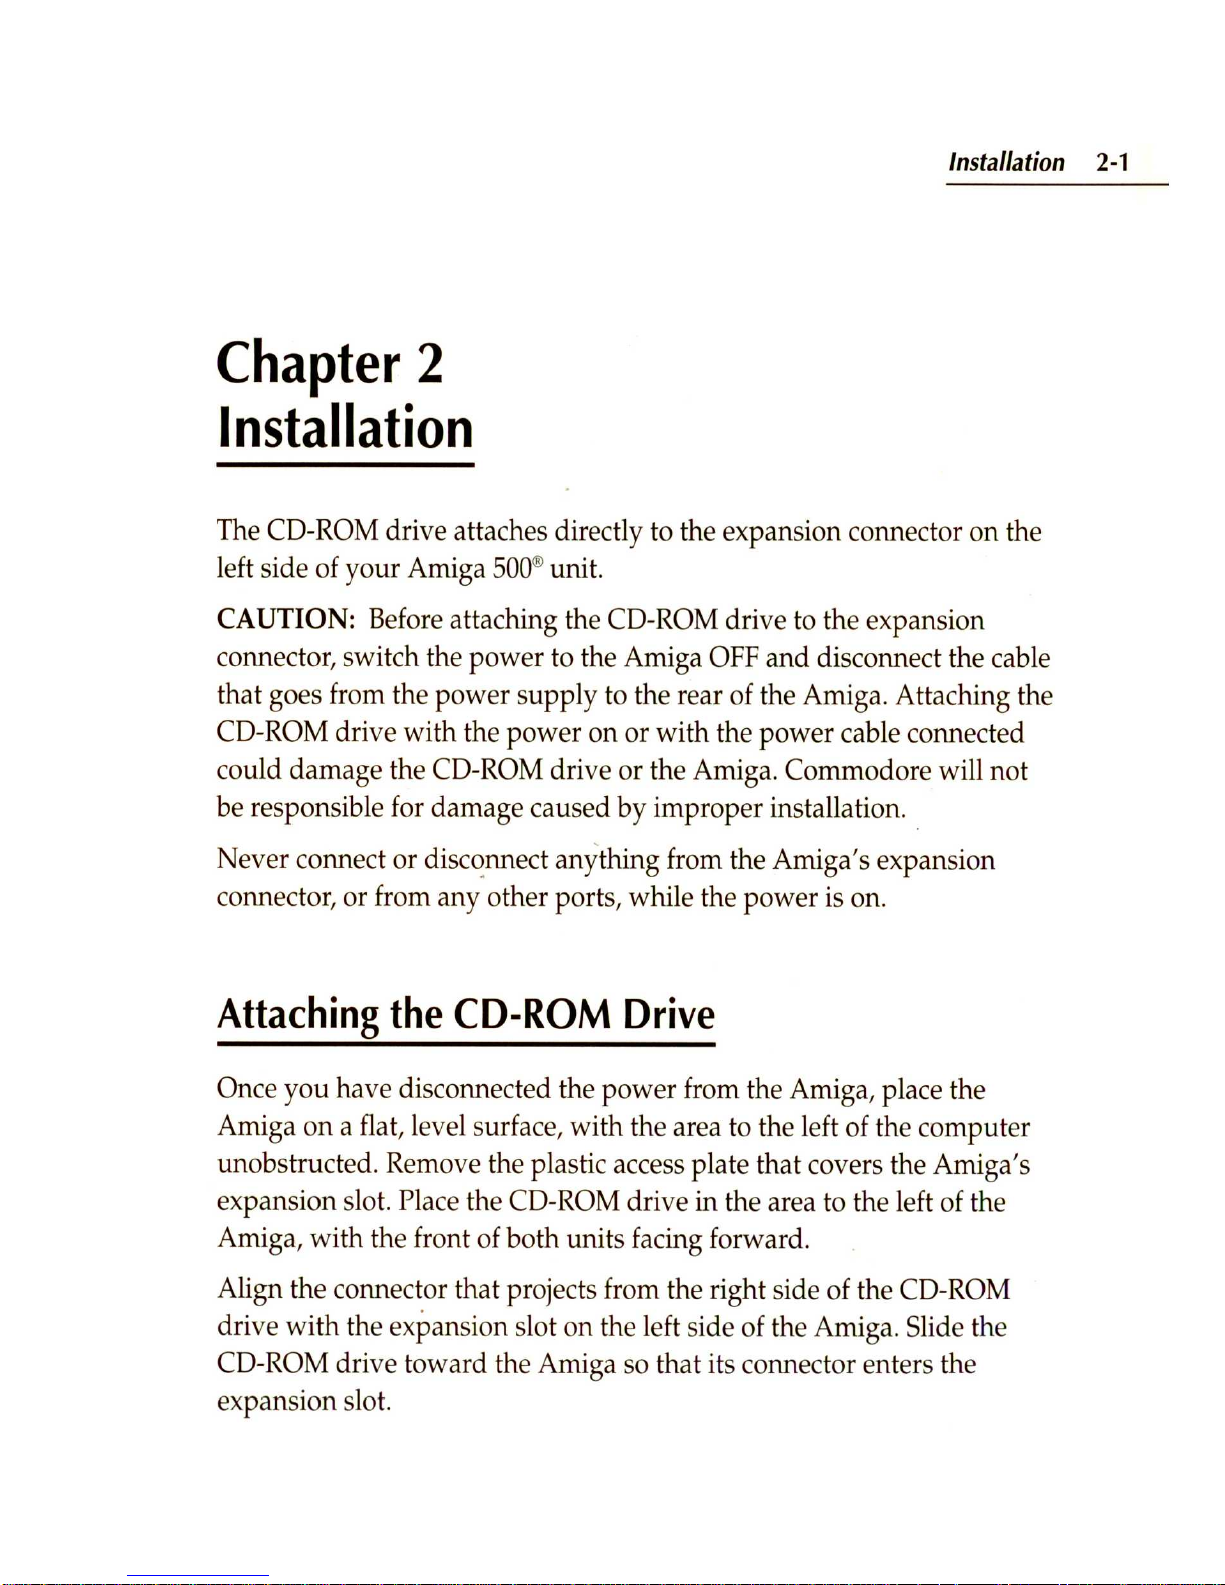
The CD-ROM dri ve attaches directly
to
the expansion connector on the
left side of your Amiga
500
® unit.
CAUTION:
Before attaching the CD-ROM drive
to
the expansion
connector, switch the power to the Amiga
OFF
and disconnect the cable
that goes from the power
supp
ly
to
the rear of the Amiga. Attaching the
CD-ROM drive with the power on or with the power cable connected
could damage the CD-ROM drive or the Amiga. Commodore will not
be responsible for damage caused by improper installation . .
Never connect or
di
sc~nnec
t
anything from the Amiga's expansion
connector, or from any other ports, while the power is on .
Attaching
the
CD-ROM
Drive
Once you ha ve disconnected the power from the Amiga, place the
Amiga on a flat, level surface, with the area to the left of the computer
unobstructed. Remove the plastic access plate that covers the Amiga's
expansion slot. Place the CD-ROM drive
in the area to the left of the
Amiga, with the front of both units facing forward.
Align the connector that projects from the right side of the CD-ROM
drive with the expansion slot on the left
si
de of the Amiga. Slide the
CD-ROM drive toward the Amiga so that its connector enters the
expansion slot.
Page 14
2-2
Installation
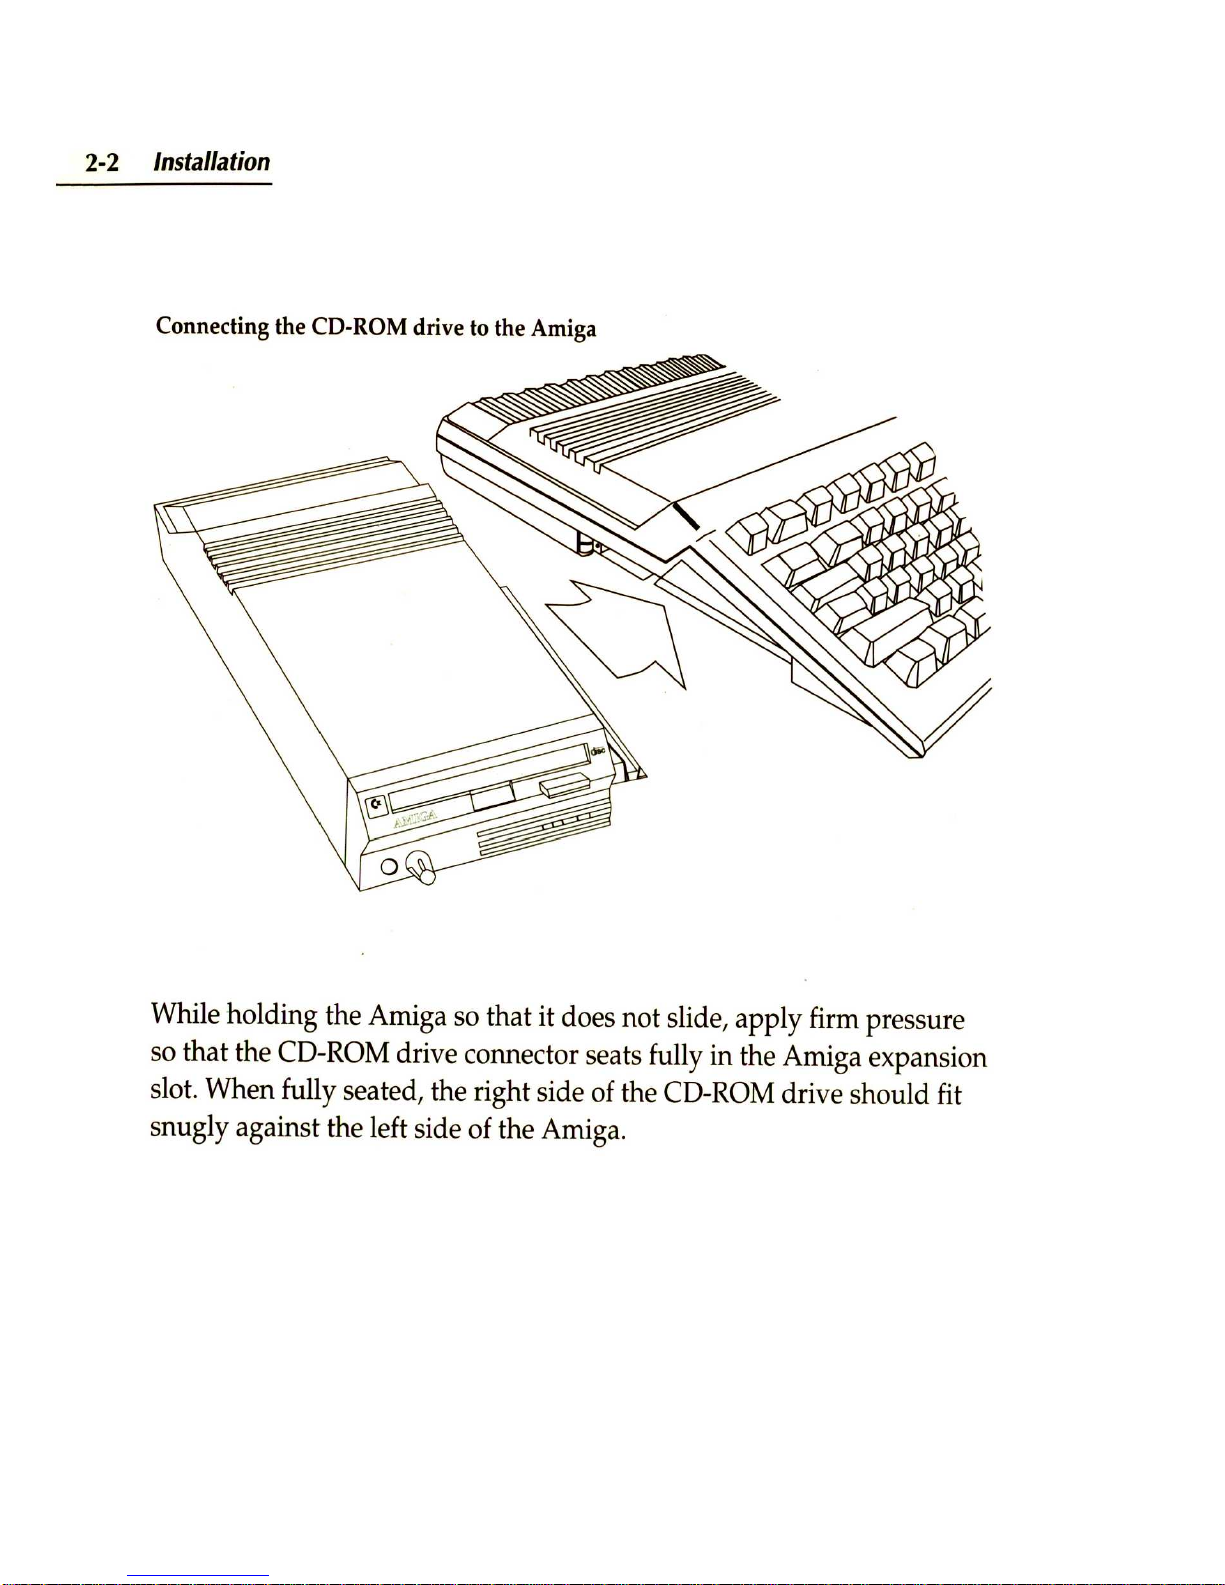
Connecting the CD-ROM drive to the Amiga
While holding the Amiga so that it does not slide, apply firm pressure
so that the CD-ROM drive connector seats fully in the Amiga expansion
slot. When fully seated, the right side of the CD-ROM drive should fit
snugly against the left side of the Amiga.
Page 15
In
stallat
ion
2-3
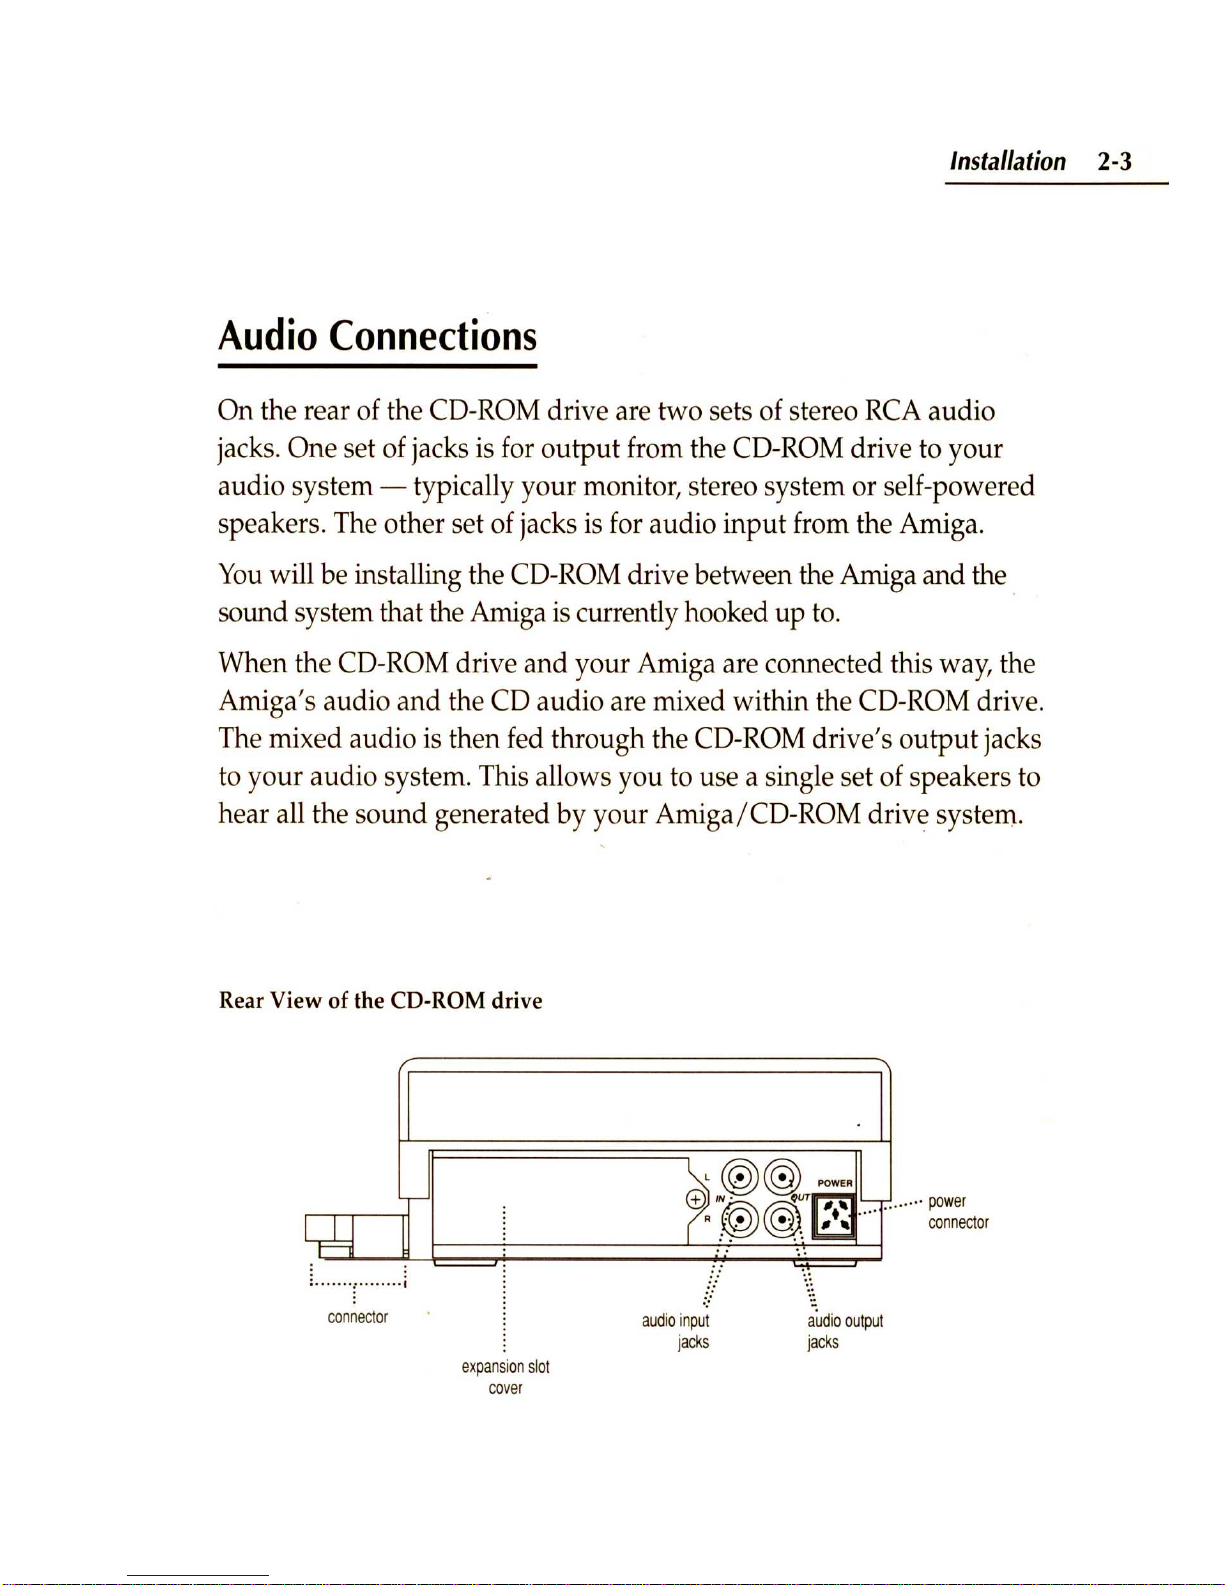
Audio
Connections
On the rear of the CD-
ROM
drive are two sets of stereo
RCA
audio
jacks. One set of jacks is for
output
from the CD-ROM drive to your
audio system - typically your monitor, stereo system or self-powered
speakers. The other set of jacks is for audio
input
from the Amiga.
You
will be installing the CD-
ROM
drive between the Amiga and the
sound system that the Amiga
is
currently hooked up t
o.
When the CD-
ROM
drive and your Amiga are connected this way, the
Amiga's audio and the CD audio are mixed within the CD-ROM drive.
The mixed audio is then fed through the CD-ROM drive's
output
jacks
to your audio system. This allows you
to
use a single set of speakers
to
hear all the sound generated by your Amiga/ CO-ROM drive system.
Rear View of the CD-ROM drive
expansion
slot
cov
er
audio inp
ut
jacks
au
dio outp
ut
jacks
Page 16

2-4
Installation
Audio Interconnection Diagra
m
cable
to
audio
system
t
au
dio
out
•
aud
io
in
o
~O
0
:
, ~ '
!-.J
r - - (
mixe
r
I '
...
~,
I ........ I
o
o
r-
o
- ,
I
~
'yolume
L._
..
.J
,
,
out
to
headphone
s
CD-ROM
drive
Input
from the
Am
iga
aud
ioeable
I
Am
iga
aud
io
out
Amiga
The left-hand se t of RCA jacks on the back of the CD-ROM drive (when
viewed from the re
ar
) is for Amiga audio input. Sound
s generated by
the Amiga come into the CD-ROM unit through th ese jacks.
Use the cable included with the CD-ROM
dri
ve
to connect the two
units. Plug one e
nd
of the cable into the audio o
utput
jacks on the rear
of the Ami ga (you will proba
bl
y have to remove plugs you c
urr
ently
have in those jack
s)
. Plug the other e
nd
of the cabl
e into the audio input
jacks on the rear of the CD-
RO
M
dri
ve
(the left-hand
set of jacks when
viewed from the rear).
NOTE:
Do not connec
t other audio devi
ces
to the CD-ROM drive's
Page 17

Installation
2-5
audio
input
jacks. These jacks are designed to handle audio signals from
an Amiga only. Distorted sound or damage to the CD-ROM drive may
result from non-Amiga audio input to these jacks.
Output
from
the
CD-ROM
Drive
The right-hand set (when viewed from the rear) of RCA jacks on the
back of the CD-ROM drive is for audio output. Sound generated by
compact discs is sent out through these jacks to your audio system. [In
this manual, "compact disc" refers to the following: CDTV titles, CD+G,
CD+MIDI, standard audio CDs, and
ISO
9660
CD-ROM discs.]
Take the cables that you removed from the Amiga
a1,ldio
output
jacks
(these should connect on the other end to a monitor, stereo system or
something else that contains speakers)
and
plug
them
into the CD-
ROM
drive's
audio output jacks (right-hand set of jacks on the rear of
the CD-ROM drive). This completes the audio installation.
Other
Audio
Options
If
you wish to keep the CD audio separate from Amiga audio, simply
connect the CD-ROM drive's audio outputs to your stereo system or
other audio device, and leave the Amiga audio outputs the way they
were before you installed the CD-ROM drive.
Headphones
Headphones can be connected
to
the jack on the front of the CD-ROM
drive (see page
1-3).
The same audio that comes through the audio
output
jacks will come through your headphones.
Page 18

2·6
Installation
The volume knob next to the headphone jack controls only the volume
of the headphones - that is,
it
doesn't control the volume of the
audio coming out of your other speakers. Also, plugging headphones
into the headphone jack does not cut off the sound coming out of your
other speakers.
Note:
Do not turn the headphone volume control knob counterclockwise until it clicks. That will disable the CD-ROM unit and
probably cause the entire system to reboot.
See
the section in the next
chapter entitled "Compatibility Switch"
for
more information about
this function.
Power
Connection
Now that the CD-ROM drive has been attached to the Amiga and
the desired audio connections made, the power supplies can be
connected. With the power switch turned
OFF,
reconnect the Amiga
power supply to the back of the computer, and insert the plug into a
three-prong
AC
outlet.
Connect the proper end of the CD-ROM drive's power cable to the
receptacle on the rear of the unit (see the illustration on page
2-3)
and
then insert the
plug
into a three-prong
AC
outlet.
Power up the system by first switching the CD-ROM drive power
supply ON, then switching the Amiga power supply ON. (The CDROM
drive will not power up until the Amiga
is
also switched on.)
Your
Amiga/ CD-ROM system
is
now ready for use.
Page 19

Chapter
3
Basics
Basics 3-1
The CD-ROM drive uses a disc caddy to assure data integrity and
reliabilit
y,
and to protect the CD from dust
and
accidental damage to
its surface.
The Disc Caddy
squeeze
these
corners
to
open
" .
....
.
....
.....
.'
metal tab
....
IMPORTANT:
You
must use a disc caddy
to
insert a compact disc in
the CD-ROM drive. Never insert a di
sc
without a caddy into the CD-
ROM drive 's front slot. Without a caddy, a di
sc
will not play and
could be difficult to remove from the unit without causing damage.
Page 20

3-2
Basics
To
open the caddy, set it
down
with the clear cover facing you and the
metal tab to the right. Squeeze the left corners of the caddy with your
thumb and middle finger. While you are doing that, flip open the clear
cover with your other hand - there is a tab on the left edge of the cover.
Load the CO into the hinged
end
of the caddy first, then let it drop into
place. Handle CDs by the edges only.
Close the clear cover. Make sure both of the left corners lock - you
should hear
an
audible click.
To
unload a disc, open the clear cover, turn the caddy over, and let the
disc drop into your hand.
Extra disc caddies, for discs that you use often, are available from your
authorized Commodore dealer (part
# CD
1400)
.
Compatibility
Switch
Some Amiga software, particularly games, may not boot properly
when equipment such as the CD-ROM drive is attached
to
the Amiga
expansion slot.
If
this problem occurs, you can temporarily disable the
CD-ROM drive with the compatibility switch.
To
the system, the CO-
RaM
drive will appear
to
be disconnected
but
you
won't
have
to
go
to
the trouble of physically disconnecting
it.
The compatibility switch is built into the headphone volume knob.
Normally the knob should be turned somewhat clockwise - this will
allow COTV emulation, CD-ROM use, and an adjustable headphone
listening level. However, when the knob is turned fully counterclockwise until it clicks, the CD-ROM drive will be disabled and ren-
dered "invisible" to the system.
Page 21

Basics
3-3
CAUTION! Don't disable the CD-ROM drive while the system is
running. Disabling the CD-ROM drive while the system
is
on will force
an immediate reboot, interrupting any
CDIV
or Amiga software that is
running.
Ihe
safest method is
to
quit any software you are running,
turn off the Amiga (the CD-ROM drive will turn off automatically), then
disable the CD-ROM drive.
Inserting a disc into the CD-ROM drive will have no effect when the
unit is disabled. Expansion devices (RAM, network, hard disk) that are
installed in the CD-ROM drive will also be unavailable when the unit
is
disabled.
Once th e CD-ROM drive is disabled, software that has problems with
expanded systems should work properly.
If
you have booted the system with the CD-ROM drive disabled,
turning the headphone volume knob clockwise won't re-enable the unit.
You
need
to
turn the headphone volume knob on and reboot the Amiga
before the CD-ROM drive will work again.
Amiga/CDTV
Modes
Your Amiga/ CD-ROM system has two basic modes of.operation:
Amiga mode and
CDIV
mode.
In general, when you use the system
in Am(ga mode, you use it the
same as you did before you attached the CD-ROM drive.
Ihe
only
difference is that now you have a CD-ROM drive attached.
In
Amiga
mode, th e CD-ROM drive
ac
ts like a high-capacity, read-only floppy
drive. See Chapter 5 for details about using the system in Amiga mode.
When you use the system in
CDIV
mode, it acts just like a standalone
CDIV
Player. Since the hardware isn't the same as a
CDIV
Player-
Page 22

3-4 Basi
cs
the lack of an infrared remote controller and front panel control are the
most notable differences - you need
to
control things a little differently.
These techniques are covered in the next chapter.
Choosing the
Mode
You
choose whether to run your system in Amiga or COTV mode when
you boot the computer.
You
change modes by rebooting.
Previously,
if
you powered
up
your Amiga
but
didn't
provide
something for it
to
boot with (e.g., a bootable hard disk, a Workbench
floppy, etc.), the image of a hand holding a Workbench floppy would
appear
on the screen.
Now
that
you
have connected the CD-ROM
drive, that image will be replaced by the animated COTV prompt
screen: a laser
beam
reflecting off a compact disc
and
illuminating
the COTV logo.
When the COTV prompt screen appears, you can either boot the system
into COTV mode or Amiga mode. Chapters 4 and 5 cover this in more
detail,
but
the basic ways
to
enter into COTV or Amiga (CD-ROM)
modes are:
•
To
get into COTV mode, insert a bootable disc (in a disc caddy - see
warning above) into the CD-ROM drive.
•
To
get into Amiga mode, insert a bootable floppy disk in the
Amiga's disk drive or have a bootable hard drive attached when
you turn on the system.
If
you enter Amiga mode, you will be able to access da ta from compact
discs you insert into the CD-ROM drive, but to emulate a COTV Player
you will need to reboot into
CDIV
mode.
Another possibility: you
won't
see the
COTV
prompt screen at all if you
Page 23

Basics
3-5
have an autobooting hard drive attached
to
your CD-ROM drive.
If
you
do, your system will always boot into Amiga mode using the data from
the hard drive.
To
use COTY mode with such a system, either:
• insert a bootable compact disc;
• set the hard drive
to
non-bootable and then reboot; or
•
turn
off the system, disconnect the hard drive
and
boot.
Boot
Priorities
If
you have more than one bootable device connected
at
power-up, the
system will attempt
to
boot from the devices in this order:
1 - floppy disk in
OFO:
2 -COTY application disc
3 -SCSI device attached
to
the CD-ROM drive (e.g., an autobooting
hard drive)
4 - CD audio disc
For example,
if
both a bootable floppy disk and a
CDTV
disc are inserted
in their respective drives at power-up, the Amiga/ CD-ROM system will
boot into Amiga mode using the floppy disk.
If
more than one bootable
SCSI
device (e.g
.,
two hard drives and a
removable hard drive) are attached
to
the system, you'll need to use
HDToolbox or another hard drive setup tool
to
set their priorities; or the
priorities can be sp.ecified in the devices' MountList entries. For more
information, see the manual that came with your
SCSI
device .
Page 24

3-6
Basics
Screen
Saver
If
a sti
ll
image
is
left displayed on a computer monitor
for
an extended
period of tim
e,
it can permanently "burn-in" a ghost of the image on
the screen.
ro
prevent that, the CD-ROM drive activates the
corv
screen saver.
If
your system
is
powered up
but
not booted by either a compact disc, a
Workbench floppy, or a
SCSI
device, the
corv
screen saver will appear
on the monitor after a pre-set period of time. This bouncing, rotating
corv
logo will protect your screen from "burn-in."
Inserting a compact disc or floppy disk, or touching th e mouse or any
key,
exits th e screen saver.
You
can set the amount of time that passes before the screen saver
takes effect through the
corv
Preferences program.
See
the next
chapter for details.
Page 25

Chapter
4
CDTV
Mode
CD
rv
Mo
de 4-1
The Amiga/CD-ROM system in
CDTV
mode will run CDTV applications
just as they should run on a standard CDTV Player. There are, however,
some differences between the hardware of your Amiga/ CD-ROM
system
and
a standard CDTV Player.
The Amiga/ CDTV does not include the following items found on the
CDTV Player:
• infrared remote control
• dedicated audio CD control buttons (Play,
FF,
etc.)
• fluorescent display
• Personal Memory Card slot
•
RF
or composite video
output
to
TV
or
VCR
• MIDI ports
Functional equivalents
to
most of these items are already a part of the
Amiga to which the CD-ROM drive is attached. For instance, the Amiga
keyboard and mouse can be used by CDTV applications in/place of the
CDTV
remote control and CD audio control buttons.
Other items are either redundant, or are easily
added
to your system .
See
Chap
ter 6 of this
manua
l for information about expansion options.
Page 26

4·2
CDrV
Mode
Loading a Compact
Disc
To
start a CDTV application or to play an audio CD, first make sure
the CD-ROM drive's compatibility switch is not in the Disable position.
Place the disc in
an
empty disc caddy, and insert the caddy into the CO-
RaM
drive's front slot until the caddy drops into place.
•
If
the disc is a CDTV application, the black-and-white "CDTV
Interactive Multimedia" screen will appear while the application
loads into memory, then the application's
own
intro screen will
appear. After that, you should follow the instructions given with
the application.
•
If
the disc is an audio CD (standard, CD+G, or CD+MIDI), the CD
Audio Control screen will automatically appear. This screen is
described in a later section entitled "The CD Audio Control Screen."
•
If
the disc is a non-CDTV CD-ROM, the CDTV logo will turn to
shades of red to indicate that the disc doesn't include the data
needed to boot the system. These CD-ROM discs (if they are in the
ISO
9660
format) are accessible through the Workbench and Shell
when the Amiga/CD-ROM system is in Amiga mode . See the next
chapter for more information .
You
can eject the disc caddy from the CD-ROM drive at any time
without damaging the caddy or disc by pressing the eject button on the
front of the unit.
It
is advisable (though not absolutely necessary) to first
stop and exit whatever operation is currently being performed before
ejecting the caddy.
In most cases, ejecting the disc will reboot the system.
Page 27

CDr
v
Mode
4-3
Emulating
the
Remote
Controller
The standard CD
TV
Player includes
an
infrared remote controller which
is
used for almost all interaction with the CD
TY.
The CD-ROM drive
does not come with this remote· controller
becaus~
the keyboard and
mouse you already have with your Amiga can serve the same purpose.
CDTV Remote Controll
er
( ! Commodore"
CDrv
REMO
TE
CONTROLLER
dose
,
0
,
Ese""
GENLOCK
'MV
""""
""""""
0i@
0 0 0 0 0 0
II:]
A B
. .
,
REW
PLAViPAUSE.
ff
'''''
0 0
0 0 0 D
L:::J
0
~
,
0
.
ENTER
"OP
0 0 0
~
~
----:
-
.....
In many cases, it will be fairly obvious how to use the mouse and
keyboard instead of the CDTV remote,
bu
t there are some operations
that need explanation. The chart on the next page shows how Amiga
keyboard and mouse
ac
tions corresPond to the
CDTV
player'S remote
controller
bu
ttons.
Page 28

4-4
CDrV
Mode
(DTV
Remote Emulation
CDTVRemote Amiga Keyboard Amiga Mouse/Joystick
cursor
buttons
curs
or
keys
mouse
or
joystick
movement
0-9
keypad
number
keys
ES
CAPE
Esc
or
Help
ENTER
Return
or
keypad
Enter
"A"
button
Left
Alt + Left
Amiga
l
eft
mouse
button
,
joystick
fire
button
"B"
button
Right
All + Right
Amiga
right
mouse
button
STOP
F1
REW
F2
P
LAY/PAUSE
F3
FF
F4
PAUSE
F5
Note that in some
CDIV
applications, the mouse may not do what you
expect. The way the A/ B buttons and
th
e cursor buttons on the remote
are defined by CDIV applications
is
somewhat different from the way
the mouse and its buttons are used by the Amiga.
Experiment with the mouse and / or consult yo
ur
CDIV
application's
manual, help text, or tutorial
to
determine the prop er method. In some
cases,
it
may be easier to use the keyboard equivalents only.
Page 29

CDr
v
Mod
e 4
-5
Other
Remote
Controller
Buttons
Some of the buttons on the CDTV remote do not have mouse or
keyboard equivalents. Their functions are either not applicable to the
Amiga/CD
-ROM, or are accessible in some non-keyboard manner.
GENLOCK
The GENLOCK button on the CDTV remote is for mode
selection of a video genlock
de
vice that can be installed in the CDTV
Player.
If
you have an external genlock attached
to
your Amiga, the
genlock's own hardware should provide this function.
CD/TV
The CD /
TV
button determines whether the television/
monitor screen is displaying
input
from the
CDIY
Player or from a
broadcast or cable
TV
source.
If
your Amiga is hooked
up
to
a
television, the
RF
modulator you already have connecting the two
should provide this function.
JOY/MOUSE
The
JOY
/ MOUSE button determines whether the
remote's cursor buttons respond as a joystick or as a mouse. This
is
not
necessary with an Amiga/CD-ROM system since you will actually
be using a joystick or a mouse - not emulating one. Just connect
whichever
input
device your CDTV application requests (joystick or
mouse) to the Amiga mouse port.
headph
one volum
e The headphone volume control for the CD-ROM
drive is found on the front of the unit. Not
e:
Don't turn this knob all the
way to left (you would
feel
it click) or you will disable the CD-ROM
drive
and
reboot the system.
POWER
The POWER button on the remote controller switches the
CDTV Player on and
off.
To
turn off your Amiga/ CD-ROM system,
simply switch off the
A500
power supply - power
to
the CD-ROM
drive will be shut off at the same time (they are interconnected).
Page 30

4-6
CDrV
Mode
Preferences
Control
Screen
The software built into the CD-ROM drive includes a Preferences
program. This allows you to set certain aspects of the CDTV-mode
operation. These are:
• time and date
• screen centering
• screen saver delay time
• button beep (on/
off)
• screen mode (interlace/ non-interlace)
• native language
You
can get to the CDTV Preferences
program
when
either the
CDTV logo or the screen saver screen are displayed.
To
call
up
the
CDTV Preferences screen:
a)
click the right mouse button once, or
b) press Return, or
c)
press Right Alt + Right Amiga.
Whatever image is on the screen will disappear, and in a few seconds
the Preferences screen will appear.
Page 31

CD
rv
Mode 4-7
CDTV Preferences Control Screen
l
'''
~mel
~----
Ea~h
option is shown in a large tile-like icon. The currently active option
is indicated by an animated highlight. Move through the different
options using the cursor keys or the mouse.
When a tile is highlighted , you can select or modify that option.
When
you
are done with all the options, pres s Return on the Amiga
keyboard or the Enter key on the key
pad
to save the setting
s.
Then
click the right mouse button or press Right Alt
+ Right Amiga to exit
the COTV Preferences screen and return to the intro screen . The settings
you
made
will be
put
into effect for that session and used in future
sessions even if you turn your system
off.
Each option is described below.
It
begins with the set of icons in the
upper left and proceeds clockwise around the screen.
Page 32

4-8
CDrV
Mode
Setting
Time
and
Date
The CDTV software picks
up
the current time and date from the
Amiga's system software.
To
change this setting, select the hours, minutes, mode
(AM/PM
or
24
hour), month, day, or year tile, then enter the new value with the
keyboard number keys.
Adjusting
Screen
Centering
When this icon is highlighted, click the left mouse button or press
Return
if
you
want
to change the position of your screen image (the
diamond
shaped
indicator on the screen
grid
will
turn
red). Then
use the cursor keys or mouse to move the indicator and change the
screen centering.
This setting only affects screens related
to
the CD-ROM drive or
CDTVapplications.
Setting
Screen
Saver
Delay
Time
This lets you set the length of time the
CDTV
logo screen will sit idle
before the screen saver takes over.
Click the left mouse button or press Return to cycle the screen saver
delay time through its five possible values: 1,5, 10,30, and infinity
(screen saver disabled) . Values represent minutes of idle time. The
value in yellow is the chosen value.
Page 33

CDrv
Mode
4-9
Setting
Native
Language
Because
CDIV
is an international product, some
CDIV
applications are
designed
to
be used by readers of many different languages. Use the
cursor keys to scroll through the various language choices. Press Return
or click the left mouse button to select the language.
Ihis
setting only
affects
CDIV
applications that have a language option for their displays.
Setting
Screen
Mode
Click the left mouse button or press Return to switch from non-
interlaced
to
interlaced screen mode.
Ihis
setting affects
CDIV
applications only.
Setting
Button
Beep
.
As
an
audio cue to let you know that a response has registered, the
CDIV
software can produce a beep whenever you press a
key.
Click the
left mouse button or press Return to toggle this option on or off.
CD
Audio
Control
Screen
Audio compact discs have a different format than
CDIV
application
discs. When you insert an audio compact disc in the CD-ROM drive, the
built-in
CDIV
software recognizes it as an audio disc.
First, the CD Audio Control screen appears.
You'll
notice that it is
similar in appearance and operation to the
CDIV
Preferences screen .
You'll also notice that it offers the same
CD
play options found on full-
Page 34

4-10
CDrV
Mode
CD Audio Control Screen
function audio CD players, including track programming, track scan,
and shuffle play.
If
you want
to
activate an option, use the cursor keys or the mouse
to
move the animated highlight
to
the desired tile. The symbols on the
tile will be highlighted in yellow when the icon has been selected.
When the option you want
is
highlighted, click the left mouse button
or press Return.
Some of the options can also be
activated with the function keys
("F" keys) on the Amiga keyboard. These are indicated in th e following chart:
Page 35

Keyboard
Shortcuts
for
CD
Audio
Control Screen
Fl
Stop
F2
Last
trackiREW
F3
Play/Pause
F4
Next
trackiFF
F5
Pause
Track
Display
F6
Time
display
mode
F7
Shuffle
play
F8
Program/Clear
F9
Intro
scan
flO
Loop
CDTV Mode
4-11
The large animated numeric display in the upper left shows the current
track number.
Track
Grid
To
the right of the track display is the track grid. This shows the
numbers of the tracks and the order in which they will.be played.
On
the sample screen shown on page
4-10,
the
12
tracks will be played in
numerical order.
If
a disc has more than
20
tracks, the track numbers above
20
will not be
displayed at first (there are only
20
spaces on the grid). These tracks will
scroll into view when you move down to the bottom of the grid.
If
you want to re-arrange the order of the tracks, you can easily tell the
CD-ROM drive exactly which tracks you want
to
hear.
You
can either
use the cursor keys or the mouse
to
select or de-select individual tracks
Page 36

4-12
CDrV
Mode
on the grid while they are highlighted, or you can select a block on
the grid and enter a track number using the number keys on the
keyboard. (Numbers larger than the number of tracks on the disk will
not be accepted.)
If
you
don't
have a preferred order in mind, you can let the CD-ROM
drive re-arrange the order of tracks at random.
See
the Shuffle Play
section for this option .
Shuffle
Play
The center icon below the track grid is the Shuffle Play option. The
Shuffle Play option tells the CD-ROM drive
to
play the tracks in random
order for listening variety. When you select this button, a new track
order is generated and then displayed on the track grid above
it.
Selecting this button a second time will
put
the tracks back in numerical
sequence. Selecting it a third time will generate a new "shuffle':
Keyboard equivalent:
F7.
Program/Clear
The icon to the right of Shuffle Play is the Program/ Clear button.
Select this icon once
to
turn off all the tracks displayed on the grid.
Selecting this icon a second time will clear the grid . Selecting it a third
time will reset the tracks in numerical order (i.e., not shuffled).
Keyboard equivalent:
F8.
Transport
Controls
The rectangle in the bottom left corner contains five icons that should
Page 37

CDrv
Mode
4-13
look familiar. These are known as transport controls
and
function in
much the same way as the controls on a standard audio CD player.
Stop
The
first
button
on
the left is
used
to stop play. This resets
the
play
sequence to the first track listed in the Track Grid (normally
Track
1)
. Keyboard equivalent:·FL
last
track/REW
If
you briefly select this button the play will skip
backward one track in the sequence displayed in the Track Grid .
If
you
select
and
hold this button, the current track will rewind while the song
is playing (the track number will not change). Keyboard equivalent:
F2
.
Play/Pause
Select this button to
playa
CD, starting with the current
track
and
proceeding in the order shown in the Track Grid. Selecting
this button while the CD is playing will pause the current track.
Reselecting this button, or selecting the Pause button, will resume
play. Keyboard equivalent:
F3
.
Next
track/FF
Briefly select this button to skip forward one track in the
sequence displayed in the Track Grid. The number in the Track Display
will change appropriately. Select and hold this button to fast-forward
through a track while the song is playing (the track number will not
change). Keyboard equivalent:
F4
.
Pause
Select this button to pause the current track. Keyboard
equivalent:
FS
. Selecting the Pause button a second time, or selecting
the Play button, will resume play.
Intro
Scan
The button to the right of the transport controls
is
the Intro Scan button.
Select this button to hear the first ten seconds of the current track selec-
Page 38

4-14
CDrV
Mode
tions, in the order shown on the Track Grid. Keyboard equivalent:
F9.
To
cancel Intro Scan, select this button again or select Stop.
loop
To
the right of the Intro Scan button is the Loop button. Loop allows
you to automatically repeat any section of the CD. The loop can be any
length ranging from under a second
to
the entire
CD. Keyboard
equivalent:
FlO.
If
you select Loop before CD play has started, you toggle the CD-ROM
drive between loop play and normal play. In normal play, each track
is
played once and CD play ends at the conclusion of the last track. In loop
play (indicated by a highlighted loop arrow) the CD will automatically
start over when the last track ends.
You
can also use the Loop button
to
define a smaller loop . When you
select the Loop button while the CD is playing, you define the start
point of the loop. The button symbol will change to a double arrow
with the left-hand arrow highlighted,
but
the track will continue to
play normally.
Select the button again when you wish
to
define the end point. The
right-hand arrow on the button will then also become highlighted, and
play will jump back to the loop start point. The defined part of the track
will continue to play over and over as many times as you wish.
To
cancel the loop mode and allow play
to
continue beyond the
end
point, select the Loop button again. The arrow on the icon will return
to
a single, unhighlighted image.
Page 39

CDrv
Mode
4-15
Time
Display
The large numerical display below the Track Display is the Time
Display.
By
default, this displays the amount of time that the current
track has been playing.
It
can also display other information which can
be accessed through the Time Display Mode
button
(see next section).
Time
Display
Mode
To
the right of the Time Display is the Time Display Mode button.
This
button
will change the information presented in the Time
Display. Selecting the Time Display Mode button will cycle through
these options:
• time elapsed in the current track (default)
• time remaining in the current track
• time elapsed since the beginning of the CD
• time remaining in the entire CD.
The symbol on the button changes to indicate the current mode.
Keyboard equivalent:
F6.
\ .
\
CD+G/CD+MIDI
The button in the lower right corner is the CD+G / CD+MIDI button.
Select this button to access the graphics or MIDI data on a CD+G or
CD+MIDI disc.
Play will start automatically from the first track. When a CD+G track is
played, the screen displays the still image(s) or slow-scan graphics
stored on the disc, and the audio plays normally.
Page 40

4-16
CDrV
Mode
Some CD+G discs have more than one
graphics"
channel." Click the left
mouse button to select the desired graphics channel. The channel
number will appear in the lower right corner of the screen.
When a CD+MIDI channel is played, the MIDI data is passed to the
Amiga serial
port
and
the audio plays normally.
(You
must
have a
MIDI interface attached to the Amiga serial port to make use of the
MIDI output.)
Once you are at the CD+G and CD+MIDI screen, you must reboot the
system to return to the main CD Audio Control screen.
Page 41

Chapter
5
Amiga
Mode
Amiga
Mode
5-1
In addition
to
allowing you
to
play COTV applications, the CD-ROM
drive can function as a very high-capacity, read-only disk drive. Since
the CD-ROM drive's built-in software reads the industry-standard
ISO
9660
format, this opens up a wealth of opportunities.
Many types of textual, numerical, and graphical data are available in
this CD-ROM format. Because the format
is
standard, even discs
produced with other comp uter systems in mind are accessible
to
your
Amiga. The CD-ROM drive will not allow your Amiga to run programs
designed for other computers,
but
it will make it possible
to
read the
data files that form the bulk of CD-ROM storage.
It
is
also possible
to
play audio CDs while in Amiga mode by using th e
COPlay utility included with the CD-ROM drive. See the accompanying
disc documentation for further information.
CD-ROM
Access
To
access a CD-ROM, you must first boot the system into the standard
Amiga environment. Make sure a COTV application disc
is
not in the
CD-ROM drive, then reboot.
If
you have an autobooting hard drive attached
to
the CD-ROM
drive 's expansion port, and a bootable compact disc is not in the drive,
your system will automa tically boot into Amiga mode.
If
you don't
Page 42

5-2
Amiga
Mode
have an autobooting hard drive:
• insert a Workbench floppy in the Amiga's
DFO:
drive either before
you power
up
the system or when you see the CDTV prompt or
screen saver screens; or
• if you have a removable-media drive attached to the CD-ROM
drive's expansion port, insert a bootable cartridge in that drive.
If
you try to boot the system directly from a CD-ROM (non-CDTV)
disc, the CDTV logo will turn red. This is
to
tell you that the disc is not
bootable. The logo will return
to
the normal colors when you remove
the non-CDTV application disc from the CD-ROM drive.
No
te:
If the CD-ROM drive has been disabled with the compatibility
switch, turn off the Amiga, turn the compatibility switch on, and turn
the system back on.
Once you have booted into Amiga mode, the CD-ROM drive
is
recognized by the system as a standard disk device - just like your
floppy or hard drive - except that
it
is always read-only.
If
you attempt
to
write to a compact disc, the operation will be blocked and you'll see
the message: "Volume <name > is write-protected."
Workbench
Access
When you insert a CD-ROM or CDTV application disc while the system
is in Amiga mode, an icon for the disc will appear on the Workbench
screen. The Amiga will display the default floppy disk icon unless the
disc is a CDTV application or some other disc created especially for
Amiga use.
As
with any disk icon, you can double-click on it
to
open a
disk window.
Page 43

Amiga
Mode
5-3
If
you use Release 2 of Amiga Workbench, you will be able to see icons
for all the files
and
directories on disc by choosing the "Show All Files"
option from the Workbench Window menu. This makes it very easy to
view
and
copy files from non-CDTV discs - you can use the familiar
icon selection
and
dragging methods.
Any Workbench operation that does not involve an attempt to write to
the compact disc
(e
.g., copying files to other Amiga drives, viewing, or
executing files, etc.) should work as expected. Attempting to delete,
rename, or edit icons in the CD-ROM disc window, or to drag icons into
an y of the compact disc's windows, will fail with a requester stating that
the disc is write-protected .
If
you use earlier versions of Workbench, you cannot view icons for
files unless the files were written with the Amiga in mind.
You
will need
to use
the
Shell to manipulate these files that you will find
oli.
non-
Amiga-specific CD-ROM discs.
Shell
Access
The device name for the CD-ROM drive is
CDO
:. Use
CDO:
or the
volume name of the disc as the first
part
of a
path
to CD-ROM
files
when
working in the Shell
and
in file requesters ; for example ,
DIR
CDO
: p i
ctures
/Sat
urn.
If
y
ou
have another device with
CDO
:
as its device name, you
must
change it to avoid conflicts.
Any AmigaDOS commands that you usually use with disks - CD,
DIR, LIST, COPY; etc. - which
do
not
attempt
to write to the CD-
ROM
can
be used normall
y.
Commands that write to the disc -
DELETE, RENAME, PROTECT, etc. - will fail with a requester stating
that the disc is write protected.
Page 44

5-4
Amiga
Mode
File
Conversion
You
can transfer data from CD-ROM discs to your Amiga memory or
to
writable disks regardless of the format of the file. However, you may
not be able to use that data immediately.
Text files, normally stored
on
CD-ROM discs in the generic ASCII
format, should be viewable right away when loaded into an Amiga text
editor or word processor. Other types of files, however, may require some
sort of conversion before you can view or process them on the Amiga.
Graphic files, in particular, are commonly provided in a wide variety of
formats other than the Amiga's native
IFF
format. Images in
GIF,
TIFF,
or
EPS
formats, for example, may be found on CD-ROMs.
Some Amiga applications have built-in conversion modules
to
load
formats other
th
an
IFF.
If
the application you are using does not have
such a facility, you will have to use a conversion program to translate
the file into an accessible form. Several conversion programs are
available; contact your local Amiga dealer for recommendations .
CD-ROM data may also be stored in a compressed format.
To
use such
data, you
must
first decompress the file with a special program. Com-
pressed files are usually identified by
an
extension on the filename, such
as .arc, .zoo, or .lzh, that identifies which compression program was
used. The file
must
be decompressed with the proper type of program.
Compression / decompression programs are commonly available in the
public domain from many sources. Consult your local user group,
BBS,
Amiga dealer, or Amiga publication for sources .
Page 45

Chapter
6
Expansion
Options
Expans
ion
Option
s
6-1
The CD-ROM drive is expandable, which means you can increase its
capabilities by adding devices to it.
There are two general ways to
add
devIces
to
your CD-ROM drive:
•
an
internal memory module
• plug-in option cartridges for the rear expansion slot.
Instructions for installation and connection of expansion devices should
be included with the expansion units.
Memory
Module
A Commodore Memory Module
add
s 2 megabytes of fast
RAM
to your
Amiga/ CD-ROM system. Consult your local dealer for more
information about this dev
ice
.
Plug-in
Expansion
Units
An expansion slot on the rear of the CD-ROM dri ve allows you
to
tie
your system
to
other systems or
add
peripherals. Each of these optional
devices comes in tpe form of a cartridge that can be easily plugged into
the CD-ROM drive's rear expansion slot, so you don't have to open the
CD-ROM drive or Amiga main uni ts.
• Extremely compact
40-
and 80-megabyte hard drive units give y
our
Page 46

6·2
Expansion
Options
system the high-speed
read/write
storage capacity that can be
necessary to make full use of CD-ROM data sources. Each drive
has an built-in autobooting controller.
Contact your Commodore dealer for more information about these or
other expansion devices as they become available.
Page 47

Page 48

 Loading...