

Page 1

User's Manual
Commodore
Page 2

Copyright © 1988 by Commodore Electronics Limited.
All rights reserved
This manual contains copyrighted and proprietary Information. No
part of this publication may be reproduced, stored in a retrieval system or transmitted in any form or by any means, electronic, mechanical, photocopying, recording or otherwise, without the prior written
permission of Commodore Electronics Limited.
Amiga is a registered trademark of Commodore-Amiga, Inc.
Commodore is a registered trademark of Commodore Electronics
Limited.
The Commodore Logo is a registered trademark of Commodore
Electronics Limited.
PIN: 363 134-01
1 2 3 4 89
Page 3

Introduction to the
Commodore AMIGA 520
Memory and Clock Expansion Cartridge
Informationen über das A520
Introduction à l'Amiga 520
Module d'extension MEV et horologe temps réel
Itroduzione a Commodore Amiga 520
Cartuccia dei espansione memoria e clock
Introducción al Commodore Amiga 520
Módulo de ampliación de memoria y reloj
Inleiding tot de Commodore Amiga 520
RAM-Expansion
Installationsvejledning
Commodore Amiga 520 Cartridge
Udvidelsesmodul Hukommelse og ur
Innføring i Commodore Amiga 520
Ekspansjonsmodul med minne og klokke
OM A 520
A 520 Minnesexpansion
Page 4

English
Operating instructions Page 5-9
Deutsch
Bedienungsanleitung Seite 10-14
Français
Mode d'emploi Page 15-20
Italiano
Istruzioni per l'uso Pagina 21-25
Español
Moda de empleo Página 26-30
Nederlands
Gebruiksaanwijzing Pagina 31-36
Dansk
Betjeningsvejledning Side 37-41
Norsk
Bruksanvisning Side 42-46
Svenska
Bruksanvisning Side 47-51
Page 5

English 5
Introduction to the Amiga 520 Video Adapter
Contents
What is the Amiga 520 Video Adapter? 5
What comes with the A 520? 5
How does the A 520 connect to a video display? 6
How do l connect my TV set? 6
How do I connect my composite monitor? 7
If your have a problem 8
Trouble-shooting chart 8
What is the Amiga 520 video adapter?
The Commodore Amiga 520 Video Adapter is a device that allows
you to connect your Amiga 500 to a TV set or a composite video
monitor. It does this by converting the RGB video signal the Amiga
produces for RGB monitors to a composite video signal that a TV or
composite monitor can interpret.
What comes with A 520?
- Amiga 520 modulator
- TV connector cable
Page 6

6 English
- Y-cable
- Introduction to the Commodore Amiga 520
If any of these items are missing or damaged, contact your dealer.
How does the A 520 connect to a video display?
At the front and right side of the A 520
- Video OUT - connects with a color composite monitor.
- Audio IN - connects with Amiga's L and R Audio.
- RGB Connector - connects the A 520 to the Amiga.
At the back of the A 520
- Channel Selector Switch - Matches the TV channel on the TV set for
viewing computer display (L = 5,5 MHz, H = 6 MHz).
- RF OUT - (Radio Frequency Out) - connects with television.
How do I connect my TV set?
1. Make sure both the TV and the Amiga are off.
Warning: Before connecting any cables make sure the power to the
computer is OFF, to avoid damaging either unit.
2. Grasp the A 520 and line up its RGB connector with the RGB video
port on the back of the computer. The two should find together with
just a slight push. (If they do not, check that the pins in the A 500's
connector are straight, and that the A 520 is right side up. Now try
again.
Page 7

English 7
3. Plug one end of the TV connector cable into the VHF antenna terminal.
4. Plug the other end of the TV connector cable into the A 520's RF
OUT port.
5. Connect the main stem of the y-audio cable into the AUDIO IN port
of the side of the A 520.
6. Connect the other two ends of the y-audio cable in the L AUDIO
and R AUDIO on the back of the Amiga Computer.
7. Set the channel selector switch on the A 520 to L or H. (L = 5,5 MHz;
R = 6 MHz).
8. Set the channel on your TV set to the same channel.
How do I connect my composite monitor?
1. Make sure both the monitor and the Amiga are OFF.
2. Grasp the A 520 and line up its RGB connector with the RGB Video
port on the back of the Computer.
3. If your monitor has its own cable, connect this cable to the Video
OUT port on the A 520. Otherwise, connect one end of the TV connector Cable to the Video IN port on the monitor and the other end to
Video OUT on the A 520.
4. Connect the main stem of the y-audio cable into Audio on the
monitor.
5. Connect the other two ends of the y-audio cable to the L Audio and
R Audio on the back of the Amiga.
6. Turn the monitor and the Amiga ON. Your Amiga is now ready to use.
Page 8
8 English
If you have a problem...
If the screen display is not clear, try adjusting the controls on your
television set or monitor. You may not get a picture at all if your control
settings or connections are not correct. In such a case you should
check all your settings and connections. Often the TV may simply be
tuned to the wrong channel, or you may have the brightness turned
off.
The Troubleshooting Chart shown on the following page lists some
of the more common problems and tells how to correct them.
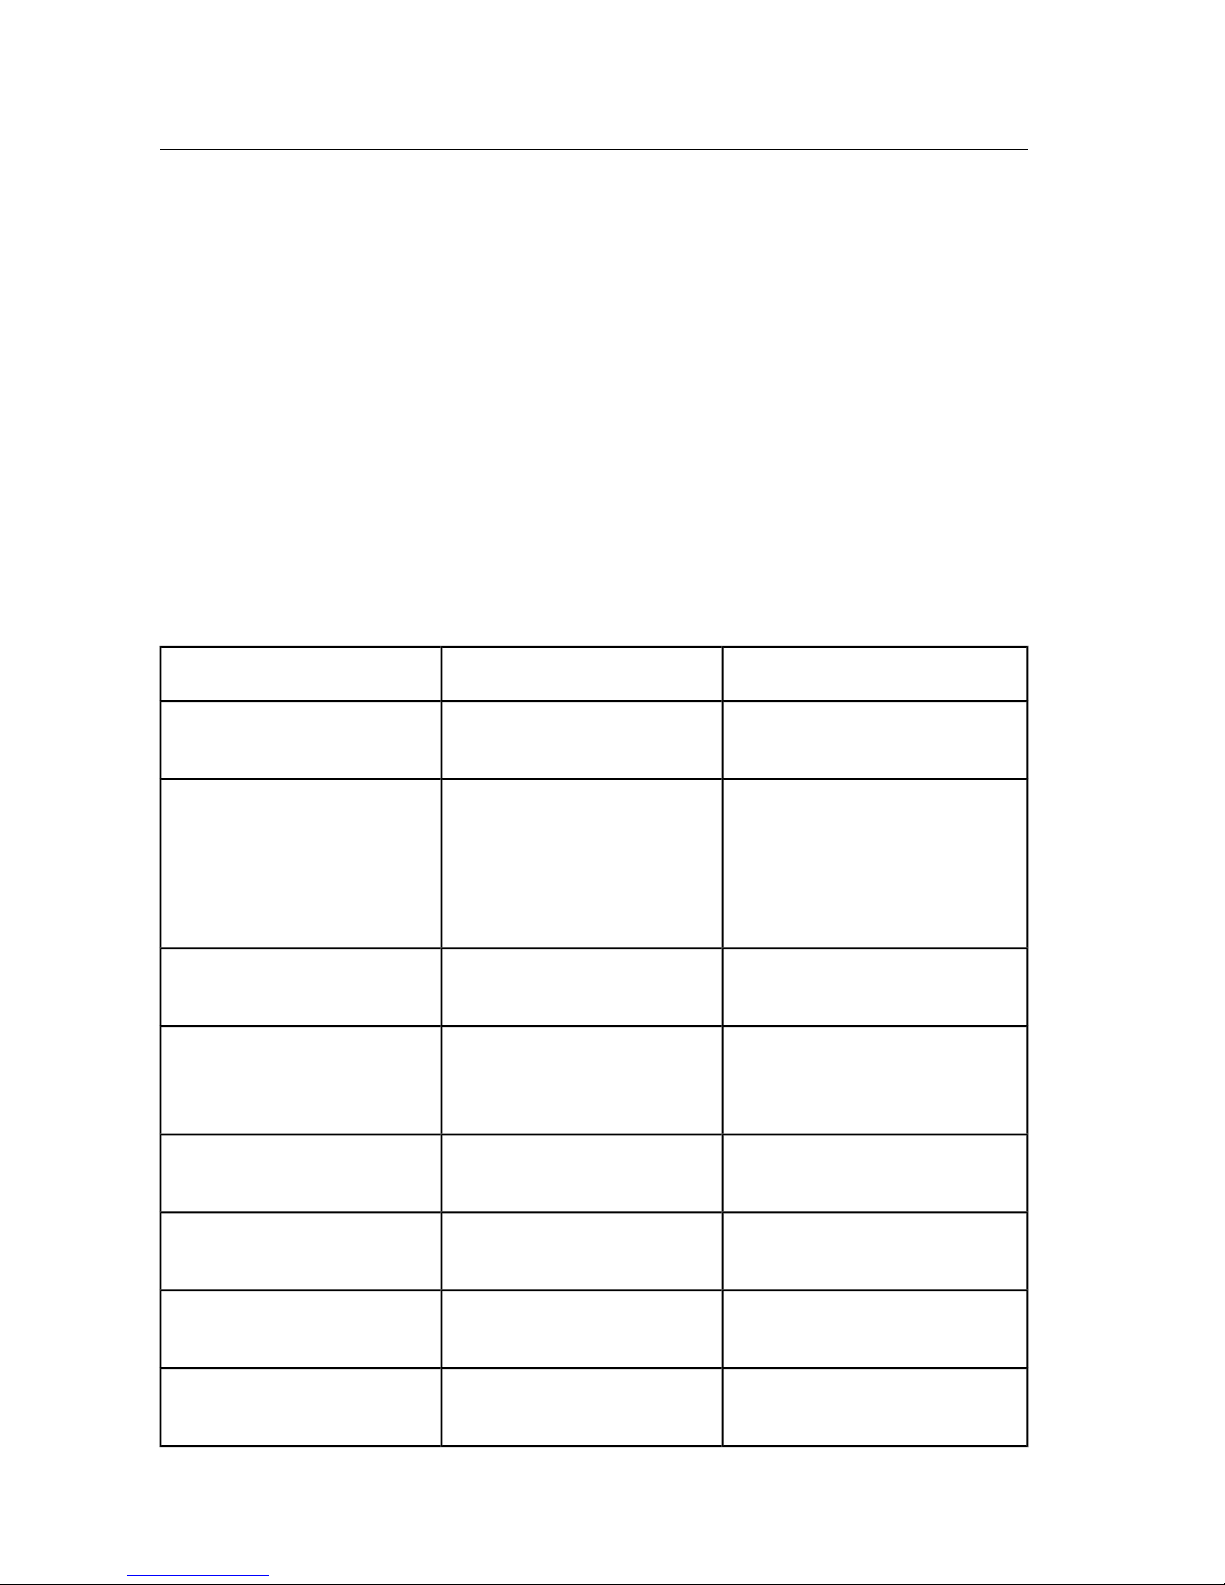
Trouble-Shooting Chart
Symptom Cause Remedy
Indicator light not 'ON' Computer not turned
ON
Make sure power switch
is in ON Position
Computer not plugged
into wall outlet
Check power socket for
loose or disconnected
power cable.
Check connection with
wall outlet.
No picture (Monitor) Monitor not connected Check monitor connec-
tions.
No picture (TV) Incorrect hookup Check computer hookup
to VHF antenna terminal;
See page 6/7 for details.
Cable to TV not
plugged in
Check output cable connection to TV.
Picture with poor or no
color
Poorly tuned color
controls
Adjust color controls on
TV or monitor
Sound with excess
background noise
Volume too high Adjust volume.
Picture OK, but no
sound
Volume too low Adjust volume.
Page 9
English 9
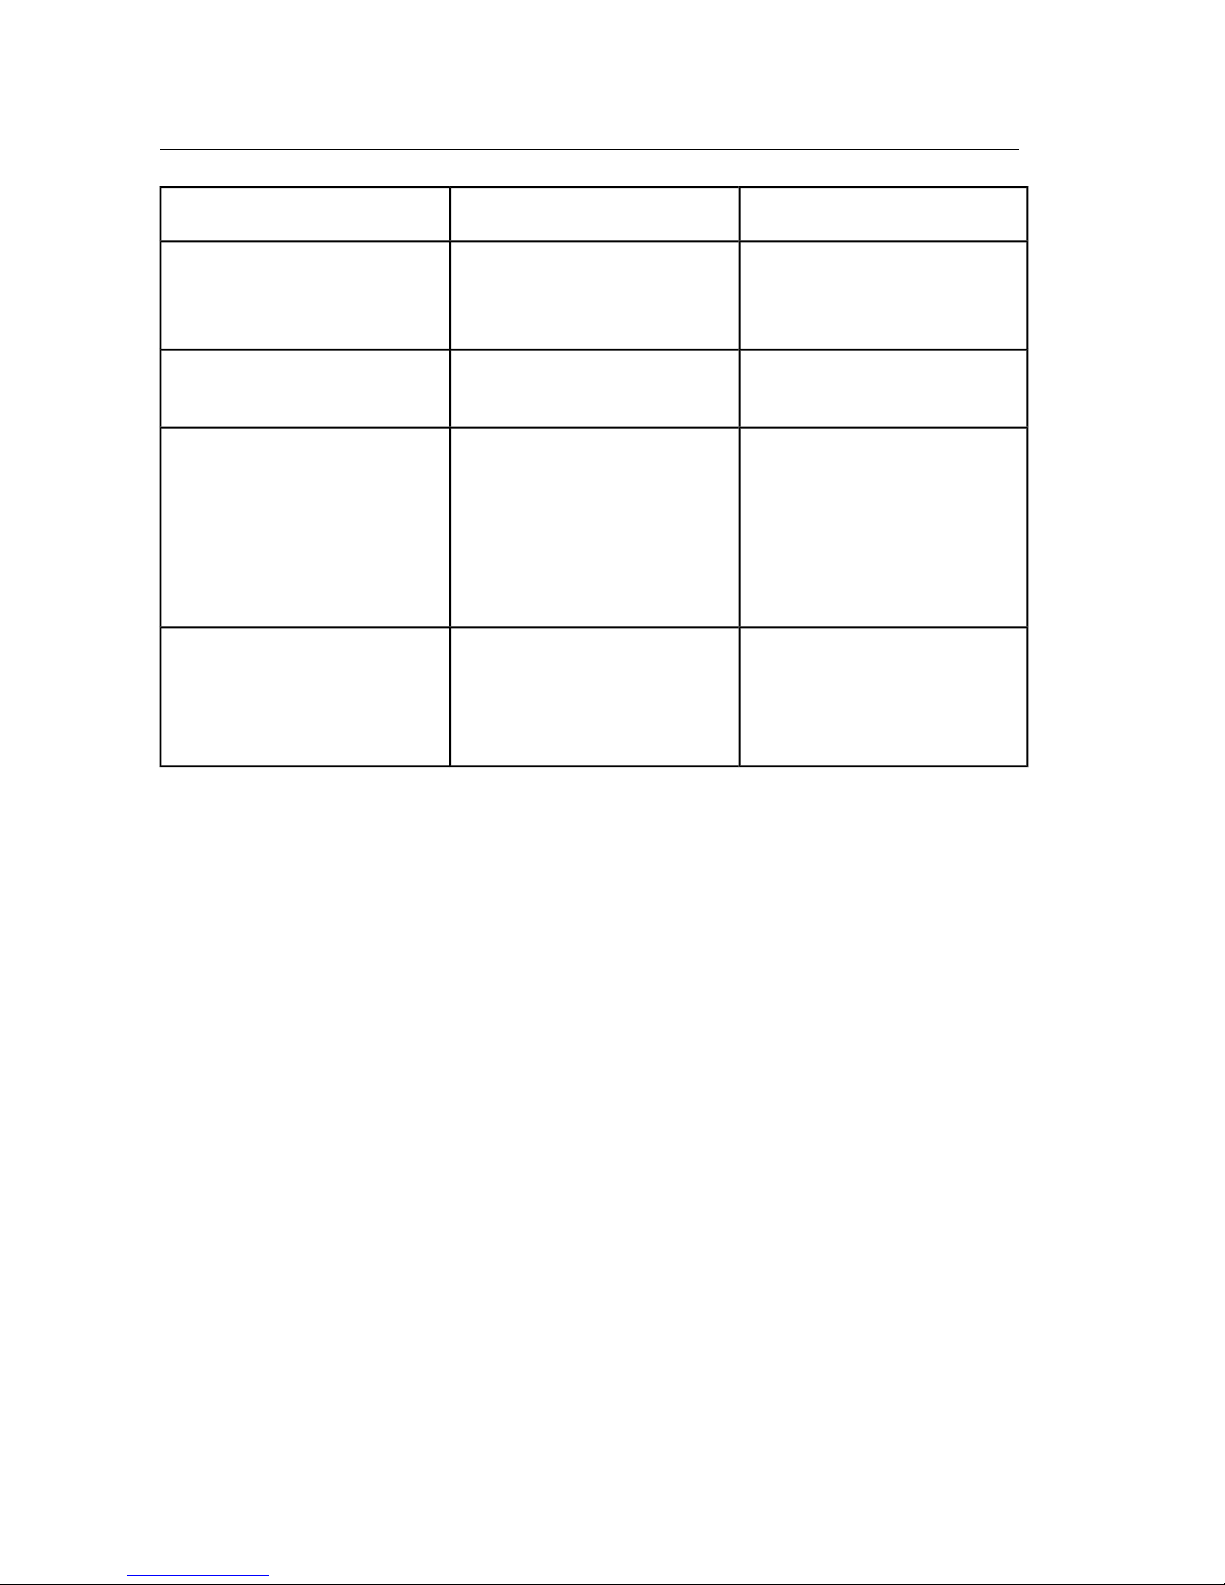
Symptom Cause Remedy
AUX input on external
amplifier not properly
connected
Connect sound jack to
AUX input on amplifier
and select AUX input.
Sound OK, but no
picture
See "No picture" listings above
See "No picture" listings above
Computer displays
garbled symbols
on the screen
Overheating Pull plug on powersup-
ply and allow computer
to cool down (make
sure air flow around
power supply is not
restricted.)
Severe interference Older Model TV Rotate TV set. Adjust
vert., horiz. and/or control knob to make interference less severe.
Page 10

10 Deutsch
Einführung Video-Adapter Amiga 520
Inhaltsverzeichnis
Was ist der Video-Adapter Amiga 520? 10
Was gehört alles zum A 520? 10
Anschlüsse des A 520 11
Wie wird das Fernsehgerät angeschlossen? 11
Wie wird der Video-Adapter angeschlossen? 12
Bei Störungen... 13
Leitfaden für die Störungsbeseitigung 13
Was ist der Video-Adapter Amiga 520?
Der Video-Adapter Commodore Amiga 520 ist eine Vorrichtung, mit
dem Sie Ihren Amiga 500 an ein Fernsehgerät oder einen VideoMonitor anschließen können. Zu diesem Zweck wandelt er das RGBVideosignal des Amiga für die RGB-Monitore in ein zusammengesetztes Videosignal um, das von einem Fernsehgerät oder einem
entsprechenden Videomonitor interpretiert werden kann.
Was gehört alles zum A 520?
- Amiga 520 Modulator
Page 11

Deutsch 11
- TV-Anschlußkabel
- Y-Kabel
- Handbuch
Sollte eines dieser Teile fehlen oder beschädigt sein, setzen Sie sich
bitte mit Ihrem Händler in Verbindung.
Anschlüsse des A 520
An der vorderen und rechten Seite des A 520
- Video OUT - Für den Anschluß eines Farbmonitors
- Audio IN - Für den Anschluß an die rechte und linke
Audiobuchse des Amigas
- RGB-Videoport - Für den Anschluß des A 520 an Ihren Amiga
An der Rückseite des A 520
-Tonwahlschalter - Stimmt die Tonnorm des Fernsehgerätes auf den
Computermonitor ab (L = 5,5 MHz, H = 6 MHz)
- RF OUT (Hochfrequenzausgang) - Für den Anschluß an das Fern-
sehgerät
Wie wird das Fernsehgerät angeschlossen?
1. Sicherstellen, daß der Fernseher und der Amiga ausgeschaltet
sind.
Warnung: Vor dem Anschluß von Kabeln sicherstellen, daß der Com-
puter ausgeschaltet ist. Andernfalls können die beiden Geräte
beschädigt werden.
Page 12

12 Deutsch
2. Den A 520 zur Hand nehmen und den RGB-Stecker in den RGB-
Videoport an der Rückseite des Computers einführen. Für den
Anschluß muß ein leichter Druck genügen. (Ist dies nicht der Fall,
sicherstellen, daß die Pins im Stecker des A 500 richtig ausgerichtet
sind und daß die richtige Seite des A 520 nach oben zeigt. Dann den
Vorgang wiederholen).
3. Das eine Ende des TV-Anschlußkabels in die Antennenbuchse
einstecken.
4. Das andere Ende des TV-Anschlußkabels mit der Buchse RFOUT
des A 520 verbinden.
5. Den Hauptstrang des Y-Audiokabels an die Buchse AUDIO IN seit-
lich am A 520 anschließen.
6. Die anderen beiden Enden des Y-Audiokabels mit der linken und
rechten Audiobuchse an der Rückseite des Amigas verbinden.
7. Den Tonwahlschalter des A 520 auf L oder H einstellen (L=5,5 MHz,
H=6 MHz, in Deutschland 5,5 MHz Norm).
8. Das Fernsehgerät auf etwa Kanal 36 einstellen.
Wie wird der Video-Adapter angeschlossen?
1. Sicherstellen, daß der Monitor und der Amiga ausgeschaltet sind.
2. Den A 520 zur Hand nehmen und die RGB-Kupplung in die RGB-
Videobuchse an der Rückseite des Computers einführen.
3. Verfügt der Monitor über ein eigenes Kabel, wird dieses Kabel mit
dem Video-Ausgangsport des A 520 verbunden. Andernfalls das
eine Ende des TV-Anschlußkabels mit dem Video-Eingangsport
des Monitors und das andere Kabelende mit dem Video-Ausgangsport des A 520 verbinden.
4. Den Hauptstrang des Y-Audiokabels mit dem Audio-Eingang des
Monitors verbinden.
Page 13
Deutsch 13
5. Die beiden anderen Enden des Y-Audiokabels mit dem linken und
rechten Audio-Anschluß an der Rückseite des Amigas verbinden.
6. Den Monitor und den Amiga einschalten. Der Amiga ist dann be-
triebsbereit.
Bei Störungen...
Wenn die Anzeige unscharf ist, kann der Bediener versuchen, die
Bildschärfe über die Regler am Fernsehgerät oder Monitor einzustellen. Bei falscher Reglereinstellung oder falschen Anschlüssen
wird möglicherweise gar kein Bild angezeigt. In diesem Fall die Einstellungen und Anschlüsse erneut überprüfen. In vielen Fällen ist
der Fernseher auch einfach nur auf den falschen Kanal eingestellt,
oder die Helligkeit wurde vollstänig ausgeschaltet.
Einige der am häufigsten auftretenden Störungen und die jeweiligen Gegenmaßnahmen sind in dem nachstehenden Leitfaden zur
Beseitigung von Störungen aufgeführt.
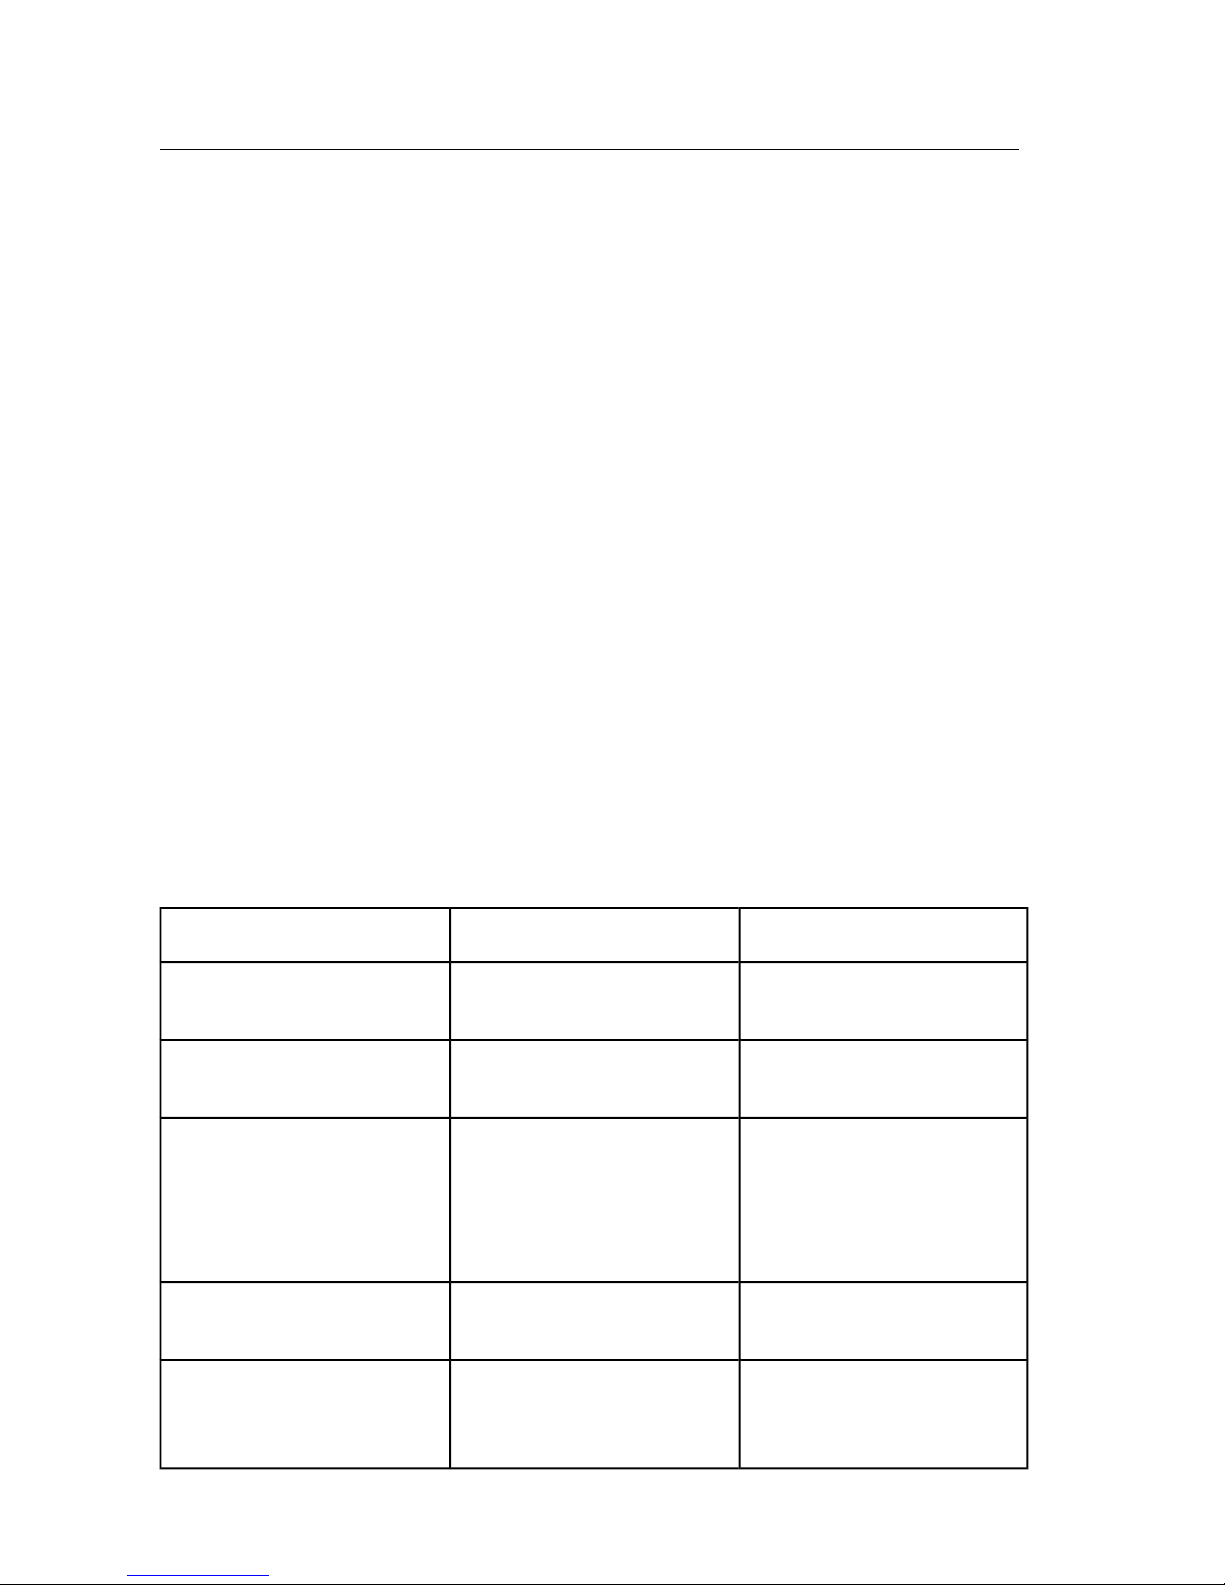
Tabelle möglicher Fehler und deren Beseitigung
Symptom Ursache Beseitigung
Power-Lampe
leuchtet nicht
Gerät nicht eingeschaltet
Netzschalter
auf ON stellen
Kein Bild auf dem
Monitor
Monitor nicht
angeschlossen
Anschlüsse
überprüfen
Kein Bild auf dem
Fernseher
Fernseher oder
Antennenkabel nicht
angeschlossen
Falscher Kanal
Anschlüsse
überprüfen
Kanal 36 UHF
einstellen
Schlechte oder keine
Farben
Kanal ungenau
eingestellt
Feineinstellung
vornehmen
Schlechter oder
kein Ton
Tonkabel nicht
angeschlossen oder
Lautstärke zu groß
Kabel bzw. Lautstärke
überprüfen
Page 14
14 Deutsch
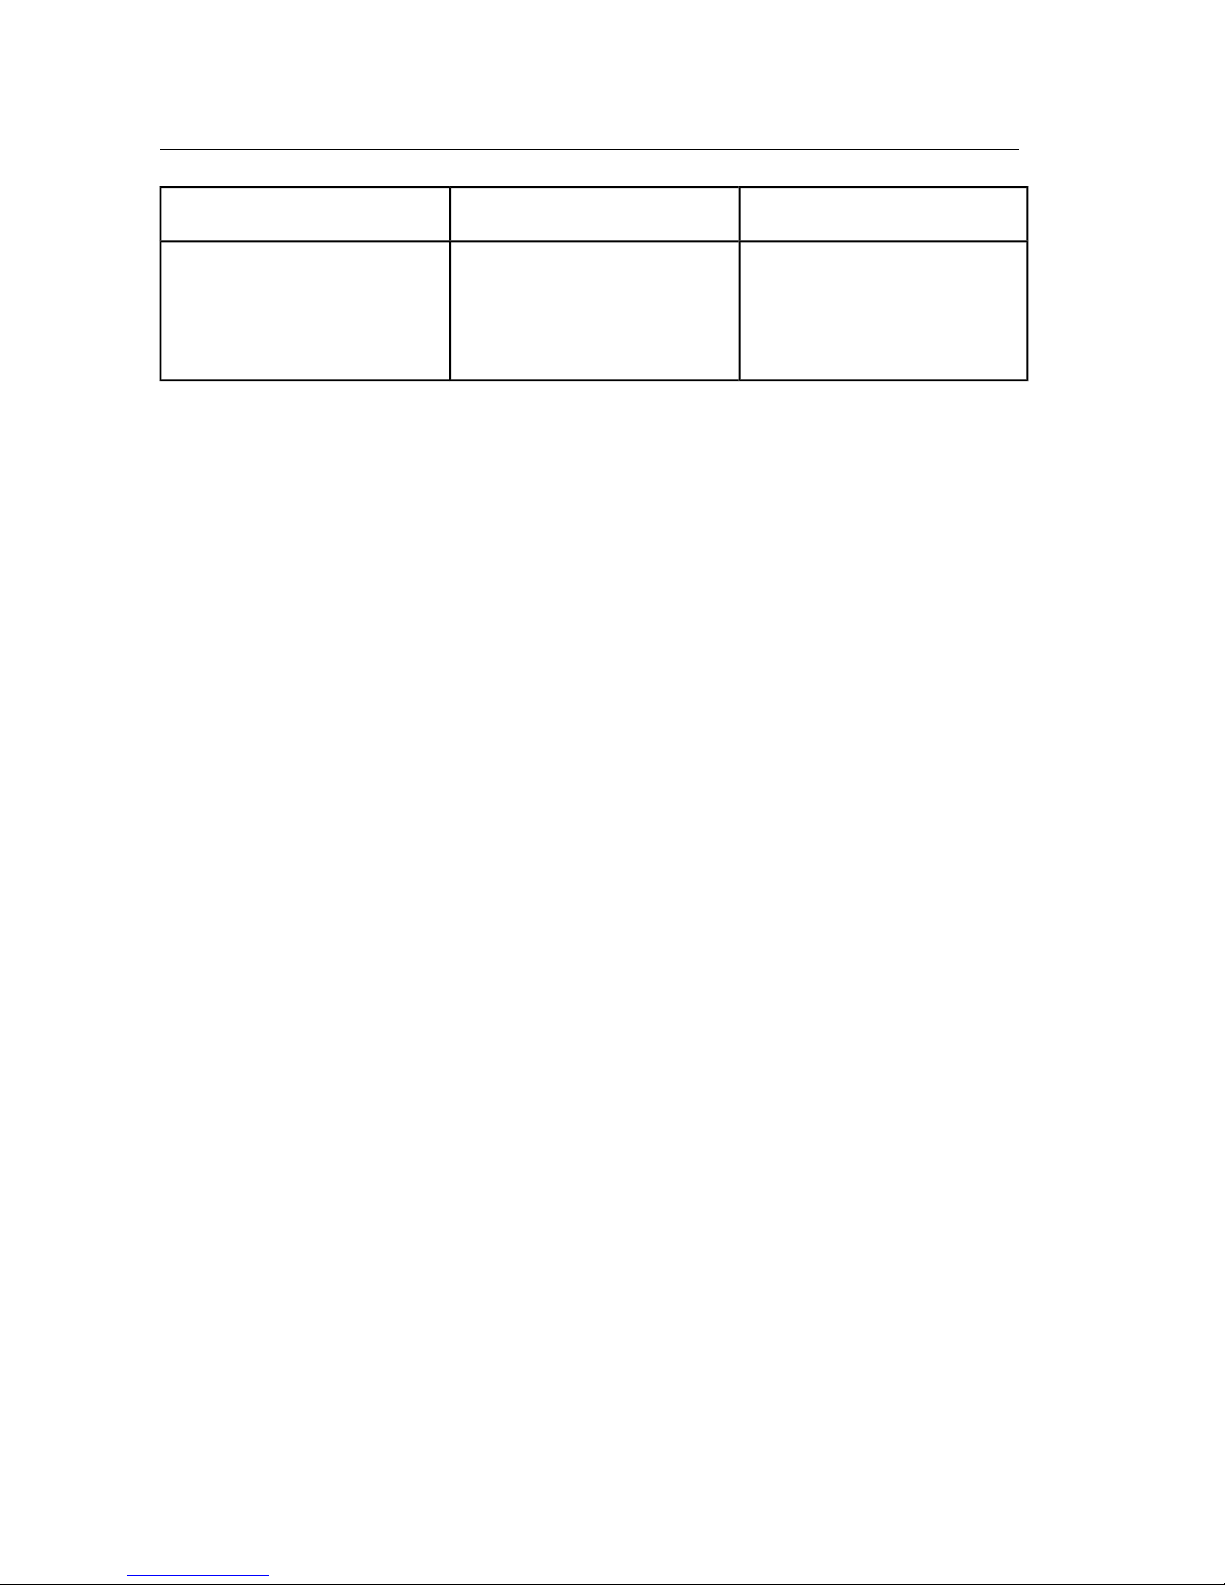
Symptom Ursache Beseitigung
Bildstörungen Älteres Fernsehmodell
oder fehlerhafte
Einstellungen
Einstellungen überprüfen, speziell vertikale
bzw. horizontale Bildposition
Page 15

Français 15
Introduction à l'Amiga 520 Carte vidéo
Table des matieres
Qu'est-ce que la carte vidéo Amiga 520? 15
Avec quoi l'A 520 est-elle fournie? 15
Comment raccorder l'A 520 à un écran? 16
Comment raccorder mon téléviseur? 16
Comment raccorder mon moniteur composite? 17
En cas de problème... 18
Tableau de dépistage des anomalies 18
Qu'est-ce que la carte vidéo Amiga 520?
La carte vidéo Commodore Amiga 520 vous permet de brancher
votre Amiga 500 sur un téléviseur ou un moniteur vidéo composite.
La carte vidéo A 520 convertit le signal vidéo RGB que l'Amiga
génère pour les moniteurs RGB en signal vidéo composite susceptible d'être interprété par un téléviseur ou un moniteur composite.
Avec quoi l'A 520 est-elle fournie?
- Modulateur Amiga 520
- Câble de raccordement TV
Page 16

16 Français
- Câble en Y
- Introduction à l'Amiga 520
Si l'un de ces éléments est manquant ou endommagé, contactez
votre revendeur.
Comment raccorder l'A 520 à un écran?
Sur la face avant et le côté droit de l'A 520
- Prise de sortie vidéo (VIDEO OUT) - pour raccorder à un moniteur
vidéo composite.
- Prise d'entrée audio (AUDIO IN) - pour raccorder aux prises audio
gauche (L) et droite (R) de l'Amiga.
- Connecteur RGB - pour raccorder l'A 520 à l'Amiga.
Sur la face arrière de l'A 520
- Sélecteur de canal - Se règle sur le canal du téléviseur pour per-
mettre l'affichage des signaux provenant de l'ordinateur (L = 5,5
MHz; H = 6 MHz).
- Sortie HF (RF OUT) - pour raccorder au téléviseur.
Comment raccorder mon téléviseur?
1. Assurez-vous que le téléviseur et l'Amiga sont hors tension.
Avertissement: Avant de procéder aux raccordements, vérifiez si
l'ordinateur est bien hors tension, afin de n'endommager ni l'Amiga
ni l'A 520.
2. Prennez l'A 520 et mettez son connecteur RGB en regard du con-
Page 17

Français 17
necteur vidéo RGB situé au dos de l'ordinateur. Enfoncez-le légèrement le raccorder. (En cas de problème, assurez-vous que toutes les
broches du connecteur de l'A 500 sont bien dressées et que le côté
droit de l'A 520 est bien dirigé vers le haut. Essayez ensuite une nouvelle fois).
3. Branchez une extrémité du câble de raccordement TV dans la
prise d'antenne VHF.
4. Branchez l'autre extrémité du câble TV dans la prise de sortie HF
(RF OUT) de l'A 520.
5. Branchez l'extrémité isolée du câble en Y sur la prise d'entrée
audio (AUDIO IN) située sur le côté de l'A 520.
6. Branchez les deux autres extrémités du câble en Y sur les prises
audio gauche (L AUDIO) et droite (R AUDIO) situées à l'arrière de
l'Amiga.
7. Réglez le sélecteur de canaux de l'A 520 sur L ou H (L = 5,5 MHz;
H = 6 MHz).
8. Réglez le sélecteur de canaux de votre téléviseur sur le même
canal.
Comment raccorder mon moniteur composite?
1. Assurez-vous que le moniteur et l'Amiga sont hors tension.
2. Prennez l'A 520 et mettez son connecteur RGB en regard du con-
necteur vidéo RGB situé au dos de l'ordinateur.
3. Si votre moniteur possède son propre câble, raccordez-le à la
prise de sortie vidéo (VIDEO OUT) de l'A 520. Sinon, raccordez une
extrémité du câble de raccordement TV sur la prise d'entrée vidéo
(VIDEO IN) du moniteur et l'autre extrémité sur la prise de sortie
video (VIDEO OUT) de l'A 520.
Page 18

18 Français
4. Branchez l'extrémité isolée du câble en Y sur la prise d'entrée
audio (AUDIO IN) du moniteur.
5. Branchez les deux autres extrémités du câble en Y sur les prises
audio gauche (L AUDIO) et droite (R AUDIO) situées à l'arrière de
l'Amiga.
6. Mettez le moniteur et l'Amiga sous tension. Votre ordinateur est
prêt à fonctionner.
En cas de problème...
Si l'image n'est pas claire, essayez de régler les commandes du téléviseur ou du moniteur. Si les commandes sont mal réglées ou si les
raccordement sont incorrects, vous n'obtiendrez peut-être aucune
image. Vous devez alors vèrifier tous les réglages et tous les raccordements. Il arrive fréquemment que le téléviseur ne soit tout simplement pas réglé sur le bon canal, ou que la commande de la luminosité soit réglée au minimum.
Le tableau de dépistage des anomalies ci-dessous énumerè quelques uns des problèmes les plus courants et vous indique comment
y remédier.
Tableau de dépistage des anomalies
Symptôme Cause Remède
Le témoin reste éteint. L'ordinateur n'est pas
sous tension.
Vérifiez si l'interrupteur
marche/arrêt de l'ordinateur est en position
"Marche" (ON).
L'ordinateur n'est pas
raccordé au secteur.
Vérifiez si la fiche du cordon d'alimentation n'est
pas détachée ou débran
chée.
Page 19

Français 19
Symptôme Cause Remède
Vérifiez le raccorde-
ment à la prise murale.
Absence d'image
(Moniteur)
Le moniteur n'est pas
raccordé.
Vérifiez les raccordements du moniteur.
Absence d'image
(Televiseur)
Raccordement incorrect Vérifiez si l'ordinateur est
bien raccordé à la borne
d'antenne VHF. Voir page
16/17 pour plus de
détails.
Le câble de raccordement
n'est pas branchésur le
televiseur.
Vérifiez le raccordement
du câble au téléviseur.
Absence ou mauvaise
qualité des couleurs
Mauvais réglage des
couleurs.
Réglez les couleurs sur le
téléviseur ou le moniteur.
Bruit de fond excessif Le niveau du volume est
trop élevé.
Réglez le volume.
Image correcte mais
absence de son.
Le niveau du volume est
trop bas.
Réglez le volume.
Mauvais raccordement de
l'entrée auxiliaire de l'amplificateur extérieur.
Raccordez la fich sur la
prise d'entrée auxiliaire
de l'amplificateur et
sélectionnez l'entrée
auxiliaire.
Son correct mais absence d'image
Voir plus haut sous "Absence d'image".
Voir plus haut sous "Absence d'image".
L'ordinateur affiche
des symboles
incohérents
Surchauffe Débranchez la fiche du
cordon d'alimentation et
laissez refroidir l'ordinateur. (Veillez à ce que l'air
circule librement autour
de l'alimentation.)
Page 20

20 Français
Symptôme Cause Remède
Nombreux parasites Ansien modéle de télé-
viseur.
Modifiez l'orientation du
téléviseur. Réduisez les
parasites au moyen des
boutons de réglage du
balayage horizontal
et/ou vertical.
Page 21

Italiano 21
Introduzione all'adattatore video A 520
Sommario
Che cos'e' l'adattatore video dell'Amiga 500? 21
Che cosa viene fornito con l'A 520? 21
Come collegare l'A 520 al monitor? 22
Come collegare la mia TV? 22
Come collegare il mio monitor composito? 23
Avete dei problemi? Consultare: 23
La scheda domande e risposte 24
Che cos'e' l'adattatore video A 520?
L'adattatore Video Commodore A 520 e' un dispositivo che vi permette di collegare il vostro Amiga 520 alle TV oppure ad un altro
monitor composito. Esso converte i segnali RGB video prodotti da
Amiga per i monitor RGB in un segnale video composito in modo che
possa essere interpretato tanto dal televisore quanto da un monitor
composito.
Che cosa viene fornito con l'A 520?
- Modulatore Amiga 520
- Cavo collegamento TV
Page 22

22 Italiano
- Cavo a Y
- Istruzioni Commodore A 520
Se mancassero dei pezzi o fossero guasti, contattate il vostro negozio.
Come collegare l'A 520 ad uno schermo video?
Sulle parti frontale e laterale dell'A520
- Video OUT - collegare un monitor composito acolori
- Audio IN - collegare con l'audio L e R di Amiga
- Connettore RGB - collegare l'A 520 all'Amiga
Sulla parte posteriore dell'A 520
- Commutatore selettore di canale - da aggiustare con il canale TV
per visualizzare la schermata del Computer
(L = 5,5 MHz; H = 6 MHz)
- RF OUT (Uscita Radio Frequenza) - collegare al televisore
Come collegare la mia TV
1. Assicurarsi che TV e Amiga siano entrambi spenti.
Attenzione! Verificare, prima di effettuare il collegamento di qual-
siasi cavo, che il computer sia spento (OFF) al fine di evitare un
guasto ad ambedue gli apparecchi.
2. Inserire il connettore RGB dell'A 520 nella presa RGB dell'Amiga,
disposta sul retro del computer. L'innesto dovrebbe avvenire premendo solo leggermente. (Se cio' non fosse, verificare che i pin del
connettore dell'A 500 siano ben diritti e che presa e connettore
combacino perfettamente. Quindi riprovare.
3. Inserire un'estremita' del cavo TV nella presa d'antenna VHF.
Page 23

Italiano 23
4. Inserire l'altra estremita' del cavo connettore TV nella presa RF
OUT dell'A 520.
5. Collegare il connettore principale del cavo a Y dell'audio nella
presa IN AUDIO posta a lato dell'A 520.
6. Collegare ora le altre due estremita' del cavo a Y nelle prese AUDIO
L e AUDIO R dell'A 520.
7. Posizionare l'interruttore selettore del canale dell'A 520 su L
oppure su H (L = 5,5 MHz; H = 6 MHz).
8. Sintonizzare il vostro TV sul medesimo canale.
Come collegare il mio monitor composito?
1. Verificare che sia il monitor che l'Amiga siano spenti.
2. Inserire il connettore RGB dell'A520 nel connettore RGB
dell'Amiga, disposto sul retro del computer.
3. Se il vostro monitor disponesse di un cavo proprio, connetterio
alla porta OUT del video sull'A520. Altrimenti, collegare un'estremita' del cavo connettore TV alla presa OUT del video sull'A 520, e
l'altra estremita'alla presa OUT del video dell'A 520.
4. Collegare il connettore principale del cavo AUDIO a Y alla presa
AUDIO IN del monitor.
5. Collegare ora le altre due estremita'del cavo a Y nelle porte AUDIO
L e AUDIO R di Amiga.
6. Accendere (ON) monitore Amiga. Il vostro Amiga e'ora pronto per
l'uso.
Se avete dei problemi...
Se lo schermo del monitor non dovesse essere perfettamente
Page 24

24 Italiano
chiaro, potete regolarlo agendo sui controlli del vostro televisore o
del monitor. Puo'capitare infatti che il vostro apparecchio non visualizzi proprio nessuna immagine se le posizioni dei controlli non sono
corrette. In tal caso dovete verificare tutte le regolazioni, inserzioni e
collegamenti. Spesso il motivo e'semplicemente che la vostra TV e'
sintonizzata su un canale diverso, oppure che il potenziometro della
luminosita'e' sullo zero.
La tabella successiva elenca alcuni dei piu'comuni e ricorrenti problemi e suggerisce come correggerli.
La scheda domande e risposte
Sintomi Cause Rimedi
Spia dell'Indicatore
non e'Accesa "ON"
Il computer non e'Acceso Verificare che l'interrut-
tore della corrente si
trovi in posizione ON
Il computer non e'colle-
gato alla presa di rete
Verificare che spina e
presa di corrante non
abbiano cavi disconnessi o non attaccati.
Controllare il collegamento alla presa di rete
Monitor senza immagine
Il monitor non e' collegato Verificare i collegamenti
del monitor
TV senza immagine Attacco abagliato Verificare l'attacco del
computer col terminale
dell'antenna VHF;
vedere
pagina dettagli
Immagine con colore
scadente
La regolazione colore e'
insufficiente
Regolare meglio il
colore
del monitor o della TV
Suono con rumore de
fondo
Il volume e' troppo elevato Regolare il volume
Page 25

Italiano 25
Sintomi Cause Rimedi
Immagine o corretta
manca il suono
II volume e' troppo basso Regolare il volume
L'input AUX non e' con-
nesso correttamente
con l'amplificatore esterno
Controllare l'attacco sonoro con l'input AUX dell'
amplificatore e selezionare l'input AUX
II suono e' corretta
l'immagine
Vedere la voce "manca
l'immagine"
Vedere la voce "manca
l'immagine"
Il monitor del
computer mostra
simboli mutilati
Surriscaldamento Disinnestare la spina
dalla presa della corrente
di rete e dare tempo al
computer di rattredarsi.
(Verificare che ci sia
abbastanza aria fresca
intorono alle prase di
corrente)
Seria interferenza Vacchio modello TV Girare la TV. Regolare le
manopole verticali, orizontali, e/o di controllo
per ridurre l'interferenza.
Page 26

26 Español
Intróduccion al adaptador de video y TV Amiga 520
para el Amiga 500
Contenido
¿Qué es el AMIGA 520? 26
¿Qué se incluye con el A 520? 26
Conectores del A 520 27
¿Cómo se conecta el A 520 a un televisor? 27
¿Cómo se conecta el A 520 a un monitor
de video compuesto? 28
Si tiene algún problema 29
Tabla de detección de averias 29
¿Qué es el AMIGA 520?
El AMIGA 520 de Commodore es un adaptador que le permite
conectar su Amiga 500 a su televisor o monitor de video compuesto.
Esto se consigue convirtiendo la señal de video RGB que produce el
Amiga para monitore RGB en una señal de video compuesto que
pueda interpretar un televisor o monitor de video compuesto.
¿Qué se incluye con el A 520?
- Modulador Amiga 520
Page 27

Español 27
- Cable de conexión a la TV
- Cable Y
- Este manual
En caso de que falte alguna de estas piezas, o estén averiadas, contacte con su distribuidor.
Conectores del A 520
En la parte frontal del A 520:
- Conector RGB: conecta el A 520 al Amiga.
- En el lado derecho del A 520:
VIDEO OUT: conectarlo a un monitor de video compuesto en color.
AUDIO IN: conectarlo con los conectores de audio L y R del Amiga
utilizando el cable Y.
En la parte posterior del A 520:
- Interruptor de selección de canal: Sintonizar el canal de TV para
visualizar la imagen del ordenador (L = 5,5 MHz; R = 6 MHz). El modo
normal para España es L.
- RF OUT: (Salida de radiofrecuencia): conectarlo al televisor.
¿Cómo se conecta el A 520 a un televisor?
1. Asegúrese de que la TV y el Amiga están apagados.
ATENCION: Antes de conectar cualquier cable, asegúrese de que el
Amiga está apagado (el interruptor en posición OFF) para evitar
cualquier daño en la unidad.
Page 28

28 Español
2. Alinee el conector RGB del A 520 con el conector RGB del Amiga
(en la parte posterior del ordenador). Ambas partes deben quedar
totalmente encajadas ejerciendo una firme presión. (Si no se puede,
compruebe que las clavijas del conector del A 500 estén derechasy
que el A 520 está correctamente orientado. Y vuelva a probar.)
3. Conecte un extremo del cable de conexión de TV en la entrada de
antena del televisor.
4. Conecte el otro extremo del cable en el conector RF OUT del A520.
5. Conecte la clavija principal del cable Y en el conector AUDIO IN de
la parte lateral del A 520.
6. Conecte los otros dos extremos del cable Y en los conectores L
AUDIO y R AUDIO de la parte posterior del Amiga.
7. Compruebe que el selector de canal del A 520 está en posición L
(5,5 MHz).
8. Ajuste el canal de su televisor para que coincida.
¿Cómo se conecta el A 520 a un monitor de video compuesto?
1. Asegúrese de que tanto el monitor como el Amiga están apagados
(posición OFF).
2. Alinee el conector RGB del A 520 con el conector RGB del Amiga
(en la parte posterior del ordenador). Ambas partes deben quedar
totalmente encajadas ejerciendo una firme presión. (Si no se puede,
compruebe que las clavijas del conector del A 500 están derechas y
que el A 520 está correctamente orientado. Y vuelva a probar.)
3. Si el monitor tiene su propio cable, conecte este cable en el
conector VIDEO OUT del A 520. Si no lo tiene, conecte un extremo
del cable conector de TV en el conector VIDEO IN del monitor, y el
otro extremo en el conector VIDEO OUT del A 520.
Page 29

Español 29
4. Conecte la clavija principal del cable Y en el conector AUDIO IN de
la parte lateral del A 520.
5. Conecte los otros dos extremos del cable Y en los conectores L
AUDIO y R AUDIO de la parte posterior del Amiga.
6. Ponga en marcha el monitor y el Amiga, éste ya estará listo para su
uso.
Si tiene algun problema...
Si la imagen en la pantalla no es clara, intente ajustar los controles
del televisor o el monitor. No obtendrá ninguna imagen si sus tomas y
conexiones no son correctas, portanto deberá repasar las tomas y
conexiones. Muchas veces se trata de una errónea sintonización
del canal del televisor, o de tener apagado el brillo.
La tabla de detección de averias presentada a continuación expone
algunos de los problemas más comunes y el modo de corregirlos.
Tabla de detección de averias
Indicio de averia Causa Reparación
No se enciende el
piloto ON.
El ordenador no
esta en ON.
Asegúrese de que el
interruptor de
alimentación esta en ON.
El ordenador no se ha
conectado a la toma
de red.
Comprobar si la toma de
corriente se ha soltado o
bien se ha desconectado
el cable.
Comprobar la conexión
con el enchufe de red.
No aparece ninguna
imagen (Monitor).
No se ha conectado
el monitor.
Comprobar las conexiones del monitor.
No aparece ninguna
imagen (TV).
Acoplamiento incorrecto. Comprobar la conexión
del ordenador con el
termina de antena VHF.
Page 30

30 Español
Indicio de averia Causa Reparación
véase la página 27/28
para más detalles.
El cable a la TV
no se ha conectado.
Comprobar la conexión
del cable de salida
a la TV.
Imagen con poco
o sin color
Controles de color
mal ajustados
Ajustar los controles
de color de la TV
o del monitor.
Sonido con excesivos
ruidos de fondo.
Volumen demasiado
alto.
Ajustar el volumen.
Imagen correcta,
pero sin sonido.
Volumen demasiado bajo. Ajustar el volumen.
Entrada AUX del
amplificador externo
mal conectada.
Conectar la clavija de
sonido a la entrada
AUX del amplificador y
seleccionar la entrada
AUX.
Sonido correcto,
pero sin imagen.
Véase el apartado "no
aparece ninguna imagen'.
Véase el apartado "no
aparece ninguna
imagen'.
El ordenador visualiza
simbolos confusos en
la pantalla.
Recalentamiento. Apagar el ordenador y
dejar que se enfrie
(asegúrese de que está
suficientemente ventilado).
Excesivas
interferencias.
Modelo de TV anticuado. Dé la vuelta a la TV.
Ajuste los botones vertical, horizontal y/o de
control para reducir las
interferencias.
Page 31

Nederlands 31
Inleiding tot de Commodore Amiga 520
TV-Modulator
Inhoud
Wat is de Amiga 520 TV-Modulator? 31
Waaruit bestaat het A 520-pakket? 31
Waartoe dienen de aansluitingen op de A 520? 32
Hoe sluit ik mijn TV-toestel aan? 32
Hoe sluit ik mijn Video-Composiet monitor aan? 33
In geval van Problemen... 34
Probleemtabel 35
Wat is de Amiga 520 TV-Modulator?
De Commodore Amiga 520 TV-Modulator zet het door de Amiga
geproduceerde analoge RGB-videosignaal om in een RF-en VideoComposiet kleursignaal. Hierdoor kunt u een TV, of een kleurenmonitor voorzien van een Video-Composiet ingang, aansluiten op uw
Amiga 500.
Waaruit bestaat het A 520-pakket?
- Amiga 520 TV-modulator
- TV-aansluitkabel
Page 32

32 Nederlands
- Y-audiokabel
- Inleiding tot de Commodore Amiga 520 TV-Modulator
Treft u een van deze artikelen niet aan of is er iets beschadigd, neem
dan contact op met uw dealer.
Waartoe dienen de aansluitingen op de A 520?
Aan de voorzijde van de A 520
- RGB Aansluiting - voor aansluiting van de A 520 op de Amiga.
Aan de rechter voorzijde van de A 520
- Video OUT - voor aansluiting van een Video-Composiet monitor.
- Audio IN - voor aansluiting van de L en R audio-uitgangen van de
Amiga op de A 520. (Hiermee wordt het RF-signaal voorzien van
geluid.)
Aan de achterzijde van de A 520
- Geluidsfrequentieschakelaar - stelt het frequentie-bereik voor het
geluidssignaal in voor de modulator (L = 5,5 MHz; H = 6 MHz)
- RF OUT - voor aansluiting van een televisie
Hoe sluit ik mijn TV-toestel aan?
1. Zorg ervoor dat zowel TV als Amiga uitschakeld zijn.
LET OP: zorg ervoor dat als u verbindingen tot stand gaat brengen
de computer niet op het elektriciteitsnet is aangesloten, dit om
schade aan een van beide toestellen te voorkomen.
2. Neem de A 520 en steek de RGB-stekker in de RGB-video-aan-
sluiting op de achterzijde van de computer. Dit mag geen kracht ver-
Page 33

Nederlands 33
gen. Is dit wel het geval, ga dan na of de pinnen van de stekker van de
A 500 recht zijn en of u de A 520 met de goede kant naar boven hebt.
Probeer vervolgens opnieuw.
3. Sluit het uiteinde van de TV-aansluitkabel met de antenne-stekker
aan op de UHF antenne-ingang.
4. Sluit het andere uiteinde van de TV-aansluitkabel aan op de RF
OUT uitgang van de A 520.
5. Sluit de oorsprong van de Y-audiokabel aan op de AUDIO IN
ingang aan de zijkant van de A 520.
6. Sluit de andere twee uiteinden van de Y-audiokabel aan op de uit-
gangen L AUDIO en R AUDIO aan de achterzijde van de Amiga.
7. Stel de geluidsfrequentie-schakelaar op de A520 voor gebruik in
Nederland in op L. (5,5 Mhz)
8. Stel een voorkeuzezender van uw TV-toestel af op kanaal 36.
LET OP: Televisies hebben in de regel niet dezelfde scherpte als een
RGB monitor. Het verdient aanbeveling het aantal tekst-kolommen
in Preferences in te stellen op 60 (dit wordt beschreven in hoofdstuk
6 van "Kennismaking met de Amiga 500" onder de kop "Tekstomvang").
Hoe sluit ik mijn Video-Composiet monitor aan?
1. Zorg ervoor dat zowel monitor als Amiga uitschakeld zijn.
LET OP: zorg ervoor dat als u verbindingen tot stand gaat brengen
de computer niet op het elektriciteitsnet is aangesloten, dit om
schade aan een van beide toestellen te voorkomen.
2. Neem de A 520 en steek de RGB-stekker in de RGB-video-aan-
sluiting aan de achterzijde van de computer.
Page 34

34 Nederlands
3. Voor het aansluiten van een Video-Composiet monitor wordt
GEEN kabel bij de A 520 geleverd. Gebruik een kabel met aan een
kant een tulp-stekker en aan de andere kant een contra-stekker
voor de Video-Composiet ingang van uw monitor. Sluit het uiteinde
met de tulp-stekker aan op de met Video OUT gemerkte uitgang van
de A 520. Sluit het andere uiteinde van de kabel aan op de Video IN
ingang van.de monitor.
4. Sluit de worden hoofdpin van de Y-audiokabel aan op de AUDIO IN
ingang van de monitor.
5. Sluit de andere twee uiteinden van de Y-audiokabel aan op de uit-
gangen L AUDIO en R AUDIO aan de achterzijde van de Amiga.
6. Bovenstaande twee punten hebben betrekking op een MONO-
geluidsaansluiting. Heeft u een monitor met STEREO-geluid of
maakt u gebruik van een externe versterker, dan kunt u het de L
AUDIO en R AUDIO uitgangen met twee losse kabels-voorzien van
de juiste connectors-verbinden met de linker en rechter geluidsingang van de versterker/monitor.
7. Schakel de monitor en de Amiga in. Uw Amiga is nu klaar voor
gebruik.
LET OP: Video-Composiet monitoren hebben in de regel niet
dezelfde scherpte als een RGB monitor. Het verdient aanbeveling
het aantal tekst-kolommen in Preferences in te stellen op 60 (dit
wordt beschreven in hoofdstuk 6 van "Kennismaking met de Amiga
500" onder de kop "Tekstomvang").
In geval van problemen...
Is het beeld op het scherm niet helder, probeer dit dan eerst te verhelpen met de regelaars van uw TV-toestel of monitor. Zijn deze niet
naar behoren ingesteld of zijn de aansluitingen niet naar behoren tot
stand gebracht, dan kan het zijn dat u in het geheel geen beeld hebt.
Controleer in dergelijke gevallen alle regelaars en aansluitingen.
Vaak is de TV niet op het juiste kanaal ingesteld of staat de beeldhelderheld op de minimale stand.
Page 35

Nederlands 35
Op de volgende bladzijden vindt u een "Probleemtabel" voor enkele
gangbare problemen en de mogelijke oplossing daarvan.
Probleemtabel
Symptoom Orzaak Oplossing
Controlelampje
brandt niet.
Computer is niet
ingeschakeld.
Kijk of de schakelaar op
de voeding wel op "ON"
staat.
Stekker van de voeding
zit niet in het stopkontakt.
Controleer of de elektriciteitskabel loszit of niet is
aangesloten. Controleer
de verbinding met het
stopkontakt.
Geen beeld. Monitor niet aangesloten. Controleer
aansluttingen.
Geen beeld (TV). Onjuiste aansluiting. Controleer aansluiting
tussen A 520 en de VHF
antenne-ingang.
TV niet op juiste kanaal. Probeer UHF kanaal 36.
Slecht beeld (TV). Niet van toepassing.
RF-kabel defekt
Draai aan kanaalkiezer.
Controleer kabel.
Beeld heeft onvol-
doende of geen
kleur.
Kleurcontrole verkeerd
afgesteld
Stel de kleurcon trole
van TV of monitor op de
juiste waarde in.
Geluid met overmati
ge achtergrondruis.
Volume te hoog. Zet volume lager.
Beeld goed, maar
geen geluid.
Volume te laag. Stel volume bij.
Y-audiokabel niet op A 520
aangesloten (bij gebruik
van RF-signaal).
Bevestig Y-audiokabel.
Frequentie-schakelaar op
A 520 verkeerd ingesteld.
Stel frequentie-schake-
laar juist in.
Page 36

36 Nederlands
Symptoom Orzaak Oplossing
AUX-ingang van externe
versterker verkeerd
aangesloten.
Sluit geluidsstekker(s)
aan op de AUX-ingang
van de versterker en stel
de keuzeknop van de
versterker in op AUX.
Geluid goed, maar
geen beeld
Zie mogelijke oorzaken
bij "Geen beeld".
Zie mogelijke oplossingen bij "Geen beeld".
Page 37

Dansk 37
Introduktion Amiga 520 Videoadapter
Indhold
Hvad er en Amiga 520 videoadapter? 37
Hvad indeholder A 520-sættet? 37
Hvordan forbindes A 520 med et video display? 38
Hvordan tilsluttes et fjernsyn? 38
Hvordan tilsluttes en dataskærm? 39
Hvis der opstår problemer... 39
Fejlfinding/problemløsning 40
Hvad er en Amiga 520 videoadapter?
Commodore Amiga 520 videoadapter er et ekstra-tilbehør, med hvilket Amiga 500 kan tilsluttes til et almindeligt fjernsyn eller en dataskærm. Videoadapteren omformer RGB-videosignalet, som Amiga
leverer til RGB-monitorer, til et sammensat videosignal, som kan
omsættes af et almindeligt fjernsyn eller en dataskærm.
Hvad indeholder A 520-sættet?
- Amiga 520 modulator
- TV-forbindelseskabel
Page 38

38 Dansk
- Y-kabel
- Introduktion til Commodore Amiga 520
Hvis dele mangler eller er beskadigede, bedes De henvende Dem til
forhandleren.
Hvordan tilsluttes A 520 til et video display?
Foran og i højre side på A 520
- Video OUT forbindelse til en farvedatasksærm.
- Audio IN forbindelse til Amigas L og R audio-stik.
- RGB-stik forbinder A 520 med Amiga.
Bagpå A520
- Kanalvælger - svarerende til TV-kanalen på fjernsynet, når det
anvendes som display til en computer (L = 5,5 MHz, H = 6 MHz)
- RF OUT - (Radio Frequency Out) er forbindelsen til fjernsynet.
Hvordan tilsluttes et Fjernsyn?
1. Både fjernsynet og Amiga 500 skal være slukket.
Advarsel: Før tilslutning af kabler eller ledninger skal computeren
slukkes (OFF) for at sikre, at hverken computeren eller fjernsynet
beskadiges.
2. Anbring RGB-stikket på A 520 lige ud for RGB-videoporten bagpå
computeren. De to elementer bør kunne forbindes med et let tryk.
(Hvis det ikke er filfældet, bør det kontrolleres, om benene på A 500stikket er lige og at A 520 ikke er vendt på hovedet). Prøv så igen.
Page 39

Dansk 39
3. Tilslut den ene ende af TV-forbindelseskablet i VHF-antenneudgangen.
4. Tilslut den anden ende af TV-forbindelseskablet i porten RF OUT
på A 520.
5. Y-kablets ene ende tilsluttes AUDIO IN-porten på siden af A 520.
6. Y-kablets to andre ender tilsluttes L AUDIO og R AUDIO bagpå
Amiga computeren.
7. Sæt kanalvælgeren på A 520 på L eller H. (L=5,5 MHz. H=6 MHz).
8. Fjernsynets kanalvælger indstilles på samme kanal.
Hvordan tilsluttes en dataskærm?
1. Både monitoren og Amiga 500 skal være slukket (OFF).
2. A 520 s RGB-stik placeres ud for RGB-videoudgangen bag på
computeren.
3. Hvis dataskærmen har et eget separat kabel, tilsluttes dette kabel i
VIDEO OUT-udgangen på A 520. I andre tilfælde tilsluttes TV-forbindelseskablets ene ende i VIDEO IN-porten på dataskærmen og den
anden ende i VIDEO OUT på A 520.
4. Y-kablets ene ende tilsluttes dataskærmens AUDIO IN.
5. Y-kablets to andre ender forbindes med udgangene L AUDIO og R
AUDIO bagpå Amigaen.
6. Tænd for dataskærmen og Amiga (ON). Amiga 500 er nu klar til
brug.
Hvis der opstår problemer...
Hvis billedet på skærmen ikke er klart, anbefales det at prøve at ind-
Page 40

40 Dansk
stille fjernsynet eller dataskærmen først. Hvis fjernsyn/dataskærm
ikke er indstillet korrekt eller forbindelserne ikke er udført rigtigt,
vises der eventuelt slet ikke noget billede. Hvis det er tilfældet bør
samtlige indstillinger og forbindelsertjekkes. Fjernsynet kan tit blot
stå på en forkert kanal, eller kontrast/lysstyrke er skruet helt ned.
Vejledningen i fejlfinding på de følgende sider beskriver en række af
de mere almindelige problemer og hvordan de kan løses.
Fejlfinding og problemløsning
Symptom Arsag Problemløsning
Indikatorlampen lyser
ikke
Computeren er ikke
tændt (på ON)
Tænd/sluk-kontakten
skal stå på ON
Computeren er ikke til-
sluttet lysnettet
Se efter, om stikket til
lysnettet er i orden, evt.
løse forbindelser?
Er stikket sat i stikkon-
takten?
Intet billede på skærmen (dataskærm)
Dataskærmen er ikke
tilsluttet
Tjek skærmforbindelserne
Intet billede på
skærmen (fjernsyn)
Forkert forbindelse Tjek forbindelsen fra
computeren til VHF-antennestikket. Nærmere
beskrivelse side: 38/39
Kablet til fjernsynet
er ikke sat i
Tjek OUTPUT-forbindelsen til fjernsynet
Darlig eller ingen
gengivelse af farver
Farveindstillingen er
ikke korrekt
Juster farvekontrollen på
fjernsynet eller monitoren
Megen baggrundsstøj
på lydsiden
For høj lydstyrke Skru ned for lydstyrken
Billede på skærmen
men ingen lyd
Lydstyrken er for lav Juster lydstyrken
AUX INPUT forbindelsen
til ekstern forstæsrker
ikke i orden
Lydstikket tilsluttes AUX
INPUT på forstærkeren,
som stilles på AUX INPUT
Page 41

Dansk 41
Symptom Arsag Problemløsning
Lyden er i orden, men
der vises intet billede
Se ovenfor under
"Intet billede..."
Se ovenfor under
"Intet billede..."
Computeren viser
"nonsens" på skærmen
Overhedning Træk stikket til strømfor-
syningen ud og lad computeren køle af (lufttilførslen til strømforsyningen må ikke blokeres)
Voldsom interferens Ældre TV-model Drej fjernsynet. Juster
vertikal, horisontal
og/eller andre kontrolindstillinger, indtil lavest
mulig interferens opnås
Page 42

42 Norsk
Innføring for Amiga 520 Video Adapter
Innhold
Hva er Amiga 520 Video Adapter? 42
Hva leveres sammen med A 520? 42
Hvordan tilsluttes A 520 til en videoskjerm? 43
Hvordan tilslutter jeg fjernsynet mitt? 43
Hvordan tilslutter jeg min kompositt-monitor? 44
Hvis du har et problem... 45
Oversikt over problemløsninger 45
Hva er Amiga 520 Video Adapter?
Commodore Video Adapter er en innretning som gjør det mulig å forbinde din Amiga 500 til et fjernsynsapparat eller til en komposittmonitor. Den gjør dette ved å konvertere RGB videosignalet Amiga'en normalt sender ut for RGB-monitorer til et kompositt-signal
som et fjernsyn eller en kompositt-monitor kan lese.
Hva leveres semmen med A 520?
- Amiga 520 modulator
- Forbindelseskabel for fjernsyn
Page 43

Norsk 43
- Y-kabel
- Innføring for Commodore Amiga 520
Hvis noe av dette mangler eller er ødelagt, ta kontakt med forhandle-
ren.
Hvordan tilsluttes A 520 til en videoskjerm?
Foran og på høyre side av A 520
- Video OUT - tilsluttes en farge-kompositt-monitor
- Audio IN - tilsluttes Amiga L og R Audio
- RGB kontakt - tilslutter A 520 til Amiga
Bakpå A 520
- Kanalvelger-bryteren - tilpasser fjernsynskanalen på fjernsynsapparatet for å kunne se computerdisplayet (L = 5,5 MHz, H = 6
MHz).
RF OUT - (Radio Frequency Out) - tilsluttes fjernsynsapparatet.
Hvordan tilslutter jeg fjernsynet mitt?
1. Påse at både fjernsynet og Amiga'en er slått av.
Advarsel: For å unngå skade på enhetene, må du påse at strømmen
til computeren er slått av før du tilslutter kablene.
2. Ta A 520 og bring dens RGB Forbindelsesstykke på linje med RGB
videoporten på baksiden av computeren. Disse skal passe sammen
met et lett trykk. (Gjør de ikke det, sjekk at stiftene i A 500's forbindelsesstykke er rette og at A 520 har riktig side opp. Prø igjen.)
Page 44

44 Norsk
3. Stikk en ende av fjernsynsforbindelseskabelen inn i VHF antenneterminalen.
4. Stikk den andre enden av fjernsynsforbindelseskabelen inn i RF
OUT-porten på A 520.
5. Forbind hovedpinnen på y-ausiokabelen med AUDIO IN-porten
på siden av A 520.
6. Forbind de to andre endene av y-audiokabelen med L AUDIO og R
AUDIO på baksiden av Amiga computeren.
7. Still kanalvelger-bryteren på A 520 på L eller H. (L = 5,5 MHz, H = 6
MHz).
8. Still kanalen på fjernsynet ditt på samme kanal.
Hvordan tilslutter jeg min kompositt-monitor?
1. Påse at både monitoren og Amiga'en er slått av.
2. Ta A 520 og bring dens RGB forbindelsesstykke på linje med RGB
videoporten på baksiden av computeren.
3. Har din monitor egen kabel, tilslutter du denne kabelen til Video
OUT-porten på A 520. Hvis ikke, tilslutt den ene enden av fjernsynsforbindelseskabelen til Video IN-porten på monitoren og den andre
enden til Video OUT på A 520.
4. Forbind hovedpinnen på y-audiokabelen med AUDIO IN-porten
på siden av A 520.
5. Forbind de to andre endene av y-audiokabelen med L AUDIO og R
AUDIO på beksiden av Amiga computeren.
6. Slå PÅ monitoren og Amiga'en. Din Amiga er nå klar til bruk.
Page 45

Norsk 45
Hvis du har et problem...
Hvis skjermbildet ikke er klart, så forsøk å justere kontrollknappene
på fjernsynsapparatet eller på monitoren. Hvis innstillinger eller tilslutninger ikke er korrekte, kan det skje at du ikke få noe bilde i det
hele tatt. I et slikt tilfelle må du sjekke samtlige innstillinger og tilslutninger. Det hender ofte at fjernsynsapparatet simpelthen er innstilt
på feil kanal, eller at lysstyrken er dreiet ned.
Oversikten over problemløsninger på de følgende sider peker på
noen av de vanligste problemer og hvordan du løser dem.
Oversikt over problemløsninger
Symptom Årsag Avhjelp
Indikatorlampe ikke
"PÅ"
Computer ikke slått PÅ Påse at strømbryter er i
PÅ-posisjon
Computer ikke tilsluttet
veggkontakt
Sjekk stikkontakt for løs
eller ikke forbundet
strømkabel.
Intet bilde (monitor) Monitor ikke tilsluttet Sjekk monitor-tilslut-
ninger.
Intet bilde (fjernsyn) Ikke korrekt tilslutning Kontroller computertil-
slutning til VHF antenneterminal, se side for detaljer.
Kabel til fjernsyn ikke
tilsluttet
Sjekk kabelforbindelse
til fjernsyn.
Bilde med dårlig eller
ingen farge
Feil tunede fargekontroller Juster fargekontroll.
Lyd med for høy bakgrunnsstoy
Lydkontroll for høy Juster lyden.
Bilde OK, men ingen
lyd
Lydkontroll for lav Juster lyden.
Page 46

46 Norsk
Symptom Årsag Avhjelp
AUX inngang på ekstern
forsterker ikke korrekt
tilsluttet
Tilslutt lydstikk til AUX
inngang på forsterker
og velg AUX inngang.
Lyd OK. men intet bilde Se under "Intet bilde"
ovenfor
Se under "Intet bilde"
ovenfor
Computer viser forvrengte symboler på
skjermen
For varm Trekk ut strømkabelen og
la computeren avkjøles.
(Påse at lufttilførselen
rundt strømkabelen ikke
er hindret).
Sterke forstyrrelser Eldre fjernsynsapparat Drei fjernsynsapparatet.
Juster vertikalen og horisontalen og/eller kontrollknapper for å redusere forstyrrelsene
Page 47

Svenska 47
A 520 RF Modulator/Video Adapter
Innehåll
Vad är A 520 RF-Modulator/Video Adapter? 47
Vad levereras tillsammans med A 520? 47
Vilka kontakter finns? 48
Hur kan jag ansluta min TV? 48
Hur kan jag ansluta min monitor? 49
Om du har några problem... 50
Felsökningstabell 50
Vad är A 520 RF-Modulator/Video Adapter?
A 520 RF-Modulator/Video Adapter är en enhet som låterdig ansluta
din Amiga 500 till en TV eller en videomonitor. Den gör detta genom
att omvandla den RGB-signal, som Amiga avger för RGB-monitorerna till en sammansatt videosignal som en TV eller en monitor kan
använda.
Vad levereras tillsammans med A 520?
- Amiga 520 modulator
- Anslutningskabel till TV
Page 48

48 Svenska
- Y-kabel
- Introduktion till Commodore A 520
Om något av detta skulle fattas eller vara skadat, kontakta din åter-
försäljare.
Vilka kontakter finns?
På framsidan och till höger på A 520
- Video OUT - ansluts till en färgmonitor
- Audio IN - ansluts till Amiga L och R Audio.
- RGB
- kontakten ansluter A 520 till Amiga.
På baksidan av A 520
Omkopplaren för kanalval överensstämmer med TV-kanalen för att
du skall kunna visa datorbilder på din TV-skärm (L = 5,5 MHz; H = 6
MHz).
RF OUT (Radio Frequency Out) ansluts till din TV.
Hur kan jag ansluta min TV?
1. Kontrollera att strömmen är av på både Amiga och din TV.
VARNING: Innan du ansluter några kablar måste du kontrollera att
strömmmen till datorn är avslagen för att undvika skador på någon av
enheterna.
2. Fatta tag i A 520 och placera dess RGB-kontakt i linje med videouttaget på datorns baksida. Dessa två skall passas in med varandra
bara genom en lätt tryckning. (Om de inte gör detta måste du kontrollera att stiften i kontakten har rätta sidan uppåt. Därefter gör du ett
nytt försök).
Page 49

Svenska 49
3. Plugga in kontakten i den ena änden av TV-kabeln i terminalens
VHF-uttag.
4. Plugga in kontakten i den andra änden av TV-kabeln i A 520-uttaget märkt RF OUT.
5. Anslut y-kabelns huvudände i uttaget märkt Audio IN på sidan av
A 520.
6. Anslut y-kabelns andra två ändar i uttagen märkta L Audio och R
Audio på baksidan av Amigan.
7. Sätt kanalväljarens omkopplare på A 520 på L eller H. (L = 5,5 MHz;
R = 6 MHz).
8. Slå på strömmen till både TV och Amiga.
9. Välj samma kanal på din TV.
Hur kan jag ansluta min monitor?
1. Kontrollera att strömmen är av på både monitorn och Amiga.
2. Fatta tag i A 520 och placera dess RGB-kontakt i linje med
videouttaget på datorns baksida.
3. Om monitorn har en egen kabel, ansluter du denna till det uttag
som är märkt Video OUT på A 520. Annars ansluter du TV-kabelns
ena ände till det uttag, som är märkt Video IN på monitorn och den
andra till uttaget Video OUT på A 520.
4. Anslut y-kabelns huvudände i uttaget märkt Audio IN på monitorn.
5. Anslut y-kabelns anndra två ändar till uttagen märkta L Audio och
R Audio på baksidan av Amigan.
6. Slå på strömmen till både monitorn och Amiga. Din Amiga är nu klar
att använda.
Page 50

50 Svenska
Om du har några problem..
Om du inte har en klar bild på skärmen kan du försöka justera inställningarna på din TV eller på monitorn. Det kan hända att du inte får
någon bild alls om inställningarna eller anslutningarna inte är korrekta. I detta fall kontrollerar du alla inställningar och anslutningar.
Ofta kan det räcka med att du byter TV-kanal eller eller justerar ljusinställning.
Felsökningstabellen på följande sidor innehåller några av de vanligaste problem du kan råka ut för och vilka åtgärder du kan vidtaga.
Felsökningstabell
Symptom Orsag Åtgärd
Indikatorlampan lyser
inte
Datorn är inte påslagen Kontrollera att
strömomkopplaren på
din Amiga är i läge ON.
Datorn har inte pluggats
in i vägguttaget.
Kontrollera strömkabelns kontakt och anslutning till vägguttaget.
Ingen bild (monitorn) Monitorn är inte ansluten. Kontrollera
anslutningarna.
Ingen bild (TV) Felaktig anslutning. Kontrollera datorns
anslutning till
VHF-modulatorn.
Bild med svag färg
eller ingen färg alls
Dålig färgjustering Justera färgkontrollerna
på TV: n eller monitorn
Ljud med mycket
störningar eller brus
Ljudvolymen för hög Justera ljudvolymen
Bilden bra, men inget
ljud
Ljudvolymen för låg Justera ljudvolymen
AUX-ingången på för-
stårkaren inte korrekt
ansluten
Koppla in ljudkabeln till
AUX-ingången på förstärkaren och välj AUX
Page 51

Svenska 51
Symptom Orsag Åtgärd
Ljudet bra, men ingen
bild
Se ovan under "Ingen
bild"
Se ovan under "Ingen
bild"
Datorn visar skräptecken på skärmen
Overhettning Dra ur nätkabeln och låt
datorn svalna (se til att
luft kan strömma fritt
kring transformatorn)
Allvarlig bildstörning Äldre TV-modell Vrid TV:n. Justera vertikal
och horisontell bildhållning för att minska bildstörningarna
Page 52

Commodore 41A189-001
 Loading...