

Page 1
User's
for
Manual
CBM
5Y4-inch
Dual
Floppy Disk
Drives
ell
commodore
Page 2
User's
for
Manual
CBM
Dual
Floppys
Model
Model
Appropriate
Commodore
•
Series
Series
•
•
Series
•
Series
Part Number 320899
2040-Model 4040
3040-Model 8050
2001
3000 CBM)
4000
8000 CBM)
Drive
for
use
Computers
(CBM-PET)
PET)
with:
October 1980
(I[
commodore
© 1980 Commodore Business Machines, Inc.
Page 3

Chapter 1
Table of Contents
Introduction.
General Information . . . . . . . . . . . . . . . . . . . . . . . . . . . . . . . . . . . . 2
Description . . . . . . . . . . . . . . . . . . . . . . . . . . . . . . . . . . . . . . . . . . . 3
Care Of The 2040, 3040, 4040 and 8050 . . . . . . . . . . . . . . . . . . . . 9
Care
Unpacking The Disk Drive 9
. . . . . . . . . . . . . . . . . . . . . . . . . . . . . . . . . . . . . . . . . . . . . 1
Front Panel 3
Back Panel 3
Interior Configuration 4
The Diskette . . . . . . . . . . . . . . . . . . . . . . . . . . . . . . . . . . 5
Specifications . . . . . . . . . . . . . . . . . . . . . . . . . . . . . . . . . 5
Of
The Diskettes 9
Page
Chapter 2
Chapter 3
Preparing To
Connecting The Disk Drive To The Computer 11
Performing The Power-On Test 12
Inserting The Diskette Into The 8050 13
Learning How To
The Block Availability
The Disk Operating System (DOS) , 22
Disk Maintenance Commands. . . . . . . . . . . . . . . . . . . . . . . . . . .
Use
Your Disk Drive 11
Inserting The Diskette Into The 2040, 3040 and 4040
The 4040 and 8050 Performance Test 14
The 2040 and 3040 Performance Test 17
Use
Your Floppy Disk Drive
Map
(BAM)
NEW
HEADER (BASIC 4.0 Direct Command) . .
Initialization (2040 and 3040) . . . . . . . . . . . . . . . . . .
Initialization (4040) . . . . . . . . . . . . . . . . . . . . . . . . . .
Initialization (8050) . . . . . . . . . . . . . . . . . . . . . . . . . .
The Directory. . . . . . . . . . . . . . . . . . . . . . . . . . . . . . .
LOAD$ 26
DIRECTORY (BASIC 4.0 Direct
Printing The
Directory.
. . . . . . . . . . . . . . .
Command).
..
13
21
22
..
23
24
..
25
..
25
..
26
..
26
..
26
27
..
27
iii
Page 4
VALIDATE..................................
COLLECT (BASIC 4.0 Direct Command). .
28
..
28
DUPLICATE 28
..
29
29
..
31
..
31
COpy
BACKUP (BASIC 4.0 Direct Command). . .
COpy
(BASIC 4.0 Direct Command) . . . . .
CONCAT (BASIC 4.0 Direct Command). . .
RENAME 31
..
RENAME (BASIC 4.0 Direct Command) . .
32
SCRATCH 32
..
SCRATCH (BASIC 4.0 Direct Command). .
33
Chapter 4
Chapter 5
BASIC Commands For Data Handling 35
..
BASIC Commands Associated with Floppy Disk Drives . . . . . . .
to
SAVE and DSAVE (Writing a Program
a Diskette) .
35
..
36
LOAD and DLOAD (Reading a Program from a
Diskette) 36
VERIFy.....................................
37
OPEN 38
DOPEN 39
CLOSE......................................
39
DCLOSE 40
Closing The Command Channel 40
Closing The Data Channel 41
PRINT# . . . .
.. ..... .... . . . . .
.. ..
..
.
..
41
INPUT# 42
GET#
43
RECORD# 43
Quickload Feature (BASIC 4.0)
to
Moving a Tape Program
Disk 45
. . . . . . . . . . . . . . . . . . . . . . .
..
44
..
Advanced Disk Programming 47
Commodore Disk Operating System (DOS) 47
..
Disk Utility Command Set . . . . . . . . . . . . . . . . . . . . . . . . . . . . .
BLOCK-READ................................
BLOCK-WRITE. . . . . . . .
......
. .... ..... ..
. . .
48
49
..
50
BLOCK-EXECUTE 50
..
BUFFER-POINTER . . . . . . . . . . . . . . . . . . . . . . . . . .
..
BLOCK-ALLOCATE "
. . . . . . . . . . . ....
50
..
51
MEMORy 51
MEMORY-WRITE
MEMORY-READ. . . . . . . . . . . . . . . . . . . .
51
..
52
MEMORY-EXECUTE 52
USER.......................................
8050
Disk Zones 59
52
Chapter 6
IV
Advanced File Handling . . . . . . . . . . . . . . . . . . . . . . . . . . . . . . . . . . .
Special Open and Close Statements For Direct Access . . . . . . . .
Random Access Example . . . . . . . . . . . . . . . . . . . . . .
To Create A File . . . . . . . . . . . . . . . . . . . . .
To Add A
Record.
. . . . . . . . . . . . . . . . . . .
To See A Record 68
To Change A Record 68
Getting The Directory of Listings . . . . . . . .
..
65
..
65
..
66
..
66
..
67
..
69
Page 5
Ending The Program . . . . . . . . . . . . . . . . . .
Relative Files 4040, 8050 . . . . . . . . . . . . . . . . . . . . . .
Creating A Relative File
Expanding A Relative File 72
Accessing A Relative File . . . . . . . . . . . . . . . . . . . . . .
..
. . . . . . . . . . . . . . . . . . . . .
..
69
..
69
..
72
..
73
Chapter 7
Chapter 8
Chapter 9
Chapter 10
Simplifying The
Loading The
Using The
Loading A Program With The
Loading And Running A Program With
Special
Error Messages - Pattern Matching File Names - Disk Commands. . .
Requesting Error Messages: Commodore Disk Drives. . . . . . . . .
Summary Of
Description of
Pattern Matching 85
User's Quick Reference: Disk Commands. . . . . . . . . . . . . . . . . .
Random 1.00 Program Listing 89
Index , . . . . . . . . . . . . . . .
Use
of Commodore Disk-Related
DOS
Support Program . . . . . . . . . . . . . . . . . . . . . .
DOS
Support Symbols: >and @ . . • • . • • . • . • . • • . •
Commands.
. . . . .
1. ... . . . . . . . . . . . .. . . . . . . . . .
Up
Arrow... . . . . . . . .
DOS
Support Information 79
CBM
Floppy Error Messages 82
DOS
Error Messages 82
List of Illustrations
Figure Title
1 Models 2040, 3040, 4040, 8050: Rear View 5
2 Floppy Disk Hookup 12
3 Position For Diskette Insertion 13
4
5 8050 Format: Expanded View of A Single Sector 63
2040,3040,4040
Format: Expanded View of A Single Sector 62
..
77
..
77
.•
78
..
78
..
79
..
81
..
81
..
86
..
95
Page
List of Tables
Table Title
1 Suggested Reading List . . . . . . . . . . . . . . . . . . . . . . . . . . . . . . . . . . . . . . 4
2 Specifications: Model 8050 Dual Drive Floppy Disk 6
3 Specifications: Models
4 Specifications: Model 4040 Dual Drive Floppy Disk 8
5 Standard Jump Table . . . . . . . . . . . . . . . . . . . . . . . . . . . . . . . . . . . . .
6 Block Distribution
7
8
9 4040
10
11 8050 Directory Header
12
2040,3040
2040,3040
BAM
4040 Directory Header. . . . . . . . . . . . . . . . . . . . . . . . . . . . . . . . . . . .
8050
BAM
BAM
Directory
Format.
Format.
2040/3040 Dual Drive Floppy
By
Track 54
Format.
. . . . . . . . . . . . . . . . . . . . . . . . .... . . . . . . . . . .
. . . . . . . . . . . . . . . . . . . . . . . . . . . . . . . . . . . . . .
. . . . . . . . . . . . . . . . . . . . . . . . . . . . . . . . .
Header.
Block.
. . . . . . . . . . . . . . . . . . . . . . . . . . . . . .
. . . . . . . . . . . . . . . . . . . . . . . . . . . . . .
Disk.
. . . . . . . . . 7
Page
..
53
..
55
..
55
..
56
..
56
..
57
..
58
v
Page 6
13
14
15
16
17
Directory
Sequential Format
Program File Format
Relative File Format 70
User's Quick Reference - Disk Commands 87
Format.
. . . . . . . . . . . . . . . . . . . . . . . . . . . . . . . . . . . . . . .
..
60
61
61
vi
Page 7
Chapter
1
INTRODUCTION
The disk-oriented Commodore Computer System
of providing you, the user, with large file-handling capabilities supported by
gramming commands and further simplified by
Read the Table of Contents and become acquainted with the broad scope of material
in
covered
gram by utilizing the computer
drive
ment of the system
tionship
That's why it
Grasping and understanding the concept that each individual component acts and reacts to
signals and commands from other devices in the system will greatly accelerate your fundamental grasp of how
the basis of this manual: teaching you how to gain mastery of the system so that it will
perform as desired. That
fashion: it permits you
The first chapters discuss basic hardware features and permit you, right from the start,
become familiar with the disk drive by doing the performance tests which comprise the first
essential "hands
learning
more comprehensive subjects.
this manual.Ithas been designed to assist you in pursuing an educational pro-
as
an adjunct to the learning process. That is, once the disk
is
properly interfaced to a Commodore Computer,
as
the hardware. Your importance, however,ismeasured in direct rela-
to
how well you understand howtoeffectively utilize the hardware and software.
is
besttothink of your computer and disk driveasonly part of a system.
to
operate, control, and master the system. This basic concept forms
is
the primary reason this manualislaid
to
advanceasfast as you desire.
on"
experience. Then, by actually using your particular disk drive and
to
carefully follow instructions, you can gain confidence in order to proceed
was
designed around the central concept
DOS
Support command abbreviations.
YOU
become as important an ele-
outina building block
BASIC
pro-
to
to
By
the time you begin Chapter 3-Learning How To
have already used some portions of the
until Chapter 7. The reason for this procedure lies within the purpose of
simplifying commands.
command structure of
archy at an early stage. This concept of providing you with enough essential information
complete a task, a step-by-step description of the task, and meaningful examplesisa feature
of this manual which will provide you with sufficient incentive to actually complete the
task.
It
is
actually easier to instruct a new user by using the simplified
DOS
Support than attempting to explain the entire command hier-
DOS
Support system whichisnot fully described
Use
Your Floppy Disk Drive-you will
DOS
Support:
to
1
Page 8
The manner in which this manual
Difficult concepts and procedures have been broken down
through examples which provide ample
each command description. When possible,
command description and,asan
Chapter 8 for easy access if problems persist.
is
laid
out
encourages
opportunitytoexperiment laterbyreturning
the
command
additional aid, a User's Quick Reference has been placed in
the
conceptoflearningbydoing.
into
steps
that
walk
the
user
format
has been included with
to
the
Error messages are also presented in Chapter 8 where
needed. The Error Message discussions have been expanded
• How
• Error message summary.
• Detailed error message descriptions.
For
those users who have been reluctanttoattempt
sumed degree
manual from least difficult
• Commands for file manipulation and maintenance
• Commands for
• Advanced programming
• Advanced file handling
• Simplified commands
Users who have
advanced subjects such as random access or relative files while others may be
just following
the
user with essential information in a logical sequence. Follow
step-by-step procedures, and learnbydoing.
With
the
the
computing powerofyour
should study
1. You will benefit most if
Table
those features
CBM
Floppys.
to
request error messages.
of
difficulty,
data
attained
the
manual's format. In either case, this manual has been laid
purchaseofyour
your
computer's
that
relatetoyour
note
that
the
entire disk command hierarchyisstructured in this
to
more complex:
handling
some degreeofprogramming skills may desiretobegin with
Commodore Dual Drive
Commodore system.
user guide, and if necessary
you
first read through this entire manual, taking
particular floppy as well as those which are
they
can be quickly referenced, if
to
include:
disk programming becauseofthe
the
examples,
GENERAL
Floppy
To
get
Disk
the
the
you
most
BASIC manuals listed in
INFORMATION
have greatly enhanced
outofyour
pre-
the
content
outtoprovide
attempt
commontoall
system
note
with
the
you
of
The information presented in this manual is extensive and may, in some cases, present in-
formation
and thoughtfully studying its
sively upgrade
This manual presents discussions, descriptions, practices and procedures relating
and operation
Four
2
thatiscurrently
your
programming skills and expertise.
of
all Commodore 5-1I4-inch Dual
models are discussed:
Model
Model
Model
Model
2040
3040
4040
8050
(DOS
(DOS
(DOS2)
(DOS 2.5)
1)
1)
beyond
contents
your particular levelofexpertise. However, by carefully
you
will gain
the
Floppy
confidence necessarytoprogres-
to
Disk Drives.
the
use
Page 9

The floppys are operationally compatible with the following Commodore Computers.
1. Series 2001
2. Series 2001 - PET 8K - Upgraded to BASIC Version 3.0
3. Series 3000 - 16K and 32K - Operating
4. Series 4000 - PET 8K, 16K, and 32K - Operating
5. Series 8000 - 32K - Operating
For ease of reference, the Models 2040,
Disks will
and
noted otherwise.
-16K
be
referred to in this manualas"the
"the
8050", respectively.
and 32K - Operating With BASIC Version 3.0
With
BASIC Version 3.0
With
BASIC Version 4.0
With
BASIC
All
descriptions and discussions are common unless
Version 4.0
3040,4040,
2040",
and 8050 Dual Drive Floppy
"the
3040",
"the
4040",
DESCRIPTION
All
CBM
Floppys describedinthis manual are dual-drive diskette storage devices. Their
individual primary components consist of read/write controls, drive motor electronics, two
drive mechanisms, two read/write heads, and track positioning mechanisms.
discussed
is
an "intelligent" peripheral, their operation requiresnospace in the computer's memory.
This means you have just
have the disks attached.
in
this manual conform to IEEE-488 interface requirements. Because each device
as
much computer memory availabletoyouaswhen you do not
All
disk drives
Front Panel
The front panel of the respective disk drive consists of an identification panel across the top;
in
slots
the doorisclosed, the disketteisclamped onto the diskette spindle hub. Also on the front
panel are three LED indicator lights. The one on the right
cator, and lights when drive 0
the 8050, the LED in the middleisa two-color power/error indicator. Itisnormally green,
indicating power
4040 the middle LED
occurs.
whichtoinsert two diskettes; and doors to close after inserting the diskettes.
is
called the Drive 0 Active Indi-
is
active. The LED on the left does the same for drive 1.
ON
but flashes red whenever a disk error occurs. On the 2040, 3040, and
is
activated if powerisapplied or removed, and whenever an error
When
On
Back Panel
The back of each disk drive contains an IEEE-488 interface connector. Near the panel's
is
lower edge
power cord.
the power ON/OFF switch. Thereisalso a "slow blow" fuse, and the
AC
3
Page 10
Table 1. Suggested Reading List
ICBM Personal
Pet
Computer
Guide.
C.S.Donahue andJ.K. Enger, Osborne/McGraw-Hill,
Berkeley,
CA
94710
Hands-On Basic with a Pet.
H. D. Peckham,
McGraw-Hill,
1979
Entering BASIC.
J.
J. Sack and
BASIC: A
C.
Pegels, Holden-Day, Inc.,
Computer
Meadows, Science Research Associates,
Programming Language.
1973
BASIC Programming.
J. Kemeny and T. Kurtz,
3100), Menlo Park, CA
BASIC
FOR
HOME COMPUTERS.
Albrecht, Finkle
3100), Menlo Park,
A Guided
TourofComputer
T. Dwyer,
Houghton Mifflin Co.,
Peoples
94025,
and
Brown, Peoples
CA
94025,
Programming in BASIC.
Computer
1967
Computer
1973
1973
Programing Time Shared Computer in BASIC.
Eugene H. Barnett,
Programming Language
Digital
101 BASIC
Equipment
Computer
Software Distribution Center,
Wiley-Interscience, LIC 72-175789
#2.
Corp., Maynard,
MA
01754
Games.
Digital
Equipment
WhatdoTo After You Hit Return.
Peoples
Computer
Co.,
1010
Doyle (P.O. Box
Basic BASIC.
S.
James
WORKBOOKS
T.I.S., P.O. Box 921, Los Alamos,
Programming
R. Zaks,
Coan, Hayden
1-5.
the
6502.
Sybex,
1978
Book
Co., Rochelle Park, NJ
NM
87544
24 Tested, Ready-to-Run Game Programs in Basic.
K.
Tracton, Tab Books,
1978
Some Basic Programs.
M.
Borchers and R. Poole, Osborne & Assoc. Inc.,
Basic Programming for Business.
I.
H. Forkner, Prentice-Hall,
1977
The Channel Data Book.
B. Lewis,
PET and
Osborne/McGraw-Hill,
the
5960
IEEE
Mandarin Ave., Goleta, CA
488
Bus (GPIP).
630
Bancroft Way, Berkeley,
93017,1978
Co.,
1010
Co.,
1010
Corp., Maynard,
3100),
1978
CA
630
Bancroft Way,
1973
Doyle (P.O. Box
Doyle (P.O. Box
MA
Menlo Park,
CA
94710
01754
94025
The interiorofyour
tained within
disk spindles.
4
floppy contains two disk drives. All
the
unit. The mechanical devices are, for
Interior Configuration
the
logic for
the
most part, located beneath
the
disk drive is con-
the
Page 11
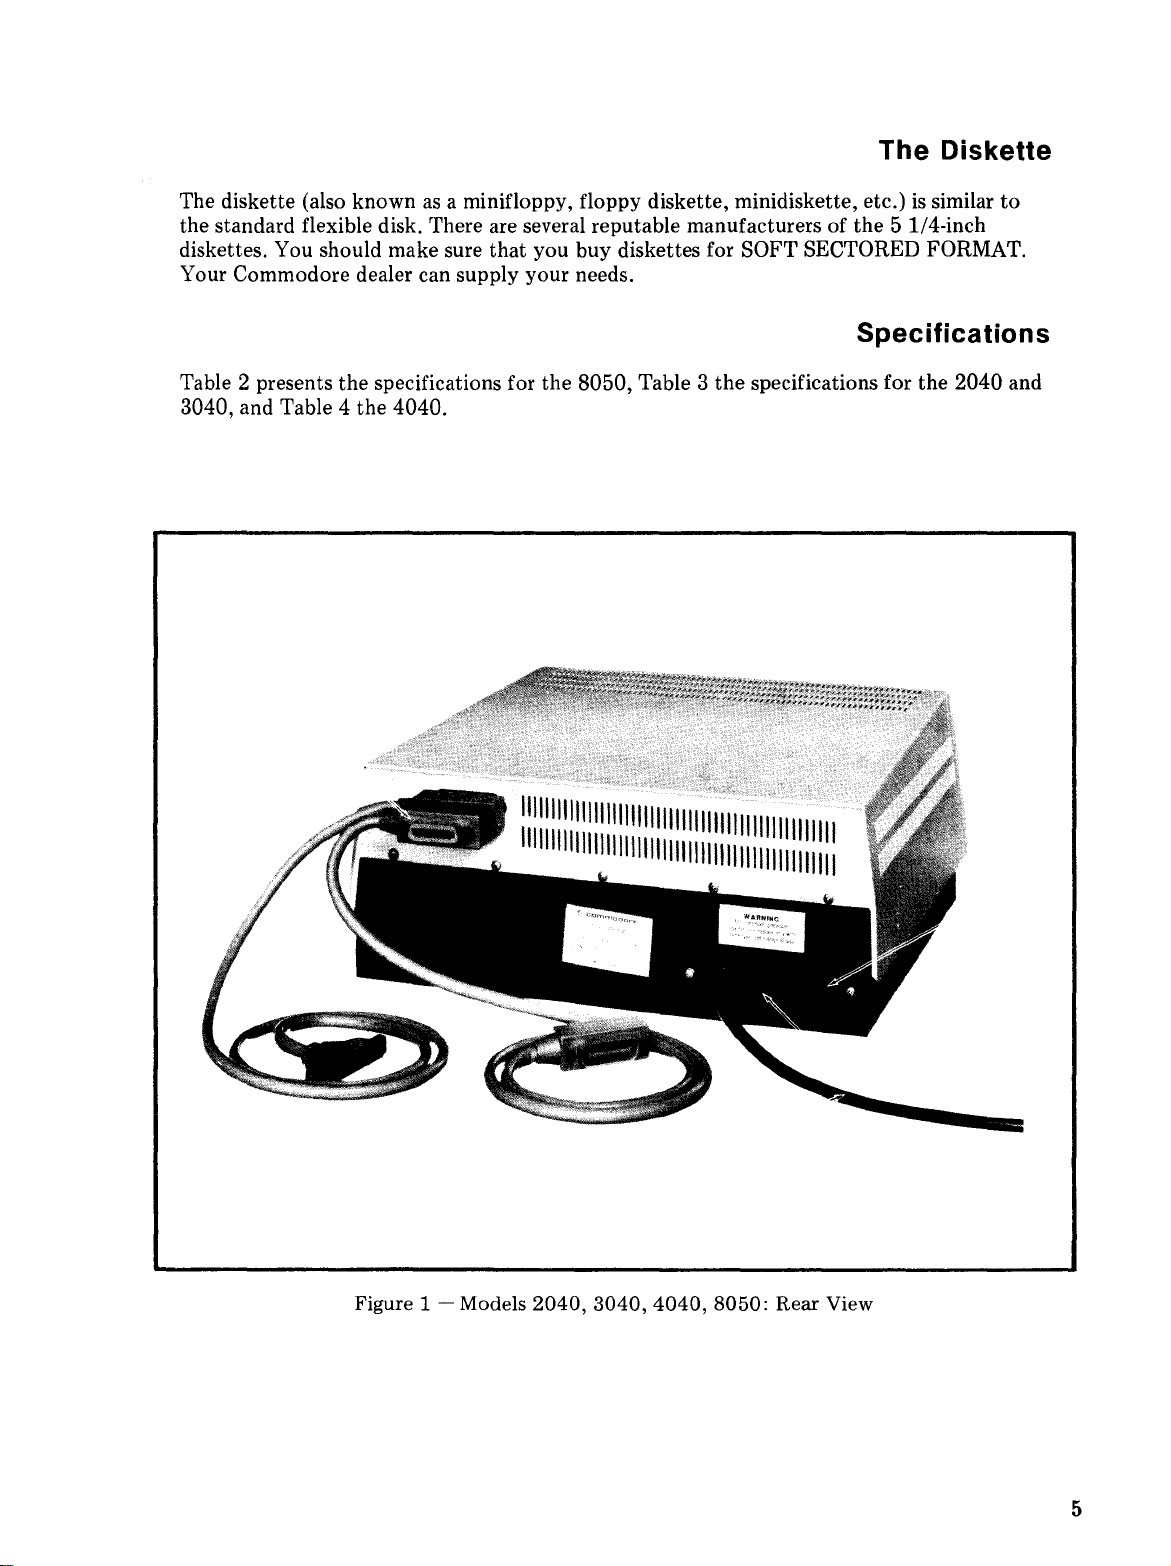
The Diskette
The diskette (also knownasa minifloppy, floppy diskette, minidiskette, etc.)issimilar
the standard flexible disk. There are several reputable manufacturers of the 5 1/4-inch
diskettes. You should make sure that you buy diskettes for SOFT SECTORED FORMAT.
Your Commodore dealer can supply your needs.
to
Specifications
Table 2 presents the specifications for the 8050, Table 3 the specifications for the 2040 and
3040, and Table 4 the 4040.
Figure 1 - Models
2040,
3040,
4040,
8050:
Rear View
5
Page 12
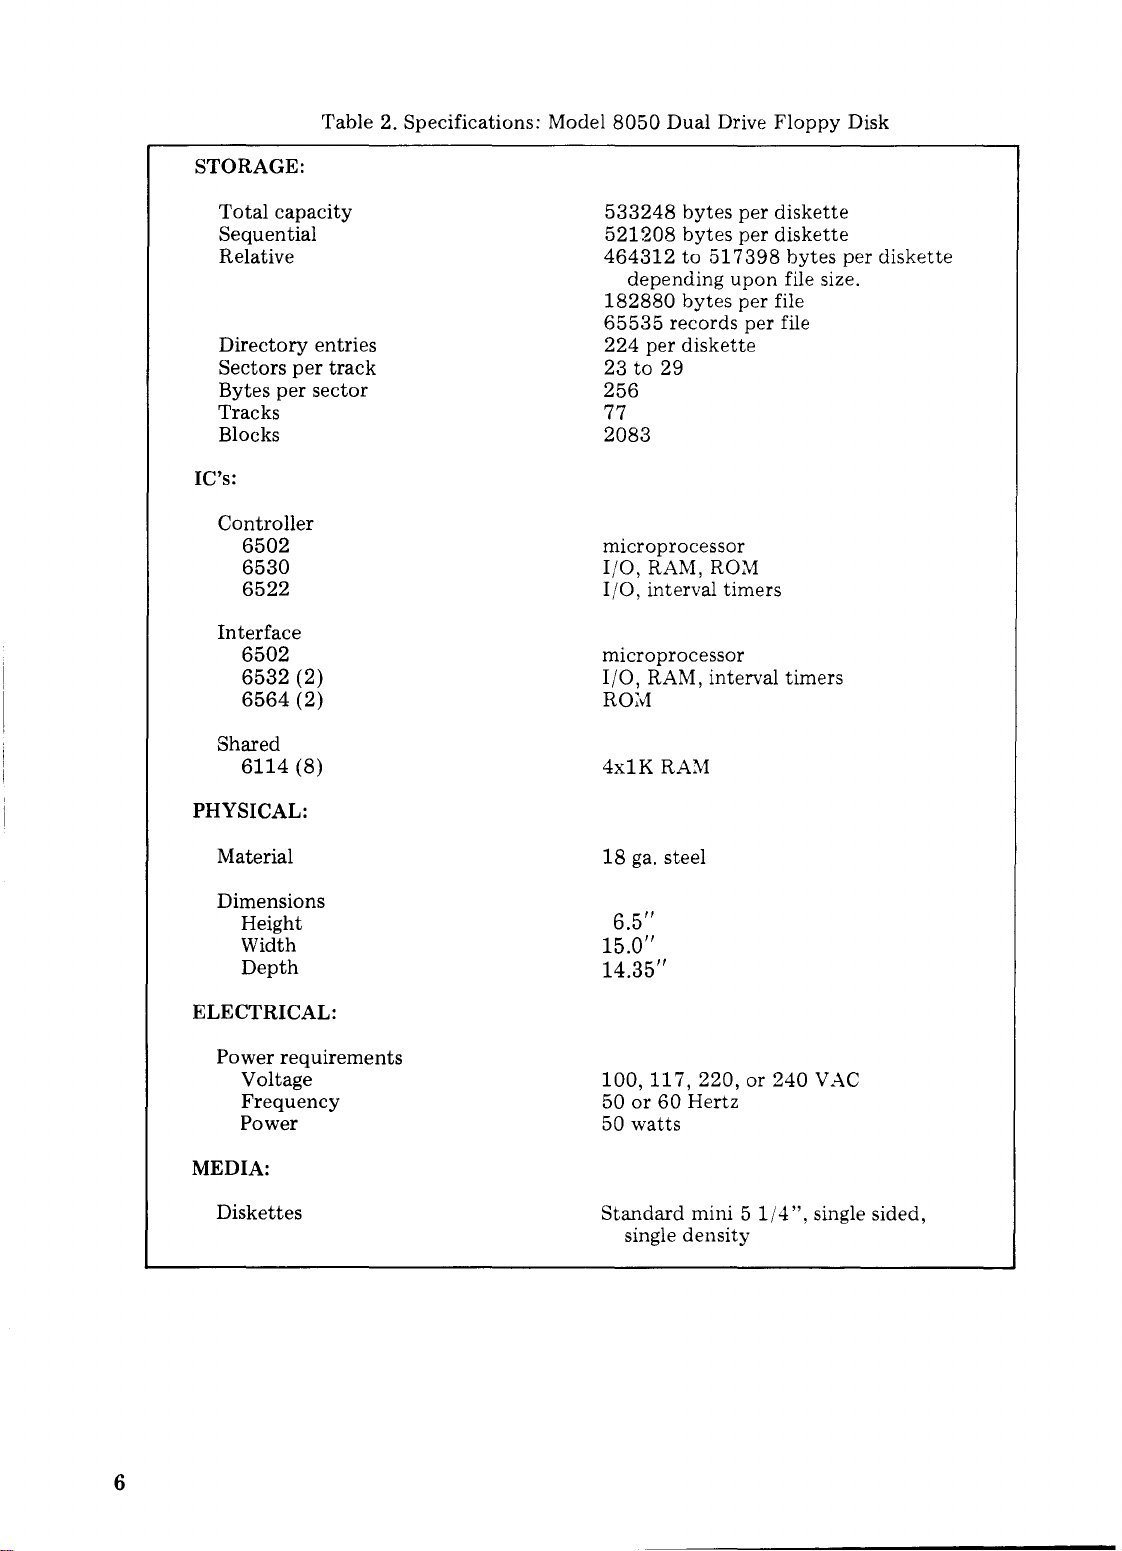
STORAGE:
Total
capacity
Sequential
Relative
Directory
Sectors
Bytes
per
Tracks
Blocks
IC's:
Controller
6502
6530
6522
Interface
6502
6532
6564
entries
per
sector
(2)
(2)
Table
2. Specifications: Model
track
8050
Dual Drive
533248
521208
bytes
bytes
per
per
464312to517398
depending
182880
65535
224
per
records
upon
bytes
diskette
per
per
23to29
256
77
2083
microprocessor
I/O,
RAM, ROM
I/O,
interval
microprocessor
I/O,
RAM, interval
RO~v1
timers
Floppy
diskette
diskette
bytes
file size.
file
file
timers
Disk
per
diskette
Shared
6114
(8)
PHYSICAL:
Material
Dimensions
Height
Width
Depth
ELECTRICAL:
Power
MEDIA:
Diskettes
requirements
Voltage
Frequency
Power
4x1K
RAM
18
gao
steel
6.5/1
15.0/1
14.35/1
100,117,220,
50or60
50
Standard
single
Hertz
watts
mini 5
density
or
1/4",
240
VAC
single sided,
6
Page 13
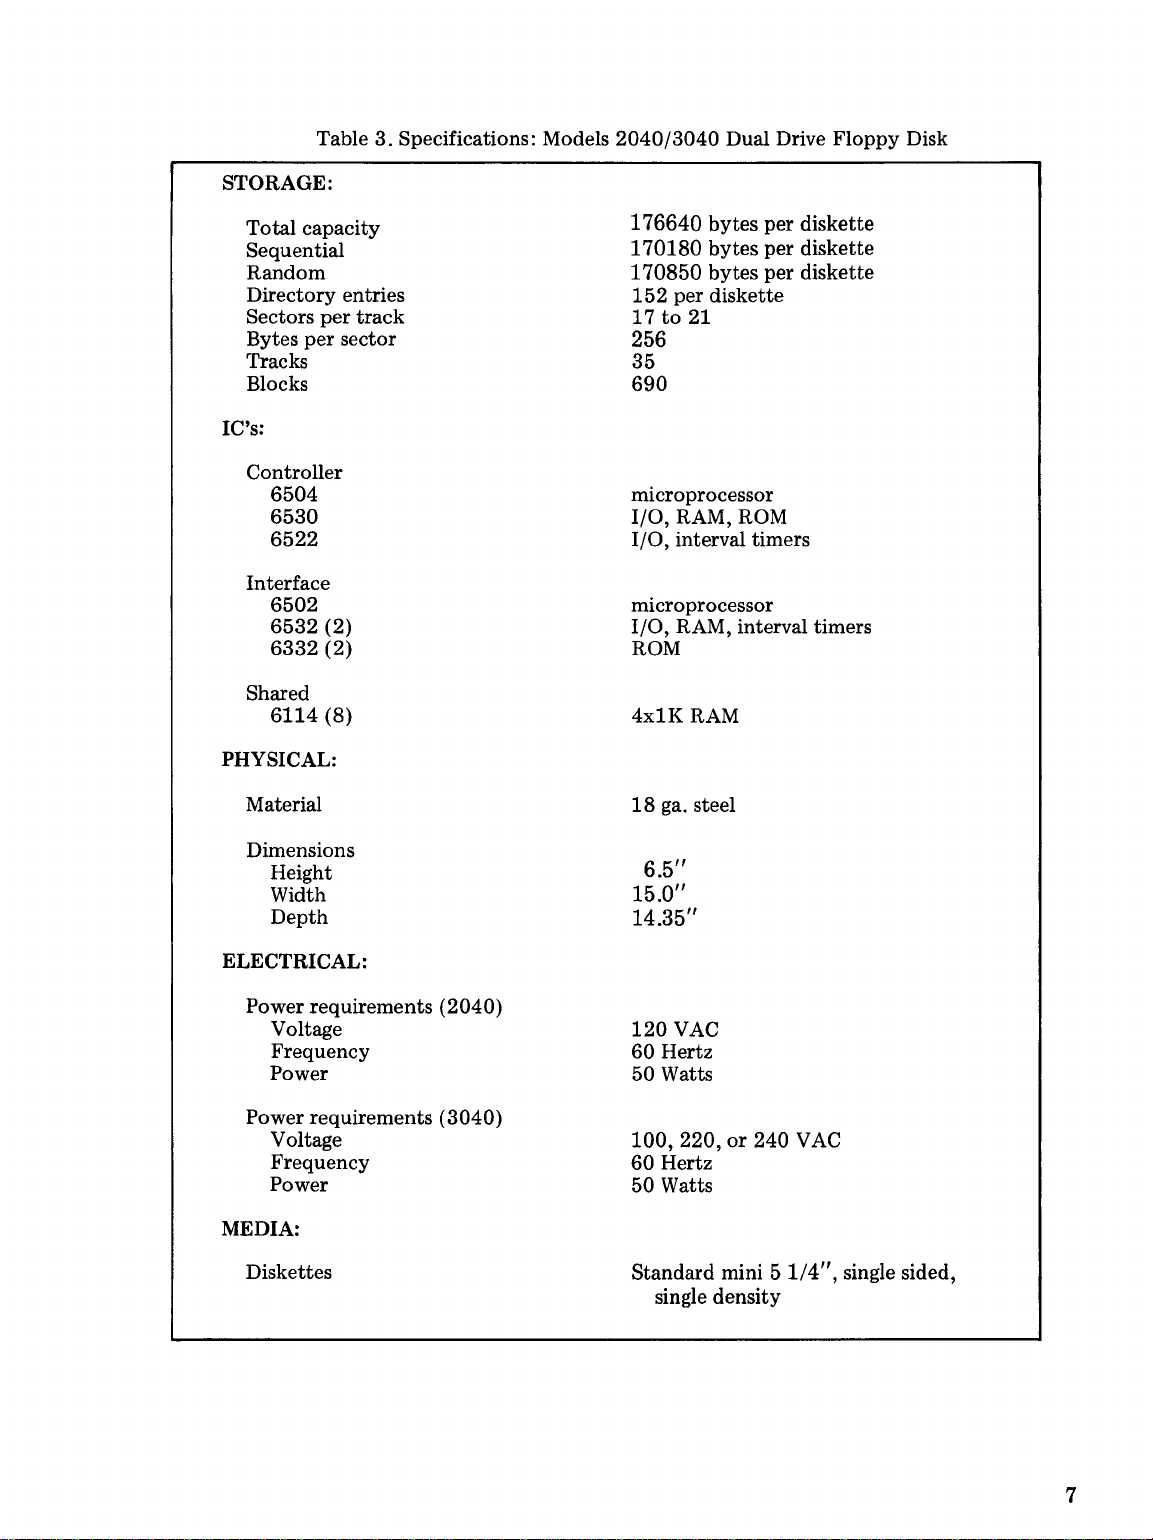
Table 3. Specifications: Models
STORAGE:
2040/3040
Dual Drive Floppy Disk
Total capacity
Sequential
Random
Directory entries
Sectors
Bytes
per
per
sector
Tracks
Blocks
IC's:
Controller
6504
6530
6522
Interface
6502
6532
(2)
6332
(2)
Shared
6114
(8)
PHYSICAL:
track
176640
170180
170850
152
17to21
bytes per diskette
bytes per diskette
bytes per diskette
per diskette
256
35
690
microprocessor
I/O, RAM, ROM
I/O, interval timers
microprocessor
I/O, RAM, interval timers
ROM
4xlK
RAM
Material
Dimensions
Height
Width
Depth
ELECTRICAL:
Power requirements
Voltage
Frequency
Power
Power requirements
Voltage
Frequency
Power
MEDIA:
Diskettes
(2040)
(3040)
18
gao
steel
6.5"
15.0"
14.35"
120
VAC
60
Hertz
50 Watts
100,
220,or240 VAC
60
Hertz
50
Watts
Standard mini 5
single density
1/4",
single sided,
7
Page 14
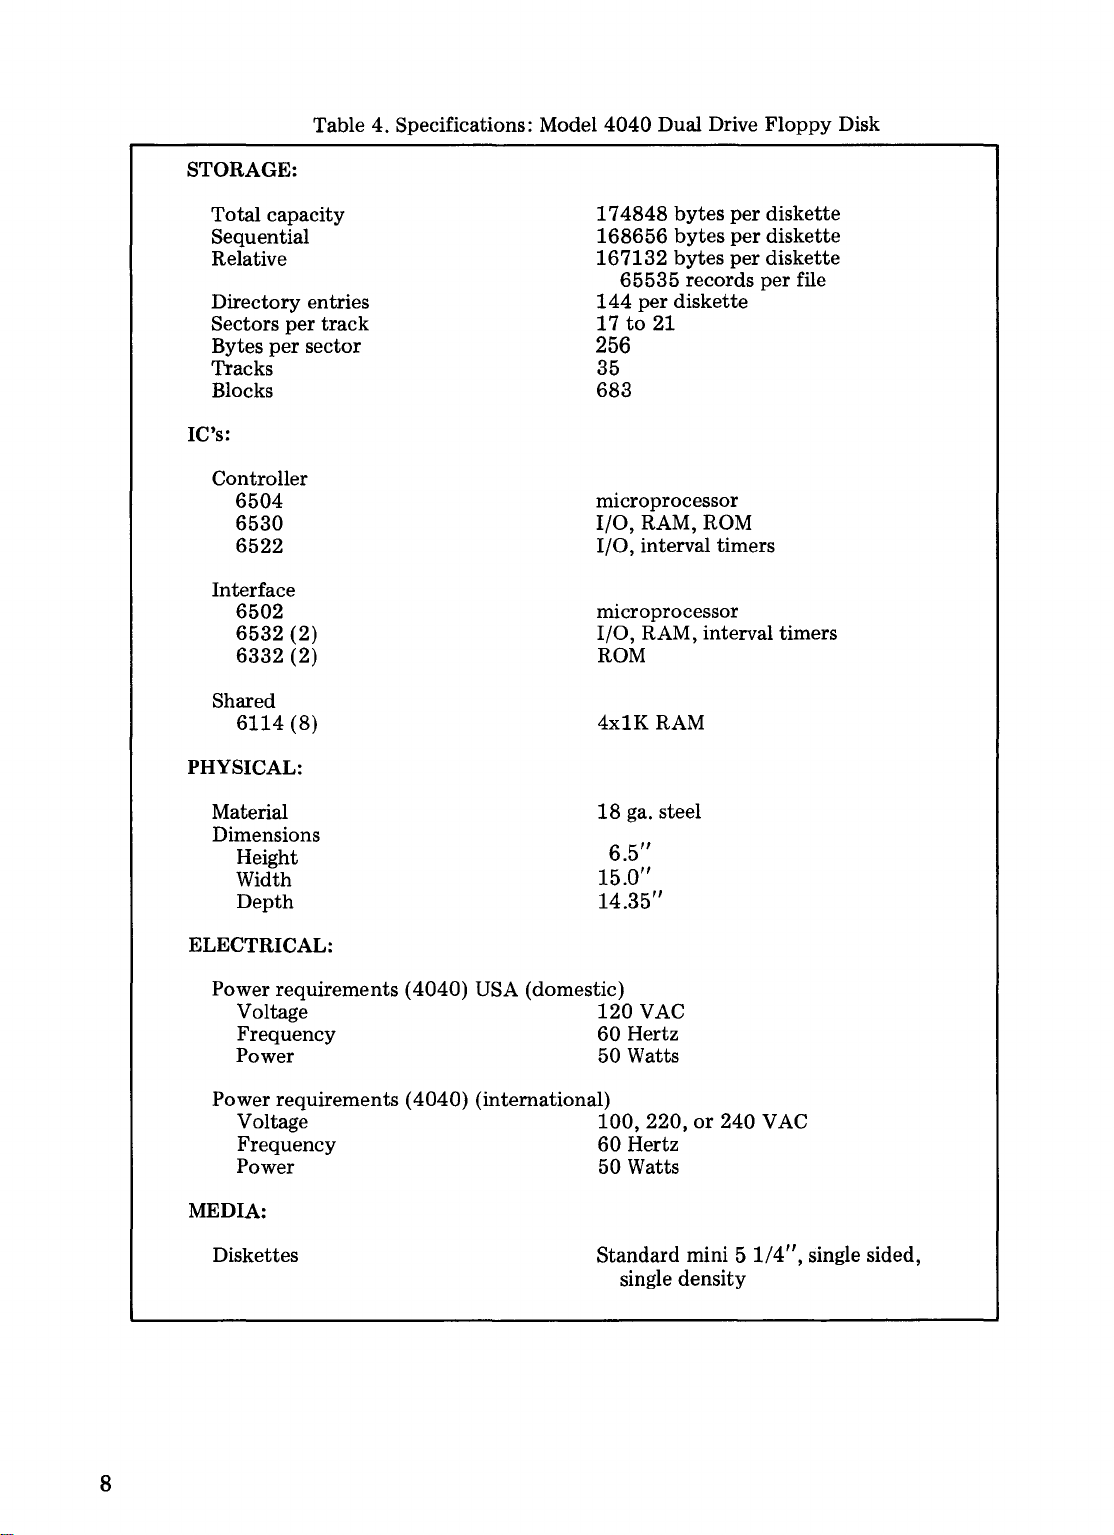
STORAGE:
Table4.Specifications: Model
4040
Dual Drive
Floppy
Disk
Total capacity
Sequential
Relative
Directory entries
6504
6530
6522
6502
6532
6332
6114
per
per
sector
(2)
(2)
(8)
Sectors
Bytes
Tracks
Blocks
IC's:
Controller
Interface
Shared
PHYSICAL:
track
174848
168656
167132
144
17to21
65535
per
bytes
per
bytes
per
bytes
per diskette
records
diskette
diskette
diskette
per
file
256
35
683
microprocessor
I/O,
RAM, ROM
I/O, interval timers
microprocessor
I/O, RAM, interval timers
ROM
4x1K RAM
18
gao
Material
Dimensions
Height
Width
Depth
ELECTRICAL:
Power requirements (4040) USA (domestic)
Voltage
Frequency
Power 50 Watts
Power requirements (4040) (international)
Voltage
Frequency
Power 50 Watts
MEDIA:
Diskettes Standard mini 5
15.0"
14.35"
120
60
100,220,or240 VAC
60
steel
6.5"
VAC
Hertz
Hertz
single density
1/4",
single sided,
8
Page 15

CARE OF THE 2040, 3040, 4040 AND 8050
The disk drive should be placed on a flat surface free of vibration. Itisimportant that dust
particles be kept at a minimum since a particle buildup will interfere with optimum opera-
If
tion.
attempt
you should experience a hardware failure contact your Commodore dealer. Any
to
correct the problem yourself could result in voiding the warranty.
CARE OF THE DISKETTES
Handle diskettes with care. Follow these instructions to maintain the quality of the diskette
and
to
protect the integrity of the data:
1. Return the diskette to its storage envelope whenever it
2.
Keep the diskettes away from magnetic fields. Exposuretoa magnetic field can distort
the data.
3. Never leave a diskette on top of your computer or disk drive.
4. Do
5.
6. Do not touch or attempt to clean the diskette surface. Abrasions will cause loss of stored
7. Before applying power
not
write on the plastic jacket with a lead pencil or ball-point pen.
or fill out the label before attaching it
Do
not expose diskettestoheat or sunlight.
data.
to
the 2040, 3040, or 4040 open the drive doors and remove
diskettes.
to
the jacket.
is
removed from the drive.
Use
a felt tip pen
UNPACKING THE DISK DRIVE
Before unpacking the disk drive, inspect the shipping carton for signs of external damage.
the cartonisdamaged, be especially careful when inspecting its contents. Carefully remove
all
packing material and the contents of the carton.
until you have made sure you have located all the contents of the carton! The carton
should contain:
DO
NOT discard any packing material
If
1. Commodore Dual Floppy Disk Drive
2. User Manual, Number 320899
3. One of the following TEST/DEMO diskettes:
a. 2040/3040/4040 TEST/DEMO diskette, PIN 4040037
b. 8050 TEST/DEMO diskette, PIN 8050050
If
any items are missing, please contact your Commodore dealer immediately.
9
Page 16
Chapter
2
PREPARING
YOUR
Before starting to use your disk drive, make sure itisin good working condition. This in-
to
cludes properly connecting it
test, and finally the performance test using the appropriate TEST/DEMO diskette.
CONNECTING THE DISK DRIVE TO THE COMPUTER
One of two connector cables are requiredtointerface the floppytothe computer. These
cables can be supplied by your Commodore dealer.
1.
PET-to-IEEE cable, PIN 320101
Use
this cable if the disk driveisto
computer.
2. IEEE-to-IEEE cable,
Use
this cable if your disk driveisto
pheral device such
printer.
PIN
as
the Commodore Model 2022, or any other suitable interfaced
your computer,
be the only (or first) IEEE device connectedtoyour
905080
be connected ("daisy-chained") to another peri-
DISK
giving
it a power-on and initial checkout
TO
USE
DRIVE
NOTE: The disk drive should be the first peripheral attached
vices are
Follow these steps
STEP 1: Turn power OFF
STEP 2: Place the disk drive in a convenient location
STEP
STEP 4: Connect the disk drive power cable to an
to
be "daisy-chained".
to
connect the disk drivetoyour computer:
to
the computer.
as
closeaspossibletothe computer.
DO
NOT connect the disk drivetoa power outlet at this time.
3:
Connect the PET-to-IEEE cable between the IEEE-488 interface connector on the
AC
If
outlet.
computer and the connector on the disk drive.
be
connected, the IEEE-to-IEEE cable(s) must be used.
this time.
to
the computer if other de-
additional IEEE devices are
DO
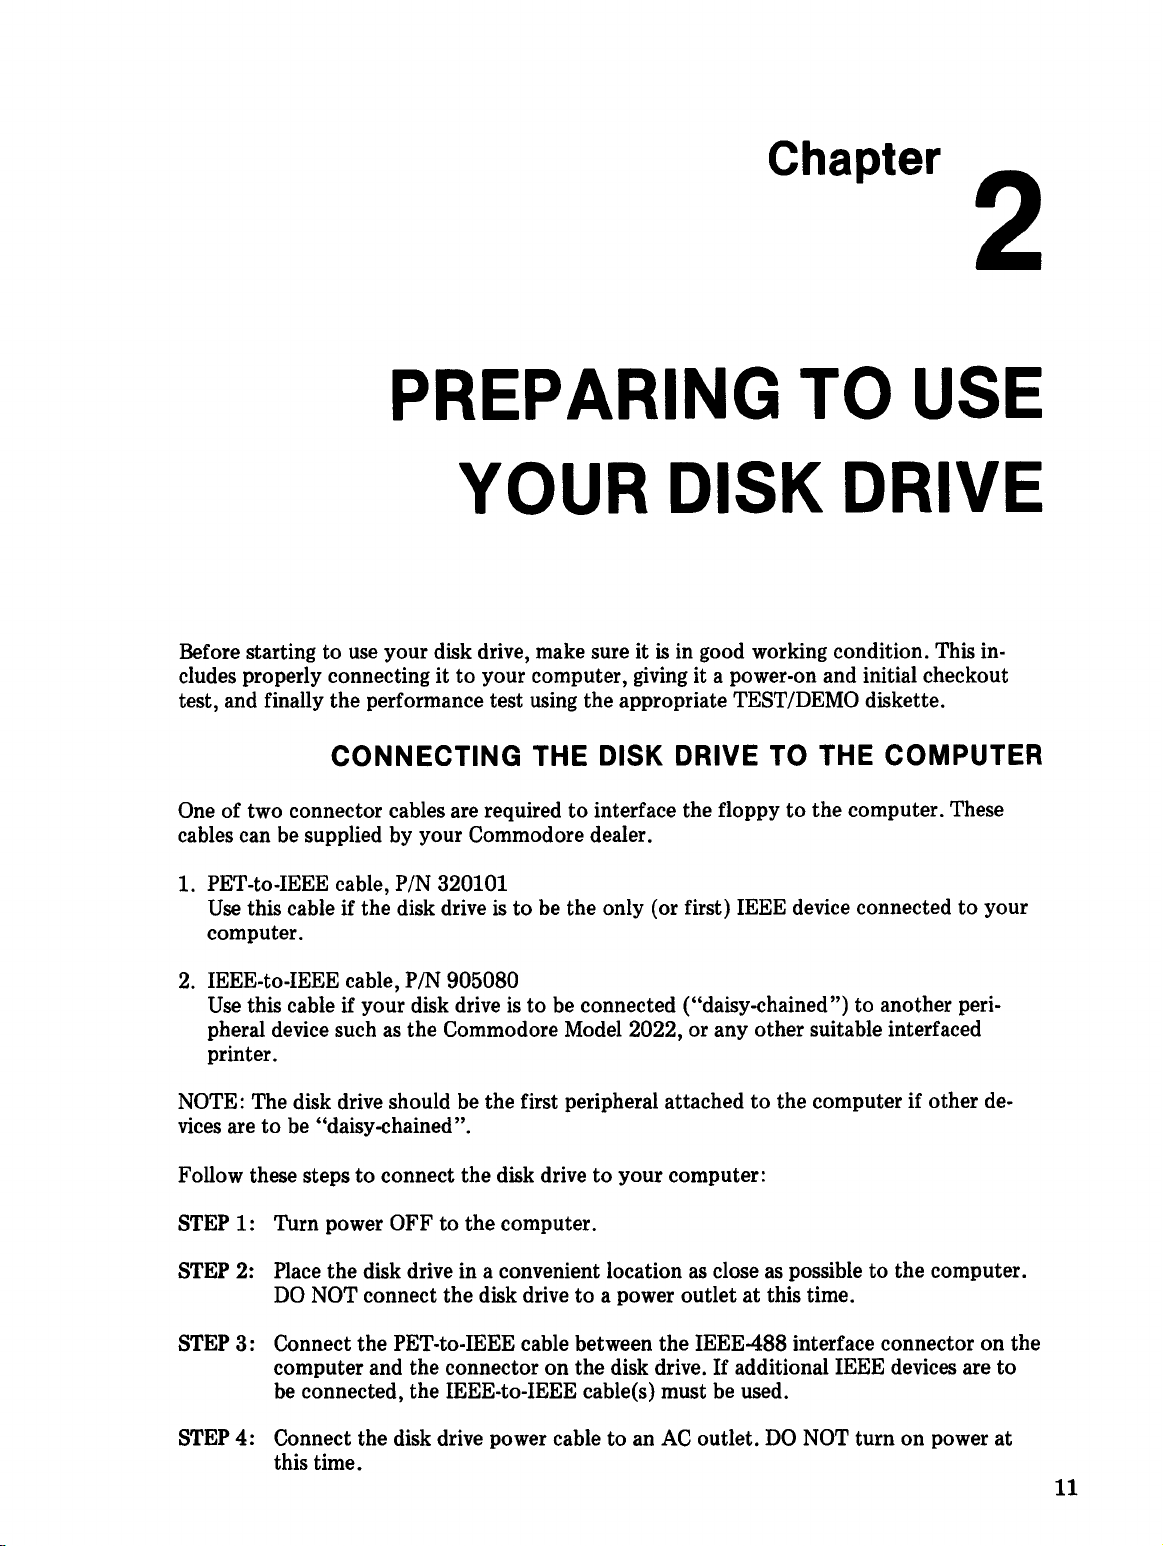
NOT turn on power at
to
11
Page 17
Floppy
Disk
IEEE-la-IEEE
(PIN 905080)
Prinler
Figure 2 - Floppy Disk Hookup
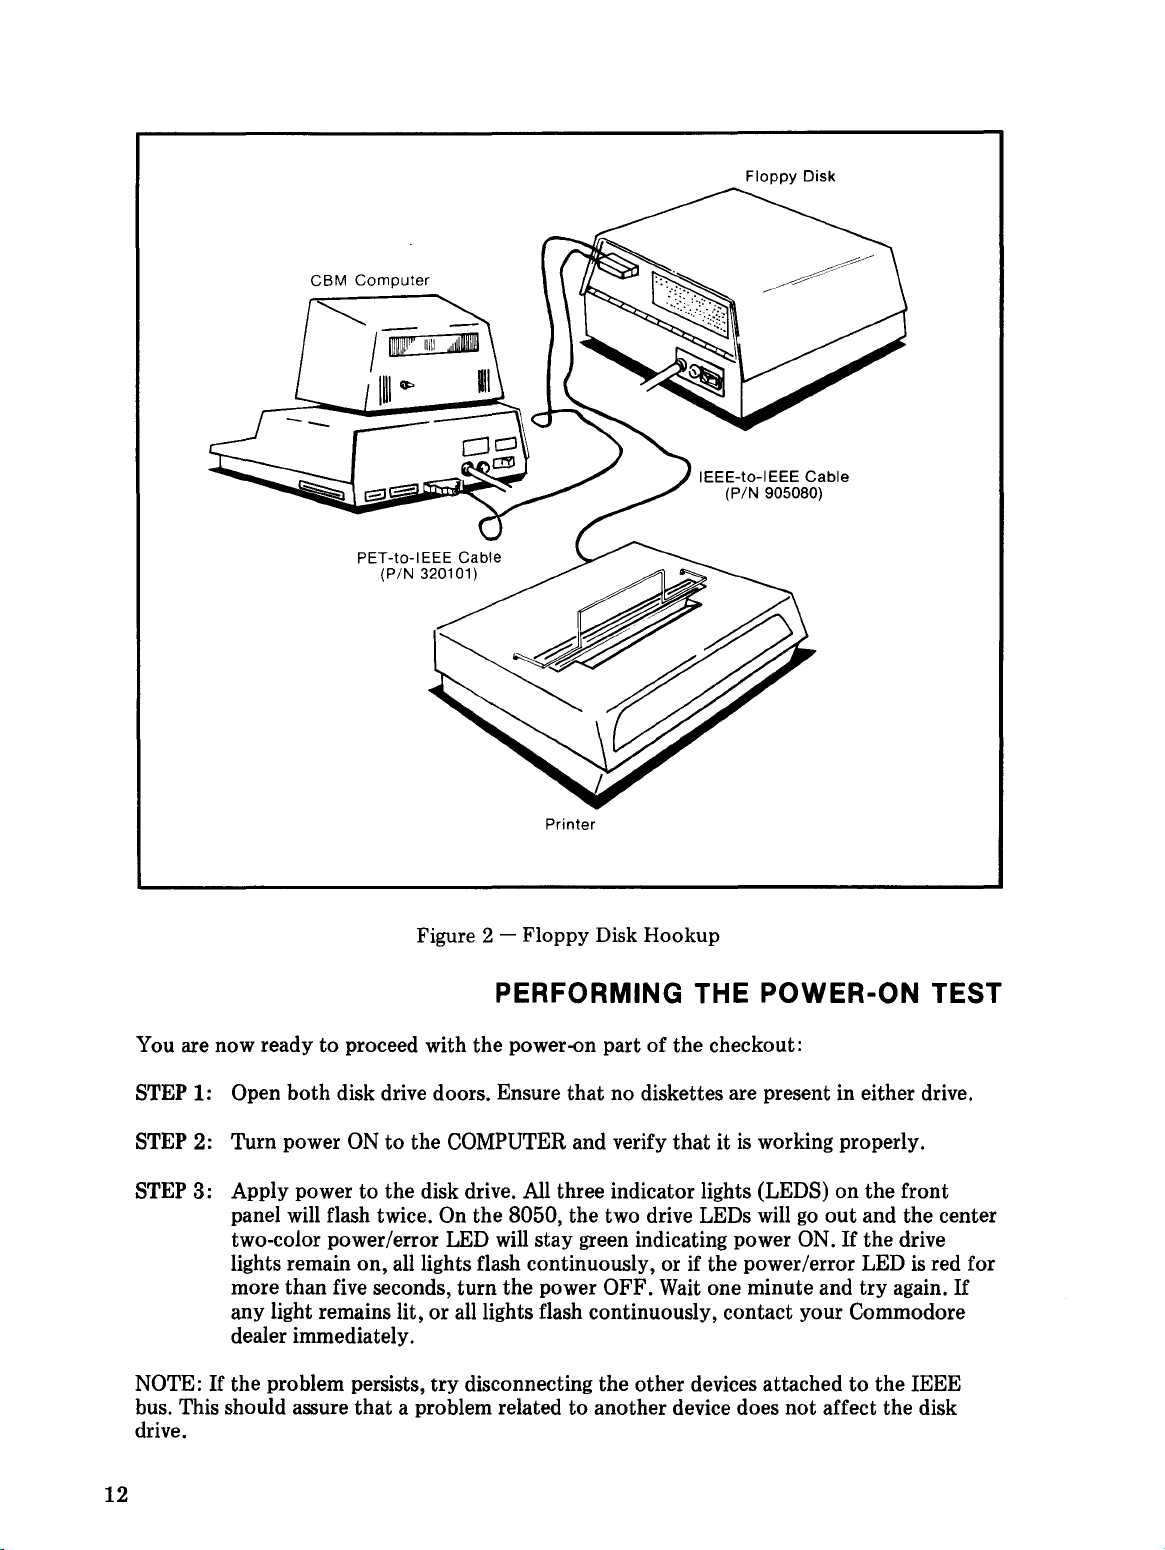
PERFORMING THE POWER-ON TEST
You are now readytoproceed with the power-on part of the checkout:
Cable
STEP 1: Open both disk drive doors. Ensure that no diskettes are present in either drive.
STEP 2: Turn power
STEP 3: Apply power to the disk drive.
panel will flash twice. On the 8050, the two drive LEDs will
two-color power/error LED will stay green indicating power ON.
lights remain on,
more than five seconds, turn the power OFF.
any light remains lit, or
ONtothe COMPUTER and verify that itisworking properly.
All
three indicator lights (LEDS) on the front
go
out
and the center
If
the drive
all
lights flash continuously, or if the power/error LEDisred for
Wait
one minute and
all
lights flash continuously, contact your Commodore
try
dealer immediately.
If
NOTE:
the problem persists,
bus. This should assure that a problem related
try
disconnecting the other devices attachedtothe IEEE
to
another device does not affect the disk
drive.
12
again.
If
Page 18
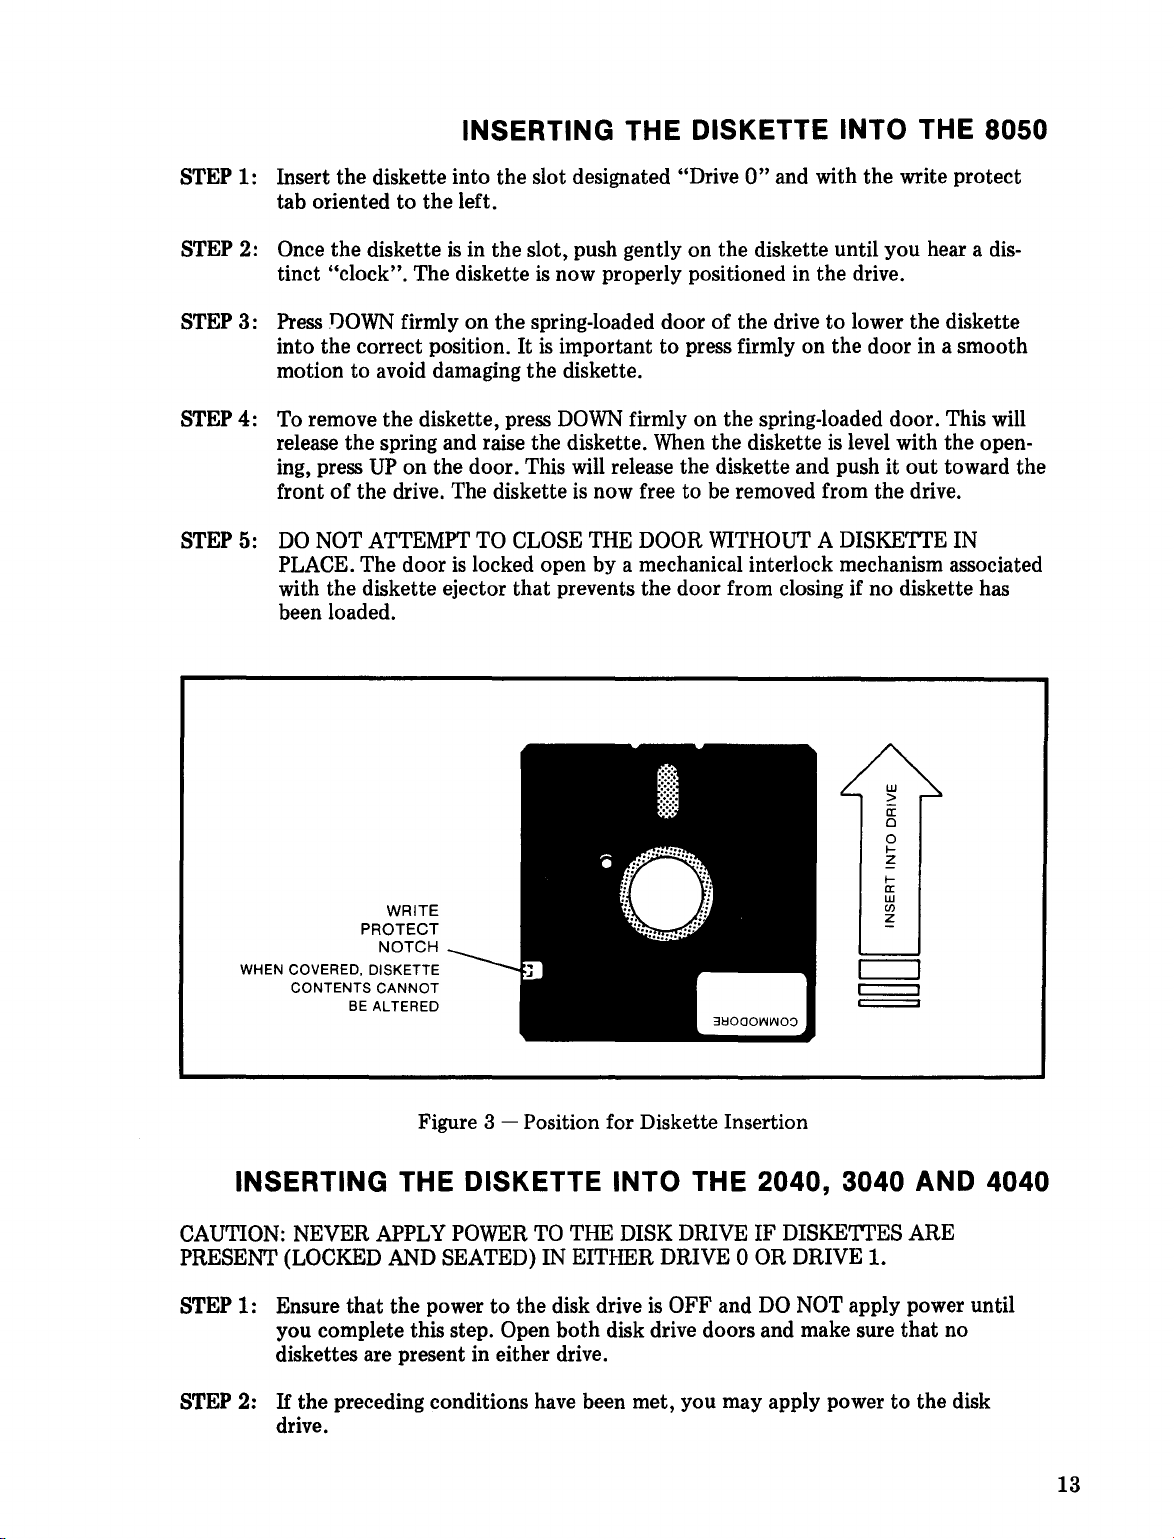
INSERTING THE DISKETTE INTO THE 8050
STEP 1: Insert the diskette into the slot designated "Drive0"and with the write protect
tab oriented
STEP 2: Once the diskette
tinct "clock". The diskette
3:
Press
STEP
STEP
4:
DOWN
into the correct position. It
motion
To remove the diskette, press
release the spring and raise the diskette.
ing, press
of
front
to
the left.
is
in the slot, push gently on the diskette until you hear a dis-
is
now properly positioned in the drive.
firmly on
to
avoid damaging the diskette.
UP
on the door. This will release the diskette and push it
the drive. The diskette is now free to be removed from the drive.
the
spring-loaded door of the drivetolower the diskette
is
importanttopress firmly on the door in a smooth
DOWN
firmly on the spring-loaded door. This will
When
the disketteislevel with the open-
out
toward the
STEP 5:
DO
NOT ATTEMPT TO CLOSE THE DOOR WITHOUT A DISKETTE IN
PLACE. The doorislocked open by a mechanical interlock mechanism associated
with the diskette ejector that prevents the door from closing if no diskette has
been loaded.
I
I-
eI:
W
WRITE
PROTECT
NOTCH
WHEN COVERED, DISKETTE
CONTENTS
CANNOT
BE ALTERED
••
en
z
•
Figure 3 - Position for Diskette Insertion
INSERTING THE DISKETTE INTO THE 2040, 3040 AND 4040
CAUTION: NEVER APPLY POWER TO THE DISK DRIVE IF DISKETTES ARE
PRESENT (LOCKED AND SEATED) IN EITHER DRIVE 0 OR DRIVE
STEP 1: Ensure that the powertothe disk driveisOFF and
STEP 2:
you complete this step. Open
diskettes are present in either drive.
If
the preceding conditions have been met, you may apply powertothe disk
drive.
both
disk drive doors and make sure
DO
NOT apply power until
1.
that
no
13
Page 19
STEP 3: Insert the diskette into the slot marked "Drive0"and with the write protect tab
oriented
to
the left.
STEP 4: Once the diskette
STEP 5: Press
STEP 6: To remove the diskette, insert your index finger under the lip of the spring-loaded
DOWN
tinct "click". The diskette
ing by the computer.
door and gently PULL. This will release the door and permit access
ette. The diskette
isinthe slot, gently push on it until itisfully seated.
firmly on the spring-loaded door of the drive until you hear a dis-
is
now locked and seated in drive 0, ready for process-
to
the disk-
is
now freetobe removed from the drive.
THE 4040 AND 8050 PERFORMANCE TEST
When
you have successfully completed the Power-On test, proceed with the Performance
Test. Don't worry if you don't fully understand exactly what
to
this point, enter the commands just
EXPECTED results are obtained during any step of the test, stop and start over again. The
most likely cause of a problem
until you become familiar with your disk unit.
All
commands are entered
press the RETURN key on your keyboard.
is
via
the keyboard and must be followed by a carriage return:
get a feel for what you can do with your disk.IfUN-
an improperly entered command. Thisisto
is
happening in this test. At
be expected
NOTE: Commands must be entered exactly
shown in the example.
example anyway. Re-enter your last command. If the light goes out, your correction was
successful and you may continue.
NOTE FOR BUSINESS KEYBOARD USERS ONLY: You can set your computer for
upper case character entry.
POKE 59468,12 and pressing the RETURN key.
Although itisnot absolutely necessarytogive
In addition, the examples in this manual can be duplicated exactly when you use only
If
upper case.
shift key when entering commands. (POKE 59468,14 will return the user
STEP 1: Insert the
STEP 2: Type: LOAD
this stepisomitted the display will be in lower case letters.
from the diskette in drive 0 and display the following:
If
the error indicator lights, you may be abletocontinue the
Do
this by typing:
DEMO
diskette into drive 0aspreviously instructed.
"*",8
and press RETURN. The computer will load the first file
as
shown.
this command, it does permit easy entry.
DO
NOT insert any spaces unless
DO
to
lower case letters.)
NOT use the
14
Page 20

STEP
3: Type: RUN and press RETURN. This
is
executed. (This program
simplifies the direct mode commands.) A brief introductory descrption of
Supportispresented in Chapter 3asit applies to Chapter 3 operations. A detailed description of
STEP
4: Insert a blank diskette into drive 1 and type:
>N1:DEMO,99
>C1=0
not necessary for the disk unittooperate; it just
DOS
Supportispresented in Chapter
will
cause the
DOS
Support Programtobe
7.
DOS
This procedure formats the diskette and copys all files from drive 0
thus creating a backup of the
drive 0 and return it to its protective envelope. Remove the diskette from drive 1
and place it in drive
STEP
5: Type:
The screen will display:
<:,EAF'CHmCT
LORD
PERD'T'
I
~JCT
•
LOAD
FOF'
"PERFORMANCE TEST",8
F'EF'FOFr'1AtJCE
•
STEP
6: Type: RUN and press RETURN.
The program instructs you to place a blank diskette into each drive. The Performance Test Program executes a shortened version of the test used by Commodore in final inspection of the 4040 or 8050. The purpose of this test
is
that the unit
to complete.
NOTE: Do not use diskettes containing any valuable information since the Performance Test Program
program will label these diskettes "Test Disk
ettes are ready for further use when the test program
formance test has been satisfied.
functioning correctly and
DEMO
O.
Close the door to drive
E':,T
will
re-format them and any data
diskette. Remove the
to
DEMO
diskette from
O.
will
take approximately seven minutes
will
be lost. The test
1"
and "Test Disk 2". These disk-
is
completed and the per-
drive 1,
is
to ensure
STEP
7: Press RETURN, the following will display:
STEP
8: Enter the appropriate responsetothe question and press RETURN.
The computer
disk drive and begin the performance test. The screen displays:
will
calculate the maximum number of tracks for the particular
15
Page 21
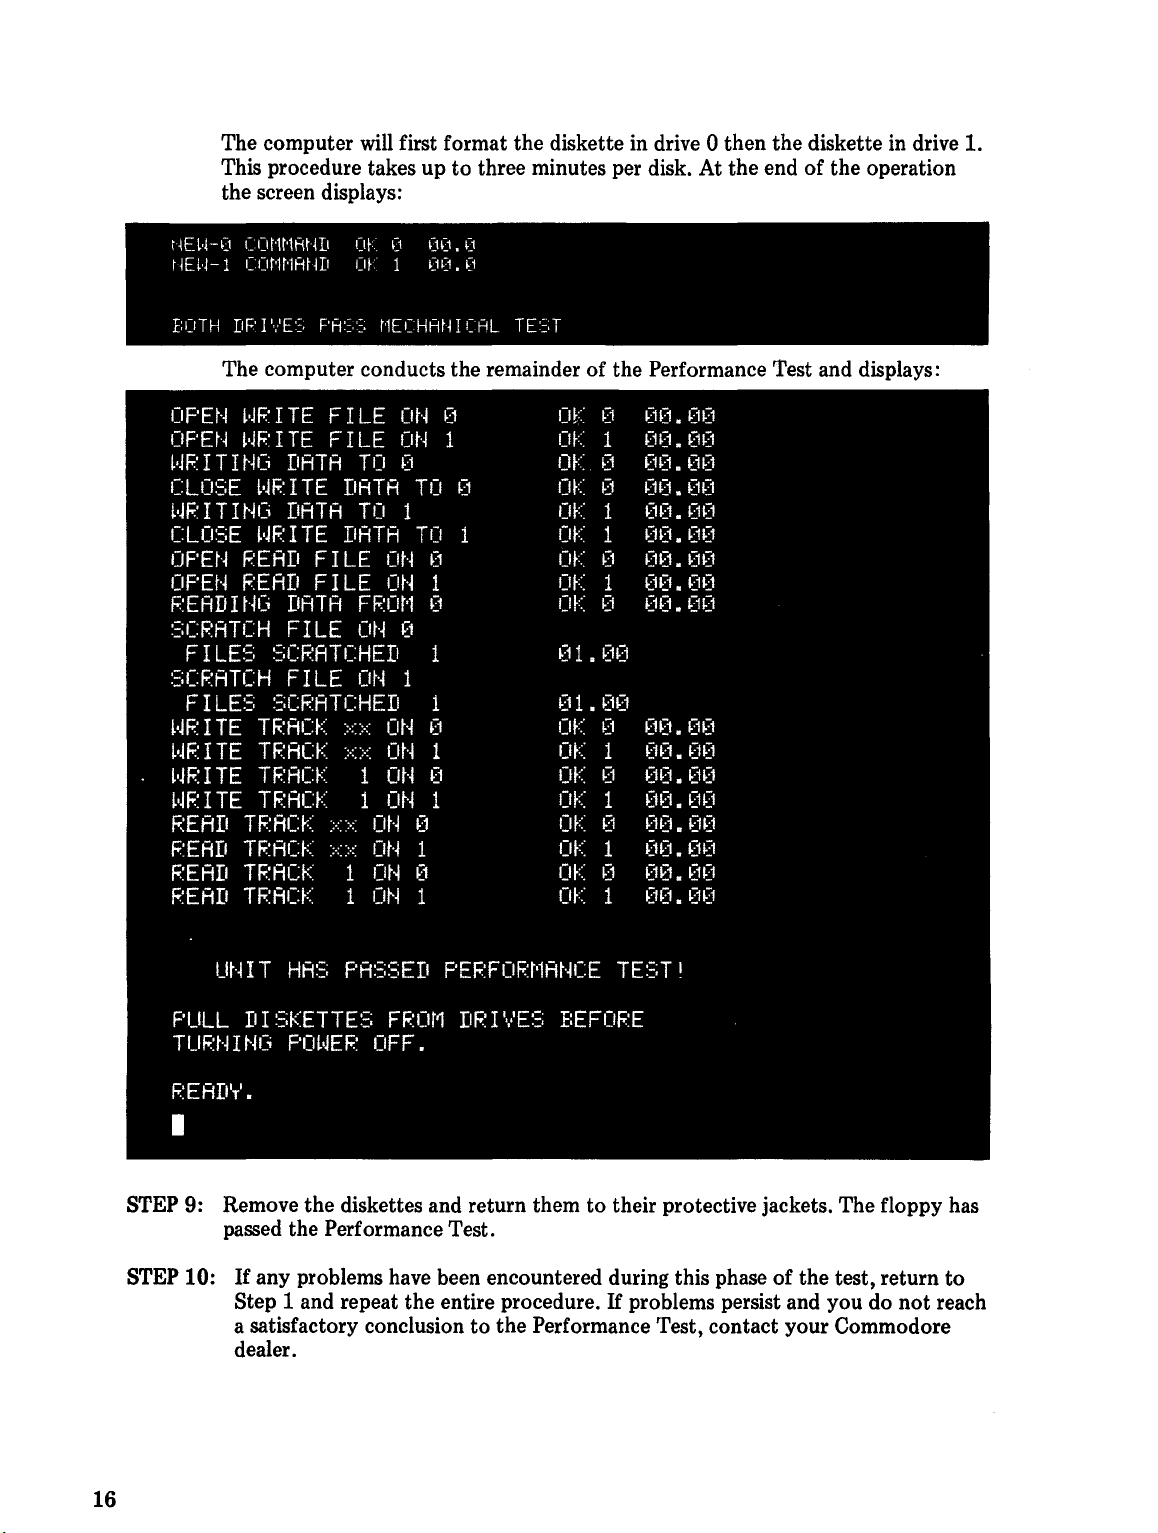
The computer
This procedure takes up to three minutes per disk. At the end of the operation
the screen displays:
The computer conducts the remainder of the Performance Test and displays:
~.JF.:
I
OPEt·~
OF'Et·~
~.J
F.:
ITI
CLO::;E
L·JP
ITI
CLO~:;E
OPEN
OF'Et·~
PEADItKi
~:;CRATCH
FILES
SCRATCH
FILE::;
L·JF.:ITE
L·JPITE
~.JF.:
I
TE
L·JPITE
PEAD
PEAD
F.:EAD
READ
TE
~.JP
I
TE
~4Ci
DATA
~'JF.:
I
~~Ci
DATA
L·JPITE
PEAD
READ
DATA
FILE
~:;CF.:ATCHED
FILE
:::;CPATCHED
Tf;;:ACK
TPACK
TF:ACK
TF.:ACK
TF.:ACI<
TF.:ACK
TF.:ACI<
TF.:ACK
TE
FILE
FILE
will
FILE
FILE
TO
DATA
TO
DATA
FF:Ot'1
Ot·~
Ot·~
>::::<
::<::<
1
1
::<>::
ot·~
::<>::
Ot·~
1
Ot~
1
O~~
first format the diskette in drive 0 then the diskette in drive 1.
ot·~
Ot·~
0
TO
1
TO
ot·~
0
Ot·~
1
0
(1
1
1
1
Ot~
0
Ot·~
1
m~
0
O~~
1
0
1
(1
1
0
1
0
1
O!:::
0
OK
1
OK.
0
OK
0
OK
1
OK
1
OK
0
OK
1
OK
0
01.00
01.~X1
OK
0
OK
1
OK
0
OK
1
~:1
OK
OK
1
(1
01<
OK
1
00.00
00.
(10
00.00
OCI.OO
00.00
00.00
O~].
00
0(1.00
~X1
0(1.
{:m.O(1
0(1.00
(H].
(H)
O~:1.
00
00.
~)O
O~).
~]O
00.
(10
00.00
16
UNIT
PULL
TURNING
F.:ERD'T'
HAS
PASSED
DISKETTES
POWEP
•
FROM
OFF.
PEPFORMANCE
DF.:IVES
TEST!
BEFOF.:E
•
STEP
9: Remove the diskettes and return them to their protective jackets. The floppy has
passed the Performance Test.
STEP
10:
If
any problems have been encountered during this phase of the test, return to
If
Step 1 and repeat the entire procedure.
a satisfactory conclusion to the Performance Test, contact your Commodore
dealer.
problems persist and you do not reach
Page 22
THE 2040 AND 3040 PERFORMANCE TEST
When
you have successfully completed the Power-On test, proceed with the Performance
don't
Test. Don't worry if you
this point, enter the commands just
EXPECTED results are obtained during any step of the test, stop and start over again. The
most likely cause of a problem
until you become familiar with the procedure.
All
commands entered
RETURN key.
NOTE: Enter the commands exactly
th&
example.Ifthe error indicator lights, you may be abletocontinue the example anyway.
Re-enter your last command.
may continue.
via
fully understand exactly whatishappening in this test. At
to
get a feel for what you can do with your disk.IfUN·
is
an improperly entered command. Thisisto
the keyboard mustbefollowed b a carriage return: press the
as
shown.
If
the light goes out, your c.orrection
DO
NOT insert any spaces unless shown in
was
be expected
successful and you
STEP 1: Insert the
diskette into drive 1. Close both drive doors.
STEP 2: Type: OPEN 1,8,15
This command opens logical file 1 on device 8. The secondary address of 15 opens
the command channel
READY.
NOTE FOR BUSINESS KEYBOARD USERS ONLY: To set the computer for
upper case character entry type:
Although it
cating with the disk drive, it does permit easy entry. In addition, the examples in
this manual can be duplicated exactly. (POKE 59468,14 will return the user
lower case letters.)
STEP 3: Type: PRINT#1,"IO"
This command initializes drive
head of the drive
sary each time the diskette
displays your entry, then the word READY.
DEMO
POKE 59468,12 and press RETURN
diskette into drive 0aspreviously instructed. Insert a blank
is
not absolutely necessarytogive
in
to
the device. The screen displays your entry followed by
this command priortocommuni-
to
O.
The initialization procedure places the magnetic
the proper position above the diskette. This processisneces-
is
removed and inserted into the drive. The computer
STEP 4: Type: LOAD"*",8 and press RETURN.
The screen displays:
17
Page 23
STEP 5: Type: RUN.
This causes the
sary for the disk unit
brief introductory discussion
to
Chapter 3 operations. A detailed description of
STEP
6: Type: >D1=O
applies
sented in Chapter 7.
This commands the disk drive
DOS
support programtobe executed. (This programisnot
to
operate, it just simplifies the direct mode commands.) A
of
DOS
Supportispresented in Chapter 3asit
DOS
to
make a backup copyofthe
DEMO
neces-
Supportispre-
diskette.
Remove the original
envelope. Insert the backup disk into drive
STEP 7: Type: >10
This command initializes the backup diskette.
STEP 8: Type: LOAD"O:DIAGNOSTIC BOOT",8
This command loads the Diagnostic Boot program from the diskette in drive 0
into memory. The screen displays your entry and:
':,ERPCHItJC,
LORIIItlCi
PERII'T'
FOP
[1
•
DEMO
IiIRC,tJO':,TIC
disk from drive 0 and return ittoits protective
BOOT
•
Concurrent with the display, the drive 0 indicator lights and the drive 0 motor
runs.
9: REMOVE THE
STEP
STEP.
STEP 10: Type: RUN and press RETURN
BACKUP
DISKE'ITE BEFORE PROCEEDING
O.
TO
THE NEXT
Follow the directions on the screen.
the test
on the screen can be used
tion, reset the disk drive by turning the computer's power switch OFF, then
STEP 11: Simultaneously press SHIFT and CLR/HOMEtoclear the screen.
command described earlier
STEP 12: RETURN THE BACKUP DISKE'ITE TO DRIVE 0
STEP 13: Type: >10
This command initializes the diskette in drive
18
is
passed.Ifall indicators remain lit in a steady pattern, the directions
to
find the problem area.
to
set the computer for upper case character entry.
If
all
three indicators flicker continuously,
Mter
O.
30 secondsofopera-
ON.
Use
the POKE
Page 24

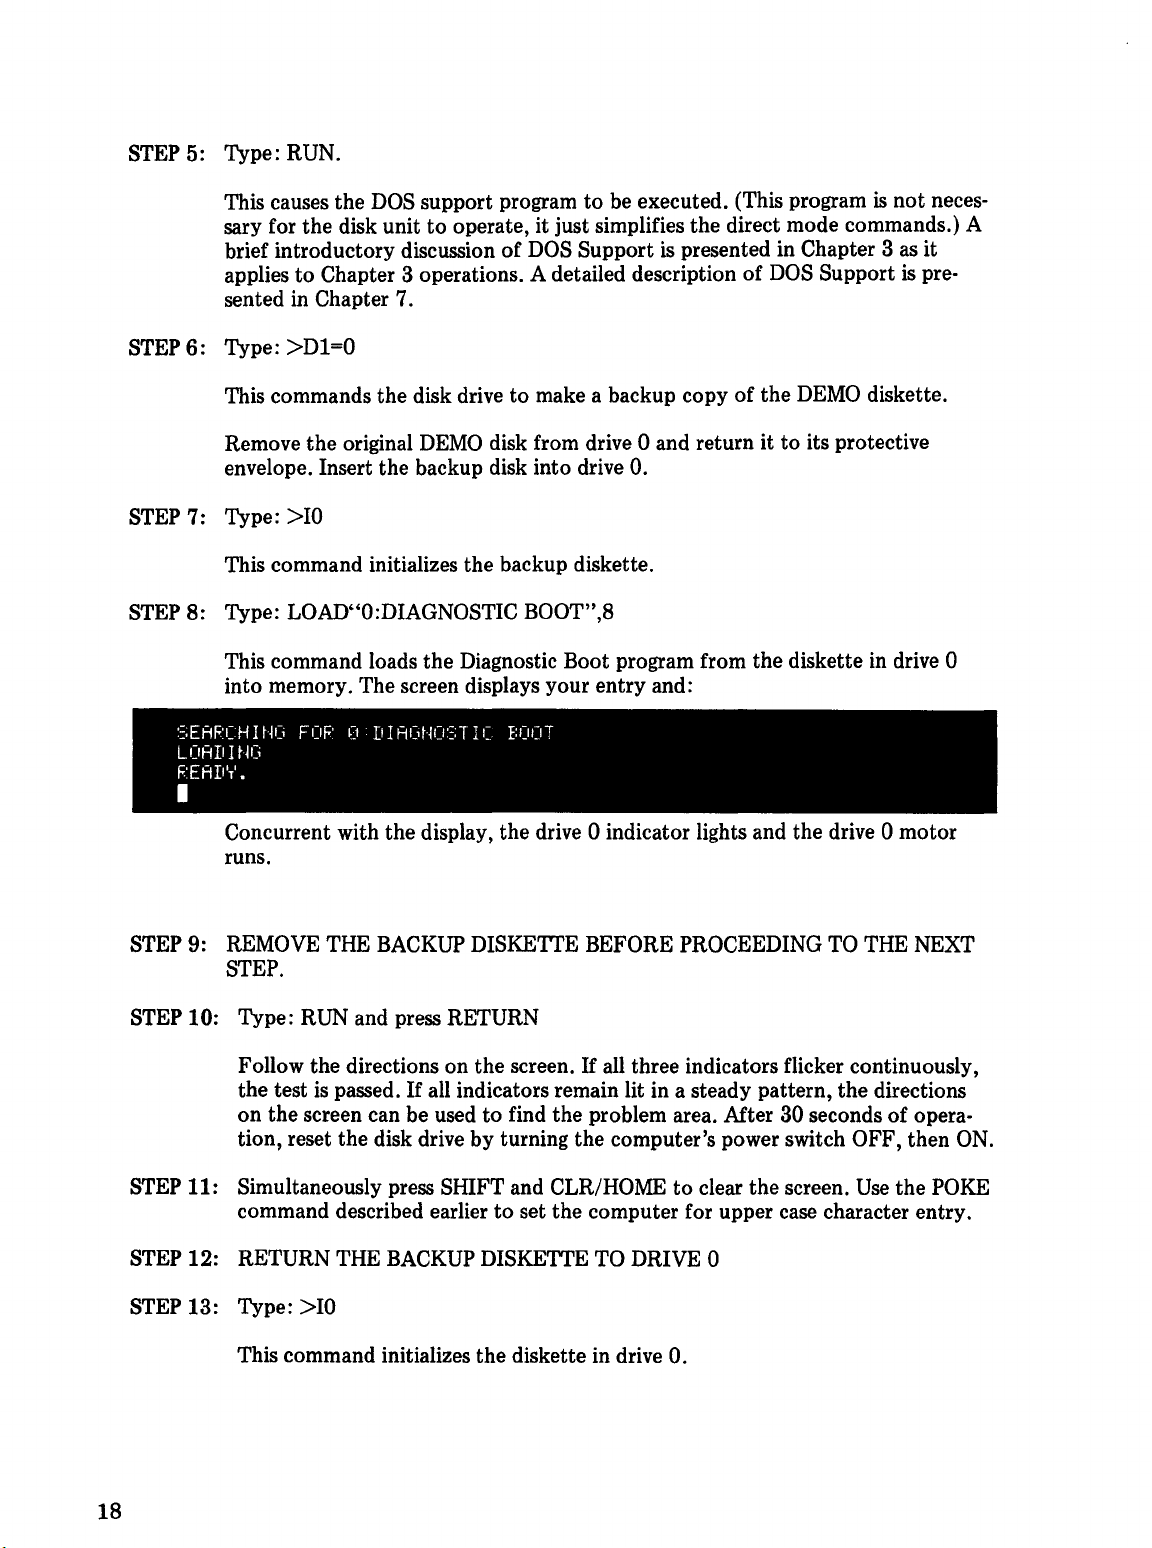
STEP 14: Type: /O:PET DISK
This loads the PET DISK program from the diskette in drive 0 into memory.
The screen displays your entry and:
':,EAF'CHUK,
LOAD
IHC,
F'EAD'T'
•
FOP(1F'ET
D
1':,[
•
STEP 15: Type: RUN
The PET DISK program
the drive 0 motor running intermittently
STEP 16: Press the RUN/STOP key.
Simultaneously press SHIFT and CLR/HOME. This completes the 2040 and
3040 performance test.
is
displayed until terminated. Note that you can hear
as
each program loads the next.
NOTES
19
Page 25
Chapter
3
LEARNING
YOUR
Your
CBM
Floppy
and file handling capability and is controlled directly with:
• BASIC commands entered via
• BASIC statements within programs, and
• special disk commands.
In this chapter
organized in such a way
manner which permits
BASIC commands which correspond
Before using
1.
operate
you
your
your
FLOPPY
Disk Drive adds and enhances
the
will learn howtoapply those commands and statements. This chapter
that
the
functions and format of disk commands are described in a
the
usertoperform disk-related tasks.
to
each disk maintenance command are also discussed.
floppy disk make sure you know how
Commodore Computer,
HOW
DISK
your
keyboard,
computing power with added storage
to:
TO
DRIVE
For
BASIC 4.0 users, those
USE
is
do
elementary programming in BASIC, and
2.
3. open and close files.
to
the
they
2040,
are used
the
that
per-
exact
the
NOTE: The BASIC statements described in this chapter apply specifically
3040,4040,
ferent format
the
with
of
usage
This chapter will first acquaint
form disk maintenance and file manipulation and will
understanding
the
ner,
proceedtoadvanced disk programming techniques. Practice
examples, and follow
more advanced disk programming techniques will dependtoa large degree upon how well
the
fundamentals have been mastered.
and 8050. Certainofthe
or
produce different results from those described herein when
computer or with
these commands and statements in
of
those BASIC commands used for data handling. Approached in this man-
user will then have developed
other
the
the
step-by-step illustrationsoftheir usage. The understandingofthe
commands and statements may follow a slightly dif-
peripherals. Consult the appropriate manual for
user with those fundamental disk commands
the
other
applications.
then
progressively advance toward an
necessary confidence and programming skills
the
disk commands, read
to
21
Page 26
To facilitate your understanding and mastery of Commodore BASIC, two computer terms
are stressed in this Chapter: Block Availability Map (BAM) and Disk Operating System
as
(DOS). Although these are conventional terms, they will be briefly discussed
to Commodore Floppy Disk Usage.
they relate
THE BLOCK AVAILABILITY MAP
The
BAMisa disk memory representation of available and allocated space on a disk. When
BAM
the system stores information on a disk, the
DOS to determine what space
cient spaceisavailabletostore a
updatedtoaccount for the space allocated. However, if the DOS detects
occupy more space than available, an error message will be generated.
Formatting a disk creates the
tion. The
As
changes occur to the
these changes. Updates
is
performed on a new RELative or SEQuential data file. Since the 8050 has two blocks
available for the
updated, this block is written
interchange of information between the two
disk, enables the system
BAMisstored on diskette in varying locations depending upon the drive used:
Model
2040,3040,4040
8050
to
BAM,
only one block of the
is
available and how many blocks can be allocated.Ifsuffi-
given
file, it will be stored on the disk and the
BAM
whichisthen loaded into DOS memory upon initializa-
BAM
BAMinDOS
the
BAM
to
to
maintain a record of free and allocated space on the disk.
memory, the
occur when a programissaved or a CLOSE or DCLOSE
the disk and the other block loaded into memory. This
will be automatically referenced by the
that
a file will
Location and Memory Required
Track 18, Sector 0
128
bytes
Track 38, Sector 0 and 1
2 Blocks
BAMondisk will be updatedtoreflect
BAM
is loaded into memory at a time. When
BAMs,
one in DOS memory and the other on
BAM
(BAM)
BAM
This description of the
either the 2040 or 3040. Strict attention
from the advantages of developing good programming techniques as well as
better understanding of the relationship of one element of the system
The DOSisresponsible for managing information exchange between the disk controller and
the computer.
The DOS performs many functions which are transparent
the operation of the system. For example, the DOS monitors the input/output (I/O) of the
disk so that channels are properly assigned and
to
occur. In addition
search the directory andtodelete and copy files.
is
There
checkout in Chapter 2. Review the Performance Test procedure and observe the special symbols of
cedures were fully explained
22
another function of DOS called
DOS
Support which were used to duplicate and initialize the disks before these pro-
monitoring of disk
can only stress the importance of initialization when using
to
this basic rule will enable the usertobenefit
to
develop a
to
another.
to
THE DISK OPERATING SYSTEM
to
the user but which are vital
that
no lengthy waits for an open channel
110,
the DOS also uses the channel structure
DOS
Support which was used during hardware
the
user. Because of its ease of use, DOS Support symbols
(DOS)
to
to
Page 27
were easiertoimplement at
cedures they replace.
and simplify your knowledge
It
is now appropriatetobriefly discuss how DOS Support can enhance
that
point than attemptingtoexplain
of
operating your Commodore computer.
the
programming pro-
The first file on
Wedge
puter memory, permits
For example, disk commands which would normally be transmitted
PRINT#1fn "commandstring" format may be transmitted via DOS SUPPORT by preceding
the command
cause DOS SUPPORT
with DOS Support special symbols can simplify learning about your Commodore computer
by providing a faster method
instructions concerning
program, often referredtoas DOS SUPPORT. This program, when loaded into com-
the
TEST/DEMO diskette
the
usertoenter abbreviations for many disk commands.
with>
or@.Typing slash (I) followed by a program name and RETURN will
to
load
the
useofthese special symbols and their limitations.
that
comes with your disk driveisthe
to
the disk using the
that
program into memory. Replacing certain disk commands
to
communicate with the disk. Chapter 7 contains detailed
Universal
DISK MAINTENANCE COMMANDS
The following disk commands permit the user to perform file manipulation and disk
maintenance.
4.0
COMMAND
Diskette
Level
BASIC
COMMAND
NEW
INITIALIZE Prepare diskette for use
LOAD"$O"
VALIDATE Reconstruct Block Availability
Formats a disk
Read disk directory
Map
FUNCTION
(BAM)
BASIC
DIRECT
HEADER
DIRECTORY
COLLECT
DUPLICATE
COPY Copies files (optional
File
Level RENAME Renames a file
SCRATCH Erases a file
NOTE: Diskette commands can be transmitted
through
that a file has been opened with
OPEN ERROR appears upon typing the OPEN command, it means
opened but had
file.
the
abbreviated commands of
not
been properly closed. This error condition will automatically close the
To
recover, retype the OPEN command.
Duplicates a diskette
concatenation)
to
the
disk by PRINT# commands
DOS
support. The examples in this chapter assume
the
OPEN 15,8,15 command.Ifthe
BACKUP
COpy
CONCAT
RENAME
SCRATCH
or
error message ?FILE
that
the
logical file was
23
Page 28
NEW
Each time a disketteisplaced in oneofthe drives, both the diskette and the drive must be
prepared for use. A previously unused diskette must first be formatted in the soft-sector
format recognized by your particular disk drive. This may be accomplished by use
NEW
disk command.
of
the
To use the
command:
where 15
channel (primary address 8, secondary address 15).
The format of
Where dr=the drive number, 0 or 1
The
NEW
user wishes
ID, and track and sector numbers at the beginning of each block. The directory header and
the
BAM
used on an already formatted diskette (with no ID specified)
reinitialize the
ting without an ID
NEW
command, to format the diskette and initialize the disk drive, enter the
PRINT#15,"commandstring"
is
the logical file number of a file which has been openedtothe disk command
NEW
is:
"NEWdr:fn,xx"
or
"Ndr:fn,xx"
fn=the file name you wish to assign
characters long.
xx=a unique two-character, alphanumeric identifier supplied by the user.
command (with ID specified)isused on an unformatted diskette or one which the
to
reformat.
are created and the disketteismade readytoaccept data. The command may be
BAM,
NEW
creates the block headers, writing the sync characters, disk
deallocating all blocks on the diskette. The time involved in reformat-
is
much less than formatting with an ID.
to
the disk.Itmay be upto16
to
clear the disk directory and
Example 1: OPEN15,8,15
PRINT#15,"NO:TESTDISK,88"
These commands will open the command and error channeltothe disk drive and format a
disk in drive 0, giving it a disk identifer of 88.
Here's an example of reformatting a diskette using the
Example 2:
The diskette will be assigned the name "NEWNAME" and the directory and
cleared. This procedure will work only if the diskette has been formatted.
NEW
The
The latter will delete the program currently in memory and clear all variables before entering a new program.
24
OPEN1,8,15
PRINT#l,
disk command SHOULD NOT be confused with the
"NO:
NEWN
AME"
NEW
command and no disk ID.
NEW
command in BASIC.
BAM
will be
Page 29
HEADER (BASIC 4.0 Direct Command)
The HEADER command has the same effectasNEW
computers using BASIC 4.0. Since formatting destroys all data previously stored, the
HEADER command has a built-in safety feature that queries the user: ARE
positive response to this question permits formatting to take place while a negative response
aborts the operation.
The format of HEADER command
HEADER
Where: fn=file name supplied by user but limited to 16 characters.
"fn"
,Ddr,Ixx
dr=drive number, 0 or 1
xx=a unique two character alphanumeric identifier (ID) supplied by user.
(same parameters
as
used by
is:
NEW
command)
command butisreserved for those
YOU
SURE? A
Initialization (2040 and 3040)
Whenever a disketteisinserted into either drive, for any reason, it
ensure that the information on the
the diskette currently in the drive. Failure
inserted or reinserted into the drive will resultina DISKIDMISMATCH
loss of data.
BAM
(in the disk memory)isthe proper information for
to
properly initialize a diskette each timeitis
MUST
be initialized to
ERROR and/or
Insert the diskette into drive 1 and initialize
OPEN 1,8,15
PRINT#l,"Il"
NOTE: FILE OPEN ERROR could occur if a previously opened file
is
second OPEN command. If the file
is
file. If this error
The diskette in drive 1
Remember
destroy previously stored data.
The INITIALIZE command on the 2040 and 3040 aligns the read/write head with track 1
on the specified diskette. It then moves
this information into the Disk Operating System (DOS) memory.
Since the 2040 and 3040 initialization function depends upon a change of
change of diskette, inserting a diskette with an ID identical
to a loss of data. This happens because the computer will reference the
the previous diskette. Since the IDs are identical the
of diskette. A SAVE or DSAVE command may now cause new data
data already present on the disk because the
area, instead of the current one. The results are unpredictable, and the diskette may become
totally useless. For this reason, unique disk IDs must be used whenever possible for each
diskette.
that
displayed, retype the OPEN command and proceed.
is
now initialized.
formattingisusually a one-time operation and that re-formatting a disk will
still open, the second OPEN command would close the
as
follows:
was
addressed with a
Do
not confuse formatting and initialization.
to
track 18, reads the disk label and ID, and loads
ID
to detect a
to
one previously used may lead
BAM
left over from
DOS
assumes there has been no change
to
be written over good
DOS
will use the old map of available storage
25
Page 30

Initialization (4040)
The 4040 utilizes a
initialization
the new disk. Operator initializationisnot
is
DOS
2 software routine each time the diskisaddressedtodetermine if
required. If a different IDisdetected, the 4040 will automatically initialize
required if unique IDs are assigned each diskette.
Initialization (8050)
The 8050 utilizes a hardware feature to detect the removal or insertion of a diskette, so it
not necessarytoinitialize since thisisan automatic function.
THE DIRECTORY
Confirm
the following methods
information:
There are two methods available to all users for listing the directory. The first method illustrates the listing procedure using LOAD and the second, the listing procedure in BASIC 4.0
using the DIRECTORY command. If using a 2040 or 3040, and have removed the disks
from the drives for any reason, the disks must be INITIALIZED before attempting
play
and continue.
that
the newly formatted disk has the correct ID and disk name by using one of
to
list the directory. The directory display includes the following
• Disk name
• Disk ID
•
DOS
version number
• File name
• File type
• Number of blocks used
• Pointer
• Number of available (free) blocks
the
directory. If using a 4040 or 8050, initializationisnot required-insert the diskette
to
first blockoffile
to
dis-
is
LOADS
This procedure will destroy any program currently in computer memory when the directory
is
LOADed. (Refertothe description of the
is
a non-destructive directory display procedure.)
STEP 1: Place a formatted disk in drive
ette and continue.
STEP 2: Type: LOAD"$1",8
The screen displays:
LOADI$l".':::
':,EAPCHIHC,
LOAIiItH:' .
PEAD'T'
•
FOJ::'
$1
then press RETURN.
>$
DOS
Support command in Chapter 7 which
1. If using a 2040 or 3040, INITIALIZE the disk-
•
STEP 3: Type: LIST
The directory for drive 1
will display the directory for drive
26
will
be displayed. SUbstituting $0 for $1 in the format
O.
Page 31

DIRECTORY (BASIC
This command will display the directory without disturbing the content of the memory.
DO
You may type: DIRECTORY
is
illustrated which uses the first two unshifted characters followed by a shifted R.
using the full word spelling but the preferred short format
4.0
Direct Command)
To display the directory, type:
If
using upper case display, type: DI_DO and press RETURN.
The _ in this example represents the upper
display the directory for drive
both drives if there
reference manual for a complete description of this BASIC command.
is
a formatted diskette present in each drive.
diRdO
1. Typing
and press RETURN.
case
display for a shifted R. Typing DI _
DI
_ or DIRECTORY will display the directory for
See
your BASIC 4.0
D1
Printing The Directory
Quite often, it becomes convenient to affix a diskette directory listing directly on the protective jacket. This permits the user
insert the diskette into the drivetoobtain this information. Should you desiretoprint the
directory, place the diskette
LOAD
OPEN 4,4:CMD4
LIST
PRINT#4:CLOSE4
"$0",8
in
to
scan the printed directory listing without having
drive 0 and enter the following commands:
Loads the directory.
Opens device 4 (printer) and changes
the primary output device
Prints the directory.
Returns output
to
the screen and closes the file.
to
4.
to
will
VALIDATE
The VALIDATE command traces through each block of data contain'ed in
If
diskette.
to the diskette. Any blocks which have been allocated but are not associated with a file
name,
files created using the BASIC 4.0 DOPEN command.
In
additiontoreconstructing the
were never properly closed.
operation aborts and leaves the diskette in its previous state. If a VALIDATE error does
occur, you must re-initialize before proceeding.
The format of VALIDATE
Where: dr=drive number (0 or 1)
this traceissuccessful, a new
as
in the case of direct access files
BAM,
If
a READ errorisencountered during a VALIDATE, the
is:
PRINT#15,"VALIDATEdr"
BAMisgenerated in the disk memory and written
willbefreed for use. This will not affect relative
VALIDATE deletes files from the directory that
all
files on the
27
Page 32

NOTE: You may abbreviate VALIDATEtoV.1f a drive numberisnot
is
ette in the last drive used during the current session
Example: OPEN1,8,15
PRINT#l,"VO"
or
verified.
specified, the disk-
PRINT#l,"VALIDATE
The COLLECT command in BASIC 4.0 performs the same functionasVALIDATE. Either
command will accomplish the following:
• Recreate a Block Availability
• Delete files from the directory which were never properly closed.
(OPENed but never CLOSEed)
The format of COLLECT is:
COLLECTDx
Where: x=drive number
Example 1: COLLECT
Verifies drive 1
Example 2:
COLLECT
Verifies drive 0
(drive defaults
(lor
D1
0"
COLLECT (BASIC
Map
accordingtovalid data on disk
0)
to
0)
4.0
Direct Command)
DUPLICATE
The DUPLICATE command formats the destination diskette and transfers each block of information from the source diskette
cate of the source diskette.
a diskette.
Due to the various formatting protocols used by
mand may NOT be used interchangeably when using diskettes prepared on different disk
drives.
28
Use
the following guidetoavoid confusion:
DUPLICATE command may be used
• a 2040 or 3040 using diskettes formatted on a 2040 or 3040.
• a 4040 using diskettes formatted on a 4040.
DUPLICATE command may NOT be used
• a 2040 or 3040 using diskettes formatted on a 4040.
• a 4040 using diskettes formatted on a 2040 or 3040.
To reproduce a diskette under these conditions, use the
gram found on the TEST/DEMO diskette which came with your disk drive.
Use
to
the destination diskette, thus creating an exact dupli-
this procedure for one method of creating a backup copy of
DOS
1, DOS 2, and
on-
on-
DOS
COpy
2.5, this com-
ALL DISK pro-
Page 33

The formatofDUPLICATE is:
PRINT#lfn,
Where: ddr=is the destination diskette (either 0 or 1)
Do
not
reverse the order of the drive numbers. If you do, you will lose all data and there
no waytorecover it. Observe good practice and place a write protect tab on the diskette
containing the valuable information. This procedure will prevent overlaying good
information.
Example: OPEN1,8,15
NOTE: The letter Disa legal abbreviation for DUPLICATE command.
The BACKUP command in BASIC 4.0 performs the same functionasDUPLICATE.
The format of BACKUP is:
"DUPLICATEddr=sdr"
sdr=is the source diskette (either 0 or 1)
PRINT#l,"DUPLICATEO=l"
or
PRINT#l,"DO=l"
BACKUP (BASIC
4.0
Direct
Command)
is
BACKUP Dsdr TO Dddr.
Where: ddr=is the destination drive
sdr=is the source drive
Note
that
the format of BACKUP differs from DUPLICATE in that the order of the drives
is
reversed.
D1
TO
Example: BACKUP
This has exactly the same effect as the previous example given when discussing DUPLICATE
command. For a complete explanation of the BACKUP command, refer
BASIC 4.0 Reference Manual.
DO
(either 0 or 1)
(either 0 or
1)
to
the Commodore
COpy
The
COpy
tiple copies (under different names)
used
catenated into the destination file.
copied
with a
command allows youtocopy files from one diskettetoanother,tocreate mul·
of
files on the same diskette. This command can also be
to
concatenate data files on the 4040 or 8050.Upto four source files can be con-
On
the 4040 or 8050 all files from one drive may be
to
a formatted diskette in the other drive. The COPY command may be abbreviated
C.
COpy
To copy a single file: PRINT#1fn,
disk command can be formatted three ways depending upon application:
"COpy
ddr:dfn=sdr:sfn"
29
Page 34

or
PRINT#1fn,"Cddr:dfn=sdr:sfn"
To concatenate and copy: PRINT#1fn,"COPYddr:dfn=sdr:sfn,sdr:sfn
or
PRINT#1fn,"Cddr:dfn=sdr:sfn,sdr:sfn
To copy all files on a
diskette:
or
Where: ddr=is the destination drive. The file
drive. This may be the same or different from the source drive.
dfn=is the destination file name. This name may be either a new name or the
same as the old file name unless the ddr
to
are
In example 1, a fileiscopied from the diskette in drive 1tothe diskette in driveO.In
example 2, files from both drives are concatenated into a file on drive
files from drive 0 are copied to drive
the disk unit if a file
example).
exist on the same diskette, they must have different names.
to
PRINT#1fn,
PRINT#1fn,"Cddr=sdr"
be copied already exists on the destination drive (drive 1 in this
"COpy
1.
An
error message FILE EXISTS will be generated in
ddr=sdr"
istobe copied
is
the same as the sdr.Ifboth files
onto
...
...
the diskette in this
1. In example 3, all
Example
A file
Example 2: PRINT#I,"Cl:JDATA=I:ACCTl,O:ADATA,O:BDATA"
Files from both drives are concatenated into a file on drive
be short,asthe maximum length of a disk command stringis40 characters.
Example 3:
All
Example 3 illustrates one waytoupgrade from a 2040 or 3040 formatted diskettetoa 4040
format: place a formatted diskette in drive
copy all files from
30
1:
PRINT#I,
is
copied from the diskette in drive 1todrive
PRINT#I,
files from drive 0 are copiedtodrive 1.
0 onto
"Cl
:ACCTI=0:ACCT"
"Cl
=0"
1.
O.
1 and the diskette
1. Note
to
that
file names should
be upgraded in drive 0 and
Page 35

COPY (BASIC 4.0 Direct Command)
The
COpy
mand and its formatisalso dependent upon application.
Use
this formattocopy the contents of the entire disk:
direct command in BASIC 4.0 performs the same functionasCOPY disk com-
COpy
Use
this formattocopy a single file:
COpy
Where: sdr=the source diskette
Dsdr TO Dddr
Dsdr,"sfn" to Dddr,"dfn"
ddr=destination diskette
fn=file name
CONCAT (BASIC 4.0 Direct Command)
The CONCAT direct command in BASIC 4.0 permits the usertoconcatenate files.
The format of CONCAT
CONCAT Dsdr,"sfn" TO Dddr,"dfn"
where the file named dfn on drive ddr
the concatenation. For example:
CONCAT DO,"YOURFILE" TO D1,"MYFILE"
is
will
contain the contents of both dfn and sfn after
will
result in MYFILE on drive 1 containing the data from the old MYFILE and from
YOURFILE. YOURFILE will remain unchanged.
NOTE: The concatenation feature of COPY disk command and CONCAT direct command
are valid only for
For further information regarding use of BASIC COPY and CONCAT commands, refer
the Commodore BASIC 4.0 Reference Manual.
DOS
2.
to
RENAME
The RENAME command renames an existing file. A file can not already exist with the file
name specified in the command or the FILE EXISTS error message will be generated.
The format of RENAME is:
PRINT#1fn, "RENAMEdr:nfn=ofn"
Where: dr=the disk drive on which the diskette
nfn=the new name of the file.
is
located.
31
Page 36

ofn=the old name of the file.
lfn=a logical file number. You assign this number arbitrarily and it may be any
whole number between 1 and 255.
NOTE: The letter R
The RENAME direct command in BASIC 4.0 performs the same functionasRENAME disk
command.
The format is:
RENAME Ddr,"ofn"
NOTE: Close any open files before using the RENAME command since the disk will
execute this command on any active files.
For further information on the RENAME command, please refer
4.0 Reference Manual.
is
a legal abbreviation for RENAME.
RENAME (BASIC
TO
"nfn"
4.0
Direct Command)
to
the Commodore BASIC
not
SCRATCH
The SCRATCH command erases unwanted files from the specified diskette and itsdirectory.
You can erase one file, several files, or all the files on a diskette.
The format of SCRATCH is:
PRINT#lfn,"Sdr:fn,dr:fn
Where: dr
To erase one file, enter the entire name of the file:
Example: PRINT#l,"SO:ACCT"
To erase several files with unrelated names, enter the entire name of each file
Example: PRINT#l,"SO:ACCT,O:CUSTOMER,O:INV"
To erase several files at one time where names have something in common, refer
in
APPENDIX B concerning pattern matching.
You may erase all files on a diskette using pattern matching
Example:
is
the disk drivetobe searched.
alone means "last drive accessed", with dr refers to the specified drive, where
not used means
is
the name of the filetobe
fn
PRINT#l
"~O:*"
...
"both
dr :fn"
drives".
erased.
to
as
in the following example:
be deleted:
to
the rules
32
Page 37

SCRATCH (BASIC 4.0 Direct Command)
SCRATCH direct command in BASIC 4.0 performs the same functionasSCRATCH disk
command.
The format is: SCRATCH
Where: dr=drive number
fn=filename
Pattern matching rules may be used with this command.
is
there
permits the file
For a complete description of the SCRATCH direct command, please refer to your BASIC
4.0 reference manual.
a built-in safety feature
to
be SCRATCHed while a negative response aborts the operation.
Ddr,"fn"
of
filetobe scratched
that
queries the user: ARE
As
with the HEADER command,
YOU
SURE? A positive response
NOTES
33
Page 38

Chapter
4
BASIC COMMANDS
FOR DATA HANDLING
BASIC
The BASIC commands described in this chapter, allow the usertocommunicate with and
transfer data to and from the disk drive.
These commands are available for ALL versions of Commodore BASIC:
OPENlfn,8,sa,
CLOSElfn
LOAD"dr:fn",8
SAVE"dr
These commands are available ONLY in BASIC 4.0:
DOPEN#lfn,"fn"
DCLOSE#lfn
DLOAD"fn"
Where: lfn=logical file number (any number between 1 and 255)
COMMANDS
"dr
:fn,t,r/w"
:fn",8
fn=file name supplied by user
x=dr=disk drive number
8=device number (8 for disk, 2 for second cassette, 4 for printer)
sa=secondary address
U=logical file
ASSOCIATED WITH FLOPPY DISK DRIVES
VERIFY"dr:fn",8
PRINT#lf
GET#lfn
INPUT#
VE"fn"
DSA
RECORD#lfn,R,B
(lor
0): both Dx and dr defaultto0
All upper-case characters shown in format are essential for the proper execution of a com-
via
mand and must be typed by user. These commands are entered
shifted characters only. On the
BASIC 3.0 commands are upward compatible with BASIC 4.0 commands. Each command
will be defined along with a brief example
is
floppy disk
you
to
try the examples and procedures.
attachedtoyour computer and has passed the performance test,weencourage
CBM
Business Model they will appear in lower case.
to
illustrate their use. As soon as your dual drive
the keyboard using un-
35
Page 39

SAVE and DSAVE (Writing a Program to a Diskette)
If
a programisin computer memory, it can be movedtoa diskette for storage. This is
accomplished with the SAVE (any Commodore BASIC) or DSAVE (BASIC 4.0) commands.
Any data transferred with the SAVE
the DOS as a program (PRG) file. Both commands transfer PRG files from the computer's
to
memory
and the device number. The device number will default
it
is
not specified.
The format
SAVE"dr:fn",dn
Where: dr=is the disk drive number.
This following example illustrates creating a one line program, SAVEing it on the diskette in
drive 0 under
Example: 10?"THIS IS A TEST"
The DSAVE command performs
modore disk system and BASIC 4.0.
the specified diskette. You must specify the drive number, the program name,
ofSAVE
fn=is any file nameof16
dn=is the device number and it must be 8.
the
SAVE"O:TESTPROG",8
VERIFY"0:TESTPROG",8
is:
transferred
name TESTPROG, and VERIFYing that itisresident on disk.
to
the
or
DSAVE commands are automaticaly designated by
to
device 1 whichisthe
It
must be 0 or 1.
characters or less you wishtoassigntothe
diskette. Blanks are countedascharacters.
the
same functionasSAVE, butisvalid only with a Com-
tape unit if
file to be
The format is:
DSAVE"fn"Ddr
"fn"
This command will save a file named
"fn",
may be any nameof16 characters or less.
on the floppy disk in drive 0 or 1. The file name,
LOAD and DLOAD (Reading a Program from a Diskette)
A program stored on diskette may be loaded into memory using
dore BASIC) or DLOAD (BASIC 4.0) commands.
The LOAD and DLOAD commands transfer PRG files from the specified diskette
computer's memory. You must specify the drive number, the program name, and the device
number. The device number will default
LOAD is:
LOAD''dr
Where: dr=is the drive number from which you are loading data.
:fn"
,dn
to
unit 1 whichisthe cassette unit. The format
36
the
LOAD (any Commo-
It
must be 0 or 1.
to
the
of
Page 40

fn=is the file name previously specified in the SAVE command and/or stored
the disk directory.
dn=is the device number and it must be 8.
in
The following example illustrates how a program
puter memory, then executed. To do this example, first type
to
key
fuse the
Example
The DLOAD command transfers performs the same function
designed for a Commodore disk unit using BASIC 4.0. The device number will default to 8
if not specified. The drive number will default
A successful LOAD or DLOAD closes all open files. Therefore you must
command in order tocontinue communicating with the disk drive command and error
channel.
clear your computer's memorysothat you can see that it really works. Don't con-
NEW
command in BASIC with the
1:
LOAD''0 :TESTPROG",8
READY.
RUN
IS
THIS
DLOAD"fn",Ddr
A TEST
is
loaded from the diskette into the com-
NEW
and depress RETURN
NEW
disk command used to format your disk.
as
LOAD, butisspecifically
to0is
not specified.
give
a new OPEN
VERIFY
The format of VERIFY command
is:
VERIFY''dr:fn",8
"fn"
This command verifies that a file named
is
information which
VERIFY command used with the tape cassette. Once again, dr refers to the drive number,
either zero or one. Note that the format of this command specifies that the drive number
placed before the filename. The 8atthe end of this commandisthe device number (8 for
disk, 2 for second tape cassette).
STEP 1: Write a short program and save it on a diskette in drive 1 under the name
using the procedure described under the section on SAVE.
NOTE: It
between the
2:
STEP
Type: VERIFY "1:TEST",8
Once verified, the screen displays:
stored in the computer's memory. This commandisthe sameasthe
is
important that the program in memoryisnot changed in any way
save
and verify operations.
stored on a floppy disk contains the same
"test"
be
37
Page 41

If
a verify error occurs, reSAVE the program and verify it again.
VERIFY may also be used in
the
format:
VERIFY'
in ordertoperform verificationofthe last file saved without re-typing the filename. Con-
firm by following these steps:
STEP 1: Write a short program and save it.
STEP 2: Clear
STEP
3:
The VERIFY function will be performed comparing the last file savedtothe content
memory.
'*",8
the
screen.
Type: VERIFY
"*",8
of
OPEN
This command sets up a correspondence between a logical file number and a file which exists
on disk.
opened.
The format
It
also reserves the buffer space within the disk unit for operations on the file being
of
the complete OPEN command is:
OPENlfn,dn,sa,"dr:fn,ft,mode"
Where: lfn=the logical file number
dn=the device number; in this case 8
sa=the secondary address. It may be any number from 2to14 and may be used
either for input or
dr=the drive number: 0 or 1
fn=the name of the file.
ft=the file type. It may be SEQ (for sequential), USR (for user), REL (for rela-
tive) or PRO (for program).
mode describes how the channel
WRITE
NOTE: Secondary address 15isthe
are discussed in subsequent chapters. Secondary addresses
operating systems (BASIC and DOS) for LOADing and SAVEing programs.
Examples:
(W).
OPEN2,8,2,"O:FILE1,SEQ,WRITE"
OPEN3,8,9,"1:TESTDATA,PRO,WRITE"
output
as specified in mode. See note below
is
to be used. It may be either READ (R) or
command and error channel and has special uses which
0 and 1 are reserved by
the
38
OPEN8,8,8,"O:NUM,USR,READ"
Page 42

The contentsofan existing file (on 4040 and 8050 only) may be replaced by preceding the
drive number with an
OPEN3,8,5,"@0:JDATA,USR,WRITE"
If
the specified file does not exist, then normal OPENing procedures are executed.
at
sign
(@)
in the OPEN command.
You can also assign some of the OPEN parameters
examples:
Example
Example 2:
The preceding methods are convenient when it
same file name.
The DOPEN commandisavailable onlytoBASIC 4.0 users.
or 8050, DOPEN may be used
The format of DOPEN is:
Where: lfn, fn, and dr are the sameasdefined for OPEN.
1:
FL$="O:FILEA,SEQ,READ"
OPEN1,8,14,FL$
FL$="O:FILEA"
OPEN1,8,14,FL$+",SEQ,WRITE"
to
create relative files or sequential files of fixed length.
DOPEN#lfn,"fn",Ddr,Lrl (,ONUdn)
Lrl defines the record length
(,W)
as
equaltorl
to
a variable nameasillustrated in these
is
necessarytoopen several channelstothe
When
used with either a 4040
DOPEN
ONUdn specifies
Wmay be specified
files, the file will be opened
DO
PENisnot available for the standard 2040 or 3040.
The CLOSE command closes a file opened by the OPEN command. Its format is:
CLOSE lfn
Where: lfn=the logical file number of a file opened by
Always close a file after working with it. You are
files in the computer and five in
files
as
soonaspossible. This way you will always have the maximum numberoffiles avail·
able for use.
the
device number equal to dn (with default device being 8)
to
mean write mode.IfWisnot specified for sequential
to
read.
the
OPEN command.
not
allowed to have more than ten open
the
disk drives, so itisprudenttomake a habit of closing
CLOSE
39
Page 43

DC
lOSE
The DCLOSE commandisavailable only to BASIC 4.0 users. This command closes files
opened with the DOPEN command.
The format of DCLOSE is:
DCLOSE#lfn
Where: lfn=the logical file number of the file to be closed.
The DCLOSE command may also be used in this format:
DCLOSE ONUdn
to
Where: dn=the device number of the disk unit (defaults
When
used in this form,DCLOSE command closes all active disk files on the specified unit.
The following examples illustrate some applications of
DC
8).
LOSE command:
Example 1:
Example 2:
DC
LOSE
Close all files currently OPEN.
DCLOSE#5
Close only logical file 5.
CLOSING THE COMMAND CHANNEL
Closing the command channel closes all channels associated with the disk drive.
part of the logical file environment
that the files have been closed.
The following example illustrates a situation in which several channels are closed down by a
single CLOSE command.
Example:
is
affected. That is, the computer does
The command channel
Data Channels
are opened for writing.
not
is
No
other
recognize
opened.
A channel
mistake.
An error message
screen.
Since there was an error, all logical files in the computer are closed,
disk drive are still open. To close the disk channels, type:
40
is
openedtothe printer by
is
displayed on the
but
the channels in the
Page 44

OPEN1,8,15
CLOSE1
Now all data channels in the disk drive are properly closed.
CLOSING THE DATA CHANNEL
The CLOSE command closes a file and the data or command channel associated with it.
Whenever you close a file opened with a write channel, the closing of that file writes the
to
final block of data
with a read channel, that channel
the disk and updates the disk directory.
is
simply closed down.
When
you close a file opened
NOTE:
all
when there are any files open since the files
When
a driveisinitialized with INITIALIZE,
channels associated with that drive are deleted. These commands should not be executed
willbedisrupted.
NEW,
DUPLICATE, or VALIDATE,
PRINT #
The PRINT# command transmits a disk command stringtothe drive.
The format of PRINT# is:
PRINT#fn,"commandstring"
Where:
"commandstring"=disk handling or disk file handling commands. These disk commands
PRINT# may also be used
A semicolon must be used
to
3.0
the diskette by the BASIC PRINT# routineaspart of the data terminator.Itis
be
The line feed
use
avoid sending extraneous line feedstothe diskette. These characters are written
aware of this face because the carriage return aloneisseenasa terminator by the DOS.
the following format:
lfn=a file previously opened using secondary address 15
are discussed
to
as
is
then stored in the fileasthe first character in the next record. To avoid this,
in
detail in Chapter 3 of this manual.
transmit data to a previously-opened sequential or relative file.
a terminator for each PRINT# statement when using BASIC
important to
to
Example: PRINT#2,"JONESABC";CHR$(13);
The CHR$(13)
the disk.
BASIC 4.0 users do
from it). In BASIC 4.0, any file opened with lfn less than 128 will automatically suppress
the line feed.
The following format may then be used:
PRINT#1fn,A$
This will produce the desired value of A$ for the record, and will not interfere with the next
record.
is
the carriage return necessary for the proper termination of the record on
When
this recordisinput, the result will be JONESABC whichisthe desired result.
not
needtofollow this procedure (though no harmful effects will result
41
Page 45

Several variables may be writtentothe disk at the same time.
The format:
PRINT#lfn,A$,B$,C$
will
result in a single variable (A$+B$+C$) being retrieved by the input command.
The format:
PRINT#lfn,A$CHR$(13)B$CHR$(13)C$
will result in the variables A$, B$, and C$ being separated by carriage returns, and they may
then be input as separate variables.
INPUT #
The INPUT# commandisusedtotransfer information from an IEEE device suchasthe disk
drive into computer memory. INPUT#isvalid only when used in a program and only when
referencing a logical file
The format for INPUT# is:
INPUT#lfn,A$ or INPUT#lfn,A
that
has been OPENed for input.
Where: lfn=a file previously opened using secondary address
A$=a string variable which will contain the data transferred.
A=a
numeric variable which will contain the data transferred.
to
INPUT# may also be used
INPUT#1fn,A$,B$,C$
Where: A$, B$,
In this format, the data strings must have been separated by carriage returns ( CHR$(13) )
at the time they were written
may contain more than
Example 1:
Example 2:
C$
20 INPUT#2,A
Input the next data item which must be in numeric form and assign the value
to variable
transfer several stringsofdata at one time:
will contain the data transferred from the disk.
to
the disk in ordertobe retrieved separately. No single string
80
characters if itisto
A.
be INPUT.
15
42
10 INPUT#8,A$
Input the next data item
as
a string and assign ittovariable A$.
Page 46

Example 3:
60 INPUT#7,B,C$
to
Input the next two data items and assign the first
the secondtostring variable C$.
For strings longer than 80 characters, the GET# command must be used.
The GET# commandisusedtotransfer individual bytes of information from an IEEE
as
device such
gram
and only when referencing a file that has been OPENed.
The format of GET# is:
GET#lfn,A$
Where: lfn=a file previously opened using secondary address 15
the disk drive into computer memory. GET# is valid only when usedina pro-
A$=a string variable which will contain the data transferred.
numeric variable
Band
GET#
GET# may also be used
ing strings which have been written to the disk in a format which
INPUT command (strings longer than 80 characters).
For example: 10 AA$=""
20 FOR
30 GET#lfn,A$
40 AA$=AA$+A$
50 NEXT
is
a program segment which would resultina string of length 254 being transferred from the
disk (logical file number lfn)
to
transfer several bytes of information, whichisuseful for retriev-
is
unacceptable for the
1=1
TO
254
to
the computer memory and stored in the variable AA$.
RECORD#
The RECORD# commandisused priortoa PRINT#, INPUT#, or GET# in order to posi-
tion the file pointer to the desired record (and byte) of a relative file. For example, if record
pointer
are generated
RECORD# is available only
is set beyond the last record and PRINT#
to
expand the filetothe desired record.
to
users equipped with BASIC 4.0. The format is:
RECORD#lfn,r
,b
is
used, the appropriate number of records
Where: lfn=a logical file number of a file previously opened with the DOPEN command
r=the desired record number. 4 may be either a variable name or value, how-
is
ever if r
0<=r<=65535
b=the byte position desired within the record. Byte positioning
1<=b<=254
a variable name, it must appear enclosed in parentheses.
is
optional.
43
Page 47

The following example illustrates how RECORD command
10
Example:
RECORD#1,120
Using the RECORD command
20 INPUT#1,A$
to
select
the
is
used with INPUT#:
record.
Input the next data item as a string and assign it
A detailed example of
found in Chapter
6.
the
usage of the RECORD command for relative file manipulation
aUICKLOAD
This command featureisvalid with
command will also function properly with a retrofitted 2040.)
This command loads the first file on the disk in drive 0 into memory. To ensure that the
first program on the diskette
given
after a cold start.
STEP 1: Turn the computer OFF, then ON.
STEP 2: Make sure the disk containing a programasthe first fileisin drive 0 and
drive door
3: Simultaneously press the SHIFT and RUN/STOP keys.
STEP
The computer will initialize the disk in drive
and load it.
is
is
closed.
DOS
2 and BASIC 4.0, and either a 4040 or 8050. (This
accessed, the command must be the first disk command
0, search for the first program on that disk,
to
variable A$.
FEATURE (BASIC
that
is
4.0)
the
When
using this feature the computer will automatically execute the DLOAD and RUN
commands and it
44
is
not necessarytoenter either command.
Page 48

MOVING
This example illustrates a session with the computer, a tape cassette and a disk drive. The
purpose
diskette
previously stored on the cassette.
Example:
istocopy a cassette program to a diskette. The programisthen read from the
to
the computer's memory and printed.Itis
A TAPE PROGRAM TO DISK
assumed that the
BASIC
program
was
Load the file from the cassette tape
computer's memory.
Create a program file containing the program
on diskette.
Erase everything from memory. (The
commandinBASIC
NEW
disk command will format a disk.)
Load the program back into the computer's
memory.
Run the program
will clear memory; the
to
verify it has been loaded.
to
the
NEW
45
Page 49

Chapter
5
ADVANCED
DISK PROGRAMMING
This chapter provides detailed information about
The utility commands provide the programmer with low-level functions that may
for special applications such
as
special disk handling routines and random access techniques.
DOS
structure and disk utility commands.
be
used
COMMODORE DISK OPERATING SYSTEM (DOS)
The DOS file interface controllerisresponsible for managing all information between the
disk controller and the
sulting in a faster response
The file systemisorganized by channels which are opened with the
ment.
When
executed with the OPEN statement, the
channel and allocates either one or two disk I/O buffer areas. If either the workspace or the
buffer is not available, a
to
structure
The common memory between the disk controller and the file interface controllerisused
256-byte buffer areas. Three of the sixteen buffers are used by the
Availability
queue.
The job queue
side by providing the disk controller with sector header and type of operation information.
The disk controller seeks the optimum job and attempts execution.
then returned in place of the job command.Ifthe jobisunsuccessful, the file side re-enters
the job a given number of times, depending upon the operation, before generating an error
message.
search the directory, and to delete and copy files.
Maps
is
the vital link between the two controllers. Jobs are initiated on the file
IEEE488
to
NO
(BAM), variable space, command channel I/O, and disk controller's job
bus. Most disk I/Oisperformed on a pipelined basis, re-
a requested operation.
DOS
assigns a workspacetoeach
CHANNEL errorisgenerated. The
BASIC
DOS
DOS
An
OPEN state-
also uses the channel
for the Block
error condition
is
as
The secondary address given in the
The number the user assigns
the work areas, and
statements transmit secondary addresses of 0 and 1, respectively. The
is
to
not relatedtothe
OPEN
a channelisonly a reference number thatisusedtoaccess
statementisused by
DOS
ordering of channels. The LOAD snd SAVE
DOSasthe channel number.
DOS
automatically
47
Page 50

interprets these secondary addresses as LOAD and SAVE functions. Unless these functions
of
are desired when opening files, avoid secondary addresses
bers,2
data.
through
14,
may be usedassecondary addressestoopen uptofive channels for
0 and1.The remaining num-
DISK UTILITY COMMAND SET
The disk utility command set consists of the following commands:
Commands
BLOCK-READ
BLOCK-WRITE
BLOCK-EXECUTE
BUFFER-POINTER
BLOCK-ALLOCATE
BLOCK-FREE
memory-write
memory-read
memory-execute
USER
Where: ch=the channel number in DOS: identicaltothe secondary address in the
associated OPEN statement.
Abbreviations
B-R
B-W
B-E
B-P
B-A
B-F
M-W
M-R
M-E
U
General Format
"B-R:"ch,dr ,t,s
"B-W:
"ch,dr,t,s
"B-E:"ch,dr,t,s
"B-P:"ch,p
"B-A:
"dr
,t,s
"B-F:"dr,t,s
"M-W"adl/adh/nc/data
"M-R"adlladh
"M-E"adlladh
"Ui:parms"
48
dr=the drive number: 0 or 1
the
t=the track number: 0 thru 77. For each track number,
for the 2040, 3040, 4040, and 8050 are shown in Appendix
p=the pointerposition for the buffer pointer.
adl=the low
adh=the high
nc=the number
data=the actual data in hexidecimaI. This is transmitted by using the CHR$
function, i.e. CHR$(1) would send
01, (decimal 1).
i=the index
parms=the parameters associated with the U command (optional).
byteofthe address*.
byte
of the address*.
of
characters: 1 through 34*.
to
the
User
Table.
the
binary equivalentofhexidecimal
sector ranges
C.
Page 51

The values used in conjunction with the memory commands exist in the 2040, 3040, and
as
4040 as hexidecimal values and must be transmitted
equivalent of the desired hexidecimal value.
NOTE:
If using variables the format must have only the command in quotes.
CHR$(n), where nisthe decimal
For
example:
"B-R:"ch,dr,t,s
"B-R:ch,dr,t,s"
To avoid confusion, it
As
implied in the preceding format, these commands may be abbreviatedtothe first characterofeach of the key words. Abbreviations only are accepted for those commands shown in
lower case. The parameters associated with each command are searched for starting at a
colon (:), or in the fourth character position if a colon
ing shows four ways
NOTE: If using a 4040 initialize the disk before the buffer read or write.
Examples:
Parameters following the key words within quotation marks may be separated by any combination of the following characters:
"BLOCK-READ: "2,1,4,0
"B-R"2,1,4,0
"B-R"2;1;4;0
"B-READ:"2;1;4;0
is
good practicetouse this format when using variables or constants.
that
the same block-read command may be given.
Character Name
correct
incorrect
is
not present. The example follow-
Keyboard Representation
Skip
Space
Comma
The use of these characters permits sending both ASCII strings and integers.
Parameters not within the confines of quotation marks should be separated by semicolons (;).
In
the following discussions, a PRINT# is assumed in all examples.
<cursor right>
Space bar
BLOCK-READ
This diskette utility command provides direct accesstoany block on a diskette in either
disk drive. Used in conjunction with other block commands, a random access file system
may be created through BASIC. This command finds the character pointer in the O-position
of the block.
or-Identify (EOI)
the computer.
When
a character in this positionisaccessed with GET# or INPUT#, an End-
is
sent. This terminates an INPUT# and sets the Status
Word
(ST)to64 in
49
Page 52

The format "B-R:"ch;dr;t;sisillustrated in the following example.
Example: "B-R: "5;1;18;0
Reads the block from drive 1, track 18, sector 0 into channel 5 buffer area.
Mter
using BLOCK READ to transfer the data to the buffer, the data may be transferred
memory by INPUT# or GET# from the logical file openedtothat
that secondary address).
The
U1
command described under USERissimilar to the BLOCK-READ command.
disk channel (Le., using
BLOCK-WRITE
When
this commandisinitiated, the current buffer pointerisusedasthe last character
is
pointer and
indicated block on the diskette and the buffer pointer
placed in the 0 position of the new buffer. The bufferisthen written to the
is
left in position 1.
to
The format
Example:
BLOCK-WRITE
retrofits. The BLOCK-WRITE command
"B-W:
"B-W:
Writes channel 7 buffer to the block on drive 0, track 35, sector 10:
"ch;dr;t;sisillustrated in the following example.
"7;0;35;10
is
not available with
DOS
2. This includes the 4040 and all 2040/3040
is replaced by the
U2
command for the 4040.
BLOCK-EXECUTE
This command allows part of the
loaded into disk drive memory and executed.
Interface Controller begins execution of the contents after the block
Execution must be terminated with a return from the subroutine (RTS) instruction. Future
system extensions or user-created functions may implement this command.
The format "B-E:"ch;dr;t;s
Example: "B-E:"6;1;1;10
Reads a block from drive 1, track 1, sector
cutes its contents beginning at position 0 in the buffer:
DOS
or user designed routines to reside on disk and be
B-Eisreally a
is
illustrated in the following example.
B-R
10
into channel 6 buffer and exe-
with an addition. The File
is
read into a buffer.
BUFFER-POINTER
This command changes the pointer assocIated with the given channel to a new value. This
useful when accessing particular fields of a record in a block or, if the blockisdivided into
records, individual records may be set for transmitting or receiving data.
is
The format "B-P: "ch,p
Example: "B-P:"2;1
Sets channel 2 pointer
buffer:
50
illustrated in the following example.
to
the beginning of the data area in the direct access
is
Page 53

BLOCK-ALLOCATE
The appropriate
allocated (used). In future operations, the
programs or writing sequential files. The updated
closure of a write file or the closure of a direct access channel.
BAMisupdated in the
DOS
memorytoreflect the indicated block
DOS
skips over the allocated block when saving
BAMiswrittentodiskette upon the
as
If the block requested has been previously allocated, the error channel indicates the next
available block (increasing track and sector numbers) with a
no blocks available that are greater in number than the one requested, zeroes are displayed
as
track and sector parameters.
The format "B-A:"dr;t;s
Example: "B-A: "1;10;0
Requests that block (sector) 0 of track 10
in drive
NOTE: The error channel should alwaysbecheck when using BLOCK ALLOCATE,sothat
is
if the block
message will also indicate the next available block.
Example: INPUT#15,EN,EM$,ET,ES
already allocated, it will notbeoverwritten. If the blockisallocated, the error
Reads the next track and sector, respectively, into ET and ES, assuming that
lfn=15 has been previously OPENed to the disk error channel.
1.
is
illustrated in the following example.
NO
BLOCK error. If there are
be
flaggedasallocated on the diskette
All
three
MEMORY
language programs. BASIC statements may
MEMORY
M-E:
commands by using the CHR$ function. The system accepts only
neither verbose spelling or the use of the colon (:)ispermitted.
commands are byte-orientedsothat the user may utilize machine
be
used to access information through the
Memory-Write
This command provides direct accesstothe
loaded to the disk drive through this command and then executed using the
EXECUTE command or one of the USER (U) commands.
with each use of the command. The low byte of the address must precede
the address.
The format
Example:
"M-W:
"M-W:
Writes four bytes
"adl/adh/nc/dataisillustrated in the following example.
"CHR$(00)CHR$(18)CHR$(4)CHR$(32)CHR$(0)CHR$(17)CHR$(96)
to
buffer 2 ($1200 or decimal 4608):
DOS
memory. Special routines may be down-
Upto34 bytes may be deposited
MEMORY
M-R,
MEMORY-
the
high byte of
M-W,
and
51
Page 54

Memory-Read
The byte pointed to by the addressinthe command string may be accessed with this com-
DOS
mand. Variables from the
M-R
command. The
transmitting information
(secondary address 15) transmits the byte.
error channel after a MEMORY-READ command until a
the MEMORY commands
The format "M-R: "adlladh
Example: "M-R"CHR$(128);CHR$(O)
Accesses the byte located at ($0080 or decimal 128):
command changes the contents of the error channel since itisused for
or the contents of the buffers may alsoberead with this
to
the computer. The next GET# from the error channel
An INPUT# should not
is
executed.
is
illustrated in the following example.
DOS
be
executed from the
command other than one of
Memory-Execute
Subroutines in the
DOS, terminate the subroutine with RTS ($60).
The format "M-E: "adlladh
Example: "M-E"CHR$(128);CHR$(49)
Requests the execution of code beginning at $3180.
DOS
memory maybeexecuted with this command. To returntothe
is
illustrated in the following example.
USER
This command provides a link to 6502 machine code accordingtoa jump table pointed
by the special VSER pointer. Refer to Table5.The second character in this command
usedasan index to the table. The ASCII character 0 through 9 or A through 0 maybeused.
Zero sets the VSER pointer to a standard jump table that contains links
VI
The special VSER commands
BLOCK-READ and the BLOCK-WRITE commands.
The format of
"VI:
VI
forces the character count (buffer pointer)to255 and reads an entire block into
memory. This allows complete access to
VI
is:
"ch;dr;t;s
(or VA) and V2 (or VB) can be usedtoreplace the
all
bytes in the block.
to
special routines.
to
is
The format of
"V2
V2 writes a buffer
B-W
does. Thisisuseful when a blockisto be read in (with B-R) and updated
field and PRINT#), then written back to diskette with
Refertothe random access exampleinChapter 6 for an application of the
commands.
52
V2 is:
:"ch;dr;t;s
to
a block on the disk without changing the contents of position 0
V2.
(B-Ptothe
VI
and V2
as
Page 55

USER
DESIGNATION
Table 5. Standard Jump Table
ALTERNATE
USER
DESIGNATION
FUNCTION
Ul
U2
U3
U4
U5
U6
U7
U8
U9
U:
U3
thru
U9 commands are user-defined. The locations jumpedtoare located in the buffer
of
areas
RAM and routines may be written to reside there and downloaded using the
command. Locations D008,
the
in
that
2040/3040 and USER commands may be used
position. Location
IOFOisthe
UA
UB
UC
UD
UE
UF
UG
UH
VI
UJ
DOOB,
BLOCK-READ replacement
BLOCK-WRITE replacement
jump
jump
jump to
jump
jump
jump
jump
DOOE,
and
DOD5
location of the
2040/3040 4040 8050
to
to
$1300 $1300 $1300
$1303 $1303 $1303
$1306 $1306 $1306
to
to
to
to
$D008
$DOOB
$DOOE
$DOD5
$1309 $1309
$130C
$130F $130F
$10FO $10FO
power up vector
are located in the expansion ROM slot
to
access a ROM or EPROM located in
NMI
vector in the 4040 and 8050.
$130C
M-W
53
Page 56

Table 6. Block DistributionByTrack
2040,3040
Track number
1to17
18to24
to
30
25
31to35
4040
Track number Sector Range
1to17
18to24
25to30
31to35
8050
Track number
1to39
40
to
53 o
54to64
65
to
77 o
Any block on a diskette may be examined by using
on the TEST/DEMO diskette.
Block or
Sector Range
o
o
o
o
Block
oto
o
o
o
Block or
Sector Range Total
o
o
to
to
to
to
to
to
to
to
to
to
to
Total
20
19
17
16
or
20
18
17
16
28
26
24
22
the
program DISPLAY T&S, provided
21
20
18
17
Total
21
19
18
17
29
27
25
23
Tables 7 through 12
PLAY T&S program.
will
assist the user in interpreting information obtained using
the
DIS-
54
Page 57

Track
18,
Sector
O.
Table 7.
2040,
3040
BAM
FORMAT
BYTE
0,1
2
3 0 Null flag
4-143
*l=available
O=block
(each
Track
18,
BYTE CONTENTS
144"-161
not
bit
Sector
CONTENTS
18,01
1
block
available
represents
Table 8.
O.
one
Track
Indicates
*Bit
block)
2040,
Disk
DEFINITION
and
sectoroffirst
version 1
for
future
mapofavailable blocks
3040
DIRECTORY
name
padded
directory
format.
DOS use.
DEFINITION
with
shifted
for
tracks
HEADER
spaces.
block.
1-35.
162-163
164-170
171-255
Note:
ASCII characters
160
0
Disk ID.
Shifted
Nulls,
may
appearinlocations
spaces.
not
used.
180
thru
191onsome
diskettes.
55
Page 58

Track
18,
Sector
O.
Table 9. 4040
BAM
FORMAT
BYTE
CONTENTS
0,1 18,01 Track and sector
2
3 0 Null
4-143
65
ASCII character A indicating
flag for future DOS use.
Bit mapofavailable blocks for tracks
*1=available block
O=block
(each
not
available
bit
represents one block)
Table 10. 4040 DIRECTORY HEADER
18,
Track
144-161
Sector
BYTE
O.
CONTENTS
Disk name padded with shifted spaces.
DEFINITION
of
first directory block.
4040
DEFINITION
format.
1-35.
162-163
164 160
165,166
166-167
171-255
50,65
160
0 Nulls,
Disk ID.
Shifted space.
ASCII representation for 2A which is DOS version and
format
type.
Shifted spaces.
not
used.
Note: ASCII characters may appear in locations
180
thru
191onsome diskettes.
56
Page 59

Track
39,
Sector
O.
Table
11.
8050
DIRECTORY
HEADER
BLOCK
BYTE CONTENTS
0,1
2
3 0 Null flag
4,5
6-21
22,23
24,25
26
27,28
29-32
33-255
38,0
67
0 Unused.
160
160
50,67
160
0 Nulls,
Track
ASCII
Disk
name
Shifted
Disk ID.
Shifted
ASCII
format
Shifted
and
not
DEFINITION
sectoroffirst BAM block.
character
for
spaces.
space.
representation
type.
spaces.
future
padded
used.
C indicating
DOS use.
with
shifted
for
2C which is DOS version
8050
spaces.
format.
and
57
Page 60

Table
12.
8050
BAM FORMAT
First
BAM
block:
BYTE CONTENTS DEFINITION
Track
38,
Sector
O.
0,1
2
3
4
5 51 Highest
6
7-10
11-255
Second
BAM
BYTE
0,1 39,1 Track
2
3
4
38,3
67
0
1
block:
Track
CONTENTS DEFINITION
67
0 Null flag for
1
Track
ASCII character C indicating
Null flag for
Lowest
Numberofblocks unusedontrack
Bit map representationofavailable blocksontrack
*BAM for tracks
38,
Sector 3.
ASCII character C indicating
Lowest
and
sectorofsecond
future
track
number
track
number+1in this
2-50,
and
sectoroffirst
future
track
number
BAM
block.
8050
DOS use.
represented in this
BAM
5 bytes
DOS use.
represented this
per
directory
8050
format.
block.
l.
track.
block.
format.
BAM
BAM
block.
block.
l.
5 51
6
7-10
11-140
141-255
*STRUCTURE
BYTE
Note:
0
1
2
3
4
"BLOCKS
DEFINITION
numberofavailable sectors for
bit
bit
bit
bit
OF
BAM
map sectors
map sectors
map
sectors
map
sectors
FREE"
may
track
Highest
Numberofblocks unusedontrack
Bit
map
*BAM
ENTRY
0-7
8-15
16-23
24-31
appearinlocations
for
Unused.
FOR
number
representationofavailable blocksontrack
tracks
A TRACK
track
1=available
O=not available
+1 in this
52-77,5bytes
180
thru
BAM
block.
5l.
per
track.
191onsome diskettes.
51.
58
Page 61

8050 DISK ZONES
The 8050 disk format uses a variable number of sectors per track according to four density
zones. The
represents tracks 1 thru
BAMismade up of two blocks (see
50
and
the
second, tracks51thru
BAM
structure information). The first block
77.
TRACK
RANGE
..........
When
the
from
1-39
40-50
51-53
54-64
65-77
the
DOS
diskette. Before reading in the other block, the DOS checks to see if changes have
NUMBER
SECTORS/TRACK TOTAL SECTORS
29
27 297 2
.............. ....... ............,
27
25
23
requires accesstoa
occurred to the current block.
the diskette. The other
BAM
OF
1131
81
275
299
................
2083
-
29
2
2052
BAM
block not currently in memory, it must be read
If
changes have been made,
blockisthen read into the
ZONE
1
..
.... .... .............
2
3 2
4
DIRECTORY
BAM
BLOCKS AVAILABLE
the
current blockiswritten
DOS
memory.
BAM
AREA
1
1
2
2
to
59
Page 62

Table
13.
DIRECTORY FORMAT
BYTE
0,1
2-31
34-63
66-95
98-127
130-159
162-191
194-223
226-255
OF
*STRUCTURE
BYTE CONTENTS
SINGLE
Track
Track
*File
*File
*File
*File
*File
*File
*File
*File
DIRECTORY
Track
18,
39,
and
entry
entry
entry
entry
entry
entry
entry
entry
Sector
Sector
1 for
1 for
sectorofnext
1
2
3
4
5
6
7
8
ENTRY
4040
8050
DEFINITION
directory
DEFINITION
block.
0
1,2
3-18
19,20
21
22-25
26,27
28,29
128+type
File
type
OR'ed
TYPES:
Track
and
File name
Relative file
block.
Relative file
Unused.
Track
effect.
Numberofblocks in file: low
and
with
$80toindicate
0=
DELeted
1 = SEQential
2 = PROGram
3 = USER
4 = RELative
sectorof1st
padded
only:
only:
sectorofreplacement
data
with shifted spaces.
track
and sector for first side
Record size.
properly
block.
file when OPEN@ is in
byte,
high
byte.
closed file.
sector
60
Page 63

Table
14.
SEQUENTIAL
FORMAT
BYTE
0,1
2-256
BYTE
0,1
2-256
Track
and
254
bytesofdata
Track
254
tokenized).
and
bytesofprogram
sectorofnext
with
Table
15.
sectorofnext
Endoffile is
DEFINITION
sequential
carriage
PROGRAM
info
returnsasrecord
DEFINITION
blockinprogram
stored
markedbythree
in CBM
data
FILE
block.
FORMAT
file.
memory
zero
terminators.
format
bytes.
(with
key
words
61
Page 64

/
SYNC
NOTE:
Nottoscale
/
/
/
/
08
IDl
ID2
TRACK
SECTOR
CHECK-
SUM
GAP
1
SYNC
POINTERSTOLINK
TOGETHER
WITHIN A
• t
,...;
0
r..:I r..:I
E-<
E-<
07
><
P=I
><
P=I
254
OF
ALL
FILE
BLOCKS
BYTES
DATA
~
CHECK- GAP
SUM
2
Figure 4 -
Figure 4 illustrates an expanded view
In addition
characters. Blocks within
block pointer. By pointing
system
to
file triggers a search for
related blocks until
2040,3040,4040
to
other information, each sector contains a data block consistingof256 stored
the
to
Format: Expanded Viewofa Single Sector
of
a single sector on a diskette formatted for
same file are linked together by means of a two character
the
locationofthe
retrieve data from non-contiguous blocks. Retrieving
the
next data block which, in turn, utilizes block pointerstolocate
the
entire fileisassembled and made available for display. All PRG,
SEQ, and USR files utilize this format.
is
A data block
numbered 1 to 35 while an
addressed by track and sector. A 2040 diskette contains 35 tracks (or rings)
8050
diskette contains 77 tracks numbered 1to77. The number
of sectors per track will vary (as illustrated in Table
ference and recording frequency.
the
18
first
The 2040 maintains a system file on track
BAM,
and file directory. The
and occupied storage locations
resident in
on
diskette. The last
the diskette name and ID. The file directory begins on
62
next data block, block pointers enable the
the
first data block within a
6)
duetodifferences in track circum-
which contains
128
bytesofsector 0, monitors available
128
the
the
BAM, diskette name, ID,
bytes of sector 0 are usedtostore
next sector, sector 1.
the
2040.
Page 65

/
SYNC
NOTE:
Nottoscale
/
/
/
/
08
IDI
ID2
TRACK
SECTOR
CHECK-
SUM
GAP I SYNC
07
POINTERS
TOGETHER
WITHIN A
+ +
,...,
0
t-< t-<
""
""
><
><
I:Q
I:Q
TO
LINK
ALL
BLOCKS
FILE
254
BYTES CHECK- GAP
OF
DATA
SUM
~
2
Figure 5 - 8050
Figure
In addition to
5 illustrates an expanded view
other
information, each sector contains a data block consisting
characters. Blocks within the same file are linked together
block pointer. By pointing
system to retrieve data from non-contiguous blocks. Retrieving
file triggers a search for the next data block which, in
the
related blocks until
entire fileisassembled and made available for display. All PRG,
Format:
of
a single sector on a diskette formatted for the 8050.
to
the locationofthe
Expanded Viewofa Single Sector
by
meansofa two character
next
data block, block pointers enable
the
first data block within a
turn,
utilizes block pointers to locate
of
256 stored
the
SEQ, and USR files utilize this format.
A data blockisaddressedbytrack and sector. A 2040 diskette contains 35 tracks (or rings)
numbered 1 to
of sectors per track will vary (as illustrated in Table
35 while an 8050 diskette contains 77 tracks numbered 1
6)
duetodifferences in track circum-
to
77. The number
ference and recording frequency.
The
8050 maintains system files
name, ID, and file directory. The BAM, resident in
on
tracks 38 and 39 which contain
the
first 255 bytesofsectors 0 and 3
the
BAM, diskette
of
track 38, monitors available and occupied storage locations on diskette. The file directory
header block, beginning
the first
30 bytes.
on
sector 0oftrack 39, contains the diskette name and ID within
63
Page 66

Chapter
6
ADVANCED
FILE HANDLING
In
the preceding chapters, you learned how to manipulate files on the disk, and were shown
the format of commands used to create and update files. In this chapter, you will utilize
these skills in a file handling application using random or relative access.
SPECIAL OPEN AND CLOSE
STATEMENTS
The BASIC statements (after initializing the disk):
OPEN2,8,4,
or
OPEN2,8,4,
open a channel to one buffer, to be used with the block commands. In the first example,
the first available buffer is allocated to channel 4. The second example
cate buffer
is
dition
position dependent code
Execute a
mitted
or read operations
generated. The explicit buffer allocation can be used to reserve a buffer for
GET#
is
the buffer number. A buffer number may only be obtained PRIOR
"#"
"#12"
12tothe channel. If the buffers are
asinthe case of an EXECUTE command.
statement to find the number of the allocated buffer. The byte trans-
to
that
buffer.
not
available, a
FOR DIRECT ACCESS
is
an attempt to allo-
NO
CHANNELS error con-
TO
any write
The CLOSE statement clears the OPENed channel and writes the
was
last used by that channel. To avoid confusion, limit yourselftoaccessing one drive with
any direct access channel.
BAM
to the diskette that
65
Page 67

RANDOM
Since the BLOCK-ALLOCATE command returns the next available diskette block through
the error channel, it can be used in the allocation of records. This feature allows creating a
random file without being concerned with the actual physical structure of
However, the allocated blocks must first be recorded in a sequential or user file in order to
be referenced by the BASIC program.
The following random file example demonstrates the use
that the
record
A smaller application might take advantage of the
Chapter 9 contains a complete listing of the random access program entitled "Random
1.00". The example program
record access through BASIC programming. Most of the programming below line 2000
relative record access. The field accessing routines left-justify binary and alpha fields, and
right-justify numeric fields.
In an actual situation, the program should generate error messages to the operator, or automatically take corrective action such
possible
including field markers, must be less than 254 characters. Field size
characters becauseofthe restrictions of the BASIC INPUT# statement. Longer fields could
be used if
would be much slower.
Ul
and
U2
commands are used. These commands are used since more than one
is
stored in a block, and itisnecessary to manage end-of-record pointers in BASIC.
B-R
is
built upon a relative record scheme and provides single
as
rounding numbers
to
add data sorts and searchesaswellaskey fields to the program. Record size,
the
BASIC program were modifiedtouse GET# for retrieval
of
and
ACCESS
block access commands. Notice
B-W
commands.
to
fit a field.
is
restrictedto80
but
EXAMPLE
the
diskette.
It
would also be
that
procedure
is
to
Two sequential files are used
bears the name of the file name given in the CREATE file code (lines 1100
six-character extension. Since primary file names are ten or less characters, the file names
are padded with spaces. The two files are named FILENAME .DESCR and FILENAME
.KEY01.
The descriptor ( .DESC) contains information about record structure and location. The
primary key file ( .KEY01) contains the first field of each record and the relative record
number. This example allows the random records to reside on a separate diskette from the
sequential support files, thereby providing added room for random data. The OPEN code
(lines 1200 to 1275) requires the disk
Note that since no file name
be
performed on the disk containing the random data. In order to backup the disk, a
BACKUP or DUPLICATE must be performed, since the
filename.
STEP 1: Insert the TEST/DEMO disk in drive
STEP 2: Type: OPEN15,8,15 and press RETURN
Opens the command channel and initializes the diskette.
support the random access file in this example. Each file
to
1180) plus a
ID
of the random file disk for comparison.
is
assignedtothe random blocks, a VALIDATE should never
DOSisunable to
O.
To
COpy
without a
Create
A File
STEP 3: Type: LOAD"O:RANDOM 1.00",8 and press RETURN
the
This command loads
random access program.
66
Page 68

STEP 4: Insert a blank diskette into drive
1.
STEP 5: Type: PRINT#15,"N1:MAILING LIST"
STEP
6:
Type: RUN and press RETURN
YOU
The screen displays: "DO
STEP 7: Type: Y and press RETURN
The screen displays: "RANDOM FILE NAME"?
STEP 8: Type the file name: PHONE LIST and press RETURN
The screen displays: "KEY FILE DRIVE NUMBER"?
STEP 9: Type: 1 and press RETURN
The screen displays: "RANDOM FILE NUMBER"?
STEP 10: Type: 1 and press RETURN
The screen displays: "ENTER
STEP 11: Type:
The screen displays: "NUMBER OF RECORDS"?
STEP 12: Type: 10 and press RETURN
For this example, ten
records the file can contain.
than ten.
CS
and press RETURN
was
entered since thisisthe
If
WISH
ID
OF RANDOM DISK"?
less records are needed, specify a number less
and press RETURN
TO
CREATE A FILE"?
MAXIMUM
number of
The screen displays: "NUMBER OF FIELDS PER RECORD"?
STEP 13: Type: 4 and press RETURN
This
is
the number of 'items' each field contains.
The screen displays: "INPUT FIELD NAME, FIELD SIZE, FIELD TYPE".
TYPES: O=BINARY, l=NUMERIC, 2=ALPHA
1?"
FIELD
FIELD
FIELD
FIELD
enter: NAME,20,2
2?"
enter: PHONE,15,2
3?"
enter: ADDRESS,40,2
4?"
enter: COMMENTS,40,2
and press RETURN
and press RETURN
and press RETURN
and press RETURN
To Add A Record
STEP 1: The screen displays: "WHOSE RECORD
Press RETURN.
The screen displays: "****ADD RECORD****"
NAME"?
DO
YOU
WISH
TO SEE?
STEP 2: Type: COMMODORE and press RETURN
The screen displays: "PHONE"?
67
Page 69

STEP
3: Type: 727-1130 and press RETURN
The screen displays: "ADDRESS"?
STEP
4: Type: 3330 SCOTT BLVD SANTA CLARA CA. 95051
The screen displays: "COMMENTS"?
STEP
5: Type: MANUFACTURES MICROCOMPUTERS and press RETURN
The screen displays:
Press RETURN
The screen displays:
NAME"? Enter the desired name. For example: SMITH and press
RETURN
PHONE"? Enter the phone number: 999-356-1012 and press RETURN
ADDRESS"? Enter the address: 247 MASSOL DR LOS GATOS
and press RETURN
COMMENTS"? Enter a comment. For example: MANUFACTURES
PERIPHERALS and press RETURN
STEP 6: The screen displays: "WHOSE RECORD
Press RETURN
"WHOSE RECORD
"****ADD RECORD****"
DO
DO
YOU
YOU
and press RETURN
WISH
TO SEE"?
WISH
TO
SEE"?
CA.
95030
The screen displays: "****ADD RECORD****"
NAME"? Enter the desired name. For example: JONES and press
RETURN
PHONE"? Enter
ADDRESS"? Enter the address: 4086 AMBER
and press RETURN
COMMENTS"? Enter a comment. For example:
COMPUTERS and press RETURN
The computer displays: "WHOSE RECORD
Enter: COMMODORE and press RETURN
After displaying the record, the screen displays:
STEP
1: Type: YES
the
phone number: 999-268-1795 and press RETURN
and press RETURN.
DO
YOU
WISH
"ANY MODS"?
WAY
SAN JOSE
MANUFACTURES
To See A Record
TO SEE"?
To
Change
A Record
CA.
95117
68
The screen displays:
Enter the number of the field you wishtochange.
"WHICH FIELD"?
Page 70

STEP
2: Type: 4 and press RETURN.
The computer displays
STEP
3: Press RETURN.
The screen display asks if there are; "ANY MODS".
STEP
4:
If
the recordiscorrect, type:
The screen displays:
Type:
The computer displays the directory.
The computer displays;
Type:
IDIR and press RETURN
II
and press RETURN. The program ends.
"WHOSE RECORD
that
"WHOSE RECORD
field:
NO
US
HEADQUARTERS
and press RETURN
Getting The Directory of Listings
DO
YOU
WISH
TO SEE"?
Ending The Program
DO
YOU
WISH
TO SEE"?
RELATIVE FILES 4040, 8050
Direct access of relative filesisa method that allows the programmer to positiontoany
record on the disk relative
dard procedure
becomes apparent
the amount of time required to find a specific record stored on disk. This reduction in the
amount of time required to locate and fetch a file through the application
handling techniques frees the user from the major objection
excessive "look
DOS
Both
ficantly reduce the amount
The two main components of a relative file are the side sector chain of blocks and the data
block chain. Both are linked together through forward pointers similar
sequential file. Record sizes, while fixed in length, may range from one to 254 bytes. The
number of records
not exceed 65,535.
The side sectors do
blocks. The record size dictates where the pointer
enced because the record size
placed when a record numberisgiven through the RECORD command. The side sector also
contains a table of pointers to all of the other side sectors within the file. In order to move
from one side sector to another, the pointer
command, and the corresponding side track and sector read into memory.Byusing the
information contained in the referenced side sector, the data block pointer can be located
and used to read in
of
having to search each track and sector for the desired information and it
that
up"
2 and 2.5 (4040 and 8050) are capable of handling relative files and should signi-
is
not
the
to
the beginning of that file. Compare this methodtothe stan-
such a relative handling method would result in a great reduction in
of
relative file
to
using sequential disk files:
time.
of
time spent retrieving disk files.
to
those used in a
limited to
contain record information, but do contain locations of the data
actual data block containing the record. The relative file data block
the
capacity of the disk but for practical purposes should
is
placed when a record numberisrefer-
is
used in an algorithm to compute where the pointer
is
referenced through the appropriate
is
DOS
69
Page 71

pointers in
disk read
the
side sectors allow
commands-a
considerable savings in
sired data block when compared
the
DOStomove from one recordtoanother within
the
amountoftime requiredtofind a de-
to
sequential methods.
two
A file may contain up
data blocks. Therefore,
182,880
to
bytes (120 pointers/side sector *6 side sectors *
be greater
than
to
six side sectors and each side sector may contain pointersto120
the
largest file on the 204 Dual Drive
the
total storage capacityofthat
16.
Table
RELATIVE FILE FORMAT
particular disk.
DATA BLOCK
BYTE DEFINITION
0,1
2-256
Track and sectorofnext
254
bytesofdata.
the
ones) in
first byte followed by00(binary all zeros)
the endofthe
(00).
nulls
Empty
record. Partially filled records are padded with
data
SIDE SECTOR BLOCK
BYTE
0,1
2 Side sector number.
Track and sectorofnext
DEFINITION
side sector block.
(0-5)
Floppy
254
bytes/block) which happens
Disk contains
block.
records contain
FF
(all binary
to
3 Record length.
4,5
6,7
8,9
10,11
12,13
14,15
16-256
Track and sectoroffirst side sector (number 0)
Track and sectorofsecond side sector (number 1)
Track and sectorofthird side sector (number 2)
Track and sectoroffourth side sector (number 3)
Track and sectoroffifth side sector (number 4)
Track and sectorofsixth side sector (number 5)
Track and sector pointers
to
120
data
To expand a relative file, a programmer may reference the last record
the
through
records from
automatically generated by
necessary
For
example, if
number referenced would expand it
RECORD command and printtothat
the
pointofthe
to
contain a file, regardlessofsize,
the
current sizeofthe
current endofthe
the
DOS. This includes any side sectors and all
relative recordisone
to
125
blocks, then an additional side sector would be
generated by the DOS since one side sector can only represent
particular record. The intermediate
filetothe reference record
but
within the capacity limitsofthe
data
block long and
120
data
blocks.
number
blocks.
generated
number
data
will be
blocks
diskette.
the
record
70
Page 72

Spanningisa key feature of relative files which aids in reducing the number of disk read/
write operations required to find and retrieve data. Before explaining how this feature
DOS
2 and 2.5 improves time utilization efficiency,weneed to examine how I/O channels
of
are utilized by relative files:
When
a channelisopened to a previously existing file, the DOS will position to
that
the first record provided
is
not
length variable
necessary on the OPEN if the fileisalready in existence, but
the DOS causes a check to be made against the record size
DO
made in the
50-record
PEN statement creating the file.Ifthese do not match, then error
not present-will be generated.
the given parameters match properly. The record
that
was originally
The relative channel requires three memory buffers from the system, whereas
sequential files only require two. Since there are twelve channels in the system
and two of these are used in directory searches and internal functions, only three
at
relative channels can be open
is
ten, which limits the total number of channels which can be open at
time.
was
foundtobe on the boundary between two data blocks,
If
a record
be used
anyone
one time. The highest numberofbuffers
that
one data block and finishing in another, then the DOS would read the first segment
as
any following records in the second data block. In practice, the records of most relative
that
can
is, starting in
as
well
data files will span across data blocks. The only exceptions are record size 1, 2, 127, and
is
254. These divide evenly into the 254 size of the data block and spanning
unnecessary.
This method of spanning has the advantage of requiring no system memory overhead aside
from
that
required for the side sector blocks in the relative files. When a recordiswritten
upon through the PRINT#statement, the data block
only written
out
when the DOS moves beyond the particular data block in which
is
not
immediately written out.Itis
that
record resides. This can occur through successive printing to sequential records, or when
positioning to another record outside of
that
particular block.
is
Because of the spanning feature, it
tive file at the same time if either channel will be writing
made in the channel's particular memory buffer area, but the change may
that
disk until the DOS moves
ever, and
in
certain instances where the fileisonly read from, it may be advantageous to
particular data block. Thereisno restriction on this, how-
recommended that two channels not be open to a rela-
to
the same file. An update may be
not
be made on
have more than one channel open to a single relative file.
The
DOS
terminates printingtoa record by detecting the EOI signal whichisgenerated with
If
each PRINT# statement.
51-record
overflow-will be generated. Any data overflow will be truncated to fit the num-
the PRINT statement goes over the maximum record size, error
ber of characters specified by the record size and the DOS will position to the next record in
sequence.
positions within
record for input the EOI signal
non-zero
terminator such
If
the print statement contains less characters than the record size, the remaining
that
record will be filled with nulls. Consequently, when positioning to a
is
generated from the DOS to the computer when the last
is
transmitted. Should the programmer desiretostore binary information, a record
as
carriage return will have to be used and the record size increased by one
charactertoaccommodate the terminator.
While
the
DOS
is generating new data blocks for relative files, the requested record number
is
compared to the number of data blocks left on the diskette.Ifthe resulting number of
data blocksisgreater than whatisleft on the diskette, then error
52-file
too large-is
generated.
71
Page 73

CREATING
A RELATIVE FILE
The following examples apply only to those users equipped with
2. In terms
computer and a 4040 or 8050 for the disk drive.
When
mer
to
space on the diskette for the future data. A simple program
illustrated below:
In the preceding example, line 110 creates a file with the name FILE1 and a record length
of 50.
of
hardware, this means a 4000 or 8000 Series PET or
a relative fileisopened for the first time, the file should be initialized by the program-
allow for faster subsequent access, and to assure that the
110 DOPEN#1,"FILE1",DO,L50
120 GOSUB 190
130 RECORD#1,100
140 GOSUB 190
150 PRINT#1,CHR$(255);
160 GOSUB 190
170 DCLOSE#l
180 END
190 IF DS<20 THEN RETURN
200 PRINT DS$
210 IF DS=50 THEN RETURN
220 STOP
both
BASIC 4.0 and DOS
CBM
must be usedasthe
DOS
reserves sufficient
to
perform such initialization
is
160
Lines 120, 140, and
gramming practice to check the error channel after each disk-related operation.
Line 130 positions the file pointer
message 50 RECORD NOT PRESENT
a warning rather than an error condition. This messageisnormally expected to occurasa
warning when a new record
or GET operation should be attempted.
Line 150 causes record number
written. During this write operation, the
exist, and automatically initializes them by placing CHR(255) in the first character.
Line 170 closes the file and causes the space
190-220
Lines
line 190 would return control to the main program. Line 200 prints the error message, and
lie 210 returns to the main program if the message
some other unexpected error (suchasa read error) occurs, line 220 will halt the program so
the user can correct the problem.
Mter
the file has been initialized, data may be written to the file. Initialization of a file in
this manner need be performed only once when the file
wishes to expand an existing file, the same procedure would be used, with the record number (line 130 in the example) changed to be the new last record.
are the error subroutine.IfDSisless than 20, no error condition exists, so
cause the error handling subroutine to be executed. Itisgood pro-
to
record number 100 which does
will
occur at this point, but shouldbeinterpreted
is
accessed for the first time and indicates that no INPUT
100
(because of the pointer positioned by line 130) to be
DOS
detects that records 1 thru 99 do
to
be allocated in the
was
50 RECORD NOT PRESENT.
EXPANDING
is
originally created.Ifthe user
not
yet exist. The
as
not
already
BAM
and file directory.
If
A RELATIVE FILE
72
Page 74

The following example, when with the disk containing the file FILE1 (with 100 records)
in
drive 0, will result in the first 100 records remaining unchanged and records containing
only CHR$(255) would be generated for records
110 DOPEN#1,"FILE1",DO,L50
120
GOSUB
130 RECORD#1,200
140
GOSUB
150 PRINT#1,CHR$(255)
GOSUB
160
170 DCLOSE#l
END
180
190 IF DS<20 THEN RETURN
200 PRINT DS$
210 IF DS=50 THEN RETURN
220 STOP
NOTE:
al.
error condition
When
sectors are transparent to the user since they are automatically generated and accessed by
the
When
If
specified, it must match the record length set at the time the file
a fileisexpanded in this manner, the required side sectors are also created. Side
DOS.
190
190
190
DOPENisused onanexisting file, specification of the record lengthisoption-
will
result.
101-200.
was
created or an
ACCESSING A RELATIVE FILE
In ordertomake the relative file system practical, the user must be able to access the file
for reading and writing of data. Both of these operations are simplified by relative files and
both may use the RECORD command for positioning to the desired record before the
operation.
to
To write data
(line 130)
110 DOPEN#1,"FILE1",DO
120
GOSUB
130 RECORD#1,25
GOSUB
140
150 PRINT#l,"RECORD
160
GOSUB
170 DCLOSE#l
180
END
190 IF DS<20 THEN RETURN
200 PRINT DS$
210 IF DS=50 THEN RETURN
220 STOP
The resulting record would appear
a predetermined recordina file, a constant may be usedinthe positioning
as
follows:
190
190
25"
190
as
follows:
1
12345678901234567890123456789012345678901234567890
RECORD 25*
Where * represents a carriage return ( CHR$(13)
234
).
5
73
Page 75

The following program illustrates the feature which permits access to individual bytes within
a record:
110 DOPEN#1,"FILE1",DO
120
GOSUB
900
130 RECORD#1,25,1
GOSUB
140
150 PRINT#l,"FIELD
160
GOSUB
900
1"
900
170 RECORD#1,25,10
GOSUB
180
190 PRINT#l,"FIELD
200
GOSUB
900
2"
900
210 RECORD#1,25,30
GOSUB
220
230 PRINT#l,"FIELD
240
GOSUB
900
3"
900
250 DCLOSE#l
END
260
900 IF DS<20 THEN RETURN
910 PRINT DS$
920 STOP
be
Lines 130, 170, and 210 cause the file pointer to
is
number 25. The following illustration
is
25 after the above example
executed:
a representation of the contents of record number
moved to different places within record
1
234
5
12345678901234567890123456789012345678901234567890
FIELD 1* FIELD 2* FIELD 3*
Where
NOTE:Itis
* represents a carriage return ( CHR$(13)
).
important that the fieldsbewritteninsequence, since writing to a byte at the
beginning of the record destroys the rest of the record in memory. For example, this means
is
that while it
possible to position and write first to byte 1 and then to byte 20, itisNOT
possible to first write byte 20 and then byte 1.
Since the carriage returnisrecognizedasa terminatorbythe
be
data may
retrieved by the following sequence:
BASIC
INPUT statement, the
110 DOPEN#1,"FILE1",DO
120
GOSUB
290
130 RECORD#1,25
140
GOSUB
290
150 RECORD#I,25,I:GOSUB 290
160 INPUT#I,A$:GOSUB 290
170 RECORD#1,25,10:GOSUB 290
180 INPUT#l,B$:GOSUB 290
190 RECORD#I,25,30:GOSUB 290
200 INPUT#I,C$:GOSUB 290
210 DCLOSE#1
END
220
290 IF DS<20 THEN RETURN
300 PRINT DS$
320 STOP
74
Page 76

Lines 160, 180, and 200 cause the stored values on disk toberead and stored in A$, B$,
and C$, respectively.
It
is
extremely usefultobe abletoaccess a record whichisdetermined during program
operation. The following routine illustrates a procedure to query the operator for a record
to
number and data and to write the data
100 PRINT "TYPE RECORD NUMBER
the disk file:
AND
DATA"
105 INPUT R,D$
110 DOPEN#1,"FILE1",DO
120
GOSUB
190
130 RECORD#l,(R)
140 GOSUB 190
150 PRINT#l,D$
160
GOSUB
190
170 DCLOSE#l
180
END
190 IF DS<20 THEN RETURN
200 PRINT DS$
220 STOP
to
Line 130 positions the file pointer
variable used in the RECORD command must
record number (R), specified by the user. Note that a
be
enclosedinparentheses.
Line 150 causes the data stored
The RECORD command may be omitted if the file
saves
time during program execution.Anexample of this occurs when writing a large data
base to the disk file. Assume that the program has already dimensioned D$
which contains 100 elements. These elements are to be written to the disk
ber 1 thru 100 of file
FILEl.
in
D$ tobestored on the disk.
istobe
accessed sequentially, which
as
an array
in
records num-
This couldbeaccomplished with the following program
segment:
110 DOPEN#1,"FILE1",DO
GOSUB
120
130 FOR
1=1
190
TO 100
150 PRINT#l,D$(I)
160 GOSUB 190
165 NEXT I
170 DCLOSE#l
180
END
190 IF DS<20 THEN RETURN
200 PRINT DS$
220 STOP
is
Since the record pointer
the first record written.Ifno RECORD commandisexecuted the
automatically set to record 1 when the fileisopened, record 1
DOS
automatically posi-
tions to the next record after each PRINT. Therefore, the contents of D$ will be written to
records 1 thru 100 of the file.
is
For detailed description of related
the BASIC 4.0 reference manual.
BASIC
commands, refer to chapter 4 of this manual and
75
Page 77

Chapter
7
SIMPLIFYING THE USE OF
COMMODORE DISK-
RELATED COMMANDS
It has been explained
command and enclosed in quotation marks. This is true,
to
grammed
The first file on the TEST/DEMO diskette contains a program called UNIVERSAL
WEDGE, often referred
takes care of
can use the quick load procedure to load the
equipped with BASIC 4.0, the following procedure
Start with a cold start condition by resetting both the computer and disk drive and insert
the TEST/DEMO disk in drive 0.
STEP
1:
perform these tasksaswellashowtoload and run programs stored on diskette.
the
Type:
The screen displays:
that
all disk commands mustbepreceded with the BASIC PRI1'.1'=
but
your computer can be pro-
LOADING
to
as DOS
tasks mentioned above. If your computer has Commodore BASIC 4.0 you
LOAD"*",8
S'L"PPORT.
and press
THE
This program, when loaded into memory,
DOS
RETCR~.
DOS SUPPORT PROGRAM
SL"PPORT
will
work:
program.
For
those of you
not
77
Page 78

STEP 2: Type: RUN and press RETURN.
DOS
This will cause the
locate itself into the top of the user memory, where it will coexist with programs
which are entered later.
is
puter
entry of disk commands.
reset. The following special symbols, once implemented, will simplify the
Support programtobe executed. This program will re-
DOS
support will not needtobe
reloaded until the com-
USING THE DOS SUPPORT SYMBOLS: > AND @
Once
DOS
SUPPORTisimplemented, preceding disk commands with PRINT#lfn or enclos-
ing
them in quotation marksisno longer required: precede the disk command with either
the greater than symbol
symbol.
(»
or the at-sign (@). The examplesinthis manual use
the>
Examples:
The OPEN statement
The>
with LOAD"$dr",8 but this command destroys any program you might have in memory.
When
the data
Examples:
NOTE: To avoid scrolling the directory, press the space bartostop the listing. To continue
the listing, press any key on the keyboard.
To stop a directory listing and return
The third use of >
symbol can alsobeused to load a diskette directly. Normally the directoryisloaded
you use
in
>10
>SO:FILE1
the>
the computer's memory.
>$0
>$l:Q*
is
the same
is
NOT required before a statement.
symbol, the directoryisprinted directly to the screen, thus preserving
is
the request of error messages.
as
is
the same
means display the entire directory of drive
meanstodisplay
PRINT#l,
as
to
BASIC, press RUN/STOP.
"10"
PRINT#15, "SO;FILE1"
all
the files on drive 1 that begin with a
O.
Q.
Example:
Use
number
Example:
78
is
>
equivalent to:
10 OPEN2,8,15
20 INPUT#2,A$,B$,C$,D$
30 PRINTA$,B$,C$,D$
LOADING A PROGRAM WITH THE I
the slash (I)toload a program from diskette. Both diskettes are searched if the drive
is
not specified.
/ACCT
loads the program
ACCT
into the computer's memory.
Page 79

LOADING AND RUNNING A PROGRAM
WITH
UP
ARROW
The up arrow
searched if necessary.
Example:
The
DOS
1. The program must be reaccessed from the disk whenever resetting the computer.
2.
DOS
is, they may NOT be used in a program.
3. The disk directory may be printed on the printer by
(t)
loads a program from a diskette and executes it. Both diskettes are
tJDATA
SUPPORT program has certain limitations. These are:
Support may only be used when communicating with the disk in direct mode. That
LOAD
OPEN 4,4:CMD4:LIST
PRINT#4:CLOSE 4
"$0",8
loads and runs the program JDATA.
SPECIAL DOS SUPPORT
giving
these commands:
INFORMATION
NOTES
79
Page 80

Chapter
8
ERROR
MESSAGES-
PATTERN MATCHING
FILE
NAMES-
DISK COMMANDS
REQUESTING ERROR MESSAGES:
The execution of the following program displays the error on the computer screen and
resets
the
device error indicator:
COMMODORE
DISK DRIVES
CBM
Series 2001
CBM
Series 3000
with
BASIC 3.0
U::1
OPEt·~
20
INPUT#l..A..B$JC..D
30
PRINTA..B$..C..
I
where A=error message number B$=error message C=track D=sector
1J 8..15
D
CBM
CBM
BASIC 4.0
Series 8000
Series 4000
with
81
Page 81

SUMMARY
OF
CBM FLOPPY ERROR
o OK, no error exists.
1 Files scratched response. Not an error condition.
2-19
20 Block header
21 Sync character not found.
22 Data block
23 Checksum error in data.
24 Byte decoding error.
25 Write-verify error.
26 Attempt
27 Checksum error in header.
28 Data extends into next block.
29 Disk
30 General syntax error.
31 Invalid command.
32 Long line.
33 Invalid filename.
34
39 Command file
50 Record
51
52 File too large.
60 File open for write.
61 File
62 File not found.
63 File exists.
64 File type mismatch.
65 No block.
66 illegal track or sector.
67 illegal system track or sector.
70 No channels available.
71
72 Disk full or directory full.
73 Power up message, or write attempt with DOS mismatch.
74 Drive not ready. (8050 only)
Unused error messages: should be ignored.
not
found on disk.
not
present.
to
write with write protect on.
id
mismatch.
No
file given.
not
found.
not
present.
Overflow in record.
not
open.
Directory error.
MESSAGES
DESCRIPTION
NOTE: Error message numbers less than 20 should be ignored with the exception of 01
gives
which
20: READ ERROR (block header not found)
21: READ ERROR (no sync character)
82
information about the number of files scratched with the SCRATCH command.
The disk controller
by an illegal sector number, or the header has been destroyed.
The disk controller
misalignment
perly seated diskette. Can also indicate a hardware failure.
of
is
unabletolocate the headerofthe requested data block. Caused
is
unable to detect a sync mark on the desired track. Caused by
the
read/write head, no disketteispresent, or unformatted or impro-
OF
DOS
ERROR
MESSAGES
Page 82

22: READ ERROR (data block not present)
that
The disk controller has been requested to read or verify a data block
was
properly written. This error message occurs in conjunction with the BLOCK commands
and indicates an illegal track and/or sector request.
23: READ ERROR (checksum error in data block)
This error message indicates that there
data has been read into the
DOS
is
an error in one or more of the data bytes. The
memory, but the checksum over the dataisin error.
This message may also indicate grounding problems.
24: READ ERROR (byte decoding error)
The data or header has been read into the
DOS
memory,
but
a hardware error has been
created due to an invalid bit pattern in the data byte. This message may also indicate
grounding problems.
25: WRITE ERROR (write-verify error)
This message
and the data in the
is
generated if the controller detects a mismatch between the written data
DOS
memory.
not
26: WRITE PROTECT
ON
This messageisgenerated when the controller has been requestedtowrite a data block
while the write protect switch
is
depressed. Typically, thisiscaused by using a diskette
with a write protect tab over the notch.
27: READ ERROR (checksum errorinheader)
The controller has detected an error in the header of the requested data block. The
block has not been read into the
DOS
memory. This message may also indicate ground-
ing problems.
28: WRITE ERROR (long data block)
to
The controller attempts
If
block.
the sync mark does not appear within a pre-determined time, the error
detect the sync mark of the next header after writing a data
messageisgenerated. The erroriscaused by a bad diskette format (the data extends
into the next block), or by hardware failure.
29: DISK ID MISMATCH
This messageisgenerated when the controller has been requested to access a diskette
which has not been initialized. The message can also occur if a diskette has a bad
header.
30: SYNTAX ERROR (general syntax)
DOS
The
is
caused by an illegal number of file names, or patterns are illegally used. For example,
two file names may appear on the left side of the
cannot interpret the command sent to the command channel. Typically, this
COpy
command.
31: SYNTAX ERROR (invalid command)
The
DOS
does not recognize the command. The command must start in the first
position.
32: SYNTAX ERROR (long line)
The command sent
is
longer than 58 characters.
33: SYNTAX ERROR (invalid file name)
Pattern matching
is
invalidly used in the OPEN or SAVE command.
83
Page 83

34: SYNTAX ERROR (no file given)
was
The file name
left out of a command or the
Typically, a colon (:) has been left
out
of the command.
DOS
does not recognize itassuch.
39: SYNTAX ERROR (invalid command)
to
This error may result if the command sent
15)
is
unrecognizable by the DOS.
command channel (secondary address
50: RECORD NOT PRESENT
Result of disk reading past the last record through INPUT#, or GET# commands. This
message will also occur after positioning
is
file. If the intent
mand), the error message may
after this error
to expand the file by adding the new record (with a PRINT# com-
be
ignored. INPUT or GET should notbeattempted
is
detected without first repositioning.
to
a record beyond end of file in a relative
51: OVERFLOW
IN
RECORD
PRINT# statement exceeds record boundary. Information
riage return which
message
will
is
sentasa record terminatoriscounted in the record size, this
occur if the total characters in the record (including the final carriage
return) exceeds the defined size.
52: FILE TOO LARGE
Record position within a relative file indicates that disk overflow
60: WRITE FILE OPEN
This message
is
generated when a write file that has not been closedisbeing opened for
reading.
61: FILE NOT OPEN
This message
DOS. Sometimes, in this case, a message
is
generated when a fileisbeing accessed that has not been opened in the
is
not generated; the requestissimply ignored.
62: FILE NOT FOUND
The requested file does
not
exist on the indicated drive.
63: FILE EXISTS
The filename of the file being created already exists on the diskette.
64: FILE TYPE
The file type does
MISMATCH
not
match the file type in the directory entry for the requested file.
is
truncated. Since the car-
will
result.
NO
65:
BLOCK
This message occurs
to
be
allocated has been previously allocated. The parameters indicate the track and
sector available with the next highest number.
blocks higher in number are
66: ILLEGAL TRACK
The
DOS
has attemptedtoaccess a track or sector which does not exist in the format
AND
being used. This may indicate a problem reading the pointer
67: ILLEGAL SYSTEM T OR S
This special error message indicates an illegal system track or sector.
84
in
conjunction with the
in
use.
SECTOR
B-A
command.Itindicates that the block
If
the parameters are zero (0), then all
to
the next block.
Page 84

70:
NO
CHANNEL (available)
The requested channel is
sequential files may be opened
have six opened files.
71: DIRgectory) ERROR
BAM
does
not
The
BAM
or the
the diskette to restore the
the corrective action. NOTE:
72: DISK FULL
Either the blocks on
for the 2040, 3040, and
two blocks are available on the 8050
has been overwritten in
match
the
diskette are used or the directoryisat
4040
not
available, or all channels are in use. A maximumoffive
at
one time to the DOS. Direct access channels may
the
internal count. Thereisa problem in the
DOS
memory. To correct this problem, reinitialize
BAM
in memory. Some active files may be terminated by
BAM
= Block Availability Map
its limitof152 entries
or 243 entries for the 8050. DISK FULLissent when
to
allow the current filetobe closed.
BAM
allocation
73: DOS MISMATCH (73,
DOS 1 and 2 are read compatible but not write compatible. Disks may be interchangeably read with either DOS,
with the other version because the format
attemptismadetowrite upon a disk which has been formatted in a non-
an
compatible format. (A utility routine
mat to another.) This message may also appear after power up.
74: DRIVE NOT READY
An
attempt
diskettes present in either drive.
Pattern matching of file namesisavailable on all Commodore floppys. Pattern matching uses
the question mark (?) and the asterisk (*)
lar names.
The asterisk
is insignificant.
FIL* could refer
FIL
or FILE1
or FILEDATA
or FILLER
has been madetoaccess the 8050 Dual Drive Floppy Disk without any
is
usedatthe
For
example:
CBM
DOS
V2.5 8050)
CBM
DOS
(73,
but
V2 ) for 4040
a disk formatted on one version cannot be written upon
is
different. This errorisdisplayed whenever
is
availabletoassist in converting from one for-
PATTERN
to
perform operations on several files with simi-
endofa string of characterstoindicate
to
files named
MATCHING
that
the rest of the name
or any other file name starting with the letters FIL.
The question mark may be used anywhere within the string of characters
the character in
or DIAGN.SRC
or PROGR.SRC
but
not
that
particular position should be disregarded.
????? .SRC could refer
TSTER.SRC
SRC.FILES
to
files named
For
example:
to
indicate
that
85
Page 85

Both the characters and the position of the characters are significant.
The question mark and asterisk may be combined in many ways:
*J??????
does not make sense because the question marks are in an area which
is
insignificant (be-
cause of the asterisk).
P???FIL* will access files with the names
PET FILE
or PRG FILE-32
or POKEFILES$$
or any other files starting with P and having FIL
SCRATCH with pattern matching should be used
positions
carefully~
5-7.
since multiple files will be
in
scratched. LOAD or DLOAD will load the first file which fits the pattern matching. OPEN
to
or DOPEN with pattern matching may be used
open an existing
first existing file encountered which fits the description will be opened.
DO
PEN should notbeused with pattern matching when creating a new file. Never
RENAME~
result~
SAVE~
if attempted.
DSAVE~
or
COpy
for pattern matching since an error condition will
USER'S QUICK REFERENCE: DISK
The
user~s
quick reference guide will assist the userinbecoming familiar with the various
commands used in both
wellaswith
all
Commodore disk units.
BASIC
3.0 and BASIC
4.0~
and with the
file~
in
which case the
However~
COMMANDS
DOS
SUPPORT utility
OPEN or
use
as
to
In order
make BASIC 4.0 easier to
language. For
•
DSAVEand DLOAD commands eliminate the needtospecify device number each
example~
with BASIC 4.0:
use~
disk commands have been incorporated into the
time you store and retrieve disk files.
• Directory display
is
now a one-step procedure and no longer interferes with the
program in memory.
• It
is
no longer necessarytowrite a program to read the error channel. The variable
DS$ contains the error message.
• Formatting
now a one-step procedure through the
use
of HEADER command.
is
Commands in BASIC 3.0 are upward compatible with BASIC 4.0. That
with
with
BASIC
BASIC
3.0~
those commands
4.0.
All
disk commands available on the 2040 are upward compatible with both
will
still work on the Series 8000 Computer furnished
the 4040 and 8050.
is~
if you are familiar
86
Page 86

Table
17.
User's Quick
Reference-Disk
Commands
BASIC
SAVE
"dr:fn",8
LOAD"dr:fn",8
LOAD"*",8
RUN
LOAD"dr:fn",8
LOAD"$0",8
LIST
(destroys
100PEN1,8,15
20INPUT#1,A,B$,C,D
30 PRINT A,B$,C,D
NOTE: Assume
mands in
letter
as illustrated.
PRINT#l,
3.0
memory)
that
the
following formats. Commands
"Ix"
UNIVERSAL
DOS SUPPORT
SAVE"dr:fn",8
/dr:fn
(searches
(preserves
>
OPEN1,8,15 has already been
INITLIALIZE
>Ix
tdr:fn
t*
>$0
return
both
drives)
memory)
maybespelled
typed
BASIC
DSAVE,
(drive defaults
DLOAD"fn
(drive defaults
DLOAD"fn"
RUN
shifted RUN/STOP
DIRECTORYor
DI<shifted
(preserves
?DS$or?DS
(DSisnumberoferror
only)
for
allofthe
outorabbreviatedbythe
PRINT#l,
PRINT#
4.0
"fn"
,Ddr
to
",Ddr
to
,Ddr
R>
memory)
"Ix"
0)
0)
com-
first
PRINT#l,"Vdr"
PRINT#l,
PRINT#l,
PRINT#l,"Cddr=sdr"
PRINT#l,
PRINT#l,"Cdr:dfn=
dr:sfn1,dr:sfn2,
PRINT#l,
"Sdr
:fn"
"Dddr=sdr"
"Cdr
:dfn=
dr:sfn"
...
"Rdr
:dfn=sfn"
VALIDATE
>Vdr
SCRATCH
>dr:fn
DUPLICATE
>Dddr=sdr
COpy
(all disk)
>Cddr=sdr
COPY (single file)
>Cdr:dfn=dr:sfn
CONCATENATE FILES
>Cdr
:dfn=dr
dr:sfn2,
RENAME FILES
>Rdr:dfn=sfn"
:sfl,
...
COLLECT
SCRATCH'
BACKUP Dsdr TO
COpy
COPY
CONCAT
RENAME Ddr,
Ddr
'fn"
Dsdr TO
Ddr,"sfn"
Ddr,"dfn
Ddr,"sfn"
Ddr,
,Ddr
Dddr
"
"dfn
"sfn"
"dfn"
Dddr
TO
TO
"
TO
PRINT#l,"Ndr
:dname,xx"
FORMAT A DISKETTE
>Ndr
:dname,xx
HEADER
"dname",Ddr,Ixx
87
Page 87

Chapter
9
RANDOM
1.00
PROGRAM LISTING
This chapter provides a complete listing of the random access program described in Chapter
6 under the heading of Random Access Example.
F.:EAD'T'
.
REM
1
2
3
4
5
6
10
11
12
13
15
16
20
21
25
30
31
32 S=0:
35
36
40 I
45
46
47
50
51
55
56
60
65
66
70
75
76
9f1
95
98
99
RANDOM
REM
SUBROUTINESTOMANAGE
REM
VARIABLES
REM
...
REM
VARIABLES
REM
ALL
F.:EM
REM
* .
REM
POKEI022,
M'=CHR$(13):REM
:;:;P'="
C0=2:
Cl=3:
CC=15:
D=0:
T=0:
DD=0:
F.:D=f1:
D$="
NR=0:
CR=0:
FR=0:
NF=0:
CF=0:
PB=0:
RS=0:
NB=0:
E=0:
REM
EN$,EMS.ET$,ES$,ET,ES
EP=.5/256:
AS=0:
PEM
AS=0:
F.:EM
"A"
DN=8:0PENCC,DN,CC:
GOT02000:
PEt1
1.0
ARE
DEFINEDBYUSER
FUNCTIONS
128:REM
REM
REM
REM
REM
REM
REM
REM
" :
REM
REt'1
PEM#PECOPDSINR-FILE
REM
REM
REM#FIELDS
REM
REM#PECOPDS
REM
REM#BLOCKSINP-FILE
REM
PEM
PEM
USE
',"'ARIABLES
REM
SET
SHOULD
ACT
TURN
FIELD
DIRECT
SEQUENTIAL
COMMAND
CURRENT
CURRENT
CURRENT
DESCRIPTOR
F.:At·WOt1
PAt~DOt1
CURRENT
1ST
CURPENT
PECOPD
EPPOP
INTEGEP
INDEX
ARRAY
AF.:E
STARTOFUSER
RANDOM
FROM
DATAOFDESCRIPTOR
PROGRAM
REFLECT
UPON
THE
DOS
SUPPORT
MARKER
CHANNEL
CHANNEL
CHANNEL
DRIVE
TRACK
SECTOR
DRIVE
DF.:I'·
...
E #
DISK
RECOPD
FREE
RECORD
IN
FIELD
PER
SIZE
FLAG,
EPROR
COPPECTI(~
ARPAY
INDEX;
REM
AS=I:
TEt'1PORAR'T'
DN=
ACCESS
DESIRED
VARIABLES
#
#
ID
RECORD
#
BLOCK
IN
OK
ADDRESSING
DEVICE
PROGRAM
FILE
3.1
#
#
#
UNUSED
BYTES
=0
CHANNEL
T&S
NUMBEP
OFF
ARE
FILES
DEFINED
STRATEGY
FILE&KEY
STRUCTURE
"+"":
REt'1
VAPIABLES
SET,
CR=
BELOW
:;:;PACE
RECORD
LIST
FILES
...
FOR
F'ADDING
OFFSETINBLOCK
89
Page 88

1
[10
Wl
1
~]~:
103
1[15
110
111
115
12[1
125
130
135
14'.:1
145
146
150
151
155
160
165
17[1
175
2~X1
2~:11
202
2'.:15
210
215
220
,-,.-.e-
.:::..:::.._1
230
2*]
245
::::O~:1
:X11
3[12
305
31'.:1
315
:::2~:1
'-"-,E:"
'':''::''-'
:~:35
340
400
401
402
4~]5
4W
415
42[1
425
43~]
435
44'.:1
45'.:1
451
452
455
46'.:1
465
470
475
4:::0
5(1'.:1
501
5f12
5W
515
520
53(1
C='-,C'
oJ·:.·;.)
....
t.t.
F:Et1
FH1
F:H1
..t.t.t.t.t.t.t.tt...t.t.t.t.t.t.t.t.t.t.
RANDOM
1ST
SET
FILE
NR,
DIMENSION
NF&NB
ROUTINE
F:Et1
GO:::UB15'.:1
IFFP%=-lTHENRETURN
FP;·;=-l
D!t'1
F:::;';
(t'~F)
:
F:Et1
DIt1FP;';
F:H1
D
1t'1FT;.;
DIt1
FH$O'W)
DH1
F$O·F'
DI~1
F(~W)
RET
UF.:
t·j
(t·jF)
(t'~F
)
:REM
FP%(I)=
:REM
:REM
REM
:REM
FIELD
FIELD
FIELD
FIELD
FIELD
FIELD
:::IZE
POSITION
SUM
[FS%(I-l)]
TYPE:
0:BINAPY,
HEADING
ARGS-ALPHA,BINAPY
ARGS-Nl~ERIC
IFIT%=-lTHENRETURN
IT;';=-l
D
It1IT;.;
DIt1I:::;';
DI
DI~1RF.:;·;
RETURt·~
REM
REM
FH1
GC6UB900
PF.:ItH#CC.."Ul:"C0.:
PF.:IHT#CC.."B-P:
FORCF=
GOSUB5~X1
t'~E::<TCF
PRItH#CC.."U2:
(t·m)
(m:)
t1
1<
1
$(
(t·W)
f.t.t.t.t.f.f.tt.tttttttt.tt.tt.
UPDATE
1
TOt~F
t~RI
RECORD,
REM
REM
REM
:REM
"C0.:
"C[1.:
TRACK
SECTOR
PRIMARY
PELATIVE
CR
D.:
T.:
PP
D.:
T.:
:::
:::
INDEX
INDEX
KEY
RECORD
..t.t.t
ARRAY
ARRAY
VALUE
GOSUB1000:IFETHEN1900
RETUF.:
t·j
REM
t.ttf.tttttttttt.t.ttttt.t.t.tt.t.
REM
READ
RECORD,
CR
REt1
GC6UB9~X1
PF.:ItH#CC,
PF:ItH#CC.."B-P:
"Ui:"C0.:
"C0;
D.:
PP
T.:
:::
GOSUB1000IFETHEN1900
FOPCF=l
GOSUB6~Xl
t'~E::-::TCF
TOt'~F
RETUF:tj
REM
t.t.t.tt.t.t.tt.t.t.tt.tt.tttttttttt.
PEM
UPDATE
FIELD(CF)
OF
PECORD
CR,
REt1
GOSUB9[10
PRItH#CC.."Ul:"C0.:
D.:
T.::3
GOSUB1000:IFETHEN1900
PI':
It-H#CC.."B-P:
GOSUB500
PPINT#CC,
:REM
"U2:
"C[1.:
FP;·;(CF)+F.:P
UPDATE
"C0;D;T;S
FIELD
GOSUB1000:IFETHEN1900
F:ETUF.:t·~
REM
....
REM
ttf.tf.tttttttttttttttttt
READ
FIELD(CF)
OF
RECORDCR..
PEM
GO:::UB9[1[1
PPIt-H#CC,
GC6UB
pF.:nH#CC.."E:-P:
GOSUB600
RETURt·~
PEM
REM
100[1
"Ul:"C0.:
:I
FETHEt·~
D.:
T.:
19[10
"C0.:FP;·;(I::F)+f':P
:REM
READ
FIELD
ttttttttttttttttttttttttt
UPDATE
FIELD(CF),
:::
B-P
IS
SET
REM
IFFT%(CF)()lTHEN520
A$=RIGHT$(SP$+STR$(F(CF»,FS%(CF»:GOT0530
AS=LEFT$(FS(CF)+SP$,FS%(CF»
PRItH#C[1..AS.:
~1$:
RETUf':tj
LIST
SINGLE
SINGLE
PER
KEY
FIELD
FIELD
UPDATE
READ
2
ALPHA
90
Page 89

6013
REM
601
REM
6132
REM
610 IF
READ
FIELD(CF),
FT%CCF)
B-P
THEN645
IS
.
SET
615 Al$=""
620
FORJ=lTOFS%CCF)
625
GET#CO,
6:30
Al$=Al$+A$
6:35
NEXT:F$(CF)=Al$
640
GET#C0,A$:RETURN
A$:
IFA$=""THENA$=CHI":$O~1)
645 INPUT#C0,F$(CF)
650
IFFT%CCF)(>lTHEN
655
FCCF)=VALCF$CCF»:RETURN
700
REM
•••••••••••••••••••••••••
701
REM
7(12
70::::
710
71~
720
725
7:30
7:35
7::::6
740
750
751
752
760
770
ALLOCATE
REM
RETUR~~ED
F.:EM
GOSUB800:IFETHEN1900:
PRINT#CC,
"B-A: "D;T;S
INPUT#CC,EN,EM$,ET,ES
IFEN=0THENRETURN
IFEN()65THEN1900
IFET=18THENT=19:S=0:GOT0715
T=ET:
S=ES
GOT0715
REM
•••••••••••••••••••••••••
F.:Etol
FI":EE
Ot~E
REM
GOSUB800:IFETHEN1900:
PRINT#CC,
"B-F: "D;T;S
RETURN
ONE
BLOCK,
T8::::;
BLOCK.,
T &S
AF.:E
ALLOCATED
REM
=REQUESTED
CHECK
T & S
VALUES
TRACK&SECTOR
T~~:::;=TRACK8:SECTOR
REM
CHECK
T & S
o::T=18ISSKIPPED)
780 INPUT#CC,EN,EM$,ET,Es
IFEN=0THENRETURN
785
79(1
GOTO
800
801
802
810
19(10
REM
•••••••••••••••••••••••••
REM
CHECK
MAX
REM
IFT>:35THEN1900
SECTOR
820 E=0:IFT=0THEN=40:GOT01900
840
A:3=16:I
FT):30THEt~880
850 A:3=17:IFT)24THEN880
860
A:3=19:
870
A::::=2(1
880
IFS>A:3THEN1900
89(1
RETURt~
900
REM
901
REM
902
REt1
905
D=RD
9H3
E=0
915
IFAS=-lTHENRP=CRf.RS+l:GOT0950
92(1
I":P=INT
9:30
T=IT%CRP):S=IS%CRP)
IFT)17THEN880
••••••••••••••••
SET
RECORD"S
C(CR-l )
,/RB+EP):IFF:p>t·m
,
••••"••
TF.:ACK,
SECTOR
OR
~::
RECOl":D
RP<)3THEt~EN=41:
POIt-4TER
940 RP=INTCCCCR-l)/RB-RP+EP).RS.RB)+l
950
IFRP)254THEN
960
RETURt·~
1000
REM
1001
1002
1005
1010
1015 IF
1017
•••••
REM
INPUT
REt1
INPUT#CC,EN$,EM$,ET,ES
EN=VALCEN$):E=0
EN$=
ET$=STR$CET):ES$=STR$CES)
EN=41:GOT01900
,.,."
2040
"00"
THEt·~
••
,.,
ERROR
RETURN
•••"••
STATUS
,.
1020 IFEN$(>RIGHT$("0"+MID$CSTR$CEN),2),2)THEN1070
10:30
IF
H~=
1
THEN
Erl$=
11335
E=E+l
1(14(1
EM$=u
~"+EN$+U!!!
1050
IF
1060
1070
1080
1085
1
(19(1
H~{30
RETUF:~~
EM$="
EM$=EM$+EN$+EM$+ET$+ES$
E=E+l
RETUl":t~
01":
EN=65
~'r'STEM
~~OT
ET:f+""+Et'1$:
u+Et1$
THEN
F.:ESPOt·Ui
EM$=EM$+uONu+ET$+".,
I
t·~G
RETUF.:~~
PI":OPERL'r'"
FF.:Ot'l
GOTO
"+ES$
19(u3
nUiE:x:
ARRA'T'S
91
Page 90

11
~)(1
REM
t.****t.****t.t.*t.*t.*******t.*
REM
IHH
I1f12
1103
11(14
11(15
11
[16
11(19
1110
1115
1116
1120
1121
1122
1123
1124
1126
1130
1135
114(1
1145
1150
1152
1155
1160
1165
1166
1167
116:::
1170
1175
11
::::~:1
1200
1201
1202
1203
1204
12(15
12(19
1210
1215
1220
·-,·-,<::,
0::.'::',_1
1
1226
1227
123~:1
1235
1240
1245
1250
1255
126(1
1265
1270
·-,-,,,,
.::..
i
._1
1
12:::0
12:::5
12:::6
129~)
129:::
1299
1400
14(11
1402
14(19
1410
1420
143~)
1440
1490
1900
CREATE
REM
INPUT:
REM
REM
REM
REM
DRIVES
F.:Et'1
R::::=1:D=RD
FORAO=lTONF:FP%(A0)=RS:RS=FS%(AO)+RS+l:NEXT:RS=RS-l
RB=INT(254/RS+EP)
OPEt·jCO.,
CiO:;UB
12:::0
PRItH#CC, "B-P:
FORA0=lTORB:FORA1=lTONF
PRINT#CO,LEFTS(SPS,FS%(Al»;MS;
t·jD<TA1,A(l
NB=INT(NR/RB+EP):IF(NR/RB-NB)t.RB)=lTHENNB=NB+l
T=1:S=0:GOSUB150
FORAO=0TONB-l:GOSUB710:IFETHEN1900
IT%(AO)=T
GO:::UB710
PRItH#CC, "B-P·
PRINT#CO,NR;MS;I;MS;NB;MS;RS;MS;RB;MS;NF;MS;
PRItH#CC, "B-(,J:
AS=::::TRHDD)+":"+LEFTS(FS+:3PS,
OPEt·jC1,Dt-j..C1,
GO::::UB1(lIXl:IFETHHj
PRINT#Cl,IDS;MS;T;MS;S;MS;
FORA0=ITONF:PRINT#Cl,CHRS(FS%(A0»;CHRS(FT%(A0»;FHS(A0);MS; :
FORA0=OTONB-l:PRINT#Cl..CHRS(IT%(A0»;CHRS(IS%(A0»;
CLOSEC1:CLOSECO:RETURN
REM
*t.'t.t.t.t.*t.t.t.t.t.t.t.t.ttt.t.tt.tt.t.
REM
OPEN
REM
INPUT:
REM
REM
REM
DRIVES
REt1
AS=:::TRS(DDH":"+LEFTS(FS+SPS, 1
OPENC1,DN,Cl,A':GOSUBI000:IFETHEN1900
INPUT#Cl,IDS,T,S
OPEtK:O.,
GOSUB12:::0
PRItH#CC.,
INPUT#C0,NR,FR,NB,RS..RB,NF
CiOSUB100:FT%(0)=TFS%(0)=S
FORA0=1TONF:GOSUB129::::FS%(A0)=ASC(AS)
GOSUB129::::FT%(A0)=ASC(AS)
INPUT#Cl,FHS(A0):NEXT
FORA0=0TCNB-l:GO::::UBI298:
GOSUB129::::IS%(A0)=ASC(AS):NEXT
GOSUB1000:IFETHENI900
CLOSECl
F.:ETURt·j
PRItH#CC.."Ul:".:
PRItH#CC, "B-P:
CiET#CO,A',A1S:A'=AS+A1S:IFIDS()ASTHENEN=43:EMS="WRONG
F.:ETUF.:t·j
CiET#C
1.,AS:I
RETURt·j
REM
t.t.t.t.tt.*t.t.t.t.t.t.t.*t.t.tt.t.*t.t.t.t.
REM
CLOSE
REM
INPUT:
REt1
PRItH#CC"
PRINT#C0,NR;MS;FR
PRItH#CC,
CLC6EO:l
RETUF.:t·j
E=E
+1:
DESCRIPTOR
FS=
FILENAME
FILE
IDS,NR,NF,FS%(),FT%(),FHS()
DD=
DESCRIPTOR
RD=
RANDOM
DISK
MUSTBEINITIALIZED
Dt-j.,
CO,
"#" :
GO:::;LIB1(11)(1:IFETHEt·j
"C0.:
1
IS%(A0)=SGOSUB430:NEXT
"CO.:
1
"CO.:
D.:
T.:
:::
AS
190(1
RELATIVE
FS=
DD=
RD=
FILE
FILENAME
DESCRIPTOR
RANDOM
DISK
MUSTBEINITIALIZED
Dt-L
CO,
"#" :
GO:::UB1(1I)O:IFETHHH
"B-R:
".:
C(l.:
RD.:
T.:S:GO:::UBI0(1tl:
IT;·;(A~:l)=ASC(AS)
C0.:
F::D.:".,
".:
C(l.:
FAS="
"THEt·jAS=CHRS
RELATIVE
VARIABLES
"B-P:
"CO
"B-(·j:
"C(l
1:::.,0":
162
FILE
FROM
1
MS;NB;MS;RS;MS;RB;MS;NF;MS;
D.:
FT;·;(~:1).:
F.:ETUF.:t·j
FILE
DRIVE
FILE
DRIVE
DRIVE
1(1)+".
DRIVE
0)+".
#
#
190~:1
DESCR,
#
#
DESCR.,U..
9~)~)
IFETHEtH9(1I)
GOSUB1(1I)O:IFETHEt·H
«(1)
OPEN
SHOULDBEVALID
F:::;·;«(1)
U.,
(~"
F.:"
9(1(1
:NEXT
RAND
NEXT
DISK":GOT01900
92
Page 91

200(1
mpUT"::m~lDO
2001
HWUT":~F.:At·mOt'1
2(H~12
I
t·WUT
2(H~nIt'~PUT"
2005
2(H36It·WUT"
2007
2010
2015
2(116PPI
2(119
202(1
2025
2030
2040
205~3
2055
2~390
2100
2103
2105
2110
2120
2140
2142
2145
2147
2150PPI t-n
2155
2156
216~3
2161
2165
2167
"VE'T'
PAtmOt'1
mpUT"Et-nEP
I
t·~Ut'1BEF.:
t'~PUT"
t·Wt'lBEP
CiC6UB110
PPINT"~
NT"
P:::=O
FOP
I =1
TOt'~F
A$=" I " : I FDD=PDTHENA$=" I "+:::TP$ (DD)
PPINT#CC,A$
CiOSUB1100:IFETHEN3900
OPEtH..:::..4..:::TF.:$(DD)+": "+LEFT$(F$+SP$.,
PRINT#4,0;M$;
CiOT02120
PEM
OPEN
I t·iPUT"
HWUT"
:~F:At-mot'1
KE'T'
mpUT"RAt·mOt'1
CiOSUB1200:IFETHEN3900
OPEtH..:::"
INPUT#4..RR:IFRP=OTHEN2147
FORI=1TOPp:INPUT#4..f<1$(I)..PP%(I):NEXT
CLO:::E4
":1~O
PPHH"T'r'PE /
PF.:
It-n"(HIT
PF.:lt-n":~lll.1,jHOSE
mpUT"~·n:::H
I FPP:i'="
IFRP$="//"THEN2400
'T'OU
~H:::H
FILE
FILE
DF.:I'·lE
FILEDPI
ID
OF
OF
PECOF.:DS".:
OF
FIELDS
INPUT
FIELD
n'PE::::
:PPI
tH"
O=B
FIELD".:I., : I
:CLOSE4
RANDOM
FILE
FILE
FILEDP!'olE
FILE
4.,
:::TP$(DD)+":
TO
PETUPt·~
OUIT)iI"
PECOF.:DDO'T'OU"
TO
"THa~2:31
:::EE
0
TO
CPEATEAFILE
t·~At'1E".:
F.:At·mOt·1
F$
t·Klt'1BEP".:
',,IE
DD
t·~Ut·1BEF.:".:
DISf<
t·~p
PEP
F.:ECOPD".:
NAME..FIELD
I
t·~AP'T'..
SIZE..FIELD
1
=t'~U~1EP
t·WUTFH$
FOP
t·~At'1E".:
DF.T·lE
ACCESS
F$
t·~Ut'lBEF.:".:
DD
t~Um:EP".:
"+LEFT$(F$+SP$..1(1)+".
TO
ADD
.'1'''.:
t:Ht·1PLE
F.:
At·mo
F.:ECOPD)"
PI':$
216::: IFRP$="/DIP"THENCiOSUB4000:GOT02160
2170
FORII=1TOPP:IFf<1$(II)<>PR$THENNEXT:CiOT02300
2175
CR=RR%(II):GOSUB300
218(1
FORI=1
21:::5
FF=(1
2190
It~PUT"
2195
mpUT"
22(10
PRHH"
2210
FF=1:CiOT02190
2220
IFFF=0THEN2160
2222
IFA=1THENf<1$(II)=F$(A)
2225
GC6UB2~30
2230
GOT02160
2300
PI':
2305
It-lPUT"DO
231 0
pr;~
2312
IFFR>NRTHEN2500
2315
CR=Fp:FR=FR+1:RR=RR+1
2320
FORI=1TC~F:PRINTFH$(I);
233~3
GOSUB2(1(1
2340
f<1$(RR)=F$(1):PR%(RR)=CR
2::::5(1
GOT02161:1
24(H~1
F.:Et'1
24135
CiOSUB
241(1
OPEt~4
2420
CiOSUB1(1(1(1
2430
PRINT#4,PP;M$;
2440
FOPI=1TORp:PPINT#4..f<1$(I);M$;RP%(I);M$;
2445
GO:::UB
245~~1
CLOSE4
2455
GOSUB1000:IFETHEN3900
249~)
POI<E
25(H)
PI':
TONF:
PRItHI.:")
At'~'T'
t'lODS
~,jH
ICHFIELD".:
"F$(A):
I t-n
":~F.:ECORD
'T'OU
I
tH"
CLOSE
:~lH:H
140~~1
..
:::.,4..
1
(H~H3
~H:::H
AnD
RAt·m
"I!"+STF.:$(DII)+"
: I
FETHaB9~3(1
: I
FETHEt-j::::9~~10
1022..::::am:F.:Et'1
ItH"
THE
FILEI:::
"FH$(
.11'"
.:
A$
: I
A
PF.:It-n"~"
tKiT
PECOF.:D
,::HWUTF$(A):
PF.:E:::Et-H"
TO
ADD".: A$:
:H:H:~l~]"
:INPUTF$(I):F(I)=VAL(F$(I»:NEXT
FILE
: "+LEFT$(F$+:::P$..1(1)+".
TUF.l~
FULL..
DOS
t·JO
I)":"..
F$(
FLEFT$(A$..
IFLEFT$(A$..1
SUPPOPT3.1
ADD
IT
251~3CiOT0216(1
3900
PRINTE..EM$:STOP
4000
FORDI=OTONp:PPINTf<1$(DI):NEXT:PETURN
t·~.II'''.:A$:
F.:D
III''';
ID$:
t'~F
I
C..
2=ALPHA:~l"
( I )
..
F:::;'~
1(1)+".
r;~D
t'1
ACCE:::::::~l"
I):
t'~E>::T:
1)<> '"T'''
F(A)=VAL(F$(A»
)<>'''T'''THEt~2160
:NEXT
IOt~AL
Ot·~
RECOF.:D:::
IFLEFT$(A$..1)<>'''T'''THEt·Q1(10
ID$=LEFT$(
TYPE"
( I )
.'
FT;'~
( I ) :
f<E'T'01..U.,
~.j"
f<E'T'(11..U"
PF.:HH
THEt~222(1
f<E'r'01..U.,
t1A'T'BEADDED"
ID$..2)
PS=FS;'~
( I )
W
+F.:S+
1 :
t'~E::<T
93
Page 92

AC
power cord, 3
Advanced disk programming, 47
Advanced file handling,
At symbol (see DOS Support)
BACKUP (BASIC 4.0 direct command), 29
BAM,
22,47
Format
2040,3040,55
4040,56
8050,58
Memory requirements, 22
BASIC commands
CLOSE command, 39
DC
LOSE command,
DLOAD command, 36
DOPEN command, 39
DSAVE command, 36
GET# command, 43
INPUT# command, 42
LOAD command, 36
OPEN command,
PRINT# command, 41
RECORD# command, 43
SAVE command, 36
VERIFY command, 37
BASIC commands, disk drive, 35
BASIC 4.0 direct commands
BACKUP command, 29
COLLECT command, 28
CONCAT command, 31
COpy
RENAME command, 32
SCRATCH command, 33
command, 31
65
40
38
Chapter
10
INDEX
Block availability map, 22
Block distribution, by track,
BLOCK-ALLOCATE command, 51
BLOCK-EXECUTE command, 50
BLOCK-READ command,
BLOCK-WRITE command, 50
Block pointer, 26
Buffer number, 65
BUFFER-POINTER command, 50
Business keyboard,
Bus, IEEE,
Cables, 11
PET to IEEE, 11
IEEE
CHR$ function, 41, 42, 48, 49, 51, 52
CLOSE command, 39
Closing the command channel,
Closing the data channel, 41
COLLECT (BASIC 4.0 direct command), 28
Command channel,
Compatability
BASIC versions, 35
Disk drives with computers, 3
DOS
CONCAT (BASIC 4.0 direct command), 31
COpy
COpy
Data blocks, 69
Data channel
Closing, 41
12
to
IEEE, 11,
Series 2001, 3
Series 3000, 3
Series 8000, 3
versions, 69
(BASIC 4.0 direct command), 31
command, 31
14,17
40
54
49
40
95
Page 93

Data file
Concatenation,
Copying, 29
Renaming, 31
Data handling, 35
BASIC commands for, 35
DCLOSE command, 40
DEMO
Description of
Descriptor (.DESC), 66
Device number, 35
Diagnostic boot, 18
Direct access, 65
Directory, 26
DIRECTORY (BASIC 4.0 direct
Directory format, 60
Directory header
Directory header block, 8050, 57
Diskettes
Disk maintenance commands, 23
Disk maintenance commands
diskette (see TEST/DEMO diskette)
Special OPEN and CLOSE statements,
65
Loading, 26
Printing, 27
command),27
2040,3040,55
4040,56
Care of, 9
Inserting diskettes
2040,3040,4040,13
8050,13
BACKUP (BASIC 4.0 direct command),
29
COLLECT (BASIC 4.0 direct command),
28
COPY (BASIC 4.0 direct command), 31
COPY command, 29
CONCAT (BASIC 4.0 direct command),
31
DIRECTORY (BASIC 4.0 direct com-
mand, 27
DUPUCATE command, 28
Limitations due
HEADER (BASIC 4.0 direct command),
25
NEW
command, 24
VALIDATE command, 28
RENAME (BASIC 4.0 direct command),
32
RENAME command, 31
SCRATCH (BASIC 4.0 direct com-
mand),33
SCRATCH command, 32
Diskette level, 23
File level, 23
29, 30
DOS
error messages, 81
to
formats, 28
Disk operating system,
59,69,70,71,72,77
Disk programming, advanced, 47
Disk utility command set,
BLOCK-READ, 48, 50
BLOCK-WRITE, 48, 50
BLOCK-EXECUTE, 48, 50
BUFFER-POINTER, 48, 50
BLOCK-ALLOCATE, 48, 51
MEMORY, 51
Memory-Write,
Memory-Read, 48, 52
Memory-Execute, 48, 52
USER, 48, 52
Disk zones, 59
DLOAD command, 36
DOPEN command, 39
DOS,15,18,22,25,47,59,69,70,71,
72,77
DOS
support, 22, 77
Loading DOS support, 15, 18, 77
Loading a program,
Loading and running a program,
Special
Using DOS
Limitations, 79
Disk backup, 15,
Disk drive
Care of, 9
Description, 3
Connecting
Power-on test, 12
Performance tests,
Specifications, disk drives, 5, 6, 7, 8
Unpacking, 9
Disk ID,
DSA
EOI signal,
Error messages, 81
Description of
Requesting error messages, 81
Summary of error messages, 82
Expanded
2040 format,
8050 format, 63
Field fitting, 66
File format, program, 61
File handling, advanced, 65
File pointer,
Floppy disk hookup, 11
Format
DOS
support, 79
symbols>
Front panel, 3
Back panel, 3
Interior configuration, 4
to
computer, 11
24, 25, 26
VE
command, 35
71
view,
single sector
62
43
15,18,22,25,47,
48
48, 51
14,17,
and @, 78
18, 66
14,
17
DOS
error messages, 82
78
BAM
2040,3040,55
15,18,
78
96
Page 94

4040,56
8050,57
Directory,
2040,3040,55
4040,56
8050,57
Formatting, 24, 25
GET#
HEADER (BASIC 4.0 direct command), 25
High byte, 48, 51
Hookup, floppy disk, 11
ID, 24, 25, 26
IEEE-488 interface,
Indicator lights (see LED indicator lights)
INPUT# command, 42
I/O channels, 22, 47, 71
Inserting diskettes
Initialization
Job
Key file, primary (see primary key file)
LED (light emitting diode; see LED
LED indicator lights, 3,
Limitations, DUPLICATE command, 28
Line feed, suppression of, 41
LOAD$ command, 26
Loading
Low byte,
Magnetic fields, 9
Maintenance commands, disk, 23
MEMORY commands, 51
OPEN command, 38
Operating system, disk, 15, 18, 22,
Parameters,
Parms,48
Pattern matching, 85
Performance test
command, 41
2040,3040,4040,13
8050,13
2040 and
4040,26
8050,26
queue,
indicator lights)
DOS support, 77
a program with a slash
and running a program with up arrow
(t)
MEMORY-WRITE command, 51
MEMORY-READ command, 52
MEMORY-EXECUTE command, 52
59,69,70,71,72,77
60
3040,25
47
symbol, 79
48,
51
48,
49
4,11,47
12,
18, 81
(I) symbol, 78
25,47,
4040/8050, 14
2040/3040,
POKE command,
Pointer, block, 26
PRG file, 36, 61
17
14,
17
Primary key file (.KEY01),
PRINT#
Program file, 61
Program file format, 61
Quickload feature,
Quick reference: commands,
Random access
Add a record,
Change a record,
Create a file,
Ending the program,
Example, 66
Field markers, 66
Field size,
Getting directoryoflistings,
Primary file names,
Primary key file, 66
Record size, 66
See a record,
Reading list, 4
RECORD# command, 43
Record pointer,
Relative files,
4040,8050,69
Accessing, 73
Block pointers, 70
Channel restrictions, 71
Creating, 72
DOS compatability, 69
Expanding a file, 70
Format, 70
Main components,
Record size, 69
Side sectors, 69
Side tracks,
Storage capacity, 70
RENAME (BASIC 4.0 direct command),
32
RENAME command, 32
Requesting error messages, 81
Safety feature, HEADER command, 25
SAVE command, 36
SCRATCH (BASIC 4.0 direct command),
33
SCRATCH command, 33
Screen displays, actual,
19,26,37,40,44,45,77,81
Secondary address, 35,
Sector, single: expanded view, 70
Sequential format, 61
Side sectors,
Side track,
Simplifying commands, 77
Single record access,
command, 41
66
66
Restrictions,
69
69
69
69
44
67
68
66
68
43
65
66
69
66
69
14,
15, 16, 17, 18,
38,42,47,
86
69
50
97
Page 95

Single sector, expanded view, 70
(I) symbol (see DOS support)
Slash
Spanning, 71
Specifications
8050,6
2040/3040, 7
4040,8
Standard jump table, 53
Summary
BASIC commands, data handling, 35
Disk commands, 86
Disk maintenance commands, 23
Disk utility commands, 48
Error messages, 81
Suppression of line feeds, 41
Symbols,
Tab, write protect,
DOS
support, 78
13
Tapetodisk, 45
TEST/DEMO diskettes,
Ul
command, 52
U2
command, 52
9,14,17,23
Universal wedge, 23, 77
Up
arrow
(t)
symbol (see
DOS
support)
USER command, 52
User's quick reference: disk commands, 86
Utility commands, disk,
48
VALIDATE command, 28
VERIFY command, 37
Wedge
Write protect tab,
(»
symbol (see
13
DOS
support)
98
Page 96

(::
commodore
Commodore Business Machines, Inc.
3330 Scott Boulevard
Santa Clara, California 95051
 Loading...