

Page 1
COMMODORE
~
®@~
COLOR
MONITOR
users
guide
Page 2

Page 3

High
Resolution
Color
Monitor
1902
-
--
©Commodore Electronics, Ltd. 1985. All rights reserved .
Page 4

Page 5
USER'S GUIDE STATEMENT
This equipment generates and uses radio frequency energy. If
it
is not properly installed and used in strict accordance with the
manufacturer's instructions, this equipment may interfere with
radio and television reception. This machine has been tested and
found to comply with the
limits
for a Class B computing device in
accordance with the specifications in Subpart
J
of
Part
15
of
FCC
Rules, which are designed to provide reasonable protection
against such interference in a residential installation. If you suspect interference, you can test this equipment by turning it
off
and on. If you determine that there is interference with radio or
television reception, try one
or
more
of
the following measures to
correct it:
• reorient the receiving antenna
• move the computer and this monitor away from the receiver
that is picking up interference
• change the relative positions of the computer equipment and
the receiver
• plug the computer and this monitor into a different outlet so
that the computer and the receiver are on different branch
circuits.
If necessary, consult your Commodore dealer or
an
experienced
radio/television technician for additional suggestions.
You
may
also wish to consult the following booklet, which was prepared
by the Federal Communications Commission: How to Identify
and Resolve Radio-TV Interference Problems. This booklet is
available from the
U.S
. Government Printing Office, Washington,
D.C.,
20402,
Stock No.
004-000-00345-4.
WARNING
THERE
IS
DANGEROUS HIGH
VOLTAGE
PRESENT
IN
THIS
MONITOR.
DO
NOT
EXPOSE THIS EQUIPMENT
TO
MOISTURE.
SUCH EXPOSURE COULD CAUSE FIRE
OR
ELECTRIC SHOCK.
If you have technical problems with your Commodore
1902
moni-
tor, unplug the set and call your dealer or service technician.
Copyright
©
1985
by Commodore Electronics, Ud.
All rights reserved.
Page 6
INTRODUCING
YOU
R MONITOR
Please read
this
brief guide carefully before you try to use your
monitor. This manual shows you how to connect the
monitor
and
use
it
in various operating modes. It also explains the picture
controls and gives instructions for the installation, use and
ser-
vice
of
the
1902.
The Commodore
1902
is a full-color dual monitor, meaning it can
display
computer
output
in either 40- or 80-column screen width .
Some computers, like the Commodore
64
, display screen
output
in a 40-column format. Others, like the Commodore PC, require
an
80-column wide screen. The Commodore
128
can display
on
both screen widths.
You
can select t
he
operating mode you want
with the
flick
of
a switch. The switch setting depends on the com-
puter you have hooked up to the
1902
monitor.
The
1902
can be used in four operating modes: two 40-column
and two aO-column. The
two
40-column modes are composite
and separated. The two aO-column modes are digital
RGB,
posi·
tive and negative sync. The following chart shows recommended
operating modes
by
computer mode . Depending
on
your com-
puter, you'
ll
find that certain operating modes give better dis-
plays while other modes may not even produce a picture.
Recommended Operating Mode
by
Computer Model
COMMODORE 128
COMMODORE 64
PLUS/4
COMMODORE
16
COMMODORE
PC
40·Column
COMPOSITE SEPARATED
X
X X
X X
X X
SO-Column
DIGITAL RGB
X
x
The
1902
monitor
features a 13" screen (measured diagonally)
and operates on the North American Television Standard
(NTSC).
Be
sure to take note
of
the warnings
in
this manual, and do
NOT
remove the back cover
or
otherwise attempt to service this monitor for safety reasons. If you have problems with your monitor
that
are not covered in this manual, see your Commodore dealer
or a qualified technician.
1
Page 7
CONNECTING THE MONITOR
TO
A COMPUTER
The
monitor
connection cable connects your
monitor
to a Commodore personal computer. Before you connect the cable, turn
off
the power
to
both your personal
computer
and the monitor.
There are
two
different
cables included
with
the
1902
that you can
use to connect the
monitor
to your computer.
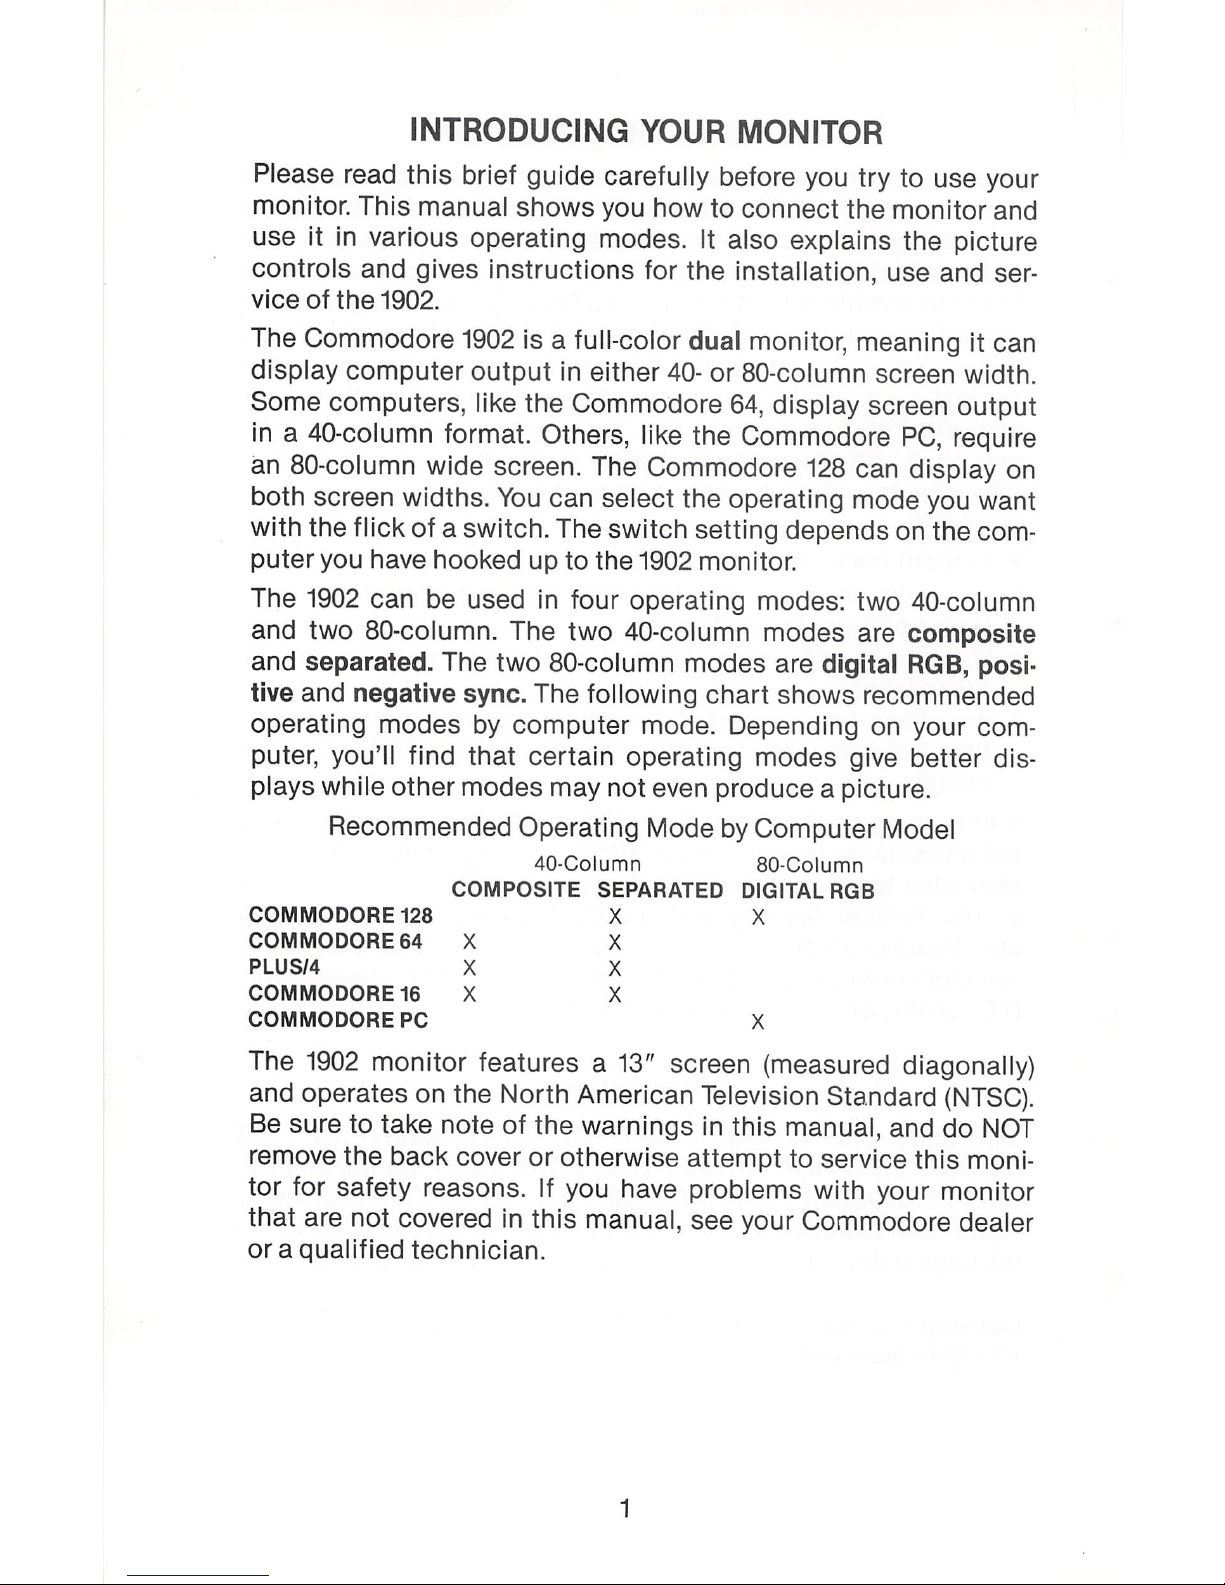
1.
One kind
of
cable has three different-colored
jacks
on one end
and a larger rounded end.
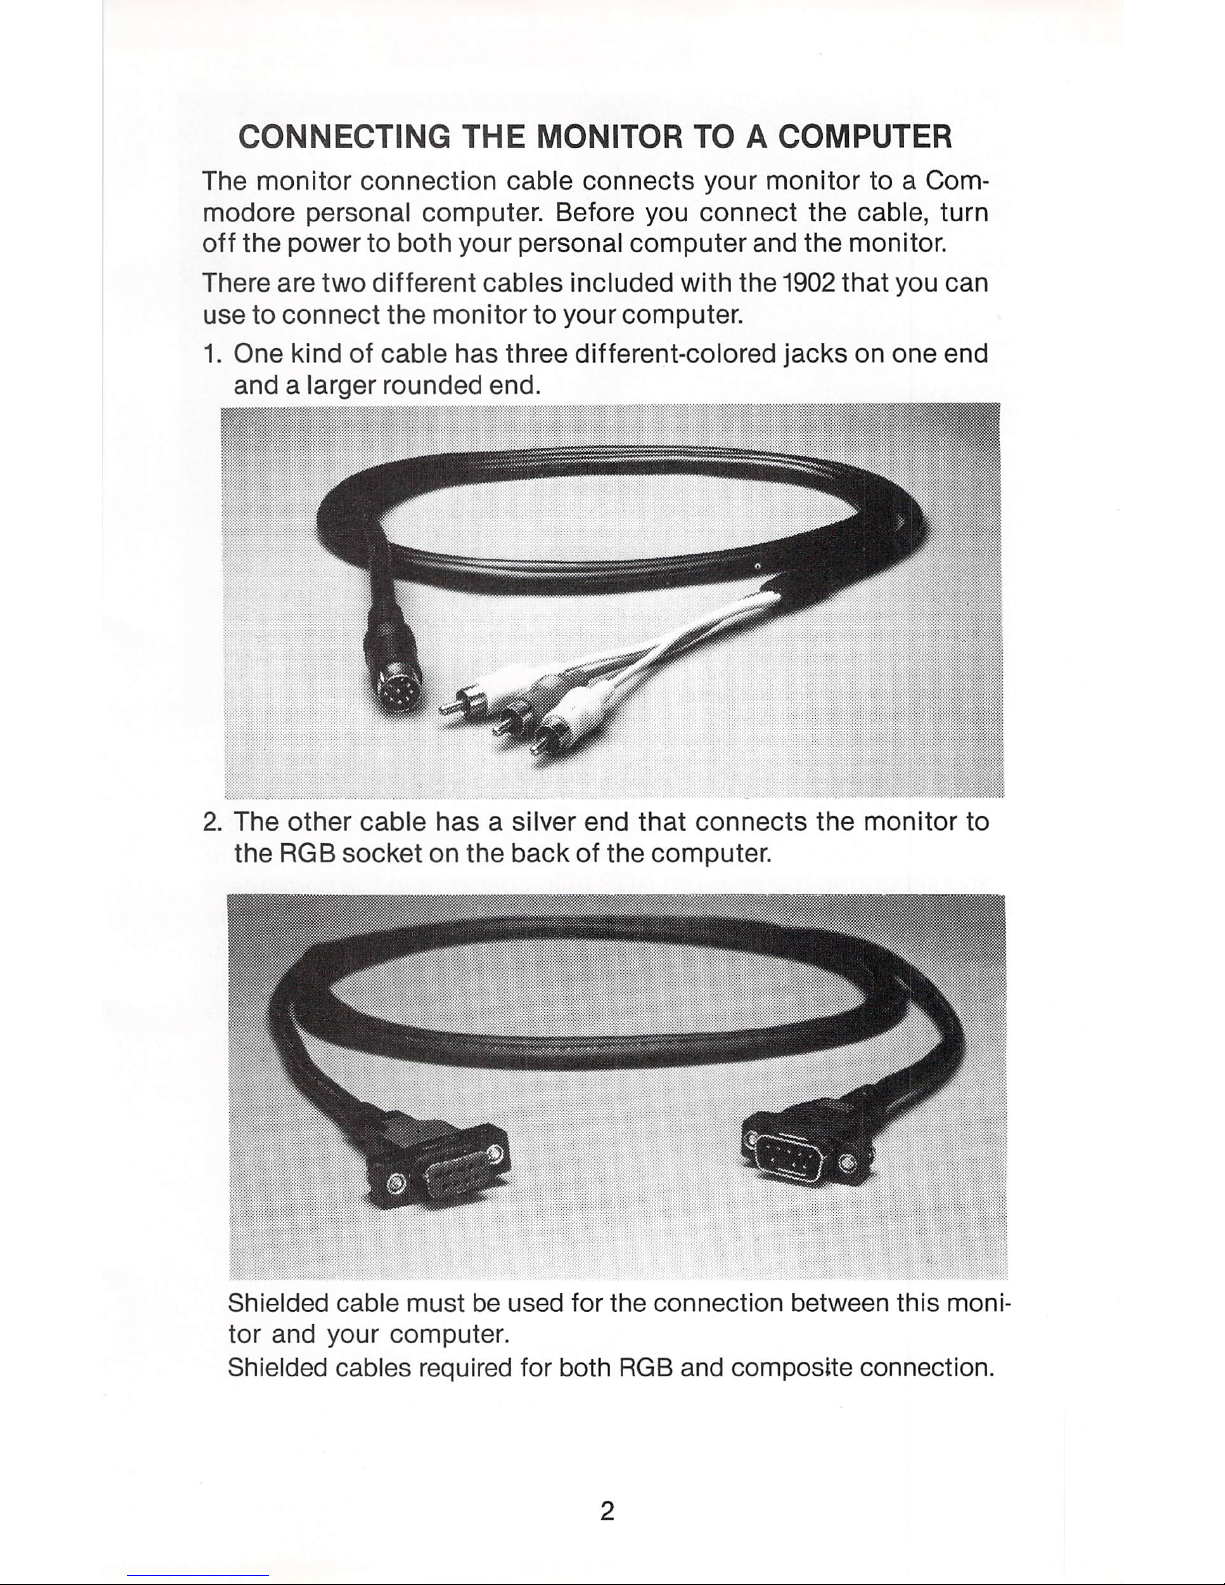
2.
The other cable has a silver end that connects the monitor to
the RGB socket on the back
of
the computer.
Shielded cable must
be
used for the connection between this moni-
tor and your computer.
Shielded cables required for both
RGB
and composite connection.
2
Page 8
. , Yt,
.,-
.•....
'
...
\\
..
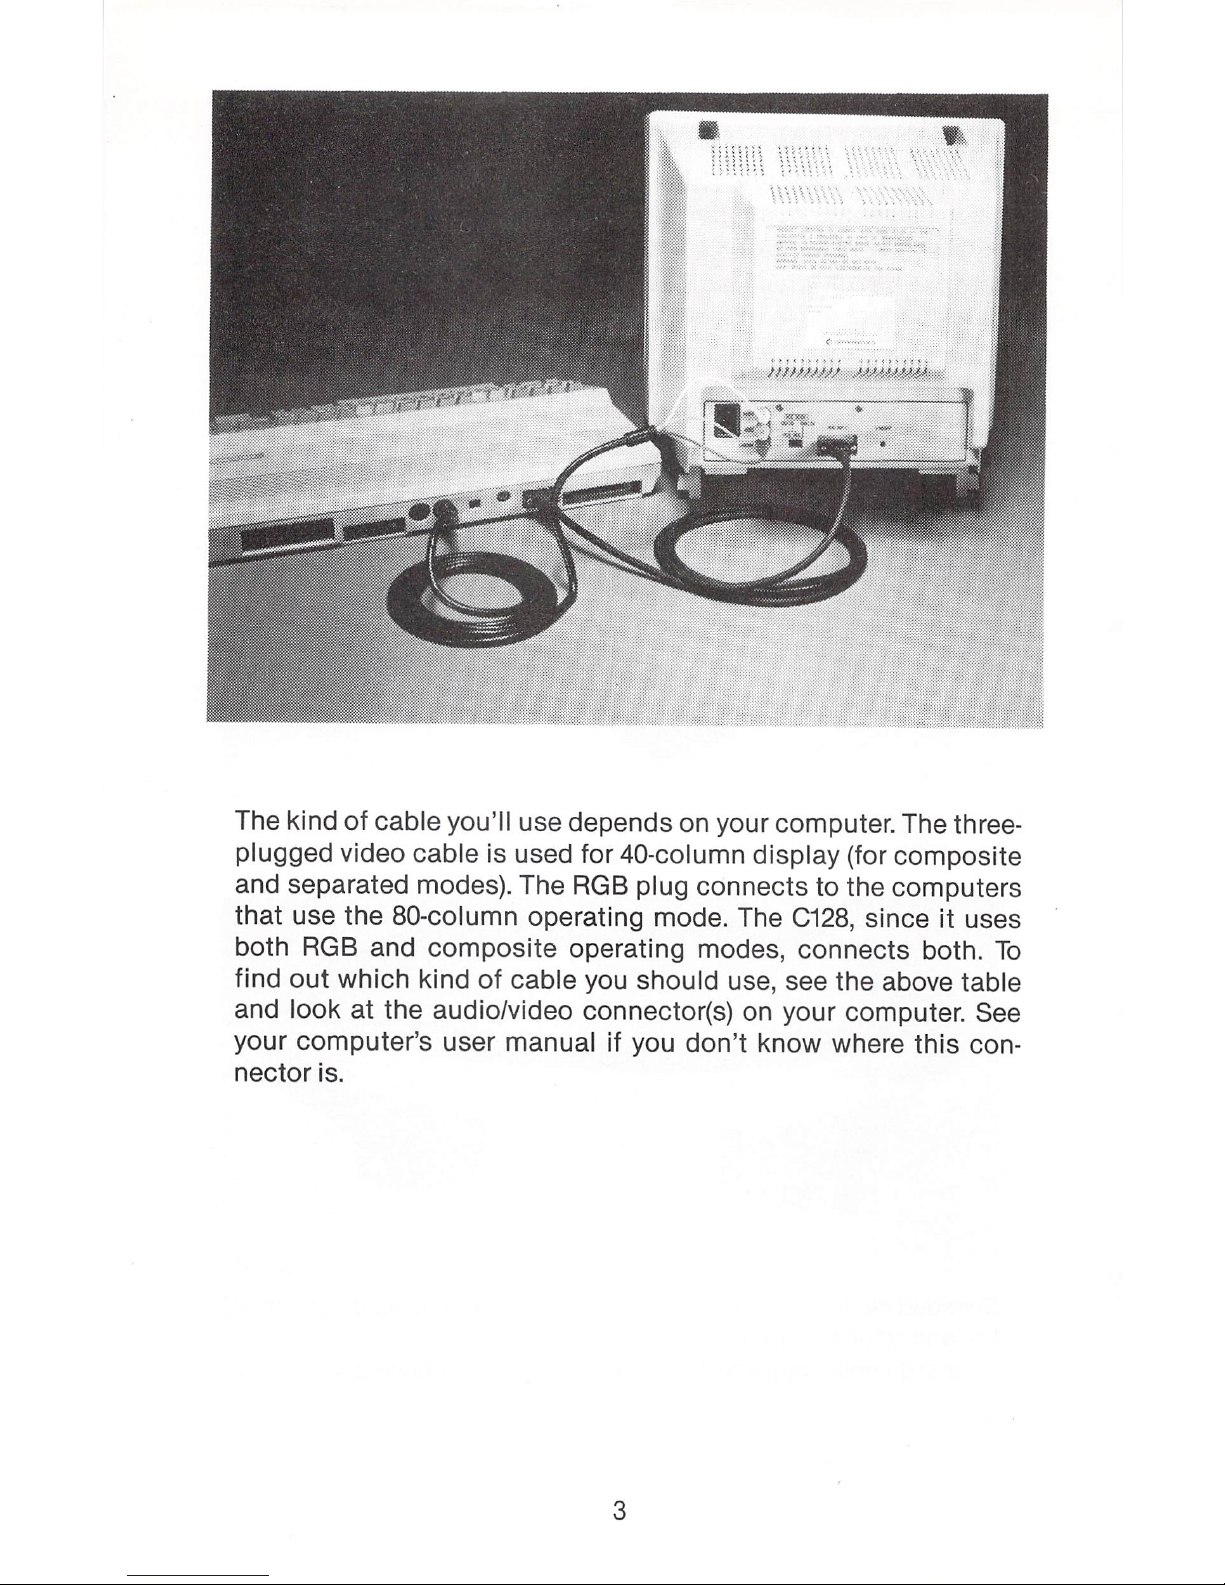
The kind
of
cable you'll use depends on your computer. The threeplugged video cable is used for 40-column display (for composite
and separated modes). The
RGB
plug connects to the computers
that
use the 80-column operating mode. The
C128
, since
it
uses
both
RGB
and composite operating modes , connects both.
To
find
out
which kind
of
cable you should use, see the above table
and look at the audio/video connector(s) on your computer. See
your
computer
's user manual if you don't know where this con-
nector is.
3
Page 9
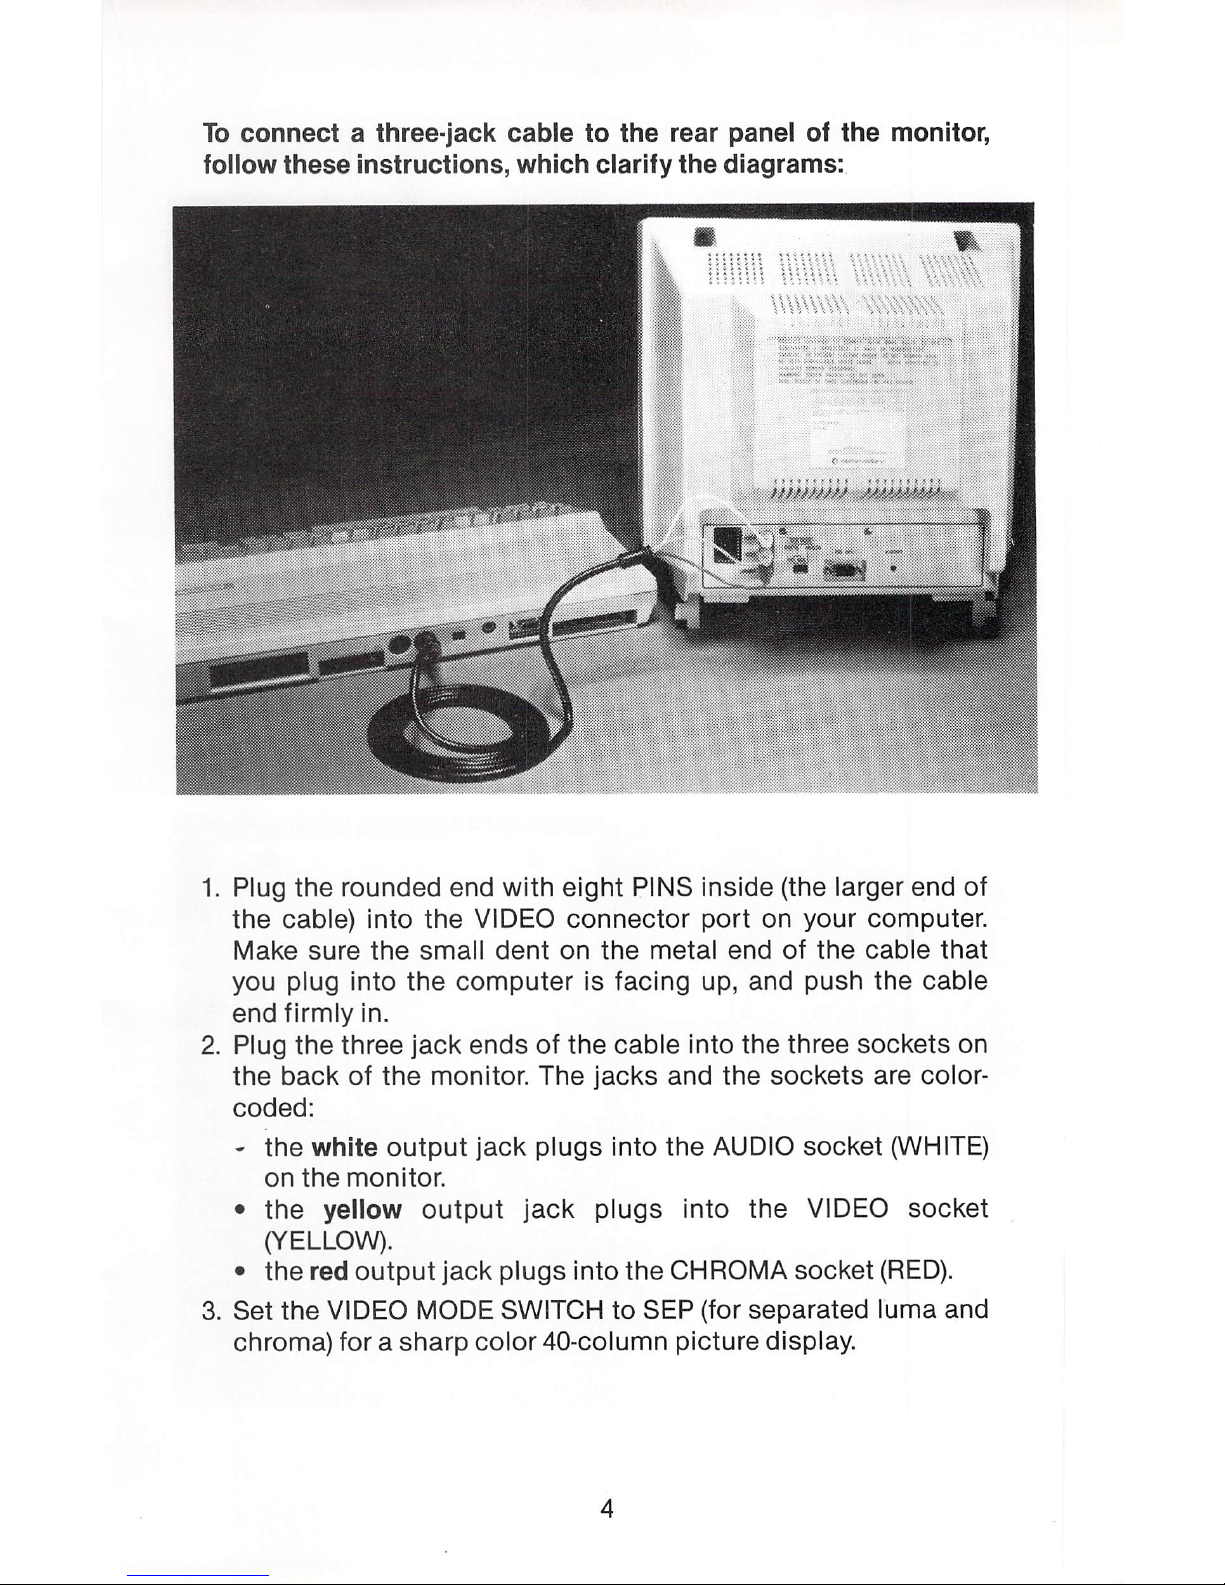
To
connect a three-jack cable to the rear panel
of
the monitor,
follow these instructions, which clarify the diagrams:
1.
Plug the rounded end
with
eight PINS inside (the larger end of
the cable) into the VIDEO connector port on your computer.
Make sure the small dent on the metal end
of
the cable that
you plug into the computer is facing up, and push the cable
end
firmly
in.
2.
Plug the three
jack
ends
of
the cable into the three sockets
on
the back
of
the monitor. The jacks and the sockets are color-
coded:
- the
white
output
jack plugs into the AUDIO socket (WHITE)
on the monitor.
• the
yellow
output
jack
plugs into the VIDEO socket
(YELLOW).
• the
red
output
jack plugs into the CHROMA socket
(RED).
3.
Set the VIDEO MODE SWITCH to SEP (for separated luma and
chroma) for a sharp color 40-column picture display.
4
Page 10
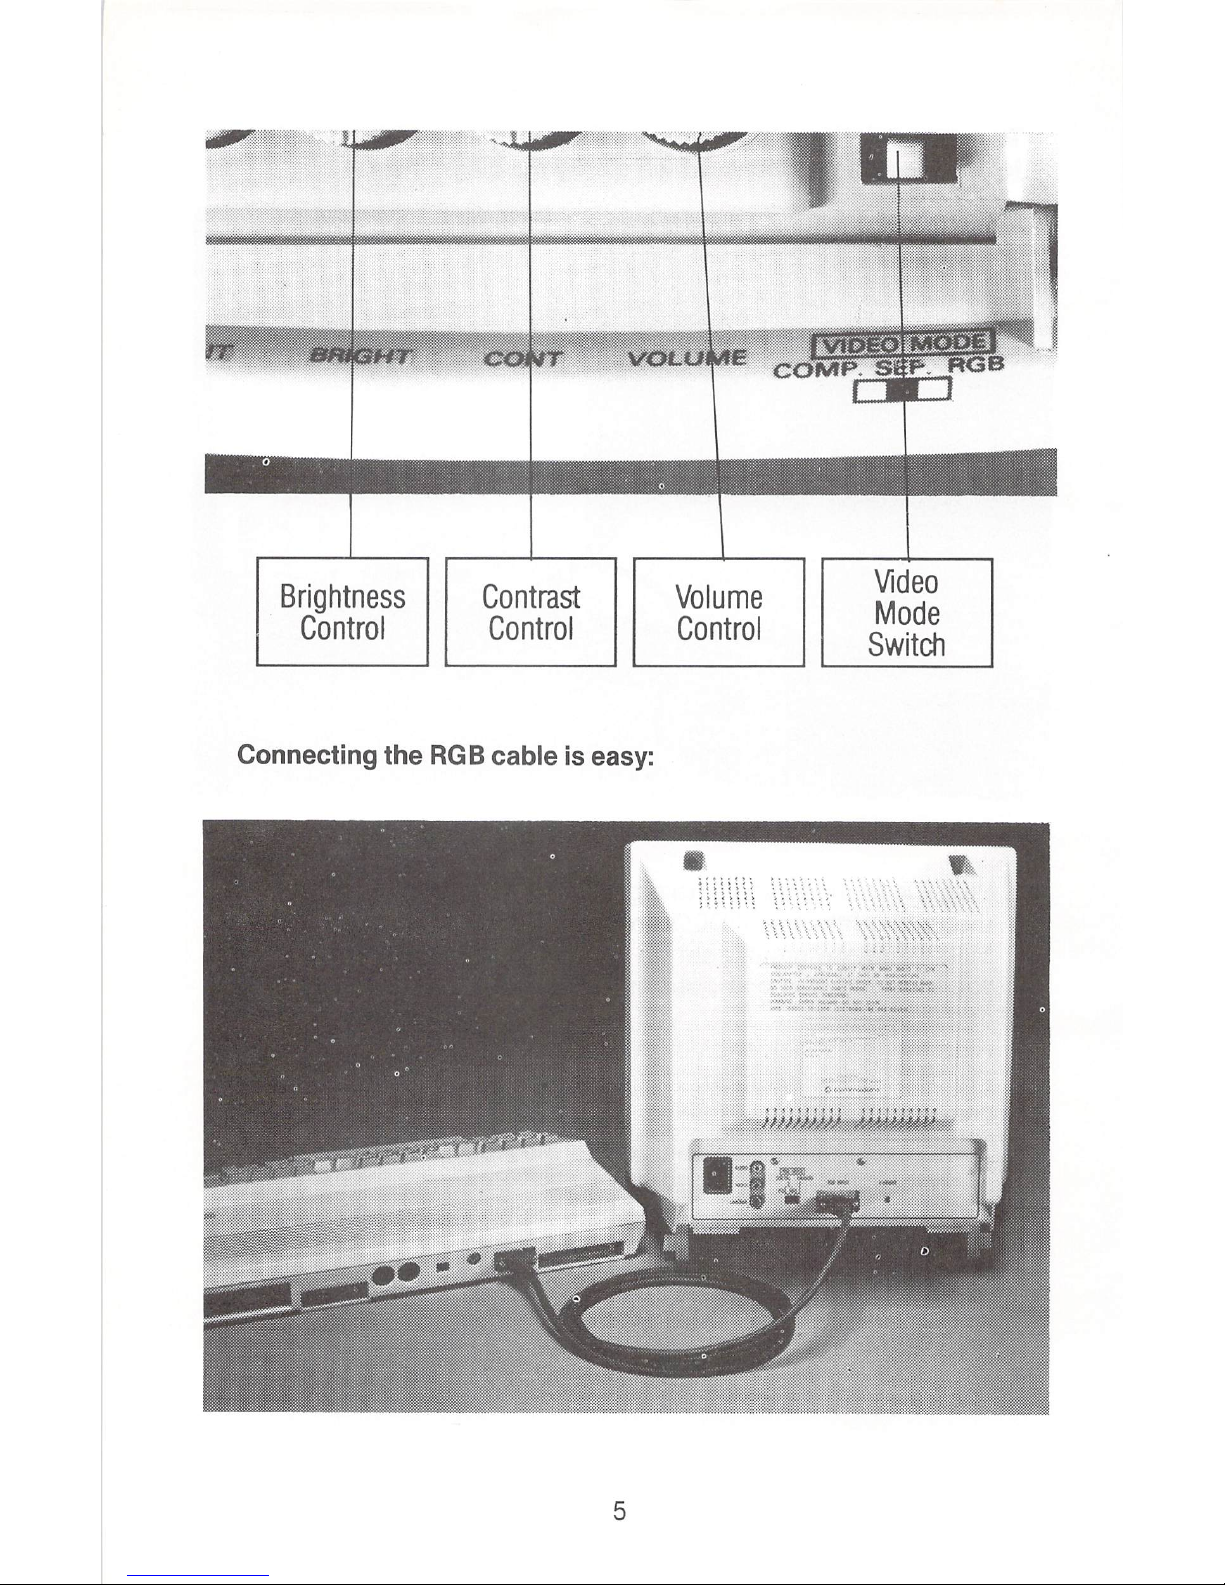
Brightness
Control
Contrast
Control
Connecting the
RGB
cable
is
easy:
5
Volume
Control
Video
Mode
Switch
Page 11
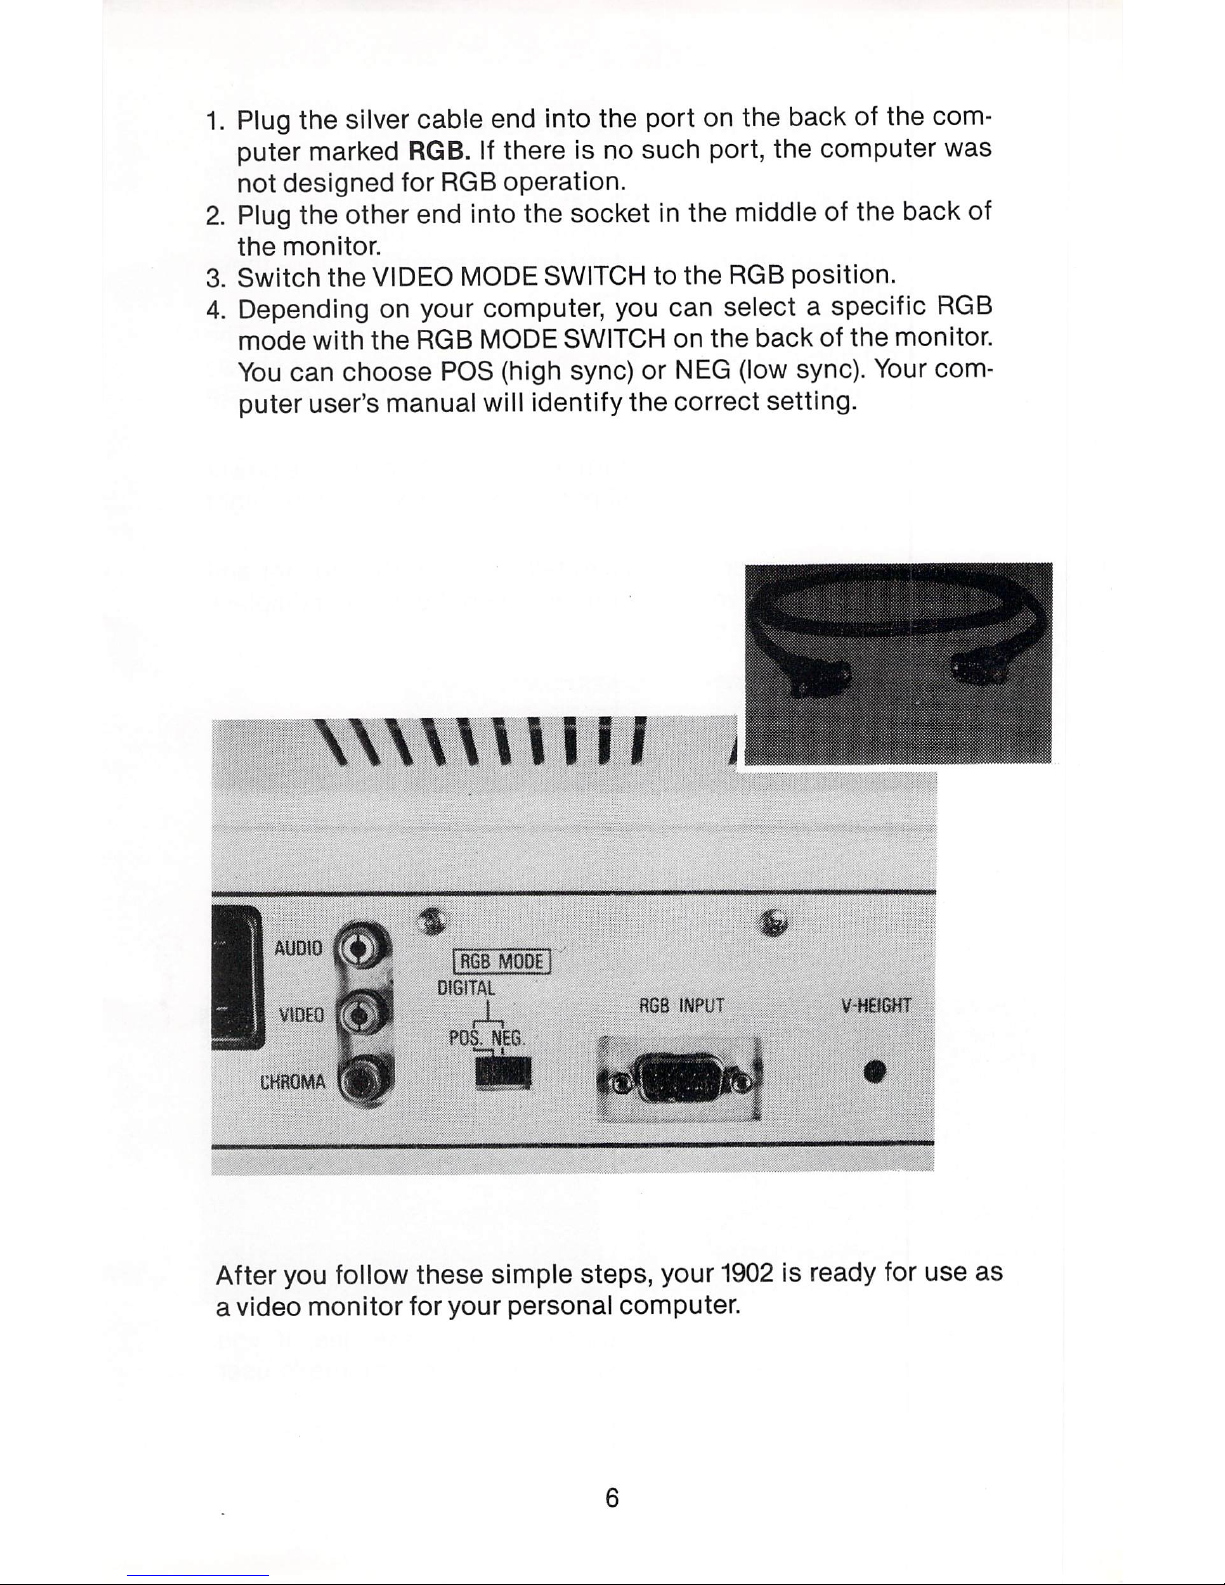
1.
Plug the silver cable end into the port on the back
of
the com-
puter marked
RGB. If there is no such port, the computer was
not designed for
RGB
operation.
2.
Plug the other end into the socket in the middle of the back of
the monitor.
3. Switch the VIDEO MODE SWITCH to the
RGB
position.
4.
Depending on your computer, you can select a specific
RGB
mode
with
the RGB MODE SWITCH on the back
of
the monitor.
You
can choose
POS
(high sync) or NEG (low sync). Your com-
puter user's manual will identify the correct setting.
\AG8
MODe
1'
./
OIGITAL
.
,
~
>
POS.
,
RGS INPUT
V-
HElGlff
After
you follow these simple steps, your
1902
is ready for use as
a video
monitor
for your personal computer.
6
Page 12

TURNING ON
YOUR
MONITOR
After
connecting your
monitor
to the computer and inserting one
end
of
the gray power cord into the
AC
receptacle on the back of
the
monitor
and the three-pronged electrical plug end into a
power outlet, you are ready
to
turn on your monitor. Follow these
simple steps:
1.
Turn
the
monitor
on by pushing down the power switch. The
POWER INDICATOR LIGHT
on
the front
of
the monitor shows
you when the power is on. Always turn the monitor
on
BEFORE
you turn the computer on.
Later, when you're ready to turn the power off, press the power
button again. The button will pop back up and the power light
will go out.
2.
Turn your computer on.
You
can tell that both the monitor and
the computer are working correctly when the monitor displays
a message like one
of
these:
Different computers display other opening messages. If you
don't
know what message to expect, see your computer's user
manual.
7
Page 13

USING
THE
MONITOR PICTURE CONTROLS
Vertical
Hold
Control
lint
Control
Contrast
Control
You
can adjust your monitor's picture with the manual control
knobs located behind the panel beneath the monitor screen. The
panel opens from the top;
just
flip open the cover
by
pressing
it
at
the top so
it
releases. NOTE: When using
RGB
operating mode,
some
of
these controls (tint and color) have no effect, since the
color shades and intensities are preset.
TINT CONTROL
Turn this konb to the right to add more green and to the left to
increase the
red
shading. The normal setting is at the center
When you're adjusting the color, concentrate on one or two colors, such as brown and yellow.
COLOR CONTROL
Turn
this knob to the right to tone colors down, and to the
left
to
brighten colors. The normal setting is at the center.
8
Page 14

BRIGHTNESS CONTROL
Turn
this knob to the
left
to increase brightness or to the right to
make the screen picture darker. The normal setting is at the
center.
CONTRAST CONTROL
Turn
this
knob to the
left
to increase contrast. The normal setting
is at the center.
HORIZONTAL POSITION CONTROL
Turn this knob clockwise to move the center of the picture
to
the
left. Turn it counterclockwise to shift the center of the picture to
the right.
VERTICAL HOLD CONTROL
Turn this knob to stop vertical rolling of the picture.
VOLUME CONTROL
Turn
this
knob to the
left
to increase sound volume and to the
right to decrease the volume.
HEADPHONE
JACK
Plug 1/8 " headphones into
this
opening. When headphones are
plugged in, the speaker is disconnected.
VERTICAL
HEIGHT
CONTROL
(on
back)
Adjust this with a
non·metal screwdriver to correct up/down
screen distortion.
9
Page 15

SAFETY PRECAUTIONS
This unit has been engineered and manufactured to assure your
personal safety. But
improper use can result
in
potential electri-
cal shock or fire hazards_
In
order not to defeat the safeguards
incorporated in this monitor, observe the following basic rules for
its installation, use and servicing. Follow all warnings and
instructions marked on your video monitor.
INSTALLATION
1.
Your set is equipped with a three-pronged
120
-volt
AC
line
plug. This safety feature allows the plug to
fit
into the power
outlet only one
way.
If
it
is necessary to use a 3-prong to
2-
prong plug adapter, make sure the adapter is properly
grounded according to
its
instructions.
2.
Operate the set only from a power source
as
indicated on the
set
or
refer to the user's manual for this information. If you
are not sure
of
the type
of
power supply to your home, con-
sult your dealer
or
local power company.
3.
Overloaded
AC
outlets and extension cords are dangerous.
So are frayed power cords and broken plugs. They may result
in a shock
or
fire hazard. Call your service technician for
replacement.
4.
Do
not allow anything to rest or roll over the power cord, and
do not pace the set where the power cord is subject to
traffic
or abuse. This may result in a shock or fire hazard.
5.
Do
not use this monitor near
water-for
example, near a bathtub, washbowl, kitchen sink, laundry tub, in a wet basement ,
or near a swimming pool, etc.
6. Sets are provided with ventilation openings in the cabinet to
allow heat generated during operation to
be
released. If these
openings are blocked, heat built up within the set can cause
failures which may result in a fire hazard.
Therefore:
• Never block the bottom ventilation slots by placing
it
on a
bed, sofa, rug, etc.;
• Never place a set in a
"built-in"
enclosure unless proper
ventilation is provided;
• Never cover the openings with cloth or other material;
• Never place the set near
or
over a radiator or heat register.
10
Page 16

7.
To
avoid personal injury:
•
Do
not place a set on a sloping shelf unless properly
secured;
• Use
only
a
cart
or
stand
recommended
by
the
manufacturer;
•
Do
not
try
to roll a
cart
with small casters across thresh-
olds or deep-pile carpets.
• Wall- and shelf-mounted installations should use factory
approved instructions.
USE
8.
Always turn the set
off
if it
is necessary to leave the room for
more than a short period
of
time. Never leave a set on when
leaving the house . A malfunction may result in a fire hazard.
9.
Caution children about dropping or pushing objects into the
set's cabinet openings. Some internal parts carry hazardous
voltages and contact can result in a fire or electrical shock.
10
. Unplug the set from the wall outlet before cleaning the face
of
the picture tube. Use a slightly damp (not wet) cloth.
Do
not
use
an
aerosol directly on the picture tube since it may over-
spray and cause electrical shock.
11
. Never add accessories to a set that has not been designed
for this purpose. Such additions may create
an
electrical
shock hazard.
12.
For added protection
of
the set during
an
electrical storm or
when the set is to be left unattended for
an
extended period
of
time, unplug it from the wall outlet. This will prevent shock
and fire hazards due to lightning
or
power-line surges.
13.
Do not bring magnetic devices such
as
magnets or motors
near the picture tube. They may have a negative effect on the
color purity
of
the picture.
14.
Sometimes you may feel static electricity when you touch the
surface
of
the picture tube. This is normal for any
TV
set or
monitor and is harmless to the human body.
11
Page 17

SERVICE
15.
Unplug the set from the wall outlet and refer servicing to
qualified service personnel under the following conditions:
A.
When the power cord or plug is damaged or frayed.
B.
If liquid has been spilled into the set.
C. If the set has been exposed to rain or water.
D.
If the set does not operate normally
by
following the oper-
at ing instructions . Adjust only those controls that are cov-
ered in the operating instructions, as improper adjustment
of
other controls may result in damage and will often
require extensive work by a qualified technician to restore
the set
to
normal operation.
E.
If the set has been dropped or the cabinet has been
damaged.
F.
When the set exhibits a
distinct
change in
performance-
this
indicates a need for servicing.
G.
If snapping
or
popping from the monitor is continuous or
frequent during operation. It is normal for some sets to
make occasional snapping or popping sounds, particularly
when being turned on or off.
16.
Do
not
attempt
to service this
monitor
yourself, as opening or
removing covers may expose you to dangerous voltage or
other hazards. Dangerous high voltage is present even when
the
monitor
is unplugged. Refer all servicing to qualified ser-
vice personnel.
17.
When replacement parts are required, have the service techni,cian verify in writing that the replacements
he
used have
the same safety characteristics as the original parts. Use
of
manufacturer's specified replacements can prevent fire,
shock
or other hazards.
18.
Upon completion of any service
or
repairs to the set, please
ask the service technician to perform the safety check
described in the manufacturer's service literature.
19.
When a video
monitor
reaches the end
of
its useful life,
improper disposal could result in a picture tube implosion.
Ask a qualified service technician to dispose
of
the set.
12
Page 18

Page 19

COMMODORE
1902
MONITEUR
COULEUR
MANUEL
D'UTILISATION
Page 20

INFORMATIONS A L'INTENTION
DE
L'UTILISATEUR
Cet
appareil
genere
et
utilise
des
hautes
frequences.
Pour
eviter
des
interferences
avec des
recepteurs
radio
et
television
, il est
necessaire
de
respecter
scrupuleusement
les
instructions
d'installation
et
d'utilisation
donnees
par
Ie
fabricant.
Des essais
ont
perm
is
de
verifier
quelles
specifications
de
cet
appareil
sont
conformes
aux
limit
es
fixees
pour
les
equipements
informatiques
Classe
B,
selon
les
spec
ifi
cations
de la
sous-section
J,
Section
15
des
reglements
etablis
par la FCC ,
dans
Ie
but
de
fournir
une
protection
raisonnable
contre
de
telles
interferences
dans
les
installations
residentielles.
En cas
de
doute
sur
Ia.
conformite
de
I'
appareil, proceder
a des essais en I'
arretant
et en Ie
mettant
en
marche.
S'il
ya
reellement
interference
avec les
recepteurs
radio
ou
television
, essayez
d'y
remedier
a I'aide
d'une
ou
plusieurs
des
mesures
suivantes:
•
reorienter I'antenne
de
reception
•
eloigner
I'ordinateur
et
son
moniteur
du
recepteur
captant
les
interferences
•
deplacer I'equipement
informatique
et Ie
recepteur
I'un
par
rapport
a I'autre
•
brancher
I'ordinateur
et
son
moniteur
dans
une
prise
secteur
differente
de
maniere
a ce
que I'ordinateur
et Ie
recepteur
soient
alimentes
par des
lignes
distinctes.
Si c'est
necessaire, consulter
Ie
revendeur
Commodore
ou
un
technicien
radio
television
qualifie.
On
trouvera
egalement
des
info
rmations
utiles
dans
Ie
manuel:
"How
to
Identify
and
Resolve
Radio-TV
Interference
Problems"
prepare
specialement
par
La
"Federal
Communications
Commission"
pour
resoudre
ce
genre
de
problemes.
Pour
I'obtenir,
s'adresser
a:
U.S.
Government
Printing
Office,
Washington,
D.C
.,
20402,
Stock
No. 004-000-
CD345-4.
ATTENTION
DES
HAUTES
TENSIONS
DANGEREUSES
SO
NT
PRESENTES
A L'
INTERIEUR
DU
MONITEUR.
NE PAS EXPOSER
L'APPAREIL
A L'
HUMIDITE
SOUS
RISQUE
D'INCENDIE
OU
D'ELECTRO-
CUTION.
En cas de
problemes
techniques
avec
Ie
moniteur
Commodore
1902,
Ie
debrancher
et
consulter
Ie
revendeurou
un
technic
ien
qualifie.
Copyright
@ 1985 par
Commodore
Electronics,
Ltd.
Tous
droits
reserves.
Page 21

INTRODUCTION
II
est
recommande
de lire
Ie
present
manuel
avant
de
mettre
Ie
moniteur
en service.
II
decrit
les
raccordements
et les divers
modes
de
fonctionnement
de I'appareil. Le
manuel
illustre
egalement
les
commandes
et
donne
des
instructions
sur
I'installation
, I
'utilisation
et I'e
ntretien
de I'appareil.
Le
Commodore
1902 est un
moniteur
couleur
a 2 modes:
il
permet
d'afficher
les
donnees
transmises
par
ordinateur
sur
lignes
de 40 ou de 80 caracteres.
Pour
certains
ordinateurs
,
comme
Ie
Commodore
64, les
donnees
sont
afficMes
sur
lignes
de 40 caracteres.
Pour
d'autres,
com
me
Ie
Commodore
PC, il est
necessaire de
disposer
d'un
ecran de 80 caracteres par
ligne
. Le
Commodore
128
utilise
les
deux
formats
. La
selection
du
mode
d'affichage
s'e
ffectue
a I'aide
d'un
simple
commutateur.
La
position
de ce
commutateur
depend
de I'
ordinateur
relie
au
moniteur
1902.
Le
moniteur
1902
possede 4 modes
de
fonctionnement:
2 avec
lignes
de 30
caracteres
et
2 avec
lignes
de
80
caracteres. Avec
lignes
de 40
caracteres
, les
modes
disponibles
sont
les
modes
composite
et
separe. Avec
lignes
de
80
caracteres,
les
modes
sont
numeriques
RGB
P~S
et NEG (RGB
signifie
rouge ,
vert
,
bleu) .·
Le
tableau
ci-dessous
donne
les
modes
de
fonctionne-
ment
recommandes
en
fonction
des
modes
de I'ordinateur:
Selon
Ie
type
d'ordinateur
utilise
, on
constate
que
certains
modes
de
fonctionnement
donnent
une
meilleure
qualite
d'affi-
chage
alors
que
d'autres
ne
permettent
meme
pas de
produire
une image.
Modes de
fonctionnement
recommandes
selon Ie
modele
d'o
rdinateur
COMMODO
RE
128
COMMODO
RE
64
PLUS/4
COMMODOR
E 16
COMMODOR
E PC
40 caracteres
COMPOS
ITE
x
x
x
SEPARE
x
x
x
x
80 caracteres
NUMERIQUE
RGB
X
x
Le
moniteu
r 1902 est eq u i pe d'un
ecran
de 13
pouces
(mesu
re
en
diagonale)
et
utilise
Ie
standard
television
nord-americains
NTSC
. Par mesure de securite, respecter to utes les
recommanda-
tions
du
present
manuel et ne jamais
demonter
Ie
panneau arriere
de I'appareil ou
tenter
d'entreprendre
soi-meme
des reparations.
En
cas de
probleme
de
fonctionnement
non
decrit
dans
Ie
present
manuel,
consulter
Ie
revendeur
Commodore
ou
un
technicien
qualifie
.
1
Page 22

RACCORDEMENT
DU
MONITEUR A UN
ORDINATEUR
Le
raccordement
a I'
ordinateur
personnel
Commodore s'effectue
au
moyen
du dl.ble
fourni
a cet effet.
Avant
de
proceder
au
raccordement, couper
I'alimentation
de
I'ordinateur
personnel
et
du moniteur.
Le
moniteur
1902 est livre avec 2 cables de
raccordement.
1.
Un de ces
cables
est
equipe
de 3
fiches
de
couleur
distinctes
a
I'extremite et
d'un
connecteur
rond
a I'autre.
2.
L'autre
cable
est
equipe
de
connecteurs
argentes
pour
Ie
raccordement
du
moniteur a la
prise RGB
montee
a I'
arriere
de
I'
ordinateur
.
Le
cable
couvert devrait etre
utilise
comme
branchement
entre
ce
moniteur
et votre ordinateur.
Cables blindes requis pour la connexion RGB et pour la connexion
composite.
2
Page 23

Le
cable
de
raccordement a utiliser
depend du
type
de
I'ordina-
teur
. Le
cable
video
muni
de 3
fiches
couleurs
doit
etre
utilise
pour I'affichage
sur
lignes
de 40 caracteres (en
mode
composite
ou
separe). Le
cable
equipe
de
connecteurs
RGB est utilise
pour
Ie
mode d'affichage
sur
lignes de
80
caracteres. Le
raccordement
de I'ordinateu
r C128
peut
s'effectuer i ndifferemment
avec I'un ou
I'
autre
cable
puisqu'il
utilise
Ie
mode RGB et
Ie
mode
composite.
Consulter
Ie
tableau
ci-avant
pour
definir
Ie
type
de
cable
a
utiliser pour
Ie
raccordement
de I'
ordinateur
. L'
emplacement
des
connecteurs
est
indique
dans
Ie
manuel
d'utilisation
de I'
ordina-
teur
utilise.
3
Page 24

Les instructions ci-apres completent les schemas de raccordement de I'ordinateur au panneau arriere
du
moniteur a I'aide
du
cable a 3 fiches.
1.
Brancher
Ie
connecteur
rond a
huit
broches
dans
la prise video
de I'
ordinateur. S'assurer
que
Ie
petit
bossage
situe
sur
la
couronne
metallique
du
connecteur a brancher
dans I'
ordina-
teur
est
dirige
vers
Ie
haut et
enfoncer
Ie
connecteur a fond
dans la prise .
2.
Brancher
les
trois
fiches
de I'autre
extremite
du
cable
dans
les
trois
prises situees a I'arriere du moniteur. Les
fiches
et les
prises
sont
operees par couleur. Brancher:
• La
fiche
blanche
du
cordon
dans
la prise
AUDIO
(blanche)
du moniteur.
• La
fiche
jaune du
cordon
dans
la prise
VIDEO
(jaune) du
moniteur.
• La
fiche
rouge du
cordo
n dans la prise
CHROMA
(rouge)
du
moniteur
.
3.
Placer
Ie
commutateur
VI
DEO
MODE
du
moniteur
sur
la
position
SEP (signaux
lumininence
et
chrominence
distincts)
pour
obtenir
un
affichage
net
sur
lignes de 40 caracteres.
4
Page 25

Luminosite
Contraste
Raccordement du cable RGB:
5
Volume
Commutateur
Mode
Video
Page 26

1.
Brancher
Ie
connecteur
argente dans la prise
RGB
situee a
I'arriere de I'
ordinateur. Si
I'ordinateur
n'est pas equipe
d'une
telle prise, il n'a pas ete con9u
pour
Ie
fonctionnement
en
mode
RGB.
2.
Brancher
I'autre
connecteur
dans
la
fiche
situee au
centre
du
panneau arriere du moniteur.
3.
Placer
Ie
commutateur
VIDEO
MODE
sur la
position
RGB.
4.
Le
commutateur
mode
RGB
monte
sur
Ie
panneau arriere du
moniteur
per
met
de
selectionner
Ie
mode
RGB convenant a
I'
ordinateur
utilise.
En
pla<;:ant
Ie
commutateur
DIGITAL
(numerique), on
selectionne
Ie
mode
de
synchronisation
POS
(Haut) ou NEG (Bas).
Le
reglage de ce
commutateur
est
indi-
que
dans
Ie
manuel
d'utilisation
de I'ordinateur.
"',\\'
1
II
IRGS
MODEr
DIGITAL
RGB
INPUT
~
..
"
...
'
J.
~,:
-~-
.,
V-
HEIGHT
••
Des
que
ces
raccordements
sont
effectues,
Ie
1902 est pret
pour
I'affichage des donnees de sortie de I'
ordinateur
personnel.
6
Page 27

MISE
EN
MARCHE
DU
MONITEUR
Apres
avoir
raccorde
Ie
moniteur
1:1
I
'ord
inateur
, insere une des
extremites
grises
du
cordon
d'alimentation
dans
la prise
CA
montee
1:1
I'arriere
du
moniteur
et insere la
fiche
1:1
trois
broches
dans
I'unite de secteur,
Ie
moniteur
peut
etre mis en
marche
. Les
etapes
sont
les suivantes:
1.
Mettre
Ie
moniteur
sous
tension
en
poussant
I'i
nterrupteur
d'alimentation
vers
Ie
bas. Le
voyant d'alimentation
monte
1:1
I'avant du
moniteur
indique
que
I'apparei l est sous
tension
.
Toujours
couper I'alimentation
du
moniteur
AVANT
de
mettre
I
'ord
inateur
sous tension.
Pour
couper
I'alimentat
ion du
moniteur,
appuyer
1:1
nouveau
sur
I'interrupteur
d'alimentation.
II
sort
en
position d'arret
et
Ie
voyant
s'etei nt.
2.
Mettre
I'ordinateur
sous tension. Si
Ie
moniteur
et I'
ordinateur
fonctionnent
correctement,
un des messages suivants est
afficM
sur
I'ecran du
mon
iteur:
II
Y a
plusieurs
fa<;:ons
differentes
de
proceder
selon les
types
d'
ordinateurs.
Pour
connaitre
Ie
message
affiche
par I'ordi
nateu r
utilise,
consulter
son manuel
d'utilisation.
7
Page 28

Posit
ion
horizontale
COMMANDES
DE REGLAGE
DU
MONITEUR
Stabilite
vertica
le
Couleur
T
einte
Luminosite
Contras
te
Vo
lum
e
Le reglage
de
I'image
affichee
par
Ie
moniteur s'effectue
a I'aide
des
boutons
situes
en-dessous
du panneau
monte
sous
I'ecran.
Ce panneau s'
ouvre
dans
Ie
haut.
II
suffit
pour
cela de
Ie
rabattre
en
appuyant
sur
son
rebord
superieur
pour
Ie
deverrouiller.
NOTE: En
mode
de
fonctionnement
RGB, certaines de ces
commandes
(teinte
et
couleu
r) n'ont
aucun
effet
puisque
la
teinte
et les
intensites
des
couleurs
sont
pre-reg lees.
T
EINTE
Tourner ce bouton
vers
la droite pour ajouter du
vert
et vers la gau-
che pour ajouter du rouge.
Le
reglage normal est
en
position centrale.
Pour faciliter
Ie
reglage de la teinte, se concentrer sur une ou deux
couleurs , telles que
Ie
brun et
Ie
jaune
COULEUR
Tourn
er ce
bouton
vers la
droite
pour
assombrir
les
couleurs
,
vers la
gauche
pour
les e
claircir. Le
reglage
normal
est
en
position
centrale
.
8
Page 29

LUMINOSITE
Tourner
ce
bouton
vers la
gauche
pour
augmenter
la
luminosite
et vers la
droite
pour
la re
duire
. Le
reglage
normal
est en
position
centrale
.
CONTRASTE
Tourner
ce
bouton
vers la
gauche
pour
augmenter
Ie
contraste
.
Le reglage
normal
est en
position
centrale.
POSITION
HORIZONTALE
Tourner ce bouton dans
Ie
sens horaire pour deplacer
Ie
contre de
I'image vers la gauche. Tourner dans
Ie
sens anti-horaire pour
deplacer
Ie
contre de I'image vers la droite.
STABI
LITE
VERTICALE
Ce
bouton
perm et d'
arreter
Ie
defilement
vertical de I'image.
VOL
UME
Tourner
ce
bouton
vers la
gauche
pour
augmenter
Ie
volume
et
vers la
droite
pour
Ie
diminuer.
PRISE
CASQUE
Cette
prise est
prevue
pour
Ie
raccordement
d'un
casque
dont
Ie
cordon
a ete
coupe
d'une
fiche
d'un
huitieme
de pouce. Le
haut-
parleur
est
automatiquement
coupe
au
moment
ou on insere
Ie
casque
.
REGL
AGE
VERTICAL
(8 I'arriere de I'appareil)
Regier
ce
bouton
8 I'
aide
d'un
tournevis non metallique
pour
corriger
la
distorsion
verticale
de I'image
affichee
8 I'ecran.
9
Page 30

MESURES
DE
SECURITE
Cet
appareil
a ete
conyu
et
fabriqu
e de
maniere a assurer
la
securite
de I'utilisateur.
Poureviter
tout risque d'electrocution et
d'incendie, respecter les instructions d'utilisation.
Pou r I'installa-
tion
et I'
entretien
du
moniteur
, respecter les regles de
securite
elementaires
ci-apres.
Se
conformer a to
us les avertissements et
instructions
figurant
sur
I'app areil.
INSTALLATION
1.
Le
cordon d'alimentation
du
moniteur
est
equipe
d'une
fiche
120 Volts
CA a trois
broches. Ceci
permet
d'eviter de
la
brancher
dans
Ie
mauvais sens dans la prise
d'alimentation.
S'il
est necessaire d'
utiliser
un
adaptateur 2 broches
/3 broches,
s'
assurer
qu'il
est
correctement
mis a la
terre, comme
I'
indiquent
les
instructions.
2.
La
source d'alimentation
de I'appareil
doit
avoir
les
carateristi-
ques
indiquees
sur
I'appareil.
Consulter
eventuellement
Ie
manuel d'
utilisation.
En
cas de
doute
sur
Ie
type d'alimentation
disponible, consulter
Ie
revendeur ou la
compagnie
d'electricite
locale.
3.
II
est
dangereu
x de
surcharger
les prises
secteur
et les
rallonges electriques
.
II
en est de meme
pour
les
cordons
electriques
endommages
et les prises cassees
qui
presentent
des risques
d'electrocution
et
d'incendie. Demander
I'assis-
tance
d'un
technicien
qua
lifie
pour
Ie
remplacement
de ces
composantes.
4.
Veiller a ce
qu'aucun
meuble
ou
objet
quelconque
ne
roule
ou
ne repose
sur
Ie
cordon
d'alimentation.
Ne pas
placer
I'appareil
a un
endroit
ou
Ie
cordon
risquerait
d'etre
endommage.
Ceci
peut
presenter des risques d'
incendie
ou
d'electrocution.
5. Ne pas
utiliser
Ie
moniteur a pro
ximite
d'eau
(baignoire
, evier,
lavabo ,
machine
a laver, sous-sol hum ide,
piscine
, etc.)
6. Le boTtier du
moniteur
com
porte
des
orifices
de
ventilation
pour
permettre
de
dissiper
la
chaleur
generee par
Ie
fonc-
tiohnement
de I'appareil.
Si
ces
orifices
etaient
obstrues,
I'appareil
risquerait
de
surchauffer
et de
prendre
feu.
Par consequent:
• Ne jamais
obstruer
les fentes de
ventilation
du
dessous
de
I'appareil en I'installa
nt
sur
un lit, un sofa, un tapis, etc.
• Ne
jamais
placer
I'appare il dans un
boitier
integral a moins
qu'une
aeration adequate ait ete prevue.
• Ne
jamais
couvrir
les
orifices
de
ventilation
avec du tissu ou
autre materiau.
• Ne
jamais
placer
I'appareil
sur
ou a promixite
d'une
douche
ou
d'un
appareil de chauffage.
10
Page 31

7.
Pour
eviter
de
se
blesser:
• Ne pas
installer I'appareil
sur
une
etagere en pente a
moins
qu'il
so
it
correctement
fixe .
• N'
utiliser
que
Ie
support
ou
Ie
chariot
recommande
par
Ie
fabricant.
• Ne pas
pousser
un
chariot
equipe
de
roues de
petites
dimensions
sur
les
seuils
de
portes
ou
les
moquettes
epaisses.
•
Toute
installation
murale
ou
sur
etagere
doit
etre
conforme
auxrecommandations
du
fabricant.
UTILISATION
8.
Toujours
couper I'alimentation
du
moniteur
quand
on
desire
s'absenter
de la salle
dans
laquelle
il
est
installe
pendant
une
periode
prolongee.
Ne
jamais
laisser un
moniteur
sous
tension
pendant
son
absence. Une
panne
peut
en
effet
presenter
des risques
d'incendie.
9.
Avertir
les
enfants
qu'ils
ne
doivent
pas
introduire
d'objets
dans les
orifices
du
boitier
de I'appareil.
Certains
composants
sont
en
effet
ali
mentes
sous
des
tensions
elevees et
tout
contact
avec
eux
peut
presenter
des
risques
d'incendie
ou
d'electrocution.
10.
Oebrancher
I'appareil
de
sa prise d'al
imentation
murale
avant
de
nettoyer
la
face
avant
du
cube
cathodique.
Pour
cette
operation,
utiliser
un
chiffon
humide
(et
non
mouille).
Ne pas
uti liser
d'aerosol
directement
su r
Ie
cube
cathod
ique, a cause
des risques
d'electrocution
dans
Ie
cas ou Ie
liquide
vaporise
serait
trop
abondant.
11. Ne
jamais
ajouter
d'accessoires
qui
n'ont
pas ete
con9us
pour
s'adapter
specialement
a
I'appareil, sous
risque
d'electrocution
.
12.
Oebrancher
I'appareil
de
sa
prise
d'alimentation
murale
pour
fournir
une
protection
supplementaire
pendant
les
orages
electriques
ou
si
Ie
moniteur
est sans
surveillance
pendant
une
periode
prolongee.
Ceci
permet d'eviter
tout
risque
d'incendie
ou
d'electrocution
dO
aux
eclairs
ou
aux
sur-
tensions
sur
la
ligne
d'a li
mentation.
13. Ne pas
amener
d'elements
magnetiques
comme
des
aimants
ou des
moteurs
electriques a proximite
du
tube.
lis
pourraient
avoir
une
influence
nefaste
sur
la
purete
de
la
couleur
de
I'image.
14.
On
pourra
personnellement
ressentir
de I'e
lectric
ite
statique
en
touchant
la
surface
du
cube
cathodique.
Ceci
est
normal
pour
tout
televiseur
ou
moniteur
et ne
presente
aucun
danger
pour
Ie
corps
humain.
11
Page 32

ENTRETIEN
15.
Debrancher I'appareil
de sa
prise d'alimentation
murale
et
s'adresser
a un
technicien
qualifie
, si I'une des
conditions
su ivantes se presente:
A.Ouand
Ie
cordon
d'alimentation
est
endommage
ou sa
prise cassee.
B.
Si un
liquide
a ete renverse
dans
I'appareil.
C.
Si I'appareil est expose a la
pluie
ou
a I'eau.
D.
Si
I'appareil
ne
fonctionne
pas
normalement
lorsqu
'on
suit
les
instructions
de
fonctionnement.
Manipuler
seulement
les
commandes
de
reglage
decrites
dans
Ie
manuel
d'
instruction; to'ut
autre
reglage
pourrait
endommager
I'
appareil
ou
demander
I'intervention
d'un
technicien
qualifie
pour
restaurer
I'etat de
fonctionnement
normal
de
I'
appareil.
E. Si I'appareil est
tombe
ou si son boi'tier a ete
endommage.
F. Si
Ie
fonctionnement
de
I'appareil
n'est
plus
conforme
a
ses
performances
initiales.
G.
Si
I'on
entend
continuellement
ou
frequemment
des
craquements
ou des
claquements a I'interieu r de I'appareil
pendant
son
fonctionnement.
II
est
normal
que
certains
appareils
emettent
ces
bruits
occasionnellement
pendant
Ie
fonctionnement, particulierment
lors
de
leur
mise en
marche
ou
de leu r arret.
16. Ne
jamais
tenter
de
reparer
soi-meme
Ie
moniteur,
sous
risque
d'electrocution
ou
d'autres
dangers
au
moment
de
I'
ouvertu
re
du boTtier.
Certains
composants
du
moniteu r sont
soumis
a de tres
hautes
tensions, me me
quand
il est
debranche
. S'adresser a un
technicien
qualifie
.
17. Si
Ie
rem
placement
de
composants
est necessaire,
demander
au
technicien
des
reparations
d'assurer
par
ecrit
que
les
composants
de
remplacement
utilises
ont
les
memes
caracteristiques
de
securite
que
les
originaux.
Utiliser
seulement
les
composants
de
rechange
specifies
par
Ie
fabricant, pour
eviter
tout
risque d'
electrocution, d'incendie
ou
tout
autre
danger
.
18.
Apres
toute
operation
d'entretien
ou de reparation,
demander
au
technicien
d'effectuer
les
verifications
de
securite
decrites
dans
Ie
manuel
d'entretien
fourni
par
Ie
fabricant.
19.
Ouand
la
duree
de vie
d'un
moniteur
video est
ecoulee
, s'en
debarrasser
conformement
aux
instructions
prescrites
pour
eviter I'implosion
du
tube.
Remettre
Ie
moniteur
video usage
a un
technicien
qualifie
.
12
Page 33

Page 34

Page 35

Page 36

315048-01
COMMODORE
::
Commodore Business Machines, Inc.
1200 Wilson D
ri
ve '
Wes
t Chester,
PA 19380
Commodore Business Machines, Limited
3370 P
ha
rmacy Avenue · Agincourt, Ontario,
M1W
2K4
Printed
in
Japan
No. 2075013778
 Loading...