

Page 1
COMMODORE
0
DISK
DRIVE
useris
guide
Page 2

Page 3
COMIVIODORE
1541-H
DISK
DRIVE
USER'S
GUIDE
ft
commodore
COMPUTERS
Page 4
The
information
in
this
manual
has
been
reviewed
andisbelieved
tobeentirely
reliable.
No
responsibility,
however,isassumed
for
inaccuracies.
The
material
in
this
manual
is
for
information
purposes
only,
and
may
be changed
without
notice.
©
Commodore
Electronics
Ltd.,
1986
"All
rights
reserved."
Page 5
TABLE
OF
CONTENTS
Introduction
1
The
advantages
ofadisk
drive
1
Featuresofthe
1541
1
Howtouse
this
book
2
Basic
Operating
Steps
2
Specifications
of
the
1541
Disk
Drive
4
PART
ONE:
GUIDETOOPERATION
Chapter1:Disk
Drive
5
Unpacking
.
5
Empty
the
drive
6
Connecting
the
cables
6
Turningonthe
power
7
Troubleshooting
guide
9
Simple
maintenance
tips
11
Chapter2:Diskettes
.
12
Whatisa
diskette?
12
Safety
rules
for
diskette
care
13
Inserting
a
diskette
13
Safety
rules
for
removing
diskettes
14
Loadingapackaged
program
14
Howtoprepareanew
diskette
15
Reusinganold
diskette
16
Organizing
a
diskette
library
17
Backups
17
Chapter3:Directories
18
Whatisa
directory?
....
18
Viewingadirectory
18
Whatadirectory
shows
18
Watch
out
for
splat
files
20
Printingadirectory
21
Readingadirectory
asafile
21
Another
waytobe
selective
21
Pattern
matching
and
wild
cards
22
Page 6
PART
TWO:
GUIDETOADVANCED
OPERATION
AND
PROGRAMMING
Chapter4:Commands
,
25
Command
Channel
25
Reading
the
Error
Channel
26
Housekeeping
hints.
«
28
Saving
programs
29
Save
with
replace
a
30
Verifying
programs
30
Erasing
programs
.
31
Scratch
for
advanced
users
33
Renaming
programs
34
Renaming
and
scratching
troublesome
programs
36
Copying
programs
37
Validating
the
diskette
38
Initializing
40
Chapter
5:
Sequential
Data
Files
42
The
conceptoffiles
42
Openingasequential
file
42
Addingtoa
sequential
file
45
Writing
file
data:
Print#
46
Closingafile
48
Reading
file
data
using
INPUT#
49
More
about
INPUT
(advanced)
50
Numeric
Data
StorageonDiskette
51
Reading
File
Data:
Using
GET#
,...
52
Demonstration
of
Sequential
Files
54
Chapter6:Relative
Data
Files
55
The
valueofrelative
access
55
Files,
Records,
and
Fields
55
File
limits
56
Creating
a
relative
file
56
Using
relative
files:
Record#
57
Completing
relative
file
creation
59
Expandingarelative
file
60
Writing
relative
file
data
61
Designing
a
relative
record
61
Writing
the
record
62
Readingarelative
record
63
The
valueofindex
files
64
Page 7

Chapter7:Direct
Access
Commands
65
A
tool
for
advanced
users
...
65
Diskette
organization
65
Openingadata channel 65
Block-Read
66
Block-Write
67
The
original
commands
68
The
buffer
pointer
.
69
Allocating
blocks
70
Freeing
blocks 71
Using
random
files
(advanced)
72
Chapter
8:
Internal
Disk
Commands
73
1541
Memory
Map
73
Memory
Read
..
74
Memory
Write
75
Memory
Execute
77
Block
Execute
77
User
commands
78
Chapter
9:
Machine
Language Programs
80
Disk-related
kernafl
subroutines
80
Appendices
A.
Changing
the
Device
Number
81
B.
Error
Messages
83
C.
Diskette
Formats
87
D.
Disk
Command
Quick
Reference
Chart
92
E.
Test/Demo
Diskette
'.
93
ListofFigures
1.
Front
Panel
5
2.
Back
Panel
6
3.
Floppy
Disk
Hookup
8
4.
Position for
Diskette
Insertion
12
Page 8

Page 9
INTRODUCTION
The
1541
disk
drive
greatly
increases
the
speed,
storage
capacity,
flexibility
and
reliabil
ityofyour
Commodore
computer.Asyou
use
the
1541
disk
drive,
you
will
appreciate
its
superiority
to
the
cassette
recorder
you
may
have
used
before
andtodisk
drives
offered
for
other
brandsofcomputers.
The
1541-n
disk
driveisfully
compatible
with
the
commodore
1541
disk
drive,
therefore
we
may
often
omit
the
"-II"
suffix
throughout
the
remainder
of
this
manual.
THE
ADVANTAGESOFA
DISK
DRIVE
•
Speed
If
you
have
usedacassette
recorder
for
data
storage,
you
probably
knowitcan
take
up
toanhour
justtosearch
one
long
cassette
tape
looking
foraspecific
program.
With
the
1541
disk
drive,alistofall
the
programsona
diskette
appearsonyour
screen
in
seconds.
The
speedofprogram
loadingisalso
greatly
improved.
It
takes
the
1541
only
a
minutetoloadalarge
program
that
would
takeahalf-hour
to
load
from
tape.
•
Reliability
Reliability
is
another
reason
for
choosingadisk
drive.Itis
all
too
common
foracassette
usertoaccidentally
eraseavaluable
programbysavinganew
programontopofthe
old
one,
without
realizing
it.
The
1541
disk
drive
automatically
verifies
everything
it
records.
•
Direct
File
Access
A
third
advantageofa
disk
driveisthe
abilitytouse
relative
files
(discussed
in
Chapter
6).Ona
diskette,
any
partofa
relative
file
canbeaccessed
and
altered
separately,
without
affecting
the
restofthe
file.
Overall,
usingadisk
drive
makes
for
easier
and
more
powerful
computing.
FEATURESOFTHE
1541
The
1541isoneofthe
most
affordable
disk
drivesonthe
market.
Compared
to
competitors,
the
1541
has high
capacity,
and
even
higher
intelligence.
Itisoneofthe
most
cost-effective
disk drives
available.
Most
home
and
personal
computers
that
useadisk
takeatleast
10KofRAM
memory
from
the
computertoholdadisk
operating
system
(knownasa
DOS.)
This
large
program
mustbein
memory
the
whole
time
the
disk
is
being
used,
and
muchofit
must
alsobekeptonevery
diskette.
The
Commodore
1541
works
differently
and
more
effectively.
It
contains
its
own
built-in
microcomputer
to
control
its
various
operations,
along
with
enough
ROM
and
RAM
memory
to
operate
without
any
help
from
the
computer.
Commodore's
DOS
"lives"
entirely
inside
the
disk
drive,
and
does
not
require
any
internal
memory
in
the
computer
to
do
its
work,
nor
does
it
have
to
be
loaded
before
use
like
DOS
on
other
computers.
It
is
so
independent
that
once
it
begins
working
onacommand,
it
will
complete
it
while
the
computer
goes
on
to
some
other
task,
effectively
allowing
you
to
do
two
thingsatonce.
Page 10
Another
key
advantage
of
the
Commodore
1541
over
disk
drives
for
other
computers
is
its
dynamic
allocation
of
disk
space.
Many
other
disk
drives
make
you
think
about
every
program
you
save.
Where
canIstore
it
on
this
diskette,
and
should
I
pack
the
disk
first?
(Packingisthe
processofmoving
all
the
leftover
work
areastothe
endofthe
diskette's
storage
space.)
All
thisishandled
automatically
on
Commodore
disk
drives.
The
1541
disk
drive
always
knows
where
the
next
program
will
go,
and
automatically
fits
it
into
the
best
available
spot.
Diskettes
created
on
the
1541
may
be
read
by
several
other
Commodore
disk
drives,
including
the
former
1540,
2040,
and
4040,
and
the
2031.
It
is
usually
possi
ble,
though
not
recommended,
to
write
data
to
any
one
of
these
drives
from
any
of
the
others.
The
1541
communicates
with
the
computer
and
other
devices
overacable
and
interface
knownasthe
Commodore
serial
bus.Itis
patterned
after
the
IEEE-488
bus
used
on
Commodore's
PET
and
CBM
models,
except
that
the
serial
version
only
uses
one
wire
for
data.
The
two
serial
ports
on
the
1541
allow
several
devices
to
be
connected
together
at
once,
each
plugged
into
the
next
in
*'daisy
chain"
fash
ion.Upto4disk
drives
and2printers
canbeconnected
this
way.
HOW
TO
USE
THIS
BOOK
This
bookisdivided
into
two
main
parts.
The
first
part
gives
you
the
information
you
needtouse
the
1541
effectively,
evenifyou
know
littleornothing
about
programming.
This
partofthe
book
tells
you
howtosetupthe
system,
howtoprepare
diskettes
for
use,
howtoreadadirectory,
and
howtoload
programs.
Part
twoofthe
bookisfor
advanced
users
and
those
who
would
liketobecome
advanced
users.
This
part
provides
more
advanced
commands,
tells
about
the
different
files
the
1541
uses,
and
howtomanage
them,aswellasgivingafew
hints
for
machine
language
programmers.
Both
beginning
and
advanced
users
will
find
valuable
information
in
the
appendi
ces—a
quick
reference
listofdisk
commands,alistofdisk
error
messages
and
what
they
mean,aglossaryofwords
usedinthis
manual,
howtouse
twoormore
disk
drives
at
once,
and
explanations
of
some
programsonthe
Test/Demo
diskette
packed
with
your
1541.
Since
ownersoffour
different
Commodore
computers
use
the
1541,wehave
separated
several
explanations
into
two
versions,
dependingonwhich
Basic
your
com
puter
uses.Ifyou
haveaVIC20or
Commodore
64,
please
read
the
pages
marked
Basic
2.
Those
with
the
Commodore16or
the
Plus/4
should
read
pages
marked
Basic
3.5.
For
many
commands,
there
will
be an
added
pageortwooffurther
comments
and
advanced
techniques.
Feel
free to
skip
anything
you
don't
understand
on
those
pages
now,
and
come
back
later.
BASIC
OPERATING
STEPS
If
you're
like
most
people,
you're
anxioustostart
using
your
new
disk
drive
(
right
away.Inviewofthat,wehave
outlined
the
basic
steps
you
needtoknow
in
ordertoget
started.
Page 11
Once
you've
mastered
the
basic
steps
however,
you
will
needtorefertothe
rest
of
this
manual
in
order
to
make
full
use
of
the
1541
*s
features.
In
fact,
before
you
begin,
you
should
takealookatthe
following
short
sections,
which
offer
precautions
on
handling
the
equipment:
"Simple
maintenance
tips,"
"Safety
rules
for
diskette
care,"
and
"Safety
rules
for
removing
diskettes."
1.
Unpack,
hook-up,
and
turnonthe
disk
drive.
There'snoshortcut
through
this
part.
You'll
havetoread
this
sectiontofind
out
what
connectstowhat,
whentoturn
everything
on,
and
howtoempty
the
drive.
If
you
run
into
any
problemsatthis
point,
refertothe
Troubleshooting
Guide.
Gently
insertapre-programmed
diskette.
For
the
purposeofdemonstration,
use
the
Test/Demo
diskette
that
was
included
with
the
disk
drive.
If
you
run
into
any
problemsatthis
point,
refertoChapter2,"Inserting
a
Diskette."
3.
Type:
LOAD
"HOW
TO
USE",8
(forBasic2)
DLOAD
"HOW
TO
USE"(for
Basic
3.5)
Press:
RETURN
HOW
TO
USE
is
the
name
ofaparticular
program
on
the
Text/Demo
diskette.
To
loadadifferent
BASIC
program,
substitute
the
name
of
that
program
inside
the
quotation
marks.
If
you
want
to
loadaprogram
that
isn't
written
in
BASIC
language,
you
must
use
the
Basic2command
and
add
the
following
after,the
8
in
that
command:
,1
If
you
run
into
any
problems
at
this
point,
refer
to
Chapter
2,
the
section
enti
tled
"LoadingaPackaged
Program."
4.
After
you
perform
step3,the
following
will
appearonthe
screen:
SEARCHING
FOR
HOW
TO
USE
LOADING
READY
At
this
point,
type
RUN
and
press
the
RETURN
key
and
follow
the
directions
for
the
program.
Page 12
SPECIFICATIONSOFTHE
1541
DISK
DRIVE
STORAGE
Total
formatted
capacity
174848
bytes
per
diskette
Maximum
Sequential
file
size
168656
bytes
per
diskette
Maximum
Relative
file
size
167132
bytes
per
diskette
Records
per
file
65535
Files
per
diskette
144
Tracks
per
diskette
35
Sectors
per
track
17-21
Sectors
per
diskette
683
total
664
free
for
data
Bytes
per
sector
256
INTEGRATED
CIRCUIT
CHIPS
USED
1
6502
microprocessor
Used
for
overall
control
2
6522
VIA
Versatile
Interface
Adapters
Used
for
input
and
output,
andasinternal
timers
16116
RAM
Random
Access
Memory
Usedas2Kofbuffers
1
16KROM
Read-Only
Memory
Containsa16K
Disk
Operating
System
(DOS)
INTERFACE
USED
Commodore
serial
bus
with
two
6-pin
DIN
connectors
Device
number
selectable
from
8-11
Secondary
addresses
0-15
PHYSICAL
DIMENSIONS
Height
Width
Depth
77
mm
184
mm
256
mm
ELECTRICAL
REQUIREMENTS
Three
wire-grounded
detachable
power
cable.
Voltage
U.S.
100-120
VAC
Export
220-240
VAC
Frequency
U.S.
60
HZ
Export
50
HZ
Power
used
25
Watts
MEDIA
Any
good
quality
5lA
inch
diskette
maybeused
(Commodore
diskettes
are
recom
mended).
Page 13
PART
1:
GUIDE
TO
OPERATION
CHAPTER
1
DISK
DRIVE
UNPACKING
The
first
thing
you
will
needtodo
with
your
disk
driveisunpack
it.
Inside
the
carton
in
which
you
found
this
manual,
there
should
also
be: a
1541
disk
drive,
supply
power
a
black
cabletoconnect
the
disk
drivetothe
computer,
a
demonstration
diskette,
and
a
warranty
cardtobe
filled
out
and
returnedtoCommodore.
Please
don't
connect
anything
until
you've
read
the
next
three
pages!Itcould
save
youalotoftrouble.
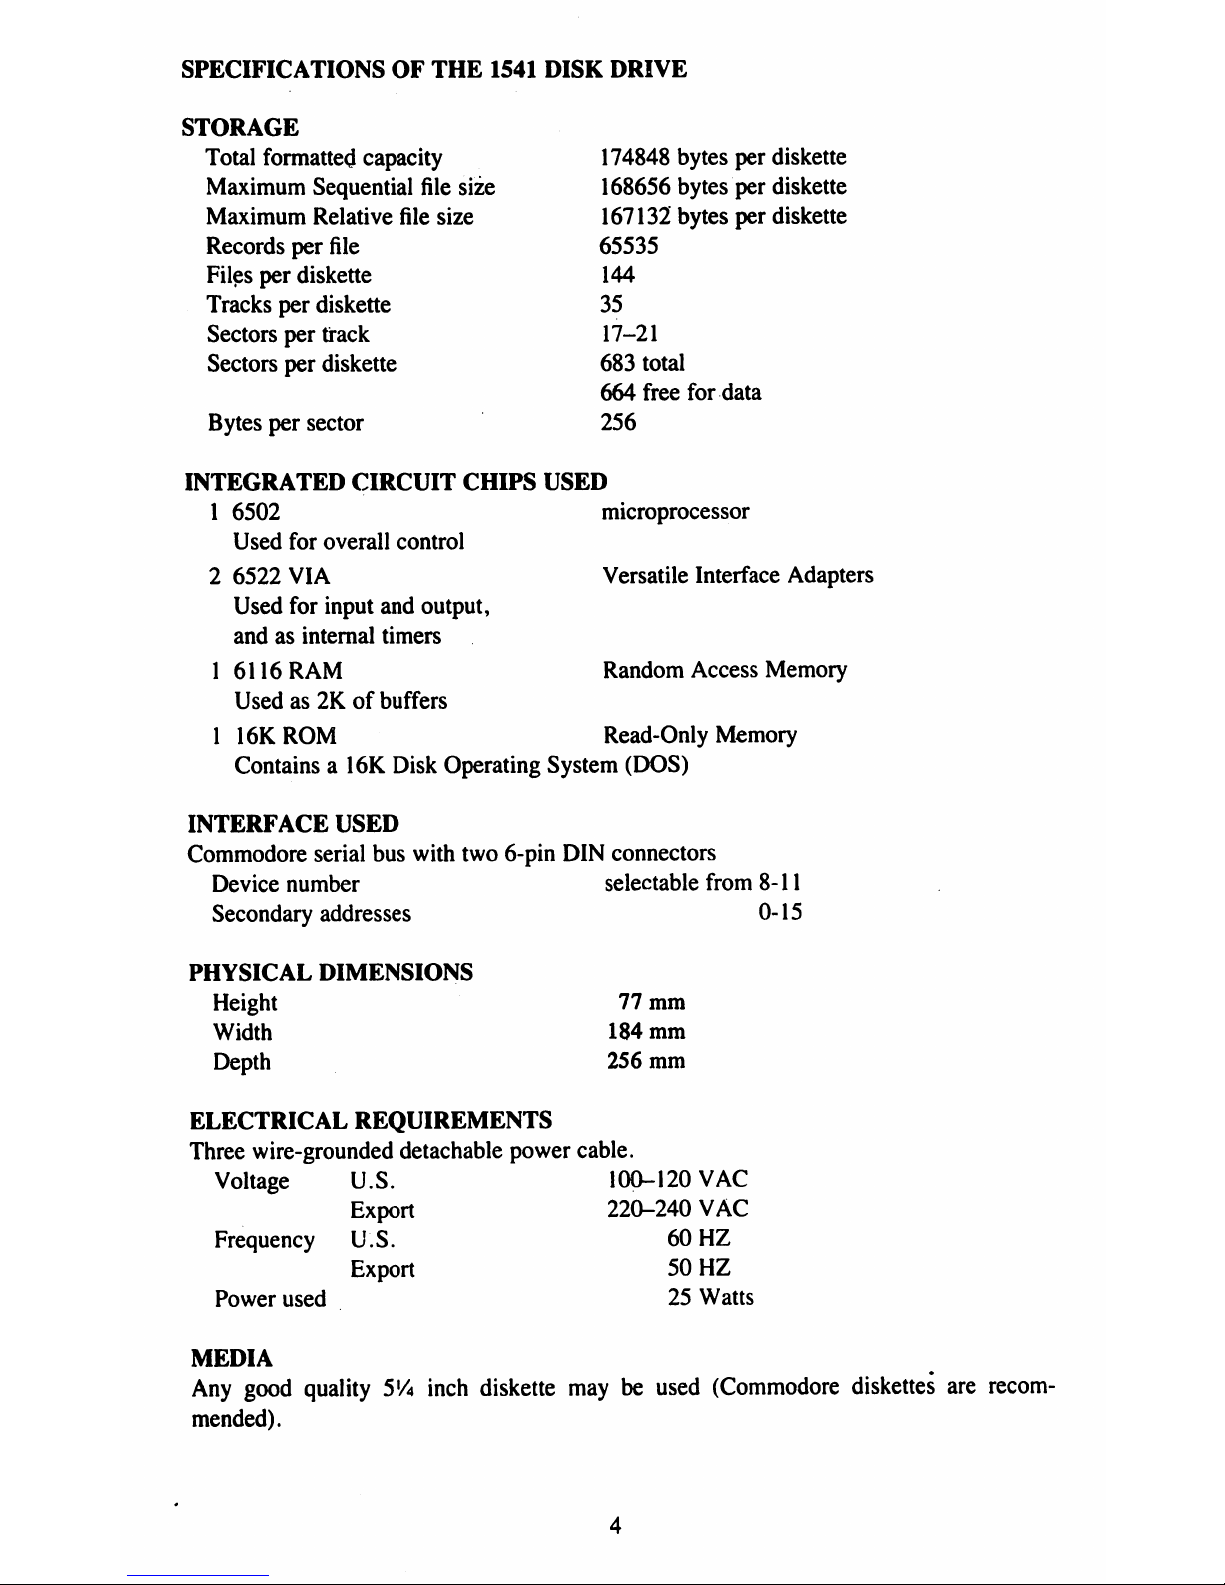
Figl.
Front
Panel
I
POWER
I
DRIVE
[commodore
154W
I
FLOPPY
DISK
DRIVE
I
V
7
DOOR
LEVER
DRIVE
INDICATER
(GREEN
LED)
LIGHT:
ACTIVE/FLASH:
ERROR
POWER
INDICATER
(RED
LED)
•LIGHT:
POWER
ON
THE
PRODUCT
DOES
NOT
NECESSARILY
RESEMBLE
THE
PICTURE
INSIDE
THE
USER'S
MANUAL.
5
Page 14
EMPTY
THE
DRIVE
First,itis
very
important
tobesure
nothingisinside the
disk
drive.Ifyou
turn
the
power
off
or
oh
withadiskette
in
the
drive,
you
could
lose
its
contents
and
have
to
re-
record
it.
Since
you
wouldn't
like
havingtodo
that,
always
checktobe
sure
nothing
is
inside
the
drive
before
turningitofforon.
When
you
first
unpack
the
disk
drive,
you
will
findacardboard
shipping spacer
inside.
Following
the
instructions
below,
pullitoutasthoughitwereadiskette,
but
don't
throwitaway.
You
will
wanttoputitback
inside
the
slot
any
time
you
moveorship
the
disk
drive
later.
To
check
whether
the
driveisempty
(Fig.
1),
simply
rotate
the
leveronthe
front
of
the
disk
drive
counter-clockwise
untilitstops,
one-quarter
turnatmost.
Then
reach
inside
the
long
slot
the
lever
covers
whenitpoints
down,
and
pull
out
any
diskette
you
find
there.
CONNECTING
THE
CABLES
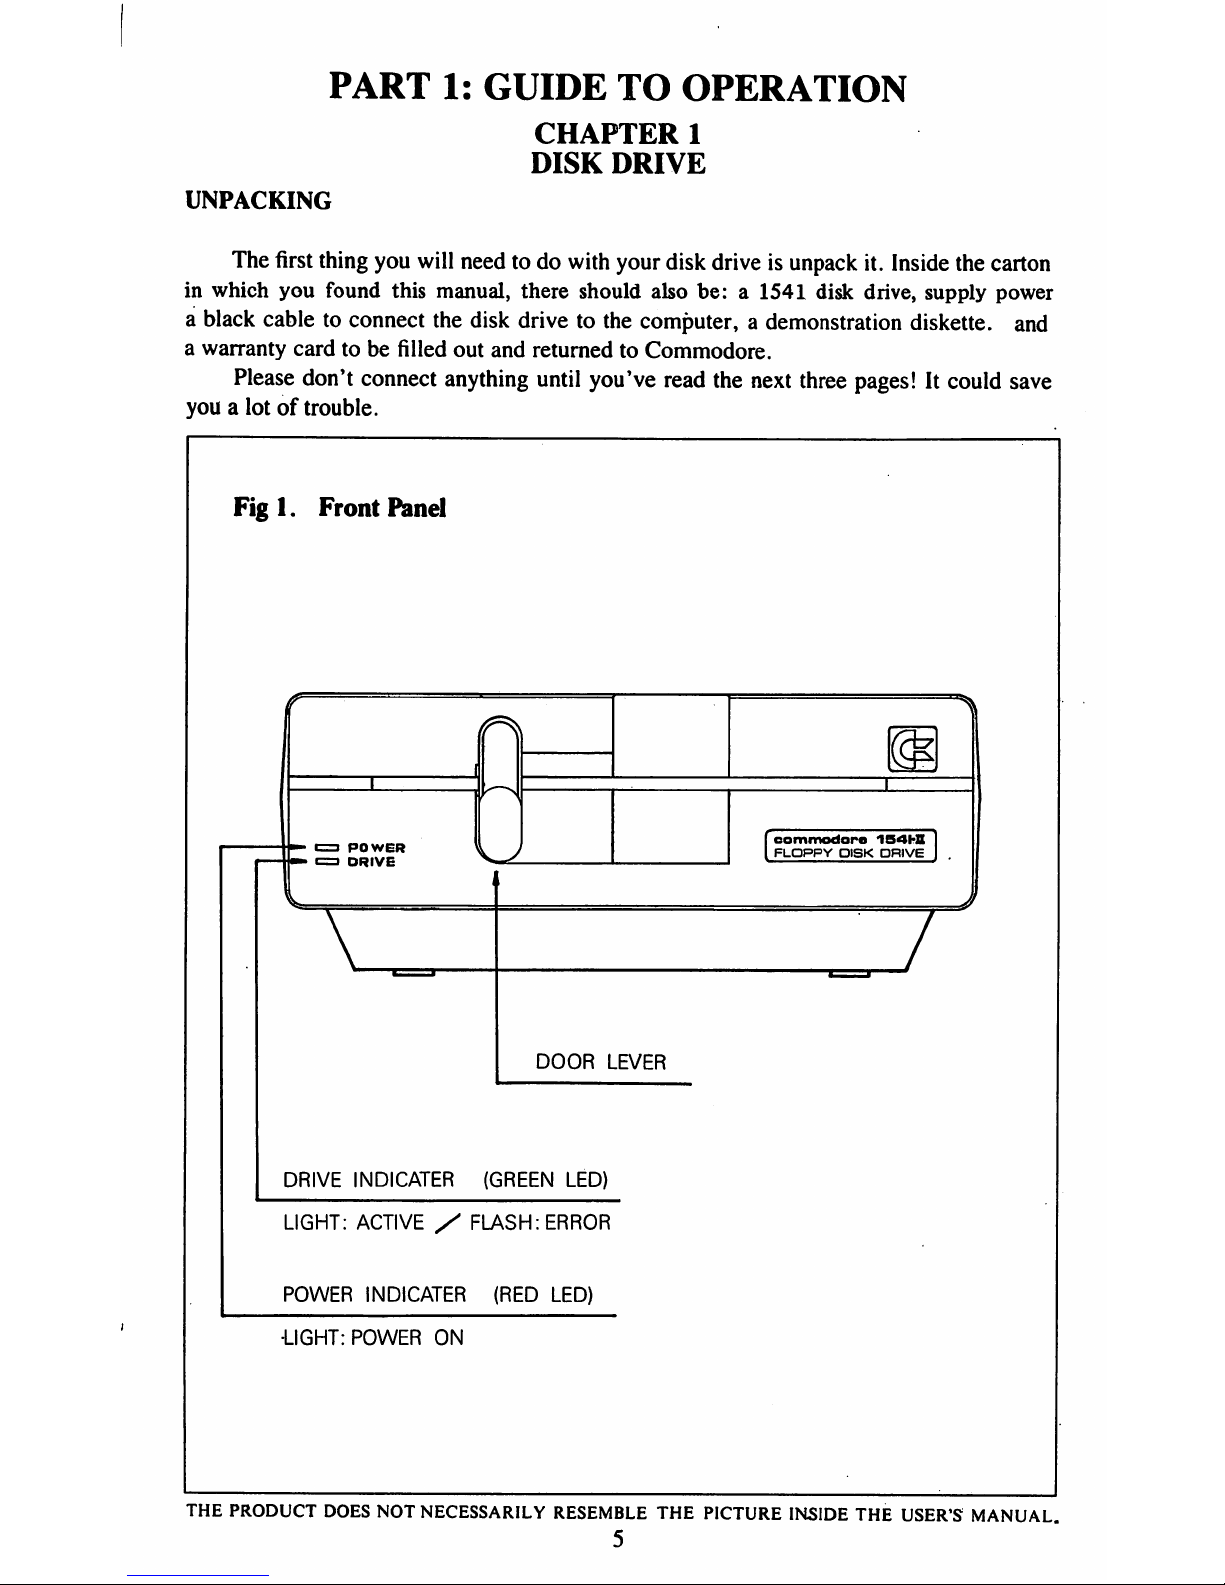
With
the
power
supply,
the
power
cable
plugs
into
the
backofthe
disk
driveatone
end,
and
intoagrounded
(3-prong)
outletatthe
other
end.It
will
onlygoin
one
way.
Before
you
plugitin
though,
make
sure
that
your
entire
computer
systemisturned
off.
The
disk
drive's
on/off
switchisin
the
back,onthe
right
side
(when
viewed
from
the
back).Itis
off
when
the
botton
halfispushed
inward.
Leave
your
whole
system
off
until
everything
is
connected.Wewill
tell
you
whenitis
safe
to turniton.
Fig
2.
Back
Panel
DIP
SWITCH
FOR
CHANGING
POWER
SWITCH
DEVICE
NUMBER
SERIAL
INTERFACE
POWER
ON/OFF
ON
1
SERIAL
PORT
OFF
0
POWER
CORD
SOCKET
CONNECTORS
FOR
INTERFACE
CABLES
Page 15
After
plugging the
power
supply
into
the
disk
drive
andasuitable
outlet,
find
the
black
cable
that
goes
from
the
disk
drivetothe
computer.Itis
calledaserial
bus
cable
to
describe
the
way
the
computer,
and
other
accessories
communicate
with
each
other
through
its
wires.Ithasanidentical
6-pin
DIN
connectorateach
end,
which
like
the
power
connector
can
onlygoin
one
way—with
the
dimpleinthe
sideofthe
plug
facing
up.
To
pluginthe
serial
bus
cable,
find
the
dimpleonthe
sideofthe
metal
partofthe
plug
and
turn
that
side
up.
Then
pushitstraight
into
oneofthe
two
serial
bus
connectors
on
the
backofthe
disk
drive.
The
other
end
goes
into
the
similar
connectoronthe
back
of
your
computer,
marked
'*serial
bus."Ifanother
accessory,
suchasa
printer,isalready
connected
there,
unplug
the
other
device's
cable
from
the
computer,
and
attachitto
the
spare
serial
bus
connectoronthe
backofthe
1541.
Then
install
the
serial
cable
from
the
1541inthe
serial
bus
connectoronthe
backofthe
computer
(Fig
3.A.)
If
you
have
more
than
one
disk
drive,
each
added
disk
drive's
serial
bus
cable
is
plugged
into
the
second
serial
bus
connectoronthe
backofthe
previous
disk
drive,
like
a
daisy
chain
(Fig
3.B).
However,
don't
connect
the
other(s)
until
you've
learned
how
to
change
their
device
numbers,asno
two
disk
drives
can
have
the
same
device
number.
We'll
cover
waysofchanging
disk
device
numbersinAppendixA.Until
you
are
ready
to
read
that
section,
you
may
finditeasiertoleave
your
extra
drive(s)
unconnected.
TURNINGONTHE
POWER
With
everything
hooked
up,
and
the
disk
drive
empty,itis
timetoturnonthe
power.
You
can
turnonthe
powertothe
disk
and
other
devicesonthe
serial
bus
(connected
via
serial
cables)inany
order
you
like.
Justbesuretoeither
turnonthe
powertothe
computer
itself
last,orto.
use a
multiple
outlet
power
box
withamaster
switchtoturn
everything
off
andonat
once.
When
everything
is
on,
including
the
computer,
the
disk
drive
will
go
throughaself
check
forasecondorso, tobesureitis
working
correctly.
After
the
drive
is
satisfied
with
its
own
health,itwill
flash
the
green
light
once,
and
the
red
power-on
light
will
glow
continuously.Atthe
same
time,
the
computer
willbegoing
throughasimilar
self-test,
and
displaying
its
hello
messageonyourTVor
video
monitor.
Once
the
green
lightonthe
disk
drive
has
flashed
and
gone
out,itis
safetobegin
working
with
the
drive.
If
the
light
doesn'tgoout,
but
continuestoflash,
you
may
haveaproblem.
Refertothe
troubleshooting
guide
for
help.
Page 16
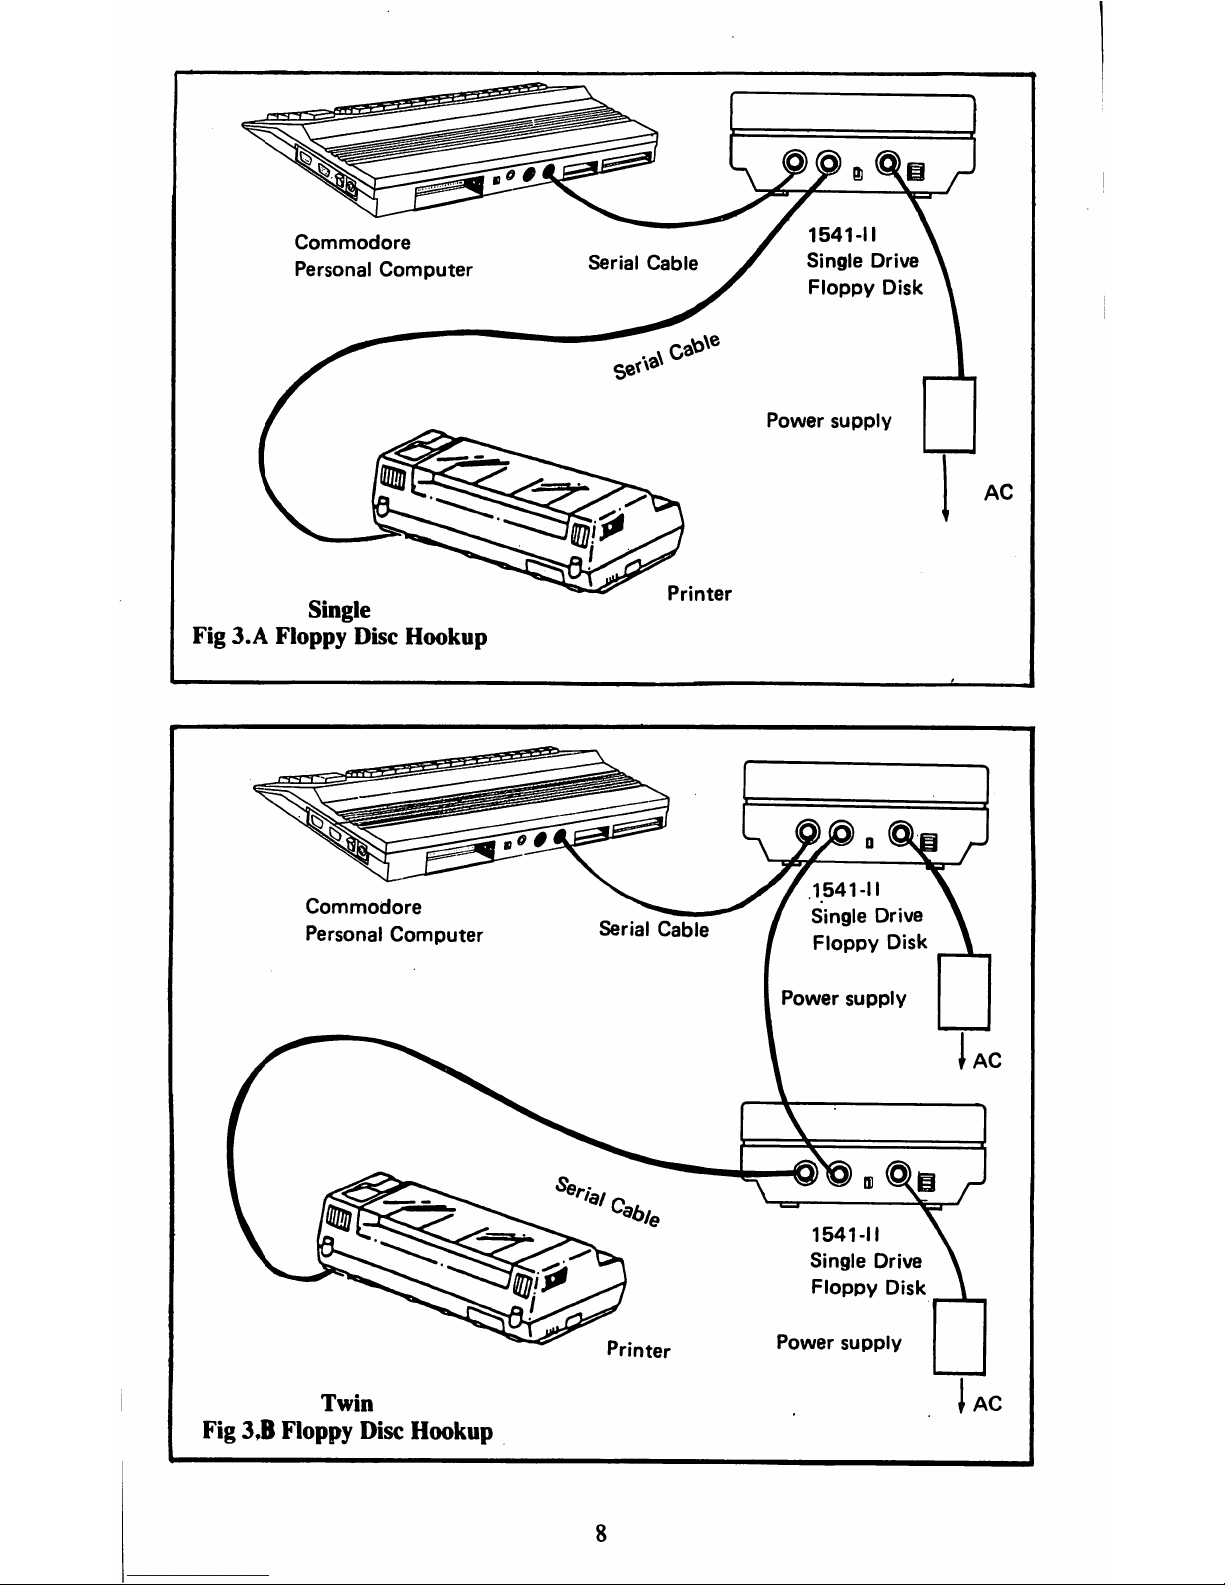
Commodore
Personal
Computer
Single
Fig
3.A
Floppy
Disc
Hookup
Printer
1541-11
Single
Drive
Floppy
Disk
Power
supply
Printer
Twin
Fig
3.B
Floppy
Disc
Hookup
Power
supply
1541-11
Single
Drive
Floppy
Disk
Commodore
Personal
Computer
lAC
Page 17
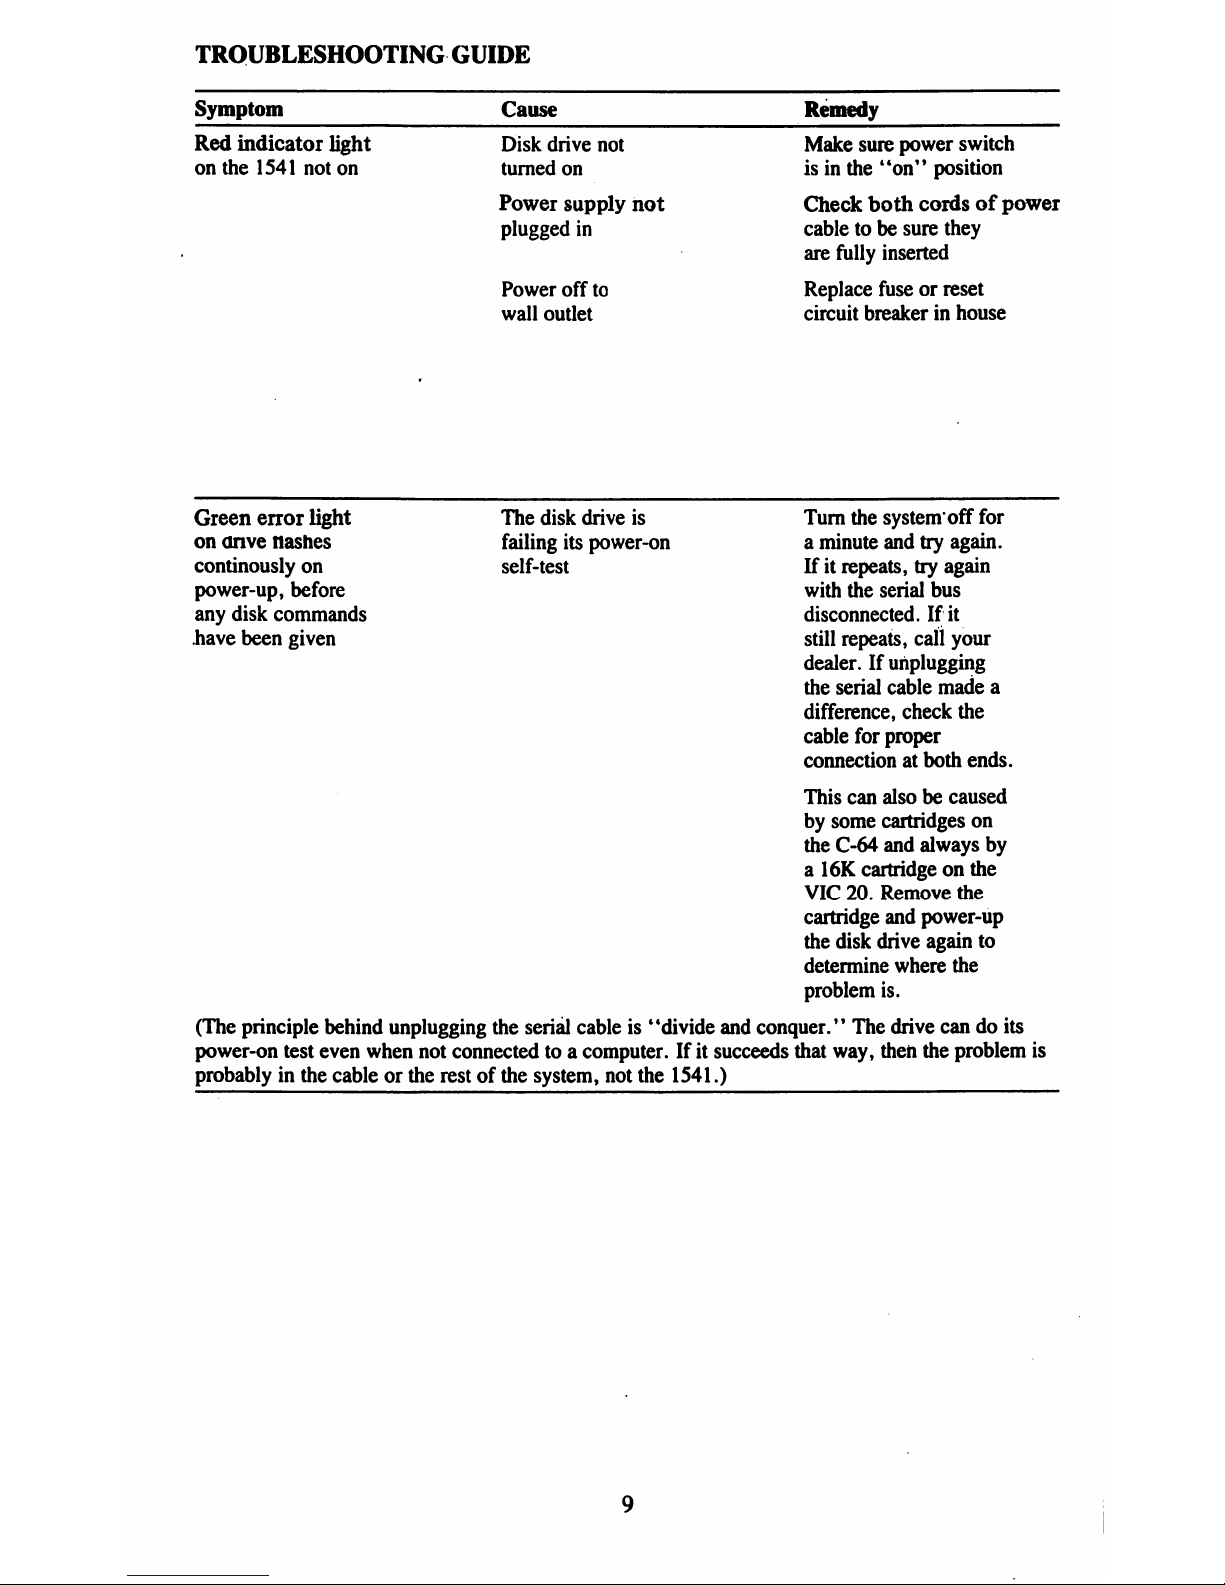
TROUBLESHOOTING
GUIDE
Symptom
Red
indicator
light
on
the
1541
not
on
Cause
Disk
drive
not
turned
on
Power
supply
not
plugged
in
Power
off
to
wall
outlet
Remedy
Make
sure
power
switch
isinthe
"on"
position
Check
both
cordsofpower
cabletobe
sure
they
are
fully
inserted
Replace
fuseorreset
circuit
breakerinhouse
Green
error
light
The
disk
drive
is
Turn
the
system'off
for
on
anve
Hashes
failing
its
power-on
a
minute
and
try
again,
continously
on
self-test
Ifitrepeats,
try
again
power-up,
before
with
the
serial
bus
any
disk
commands
disconnected.
If
it
have
been
given
still
repeats,
call
your
dealer.Ifunplugging
the
serial
cable
made
a
difference,
check
the
cable
for
proper
connection
at
both
ends.
This
can
alsobecaused
by
some
cartridges
on
the
C-64
and
always
by
a
16K
cartridgeonthe
VIC
20.
Remove
the
cartridge
and
power-up
the
disk
drive
again
to
determine
where
the
problem
is.
(The
principle
behind
unplugging
the
serial
cableis"divide
and
conquer.'1
The
drive
candoits
power-on
test
even
when
not
connectedtoa
computer.Ifit
succeeds
that
way,
then
the
problem
is
probablyinthe
cableorthe
restofthe
system,
not
the
1541.)
Page 18
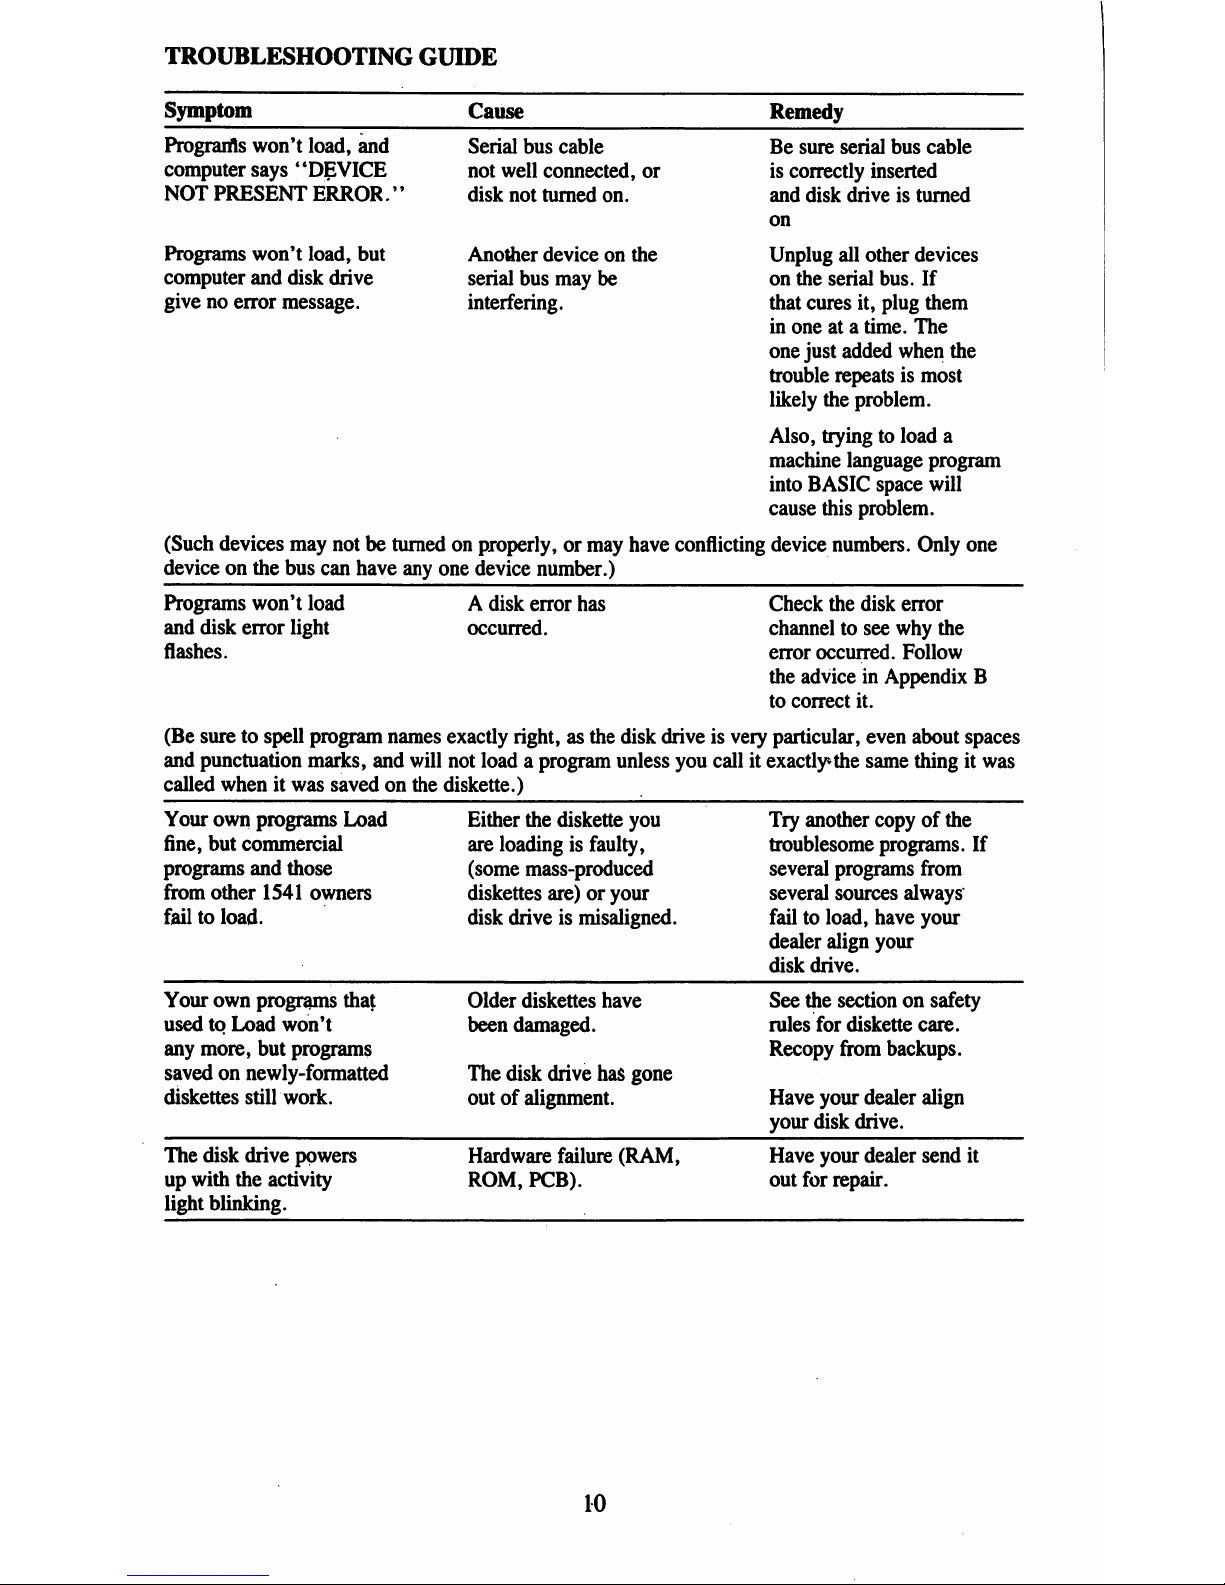
TROUBLESHOOTING
GUIDE
Symptom
Cause
Program's
won't
load,
and
computer
says
"DEVICE
NOT
PRESENT
ERROR.''
Programs
won't
load,
but
computer
and
disk
drive
givenoerror
message.
Serial
bus
cable
not
well
connected,
or
disk
not
turned
on.
Another
deviceonthe
serial
bus
may
be
interfering.
Be
sure
serial
bus
cable
is
correctly
inserted
and
disk
driveisturned
on
Unplug
all
other
devices
on
the
serial
bus.
If
that
cures
it,
plug
them
in
oneata
time.
The
one
just
added
when
the
trouble
repeatsismost
likely
the
problem.
Also,
tryingtoload
a
machine
language
program
into
BASIC
space
will
cause
this
problem.
(Such
devices
may
notbeturnedonproperly,
or
may
have
conflicting
device
numbers.
Only
one
deviceonthe
bus
can
have
any
one
device
number.)
Programs
won't
load
and
disk
error
light
flashes.
A
disk
error
has
occurred.
Check
the
disk
error
channeltosee
why
the
error
occurred.
Follow
the
adviceinAppendix
B
to
correct
it.
(Be
suretospell
program
names
exactly
right,
as the
disk
driveisvery
particular,
even
about
spaces
and
punctuation
marks,
and
will
not
loadaprogram
unless
you
callitexactly
the
same
thingitwas
called
whenitwas
savedonthe
diskette.)
Your
own
programs
Load
fine,
but
commercial
programs
and
those
from
other
1541
owners
failtoload.
Either
the
diskette
you
are
loadingisfaulty,
(some
mass-produced
diskettes
are)oryour
disk
driveismisaligned.
Try
another
copyofthe
troublesome
programs.
If
several
programs
from
several
sources
always
failtoload,
have
your
dealer
align
your
disk
drive.
Your
own
programs
that
usedtoLoad
won't
any
more,
but
programs
savedonnewly-formatted
diskettes
still
work.
Older
diskettes
have
been
damaged.
The
disk
drive
has
gone
outofalignment.
See
the
sectiononsafety
rules
for
diskette
care.
Recopy
from
backups.
Have
your
dealer
align
your
disk
drive.
The
disk
drive
powers
up
with
the
activity
light
blinking.
Hardware
failure
(RAM,
ROM,
PCB).
Have
your
dealer
send
it
out
for
repair.
10
Page 19
SIMPLE
MAINTENANCE
TIPS
Your
1541
should
serve
you
well
for
yearstocome,
but
there
areafew
things
you
candoto
avoid
costly
maintenance.
1.
Keep
the
drive
well-ventilated.
Likearefrigerator,
it
needsafew
inchesofair
circulation
on
all
sidestowork
properly.
2.
Use
only
good
quality
diskettes.
Badly-made
diskettes
could
cause
increased
wear
on
the
drive's
read/write
head.Ifa
particular
diskette
is
unusually
noisyinuse,itis
probably
causing
added
wear,
and
shouldbereplaced.
3.
Avoid
using
programs
that
"thump"
the
driveasthey
load.
Many
commercial
programs,
and
diskettes
that
are
failing,
cause
the
disk
drivetomakeabumping
or
chattering
noiseasit
attemptstoreadabad
sector.
If
the
diskette
canbecopiedtoa
fresh
diskette,
dosoimmediately.
Ifitis
protected
by
its
maker
against
copying,
the
thumping
is
intentional
and
will
havetobe
endured.Beaware,
however,
that
excessive
thumping,
especially
when
the
driveishot,
caused
some
older
1541'stogo
outofalignment
and
led
to
costly
repairs.
Current
1541's
have been
redesigned
to
prevent
the
problem.
Note:
the
"Memory-Write"
exampleinChapter8temporarily
turns
off
the
bumps.
4.Itwouldbea
good
ideatohave your
1541
checked
over
about
onceayearinnormal
use.
Several
items
are
likelytoneed
attention:
the
felt
load
padonthe
read/write
head
may
be
dirty
enoughtoneed
replacement,
the
head
itself
may
needabitofcleaning
(with
91%
isopropyl
alcoholona
cotton
swab),
the
rails
along
which
the
head
moves
may
need
lubrication
(with a
special
Molybdenum
lubricant,
NOT
oil),
and
the
write
protect
sensor
may
needtobe
dustedtobe
sure
its
optical
sensor
hasaclear
view.
Since
mostofthese
chores
require
special
materialsorparts,itis
besttoleave
the
worktoan
authorized
Commodore
service
center.Ifyou
wishtodo
the
work
yourself,
ask
your
dealertoorder
the
1541
maintenance
guide
for
you
(part
number
990445),
butbeaware
that
home
repair
of
the
1541
will
void
your
warranty.
11
Page 20
CHAPTER
2
DISKETTES
WHAT
ISADISKETTE?
Beforeweactually
begin
using
the
drive,
let's
takeamomenttolookatthe
Test/Demo
diskette
packed
with
the
disk
drive.Todo
this,
graspitby
the
label,
which
shouldbesticking
outofthe
paper
jacket.
Then
pullitoutofthe
jacket
which
keepsitfree
of
dust
and
other
contaminants.
(Save
the
jacket;
the
diskette
should
alwaysbekeptinits
jacket
except
when
actually
in
useinthe
disk
drive.)Itis
often
calledafloppy
diskette,
becauseitis
flexible,
even
thoughitis
not
safetobend
diskettes.
A
diskette
is
much
likeacassette
tape,
butinthe
formofa
circle
and
enclosed
within
a
protective
square
plastic
cover.Asonacassette
tape,
onlyasmall
exposed
portion
of
the
magnetic
recording
surfaceissensitive.
You
may
touch
the
restofthe
diskette
any
time
you
like,
but
avoid
touching
the
few
small
portions
that
are
not
coveredbythe
protective
cover.
Also,
never
trytoremove
this
cover.
Unlike
the
paper
jacket,
the
plastic
diskette
coverisintendedtoremainonpermanently.
Next,
notice
the
notchonone
sideofthe
diskette
(it
maybecoveredbya
piece
of
tape).
This
notchiscalled
the
write
protect
notch.
Whenitis
covered
with
the
opaque
tape
packed
with
blank
diskettes,
the
disk
drive
cannot
change
the
contentsofthat
diskette.
Never
remove
the
tapeonthe
Test/Demo
diskette.
The
labelonthe
topofthe
diskette
says
"1541
Test/Demo"onit,
and
tells
you
which
diskette
you
are
using.
Blank
diskettes
come
with
extra
labelsinaddition
to
one
appliedbythe
makerofthe
diskette.
Use
themtodescribe
your
own
diskettes.
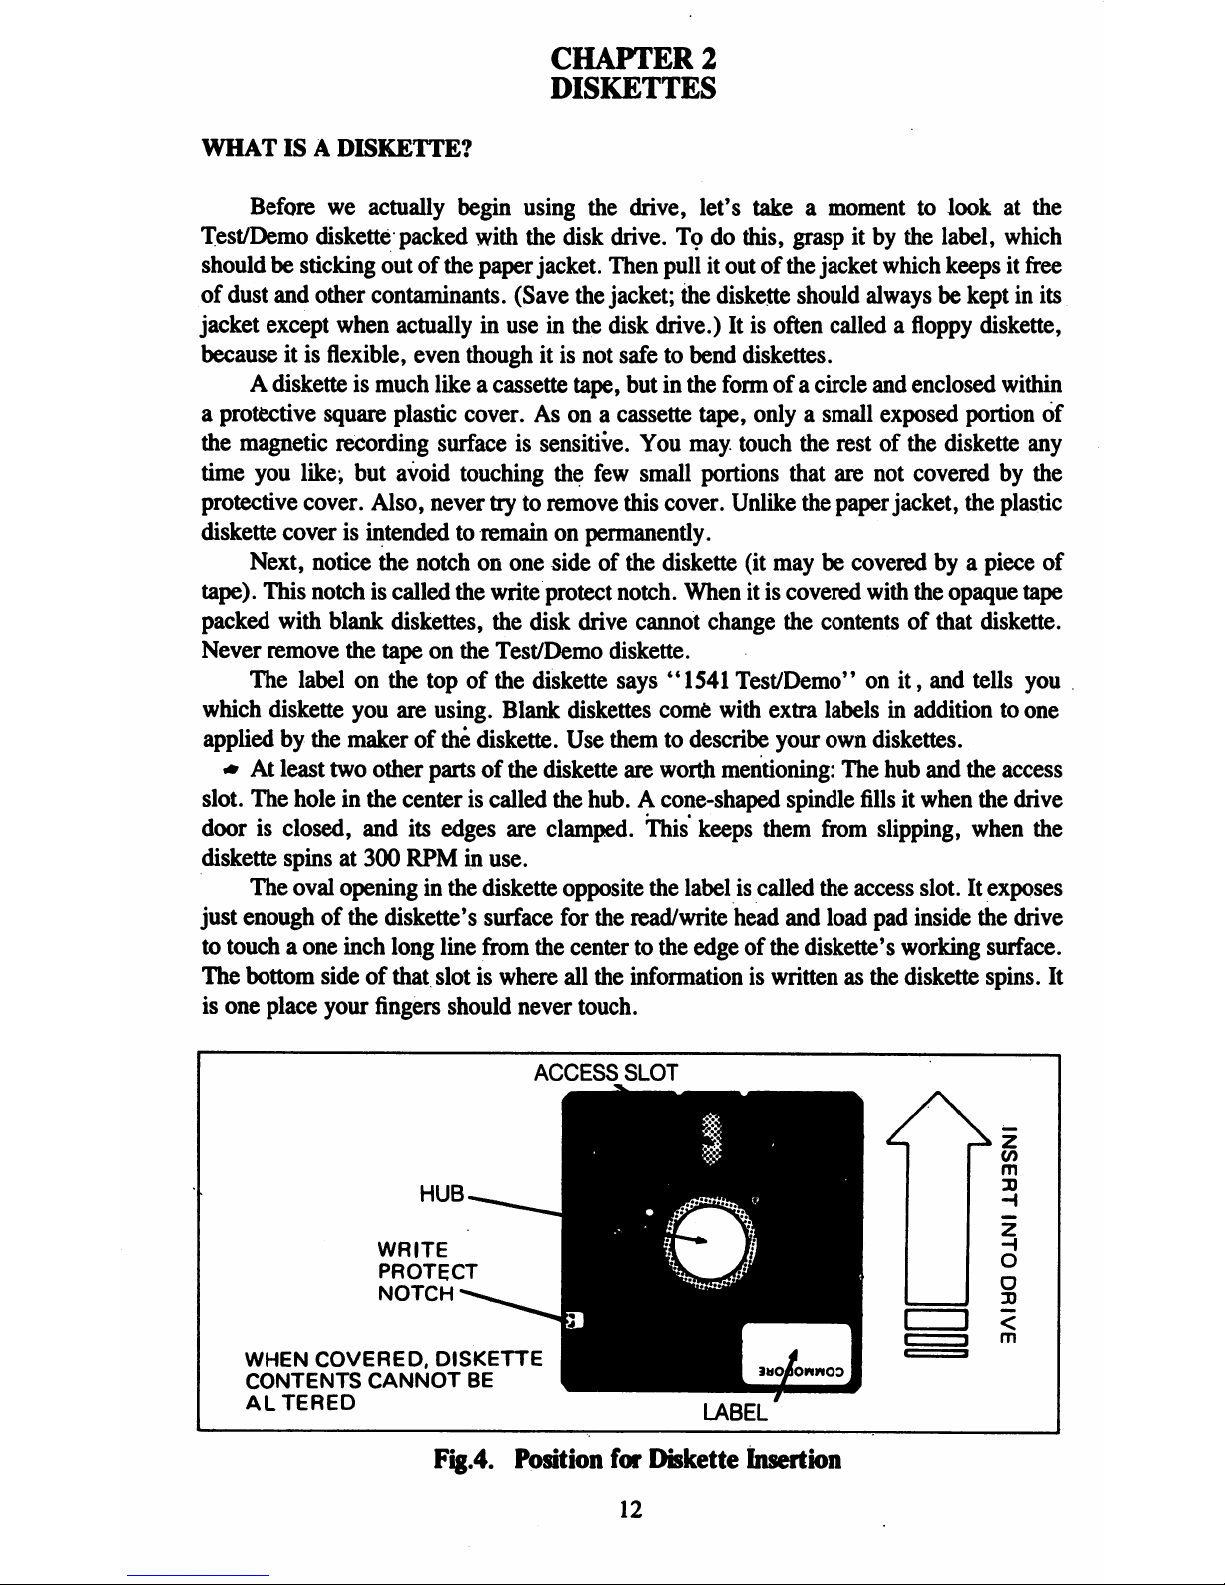
<*Atleast
two
other
partsofthe
diskette
are
worth
mentioning:
The
hub
and
the
access
slot.
The
holeinthe
centeriscalled
the
hub.Acone-shaped
spindle
fillsitwhen
the
drive
doorisclosed,
and
its
edges
are
clamped.
This
keeps
them
from
slipping,
when
the
diskette
spinsat300
RPMinuse.
The
oval
openinginthe
diskette
opposite
the
labeliscalled
the
access
slot.Itexposes
just
enoughofthe
diskette's
surface
for
the
read/write
head
and
load
pad
inside
the drive
to
touchaone
inch
long
line
from
the centertothe
edgeofthe
diskette's
working
surface.
The
bottom
sideofthat
slotiswhere
all
the
information
is
writtenasthe
diskette
spins.
It
is
one
place
your
fingers
should
never
touch.
ACCESS
SLOT
HUB
WRITE
PROTECT
NOTCH
WHEN
COVERED,
DISKETTE
CONTENTS
CANNOT
BE
ALTERED
LABEL
Fig.4.
Position
for
Diskette
Insertion
12
Page 21
SAFETY
RULES
FOR
DISKETTE
CARE
1.
Keep
the
disk
drive
and
its
diskettes
away
from
all
moisture,
dust,
smoke,
food,
and
magnets
(including
the
electromagnets
in
telephones
and
TV's).
Also
keep
them
away
from
temperatures
either
too
hotortoo cold
for
youtoworkinfor
extended
periods.
2.
When
notinthe
drive,
diskettes
shouldbestored
upright
inside
their
paper
jackets.
Do
not
allow
themtobecome
bentorfolded.
Since
the
working
partofthe
diskette
is
on
the
bottom,
never
setitdownona
table
top,orother
place
where
dustormoisture
might
affect
it,
andbeespecially
carefultokeep
your
fingers
away
from
the
openings
in
the
diskette
cover.
3.
Although
some
people
sell
kits
intendedto"double
your
diskette's
capacity"
by
cuttinganextra
write-protect
notch
intoadiskette,
itisbest
nottouse
the
other
side
of
the
diskette
on
the
1541
drive,
evenifyour
diskette
is
labeled
"double-sided."
Doing
so
will
cause
added
weartoyour
diskettes
and
drive,
and
may
cost
youanimportant
program
some
day.
4.
When
buying
diskettes,
you
may
use
any
good
quality
5lA
inch
diskette.
5.
Make
sure
the
diskette
center
holeismoreorless
centeredinits
opening
before
inserting
the
diskette
into
the
drive.
Although
the
hub
assembly
will
correctly
center
most
any
diskette,
it
wouldbevery
difficult
to
rescue
data
fromadiskette
recorded
with
its
hub
off-center.
One
waytohelp
center
diskettes
isto"tickle"
the
drive
door
shut
insteadofslammingitdown.Bygently
closing
it
part-way,
and
then
openingabit
and
then
closing
the
restofthe
way,
you
give
the
spindle
more
chancestocenter
the
diskette
properly.
Another
waytoease
diskette
centering
istobuy
diskettes
that
come
with
reinforced
hubs.
These
hard
plastic
rings
around
the
hub
opening
make
the
diskette
hub
more
rigid,
and
easiertocenter
properly.
INSERTINGADISKETTE
To
insertadisketteina
1541
(Fig.
1),
first
open
the
drive
doorbyrotating
the
door
lever
counter-clockwise
one
quarter
turn
untilitstops,
with
the
lever
level
with
the
slot
in
the
frontofthe
drive.
Grasp
the
diskettebythe
side
opposite
the
large
oval
access
slot,
and
holditwith
the
labelupand
the
write-protect
notchtothe
left.
Now
insert
the
diskettebypushing
it
straight
into
the
slot,
the
access
slot
goinginfirst
and
the
label
last.Besure
the
diskette
goesinuntilitstops
naturally,
withnopart
showing
outside
the
drive,
but
you
shouldn't
havetoforceorbenditto
getitthere.
With
the
disketteinposition,
seatitproperly
for
usebytwisting
the
door
lever
clockwise
one-quarter
turn,
vertically
over
the
slot
untilitstops.Ifit
does
not
move
easily,
stop!
You may
have
put
the
diskette
in
the
wrong
way,orincompletely.
If
that
happens,
reposition
the
diskette
until
the
door
lever
closes
easily.
13
Page 22

SAFETY
RULES
FOR
REMOVING
DISKETTES
Always
remove
diskettes
before
turningadrive
offoron.Ifa
diskette
wereinplace
and
the
door
closedatpoweronor
off,
you
could
lose
partorallofthe
dataonthat
diskette.
Similarly,
do
not
removeadiskette
from
its
drive
when
the green
drive
activity
light
is
on!
That
light
only
glows
when
the
driveisactually
in
use.
Removing
the
diskette
with
it
on
may
resultinyour
losing
information
currently
being
writtentothe
diskette.
LOADINGAPACKAGED
PROGRAM
To
use
prepackaged
BASIC
programs
available
on
diskette,
hereisthe
procedure:
After
turningonyour
computer
system,
carefully
insert
the
preprogrammed
diskette
as
describedonthe
previous
page.
For
purposeofdemonstration,
use
the
Test/Demo
diskette
included
with
the
disk
drive.
The
following
commands
will
loadaprogram
from
the
diskette
into
the
computer:
BASIC
2:
LOAD
"program
name",device
number,relocate
flag
Example:
LOAD
"HOW
TO
USE",8
BASIC3.5:
DLOAD
"program
name",Ddrive
#,Udevice
number,relocate
flag
Example:
DLOAD
"HOW
TO
USE"
After
each
command
press
the
RETURN
key
In
both
cases
the
exact
nameofthe
program
wantedisplaced
between
quotation
marks.Drive#is
optional.
Nextisthe
device
numberofyour
disk
drive
which,
unless
you
change
it,isalways
8
on
the
1541.Ifyou
have
more
than
one
drive
however,
you
will
needtochange
the
device
numberonany
additional
drive
(see
AppendixAfor
instructions
on
setting
a
drive's
device
number).
14
Page 23
Lastisthe
relocate
flag.Itcan
have
oneoftwo
values,0and1.If
the
relocate
flag
is
0oromitted,
all
Commodore
computers
that
use
the
1541
automatically
relocate
the
programs
they
loadtoliveinthe
partofcomputer
memory
reserved
for
BASIC
programs.
If
the
relocate
flag
valueis1,
auto-relocation
is
turned
off,
and
the
programisloaded
into
the
exact
partofmemory
from
whichitwas
originally
saved.
This
feature
allows
machine-language
and
other
special
purpose
programstocome
into
the
computer
at
the
correct
location
for
themtooperate
properly.Atthis
pointinyour
learning,
the
only
thing
you
needtoknow
about
the
relocate
flagishowtouse
it.
Simply
include
the1at
the
endofthe
LOAD
commandifa
particular
program
doesn't
run
properly
when
loaded
the
usual
way.
After
you
typeinthe
command
and
press
the
RETURN
key,
the
fallowing
will
appearonthe
screen:
SEARCHING
FOR
"HOW
TO
USE"
LOADING
READY.
When
the
word
READY
and
the
flashing
cursor
reappearonthe
screen
and
the
green
light
goes
offonthe
drive,
the
program
named
"HOW
TO
USE"onthe
Test/Demo
diskette
has
been
loaded
into
the
computer.Touse
it,
just
type
the
word
RUN
and
press
the
RETURN
key.
The
same Load
command
will
also
allow
youtoload
other
prepackaged
programs
from
the
Test/Demoorother
diskettes.
Merely
substitute
the
exact
program
name
that
you
wanttouse
between
the
quotation
marksinthe
above
example,
and
that
willbethe
program
the
computer
will
load(alistofTest/Demo
programsisshowninChapter3,in
the
section
entitled
"WhataDirectory
Shows").
Note:
here
andinthe
remainderofthe
book,wewill
assume you
areingraphic
mode,
seeing
upper
case
letters
and
graphic
characters
when
you
type.
Thisisthe
normal
condition
of
all
Commodore
computers
coveredbythis
manual
when
they
are
first
turned
on.Ifyou
now
see
lower-case
letters
when
you
type
without
using
the
SHIFT
key,
you
are
in
text
mode
instead.
Press
the
COMMODORE
key
(Q:),atthe
lower
left
cornerofyour
keyboard,
together
with a
SHIFT
keytoswitchtographic
mode.
HOW
TO
PREPAREANEW
DISKETTE:
BASIC
2
A
diskette
needsapatternofmagnetic
groovesinorder
for
the
drive's
read/write
headtofind
thingsonit.
This
patternisnotonyour
diskettes
when
you
buy
them,
but
addingittoadisketteissimple
once
you
knowtodo
it.
Hereisthe
procedure:
FORMAT
FOR
THE
DISK
NEW
COMMAND
OPEN
15,device
#,15,"Ndrive
#:diskette
name,id"
CLOSE
15
This
Open
command
willbedescribed
more
fully in
Chapters
4
and5.For
now,
just
copyitas
is,
replacing
only
the
parts
giveninlower
case.
These
include:
the
device
15
Page 24
numberofthe
1541,
normally8;the
drive
number,
always0on
the
1541;
any
desired
name
for
the
diskette,
upto16
characters
in
length,
followedbya2character
diskette
ID
number.
The
Close
command
is
often
optional;
just
don't
Open
that
same
file
again
without
Closingitthe
first
time.
EXAMPLE:
OPEN
15,8,15,"N0:MY
FIRST
DISK,01":
CLOSE
15
Note:
the
chattering
or
thumping
noise
you
hear
just
after
the
disk
New
command
beginsisentirely
normal.
The
disk
mustbesureitisattrack1,whichitassures
by
stepping
outward45times
(ona35
track
diskette.)
The
noise
you
hearisthe
head
assembly
hitting
the
track1bumper
after
its
inevitable
arrival.
HOW
TO
PREPAREANEW
DISKETTE:
BASIC
3.5
A
diskette
needsapatternofmagnetic
groovesinorder
for
the
drive's
read/write
headtofind
thingsonit.
This
patternisnotonyour
diskettes
when
you
buy
them,
but
addingittoadiskette
is
simple
once
you
knowtodo
it.
Hereisthe
procedure:
FORMAT
FOR
THE
HEADER
COMMAND
HEADER'diskette
name''
,Iid,Ddrive
#
,Udevice
#
Where
"diskette
name"isany
desired
name
for
the
diskette,
upto16
characters
in
length;
"id"isa2character
disketteIDnumber;
"drive#"is
the
drive
number, 0
if
omitted
(asitmustbeon
the
1541);
and
"device#"is
the
disk's
device
number,
assumed
tobe8ifomitted.Asdescribedinthe
next
page,
"id"isoptionalif(and
only
if)
the
diskette
has
been
previously
formattedona
1541.
Also,
theIDmustbea
string
literal,
not
a
variableorexpression,
and
may
not
include
Basic
reserved
words.
Thus,
",IFI"
cannot
be
used
becauseIfisaBasic
keyword,
and
",I(A$)"isnot
allowed
becauseA$is
a
variable.
",IA$"isallowed,
but
theIDnumber
willbethe
letter
"A"
plusadollar
sign
($),
not
the
contents
of
the
variable
A$.Ifyou
needavariable
ID
number,
use
the
Basic
2
formofthe
format
command.
EXAMPLE:
HEADER
"MY
FIRST
DISK,I01,DO"
Note:
the
chattering
or
thumping
noise
you
hear
just
after
the
Header
command
beginsisentirely
normal.
The
disk
mustbesureitisattrack1,whichitassures
by
stepping
outward45times
(ona35
track
diskette).
The
noise
you
hearisthe
head
assembly
hitting
the track1bumper
after
its
inevitable
.arrival.
REUSINGANOLD
DISKETTE
After
you
have
once
formatted
a
particular
diskette,
you
can
re-format
itasthough
it
were
brand
newatany
time,
using
the
above
procedures.
However,
you
can
also
change
its
name
and
erase
its
programs
more
quickly
and
easilybyomitting
theIDnumber
in
16
Page 25

your
format
command.Byleaving
off
theIDnumber,
the
format
command
will
finishina
few
seconds
insteadofthe
usual90seconds.
ORGANIZINGADISKETTE
LIBRARY
Though
you
may
not
believe
it
now,
you
will
eventually
have
dozens,
if
not
hundreds
of
diskettes.
You
can
ease
life
thenbyplanning
now.
Assign
each
diskette
a
unique
ID
number
when
you
format
it.
There
are
diskette
cataloging
programs
you
can
buy,
that
store
and
alphabetize
a
listofall
your
file
names,
but
areoflimited
value
unless
your
disketteIDnumbers
are
unique.
At
least
two
valid
approaches
are
usedinassigning
ID
numbers.
One
startsat00
with
the
first
diskette,
and
continues
upward
with
each
new
diskette,
through
99,
and
then
onward
fromAA
through
ZZ.
Another
organizes
diskettes
within
small
categories,
and
starts
theIDnumber
for
each
diskette
in
that
category
with
the
same
first
character,
going
from0to
9 andAtoZwith
the
second
character
as before.
Thus,
all
'Tax"
diskettes
could
haveIDnumbers
that
begin
with
"T."
Either
approach
works
well
when
followed
diligently.
Whileonthis
subject,
maywesuggest
you
choose
names
for
diskettes
on
the
same
basis,
so they
too
willbeunique,
and
descriptive
of
the
filesonthem.
BACKUPS
WhentodoaBackup
Although
the
1541isfar
more
reliable
thanacassette
drive
under
most
circum
stances,
its
diskettes
are
still
relatively
fragile,
and
haveauseful
lifeofonlyafew
years
in
steady
use.
Therefore,
itisimportant
to
make
regular
backupsofimportant
programs
and
files.
Makeabackup
whenever you
wouldn't
wanttoredo
your
current
work.
Justasyou
should
save
your
work
every
half
hourorso
when
writing a
new
program,soyou
should
also
backupthe
diskette
you're
usingatleast
daily
while
you
are
changingitfrequently.
Inabusiness,
you
would
makeanarchival
backup
every
time
important
information
was
duetobe
erased,
suchaswhenanew
accounting
period
begins.
HowtodoaBackup
We
have
included
programsonthe
Test/Demo
diskette
that
can be
used
for
similar
purposes.
These
programs
are
described
furtherinAppendix
E.
HowtoRotate
Backups
Once
you
begintoaccumulate
backups,
you'll
wanttorecycle
older
ones.
One
good
methodisto
date
each
backup.
Then
retain
all
backups
until
the
current
projectisfinished.
When
you
are
sure
the
last
backupiscorrect,
make
another
backupofittofile,
and
move
all
older
backupstoa
boxofdiskettes
that
maybereused.
One
other
popular
approach,
suitedtoprojects
that
never
end,isto
rotate
backups
in
a
chain,
wherein
there
are
son
backups,
father
backups,
and
grandfather
backups.
Then,
when
another
backupisneeded,
the
grandfather
diskette
is
reused,
the
father
becomes
the
grandfather,
and
the
son
becomes
the
father.
Whichever
approachisused,itis
recommended
that
the
newly-made
backup
become
the
diskette
thatisimmediately
used,
and
the
diskette
thatisknowntobe
good
should
be
filed
away
as the
backup.
That
way,ifthe
backup
fails,
you'll
knowitimmediately,
rather
than
after
all
the
other
backups
have
failed
some
dark
day.
17
Page 26
CHAPTER
3
DIRECTORIES
WHAT
ISADIRECTORY?
Oneofthe
primary
advantages
of a
disk
driveisthatitcan,
with
nearly
equal
ease
and
speed,
access
any
partofa
diskette's
surface,
and
jump
quickly
from
one
spot
to
another.ADATASSETTE™,onthe
other
hand,
usually
readsacassette
file
from
the
beginningtothe
end,
without
skipping
around.Tosee
what'sona
cassette,
itisnecessary
to
lookatits
entire
length,
which
could
takeaslongasan
hour.Ona
disk
drive,byway
of
contrast,
itisa
quick
and
simple
mattertoviewalistofthe
programs
and
data
filesona
diskette.
This
listiscalled
the
directory.
VIEWING
THE
DIRECTORY:
BASIC
2
To
view
the
directory
in
Basic2,itisusually
necessary
to
load
it,
likeaprogram.
As
when
you
load
other
programs,
this
erases
anything
alreadyinBasic
memory,sobe
sure
to
save
any
work
you
don't
wanttolose
before
loading
the
directory
in
Basic2.(Chapter
4
describes
howtoSave
a program.)
For
example,toload
the
entire
directory
from
disk
device8,type:
LOAD'T',8
Then,todisplay*the
directoryonyour
screen
afteritloads
into
computer
memory,
type
LIST.
You
may
slow
the
listingbypressing
the
CONTROL
keyonthe
VIC20and
Commodore
64,
and
haltitentirelybypressing
the
STOP
key.
You
can
also
use
this
commandtolimit
the
directory
to
desired
filesbyusing
pattern-
matching
characters
described
laterinthis
chapter.
VIEWING
THE
DIRECTORY:
BASIC
3.5
To
view
the
directory
in
Basic
3.5,
simply
type
the
word
DIRECTORYona
blank
line,
and
press
the
RETURN
key.
Unlike
Basic
2's
methodofloadingadirectory,
this
does
not
erase
anything
alreadyinBasic
memory,soyou
can
safely
ask
foradirectory
at
almost
any
time,
even
from
within
another
program.
Again,
you
may
slowadirectory
listingonthe
Commodore16and
Plus/4byholding
down
the
COMMODORE
key(Ql),or
haltitentirely
by
pressing
the
STOP
key.
You
may
also
pauseitwith
CONTROL-S
(by
holding
down
the
CONTROL
key
while
pressing
the.
"S"
key),
and
resume by
pressing
any
other
key.
WHATADIRECTORY
SHOWS
Now
let's
lookatatypical
directoryonyour
1541
Test/Demo
Diskette.
18
Page 27
READY.
14
IS
12
4
1
4
S
4
6
4
14
9
S
7
7
10
7
7
7
30
35
8
7
9
10
•
•HOW
TO
USE"
■HOW
PART
Em
•HOW
PART
3"
■VIC-20
WEDGE"
■C-64
WEDGE*
■DOS
3.I"
•PRINTER
TEST"
"DISK
ADDR
CHANGE"
■VIEW
BAM"
■CHECK
DISK"
■DISPLAY,
T&SW
■PERFORMANCE
TEST"
"SEQ.FILE.DEMO"
■SO.BACKUP.C16"
■SD.BACKUP.PLUS4"
■SD.BACKUP.C64"
"PRINT.64.UTIL"
■PRINT.C16.UTIL"
■PRINT.44.UTIL"
■C64
BASIC
DEMO"
"44
BASIC
DEMO"
■LOAD
ADDRESS-
■UNSCRATCH"
■HEADER
CHANGE"
"REL.FILE.DEMO"
PRG
PRG
PRG
PRG
PRG
PRG
PRG
PRG
PRG
PRG
PRG
PRG
PRG
PRG
PRG
PRG
PRG
PRG
PRG
PRG
PRG
PRG
PRG
PRG
PRG
IMPORTANT
NOTE:
Your
Test/Demo
diskette
may
contain
additional
programs.
Commodore
may
update
the
diskette
from
time
to
time.
426
BLOCKS
FREE.
Starting
with
the
top
line,
hereiswhatittells
us:
The0at
the
left
end
tellsusthat
the
1541's
single
driveisdrive0.Ifwehad
gotten
this
directory
fromadual
disk
drive,itmight
have
said
"1"
instead.
The
next
thingonthe
top
lineofthe
directory
after
the
format
typeisthe
nameofthe
diskette,
enclosedinquotation
marks,
and
printedinreverse
field.
Justaseach
program
hasaname,sodoes
the
diskette
itself,
assigned
when
the
diskette
was
formatted.
The
diskette
name
maybeupto16
characters
long,
and
serves
mainlytohelp
you
organize
your
diskette
library.
By
keeping
related
files
together
on
the
same
diskette,
you'll
ease
the
taskoffinding
the
program
you
want
later,
when
you
have
dozensorhundreds
of
diskettes.
The
two
character
code
to
the
right
of
the
name
is
the
diskette
ID,
also
created
when
the
diskette
was
formatted,
and
equally
useful
for
individualizing
diskettes.
The2Aat
the
right
endofthe
top
line
tellsusthat
the
1541
uses
version2of
Commodore's
DOS
(disk
operating
system),
and
that
it,
like
most
Commodore
drives,
uses
format
"A."
19
Page 28

The
restofthe
directory
contains
one
line
per
programorfile,
each
line
supplying
three
piecesofinformation
about
its
subject.
At
the
left
endofeach
lineisthe
sizeofthat
line's
fileinblocks
(or
sectors)
of
256
characters.
Four
blocks
are
equivalent
toIK(1024
characters)
of
RAM
(read/write)
memory
inside
the
computer.
The
middleofeach
directory
line
contains
the
nameofthe
file,
enclosedinquotation
marks.
All
characters
between
the
quote
marks
are
partofthe
name,
and
mustbeincluded
when
loadingoropening
that
file.
The
right
portionofeach
directory
lineisa
three
character
abbreviation
for
the
file
typeofthat
entry.Aswe
will
see
in later
chapters,
there
are
many
waystostore
information
onadiskette,
mostofwhich
are
associated
withadistinctive
file
type.
TYPESOFFILES
AVAILABLE
Currently
used
file
types
include:
PRG =
Program
files
SEQ=Sequential
data
files
REL=Relative
data
files
USR=User
(nearly
identical
to
sequential)
DEL=Deleted
(you
may
never
see
oneofthese.)
(Note:
Direct
Access
files,
also
called
Random
files,donot
automatically
appear
in
the
directory.
They
are
discussed
in
Chapter
7.)
After
all
the directory
entries
have
listed,
the
directory
finishes
withamessage
showing
how
many
blocksofthe
diskette
are
still
available
for
use.
This
number
can
vary
from
664ona
new
diskette
to0on
one
thatisalready
completely
full.
WATCH
OUT
FOR
SPLAT
FILES!
One
indicator
you
may
occasionally
noticeona
directory
line,
after
you
begin
saving
programs and
files,isan
asterisk
appearing
just
before
the
file
typeofa
file
thatis0
blocks
long.
This
indicates
the
file
was
not
properly
closed
afteritwas
created,
and
that
it
should
notberelied
upon.
These
"splat"
files
(as
they
are
calledinEngland)
will
normally
needtobe
erased
from
the
diskette
and
rewritten.
However,donot
use
the
Scratch
commandtoget
ridofthem.
They
can
onlybesafely
erasedbythe
Validate
and
Collect
commands.
Oneofthese
should
normallybeused
wheneverasplat
fileisnoticed
onadiskette.
(All
these
commands
are
described
in
the
next
chapter.)
There
are
two
exceptions
to
the
above
warning:
oneisthat
Validate
and
Collect
cannotbeusedonsome
diskettes
that
include
direct
access
(random)
files,
and
the
other
is
thatifthe
information
in
the
splat
file
was
crucial
and
can'tbereplaced,
thereisa
way
to
rescue
whatever
partofthe
file
was
properly
written.
(This
optionisalso
described
in
the
next
chapter).
20
Page 29
PRINTINGADIRECTORY
To
makeapermanent
copyofa
directory,
perhapstofastentothe
diskette's
outer
(paper)
envelope,
you
will
needtosend
the
directory
toaprinter,
suchasCommodore's
MPS
801,
1520 and
1526
serial
bus
models.Todo
this,
you
may
needtorefertoyour
printer
manual,
but
briefly
the
procedure
for
listingadirectorytodevice4isasfollows:
LOAD44$0",8
OPEN
4,4:CMD
4:LIST
PRINT#4:CLOSE
4
Also
note
that
allofthe
statements
that
can be
combinedonone
line
already
have
been.
Type
theminimmediate
modetoavoid
disturbing
the
directory.
All
other
options,
suchasdiffering
device
numbers,
and
selective
directories
(see
next
section)
can
alsobespecified
as
usualinthe
Load
command.
WARNING:Besuretoinclude
the
PRINT#
command
after
every
printer
listing.
Otherwise,
the
printer
will
remainasan
unwanted
listener
on
the
serial
bus,
and
may
disrupt
other
work.
Also,donot
abbreviate
PRINT#as?#.
Although
it
will
look
proper
when
listed
out,itwill
causeaSYNTAX
ERRORinuse.
The
proper
abbreviation
for
PRINT#ispR.
READINGADIRECTORYASA
FILE
If
you
would
liketoreadadirectory
from
withinaprogram,
you
maydoso.InBasic
3.5,
simply
include
the
DIRECTORY
commandinyour
Basic
program.InBasic
2,
however,
and
optionally
in
the
others,
you
will
havetoOpen
the
directory
as
though
it
were"a
data
file
and
readitcharacter
by
character.
See
the
discussion
of
Get#inChapter
5
for
more
information.
ANOTHER
WAY
TO
BE
SELECTIVE
Before
discussing
the
pattern-matching
options
available
for
useinseveral
disk
commands,
let's
cover
one
more
thatisonly
usableina
directory.
Several
different
types
of
files
can
coexist
peacefully
on^the
same
diskette.Byaltering
our
directory
load
command,wecan
createadirectory
from
the
filesofa
single
selected
type.
Thus,
we
might
requestalistofall
sequential
data
files
(see
Chapter
5),
oneofall
the
relative
data
files
(see
Chapter
6),oroneofonly
program
files.Todo
this,
simply
addtothe
end
of
your
selective
directory
request
the
equals
sign
(=)
followedbythe
first
letterofthe
file
type
you
wantinyour
directory.
For
example,
the
Basic2command:
21
Page 30
LOAD"$0:*=S",8
will
load a
directory
of
all
sequential
files,
while
the
Basic
3.5
command:
DIRECTORY,4
4A*=R"
will
display
a
directory
consisting
only of
relative
files
beginning
with
the
letter
"A".
The
possible
file
types,
and
their
abbreviations
for
this
use
are:
P=Program
S=Sequential
R=Relative
U=User
D=Deleted
A=Append
M
=
Modify
PATTERN
MATCHING
AND
WILD
CARDS
Justascassette
users
can
load
programs
without
givingafull
name,
disk
users
can
use
special pattern
matching
characters
to
load a
program
fromapartial
name.
The
same
characters
can
alsobeusedtoprovide
selective
directories.
The
two
special
characters
usedinpattern
matching
are
the
asterisk
(*)
and
the
question
mark
(?).
They
act
something
likeawild
cardina
gameofcards.
The
difference
between
the
twoisthat
the
asterisk
makes
all
characters
in
and
beyond
its
position
wild,
while
the
question
mark
only
makes
its
own
character
position
wild.
Here
are
some
examples,
and
their
results:
LOAD
"A*",8
loads
the
first
fileondisk
that
begins
withan"A",
regardless
of
what
follows.
"ARTIST",
"ARTERY",
and
"AZURE"
would
all
qualify,
but
"BARRY"
wouldn't,
even
thoughithasan"A"
elsewhere
in
its
name.
DLOAD
"SM7TH"
(Basic
3.5)
loads
the
first
program
that
starts
with
"SM",
ends
with
"TH",
and
has
one
other
character
between.
This
would
load
"SMITH"
or
"SMYTH",
but
not
"SMYTHE"
OPEN
8,8,2;4R?C*,S,R"
We'll
study
OpeninChapter5,but
the
pattern
used
here
means
that
the
selected
file
will
begin
withan"R"
and
havea"C"inthe
third
character
of
its
name.
DIRECTORY,"Q*"
(Basic
3.5)
will
loadadirectory
of
files
whose
names
begin
with
"Q".
LOAD
"*",8
and
DLOAD
"*"
are
special
cases.
When
an
asterisk
is
used
alone
as
a
name,itmatches
the
last
file
used.Ifnone
have
been
used
yetonthe
current
diskette
since
turning
on
the
drive,
using
the
asterisk
alone
loads
the
first
program
on
the
diskette.
10
INPUT
A$:LOAD
A$+"*",8
loads
any
file
whose
name
starts
with
the
characters
enteredinA$.
22
Page 31

FORMAT
FOR
PATTERN
MATCHING:
EXAMPLES:
"expression*"
"C-64*"
or
"expression?expression"
"C?64
WEDGE"
or
4
'expression?expression*''''C-647WED*''
Use
anyofthe
above
patternsinanyofthe
disk
commands
whose
format
includes
a
pattern.
This
appliestoLoad,
Dload,
Directory,
Open,
Scratch,
andtothe
source
file
in
the
Copy
and
Rename
commands.
More
than
one
"?"
can
appearinthe
same
pattern.
As
you
might
expect,
their
useinpattern
matching
means
you
can't
use
the
asterisk
or
question
markina
file
name
when
savingorwritingafile
(see
next
chapter.)
23
Page 32

Page 33

PART
TWO:
GUIDE
TO ADVANCED
OPERATION
AND
PROGRAMMING
CHAPTER
4
COMMANDS
COMMAND
CHANNEL
Commodore
disk
drives
expecttoreceive
manyoftheir
instructions
over
what
is
knownasa
command
channel.
Althoughwewill
not
explain
the
concepts
behindituntil
Chapter6,we
will
learnitto
useitnow,soyou
can
give
your
1541
disk
the
commands
it
needstodo
some
essential
chores.
To
instruct
the
command
channel,weuseaBasic
Open
statement
to
the
disk,
with
a
secondary
addressof15.
The
usual
formofthis
statement
is:
OPEN
15,8,15
The
first15isafile
number,
and
couldbeany
number
from1to
255.Itis
used
to
match
the
secondary
address
(the
last
numberonthe
line),
whichisalso
15.
The
middle
numberisthe
primary
address,
better
knownasthe
device
number,
andisnormally
8
when
talking
with
the
1541.Asecond
disk
drive
would
usuallybe9,athird,10andsoon.
Once
the
command
channel
has
been
opened,
use
the
Basic
Print#
commandtosend
information
to
the
disk
drive,
and
Basic's
Input#
commandtoreceive
information
back
from
the
disk
drive.
These
two
commands
are
like
Basic's
Print
and
Input
statements,
except
that
they
use
the
device
number
specified
in
the
preceding
Open
statement
instead
of
defaulting
to
the
screen
and
keyboard
respectively.
In
Basic2,you'll
use
both
Print#15
and
Input#15
extensively,
to
send
housekeep
ing
commandstothe
disk
andtocheck
its
error
status.
Basic
3.5
has
built-in
commands
for
mostofthese
chores.
Even
so,itwillbegood
for
thoseofydu
with
Basic
3.5tosee
how
such
commands
are
sent.
SendingaCommand
via
the
Command
Channel
Hereisthe
waywesend
the
Initialize
commandtothe
disk
via
the
command
channel.
PRINT#15,"I0"
This
command
assumes
we
have
already
opened
the
file
15
to the
command
channel.
"IO"
canbereplaced
with
any
string
expression
thatisa
valid
disk
com
mand.
If
file
15
isn't
already
open,
we
can
combine
the
Open
and
the
Print#
in
a
single
statement:
OPEN
15,8,15,<4I0"
However,
this
only
works
for
the
first
disk
command
given.
After
that,
file15is
already
open,
and
Opening
it
again
would
causea"FILE
OPEN"
error.
Added
com
mands
are
sent
via
Print#
instead.
25
Page 34

FORMAT
FOR
SENDING
DISK
COMMANDS
OPEN
15,device#,15,command$
or
Print#
15,
commands
Examples:
OPEN
15,8,15,
"VO"
or
PRINT#15,"VO"
where
"device#"is
the
disk's
device
number,
normally8,and
"command$"isany
valid
string
expression.
Ifitis
not
alsoavalid
disk
command,itwill
resultinan
error
on
the
disk
drive.
Thisisindicatedbya
flashing
error
lightonthe
disk
drive,
andanerror
message
suchas"31,SYNTAX
ERROR"
when
the
error
channelisreadasdescribed
on
the
next
two
pages.
READING
THE
ERROR
CHANNEL:
BASIC
2
In
Basic2,thereisno
simple
waytolearn
whatiscausing
the
error
lighttoflash
on
the
disk
drive
without
writingasmall
program.
This,inturn,
causes
youtolose
any
program
variables
alreadyinmemory.
The
reason
for
thisisthat
the
INPUT#
command
cannot
easilybeusedinimmediate
mode
(that
is,
withoutaline
number).
You
will
often
need
to
be
able
to
read
the
disk
error
channel,
to
see
why
the
disk
error
lightisflashing,
and
thereby
turn
the
error
light
off
again.
Hereisa
brief
programtocheck
for
disk
errors:
10J3PEN
15,8,15
20
INPUT#15,EN,EM$,ET,ES
30
PRINT
EN,EM$,ET,ES
40
CLOSE
15
This
little
program
reads
the
error
channel
into4Basic
variables,
and
prints
the
results
on
the
screen.
A
message
will
be
displayed
whether
there
is
an
error
or
not,
but
if
there
was
an
error,
this
program
will
also
clear
it
from
disk
memory
and
turn
off
the
error
lightonthe
disk
drive.
Once
the
message
is
on
the
screen,
you
can
look
it
up
in
AppendixBto
see
what
it
means,
and
whattodo
about
it.
READING
THE
ERROR
CHANNEL:
BASIC
3.5
In
Basic
3.5,
it
is
very
easy
to
learn
what
is
causing
the
error
light
to
flash
on
the
disk
drive,
and
no
need
to
writeaprogram.
Simply
type:
26
Page 35

PRINT DS$
or
abbreviate
it
to
?DS$
eitherinimmediate
modeorwithinaprogram,
and
the
current
error
status
messageofthe
disk
willbedisplayed
on
the
screen.
A
message
willbedisplayed
whether
thereisan
error
or
not,
butifthere
wasanerror,
printing
its
message
will
also
clearitfrom
the
disk
memory
and
turn
off
the
error
lightonthe
disk
drive.
Once
the
messageison
the
screen,
you
can
lookitupinAppendixBto
see
what
it
means,
and
whattodo
about
it.
ERROR
CHECK
SUBROUTINE
Since
thoseofyou
who
are
writing
programs
shouldbechecking
the
error
status
after
each
disk
command,
you
may
want
to
include
a
small
subroutine
in
each
program
to
take
careofthe
error
channel.
Hereisoneweuse:
Basic2version:
Basic
3.5
version:
59980
REM
READ
ERROR
CHANNEL
59990
REM
READ
ERROR
CHANNEL
59990
INPUT#15,
EN,EM$,ET,ES
60000
IF
DS>1
THEN
PRINT
DS$:STOP
60000IFEN>1THEN
PRINT
EN,EM$,ET,ES:STOP
60010
RETURN
60010
RETURN
The
Basic2version
assumes
file
15
has
already
been
opened
earlier
in
the
program,
and
thatitwillbeclosed
somewhere
elseatthe
endofthe
program.
This
subroutine
reads
the
error
channel
and
puts
the
results
into
the
named
variables.
In
the
Basic2version,
they
are
EN,
EMS,
ET,
and
ES,
which
stand
for
Error
Number,
Error
Message,
Error
Track
and
Error
Sector
respectively.
Of
the
four,
only
EM$
has
to
beastring,
and
you
could
choose
other
variable
names,
although
these
have
become
traditional
for
this
use.
The
Basic
3.5
version
subroutine
uses
the
reserved
variablesDSand
DS$
already
set
aside
for
this
purpose.
They
are
updated
automatically
by
Basic
whenever
they
are
used.
Otherwise,
the
two
versionsofthe
subroutine
are
equivalent.
Two
error
numbers
are
harmless:
0
means
everything
is
OK,
and1tells
how
many
files
were
erasedbya
Scratch
command.Ifthe
error
statusisanything
else,
line
60000
prints
the
error
message
and
halts
the
program.
After
you
have
repaired
the
damage,
you
may
then
continue
the
program
with
Basic's
Cont
command.
Because
thisisa
subroutine,
you
accessitwith
the
Basic
Gosub
command,
either
in
immediate
modeorfromaprogram.
(For
example,
"200
GOSUB
59990".)
The
Return
statement
in
line
60010
will
jump
backtoimmediate
modeorthe
next
statement
in
your
program,
whicheverisappropriate.
27
Page 36

HOUSEKEEPING
HINTS
Hint
#1:Itis
besttoopen
file15onceatthe
very
startofa
program,
and
only
closeitat
the
endofthe
program,
after
all
other
files
have
already
been
closed.Dothis
because
closing
the
command
channel
automatically
closes
all
other
disk
files.Byopening
once
at
the
start,
the
fileisopen
whenever
needed
for
disk
commands
elsewhere
in
the
program.
Closingitat
the
end
makes
sure
air
disk
files
are
properly
closed
without
interrupting
any
other
file
commands.
Hint
#2:IfBasic
halts
withanerror
when
you
have
files
open, Basic
aborts
them
without
closing
them
properlyonthe
disk.Toclose
them
properlyonthe
disk,
you
must
type:
OPEN
15,8,15:CLOSE15
This
opens
the
command
channel
and
immediately
closes
it,
along
with
all
other
disk
files.
Failuretocloseadisk
file
properly
bothinBasic
andonthe
disk
may
result in
losing
the
entire
file!
HINT
#3:
One
disk
error
messageisnot
alwaysanerror.
Error
73,
"CBM
DOS
2.6
1541"
will
appearifyou
read
the
disk
error
channel
before
sending
any
disk
commands
when
you
turnonyour
computer.
Thisisa
handy
waytocheck
which
versionofDOS
you
are
using.
However,ifthis
message
appears
later,
after
other
disk
commands,itmeans
thereisa
mismatch
between
the
DOS
usedtoformat
your
diskette
and
the
DOSinyour
drive.
HINT
#4:Toreset
drive,
type:
OPEN
15,8,15,"UJ"
Then
wait
until
the
drive
activity
LEDisoff
and
motor
goes
off,
then
type:
CLOSE
15.
This
also
appliestosendingaUI
+
oraUI-
SAVING
PROGRAMS:
BASIC
2
Before
you
can
saveaprogramtodiskette,
the
diskette
mustbeformatted,
as
described
earlier.
Savingtodiskette
is
just
like
savingtocassette,
except
that
the
device
numberofthe
disk
driveisnot
optional.
FORMAT
FOR
THE
SAVE
COMMAND
SAVE*'drive #:file
name*'
,device
#
where
"file
name"isany
string
expression
ofupto16characters,
precededbythe drive
number
(always0on
the
1541)
andacolon,
and
followedbythe
device
numberofthe
disk,
normally
8.
However,itwill
not
workincopying
programs
that
are
notinthe
Basic
text
area,
such
as
"DOS
5.1"
for
the
Commodore
64.
To
copy
it
and
similar
machine
language
programs,
you
will
needamachine
language
monitor
program.
Its
use
for
this
purposeisidentical
to
the
monitor
save
describedonthe
next
page
under
Basic
3.5.
28
Page 37

Note:
the
"0:"atthe
startoffile
namesisa
holdover
from
the
days
when
all
Commodore
disks
had
two
drivesinthe
same
cabinet.
Although
the
1541
will
normally
defaulttodrive0(not
having
a drive
1,)itis
besttospecify
the
drive
number
whenever
savingorwritingafile.
This
avoids
potential
confusioninDOS
(the
Disk
Operating
System.)
SAVING
PROGRAMS:
BASIC
3.5
Before
you
can
saveaprogramtodiskette,
the
diskette
mustbeformatted,
as
described
earlier.
Savingtodiskette
is
just
like
savingtocassette,
except
that
the
device
numberofthe
disk
driveisnot
optional.
FORMAT
FOR
THE
DSAVE
COMMAND
DSAVE
"file
name",Ddrive
#,Udevice
#
where
"file
name"isany
string
expression
ofupto16characters,
optionally
followed
by
the
drive
number
(the
"D"
parameter,
always0on
the
1541),
and
the
device
number
of
the
disk
drive
(the
"U"
parameter).
If
omitted,
the
drive
number
defaults
to 0,
and
the
device
numberto8.
However,itwill
not
workincopying
programs
that
are
notinthe
Basic
text
area,
suchas"DOS
5.1"
for
the
Commodore
64.Tocopyitand
similar
machine
language
programs,
you
will
need
the.Scommandofthe
machine
language
monitor
built
into
the
Commodore16and
Plus/4.Toaccessabuilt-in
monitor,
type
MONITOR.Toexit-a
monitor,
typeXaloneona
line.
FORMAT
FORAMONITOR
SAVE
S''drive
#:file
name",device
#,starting
address,ending
address■+
1
where
"drive
#:"isthe
drive
number,
0 on
the
1541;
"file
name"isany
valid
file
name
upto14
characters
long
(leaving
2
for
the
drive
number
and
colon);
"device#"isatwo
digit
device
number,
normally08on
the
1541
(the
leading0is
required);
and
the
addresses
tobesaved
are
giveninHexadecimal
(base
16,)
but
withoutaleading
dollar
sign
($).
Note
that
the
ending
address
listed
mustbe1
location
beyond
the
last
location
to
be
saved.
EXAMPLE:
Hereisthe
required
syntaxtosaveacopyof"DOS
5.1"
S"0:DOS
5.1",08,CC00,CF5A
29
Page 38

SAVE
WITH
REPLACE
OPTION
Ifafile
already
exists,
it
can'tbesaved
again
because
the
disk
only
allows
one
copy
of
any
given
file
name
per
diskette.
It is
possible
to
get
around
this
problem
using
the
Rename
and
Scratch
commands
described
later.
However,ifall
you
wishtodoisreplace
a
programordata
file
witharevised
version,
another
commandismore
convenient.
KnownasSave-with-replace
,or©Save,
this
option
tells
the
disktoreplace
any
file
it
findsinthe
directory
with
the
same
name,
substituting
the
new
file
for
it.
FORMAT
FOR
SAVE
WITH
REPLACE:
FORMAT
FOR
SAVE
WITH
REPLACE:
BASIC
2
BASIC
3.5
SAVE
"©Drive
#:file
name",
device#DSAVE
4<@file
name",Ddrive
#,
Udevice
#
where
all
the
parameters
are as
usual
except
for
addingaleading
"at1'
sign
(@.)
The
"0:"inthe
Basic2version,
thoughaholdover
from
earlier
dual
drivesisrequired
here.
EXAMPLES:
SAVE"@0:REVISED
PROGRAM",8
DSAVE
"©REVISED
PROGRAM"
The
actual
procedure
is
that
the
new
versionissaved
completely,
then
the
old
version
is
scratched,
and
its
directory
entry
alteredtopointtothe
new
version.
Becauseitworks
this
way,
thereislittle,
if
any,
danger
thatadisaster
suchashaving
the
power
going
off
midway
through
the
process
would
destroy
both
the
old
and
new
copiesofthe
file.
Nothing
happenstothe
old
copy
until
after
the
new
copyissaved
properly.
However,wedo
offer
one
caution—do
not
use
©Saveonan
almost-full
diskette.
Only
useitwhen
you
have
enough
roomonthe
diskette
to
holdasecond
complete
copy
of
the
program
being
replaced.
Duetothe
way
@Save
works,
both
the
old
and
new
versions
of
the
file
areondisk
simultaneously
at
one
point,asa
wayofsafeguarding
against
loss
of
the
program.Ifthereisnot
enough
room
leftondiskette
to
hold
that
second
copy,
only
as
muchofthe
new
version
willbesavedonthe
1541asthereisstill
room
for.
After
the
command
completes,
a
lookata
directory
will
show
the
new
versionispresent,
but
doesn't
occupy
enough
blockstomatch
the
copyinmemory.
Unfortunately,
the
Verify
command
(see
next
section)
will
not
detect
this
problem, because
however
much
did
get
saved
will
have
been
saved
properly.
VERIFYING
PROGRAMS
Although
notasnecessary
with a
disk
driveaswithacassette,
Basic's
Verify
command
canbeusedtomake
doubly
certain
thataprogram
file
was
properly
saved
to
disk%Itworks
much
like
the
Load
command,
except
thatitonly
compares
each
character
in
the
program
against
the
equivalent
character
in
the
computer's
mem
ory,
insteadofactually
being
copied
into
memory.
30
Page 39

If
the
disk
copyofthe
program
differs
evenatiny
bit
from
the
copyinmemory,
"VERIFY
ERROR"
willbedisplayed,
to
tell
you
that
the
copies
differ.
Thisinitself
doesn't
mean
either
copyisbad, butifthey
were
supposedtobe
identical,
oneorthe
other
has a
problem.
Naturally,
there'snopointintryingtoverifyadisk
copyofa
program
after
the
originalisno
longerinmemory.
With
nothingtocompare
to,anapparent
error
will
always be announced,
even
though
the
disk
copyisalways
and
automatically
verified
as
it
is
writtentothe
disk.
FORMAT
FOR
THE
VERIFY
COMMAND:
VERIFY
"drive
#:pattern",device
#,
relocate
flag
where
"drive
#:"isan
optional
drive
number(0on
the
1541,)
"pattern"isany
string
expression
that
evaluates
toafile
name,
withorwithout
pattern-matching
characters,
and
"device#"is
the
disk
device
number,
normally8.If
the
relocate
flagispresent
and
equals1,the
file
willbeverified
where
originally
saved,
rather
than
relocated
into
the
Basic
text
area.
A
useful
alternate
formofthe
command
is:
VERIFY
"*",device#
It
verifies
the
last
file
used
without
havingtotype
its
nameordrive
number.
However,
it
won't
work
properly
after
save-with-replace,
because
the
last
file
used
was
the
one
deleted,
and
the
drive
will
trytocompare
the
deleted
filetothe
programinmemory.
No
harm
will
result,
but
"VERIFY
ERROR"
will
alwaysbeannounced.Touse
verify
after
@SAVE,
includeatleast
partofthe
file
name
thatistobeverified
in
the
pattern.
One
other note
about
Verify—when
you
Verifyarelocated
file,anerror
will
nearly
alwaysbeannounced,
duetochangesinthe
link
pointers
of
Basic
programs
made
during
relocation.
Itisbesttoonly
verify
files
saved
from
the
same
typeofmachine,
and
identical
memory
size.
For
example,aBasic
program
saved
fromaVIC20can't
easily
be
verified
usingaCommodore
64,
even
when
the
program
would
work
fineonboth
machines
(unless
the
programisre-saved).
This
shouldn't
matter,asthe
only
time
you'll
be
verifying
filesonmachines
other
than
the
one
which
wrote
themiswhen
you
are
comparing
two
disk
filestoseeifthey
are the
same.
Thisisdonebyloading
one
and
verifying
against
the
other,
andassuggested,
can
onlybedoneonthe
same
machine
and
memory
sizeasthe
oneonwhich
the
files
were
first
created.
ERASING
OLD
PROGRAMS:
BASIC
2
The
Scratch
command
allows
youtoerase
unwanted
files,
and
free
the
space
they
occupied
for
usebyother
files.Itcanbeusedtoerase
eitherasingle
file,orseveral
files
at
once
via
pattern-matching.
31
Page 40

FORMAT
FOR
THE
SCRATCH
COMMAND:
PRINT#
15,'
'SCRATCHO:pattern''
or
abbreviate
it
as:
PRINT#15,"S0:pattern"
"pattern"
can
be
any
file
name
or
combination
of
characters
and
wild
card
characters.
As
usual,
it
is
assumed
that
the
command
channel
has
already
been
opened
as
file
15.
Although
not
absolutely
necessary,
it
is
best
to
include
the
drive
number
in
Scratch
commands.
If
you
check
the
error
channel
afteraScratch
command,
as
described
in
the
prior
section,
the
value
for
ET
(error
track)
will
tell
you
how
many
files
were
scratched.
For
example,
if
your
diskette
contains
program
files
named
"TEST",
"TRAIN",
"TRUCK",
and
"TAIL",
you
may
scratch
all
four,
along
with
any
other
files
beginning
with
the
letter
"T",byusing
the
command:
PRINT#15,"S0:T*"
Then,toprove
they
are
gone,
you
can
type:
GOSUB
59990
to
call
the
error
checking
subroutine
given
earlier
in
this
chapter,
andifthe
four
listed
were
the
only
files
beginning
with
"T",
you
will
see:
01,FILES
SCRATCHED,04,00
READY.
■
The
"04"
tells
you4files
were
scratched.
ERASING
OLD
PROGRAMS:
BASIC
3.5
The
Scratch
command
allows
you
to
erase
unwanted
programs
and
files
from
your
diskettes,
and
free
up
the
space
they
occupied
for
use
by
other
files
and
programs.
It
can
be
usedtoerase
eitherasingle
file,orseveral
filesatonce
via
pattern-matching
(described
at
the
endofChapter
3).
FORMAT
TOR
THE
SCRATCH
COMMAND:
SCRATCH
"pattern",Ddrive
#,Uunit
#
32
Page 41

"pattern"
can be
any
file
nameorcombination
of
characters
and
wild
card
characters.
As
usual,
"D"
stands
for
drive
number,
which
may
onlybe0onthe
1541.Ifthe
drive
numberisomitted,0is
assumed.
Likewise,
"U"
stands
for
unit
(device)
number,
normally
8. If
"U"isomitted,8is
assumed.
Thankstothe
defaults,
the
usual
formofthe
Scratch
command
becomes:
SCRATCH
"pattern"
Asaprecaution,
you
willbeasked:
ARE
YOU
SURE?
■
before
Basic
obeysaScratch
command.Ifyou
are
sure,
Simply
pressYand
RETURN.
If
not,
press
RETURN
aloneortype
any
other
answer,
and
the
command
willbecancelled.
The
numberoffiles
that
were
scratched
willbeautomatically
displayed.
For
exam
ple,ifyour
diskette
contains
program
files
named*'TEST'','
TRAIN",*TRUCK'',
and
"TAIL",
you
may
scratch
all
four,
along
with
any
other
files
beginning
with
the
letter
"T",byusing
the
command:
SCRATCH
"T*"
andifthe
four
listed
were
the
only
files
beginning
with
"T",
you
will
see:
01,FILES
SCRATCHED,04,00
READY.
■
The
"04"
tells
you4files
were
scratched.
SCRATCH
(FOR
ADVANCED
USERS)
Scratchisa
powerful
command,
and
shouldbeused
with
caution,
tobesure
you
only
delete
the
files
you
really
want
erased.
When
usingitwithapattern,wesuggest
you
first
use
the
same
patternina
Directory
command,tobe
sure
exactly
which
files
will
be
deleted.
That
way
you'll
havenounpleasant
surprises
when
you
use
the
same
pattern
in
the
Scratch
command.
Recovering
fromaScratch
If
you
accidentally
Scratchafile
you
shouldn't
have,
thereisstillachanceofsaving
it.
Like
Basic's
New
command,
Scratch
doesn't
really
wipe
out a
file
itself;
it
merely
clears
the
pointers
toitin
the
diskette
directory.
If
you
immediately
set
the
diskette
aside
and
protect
it
withawrite-protect
notch,tobe
surenoone
adds
any
filestothe
diskette,
a
skilled
userina
nearby
Commodore
user
group
maybeabletorecover
your
file
for
you.
It
will
helpifyou
can
remember
what
kindoffileitwas
you
scratched
(program,
sequential,
etc.),
since
that
information
cannotbedirectly
recovered
from
whatisleftofthe
file.
33
Page 42

More
about
Splats
One
other
warning—never
scratchasplat
file.
These
are
files
that
showupin
a
directory
listing
withanasterisk
(*)
just
before
the
file
type
foranentry.
The
asterisk
(or
splat)
means
that
file
was
never
properly
closed,
and
thus
thereisno
valid
chainofsector
links
for
the
Scratch
commandtofollowinerasing
the
file.
If
you
Scratch
suchafile,
odds
are
you
will
improperly
freeupsectors
that
are
still
neededbyother
programs,
and
cause
permanent
damagetothose
other
programs
later
when
you
add
more
filestothe
diskette.
If
you
findasplat
file,orif
you
discover
too
late
that
you
have
scratched
suchafile,
immediately
validate
the
diskette
using
the
Validate
command
described
laterinthis
chapter.
If
you
have
added
any
filestothe
diskette
since
scratching
the
splat
file,itis
besttoimmediately
copy
the
entire
diskette
onto
another
fresh
diskette,
butdothis
withacopy
.program
rather
than
withabackup
program.
Otherwise,
the
same
problem
willberecreated
on
the
new
diskette.
When
the
new
copy
is
done,
compare
the
numberofblocks
freeinits
directory
to
the
number
freeonthe
original
diskette.
If
the
numbers
match,nodamage
has
been
done.Ifnot,
very
likelyatleast
one
fileonthe
diskette
has
been
corrupted,
and
all
shouldbeimmediately
checked.
Locked
Files
Very
occasionally,
a
diskette
will
contain
a
locked
file;
thatisone
which
cannot
be
erased
with
the
Scratch
command.
Such
files
mayberecognized
by
the
"<"
character
which
immediately
follows
the
file
typeintheir
directory
entry.Ifyou
wishtoerase
a
locked
file,
you
will
havetouseadisk
monitortoclear
bit6of
the
file-type
byteinthe
directory
entryonthe
diskette.
Conversely,
to
lockafile,
you
would
set
bit6of
the
same
byte.
For
more
information
on
how
such
tricks
are
done,
see
Chapter
9 and
Appendices
D
andE.
RENAMING
PROGRAMS:
BASIC
2
The
Rename
command
allows
youtoalter
the
nameofa
programorother
fileinthe
diskette
directory.
Since
only
the directory
is
affected,
Rename
works
very
quickly.
FORMAT
FOR
RENAME
COMMAND:
PRINT#15,"RENAME0:new
name=old
name"
oritmaybeabbreviated
as:
PRINT#15,"R0:new
name=old
name"
where
"new
name"
is
the
name
you
want
the
file
to
have,
and
"old
name"
is
the
name
it
has
now.
"new
name"
may
be
any
valid
file
name,
up
to
16
characters
in
length.
It
is
assumed
you
have
already
opened
file15to
the
command
channel.
One
caution—be
sure
the
file
you
are
renaming
has
been
properly
closed
before
you
rename
it.
34
Page 43

EXAMPLES:
Just
before
savinganew
copyofa
"calendar"
program,
you
might
type:
PRINT#
15/
'RO:CALENDAR/B
ACKUP=CALENDAR''
Ortomoveaprogram
called
"BOOT",
currently
the
first
programona
diskette
to
someplace
elseinthe
directory,
you
might
type:
PRINT#
15,'
'R0:TEMP=BOOT"
followedbya
Copy
command
(described
later),
which
turns
"TEMP"
intoanew
copy
of
"BOOT",
and
finishing
with
a Scratch
commandtoget
ridofthe
original
copy
of
"BOOT",
since
renamedto"TEMP"bythe
command
above.
RENAMING
PROGRAMS:
BASIC
3.5
The
Rename
command
allows
youtoalter
the
nameofa
programorother
fileinthe
diskette
directory.
Since
only
the
directory
is
affected,
Rename
works
very
quickly.
FORMAT
FOR
RENAME
COMMAND:
RENAME
"old
name"TO"new
name",Ddrive
#,Udevice
#
where
"new
name"isthe
name
you
want
the
filetohave,
and
"old
name"isthe
name
it
has
now.
"new
name"
may
be any
string
expression
that
evaluates
toavalid
file
name,
upto16
characters
in
length.If"D"isleft
out,
drive0is
assumed.If"U"isabsent,
clevice
8isassumed.
One
caution—be
sure
the
file
you
are
renaming
has
been
properly
closed before
you rename
it.
EXAMPLES:
Just
before
savinganew
copyofa
"calendar"
program,
you
might
type:
RENAME
"CALENDAR"TO"CALENDAR/BACKUP"
Ortomoveaprogram
called
"BOOT",
currently
the
first
programona
diskette
to
someplace
elseinthe
directory,
you
might
type:
RENAME
"BOOT"TO"TEMP"
followedbya
Copy
command
(described
later),
which
turns
"TEMP"
intoanew
copy
of
"BOOT",
and
finishing
withaScratch
commandtoget
ridofthe
original
copy
of
"BOOT",
since
renamedto"TEMP"bythe
command
above.
35
Page 44

RENAMING
AND
SCRATCHING
TROUBLESOME
FILES
(ADVANCED
USERS)
Eventually,
you
may
run
acrossafile
which
hasacrazy
filename,
suchasa
comma
by
itself
(",")orone
that
includes
a
SHIFTed
SPACE.Orperhaps
you
will find
one
that
includes
nonprinting
characters.
Anyofthese
canbetroublesome.
Comma
files,
for
instance,
areanexception
to
the
rule
thatnotwo
files
can
have
the
same
name.
Since
it
shouldn't
be
possibletomakeafile
whose
nameisonlyacomma,
the
disk
never
expects
youtodoitagain.
Files
withaSHIFT-SPACEintheir
name
can
alsobetroublesome,
because
the
disk
interprets
the
shifted
SPACEassignalling
the
endofthe
file
name,
and
prints
whatever
follows
after
the
quotation
mark
that
marks
the
end
of a
nameinthe
directory.
This
technique
can
alsobeuseful,
allowing
youtohavealong
file
name,
but
also
make
the
disk
recognize
a
small
partofitasbeing
the
sameasthe
whole
thing
without
using
pattern-matching
characters.
In
any
case,ifyou
haveatroublesome
filename,
you
can
use
the
Chr$()
function
to
specify
troublesome
characters
without
typing
them
directly.
This
may
allow
youtobuild
them
intoaRename
command.Ifthis
fails,
you
may
also
use
the
pattern-matching
characters
inaScratch
command.
This
gives
youawaytospecify
the
name
without
using
the
troublesome
characters
at
all,
but
also
means
lossofyour
file.
For
example,ifyou
have
managedtocreateafile
named
""MOVIES",
with
an
extra
quotation
markatthe
frontofthe
file
name,
you
can
renameitto
"MOVIES"
by
using
the
Chr$()
equivalent
ofaquotation
markinthe
Rename
command:
BASIC2FORMAT:
PRINT#15,"R0:MOVIES
="+
CHR$(34)+"MOVIES"
BASIC
3.5
FORMAT:
RENAME
(CHR$(34)+"MOVIES")TO"MOVIES"
The
CHR$(34)
forcesaquotation
mark
into
the
command
string
without
upsetting
Basic.
The
procedure
forafile
name
that
includesaSHIFT-SPACEissimilar,
but
uses
CHR$(160).
In
cases
where
even
this
doesn't
work,
for
exampleifyour
diskette
contains
a
comma
file,
(one
named
",")
you
can
get
ridofit
this
way:
BASIC2FORMAT:
BASIC
3.5
FORMAT:
PRINT#15,"S0:?"
SCRATCH"?"
Dependingonthe
exact
problem,
you
may
havetobe
very
creative
in
choosing
pattern-
matching
characters
that
will
affect
only
the
desired
file,
and
may
havetorename
other
files
firsttokeep
them
from
being
scratched
too.
36
Page 45

COPYING
PROGRAMS:
BASIC
2
The
Copy
command
allows
youtomakeaspare
copyofany
programorfileona
diskette.
However,ona
single
drive
like
the
1541,
the
copy
mustbeon
the
same
diskette,
which
meansitmustbegivenadifferent
name
from
the
file
copied.
It's
also
used
to
concatenate
uptofour
sequential
data
files
(combining
thembylinking
onetoanother,
endtoendina
chain).
Files
are
linkedinthe
orderinwhich
they
appearinthe
command.
The
source
files
and
other
filesonthe
diskette
are
not
changed.
Files
mustbeclosed
before
they
are
copied
or
concatenated*.
FORMAT
FOR
THE
COPY
COMMAND
PRINT#15,44COPYdrive
#:new
file=drive
#:old
file"
EXAMPLES:
PRINT#
15,4
4COPY0:B
ACKUP=ORIGINAL''
or
abbreviated
as
PRINT#15,44Cdrive
#:new
file=drive
#:old
file"
PRINT#
15/
4C0:B
ACKUP=ORIGINAL''
where
4<drive#"is
the
drive
number(0on
the
1541,)
t4new
file"isthe
copy,
and
4<old
file"isthe
original.
FORMAT
FOR
THE
CONCATENATE
OPTION
PRINT#15,44Cdrive
#:new
file=drive
#:file
l,drive#:file
2,drive
#:file
3,drive
#:file4"
where
44drive#"is
the
drive
number
for
each
file.
Sinceitis
always0on
the
1541,
the
drive
numberisoften
omitted.
EXAMPLES:
After
renaming
a
file
named
4<BOOT"to44TEMP"inthe
last
section's
example,
we
can
use
the
Copy
commandtomakeaspare
copyofthe
program
elsewhereonthe
diskette,
under
the
original
name:
PRINT#
15,4
4C0:BOOT=TEMP''
After
creating
several
small
sequential
files
that
each
fit
easilyinmemory
along
with
a
programweare
using,wecan
use
the
concatenate
optiontocombine
themina
master
file,
even
if
the
result
is
too
big
to
fit
in
memory.
(Do
be
sure
it
will
fit
in
remaining
space
on
the
diskette—it
willbeas
bigasthe
sumofthe
sizesofthe
filesinit.)
PRINT#15,44C0:A-Z
=
A-G,H-M,N-Z"
37
Page 46

NOTE:
Dual
drives
make
fuller
useofthis
command,
copying
programs
from
one
diskette
to
anotherina
single
disk
unit.Todo
thatonthe
1541,
refertoAppendixEto
find
the
programs
that
you
need.
COPYING
PROGRAMS:
BASIC
3.5
The
Copy
command
allows
youtomakeaspare
copyofany
programorfileona
diskette.
However,ona
single
drive
like
the
1541,
the
copy
mustbeon
the
same
diskette,
which
meansitmustbegivenadifferent
name
from
the
file
copied.
The
source
file
and
other
filesonthe
diskette
are
not
changed.
Files
niustbeclosed
before
they
are
copied.
Although
the
1541
supportsaConcatenate
option,
Basic
3.5
doesn't
haveaspecial
command
for
it.
The
Basic2syntax
from
the
previous
page
maybeused
instead.
FORMAT
FOR
THE
COPY
COMMAND
COPY
Ddrive
#,"old
file"toDdrive
#,"new
file",Udevice
#
where
"D"isthe
drive
number
(always0on
the
1541,)
"new
file"isthe
copy,
"old
file"isthe
original,
and
"U"isthe
device
number.Ifomitted,
the
drive
number
defaults
to0and
the
device
number
(unit)to8.
EXAMPLES:
After
renamingafile
named
"BOOT"to"TEMP"inthe
last
section's
example,
we
can
use
the
Copy
commandtomakeaspare
copyofthe
program
elsewhereonthe
diskette,
under
the
original
name:
COPY
"TEMP"TO"BOOT"
To
copyafileona
second
disk
drive,wewould
use:
COPY
"ORIGINAL"TO"BACKUP"
,U9
NOTE:
Dual
drives
make
fuller
useofthis
command,
copying
programs
from
one
diskette
to
anotherina
single
disk
unit.Todo
thatonthe
1541,
refertoAppendixEto
find
the
programs
that
you
need.
VALIDATING
THE
DISKETTE:
BASIC
2
The
Validate
command
recalculates
the
Block
Availability
Map
(BAM)ofthe
current
diskette,
allocating
only
those
sectors
still
being
usedbyvalid,
properly-closed
files
and
programs.
All
other
sectors
(blocks)
are
left
unallocated
and
free
for
re-use,
and
all
improperly-closed
files
are
automatically
Scratched.
However,
this
bare
description
of
its
workings
doesn't
indicate
either
the
powerorthe
dangerofthe
Validate
command.
Its
powerisin
restoring
to
good
health
many
diskettes
whose
directories
or
block
availability
maps
have
become
muddled.
Any
time
the
blocks
usedbythe
filesona
diskette
plus
the
blocks
shownasfree
don't
addupto
the
664
availableona
fresh
diskette,
Validate
is
needed,
with
one
exception
below.
Similarly,
any
timeadiskette
containsanimproperly-
38
Page 47

closed
file
(splat
file),
indicated
byanasterisk
(*)
nexttoits
file
typeinthe
directory,
that
diskette
needstobe
validated.
In
fact,
but
for
the
one
exception
below,itisagood
idea
to
validate
diskettes
whenever
you
are the
least
bit
concerned
about
their
integrity.
The
exception
is
diskettes
containing
Direct
Access
files,asdescribed
in
Chapter
7.
Most
direct
access
(random)
filesdonot
allocate
their
sectorsina
way
the
Validate
command
can
recognize.
Thus,
using
Validateonsuchadiskette
may
resultinun-
allocating
all
direct
access
files,
with
lossofall
their
contents
when
other
files
are
added.
Unless
specifically
instructed
otherwise,
never
use
Validate
onadiskette
containing
direct
access
files.
(Note:
these
are
not
the
sameasthe
relative
files
described
in
Chapter
6.
Validate
maybeusedonrelative
files
without
difficulty.)
FORMAT
FOR
THE
VALIDATE
COMMAND
PRINT#15,"VALIDATE*)"
or
abbreviated
as
PRINT#15,"V0"
where
"0"isthe
drive
number
(always0on
the
1541.)Asusual,itis
assumed
file15has
been
openedtothe
command
channelonthe
1541.
EXAMPLE:
PRINT#15,"V0'
VALIDATING
THE
DISKETTE:
BASIC
3.5
The
Collect
commandinBasic
3.5isthe
same
as the
Validate
commandinBasic
2.
It
recalculates
the
Block
Availability
Map
(BAM)ofthe
current
diskette,
allocating
only
those
sectors
still
being
usedbyvalid,
properly-closed
files
and
programs.
All
other
sectors
(blocks)
are
left
unallocated
and
free
for
re-use,
and
all
improperly-closed
files
are
automatically
Scratched.
However,
this
bare
description
of
its
workings
doesn't
indicate
either
the
powerorthe
dangerofthe
Collect
command.
Its
powerisin
restoring
to
good
health
many
diskettes
whose
directories
or
block
availability
maps
have
become
muddled.
Any
time
the
blocks
usedbythe
filesona
diskette
plus
the
blocks
shownasfree
don't
add
uptothe
664
available
onafresh
diskette,
Collectisneeded
(with
one
exception
below.)
Similarly,
any
timeadiskette
containsanimproperly-closed
file
(splat
file),
indicated
by
an
asterisk
(*)
nexttoits
file
typeinthe
directory,
that
diskette
needstobe
collected. In
fact,
but
for
the
one
exception
below,itisagood
ideatocollect
diskettes
whenever
you
are
the
least
bit
concerned
about
their
integrity.
Just
note
the
numberofblocks
freeinthe
diskette's
directory
before
and
after
using
Collect,
andifthe
totals
differ,
there
was
indeed
a
problem,
and
the
diskette
should
probablybecopied
ontoafresh
diskette
filebyfile,
using
the
Copy
command
describedinthe
previous
section,
rather
than
usingabackup
commandorprogram..
The
exceptionisdiskettes
containing
Direct
Access
files,asdescribed
in
Chapter
7.
Most
direct
access
(random)
filesdonot
allocate
their
sectorsina
way
Collect
can
recognize.
Thus,
collecting
suchadiskette
may
resultinun-allocating
all
direct
access
39
Page 48

files,
with
lossofall
their
contents
when
other
files
are
added.
Unless
specifically
instructed
otherwise,
never
collect
a
diskette
containing
direct
access
files.
(Note:
these
are
not
the
sameasthe
relative
files
describedinChapter6.Collect
maybeused
on
relative
files
without
difficulty.)
FORMAT
FOR
THE
COLLECT
COMMAND
COLLECT
Ddrive
#,Udevice
#
where
"D"isthe
drive
number
(always0on
the
1541,)
and
"U"
the
device
number.
As
usual,ifomitted
they
defaulttodrive0and
device8respectively.
EXAMPLE:
COLLECT
DO
INITIALIZING
One
command
that
should
not
oftenbeneededonthe
1541,
butisstillofoccasional
valueisInitialize.
On
the
1541,
and
nearly
all
other
Commodore
drives,
this
function
is
performed
automatically,
whenever
a
new
diskette
is
inserted.
(The
optical'
write-protect
switch
is
used
to
sense
whenadiskette
is
changed.
>'
The
resultofan
Initialize,
whether
forcedbya
command,ordone
automatically
by
the
disk,isa
re-reading
of
the
current
diskette's
BAM
(Block
Availability
Map)
into
a
disk
buffer.
This
information
must,ofcourse,
alwaysbecorrectinorder
for
the
disk
to
store
new
files
properly.
However,
since
the
choreishandled
automatically,
the
only
time
you'd
needtouse
the
commandisif
something
happenedtomake
the
information
in
the
drive
buffers
unreliable.
Even
so,
you
may
use
the
command
for
reassurance,
as often
as
you
like,solongasyou
close
all
your
files
except
for
the
command
channel
first.
FORMAT
FOR
THE
INITIALIZE
COMMAND
EXAMPLE:
PRINT#15,ttINITIALIZEdrive#"PRINT#
15,"INITIALIZE
0"
oritmaybeabbreviated
to
PKINT#15,''Idrive
#"
PRINT#15,t<I0"
where
the
command
channelisassumedtobe
opened by
file
15,
and
"drive#"is0on
the
1541.
40
Page 49

One
use
for
Initialize
istokeepacleaning
diskette
spinning,
if
you
choosetouse
one.
(There
is
no
need
to
use
such
kits
on
any
regular
basis
under
normal
conditions
of
cleanliness
and
care.)
Nonetheless,
if
you
are
using
suchakit,
the
following
short
program
will
keep
the
diskette
spinning
long
enough
for
your
need:
10
OPEN
15,8,15
20
FOR
1=1TO99
30:PRINT#15,"I0"
40
NEXT
50
CLOSE
15
It
usesanInitialize
looptokeep
the
drive
motoronfor
about20seconds.
41
Page 50

CHAPTER
5
SEQUENTIAL
DATA
FILES
THE
CONCEPTOFFILES
A
fileona
diskette
is
just
likeafile
cabinetinyour
office—an
organized
placetoput
things.
Nearly
everything
you
putona
diskette
goesinone
kindoffileoranother.Sofar
all
we've
used
are
program
files,
but
there
are
others,aswe
have
mentioned.
In
this
chapterwewill
learn
about
sequential
data
files.
Aswejust
suggested,
the
primary
purposeofa
data
fileisto
store
the
contents
of
program
variables,
so
they
won'tbelost
when
the
program
ends.Asequential
data
file
is
oneinwhich
the
contentsofthe
variables
are
stored
"in
sequence,"
one
right
after
another,
justaseach
linkina
chain
follows
the
previous
link.
You
may
alreadybefamiliar
with
sequential
files
from
usingaDATASSETTE™,
because
sequential
filesondiskette
are
just
like
the
data
files
usedoncassettes.
Whetheroncassette
or
diskette,
sequential
files
mustberead
from
beginning
to
end,
without
skipping
aroundinthe
middle.
When
sequential
files
are created,
information
(data)istransferred
bytebybyte,
throughabuffer,
onto
the
magnetic
media.
Onceinthe
disk
drive,
program
files,
sequential
data
files,
and
user
files
all
work
sequentially.
Even
the
directory
acts
like
a
sequential
file.
To
use
sequential
files
properly,
we
will
learn
some
more
Basic
wordsinthe
next
few
pages.
Then
we'll
put
them
together
inasimple
but
useful
program.
Note:
Besides
sequential
data
files,
two
other
file
types
are
recorded
sequentially
onadiskette,
and
maybeconsidered
varying
formsofsequential
files.
They
are
program
files,
and
user
files.
When
you
saveaprogramona
diskette,
itissaved
in
order
from
beginning
to
end,
just
like
the
information
inasequential
data
file.
The
main
difference
isinthe
commands
you
usetoaccess
it.
User
files
are
even
more
similartosequential
data
files—differing,
for
most
purposes,
in
name
only.
User
files
are
almost
never
used,
but
like
program
files,
they
couldbetreatedasthough
they
were
sequential
data
files
and
are
accessed
with
the
same
commands.
For
the
advanced
user,
the
similarity
of
the
various
file
types
offers
the
possibility
of
such
advanced
tricksasreading a
program
file
into
the
computer
a
byte
(character)
atatime
and
rewriting
ittothe
diskette
inamodified
form.
The
ideaofusing
one
programtowrite
anotherispowerful,
and
availableonthe
Commodore
disk
drives.
OPENINGAFILE
Oneofthe
most
powerful
toolsinCommodore
Basicisthe
Open
statement.
With
it,
you
may
send
almost
any
data
almost
anywhere,
much
likeatelephone
switchboard
that
can
connect
any
callertoany
destination.
As
you
might
expect,acommand
that
can
do
this
muchisfairly
complex.
You
have
already
used
Open
statements
regularly
in
some
of
your
diskette
housekeeping
commands.
42
Page 51

Beforewestudy
the
formatofthe
Open
statement,
let's
review
someofthe
possible
devicesina
Commodore
computer
system:
Device#:Name:
0
1
2
3
4
8
Keyboard
DATASSETTE
RS232
Screen
Printer
Disk
drive
Used
for:
Receiving
input
from
the
computer
operator
Sending
and
receiving
information
from
cassette
Sending
and
receiving
information
fromaModem
Sending
outputtoa
video
display
Sending
outputtoa
hard
copy
printer
Sending
and
receiving
information
from
diskette
Becauseofthe
flexibility
of
the
Open
statement,
itispossible
forasingle
program
statement
to
contact
any
oneofthese
devices,
or
even
others,
dependingonthe
valueofa
single
character
in
the
command.
OftenanOpen
statement
is
the
only
difference
between
a
program
that
usesaDATASSETTE™
and
one
using
the
1541.Ifthe
character
is
kept
in
a
variable,
the
device
used
can
even
change
each
time
that
partofthe
programisused,
sending
data
alternately
and
with
equal
easetodiskette,
cassette,
printer
and
screen.
REMEMBER
TO
CHECK
FOR
DISK
ERRORS!
In
the
last
chapterwelearned
howtocheck
for
disk
errors
after
disk
com
mandsina
program.Itis
equally
important
to
check
for
disk
errors
after
using
file-
handling
statements.
Failuretodetectadisk
error
before
using
another
file-
handling
statement
could
cause
lossofdata,
and
failureofthe
Basic
program.
The
easiest
waytocheck
the
diskisto
follow
all
file-handling
statements
with
a
Gosub
statement
toanerror
check
subroutine.
EXAMPLE:
840
OPEN
4,8,4,"0:DEGREE
DAY
DATA,S,W"
850
GOSUB
59990:REM
CHECK
FOR
DISK
ERRORS
FORMAT
FOR
THE
DISK
OPEN
STATEMENT:
OPEN
file#,device#,channel
#,"drive
#:file
name,file
type,direction"
where:
"file#"isaninteger
(whole
number)
between1and-255.Ifthe
file
number
is
greater
than
127,aline-feed
character
is
inserted
after
each
carriage
returninthe
file
opened.
Though
this
maybehelpfulinprinter
files,
it
will
cause
severe
problemsindisk
files,
andistobeavoidedatall
costs.Donot
openadisk
file
withafile
number
greater
than
127.
After
the
fileisopen,
all
other
file
commands
will
refertoitbythe
number
given
here.
Only
one
file
can
use
any
given
file
numberata
time.
"device#"is
the
number,orprimary
address,ofthe
devicetobe
used.
This
numberisan
integerinthe
range
0-31,
andisnormally8on
the
1541.
43
Page 52

"channel#"isasecondary
address,
giving
further
instructions
to
the
selected
device
about
how
further
commands
aretobe
obeyed.Indisk
files,
the
channel
number
selects
a
particular
channel
along
which
communications
for
this
file
can
take
place.
The
possible
rangeofdisk
channel
numbersis0-15,
but0is
reserved
for
program
Loads,1for
program
Saves,
and15for the
disk
command
channel.
Also be
sure
thatnotwo
disk
files
have
the
same
channel
number
unless
they
will
neverbeopenatthe
same
time.
(One
way
todothisisto
make
the
channel
number
for
each
file
the
sameasits
file
number.)
"drive#"is
the
drive
number,
always0on
the
1541.Donot
omit
it,oryou
will
onlybeabletouse
two
channels
at
the
same
time
insteadofthe
normal
maximumofthree.
If
any
pre-existing
fileofthe
same
nameistobereplaced,
precede
the
drive
number
with
the
"at"
sign
(@)torequest
Open-with-replace.
"file
name"isthe
file
name,
maximum
length16characters.
Pattern
matching
characters
are
allowedinthe
name
when
accessing
existing
files,
but
not
when
creating
new
ones.
"file
type"isthe
file
type
desired:
S=sequential,
P=program,U=
user,
and
L=lengthofa
relative
file.
"direction"
is
the
typeofaccess
desired.
There
are
three
possibilities:
R=read,
W=write,
andM=
modify.
When
creating
a
file,
use
"W"towrite
the
datatodiskette.
When
viewingacompleted
file,
use
"R"toread
the
data
from
diskette.
Only
use
the
"M"
(modify)
optionasa
last
ditch
wayofreading
back
data
fromanimproperly-closed
(Splat)
file.
(If
you
try
this,
check
every
byteasitisreadtobe
sure
the
dataisstill
valid,
as
such
files
always
include
some
erroneous
data,
and
havenoproper
end.)
"file
type"
and
"direction"
don't
havetobe
abbreviated.
They
canbespelled
out
in
full
for
clarityinprinted
listings.
"file
#",
"device#"and
"channel#"mustbevalid
numeric
constants,
variables
or
expressions.
The
restofthe
command
mustbea
valid
string
literal,
variable
or
expression.
The
maximum
numberoffiles
that
maybeopen
simultaneously
is
10,
including
all
filestoall
devices.
The
maximum
numberofsequential
disk
files
that
canbeopenatonce
is3(or2if
you
neglecttoinclude
the
drive
numberinyour
Open
statement),
plus
the
command
channel.
EXAMPLESOFOPENING
SEQUENTIAL
FILES:
To
createasequential
fileofphone
numbers,
you
could
use:
OPEN2,8,2,"0:PHONES,SEQUENTIAL,WRITE"
or
save
yourself
some
typing
with:
OPEN
2,8,2,"0:PHONES,S,W"
On
the
off-chance
we've
already
gota"PHONES"
fileonour
diskette,
we
can
avoid
a
"FILE
EXISTS"
error
messagebydoingan©OPEN
OPEN
2,8,2,"@0:PHONES,S,W"
44
Page 53

Of
course,
this
erases
all
our
old
phone
numbers,somake
sure
that
any
information
that
maybedeletedisofnoimportance.
After
writing
our
phone
file,weremove
our
diskette
and
turn
off
the
system.
Later,torecall
the
datainthe
file,wewould
reopenitwith
something
like
OPEN
8,8,8,"0:PHONES,S,R"
It
doesn't
matter
whether
the
file
and
channel
numbers
match
the
onesweused
before,
but
the
file
name
does
havetomatch.
However,itis
possible
to
useanabbreviation
form
of
the
file
name,ifthere
arenoother
files
that
would
have
the
same
abbreviation:
OPEN
10,8,6,"0:PH*,S,R"
Ifwehave
too
many
phone
numbers,
they
might
not
fitinone
file.Inthat
case,
we
might
use
several
similar
file
names,
and
letaprogram
choose
the
correct
file.
100
INPUT
"WHICH
PHONE
FILE
(1-3)";PH
110IFPHO1
AND
PHO2
AND
PH<>3
THEN
100
120
OPEN
4,8,2,"PHONE"
+
STR$(PH)+",S,R"
You
can
omit
the
drive
numberonan
Open
commandtoread a
file.
Doingsoallows
those
with
dual
drivestosearch
both
diskettes
for
the
file.
Note:
Basic2and
Basic
3.5
use
the
same
file
handling
commands
and
the
same
direct
access
commands
(chapters
7-8).
Unless
otherwise
noted,
you
may
use
the
same
commands
for
both
throughout
the
remainderofthis
book.
ADDINGTOA
SEQUENTIAL
FILE
On
Commodore's
PET
and
CBM
models,anAppend
command
allows
youtoreopen
an
existing
sequential
file
and
add
more
information
to
the
endofit.
The
same
thing
can
be
done
another
wayonthe
1541.Inplaceofthe
"type"
and
"direction"
parameters
in
your
Open
statement,
substitute
",A"
for
Append.
This
will
reopen
your
file,
and
position
the
disk
headatthe
endofthe
existing
datainyour
file,
readytoaddtoit.
FORMAT
FOR
THE
APPEND
OPTION
OPEN
file
#,device
#,channel
#,"drive
#:file
name,A"
where,
everything
isason
the
previous
page
except
for the
ending
"A"
replacing
the
"type"
and
"direction"
parameters.
45
Page 54

EXAMPLE:
If
you
are
writingagrading
program,itwouldbeconvenient
to
simply
tackoneach
student's
new
gradestothe
endoftheir
existing
grade
files.Toadd
datatothe
"JOHN
PAUL
JONES"
file,wecould
type
OPEN
1,8,3,"0:JOHN
PAUL
JONES,A"
In
this
case,
DOS
will
allocate
at
least
one
more
sector
(block)tothe
file
the
first
time
you
appendtoit,
evenifyou
only
add
one
character
of
information.
You
may
also
notice
that
using
the
CollectorValidate
command
didn't
correct
the
file
size.Onthe
other
hand,
your
dataisquite
safe,
andifthe
wasted
space
becomesaproblem,
you
can
easily
-correct
it
by
copying
the
file
to
the
same
diskette
or a
different
one,
and
scratching
the
original
file.
Here'sasequenceofcommands
that
will
copy
such
filestothe
original
diskette
under
the
original
name,
for
easeofcontinued
use:
BASIC
2:
PRINT#15,"R0:TEMP
=
JOHN
PAUL
JONES"
PRINT#15,<tC0:JOHN
PAUL
JONES=TEMFf
PRINT#15,"S0:TEMP"
BASIC
3.5:
RENAME
"JOHN
PAUL
JONES"TO"TEMP"
COPY
"TEMP"TO"JOHN
PAUL
JONES"
SCRATCH
"TEMP"
If
you
are
using
Basic2,be
suretoopen
file15to
the
command
channel
beforehand
(i.e.,
with
OPEN
15,8,15)
and
closeitafterwards
(i.e.,
with
CLOSE
15).
WRITING
FILE
DATA:
USING
PRINT#
Afterasequential
file
has
been
openedtowrite
(withatype
and
direction
of
",S,W"),weuse
the
Print#
commandtosend
datatoit
for
storageondiskette.
If
you
are
familiar
with
Basic's
Print
statement,
you
will
find
Print#
works
exactly
the
same
way,
except
that
the
listofitems
following
the
command
wordissenttoa
particular
file,
insteadofautomatically
appearingonthe
screen.
Even
the
formatting
options
(punctua
tion
and
such)
workinmuch
the
same
wayasin
Print
statements.
This
means
you
have
to
be
sure
the
items
sent
make
sensetothe
particular
file
and
device
used.
For
instance,
a
comma
between
variables
inaPrint
statement
actsasa
separator
in
screen
displays,
making
each
successive
item
appearinthe
next
preset
display
field
(typically
at
the
next
column
whose
numberisevenly
divisible
by
10).Ifthe
same
comma
is
included
between
variables
goingtoa disk
file,itwill
again
actasa
separator,
again
inserting
extra
spaces
into
the
data.
This
time,
however,itis
inappropriate,
as
the
extra
spaces
are
simply
wastedonthe
diskette,
and
may
create
more
problems
when
reading
the
file
back
into
the
computer.
Therefore,
you
are
urgedtofollow
the
following
format
precisely
when
sending
datatoa
disk
file.
FORMAT
FOR
THE
PRINT#STATEMENT
PRINT#file#,data
list
46
Page 55

where
"file#"is
the
same
file
number
giveninthe
desired
file's
current
Open
statement.
During
any
given
accessofa
particular
file,
the
file
number
must
remain
constant
because
it
servesasa
shorthand
wayofrelating
all
other
file-handling
commands
backtothe
correct
Open
statement.
Givenafile
number,
the
computer
can
lookupeverything
else
aboutafile
that
matters.
The
"data
list"isthe
sameasforaPrint
statement
-alistofconstants,
variables
and/or
expressions,
including
numbers,
stringsorboth.
However,itis
strongly
recom
mended
that
each
Print#
statement
to
disk
include
only
one
data
item.Ifyou
wish
to
include
more
items,
they
mustbeseparated
byacarriage
return
character,
notacomma.
Semicolons
are
permitted,
but
not
recordedinthe
file,
anddonot
resultinany
added
spacesinthe
file.
Use
themtoseparate
itemsinthe
list
that
might
otherwisebeconfused,
suchasa
string
variable
immediately
following
a
numeric
variable.
Note:Donot
leaveaspace
between
PRINT
and#,anddonot
abbreviate
the
commandas?#.
The
correct
abbreviation
for
Print#ispR.
EXAMPLES:
To
recordafew
grades
for
John
Paul
Jones,
usingasequential
disk
file#1previously
opened
for writing,wecould
use:
200
FOR
CLASS=1TOCOURSES
210:
PRINT#1,GRADE$(CLASS)
220
NEXT
CLASS
320
GOSUB
59990:REM
CHECK
FOR
DISK
ERRORS
(assuming
your
program
includesanerror
check
subroutine
like
the
oneinthe
last
chapter).
In
using
Print#
there
is
an
exception
to
the
requirement
to
check
for
disk
errors
after
every
file-handling
statement.
When
using
Print#,asingle
check
after
an
entire
set
of
data
has
been
written
will
still
detect
the
error,
so
long
as
the
check
is
made
before
any
other
file-handling
statement
or
disk
command
is
used.
You
may
be
familiar
with
Print
statements
in
which
several
items
follow
each
other:
400
PRINT
NAME$,STREET$,CITY$
To
get
those
same
variables
onto
sequential
disk
file
number5instead
of
the
screen,
the
best
approach
wouldbeto
use
three
separate
Print#
statements,
as
follows:
400
PRINT#5,NAME$
410PRBSfT#5,STREET$
420PRINT#5,CITY$
47
Page 56

However,ifyou
needtocombine
them,
hereisa
safe
waytodo
it:
400PRINT#5,NAME$;CHR$(13);STREET$;CHR$(13);CITY$
CHR$(13)isthe
carriage
return
character,
and
has
the
same
effectasputting
the
print
itemsinseparate
lines.Ifyoudothis
often,
some
space
and
time
maybesaved
by
previously
defining
a
variableasequaltoCHR$(13):
10CR$=CHR$(13)...
400PRINT#5,NAME$;CR$;STREET$;CR$;CITY$
The
basic
ideaisthataproper
sequential
disk
file
write,ifredirected
to
the
screen,
will
display
only
one
data
item
per
line,
with
each
succeeding
itemonthe
next
line.
CLOSINGAFILE
WHEN
YOU
ARE
DONE
USING
IT
After
you
finish
usingadata
file,itis
extremely
important
that
you
Close
it.
During
the
processofwritingafile,
dataisaccumulated
inamemory
buffer,
and
only
written
out
to
the
physical
cassette
or
diskette
when
the
buffer
fills.
Working
this
way,
thereisalmost
alwaysasmall
amountofdatainthe
buffer
that
has
not
been
writtentodisketteorcassette
yet,
and
which
would
simplybelostifthe
computer
system
were
turned
off.
Similarly,
there
are
diskette
housekeeping
matters,
such
as
updating
the
BAM
(Block
Availability
Map)ofsectors
usedbythe
current
file,
which
are
not
performed
during
the
ordinary
courseofwritingafile.
Thisisthe
reason
for
havingaClose
statement.
Whenweknow we
are
done
withafile,
the
Close
statement
will
write the
restofthe
data
buffer
outtocassetteordiskette,
update
the
BAM,
and
complete
the
file's
entryinthe
directory.
Always
Closeadata
file
when
you
are
done
using
it!
Failuretodosomay
cause
lossofthe
entire
file!
However, do
not
cloSe
the
disk
command
channel
until
all
other
files
have
been
Closed.
The
command
channel
(described
in
the
last
chapter),
when
used,
shouldbethe
first
file
Opened,
and
the
last
file
Closedinany
program.
Otherwise,
remaining
files
may
be
closed
automatically.
As
also
described
there,
this
may
be usedtoadvantageifa
program
haltsonan
error
while
disk
files
are
open.
FORMAT
FOR
THE
CLOSE
STATEMENT
CLOSE
file
#
where
"file#"is
the
same
file
number
giveninthe
desired
file's
current
Open
statement.
EXAMPLES:
To
close
the
data
file#5usedasan
exampleonthe
previous
page,wewould
use
CLOSE
5
In
Commodore's
CBM
and
PET
computers,
thereisa
Dclose
statement,
that,
when
used
alone,
closes
all
disk
filesatonce.
Withabitofplanning,
the
same
canbedone
in
Basic2and
3.5
viaaprogram
loop.
Since
thereisno
harminclosingafile
that
wasn't
48
Page 57

open,
close
every
file
you
even
think
might
be
open
before
endingaprogram.
If
for
example,wealways
gave
our
files
numbers
between1and
10,wecould
close
them
all
with
9950FORI=lTO10
9960
CLOSE
I
9970
GOSUB
59990:REM
CHECK
FOR
DISK
ERRORS
9980
NEXT
I
(assuming
your
program
includes
an
error
check
subroutine
like
the
oneinChapter
4)
READING
FILE
DATA: USING
INPUT#
Once
information
has
been
written
properly
toadiskette
file,itmayberead
back
into
the
computer
withanInput#
statement.
Justasthe
Print#
statement
is
much
like
the
Print
statement,
Input#
is
nearly
identical
to
Input,
except
that
the
list
of
items
following
the
command
word
comes
fromaparticular
file
insteadofthe
keyboard.
Both
statements
are
subject
to"the
same
limitations—halting
input
afteracomma
or colon,
not
accepting
data
items
too
largetofitinBasic's
Input
buffer,
and
not
accepting
non-numeric
data
into
a
numeric
variable.
FORMAT
FOR
THE
INPUT#
STATEMENT
PRINT#file
#,variable
list
where
"file#"is
the
same
file
number
giveninthe
desired
file's
current
Open
statement,
and
"variable
list"isoneormore
valid
Basic
variable
names.Ifmore
than
one
data
elementistobeinputbya
particular
Input#
statement,
each
variable
name
must
be
separated
from
othersbya
comma.
EXAMPLES:
To
read
backinthe
grades
written
with
the
Print#
example,
use:
300
FOR
CLASS=1TOCOURSES
310
INPUT#1,GRADE$(CLASS)
320
GOSUB
59990:REM
CHECK
FOR
DISK
ERRORS
330
NEXT
CLASS
(assuming
your
program
includes
an
error
check
subroutine
like
the
one
on
page
27).
To
read
back
in
the
address data
written
by
another
Print#
example,
it
is
safest
to
use:
800INPUT#5,NAME$
810
GOSUB
59990:REM
CHECK
FOR
DISK
ERRORS
820
INPUT#5,STREET$
830
GOSUB
59990.REM
CHECK
FOR
DISK
ERRORS
840INPUT#5,CITY$
850
GOSUB
59990:REM
CHECK
FOR
DISK
ERRORS
49
Page 58

but
many
programs
cheatonsafetyabit
ana
use
800
INPUT#5,NAME$,STREET$,CITY$
810
GOSUB
59990:REM
CHECK
FOR
DISK
ERRORS
Thisisdone
primarily
when
top
speedinthe
programisessential,
and
thereislittleorno
riskofreading
improper
data
from
the
file.
MORE
ABOUT
INPUT#
(FOR
ADVANCED
USERS)
Troublesome
Characters
After
you
begin
using
data
files
regularly,
you
may
encounter
two
Basic
error
messages
moreorless
frequently.
They
are
"STRING
TOO
LONG
ERROR"
and
"FILE
DATA
ERROR".
Both
are
likelytohalt
your
programatan
Input#
statement,
but
may
also
have
been
causedbyerrorsina
Print#
statement
when
the
file
was
written.
"STRING
TOO
LONG"
ERRORS
A
Basic
string
maybeupto255
characters
long,
although
the
longest
string
you
can
enter
viaasingle
Input
statement
is
just
under2linesoftext(4on
the
VIC
20).
This
lower
limitation
is
duetothe88character
sizeofthe
Input
bufferinCommodore's
serial
bus
computers.
The
same
limit
appliestoInput#
statements.
Ifasingle
data
element
(string
or
number)
being
read
fromadisk
file
intoanInput#
statement
contains
more
than
87
characters,
Basic
will
halt
witha"STRING
TOO
LONG
ERROR".Toprevent
this
error,besuretolimit
each
stringtounder88characters,
and
separate
all
file
data
items
with
carriage
returns
(See
the
next
section
foracure
once
the
error
has
occurred.)
"FILE
DATA"
ERRORS
The
other
error
message
"FILE
DATA
ERROR"iscausedbyattempting
to
read
a
non-numeric
character
intoanumeric
variable.
Toacomputer,
a
numberisthe
characters
0
through
9,
the"+"an3"-"signs,
the
decimal
point
(.),
the
SPACE
character,
and
the
letter
"E"
usedinscientific
notation.
If
any
other
character
appearsinan
Input#toa
numeric
variable,
"FILE
DATA
ERROR"
willbedisplayed
and
the
program
will
halt.
The
usual
causesofthis
error
areamismatch
between
the
orderinwhich
variables
are
writtentoand
read
fromafile,amissing
carriage
return
withinaPrint#
statement
that
writes
more
than
one
data
item,ora
data
item
that
includes
eitheracommaora colon
withoutapreceding
quotation
mark.
Onceafile
data
error
has
occurred,
you
should
correctitby
reading
the
data
item
intoastring
variable,
and
then
converting
it
backtoa
number
with
the
Basic
Val()
statement
after
removing
non-numeric
characters
with
the
string
functions
described
in
your
computer
users
manual.
COMMAS
(,)
AND
COLONS
(:)
As
suggested
before,
commas
and
colons
can
cause
troubleina
file,
because
they
delimit
(end)
the
data
elementinwhich
they
appear
and
cause
any
remaining
characters
in
the
data
elementtobe
read
into
the
next
Input#
variable.
(They
have
the
same
effectinan
Input
statement,
causing
the
common
"EXTRA
IGNORED"
error
message.)
However,
sometimeswereally
needacommaorcolon
withinadata
element,
suchasa
name
written
as
"Last,
First".
The
cureisto
precede
such
data
elements
withaquotation
mark.
After
a
50
Page 59

quotation
mark,ineitheranInputorInput#
statement,
all
other
characters
except
a
carriage
returnoranother
quotation
mark
are
acceptedaspartofthe
current
data
element.
EXAMPLES:
To
forceaquotation
mark
intoadata
element
goingtoa
file,
appendaCHR$(34)
to
"
the
start
of
the
data
element.
For
example:
PRINT#2,CHR$(34)
-I-''STRASMA,
JIM''
or
PRINT#2,CHR$(34);4<STRASMA,
JIM"
If
youdothis
often,
some
space
and
time
maybesavedbypreviously
defining
a
variable
as
equaltoCHR$(34)aswe
did
earlier
with
CHR$(13):
20QT$=CHR$(34)
400
PRINT#5,QT$+NAMES
In
each
case,
the
added
quotation
mark
willbestripped
outofthe
databythe
Input
or
Input#
statement,
but
the
commaorcolon
will
remain
safely
partofthe
data.
NUMERIC
DATA
STORAGEONDISKETTE
Inside
the
computer,
the
space
occupiedbya
numeric
variable
depends
onlyonits
type.
Simple
numeric
variables
use7bytes
(character
locations)
of
memory.
Real
array
variables
use5bytes
per
array
element,
and
integer
array
elements
use2bytes-
each.
In
contrast,
whenanumeric
variableorany
typeiswrittentoa
file,
the
spaceitoccupies
depends
entirely
on
its
length,
not
its
type.
Numeric
dataiswrittentoa
fileinthe
formofa
string,asif
the
Str$()
function
had
been
performedonit.
The
first
character
willbea
blank
spaceifthe
numberispositive,
andaminus
sign
(-)ifthe
numberisnegative.
Then
comes
the
number,
digitbydigit.
The
last
character
isacursor
right
character.
This
format
allows
the
disk
datatobe
read
back
intoastringornumeric
variable
later.
It
is,
however,
somewhat
wasteful
of
disk
space,
and
it
can
be
difficult
to
anticipate
the
space
requiredbynumbersofunknown
length.
For
this
reason,
some
programs
convert
all
numeric
variables
into
strings
before
writing
themtodiskette,
and
use
string
functions
to
remove
any
unneeded
characters
in
advance.
Doingsostill
allows
those
data
elements
toberead
back
intoanumeric
variable
by
Input#
later,
although
file
data
errors
maybeavoidedbyreading
all
datainas
strings,
and
converting
to
numbers
after
the
information
is
inside
the
computer.
For
example,
t4N$=MID$(STR$(N),2)"
will
convertapositive
numberNinto
a
stringN$without
the
usual
leading
space
for
its
numeric
sign.
Then
insteadofwriting
PRINT#5,N,
you
would
use
PRINT#5,N$.
51
Page 60

READING
FILE
DATA:
USING
GET#
The
Get#
statement
retrieves
data
from
the
disk
drive,
one
character
atatime.
Like
the
similar
keyboard
Get
statement
in
Basic,itonly
acceptsasingle
character
into
a
specified
variable.
However,
unlike
the
Get
statement,
it
doesn't
just
fall
throughtothe
next
statement
if
thereisno
datatobe
gotten.
The
primary
useofGet#isto retrieve
from
diskette
any
data
that
cannotberead
intoanInput#
statement,
either
becauseitis
too
long
to
fitinthe
input
bufferorbecauseitincludes
troublesome
characters.
FORMAT
FOR
THE
GET#
STATEMENT:
GET#file#,variable
list
where
"file#"is
the
same
file
number
giveninthe
desired
file's
current
Open
statement,
and
"variable
list"isoneormore
valid
Basic
variable
names.Ifmore
than
one
data
elementistobeinputbya
particular
Get#
statement,
each
variable
name
must
be
separated
from
othersbya
comma.
In
practice,
you
will
almost
never
seeaGetorGet#
statement
containing
more
than
one
variable
name.Ifmore
than
one
character
is
needed,
a loopisused
rather
than
additional
variables.
Alsoasin
the
Input#
statement,
itissafertouse
string
variables
when
the
filetobe
read
might
containanon-numeric
character.
Dataina
Get#
statement
comesinbytebybyte,
including
such
normally
invisible
characters
as
the
Carriage
Return,
and
the
various
cursor
controls.
All
but
one
willberead
properly.
The
exceptionisCHR$(0),
the
ASCII
Null
character.
Itisdifferent
from
an
empty
string
(oneofthe
formA$=""),
even
though
empty
strings
are
often
referred
to
as
null
strings.
Unfortunately,
inaGet#
statement,
CHR$(0)isconverted
intoanempty
string.
The
cureisto
test
foranempty
string
afteraGet#,
and
replace
any
that
are
found
with
CHR$(0)
instead.
The
first
example
below
illustrates
the
method.
EXAMPLES:
To
readafile
that
may
containaCHR$(0),
suchasa
machine
language
program
file,
we
could
correct
any
CHR$(0)
bytes
with
1100
GET#3,G$:IF
G$ =""THENG$=
CHR$(0)
Ifanoverlong
string
has
managedtobe
recordedina
file,itmaybesafely
read
back
into
the
computer
with
Get#,
usingaloop
suchasthis
3300B$=
""
3310GET#l,A$
3320IFA$<>CHR$(13)
THENB$=B$+
A$:GOTO
3310
The
limit
for
suchatechnique
is
255
characters.
It
will
ignore
CHR$(0),
but
that
may
be
an
advantageinbuilding
a
text
string.
52
Page 61

Get#
maybeespecially
usefulinrecovering
damaged
files,orfiles
with
unknown
contents.
The
Basic
reserved
variableST(the
file
STatus
variable)
canbeusedtoindicate
when
allofa
properly-closed
file
has
been
read.
500
GET#2,S$
510SU=
ST:REM
REMEMBER
FILE
STATUS
520
PRINT
S$;
530IFSU=0
THEN
500:REMIFTHERE'S
MORETOBE
REAL
540IFSUO64
THEN
PRINT
"STATUS
ERROR:ST=
";SU
CopyingSTintoSUis
often
an unneccessary
precaution,
but
mustbedoneifany
other
file-handling
statement
appears
between
the
one
which
read
from
the
file
and
the
one
that
loops
backtoread
again.
For
example,itwouldberequired
if
line
520
was
changed
to
520PRINT#l,S$;
Otherwise,
the
file
status
checkedinline
530
wouldbethatofthe
write
file,
not
the
read
file.
POSSIBLE
VALUESOFTHE
FILE
STATUS
VARIABLE
t4ST",
IFST
=
0
1
2
4
8
16
32
64
128
AND
THEIR
MEANINGS
THEN
AllisOK
Receiving
device
was
not
available
(time
outontalker)
Transmitting
device
was
not
available
(time
outonlistener)
Cassette
data
file
block
was
too
short
Cassette
data
file
block
was
too
long
Unrecoverable
read
error
from
cassette,
verify
error
Cassette
checksum
error—oneormore
faulty
characters
were
read
Endoffile
reached
(EOI
detected)
Device
not
present,orendoftape
mark
foundoncassette
53
Page 62

DEMONSTRATIONOFSEQUENTIAL
FILES
Use
the
following
program
for
your
Comments
have
been
addedtohelp
you
150CR$=CHR$(13)
160
OPEN
15,8,15
170
PRINT
CHR$(147):REM
CLEAR
SCREEN
190
PRINT
"**
WRITEAFILE
**"
210
PRINT
220
OPEN
2,8,2,"@0:SEQ
FILE,S,W"
230
GOSUB
500
240
PRINT'ENTER
A WORD,
THENANUMBER1*
250
PRINT"OR
4END,0'TOSTOP*'
260
PRINT
270
INPUT
A$,B
280
PRINT#2,A$;CR$;B
290
GOSUB
500
300IFA$O"END"
THEN
270
310
PRINT
320
CLOSE
2
340
PRINT
"**
READ
SAME
FILE
BACK
**"
360
PRINT
370
OPEN
2,8,2,"0:SEQ
FILE,S,R"
380
GOSUB
500
390
INPUT#2,A$,B
400RS=ST
410
GOSUB
500
420
PRINT
A$,B
430IFRS=0
THEN
390
440IFRSO64
THEN
PRINTt4STATUS=";RS
450
CLOSE
2
460
END
480
REM**ERROR
CHECK
S/R
**
500
INPUT#15,EN,EM$,ET,ES
510IFEN>0
THEN
PRINT
EN,EM$,ET,ES:STOP
520
RETURN
first
experiments
with
sequential
files.
better
understand
it.
Makeacarriage
return
variable
Open
demo
file
with
replace
Check
for
disk
errors
Acceptastring&number
from
keyboard
Write
themtothe
disk
file
Until
finished
Tidy
up
Reopen
same
file
for
reading
Read
next
string&number
from
file
Remember
file
status
Display
file
contents
until
done,
unless
there'sanerror
Then
quit
A
Basic
3.5-only
version
could
replace
line
500
with
500IFDS>0
THEN
PRINT
DS$:STOP
and
delete
line
510
54
Page 63

CHAPTER
6
RELATIVE
DATA
FILES
THE
VALUE
OF
RELATIVE
ACCESS
Sequential
files
are
very
useful
when
you're
just
working
with
a continuous
stream
of
data—
i.e.,
information
that
canbereadorwritten
allatonce.
However,
sequential
files
are
not
usefulordesirable
in
some
situations.
For
example,
after
writingalarge
list
of
mail
labels,
you
wouldn't
wanttohavetore-read
the
entire
list
each
time
you
need
a
person's
record.
Instead,
you
need
some
kindofrandom
access,awaytogettoa
particular
labelinyour
file
without
havingtoread
through
all
those
preceding
it
first.
Asanexample,
comparearecord
turntable
withacassette
recorder.
You
have
to
listentoa
cassette
from
beginningtoend,
butaturntable
needle
canbepickedupat
any
time,
and
instantly
movedtoany
spotonthe
record.
Your
disk
drive
works
likeaturntable
in
that
respect.
In
this
chapterwewill
learn
aboutatypeoffile
that
reflects
this
flexibility.
Actually,
two
different
typesofrandom
access
files
maybeusedonCommodore
disk
drives:
relative
files
and
random
files.
Relative
files
are
much
more
convenient
for
most
data
handling
operations,
but
true
random
access
file
commands
are
also
available
to
advanced
users,
and
willbediscussedinthe
next
chapter.
FILES,
RECORDS,
AND
FIELDS
When
learning
about
sequential
files,wedid
not
worry
about
the
organization
of
data
withinafile,solongasthe
variables
usedtowrite
the
file
matchedupproperly
with
those
which
readitback
into
the
computer.
Butinorder
for
relative
accesstowork,weneed
a
more
structured
and
predictable
environment
for
our
data.
The
structurewewill
useissimilartothat
usedinthe
traditional
filing
cabinet.Ina
traditional
office,
all
customer
records
mightbekeptina
single
file
cabinet.
Within
this
file,
each
customer
has a
personal
recordina
file
folder
with
their
nameonit,
that
contains
everything
the
office
knows
about
that
person.
Likewise,
within
each
file
folder,
there
maybemany
small
slipsofpaper,
each
containing
one
bitofinformation
about
that
customer,
suchasa
home
phone
number,orthe
dateofthe
most
recent
purchase.
Inacomputerized
office,
the
file
cabinetisgone,
but
the
conceptofa
file
containing
all
the
information
aboutagrouportopic
remains.
The
file
folders are
gone
too,
but
the
notionofsubdividing
the
file
into
individual
records
remains.
The
slipsofpaper
within
the
personal
records
are
gone
too,
replacedbysubdivisions
within
the
records,
called
fields.
Each
fieldislarge
enoughtohold
one
pieceofinformation
about
one
recordinthe
file.
Thus,
within
each
file
there
are
many
records,
and
within
each
record
there
are
typically
many
fields.
A
relative
file
takes
careoforganizing
the
records
for
you,
numbering
them
from1to
whatever,byones,
but
the
fields
areupto
youtoorganize.
Each
record
willbeof
the
same
size,
but
the
1541
won't
insist
that
they
allbedivided
the
same
way.Onthe
other
hand,
they
normally
will
allbesubdivided
the
same
way,
andifit
canbeknown
in
advance
exactly
where
each
field
starts
within
each
record,
there
are
even
fast
ways
to
accessadesired
field
withinarecord
without
reading
through
the
other
fields.Asall
of
this
implies,
access
speedisa
primary
reason
for
putting
information
intoarelative
disk
file.
Some
well-written
relative
file
programs
are
abletofind
and
read
the
recordofone
'55
Page 64

desired
person
outofa
thousandinunder15seconds,
a
featnosequential
file
program
could
match.
FILE
LIMITS
Oneofthe
nicest
aspectsofrelative
filesisthat
all
thisisdone
for
you
without
your
havingtoworryatall
about
exactly
whereonthe
diskette's
surface
a
given
record
will
be
stored,
or
whetheritwill
fit
properly
within
the^current
disk
sector,
or
needtobe
extended
onto
the
next
available
sector.
DOS
takes
careofall
that
for
you.
All
you
needtodo
is
specify
how
long
each
record
is,inbytes,
and
how
many
records
you
will
need.
DOS
will
do
the
rest,
and
organize
thingsinsuchaway
thatitcan
quickly
find
any
recordinthe
file,
as
soonasitisgiven
its
record
number
(ordinal
position
within
the
file).
The
only
limit
that
will
concern
you,isthat
each
record
mustbethe
same
size,
and
the
record
length
you
choose
mustbebetween2and
254
characters.
Naturally
the
entire
file
also
has
to
fit
on
your
diskette
too,
which
means
that
the
more
records
you
need,
the
shorter
each
must
be.
CREATINGARELATIVE
FILE
Whenarelative
fileistobeused
for
the
first
time,
its
Open
statement
will
create
the
file;
after
that,
the
same
Open
statement
will
be usedtoreopen
the
file
for
both
reading
and
writing.
FORMAT
STATEMENTTOOPENARELATIVE
FILE:
OPEN
file#,device#,channel#,"drive#:file
name,
L,"+CHR$
(record
length)
where
"file#"is
the
file
number,
normallyaninteger
between1and
127;
"device#"is
the
device
number
to
be
used,
normally
8
on
the
1541;
"channel
#"
selects
a
particular
channel
along
which
communications
for
this
file
can
take
place,
normally
between2and
14;
"drive#"is
the
drive
number,
always0on
the
1541;
and
"file
name'*isthe
file
name,
with a
maximum
lengthof16
characters.
Pattern
matching
characters
are
allowed
in
the
name
when
accessing
an
existing
file,
but
not
when
creating
a
new
one.
The
"record
length"isthe
sizeofeach
record
within
the
fileinbytes
used,
including
carriage
returns,
quotation
marks
and
other
special
characters.
56
Page 65

Notes:
1.Donot
precede
the
drive
number
with
the
"at"
sign
(@);
thereisno
reason
to
replacearelative
file.
2.,L,"+CHR$(record
length)isonly
required
whenarelative
fileisfirst
created,
thoughitmay
used
later,solongasthe
"record
length"isthe
same
as
when
the
file
was
first
created.
Since
relative
files
mayberead
fromorwritten
to
alternately
and
with
equal
ease, thereisno
needtospecify
ReadorWrite
mode
when
openingarelative
file.
3.
"file
#",
"device#"and
"channel#"mustbevalid
numeric
constants,
variables
or
expressions.
The
restofthe
command
mustbea
valid
string
literal,
variableorexpression.
4.
Only1relative
file
canbeopenata
timeonthe
1541,
although
a
sequential
file
and
the
command
channel
may
alsobeopenatthe
same
time.
EXAMPLES:
To
createorre-open
a
relative
file
named
"GRADES",ofrecord
length
100,
use
OPEN
2,8,2,"GRADES,L,"
+CHR$(100)
To
re-openanunknown
relative
fileofthe
user's
choice
that
has
already
been
created,wecould
use
200
INPUT"WHICH
FILE";FI$
210
OPEN
5,8,5,FI$
USING
RELATIVE
FILES:
RECORD#
Whenarelative
fileisopened
for
the
first
time,itis
not
quite
ready
for
use.
Both
to
save
time
when
using
the
file
later,
andtoassure
that
the
file
will
work
reliably,
it
is
necessary
to
create
several
records
before
closing
the
file
for the
first
time.Ata
minimum,
enough
recordstofill
more
than2disk
sectors
(512
bytes)
shouldbewritten.
In
practice,
most
programsgoahead
and
createasmany
recordsasthe
programiseventually
expected
to
use.
That
approach
has
the
additional
benefitofavoiding
such
problemsasrunning
out
of
roomonthe
diskette
before
the
entire
fileiscompleted.
If
you
simply
begin
writing
datatoa
just-opened
relative
file,itwill
act
much
like
a
sequential
file,
putting
the
data
elements
writtenbythe
first
Print#
statement
in
Record
#1,
those
writtenbythe
second
Print#
statement
in
record#2andsoon.
(As
this
implies,
each
relative
record
mustbewrittenbya
single
Print#
statement,
using
embed
ded
carriage
returns
within
the
datatoseparate
fields
that
willbereadinvia
oneormore
Input#
statements
later.)
However,itis
far
better to
explicitly
specify
which
record
numberisdesired
viaaRecord#
commandtothe
disk.
This
allows
youtoaccess
records
in
any
desired
order,
hopping
anywhereina
file
with
equal
ease.
Properly
used,italso
avoidsasubtle
error
(bug)
commontoall
Commodore
disk
drives.
57
Page 66

FORMAT
FOR
THE
RECORD#
COMMAND:
PRINT#15,
"Pff+CHR$
(channel
#+96)+CHR$
(<record#)+
CHR$
(>record#)+
CHR$
(offset)
where
"channel#"is
the
channel
number
specified
in
the
current
Open
statement
for
the
specified
file,
"<record#"is
the
low
byteofthe
desired
record
number,
expressed
as
a
two
byte
integer,
">record#"is
the
high
byteofthe
desired
record
number,
and
an
optional
"offset"
vaiue,
if
present,
is
the
byte
within
the
record
at
whichafollowing
ReadorWrite
should
begin.
To
fully
understand
this
command,wemust
understand
how
most
integers
are stored
in
computers
basedonthe
6502
and
related
microprocessors.
In
the
binary
arithmetic
used
by
the
microprocessor,
itispossibletoexpress
any
unsigned
integer
from
0-255ina
single
byte.Itis
also
possible
to
store
any
unsigned
integer
from
0-65535in2
bytes,
with
1
byte
holding
the
partofthe
number
thatisevenly
divisible
by
256,
and any
remainder
in
the
other
byte.Inmachine
language,
such
numbers
are
written
backwards,
with
the
low-
order
byte
(the
remainder)
first,
followedbythe
high
order
byte.Inassemhly
language
programs
written
with
the
Commodore
Assembler,
the
low
partofa
two
byte
number
is
indicated
by
preceding
its
label
with
the
less-than
character
(<).
Similarly,
the
high
part
of
the
numberisindicated
by
greater-than
(>).
SAFETY
NOTE:
GIVE
EACH
RECORD#
COMMAND
TWICE!
To
avoid
the
remote
possibility
of
corrupting
relative
file
data,itis
necessary
to
give
Record#
commands
twice—once
beforearecordisread or
written,
and
again
immediately
afterwards.
EXAMPLES:
To
position
the
record
pointer
for
file
number2to
record
number3,we
could
type:
PRINT
#15,
"P"+CHR$
(98)+CHR$
(3)+CHR$
(0)
The
CHR$(98)
comes
from
adding
the
constant
(96)
to
the
desired
channel
number
(2).
(96+2=98)
Although
the
command
appears
to
work
even
when
96
is
not
added
to
the
channel
number,
the
constant
is
noimally
added
to
maintain
compatibility
with
the
way
Record#
works
on
Commodore's
CBM
and
PET
computers.
Since3is
less
than
256,
the
high
byte
of
its
binary
representation
is
0,
and
the
entire
value
fits
into
the
low
byte.
Since
we
want
to
read
or
write
from
the
beginning
of
the
record,nooffset
valueisneeded.
Since
these
calculations
quickly
become
tedious,
most
programs
urc
written
to
do
them
for
you.
Here
is
an
example
ofaprogram
which
inputs
a
record
number
and
converts
it
into
the
required
low
byte/high
byte
form:
58
Page 67

450
INPUT"RECORD#DESIRED";RE
46aIFRE<1ORRE>65535
THEN
450
470RH=INT(RE/256)
480RL =
RE-256*RH
490
PRINT#15,
"P"
+CHR$
(98)
+CHR$
(RL)+CHR$
(RH)
Assuming
RH
andRLare
calculated
asinthe
previous
example,
programs
may
also
use
variables
for
the
channel,
record,
and
offset
required:
570
INPUT
"CHANNEL,
RECORD,&OFFSET
DESIRED";CH,RE,OF
630
PRINT#15,"P"+CHR$(CH+96)+CHR$(RL)+CHR$(RH)+CHR$
(OF)
ANOTHER
RECORD#
COMMAND
Basic
4.0onCommodore's
PET
and
CBM
models
includes
a
Basic
Record#
command
not
foundinanyofthe
serial
bus
computers.
However,
some
available
utility
programs
for
these
models
include
it.Itserves
the
same
functionasthe
Record#
command
explained
above,
but
hasasimplified
syntax:
RECORD#file
#,record
#,offset
where
"file#"is
the
relative
file
number
being
used,
not
the
command
channel's
file,
"record#"is
the
desired
record
number,
and
"offset"isas
above.
If
you
seeaRecord#
command
writteninBasic4formina
program
you
want
to
use,
simply
convertitinto
the
usual
form
for
both
Basic2and
3.5
described
in
this
section.
COMPLETING
RELATIVE
FILE
CREATION
Now
thatwehave
learned
howtouse
both
the
Open
and
Record#
commands,weare
almost
readytoproperly
createarelative
file.
The
only
additional
factweneedtoknow
is
that
CHR$(255)isa
special
character
inarelative
file.Itis
the
character
usedbythe
DOS
to
fill
relative
recordsasthey
are
created,
beforeaprogram
fills
them
with
other
information.
Thus,ifwe
wanttowrite
the
last
recordweexpecttoneedinour
file
with
dummy
data
that will
not
interfere
with
our
later
work,
CHR$(255)isthe
obvious
choice.
Hereishowitworksinan
actual
program
which
you
may
copy
for
useinyour
own
relative
file
programs.
1020
OPEN
15,8,15
Open
command
channel
1380
INPUT"
ENTER
RELATIVE
FILE
NAME''
;FI$
Select
file
parameters
1390
INPUT"ENTER
MAX.#OF
RECORDS";NR
1400
INPUT-ENTER
RECORD
LENGTH";RL
59
Page 68

1410OPEN
l,8,2,4t0:"+FI$+",L,"
1420
GOSUB
59990
1430RH=INT(NR/256)
1440RL=NR-256*RH
1450PRINT#15,t4P"
+
CHR$(96+2)
+
CHR$(RL)+CHR$(RH)
1460
GOSUB
59990
1470
PRINT#1,CHR$(255);
1480
GOSUB
59990
1490PRINT#15/'P"
+
CHR$(96+2)
+
CHR$(RL)+CHR$(RH)
1500
GOSUB
59990
1510
CLOSE
1
1520
GOSUB
59990
9980
CLOSE
15
9990
END
59980
REM
CHECK
DISK
SUBROUTINE
59990
INPUT#15,EN,EM$,ET,ES
60000IFEN>1
AND
ENO50
THEN
PRINT
EN,EM$,ET,ES:STOP
60010
RETURN
Begintocreate
desired
file
Check
for
disk
errors
Calculate
length
values
Positiontolast
record
number
Send
default
character
to
it
Re-position
for
safety
Now
the
file
canbesafely
closed
And
the
command
channel
closed
Beforeweend
the
pro
gram
Ignore
"RECORD
NOT
PRESENT"
Two
lines
require
additional
explanation.
When
line
1470
executes,
the
disk
drive
will
operate
forupto
tenormore
minutes,
creating
all
the
recordsinthe
file,upto
the
maximum
record
number
you
selectedinline
1390.
Thisisnormal,
and
only
needstobe
done
once.
During
the
process
you
may
hear
the
drive
motor
turning
andanoccasional
slight
clickasthe
head
steps
from
tracktotrack,
everything
is
probably
just
fine.
Second,
line
60000
aboveisdifferent
from
the
equivalent
lineinthe
error
check
subroutine
given
earlier.
Here
disk
error
number50is
specifically
ignored,
becauseitwillbegenerated
when
the
error
channelischecked
in line
1460.Weignoreitbecause
not
having
a
requested
record
would
onlybean
errorifthat
record
had
previously
been
created.
EXPANDINGARELATIVE
FILE
Whatifyou
underestimate
your
needs
and
needtoexpandarelative
file
later?
No
problem.
Simply
request
the
record
number
you
need,
evenifit
doesn't
currently
exist
in
the
file.
If
fthere
is
no
such
record
yet,
DOS'
will
create
it
as
soon
as
you
try
to
write
information
in
it,
and
also
automatically
create
any
other
missing
records
belowitin
number.
The
only
penalty
willbea
slight
time
delay
while
the
records
are
created.
60
Page 69

WRITING
RELATIVE
FILE
DATA
The
commands
usedtoread
and
write
relative
file
data
are
the
same
Print#,
Input#,
and
Get#
commands
usedinthe
preceding
chapteronSequential
files.
Each
command
is
usedasdescribed
there.
However,
some
aspectsofrelative
file
accessdodiffer
from
sequential
file
programming,
andwewill
cover
those
differences
here.
DESIGNINGARELATIVE
RECORD
As
stated
earlierinthis
chapter,
each
relative
record
has a
fixed
length,
including
all
special
characters.
Within
that
fixed
length,
there
are
two
popular
waystoorganize
various
individual
fieldsofinformation.
Oneisfree-format,
with
individual
fields
varying
in
length
from
recordtorecord,
and
each
field
separated
from
the
nextbya
carriage
return
character
(eachofwhich
does
takeup1
character
spaceinthe
record).
The
other
approach
is
to
use
fixed-length
fields,
that
may
or
may
not
be
separated
by
carriage
returns.
If
fixed
length
fields
are
not
all
separated
by
carriage
returns,
you
will
either
needtobe
sure
a
carriage
returnisincluded
within
each88character
portionofthe record.Ifthisisnot
done,
you
will
havetouse
the
Get#
commandtoread
the
record,ata
significant
cost
in
speed.
Relative
recordsof88orfewer
characters,
or
final
portionsofrecords
that
are88or
fewer
characters
in
length,
need
not
end
inacarriage
return.
The
1541
is
smart
enough
to
recognize
the
endofa
relative
record
even
without a
finahcarriage
return.
Though
the
savingofa
single
character
isn't
much,
when
multiplied
by
the
numberofrecordsona
diskette,
the
savings
couldbesignificant.
Since
each
relative
record
mustbewrittenbya
single
Print#
statement,
the
recom
mended
approachisto
buildacopyofthe
current
recordinmemory
before
writingitto
disk.Itcanbecollected
intoasingle
string
variable
with
the
helpofBasic's
many
string-
handling
functions,
and
then
all
written
outatonce
from
that
variable.
Hereisan
example.Ifwe
are
writing
a
4-line
mail
label,
consisting
of4fields
named
"NAME",
"STREET",
"CITY&STATE",
and
"ZIP
CODE",
and
haveatotal
record
sizeof87
characters,
we
can
organizeitin
eitheroftwo
ways:
WITH
FIXED
LENGTH
FIELDS
WITH
VARIABLE
LENGTH
FIELDS
Field
Name
Length
Field
Name
Length
NAME
27
characters
NAME
31
characters
STREET
27
characters
STREET
31
characters
CITY&STATE
23
characters
CITY&STATE
26
characters
ZIP
CODE
10
characters
ZIP
CODE
11
characters
Total
length*87
characters
Potential
length
99
characters
Edited
length
87
characters
With
fixed
length
records,
the
field
lengths
addupto
exactly
the
record
length.
Since
the
total
lengthisjust
within
the
Input
buffer
size
limitation,
no
carriage
return
characters
are
needed.
With
variable
length
records,wecan
take
advantageofthe
variability
of
actual
address
lengths.
While
one
name
contains27letters,
another
may
have
only
15,
and
the
same
variability
existsinStreet
and
City
lengths.
Although
variable
length
records
lose1character
per
field
for
carriage
returns,
they
can
take
advantageofthe
difference
61
Page 70

between
maximum
field
length
and
average
field
length.Aprogram
that
uses
variable
record
lengths
must
calculate
the
total
lengthofeach
recordasitisentered,tobe
sure
the
totalofall
fields
doesn't
exceed
the
space
available.
WRITING
THE
RECORD
Hereisan
exampleofprogram
linestoenter
variable
length
fields
for
the
above
file
design,
build
them
intoasingle
string,
and
send
themtorecord
numberREin
file
number
3
(assumedtobearelative
file
that
uses
channel
number
3).
150CR$=CHR$(13)
2000
INPUT4
4NAME";NA$
2010IFLEN(NA$)>30
THEN
2000
2020
INPUT4
'STREET"
;SA$
2030IFLEN(SA$)>30
THEN
2020
2040
INPUT44CITY&STATE";CS$
2050IFLEN(CS$)>25
THEN
2040
2060
INPUT4
4ZIP
CODE";ZP$
2070IFLEN(ZP$)>10
THEN
2060
2080
DAS=NA$+
CR$+SA$+
CR$
+
CS$+CR$+ZP$
2090IFLEN(DA$)<87
THEN
2120
2100
PRINT44RECORD
TOO
LONG"
2110
GOTO
2000
2120RH=INT(RE/256)
2130RL=RE-256*RH
2140
PRWT#15,44F'+CHR$(96
+3)+
CHR$(RL)+CHR$(RH)
2150
GOSUB
59990
2160PRINT#3,DA$
2170
GOSUB
59990
2180
PRINT#15,44P"
+CHR$(96+3)
+
CHR$(RL)+CHR$(RH)
2190
GOSUB
59990
Carriage
Return
Enter
fields
And
check
lengthofeach
Build
output
data
string
Check
its
length
If
too
long
overall
Calculate
record
number
Positiontorecord
number
RE
Check
for
disk
errors
Send
datatoit
Re-position
for
safety
To
use
the
above
program
lines
for
the
version
with
fixed
length
fields,wewould
alterafew
linesasfollows:
150
160BL$="
2000
INPUT44NAME";NA$
2005LN=LEN(NA$)
2010IFLEN(NA$)>27
THEN
2000
2015
NA$=NA$+LEFT$(BL$,27-LN)
2020
INPUT<4STREET";SA$
2025LN=LEN(SA$)
Not
needed
this
time
27
shifted
space
characters
Checking
for
different
lengths
And
paddingtopreset
sizes
62
Page 71

2030IFLEN(SA$)>27
THEN
2020
2035
SA$=SA$+LEFT$(BL$,27-LN)
2040
INPUT"CITY&STATE";CS$
2045LN=LEN(CS$)
2050IFLEN(CS$)>23
THEN
2040
2055
CSS=CSS+LEFT$(BL$,23
-LN)
2060
ENfPUT'ZIP
CODE";ZP$
2065LN=LEN(ZP$)
2070IFLEN(ZP$)>10THEN
2060
2075
ZP$=ZP$+LEFT$(BL$,10-LN)
2080
DAS = NAS+SAS+CSS+ZPS
Note
lackofseparators
2120RH=INT(RE/256)
2130RL=RE-256*RH
2140PRINT#15,"P"+CHR$(96
+3)+
CHRS(RL)+CHRS(RH)+CHRS
(1)
2150
GOSUB
59990
2160
PRINT#3
,DA$;
Note
added
semicolon
2170
GOSUB
59990
2180
PRINT#
15,"P"+CHR$(96+3)
+
CHRS(RL)+CHRS(RH)+CHRS
(1)
2190
GOSUB
59990
If
field
contents
varyinlength,
variable
field
lengths
are
often
preferable.
On
the
other
hand,ifthe
field
lengths
are
stable,
fixed
field
lengths
are
preferable.
Fixed
length
fields
are
also
required
if
you
wanttouse
the
optional
offset
parameter
of
the
Record#
commandtopointata
particular
byte
withinarecord.
However,
one
warning
must
be
made
about
using
the
offset
this
way.
When
any
part
of a
recordiswritten,
DOS
overwrites
any
remaining
spacesinthe
record.
Thus,ifyou
must
use
the
offset
option,
never
update
any
fieldina
record
other
than
the
last
one
unless
all
succeeding
fields
will
alsobeupdated
from
memory
later.
The
above
programs
are
carefultomatch
record
lengths
exactlytothe
space
available.
Programs
that
don'tdoso
will
discover
that
DOS
pads
short
records
outtofull
size
with
fill
characters,
and
truncates
overlong
recordstofill
only
their
allotted
space.
Whenarecordistruncated,
DOS
will
indicate
error
51,''RECORD
OVERFLOW'',
but
short
records
willbeaccepted
withoutaDOS
error
message.
READINGARELATIVE
RECORD
Oncearelative
record
has
been
written
properlytodiskette,
readingitback
into
computer
memoryisfairly
simple,
but
the
procedure
again
varies,
dependingonwhether
it
uses
fixedorvariable
length
fields.
Here
are
the
program
lines
neededtoread
back
the
variable
fields
created
above
from
record
numberREin
file
and
channel
3:
3000RH=
INT(RE/256)
Calculate
record
number
3010RL=RE-256*RH
3020
PRINT#15,ttP"+CHR$(96
+3)+
CHRS(RL)+CHR$(RH)+CHRS
(1)
Position
to
record
number
RE
63
Page 72

3030
GOSUB
59990 Check
for
disk
errors
3040
INPUT#1,NA$,SA$,CS$,ZP$
Readinfields
3050
GOSUB
59990
3060
PRINT#15,"P"
+CHR$(96+3)
+
CHR$(RL)+CHR$(RH)
Re-position
for
safety
Here
are
the
lines
neededtoread
back
the
version
with
fixed
length
fields:
3000RH=INT(RE/256)
3010RL=RE-256*RH
3020
PRINT#15,"P"
+
CHR$(96+3)+CHR$
(RL)+CHR$(RH)
3030
GOSUB
59990
3040
INPUT#1,DA$
Readinentire
record
3050
GOSUB
59990
3060
PRINT#15,"P"
+CHR$(96+3)
+
CHR$(RL)+CHR$(RH)
3070
NA$ =
LEFT$(DA$,27)
Split
data
into
fields
3080
SA$=MID$(DA$,28,27)
3090
CS$=MID$(DA$,55,23)
3100
ZP$=RIGHT$(DA$,
10)
This
ends
our
discussion
of
relative
files.Acomplete
"RELATIVE
FILE"
program,
similartothe
examplesinthis
chapter,
is
includedonthe
Test/Demo
diskette.
THE
VALUEOFINDEX
FILES
(ADVANCED
USERS)
In
the
last
two
chapterswehave
learned
howtouse
sequential
and
relative
files
separately.
But
they
are
often
used
together,
with
the
sequential
file
usedtokeep
brief
recordsofwhich
nameinthe
relative
fileisstoredineach
record
number.
That
way
the
contentsofthe
sequential
file
canberead
intoastring
array
and
sorted
alphabetically.
After
sorting,
a technique
knownasa
binary
search
canbeusedtovery
quickly
find
an
entered
nameinthe
array,
and
readinor
write
the
associated
recordinthe
relative
file.
Advanced
programs
can
maintain
twoormore
such
index
files,
sortedindiffering
ways
simultaneously.
64
Page 73

CHAPTER
7
DIRECT
ACCESS
COMMANDS
A
TOOL
FOR
ADVANCED
USERS
Direct
access
commands
specify
individual
sectorsonthe
diskette,
reading
and
writing
information
entirely
under
your
direction.
This
gives
them
almost
complete
flexibility
in
data-handling
programs,
but
also
imposes tremendous
responsibilities
on
the
programmer,tobe
sure
nothing
goes
awry.Asa
result,
they
are
normally
used
only
in
complex
commercial
programs
abletoproperly
organize
data
without
help
from
the
disk
drive
itself.
A
far
more
common
use of
direct
access
commandsisin
utility
programs
used
to
view
and
alter
partsofthe
diskette
that
are
not
normally
seen
directly.
For
instance,
such
commands
canbeusedtochange
the
nameofa
diskette
without
erasing
allofits
programs,
to
lockaprogramsoit
can'tbeerased,orhide
your
nameina
location
where
it
won'tbeexpected.
DISKETTE
ORGANIZATION
There
areatotalof683
blocksona
1541
diskette,
of
which
664
are
available
for
use,
with
the
rest
reserved
for
the
BAM
(Block
Availability
Map)
and
the
Directory.
The
diskette's
surfaceisdivided
into
tracks,
which
are
laid
outasconcentric
circles
on
the
surfaceofthe
diskette.
There
are35different
tracks,
starting
with
track1at
the
outsideofthe
diskette
to
track35at
the
center.
Track18is
used
for
the
directory,
and
the
DOS
fillsupthe
diskette
from
the
center
outward,
alternately
in
both
directions.
Each
trackissubdivided
into
sectors
(also
called
blocks).
Because
thereismore
roomonthe
outer
tracks,
there
are
more
sectors
per
track
there.
The
outermost
tracks
contain21sectors
each,
while
the
innermost
ones
only
have17sectors
each.
The
table
below
shows
the
numberofsectors
per
track.
Table
6.1:
Track
and
Sector
Format
TRACK
NUMBER
1to17
18to24
25to30
31to35
SECTOR
NUMBERS
0
through
20
0
through
18
0
through
17
0
through
16
TOTAL
SECTORS
21
19
18
17
In
this
chapterwewill
describe
the
DOS
commands
for
directly
reading
and
writing
any
track
and
blockonthe
diskette,
as
wellasthe
commands
usedtomark
blocksasused
or
unused.
Unless
otherwise
notes,
all
direct
access
commands
are
the
sameinboth
Basic
2
and
Basic
3.5.
OPENINGADATA
CHANNEL
FOR
DIRECT
ACCESS
When
working
with
direct
access
data,
you-need
two
channels
opentothe
disk:
the
command
channel
we've
used
throughout
the
book,
and
another
for
data.
The
command
channelisopened
with
the
usual
OPEN
15,8,15orequivalent.
A
direct
access
data
65
Page 74

channelisopened
much
like
other
files,
except
that
the
pound
sign
(#),
optionally
followedbya
memory
buffer
number,isusedasa
file
name.
FORMAT
FOR
DIRECT
ACCESS
FILE
OPEN
STATEMENTS:
OPEN
file
#,device#,channel#,"#buffer
#"
where
"file#"is
the
file
number,
"device#"is
the
disk's
device
number,
normally
8;
"channel#"is
the
channel
number,anumber
between2and14thatisnot
usedbyother
files
open
at
the
same
time;
and
"buffer
#",
if
present,
isa0,
1,
2,
or
3,
specifying
the
memory
buffer
within
the
1541touse
for
this
file's
data.
EXAMPLES:
Ifwedon't
specify
which
disk
buffertouse,
the
1541
will
select
one:
OPEN5,8,5,"#"
Orwecan
make
the
choice
ourselves:
OPEN4,8,4,"#2"
BLOCK-READ
The
purpose ofaBlock
Readisto
load
the
contentsofa
specified
sector
into
a
file
buffer.
Although
the
Block
Read
command
(B-R)isstill
partofthe
DOS,
command
set,itis
nearly
always
replacedbytheUlcommand.
FORMAT
FOR
THE
BLOCK-READ
COMMAND:
PRINT#15,
"Ul";
channel#;drive#;track#;sector
#
where
"channel#"is
the
channel
number
specified
when
the
file
into
which
the
block
willberead
was
opened,
"drive#"is
the
drive
number,
always0on
the
1541,
and
"track#"and
"sector#"are
respectively
the
track
and
sector
numbers
containing
the
desired
blockofdatatobe
read
into
the
file
buffer.
ALTERNATE
FORMATS:
PRINT#15,"Ul:"channel
#;drive
#;track
#;sector
#
PRINT#15,"UA:"channel
#;drive
#;track
#;sector
#
PRINT#15,"Ul:channel
#,drive
#,track
#,sector
#"
66
Page 75

EXAMPLE:
Hereisa
complete
programtoread a
sector
into
disk
memory
using
Ul,
and
from
there
into
computer
memory
via
Get#.
(Ifacarriage
return
will
appearatleast
once
in
every88characters
of
data,
Input#
may
be usedinplaceofGet#).
110
MB=7936:REM
$1FOO
Defineamemory
buffer
120
INPUT"TRACKTOREAD";T
Selectatrack
130
INPUT-SECTORTOREAD";S
and
sector
140
OPEN
15,8,15
Open
command
channel
150
OPEN
5,8,5,"#"
Open
direct
access
channel
160
PRINT#15,"Ul";5;0;T;S
Read
sector
into
disk
buffer
170
FORI=
MB
TO
MB+255
Usealoop
to
180
GET#5,A$:IFA$=""
copy
disk
buffer
THENA$=
CHR$(0)
into
computer
memory
190
POKE
I,ASC(A$)
Tidyupafter
200
NEXT
210
CLOSE
5:CLOSE
15
220
END
As
the
loop
progresses,
the
contentsofthe
specified
track
and
sector
are
copied
into
computer
memory,
beginningatthe
address
setbyvariableMBin
line
160,
and
may
be
examined
and
altered
there.
Thisisthe
basis
for
programs
like
"DISPLAYT&
S"onthe
Test/Demo
diskette.
BLOCK-WRITE
The
purpose
of a
Block
Writeisto
save
the
contentsofa
file
buffer
intoaspecified
sector.
It is
thus
the
reverseofthe
Block
Read
command.
Although
the
Block
Write
command
(B-W)isstill
partofthe
DOS
command
set,itis
nearly
always
replacedbythe
U2
command.
FORMAT
FOR
THE
BLOCK-WRITE
COMMAND:
PRINT#15,"U2'';channel
#;drive
#;track
#;sector
#
where
"channel#"is
the
channel
number
specified
when
the
file
into
which
the
block1
willberead
was
opened;
"drive#"is
the
drive
number
(always0on
the
1541);
and
"track#"and
"sector#"are
respectively
the
track
and
sector
numbers
that
should
receive
the
blockofdata
being
saved
from
the
file
buffer.
ALTERNATE
FORMATS:
PRINT#15,'4U2:''channel
#;drive
#;track
#;sector
#
PRINT#15,"UB:"channel
#;drive
#;track
#;sector
#
PRINT#15,"U2:channel
#,drive
#,track
#,sector
#"
67
Page 76

EXAMPLES:
To
restore
track
18,
sector1of
the
directory
from
the
disk buffer
filledbythe
Block
Read
exampleonpage
82,wecan
use
PRlNT#15,"U2";5;0;18;l
We'll
returntothis
exampleonthe
next
page,
afterwelearntoalter
the
directory
in
a
useful
way.
We
can
also
useaBlock
WritetowriteanameinTrack1,Sector1,a
rarely-used
sector.
This
canbeusedasa
wayofmarkingadisketteasbelongingtoyou.
Hereisa
programtodo
it,
using
the
alternate
formofthe
Block
Write
command:
110
INPUT"YOUR
NAME"
;NA$
Enteraname
120
OPEN
15,8,15
Open
command
channel
130
OPEN
4,8,4,4t#"
Open
direct
access
channel
140
PRINT#4,NA$
Write
nametobuffer
150
PRINT#15,4tU2";4;0;l;l
Write
buffertoTrack
1,
160
CLOSE
4
Sector1of
diskette
170
CLOSE
15
Tidyupafter
180
END
THE
ORIGINAL
BLOCK-READ
AND
BLOCK-WRITE
COMMANDS
(EXPERT
USERS
ONLY)
Although
the
Block
Read
and
Block
Write
commands
are
nearly
always
replaced
by
theUlandU2commands
respectively, the
original
commands
can
stillbeused,aslong
as
you
fully
understand
their
effects.
UnlikeUland
U2,
B-R
and
B-W
allow
youtoread
or
write
less
than a
full
sector.Inthe
caseofB-R,
the
first
byteofthe
selected
sector
is
usedtoset
the
buffer
pointer
(see
next
section),
and
determines
how
many
bytesofthat
sector
are
read
intoadisk
memory
buffer.Aprogram
may
checktobe
sureitdoesn't
attempttoread
past
the
endofdata
actually
loaded
into
the
buffer,bywatching
for
the
valueofthe
file
status
variableSTto
change
from0to
64.
When
the
bufferiswritten
back
to
diskettebyB-W,
the
first
byte
writtenisthe
current
valueofthe
buffer
pointer,
and
only
that
many
bytes
are
written
into
the
specified
sector.
B-R
and
B-W
may
thus
be
usefulinworking
with
custom-designed
file
structures.
FORMAT
FOR
THE
ORIGINAL
BLOCK-READ
AND
BLOCK-WRITE
COM
MANDS:
PRINT#15,4tBLOCK-READ'';channel
#;drive
#;track
#;sector
#
abbreviated
as:
PRINT#15,"B-R";channel
#;drive
#;track
#;sector
#
and
PRINT#15,ttBLOCK-WRITE*';channel
#;drive
#;track
#;sector
#
68
Page 77

abbreviated
as:
PRINT#15,"B-W";channel
#;drive
#;track
#;sector
#
where
"channel#"is
the
channel
number
specified
when
the
file
into
which
the
block
willberead
was
opened,
"drive#"is
the
drive
number
(always0on
the
1541),
and
44track#"and
"sector#"are
respectively
the
track
and
sector
numbers
containing
the
desired
blockofdatatobe
partially
read
intoorwritten
from
the
file
buffer.
IMPORTANT
NOTES:
1.Ina
true
Block-Read,
the
first
byteofthe
selected
sectorisused
to
determine
how
many
bytesofthat
sectortoread
into
the
disk
memory
buffer.
It
thus
cannotbeusedtoreadanentire
sector
into
the
buffer,asthe
first
data
byte
is
always
interpreted as
being
the
numberofcharacters
to
read,
rather
than
partofthe
data.
2.
Similarly,
inatrue
Block-Write,
when
the
bufferiswritten
backtodiskette,
the
first
byte
writtenisthe
current
valueofthe
buffer
pointer,
and
only
that
many
bytes
are
written
into
the
specified
sector.Itcannot
be usedtorewriteanentire
sector
onto
diskette
unchanged,
because
the
first
data
byteisoverwritten
by
the
buffer
pointer.
THE
BUFFER
POINTER
The
buffer
pointer pointstowhere
the
next
ReadorWrite
will
begin
withinadisk
memory
buffer.Bymoving
the
buffer
pointer,
you
can
access
individual
bytes
within
a
blockinany
order.
This
allows
youtoedit
any
portionofa
sector,
or organizeitinto
fields,
likearelative
record.
FORMAT
FOR
THE
BUFFER-POINTER
COMMAND:
PRINT#15,<4BUFFER-POINTER";channel#;byte
usually
abbreviated
as:
PRINT#15,"B-P";channel
#;byte
where
"channel#"is
the
channel
number
specified
when
the
file
reserving
the
buffer
was
opened,
and
"byte"isthe
character
number
within
the
bufferatwhichtopoint.
ALTERNATE
FORMATS:
PRINT#15,"B-P:"channel
#;byte
PRINT#15,"B-P:channel
#;byte"
EXAMPLE:
Hereisa
program
that
locks
the
first
programorfileona
1541
diskette.
It
works
by
reading
the
startofthe
directory
(Track
18,
Sector1)into
disk
memory,
setting
the
buffer
69
Page 78

pointertothe
first file
type
byte
(see
AppendixCfor
detailsofdirectory
organization),
lockingitby
setting
bit6and
rewriting
it.
110
OPEN
15,8,15
Open
command
channel
120
OPEN
5,8,5,"#"
Open
direct
access
channel
130
PRINT#15,"Ul";5;0;18;l
Read
Track
18,
Sector
1
140
PRINT#15,"B-P";5;2
PointtoByte
2 of
the
buffer
150
GET#5,A$:IF
A$=""THENA$=
CHR$(0)
Readitinto
memory
160A=
ASC(A$)OR64
Turnonbit6to
lock
170
PRINT#15,"B-P";5;2
PointtoByte2again
180
PRINT#5,CHR$(A);
Overwrite
itinbuffer
190
PRINT#15,"U2";5;0;18;l
Rewrite
buffer
to diskette
200
CLOSE
5
Tidyupafter
210
CLOSE
15
220
END
After
the
above
programisrun,
the
first
fileonthat
diskette
cannolongerbeerased.
If
you
later
needtoerase
that
file,
re-run
the
same
program,
but
substitute
the
revised
line
160
belowtounlock
the
file
again:
160A=
ASC(A$)
AND
191
Turn
off
bit6to
unlock
ALLOCATING
BLOCKS
Once
you
have
written
something
inaparticular
sectorona
diskette
with
the
help
of
direct
access
commands,
you
may
wishtomark
that
sectoras"already
used,"tokeep
other
files
from
being
written
there.
Blocks
thus
"allocated"
willbesafe
until
the
diskette
is
validated.
FORMAT
FOR
BLOCK-ALLOCATE
COMMAND:
PRINT#15,<tBLOCK-ALLOCATE";drive
#;
track
#;sector
#
usually
abbreviated
as:
PRINT#15,"B-A";drive
#;
track
#;sector
#
where
"drive#"is
the
drive
number,
always0on
the
1541,
and
"track#"and
"sector
#"
are the
track
and
sector
containing
the
block
of
data
to
be
read
into
the
file
buffer.
ALTERNATE
FORMAT:
PRINT#15,"B-A:";drive
#;
track
#;sector
#
EXAMPLE:
If
you
trytoallocate
a
block
that
isn't
available,
the
DOS
will
set
the
error
message
to
number
65,NOBLOCK,
and
set
the
track
and
block
numbersinthe
error
message
to
70
Page 79

the
next
available
track
and
block
number.
Therefore,
before
selecting
a
blocktowrite,
trytoallocate
that
block.Ifthe
block
isn't
available;
read
the
next
available
block
from
the
error
channel
and
allocate
it
instead.
However,donot
allocate
data
blocksinthe
directory
track.Ifthe
track
number
returned
is0,the
diskette
is
full.
Hereisa
program
that
allocates
a
placetostoreamessageona
diskette.
100OPEN15,8,15
110OPEN5,8,5,"#"
120
PRINT#5,"I
THINK
THEREFOREIAM"
130T=l:S=l
140
PRINT#15,"B-A";0;T;S
150
INPUT#15,EN,EM$,ET,ES
160IFEN=0
THEN
210
170IFENO65
THEN
PRINT
EN,EM$,ET,ES:STOP
180IFET=0
THEN
PRINT
"DISK
FULL":STOP
190IFET=18THEN
ET=
19:ES=0
200
T =
ET:S=ES:GOTO
140
210
PRINT#15,"U2";5;0;T;S
220
PRINT
"STORED
AT:",T,S
230
CLOSE
5:CLOSE
15
240
END
FREEING
BLOCKS
Open
command
channel
**
direct
access
"
Writeamessagetobuffer
Startatfirst
track§or
Try
allocating
it
Seeifit
worked
If
so,
we're
almost
done
"NO
BLOCK"
means
already
allocated
If
next
trackis0,
we're
outofroom
Don't
allocate
the
directory!
Try
suggested
track§or
next
Write
buffertoallocated
sector
Say
where
message
went
and
tidy
up
The
Block-Free
commandisthe
opposite
of
Block-Allocate.
It
freesablock
that
you
don't
need
any
more,
for
re-usebythe
DOS.
Block-Free
updates
the
BAMtoshow
a
particular
sectorisnotinuse,
rather
than
actually
erasing
any
data.
FORMAT
FOR
BLOCK-FREE
COMMAND:
PRINT#15,"BLOCK-FREE'';drive
#;track
#;sector
#
abbreviated
as:
PRINT#15,"B-F";drive
#;track
#;sector
#
where
"drive#"is
the
drive
number
(always0on
the
1541),
and
"track#"and
"sector
#"
are
respectively
the
track
and
sector
numbers
containing
the
desired
blockofdata
to
be
read
into
the
file
buffer.
ALTERNATE
FORMAT:
PRINT#15,"B-F:";drive
#;track
#;sector
#
71
Page 80

EXAMPLE:
To
free
the
sectorinwhichwewrote
our
nameinthe
Block
Write
example,
and
allocated
in
the
first
Block-Allocate
example,wecould
use
the
following
command:
PRINT#15,"B-F";0;l;l
USING
RANDOM
FILES
(ADVANCED
USERS
ONLY)
By
combining
the
commands
in
this
chapter,
it
is
possible to
developafile-
handing
program
that
uses
random
files.
What
you
need
to
know
now
is
how
to
keep
track
of
which
blocks
on
the
disk
suchafile
has
used.
(Even
though
you
know
a
sector
has
not
been
allocated
by
your
random
file,
you
must
alsobesureitwasn't
allocated
by
another
unrelated
fileonthe
diskette.)
The
most
common
wayofrecording
which
sectors
have
been
usedbya
random
file
is
inasequential
file.
The
sequential
file
storesalistofrecord
numbers,
with
the
track,
sector,
and
byte
locationofeach
record.
This
means
three
channels
are
neededbya
random
file:
one
for
the
command
channel,
one
for
the
random
data,
and
the
last
for the
sequential
data.
72
Page 81

CHAPTER
8
INTERNAL
DISK
COMMANDS
Expert
programmers
can
give
commands
that
directly
alter
the
workings.pf
the
1541,
muchasskilled
programmers
can
alter
the
workingsofBasic
inside
the
computer
with
Peeks,
Pokes
and
Sys
calls.Itis
also
possibletowrite
machine
language
programs
that
load
and
run
entirely
within
the
1541,
eitherbywriting
them
into
disk
memory
from
the
computer,orby
loading
them
directly
from
diskette
into
the
desired
disk
memory
buffer.
In
use,
thisissimilartoloading
and
running
machine
language
programsinyour
computer.
As when
learningtouse
Peek(),
Poke
and
Sysinyour
computer,
extreme
caution
is
advisedinusing
the
commandsinthis
chapter.
They
are
essentially
machine
language
commands,
and
lack
allofBasic's
safeguards.
If
anything
goes
wrong,
you
may
have
to
turn
the
disk
drive
off
andonagain
(after
removing
the
diskette)
to
regain
control.Donot
practice
these
commandsonany
important
diskette.
Rather,
makeaspare
copy and
work
with
that.
Knowing
howtoprograma6502inmachine
language
will
help
greatly,
and
you
will
also
needagood
memory
mapofthe
1541.Abrief
1541
map
appears
below.
Location
0000-00FF
0100-01FF
0200-02FF
0300-07FF
1800-180F
1C00-1C0F
C100-F258
F259-FE66
FE67-FE84
FE85-FEE6
FEE7-FF0F
FFE6-FFFF
1541
MEMORY
MAP
Purpose
2KofRAM
memory
Zero
page
work
area:
job queue,
important
variables
&
pointers
Stack
work
area
Command
buffers&tables:
channels,
parser,
output,
variables
Data
buffers
0-4,1per
pageofmemory.
Input/Output
chips
6522
VIA:
I/Otocomputer
65?2
VIA:
I/Otodisk
controller
Disk
Operating
System
ROM
Interface
Processor:
receive&interpret
commands
from
computer
Floppy
Disk
Controller:
executes
IP's
commands,
controls
mecha
nism
IRQ
handler:
switches
fromIPto
FDC&back
every10ms.
ROM
tables&constants
Patch
area
JMP
table:
User
command
vectors
73
Page 82

Other
Resources:
More
detailed
information
about
Commodore
disk
drives
canbefoundinthese
books:
Inside
Commodore
DOS,byImmers&Neufeld
(Datamost,
cl984)
The
Anatomyofthe
1541
Disk
Drive,byEnglisch&Szczepanowski
(Abacus,
cl984)
Programming
the
PET/CBM,byWest
(Level
Limited,
cl982)
The
PET
Personal
Computer
Guide,byOsborne&Strasmas
(Osborne/McGraw-Hill,
c
1982)
MEMORY-READ
The
disk
contains
16KofROM
(Read-Only
Memory),aswellas2KofRAM
(Read-
Write
Memory).
You
can
get
direct
accesstoany
location
within
these,orto
the
buffers
that
the
DOS
has
setupin
RAM,byusing
memory
commands.
Memory-Read
allows
you
to
select
which
byteorbytestoread
from
disk
memory
into
the
computer.
The
Memory-
Read
commandisthe
equivalent
of
.the
Basic
Peek()
function,
but
reads
the
disk's
memory
insteadofthe
computer's
memory.
Note:
Unlike
other
disk
commands,
thoseinthis
chapter
cannotbespelled
out
in
full.
Thus,MRis
correct,
but
MEMORY-READisnotapermitted
alternate
wording.
FORMAT
FOR
THE
MEMORY-READ
COMMAND:
PRINT#15,t4M-R"CHR$(<address)CJ4R$(>address)CHR$(#
of
bytes)
where
"<address"isthe
low
order
pari,
and
">address"isthe
high
order
partofthe
addressindisk
memorytobe
read.Ifthe
optional
t4#ofbytes"isspecified,
it
selects
'how
many
memory
locations
will
be
read
in,
from
1-255.
Otherwise,
1
character
will
be
read.Ifdesired,
a
colon
(:)
may
follow
M-R
inside
the
quotation
marks.
ALTERNATE
FORMAT:
PRINT#15,t4M-R:"CHR$(<address)CHR$(>address)CHR$(#
of
bytes)
The
next
byte
read
using
the
Get#
statement
through channel
#15
(the
error
channel),
will
be
from
that
address
in
the
disk
controller's
memory,
and
successive
bytes
willbefrom
successive
memory
locations.
Any
Input#
from
the
error
channel
will
give
peculiar
results
when
you're
using
this
command.
This
can be
clearedupby
sending
any
other
commandtothe
disk,
except
another
memory
command.
74
Page 83

EXAMPLES:
To
see
how
many
tries
the
disk
will
maketoreadaparticular
sector,
and
whether
"seeks"
one-half
tracktoeach
side
willbeattemptedifa
read
fails,
and
whether
t4bumps"totrack
one
and
back
willbeattempted
before
declaring
the
sector
unreadable,
we
can*use
the
following
lines.
They
will
readaspecial
variable
in
the
zero
pageofdisk
memory,
called
REVCNT.Itis
locatedat$6A
hexadecimal
($6A
hexadecimal
=
6x16
+
10=106).
110
OPEN
15,8,15
120
PRINT#
15,''M-R"CHR$(
106)CHR$(0)
130
GET#15,G$:IFG$=""THENG$=
CHR$(0)
140G=ASC(G$)
150B=GAND
128:B$="ON":IFBTHENB$=
"OFF"
160S=GAND
64:S$="ON":IFSTHENS$=
"OFF"
170
T =GAND
31:PRINT"#OF
TRIES
IS";T
180
PRINT
"BUMPS
ARE";B$
190
PRINT
"SEEKS
ARE";S$
200
CLOSE
15
210
END
Open
command
channel
SameasG=PEEK(106)
Check
bit
7
Check
bit
6
Check
bits
0-5
and
give
results
Tidyupafter
Here'samore
general
purpose
program
that
reads
oneormore
locations
anywhereindisk
memory:
110OPEN15,8,15
120
INPUT"#OFBYTESTOREAD(0=
END)";NL
130IFNL<1
THEN
CLOSE
15:END
140IFNL>255THEN120
150
INPUT"STARTINGATADDRESS";AD
160AH=
INT(AD/256):AL
=
AD-AH*256
170PRINT#15,"M-R"CHR$(AL)CHR$(AH)
CHR$(NL)
180
FOR
1=1TONL
190:GET#15,A$:IFA$=""THENA$=
CHR$(0)
200:
PRINT
ASC(A$);
210
NEXT
I
220
PRINT
230
GOTO
120
Open
command
channel
Enter
numberofbytes
wanted
unless
done
or
way
outofline
Enter
starting
address
Convertitinto
disk
form
Actual
Memory-Read
Loop
til
have
all
the
data
printingitaswego
Forever
MEMORY-WRITE
The
Memory-Write
commandisthe
equivalent
of
the
Basic
Poke
command,
but
has
its
effectindisk
memory
insteadofwithin
the
computer.
M-W
allows
youtowriteupto
34
bytesata
time
into
disk
memory.
The
Memory-Execute
and
some
User
commands
can
be
usedtorun
any
programs
written
this
way.
75
Page 84

FORMAT
FOR
THE
MEMORY-WRITE
COMMAND:
PRINT#
15,*'M-W'CHR$(<address)CHR$(>address)CHR$
(#ofbytes)CHR$(data
byte(s))
where
"<address"isthe
low
order
part,
and
t4>address"
is
the
high
order
partofthe
addressindisk
memorytobegin
writing,
*'#ofbytes"isthe
numberofmemory
locations
that willbewritten
(from
1-34),
and
"data
byte"is1ormore
byte valuestobe
written
into
disk
memory,
eachasa
CHR$()
value.Ifdesired,
a
colon
(:)
may
follow
M-
W
within
the
quotation
marks.
ALTERNATE
FORMAT:
PRINT#
15/
'M-W:'
'CHR$(<address)CHR$(>address)CHR$
(#ofbytes)CHR$(data
byte(s))
EXAMPLES:
We
can
use
this
linetoturn
off
the
"bumps"
when
loading
DOS-protected
programs
(i.e.,
programs
that
have
been
protected
against
being
copiedbycreating
and
checking
for
specific
disk
errors).
PRINT#15,ttM-W"CHR$(106)CHR$(0)CHR$(l)CHR$(133)
The
following
line
can
be.usedtorecover
bad
sectors,
suchaswhenanimportant
file
has
been
damaged
and
cannotberead
normally.
PRINT#15,ttM-W"CHR$(106)CHR$(0)CHR$(l)CHR$(31)
The
above
two
examples
maybevery
useful
under
some
circumstances.
They
are
the
equivalent
of
POKE
106,133
and
POKE
106,31
respectively,
butindisk
memory,
not
inside
the
computer.Asmentionedinthe
previous
section's
first
example,
location
106
in
the
1541
disk
drive
signifies
three
separate
activities
to
the
drive,
all
related
to
error
recovery.
Bit7(the
high
bit),ifset
meansnobumps
(don't
thump
the
drive
backtotrack
1).
Bit6,if
set,
meansnoseeks.Inthat
case,
the
drive
won't
attempttoread
the
half-track
above
and
below
the
assigned
tracktoseeifit
can
read
the
data
that
way.
The
bottom
6
bits
are
the
countofhow
many
times
the
disk
will
trytoread
each
sector
before
and
after
trying
seeks
and
bumps
before
giving
up.
Since31is
the
largest
number
that
can
be
expressed
in6bits,
thatisthe
maximum
numberoftries
allowed.
From
this
example,
you
can
see
the
valueofknowing
something
about
Peeks,
Pokes,
and
machine-language
before
using
direct-access
disk
commands,aswellastheir
poten
tial
power.
76
Page 85

MEMORY-EXECUTE
Any
routineindisk
memory,
eitherinRAMorROM,
canbeexecuted
with
the
Memory-Execute
command.Itis
the
equivalent
of
the
Basic
Sys
calltoa
machine
language
programorsubroutine,
but
worksindisk
memory
insteadofwithin
the
com
puter.
FORMAT
FOR
THE
MEMORY-EXECUTE
COMMAND:
PRINT#15,4tM-E"CHR$(<address)CHR$(>address)
where
"<address"
is
the
low
order
part,
and
">address"
is
the
high
order
partofthe
addressindisk
memoryatwhich
execution
istobegin.
ALTERNATE
FORMAT:
PRINT#15/<M-E:"CHR$(<address)CHR$(>address)
EXAMPLE:
Hereisa
Memory-Execute
command
that
does
absolutely
nothing.
The
first
instruc
tionitexecutesisan
RTS,
which
ends
the
command:
PRIOT#15,"M-E"CHR$(88)CHR$(242)
A
more
plausible
use
for
this
command
would
be
to
artificially
trigger
an
errat
message.
Don't
forgettocheck
the
error
channel,oryou'll
miss
the
message:
PRIOT#15,''M-E"CHR$(201)CHR$(239)
However,
most
uses
require
intimate
knowledgeofthe
inner
workingsofthe
DOS,
and
preliminary
setup
with
other
commands,
suchasMemory-Write.
BLOCK-EXECUTE
This
rarely-used
command
will
loadasector
containing
a
machine
language
routine
intoamemory
buffer
from
diskette,
and
executeitfrom
the
first
location
within
the
buffer,
untilaReTurn
from
Subroutine
(RTS)
instruction
ends
the
command.
FORMAT
FOR
THE
BLOCK-EXECUTE
COMMAND:
PRINT#15,"B-E'';channel
#;drive
#;track
#;sector
#
where
"channel#"is
the
channel
number
specified
when
the
file
into
which
the
block
willbeloaded
was
opened,
"drive#"is
the
drive
number
(always0on
the
1541),
and
"track#"and
"sector#"are
respectively
the
track
and
sector
numbers
containing
the
desired
block of
datatobe
loaded
into
the
file
buffer
and
executed
there.
77
Page 86

ALTERNATE
FORMATS:
PRINT#15,44B-E:'';channel
#;drive
#;track
#;sector
#
PRINT#15,44B-E:channel
#,drive
#,track
#,sector
#"
EXAMPLES:
Assuming
you've
writtenamachine
language
program
onto
Track1,Sector8of
a
diskette,
and
would
liketorunitin
buffer
number1in
disk
memory
(starting
at
$0400
hexadecimal,
you
coulddosoasfollows:
110
OPEN
15,8,15
Open
command
channel
120
OPEN
2,8,2,44#1"
Open
direct
access
channeltobuffer
1
130PRINT#15,44B-E";2;0;l;8
LoadTrack1,Sector8init&
execute
140
CLOSE
2
Tidyupafter
150
CLOSE
15
160
END
USER
COMMANDS
Most
User
commands
are
intendedtobe
usedasmachine
language
JMP
or Basic
SYS
commandstomachine
language
programs
that
reside inside
the
disk
memory.
However,
someofthem
have
other
usesaswell.
The
Userl
and
User2
commands
are
used
to
replace
the
Block-Read
and
Block-Write
commands,UIre-starts
the
1541
without
changing
its
variables,
UJ
cold-starts
the
1541
almostasifithad
been
turned
off
and
on
again,
and
UI-
speedsupthe
1541
when
used
with
the
VIC20only.
(Note:
VIC20owners
don't
havetouse
UI-;
the
1541
works
with
the
VIC
20,
withorwithout
this
command.)
User
Command
Function
UIorUA
replaces
Block-Read
U2orUB
replaces
Block-Write
U3orUC
JMP
$0500
(sameasSYS
5*256,
but
within
the
1541
itself.)
U4orUD
JMP
$0503
(SYS
5*256+3)
U5orUE
JMP
$0506("
5*256+6)
U6orUF
JMP
$0509
(*'
5*256+9)
U7orUG
JMP
$050C(4<
5*256
+12)
U8
or
UH
JMP
$050F
(t4
5*256+15)
U9
or
UI
1541
NMI
(non-maskable
interrupt—warm
start)
U:
or
UJ
1541
reset
(cold
start,
allow2seconds
before
next
command.)
UI+
restore
1541tousual
speed
UI-
speed
1541
up
by
25%
when
used
with
VIC
20
only.
By
loading
these
memory
locations
with
another
machine
language
JMP
command,
such
as
JMP
$0520,
you
can
create
longer
routines
that
operate
in
the
disk's
memory
along
withaneasy-to-use
jump
table.
78
Page 87

FORMAT
FOR
USER
COMMANDS:
PRINT#15,<<Ucharacter"
where
"character"
defines
oneofthe
preset
user
commands
listed
above.
EXAMPLES:
PRINT#15,"U:"
Preferred
formofDOS
RESET
command
PRINT#15,"U3"
Execute
programatstartofbuffer
2
79
Page 88

CHAPTER
9
MACHINE
LANGUAGE
PROGRAMS
Hereisa
listofdisk-related
Kernal
ROM
subroutines
andapractical
exampleoftheir
useina
program
which
readsasequential
file
into
memory
from
disk.
Note
that
most
require
advance
setupofoneormore
processor
registers
or
memory
locations,
and
all
are
"■called
with
the
assembly
language
JSR
command.
Foramore
complete
description
astowhat
each
routine
does
and
how
parameters
are
set
for
each
routine,
see
the
Programmer's
Reference
Guide
for
your
specific
computer.
DISK-RELATED
KERNAL
SUBROUTINES
Label
Address
Function
SETLFS
SETNAM
OPEN
CLOSE
CHKIN
CHKOUT
CLRCHN
CHRIN
CHROUT
START
NEXT
END
=
=
=
=
=
=
=
=
LDA
LDX
LDY
JSR
LDA
LDX
LDY
JSR
JSR
LDX
JSR
JSR
BEQ
JSR
JMP
LDA
JSR
JSR
RTS
$FFBA
$FFBD
$FFC0
$FFC3
$FFC6
$FFC9
$FFCC
$FFCF
$FFD2
#4
#<FNADR
#>FNADR
SETNAM
#3
#8
#0
SETLFS
OPEN
#3
CHKIN
CHRIN
END
CHROUT
NEXT
#3
CLOSE
CLRCHN
;SET
LOGICAL,
FIRST&SECOND
ADDRESSES
;SET
LENGTH&ADDRESSOFFILENAME
;OPEN
LOGICAL
FILE
;CLOSE
LOGICAL
FILE
;SELECT
CHANNEL
FOR
INPUT
;SELECT
CHANNEL
FOR
OUTPUT
;CLEAR
ALL
CHANNELS&RESTORE
DEFAULT
I/O
;GET
BYTE
FROM
CURRENT
INPUT
DEVICE
;OUTPUT
BYTETOCURRENT
OUTPUT
DEVICE
;SET
LENGTH&ADDRESS
;OF
FILE
NAME,
LOW
;&
HIGH
BYTES
;FOR
NAME
SETTER
;SET
FILE
NUMBER,
;DISK
DEVICE
NUMBER,
;AND
SECONDARY
ADDRESS
;AND
SET
THEM
;OPEN
3,8,0,t4TEST"
;SELECT
FILE3FOR
INPUT
;GET
NEXT
BYTE
FROM
FILE
;UNTIL
FINISHORFAIL
;OUTPUT
BYTETOSCREEN
;AND
LOOP
BACK
FOR
MORE
;WHEN
DONE
;CLOSE
FILE
;RESTORE
DEFAULT
I/O
;BACKTOBASIC
FNADR
.BYT
"TEST"
;STORE
FILE
NAME
HERE
80
Page 89

APPENDIX
A:
CHANGING
THE
DEVICE
NUMBER
SOFTWARE
METHOD
One
waytotemporarily
change
the
device
numberofa
disk
driveisviaaprogram.
When
powerisfirst
turned
on,
the
drive
readsanI/O
location
whose
valueiscontrolled
byajumperonits
circuit
board,
and
writes
the
device
numberitreads
there
into
memory
locations
119 and
120.
Any
time
thereafter,
you
may
write
over
that
device
number
with
a
new
one,
which
willbeeffective
untilitis
changed
again,orthe
1541isreset.
FORMAT
FOR
TEMPORARILY
CHANGING
THE
DISK
DEVICE
NUMBER:
PRINT#15,''M-W"CHR$(119)CHR$(0)CHR$(2)CHR$
(device#+
32)CHR$(device
#+64)
EXAMPLE:
Hereisa
program
that
sets
any
device
number
from
8-11:
10
INPUT'NEW
DEVICE
NUMBER';DV
20IFDV<8
OR
DV>11
THEN
10
30
OPEN
15,8,15
40
PRINT#15,"M-W"CHR$(119)CHR$(0)CHR$(2)CHR$(DV
+
32)CHR$(DV+64)
50
CLOSE
15
Note:
If
you
will
be
using
two
disk
drives,
and
want
to
temporarily
change
the
device
numberofone,
you
will
needtorun
the
above
program
with
the
disk
drive
whose
device
numberisnottobe
changed
turned
off.
After
the
program
has
been
run,
you
may
turn
that
drive
back
on.Ifyou
needtoconnect
more
than
two
drives
at
once,
you
will
needtouse
the
hardware
methodofchanging
device
numbers,
although
you
maybeabletogetbyinanemergencybyunplugging
the
serial
bus
cable
from
drives
whose
device
number
has
already
been
set
while
changing
others.
Thisisnot
recommended,
however,asthereisalways
dangerofdamaging
electronic
devices
when
pluggingincables
with
the
power
on.
81
Page 90

STEPS
TO
CHANGE
THE
DEVICE
NUMBER
USING
THE
SWITCH
1.
Turn
off
the
disk
drive.
2.
Refertothe
following
charttoset
the
DIPSWat
the
backofthe
disk
drive
for
device
number
setting.
Device
#
swl
sw2
8
9
10
11
ON
OFF
ON
OFF
ON
ON
OFF
OFF
3.
Turn on
the
disk
drive.
82
Page 91

APPENDIX
B:
DOS
ERROR
MESSAGES
AND
LIKELY
CAUSES
Note:
Many
commercial
program
diskettes
are
intentionally
created
with
one
or
moreofthe
following
errors,tokeep
programs
from
being
improperly
duplicated.
Ifadisk
error
occurs
while
you
are
makingasecurity
copyofa
commercial
program
diskette,
check
the
program's
manual.Ifits
copyright
statement
does
not
permit
purchasers
to
copy
the
program
for
their
own
use,
you
may
notbeable
to
duplicate
the
diskette.
In
some
such
cases,asafety
spare
copyofthe
program
diskette
is
available
from
your
dealerordirectly
from
the
company
forareasonable
fee.
00:
OK
(notanerror)
Thisisthe
message
that
usually
appears
when
the
error
channelischecked.
It
means
thereisno
current
errorinthe
disk
unit.
01:.FILES
SCRATCHED
(notanerror)
Thisisthe
message
that
appears
when
the
error
channelischecked
after
using
the
Scratch
command.
The
track
number
tells
how
many
files
were
erased.
NOTE:Ifany
other
error
message
numbers
less
than20ever
appear,
they
may
be
ignored.
All
true
errors
have
numbersof20ormore.
20:
READ
ERROR
(block
header
not
found)
The
disk
controller
is
unabletolocate
the
header of
the
requested
data
block.
Causedbyan
illegal
block,ora
header
that
has
been
destroyed.
Usually
unrecoverable.
21:
READ
ERROR
(no
sync
character)
The
disk
controller
is
unabletodetectasync
markonthe
desired
track.
Causedbymisalignment,
oradiskette
thatisabsent,
unformatted
or
improperly
seated.
Can
also
indicate
hardware
failure.
Unless
causedbyone
of
the
above
simple
causes,
this
errorisusually
unrecoverable.
22:
READ
ERROR
(data
block
not
present)
The
disk
controller
has
been
requested
to
readorverifyadata
block
that
was
not
properly
written.
Occursinconjunction
with
Block
commands
and
indicates
an
illegal
track
and/or
sector
request.
23:
READ
ERROR
(checksum
errorindata
block)
Thereisan
errorinthe
data.
The
sector
has
been
read
into
disk
memory,
but
its
checksumiswrong.
May
indicate
grounding
problems.
This
fairly
minor
error
is
often
repairable
by
simply
reading
and
rewriting
the
sector
with
direct
access
commands.
83
Page 92

24:
READ
ERROR
(byte
decoding
error)
The
dataorheader
has
been
read
into
disk
memory,
butahardware
error
has
been
createdbyan
invalid
bit
patterninthe
data
byte.
May
indicate
grounding
problems.
25:
WRITE
ERROR
(write-verify
error)
The
controller
has
detected
a
mismatch
between
the
data
writtentodiskette
and
the
same
dataindisk
memory.
May
mean
the
diskette
is
faulty.Ifso,
try
another.
Use
only
high
quality
diskettes
from
reputable
makers.
26:
WRITE
PROTECT
ON
The
controller
has-been
requested
to
writeadata
block
while
the
write
protect
sensoriscovered.
Usually
causedbywritingtoa
diskette
whose
write
protect
notch
is
covered
over
with
tapetoprevent
changing
the
diskette's
contents.
27:
READ
ERROR
(checksum
errorinheader)
The
controller
detectedanerrorinthe
header
bytesofthe
requested
data
block.
The
block
was
not
read
into
disk
memory.
May
indicate
grounding
problems.
Usually
unrecoverable.
28:
WRITE
ERROR
(long
data
block)
The
controller
attemptstodetect
the
sync
markofthe
next
header
after
writing
a
data
block.Ifthe
sync
mark
does
not
appearontime,
this
error
message
is
generated.
Itiscausedbya
bad
diskette
format
(the
data
extends
into
the
next
block)orbyahardware
failure.
29:
DISKIDMISMATCH
The
disk
controller
has
been
requestedtoaccessadiskette
which
has
not
been
initialized.
Can
also
occurifa
diskette
hasabad
header.
30:
SYNTAX
ERROR
(general
syntax)
The
DOS
cannot
interpret
the
command
senttothe
command
channel.
Typically,
thisiscausedbyan
illegal
numberoffile
names,oran
illegal
pattern.
Check
your
typing
and
try
again.
31:
SYNTAX
ERROR
(invalid
command)
The
DOS
does
not
recognize
the
command.Itmust
begin
with
the
first
character
sent.
Check
your
typing
and
try
again.
32:
SYNTAX
ERROR
(invalid
command)
The
command
sentislonger
than58characters.
Use
abbreviated
disk
commands.
33:
SYNTAX
ERROR
(invalid
file
name)
Pattern
matching
characters
cannotbeusedinthe
Save
commandorwhen
Opening
files
for
the
purposeofWriting
new
data.
Spell
out
the
file
name.
34:
SYNTAX
ERROR
(no
file
given)
The
file
name
was
left
out
ofacommand
or
the
DOS
does
not
recognize
it
as
such.
Typically,
a
colon
(:)
has
been
omitted.
Try
again.
84
Page 93

39:
SYNTAX
ERROR
(invalid
command)
The
DOS
does
not
recognize
a
command
senttothe
command
channel
(secondary
address
15).
Check
your
typing
and
try
again.
50:
RECORD
NOT
PRESENT
The
requested
record
number
has
not
been
created
yet.
Thisisnotanerrorina
new
relative
fileorone
thatisbeing
intentionally
expanded.
It
results
from
reading
past
the
last
existing
record,orpositioning
toanon-existent
record
number
with
the
Record#
command.
51:
OVERFLOWINRECORD
The
datatobe
writteninthe
current
record
exceeds
the
record
size.
The
excess
has
been
truncated
(cut
off).Besuretoinclude
all
special
characters
(suchascarriage
returns)incalculating
record
sizes.
52:
FILE
TOO
LARGE
There
isn't
room
leftonthe
diskettetocreate
the
requested
relative
record.
To
avoid
this
error,
create
the
last
record
number
that
willbeneededasyou
first
create
the
file.Ifthe
fileisunavoidably
too
large
for
the
diskette,
either
splititinto
two
filesontwo
diskettes,
or
use
abbreviations
in
the
data
to
allow
shorter
records.
60:
WRITE
FILE
OPEN
A
write
file
that
has
not
been
closedisbeing
re-opened
for
reading.
This
file
must
be
immediately
rescued,asdescribed
in
Housekeeping
Hint#2in
Chapter4,or
it
will
becomeasplat
(improperly
closed)
file
and
probablybelost.
61:
FILE
NOT
OPEN
A
fileisbeing
accessed
that
has
not
been
openedbythe
DOS.Insome
such
casesnoerror
messageisgenerated.
Rather
the
requestissimply
ignored.
62:
FILE
NOT
FOUND
The
requested
file
does
not
existonthe
indicated
drive.
Check
your
spelling
and
try
again.
63:
FILE
EXISTS
A
file
with
the
same
nameashas
been
requested
foranew
file
already
existsonthe
diskette.
Duplicate
file
names
are
not
allowed.
Select
another
name.
64:
FILE
TYPE
MISMATCH
The
requested
file
accessisnot
possible
using
filesofthe
type
named.
Reread
the
chapter
covering
that
file
type.
65:
NO
BLOCK
Occursinconjunction
with
B-A.
The
sector
you
triedtoallocateisalready
allocated.
The
track
and
sector
numbers
returned
are
the
next higher
track
and
sector
available.
If
the
track
number
returnediszero
(0),
all
remaining
sectors
are
full.Ifthe
diskette
is
not
full
yet,
tryalower
track
and
sector.
85
Page 94

66:
ILLEGAL
TRACK
AND
SECTOR
The
DOS
has
attempted
to
accessatrackorsector
which
does
not
exist.
May
indicate
a
faulty
link
pointerina
data
block.
67:
ILLEGAL
SYSTEMTOR
S
This
special
error
message
indicates
an
illegal
system
trackorblock.
70:
NO
CHANNEL
(available)
The
requested
channelisnot
available,
or
all
channels
areinuse.Amaximum
of
three
sequential
filesorone
relative
file
plus
one
sequential
file
maybeopened
at
one
time,
plus
the
command
channel.Donot
omit
the
drive
numberina
sequential
Open
command,oronly
two
sequential
files
canbeused.
Close
all
filesassoon
as
younolonger
need
them.
71:
DIRECTORY
ERROR
The
BAM
(Block
Availability
Map)onthe
diskette
does
not
match
the
copyindisk
memory.Tocorrect,
Initialize
the
diskette.
72:
DISK
FULL
Either
the
diskette
or
its
directory
is
full.
DISK
FULLissent
when2blocks
are
still
available,
allowing
the
current
filetobe
closed.Ifyou
get
this
message
and
the
directory
shows
any
blocks
left,
you
have
too
many
separate
filesinyour
directory,
and
will
needtocombine
some,
delete
any
that
arenolonger
needed,orcopy
some
to
another
diskette.
73:
DOS
MISMATCH
(CBM
DOS
V2.6
1541)
If
the
disk
error
statusischecked
when
the
driveisfirst
turned
on,
before a
directory
or
other
command
has
been
given,
this
message
will
appear.Inthat
use,
it
is
notanerror,
but
ratheraneasy
waytosee
which
versionofDOSisin
use.Ifthe
message
appearsatother
times,anattempt
has
been
madetowritetoa
diskette
with
an
incompatible
format,
suchasthe
former
DOS1on
the
Commodore
2040
disk
drive.
Use
oneofthe
copy
programsonthe
Test/Demo
diskette
to
copy
the
desired
file(s)
toa1541
diskette.
74:
DRIVE
NOT
READY
An
attempt
has
been
madetoaccess
the
1541
single
disk
withoutaformatted
diskette
in
place.
Blank
diskettes
cannotbeused
until
they
have
been
formatted.
86
Page 95

PENDIX
C:
DISKETTE
FORMATS
NOTE
Nottoscale
snt
■til
iuiii
lUtl
ii
•ueii
neti
iirai
hiiii
him
Wllll
ii
cuutni
limit
ii
cuutni
huh
i
w
ITTI
10?
ITTI
ItltU
Itf
tm
uu
un
•IKl
ii
HI
un
imtunIlltt
toe
ini
toe
ini
intiucni
ur
1541
Format:
Expanded
Viewofa
Single
Sector
87
Page 96

1541
BLOCK
DISTRIBUTIONBYTRACK
Track
number
1to17
18to24
25to30
31to35
RangeofSectors
0to20
0tol8
Oto
17
0tol6
Total#of
Sectors
21
19
18
17
1541
BAM
FORMAT
Track
18,
Sector
0.
BYTE
0,1
2
3
4-143
CONTENTS
18,01
65
0
DEFINITION
Track
and
sectoroffirst
directory
block.
ASCII
character
A
indicating
1541/4040
format.
Null
flag
for
future
DOS
use.
Bit
mapofthe
available
blocksintracks
1-35.
1=available
block
0=block
not
available
(each
bit
represents
one
block)
1541
DIRECTORY
HEADER
Track
18,
Sector
0.
BYTE
144-159
160-161
162-163
164
165-166
167-170
170-255
CONTENTS
160
160
50,65
160
0
DEFINITION
Diskette
name
padded
with
shifted
spaces.
Shifted
spaces.
Diskette
ID.
Shifted
space
ASCII
representation
of
2A,
which
are,
respectively,
the
DOS
version
(2)
and
format
type
(1541/4040).
Shifted
spaces.
Nulls
($00),
not
used.
88
Page 97

PROGRAM
FILE
FORMAT
BYTE
DEFINITION
FIRST
SECTOR
0,1
Track
and
sectorofnext
blockinprogram
file.
2,3
Load
addressofthe
program
4-255
Next
252
bytesofprogram
information
storedasin
computer
memory
(with
key
words
tokenized).
REMAINING
FULL
SECTORS
0,1
Track
and
sectorofnext
blockinprogram
file.
2-255
Next
254
bytesofprogram
info
storedasin
computer
memory
(with
key
words
tokenized).
FINAL
SECTOR
0,1
Null
($00),
followedbynumberofvalid
data
bytesinsector.
2-???
Last
bytesofthe
program
information,
storedasin
computer
memory
(with
key
words
tokenized).
The
endofa
Basic
file
is
markedby3
zero
bytesina
row.
Any
remaining
bytesinthe
sector
are
garbage,
and
maybeignored.
SEQUENTIAL
FILE
FORMAT
BYTE
DEFINITION
ALL
BUT
FINAL
SECTOR
0-1
Track
and
sectorofnext
sequential
data
block.
2-255
254
bytesofdata.
FINAL
SECTOR
0,1
Null
($00),
followedbynumberofvalid
data
bytesinsector.
2-???
Last
bytesofdata.
Any
remaining
bytes
are
garbage
and
maybeignored.
89
Page 98

1541
RELATIVE
FILE
FORMAT
BYTE
DEFINITION
DATA
BLOCK
0,1
2-255
Track
and
sectorofnext
data
block.
254
bytesofdata.
Empty
records
contain
$FF
(all
binary
ones)inthe
first
byte
followedby$00
(binary
all
zeros)tothe
endofthe
record.
Partially
filled
records
are
padded
with
nulls
($00).
SIDE
SECTOR
BLOCK
0-1
2
3
4-5
6-7
8-9
10-11
12-13
14-15
16-255
Track
and
sectorofnext
side
sector
block.
Side
sector
number
(0-5)
Record
length
Track
and
sectoroffirst
side
sector
(number
0)
Track
and
sectorofsecond
side
sector
(number
1)
Track
and
sectorofthird
side
sector
(number
2)
Track
and
sectoroffourth
side
sector
(number
3)
Track
and
sectoroffifth
side
sector
(number
4)
Track
and
sectorofsixth
side
sector
(number
5)
Track
and
sector
pointersto120
data
blocks.
90
Page 99

1541
DIRECTORY
FILE
FORMAT
Track
18,
Sector
1.
BYTE
0,1
2-31
34-63
66-95
98-127
130-159
162-191
194-223
226-255
DEFINITION
Track
and
sectorofnext
directory
block.
File
entry
1*
File
entry
2*
File
entry
3*
File
entry
4*
File
entry
5*
File
entry
6*
File
entry
7*
File
entry
8*
♦STRUCTUREOFEACH
INDIVIDUAL
DIRECTORY
ENTRY
BYTE
0
1-2
3-18
19-20
21
22-25
26-27
28-29
CONTENTS
128
+
type
•
DEFINITION
File
type
OR'ed
with
$80toindicate
properly
closed
file.
(if
OR'ed
with
SCO
instead,
fileislocked.)
TYPES:0=
DELeted
1=SEQuential
2=PROGram
3=USER
4=RELative
Track
and
sectoroffirst
data
block.
File
name
padded
with
shifted
spaces.
Relative
file
only:
track
and
sectoroffirst
side
sector
block.
Relative
file
only:
Record
length.
Unused.
Track
and
sectorofreplacement
file
during
an
©SAVEor©OPEN.
Numberofblocksinfile:
storedasa
two-byte
integer,
in
low
byte,
high
byte
order.
91
Page 100

APPENDIX
D:
DISK
COMMAND
QUICK
REFERENCE
CHART
General Format:
OPEN
15,8,15:PRINT#15,command:CLOSE
15
(Basic
2)
HOUSEKEEPING
COMMANDS
BASIC
2
BASIC
3.5
BOTH
NEW
COPY
RENAME
SCRATCH
INITIALIZE
VALIDATE
NEW
COPY
RENAME
SCRATCH
VALIDATE
INITIALIZE
FILE
COMMANDS
BASIC
2
BASIC
3.5
BOTH
LOAD
SAVE
LOAD
SAVE
CLOSE
GET#
INPUT#
OPEN
PRINT#
RECORD#
"NO:diskette
name,id"
"C0:new
file=0:old
file"
"R0:new
name=old
name"
"S0:file
name"
"10"
"VO"
HEADER*diskette
name,"
lid,DO
COPY
"old
file"TO"new
file"
RENAME
"old
name"TO"new
name"
SCRATCH
"file
name"
COLLECT
"10"
LOAD
"file
name",8
SAVE"0:filename",8
DLOAD
"file
name"
DSAVE
"file
name"
CLOSE
file
#
GET#file
#,variable
list
INPUT#file
#,variable
list
OPEN
file
#,8,channel
#,"0:file
name,file
type,direction"
PRINT#file
#,data
list
"P"+CHR$(channel
#)+CHR$(<record
#)
+
CHR$(>record
#)+CHR$(offset)
DIRECT
ACCESS
COMMANDS
BLOCK-ALLOCATE
BLOCK-EXECUTE
BLOCK-FREE
BUFFER-POINTER
BLOCK-READ
BLOCK-WRITE
MEMORY-EXECUTE
MEMORY-READ
MEMORY-WRITE
USER
"B-A";O;track
#;sector
#
"B-E";channel
#;O;track
#;sector
#
"B-F";O;track
#;sector
#
"B-P";channel
#;byte
"Ul";channel
#;O;track
#;sector
#
"U2";channel
#;O;track
#;sector
#
"M-E"CHR$(<address)CHR$(>address)
"M-R"CHR$(<address)CHR$(>address)CHR$(#
of
bytes)
"M-W"CHR$(<address)CHR$(>address)CHR$(#
of
bytes)
CHR$
(data
byte)
"Ucharacter"
92
 Loading...