

Page 1
Commidea Ltd
100 Eureka Park
Ashford
Kent TN25 4AZ
Commidea: 08444 828 200
Commidea Fax: 08444 828 210
Merchant Helpdesk: 08444 828 222
Merchant Helpdesk Fax: 08444 828 223
Merchant Helpdesk operational hours:
Monday to Friday 8am - 8pm
Saturday 9am - 8pm
Sunday 10am - 5pm
E-mail: [email protected]
Visit us at: www.commidea.com
Ocius easiPAY Vx510 QRG – V1.5
Vx510 Quick
Reference Guide
Page 2

1. Powering on the TerminalIntroduction
2 3
Contents
2. Logging into the System
OCIUS
--------
1. NEW TXN
2. MENU
3. -----
4. LOG OFF
5. -----
PRESS ENTER TO
START COMMUNICATIONS
SETUP F4
ENTER LOGIN ID
PLEASE PRESS ENTER
TO CONTINUE
ENTER PIN
PLEASE PRESS ENTER
TO CONTINUE
1. Powering on the Terminal Page 3
2. Logging into the System Page 3
3. Changing IDs and PINs Page 4
4. Logging off the System Page 4
5. Reports Page 5
6. Chip & PIN Transactions Page 6
7. Chip & Signature Transactions Page 7
8. Swipe Transactions (Non Chip & PIN) Page 8
9. Cardholder Not Present Page 9
10. Card Security Code and Address Checking Page 11
11. Fallback to Signature Page 12
12. Offline Transactions Page 12
13. Transaction Results Page 13
14. End of Day Process Page 14
15. Ordering New Till Rolls Page 14
16. Warranty Repairs / Returns Page 15
17. Short Term Rental - Returning the Terminal Page 15
18. Returning the Terminal Page 16
19. Frequenty Asked Questions Page 17
Thank you for choosing the Commidea Ocius easiPAY Terminal as your payment solution.
The purpose of this guide is to provide you with something to refer to quickly should you need
assistance with the terminal, be it for day to day use, different transaction types, or how to
return it.
Thank you again for choosing a Commidea solution!
Before using the terminal, it will require the power cable to be connected to the ‘Power’ socket
on the underside of the unit.
Once connected, the terminal will turn on and initialise the Ocius software.
When the terminal is first powered on and has finished booting, it will display the screen
as shown to the right.
Press 1 to Start the terminal.
Enter the terminal User ID (login ID) that has been allocated
to you / your store – e.g. ‘1234’. If a mistake is made, press
the yellow ‘Clear’ button, or the red ‘Cancel’ button to
cancel the login.
Once completed, press the green ‘Enter’ key to continue.
Enter your User Password (Login PIN) – e.g. ‘1234’
Press the green ‘Enter’ key to continue.
When prompted for updates, press ‘Yes’, and
should any be required by the terminal, they will
be automatically downloaded.
The Ocius menu will be presented as displayed on the right.
Page 3

5. Reports3. Changing IDs and PINs
4
4. Logging off the System
5
Once you have logged into your terminal, please change your default User ID and
User PIN for security purposes by following the instructions below:
To change the User ID
Select option (2) – Menu
Then select option (5) – User Management
Now select option (1) – Change User ID
Follow the on screen instructions
Once back at the main screen you MUST then select option (4) to logout.
Login again, this time using the new User ID and PIN
The screen will display ‘Unexpected Login ID’, select ‘Replace Account’
Enter the Manager PIN – this will download the changes to your terminal
To change the User PIN
Select option (2) – Menu
Then select option (5) – User Management
Now select option (2) – Change User PIN
Follow the on screen instructions
Once back at the main screen you MUST then select option (4) to logout.
Login again, this time using the new PIN
The screen will display ‘Unexpected Login ID’, select ‘Replace Account’
Enter the Manager PIN – this will download the changes to your terminal
Pressing ‘4’ on the main Ocius Menu screen will log the current user off the terminal and return
to the login prompt.
Reports can be accessed via:
Main Screen – Option (2) – Menu
Menu Screen – Option (1) – Txn Management
Txn Management Screen – Option (1) – Reports
The following reports are all available within the reports list. The press the number for the report
required on the terminal to produce it.
1. Livestore
Grouped by Account, this displays all transactions
which have been charged but are currently waiting
to be submitted for settlement.
2. X Report
Grouped by Account, this report is split into two
sections; ‘Card Scheme’ and ‘End of Day Total’
The first displays the livestore totals broken down
by card scheme, which have been charged but not
yet submitted for settlement.
The second section shows totals for all transactions
that are charged and have been included in an End
of Day (EOD) but not yet submitted.
DD MMM YYYY HH:MM:SS
LIVESTORE REPORT
Terminal: [PTID]
ACCOUNT: [Account Name] ([No. Txns])
Currency: [Currency]
Card Scheme
Sale Cashback Refund Total
Amex
0.00 0.00 0.00 0.00
Visa
1.00 0.00 0.00 1.00
MasterCard
1.00 0.00 0.00 1.00
Maestro
0.00 0.00 0.00 0.00
Delta
0.00 0.00 0.00 0.00
Solo
0.00 0.00 0.00 0.00
Electron
0.00 0.00 0.00 0.00
Visa CPC
0.00 0.00 0.00 0.00
EDC/Maestro
0.00 0.00 0.00 0.00
LIVESTORE TOTAL (0)
2.00 0.00 0.00 2.00
DD MMM YYYY HH:MM:SS
X REPORT
Terminal: [PTID]
ACCOUNT: [Account Name] ([No. Txns])
Currency: [Currency]
EOD Method: [Method; ‘Auto’ or ‘Manual’]
Card Scheme
Sale Cashback Refund Total
Amex
0.00 0.00 0.00 0.00
Visa
1.00 0.00 0.00 1.00
MasterCard
1.00 0.00 0.00 1.00
Maestro
0.00 0.00 0.00 0.00
Delta
0.00 0.00 0.00 0.00
Solo
0.00 0.00 0.00 0.00
Electron
0.00 0.00 0.00 0.00
Visa CPC
0.00 0.00 0.00 0.00
EDC/Maestro
0.00 0.00 0.00 0.00
END OF DAY TOTAL ([No. Txns])
2.00 0.00 0.00 2.00
Page 4

7
5. Reports (continued...)
6
3. Z Report*
Grouped by Account, this report is split into three
sections; ‘Card Scheme’, ‘Current End Of Day
Total’ and ‘Overall End Of Day Total’.
The first section is the livestore totals broken down
by card scheme. These are the transactions that
will be marked for an EOD when the Z Report has
finished.
The second section gives totals for all transactions
that are charged and have been included in an
EOD but not yet submitted, showing totals only and
not broken down by card scheme. It will display the
same value as the Overall End Of Day total when
Automatic EOD is used. If Manual EOD is being
used the current end of day total will be reset to
zero after each Z Report is run.
The third and final section displays the total of all
transactions awaiting submission.
*Merchants not utilising the Automatic EOD
functionality will use a Z Report to initiate a manual
submission.
4. Session
Grouped by Account, all transactions charged since
the current operator logged onto the terminal but
have not yet been submitted for settlement.
These values are reset each time the current
operator logs out.
5. Transaction
Grouped by Account, this report displays the last
10 transactions processed on the account by the
terminal, regardless of the result of the transaction
or if it has been submitted as of yet.
6. Detailed Settlement
Grouped by Account, this report shows the last 3
days of submissions from the account, broken
down by authorisation centre.
7. Summary Settlement
Grouped by Account, this report shows the last 7
days of submissions from the account, without
any further breakdown.
8. Q Report
Grouped by Account, the Quick report shows the
totals for transactions which have been charged
but not yet included in a submission.
9. Offline Transaction
This report details all of the transactions which
are currently stored offline on the terminal.
DD MMM YYYY HH:MM:SS
Z REPORT
Terminal: [PTID]
ACCOUNT: [Account Name] ([No. Txns])
Currency: [Currency]
EOD Method: [Method; ‘Auto’ or ‘Manual’]
Card Scheme
Sale Cashback Refund Total
Amex
0.00 0.00 0.00 0.00
Visa
1.00 0.00 0.00 1.00
MasterCard
1.00 0.00 0.00 1.00
Maestro
0.00 0.00 0.00 0.00
Delta
0.00 0.00 0.00 0.00
Solo
0.00 0.00 0.00 0.00
Electron
0.00 0.00 0.00 0.00
Visa CPC
0.00 0.00 0.00 0.00
EDC/Maestro
0.00 0.00 0.00 0.00
CURRENT END OF DAY TOTAL ([No. Txns])
2.00 0.00 0.00 2.00
OVERALL END OF DAY TOTAL ([No. Txns])
2.00 0.00 0.00 2.00
DD MMM YYYY HH:MM:SS
SESSION REPORT
Terminal: [PTID]
Login Date: [DD MMM YYYY]
ACCOUNT: [Account Name] ([No. Txns])
Currency: [Currency]
Sale Cashback Refund Total
0.00 0.00 0.00 0.00
DD MMM YYYY HH:MM:SS
T REPORT
ACCOUNT: [Account Name] ([No. Txns])
Currency: [Currency]
Date/Time Pan Value
Result
Reference
dd/mm hh:mm ..*****23 1.00 ACC
TEST1
dd/mm hh:mm ..*****23 1.00 ACC
TEST2
dd/mm hh:mm ..*****23 1.00 ACC
TEST3
dd/mm hh:mm ..*****23 1.00 ACC
TEST4
dd/mm hh:mm ..*****23 1.00 ACC
TEST5
dd/mm hh:mm ..*****23 1.00 ACC
TEST6
dd/mm hh:mm ..*****23 1.00 ACC
TEST7
dd/mm hh:mm ..*****23 1.00 ACC
TEST8
dd/mm hh:mm ..*****23 1.00 ACC
TEST9
dd/mm hh:mm ..*****23 1.00 ACC
TEST10
DD MMM YYYY HH:MM:SS
DETAILED SETTLMENT REPORT
Terminal: [PTID]
ACCOUNT: [Account Name] ([No. Txns])
Currency: [Currency]
DATE: [DD/MM/YYYY]
DATE: [DD/MM/YYYY]
DATE: [DD/MM/YYYY]
DD MMM YYYY HH:MM:SS
SUMMARY SETTLMENT REPORT
Terminal: [PTID]
ACCOUNT: [Account Name] ([No. Txns])
Currency: [Currency]
DATE: [DD/MM/YYYY]
Purch Val Count Ref Value
Count
1.00 1 0.00 0
DATE: [DD/MM/YYYY]
Purch Val Count Ref Value
Count
1.00 1 0.00 0
DATE: [DD/MM/YYYY]
Purch Val Count Ref Value
Count
1.00 1 0.00 0
DATE: [DD/MM/YYYY]
Purch Val Count Ref Value
Count
1.00 1 0.00 0
DATE: [DD/MM/YYYY]
Purch Val Count Ref Value
Count
1.00 1 0.00 0
DATE: [DD/MM/YYYY]
Purch Val Count Ref Value
Count
1.00 1 0.00 0
DD MMM YYYY HH:MM:SS
Q REPORT
Terminal: [PTID]
ACCOUNT: [Account Name] ([No. Txns])
Currency: [Currency]
Sale Cashback Refund Total
0.00 0.00 0.00 0.00
Stored Offline Txn Report
------------------------------------------------------------------------------------Report Generated:
YYYY-MM-DD HH:MM:SS
Card number Type Value
------------------------------------------------------------------------------------492912*****23 PURC 10.00
------------------------------------------------------------------------------------Total 10.00
These totals include any Cashback and Gratuity values
Page 5

6. Chip & PIN Transactions
8 9
7. Chip & Signature Transactions
OCIUS
--------
1. NEW TXN
2. MENU
3. -----
4. LOG OFF
5. -----
TRANSACTION TYPE
-----------------------
1. PURCHASE
2. REFUND
3. CASH ADVANCE
4. CARD NOT PRESENT
5. MODIFIERS
ENTER AMOUNT
£ 0.00
PLEASE PRESS ENTER
TO CONITNUE
ENTER REFERENCE
NUMBER
PLEASE PRESS ENTER
TO CONITNUE
PLEASE INSERT OR
SWIPE CARD
TOTAL: £10.00
ENTER CASHBACK
£ 0.00
PLEASE PRESS ENTER
TO CONITNUE
PLEASE TEAR RECEIPT
REPRINT - F2
PLEASE PRESS ENTER
TO CONTINUE
ENTER YOUR PIN
TOTAL: £10.00
VALID SIGNATURE?
1. YES
2. NO
3. REPRINT VOUCHER
Press ‘1’ to begin a new transaction.
Select the transaction type from the list presented on
screen. Please note that, depending upon configuration,
some of these options may not be available.
Key in the transaction value in pence. E.g. £100.00 =
10000. Once correct, press the green ‘Enter’ key to
continue.
If the value is keyed incorrectly, use the yellow ‘Clear’
button to correct accordingly.
If a Merchant Reference is enabled on the Account,
please enter it here. Use the ‘Alpha’ key to choose from
the characters available for each key, after the key has
been pressed.
If a Merchant Reference isn’t required this step can be
bypassed using the ‘Enter’ key.
When prompted to do so, insert the card, (if not originally
inserted to initiate the transaction).
If cashback is enabled on the account then it will be
prompted for at this stage of the transaction. Should
cashback be required, enter the value and press enter
to continue.
The customer should type in their 4 digit PIN and press the
green ‘Enter’ key for validation.
If the PIN is entered incorrectly, the customer will be informed
and asked to re-enter their PIN.
Once the PIN has been successfully validated the terminal
will print the merchant receipt. The option to reprint the
receipt is provided in case there is a problem, for example;
the till roll needs replacing. Should a reprint be required the
operator should press ‘F2’. Press enter to continue.
The cardholder receipt is printed, and the terminal then
asks for the card to be removed before being returning to the
main menu.
The terminal asks for the card to be inserted. If a signature
is required, the terminal prints the receipt for the cardholder
to sign.
If the signature matches the signature on the card, press ‘1’
to continue, or ‘2’ to cancel the transaction.
The terminal will then print the customer copy of the receipt.
Some cards containing a chip will not allow the customer to enter a PIN.
Instead, a signature request is obtained.
The transaction starts as for Chip & PIN, with the transaction details being entered.
Page 6

9. Cardholder Not Present8. Swipe Transactions (Non Chip & PIN)
10 11
PLEASE INSERT OR
SWIPE CARD
TOTAL: £10.00
PLEASE SWIPE CARD
PRESS (X) TO EXIT
TOTAL: £10.00
PLEASE TEAR RECEIPT
REPRINT - F2
PLEASE PRESS ENTER
TO CONTINUE
VALID SIGNATURE?
1. YES
2. NO
3. REPRINT VOUCHER
OCIUS
--------
1. NEW TXN
2. MENU
3. -----
4. LOG OFF
5. -----
TRANSACTION TYPE
-----------------------
1. PURCHASE
2. REFUND
3. CASH ADVANCE
4. CARD NOT PRESENT
5. MODIFIERS
CARD NOT PRESENT
-----------------------
1. MAIL PURCHASE
2. TELEPHONE PURCHASE
3. MAIL REFUND
4. TELEPHONE REFUND
5. MODIFIERS
ENTER AMOUNT
£ 0.00
PLEASE PRESS ENTER
TO CONITNUE
ENTER REFERENCE
NUMBER
PLEASE PRESS ENTER
TO CONITNUE
Press ‘1’ to begin a new transaction.
Select ‘Card Not Present’ from the list presented on screen,
by pressing ‘4’. Please note that, depending upon
configuration, some of these options may not be available.
Select the type of cardholder not present transaction
to process from the list provided.
Key in the transaction value in pence. E.g. £100.00 =
10000.
Once correct, press the green ‘Enter’ key to continue.
If the value is keyed incorrectly, use the yellow ‘Clear’
button to correct accordingly.
If a Merchant Reference is enabled on the Account, please
enter it here. Use the ‘Alpha’ key to choose from the
characters available for that key.
If a Merchant Reference isn’t required this step can be
bypassed using the ‘Enter’ key.
After entering the transaction details, ask the customer for
their payment card and insert it into the slot at the bottom
of the device.
If the chip cannot be read, the terminal will ask for the card
to be removed (‘Please Remove Card’) and re-inserted
again (‘Please Insert or Swipe Card’). If after three attempts
the chip still cannot be read, or the card does not have a
chip on it, then it is possibly damaged.
Please swipe the card in the reader down the right hand
side of the device when prompted.
Tear the merchant receipt, press ‘1’ to continue.
Ask the customer to sign the merchant receipt produced.
If the signature matches that on the card, press ‘1’ to
continue, or ‘2’ to cancel the transaction.
The terminal will then print the customer copy of the receipt.
Within the transaction type menu there are numerous options, one of which is ‘Card Not Present’.
Follow the below instructions for processing cardholder not present transactions:
Page 7

13
9. Cardholder Not Present (continued...)
12
10. Card Security Code and Address Checking
KEY IN CARD DETAILS
PLEASE PRESS ENTER
TO CONTINUE
ENTER EXP DATE (MMYY)
PLEASE PRESS ENTER
TO CONTINUE
CARD SECURITY CODE
PLEASE PRESS ENTER
TO CONTINUE
ENTER ADDRESS LINE 1
(numbers only)
PLEASE PRESS ENTER
TO CONTINUE
ENTER POSTCODE
PLEASE PRESS ENTER
TO CONTINUE
TRANSACTION ACCEPTED
Data Matched
PLEASE PRESS ENTER
TO CONTINUE
TRANSACTION DECLINED
Data Not Matched
PLEASE PRESS ENTER
TO CONTINUE
Data Matched
1. CONFIRM
2. REJECT
PLEASE TEAR RECEIPT
REPRINT - F2
PLEASE PRESS ENTER
TO CONTINUE
If the acquirer rejects the transaction due to the security checks
then the terminal will report the result as shown here.
A ‘declined’ merchant receipt and ‘Void’ cardholder receipt
will then be produced.
In certain scenarios the information supplied will not be
automatically declined or accepted; therefore providing the
operator with a choice of confirming or rejecting the transaction.
This decision will be based upon the transaction amount and
the information supplied. Press ‘1’ to confirm or ‘2’ to reject.
Once the card has been validated the terminal will print the
merchant receipt. The option to reprint the receipt is provided in
case the till roll needs replacing. Should a reprint be required
the operator should press ‘F2’. Press enter to continue.
The cardholder receipt is then printed, and the terminal returns
to the main menu.
Enter the card number when prompted to on the next
screen, and press enter to continue.
Enter the expiry date on the card, in the format ‘MMYY’ and
press enter to continue.
Enter the card security code from the card and press enter
to continue. This card security code is usually found on the
back of the card, and is either a 3 or 4 digit number.
Enter the numbers from the first line of the cardholder
address. Press enter to continue.
Enter the cardholder postcode. Press enter to continue.
The transaction is sent for authorisation and the result of
the AVS/CV2 checking is returned from the acquirer.
If the result of the checking is successful, then the operator
is informed via the screen as shown on the left.
If you are performing a Cardholder Not Present (CNP) transaction, you also have the
opportunity to perform some extra security checks on the validity of the card. At the required
point in the transaction process you will be prompted to enter the cardholder’s address and
card security code. If you choose to enter these details and the card is authorised, your
screen will display one of the following results:
“Data Matched” – all information supplied matched correctly.
“Sec Code Matched” – the security code matched but at least one of the address pieces
of information did not.
“Data Not Matched” – if the security code and the other data does not match.
“Data Not Checked” – if neither the security code or the data was provided to be checked.
“Address Match Only” – if the security code either failed or was not checked, but the address
was correct.
You are then given the choice to Accept or Reject the transaction. This decision is entirely
up to you, as the merchant, to assess the results and decide whether to proceed or abort
the transaction at this stage.
Page 8

13. Transaction Results11. Fallback to Signature
14 15
12. Offline Transactions
PIN BLOCKED
PIN CANCELLED
OCIUS
--------
1. NEW TXN
2. MENU
3. -----
4. LOG OFF
5. -----
OL
T
RETURN TERMINAL TO
CASHIER
VOICE REFERRED
CALL AUTH CENTRE
PLEASE PRESS ENTER
TO CONTINUE
TEL: 08444828222
4929123123123
EXP: 12/12
MID: 11111111
TID: 04380001
AMT: 10.00
1. AUTHORISE 2. ABORT
The transaction starts as for Chip & PIN (see page 6), with the transaction details being entered.
The card is inserted, the terminal reads the card and asks for the PIN.
If the PIN has been blocked because it has been entered
incorrectly 3 times, either with the merchant or previously
elsewhere, ‘PIN Blocked’ will briefly appear.
For foreign visitors who may not know their PIN, the
customer can press the green ‘Enter’ key to bypass PIN
entry. ‘PIN Cancelled’ will be displayed briefly and the
transaction will continue as a Signature Verified transaction.
Please note that it is not permitted to bypass PIN entry for
UK Issued cards; this will result in a declined response.
If fallback is allowed, then the screen will display ‘Perform Signature’. The transaction
will then continue as a Chip & Signature transaction (as detailed on page 7).
If communication to the server is lost or interrupted, the terminal will process
transactions offline, displaying ‘Saving Transaction’ to make the operator aware.
After the transaction has been completed, a ‘T’ symbol will
be displayed in the top left corner of the screen, signifying
that there are transactions stored offline to be submitted.
When the terminal is offline (cannot establish a connection
to the server), ‘OL’ will be displayed along the left hand side
of the Ocius menu screen.
Any stored transactions must be submitted to the server before they can be
completed. Submission of stored transactions will be prompted prior to running any
reports, or can be manually initiated using the following process:
Main Screen – Option (2) – Menu
Menu Screen – Option (1) – Txn Management
Txn Management Menu – Option (2) – Submit Txn
Authorisations and Confirmations
When successful; a transaction will be authorised by the acquirer and then confirmed by
the terminal.
An authorisation is obtained to check if the cardholder’s account has the funds available.
The confirmation stage (during which “CONFIRMED” is displayed on screen) verifies that the
transaction has been completed and is ready for submission.
Voice Referrals
A transaction may be voice referred at any time. This can be
prompted by the acquirer or the card issuer and, as a result, the
acquirer should be contacted to complete the transaction. This
can also occur when the terminal is working in offline mode due
to network problems. Press Enter to continue.
The details of the transaction and the telephone number to use
to contact the acquirer are then supplied. The details on screen
will be requested, so be sure to have the terminal in front of you
during the call.
The phone number and information used by the acquirer to
identify the merchant is displayed, as well as the card number,
expiry date and the value of the transaction.
If successful, an authorisation code will be provided over the
phone. Press ‘1’ to authorise and then enter the code on the
next screen. The code may be alphanumeric, in which case the
‘ALPHA’ key can be used to produce the correct characeters.
Declines
The result of a transaction can be ‘Declined’ when the terminal is online, at any time, and is
generated by the acquirer or card issuer. This usually occurs as a result of a problem with
the cardholder’s account, whereby the card has been marked as being lost or stolen or if
there is a lack of funds preventing the transaction from being completed. There are,
however, many other reasons why this may occur. Unfortunately this information is not
made available at transaction time.
Page 9

16. Warranty Repairs / Returns14. End of Day Process
16 17
15. Ordering New Till Rolls 17. Returning the Terminal
To ensure the continued smooth running of the software and service you should, as part
of your end of day process, perform the following:
• Submit any stored offline transactions accumulated throughout the day (see page 12)
• Print a Z report to produce details of all transactions processed on the terminal (since
the last Z report) (see page 5)
• Logoff the terminal (see page 4)
Before returning a unit for repair or warranty, please ensure that you have been
advised to do so by Commidea Merchant Helpdesk (08444 828 222) and that you
have a call reference number. Please also ensure that all parts/cables are
returned, not just the unit.
If you have Standard cover for your terminal, please send it back to:
Commidea Ltd
Unit 1
Stag Enterprise Park
Leacon Road
Ashford
Kent
TN23 4TW
If you have Gold or Platinum cover, your terminal will be collected as part of the
‘Next Day Swapout’ service.
N.B. it is the responsibility of the merchant to ensure that proof of
postage/collection is obtained.
To order new till rolls please contact Customer Services on 08444 828 268. In line with the EU WEEE and RoHS directives regarding the disposal of electronic
equipment, please do not dispose of these units in your day to day waste. They must be
returned to the manufacturer for disposal.
When returning the unit, please send it to:
Commidea Ltd
Unit 1
Stag Enterprise Park
Leacon Road
Ashford
Kent
TN23 4TW
Before returning the unit it is necessary to obtain an RMA/Reference Number
from Merchant Helpdesk (08444 828 222).
Page 10
18. Short Term Rental - Returning the Terminal
18 19
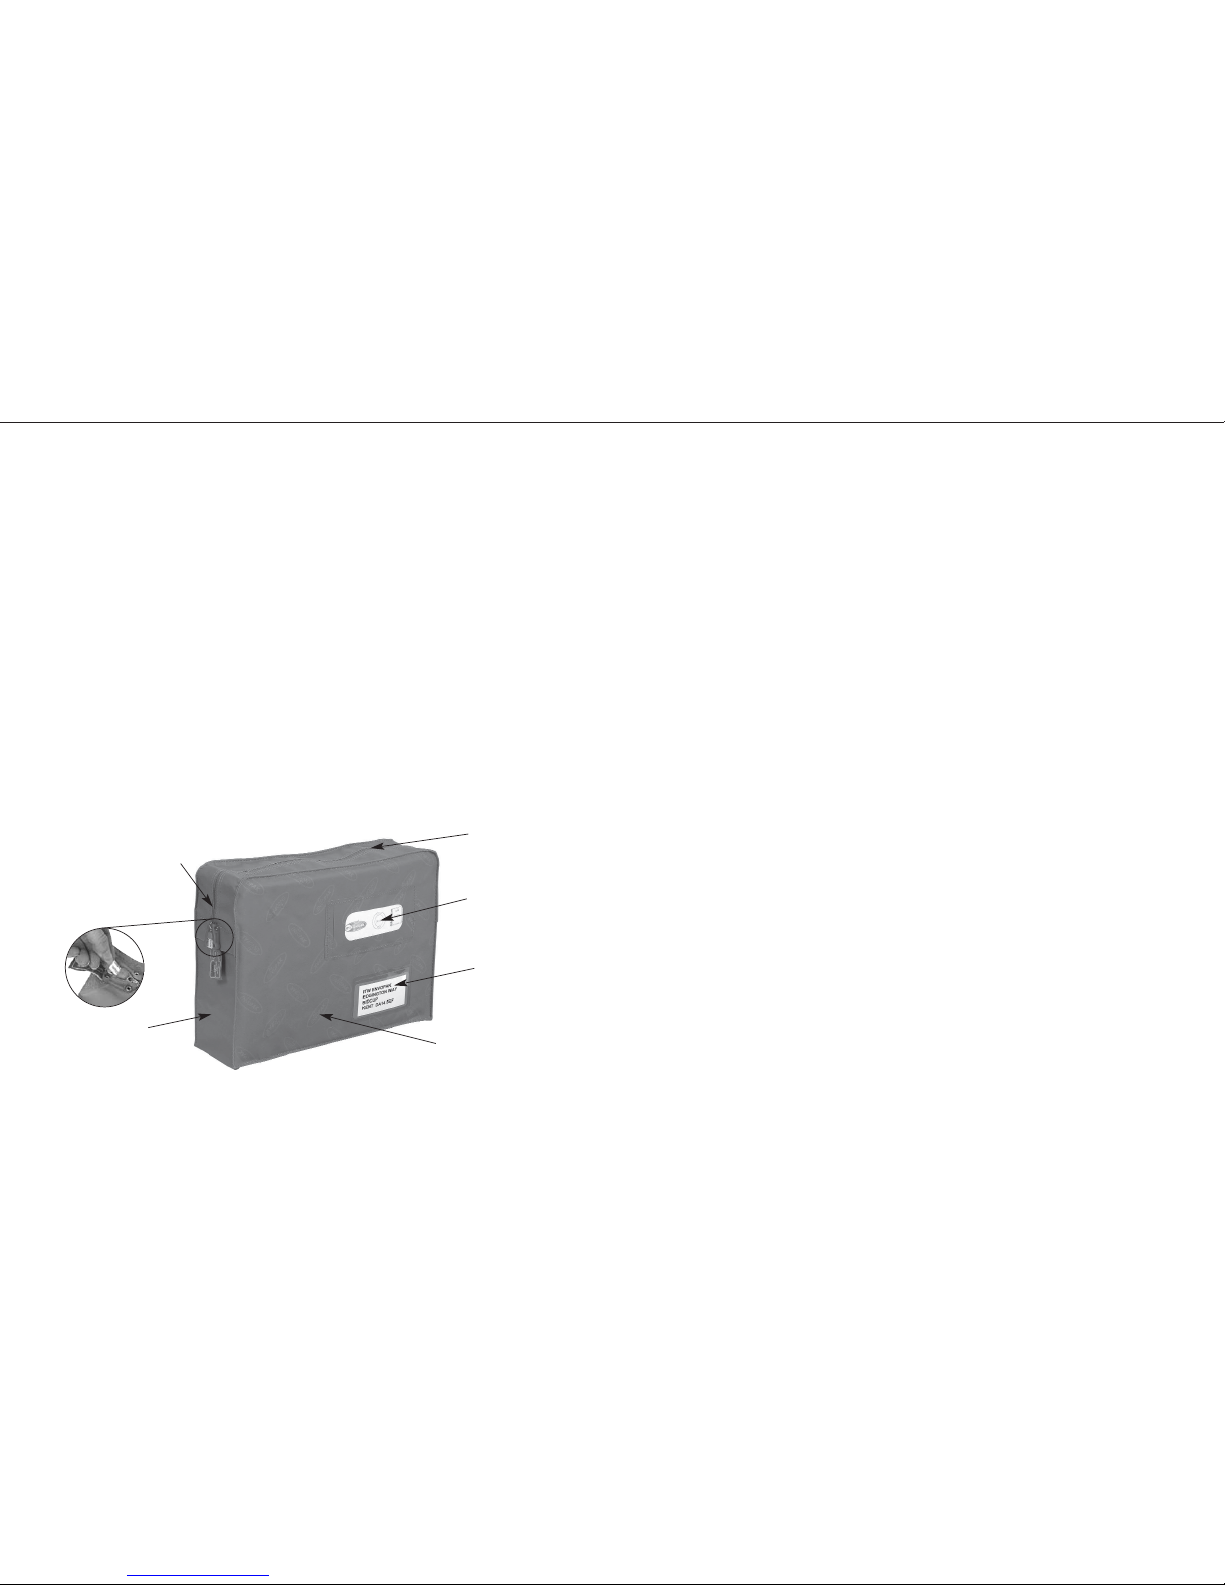
Franking slip fitment for
attaching franking slip
Long lasting water
repellent material
Watermarked material
identifying a genuine
‘Envopak’
Security chamber to be
used with seal for tamper
evident protection
Zip with reversed teeth
to prevent picking
Window for reversible
information card
19. Frequently Asked Questions
Please check for offline transactions and submit them if necessary (see page 12, chapter
12, ‘Offline Transactions’.) Failure to submit offline transactions will result in them not
being paid to your account.
Please ensure that the terminal is placed back into its box with its charging pack (mains
lead and power pack), and also include this instruction booklet – after ensuring that you
are ready to return the terminal.
Place the box into the Envopak bag supplied, fixing the Envopolyseal (supplied in
terminal box) into the zip lock once you are certain that everything is enclosed – this is for
extra security whilst the terminal is in transit.
The terminal can be returned by taking the sealed envopack to any Post Office counter.
Please ensure that you obtain a proof of postage certificate.
Please return the package to:
Commidea Ltd
Unit 1
Stag Enterprise Park
Leacon Road
Ashford
Kent
TN23 4TW
My terminal won’t turn on... Page 17
What do the keys on the keypad do? Page 17
Our transactions say DECLINED or VOID... Page 17
There are strange symbols on the screen that I’ve not seen before... Page 18
I don’t think I have received the money for my transaction... Page 18
There are stored transactions on my terminal, how do I submit them? Page 18
Will my money go into my bank if I power off my terminal at night? Page 18
Do I have to do anything at the end of the day to submit transactions? Page 18
My terminal won’t print transaction reports... Page 18
My X and Z readings won’t print... Page 19
I’ve been asked for my PTID, where do I find it? Page 19
My terminal won’t read Chip & PIN card... Page 19
My terminal says “Unkown Card” or “Card Type not Recognised”... Page 19
If you need assistance reconciling a transaction... Page 19
If your questions have not been answered, or you require further information, please
do not hesitate to contact Commidea’s Merchant Helpdesk on 08444 828 222.
Should you require any assistance regarding authorisation, settlement and financial queries
regarding your merchant agreement, please contact your Merchant Acquirer helpdesk.
My terminal won’t power on…
Please ensure that the terminal is plugged in to the mains using the supplied adapter.
What do the keys on the keypad do?
Enter Key: (Green)
This is probably the most used key. You will use this to confirm steps when processing
transactions and using the terminal.
Cancel Key: (Red)
The cancel key is used to cancel a transaction at any time.
Alpha Key:
This is used to show alpha characters on the screen. For example, if you wanted to type in the
letter
‘A’, you would press key 2 followed by the Alpha key once.
Backspace Key: (Yellow)
This is similar to the backspace key on a computer keyboard and deletes one character to the left
when pressed.
Purple and Function Keys:
These keys will have different uses depending on the screen you are on. You will normally see an
icon or text on the screen next to the button. At this point you may press the relevant button to
activate that option.
Our transactions all say DECLINED or VOID…
If not connected to the GPRS network, the terminal will be in Offline Mode. Whilst in Offline
Mode, some Chip & PIN transactions may get DECLINED as the Chip will decide not to proceed
with a transaction.
Page 11

19. Frequently Asked Quesions
20 21
In this instance, the transaction will be stored offline on the terminal to be submitted later.
The terminal will normally prompt you to reconnect to the GPRS network when trying to perform
a transaction. Alternatively you can restart the terminal and re-establish your GPRS connection.
Please check that the merchant number printed on your transaction receipt is the same as that
shown on documentation from your bank.
There are strange symbols on the screen that I’ve not seen before…
You may see a T symbol in the top left of the screen. This indicates a transaction has been stored
on the terminal.
You may see an OL symbol on the left of the screen. This indicates the terminal is operating
offline without being connected to the GPRS. In this instance, transactions may prompt you to
'Call for Voice Authorisation'.
The transaction will be stored on the terminal to be submitted later. The transaction will be stored
and submitted as per the status shown on the customer’s receipt.
I don’t think I have received the money for my transaction…
Please check that you do not have stored transactions on your terminal.
Please check that the merchant number printed on your transaction receipt is the same as that
shown on documentation from your bank.
There are stored transactions on my terminal, how do I submit them?
To upload your stored transactions ensure the terminal is on the main menu and then select
2 – Menu
1 – Txn Management
2 – Submit Txn
The terminal will then begin to upload the stored transactions. When completed, it will return
to the main menu.
Will my money go into my bank if I unplug my terminal from the mains at
night?
Yes. Transactions are sent to us as you do them, unless processed offline. We recommend that
the merchant performs some form of End of Day process, as detailed in section 14, page 14.
Do I have to do anything at the end of the day to submit my
transactions?
As long as your transactions are processed online, then all transactions are submitted as you do
them and you do not have to do anything. If you want reports on a daily basis, then you may want
to run your Z Report at this time. It is also good to check if you have any stored offline
transactions and submit them.
My terminal won’t print transaction reports…
Check that paper is loaded and is the correct way round. If the wrong type of paper is used or
is not inserted correctly it may fail to print.
If paper fails to feed, check it is inserted correctly and that the paper cover is closed securely.
Print a system information voucher to test printing capabilities by selecting:
2 – Menu
3 – System
2 – System Info
A small update can be sent to the terminal, which may reset the printing commands.
Please ask Commidea Merchant Helpdesk to do this.
My X and Z readings won’t print…
Please see section:“My terminal won’t print transaction reports…”, Page 18
If the X or Z reading shows zero values, this suggests that no transactions have been recorded
since the last Z reading that was performed. Stored transactions will not show on the X and Z
readings until 15 minutes after they have been uploaded.
If the terminal shows 'Report Failed', this suggests there may be an issue with your account.
Please contact Merchant Helpdesk for further guidance (08444 828 222).
I’ve been asked for my PTID where do I find it?
The PTID is a unique identity number given to your terminal. The PTID (displayed on the voucher
as ‘Terminal ID’) will be shown on the “System Information Voucher”, printed by selecting:
2 – Menu
3 – System
2 – System Info
Alternatively, the PTID is also marked on the terminal itself and can be found on the underside
of the terminal, as the ‘S/N’ number.
My terminal won’t read Chip & PIN cards…
Please try an alternative card to ensure that there is not a fault with the Chip on the card.
Ensure that the Chip card is orientated correctly and inserted fully.
Ensure that the Chip card is not withdrawn from the card reader until prompted to do so.
My terminal says “Unknown Card” or “Card Type not Recognised”…
Please check that your Merchant Agreement allows you to accept that type of card.
Please check that Commidea has been provided with the details and Merchant Numbers for
all the card types that you are permitted to accept.
If you need assistance reconciling a transaction…
Please ensure that you have as much of the below information as possible. This will allow
us to answer your questions quickly and accurately.
• The card number*
• The value of the transaction
• The Authorisation code and EFTSN number (shown on the receipt)
• The date of the transaction
• Your primary Merchant Number
• A detailed description of any error message
* For security reasons, never give out full card
numbers… the first six digits combined with the
last four should be sufficient.
 Loading...