

Page 1
SPX-602H
User’s Manual
Edition 1.0
2009/10/13
Page 2

Page 3

SPX-602H
Copyright
Copyright 2009 all rights reserved. This document is copyrighted and all rights are reserved.
The information in this document is subject to change without prior notice to make
improvements to the products.
This document contains proprietary information and protect ed by copyright. No part of this
document may be reproduced, copied, or translated in any form or any means without prior
written permission of the manufacturer.
All trademarks and/or registered trademarks contains in this document are property of their
respective owners.
Disclaimer
The company shall not be liable for any incidental or consequential damages resulting from
the performance or use of this product.
The company does not issue a warranty of any kind, express or implied, including without
limitation implied warranties of merchantability or fitness for a particular purpose.
The company has the right to revise the manual or include changes in the specifications of
the product described within it at any time without notice and without obligation to notify any
person of such revision or changes.
Trademark
All trademarks are the property of their respective holders.
Any questions please visit our website at TUhttp://www.commell.com.twUT.
1
Page 4
SPX-602H
Packing List:
Hardware :
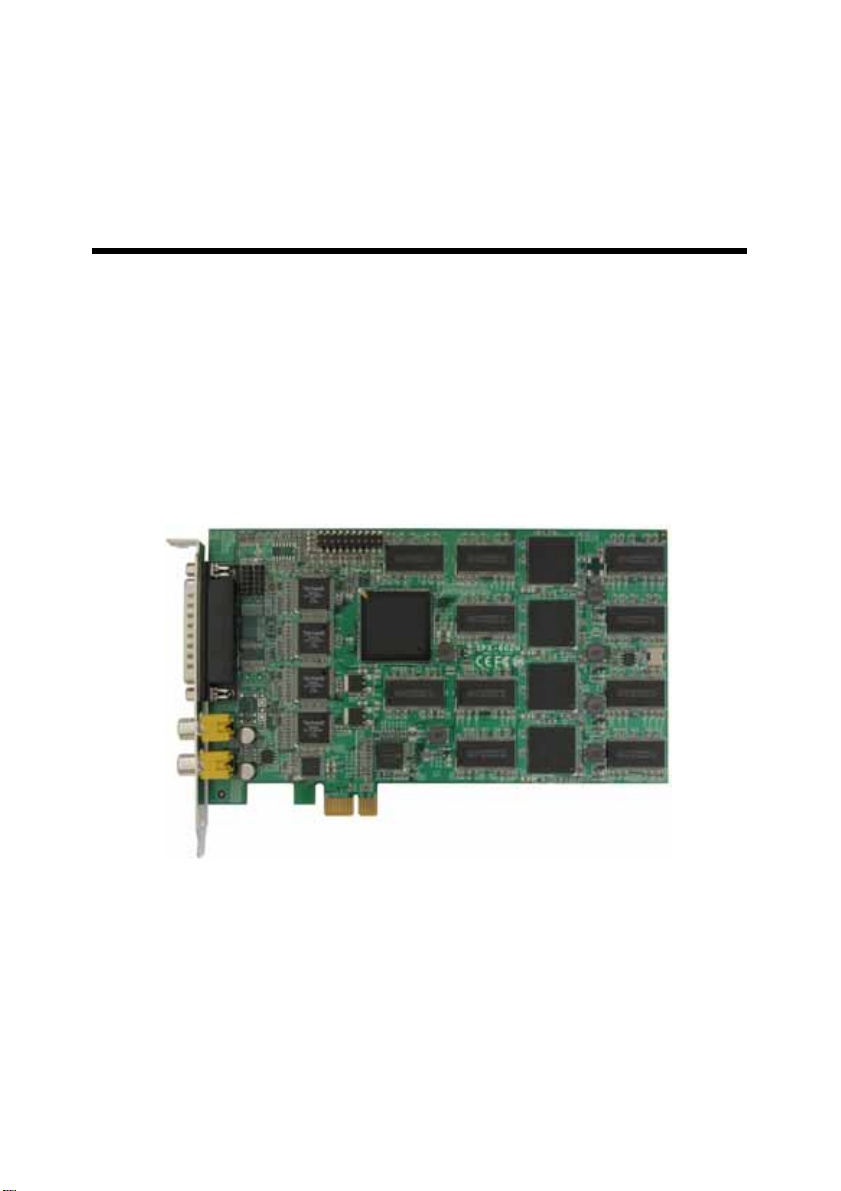
SPX-602H PCI-Express x1 Capture Card x1
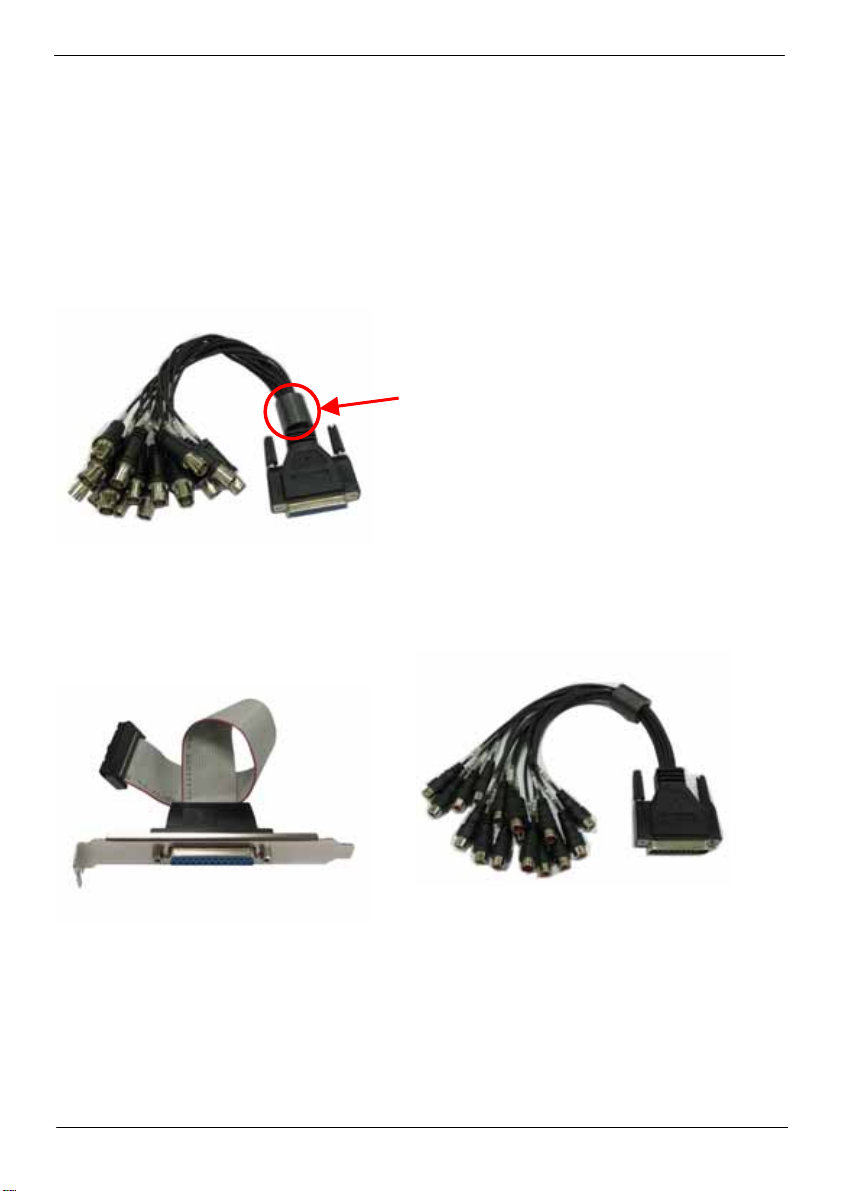
Cable kit :
Video cable ( Included )
EMI (optional)
16-Ch BNC video input Cable x 1
( OALDB25-BNC16 )
Audio cable ( Option )
D-SUB 25 Cable x 1
( OAL1P-601H ) ( OALDB25-AUD16 )
16-Ch RCA audio input Cable x 1
CD Content : Windows Drivers/SDK & User’s Manual
2
Page 5

SPX-602H
1.0 <Product Specification>
General Specification
Form Factor PCI-Express x1
Compression Format H.264 Hardware compression technology
Video Display Rate:
NTSC:16-ch total 480 fps / D1 resolution
PAL: 16-ch total 400 fps / D1 resolution
Recording Rate:
NTSC: 16-ch total 480 fps / D1 resolution
PAL: 16-ch total 400 fps / D1 resolution
Audio 16-ch G.721 compression technology
TV-Output SPOT & CALL Monitor
GPIO
OS Support Windows XP , Vista ( 32-bit )
Software Windows SDK Network Streaming SDK
Cable kit 1 x D-sub 25 to 16 channel BNC video Cable
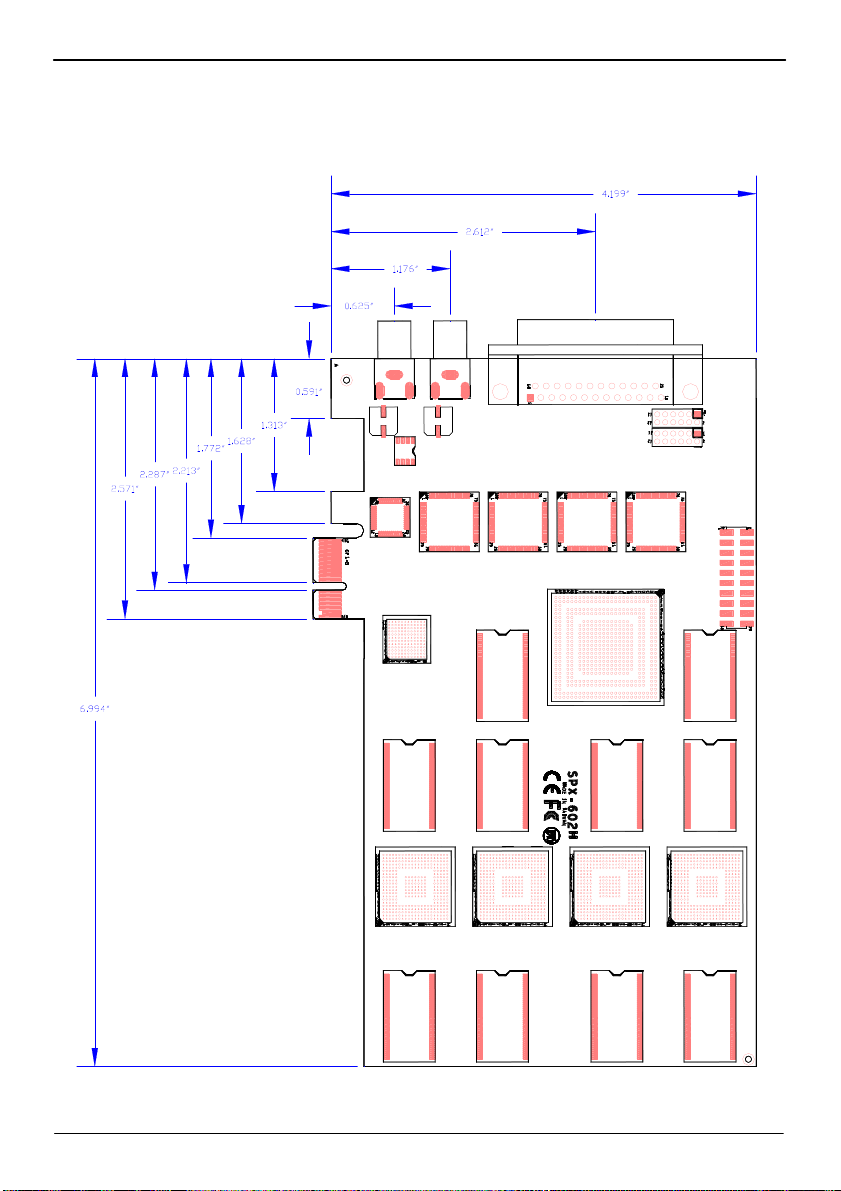
Dimensions (L x W) 177.65mm x 111.15mm
3
16-bits GPIO interface ( reserved )
( OALDB25-BNC16 )
1 x 20-pin header to 1 x D-sub 25 Cable (option)
( OAL1P-601H )
1 x D-sub 25 to 16 channel RCA au dio Cable (option)
( OALDB25-AUD16 )
Page 6
SPX-602H
A
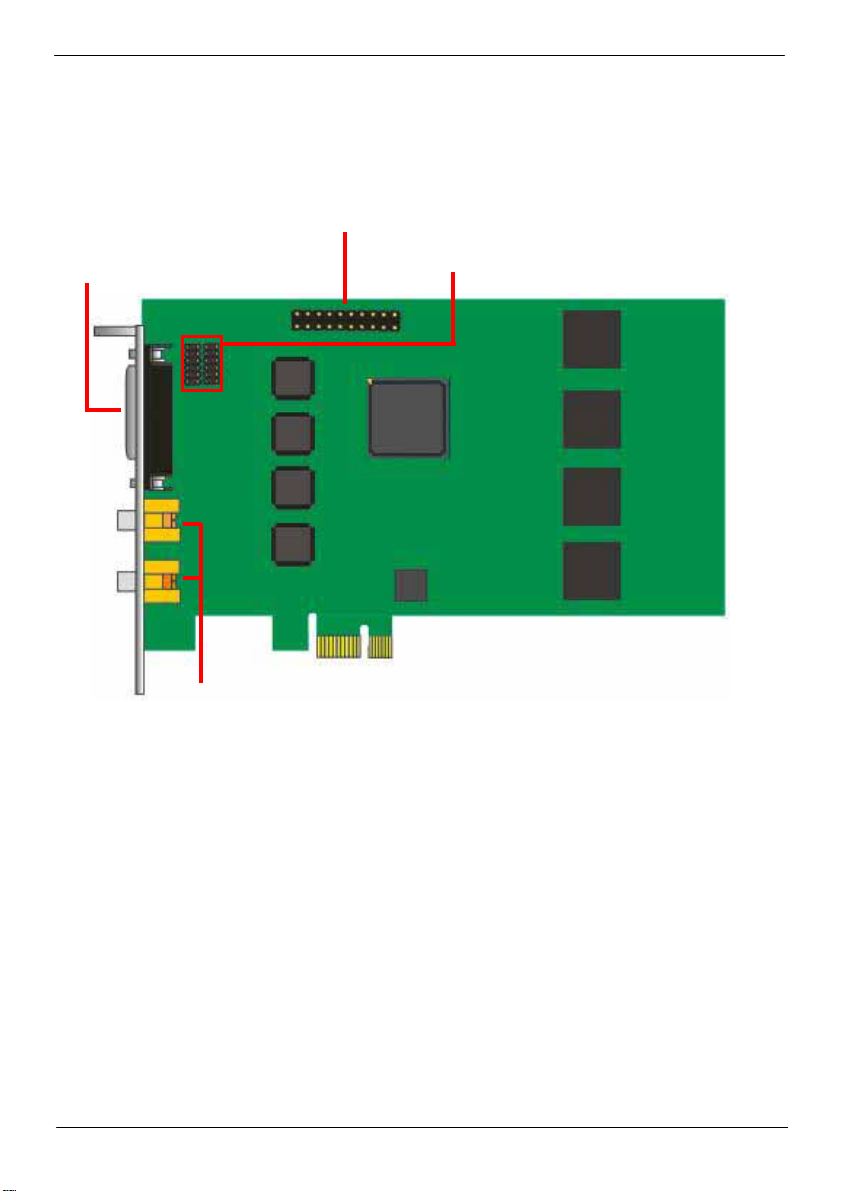
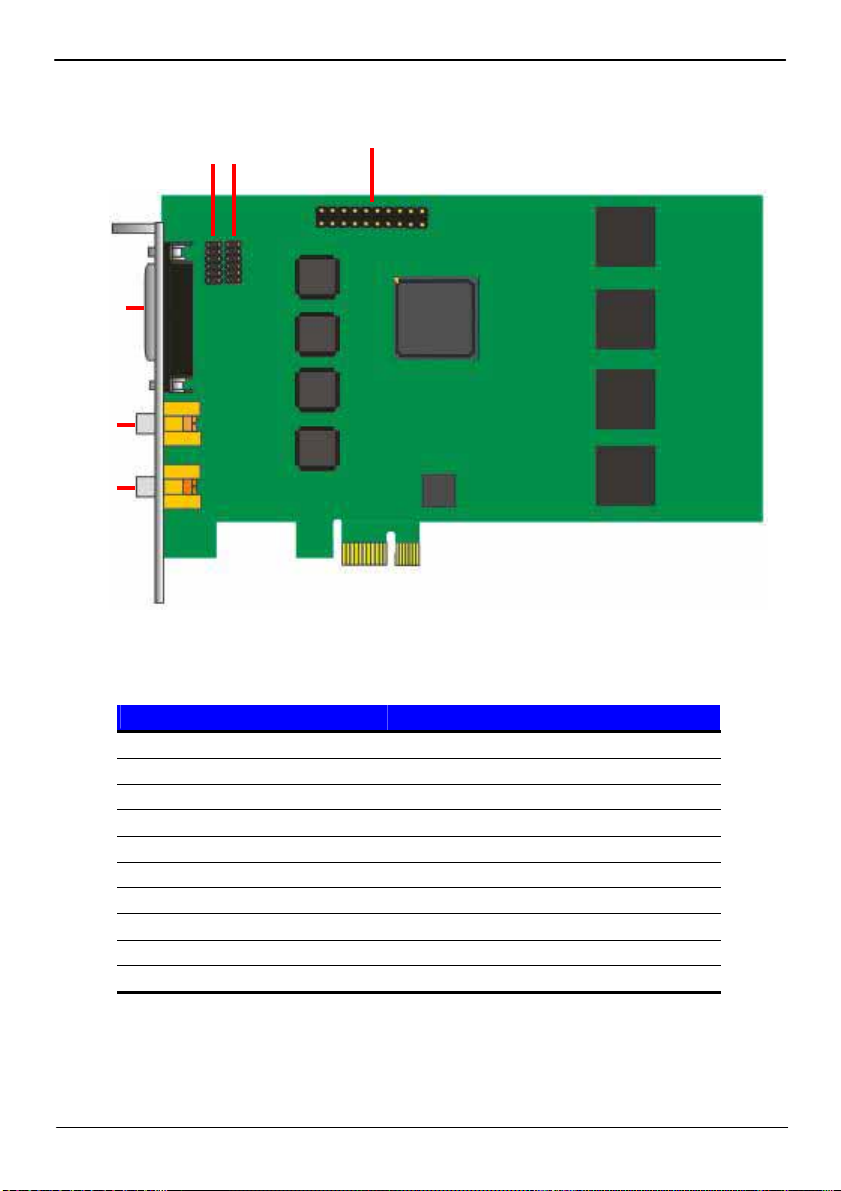
1.1 <Component Placement>
udio input
Video input
TV output
GPIO
4
Page 7
SPX-602H
1.2 <Mechanical Drawing>
5
Page 8
SPX-602H
1.3 <Connector Reference>
J1
J7 J8
J2
J3
Call
J4
SPOT
Connector: J1 ( 16 channel audio Input )
Type: 20-pin (10x2) header(2.54mm) X 1
Pin Description Pin Description
1 Audio Input Ch 9 2 Audio Input Ch 1
3 Audio Input Ch 10 4 Audio Input Ch 2
5 Audio Input Ch 11 6 Audio Input Ch 3
7 Audio Input Ch 12 8 Audio Input Ch 4
9 Audio Input Ch 13 10 Audio Input Ch 5
11 Audio Input Ch 14 12 Audio Input Ch 6
13 Audio Input Ch 15 14 Audio Input Ch 7
15 Audio Input Ch 16 16 Audio Input Ch 8
17 GND 18 GND
19 GND 20 GND
6
Page 9

SPX-602H
(
(
Connector: J2 ( 16 channel video Input ) D-sub25
Connector: J3
Connector: J4
Connector: J7 ( 8-bit GPIO ) reserved
Type: 12-pin (6x2) header(2.0mm) X 1
Pin Description Pin Description
1 GND 2 GND
3 GPIO0 PD11 4 GPIO4 PD15
5 GPIO1 PD12 6 GPIO5 PD16
7 GPIO2 PD13 8 GPIO6 PD17
9 GPIO3 PD14 10 GPIO7 PD18
11 +3.3V 12 +12V
Connector: J8 ( 8-bit GPIO ) reserved
Type: 12-pin (6x2) header(2.0mm) X 1
Pin Description Pin Description
1 GND 2 GND
3 GPIO8 PD19 4 GPIO12 PD23
5 GPIO9 PD20 6 GPIO13 PD24
7 GPIO10 PD21 8 GPIO14 PD25
9 GPIO11 PD22 10 GPIO15 PD26
11 +3.3V 12 +12V
Call Monitor ) RCA
SPOT Monitor ) RCA
7
Page 10
SPX-602H
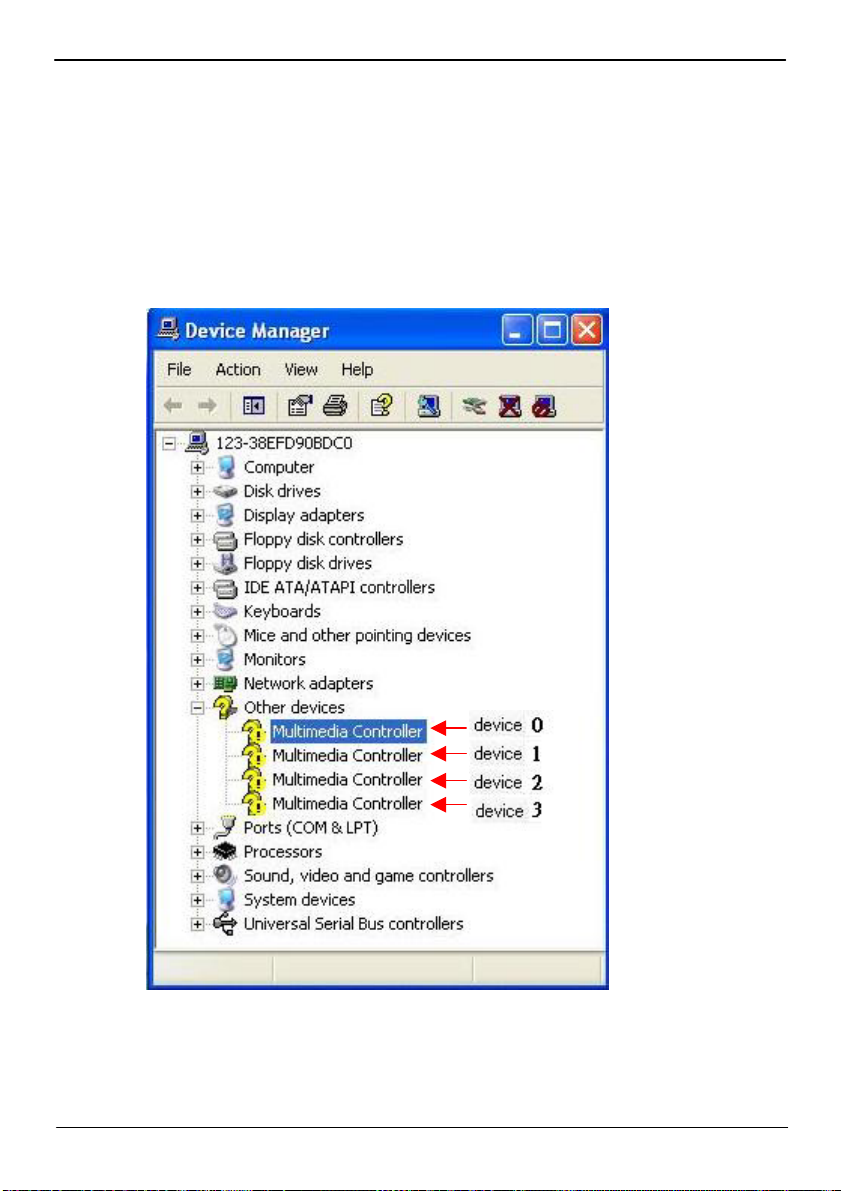
1.4 <Driver Setting>
1. Copy the CD Driver folder to disk, Ex: C:\ , D:\ …
2. Please choose Device Manager
then you can see Other devices
update driver follow the device 0 to 3
8
Page 11

SPX-602H
3. Please choose Multimedia Controller then press advanced
9
Page 12

SPX-602H
4. Please select file location
C:\SPX-602H_090907\driver
10
Page 13

SPX-602H
5. Please press continue anyway
11
Page 14

SPX-602H
6. Press Finish
12
Page 15

SPX-602H
7. Driver install succeed
13
Page 16

SPX-602H
1.5 <Application files>
Location Æ C:\SPX-602H_090907\bin
AHWinApp.exe (Demo program)
AHWinPlayer.exe (Search program)
NetViewer.exe (Streaming program)
ALWatermark.exe (For checking watermark)
ALMonitor.exe (For check current compression rate)
ALCommon.dll (puplic library)
AZDevCtrl.dll (Driver interface library)
MyAVCD.dll (S/W Decoder library)
G721Codec.dll (Voice codec library)
WatermarkDLL.dll (Watermark library)
14
Page 17

SPX-602H
1.6 <Demo program play>
1) The Program is composed by Application program and Player
(AHWinPlayer.exe).
2) If the application program was activated, it will be come out below window in
the screen (FYI, Default camera input is set by NTSC).
3) If the program is activated, 16ch display screen will be come out as a
default.
4) The right part of display is composed of Display mode, Reset & Exit,
Display set block.
5) The below [1]~[16] button of Display is for channel choice.
6) The below number of channel choice button means frame per second
of each channel compressed and if the capture start, put a mark frame
number which is captured.
7) The Show, Hide block in the right-below part could activate or disable
detailed setting dialogs.
15
Page 18

SPX-602H
1.6.1 <Display Mode>
1) The screen displayed is controlled by
Display Mode.
2) If it choose [1 Display], it comes out
720x480 size for just one channel
in display screen and in this time,
the channel could be changed by
pressing [CH Down], [CH Up] button
and also choose channel by pressing
[1]~[16] button.
3) [4 Display], [6 Display], [8 Display],
[9 Display], [10 Display], [13 Display],
[16 Display] could choose the
channel in the same way.
1.6.2 <Search>
1)This button to playback the record file
1.6.3 <Capture>
1) There are two [Start] and [Stop] buttons.
2) If choose [Start] button, the live and capture image is displayed.
3) If choose [Stop] button, the live and capture image stops.
16
Page 19

SPX-602H
1.6.4 <Reset & EXIT>
1) There are two [All Reset], [EXIT] buttons.
2) If [All Reset] button press, the value in PC Card is initialized in PC Card.
3) If [EXIT] button press, Application program is finished.
1.6.5 <Display>
1) It could choose [Live] or [H.264] in Display setting block.
2) If you choose [Live] in capturing status, the chosen channel’s live image
is displayed in the screen in the real time.
3) If you choose [H.264] in capture start status, you could wat ch law capture
image.
17
Page 20

SPX-602H
1.6.6 <Capture Information>
1) You could see camera off and motion event
status in the right part of program window.
2) On the occasion of not having camera input,
it will be displayed the red color “V” letter.
3) On the occasion of working motion event, it
will be displayed the red color “M” letter.
1.6.7<Menu expansion>
1) There are two [Show] and [Hide] buttons.
2) If you press [Show] button, Menu expansion which could set
application program in detail is displayed under main screen.
3) [Hide] is used for hiding this expansion-menu.
18
Page 21

SPX-602H
1.7 <Demo program menu expansion>
1.7.1 <General>
1) There are [General], [Camera], [Codec], [Register], [Color], [OSD],
[Motion], [Audio], [Spot], [Network] tap in expansion-menu.
2) You could NTSC and PAL in [General] t ap.
2) Default is NTSC, if you want change from NTSC to PA L, choose
[PAL-B] and press [All Reset] button.
3) You could choose Hard disk drive in [Save Drive]. Default is C Drive.
1.7.2 <Camera>
1) [Camera] : You can check the tab-settings through Rec in [Display] of
main screen. User can use this image when the user does Network
transmit.
2) Each channel could set the resolution.
3) All channel is set 720x480 (D1) resolution as a default. (NTSC).
19
Page 22

SPX-602H
1.7.3 <Codec>
1) It choose Encoding Path.
2) [GOP] : could control the number of group of I frame and P frame.
3) [Skip Count] : could control the number of frame per second of chosen
channel.
4) [Bit Rate] : set the display quality of chosen channel.
- set VBR, CBR or Hybird-VBR
- I-Frame QP : set the display quality value of I Frame.
- P-Frame QP : set the display quality value of P Frame.
- QP-Limit, BPS Limit : set display quality limited value when it set CPR.
5) [Watermark] : recognition of On/Off water mark of chosen channel and
choose the level.
6) [Frame Picture Type] :set field resolution of Odd, Even of D1 image.
On the occasion of Separated, it is displayed Even Field in upper side, Odd
Field in below side.
7) [Key Frame Encoding] : set whether or not use of Key Frame of chosen
channel.
8) [Interpolation Encoding] : set function to be shorten color line when H.264
compress, the color information is changed from 4:2:2 to 4:2:0
20
Page 23

SPX-602H
1.7.3 < Pre-Filter >
1) Choose Encoding Path. (Possible to set per each path)
2) [Pre-Filter Enable]: Activate filter function of chosen Path.
3) [Crominance Enable] : It activate the noise reduction function in the
chrominance level.
4) [Apply Automatically] : If you check [Apply Automatically] clause, the filter
function is activated automatically when the noise-image put into
5) [Pre-Filter Type] : It sets kinds of filter.
- HV :
It has the lowest level of noise-reduction function. The improving effect
of compression rate is very small and the picture quality is maintained as the
original one.
- HS : It has lower level of noise-reduction function. The improving effect of
compression rate is is small and the picture quality is maintained as nearly
as the original one.
- CX : It has middle level of noise-reduction function. The improving effect of
compression rate is better. The picture quality is little lower and the
resolution in the border of the original one become dim.
- AS : It has high level of noise-reduction function. The improving effect of
compression rate is best. The picture quality is lower and the resolution in
the border of the original one become dimmer.
21
Page 24

SPX-602H
1.7.4 < Register >
1) Register Tap could set PCI Base Memory of BAR2/BAR3, AM8816,
TW2864.
2) You could access on the register of each function by using various taps
PCI Base Memory BAR3.
3) [Get] button shows the selected IC Register on the Data space, [Set]
button write the input value of Data space on the chip’s Address.
(Caution) You have to 16 hex character in Address and Data space.
Ex) 31(0), 3B(0), 0x3C (X)
1.7.5 < Color >
1) Each channel or all channel at the same time could set [Brightness],
[Contrast], [Color], [Hue].
2) Choose the channel in the left and set the value in the right.
3) If you want to set at the same time, check and set [All]
4) If you press Default on the right below side, all channel will be
initialization.
22
Page 25

SPX-602H
1.7.6 <OSD >
1) It could be revised the OSD to be seen by PC, TV Monitor.
2) Each camera has been set channel number as a default like channel 1.
3) If it click [Start] in the [Capture] after revising OSD and checking
[EncdeOSD], the revised letter is displayed in the Monitor screen.
4) If you don’t want see OSD, it has only to do disable [EncdeOSD] after
stopping [Capture].
1.7.7 <Motion>
1) It is set the [Motion Capture Enable], [Threshold], [Detect Block Count],
[Rect] In Motion tap.
2) On the occasion of choosing only one channel in [Motion Channel], input
setting value is applied in the just chosen channel.
3) On the occasion of checking [ALL] check box, it could set all channel value
at one time.
4) It is controlled sensitivity of Motion Detect in slide bar of [Threshold] block.
5) It could control block-count to recognize motion by using slide-bar of
23
Page 26

SPX-602H
[Detect Block Count].
6) It could choose motion part in [Rect].
a) [All Area] – Designated all area into motion part.
b) [Part Area] – Designated part of screen into motion part by using mouse.
c) [Area Erase] – deleted all designated part.
1.7.8 <Audio>
1) [Audio] support 16ch and each channel is possible to enable or record.
2) Volume control is possible in each [Audio In], [Audio Out].
4) If it check all in [Audio Channel Select], all channel is chosen and could
set at one time.
Note : SDK does not support audio playback function.
24
Page 27

SPX-602H
1.7.9 < Spot >
SPOT Monitor select display mode 1 or 4 & Sequence Rotation 1~5 sec
1.7.10 <Network>
Enable or Disable the Network Server.
25
Page 28

SPX-602H
1.8 <Play back program>
If you play AHWinplayer.exe, it will come out like upper. This is
the program for play recorded video image.
The recorded file folder at C:\Alogics or D:\Alogics…
Video file Æ xxxxxx.264
Audio file Æ xxxxxx.g721
Note:
SDK does not support audio playback function.
26
Page 29

SPX-602H
1.
3.
2.
4.
5.
6.
1) Calendar status : It displays recorded date and chosen date in right upper part.
The chosen date is displayed by red color and the recorded date is displayed
with shadow by dark color. It could choose the date by clicking mouse.
2) You can choose the partition mode on the right side of Display Mode tab.
3) Time status : It is displayed the re corded time by hours and min utes in the below
part. The number of 0~24 means time and the chosen time is displayed by red
color and the recorded time is displayed with shadow by dark color. It could
choose the time by clicking the number.
4) Minute unit status : The chosen time is divided with 60 minutes a nd displayed i n
the right below part. A default is displayed 60 minute in 4 channel. On the
occasion of having the recorded part, it is display with shadow. If it clicks the
point which you want to search, it is displayed by minute unit.
Slide bar : It could control the time which you look for by moving the slide bar.
The slide bar is fit into minute unit.
27
Page 30

SPX-602H
5) Play button : There are buttons related play in the below part of slide bar.
From left, there are (R-I/Search : moving per I frame unit in reverse), (R-Search:
moving per a picture in reverse ), (Stop), (Play), (Pause), (F-Search: moving per
a picture), (F-I/Search :moving per I frame unit).
6) speed control : There are [Up], [Down] buttons related speed in the right side of
button related play. When it play or play in reverse, it could control the speed
and support 1/32, 1/16, 1/8, 1/4, 1/2, 1, 2, 4, 8, 16, 32 times.
3.
2.
4. 4.
If you want to play the recording data, please follow up below step.
1.
1) Select the date in the upper-right side calendar.
2) Select the hour in the hour menu below screen.
3) Select the minute in the minute menu below the application program,
then slide bar will be moved to the place.
4) I/Search button, you can find out the nearest I-Frame. Then push the
play button.
28
Page 31

SPX-602H
1.9 <Network Streaming program>
Copy the Driver folder to your remote PC and run NetViewer.exe
You’ll see the network streaming program GUI .
Then , Fill in the IP Address and Push the Connect .
29
Page 32

SPX-602H
Contact Information
Any advice or comment about our products and service, or anything we
can help you please don’t hesitate to contact wit h us. We will do our best to
support you for your products, projects and business.
Taiwan Commate Computer Inc.
Address
TEL +886-2-26963909
FAX +886-2-26963911
Website
E-Mail
19F, No. 94, Sec. 1, Shin Tai Wu Rd., Shi Chih
Taipei Hsien, Taiwan
TUhttp://www.commell.com.twUT
TUinfo@commell.com.twUT (General Information)
TUtech@commell.com.twUT (Technical Support)
Commell is the trademark of Taiwan Commate Computer INC.
30
 Loading...