

Page 1
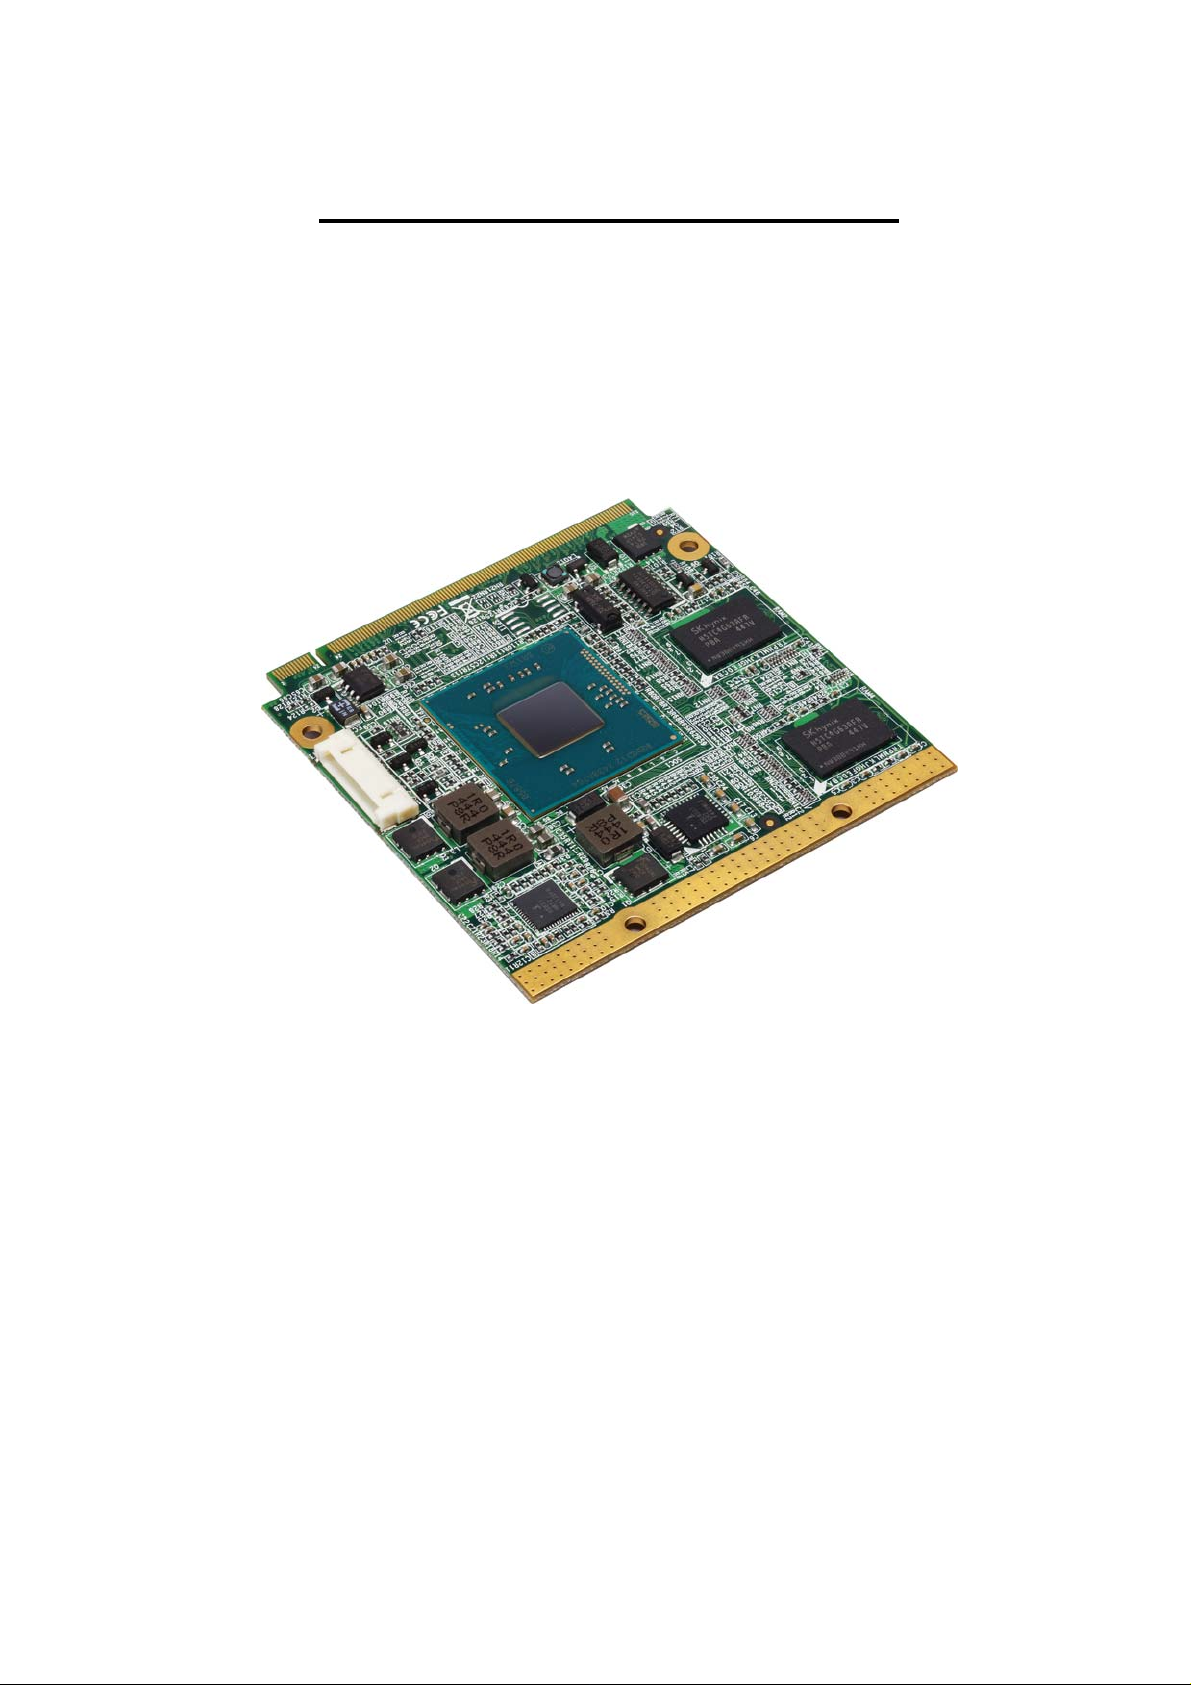
QE-E70
Qseven CPU Module
User’s Manual
Edition 1.1
2015/07/15
Page 2
LN-D70 User’s Manual
Copyright
Copyright 2015, all rights reserved. This document is copyrighted and all rights are
reserved. The information in this document is subject to change without prior notice to
make improvements to the products.
This document contains proprietary information and protected by copyr ight. No part of
this document may be reproduced, copied, or translated in any form or any means
without prior written permission of the manufacturer.
All trademarks and/or registered trademarks contains in this document are property of
their respective owners.
Disclaimer
The company shall not be liable for any incidental or consequential damages resulting
from the performance or use of this product.
The company does not issue a warranty of any kind, express or implie d, including
without limitation implied warranties of merchantability or fitness for a particular
purpose.
The company has the right to revise the manual or include changes in the
specifications of the product described within it at any time without notice and witho ut
obligation to notify any person of such revision or changes.
Trademark
All trademarks are the property of their respective holders.
Any questions please visit our website at TUhttp://www.commell.com.twUT
Packing List:
Please check the package content before you starting using the board.
Hardware:
QE-E70 Qseven CPU Module x 1
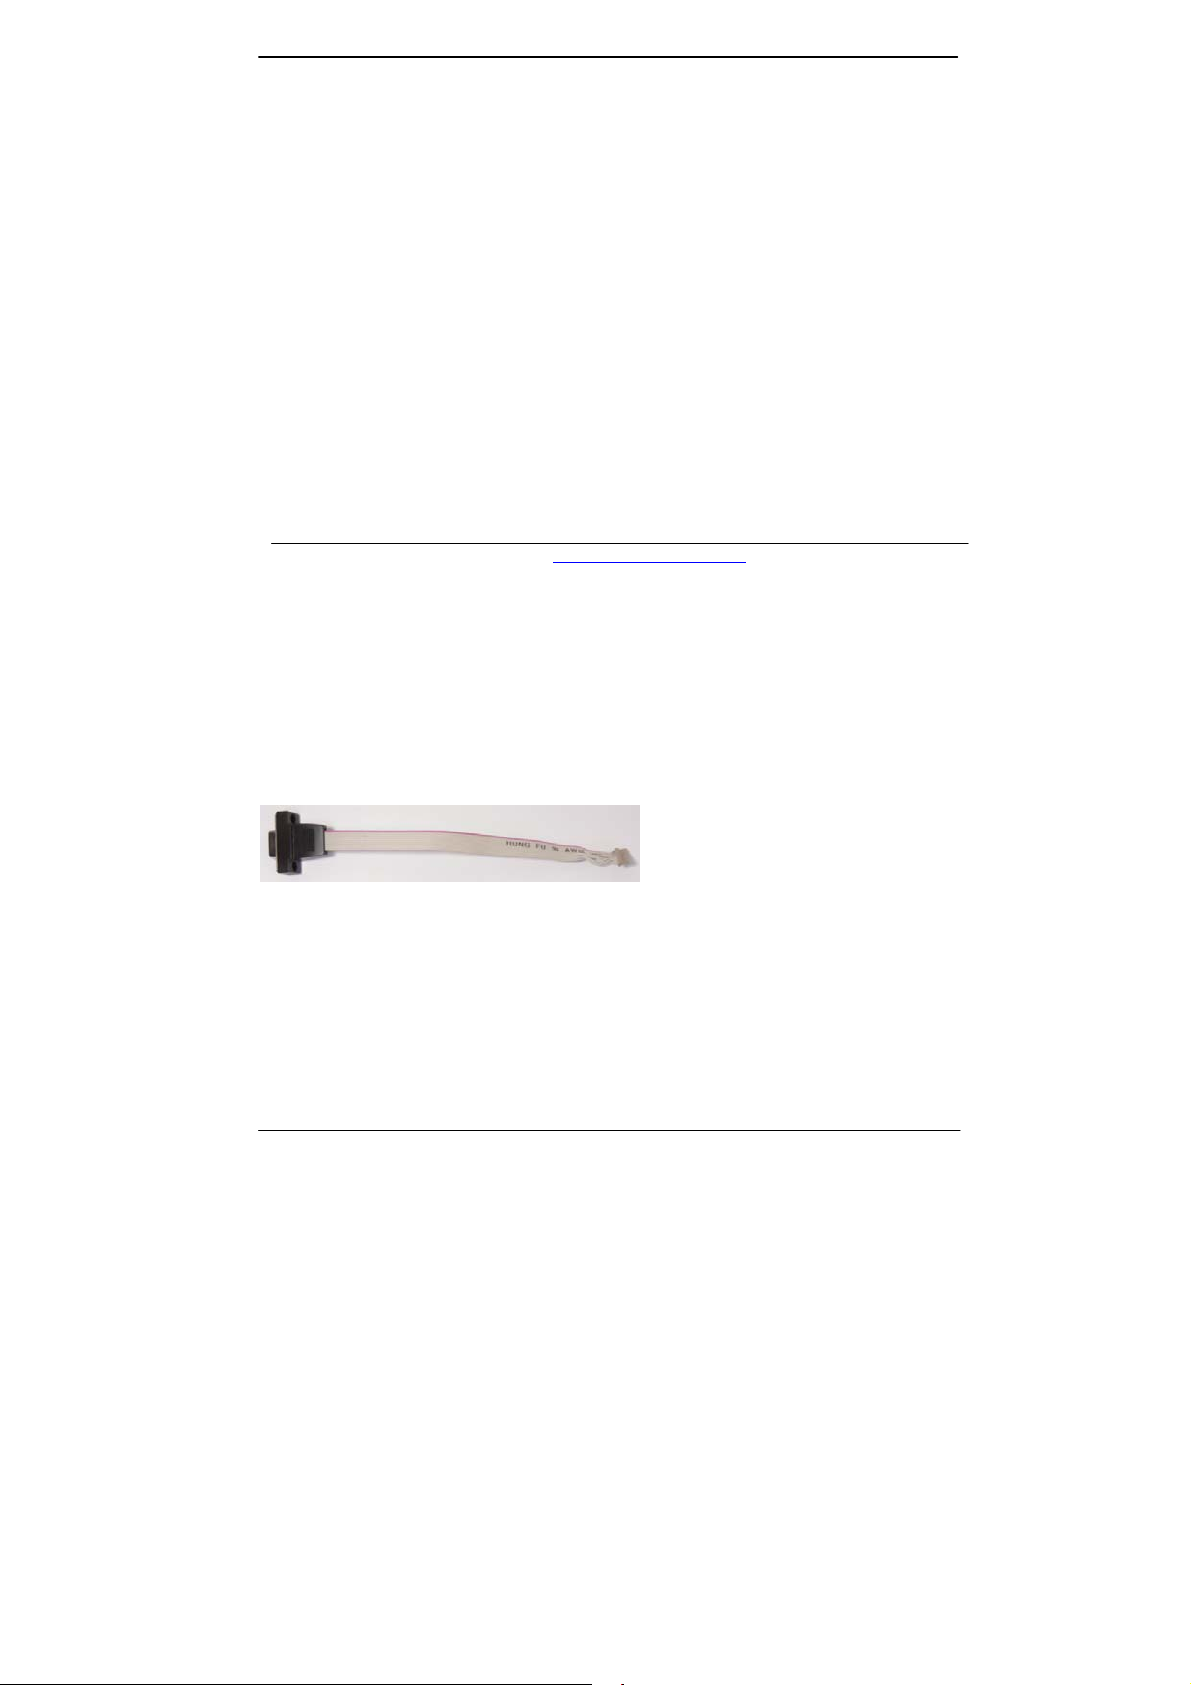
Cable Kit:
CRT cable without bracket x 1
(OALVGA-DF14NB)/ (1040596)
-2-
Page 3
Power Cable x 1
LDC-A / (1040433)
LN-D70 User’s Manual
Printed Matters:
Driver CD (Including User’s Manual) x 1
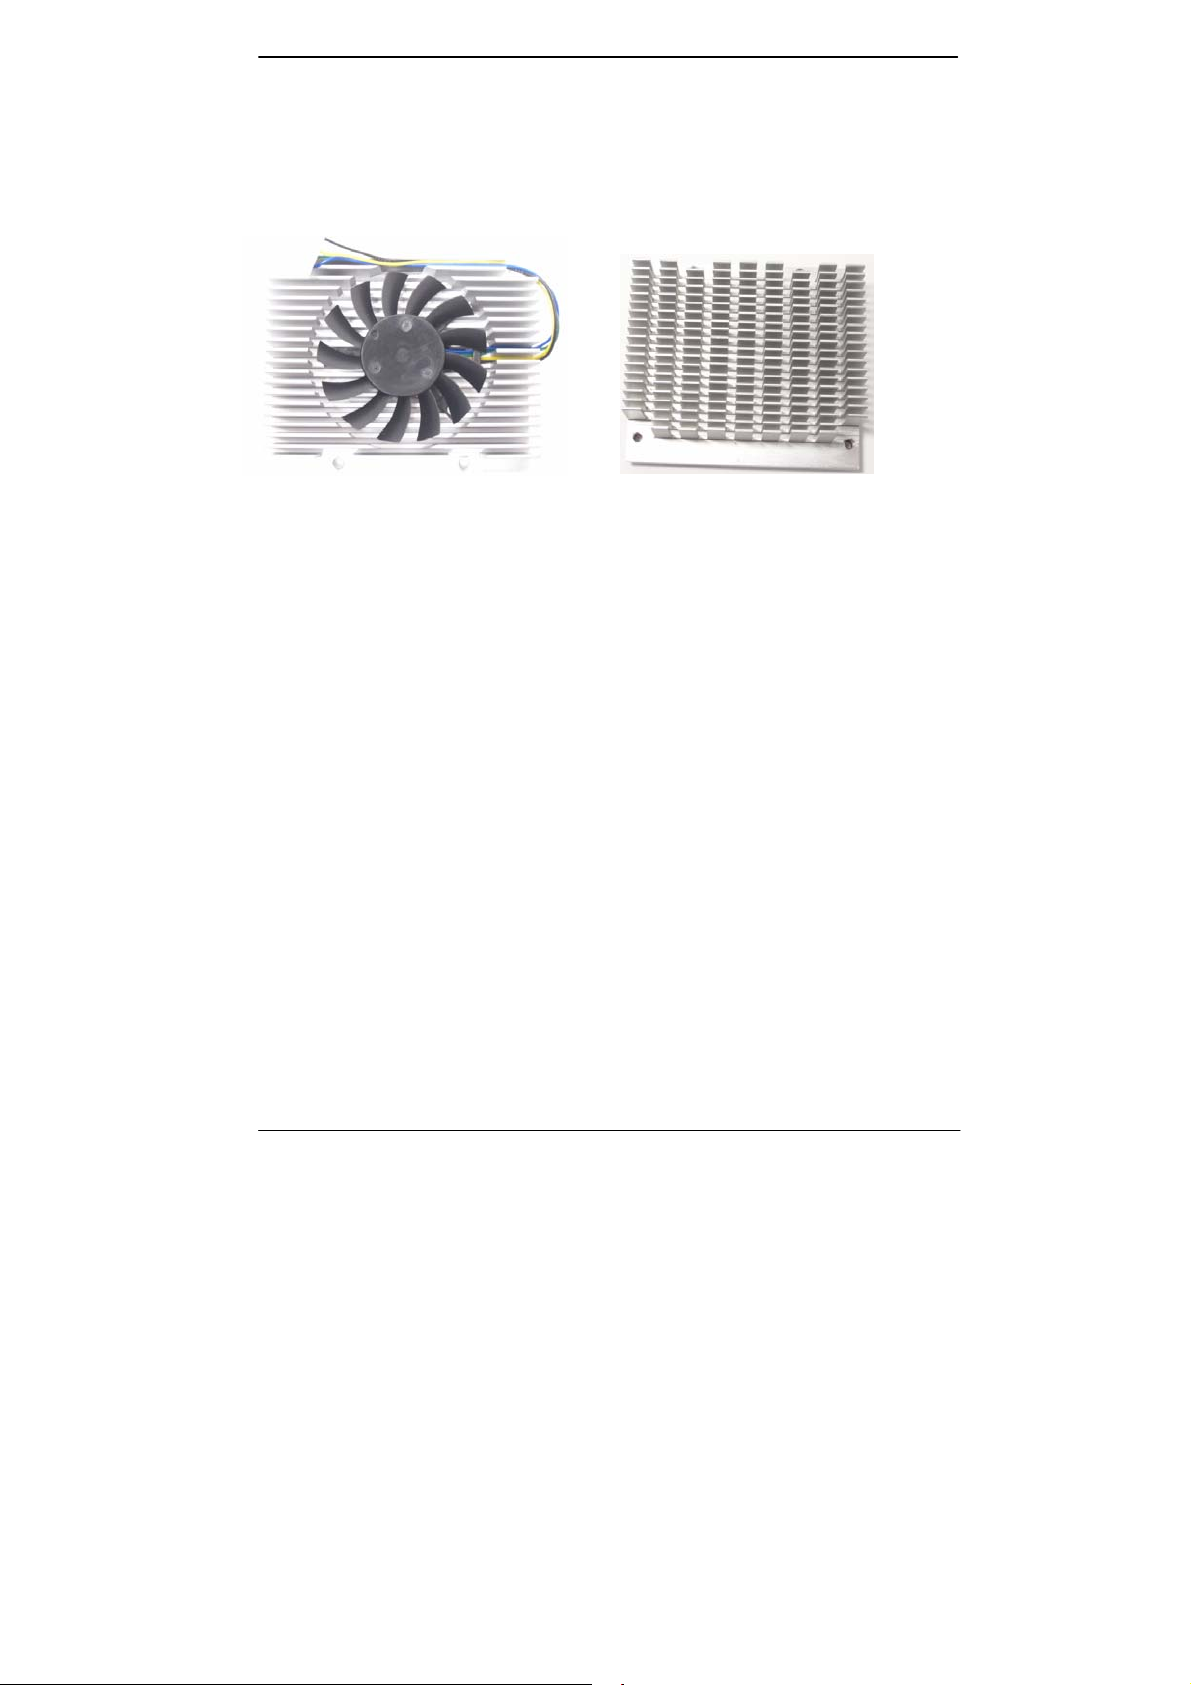
Cooler: Heat Sink:
(OHSF-7) / (2181010020)
QE-E70J, QE-E70E
(OHS-9) / (2181110011)
QE-E70N
Index
Chapter 1 <Introduction>..............................................................................5
1.1 <Product Overview> ..................................................................................... 5
1.2 <Product Specification>................................................................................6
1.3 <Mechanical Drawing>.................................................................................8
1.4 <Block Diagram>..........................................................................................9
Chapter 2 <Hardware Setup>......................................................................10
2.1 <Connector Location>................................................................................ 10
2.2 <Interface Reference>................................................................................ 11
2.2.1 <Internal interface>........................................................................ 11
2.3 < Connector Pin Assignments>.................................................................. 11
2.3.1 <PCI Express Interface Signals>................................................... 14
2.3.2<Serial A T A Interface Signals>........................................................ 15
2.3.3<Serial A T A Interface Signals>........................................................ 15
2.3.4<SDIO Interface Signals>...............................................................16
-3-
Page 4

LN-D70 User’s Manual
2.3.5<High Definition Audio Signals/AC'97>...........................................16
2.3.6<LVDS Flat Panel Signals>............................................................. 17
2.3.7<DisplayPort Interface Signals>......................................................18
2.3.7<HDMI Interface Signals>............................................................... 18
2.3.8<LPC Interface Signals>................................................................. 19
2.3.9<SPI Interface Signals>..................................................................19
2.3.10<Input Power Pins> ...................................................................... 20
2.3.11<Power Control Signals> ..............................................................20
2.3.12<Power Management Signals>.....................................................20
2.3.13<Miscellaneous Signals>..............................................................21
2.3.14<Thermal Management Signals>.................................................. 21
2.4 < VGA Interface >.......................................................................................22
Chapter 3 <System Setup>.........................................................................23
3.1 <Audio Configuration>................................................................................ 23
3.2 <Display Properties Setting>......................................................................23
3.3 <SATA configuration>.................................................................................25
3.4 <USB3.0 configuration> .............................................................................26
3.4.1 < USB 3.0 eXtensible Host Controller Driver install >.................... 26
Chapter 4 <BIOS Setup>.............................................................................27
Appendix A <Flash BIOS>...........................................................................29
A.1 <Flash Tool> ..............................................................................................29
A.2 <Flash BIOS Procedure>...........................................................................29
Appendix B <Programming GPIO’s>.........................................................30
Appendix C <Programming Watchdog Timer >........................................31
Contact Information.....................................................................................32
-4-
Page 5

LN-D70 User’s Manual
Chapter 1 <Introduction>
1.1 <Product Overview>
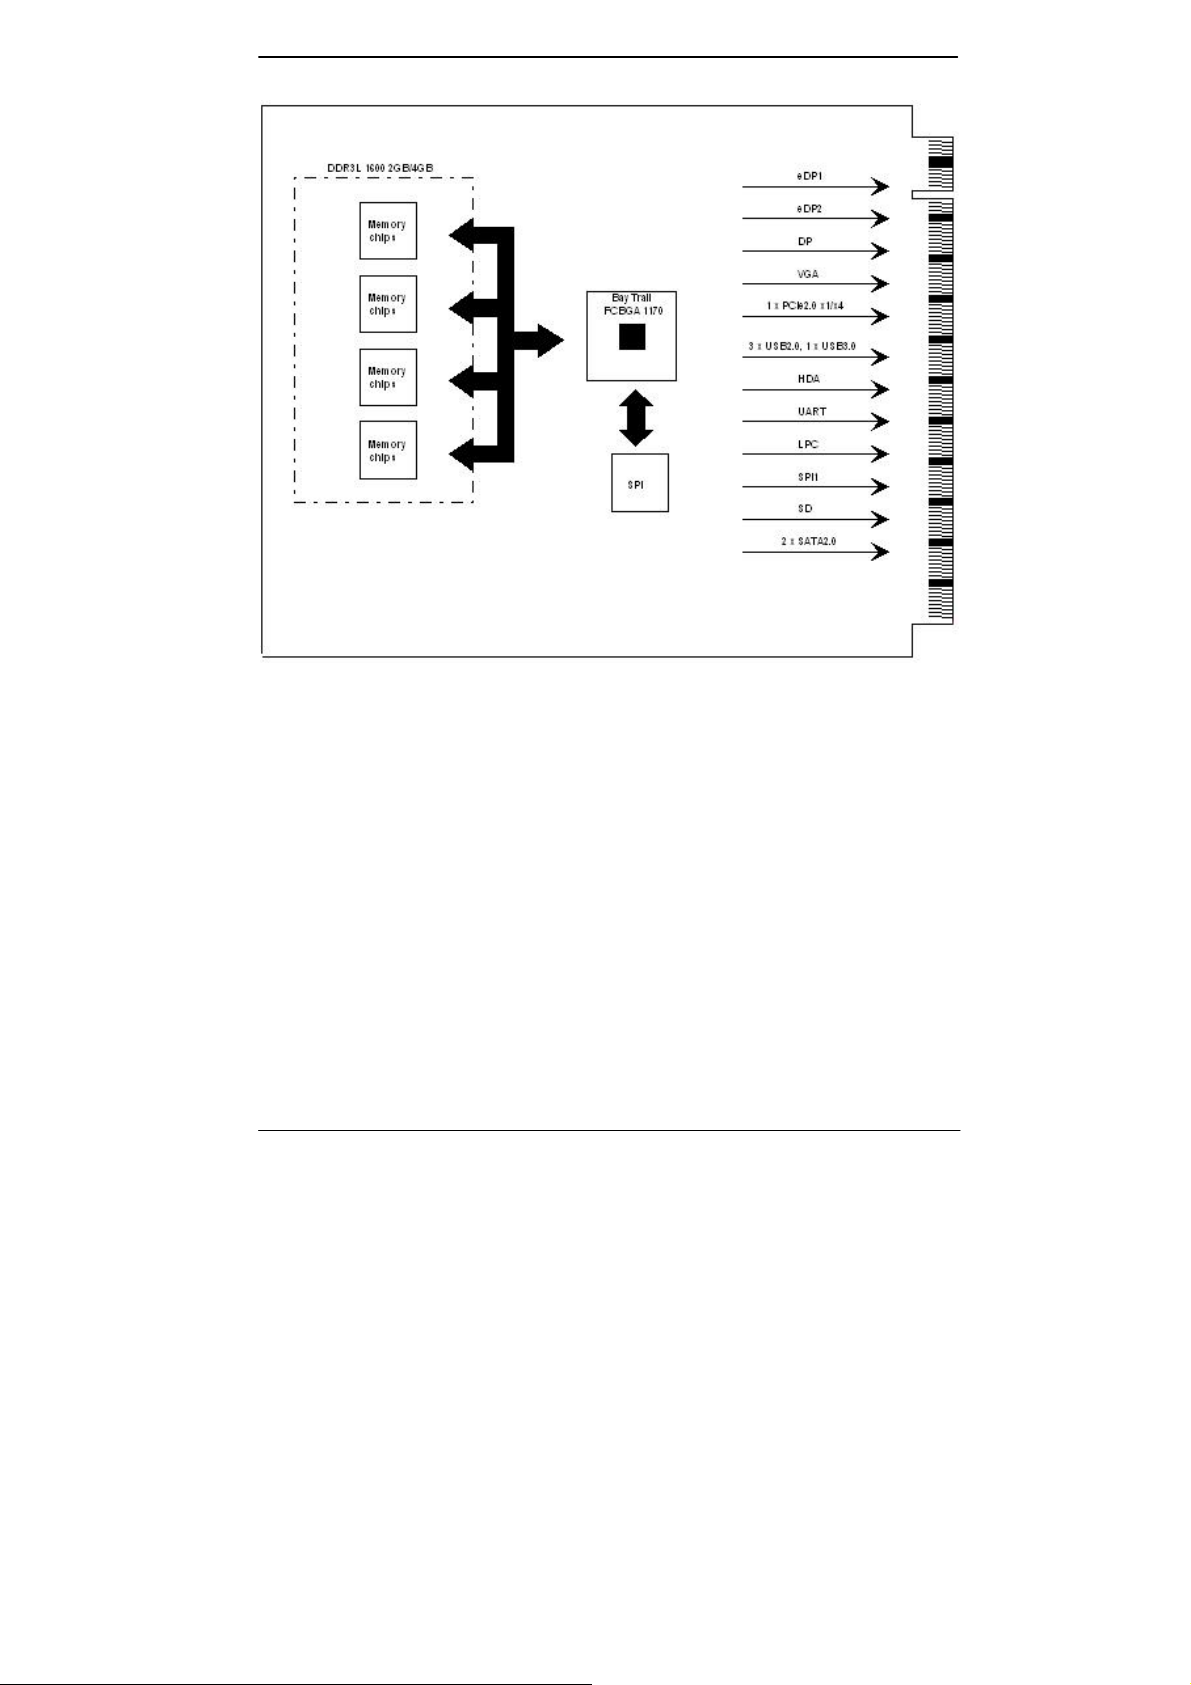
QE-E70 is the system-on-chip (SoC) designed for intelligent systems, delivering
outstanding compute, graphical, and media performance while operating in an extended
range of thermal conditions. These SoCs are based on the Silvermont microarchitecture,
utilizing Intel’s industry-leading 22nm process technology with 3-D Tri-Gate transistors,
which deliver significant improvements in computational performance and energy
efficiency.
New features for
The Intel® Celeron® Processor J1900 / N2930 and Intel® Atom E3845 Processor
supports, graphics, media performance, flexibility and more enh anced security that is
suitable for a variety of intelligent systems the ideal choice.
Outstanding integration of I/O interfaces
Supports display interfaces with graphics processing, camera interfaces with image
processing, audio with digital signal processing, multiple storage types, an d leg acy
embedded I/O. Provides interface expansion capabilities through industry-standard
high-bandwidth interfaces such as PCI Express* Gen 2.0, Hi-speed USB 2.0, and USB
3.0 connectivity.
Intel® Celeron® and Atom Processor
All in One multimedia solution
Based on Intel® J1900 / N2920 / E3845 SoC, the board provides high performance
onboard graphics, CRT, 24-bit dual channel LVDS interface, Display Port, DVI and two
channels High Definition Audio, to meet the very requirement of the multimedia
application.
Flexible Extension Interface
The board provides four PCIe2.0x1,LPC for super I/O,SDIO and SPI for system BIOS.
-5-
Page 6

LN-D70 User’s Manual
1.2 <Product Specification>
General Specification
Form Factor Qseven CPU Module
CPU Bay Trail Intel® Celeron™ J1900 / N2930 and Atom™ E3845 Mobile
Processor
Package Type: FCBGA1170
Memory Support DDR3L 1600 MHz 2GB or 4GB on board memory
Watchdog Timer Generates a system reset with internal timer for 1min/s ~ 255min/s
Graphic Intel® Clear Video integrated HD Graphics Technology
DDI Two DDI port interface for DisplayPort, DVI or eDP
Extended Interface
External I/O Interface
Four PCIe2.0 x1
LPC for super I/O
SMBus
SPI for System BIOS
Two SATAII(3Gb/s)
Four USB 2.0 & one USB 3.0
High definition audio interface
Internal I/O Interface
Power Requirement 5V and 5V standby
Dimension 70mm x 70mm(L x W)
Temperature
Ordering Code
QE-E70JED-2GB(4GB)
QE-E70EED-2GB(4GB)
QE-E70NED-2GB(4GB) Intel Celeron Processor N2930 (2M Cache, 2.16GHz), eDP, DP, VGA, H D
QE-E70JE2-2GB(4GB)
CRT interface
Operating within 0~60 ℃.(for QE-E70N and QE-E70J)
Storage within -20~85 ℃ centigrade. (for QE-E70N and QE-E70J)
Operating within -40~85 ℃.(for QE-E70E)
Storage within -40~85 ℃centigrade. (for QE-E70E)
Intel Celeron Processor J1900 (2M Cache, 2.42GHz), eDP, DP, VGA, HD
Audio interface, two Serial ATAII, one USB3.0 , four USB 2.0, four PCIe x1,
2G(4G) Memory
Intel Atom Processor E3845 (2M Cache, 1.91GHz), eDP, DP, VGA, HD Audio
interface, two Serial ATAII, one USB3.0 , four USB 2.0, four PCIe x1, 2G(4G)
Memory
Audio interface, two Serial ATAII, one USB3.0 , four USB 2.0, four PCIe x1,
2G(4G) Memory
Intel Celeron Processor J1900 (2M Cache, 2.42GHz), two eDP, VGA, HD
-6-
Page 7

LN-D70 User’s Manual
Audio interface, two Serial ATAII, one USB3.0 , four USB 2.0, four PCIe x1,
2G(4G) Memory
QE-E70EE2-2GB(4GB) Intel Atom Processor E3845 (2M Cache, 1.91GHz), two eDP, VGA, HD Audio
interface, two Serial ATAII, one USB3.0 , four USB 2.0, four PCIe x1, 2G(4G)
Memory
QE-E70NE2-2GB(4GB) Intel Celeron Processor N2930 (2M Cache, 2.16GHz), two eDP, VGA, HD
Audio interface, two Serial ATAII, one USB3.0 , four USB 2.0, four PCIe x1,
2G(4G) Memory
The specifications may be different as the actual production.
For further product information please visit the website at
TUhttp://www.commell.com.twUT
-7-
Page 8
LN-D70 User’s Manual
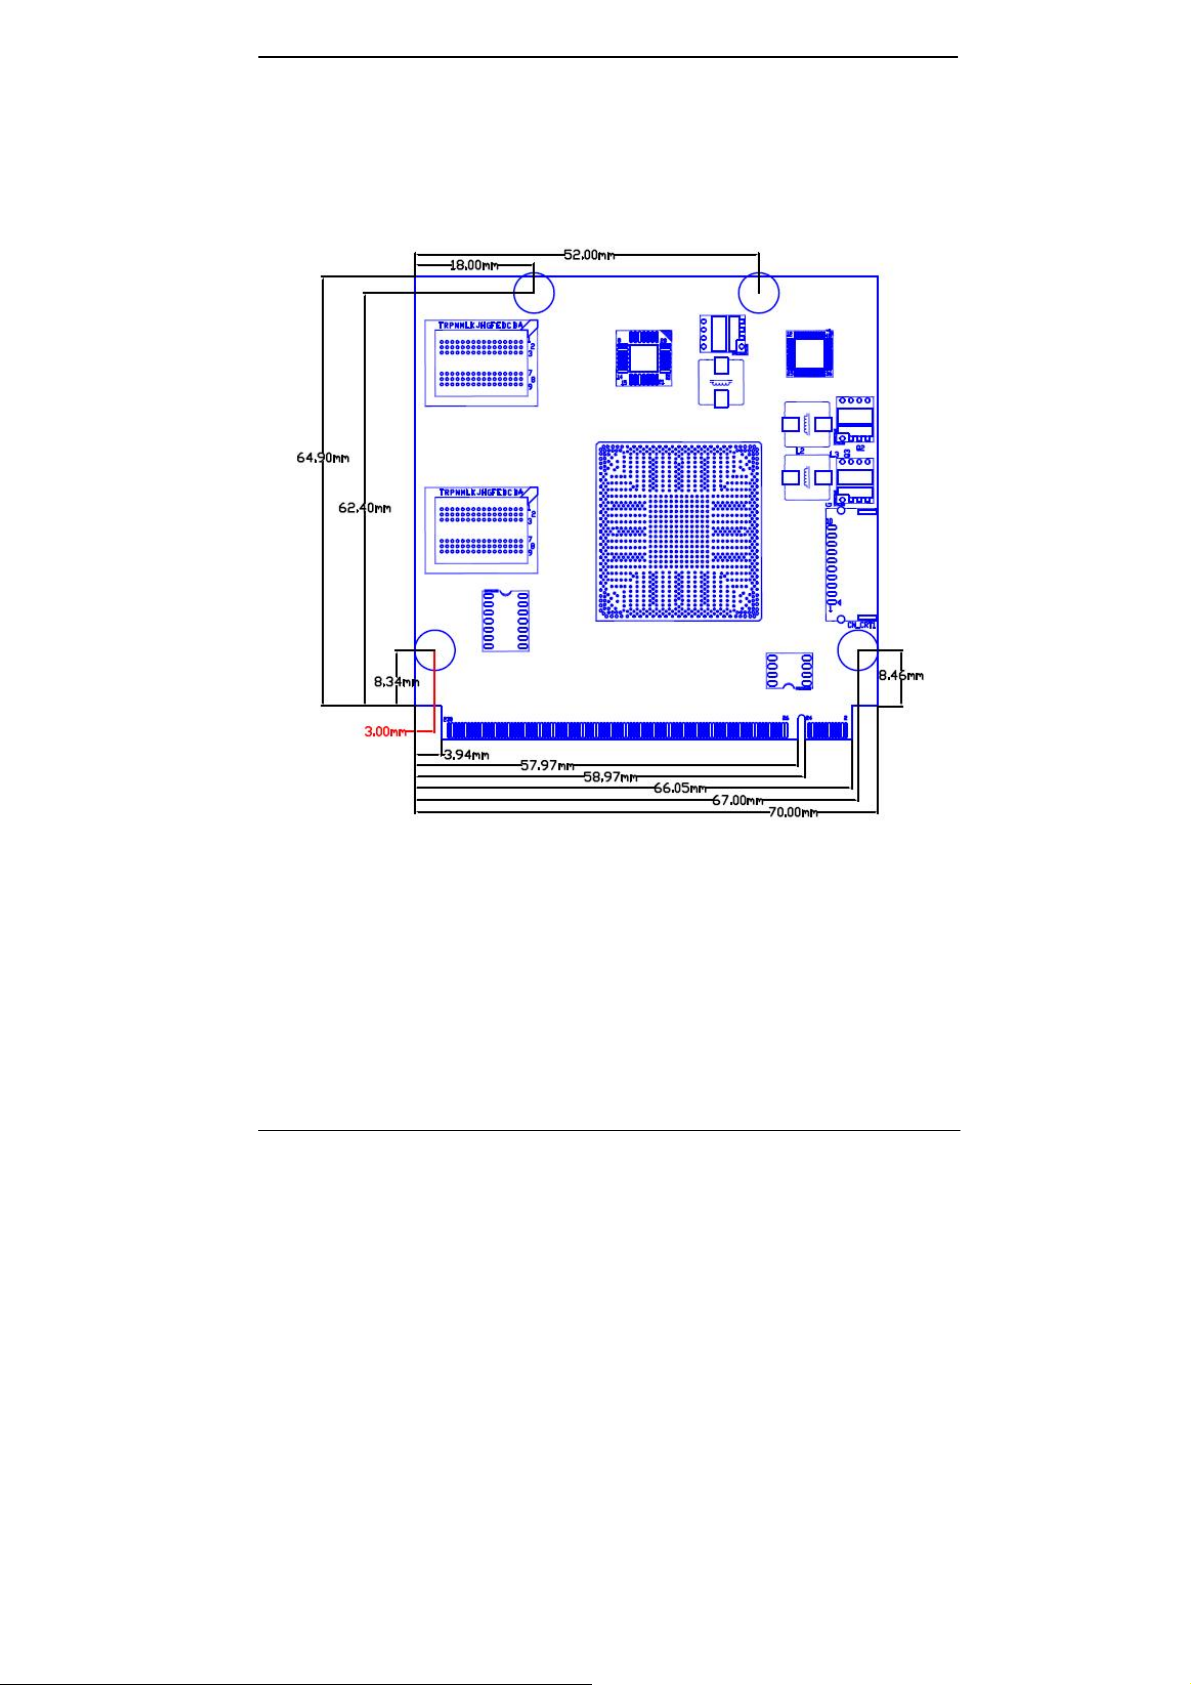
1.3 <Mechanical Drawing>
-8-
Page 9
LN-D70 User’s Manual
1.4 <Block Diagram>
9-
-
Page 10
LN-D70 User’s Manual
Chapter 2 <Hardware Setup>
2.1 <Connector Location>
10-
-
Page 11

LN-D70 User’s Manual
2.2 <Interface Reference>
2.2.1 <Internal interface>
Interface Function Remark
CPU FCBGA1170 CPU
CN_CRT 10-pin VGA connector
2.2.2 <External Interface>
interface Function Remark
PCIe2.0 Four PCIe2.0 x1
LPC LPC for super I/O
SDIO
SPI SPI for System BIOS
SATAII Two SATAII(3Gb/s),
USB Four USB 2.0 & one USB 3.0,
Audio High definition audio interface
SDIO for super I/O
2.3 < Connector Pin Assignments>
There are 115 edge fingers on the top and bottom side of the QsevenR module that
mate with the MXM connector. Table 2.3 lists the pin assignments for all 230 edge
fingers.
Table 2.3 Connector Pinout Description
Pin Signal Pin Signal
1 GND 2 GND
3 GBE_MDI3- 4 GBE_MDI25 GBE_MDI3+ 6 GBE_MDI2+
7 GBE_LINK100# 8 GBE_LINK1000#
9 GBE_MDI1- 10 GBE_MDI011 GBE_MDI1+ 12 GBE_MDI0+
13 GBE_LINK# 14 GBE_ACT#
15 GBE_CTREF 16 SUS_S5#
17 WAKE# 18 SUS_S3#
19 SUS_STAT# 20 PWRBTN#
21 SLP_BTN# 22 LID_BTN#
23 GND 24 GND
KEY KEY
25 GND 26 PWGIN
11-
-
Page 12

LN-D70 User’s Manual
27 BATLOW# 28 RSTBTN#
29 SATA0_TX+ 30 SATA1_TX+
31 SATA0_TX- 32 SATA1_TX33 SATA_ACT# 34 GND
35 SATA0_RX+ 36 SATA1_RX+
37 SATA0_RX- 38 SATA1_RX39 GND 40 GND
41 BIOS_DISABLE# / BOOT_ALT# 42 SDIO_CLK#
43 SDIO_CD# 44 SDIO_LED
45 SDIO_CMD 46 SDIO_WP
47 SDIO_PWR# 48 SDIO_DAT1
49 SDIO_DAT0 50 SDIO_DAT3
51 SDIO_DAT2 52 SDIO_DAT5
53 SDIO_DAT4 54 SDIO_DAT7
55 SDIO_DAT6 56 RSVD
57 GND 58 GND
59 HDA_SYNC/ I2S_WS 60 SMB_CLK/ GP1_I2C_CLK
61 HDA_RST#/ I2S_RST# 62 SMB_DAT/ GP1_I2C_DAT
63 HDA_BITCLK/ I2S_CLK 64 SMB_ALERT#
65 HDA_SDI/ I2S_SDI 66 GP0_I2C_CLK
67 HDA_SDO/ I2S_SDO 68 GP0_I2C_DAT
69 THRM# 70 WDTRIG#
71 THRMTRIP# 72 WDOUT
73 GND 74 GND
75 USB_P7-/ USB_SSTX0- 76 USB_P6-/ USB_SSRX077 USB_P7+/ USB_SSTX0+ 78 USB_P6+/ USB_SSRX0+
79 USB_6_7_OC# 80 USB_4_5_OC#
81 USB_P5-/ USB_SSTX1- 82 USB_P4-/ USB_SSRX183 USB_P5+/ USB_SSTX1+ 84 USB_P4+/ USB_SSRX1+
85 USB_2_3_OC# 86 USB_0_1_OC#
87 USB_P3- 88 USB_P289 USB_P3+ 90 USB_P2+
91 USB_CC 92 USB_ID
93 USB_P1- 94 USB_P095 USB_P1+ 96 USB_P0+
97 GND 98 GND
99 eDP0_TX0+/ LVDS_A0+ 100 eDP1_TX0+/ LVDS_B0+
101 eDP0_TX0-/ LVDS_A0- 102 eDP1_TX0-/ LVDS_B0103 eDP0_TX1+/ LVDS_A1+ 104 eDP1_TX1+/ LVDS_B1+
105 eDP0_TX1-/ LVDS_A1- 106 eDP1_TX1-/ LVDS_B1107 eDP0_TX2+/ LVDS_A2+ 108 eDP1_TX2+/ LVDS_B2+
109 eDP0_TX2-/ LVDS_A2- 110 eDP1_TX2-/ LVDS_B2-
12-
-
Page 13

LN-D70 User’s Manual
111 LVDS_PPEN 112 LVDS_BLEN
113 eDP0_TX3+/ LVDS_A3+ 114 eDP1_TX3+/ LVDS_B3+
115 eDP0_TX3-/ LVDS_A3- 116 eDP1_TX3-/ LVDS_B3117 GND 118 GND
119 eDP0_AUX+/ LVDS_A_CLK+ 120 eDP1_AUX+/ LVDS_B_CLK+
121 eDP0_AUX-/ LVDS_A_CLK- 122 eDP1_AUX-/ LVDS_B_CLK123 LVDS_BLT_CTRL
/GP_PWM_OUT0
125 GP2_I2C_DAT/
LVDS_DID_DAT
127 GP2_I2C_CLK /
LVDS_DID_CLK
129 CAN0_TX 130 CAN0_RX
131 DP_LANE3+/ TMDS_CLK+ 132 RSVD (Differential Pair)
133 DP_LANE3-/ TMDS_CLK- 134 RSVD (Differential Pair)
135 GND 136 GND
137 DP_LANE1+/ TMDS_LANE1+ 138 DP_AUX+
139 DP_LANE1-/ TMDS_LANE1- 140 DP_AUX141 GND 142 GND
143 DP_LANE2+ / TMDS_LANE0+ 144 RSVD (Differential Pair)
145 DP_LANE2- / TMDS_LANE0- 146 RSVD (Differential Pair)
147 GND 148 GND
149 DP_LANE0+ / TMDS_LANE2+ 150 HDMI_CTRL_DAT
151 DP_LANE0- / TMDS_LANE2- 152 HDMI_CTRL_CLK
153 DP_HDMI_HPD# 154 RSVD
155 PCIE_CLK_REF+PCIE_CLK_REF+ 156 PCIE_WAKE#
157 PCIE_CLK_REF- 158 PCIE_RST#
159 GND 160 GND
161 PCIE3_TX+ 162 PCIE3_RX+
163 PCIE3_TX- 164 PCIE3_RX165 GND 166 GND
167 PCIE2_TX+ 168 PCIE2_RX+
169 PCIE2_TX- 170 PCIE2_RX171 UART0_TX 172 UART0_RTS#
173 PCIE1_TX+ 174 PCIE1_RX+
175 PCIE1_TX- 176 PCIE1_RX177 UART0_RX 178 UART0_CTS#
179 PCIE0_TX+ 180 PCIE0_RX+
181 PCIE0_TX- 182 PCIE0_RX183 GND 184 GND
185 LPC_AD0 / GPIO0 186 LPC_AD1 / GPIO1
187 LPC_AD2 / GPIO2 188 LPC_AD3 / GPIO3
189 LPC_CLK / GPIO4 190 LPC_FRAME# / GPIO5
-
124 GP_1-Wire_Bus
126 eDP0_HPD# /
LVDS_BLC_DAT
128 eDP1_HPD# /
LVDS_BLC_CLK
13-
Page 14

LN-D70 User’s Manual
191 SERIRQ / GPIO6 192 LPC_LDRQ# / GPIO7
193 VCC_RTC 194 SPKR / GP_PWM_OUT2
195 FAN_TACHOIN /
GP_TIMER_IN
197 GND 198 GND
199 SPI_MOSI 200 SPI_CS0#
201 SPI_MISO 202 SPI_CS1#
203 SPI_SCK 204 MFG_NC4
205 VCC_5V_SB 206 VCC_5V_SB
207 MFG_NC0 208 MFG_NC2
209 MFG_NC1 210 MFG_NC3
211 VCC 212 VCC
213 VCC 214 VCC
215 VCC 216 VCC
217 VCC 218 VCC
219 VCC 220 VCC
221 VCC 222 VCC
223 VCC 224 VCC
225 VCC 226 VCC
227 VCC 228 VCC
229 VCC 230 VCC
196 FAN_PWMOUT /
GP_PWM_OUT1
2.3.1 <PCI Express Interface Signals>
Signal Description
PCIE0_RX+
PCIE0_RXPCIE0_TX+
PCIE0_TXPCIE1_RX+
PCIE1_RXPCIE1_TX+
PCIE1_TXPCIE2_RX+
PCIE2_RXPCIE2_TX+
PCIE2_TXPCIE3_RX+
PCIE3_RXPCIE3_TX+
PCI Express channel 0, Receive Input differential pair.
PCI Express channel 0, Transmit Output differential pair.
PCI Express channel 1, Receive Input differential pair.
PCIE xpress channel 1, Transmit Output differential pair.
PCI Express channel 2, Receive Input differential pair.
PCI Express channel 2, Transmit Output differential pair.
PCI Express channel 3, Receive Input differential pair.
PCI Express channel 3, Transmit Output differential pair.
14-
-
Page 15

LN-D70 User’s Manual
PCIE3_TXPCIE_CLK_REF+
PCIE_CLK_REFPCIE_WAKE# PCI Express Wake Event: Sideband wake signal asserted by
PCIE_RST# Reset Signal for external devices.
PCI Express Reference Clock for Lanes 0 to 3.
components requesting wakeup.
2.3.2<Serial ATA Interface Signals>
Signal Description
SATA0_RX+
SATA0_RXSATA0_TX+
SATA0_TXSATA0_RX+
SATA0_RXSATA0_TX+
SATA0_TXSATA_ACT# Serial ATA Led. Open collector output pin driven during SATA
Serial ATA channel 0, Receive Input differential pair.
Serial ATA channel 0, Transmit Output differential pair.
Serial ATA channel 1, Receive Input differential pair.
Serial ATA channel 1, Transmit Output differential pair.
command activity.
2.3.3<Serial ATA Interface Signals>
Signal Description
USB_P0+
USB_P0USB_P1+
USB_P1-
USB_P2+
USB_P2USB_P3+
USB_P3USB_SSRX0+
USB_SSRX0-
Universal Serial Bus Port 0 differential pair.
Universal Serial Bus Port 1 differential pair.
This port may be optionally used as USB client port.
Universal Serial Bus Port 2 differential pair.
Universal Serial Bus Port 3 differential pair.
Multiplexed with receive signal differential pairs for the
Superspeed USB data path.
15-
-
Page 16

LN-D70 User’s Manual
USB_SSTX0+
USB_SSTX0USB_0_1_OC# Over current detect input 1. This pin is used to monitor the
USB_2_3_OC# Over current detect input 2. This pin is used to monitor the
Multiplexed with transmit signal differential pairs for the
Superspeed USB data path.
USB power over current of the USB Ports 0 and 1.
USB power over current of the USB Ports 2 and 3.
2.3.4<SDIO Interface Signals>
Signal Description
SDIO_CD#
SDIO_CLK
SDIO_CMD
SDIO_WP
SDIO Card Detect. This signal indicates when a SDIO card is presen
SDIO Clock. With each cycle of this signal a one-bit transfer
on the command and each data line occurs. This signal has
maximum frequency of 48 MHz.
SDIO Command/Response. This signal is used for card
initialization and for command transfers. During initialization
mode this signal is open drain. During command transfer this
signal is in push-pull mode.
SDIO Write Protect. This signal denotes the state of the
write-protect tab on SD cards.
SDIO_PWR# SDIO Power Enable. This signal is used to enable the power
being supplied to a SD card device.
SDIO_DAT0-3 SDIO Data lines. These signals operate in push-pull mode.
2.3.5<High Definition Audio Signals/AC'97>
Signal Description
HDA_RST# HD Audio/AC'97 Codec Reset.
HDA_SYNC Serial Bus Synchronization.
HDA_BCLK HD Audio/AC'97 24 MHz Serial Bit Clock from Codec.
HDA_SDO HD Audio/AC'97 Serial Data Output to Codec.
HDA_SDI HD Audio/AC'97 Serial Data Input from Codec.
16-
-
Page 17

LN-D70 User’s Manual
2.3.6<LVDS Flat Panel Signals>
Signal Description
LVDS_PPEN Controls panel power enable.
LVDS_BLEN Controls panel backlight enable.
LVDS_BLT_CTRL Primary functionality is to control the panel backlight brightness via
pulse width modulation (PWM).
eDP0_TX0+
eDP0_TX0eDP0_TX1+
eDP0_TX1eDP0_TX2+
eDP0_TX2eDP0_TX3+
eDP0_TX3eDP0_AUX+
eDP0_AUXeDP1_TX0+
eDP1_TX0eDP1_TX1+
eDP1_TX1eDP1_AUX+
eDP1_AUX-
Display Port primary channel differential pair 0.
Display Port primary channel differential pair 1.
Display Port primary channel differential pair 2.
Display Port primary channel differential pair 3.
Display Port primary auxiliary channel.
Display Port secondary channel differential pair 0.
Display Port secondary channel differential pair 1.
Display Port secondary auxiliary channel.
eDP0_HPD# If the primary functionality is not used, it can be used as an
emedded DisplayPort primary Hotplug detection.
eDP1_HPD# If the primary functionality is not used, it can be used as an
emedded DisplayPort secondary Hotplug detection.
17-
-
Page 18

LN-D70 User’s Manual
2.3.7<DisplayPort Interface Signals>
Signal Shared With Description
DP_LANE3DP_LANE3+
DP_LANE2DP_LANE2+
DP_LANE1DP_LANE1+
TMDS_CLKTMDS_CLK+
TMDS_LANE0TMDS_LANE0+
TMDS_LANE1TMDS_LANE1+
DisplayPort differential pair lines lane 3.
DisplayPort differential pair lines lane 2.
DisplayPort differential pair lines lane 1.
DP_LANE0DP_LANE0+
DP_AUX
DPHDMI_HPD#
TMDS_LANE2TMDS_LANE2+
DisplayPort differential pair lines lane 0.
Auxiliary channel used for link management and
device control. Differential pair lines.
Hot plug detection signal that serves as an
interrupt request.
2.3.7<HDMI Interface Signals>
Signal Shared With Description
TMDS_CLKTMDS_CLK+
TMDS_LANE0TMDS_LANE0+
TMDS_LANE1TMDS_LANE1+
TMDS_LANE2-
TMDS_LANE2+
HDMI_CTRL_CLK
DP_LANE3DP_LANE3+
DP_LANE2DP_LANE2+
DP_LANE1-
DP_LANE1+
DP_LANE0-
DP_LANE0+
TMDS differential pair clock lines.
TMDS differential pair lines lane 0.
TMDS differential pair lines lane 1.
TMDS differential pair lines lane 2.
DDC based control signal (clock) for HDMI
device.
18-
-
Page 19

LN-D70 User’s Manual
Note: Level shifters must be implemented
on the carrier board for this signal in order to
be compliant with the HDMI Specification.
HDMI_CTRL_DAT
DP_HDMI_HPD#
DDC based control signal (data) for HDMI
device.
Note: Level shifters must be implemented
on the carrier board for this signal in order to
be compliant with the HDMI Specification.
Hot plug detection signal that serves as an
interrupt request.
2.3.8<LPC Interface Signals>
Signal Description
HLPC Interface
Signals
LPC_FRAME# LPC frame indicates the start of a new cycle or the termination of
Multiplexed Command, Address and Data.
a broken cycle.
LPC_CLK LPC clock.
SERIRQ Serialized Interrupt.
2.3.9<SPI Interface Signals>
Signal Description
SPI_MOSI Master serial output/Slave serial input signal. SPI serial output
data from QsevenR module to the SPI device.
SPI_MISO Master serial input/Slave serial output signal. SPI serial input
data from the SPI device to QsevenR module.
SPI_SCK SPI clock output.
SPI_CS0# SPI chip select 0 output.
SPI_CS1# SPI Chip Select 1 signal is used as the second chip select when
two devices are used. Do not use when only one SPI device is
used.
19-
-
Page 20

LN-D70 User’s Manual
2.3.10<Input Power Pins>
Signal Description
VCC
Power Supply +5VDC ±5%.
VCC_5V_SB
VCC_RTC 3 V backup cell input. VCC_RTC should be connected to a 3V
GND Power Ground.
Standby Power Supply +5VDC ±5%.
backup cell for RTC operation and storage register non-volatility
in the absence of system power.
(VCC_RTC = 2.4 - 3.3 V).
2.3.11<Power Control Signals>
Signal Description
PWGIN High active input for the QsevenR module indicates that all power
rails located on the carrier board are ready for use.
PWRBTN# Power Button: Low active power button input. This signal is
triggered on the falling edge.
2.3.12<Power Management Signals>
Signal Description
RSTBTN# Reset button input. This input may be driven active low by an
external circuitry to reset the QsevenR module.
BATLOW# Battery low input. This signal ma y be driven active low by
external circuitry to signal that the system battery is low or may
be used to signal some other external battery management
event.
SUS_STAT# Suspend Status: indicates that the system will be entering a low
power state soon.
SUS_S3# S3 State: This signal shuts off power to all runtime system
components that are not maintained during S3 (Suspend to
Ram), S4
or S5 states.
The signal SUS_S3# is necessary in order to support the optional
20-
-
Page 21

LN-D70 User’s Manual
S3 cold power state.
SUS_S5# S5 State: This signal indicates S4 or S5 (Soft Off) state.
SLP_BTN# Sleep button. Low active signal used by the ACPI operating
system to transition the system into sleep state or to wake it up
again.
This signal is triggered on falling edge.
2.3.13<Miscellaneous Signals>
Signal Description
WDOUT Watchdog event indicator. High active output used for
signaling a missing watchdog trigger. Will be deasserted by
software, system reset or a system power down.
SMB_CLK Clock line of System Management Bus.
SMB_DAT Data line of System Management Bus.
SMB_ALERT# System Management Bus Alert input. This signal may be
driven low by SMB devices to signal an event on the SM Bus.
SPKR Primary functionality is output for audio enunciator, the
“speaker" in PC AT systems.
BIOS_DISABLE# Module BIOS disable input signal. Pull low to disable module's
on-board BIOS. Allows off-module BIOS implementations.
This signal can also be used to disable standard boot firmware
flash device and enable an alternative boot firmware source,for
example a boot loader.
2.3.14<Thermal Management Signals>
Signal Description
THRM# Thermal Alarm active low signal generated by the external
hardware to indicate an over temperature situation. This signal
can be used to initiate thermal throttling.
21-
-
Page 22

LN-D70 User’s Manual
2.4 < VGA Interface >
Connector: CN_CRT
Type: onboard 10-pin connector for CN_CRT connector pitch 2.00mm
Pin Signal Pin Signal
1 5VCDA 2 5VCLK
3 CRTGND 4 BR
5 BG 6 BB
7 5HSYNC 8 5VSYNC
9 CRTGND 10 CRTGND
22-
-
Page 23

LN-D70 User’s Manual
Chapter 3 <System Setup>
3.1 <Audio Configuration>
The board integrates REALTEK® ALC262 code. It can support 2-channel sound under
system configuration. Please follow the steps below to setup your sound system.
1. Install REALTEK HD Audio driver.
2. Lunch the control panel and Sound Effect Manager.
3. Select Speaker Configuration
3.2 <Display Properties Setting>
Based on Intel J1900/N2930 with HD Graphic, the board supports two DACs for display
device as different resolution and color bit.
Please install the Intel Graphic Driver before you starting setup display devices.
23-
-
Page 24

LN-D70 User’s Manual
1. Click right button on the desktop to lunch Screen resolution > Advanced settings
2. Click Graphics Properties… button for more specificity setup.
Click Graphics Properties... for
advanced setup
3. This setup options can let you define each device settings.
24-
-
Page 25

LN-D70 User’s Manual
3.3 <SATA configuration>
SA TA Mode:
This option can let you select whether the Serial ATA hard drives would work under
normal IDE or AHCI.
25-
-
Page 26

LN-D70 User’s Manual
3.4 <USB3.0 configuration>
The USB3.0 port need to Install USB 3.0 eXtensible Host Controller Driver and
enable xHCI Mode.
3.4.1 < USB 3.0 eXtensible Host Controller Driver install >
Step1. Copy the USB 3.0 driver from “Driver CD” to the local hard driver directory.
( Do not run this driver from a USB storage device)
Step2. Configure default BIOS, click Advanced > South Cluster Configuration > USB
Configuration, disable “EHCI Mode”.
Step3. enable “xHCI Mode” and push “F10” to save configuration. Restart your
computer.
26-
-
Page 27

LN-D70 User’s Manual
Step4. If you enable xHCI Mode , USB 2.0 and USB 3.0 ports can’t use without
drive. We recommend that you connect PS/2 mouse / keyboard installing
USB 3.0 driver.
Step5. Double click the “Setup.exe” from the directory. Click “Next” to continue.
Step6. Lastly, the “Setup Complete” screen appears so click “Finish” to
restart your computer.
Chapter 4 <BIOS Setup>
The motherboard uses the Phoenix BIOS for the system configuration. The Phoenix
BIOS in the single board computer is a customized version of the industrial standard
BIOS for IBM PC AT-compatible computers. It supports Intel x86 and compatible CPU
27-
-
Page 28

LN-D70 User’s Manual
architecture based processors and computers. The BIOS provides critical low-level
support for the system central processing, memory and I/O sub-systems.
The BIOS setup program of the single board computer let the customers modify the basic
configuration setting. The settings are stored in a dedicated battery-backed memory,
NVRAM, retains the information when the power is turned off. If the battery runs out of
the power, then the settings of BIOS will come back to the default setting.
The BIOS section of the manual is subject to change without notice and is provided h ere
for reference purpose only. The settings and configurations of the BIOS are current at
the time of print, and therefore they may not be exactly the same as that displayed on
your screen.
To activate CMOS Setup program, press <DEL> key immediately after you turn on the
system. The following message “Press DEL to enter SETUP” should appear in the lower
left hand corner of your screen. When you enter the CMOS Setup Utility, the Main Menu
will be displayed as Figure 4-1. You can use arrow keys to select your function, press
<Enter> key to accept the selection and enter the sub-menu.
Figure 4-1 CMOS Setup Utility Main Screen
28-
-
Page 29

LN-D70 User’s Manual
Appendix A <Flash BIOS>
A.1 <Flash Tool>
The board is based on Phoenix BIOS and can be updated easily by the BIOS auto
flash tool. You can download the tool online from below link
http://www.commell.com/Support/Product%20Technical%20Support/LN-D70.
htm
A.2 <Flash BIOS Procedure>
1.Extract the zip file(re-flash tool and BIOS file) to root of the USB flash
drive.
2.Insert your USB flash drive in USB port of the board and power
on the system.
3. Boot to EFI-Shell mode (UEFI Boot Enable, Legacy Boot Disable)
then input the “fs0:” command to switch to the root of the USB flash
drive.
29-
-
Page 30

LN-D70 User’s Manual
4. Type the ” fpt64.efi -y -f xxx.bin” command to start flash BIOS
processes. ( xxx.bin means the BIOS file that you want to update)
5. When it finished all update processes, restart the system.
Any question about the BIOS re-flash please contact your distributors or visit the
web-site at below:
http://www.commell.com.tw/support/support.htm
UT
Appendix B <Programming GPIO’s>
The GPIO’ can be programmed with the MSDOS debug program using
simple IN/OUT commands. The following lines show an example how to
do this. (The GPIO is open drain)
GPIO0…..GPIO7 bit0……bit7
-o 4E 87 ;enter configuration
-o 4E 87
-o 4E 07
-o 4F 07 ;enale GPIO function
-o 4E 30
-o 4F 10 ;enable GPIO configuration
-o 4E F0
-o 4F xx ;set GPIO as input/output; set ‘1’ for input,’0’for
output
30-
-
Page 31

LN-D70 User’s Manual
-o 4E F1
-o 4F xx ;if set GPIO’s as output,in this register its value can
be set
Optional :
-o 4E F2
-o 4F xx ; Data inversion register ; ‘1’ inverts the current valus
of the bits ,’0’ leaves them as they are
-o 4E 30
-o 4F 01 ; active GPIO’s
For further information, please refer to NCT6106D datasheet.
Appendix C <Programming Watchdog Timer >
The watchdog timer makes the system auto-reset while it stops to work for a period.
The integrated watchdog timer can be setup as system reset mode by program.
Timeout Value Range
- 1 to 255
- Second or Minute
Program Sample
The integrated Watchdog Timer can be set up by programming.
-O 4E 87
-O 4E 87
Enter configuration
31-
-
Page 32

LN-D70 User’s Manual
-O 4E 07 Logic Device Enable
-O 4F 08
-O 4E 30 WDT Enable
-O 4F 01
-O 4E F0 Set as Second*
-O 4F 00
-O 4E F1
-O 4F 0A Set reset time 10 Sec
You can select Timer setting in the BIOS, after setting the time options, the system
will reset according to the period of your selection.
Contact Information
Any advice or comment about our products and service, or
anything we can help you please don’t hesitate to contact with us.
We will do our best to support you for your products, projects and
business.
Taiwan Commate Computer Inc.
19F., No.94, Sec. 1, Xintai 5th Rd., Xizhi Dist., New Taipei
Address
TEL +886-2-26963909
FAX +886-2-26963911
Website
E-Mail
Facebook
Twitter https://twitter.com/Taiwan_Commate
Commell is a brand name of Taiwan commate computer Inc.
City 22102, Taiwan
TUhttp://www.commell.com.twUT
TUinfo@commell.com.twUT (General Information)
TUtech@commell.com.twUT (Technical Support)
https://www.facebook.com/pages/Taiwan-Commate-Computer-Inc/547993955271899
32-
-
 Loading...