

Page 1

CommBox Interactive
Classic 4K User Manual
Revision: 5
Page 2

Table of Contents
1 Preparations 4
1.1 Parts List 4
1.2 Control Lights & Buttons 4
1.2.1 Light indicators 4
1.2.2 Control buttons 4
1.3 Input/Output Connections 5
1.3.1 Connector name and function 5
1.3.2 USB multimedia playback format 6
1.4 Remote Controller Button Description 7
2 Setup 9
2.1 Remote Control Setup 9
2.1.1 Inserting batteries into the remote 9
2.2 Touchscreen Setup 9
2.2.1 Turning on the power 9
2.2.2 Changing language of the menu 9
2.2.3 Cleaning 10
3 Connect to a PC or a Laptop 11
3.1 HDMI Connection 11
3.2 VGA Connection 11
4 Menu Control 13
4.1 Input Selection 13
4.2 Video Adjustment 14
4.3 Audio Adjustment 15
4.4 Setup Adjustment 16
5 Troubleshooting 18
5.1 Touch Issues 18
5.2 Sound Issues 18
5.3 Image 19
5.4 Touch 20
Page 3

6 Supported Resolutions 21
7 Index 22
Page 4
4
+61 2 9975 6001
1 Preparations
1.1 Parts List
If these items are missing, contact your dealer or service center:
Power Cable (Optional)
Remote Controller HDMI Cable
AAA 1.5V Battery x 2
Touch USB Cable & Extension cable
1.2 Control Lights & Buttons
You can control the touchscreen by using the control buttons on the right side of the frame.
1.2.1 Light indicators
Remote Sensor Power indicator
Power on Green
Stand-by Red
Power Saving (Eco) Red
Power Saving (Normal) Orange or Red/Green Blinking
1.2.2 Control buttons
Button Function
Up When a menu is visible on-screen, this button operates identically to the up-
arrow
Down When a menu is visible on-screen, this button operates identically to the down-
arrow
Page 5
+61 2 9975 6001
5
Vol- Volume decrease
Vol+ Volume increase
Source Open/close source menu for input select
Menu On-screen display OSD, or to exit the on-screen display and return to the
previous one.
Power Power on/off
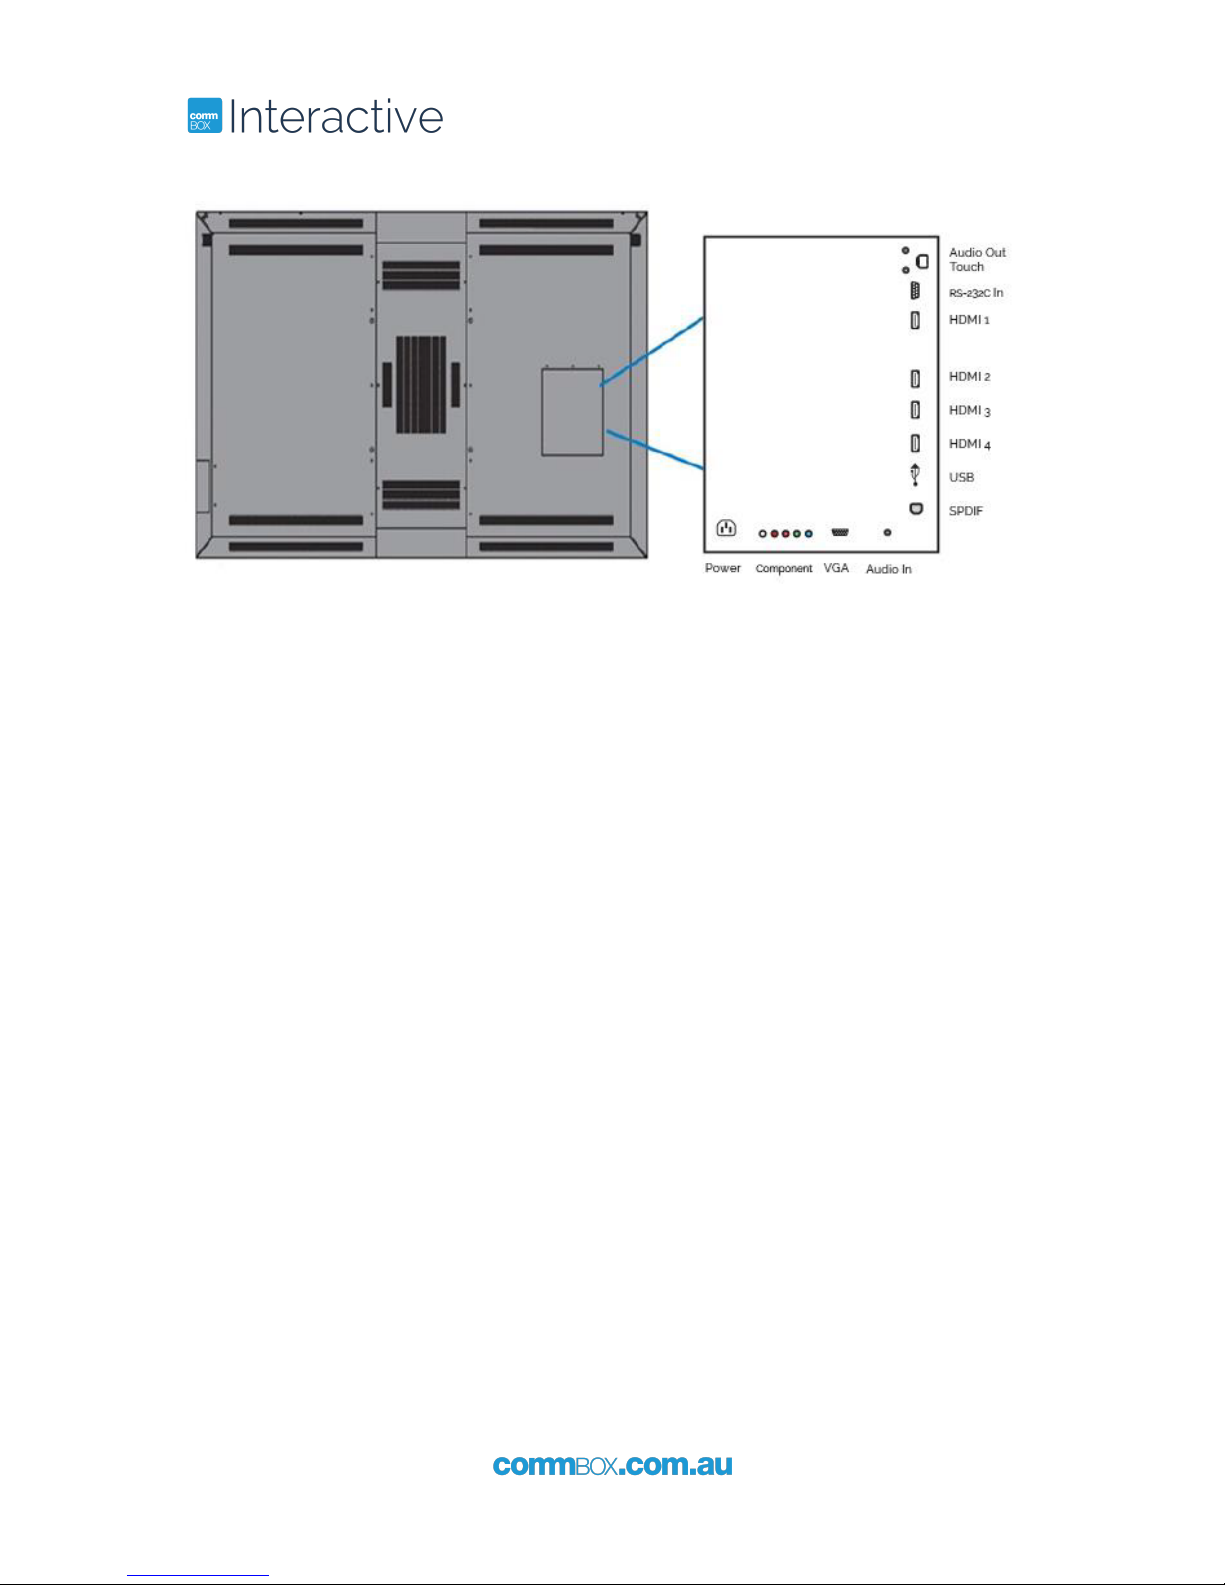
1.3 Input/Output Connections
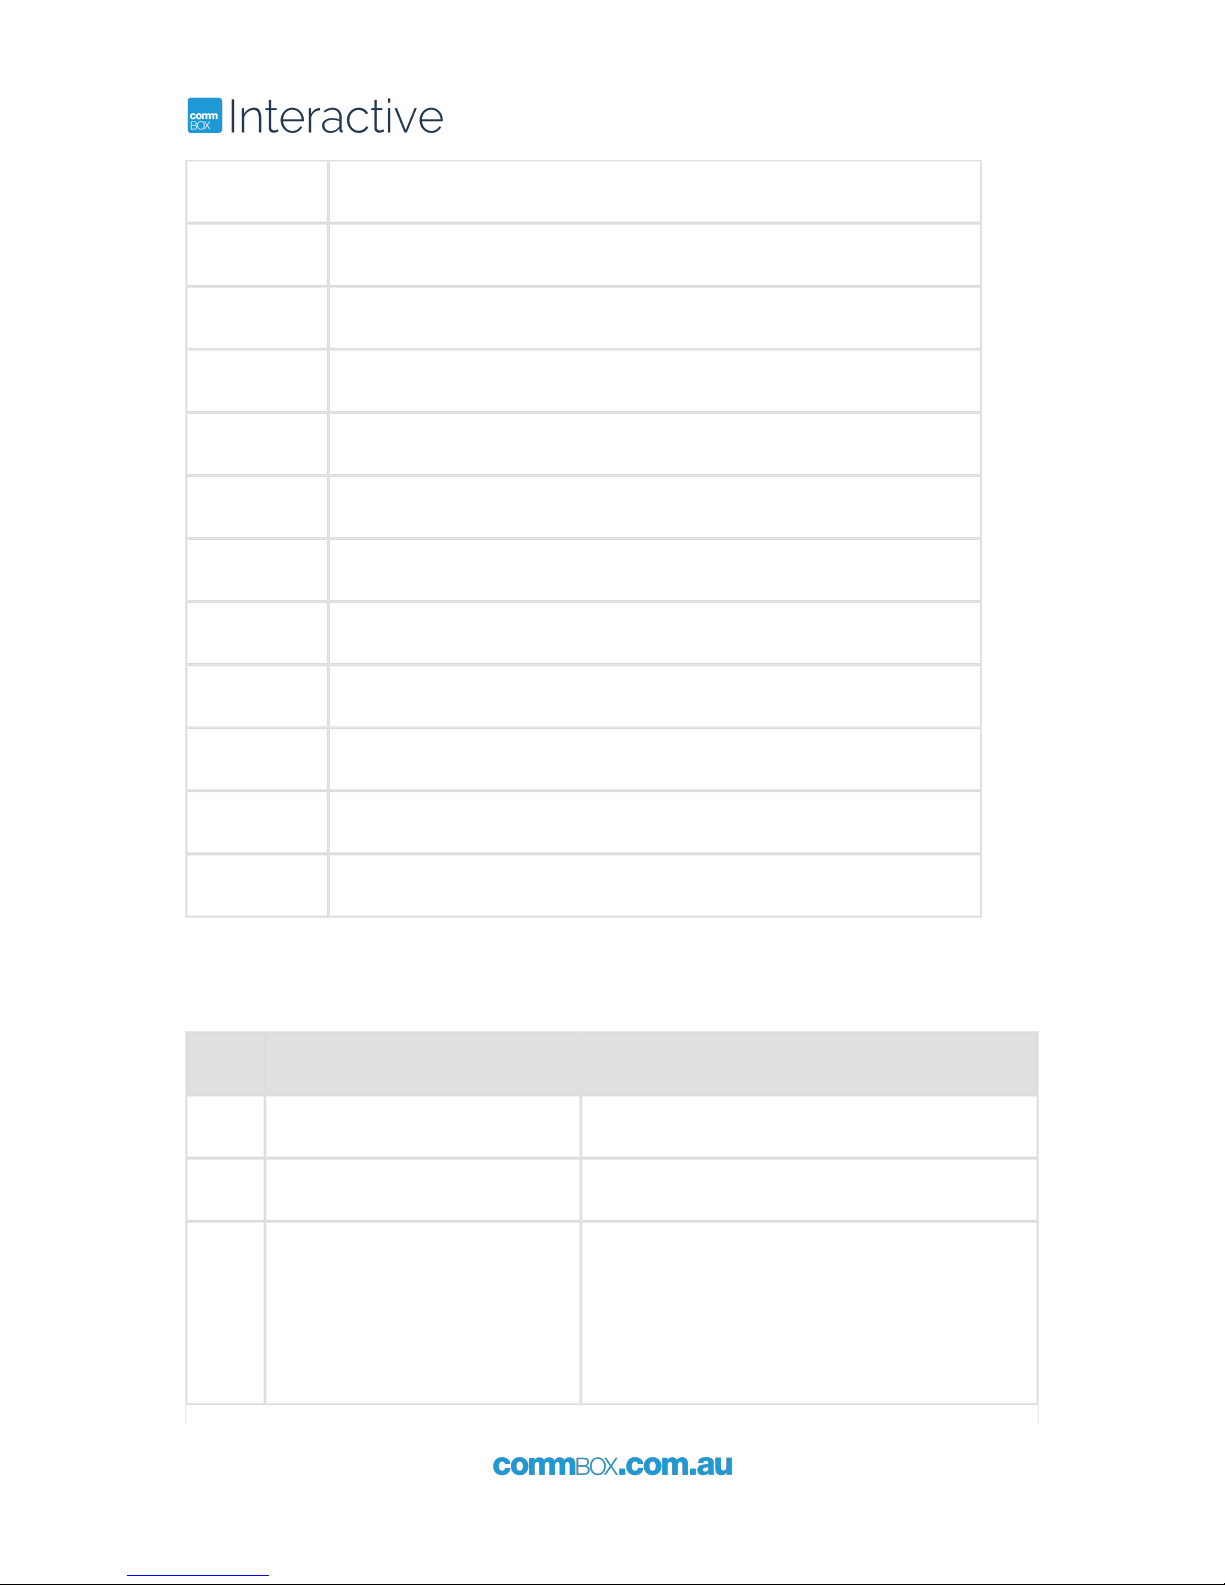
1.3.1 Connector name and function
Input/Output Function
Earphone To connect audio output
SPDIF To connect SPDIF
Page 6
6
+61 2 9975 6001
Composite To connect composite for DVD etc
Audio In To connect audio input (3.5)
VGA In To connect VGA video input
Component To connect component for DVD etc
HDMI 3 In To connect HDMI 1.4 video & audio input - 3
HDMI 2 In To connect HDMI 1.4 video & audio input - 2
HDMI 1 In To connect HDMI 1.4 video & audio input – 1
USB In To connect with USB device
Audio Out To connect audio output
Touch In To connect touch
RS-232C In To connect RS232 input cable with control device (D-sub 9pin)
Power Input Power connector (AC 100-240V, 50/60Hz)
1.3.2 USB multimedia playback format
The below table shows the supported file types.
Media File Extension Detail
Music WMA, MP3,M4A, AAC .wma, .mp3, .m4a
Photo JPG, BMP, PNG .jpg, .bmp, .png
Movie MPEG1, MPEG2, MPEG4,
H264,
RM, RMVB, MOV, MJEPG,
VC1,
Divx, FLV
.avi, .mpg, .dat, .vob, .div, .mov, .mkv, . rm,
.rmvb, .mp4, .mjpeg, .ts,
.trp, .wmv, .asf, .flv
Page 7
+61 2 9975 6001
7
TXT .TXT
If the product does not operate even though the power is connected, check the
power switch on the touchscreen is turned on.
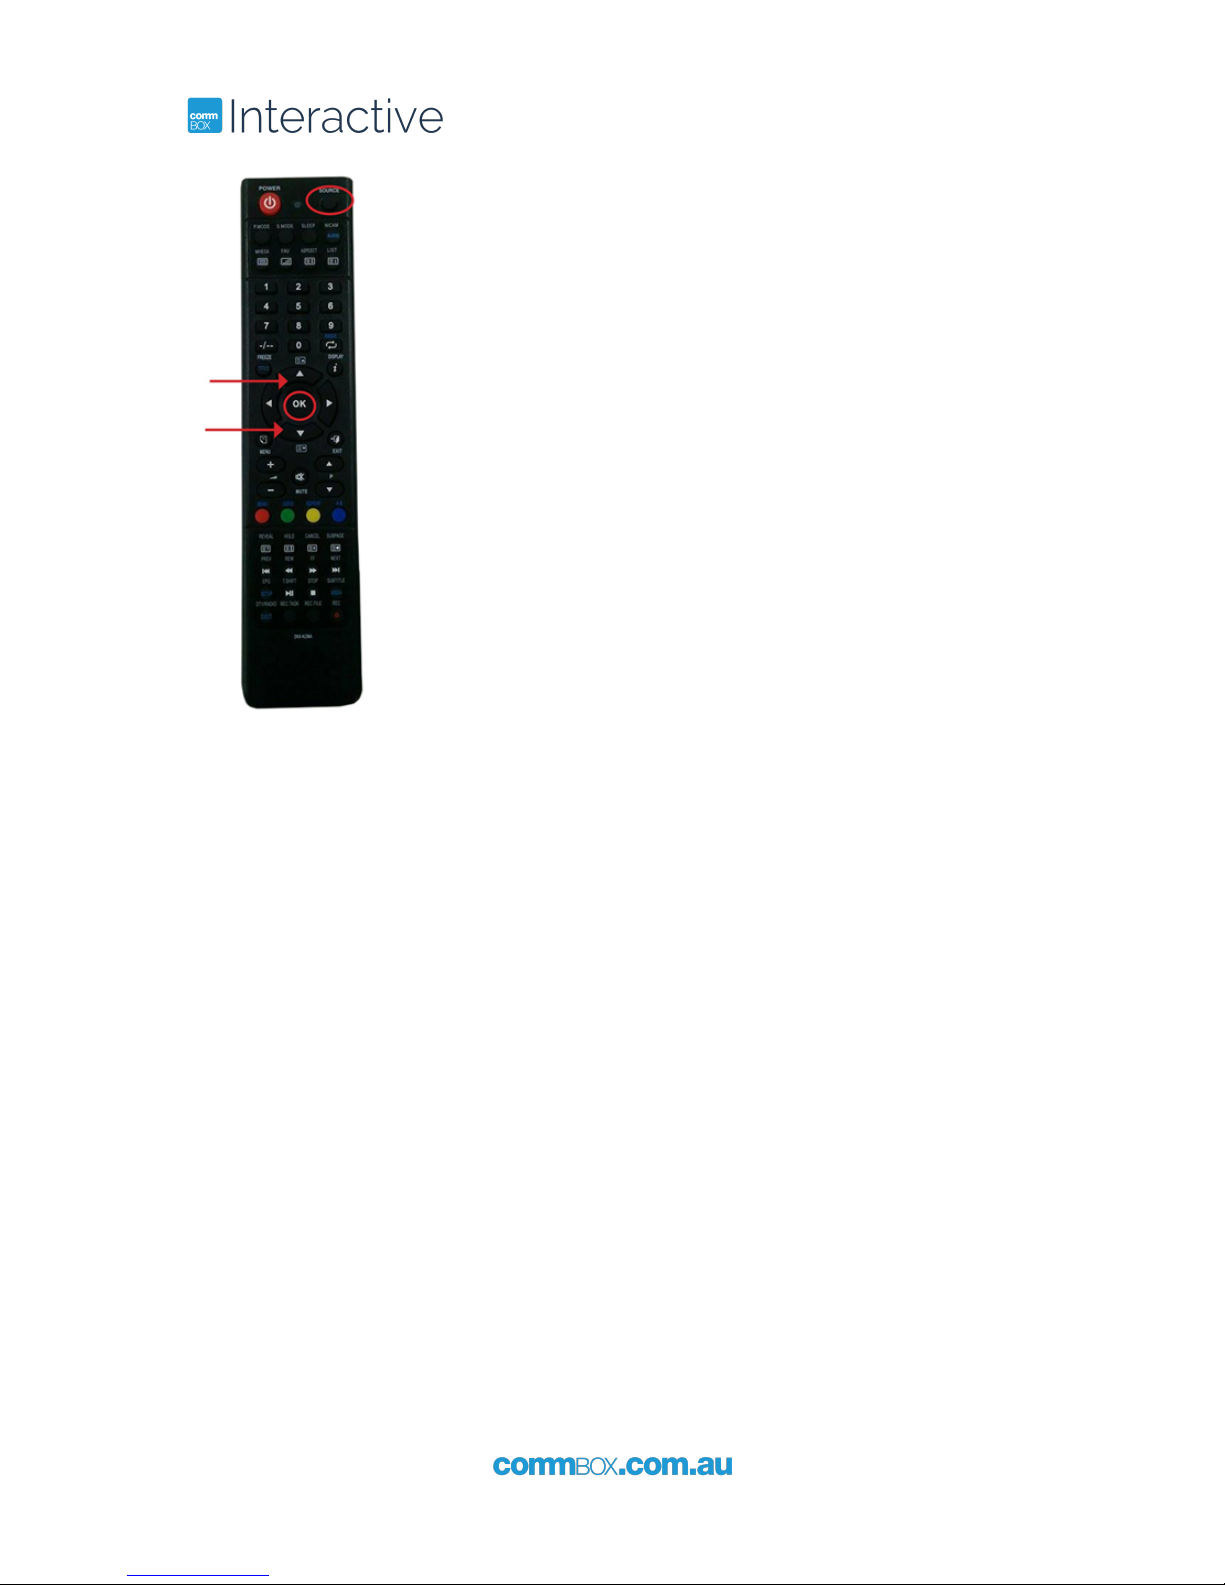
1.4 Remote Controller Button Description
Button Function
Source Select input signal
Aspect Adjust the window ratio
Arrow Up Navigate up
Arrow Down Navigate down
Arrow Left Navigate left
Arrow Right Navigate right
OK Select to change menu
Menu Display or hide menu on the screen
+ Volume up
- Volume down
Title (Freeze) Freeze toggle On/Off
Page 8
8
+61 2 9975 6001
Page 9
+61 2 9975 6001
9
1.
2.
3.
1.
2.
2 Setup
2.1 Remote Control Setup
2.1.1 Inserting batteries into the remote
Press the tab on the battery case and open it
Insert the battery (1.5V AAA) into the battery case
Replace the battery case and push it down until clack sounds
If anything obstructs the front of the IR receiver the remote may not work
When loading the battery, check if the polarity of the batteries is correct
If you are not using the remote for long time, remove the batteries to prevent
damage caused by leaking battery fluid
Don't expose the battery to direct sunlight or excessive heat such as a fire
2.2 Touchscreen Setup
2.2.1 Turning on the power
Connect the power cable of the product into outlet with AC 100-240V 50 / 60Hz
Turn on the main AC power switch
If the power indicator is green, the screen will turn on automatically
If the power light is red and not green, press the power button on the remote or on the
bottom right hand side of the touchscreen to turn on the power
2.2.2 Changing language of the menu
The menu's language is set to English as the default
Users can select alternative languages if required
To change the menu language,
Press the Menu button to open the menu. Select Setup from the main menu
Select Language of the Setup menu
Page 10

10
+61 2 9975 6001
3. Scroll to the language you want to select and click OK, and then exit the menu
2.2.3 Cleaning
After disconnecting the power cable, clean the product screen lightly with a dry and soft cloth
Do not clean the product with a wet cloth or spray.
If washed with any cleaning agent including brighteners, abrasives, waxes, benzene,
alcohol, solvent or surface active agent, the surface of the product may be damaged.
If cleaning inside the product is required, please contact your dealer or service center
Page 11

+61 2 9975 6001
11
3 Connect to a PC or a Laptop
3.1 HDMI Connection
HDMI input is recommended because it receives a digital signal input from an external
device with HDMI output to ensure high quality of digital signal.
Use the cable provided with the product. Otherwise, no image may be shown on the screen
or normal display may not be shown.
If connecting the product to the PC, it supports the VESA Display Data Channel (DDC)
standard. This standard supports "plug and play" function which helps the PC recognize the
product automatically to output the optimal resolution.
In order to operate the 'plug and play' after connecting the product, connect the video cable
of the PC to the product before turning on your PC, and turn on the power of this product
first and then turn on the power of the PC.
When the incompatible resolution of the input signal is input to the product no image is
shown on the screen or normal display is not shown.
For touch functionality to work you are also required to connect the Touchscreen's USB
Cable to the laptop you will be using with the touch system.
3.2 VGA Connection
To see the video, connect D-Sub 15P cable of the PC to the VGA In port of the product. For
VGA, you will also need to connect audio output to PC Audio.
If connecting the product to the PC, it supports the VESA Display Data Channel (DDC)
standard. This standard supports "plug and play" function which helps the PC recognize the
product automatically to output the optimal resolution.
In order to operate the 'plug and play' after connecting the product, connect the video cable
of the PC to the product before turning on your PC, and turn on the power of this product
first and then turn on the power of the PC.
When the incompatible resolution of the input signal is input to the product no image is
shown on the screen or normal display is not shown. For touch functionality to work you are
also required to connect the Touchscreen's USB Cable to the laptop you will be using with
the touch system
Page 12
12
+61 2 9975 6001
Page 13
+61 2 9975 6001
13
1.
2.
3.
4 Menu Control
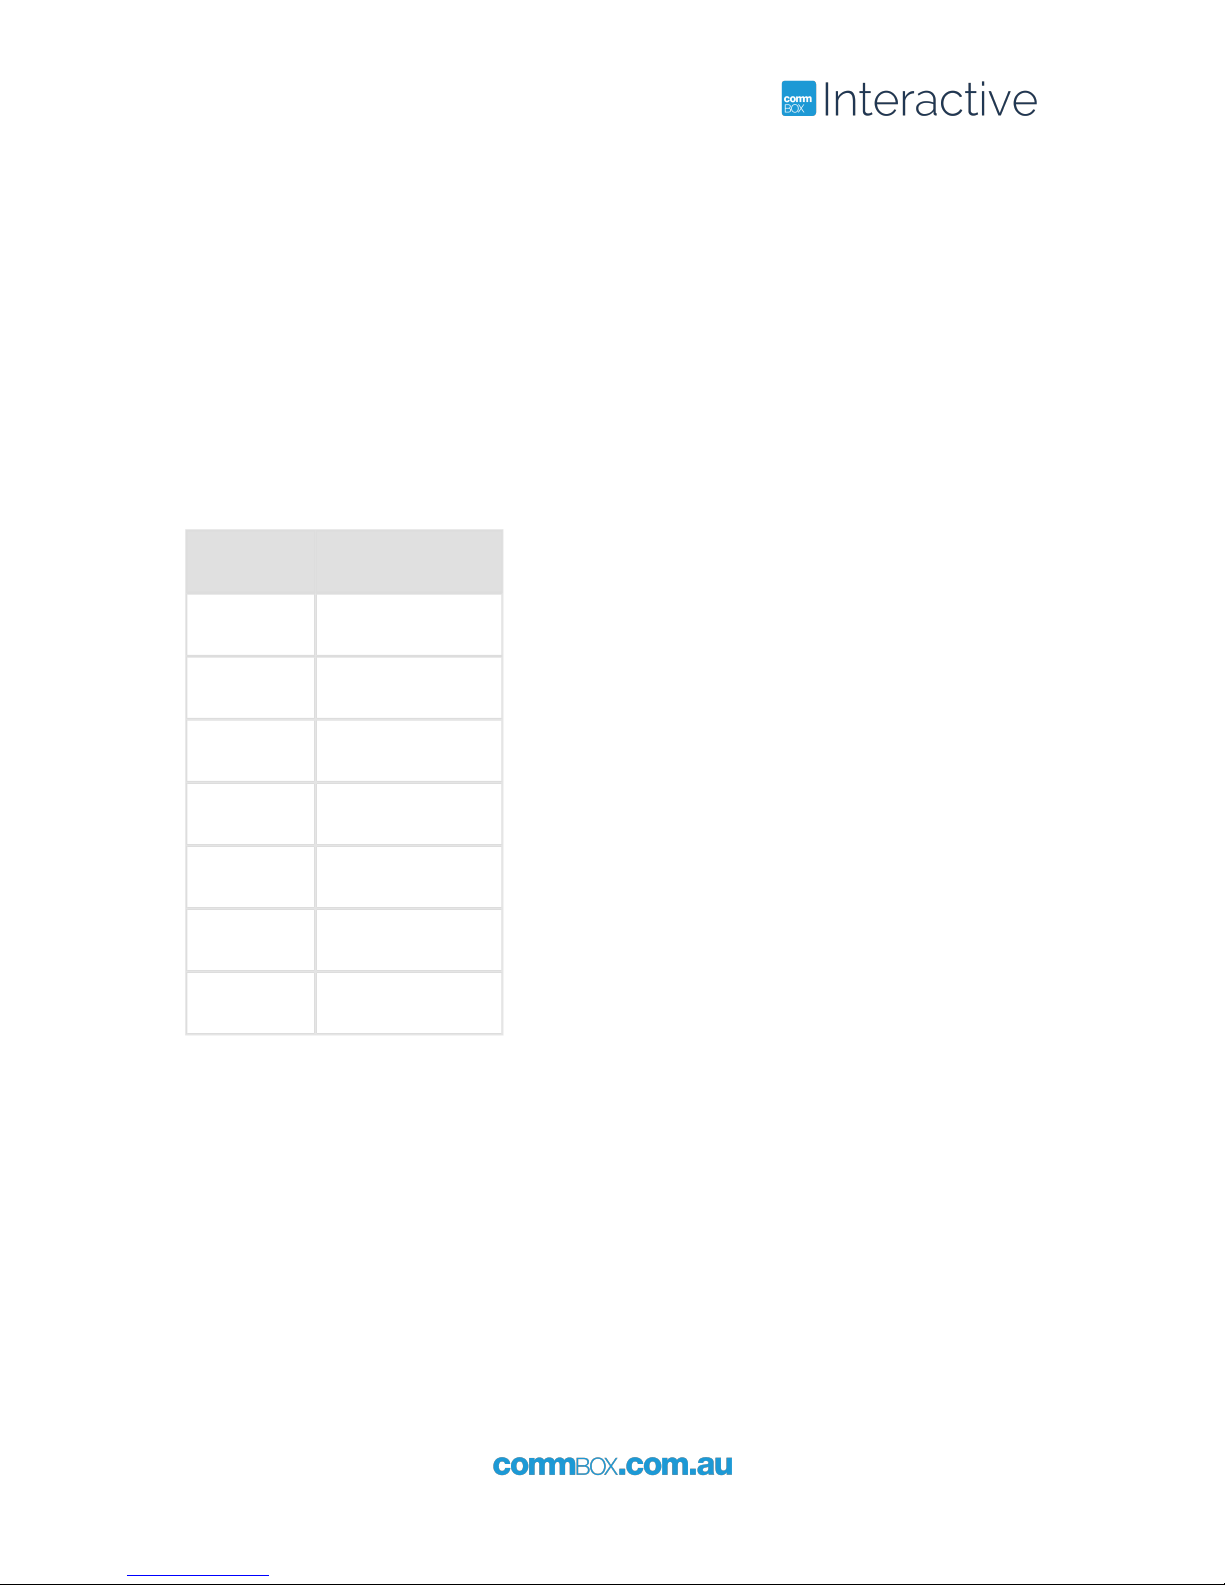
4.1 Input Selection
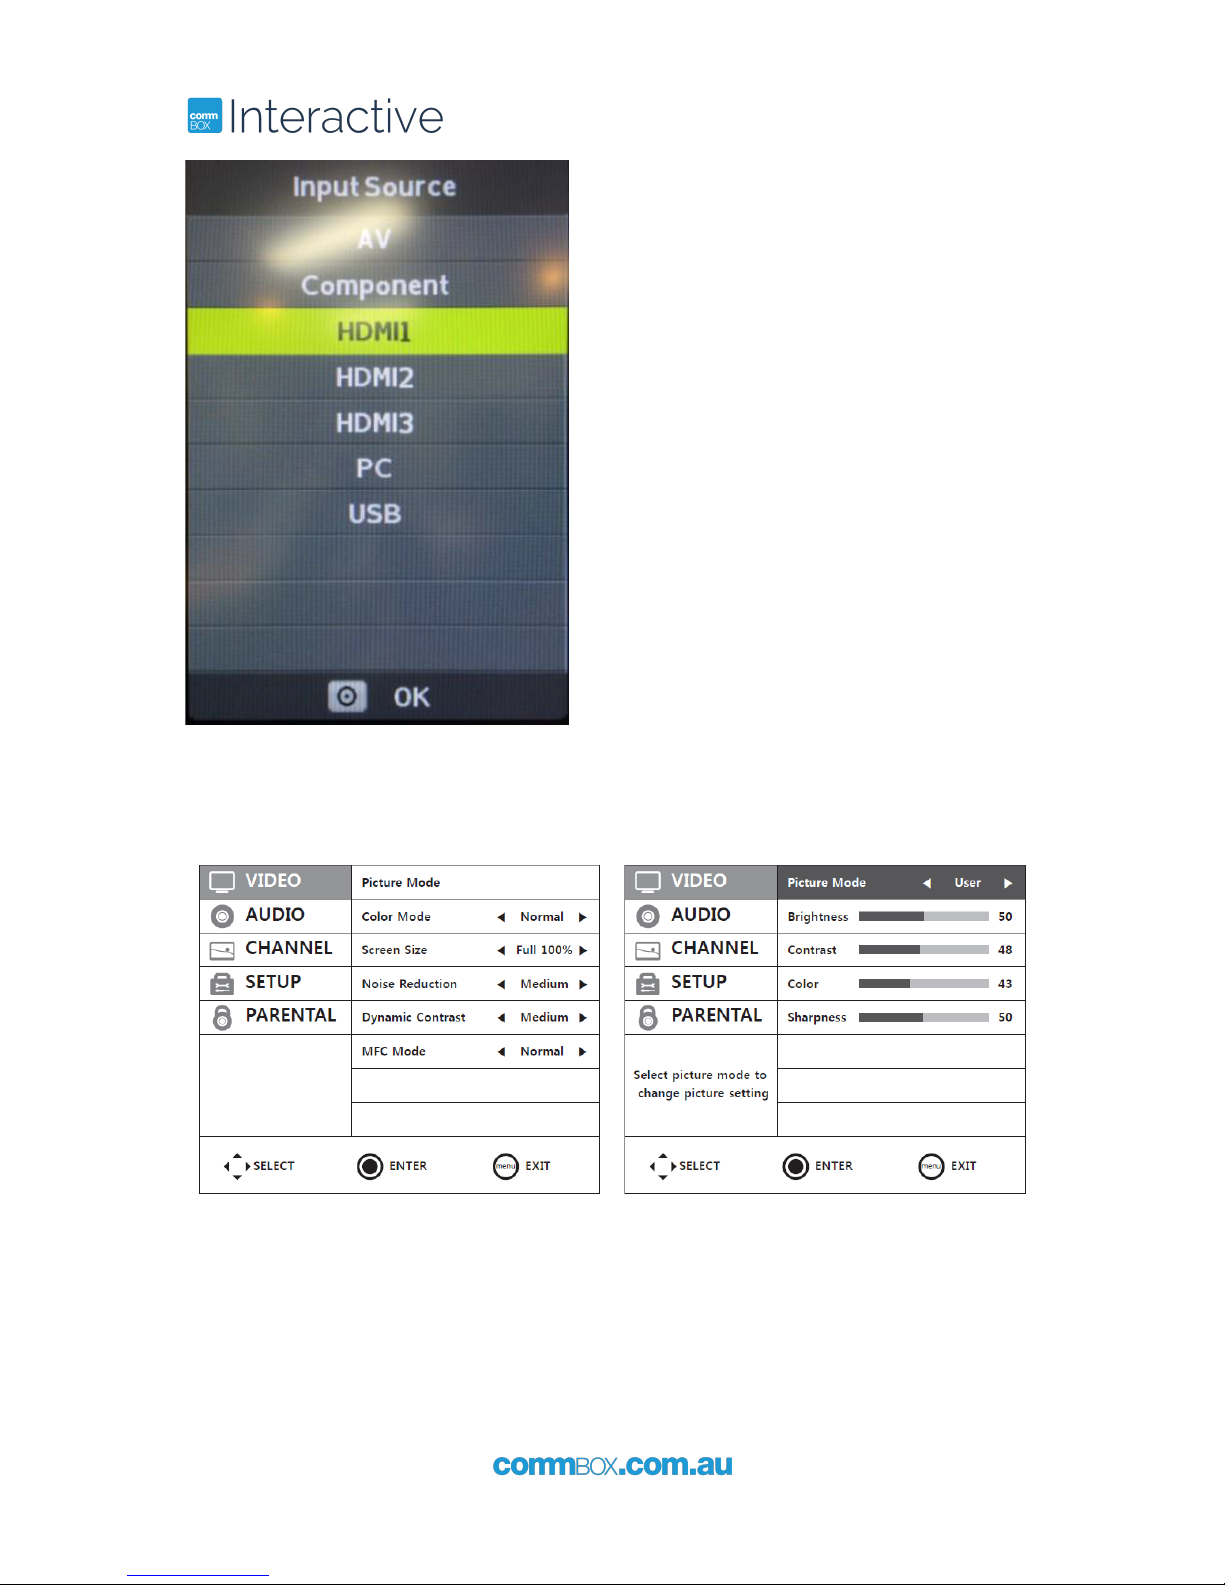
To select a source, first press the top right Source button on your remote. This will
bring up the Input Menu (pictured below right).
Use the Up and Down arrows in the centre of the remote to move up and down to
highlight your source.
Press OK to select your chosen source
Input Description
AV Composite
Component Component Input
HDMI1 HDMI1 Input
HDMI2 HDMI2 Input
HDMI3 HDMI3 Input
PC VGA Input
USB USB Input
Page 14
14
+61 2 9975 6001
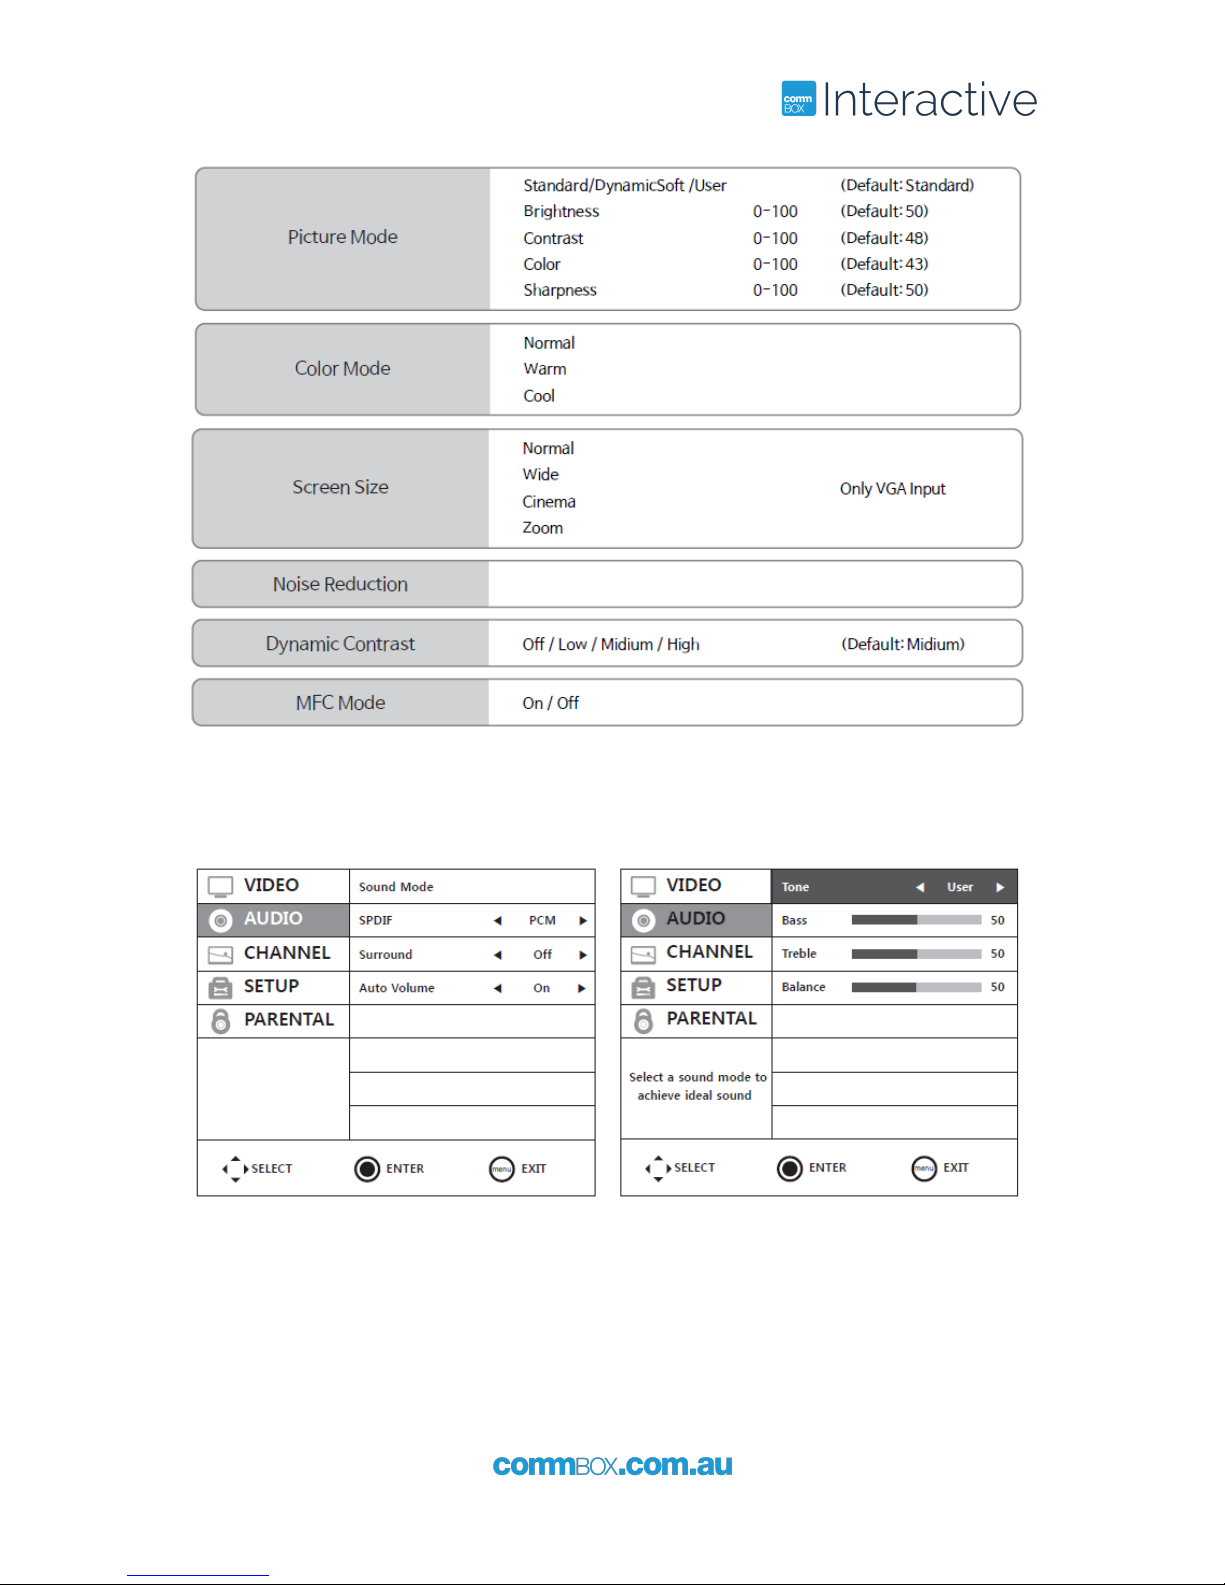
4.2 Video Adjustment
Page 15
+61 2 9975 6001
15
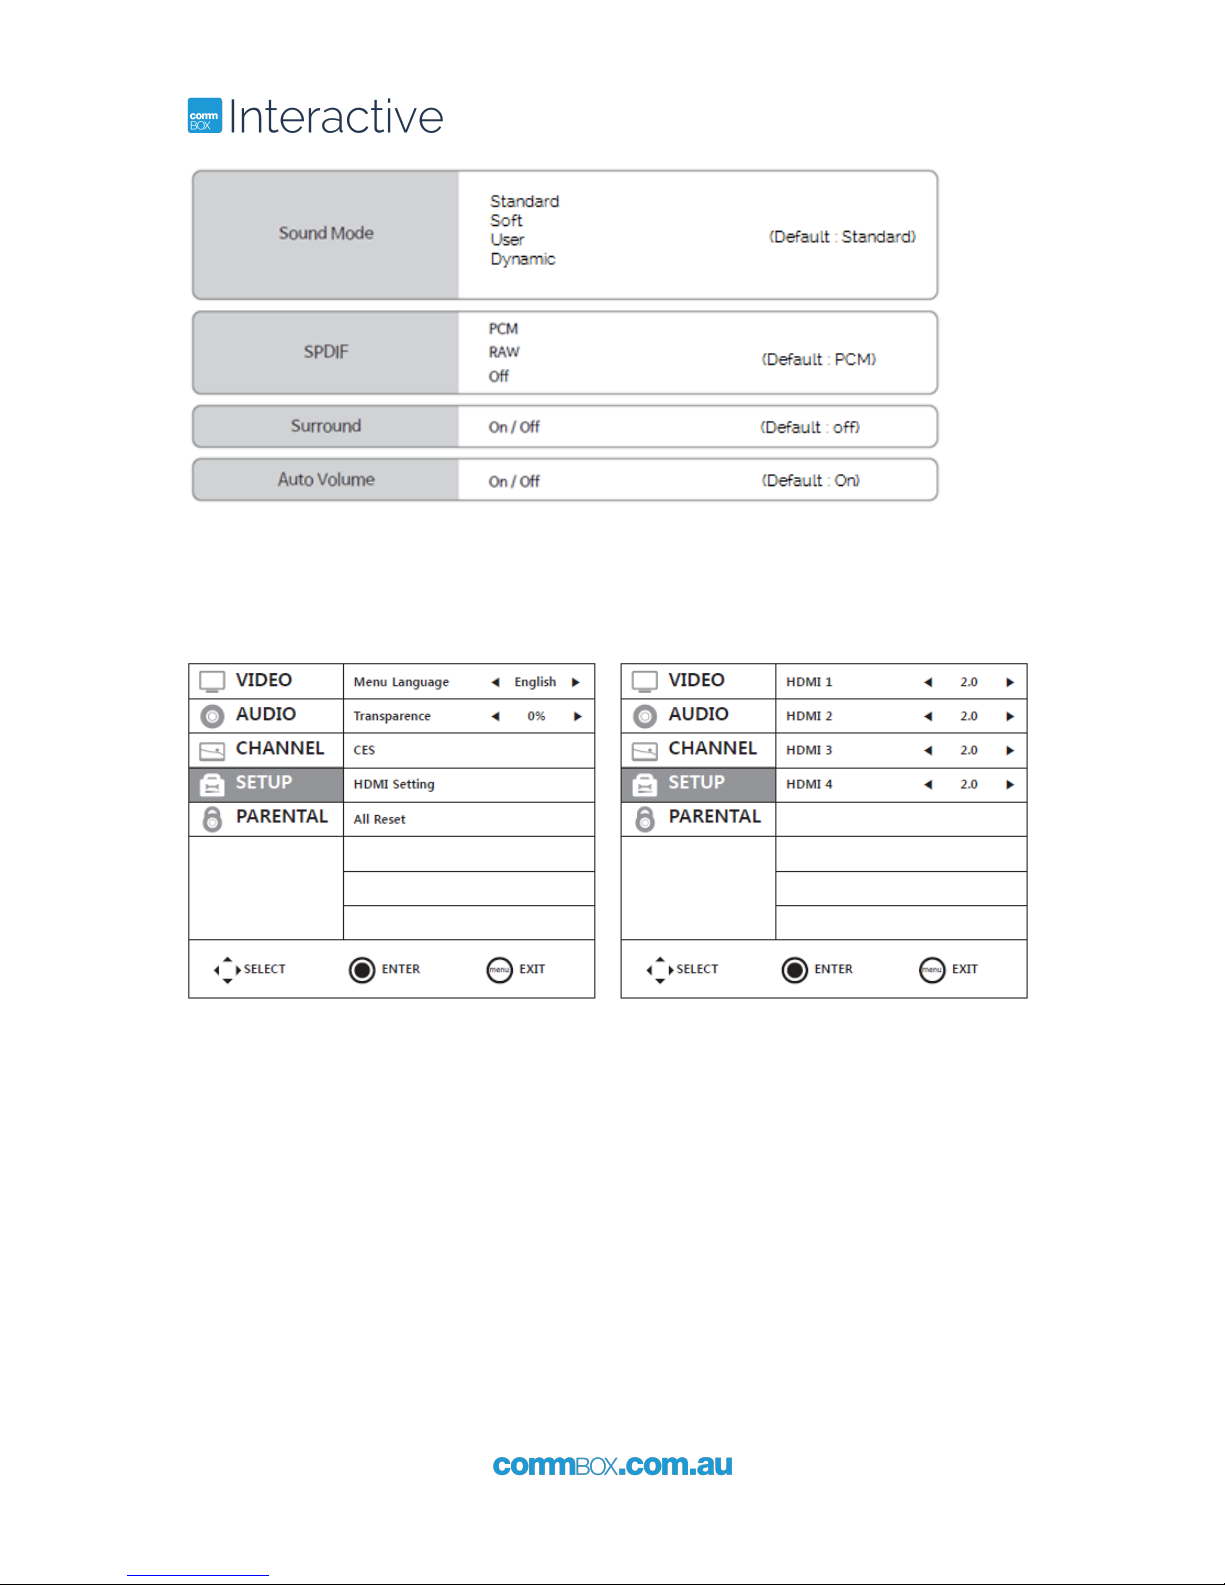
4.3 Audio Adjustment
Page 16
16
+61 2 9975 6001
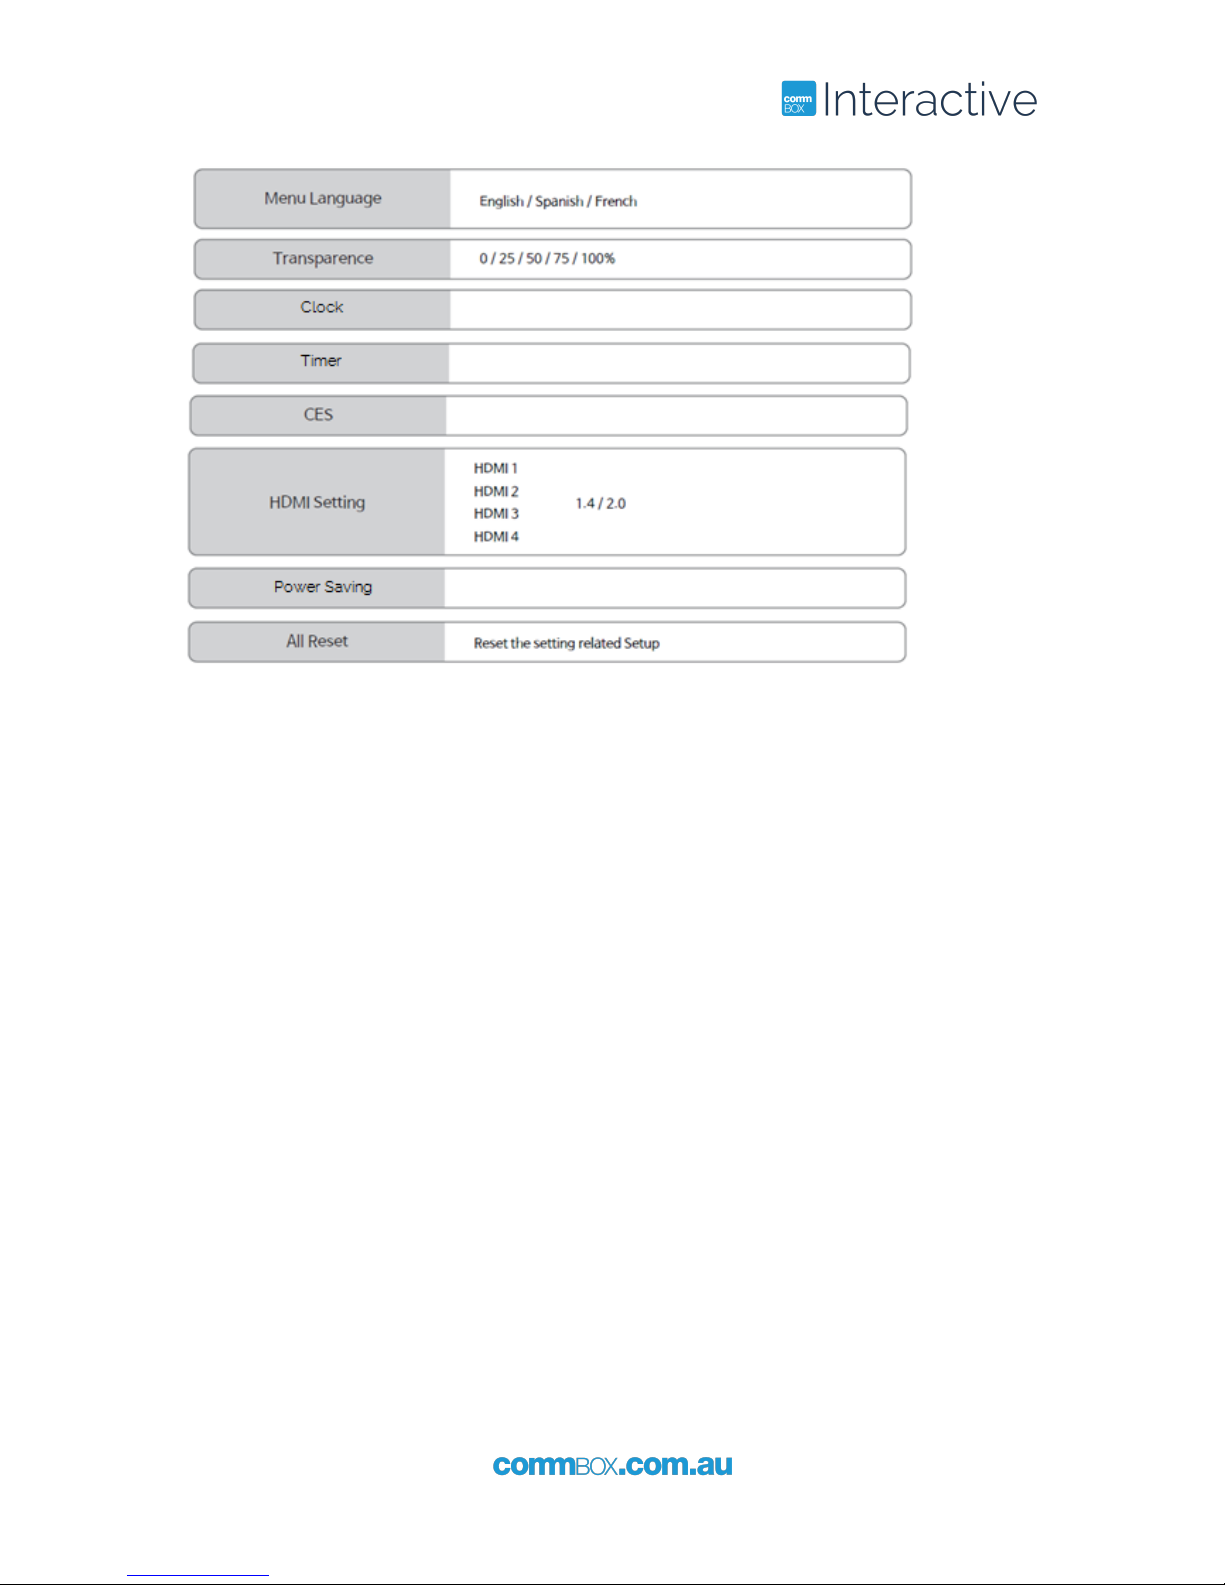
4.4 Setup Adjustment
Page 17
+61 2 9975 6001
17
Page 18
18
+61 2 9975 6001
5 Troubleshooting
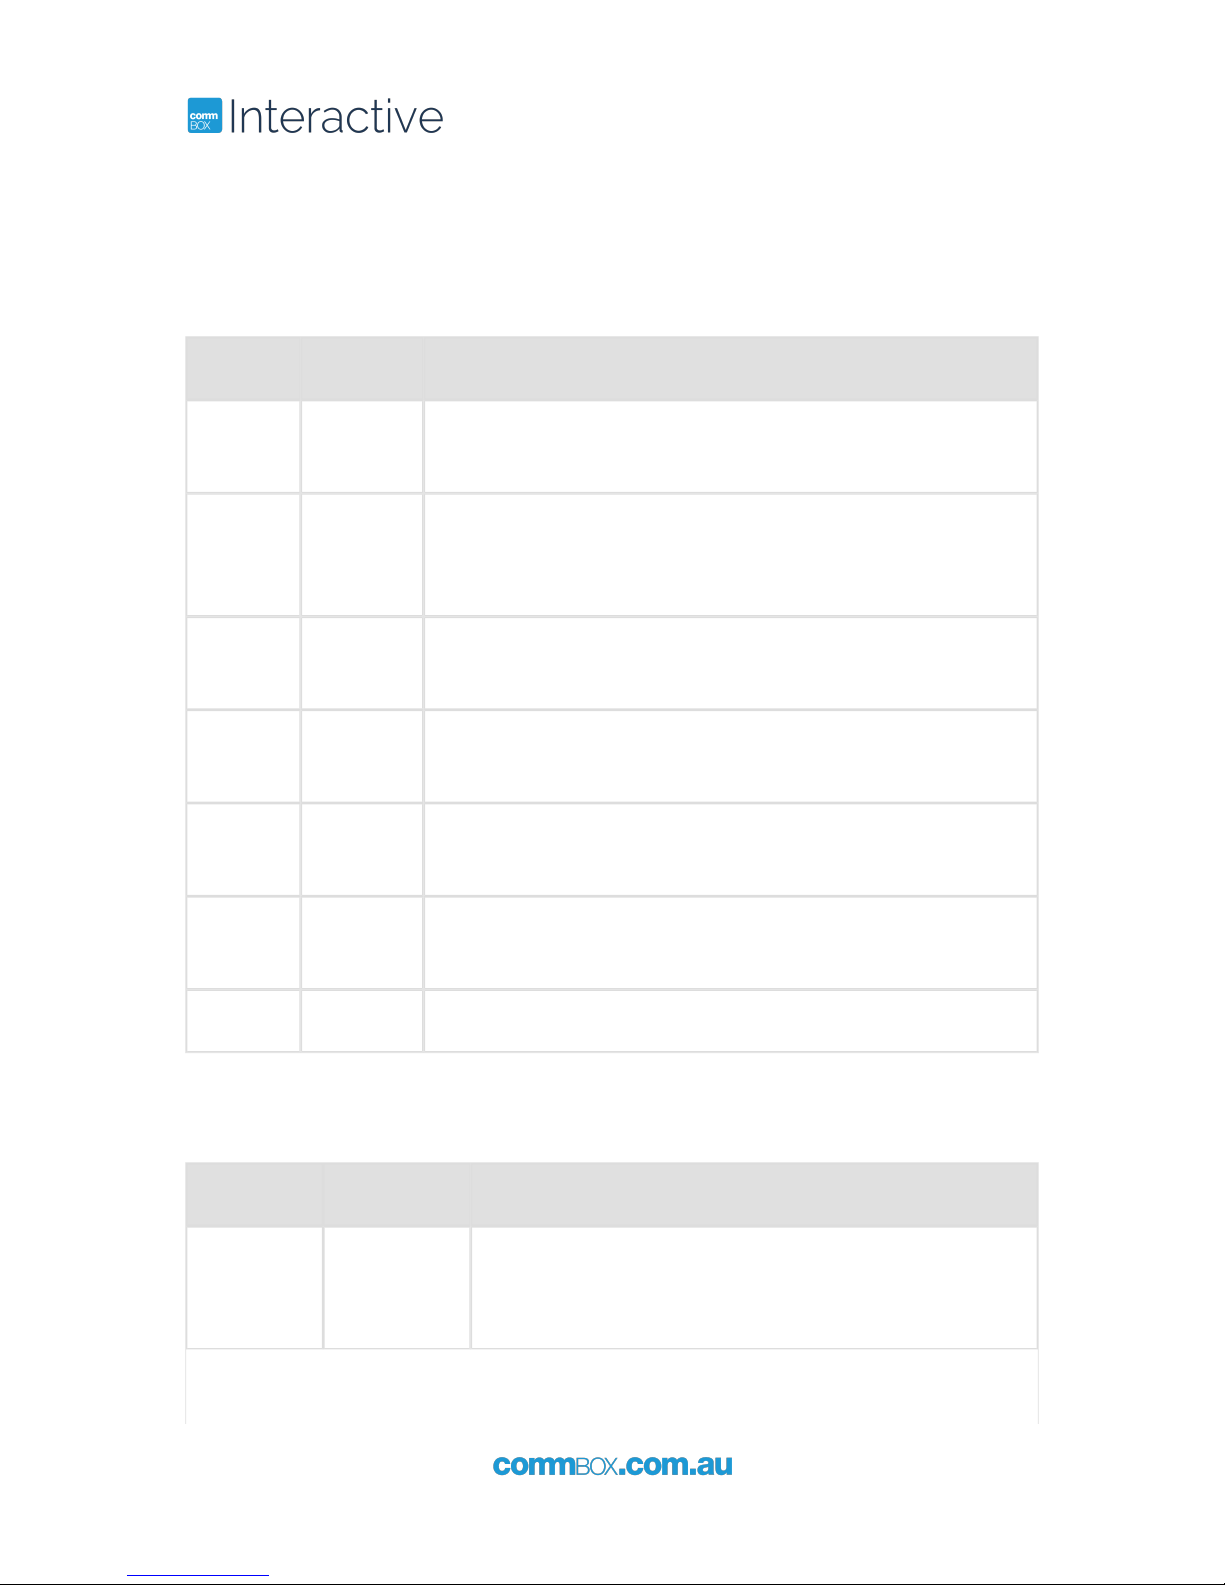
5.1 Touch Issues
Issue Check Action
No Touch USB
Cable
Install USB lead between device and Touch USB connection on
touchscreen
Laptop
USB
Socket
Try alternative USB connections on laptop
USB cable
length
Recommended length for USB is 5m. If laptop is further away,
then a USB powered extender is required
Reflected
Sunlight
If possible, reposition out of reflected sunlight
Internal
USB Lead
Replace internal USB lead
Alignment Output
Resolution
Ensure the output resolution of the attached device is set to a
16: 9 aspect ratio
Camera Using T3k software check the alignment of the cameras
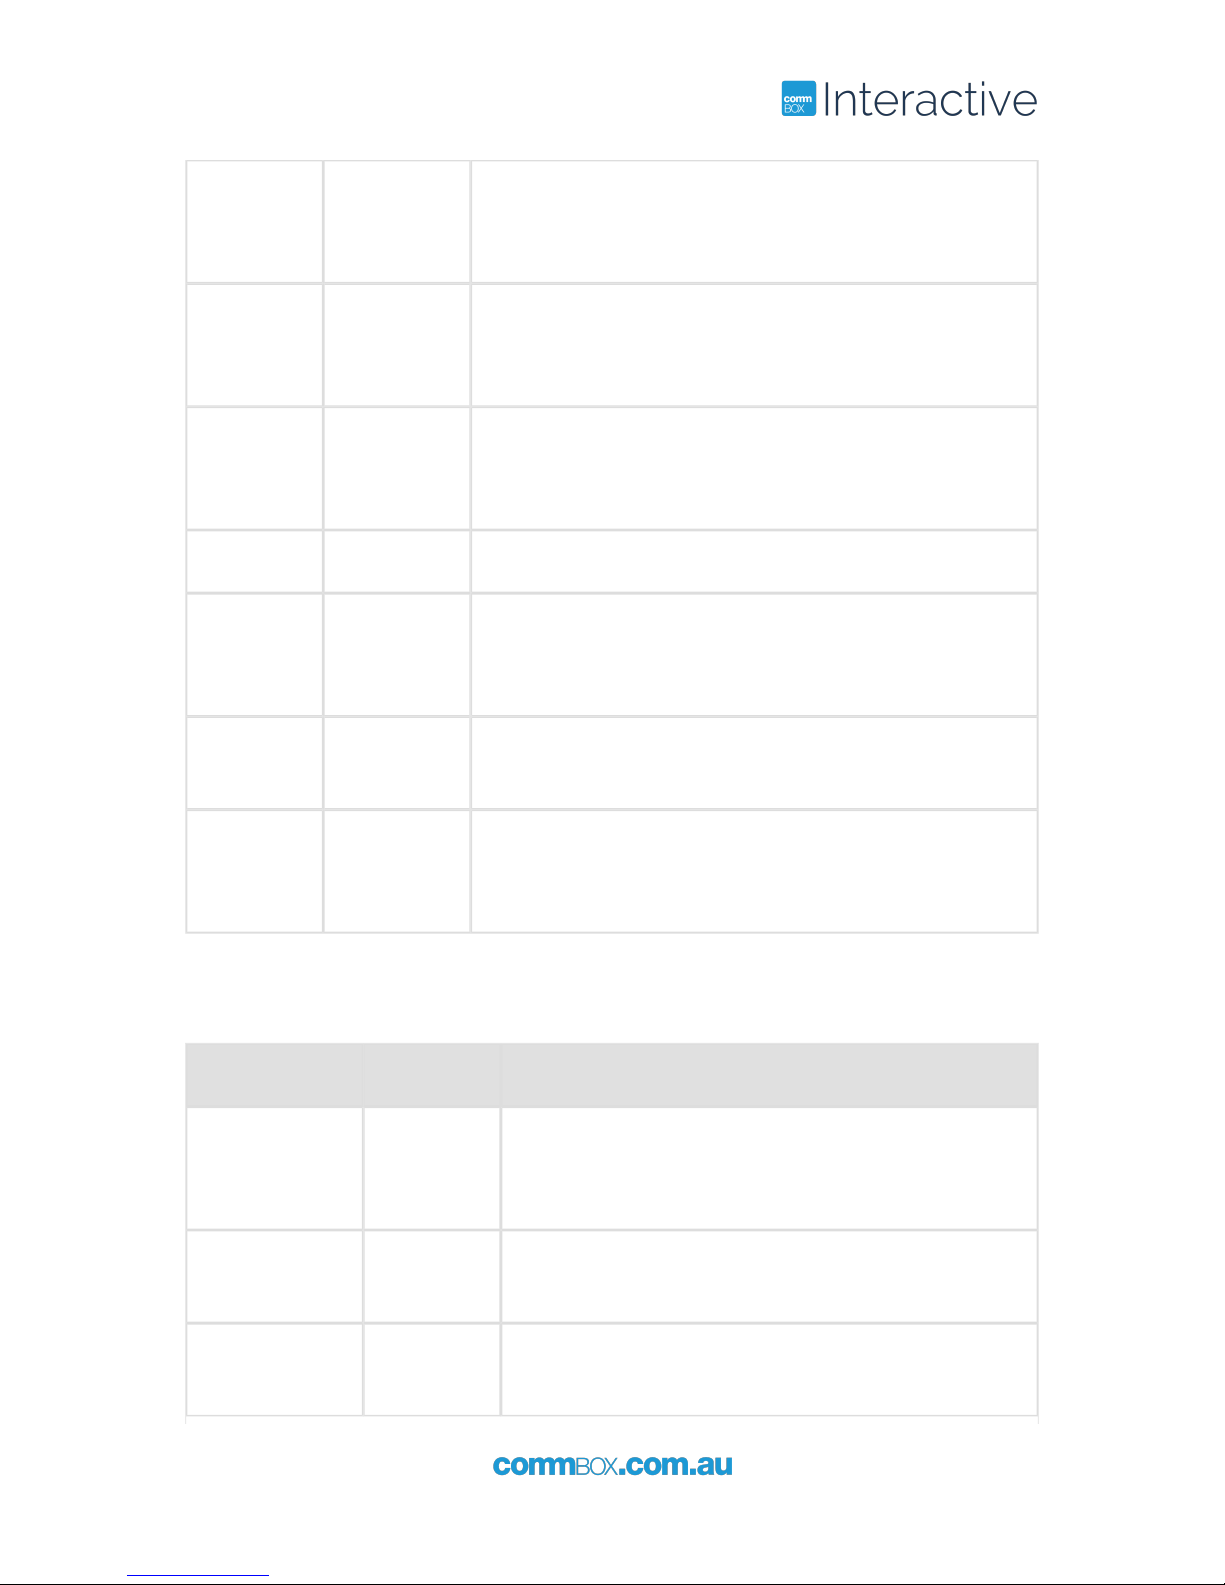
5.2 Sound Issues
Issue Check Action
No Sound
on HDMI
Sound
Settings on
Windows
Right-click volume control in system tray, click Playback
devices, select DTV and set as default
Page 19
+61 2 9975 6001
19
Sound
Settings on
Mac
Click Apple symbole on the top left corner, click System
Preferences > Sound > Output > Select DTV
No Sound
on VGA or
DVI-D
PC Audio
Cable - 3.5
mm M to M
Install into the “Sound” socket
No sound
on internal
speaker
Volume level Increase the volume level on both the CommBox
Touchscreen, Media PLayer and Device e.g laptop or PC
Audio Board Replace the Audio board
No Sound
on External
Speakers
Speaker
Outputs
Ensure the external speakers are connected to the correct
jacks
Speaker
Connections
Check for any shorts on the wires connecting to the
speakers
Internal
Amplifier
Power down the touchscreen, remove any external
speaker connections, wait for 30 seconds, reapply power
and test internal speakers only
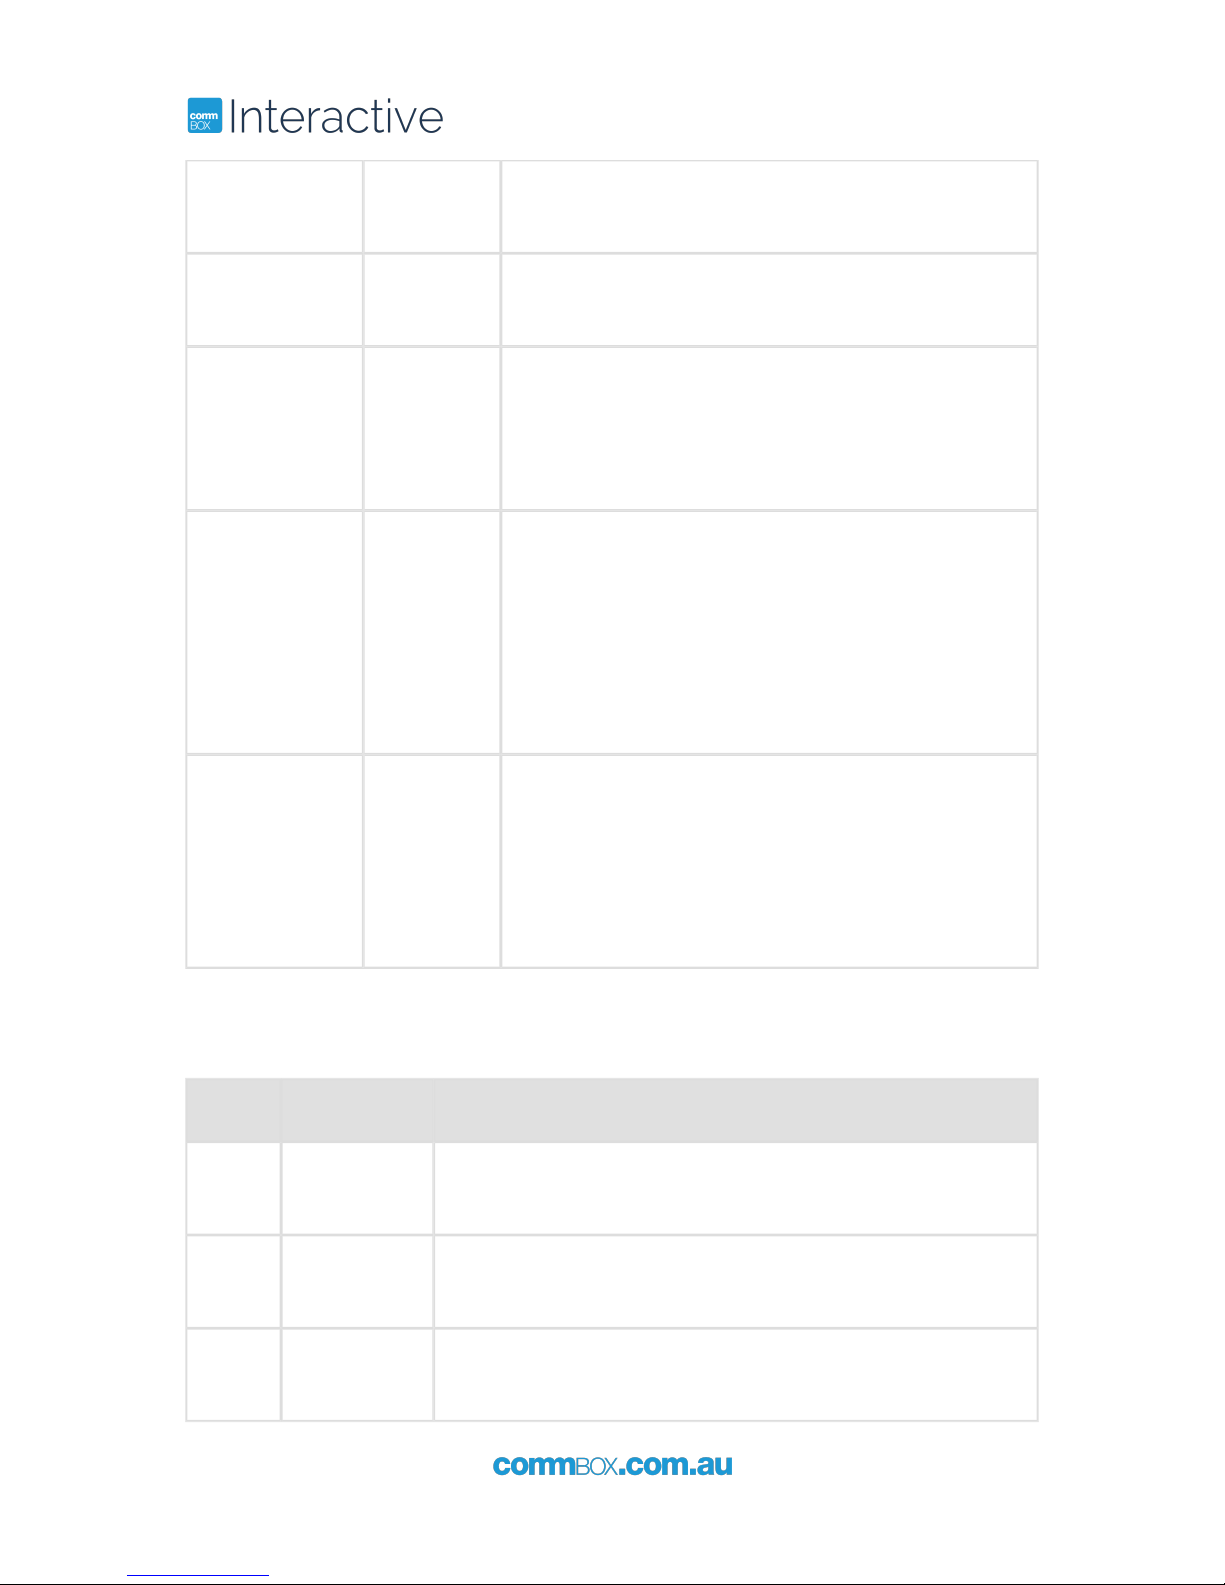
5.3 Image
Issue Check Action
No Signal Signal
Cable
Connections
Ensure that the signal cables are seated correctly
Selected
Input
Ensure that the correct input has been selected
according to the input that is connected
Invalid Format Output
Resolution
Ensure that a 16:9 output resolution is being sent from
the device
Page 20
20
+61 2 9975 6001
Check
HDMI Setup
Refer to section "Setup Adjusting". HDMI ports must be
set to 2.0 for 4K resolution. If using FHD set to 1.4
VGA Alignment Auto Adjust When in PC input there is an Auto Adjust in the Picture
Menu
Stretching
Image
Device
Output
When mirroring or Duplicate displays is selected the
output resolution can only be as high as the device
screen willl go. Hold Windows key and press P to go to
projector only
What kind of
computer or
specification do I
need for
4K@60Hz?
Video output must be 4K@60Hz
Memory and graphic card: 8GB above and
NVIDIA® GeForce® GTX 745 (included 4GB DDR3)
HDD : 1TB(64MB cash)7200RPM SATA 6Gb/S
Same or above specification
( e.g Gamming desktop is normally suitable for this
specifications : Dell Alienware X51 series)
UD@60Hz is not
displayed
Connect directly from HDMI 2.0 of PC to HDMI port of
the screen. Screen has to be set HDMI 2.0 in OSD
setting menu.
Use the above’s gender of DP and HDMI port if your
computer has only DP port for UD@60Hz.
-Nextlink-MDPHC220
5.4 Touch
Issue Check Action
No
Remote
Batteries Replace batteries in the remote
Remote
Control
If possible test remote on a different Commbox Touchscreen
Touchscreens
Buttons
Check that the control buttons on the bottom right side of the
Commbox Touchscreen are working
Page 21
+61 2 9975 6001
21
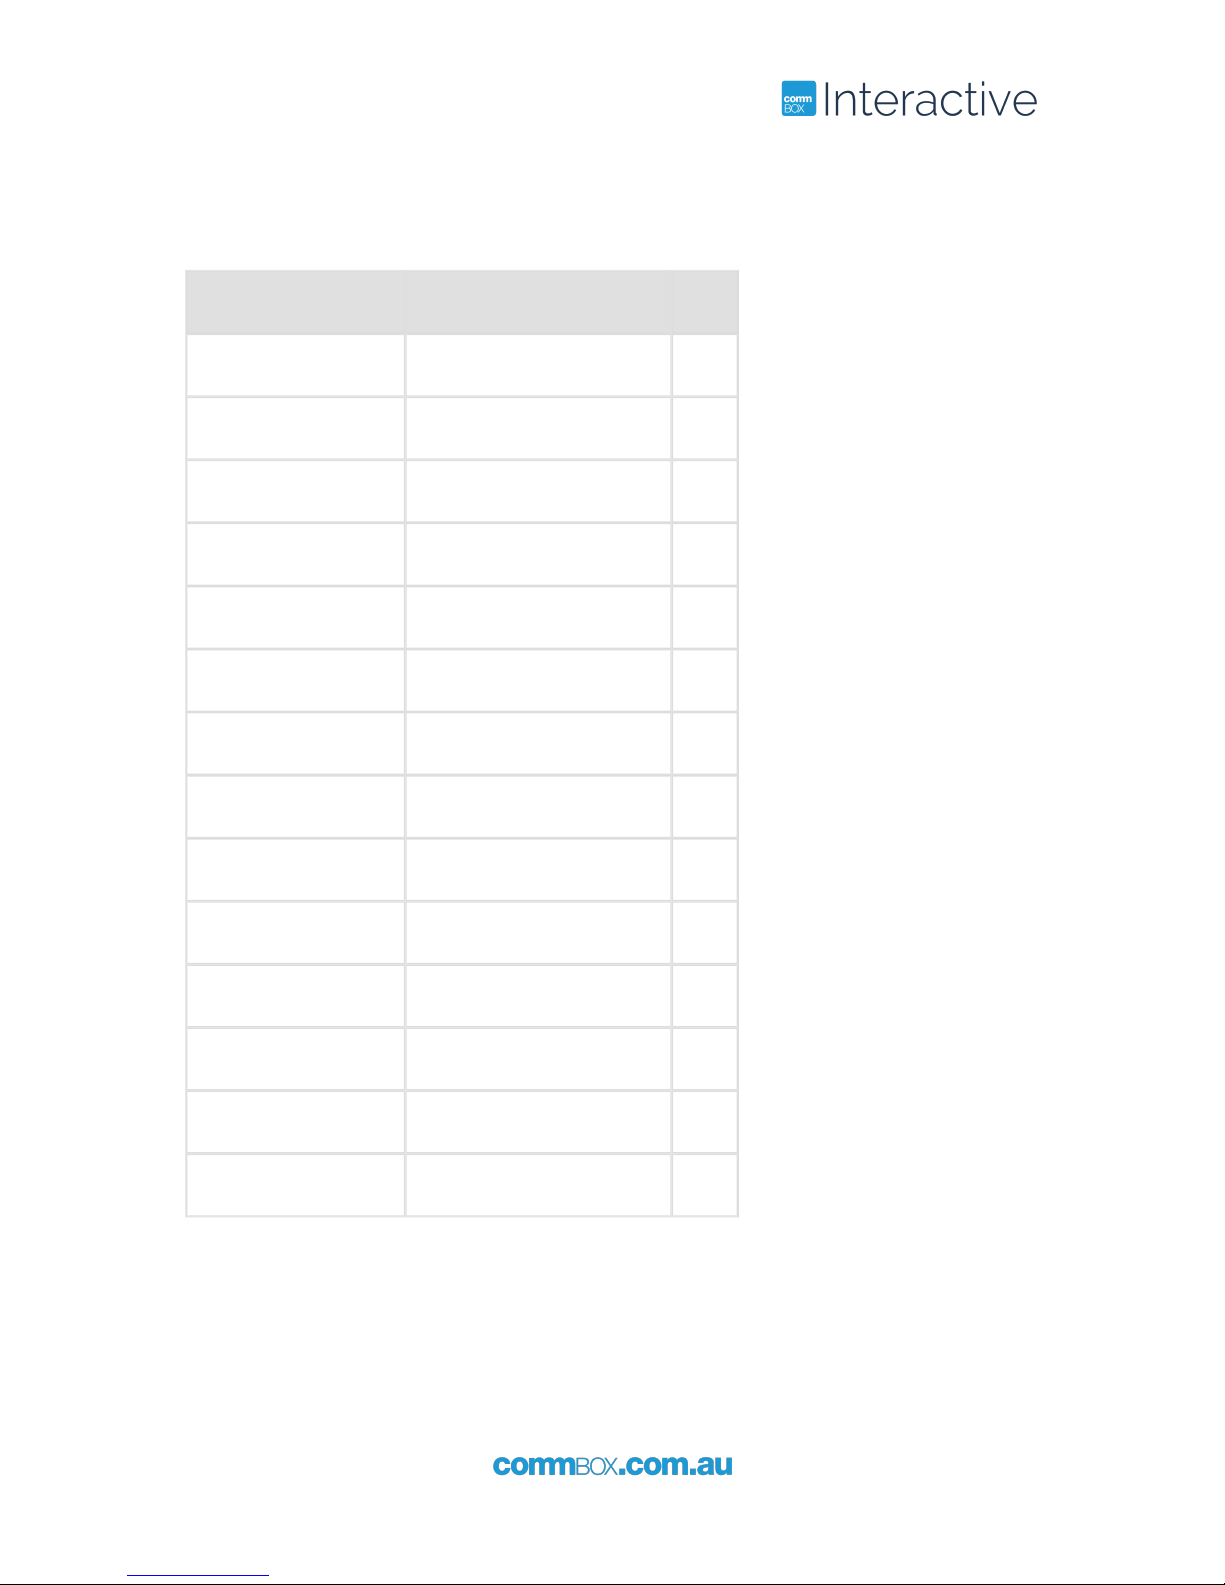
6 Supported Resolutions
Signal Types Supported Video Timings Note
640 x 480 @ 60Hz
800 x 600 @ 60Hz
1024 x 768 @ 60Hz
D-SUB 1280 x 768 @ 60Hz
1360 x 768 @ 60Hz
Component & HDMI 3840 x 2160 60Hz
1080p 50Hz / 60Hz
1080i 50Hz / 60Hz
720p
576p
576i
480p
480i
CVBS NTSC / PAL
Page 22

22
+61 2 9975 6001
Index
 Loading...