


COMM BOX PTY LTD | ABN: 431 583 817 05 | Telephone: +61 2 9975 6001 | Fax: +61 2 9975 2032
PO Box 6667 Frenchs Forest NSW 2086 Australia | www.commbox.com.au AUSTRALIA, CHINA,
MALAYSIA, SINGAPORE, KOREA, SOUTH AFRICA
1
ZTS0025 “AVBox”
Overview.
The ZTS0025 AVBox is part of the S:Range (Simple, Smart, Stand Alone) family
of products.
It is a simple to use 4 input stereo audio and video switcher with audio gain
control, faders and EQ as well as a stereo, 17 watts RMS per channel amplifier.
It can be used completely stand-alone, receiving its instructions directly from a
Joey via its inbuilt IR receiver, in conjunction with control processors or directly
connected to any control panel in the CommBox range.
Like all products in the S:Range, it can also be addressed so as to allow up to 16
S:Range units to be used in the same system.
The unit operates from a 12 volt AC lighting transformer. It can also supply power
via the IRBus to operate, for example, a wall mount Joey touchscreen.
The Class D digital amplifiers are very efficient and draw virtually zero power
when not handling audio. This feature allows the AV Box to comply with Green
Power requirements without the need for an On-Off switch.
L-
Speakers
L+R-R+
1
2
3 4
Audio out
IRBus
AC 12v.Rear
2 4
3
Audio inputs
L L
R R
1
Video inputs Video out
GND
Data
+12
AVBox ZTS0025
commandsystems.com.au
FIG.1. Rear panel view

COMM BOX PTY LTD | ABN: 431 583 817 05 | Telephone: +61 2 9975 6001 | Fax: +61 2 9975 2032
PO Box 6667 Frenchs Forest NSW 2086 Australia | www.commbox.com.au AUSTRALIA, CHINA,
MALAYSIA, SINGAPORE, KOREA, SOUTH AFRICA
2
The AVBox is very versatile.
An AVBox can be used standalone, directly controlled by a Joey or other
control panels.
An AVBox may be used to add audio-video capabilities to a CommBox
Micro or to add one or more independent output zones to the internal AV
switcher in a Classic range processor. In this case you can take advantage
of the fact that the IRBus input on the AVBox may be directly driven from
any serial port on any CommBox processor.
Several AVBox units can be linked together to form a multi-room AV
system. Up to 15 can be driven from a single IRBus serial line, either from
a control panel or from a processor serial port.
Other than setting the box address, no programming is required. See the section
“Programming a Joey to control an AVBox”.

COMM BOX PTY LTD | ABN: 431 583 817 05 | Telephone: +61 2 9975 6001 | Fax: +61 2 9975 2032
PO Box 6667 Frenchs Forest NSW 2086 Australia | www.commbox.com.au AUSTRALIA, CHINA,
MALAYSIA, SINGAPORE, KOREA, SOUTH AFRICA
3
Example 1 - a typical “standalone” installation.
L-
Speakers
L+R-R+
1
2
3 4
Audio out
IRBus
AC 12v.Rear
2 4
3
Audio inputs
L L
R R
1
Video inputs Video out
GND
Data
+12
AVBox ZTS0025
commandsystems.com.au
VHS
8888 88
Audio store
Wallmount
Joey
Plasma
monitor
Camera
PayTV Settop box
Speakers
DVD
Transformer
COMM BOX PTY LTD | ABN: 431 583 817 05 | Telephone: +61 2 9975 6001 | Fax: +61 2 9975 2032
PO Box 6667 Frenchs Forest NSW 2086 Australia | www.commbox.com.au AUSTRALIA, CHINA,
MALAYSIA, SINGAPORE, KOREA, SOUTH AFRICA
4
Example 2 - controlling one or more AVBox from a CommBox
Micro or other processor
L-
Speakers
L+R-R+
1
2
3 4
Audio out
IRBus
AC 12v.Rear
2 4
3
Audio inputs
L L
R R
1
Video inputs Video out
GND
Data
+12
AVBox ZTS0025
commandsystems.com.au
L-
Speakers
L+R-R+
1
2
3 4
Audio out
IRBus
AC 12v.Rear
2 4
3
Audio inputs
L L
R R
1
Video inputs Video out
GND
Data
+12
AVBox ZTS0025
commandsystems.com.au
ComBox Micro
Serial ports
GND o
Data o
+12 o
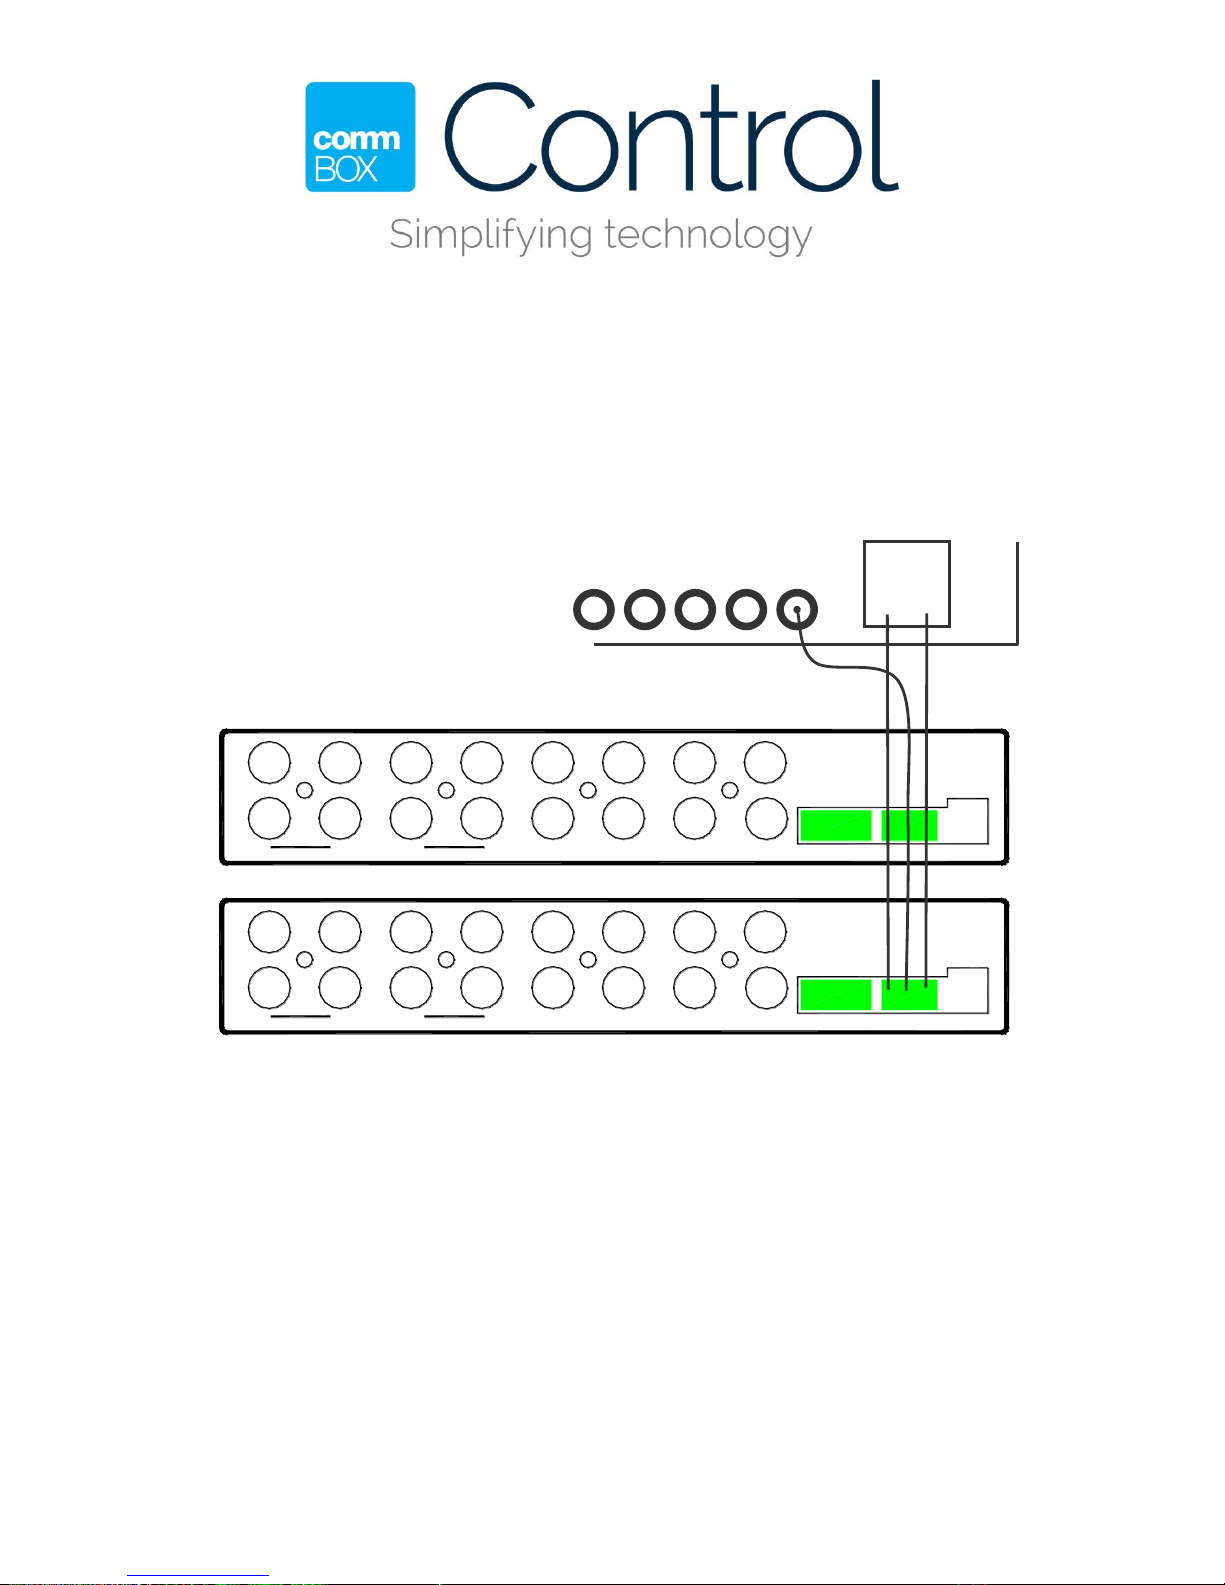
By setting two or more AVBoxes to
different addresses it’s possible to
control them individually. This is
useful for multi-room systems that
are centrally controlled.
The IRBus input is compatible with
signals from control panels and
infra-red outputs from serial ports.
COMM BOX PTY LTD | ABN: 431 583 817 05 | Telephone: +61 2 9975 6001 | Fax: +61 2 9975 2032
PO Box 6667 Frenchs Forest NSW 2086 Australia | www.commbox.com.au AUSTRALIA, CHINA,
MALAYSIA, SINGAPORE, KOREA, SOUTH AFRICA
5
L-
Speakers
L+R-R+
1
2
3 4
Audio out
IRBus
AC 12v.Rear
2 4
3
Audio inputs
L L
R R
1
Video inputs Video out
GND
Data
+12
AVBox ZTS0025
commandsystems.com.au
L-
Speakers
L+R-R+
1
2
3 4
Audio out
IRBus
AC 12v.Rear
2 4
3
Audio inputs
L L
R R
1
Video inputs Video out
GND
Data
+12
AVBox ZTS0025
commandsystems.com.au
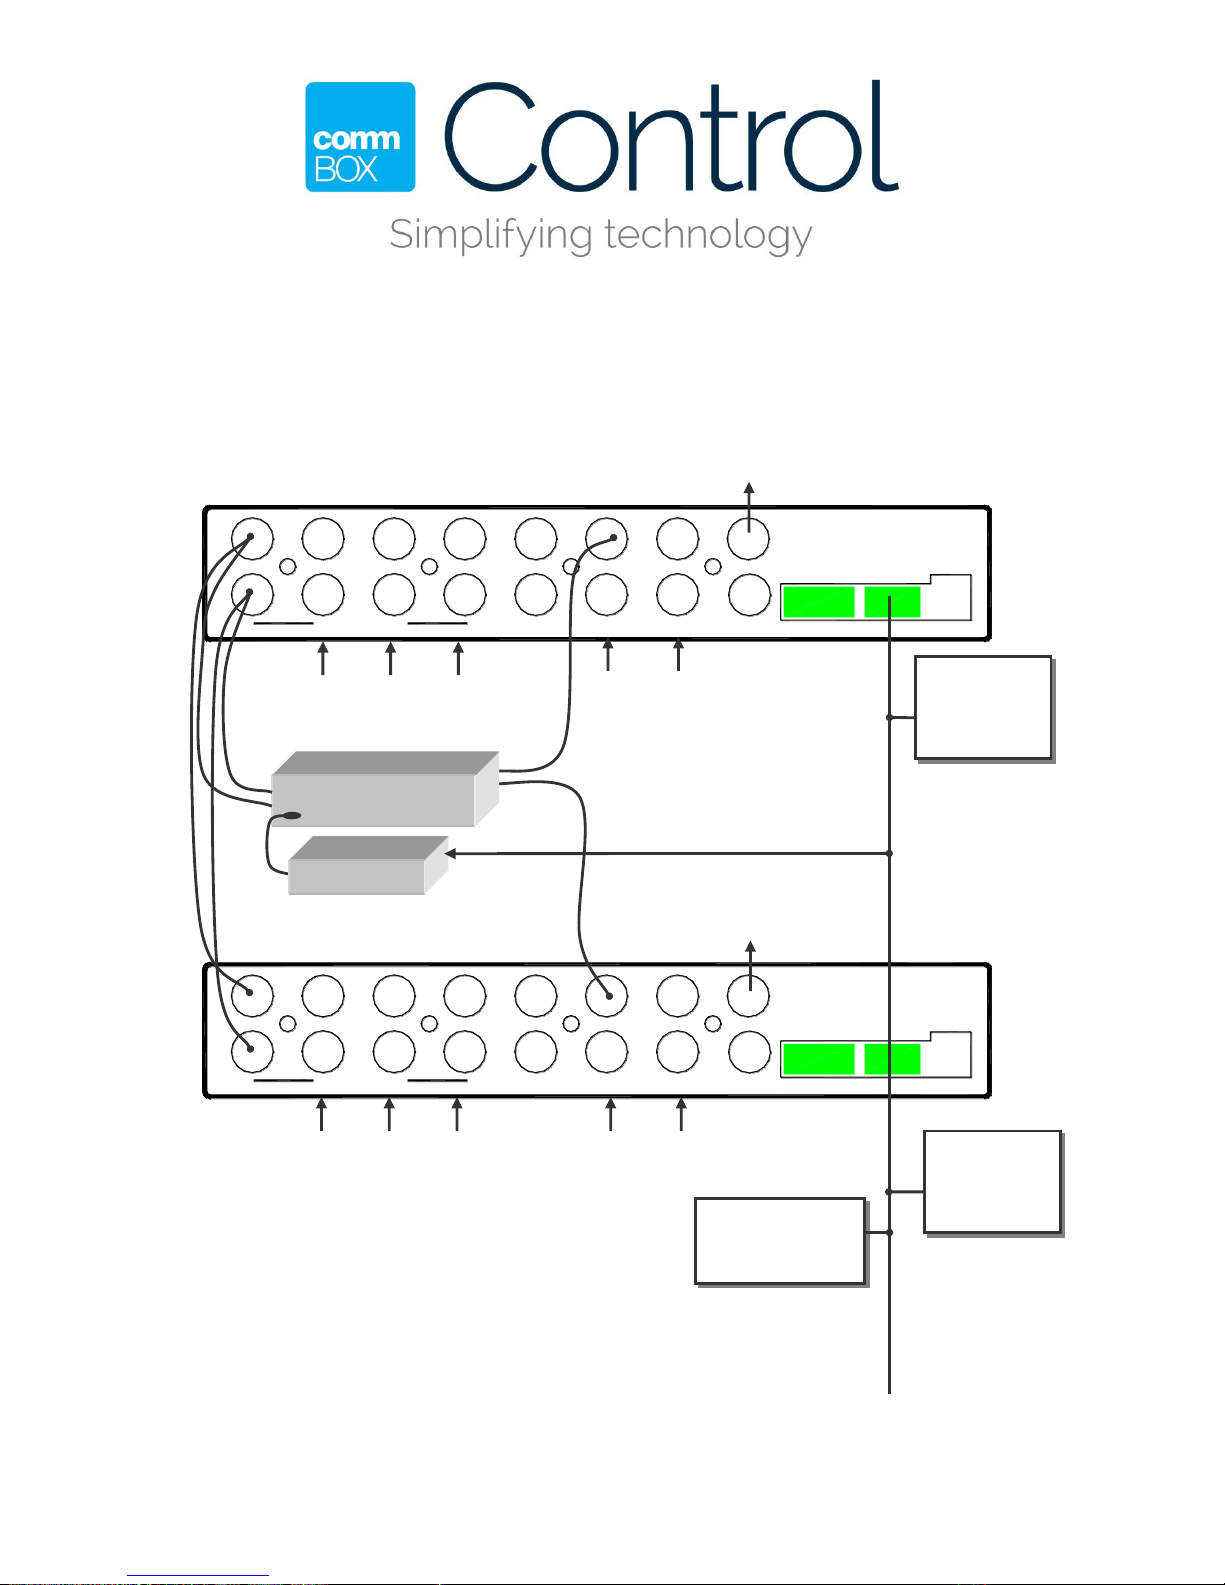
Example 3 – A multi-zone system using direct control from
multiple control panels without a processor, with common
and local inputs.
Local audio inputs
Local video
inputs
Cable set-top box
Local audio inputs
Local video
inputs
Video
display
Video
display
MacroBox
Zone 1
control
panel /IR
Receiver.
* IRBus
+12 and
GND not
shown for
clarity
Zone 2
control
panel /IR
Receiver.
Master control
panel.
Zone 1
Zone 2
COMM BOX PTY LTD | ABN: 431 583 817 05 | Telephone: +61 2 9975 6001 | Fax: +61 2 9975 2032
PO Box 6667 Frenchs Forest NSW 2086 Australia | www.commbox.com.au AUSTRALIA, CHINA,
MALAYSIA, SINGAPORE, KOREA, SOUTH AFRICA
6
Example 4 – Using with a projector with an HDMI input and a
Joey Micro or Lite control panel.
VGA
in
SK1
SK2SK4
SK3
PCB0241C
DC In
PIR
RS232 Port 2 RS232 Port 1
IR Output 1
IR Output 2
Progm Port
IRBus
+12V
GND
Data
RS232 Port
Pin 4 - TxD
Pin 5 - GND
Pin 6 - CTS
PIR Port
Pin 5 - GND
Pin 4 - Sense
Pin 6 - +12V
Command
Systems P/L
Joey Panel
SK9
SK8
SK7
SK6
SK5
L-
Speakers
L+R-R+
1
2
3 4
Audio out
IRBus
AC 12v.Rear
2 4
3
Audio inputs
L L
R R
1
Video inputs Video out
GND
Data
+12
AVBox ZTS0025
commandsystems.com.au
12v
transformer
Wallplate
HDMI
VGA
VGA Audio
DVD Video
DVD Audio
Stereo pairs
Speaker connections not shown
No plugpack
is required
for Joey –
power
comes from
the AVBox.
Optional IR
control of DVD
player
Optional PIR
room movement
sensor
Projector
audio out
HDMI
in
Video
in
RS232
HDMI must go through the projector, but the AVBox can accept the projector’s audio output.
We strongly recommended that you program the Joey so that the projector’s volume control
is set to maximum when the HDMI input is selected.
When programming the Joey, as well as adding the volume controls, you’ll need to have
the HDMI key send AV Box code “Select Input 1”.
The PC input key should send AV box “Select Input 2”.
The DVD key should send AV Box “Select Input 3”.
See page 9 for more information.
COMM BOX PTY LTD | ABN: 431 583 817 05 | Telephone: +61 2 9975 6001 | Fax: +61 2 9975 2032
PO Box 6667 Frenchs Forest NSW 2086 Australia | www.commbox.com.au AUSTRALIA, CHINA,
MALAYSIA, SINGAPORE, KOREA, SOUTH AFRICA
7
Operation.
As with all S:Range products, the AVBox is controlled by
CommBox IR codes, which may be generated by
CommBox processors, CommBox touch panels or 3rd
party controllers.
Each module has its address assigned by DIP-switches.
A module will only respond to a command with a
matching address – e.g. module "12" only responds to
commands addressed to module "12". In larger systems
multiple modules with the same address may be used.
CommBox key codes from 0 to 15 are interpreted as address codes.
CommBox key codes from 16 to 31 are interpreted as command codes.
Command format: ADDRESS, OPERATION
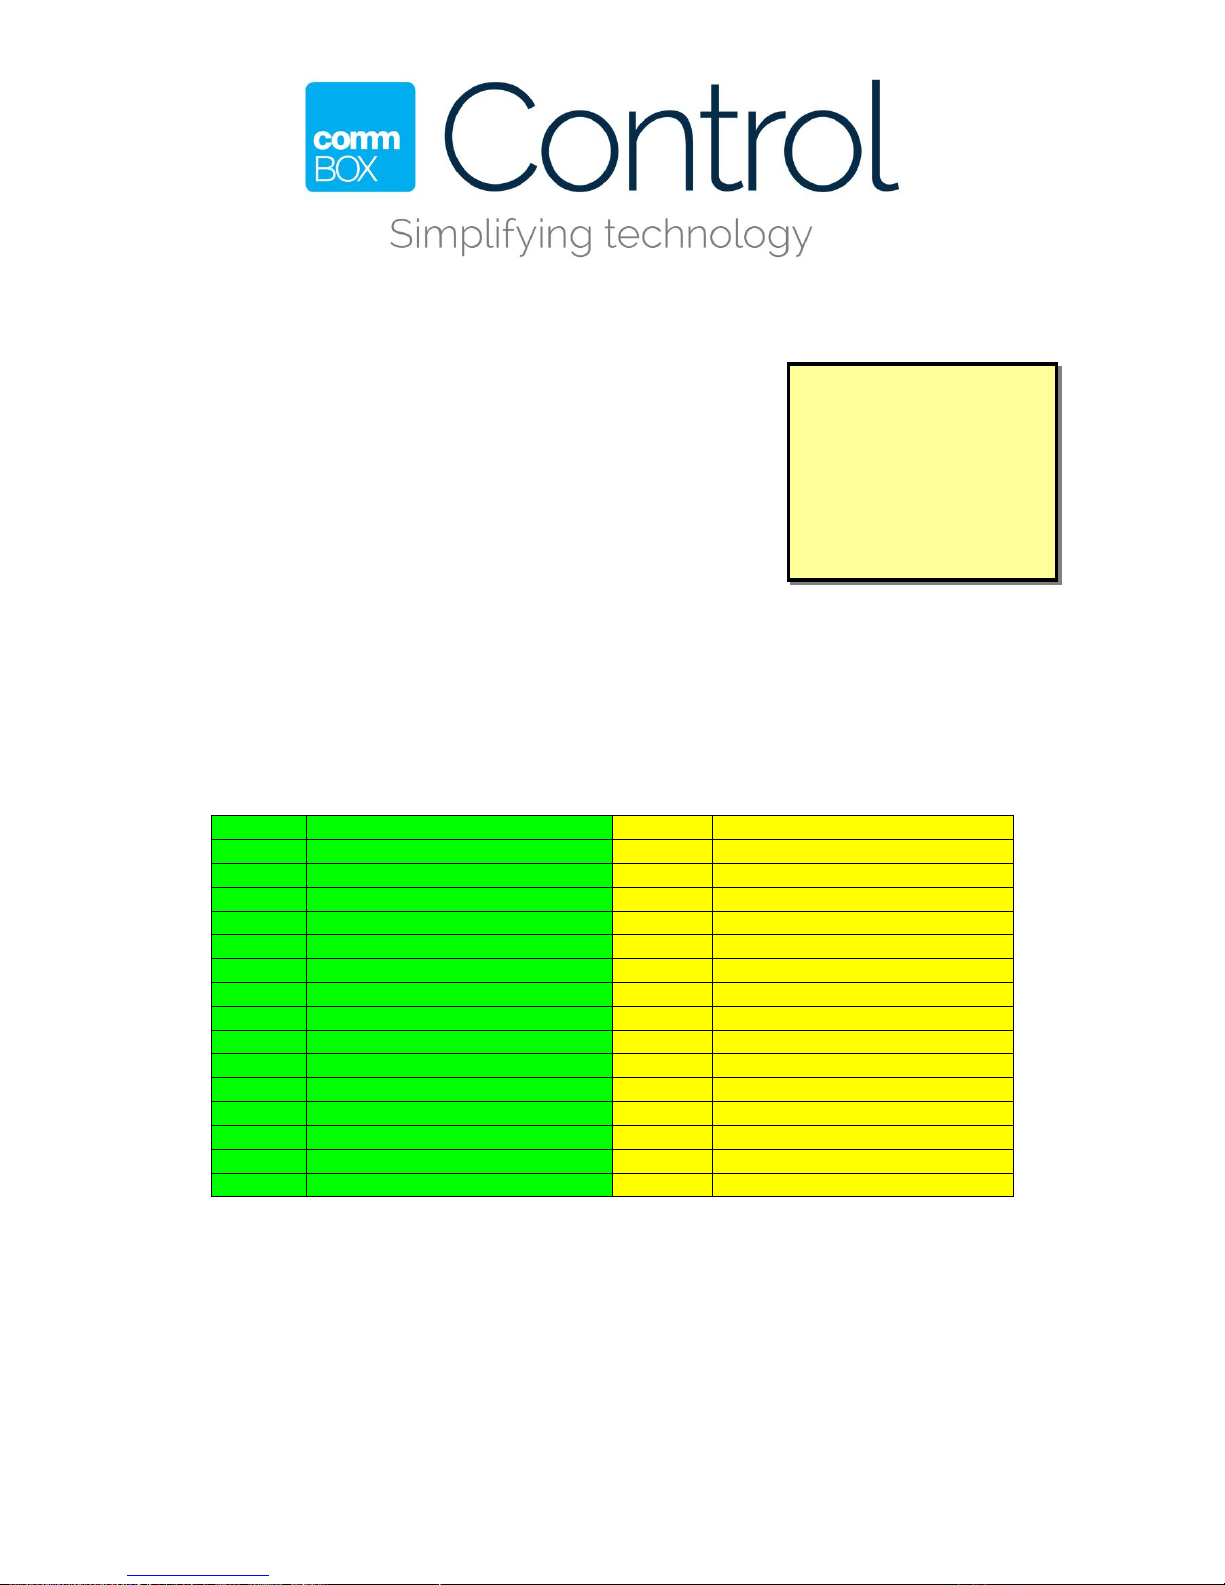
Table 1. CommBox address and operation key codes
Key code Address Key code Operation
0
Address 0
16
Select input 1
1
Address 1
17
Select input 2
2
Address 2
18
Select input 3
3
Address 3
19
Select input 4
4
Address 4
20
Bass Up
5
Address 5
21
Bass Down
6
Address 6
22
Treble Up
7
Address 7
23
Treble Down
8
Address 8
24
Mute
9
Address 9
25
Volume Up
10
Address 10
26
Fade Front
11
Address 11
27
Volume Down
12
Address 12
28
Fade Rear
13
Address 13
29
Balance Left
14
Address 14
30
Balance Right
15
Address 15
31
(Not used)
Example: For an AVBox address set to address 5, to select input 4, send
codes 5, 19.
* If using the Joey editor, you don’t need to refer to this table as it is
available as a dropdown selection in the Code Sequencer.
You don’t need to be
concerned with
addresses if you are
using a single AVBox.
Just set its address to
zero (4 dipswitches off)
and forget about
addresses.

COMM BOX PTY LTD | ABN: 431 583 817 05 | Telephone: +61 2 9975 6001 | Fax: +61 2 9975 2032
PO Box 6667 Frenchs Forest NSW 2086 Australia | www.commbox.com.au AUSTRALIA, CHINA,
MALAYSIA, SINGAPORE, KOREA, SOUTH AFRICA
8
Setting the Address DIP - switches
ADDRESS ADDRESS
ON ON
“0” “8”
“1” “9”
“2” “10”
“3” “11”
“4” “12”
“5” “13”
“6” “14”
“7” “15”
1 2 3 4 5 6 7 8 1 2 3 4 5 6 7 8
DIP switch DIP switch
- NOT USED for address
* Dipswitch 8 is used to enable or disable the internal IR receiver.

COMM BOX PTY LTD | ABN: 431 583 817 05 | Telephone: +61 2 9975 6001 | Fax: +61 2 9975 2032
PO Box 6667 Frenchs Forest NSW 2086 Australia | www.commbox.com.au AUSTRALIA, CHINA,
MALAYSIA, SINGAPORE, KOREA, SOUTH AFRICA
9
Programming a Joey to control an AVBox
In this example, we’ll program the
Volume Up key for an AVBox in a
standalone environment. In other
words, we only have one AVBox.
We’ll assume you have already
created the Volume Up key
graphically.
1. Set the AVBox address to 0,
i.e. all switches off. This
way we don’t need to send
an address code.
2. Open the Joey Editor and
the file you wish to work
with.
3. Select Edit Behaviour.
4. Double-Click the Volume Up
key.
5. Click “Add”. The Code
Sequencer window will
open.
6. In the Codeset drop-down,
choose AVBox. (If this
choice is not available, see
“Upgrading your Joey
Editor” below.)
7. Choose Volume Up from the
Codes list. Click OK.
Repeat items 4, 5 and 7 for all the
keys that you wish to use to control the AVBox.
Upgrading your Joey editor
If the AVBox choice fails to appear in the Code Sequencer, you can either use the
CommBox code and refer to Table 1 for the code relationships or add it by adding
a file “AVBox.ini” in the “ROMcode” folder in your Joey directory. This file is
available for download at www.commandsystems.com.au.

COMM BOX PTY LTD | ABN: 431 583 817 05 | Telephone: +61 2 9975 6001 | Fax: +61 2 9975 2032
PO Box 6667 Frenchs Forest NSW 2086 Australia | www.commbox.com.au AUSTRALIA, CHINA,
MALAYSIA, SINGAPORE, KOREA, SOUTH AFRICA
10
Programming a system to control multiple AVBoxes
(or multiple s:range products)
All s:range products share a common code protocol. They rely on a code from 0
to 15 being sent to them to match the address set on a dipswitch and so enable
the remaining codes to operate the device.
If you have just one box, you can set it to address 0 and forget about addressing
and the following section. However if you are using two or more s:range boxes
you will need to know about how to handle addressing.
Case 1 – you have a separate menu/screen for the controls for each box.
1. On the key that opens each menu, send the address code for the box
that’s associated with that menu. This will enable the box for commands.
2. Within the menu, just send the required command, without the preceding
address code.
3. If you want to disable “accidental” control of all items within a menu, send
a “0” from the Back or Close key. This will disable the control of all boxes,
except of course any box that’s set to address 0.
This method is preferred because it provides faster, smoother response,
particularly when you are performing volume adjustments.
Case 2 – you are controlling more than one box from the same menu.
1. For each key in the
menu, send the address
code followed by the
command code, as in
the example shown
here.
2. If you are sending a
command such as a
volume control, insert a
– begin loop – after the
address code. This will
cause the address code
to be sent when the key
is first pressed, followed
by the Volume Up. In
this way you get
smoother, more
responsive volume control operation.
 Loading...