


USER MANUAL
4K Interactive Flat Panel Display
COMMBOX PULSE 65”
Rev.30/May/2017
Rev.11/Oct/2017 (added RS-232 protocol)

2
NOTICES
COPYRIGHT AND TRADEMARKS
Copyright © 2016 CommBox Corporation. All rights reserved.
All brand names and product names are trademarks, registered trademarks or trade names of their respective
holders.
General
Every effort has been made to ensure accuracy, however in some cases changes in the products or availability
could occur which may not be reflected in this document. We reserve the right to make changes to
specifications at any time without notice. Performance specifications are typical, but may vary depending on
conditions beyond our control such as maintenance of the product in proper working conditions. Performance
specifications are based on information available at the time of printing. We makes no warranty of any kind
with regard to this material, including, but not limited to, implied warranties of fitness for a particular purpose.
We will not be liable for errors contained herein or for incidental or consequential damages in connection with
the performance or use of this material. Our manufacturing facility is ISO 9001 and 14001 certified.
REGULATORY
The product has been tested and found to comply with the limits for a Class B digital device, pursuant to Part
of KC, CE, CB, and FCC Rules. These limits are designed to provide reasonable protection against harmful
interference when the product is operated in a commercial environment. The product generates, uses, and
can radiate radio frequency energy and, if not installed and used in accordance with the instruction manual,
may cause harmful interference to radio communications. Operation of the product in a residential area is
likely to cause harmful interference in which case the user will be required to correct the interference at the
user’s own expense.
Environmental
The product is designed and manufactured with high-quality materials and components that can be recycled
and reused. This symbol means that electrical and electronic equipment, at their end-of-life, should be
disposed of separately from regular waste. Please dispose of the product appropriately and according to local
regulations. In the European Union, there are separate collection systems for used electrical and electronic
products. Please help us to conserve the environment we live in!

3
Table of Contents
1 BEFORE USING THE PRODUCT ............................................. 5
1.1 Safety Precautions ................................................................. 5
2 PREPARATIONS ............................................................. 6
2.1 Parts List ............................................................................ 6
2.2 Control product .................................................................... 7
2.3 Input/output connection .......................................................... 8
2.4 Remote Controller Button Description ........................................ 10
3 INSTALLATION GUIDE .................................................... 11
3.1 Caution before installation ..................................................... 11
3.2 Unpacking Process ............................................................... 12
3.3 Handling Guide ................................................................... 13
3.4 Product Installation .............................................................. 15
3.5 Wall mounting Installation ...................................................... 15
3.6 Remote Controller ............................................................... 16
3.7 Setup .............................................................................. 16
4 REMOTE CONTROL ....................................................... 17
4.1 RS-232C connection ............................................................. 17
5. CONNET THE EXTRAL DEVICES ................................................ 19
5.1 HDMI Connection ........................................................... 19
4.2 VGA Connection ................................................................. 19
6. TOUCH REQUIREMENTS ................................................ 21
6. 1 Touch Requirements ....................................................... 21
7 MENU CONTROL .......................................................... 23

4
7.1 Input selection ................................................................... 23
7.2 User function ..................................................................... 24
8 TROUBLE SHOOTING ..................................................... 25
9 PRODUCT SPECIFICATION ................................................ 28
10 SUPPORTED RESOLUTIONS .............................................. 30
11 REQURIED INFORMATION ............................................... 31
11.1 Prevent image sticking ......................................................... 31

5
1 BEFORE USING THE PRODUCT
⚫ Before installing or using the product, to avoid damaging the product, read and follow as the guidelines
of the user manual for your safety.
⚫ The color, design and specification may change without notice to enhance the function.
1.1 Safety Precautions
Precautions are divided into two "Warning" and "Caution", and meaning of the each is as follows.
Warning: If you do not follow, it could result in serious injury or death.
Caution: If you do not follow, it could result in minor injury or product damage.
Please keep users to access USER MANUAL easily.

6
2 PREPARATIONS
2.1 Parts List
If these items are missing, contact your dealer or service center.
The following images may differ from the image shown.
Other parts not packed in contents may cause performance degradation or
problem during usage.
Power Cable
(Option)
HDMI Cable
Remote
Control
AAA 1.5V
Battery x 2
Touch USB Cable
Cleaning cloth

7
2.2 Control product
The following images may differ from the image shown.
• You can control the product by using the control buttons on the rear side of the product.
*Note : sound bar is an optional item.
Remote Sensor / Power indicator - side ①
Control buttons – ②
Power on
Green
Stand-by
Red
Up
To move to the upper menu or select
Down
To move to the lower menu
Vol-
To turn down the volume
Vol+
To turn up the volume.
Source
To display input signal
Menu
To display or hide the on-screen menu
Power
Power on/off button

8
2.3 Input/output connection
The items may differ from the image shown.
Connector name and description
No.
Connector
Description
①
Speaker Out
To connect External Speaker
②
Touch USB
To connect Touch USB
③
RS-232C
To connect RS232 input cable with control device
④
HDMI 1
To connect HDMI 1.4/2.0(MHL 3.0) video & audio input - 1
⑤
HDMI 2
To connect HDMI 1.4/2.0(MHL 3.0) video & audio input - 2
⑥
HDMI 3
To connect HDMI 1.4/2.0 video & audio input - 3
⑦
HDMI 4
To connect HDMI 1.4/2.0 video & audio input - 4
⑧
USB
To connect with USB device
⑨
S/PDIF
To connect SPDIF
⑩
SOUND
To connect sound input (3.5Φ)
⑪
D-SUB
To connect D-sub 9pin
⑫
Component
To connect component for (PR,PB,Y/CVBS,R,L) etc.
⑬
Earphone
To connect audio output (it will be removed.)
⑭
AC 100-240V, 50/60Hz
Power connector (AC 100-240V, 50/60Hz)
※Note, 1-When you use VGA connector, please use a standard cable. Wrong VGA cable damages to RS-232 board.
2-Depends on models, the connectors may be different. Further more information, please contact us.
- USB Multimedia playback format
Media
File Ext.
Decoder
Notes
Music
.mp3
MPEG1 Audio Layer
(Not corresponding MP3
Pro)
Sampling Frequency【K】32/44.1/48
Sample Rate: 8K~48KHz Bit Rate: [Kbit/s]
32/40/48/56/64/80/96/112/128/160/192/224
/256/320/VBR
Photo
.jpg/.jp
eg
Progressive JPEG
Max Resolution: 1024×768
Baseline JPEG
.avi, .mpg, .dat, .vob, .div, .mov, .mkv, .rm, .rmv
b, .mp4, .mjpeg, .ts, .trp, .wmv, .asf, .flv
⑭ ⑬ ⑫ ⑪ ⑩
①
②
③
④
⑤
⑥
⑦
⑧
⑨

9
Caution
• When you connect the signal cables to the input / output terminals, check the above picture
of the input / output terminal, and connect in the right direction. If connected incorrectly, it
may cause damage or breakdown of the input / output terminals.
• If the product does not operate even though the power is supplied, check if the power switch is
set to power-on or off.

10
2.4 Remote Controller Button Description
Button Description
The following images may differ from the actual items.
Button not described does not work.
POWER
Power on/off button
SOURCE
Select input signal
ASPECT
Adjust the window’s ratio
▲
Move to the upper menu
▼
Move to the lower menu
◀
Move to the left menu
▶
Move to the right menu
OK
Select to change menu
MENU
Display or hide menu on the screen
+
Volume up
-
Volume down
FREEZE
Toggles freeze image on/off
P.Mode
Selects image quality presets
S.Mode
Selects Audio quality presets
ASPECT
Selects the aspect ratio of the panel
SLEEP
Selects the timeout option

11
3 INSTALLATION GUIDE
3.1 Caution before installation
Caution: Installation must be performed by a qualified custom video installation specialist
under the conditional installation environment as below.
Ambient temperature
• Install the product in a well-ventilated that can maintain the ambient temperature of below
35° C (95° F).

12
3.2 Unpacking Process
The following images may differ from the actual items.
Before unpacking the box, refer to the diagram below.
1. Remove the outer packing box.
2. Remove the top foam.
3. Lower down or remove the
wrapping.
4. Three or more people, remove the
packing from the product.
13
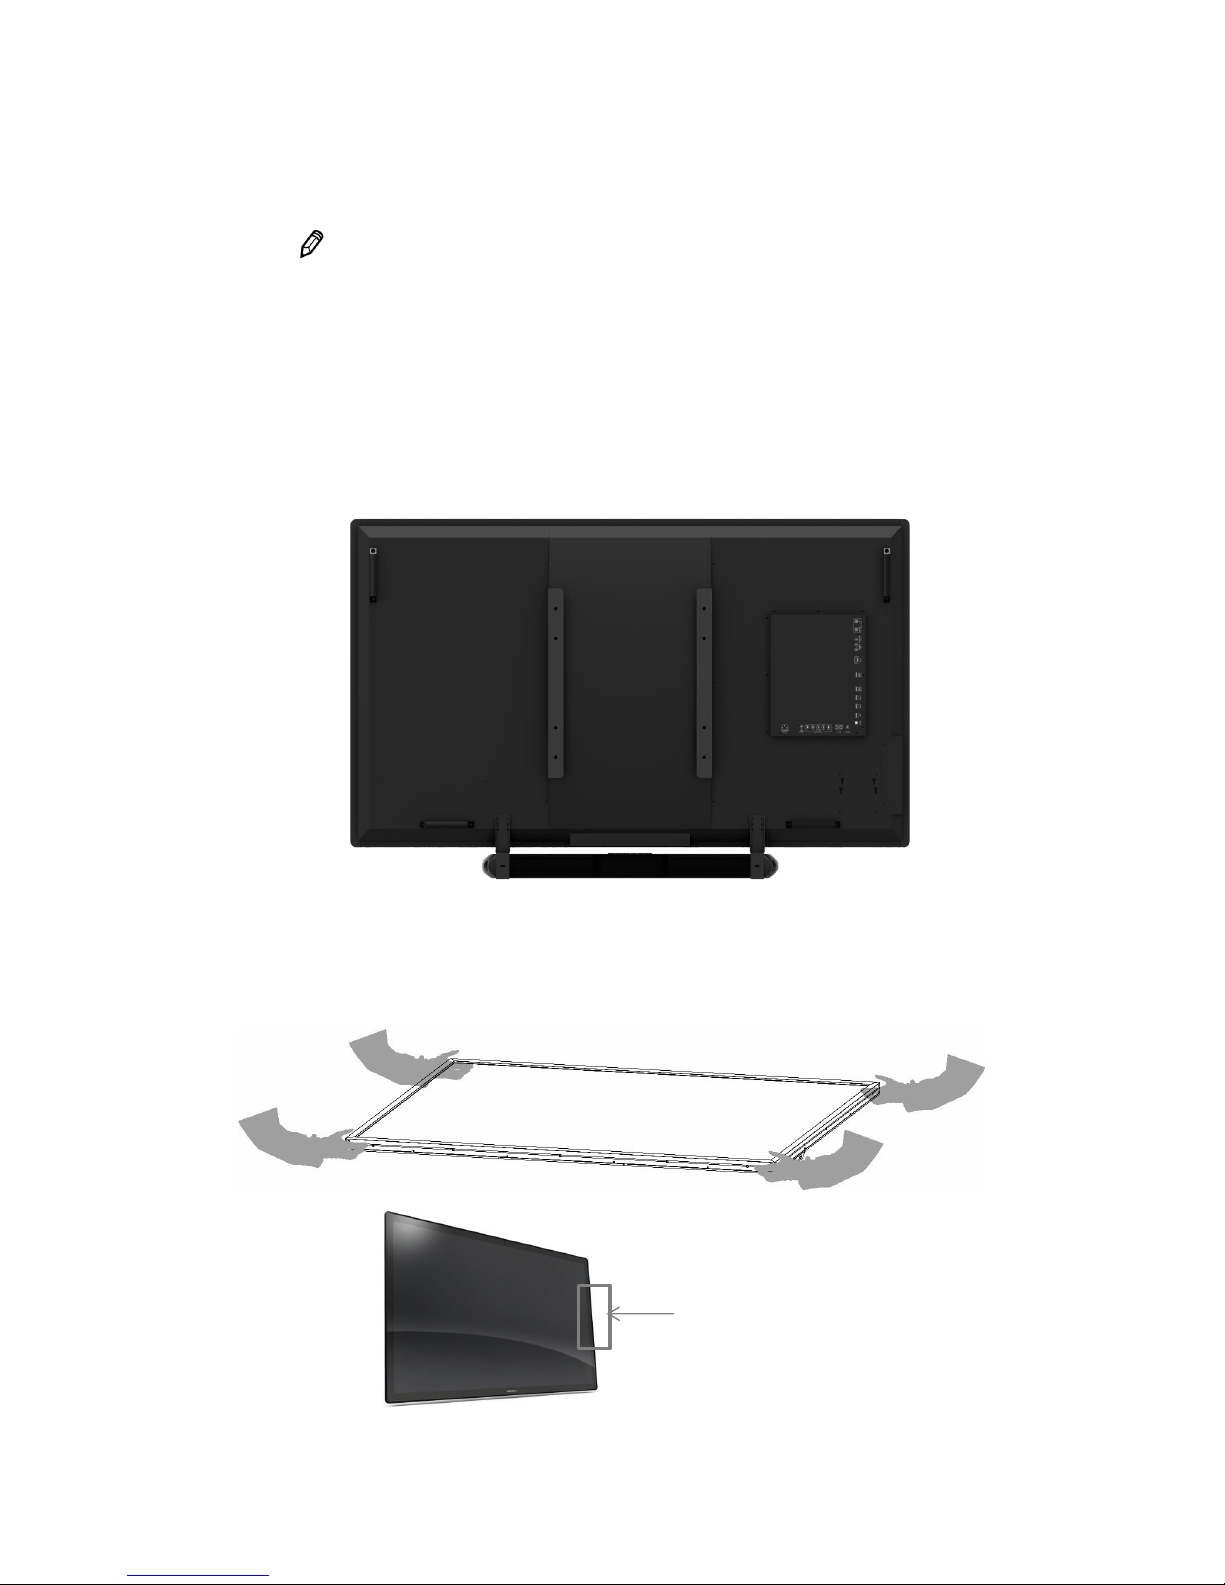
3.3 Handling Guide
The following images may differ from the actual items.
Holding a product
1. Right way
At least two people are required to handle the product during transportation.
Two people should each hold the left and right hand grips on the backside of the product,
grip the bottom portion of the rear side of the product to move.
(The illustration below may differ from the actual items.)
2. Wrong way
Do not use or touch any part of the front screen of the product during transportation
.
X
The metal bezel protector is for protecting any
damage during the delivery. Use the supplied
allen key to remove the protective

14
Putting a product
1. Right Way
Before putting the product on the floor, prepare flat and soft cushions. Place the product
horizontally and slowly on the floor. Lay screen flat to avoid damaging fragile areas.
2. Wrong way
Put down carefully not to damage the outside of the product. If the corner part of the product
is placed first, the bezel may be damaged easily.
Handling (PCAP Sensor & AG glass)
Use gloves and finger coat to prevent stains on the touch panel and injury by the sharp edge of the touch panel.
Do not take hold of FPC tail when handing the touch panel.
Do not pile up touch panels.
Do not put anything on the touch panel.
Do not fold the FPC tail.
Clean off the touch panel with alcohol and soft clothes when necessary
Prevent alcohol from penetrating into the touch panel and do not use organic solvents except for alcohol.
Cushions
X

15
3.4 Product Installation
When installing the product with wall mount, have the product installed by a well-trained
technician. Please refer to the User Guide of Wall Mounting.
The product has VESA standard of 400X400 MM for wall mounting, and of M8
(Maximum length 35mm) of the screws by size.
Warning: We are not responsible for the product damage or personal injury caused by
user’s own installation.
3.5 Wall mounting Installation
Install the product only on the robust and vertical wall. When installing inside the wall or
cabinet, install the product with a space behind/between the product and the wall as the
illustration below.
Ambient temperature is kept below 35 °C.
60mm
100mm
100mm
100mm
100mm

16
3.6 Remote Controller
Inserting batteries in the remote controller
• Press the tab on the battery case and open it.
• Insert the battery (1.5V AAA) into the battery case.
• Insert the battery case until clack sounds.
Notice on battery
• When loading the battery, check if the polarity of the batteries is correct.
• If not using the remote controller for long time, remove the batteries to prevent damage
caused by battery fluid leak.
• Don’t expose the battery to direct sunlight or excessive heat such as a fire.
Notes on the remote controller
• If anything interrupts in front of IR receiver or between IR receiver and remote controller,
the remote controller may not work.
• If the receiving distance of the remote controller becomes narrow or does not work,
replace the battery with new one.
• In case of the product is exposed to direct sunlight or fluorescent light, it may not operate.
3.7 Setup
Turning on the power
1. Connect the power cable of the product into outlet with AC 100-240V 50 / 60Hz.
2. Turn on the main AC power switch.
3. If the power indicator is green, the screen turns on automatically.
4. If the power light is red not green, press the power key on the remote controller or operate
to turn on the power.
Changing language of the menu
• The language of the menu is English as the default setting.
• Users can select a language
• To change the menu language,
1. Press the Menu button to go to the menu.
2. Select the OSD from the main menu.
3. Select the language of the OSD setup menu.
4. Select the language you want to select, and then exit the menu.

17
4 REMOTE CONTROL
4.1 RS-232C connection
Physical Connector
Connector on the display: DB9 Male, configured as DTE.
Type(Version)
Male (4)
RX 2 TX
3 G 5
※ Please check the RS-232pinout type in your serial number.
Communication Parameter
Baud Rate
9600
Data Length
8 bit
Parity Bit
None
Stop Bit
1 bit
Hardware Handshake
Not supported
Authentication
None
Serial Command List
Parameter
Character code in hexadecimal
Character
POWER_ON
21 31 50 4F 57 52 20 31 0D
!1POWR(SP)1(CR)
POWER_OFF
21 31 50 4F 57 52 20 30 0D
!1POWR(SP)0(CR)
Response Power Off
21 31 50 4F 57 52 3D 30 0D
!1POWR=0(CR)
Query the Power Status
21 31 50 4F 57 52 20 3F 0D
!1POWR(SP)?(CR)
Error Response-Display
21 31 50 4F 57 52 3D 45 52 52 34 0D
!1POWR=ERR4(CR)
SOURCE_HDMI1
21 31 49 4E 50 54 20 32 31 31 0D
!1INPT(SP)211(CR)
SOURCE_HDMI2
21 31 49 4E 50 54 20 32 31 32 0D
!1INPT(SP)212(CR)
SOURCE_HDMI3
21 31 49 4E 50 54 20 32 31 33 0D
!1INPT(SP)213(CR)
SOURCE_VGA
21 31 49 4E 50 54 20 31 31 31 0D
!1INPT(SP)111(CR)
SOURCE_COMPOSITE
21 31 49 4E 50 54 20 31 33 31 0D
!1INPT(SP)131(CR)
SOURCE_COMPONENT
21 31 49 4E 50 54 20 31 35 31 0D
!1INPT(SP)151(CR)
SOURCE_USB
21 31 49 4E 50 54 20 33 31 31 0D
!1INPT(SP)311(CR)
INPUT STATUS Query
21 31 49 4E 50 54 20 3F 0D
!1INPT(SP)?(CR)
Response HDMI 1
21 31 49 4E 50 54 3D 32 31 31 0D
!1INPT=211(CR)
INC VOL BY 15
21 31 56 4F 4C 4D 20 2B 31 35 0D
!1VOLM(SP)+15(CR)
DEC VOL BY 1
21 31 56 4F 4C 4D 20 2D 0D
!1VOLM(SP)-(CR)
SET VOL LEVEL 25
21 31 56 4F 4C 4D 20 32 35 0D
!1VOLM(SP)25(CR)
VOL level query
21 31 56 4F 4C 4D 20 3F 0D
!1VOLM(SP)?(CR)
Response VOL 25
21 31 56 4F 4C 4D 3D 32 35 0D
!1VOLM=25(CR)
VOL ERROR Response
21 31 56 4F 4C 4D 3D 45 52 52 32 0D
!1VOLM=ERR2(CR)
Audio Mute off
21 31 4D 55 54 45 20 30 0D
!1MUTE(SP)0(CR)
Toggle Audio Mute
21 31 4D 55 54 45 20 32 0D
!1MUTE(SP)2(CR)

18
Query Audio Mute Status
21 31 4D 55 54 45 20 3F 0D
!1MUTE(SP)?(CR)
Response Audio Mute
21 31 4D 55 54 45 3D 31 0D
!1MUTE=1(CR)
Freeze On
21 31 46 52 45 5A 20 31 OD
!1FREZ(SP)1(CR)
Query Freeze Staus
21 31 46 52 45 5A 20 3F 0D
!1FREZ(SP)?(CR)
Response Freeze on
21 31 46 52 45 5A 3D 31 0D
!1FREZ=1(CR)
Remote_Aspect
21 31 52 45 4D 4F 20 39 0D
!1REMO(SP)9(CR)
Remote_MENU
21 31 52 45 4D 4F 20 33 30 0D
!1REMO(SP)30(CR)
Remote_UP
21 31 52 45 4D 4F 20 32 35 0D
!1REMO(SP)25(CR)
Remote_DOWN
21 31 52 45 4D 4F 20 32 36 0D
!1REMO(SP)26(CR)
Remote_OK
21 31 52 45 4D 4F 20 32 39 0D
!1REMO(SP)29(CR)
Remote_LEFT
21 31 52 45 4D 4F 20 32 37 0D
!1REMO(SP)27(CR)
Remote_RIGHT
21 31 52 45 4D 4F 20 32 38 0D
!1REMO(SP)28(CR)
Remote_PREV
21 31 52 45 4D 4F 20 34 35 0D
!1REMO(SP)45(CR)
Remote_REW
21 31 52 45 4D 4F 20 34 36 0D
!1REMO(SP)46(CR)
Remote_FF
21 31 52 45 4D 4F 20 34 37 0D
!1REMO(SP)47(CR)
Remote_NEXT
21 31 52 45 4D 4F 20 34 38 0D
!1REMO(SP)48(CR
Remote_PLAY
21 31 52 45 4D 4F 20 35 30 0D
1REMO(SP)50(CR)
Remote_STOP
21 31 52 45 4D 4F 20 35 31 0D
!1REMO(SP)51(CR)
Remote_FREEZE
21 31 52 45 4D 4F 20 32 33 0D
!1REMO(SP)23(CR)
Remote_MUTE
21 31 52 45 4D 4F 20 33 34 0D
!1REMO(SP)34(CR)
Remote_EXIT
21 31 52 45 4D 4F 20 33 31 0D
!1REMO(SP)31(CR)
Response of Aspect
21 31 52 45 4D 4F 3D 39 0D
!1REMO=9(CR)
Response of MENU
21 31 52 45 4D 4F 3D 33 30 0D
!1REMO=30(CR)
Response of UP
21 31 52 45 4D 4F 3D 32 35 0D
!1REMO=25(CR)
Response of DOWN
21 31 52 45 4D 4F 3D 32 36 0D
!1REMO=26(CR)
Response of OK
21 31 52 45 4D 4F 3D 32 39 0D
!1REMO=29(CR)
Response of LEFT
21 31 52 45 4D 4F 3D 32 37 0D
!1REMO=27(CR)
Response of RIGHT
21 31 52 45 4D 4F 3D 32 38 0D
!1REMO=28(CR)
Response of PREV
21 31 52 45 4D 4F 3D 34 35 0D
!1REMO=45(CR)
Response of REW
21 31 52 45 4D 4F 3D 34 36 0D
!1REMO=46(CR)
Response of FF
21 31 52 45 4D 4F 3D 34 37 0D
!1REMO=47(CR)
Response of NEXT
21 31 52 45 4D 4F 3D 34 38 0D
!1REMO=48(CR)
Response of PLAY
21 31 52 45 4D 4F 3D 35 30 0D
!1REMO=50(CR)
Response of STOP
21 31 52 45 4D 4F 3D 35 31 0D
!1REMO=51(CR)
Response of FREEZE
21 31 52 45 4D 4F 3D 32 33 0D
!1REMO=23(CR)
Response of MUTE
21 31 52 45 4D 4F 3D 33 34 0D
!1REMO=34(CR)
Response of EXIT
21 31 52 45 4D 4F 3D 33 31 0D
!1REMO=31(CR)

19
5. CONNET THE EXTRAL DEVICES
5.1 HDMI Connection
• HDMI input is recommended because it receives a digital signal input from an external device
with HDMI output to ensure high quality of digital signal.
* Use the cable provided with the product. Otherwise, no image may be shown on the screen or
normal display may not be shown.
• If connecting the product to the PC, it supports the VESA Display Data Channel (DDC) standard.
This standard supports "plug and play" function which helps the PC recognize the product
automatically to output the optimal resolution.
In order to operate the 'plug and play' after connecting the product, connect the video cable
of the PC to the product before turning on your PC, and turn on the power of this product first
and then turn on the power of the PC.
• When the incompatible resolution of the input signal is input to the product no image is
shown on the screen or normal display is not shown. As for the supported resolutions, refer to
page 31.
If you receive a 3840 x 2160 60Hz input HDMI cable, please use the 4K,2K certified
products. The screen may look strange.
4.2 VGA Connection
• To see the video, connect D-Sub 15P cable of the PC to the VGA In port of the product.
• If connecting the product to the PC, it supports the VESA Display Data Channel (DDC) standard.
This standard supports "plug and play" function which helps the PC recognize the product
automatically to output the optimal resolution.
In order to operate the 'plug and play' after connecting the product, connect the video cable
of the PC to the product before turning on your PC, and turn on the power of this product first
and then turn on the power of the PC.
• When the incompatible resolution of the input signal is input to the product no image is
shown on the screen or normal display is not shown. As for the supported resolutions, refer
to page 31.

20

21
6. Touch Requirements
6. 1 Touch Requirements
OS Compatibility
OS
Version
Interfaces
Windows
Windows 10(not support OEM version OS.)
Windows 8(not support OEM version OS.)
Windows 7
Windows Vista, XP/2000
Windows CE.net/5.0/6.0/7.0
Windows Embedded
Windows XP Tablet PC edition
USB/RS232
Linux
The Linux public driver supports most of the Linux distribution,
including Ubuntu, Debian, SuSE(openSuSE), Fedora Core, Mandriva,
Slackware and so on. Please according to your kernel version,
download corresponding driver.
Kernel
X86 / X-window
ARM/MIPS
MultiTouch
32bits
64bits
3.x.x/4.x.x
O O O
O
2.6.36
Upward
O O O
O
2.6.24~35
O O O
X
2.6.23
Downward
O O X
X
2.4.x
O X X
X
USB/RS232
Android
Please download the driver and refer the programming guide to
install From EETI Homepage
Android 2.3 ~ later
USB/RS232
Mac
Please download the driver and refer the programming guide to
install.
Mac OS X (Power PC)
- Mac OS X 10.5.3 Leopard -> 1.17.4003 (driver)
Mac OS X (Intel CPU)
- Mac OS X 10.7.4 Earlier (32Bit) -> 1.20.1004 32Bit (driver)
- Mac OS X 10.7.4 Earlier (64Bit) -> 1.20.1004 64Bit (driver)
- Mac OS X 10.7.5 (32bit) -> 1.23.1507.75
- Mac OS X 10.7.5 (64bit) -> 1.23.0925.89 64Bit
- Mac OS X 10.8.x Mountain Lion -> 1.23.0925.89 64Bit
- Mac OS X 10.9.x Mavericks -> 1.23.0925.89 64Bit
- Mac OS X 10.10.x Yosemite -> Without driver
- Mac OS X 10.11 El Capitan -> Without driver
- Mac OS 10.12 Sierra -> Without driver
USB
QNX
QNX RTOS v6.3
USB/RS232

22
USB/RS232 Type Controller
Circuit Board Dimension
325mm x 100mm
Channels of Panel
Max. Tx:108 Rx:192 channels (include shielding pin)
Input Voltage
3.5V~5.5V.Typical 5V.
Operating Temperature
-40 to 85 ℃
Storage Temperature
-40 to 85 ℃
Relative Humidity
95% at 60 ℃, RH Non-condensing
Interface
1.1 Full Speed, RS232: No parity,8 data bits,1 stop bit, baud rate 19200bps
Resolution
4096×4096 resolution
Report rate(points/sec)
>100 Hz
Response time
Average < 25 ms

23
7 MENU CONTROL
7.1 Input selection
Press the Input button and then select ▲ or ▼, or the input you want to select,
and then press the ▶ (+) button.
Input
Description
Component
Component input
HDMI1
HDMI1 input
HDMI2
HDMI2 input
HDMI3
HDMI3 input
HDMI4
HDMI4 input
PC
VGA input
USB
USB input

24
7.2 User function
Upper
Lower
Value
Note
VIDEO
Picture mode
Standard, Dynamic, Soft, User
(Default: Standard)
Color Mode
Normal, Warm, Cool, User
(Default: Normal)
Screen size
Just Scan
Normal, wide, cinema, zoom
Noise Reduction
Medium, High, Off, Low
(Default: Medium)
Dynamic Contrast
Medium, High, Off, Low
(Default: Medium)
MEMC
Off, Low, Normal, High
(Default: Off)
AUDIO
Sound Mode
Standard, Soft, User, Dynamic
(Default: Standard)
SPDIF
Off, PCM, RAW
(Default: Off)
Surround
On, Off
(Default: Off)
Auto Volume
On, Off
(Default: Off)
CHANNEL
SETUP
Menu Language
English, Korean
(Default: English)
Transparence
0, 24, 50, 75, 100%
(Default: 0)
Clock
Hour
12AM-11PM
12AM
Minute
0-59 0 Time Format
12-hour, 24-hour
12-hour
Timer
Power On Timer
On, Off
Off
Hour
12AM-11PM
0
Minute
0-59
0
Power Off Timer
On, Off
Off
Hour
12AM-11PM
0
Minute
0-59 0 Sleep Timer
Off, 5-240Min
Off
CEC
CEC Control
On, Off
Off
Device Standby
On, Off
Off
TV Standby
On, Off
Off
Audio Receiver
On, Off
Off
Root Menu
HDMI
Setting
HDMI1
1.4, 2.0
2.0
HDMI2
1.4, 2.0
2.0
HDMI3
1.4, 2.0
2.0
HDMI4
1.4, 2.0
2.0
Power Saving Mode
On
All Reset
Yes, No
All Reset
PARENTAL
Parental
Control
Change PIN
Enter Old PIN, Enter New PIN,
Confirm PIN
Input Block
Component, HDMI, PC, USB

25
8 TROUBLE SHOOTING
The table below provides some general guidelines for trouble shooting problems you may
encounter with your product. If the suggested solutions fail to resolve the problem or if you
encounter an issue not described here, please contact your dealer or service centre.
Symptom
Checklist & Solution
The power is not turned on.
(When the LED light indication is red
or orange.)
• Turn on power switch of the product or by using
remote controller, check if the product is in power
saving mode for no input of video signal.
The power is not turned on.
(LED indication that the light is off)
• Ensure that the product is plugged in and that the AC
outlet is active.
• Set the main power switch to the on position.
• Try to connect other electric equipment to AC outlet to
check if there is no problem in power source.
The remote controller does not
work.
• Replace the batteries in the remote controller.
• If the remote controller receiver of the product is
prevented by any object, delete the object and try to
operate again.
• If the remote controller receiver of the product is
exposed to direct sunlight or strong light, try to block
the light and operate again.
• Check the control buttons (OSD buttons) work
properly.
The power is on only but the screen
does not appear.
When the LED indicator of the product is green, video
displays on the screen. Turn on the power of the
product by using the power switch or remote controller.
•Turn off the AC power, and then turn it on again.
A message of ‘Input out of range’ is
displayed.
• Check if a signal with other resolution which the
product does not support is input to the product and
refer to the details in the page 31.
Images are not displayed correctly or
noise is shown on the screen.
• Ensure the cables are connected in and video signal is
active.
• Change the cable.
• Check if a signal with other resolution which the
product does not support is input to the product and
refer to the details in the page 31.
• Connect another product to check if there is no
problem, considering the possibility of problem in outer
video signal equipment.
• Ensure the input windows resolution and ratio(16:9)
• When mirroring or duplicate displays can only be as
high as the device screen will go. Hold Windows key and
press P to Display only

26
'No Signal' message is displayed.
• Check to see if the external signal device is turned on.
• Check if computer is on power saving mode by
handling the mouse or pressing keyboard to wake.
• Check to see if the external signal devices and cables
are connected.
• Check to see if the cable connections are loose or
missing.
• Try changing the cable.
• Check if the input selection of products is correctly set
to an external device by using the SOURCE button on the
remote controller.
HDMI screen is not displayed.
Or screen appears strange.
• Check to see if the cable connections are loose or
missing out.
• Try changing the cable.
• If you use an HDMI cable not certified, it may result in
a problem.
HDMI display is small or large visible.
• Try adjusting video output size of the graphic card in
case of computer.
The colour of VGA screen is strange.
• Check to see if the cable connections are loose or
missing out.
• Try changing the cable.
• Connect another product to check if there is no
problem, considering the possibility of problem in outer
video signal equipment.
The position of VGA screen is
strange.
• Try adjusting the automatic position by using the
menu on the remote controller.
The screen is too bright and the
image is not separated.
• From the menu, try making the value of the black level
lower on the screen menu setting.
• Or try to initialize the screen menu settings.
The dark area of the screen is too
bright
• From the menu, try making the value of the contrast
lower on the screen menu settings.
• Or try to initialize the PICTURE settings.
Screen looks too dark.
• Try to initialize the PICTURE settings.
Touch doesn’t work
• See Connecting the Touch Screen Controller Host
Computer to the Display
Touch Alignment
• Ensure the output resolution of the attached device is
set to a 16:9
• Using T3k software(touch setting program) check the
alignment of the cameras
No Sound on VGA
• Install into the “Sound” socket or check the Audio
setting in the computer
No Sound on internal speaker
• Increase the volume level on both the CommBox
interactive display, Media Player and Device e.g. laptop
or PC
No Sound on External Speakers
• Ensure the external speakers are connected to the
correct jacks.

27
• Check for any shorts on the wires connecting to the
speakers.
•Power down the touchscreen, remove any external
speaker connection, wait for 30 seconds, reapply power
and test internal speakers only.
UD@60Hz is not displayed.
• Connect directly from HDMI 2.0 of PC to HDMI port of
the screen. Screen has to be set HDMI 2.0 in OSD setting
menu.
• Use the bellow’s gender of DP and HDMI port if your
computer has only DP port for UD@60Hz.
What kind of computer or
specification do I need for
4K@60Hz?
• Video output must be 4K@60Hz
• Memory and graphic card: 8GB above and
NVIDIA® GeForce® GTX 745 (included 4GB DDR3)
• HDD : 1TB(64MB cash)7200RPM SATA 6Gb/S
Same or above specification
(※ e.g. Gamming desktop is normally suitable for this
specifications: Dell Alienware X51 series)

28
9 PRODUCT SPECIFICATION
Product specifications are subject to change without notice.
Model
PULSE65 (Silver Nano wired)
Size (WxHxD)
1512 x 887 x 75mm
Weight
62Kg
Display
Display size (WxHxD)
1430.4 x 805.6mm (64.5inch)
Resolution
3840 x 2160
Brightness
500cd/m2
Response time
8ms
Viewing angle
Horizontal/vertical 178'/178'
Touch
20point as standard
PCAP technology
PCAP (Silver Nano wire)
Surface Treatment
Soda lime (thermal Strengthened) Black, AG
transparency : More than 86%±2.0% (Typical)
Cover glass thickness
4mm
Glass hardness
7H
Anti-glare coating
Yes
Supported OS
Windows7/8/8.1 above, Mac OSX 10.5above (Multi touch support from
10.10), Linux Ubuntu12.04,13.04, Android 3.0 above
Interface
USB 1.1/2.0FS
Life time
50,000h
Connectivity
Video Input
HDMIx4,VGAx1, YPBPR1x1, USB for media
Audio Input
3.5 Stereo, AV in x 1
Audio Output
AV outx1, SPDIFx1, SPK out (2x3.5mm mono)
USB for touch
USB
Control
RS-232
Built-in speaker
15Wx2
Plug & Play
VESA
Solutio
n
Annotation Software
- Multi natural ink for collaboration (2 people-standard, 10 people-optional)
- Real time multi writing with 10 people ink and independent ink menu
bar(optional)
Built-in PC (
optional
)
Storage/RAM
SSD 128GB with 8GB RAM
Processor
6th generation intel Skylake core i5
Graphics
Intel HD Graphics 530
Ports
DP -out , HDMI-out , Mic/Audio jack , DC jack , RJ45 LAN ,
USB3.1 Type C , 2 x USB3.1 , 3 x USB2.0
OS
Windows10
Wi-Fi/Bluetooth
Intel Wireless -AC 3160 802.11AC / BT 4.0
Power
Power requirements
100 to 240V AC, 50/60Hz
Power consumption Typ.
108W
Operating
Environment
Temperature
Operating
5 to 60'C
Temperature Storage
- 20to 60'C
Humidity Operating
8 to 85%
Humidity Storage
8 to 90%
Ac
ce
ss
ori
es
Cable
HDMI &USB extension cables, Power cable, Remote controller,

29
Quick guide, Passive pen
Options
Active pens
Wall mount bracket, Motorized moveable stand
※ Product design and specification can be changed for quality improvement without prior notice.

30
10 SUPPORTED RESOLUTIONS
Video
Input
CVBS
Video system
PAL/NTSC
Video Level
1.0Vp-p±5%
Component
480i, 480p, 576i, 576p, 720p, 1080i, 1080p
HDMI
480i, 480p, 576i, 576p, 720p, 1080i, 1080p, 4K 30Hz, 4K 60Hz
Audio
Input
CVBS &
component
Audio
L/R RCA input
0.2 ~ 2.0 V RMS

31
11 REQURIED INFORMATION
11.1 Prevent image sticking
If a static image (title, menu image, picture, motionless movie etc.) is maintained for a long time,
screen burn may occur. Screen burn may be subject to operating time of still picture. Since the screen
burn is not a defect, but a characteristic of the product, it is excluded from the product warranty.
Thus, please refer to the following information for the prevention of screen burn.
• When external device (PC) is not used for a long time, please use screensavers.
(The screensaver should be monochrome or moving image.)
• If 4:3 aspect ratio is used for a long time, image sticking might occur.
So, it is recommended to use the full screen (16:9 resolution).
• In case of displaying still picture for long time, change pictures periodically.
If screen burn is shown, turn off the unit for a while and turn it on again.
Turn off time may be requiring.
 Loading...