

Page 1

USER MANUAL
T45-K
www.commax.com
Thank you for purchasing COMMAX products.
Please carefully read this User’s Guide (in particular, precautions for safety) before using a product and
follow instructions to use a product exactly.
The company is not responsible for any safety accidents caused by abnormal operation of the product.
Page 2

CONTENTS
Cautions
Product description
Includid items
Parts and their functions
Dimensions
Fingerprint registration
Verification mode
Functions key
Displays
Menu navigation buttons
Access to the system menu
Enroll
CONTENTS
Delete
Amend
Set temp ID
User
Getting Started
Start
Operationg menu
COMMAX Access Control Solutions
Page 3

Basic Time, Data, Language, Volume, Background Image
CONTENTS
Verification Mode, ID Mask, Use Tamer Alarm
Use Touch Sensor, Calibrate Sensor, Lumidigm Spoof, Restore Factory
Advanced
Setting
AC Setting▶ Define Timezone, User Timezone, Lock Type(NC,NO), Lock Door,Release Time,
Door Open Warning, Instrsion Detection Sensor Mode, Reaccess Count,
Reaccess Limit Time, Wiegand Format, Anti-Passback, Setting Reader Of Outer Fingerprint
Communication▶Device ID, Baud Rate, TCP/IP Settings, Setting Wireless LAN,
Managing Computer IP Address, Communication Password
Schedule▶ Set Tmode, Ring Settings, Auto Door, Auto Funckey, None-Relay Funckey,
Day Light, Holiday, Funckey Alram, CD2 Auto Funckey, Idle Settings
Log Setting▶ Management Log Warning, General Log Warning
3.USB MEMORY
Dounload General Log/ Download All General Log/ Download Management Log/
Download All Management Log/ Download User Info/ Upload User Info/ Upgrade Firmware
4.SYSTEM INFO
Memory▶ User, Fingerprint, ID Card, General Log, Management Log, Number of photo
Device Info▶ Release Date, Serial Number, Manufacturer, Product Name,
Product Type, Engine Version, Firmware Version
Advanced▶ View General Log, View Management Log, View User Info
5.TEST
Test All/ Test Memory/ Test LCD/ Test Sound(AUTO)/ Test Sound(MANUAL)/ Test Sensor/ Test RTC/
Test cast status/ Test Card Reader
COMMAX Access Control Solutions
Page 4

Keep out of direct sunlight
and heat radiation sources
Before using this device, read and follow all instructions for safety.
Shall not be exposed to dripping
or splashing and no objects filled
with liquids such as vases,
shall be placed on the products.
When cleaning, do not use liquid solvent or
wet cloth. Wipe with soft cloth.
Never disassemble or modify this device in any way.
(KJTECH Co., Ltd is not liable for porblems caused
by unauthorized modification or attempted repair )
Do not install this device
near by TV,monitor or magnetic
interference
If the product fails to operate
normally, contact the authorized
dealer or service senter
Cautions
COMMAX Access Control Solutions
Page 5

Product Specification
Confirm the specifications.
ARM926E_21bit
NAND Flash 8G + 256RAM
4.3TFT COLOR LCD
5K, 10K, 30K, 50K
Loading function
RS-485, TCP-IP
Loading function
Loading function
Loading function (inner skin way)
Micro SD, USB 2 Slot
500K, 100K
2 EA
VOIP function
125Khz (EM/HID/Prox)
13.56Mhz (Mi fare/I-calss SE/ Felice)
26/34/37/40 bit
4.3inches full touch
143x143x42(mm)
CPU
Memory
display
Fingerprint Capacity
Camera
Communication method
Wi-Fi
Fingerprint forgery prevention
USB
Event Data
Relay
Door phone function
OE(Power of Ethernet)
RF Card
Wie gand input / Output
KEY PAD
Product Size
COMMAX Access Control Solutions
Page 6

Includid Items
Bracket
9PIN 6PIN 5PIN 4PIN
(Power, 485 CON)
Cable Screw / Program CD
For Bracket 4ea T3x20mm
For T45-K 2ea M3x6mm
T45-K
T45-K
Wiring harness by the
'wiring manual' to see it.
This system comes with the following comeponents.
COMMAX Access Control Solutions
Page 7

LED
Product statu.
CAMER
Face capture
Mike
Door phone function.
Fingerprint Sensor
User registration,
authentication,
On the fingerprint input
Be used.
Card Sensor
Is used for user
authentication.
Color TFT LCD
Displays time,
device status,
user list and UI
for operation
USB & Micro SD
USB & micro SD memory devices
For connecting slot.
Connector
Cable for connection to
Connector.
Parts and Their Functions
Function Key
It would be used
event selection key
such as time attendance
or enter/exit administration.
COMMAX Access Control Solutions
Page 8

Dimensions
Front View Bracket
Bracket
Side View
T45-K
COMMAX Access Control Solutions
Page 9

Fingerprint Registration
You have to register fingerprint in proper way to
enhance recognition rate. Recommended to use
finger which has no damage. Recommended to
register more than two fingerprint in case.
Place the finger on the sensor as seen in below in the proper way. Place the entire area of your finger firmly to the sensor.
Notes on the fingerprint input
Proper way
Improper Way
COMMAX Access Control Solutions
Page 10

Card Authentication Method ID Authentication Method Fingerprint Authentication Method
Verification mode can be setup in verification mode (Settings>Basic>Verification Mode)
Vertfication Mode
CD
CD&FD
ID&CD
ID&CD&FD
ID
ID&FD
OPEN
CLOSE
FP
KJ-3500 supports various type of access mode : Combination of Fingerprint, Card and ID(PIN)
Setting of operating mode
in accordance with security
level refer to environment
setting > advanced setting >
operating mode
COMMAX Access Control Solutions
Page 11

Functions Key
Function Key is usually used for Time & Attendance.
The admin is able to setup a certain definition to a function key in the program (F1 = Sing in) The admin is able to find out
the users attendance records.
1. Press Function Key (F1~F4) only or press numbers after Function Key .
2. Present the card to enter.
CARD Authentication Scheme F1~F4 + 0~9
FD Authentication Scheme F1~F4 + Fingerprint
1. Press Function Key (F1~F4) only or Press numbers after Function Key .
2. Place Finger Print to enter.
ID Authentication Scheme F1~F4 + 0~9
1. Press Function Key (F1~F4) only or Press numbers after Function Key .
2. Input ID used to enter.
COMMAX Access Control Solutions
Page 12

Displays
These displays are primary screens.
COMMAX Access Control Solutions
Page 13

Menu Navigation Buttons
Forward
Backward
Previous Menu
End Menu
Act(Select Menu)
COMMAX Access Control Solutions
Page 14

Access To The System Menu 1
Default condition and admin is not registered.
*>1 2 3 4 > # Menu
1. Press * on the touch pad
2. Press # after putting 1, 2, 3, 4
3. Success entering system menu
4. Move to your desired menu to use F1 or F2
COMMAX Access Control Solutions
Page 15

Access To The System Menu 2
Only when admin is registered. Refer to “Admin Registration part” for admin registration.
When admin ID is incorrect, access to the system menu is denied. When admin ID is not registered anyone can be access to system menu.
So it is highly recommended to register admin More than one. Unless stated otherwise instructions in this manual stars from system menu.
COMMAX Access Control Solutions
* > Administrator ID > # > Fingerprint(Card) Certificate > Menu
1. Press * on the touch pad
2. Press * with registered administrator ID
3. Certificate registered fingerprint or card of administrator
4. Success to access system menu
5. Move to menu that wants F1 or F2
It could be back to the
main menu to press
* if put wrong No.(ID)
Page 16

www.commax.com
USER
COMMAX Access Control Solutions
Page 17

1.Press * on the main
2.Press # with registered No. and ID as an administrator
3.Select users to press #
4.Select registration to press #
5.Use F1 or F2 to move, put ID and press #
to designate authority It can register fingerprints,
cards and pictures to put a button
In the case registered manager, initial P/W vanish,
so preparing the absence or leaving of manager, we recommend registering one more manager.
In the middle of registration process, first fingerprint or second fingerprint or card, one or two doing, other process will be omit.
User>Registration
COMMAX Access Control Solutions
Page 18

6.Enter fingerprint when a sensor light comes.
* It totally register fingerprint for 3 times and
it would move to previous menu to press * if finishes
fingerprint registration.
7.A card that would use for enter/exit should be read
if puts on a screen.
Press # to register a card
8.Register to press # after shooting button for photo.
9.Go back to a main menu to press F4 if
all procedures are clear.
User>Registration
COMMAX Access Control Solutions
Page 19

Enter to System Menu
1.Select user to press #
2.Select Delete to press #
3.Put administrator's or user's ID for delete
4.It would be finished to press # after selecting
fingerprint or card that wants to delete
User>Delete
Same as registration process, it is able to delete 1st fingerprint, 2nd fingerprint and card in each,
If wish to delete all 3data, select ‘Delete All’ and corresponding ID is deleted
COMMAX Access Control Solutions
Page 20

User>Amend
Function of amending user, it is possible to change manger to user or user to manager,
also amend registered fingerprint and card data.
1. After entry system menu > user > enroll
2. After input ID of needing of amend #,
and push OK.
3. After select fingerprint or card then amend
4. Return to initial screen
COMMAX Access Control Solutions
Page 21

1.Select User to press #
2.Select temporary ID setting to press #
3.Set ID to press # after temporary ID enters
※ It could put until 8 digits(max)
Enter to System Menu
User>Set Temp ID
Temp ID cannot be an Admin and not use fingerprint Admin can determine access times of Temp ID
(min.1~max.9) Access times are expired, Admin can revert it.
emp ID leaves log data Pre-registered ID is not used as a temp ID.
COMMAX Access Control Solutions
Page 22

SETTING
www.commax.com
COMMAX Access Control Solutions
Page 23

Setting>Basic
1.Time
Set-up the time of the device. Device’s time is applied
to the time of the event. so it is important the accurate time
2.Date
Setup the date of the device
3.Language (Korean/English/Chinese)
Choose the language
4.Volume
It can be adjust volume 0 ~ 10 from device.
5.Background image
It can be set background image
COMMAX Access Control Solutions
Page 24

Setting>Advanced 1
1.Camera setting
Photo setting ▶ No display : no shoot when confirmation
Now photo : shooting whenever authentication
Registered photo : indication photo when enroll
Photo event save ▶ Do not save
Saving when failure of authentication.
Saving when success of authentication
Save all
VOIP image quality ▶ Setting 160 * 120/ 320 * 240
COMMAX Access Control Solutions
Page 25

Setting>Advanced 2
2.Verification Mode
Depends on the security level, it is able to adjust the verification mode.
①
ANY MODE : Access granted with any form of authorization
② FINGER : Fingerprint Only- No access with ID or Card
③
CD OR FP : Card & fingerprint - ID do not have effect,
and can enter card and fingerprint
④
ID&FP OR CD : Authentication to ID & fingerprint,
can enter by card of authentication.
⑤
ID&FP OR ID&CD : Authentication by ID and fingerprint and
can enter authentication by ID & CARD.
⑥
ID&FP OR CD&FP : Authentication by ID and fingerprint and
can enter authentication by card and fingerprint.
⑦
OPEN : Always Open(Fail Safe Mode)
⑧
CLOSE : Always Closed (Fail-Secure Mode)
-No access with any form of authorization
⑨
CD : Card Only- No access with ID or Fingerprint
⑩
ID OR FP : ID or Fingerprint only- No access with Card
⑪
ID OR CD : ID or Card Only- No access with Fingerprint
⑫
ID&CD : Both Card and Fingerprint required for Access-
-must punch in ID before Card authentication
⑬
CD&FP: Both card and fingerprint required for Access
- Card must be authorized before fingerprint authentication
⑭
ID&FP : Both ID and Fingerprint required for Access
- must punch in ID before fingerprint authentication
⑮
ID&CD&FP : All three formas needed for access
COMMAX Access Control Solutions
Page 26

Setting>Advanced 3
Please select carefully when doing of setting initial or delete and enroll of event.
It take 1 ~ 5 min. of user is more it take much time.
3.ID mask
When the user input ID, it hides user ID as xxxxxx and enhance the security.
4.Use Tamer Alarm
When it detects tamper, it activate alarm.
5.Calibrate Sensor
Optical sensor perceive surroundings and optimize the brightness.
When use this function, it has to block extraneous light
6.Lumidigm spoof (include only inner skin authentication way)
This function realization of inner skin, through setting value,
fix detectability factor of fake fingerprint.
7.Restore Factory Settings
Reset all settings to the default
8.Clear General Log
Delete all general log data
9.Claer Management Log
Delete all management log data
10.Clear Enroll Data
Delete entire user data including fingerprint,
card data and it is unrecoverable
COMMAX Access Control Solutions
Page 27
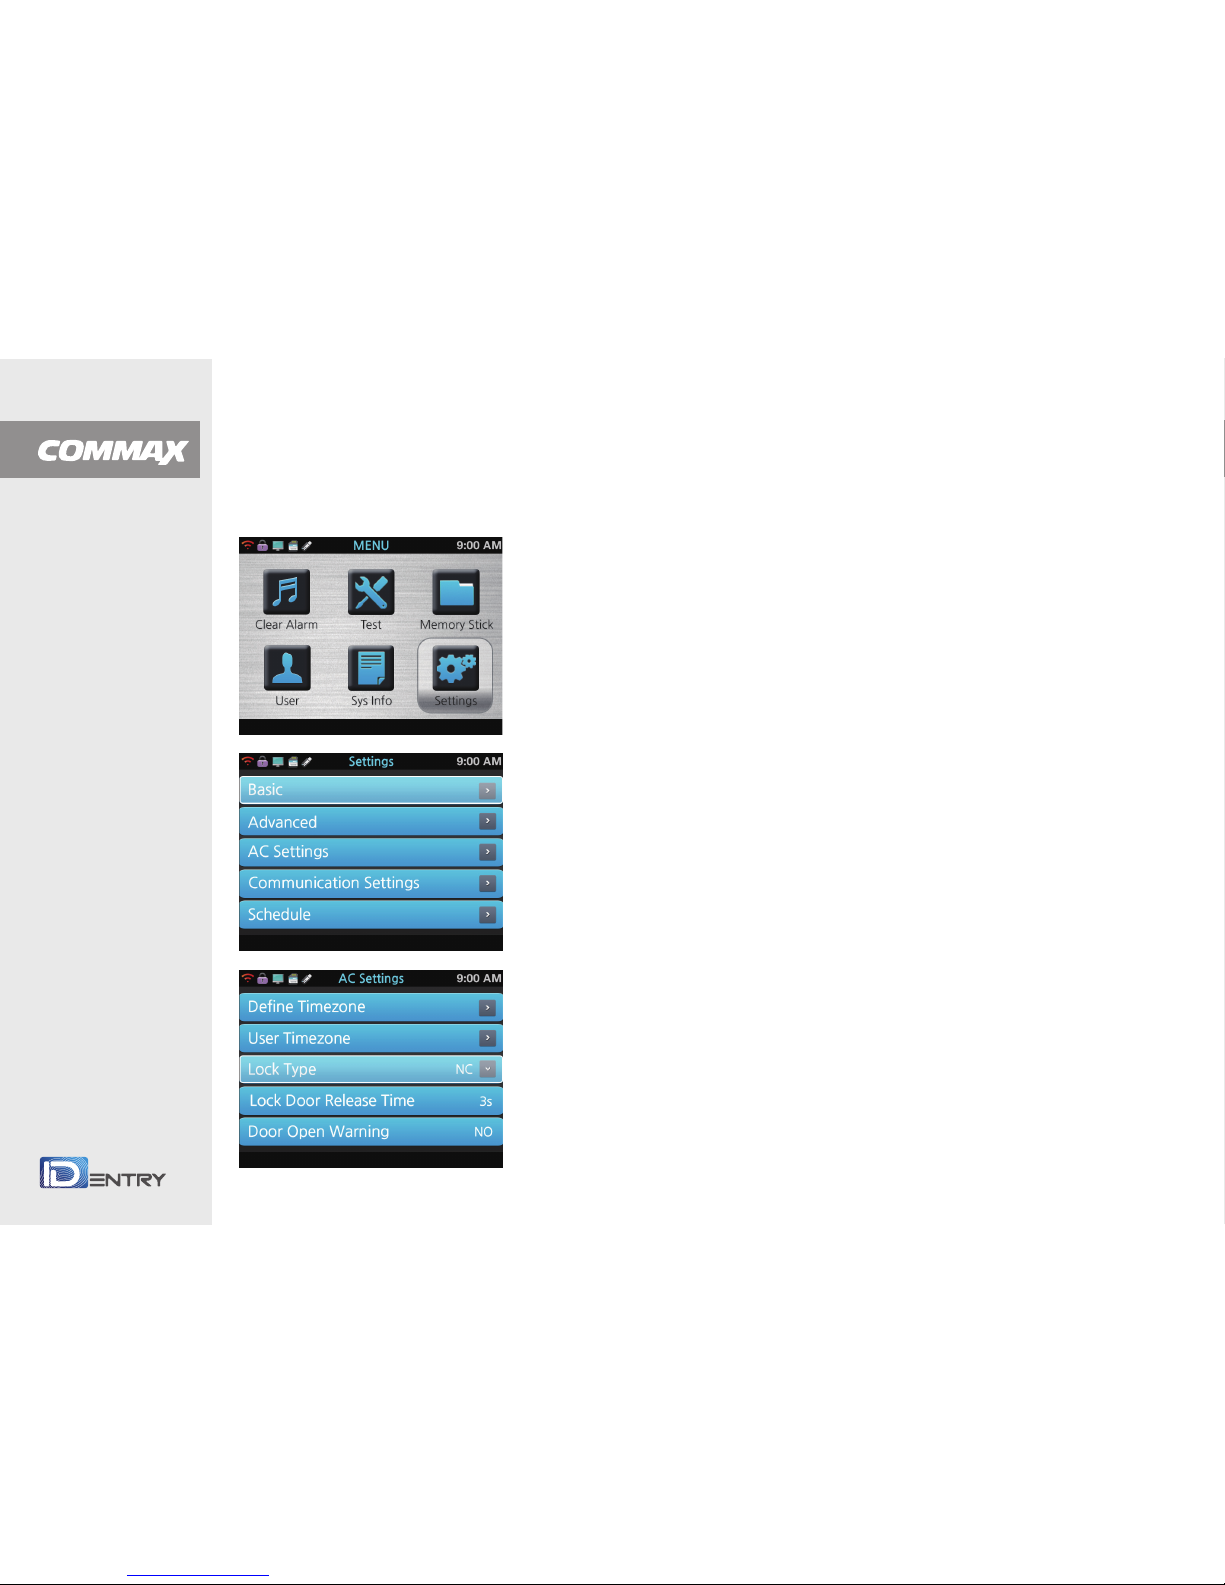
Setting>AC Settings 1
1.Define Timezone
Able to set-up 256 timezones. refer to software (Guardian)
manual 7.3 time zone set-up
2.User Timezone
Able to allocate 2 time zone for each user.
0 for [ All Time ] and 257 for [ None Time ]
3.Lock Type(NC, NO)
NC or NO set up door lock type
4.Lock Door Release Time
Default 3sec. available to adjust between 1 ~ 99sec
5.Door Open Warning
Once door open, if the door remains open over setting condition,
it activates alarm
6.Intrusion detection sensor mode. (intrusion detection, fire detection)
Select the intrusion detectionor fire detection if setting of fire detection and
working fire detection sensor, the door which connect device open forcely.
7.Reaccess Count
No, 0~ 9 Limit reaccess count between no, 0 ~ 9times
8.Reaccess Limit Time
Limit reaccess time between no. 0 ~ 600minutes
COMMAX Access Control Solutions
Page 28

9.Wiegand Format : 26,34,35,37,64Wiegand format (26,34,35,37,64)
Designate wiegand output format 26,34,35,37, or 64.
Read all wiegand data regardless of wiegand settings
10.Anti-Passback : No / Yes
Anti-passback activates through external wiegand input.
If there is two controllers for enter and exit, re-enter is allowed only
it has exit event data
(EX : Public Parking lot, Restricted Area, Membership center )
11.
Setting Reader Of Outer Fingerprint
Setting using or not using of outer fingerprint reader.
If the function will be vitalized, the fingerprint also can use reader function,
it can be up the level of security.
Setting>AC Settings 2
COMMAX Access Control Solutions
Page 29
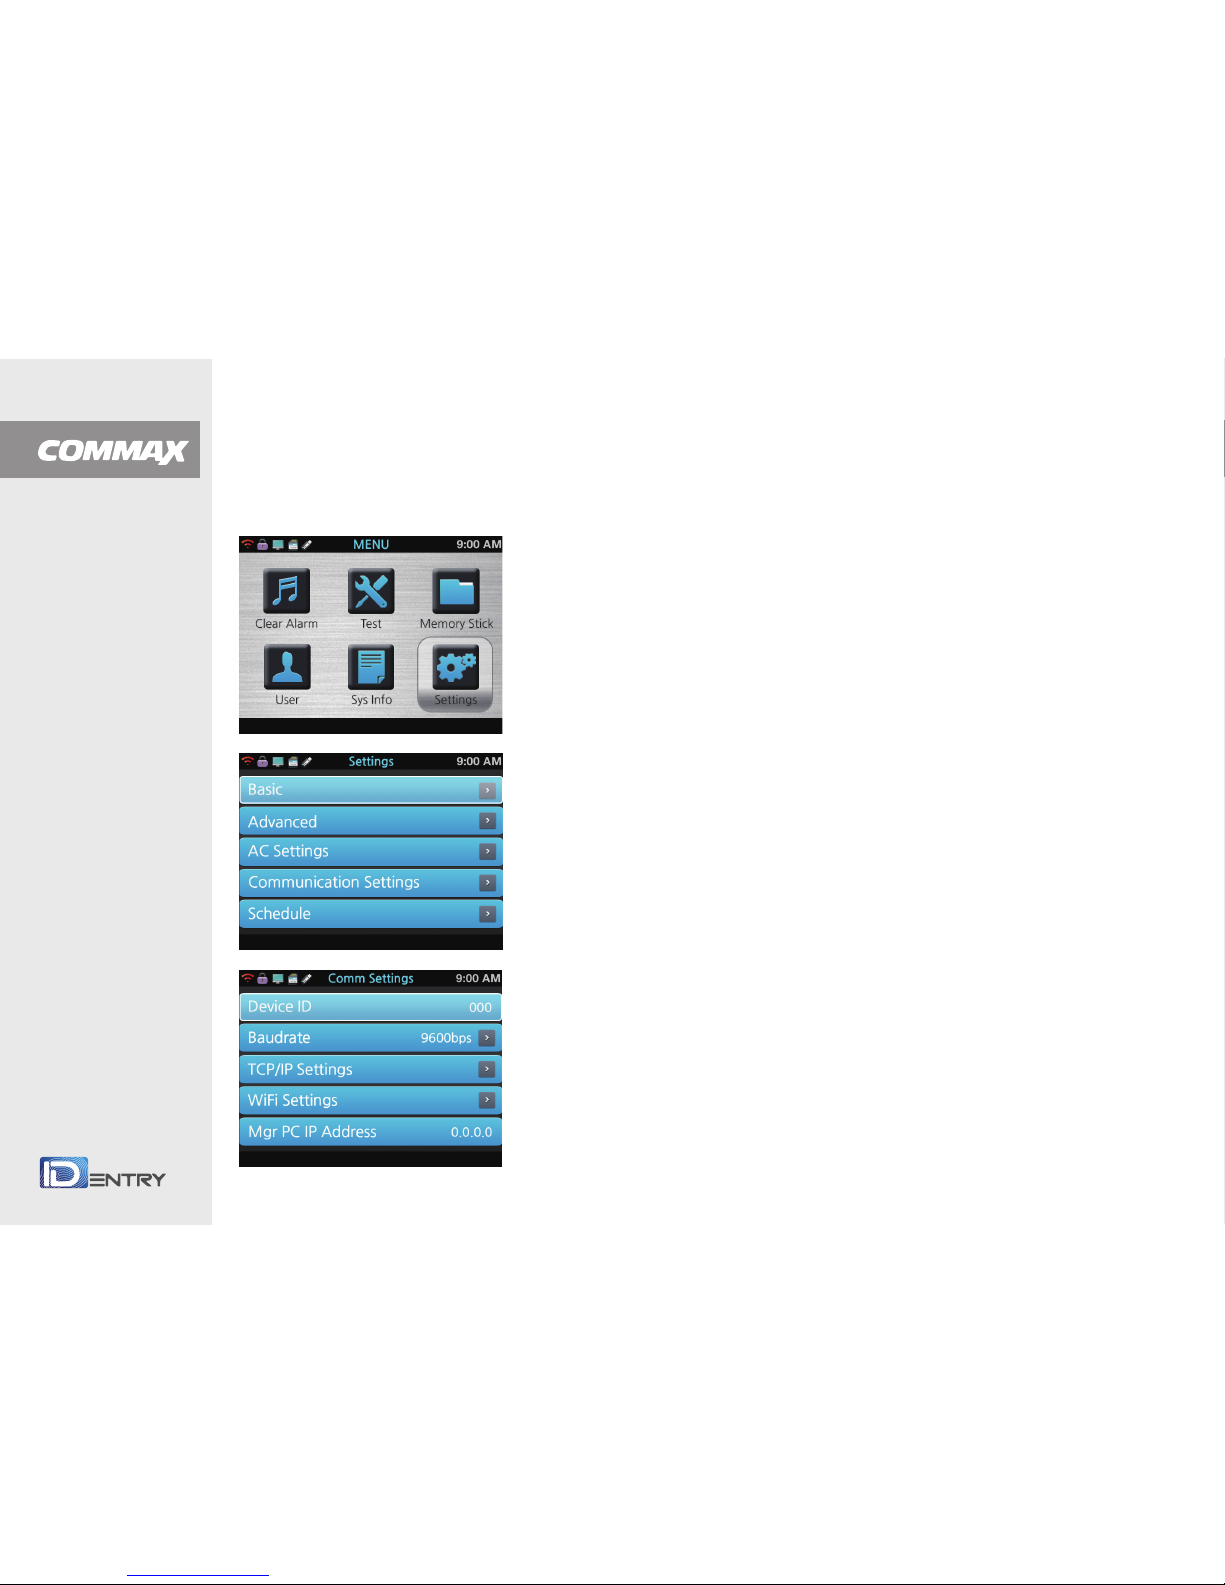
1.Device ID (1 ~ 999)
Setting ID of device
It can be setting range 1 ~ 999, when making network through
connecting computer and controller.
Each controller have to own their own address.
This is function of changing or giving address of inherent.
[Each product of connecting to network,
have to set each different value of address]
2.Baud rate : 115200 bps
RS-485 Communication speed
Setting>Communications Settings 1
3.TCP/IP Settings
3-1.DHCP (No/Yes): Choose DHCP on or off
3-2.IP Address (192.168.1.224): Setup IP Address
3-3.Subnet Mask(255.255.255.0): Setup subnet mask.
3-4.Defauit Gateway (192.168.1.1): Setup default gateway
3-5.Port(5005): Setup default gateway
3-6.MAC Address: Displays MAC Address of the device.
To connect device with software (Guardian) by TCP/IP ( LAN),
it must set-up IP Address,
Subnet Mask, Gateway, (All the above data is for reference only and
an confirm the details in network environment of the PC to connect)
COMMAX Access Control Solutions
Page 30
Setting>Communications Settings 2
4.Setting wireless LAN
Setting the device of wireless network
It is possible use wireless LAN in OTP 20 , and it only can use wire
LAN in the inner skin authentication
5.Managing computer IP address
If setting wireless network of item 4,
it have to set IP address in the computer.
6.Communication Password
If the communication password is not correct,
it is impossible to communicate with the software
COMMAX Access Control Solutions
Page 31

Setting>Schedule 1
This page setting function, this function is used by guardian program. It is possible to set the device itself.
1.Set Tmode
Setup the door mode and it is converted automatically according
to the time and schedule.
Refer to software (Guardian) manual 7-4 controller
Special function/ Door mode how to setup the door mode
2.Ring Settings
Setup the bell ring schedule.
Refer to Software (Guardian) manual 7-4 controller special function /
Bell Time how to setup the bell rings
3.Auto Door
Setup the operation time of the automatic door
refer to software (Guardian) manual 7-4 controller
Special function Auto Door how to setup the auto door.
※ Please refer setting way of controller/ special function / setting off day
4.Auto Funckey
At the designated date and time, the corresponding key is set-up as default.
Refer to Software (Guardian) manual 7-4 controller
Special function auto F-Key how to setup the auto F-Key.
5.None-Relay Funckey
Setup none-relay Funckey and buzzer alarm key.
Refer to Software (Guardian) manual
7-4 controller Special function No act F-Key how to setup the No Act F-key.
COMMAX Access Control Solutions
Page 32

Setting>Schedule 2
6.Day Light
Setup the daylight.
Refer to Software (Guardian) manual 7-4 controller
Special function Daylight how to setup Daylight.
7.Holiday
Holiday settings must comply with the day of the week
Refer to Software (Guardian) manual 7-4 controller Holiday setup
8.Funckey Alarm
Once input the alarm key and succeed to identify,
it activates buzzer alarm or relay alarm.
9.CD2 Auto Funckey
Input card data to the external reader by Wiegand, and succeed to identify,
it is used to save the event. If a controller is connected to a reader,
this function gives a function key to the external reader automatically,
thus a an automatically setup
function key is given to a user who is authorized from an external reader.
Events of user entries from the reader are stored. (Ex. For time & attendance)
10.Idle Settings
LCD power cut off : 0 ~ 60minutes
IDLE mode : 0 ~ 60minutes
COMMAX Access Control Solutions
Page 33

Setting>Log Settings
1.Management Log Warning (NO, 0~100)
If the management logo exceeds the setting value, it alarms
2.General Log Warning (NO, 0~200)
If the management logo exceeds the setting value, it alarms
COMMAX Access Control Solutions
Page 34

www.commax.com
USB MEMORY
COMMAX Access Control Solutions
Page 35

USB Memory
Insert USB memory into the slot at the bottom of the device and up/download the events data and update the firmware
1.Download General log
Download new general events
2.Download All General log
Download all general events
3.Download Management log
Download new management events
4.Download All Management log
Download all management events
5.Download User Info
Download user data
6.Upload User info
Upload user data
7.Upgrade Firmware
Update Firmware
COMMAX Access Control Solutions
Page 36

www.commax.com
SYSTEM INFO
COMMAX Access Control Solutions
Page 37

1.User
User numbers which is enrolled in the device
2.Fingerprint
Tempalte numvers which is enrolled in the device
3.ID Card
ID Card numbers which is enrolled in the device
4.General Log
General log(access event) numbers
5.Management Log
Management log (system event) nembers
6.Number of photo
Saving the photo when access event
System IInfo>Memory
COMMAX Access Control Solutions
Page 38

System Info>Device Info
Device info is set from the manufacturer and the user cannot edit this info
1.Release Date
Dispalys the device relase date
2.Serial Number
Displays the device serial number
3.Manufacturer
Displays the device manufacturer.
4.Product Name
Displays the device name.
5.Product Type
Dispalys the device Type.
6.Engine Version
Displays the engine version
7.Firmware Version
Displays the firmware version
COMMAX Access Control Solutions
Page 39

System Info>Advanced
1.View General Log
Search and view the general access event
2.View Management Log
Search and view the system management event
3.View User info
Search and view the numbers of the fingerprint and card
COMMAX Access Control Solutions
Page 40

www.commax.com
TEST
COMMAX Access Control Solutions
Page 41

Test
1.Test All
Test overall status and functions of the device
2.Test Menory
Test memory and takes 1~2 minutes, After test,
it reboots and displays the result
3.Test LCD
Test LCD
4.Test Sound (Auto)
Test Voice announcement automatically,
if there is no voice chip, it finishes quickly
5.Test Sound (Manual)
Test Voice announcement manually
6.Test Sensor
Test Finger sensor
7.Test RTC
Test RCT.
8.Test Case Status
Test the status of the case.
9.Test Card Reader
Test the card reading.
10.Test Camera
Test the camera
COMMAX Access Control Solutions
Page 42
 Loading...