

Page 1

USER MANUAL
T20 Series
www.commax.com
Thank you for purchasing COMMAX products.
Please carefully read this User’s Guide (in particular, precautions for safety) before using a product and
follow instructions to use a product exactly.
The company is not responsible for any safety accidents caused by abnormal operation of the product.
Page 2

CONTENTS
COMMAX Access Control Solutions
1.Before Starting
Cautions
Product Specification
Components
Parts and Functions
Dimensions
Fingerprint Registration
Verification Mode
Displays
Ethernet Connection with Hub
Ethernet Connection with PC
2.Instruction of Card Type
Instruction of Card Type
3.Instruction of Fingerprint Type
Instruction of Fingerprint Type
4.User
User-Registration
User-Delete
User-Temporary ID
5.Setting
Setting - Basic
Setting - Advanced
Setting - Access
Setting - Communication
Setting - Event
6.USB Memory
USB Memory
7.Information
Memory Information
Device Information
8.Installation Guide
Part Name
Cable Connection - Power
Cable Connection - TCP/IP
Cable Connection - Wiegand Out
Cable Connection - RF Card Reader
Cable Connection - Sensor
Cable Connection - Relay
RS485 / RS422(T-20)
28
4
3
5
6
10
11
12
13
14
15~18
19
20~22
23
24~25
26
27
29
30~32
33~35
36~37
38
39
40
41
42
43
44
45
46
47
48
49
50
51
52
7
8
9
Page 3

Before Starting
www.commax.com
COMMAX Access Control Solutions
Page 4

COMMAX Access Control Solutions
Product Specification
Confirm the specifications.
External Connector : 1.25mm pitch
T20 Series
T20-F T20-D T20-C
Page 5

COMMAX Access Control Solutions
Cautions
Avoid direct sunlight or heat radiations
Do not use liquid solvent or wet cloth
when cleaning. Use soft cloth.
Do not put around strong magnetic
things such as TV, monitor and magnet
Call service centre if you have
any problems.
Be careful not to drip liquid such as
water or beverage into the item.
Do not renovate, repair or separate as
you want randomly. A/S will not be taken.
Page 6

COMMAX Access Control Solutions
Components
Bracket
Cable Screw / Programme CD
TCP/IP Extension Cable
T-20
Page 7

COMMAX Access Control Solutions
Parts and Functions
Color TFT LCD
Display time,
device
status, user list
and UI
LED
Light on system status
LED
Light on system status
Fingerprint Sensor
Register and
identify
user’s fingerprint
Speaker
Output sound effect
& voice message
Connector
Connect to cable
USB
Slot to connect
USB memory
Page 8

COMMAX Access Control Solutions
Dimensions
48(mm)
38(mm) 34.4(mm)
9.2(mm)
138(mm)
124.4(mm)
Page 9

COMMAX Access Control Solutions
Fingerprint Registration
Proper way
Improper way
Note - Register fingerprint
Register fingerprint properly.
Recommend to register other finger part
when a finger is wounded.
Recommend to register more than
two fingers to ready for various situations.
Page 10

COMMAX Access Control Solutions
Verification Mode
Verify set points on the menu - Settings / Advanced / Operated Mode
Card
Fingerprint
CARD
Page 11

COMMAX Access Control Solutions
Displays
There is a display component of basic menu.
Page 12

COMMAX Access Control Solutions
Ethernet Connection with Hub
Ethernet Hub
Page 13

COMMAX Access Control Solutions
Ethernet Connection with PC
KJ 3400 that is supported to automatic MDI / MDIX can connect to PC through straight type
but not cross type.
Page 14

Instruction of Card Type
www.commax.com
COMMAX Access Control Solutions
Page 15

COMMAX Access Control Solutions
Instruction of Card Type
1.File Excusion
1) Run Shortcut Tool. exe of KJ 3400
2) Connect TCP-IP to 3400 terminal port and PC
Page 16

COMMAX Access Control Solutions
Instruction of Card Type
2. Programme Explanation
1)Search device
2)It can set communication parameter of installed product
3)It can register and delete master card
3. Device Search of Programme Explanation(A)
1) It can check equipment state
(no. unique ID , ID , IP Address , Subnet Mask, Default, Port, Language)
when click search device.
Page 17

COMMAX Access Control Solutions
Instruction of Card Type
4. Change IP Address and Port(B)
5.Register and Delete Master Card(C)
1) It can modify selected Denice, ID ,Ip Address, Subnet mask,
Default Gateway, Port Number and Language
Page 18

COMMAX Access Control Solutions
Instruction of Card Type
a) Read All: Bring all information of registered master card at the device
b) Delete All: Delete all information of registered master card at the device
c) Delete: Delete only only one card at the device
d) Register: Register only one card at the device
e) Get from device:
f) Card type: Select register or delete card
1) Register / Delete Master Card
- It can flash LED of data click device when clicks GET FROM DEVICE(See E)
- It automatically can be put card No. by voice message "verify card" next to GET FROM DEVICE.
- It can register one(See D) to select register or delete card at the card type(See F)
Page 19

Instruction of
Fingerprint Type
www.commax.com
COMMAX Access Control Solutions
Page 20

COMMAX Access Control Solutions
Instruction of Fingerprint Type
[ Fingerprint Type ]
Fingerprint prism implements menu button
Press fingerprint sensor for 3 seconds and access to system
menu If admin user registered, only confirmed admin user has
right to access to the system
Note :
Dafult has no admin user and open to access system menu
for anyone Multiple admin user can be reigistered
ESC
OK
Page 21

COMMAX Access Control Solutions
Instruction of Fingerprint Type
Default : No admin user registered
1. Press fingerprint sensor for 3 seconds and access to system menu
2. Move between menus using navigator button
ESC
OK
Page 22

COMMAX Access Control Solutions
Instruction of Fingerprint Type
4. ID (passwords), and how to set up a user or administrator
Use the arrows on the arrow on the sensor then
press the OK button ID (password) can be up and down.
Then click OK to set the ID can be set.
Page 23

User
www.commax.com
COMMAX Access Control Solutions
Page 24
COMMAX Access Control Solutions
User - Registration
Page 25

COMMAX Access Control Solutions
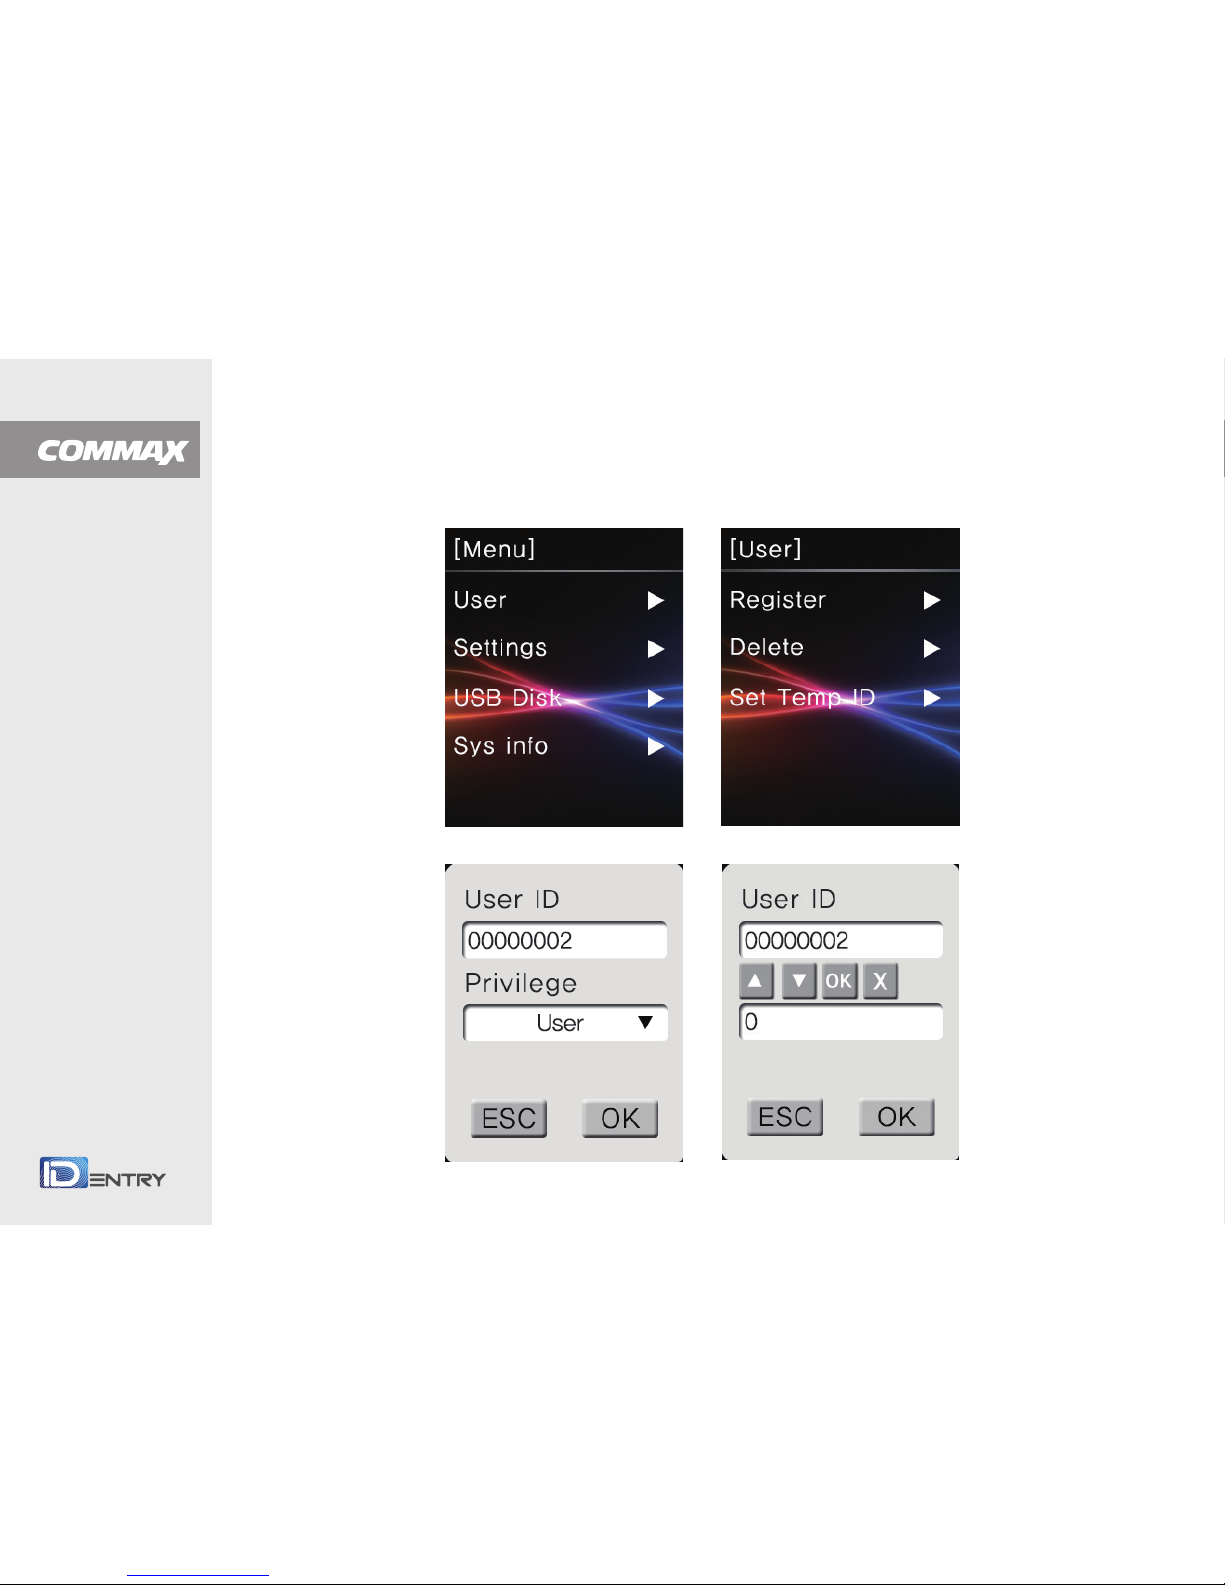
User - Delete
1. Access to system menu
2. Select "User" and press OK button
3. Select "Delete" and press OK button
4. Input password (USER ID) to delete and press OK button
5. Select "Fingerprint" and/or "ID Card" to delete
( If want to delete both fingerprint and card of the
relevant ID, select "Delete All")
6. Press OK button after selection
7. Complete the delete
Page 26

COMMAX Access Control Solutions
User - TEMP ID
1. Access to system menu
2. Select "User" and press OK button
3. Select "Set Temp IP" and press OK button
4. Input Temp ID (Upto 8 digits ) and press OK button
5. Input access admission times ( Min. 1, Max. 9)
with this them ID and Press OK button )
6. Setup Temp ID completed
Page 27

Settings
www.commax.com
COMMAX Access Control Solutions
Page 28

COMMAX Access Control Solutions
Settings - Basic
1. Time
Set-up the time of the device
Device's time is applied to the time of the event. So it is
important the accurate time.
2. Date
Setup the date of the device.
3. Date Format (YYYY-MM-DD)
Define date format at home screen
4. Language
Choose the language
Page 29

COMMAX Access Control Solutions
Settings - Advanced
1. Verification Mode
Depends on the security level, it is able to adjust
the verification mode.
2. ID mask
When the user input ID, it hides user ID as XXXXXX and enhance the security.
3. Tamer Alarm
When it detects tamper, it activates alarm.
4. Touch Sensor
If touch sensor is on, sensor lights off in normal condition and lights on
when the user touch the sensor only.
Page 30

COMMAX Access Control Solutions
Settings - Advanced
5. Calibrate Sensor
Optical sensor perceive surroundings and optimize the brightness.
When use this function, it has to block external light.
6. Factory Settings
Reset all settings to the default
7. Clear General Log
Delete all general log data
8. Clear Admin Log
Delete all Admin log data
9. Clear User Info
Delete entire user data including fingerprint, card data and it is unrecoverable
Page 31

COMMAX Access Control Solutions
Settings - Advanced
1) ANY MODE : Access granted with any form of authorization
2) FINGER
: Fingerprint only – Not able to access even with the registered
ID or Card
3) CD OR FP
: Card or Fingerprint only - Not able to access even with the
registered ID
4) OPEN
: Always Open (Fail Safe Mode)
5) CLOSE
: Always Closed ( Fail Secure Mode )
- No access with any form of authorization
6) CD
: Card only - Not able to access even with the registered ID or Fingerprint
7) CD&FP
: Both Card and Fingerprint required for Access
- Card must be authorized before fingerprint authentication
1. VERIFICATION MODE
Page 32

COMMAX Access Control Solutions
Settings - AC Settings
1. User Time Zone
Able to allocate 2 time zones for each user.
"0" for All Time Access and "257" for Never Access.
2. Lock Type
NC or NO Set up door lock type
3. Door Release Time
Default 3sec. Available to adjust between 1 ~ 99sec.
4. Door Open warning
Once door open, if the door remains open over setting condition, it activates alarm
5. Intrusion Sensor (Intrusion/ fire)
This function is connected to a fire alert system. An alert signal is activated when
there is a fire or intrusion and all doors are forced open, Intrusion detector closes
all doors when an intrusion is detected.
Page 33
COMMAX Access Control Solutions
Settings - AC Settings
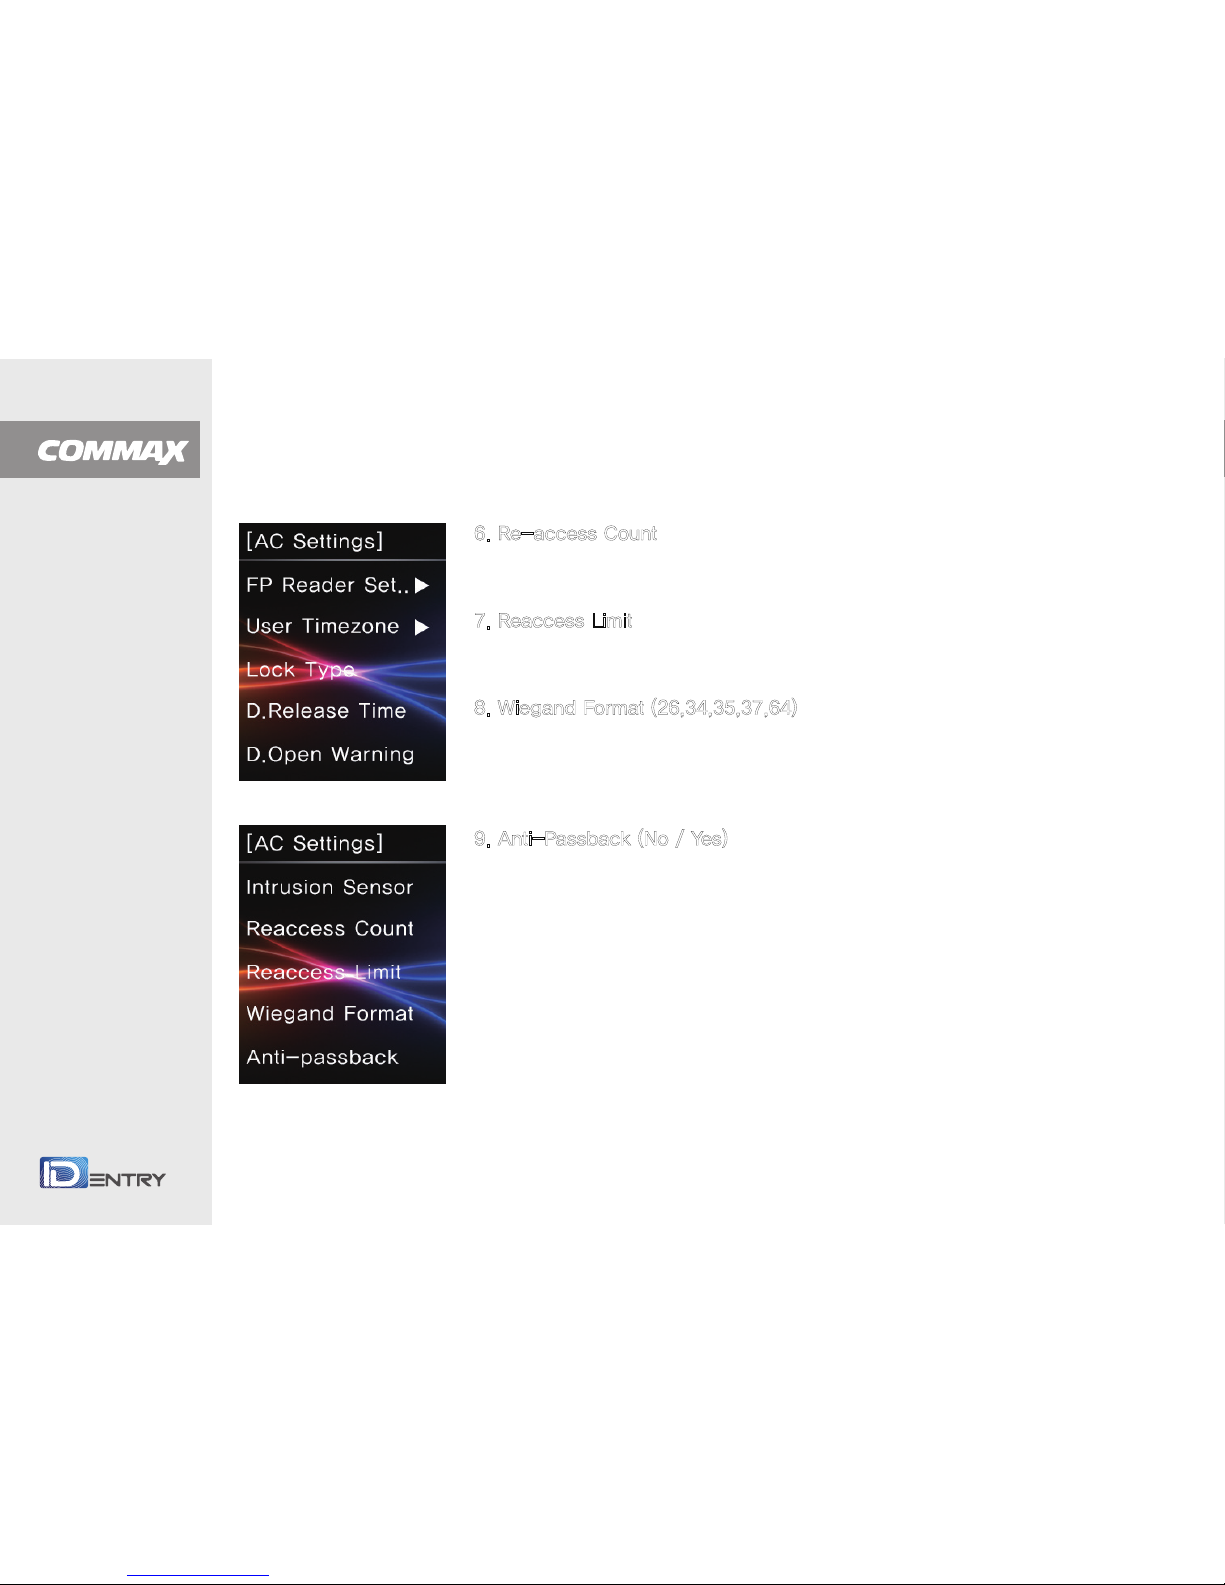
6. Re-access Count
No, 0~ 9 Limit re-access count between no.0 ~ 9times.
7. Reaccess Limit
Limit re-access time between no. 0 ~ 600minutes.
8. Wiegand Format (26,34,35,37,64)
Designate wiegand output format 26,34,35,37, or 64.
Read all wiegand data regardless of wiegand settings
9. Anti-Passback (No / Yes)
Anti-passback activates through external wiegand input.
If there is two controllers for enter and exit, re-enter is allowed only it has
exit event data (EX : Public Parking lot, Restricted Area, Membership center )
Page 34

COMMAX Access Control Solutions
Settings - Communication settings
1. Device ID (1 ~ 999)
Device ID ranges between 1 ~ 999.
When many devices are connected in one network, each device must
have unique address.
2. TCP/IP Settings
1) DHCP : No/ Yes
Choose DHCP on or off
2) IP Address : 192.168.1.224
Setup IP Address
3) Subnet Mask : 255.255.255.000
Setup subnet mask
4) Port : 5005
Setup TCP Port
Page 35

COMMAX Access Control Solutions
Settings - Communication settings
5) Default Gateway : 192.168.001.001 Setup default gateway
6) Port : 5005 Setup TCP Port
7) MAC Address
Displays MAC Address of the device. Cannot set it up from the device
8) Server Settings
7-1. IP Address Port / 7-2. Port / 7-3 Send Event
3.Com.Password (0~8)
Set the password for the communications equipment. Password is not correct
communication the PC program Communication is impossible.
Page 36

COMMAX Access Control Solutions
Settings - Log Settings
1. Admin Log Warning ( 0 ~ 100)
If the management logo exceeds the setting value, it alarms
2. General Log Warning (0~2000)
If the management logo exceeds the setting value, it alarms
Page 37

USB Disk
www.commax.com
COMMAX Access Control Solutions
Page 38

COMMAX Access Control Solutions
USB Disk
Insert USB memory into the slot at the bottom of the device and up/download the events data and update
the firmware
1. Download General log
Download new general events
3. Download Admin log
Download new management events
5. Download User Info
Download user data
7. Upgrade Firmware
Update Firmware
(File Name should be KJ-3400FW.bin)
2. Download All General log
Download all general events
4. Download All Admin log
Download all management events
6. Upload User info
Upload user data
Page 39

Information
www.commax.com
COMMAX Access Control Solutions
Page 40

COMMAX Access Control Solutions
Information - Memory
1. User
User numbers which is enrolled in the device
2. Fingerprint
Template numbers which is enrolled in the device
3. ID Card
ID Card numbers which is enrolled in the device
4. General Log
General log ( access event ) numbers
5. Admin Log
Management log ( system event ) numbers
Page 41

COMMAX Access Control Solutions
Information - Device Info
1. Release Date
Displays the device release date
3. Manufacturer
Displays the device manufacturer
5. Product Type
Displays the device Type
7. Firmware Version
Displays the firmware version
2. Serial Number
Displays the device serial number
4. Product Name
Displays the device Name
6. Engine Version
Displays the engine version
Page 42

Installation Guide
www.commax.com
COMMAX Access Control Solutions
Page 43
COMMAX Access Control Solutions
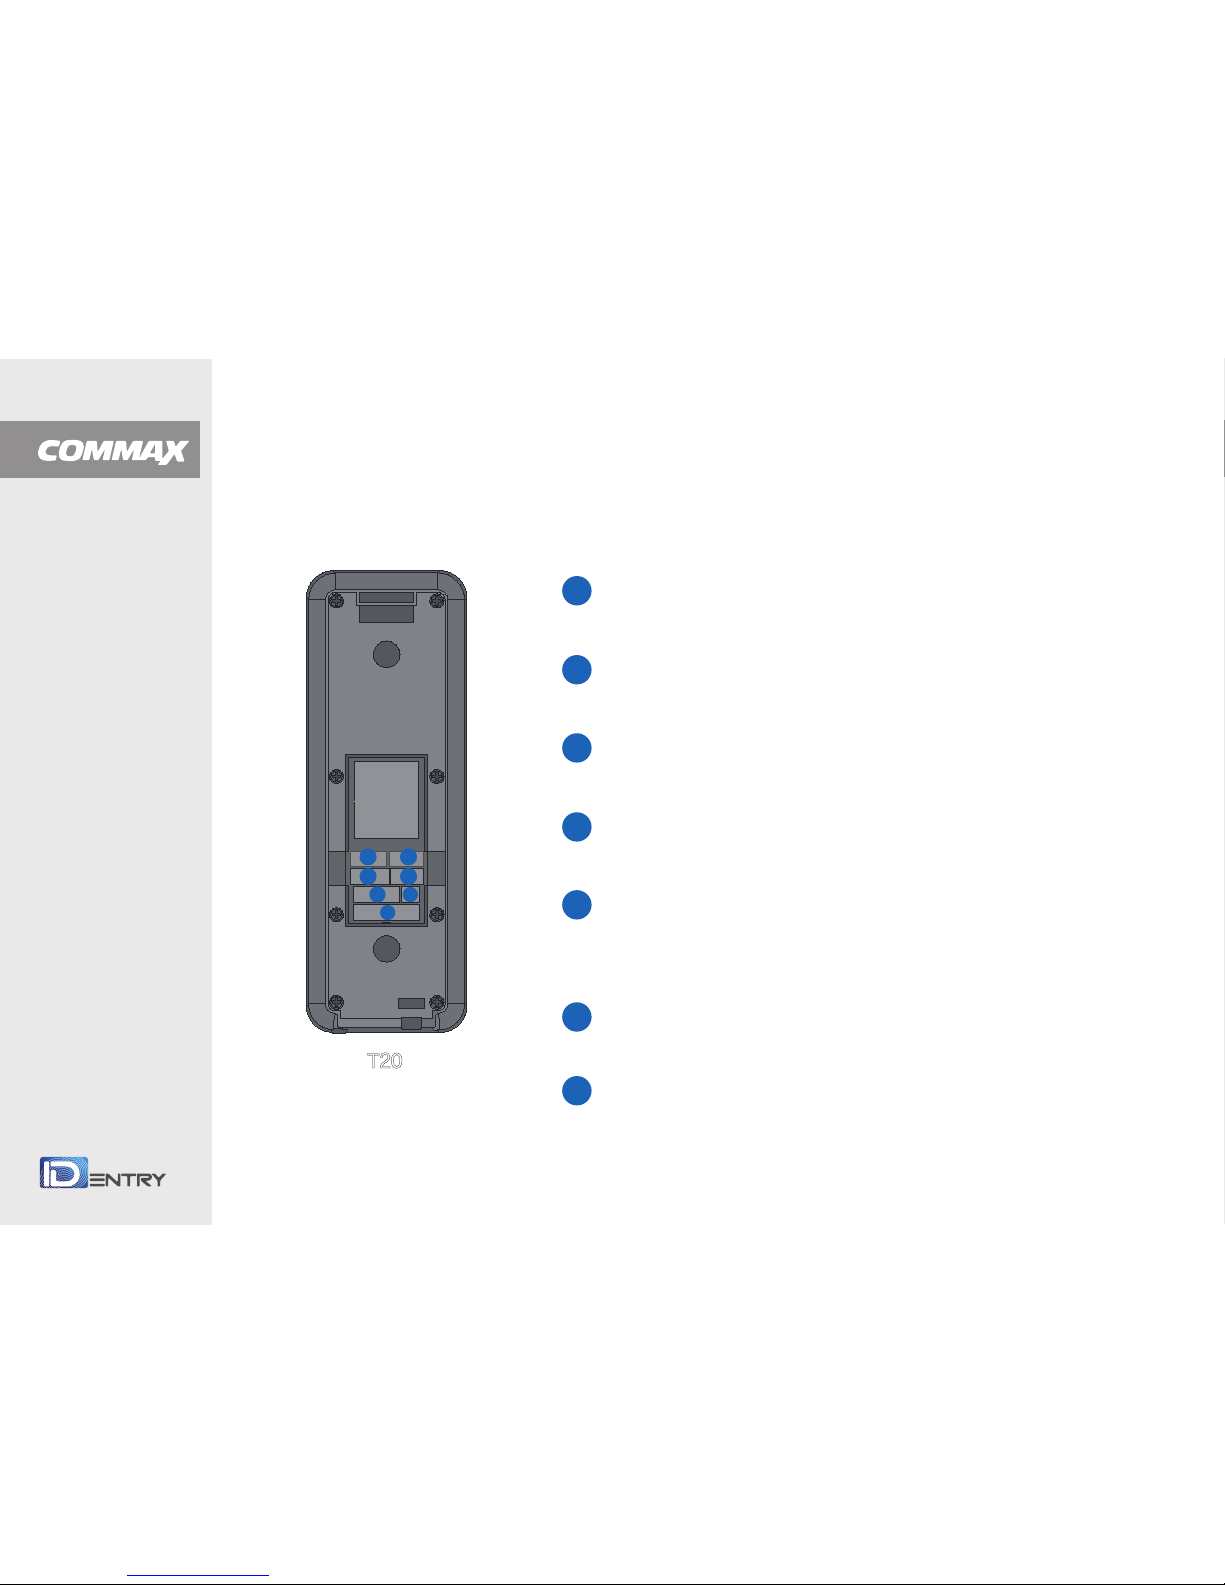
Part Name
KJ 3400 that is supported to automatic MDI / MDIX can connect to PC through
straight type but not cross type.
T20
CN1) TCP/IP Connector
- Use TCP/IP to connect extension cable
CN501) Relay 1,2
- Connect with door lock, alarm device and etc.
CN503) Wiegand Input
- Connect with extension card reader
CN506) Wiegand Output
- Output to set-up card data
CN505) Sensor Input
- Connect to exit button or various sensors
(door contact, security sensor or etc.)
CN2) Power Input
- Supply 12V to desktop through power supply
CN3) RS485 / RS422(T-20)
- Possible to use 485 or 422 communication
1
3
1 7
4
5
6
2
2
3
4
5
6
7
Page 44
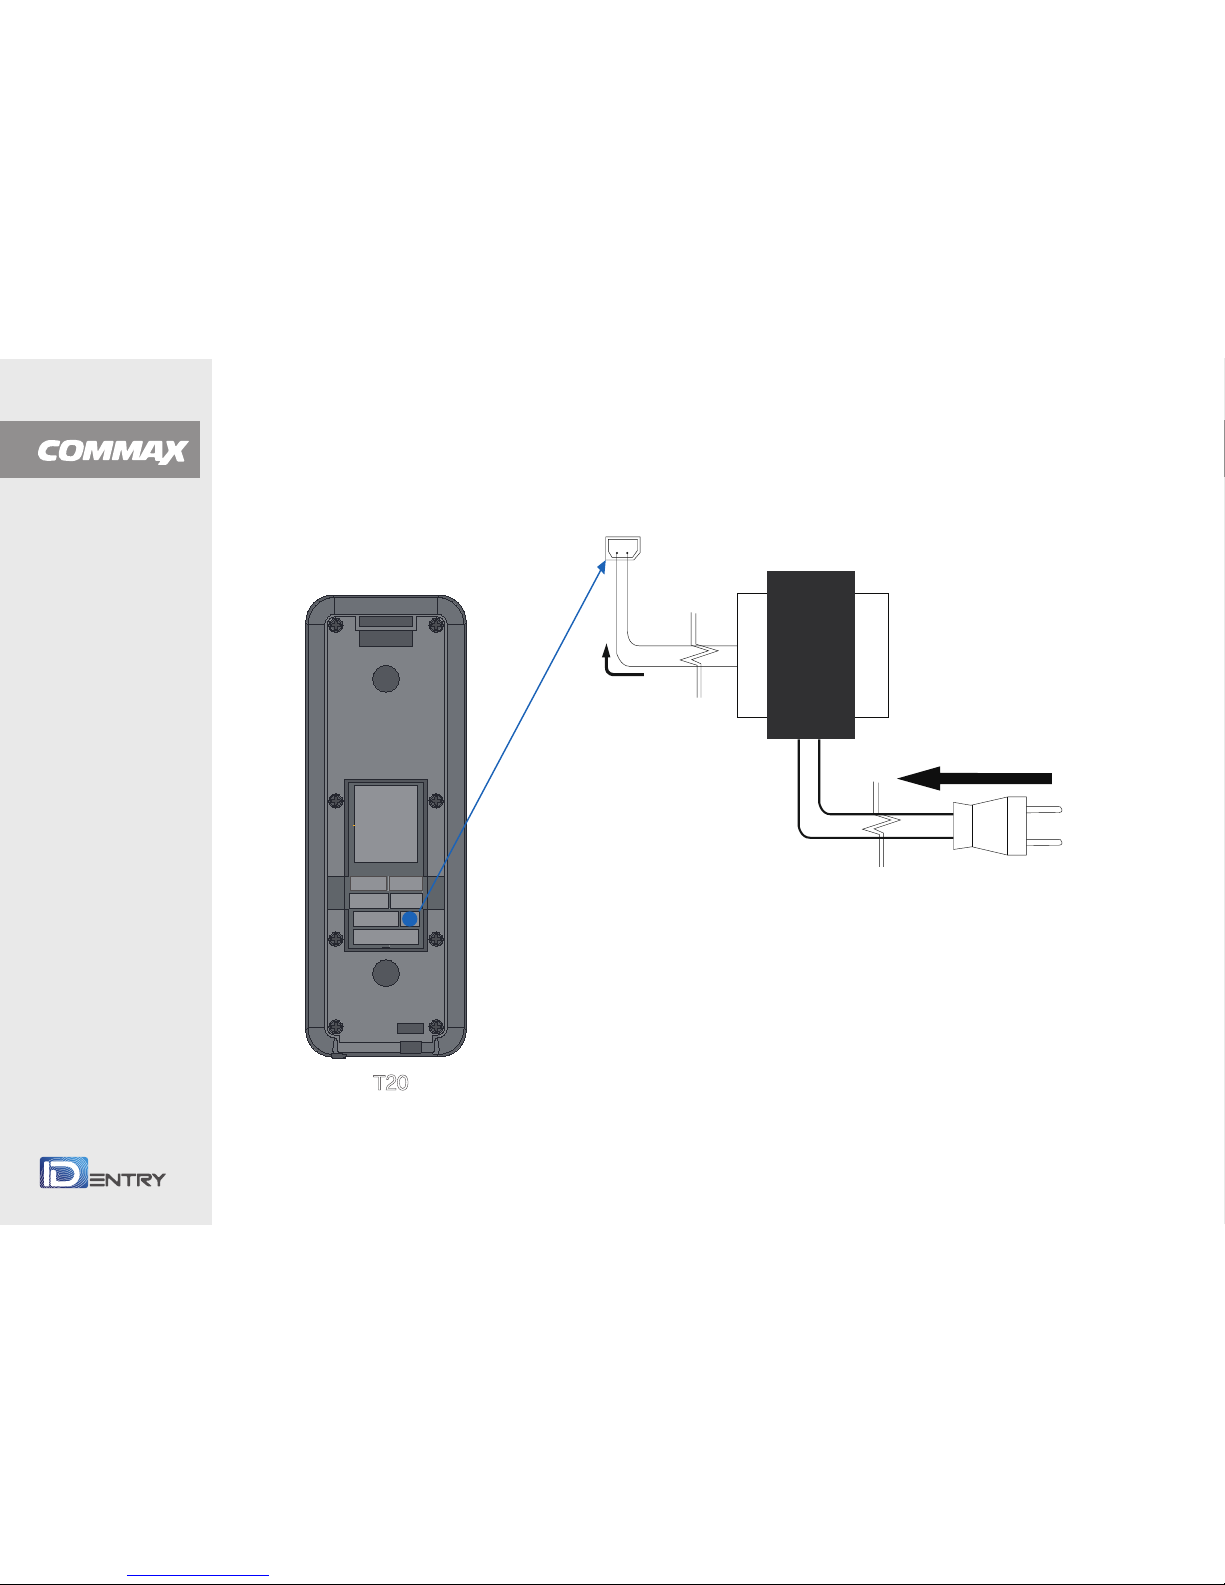
COMMAX Access Control Solutions
Cable Connection
T20
- Connect DC12 Power supply to "CN2" Doesn’t matter the
direction of the GND and VCC.
6
Transfomer
DV12V
AC220V
GND
VCC
Page 45

COMMAX Access Control Solutions
Cable Connection - TCP/IP
T20
It can build access control system by LAN or WAN without
limited distance if uses TCP/IP way.
It can connect RJ45 of opposite after connecting CN1 using
enclosed extension cable.(See Manual for IP settings)
HUB
TCP/IP
1
Page 46

COMMAX Access Control Solutions
Cable Connection - Wiegand Out
T20
It can only operate a card or fingerprint reader but not controller
if it connects with other main controller.
At this time, it can use wiegand out socket(CN503) when information that has hands
over to main controller.
12V
GND
WIG 0
WIG 1
GND
CON13
LMP
RNT
DATA 0
DATA 1
PWR
RDE-A
U8
U1
RELAY1
RELAY2
ACU
(ex: PCSC IQ-Serise)
4
Page 47

COMMAX Access Control Solutions
Cable Connection - RF Card Reader
T20
It can connect cable of card reader that is set CON4 if connects with RF card reader.
Above picture shows connecting with KP-10(KP-20).
CON4
Reader
(ex : KP-10)
Red:12V
Black : GND
Green : Date 0
White : Date 1
Blue : LED Control
3
Page 48

COMMAX Access Control Solutions
Cable Connection - Sensor
T20
Above picture shows to control automatic sliding door and related equipment.
It is to connect cable from door contact, sensor, exit button and infrared sensor like above picture.
CON2
Sliding Door
EXIT BUTTON
Invasion Sensor
(or Fire Alram)
Door Contact
Embedded
AutoDoor Sensor
Exit
GND
Door Contact
GND
GND
GND
Invasion(Fire)
Timed Input
+5V
5
Page 49

COMMAX Access Control Solutions
Cable Connection - Relay
T20
400 operates access control as a physical method that is installed various sensors read various
situations related with various equipment as above picture.
It is operated equipment from various electric strikes or alarms connecting to CON4.
RELAY-1
RELAY-2
CON12
N.O.
N.C.
COM
COM
N.C.
N.O.
Alram
Alert
Device
GND
Transfomer
Electric Magnetic
Lock
DC12V
2
Page 50

COMMAX Access Control Solutions
RS485 / RS422(T-20)
T20
RS485+
RS485-
Connect 1 and 4 → RS485+
Connect 2 and 3 → RS485-
It can be 422communication to connect 4 pins all.
3
1 7
4
5
6
2
1
2
3
4
A
B
Z
Y
A
B
Z
Y
RS 485 Communication Cable Connection
RS 422 Communication Cable Connection
Page 51

 Loading...