

Page 1

• Thank you for purchasing COMMAX products.
• Please carefully read this User’s Guide (in particular, precautions for safety) before using a product and follow
instructions to use a product exactly.
• The company is not responsible for any safety accidents caused by abnormal operation of the product.
User Manual
Lobby Camera Phone DRC-GUM/RF1
• Thank you for purchasing COMMAX products.
• Please carefully read this User’s Guide (in particular, precautions for safety) before using a product and follow
instructions to use a product exactly.
• The company is not responsible for any safety accidents caused by abnormal operation of the product.
62
Page 2

Registration of Household Unit Number ................................................................................34
Table of Contents
1. Greeting .....................................................................................................................................1
2. Safety Warning & Caution..........................................................................................................2
3. Parts ...........................................................................................................................................4
4. Password type............................................................................................................................8
5. How to input Password ..............................................................................................................9
6. Check house Password ...........................................................................................................12
7. Set building Number and ID to Lobby panel ...........................................................................13
8. RF card key appliances ...........................................................................................................15
9. How to set the direct Call number ...........................................................................................24
10. Door release by internal information forwarding to SecuMAX way ........................................25
11. Door opening hours setting ..................................................................................................26
12. Line-by-line call function Setting ............................................................................................27
13. Call Tones selection .............................................................................................................28
14. Setting the Number of Call Ring Repetitions .........................................................................29
15. Door release by external information forwarding to SecuMAX way ......................................30
16. Set to be forced opening the Main Entrance door by SecuMAX ...........................................31
17. Selecting the Wiring Method .................................................................................................32
18. Video Out Impedance Adjustment Setting ............................................................................33
19.
How to set the Video Floor Distributor(or CDV Converter) data ...........................................34
20.
Registration of Household Unit Number ................................................................................36
21.
Checking Videophone Status of Household Units .................................................................38
22.
Setting the Keypad LED Option ............................................................................................40
23.
Activation of Electronic Key (Password) Function .................................................................41
24.
Setting the Volume of Voice and Beep Sound ......................................................................42
25.
Method of name data sending................................................................................................43
26.
How to receive the name of the data .....................................................................................44
27. How to set the Audio Floor Distributor data ...........................................................................45
28. Setting the door release by building password .....................................................................47
29. When you want to call a household .......................................................................................49
30. When you want to call a Guard Station..................................................................................51
31. Door Release by Unit Password ...........................................................................................51
32. Supplement (summary of various programs) .........................................................................52
33. Wiring Information ..................................................................................................................54
34. Miscellaneous ........................................................................................................................58
35. Part list ...................................................................................................................................58
36. Specifications and Features ..................................................................................................58
37. RF-ID Model (Optional) .........................................................................................................59
1. Greeting
* Thank you for purchasing a COMMAX product
* This product is a high tech Main Entrance interphone that supports electronic
Please read this manual carefully.
1
Page 3

2. Safety Warning & Caution
Please follow the things described below in order to prevent any
danger or property damage.
Prohibition.
Warning
Caution
It may cause a serious damage or
injury if violated.
It may cause a minor damage or
injury if violated.
No disassembly
No touch
Must follow strictly.
Shows plugging out the power cord
without an exception
Shows the warning and caution for an electric shock.
Shows the warning and caution for a fire.
Warning
Please don’t use several
products at the same time on
one power socket.
·It may cause a fire due to an
abnorma
l overheating.
Please don’t install the
product in the place where
there is much oil, smoke or
humidity.
·It may cause an electric
shock or fire.
Power & Installation
Please don’t bend the power
cable excessively or it may
cause an electric shock.
·fire when using a damaged
power cable.
Please don’t install the
product with the lightening
and thunder.
·It may cause an electric
shock or fire.
Please don’t handle the power
cable with a wet hand.
·It may cause an electric
shock.
Please don’t use and connect
this product with other
products with different rated
voltage
·It may cause a disorder or
fire.
Please plug out the power
cable from the socket when
not using it for a long period
of time.
·It may shorten the product
lifespan or cause a fire.
When installing the product
that generates heat, please
install the product away from
the wall (10cm) for the
ventilation.
·It may cause a fire due to
the increased internal
temperature.
2
Page 4
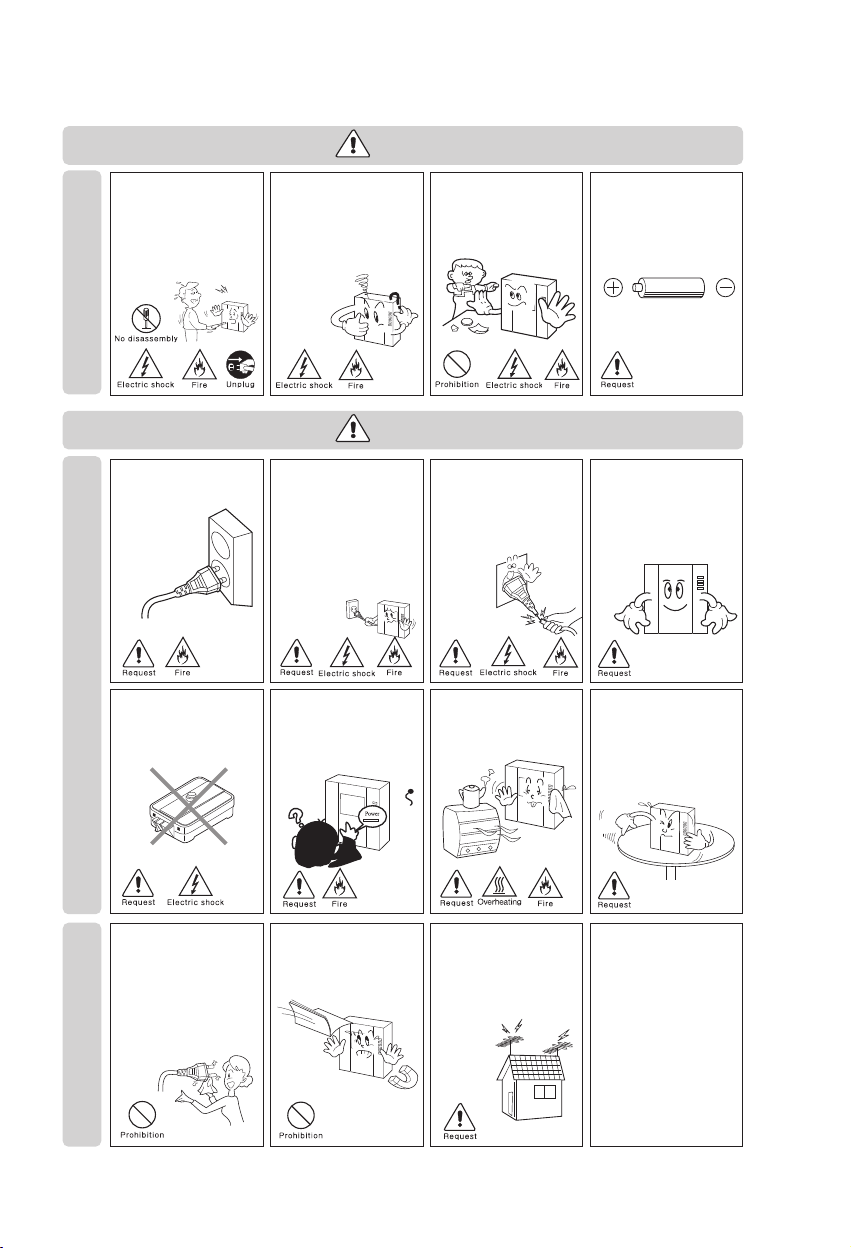
Warning
Please don’t disassemble,
repair or rebuild this product
arbitrarily (please contact the
service center if a repair is
needed.
·It may cause an electric
shock or fire.
Cleaning & UsePower & Installation
Please plug the power cable
firmly into the inner end
·It may cause a fire.
Please be careful when using
an AC circuit breaker since
there is a possibility of an
electric shock.
If an abnormal sound, burning
s
mell or smoke is coming out
of the product, please plug out
the power cable and contact a
service center.
·It may cause an electric
shock or fire.
Caution
Please hold the plug tightly
when unplugging the power
cable (a part of the copper
wire may be disconnected if
the grabbing is only made on
the cord when pulling out the
cable).
·It may cause an electric
shock or fire
Please check the use voltage
and current for the DC-only
products and use the
appropriate rectifier.
·It may cause a fire.
Please don’t insert any
metallic or burnable materials
into the ventilation hole.
·It may cause an electric
shock or fire.
When connecting the power
cables after cutting the cable,
please install the product with
power off
·It may cause an electric
shock or fire
Please avoid direct rays of the
sun or heating devices at a
time of installation.
·It may cause a fire.
Please use only the designated
batteries for the products of
using DC power.
·It may cause an electric
shock or fire.
When installing the product,
please fix it firmly while using
the wall-mounting unit and
screws.
·It may cause an injury from
the falling object.
Please don’t install the
product on an unstable place
or small support board.
·It may cause an injury if it
falls down while in use.
When cleaning the product,
please rub it with a soft and
dry cloth after plugging out
the power cable. (Please don’t
use any chemical products
such as wax, benzene, alcohol
or cleanser.)
Cleaning & Use
’t drop the product
Please don
on the ground and don’t apply
a shock .
·It may cause a failure.
Please use the designated
connection cable within the
maximum calling distance
designated for the product
·It may reduce the product
performance.
3
Page 5
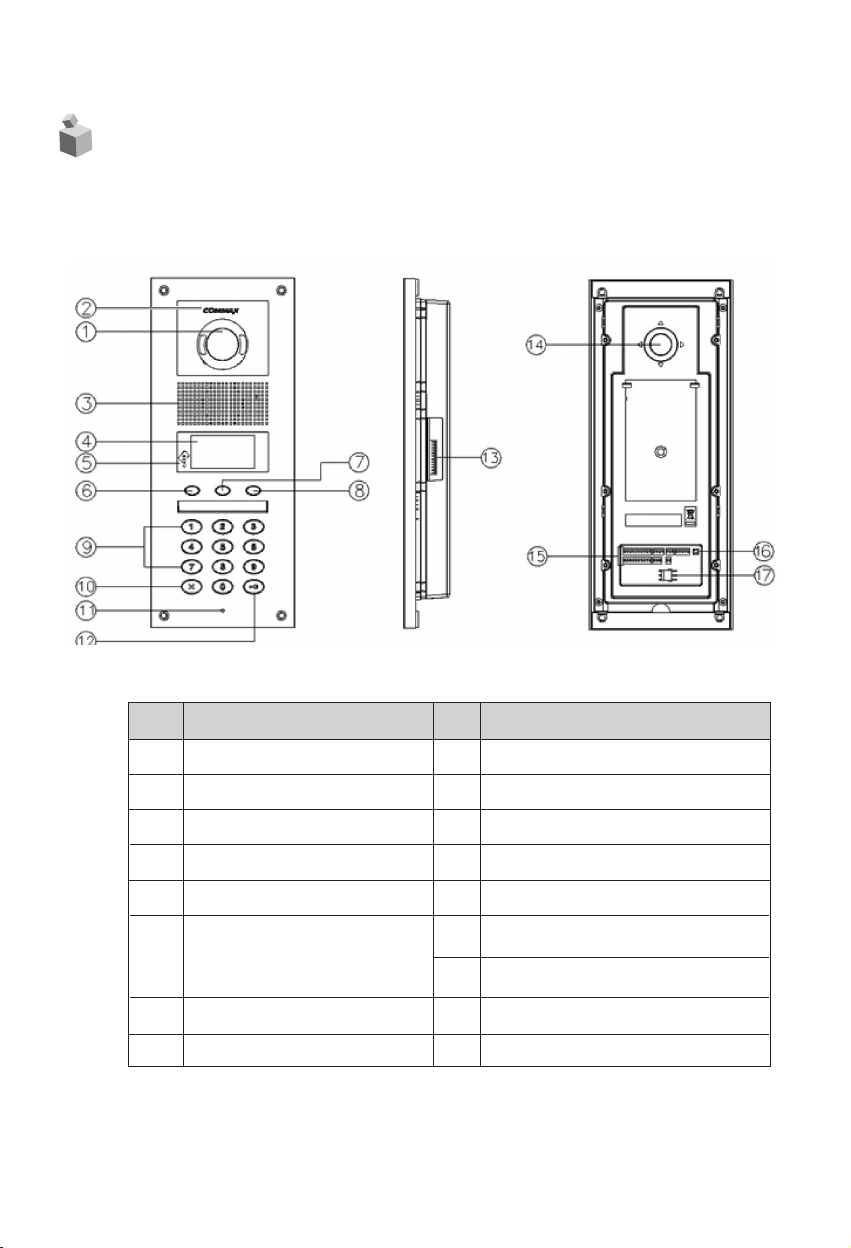
3. Parts
3-1. The name of parts
NO. Description NO. Description
1 Camera
2 Night Lamp
3 Speaker
4 OLED Display
5 RFID card receiver
Name Searching button /
6
Menu Page Button
7 Program Button
8 Call Button
9 Number button
10 Cancel Button
11 C-MIC
12 Electric Key Button
13 Extension Port
14 Camera angle
15 Wire Connection Port
16 Reset Button
17 Door Release Port
4
Page 6

3-2. Important function
✽ Starting OLED display (Power ON OLED display)
✽ RF/ID Receiver ③(Optional)
When open door by wireless card key, please tag it to this points.(See bellow
photo).
"Open door" message and Icon will be displayed in OLED.
✽ Call Button ⑧(E : Press)
Call unit (House).
✽ Program button ⑦(P : Program)
Call program menu button.
5
Page 7
✽ Name searching button ⑥(S : Search)
Tenants name searching button.
✽ Electric key button ⑫(K : Key)
Open door by Password Number.
(Deactivate Password LOCK function only.)
✽ Cancel button ⑩(X : Cancel)
When user wants to cancel function, press it.
✽ Reset button ⑮
Reset security guard password or management office password.
When forgot password, press reset button which is on back side of products 15
(Press & Hold over 3 sec. after power on)
6
Page 8

✽ Call security
1. Press, name search button and call security which is top of the name list.
2. Press "9999" and press call button.
✽ Must know before use.
1) If you hear "beep beep beep..."during any program modes, please restart from
the beginning. The beep sounds for improper process.
2) If password is forgotten,
2-1) Password for any household :
Use the identifying household password function (6-1) to confirm the password
(methods to confirm password shall be requested to the Management office or
Security cPress).
2-2) Password for any building:
Reset the password by using Management password
2-3) Password for Management
Press "Reset Button"..
The password will be reset to factory default.
3) Deleting All RF Card Keys function in "8-5" shall ONLY be used when the
product is initially installed.
7
Page 9

4. Password type
4-1. Password for the Management Office ("Management Password")
A password for the Manager
Factory default for the Manager Password is 4321.
4-2. Password for any buildings ("Building Password")
A common password for a corresponding building.
Factory default for the Building Password is 1234.
4-3. Password for any household units "Unit Password")
A password for each household unit can be set.
Factory default for the Unit Password is 1234.
8
Page 10

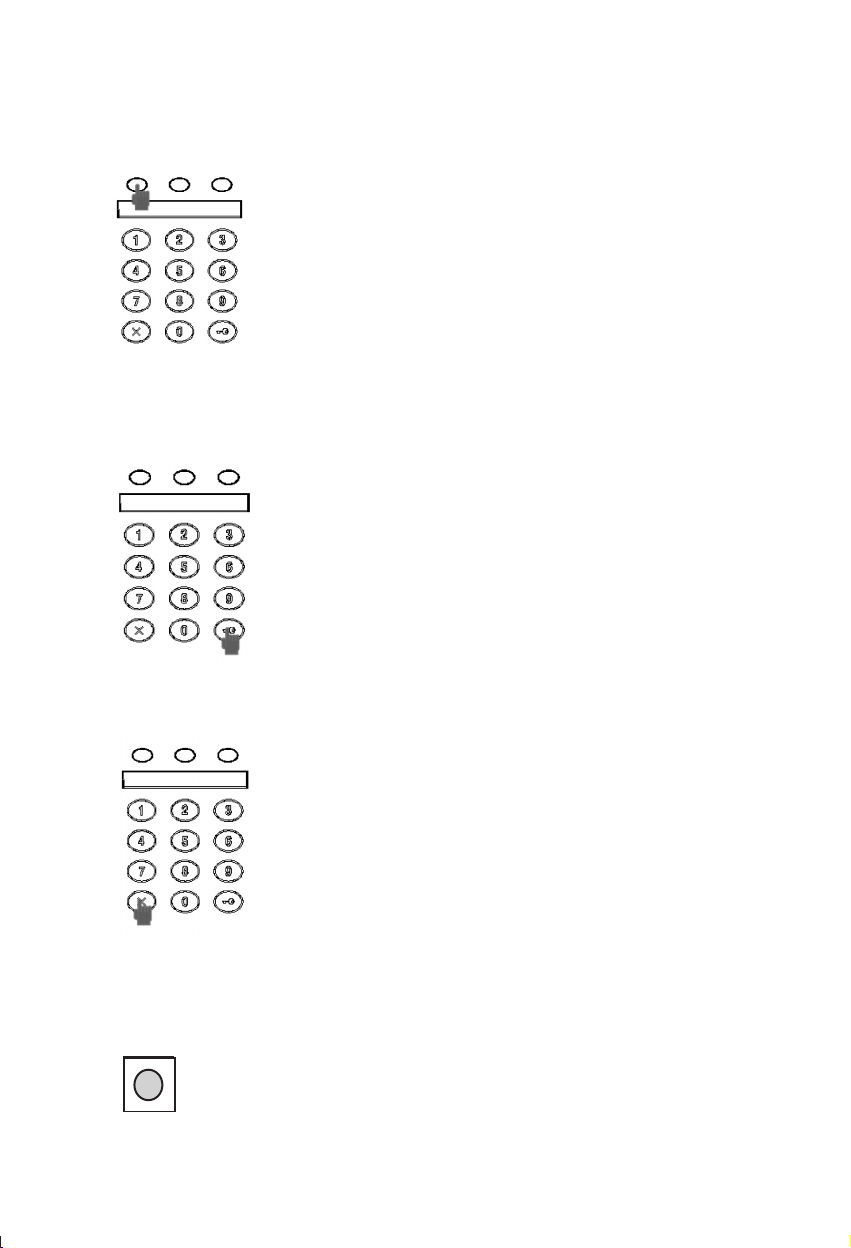
5. How to input Password
5-1. Press management Password
• P - old Password - E - New Password - E
• Password must be 4 digits.
• "0000", "1234", "4321" can't be used as Password
① Press program button (P).
② Press old management default Password (4,3,2,1).
③ Press call button (E).
④ Press "0" (Set up management Password button)
⑤ Press call button (E).
⑥ Press new Password.
⑦ Press call button (E).
⑧ Management Password has been changed.
<Caution>
Please do not keep the factory default password. New password setting
after the installation is strongly recommended.
9
Page 11

5-2. Press building Password
• P - old Password - E - 1 - E - New Password - E
• Password must be 4 digits.
•"0000°", "1234", "4321" can't be used as Password
① Press program button (P).
② Press old building default Password (4,3,2,1).
③ Press call button (E).
④ Press "1" (Set up building Password button)
⑤ Press call button (E).
⑥ Press new Password.
⑦ Press call button (E).
⑧ Building Password has been changed.
10
Page 12

5-3. Press house (Unit) Password
• K - 20 - E- house Number - E- old Password - E - New Password - E
• Password must be 4 digits.
•"0000", "1234", "4321" can't be used as Password
• Unit Password no. may not be changed because of Interphone types.
(Some model of Interphone can change Password in house. Please, check manual of
interphone)
① Press program button (K)
② Press "20" (Set unit Password Number)
③ Press call button (E).
④ Press house Number
⑤ Press call button (E).
⑥ Press old house Password (4,3,2,1).
⑦ Press call button (E).
⑧ Press new house Password.
⑨ Press call button (E).
⑩ House Password has been changed.
11
Page 13

6. Check house Password
6-1. Check house Password
• P - management Password - E - 16 - E - Household Unit Number E
① Press program button (P).
② Press management Password.
③ Press call button (E).
④ Press "16" (Set ID Number function key)
⑤ Press call button (E).
⑥ Press new ID Number
⑦ Press call button (E).
⑧ ID Number has been changed.
12
Page 14

7. Set building Number and ID to Lobby panel
• This setting is mandatory because building Number and ID automatically are set up when
lobby panel call house and security guard.
• Max. 99 lobby panel can be installed for one building.
7-1. Set building Number in Lobby panel interphone.
• P - Management Password - E - 2 - E - Building Number - E
① Press program button (P).
② Press management Password.
③ Press call button (E).
④ Press "2" (Set building Number function key)
⑤ Press call button (E).
⑥ Press new building Number
⑦ Press call button (E).
⑧ Building Number has been changed.
13
Page 15

7-2. Set ID no. in Lobby Panel
• P - Management Password - E - 3 - E - ID - E
① Press program button (P).
② Press management Password.
③ Press call button (E).
④ Press "3" (Set ID Number function key)
⑤ Press call button (E).
⑥ Press new ID Number
⑦ Press call button (E).
⑧ ID Number has been changed.
14
Page 16

8. RF card key appliances
8-1 RF card key test way
• P- Management Password - E - 9 - E - Card Test - X(Cancel)
• This function is only for the test of wireless card key
① Press down the (P) button
② Press Management Passwords
③ Press Call Button "E".
④ Press number "9" for the test of wireless card key
⑤ Press Call Button "E"
⑥ The card registration number will be on OLED when the card key is close to the RF/ID
receiver.
⑦ Press down the (X) button for finish after test.
15
Page 17

8-2. RF card key input way
• P- Management Password - E- 10 - E - Place card close to the RF/ID receiver - X(cancel)
<References>
Up to 2048 cards can be registered(if not to connect with SecuMAX)
16
Page 18

8-3-1. RF card key separate deletion way
• P - Management Password - E - 12 - E - Delete cards - X(Cancel)
① Press Program Button "P"
② Press Management Password
③ Press Call Button "E"
④ Press number "12"(separate delete number)
⑤ Press Call Button "E"
⑥ Place the card key close to the RF/ID receiver.
⑦ Press down the "X" to finish when separate deletion is completed
17
Page 19

8-3-2. RF card key separate deletion way
• P - Management Password - E- 12 - E - Identification number - E - X(Cancel
① Press Program Button "P"
② Press Management Password
③ Press Call Button "E"
④ Press number "12"(separate delete number)
⑤ Press Call Button "E"
⑥ Input the identification number you want to delete.
⑦ Press Call Button "E"
⑧ Press down the "X" to finish when separate deletion is completed
18
Page 20

8-4. RF card key registration check way
• P- Management password - E - 13 - E - Check the cards - X(Cancel)
① Press Program Button "P"
② Press Management Password
③ Press Call Button "E"
④ Press number "13"(registration check)
⑤ Press Call Button "E"
⑥ Place the card key close to the RF/ID receiver
⑦ Press down X button to finish when check is completed
19
Page 21

8-5. RF card key all delete way
• P - Management password - E - 11 - E - E
• All deletion way is only useful when initially set up, unless all registered cards are to be
deleted.
① Press down "P" button
② Press Management Password
③ Press down "E" button
④ Press number "11" (all delete number)
⑤ Press Call Button "E"
⑥ Press Call Button "E" one more
⑦ The number on OLED display to be changed
⑧ Press down X button if to cancel.
<References>
All numbers can be deleted only if the mode "1" in the program
number(23) is selected & executed the all delete process within 30
seconds.
20
Page 22

8-6. RF card key capacity change way
• P- Management password - E - 19 - E - 0 - E : Up to 2048 RF Cards can be registered
• P- Management password - E - 19 - E - 1 - E : Unlimited RF Cards can be registered
① Press down "P" button
② Press Management Password
③ Press down "E" button
④ Press number "19" (capacity change number)
⑤ Press Call Button "E"
⑥ Select mode between numbers "0" and "1".
(0 : Up to 2048 RF Card Keys can be registered)
(1 : Unlimited RF Card Keys can be registered)
⑦ Press Call Button "E"
21
Page 23

8-7. RF card key data transmission
• P - Management Passwords - E - 32 - E - Press destination lobby phone number - E
① Press Program Button "P"
② Press Management password
③ Press Call Button "E"
④ Press number "32" for data transmission
⑤ Press Call Button "E"
⑥ Press number "destination lobby phone number"
⑦ Press Call Button "E"
<References>
• Data can be sent only if the mode "99" in the program number(23) is
selected & executed the process within 30 seconds.
• You cannot use any other function before it completes(It takes about 5
minutes). If you want to complete more quickly, use the download
program.
22
Page 24

8-8. RF card key data reception
• P- Management Passwords - E - 33 - E - Press source lobby phone number - E
① Press Program Button "P"
② Press Management password
③ Press Call Button "E"
④ Press number "33" for data reception
⑤ Press Call Button "E"
⑥ Press number "source lobby phone number"
⑦ Press Call Button "E"
<References>
• Data can be received only if the mode "99" in the program
number(23) is selected & executed the process within 30 seconds.
• You cannot use any other function before it completes(It takes about 5
minutes). If you want to complete more quickly, use the download
program.
23
Page 25

9. How to set the direct Call number
• P - Management Password - E - 4 - E - Household number - E
• This function is to set the direct call number
① Press Program Button "P"
② Press Management Passwords
③ Press Call Button "E"
④ Press number "4" (Program Number).
⑤ Press Call Button "E"
⑥ Enter the Household number
⑦ Press Call Button "E"
- If you want to set other direct Call number, Press the extension panel button you want
to set.
⑧ Press down the (X) Button for finish after setting.
24
Page 26

10. Door release by internal information
forwarding to SecuMAX way
• P - Management password - E - 22 - E - 0 - E : Forwarding to SecuMAX disabled
• P - Management password - E - 22 - E - 1 - E : Forwarding to SecuMAX enabled
• This function is to set the door release by internal sensor information forwarding to
SecuMAX.
① Press Program Button "P"
② Press Management Passwords
③ Press Call Button "E" for call
④ Press number "22" for forwarding to SecuMAX
⑤ Press Call Button "E"
⑥ Select the mode
(0 : Forwarding to SecuMAX disabled)
(1 : Forwarding to SecuMAX enabled)
⑦ Press Call Button "E"
25
Page 27

11. Door opening hours setting
• P - Management Passwords - E - 5 - E - Opening hours - E
• This function is to control the common entrance door opening hours
① Press Program Button "P"
② Press Management Passwords
③ Press Call Button "E"
④ Press number "5" for door opening hours setting
⑤ Press Call Button "E"
⑥ Select door opening hours(Opening hours is in the middle of 1~25 seconds)
⑦ Press down any number for setting of door opening hours between 0~25 seconds
⑧ Press Call Button "E"(Changed opening hours is input)
26
Page 28

12. Line-by-line call function Setting
• P - Management password - E - 21 - E - 0 - E: available for entire house call
• P - Management password - E - 21 - E - Line number - E : call only specified line
ex) In case 1 line ~ 2 line, input "0102"
• This function is only for specified line call, not for entire house call
① Press Program Button "P"
② Press Management Passwords
③ Press Call Button "E"
④ Press number "21" for call line-by-line
⑤ Press Call Button "E"
⑥ Select the line for call
ex) If to call only from 1 line to 3 line, Press "0103"
⑦ Press Call Button "E"(Changed setting would be input)
27
Page 29

13. Call Tones selection
• P - Management password - E - 7 - E - 0 - E : Melody sound
• P - Management password - E - 7 - E - 1 - E : Bell(Ringer sound)
• This function is to set the recall sound of house & guard station at the common entrance
① Press Program Button "P"
② Press Management Passwords
③ Press Call Button "E" for call
④ Press number "7" for selection of call tones
⑤ Press Call Button "E" for cal
⑥ Select the mode
(0 : Melody sound)
(1 : Bell sound)
⑦ Press Call Button "E"(Changed call tones will be set)
28
Page 30

14. Setting the Number of Call Ring Repetitions
• P - Management Password - E - 25 - E - 0 - E : Continuous call ring enabled.
• P - Management Password - E - 25 - E - 1 - E : 1 time Call ring enabled.
• This function sets number of call ring repetition when a call is made to any households
or security office.
① Press Program Button "P".
② Press Management Password.
③ Press Call Button "E".
④ Press "25" (number twenty-five)
⑤ Press Call Button "E".
⑥ Select the mode
(0 : Continuous call ring)
(1 : 1 time call ring)
⑦ Press Call Button “E”
29
Page 31

15. Door release by external information
forwarding to SecuMAX way
• P - Management password - E - 18 - E - 0 - E : Forwarding to SecuMAX disabled
• P - Management password - E - 18 - E - 1 - E : Forwarding to SecuMAX enabled
• This function is to set the door release by internal sensor information forwarding to
SecuMAX.
① Press Program Button "P"
② Press Management Passwords
③ Press Call Button "E" for call
④ Press number "18" for forwarding to SecuMAX
⑤ Press Call Button "E"
⑥ Select the mode
(0 : Forwarding to SecuMAX disabled)
(1 : Forwarding to SecuMAX enabled)
⑦ Press Call Button "E"
30
Page 32

16. Set to be forced opening the Main Entrance
door by SecuMAX
• P - Management password - E - 29 - E - 0 - E : Forced opening by SecuMAX disabled
• P - Management password - E - 29 - E - 1 - E : Forced opening by SecuMAX disabled
• This function is to set the opening the Main Entrance door forced opening by SecuMAX
① Press Program Button "P"
② Press Management Passwords
③ Press Call Button "E" for call
④ Press number "29"
⑤ Press Call Button "E"
⑥ Select the mode
(0 : Forced opening by SecuMAX disabled)
(1 : Forced opening by SecuMAX enabled)
⑦ Press Call Button "E"
31
Page 33

17. Selecting the Wiring Method
• P - Management Password - E -6 - E - 4 - E : common 4 wire method
• P - Management Password - E - 6 - E - 6 - E : common 6 wire method
• If common 6 wire method selected, there will be no video signal sent to all household
units.
① Press Program Button "P".
② Press Management Password.
③ Press Call Button "E".
④ Press "6" (number six).
⑤ Press Call Button "E".
⑥ Select the wiring method by Pressing number
(4 : Common 4 Wire Method)
(6 : Common 6 Wire Method)
⑦ Press Call Button "E".
32
Page 34

18. Video Out Impedance Adjustment Setting
• P - Management Password - E - 8 - E - 0 - E : Short distance transmission.
• P - Management Password - E - 8 - E - 1 - E : Long distance transmission.
• Factory default is set as "short distance transmission".
① Press Program Button "P".
② Press Management Password.
③ Press Call Button "E".
④ Press "8" (number eight).
⑤ Press Call Button "E".
⑥ Select the transmission distance option between numbers "0" and "1".
(0 : Short distance)
(1 : Long distance)
⑦ Press Call Button "E".
33
Page 35

How to set the Video Floor Distributor
19.
(or CDV Converter) data
• P - Management Password - E - 36 - E - Module ID - E - Setting the data - P
• This function is to set household data of the video floor distributor or CDV converter
when it is installed.
• Please, Refer to the manual of the video floor distributor or CDV converter if you want to
know about more detailed functions.
34
Page 36

① Press Program Button "P".
② Press Management Password.
③ Press Call Button "E".
④ Press number "36" (Program Number).
⑤ Press Call Button "E".
⑥ Enter the Module ID.
⑦ Enter the household number, password and Monitoring Lobby ID.
- If you want to move cursor, Press the Searching Button(S).
⑧ Press Call Button "E".
⑨ If you want to move page, Press the Electric Key(K) Button.
(Setting the other number)
- Repeat ⑦ & ⑧ procedures.
⑩ Press Program Button "P" after finish to set all number
- Please, wait to complete upload.
<References>
• Data can be received only if the mode "99" in the program number(23)
is selected & executed the process within 30 seconds.
• You cannot use any other function before it completes(It takes about 1
minutes).
※ The following registration method is applicable to other systems EXCEPT the MODUM
system, for example Gateview System or RS-481 System.
35
Page 37

Registration of Household Unit Number
20.
• P - Management Password - E - 15 - E - Call Security from the monitor.- number of
household - E - serial number - E
• This method applies to the case that there is no security station installed. Calling
security from the monitor will direct the call to the lobby phone. Household Unit Number
can be set at the lobby phone.
36
Page 38

① Press Program Button "P".
② Press Management password.
③ Press Call Button "E".
④ Press "15" (number fifteen).
⑤ Press Call Button "E".
⑥ From a household unit, call security. The factory default household unit number appears
on the OLED display of the lobby phone. Please Press the actual unit number.
⑦ Press the actual unit number and press Call Button "E".
⑧ Press "0" (0 is Master lobby phone number. If multiple lobby phones are installed,
please Press the corresponding lobby phone number) and press Call Button "E".
⑨ On the OLED display, the unit number input mode appears.
⑩ By repeating 6, 7, 8, 9 procedures, other unit numbers can be registered.
⑪ As unit number registration is done press Cancel Button "X" to exit.
<References>
• Master-videophone's "Multi Sub Number" is number 0 (zero).
• Sub-videophone's "Multi Sub Number" is given between 1 and 3.
• Up to 4 videophones can be installed in a single household unit and
the "Multi Sub Numbers" shall not be overlapped.
• "Multi Sub Numbers" for sub-videophones shall be registered in
numerical order.
• At least one Master-videophone with "Multi Sub Number 0" must be
installed and if only one videophone is installed, it is considered as
Master-videophone (set as Multi Sub Number 0).
• In case that ADT-481 is installed, it does not register as Master unit.
• If sub-videophone is 485 system, its Master-videophone's Multi Sub
Number is 1 (one) and those of sub-videophones are between 2 and
9.
37
Page 39

Checking Videophone Status of Household Units
21.
• P - Management password - E - 14 - Unit Number - E - serial number - E
• This function is to check the status of videophones installed in each household unit.
38
Page 40

① Press Program Button "P".
② Press Management Password.
③ Press Call Button "E".
④ Press "14" (number fourteen).
⑤ Press Call Button "E".
⑥ Press the Unit Number and press Call Button "E".
⑦ Press "0" (number zero as Master lobby phone or Press a corresponding lobby phone
number) and press Call Button "E". Status of the household unit appears (Please refer to
below for the status).
⑧ To check another unit status, repeat 6 & 7 procedures.
⑨ As the status check is done press Cancel Button "X" to exit.
Status of household unit indication
• Standby : standby mode (applies even when the household unit
monitor is communicating with an individual door phone of
the unit or via telephone line).
• Busy Line : Busy mode (applies when the household unit monitor is
communicating with another household unit or security
station.
• Away status : Away mode
• Emergency : in case of emergency (emergency, fire, gas leak, burglar)
• Error : Communication failure/error (Please check the unit's
videophone).
39
Page 41

Setting the Keypad LED Option
22.
• P – Management Password – E – 20 – 0 – E : Keypad LED OFF
• P – Management Password – E – 20 – 1 – E : Keypad LED ON
• This function to set keypad LED ON/OFF.
① Press the program button (P).
② Please set up the Management password.
③ Press the call button (E).
④ Press number “20” (setting number of Electronic key)
⑤ Press the call button (E).
⑥ Select mode by numbers “0” or “1”.
(0 : White keypad LED light only work when you used lobby phone)
(1 : White keypad LED light always on)
⑦ Press the call button (E).(It will be changed)
40
Page 42

Activation of Electronic Key (Password) Function
23.
• P - Management Password - E - 31 - 1 - E : Electronic Key (Password) enabled.
• P - Management Password - E - 31 - 0 - E : Electronic Key (Password) disabled.
• This function is to enable or disable the password access.
① Press Program Button "P".
② Press Management Password.
③ Press Call Button "E".
④ Press "31" (number thirty-one).
⑤ Press Call Button "E".
⑥ Select mode between numbers "0" and "1".
(1 : Password enabled)
(0 : Password disabled)
⑦ Press Call Button "E".
41
Page 43

Setting the Volume of Voice and Beep Sound
24.
• P - Management Password - E - 30 - E - Beep Volume (1~2) - Voice Volume (1~7) - E
• This function enables the adjustment of Beep & Voice volume.
① Press Program Button "P".
② Press Management Password.
③ Press Call Button "E".
④ Press "30" (number thirty).
⑤ Press Call Button "E".
⑥ Press desirable Beep Volume (1~2) and then desirable Voice Volume (1~7).
⑦ Press Call Button "E".
<References>
• Beep sound volume applies to paging tone and button sound tone.
42
Page 44

Method of name data sending
25.
• P - Management Password - E - 34 - E - Press destination lobby phone number - E
Press Program Button "P".
①
② Press Management Password.
③ Press Call Button "E".
④ Press number "34" (setting number of caller name)
⑤ Press Call Button "E".
⑥ Press number "destination lobby phone number"
⑦ Press Call Button "E".
<References>
• Data can be send only if the mode "99" in the program number(23) is
selected & executed the process within 30 seconds.
• You cannot use any other function before it completes(It takes about 5
minutes). If you want to complete more quickly, use the download
program.
43
Page 45

How to receive the name of the data
26.
• P - Management Password - E - 35 - E - Press source lobby phone number - E
Press Program Button "P".
①
② Press Management Password.
③ Press Call Button "E".
④ Press number "35" (setting number of name data)
⑤ Press Call Button "E".
⑥ Press number "source lobby phone number".
⑦ Press Call Button "E".
<References>
• Data can be received only if the mode "99" in the program number(23)
is selected & executed the process within 30 seconds.
• You cannot use any other function before it completes(It takes about 5
minutes). If you want to complete more quickly, use the download
program.
44
Page 46

27. How to set the Audio Floor Distributor data
• P - Management Password - E - 36 - E - Module ID - E - Setting the data - P
• This function is to set household data of the audio floor distributor when it is installed.
• Please, Refer to the manual of audio floor distributor
if you want to know about more detailed functions.
45
Page 47

① Press Program Button "P".
② Press Management password.
③ Press Call Button "E".
④ Press "36" (Program Number).
⑤ Press Call Button "E".
⑥ Enter the Module ID.
⑦ Enter the household number, password and DTMF setting value.
- If you want to move cursor, Press the Searching Button(S).
⑧ Press Call Button "E".
⑨ If you want to move page, Press the Electric Key(K) Button.(Setting the other number)
- Repeat ⑦ & ⑧ procedures.
⑩ Press Program Button "P" after finish to set all number
- Please, wait to complete upload.
<References>
•It's able to set the DTMF setting value when audio floor distributors
with DTMF function are installed.(ex. CCU-232AGF)
•DTMF setting value '0' : The function of DTMF is disabled.
DTMF setting value '1' : The function of DTMF is enabled.
<References>
•Data can be received only if the mode "99" in the Program number(23)
is selected & executed the process within 30 seconds.
•You cannot use any other function before it completes(It takes about 1
minutes).
46
Page 48

28. Setting the door release by building password
28-1. Setting the Door Release by Building Password
• P – Management Password – E – 28 – 1 – E : Door release by Building Password
enabled.
• P – Management Password – E – 28 – 0 – E : Door release by Building Password
disabled.
• This function enables the door release by Building Password.
• This function provides least security to the access of the entrance since the password is
being shared among number of people. Please keep the security of Building Password
strictly and/or change the Building Password periodically.
① Press Program Button “P”.
② Enter Management Password.
③ Press Call Button “E”.
④ Enter “28” (number twenty-eight).
⑤ Press Call Button “E”.
⑥ Select mode between the numbers “0” and “1”.
(1 : Door release by Building Password enabled)
(0 : Door release by Building Password disabled)
⑦ Press Call Button “E”.
47
Page 49

28-2. Using a door release by Building Password function.
48
Page 50

29. When you want to call a household
1) called to a household
2) Call by Extension panel button
49
Page 51

3) call by searching name
50
Page 52

30. When you want to call a Guard Station
31. Door Release by Unit Password
51
Page 53

32. Supplement (summary of various programs)
Setting Passwords
1. P–Previous Management Password–E–0–E– New Management Password–E:
Management Password Registration.
. P-Previous Building Password-E-1-E-New Building Password-E : Building Password
2
Registration
3. K-20-E-Household Unit Number-E-Previous Unit Password-E-New Unit Password-E :
Unit Password Registration
4. P-Management Password-E-16-E-Unit Number-E : Retrieving Unit Password
Retrieving Unit Information
1. P-Management Password-E-14-E : Checking the unit’s interphone status
2. P-Management Password-E-15-E : Unit Number Registration
Building number, Lobby phone number, and Door release function Settings
1. P-Management Password-E-2-E-Building Number-E : Building Number Registration
. P-Management Password-E-3-E-Lobby Phone Number-E : Lobby Phone Number
2
Registration
3. P-Management Password-E-28-E : Door Release Function enabled/disabled (00:
Disabled, 01: Enabled)
4. P-Management Password-E-31-E : Electronic Key (Password) enabled/disabled (00:
Disabled, 01: Enabled)
RF Card Key Programming
1. P-Management Password-E-9-E : RF Card Key Testing
2. P-Management Password-E-10-E : RF Card Key Registration
3. P-Management Password-E-11-E : All RF Card Keys Initialization
4. P-Management Password-E-12-E : Deletion an individual RF Card Key
5. P-Management Password-E-13-E : RF Card Key Registration Confirmation
6. P-Management Password-E-32-E-Destination-E: RF Card Key Data Transmission
7. P-Management Password-E-33-E-Destination-E: RF Card Key Data Reception
Name Data Management
1. P-Management Password-E-34-E-Destination-E: Name Data Transmission
2. P-Management Password-E-35-E-Destination-E: Name Data Reception
52
Page 54

SecuMAX Management
1. P-Management Password-E-18-E : Set to Door release by external information
forwarding to SecuMAX.
. P-Management Password-E-22-E : Set to Door release by internal information
2
forwarding to SecuMAX.
3. P-Management Password-E-29-E : Set to be forced opening the Main Entrance door by
SecuMAX.
Door Release by Password
1. Unit Number-K-Unit Password-E : by Unit Password.
2. E-Building Password : by Building Password
How to make a unit call and guard station call from a lobby phone
1. Press house number-E : to Household
2. S-Name Search-E : to Household
3. Press Number ‘9999’-E : to Guard Station
4. Name search-Select Guard-E : to Guard Station
Other settings
1. P-Management Password -E-5-E : Door Release Duration Setting
2. P-Management Password -E-6-E : Selecting Wiring Methods
(04: Common 4 wires, 06: Common 6 wires)
3. P-Management Password -E-7-E : Selecting Call Rings (00:MELODY, 01:BELL)
4. P-Management Password -E-8-E : Setting Video Out Impedance
(00: Short range, 01: Long range)
5. P-Management Password -E-20-E : Setting the Keypad LED Option
(00 : Only work when you used lobby phone)
(01 : Always On)
6. P-Management Password -E-21-E : Setting the Call by Unit Line
7. P-Management Password -E-25-E : Setting number of Call Rings
(00: continuous, 01: once)
P-Management Password -E-30-Beep Volume-Voice Volume-E : Setting the Volume of
8.
Voice and Beep Sound
9. P-Management Password-E-4-E-Household number-E : Setting the Direct Call number
10. P-Management Password-E-36-E-Module ID-E-Setting Data-P : Setting the CDV-
Converter
53
Page 55

33. Wiring Information
1) Guard interphone
GateView GuardStation
481 GuardStation
54
Page 56

2) Sensor connection method
3) Extension Panel
<Caution>
• You can use DRC-nUX(n is the number of button) for extending.
(MAX. 5 units)
55
Page 57

4) Entrance interphone (DRC-GUM)
<Caution>
• If installed outdoor, it requires extra molding for water-proof and
rainshield.
• Recommanded height is pertinent from 1450mm ~ 1500mm
56
Page 58

5) System schematic
57
Page 59

34. Miscellaneous
※ Please carefully read this User’s Guide before calling service man After checking the entire
check list, please contact customer service center. We will do our best to make you satisfy
with our services.
35. Part list
Item Description Q’ty
CONN. 2PX300 Wiring Connector 1
CONN.3P(3.96)X250 Wiring Connector 1
CONN.3PX300 Wiring Connector 2
CONN. 4PX300 Wiring Connector 1
CONN. 10PX300 Wiring Connector 2
SCREW FHM 4X40 SUS NI Bracket + Flush Mount Bracket 4
WRENCH HEX 2.5# Hex Wrench 1
POWER CODE Adapter Connector 1
36. Specifications and Features
Installation Flush Mount Type installation
Model DRC-GUM/RF1
Gateview System (UTP Cable)
Wiring
Power Source DC 12V, 1A
Power Consumption Standby : 115mA, Maximum : 280mA
Call Method Handsfree (one way)
Image Sensor Color CMOS
Horizontal/Vertical 15,735KHz / 60Hz,
Scanning Frequency 15,625KHz / 50Hz
Imaging Angle
Lowest Intensity of
Illumination
Effective Call Range UTP CAT. 5e, 300m
RF Sensing Range 25mm
Lighting Built-in LED light for night use
Temperature -20°C(tested up to -40°C ) ~ 40°C
Dimensions 130 (W) x 315 (H) x 40 (D) mm
Household unit monitor (8 wires-common 6
wires+video 2 wires),
Security station phone (common 4 wires)
Diagonal 100˚, Horizontal 80˚, Vertical 60˚
0.1 Lux (up to 300mm from the camera)
58
Page 60

37. RF-ID Model (Optional)
Communication Device Certification(RF Option)
Model Name DRC-GUM/RF1
Frequency 13.56MHz
Antenna power range Under 47.5mV/m within 10 meter radius
Power DC 12V
Emission Type A1D
Number of Channel 1 Channel
Modulation method ASK
Communication method Simplex Operation Method
Temperature -10°C(tested up to -40°C) ~ +50°C, 95%
59
Page 61

Memo
60
Page 62

513-11, Sangdaewon-dong, Jungwon-gu, Seongnam-si, Gyeonggi-do, Korea
Int’l Business Dept. Tel. : +82-31-7393-540~550 Fax. : +82-31-745-2133
Web site : www.commax.com
PM10GUMRF110
Printed In Korea / 2014.10.104
 Loading...