

Page 1

APR/15/2002
COMMANDO
REMOTE ENGINE STARTER
MODEL FM-760
WITH ALARM SYSTEM
OWNER’S MANUAL
6979 USA
1
Page 2
APR/15/2002
OPERATION:
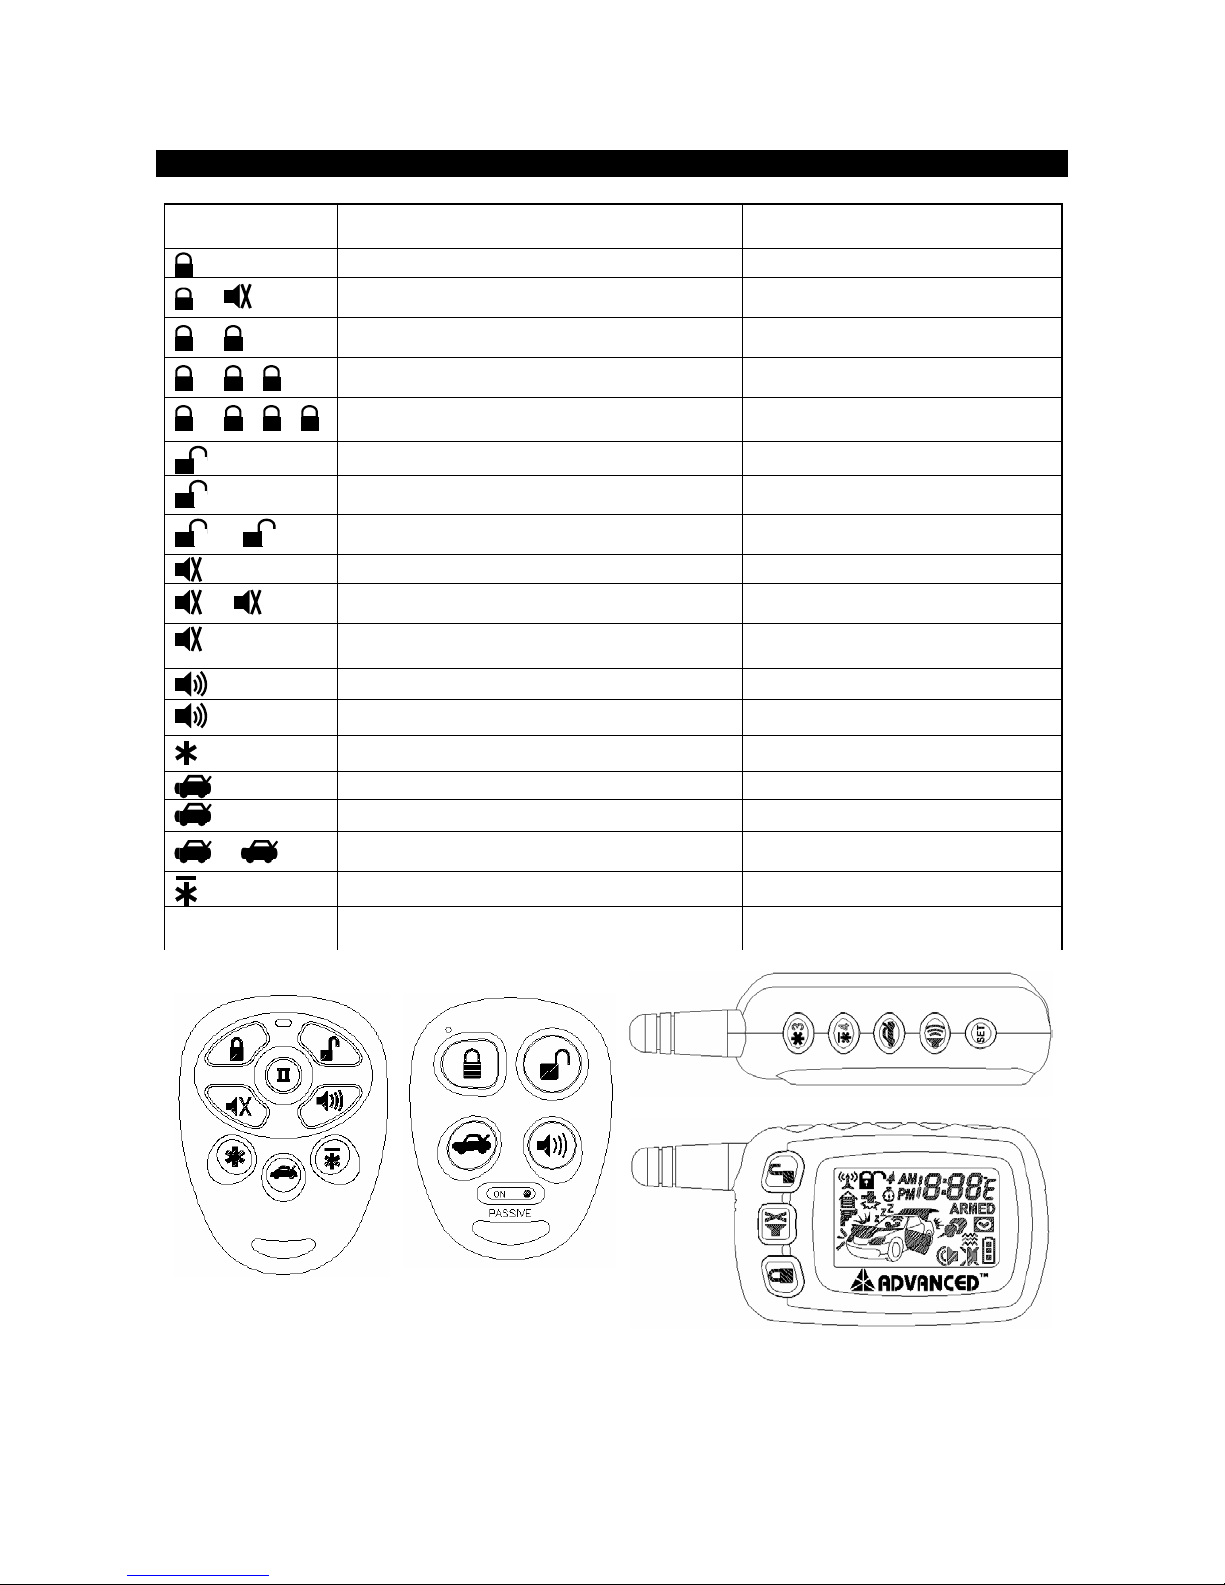
A. REGULAR TRANSMITTER OPERATION:
Transmitter
Button
-
-
- -
- - -
(2-second)
-
-
(2-second)
(3-second)
(1 second)
(2-second)
-
II
System Function Remark
Lock Doors & Arm System
Arm and Noiseless mode Press within 3 seconds.
Arm and Delete The Zone 1 / Shock Sensor Press twice within 3 seconds.
Arm and Delete The Zone 4 / Optional Sensor Press third time within 6 seconds.
Arm and Delete The Zone 1 / Shock Sensor
Delete The Zone 4 / Optional Sensor
Unlock Doors & Disarm System
Disarm & Channel 2 (Trunk) Timer Control Press and Hold for 2 seconds
Two Steps Door Unlock & Disarm System Press twice within 3 seconds.
Silent Arming / Disarming
Hidden Alarm Function
Activate Car-Jacking
Car Locator
Panic function Press and Hold for 3 seconds
Activate Remote Start Press and Hold for 1 seconds
System’s Status Check For TX-780V Only
Channel 2 (Trunk) Timer Control Press and Hold for 2 seconds
Passive Arming By-pass While the system Disarmed.
Turn Off The Remote Start
Switching code For 2nd Car Operation or
Garage Door Opener
Press fourth time within 6 seconds.
Ignition in "off" position.
Ignition in 'on' position and
Press and Hold for two seconds
For TX580S Only
TX580S TX040S TX-780V
REGULAR
TRANSMITTER TRANSMITTER LCD SCREEN TRANSMITTER
6979 USA
PASSIVE / ACTIVE
2
TWO WAY CONMUNICATION
Page 3
APR/15/2002
Second Vehicle Transmitter Programming: (Random code transmitter does not have this feature)
Your 8-button remote transmitter can be utilized to control a second vehicle security system, To program the
remote control transmitter to a second vehicle, follow the instructions for Transmitter programming. All
programming parameters be the same except for the following:
1. Prior to pushing any button on the transmitter. Press the Select the
2. Once the
3. While the LED is illuminated, press any button on the remote control transmitter.
II button is pressed the LED on the transmitter will illuminate for 3.5 seconds.
II button first.
B. UNIQUE OPTIONAL TX040S PASSIVE/ACTIVE TRANSMITTER
Turning the Passive System ON:
For total passive operation and conveniences, moving the passive transmitter's slider switch to “ON” position
on the front case.
This will allow the system to auto arm as you exit and to auto disarm as you approach the vehicle.
The vehicle will remained disarmed and unlocked while you are moving around near the vehicle. After the
passive disarm signals disappear the system will begin auto arming again etc. the vehicle will re-arm and
re-lock the door 15 seconds after the last passive disarm signal was received.
In case the system armed and locks all doors, while you leave your ignition key and this transmitter inside
the vehicle. Rock the vehicle the transmitter will disarm and unlock the doors.
AUTO DISARM
When you move toward your vehicle with the passive transmitter, the system will:
1. Automatically disarm the system.
2. Unlock the vehicle’s door.
AUTO ARM:
When you move out of range with the passive transmitter, the system will:
1. Automatically arm the system after 15 seconds.
2. Lock the vehicle’s door.
Note 1. Time delay:
a. Upon the system is arm passively, the system will set a 15 seconds time delay for the passive
feature, the passive feature will not work in 15 seconds.
b. Upon you are active pressing the button on the transmitter to arm the system, the system will set a
60 seconds time delay for the passive feature, the passive feature will not work in 60 seconds.
Note 2. Turning the Passive System Off :
a. You can disable the passive feature by moving the transmitter's slider switch to OFF. It will turn into
normal active transmitter.
b. If you are working around your vehicle and keeping your passive transmitter with you, you might
want to turn the passive system off. If you don’t, the transmitter will keeping locking and unlocking your
doors.
TX040S PASSIVE/ACTIVE TRANSMITTER OPERATION:
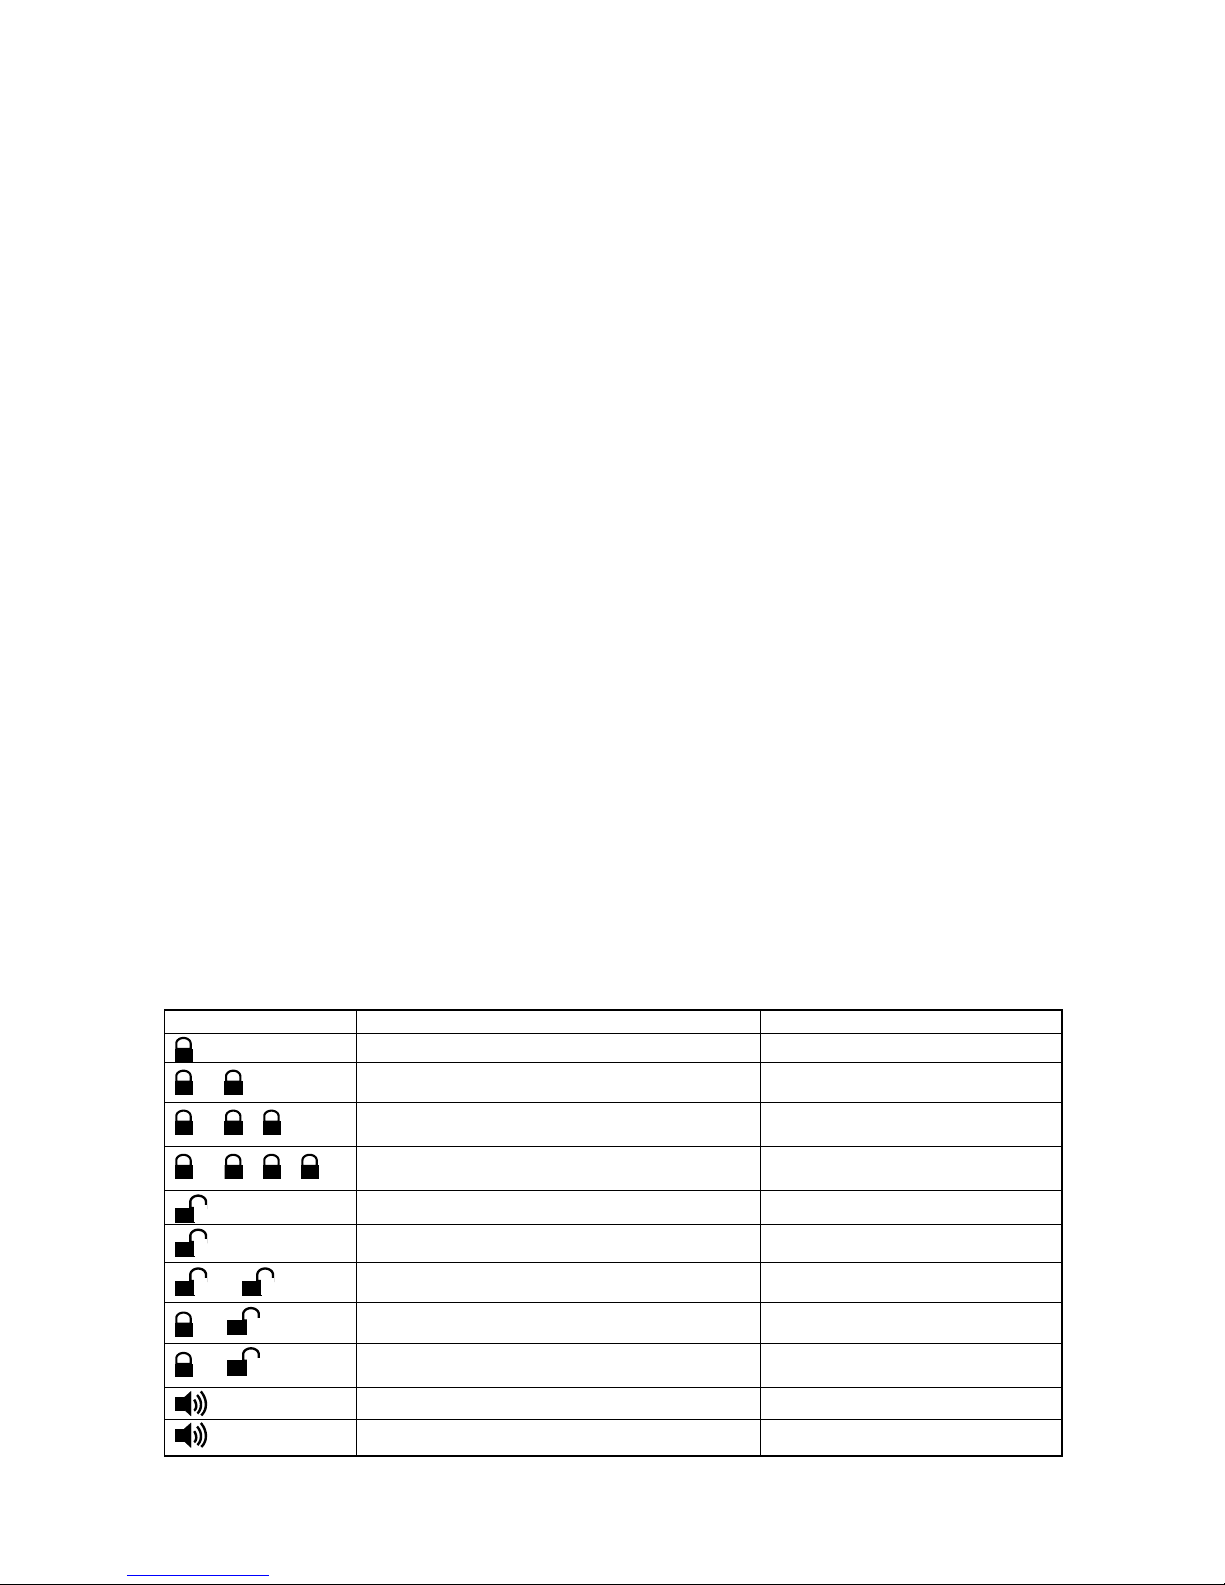
Transmitter Button System Function Remark
-
- -
- - -
(2-second)
-
+
+ (2-second)
(3-second)
Lock Doors & Arm System
Arm and Delete The Zone 1 / Shock Sensor Press twice within 3 seconds.
Arm and Delete The Zone 4 / Optional Sensor Press third time within 6
Arm and Delete The Zone 1 / Shock Sensor
Delete The Zone 4 / Optional Sensor
Unlock Doors & Disarm System
Disarm & Channel 2 (Trunk) Timer Control. Press and Hold for 2 seconds
Two Steps Door Unlock & Disarm System Press twice.
Silent Arming / Disarming
Activate Car-Jacking
Car Locator
Panic function Press and Hold for 3 seconds
seconds.
Press fourth time within 6
seconds.
Ignition in "off" position.
Ignition in 'on' position and
Press and Hold for 2 seconds
6979 USA
3
Page 4
APR/15/2002
+ (1 second)
(2-second)
-
+
Activate Remote Start Press and Hold for 1 seconds
Channel 2 (trunk) Timer control Press and Hold for 2 seconds
Passive Arming By-pass While the System Disarmed.
Turn Off The Remote Start
C. LED display:
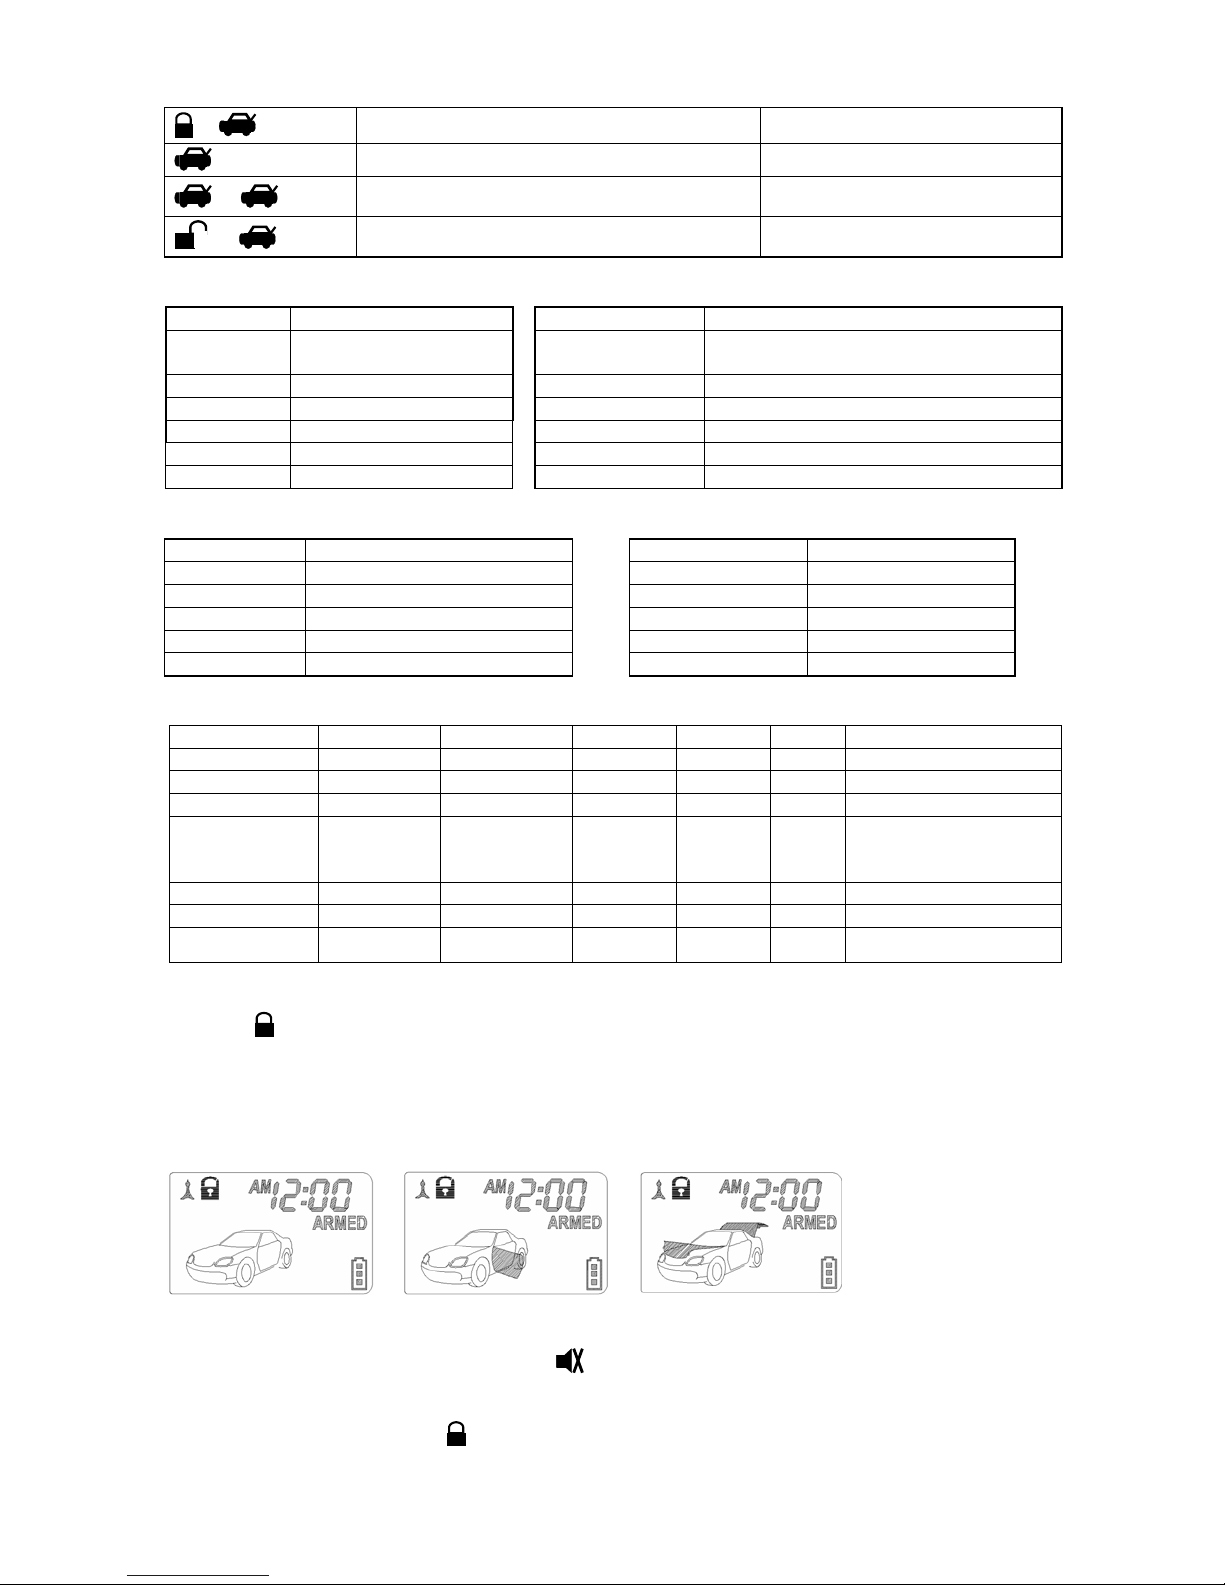
LED Function LED Function
Off Disarmed 1 flashes... pause Zone 1 / Trigger on-board Shock
Sensor
Slow Flash Armed 2 flashes... pause Zone 2 / Trigger on Trunk/Hood
Flash Passive Starter Disable 3 flashes... pause Zone 3 / Trigger on Door Switch
Fast Flash Passive Arming 4 flashes... pause Zone 4 / Trigger on Optional Sensor
On (Solid) Valet Mode 5 flashes... pause Zone 5 / Trigger on PIR or Door Sensor
Pause On Password Lock-Out
6 flashes... pause Zone 6 / Trigger on Ignition Switch
D. CHIRP INDICATORS: E. PARKING LIGHT:
Chirp Function Parking light Function
1 chirp Arm 1 flash Arm
2 chirps Disarm 2 flashes Disarm
3 chirps Defective Reminder 3 flashes Disarm / Triggered
4 chirps Disarm / Triggered 12 flashes Car Locator
6 chirps Car Locator Constant On Under Remote Start
F. ALARM OPERATING CONDITION:
Siren / Horn Parking Light LED Doors Starter Dome Light
1. Arming 1 or 3 Chirps 1 Flash Slow Flash Locking Disable
2. Disarming 2 or 4 Chirps 2 or 3 Flashes Fast Flash Unlocking Turns on for 30 -second
3. Trigger Alarming Flashes Slow Flash Disable Flashes
4. Passive
Starter
Disable
5. Panic Alarming Flashes Flashes
6. Car-Jacking Alarming Flashes Disable Flashes
7. Car Locator 6 Chirps 12 Flashes
Fast Flash Disable
G. ACTIVE ARMING – LOCK & ARM:
1. Press button on the transmitter.
2. The siren will chirp once and parking light will flash once indicating that the system is now armed. The
vehicle doors will lock upon arming when interfaced with the security system.
Note: The wireless PIR sensor and wireless door/window sensor is delay trigger, it will arm after 30
seconds.
System Arm
DEFECTIVE SENSOR REMINDER: If the siren sounds 3 chirps, then you have left a door, trunk, or hood
lid ajar. (See Feature “I
SILENT ARMING / DISARMING:
system, No chirp sound will be heard, arm / disarm confirmation will be through the vehicles parking lights
only.
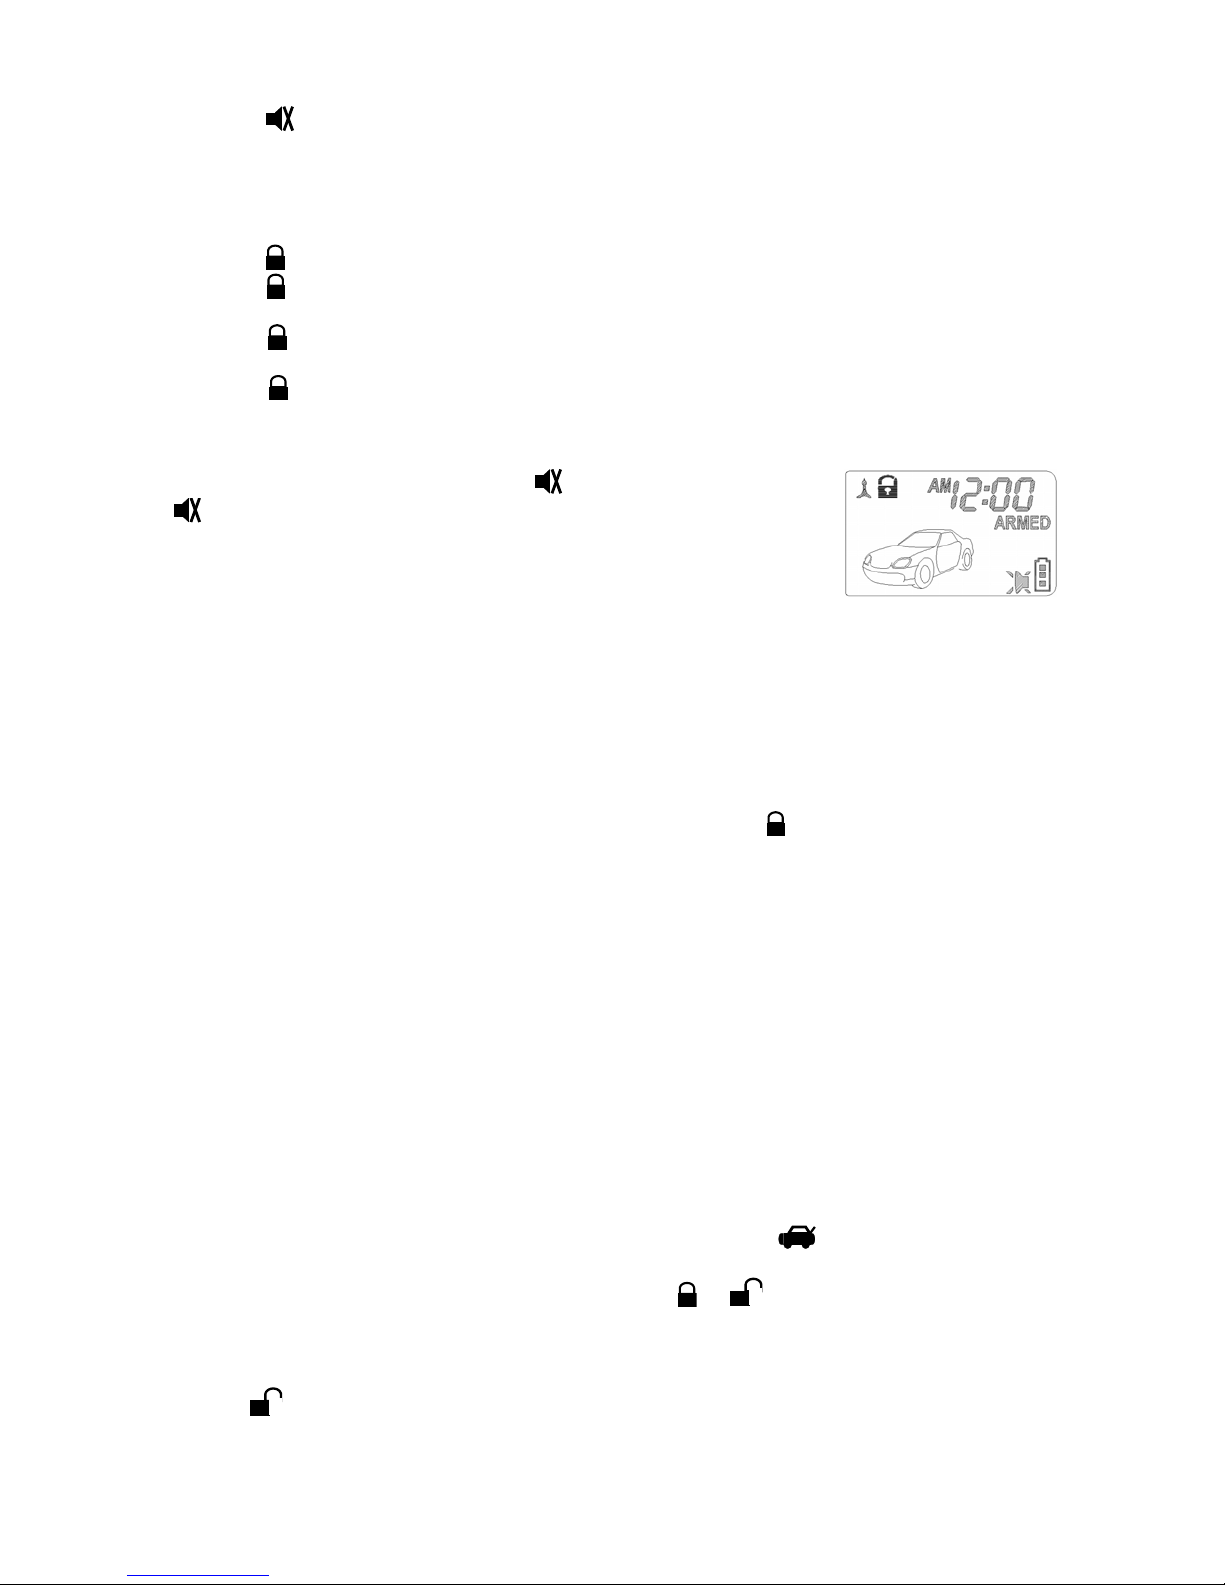
NOISELESS MODE: Press the
6979 USA
Door Ajar
- 4 Programming)
Press the button on the transmitter will arm or disarm your security
button once: The siren chirps once, The system is armed.
Trunk / Hood Ajar
4
Page 5
APR/15/2002
Press the
On this mode trigger the zone 1 shock sensor or zone 4 optional sensor the trigger timer will reduced from
60 seconds to 15 seconds. .
The noiseless feature is programmed to activate for one arming cycle only. The security system will return
to normal operation during the next arming cycle.
SHOCK SENSOR / OPTIONAL SENSOR BY-PASS:
Press the
Press the
now bypassed.
Press the
(connected to 4 pin plug) is now bypassed.
Press the
Sensor and the Zone 4 / Optional Sensor (connected to 4 pin plug) are now bypassed.
The sensor bypass feature is programmed to activate for one arming cycle only. The security system will
return to normal operation during the next arming cycle.
HIDDEN ALARM FUNCTION: Press the
button within 3 seconds. The security system will arm and with
“Hidden Alarm Function”. The siren/horn will be silenced and parking
light/dome light will not flash even if the sensors are triggered in the armed
status.
PASSIVE STARTER DISABLES: (see Alarm Feature I
The purpose of the feature is to protect the vehicle from being stole at all times, regardless of whether or
not the alarm is armed.
The starter of the vehicle will be disable 60 seconds after the ignition is turned off. Once the key is turned
off, the LED will flash fast for 60 seconds.
After 60-second timer has elapsed, the LED will flash slowly (one-half its normal armed rate) to indicate the
passive starter disable is activated and the system will not respond to any trigger input except the ignition
switch.
ARMING WHILE DRIVING: (see Alarm Feature I
You system can be armed while driving the vehicle! Simple press
vehicle is running, or the ignition is on. The system will chirp once and then once more to indicate the
ignition is on. The system will not respond to any input except the door trigger and the starter kill relay and
ignition disable relay will not be activated. The system will disarm automatically when the ignition is turned
off. The siren will chirp twice and the LED will stop flashing.
button within 3 seconds: The siren chirps once again, the system is now in Noiseless mode,
button once: The siren chirps once, The system is armed.
button a second time within 3 seconds: The siren chirps once, the Zone 1 / Shock Sensor is
button a third time within 6 seconds: The siren chirps twice, the Zone 4 / Optional Sensor
button a fourth time within 6 seconds: The siren chirps three times, the Zone 1 / Shock
button first then press the
- 2 Programming)
- 6 Programming)
button for 2 seconds while the
H. PASSIVE ARMING
Active arming / disarming is controlling your security system via the remote transmitter. This security
system is equipped with an optional Passive Arming feature, which allows the security system to arm 30
seconds after the last door is closed. Operation is as follows.
1. Turn the ignition to the “OFF” position and exit the vehicle.
2. After all entrances are closed, the security system LED will flash fast for 30 seconds. If you reopen any
door / hood / trunk, the security system LED will stop flashing. It will begin flashing again once the
vehicle all entrances are closed.
3. After 30-second timer has elapsed, the security system will automatically “ARM”. The siren will chirp [1]
time and the parking lights will flash [1] time.
PASSIVE ARMING WITH PASSIVE DOOR LOCKING (See Alarm Feature “I
The vehicle doors will automatically lock after passive arming cycle has been completed.
PASSIVE ARMING BY-PASS: While the system disarmed, Press the
will respond with [1] chirp and LED will turn “ON”. The security system will remain in this temporally state
for as long as you wish. To exit passive by-pass, press the
to normal status.
button and the system will return
or
-
2” Programming):
buttons twice, the security
I. ACTIVE DISARMING – UNLOCK & DISARM:
1. Press button on the transmitter.
6979 USA
5
Page 6
APR/15/2002
2. The siren will chirp twice and parking light will flash twice to indicating that the security system is now
disarmed. The vehicle doors will unlock and dome light wills turns on for 30 seconds upon disarming
when interfaced with the security system.
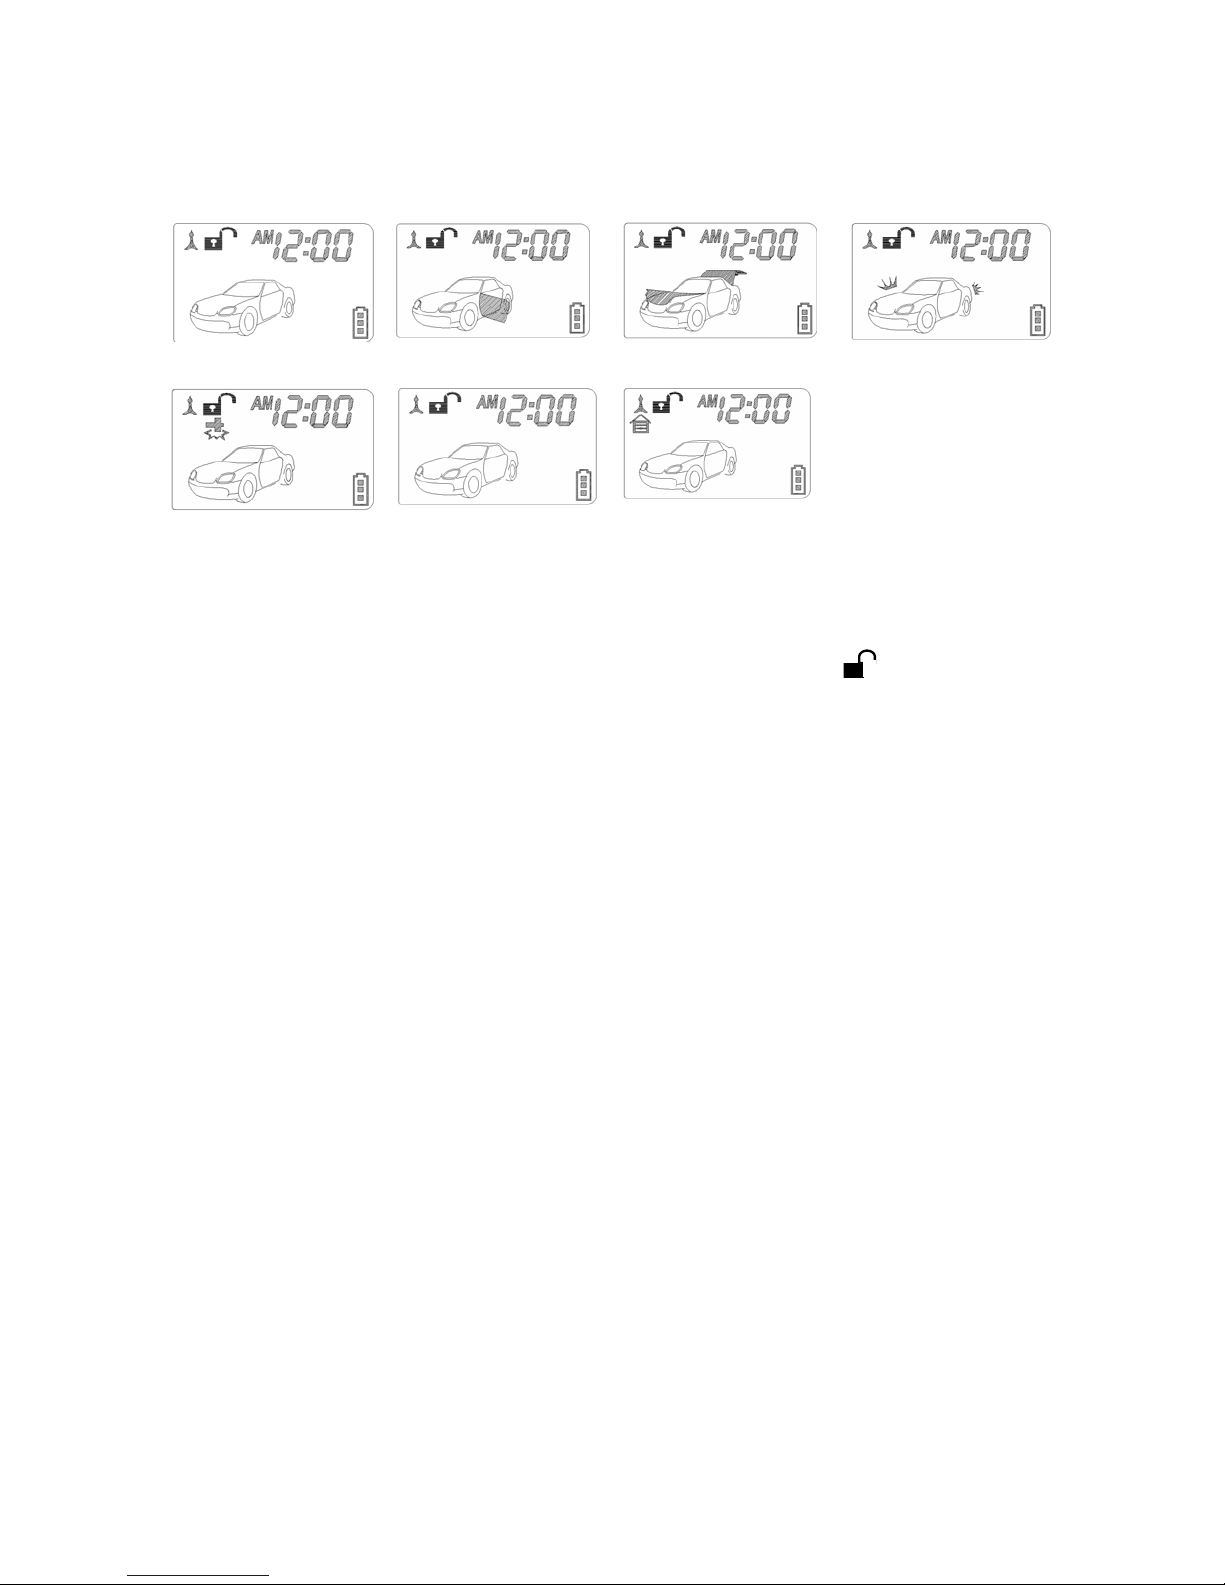
System Disarm
Doors Trigger
Trunk/Hood Trigger
Shock Sensor Trigger
Optional Sensor Trigger
TAMPER DISARMING: If alarm triggered, upon disarm the system, siren chirp 4 times, parking light flash
3 times.
PATHWAY ILLUMINATION (See Alarm Feature “II
light “ON” for 30 seconds upon a unlock signal and for 10 seconds upon the lock signal.
TWO STEPS DOOR UNLOCK (See Start Feature “I
unlock the drives door only when disarming the security system. Pushing the
within 3 seconds will unlock the entire vehicle.
AUTOMATIC RE-ARM (See Alarm Feature “
system will automatically re-arm itself 60 seconds after disarming with remote transmitter. Automatic rearm
will cancel if any door is opened before the 60 seconds timer has elapsed.
Ignition Trigger
Activate PIR Sensor
- 4” Programming): This feature turns the parking
- 5” Programming): This feature will independently
button a second time
I - 3” Programming): If this feature is selected, the security
J. DISARMING WITHOUT A TRANSMITTER
OVERRIDES THE ALARM WITHOUT PASSWORD PIN CODE: (Alarm Feature III - 4 Programming)
The Override function may be used if the remote transmitter is lost or inoperative.
1. Enter the vehicle and turn the ignition switch to 'ON’ position. (Alarm will sound.)
2. Within 10 seconds push and release the valet switch
The alarm will stop sounding and enter the disarm mode. You can now start and operate the vehicle
normally.
OVERRIDES THE ALARM WITH PASSWORD PIN CODE: (Alarm Feature III - 4 Programming)
Unlike valet switch easily found, and defeated, this security system allows the consumer to program a
password pin code. Offering a higher level of security.
1. Enter the vehicle and turn the ignition switch to 'ON’ position. (Alarm will sound.)
2. Within 5 seconds, enter your chosen first 10ths digit by press and release the Valet Switch.
(When finished above procedures, system's siren stop alarming, parking light stop flashing, other
sensor stop trigger, but the vehicle can not be start and drive away.)
3. Within 15 seconds of the last entered 10ths digit, turn the Ignition Switch “OFF” then “ON”.
4. Within 15 seconds, enter your chosen second 10ths digit by press and release the Valet Switch.
5. Turn the ignition switch “OFF” position.
[4] Chirps form siren/horn, [3] flash from parking light to indicate the system was disarmed.
Note 1: You must override the alarm within 60 seconds. If not, the system will automatically re-arm.
Note 2: If some one key-in at wrong password pin code, the system allows him to make 2 mistakes, if
third time still wrong, it will automatically shut down for 5 minutes. During the period the system will not
accept any correct number and the LED will “pause on” (the LED will turns on 1 second and turns off 0.1
seconds pause).
EXAMPLE: To Override The System With The Password Code 83, you would;
1. Enter the vehicle and turn the ignition switch to 'ON’ position. (Alarm will sound.)
2. Within 5 seconds, Press and Release the Valet Switch 8 times
(When finished above procedures, system's siren stops alarming, parking light stop flashing, other
sensor
stop trigger, but the vehicle can not be start and drive away.)
6979 USA
6
Page 7
APR/15/2002
3. Within 15 seconds of the last entered 10ths digit, turn the Ignition Switch “Off” then “ON”.
4. Within 15 seconds, Press and Release the Valet Switch 3 times
5. Turn the Ignition Switch to “Off” position.
[4] Chirps form siren/horn, [3] flash from parking light to indicate the system was disarmed.
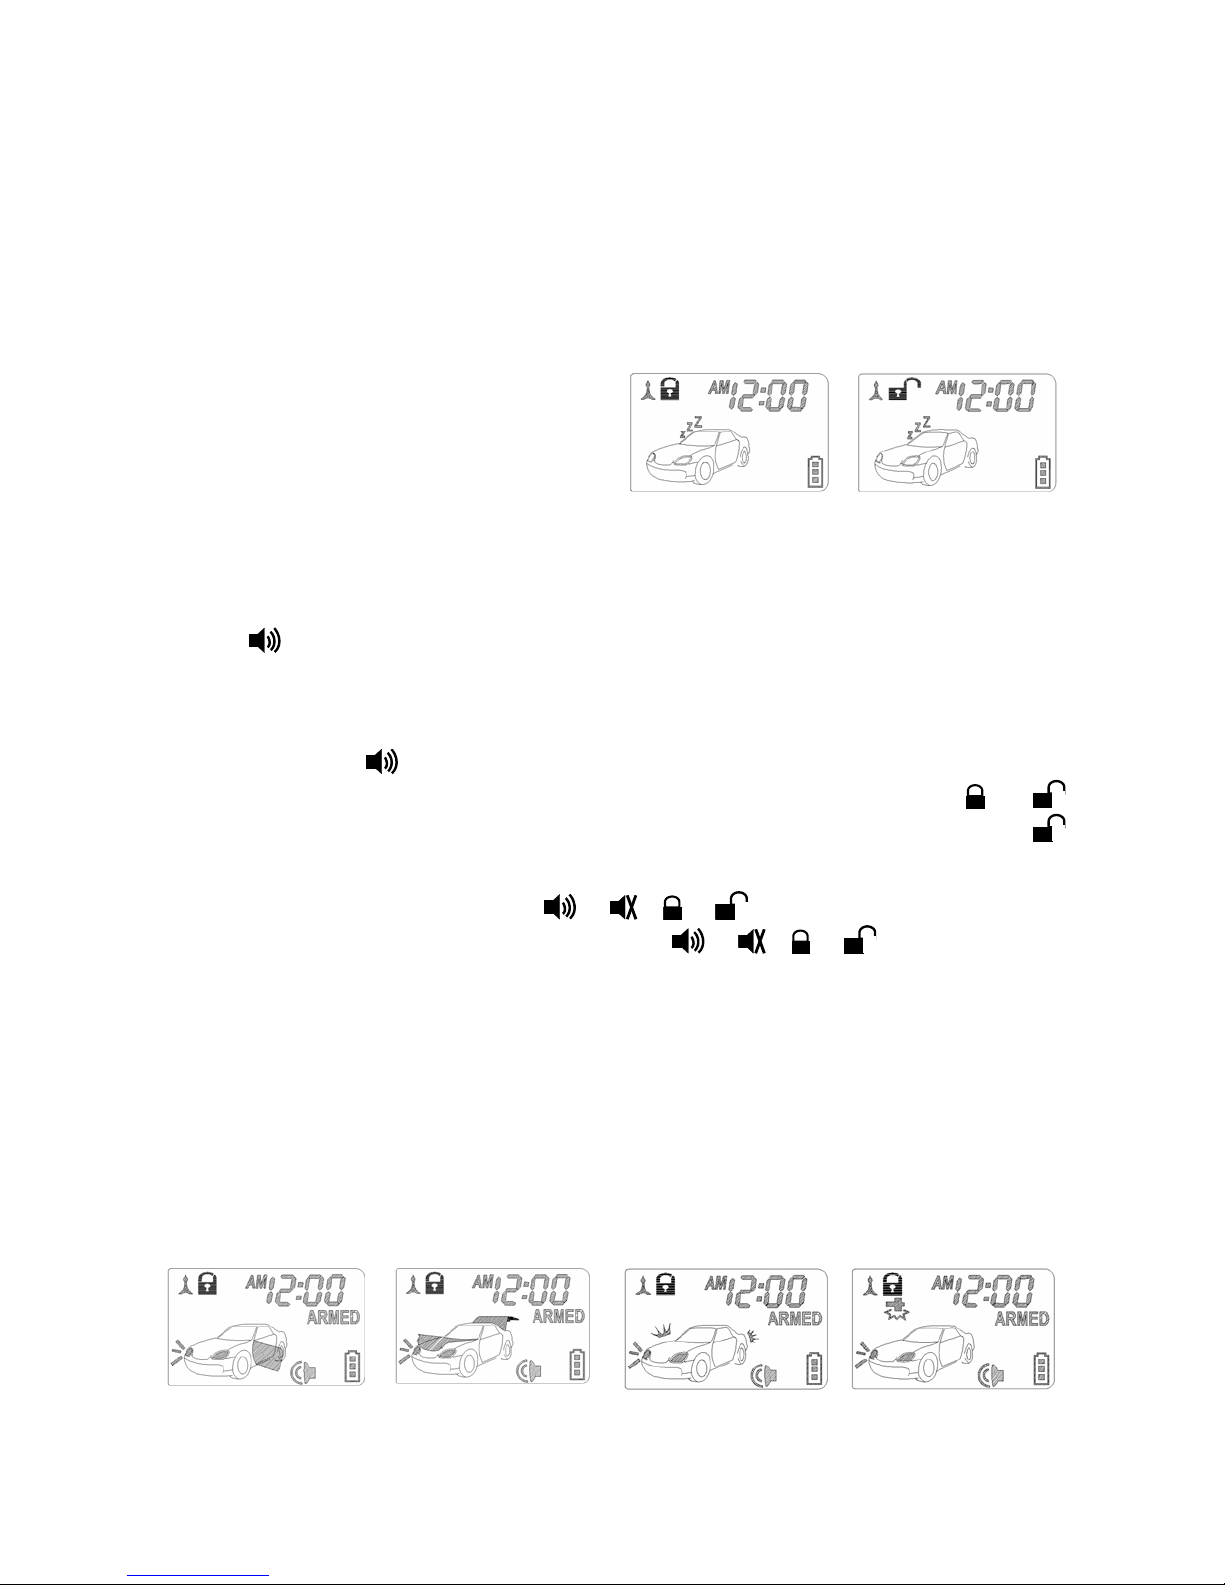
K. VALET MODE: (System in Disarm or Valet mode)
The valet switch allows you to temporarily bypass all alarm function, eliminating the need to hand your
transmitter to parking attendants or garage mechanics. When the system is in valet mode, all alarm function
and remote start function are bypassed, however the remote panic feature and remote door locks will
remain operational. To use the valet mode, the system must first be disarmed either by using you remote
transmitter, or by operating the Manual override sequence.
Enter Valet Mode:
1. From the disarmed condition, turn the ignition to
“ON” position.
2. Push and hold valet switch for 2 seconds until
the LED turns on. The LED wills remain on as
long as the system is in 'valet mode'.
Exit Valet Mode:
1. Return to normal operation, turn ignition 'on'.
2. Push and hold valet switch for 2 seconds, The LED wills turns off indicate the system are exiting the
valet mode.
Remote Door Lock
Remote Door Unlock
L. CAR LOCATOR
Press the button to active car locator function. The siren will chirp 6 times. The parking light will flash
12 times, for you to easily locate your car.
M. PANIC FUNCTION: (See Alarm Feature I – 7 Programming)
The transmitter can be used as a remote panic switch to manually trigger the alarm in case emergency.
1. Press and hold the
2. During panic mode, the normal function of this transmitter button will be suspended. The
button for 3 seconds. The alarm will immediately sound.
and
buttons can be used to lock and unlock the doors (if the option is installed), however once the
button is pressed, the vehicle’s starter disable device, (where installed) will be enable allowing the
vehicle to start.
3. To stop the alarm, press and hold the
seconds. Also if any transmitter button other than the
released, the panic mode will be turned off immediately.
4. If the button is not pressed, the alarm will automatically stop after 60 seconds.
or or or button on the transmitter again for 3
or or or button is pressed and
N. TRIGGER THE SYSTEM
When armed, your vehicle is protected as follows:
1. Light impacts will trigger the warn-away signal. A [3] long chirp from siren/horn.
2. Heavy impacts / Doors open / Hood open / Trunk open / Turn on the ignition key / Activate PIR sensor /
Activate door/window sensor will trigger the programmed sequence.
The starter disable relay (if installed) prevents the vehicle’s starter from cranking. The siren, horn, parking
lights, and dome light will turn on to alerting of an intrusion for 60 seconds. Then it will stop and automatic
reset and re-arm. If the one of sensors or detectors still active, the alarm system will sound a maximum of
3 times of 60 seconds cycles.
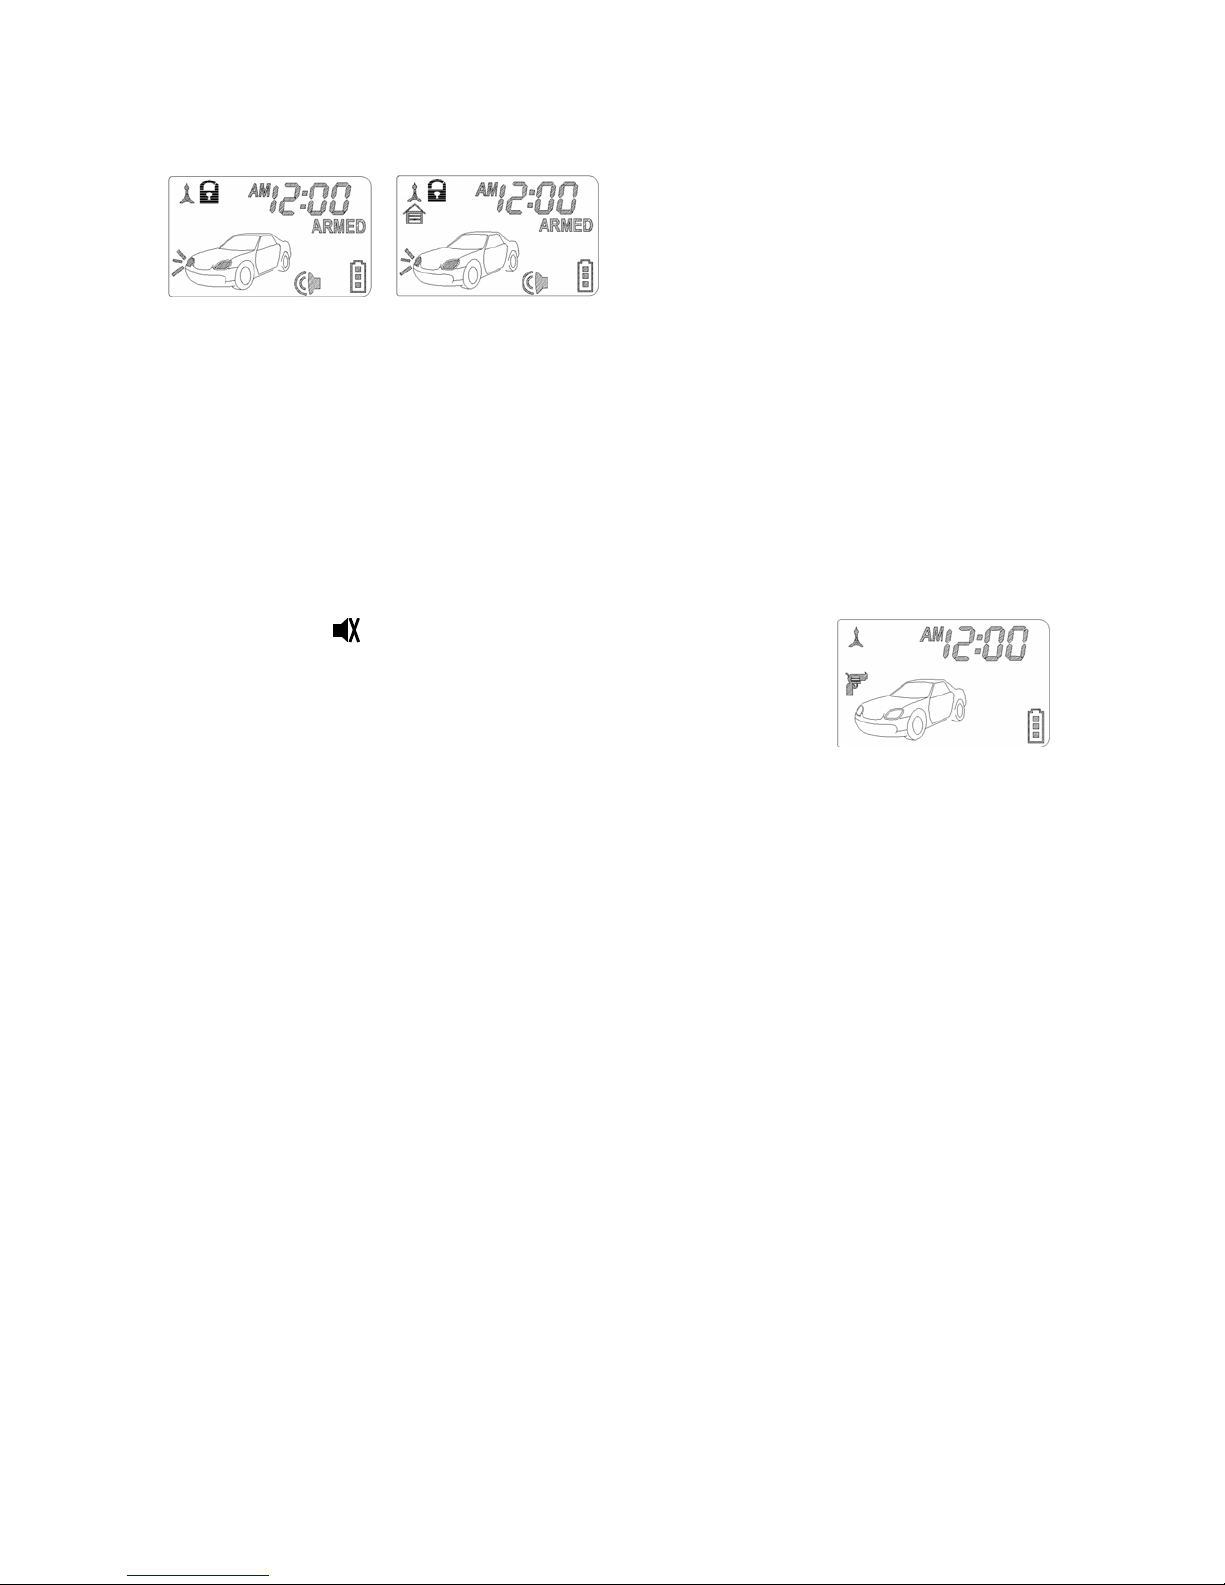
Doors Trigger
Trunk/Hood Trigger
Shock Sensor Trigger
Optional Sensor Trigger
6979 USA
7
Page 8
APR/15/2002
Ignition Trigger
Activate PIR Sensor
NOISE ABATEMENT CIRCUIT: You system has “Noise Abatement Circuit”. It prevents annoying repetitive
trigger sequences due to faulty door pin switches or environmental condition such as thunder, jackhammers
airport noise, etc.
Here’s how “Noise Abatement Circuit” works: The alarm triggers five times. Each time, the same sensor or
switch is triggering the alarm. “Noise Abatement Circuit” will interpret this pattern of triggers as false alarm.
After the fifth trigger, “Noise Abatement Circuit” ignores, or bypasses, that sensor or switch until the other
sensor or switch is trigger.
Doors (Hood/Trunk) are covered by “Noise Abatement Circuit” differently: If the alarm is triggered by an open
door for six full cycles, the doors will be bypassed until the trigger ceases.
O. ANTI CAR-JACKING
Warning: If you don't need the car jacking function in this alarm system, be sure to set car jacking feature
“OFF”. This system is default setting all car-jacking “OFF”. (See Alarm Feature I
ACTIVE CAR JACK:
1. Press and hold
vehicle’s ignition is ON. The parking light will turns on for 1.5” seconds to
indicate this enter.
2. Once the system is armed, If you are forced from the vehicle, the system
will trigger when the door is opened and closed while the ignition is “ON”.
PASSIVE CAR JACK:
It operate as below:
1. Turn the ignition switch to “ON”, the system will arm.
2. Once the system is armed, If you are forced from the vehicle, the system will trigger when the door is
opened and closed while the ignition is “ON”.
TRIGGER THE CAR JACK MODE:
3-timer circuits will function as follows:
First timer:
a. 50 seconds after the system has beer triggered. The siren will start chirping for 15 seconds.
b. During this 15 seconds period of chirping, you will be alerting to push the valet switch once to turn off
the car-jacking feature.
c. If not, it will enter second timer car jacking.
Second timer:
65 seconds after the system has beer triggered. The siren starts alarming and the parking light starts
flashing.
Third timer:
90 seconds after the system has beer triggered
a. The siren still alarming and the parking light flashing, and
b. The starter disable will activate to prevent the vehicle from starting.
c. It will remain active until the vehicle's battery power exhausted.
OVERRIDE THE SYSTEM TO TURN OFF CAR JACKING:
Turn the ignition switch from OFF to ON, and within 10 seconds push valet switch, the siren will stop and
the system disarmed
Note: If you use password pin code to double protect the vehicle security, you will need to use it to
completely disarm the system.
button on the transmitter for 2 seconds while the
- 5 Programming.)
P. DOME LIGHT CONVENIENCE DELAY & SUPERVISION
The alarm with a unique feature which will turn on your vehicle dome light as following:
1. Upon disarming, the interior lights will remain on for 30 seconds.
2. If the vehicle is intruded, the interior light will flash for the same duration as the siren.
Note: Turn on the ignition switch or arm the alarm will turn off the dome light.
6979 USA
8
Page 9
APR/15/2002
Q. IGNITION CONTROL DOOR LOCKS. (See Alarm Feature II – 2 Programming).
If the vehicles door locks have been interfaced to the security system, the system will automatically lock
the vehicle's doors when the ignition is turned “ON” and /or unlock the vehicle’s doors when the ignition is
turned “OFF”.
R. TRUNK RELEASE (CHANNEL 2) OUTPUT.
This will become a 1 second pulse ground by activate button on the transmitter for two seconds. This
feature allows you to remote control trunk release or other electric device. This output can also be
programmed to provide the following type of output: momentary, latched, latched-reset with ignition,
30-second timed. (See Alarm Feature II-6 Programming)
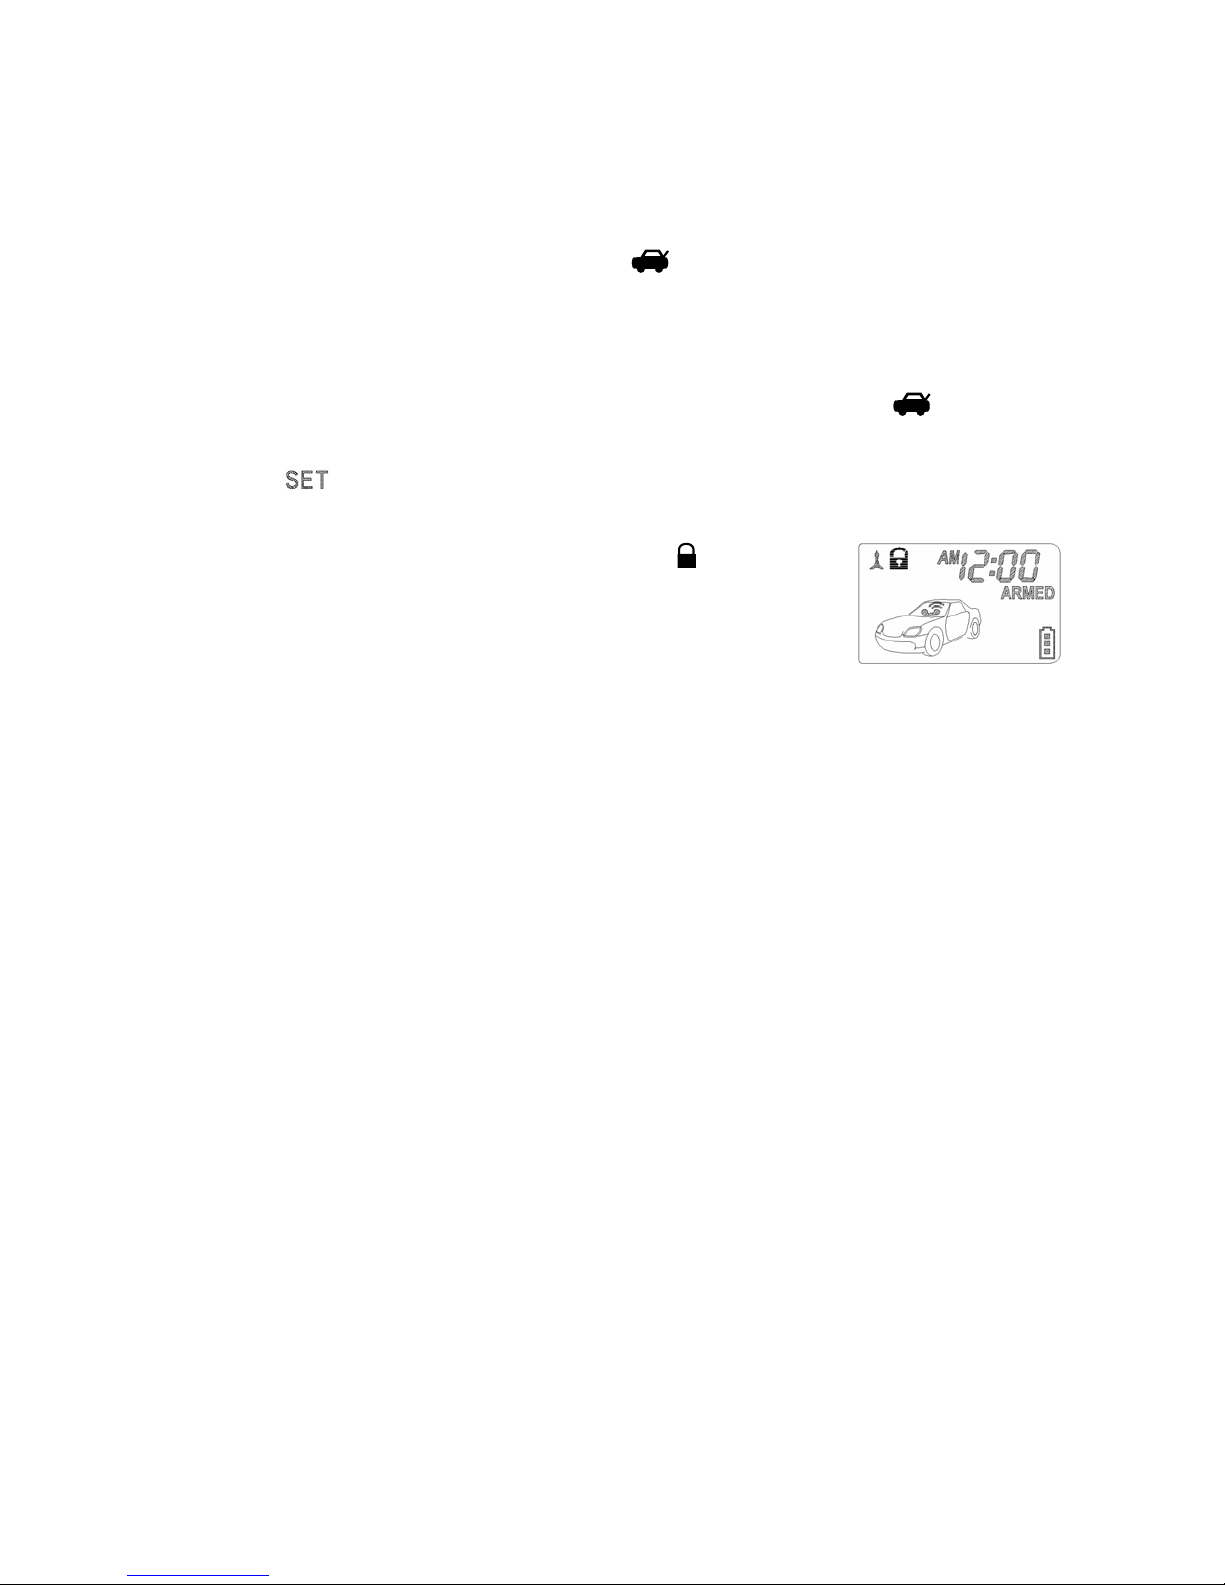
S. SYSTEM’S STATUS CHECK.
When you want to check the system’s present status thru the LCD screen, Press the button on “Two
Way LCD Screen Transmitter”, With one melody sound, the system’s status will be shown on the LCD
screen.
Note: Press
for 2 seconds with 2 beeps confirmation to clear the trigger icons of LCD screen.
T. DRIVER PAGING (OPTIONAL)
1:The function works only in arming status as well as press for 2 seconds.
It responds with chirps of the vehicle, melody sound and "call" indication
flashes
on the LCD screen to confirm the function is on.
2: When tapping the paging (knock) sensor, one chirp sound shall be emitted
from
the vehicle.
3. Any time while the system arms again, the function will be no more
available.
If you installed the optional PAGING (KNOCK) SENSOR, it is useful the event that someone wants to
page the driver of the parked vehicle.
If someone tries to page you by tapping the paging (knock) sensor which is usually mounted on the bottom
part of front window, the paging melody sound continues sounding from you Remote LCD Transmitter and
“call” indication flashes on the LCD screen.
U. POWER ON MEMONRY:
This security system is equipped with circuitry that will allow the unit to remember its alarm state if the
power is lost and then reconnected.
6979 USA
9
Page 10
APR/15/2002
REMOTE START OPERATION:
WARNINGS:
As with any product that performs automatic functions, there are certain safety precautions that you must
practice and be aware of.
1. Keep the transmitter out of children’s reach.
2. Do not leave anyone in the vehicle while running on remote control.
3. Alert servicing personnel that the vehicle can be started automatically.
4. Do not start the vehicle by remote while it’s in an enclosed area or garage.
5. Always apply the parking brake and lock the vehicle as you exit the vehicle.
6. Should the unit malfunction, disconnect the fuse until the problem is corrected.
7. The use and operations of this system is the sole responsibility of the operator.
8. Some areas may have local ordinances that prohibit leaving a vehicle running on public streets.
A. TO REMOTE START THE VEHICLE:
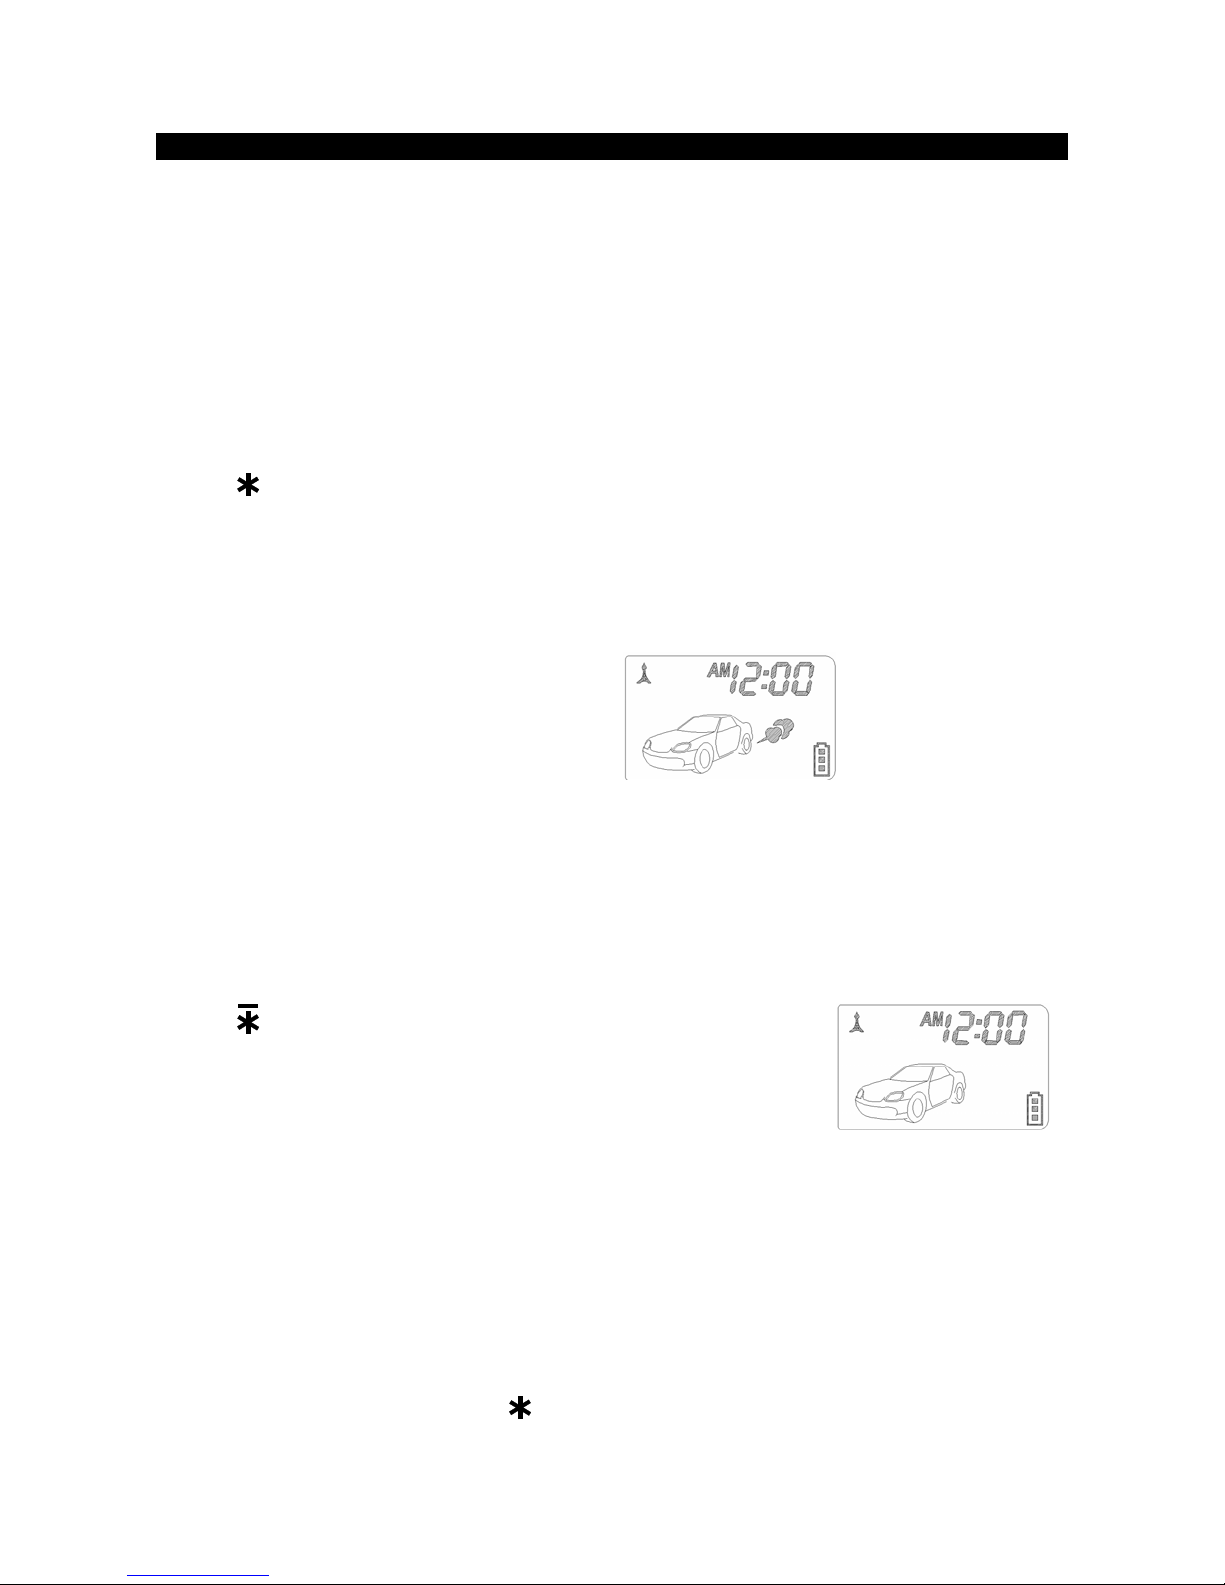
When you want to start your vehicle,
1. Press
2. The parking light will activate to indicate the remote start received the signal.
3. The engine will start approximately 5 seconds.
4. Once the engine is running, after couple seconds the parking light will turn on again and climate controls
will activate and adjust the vehicles interior temperature to your preset setting.
5. The vehicle will run for 5 to 30 minute cycle and automatically shut down.
Activate Remote Start
Melody sound from
Two-way
LCD Transmitter
button on the transmitter for 1 seconds.
Engine is Running
NOTE:
The Remote Start Unit will not start the vehicle if any one of the following conditions exists:
1. The hood is opened.
2. The brake pedal is pressed.
3. Move the optional remote start enable toggle switch to OFF position. (If installed)
4. The gear selector is in any gear other then “PARK” or “NEUTRAL”
B. TO TURN OFF THE REMOTE START:
When the engine is running (by remote start), if you want to stop it,
1. Press
2. Move the optional remote start enable toggle switch to OFF position. (If
installed)
3. Press the brake pedal
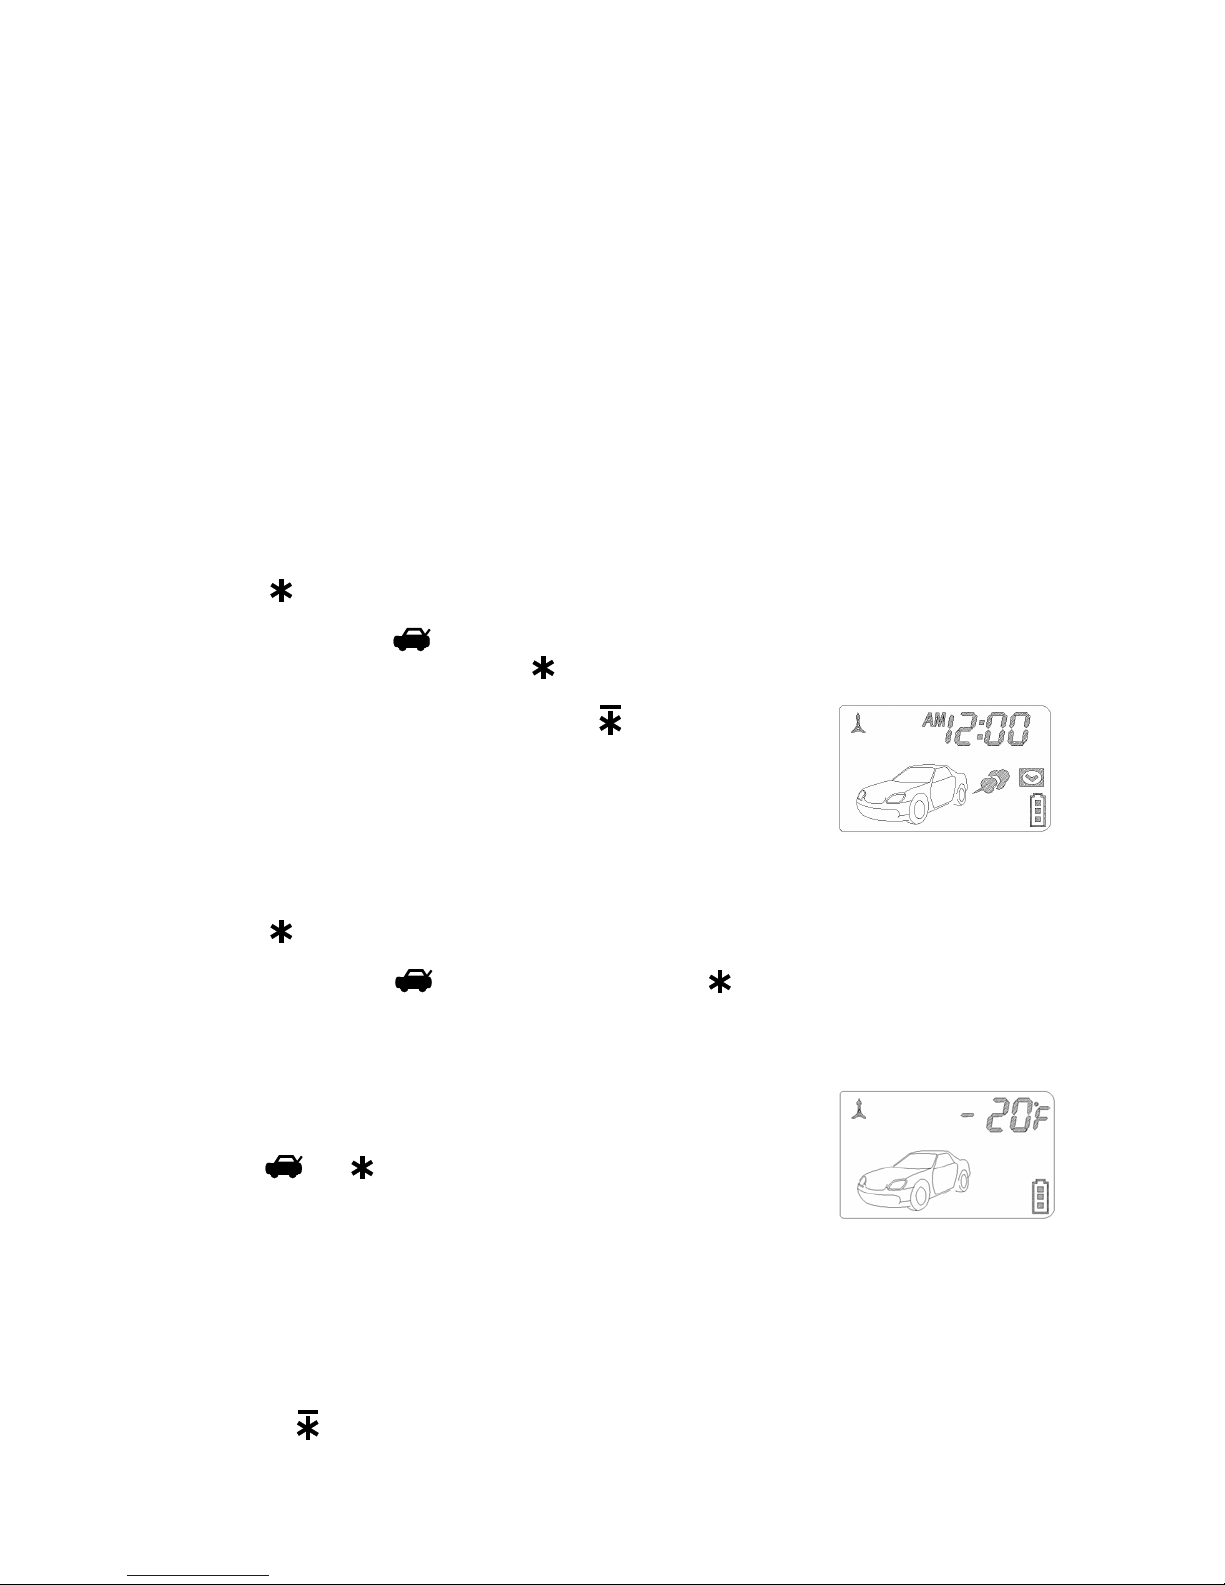
The vehicle will shut down and turn off the parking light to indicate engine
stopped.
button on the transmitter.
C. TO OPERATE THE VEHICLE WHILE RUNNING ON THE REMOTE START:
To operate the vehicle while running on the remote start.
1. Insert the ignition key and turn it to “ON” (not the start) position.
2. Press the brake pedal.
Note: If the brake pedal is pressed before the key is in the ON position, the engine will shut down.
D. TEMPORARY STOP FEATURE:
This feature allows the vehicle to remain running after the key has been removed from the ignition. This
feature is useful for occasions when you wish to exit and lock the vehicle for short periods of time, but would
like to leave the motor running and the climate control on.
1.Before turning off the engine, press the
times to confirm enter.
2.Turn the ignition key to OFF position. (The engine will stay running.)
button on the transmitter and the LED indicator will flash 3
6979 USA
10
Page 11
APR/15/2002
3.The engine will run until the pre-programmed time elapsed or shutdown input is received.
E. TIMER / TEMPERATURE START:
This unit can be programmed to start and run the engine every 3 or 24 hours. The engine will run for the
programmed run time and then shut down.
IMPORTANT: Timer Start should be used only in open areas, Never start and run the vehicle in on enclosed
space as a garage or carport.
3 hours timer start with Temperature-control OFF: This feature is design for an extreme cold climate
usage. The system will auto start the vehicle every 3 hours, to prevent engine freezing and hard to start. A
MAXIMUM OF SIX CYCLES CAN OCCUR.
3 hours timer start with Temperature-control: If you installed the optional Temperature Sensor and
programmed the temperature ON to operate. The system can be programmed to automatically start the
vehicle engine whenever the temperature inside the vehicle reaches or drops below the preprogrammed
temperature level. The system will monitor the air temperature every 3 hour and will only start the engine
during extreme cold temperatures. There are three temperature level to choose form. (This feature is
programmed OFF from the factory and must be programmed ON to operate. (See Start Feature
Programming)
24 hours timer start: This feature is design for a battery charge usage. When the car owner has a long
vocation, he can use this feature to auto start the vehicle and charge the battery every day, to prevent a low
battery.
ENTER:
1. Press the
have turned on or flashing.
2. Immediately depress the
4-a. 3 Hours auto start: Rapidly depress the
or horn chirps (3) times. The vehicle is now programmed to start every (3) hours.
button to remote start the vehicle. As soon as the vehicle is running and the parking light
button once, within 2 seconds.
button once. The parking light will flash (3) times. The siren
I – 7
4-b. 24 Hours auto start: Rapidly press and hold the
The parking light will flash (12) times. The siren or horn chirps (12) times.
The vehicle is now programmed to start every (24) hours
5. Press the brake pedal to stop the vehicle running.
Exit the timer start:
Timer start can be exited manually as follows:
1. Make sure the remote start system is not operating the engine.
2. Turn the ignition on. The LED and parking light will flash (4) times. The horn chirps (4) times.
Or
1. Press the
have turned on or flashing.
2. Immediately depress the
will flash (4) times. The siren or horn chirps (4) times. The vehicle is no longer programmed to start
automatically.
button to remote start the vehicle. As soon as the vehicle is running and the parking light
button then press and hold the button for 2 seconds. The parking light
button once.
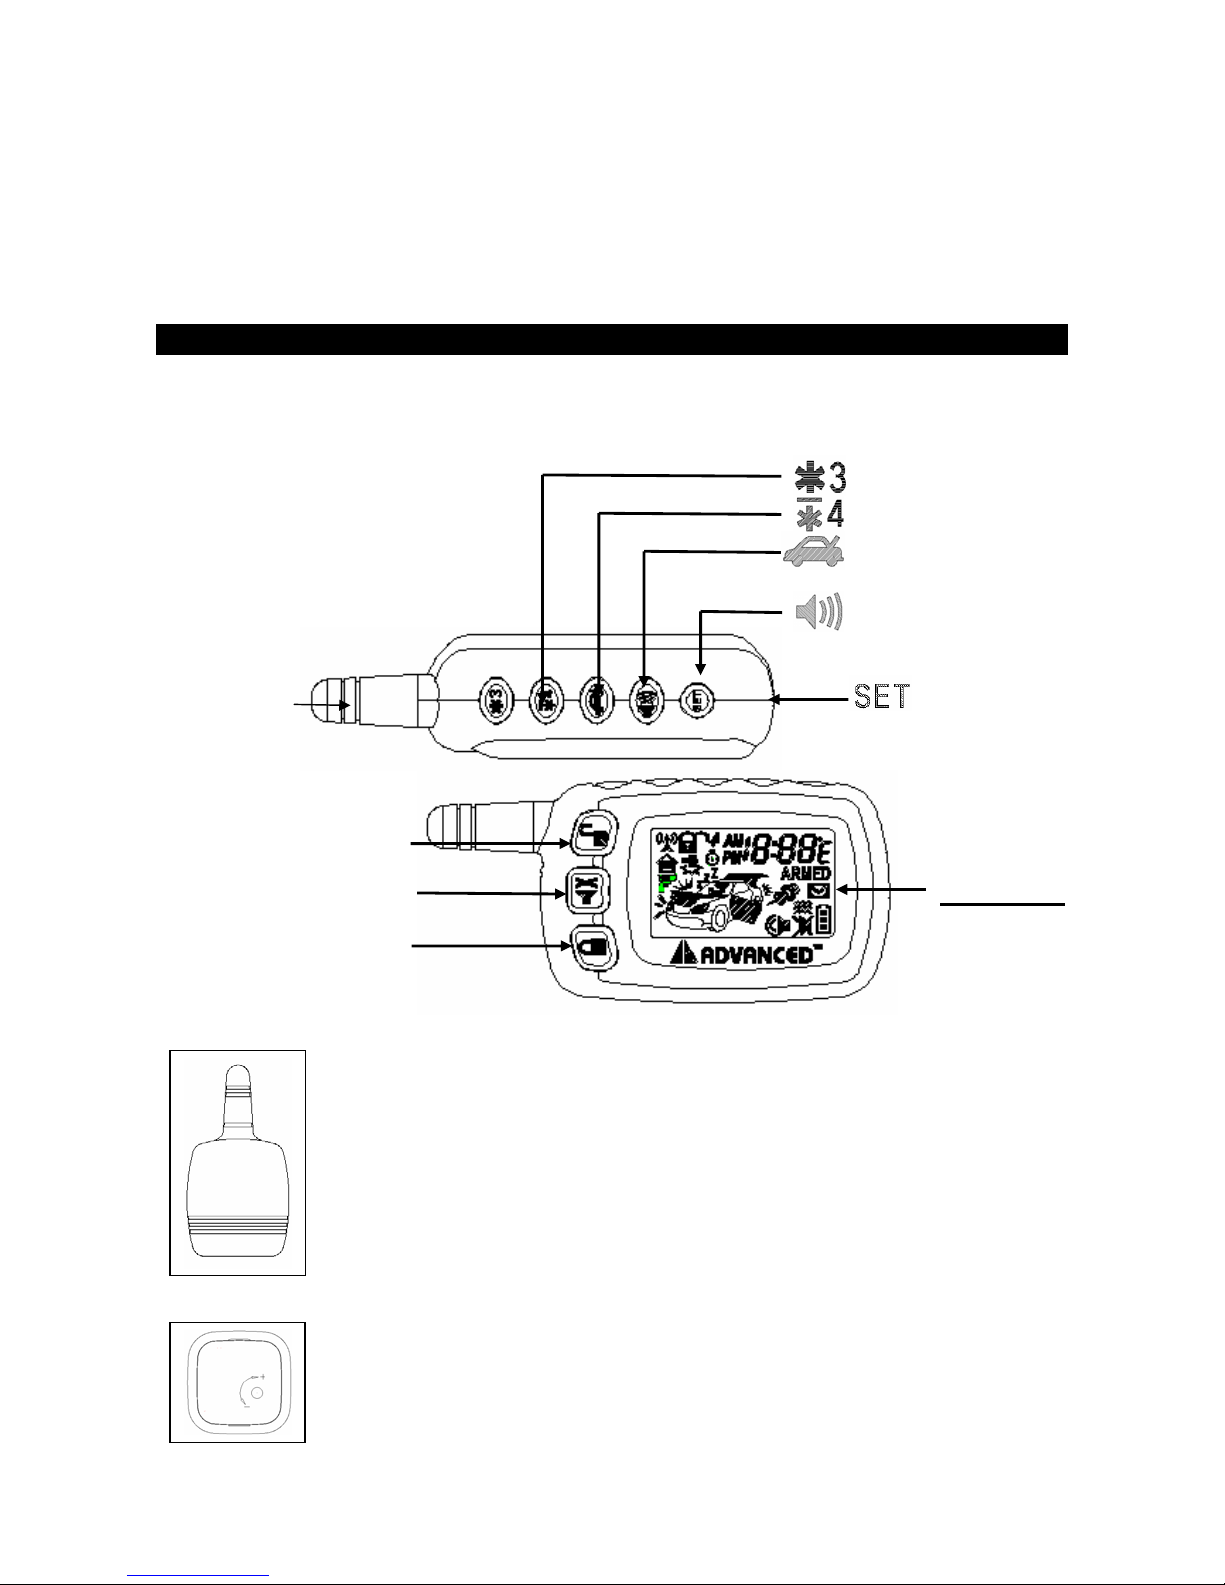
F. TEMPERATURE CHECK (OPTIONAL)
If you installed the optional temperature sensor, you can monitor, thru the LCD
screen, the present indoor temperature of the passenger compartment before
cooling or heating your vehicle.
Press the
Screen Transmitter”, the in-door temperature and system’s status will be
shown on the LCD screen.
and button at the same time on the “Two Way LCD
G. SHUT-DOWN INPUT FOR REMOTE STARTER:
If any of the following conditions exist while the system is operating, the engine will not start or will shut down
immediately:
1. The hood is opened.
2. The brake pedal is pressed.
3. Engine is over-revved. {“Tachometer checking type” only}
4. The pre-programmed run time (5 /10 / 20 / 30 minutes) has elapsed.
5. Transmitter
6. Move the optional remote start enable toggle switch to OFF position. (If installed)
6979 USA
button is pressed.
11
Page 12
APR/15/2002
7. The vehicle refused to start running after {3} unsuccessful attempts.
H. DISABLING THE REMOTE START SYSTEM: (If installed)
This feature allows your system’s remote start unit to be temporarily disabled to prevent the vehicle from
being remote started accidentally. This feature is useful if the vehicle is being serviced or stored in an
enclosed area. To disable the remote start, move the optional remote start enable toggle switch to the OFF
position. (E)
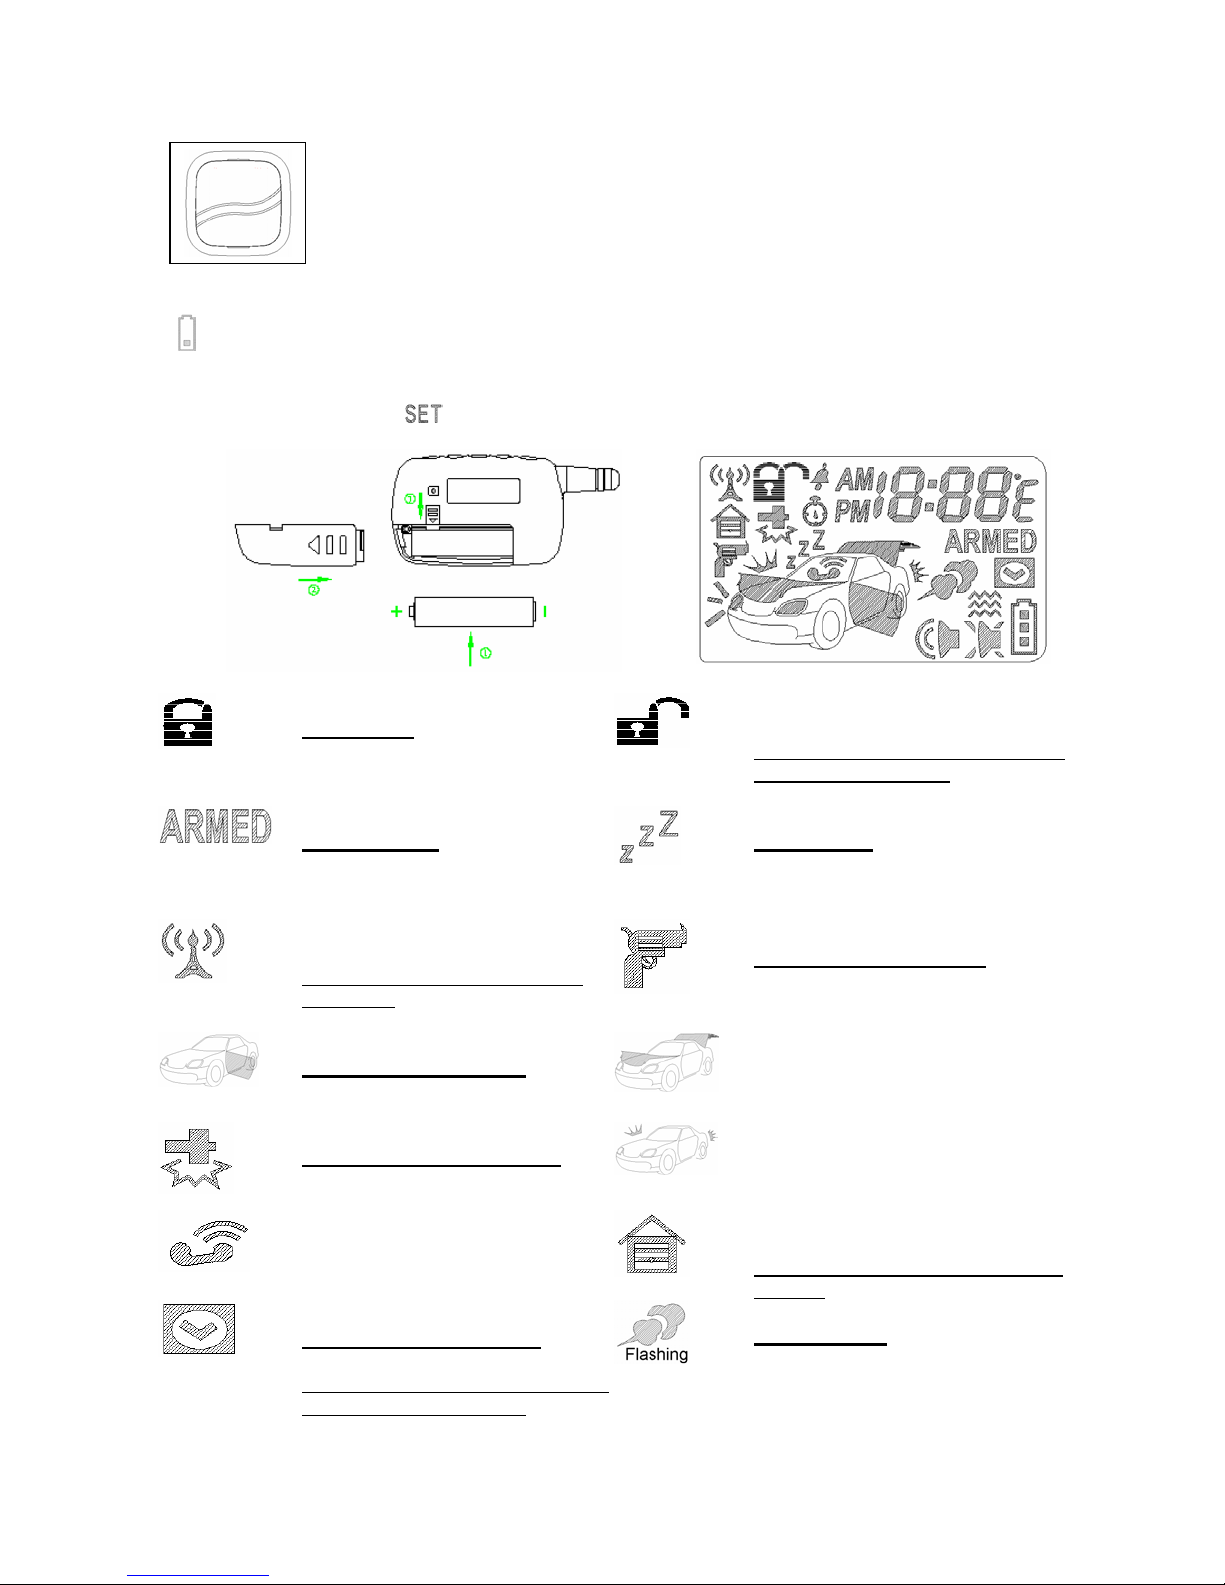
LCD REMOTE TRANSMITTER:
Brief look of optional device
Two Way Remote Control
Engine Start
Engine Stop
Trunk release /
System’s Status Check
Car locator /Panic
Antenna
Door Unlock /
Silent Arm / Disarm
Door Lock / Arm
Two Way Transceiver/Antenna Module
Paging Sensor (Optional)
It transmits and receives RF signals with the Remote Control.
If you applied optional two-way LCD screen remote transmitter on your alarm system,
you must install the new two-way transceiver /Antenna module on your control module.
The device is usually mounted at the bottom part of the front window.
In this device, there are paging(knock) sensor, which delivers the tapping impact to
the Remote Control(for paging driver).
Turn on the light
/ Clear Trigger Icon
/ Feature Setting
LCD screen
6979 USA
12
Page 13
APR/15/2002
Temperature Sensor (Optional)
The temperature sensor which takes the temperature of the passenger compartment
to display on the LCD screen of the Remote Control.
Battery replacement
A 1.5V type AAA Alkaline battery powers the Remote Transmitter. When the power of the battery weakens
a
icon shall be displayed on the LCD screen. When the old battery is replaced to new one, there will be
beep sounds indicate the power is up and the clock on the LCD screen returns to AM12:00 after displaying
all the icons.
Correct the time by pressing
for 2 seconds before using (See Timer Setting).
Door Unlock
Door Lock
Your vehicle doors are locked
Armed Mode
Your vehicle is in armed mode
Your vehicle doors are unlocked and
the system is Disarmed
Valet Mode
All the function shall be temporarily
on hold.
Remote Transmission
Anti-Carjacking Mode
You are transmitting the signal to
control unit
Door Open Warning
Doors are illegally opened (Zone 3)
Optional Sensor Trigger
Trigger on Optional Sensor (Zone 4)
Driver paging
Someone is paging you in front of
your vehicle
Your vehicle is activated
Anti-Carjacking
Trunk/Hood Trigger
Trunk or Hood is illegally opened
(Zone 2)
Shock Sensor Triggered
Trigger on board shock sensor
(Zone 1)
Home Security trigger
Your PIR or Door Switch is triggered
(Zone 5)
6979 USA
Timer Controlled Start
At the set time(3 hours or 24 hours),
engine starts automatically
13
Engine Start
Your vehicle's engine is running
Page 14
APR/15/2002
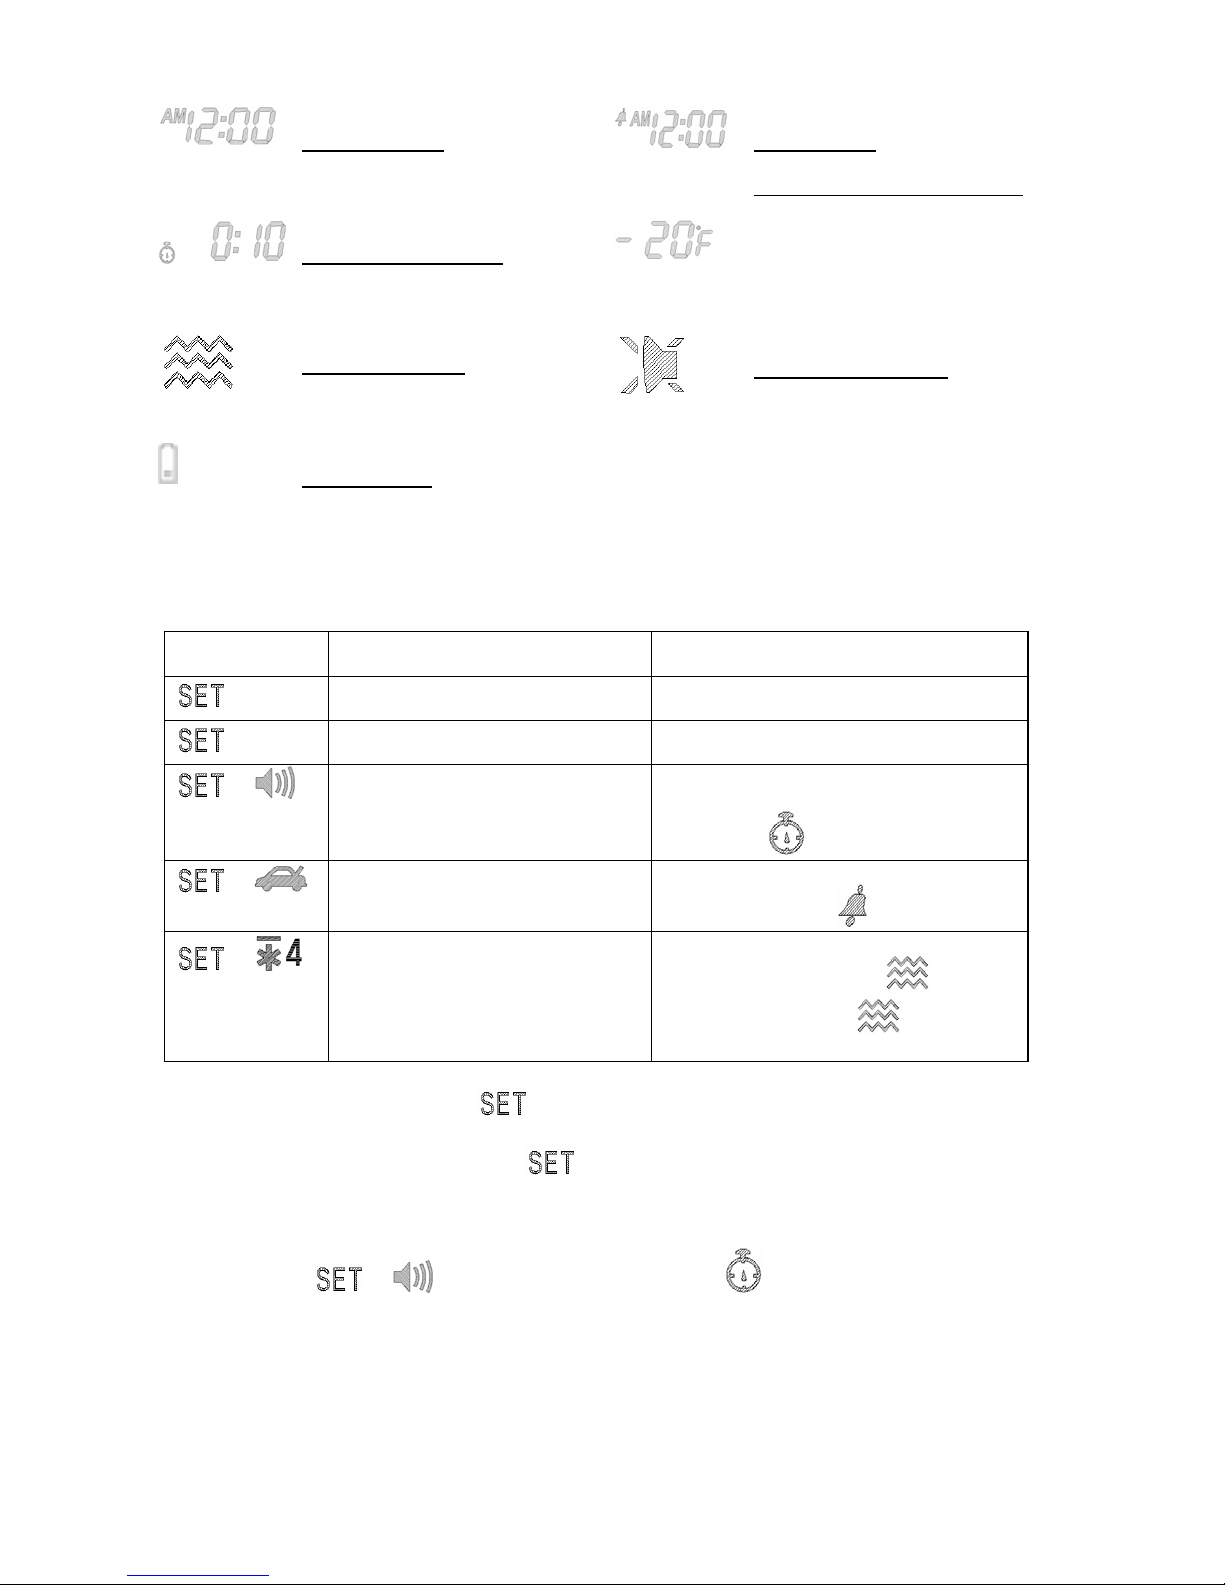
Time Monitor
Time indicator of your vehicle
Count Down Timer
Reminder when time is up for
parking
Alert Alarm
You have set morning call alarm
Temperature Monitor
Indoor temperature of
your vehicle
Vibration Mode
Remote Control vibrates when the
system is triggered
Low Battery
You have to replace the battery of
remote control.
Mute Chirp Sound
Operating silent when the icon is
emitted
PROGRAMMING OF THE LCD REMOTE TRANSMITTER:
Transmitter
Button
+
+
+
Description Operation
LCD screen lamp ON
Clear the trigger icon(s) on the LCD
screen
Set up fixed count down timer
(10min./ 20min./ 30min./ 1Hr/ 1.5Hr/
2Hr)
Alert Alarm Setting(ON / OFF)
Set up Vibration / Melody Mode
Press once lamp on for 5 seconds
Press & hold for 2 seconds
Press both button cycling
*leave both buttons starting count
down then
Press both button switching
*Alarm On indicates
Press both buttons switching
*Vibration mode indicates
flashes
on the screen
.
1. SCREEN LAMP ON: Press button
2. CLEAR THE TRIGGER ICON(S): Press
clear the trigger icon(s) on the LCD screen.
3. SET UP FIXED COUNT DOWN TIMER:
1. Press button
2. Release the buttons start counting down.
3. Press both buttons simultaneously again showing next order time on the screen ( ie.0:20), press them
again
(ie.0:30)…..and so on.
Note: 1. The count down period is fixed as 10 minutes,20 minutes,30 minutes,1 hour, 1.5 hours
and 2 hours maximum.
2. When count down timer showing 0:00 means to turn off the timer.
6979 USA
+ once, the LCD screen will shows icon and timer (ie. 0:10) ,
*Melody mode without
response melody
once, the LCD screen lamp will Turns On for 5 seconds.
once for 2 seconds then respond beep sound twice. It will
14
but
Page 15
APR/15/2002
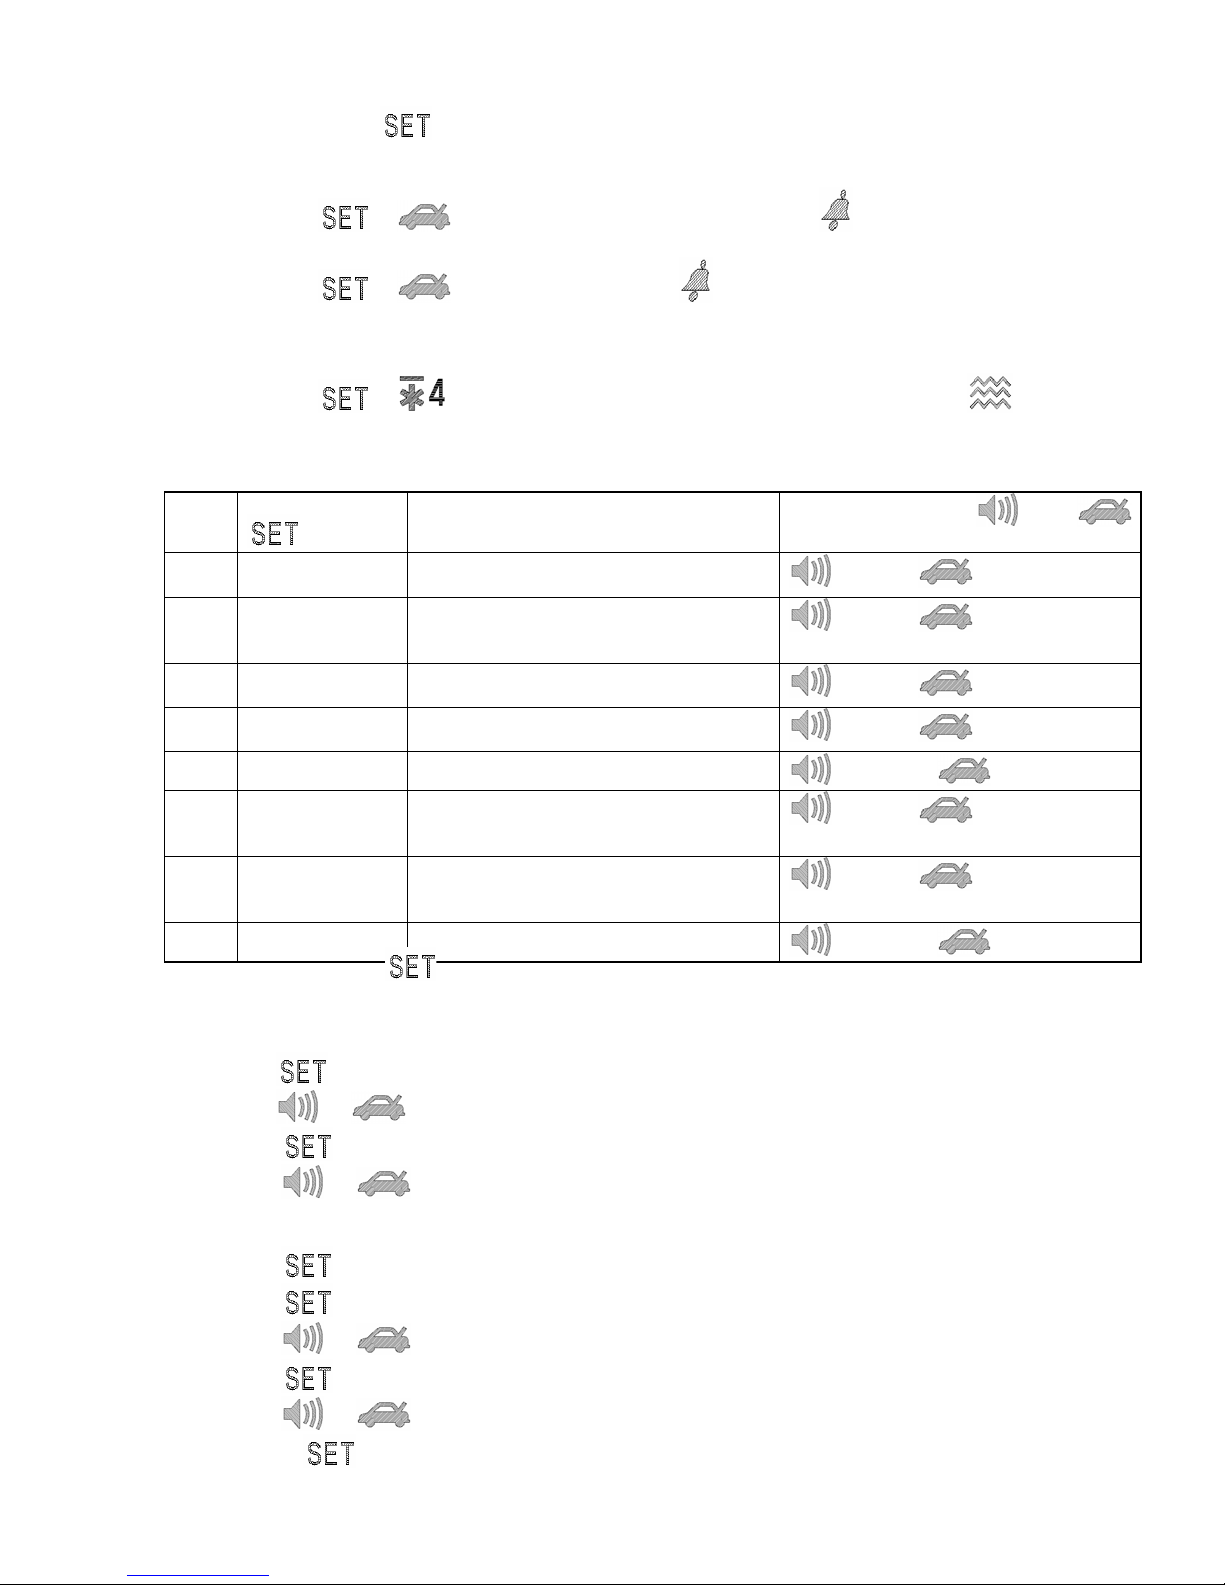
3. Press
for real time indication when the timer is counting down.
4. ALERT ALARM SETTING (ON/OFF)
Press button
+ simultaneously , the LCD screen will show icon and alarm time (ie
12:00) to turn on the alert alarm.
Press button
+ simultaneously again, the icon will disappear to turn off the alert
alarm.
5. SET UP VIBRATION / MELODY MODE:
Press button + simultaneously to select the mode of vibration or melody, the icon
will displayed on the LCD screen to show the LCD remote transmitter is on vibration mode.
TIMER SETTING:
Step Transmitter
Button
1 Press & Hold for
4 seconds
2 Once Time setting (Minute)
3 Once Alert Alarm Time Setting (Hour)
4 Once Alert Alarm Time Setting (Minute)
5 Once Alert Alarm Setting (On / Off)
6 Once Count down Timer Setting (Hour)
7 Once Count down Timer Setting (Minute)
8 Once Count down Timer ON/OFF
EXIT: Press and hold the button for 4 seconds or leave it for 10seconds, the system will exit
the programming mode.
1.TIME SETTING: Example to AM 10:30
Description
Time setting (Hour)
*Flash digit for adjusting
*Flash digit for adjusting
*Flash digit for adjusting
*Flash digit for adjusting
*Flash digit for adjusting
(Max.19 hours 59 minutes)
*Flash digit for adjusting
(Max.19 hours 59 minutes)
Press Transmitter
Button
for - and for +
for - and for +
for - and for +
for - and for +
for Off and for On
for - and for +
for - and for +
for Off and for On
or
1.Press
2.Press
3. Press
4..Press
once for 4 seconds then the hours digit flashes for adjusting.
or to decrease or increase the hour digit until AM10:xx
once again then the minutes digit flashes.
or to decrease or increase the minutes digit until AM 10:30
2. ALERT ALARM TIME SETTING: Example to PM 6:30
1. Press once for 4 seconds then the hours digit flashes.
2. Press
3. Press
4. Press
5. Press
6. Press
twice then the alert alarm hours digit is flashing.
or to decrease or increase the hour digit until PM6:xx
once again then the minutes digit flashes.
or to decrease or increase the minutes digit until PM6:30
once again for alert alarm ON/OFF adjusting.
6979 USA
15
Page 16

APR/15/2002
7. Press
for Off and for On the alert alarm at PM6:30.
3. COUNT DOWN TIMER SETTING: Example set count down timer at 2:30
1.Press
2.Press
3.Press
4.Press
5. Press
6. Press
7. Press button
once for 4 seconds.
5 times then the hour digit flashes.
or to decrease or increase the hours digit until 2:xx
once again then the minutes digit flashes.
or to decrease or increase the minutes digit until 2:30
once again for count down timer ON/OFF adjusting.
for Off and for On of the count down timer at 2:30.
Note: Maximum is 19 hours 59 minutes.
6979 USA
16
 Loading...