

Page 1

7/23/02
COMMANDO
MODEL ALA550
REMOTE CONTROL AUTO ALARM SYSTEM
INSTALLATION & OPERATION INSTRUCTIONS
ALA550
1
Page 2
(-)
H7 10 Pin
: 10 Pin White Mini Connector
H7
LED Indicator
Black Antenna Wire
Wh i te
H6 2 Pin
Wh i te
H5 Black
Wi r e
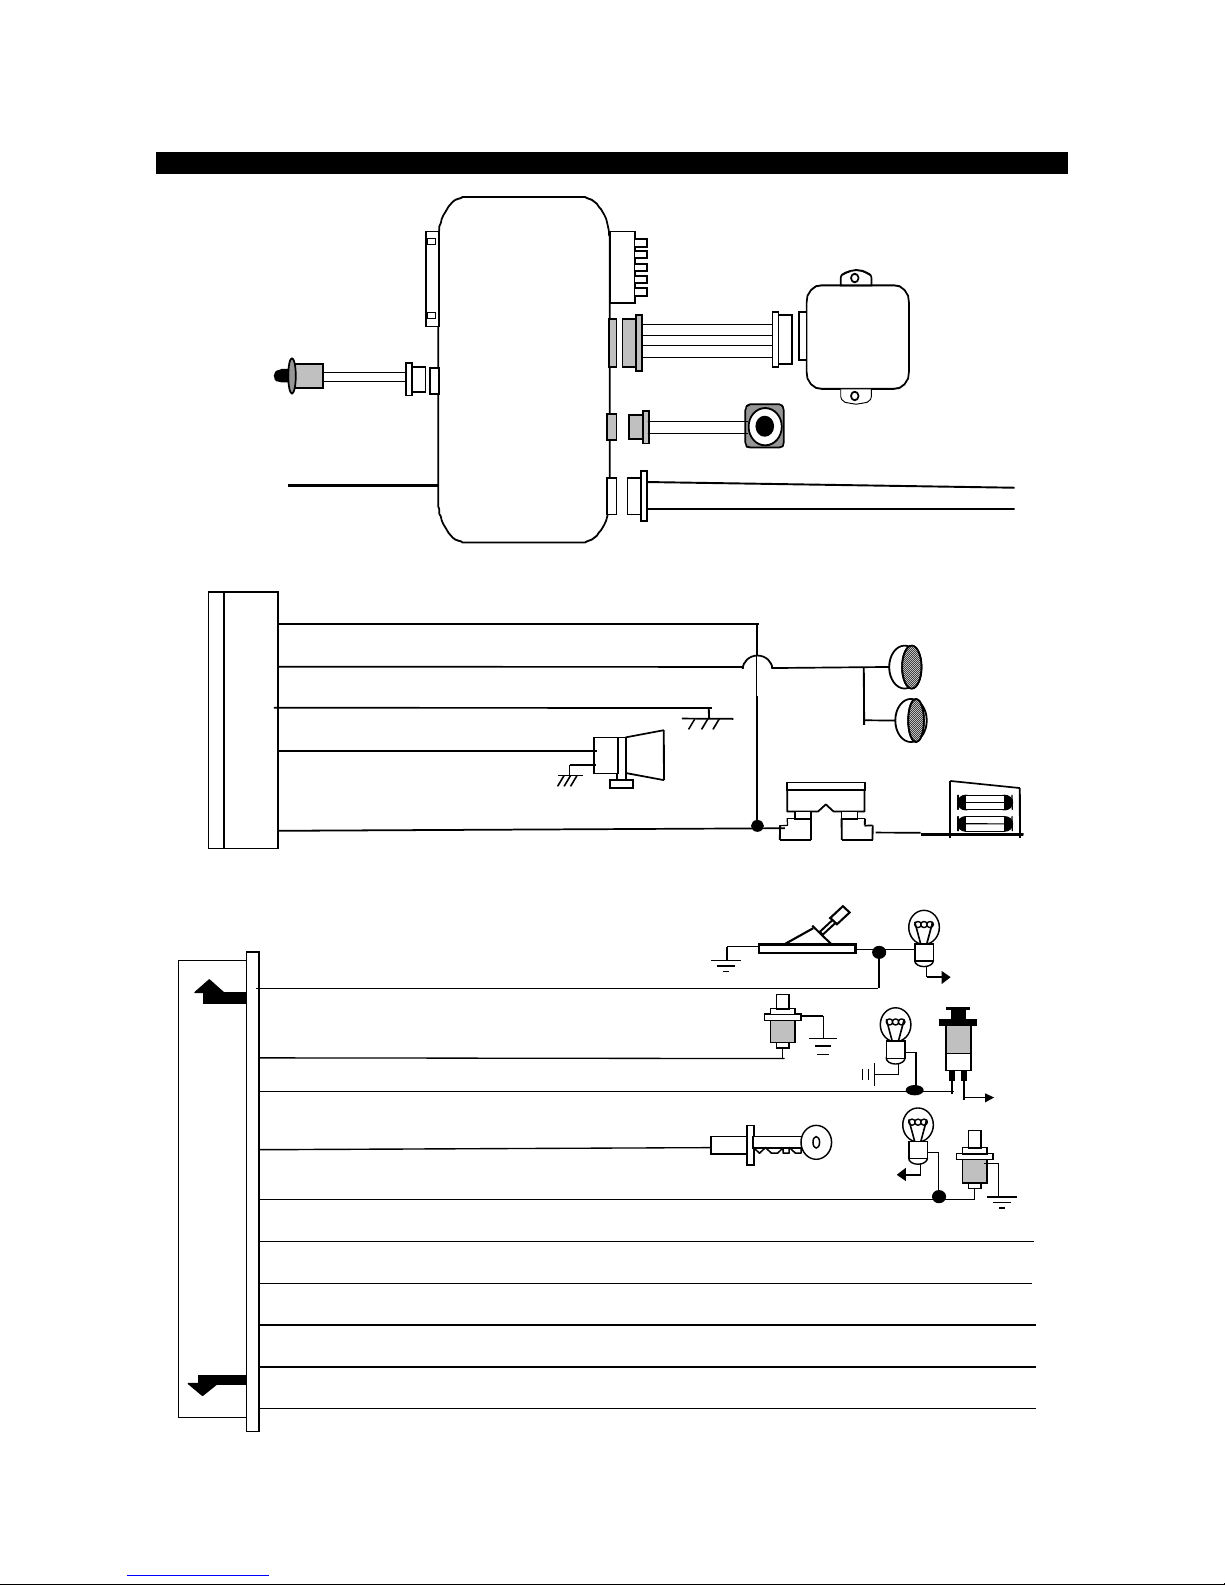
H1: MAIN 5 PIN WIRE HARNESS:
Red / White Wire: Parking Light Relay input
WIRING DIAGRAM
: Main 5 Pin White harnes s
H1 5 Pin
Wh it e
H2 4 Pin
Ora nge
H3 2 Pin
Blue
H4 3 Pin
Wh it e
H1
Blue:
Green: (-) 200mA Lock Pulse or (+) Unlock Pulse
7/23/02
Dual Zone
Shock
Sensor
Valet Switch
200mA Unlock Pulse or (+) Lock Pulse
White Wire: Parking Light Relay Output
Black Wire: Ground to V ehicle FRA ME
Brown Wire: Positive output To Siren
Or Horn(Programmable)
Red Wire: +12V To Constant Battery Source
H7: 10 PIN MINI CONNECTOR WIRE HARNESS:
Black/White Wire: Han dbrake switch ground Input
Blue Wire: Zone 2 / Instant Trigger Ground Input
Violet Wire: Zone 3 / Positive Door Pin Trigger Input
Yellow W ire: Zone 5 / To Ignition Switched + 12V
Green Wire: Zone 3 / Negative Door Pin Trigger Input.
Orange Wire: (-)200mA Grounded Output when armed
15A Fuse
Handbrake
+12V
+12V
+12V
Brown Wire: (-) 200mA of 2 step s door unlock Output.
Pink Wire: (-)200mA Programming Output { Channel 3 (Factory default Setting) / Horn output.}
Gray Wire: (-) 200mA Programming O utput {Channel 2 (Factory default Setting) / Pager output.}
White Wire: (-) 200mA of dome light Output
ALA550
2
Page 3

7/23/02
WIRING
Keep wiring away from moving engine parts, exhaust pipes and high-tension cable. Tape wires that pass
through holes on the firewall to prevent fraying. Watches out sharp edges that may damage wires and
causes short circuit.
CAUTION: Do not connect the wire harness to the control module until all wiring to vehicle is complete.
H1. MAIN 5 PIN WIRE HARNESS:
H1/1. RED / WHITE WIRE –PARKING LIGHT RELAY INPUT --
The RED/WHITE wire is the input to the flashing parking light relay. The connection of the RED/WHITE
wire will determine the output polarity of the flashing parking light relay.
If the vehicle you are working on has +12volt switched parking light, you don’t need connect this wire. This
wire already connected to +12volt.
If the vehicle’s parking light with ground switched, cut the RED/WHITE wire, connect the RED/WHITE
wire to chassis ground.
H1/2. WHITE WIRE -- PARKING LIGHT RELAY OUTPUT (+12 V 10A OUTPUT) --
Connect the WHITE wire to the parking light wire coming from the headlight switch. Do not connect the
WHITE wire to the dashboard lighting dimmer switch. (Damage to the dimmer will result). The limitation of
the WHITE wire is 10 Amp max. Do not exceed this limit or damage to the alarm and parking relay will
result.
H1/3. BLACK WIRE -- SYSTEM GROUND –
This is main ground connection of the alarm module. Make this connection to a solid section of the vehicle
frame. Do not connect this wire to any existing ground wires supplied by the factory wire loom, make the
connection to the vehicle's frame directly.
H1/4. BROWN WIRE -- SIREN DRIVE OR HORN OUTPUT -- (Set Feature III – 2 Programming)
SIREN DRIVE OUTPUT (Factory default setting)
This is the positive (+) output connection for the siren. Current capacity is 2 Amp. Make connection to
the (+) red wire from the siren. Make the (-) black wire coming from the siren to a good chassis ground.
(+) Low Current HORN OUTPUT
This wire is provided to use the existing vehicle's horn as the alarm system's option’s warning audible
device. It's a transistorized low current output, and should only be connected to the low current positive (+)
output from the vehicle's horn switch.
-- (Set Alarm Feature III – 2 To Horn Output)
H1/5. RED WIRE -- SYSTEM POWER (+12V CONSTANT) --
The RED wire supplies power to the system. Connect this wire to a constant +12 volt source.
H2. 4 PIN ORANGE CONNECTOR FOR 2 STAGE SHOCK SENSOR
4. Green
3. Blue
2. Black
1. Red
Route the red, black, blue and green wires in the 4 pin white connector from shock sensor to the control
module, and plug one end into the shock sensor, and the other end into the mating white connector on the
side of the module.
Wire / Warn Away Input
Wire /
Wire / +12Volt
Zone 4
Wire / Negative
Ground Trigger
H5. RF ANTENNA - BLACK THIN WIRE
The black thin wire on control module is the receiver antenna wire. Antenna placement is very important!
Ensure that it is unwrapped and stretched out with the last 6" straight and keep it away from large metal
objects or chassis for best reception.
H7. 10-PIN MINI CONNECTOR WIRE HARNESS.
H7/1. BLACK/WHITE WIRE – GROUND HANDBRAKE SWITCH SENSING INPUT--
This wire is the ground trigger input wire for groung handbrake switch. If you programmed “ Safety lock
with handbrake.” (See See Alarm Feature
handbrake switch for this application.
H7/2. BLUE WIRE -- GROUND INSTANT TRIGGER INPUT --
This wire is the ground trigger input wire for hood/trunk pin switches.
H7/3. VIOLET WIRE -- POSITIVE DOOR SWITCH SENSING INPUT--
II – 3 Programming) then you must connect the violet wire to the
ALA550
3
Page 4
7/23/02
X
This wire is the positive trigger input wire for positive door pin switch. This wire is connection for "positive"
type factory door pins(typical FORD MOTOR). Locate the "common wire" for all door pins and make the
connection of the Violet Wire here.
H7/4. YELLOW WIRE – TO IGNITION SWITCHED +12V --
This wire is connected to a switched 12 volt source. This wire should receive "12 volt" when the ignition
key is in the "ON" and "START" position. When the ignition is turned "OFF", this wire should receive "0"
volt .
H7/5. GREEN WIRE -- NEGATIVE DOOR SWITCH SENSING INPUT --
This wire is the ground trigger input wire for negative door pin switch. This wire is connection for
"grounding" type factory door pins locate the "common wire" that connects the door pin switches. Make
the connection of the GREEN Wire here.
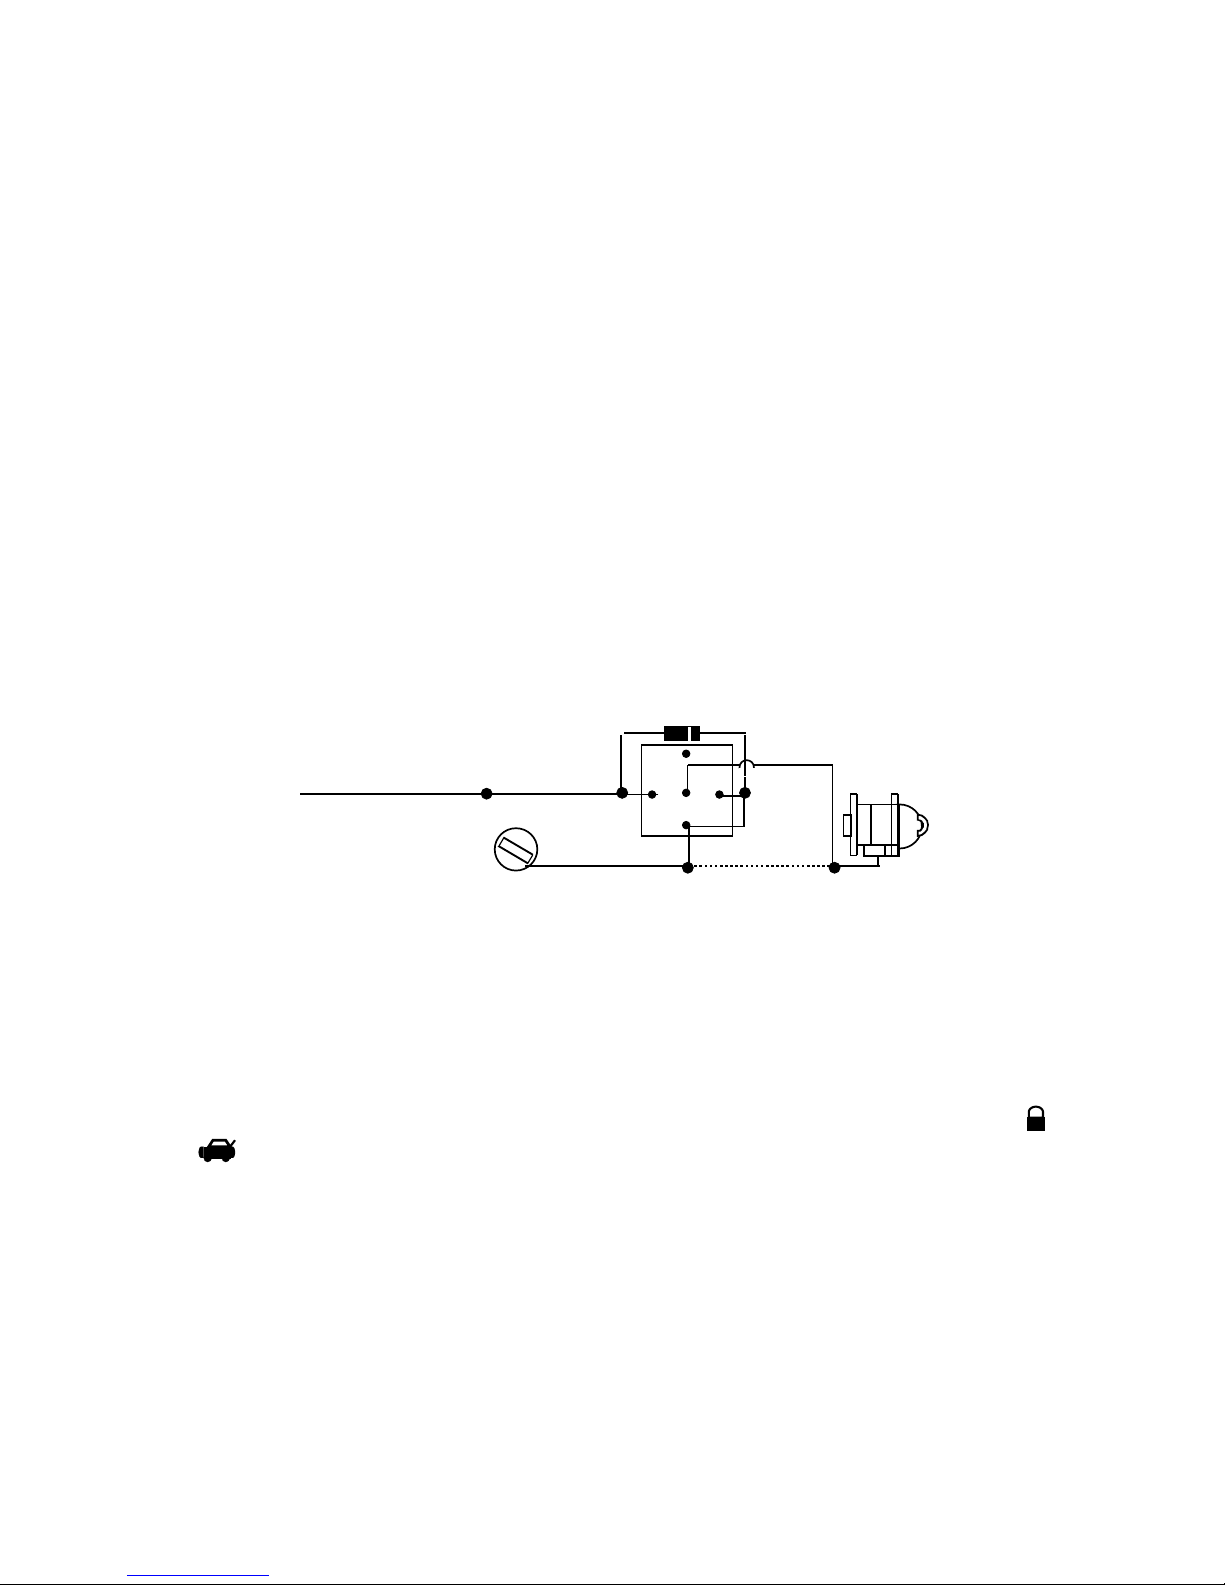
H7/6. ORANGE WIRE – (-) 200mA GROUNDED OUTPUT WHEN ARMED --
This wire will become grounded when the alarm is armed. The current capacity of this wire is 200mA. This
output can control starter disable, when an intrusion is detected and the system is triggered. The vehicle
prevent from any unauthorized starting.
a). Find the wire from the starter solenoid, (usually located on the starter) and going to the ignition switch.
b). When found, use voltmeter, connect one probe of the voltmeter to ground and connect the other end of
the probe to the starter wire, it should receive "12 volt" only when the ignition key in the "START"
position.
c). After locating the correct wire, cut it in half, try to start the vehicle. The engine should not "crank over".
d). When the extend wires are needed, they must be exactly same gauge as the cut wire. Connect the cut
wire from the key switch to the RED wire (pin #30) of the relay, and connect the starter wire to the
WHITE wire (pin #87a ) of the relay.
e). Connect the ORANGE Wire from the control module to the ORANGE wire (pin #86) of the relay.
NOTE: If more than one electronic device will be connected to the ORANGE Wire, it will be necessary to
isolate the connection of each device control wires with a IN4003 diode.
IN4003 Diode
H7/6 Orange wire
“Off”
“Acc”
Orange wire
“On”
“Start”
87
86
87a
30
Red wire
85
White wire
Starter
Cut
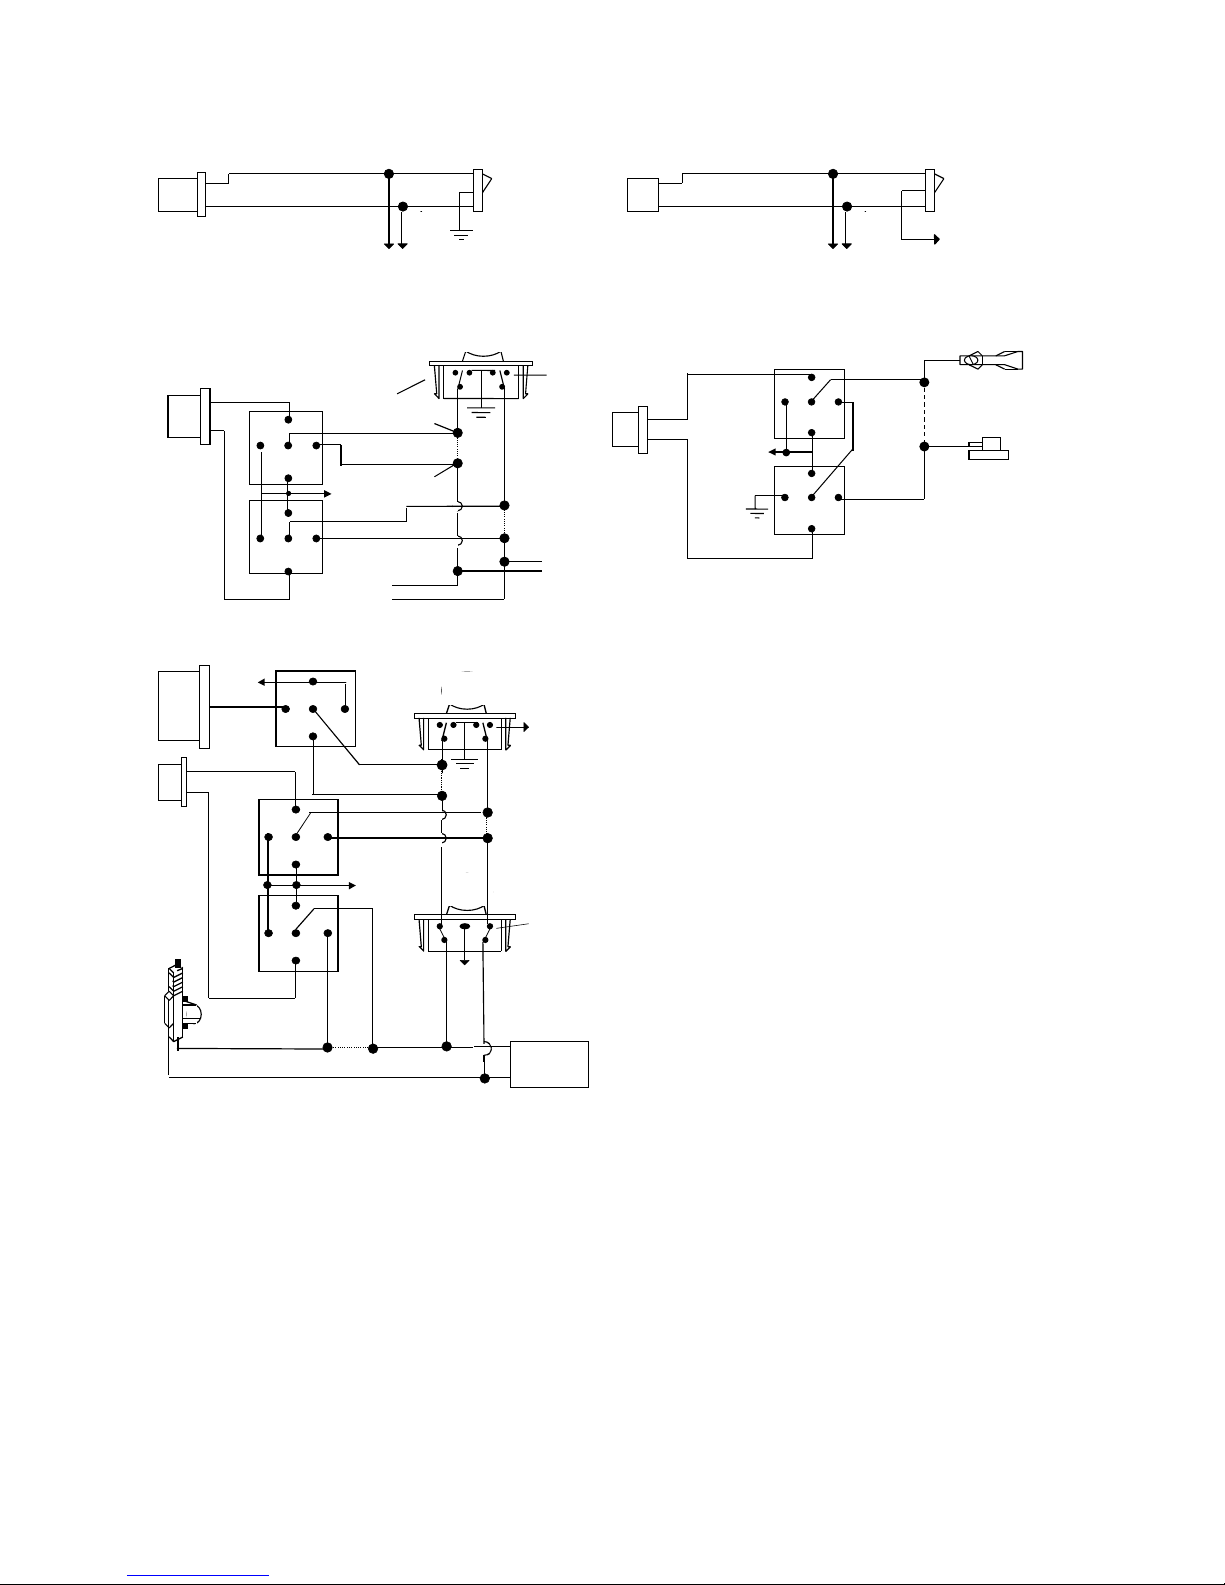
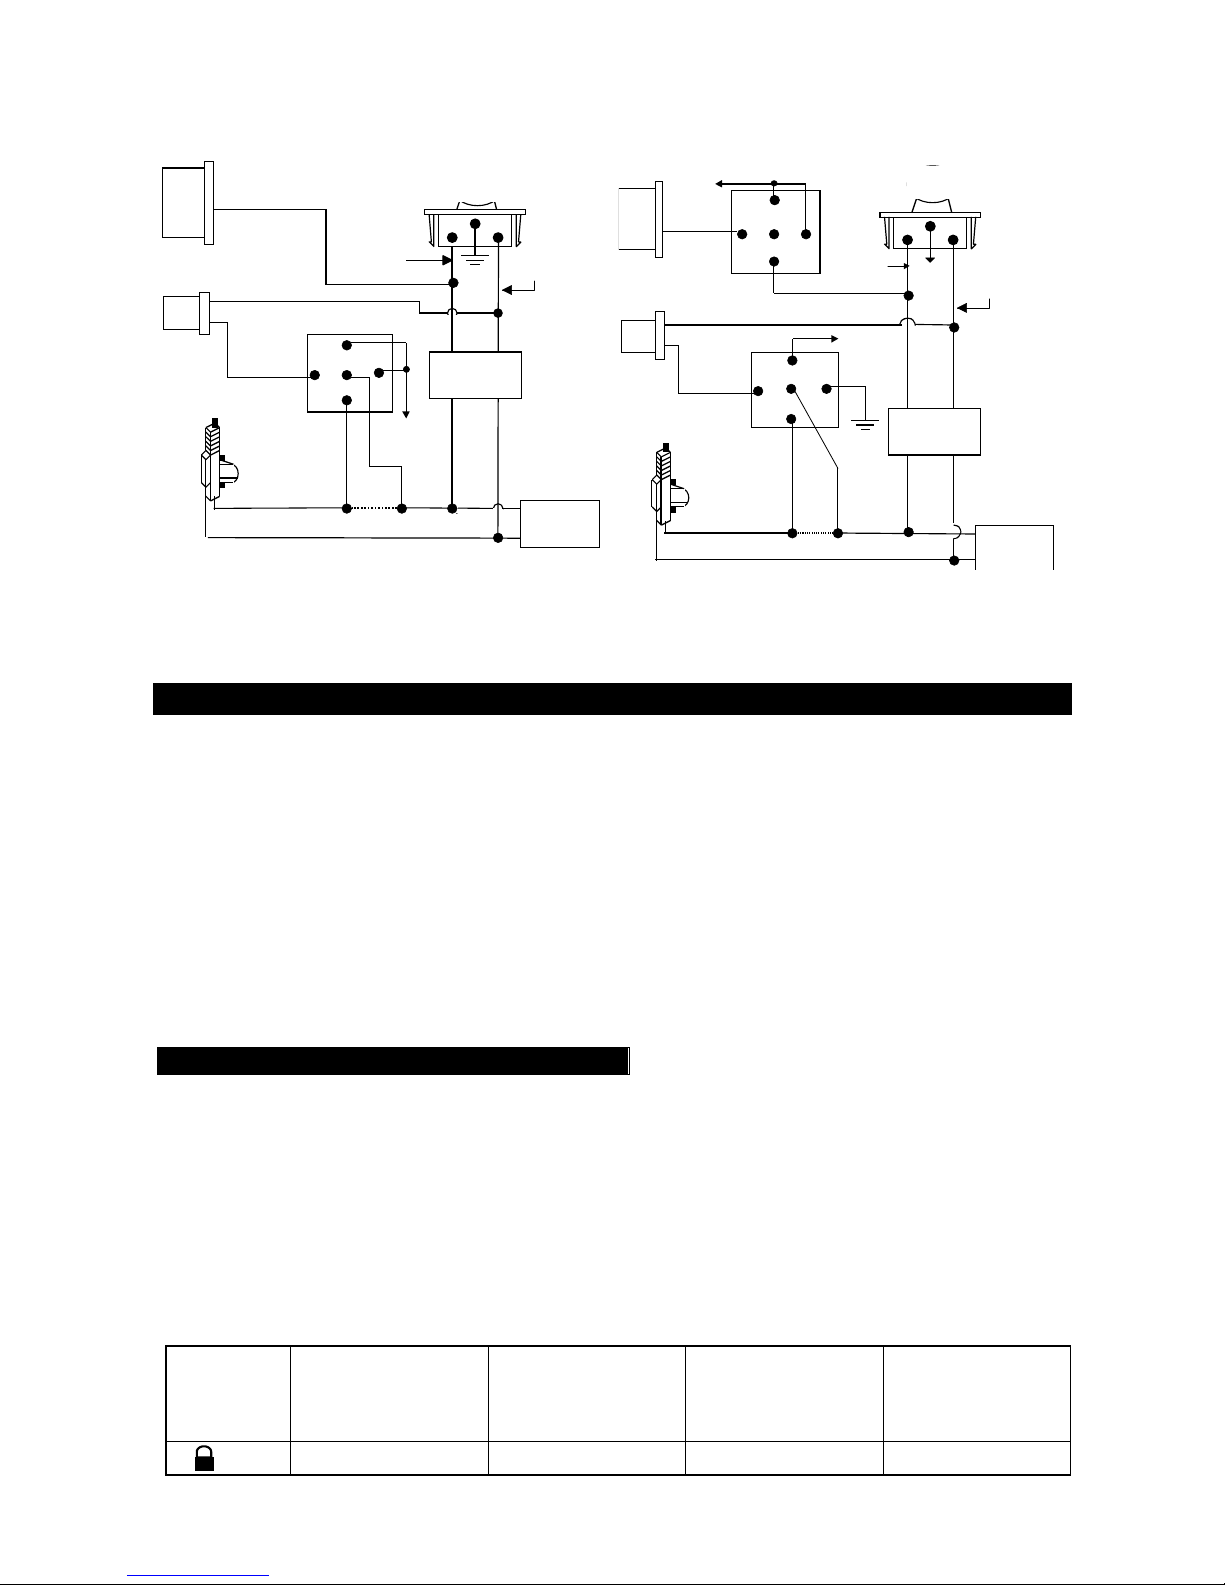
H7/7. BROWN WIRE – (-) 200mA 2 STEPS UNLOCK OUTPUT --
The 2 steps unlock feature will work for the most fully electronic door lock circuit. The vehicle must have an
electronic door lock switch (not the lock knob or key switch), which lock and unlock all of vehicle's doors.
When wired for this feature, press the disarm (or unlock) button one time will disarm the alarm and unlock
the driver's door only. If, press disarm (or unlock) button two times within 3 seconds, the alarm will disarm
and all doors will unlock.
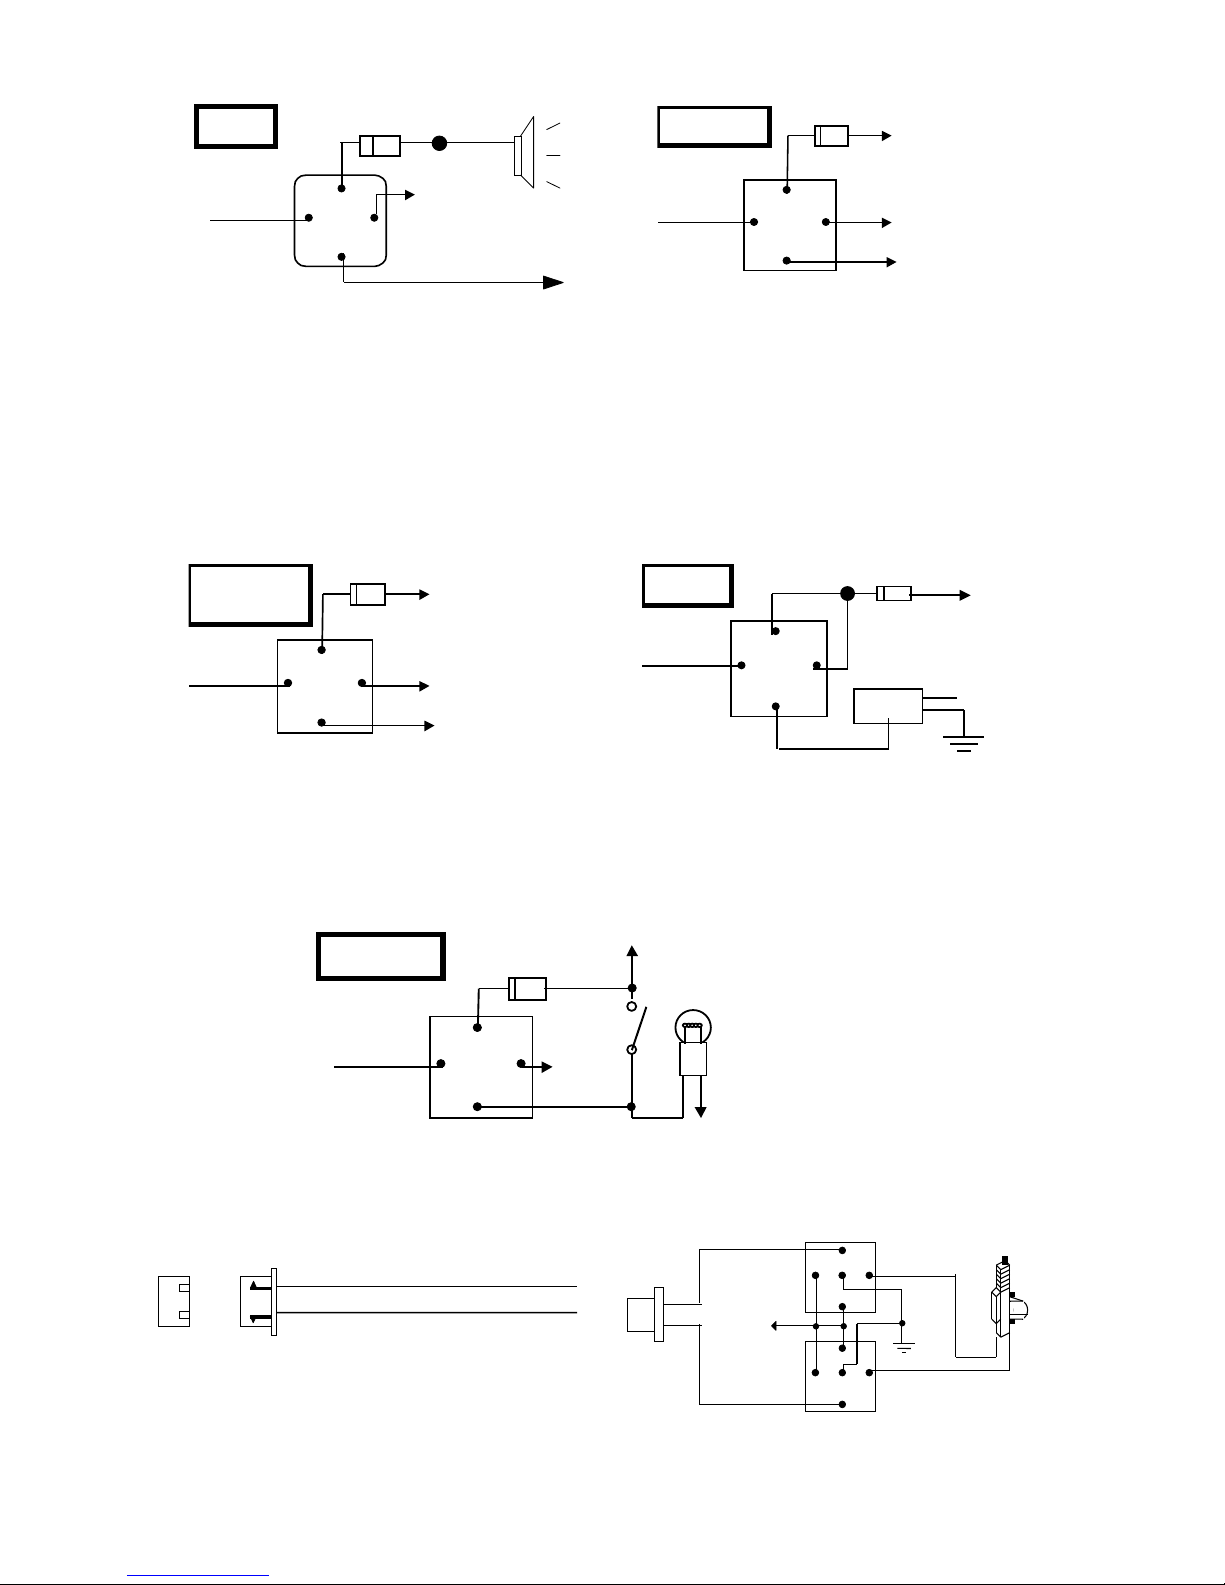
H7/8. PINK WIRE – (-) 200mA TIMER CONTROL CHANNEL 3 / HORN OUTPUT –
TIMER CONTROL CHANNEL 3 OUTPUT (Factory default setting on momentary grounded)
This wire is built-in user-programmable timer output provides a ground through this wire. Press the
button on the transmitter. You may program the built-in timer to send a ground signal for any time
interval between 1 second and 2 minutes. For instance, this timer output may be used to turn on the
headlight with the remote control. Also on certain BMW, Mercedes Benz, Jaguar and Volkswagen cars,
you can use this unique timed output to allow remote closure of all power window and sunroof without
the need for an external module! (See Alarm Feature
HORN OUTPUT (See Feature
III – 5 Programming)
III – 5 Programming)
This wire is provided to use the existing vehicle's horn as the alarm system optional warning audible
device. It's a transistorized low current output, and should only be connected to the low current ground
output from the vehicle's horn switch. When the system is triggered, the horn will sound.
+
ALA550
4
Page 5
1/2/02
y
(+)
A
87a
30
87
Fuse
System Requirements
85
+12V Or Ground
Depending On
+12V
Electric Device
HORN
Pink wire
FUSE
87
87a
8586
30
System Requirements
To horn
+ 12 V
+12V Or Ground
Depending On
CHA NNEL 3
Pink W ire
86
H7/9 . GRAY WIRE – (-) 200mA TIMER CONTROL CHANNEL 2 / PAGER OUTPUT –
TIMER CONTROL CHANNEL 2 OUTPUT (Factory default setting on 1 second pulse grounded)
This will become a 1 second pulse ground by activate channel 2 on transmitter for two seconds, the
current capacity of this wire is 200mA. This feature allow you to remote control trunk release or other
electric device. This output can also be programmed to provide the following type of output: 1 second
pulse, latched, timer control and pager. (See Alarm Feature
PAGER OUTPUT (See Feature III – 3 Programming)
III - 3 Programming)
This wire provides a negative output, when the alarm triggered. The current capacity of this wire is
200mA. For optional electrical device in this system, please connected to an additional relay. (I.E. Pager
interface....)
CHANNEL 2 /
TRUNK
Gray Wire
86
87a
30
87
Fuse
System Requirements
85
+12V Or Ground
Depending On
+12V
Electric Device
PAGER
87
Wire
Gra
86
87a
85
30
Power Wire
Fuse
+12 V
Pager
H7/10. WHITE WIRE – (-) 200mA DOME LIGHT CONTROL OUTPUT –
This wire becomes grounded when the dome light control circuit active. The current capacity of this wire
is 200mA. This wire can control the operation of the interior light . An optional 10 Amp relay can be used to
this system for interior light operation.
a). Upon disarming, the interior lights will remain on for 30 seconds.
b). If the vehicle is violated, the interior light will flash for the same duration as the siren.
Domelight
White Wire
86
87a
30
87
Fuse
85
Door
Switch
+12V
Courtesy
Light
H4. 3 PIN DOOR LOCK HARNESS:
( - ) Unlock Pulse
Wire
Blue
Green
ALA550
( - ) Lock Pulse
Wire
( + ) Unlock Pulse
Lock Pulse
INSTALL NEW DOOR LOCK MOTOR
Blue Wire
3 Pin
Plug To
larm
+12V
Green
5
30 86
87
87a
85
86
87a
87
30
85
Page 6
1/2/02
A
A
A
NEGATIVE TRIGGER DOOR LOCK SYSTEM
Blue Wire Door Unlock
Green Wire Door Lock
To Exiting
Door Lock Relay
Locking
Master
Switch
5-WIRE ALTERNATING DOOR LOCK
3 Pin Plug
To Alarm
Green Wire
87
87
Blue Wire
87a
86
85
86
87a
85
Master Door
Lock Switch
30
+12V
30
To Slave Door
Lock switches
Cut the Existing
Unlock Wire
2 STEP DOOR UNLOCK WIRE CONNECTION FOR
5 WIRE ALTERNATING DOOR LOCKS
+ 12V
10-Pin
Plug
From
larm
3 Pin
Plug
To
larm
H7/7 Brown
Wire
H4/3 G reen Wire
H4/1
Blue Wire
86
87A
85
87
87A
86
878587A
86
87
85
30
Cut the Unlock Wire
30
+ 12V
30
Splice
Splice
OEM Door Master Lock
Unlock
x
+12V
Cut the Existing
X
Lock Wire
Lock
X
Cut the Existing
Lock Wire
LockUnlock
+12V
To Door
Lock
Motor
+12V
OEM Slave
Door Lock
Switch
POSITIVE TRIGGER DOOR LOCK SYSTEM
Blue Wire Door lock
Green Wire Door Unlock
To E xi ti ng
Door Lock Relay
Locking
Master
Switch
+ 12V
VACUUM OPERATED CENTROL LOCKING
3 Pin
Plug To
larm
Green Wire
+12V
Blue Wire
86
87a
30
87
85
86
87a
87
30
85
X
Door Switch
Cut
Compressor
VACUUM OPERATED DOOR LOCKING SYSTEM:
TYPICAL OF MERCEDES BENZ AND AUDI.
Locate the wire under the driver's kick panel. Use the
voltmeter connecting to ground, verify that you have the
correct wire with the doors unlocked, the voltmeter will
receive "12 volt". Lock the doors and the voltmeter will
read "0 volt". Move the alligator clip to +12V and the
voltmeter will receive "12 volt". Cut this wire and make
connections. Be sure to program door lock timer to
3.5 seconds.(See Feuture II – 1 Programming.)
OEM Dr iver’s
Door Lock Motor
Cut Existing Unlock Wire
ALA550
To All Ot her
Door Lock
Motors
6
Page 7
1/2/02
A
A
2 STEP DOOR UNLOCK WIRE CONNECTION FOR
GROUND SWITCHED DOOR LOCKS
10-Pin
Plug
From
larm
3 Pin Plug
To Alarm
H7/7 Brown Wire
H4/3 Green
Wire
Door Lock
H4/1 Blue
Wire
Door Unloc k
OEM Driver's
Door Loc k
Motor
Existing Neg.
Unlock Wir e
87
86
87A
30
Cut Existing Unlock Wire
OEM Door Master Lock Switch
85
X
+ 12V
OEM Door
Lock Relay
LockUnlock
Existi ng Neg.
Lock Wire
To All Ot her
Door Loc k
Motors
2 STEP DOOR UNLOCK WIRE CONNECTION FOR
POSITIVE SWITCHED DOOR LOCKS\
10-Pin
Plug
From
larm
3 Pin Plug
To Alarm
+12V
H7/7
Brown Wire
86 85
H4/1 Blue Wire Door Lock
H4/3 Green
Wire
Door Unlock
OEM Driver's
Door Lock
Moto r
87
87A
30
87
87A
86
30
Cut Exist ing Unlock Wire
OEM Door Master Lock Switch
Existing Pos.
Unlock Wire
+ 12V
85
X
+ 12V
OEM Door
Lock Relay
LockUnlock
Existing Pos.
Lock Wire
To All Other
Door Lock
Motors
PROGRAMMING
A. THE TRANSMITTERS:
Enter:
1. Turn the Ignition switch ‘OFF/ON’ 3 TIMES and stay in ON position. Within 15 seconds.
2. Push the Valet switch 3 times and hold it until a long chirp is hearing then release the valet switch. You
are now in the Transmitter programming mode.
Program:
1. Press button on one of the transmitter until the siren responds with a confirming chirp the first transmitter
is now programmed.
2. Press button on the second transmitter until the siren responds with a confirming chirp, the second
transmitter is now programmed.
3. Apply the same procedure to program 3rd and 4th
.
Exit: Turn Ignition to 'OFF' position, or leave it for 15 seconds. A 3 long chirps to confirm exit.
Note: If more than 4 transmitters programmed, the system only kept the last 4 transmitters.
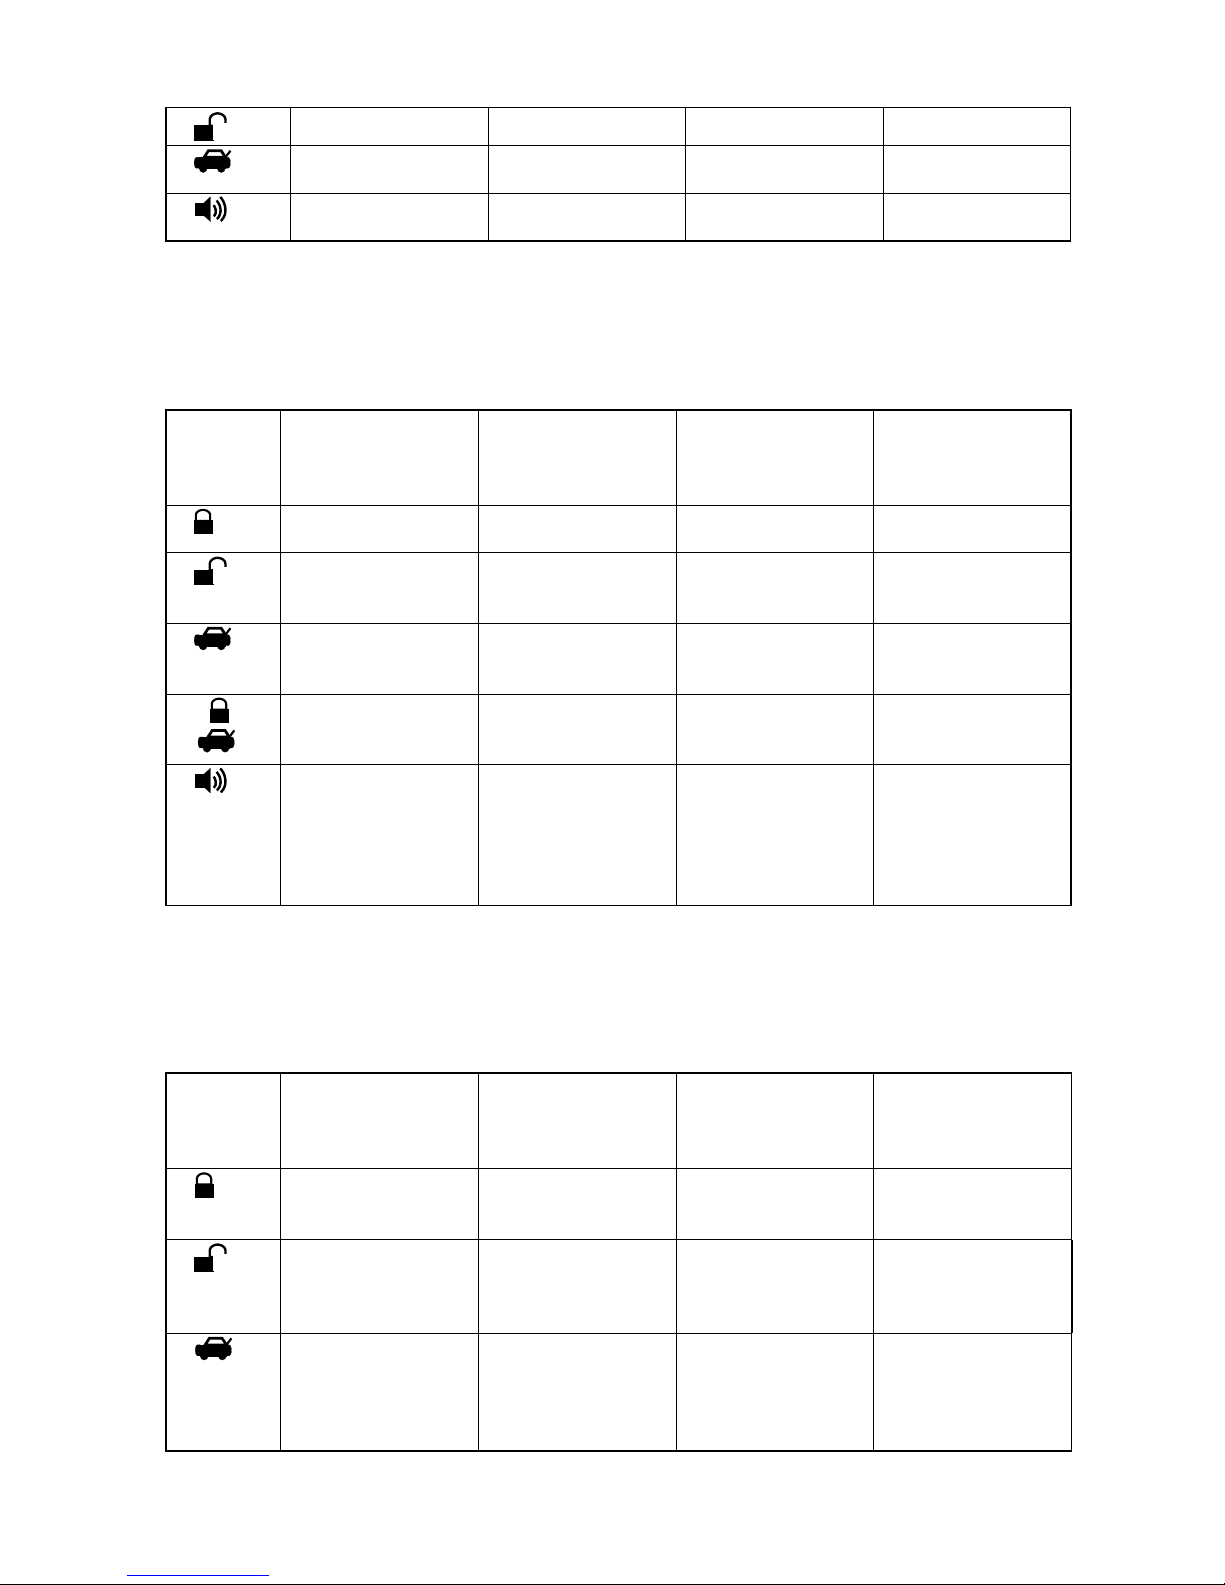
B. ALARM FEATURES PROGRAMMING:
ALARM FEATURE “I” PRORAMMING:
1. Turn the Ignition switch ‘ON/OFF’ 3 TIMES and stay in OFF position.
2. Push the Valet switch 2 times and hold it until one chirp and a long chirp is hearing then release the
valet switch. You are now in the Alarm feature ‘I’ programming mode.
3. Press and release the transmitter button ‘A’ corresponding to the feature ‘A’ you want to program.
a. The siren chirps and LED pause will indicate the latest setting.
b. The factory default setting is always [1] LED flash, [1] chirp.
4 Depress the transmitter button ‘A’ to change the feature. Simple re-depressing the transmitter button ‘A’
again until the module advances to your desired setting.
a. In this case, Press button ‘A’ again, the module would advance to [2] LED flash, [2] chirp. Press button
‘A’ again, the module would advance to [3] LED flash, [3] chirps etc.
4. Depress the transmitter button ‘B’ corresponding to the feature ‘B’ you wants to program.
Press
Transmitter
Button
1
One Chirp /
LED one pulse
Factory Default
Two Chirps /
LED two pulse
Three Chirps /
LED three pulse
Setting
All Chirp on Siren Chirp on only Horn Chirp on only All Chirp off
Four Chirps /
LED four pulse
ALA550
7
Page 8
1/2/02
2
3
4
Automatic Rearm on Automatic Rearm off
With Door Ajar error
chirp
Without Anti Car-jack
mode
Bypass Door Ajar
error chirp.
Active Anti Car-jack
mode
Passive Anti
Car-jack mode
Exit: Turn Ignition to 'ON' position, or leave it for 15 seconds. A 3 long chirps to confirm exit.
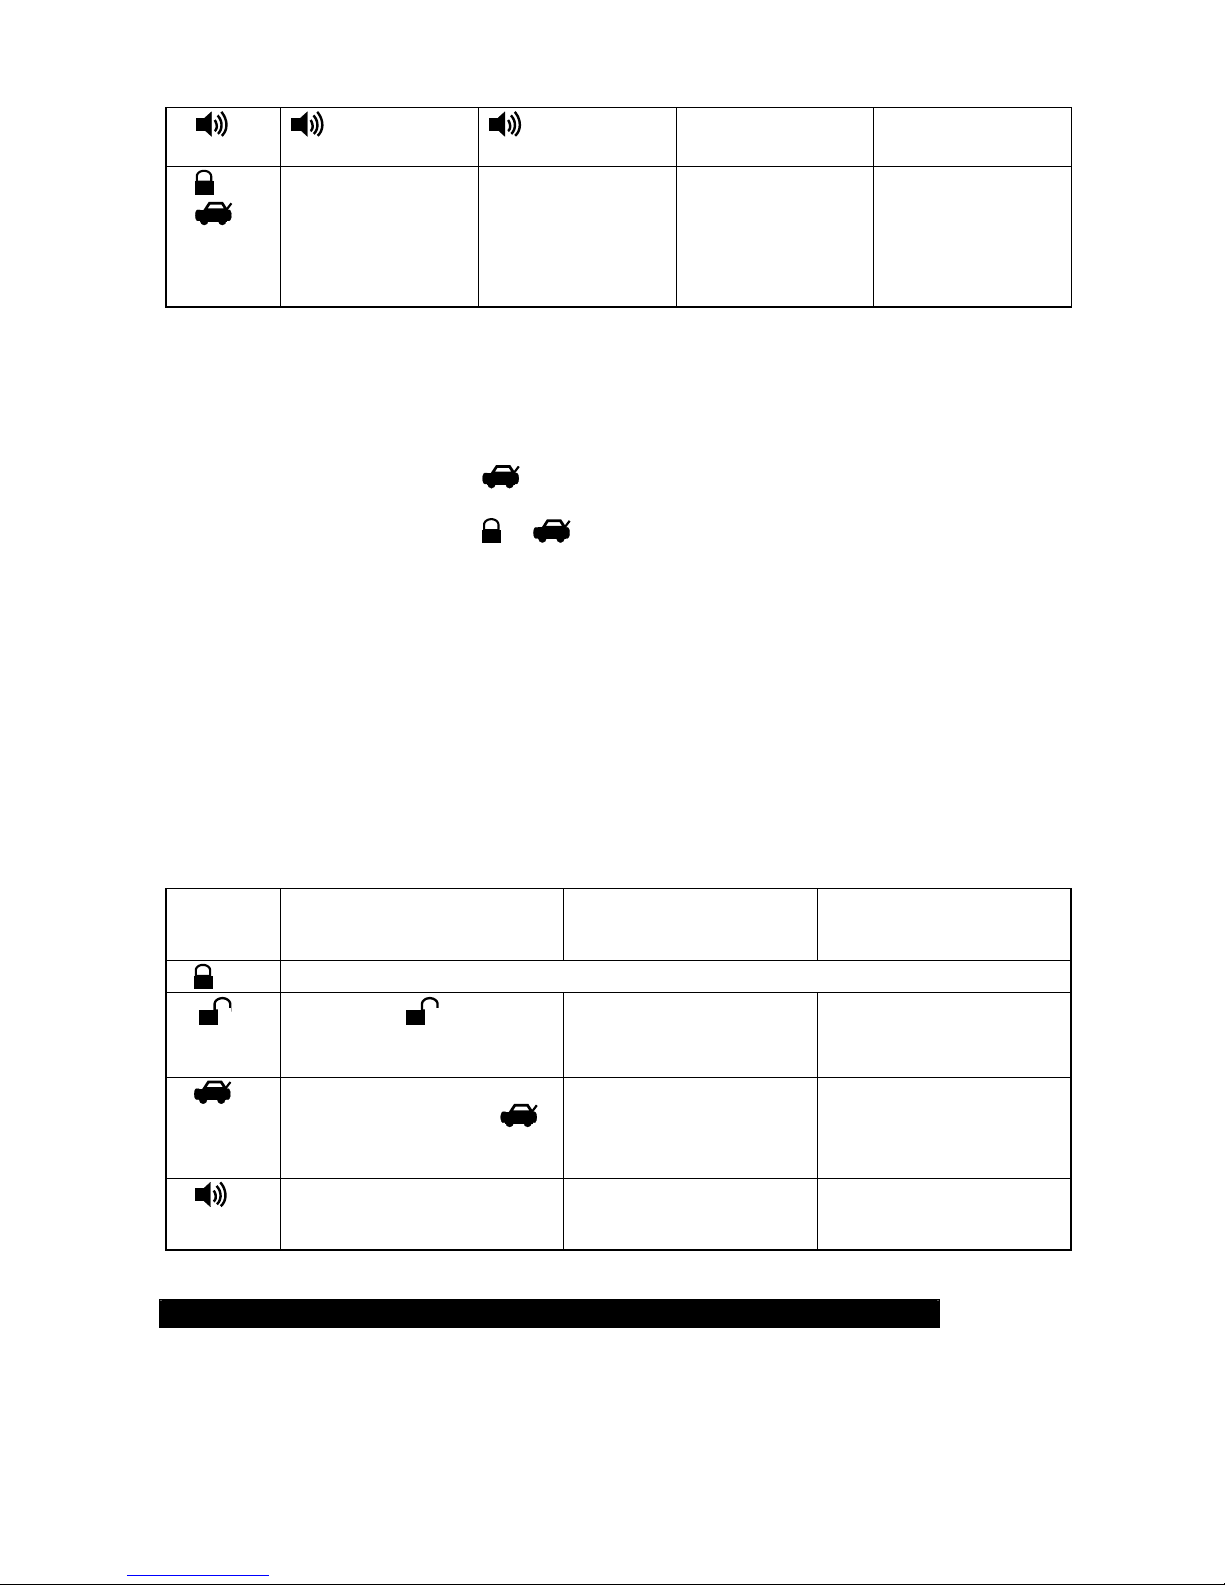
ALARM FEATURE “II” PRORAMMING:
1 Turn the Ignition switch ‘ON/OFF’ 3 TIMES and stay in OFF position.
2 Push the Valet switch 4 times and hold it until two chirps and a long chirp is hearing then release the
valet switch. You are now in the Alarm feature ‘II’ programming mode.
3 Press and release the transmitter button ‘A’ corresponding to the feature ‘A’ you want to program.
Press
T
ransmitte
Button
1
2
3
4
5
One Chirp / LED one
r
pulse
Factory Default
Setting
0.8-second Door
lock pulses.
Active arming Passive arming
Ignition controlled
door locks (3
seconds delay)
Ignition controlled
+
door unlock
Pathway illumination
feature “off”
Two Chirps / LED
two pulse
3.5-second Door
lock pulse.
without passive door
locking
Ignition controlled
door locks (15
seconds delay)
Without ignition
controlled door
unlock
Parking light “on” for
30- second upon an
unlock signal
Three Chirps / LED
three pulse
Double pulse unlock
Passive arming with
passive door locking.
Safety lock with
Handbrake
Parking light “on” for
30- second upon an
unlock signal &
10-second upon a
lock signal.
Four Chirps / LED
four pulse
Without ignition
controlled door locks
Exit: Turn Ignition to 'ON' position, or leave it for 15 seconds. A 3 long chirps to confirm exit.
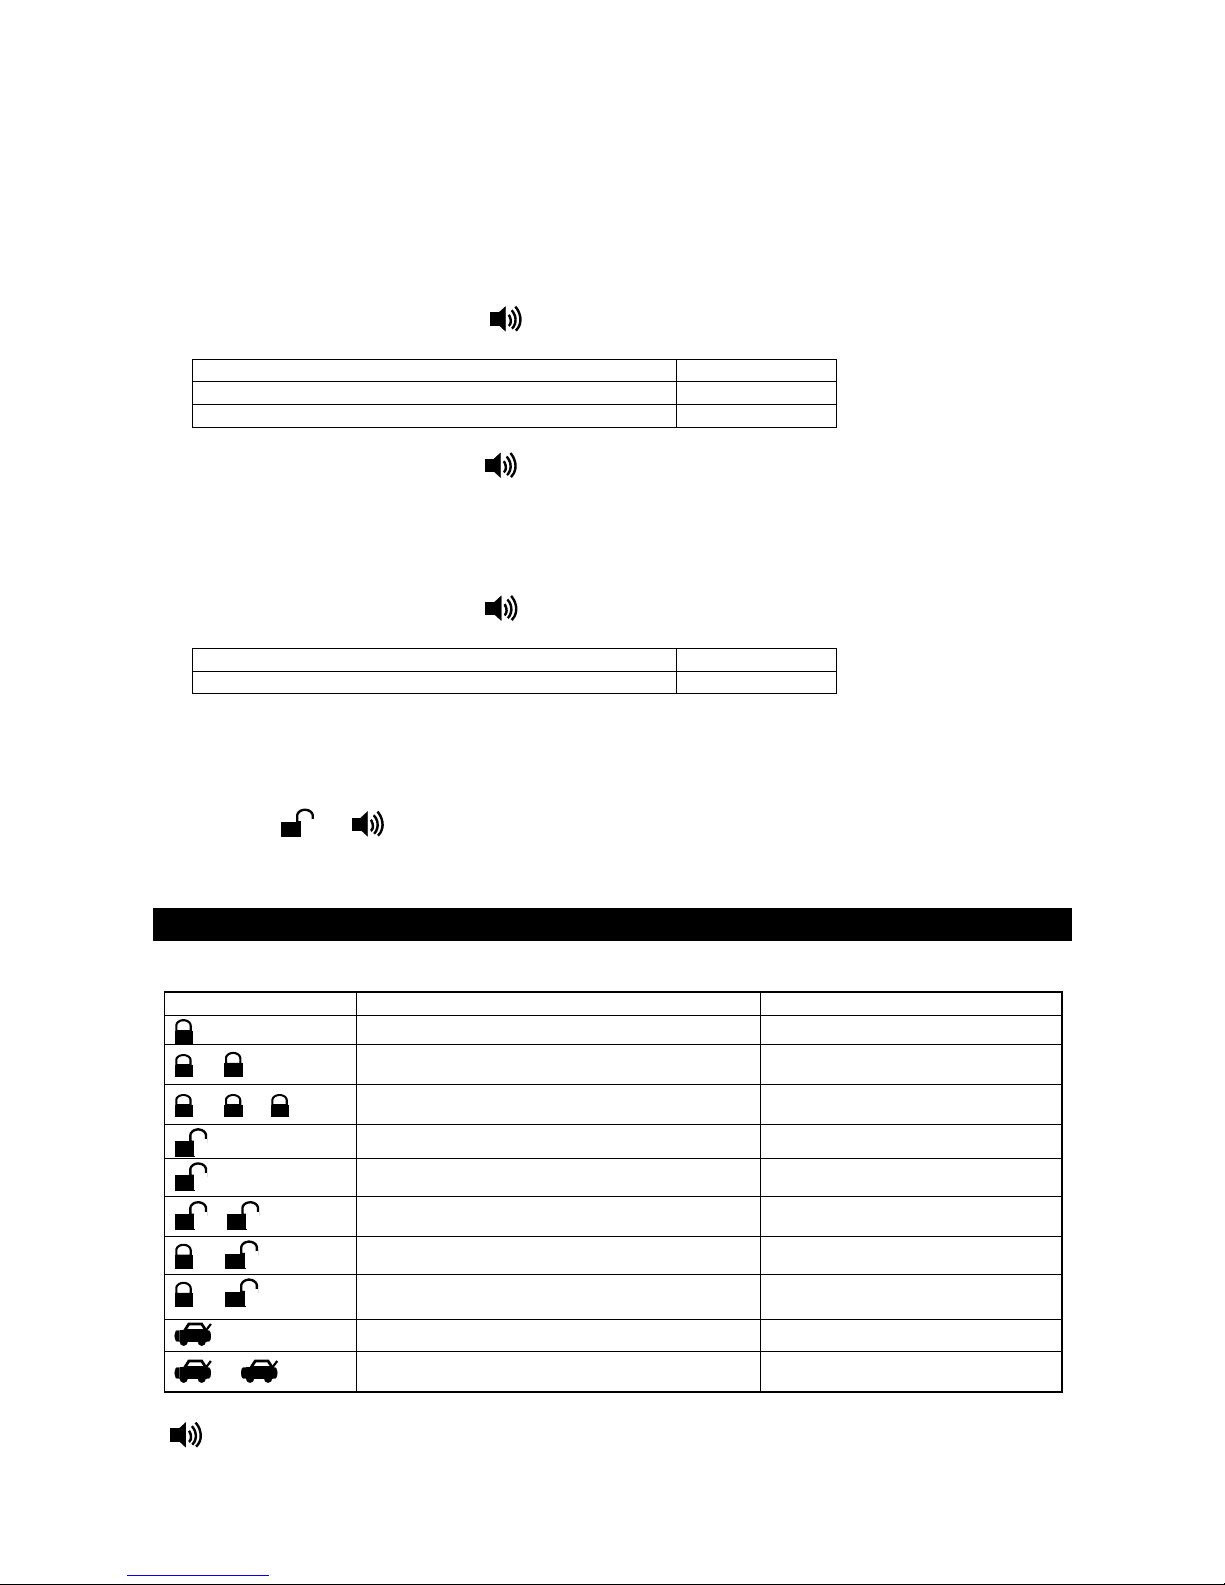
ALARM FEATURE “III” PRORAMMING:
1 Turn the Ignition switch ‘ON/OFF’ 3 TIMES and stay in OFF position.
2 Push the Valet switch 6 times and hold it until three chirps and a long chirp is hearing then release the
valet switch. You are now in the Alarm feature ‘III’ programming mode.
3 Press and release the transmitter button ‘A’ corresponding to the feature ‘A’ you want to program.
Press
T
ransmitte
Button
1
2
3
One Chirp /
r
LED one pulse
Factory Default
Setting
Transmitter can not
Arm the System
When Driving
H1/4 Brown Wire =
Constant Siren
output for 6-tone
siren
H7/9 Gray Wire
Channel 2 Output =
1 second pulse
output for trunk
release.
Two Chirps /
LED two pulse
Transmitter can be
Arming the System
When Driving
H1/4 Brown Wire =
5-second pulse
Siren output for
signal tone siren
H7/9 Gray Wire
Channel 2 Output =
Latch output
Three Chirps /
LED three pulse
H1/4 Brown Wire =
Random pulse Siren
output
H7/9 Gray Wire
Channel 2 Output =
Timer controlled
output
Four Chirps /
LED four pulse
H1/4 Brown Wire =
Horn pulse output
H7/9 Gray Wire =
Pager output
ALA550
8
Page 9
1/2/02
4
5
Channel 2 (3) Timer Control Output Programming.
Enter:
1. Turn the Ignition switch ‘ON/OFF’ 3 TIMES and stay in OFF position.
2. Push the Valet switch 6 times and hold it until three chirps and a long chirp is hearing then release the
Timer Program:
1-a. Press and release the transmitter
1-b. Press and release the transmitter
2. Press and hold the valet switch, the timer will immediately start.
3. When the desired interval has passed, release the valet switch. 1 long chirp for confirmation.
Note 1:
If your built-in timer control window/sunroof closure in your car DO NOT change the timer setting! This
requires installer-only programming. Changing the value will adversely effect operation and may cause
damage.
+
valet switch. You are now in the Alarm feature ‘III’ programming mode.
your are in features “Channel 2 Timer Programming mode”.
indicate your are in features “Channel 3 Timer Programming mode”.
(Set any interval between 1 second and 2 minutes)
Button =
PANIC Function.
H7/8 Pink Wire
Channel 3 Output =
Momentary output
Button =
Channel 3 Function.
H7/8 Pink Wire
Channel 3 Output =
Latched output
button 3 times, [3] LED flash, [3] siren/horn chirp to indicate
+ button 3 times, [3] LED flash, [3] siren/horn chirp to
H7/8 Pink Wire
Channel 3 Output =
Timer programming
(set to any interval
between 1 second
and 2 minutes.)
H7/8 Pink Wire =
Horn output
ALARM FEATURE “
1 Turn the Ignition switch ‘ON/OFF’ 3 TIMES and stay in OFF position.
2 Push the Valet switch 8 times and hold it until four chirps and a long chirp is hearing then release the
valet switch. You are now in the Alarm feature ‘IV’ programming mode.
3 Press and release the transmitter button ‘A’ corresponding to the feature ‘A’ you want to program.
Press
T
ransmitte
Button
1
2.
3
4
One Chirp /
r
LED one pulse
Factory Default Setting
Exit the programming mode. (3 long chirp to confirm this exit.)
Press & hold button for 4
seconds to delete the sensor
code
Override Without Password
Pin Code
button for 4 seconds to delete
the Password pin code
“TEST” Mode for Zone 2 Hood
& Zone 3 Door Pin Switch
IV” PRORAMMING:
Two Chirps /
LED two pulse
Wireless door / window
sensor & PIR sensor
programming mode
Override With Password
/
Press & hold
Pin Code
code programming
“TEST” Mode for Zone 4 /
the Optional Sensor
connected to 4 pin plug.
/
Password pin
Three Chirps /
LED three pulse
“TEST” Mode for Zone 1 /
Wireless door/window
sensor & PIR sensor
Exit: Turn Ignition to 'ON' position, or leave it for 15 seconds. A 3 long chirps to confirm exit.
Program The Wireless PIR Sensor or Wireless Door/Window Sensor.
This system has a very unique interfacing with optional sensor, to extend more protection, such as PIR
(IR-70S) sensor or Door/Window sensor. (DS-70S)
For example, in your garage you can put a PIR for protection. (A device to detect person's movement in a
protected area.) If system armed, a person walk through the detect area, the siren inside the car will
alarming to raise the attention to the owner.
ALA550
9
Page 10

1/2/02
So the same thing applies in door/window sensor, (A device to detect door/window open.) you may put the
sensor to the garage door or window. If system armed, a person opens the door or window, the siren will
alarm.
Set the PIR and door/window sensor the same code if you use both of them.
Enter:
4. Turn the Ignition 'switch ‘ON/OFF’ 3 TIMES and stay in OFF position.
5. Push the Valet switch 8 times and hold it until four chirps and a long chirp is hearing then release the
valet switch. You are now in the Alarm feature ‘IV’ programming mode.
Program:
1. Press and release the transmitter
button once, [2] LED flash, [2] siren/horn chirp to indicate your are
in features “Sensor Programming mode”.
2. Activate the sensor to let the system program it's code. [2] Chirps to confirm programmed. (Only one code
could be program)
Delete:
Within 15 seconds, Again press and hold the transmitter button for 4 seconds. One chirp to confirm
deleted the sensor code.
Password Pin Code Setup:
Enter:
1. Turn the Ignition 'switch ‘ON/OFF’ 3 times and stay in OFF position.
2. Push the Valet switch 8 times and hold it until four chirps and a long chirp is hearing then release the
valet switch. You are now in the Alarm feature ‘IV’ programming mode. You can program or delete the
password pin code as below:
Program:
1. Press and release the transmitter
button once, [2] LED flash, [2] siren/horn chirp to indicate your are
in features “Password Pin Code Programming mode”.
2. Within 5 seconds, begin to enter your chosen first 10ths digit by pressing and releasing the valet Switch
from 1 – 9 times.
3. Within 15 seconds of the last enter (the 1
st digit code), turn the Ignition switch to “ON” position.
4. Within 15 seconds, enter your chosen the second digit code by pressing and releasing the valet Switch
from 1 – 9 times.
5. Finish by turning the ignition switch to “OFF” position.
If the new password code was accepted, the unit would report back the newly entered code, by flashing the
LED, first indicating the first digit code has been memorized, pause and then the second digit code. The unit
will report the new code three times with a one-second’s pause between each code.
Note: If 15 seconds of inactivity expire, or if the ignition switch is turned “ON” for more then 5 seconds during
of above steps, the unit will revert back to the last successfully stored code. A [3] long chirps to confirm exit.
Will revert back to the last successfully stored code
Delete Password Pin Code / Override Without Password Pin Code (Factory default setting):
Within 15 seconds, press and hold the transmitter button for 4 seconds. A one chirps to confirm
Deleted the Password Pin Code.
Example: To program the Password Code 92, you would;
Enter:
1. Turn the Ignition 'switch ‘ON/OFF’ 3 times and stay in OFF position.
2. Push the Valet switch 8 times and hold it until four chirps and a long chirp is hearing then release the
valet switch. You are now in the Alarm feature ‘IV’ programming mode.
Program:
1. Press and release the transmitter
button once, [2] LED flash, [2] siren/horn chirp to indicate your are
in features “Password pin code programming mode”.
2. Within 5 seconds, press and release the valet Switch 9 times.
3. Within 15 seconds of the last enter (the 1
st digit code), Turn the Ignition Switch to “ON” position.
4. Within 15 seconds press the valet Switch twice.
5. Turn the Ignition Switch to “OFF’ position.
You will note the LED flashing nine times, pause and then flash two times, pause. This pattern will be
repeated three times indicating the new code (92) has been accepted and stored in memory.
Test Mode
ALA550
10
Page 11
1/2/02
In this test mode, this system can test the Zone 1 Wireless PIR or Door switch / Zone 2 Instant ground
trigger / Zone 3 Door trigger and the Zone 4 optional sensor sensitivity. The installer can save time to test
the optional sensor sensitivity and sensor without using the traditional arming/disarming procedures to test
the sensors.
Enter:
1. Turn the Ignition 'switch ‘ON/OFF’ 3 TIMES and stay in OFF position.
2. Push the Valet switch 8 times and hold it until four chirps with a long chirp is hearing then release the
valet switch. You are now in the Alarm feature ‘IV’ programming mode.
4-a. Test the Zone 2 Instant Ground Trigger & Zone 3 Door Trigger:
Press and release the transmitter
are in Zone 2 / instant ground trigger and Zone 3 / Door trigger test mode.
Trigger sensor Siren chirps
Zone 2 / Instant Ground trigger (H7/2 Blue wire) 2
Zone 3 / Door trigger (H7/3 Violet & H7/5 Green Wire) 3
4-b. Test the Zone 4 / Optional Sensor (Connected to H2 4 Pin Plug):
Press and release the transmitter
are in optional sensor (connected to H2 4 pin plug) test mode.
1. Activate the warn-away (first stage optional sensor), system will emit a short chirp.
2. Activate the full alarm (second stage optional sensor), system will emit a long chirp.
3. Continue to test the optional sensor until reach the proper sensitivity.
4-c. Test the Zone 1 / Wireless PIR or Door Switch:
Press and release the transmitter
are in optional wireless PIR or Door switch test mode.
Trigger sensor Siren chirps
Zone 1 / Optional wireless PIR or Door Switch 1
button once. [1] LED flash, [1] siren/horn chirp to indicate your
button again. [2] LED flash, [2] siren/horn chirps to indicate your
button again. [3] LED flash, [3] siren/horn chirps to indicate your
RETURN TO FACTORY DEFAULT SETTING:
1. Turn the ignition ON then OFF 3 TIMES and stay in OFF position.
2. Push the Valet switch 12 times and hold it until six chirp with a long chirp is hearing then release the
valet switch. You are now in the “Return To Factory Default Setting” programming mode.
3. Press the
chirps and 3 long chirps to confirm the system “Alarm Feature I & II & III & IV Programming all return to
factory default setting.
Exit: Turn the ignition switch “on” or leave it for 15 seconds. A 3 long chirps to confirm exit.
+ button on the transmitter together for 6 seconds, there will be a confirmation six
OPERATION MANUAL
TRANSMITTER OPERATION:
A.
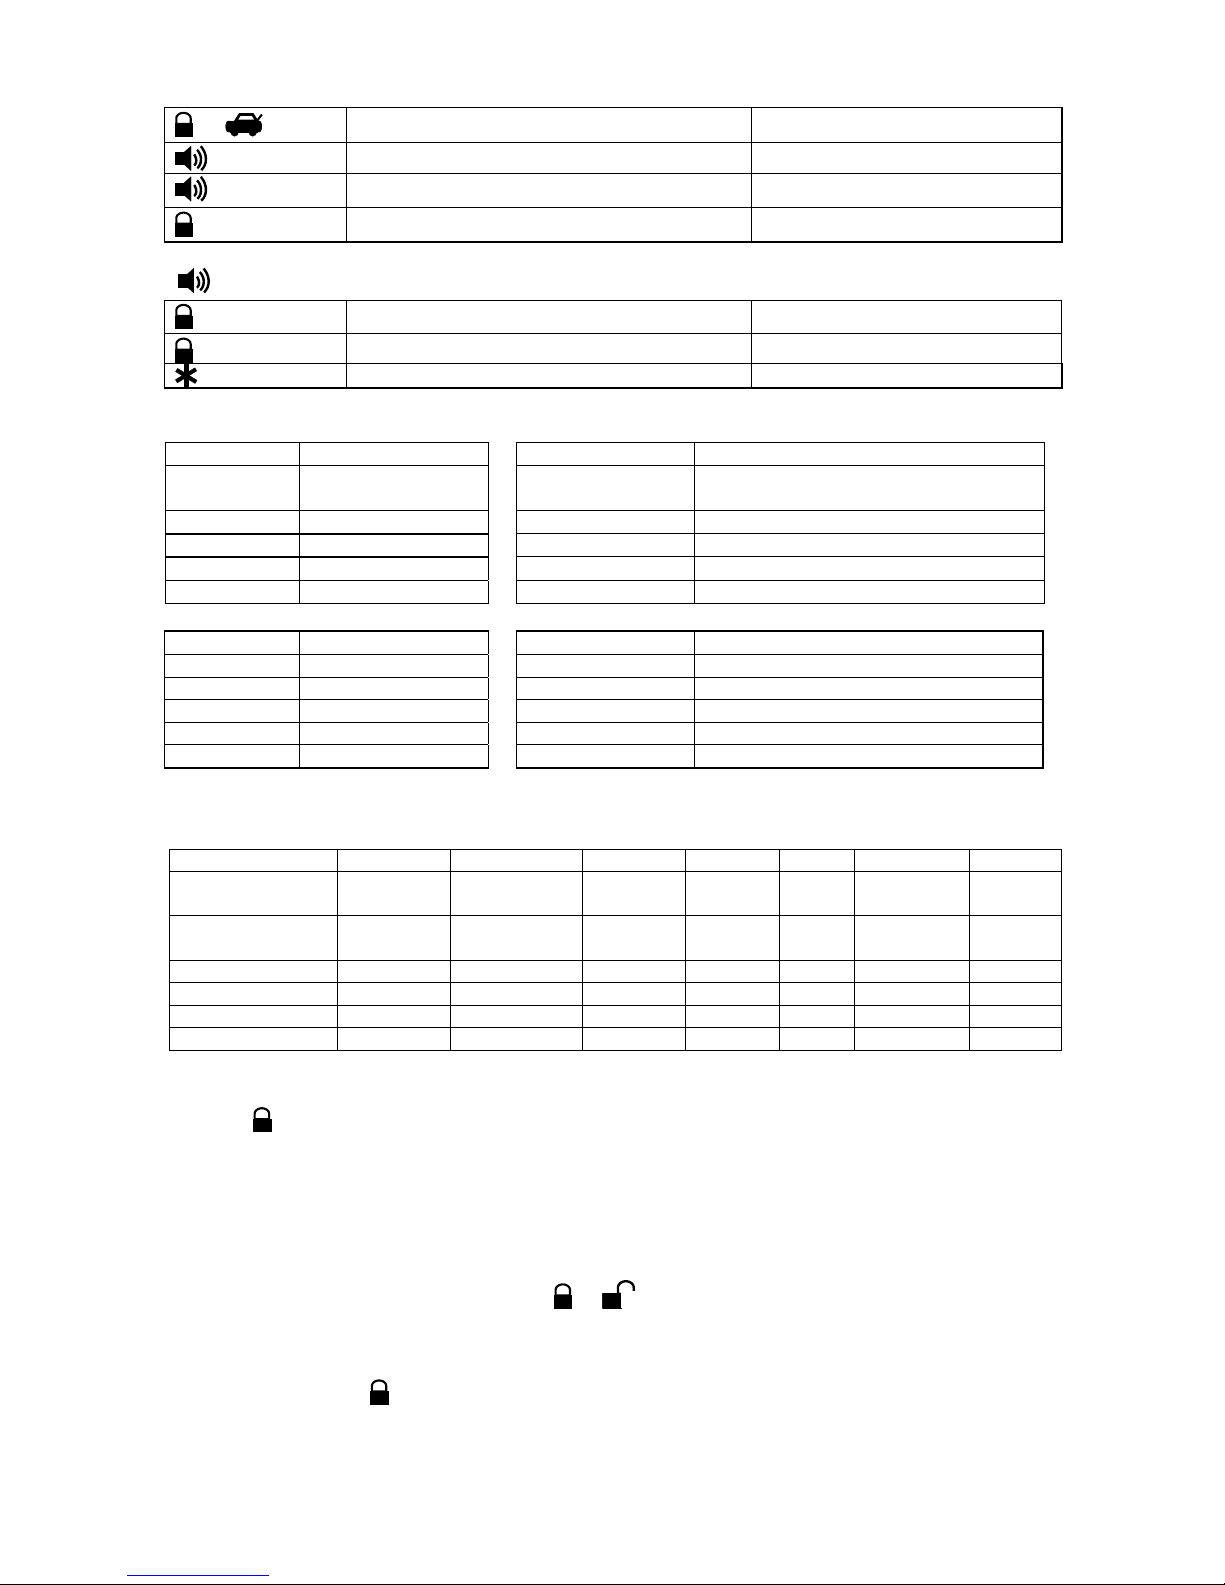
Transmitter Button System Function Remark
-
- -
(2-second)
-
+
+ (2-second)
(2-second)
-
Lock Doors & Arm System
Arm and Delete The Zone 4 / Shock Sensor Press twice within 3 seconds.
Arm and Noiseless mode Press within 3 seconds.
Unlock Doors & Disarm System
Disarm & Channel 2 (Trunk) Timer Control Press and Hold for 2 seconds
Two Steps Door Unlock & Disarm System Press twice within 3 seconds.
Silent Arming / Disarming
Activate Anti Car-Jacking
Channel 2 (Trunk) Timer Control Press and Hold for 2 seconds
Passive Arming By-pass While the system disarmed.
Ignition in "off" position.
Ignition in 'on' position and
Press and Hold for two seconds
Button = Panic Function. (Factory Default Setting)
ALA550
11
Page 12
1/2/02
+
(3-second)
(3-second)
Button = Channel 3 Function. (See Feature III – 4 Programming)
(3-second)
Channel 3 Timer Control
Car Locator
Panic Function Press and Hold for 3 seconds
Panic Function Press and Hold for 3 seconds.
Panic Function Press and Hold for 3 seconds.
Car Locator While the system in Armed
Channel 3 Timer Control
B. LED INDICATORS:
LED Status LED Status
Off Disarmed 1 flashes... pause Zone 1 / Trigger on PIR or Door
Sensor
Slow flash Armed 2 flashes... pause Zone 2 / Trigger on Trunk/Hood
Fast flash Passive arming 3 flashes... pause Zone 3 / Trigger on Door Switch
On (solid) Valet mode 4 flashes... pause Zone 4 / Trigger on Shock Sensor
5 flashes... pause Zone 5 / Trigger on Ignition Switch
C. CHIRP INDICATORS: D. PARKING LIGHT:
Chirp Function Parking light Function
1 chirp Arm 1 flash Arm
2 chirps Disarm 2 flashes Disarm
3 chirps Defective reminder 3 flashes Disarm / Triggered
4 chirps Disarm / Triggered 12 flashes Car locator
6 chirps Car locator
E. SYSTEM OPERATING CONDITION:
Siren, Horn Parking Light LED Doors Starter Dome Light Pager
1. Arming 1 or 3
Chirps
2. Disarming 2 or 4
Chirps
3. Trigger Alarming Flashes Slow Flash Disable Flashes On
4. Panic Alarming Flashes Flashes
5. Car-Jacking Alarming Flashes Disable Flashes
6. Car Locator 6 Chirps 12 Flashes
1 Flash Slow Flash Locking Disable
2 or 3 Flashes Fast Flash
or Off
Unlocking Turns on for
30 -second
F. ACTIVE ARMING – LOCK & ARM:
1. Press button on transmitter.
2. The siren will chirp once and parking light will flash once indicating that the system is now armed. The
vehicle door will lock upon arming when interfaced with the security system.
Note: The wireless PIR sensor and wireless door/window sensor is delay trigger, it will arm after 30
seconds.
DEFECTIVE SENSOR REMINDER: If the siren sound 3 chirps, then you have left a door, trunk, or hood
lid ajar. (See Feature “I
- 3 Programming)
SILENT ARMING / DISARMING:
your security system, No chirp sound will be heard, arm / disarm confirmation will be through the vehicle’s
parking light only.
NOISELESS MODE:
Press and release the
ALA550
button once: The siren chirps once, The system is armed.
Press the + button together on the transmitter will arm or disarm
12
Page 13

1/2/02
Press the
mode, On this mode trigger the zone 4 shock sensor the trigger timer will reduced from 30 seconds to 15
seconds. .
The noiseless feature is programmed to activate for one arming cycle only. The security system will return
to normal operation during the next arming cycle.
SHOCK SENSOR / OPTIONAL SENSOR BY-PASS: Press the
3 seconds will arm the security system, by-pass the shock sensor and the optional sensor connected to 4
pin plug. The system will chirp one additional time to confirm the sensor bypass mode was activated. The
sensor bypass feature is programmed to activate for one arming cycle only. The security system will return
to normal operation during the next arming cycle.
ARMING WHILE DRIVING: (see Alarm Feature III
Your system can be armed while ignition on! Simple press
running, or the ignition is on. The system will chirp once and then once more to indicate the ignition is on.
The system will not respond to any input except the door trigger, mean while the starter kill relay and
ignition disable relay will not be activated. The system will disarm automatically when the ignition is turned
off. The siren will chirp twice and the LED will stop flashing.
button 3 times within 3 seconds: The siren chirp once again, the system is now in Noiseless
button on the transmitter twice within
- 1 Programming)
button for 2 seconds while the vehicle is
G. PASSIVE ARMING (See Feature “II - 2” Programming)
Active arming / disarming is controlling your security system via the remote transmitter. This security
system is equipped with an optional Passive Arming feature, which allows the security system to arm 30
seconds after the last door is closed. Operation is as follows.
1. Turn the ignition to the “OFF” position and exit the vehicle.
2. After all entrances are closed, the security system LED will flash fast for 30 seconds. If you reopen any
door / hood / trunk, the security system LED will stop flashing. It will begin flashing again once the
vehicle all entrances are closed.
3. After 30-second timer has elapsed, the security system will automatically “ARM”. The siren will chirp [1]
time and the parking lights will flash [1] time.
PASSIVE DOOR LOCKING: (See Feature “II
The vehicle’s door will automatically lock after passive arming cycle has been completed.
PASSIVE ARMING BY-PASS: While the system disarmed, press the
will respond with [1] chirp and LED will turn “ON”. The security system will remain in this temporarily
-
2” Programming)
buttons twice, the security
state for as long as you wish. To exit passive by-pass, press the
return to normal status.
button and the system will
or
H. ACTIVE DISARMING – UNLOCK & DISARM:
1. Press button on the transmitter.
2. The siren will chirp twice and parking light will flash twice to indicating that the security system is now
disarmed. The vehicle’s door will unlock and dome light will turn on for 30 seconds upon disarming when
interfaced with the security system.
TAMPER DISARMING: If alarm triggered, upon disarm the system, siren chirp 4 times, parking light flash
3 times.
PATHWAY ILLUMINATION (See Alarm Feature “II
light “ON” for 30 seconds upon a unlock signal and for 10 seconds upon the lock signal.
TWO STEPS DOOR UNLOCK: This feature will independently unlock the drives door only when disarming
the security system. Pushing the
the entire vehicle.
AUTOMATIC RE-ARM (See Feature “
will automatically re-arm itself 60 seconds after disarming with remote transmitter. Automatic rearm will
cancel if any door is opened before the 60 seconds timer has elapsed.
button on the transmitter a second time within 3 seconds will unlock
I - 2” Programming): If this feature is selected, the security system
- 5” Programming): This feature turns the parking
I. DISARMING WITHOUT A TRANSMITTER
OVERRIDE THE ALARM WITHOUT PASSWORD PIN CODE: (Factory Default Setting)
The Override function may be used if the remote transmitter is lost or inoperative.
1. Enter the vehicle and turn the ignition switch to 'ON’ position. (Alarm will sound.)
2. Within 10 seconds push and release the valet switch
ALA550
13
Page 14

1/2/02
The alarm will stop sounding and enter the disarm mode. You can now start and operate the vehicle
normally.
OVERRIDES THE ALARM WITH PASSWORD PIN CODE:
Unlike valet switch easily found, and defeated, this security system allows the consumer to program a
password pin code. Offering a higher level of security.
1. Enter the vehicle and turn the ignition switch to 'ON’ position. (Alarm will sound.)
2. Within 5 seconds, enter your chosen the first digit code by press and release the Valet Switch.
(When finished above procedures, system's siren stop alarming, parking light stop flashing, other
sensor stop trigger, but the vehicle can not be start and drive away.)
3. Within 15 seconds of the last enter (the 1 st digit code), turn the Ignition Switch “OFF” then “ON”.
4. Within 15 seconds, enter your chosen the second digit code by press and release the Valet Switch.
5. Turn the ignition switch “OFF” position.
[4] Chirps form siren/horn, [3] flash from parking light to indicate the system was disarmed.
Note 1: You must override the alarm within 60 seconds. If not, the system will automatically re-arm.
EXAMPLE: To Override The System With The Password Code 83, you would;
1. Enter the vehicle and turn the ignition switch to 'ON’ position. (Alarm will sound.)
2. Within 5 seconds, Press and Release the Valet Switch 8 times
(When finished above procedures, system's siren stops alarming, parking light stop flashing, other
sensor
stop trigger, but the vehicle can not be start and drive away.)
3. Within 15 seconds of the last enter (the 1st digit code), turn the Ignition Switch “Off” then “ON”.
4. Within 15 seconds, Press and Release the Valet Switch 3 times
5. Turn the Ignition Switch to “Off” position.
[4] Chirps form siren/horn, [3] flash from parking light to indicate the system was disarmed.
(Alarm Feature IV - 3 Programming)
J. VALET MODE:
The valet switch allow you to temporarily bypass all alarm function, eliminating the need to hand your
transmitter to parking attendants or garage mechanics. When the system is in valet mode, all alarm
function are bypassed, however the remote panic feature and remote door lock will remain operational.
To use the valet mode, the system must first be disarmed either by using you remote transmitter, or by
operating the
Manual override sequence.
Enter Valet Mode:
1. From the disarmed condition, turn the ignition to “ON” position.
2. Push and hold valet switch for 2 seconds until the LED turn on. The LED will remain on as long as the
system is in 'valet mode'.
Exit Valet Mode:
1. Return to normal operation, turn ignition 'on'.
2. Push and hold valet switch for 2 seconds, The LED will turn off indicate the system are exiting the valet
mode.
(System in Disarm or Valet mode)
K. CAR LOCATOR (See Feature III – 4 Programming)
Press the button on the transmitter to active car locator function. (Factory Default setting )
Under Armed mode, press the
button = Channel 3 Function)
The siren will chirp 6 times. The parking light will flash 12 times, for you to easily locate your car.
L. PANIC FUNCTION: (See Feature III – 4 Programming)
The transmitter can be used as a remote panic switch to manually trigger the alarm in case emergency.
1. Press and hold the
immediately sound. (Factory Default setting )
2. During panic mode, the normal function of this transmitter button will be suspended. The
buttons can be used to lock and unlock the doors (if the option is installed), however once the
button is pressed, the vehicle’s starter disable device, (where installed) will be enable allowing the
vehicle to start.
ALA550
button or button on the transmitter for 3 seconds. The alarm will
button on the transmitter to active car locator function. (If you Program
and
14
Page 15

1/2/02
3. To stop the alarm, press and hold the
any transmitter button other than the
turned off immediately.
4. If the button is not pressed, the alarm will automatically stop after 30 seconds.
or button on the transmitter again for 3 seconds. Also if
or button is pressed and released, the panic mode will be
M. TRIGGER THE SYSTEM
When armed, your vehicle is protected as follows:
1. Light impacts will trigger the warn-away signal. A long chirp from siren/horn.
2. Heavy impacts / Doors open / Hood open / Trunk open / Turn on the ignition key / Activate PIR sensor
/ Activate door/window sensor will trigger the programmed sequence.
The starter disable relay (if installed) prevents the vehicle’s starter from cranking. The siren, horn, parking
lights, and dome light will turn on to alerting of an intrusion for 30 seconds. Then it will stop and automatic
reset and re-arm. If the one of sensors or detectors still active, the alarm system will sound a maximum of
6 times of 30 seconds cycles.
NOISE ABATEMENT CIRCUIT: Your system has “Noise Abatement Circuit”. It prevents annoying
repetitive trigger sequences due to faulty door pin switches or environmental condition such as thunder,
jackhammers airport noise, etc.
Here’s how “Noise Abatement Circuit” works: The alarm triggers five times. Each time, the same sensor or
switch is triggering the alarm. “Noise Abatement Circuit” will interpret this pattern of triggers as false alarm.
After the fifth trigger, “Noise Abatement Circuit” ignores, or bypasses, that sensor or switch until the other
sensor or switch is triggered.
Doors (Hood/Trunk) are covered by “Noise Abatement Circuit” differently: If the alarm is triggered by an
open door for six full cycles, the door will be bypassed until the trigger ceases.
N. ANTI CAR-JACKING
Warning: If you don't need the anti car jacking function in this alarm system, be sure to set anti car jacking
feature “OFF”. This system is default setting all anti car-jacking “OFF”. (See Alarm Feature
Programming.)
ACTIVE ANTI CAR-JACKING
1. TRANSMITTER STAND-BY THE ANTI CAR JACKING:
I - 4
Press and hold
The parking light will turn on for 1.5 seconds to indicate the anti car jacking mode is stand-by
2. DOOR SWITCH ACTIVATE ANTI CAR JACKING:
Under stand-by mode of anti car-jacking mode
1. Turn the ignition switch to “ON” position, the system is armed.
2. Once the system is armed, If you are forced out from the vehicle, the system will active the anti car
jacking trigger when the door is opened and closed.
PASSIVE ANTI CAR JACKING :
It operate as below:
1.Turn the ignition switch to “ON”, the system will arm.
2.If you are forced out from the vehicle, the system will trigger when the door is opened and closed.
TRIGGER THE ANTI CAR JACKING MODE:
3-timer circuits will function as follows:
First timer:
a. 50 seconds after the system has been triggered. The siren will start chirping for 15 seconds.
b. During this 15 seconds period of chirping, you will be alerting to push the valet switch once to turn off
the car-jacking feature.
c. If not, it will enter second timer anti car jacking.
Second timer:
65 seconds after the system has been triggered. The siren starts alarming and the parking light starts
flashing.
Third timer:
90 seconds after the system has been triggered
a. The siren still alarming and the parking light flashing, and
b. The starter disable will activate to prevent the vehicle from starting.
c. It will remain active until the vehicle's battery power exhausted.
OVERRIDE THE SYSTEM TO TURN OFF ANTI CAR JACKING:
+ button on the transmitter for 2 seconds while the vehicle’s ignition is ON.
ALA550
15
Page 16

1/2/02
Turn the ignition switch from OFF to ON, and within 10 seconds push valet switch, the siren will stop and
the system disarmed
Note: If you use password pin code to double protect the vehicle security, you will need to use it to
completely disarm the system.
O. DOME LIGHT CONVENIENCE DELAY & SUPERVISION
The alarm with a unique feature which will turn on your vehicle dome light as following:
1. Upon disarming, the interior lights will remain on for 30 seconds.
2. If the vehicle is intruded, the interior light will flash for the same duration as the siren.
Note: Turn ON the ignition switch or arm the alarm will turn off the dome light.
P. IGNITION CONTROL POWER DOOR LOCK SAFETY SYSTEM. (See Feature II – 3/4
Programming.).
a. Safety lock with ignition switch and vehicle’s door. (Factory default setting)
1. Turn the ignition switch on and close all vehicle’s door. After 3 seconds, the system will automatically
lock the central locking system.
2. Turn the ignition switch off . The system will automatically unlock the central locking system.
b. Safety lock with ignition switch and handbrake.
Connect the black/white wire to the handbrake switch for this application and programmed the “Safety
lock with handbrake” on feature programming.
1. Turn the ignition switch on, close all vehicles’ door and release the handbrake. The system will
automatically lock the central locking system.
2. While the ignition switches on, Re-open and close the vehicle’s door and release the handbrake, The
system will automatically lock the central locking system.
3. Turn the ignition switch off and pulling up the handbrake. The system will automatically unlock the
central locking system.
Q. POWER ON MEMONRY:
This security system is equipped with circuitry that will allow the unit to remember its alarm state if the
power is lost and then reconnected.
This device complies with part 15 of the FCC rules. Operation is subject to the following two conditions.
(1) This device may not cause harmful interference, and
(2) This device must accept any interference received, including interference that may cause undesired
operation.
T0723
ALA550
16
 Loading...