

Page 1
Page 2
Introduction to the PrivateTIME® PT1000
Thank you for purchasing the
PrivateTIME PT1000.
The PT1000 is a high-quality
telephone/speakerphone and
digital answering machine with
two unique features.
Its one-touch PrivateTIME
button, that when activated, stops unwanted callers from disturbing
you. Only family and friends that know your PRIVACY code will ring
through. Telemarketers are commanded to hang up, while others are
sent directly to its built-in answering machine without ever ringing
your phones (see page 15).
Off-Hook Alert – Audible alarm and visual indicator alert you to any
extension phone left off-hook throughout your home (see page 19).
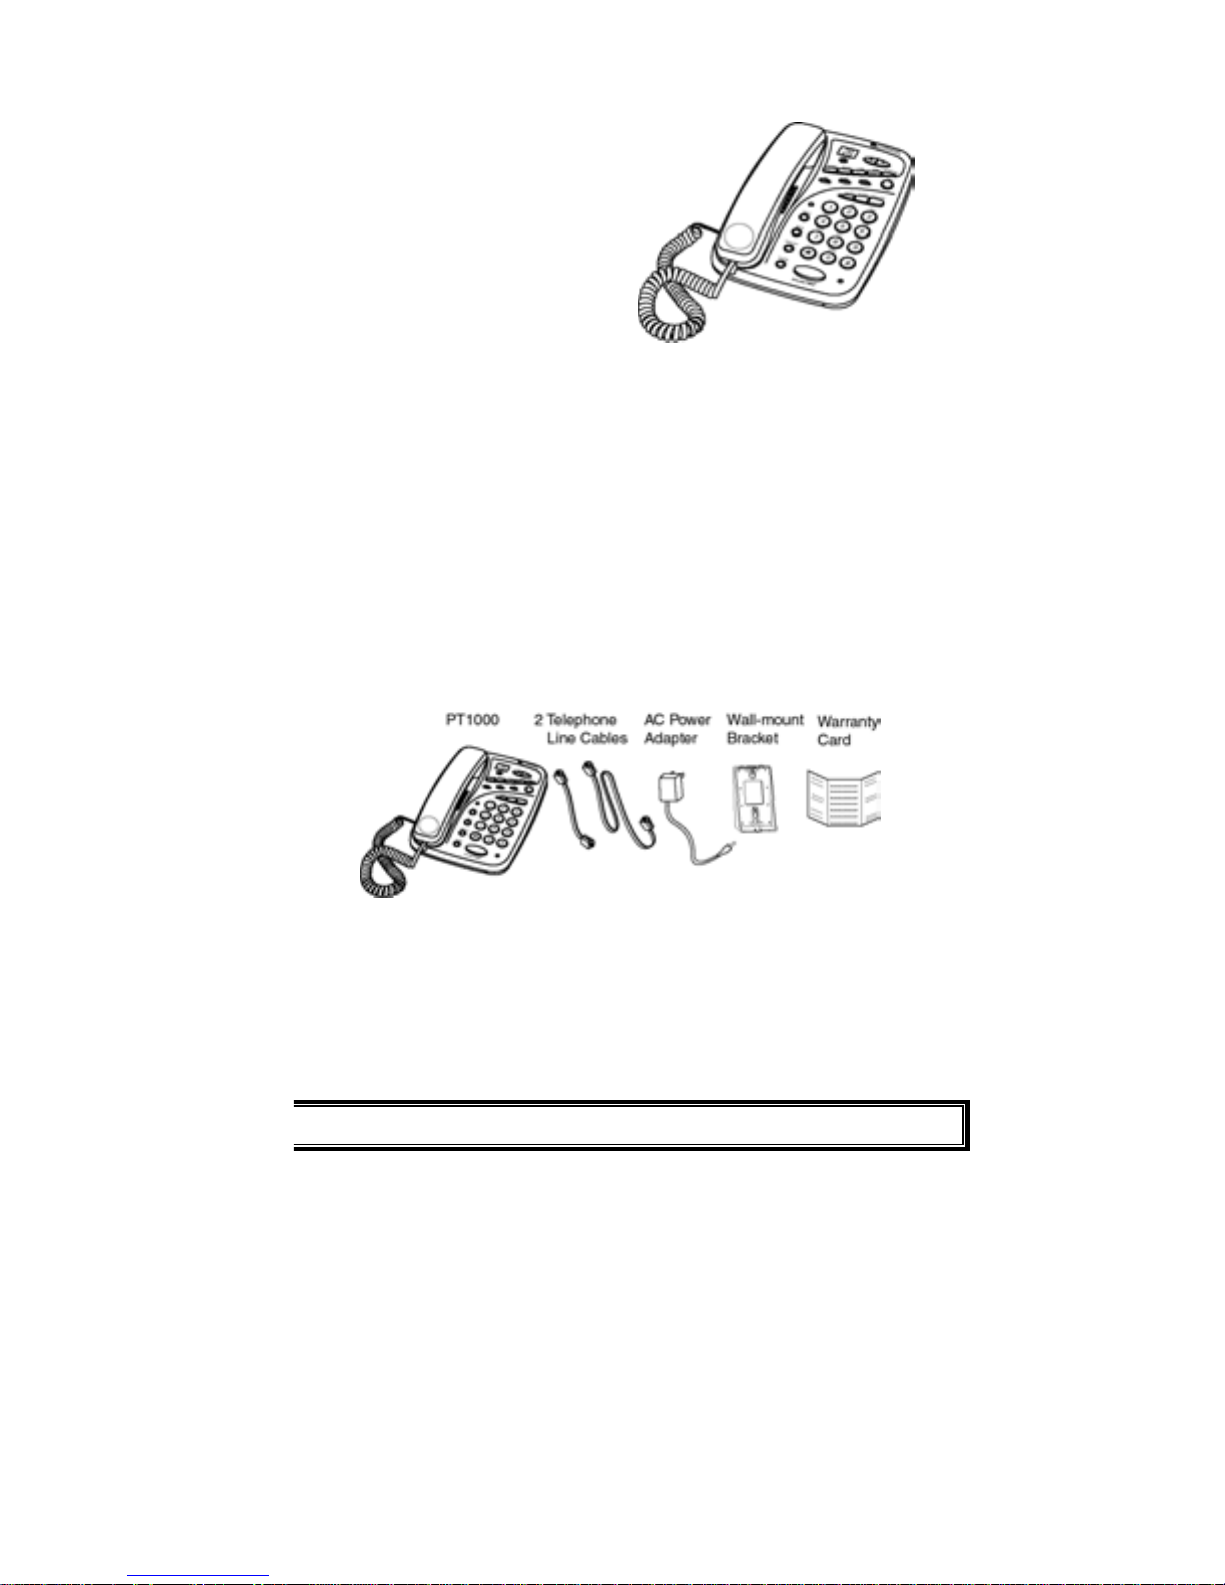
Unpacking the PT1000
When you open the PT1000 box for the first time, inspect the
contents. In the box you the should find following items:
If any of these items are missing or damaged, contact the dealer where
you purchased the unit, or call Customer Service at the number listed
in "One year limited warranty/Service Information."
PT1000 Operator’s Guide
Page 3
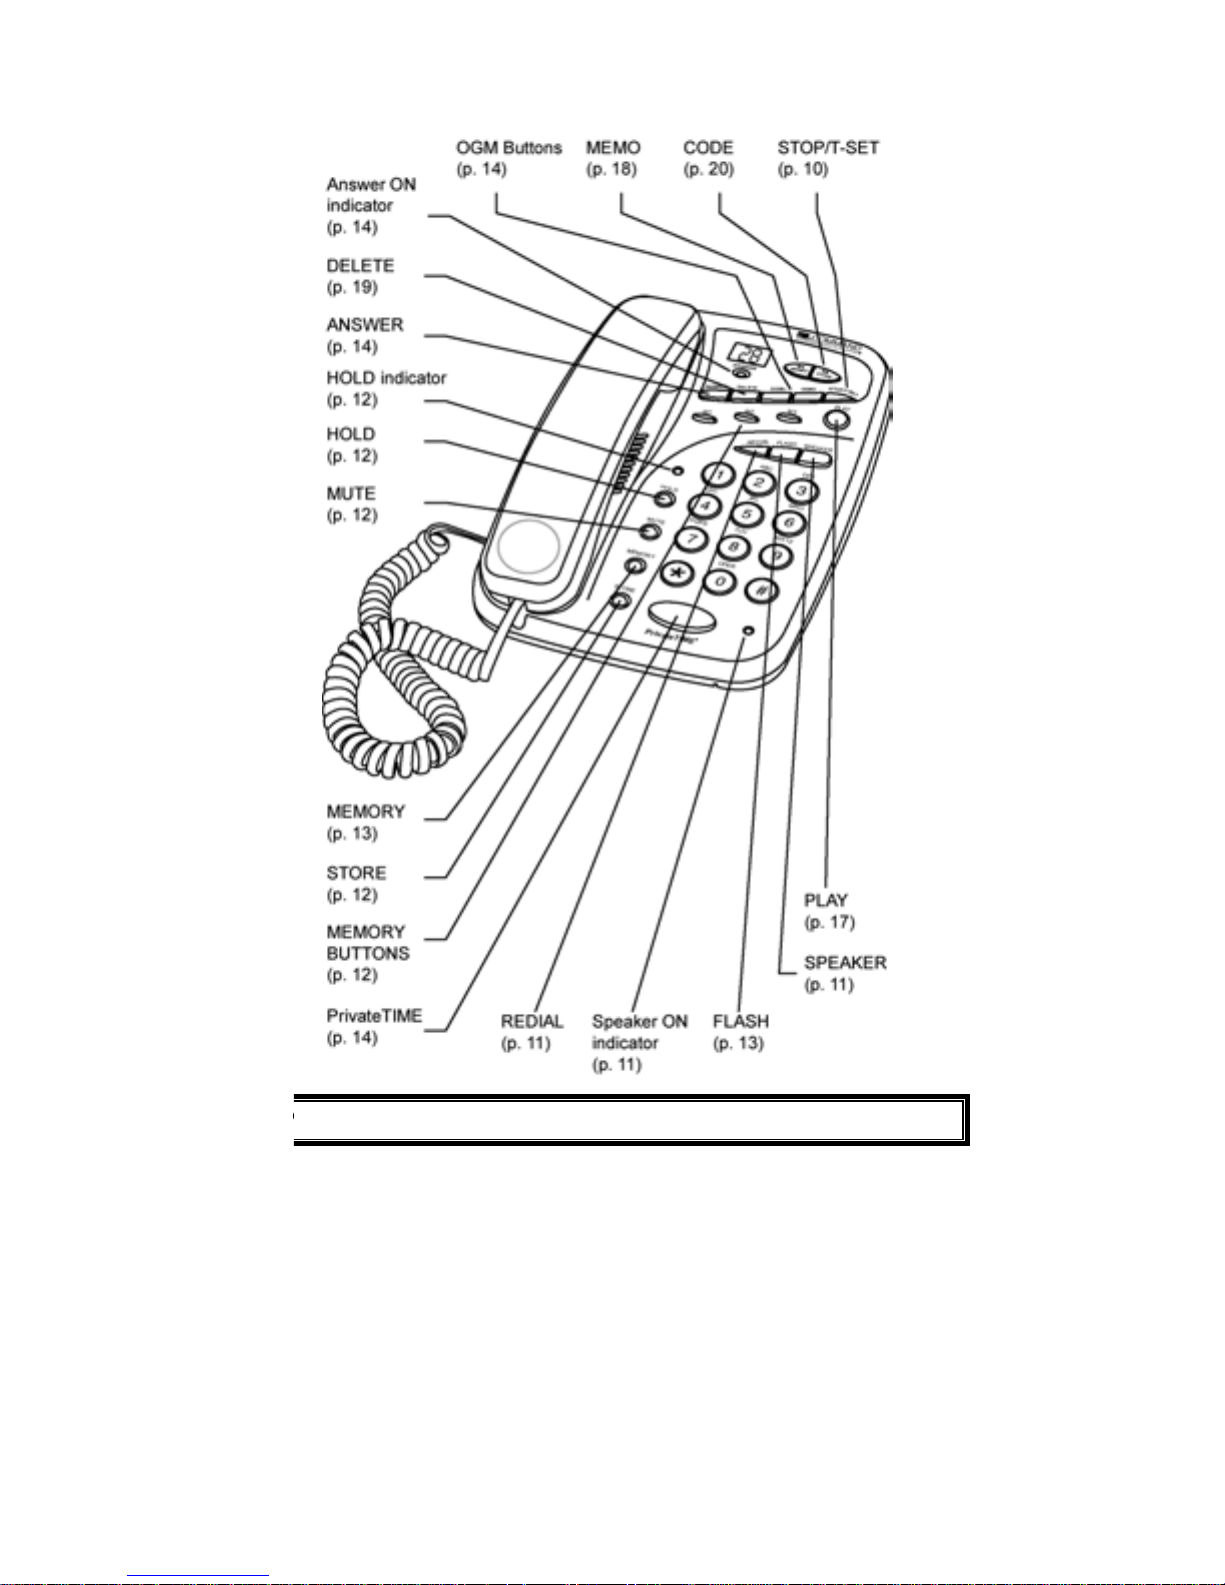
Base unit
T1000 Operator’s Guide 2
Page 4
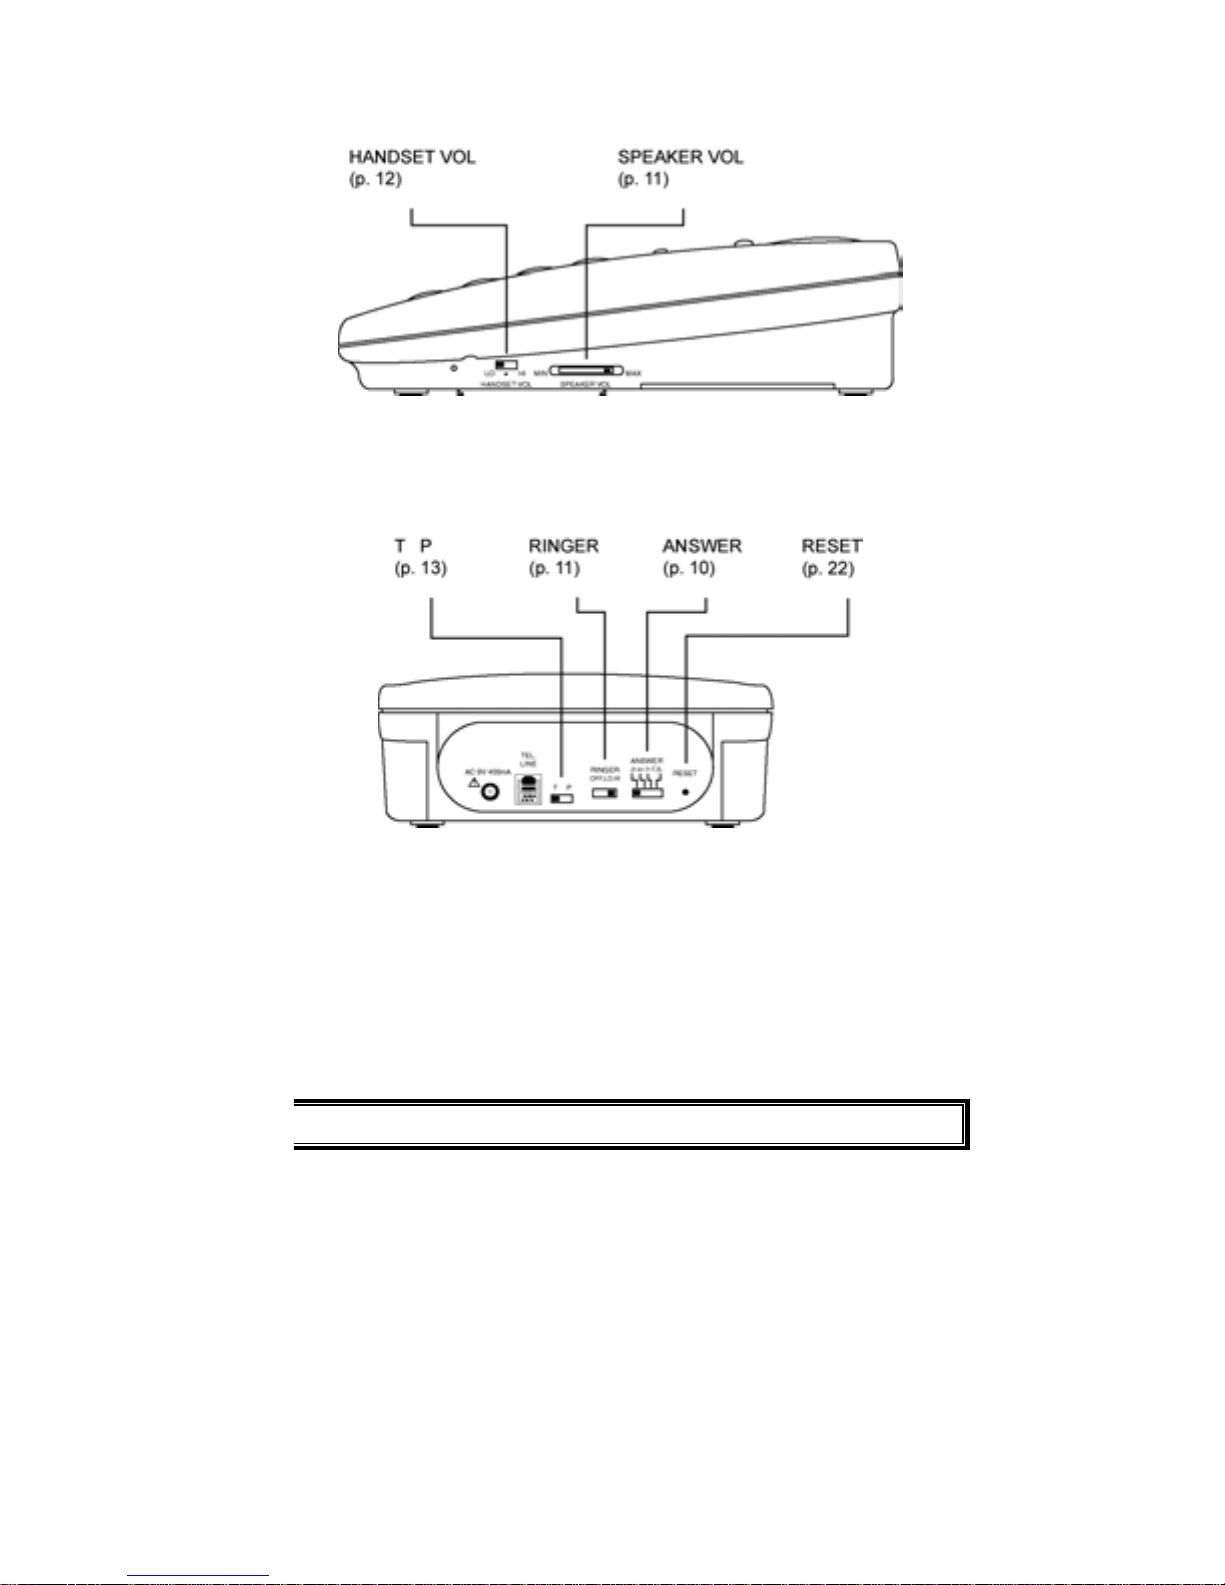
Side
Back
PT1000 Operator’s Guide
Page 5
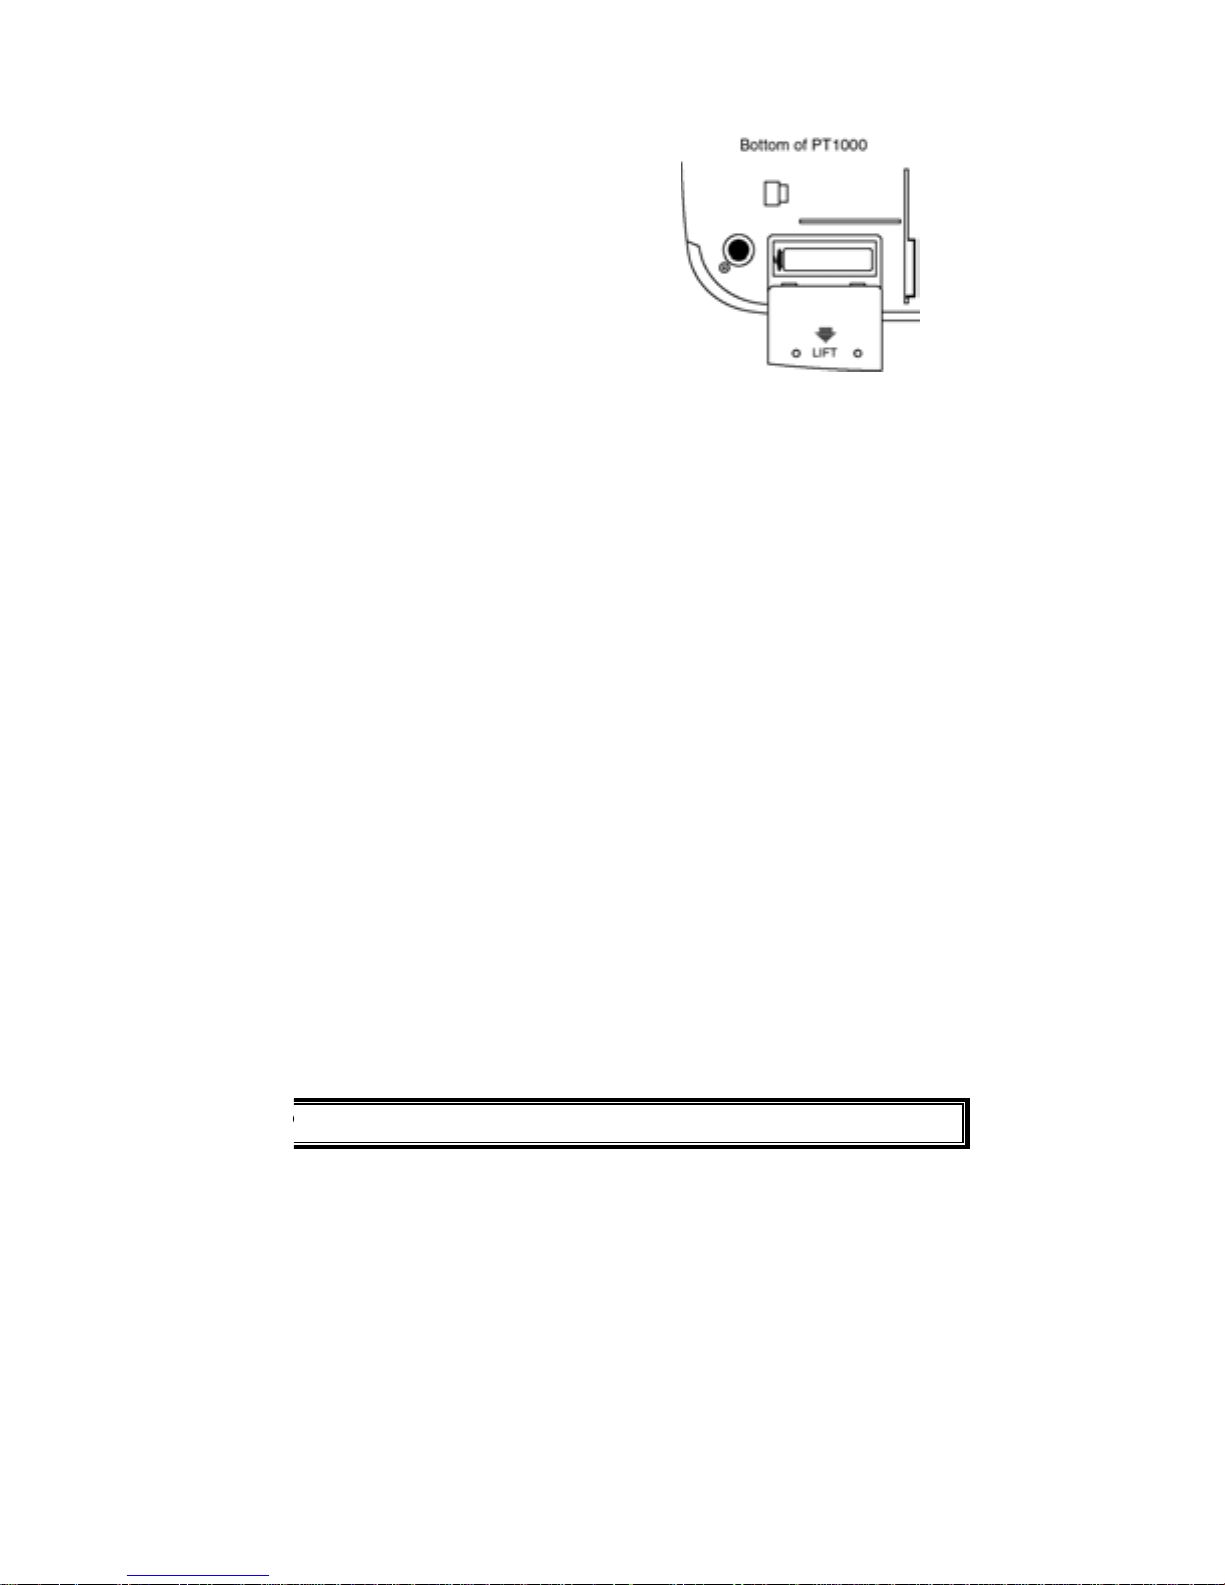
Set up the PT1000
Installing the 9V battery
The use of a 9V alkaline battery
(not supplied) saves the messages,
time and day settings, privacy
access codes, and remote operation
security codes in the event of a
power failure.
1. Use a Phillips screwdriver to remove the screws
on the battery compartment cover, then remove cover.
2. Snap the battery's contacts firmly to the battery connector
and place the battery in the compartment.
3. Replace cover and secure it with the screws.
Replace the battery when Lo displays.
Caution:
To avoid losing stored information, be sure the AC power
adapter is plugged in and connected to the PT1000 before
you replace the battery.
Always remove an old or weak battery. Batteries can leak
chemicals that can destroy electronic parts.
T1000 Operator’s Guide 4
Page 6
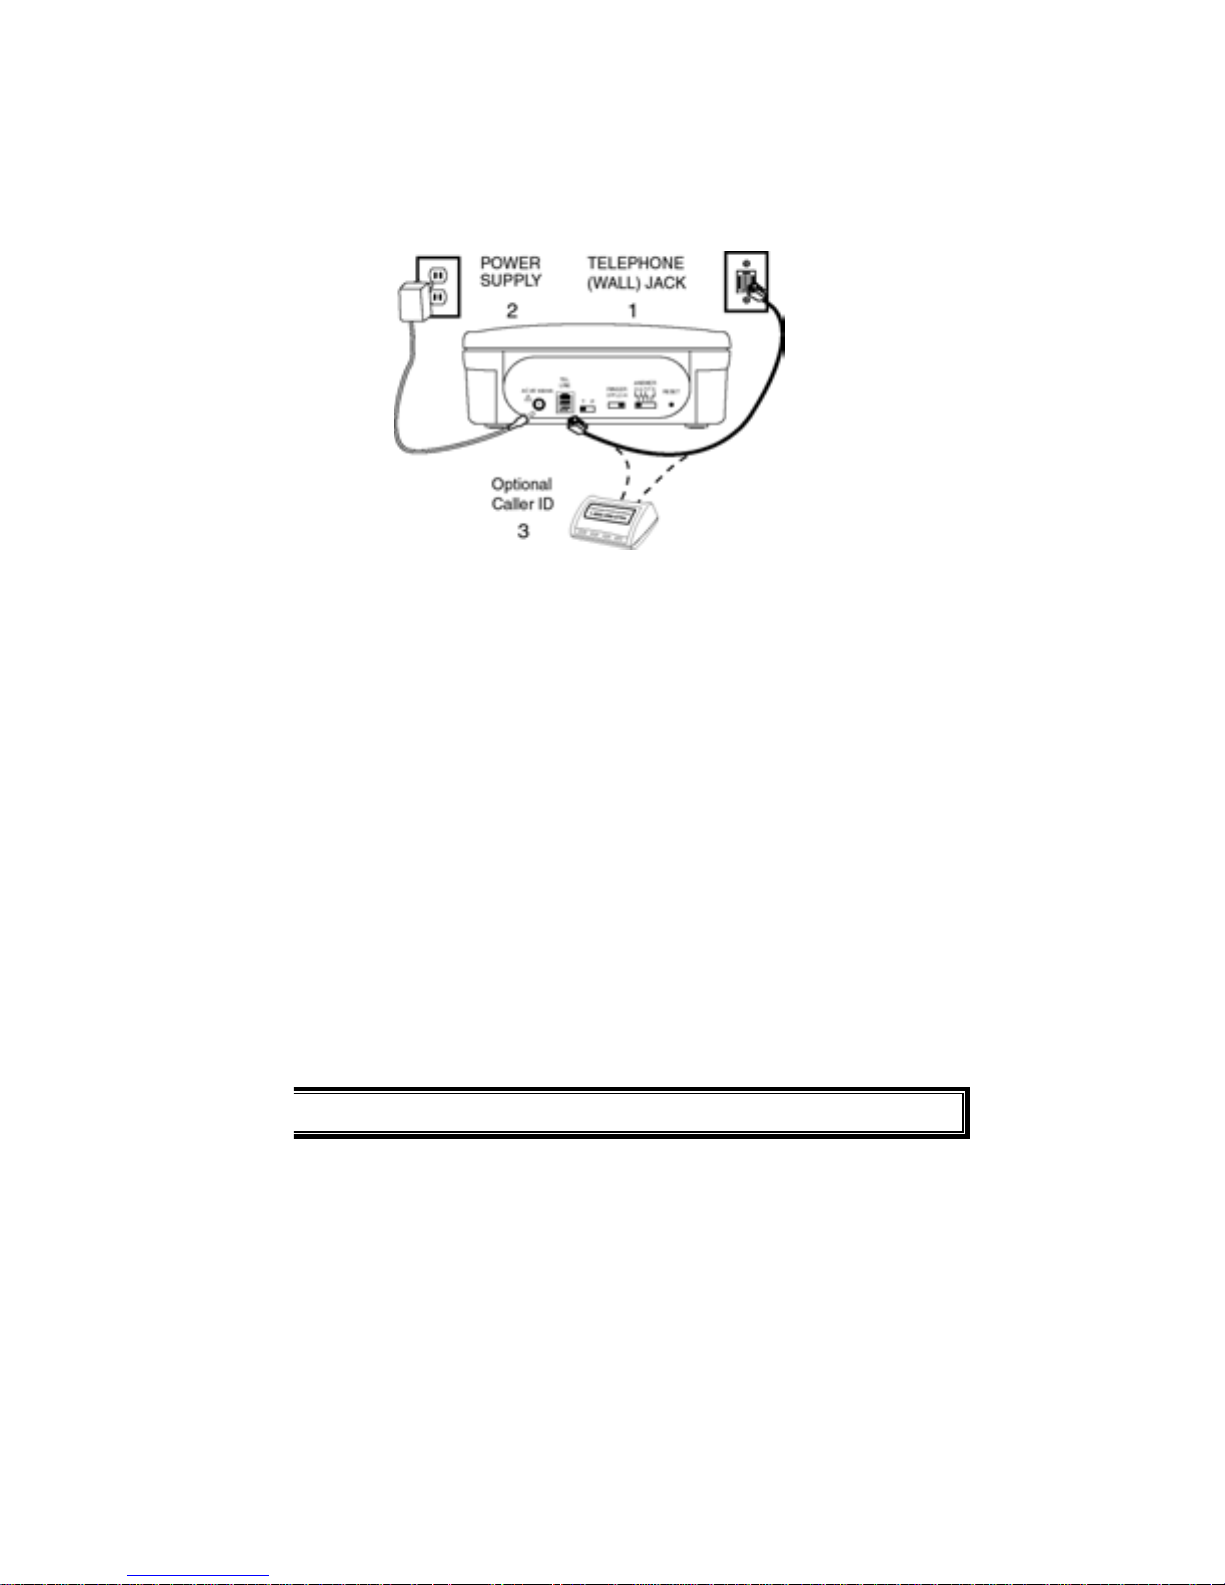
Connecting the PT1000
Select a location that is near both a modular phone jack and an
AC outlet.
On a desk
1. Plug one end of the supplied telephone cable into the
TEL LINE port on the back of the PT1000. Plug the
other end of this cable into the telephone wall jack.
2. Plug the supplied AC adapter’s barrel plug into the AC 9V
400mA jack on the back of the unit, then plug other end
of the adapter into a standard AC outlet.
3. You can connect an optional Caller ID (not included) –
a. Plug one end of a telephone cable into the Caller ID
LINE port, plug the other end of this cable into the
telephone wall jack.
b. Plug one end of a telephone cable into the Caller ID
PHONE port, plug the other end of this cable into the
PT1000 TEL LINE port.
Note: If you wish to receive Caller ID while PrivateTIME is activated,
set the PT1000 to answer on 2 rings (see page 10 “Setting the
number of rings”). All other phone company Voice Mail services
will not operate when the PrivateTIME function is activated.
PT1000 Operator’s Guide
Page 7
When power is first applied, the display counts from 0 to 20. A beep
sounds, then the following displays may appear:
z 0 – number of messages
z Al – outgoing message 1 not recorded
z A2 – outgoing message 2 not recorded
z Lo –battery is weak or missing
z Ph –phone line not connected, or phone in use
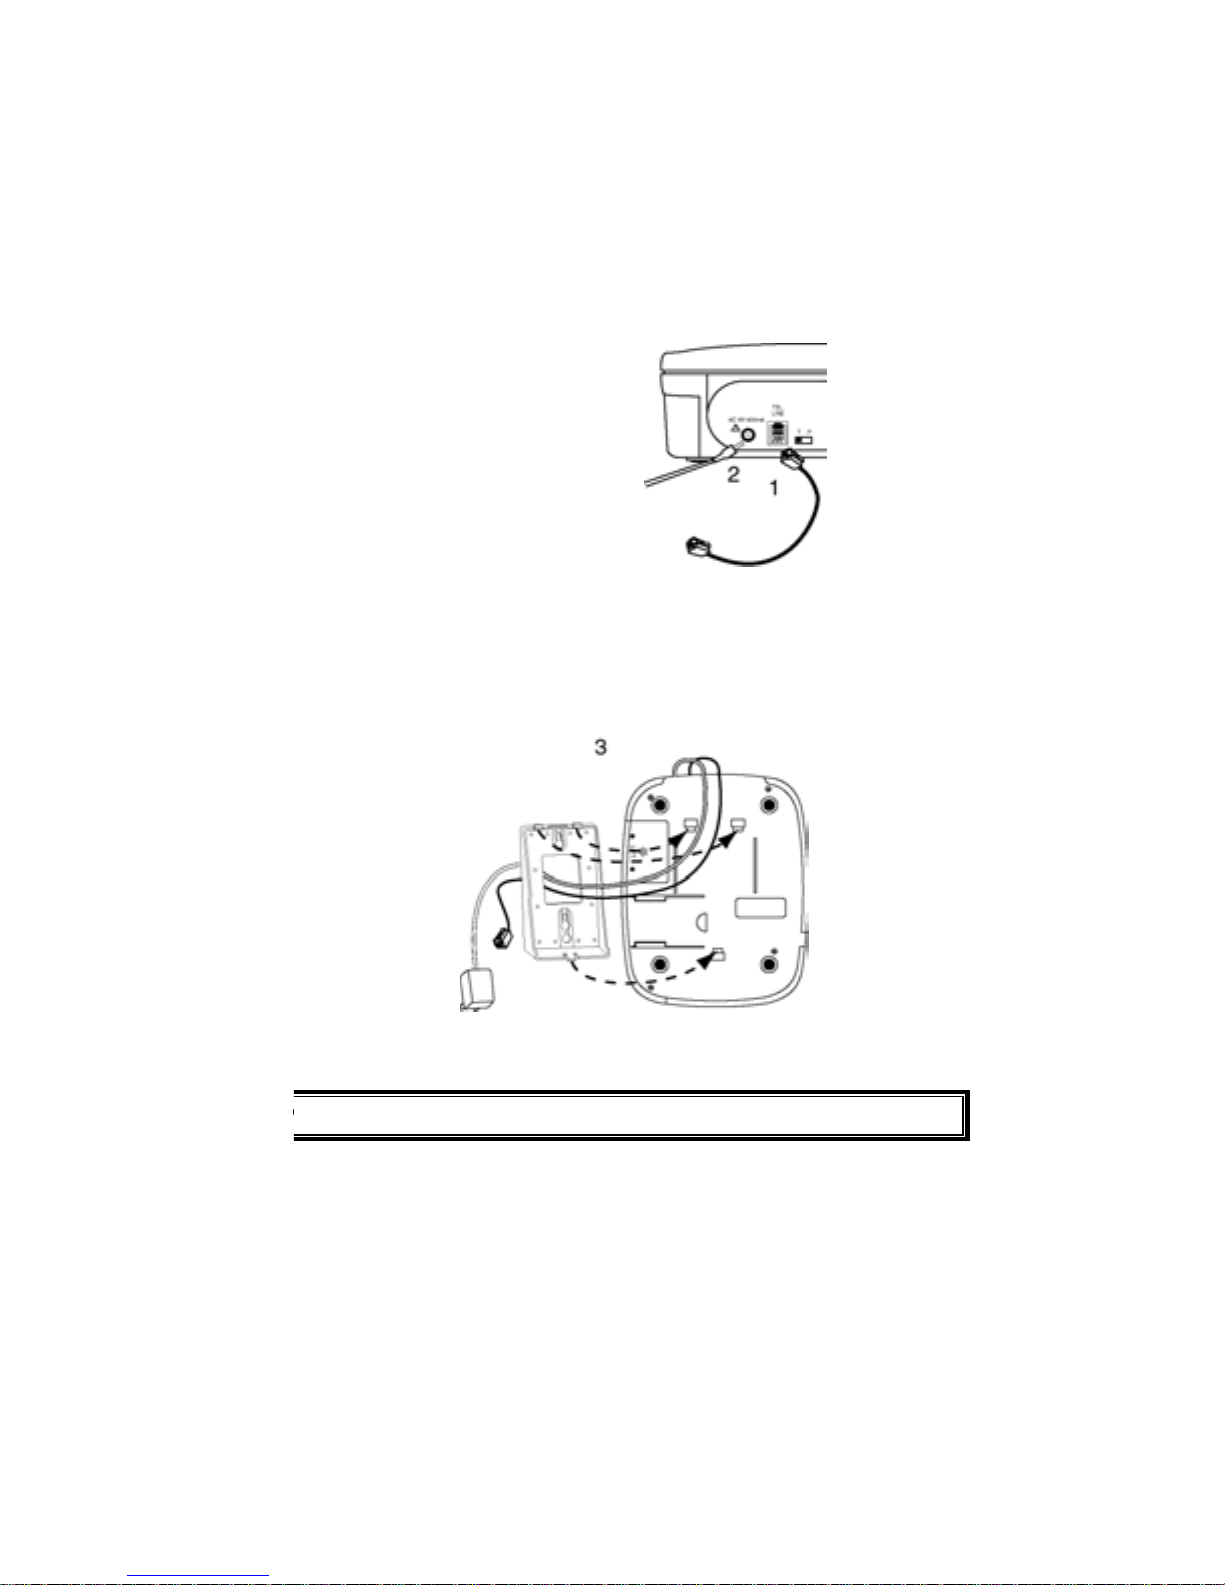
On a wall plate
1. Plug the supplied short
telephone cable into the
TEL LINE port on the
back of the unit.
2. Plug the supplied AC
adapter’s barrel plug into
the AC 9V 400mA jack
on the back of the unit.
3. To mount on a wall plate, route the adapter cord hanging
down and the other end of the short telephone cable through
the center of the bracket. Insert the tabs on the top end of the
bracket into the slots on the bottom of the unit, then push the
tab on the bottom end of the bracket into the lower slot on the
unit.
T1000 Operator’s Guide 6
Page 8
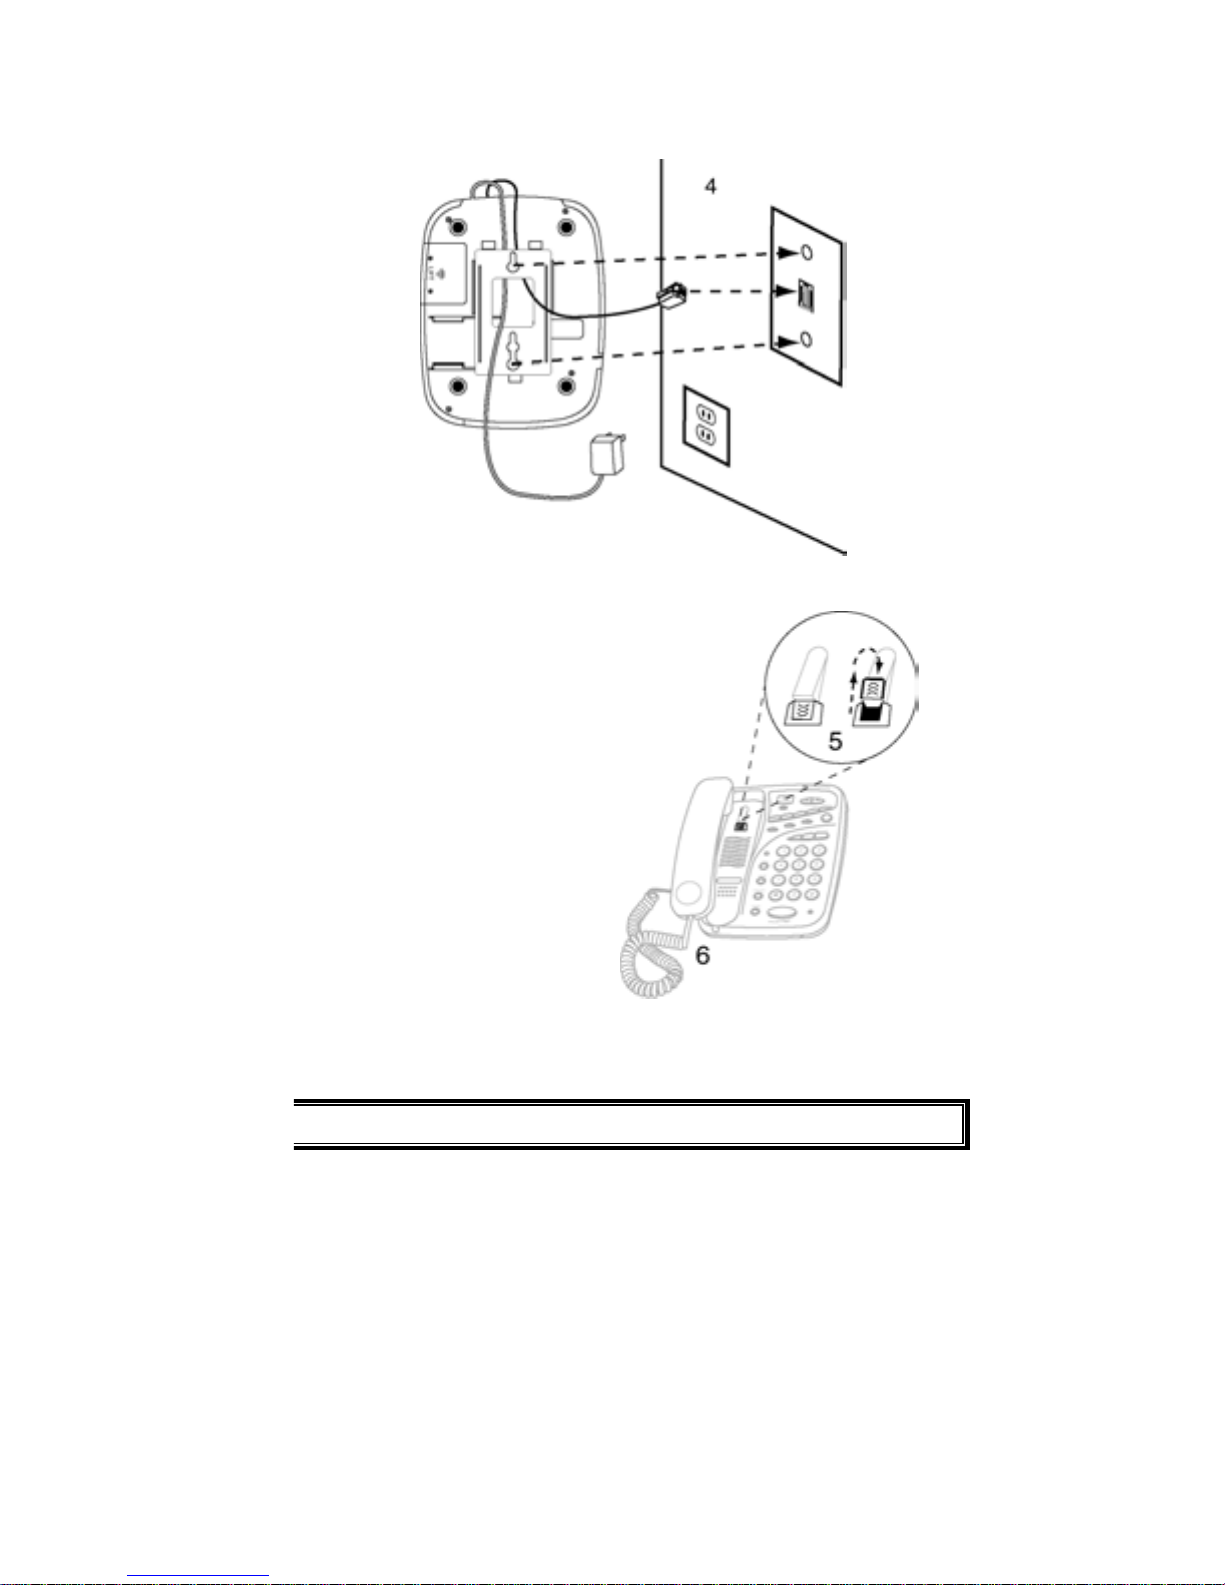
4. Plug the other end of the short telephone cable into the wall
plate jack, align the base’s keyhole slots with the wall plate
studs, and slide the base downward to secure it.
5. Slide the handset clip
out of its retaining
slot, rotate it 180º
then slide it back into
its slot.
6. Plug one end of the
supplied coiled
handset cord into the
jack on the left side
of the base. Plug the
other end into the
handset’s jack. Then
place the handset on
the base.
7. Plug the adapter into
a standard AC
outlet.
PT1000 Operator’s Guide
Page 9
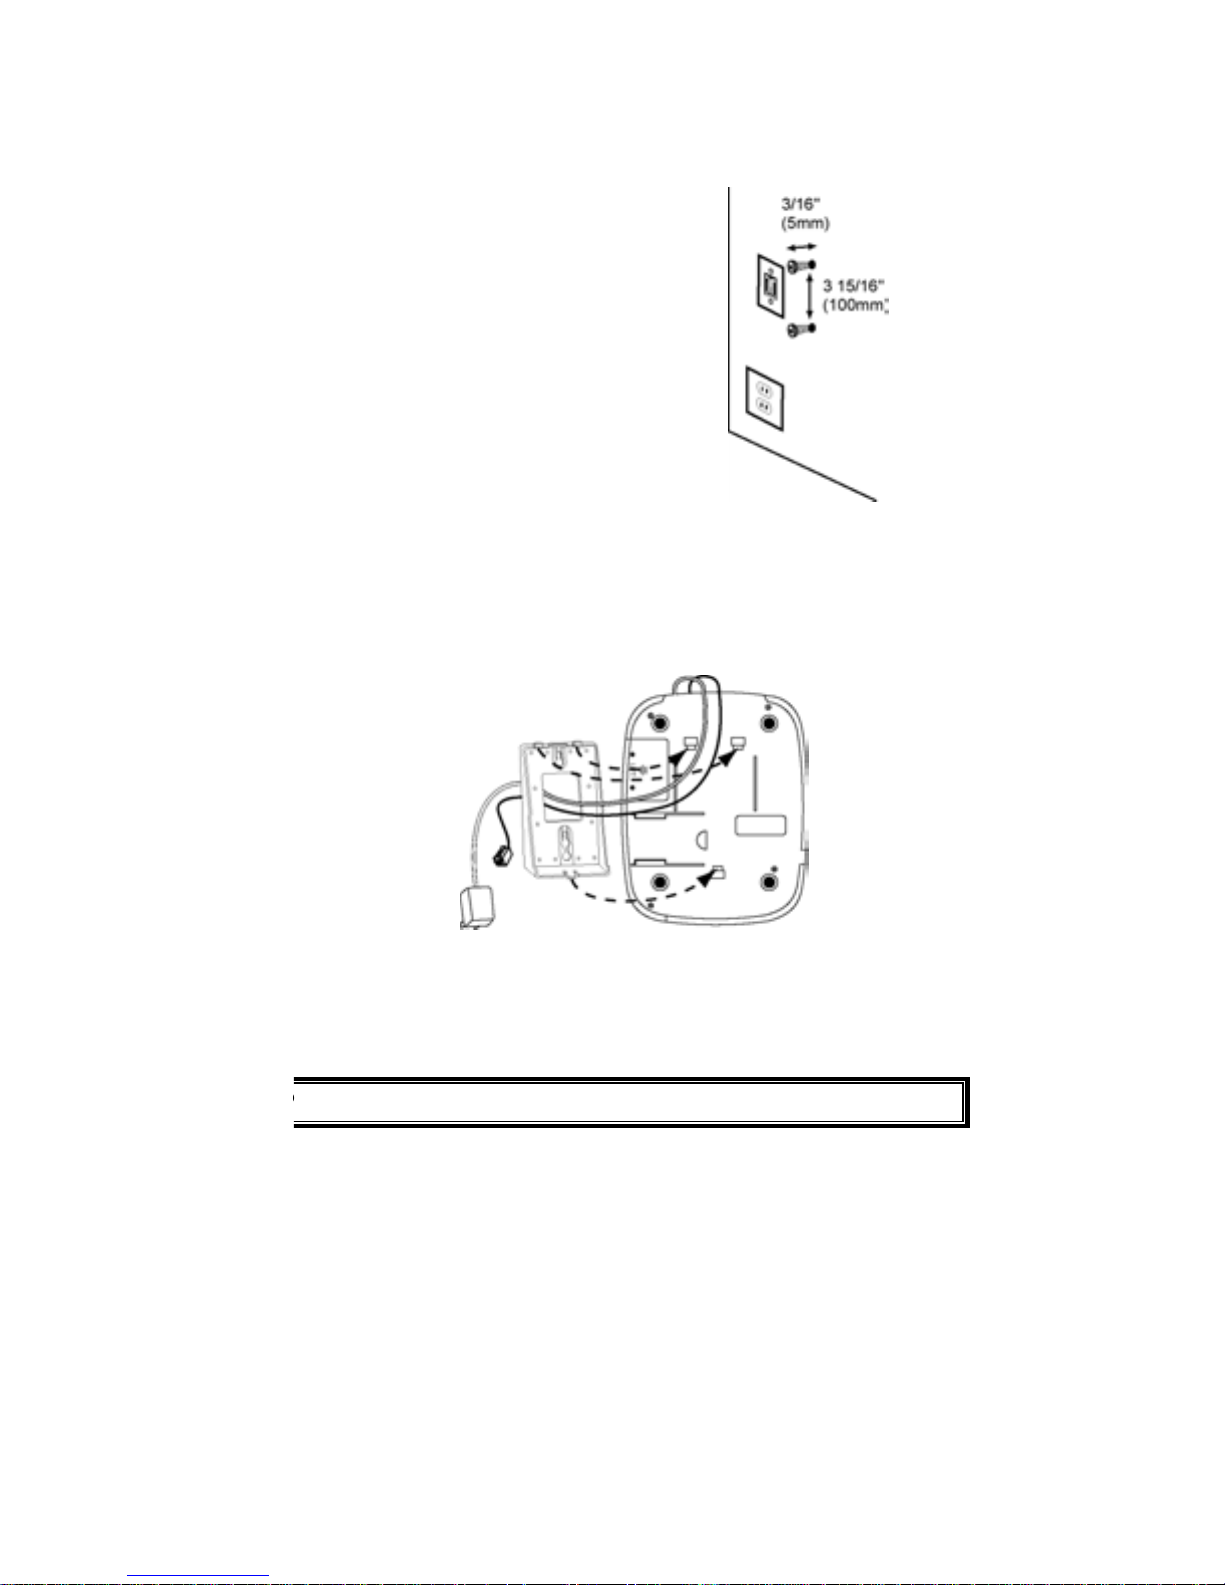
On a wall
You need two screws (not supplied) with heads that fit the keyhole
slots on the mounting bracket.
1. Drill two holes 3 15/16 inches
(100 mm) apart. Then thread
a screw into each hole, letting the
heads extend about 3/16 inch
(5 mm) from the wall.
2. Route the adapter cord hanging down and the other end of the
short telephone cable through the center of the bracket. Insert
the tabs on the top end of the bracket into the slots on the
bottom of the unit, then push the tab on the bottom end of the
bracket into the lower slot on the unit.
T1000 Operator’s Guide 8
Page 10
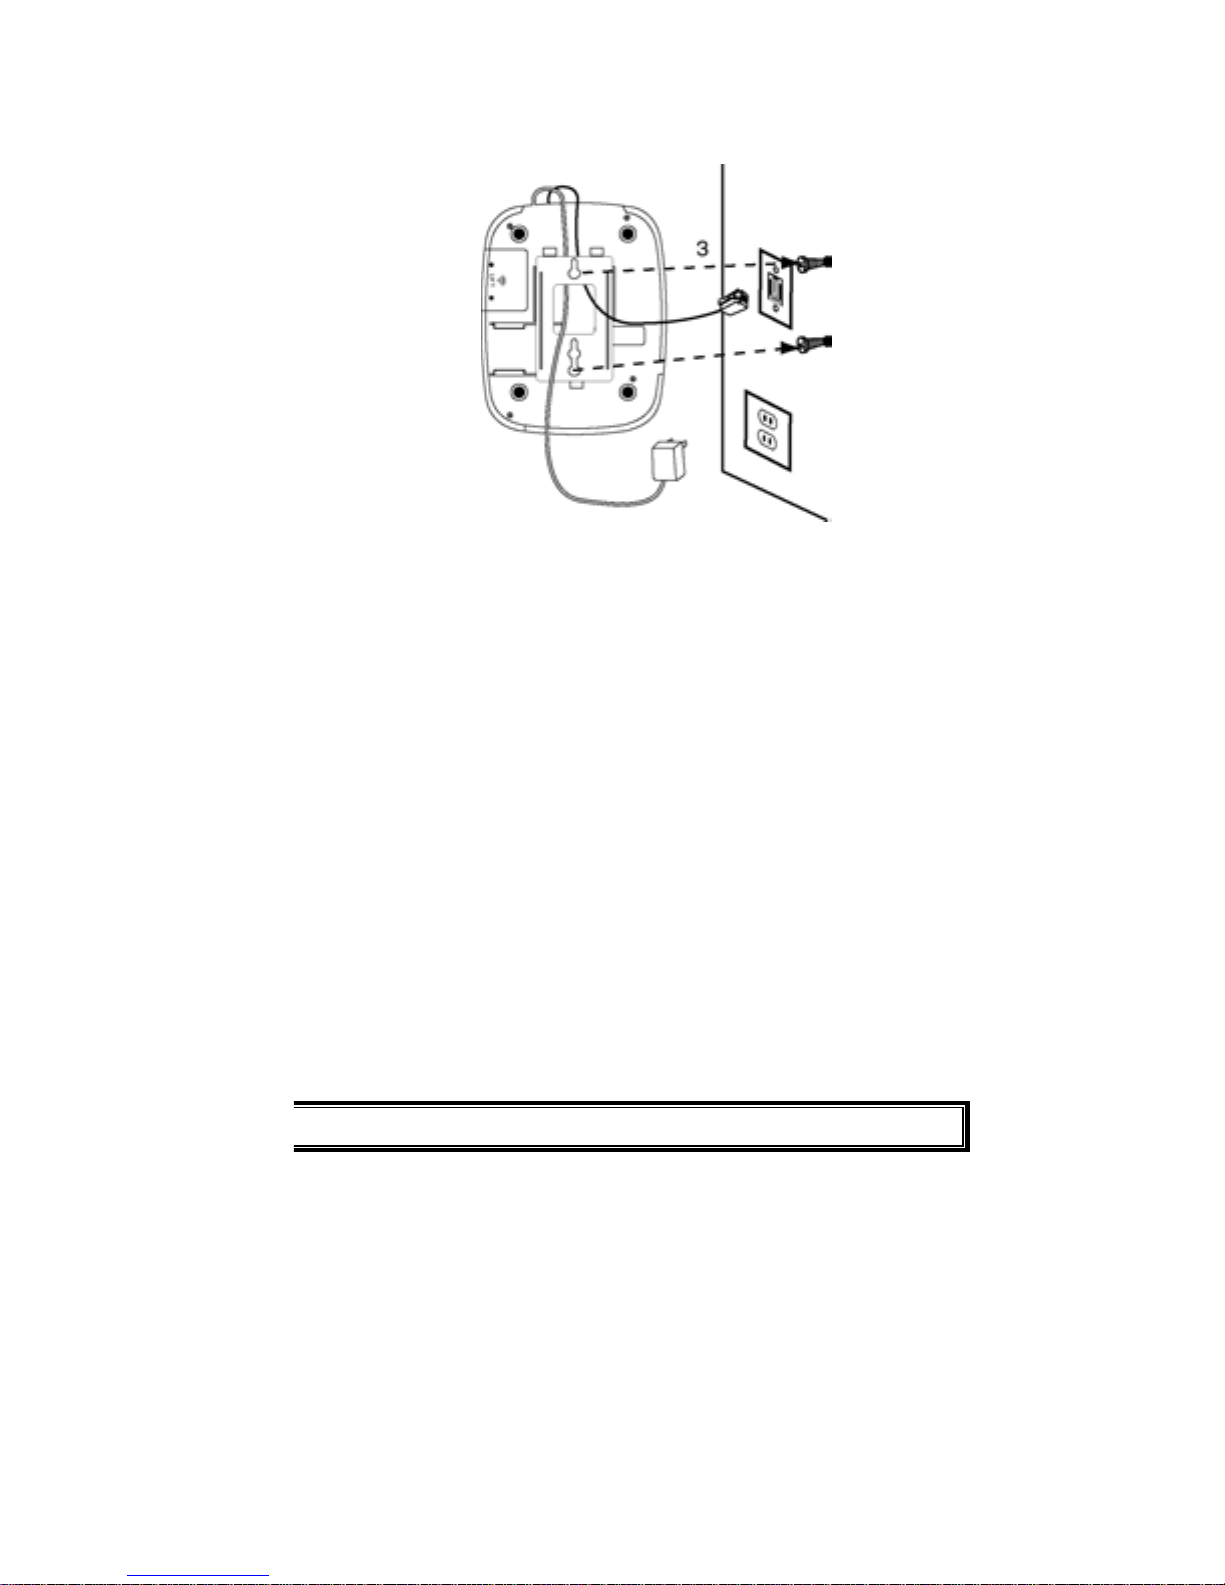
3. Align the keyhole slots with screws and slide the unit down
to secure it, then plug the telephone cable into a modular
phone line jack.
4. Plug the adapter into a standard AC outlet.
Follow steps 5 – 7 on page 7 to complete this installation.
PT1000 Operator’s Guide
Page 11

Setting the time and day
The day and time of each recorded message will be announced.
1. Hold down T-SET. CL (clock) displays, then 1 to 7 (the day
of week) displays, and announces the day.
2. To change the day, press to move backward or to move
forward until the desired day is announced.
3. Press T-SET. The current hour is announced.
4. To change the hour, press or until the desired hour is
announced.
5. Press T-SET. The current minute is announced.
6. To change the minutes, press or until the desired
minutes are announced.
7. Press T-SET. CL displays, the day and time is announced, a
beep is heard, CL disappears.
To check the current day and time setting at any time, press T-SET.
CL (clock) displays, and the PT1000 announces the day and time,
then beeps.
Note: If you do not complete each step within 8 seconds, you will hear
four beeps. Start again at Step 1.
To avoid losing the day and time settings during a power failure,
we recommend you install a backup battery before you set the day
and time (see page 4 "Set up the PT1000").
Setting the number of rings
Set the ring select switch on the rear panel to 2, 4, 7, or TS. This
reflects the number of rings before your answering system answers a
call (2 rings, 4 rings, 7 rings, or toll-saver).
If you plan to check your messages by calling long distance, set the
ring select switch to TS (see page 20 "Toll-Saver").
T1000 Operator’s Guide 10
Page 12

Telephone operation
Making and receiving calls
Select Pulse or Tone mode.
Handset Speakerphone
Making
Calls
Receiving
calls
Redial
To redial the last number dialed, simply pick up the handset or press
SPEAKER, then press REDIAL. The telephone will automatically
redial the last number dialed.
Note: The maximum capacity for last number redial memory is 32
Speakerphone
To switch a call to speakerphone, press SPEAKER during a call (the
red SPEAKER indicator lights), then place the handset on the base.
Also, you can switch a speakerphone call to the handset anytime
during a call by simply picking up the handset.
Ringer volume
1. Pick up handset.
2. Dial desired number.
3. Hang up upon
completion of the call.
1. Pick up handset.
2. Speak.
3. Hang up upon
completion of the call.
digits.
1. Press SPEAKER key.
2. Dial telephone
number.
3. To hang up, press
SPEAKER key again.
1. Press SPEAKER key.
2. Speak.
3. To hang up, press
SPEAKER key again.
To adjust the ringer volume of your telephone, move the RINGER
volume switch, located on the rear panel, to the desired OFF/LO/HI
position.
Speaker/off-hook alert volume
While on a call, to adjust the speaker volume, slide the
SPEAKER VOL control switch located on the right side of the unit to
the desired MAX - MIN level. This switch also controls the volume of
the off-hook alert feature. See page 19.
1 PT1000 Operator’s Guide
Page 13

Handset Volume
While on a call, to adjust the volume on the handset, slide the
HANDSET VOL control switch located on the right side of the unit to
zz
the desired level LO
zz
HI.
Placing a call on mute
1. Press MUTE, the red indicator above the HOLD button will
light.
2. Press MUTE again to resume normal conversation. The red
indicator will turn OFF.
Placing a call on hold
1. Press HOLD and hang up. The red indicator above the
HOLD button will flash.
2. To release the call on hold, pick up the handset, press
SPEAKER or pick up an extension phone (if available). The
red HOLD indicator will turn OFF.
Speed dial numbers
There are 3 one-touch (max. 32 digits each) speed dial buttons, M1,
M2, M3 and 12 two-touch (max. 32 digits each) speed dial memory
stations.
Storing speed dial numbers
One-touch
Press STORE, enter a phone number up to 32 digits, press
STORE again, then enter M1 – M3.
Two-touch
1. Press STORE, enter a phone number up to 32 digits, press
STORE again.
2. Enter any keypad button 0-9 including the
and buttons as
memory positions.
T1000 Operator’s Guide 12
Page 14

Dialing the stored Numbers
One-touch
1. Pick up handset (or turn SPEAKER on).
2. Press M1-M3, the number stored in that memory will be
dialed.
Two-touch
Press MEMORY, then press a keypad button corresponding to a
stored speed dial number 0-9 including the
Temporary tone dialing (for rotary service users)
If you have pulse service, you can still use special services that require
tone signals, such as bank-by-phone, by following these steps:
1. Set the T P switch located on the rear panel to P.
2. Dial the phone number
and buttons.
3. When the call is answered, press
dialed are sent as tone signals.
4. After the call is completed, the unit resets to pulse dialing.
Flash button
1. Press FLASH if you hear a Call Waiting tone while
speaking.
2. The first call is put on hold and you can answer the second
call.
3. Press FLASH again to return to the first call.
. Any additional numbers
PT1000 Operator’s Guide
Page 15

Answering machine operation
Recording outgoing messages
There are two outgoing messages:
1. OGM1 – used for normal answering machine greeting.
2. OGM2 – used when PrivateTIME function is activated
(see page 15)
The maximum length for each out going message is 60 seconds. As
you record, the message counter shows the recording time.
Follow these steps to record an outgoing message:
1. Press and hold the OGM1 (or OGM2) button until the unit
beeps, a 0 displays and the timer starts counting.
2. Release OGM1 (or OGM2) and record your greeting.
3. When you finish recording, press STOP. The unit beeps and
plays back your recorded greeting.
To check outgoing messages
Press OGM1 (or OGM2). The unit beeps, Al or A2 displays, and the
recorded greeting plays.
If no outgoing message is recorded when you press OGM1 or OGM2,
the unit announces "You have no announcement one" (or "two") and
sounds four beeps.
Setting the unit to answer calls
• Press ANSWER to turn on the answering machine.
• The ANSWER indicator lights and the unit announces
“answer on” and plays OGM1.
• To stop the announcement playback, press STOP.
Notes: Before the unit can be set to answer, an outgoing message
must be recorded in OGM1.
You can turn on the answering machine by using a touch tone
phone (see page 21 "List of direct commands").
T1000 Operator’s Guide 14
Page 16

PrivateTIME feature
When the Private TIME button is activated, only callers with your
privacy code can ring through. Callers without your privacy code will
be routed to your answering machine.
To use the Private TIME feature
Before the Private TIME feature can be used, an outgoing message
must be recorded in OGM2 (see page 14). Sample greeting: “If you
know your privacy code, please enter the number or wait for the tone
to leave a message. Telemarketers, permanently remove this number
from your call list and immediately hang up.”
There are two modes of Private TIME operation:
1. 60 minute time sets duration of operation for one hour.
a. Press the Private TIME button.
b. The unit will beep and play OGM2.
c. The large red indicator flashes and continues to flash for 60
minutes, then phones will return to normal operation.
d. Press ANSWER to turn answering machine back on.
2. Manual – will stay on until you turn it off.
a. Press and hold down the Private TIME button.
b. The unit will beep and play OGM2.
c. The large red indicator lights and remains a solid red.
d. Press the Private TIME button again to turn off. Phones
will return to normal operation.
e. Press ANSWER to turn answering machine back on.
Setting privacy codes
A total of four separate privacy codes can be programmed, each
consisting of four digits. These codes are to be given to people you
want to ring through when Private TIME is activated.
Each code rings your Private TIME phone in a unique cadence, to
identify who’s calling. Or, a ring cadence can be assigned to each
member of the household to identify calls specifically for them.
PT1000 Operator’s Guide
Page 17

Changing the privacy codes
The factory default settings are as follows:
Code 1 – 1234 – ring, pause…repeat
Code 2 – 2345 – ring, ring, pause…repeat
Code 3 – none – ring, ring, ring, pause…repeat
Code 4 – none – ring, ring, ring, ring, pause…repeat
To change codes:
1. Press STORE, St displays
2. Press CODE, Co displays
3. Enter a 4-digit number. The numbers appear in the display
from right to left.
4. Press STORE
5. Store a location number 1 – 4 to store code.
To check privacy codes:
1. Press CODE for two seconds, Co displays
2. Press the location number 1 – 4
3. Privacy code is announced
Receiving calls with Private TIME on
The unit will answer the call and announce OGM2 to the caller
requesting the caller to enter your privacy code.
Correct privacy code: The caller will hear a confirmation tone, one
long beep and three short beeps, then silence until either the call is
answered, or OGM2 plays again (in approximately 35 seconds) so the
caller can leave a message.
• Only the PT1000 phone will ring the cadence according to
the privacy code entered.
• No other extension phones will ring, although the call can
be answered from any extension phone connected to the
line.
Incorrect privacy code: If a caller enters an incorrect privacy code,
a message can be recorded after the beep or the caller can continue to
enter a code until the correct privacy code is entered.
Note: The unit will hang up and reset to answer the next call if any of
the following occur:
1. The caller hangs up.
2. Any extension phone connected to the same line is picked up.
3. There’s more than 8 seconds of silence. The caller will hear several
beeps and the announcement, “Thanks for your call” and the unit
hangs up.
T1000 Operator’s Guide 16
Page 18

Recording incoming messages
1. The maximum recording capacity is 16 minutes or 68
recorded messages.
2. If the recording memory is full, FL and the number of
recorded messages alternately display. The unit will still
answer calls and announce to the caller, “Memory is full,
thank you for your call."
3. The unit stops recording and resets to answer the next call
when:
• The caller hangs up
• There are more than 8 seconds of silence
• Any extension phone connected to the same line
is picked up
Playing Messages
New Messages: The red ANSWER indicator will be flashing. The
message counter displays the total number of messages, both old (ones
you have listened to and saved) and new.
Play Only New Messages: Hold down PLAY for 2 seconds. If
there are no new messages stored, the unit announces, "You have no
new messages."
Play All Messages: Press PLAY. The unit announces the number of
messages recorded, the message number and the day and time the
message was recorded, and then plays the message.
After all messages play, the unit announces, “End of messages.”
Replay a Message: While you are listening to a message, press .
That message replays from the beginning.
Replay a Previous Message: Hold down until the desired
message number displays in the message counter display. Release
to play the selected message.
Skip to the Next Message: Press . The next message plays.
Pause While Listening to Messages: Press PLAY. PA (pause)
appears on the display. To resume playback, press PLAY again within
60 seconds. Otherwise the unit beeps, and announces "End of
messages," and resets to answer calls.
PT1000 Operator’s Guide
Page 19

Fast Forward: Holding down allows you to quickly scan a
message or move to any place within a message. To resume normal
playback, release .
Stop Playback: Press STOP. The unit beeps, announces "End of
messages," and resets to answer calls.
Recording a memo
You may record a personal message:
1. Press MEMO. The unit will beep, and
displays. Record
oo
your message. The display shows your recording time.
2. Press STOP when you finish your memo. The unit beeps
once and resets to answer calls.
3. To listen to your memo, simply press PLAY. Your memo is
stored with incoming messages.
Recording a conversation
You can record both sides of a conversation on any phone connected
to the same phone line.
Note: It is illegal in some areas to record a conversation without the
consent of all parties to the conversation, including the phone
company. Check the laws in your area before you use the twoway recording feature.
To record a phone conversation, hold down MEMO until the display
changes from
to oo. Recording continues until:
oo
z you press STOP
z the unit hears 8 seconds of a busy signal or 25 seconds of
silence
z the memory is full
The recorded conversation is stored as a message (see page 17
"Playing messages").
Deleting Messages
You cannot delete new messages. If you have only new messages, the
unit beeps four times when you press DELETE.
T1000 Operator’s Guide 18
Page 20

To delete a specific message, press DELETE while the message is
playing. The unit beeps and deletes the message, then plays the next
message.
To delete all messages, press and hold DELETE, dL displays. The
unit announces "Erase messages" and sounds a beep.
Screening calls
Lets you listen as a caller leaves a message so you can decide whether
or not to answer the call.
If you do not want to answer the call, simply let the caller finish
recording.
If you decide to answer the call, pick up any phone on the same phone
line. The unit stops recording and resets to answer the next call.
Note: If you pick up the phone before the unit answers, the unit may
not stop playing the outgoing announcement. If this happens,
press STOP.
Receiver off-hook alert
When any telephone handset (connected to the same phone line) is left
off-hook throughout the house, the unit will emit an alert tone and Ph
appears in the display. This tone alert continues for approximately one
minute, and repeats every five minutes. This will occur under the
following conditions:
1. The off-hook alerting signal from the phone company is
detected.
2. The absence of any audio on the telephone line for a period of
15 minutes.
To stop the alert tone, hang up the telephone handset that is off-hook.
If the alert one continues, press the STOP/T-SET button.
Remote operation
The unit can be operated from any touch tone phone or rotary phone
using a pocket tone dialer.
PT1000 Operator’s Guide
Page 21

Setting the remote security operation code
1. Press STORE and St displays.
2. Press CODE and Co displays.
3. Enter a 4-digit number. The numbers appear in the display
from right to left.
4. Press STORE.
5. Press the 5 button.
The factory security default code is 7280.
To check the security code:
1. Press CODE for two seconds, Co displays.
2. Press the 5 button.
3. Security code is announced.
Toll saver
This feature is used when checking for messages from a long distance
number.
Set the ring select switch on the rear panel to TS (toll-saver). This sets
the unit to answer after two rings, only if you have new messages. If
there are no new messages, the unit answers after four rings. This
gives you time to hang up before the unit answers to avoid longdistance charges (see page 10 "Setting the number of rings").
Using remote commands
Operation from a remote location.
1. Dial your phone number.
Note: Even if the unit is not set to answer calls, it will answer in
approximately 15 rings.
2. When the unit answers, enter your remote operation security
code. You will hear a beep to confirm that you entered the
correct code.
Note: If there is more than an 8 second pause between entering each
digit of the security code, the unit hangs up.
3. Enter the remote commands (see page 21 “List of direct
commands”).
4. When you finish, hang up. The unit resets to answer calls.
T1000 Operator’s Guide 20
Page 22
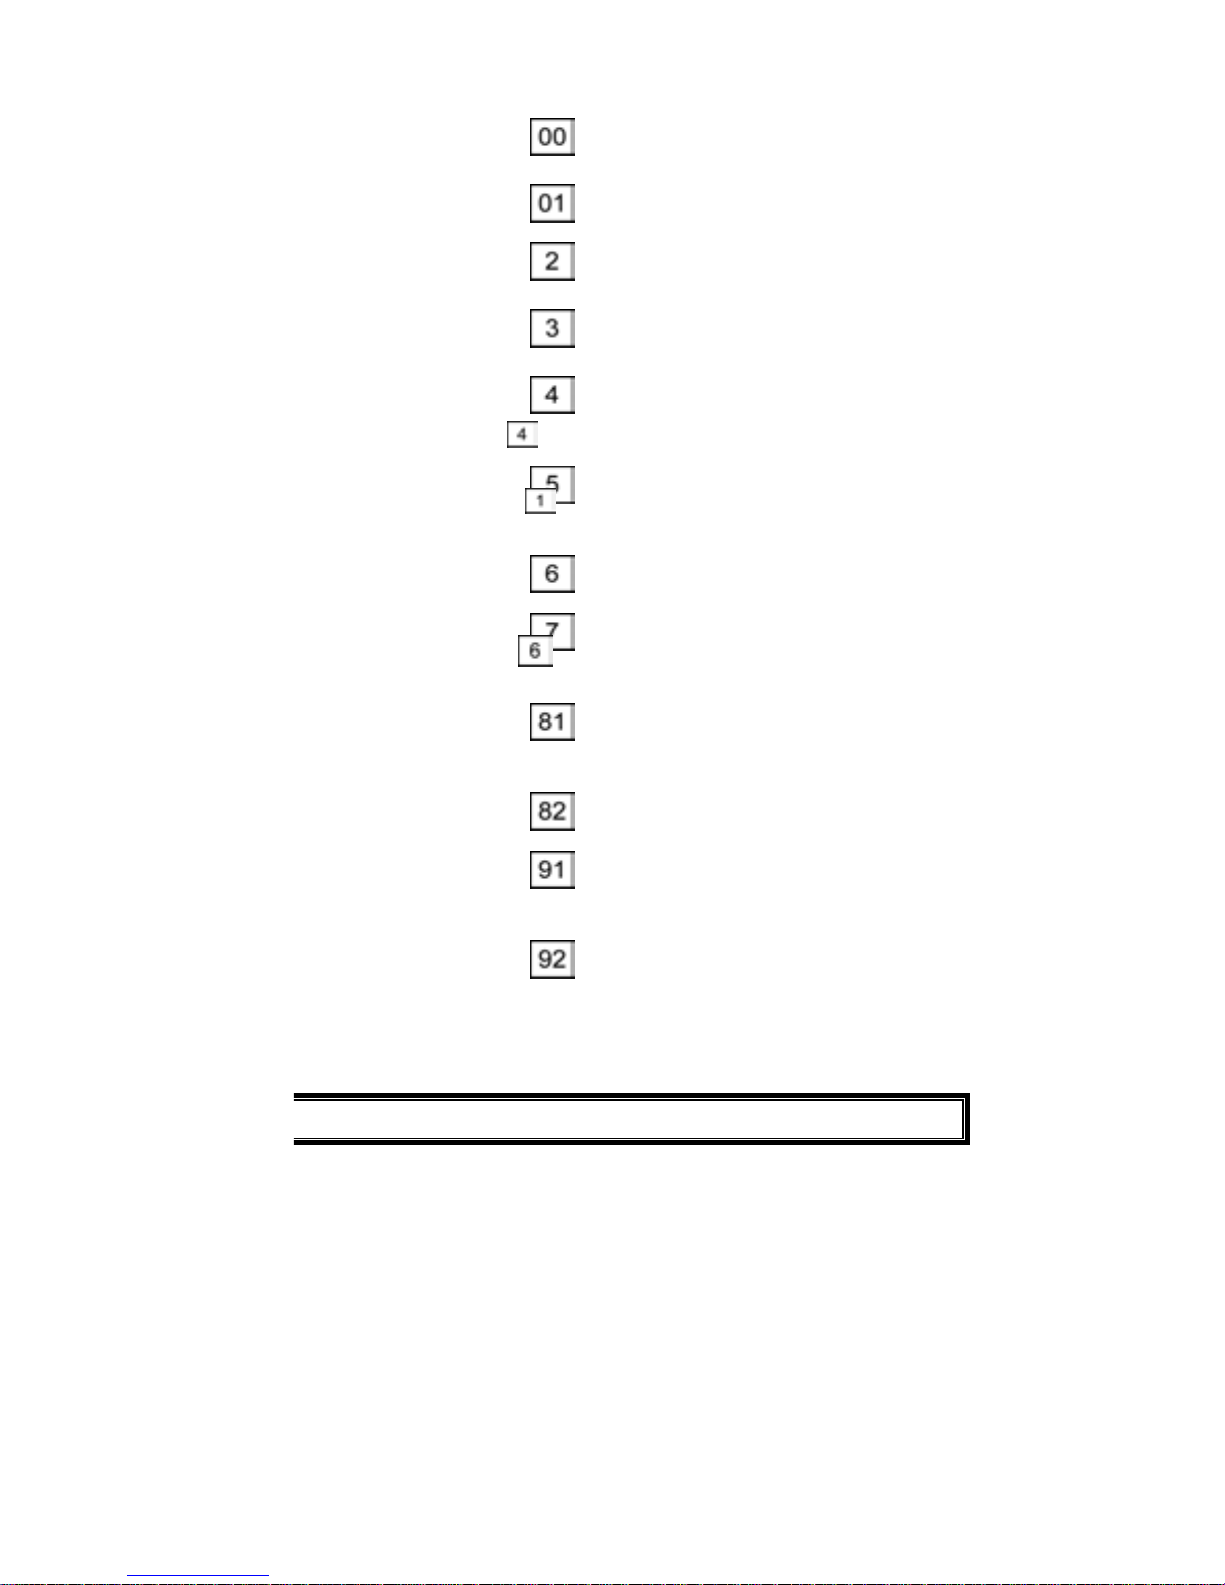
List of direct commands
Answer OFF
Answer ON
*All message
playback
* New message
playback
Room monitor
Delete messages
STOP
Record memo
• System turns off and will not
answer until you turn it on
• System turns on
• All messages are played back
• Only new messages are played back
• The sound around the unit is
monitored for 20 seconds to
continue, press again
• Deletes all but new messages
• After “Erase Messages” is
announced, press
• During OGM or message playback
• Your memo is stored with incoming
messages. Press when
finished.
Change OGM1
Play OGM1
Change OGM2
Play OGM2
• Record after beep
• Press 6 when finished recording
• Unit beeps and plays new OGM1
• OGM1 is played
• Record after beep
• Press 6 when finished recording
• Unit beeps and plays new OGM2
• OGM2 is played
* See sub-commands on page 22.
1 PT1000 Operator’s Guide
Page 23

* The following sub-commands can only be used with message
commands and on page 21.
Press
Replay previous message
Skip current message
Repeat current message
Delete current message
Stop message playback
Resetting the PT1000
If your unit stops working properly, insert a straightened paper clip in
the RESET hole on the rear panel.
Note: The outgoing messages and all information stored in memory
are erased when you press RESET.
T1000 Operator’s Guide 22
Page 24

Registration information
The PrivateTIME PT1000 has been registered with the Federal Communications
Commission (FCC). It meets FCC requirements and may be connected directly
to your telephone line. On the bottom of this equipment is a label that contains,
among other information, the FCC registration number and Ringer Equivalence
Number (REN) for this equipment. If requested, this information must be
provided to the telephone company. Use the REN to help determine the
maximum number of devices you can connect to your telephone without
eliminating their ability to ring when your number is called. In many areas, the
sum of the RENs of all devices connected to one line should not exceed 5.0. To
determine how many devices you can connect to your line, contact your local
telephone company to find out the maximum REN for your area.
The PT1000 may not be connected to a party line or coin line telephone network.
If the PT1000 does not function properly, disconnect the unit. Follow the
instructions provided in the section "One year limited warranty" to obtain the
necessary repair service.
If the PT1000 causes harm to the network, the telephone company may
discontinue your service temporarily. If possible, they will notify you in
advance. But if advance notice is not practical, the telephone company will
notify you as soon as possible. Also, you will be advised of your right to file a
complaint with the FCC if you believe it is necessary.
The telephone company may make changes in the telephone network. Should
these changes affect the PT1000, the telephone company must notify you, in
writing, to enable you to maintain uninterrupted service.
If you need to order a modular jack from the telephone company, request either a
USOCRJ11C or a USOCRJ13C.
PT1000 Operator’s Guide
Page 25

FCC Rules Part 15—Computing Devices
Note: This equipment has been tested and found to comply with the limits for a
Class B digital device, pursuant to Part 15 of the FCC rules. These limits are
designed to provide reasonable protection against harmful interference in a
residential installation. This equipment generates, uses and can radiate radio
frequency energy and, if not installed and used in accordance with the
instructions, may cause harmful interference to radio communications. However,
there is no guarantee that interference will not occur in a particular installation.
If this equipment does cause harmful interference to radio or television
reception, which can be determined by turning the equipment off and on, the
user is encouraged to try to correct the interference by one or more of the
following measures:
Reorient or relocate the receiving antenna.
Increase the separation between the equipment and receiver.
Connect the equipment into an outlet on a circuit different from that to which
the receiver is connected.
Consult the dealer or an experienced radio/TV technician for help.
CAUTION: Changes or modifications not expressly approved by the
manufacturer could void the user's authority to operate the PrivateTIME
PT1000.
T1000 Operator’s Guide 24
Page 26

One year limited warranty/Service information
WARRANTOR: Command Communications, Inc.
ELEMENTS OF WARRANTY: Command Communications, Inc. warrants, for
the duration of this warranty, the PrivateTIME PT1000 (hereafter referred to as
the "Product") to be free from defects in materials and craftsmanship with only
the limitations or exclusions set out below.
WARRANTY DURATION: This warranty shall terminate and be of no further
effect one year after the date of original purchase of the Product or at the time the
Product is (A) damaged or not maintained as reasonable and necessary, (B)
modified, (C) improperly installed, (D) repaired by someone other than the
warrantor for defect or malfunction covered by this warranty, (E) used in a
manner or purpose for which the Product was not intended, (F) damaged by an act
of God (such as a lightning strike), or (G) sold by the original purchaser.
STATEMENT OF REMEDY: In the event the product does not conform to this
warranty at any time that this warranty is in effect, the warrantor shall repair the
defect, return it to you without charge for parts, service, or any other costs
incurred by the warrantor or its representative in connection with the performance
with this warranty.
This warranty does not cover or provide for the reimbursement or payment of
incidental or consequential damages. Some states do not allow this exclusion or
limitation of incidental or consequential damages, so the above exclusion or
limitation may not apply to you.
Service information / Procedure for obtaining performance
of warranty:
1. Pack the PT1000 in the original carton or equivalent.
2. Enclose a copy of the bill of sale or other documentation showing
original purchase date.
3. Contact the dealer where you purchased the PT1000, or call the
service center listed below to obtain a return material authorization
number (RMA #).
4. Mail the above prepaid and insured to the warrantor at:
Command Communications, Inc.
7025 South Fulton Street, #120
Englewood, CO 80112
1-800-288-6794
Web Site: www.commandcommunications.net
PT1000 Operator’s Guide
Page 27

Command Communications, Inc. cannot be held responsible for any loss or
damage in transit.
Please retain proof of purchases to establish date of original purchase. Your
warranty starts with the date of original purchase.
NOTE: Any unit returned without an RMA # clearly marked on the exterior
package will be refused and returned at the sender's expense.
LEGAL REMEDIES: This warranty gives you specific legal rights, and you may
also have rights that vary from state to state.
Though every effort has been made to ensure accuracy, these instructions may
include technical or typographical errors. Content of these instructions may be
changed from time to time due to product improvement. These changes will be
incorporated in new editions of these instructions. We disclaim liability for any
changes, errors, or omissions.
International return policy
If this product is purchased outside the U.S. from an authorized Command
Communications' dealer, it should be returned for repair at the location where
it was purchased, as provisions have been established to handle warranty
repair outside the U.S.
If you send the product directly to Command Communications for repair, you
will be responsible to pay all freight, handling, and Custom charges (both
ways).
T1000 Operator’s Guide 26
Page 28

www.commandcommunications.net
© 2001 Command Communications, Inc.
All rights reserved. Printed in China
COMMAND COMMUNICATIONS, the Arrow logo and
PrivateTIME are registered trademarks of
Command Communications, Inc., Englewood, CO 80112
7025 South Fulton Street, #120
Englewood, CO 80112
Customer Service: 1-800-288-6794
Email: [email protected]
C100101kr MN076
 Loading...