

Page 1

Co
mmaCube User Menu
1
CommaCube User Menu
Comma Technology Ltd
12th June, 2017
Page 2

Co
mmaCube User Menu
2
Contents
A.
I
ntroduction of CommaCube ............................................................................................................ 3
1. CommaCube Overview ................................................................................................................. 3
2. P
acking List ................................................................................................................................... 3
3. Accessor
ies of CommaCube .......................................................................................................... 4
4. Button Functions .......................................................................................................................... 5
5. LE
D Indicator Table ....................................................................................................................... 5
6. Buzzer Indicator Table .................................................................................................................. 5
B. In
troduction of Application .............................................................................................................. 7
1. Overview ...................................................................................................................................... 7
2. D
ownload and Installation ............................................................................................................ 7
3. Demo Application Quick Start ....................................................................................................... 7
I. Tu
rn on the device .................................................................................................................... 7
II. O
pen Application ...................................................................................................................... 7
III. Add Comma’s devices ........................................................................................................... 8
IV. Search BLE Device ................................................................................................................. 9
V. Establi
sh Bluetooth connection ............................................................................................... 10
VI. Re
ad Data ........................................................................................................................... 11
4. D
evice Configuration .................................................................................................................. 13
Page 3
Co
mmaCube User Menu
3
CommaCube User Operation Menu(Hardware)
A. Introduction of CommaCube
1
. CommaCube Overview
Th
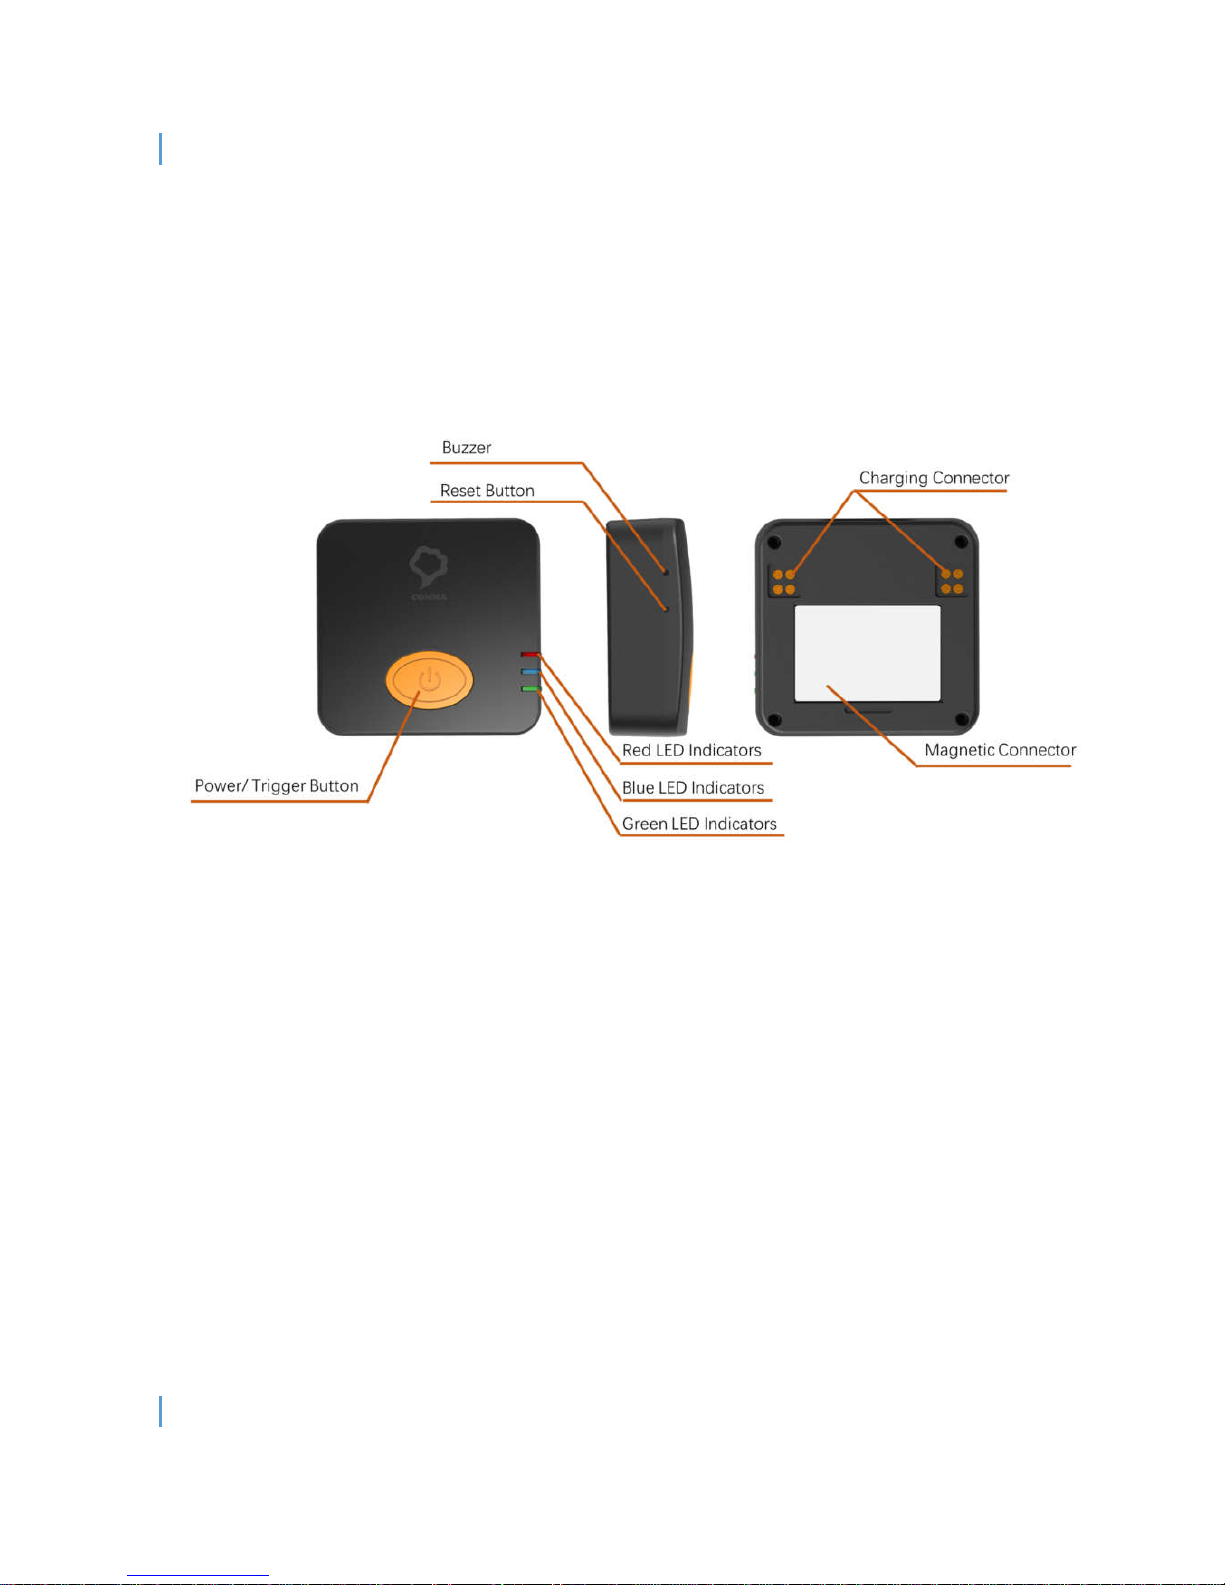
e overview of CommaCube is shown in Figure 1.
Figu
re 1 CommaCube Overview
2
. Packing List
Th
e following items are included in your packaging box of CommaCube
CommaCube scanner
CommaCharger
USB connecting line
User’s manual
Page 4
Co
mmaCube User Menu
4
3
. Accessories of CommaCube
Th
rough the innovative magnetic design, CommaCube can be equipped with different accessories
easily. Users can choose the most appropriate type of accessories according to the operations’
characteristics and working habits to make good use of CommaCube, and enhance work efficiency
as well as experience.
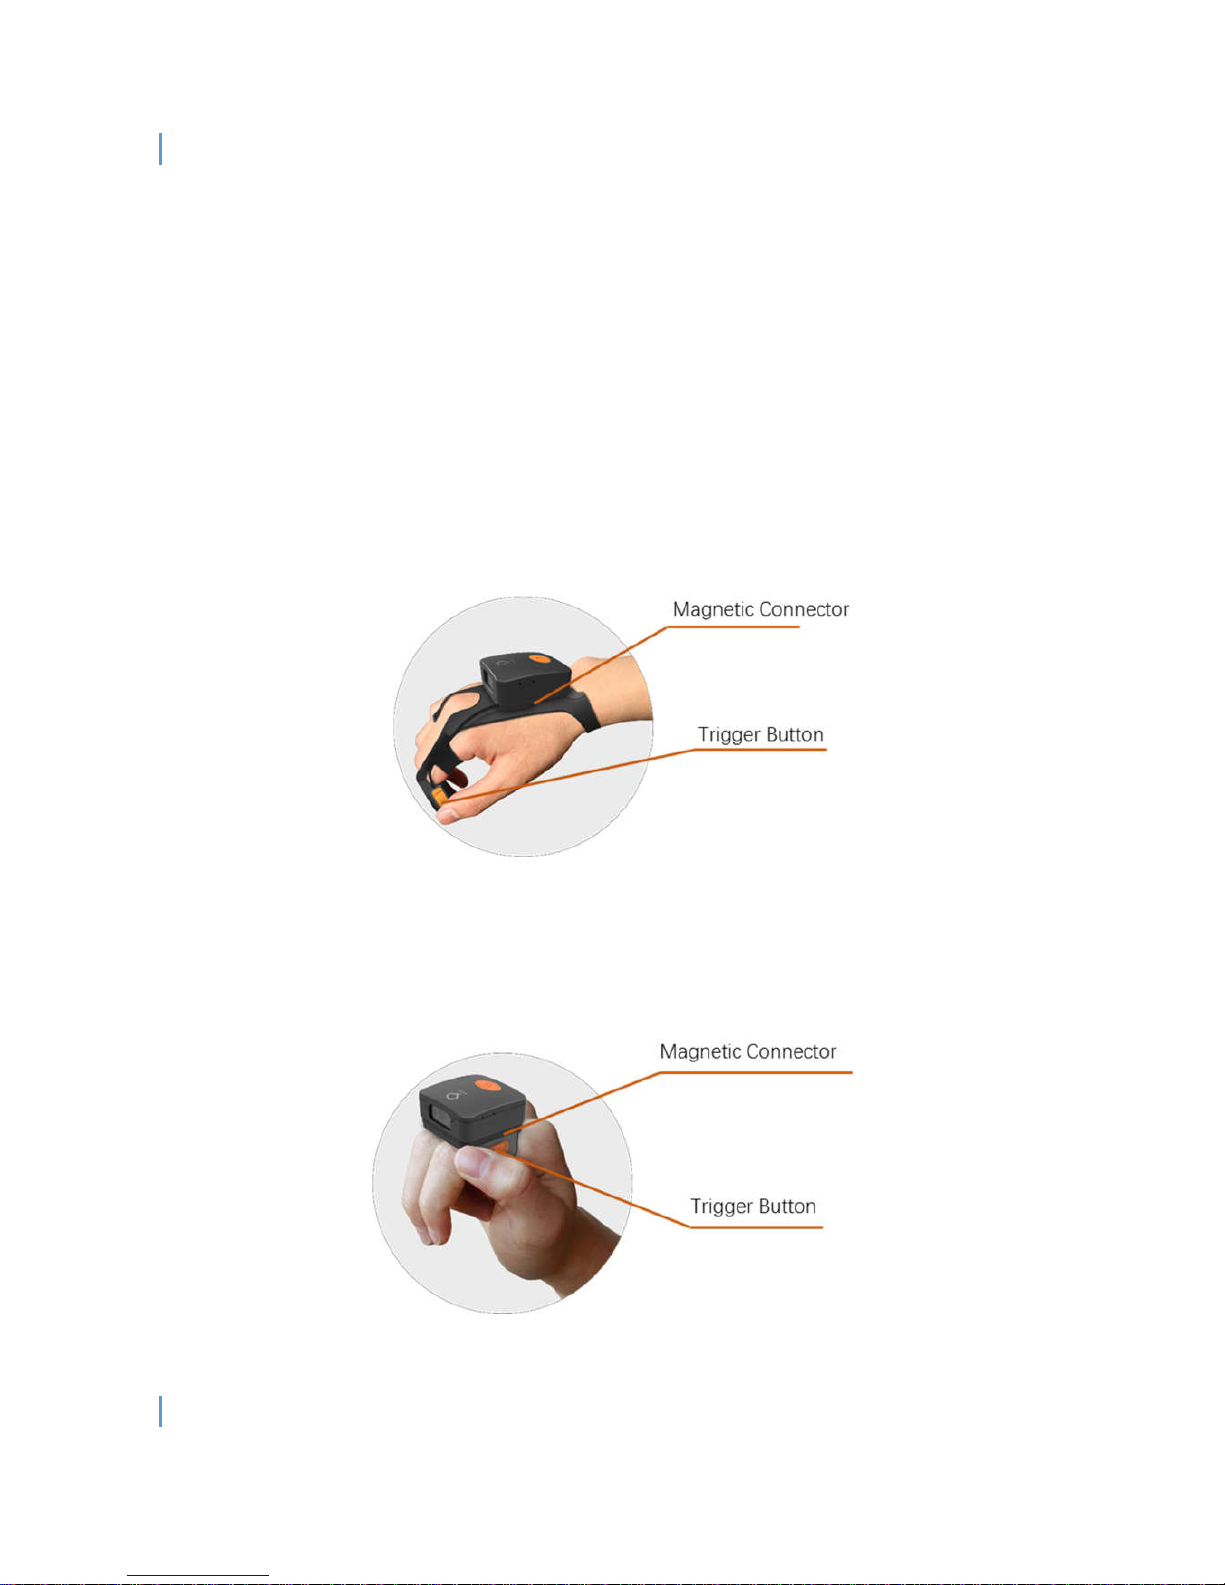
CommaGlove, as shown in Figure 2, enables users to use the CommaCube as gloves. Through
magnetic connector on CommaGlove, CommaCube can be easily attached. Multiple sizes of
CommaGlove are available. Also, left-hand and right-hand versions will be both provided. The
Trigger Button is another accessory that acts as the additional scanning trigger. It could be fixed on
the smart glove to assist with scanning operations.
Figu
re 2 CommaCube Equipped with CommaGlove (Optional Accessory)
CommaRing, as shown in Figure 3, enables users to use the CommaCube as rings. Through
magnetic connector, CommaCube can be easily attached to CommaRing. CommaRing can be
rotated for 180 degrees, therefore facilitates multiple scanning directions and usage by both left
and hands.
Fi
gure 3 CommaCube Equipped with CommaRing (Optional Accessory)
Page 5
Co
mmaCube User Menu
5
C
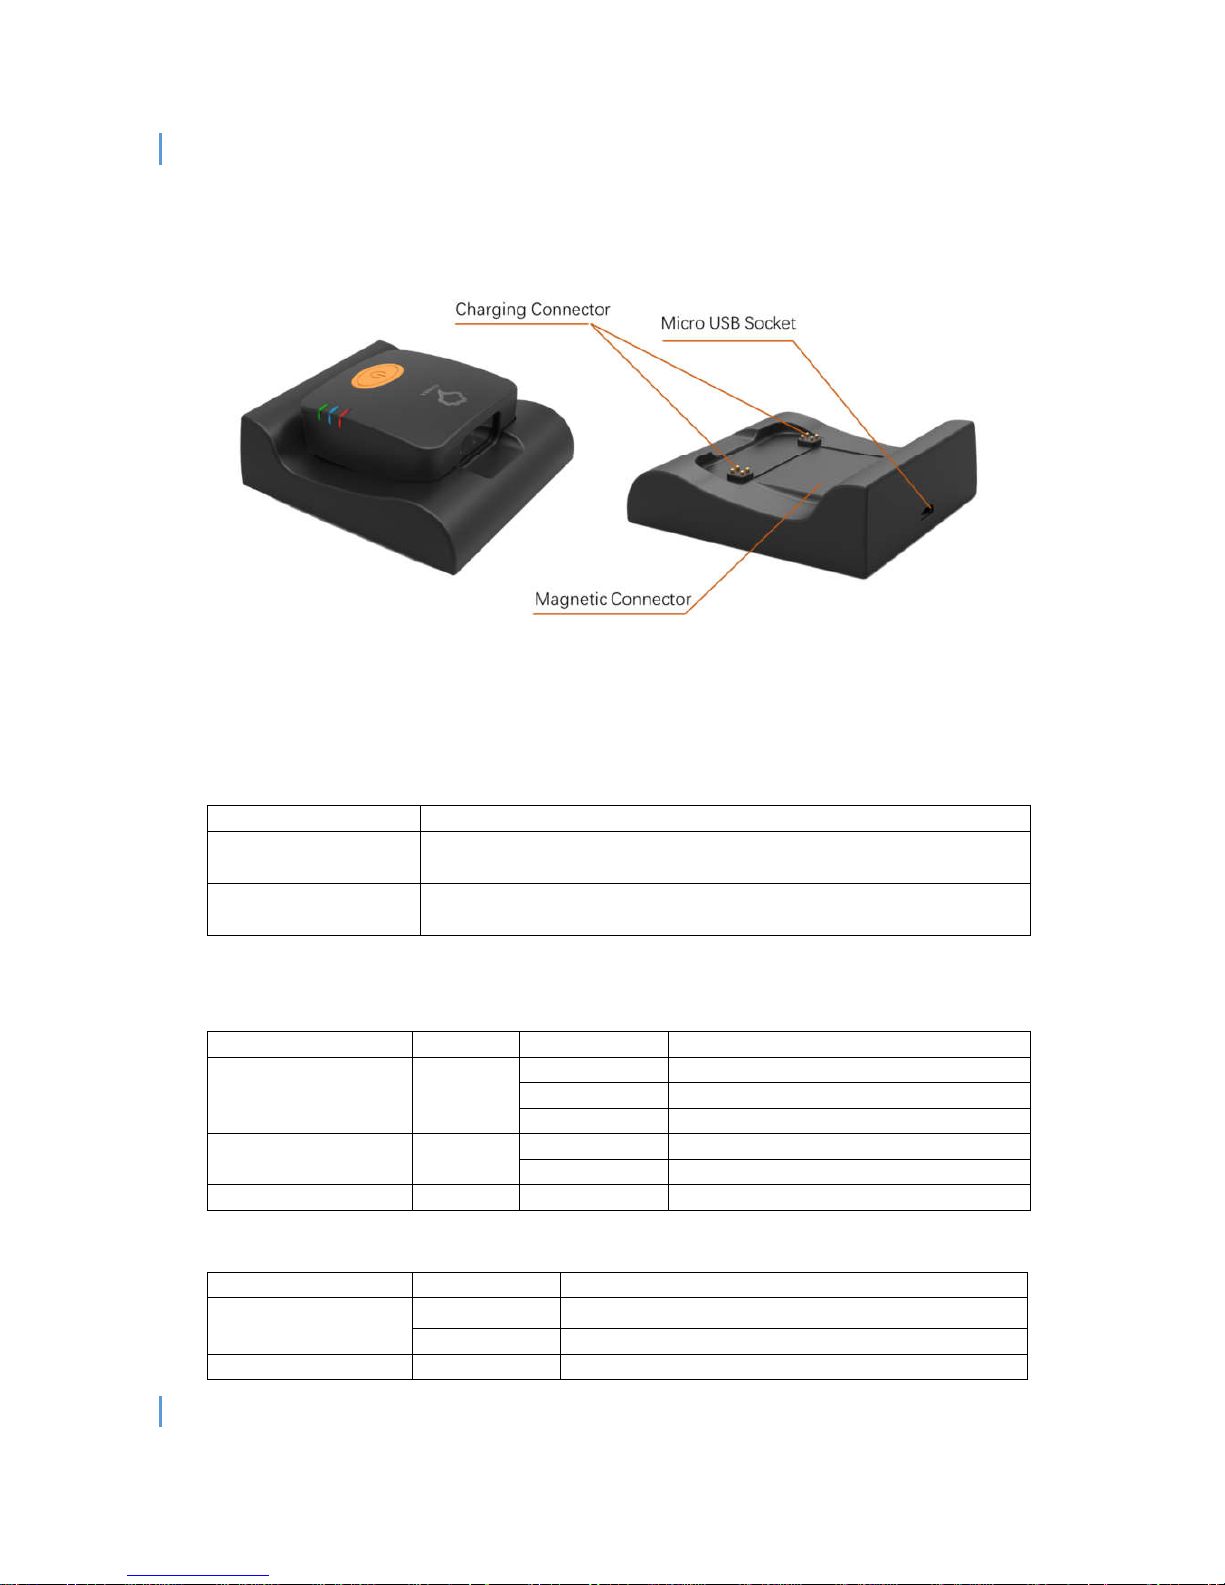
ommaCharger, as shown in Figure 4, is a standard accessory provided in the package that used to
charge CommaCube. CommaCube can be accurately attached to CommaCharger with the help of
magnets. CommaCube can work while being charged.
Figu
re 4 Overview of CommaCharger (Standard Accessory)
4
. Button Functions
Th
e followings are the brief description of the Button Functions
O
peration
D
escription
P
ower on / off
Lon
g press the power / trigger button to power on / off the device
1 short beep sound
Tri
gger Scan
P
ress the power / trigger button
Short beep sound for scanning success
5
. LED Indicator Table
O
peration Status
C
olor
L
ED Status
D
escription
Power Status Red
Static
Ful
l battery
(charg
ing)
Slow Blinking
Low battery
Lo
ng Blinking
C
harging
Bl
uetooth Status Blue
Static
Connected
Bli
nking
D
isconnected
Sca
n Result Status
Gr
een
Fl
ash 1 time
S
can success
6
. Buzzer Indicator Table
B
uzzer Status
T
ime
D
escription
Short Beep
Once Scanning success
Tw
ice Bluetooth connection success
Lon
g Beep
2 Seconds-
Bl
uetooth disconnect
Page 6

Co
mmaCube User Menu
6
Off-line cache memory full
Page 7

Co
mmaCube User Menu
7
CommaCube User Operation Menu (Application)
B
. Introduction of Application
1
. Overview
We
provide a SDK for developer to integrate our product to their own application. Also, a demo
application, Comma Family App, is provided for user to test and experience our products.
2
. Download and Installation
U
ser can visit our website https://www.smartcomma.com/download/CommaFamily.apk , or scan
the below 2D barcode to download and install the latest demo application to your android device
(requires Bluetooth LE and Android 4.3 or above).
Figu
re 5 URL for Comma Family Application
3
. Demo Application Quick Start
After
install the application, the operation of the demo application as follow
I
. Turn on the device
Press the power button on the top of the CommaCube to turn on the device. When a beep sound
occurs and the blue LED starts flashing, the device has finished bootup.
II
. Open Application
Cl
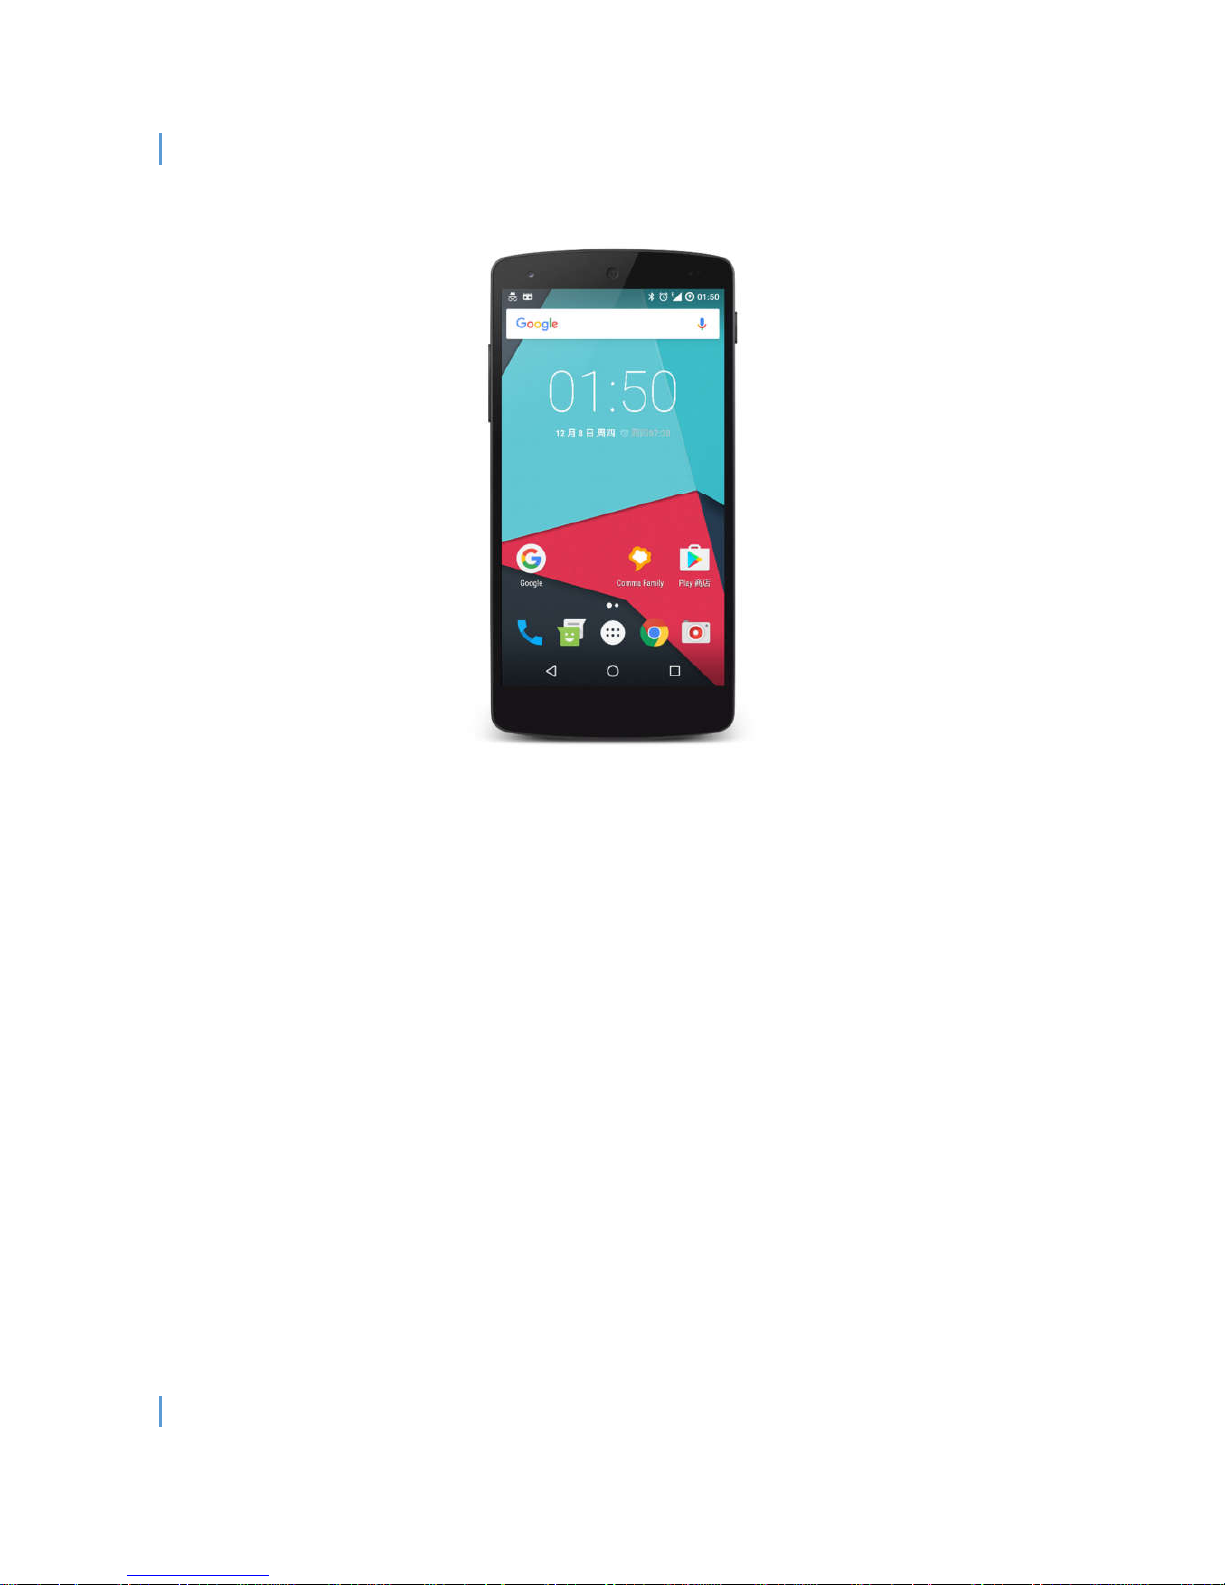
ick the CommaFaily icon to open the demo application.
Page 8
Co
mmaCube User Menu
8
Fi
gure 5 Comma Family Application
III
. Add Comma’s devices
Th
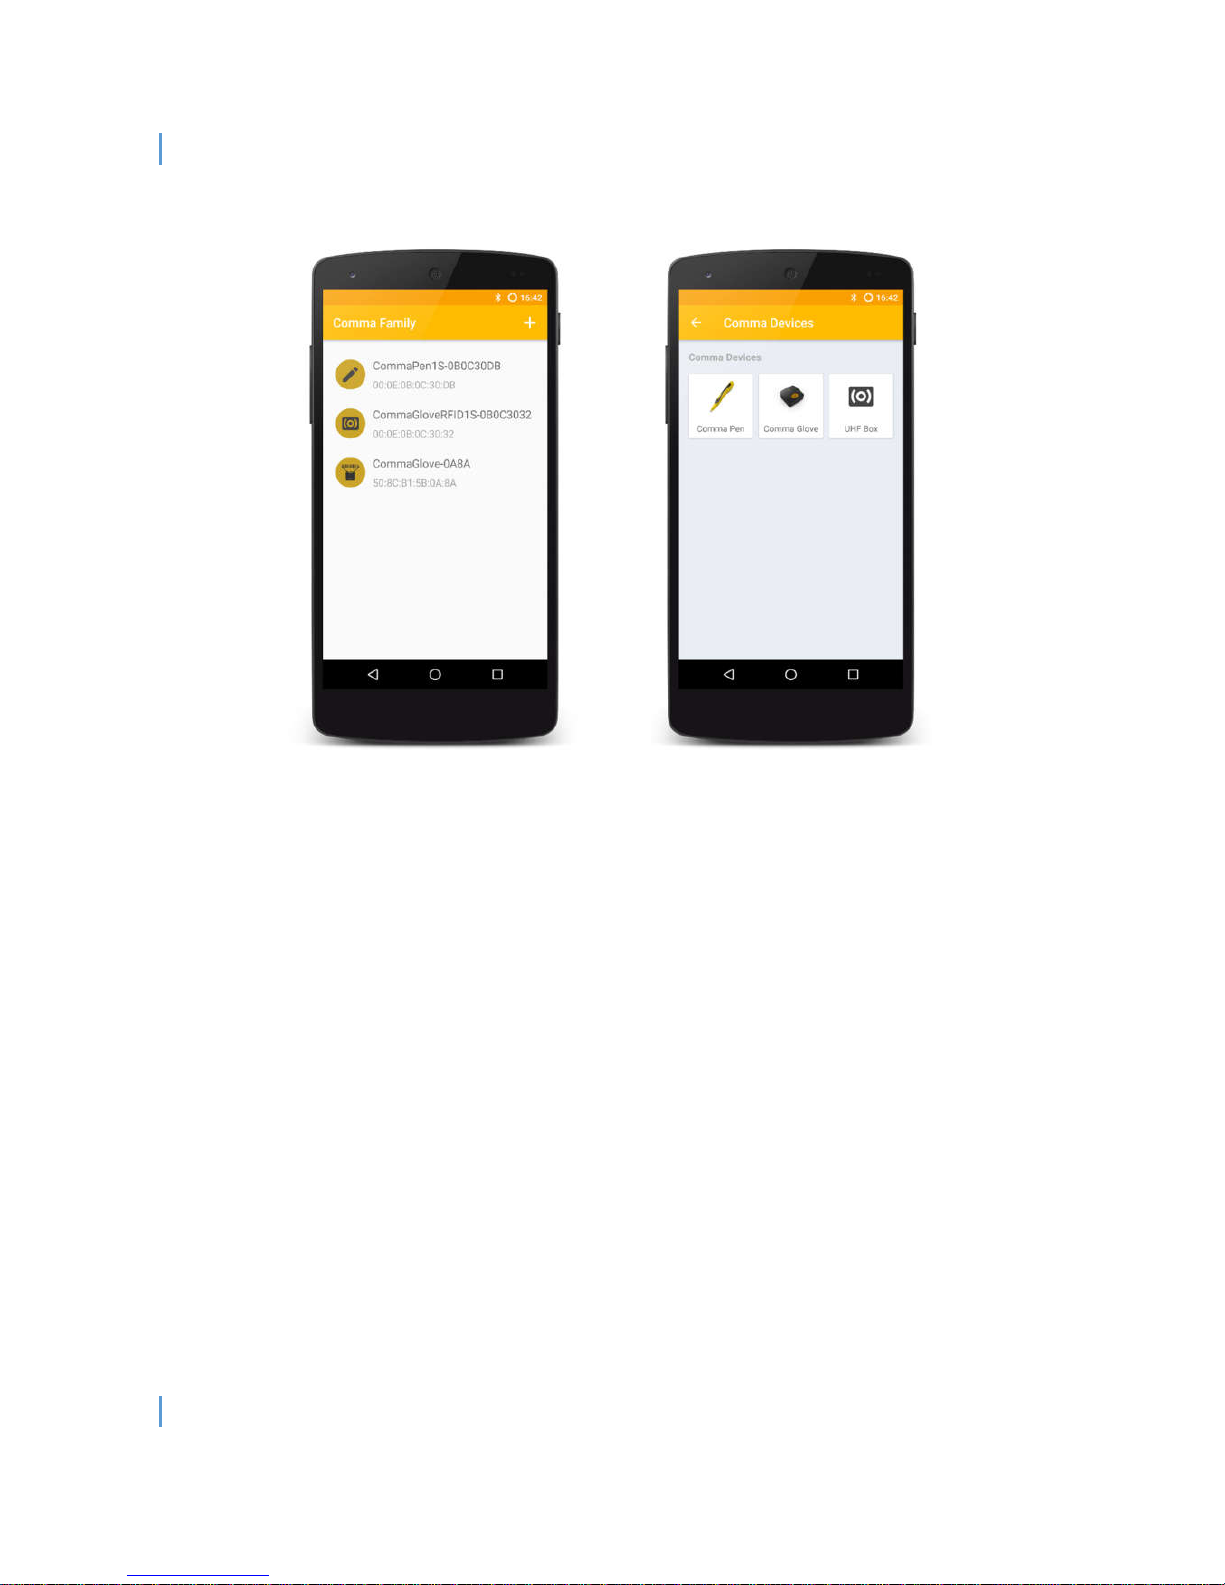
e main interface of Comma Family is register devices list, which is shown in the left-hand side of
Figure 6. To add a new Comma’ device, click the “+” button in the upper right corner and the device
selection screen will be displayed, which is shown in the right-hand side of Figure 6. Then, select
CommaCube icon to register CommaCube.
Page 9
Co
mmaCube User Menu
9
Figure 6 Application Main Screen (Left), Add Comma’s Devices Interface (Right)
IV. Se
arch BLE Device
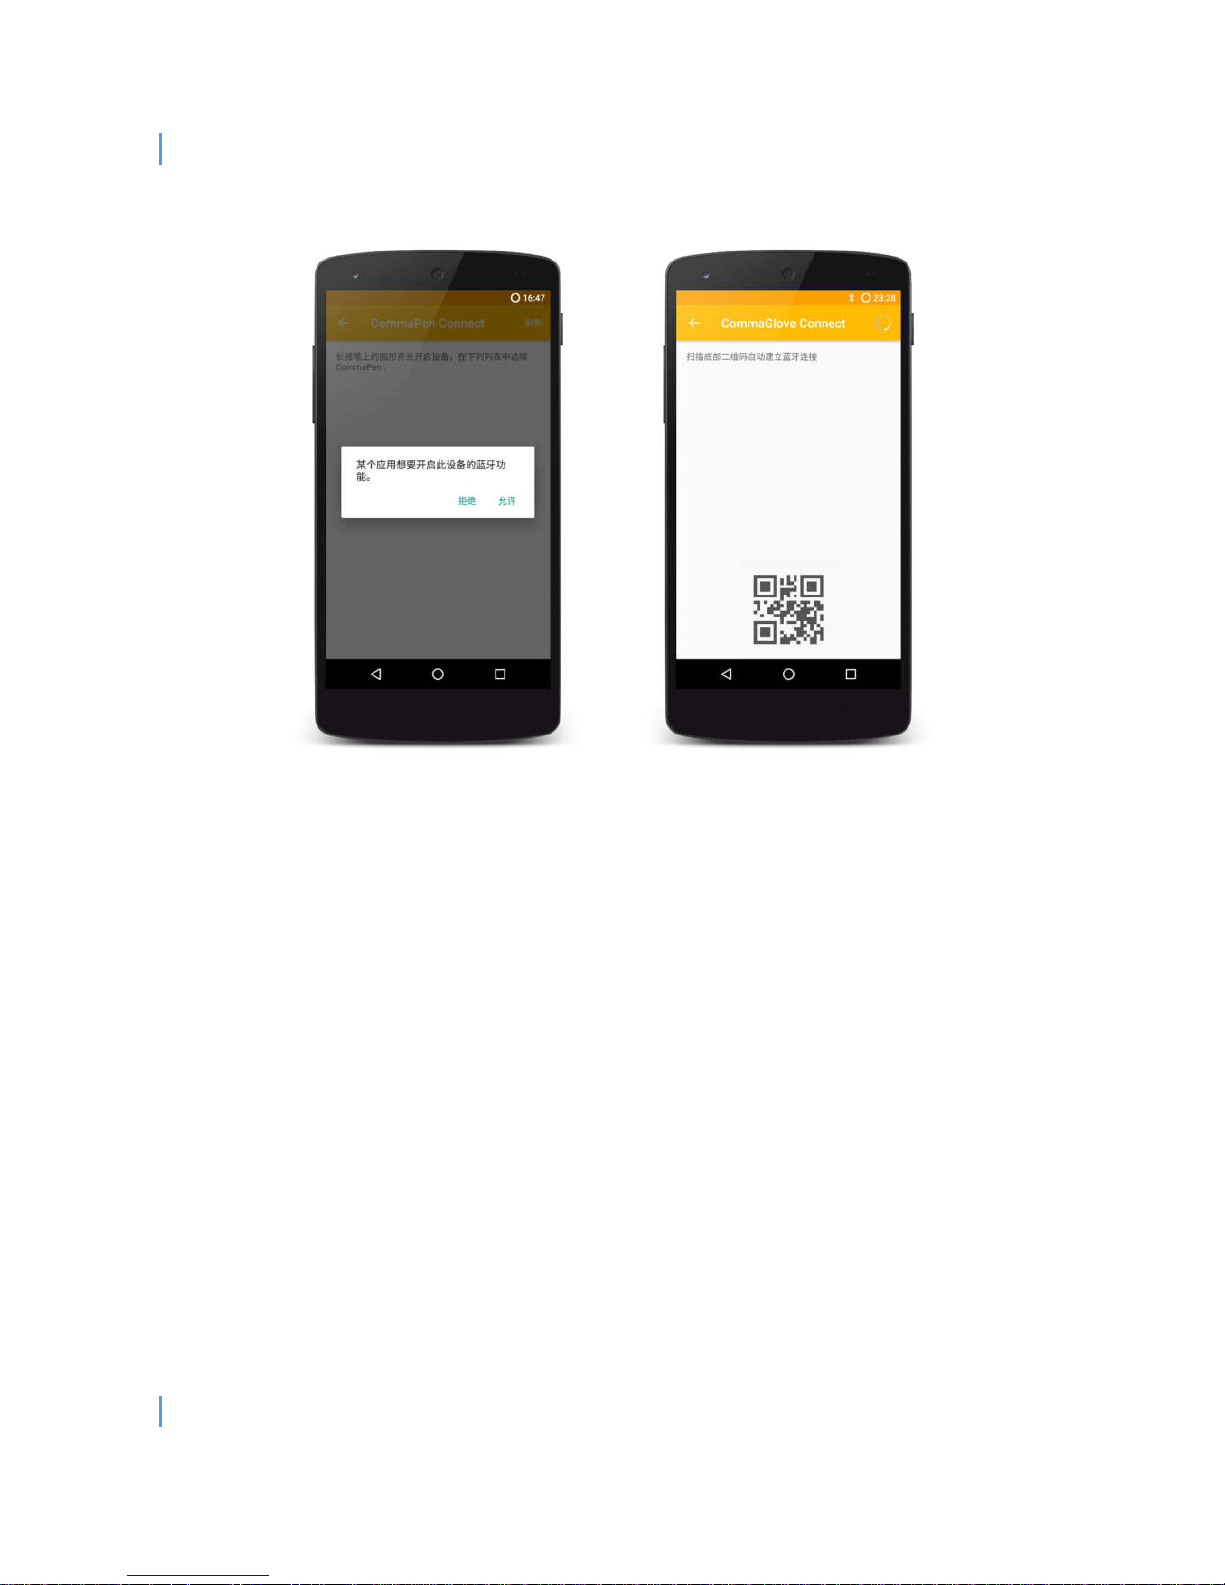
After select the device type, the demo application will jump to device discovery interface and start
searching and listed all available BLE devices (Right-hand side of Figure 7). If the Android Bluetooth
is not open, the application will ask for open the Bluetooth (Left-hand side of Figure 7).
Page 10
Co
mmaCube User Menu
1
0
Figure 7 Bluetooth Discovery Interface
V. E
stablish Bluetooth connection
Cl
ick the CommaCube device in the list or scan the QR code blow the screen direct to connect the device.
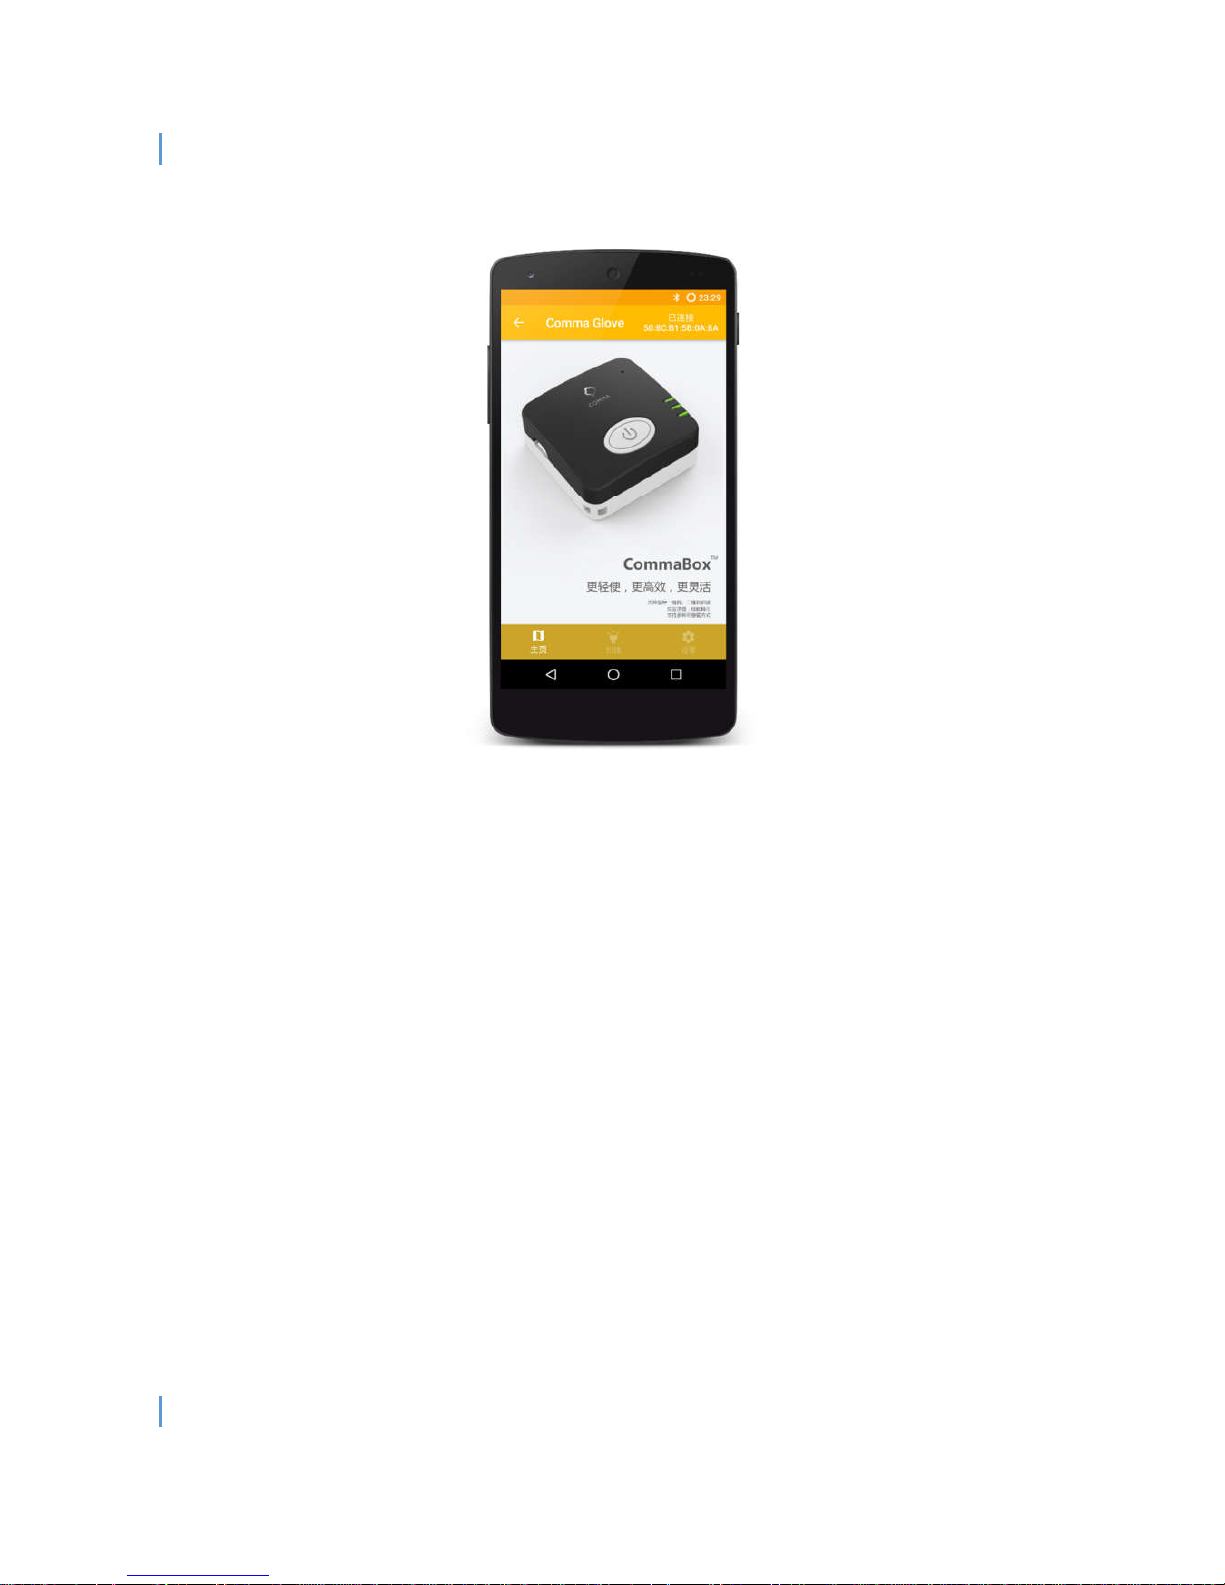
If the connection success, the device will emit 1 beep sound and the blue LED will light static. The
application will redirect to the device main interface (Figure 8).
In the device main interface, the upper right-hand corner shows the Bluetooth connection status. You
can click the status to toggle the Bluetooth connection.
** In the current version (v2.0.21), if user back to Comma Family main interface or exit the application,
the application will disconnect the current device.
Page 11
Co
mmaCube User Menu
1
1
Figure 8 Device Main Interface
V
I. Read Data
You
can trigger CommaCube to read data in 3 ways. If the read process success, the device will emit
a beep sound and a green LED will light 1 time.
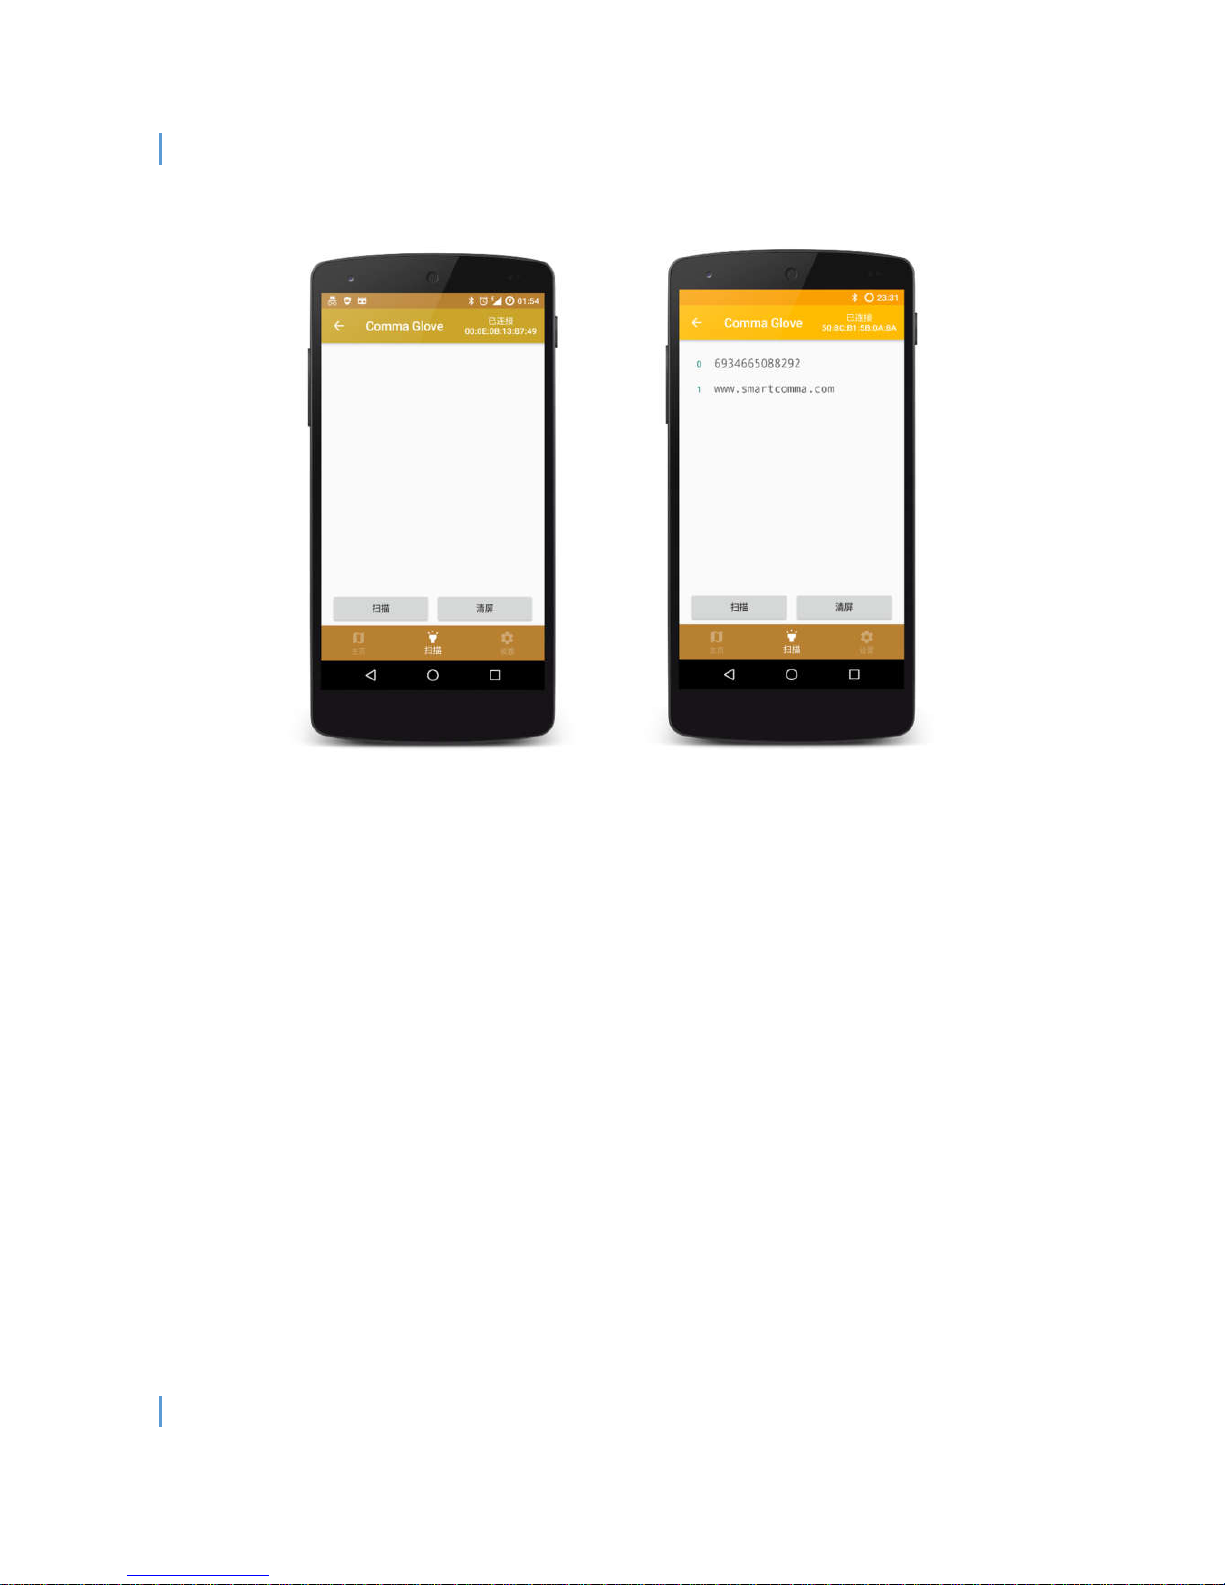
a) Soft trigger by click the “Scan” button (Right-hand side of Figure 9).
b) Press the power / trigger button on the top of the CommaCube (Figure 1)
c) Press the read button via the USB auxiliary trigger (require CommaCube accessory, Figure 2)
If the read operation success, the result will display in the result list (Right-hand side of Figure 9).
Page 12
Co
mmaCube User Menu
1
2
Figure 9 Data Reading
Page 13
Co
mmaCube User Menu
1
3
4
. Device Configuration
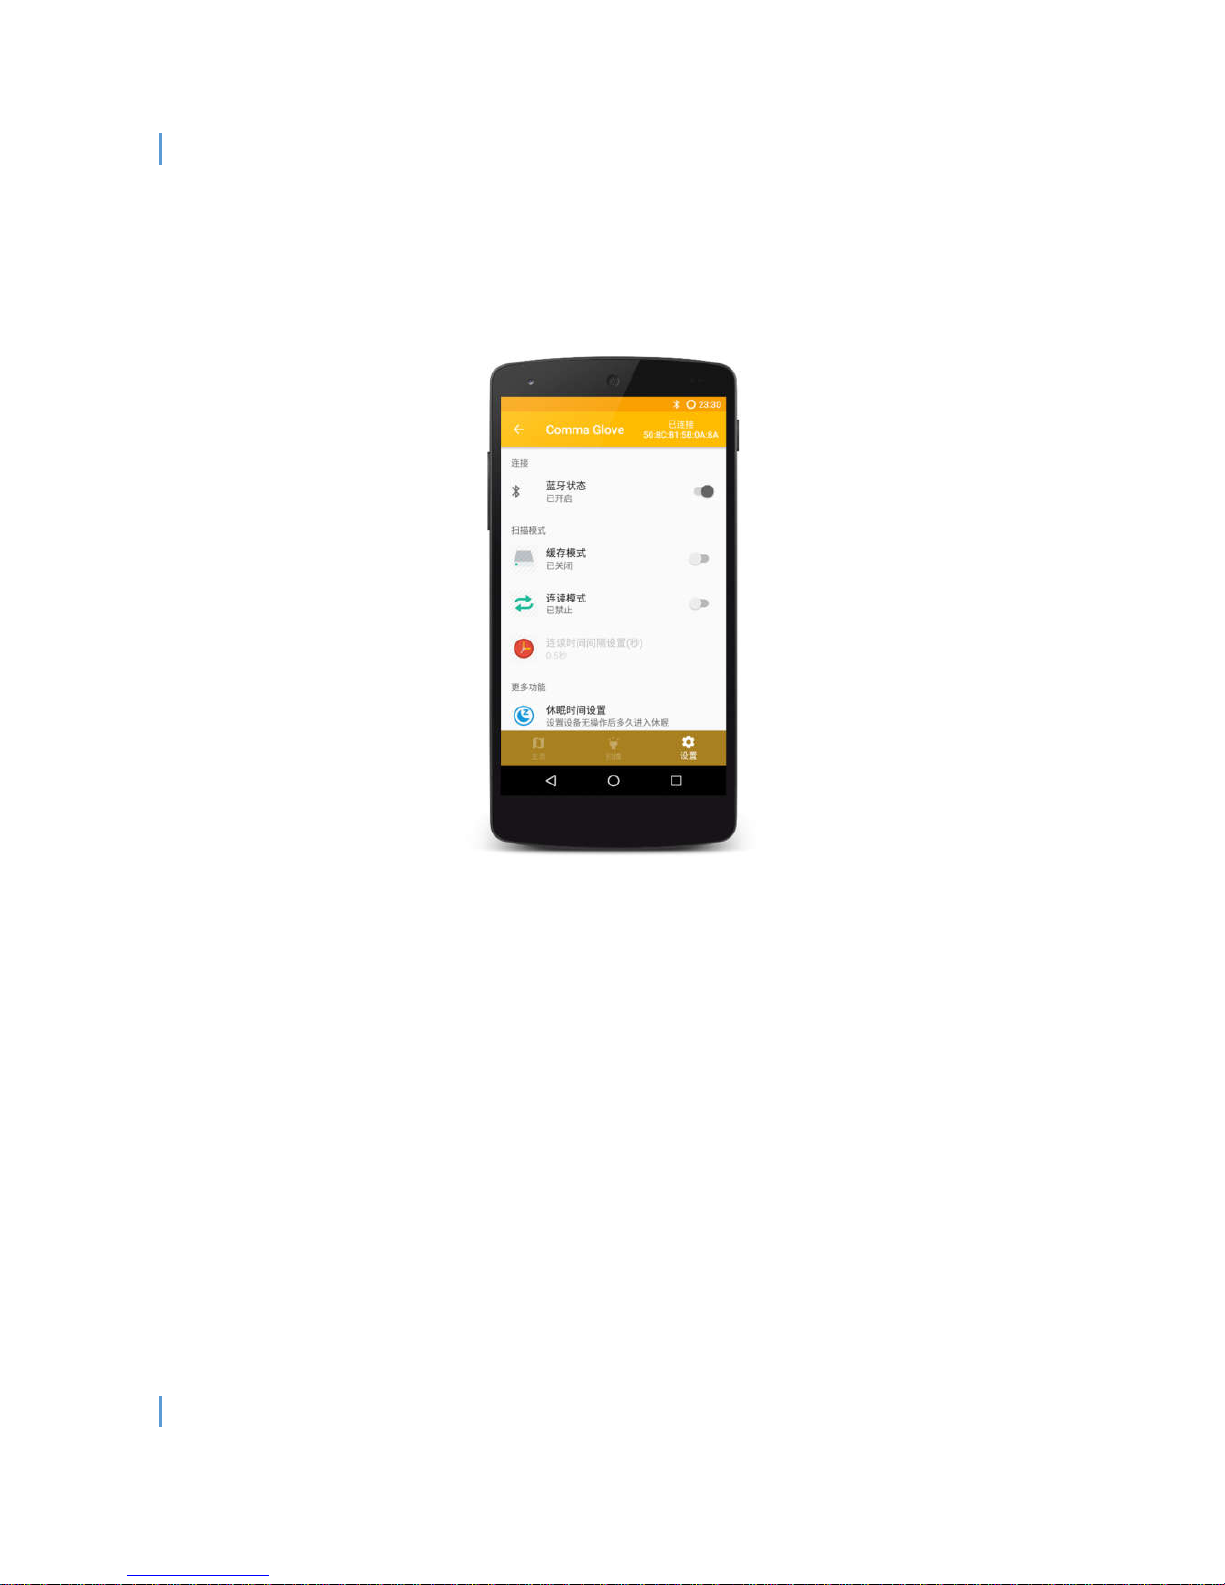
In t
he device configuration tab (Figure ), user can change the CommaCube setting or reading
behavior. The details of configurations are descripted as follows.
Figure 11 Device Configuration
a) Blue
tooth Setting
Turn on or off the Android device Bluetooth.
b) Cache Mode
If the cache mode is on, the Comma’s devices will cache the scanning data while the Bluetooth
connection discounted from the Android device, and transmit cached data to Android device while
the Bluetooth connection resume.
c) Continuous Read Mode
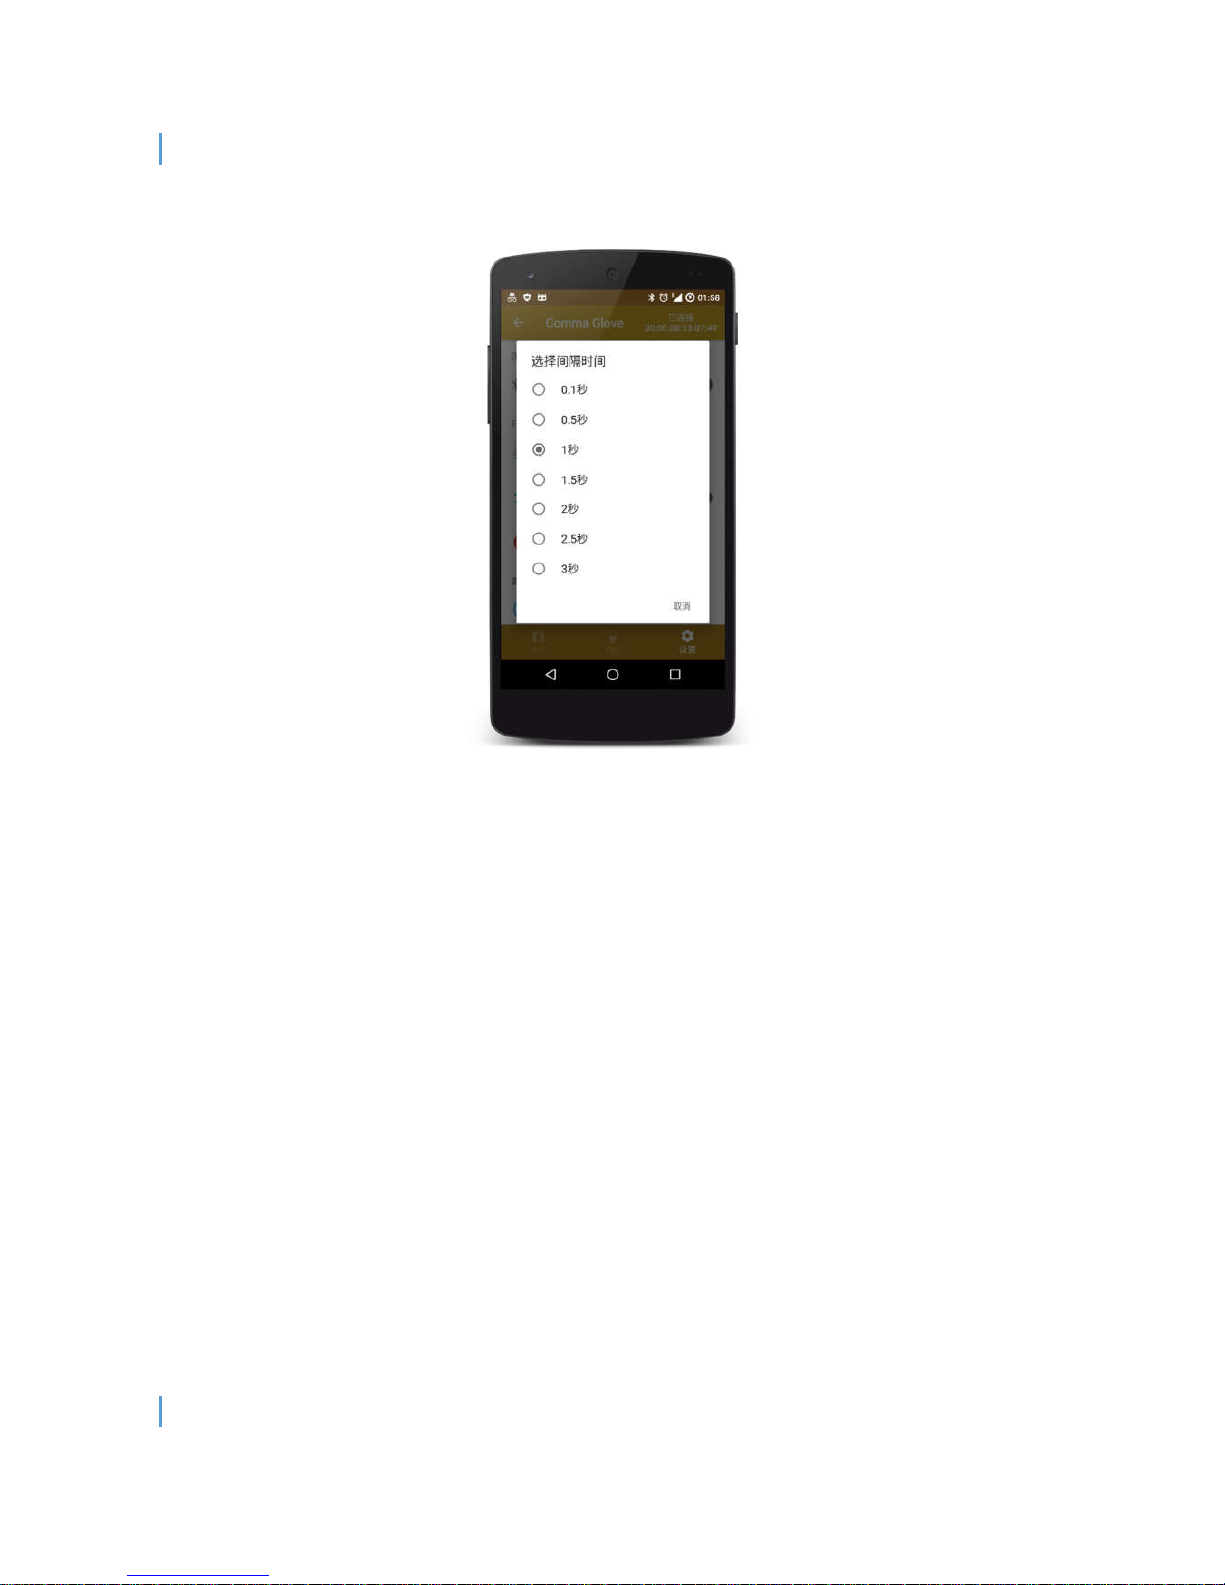
If the continuous read mode is on, the Comma’s device will auto trigger scan action with a
predefined time interval (Figure 10).
** The Cache Mode and Continuous Read Mode cannot enabled at the same time in current version
(v2.0.21)
Page 14
CommaCu
be User Menu
14
Figure 10 Continuous Read Mode
d) Barco
de Advance Setting
User can change the CommaCube scanning behavior via scan the function quick code.
Each configuration requires three steps action to apply the setting.
I. Scan “initiation” code
II. Scan “function” quick code
III. Scan “ending” code
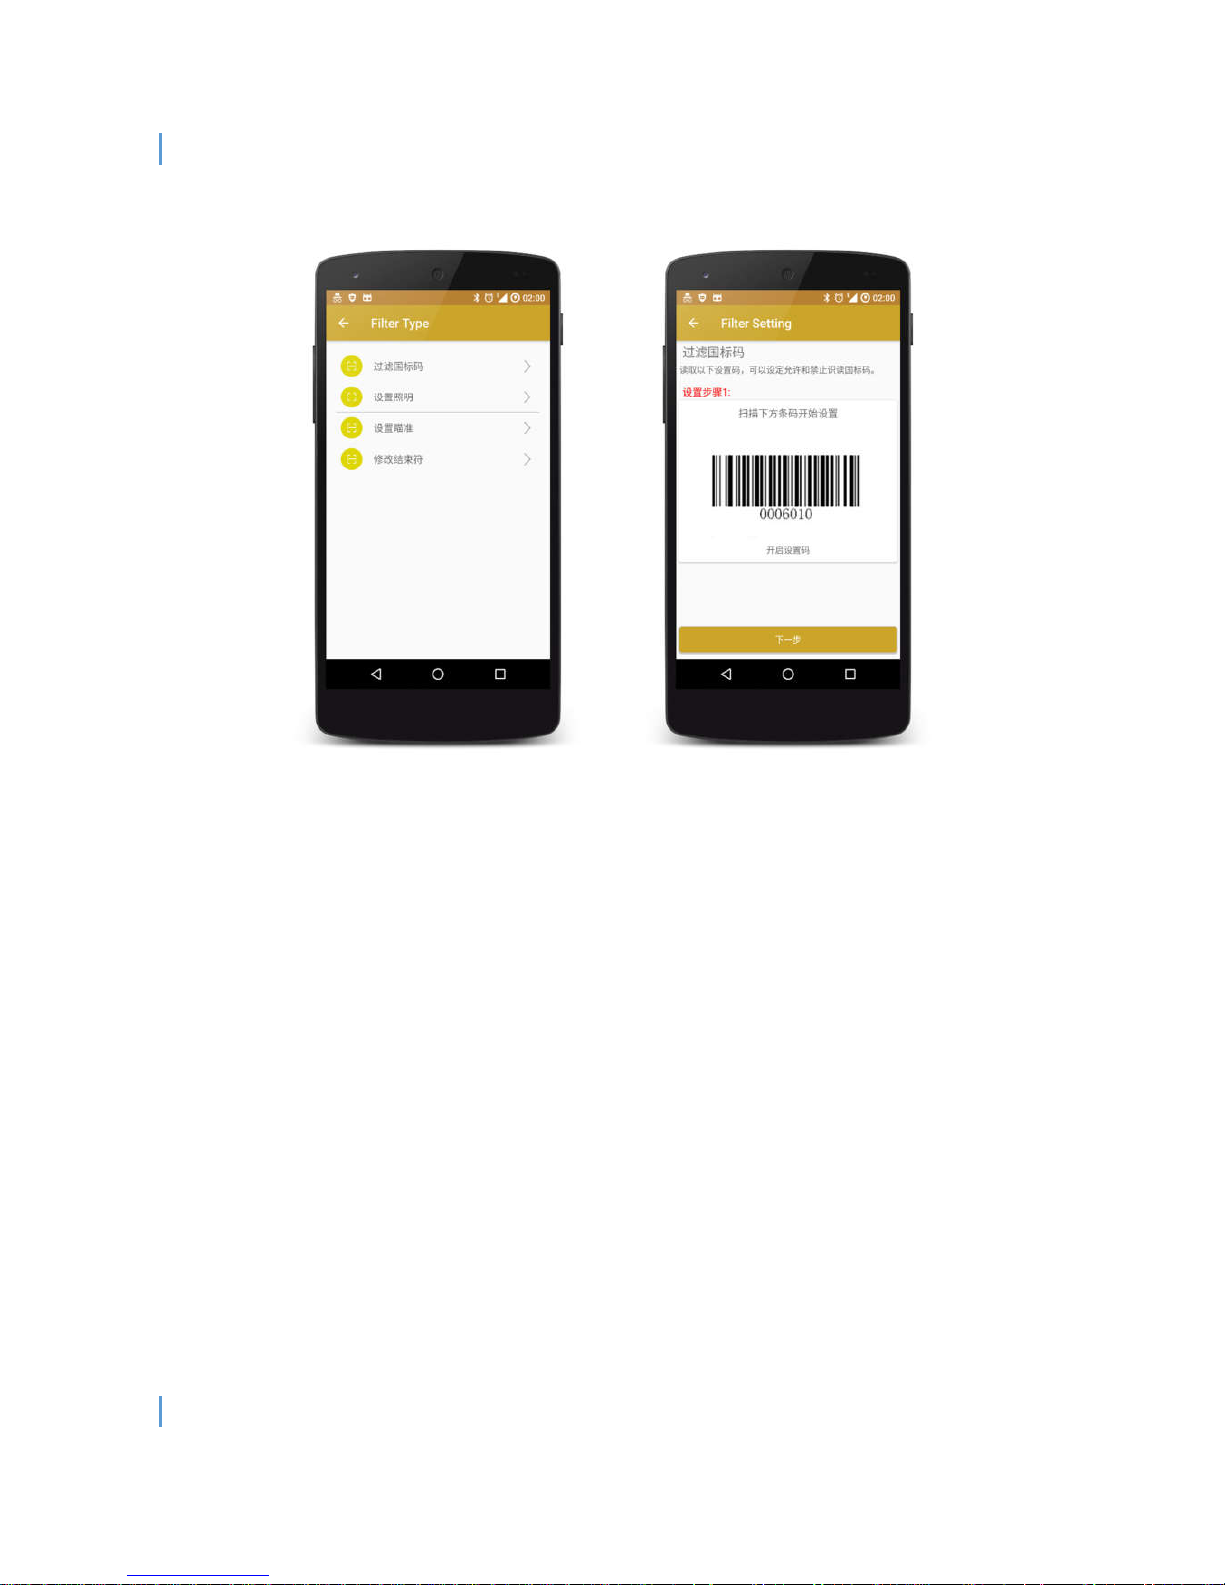
The following example is the operation to disable / enable the GB code filtering function.
I. Select “Filter GB Code”, then, use CommaCube to scan the “Initiation” code (Figure 11).
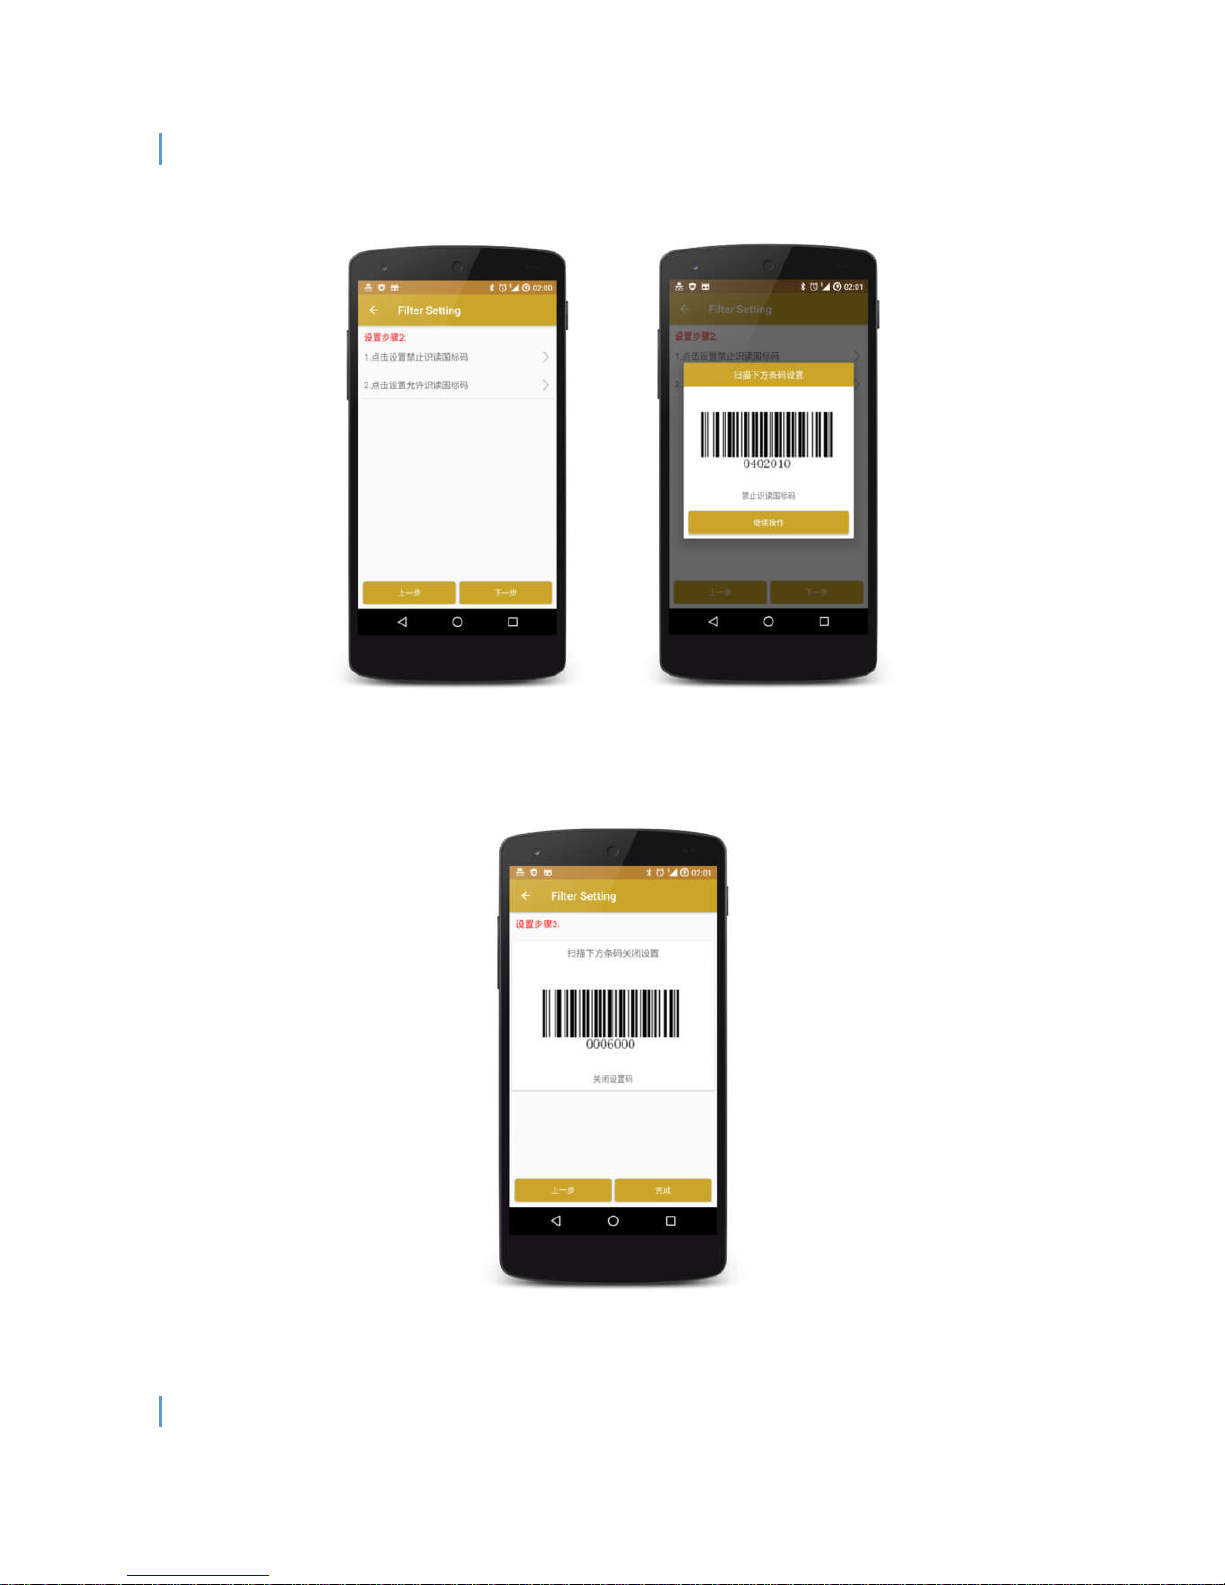
II. Select the mode to enable / disable, then, scan the function quick code (Figure 12).
III. Finally, scan the “Ending” code to complete the operation (Figure 13).
Page 15
CommaCube
User Menu
15
Figure 11 Scan the initiation code
Page 16
CommaCube
User Menu
16
Figure 12 Scan the function quick code
Figure 13 Scan the ending code
Page 17

CommaCube User Menu
17
Warning Statement
This equipment has been tested and found to comply with the limits for a
Class B digital device, pursuant to part 15 of the FCC Rules. These limits are
designed to provide reasonable protection against harmful interference in a
residential installation. This equipment generates, uses and can radiate radio
frequency energy and, if not installed and used in accordance with the
instructions, may cause harmful interference to radio communications.
However, there is no guarantee that interference will not occur in a particular
installation. If this equipment does cause harmful interference to radio or
television reception, which can be determined by turning the equipment off
and on, the user is encouraged to try to correct the interference by one or
more of the following measures:
• Reorient or relocate the receiving antenna.
• Increase the separation between the equipment and receiver.
• Connect the equipment into an outlet on a circuit different from that to
which the receiver is connected.
• Consult the dealer or an experienced radio/TV technician for help.
Caution: Any changes or modifications to this device not explicitly approved
by manufacturer could void your authority to operate this equipment.
This device complies with part 15 of the FCC Rules. Operation is subject to the
following two conditions: (1) This device may not cause harmful interference,
and (2) this device must accept any interference received, including
interference that may cause undesired operation.
The device has been evaluated to meet general RF exposure requirement.
The device can be used in portable exposure condition without restriction.
 Loading...