

Page 1
IOS Android
Pic1
Pic 2
Pic 3
Pic 4
SMART WIFI BULB
Thank you for purchasing this quality product. Should you have any issues or questions
regarding this product, please write to [email protected] for further support. For more products
and special offers, please contact us at [email protected].
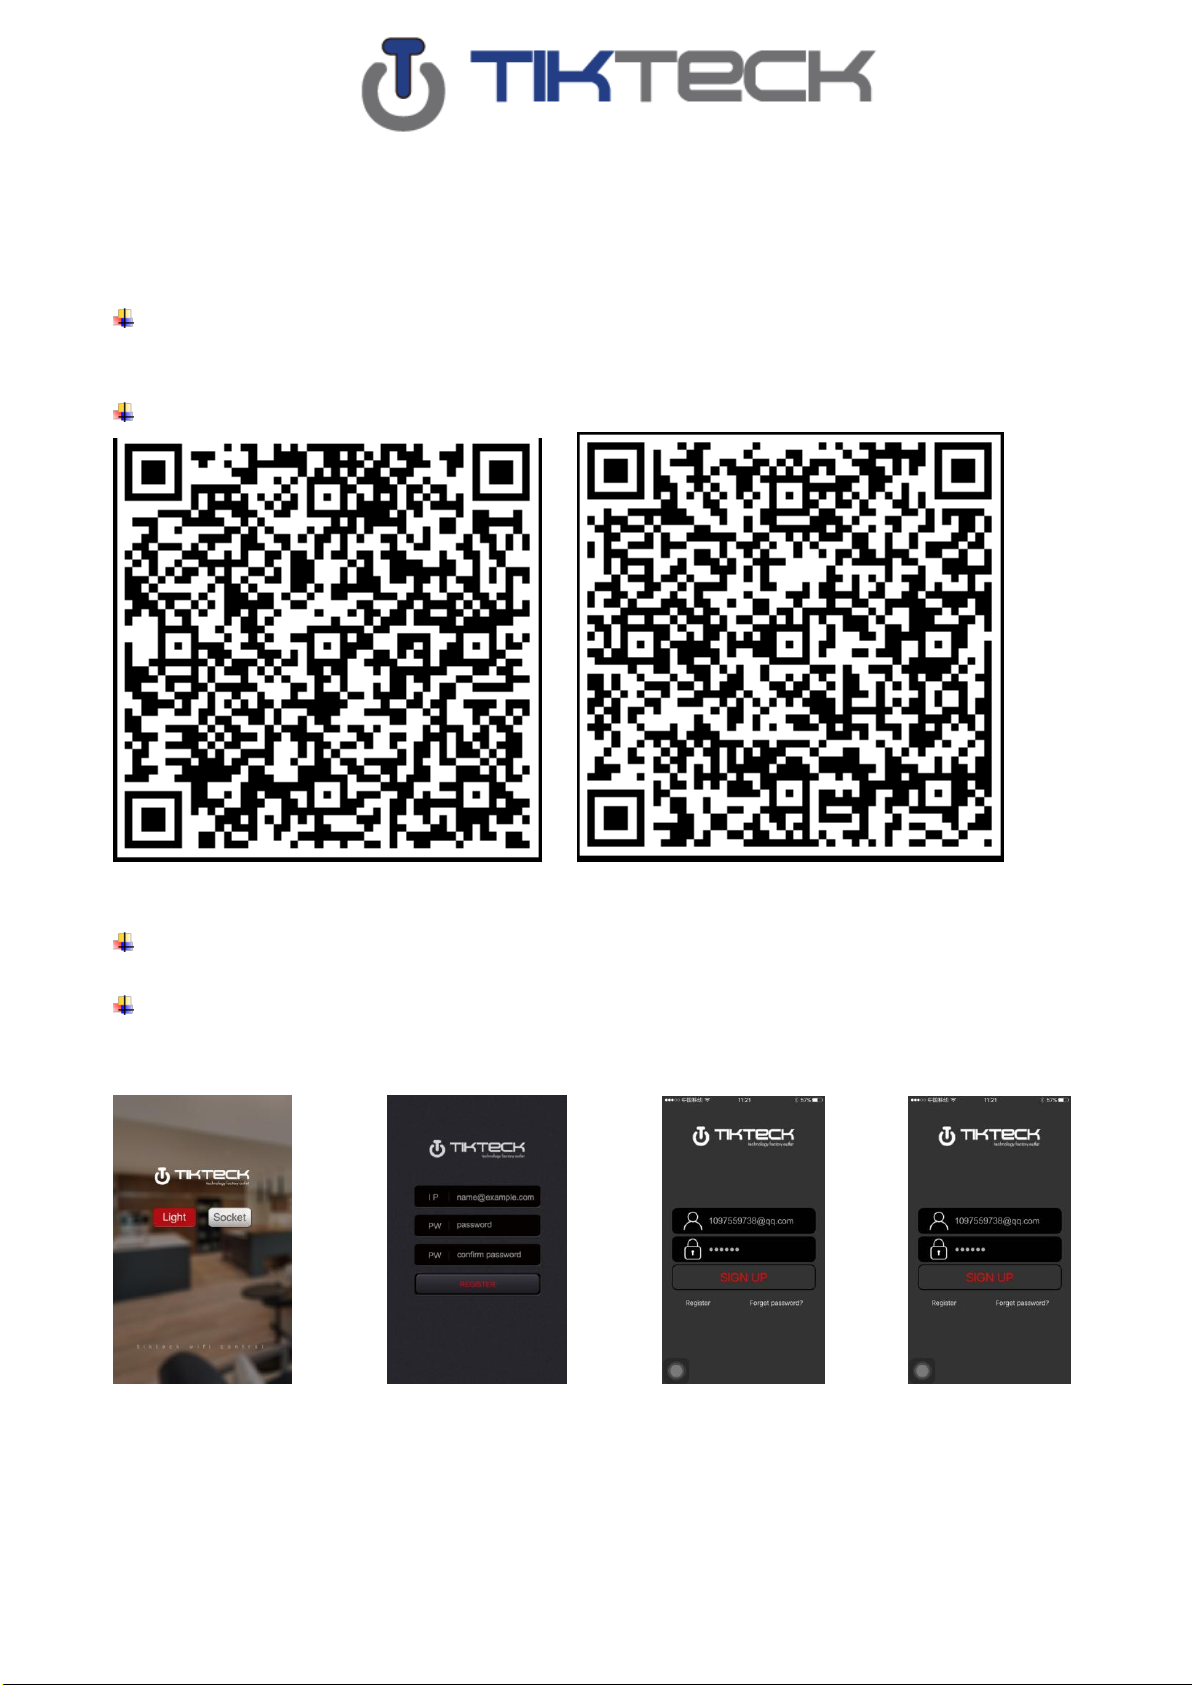
1 Download and install IOS“Tikteck WIFI Home”App from Apple store,Android”Tikteck
Smart Home V1” from Google play.
Or scan below QR code.
2.1 Sign in App:Choose the “light” or “socket” bottom and click the “register”.Sign in with your
email+ password like picture 1 and picture 2.
2.2 First to confirm your eamil and password, then input your register and password and click
the “SIGN UP” like the picture 3 and 4.
Page 2
Pic1
Pic2
Pic1
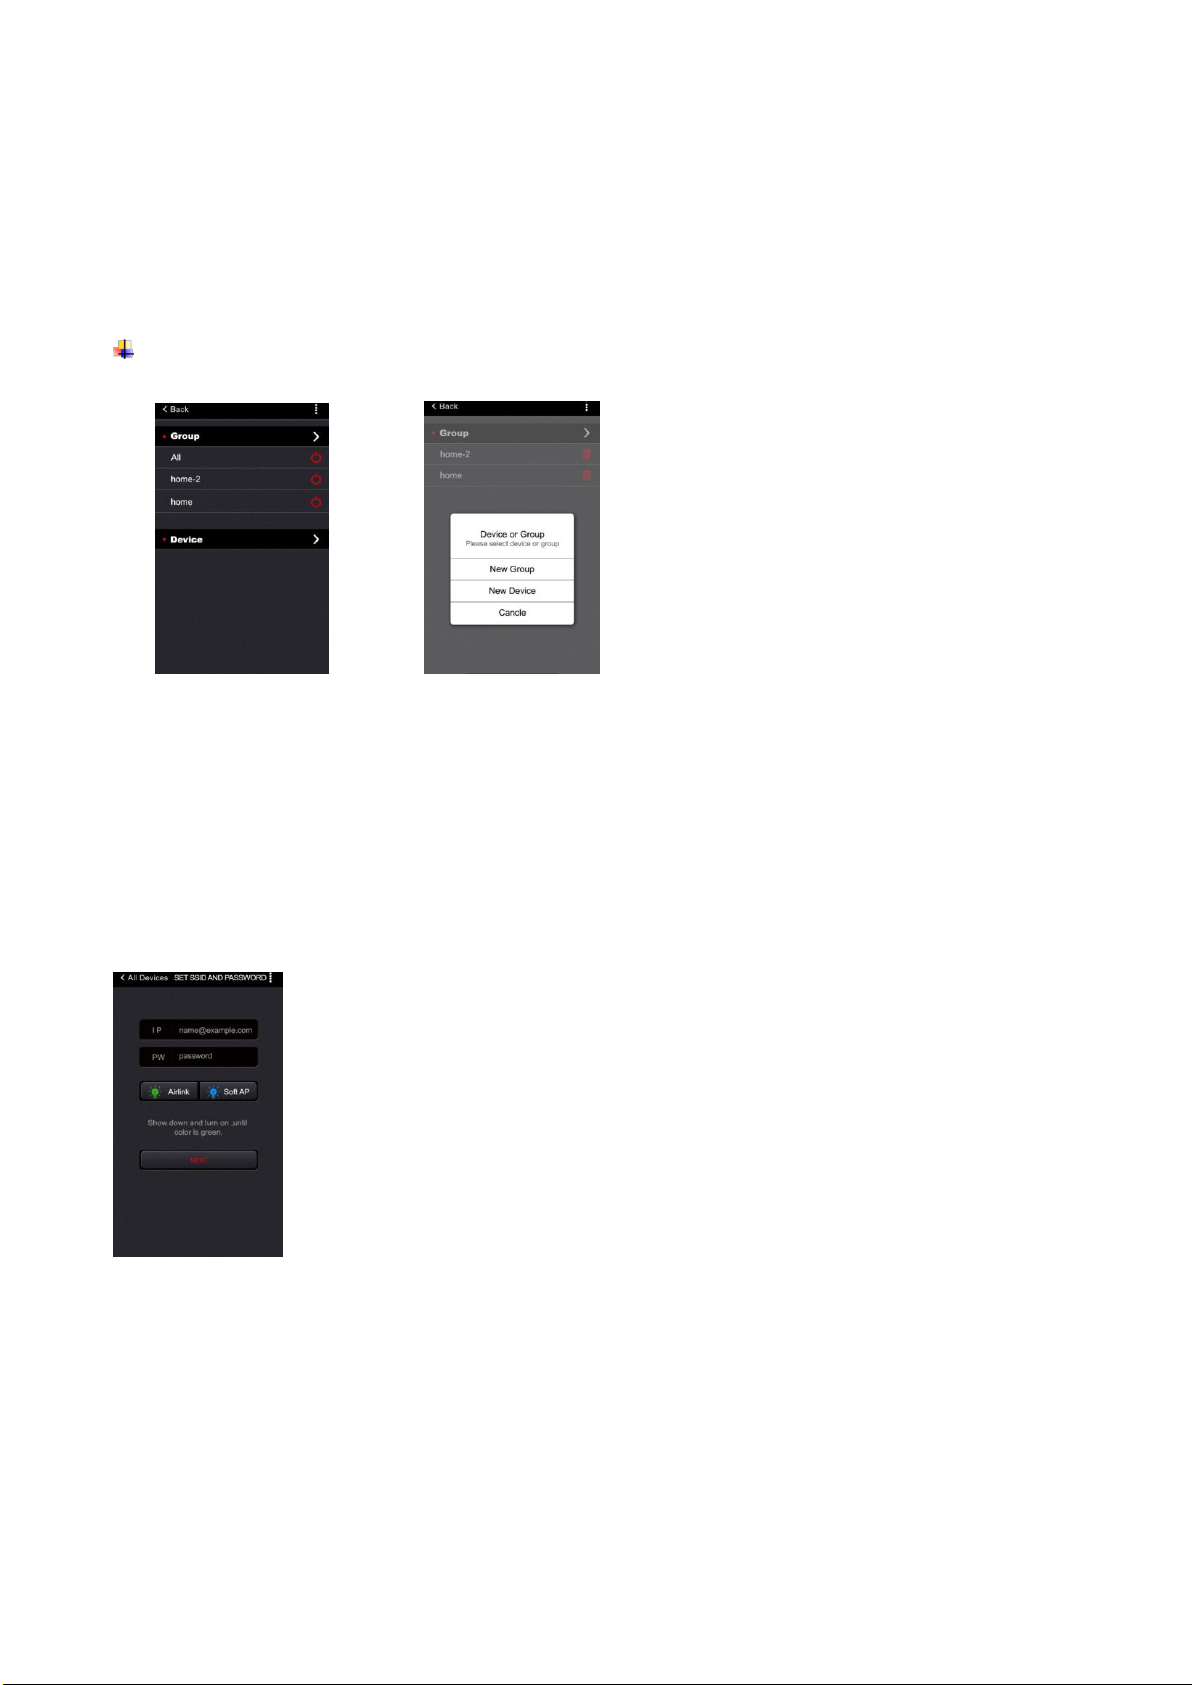
3 Add device : 3.1 Go to the App, tap “+” and “New Device” at the bottom,
The App interface is shown as in the picture 1 and picture 2
3.2 Airlink mode: turn on the Wi-Fi bulb and make sure the light is green flashing.If
not, please turn off the bulb, and then switch it by following the steps: On-off-on-off-on three or
four times.until it is green flashing. Switch time interval shall not exceed 6 seconds.
3.2.1When the WiFi bulb is green flashing, select the airlink,wifi name and enter password, tap
“Next”, as shown in the picture 1 and 2.
3.2.2 When the WiFi bulb has been became to colorful, it means that the WiFi bulb is being
paired;when the wifi bulb becomes white, it means paired successfully.as show in the picture 1
and 2.
3.3 Soft AP mode: 3.3.1 turn on the Wi-Fi bulb and make sure the light is blue flashing. If
not, please turn off the bulb, and then switch it by following the steps: On-off-on-off-on three or
four times.until it is blue flashing. Switch time interval shall not exceed 6 seconds.
3.3.2 When the WiFi bulb is green flashing, select the SoftAP, WiFi name and enter password,
Page 3
tap “Next”, as shown in the picture 1 and 2.
Pic1
Pic2
Pic3
Pic4
Pic5
Pic1
Pic2
Pic3
Pic 1
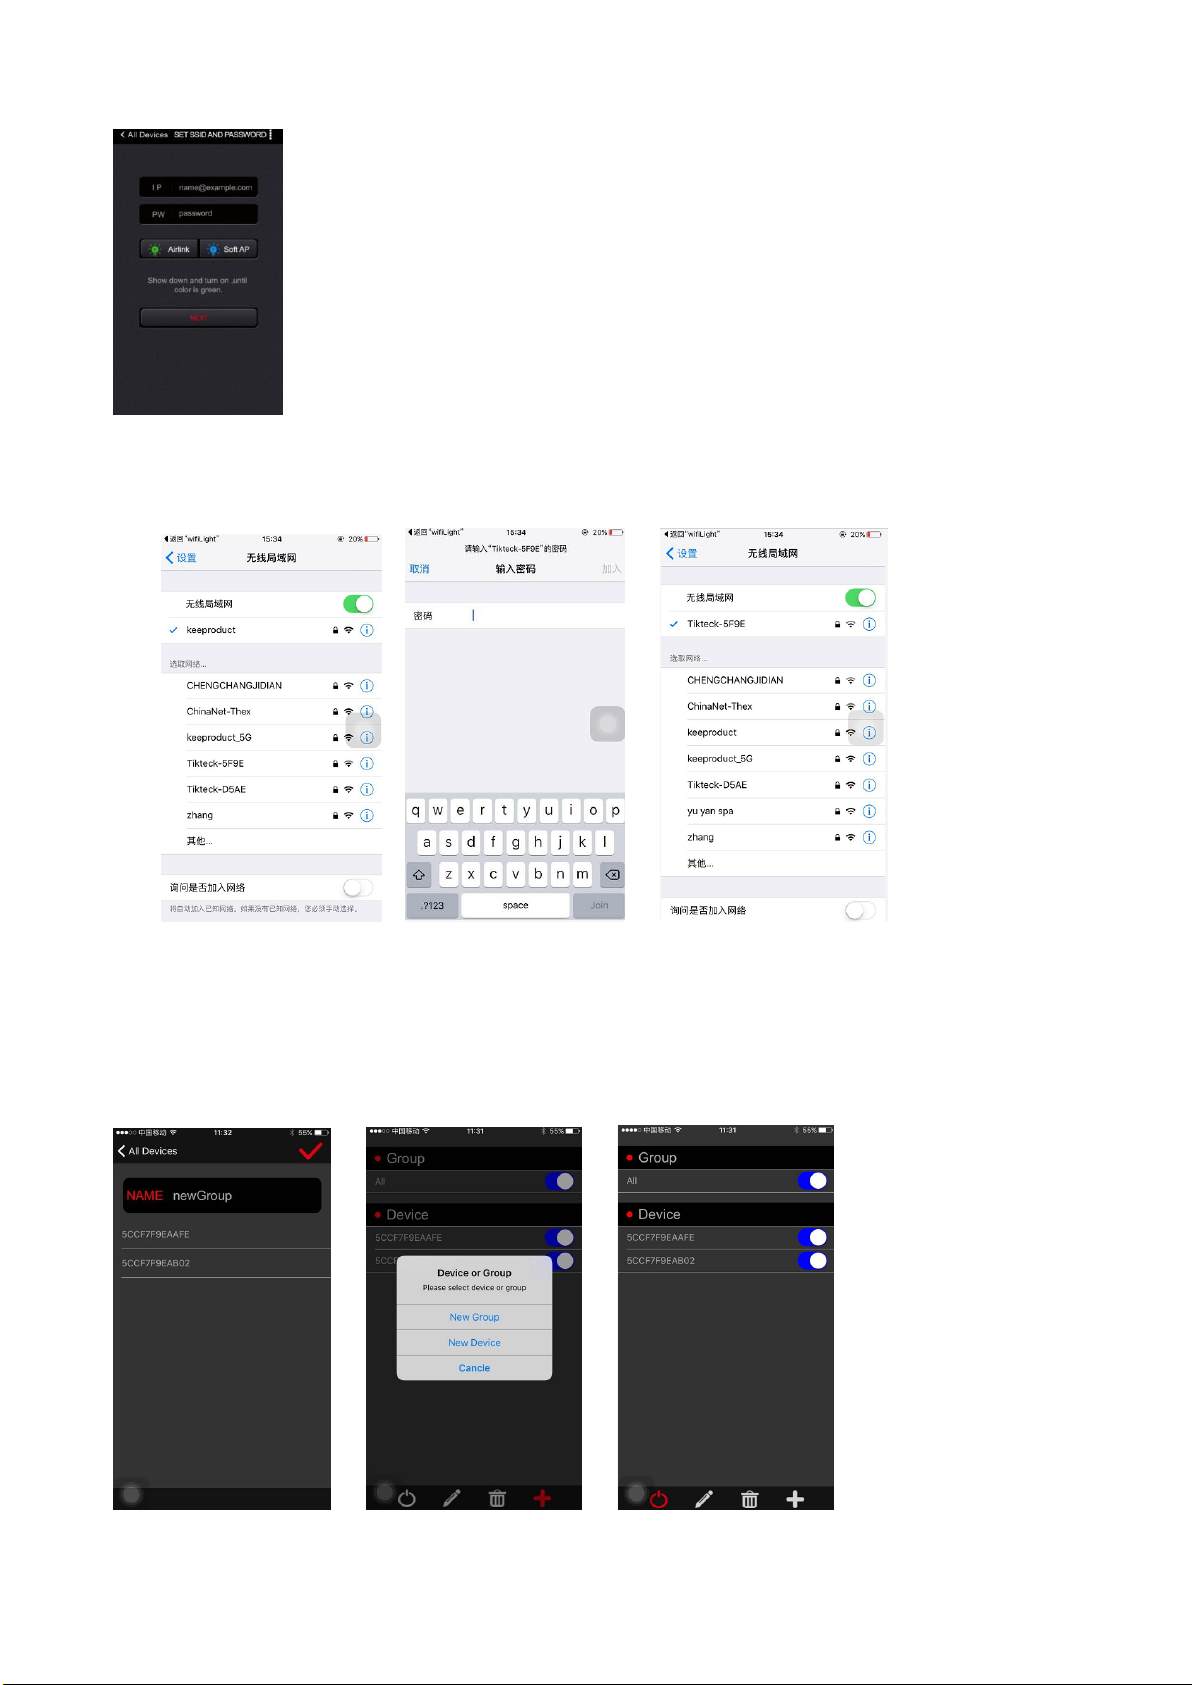
3.3.3 Next step goes to WLAN connection. Choose the wifi bulb you need to connect as pic 3
and input code “00000000” and join as pic 4. Then wifi bulb will be connected as pic 5
4. APP operation:
4.1 Entering APP, you can find below page. All connected bulbs are shown as pic 1.Tap”+” to
add or device as pic 2. Tap”new group” to choose the bulb you want to make a group and name it
as pic 3 then you can find this group on main page. Tap”new device”, just repeat above step 2 or
step 3 to add new bulb.
Tap rubbish to delete group you don’t like any more as pic 4
Page 4
Pic4
Pic5
Pic6
Pic7
Pic8
Pic 8
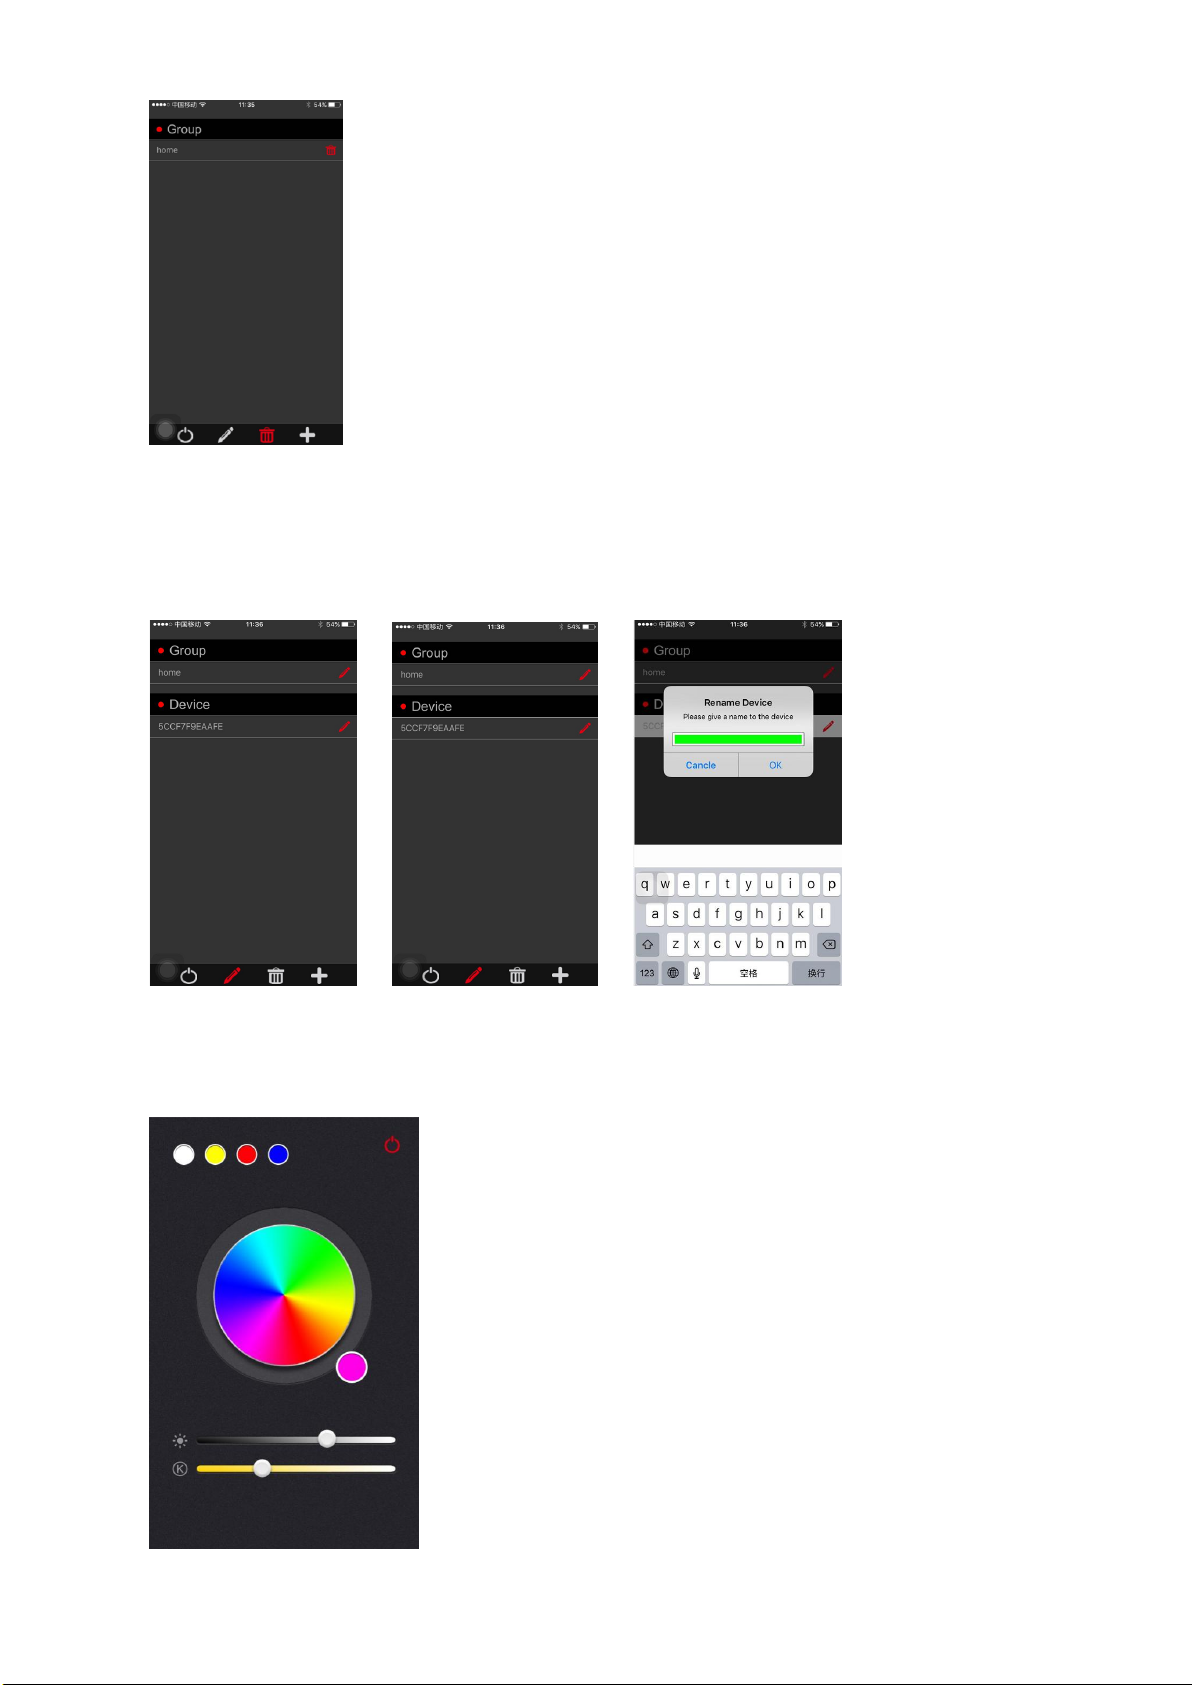
Tap”edit”, you can choose to edit existing bulb or group as pic 5. When group is tapped, the
group name, group name can be edited and changed and the certain bulb in this group can
be chosen or not chosen as pic 6. When bulb is tapped, bulb name can be changed as pic 7.
4.2 On the main page, tap any group or device you want to control and enter color circle to
choose color you want. You can turn on/off bulb by tapping switch on right corner. Brightness
and coloe temperature can be adjusted by scroll bar under color circle as pic 8.
Page 5
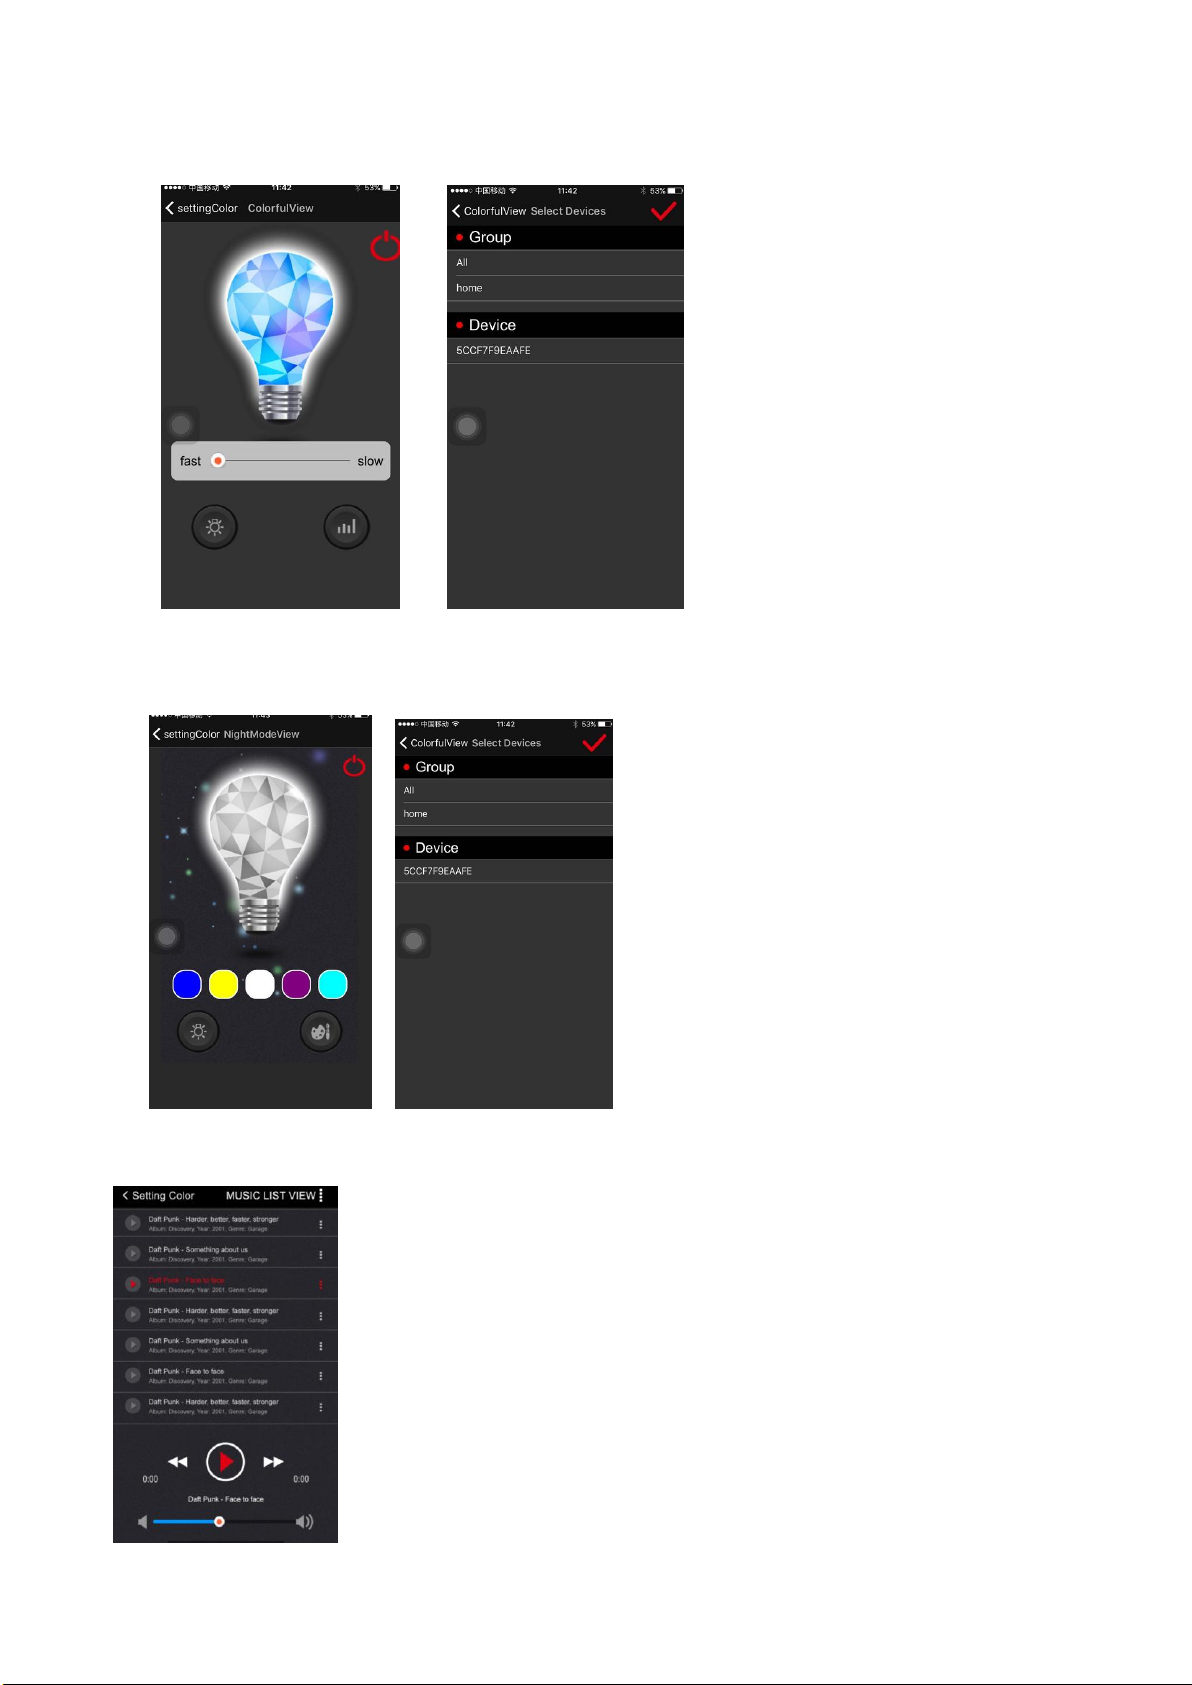
7 Color mode: Tap the first bottom icon on color circle page for 7 color mode as pic 9. Tap
Pic9
Pic10
Pic11
Pic12
Pic13
icon bulb, device can be choosen as pic 10.Tap icon speed,color change speed can be
controlled.
Night mode:Tap icon moon for night mode as pic 11. Tap icon bulb, device can be choosen
as pic 12.Tap icon coloe,color can be changed.
Music: Tap icon music as pic 13, mucis in the phone can be chosen and played as pic 13.
Page 6
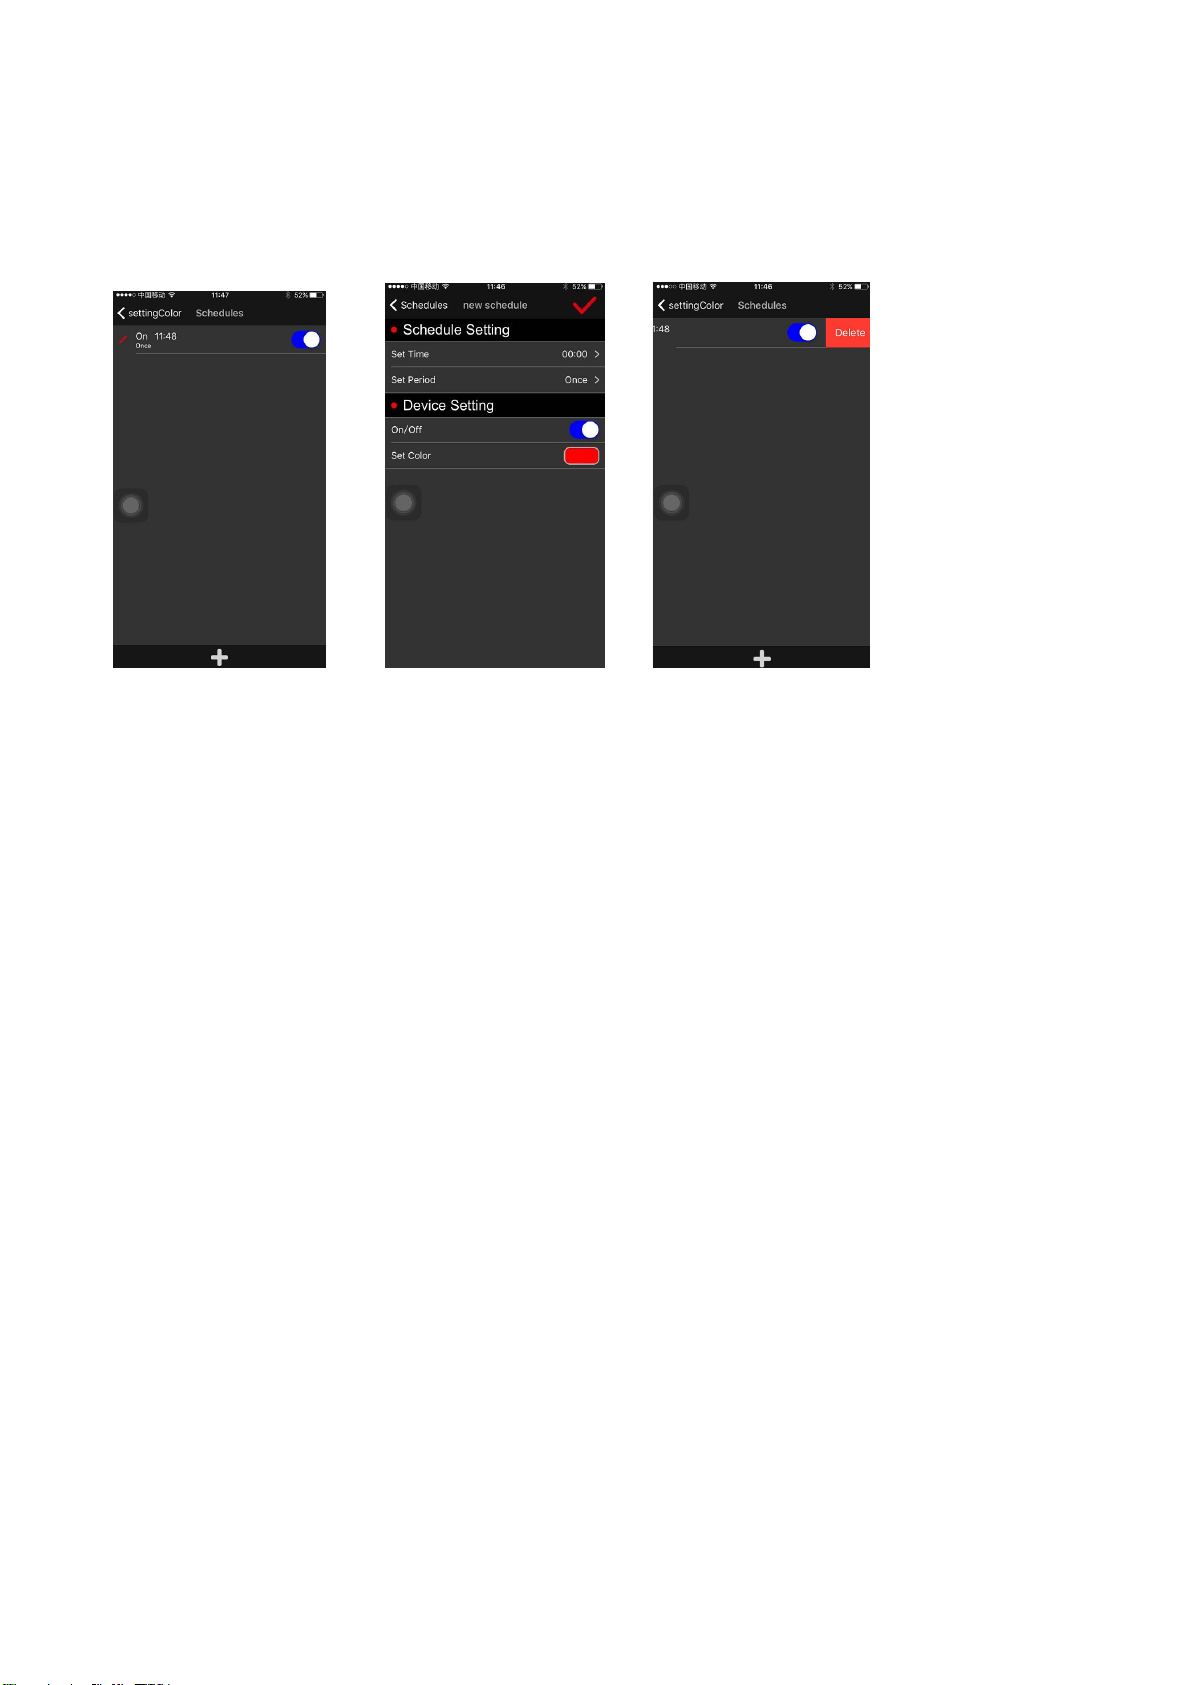
Timer schedule: Tap icon clock as pic 14, timer can be scheduled.
Pic14
Pic15
Pic16
Tap “+” to add a new schedule as pic 15 for setting time,period,on/off and color for the new timer
Tap any existing timer,you can edit existing timer as pic 15 for setting time,period,on/off and
color
Tap delete and choose timer you want to delete, confirm to delete as pic 16, you can delete the
timer you don’t want.
Quick Guide of
Using Amazon Echo To Control Wifi Bulb
1. Preparation content
1.Amazon Alexa APP
2. Amazon Alexa account,users need to register their own account?
3. Tikteck APP
4. Tikteck APP account, need to register your own account
5. Echo, Echo Dot ,Tap and other Amazon voice-operated devices.
6. Smart wifi Bulb
2. Register Tikteck APP and add device per all above steps
3. Set your Echo speaker by Alexa APP
The Wi-Fi Network of Echo speaker can be setted by the PC version or Alexa APP.
PC version URL?http://alexa.amazon.com/spa/index.html
Attention?The domestic test can be directly used with PC version, because China Store APP
market
can not download the App.
Because the operating of PC version is similar to Alexa APP, here only gives the introduction of
Alexa APP.
You can download Amazon Alexa APP from Google Play or APP Store.
Attention: both are foreign markets, App Store must use a foreign account to download.
Page 7
Download link:
iOS?https://itunes.apple.com/us/app/amazon-alexa/id944011620?mt=8
Android?https://www.amazon.com/Amazon-com-Amazon-Alexa/dp/B00P03D4D2
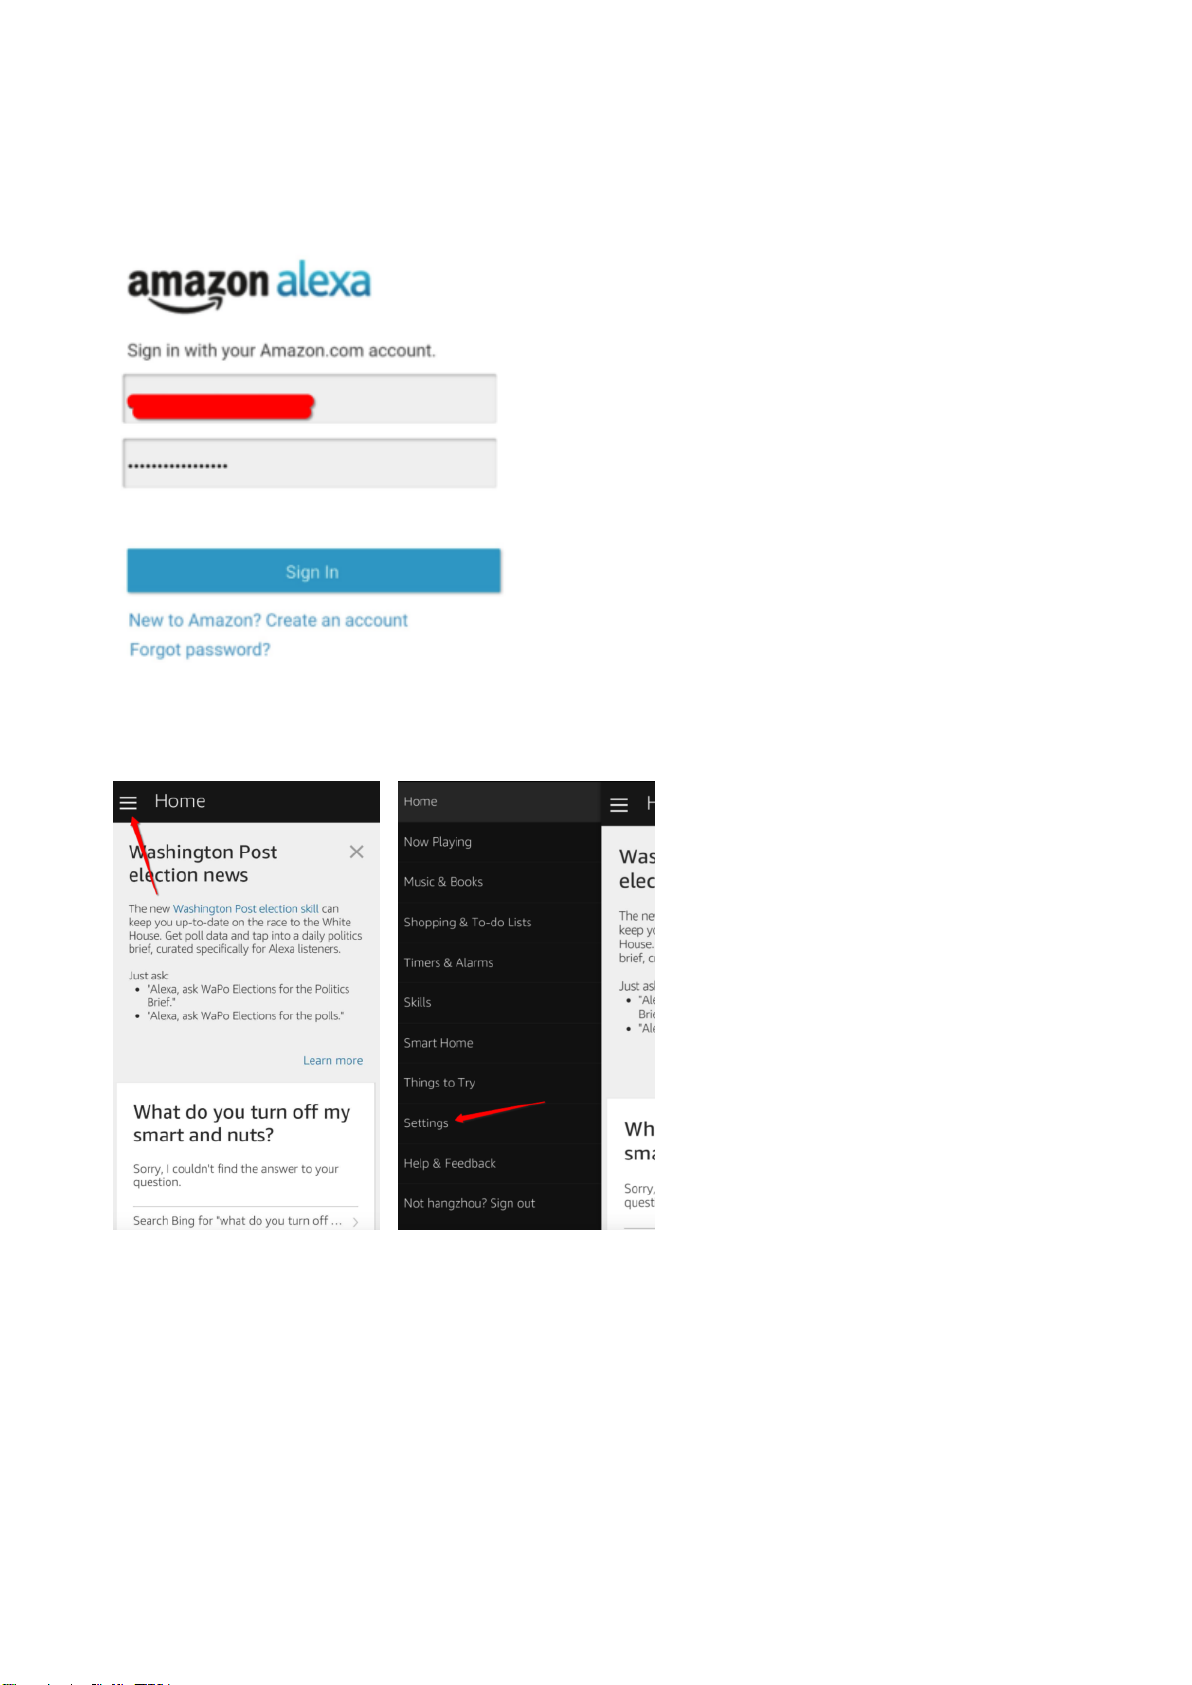
Install the APP and open it.
Then sign in with Alexa account&password.(If not registered, sign up first.)
After login, click the menu on the left corner.
Then click “Settings” , and choose “Set up a new device”.
Page 8
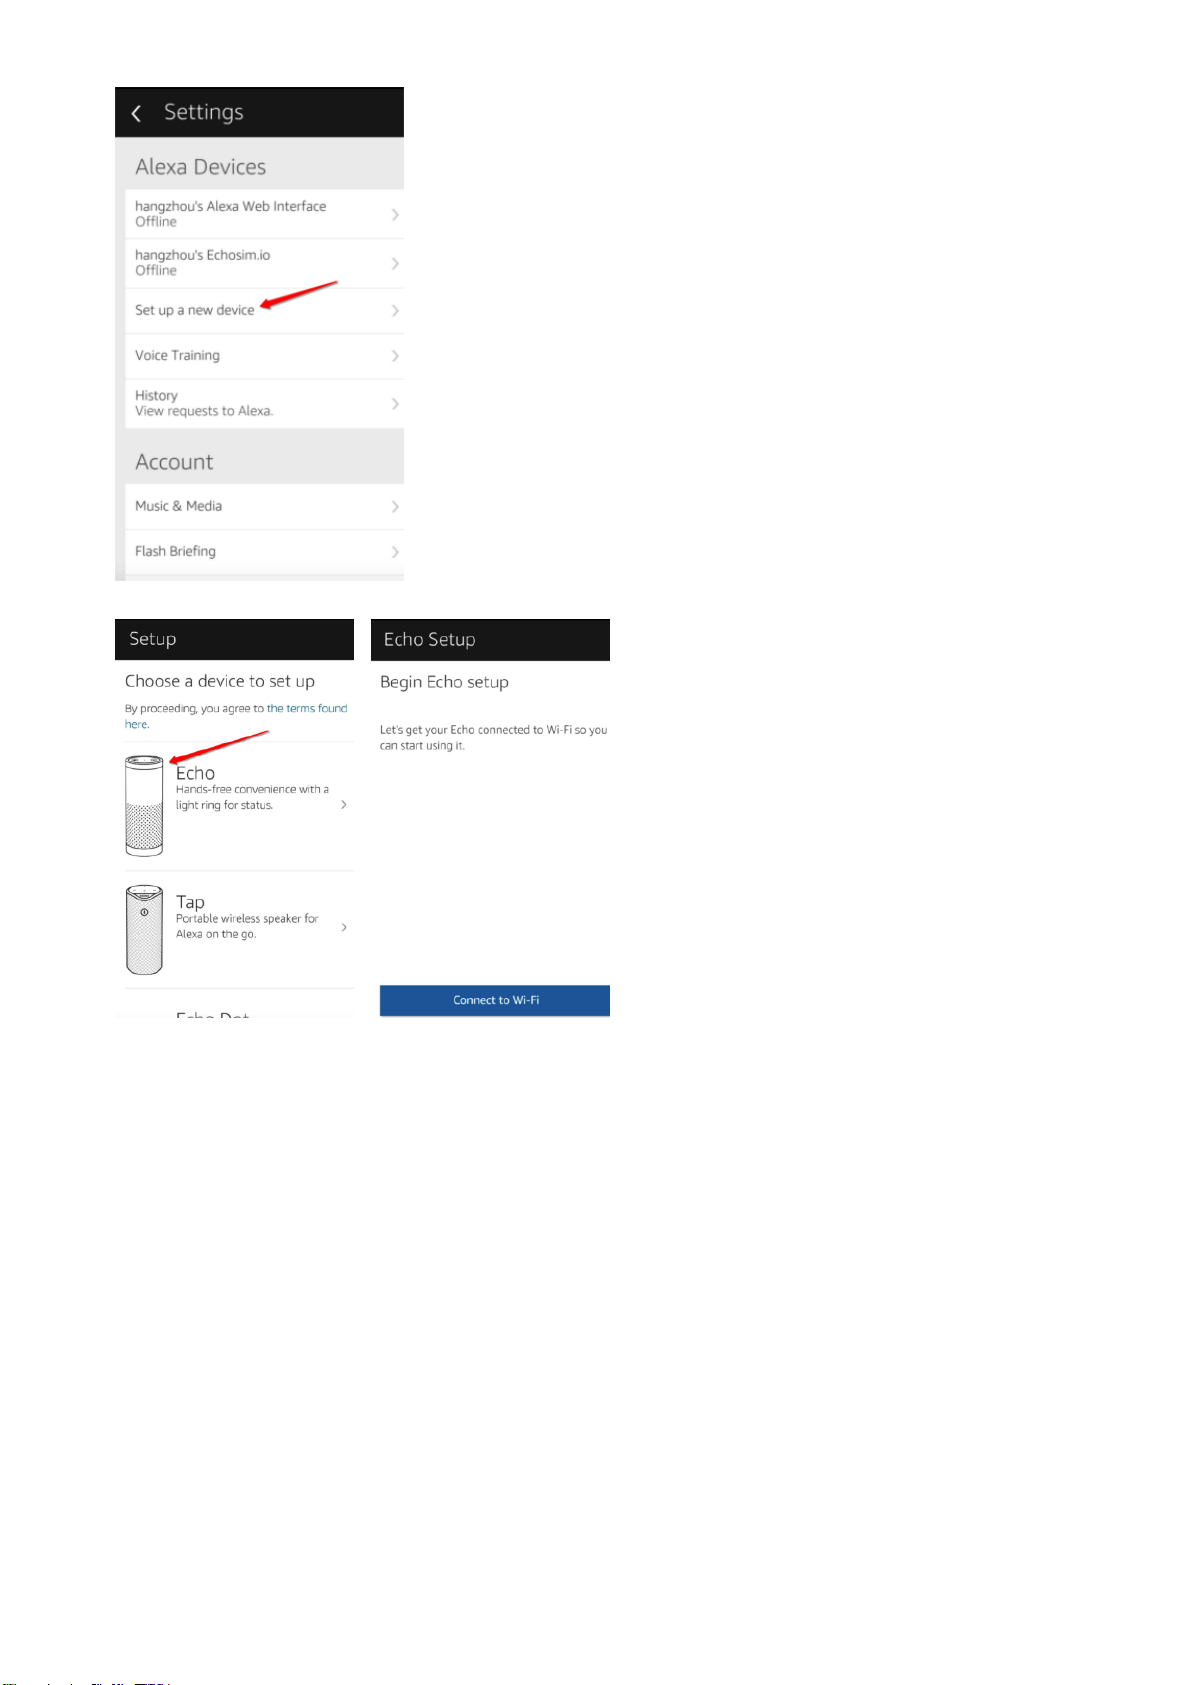
Choose a device (for example, Echo).
When the below page appears, long press the small dot on your Echo device until the light
turns to yellow. Then click Continue on App.
Attention: at this time the mobile phone can not open a variety of VPN software.
Page 9
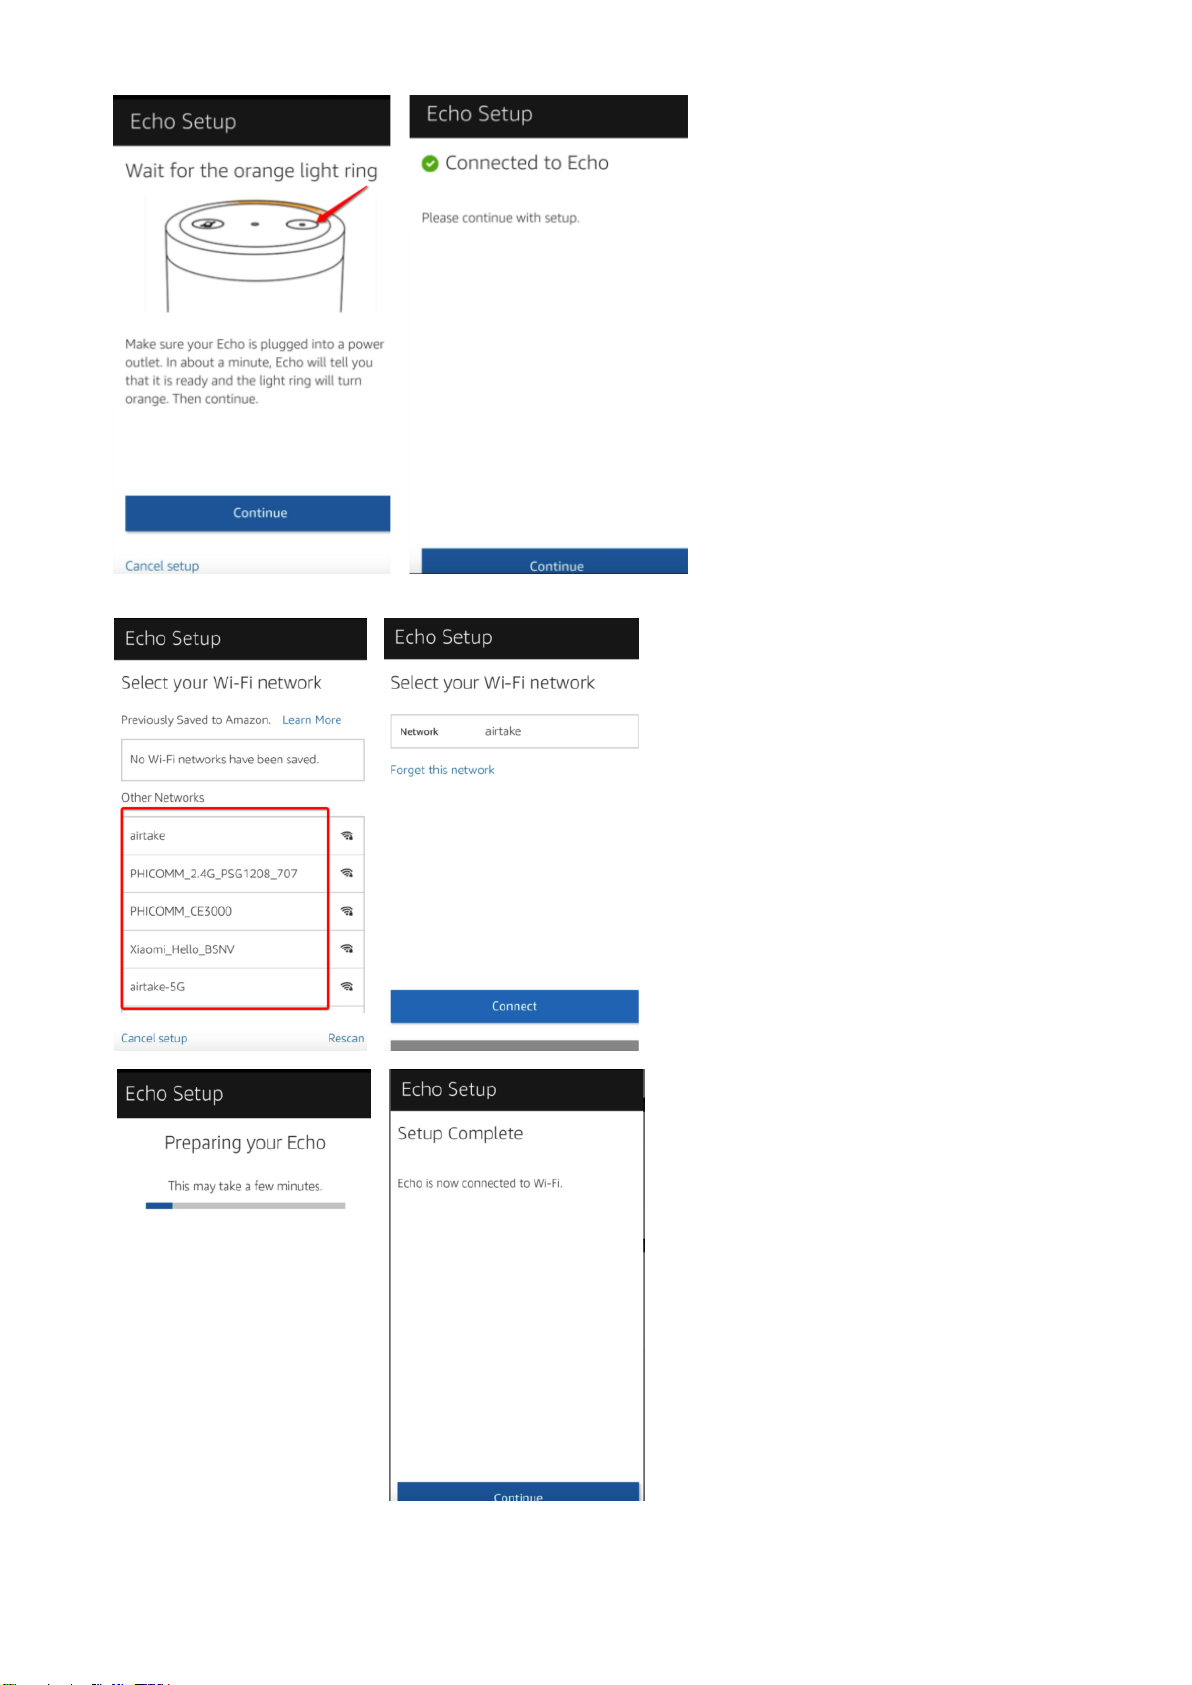
Choose your own wifi and wait for a few minutes.
After a introduction vedio, click next step, it will go to Home page automatically. Now the
Echo is connected to Wi-Fi successfully .
Page 10
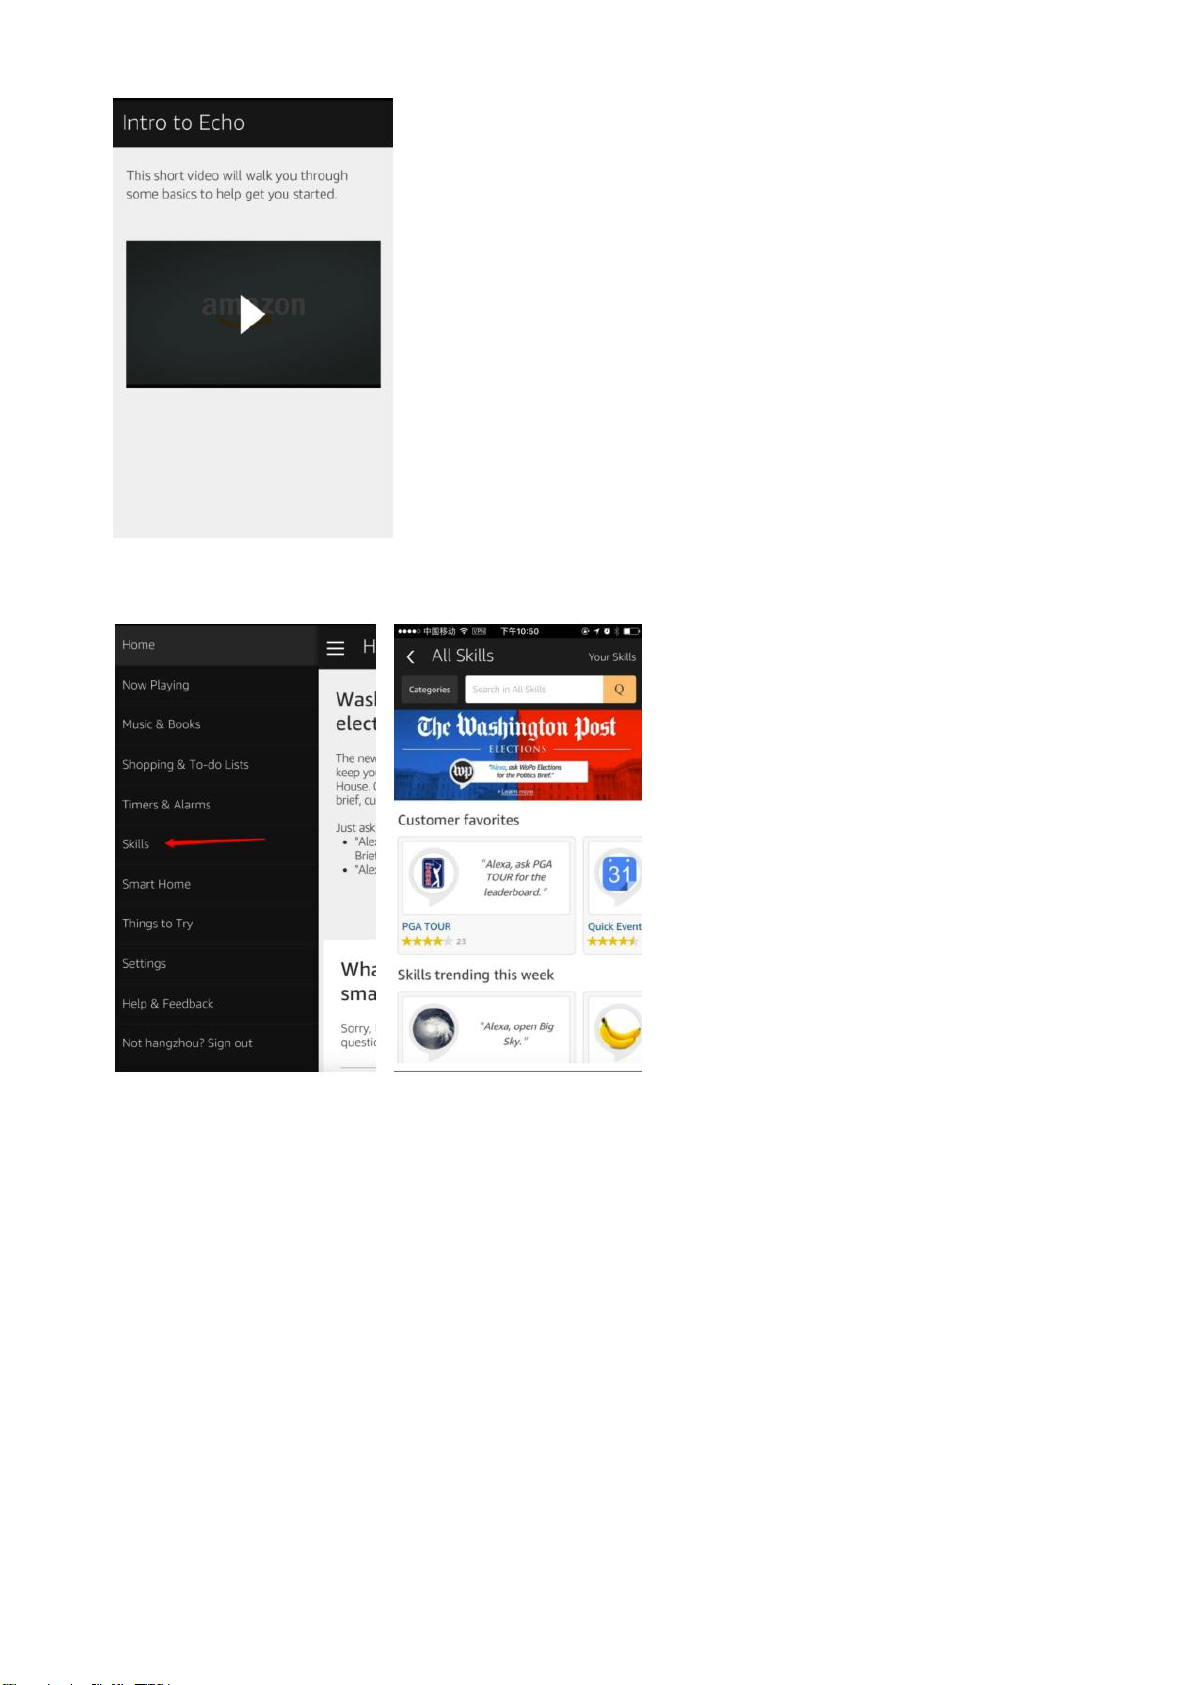
4. Enable Tikteck Smart skill in Alexa APP
Choose “Skills” in the options bar, and then search " Tiktecklab " in the input box.
Select Tiktecklab in the search results, and then click “Enable Skill”.
Page 11
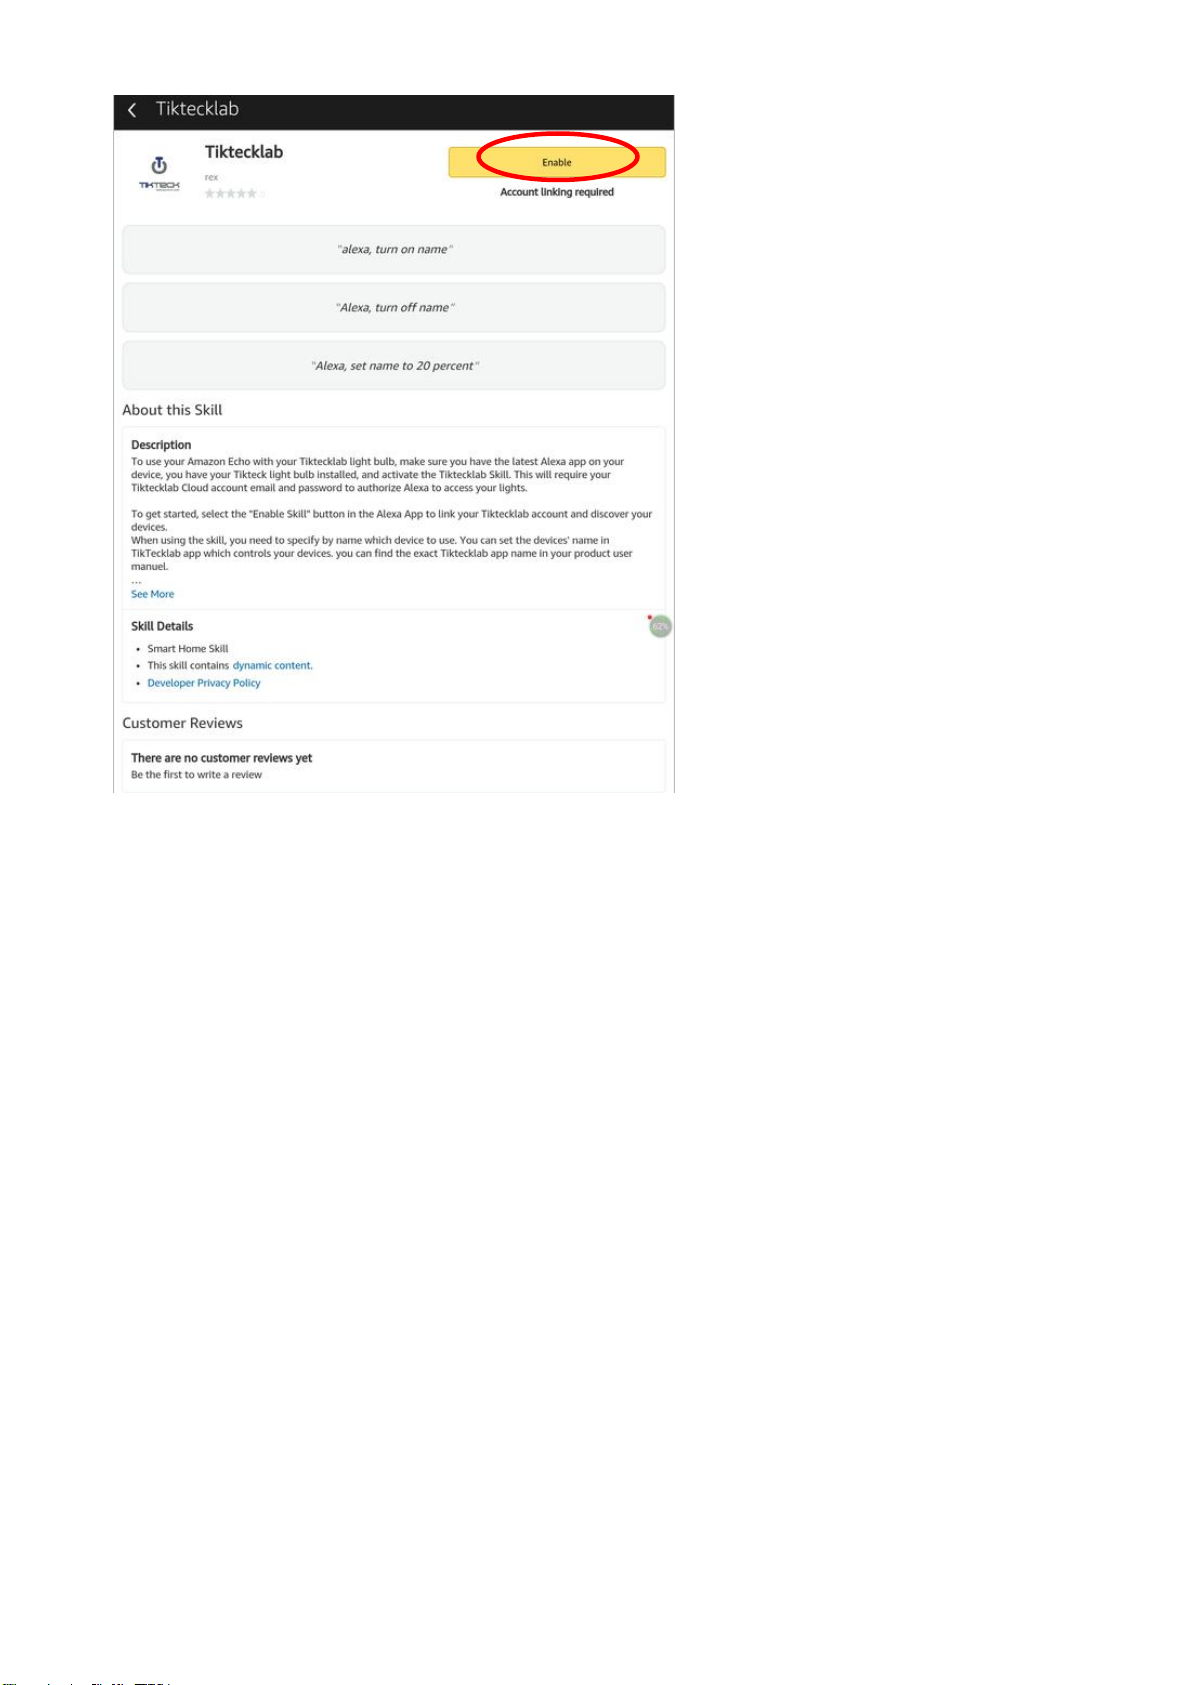
Attention: If there are more than one test, there will be the following interface, which
indicates that the account has been bound. You can click on the "Disable Skill" to remove the
binding, and then click on the "Enable Skill" to continue to bind a new Tiktecklab account.
Page 12
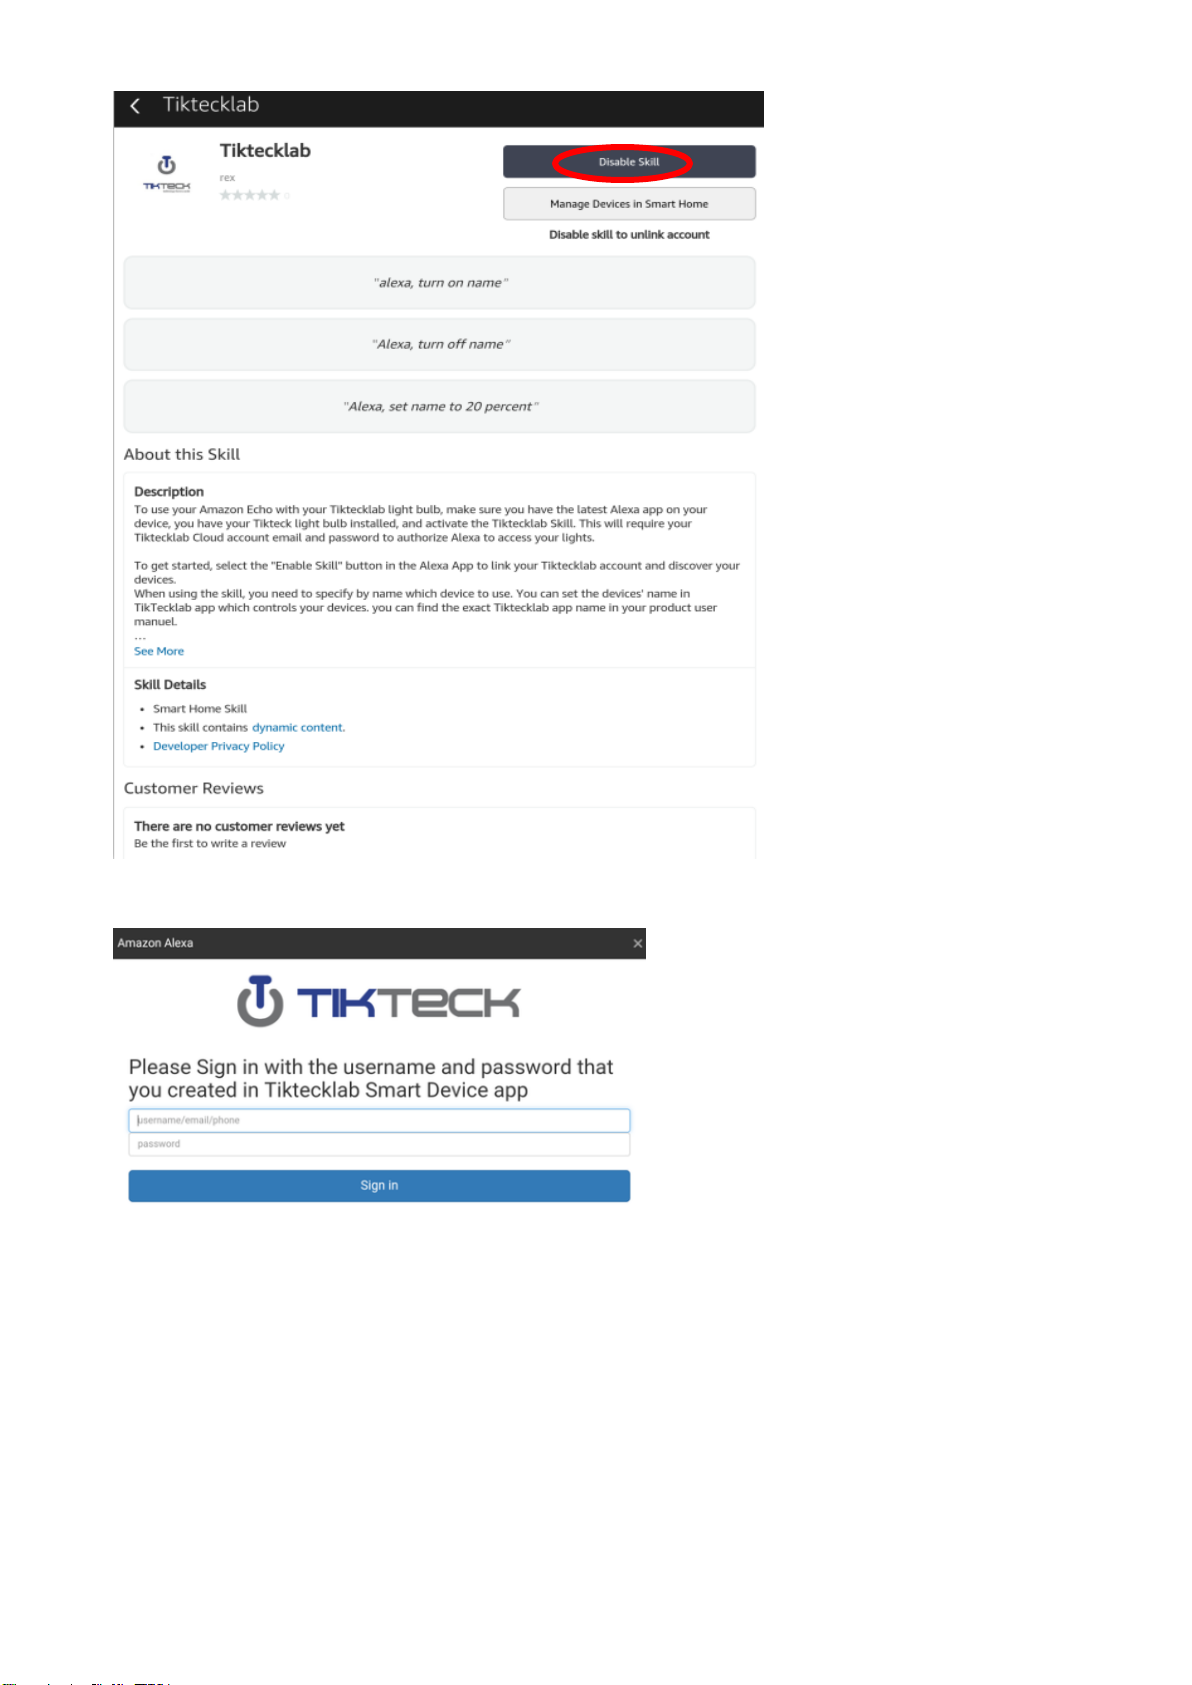
Then input the user name and password that You had previously registered.(Only support
the account in the United States.)
When you see the page below, it means the Alexa account is linked with Tiktecklab account.
Page 13
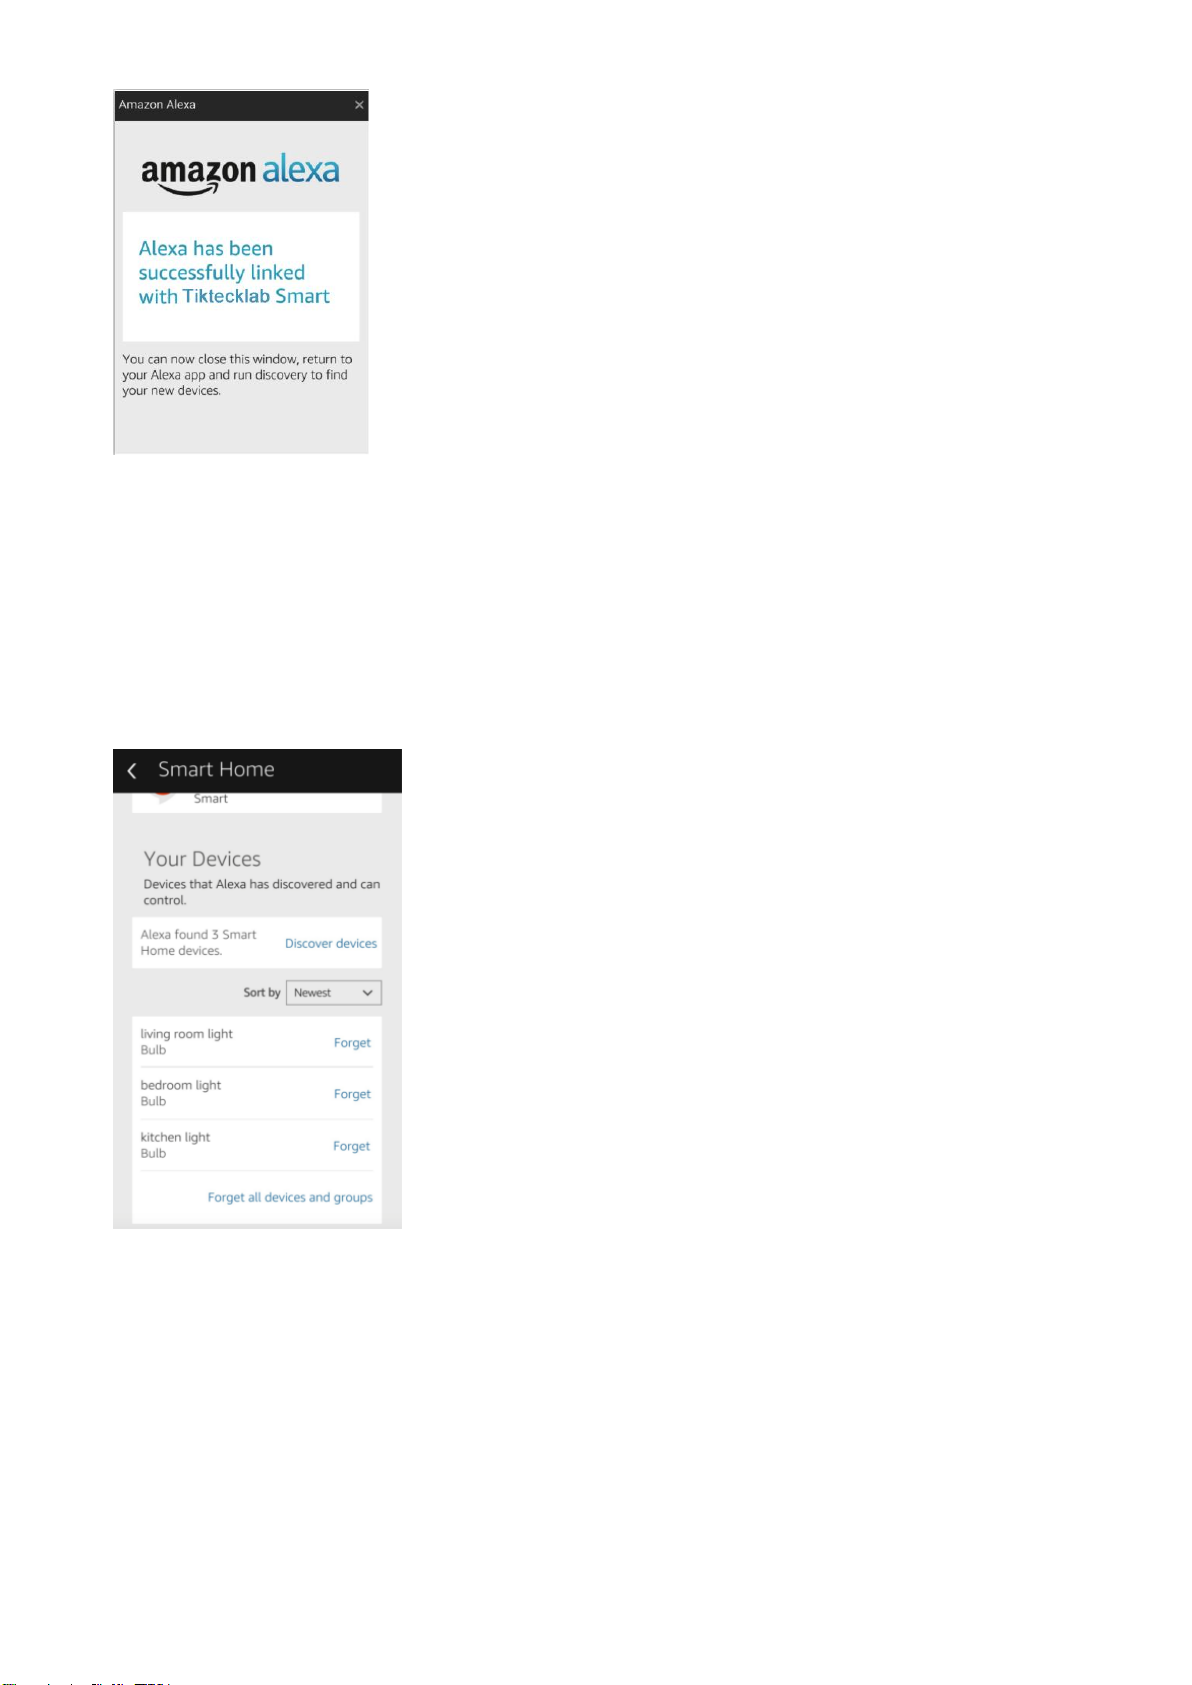
5. Control Smart Bulb by Voice
5.1. Discover devices
Firstly, you need to say to Echo:
Echo(or Alexa), Discover my devices.
Echo will start to finding the devices which is added in Tikteck APP, it will take about 20
seconds,
then it will tell you the result.
You can also click “Discover devices” in Alexa APP, it will show the devices that found
successfully.
5.2. Control devices by voice
You can control the bulbs by instructions like these:
Echo(or Alexa), turn on bedroom light
Echo(or Alexa), turn off bedroom light
Echo(or Alexa), set bedroom light to 50 percent
Echo(or Alexa), increase bedroom light to 50 percent
Echo(or Alexa), decrease bedroom light to 50 percent
Attention:The name of the device must be consistent with the addition of Tikteck app.
You can also group the bulbs and give instructions to control them together.
Page 14
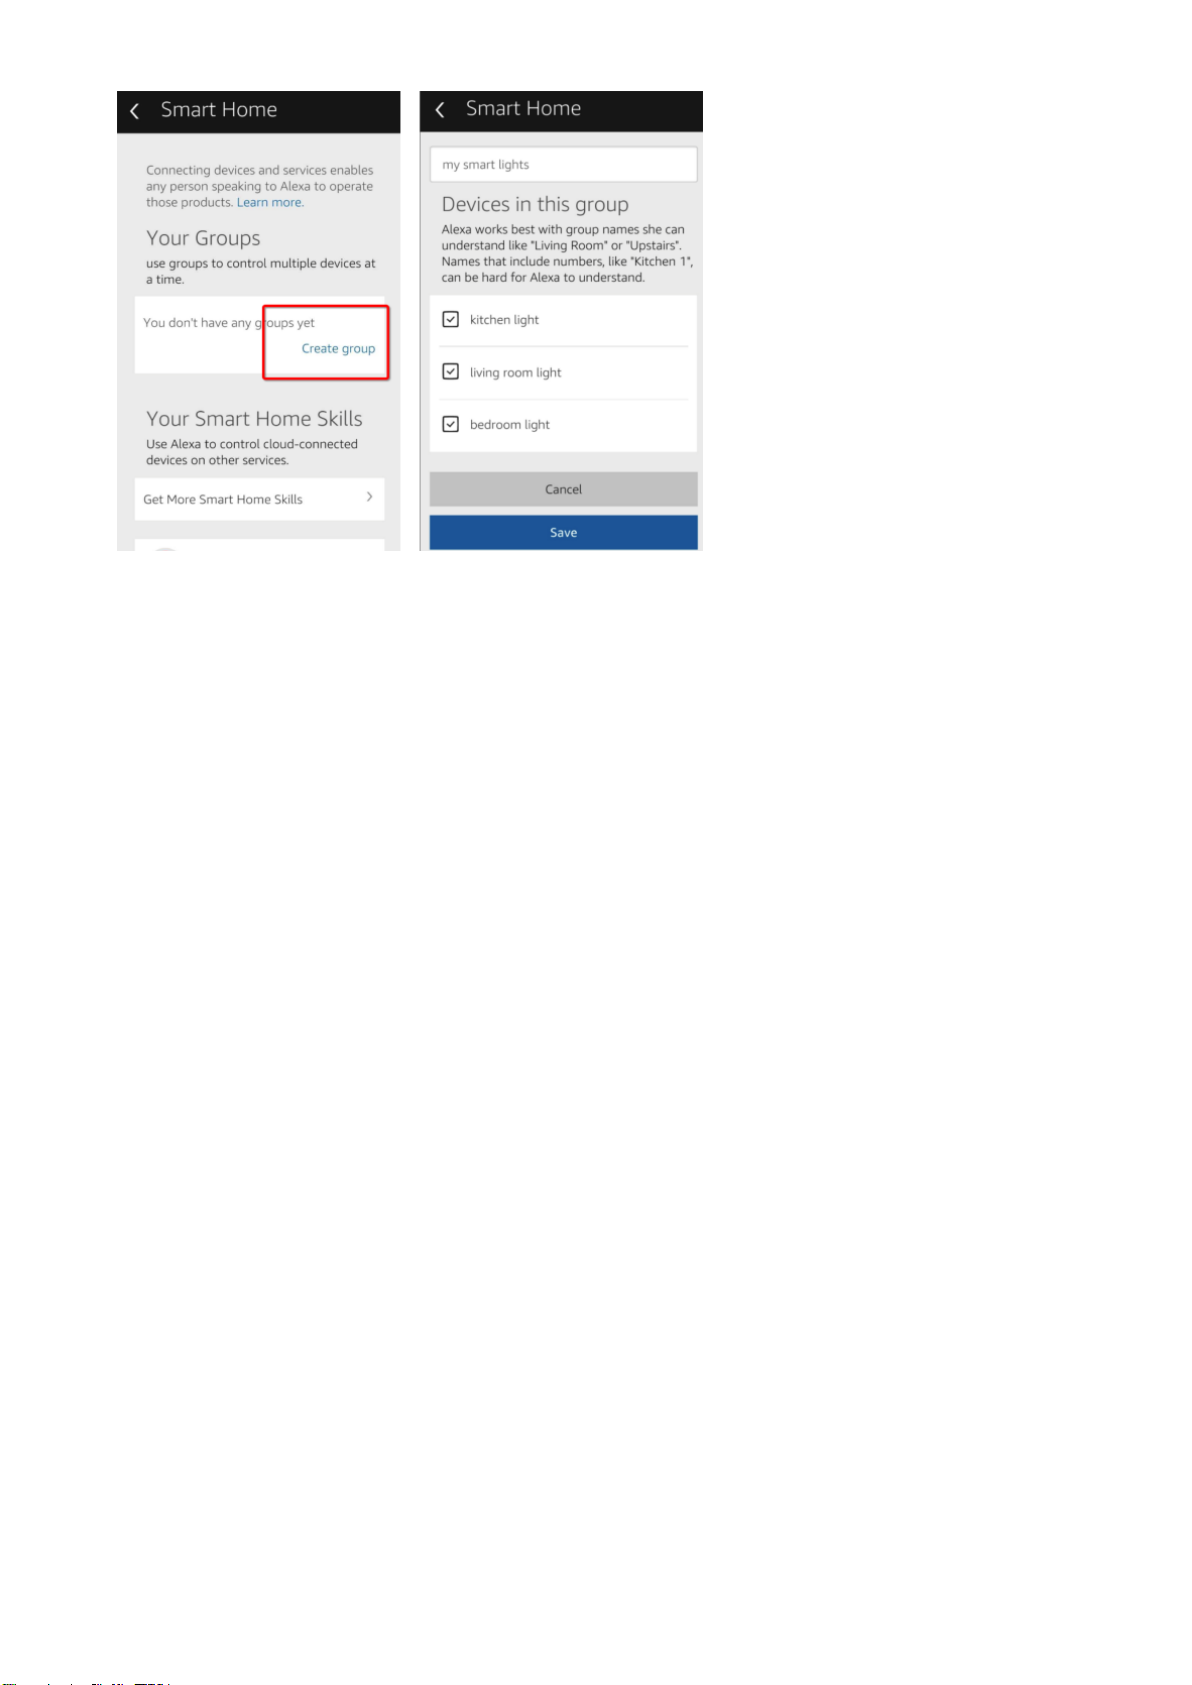
After group created, you can turn off all the bulbs in this group.
Echo, turn off my smart lights.
Attention:Echo is one of the wake-up name, which can be any of these three
names( Settings)
Alexa
Echo
Amazon
5.3. Support Skill list
You can control devices by instructions like these:
Alexa, turn on [bedroom light]
Alexa, turn off [bedroom light]
Alexa, set [bedroom light] to 50 percent
Alexa, increase [bedroom light] to 50 percent
Alexa, decrease [bedroom light] to 50 percent
Alexa, turn on [fridge socket]
Alexa, turn off [fridge socket]
Alexa, turn on [smart heater]
Alexa, turn off [smart heater]
Alexa, set [smart heater] to 34
Alexa, raise [smart heater] by 4
Alexa, lower [smart heater] by 2
FCC Statement
This equipment has been tested and found to comply with the limits for a Class B digital device, pursuant to Part 15
of the FCC Rules. These limits are designed to provide reasonable protection against harmful interference in a
residential installation. This equipment generates uses and can radiate radio frequency energy and, if not installed
and used in accordance with the instructions, may cause harmful interference to radio communications. However,
there is no guarantee that interference will not occur in a particular installation. If this equipment does cause harmful
interference to radio or television reception, which can be determined by turning the equipment off and on, the user
is encouraged to try to correct the interference by one or more of the following measures:
-- Reorient or relocate the receiving antenna.
-- Increase the separation between the equipment and receiver.
-- Connect the equipment into an outlet on a circuit different from that to which the receiver is connected.
-- Consult the dealer or an experienced radio/TV technician for help.
This device complies with part 15 of the FCC Rules. Operation is subject to the following two conditions:
Page 15

(1) This device may not cause harmful interference, and (2) this device must accept any interference received,
including interference that may cause undesired operation.
Changes or modifications not expressly approved by the party responsible for compliance could void the user's
authority to operate the equipment.
The distance between user and products should be no less than 20cm
 Loading...