

Page 1
OTTO
Series
QUICK START GUIDE
CMNO LTD. 2019
OTTO MASTER. QUICK START GUIDE 1
Page 2
!
All rights reserved. No part of this publication may be reproduced,
processed or disseminated in any form whatsoever, such as by photo-
copying, recording or with any other electronic or mechanical process,
without written consent from the publisher. Requests for authorisa-
tions shall be directed in writing to the publisher at the address given
below.
CMNO LTD
Ioannis Stylianou, 6
Floor 2, Flat 202
2003, Nicosia Cyprus
info@comino.com
www.comino.com
+357 25262933
OTTO MASTER. QUICK START GUIDE 2
Page 3

OVERVIEW
1.
2.
3.
4.
5.
6.
INTRODUCTION
1.1 PRODUCT ELEMENTS
UNPACKING AND CHECKING THE CONTENTS
SETTING UP
STARTING UP THE DEVICE
ADJUSTING SYSTEM
HOW TO FILL A COOLANT
4
5
6
8
10
11
12
OTTO MASTER. QUICK START GUIDE 3
Page 4

1.
INTRODUCTION
Congratulations on purchasing your COMINO OTTO Professional Computer.
We are pleased to welcome you as our customer. This manual contains all
safety information and instructions necessary for using your COMINO OTTO
Professional Computer.
Before using your device, please familiarize yourself with all relevant in-
formation. Be sure to use the device in the manner described and for the
applications indicated. If you pass on the device, be absolutely sure to also
pass on all instructions and other relevant documents. Please contact the
manufacturer if you still have specic questions after reading these user
instructions:
CMNO LTD
Ioannis Stylianou, 6
Floor 2, Flat 202
2003, Nicosia Cyprus
www.comino.com
+357 25262933
OTTO MASTER. QUICK START GUIDE 4
Page 5
1.
INTRODUCTION
1.1
Magnetic
side panels
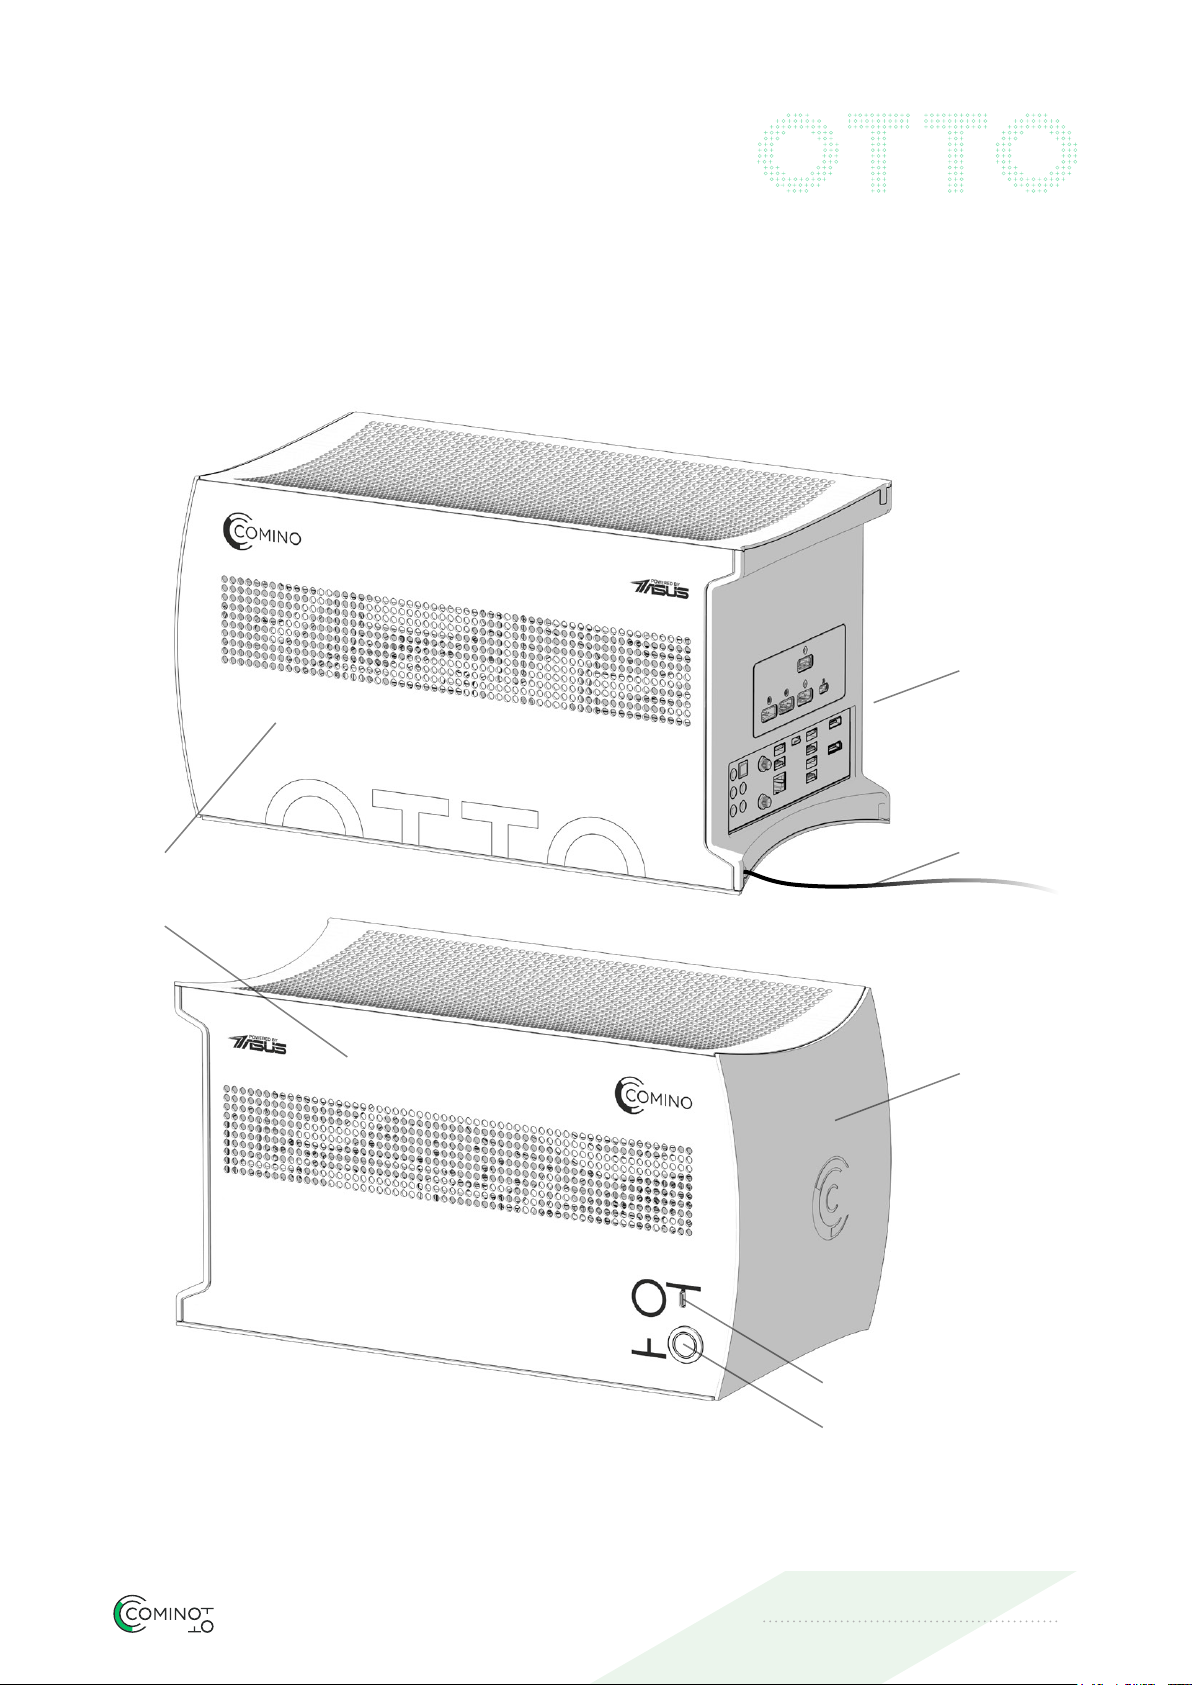
PRODUCT ELEMENTS (see Pic.1)
I/O Ports*
Power cable
Reservoir
Type-C USB
On/Off button
* — may vary depending on a model.
Pic.1
OTTO MASTER. QUICK START GUIDE 5
Page 6
2.
UNPACKING AND CHECKING
THE CONTENTS
2.1
2.2
2.3
Put the box the right way, cut the adhesive tape on the box with
an oce knife
Check if the package contains all of the components ordered
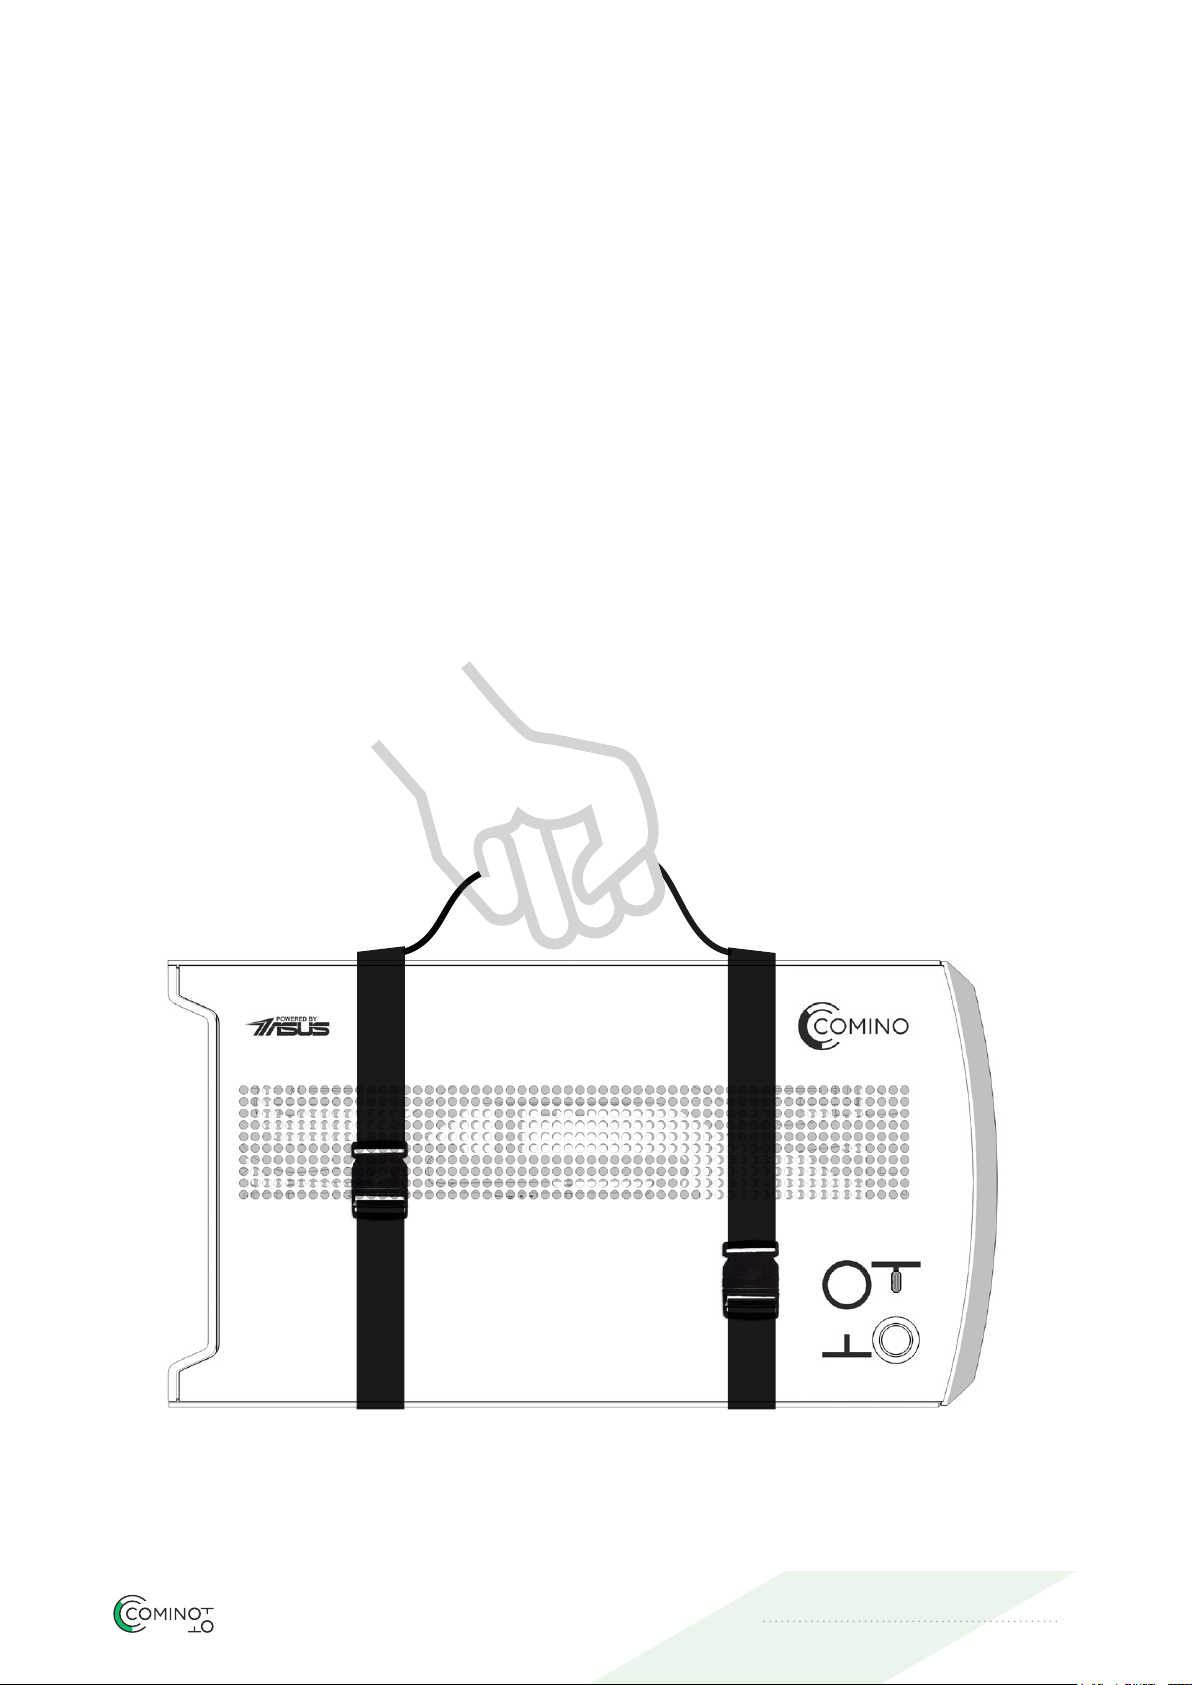
Take Otto out of the box, properly holding its handle (see Pic.2)
Pic.2
OTTO MASTER. QUICK START GUIDE 6
Page 7
2.
UNPACKING AND CHECKING
THE CONTENTS
2.4
2.5
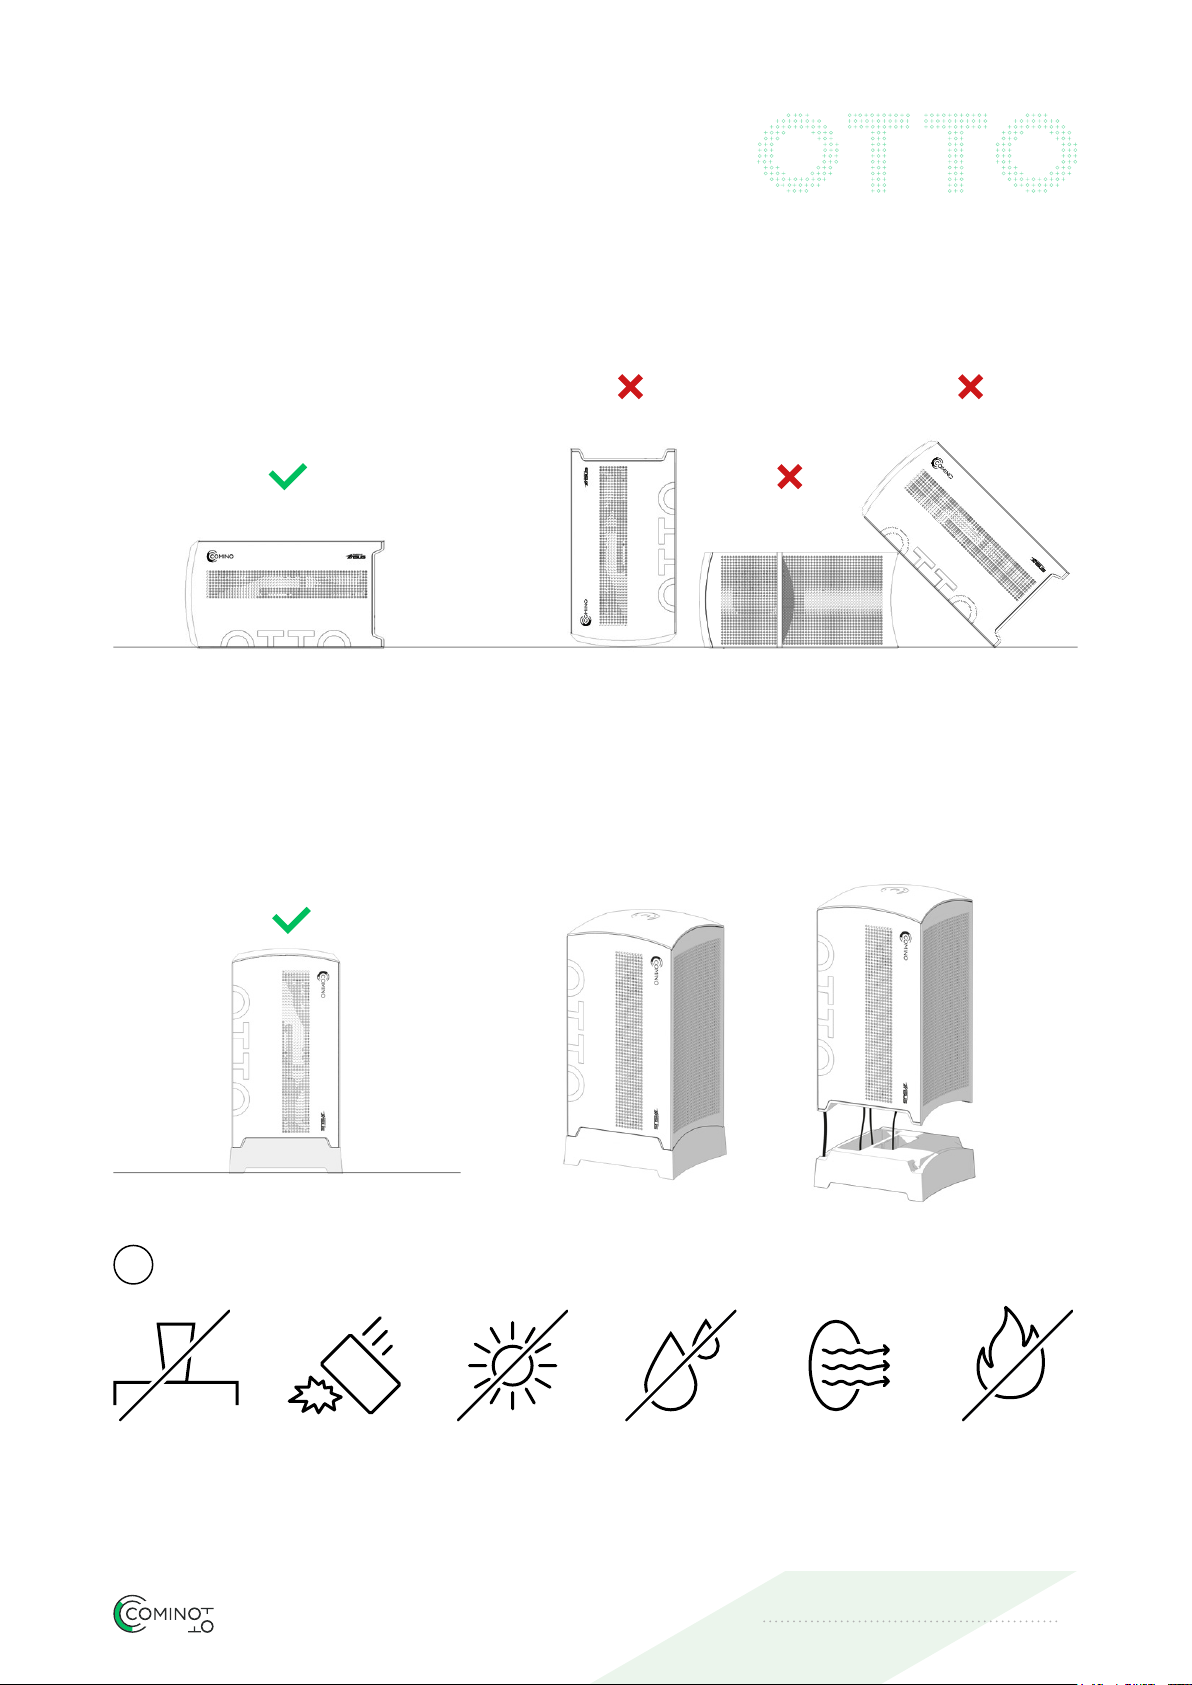
Place OTTO on an even horizontal surface (see Pic.3).
Pic.3
If you want to place OTTO in a vertical position, use the included stand.
Carefully insert the wires into the stand holes, place the power cord into its
slot and put OTTO on the stand (see Pic.4).
WARNINGS
!
DO NOT place
objects on the
surface of the
device
Pic.4
DO NOT throw
the device
DO NOT expose
the device to
direct sunlight
during operation
DO NOT place
the device near,
or expose it to,
liquids or mois-
ture
DO NOT block
ventilation
openings
DO NOT place
the device on
heat-sensitive sur-
faces or close to
heaters, air-condi-
tioners or combus-
tible materials
OTTO MASTER. QUICK START GUIDE 7
Page 8

3.
SETTING UP
3.1
3.2
Before starting up your device for the rst time, check:
• connection of all cables
• coolant fullness
• there are no leaks
• all uid ports are closed
• ventilation openings are not blocked
• monitor and peripheral cables are connected
• power cord is plugged in
• button on the power supply in the ON position
Сonnecting monitor and peripheral devices (mouse, keyboard, wi antenna)
Connect peripheral devices via the appropriate connectors on the back
of the device.
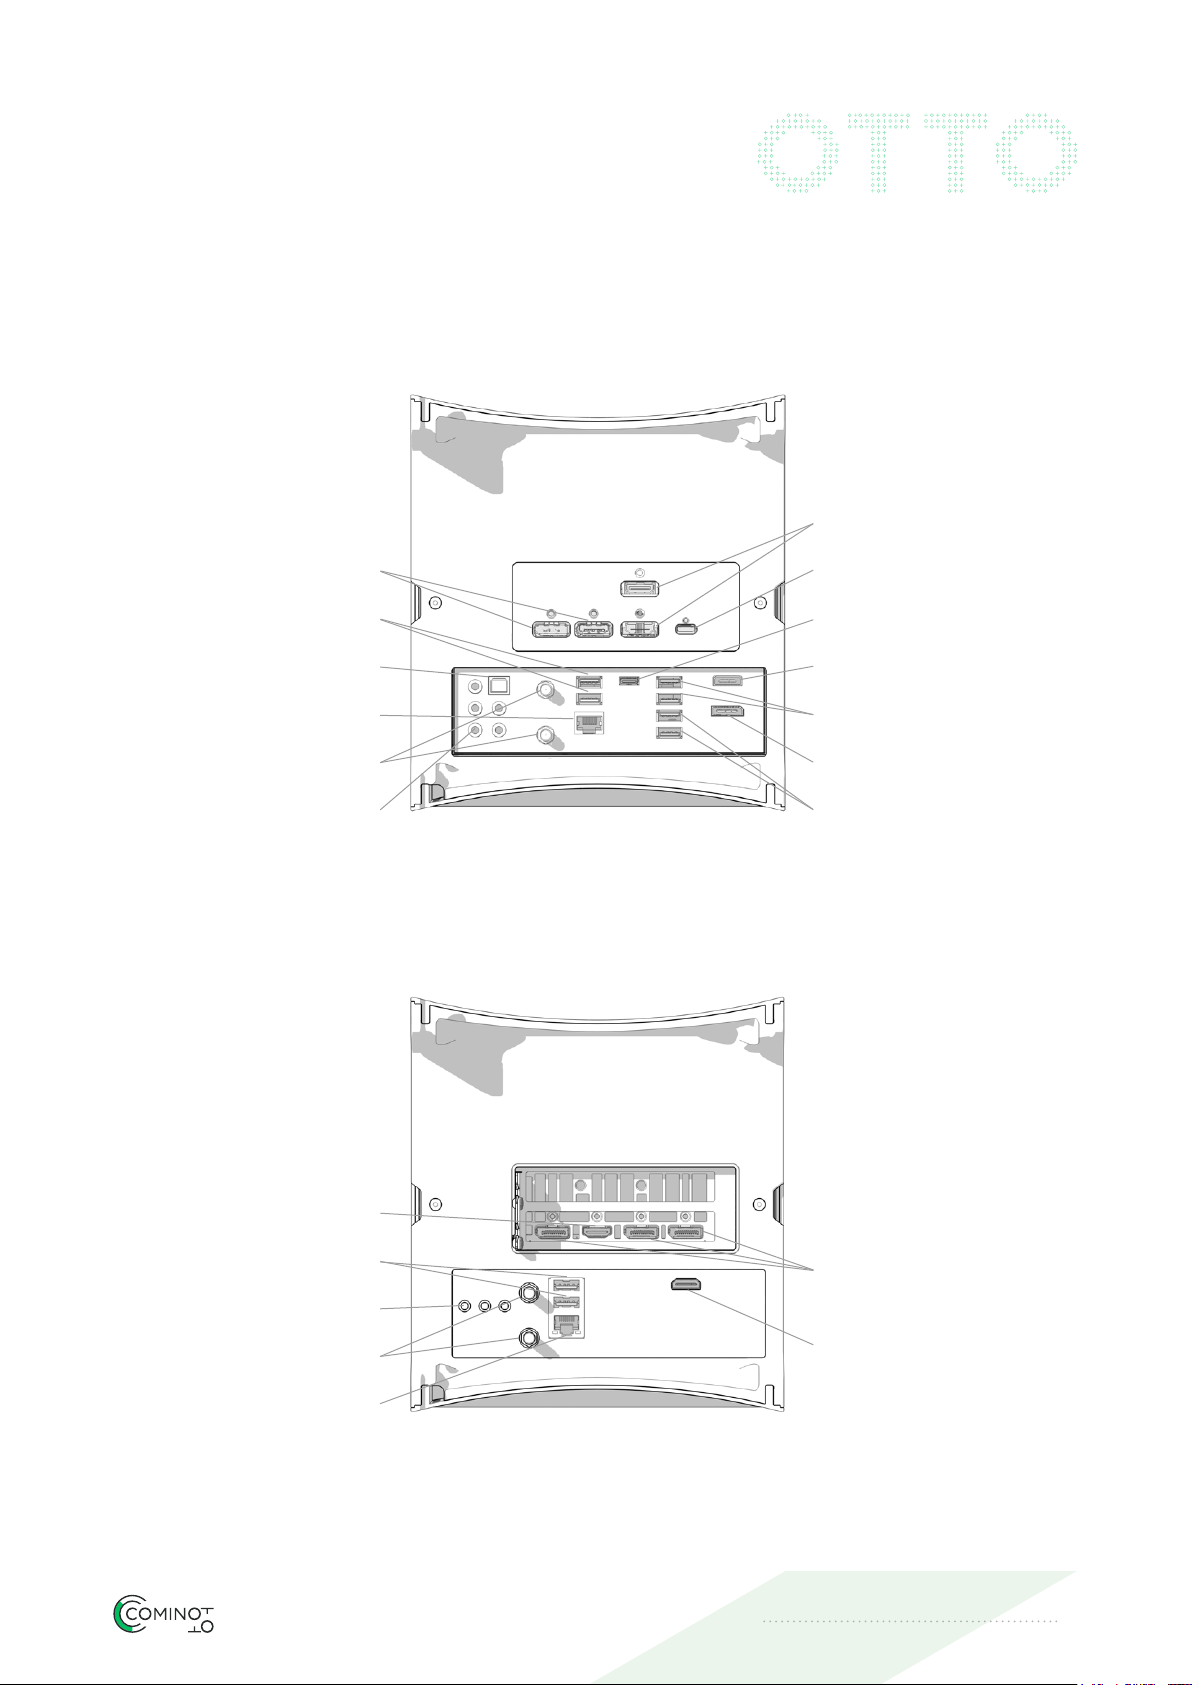
Depending on a model you have, OTTO MASTER or OTTO SUPER, input
and output ports may vary, as well as their location (Pic 5, next page).
OTTO MASTER. QUICK START GUIDE 8
Page 9
SETTING UP3.
OTTO MASTER
HDMI x2
DisplayPort x2
USB 3.1 x2
Optical S/PDIF
LAN (RJ45)
ASUS Wi-Fi GO! x2
Audio jack(s) x5
OTTO SUPER
VirtualLink
Type-C
HDMI 2.0
USB 2.0 x2
DisplayPort
USB 3.1 x2
HDMI (HDCP sup.)
USB 3.1 x2
Audio jack(s) x3
ASUS Wi-Fi GO! x2
LAN (RJ45)
OTTO MASTER. QUICK START GUIDE 9
x3 DisplayPort (Native)
(DisplayPort 1.4)
HDMI Output (Native)
(HDMI 2.0b)
Pic.5
Page 10
4.
STARTING UP
THE DEVICE
4.1
STARTING UP THE DEVICE
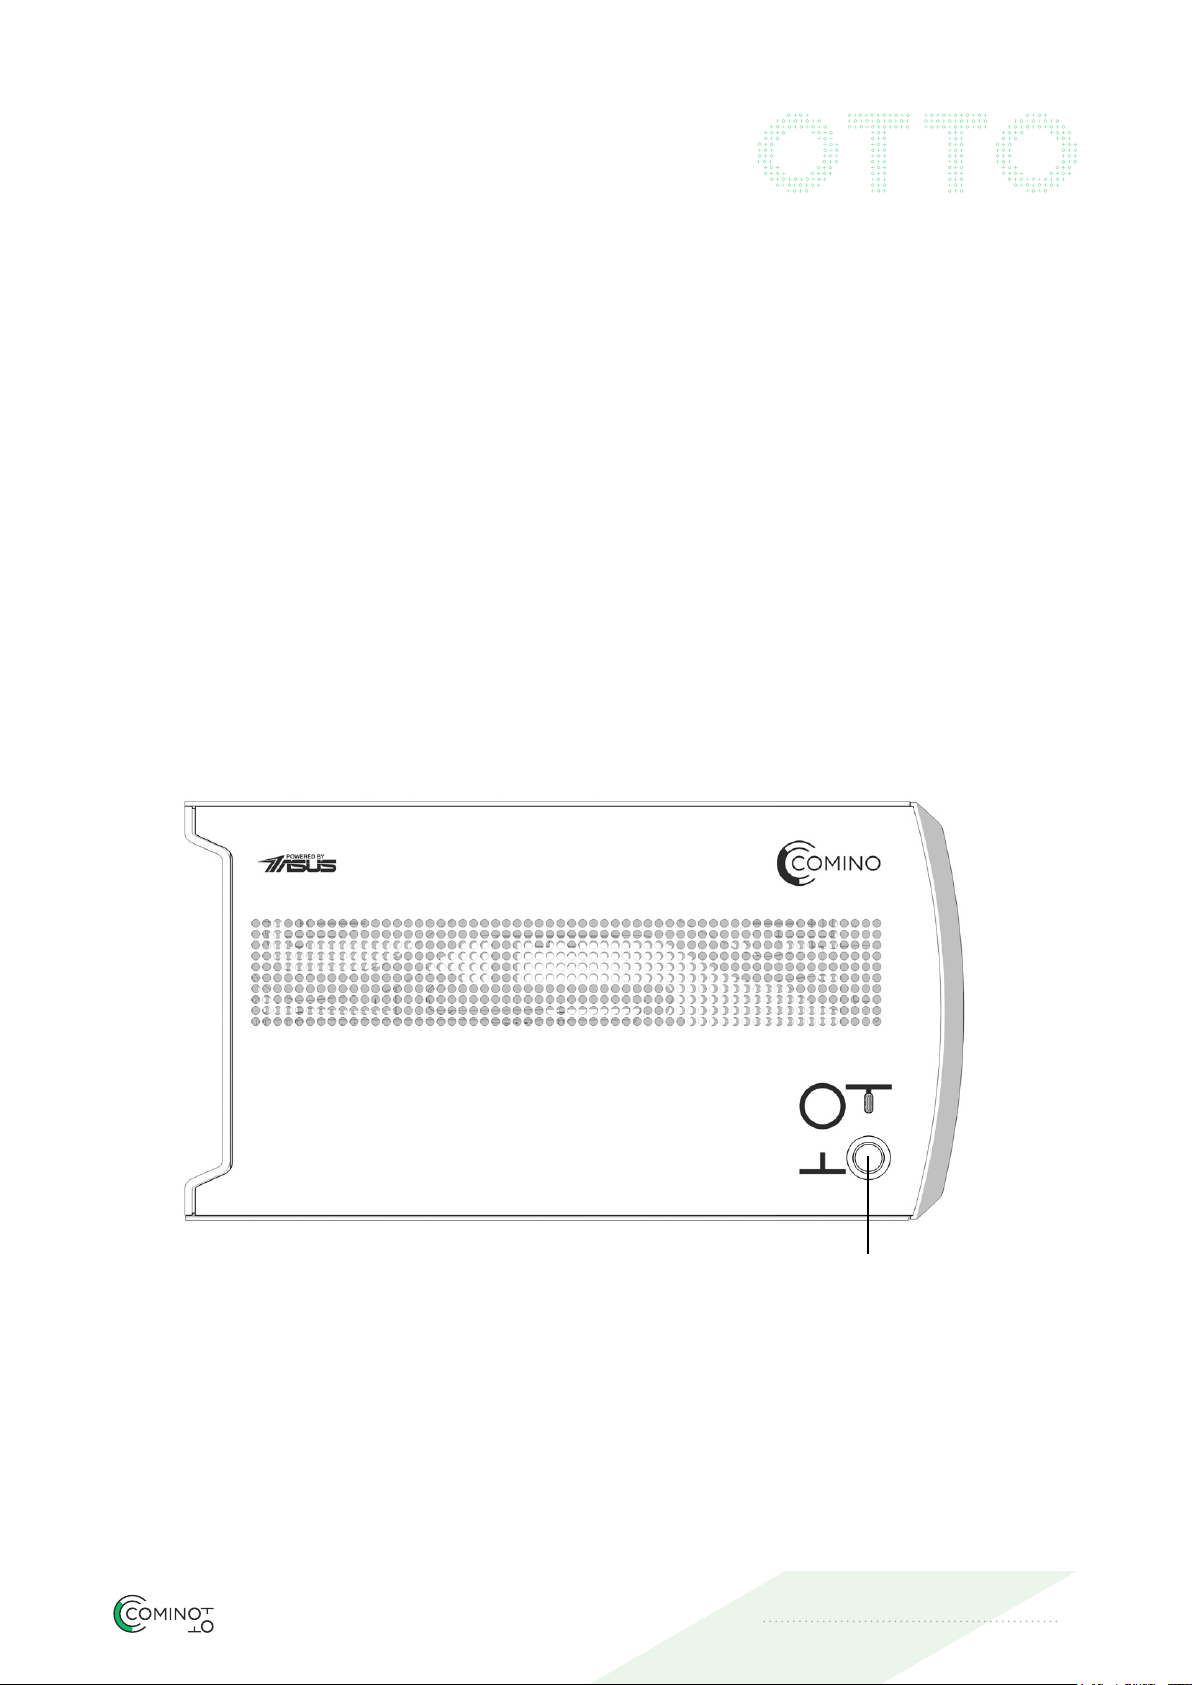
To run OTTO, press the On/Off button on the device case (see Pic.6)
SHUTTING DOWN THE DEVICE
press the On/Off button on the case or via OS (see Pic.6)
On/Off
button
Pic.6
OTTO MASTER. QUICK START GUIDE 10
Page 11
5.
ADJUSTING SYSTEM
5.1
To control and adjust OTTO’s voltage, temperature and fan speed info use
Fan Xpert tool, which is a part of ASUS AI Suite.
AI Suite software product is developed for Asus motherboards. This utility
allows to use predened cooling system settings, which is manageable on
this PC. Use it to set Silent, Normal or Performance mode.
To adjust a nearly endless spectrum of colors, patterns and even the abili-
ty to link lighting to music, in-game action, or CPU/GPU temperatures use
ASUS Aura RGB.
Asus AI Suite and Asus Aura RGB can be downloaded from Asus’s ocial
website: https://www.asus.com
OTTO MASTER. QUICK START GUIDE 11
Page 12
6.
HOW TO FILL
A COOLANT
6.1
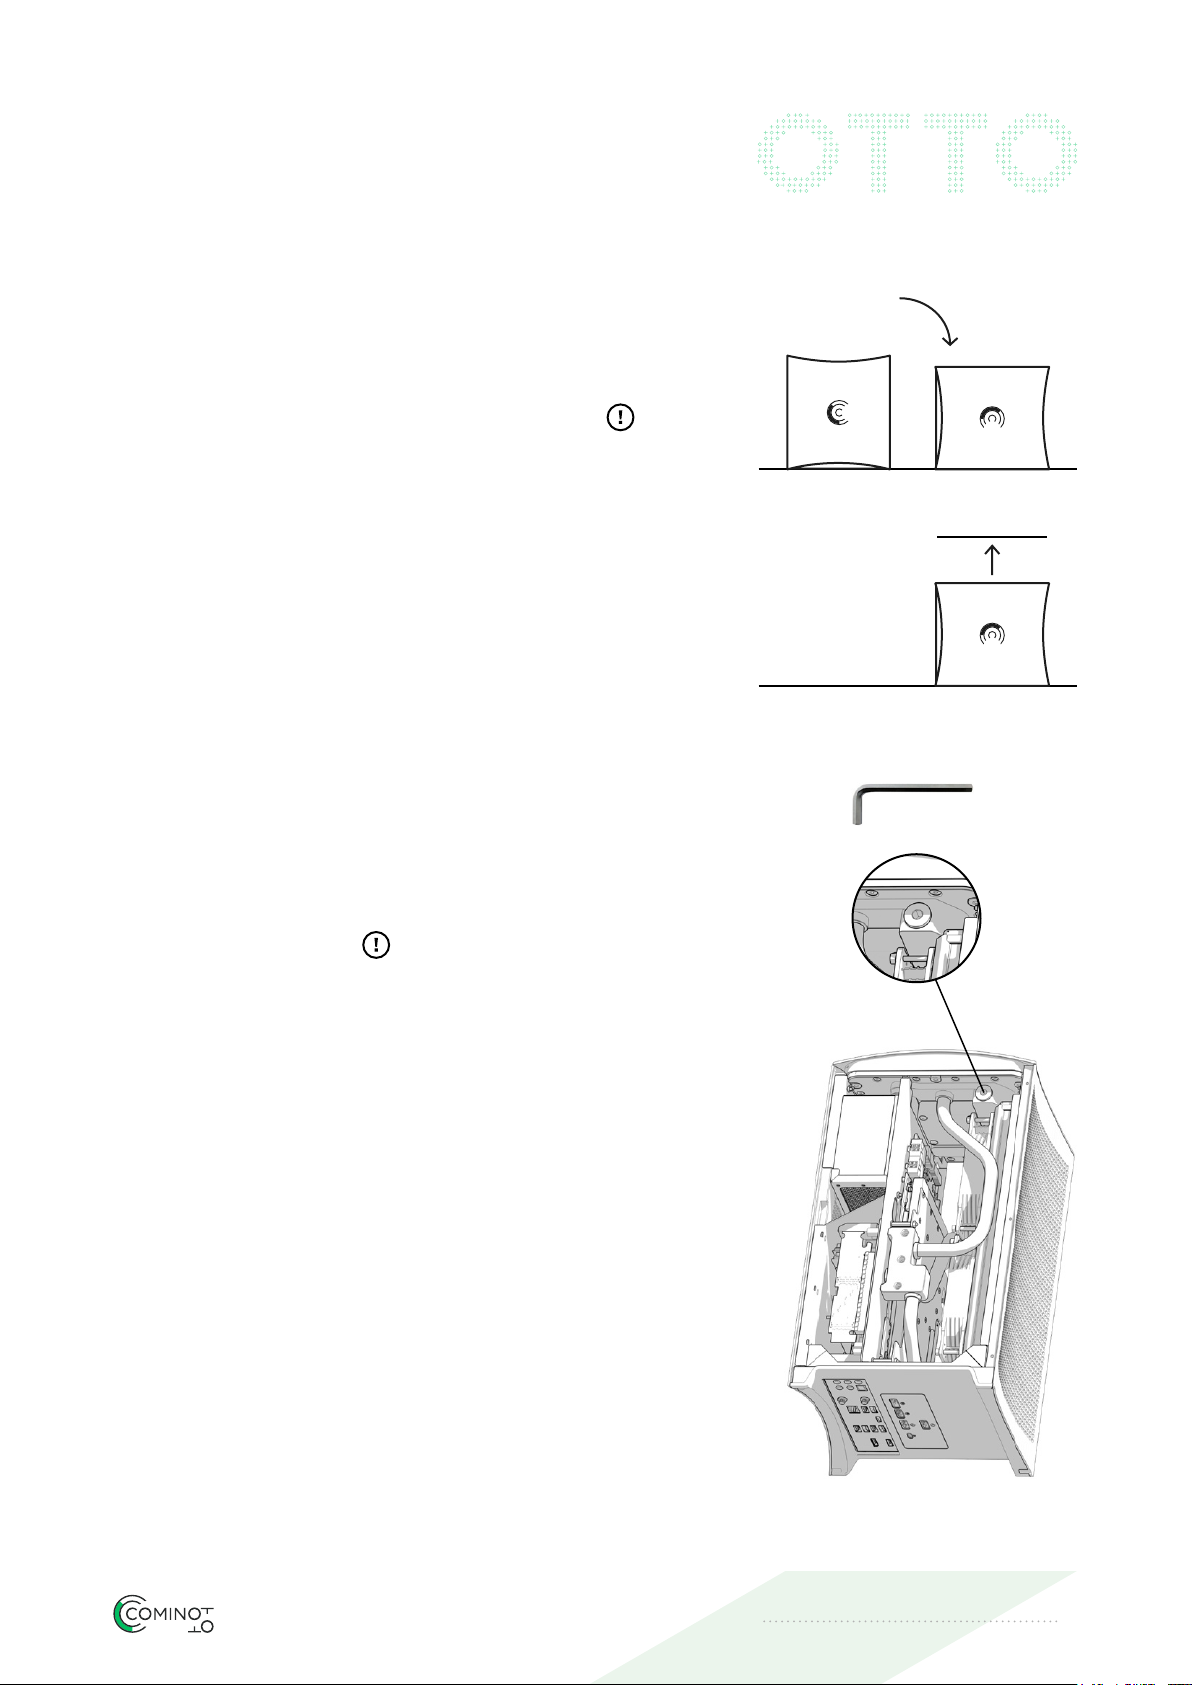
1. Make sure that no power is supplied
to OTTO and the power cord is not
plugged into the power socket.
2. Put OTTO on its left or right side.
3. Remove the magnetic side panel.
4. Open the lid with a hex wrench.
5. Carefully pour the coolant into
the uid port until the level.
No liquid must be spilt inside
the device!
6. Close the lid with a hex wrench
and place OTTO in its normal position.
7. Switch ON OTTO to let liquid spread
the tubings.
8. Switch OFF OTTO again fast enough so
the system is not overheated (after 10-15
seconds or when the reservoir is 2/3 full).
9. Put OTTO on its left or right side.
OTTO MASTER. QUICK START GUIDE 12
Page 13
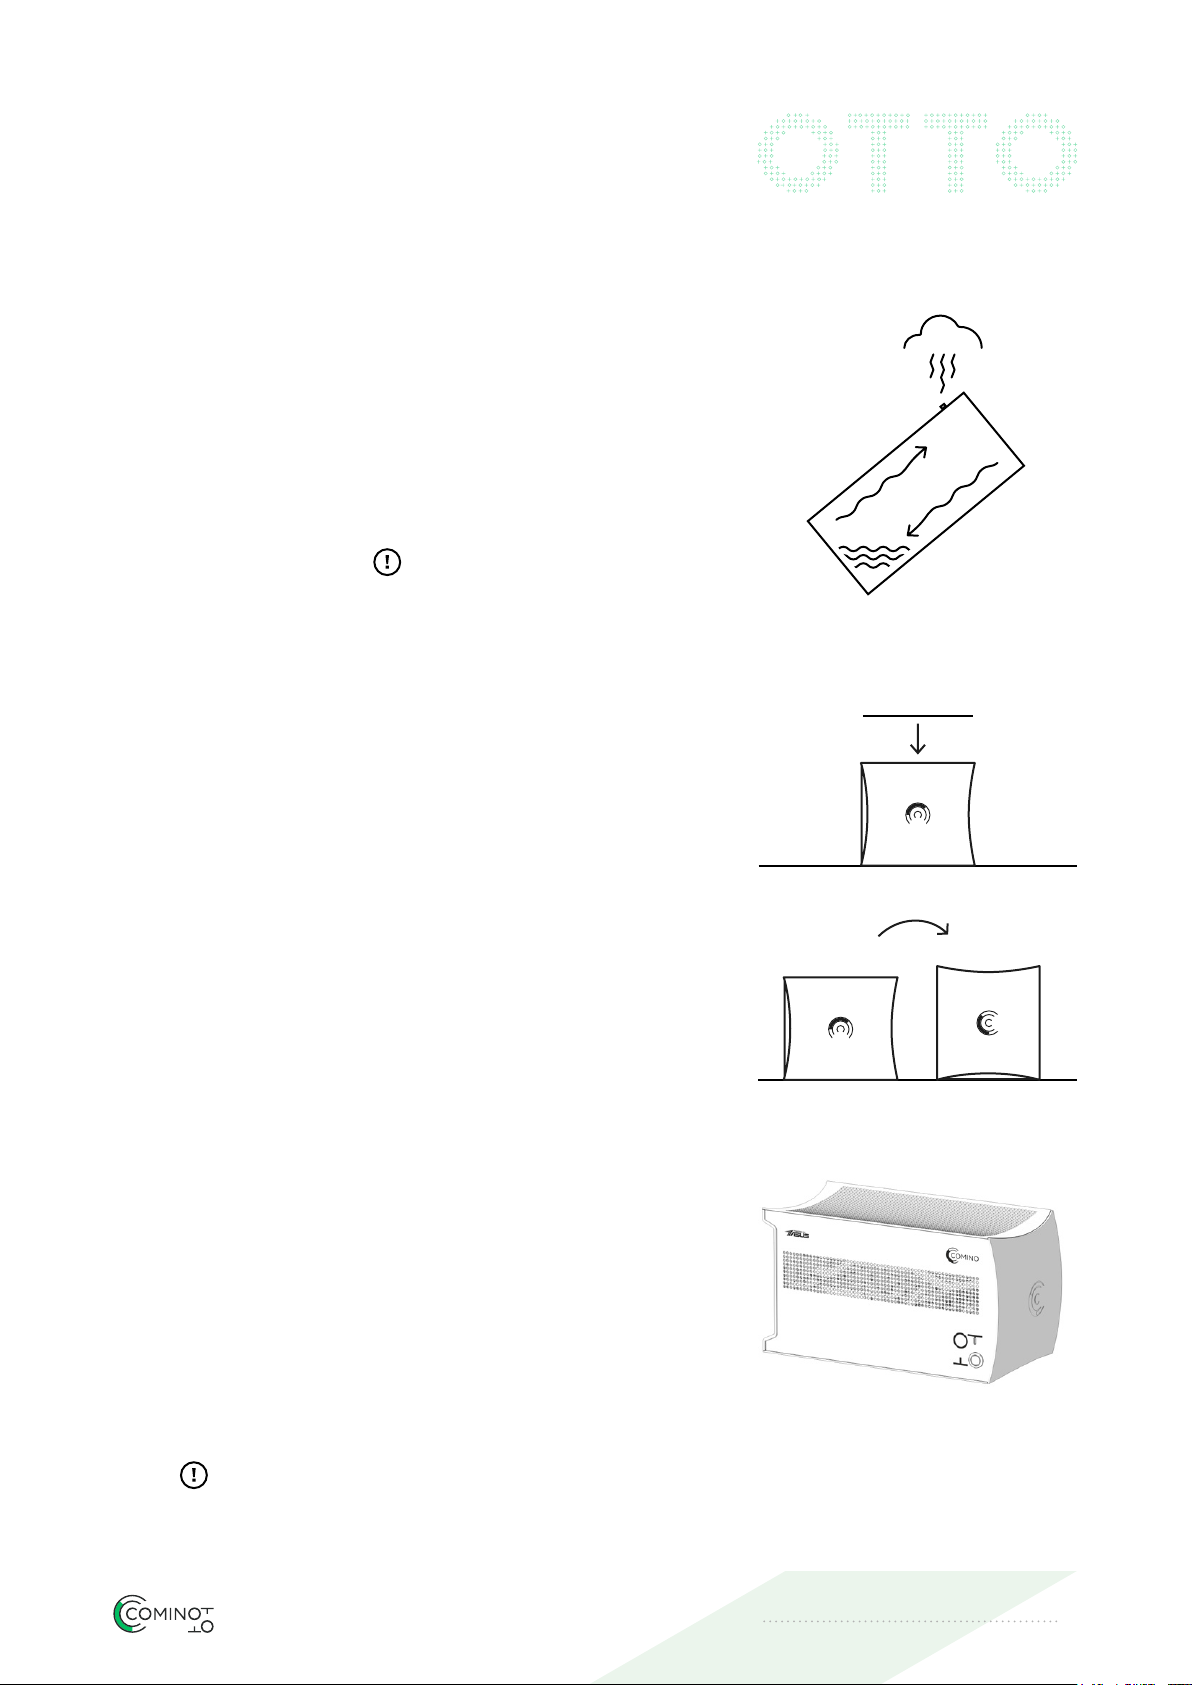
HOW TO FILL A COOLANT6.
10. Open the lid with a hex wrench.
11. Carefully pour the coolant into the uid
port until the level again.
No liquid must be spilt inside
air
the device!
12. Close the lid with a hex wrench and place
OTTO in its normal position.
13. Switch ON OTTO.
14. Lift up the fore part of OTTO at 40-45º
to release air.
15. Repeat relling until the reservoir
and liquid system are full to the level.
ATTENTION: there should be some air
liquid
in the system to let warm liquid swell out.
16. Put on the magnetic side panel when
OTTO is lled with coolant.
Now you can use OTTO.
Always use only specially prepared coolant or distilled water with the addi-
tion of an additive for liquid cooling circuits according to the instructions.
OTTO MASTER. QUICK START GUIDE 13
Page 14

CMNO LTD
Ioannis Stylianou, 6
Floor 2, Flat 202
2003, Nicosia Cyprus
www.comino.com
OTTO MASTER. QUICK START GUIDE 14
 Loading...