

Comfort Glow FIRELOG MATE CGFLB18, FIRELOG MATE CCGFLB18 Owner's Operation And Installation Manual
Page 1
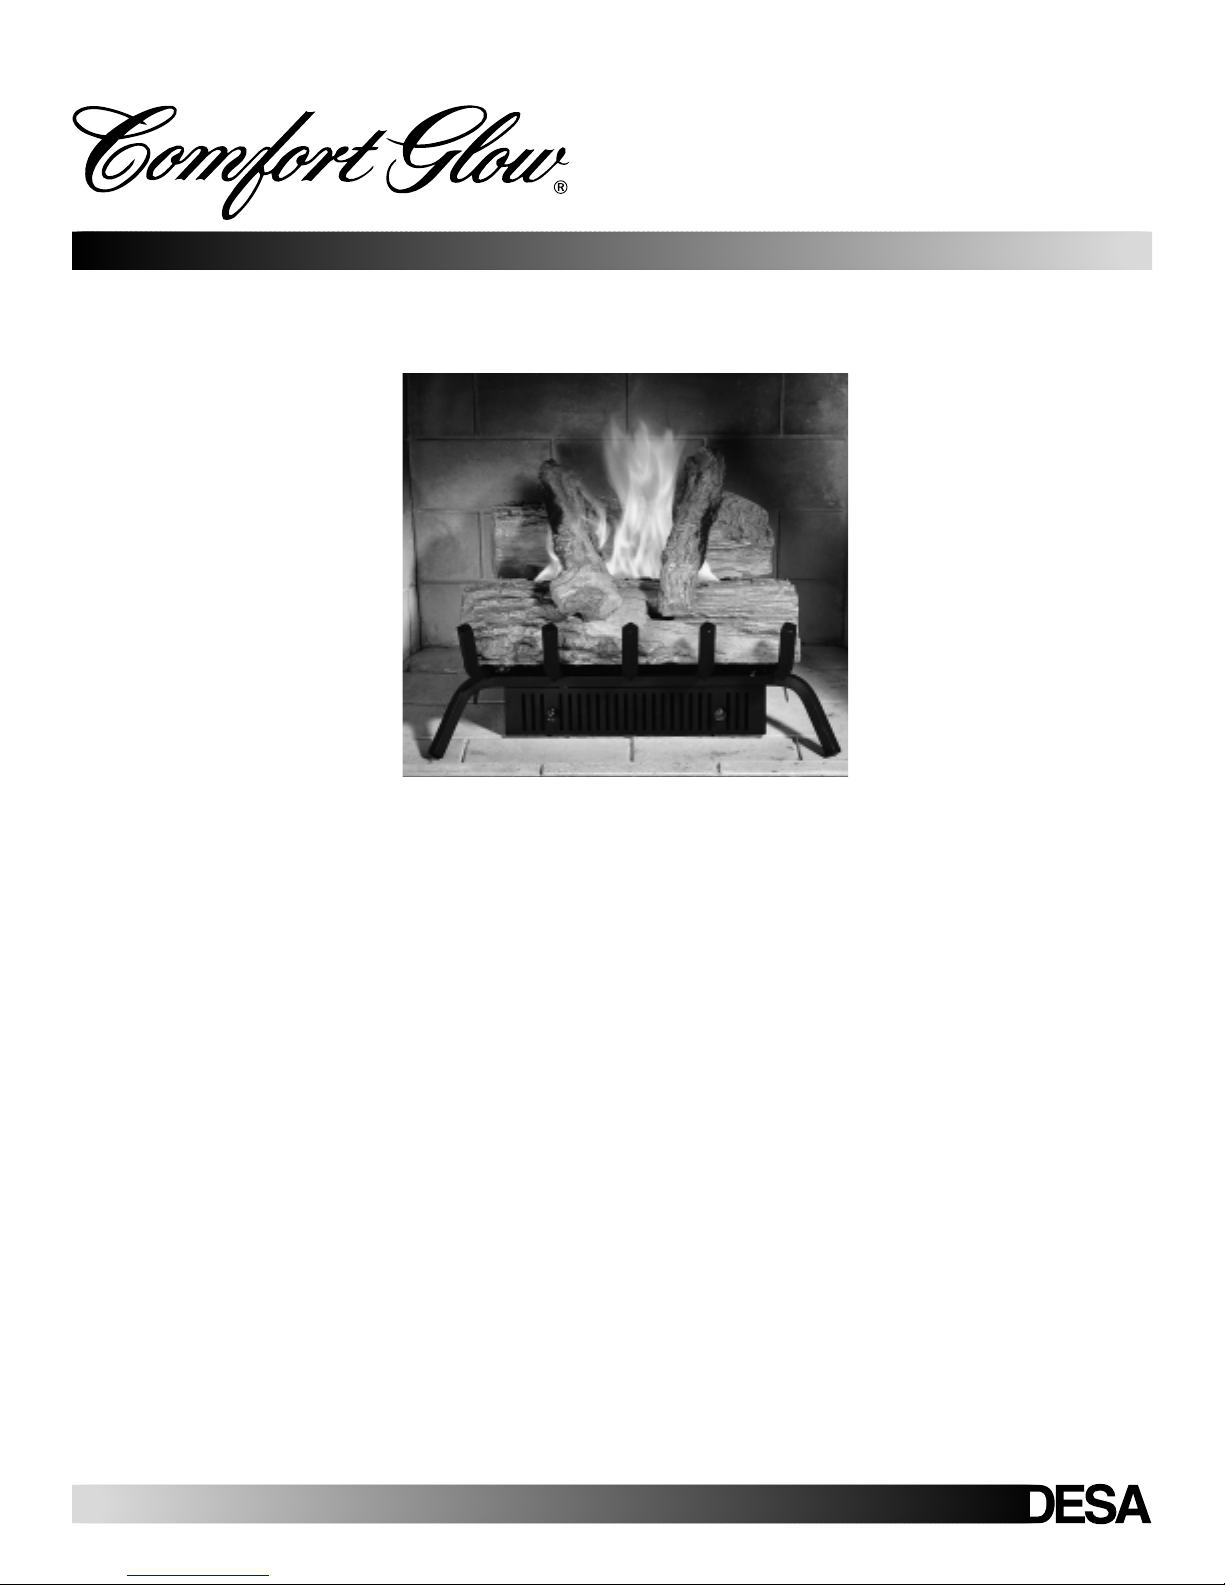
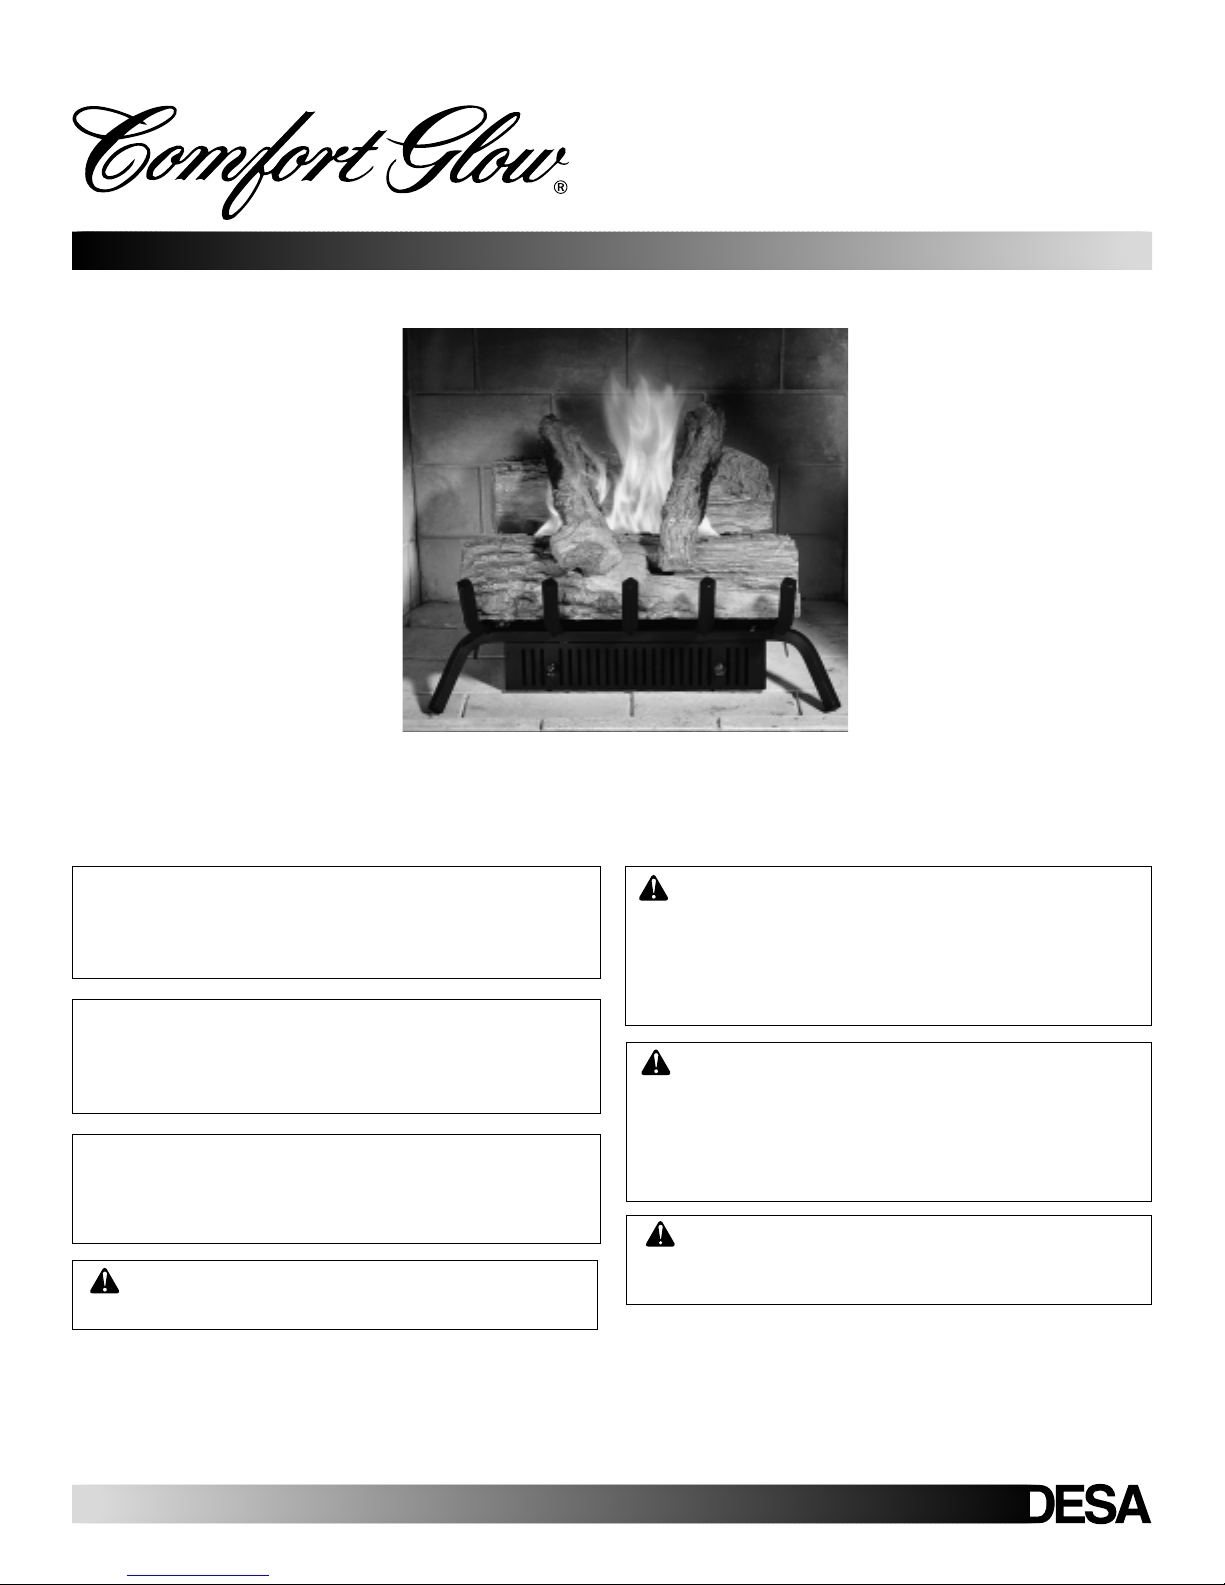
FIRELOG MATE
OWNER’S OPERATION AND INSTALLATION MANUAL
Models CGFLB18 and CCGFLB18
FIRELOG MATE
MANUEL D’UTILISATION ET D’INSTALLATION
Modèles CGFLB18 et CCGFLB18
FIRELOG MATE
MANUAL DE USO E INSTALACIÓN DEL PROPIETARIO
Modelos CGFLB18 y CCGFLB18
Page 2

108649
Page 3
FIRELOG MATE
OWNER’S OPERATION AND
INSTALLATION MANUAL
For more information, visit www.desatech.com
For more information, visit www.desatech.com
Models CGFLB18 and CCGFLB18
Designed for use with any brand of manufactured (wax) fire log or gelled-alcohol fuel.
IMPORTANT: Read this owner’s manual carefully and
completely before trying to assemble, operate, or
service this product. Improper use can cause serious
injury or death from burns or fire.
IMPORTANT: When paired with a manufactured (wax)
fire log, the Firelog Mate must be used in a masonry
fireplace or a UL 127 listed woodburning firebox with
the damper in the fully open position.
IMPORTANT: When burning gelled-alcohol fuel, ensure the cross-over logs do not come in contact with
flames. This will cause soot. Follow manufacturer’s
instructions.
WARNING: Not for use with solid fuels other than
those specified for use with this product.
WARNING: Logs, grate, and ash pan become very
hot when in use. Keep children, adults, and animals
away from hot surfaces to avoid burns or clothing
ignition. Logs, grate, and ash pan will remain hot for
a time after use. Allow surfaces to cool completely
before touching.
WARNING: Do not allow children near this product when operating. Especially watch for toddlers.
Children should be carefully supervised while in the
hearth area. They may not understand the danger of
fire or the safety precautions of using this product.
They could be severely injured due to burns.
WARNING: Do not place clothing, paper products, or any other flammable materials on or near this
product.
Save this manual for future reference.
Save this manual for future reference.
Page 4
SAFETY INFORMATION
PRODUCT INFORMATION
2
UNPACKING
INSTALLATION
SAFETY INFORMATION
1. Keep the area around the product clear and free from combustible materials, gasoline, or other flammable vapors and liquids.
2. You must operate this log set with a fireplace screen in place.
Make sure fireplace screen is closed during burning.
3. Let log set cool off before servicing or repairing.
4. Do not cook anything with this product. This includes hot dogs,
marshmallows, hamburgers, or any other food. Grease from
food could flame up causing severe burns or ignite clothing.
5. Surfaces of this product can become extremely hot. Therefore,
children and pets should be carefully supervised when they
are in the area of this product. This log set should not be left
unattended while it is burning.
6. Do not operate this product around intoxicated people. They
could injure themselves or others when using this product.
7. Except in cases of emergency, do not extinguish fire with water or other liquid or solid material. This may cause damage to
the logs.
8. Wax firelogs produce soot and creosote which may accumulate in the fireplace venting system, and may ignite if highly
heated. A qualified agency or certified chimney sweep should
examine and clean the venting system once every year.
INSTALLATION
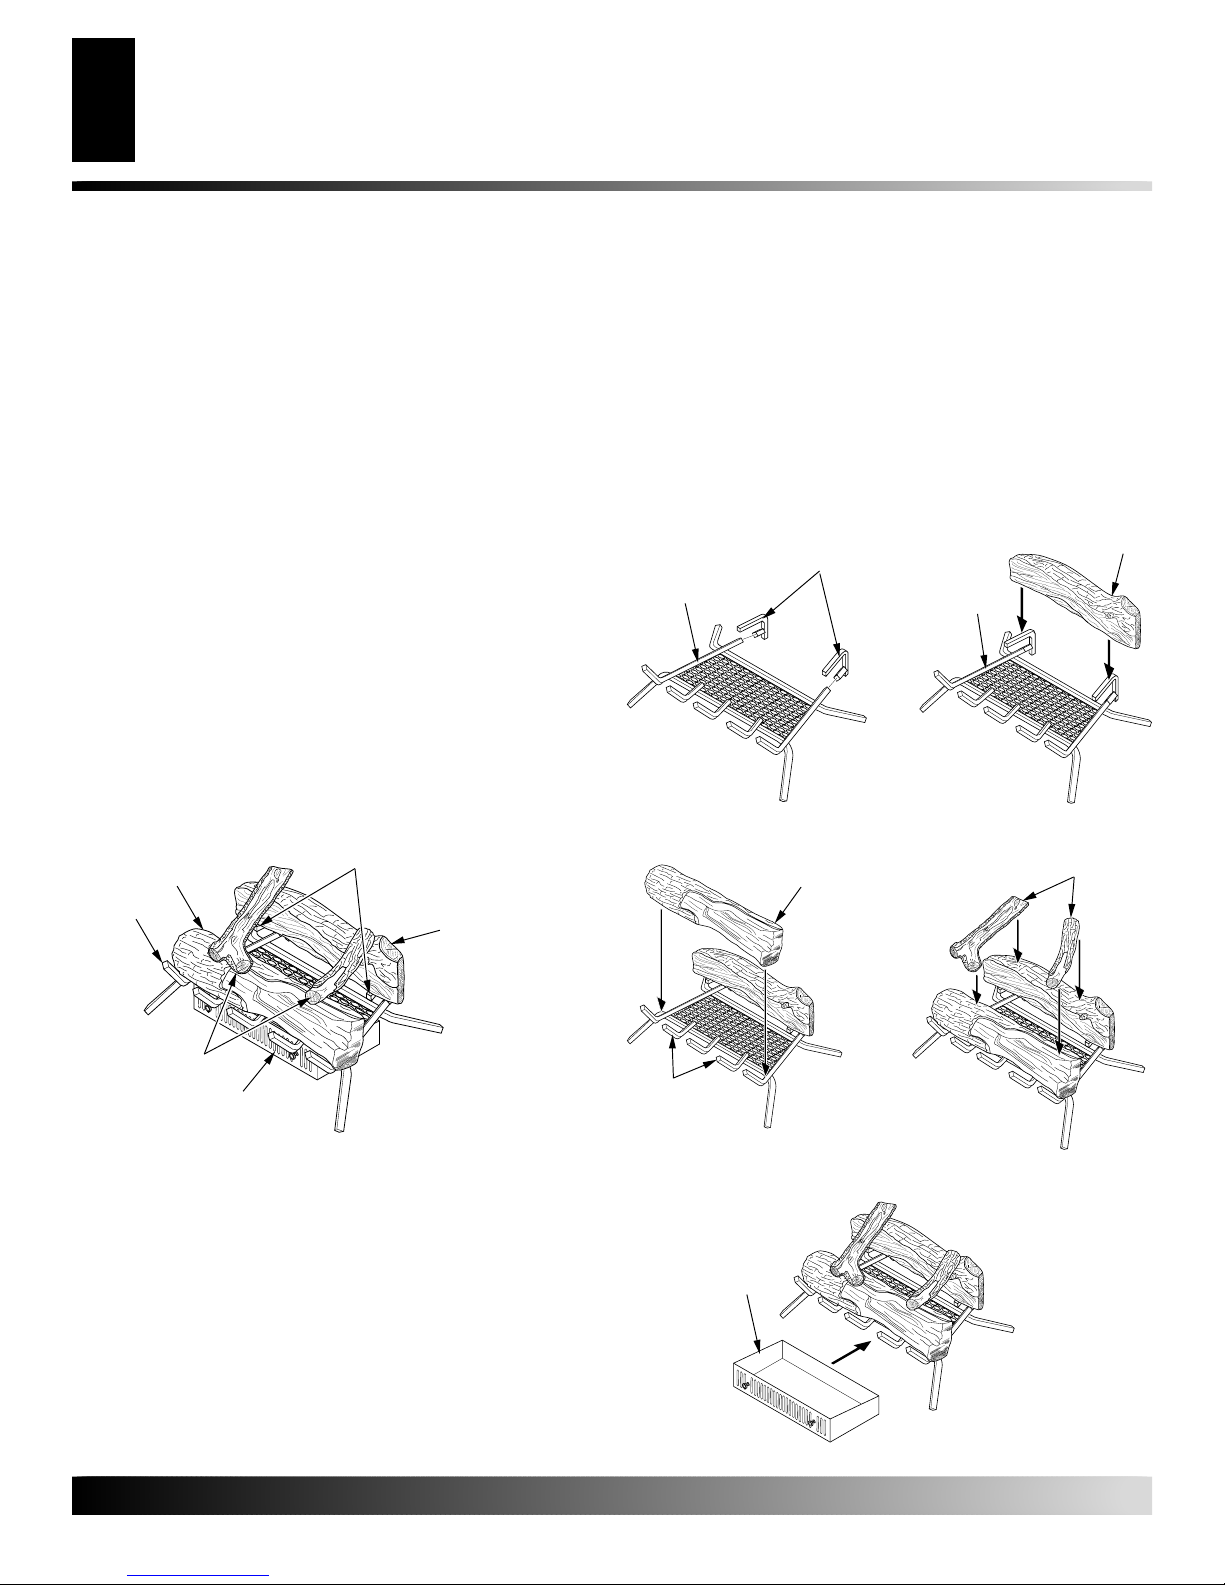
1. Slide the two rear log grate steps over the two outer horizontal
supports on the grate as shown in Figure 2.
2. Place grate assembly in center of fireplace floor.
3. Place the back log onto the grate steps (see Figure 3).
4. Place the front log on the grate and slide forward against the
front bars on the grate (see Figure 4).
5. Place the smaller top logs onto the bottom logs (see Figure 5).
Leave as much open space between logs as possible to minimize flame impingement and sooting.
they are handled roughly or if hit together while being placed.
6. Slide ash pan underneath center of grate and logs (see Figure 6).
Grate Steps
Grate
Note:
Grate
Assembly
Logs may chip if
Back Log
PRODUCT IDENTIFICATION
Front Log
Grate
Top Logs
Ash Pan
Figure 1 - Product Identification
Grate Steps
Back
Log
UNPACKING
1. Remove logs, grate, ash pan, and grate steps from carton.
2. Remove all protective packaging applied to logs and ash pan
for shipment.
3. Check all items for any shipping damage. If damaged, promptly
inform dealer.
Figure 2 - Installing Grate Steps
Front Log
Front Bars
on Grate
Figure 4 - Installing Front Log Figure 5 - Installing Top Logs
Ash Pan
Figure 3 - Installing Back Log
Top Logs
For more information, visit www.desatech.com
For more information, visit www.desatech.com
Figure 6 - Installing Ash Pan
108649
Page 5
OPERATION
CLEANING AND MAINTENANCE
ILLUSTRATED PARTS BREAKDOWN
3
3
OPERATION
1. Remove smaller top logs and set aside carefully.
2. If using wax log, place wax log on grate between larger bottom logs (see Figure 7). Follow manufacturer’s instructions.
Note:
Combustion air is needed for the fire log to burn properly. The rear log grate step can be adjusted to create more
space between the front and back log allowing more air around
the fire log.
3. If using gelled-alcohol fuel, place 1 to 3 canisters on grate
between larger bottom logs (see Figure 8). Follow
manufacturer’s instructions.
4. Replace top logs roughly perpendicular to, and toward outside
of bottom logs (see Figure 5).
Note:
When burning gelled-alcohol fuel, ensure the cross-over
logs do not come in contact with flames. This will cause soot.
Follow manufacturer’s instructions.
5. Ignite paper on wax log and allow to burn completely.
IMPORTANT:
Damper must be fully open.
CLEANING AND MAINTENANCE
• Keep the area around the log set clean and clear of debris.
• Occasionally, you may use a soft bristle brush to clean logs.
• Once every year a qualified agency or certified chimney sweep
should examine and clean the venting system of the fireplace.
• Empty ash pan after each use. Let product cool completely
before emptying ash pan.
ILLUSTRATED PARTS
BREAKDOWN
7
5
6
2
Figure 7 - Installing Wax Log (Follow Manufacturer's Instructions)
4
3
1
KEY PART
NO. NUMBER DESCRIPTION QTY.
1 108699-01 Grate 1
2 901630-01 Grate Steps 2
3 108650-01 Ash Pan 1
4 901713-01 Front Log 1
5 901111-01 Back Log 1
6 901102-01 Top Log 1 1
7 901476-01 Top Log 2 1
Figure 8 - Installing Gelled-Alcohol Fuel (Follow Manufacturer's
Instructions)
For more information, visit www.desatech.com
For more information, visit www.desatech.com
108649
Page 6

4
WARRANTY INFORMATION
KEEP THIS WARRANTY
Model
Serial No.
Date Purchased
Always specify model and serial numbers when communicating with the factory.
We reserve the right to amend these specifications at any time without notice. The only warranty applicable is our standard written warranty. We make
no other warranty, expressed or implied.
LIMITED WARRANTY
COMFORT GLOW FIRELOG MATE
DESA International warrants this product to be free from defects for one (1) year from the date of first purchase, provided that the product
has been properly installed, operated and maintained in accordance with all applicable instructions. To make a claim under this warranty the
Bill of Sale or cancelled check must be presented.
This warranty is extended only to the original retail purchaser. This warranty covers the cost of part(s) required to restore this log set to proper
operating condition and an allowance for labor when provided by a DESA Authorized Service Center. Warranty part(s) MUST be obtained
through authorized dealers of this product and/or DESA International who will provide original factory replacement parts. Failure to use
original factory replacement parts voids this warranty. The log set MUST be installed by a qualified installer in accordance with all local codes
and instructions furnished with the unit.
This warranty does not apply to parts that are not in original condition because of normal wear and tear, or parts that fail or become damaged
as a result of misuse, accidents, lack of proper maintenance or defects caused by improper installation. Travel, diagnostic cost, labor,
transportation and any and all such other costs related to repairing a defective log set will be the responsibility of the owner.
TO THE FULL EXTENT ALLOWED BY THE LAW OF THE JURISDICTION THAT GOVERNS THE SALE OF THE PRODUCT; THIS
EXPRESS WARRANTY EXCLUDES ANY AND ALL OTHER EXPRESSED WARRANTIES AND LIMITS THE DURATION OF ANY
AND ALL IMPLIED WARRANTIES, INCLUDING WARRANTIES OF MERCHANTABILITY AND FITNESS FOR A PARTICULAR
PURPOSE TO ONE (1) YEAR FROM THE DATE OF FIRST PURCHASE; AND DESA INTERNATIONAL’S LIABILITY IS HEREBY
LIMITED TO THE PURCHASE PRICE OF THE PRODUCT AND DESA INTERNATIONAL SHALL NOT BE LIABLE FOR ANY
OTHER DAMAGES WHATSOEVER INCLUDING INDIRECT, INCIDENTAL OR CONSEQUENTIAL DAMAGES.
Some states do not allow a limitation on how long an implied warranty lasts or an exclusion or limitation of incidental or consequential
damages, so the above limitation on implied warranties, or exclusion or limitation on damages may not apply to you.
This warranty gives you specific legal rights, and you may also have other rights that vary from state to state.
For information about this warranty write:
For more information, visit www.desatech.com
For more information, visit www.desatech.com
INTERNATIONAL
2701 Industrial Drive
P.O. Box 90004
Bowling Green, KY 42102-9004
www.desatech.com
108649
Page 7

FIRELOG MATE
MANUEL D’UTILISATION ET
D’INSTALLATION
Pour en savoir davantage, visitez le www.desatech.com
Pour en savoir davantage, visitez le www.desatech.com
Modèles CGFLB18 et CCGFLB18
Conçu pour un usage avec toute marque de bûche (de cire) fabriquée ou d’alcool carburant gélifié.
IMPORTANT : Lisez le présent manuel de l’utilisateur
soigneusement et complètement avant d’essayer de
monter, d’utiliser ou de faire l’entretien de ce produit.
Un emploi abusif peut entraîner une blessure grave
ou la mort suite à des brûlures ou par le feu.
IMPORTANT : Jumelé à une bûche (de cire) fabriquée,
le porte-bûches (Firelog Mate) doit servir dans un
foyer maçonné ou une chambre de combustion du
bois homologuée par l’UL 127 avec le registre en
position ouverte complètement.
IMPORTANT : Quand vous brûlez de l’alcool carburant
gélifié, assurez-vous que les bûches de croisement
ne touchent pas les flammes. Cela produirait de la
suie. Suivez les instructions du fabricant.
AVERTISSEMENT : Ne convient pas aux combustibles solides autres que ceux indiqués pour
l’emploi avec ce produit.
AVERTISSEMENT : Les bûches, la grille et le
cendrier deviennent très chauds pendant l’utilisation.
Gardez les enfants, les adultes et les animaux à l’écart
de la surface chaude pour éviter les brûlures ou
l’inflammation des vêtements. Les bûches, la grille et
le cendrier resteront chauds un certain temps après
usage. Laissez la surface refroidir complètement
avant d’y toucher.
AVERTISSEMENT : Ne permettez pas aux enfants
d’approcher lorsque l’appareil est en marche.
Surveillez surtout les tout-petits. Les enfants
devraient être supervisés avec soin près de l’âtre.
Ils peuvent ne pas comprendre le danger du feu ou
les précautions de sécurité à prendre. Ils pourraient
subir des brûlures graves.
AVERTISSEMENT : Ne placez aucuns vêtements,
papiers ou autres matières inflammables par-dessus
ou près de ce produit.
Conservez le présent manuel pour consultation future.
Conservez le présent manuel pour consultation future.
Page 8

RENSEIGNEMENTS DE SÉCURITÉ
IDENTIFICATION DU PRODUIT
2
DÉBALLAGE
INSTALLATION
RENSEIGNEMENTS DE
SÉCURITÉ
1. Gardez l’espace autour du produit libre de toutes matières combustibles, essence ou autres vapeurs et liquides inflammables.
2. Vous devez utiliser ce jeu de bûches avec un pare-feu en place.
Vérifiez que le pare-feu est bien fermé avant d’allumer.
3. Laissez le jeu de bûches refroidir avant de procéder à l’entretien,
d’installer ou de réparer.
4. Ne cuisinez rien à l’aide du produit. Cela comprend les hotdogs, les guimauves, les hamburgers ou toute autre nourriture.
La graisse d’aliments pourrait prendre feu et causer des brûlures
graves ou enflammer les vêtements.
5. Les surfaces de ce produit peuvent devenir très chaudes. Par
conséquent, les enfants et les animaux familiers devraient être
supervisés avec soin près du produit. Il ne faut pas laisser ce
jeu de bûches sans surveillance quand il brûle.
6. N’employez pas ce produit près de gens en état d’ébriété. Ils
pourraient se blesser ou infliger des lésions à d’autres personnes
lors de l’utilisation.
7. Sauf en cas d’urgence, n’éteignez pas le feu avec de l’eau ou
une autre matière liquide ou solide. Cela pourrait endommager
les bûches.
8. Les bûches de cire produisent de la suie et de la créosote, qui
peuvent s’accumuler dans le système de ventilation du foyer
et s’enflammer sous une chaleur élevée. Un organisme qualifié
ou un ramoneur certifié devrait examiner et nettoyer le système
de ventilation une fois par an.
DÉBALLAGE
1. Retirez les bûches, la grille, le cendrier et les pattes de grille
du carton.
2. Enlevez tout l’emballage protecteur appliqué sur les bûches et
le cendrier pour l’expédition.
3. Inspectez tous les articles pour tout signe de dommages pendant l’expédition. En cas de dommages, informez rapidement
le distributeur.
INSTALLATION
1. Glissez les deux pattes de grille à bûche arrière sur les deux
supports horizontaux extérieurs de la grille comme dans la
figure 2.
2. Placez l’assemblage de grille au centre du sol du foyer.
3. Déposez la bûche arrière sur les pattes de grille (voir la figure 3).
4. Mettez la bûche avant sur la grille, et glissez-la vers l’avant
contre les barreaux antérieurs de la grille (voir la figure 4).
5. Disposez les petites bûches du dessus sur les bûches du dessous
(voir la figure 5). Laissez autant d’espace ouvert entre les
bûches que possible pour minimiser la projection de flammes
et le dépôt de suie. Remarque : Les bûches peuvent perdre
des éclats si elles sont manipulées brusquement ou frappées
ensemble en les plaçant.
Pattes de grille
Grille
Assemblage
de grille
Bûche arrière
IDENTIFICATION DU PRODUIT
Pattes de grille
Bûche avant
Grille
Bûches
du dessus
Figure 1 – Identification du produit
Pour en savoir davantage, visitez le www.desatech.com
Pour en savoir davantage, visitez le www.desatech.com
Cendrier
Bûche arrière
Figure 2 – Montage des
pattes de grille
Bûche
avant
Barreaux
antérieurs de
la grille
Figure 4 – Dépôt de la bûche
avant
Figure 3 – Installation de la
bûche arrière
Bûches du
dessus
Figure 5 – Placement des
bûches du dessus
108649
Page 9

INSTALLATION
1
2
3
4
5
6
7
Suite
INSTALLATION
UTILISATION
NETTOYAGE ET ENTRETIEN
TABLEAU DE COMPOSITION ILLUSTRÉ
3
3
6. Glissez le cendrier en dessous du centre de la grille et des bûches
(voir la figure 6).
Cendrier
Figure 6 – Pose du cendrier
UTILISATION
1. Enlevez les petites bûches du dessus, et mettez-les de côté
avec soin.
2. Si vous vous servez d’une bûche de cire, placez-la sur la grille
entre les grosses bûches du dessous (voir la figure 7). Suivez
les instructions du fabricant.
Remarque :
consume bien. Les pattes de grille à bûche arrière s’ajustent
pour agrandir l’espace entre les bûches avant et arrière et fournir
davantage d’air autour de la bûche de cire.
3. Si vous utilisez de l’alcool carburant gélifié, déposez 1 à 3
boîtes métalliques sur la grille entre les grosses bûches du
dessous (voir la figure 8). Suivez les instructions du fabricant.
4. Remettez les bûches du dessus à peu près à angle droit par rapport
aux bûches du dessous, vers leurs extrémités (voir la figure 5).
Remarque :
assurez-vous que les bûches de croisement ne touchent pas les
flammes. Cela produirait de la suie. Suivez les instructions
du fabricant.
Il faut de l’air comburant pour que la bûche se
Quand vous brûlez de l’alcool carburant gélifié,
5. Allumez le papier sur la bûche de cire, et laissez-le brûler en
entier.
IMPORTANT :
Le registre doit être ouvert au maximum.
NETTOYAGE ET ENTRETIEN
• Gardez l’aire qui entoure le jeu de bûches propre et libre de détritus.
• De temps en temps, vous pouvez prendre une brosse souple pour
nettoyer les bûches.
• Une fois par an, un organisme qualifié ou un ramoneur certifié
devrait examiner et nettoyer le système de ventilation du foyer.
• Videz le cendrier après chaque usage. Laissez le produit refroidir
complètement avant de vider.
TABLEAU DE COMPOSITION
ILLUSTRÉ
Figure 7 – Mise en place de
la bûche de cire (suivez les
instructions du fabricant)
Pour en savoir davantage, visitez le www.desatech.com
Pour en savoir davantage, visitez le www.desatech.com
108649
Figure 8 – Insertion de l’alcool
carburant gélifié (suivez les
instructions du fabricant)
NO NUMÉRO
CLÉ DE PIÈCE DESCRIPTION QTÉ
1 108699-01 Grille 1
2 901630-01 Pattes de grille 2
3 108650-01 Cendrier 1
4 901713-01 Bûche avant 1
5 901111-01 Bûche arrière 1
6 901102-01 Bûche du dessus 1 1
7 901476-01 Bûche du dessus 2 1
Page 10

4
INFORMATION SUR LA GARANTIE
CONSERVEZ LA PRÉSENTE GARANTIE
Modèle
No de série
Date d’achat
Précisez toujours le modèle et les numéros de série quand vous communiquez avec l’usine.
Nous nous réservons le droit de modifier les présentes caractéristiques en tout temps sans préavis. La seule garantie applicable constitue notre garantie
écrite standard. Nous ne donnons aucune autre garantie, expresse ou implicite.
GARANTIE RESTREINTE
COMFORT GLOW FIRELOG MATE
DESA International garantit que ce produit est exempt de tous défauts pour une période d’un (1) an après la date d’achat initial, à condition que
le produit ait été installé, utilisé et entretenu de façon appropriée conformément à toutes les instructions applicables. Pour faire une demande
en vertu de cette garantie, il faut présenter la facture ou le chèque oblitéré.
Cette garantie n’est offerte qu’à l’acheteur au détail original. Elle couvre le coût des pièces requises pour remettre le jeu de bûches en bon état
de fonctionnement et les frais de main-d’œuvre si elle est fournie par un Centre agréé de réparation DESA. Les pièces en garantie DOIVENT
provenir de distributeurs agréés de ce produit ou de DESA International, qui fourniront des pièces de rechange originales de l’usine. Le fait de
ne pas recourir à des pièces de rechange originales de l’usine annule la présente garantie. Le jeu de bûches DOIT être installé par un installateur
qualifié en conformité avec tous les codes locaux et les instructions inclues avec l’unité.
La garantie ne s’applique pas aux pièces qui ne se trouvent plus dans leur état original à cause d’une usure normale ou d’éléments qui font défaut
ou qui sont endommagés à la suite d’un emploi abusif, d’accidents, d’un manque d’entretien adéquat ou d’une mauvaise installation.
L’expédition, les frais de diagnostic, la main-d’œuvre, le transport et tous les autres frais connexes liés à la réparation d’un jeu de bûches
défectueux incomberont au propriétaire.
dans toute La portée permise par LA LOI DE LA juridiction QUI RÉGIT LA VENTE DU PRODUIT, CETTE GARANTIE EXPRESSE
EXCLUT TOUTES AUTRES GARANTIES EXPRESSES ET LIMITE LA DURÉE DE TOUTES GARANTIES IMPLICITES, DONT LES
GARANTIEs DE QUALITÉ MARCHANDE ET DE CONVENANCE POUR UN USAGE PARTICULIER, À UN (1) AN DE LA DATE
D’ACHAT INITIAL; de plus, la responsabilité de DESA INTERNATIONAL sE LIMITE par la présente au prix d’achat du PRODUIT – DESA
INTERNATIONAL NE SERA RESPONSABLE D’AUCUNS AUTRES dOMMAGES QUELS QU’ILS SOIENT, Y COMPRIS LES
DOMMAGES INDIRECTS OU CONSÉCUTIFS.
Certains États n’autorisent pas une limitation de la durée d’une garantie implicite ou une exclusion / une limitation de dommages consécutifs;
la restriction ci-dessus sur les garanties implicites ou l’exclusion / la limitation de dommages peut donc ne pas s’appliquer à vous.
La présente garantie vous accorde des droits juridiques précis, et vous pouvez aussi avoir d’autres droits, qui varient d’un État à l’autre.
Pour vous renseigner sur la garantie, écrivez à :
INTERNATIONAL
2701 Industrial Drive
P.O. Box 90004
Bowling Green, KY 42102-9004
www.desatech.com
Pour en savoir davantage, visitez le www.desatech.com
Pour en savoir davantage, visitez le www.desatech.com
108649
Page 11

FIRELOG MATE
MANUAL DE USO E INSTALACIÓN DEL
PROPIETARIO
Para obtener más información, visite www.desatech.com
Para obtener más información, visite www.desatech.com
Modelos CGFLB18 y CCGFLB18
Diseñado para usarse con cualquier marca de leño manufacturado (con parafina) o combustible
de alcohol gelificado.
IMPORTANTE: Lea detenida y completamente este
manual del propietario antes de intentar armar, usar
o realizar el mantenimiento de este producto. El uso
inadecuado puede causar lesiones serias o la muerte
debido a quemaduras o incendios.
IMPORTANTE: Cuando se use con leños
manufacturados (con parafina), el Firelog Mate debe
usarse en una chimenea de piedra o ladrillo o una
cámara de combustión para leños con la certificación
UL 127, con el regulador en la posición de
completamente abierto.
IMPORTANTE: Si usa alcohol gelificado, asegúrese
de que los leños cruzados no entren en contacto con
las llamas. Esto causará hollín. Siga las instrucciones
del fabricante.
ADVERTENCIA: No debe usarse con combustibles sólidos que no sean los especificados para
usarse con este producto.
ADVERTENCIA: Los leños, la parrilla y el platillo
para cenizas se ponen muy calientes cuando están en
uso. Mantenga a los niños, adultos y animales lejos de
la superficies caliente para evitar quemaduras o que
la ropa se prenda fuego. Los leños, la parrilla y el
platillo para cenizas permanecerán calientes durante
un tiempo después del uso. Deje que la superficies se
enfríe completamente antes de tocarlas.
ADVERTENCIA: No deje que los niños se acerquen
a este producto cuando esté en uso. Tenga especial
cuidado con los niños pequeños. Se debe supervisar
cuidadosamente a los niños mientras estén en el área
de la chimenea. Ellos pueden no entender el peligro
del fuego ni las precauciones de seguridad requeridas
al usar este producto y pueden sufrir lesiones graves
debido a quemaduras.
ADVERTENCIA: No coloque ropa, productos de
papel ni ningún otro material inflamable encima o
cerca de este producto.
Guarde este manual para referencia futura.
Guarde este manual para referencia futura.
Page 12

INFORMACIÓN DE SEGURIDAD
2
IDENTIFICACIÓN DEL PRODUCTO
DESEMBALAJE
INSTALACIÓN
INFORMACIÓN DE SEGURIDAD
1. Mantenga el área alrededor del producto libre de materiales
combustibles, gasolina u otros vapores y líquidos inflamables.
2. Este juego de leños debe usarse con la red metálica de la
chimenea colocada. Asegúrese de que la red metálica de la
chimenea esté cerrada antes del encendido.
3. Deje enfriar el juego de leños antes de realizar el mantenimiento
o las reparaciones.
4. No cocine nada en este producto. Esto incluye salchichas, dulce
de malvavisco (“marshmallows”), hamburguesas o cualquier
otro alimento. La grasa de los alimentos puede prenderse en
llamas y causar quemaduras graves o hacer que la ropa se
prenda fuego.
5. Las superficies de este producto pueden calentarse en forma
extrema. Por lo tanto, los niños y los animales deben
supervisarse cuidadosamente cuando estén cerca del área de
este producto. Este juego de leños no debe quedar desatendido
mientras esté encendido.
6. No use este producto cerca de personas ebrias. Pueden causarse
lesiones a sí mismas o a otras personas al usar este producto.
7. Excepto en casos de emergencia, no apague el fuego con agua
ni con otros líquidos o materiales sólidos. Esto puede causar
daño a los leños.
8. Los leños de parafina producen hollín y creosota, los cuales
pueden acumularse en el sistema de ventilación de la chimenea
y encenderse si se calientan demasiado. Una agencia calificada
o un deshollinador diplomado debe examinar y limpiar el
sistema de ventilación una vez al año.
DESEMBALAJE
1. Retire los leños, la parrilla, el platillo para cenizas y los estribos
de la parrilla de la caja de cartón.
2. Retire el material protector de los leños y del platillo para
cenizas utilizado para el transporte.
3. Asegúrese de que ninguno de los artículos se haya dañado durante el transporte. En caso de daño, informe inmediatamente
al distribuidor.
INSTALACIÓN
1. Deslice los dos estribos de la parrilla del leño posterior sobre
los dos soportes horizontales exteriores de la parrilla, tal como
se muestra en la figura 2.
2. Coloque el conjunto de la parrilla en el centro del piso de la
chimenea.
3. Coloque el leño posterior encima de los estribos de la parrilla
(ver figura 3).
4. Coloque el leño frontal en la parrilla y deslícelo hacia adelante
contra las barras frontales de la misma (ver figura 4).
5. Coloque los leños superiores más pequeños encima de los inferiores
(ver figura 5). Deje el máximo posible de espacio libre entre los
leños para minimizar la incidencia de las llamas y la generación
de hollín.
cuidado o si se golpean unos contra otros al colocárlos.
Parrilla
Nota:
Los leños pueden despostillarse si se manejan sin
Estribos de la
parrilla
Conjunto de
la parrilla
Leño posterior
IDENTIFICACIÓN DEL
PRODUCTO
Estribos de
la parrilla
Leño frontal
Parrilla
Leños
superiores
Platillo para
cenizas
Figura 1: Identificación del producto
Para obtener más información, visite www.desatech.com
Para obtener más información, visite www.desatech.com
Leño
posterior
Figura 2: Instalación de los
estribos de la parrilla
Leño
frontal
Barras frontales
de la parrilla
Figura 4: Instalación del
leño frontal avant
Figura 3: Instalación del leño
posterior
Leños
superiores
Figura 5: Instalación de los
leños superiores
108649
Page 13

INSTALACIÓN
Continuación
INSTALACIÓN
USO
LIMPIEZA Y MANTENIMIENTO
LISTA DE PIEZAS QUE APARECEN EN LAS FIGURAS
3
3
6. Deslice el platillo para cenizas debajo del centro de la parrilla
y los leños (ver figura 6).
Platillo
para
cenizas
Figura 6: Instalación del platillo para cenizas
USO
1. Retire los leños superiores más pequeños y colóquelos
cuidadosamente a un lado.
2. Si usa un leño de parafina, colóquelo en la parrilla entre los
leños inferiores más largos (ver figura 7). Siga las instrucciones
del fabricante.
Nota:
Se necesita aire de combustión para que el leño arda
adecuadamente. El estribo posterior de la parrilla puede
ajustarse para que haya más espacio entre el leño frontal y el
posterior para que haya más aire alrededor del leño.
3. Si usa combustible de alcohol gelificado, coloque entre 1 y 3
latas en la parrilla entre los leños inferiores más largos (ver
figura 8). Siga las instrucciones del fabricante.
4. Vuelva a colocar los leños superiores en forma
aproximadamente perpendicular y hacia la parte exterior de
los leños inferiores (ver figura 5).
Nota:
Al utilizar combustible de alcohol gelificado, asegúrese
de que los leños cruzados no entren en contacto con las llamas. Esto producirá hollín. Siga las instrucciones del fabricante.
5. Encienda con un papel el leño de parafina y deje que se consuma
completamente.
IMPORTANTE:
El regulador debe estar completamente abierto.
LIMPIEZA Y MANTENIMIENTO
• Mantenga el área alrededor del juego de leños limpia y sin
desperdicios.
• De vez en cuando, se puede usar un cepillo de cerdas suaves
para limpiar los leños.
• Una vez al año, una agencia calificada o un deshollinador diplomado
debe examinar y limpiar el sistema de ventilación de la chimenea.
• V acíe el platillo para cenizas después de cada uso. Deje que el producto
se enfríe completamente antes de vaciar el platillo para cenizas.
LISTA DE PIEZAS QUE
APARECEN EN LAS FIGURAS
7
5
6
2
4
3
1
Figura 7: Instalación del leño
de parafina (siga las
instrucciones del fabricante)
Para obtener más información, visite www.desatech.com
Para obtener más información, visite www.desatech.com
108649
Figura 8: Instalación del
combustible de alcohol
gelificado (siga las
instrucciones del fabricante)
NÚMERO NÚMERO
DE CLAVE DE PARTE DESCRIPCIÓN CANTIDAD
1 108699-01 Parrilla 1
2 901630-01 Estribos de la parrilla 2
3 108650-01 Platillo para cenizas 1
4 901713-01 Leño frontal 1
5 901111-01 Leño posterior 1
6 901102-01 Leño superior 1 1
7 901476-01 Leño superior 2 1
Page 14

4
INFORMACIÓN SOBRE LA GARANTÍA
GUARDE ESTA GARANTÍA
Modelo
No. de serie,
Fecha de compra
Indique siempre el modelo y los números de serie cuando se comunique con la fábrica.
Nos reservamos el derecho de enmendar estas especificaciones en cualquier momento y sin previo aviso. La única garantía aplicable es nuestra garantía
estándar por escrito. No otorgamos ninguna otra garantía, explícita ni implícita.
GARANTÍA LIMITADA
COMFORT GLOW FIRELOG MATE
DESA International garantiza que este producto está libre de defectos por un (1) año desde la fecha de la primera compra, siempre que el producto
haya sido instalado, usado y mantenido adecuadamente según todas las instrucciones correspondientes. Para hacer un reclamo bajo esta garantía,
se debe presentar la factura de venta o el cheque cobrado.
Esta garantía se otorga al comprador minorista original solamente. Esta garantía cubre el costo de la(s) pieza(s) requerida(s) para restaurar este
juego de leños a su condición de uso apropiado y una asignación de dinero para mano de obra cuando sea proporcionada por un Centro de Servicio
Autorizado DESA. La(s) pieza(s) cubierta(s) por la garantía DEBEN obtenerse a través de distribuidores autorizados de este producto y/o DESA
International, la cual proporcionará piezas de repuesto de fábrica originales. El no usar piezas de repuesto de fábrica originales invalida esta
garantía. El juego de leños DEBE ser instalado por un individuo cualificado en cumplimiento con todos los códigos locales e instrucciones
suministradas con la unidad.
Esta garantía no se aplica a las piezas que no estén en su condición original debido al uso y desgaste normales o piezas que hayan fallado o sufrido
daño debido a mal uso, accidentes, falta de mantenimiento apropiado o defectos causados por una instalación inadecuada. El viaje del técnico,
el costo del diagnóstico, la mano de obra, el transporte y todos los otros costos relacionados con la reparación de un juego de leños defectuoso
serán de responsabilidad del propietario.
EN LA MEDIDA MÁXIMA QUE LO PERMITA LA LEY DE LA JURISDICCIÓN QUE RIGE LA VENTA DE ESTE PRODUCTO, ESTA
GARANTÍA EXPRESA EXCLUYE CUALQUIERA Y TODAS LAS DEMÁS GARANTÍAS EXPRESAS Y LIMITA LA DURACIÓN DE
CUALQUIERA Y TODAS LAS GARANTÍAS IMPLÍCITAS, INCLUYENDO LAS GARANTÍAS DE COMERCIABILIDAD E IDONEIDAD
PARA UN PROPÓSITO PARTICULAR A UN (1) AÑO A PARTIR DE LA FECHA DE LA PRIMERA COMPRA; Y LA RESPONSABILIDAD
DE DESA INTERNATIONAL ESTÁ LIMITADA POR LA PRESENTE AL PRECIO DE COMPRA DEL PRODUCTO Y, POR LO TANTO,
DESA INTERNATIONAL NO SERÁ RESPONSABLE POR NINGÚN OTRO DAÑO INCLUYÉNDOSE LOS DAÑOS INDIRECTOS,
INCIDENTALES O EMERGENTES.
Algunos estados no permiten la limitación del tiempo de duración de una garantía implícita o la exclusión o limitación de daños incidentales o
emergentes, de manera que la limitación anterior de garantías implícitas o la exclusión o limitación de daños puede no ser aplicable en su caso.
Esta garantía le otorga derechos legales específicos y usted puede tener otros derechos que varían de estado a estado.
Para obtener información acerca de esta garantía escriba a:
INTERNATIONAL
2701 Industrial Drive
P.O. Box 90004
Bowling Green, KY 42102-9004
www.desatech.com
Para obtener más información, visite www.desatech.com
Para obtener más información, visite www.desatech.com
108649
Page 15

108649
Page 16

INTERNATIONAL
2701 Industrial Drive
P.O. Box 90004
Bowling Green, KY 42102-9004
www.desatech.com
108649 01
NOT A UPC
PAS UN CUP
NO ES UN UPC
108649-01
Rev. A
06/01
108649
 Loading...