

Page 1
WARNING! IF THE INFORMATION IN THIS MANUAL IS NOT FOLLOWED EXACTLY, A FIRE MAY
Comfort Home Products, Inc
FOR YOUR SAFETY
ANSI/UL 1278. MOVABLE AND WALL-OR CEILING HUNG ELECTRIC ROOM HEATERS
COMFORT GLOW PHONE NUMBER (814) 643-1775
http://www.worldmkting.com
Model:
Made in China
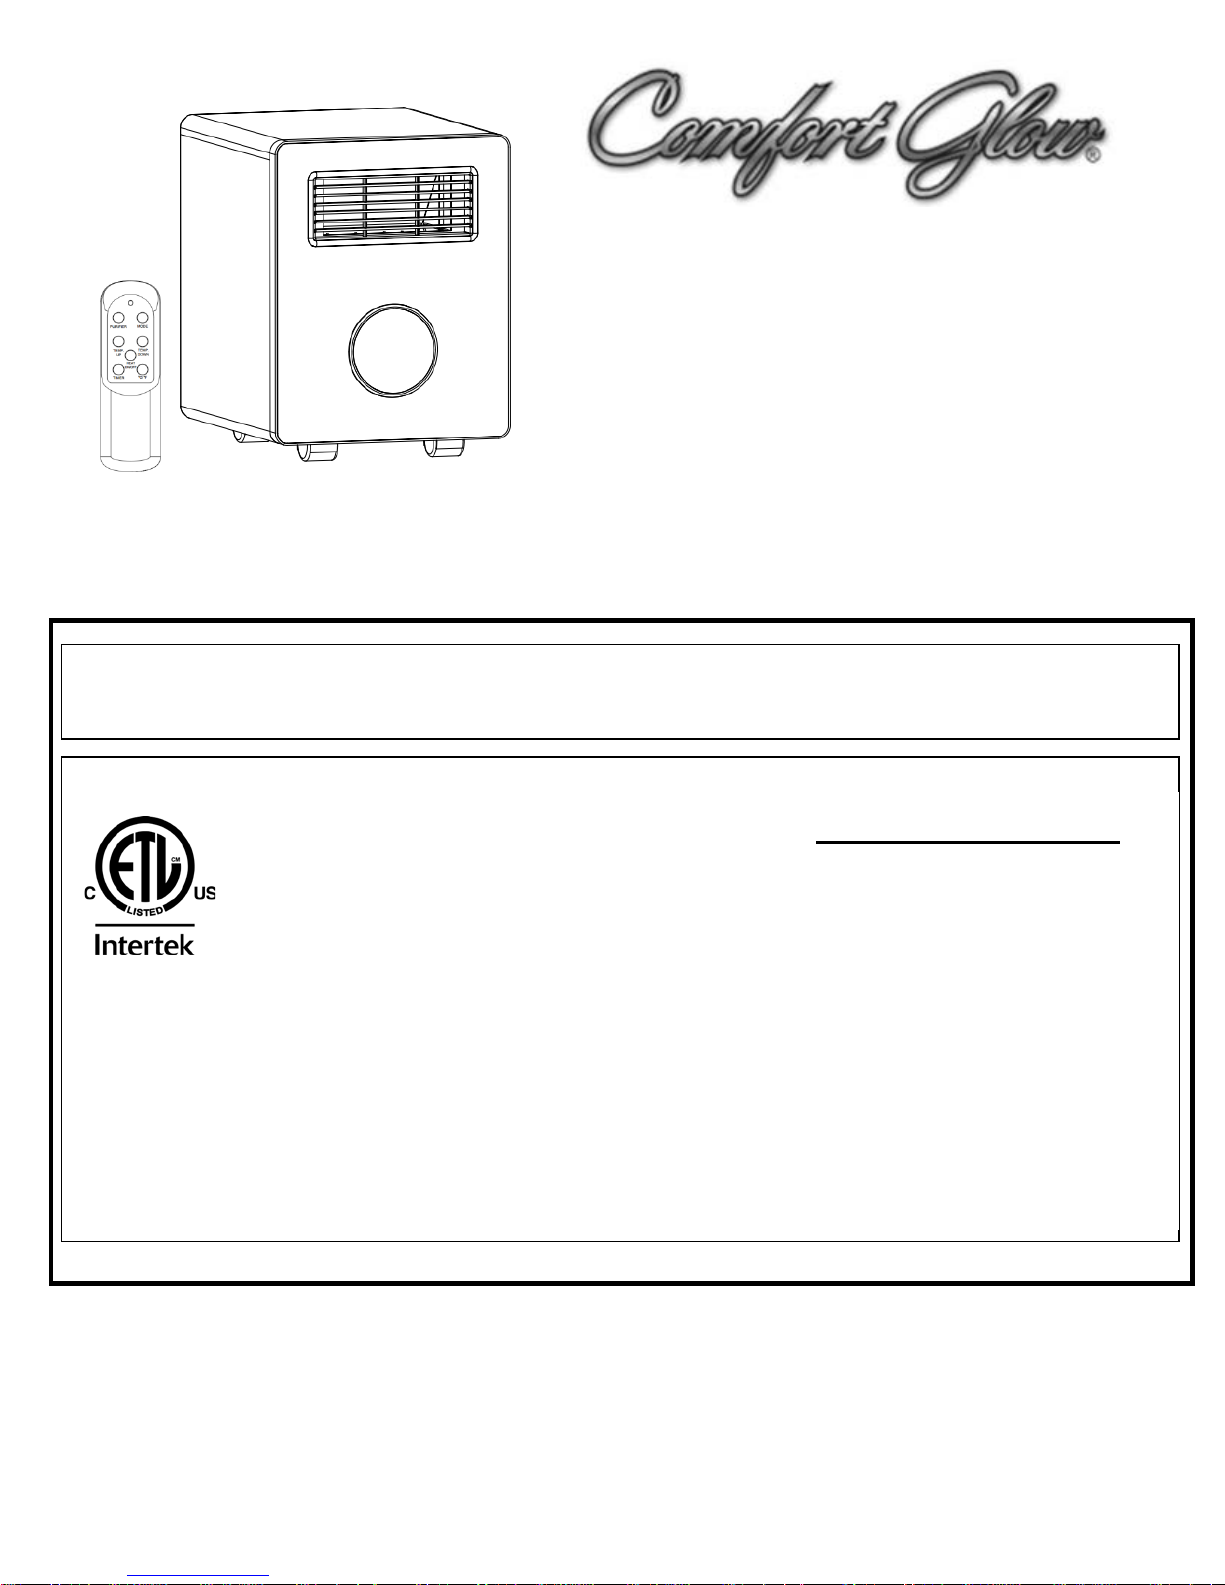
CDE4800
Advanced PTC
Heating System
Electric Heater
Owner's Manual
RESULT CAUSING PROPERTY DAMAGE, PERSONAL INJURY OR LOSS OF LIFE.
CUSTOMER: PLEASE RETAIN THIS MANUAL FOR FUTURE USE
12256 William Penn Hwy, Suite A
Huntingdon, PA 16652
DO NOT STORE OR USE
GASOLINE OR OTHER
FLAMMABLE VAPORS OR
LIQUIDS IN THE VICINITY OF
THIS OR ANY OTHER
ELECTRIC APPLIANCE
Page 2

Thank you for purchasing a Comfort Glow portable comfort furnace. For your
safety and to insure that you get the full benefit of this powerful heater please
take the time to read this guide completely BEFORE using your heater.
Table of contents, Specifications, Safety features 2
Important Safety Instruction 3
What to expect, Results, Suggestions and Helpful Hints 4
Operation, Maintenance 5-10
Troubleshooting, Hepa Replacement 11
Warranty Guidelines 12-13
SPECIFICATIONS
Features: Electrical:
Remote Control Voltage 120V 60Hz
Electronic Thermostat Power Consumption:
High & Low Heat Settings High: 1500w Low: 750w
Timer ( +5% - 10% tolerance)
Cool Touch
Easy Roll Casters
1 Year Warranty
SAFETY FEATURES
Tip-Over Safety Feature
This heater is equipped with a tip-over safety feature. Once the heater is tipped over, an internal switch will
automatically shut the heater off. Once the heater is restored an upright position, the heater will reset. To continue
operation, turn on the heater using the supplied remote control or the control panel on the heater.
Overheat Safety Feature
This heater is equipped with a overheat safety feature. When the heaters internal components reach a certain
temperature that could cause overheat and possible fire, the heater will automatically shut off.
2
Page 3

INTENDED USE: This product is intended only for indoor household or office use.
IMPORTANT SAFETY INSTRUCTIONS
It is NOT intended for industrial or commercial use. DO NOT USE OUTDOORS
PLEASE READ AND SAVE THESE IMPORTANT SAFETY INSTRUCTIONS when using electrical appliances, basic
precautions should always be followed to reduce the risk of fire, electrical shock, and injury to persons including
the following:
1. Read all instructions before using this heater.
2. This heater is hot when in use. To avoid burns, do not let bare skin touch hot surfaces. If provided, use handles
when moving this heater. Keep combustible materials, such as furniture, pillows, bedding, papers, clothes and
curtains at least 3 feet (0.9m) from the heater.
3. Extreme caution is necessary when any heater is used by or near children, pets or invalids and whenever the
heater is left operating unattended.
4. Use your heater only in dry environments. This heater is not intended for use in bathrooms, laundry areas and
similar indoor locations. Never locate the heater where it may fall into a bathtub or other water container. Do not
use your heater outdoors. Do not use near sinks, swimming pools or other damp areas such as flooded basements,
garages, etc or anyplace where the heater could come in contact with water.
5. A heater has hot and arcing parts inside. Do not use in areas where gasoline, paint, or flammable liquids are
used or stored.
6. To disconnect heater, first turn controls to off, then remove plug from outlet. Always unplug the heater when
not in use.
7. Always unplug heater by removing the plug end from the outlet when not in use. Never unplug by pulling on
the cord as this can damage the power cord.
8. Do not operate any heater with a damaged cord or plug or after the heater malfunctions, has been dropped or
damaged in any manner. Return heater to authorized service facility for examination, electrical or mechanical
adjustment or repair.
9. Always plug heaters directly into a wall outlet/receptacle. Never use with an extension cord or relocatable
power strip.
10. Do not run cord under carpeting. Do not cover cord with throw rugs, runners, or similar coverings. Arrange
cord away from traffic area and where it will not be tripped over.
11. It is normal for the plug to feel warm to touch; however, a loose fit between the AC outlet (receptacle) and
plug may cause overheating and distortion of the plug. Contact a qualified electrician to replace loose or worn
outlet.
12. Do not insert or allow foreign objects to enter any ventilation or exhaust opening as this may cause an
electrical shock or fire, or damage the heater.
13. To prevent a possible fire, do not block air intakes or exhaust in any manner. Do not use on soft surfaces, like a
bed, where openings may become blocked.
14. Do not operate heater with any safeguards removed.
15. Use this heater only as described in this manual. Any other use not recommended by the manufacturer may
cause fire, electric shock, or injury to persons.
16. This heater draws 12.5 amps during operation. To prevent overloading a circuit, do not plug the heater into a
circuit that already has other appliances working.
17. Do not use outdoors.
18. Save these instructions.
3
Page 4

WHAT TO EXPECT FROM YOUR COMFORT FURNACE
The Comfort Glow portable comfort furnace is not intended to replace your central heating system nor is it intended to
be a sole heating source. Your comfort furnace is intended as a supplemental zone heating source. The goal of this
heater is to reduce the total home heating costs by allowing you to turn back the central heat system and provide
supplemental heat to the rooms being occupied.
The Comfort glow portable comfort furnace is not an instant room heater. It may take 24-36 hours for your heater to
reach maximum efficiency. The portable comfort furnace will warm all the elements in the area being heated (furniture,
floors, walls etc.) This will take some time based on the size of the area, insulation ambient temperature and many
other factors but once these elements are heated they will help to maintain a more steady room temperature and less
on/off cycling of your central heat. You will notice that the comfort furnace does not rely on high speed flow of air. This
sensitive flow is by design. The purpose of the built in circulator is to move a large volume
hot/cold spots in the area being heated, and thereby promoting a more consistent room temperature.
of air without creating
About your Heater:
Target Temperature function: Heater will operate until target temperature is reached at heaters location. Note: This
may vary from the room temperature.
Timer Function: User can program heater to turn-on or turn-off in 2-12 hours.
Cool down Cycle: fan will continue to operate for approximately 3 minutes after heating elements have turned off.
Safety Devises: See page 2
For Best Heating Results please follow these suggestions:
1) Close doors to areas you do not wish to heat.
2) Locate a three prong outlet along an interior wall if possible. Position the heater so that the warm air can blow
unobstructed across the room towards the exterior walls.
3) Check your windows and doors for the infiltration of cold air and insulate as needed to avoid heat loss. Rapid
heat loss will minimize the effectiveness of your Infrared heater as it would any conventional type heater.
4) Keep the area around the heater free of obstructions to insure maximum airflow. Keep electrical cords,
drapery, furniture, and other combustibles 3 feet (0.9 M) away from the front of the heater and away from the
sides.
5) Avoid locating your heater in high traffic areas or in direct sunlight.
6) Avoid locating your heater near your central heating thermostat.
4
Page 5
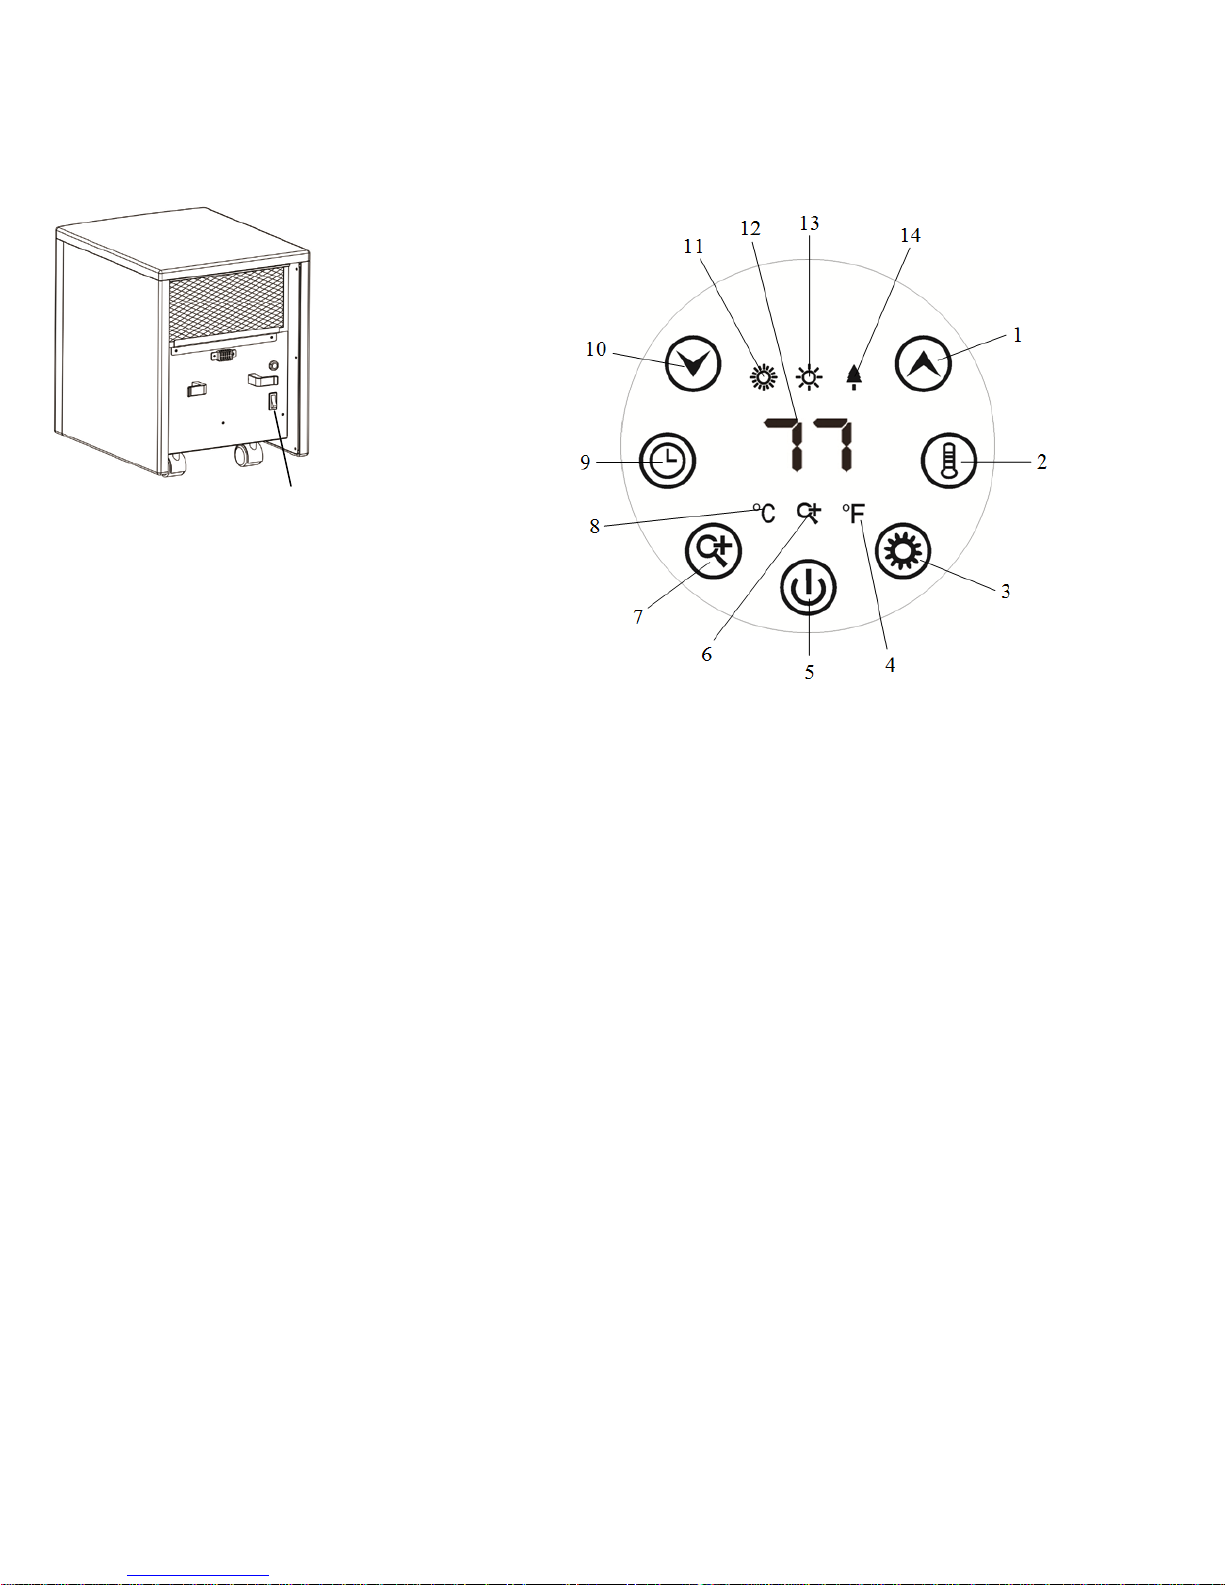
NOTE: Main Power switch is on rear of applaince.
Control Panel
Main Power Switch
1. Temp up button: To increase desired temperature.
2. °C/°F Button: For Selecting Fahrenheit or Celsius display.
3. Mode button: To select between High, Low, and Eco mode.
4. Fahrenheit indicator: Will be lit when temperature displayed is in Fahrenheit.
5. ON/OFF button: Powers the display on and off.
6. Purifier Mode indicator: Will be lit when Purifier mode is engaged.
7. Purifier button: To engage Purifier mode.
8. Celsius indicator: Will be lit when temperature displayed is in Celsius.
9. Timer button: Used for setting timer and to adjust time value for the timer.
10. Temp down button: To decrease desired temperature.
11. High Mode indicator: Will be lit when High Heat mode is engaged.
12. Digital display: Indicates set room temperature or time (value of the timer).
13. Low Mode indicator: Will be lit when Low Heat mode is engaged.
14. Energy-saving mode: Will be lit when energy-saving mode is engaged.
5
Page 6
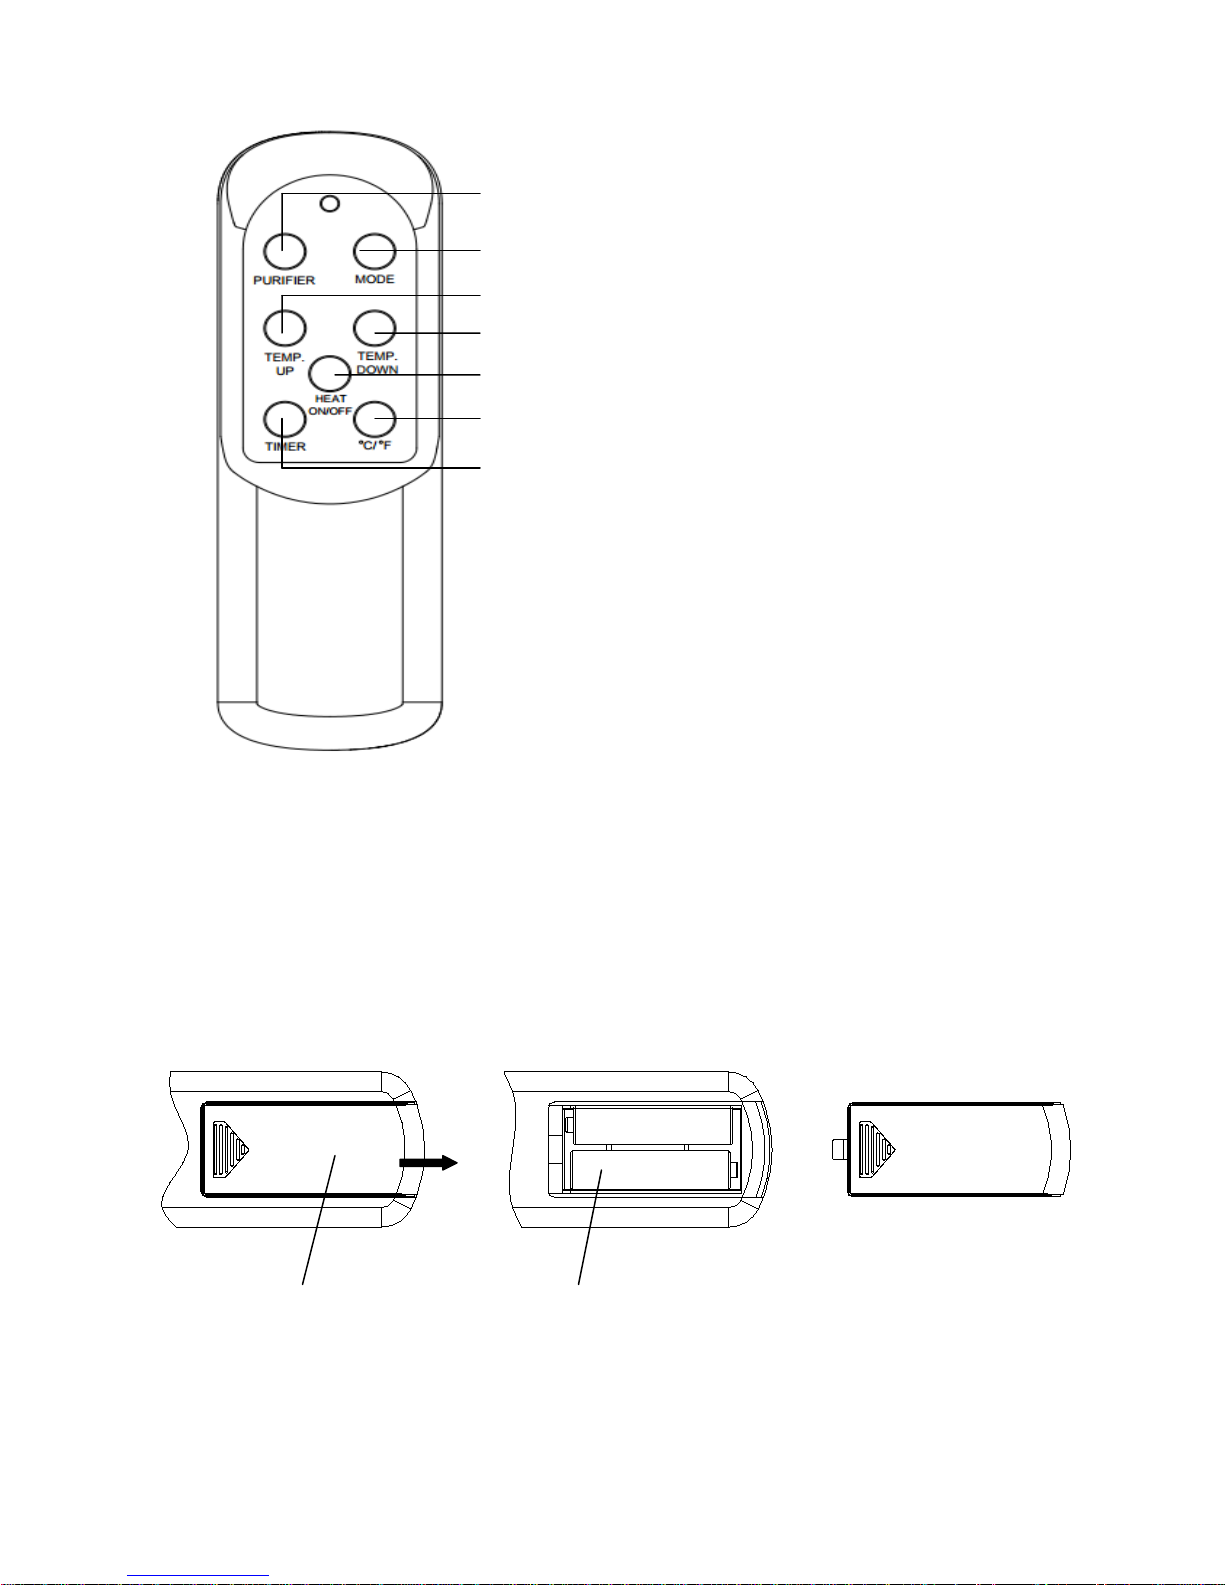
REMOTE OPERATION
PUSH
Cover
Battery
Pruifier: Sets Purifiere on or off
Mode Selector
Temp up: Increase Set temperature
Temp down button: Decrease Set temperature
Heat On/Off: To power the display
Fahrenheit / Celsisus selector
Timer button: To enable and set timer
PREPARATION
Place the heater on a firm, level surface and plug into a grounded 120V 60Hz power outlet. And turn on the
power switch in the rear of the unit. Only operate heater in upright position with caster wheels attached.
Insert 2 AAA batteries into the remote control before using (Batteries Not Included)
6
Page 7

Helpful Tips:
Turn the heater on by pressing the Power button on the control
High Mode uses 1500W; Low Mode uses 750W. ECO mode is an
Appliance Remote
Appliance Remote
1) If heater will not turn on, check main power switch. Rear of Appliance.
2) Check air filter, clean as needed.
3) If your room has minimal heat loss, and is closed off to cooler areas you may be able to reduce the cost of
operation by setting the heater to low after the room has reached a comfortable temperature.
4) If remote is lost you can still operate the heater manually.
5) Do not drag your heater across the room by pulling it by the cord. Store cord on cord wrap when not in use.
6) Use the timer to turn off your heater and save energy
7) Cool Down feature: When the thermostat cycles “off” or when you turn the unit off the fan will continue to run
for a few moments to finish distributing the heat and to cool down the heaters heating elements.
OPERATING INSTRUCTIONS
1. Turn Main Power switch on rear of appliance to On.
2. Start and select working mode
panel or by pressing the Heat On/Off button on the supplied
remote control.
Once power is off, heating element will stop working at first. Fan
will prolong working for 3 min to emit plenty of heat inside. This
mark will indicate running during the 3 min.
Select a heat Mode
Press the HEAT button to toggle between the two heat settings
Auto and High.
Economic Energy Saving Function. When ECO mode is chosen, the
heater will manage itself from less to more heating power (watts)
in an attempt to maintain a constant warm 68°(20°).
7
Page 8

The Fahrenheit indicator LED will light , when the temperature
Appliance Remote
Appliance Remote
Appliance Remote
3. Setting Desired Temperature
Only in Auto heat-up can setting temperature be performed.
Adjust the desired temperature by pressing the Up/Down arrows on
the control panel or remote control.
Set temperature indication varies from 59° F to 86° F, or from
15° C to 30°C. Once you have chosen the desired temperature,
the heater will remain on until the room temperature increases
to the ser temperature. The heater will cycle on and off to
maintain the desired room temperature.
4. Setting Purifier
Press C/F button to change the display temperature between
Fahrenheit and Celsius.
is displayed in Fahrenheit.)
The Celsius LED will light, when the temperature is displayed in
Celsius.
Open or close the purification function.
8
Page 9
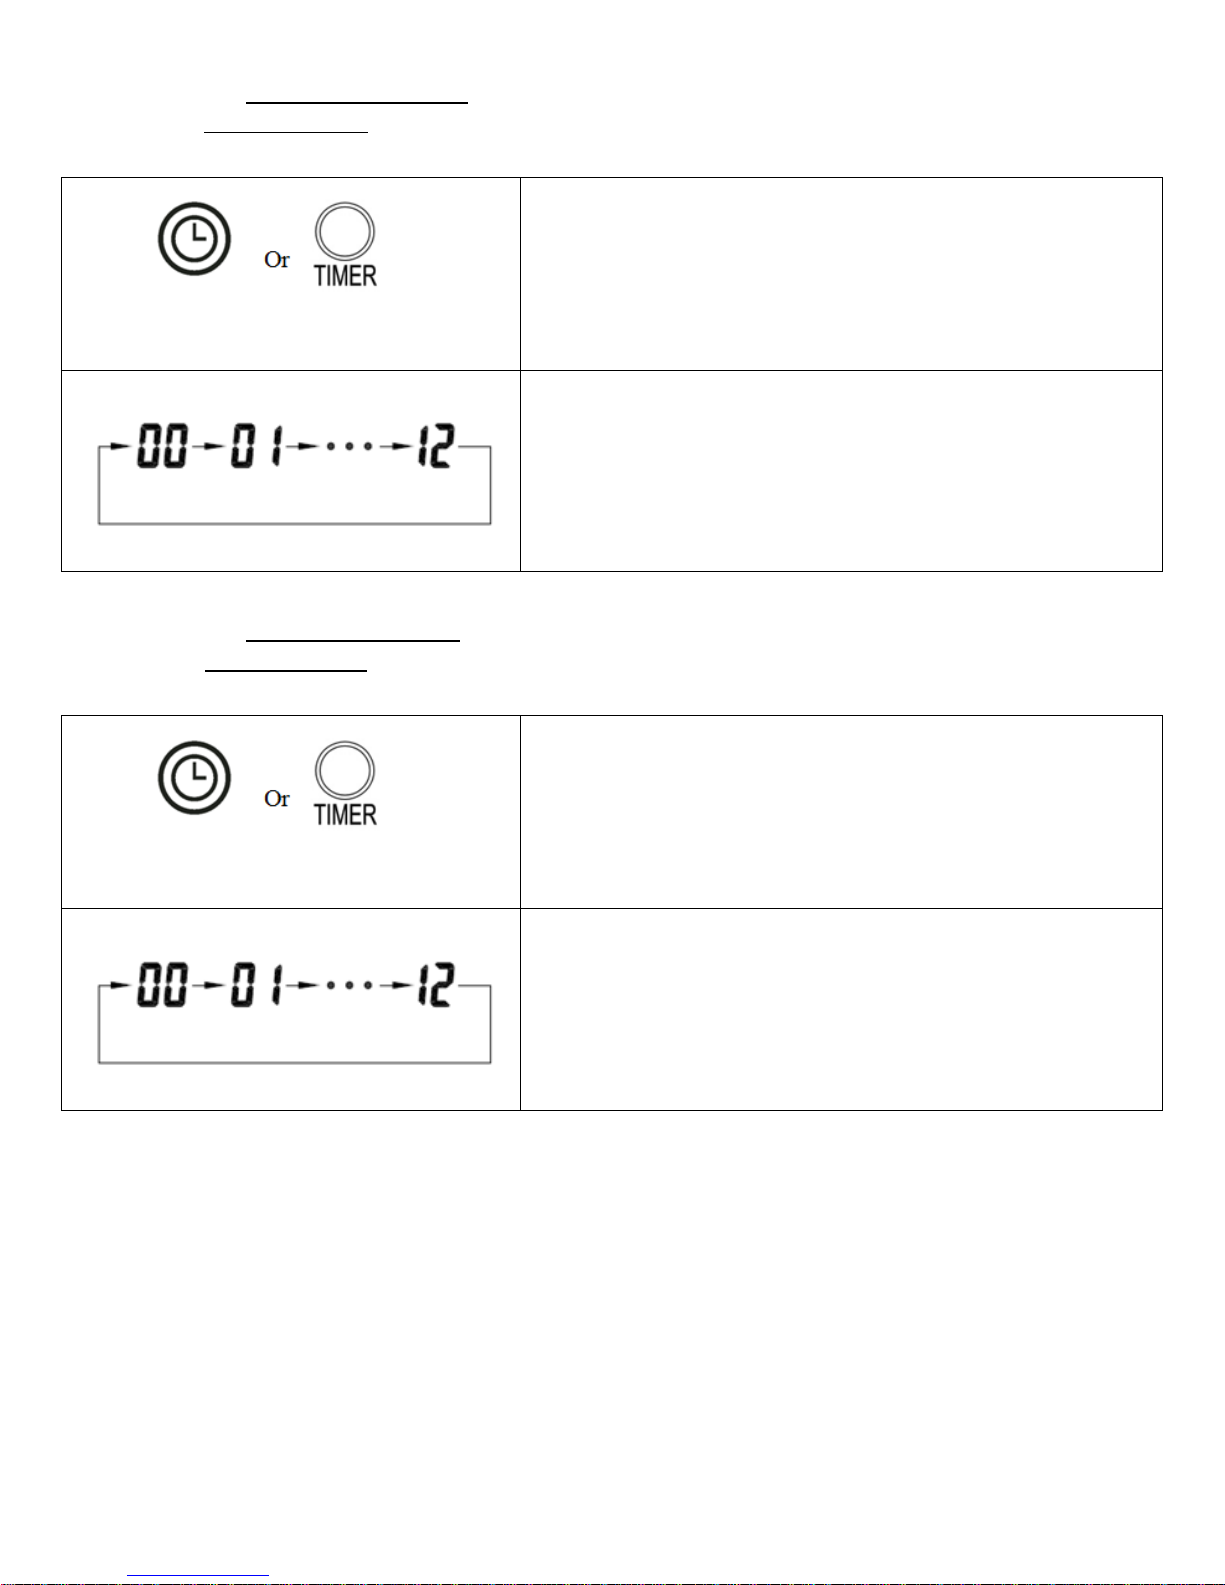
5. Setting the POWER OFF TIMER Function
Appliance Remote
Appliance Remote
Note: The Power-Off-Timer Function will allow for the heater to power OFF after a certain set time, and can
only be set while the heater’s display is in the “On” position.
Turn the heater to the “On” position .Press the Timer button
on the heater’s control panel or the remote.
The digital display changes from the “temperature” to the
“hours” option for the timer. Continue to press the timer
button to change the number of hours you would like the
heater to run before powering itself off .The hour options for
the timer are from 0 to 12 hrs. (in 1 hr increments).
6. Setting the POWER ON TIMER Function
Note: The Power-On-Timer Function will allow for the heater to power ON after a certain set time, and can
only be set while the heater’s display is in the “Off” position.
Turn the heater to the “OFF” position .Press the Timer button
on the heater’s control panel or the remote.
The digital display shows the “hours” option for the timer.
Continue to press the timer button to change the number of
hours you would like the heater’s internal clock to count down
before powering itself on .The hour options for the timer are
from 0 to 12 hrs. (in 1 hr increments).
9
Page 10
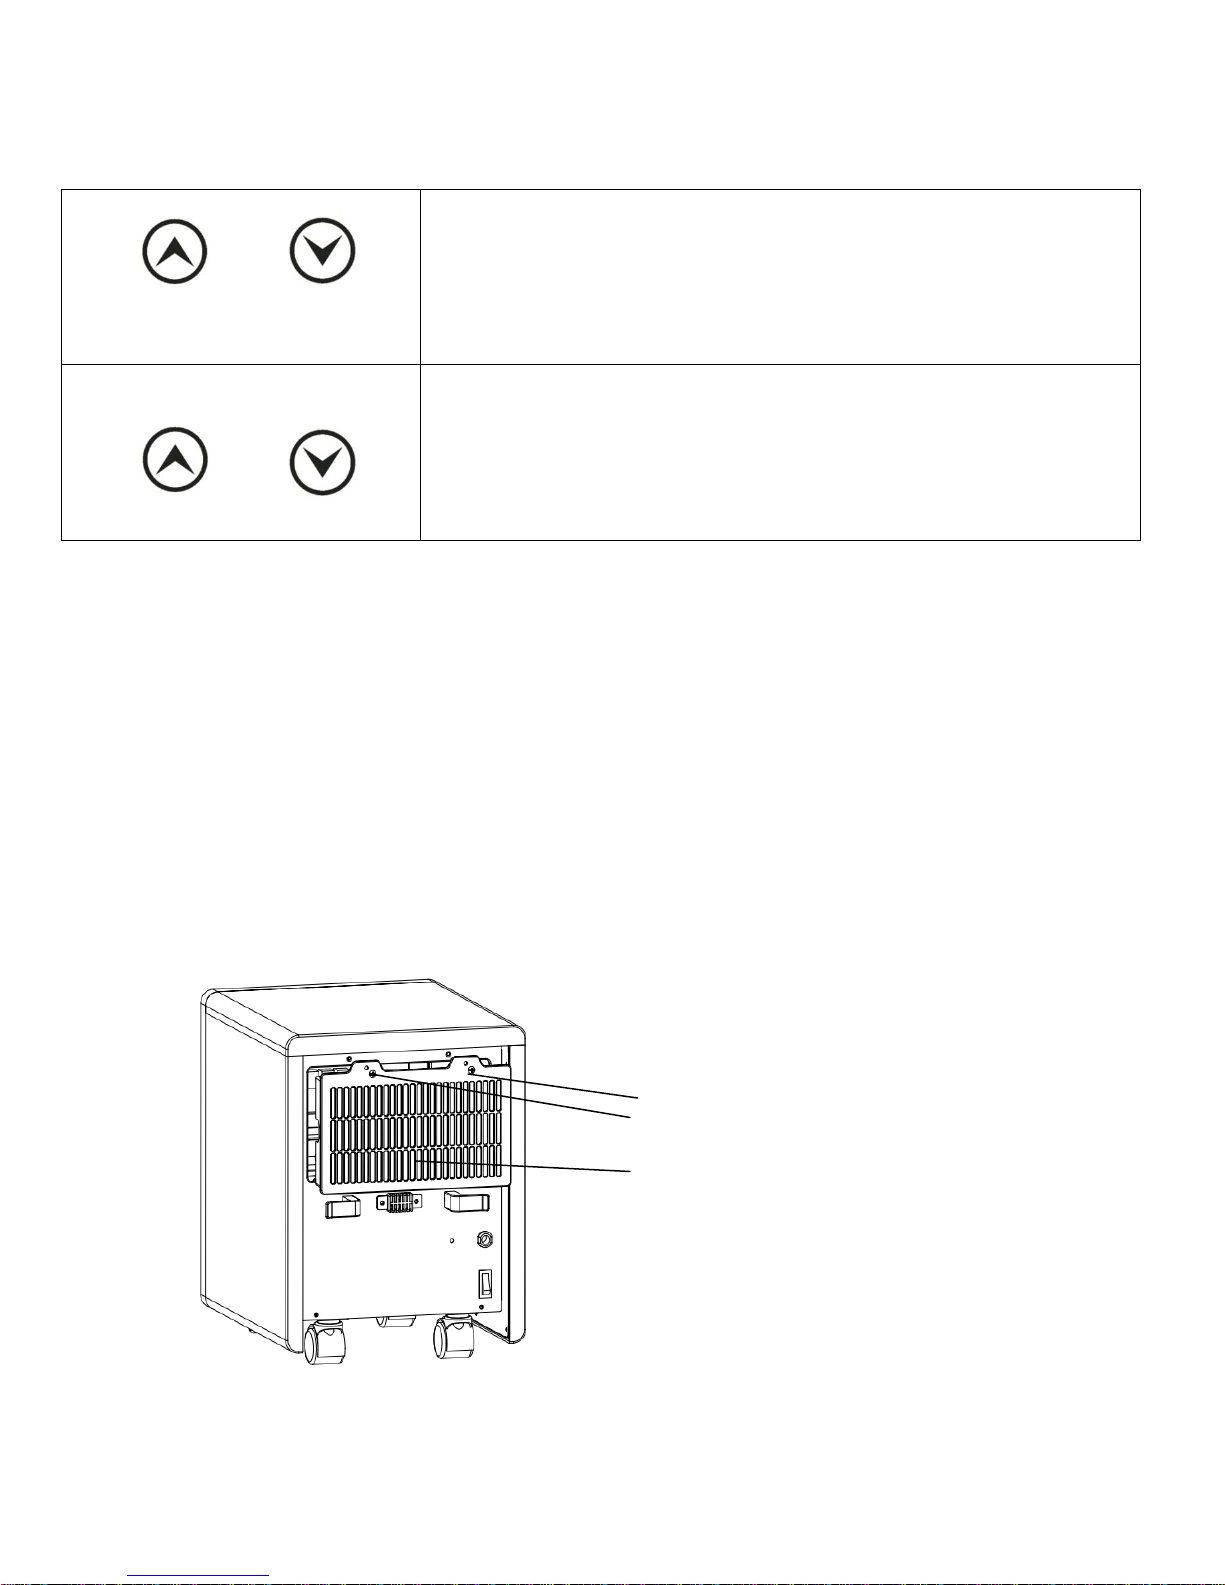
7. Setting Electro lock
Remove Bracket screws (2X)
Remove Air Filter
The Electro Lock can help avoid the heater from being accidentally engaged by children. The locking
mechanism can be set in both the ON and OFF modes.
Press Temp Up and Temp Down buttons at the same time for 3
seconds. Locking is complete when you hear a beep. When locked, the
And
And
functions of the control panel and remote will be locked for use.
When you need to unlock it, press Temp Up and Temp Down buttons
at the same time for 3 seconds. You will hear a beep .The control panel
and remote control will become functional again.
MAINTENANCE
1. Turn off the power switch in the rear of the unit.
2. Unplug the unit and let it cool completely.
3. To keep the heater clean, the outer shell may be cleaned with a soft, damp cloth. You may use a mild
detergent if necessary. After cleaning, dry the unit with a soft cloth. CAUTION: DO NOT let liquid enter
the heater.
4. DO NOT use alcohol, gasoline, abrasive powders, furniture polish, or rough brushes to clean the heater.
This may cause damage or deterioration to the surface of the heater.
5. DO NOT immerse the heater in water.
6. Wait until the unit is completely dry before use.
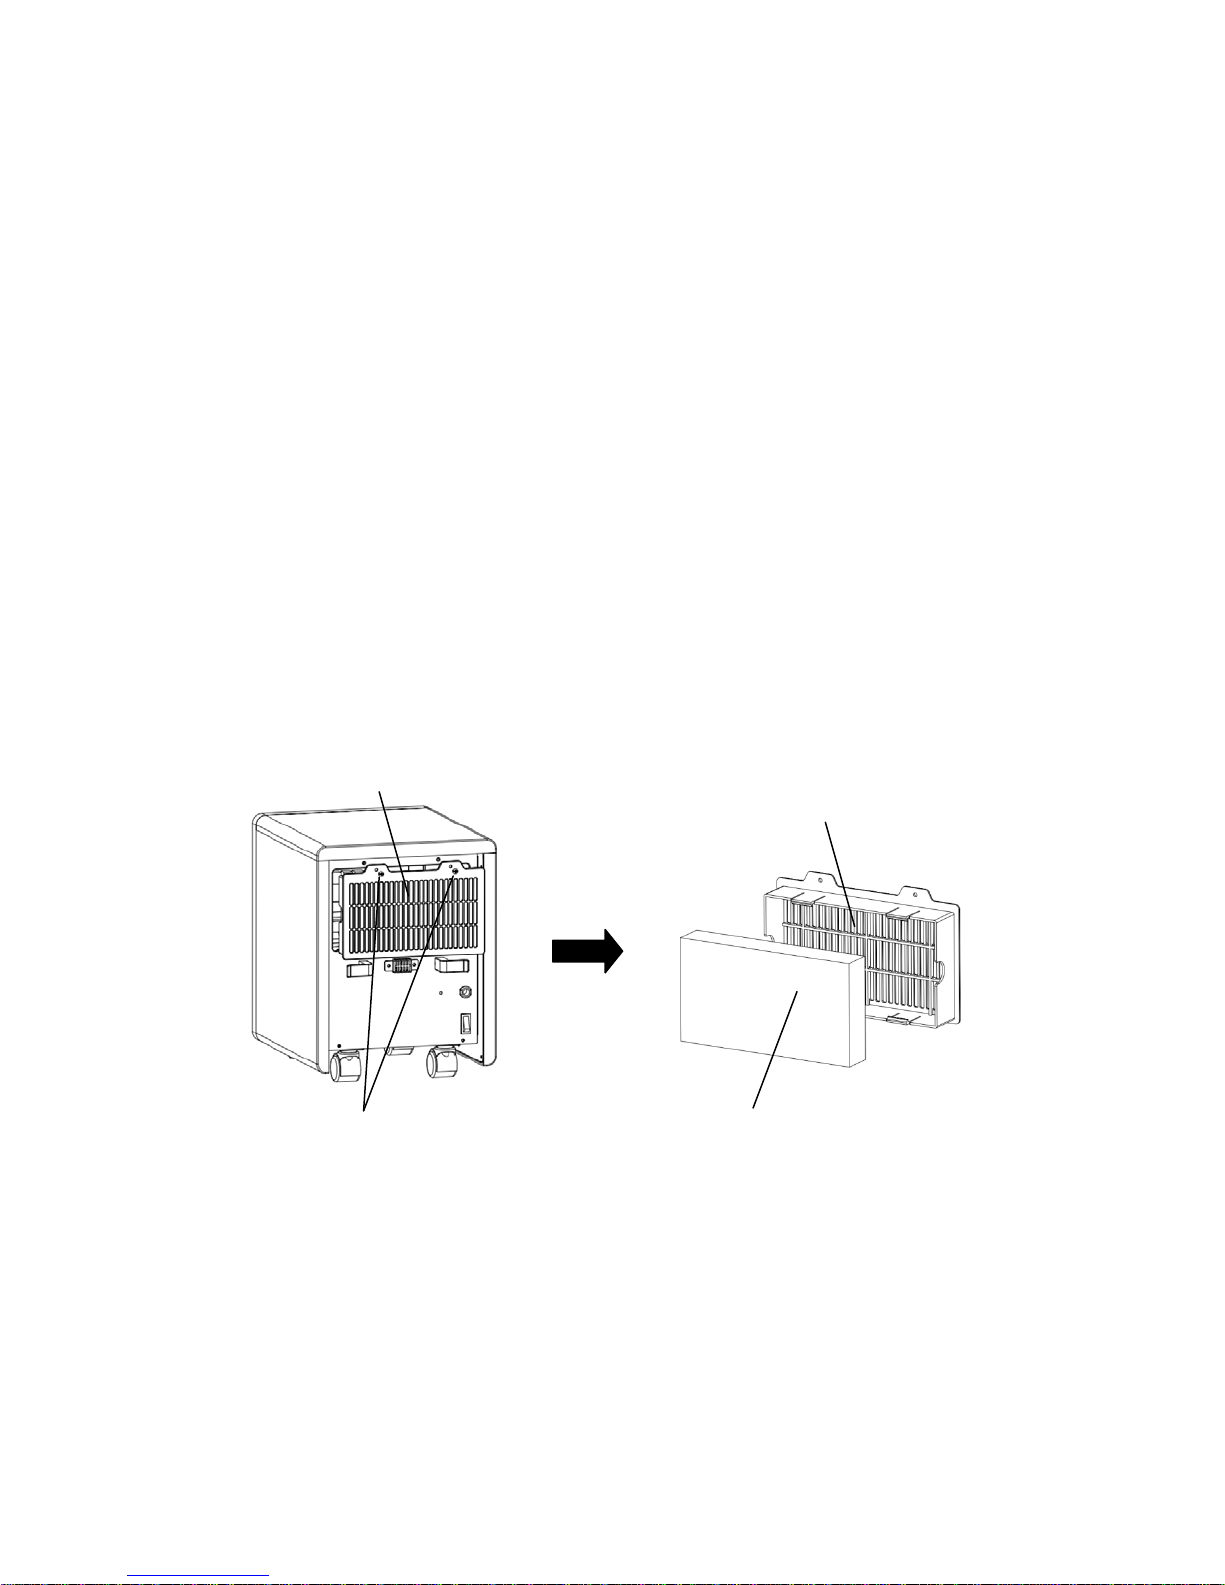
7. Air filter needs cleaning after used 3 months of use. Please take off the filter with the 2 steps in the
drawing below. Flush and clean the filter with water, Then, dry it out and re-assemble.
10
Page 11
TROUBLESHOOTING
Remove Air filter
Remove bracket screws (2X)
HEPA
Air inlet hood
If the heater will not operate, please check the following before seeking repair advice:
1. Check if the power cord is plugged into an electrical outlet, if not, plug in.
2. Check if electricity to the main power switch (in the back) is working.
3. Check to see if the battery on the remote is placed correctly, undamaged.
NOTE: For the heater to function properly, the desired temperature on the heater must be set a few
degrees higher than the temperature in the room. If the seems to not be heating, increase the desired
temperature on the heater to engage the heat elements.
HEPA FILTER REPLACEMENT
1.Remove 2 bracket screws, push up and remove the air filter.
2.Take off the HEPA filter in air filter.
3.Insert new HEPA filter and put air filter back to unit, tighten the 2 screws.
11
Page 12

LIMITED WARRANTY:
A limited warranty is extended to the original purchaser of this heater and warrants against malfunction due to
manufacturing defects for a period of (1) one year from the date of retail purchase. Please read and follow all details
noted below.
CLAIMS HANDLED AS FOLLOWS:
- DO NOT RETURN TO PLACE OF PURCHASE
- Contact our Customer Service Department at 1-800-776-9425. You must have the model number, serial
number and date of purchase.
- They will provide you with further instructions, which may include replacement parts, repair or replacement
at our option.
CALL 1-800-776-9425 FOR SERVICE (9AM-6PM MON.-FRI.) or EMAIL US AT info@worldmkting.com
DUTIES OF THE OWNER:
This heating appliance must be operated in accordance with the written instructions furnished with this heater. This
warranty shall not excuse the owner from properly maintaining this heater in accordance with the written instructions
furnished with this heater. A bill of sale, canceled check or payment record must be kept to verify purchase date and
establish warranty period. Original carton should be kept in case of warranty return of unit.
WHAT IS NOT COVERED:
1. Damage caused by misuse or use contrary to the owner’s manual and safety guidelines.
2. Damage caused by a lack of normal maintenance.
3. Repair by an unauthorized person.
4. Damage caused by connection to an improper voltage.
5. Damaged caused by use outdoors.
12
Page 13

LIMITATIONS:
This warranty does not imply or assume any responsibility for consequential damages that may result from the
use, misuse, or the lack of routine maintenance of this heating appliance. A cleaning fee and the cost of parts
may be charged for appliance failures resulting from lack of maintenance. This warranty does not cover claims,
which do not involve defective workmanship or materials. FAILURE TO PERFORM GENERAL MAINTENANCE
(INCLUDING CLEANING) WILL VOID THIS WARRANTY.
THIS LIMITED WARRANTY IS GIVEN TO THE PURCHASER IN LIEU OF ALL OTHER WARRANTIES, EXPRESSED OR
IMPLIED, INCLUDING BUT NOT LIMITED TO THE WARRANTIES OF MERCHANTABILITY OF FITNESS FOR A
PARTICULAR PURPOSE. THE REMEDY PROVIDED IN THIS WARRANTY IS EXCLUSIVE AND IS GRANTED IN LIEU OF
ALL OTHER REMEDIES. IN NO EVENT WILL WORLD MARKETING OF AMERICA BE LIABLE FOR INCIDENTAL OR
CONSEQUENTIAL DAMAGES.
Some states do not allow limitations on how long an implied warranty lasts, so the above limitation may not
apply to you. Some states do not allow the exclusion or limitation of incidental or consequential damages so
the above limitation or exclusion may not apply to you.
For your record, staple your sales receipt to this manual and record the following
DATE OF PURCHASE:
PLACE OF PURCHASE:
SERIAL NUMBER:
MODEL NUMBER:
Register your warranty at www.worldmkting.com
Printed in China
13
Page 14

¡ADVERTENCIA! SI LA INFORMACIÓN CONTENIDA EN ESTE MANUAL no se sigue
PERSONALES O LA MUERTE.
PARA SU SEGURIDAD
Comfort Home Products, Inc
COMFORT GLOW PHONE NUMBER (814) 643-1775
ANSI/UL 1278. MOVABLE AND WALL-OR CEILING HUNG ELECTRIC ROOM HEATERS
Hecho en China
Modelo:
radiador eléctrico
CDE4800
avanzada PTC
sistema de calefacción
Instrucciones de instalación y el Manual de Propietario
estrictamente, puede ocasionar un incendio, causando daños materiales, LESIONES
12256 William Penn Hwy, Suite A
Huntingdon, PA 16652
NO utilice ni almacene
gasolina u otro s líquidos
inflamables cerca de este o
CUALQUIER OTRO
APARATO
http://www.worldmkting.com
El INSTALADOR: No DESECHE ESTE MANUAL - HOJA PARA el PROPIETARIO CLIENTE: RETENGA POR FAVOR ESTE MANUAL
PARA
14
Page 15

Gracias por comprar un Resplandor de Consuelo horno portátil de consuelo. Para su
seguridad y para asegurar que consigue el beneficio lleno de esta calentadora poderosa
toma por favor el tiempo de leer esta guía completamente ANTES QUE cante su calentadora.
Tabla de características de seguridad de contenidos, especificaciones, 15
Instrucciones importantes de seguridad 16
Qué esperar, resultados, sugerencias y consejos útiles 17
Operación, mantenimiento 18-23
Resolución de problemas, reemplazo Hepa 24
Directrices de garantía 25-26
ESPECIFICACIONES:
Características: Eléctrica:
control Remoto Voltaje120V 60Hz
Termostato electrónico Consumo De Energía:
High & Low configuraciones de temperatura High: 1500w Low: 750w
Reloj ( +5% - 10% tolerance)
frío al tacto
Fácil Rollo Ruedas
1 año de garantía
CARACTERÍSTICAS DE SEGURIDAD
Característica de seguridad de volcadura
Este calefactor está equipado con un dispositivo de seguridad de la volcadura. Una vez que el calentador se
vuelca, un interruptor interno apagará automáticamente el calentador. Una vez que el calentador se restaura
una posición vertical, el calentador se restablecerá. Para continuar la operación, encienda el calentador
usando el control remoto suministrado o el panel de control en el calentador.
Característica de seguridad de sobrecalentamiento
Este calefactor está equipado con un dispositivo de seguridad de sobrecalentamiento. Cuando los
calentadores componentes internos alcancen una temperatura determinada que podría causar
sobrecalentamiento y posibles incendios, el calentador se apaga automáticamente.
15
Page 16

USO DESTINADO
INSTRUCCIONES IMPORTANTES
Este producto es pensado sólo para interior de la casa o el uso de la oficina. No es pensado para el valor
industrial ni el uso comercial. No UTILICE FUERA
LEA POR FAVOR Y SALVO ESTAS INSTRUCCIONES IMPORTANTES de SEGURIDAD cuando se usa
electrodomésticos, precauciones básicas siempre deben ser seguidas para reducir el riesgo del fuego, de golpe
eléctrico, y de la herida a personas, inclusive lo Siguiente:
. Lea todas las instrucciones antes de utilizar esta calentadora.
1
2. Esta calentadora tiene calor cuando en el uso. Para evitar quemaduras, no permiten toque descubierto de piel
superficies calientes. Si proporcionado, asideros de uso al mover esta calentadora. Mantenga materiales combustibles,
como muebles, ropa de cama de almohadas, los papeles, la ropa y las cortinas por lo menos 3 pies (0,9) de la
calentadora.
3. El cuidado extremo es necesario cuando cualquier calentadora es utilizada por o cerca de niños, los animales favoritos
o los inválidos y siempre que la calentadora sea dejada operando desatendido.
4. Utilice su calentadora sólo en ambientes secos. Esta calentadora no es pensada para el uso en cuartos de baño, áreas
de ropa sucia y ubicaciones interiores semejantes. Nunca sitúe la calentadora donde puede caerse en una bañera u otro
contenedor de agua. No utilice su calentadora fuera. No utilice cerca fregaderos, las albercas ni otras áreas húmedas
como sótanos inundados, los garajes, etc ni en algún lugar donde la calentadora podría entrar contacto con agua.
5. Una calentadora tiene caliente y las partes de arcing adentro. No utilice en áreas donde gasolina, la pintura, ni
líquidos flamables son utilizados ni son almacenados.
6. Para desconectar calentadora, primero controles de vuelta a lejos, el quita tapón de la salida. Siempre desenchufe la
calentadora cuando no en uso.
7. Siempre desenchufe calentadora quitando el fin de tapón de la salida cuando no en uso. Nunca desenchufe tirando de
la cuerda como esto puede dañar el cable de alimentación.
8. No opere ninguna calentadora con una cuerda ni el tapón dañados ni después de que la calentadora falle, haya sido
dejada caer o ha sido dañada en ninguna manera. Regrese calentadora a la facilidad autorizada del servicio para el
examen, ajuste reparación eléctricos o mecánicos.
9. Siempre tape calentadoras directamente en un salida/receptáculo de pared. Nunca utilice con un alargador ni la tira
del poder de relocatable.
10. No corra cuerda bajo alfombrar. No cubra cuerda con tapetes de tiro, con los corredores, ni con cubiertas
semejantes. Arregle cuerda lejos de área de tráfico y de donde no será tropezado sobre.
11. Es normal para el tapón para sentirse tibio tocar; sin embargo, un ataque flojo entre la salida de C.A. (receptáculo) y
el tapón puede causar recalentar y deformación del tapón. Contacte a un electricista calificado para reemplazar salida
floja o gastada.
12. No inserte ni permita objetos extranjeros entrar ninguna ventilación ni el escape que abren como esto puede causar
un golpe o el fuego eléctricos, o dañar la calentadora.
13. Para prevenir un fuego posible, no bloquea tomas de aire ni agota en ninguna manera. No utilice en superficies
suaves, como una cama, donde aperturas pueden llegar a ser bloqueadas.
14. No opere calentadora con cualquier medidas de protección quitado.
15. Utilice esta calentadora sólo como descrito en este manual. Cualquier otro uso no recomendado por el fabricante
puede causar el fuego, la descarga eléctrica, ni la herida a personas.
16. Esta calentadora dibuja 12.5 amperios durante operación. Para prevenir sobrecargando un circuito, no tapa la
calentadora en un circuito que ya tiene otros aparatos que trabaja.
17. No utilice fuer.
18. Salvo estas instrucciones
16
Page 17

QUÉ ESPERAR DE SU CALENTADOR COMFORT
El calentador Comfort Glow no tiene como objetivo reemplazar su sistema de calentamiento central ni pretende ser la
única fuente de calentamiento. Su calentador Comfort pretende ser una fuente de calentamiento suplementaria y de
zona. El objetivo del calentador es reducir los costos totales de calentamiento del hogar, al permitirle disminuir el uso
de su sistema de calentamiento central y proveyéndole calor suplementario a los cuartos que están siendo ocupados.
El calentador Comfort Glow no es un calentador instantáneo de cuarto. Puede tardar entre 24-36 horas para que su
calentador llegue a su máxima eficiencia. El calentador Comfort Glow portable calentará todos los elementos en el área
que está siendo calentada (muebles, pisos, paredes, etc.) Esto tomará tiempo dependiendo del tamaño del área,
temperatura de ambiente insulado, y muchos otros factores, pero una vez que estos elementos sean calentados,
ayudarán a mantener una temperatura en el cuarto consistente y disminuir el ciclo de prendido/apagado de su
calentador central. Notará que el calentador no depende de un flujo de aire rápido. Este flujo sensible es por diseño. El
propósito del circulados que contiene es mover grandes volúmenes de aire sin crear puntos calientes/fríos en el área
siendo calentada, promoviendo una temperatura consistente en el cuarto.
Acerca de su calentador:
Objetivo en función de la temperatura: calentador funcionará hasta que se alcanza la temperatura objetivo en lugar de
calentadores. Nota: Esto puede variar de la temperatura
Función de temporizador: El usuario puede programar el calentador encendido o apagado en 1-12 horas
Posición Eco: En este modo la temperatura alternará entre alto/bajo/apagado ajustes para mantener una temperatura
en el calentador de 20 ° C/68 ° F.
Enfriar el ciclo: ventilador seguirá funcionando para aproximadamente 3 minutos después elementos de calefacción se
han apagado
Los dispositivos de seguridad: Ver página 2
Para mejores resultados de calefacción por favor sigan estas sugerencias:
1) Cerrar las puertas a las áreas que usted no desea calor.
2) Localizar un enchufe de tres clavijas a lo largo de una pared interior si es posible. Coloque el calentador para que
el aire caliente puede volar sin obstáculos a través de la habitación hacia las paredes exteriores.
3) Comprueba tus ventanas y puertas para la infiltración de aire frío y aislar según sea necesario para evitar la
pérdida de calor. Pérdida de calor rápida reducirá la efectividad de su calentador infrarrojo como lo haría
cualquier calentador de tipo convencional.
4) Mantenga el área alrededor del calentador libre de obstrucciones para asegurar la máxima circulación de aire.
Mantenga los cordones eléctricos, cortinas, muebles y otros materiales combustibles 3 pies (0.9 M) de la parte
delantera del calefactor y lejos de los lados.
5) Evite colocar su calentador en áreas de alto tráfico o luz solar directa.
6) Evite colocar su calentador cerca de su termostato de calefacción central.
17
Page 18

NOTA: El interruptor de alimentación está en la parte posterior del artefacto.
Panel de control:
Main Power Switch
1. Botón de subir temp.: Para aumentar la temperatura deseada.
2. Botón °C/°F: Para seleccionar la pantalla de Fahrenheit o Celsius.
3. Botón de modo: Para seleccionar modo Alto, Bajo y Eco.
4. Indicador de Fahrenheit: Se iluminará cuando la temperatura se muestre en grados Fahrenheit.
5. Botón ON/OFF: Enciende o apaga pantalla.
6. Indicador de modo Purificador: Se iluminará cuando el modo Purificador esté activado.
7. Botón Purificador: Para activar el modo Purificador.
8. Indicador de Celsius: Se iluminará cuando la temperatura se muestre en grados Celsius.
9. Botón Temporizador: Se usa para establecer el temporizador y ajustar el tiempo del
temporizador.
10. Botón de bajar temp.: Para bajar la temperatura deseada.
11. Indicador de modo Alto: Se iluminará cuando el modo Alto esté activado.
12. Pantalla digital: Indica la temperatura del ambiente o el tiempo establecidos (valor del
temporizador).
13. Indicador de modo Bajo: Se iluminará cuando el modo Bajo esté activado.
14. Modo Ahorro de energía: Se iluminará cuando el modo Ahorro de energía esté activado.
18
Page 19

PUSH
Cubierta
Batería
PREPARACIÓN
Coloque el calefactor sobre una superficie firme y nivelada y enchufe en un tomacorriente con conexión a tierra
de 120V 60Hz. Y encienda el interruptor en la parte trasera de la unidad. Sólo operar calentador en posición
vertical con ruedas pivotantes adjunta. Inserte 2 baterías AAA en el control remoto antes de usar (pilas no
incluidas)
19
Page 20

Puntas útiles:
Presione el botón de encendido en el panel de control o en el
El modo Alto consume 1500 W; el modo Bajo consume 750 W. El modo
Aparato Remoto
Aparato Remoto
1) Si calentadora no prenderá, el cheque principal interruptor del poder
2) El filtro de aire del cheque, limpia como necesitado
3) Si su cuarto tiene pérdida mínima de calor, y es bloqueado a áreas más frías que usted puede poder reducir
el costo de operación poniendo la calentadora al punto más bajo después de que el cuarto haya alcanzado
una temperatura cómoda.
4) Si telemando le es perdido todavía puede operar la calentadora manualmente.
5) No arrastre calentadora a través del cuarto tirandolo por la cuerda
6) Utilice el reloj para apagar su calentadora y salvo energía
7) Enfríese característica: Cuando el termostato va en bicicleta "lejos" o cuando apaga la unidad el ventilador
continuará correr por unos momentos de terminar distribuir el calor y para enfriarse las calentadoras que
calientan elementos.
INSTRUCCIONES DE FUNCIONAMIENTO
1. Encienda el interruptor de alimentación en la parte posterior del artefacto.
2. Inicie y seleccione el modo de funcionamiento.
control remoto suministrado para encender el calefactor.
Una vez apagado, primeramente dejará de funcionar la
resistencia. El ventilador seguirá funcionando durante 3 minutos
para suministrar suficiente calor en el interior. Esta marca indicará
que seguirá funcionando por 3 minutos.
Selección de modo de calefacción
Presione el botón HEAT para alternar entre los dos ajustes Auto y
Alto.
ECO es una función de ahorro de energía. Al seleccionar el modo ECO, el
calefactor administrará automáticamente la potencia (vatios) de menor
a mayor para intentar mantener un calor constante de 68°(20°).
20
Page 21

3. Ajuste de la temperatura deseada
Se iluminará el indicador LED de Fahrenheit, cuando la
Aparato Remoto
Aparato Remoto
Aparato Remoto
El ajuste de temperatura se puede hacer solamente en calefacción automática.
Presione las flechas hacia arriba o abajo en el panel de control o
en el control remoto para establecer la temperatura deseada.
El indicador de temperatura varía desde 59° F a 86° F o desde
15° C a 30° C. Una vez seleccionada la temperatura deseada, el
calefactor permanecerá encendido hasta que la temperatura del
ambiente alcance la temperatura establecida. El calefactor
continuará con un ciclo de actividad e inactividad para mantener
la temperatura deseada en el ambiente.
4. Ajuste del Purificador
Presione el botón C/F para que la temperatura se muestre en
Fahrenheit o Celsius.
temperatura se muestre en Fahrenheit.)
Se iluminará el indicador LED de Celsius, cuando la temperatura
se muestre en Celsius.
Activa o desactiva la función de purificación.
21
Page 22

5. Ajuste de la función TEMPORIZADOR DE APAGADO
La pantalla digital cambiará de la opción de "temperatura" a
La pantalla digital mostrará la opción de "horas" para
Aparato Remoto
Aparato Remoto
Nota: La función Temporizador de apagado permite apagar el calefactor después de determinado tiempo y
solamente se puede establecer cuando la pantalla del calefactor está en "On" (encendida).
Encienda el calefactor en "On". Presione el botón
Temporizador en el panel de control o en el control remoto.
"horas" para establecer el temporizador. Siga presionando el
botón del temporizador para cambiar la cantidad de horas que
desea mantener en funcionamiento el calefactor. Las opciones
de horas van de 0 a 12 horas (en incrementos de 1 hora).
6. Ajuste de la función TEMPORIZADOR DE ENCENDIDO
Nota: La función Temporizador de encendido permite encender el calefactor después de determinado
tiempo y solamente se puede establecer cuando la pantalla del calefactor está en "Off" (apagada).
Deje el calefactor en "OFF". Presione el botón Temporizador en
el panel de control o en el control remoto.
establecer el temporizador. Siga presionando el botón del
temporizador para cambiar la cantidad de horas del reloj
interno que faltarán para que se encienda calefactor. Las
opciones de horas van de 0 a 12 horas (en incrementos de 1
hora).
22
Page 23

7. Ajustes del bloqueo eléctrico
Presione los botones de Subir Temp. y Bajar Temp. simultáneamente
El bloqueo eléctrico ayuda a evitar que los niños tengan accidentes con el calefactor. El mecanismo de
bloqueo se puede establecer tanto en modo apagado como encendido.
durante 3 segundos. El artefacto quedará bloqueado cuando escuche
y
el pitido. Una vez bloqueado, se bloquearán las funciones del panel de
control y del control remoto.
Para desbloquear, presione los botones de Subir Temp. y Bajar Temp.
y
simultáneamente durante 3 segundos. Escuchará un pitido. El panel de
control y el control remoto se podrán volver a utilizar.
MANTENIMIENTO
1) Apague el interruptor de encendido en la parte trasera de la unidad.
2) Desenchufe la unidad y deje que se enfríe completamente.
3) Para limpiar el calentador, la cáscara externa puede limpiarse con un paño suave y húmedo. Puede usar un
detergente suave si es necesario. Después de limpiar, secar la unidad con un paño suave. PRECAUCIÓN: No deje
líquido entra al calentador.
4) No utilice alcohol, gasolina, polvos abrasivos, lustrador de muebles o ásperos cepillos para limpiar el calentador.
Esto puede causar daño o deterioro a la superficie de la estufa.
5) No sumerja el calentador de agua.
6) Espere hasta que la unidad esté completamente seca antes de usarlo.
7) Filtro de aire debe ser limpiada después de 3 meses de uso. Por favor, siga las instrucciones en la página
siguiente.
23
Page 24

Solución de problemas
Si el calefactor no funciona, verifique lo siguiente antes de solicitar reparación:
1. Verifique que el cable de alimentación esté conectado al tomacorriente, si no es así, enchúfelo.
2. Verifique si está llegando alimentación al interruptor (en la parte posterior).
3. Verifique que las pilas del control remoto estén sanas y colocadas correctamente.
NOTA: Para que el calefactor funcione correctamente, la temperatura deseada se debe establecer en unos
grados por encima de la temperatura ambiente. Si considera que no está calentando, aumente la temperatura
deseada en el calefactor para activar la resistencia.
Cambio del filtro HEPA
1. Extraiga los 2 tornillos, hale hacia arriba y extraiga el filtro.
2. Extraiga el filtro HEPA dentro del filtro de aire.
3. Inserte un nuevo filtro HEPA y vuelva a colocar el filtro de aire en la unidad, ajuste los 2 tornillos.
24
Page 25

GARANTIA ELECTRICA PORTATIL de CALENTADORA
La GARANTIA LIMITADA:
Una garantía limitada es extendida al comprador original de esta calentadora y autorizaciones contra falla debido a
defectos industriales por un período de
(1) un año de la fecha de la compra de la venta al por menor. Lea por favor y siga todos los detalles notados abajo.
Los RECLAMOS MANEJARON DE LA SIGUIENTE MANERA:
- No REGRESA a COLOCAR DE la COMPRA
- Contacta nuestro Departamento de Servicio de Costomer en 1-800-776-9425. Debe tener el número modelo, el
número de serie y la fecha de la compra.
-Le proporcionarán con instuctions adicional, que puede repuestos de incluse, la reparación o el reemplazo en
nuestra opción
LLAME 1-800-776-9425 PARA el SERVICIO (9AM-6PM Lunes-Viernes)
PEMAIL EEUU EN info@worldmkting.com
Los DEBERES DEL PROPIETARIO:
Este aparato de la calefacción debe ser operado de acuerdo con las instrucciones escritos amuebladas con esta
calentadora. Esta garantía no dispensará al propietario de mantener apropiadamente esta calentadora de acuerdo con
las instrucciones escritos amueblados con esta calentadora. Una escritura de venta, registro de cheque pagado o pago
debe ser mantenido para verificar la compra la fecha y establecer el período de garantía. El cartón original debe ser
mantenido en caso del regreso de garantía de la unidad.
LO QUE no ES CUBIERTO:
1. El daño causado por maltrato o utiliza al contrario del manual de propietarios y pautas de seguridad.
2. El daño causado por una falta de mantenimiento normal.
3. Repare por una persona no autorizada.
4. El daño causado por conexión a un voltaje impropio.
5. Dañado causado por el uso fuera.
25
Page 26

Las LIMITACIONES:
Esta garantía no implica ni asume responsabilidad para daños consecuentes que pueden resultar del uso, del
maltrato, o de la falta de mantenimiento rutinario de este aparato de la calefacción. Un honorario de limpieza
y el costo de partes pueden ser cargados para fracasos de aparato que resultan de la falta de mantenimiento.
Esta garantía no cubre reclamos, que no implican habilidad ni materiales defectuosos. El INCUMPLIMIENTO
MANTENIMIENTO GENERAL (INCLUSIVE LIMPIEZA) VACIARA ESTA GARANTIA.
ESTA GARANTIA LIMITADA ES DADA AL COMPRADOR EN VEZ DE TODAS LAS OTRAS GARANTIAS, EXPRESADO O
IMPLICITO, INCLUSIVE PERO no LIMITADO A LAS GARANTIAS DE COMERCIALIZACION DE la SALUD PARA UN
PROPOSITO PARTICULAR. EL REMEDIO PROPORCIONADO EN ESTA GARANTIA ES EXCLUSIVO Y GRANT EN VEZ
DE TODOS LOS OTROS REMEDIOS. EN ningún ACONTECIMIENTO HACE MARKETING de MUNDO DE AMERICA
ES RESPONSABLE DE el CASUAL O DAÑOS CONSECUENTES.
Algunos estados no permiten limitaciones en cuánto tiempo una garantía implícita dura, así que la
limitación antes mencionada no le puede aplicar. Algunos estados no permiten la exclusión ni la
limitación de daños casuales ni consecuentes tan que la limitación ni exclusión antes mencionadas no
le pueden aplicar.
Para su registro, cosa con una grapa su recibo de ventas a este manual y registra lo Siguiente:
La FECHA DE la COMPRA:
El LUGAR DE la COMPRA:
El NUMERO DE SERIE:
NUMERO MODELO: _______________________________________________
Registre su garantía en www.wotldmkting.com
Impreso en China
26
Page 27

ATTENTION: LE NON-RESPECT DES INFORMATIONS CONTENUES DANS CE MANUEL PEUT RÉSULTER EN UN
Comfort Home Products, Inc
POUR VOTRE SÉCURITÉ
ANSI/UL 1278. MOBILE ET MUR-OU PLAFOND A PENDU APPAREILS DE CHAUFFAGE DE PIECE D'ELECTRIQUE
COMFORT GLOW PHONE NUMBER (814) 643-1775
Fait en Chine
Modèle:
QDE4800
INCENDIE CAUSANT DES DOMMAGES MATÉRIELS, DES LÉSIONS CORPORELLES OU LA PERTE DE VIES.
12256 William Penn Hwy, Suite A
Huntingdon, PA 16652
PTC avancée
Système de chauffage
Chauffage Électrique
Manuel du propriétaire
POUR VOTRE SÉCURITÉ NE PAS
OU DE LIQUIDES À PROXIMITÉ
DE CET APPAREIL OU DE TOUT
UTILISER DE GAZ
NI AUCUNE AUTRE VAPEUR
INFLAMMABLE
AUTRE APPAREIL
http://www.worldmkting.com
NE PAS JETER CE MANUEL - LE LAISSER À L'UTILISATEUR
27
Page 28

Merci pour acheter une Lueur de Confort fournaise de confort portative. Pour votre sécurité
et assurer que vous obtenez l'avantage plein de cet appareil de chauffage puissant prend s'il
vous plaît le temps pour lire ce guide complètement avant d'utiliser votre appareil de
chauffage.
Tableau de caractéristiques de sécurité de contenu, spécifications 28
Consignes de sécurité importantes 29
À quoi s'attendre, les résultats, des Suggestions et des conseils utiles 30
Exploitation, entretien 31-36
Dépannage, Hepa Replacement 37
Directives de Garantie 38-39
SPÉCIFICATIONS
Caractéristiques : électrique :
télécommande tension 120V 60Hz
Thermostat électronique Consommation D'Énergie:
Paramètres haute et basse chaleur High: 1500w Low: 750w
minuteur ( +5% - 10% tolerance)
Rouleau Facile Roulettes
1 an de garantie
CARACTÉRISTIQUES DE SÉCURITÉ
Dispositif de sécurité de basculement
Cet appareil est équipé d'un dispositif de sécurité de basculement. Une fois que le radiateur est renversé, un
commutateur interne s'éteint automatiquement l'appareil de chauffage. Une fois que le radiateur est restauré
une position verticale, le radiateur se réinitialise. Pour poursuivre, allumez l'appareil de chauffage à l'aide de la
télécommande fournie ou le panneau de commande sur l'appareil de chauffage.
Dispositif de sécurité de surchauffe
Cet appareil est équipé d'un dispositif de sécurité de surchauffe. Lorsque les composants internes atteignent
une certaine température qui pourrait causer de chauffage surchauffe et risque d'incendie, l'appareil s'éteint
automatiquement.
28
Page 29

UTILISATION PRÉVUE: CE PRODUIT EST DESTINÉ À UNE UTILISATION INTÉRIEURE DANS LES FOYERS PERSONNELS OU
CONSIGNES DE SÉCURITÉ IMPORTANTES
BUREAUX.Il n'est PAS destiné à une utilisation industrielle ni commerciale. NE PAS UTILISER À L'EXTÉRIEUR.
VEUILLEZ LIRE ET CONSERVER CES IMPORTANTES CONSIGNES DE SÉCURITÉ: Les précautions de base doivent
toujours être suivies lors de l'utilisation d'appareils électriques afin de réduire les risques d'incendie, les chocs
électriques et les lésions corporelles:
1. Lire toutes les instructions avant d'utiliser ce poêle.
2. Ce poêle est chaud lors de son utilisation. Afin d'éviter toute brûlure, ne pas toucher les surfaces chaudes avec la
peau nue. Si fournies, utiliser les poignées pour déplacer le chauffage. Tenir les matériaux combustibles, tels que
les meubles, oreillers, draps, papiers, vêtements, et rideaux au moins à 0,9m du chauffage.
3. Une attention extrême est nécessaire lors de toute utilisation de chauffage
4. Utiliser votre poêle uniquement dans des environnements secs. Ce poêle n'est pas destiné à une utilisation en
salle de bain, en buanderie, ou tout autre lieu intérieur similaire. Ne jamais placer le poêle à proximité d'une
baignoire ou tout autre contenant d'eau dans lequel il pourrait tomber. Ne pas utiliser le poêle à l'extérieur. Ne pas
utiliser à proximite d'un évier , d'une piscine ou autre zone humide telle que sous-sols innondés, garages, etc ou
tout autre lieu où le poêle pourrait entrer en contact avec de l'eau.
5. Un poêle contient des pièces arquées et chaudes. Ne pas utiliser dans des lieux où essence, peinture, ou
liquides inflammables sont utilisés ou stockés.
6. Afin de déconnecter le poêle, mettre l'appareil sur la position arrêt, et retirer ensuite la prise. Toujours
débrancher le poêle lorsqu'il n'est pas utilisé.
7. Toujours débrancher le poêle en retirant la prise lorsque celui-ci n'est pas en cours d'utilisation. Ne jamais
débrancher en tirant sur le cordon car cela pourrait l'endommager.
8. Ne pas faire fonctionner de poêle dont le cordon ou la prise sont endommagés ou en état de disfonctionnement
causé par la chute ou dommage de l'appareil. Renvoyer le poêle au centre de service pour tout examination,
ajustement méchanique ou technique ou réparation.
9. Toujours brancher le poêle directement dans une prise électrique ou réceptacle mural. Ne jamais utiliser avec
une corde d'extension ou une multi-prise.
10. Ne pas faire passer le cordon sous un tapis. Ne pas couvrir le cordon avec des carpettes, draps ou couvertures
similaires. Placer le cordon à l'écart des zones de passage, là ou il ne pourra pas être accroché
11. Il est normal que la prise soit chaude au toucher ; cependant, un espace entre la prise de courant et la prise
peut causer une surchauffe et une distortion de la prise. Veuillez contacter un électricien qualifié afin de remplacer
la prise usée ou distordue.
12. Ne pas insérer ou ne laisser entrer aucun objet extérieur dans la ventilation or dans la sortie d'échappement,
cela pourrait créer un choc électrique, un incendie ou endommager le poêle.
13. Afin d'éviter un éventuel incendie, ne pas bloquer les entrées et sorties d'aérations. Ne pas utiliser sur les
surfaces molles, telles qu'un lit, qui pourrait bloquer les aérations.
14. Ne pas mettre en marche le poêle sans enlever les protections.
15. Utiliser ce poêle comme décrit dans ce manuel uniquement. Toute autre utilisation non-recommandée par le
fabriquant peut causer un incendie, un choc électrique ou des blessures physiques.
16. Ce poêle consomme 12.5 ampère lors de son utilisation. Afin d'éviter une surcharge, ne pas brancher le poêle
sur un circuit électrique où sont déja branchés d'autres appareils.
17. Ne pas utiliser en extérieur.
18. Conserver ces instructions.
29
Page 30

QU'ATTENDRE DE VOTRE CHAUFFAGE COMFORT FURNACE
Le chauffage portable Comfort Furnace de la marque Confort Glow n'est en aucun cas destiné à remplacer
votre système de chauffage central ni ne doit être utilisé en tant qu'unique source de chauffage. Votre
chauffage est destiné à être utilisé en tant que source supplémentaire de chauffage par zone. L'objectif de ce
chauffage est de réduire le coût total des dépenses en chauffage en réduisant votre chauffage central et
d'apporter une source de chauffage supplémentaire dans les pièces que vous occupez.
Le chauffage portable Comfort Furnace de la marque Confort Glow n'est pas un chauffage instantanné. Celuici peut prendre 24-36 heures afin d'atteindre un seuil d'efficacité maximal. Le chauffage portable Comfort
Furnace de la marque Confort Glow chauffera tous les éléments (meubles, sol, murs etc.) dans la pièce où est
installé le chauffage. Ceci prendra du temps en fonction de la taille et de l'isolation thermique de la pièce ainsi
que de nombreux autres facteurs. Ainsi, une fois que ces éléments auront chauffés, il vous sera plus facile de
maintenir une température stable dans la pièce que vous occupez et ainsi prévenir une mise en marche et
arrêt incessants de votre chauffage central. Vous remarquerez que votre chauffage ne souffle pas un gros
débit d'air. Ce faible débit d'air n'est pas un hasard. L'objectif du circulateur d'air intégré est de créer et
déplacer une importante masse d'air dans la pièce étant chauffée sans créer de zones froides/chaudes,
garantissant ainsi une température plus uniforme.
Sur votre appareil de chauffage
Cibler la fonction de la température : radiateur fonctionnera jusqu'à ce que la température de consigne est atteinte à
l'emplacement des appareils de chauffage. Remarque : Cela peut varier de la température de la pièce.
Fonction timer : Utilisateur pouvez programmer radiateur à sa mise en marche ou de mise hors tension de 1 à 12
heures.
Position Eco : Dans ce mode, la température va naviguer entre élevée/faible/arrêt réglages pour maintenir une
température au dispositif de chauffage de 20 ° C/68 ° F.
Refroidir par Cycle : ventilateur continue de fonctionner pour environ 3 minutes après éléments chauffants ont éteint.
Dispositifs de sécurité : Voir page 2
Pour de meilleurs résultats, veuillez suivre ces suggestions :
1) Fermer les portes aux zones que vous ne souhaitez pas de chaleur.
2) Localiser le long d'un mur intérieur si possible. Placez l'appareil afin que l'air chaud peut souffler dégagée à
travers la pièce vers les murs extérieurs.
3) Vérifiez vos fenêtres et portes pour l'infiltration d'air froid et isoler au besoin pour éviter la perte de chaleur.
Perte rapide de la chaleur réduira l'efficacité de votre appareil de chauffage infrarouge, comme il le ferait un
radiateur de type conventionnel.
4) Garder la zone autour de l'appareil de chauffage sans obstructions pour assurer le débit d'air maximal. Gardez
les cordons électriques, rideaux, meubles et autres matériaux combustibles de 3 pieds (0,9 M) du devant de
l'appareil de chauffage et des côtés.
5) Éviter de placer votre appareil de chauffage aux endroits achalandés ou en plein soleil.
6) Éviter de placer votre appareil de chauffage près de votre thermostat de chauffage central.
30
Page 31

REMARQUE : L'interrupteur d'alimentation principal se trouve à l'arrière de l'appareil.
Panneau de contrôle
Interrupteur principal
1. Bouton Temp up : Pour augmenter la température souhaitée.
2. Bouton °C/°F : Pour choisir l'affichage en Fahrenheit ou Celsius.
3. Bouton Mode : Pour choisir entre les modes High, Low et Eco.
4. Indicateur Fahrenheit : Est allumé quand la température est affichée en Fahrenheit.
5. Bouton ON/OFF : Allume ou éteint l'affichage.
6. Indicateur du mode Purifier : Est allumé quand le mode purificateur est en marche.
7. Bouton Purifier : Pour activer le mode purificateur d'air.
8. Indicateur Celsius : Est allumé quand la température est affichée en Celsius.
9. Bouton Timer : Utilisé pour régler la minuterie et pour ajuster les valeurs de temps de la
minuterie.
10. Bouton Temp down : Pour diminuer la température souhaitée.
11. Indicateur High Mode : Est allumé quand le mode de chaleur élevée est en marche.
12. Affichage numérique : Indique la température ou la durée réglée (valeur de la minuterie).
13. Indicateur Low Mode : Est allumé quand le mode de chaleur faible est en marche.
14. Mode Energy-saving : Est allumé quand le mode d'économie d'énergie est en marche.
31
Page 32

COMMANDE À DISTANCE
PUSH
COUVERTURE
BATTERIE
PRÉPARATION
Placer l'appareil sur une surface ferme et plane et brancher dans une prise de courant reliée à la terre de 120 v
60Hz. Et allumez l'interrupteur à l'arrière de l'appareil. Seulement utiliser radiateur en position verticale avec
roulettes attachées.
Insérez les 2 piles AAA dans la télécommande avant d'utiliser (piles non incluses)
32
Page 33

Pointes serviables:
Allumer l'appareil chauffant en appuyant sur le bouton Power sur
le panneau de contrôle ou en appuyant sur le bouton On/Off de la
Le mode High utilise 1500 W; le mode Low utilise 750 W. Le
Appareil Télécommande
Appareil Télécommande
1) Si l'appareil de chauffage n'allumera pas, le contrôle interrupteur général principal
2) Vérifier le filtre à air, nettoyer comme nécessaire
3) Si votre pièce a la perte de chaleur minimale, et est loin fermé aux secteurs plus frais que vous pouvez pouvoir
réduire le coût d'opération en réglant l'appareil de chauffage au niveau bas après que la pièce a atteint une
température confortable
4) Si éloigné est perdu peut vous fonctionner toujours l'appareil de chauffage manuellement.
5) Ne pas traîner votre appareil de chauffage à travers la pièce en le tirant par la corde. Ranger la corde sur la
corde emballe quand pas dans l'usage.
6) Utiliser le minuteur pour éteindre votre énergie d'appareil de chauffage et arrêt.
7) Refroidir la caractéristique : Quand le thermostat va à vélo « loin » ou quand vous tournez l'unité du
ventilateur continuera à être candidat à quelques moments pour finir distribuer la chaleur et refroidir les
éléments chauffants d'appareils de chauffage.
CONSIGNES D'UTILISATION
1. Tourner l'interrupteur d'alimentation principal à l'arrière de l'appareil pour allumer.
2. Démarrer et sélectionner le mode de fonctionnement
télécommande fournie.
Une fois l'appareil éteint, l'élément chauffant cessera d'abord de
fonctionner. Le ventilateur continuera à fonctionner pendant 3
minutes pour émettre beaucoup de chaleur à l'intérieur. Cette
marque indiquera le fonctionnement pendant les 3 minutes.
Sélectionner un mode de chaleur
Appuyer sur le bouton HEAT pour alterner entre les deux réglages
de chaleur, automatique (Auto) et élevé (High).
mode ECO est une fonction d'économie d'énergie. Quand le mode
ECO mode est choisi, l'appareil chauffant se règle
automatiquement en passant d'une puissance de chauffage basse
à une puissance plus élevée (watts) dans afin de garder une
température confortable constante de 20 °C (68 °F).
33
Page 34

3. Régler la température souhaitée
L'indicateur Fahrenheit à DEL s'allume quand la température est
Appareil Télécommande
Appareil Télécommande
Appareil Télécommande
Les réglages de température peuvent seulement être effectués en mode de chauffage
automatique.
Ajuster la température souhaitée en appuyant sur les flèches
Up/Down sur le panneau de contrôle ou la télécommande.
L'indication de la température réglée varie entre 15 °C et 30 °C
(59 °F et 86 °F). Une fois la température souhaitée choisie,
l'appareil chauffant demeurera allumé jusqu'à ce que la
température de la pièce augmente jusqu'à la valeur réglée.
L'appareil chauffant s'éteindra et s'allumera en alternance pour
maintenir la température de la pièce à la valeur souhaitée.
4. Régler le purificateur
Appuyer sur le bouton C/F pour changer l'affichage de la
température entre Fahrenheit et Celsius.
affichée en Fahrenheit.
L'indicateur Celsius à DEL s'allume quand la température est
affichée en Celsius.
Ouvrir ou fermer la fonction de purification.
34
Page 35

L'affichage numérique passe de l'option de la température à
L'affichage numérique affiche l'option des heures de la
Appareil Télécommande
Appareil Télécommande
5. Régler la fonction POWER OFF TIMER (minuterie pour mise hors tension)
Remarque : La fonction Power-Off-Timer permet d'éteindre automatiquement l'appareil chauffant après une
certaine durée préréglée et peut seulement être réglée quand l'affichage de l'appareil chauffant indique ON.
Régler en position ON. Appuyer sur le bouton Timer sur le
panneau de contrôle de l'appareil chauffant ou sur la
télécommande.
l'option des heures de la minuterie. Continuer à appuyer le
bouton Timer pour changer le nombre d'heures de
fonctionnement souhaité pour l'appareil chauffant avant qu'il
s'éteigne automatiquement. Les options d'heures pour la
minuterie sont de 0 à 12 heures (par incréments d'une heure).
6. Régler la fonction POWER ON TIMER (minuterie pour mise sous tension)
Remarque : La fonction Power-Off-Timer permet d'allumer automatiquement l'appareil chauffant après une
certaine durée préréglée et peut seulement être réglée quand l'affichage de l'appareil chauffant indique OFF.
Régler en position OFF. Appuyer sur le bouton Timer sur le
panneau de contrôle de l'appareil chauffant ou sur la
télécommande.
minuterie. Continuer à appuyer le bouton Timer pour changer
le nombre d'heures souhaité que durera le décompte de
l'horloge interne de l'appareil avant qu'il s'allume
automatiquement. Les options d'heures pour la minuterie sont
de 0 à 12 heures (par incréments d'une heure).
35
Page 36

7. Régler l'Electro Lock
Appuyer sur les boutons Temp Up et Temp Down en même temps
Pour le déverrouiller, appuyer sur les boutons Temp Up et Temp Down
L'Electro Lock peut aider à éviter que l'appareil chauffant soit accidentellement mis en marche par les enfants.
Le mécanisme de verrouillage peut être réglé autant en mode ON qu'en mode OFF.
et
pendant 3 secondes. Le verrouillage est complété quand vous
entendez un bip. Lorsque l'appareil est verrouillé, les fonctions du
panneau de contrôle et de la télécommande seront verrouillées à
l'utilisation.
en même temps pendant 3 secondes. Vous entendrez un bip. Le
panneau de contrôle et la télécommande sont de nouveau
et
fonctionnels.
ENTRETIEN
1) Éteignez l'interrupteur d'alimentation à l'arrière de l'appareil.
2.) Débranchez l'appareil et laissez-le refroidir complètement.
3.) Pour nettoyer le radiateur, l'enveloppe extérieure peut être nettoyé avec un chiffon doux et humide. Vous
pouvez utiliser un détergent doux si nécessaire. Après nettoyage, sécher l'appareil avec un chiffon doux.
ATTENTION : Ne laissez pas le liquide entrer dans l'appareil de chauffage.
4) Ne pas utiliser d'alcool, essence, poudres abrasives, encaustique ou brosses rugueuses de nettoyer le radiateur.
Cela peut provoquer des dommages ou la détérioration de la surface du radiateur.
5) Ne pas immerger l'appareil dans l'eau.
6) Attendez que l'appareil soit complètement sec avant de l'utiliser.
7) Filtre à air doit être nettoyé après 3 mois d'utilisation.
36
Page 37

Dépannage
Si l'appareil chauffant ne fonctionne pas, veuillez vérifier la liste suivante avant de contacter un spécialiste :
1. Vérifier si le cordon d'alimentation est branché dans une prise de courant et brancher s'il ne l'est pas.
2. Vérifier si l'électricité fonctionne à l'interrupteur d'alimentation principal (à l'arrière).
3. Vérifier si les piles de la télécommande sont positionnées correctement et non endommagées.
REMARQUE : Pour que l'appareil chauffant fonctionne correctement, la température souhaitée de l'appareil
doit être réglée de quelques degrés plus élevée que la température de la pièce. Si l'appareil ne semble pas
chauffer, augmenter la température souhaitée sur l'appareil chauffant pour mettre les éléments chauffants en
marche.
Remplacement du filtre Hepa
1. Retirer les 2 vis du support, pousser vers le haut et retirer le filtre à air.
2. Retirer le filtre HEPA du filtre à air.
3. Insérer le nouveau filtre HEPA et remettre le filtre à air dans l'appareil, visser les 2 vis.
37
Page 38

GARANTIE DU POÊLE ÉLECTRIQUE PORTABLE
GARANTIE LIMITÉE:
Une garantie limitée est remise à l'acheteur original de ce poêle et le couvre contre le disfonctionnement lié
aux défauts de fabrication pendant une période d'un (1) an à compter de la date d'achat du produit.
PROCÉDURE DE REVENDICATION:
- NE PAS RENVOYER LE PRODUIT À l'ENDROIT D'ACHAT
- Contactez notre Service Client au 1-800-776-9425. Se munir du numéro du modèle, du numéro de
série et de la date d'achat.
- Ils vous fourniront de plus amples informations, concernant par exemple le remplacement de
pièces, la réparation ou le remplacement du poêle si necessaire.
APPELEZ LE 1-800-776-9425 (9h00-18h00 LUN.-VEN.)
ou ENVOYEZ UN EMAIL À
DEVOIRS DU PROPRIÉTAIRE:
info@worldmkting.com
Cet appareil de chauffage doit fonctionner en accord avec les instructions fournies avec le poêle. Cette
garantie ne doit pas dissuader le propriétaire d'un entretien correct du poêle en accord avec les instructions
écrites fournies avec ce poêle. Une facture de paiment, un chèque annulé ou un reçu de paiement doivent
être conservés afin de pouvoir vérifier la date d'achat et établir une période de garantie. Le carton original doit
être conservé en cas de retour d'article dans le cadre de la garantie.
CE QUI N'EST PAS COUVERT:
1. Dommages causés par une mauvaise utilisation ou une utilisation contraire au manuel de l'utilisateur
et aux consignes de sécurité.
2. Dommage causés par un manque d'entretien.
3. Réparation effectuée par une personne non-compétente.
4. Dommage causé par le branchement sur un mauvais voltage.
5. Dommage causé par une utilisation en extérieur.
38
Page 39

RESTRICTIONS:
Cette garantie n'implique ni ne suppose aucune responsabilité pour les dommages collatéraux pouvant résulter de
l'utilisation, de la mauvaise utilisation, ou du manque d'entretien régulier de cet appareil de chauffage. Un frais
d'entretien ainsi que le coût des pièces peuvent être facturés pour les défauts de fonctionnement de l'appareil résultant
du manque d'entretien. Cette garantie ne couvre pas les revendications, qui n'incluent pas une qualité de travail
défectueuse ni les matériaux. LE REFUS D'ENTRETIEN GÉNÉRAL (NETTOYAGE INCLUS) ANNULERA LA GARANTIE.
CETTE GARANTIE LIMITÉE EST ACCORDÉE À l'ACHETEUR EN GUISE DE TOUTE AUTRE GARANTIE, EXPRIMÉE OU IMPLICITE,
INCLUANT MAIS NON-LIMITÉES À LA GARANTIE DE CONFORMITÉ, D'UTILISATION, D'APTITUDE À UN USAGE PARTICULIER
ET DE NON-CONTREFACON. LA SOLUTION FOURNIE PAR CETTE GARANTIE EST EXCLUSIVE ET EST CONFÉRÉE EN GUISE DE
TOUT AUTRE SOLUTION. EN AUCUN CAS LE MONDE DU MARKETING D'AMÉRIQUE NE SERA RESPONSABLE DES
DOMMAGES CIRCONSTANCIELS OU COLLATÉRAUX.
Certains états n'autorisent aucune limitation quant à la durée d'une garantie implicite. Dans ce cas, la limitation cidessus ne s'appliquera pas. Certains états n'autorisent pas l'exclusion ou la limitation de dommages circonstanciels ou
collatéraux. Dans ce cas, l'exclusion ou la limitation ci-dessus ne s'appliquera pas.
Pour information, attachez vos recus d'achat à ce manuel et annotez les informations suivantes
DATE D'ACHAT:
LIEU D'ACHAT:
NUMÉRO DE SÉRIE:
NUMÉRO DU MODÈLE:
Enregistrer votre garantie à www.worldmkting.com
Imprimé en Chine
39
 Loading...