


Instructions for use
Comfort Digisystem
Microphone DM30
English


Contents
I. User guide.....................................................................7
1. Introduction............................................................9
Your device......................................................................9
SST™.........................................................................9
Overview.................................................................10
Included accessories.............................................12
2. Getting started.....................................................13
Charge...........................................................................13
Start up..........................................................................15
Use the neckloop...........................................................16
Navigate the menu........................................................17
3. Usage....................................................................19
Use the device as a teacher unit...................................20
Use the device as a student unit...................................21
External audio sources.................................................22
Connect an external audio source.........................22
II. For professionals.......................................................25
4. Basic setup...........................................................27
Change the menu language..........................................27
Master Unit....................................................................27
Configure the device as a master unit...................28
Companion Unit.............................................................28
Configure the device as a Companion Unit...........28
Configure the function button.......................................29
3Microphone DM30

5. Pairing Comfort Digisystem devices.....................31
The pairing button.........................................................31
Change channel.............................................................32
Available channels.................................................33
Send pairing information..............................................33
Receive pairing information..........................................34
6. Advanced features................................................37
FCR................................................................................37
Enable FCR.............................................................38
Enable the FCR indicator.......................................39
Input levels....................................................................39
Adjust the level of the built-in microphone...........39
Adjust the level of the external microphone.........40
Adjust the level of the line input............................40
Volume limits.................................................................40
Set a maximum volume level................................40
Set a fixed volume level.........................................41
Lock the buttons............................................................41
Name the device............................................................41
PIN code settings..........................................................42
Set a PIN Code.......................................................42
Choose which functions to lock.............................43
Hide the PIN entry dialogue...................................43
Change the PIN code.............................................43
Disable the PIN code..............................................44
Reset all settings...........................................................44
III. Product information..................................................45
7. Menu overview.....................................................47
Back...............................................................................48
Microphone DM304

Communication.............................................................48
Mode..............................................................................48
Sound.............................................................................49
Settings.........................................................................49
Key Lock........................................................................50
About.............................................................................50
8. Function indicator.................................................51
9. Optional accessories............................................53
10. Technical specifications......................................55
IV. Miscellaneous............................................................57
11. Radio...................................................................59
Channel planning..........................................................59
Radio range...................................................................59
12. Battery maintenance..........................................61
13. Troubleshooting.................................................63
Service and warranty......................................................65
Contact information........................................................67
Product symbols.............................................................69
5Microphone DM30

Microphone DM306

User guideI.
This part of the instruction manual covers day-to-day tasks that a
user of the product should be familiar with.
7Microphone DM30


Introduction1.
Thank you for choosing Microphone DM30!
Microphone DM30 is part of
wireless technology to give you the best sound quality available,
together with secured transmission to prevent eavesdropping.
To get the most out of your new product, please read these
instructions before using it for the first time. Take special notice
to the printed document
the box.
Comfort Digisystem
Important Safety Instructions
Your device
Microphone DM30 is as a combined transmitter and receiver that
is especially designed for use in schools. It allows for two-way
communication and is configurable as teacher or student
microphone, according to your needs.
™
SST
SecureStream Technology (SST)
digital transmission technology. It lets you communicate securely
and latency free with other Comfort Digisystem devices.
is Comfort Audio's proprietary
™
that uses digital
included in
9Microphone DM30
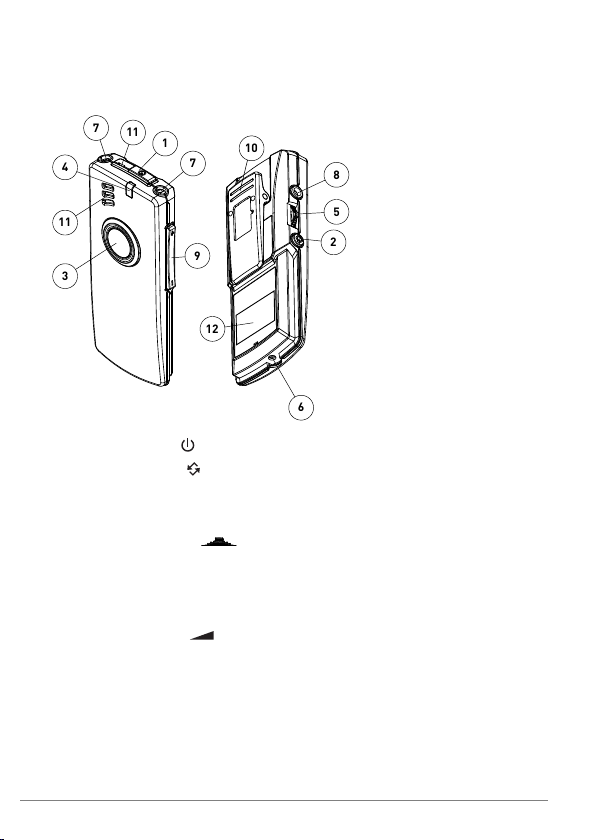
Overview
3
11
4
7
11
1
7
9
12
6
2
5
8
10
1.
Power button
2.
Pairing button
3. Function button
4. Function indicator
5. Menu controller
6. Charger input
7. Neckloop output
8. Aux input and output
9. Volume button
10. Clip
11. Microphone
12. Display
Microphone DM3010
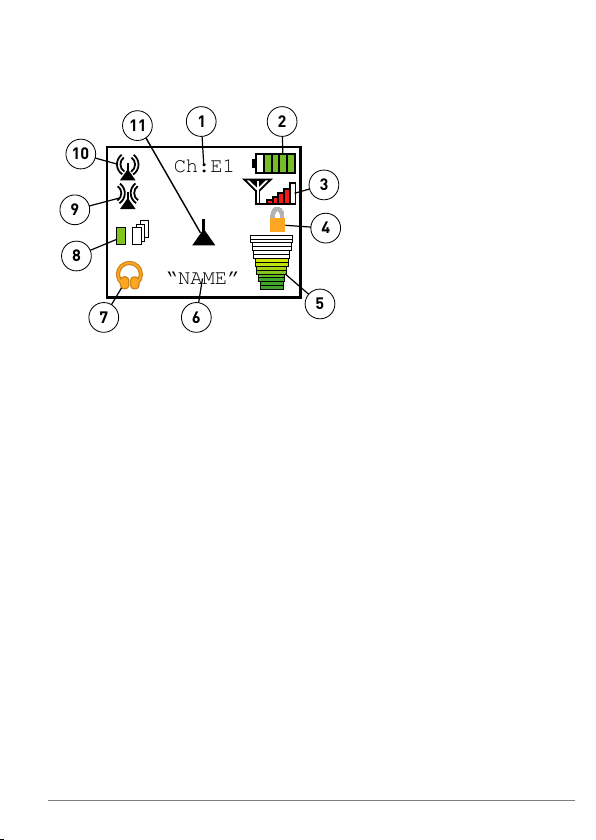
Display
Ch:E1
“NAME”
1
2
3
4
5
6
7
8
9
10
11
1. Current channel
2. Battery status
3. Signal quality
4. Key lock padlock
5. Volume bar
6. Unit name
7. Current aux setting
8. Unit mode
9. Receiver status
10. Transmitter status
11. Current button mode
11Microphone DM30
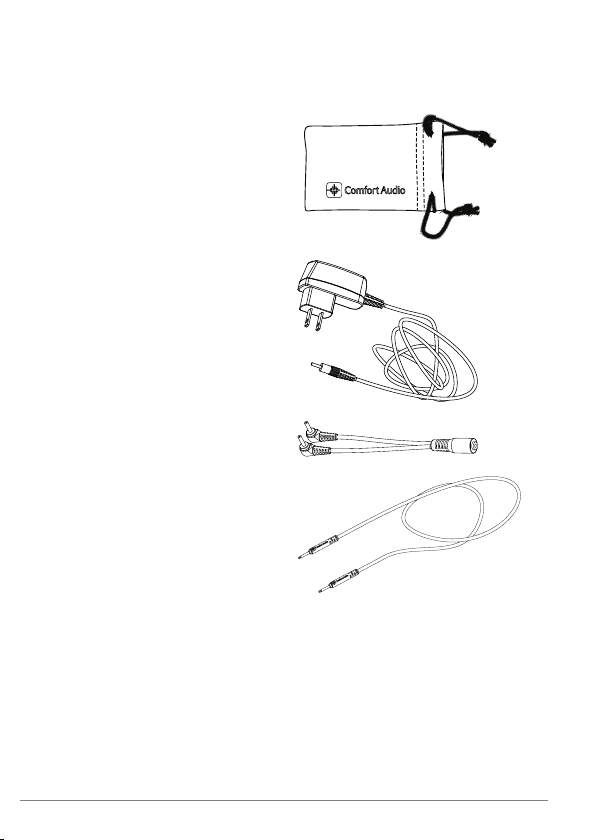
Included accessories
Microfibre pouch
Power supply
Cable split
Neck loop Digisystem
Microphone DM3012
Getting started2.
This section will teach you how to perform the basic steps needed
to get started.
Charge
Charging can be done at any time. If you make it routine to charge
your product whenever you do not use it, it is always ready for use
when you need it.
1.
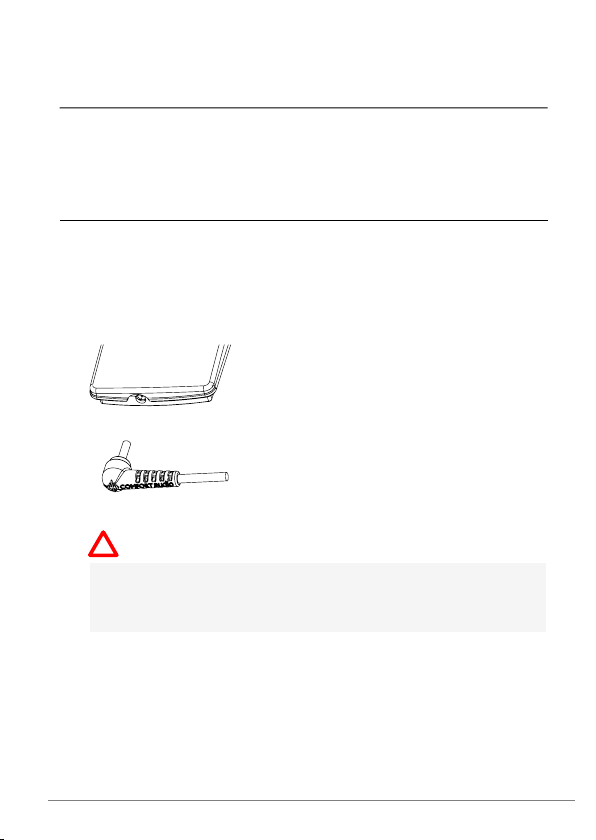
Insert the supplied charger into the charger input.
Caution: Only use the charger supplied by Comfort Audio
AB. Using any other type of charger might damage your
device.
13Microphone DM30
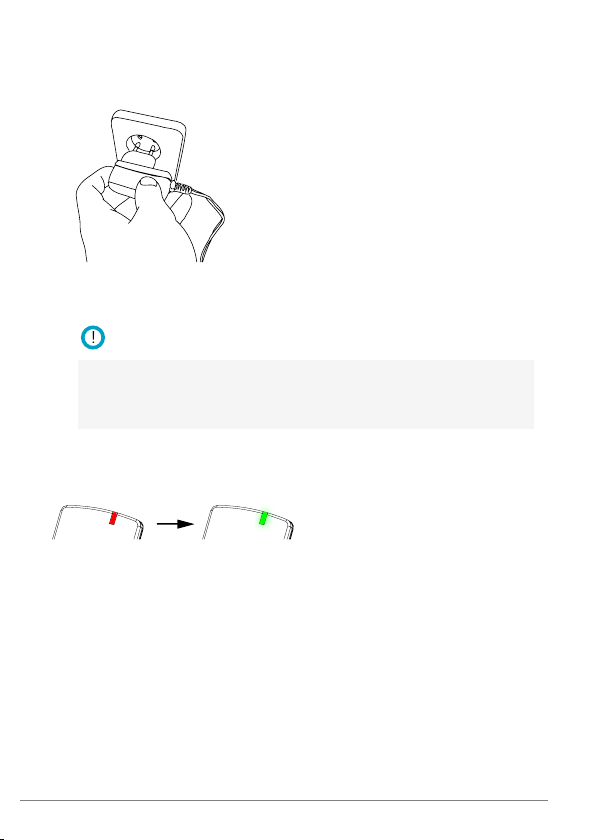
2.
!
Plug the charger into the wall socket.
The function indicator turns red to indicate charging.
Note: The unit might become warm during charging, this is
entirely normal. The unit is equipped with overcharging- and
temperature monitoring to protect the batteries.
The charging is done when the function indicator turns green.
Microphone DM3014
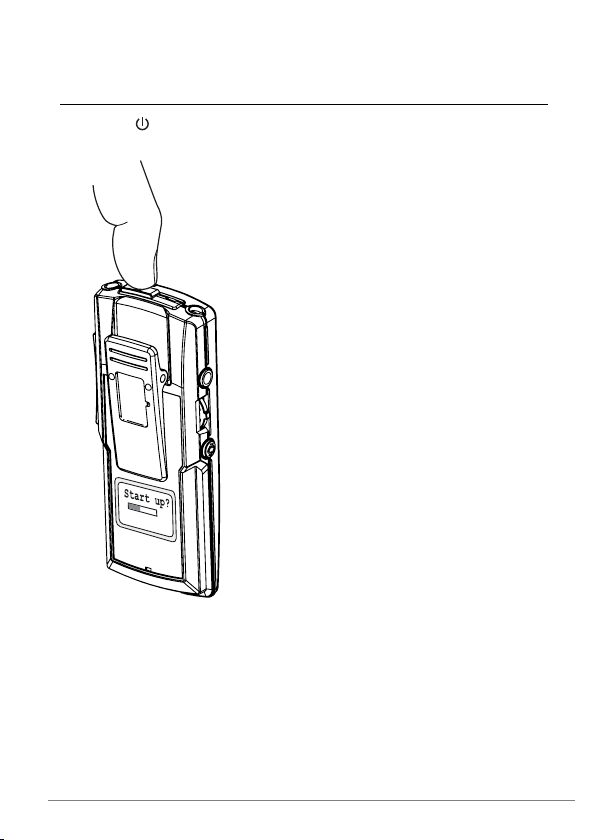
Start up
Press until the start up bar is fully lit.
15Microphone DM30
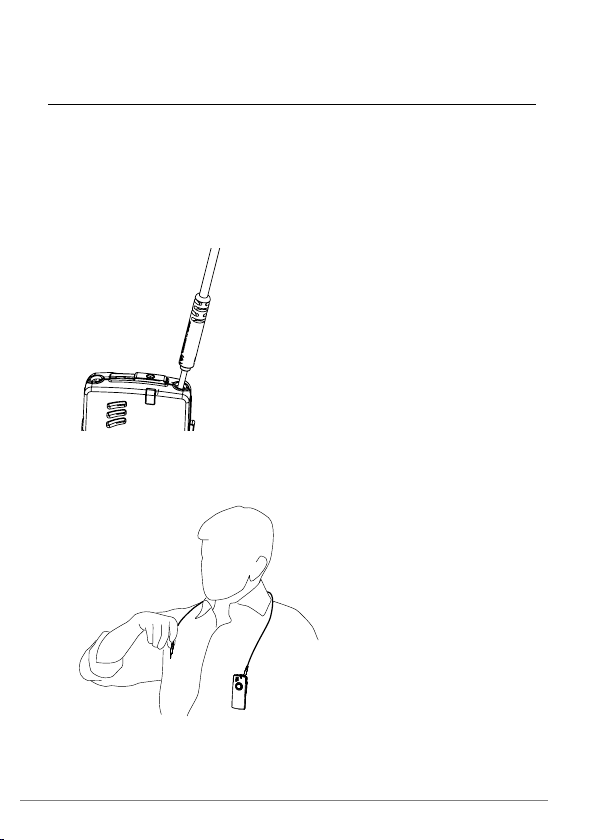
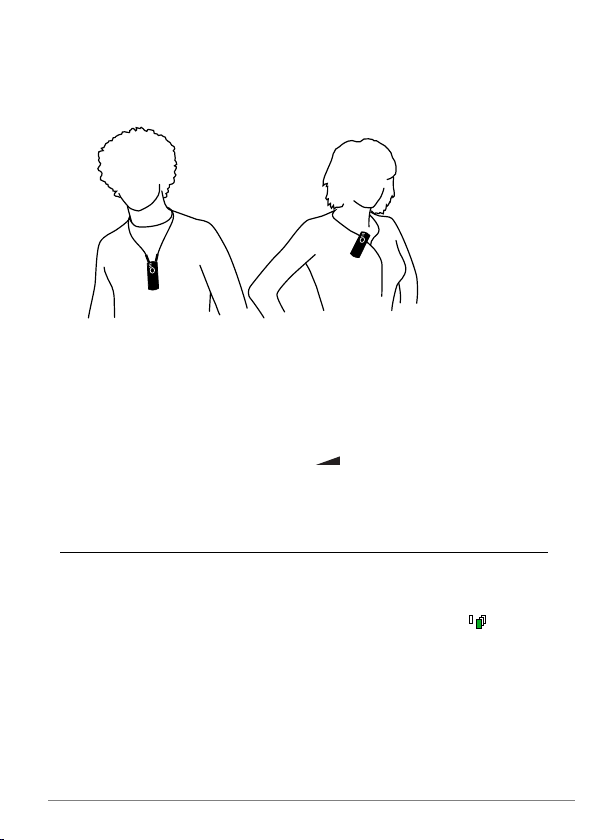
Use the neckloop
If you are going to use your product with a hearing aid or hearing
implant in the T- or M/T-position, you need to connect the neckloop
and wear it around your neck.
1.
Connect one end of the neckloop to the sockets on top of the
unit.
2.
Place the neckloop behind your neck.
Microphone DM3016
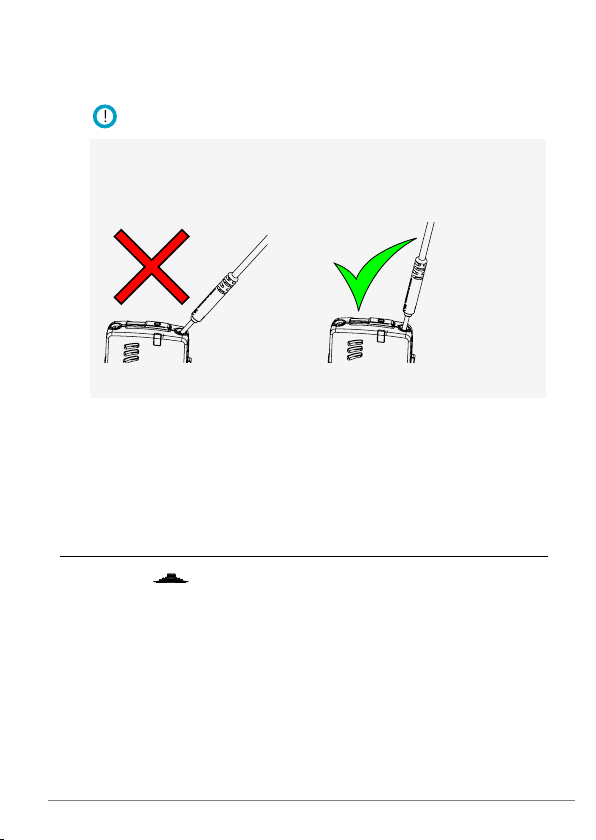
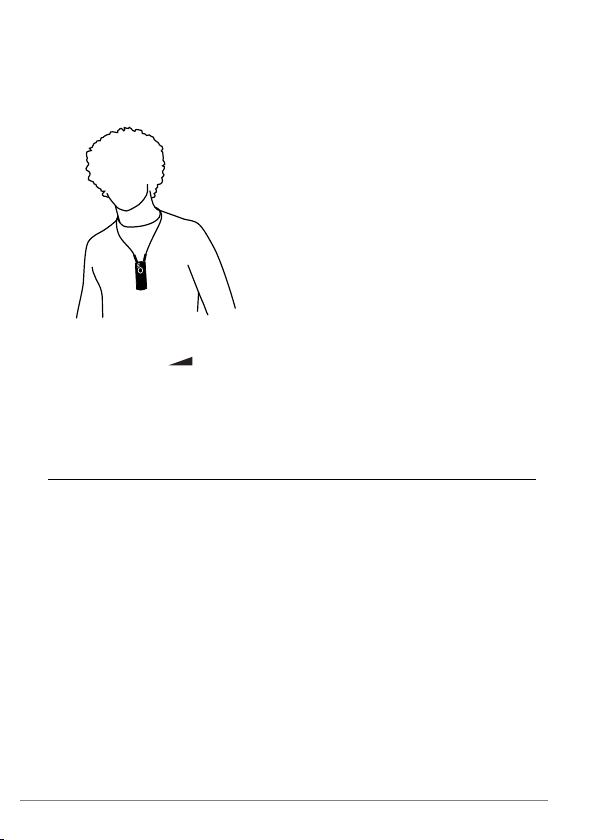
3.
!
Connect the other end of the neckloop.
Important: Make sure the neckloop is inserted properly.
Improper insertion might cause you to drop the device or
damage the connections.
4.
Switch your hearing aid or hearing implant into its T- or
M/T-position.
You should now hear the sound come through your hearing aid.
Navigate the menu
You can use on the side of the unit to navigate your way
through the menu.
17Microphone DM30

1.
Press to activate the menu.
2.
Flick the controller up or down to select the desired menu
option.
3.
Press to enter the selected sub menu or activate the
selected menu option.
4.
When done, use the Back option to move to the previous menu.
Microphone DM3018
Usage3.
Microphone DM30 is purpose made to be used with other units of
the same type. Together with the other units it forms a system for
two-way communication among teacher and students.
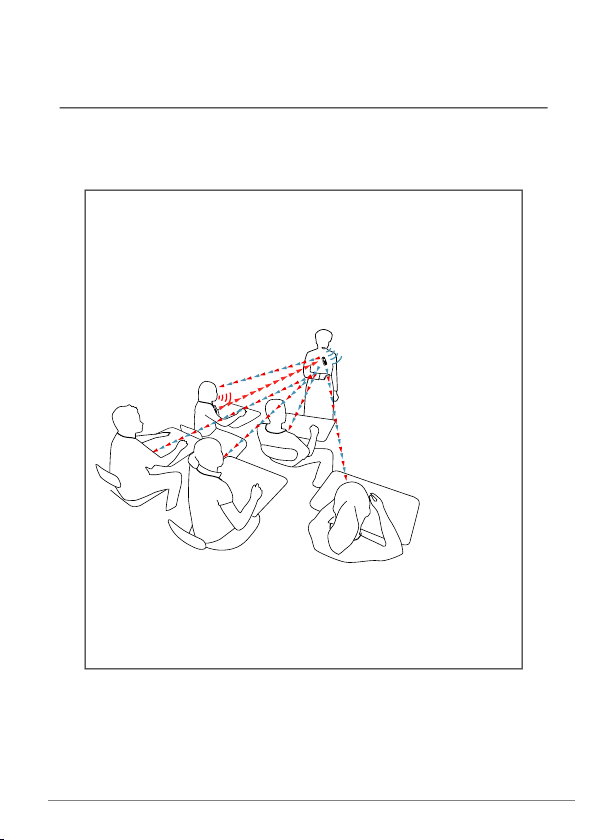
A typical set-up consists of one unit configured as a
teacher unit, and one or several units configured as
student units. This set-up allows each student to hear
the teacher and fellow students that are using the
push-to-talk feature.
Figure 1: The teacher's voice is mixed with the voice of
the student pushing the function button and sent back
out to the rest of the class.
19Microphone DM30
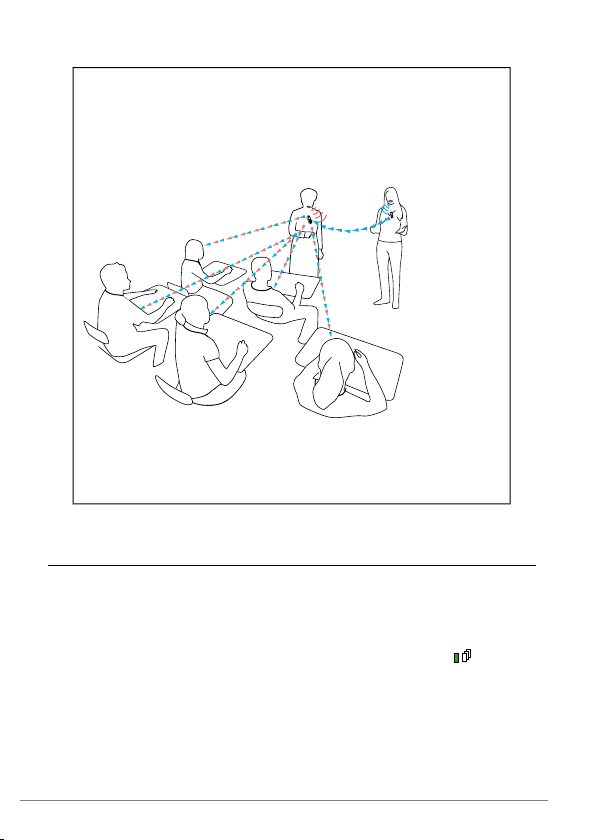
Alternatively, two units can be used together to allow
team-teaching. A secondary unit, worn by the assistant
teacher, then transmits sound via the primary teacher's
unit to the student's units.
Figure 2: The teacher's voice is mixed with the voice of
the assistant teacher and sent back out to the class.
Use the device as a teacher unit
Use Microphone DM30 as a teacher unit to transfer the voice of
the teacher, mixed with the sound from another unit in the system,
directly to the students.
Use a unit configured as a Master Unit. Verify that the -symbol
is visible in the display. For information on configuring the device
see
Basic setup
on page 27.
Microphone DM3020
1.
Have the teacher attach the unit to his or her clothes with the
clip, or use a necklace to hang it around the neck.
For optimum sound quality the unit should be placed no more
than 30 cm (12 in.) from the mouth.
2.
Let the teacher talk into the microphone in a normal voice and
make sure the students can hear.
3.
If the teacher is using head phones or a neckloop for
monitoring, he or she can use to adjust the volume to a
suitable level.
Use the device as a student unit
Students can use the device to listen and talk to other persons
wearing Microphone DM30 devices.
Use a unit configured as a Companion Unit. Verify that -symbol
is visible in the display. For information on configuring the device
see
Basic setup
on page 27.
21Microphone DM30
1.
Have the student wear the unit around the neck using the
neckloop.
2.
Let someone talk into the teacher microphone and let the
student use to adjust the volume to a suitable level.
3.
Optional: Ask the student to talk into the microphone and use
the function button to turn the transmission on or off.
External audio sources
You can connect any sound source that has a line out socket to the
device. This lets you listen to television, conference telephones,
voice recorders and the like. It is also possible to connect an
external microphone, such as a clip-on microphone, or a pair of
headphones.
Connect an external audio source
Connecting an external audio source will bring up a menu where
you can select the type of device you have connected.
Microphone DM3022
1.
!
Connect your external audio source to the aux socket.
For line sources you can use the supplied audio cable.
The Socket menu will be shown automatically.
2.
Select the option that corresponds to the device you have
connected.
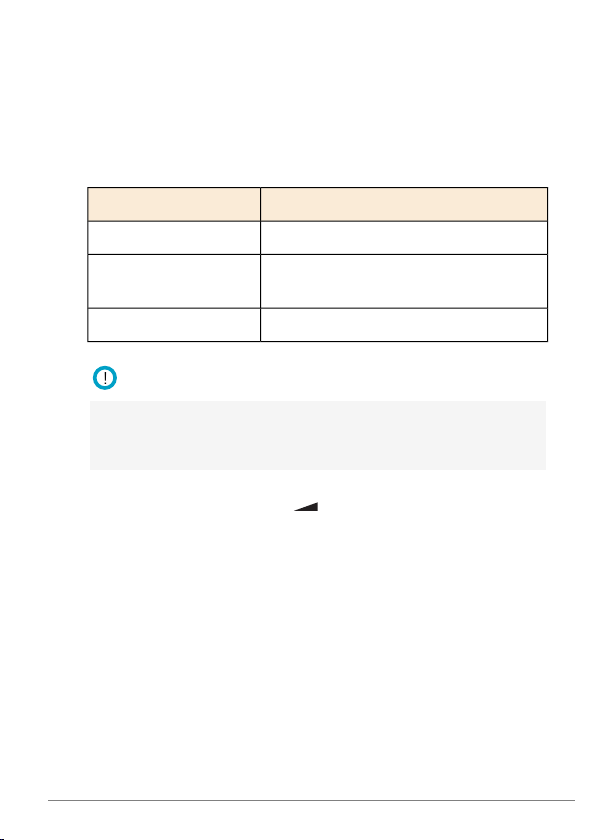
DescriptionOption
Computer, TV, music player etc.Line In
External Mic
Boom microphone, clip on
microphone etc.
Headphones or earphones.Head Phones
Note: When Line-in is activated and a cable is connected,
the unit switches automatically to continuous transmission,
even if Push to talk or Mic. On/Off is activated.
3.
Adjust the volume by using till you find a suitable level.
23Microphone DM30


For professionalsII.
The following sections covers advanced features and procedures
primarily intended for professionals and advanced users.
25Microphone DM30


Basic setup4.
Before setting up the product you should make sure that the menu
is set to the preferred language. You should also decide whether
it should be used as a Master Unit or as a Companion Unit.
Change the menu language
The default menu language is English. You can change language
from the menu Settings.
1.
Select Settings > Language.
2.
Select the language you want from the list of available
languages.
Master Unit
The
Master Unit
other paired Microphone DM30 units. It receives sound from
another unit and mixes it with the sound from the built-in
microphone. The mixed audio is transmitted on a separate master
channel to any paired receivers. Listeners will hear both the Master
Unit and the second unit on that channel. This lets two persons
talk freely without forced interruptions.
By using push-to-talk microphones, the Master Unit can be used
with multiple microphones. Such a set-up is useful in classroom
situations were the students take part in discussions and need to
hear the classmates and the teacher.
is the device in a system that acts as a mixer for
27Microphone DM30

Configure the device as a master unit
You typically configure the device as a Master Unit when it is going
to be used by a teacher or lecturer. With this set-up the device will
mix the voices of the teacher and student and broadcast them to
the class.
1.
Select Mode.
2.
Check Master Unit.
When the unit is programmed as Master Unit, the display shows
.
Companion Unit
A
Companion Unit
and communicate with other Companion Units by relaying sound
through the Master Unit.
A Companion Unit is typically used with the push-to-talk feature
enabled to let several users take turn transmitting sound to the
Master Unit.
Configure the device as a Companion Unit
The Companion Unit setting is normally used if the device is used
by a student. It lets the student hear both the teacher and fellow
students.
1.
Select Mode.
2.
Check Companion Unit.
When the unit is programmed as Companion Unit, the display
shows
will let the user listen to the master channel
Microphone DM3028

Configure the function button
The function button on the unit can be configured for different
purposes through the menu option Mode. For example, it can be
set to push-to-talk, to allow the use of several microphones on a
single channel, or as a mute switch to temporarily mute the sound
when having a private conversation.
1.
Select Mode > Button Mode.
2.
Select one of the following options:
DescriptionOption
The button has no function.None
Push to talk
Mic. On/Off
Mute switch
Receiv. On/Off
The microphone is on while the button is
pushed and muted on release.
The microphone is toggled on and off with
each press off the button.
The microphone is muted while the button
is pushed and active on release. (Master
Units only.)
The built-in receiver is toggled on and off
with each press of the button. (Master
Units only.)
29Microphone DM30


Pairing Comfort Digisystem
!
5.
devices
By pairing two or more Comfort Digisystem devices you ensure
that they can communicate securely with each other.
Comfort Digisystem is a digitally encrypted communication system
that relies on unique
Any units that are to be used together needs to be set to the same
channel and share the same code key.
When you perform a pairing procedure you send information about
the channel and code key from one unit to one or several others.
This lets you create a channel and code key combination on one
unit and distribute it to other units to form a system.
The information about the channel and code key is referred to as
pairing information
receive pairing information.
Important: At delivery all units share the same factory code key.
To make the system secure, you need to generate a new code
key.
The pairing button
All Comfort Digisystem units are equipped with a pairing button.
The pairing button gives you quick access to the pairing features
of the device.
code keys
. Microphone DM30 is able to both send and
to provide transmission security.
31Microphone DM30

Table 1: Pairing short cuts accessible through the pairing button.
Back
1 904.650 MHz
2 905.250 MHz
3 905.850 MHz
DescriptionOption
Takes you to the pairing menu.A single press.
A long press.
Sets the unit to receive pairing
information. (For units with
more than one channel, this
affects the transmitter channel
only.)
A double press.
Sends pairing information. (For
units with more than one
channel, this affects the
transmitter channel only.)
Change channel
If a channel does not suit your setup, or if you are experiencing
interference from some other radio source, you can change to a
different channel via the Channel menu.
1.
Select Communication > Channel.
2.
Choose the channel you wish to use in the channel list.
The green circle next to the frequency indicates that the
channel is free from interference. If the channel is occupied
the circle will be grey.
Microphone DM3032

Available channels
Transmitter
Comfort Digisystem has a total of 38 channels to choose from.
These channels should not require a license in North America.
However, always verify with the local frequency assignment
authority which channels are free to use and which require a
licence.
Send pairing information
By sending pairing information from Microphone DM30 you can
synchronise its channel and code key with another unit. Any existing
pairing information in the other unit will be overwritten.
1.
Select Communication > Pair
2.
Set the unit or units that you would like to pair with Microphone
DM30 to receive pairing information.
33Microphone DM30

3.
Back
Send Info
Receive Info
New Code Key
Back
Send Info
Receive Info
New Code Key
!
To send the pairing information, select
options:
DescriptionOption
Send the
one
of the following
existing
code key.Send Info
New Code Key
Generate and send a
key.
Important: This will break the
pairing with any previously
paired units.
When the info is sent the text Info sent! will appear in the
display.
Receive pairing information
When the unit is set to receive pairing information its current
channel and code key will be overwritten by the received
information.
1.
Set the unit to receive information by selecting
Communication > Pair.
2.
Select Receive Info.
3.
Send pairing information from the unit you are pairing with
Microphone DM30.
Microphone DM3034
new
code

If the pairing is successful, the word OK will appear in the display
of Microphone DM30.
35Microphone DM30


Advanced features6.
This product has special features and settings that lets you tailor
the unit to the user's specific needs.
FCR
Free Channel Request (FCR)
channel is occupied. This eliminates problems with interference
that can occur when multiple microphones are used
simultaneously, as in push-to-talk configurations.
blocks transmission when the selected
37Microphone DM30

A student pushes the push-to-talk button to respond to
a question and all other microphones with FCR enabled
are blocked. As soon as the button is released the other
students are free to use their microphones. The teacher
is using a separate channel to be able to talk freely
without interrupting the students.
Figure 3: The student microphones shine red to indicate
that someone else is using the channel.
Enable FCR
FCR can be enabled to avoid interfering with other microphones
when using push-to-talk.
Make sure the unit is configured as a Companion Unit with
push-to-talk enabled.
1.
Select Mode > Button Mode.
2.
Check FCR.
Microphone DM3038

Enable the FCR indicator
You can activate the FCR Indicator to get visual feedback when the
FCR feature blocks transmission. The function indicator will turn
red to indicate blocked transmission.
1.
Select Mode > Button Mode.
2.
Check FCR indicator.
Input levels
The sensitivity of the various inputs are adjustable so you can match
the levels to different audio sources and situations.
Tip: Use a low input sensitivity and a short microphone distance
to reduce the risk of acoustic feedback when the device is used
with a speaker system.
Adjust the level of the built-in microphone
Adjust the sensitivity of the built-in microphone to cater for different
acoustic situations.
1.
Select Sound.
2.
Select Level under Internal Mic.
3.
Adjust the volume to the desired level.
4.
Press to confirm you choice.
39Microphone DM30

Adjust the level of the external microphone
Adjust the input level of the external microphone to compensate
for different microphone sensitivities.
1.
Select Sound > Socket.
2.
Select Level under External Mic.
3.
Adjust the volume to the desired level.
4.
Press to confirm you choice.
Adjust the level of the line input
If needed, adjust the sensitivity of the line input to match the output
level of the connected device.
1.
Select Sound > Socket.
2.
Select Level under Line In.
3.
Adjust the volume to the desired level.
4.
Press to confirm you choice.
Volume limits
Setting the volume too loud can be unpleasant and potentially
cause damage to the hearing. This product is equipped with a
maximum volume feature that limits the loudness to a predefined
level that you deem safe. You can also set a fixed volume level if
you prefer control of the volume from the hearing aid only.
Set a maximum volume level
To prevent the volume from being turned up too loud by accident,
you can set a maximum allowed volume level.
Microphone DM3040

1.
Select Sound > Socket > Max/Fix Vol..
2.
Select Settings under Max Volume.
3.
Adjust the volume to the desired level.
4.
Press to confirm you choice.
Set a fixed volume level
If there is no need of a user adjustable volume, you can lock the
volume to a fixed level.
1.
Select Sound > Socket > Max/Fix Vol..
2.
Select Settings under Fix Volume.
3.
Adjust the volume to the desired level.
4.
Press to confirm you choice.
Lock the buttons
If you want to avoid accidental button presses it is possible to lock
all functions by activating the key lock. (You can always use the
power button regardless of the key lock.)
Select Key Lock.
An orange padlock symbol will appear in the display of the device.
Name the device
To help identify the device, you can enter a name that will be shown
in the display and during Bluetooth pairing.
1.
Select Settings > Name.
41Microphone DM30

2.
Enter new PIN
1000 0
1
!
Use to scroll through the list of characters. Press
to enter the selected character.
3.
When done select . (To cancel, select instead.)
PIN code settings
To prevent tampering or unintentional changes of the settings, you
can lock the product with a four digit PIN code.
Set a PIN Code
1.
Select Settings > PIN Code.
2.
Check Enabled.
3.
Use to scroll through the list of characters. Press
to enter the selected character.
4.
When done select . (To cancel, select instead.)
Important: Make note of the PIN code. If you forget the PIN,
contact your point of purchase.
Microphone DM3042

Choose which functions to lock
By selecting which functions to lock with the PIN code you can
allow access to commonly used functions while preventing access
to others.
1.
Select Settings > PIN Code > Lock Select.
2.
Select the functions you want to lock:
DescriptionOption
Lock access to the Mode menu.Mode
Lock access to the Pair menuPair
Lock access to the Sound menuSound
Lock access to all menus.All Menus
Hide the PIN entry dialogue
To reduce the temptation to guess the PIN, the PIN entry dialogue
can be hidden. The user then has 3 seconds from start up to access
the dialogue before it is hidden.
1.
Select Settings > PIN Code > Lock Select.
2.
Select Hide PIN Entry.
Change the PIN code
1.
Select Settings > PIN Code.
2.
Enter the current PIN code.
3.
Select Change PIN.
4.
Enter the new PIN code.
43Microphone DM30

5.
!
Select to confirm PIN.
Disable the PIN code
If you no longer wish to lock access to the unit, you can disable the
PIN code. The PIN will be reset and a new code will have to be
entered if you choose to enable it again.
1.
Select Settings > PIN Code.
2.
Enter the current PIN code.
3.
Uncheck the Enabled option.
Reset all settings
If you need to reset all settings to their default values, you can do
a factory reset.
1.
Select Settings > Factory Reset.
2.
Select Yes.
Important: All settings will be lost. Any pairing needs to be
redone.
Microphone DM3044

Product informationIII.
45Microphone DM30


Menu overview7.
Back
Communication
Back
Channel
Pair
Mode
Sound
Settings
Key Lock
About
Back
Master Unit
Companion Unit
Button Mode
Receiver On/Transmitter On
Back
Loop
Socket
Internal Mic
Back
PIN Code
Charge
Language
Name
Func.Indicator
Factory Reset
Time out TX
LBT
47Microphone DM30

Back
Leave the current menu.
Communication
Settings for radio channels and pairing.
Change the transmitting and receiving channel.Channel
Pair
Pair the unit with another Comfort Digisystem
device. Allows you to generate a new code key to
make the system secure.
Mode
Set the operating mode of the unit.
Master Unit
Companion Unit
Receiver On
Transmitter On
Make the unit a Master Unit that receives
sound from Companion Units.
Make the unit a Companion Unit that
transmits sound to the Master Unit.
Configure the function button.Button Mode
Enable the built-in receiver. Only available
as Master Unit.
Enable the built-in transmitter. Only
available as Companion Unit.
Microphone DM3048

Sound
Settings related to the sound of the unit.
Enable the neckloop output.Loop
Socket
Various level adjustments and settings for
sound sources connected to the aux socket.
Set the level of the built-in microphone.Internal Mic
Settings
General settings.
PIN Code
Charge
Factory Reset
Time out TX
Lock the unit with a PIN code to prevent
tampering.
When Auto Power Off is activated, the unit will
turn
off
when charged. Auto Restart will start
the unit when charging is interrupted. Default is
to stay on during charging.
Set the menu language.Language
Give the unit a name to help identify it.Name
Toggle the function indicator on or off.Func.Indicator
Reset the unit to factory settings. All settings
will be lost!
Automatically turn off transmission if no sound
is detected during 1 minute. Transmission
restarts when sound is detected.
49Microphone DM30

LBT
Verify that the selected channel is free before
the transmission is started. This is done to avoid
interference with any existing signals. If the
selected channel is busy, the following text will
appear: “This channel is busy, select
a new channel”.
Key Lock
Manually activate the key lock.
About
Information about the firmware version.
Microphone DM3050

Function indicator8.
//...
...//...
...//...
//...
...//...
...//...
!
The
function indicator
status.
Table 2: Pairing indications
Ready to receive pairing
information
Pairing information sent.
Information received
Table 3: Charging indications
Normal operation
Charging in progress
Charging complete
Low battery
gives you information about the units current
IndicationStatus
IndicationStatus
Note: If the unit is on while charging the function indicator stays
red even when the battery is fully charged.
51Microphone DM30


Optional accessories9.
The following accessories can be used with your product:
Soft case
Charging stand
Table stand
Neckholder
53Microphone DM30

Boom microphone, black
Boom microphone, beige
Clip on microphone
Microphone DM3054

Technical specifications10.
transmitter/receiver
transmitter
Operating time
SST - SecureStream TechnologyType of
Approx. 30 m (100 ft)Range
97x41x17 mm (3.8x1.6x0.7 in.)Dimensions
51 g (1.8 oz)Weight
904 - 927 MHz, 2.40 - 2.48 GHzFrequency range
904 - 927 MHz, 2.40 - 2.48 GHzFrequency range receiver
Built-inAntennas
Up to 10 hours. Dependent on usage
conditions. Measured with factory
settings.
Up to 3 hours.Charging time
Built-in microphone omnidirectionalMicrophone
Mic, Line in, headphones, neckloopConnections
55Microphone DM30


MiscellaneousIV.
57Microphone DM30


Radio11.
Comfort Digisystem relies on radio technology to transfer the
sound between transmitters and receivers. Like all radio systems,
it communicates on specific channels. If you use two transmitters
on the same channel, or neighbouring ones, there may be
interference. Other electronic equipment can also interfere with
radio transmissions.
Channel planning
To achieve optimal radio performance you need to take into account
the distance between transmitters and their frequencies. A longer
distance between transmitters allows you to use frequencies that
are closer together.
If several transmitting frequencies are being used in the same
room, the frequency differences between the units should be at
least 1 MHz for optimal operation.
Radio range
The radio range between the units is around 30 m (100 ft). However,
this may vary depending on the particular environment you are in.
59Microphone DM30


Battery maintenance12.
This product has a built in Lithium-Ion Polymer battery. Lithium-Ion
batteries do not suffer from so called memory effects and do not
need to be routinely discharged to preserve performance.
The battery's capacity will degrade over time. This is normal for
all rechargeable batteries. Battery lifetime is dependent on usage
patterns. The battery is preferably charged little and often; it will
reach 90% of its capacity after half its charging time. If stored for
long periods of time, the battery is best left semi-charged. Contact
your point of purchase when it is time to change the battery.
Operating times vary depending on which features are used.
61Microphone DM30


Troubleshooting13.
Consult the following guide if you have problems with your
equipment. If you still have questions, please contact your point
of purchase.
SolutionCauseSymptom
• The device does not
start.
• Poor speech
intelligibility.
• Poor range and/or static
interference.
sound transfer).
• Device will not start
during charging.
• No sound is heard.
• The battery is depleted.
•
is released too soon.
• The distance between
the microphone and the
person speaking is too
long.
• The distance between
the microphone and the
receiver is too long.
• The units are not paired.• Loud hissing noise (no
activated.
• The microphone is
muted.
• The transmitter and
receiver channel does
not match.
• Charge the battery.
•
Press for at least 2
sec.
• Reduce the distance to
the speaker.
• Reduce the distance to
the receiver. Maximum
distance is approx. 30 m
(100 ft).
• Redo the pairing
procedure. See
Comfort Digisystem
devices
• Disable Auto Power Off• Auto Power Off is
• Unmute the
microphone.
• Redo the pairing
procedure. See
Comfort Digisystem
devices
Pairing
on page 31
Pairing
on page 31
63Microphone DM30


Service and warranty
Comfort Audio AB accords a limited warranty for two years as of
the date of delivery. This covers all defects of manufacture and
materials. For accessories the warranty period is 90 days as of the
date of delivery. Local agreements or regulations may exist. Defects
caused by careless handling or intervention inside the product or
its accessories are not covered by the warranty.
If you are in a need of service on your device, please contact your
point of purchase. You are always welcome to contact Comfort
Audio if you have any questions.
65Microphone DM30


Contact information
Head office
SWEDEN
Comfort Audio AB
Box 154
SE-301 05 Halmstad
+46 35 260 16 00
info@comfortaudio.com
www.comfortaudio.com
Subsidiaries
NORWAYDENMARK
Comfort Audio ASComfort Audio ApS
Postboks 304Benediktevej 5, 1.sal
NO-3201 SandefjordDK-3480 Fredensborg
+47 959 87 910 +45 33 78 03 02
info@comfortaudio.no info@comfortaudio.dk
www.comfortaudio.no www.comfortaudio.dk
67Microphone DM30

USA
Comfort Audio Inc.
411 E. Business Center Drive
Suite 109
Mount Prospect, IL 60056, USA
+1 888 421-0843
usa@comfortaudio.com
www.comfortaudio.us
BENELUXGERMANY
Comfort Audio BVComfort Audio GmbH
Nieuwe Steen 20Curiestraβe 2
NL-1625 HV HoornDE-70563 Stuttgart
+31 229-87 01 10 +49 711 67 400 224
info@comfortaudio.nl info@comfortaudio.de
www.comfortaudio.nl www.comfortaudio.de
Microphone DM3068

Product symbols
The product complies with the
European directive 93/42/EEC,
including amendments,
concerning medical devices.
The product complies with the
essential requirements of the
European Directive 1999/5/EC,
including amendments,
concerning Radio and
Telecommunications terminal
equipment.
The product is covered by the
European directive 2002/96/EC,
including amendments,
concerning Waste Electrical and
Electronic Equipment (WEEE).
Recycle the product and its
accessories according to
national regulations.
Direct current.
Restriction of usage related to
transmitted frequencies may
apply, due to national
regulations.
Connector for battery charger.
69Microphone DM30

Indoor use only.
Class II equipment.
Microphone DM3070

Trademark and copyright notices
Comfort Digisystem™ is a trademark of Comfort Audio AB.
SecureStream Technology™ is a trademark of Comfort Audio AB.
Comfort Audio™ is a trademark of Comfort Audio AB.
71Microphone DM30


MA0506
130610
©
Comfort Audio AB. All rights reserved.All content is subject to change without notice.
Comfort Audio AB
Box 154
SE-301 05 Halmstad, Sweden
Phone: +46 35 260 16 00
info@comfortaudio.com
www.comfortaudio.com
 Loading...