

Page 1
Comfort Contego
User Manual
Please read the User Manual
before using this product.
Comfort Contego R900
Receiver
Comfort Contego T900
Transmitter
DO NOT USE the COMFORT CONTEGO
if you have a PACEMAKER or other
implanted device. The Comfort Contego
could cause the pacemaker or other implanted
device to malfunction and cause serious injury
or death.
English
Page 2

2
Comfort Contego is not to be used as a substitute to the hearing aids and should be used in
accordance with the specications and recommendations provided by your physician.
NOTE!
Max output > 130 dB SPL. Could be very dangerous for your hearing.
It is recommended that customers keep the volume control in the lowest
position, when turning on the device.
Comfort Audio is not liable for damages arising from usage of the equipment not in accordance with
the instructions provided by Comfort Audio. Comfort Audio shall not be liable for performance prob-
lems and/or damages caused in any way by customer’s modication of any part of the equipment.
Industry Canada, Operation is subject to the following two conditions:
(1) this device may not cause interference, and
2) this device must accept any interference, including interference that may cause undesired
operation of the device.
Federal Communications Commission Statement, This device complies with part 15 of the
FCC Rules. Operation is subject to the following two conditions:
(1) this device may not cause harmful interference, and
(2) this device must accept any interference received, including interference that may cause
undesired operation.
WARNING!
Changes or modications not expressly approved by the party responsible for
compliance could void the user’s authority to operate the equipment
NOTE:
This equipment has been tested and found to comply with the limits for a Class B digital device, pursuant
to Part 15 of the FCC Rules. These limits are designed to provide reasonable protection against harmful
interference in a residential installation. This equipment generates, uses and can radiate radio frequency
energy and, if not installed and used in accordance with the instructions, may cause harmful interference
to radio communications. However, there is no guarantee that interference will not occur in a particular
installation. If this equipment does cause harmful interference to radio or television reception, which can
be determined by turning the equipment off and on, the user is encouraged to try to correct the interference by one or more of the following measures:
-- Reorient or relocate the receiving antenna.
-- Increase the separation between the equipment and receiver.
-- Connect the equipment into an outlet on a circuit different from that to which the receiver is connected.
-- Consult the dealer or an experienced radio/TV technician for help.
Page 3

3
Contents Page
Introduction 4 - 5
This is included 6 - 7
Getting started 8 - 11
Charging 8
Functions - receiver 12 - 14
Functions - transmitter 14 - 15
Menu 16 - 17
Symbols receiver 18 - 19
Symbols transmitter 20 - 21
Radio range and channels 22
Using the neck loop/headphones 23
Special functions, Watching TV 24
Troubleshooting 25
Safety instructions 26
Service, guarantee and technical data 27
Page 4

4
Introduction
Congratulations on your choice of the Comfort Contego. In the bag you
will nd everything you need to improve your grasp of speech in all kinds
of situations. It is easy to use and works regardless of whether you have
a hearing aid or not. The sound is transmitted digitally which gives an
extremely good speech reception. Comfort Contego is almost impossible
to intercept as the receiver and transmitter are paired using a coded key.
Please read through the instructions for use before you use the product.
Page 5

5
For conversations
at home or at work
At a restaurant
Watching TV
With a directional
microphone on the
receiver.
Page 6

6
This is included
Bag
Receiver - Contego R900
Transmitter - Contego T900
Page 7

7
Neck loop with or
extension cable
Headphones
Sound Kit
Charger
Earphones
Alternatives
Page 8
8
Getting started
Charging
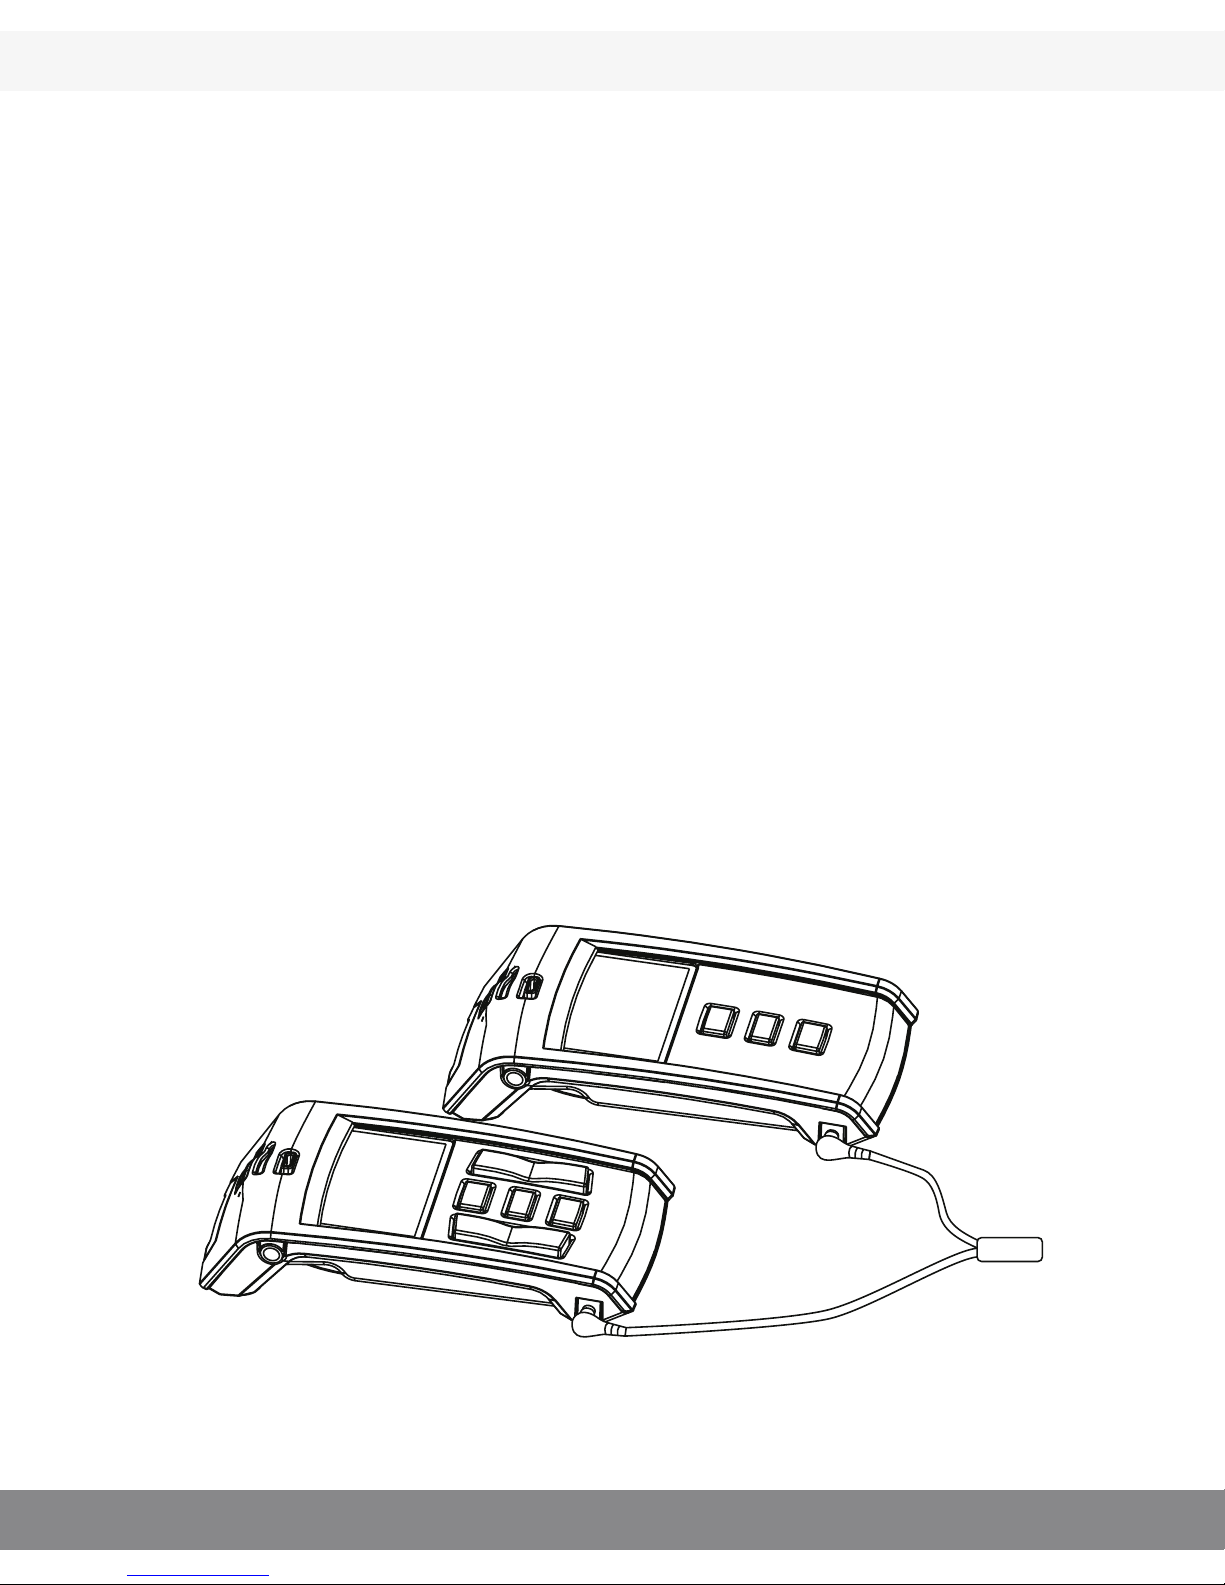
Comfort Contego contains a rechargeable battery. Charge the
transmitter and the receiver for at least 4 hours before using them
for the rst time.
An empty battery takes about 4 hours to charge. When the battery
is charged you can use the unit for up to 16 hours. The transmitter
can be charged during use.
To charge:
When the battery is being charged the battery symbol on the
display blinks. When the battery symbol is full Comfort Contego
is fully charged and charging ceases. Changing the battery without
the assistance of an authorized dealer will void the Limited
Warranty.
Use only the Comfort Audio charger that is supplied.
Page 9
9
Starting to use the Comfort Contego
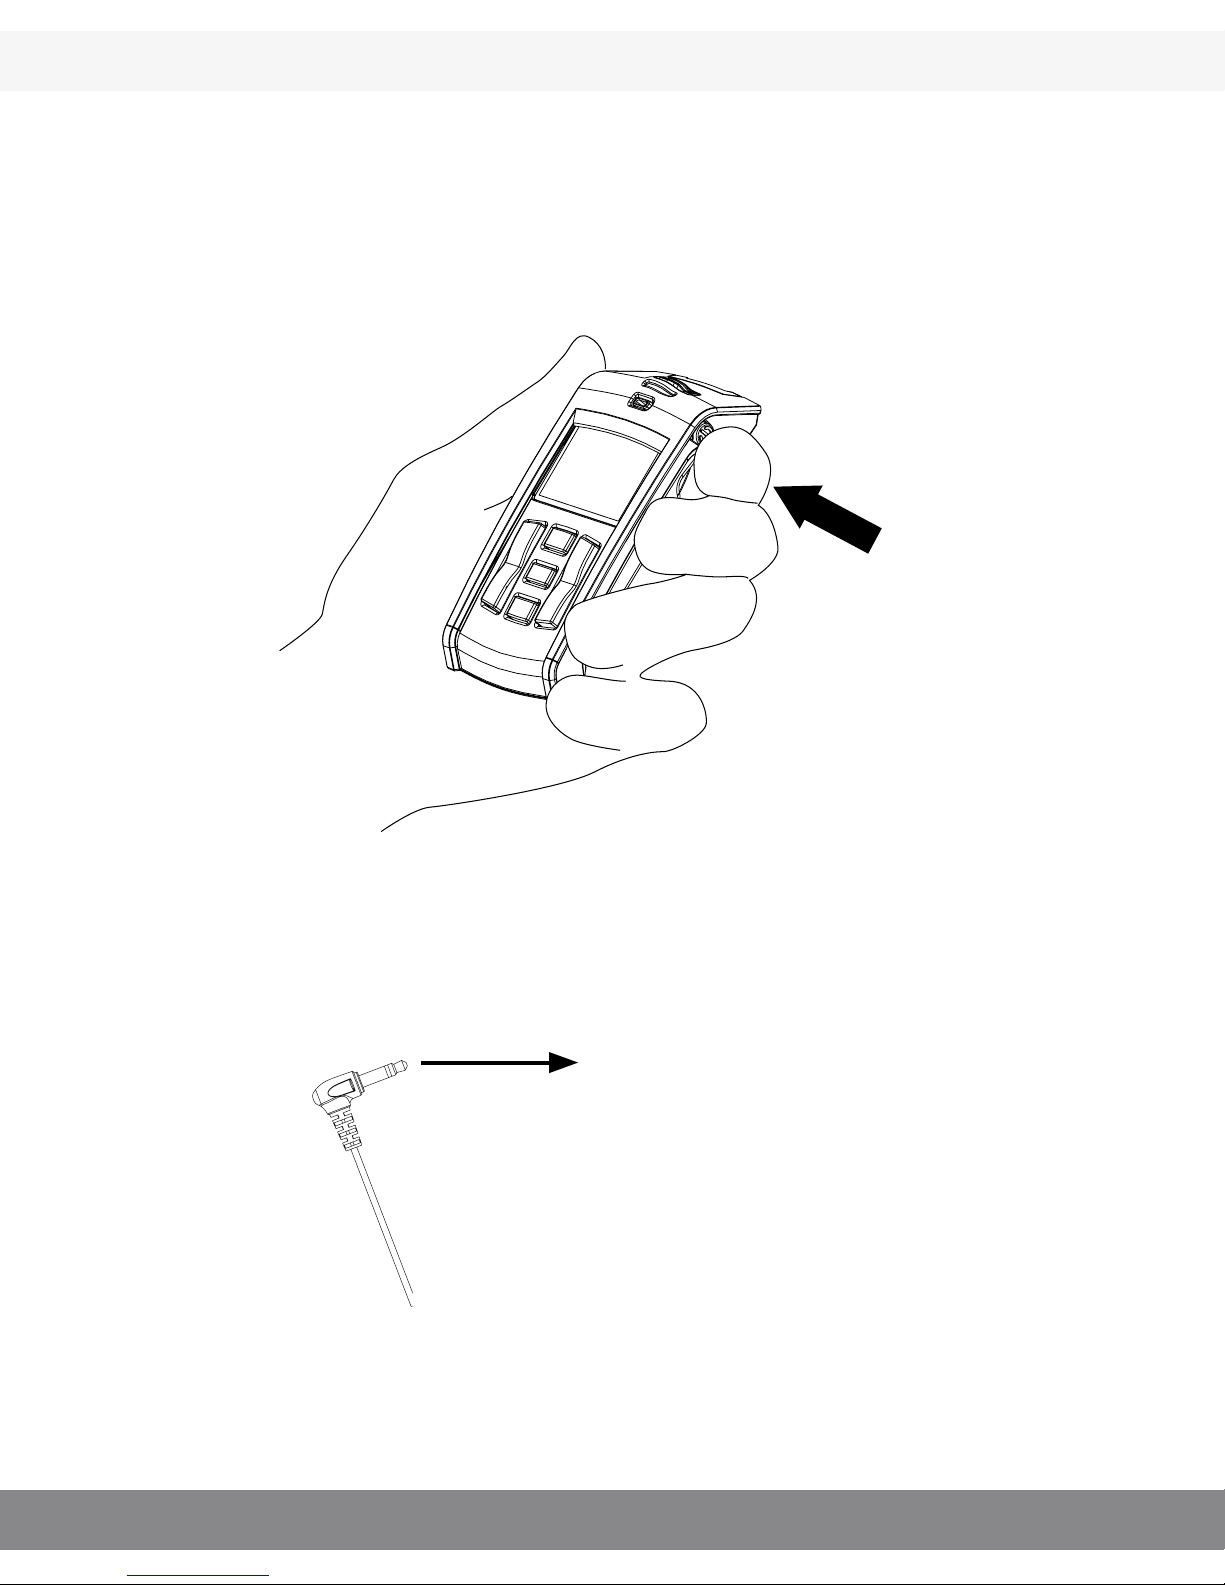
1. When the Comfort Contego is fully charged - start the receiver
by pressing the button for about 2 seconds.
2. Then connect the neck loop and turn the hearing aid to the T
position. Use the headphones instead of the neck loop if you don’t
use hearing aids.
Page 10
10
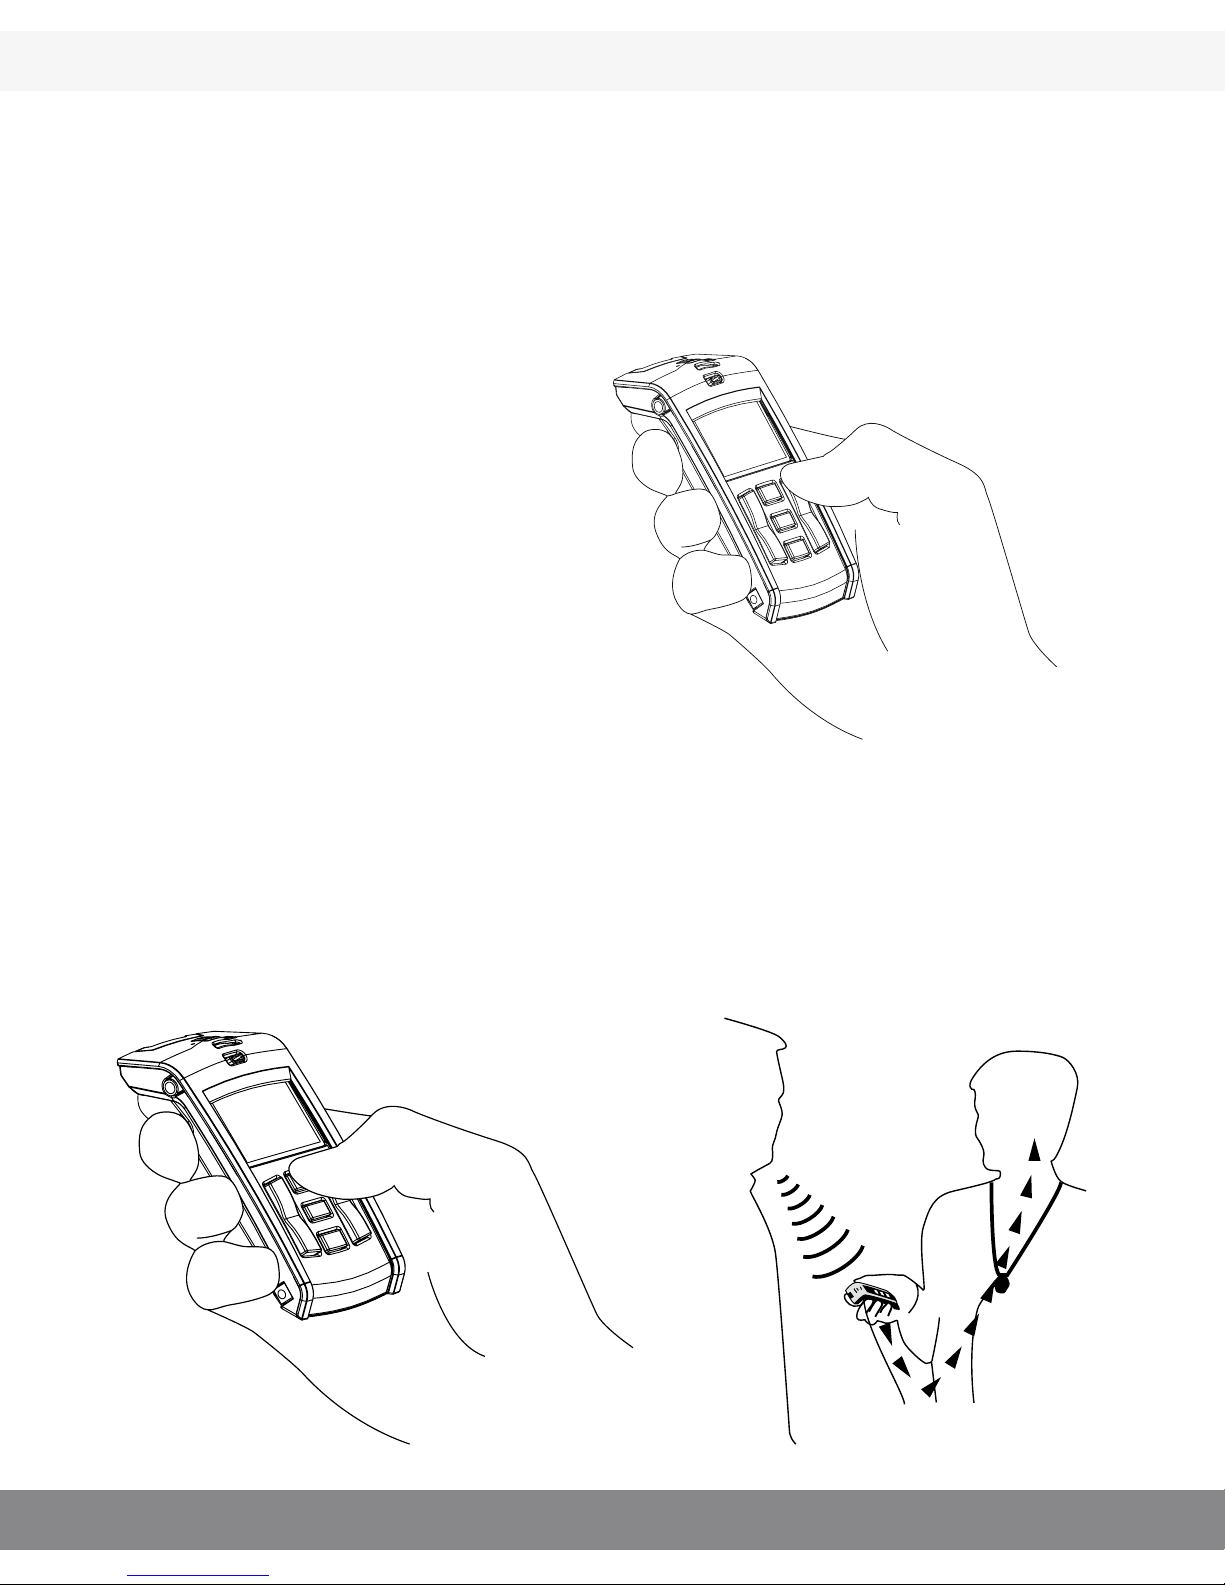
3. Picking up sound via the built in microphones in the receiver.
Set the audio level by means of the right hand volume controller
(see page 12) (Note! Start listening at a low volume. If the volume
is not set on the lowest position, the sound could potentially cause
harm to the customers’ hearing.)
Select the directional or omni-directional microphone with the arrow buttons in the middle (see page 12). Place the receiver on a table or aim it at the person you want to listen to. Choose directional
or omni-directional settings depending on the situation. Normally
in noisy surroundings directional setting is preferred.
Page 11
11
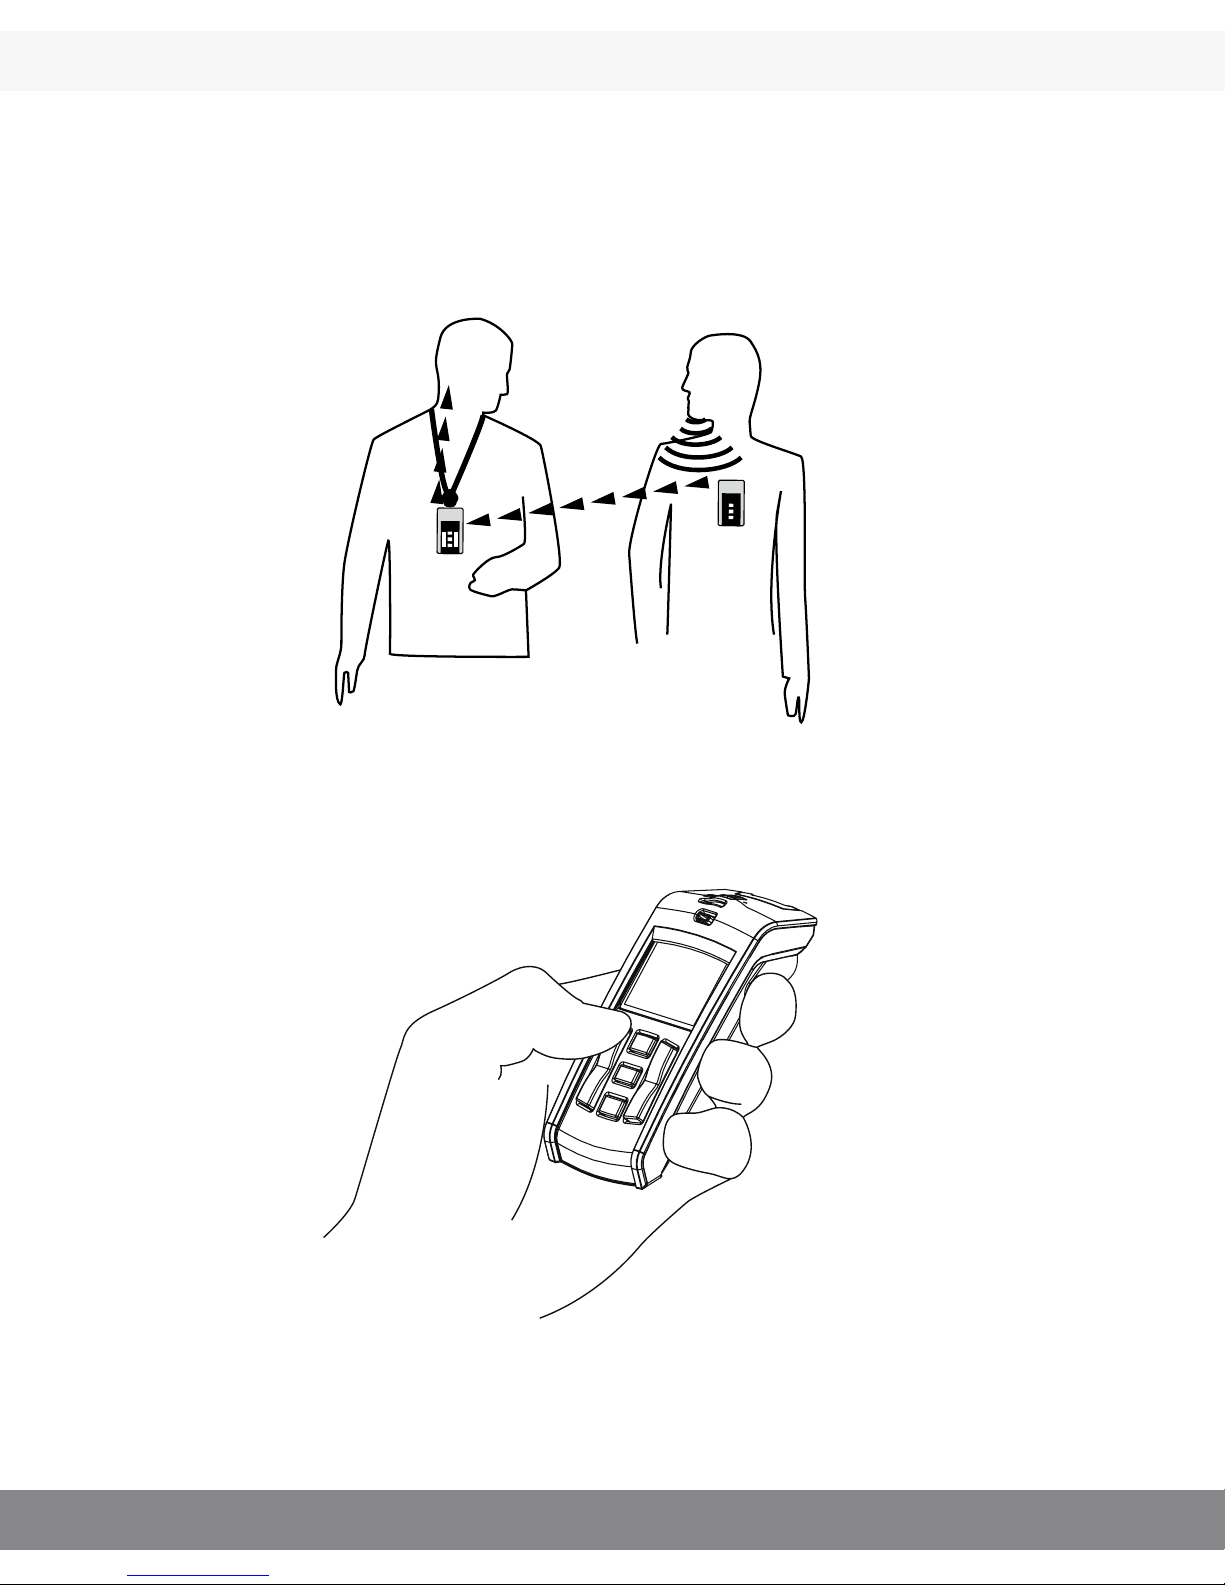
4. Picking up sound by means of transmitter.
When the distance between you and the speaker /sound source is
longer, let the person you want to hear use the transmitter.
Set the audio level by means of the left hand volume controller.
(see page 12) (Note! Start listening at a low volume)
(When the transmitter or receiver is turned on, the most recent settings for volume and microphone type are automatically selected)
Page 12
12
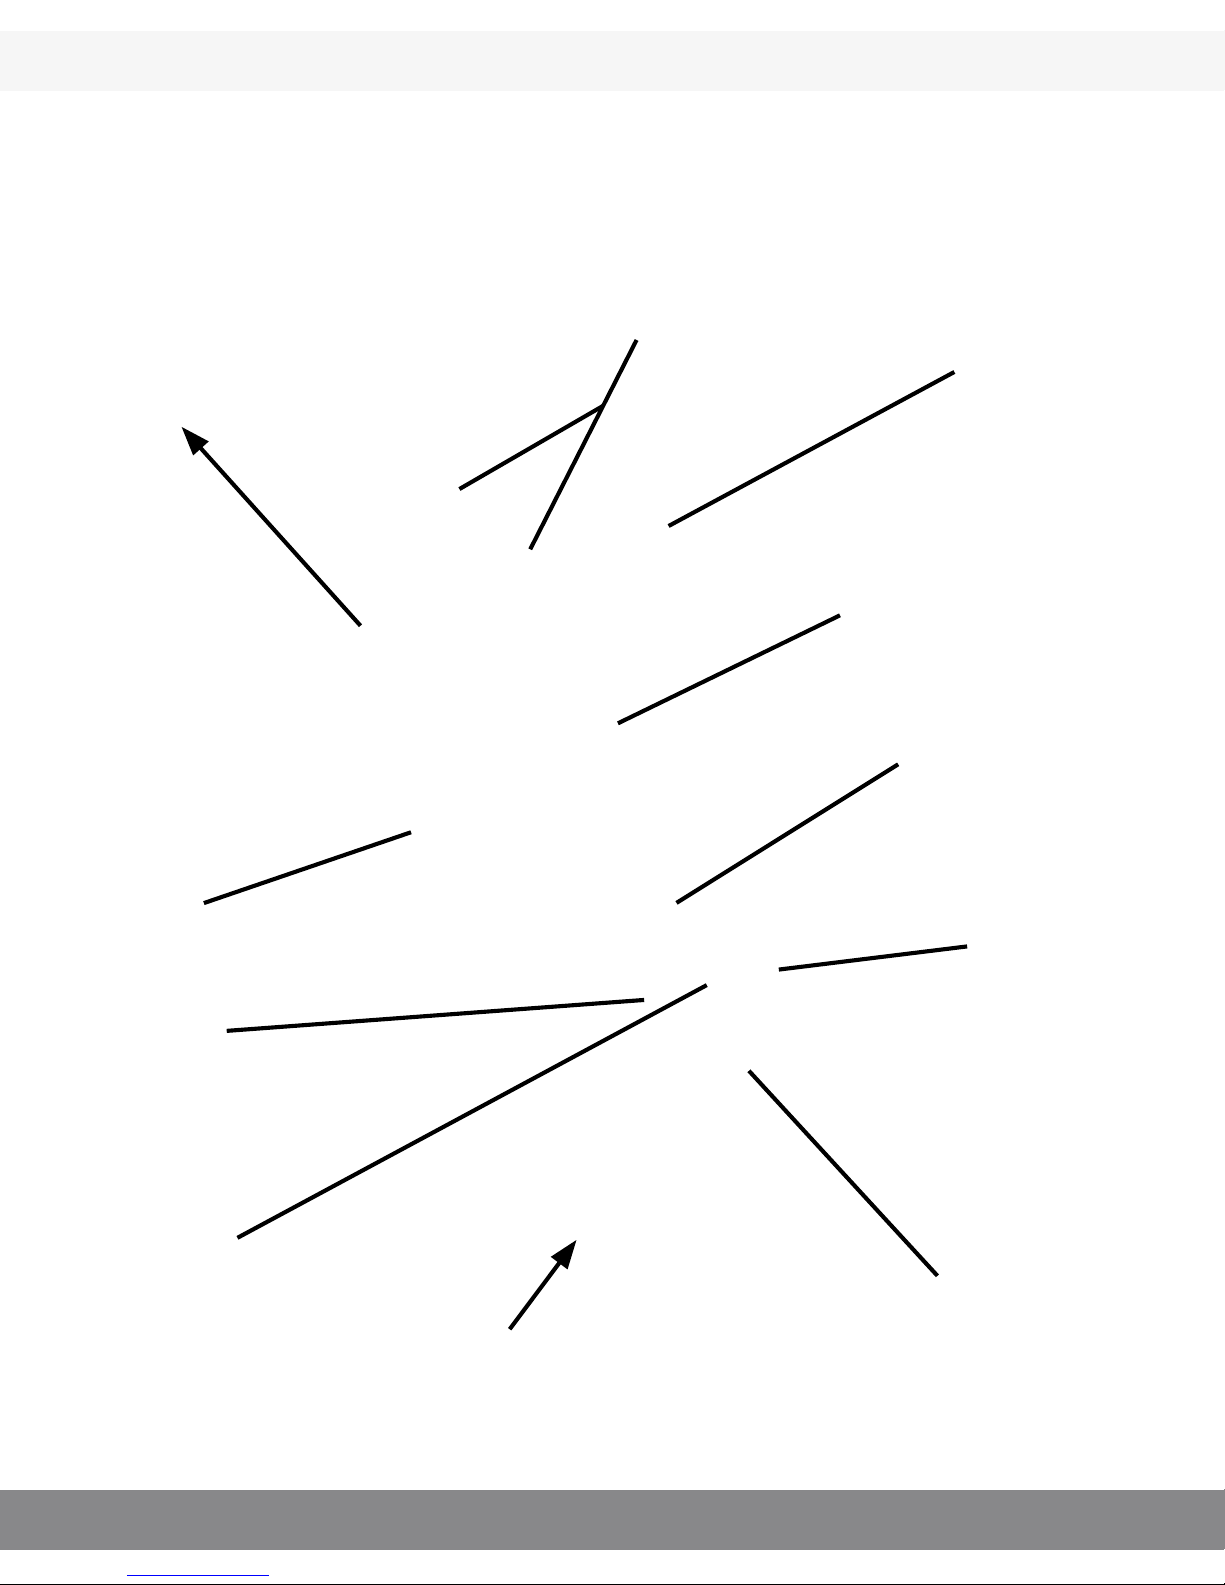
Functions - Receiver, Comfort Contego R900
Clip on the back
Plug for neck loop/headphones
Power switch
On/Off
Display
Microphones
Menu/OK
Charging
Volume
controller,
receiver
Volume
controller,
transmitter
Omni-directional
microphone setting
Directional
microphone
setting
Page 13

13
Functions R900
The most important functions can be accessed without needing to
go into the menu. (For menu see page 16.)
Volume controller receiver
(internal microphones)
By pressing the plus sign you
increase the volume on the
receiver microphone
By pressing the minus sign
you decrease the volume on
the receiver microphone
Directional microphone
With the uppermost arrow
you select the directional
microphone
Omni-directional
microphone
With the lower arrow you
select the omni-directional
microphone
Page 14

14
Functions Receiver R900
Volume controller
(transmitter)
By pressing the plus sign you
increase the volume from the
transmitter microphone.
By pressing the minus sign
you decrease the volume from
the transmitter microphone.
Functions Transmitter T900
Directional microphone
With the uppermost arrow
you select the Uni-directional microphone.
Omni-directional microphone
With the lower arrow you
select the omni-directional
microphone.
By pressing the uppermost
arrow you increase the
line in amplication.
By pressing the lower arrow you decrease the line
in amplication.
Line in unattached Line in attached
Page 15

15
Clip on the back
Line in
On/off
Microphones
Menu/OK
Functions - Transmitter, Comfort Contego T900
Omni-directional
microphone setting
Charging
Display
Directional
microphone
setting
Page 16
16
Menu Receiver and transmitter
The functions in the menus are the same for both the receiver and
the transmitter.
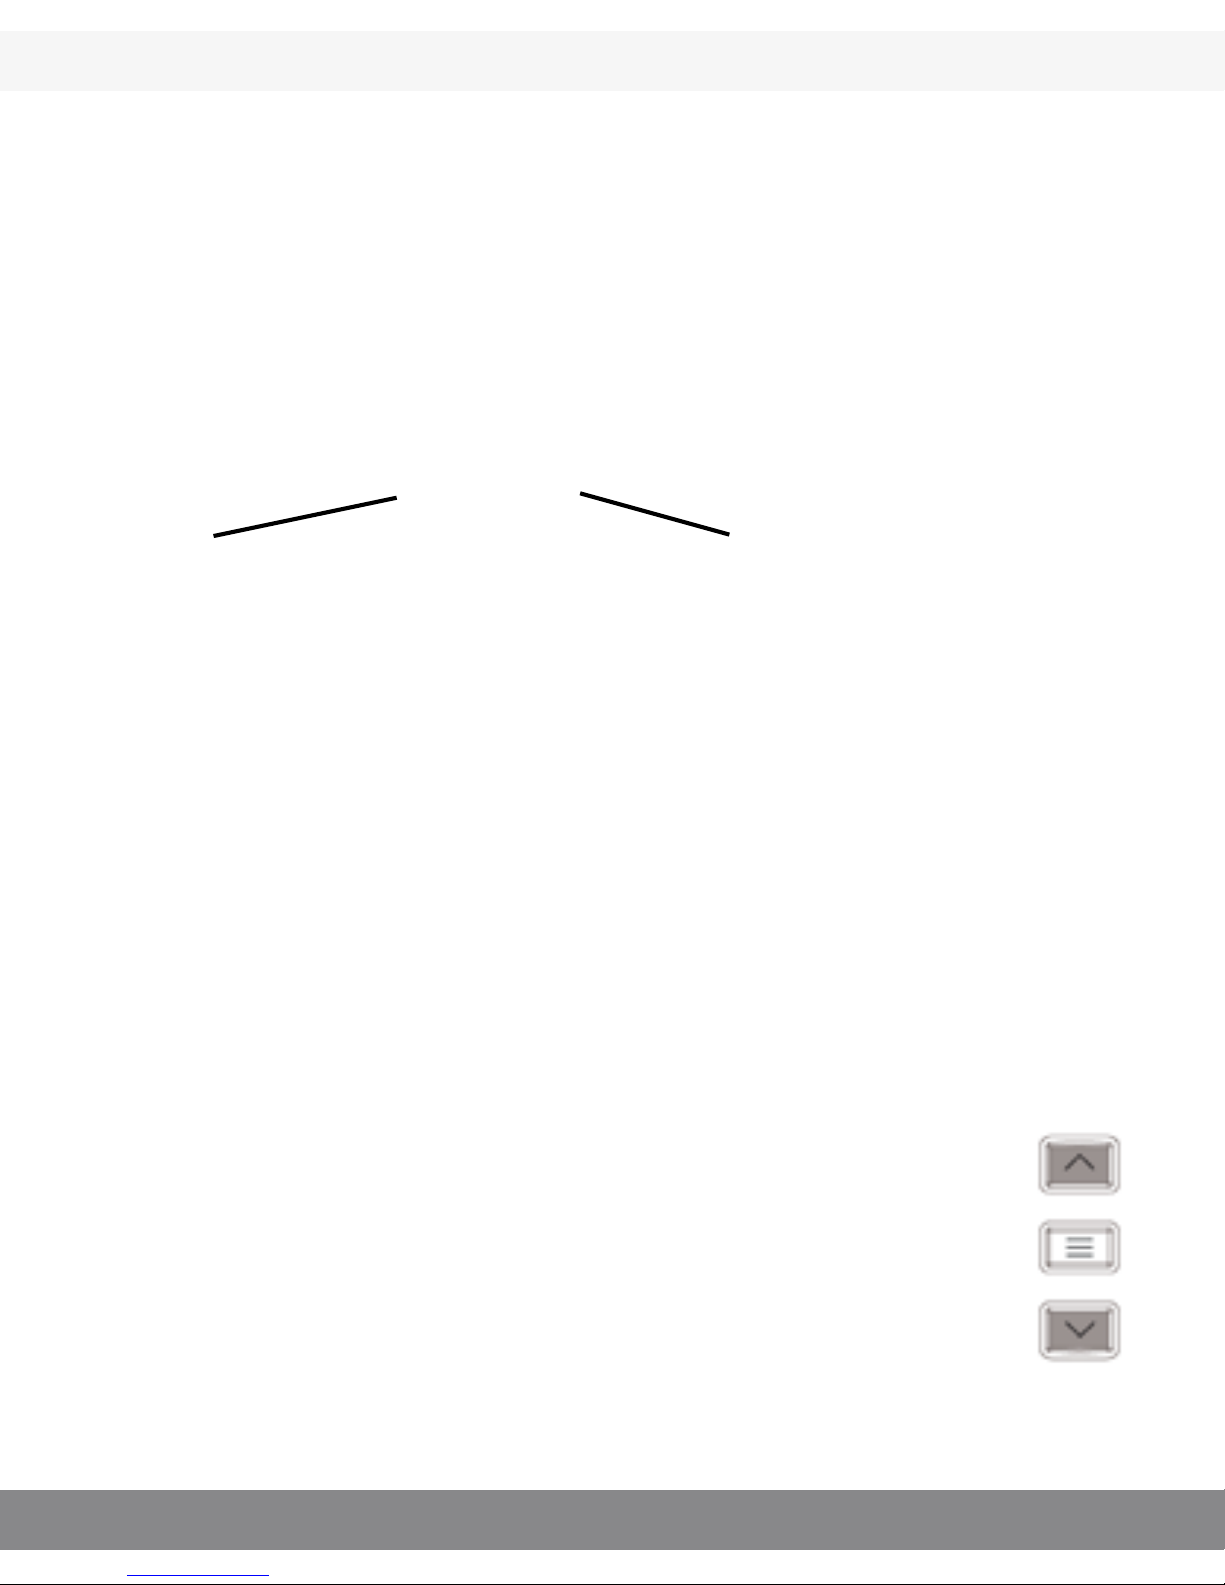
Press and hold the Menu/OK button for a short moment to access
the menu:
Choices displayed on the transmitter:
Back
Channel
Pairing
Line in
Language
Key lock
You select the function by navigating
up or down with the arrow buttons
To make a selection, press Menu/OK
To return, also press Menu/OK
Menu/OK
Receiver Transmitter
Receiver Transmitter
Choices on the receiver:
Back
Pairing
Language
Key lock
Page 17

17
Channel settings
The transmitter and receiver are set on the same channels when you
receive the product. To change channels choose Channel in the menu
and press OK, navigate between the channels by using the arrows up
and down. To choose a channel press OK.
Pairing
In order to use the receiver and the transmitter they must be paired.
(When you receive them they are already paired). Conrm that both
the transmitter and receiver are charged and ON. Press MENU key
on the transmitter and receiver. Scroll to PAIR and press OK (Menu
Key). A new menu will show. Press pair. The unit will display
“Wait for receiver/transmitter”. Press OK on the transmitter. In a few
seconds the Units will PAIR and display “Pairing Complete”.
Line in
Here you choose if you want to use a external sound source. When
you receive the Contego it is on “Line in”
Language
Select the language with the arrows. Press OK.
Key lock
When you are in the menu selection “Lock Keys” and press Menu/
OK you lock the keys. To unlock them press the up and down
arrow keys simultaneously.
Page 18
18
R900
Contego
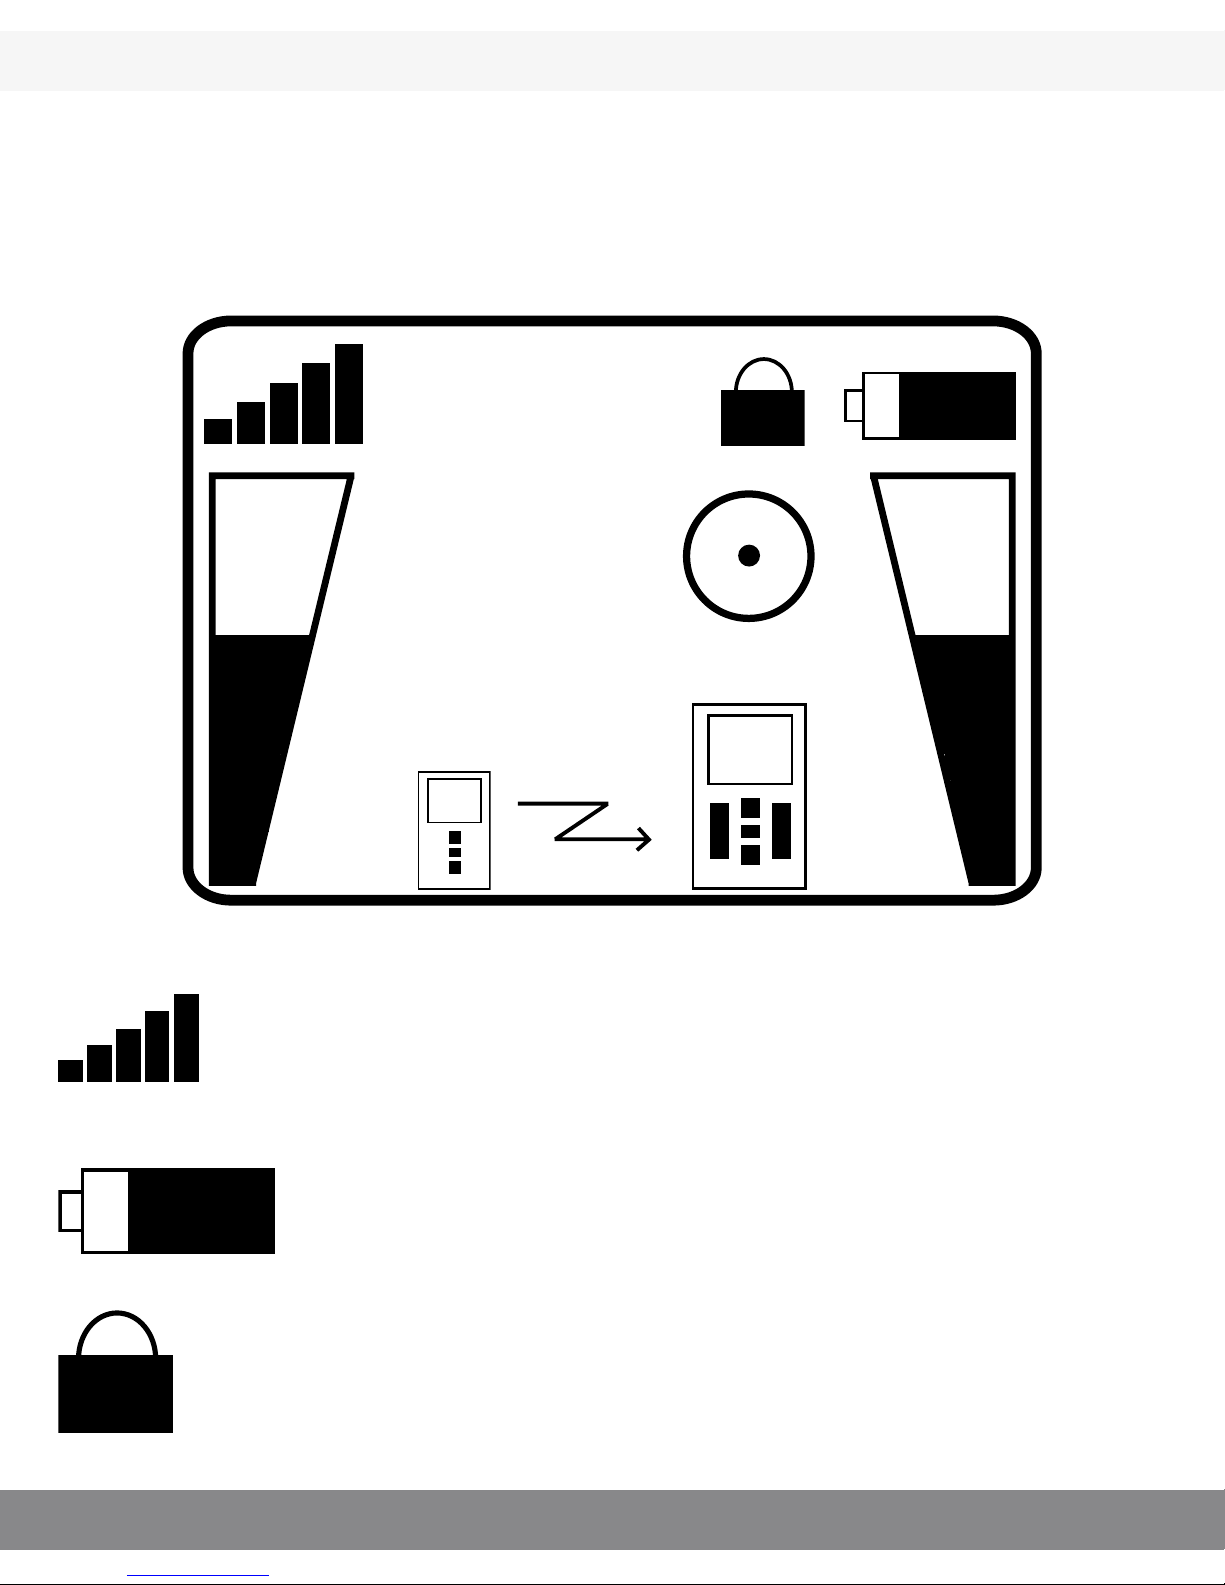
Display Symbols on the Receiver, Comfort Contego R900
9
9
CH:1
Signal strength
Shows how strong the signal between the
receiver and the transmitter is.
Battery status
Shows the current battery capacity.
Key Lock
When the padlock is showing the key lock is
activated. (see page 17).
Page 19
19
9
9
CH:1
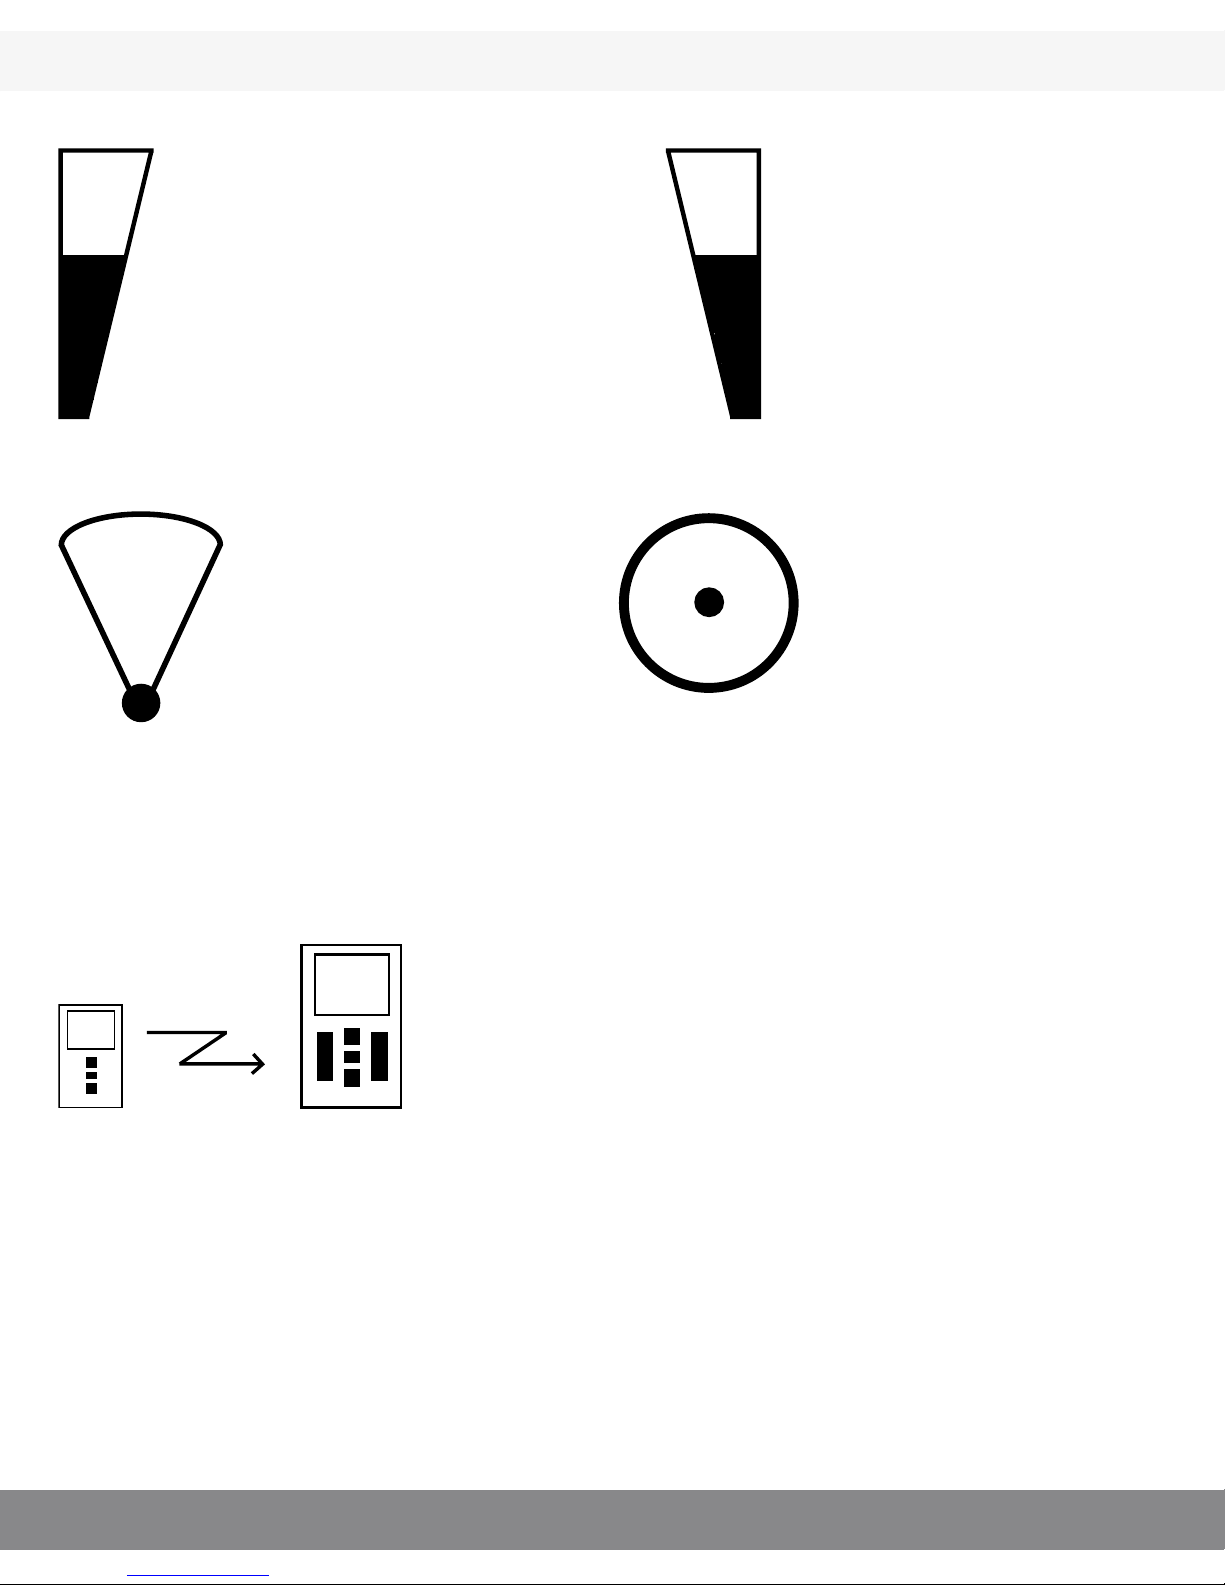
Volume transmitter
The bar display and
the number beside it
show the volume on
the transmitter.
Directional microphone setting
With the directional
microphone setting
you receive a directional microphone
aimed at a limited
area.
Volume receiver
The bar display and
the number beside it
show the volume on
the receiver.
Omni-directional
microphone setting
With the omni-directional microphone
setting you can cover
a larger area.
Channel
The number shows which channel
the receiver is set on. (The receiver
and transmitter must be on the same
channel in order to be able to work
together.) When the exclamation
mark “!” is displayed it means that
you are transmitting on a frequency
that you must apply for permission
to use. (
Comfort Audio is not liable for
unauthorized use of radio waves, such as,
but not limited to: interferences with police
communication, or strategic communica-
tion, military installations etc.)
Transmission
Shows that there is contact
between the receiver and the
transmitter. If the receiver
and transmitter are too near
one another “Too close” is
displayed
Page 20
20
T900
Contego
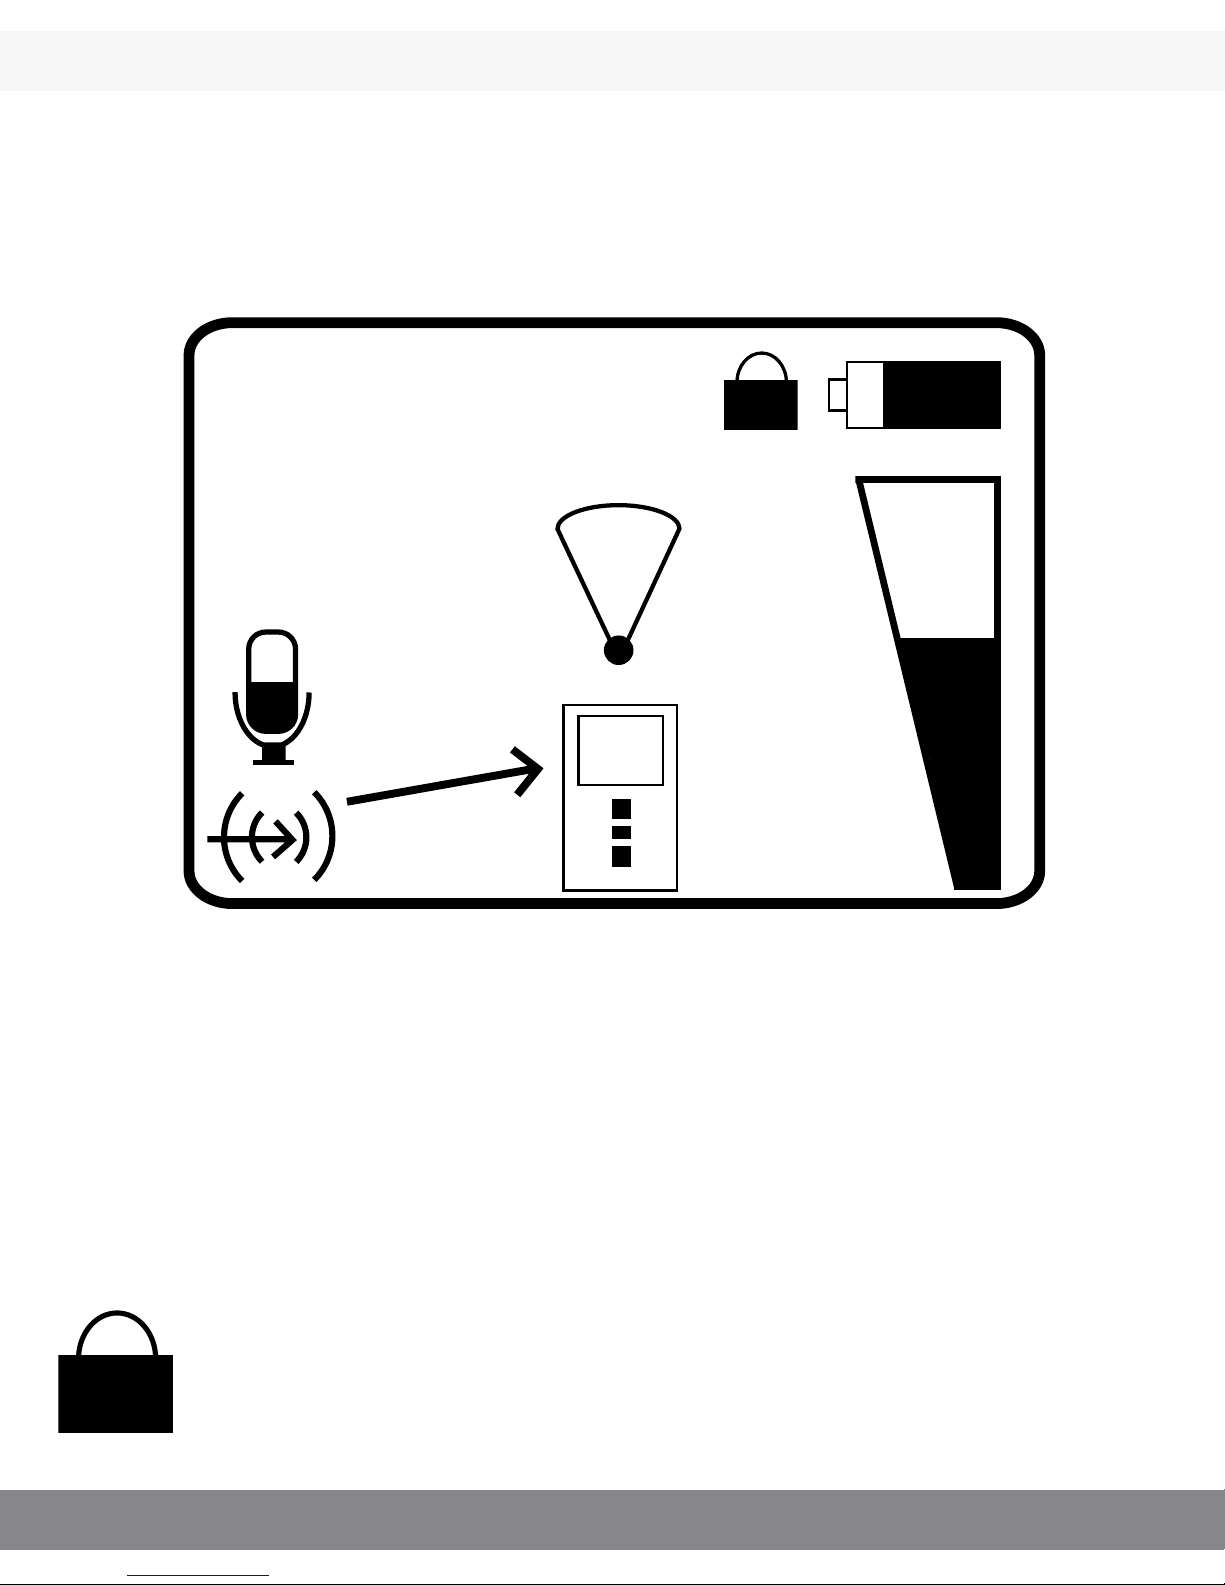
Display Symbols Transmitter, Contego T900
CH:1
CH:1
Channel
The number shows which channel the receiver is
set on. When the exclamation mark “!” is displayed it means that you are transmitting on a frequency that you must apply for permission to use.
Key Lock
When the padlock is displayed the key lock is
activated (see page 17)
9
Page 21
21
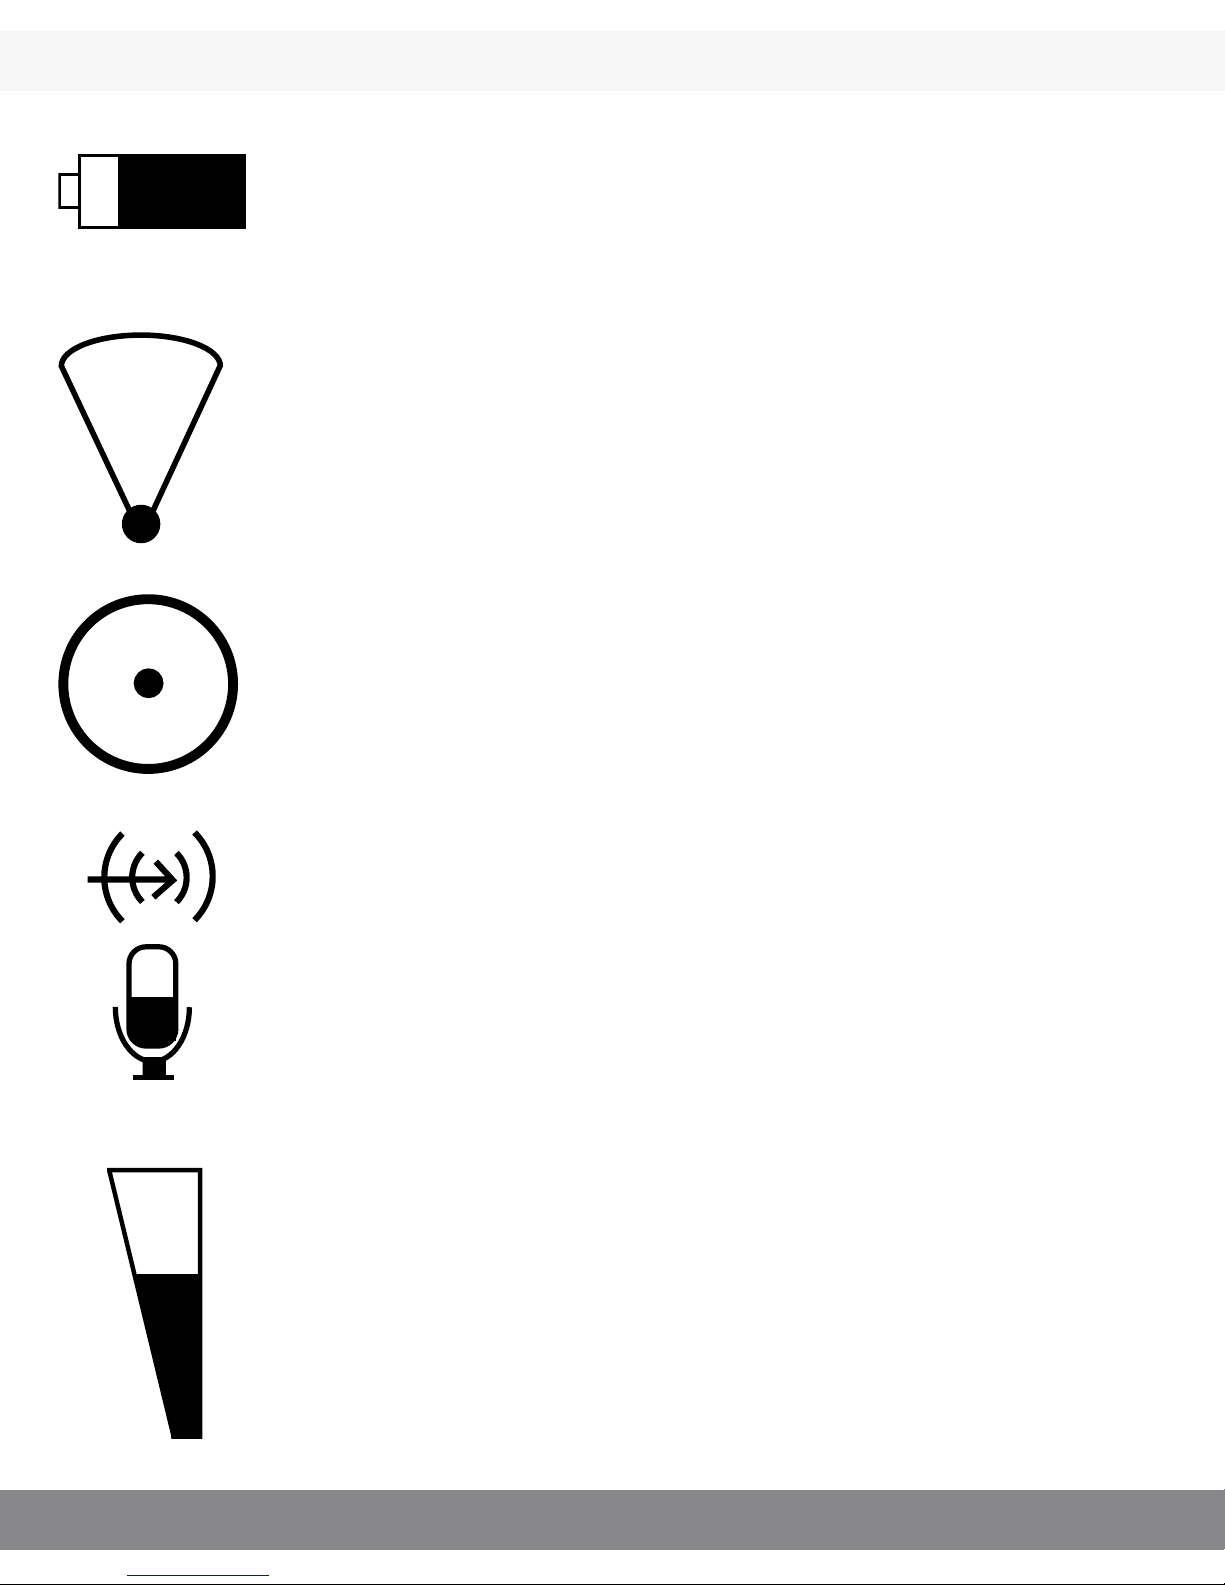
Battery status
Shows the current battery capacity.
Directional microphone setting
With the directional microphone setting you
receive a directional microphone aimed at a
limited area.
Omni-directional microphone setting
With the omni-directional microphone setting
you can cover a larger area. This is perfect
for a meeting or a dinner with several people.
Line in / Microphone
Line in is for listening to a external sound
source, for example a TV or a stereo. When
the cable is connected, an arrow is shown
between the symbol and the transmitter.
Amplication Line in
The bar display and the number beside it
show the amplication of the external sound
source.
9
Page 22

22
Radio range and channels
The aerials for the transmitter and receiver are built in.
The range is up to 25 meters. This can vary depending on
the kind of environment you are in.
Like all radio transmitters Comfort Contego communicates on
special channels. If you use two transmitters on the same channel
there will be an interference.
Other electronic equipment can also interfere with the
radio transmissions.
The channel that you use in your country is perhaps not permitted
abroad. Always get in touch with your hearing aid provider in
your country in order to nd out which channels are permitted in
different countries.
Comfort Audio is not liable for unauthorized use of radio
waves, such as, but not limited to: interferences with police
communication, or strategic communication, military
installations etc.
Page 23
23
Neck loop
With a neck loop connected to the receiver you can listen with a
hearing aid set on the T position.
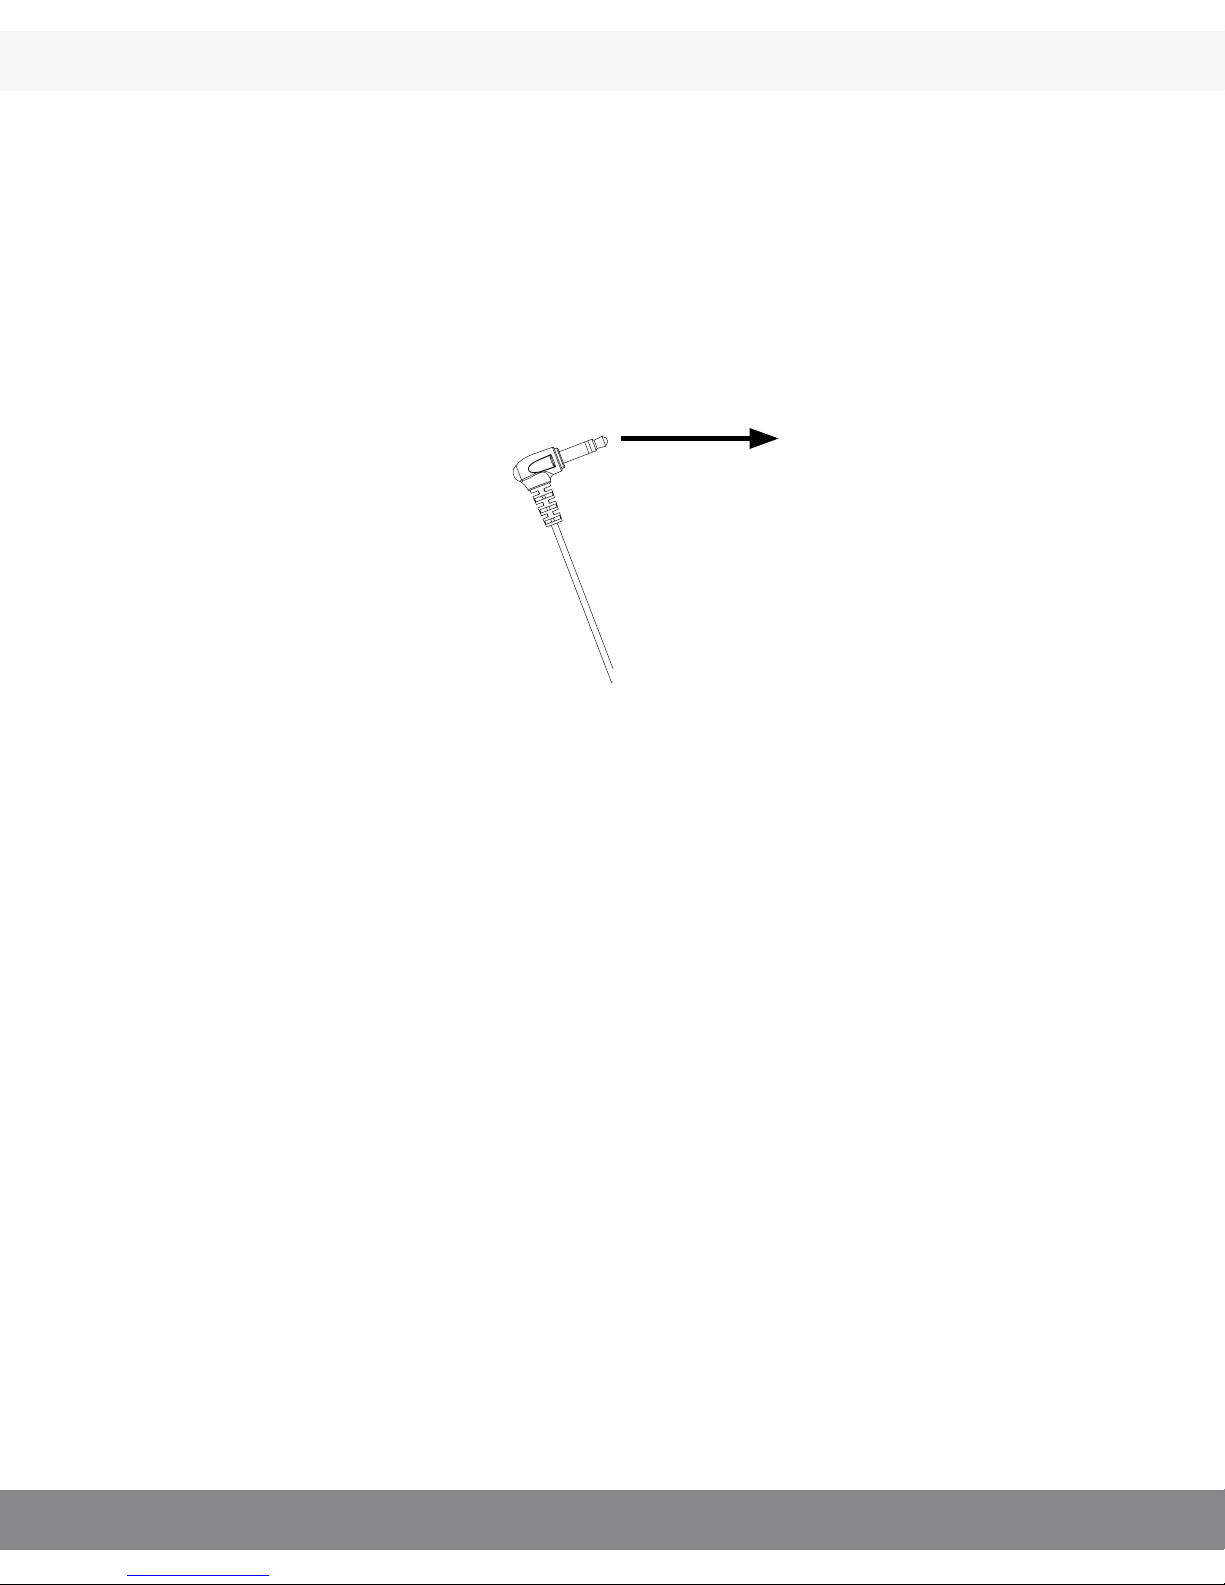
Connect the neck loop
or the extension cable
to the receiver:
Injuries may occur if loop gets caught. Keep the neck loop
away from objects representing a danger like moving machineries,
steering wheel while driving, elevator doors etc. Do not use the
neck loop during sport activities or play.
Headphones or earphones
Headphones or earphones can be connected in the same way as
described above.
Page 24
24
Special functions
Add a receiver / more receivers
If you want to use more than one receiver to listen with this is not
a problem (e.g. during a guided tour.) In order to add a receiver go
into the menu on the extra receiver, Choose Pair. Then go into the
menu of the transmitter. Choose Pair and press OK. Pair complete!
The new receiver can then be used to listen with.
Tip: - More than one receiver can be paired at the same time.
- Instead of using the transmitter menu you can pair by
pushing two quick times on the menu button on the transmitter.
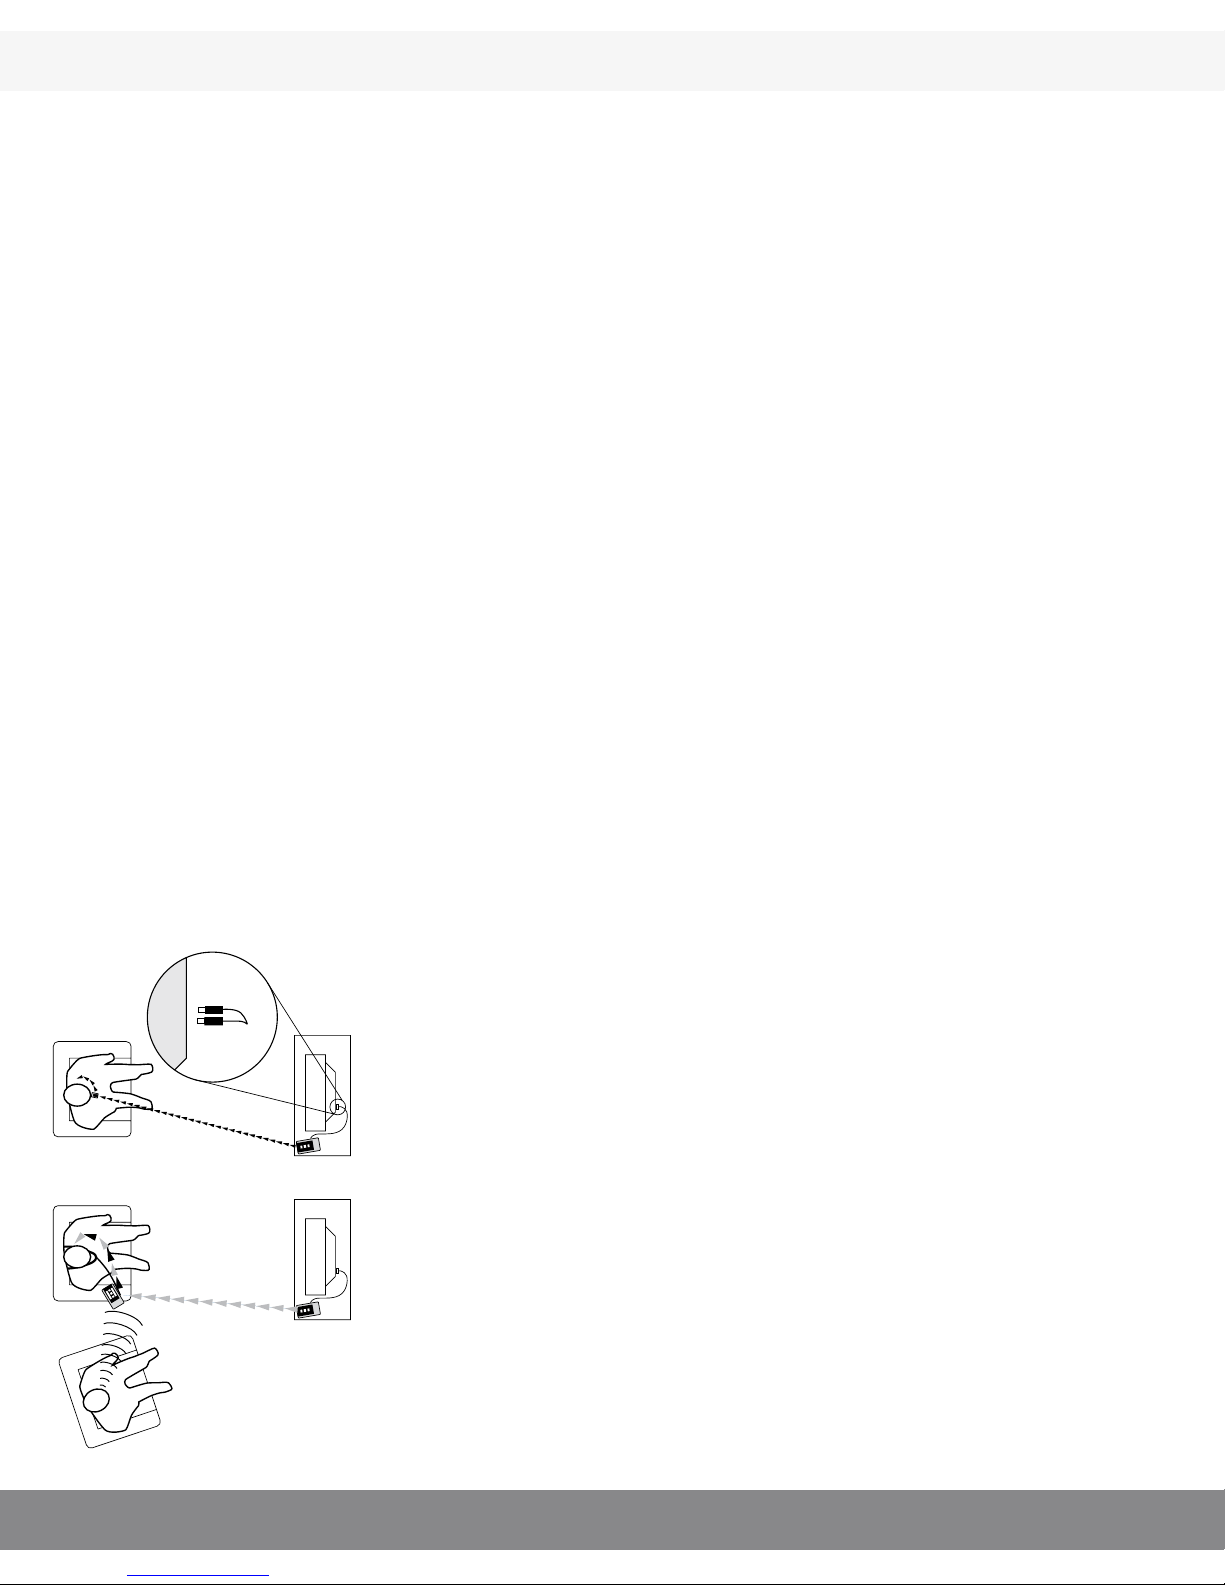
Watching TV
In order to be able to hear the TV or other sources of sound you
can use the sound kit. You can then listen with the receiver.
Connect the cable (A) between the TV
and the socket on the Contego transmitter
(T900). (Make sure the transmitter is set on
“Line in”)
With the help of the built in microphone in
the receiver you can also listen to people
sitting next to you on the sofa.
A
Page 25

25
Troubleshooting
Transmitter and receiver do not start.
Charge the transmitter and the receiver. Remember that you must
hold the ON/OFF button in for 2 seconds in order to start Comfort
Contego. If it still does not work - check the charger is connected
to the mains. Contact your retailer to change the battery.
Poor speech reception
The distance between the transmitter and the receiver is too long.
The distance between the microphone and the person speaking can
also be too long.
Poor range and interference
In certain environments consisting of concrete, iron and metal
plates, the range can be reduced. There can also be interfering
equipment nearby. Change channel.
If you change channel on the transmitter the receiver must be on
and within the transmitters range to follow the channel switch.
NOTE
If you use a hearing aid make sure that it is working and that it
is in the T setting. Always make sure that the receiver and the
transmitter are paired.
Page 26

26
Important Safety Instructions
Not following the Important Safety Instructions, or trying to repair
and/or tampering the Equipment without the assistance of an
authorized technician will void the Limited Warranty. Comfort Audio
is not liable for any damages arising out of such unauthorized uses,
repairs, and/or tampering.
1) Read these instructions.
2) Keep these instructions.
3) Heed all warnings.
4) Follow all instructions.
5) Do not use this apparatus near water, it may damage the product.
6) Clean only with dry cloth, otherwise you could damage the product.
7) Install in accordance with the manufacturer’s instructions. If not, it may
damage the product.
8) Do not use or install near any heat sources such as radiators, heat regis-
ters, stoves, or other apparatus (including ampliers) that produce heat.
9) Protect the power cord from being walked on or pinched particularly at plugs,
convenience receptacles, and the point where they exit from the apparatus.
10) Only use attachments/accessories specied by the manufacturer.
11) Unplug this apparatus during lightning storms or when unused for
long periods of time.
12) Refer all servicing to qualied service personnel. Servicing is required
when the apparatus has been damaged in any way, such as power-supply
cord or plug is damaged, liquid has been spilled or objects have fallen into
the apparatus, the apparatus has been exposed to rain or moisture, does not
operate normally, or has been dropped.
The weights, dimensions, capacities, performance ratings and other data in Comfort Audio’s brochures, prospectus, circulars, advertisements, price lists and instructions sheets are mentioned only as general information. They
are only approximate and shall not bind Comfort Audio.
Page 27

27
Service and guarantee
Comfort Audio AB provides a comprehensive guarantee for two years after the date of
delivery. This covers all manufacturing faults. Headphones, earbuds and cables are warranted under normal use for thirty days from date of purchase. Faults caused by careless
use or opening the Comfort Contego are not covered by the guarantee.
Accessories and spare parts
Spare parts and accessories can be ordered (see pages 6-7 for pictures.) You are always
welcome to contact your nearest retailer if there is anything you are unsure about.
NOTE: The Comfort Contego battery last up to 5 years when using it in a normal
way. The capacity of the battery deteriorates step by step after many charging and discharges. When the times come for a battery change, the product, both thetransmitter
and receiver should be sent back to the retailer or Comfort Audio service centre.
Technical data
Type of transmitter
Digital modulation, with encryption
Range
- 75 feet
Size
0,87 x 1,77 x 3,86 inches
Weight
2,1 oz
Frequency range
904 - 926 MHz
Channels
38
Antenna
Built in
Operating time
- 16 hours
Battery
Rechargeable Li-Ion
Charging time
4 hours
Microphones
Built in, directional and omni-directional
Input
Max Output:
Max Gain:
Line in / Microphone
Max output < 130 dB SPL
Max Gain < 50 dB
Page 28
80
Comfort Audio AB, Box 154, SE-301 05 Halmstad, Sweden
Tel +46 35 - 15 23 00 Fax +46 35 - 15 23 23
[email protected] www.comfortaudio.us
Comfort Audio © All rights reserved
Manufactured by:
 Loading...