

Comfort-Aire REG-123A Owner’s Manual

iii_!_iiii!iill _' ii _i_ii:i:
iiiii"_!_!__ _, _ i _ .......
i
MODELS: REG-123A
Safety Precautions .......................... 3
Before Operation ............................ 7
Introduction .................................... 8
Symbots Used in this Manua] ........8
Features ........................................ 8
Electrical Safety ............................ 9
Electrical Data............................... 9
Temporary Use of an
Adapter ..................................... ! 1
Temporary Use of an
Extens4onCord ............................ 11
Installation .................................... 12
Window Requiremen_ ............. 13
Size ....................................... ! 3
Select the best location .......... 13
Prepat-ation of Chassis ............... 14
Unit _nstallation ............................ 15
FOR YOUR RECORDS
Wrde the model a,nd serlat nu,rnbers here'
Model #
Serial #
You carl tindlthem on a label on 1heskJe el Ihe p._odud_
De_!ler's Name
Date P_rchased
ImStap.le your receipt to this page in the event you need=it
tr'_plrJve date ,-_fpur,-ha.ee or frJr warranty isque£.
READ THIS MANUAL
Inside you will find many helpful h_nts on how to use and
m,aintain your air condnhonet propedy Just a httle p_event,we
.care on your ;)art can save you a _jreal deal o_ hme a,nd
money ovel [hc IltO of youl air corldthoncr_
Yeulll find many answe[s to common problems in the chart
of troubleshooting tips. ff you review ou[ ch_t_tof
Troubleshooting, Tips first, you :may not need to ca_l for
servif:e at all
PRECAUTION
Operating Instructions ............... 1/
Iocation and Funrtion
of Lontrols .................................... t7
Re.J_e Cent_,_ Ope'_L_ons ....................... ] 8
Re_ote C¢_t'_F_, , ...................... l 9
Additional tea[u_e_ ....................... 20
Air Direction .............................. 20
Drain Pipe ................................ 20
Maintenance and Service ............ 2l
Air Filter ................................. 2t
Cleaning the Air Conditioner .....2I
How to Remove the
Front Grille ...................................
Common Problems and
Solutions ....................................... 23
Troubleshooting ....................... 24
• Con,tact an Authorized Service Center for repair o;r
maintenan, ce of thins ,unit. Calll 1-877-755-7932 to
locate the nearest ASC.
•This air conditioner is not mte_nded for use by young
children or inva!lids without supervision.
-¥o,u,ng children, should be supervised _o ensure that
they do not play with the air conditioner.
• If the power cord requires replacement, Ihave an
Authorized= Servicer install an exact replacement part.
• Inslallation work must be performed in accordance
with the Nation, all Electric Code Iby q,ual_fied and
authori_zed personn,el on_ly.
2 Room Air ,Conditioner
To prevent iniury to the user or other peop, le and property damage, the following instructions
must be followed.
[] incorrect operation due to ignoring instructions will _us.e harm or damage.. The seriousness
is clas.sifi_ by the bllowing indications.
[] Because ot the weight of the product, it is r_omm,ended that you have a helper to. assist in
the installation.
[] Meanings of symbols us._ in this manual are as. shown below.
Biesure not to dO 'i, _]
B,esure to follow
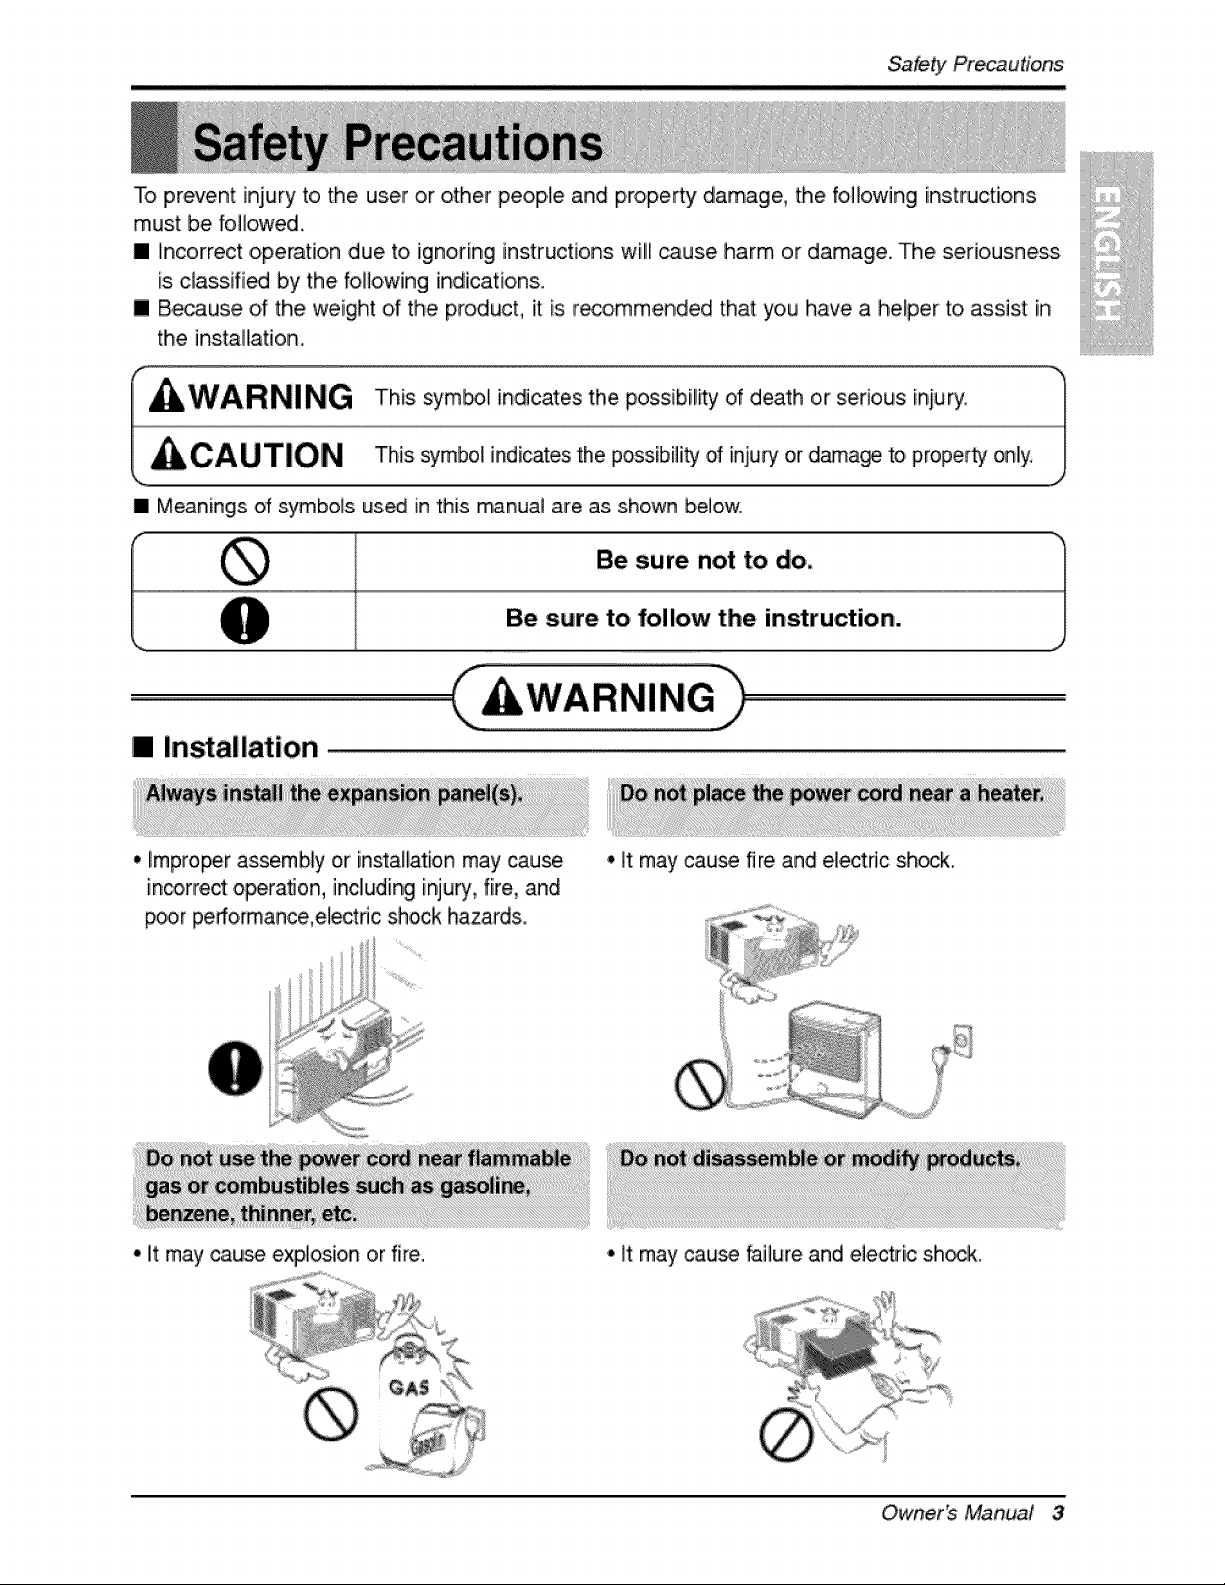
[] Installation
q
• improper assembly or installation may cause
incorrect operatbn, inclluding injury, fire, and
poor pe#o_ance,electric shock hazards.
• it may cau_ explosion or fire.
(
• It may cause fire and electric sh_K
° it may cause failure and ele_ric sh_k.
Owner_ Manual 3
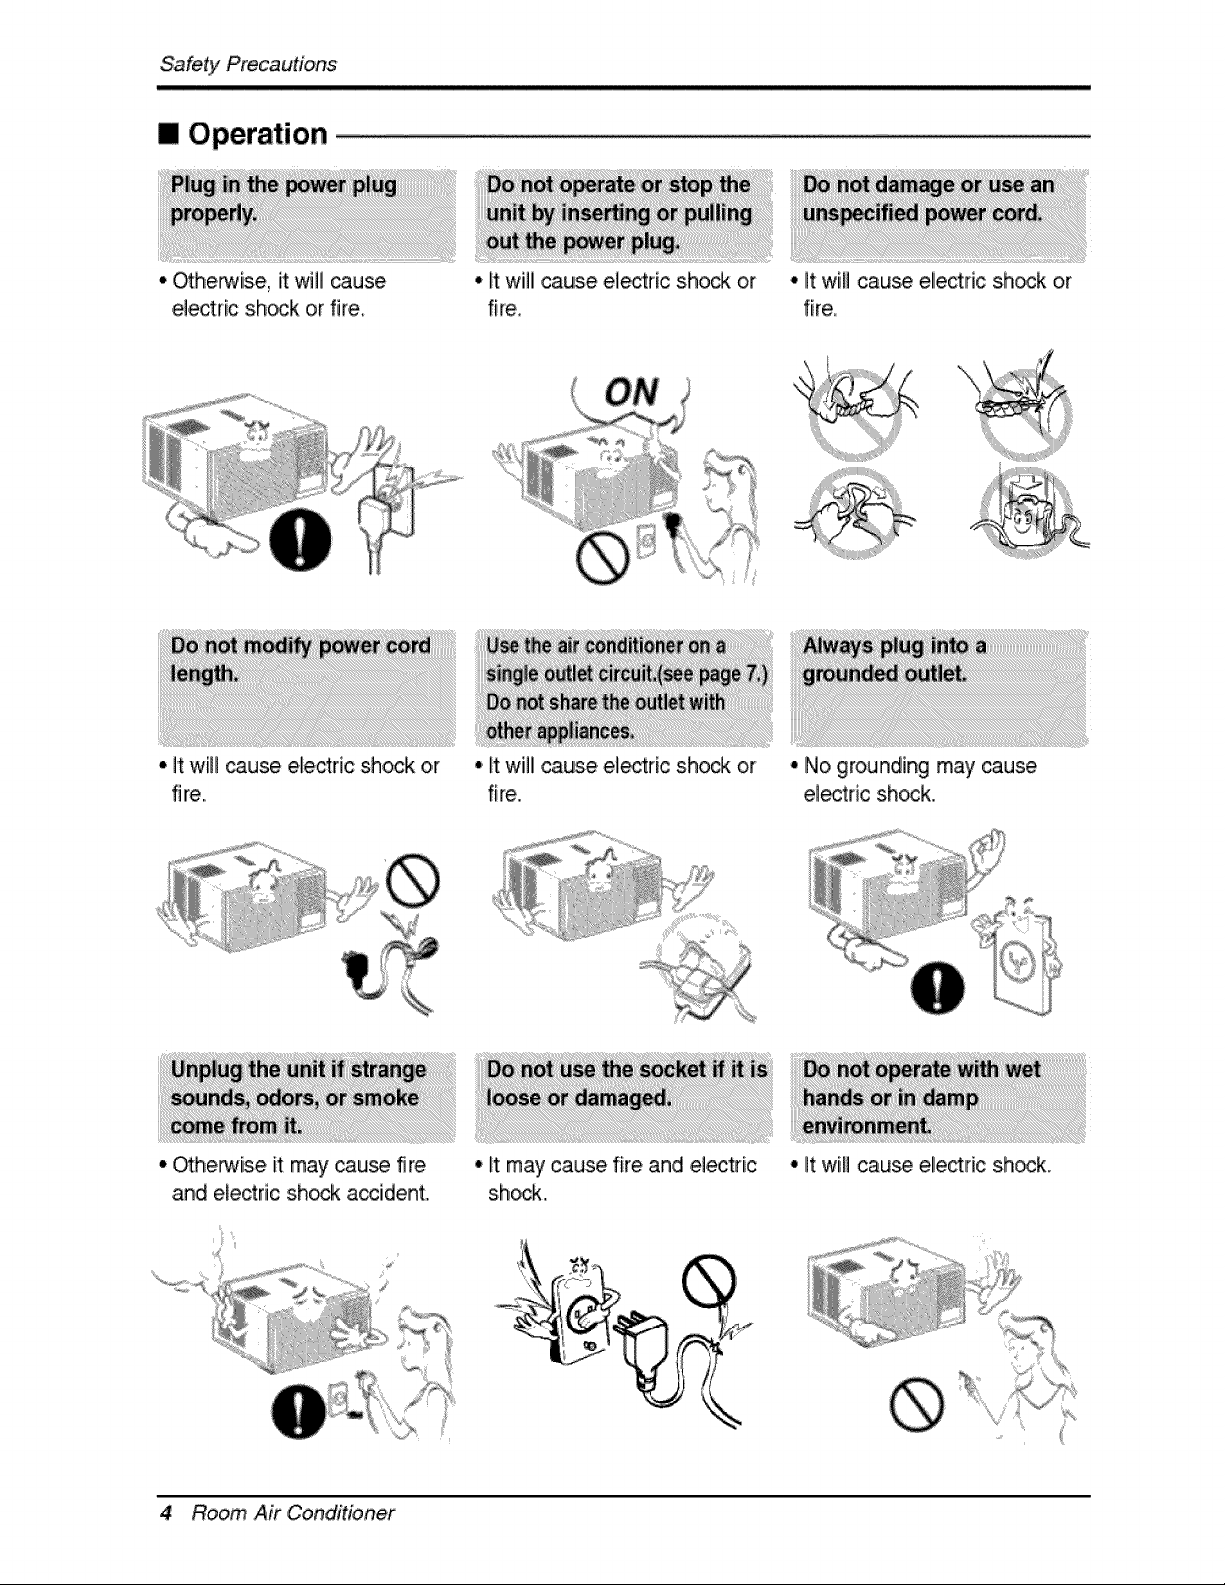
[] Operation
• Otherwise, it wi]] cause
electric sh_k or fire
° It will _use electric shock o,r
fire.
• it wi]li cause el_tric shock or
fire,
o'it will cause e_ric shock or
fire.
° it will cause eliectr[c sh_k or
fire
° INo grounding may cause
el_ric shock.
° _he_ise it may ,cause fi re
and electric sh_k acciident.
4 Room Air Condittbner
° _tmay cause fire and eiectr[,c
sh_;k,.
° It will cause electric sh_k.
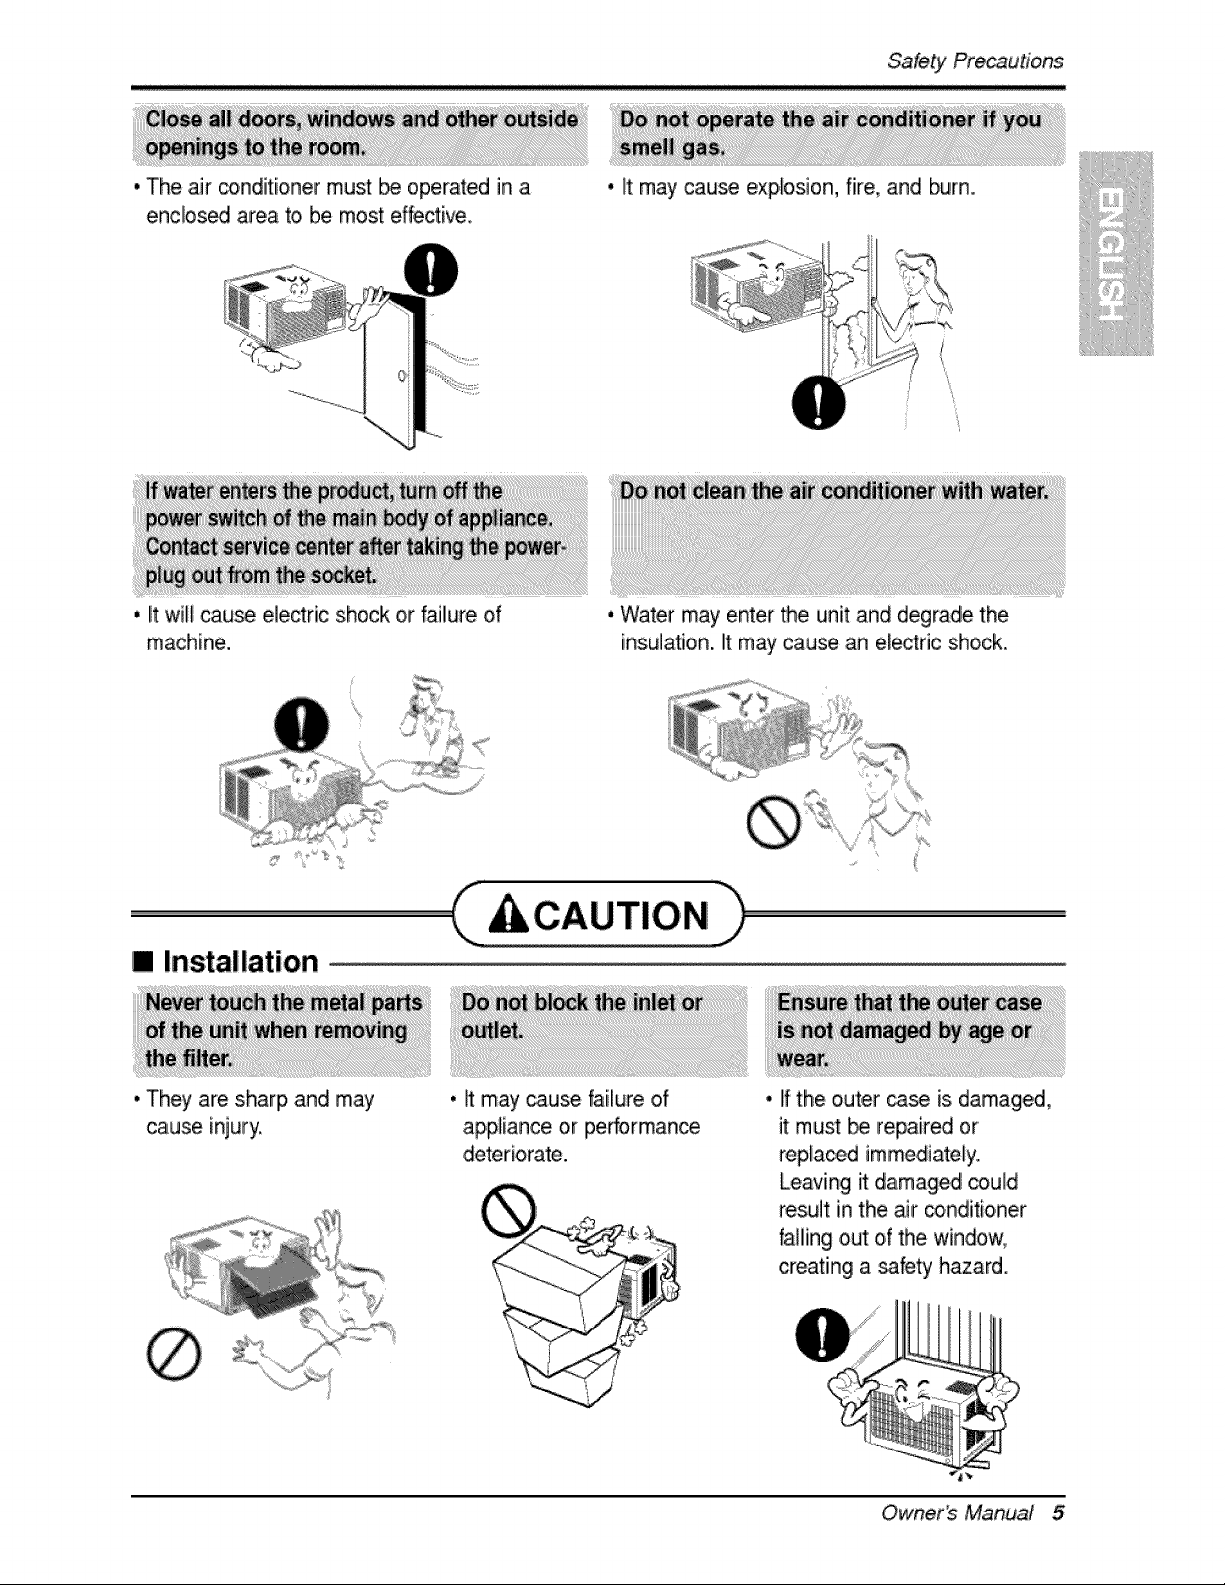
, The air conditioner must be operated in a
enclosed area to, be most effective,
• It may cause exp,losJon, fire, and burn.
, Ut:wJ!l cau_ electric shock or fai!lure of
machine.
[] Installation
. They are sharp and may
cause injury,
• _ may _use failure of
appliance or performan_
deteriorate.
, Water may enter _e unit and degrade the
insulation. It may cause an electric shock.
:CAUTION
• If the outer case is damaged,
it must _ repair_ or
repi_aced immediately.
Leaving it damaged _uld
result in the air _nditioner
falling out of the window,
creating a _fety hazard.
Owner_ Manual 5
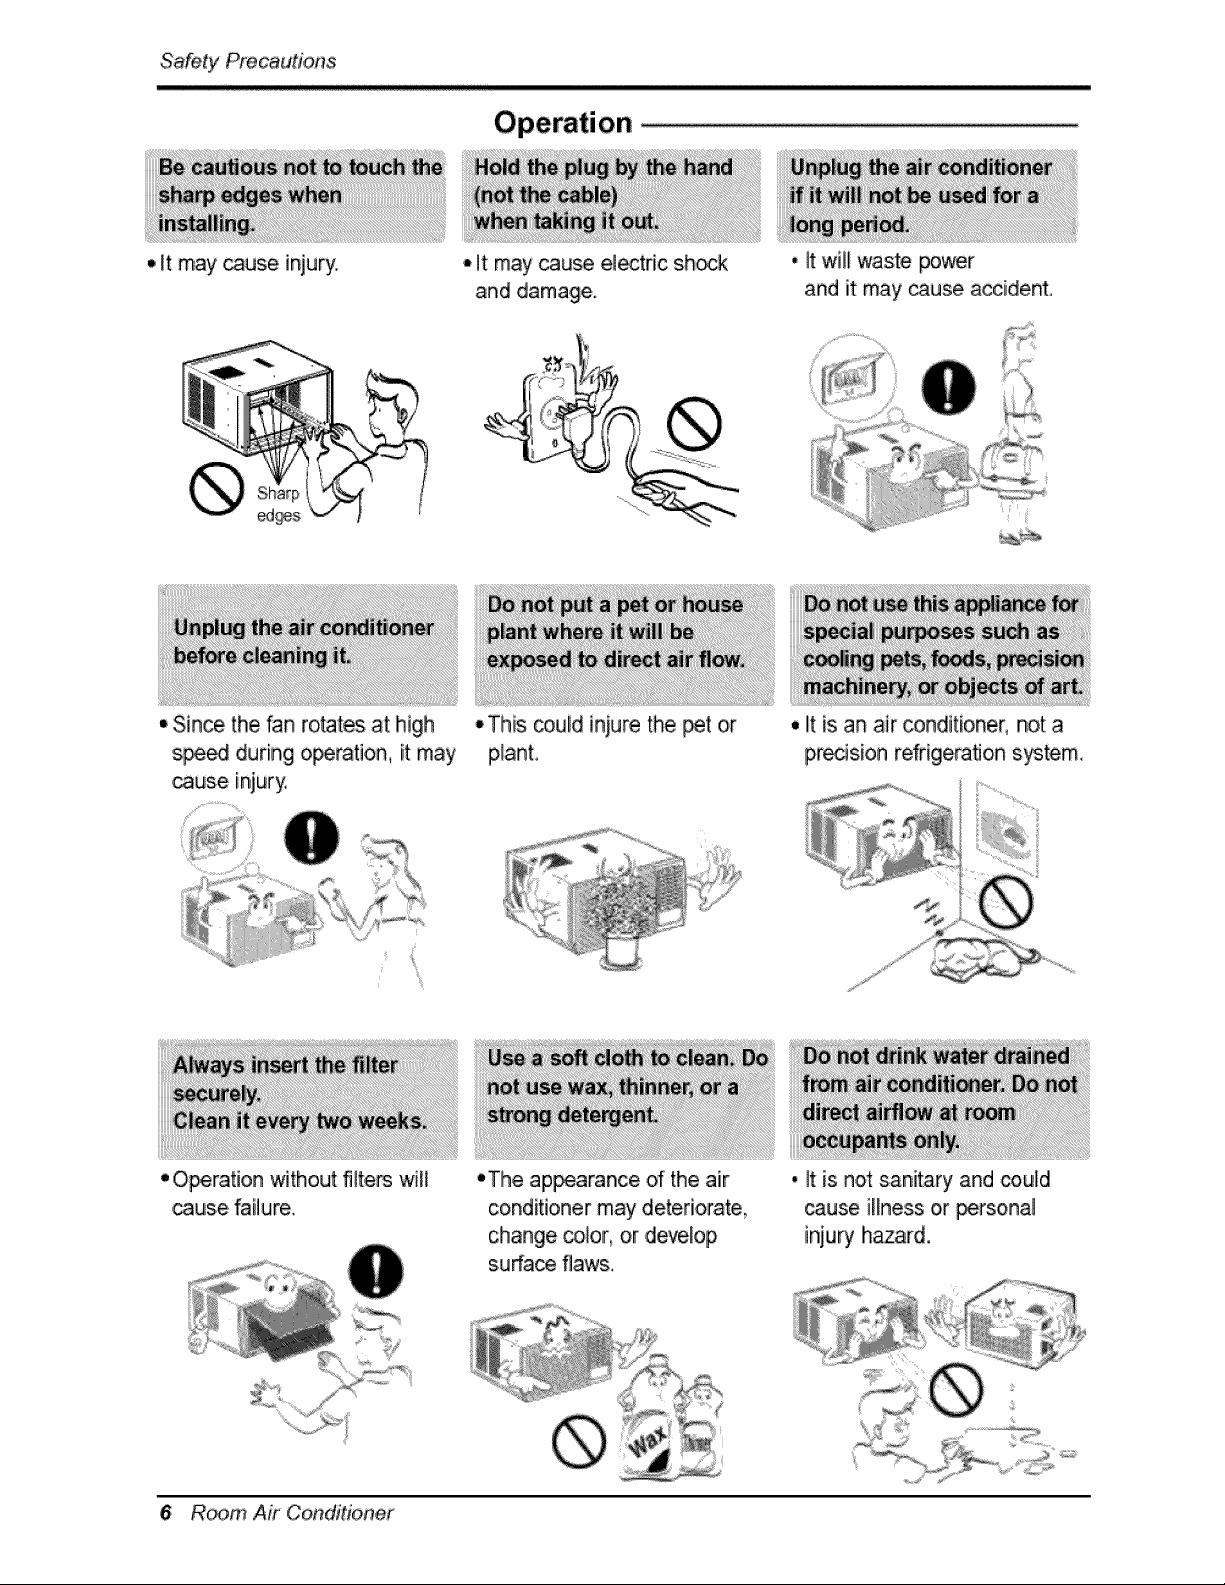
• It may _use injury: * It may cau_ e_ectric shock
and damage.
, it will waste power
and it may cause accident
• Since the fan routes at high
speed during o_ration, it may
cause injury.
• Operation without filters will
cause failure.
• This _uUd iniure the pet or
plant,
• The ap_arance of' the air
conditioner may deteriorafe,
change color_ or develop
su_a_ flaws.
• it is an air condit:ioner, not:a
precision refrigeration system,,
, It is not sanitary and could
cause illness ,oir_rsonal
injury h_ard.
6 Rc_m Air Conditioner
BeforeOperation,
1i' Plug in the power cord properly.
2:. Use a dedicated circuit. Overloading the line could create a fire hazard.
3. Iao not use an extension cord. See page, 11 for more details.
4. Do not staWstop operation by plugging/unplugging the power cord.
5. IIfthe power cord is damaged and requires, replacement, have an Authorized
Servicer install an exact replacement part.
/i i _ i__
1i_ Being exposed to direct airflow for .an extended period of time could b,e
hazardous to your health, Do, not expose occupants, pets, or plants to direct
airflow for extended periods of time.
2. Due to the possibility of oxygen deficiency, ventilate the room when used
together with stoves ,or other heating devices.
3 Do not use this. air conditioner for non-specified special purposes (e.g.
preserving precision devices, food, peR, p,lan_, and art objects). Such usage
could damage the items.
43The air conditioner is a consumer comfort appliance, not a precision climate
control system.
1. Do not touch the metai parts of the unit when removing the filter. Iquries ,can
occur when handling sharp metal edges.
2. Do not use water to clean inside the air conditioner. Exposure to water can
destroy the insulation, leading to possible electric shock.
3. When cleaning the unit, first make sure that the power and breaker are turned
off. The fan rotates at a very high speed during operation. There is a
possibility of injury if the unit's power is accidentally triggered o,nwhile
cleaning inner parts of the unit.
For repair and maintenance, contact an Authorized Service Center. See the,
warranty page for details or call 1i-877-755-7932 Have your model number and
serial number .available. They should be written on page 2 of this manual.
Owner_ Manual 2'
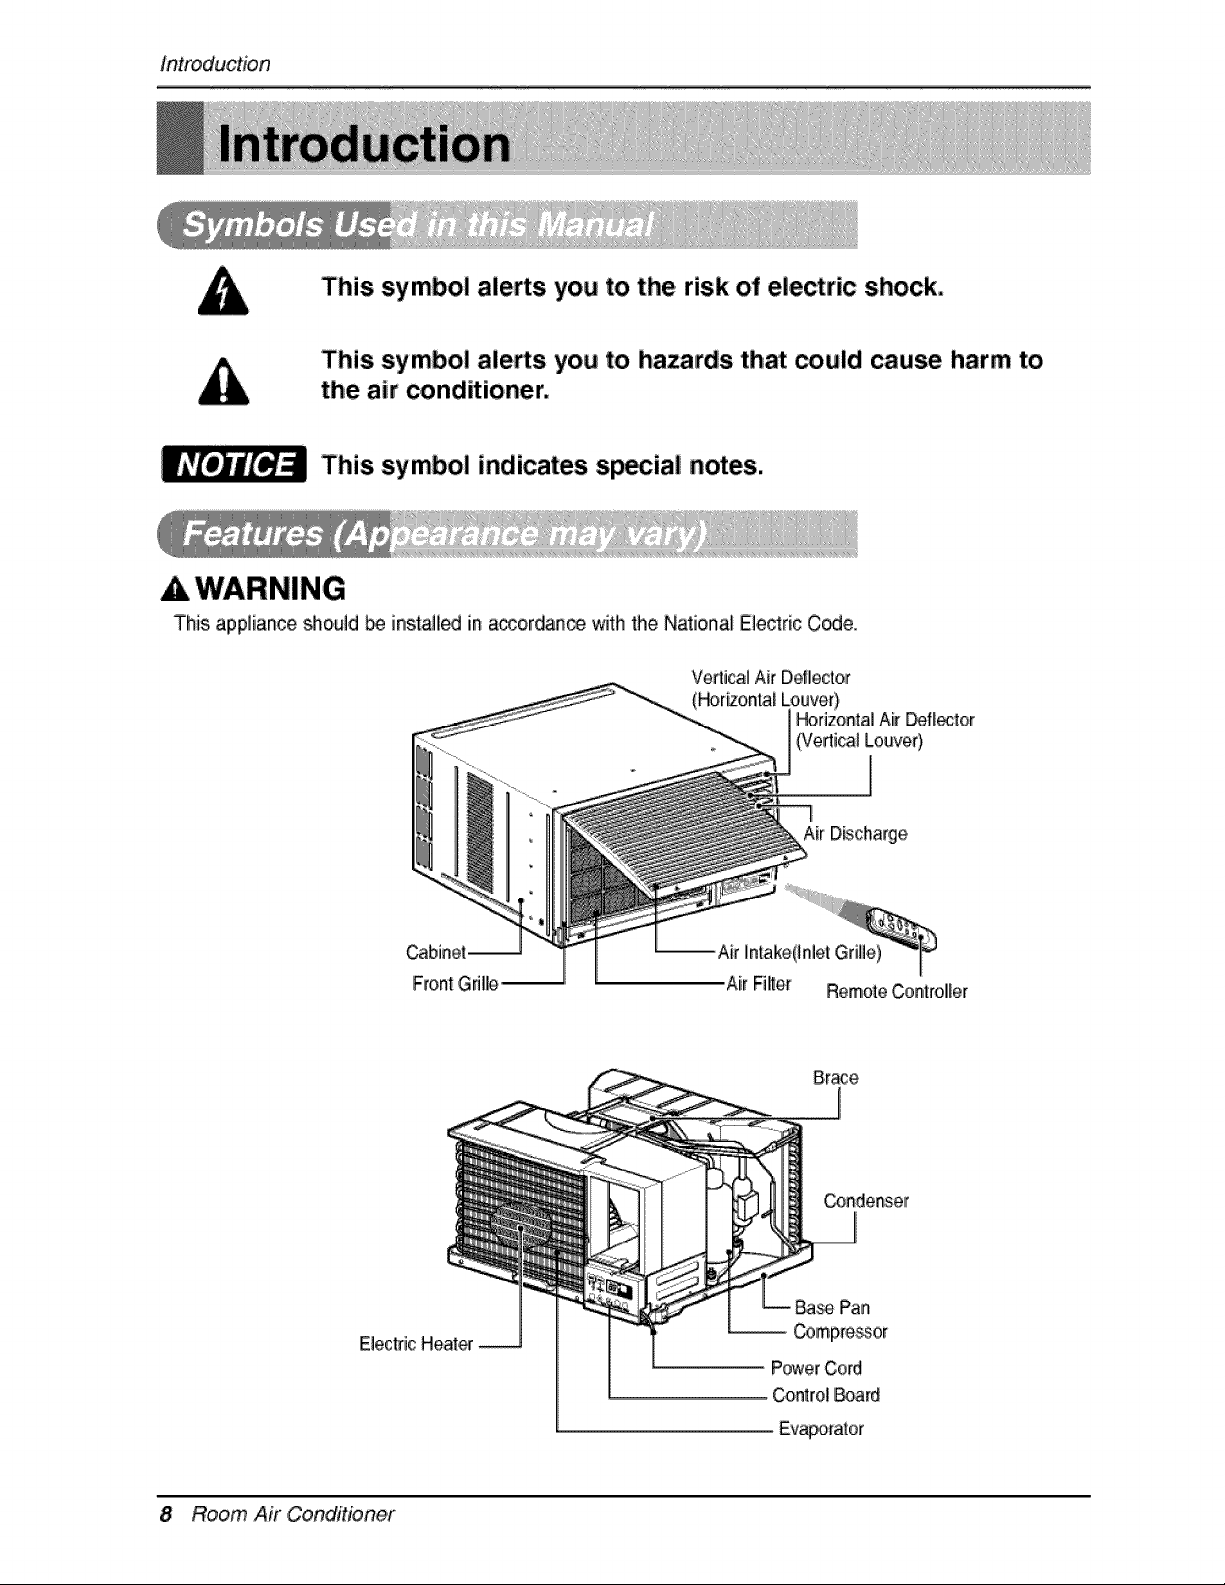
Introduction
This symbol alerts you to the, risk of electric shock,
This symbol alerts you to hazards that _uld cause harm to,
the air cond_ioner.
This,symbol indicates sp_ial notes.
This, appliance _o, uid _ insta_liedin a_o, rdan_ _th the National Elect:rioC_e.
Ve[tical Air D,efliector
(H_rizo,ntalLouver)
HorizontalAir _l:lector
(Vertical Louver)
Air Discharge
B,race
1
EiectdcH,eat_
8 Room Air Conditioner
PowerCord
ControlBoard
Ev_rator
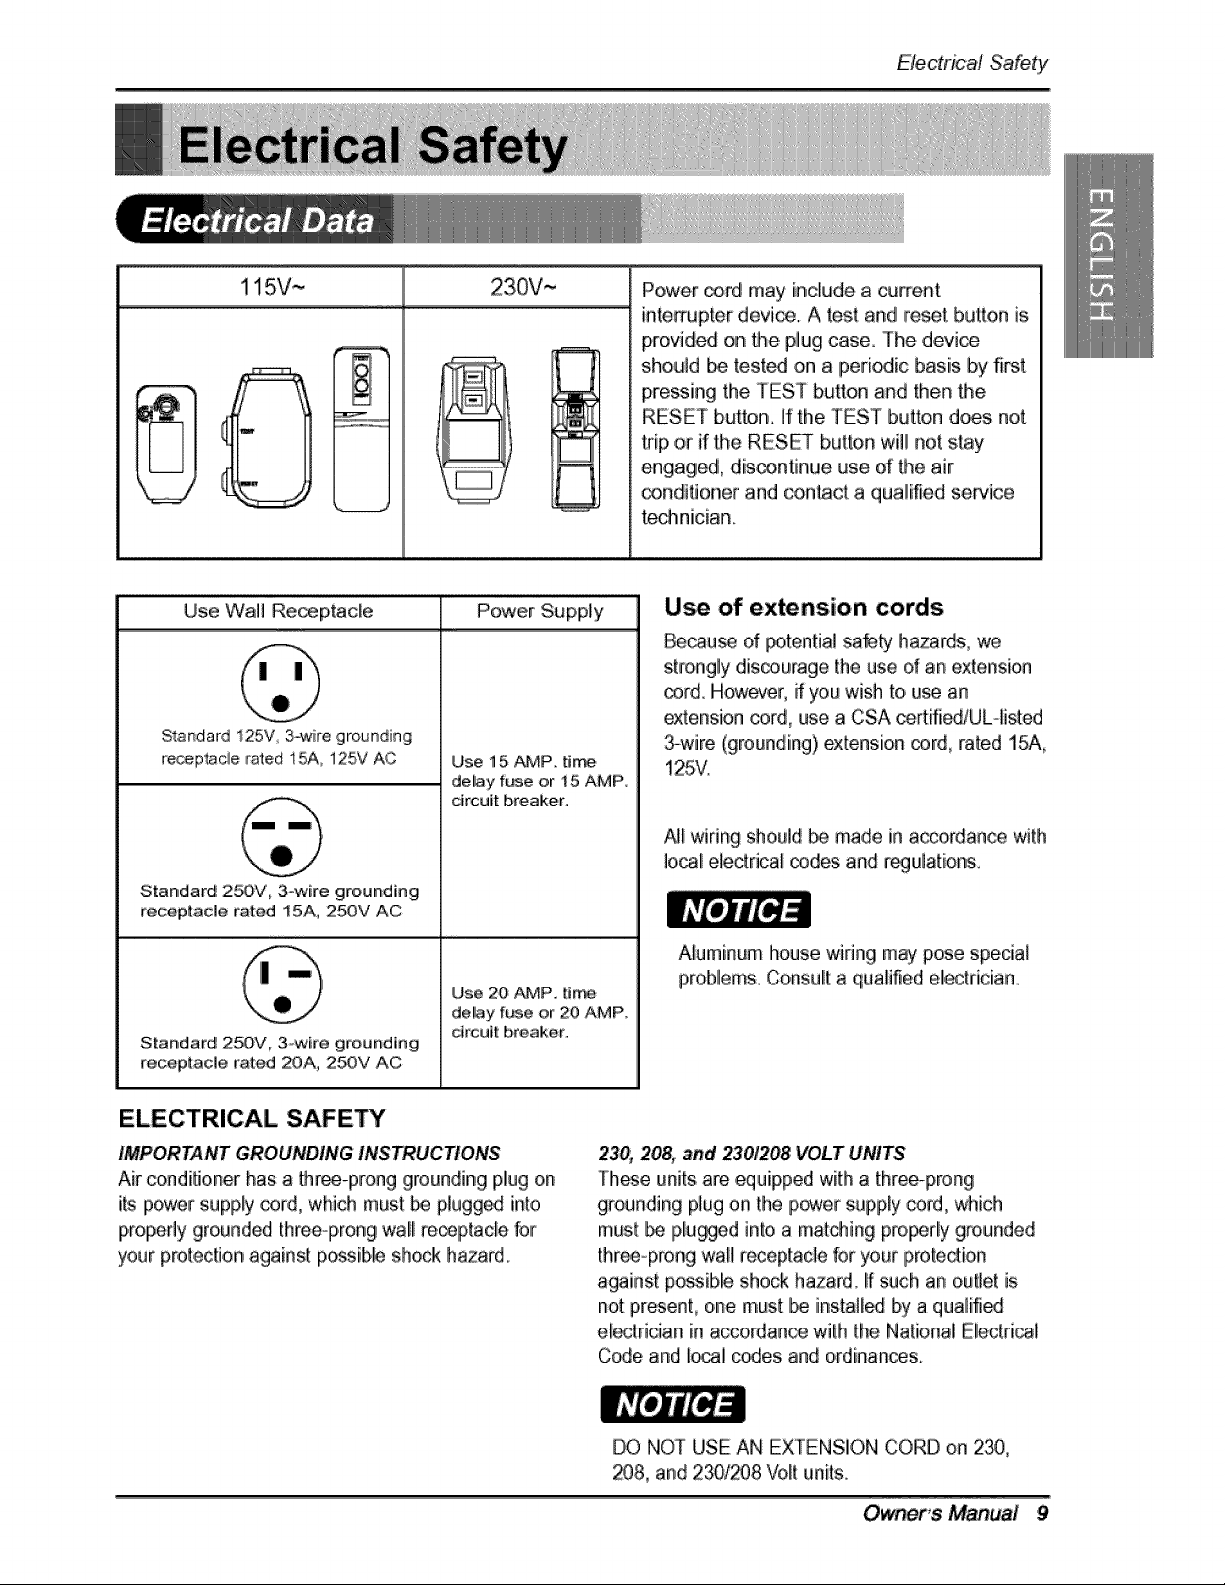
Elect.deal Safety
115V~ 230V ~
Use Wall Receptacle Power Supply
Sl_andardI25V, 3-wire gmun,ding
receplac_e rated 15A_125V AC
Standard 250V'_ 3-wire grounding
_eceptacle rated 15A, 250V AC
Use 15 AMP, tJer_
de_ay fL_e or 15 AMP
drcuit breaker°
Power _rd may include a current
inte_upter device. A test and reset butto,n i,s
provided on Me, plug case. The devil,
shouM _ tested on a periodic basis by first
pressing the TES]" button and then the
RESET button, if the TES] button does not
#'ip ,o,rif the RESET button wil! not s,_y
engaged, di.s_ntinu,e use d the air
_ndifloner and contact a qualified seHice
te_nic:ian_
Use of extension cords
Be_u_ d _ential sa_ hazards, we
strongly dis_urage the use d an extension
®rd. However, if you wish to u_ an
extension _rd, use a CSA certifiiedlUL-listed
3-wire (grounding) extension oord rated 15A,
125V.
N_wiring should _ made in .accordance with
Io_ eledrical codes and r_ulations.
@.-
Standard250V, 3owit'e grounding
receptacle rated _A, 2_V AC
Use 20 AMP_ t_
de_ay f_e or :20 AMP_
drcait breaker.
ELECTRICAL SAFE_
IMPORTANT GROUNDING INSTRUCTIONS
Air conditioner has a three-prong grounding plug on
its power supply cord, which triust _ pNgged into
properly grounded threeoprong wal_receptacle for
your pm_ection against p,ossib# shock hazard.
Aluminum house wiring may pose special
problems. Consult a qualified electrician.
230, 208, and 2301208 VOLT UNITS
'These units am equipped with a throe-prong
grounding pJugon the peter supply ,cord,which
must/L_ iplu_ed into a matching properly grounded
thr_prong wad r,eceptacJefor your prot,e,ction
against possib_ shock hazard. If ,such an outlet is
not:pr_ent, one must i_ installed by a qualified
e_ectrician iil accordance with the National Electrical
Code and i_al c_es and o,rdinan_s.
DO NOT USE AN EX"[ENSION CORD on 2_,
_8, and 23012_8Volt units.
Owner's Mar, ual 9
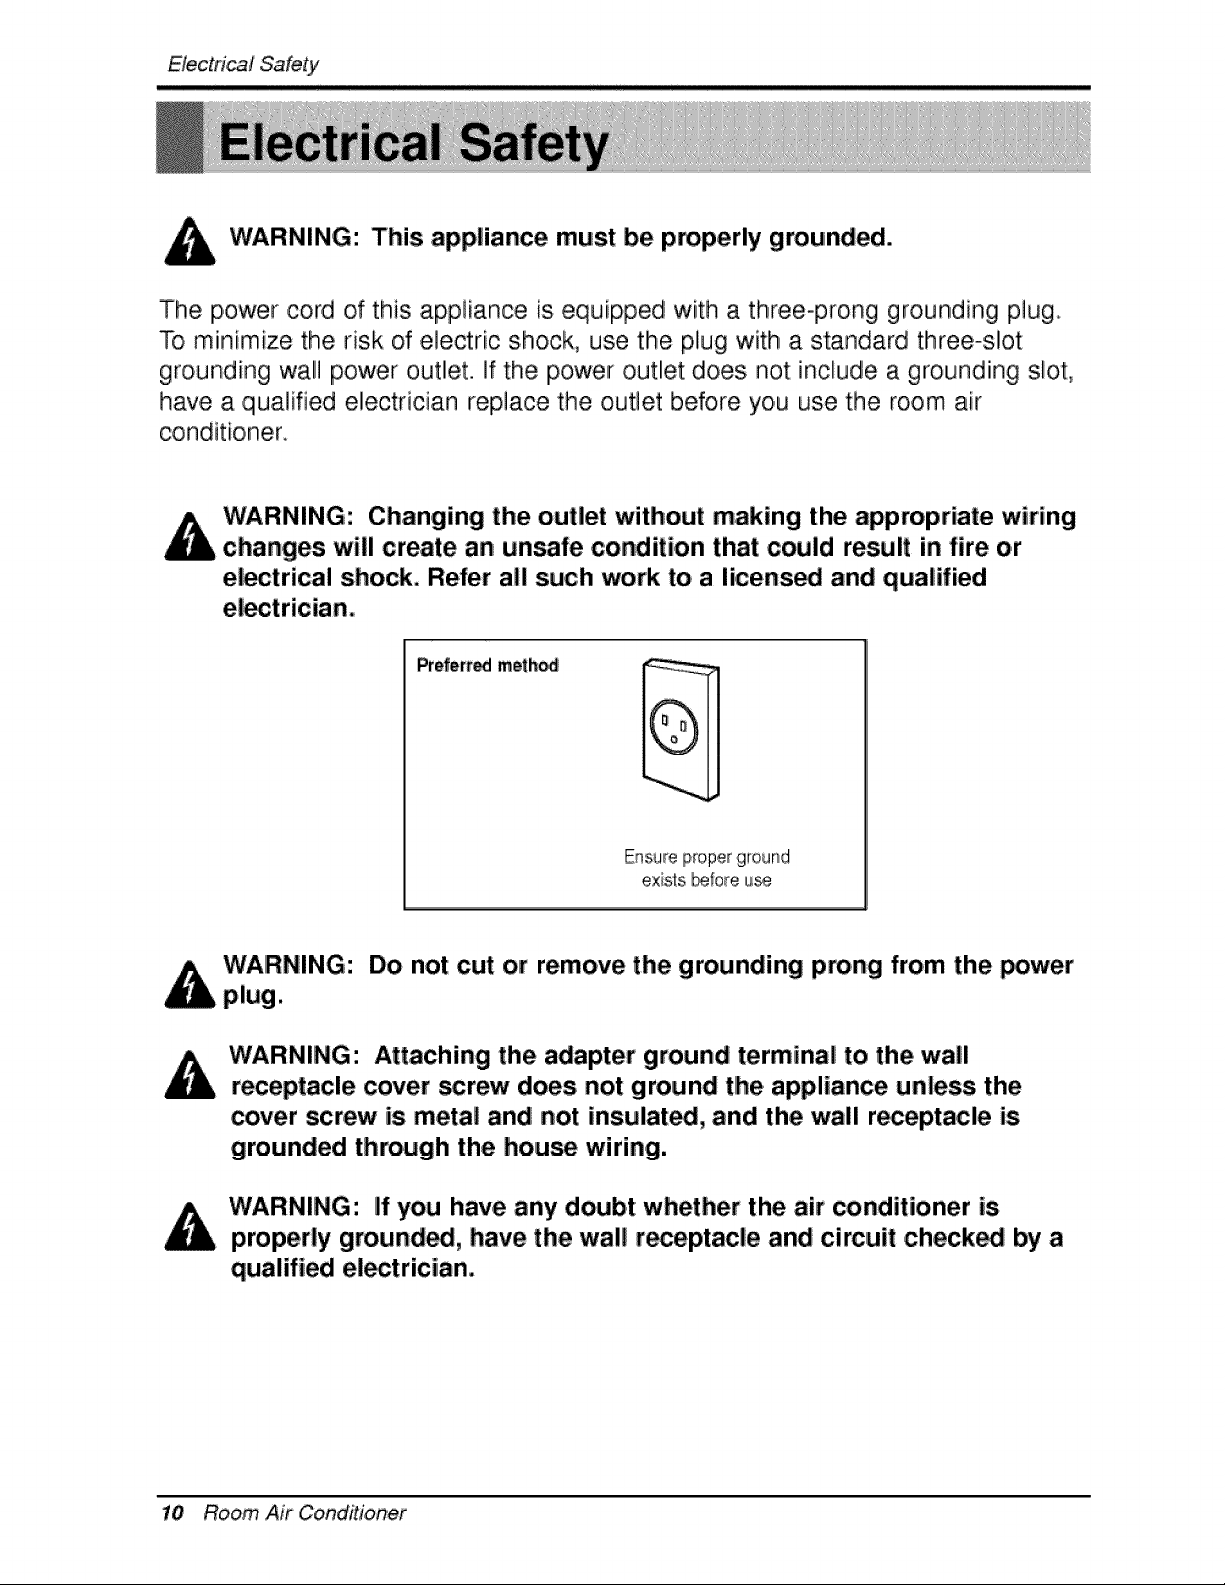
WARNING: This appliance must be properly grounded..
The power cord of this appliance is equipped with a three-prong grounding plug.
To miinimize the risk of electric shock, use the plug with a standard three-slot
grounding wall power outlet. If the power outlet does not include a grounding slot,
have a qualified eiectrician replace the outlet before you use the room air
conditioner.
Changing the outlet without making the appropriate wiring
changes will create an unsafe condition that could result in fire o.r
el_trical shock, Refer all such work to a li.cens_ and qualified
exists _t:ore u_
Do not cut or remove the grounding prong from the _wer
WARNING: Attaching the adapter ground terminal to the wall
receptacle cover _rew does not ground tlhe appliance unless the
cover screw is metal and not insulate, and the wall receptacle is
grounded through the house wiring.
WARNING: If you have any doubt whether the air conditioner is
properly ground_, have the wall r_eptacle and circuit checked by a
qualified el_trician,
10 Room Air Coeditioner
Electrical Safety
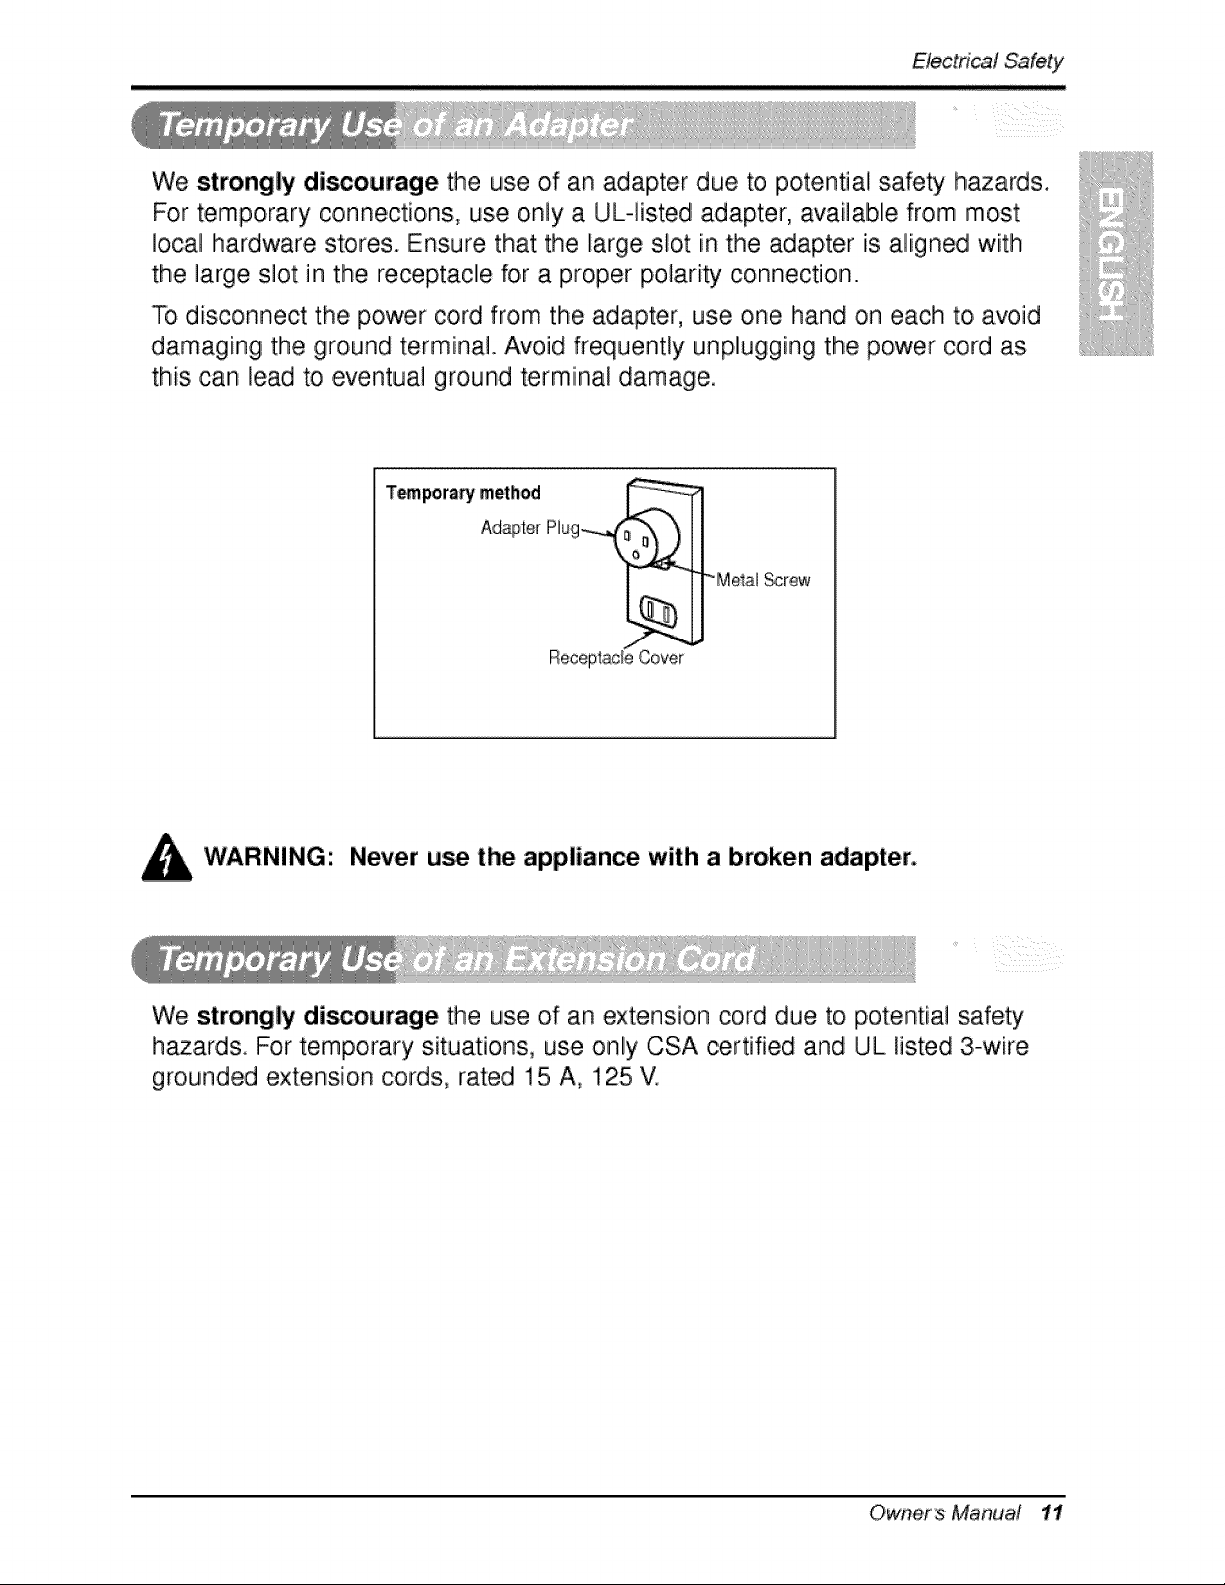
We strongly di_ourage the use of an adapter due to potential sdety hazards.
For temporary connections, use only a UL-][sted adapter, avaiiaibie from most
local hardware stores. Ensure that the large slot in the adapter is aligned with
the large slot in the receptacle for a proper polarity connection.
To disconnect the power cord from the adapter, use one hand on each to avoid
damaging the ground terminal. Avoid frequently unplugging the power cord as
this can lead to eventual ground terminal damage.
Adapter Plug_._ i
"Metal _rew
Receptacle Cover
Never u_ the appliance with a broken adapter,
We strongly di_ourage the use of an extension cord due to potential safety
h_ards. For temporary situations, use only CSA certified and UL listed 3-wire
grounded extension cords, rated 15 A, ! 25 V.
Owners Manual 11
Instaifl,ation
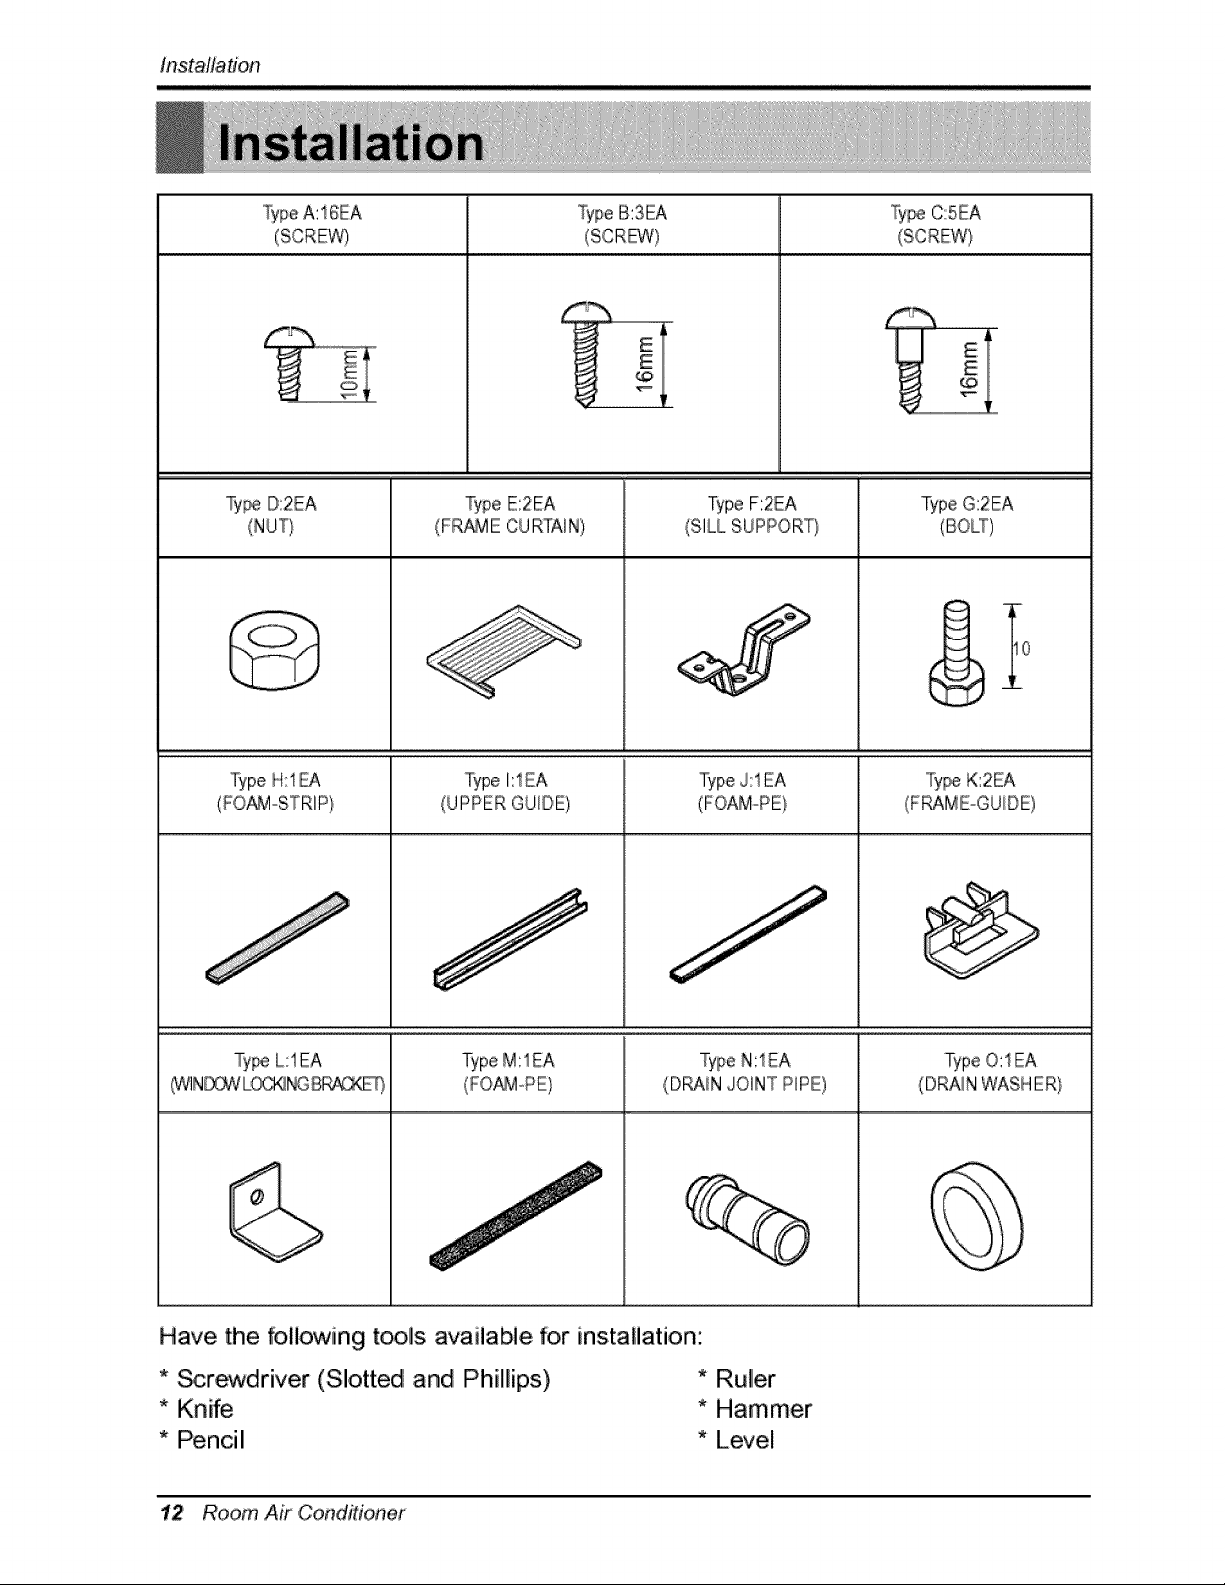
Type&SEA "[y_ C:5EA
E
Ty_ D:2EA TypeE:2EA TypeF:2EA
(FR_E CURTAIN) (SILLSUPPORT)
TypeH:I_ TypeI:1EA TypeJ:t EA %v_ K:2EA
(UPPERGUIDE)
_ L:IEA TypeO:1EA
(W1ND_LQ_SB_£"_ ,(D_N JOINT PIPE) (DRAINWASHER}
TypeG:2EA
10
_ j,
Have the following tools available for installation:
* _r_dlriver (Slotted and Philllips) * Ruller
* Knife * Hammer
* Pencil * Level
12 Room Air ,Conditioner
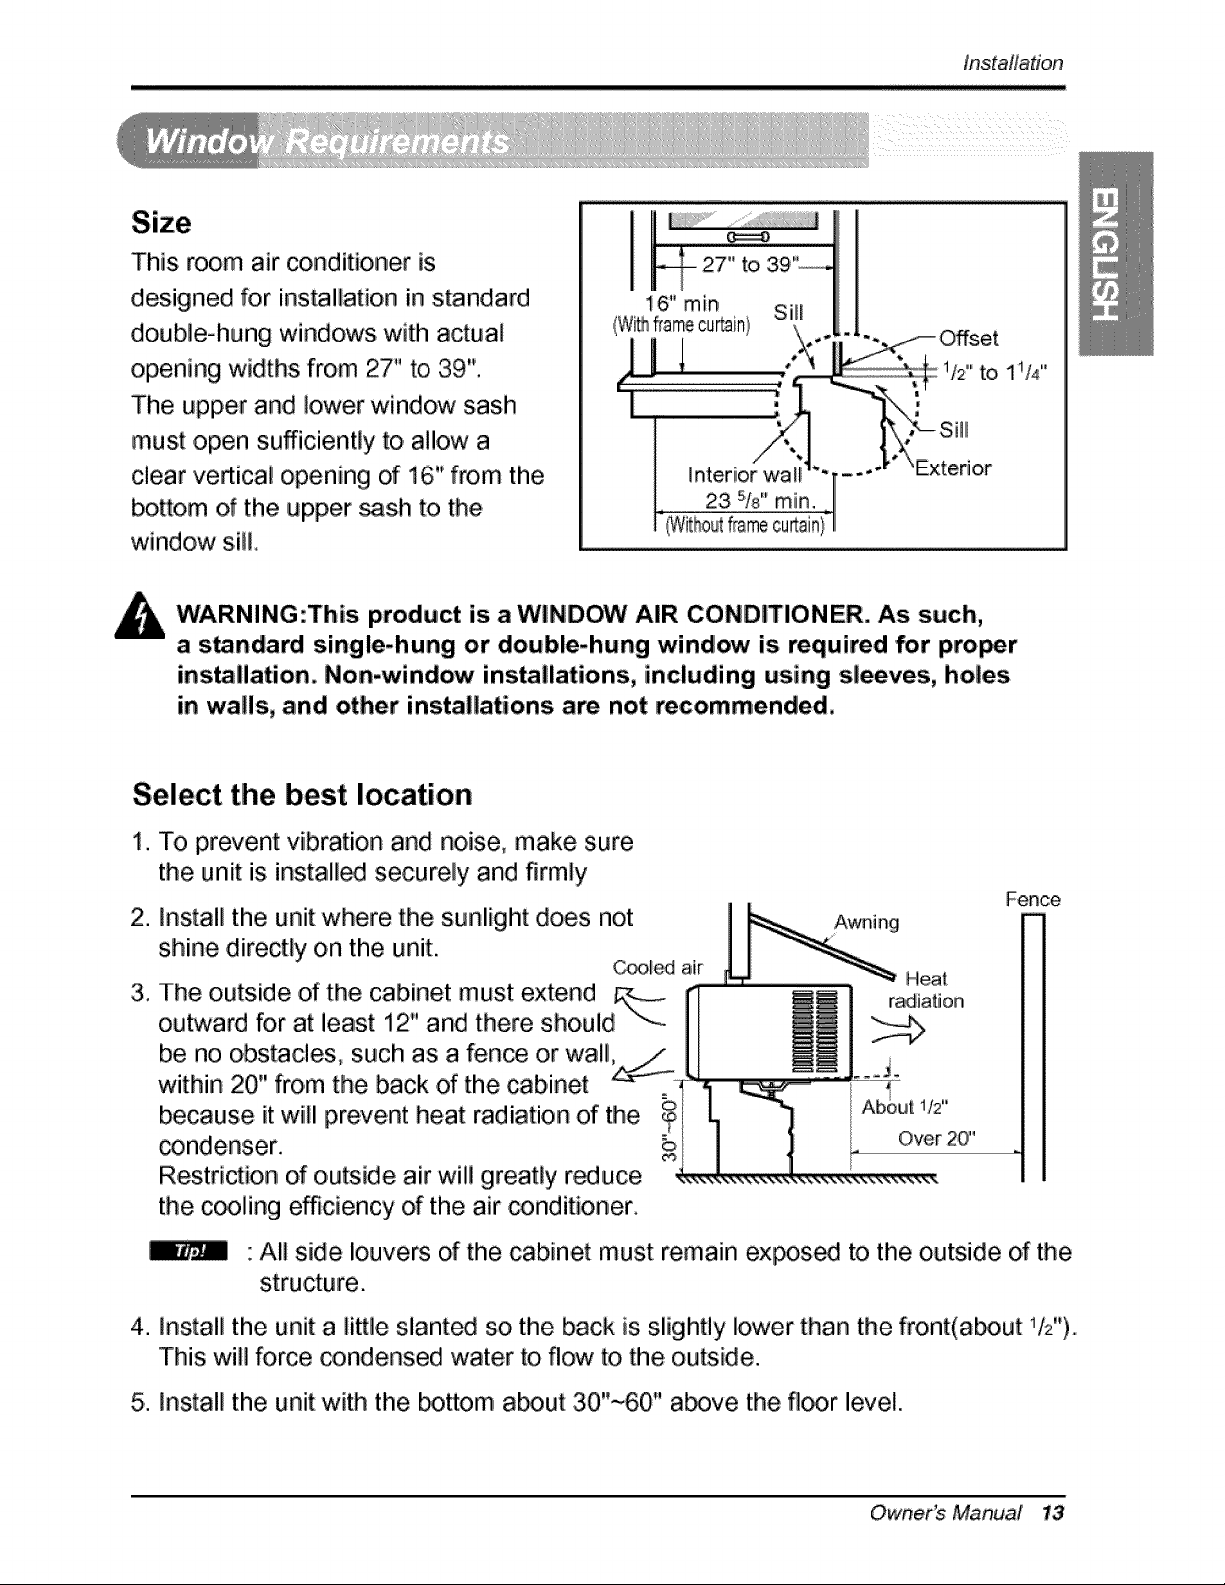
This room air conditioner is
designed for installation in standard
doublie-hung windows with actual
opening widths from 27" to 39".
The upper and lower window sash
must open sufficiently to a!!ow a
clear ve_ical opening of i6" f_m the
bottom of the upper _sh to the
window si!l
WARNING:This product is a WINDOW AIR CONDITIONER. As such,
a standard single-hung or doiuble_hung wind_ is required for proper
installation. Non-window installations, including using sleeves, holes
in walls, and other installations are not recommended..
instafladon
to 1t/4"
Select the best location
1. To prevent vibration and noise, make sure
the unit is.install_ securely and firmly
Fence
2. Install the unit where the sunlight does not / ,ingl
shine, directly on the unit. /
C_led air _ _ Heat
3, The outside d t!he cabinet must extend R'_._ _ radiation
outward for at least ii2' and there should II
' I _ '_'-_""
be no obs_cles., such as a fence o,rwalll, " Jl ,_,_ i
within 20" from the back of the cabinet _ _ _t-!__i_ ...............
because it will prevent heat radiation of the _/ [1 -"_'] AboutI/Z' ,
condenser.. II o,o, 0,
Restriction of outside air wili greatly r_uce
the c_ling efficiency d the air conditioner.
All side louvers of the cabinet must remain expos_ to the outside of the
4. Install the unit a li_le slanted so the back is slightly lower than the front(about V2").
This will force _ndensed water to flow to,the outside.
J
5,.Install the unit with the _ttom a_ut 30"~60" a_ve the fl_r level.
Owner_Manual 13
Installation
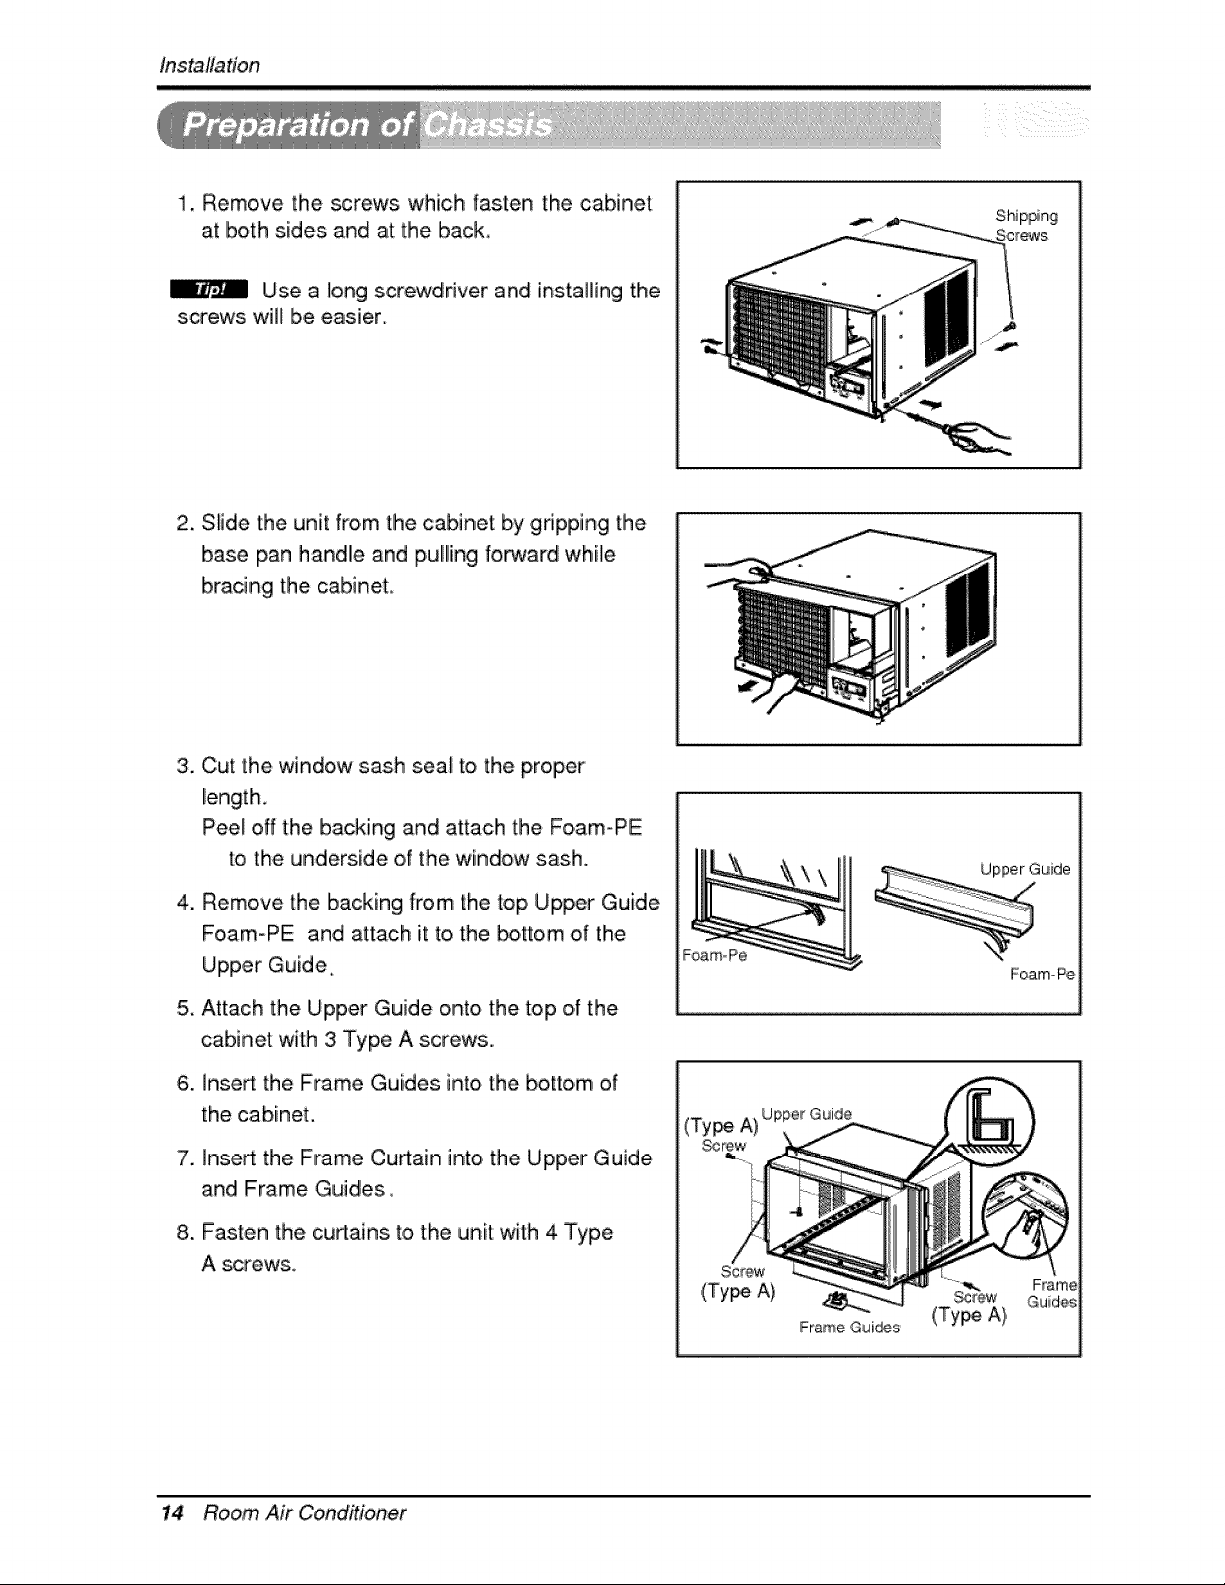
1, Remove the screws which fasten the cabinet
at both sides and at the ba,ck,
Use a long screwdriver and installing the
screws will b,e easier.
2. S_ide the unit from the cabinet by gripping the
base pan handlUe and pulling forward wh[_e
bracing the cabinet,
ii x{
3. Cut the window sash sea_ to the proper
length,
Peel off the backing and attach the Foam-PE
to the underside of the window sash.
.
Remove the backing from the top, Upper Guide
Fo,am-PE and attach it to the bottom of the
Upper Guide
5_
Attach the Upper Guide onto the top of the
cabinet with 3 Type A screws.
6. ]nse_ the Frame Guides into the bottom of
the cabinet,
,
Inse_ the Frame Cu_ain into the Upper Guide
and Frame Guides,
8. Fasten the curtains to the unit: with 4 Type
Foam Pe
Foam-Pe
Screw
,(Ty_ A)
Frame ,Gui_s, (Type A),
14 Room, Air Co,nditioner

tnsta#adon
Caution: During the following step, ihold unit firmly until window sash
is lowered to top channel _hind side panel frames. Personal injury or'
property damage, may result if un_ falls from window.
,
Open the window. Mia_ a line on
center of Me window stoo,[(or desired
air conditioner IocatJon)_
Carefully p_acethe cabine! on the
window stool and align the center
mark on '[he boltom front with the
center line markd in the window
stool.
2_
Pull the _3ttom window sash down
behind the up_r guide unti_ it meets.
_i :Do not pull lhe window sash
down _ tightJy that the movement of
Frame Cu_ain is,restricted.
3. Lo_liy as_mble the si]lisupport
using the parLs in Figure 3.
Upper Guide
INDOOR
Foam-Pe
Cabinet
Frame Cu_ala
F_m-Pe
_Wi_ow Stooi
FromAngle Figure 1
Figure 2
4,.S,elect the _itJon that:wiHIplac_ the
sill support near the outer most _int
on sill (See Figure 4),
_i " B,e_refu] when you install
#}e cabinet ,(Frame Guides wi]l be
broken easily).
5_
Attach the sill support to,the cabinet
track ho,lle[n relation to Me se]_ted
position using 2 Ty_ A screws in,
each sup_rt(See Figure 4).
6_ The _binet shoulid be instalil_ with a
ve_ s|igh't tilt(about Vz") downward
toward the, outside (See Figure 5),,,
Adjust the _lt ,and the nut of sil!
sup_rt for balandngi the cabinet.
7. Attach the @binet to the window stool
by driving the screws (Type B:Length
sixteen millimeters and below.) through
the front angle into window stool
Bo_t
INDOOR
Sc_,ew(Type B)
Nut Figure 3
S_'ew(Type A)
DUTDOORFigure4
Sil! Supper
8. P'uHeach Frame cut.in fullly to,each
window sash track, and repeat step 2
le
Figure 5
Si_iSupport
Owner_ Manual 15
 Loading...