

Page 1

4-in-1 Hand Blender Set
Instruction Manual
Model: CHB50P5ATB
IMPORTANT NOTE: Please read the instructions carefully before use the machine.
Please properly retention of the instructions for your future reference.
Page 2

Page 3

Owner’s Manual
IMPORTANT SAFEGUARDS
...................................................................... 3
PARTS AND FEATURES ............................................................................. 5
BLENDING ATTACHMENT ......................................................................... 6
HOW TO USE CHOPPER .......................................................................... 10
CARE AND CLEANING .............................................................................. 12
MAINTAINING .............................................................................................. 14
PRODUCT INFORMATION ....................................................................... 14
FAULT ANALYSIS AND ELIMINATION ................................................. 14
SMOOTHIES AND DRINKS ...................................................................... 15
WARRANTY ................................................................................................. 21
Read This Manual
Inside you’ll find many helpful hints on how to use and maintain your Hand
Blender properly. Just a little preventive care on your part can save you a
great deal of time and money over the life of your appliance.
These instructions may not cover every possible condition of use, so attention
to safety details is required when operating and maintaining this product.
CAUTION
• This appliance is not intended for use by people (including children) with
reduced physical, sensory, or mental capabilities or lack of experience and
kno wledge, unless they have been provided with supervision or instruc
concerning use of the appliance by a person responsible for their safety.
• Children should be supervised to ensure that they do not play with the
appliance.
• The appliance shall be installed in accordance with national wiring
regulations.
tion
Welcome
You are about to see how quick, easy, and delicious healthy eating can be!
Please read all the safety information, warnings, and instructional material found
in this booklet before getting start. Set your machine on a dry, level surface.
Then, follow the cleaning instructions to prepare your machine for use. Always
clean your machine before the first use.
Page 2
Page 4

IMPORTANT SAFEGUARDS
To prevent injury to the user or other people and property damage, the
instructions shown here must be followed. Incorrect operation due to ignoring
of instructions may cause harm or damage. The level of risk is shown by the
following indications.
WARNING
• Read all instructions.
• T
o protect against electric shock, do not put the motor body, cord or
electrical plug of this hand blender in water or other liquids. Only the
detachable blending shaft and other certain parts of this appliance have
been designed for immersion into water or other liquids. Never submerge
any other portion of this unit. If hand blender falls into liquid, remove
immediately. Do not reach into the liquid without unplugging the unit first.
• This appliance should not be used by children. To avoid possible
accidental injury, close supervision is necessary when any appliance is
used by or near children or individuals with certain disabilities.
• Unplug from outlet when not in use, before putting on or taking off parts,
and before cleaning.
• Avoid contacting moving parts and check work bowl for presence of
foreign objects before using.
• Do not operate any appliance with a damaged cord or plug or after the
appliance malfunctions, or is dropped or damaged in any manner. Return
appliance to the nearest authorized service facility for examination, repair
or electrical or mechanical adjustment.
• The use of attachments not recommended or sold by the manufacturer
may cause fire, electric shock or injury.
• Do not use outdoors or for other than its intended use.
Household use only.
• Do not let cord hang over edge of table or counter.
•
Do not let cord come in contact hot surfaces, including the stove.
• Remove detachable shaft from the motor body before washing the
blades or shaft.
• During operation, keep hands, hair and clothing, as well as spatulas and
other utensils, away from attachments and any mixing container to reduce
risk of injury to persons and/or damage to the appliance. A spatula may be
used, but must be used only when the unit is not operating.
Page 3
Page 5

WARNING
• Blades are SHARP. Handle carefully when removing, inserting or cleaning.
Exercise the same care when removing or inserting the cutting blade, or
disc for the food processor attachment.
• To reduce the risk of injury, never place cutter-assembly blades on base
without jar properly attached.
• The use of attachments inside a glass jar is not recommended by the
manufacturer. It may cause a risk to injury to persons.
• Do not blend hot liquids.
• This appliance has a polarized plug (one blade is wider that the other). To
reduce the risk of electric shock, this plug will fit in a polarized outlet only one
way. If the plug does not fit fully in the outlet, reverse the plug. If still does not
fit, contact a qualified electrician. Do not modify the plug in any way.
• The maximum rating is based on the wand-type attachment as it draws
the greatest load. Other attachment may draw significantly less power.
• Be certain cover is securely locked in place before operating appliance.
• When mixing liquids, use a tall container or mix small quantities at a time
to reduce spillage, splattering and the possibility of injury from burning.
• Make sure the appliance is off, the motor has stopped completely, and
the appliance is unplugged fr
attachments and before cleaning.
om outlet before putting on or taking off
SAVE THESE INSTRUCTIONS.
NOTICE
The failure to follow any of the important safeguards and the important
instructions for safe use is a misuse of your hand blender that can void
your warranty and create the risk of serious injury.
RECYCLING
The appliance must not be disposed of with household waste, but taken
to an authorized waste separation and recycling center.
Page 4
Page 6

PARTS AND FEATURES
Stepless speed
Power button
Whisk
Attachment
Beaker
Turbo button
Blending shaft (SUS304)
NOTICE
• The hand blender is not designed for use as a heat source.
• This appliance is not intended to chop ice.
• To use the hand blender in a saucepan, remove the pan from
the stove.
• To puree foods, liquid is needed. Add cooking liquid, broth, juice, milk, or
cream until desired consistency is reached.
• For thorough blending, move hand blender up and down in mixture until
smooth.
• To achieve best blending results and to reduce splattering, use deep, tall
containers.
• We recomme
food chopper. Meat should be cut into 2-inch pieces before
processing.
• Beaker size: Max 600ml (20oz.).
• Speeds of the hand blender: High Speed and Low Speed.
nd chopping only 5 oz. of meat at a time in the
Cover
Blade
Chopping
Bowl
Page 5
Page 7
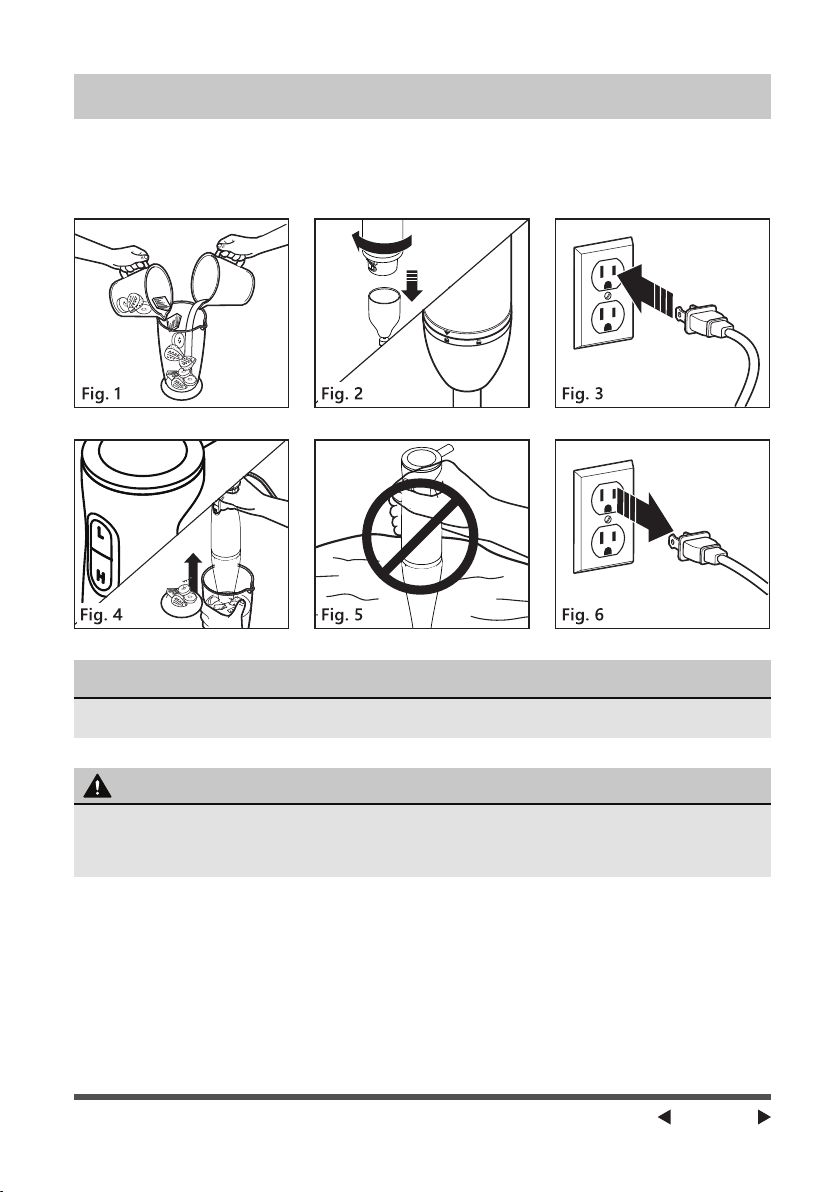
ATTACHMENTS
Align the motor body housing with the attachment shaft and push the pieces
together until you hear and feel them click together. Assemble as shown in
Fig. 2.
NOTICE
Do not immerse the motor unit in water.
CAUTION
• Always inspect attachments before each use.
• Do not use cracked, bent, or damaged attachments.
Page 6
Page 8

Blending Attachment
1. Detachable Blending Shaft and
Blade Guard
Snaps into the motor body
housing. The fixed mount stainless
blade is partially covered by a
stainless guard to keep splatter to
a minimum.
2. Beaker (20 oz)
Beaker is top-rack dishwasher
safe. Use this container to blend
drinks, shakes, salad dressings and
more. Designed for easy gripping
and drip free pouring.
3. Please check accessories before
using this appliance.
4. Place the beaker on a flat surface,
do not pour over 600ml.
Whisk Attachment
1. Do not immerse whisk attachment
gearbox in water or any other
liquids.
2. Use the whisk attachment for
beating heavy cream or egg whites.
3. When beating egg whites, use a
very clean metal or glass bowl,
never plastic. Plastic can contain
hidden oils and fats that can ruin
the delicate egg-white foam. To
help stabilize the egg whites, add
1/8 teaspoon of cream of tartar
per egg white prior to beating
them. (If using a copper bowl, omit
the cream of tartar.) Beat the egg
whites until desired peaks form.
4. When adding sugar to beaten
egg whites, add it slowly when
soft peaks just begin to form, and
then continue beating to form
desired peaks.
5. Assembled appliance body
and blending shaft completely
(secure blending shaft is locked onto
motor body housing).
6. Place plug into socket of supply power.
7. Hold appliance body tightly and
let finger can easy operate speed
button.
8. Hold motor body housing tightly
allowing fingers to easily control high or
low speed levels.
9. To purée a soup, use the hand blender
to blend the soup ingredients to the
desired consistency using a gentle
up-and-down motion right in the
saucepan or pot.
10. Release speed button, let the
blade stop. Then pull hand blender
wand out of the beaker. Unplug
the power cord.
5. Beating the egg whites too long
causes them to dry out and
become less stable.
6.
When beating heavy cream, if
possible and time allows, use a
chilled bowl and chill the whisk
attachment. The best shaped
bowl for whipping cream is one
that is deep with a rounded
bottom to minimize any splatter.
7. The cream should come out
of the refrigerator just before
whipping. Whipped cream may
be used at either soft or firm
peaks, depending on preference.
It may be flavored as desired.
For best results, whip cream just
before using.
8. It may also be used for any task
that you would normally whisk.
Page 7
Page 9

Blender Attachment
1. When blending, pour liquid
ingredients in first, unless recipe
instructs otherwise.
2. When blending a fruit, smoothie,
cut most solid foods into 1/2-inch
pieces for easy blending.
3. Be sure that blending blade
guard is fully submerged before
blending ingredients.
4. Do not attempt to blend fruit pits,
bones or other hard materials, as
these are liable to damage the
blades.
5. Do not fill mixing containers too
full. The level of mixture will rise
when blending and can overflow.
6. Liquid should not come closer
than 1 inch of where the shaft
attaches to the motor housing.
7. Using a gentle up-and-down
motion is the best way to blend
and incorporate ingredients
8. To whip air into a mixture, always
hold the blade just under the
surface.
9. When using a nonstick cooking
surface, be careful not to scratch
the coating with the hand blender.
10. To purée a soup, use the hand
blender to blend the soup
ingredients to the desired
consistency
and-down motion right in the
saucepan or pot.
11. When blending ingredients right
in a pot or pan, tilt the pan away
from you to create a deeper area
for blending to prevent splatter.
12. Do not let hand blender stand in a
hot pot on stove while not in use.
13. Use the hand blender to make
smooth gravies and pan sauces.
14. The hand blender is perfect for
frothing milk for cappuccino or
lattes. Just warm milk in a small
saucepan, and then pulse the
hand blender gently, being sure
to keep the blending blade guard
fully submerged.
15. Do not immerse motor body
housing in water or any other
liquids.
using a gentle up-
Page 8
Page 10

Food Chopper / Grinder Attachment
1. Do not overload work bowl. For
best results, most foods should
not reach more than 2
way up the work bowl.
2. Liquids in work bowl should not
exceed 1.
given in the recipe section as a
guide.
3. For raw ingredients: Peel, core and/
or remove seeds and pits. Food
should be between 1/2 and 1 inch,
depending on hardness of the food.
4. The size of pieces you put in bowl
should be about the same size to
achieve even results.
5. Do not attempt to chop fruit pits,
bones or other hard materials, as
these are liable to damage the
blades.
6. Pulse food in 1-second increments
to chop. For the finest chop,
process continuously. Watch
ingredients closely to achieve
desired consistency and scrape
the work bowl as necess
7. Do not operate chopper/grinder
attachment for more than 30
seconds continuously.
1/2
cups. Use quantities
3 of the
ary.
8. When making compound butters,
remove the butter from the
refrigerator and let it come
to room temperature before
blending the ingredients.
9. Some spices may scratch the work
bowl.
10. Do not immerse food processor
cover in water or any other liquids.
11. Place food or liquid to be blended
into a mixing bowl, place it on a
sturdy work surface, and assemble
the blender body and motor body
housing tightly.
12.
To avoid splashing, plug in and place
the blade in food before turning on.
13. Hold the beaker steady, then press
high or low speed button.
14. Don’t let liquid get above the join
between the power handle and
blender shaft.
15. If you blender has blockage, unplug
before clearing.
Never place fingers near blades to
unclog blockage.
16. After use, unplug and dismantle.
Page 9
Page 11

HOW TO USE CHOPPER
Chopper Attachment
1. Connect the motor body housing
to the top of the work bowl cover.
2. Align the spine in the chopper
cover’s drive shaft with the ribbed
opening on the underside of the
motor body housing.
3. When aligned properly, slide the
two pieces together until you feel
and hear a slight click.
4. Place the chopping blade into
center of the work bowl over
metal blade shaft.
5. Place the motor body housing with
cover on top of the work bowl and
rotate clockwise to lock into place.
6. Plug the power cord of the hand
blender into an electrical outlet.
7. Remove bones and cut food into
1-2cm cubes.
8. Open chopper lid and fit chopper
ade right.
bl
NOTICE
You can chop meat, cheese,
vegetable, herbs, bread, biscuits
and nuts, avoid use to chop
hard food such as
cubes, spices or
otherwise will damage
the blade.
9. Do not allow food to surpass 500ml.
10. Secure chopper lid and lock on to
bowl.
11. Fit stick blender body on chopper
tightly.
12. Plug in. Hold the bowl and blender
body tightly, then press speed
button.
13. After use, unplug and dismantle.
coffee bean, ice
chocolate,
Page 10
Page 12

Processing Guide
Food type Maximum Amount Approx. Time (s)
03-01)zO 5.01( g003taeM
02)zO 57.0( g02sbreH
03)zO 07( g002stuN
03)zO 5( g051eseehC
05ecils 1daerB
52ggE deliobdraH
01)zO 5.3( g001snoinO
Whisk Attachment
1. Whisk attachment snaps into the gearbox which connects to the motor
body housing.
2. The whisk is great for whipping cream, egg whites and other delectable
treats.
3. Push the wire whisk into the whisk body and fit this whisk-ASM to stick
blender body and turn & lock it.
4. Place your food in a bowl.
5. Plug in. To avoid splashing, start on speed L, move the whisk clockwise.
6. After use, unplug in and dismantle it.
7. Don’t whisk more than four eggs whites or 400ml (3/4 Pt) cream.
8. Don’t let liquid get above the whisk wires.
NOTICE
Please not use it whisk heavier mixtures such as margarine and sugar,
you will damage the whisk.
Page 11
Page 13

CARE AND CLEANING
Chopper lid, Whisk holder,
Blending shaft inner, Main Unit
WARNING
Never hold motor unit portion of hand blender under running water.
Simply wipe clean with a damp cloth.
Cleaning Motor Body and Blending Shaft
1. Unplug before cleaning the
motor body and blending shaft
thoroughly after using.
2. Remove the blending shaft from
the motor body. Clean the motor
body only with a sponge or damp
cloth. Do not use abrasive cleaners
that could scratch the surface.
Cleaning Whisk Attachment
1. To clean your whisk attachment,
simply release the attachment
from the motor body housing.
2. Once the whisk is removed, detach
the metal whisk from the gearbox
by pulling the pieces apart. To
clean the gearbox, simply wipe
with a damp cloth.
3. To clean the metal whisk, wash
with warm, soapy water or put in
the top shelf of the dishwasher.
3. To clean the blending shaft, wash
by hand in hot water, using mild
detergent.
4. Be mindful of the fixed, razorsharp edges.
5. Do not put the motor body or
blending shaft in the dishwasher.
4. Do not submerge the gearbox in
water or any other liquids.
NOTICE
Any service, other than cleaning
and normal user maintenance,
should be performed by an
authorized Service Representative.
Page 12
Page 14

Chopper/Grinder Attachment
1. To simplify cleaning, rinse the
work bowl, blade and cover
immediately after use so that
food won’t dry on them. Do not
submerge the work bowl cover in
water or put in the dishwasher.
2. Wash chopping blade and work
bowl in warm, soapy water. Rinse
and dry. Wipe the underside of
the cover with a sponge or damp
cloth to remove any food. Wash
the blade carefully. Avoid leaving
it in soapy water where it may
disappear from sight.
3. You can wash the work bo
chopping blade on the top shelf
of your dishwasher. Unload the
dishwasher carefully to avoid
contact with the sharp blade.
Wipe the motor body and top of
the cover with a damp sponge or
cloth. Dry it immediately. Never
submerge the motor body or the
cover in water or other liquids.
4. The chopper/grinder attachment
is intended for HOUSEHOLD USE
ONLY.
wl and
CAUTION
If you put the wand and whisk
into the water to clean, you must
pay attention to the following
two aspects:
1. Height of water can’t over the
plastic part at top of blending
shaft.
2. Whisk must take out from
the whisk body. Whisk can
immerse in water for cleaning,
but the whisk body only allows
cloth to wipe.
NOTICE
Don’t permit water or liquid be
flow into chopper lid, stick blender
body, blending shaft, whisk body.
If water get inside, drain and dry it
before use it.
Page 13
Page 15

MAINTAINING
1. If the power cord is damaged,
for safety reasons, it must be
send to our company authorized
shop repair and changed.
2. If the appliance is in an abnormal
3. When not use, please store away
from children.
4. Keep appliance in a dry storage
place when not in use.
5. Do not plug in when not in use.
state, please contact with shop
where purchase this appliance and
make it clear or change it.
PRODUCT INFORMATION
Specifications
Product name Model No. Rated voltage Rated frequency Rated power
HAND BLENDER
CHB50P5ATB
120V~ 60Hz MAX.500W
FAULT ANALYSIS AND ELIMINATION
Symptom
Product does
not work
Mixing sword
master
The abnormal
odor products,
hot, the
phenomenon
such as
smoking
Analysis of
Possible Causes
Did not press the inching
switch
Excessive amount of
food processing
Ingredients stick to
blade
Excessive amount of
food processing
Product continuous
working time is too long
Processing the
ingredients of
temperature is too high
Countermeasure
Keep the point switch in the pressed state
Reduce the quantity of ingredients
Cut off the power supply, clean up the
blade on the ingredients
Reduce the quantity of ingredients
Shorten the product continuous working
time
The temperature of the ingredients do
not exceed 60 ˚C
Page 14
Page 16

SMOOTHIES AND DRINKS
Simple Fruit Smoothie
Makes 16 Ounces:
1/2
1.
pieces
cups mixed fruit, fresh or frozen.
1/2
cup juice (use your favorite),
1/2
banana, cut into 1-inch
1. Put all ingredients, in the order listed, into the mixing cup.
2. Using the blending shaft, start blending on low speed, gradually increasing to
high speed until smooth, about 30–45 seconds.
3. Serve immediately.
Nutritional information per serving (8 ounces):
• Calories 112 (4% from fat) • carb. 28g • pro. 1g • fat 1g • sat. fat
Breakfast Shake
Makes about 16 ounces:
yogurt,
1/2
cup peach pieces (fresh or frozen, cut into
1/2
cup juice (use your favorite),
blueberries, 1 tablespoon ground flax seeds (optional), 1 frozen banana, cut
1/2
into
-inch pieces.
1. Put all ingredients, in the order listed, into the mixing cup.
2. Using the blending shaft, start blending on low speed, gradually increasing to
high speed until smooth, about 30–45 seconds.
3. Serve immediately.
Nutritional information per serving (8 ounces):
• Calories 181 (11% from fat) • carb. 38g • pro. 4g • fat 2g • sat. fat 0g
• chol. 4mg • sod. 43mg • calc. 111mg • fiber 4g
1/2
cup low-fat
1/2
-inch pieces),
1/4
cup
Power Blast Protein
Makes about 16 ounces:
1/2
cup coconut milk,
2 tablespoons protein powder, 1 banana (cut into
mango pieces (
1/2
-inch pieces),
1/2
cup pineapple pieces (
1. Put all ingredients, in the order listed, into the mixing cup.
2. Using the blending shaft, start blending on low speed, gradually increasing to
high speed until smooth, about 30–45 seconds.
3. Serve immediately.
Nutritional information per serving (8 ounces):
• Calories 270 (40% from fat) • carb. 38g • pro. 6g • fat 13g • sat. fat 11g
• chol. 5mg • sod. 68mg • calc. 89mg • fiber 4g
Page 15
1/3
cup low-fat yogurt,
1/2
-inch pieces), 1 cup
1/2
-inch pieces).
Page 17

Cherry Ginger Smoothie
Coconut milk beverage is made for drinking and has fewer calories and
grams of fat than canned coconut milk. For a thicker, creamier drink,
substitute
Makes about 1 cup: 1 cup dark, sweet, frozen cherries,
beverage,
2/3
cup canned coconut milk for the coconut milk beverage.
3/4
cup coconut milk
1/2
1.
-inch piece fresh ginger, peeled.
1. Put all ingredients, in the order listed, into the mixing cup.
2. Using the blending shaft, start blending on low speed, gradually increasing to
high speed until smooth, about 30–45 seconds.
3. Serve immediately.
Nutritional information per serving (1 cup):
• Calories 128 (23% from fat) • carb. 24g • pro. 1g • fat 3g • sat. fat 3g
• chol. 0mg • sod. 1mg • calc. 1mg • fiber 4g
Mango Lassi
Adjust the amount of sugar in this recipe based on your personal preference
and the ripeness of your mango—riper mangoes are sweeter.
Makes 2 cups: 4 ice cubes, 1 ripe mango, peeled, pitted and cut into
pieces,
1/2
1/2
1.
cups plain, whole-milk yogurt,
teaspoon ground cinnamon, pinch kosher salt, 3 teaspoons granulated
1/2
teaspoon ground cardamom,
sugar, divided.
1. Put the ice cubes, mango, yogurt, spices, and salt into the mixing cup.
2. Using the blending shaft, start blending on low speed, gradually increasing to
high speed until smooth, about 1 minute.
3. Taste and add sugar, 1 teaspoon at a time, blending after each addition,
until desired sweetness is reached.
4. Serve immediately.
1/2
-inch
NOTICE
If a thinner drink is desired, add cold water, a tablespoon or two at a time,
blending after each addition, until desired consistency is achieved.
Nutritional information per serving (1 cup):
• Calories 223 (25% from fat) • carb. 34g • pro. 9g • fat 6g • sat. fat 4g
• chol. 23mg • sod. 181mg • calc. 319mg • fiber 2g
Page 16
Page 18

Sweet Whipped Cream
Spoon a dollop over our milkshake or Mexican Hot Chocolate (page 20) for
a finishing touch.
Makes 2 cups:
1/2
1.
sugar,
1/4
1.
cups chilled heavy cream, 2 tablespoons confectioners’
teaspoons pure vanilla extract.
1. Put all ingredients in a large bowl. Using the whisk attachment, begin to
whip on Low speed, being sure the whisk just skims the surface of the
cream.
2. Continue blending on low speed until cream begins to thicken, then gradually
increase speed to high speed and move whisk in an up-and-down motion
throughout the bowl until desired stiffness is achieved. Whipped cream will
reach soft peaks between 50 to 60 seconds.
Nutritional information per serving (2 tablespoons):
• Calories 67 (88% from fat) • carb. 2g • pro. 0g • fat 6g • sat. fat 5g
• chol. 25mg • sod. 6mg • calc. 0mg • fiber 0g
Vinaigrette
Makes about 1 cup:
Dijon mustard,
3/4
pepper,
cup extra virgin olive oil.
1/4
cup wine vinegar (any variety will work), 1 teaspoon
1/4
teaspoon kosher salt,
1/8
teaspoon freshly ground black
1. Put all ingredients, in the order listed, into the mixing cup.
2. Using the blending shaft, blend on low speed, keeping the blade guard
completely submerged, until the mixture starts to emulsify. Continue
processing, using a gentle up-and-down motion, until homogenous, about
30 seconds.
3. Taste and adjust seasoning as desired.
Nutritional information per serving (2 tablespoons):
• Calories 181 (100% from fat) • carb. 0g • pro. 0g • fat 21g • sat. fat 3g
• chol. 0mg • sod. 91mg • calc. 0mg • fiber 0g
Page 17
Page 19

Mayonnaise/Aioli
A hefty amount of garlic transforms this mayonnaise recipe into aioli, a dip
traditionally used for crudités. Like mayonnaise, it can also be used to top
burgers, fish and crab cakes.
Makes 1 cup: 2 garlic cloves, peeled (if making aioli), 2 large egg yolks,
2 tablespoons fresh lemon juice, 1 to 2 pinches kosher salt, 1 tablespoon
Dijon mustard,
1. Put all ingredients (omitting the garlic if making mayonnaise), in the order
listed, into the mixing cup. Allow to sit for about 30 seconds to 1 minute.
2. Insert the blending shaft into the mixing cup so that the blade guard
touches the bottom of the cup. Blend on low speed, keeping the blade on the
bottom. Once the ingredients thicken and start to emulsify, continue
processing, using a gentle up-and-down motion, until thick and all of the oil
is completely incorporated.
3. Taste and adjust seasoning as desired.
Nutritional information per serving (1 tablespoon, Mayonnaise):
• Calories 169 (98% from fat) • carb. 0g • pro. 0g • fat 19g • sat. fat 2g
• chol. 23mg • sod. 32mg • calc. 3mg • fiber 0g
Nutritional information per serving (1 tablespoon, Aioli):
• Calories 169 (98% from fat) • carb. 1g • pro. 0g • fat 19g • sat. fat 3g
• chol. 23mg • sod. 33mg • calc. 4mg • fiber 0g
1/3
1.
cups vegetable oil.
Chocolate Peanut Butter Ice Cream Shake
Makes 2 cups:
butter, 1 teaspoon chocolate syrup,
1. Put all ingredients, in the order listed, into the mixing cup.
2. Using the blending shaft, blend on low speed, using a gentle up-and-down
motion, until smooth and homogenous, about 30–40 seconds.
3. Serve immediately.
Nutritional information per serving (
• Calories 156 (46% from fat) • carb. 18g • pro. 4g • fat 8g • sat. fat 5g
• chol. 23mg • sod. 69mg • calc. 112mg • fiber 1g
1/2
1.
cups chocolate ice cream, 2 teaspoons creamy peanut
3/4
cup whole milk.
1/2
cup):
Page 18
Page 20

Hollandaise
Using a hand blender makes this tricky-to-make sauce a no-fuss recipe that
you will want to put on top of more than just poached eggs.
Makes about 1 cup: 4 large egg yolks, 1 tablespoon fresh lemon juice,
teaspoon kosher salt,
1/2
pound (2 sticks) unsalted butter, melted and kept
slightly warm (not hot), warm water, as needed
1. Put the egg yolks, lemon juice and salt into the mixing cup. Slowly pour
the warm butter into the cup, carefully leaving any white milk solids on the
bottom of the pot behind. Allow to rest for about 1 minute.
2. Insert the blending shaft into the cup so that the blade guard touches
the bottom of the cup. Blend on low speed, keeping the blade on the bottom.
Once the ingredients thicken and start to emulsify, continue processing,
using a gentle up-and-down motion, until thick and all the ingredients are
incorporated.
3. If sauce is too thick, blend in warm water, 1 teaspoon at a time, until desired
consistency is achieved (approximately 2 tablespoons total).
4. Taste and adjust seasoning as desired. Serve immediately or transfer to a
double boiler to keep warm.
Nutritional information per serving (2 tablespoons):
• Calories 230 (97% from fat) • carb. 0g • pro. 1g • fat 25g • sat. fat 15g
• chol. 153mg • sod. 218mg • calc. 11mg • fiber 0g Basic
3/4
Watermelon-Mint Refresher
Makes 2 cups: 1 cup frozen strawberries, 1 tablespoon fresh mint leaves,
1/2
2 cups chopped watermelon (cut into
1. Put all ingredients, in the order listed, into the mixing cup.
2. Using the blending shaft, start blending on low speed, gradually increasing
to high speed until smooth, about 30–45 seconds.
3. Serve immediately.
Nutritional information per serving (1 cup):
• Calories 75 (10% from fat) • carb. 18g • pro. 1g • fat 1g • sat. fat 0g
• chol. 0mg • sod. 5mg • calc. 24mg • fiber 2g
Page 19
-inch pieces).
Page 21

Mexican Hot Chocolate
Mexican chocolate is a stoneground chocolate that is mixed with sugar,
spices or vanilla. It can be found in gourmet markets, some larger grocery
stores or online.
Makes
into
1/2
1.
cups:
1/2
-inch pieces, 2 teaspoons granulated sugar, large pinch ground
cinnamon, pinch cayenne, sweetened whipped cream (page 17), for serving.
1. Put the milk into a medium saucepan set over medium heat and bring to a
strong simmer.
2. While the milk is heating, put the remaining ingredients into the chopping
bowl. Pulse on high speed until chocolate is finely chopped, about 10 to
15 times.
3. Remove milk from heat and add in the chopped chocolate-spice mixture.
Insert the blending shaft into the pot. Being sure to keep the metal blade
completely submerged, pulse on low speed until chocolate is completely
melted and combined, and hot chocolate is frothy.
4. Serve immediately with sweetened whipped cream.
Nutritional information per serving (
• Calories 207 (34% from fat) • carb. 31g • pro. 5g • fat 8g • sat. fat 5g
• chol. 18mg • sod. 66mg • calc. 161mg • fiber 1g
1/2
1.
cups whole milk, 3 ounces Mexican chocolate, broken
1/2
cup):
Page 20
Page 22

LIMITED ONE YEAR WARRANTY
This is the only express warranty for this product and is in lieu of any other
warranty or condition.
This product is warranted to be free from defects in material and
workmanship for a period of one (1) year from the date of original purchase.
During this period, your exclusive remedy is repair or replacement of this
product or any component found to be defective, at our option; however,
you are responsible for all costs associated with returning the product to
us and our returning the product or component under
If the product or component is no longer avaliable, we will replace with a
similar one of equal or greater value.
This warranty does not cover glass, filters, wear from normal use, use not in
conformity with the printed directions, or damage to the product resulting
from accident, alteration, abuse or misuse. This warranty extends only to the
original consumer purchaser or gist recipient. Keep tile original sales receipt, as
proof of purchase is required to make a warranty claim. This warranty is void if
product is used for other than single-family household use or subjected to any
voltage and waveform other than as specified on the label (e.g., 120V~).
We exclude all claim
breach of express or implied warranty. All liability is limited to amou
purchase price. Every implied warranty, including any statutory warranty or
condition of merchantability or fitness for particular purpose, is disclaimed
except to the extent prohibited by law, in which case such warranty or
condition is limited to the duration of this written warranty.
This warranty gives you specific legal rights. You may have other legal rights
that vary depending on where you live. Some states or provinces do not allow
limitations on implied warranties or special, incidental consequential damages,
so tile foregoing limitations may not apply to you.
s for special, incidental, and consequential damages by
this warranty to you.
nt of the
NOTICE
Customer Service Management Office:
5 Sylvan Way, Suite 100 Parsippany, NJ, 07054
Amazon Store: https://www.amazon.com/comfee
Tel: 866-646-4332
E-mail: officialservice@comfeeappliance.com
Page 23

Page 24

 Loading...