

Page 1
Please read the instructions carefully before use the machine
Please properly retention of the instructions for your future reference
Instruction Manual
Model: BM2095
KITCHEN MACHINE
Page 2

Read all instructions.
To protect against risk of electrical shock DO NOT put in water or other
liquid.
Close supervision is necessary when any appliance is used by or near
children.
Unplug from outlet when not in use, before putting on or taking off parts,
and before cleaning.
Avoid contacting moving parts.
DO NOT operate any appliance with a damaged cord or plug or after the
appliance malfunctions, or is dropped or damaged in any manner. Return
appliance to the nearest authorized service facility for examination, repair
or electrical or mechanical adjustment.
The use of attachments not recommended or sold by the manufacturer
may cause fire, electric shock or injury.
DO NOT use outdoors.
DO NOT let cord hang over edge of table or counter.
DO NOT let cord contact hot surface, including the stove.
Keep hands and utensils out of container while blending to reduce the
risk of severe injury to persons or damage to the blender. A scraper may
be used but must be used only when the blender is not running
Blades are sharp. Handle carefully.
To reduce the risk of injury, never place cutter-assembly blades on base
without jar properly attached.
Always operate blender with cover in place.
The use of attachments, including canning jars, not recommended by the
manufacturer may cause a risk of injury to persons.
1.
2.
3.
4.
5.
6.
7.
8.
9.
10.
11.
12.
13.
14.
15.
1
IMPORTANT SAFEGUARDS
When using electrical appliances, basic safety precautions should
always be followed including the following:
IMPORTANT SAFETY INSTRUCTIONS
Blender
Page 3

2
16.
17.
18.
19.
20.
21.
22.
23.
24.
25.
26.
27.
28.
29.
30.
DO NOT blend hot liquids.
Moving Parts. Keep fingers out of discharge opening.
Never feed food by hand. Always use food pusher.
Blades are sharp. Handle carefully.
Never feed food by hand. Always use food pusher.
DO NOT use fingers to scrape food away from discharge disc while
appliance is operating. Cut type injury may result.
Keep hands and utensils away from moving blades or discs while
processing food to reduce the risk of severe injury to persons or damage
to the food processor. A scraper may be used but must be used only
when the food processor is not running.
Blades are sharp. Handle carefully.
To reduce the risk of injury, never place cutting blade or discs on base
without first putting bowl properly in place.
Be certain cover is securely locked in place before operating appliance.
Never feed food by hand. Always use food pusher.
DO NOT attempt to defeat the cover interlock mechanism.
DO NOT fill the bowl above the marked maximum fill line (or rated
capacity) to avoid risk of injury due to damage to the cover or bowl.
Keep hands, hair, clothing, as well as spatulas and other utensils away
from beaters during operation to reduce the risk of injury to persons, or
damage to the mixer.
Remove beaters from mixer before washing
SAVE THESE INSTRUCTIONS
HOUSEHOLD USE ONLY
IMPORTANT SAFETY INSTRUCTIONS
Vegetable shredder/slicers (disc type)
Meat grinders
Food processors
Food mixers
Page 4
3
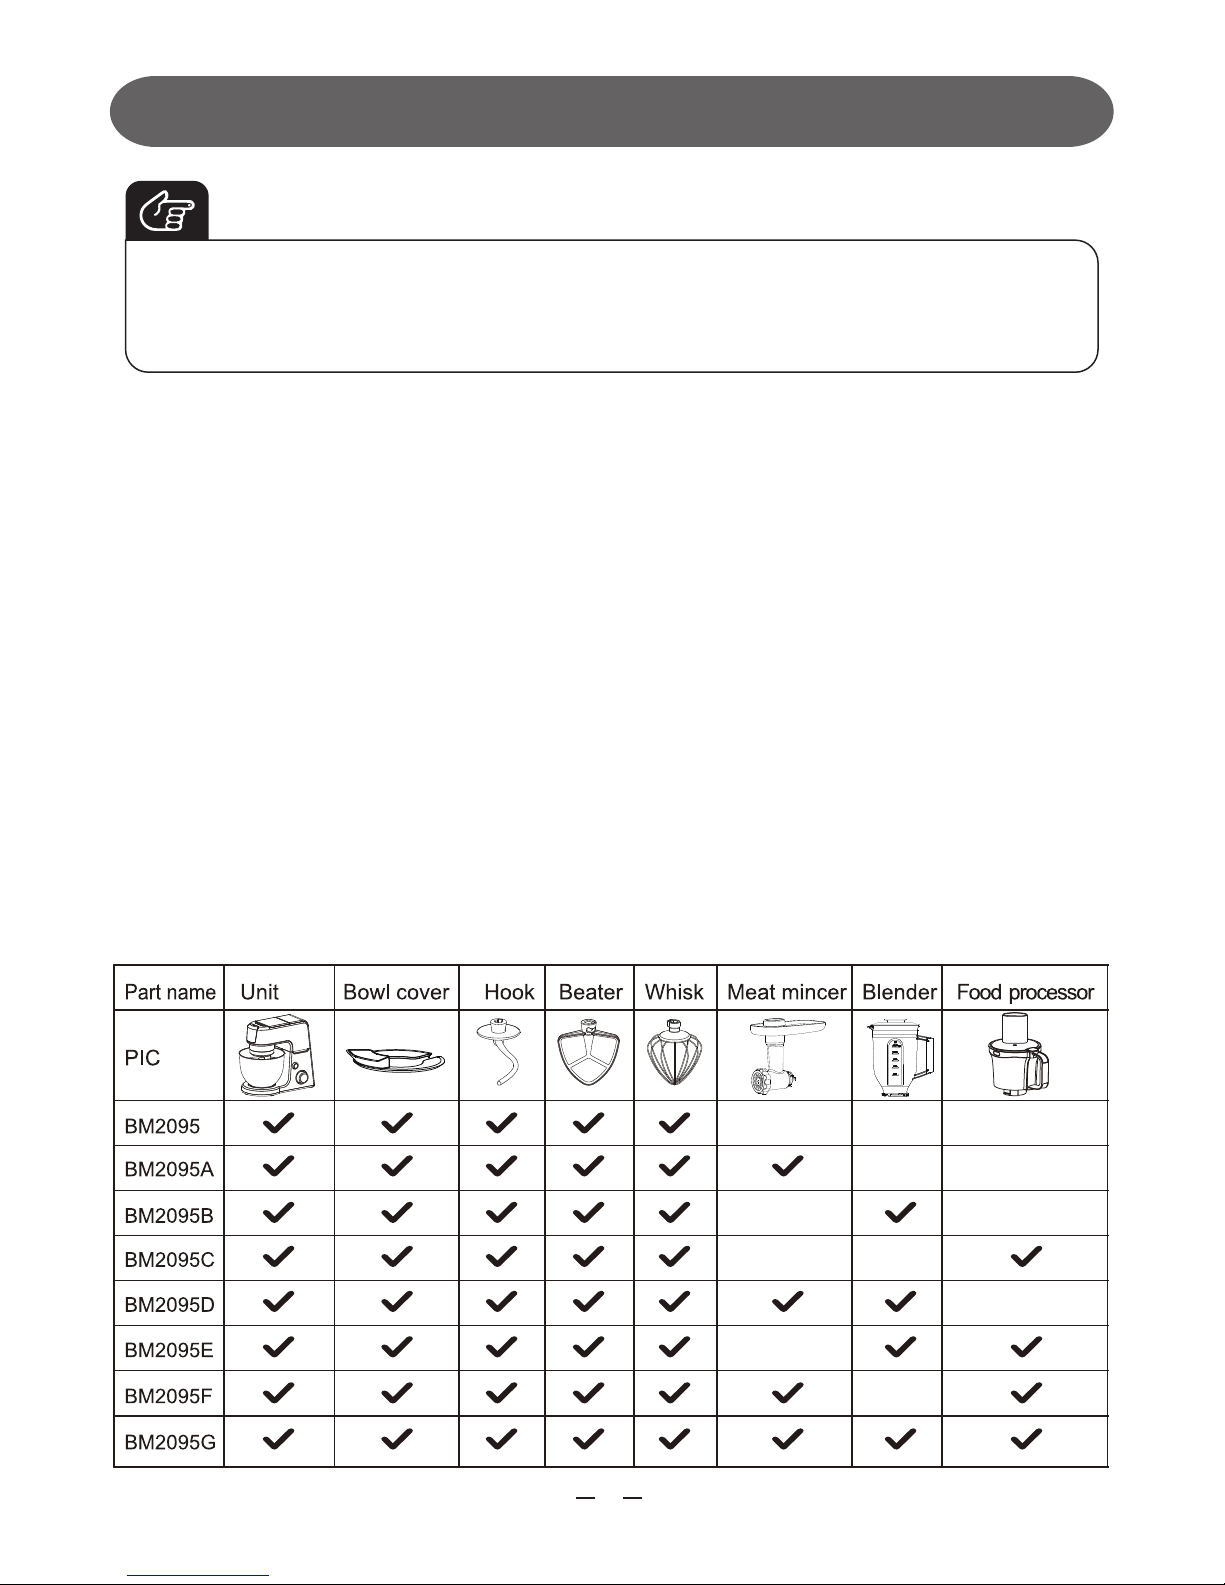
Model series
IMPORTANT SAFETY INSTRUCTIONS
The failure to follow any of the important safeguards and the important
instructions for safe use is a misuse of your kitchen machine that can
void your warranty and create the risk of serious injury.
Note
Page 5
4
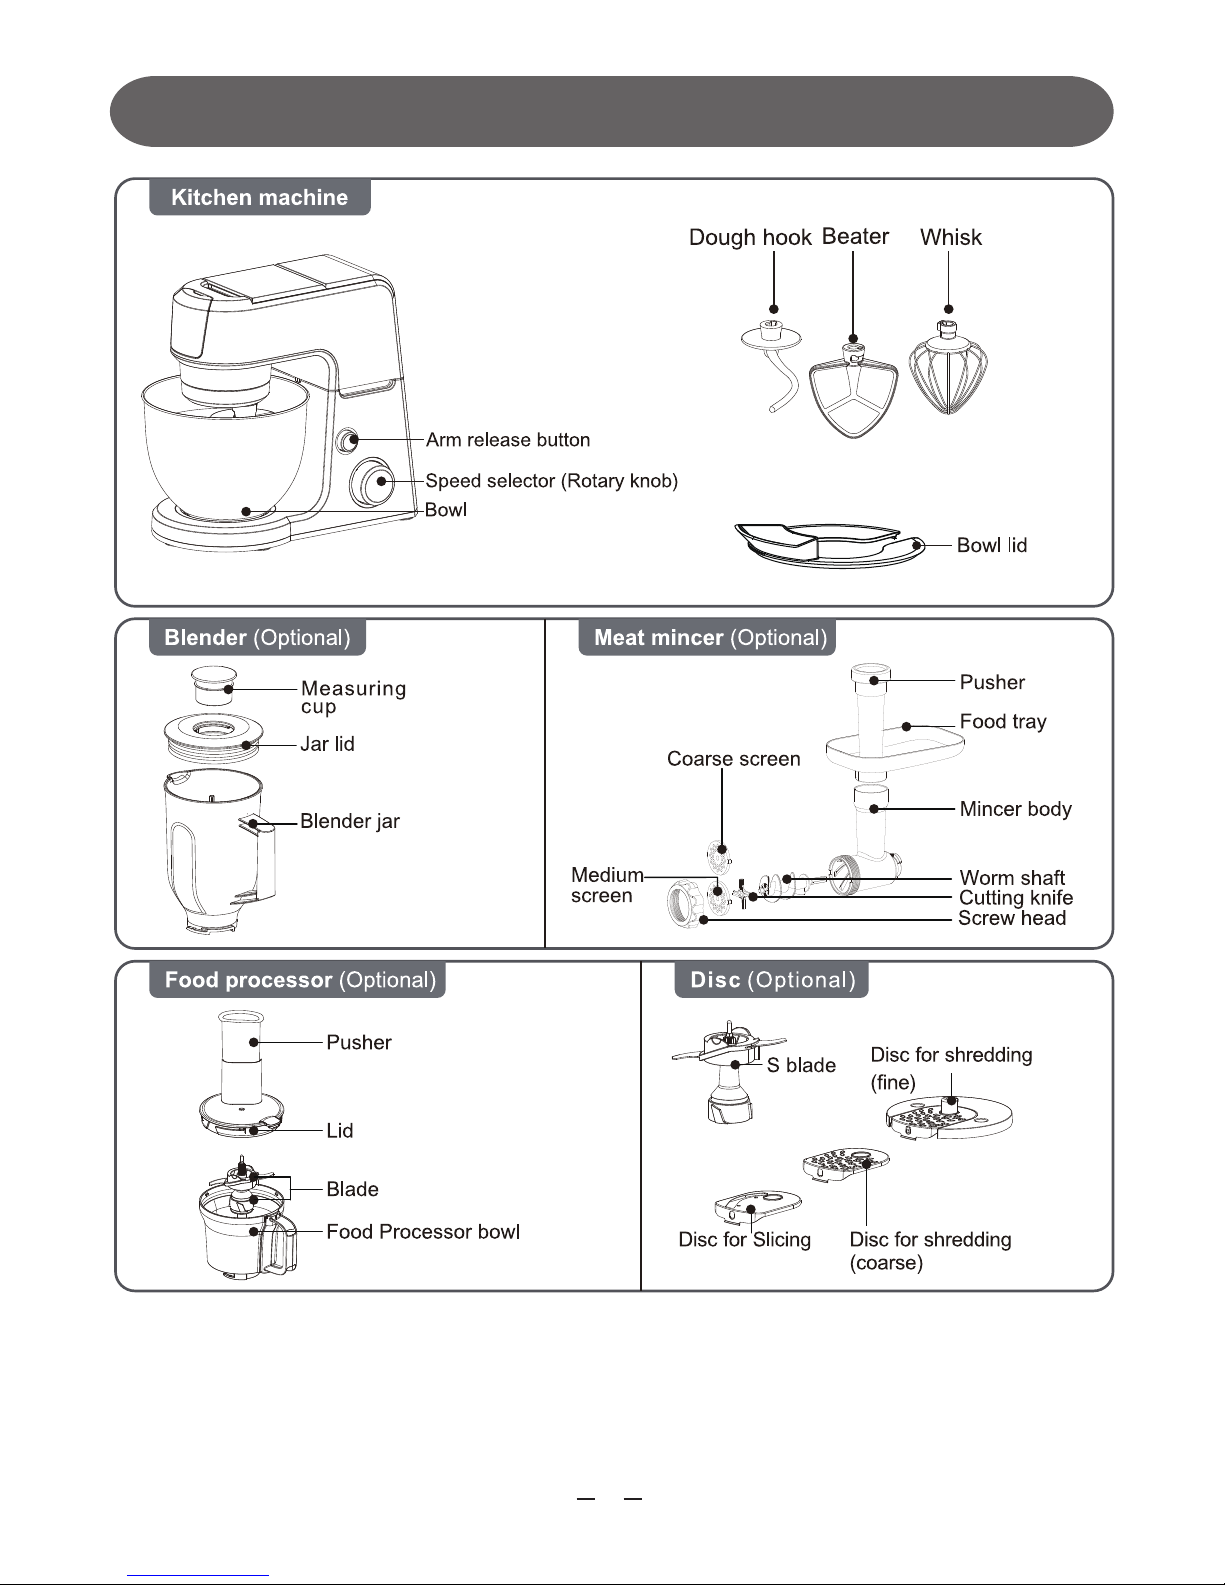
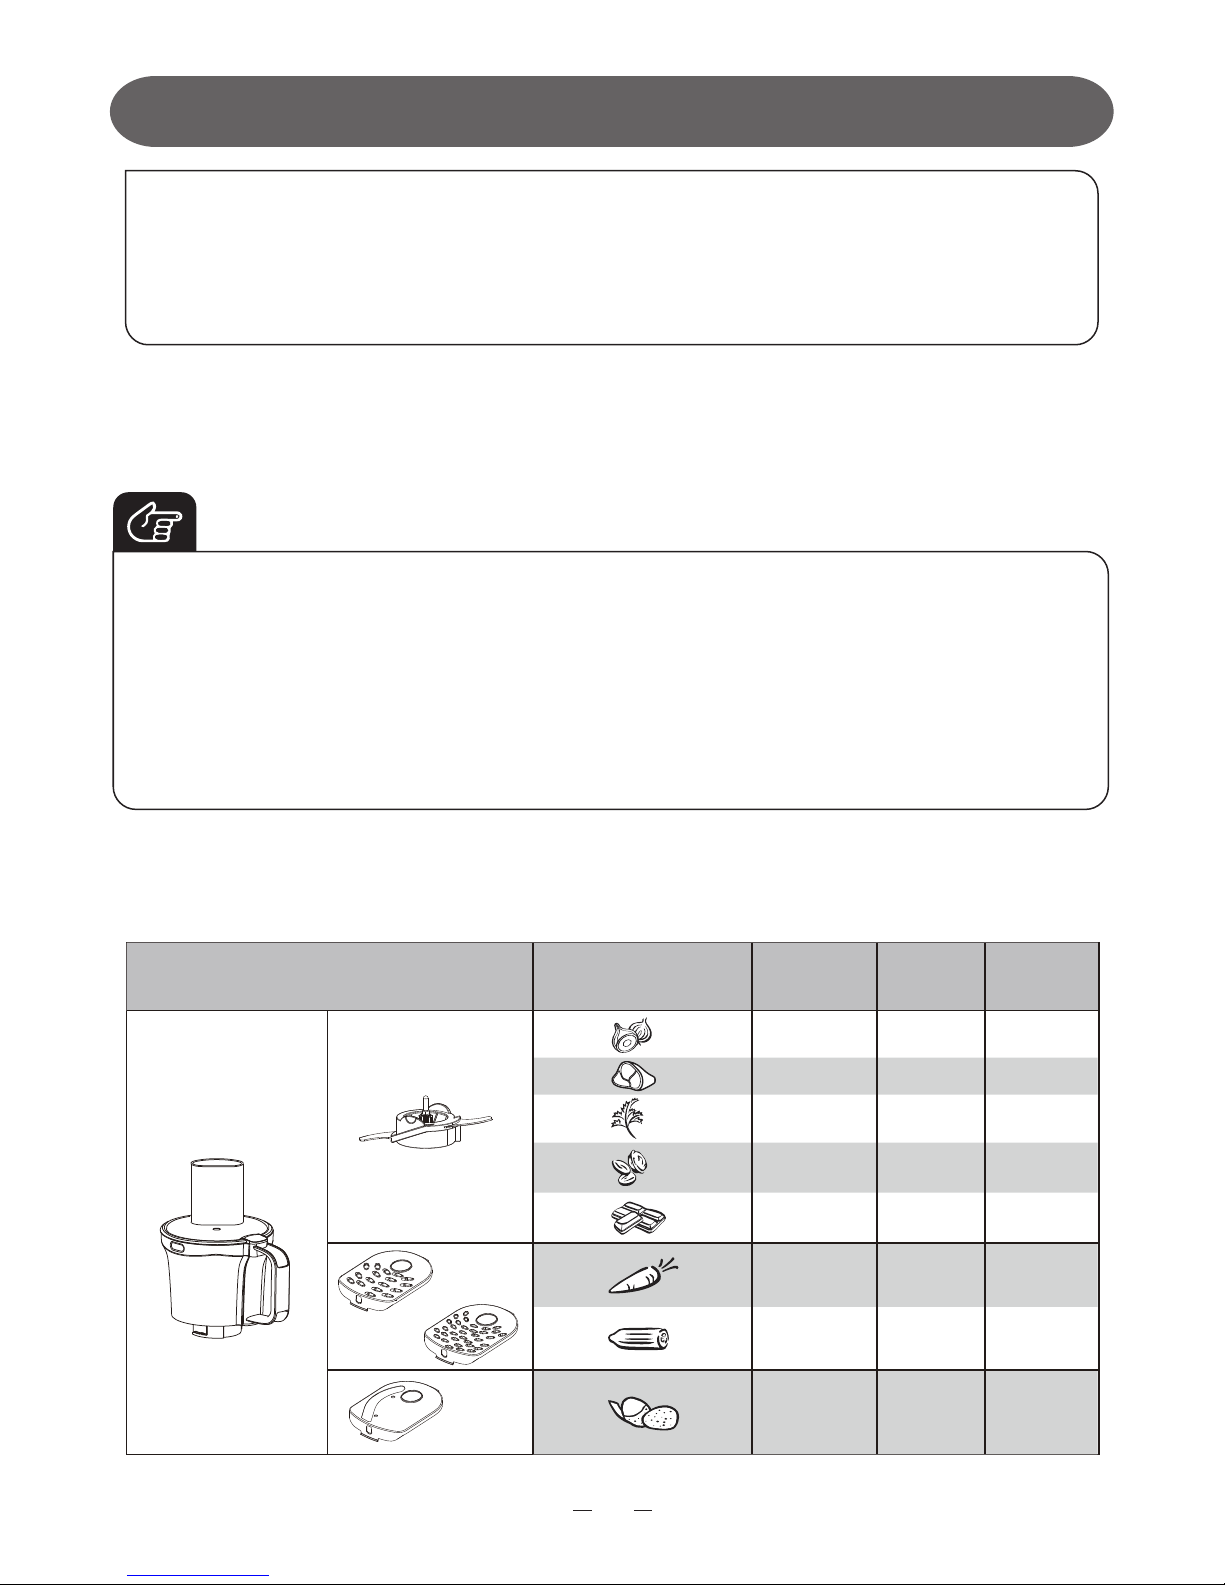
PART NAME
Assembly
(2.5L)
Page 6
5
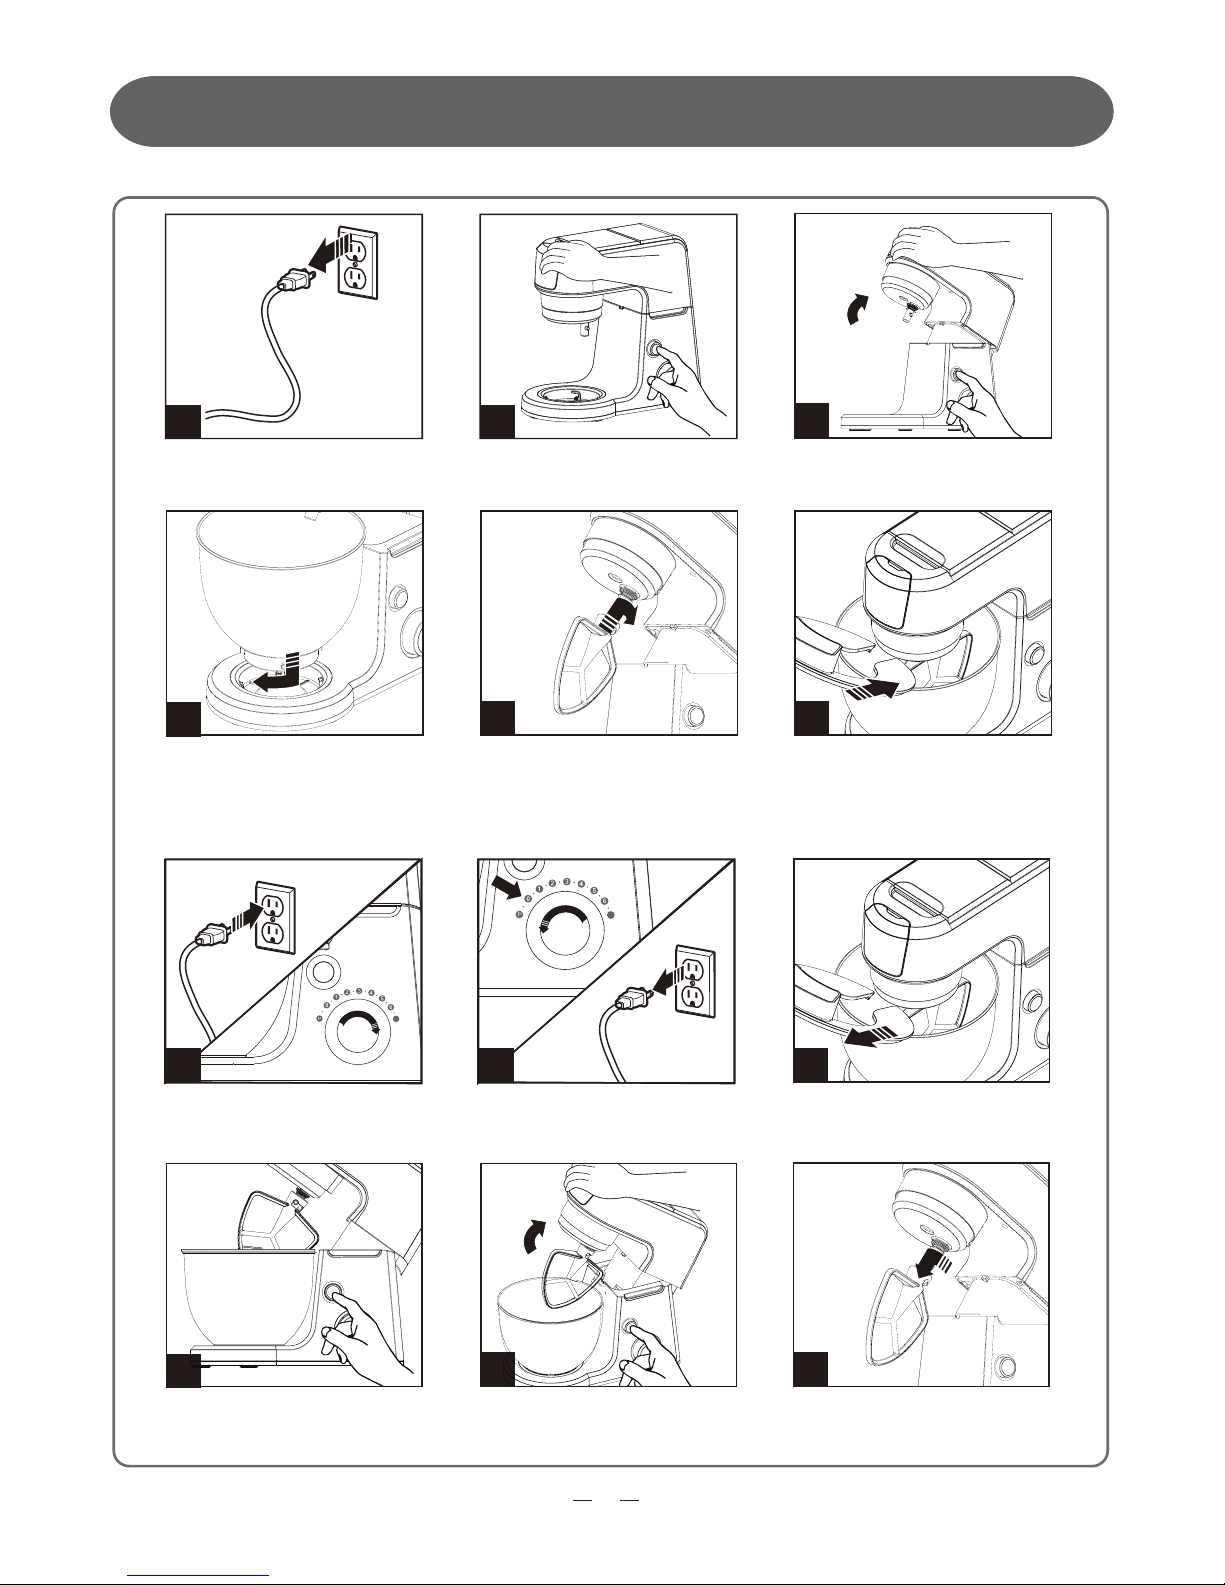
INSTRUCTIONS FOR USE
Kitchen machine
1
3
2
4
65
Always make sure mixer is
unplugged and setting control
is set to OFF(0).
Press up on mixer release button. Tilt mixer head up.
Place bowl in bowl base and turn
clockwise until bowl locks into
place.
Slide the bowl lid.
Insert attachment onto output
shaft and press upward as far
as possible. Turn the attachment
counterclockwise, hooking
attachment over pin on shaft.
937 8
10 11 12
Remove attachment by pressing
attachment upward as far as
possible. Turn the attachment
clockwise and pull to remove.
Plug mixer into wall outlet.
Select desired speed.
When finished, rotate speed
control to Off(0). Unplug from
outlet.
Slide out the bowl lid.
Press up on mixer release button. Tilt mixer head up.
7
7
Page 7

6
INSTRUCTIONS FOR USE
Page 8

7
INSTRUCTIONS FOR USE
Before you use the kitchen machine and accessories for the first time, thoroughly clean the
parts that come into contact with food. You can only plug in and switch on the appliance after
you correctly assemble the accessories.
Your kitchen machine will be automatically turned off after 15 minutes of continuous
operation. This can avoid potential safety problems due to prolonged usage.
Before you start , make sure that you pick the desired attachment from following and
assemble according to user manual.
Before first use
Mixing bowl tools
Auto stop
Before switching on your kitchen machine, make sure the knob is at 0 position and then
attach the whisk, beater or dough hook.
Up to 500g of flour plus other ingredients can be processed in the bowl.
Follow the recommended quantities, processing time and speed as indicated in user
manual. Do not exceed the suggested processing speed to avoid damage to the
machine.
It is normal that the tool connector will rotated with the gear cover, during the use of other
accessories such as blender, food Processor, etc.
Make sure the outlet covers on the arm are well locked before using your kitchen
machine.
1.
2.
3.
4.
5.
5 min
3 min
3 min
5 min
3 min
7
7
1-4
1-4
1-4
Beater
Whisk
Speed
Time
(Max)
Food
5 min 1-3
Hook
125ml
350g
400g
300g
x6
Kg
(Max)
500g
250g
Note
Page 9

INSTRUCTIONS FOR USEINSTRUCTIONS FOR USE
8
Page 10

INSTRUCTIONS FOR USEINSTRUCTIONS FOR USE
9
Recipes: Pizza dough (Hook)
U sing Speed 1 to mix strong flour and edible oil, put water into bowl slowly until
the dough formed,
Adjust the speed setting to 2 setting until the dough become smooth and elastic.
Recipe: Cake batter (Beater)
To avoid splashing, always increase speed gradually.
Whisk: before whisking egg whites or cream, make sure that the bowl and
the whisk are dry and free from grease.
Kneading: use the dough hook to knead yeast dough for bread and pizzas.
You need to adjust the amount of liquid to form the dough according to the
humidity and temperature condition.
If you want to re-knead the dough with your kitchen machine, press the
dough down t
o the bottom of the bowl to avoid the dough wrapping on the
tool. Make sure that you re-knead the dough within the recommended
speed.
•
•
•
•
Ingredient1:
• 150g strong flour(has a protein content of 11%)
• 1/8 cup edible oil
• 1/4 cup water
Ingredient2:
• 300g strong flour(has a protein content of 11%),
• 30g oil
• 168ml water
2.
1. Assemble the hook accessory to the unit.
3.
Ingredient1:
• 100g flour • 100g white sugar
• 100g soft butter • 2 eggs
U sing Speed 1 to mix strong flour and edible oil, put water into bowl slowly until
the dough formed,
Adjust the speed setting to 2 setting until the dough become smooth and elastic.
2.
1. Assemble the beater accessory to the unit.
3.
Tip
Page 11

INSTRUCTIONS FOR USEINSTRUCTIONS FOR USE
10
1.25L
9X
400g
600ml
1 min
20 times
2 min
7
P
7
Speed
Time
(Max)
Food
Kg
(Max)
Recipes: Meringue (maximum x 6 quantity) (Whisk)
• 1pc egg white • 2 spoon white sugar(20g)
Recipes: Cheese Cream (maximum x 2 quantity) (Beater)
Max speed mix cream and butter until the mixture were mixed smooth and fully
(approximate 40s)
Slow it and adjust speed setting to four, then put white powder sugar into bowl,
Finally set the speed at max speed until the mixture mixed fully (approximately 1
min 20s)
Blender
Add the egg white into the bowl (should clean and dry the bowl before using).
Whisking it on high speed for 3 min or until the egg white is stiff and airy.
2.
1. Assemble the whisk accessory to the unit.
2.
• 62g cream cheese at temp. ambient • 45g butter at temp. ambient
• 1 cups white powder sugar
2.
1. Assemble the beater accessory to the unit.
3.
4.
Never open the lid to put your hand or any object in the jar while the blender
is running.
To add liquid ingredients during blending, pour them into the blender jar
through the feeding hole by removing the measuring cup.
Precut ingredients into small pieces before you process them.
If you want to prepare a large quantity, process small batches of ingredients
•
•
•
•
Tip
Page 12
INSTRUCTIONS FOR USEINSTRUCTIONS FOR USE
11
500g
500g
50g
250g
250g
500g
1pcs
500g
P
P/7
P
7
7
4
4
3
5X1 sec
5X1 sec
30 sec
60 sec
45 sec
30 sec
30 sec
30 sec
Speed
Time
(Max)
Food
Kg
(Max)
To remove the food that sticks to the blade or bowl wall, stop processing and
switch off the appliance first, and then use a spatula.
Blade unit
Discs
Before you start, make sure you pick your desired disc from following and
assemble.
Food processor
instead of a large quantity at once.
Put the ingredients in the blender jar within the maximum level indication.
To achieve the best result when blending thick puree, fill the blender jar half
full and process the ingredients in separate blending batches.
•
•
Always put the blade unit in the bowl before you start to add the ingredients.
Do not use the blade unit to chop hard ingredients, like coffee beans,
turmeric, nutmeg, and ice cubes, as this may cause the blade to get
blunt.
Do not let the appliance run too long when you chop (hard) cheese or
chocolate. Otherwise these ingredients become too hot, start to melt, and
turn lumpy.
•
•
•
Note
Page 13

INSTRUCTIONS FOR USE
In case of abnormalities such as abnormal noises, smell, smoke, etc., you should
immediately cut off power and stop use.
If the product cannot work, please check if the power supply is connected, if the
switch is put to the ON position and if fittings are installed in place.
If the product still cannot work after checks mentioned above, please consult the
designated repair centre for maintenance.
ABNORMALITY ANALYSIS AND HANDING
Abnormality Handling
1.
2.
3.
INSTRUCTIONS FOR USE
Precut large ingredients into chunks that fit in the feeding tube.
12
Switch off and unplug the appliance.
Detach the mincer body assembly.
Clear the blockage.
Reassemble the mincer body.
Connect the power plug to the power supply and reselect the desired speed.
Meat mincer
2kg
3 min
7
Speed
Time
(Max)
Food
Kg
(Max)
1.
The meat mincer is intended for mincing raw or cooked meat.
When the meat gets stuck in the mincer body, follow the steps below to reset:
2.
3.
4.
5.
This appliance is equipped with motor themal protector. If the appliance overheats, it
switches off automatically. Unplug the appliance and let it cool down until room
temperature then put the mains plug back into the power outlet and switch on the
appliance again. Please contact your dealer or an authorized service center if it is
activated too often.
Safety system
Note
Page 14

CLEANING AND MAINTENANCE
13
Clean the main unit with a moist cloth.
Clean the other parts in hot water(<60℃) with some washing-up liquid or in a
(refer to the table).
Store the appliance and accessories in a dry place after cleaning.
Before you clean the appliance, unplug it.
Refer to the table for information on cleaning the parts with water,
dishwashing machine and/or moist cloth.
Make sure that the cutting edges of the blades and discs do not come into
contact with hard objects. This may cause the blade to get blunt.
The cutting edges are sharp. Be careful when you clean the discs, and
S-blede of the food processor, blender.
•
•
•
•
1.
2.
3.
Caution:
Page 15

14
ACL
ACN
ACL
ACN
GND
M1
M2
CONTROL PCBA
M
FP Switch Blender Switch
Lift up Switch
The appliance must not be disposed of with regular household waste.
At the end of its service life, the appliance must be properly delivered
to a collection point for the recycling of electrical and electronic
equipment. By Collection By Collection and recycling of old appliances,
you are making an important contribution to the conservation of our
natural resources and provide for environmentally sound and healthy
disposal.
Environmental protection
CIRCUIT PRINCIPLE DIAGRAM
Page 16

15
This is the only express warranty for this product and is in lieu of any other
warranty or condition.
This product is warranted to be free from defects in material and workmanship for
a period of one(1) year from the date of original purchase. During this period,
your exclusive remedy is repair or replacement of this product or any component
found to be defective, at our option; however, you are responsible for all costs
associated with returning the product to us and our returning the product or
component under this warranty to you. If the product or component is no longer
available, we will replace with a similar one of equal or greater value.
This warranty does not cover glass, filters, wear from normal use, use not in
conformity with the printed directions, or damage to the product resulting from
accident, alteration, abuse, or misuse. This warranty extends only to the original
consumer purchaser or gift recipient. Keep tile original sales receipt, as proof of
purchase is required to make a warranty claim. This warranty is void if product is
used for other than single-family household use or subjected to any voltage and
waveform other than as specified on the label .
We exclude all claims for special, incidental, and Consequential damages by
breach of express or implied warranty. All liability is limited to amount of the
purchase price. Every implied warranty, including any statutory warranty or
condition of merchantability or fitness for particular purpose, is disclaimed except
to the extent prohibited by law, in which case such warranty or condition is limited
to the duration of this written warranty.
This warranty gives you specific legal rights. You may have other legal rights that
vary depending on where you live. Some states or provinces DO NOT allow
limitations on implied warranties or special, incidental consequential damages, so
tile foregoing limitations may not apply to you.
1 Year Limited Warranty
Page 17

Specifications
KITCHEN MACHINE
BM2095
 Loading...