

Page 1

T10 3D Printer User Manual Ver.180809EN
1 / 49
T10 3D Printer
User Manual
http://www.cometrue3d.com/
Page 2

T10 3D Printer User Manual Ver.180809EN
2 / 49
Safety Information
Read this manual completely before using our 3D printer. Please be sure to follow the
instructions and warning information below.
● Forbid to Use Non-ComeTrue® Original Liquid Cleaners for Electronics Safety.
● Use the power specification which only indicated on the 3D printer label.
● Do not use injured power cord.
● Be careful of the power cord connection. If the plug is injured, please change the power cord or contact with
professional staff. If there is any fuse in the plug, be sure to replace it with a fuse of the correct specification
and rated power.
● Do not repair the 3D printer by yourself.
● Keep away from combustible materials.
● Do not block the ventilation holes of 3D printer.
● Avoid putting the 3D printer in a place where temperature and humidity may change dramatically. Avoid sun
exposure, high temperature and chemicals.
● Do not put the machine in a vibrated place and do not drag the machine.
● Do not put your hand into the 3D printer or touch the binder cartridge when printing is in progress.
● Do not use your hand to move the print head, otherwise it may damage the printer.
● Do not put the 3D printer in a place where there may be interfered by electric waves, ex: megaphone or wireless
telephone.
● Do not put the 3D printer near television, radio, air conditioner or humidifier.
● Install the 3D printer close to the place where you are going to put because any movement after installation is
completed may cause damage to the printer.
● If the binder cartridge contact with your skin, wash it with water and soap. If the binder cartridge contact with
eyes, wash them with plenty of water instantly.
● Do not use expired binder cartridge.
● Do not touch the orifice of the print head or other parts around it, or it may affect the normal operation and
printing quality
● If the power cord is damaged, it must be replaced by a special wire or special components from the manufacturer
or its service agent. ”
● This machine is not applicable to be used by people (including children) with physical disability, mental disability,
or lack of experience and knowledge in using similar products.
● Keep this machine away from children.
● Please turn off the power after using it.
● Warning Symbols:
Page 3
T10 3D Printer User Manual Ver.180809EN
3 / 49
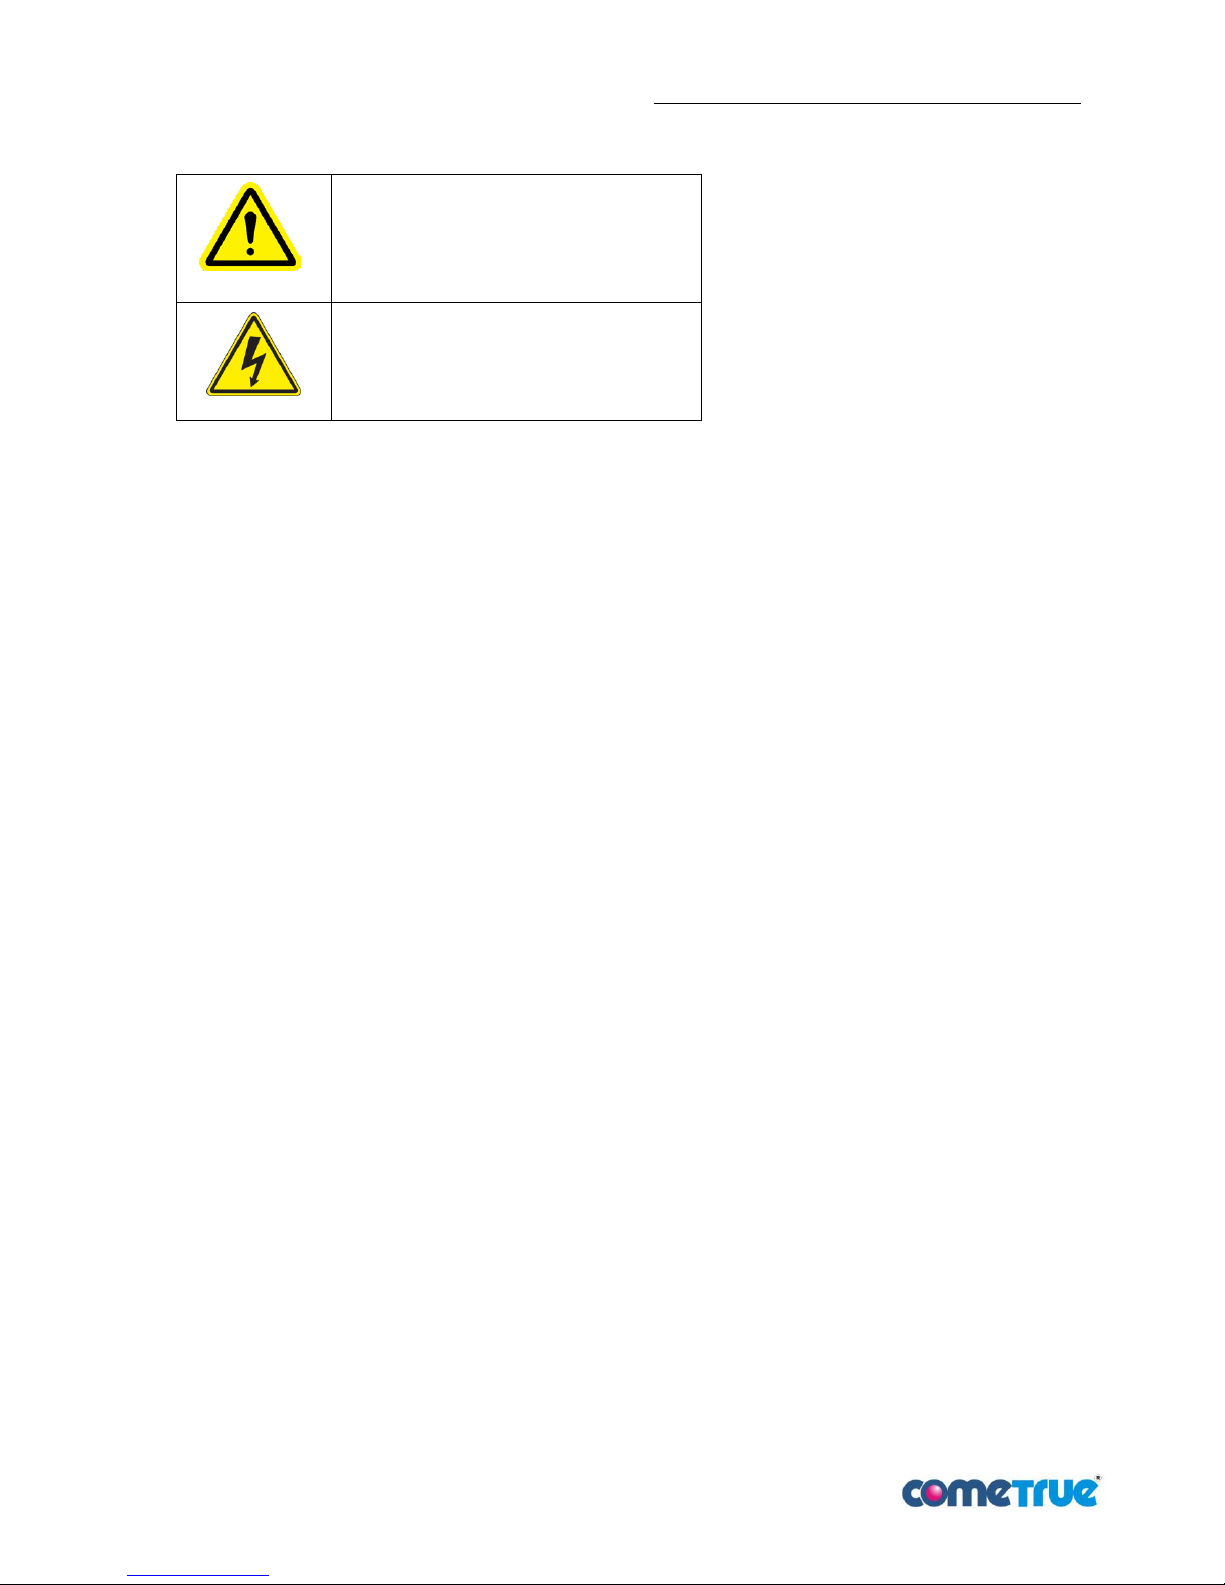
Mind the symbols below when using ComeTrue T10 3D printer:
General Caution:
Be careful
to avoid damaging the equipment.
High Voltage:
Be careful of the high voltage.
Page 4

T10 3D Printer User Manual Ver.180809EN
4 / 49
Contents
Safety Information ................................................................................................................................. 2
1 ComeTrue 3D printer operating principle .................................................................................... 6
2 ComeTrue 3D printer T10 structure .............................................................................................. 6
2.1 COMETRUE T10 APPEARANCE .................................................................................................................................................. 6
2.2 3D PRINTER INTERIOR ................................................................................................................................................................. 6
2.3 ACCESSORIES ............................................................................................................................................................................... 7
3 Before installation ................................ .......................................................................................... 8
4 3D printer slicing software ComeTrue Print installation ............................................................. 8
5 3D printer before printing ........................................................................................................... 11
5.1 INSTALLING BINDER CARTRIDGE, CLEANER AND PRINT HEAD ............................................................................................... 11
5.1.1 Binder cartridge and cleaner installation ............................................................................ 11
5.1.2 Print head installation ................................................................................................................ 13
5.2 FILL FEED BOX UP WITH POWDER ............................................................................................................................................. 15
5.3 POWDER SPREADING AND PRINT TESTING ............................................................................................................................. 16
5.3.1 Powder spreading .................................................................................................................... 16
5.3.2 Print testing ................................................................................................................................ 18
6 Quick start ................................ ................................................................................................ ..... 21
7 After printing ................................................................................................................................ 27
7.1 PICK UP THE PART ...................................................................................................................................................................... 27
7.2 PLATFORM CLEANING ............................................................................................................................................................... 28
7.2.1 Platform powder cleaning .................................................................................................... 28
7.2.2 Print bar cleaning ..................................................................................................................... 30
7.2.3 Powder- spread roller cleaning ........................................................................................... 31
Page 5

T10 3D Printer User Manual Ver.180809EN
5 / 49
7.2.4 Wiper maintenance ................................................................................................................. 32
7.2.4.1 Wiper cleaning .............................................................................................................. 32
7.2.4.2 Sponge roller changing ............................................................................................. 34
7.2.5 Print head cleaning .................................................................................................................. 37
7.2.6 Waste ink and waste powder handling ............................................................................ 38
7.2.7 Advanced maintenance ......................................................................................................... 38
8 Post process ................................................................................................................................ .. 39
9 3D printer operating and maintenance ...................................................................................... 41
9.1 COMETRUE T10 MAINTENANCE TABLE .................................................................................................................................. 41
9.2 PRINT HEAD MAINTENANCE ..................................................................................................................................................... 42
9.3 SERVICE STATION MAINTENANCE ........................................................................................................................................... 42
9.4 CONFIRM POWDERS IN FEED BOX............................................................................................................................................ 42
9.5 BINDER CARTRIDGE CHANGING ............................................................................................................................................... 42
9.6 INTERIOR CLEANING .................................................................................................................................................................. 42
9.7 3D PRINTER TROUBLESHOOTING ............................................................................................................................................. 43
9.8 STATUS MONITOR .................................................................................................................................................................... 44
10 Firmware update .......................................................................................................................... 47
11 Reference material ....................................................................................................................... 49
Page 6
T10 3D Printer User Manual Ver.180809EN
6 / 49
1 ComeTrue 3D printer operating principle
ComeTrue 3D printer combines inkjet technology and rapid prototyping technology, it can produce a
three-dimensional product rapidly, and its operation is similar to produce a real product which uses printing
technology. The materials used are composite powders and binder, utilizing combination of binder and
powder to produce a real product. The method used is lamination method, which paves one layer of powder,
and then spray binder in the specific place. .Paving powder and spraying binder repeatedly until the product is
finished.
2 ComeTrue 3D printer T10 structure
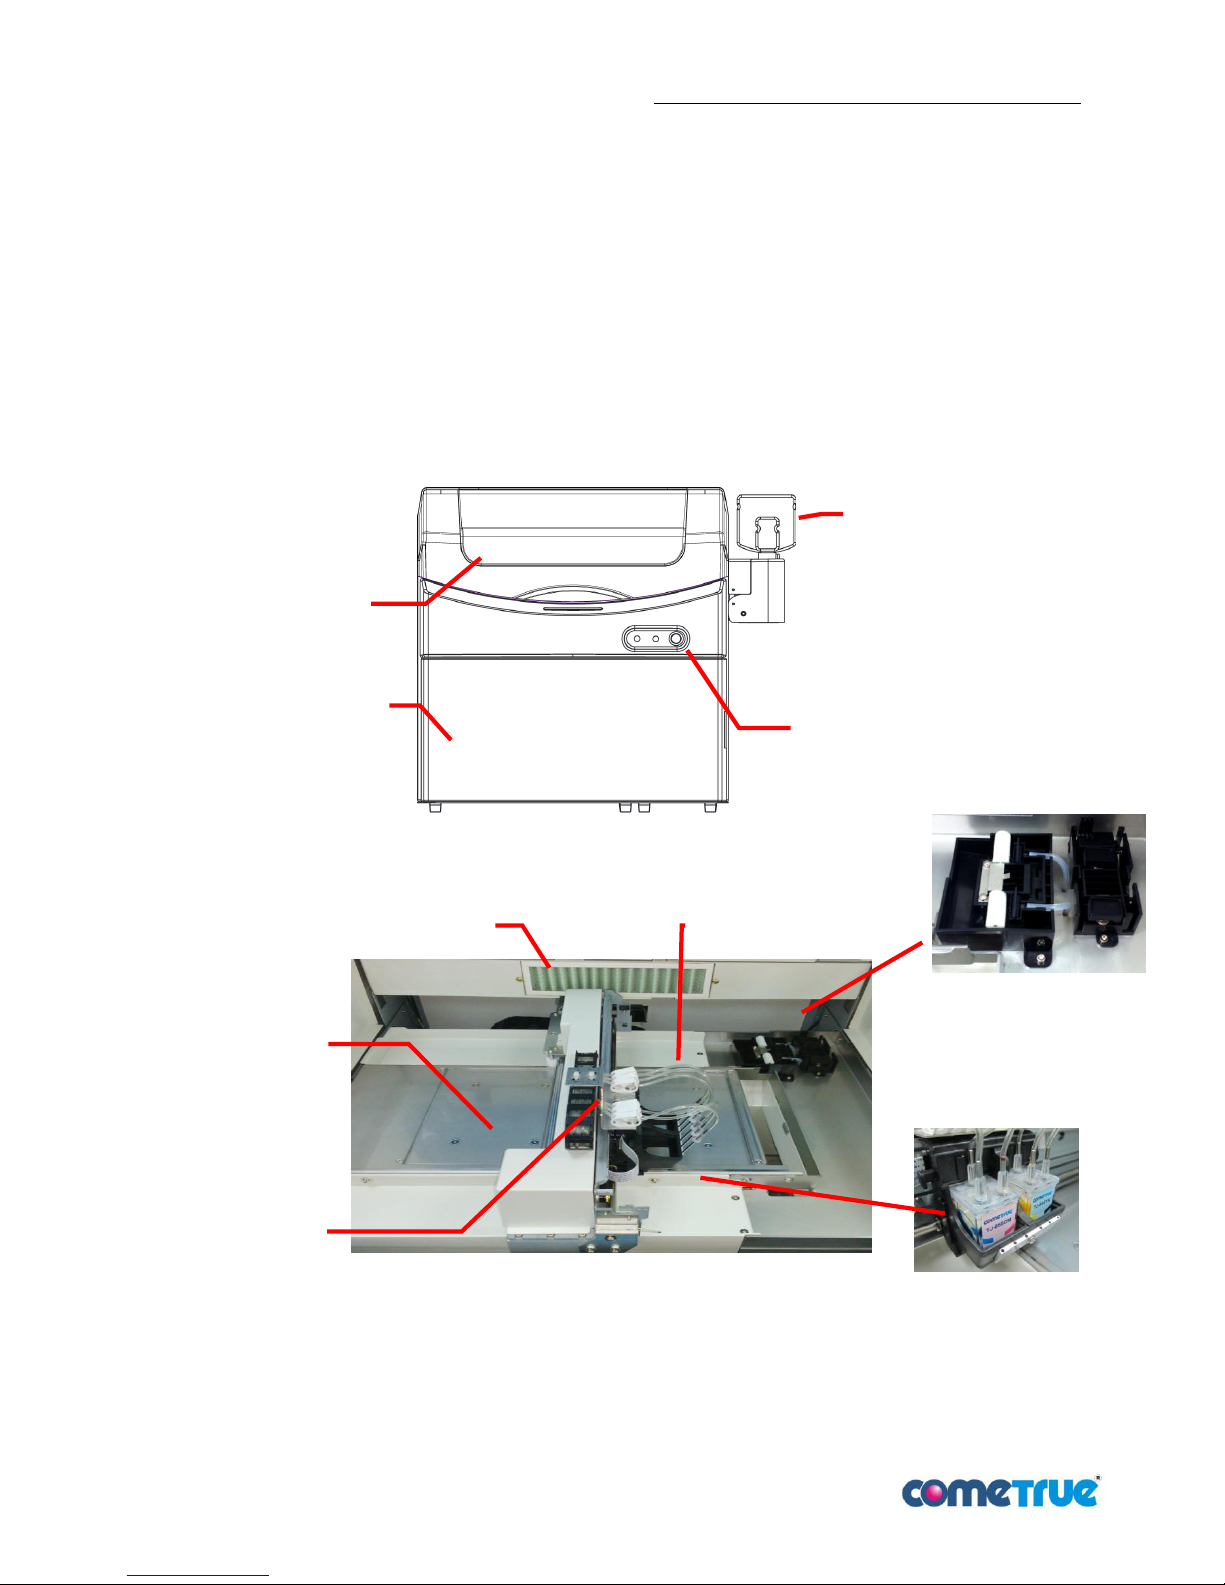
2.1 ComeTrue T10 appearance
pic 1:ComeTrue T10 appearance
2.2 3D printer interior
pic 2:ComeTrue T10 platform
Binder
Top cover
Power switch
Front cover
Print head(set)
Cleaning device
Build box
Fan
Print Bar
Feed Box
Page 7
T10 3D Printer User Manual Ver.180809EN
7 / 49
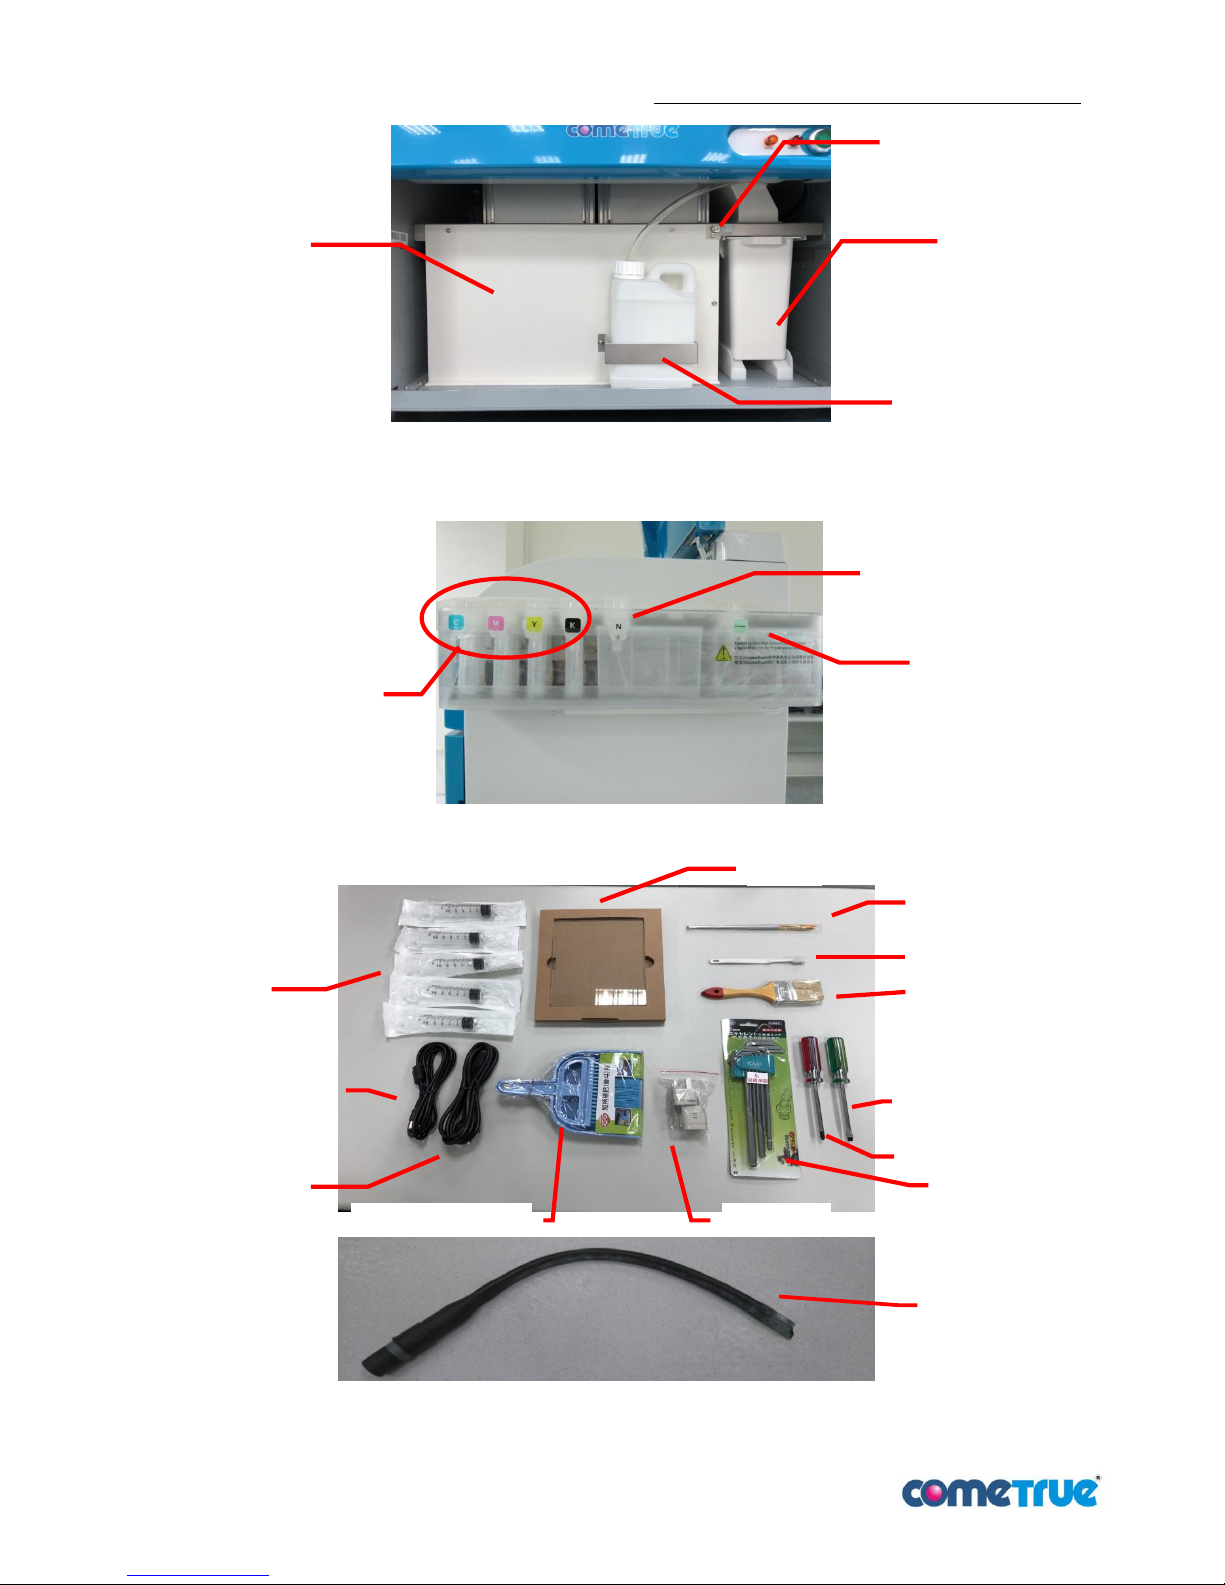
pic 3:ComeTrue T10 bottom structure (inside the front cover)
pic 4:ComeTrue T10 cartridge
2.3 Accessories
pic 5:ComeTrue T10 accessories
Cleaner
CMYK Binder (Color Binder)
Binder (Clear Binder)
Syringe
Power cord
Mini broom set
Toothbrush
Paint brush
Phillips screwdriver
Hex wrench
Flathead screwdriver
long soft straw
Z-Axis Cover
Waste powder tank
Waste ink bottle
Watercolor brush
USB cable
Glass
Adapter
Waste pipe holder
Page 8
T10 3D Printer User Manual Ver.180809EN
8 / 49
3 Before installation
1. Prepare Liquid Cleaner for the cleaning usage.
2. In order to facilitate the operation, maintain and keep ventilation, , keep at least 60 cm of space around the
machine for operating.
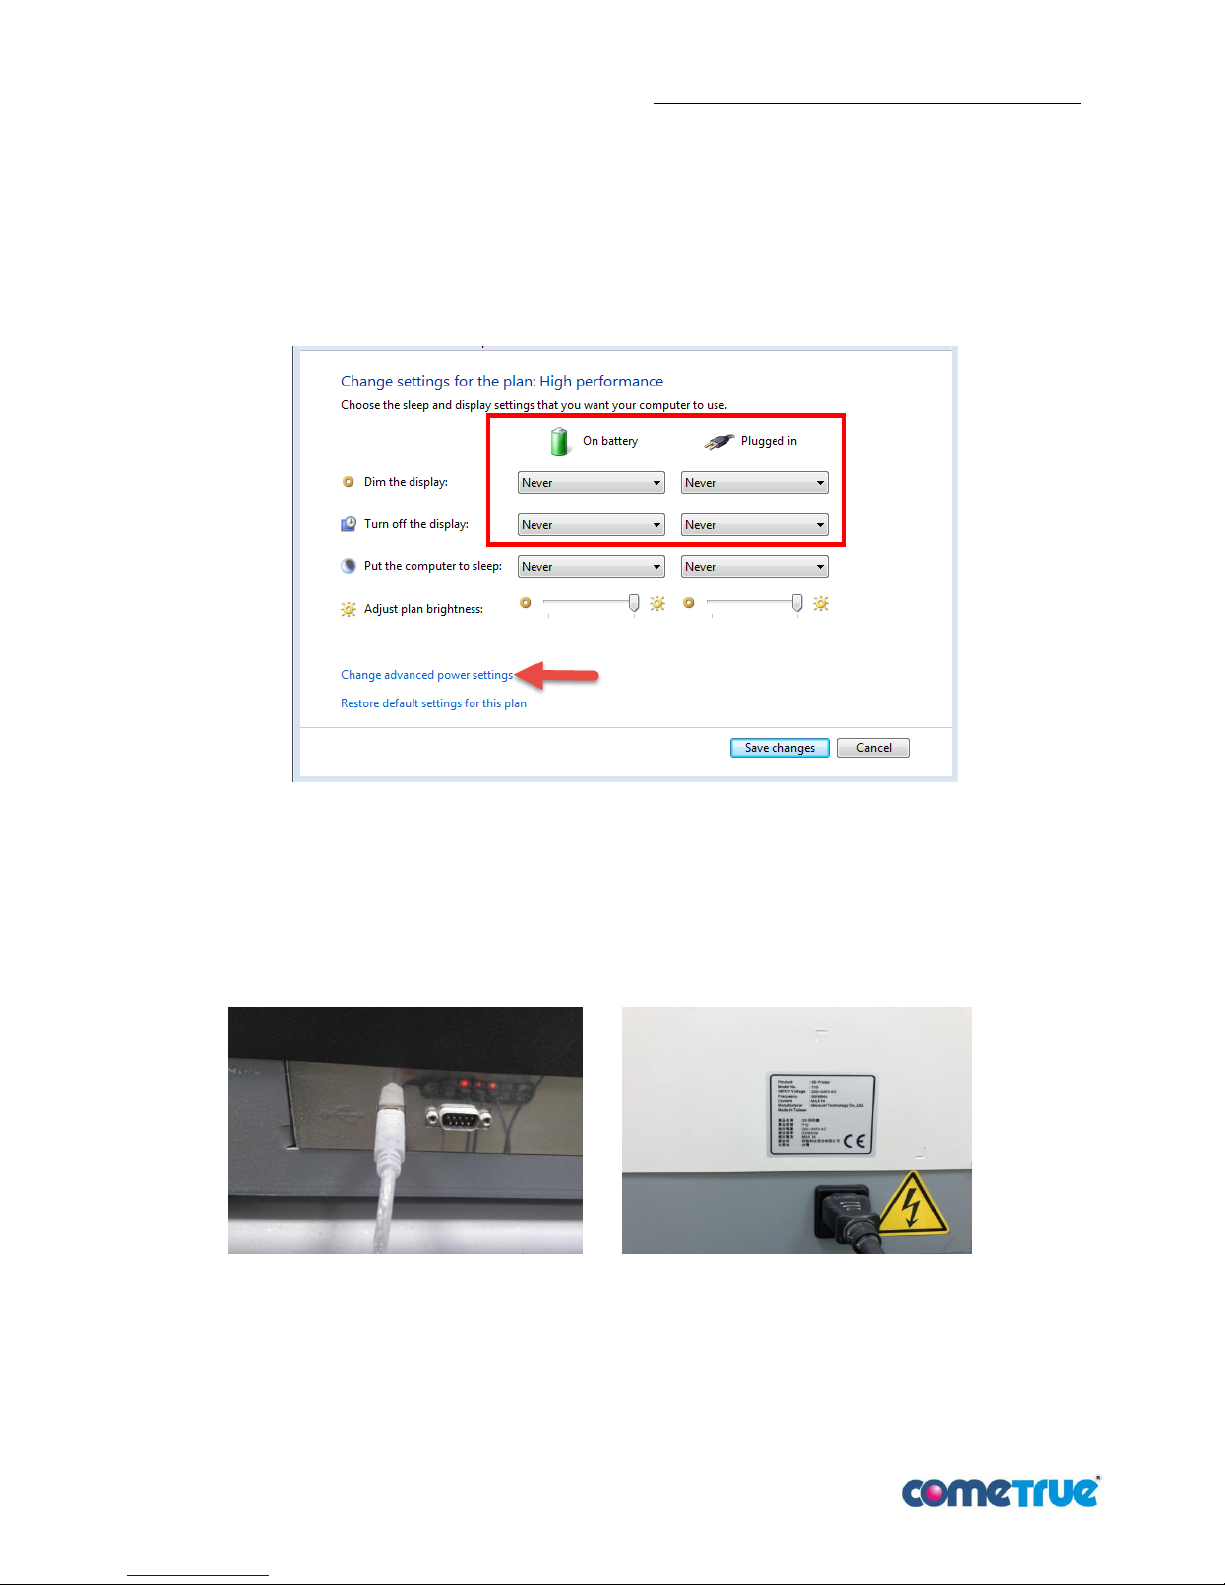
3. Set the power setting of computer in Panel of Control Power Setting change the sleep time to never
and the screen to never close. (as pic 6)
pic 6:Change power setting of computer
4. It is recommended that the machine operating temperature should be 10~30℃,and humility should
be15~60﹪RH。
4 3D printer slicing software ComeTrue Print installation
1. Connect the USB cable and power cord (pic 7,8), then turn on the machine.
pic 7:USB Cable pic 8:Power Cord
2. Insert the ComeTrue Print CD to the computer.
3. Select Setup.exe file, and run the installation.
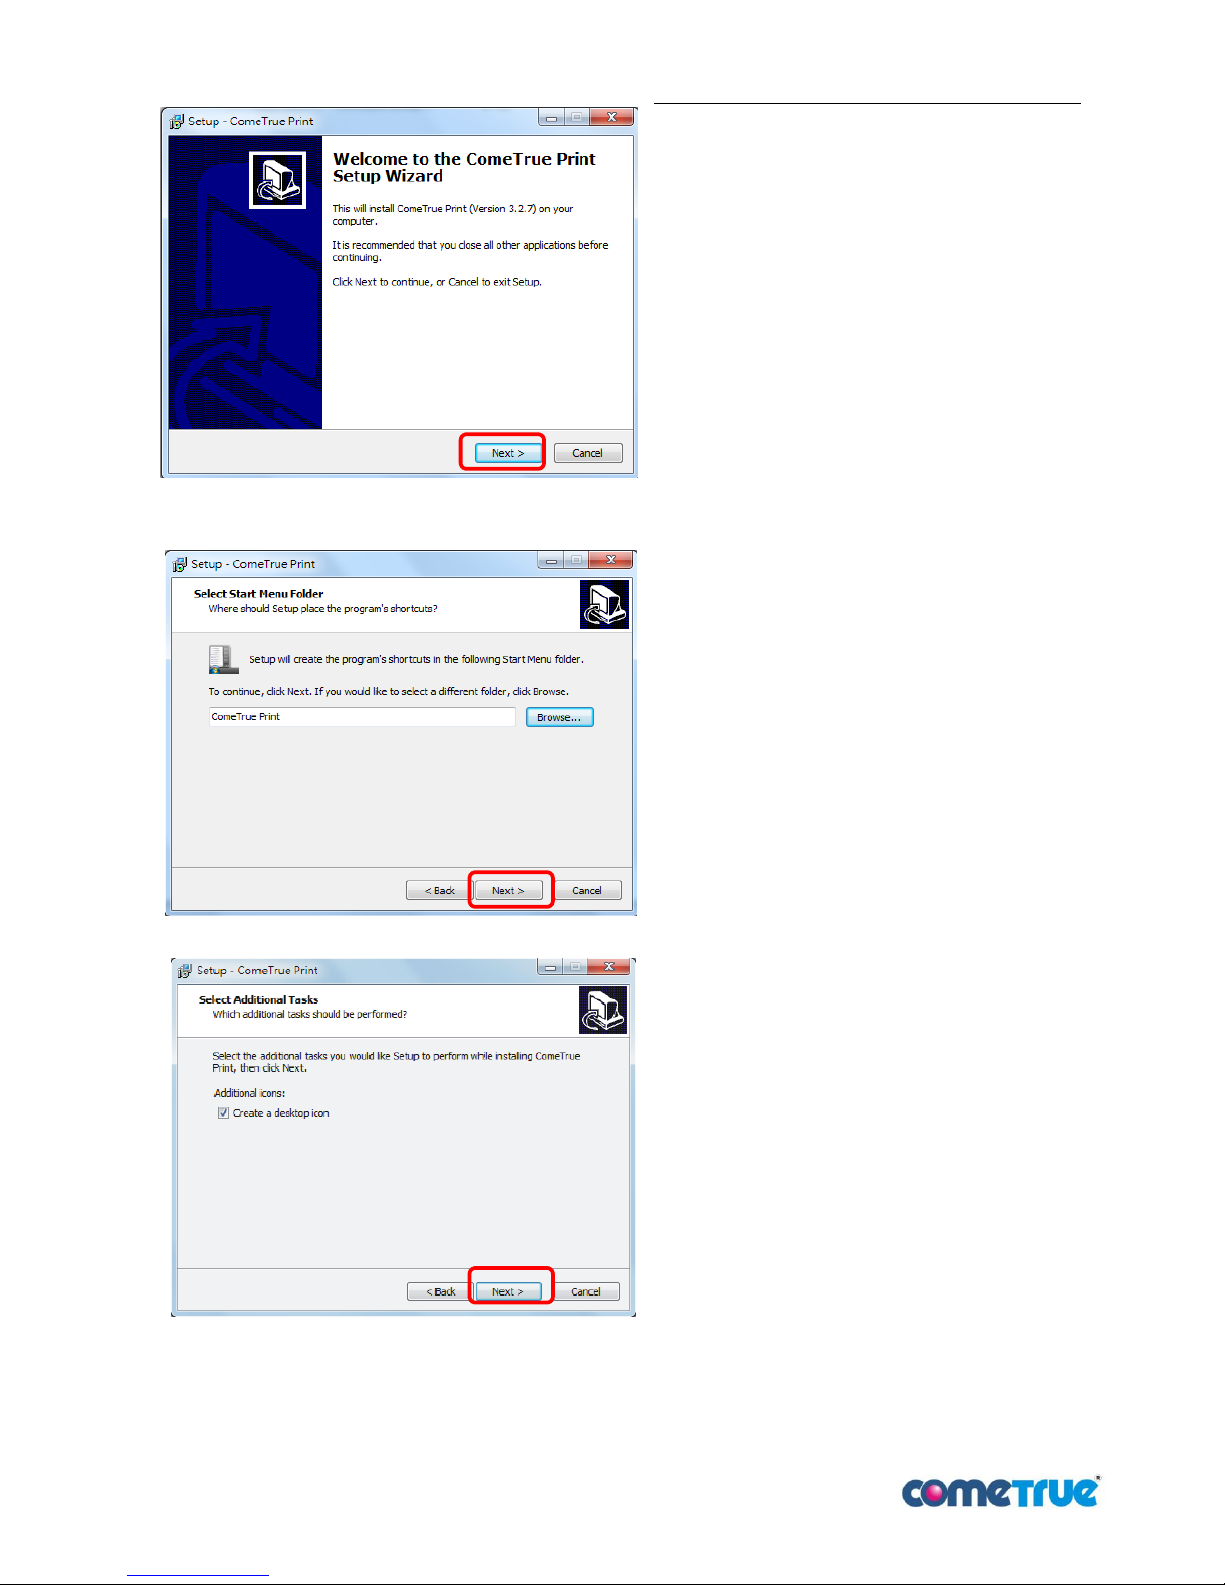
4. Select “Next”, to the next window.
Page 9
T10 3D Printer User Manual Ver.180809EN
9 / 49
5. Select the installation folder, then press “Next”.
6. Select the name of folder, then press “Next”.
7. Select “Next”, to the next process.
.
pic 9:Select Next
pic 10:Select Next
pic 11:Select Next
Page 10
T10 3D Printer User Manual Ver.180809EN
10 / 49
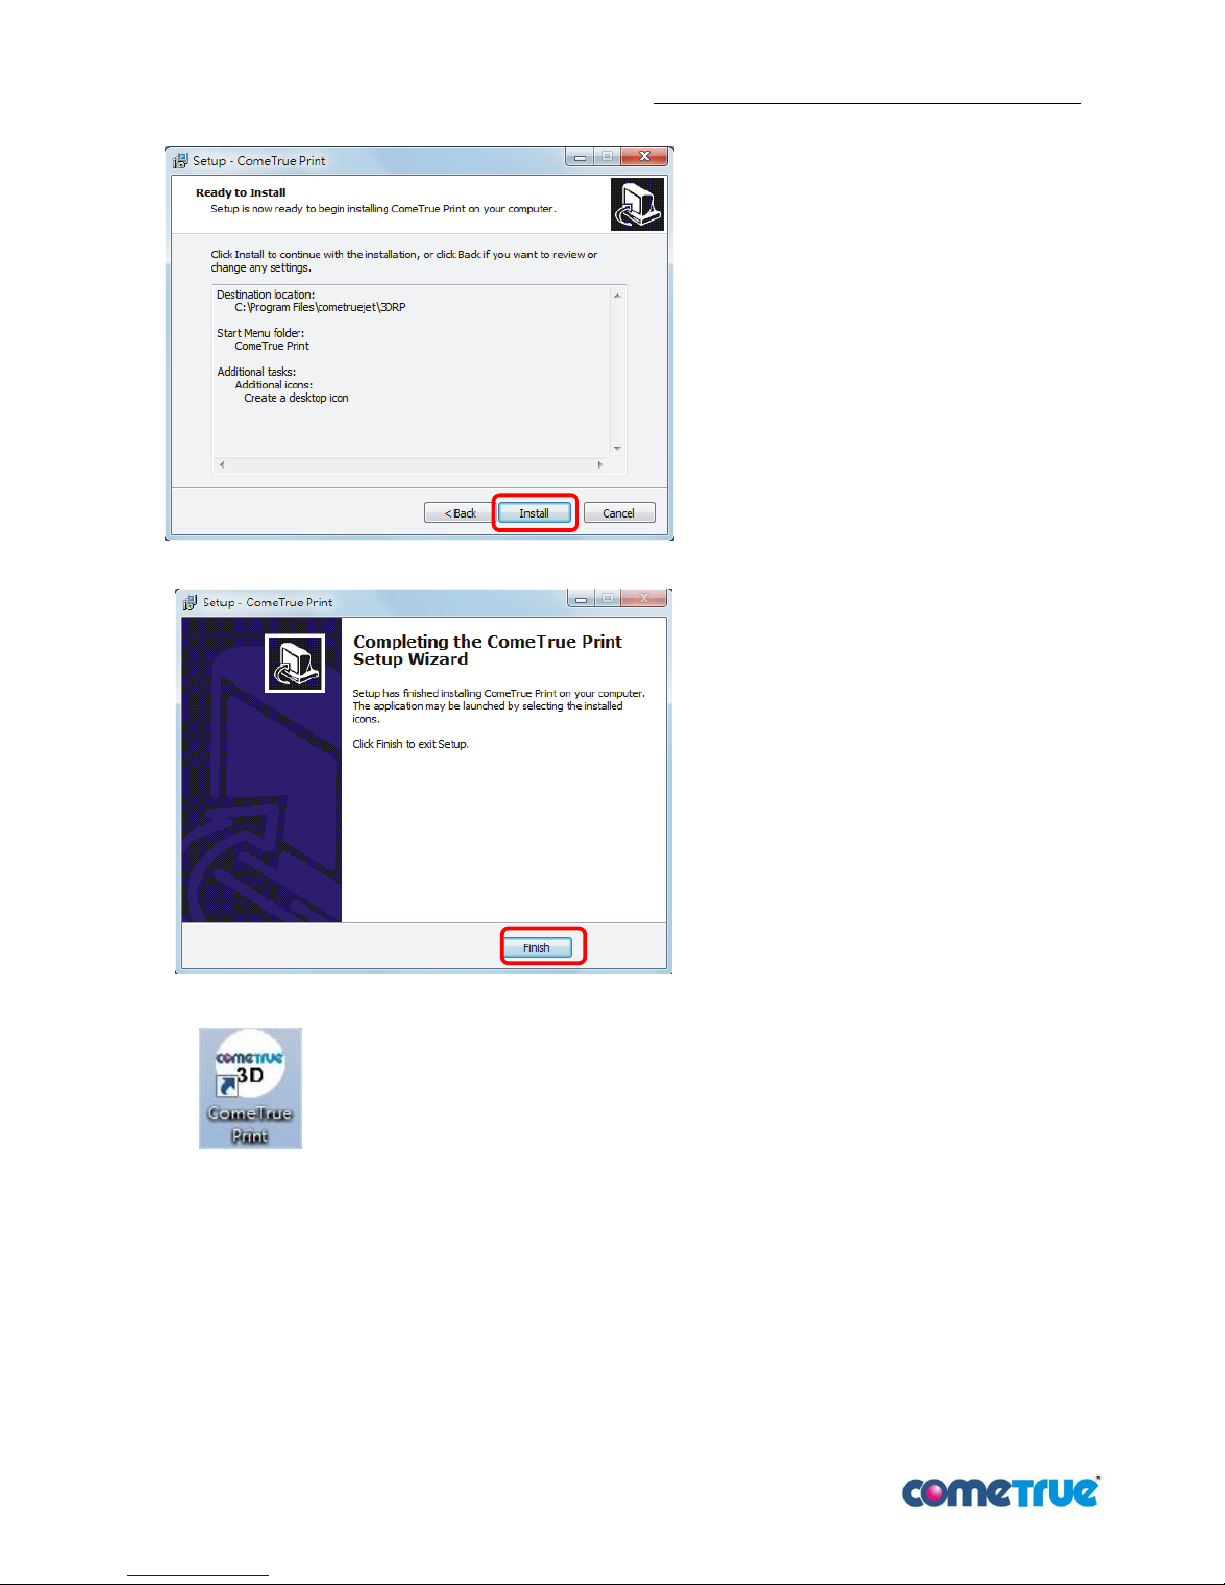
8. Select Install for installation.
9. Select “Finish”, the installation is finished.
. .
10. After installation, there will be an icon “ComeTrue Print” on the desktop.
pic 14:Shortcut
NOTE:This slicing software supports VRML 2.0(*.wrl) and STL file.
11. Before inserting 3D printing file into ComeTrue Print, use 3D repair software to ensure that the file has no
broken face and convert to VRML 2.0 format to avoid failure.
pic 13:Select Finish
pic 12:Select Install
Page 11
T10 3D Printer User Manual Ver.180809EN
11 / 49
5 3D printer before printing
5.1 Installing binder cartridge, cleaner and print head
5.1.1 Binder cartridge and cleaner installation
Please install the binder cartridge and cleaner when using T10 3D Printer at the first time, and make sure
that the ink is enough for you to use each time.
.
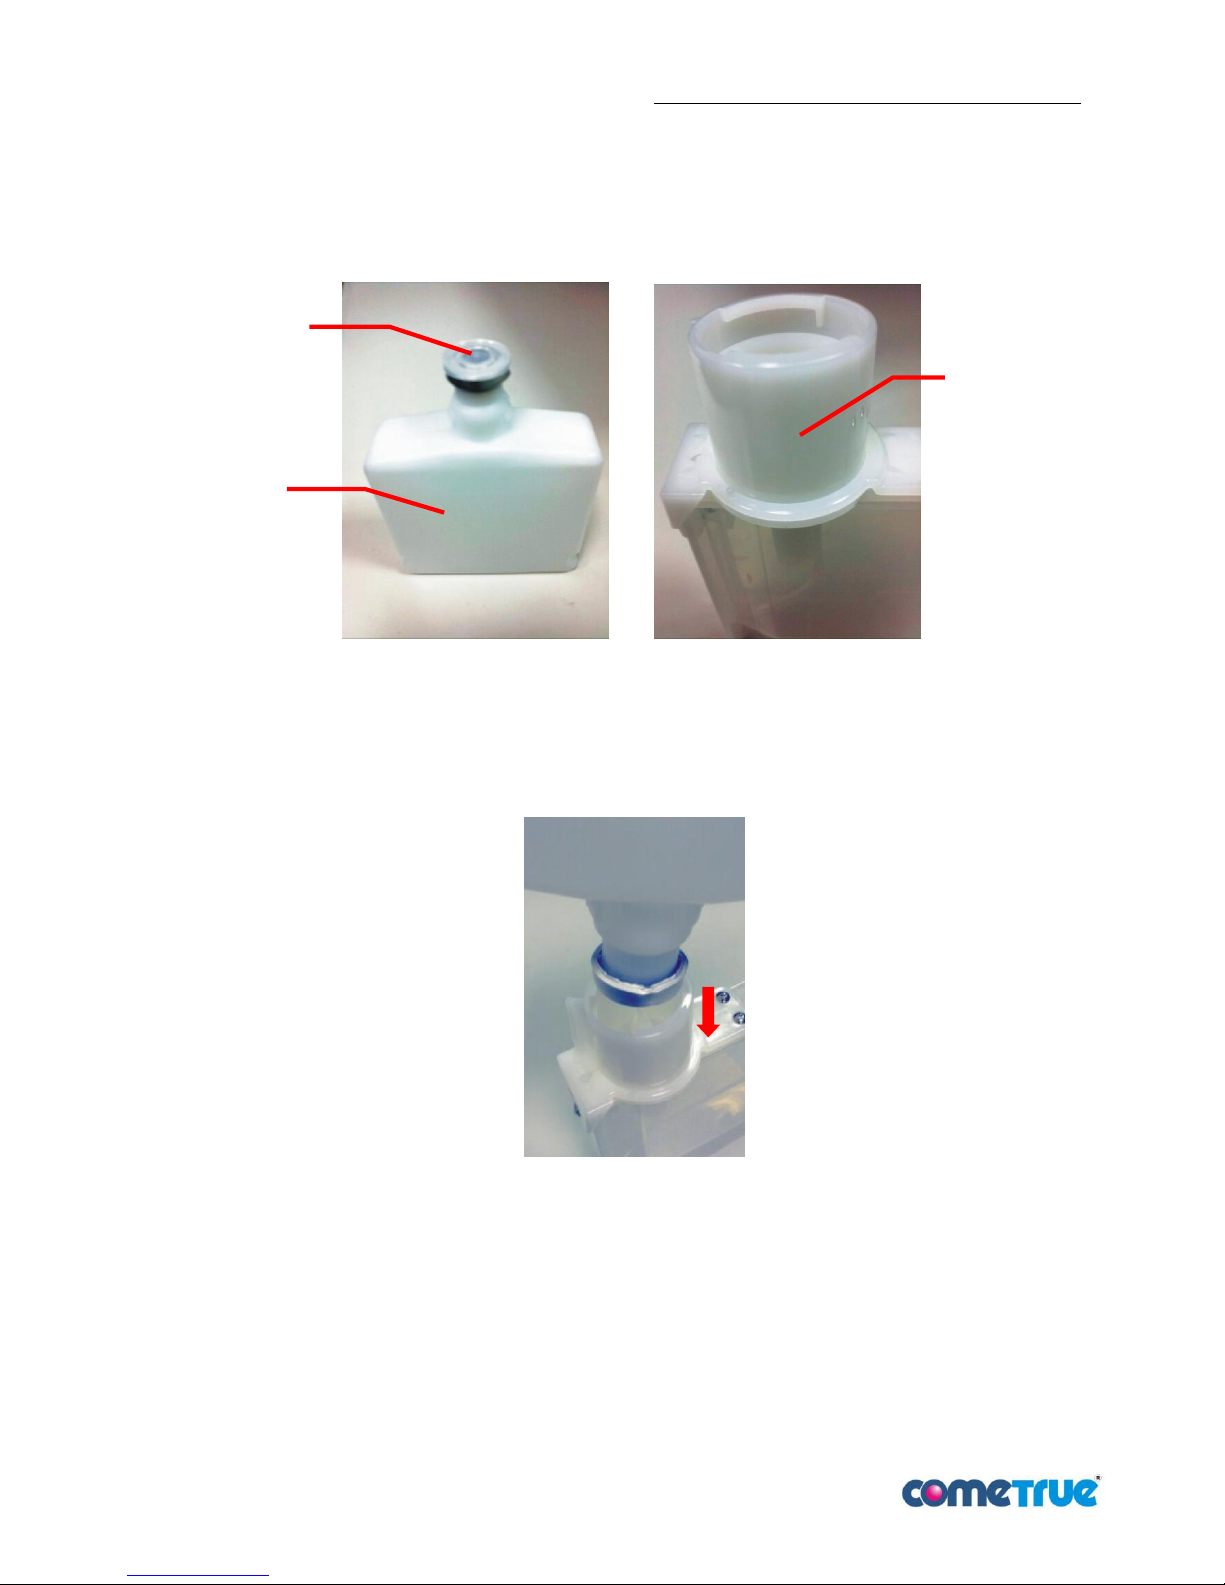
pic 15:Binder cartridge pic 16:Binder tank and adapter
Follow the process when using or changing the binder cartridge (CMYK binder, clear binder and cleaner)
a. Open the binder cartridge cap first.
b. Invert the binder cartridge and insert it on the adapter, push down to break the rubber plug as follows.
pic 17:Install the binder cartridge on the adapter
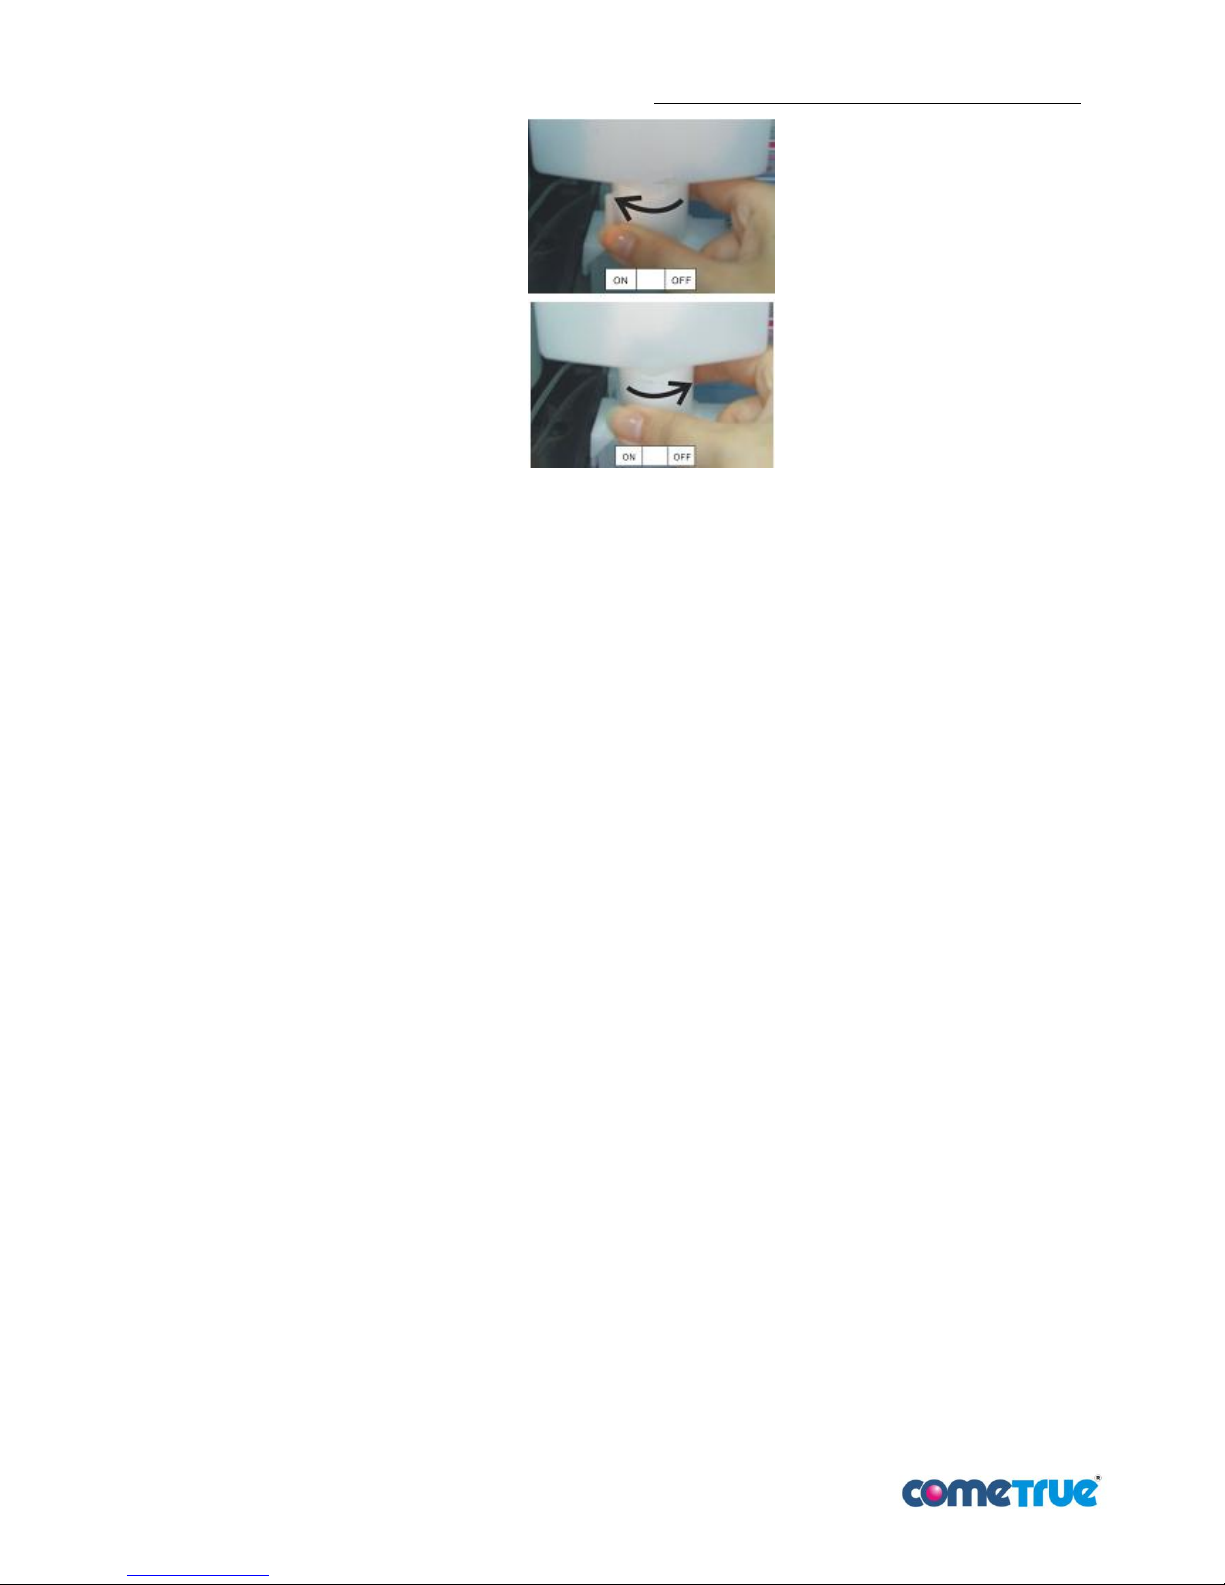
c. Turn the adapter head to OFF to finish the installation. (as pic 18)
Cap
Bottle
Binder Adapter
Page 12
T10 3D Printer User Manual Ver.180809EN
12 / 49
pic 18:Power switch direction of the adapter head
Page 13
T10 3D Printer User Manual Ver.180809EN
13 / 49
5.1.2 Print head installation
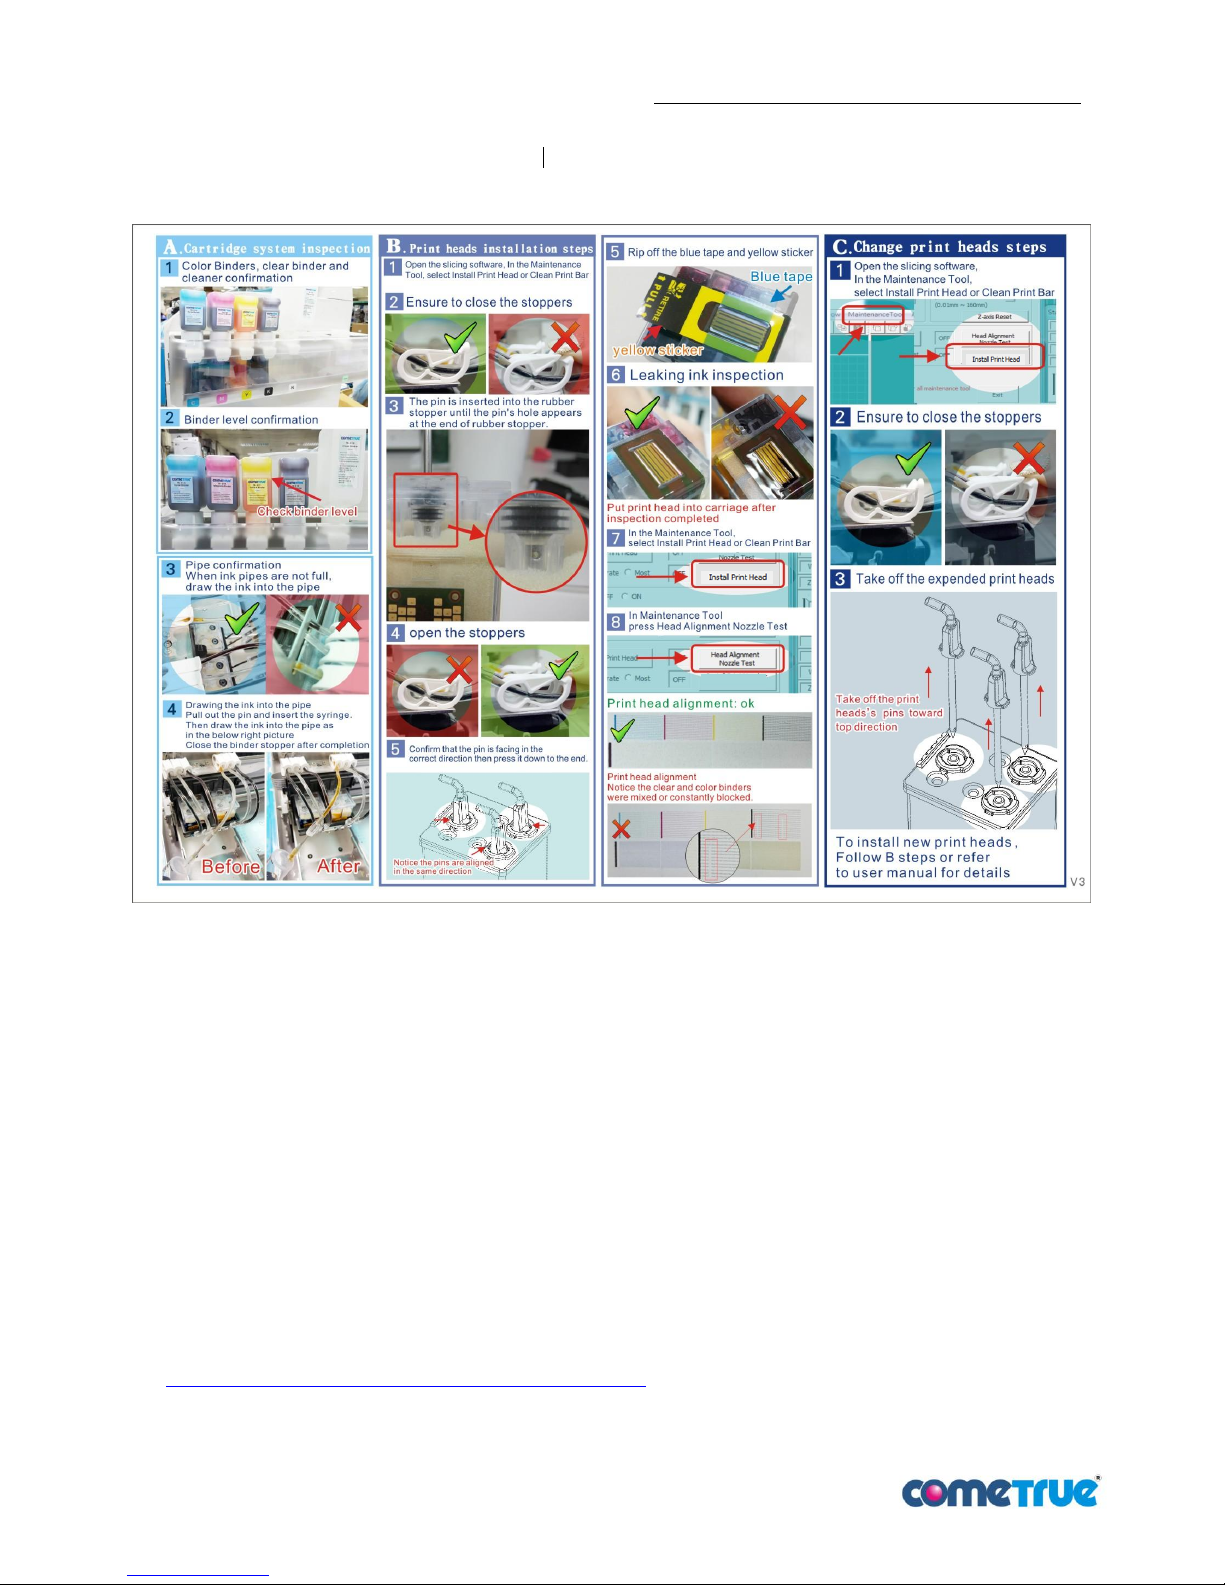
Print head installation 3 steps. (as pic 19)
a. Inspect cartridge system b. Install print heads c. Change print heads
pic 19:Print head installation instructions
NOTE:
To avoid pipe clogging due to binder precipitation, please follow the recommendations to maintain the pipe below:
1. If you print less than four times a week, use a syringe to remove 10cc of the color binder from the pipe
every two weeks.
2. If you do not print for more than two weeks, remove all the binder from the cartridge and the pipe then
thoroughly clean the pipe with water and then reinstall the binder until next time when you use.
3. The extracted binder can be stored in a clean and sealable container or empty used cartridge (the cartridge
must be sealed) until next time when you use.
4. After cleaning the binder pipe, please put the print head back into the Carriage and
ensure that the print head has returned to the Cap to prevent it from
drying out.
5. For more detailed about pipe cleaning procedures, please refer to the video of ComeTrue® official website:
https://www.cometrue3d.com/en/s/support/user-videos-en
Select the video [Cleaning the ink pipe] in video list
Page 14
T10 3D Printer User Manual Ver.180809EN
14 / 49
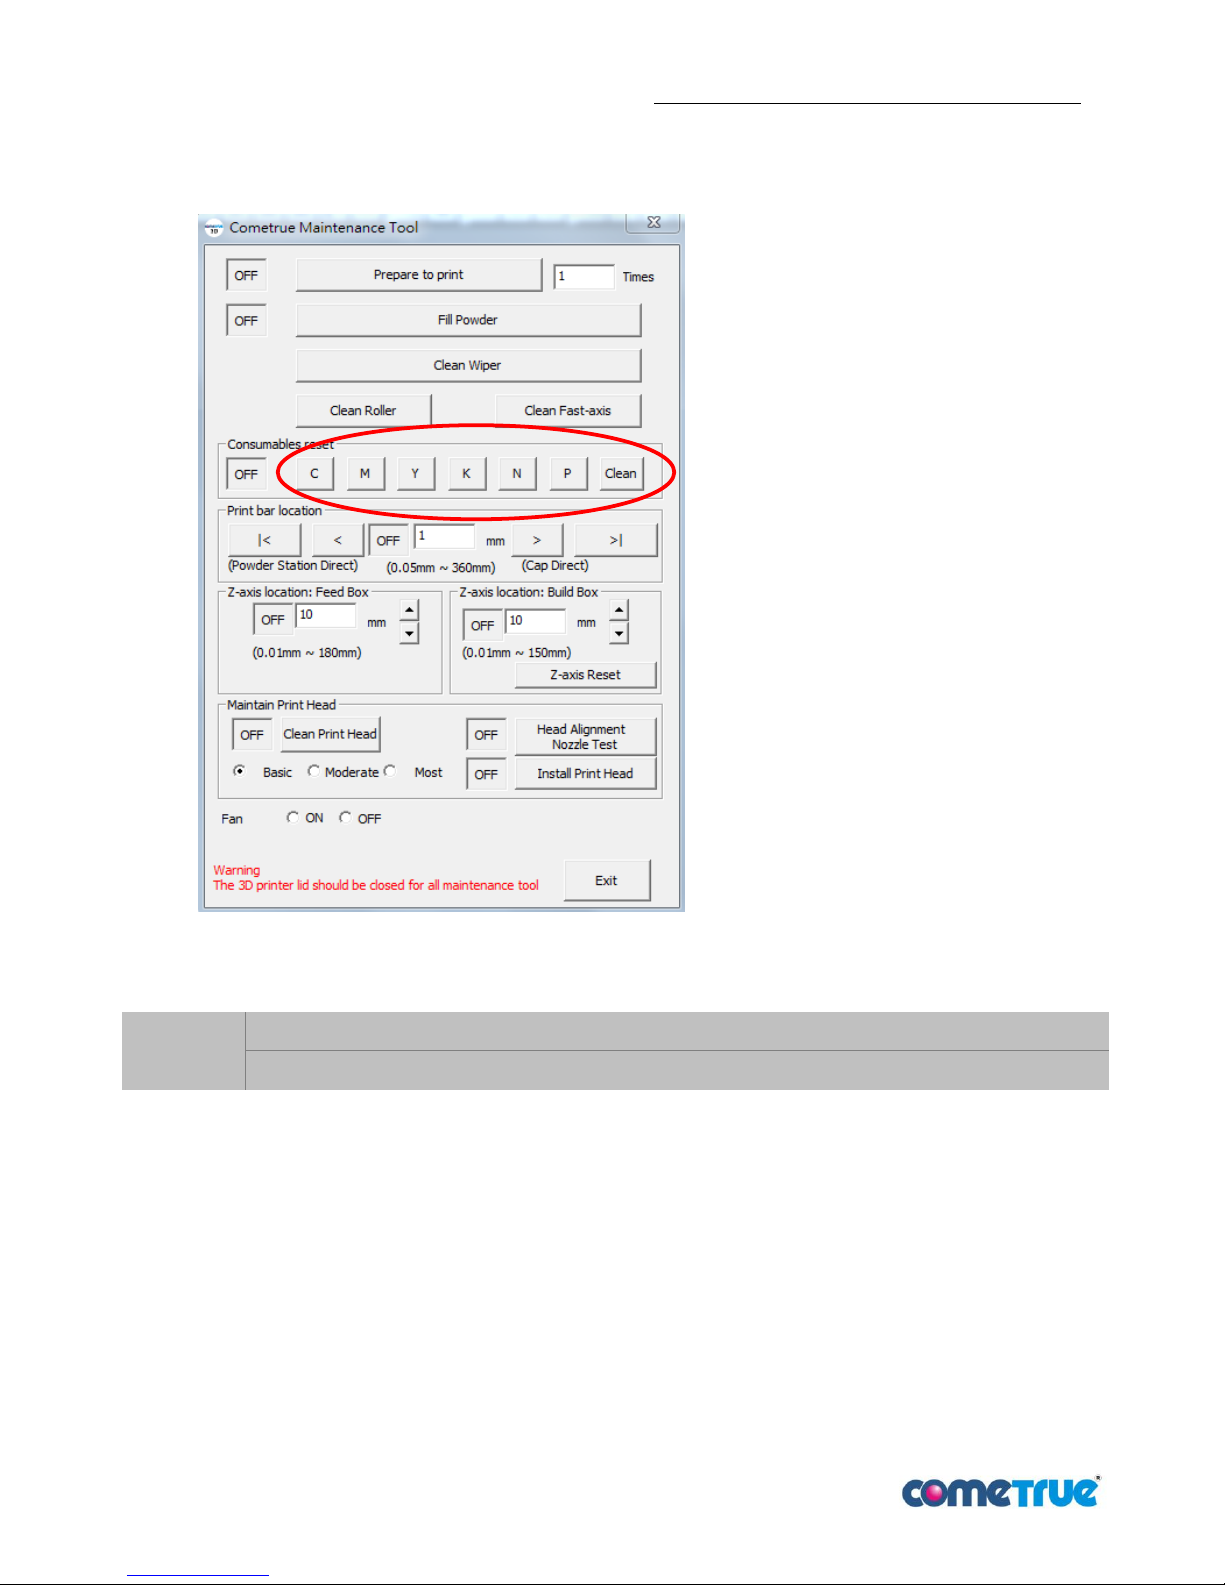
pic 20:Reset buttons
Symbol
C M Y K N P Clean
Meaning
Cyan
Magenta
Yellow
Black
Clear binder
Powder
Cleaner
NOTE:
After cleaning waste
powder or changing
binder cartridge, please
press CMYKNP Clean
these 7 buttons to reset
the counter.
Page 15
T10 3D Printer User Manual Ver.180809EN
15 / 49
5.2 Fill feed box up with powder
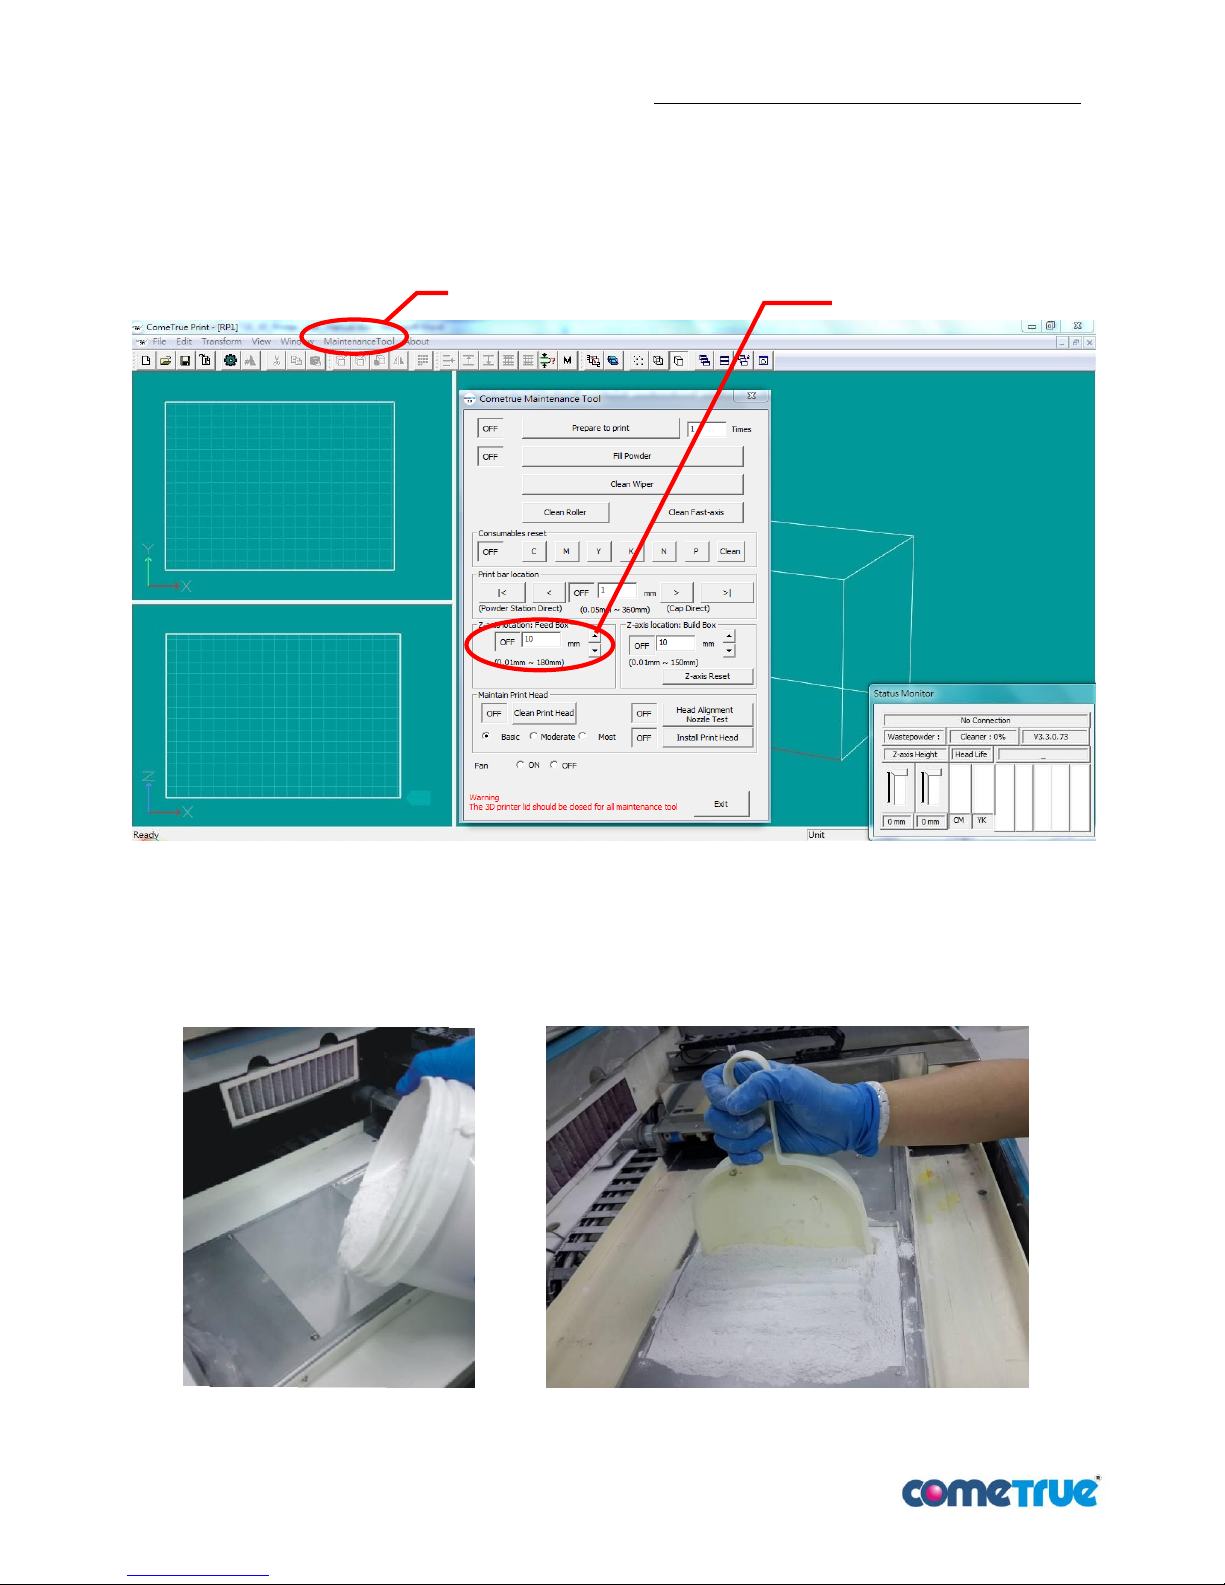
a. Click Maintenance Tool. Key in 180mm in z-axis(feed box) (the maximum depth of Feed Box in this
machine) then press the down button, to decline the feed box into 180mm. ( pic 21)
pic 21:Adjust the depth of feed box
b. Pour powder into the feed box.
c. To flatten the powder, please take mini broom to stir powders.
d. Continue pouring and stirring powders until the feed box filled up with powder.
pic 22:Pouring powders pic 23:Stirring powders
Maintenance Tool
Adjust the depth of feed box
Page 16
T10 3D Printer User Manual Ver.180809EN
16 / 49
5.3 Powder spreading and print testing
5.3.1 Powder spreading
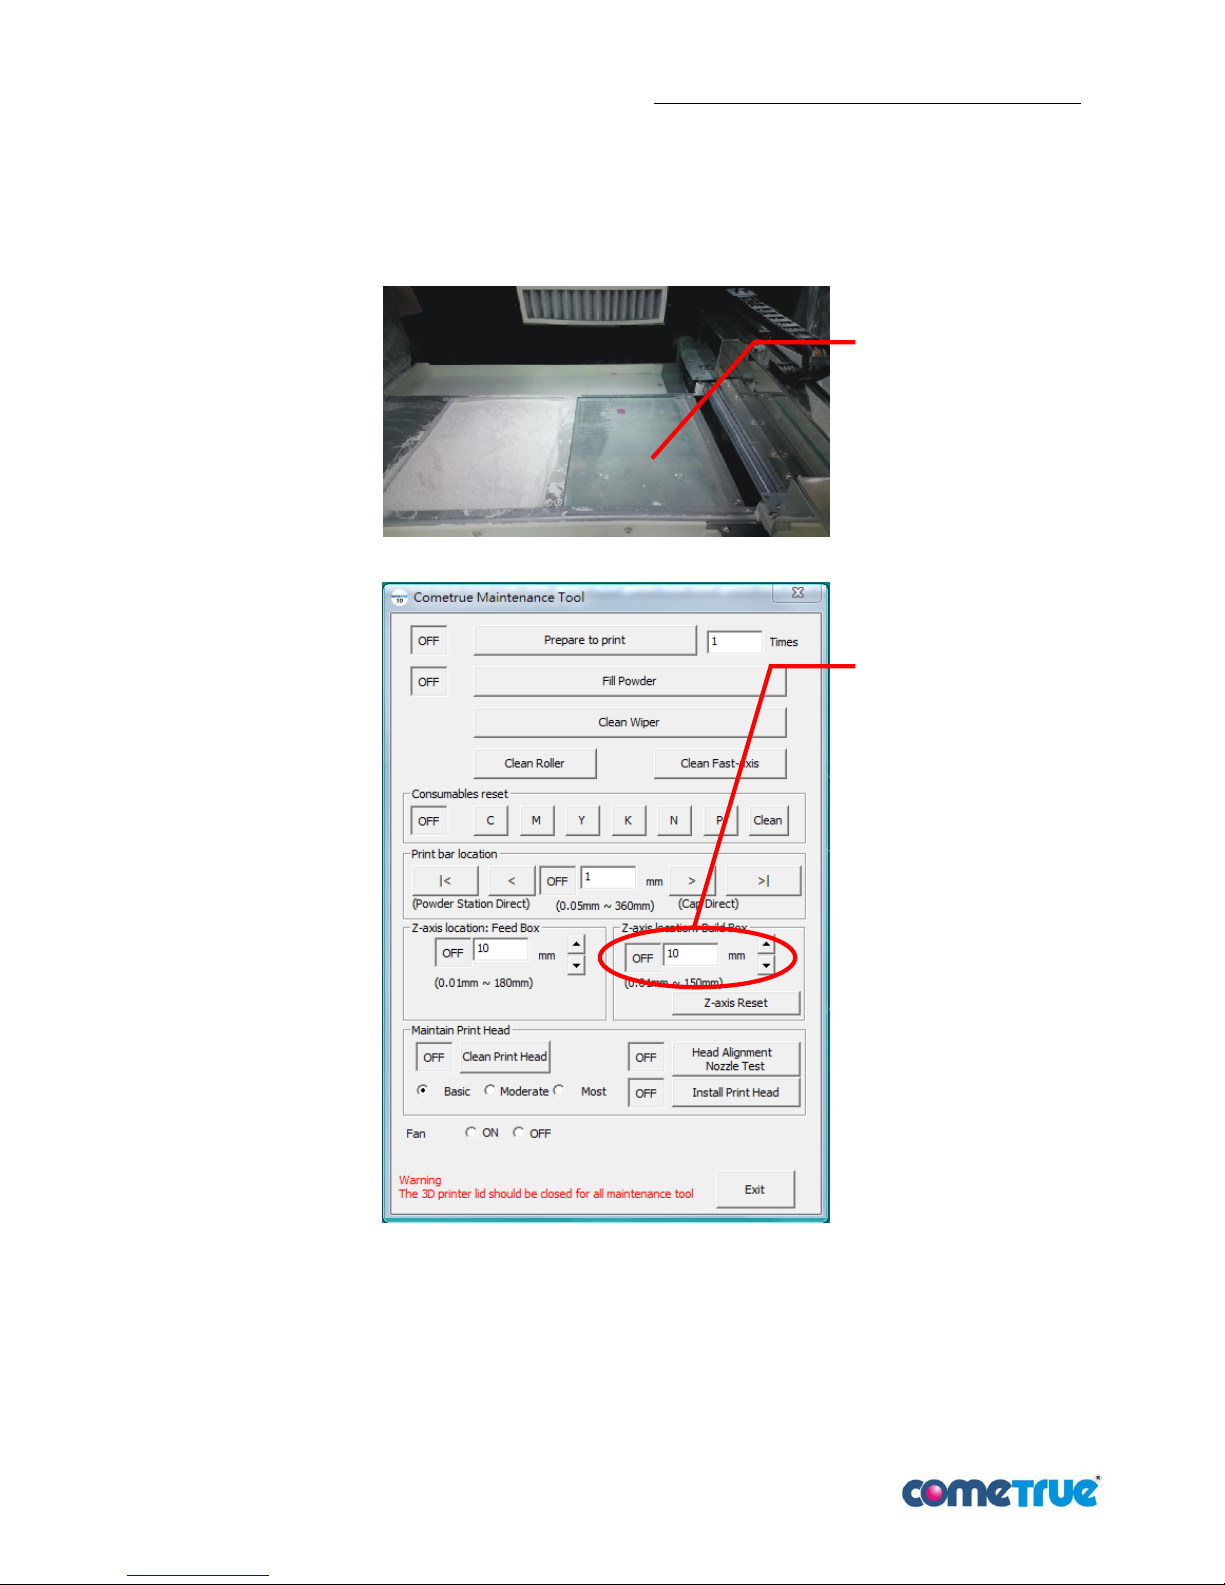
a. Rise the Build Box to the highest level ( pic 24), the height of Build Box can be controlled
in Maintenance Tool Build Box (pic 25)
pic 24:Build box
pic 25:Slicing software Maintenance Tool to control Build Box
Build box up to
the highest level
Adjust the depth of
Build Box, key in value
from up to down.
Page 17
T10 3D Printer User Manual Ver.180809EN
17 / 49
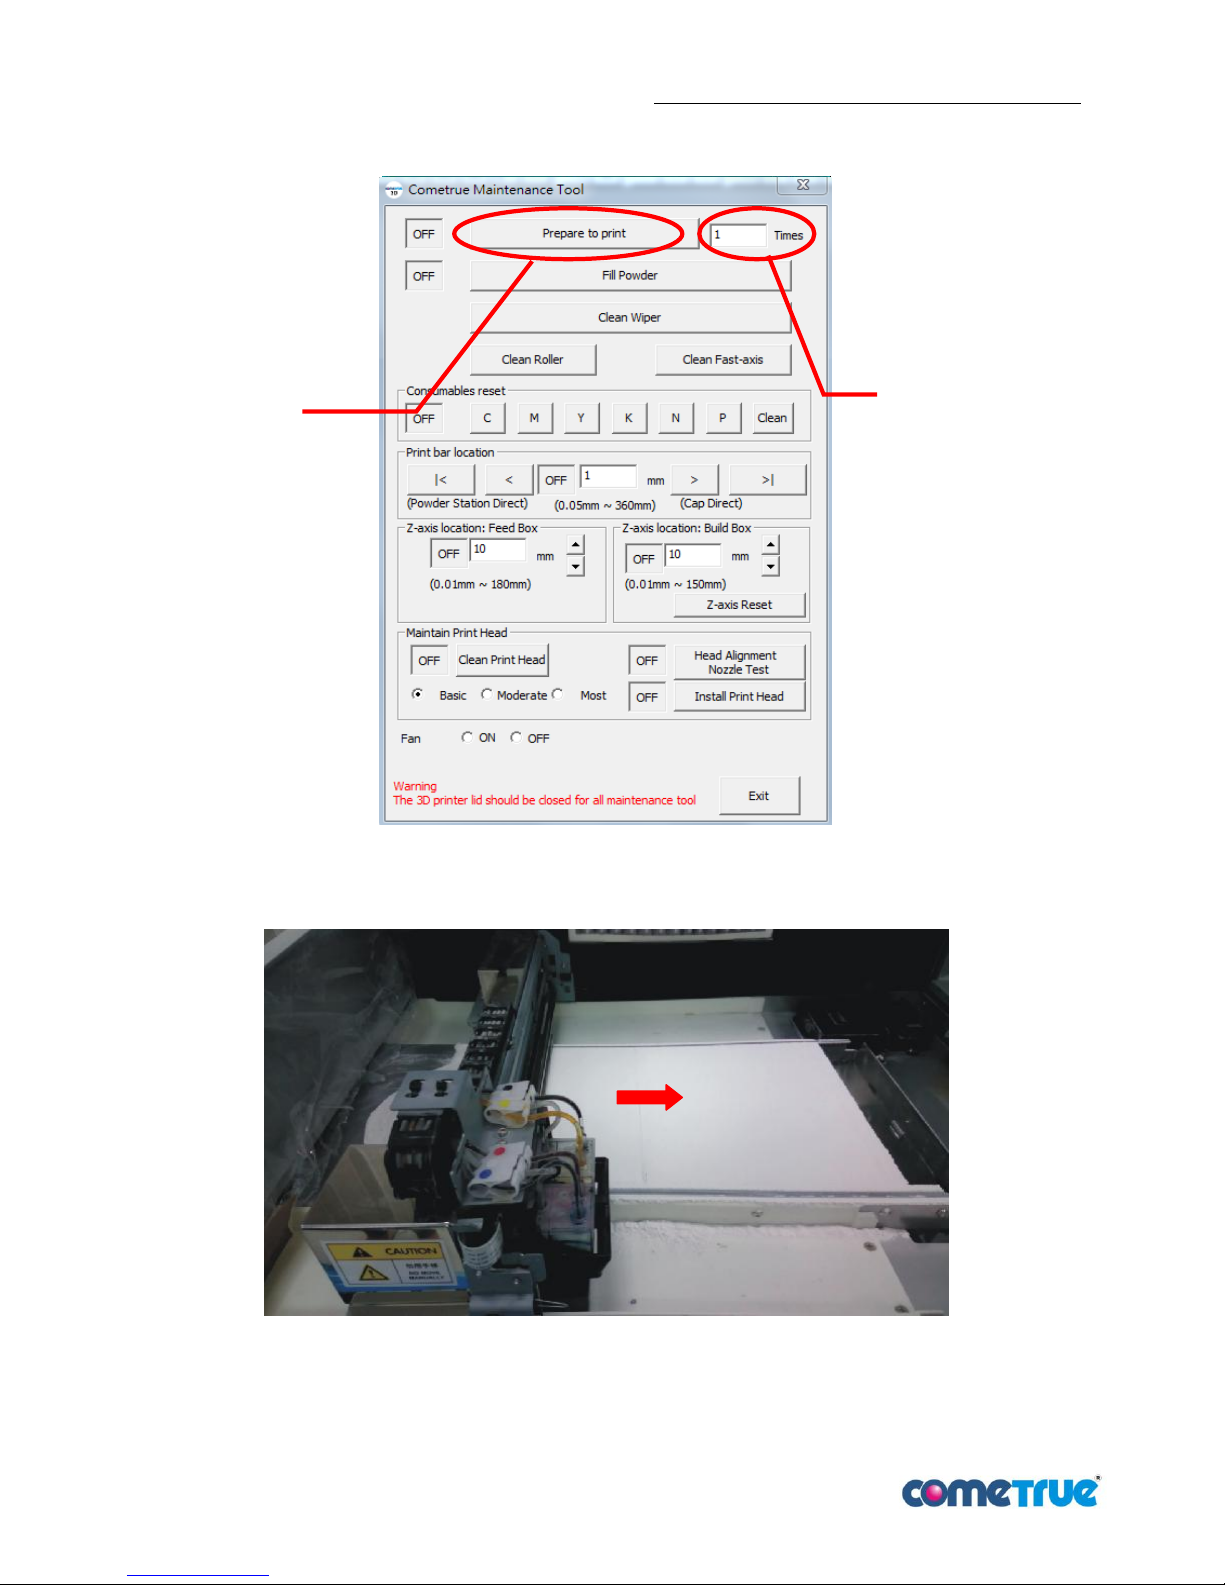
b. In Maintenance Tool Prepare to print, type in the times of powder spreading, then press Prepare to
Print to start powder spreading (pic 26). (pic 27) shows powder spreading.
pic 26:Powder spreading in Maintenance Tool
c. When powders of the two boxes are almost leveled then the spreading can be finished.
pic 27:Powder spreading. (arrow shows the direction of spreading)
Start spreading
The number of powder
spreading
Page 18
T10 3D Printer User Manual Ver.180809EN
18 / 49
5.3.2 Print testing
After finish powder spreading, do the print testing first, including Head Alignment and Nozzle Test. Follow
the steps below:
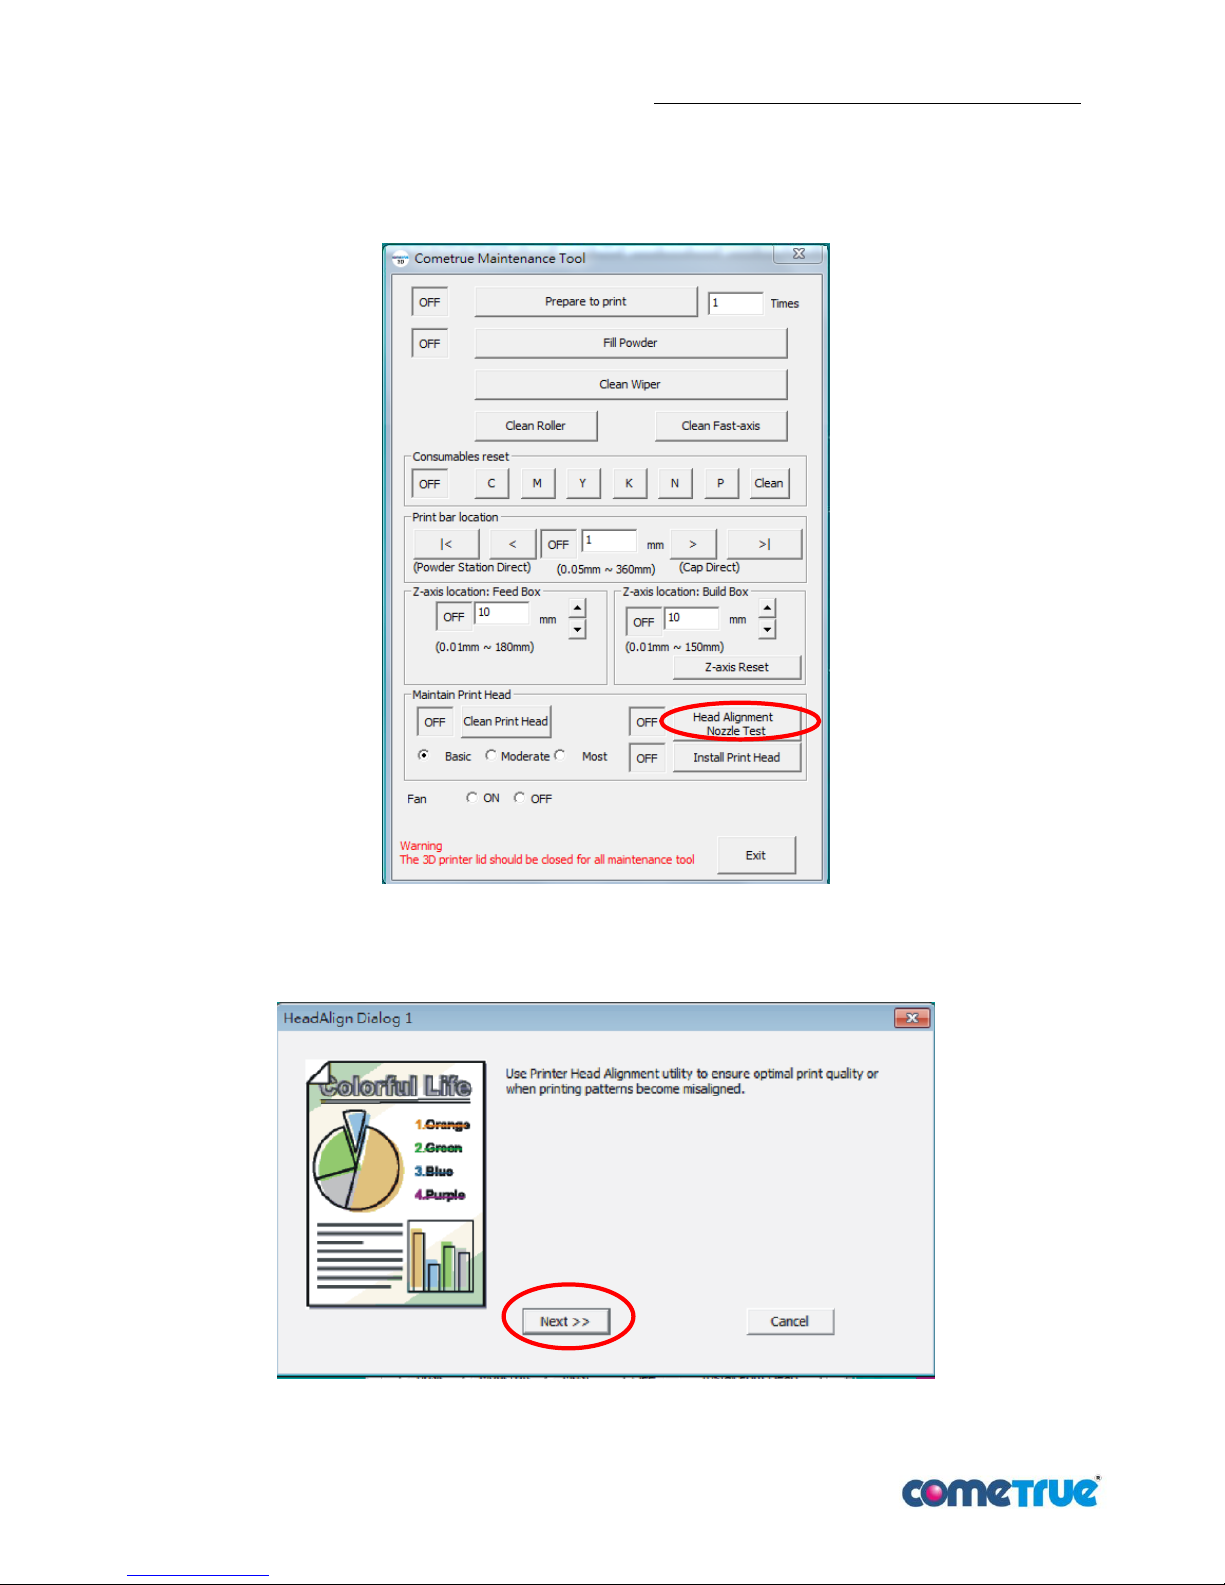
a. In Maintenance Tool Head Alignment Nozzle Test.
pic 28:Press Head Alignment Nozzle Test
b. In HeadAlign Dialog 1 press “Next”.
pic 29:HeadAlign Dialog 1 window
Page 19
T10 3D Printer User Manual Ver.180809EN
19 / 49
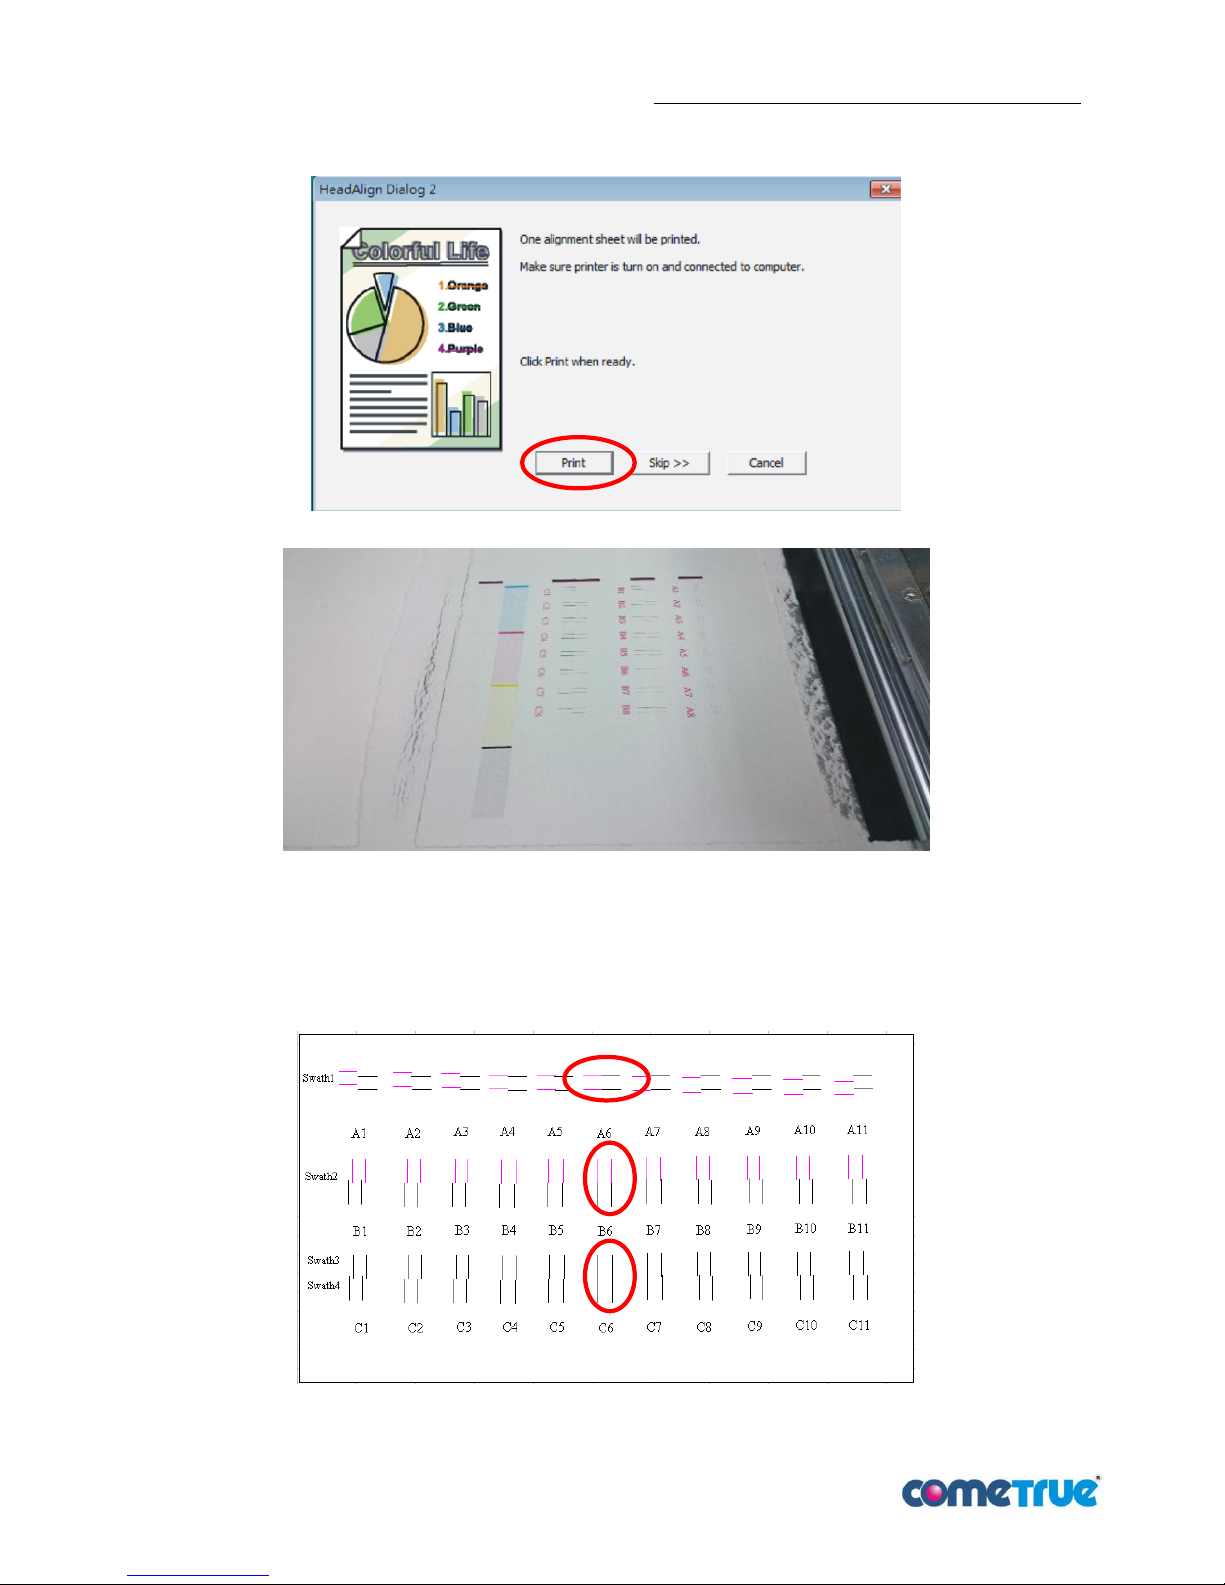
c. In HeadAlign Dialog 2 press Print, as pic 30. Start printing, as pic 31.
pic 30:HeadAlign Dialog 2 window
pic 31:Straight line alignment and nozzle testing
Alignment A shows left/right deviation of the two print heads (horizontal)
Alignment B shows up/down deviation of the two print heads (vertical)
Alignment C shows deviation of the two directions in the printing process.
d. Remember the minimum deviation of ABC.As pic 32, choosing A6, B6, C6.
pic 32:Confirm the alignment value(A6, B6, C6)
Page 20
T10 3D Printer User Manual Ver.180809EN
20 / 49
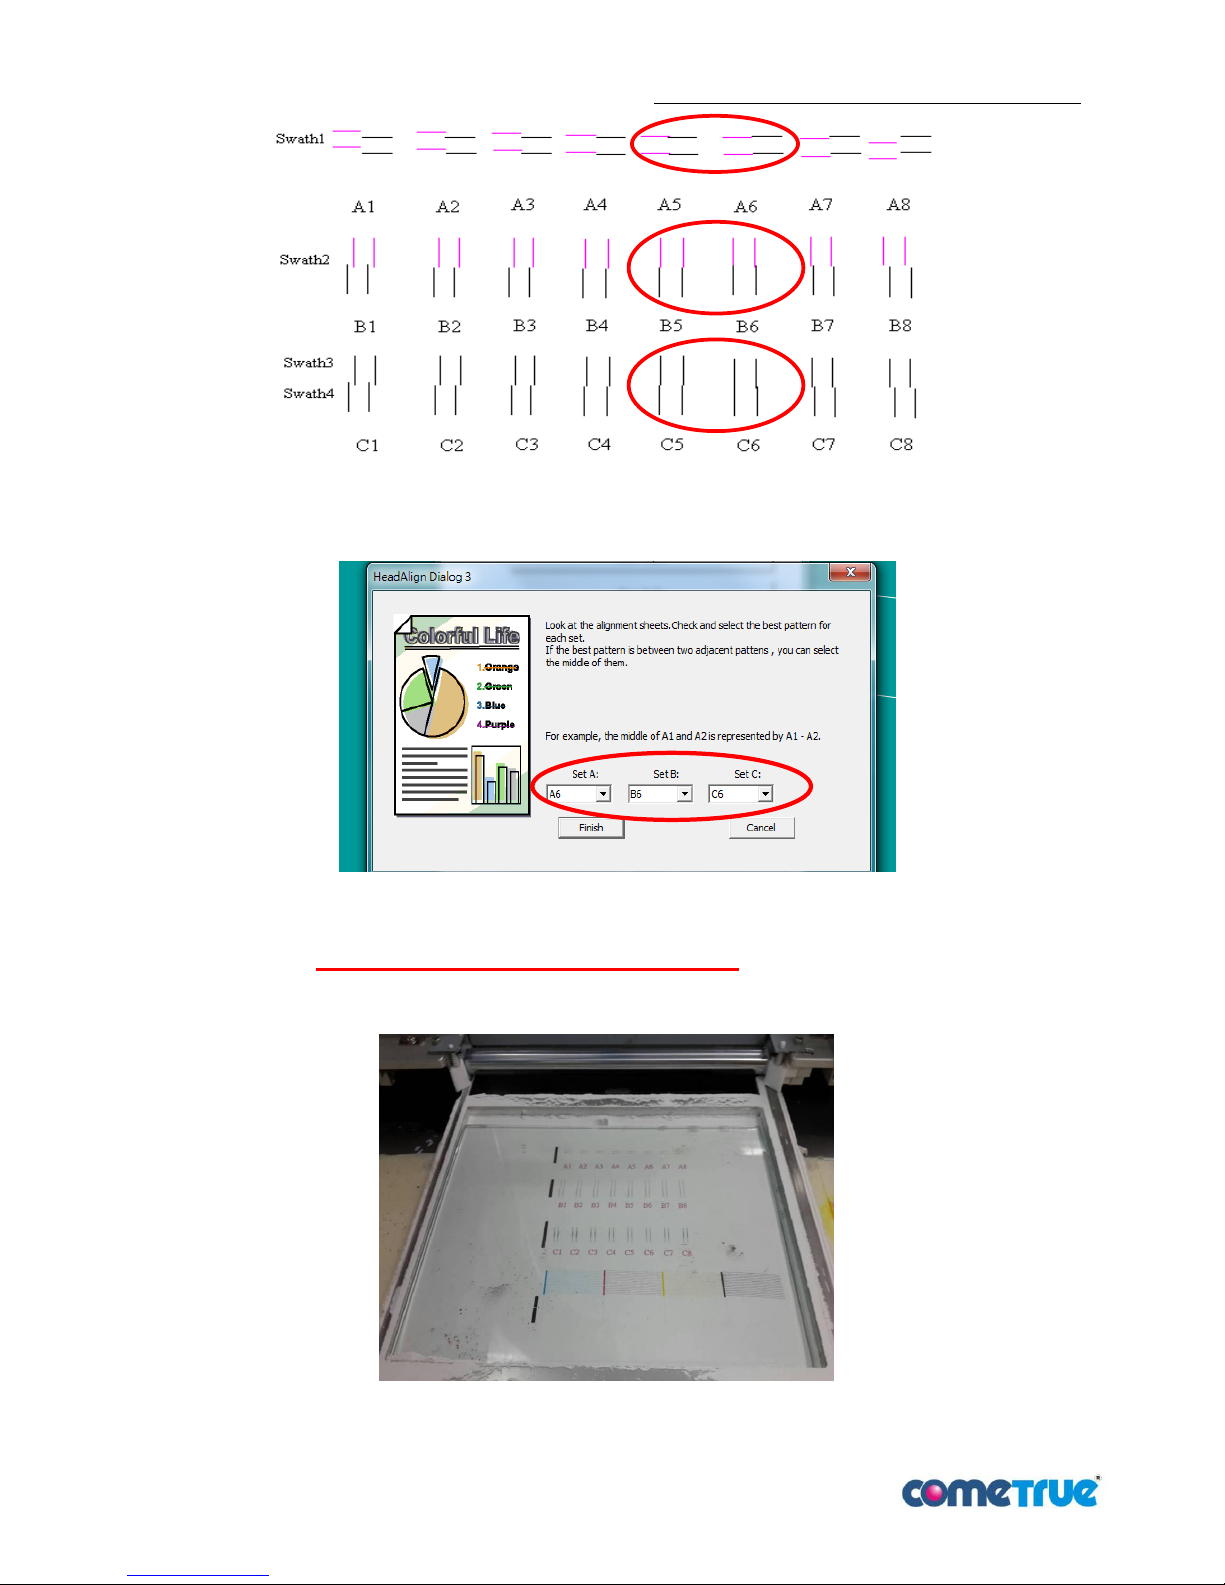
pic 33:Select the alignment value(A5-A6, B5-B6, C5-C6)
e. Select the confirmed value (ABC) in HeadAlign Dailog 3, as pic 34.
pic 34:Select the confirmed alignment value (in the red circle)
f. Declining the build box 5mm and put the glass on it.
g. Finally, spread one layer of powder onto build box then ready to print.
pic 35:Put glass on build box
Page 21
T10 3D Printer User Manual Ver.180809EN
21 / 49
6 Quick start
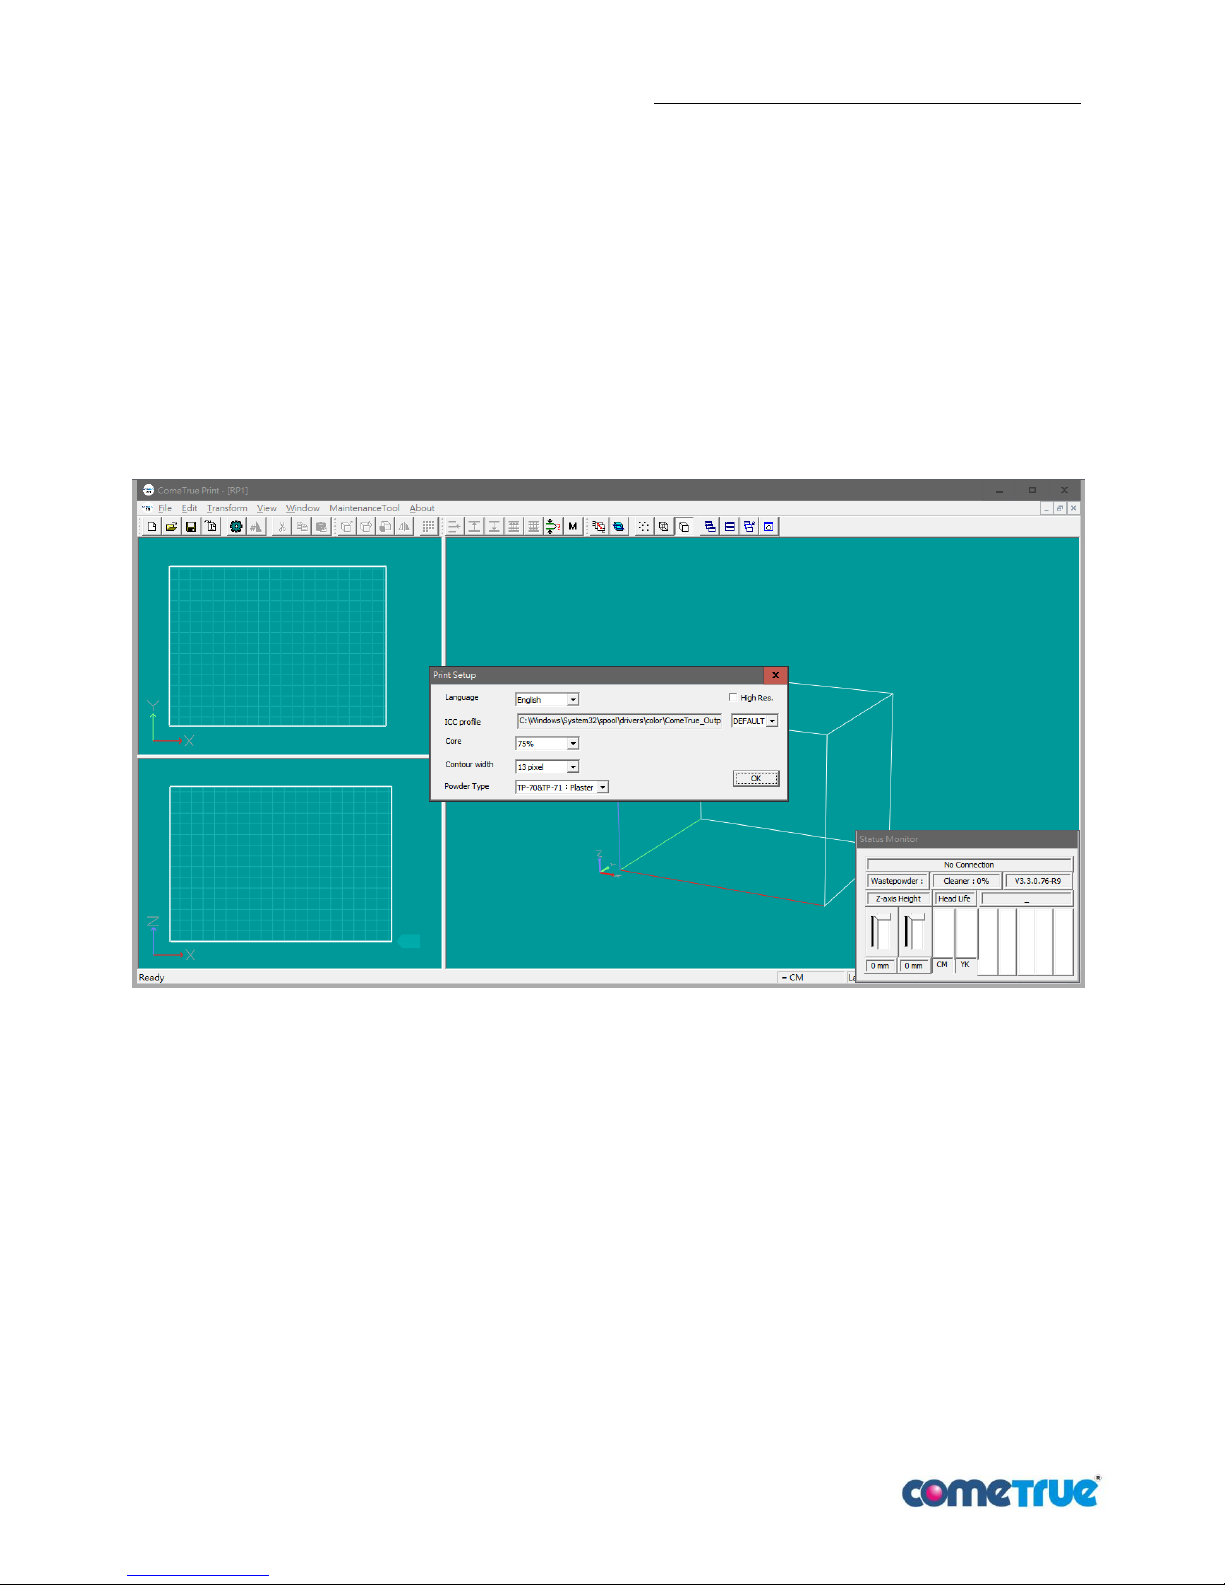
◆There are languages, Color Setting mode , CORE , Contour width and Powder Type in print setup.
◆ Languages provided are English, Traditional Chinese and Simplified Chinese.
◆ Slicing software supports three COLOR Setting mode. (default is DEFAULT Mode)
DEFAULT MODE : Strengthen dark color performance
CONTRAST MODE:Increase the contrast
STANDARD MODE :for most 3D files.
◆ CORE is 0%~100%, default is 75%. (Higher core for stronger parts but takes more clear binder)
◆ Contour width is 3 pixel~27 pixel, default is 13 pixel(width=1.12mm).
◆ Powder type is divided into TP-71: Plaster and TP-80:Ceramic. (default is TP-71: Plaster)
pic 36:Print setup
Print Suggestions:
It is recommended to use hollow printing for over 10CM parts.
It can save material and get the best printing quality (relatively no deformation).
Page 22
T10 3D Printer User Manual Ver.180809EN
22 / 49
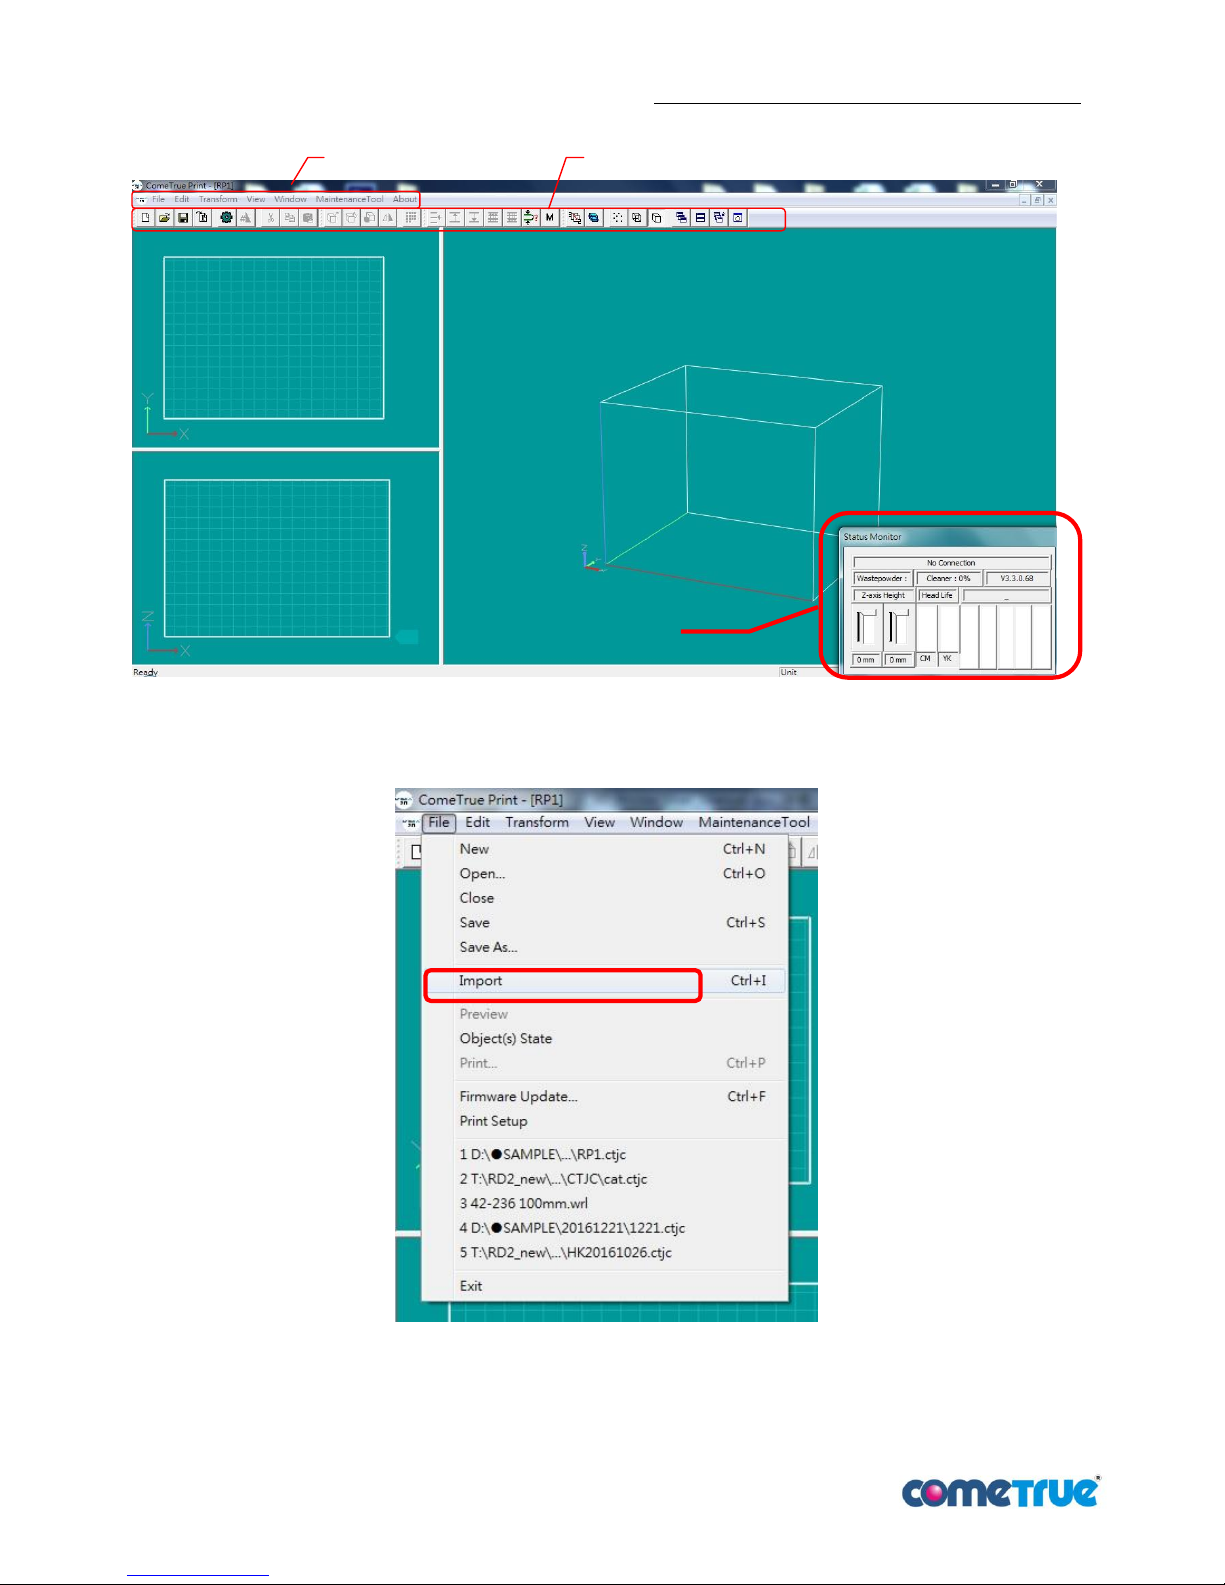
1. Open ComeTrue Print as the graph below
pic 37:ComeTrue Print interface
2. Select File Import insert the file (wrl, stl).
pic 38:Select Import
Menu
Toolbar
Status Monitor
Top view
Side view
3D view
Page 23
T10 3D Printer User Manual Ver.180809EN
23 / 49
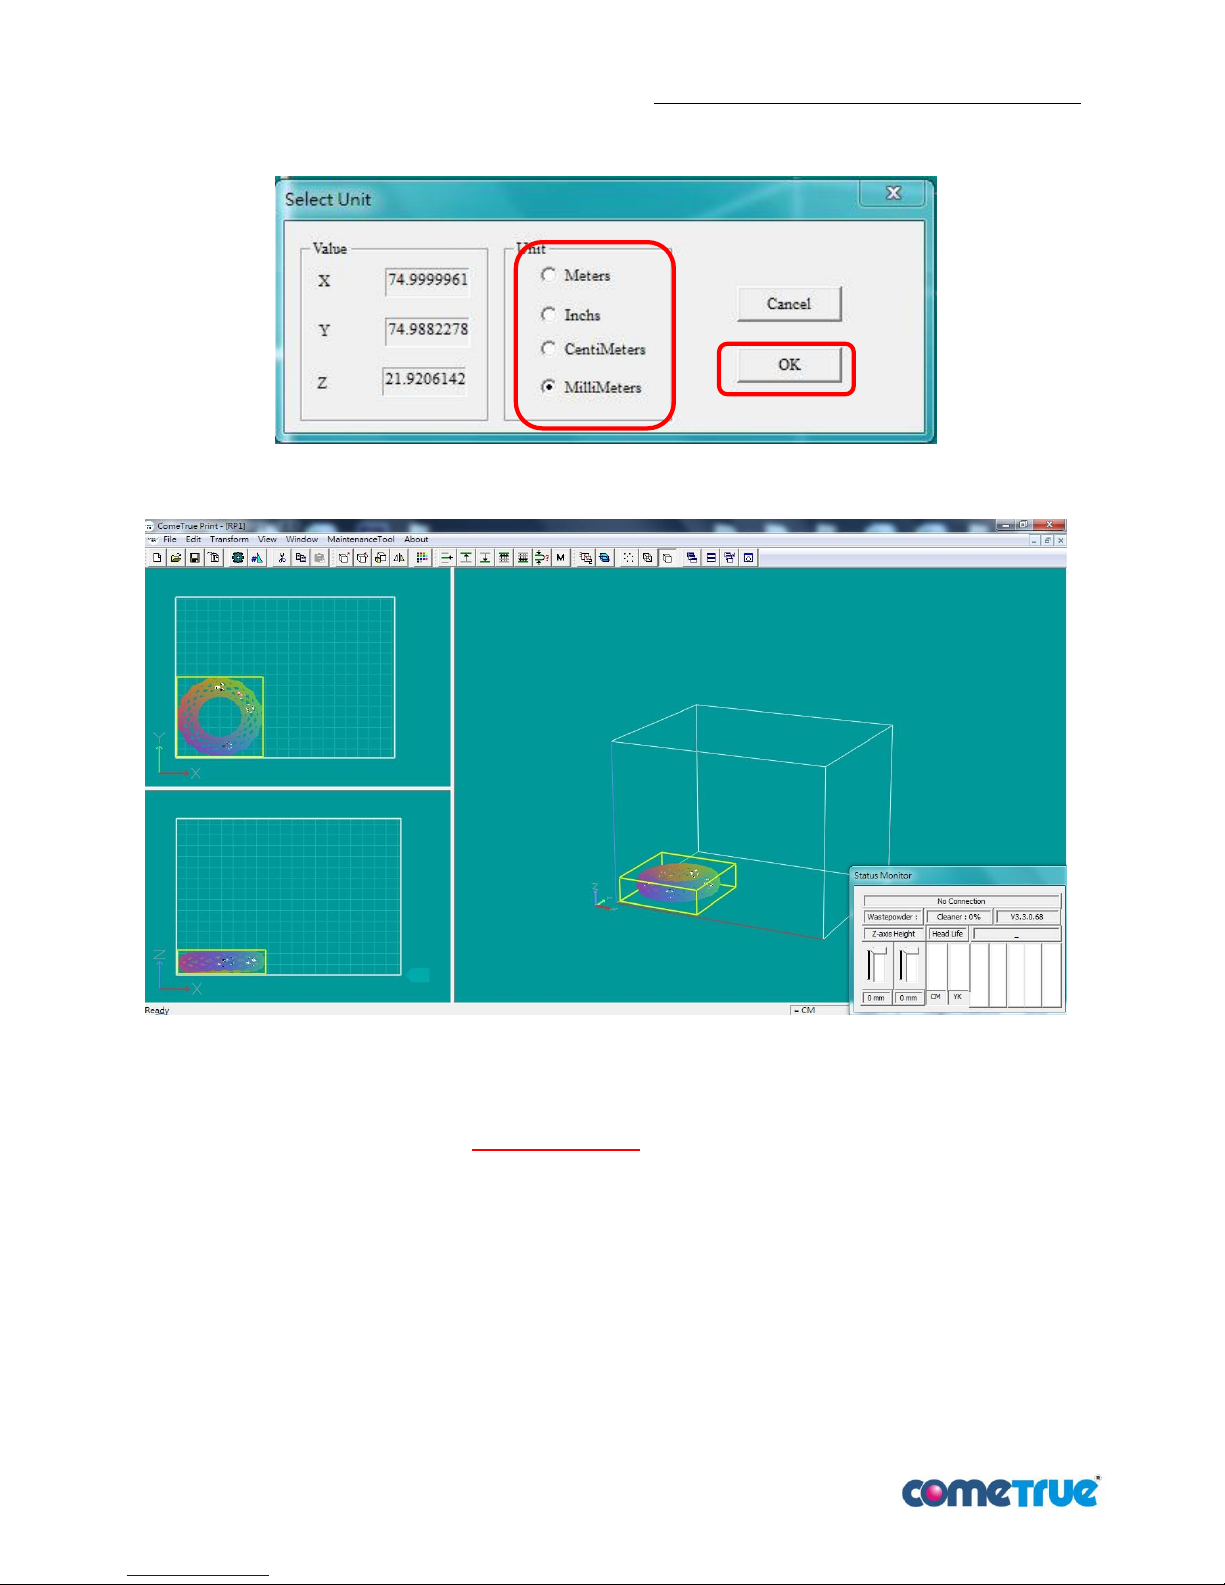
3. The Select Unit will pop up, choose the appropriate unit(pic 39), select “OK” to import file.(pic 40)
pic 39:After choosing unit then select OK
pic 40:File inserts successfully
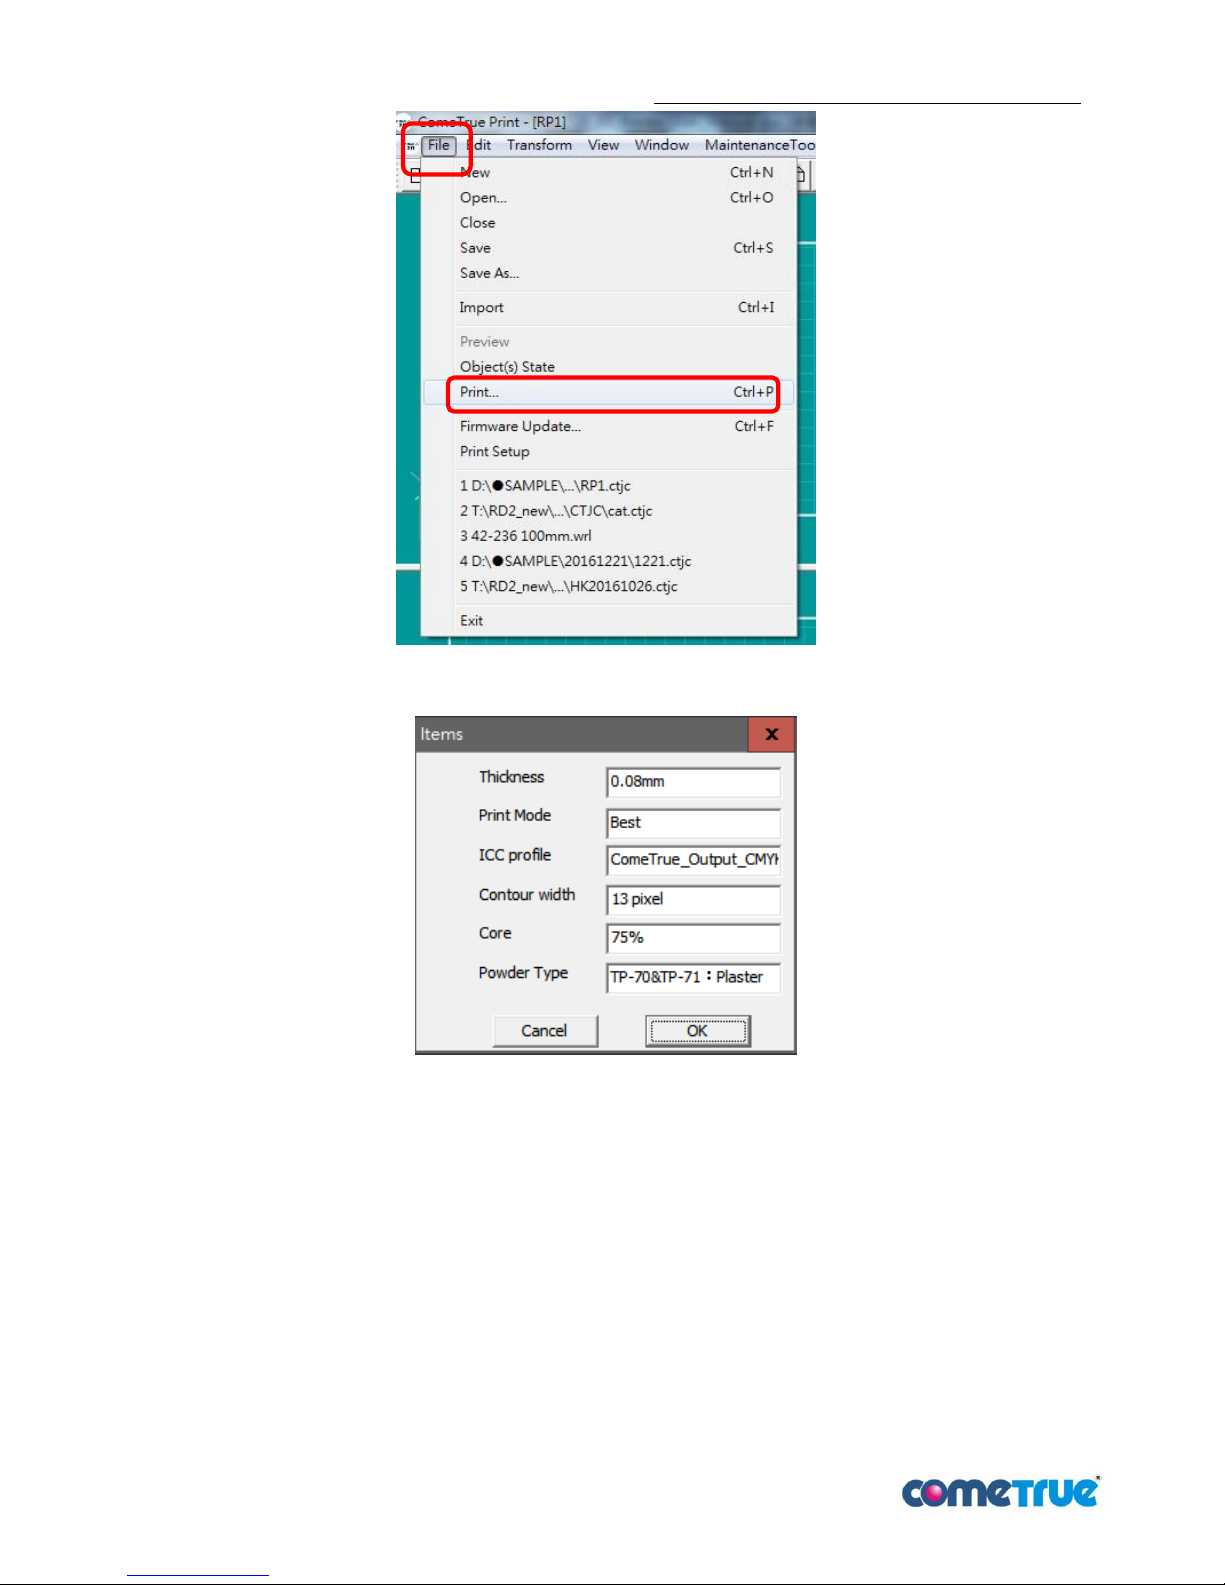
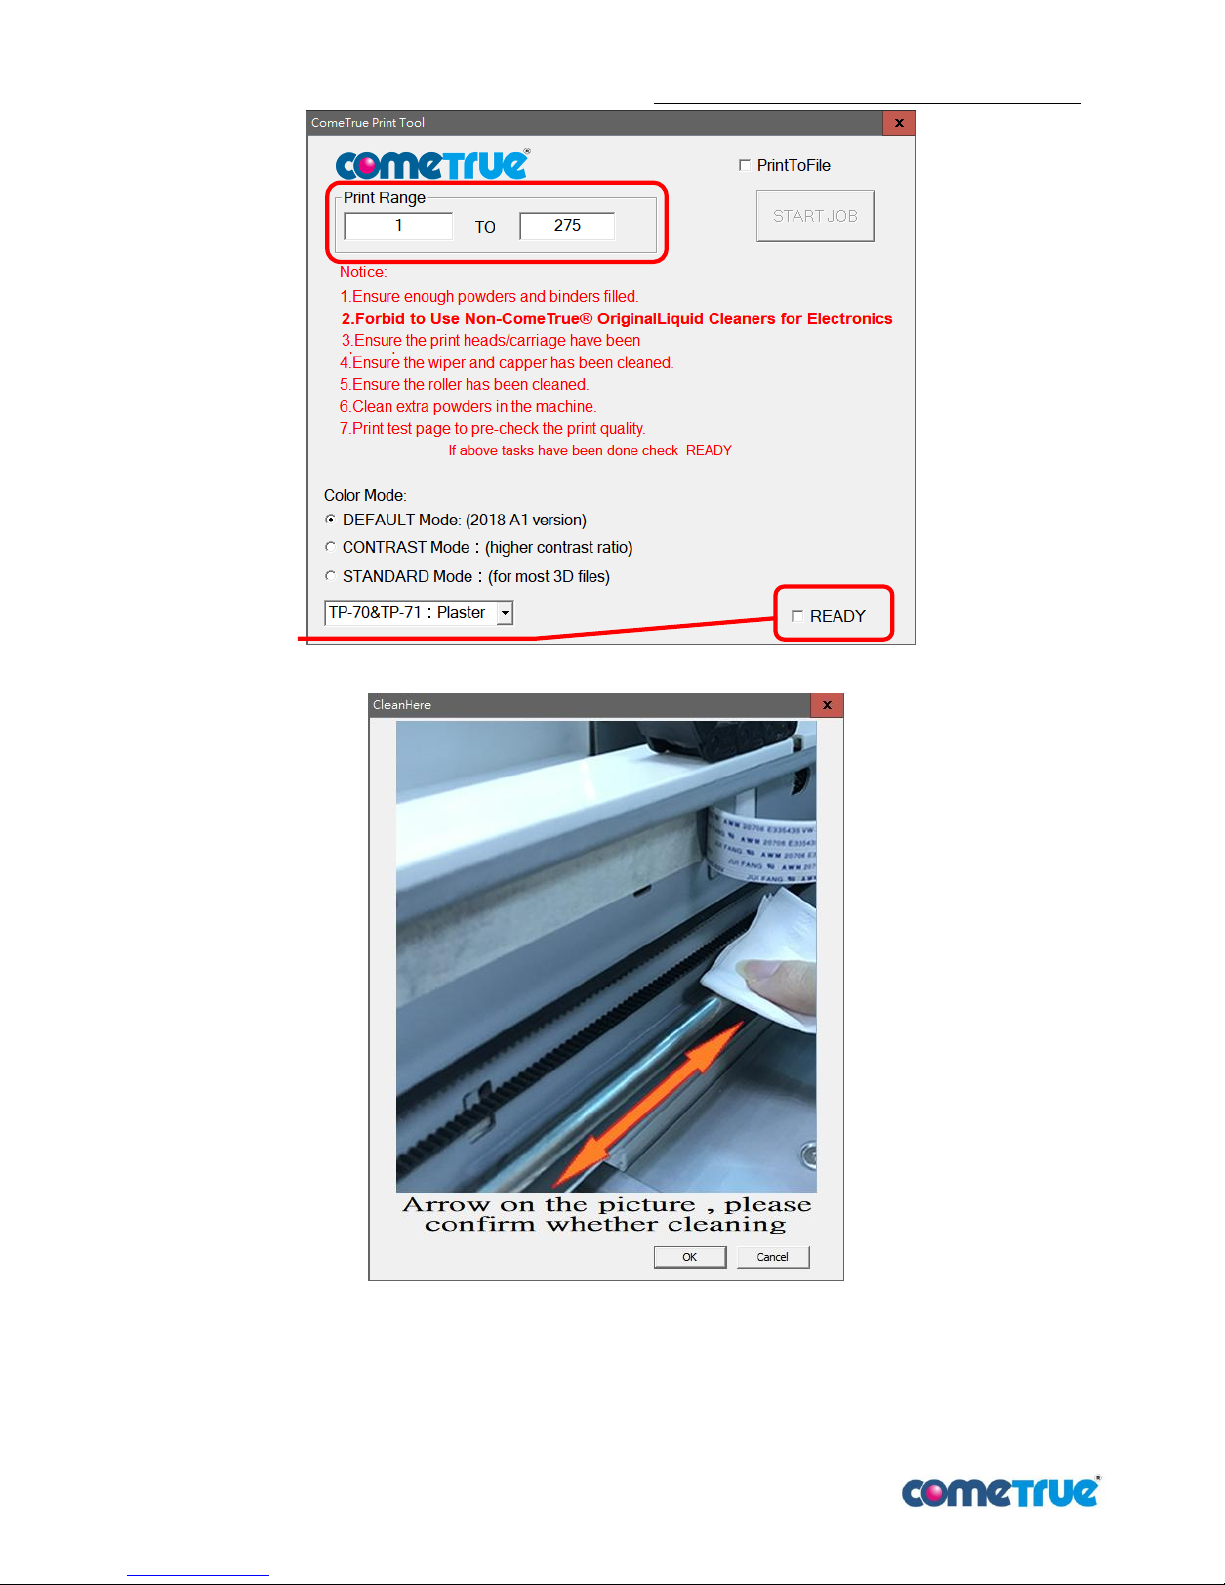
4. Confirm the file, then go to print. Select” File Print “ (as pic 41). Then, confirm the print settings (pic 42).
When ComeTrue Print Tool pops up, Confirm the Notice, and click Ready to finish (pic 43). One more window
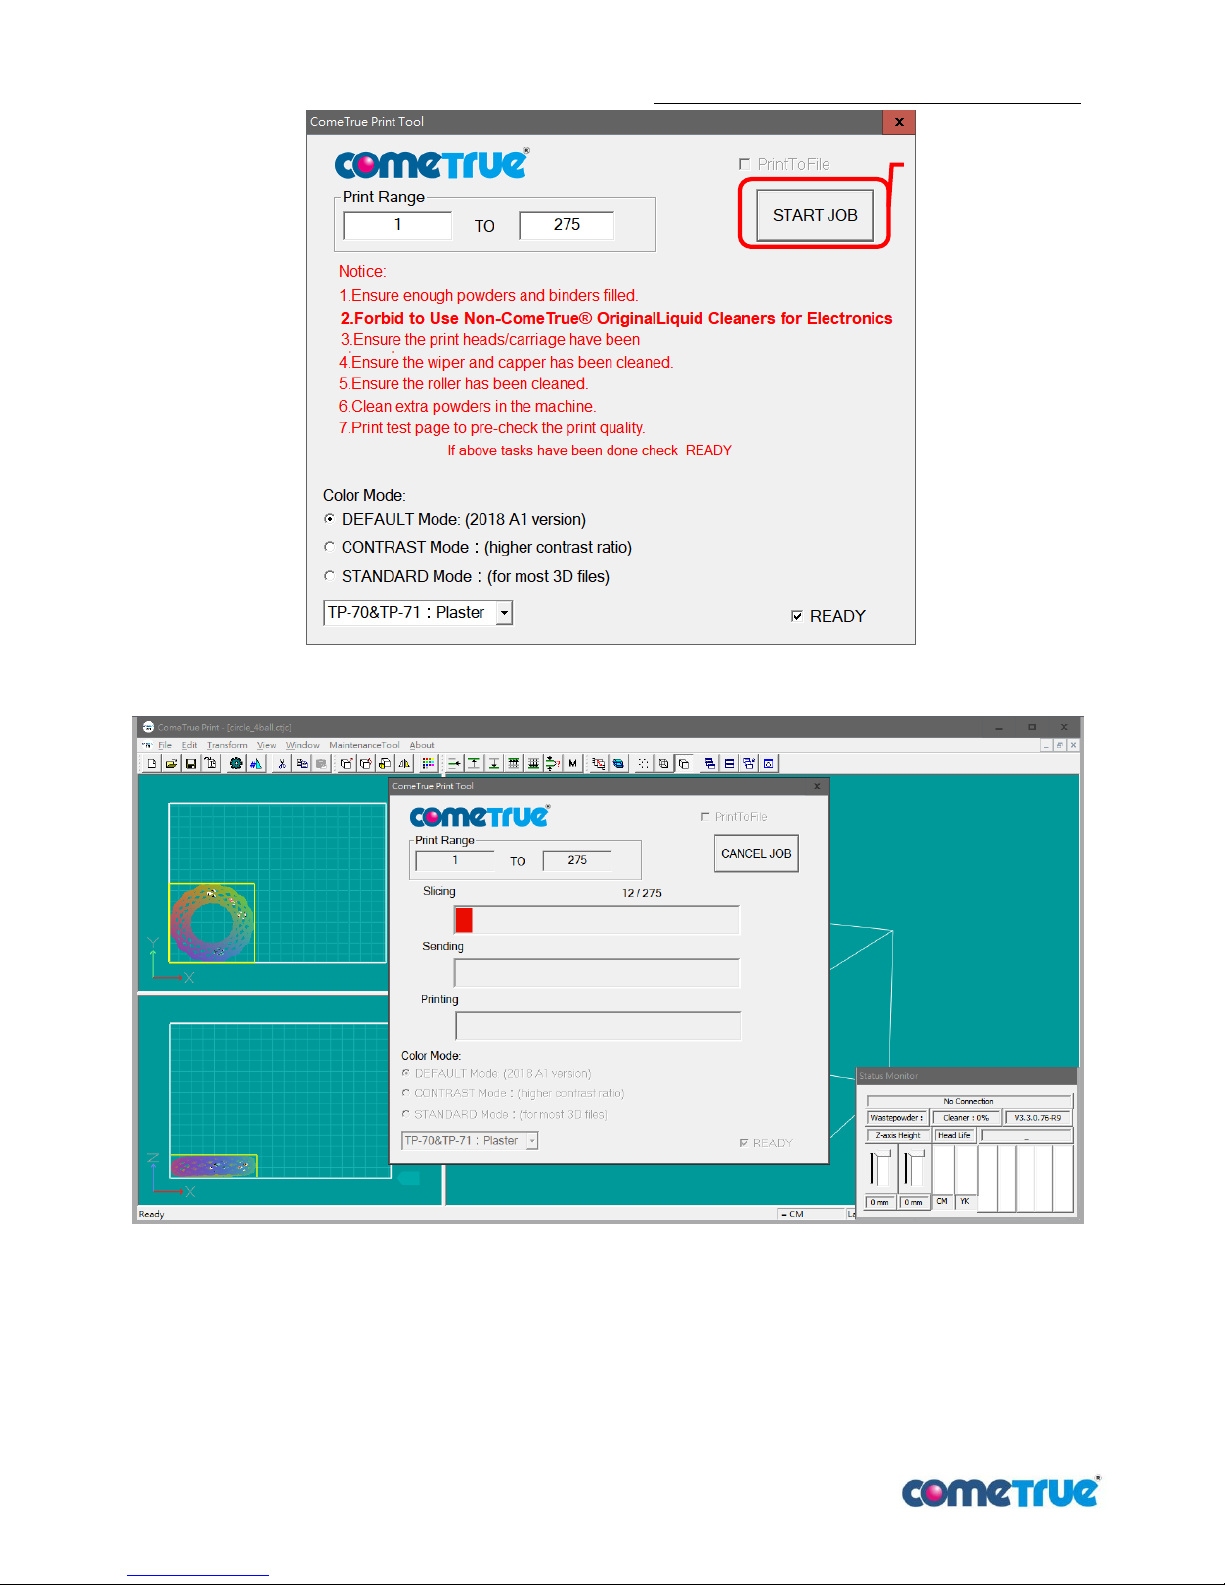
will pop up to ensure the fast-axis has already been cleaned. Press "OK" to continue (as pic 44 ) and select
“START JOB” to start printing (as pic 45).
Page 24
T10 3D Printer User Manual Ver.180809EN
24 / 49
pic 41:File Print
pic 42:Confirm the print settings
Page 25
T10 3D Printer User Manual Ver.180809EN
25 / 49
pic 43:ComeTrue Print Tool window
pic 44:Ensure the print bar has already been cleaned.
READY checking
Page 26
T10 3D Printer User Manual Ver.180809EN
26 / 49
pic 45:After checking Ready, select START JOB
pic 46:Print the part
Select START JOB
to start printing
Page 27
T10 3D Printer User Manual Ver.180809EN
27 / 49
7 After printing
7.1 Pick up the part
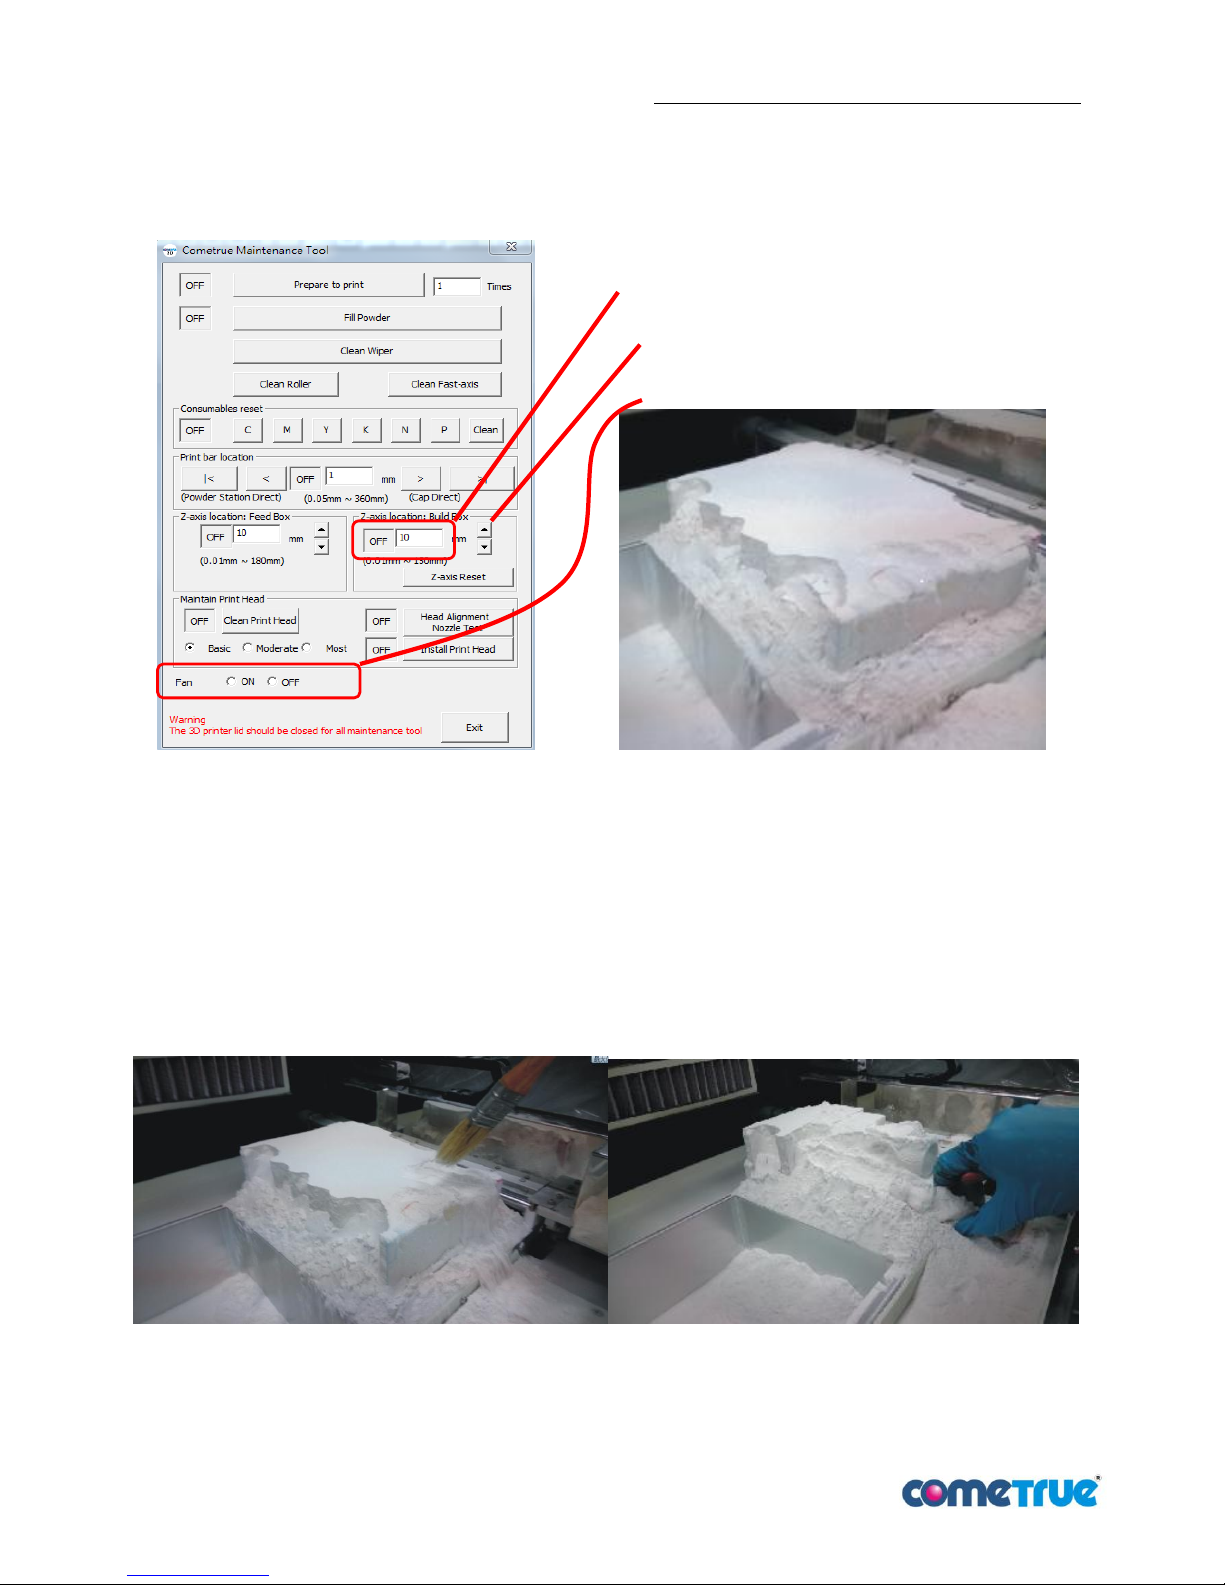
1. Enter Maintenance Tool, select ON in the Fan Status to open the fan. Key in the height of build box in
Z-axis, select the up arrow to rise the build box (pic 47).
pic 47:Control the height of build box pic 48:Increasing the height of build box
2. Use the paint brush to clean the extra powder(pic 49).
3. Pick up the part by hand or take it along with glass (pic 50).
4. After taking the part out, put it into TD3 depowder recycling system, and bake the part at
least 2~4 hours (press Heater button).Then depowder (press Depowder button, and press airbrush for
operation). For more detailed information about the depowder recycling system, please refer to the user
manual of depowder recycling system.
5. After depowdering, the part should be solidified for reinforcement and surface embellished. Please refer to
chapter 0 Curing and post process.
pic 49:Cleaning the extra powder pic 50:Pick up the part
Type in the height of the build
box to rise up
Rise the build box
Turn on the fan
Page 28
T10 3D Printer User Manual Ver.180809EN
28 / 49
7.2 Platform cleaning
After printing is completed, the platform must be cleaned, which will be more convenient until next time when
you use.
7.2.1 Platform powder cleaning
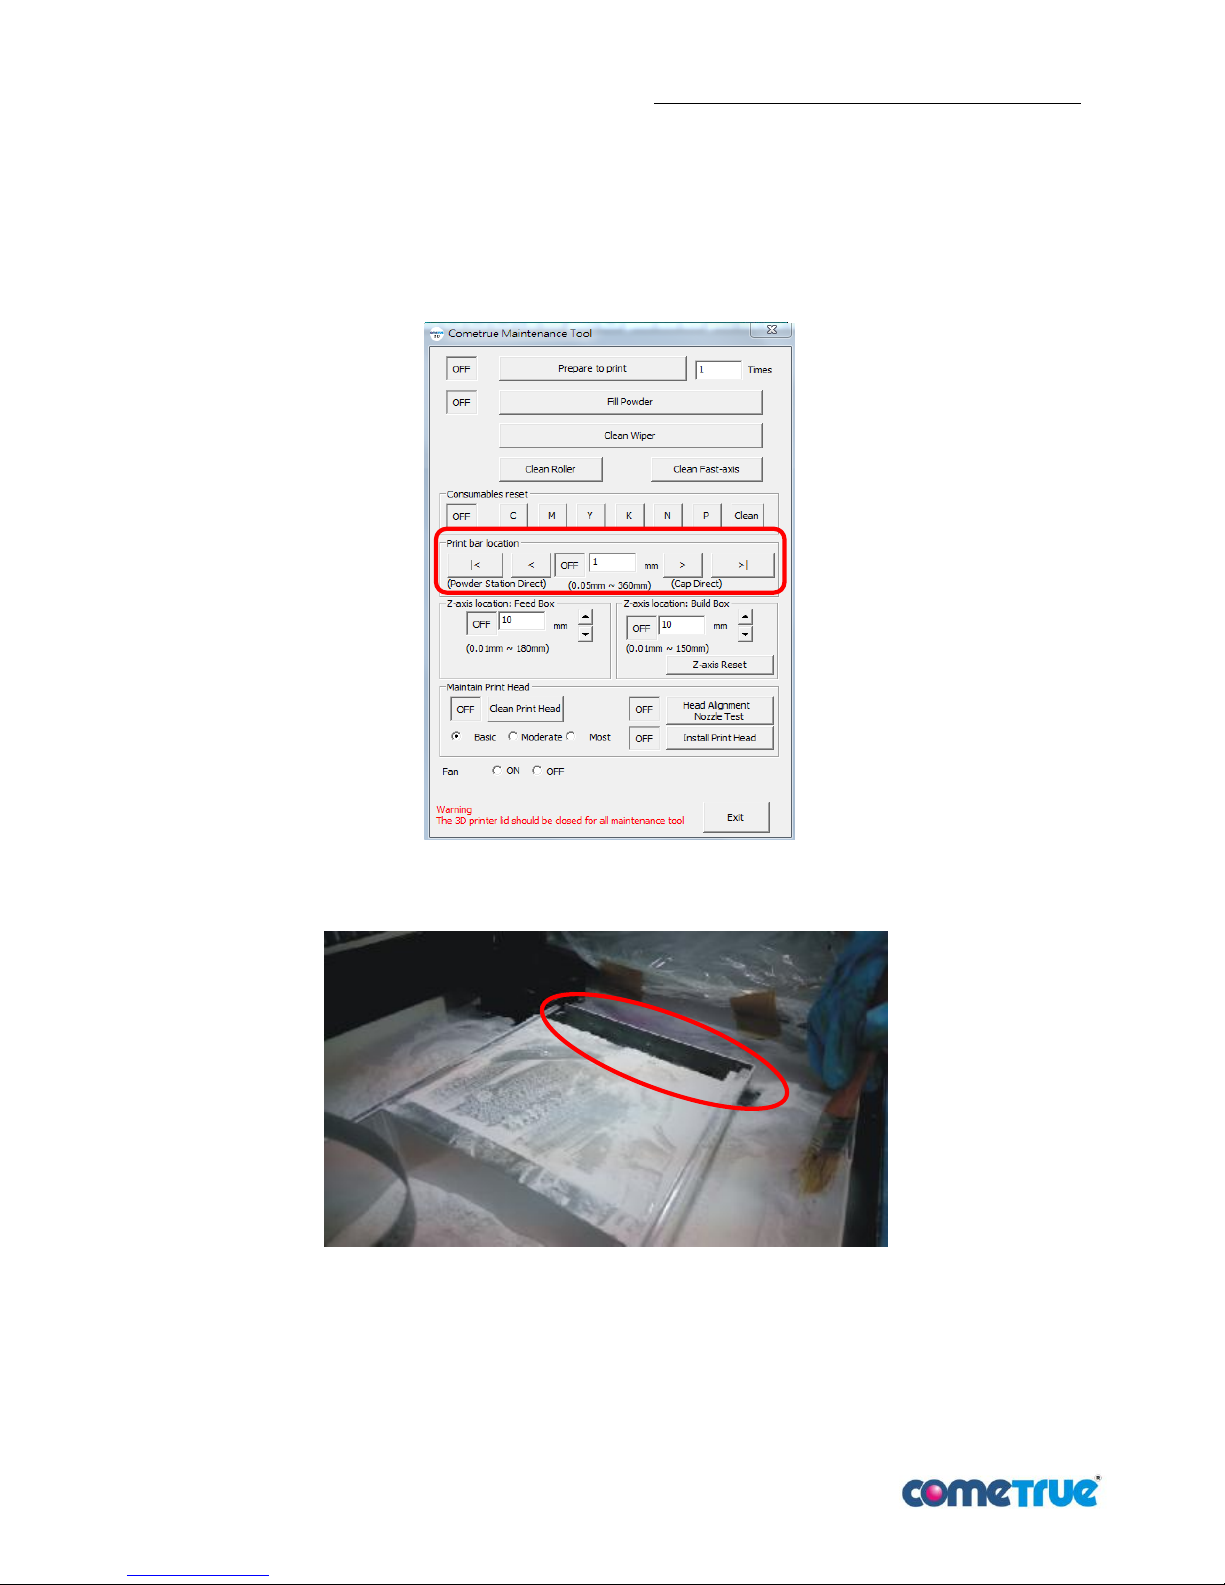
1. Open the maintenance tool to control the Print Bar,(as pic 51), key in numbers then press left/right button
to move Print Bar to the better place for cleaning.
pic 51:Print Bar control
2. Use brush to clean the platform, wipe powders to the gutter(as pic 52).
pic 52:Wiping powders (The red circle is gutter)
Page 29
T10 3D Printer User Manual Ver.180809EN
29 / 49
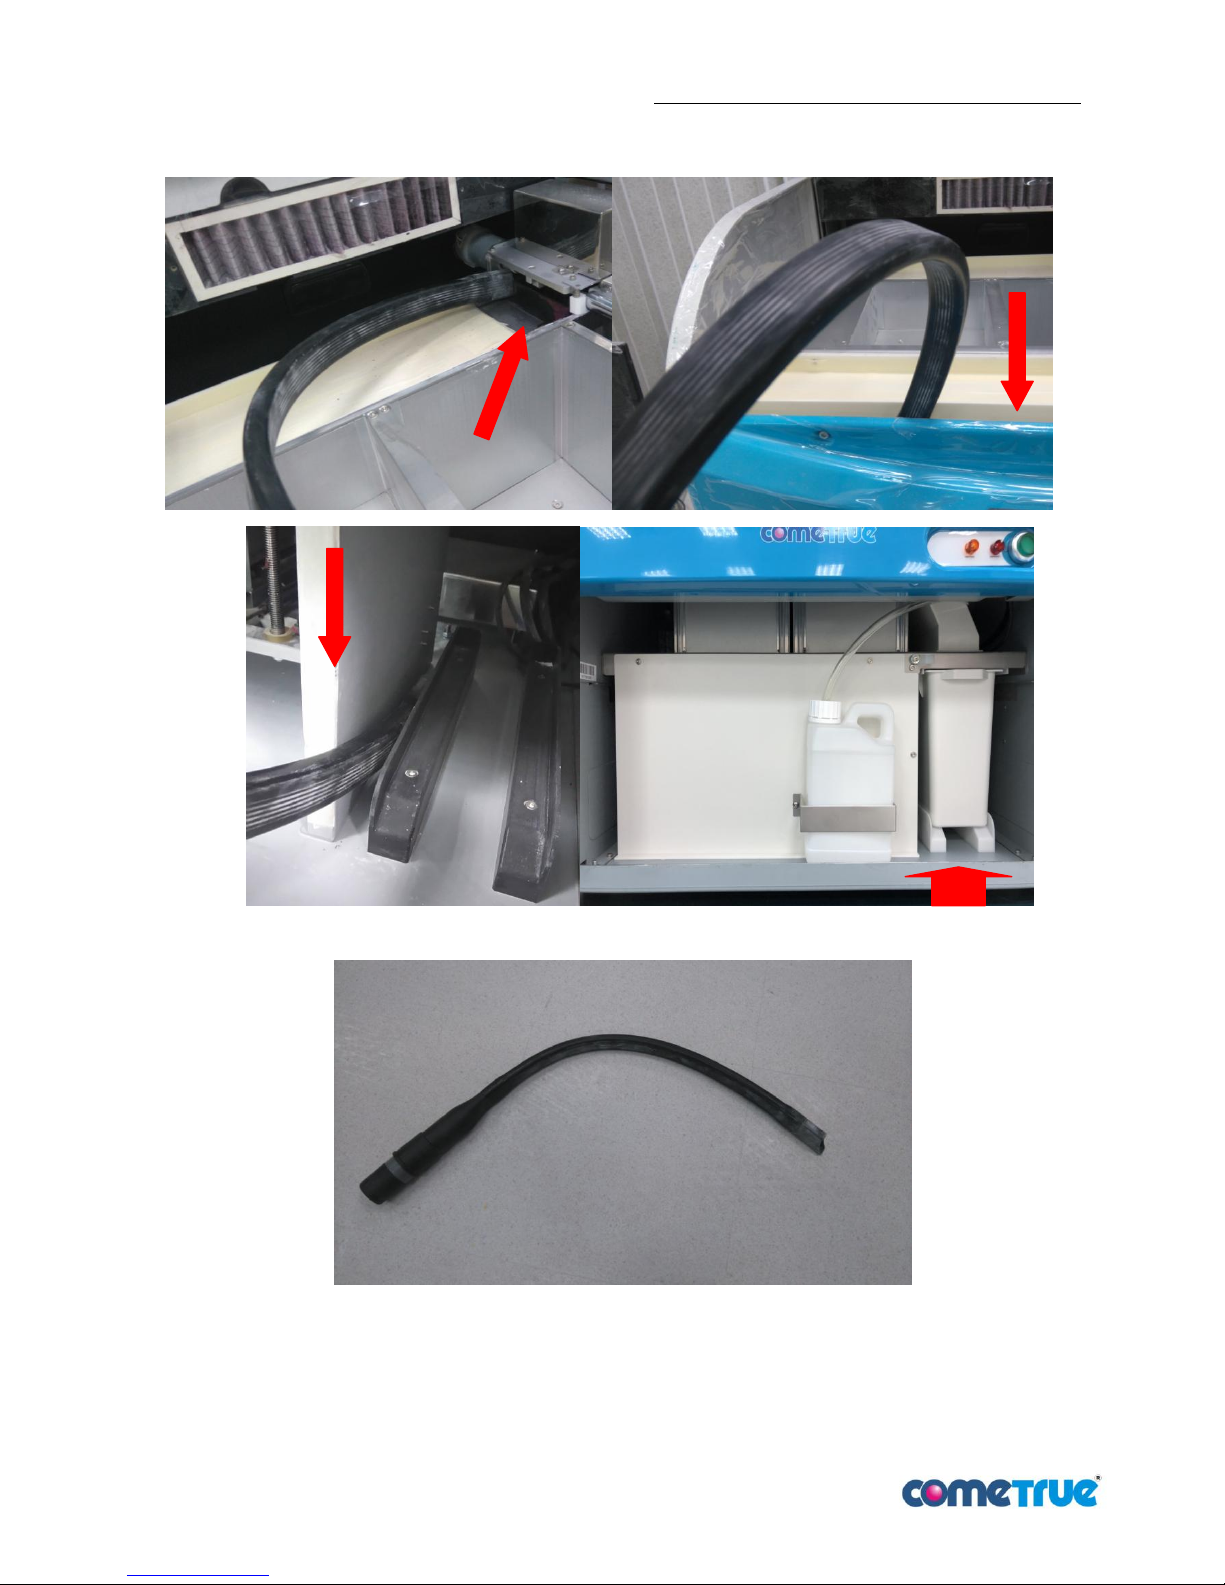
3. Not only using brush, but also the industrial vacuum cleaner which can be used to clean. And we highly
recommend using attached long soft straw (as pic 53) to clean some specific positions below.
pic 53:Positions where you had better use industrial vacuum cleaner to clean
7.2.2 pic 54:The long soft straw
Page 30
T10 3D Printer User Manual Ver.180809EN
30 / 49
7.2.2 Print bar cleaning
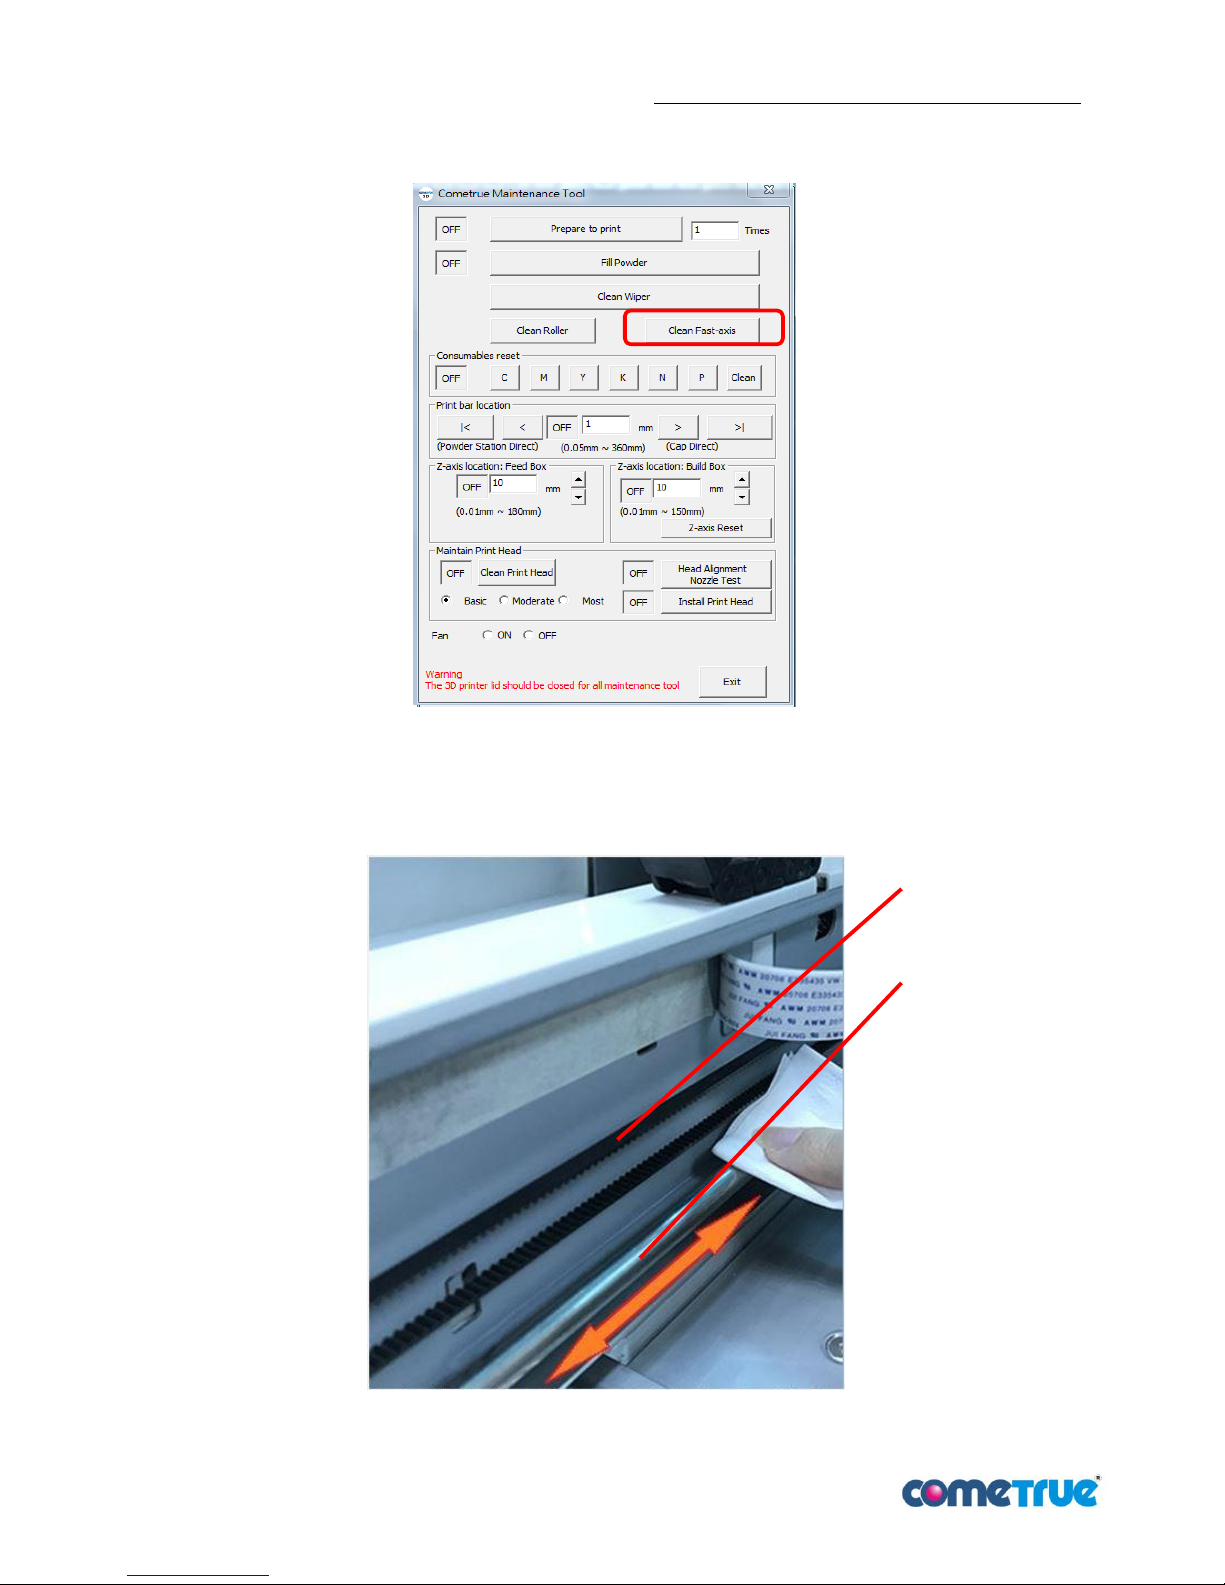
1. In the maintenance tool, click "Clean Fast-axis"
pic 55:Clean Fast-axix
2. While the print bar goes to the right position, using dry towels to clean the print shaft and transmission
belt.
pic 56:The position of print shaft and transmission belt
Transmission Belt
Fast-Axis Shaft
Page 31
T10 3D Printer User Manual Ver.180809EN
31 / 49
7.2.3 Powder- spread roller cleaning
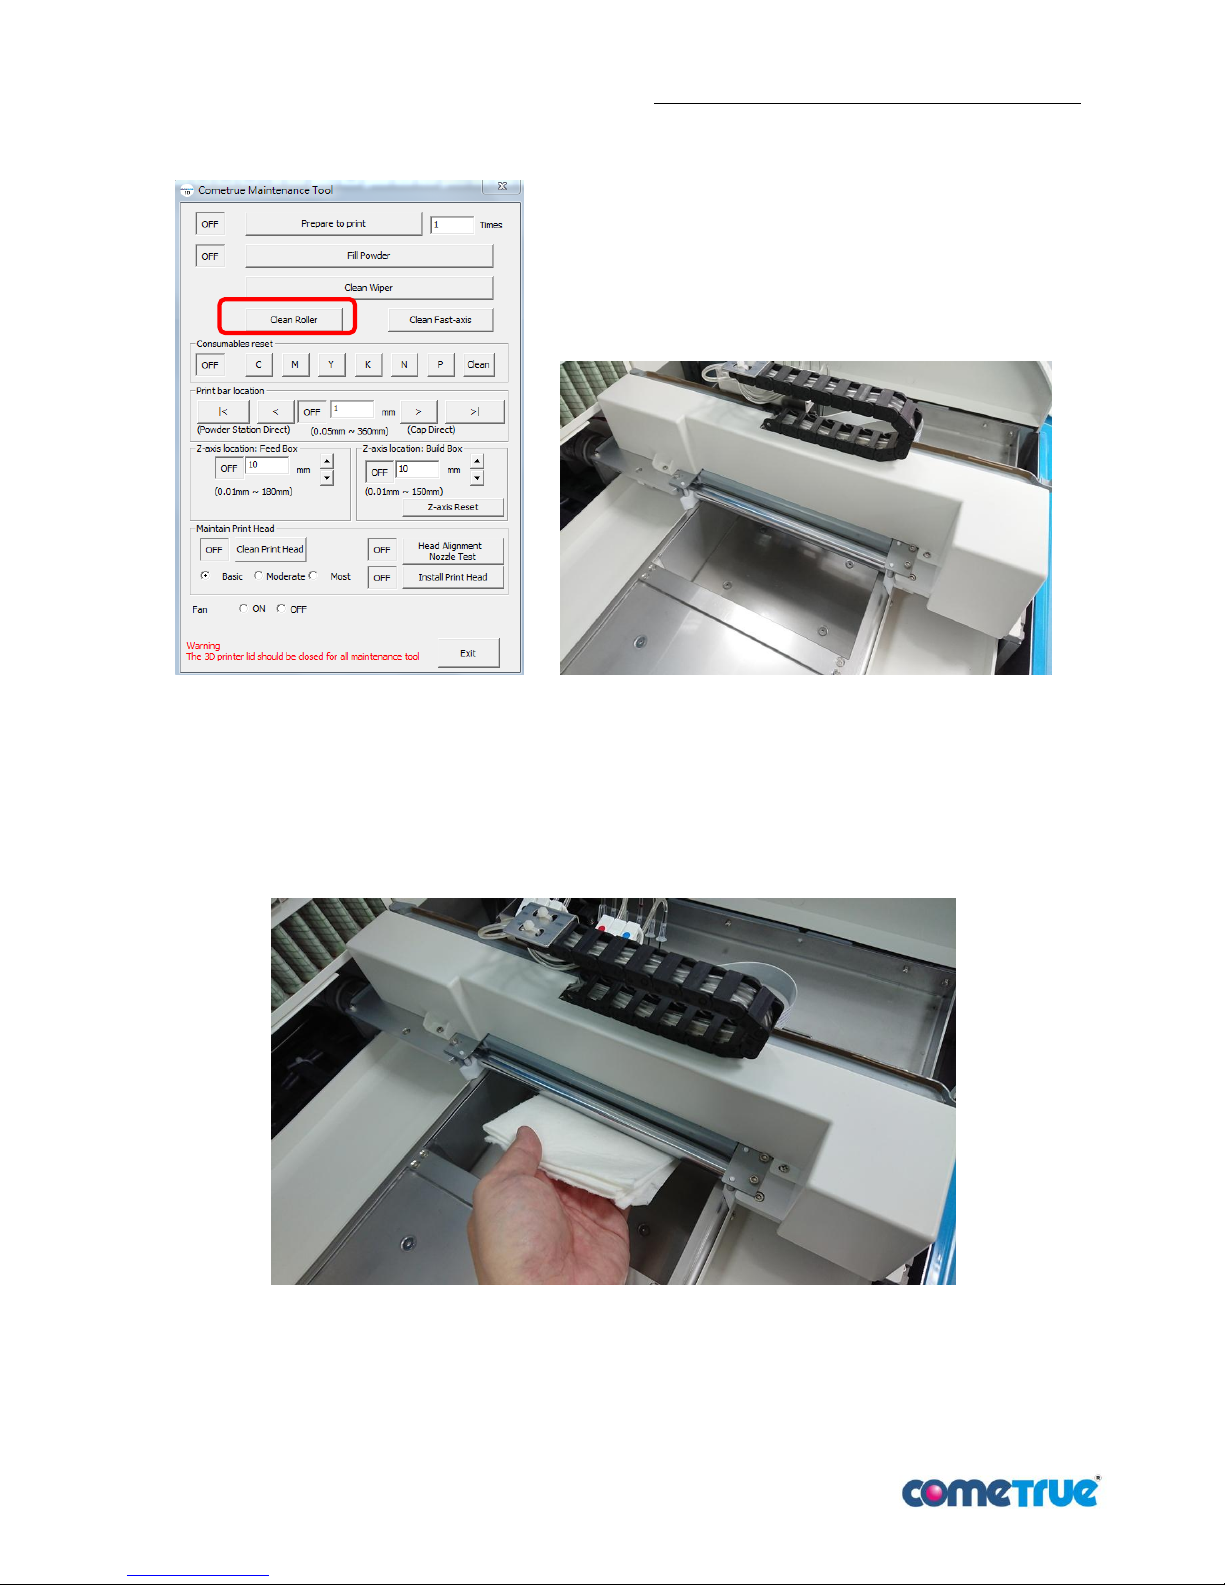
1. In maintenance tool. Select "Clean Roller" to spin the roller.
pic 57:Select Clean Roller pic 58:Roller spinning
2. Using the brush to clean the whole extra powder which onto the Print Bar.
3. Using wet towel to clean the roller then dry up by dried towel. After cleaning, press "Clean Roller" again to
back the roller to its original position.
pic 59:Roller cleaning
Page 32
T10 3D Printer User Manual Ver.180809EN
32 / 49
7.2.4 Wiper maintenance
7.2.4.1 Wiper cleaning
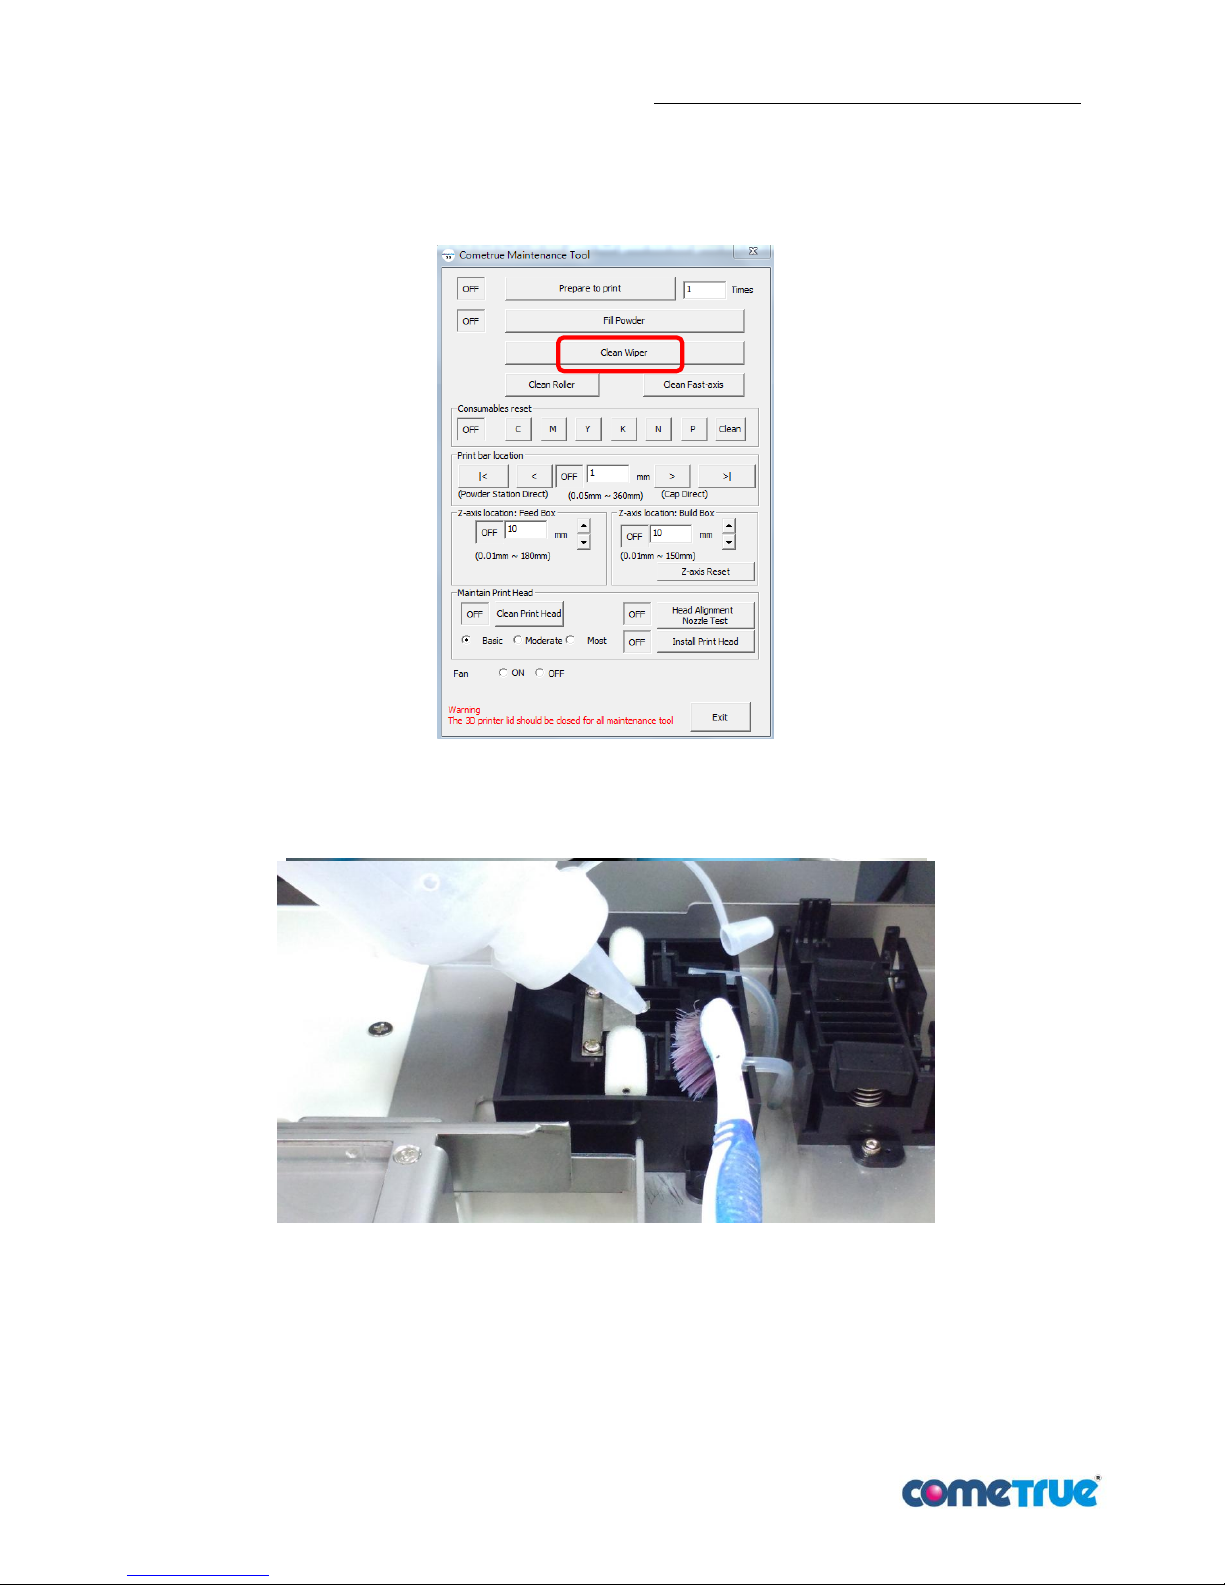
1. In maintenance tool. Select Clean Wiper (as pic 60), wait until the Print bar go to the best place for
cleaning Wiper
pic 60:Select Clean Wiper
2. Using toothbrush and water to clean the wiper (pic 61).
pic 61:Cleaning Wiper
Page 33
T10 3D Printer User Manual Ver.180809EN
33 / 49
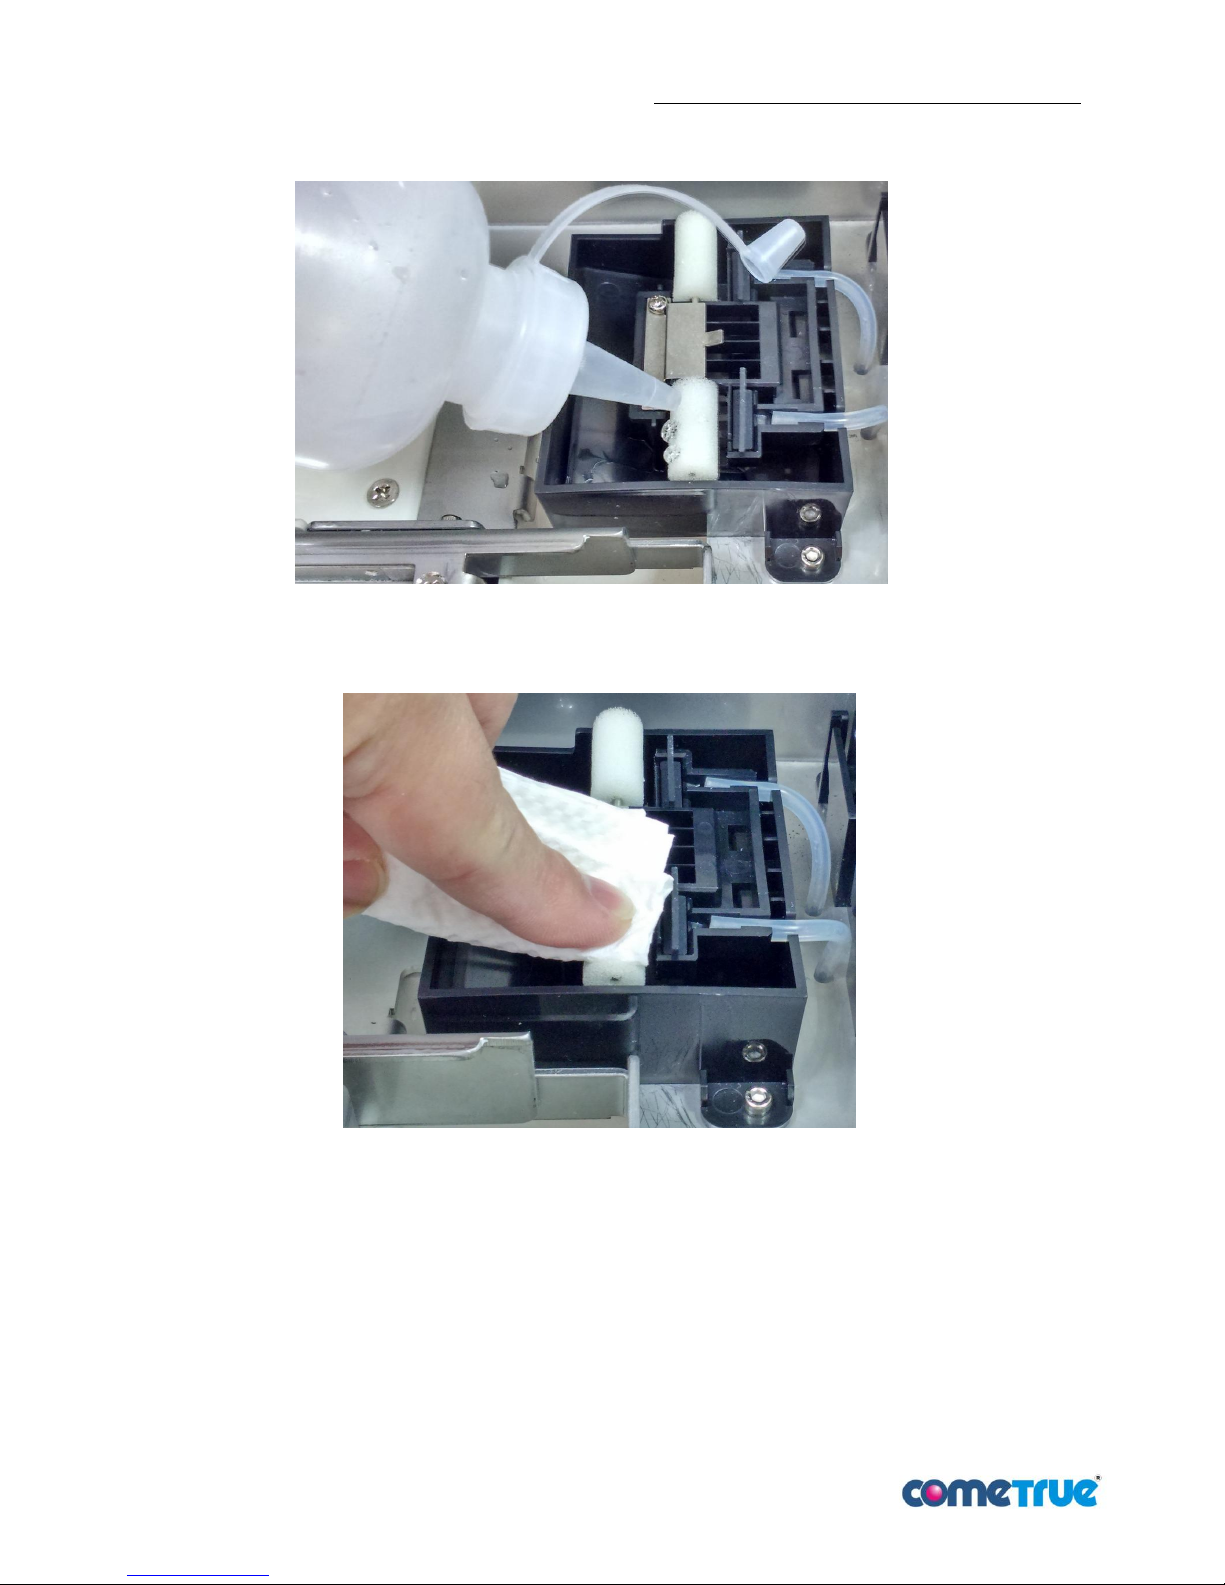
3. Using water to clean the sponge.
pic 62 : clean the sponge
4. Lightly press the sponge with paper towel to soak up the water on the sponge.
pic 63 : press the sponge with paper towel
5. After cleaning, using tissue to wipe the remaining water of the wiper box. Afterwards, click "Clean Wiper"
again to move the print bar back to its original position.
Page 34
T10 3D Printer User Manual Ver.180809EN
34 / 49
7.2.4.2 Roller sponge cleaning
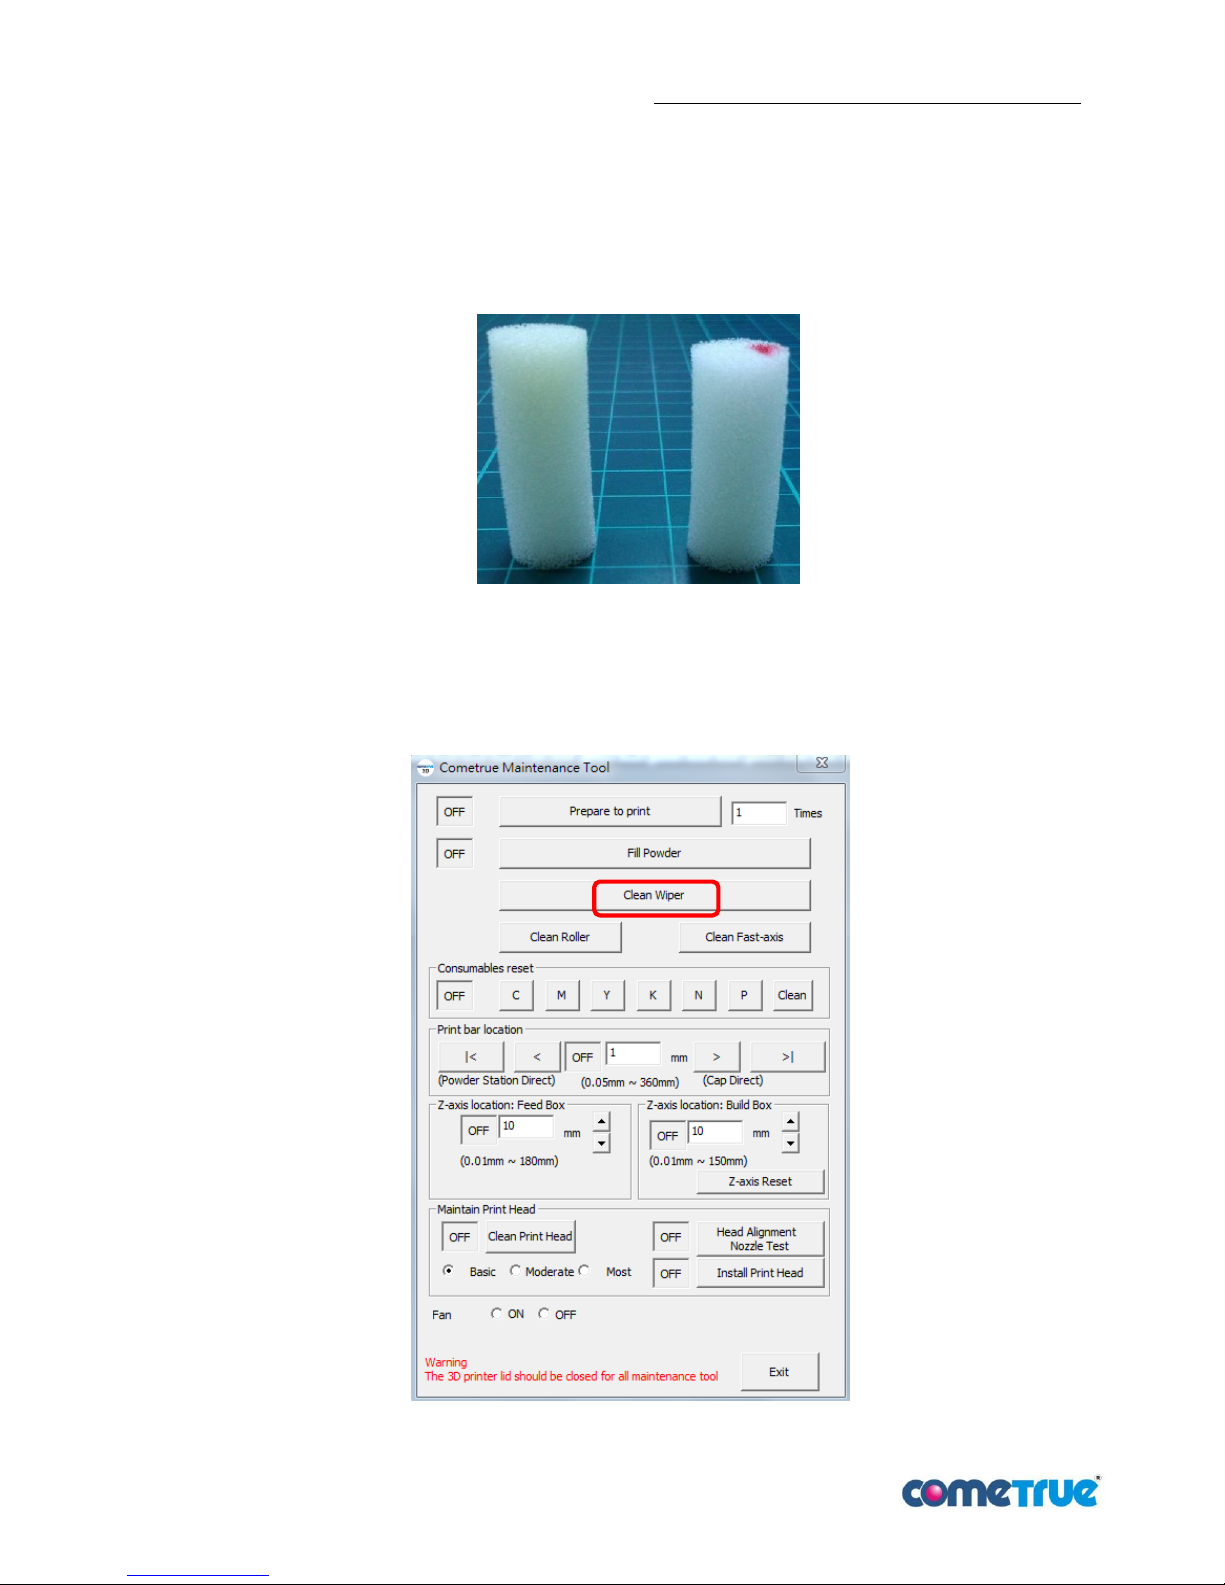
After using the sponge for a period of time, the cleaning effect will be reduced. Therefore,
changing it regularly is necessary. Every single new print head has a set of sponge. While changing the
print head, please change the sponge as well.
pic 64 : sponge
Please follow the steps to change the sponge.
1. In maintenance tool. Select Clean Wiper (as pic 65), wait until the Print bar go to the best place for cleaning
Wiper.
pic 65 : Click “Clean Wiper”
Page 35
T10 3D Printer User Manual Ver.180809EN
35 / 49
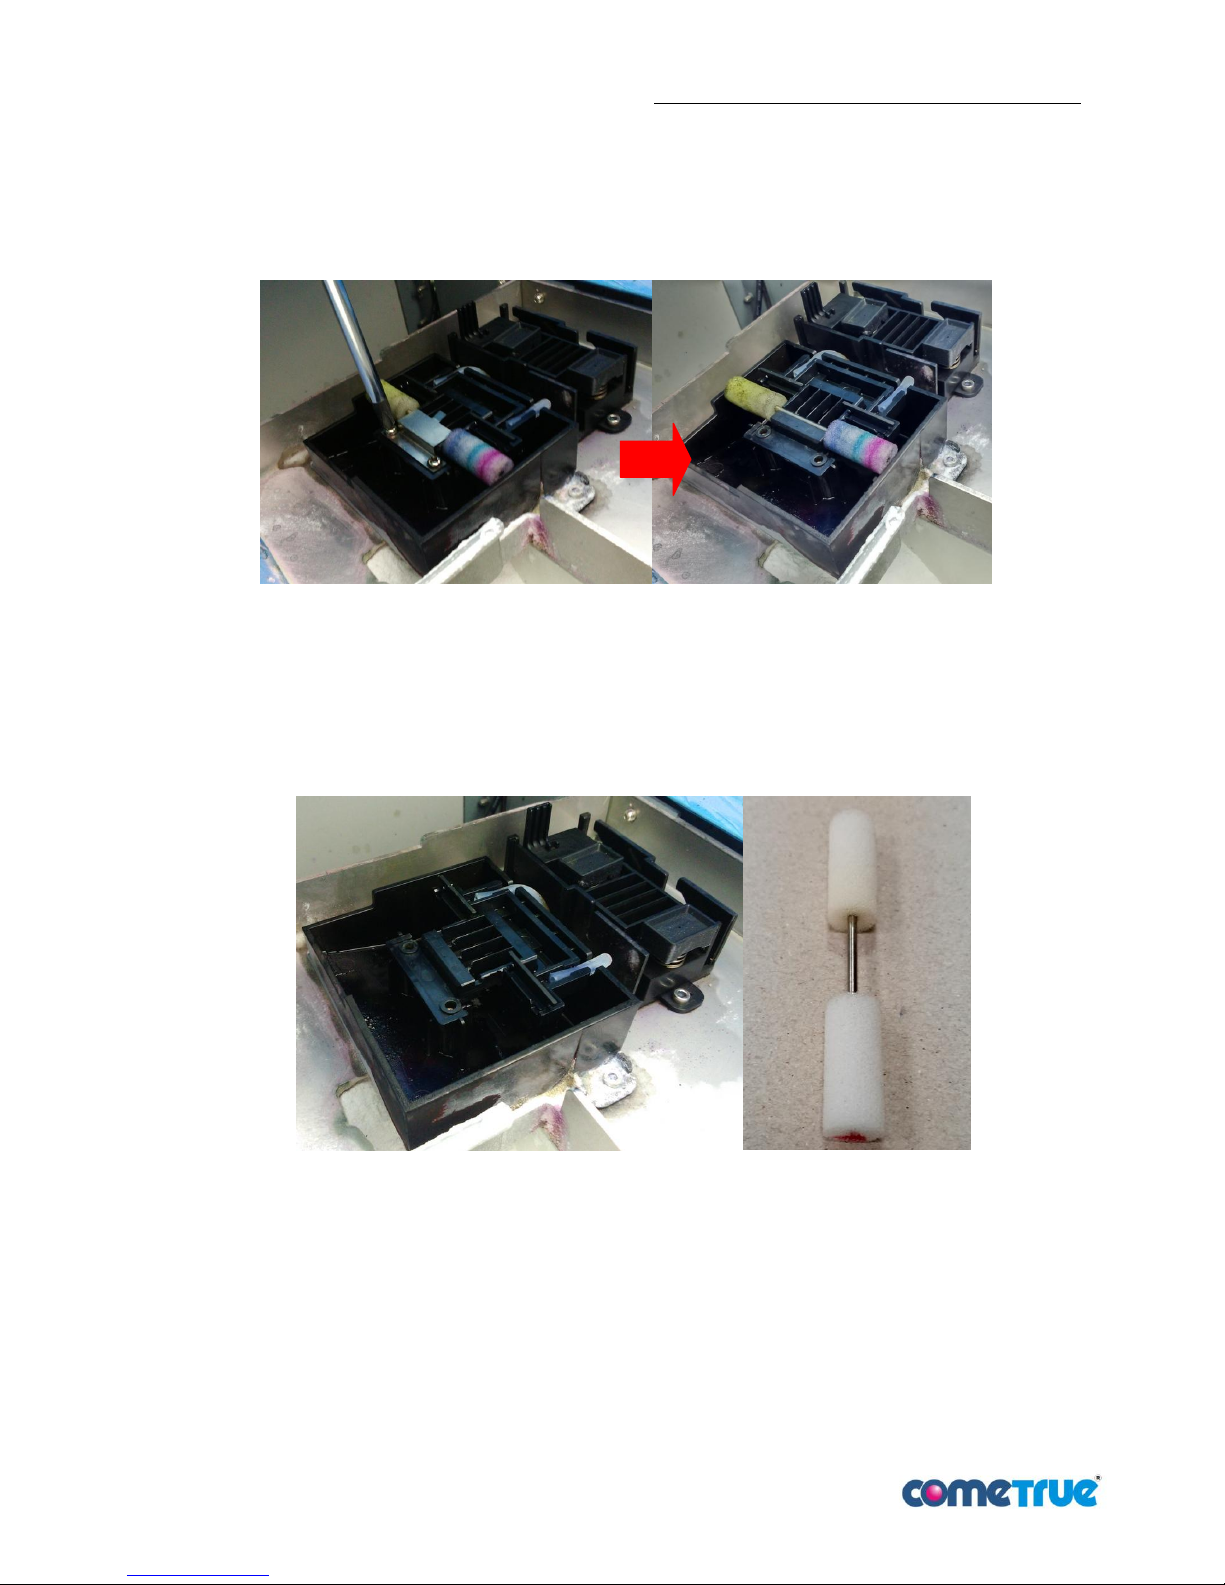
2. Using Phillips screwdriver to remove the screw then take out the plate.
pic 66: remove the screw
3. Take out the old sponge and shaft from the holder then remove the old sponge from the shaft. Then
change to a new one.
pic 67: change new sponge
Page 36
T10 3D Printer User Manual Ver.180809EN
36 / 49
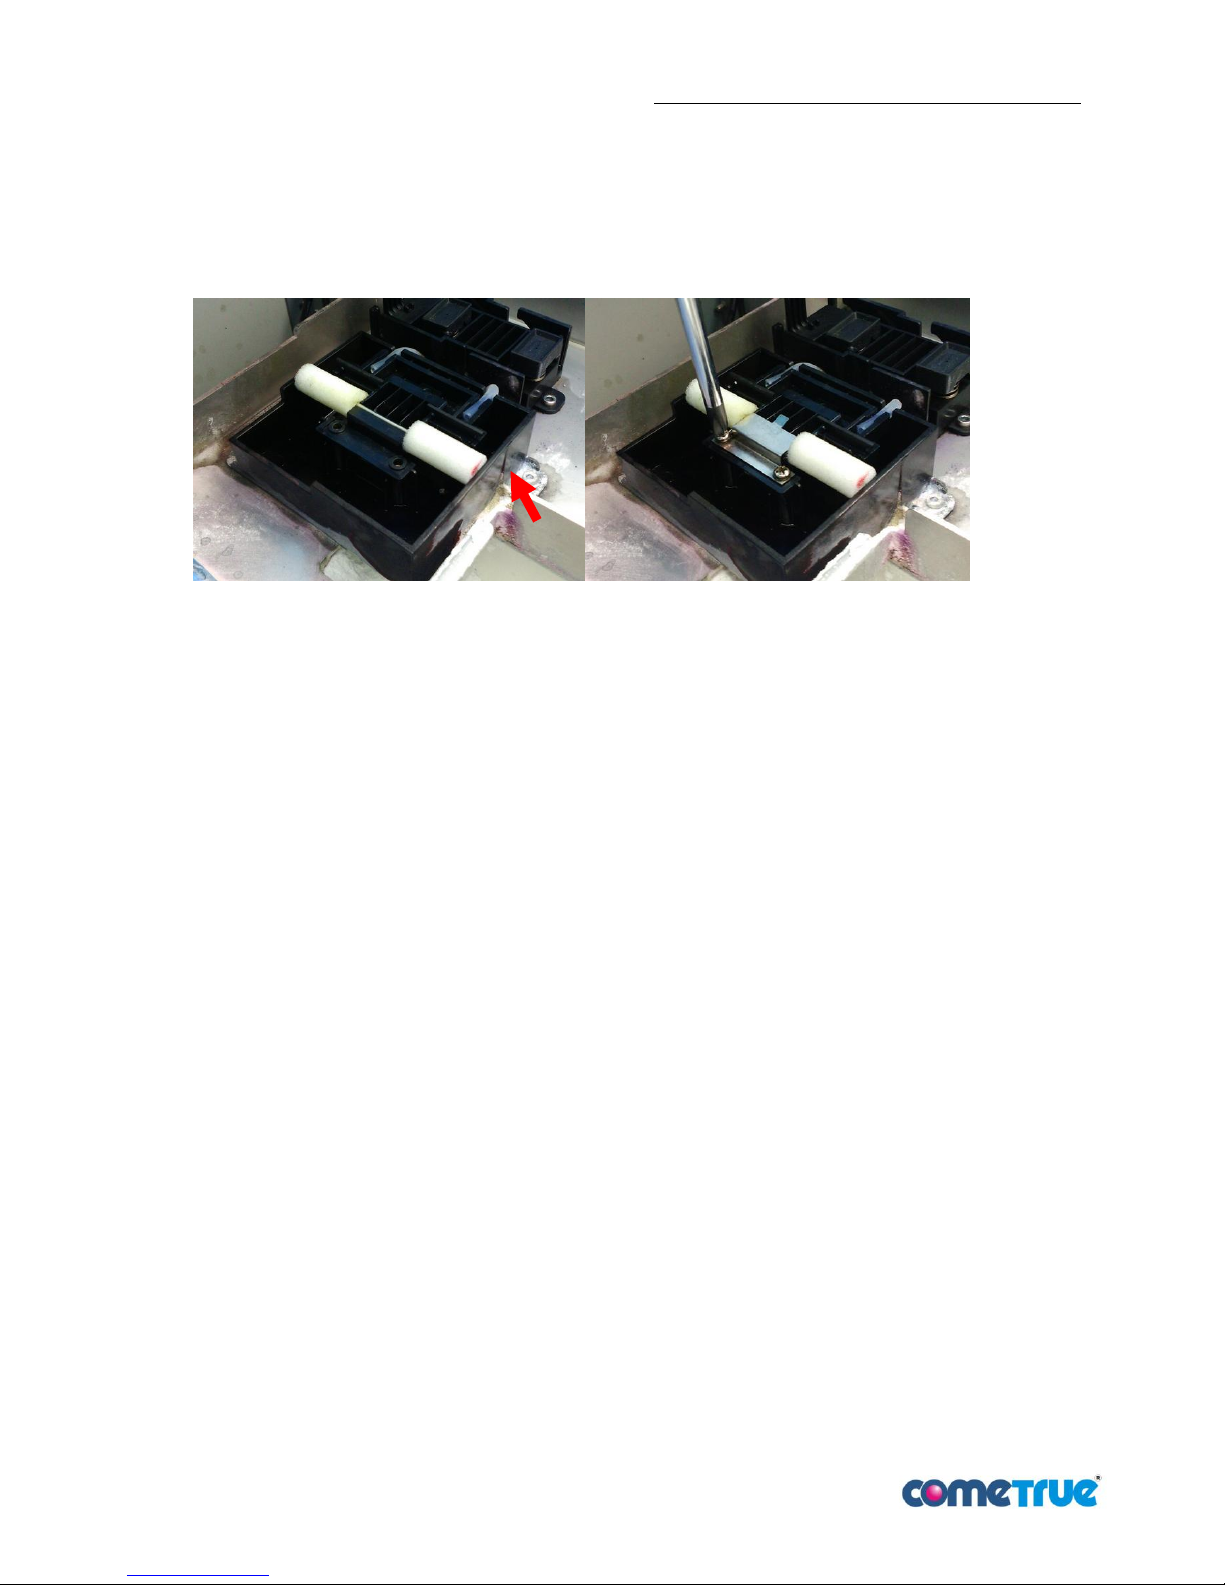
4. Place the shaft with a new sponge and replace it to the groove of the holder. When installing, place a
sponge with a red mark on the CM side. After the shaft is inserted, lock the plate to the holder.
pic 68: lock the plate to the holder
5. After the replacement is completed, select Clean Wiper in maintenance tool to let it go back to the right
position.
Red Mark
Page 37
T10 3D Printer User Manual Ver.180809EN
37 / 49
7.2.5 Print head cleaning
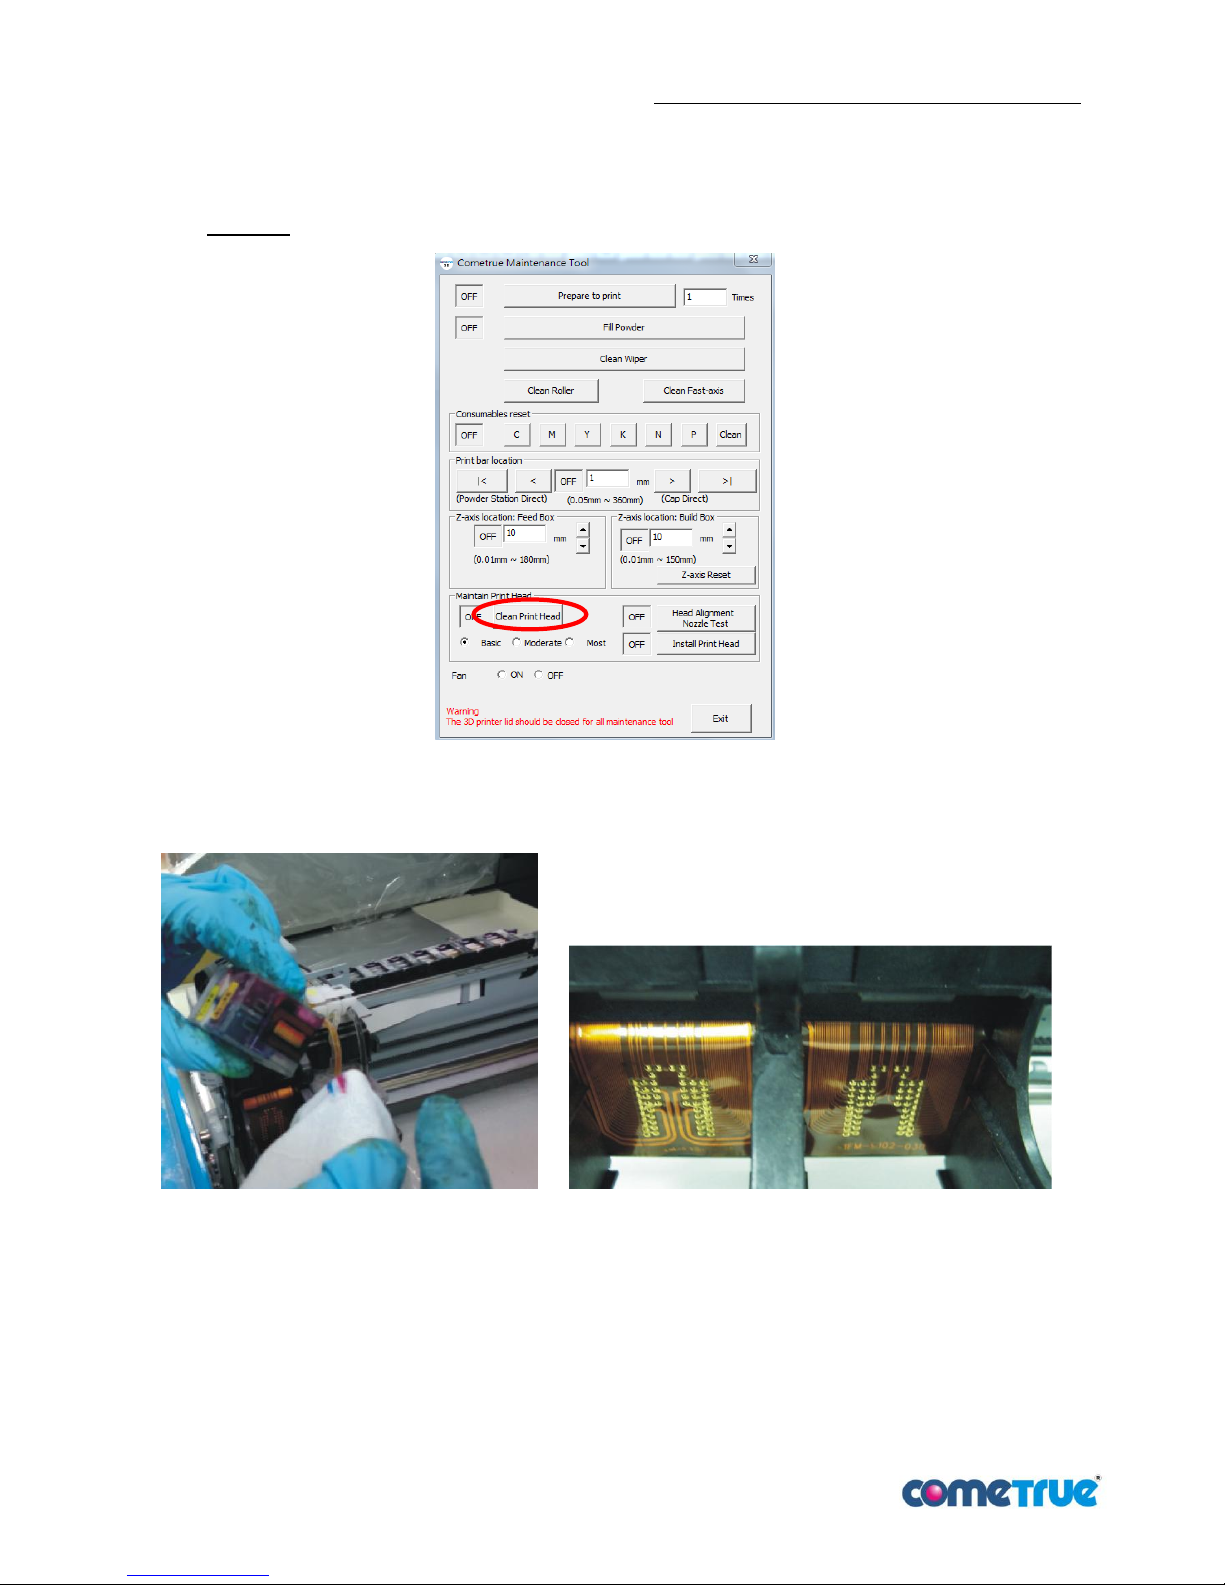
1. In maintenance tool, Select the cleaning level in Print Head maintenance. Then select "Clean Print Head"
to clean print head automatically. (pic 69)
Attention: For the printing quality, please select "Most" if the machine will not be used for over 5 days.
pic 69:Click “Clean Print Head”
2. Remove the print head (see5.1.2 Print head installation), then using dry tissue to wipe it.(pic 70).
pic 70:Wiping print head pic 71:Carriage Dimple Board
3. Carriage Dimple Board should also be cleaned. Then, install the print head back to its base.
Attention: Please do print head alignment if the print head has been reinstalled. (See 5.3.2 Print testing)
Page 38
T10 3D Printer User Manual Ver.180809EN
38 / 49
7.2.6 Waste ink and waste powder handling
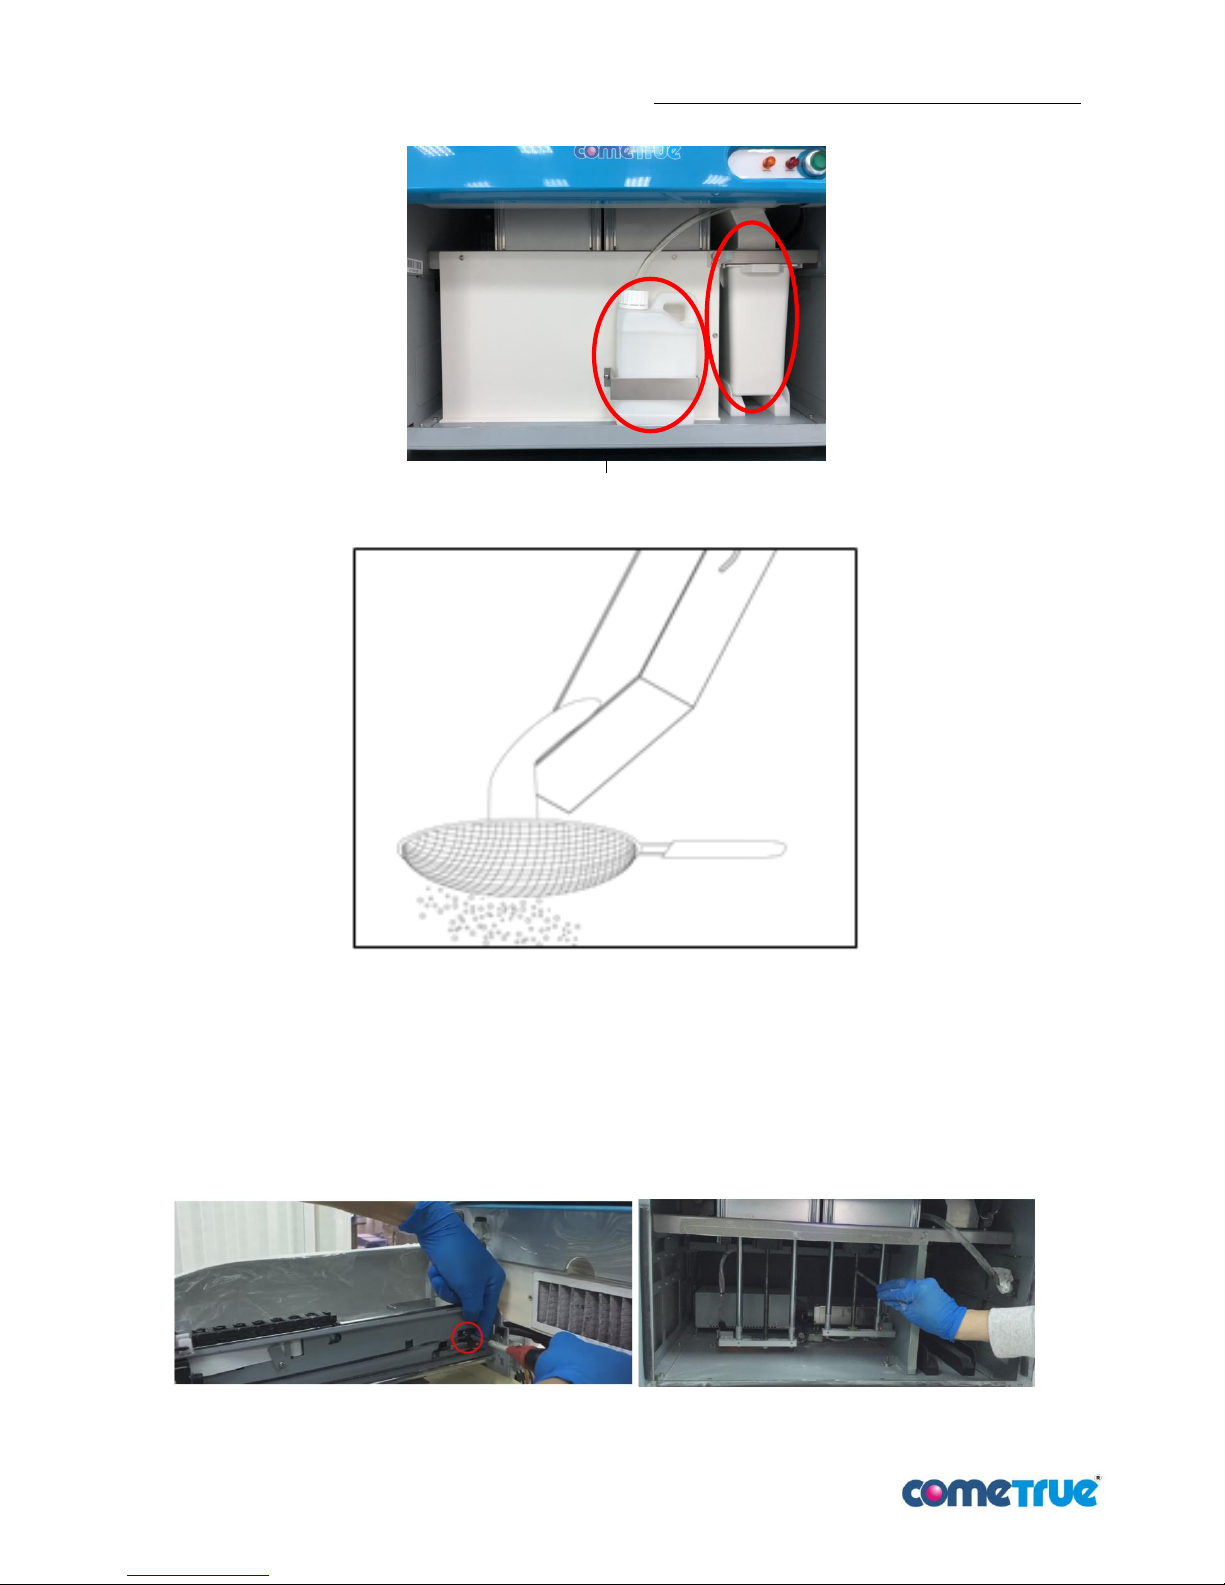
pic 72:Waste ink bottle and waste powder tank
pic 73:filter the waste powder for reusing
Pour away the waste ink. Use the sieve to filter the waste powder for reusing.
7.2.7 Advanced maintenance
For the printing quality and machine reliability, please contact with certified engineer from your agents to
do advanced maintenance every 2 months.
pic 74:Advanced maintenance
Page 39
T10 3D Printer User Manual Ver.180809EN
39 / 49
8 Post process
After the process of drying and depowder, all the printing parts can be used by different kinds of infiltrant for
curing to achieve different quality and characteristic.
TI-915 is a single part instant infiltrant, it possesses low viscosity, low odor, fast-drying, etc. It provides rapid
curing process and increases the reinforcement. Because of the reaction of this product is very fast, gloves,
masks, protective cloth, goggle should be prepared before using.
TI-915 process:
pic 75:TI-915 progress
Note: Repeat the process to make parts shiny.
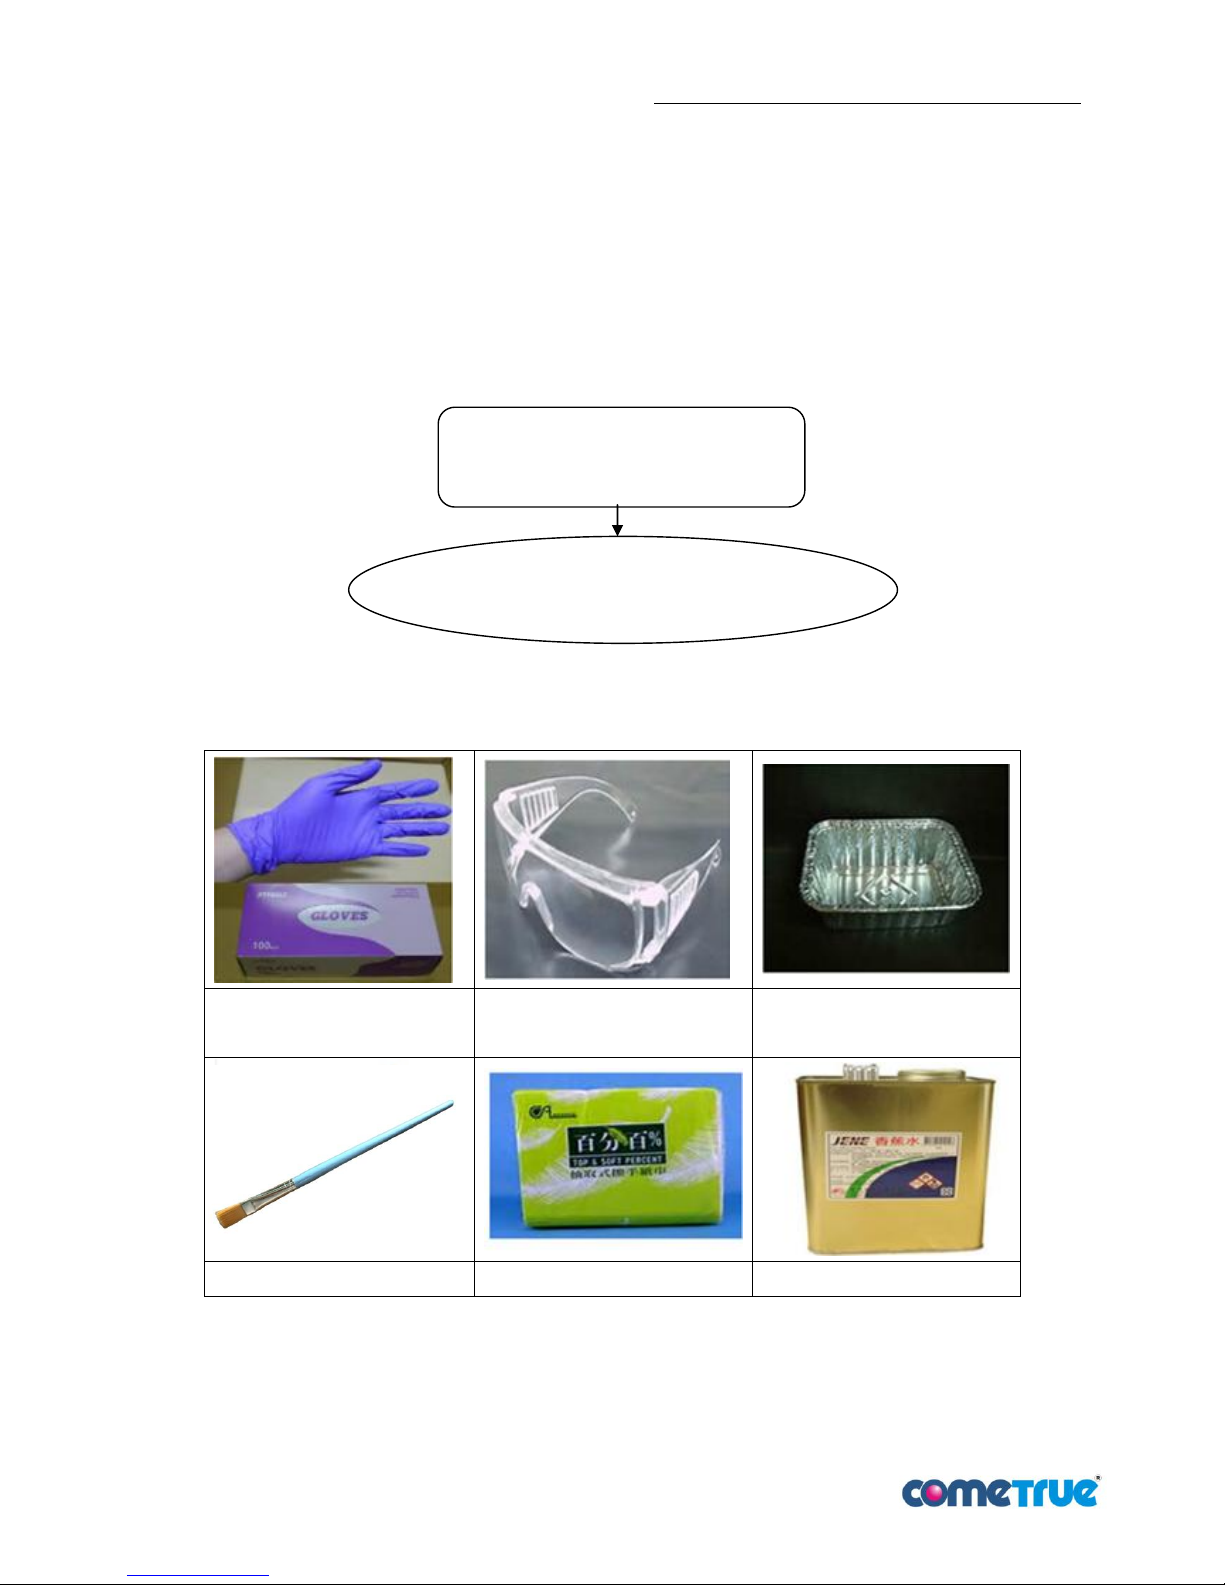
1. Tools: Please prepare those tools for the process
NBR gloves
Goggles
Aluminum foil bowl or
Disposable plastic bowl
Brush
Paper towels
Banana oil
pic 76:Tools required
Using TI-915 by immerse, brush or
pour.
Wait 30~60 min for drying
Page 40
T10 3D Printer User Manual Ver.180809EN
40 / 49
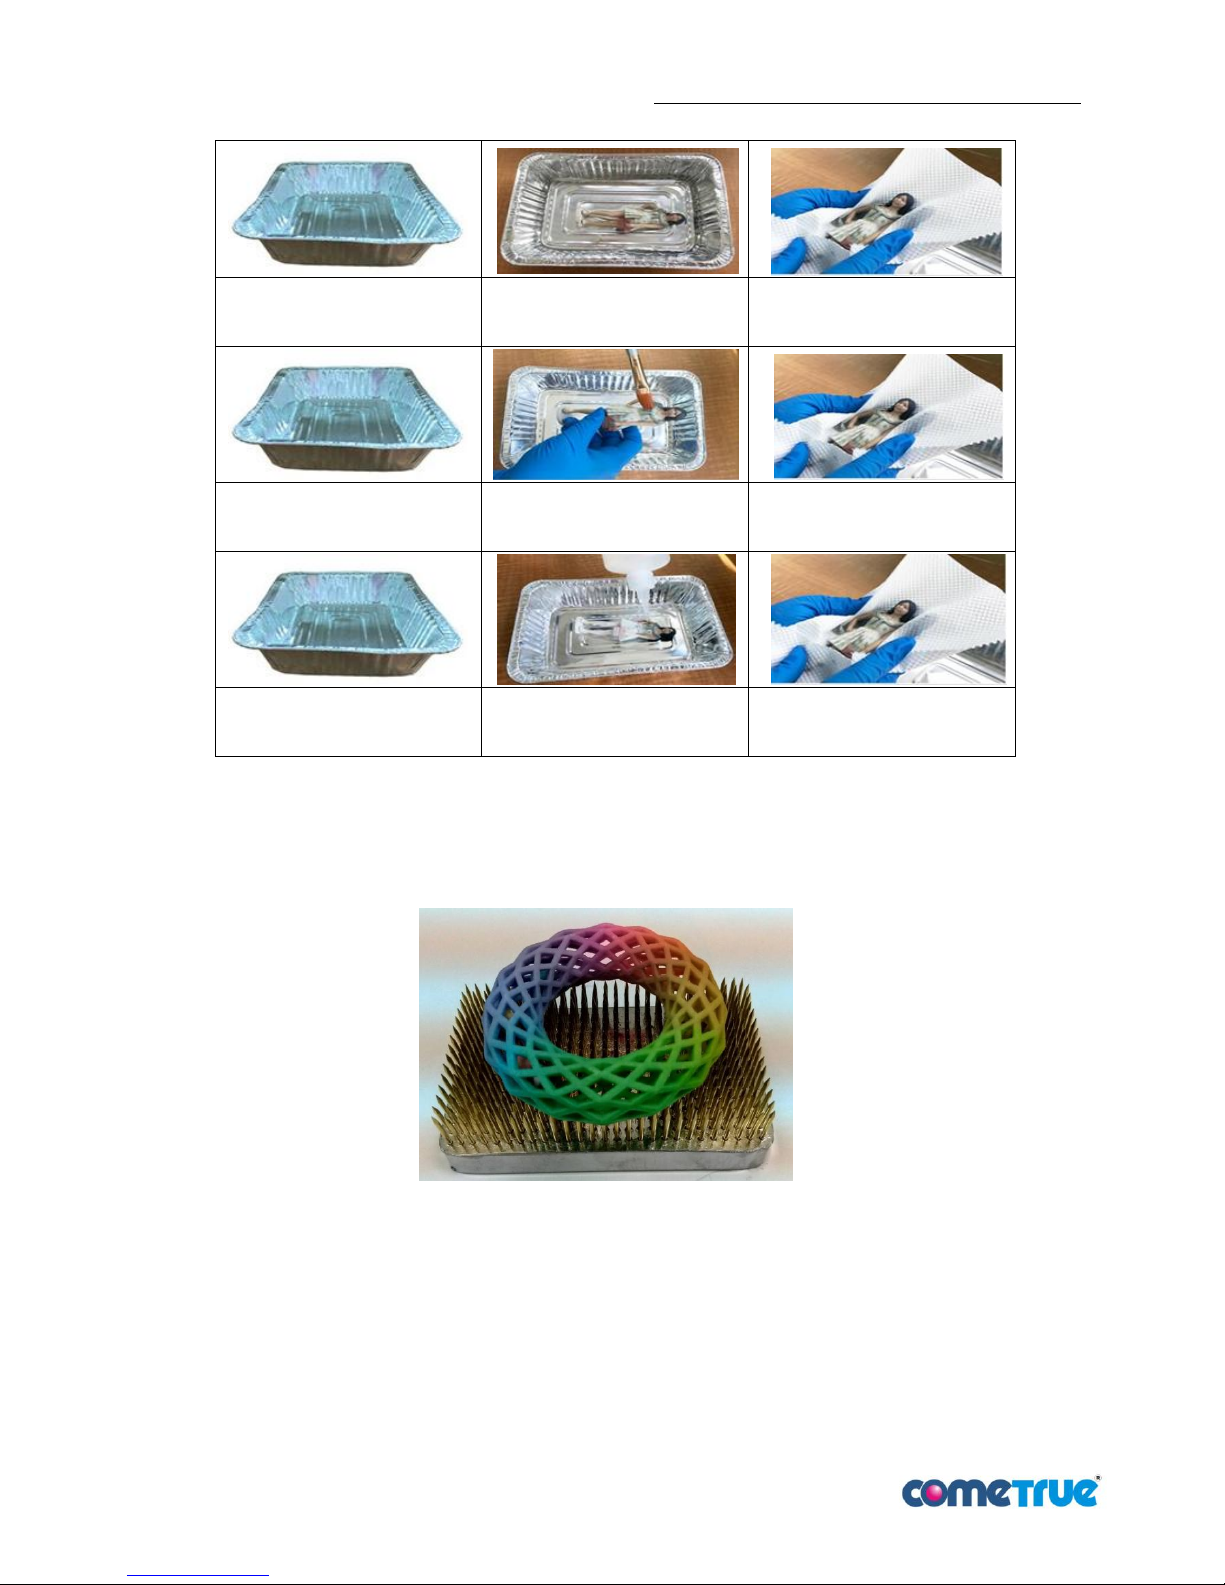
2. Process: immerse, brush or pour the part.
Take a bowl and fill in TI-915
Immerse the part into
TI-915 for few minutes
Using paper towel to
wipe the extra 915 out
Take a bowl and fill in TI-915
Brush TI-915 on the part
Using paper towel to
wipe the extra 915 out
Take a bowl and fill in TI-915
Pour TI-915 into the part
Using paper towel to
wipe the extra 915 out
pic 77:Processing method
3. Drying: Put the part on wire-netting or needle bed for drying.
pic 78:Drying the part
Page 41
T10 3D Printer User Manual Ver.180809EN
41 / 49
9 3D printer operating and maintenance
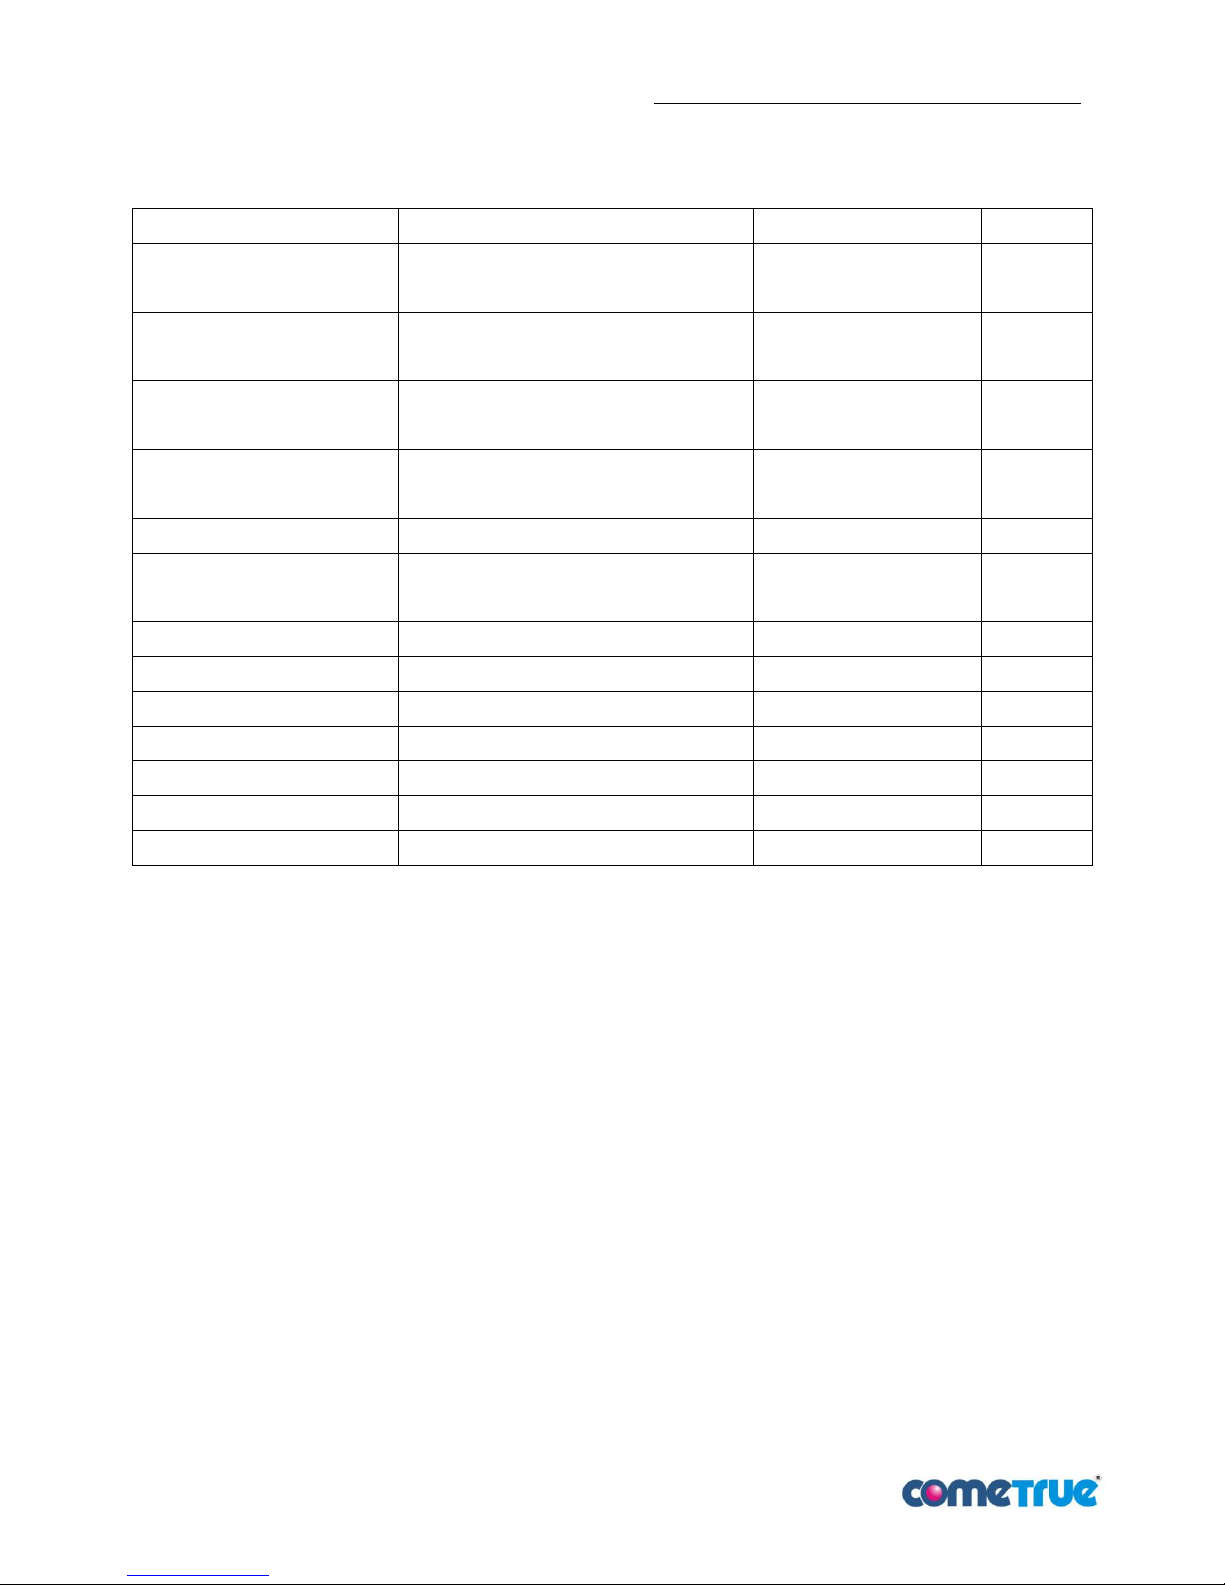
9.1 ComeTrue T10 maintenance table
Item
Method
Period
Chapter
Print head surface, print head
FPC, Carriage FPC
Use dry soft tissue to wipe its surface.
Every time after printing
7.2.5
Binder pipe
Use syringe to pump when there’s air or
bubble in pipe.
Every time before printing
0
Wiper
Use clean soft tissue and distilled water to
wipe its surface.
Every time after printing
7.2.4
Powder in feed box
Filled powders in build box before printing
molded.
Every time before printing
5.2
Powder spreading roller
Use clean soft tissue to clean
Every time after printing
7.2.2
Binder cartridge supplement
bottle
When the binder is run out (can change it
during printing).
Check while printing
5.1.1
Waste ink bottle
Pour away the waste liquid
Every time after printing
7.2.6
Print Bar
Use oil brush or vacuum cleaner
Every time after printing
5.2
Platform
Use oil brush to clean powders
Every time after printing
7.2.1
Waste powder tank
Pour away powders for sieving
Every time after printing
7.2.6
Slow axis advanced maintenance
Contact your agents for certified engineer
Every 2 months
7.2.7
Fast axis advanced maintenance
Contact your agents for certified engineer
Every 2 months
7.2.7
Z axis advanced maintenance
Contact your agents for certified engineer
Every 2 months
7.2.7
Page 42
T10 3D Printer User Manual Ver.180809EN
42 / 49
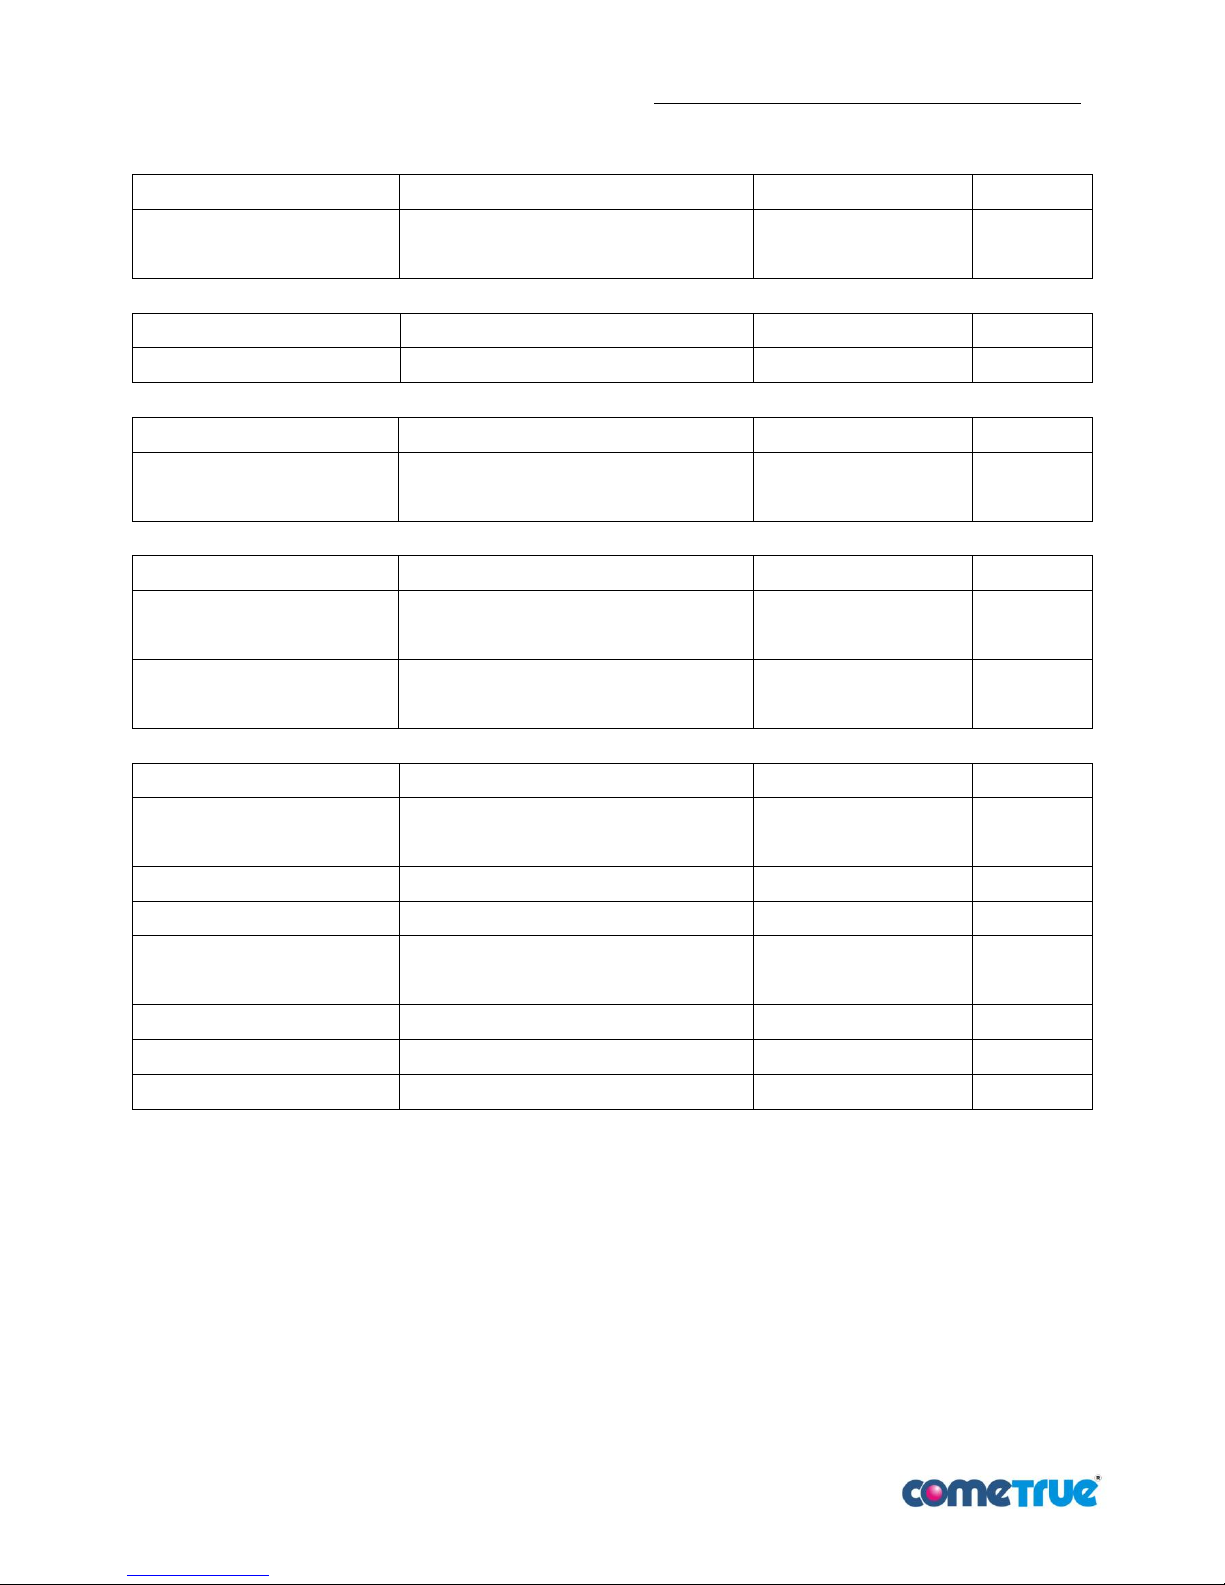
9.2 Print head maintenance
Item
Method
Period
Chapter
Print head surface, print head
FPC, Carriage FPC
Use clean soft tissue to wipe its surface
Every time after printing
7.2.5
9.3 Service Station maintenance
Item
Method
Period
Chapter
Wiper
Use brush to clean the surface of wiper
Every time after printing
7.2.4
9.4 Confirm powders in feed box
Item
Method
Period
Chapter
Powders in feed box
Filled powders in build box before printing
molded.
Every time before printing
5.2
9.5 Binder cartridge changing
Item
Method
Period
Chapter
Binder cartridge supplement
bottle
When the binder is run out (can change
during printing).
Check while printing
5.1.1
Binder pipe
Use syringe to pump when there’s air or
bubble in pipeline
Every time before printing
0
9.6 Interior cleaning
Item
Method
Period
Chapter
Powder spreading roller
Use wet soft tissue to clean, then use dry
soft tissue to wipe it
Every time after printing
5.2
Waste ink bottle
Pour away waste liquid after printing
Every time after printing
7.2.6
Print Bar
Use oil brush or vacuum cleaner to clean
Every time after printing
5.2
Platform
Use oil brush to clean powders which
onto the platform
Every time after printing
7.2.1
Slow axis advanced maintenance
Contact your agents for certified engineer
Every 2 months
7.2.7
Fast axis advanced maintenance
Contact your agents for certified engineer
Every 2 months
7.2.7
Z axis advanced maintenance
Contact your agents for certified engineer
Every 2 months
7.2.7
Page 43
T10 3D Printer User Manual Ver.180809EN
43 / 49
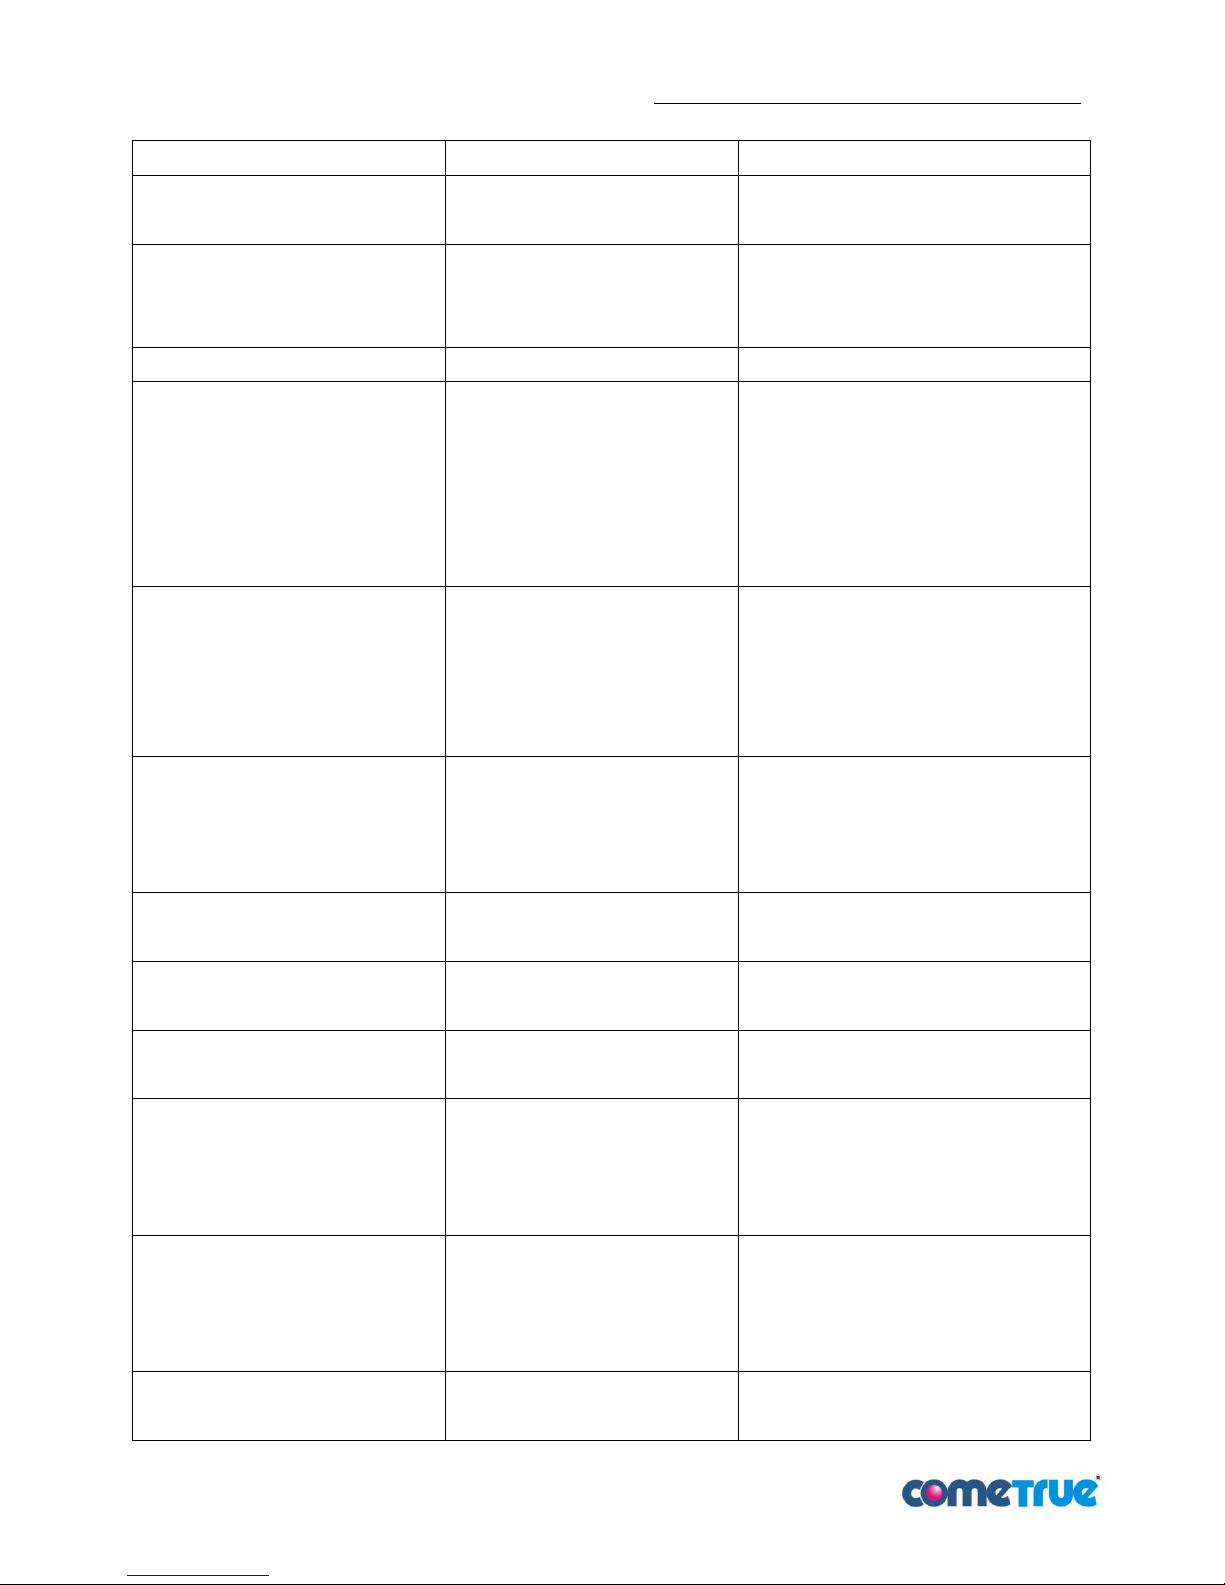
9.7 3D printer troubleshooting
Fault condition
Reason
Solution
LED green power unlighted
No AC power to the machine
1. confirm AC power is in supplied to the
machine
Cannot open the machine
Power Cord did not connect
correctly
1. confirm Power Cord is working
2. confirm Power Cord did connect
correctly
LED yellow lights on
Top cover is opened
Close the top cover
3D printer cannot work
1. USB between printer and
computer did not connect
correctly
2. Print type did not choose
correctly
3. Defect in machine
1. confirm USB connection
2. setting T10_86 as the default printer
in computer
3. contact with dealer for maintenance
Print head is operating abnormally
Printing process is abnormal or
interference during operation
1. Restart
2. contact with dealer for maintenance if
it still abnormal after restart
3. check if there is any interference
while operating.
Powder spreading is not smooth
1. spreading roller stick some
powder
2. spreading roller is not working
3. interference in spreading area
1. clean spreading roller
2. contact with dealer for maintenance
3. clean the interference in spreading
area
The cleaner of wiper is not working
1. cleaner is run out
2. pump of cleaner is not working
1. add more cleaner
2. contact with dealer for maintenance
Binder pipe is leaking
1. binder pipe is connecting
badly
1. contact with dealer for maintenance
Binder head is not spraying
1. binder head is blocked or dirty
2. defect in print head
1. do Clean Print Head for cleaning
2. change new print head
Print head is printing with white line
1. print head is blocked or dirty
2. print head and Carriage CFP
is dirty or connecting badly
3. defect in print head
1. do Clean Print Head for cleaning
2. clean the connection between print
head and Carriage CFP
3. change new print head
Slow axis (PRINT BAR) is shaking
1. interference between print bar
and build box
2. the screw of print bar is
loosing
1. remove interference
2. lock the screw tightly
Powder is too coarse when
spreading powder
1. roller of print bar stick some
spreading powder
1. use clean paper to wipe it out
Page 44
T10 3D Printer User Manual Ver.180809EN
44 / 49
Dirt is still in print head after cleaning
1. Defaced wiper of SERVICE
STATION cleaner is not
enough
1. clean with water or cleaner
2. add more cleaner
Dirty water in printer
1. waste ink pipe is falling
2. pulling of silicon pipe in
cleaner system
3. waste tank is full
1. reinstall the pipe
2. rearrange silicon pipe
3. pour away waste liquid
Feed box is not feeding or uneven
Powder is not enough in feed box
1. add more powders
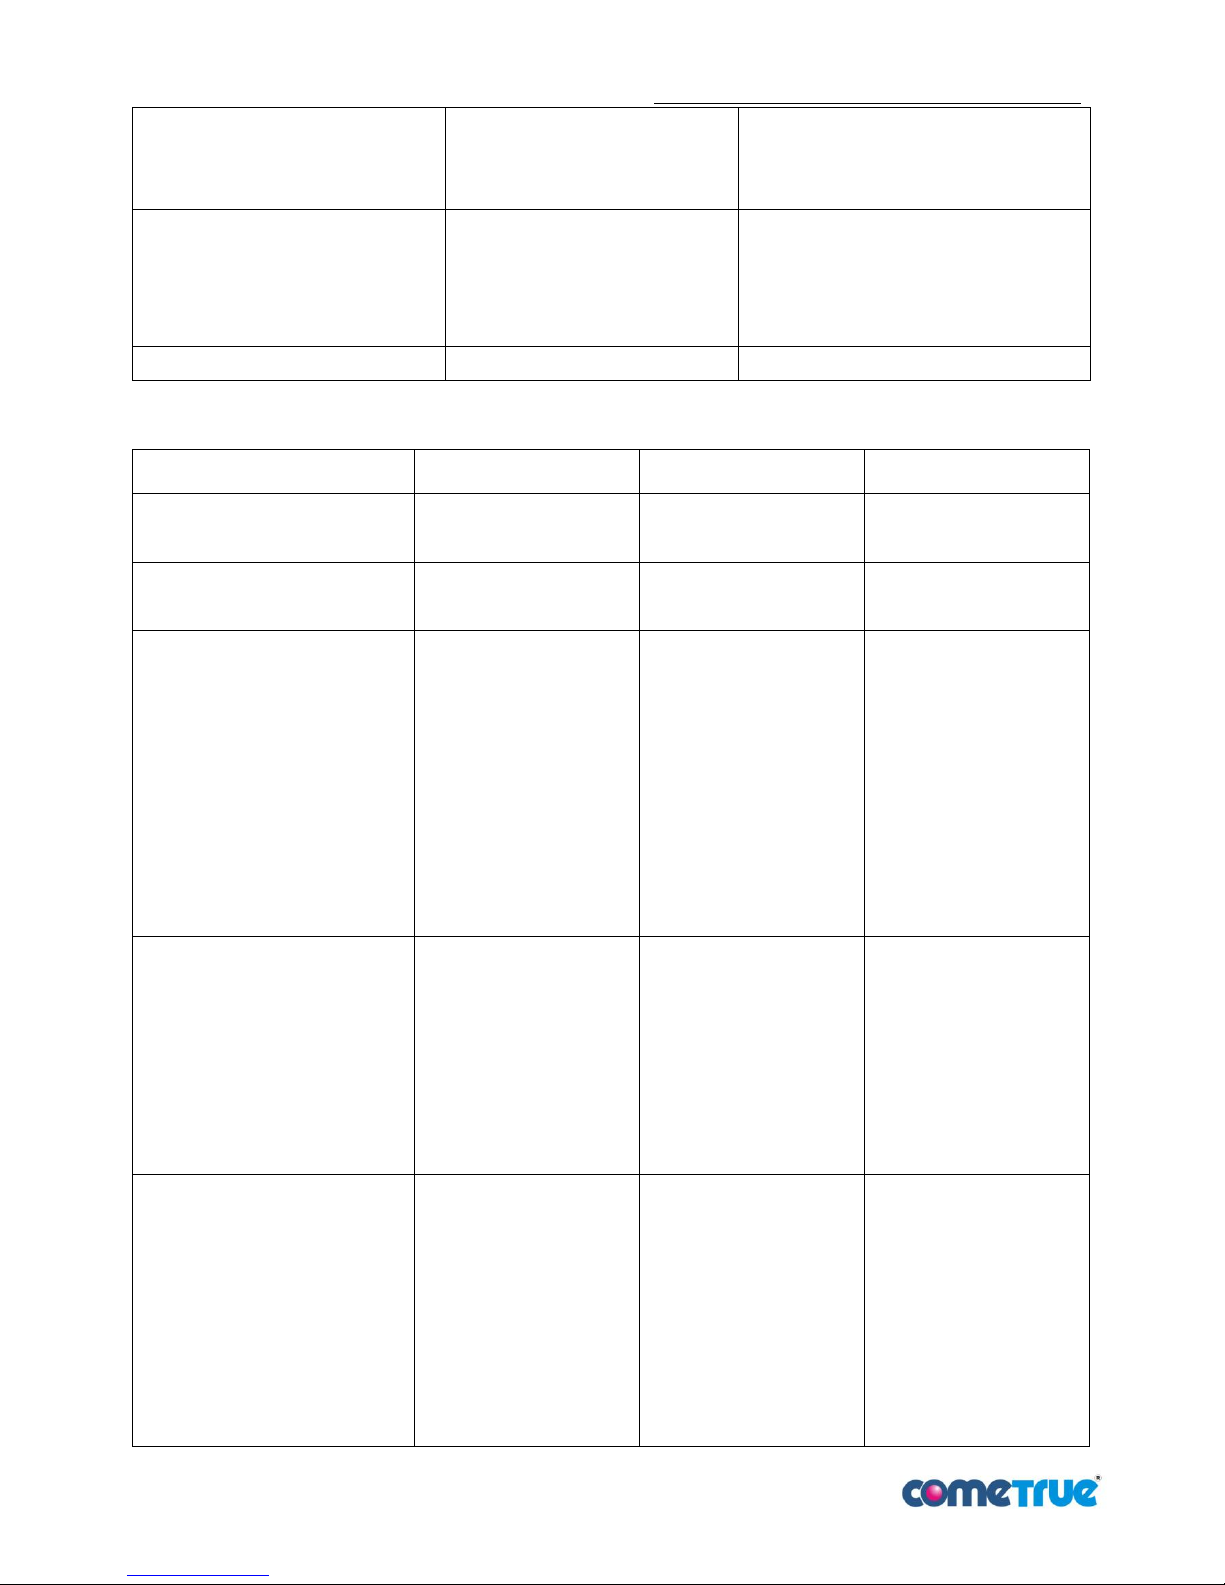
9.8 Status Monitor
(※Status Monitor display and flash error light/warning message※)
Status Monitor
Light
Reason
Solution
Ready to print!
Yellow indicator flashing
Top cover is opened
when standby
Close top cover
The top cover is opened!
Yellow indicator flashing
Top cover is opened
when printing
Close top cover
Fast-axis error!
Red indicator flashing
slowly
Fast-axis moves
abnormally
1. Check if there is
any interference in
Fast-axis
2. clean the roller of
Fast-axis
3. restart to test
4. contact with
technicians for
maintenance
Slow-axis error!
Red indicator flashing
rapidly
Slow-axis is not in its
right position
1. check if there is
any interference in
Slow-axis
2. restart to test
3. contact with
technicians for
maintenance
1. The sensor detected error
upon the feed box!
2. The sensor detected error
under the feed box!
3. The sensor detected error
upon the build box!
4. Build box down sensor
detected error under the
Red indicator flashing
one long and two short
then check the message
from Status Monitor.
Z-axis of Feed box and
build box moves up or
down abnormally.
1. Restart to test the
moving function of
Z-axis
2. contact with
technicians for
maintenance
Page 45

T10 3D Printer User Manual Ver.180809EN
45 / 49
build box!
Voltage is abnormal in print
head!
Red indicator flashing 4
times
13 V voltage print head
reads abnormally when
printing
1. restart to test
2. contact with
technicians for
maintenance
1. Print head CM is
overheated!
2. Print head YK is
overheated!
3. Both print head CM and
YK are overheated!
Red indicator flashing 3
times then check the
message from Status
Monitor
When printing
1. Temperature of print
head CM is
abnormal
2. Temperature of print
head YK is
abnormal
3. Both temperature of
CM and YK are
abnormal
1. open top cover,
reconnect the print
head then close it
2. change new print
head (need to
reprint after correct
it)
3. contact with
technicians for
maintenance
Job stops!
Red indicator on
1. computer may shut
down, hibernate or
crashed
1. make sure your
computer will not
shut down or into
hibernate mode
when standby
2. restart to test
No Connection
Red indicator flashing
two times
USB cable is
disconnected or falls off
1. the printer or USB
cable falls off
2. reconnect the
printer or USB
cable
3. restart printer and
slicing software
4. replace with a
new USB cable
5. contact with
technicians for
maintenance
Page 46
T10 3D Printer User Manual Ver.180809EN
46 / 49
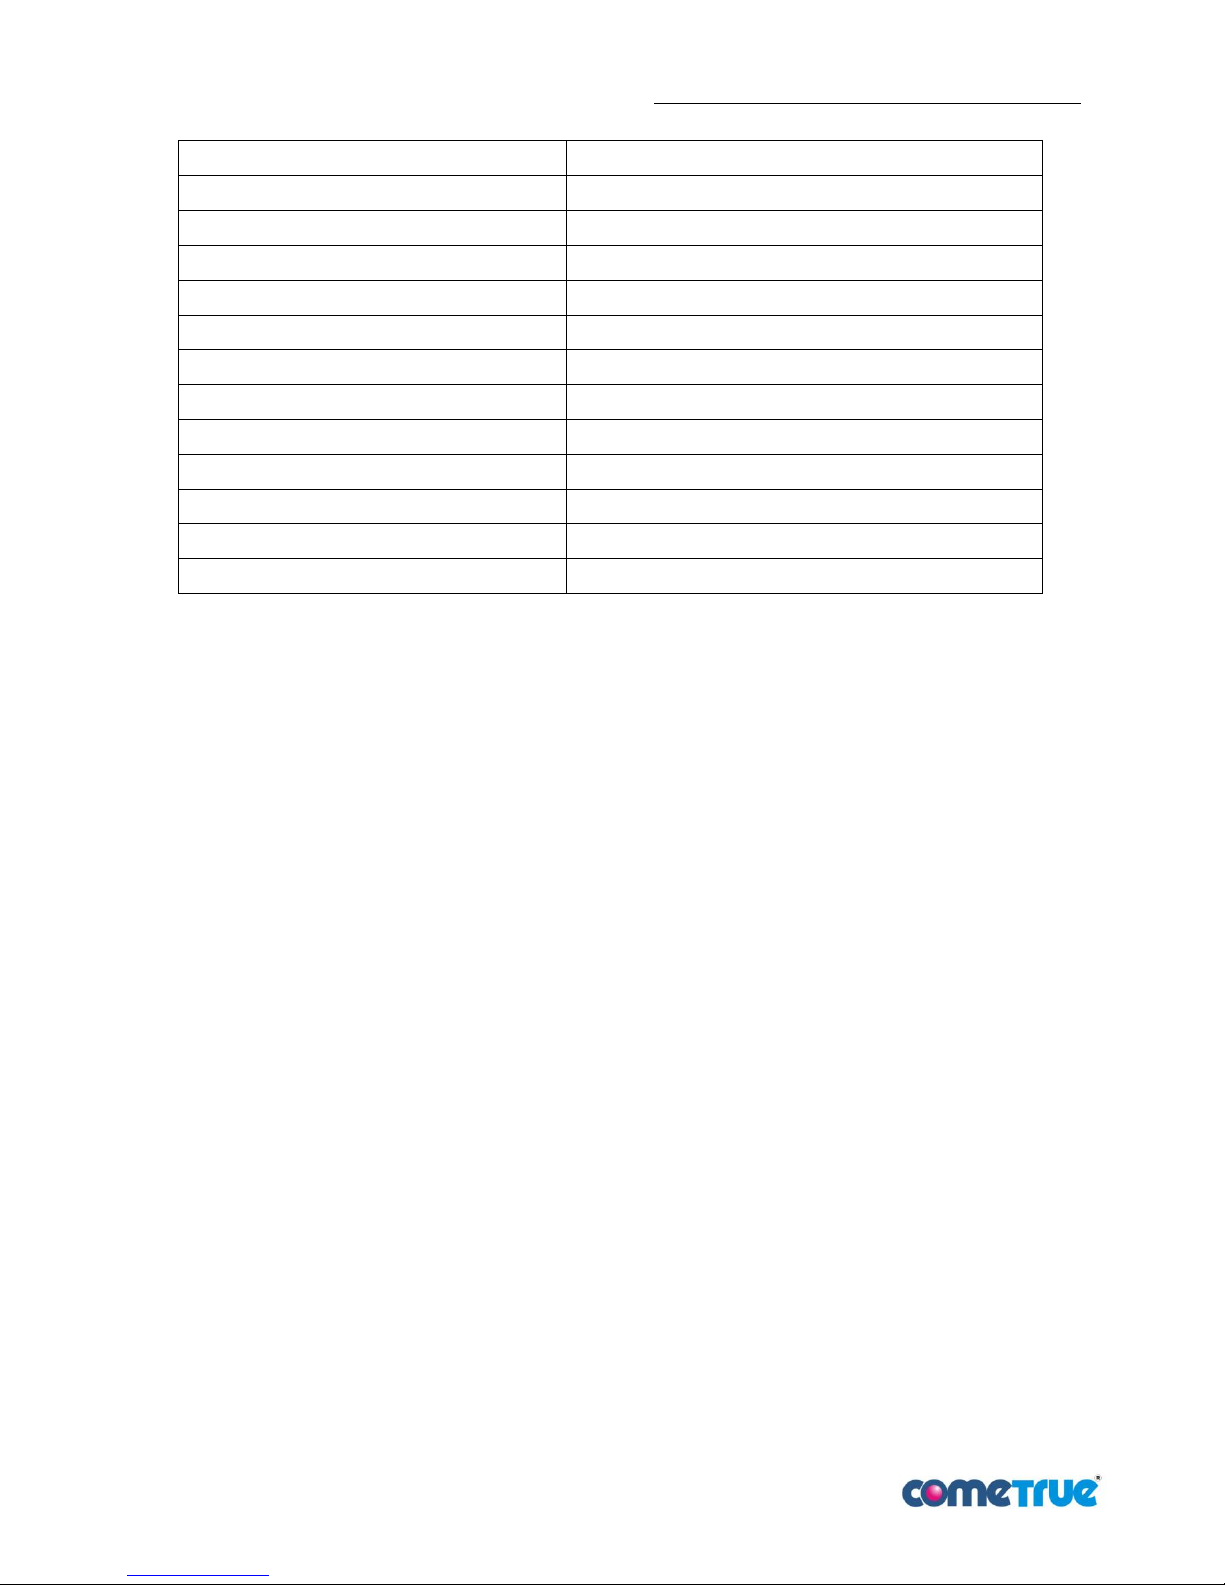
(※Status Monitor Printer Operation Display※)
Status Monitor
Printer Operating Action
Machine initial!
Initialization
Ready to print!
Standby
3Dparts are under printing!
Printing
The top cover is opened!
Top cover is opened when printing
Powders are under manual spreading!
Spreading powder manually
Wipers are under cleaning!
Cleaning Wiper base
Rollers are under cleaning!
Cleaning roller
Slow-axis is under moving!
Slow-axis is moving
Z-axis is under moving!
Feed box or build box is moving
The print head is under cleaning!
Cleaning print head
The print head is under installing!
Installing print head
The fan is opened!
Start to run powder absorbing fan
Page 47
T10 3D Printer User Manual Ver.180809EN
47 / 49
10 Firmware update
When a new version of the firmware is released, please manually update the firmware through the following
process to achieve better print quality and stability. Updating firmware by follow the steps below:
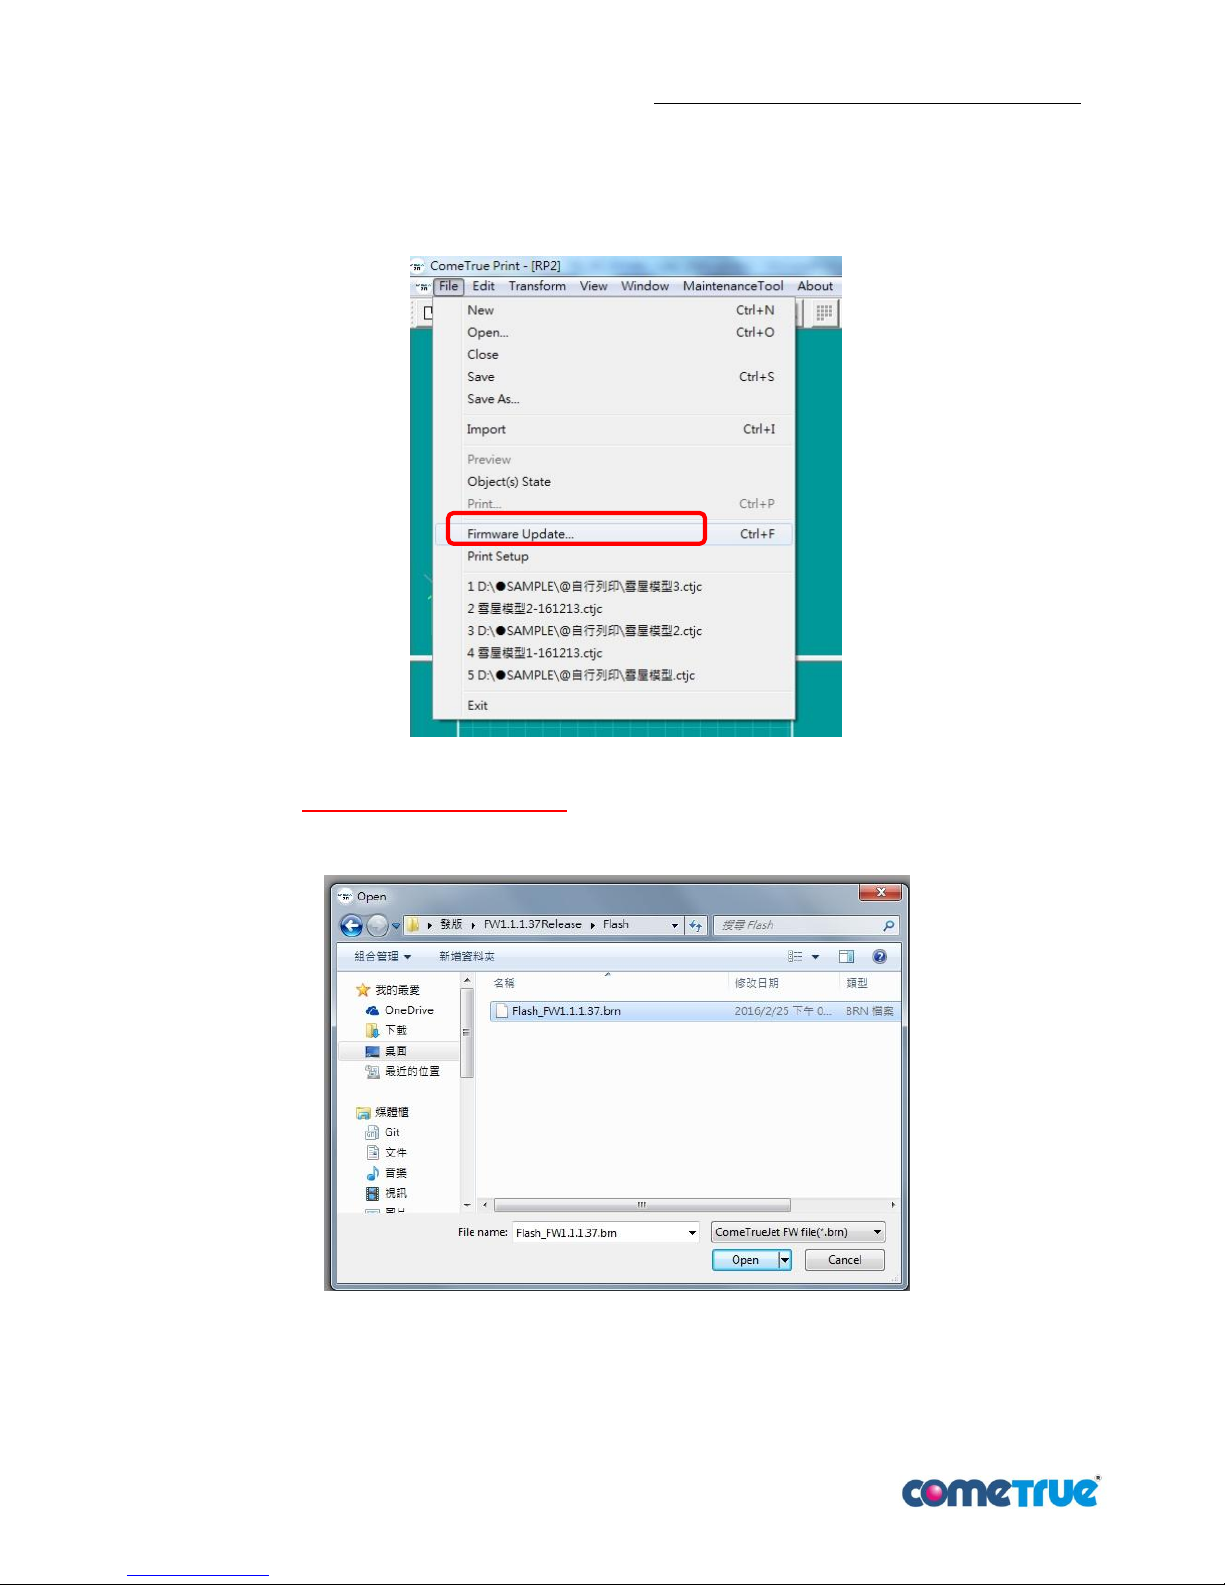
1. Select "File" -> "Firmware Update"
pic 79:Firmware update
2. Attention:Please update flash data first (File name: Flash_FWx.x.x.x.brn)
3. Select Flash file
4. Carrier will slightly move out then move back to make the sound "Click!" when Flash is updated to finish.
The flash updating process takes about 3 seconds.
Page 48
T10 3D Printer User Manual Ver.180809EN
48 / 49
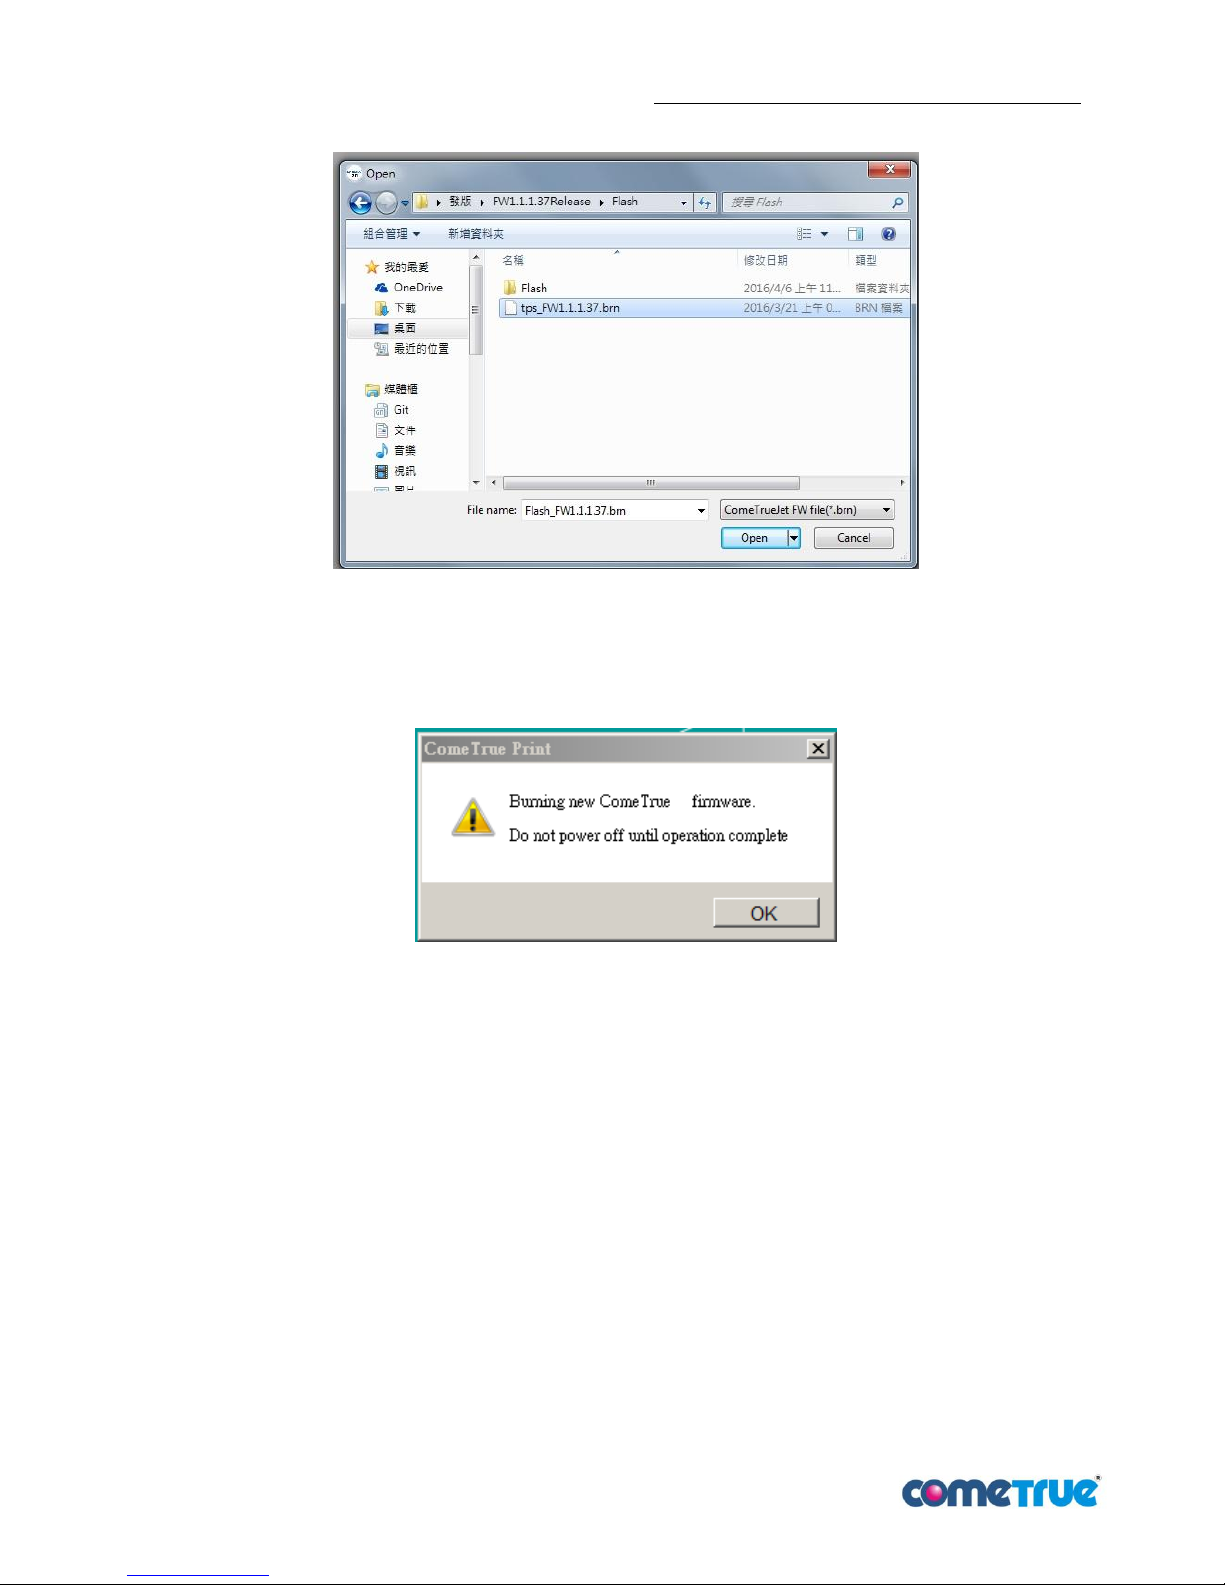
5. And repeat the process above to update the main program(File name: tps_FWx.x.x.x.brn)
When the main program is updated to finish, T10 will automatically restart. DO NOT power off
during this period.
The main program update takes about three minutes.
pic 80:Updating message
6. Unexpected power failure when firmware is updating:
a. Power on after power is repaired.
b. Wait 1 minute to confirm that the machine does not enter the setup program. .(No any actions.)
c. Open ComeTrue print to update the main program.
d. Wait 3 minutes after pressing update button
e. Restart the printer manually, then the firmware should be updated.
Page 49
T10 3D Printer User Manual Ver.180809EN
49 / 49
11 Reference material
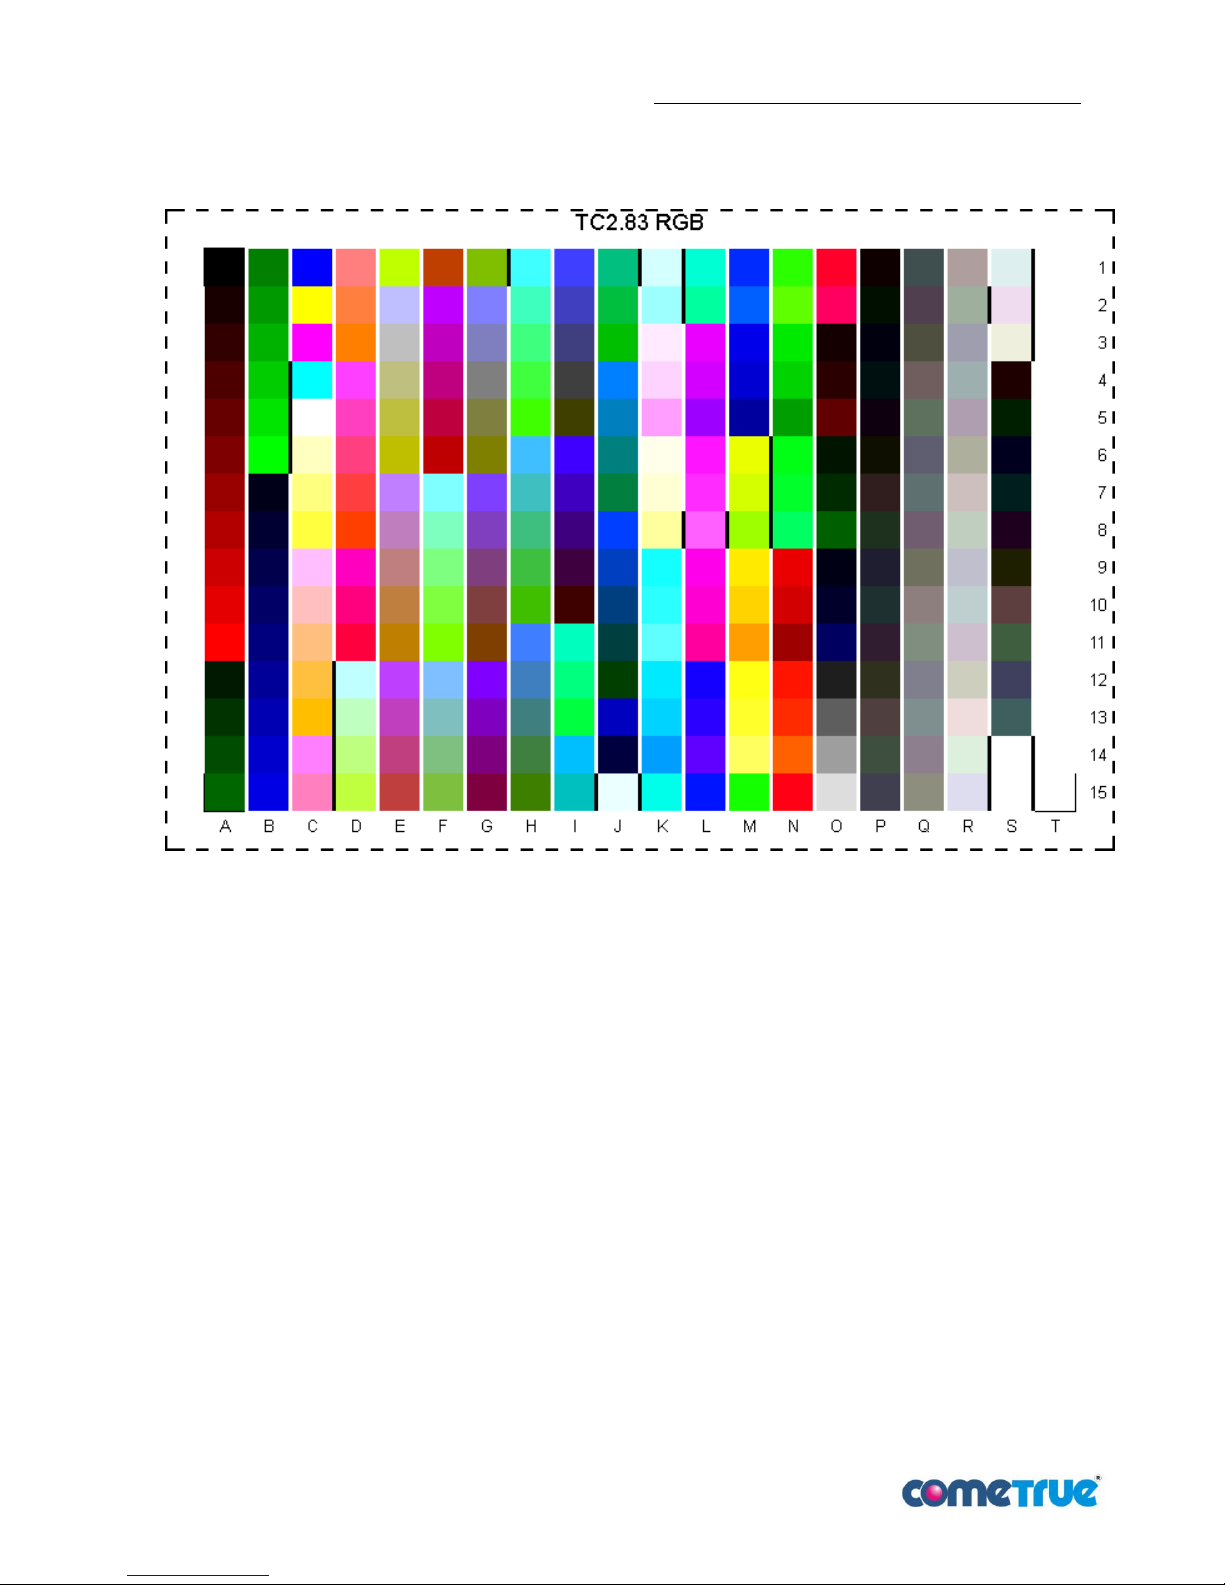
Color plate TC2.83 RGB As a reference color
 Loading...