


__________________________________________________________
Wireless Access Point
802.11g
User guide
(Model-nr WRP64)
MIMO Wireless Access Point
User guide
(Model-nr WRP64MIMO)
Version 1.01 – Sept. 2006
English

__________________________________________________________
Thank you very much for your purchasing of our Wireless AP. It
supports IEEE802.11G Standard, transferring date with speed of
54 Mbps, also conforms to IEEE802.11B Standard. Our MIMO
wireless AP and our standard Wireless AP satisfy enterprise with
small scale, SOHO user to lay out WAN and LAN. WRP64 and
WRBP4MIMO provide multi-protection for the security for the
networks, such as support or prohibit SSID broadcast, not
allowing AP to broadcast SSID network name for SSID
prevention.The WRP64 and WRP64MIMO support WEP a n d WP A
for the security of WLANS.
This manual is the user’s guide for WRP64 and WRP64MIMO.
This manual consists of hardware specification, installation
guide, configuration guide and definition on how to use WRP64
and WRP64MIMO.
Pls use this manual for your reference.

__________________________________________________________
TABLE OF CONTENTS
1. WARNING ..........................................................................................5
2. PACKAGE CONTENTS........................................................................6
3. SPECIF ICATIONS ................................................................................7
4. INSTALLATION ................................................................................... 9
4.1 Before installation ..................................................................... 9
4.2 Installation ..................................................................................... 9
5. TCP/IP Networking parameters ...................................................10
5.1 Windows 2000 SETUP .............................................................. 10
5.2 Windows XP SETUP .................................................................14
6. Web User Interface........................................................................20
6.1 The homepage..............................................................................20
6.2 – Wireless wizard......................................................................23
6.3 LAN Status ................................................................................. 24
6.4 Wireless Status ..........................................................................25
7. BASIC SETUP....................................................................................27
7.1 Configuration LAN – LAN SETUP ............................................ 27
7.2 Wireless Setup ..........................................................................29
7.2.1 Basic configuration........................................................... 30
7.2.2 Advanced Configuration ..................................................31
7.3 DHCP SERVER SETUP................................................................35
8 – SYSTEM setup ................................................................................ 37
8.1 Administration and right access – Admin Setup..................37
8.2 Firmware Upgrade ................................................................... 39
8.3 System log ................................................................................. 42

__________________________________________________________
8.4 Other functions - Miscellaneous............................................43
Appendix A Ethernet cabling ..........................................................46

__________________________________________________________
1. WARNING
1. Pls used adaptor provided by manufacturer, otherwise
will break the Wireless AP.
2. Do not drop the device down or any damage to
the AP and its electronic component.
3. Do not disassemble it , otherwise warranty for repair
will not be guaranteed
4. Do not exposure the product under heavy sunshine, to
avoid heat.
5. Pls keep you product dry and away from fire and
humidity.
6. Pls keep the product under shield and run under 0-40 to
the perfect state.

__________________________________________________________
2. PACKAGE CONTENTS
The package content of the AP is:
1. A wireless AP or MIMO Wireless AP
Model-nr WRP64 or WRP64MIMO
2. DC Power adapter (7.5V, 1.5A)
3. CD-ROM containing this manual

__________________________________________________________
3. SPECIFICATIONS
These Wireless APs are integrating many functions such as:
11G 54Mbps :Support 802.11g and 802.11b , high-speed
data rate up to 54Mbps for 802.11g (draft) and 11Mbps for
802.11b with wide range coverage.
MIMO: Support 802.11g and 802.11b, Integration of Multiple
input, Multiple Output technology for better performance.
DHCP Server Supported:All of the networked computers
can retrieve TCP/IP settings automatically from this product.
Static IP address Binding: Authorize user to manage and
configure PC in LAN in most by binding MAC address and IP
address together.
Remote Management:Users can totally manage the AP
remotely.
Support VPN Pass-through:Supports VPN Pass-through PPTP
dialogue,and also supports users to configure VPN Server and
Client in LAN.
System Log: record of all events into the system log
NTP synchronization: tiem stamp to event log
MAC Address filtering: Limit wireless access to pre-identified
MAC addresses.

__________________________________________________________
Detailed Specifications
WIRELESS AP
Standard IEEE802.11g, IEEE802.11b, IEEE802.3
IEEE802.3u
Protocols TCP/IP, DHCP, UDP, HTTP, IPSec/VPN
Pass-through
External ports LAN: One 10/100 Mbps
Frequency 2.412 – 2.472 GHz
Communications 54 Mbps, 48, 36, 24, 18, 12, 9, 6,
11 Mbps 5.5, 2, 1
Channels 14 (Europe: from 1 to 13)
Modulation CCK, DQPSK, DBPSK, OFDM
RF Power 16-18 dBm
Antenna 1* 2.4 GHz Dipole Antenna (WRP64)
3 * 2.4 GHz Dipole Antenna (WRP64MIMO)
Cable UTP 100Base-TX: UTP/STP 5 or above std.
Interface Web UI
OS Windows 95/98SE/ME/NT/2000/XP
MacOS – Linux or other UNIX system

__________________________________________________________
4. INSTALLATION
4.1 Before installation:
4.1.1. Firstly please confirm your computer OS (Windows
95, 98, NT, ME, 2000, XP, Linux, Mac) and Web
browser (Internet Explorer 4.0 with JavaScript
function、Netscape Navigator 4.0 or above version).
4.1.2. Make sure there is LAN Card which has been
correctly installed in your computer.
4.2 Installation
Setup LAN connection: connect your computer LAN
card’s port to the LAN port of the AP. with a
common network cable.
Turn on the power : connect and the power supply,
turn on it. Then access point is starting. After 12
secondes the CPU LED will be illuminated, then the
system will come to normal work state.
Start your computer
__________________________________________________________
5. TCP/IP Networking parameters
Users should configure local network to access the Access
point
5.1 Windows 2000 SETUP
(1) Install the AP.
(2) Start Windows 2000 and check LAN LED is on or off. If
off, please confirm the connection of your computer
with the AP.
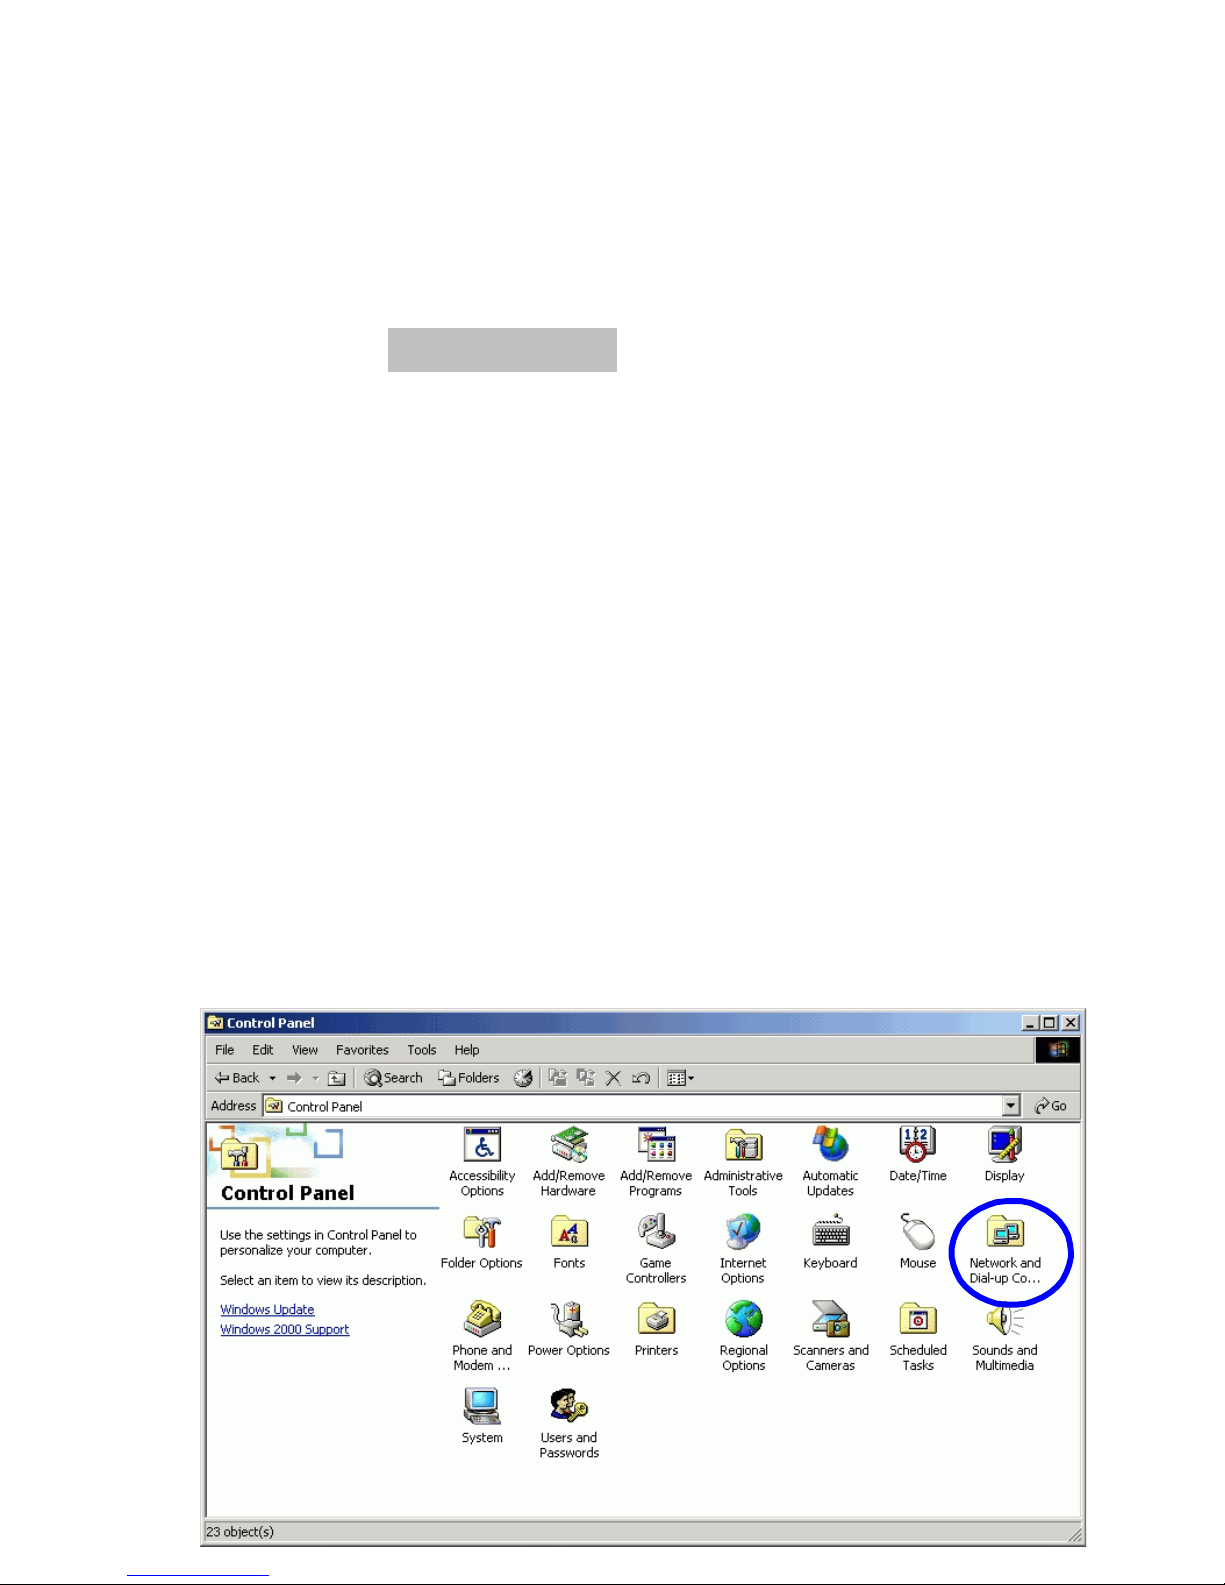
(3) Click “start”->“Setting”->“Panel Control”
__________________________________________________________
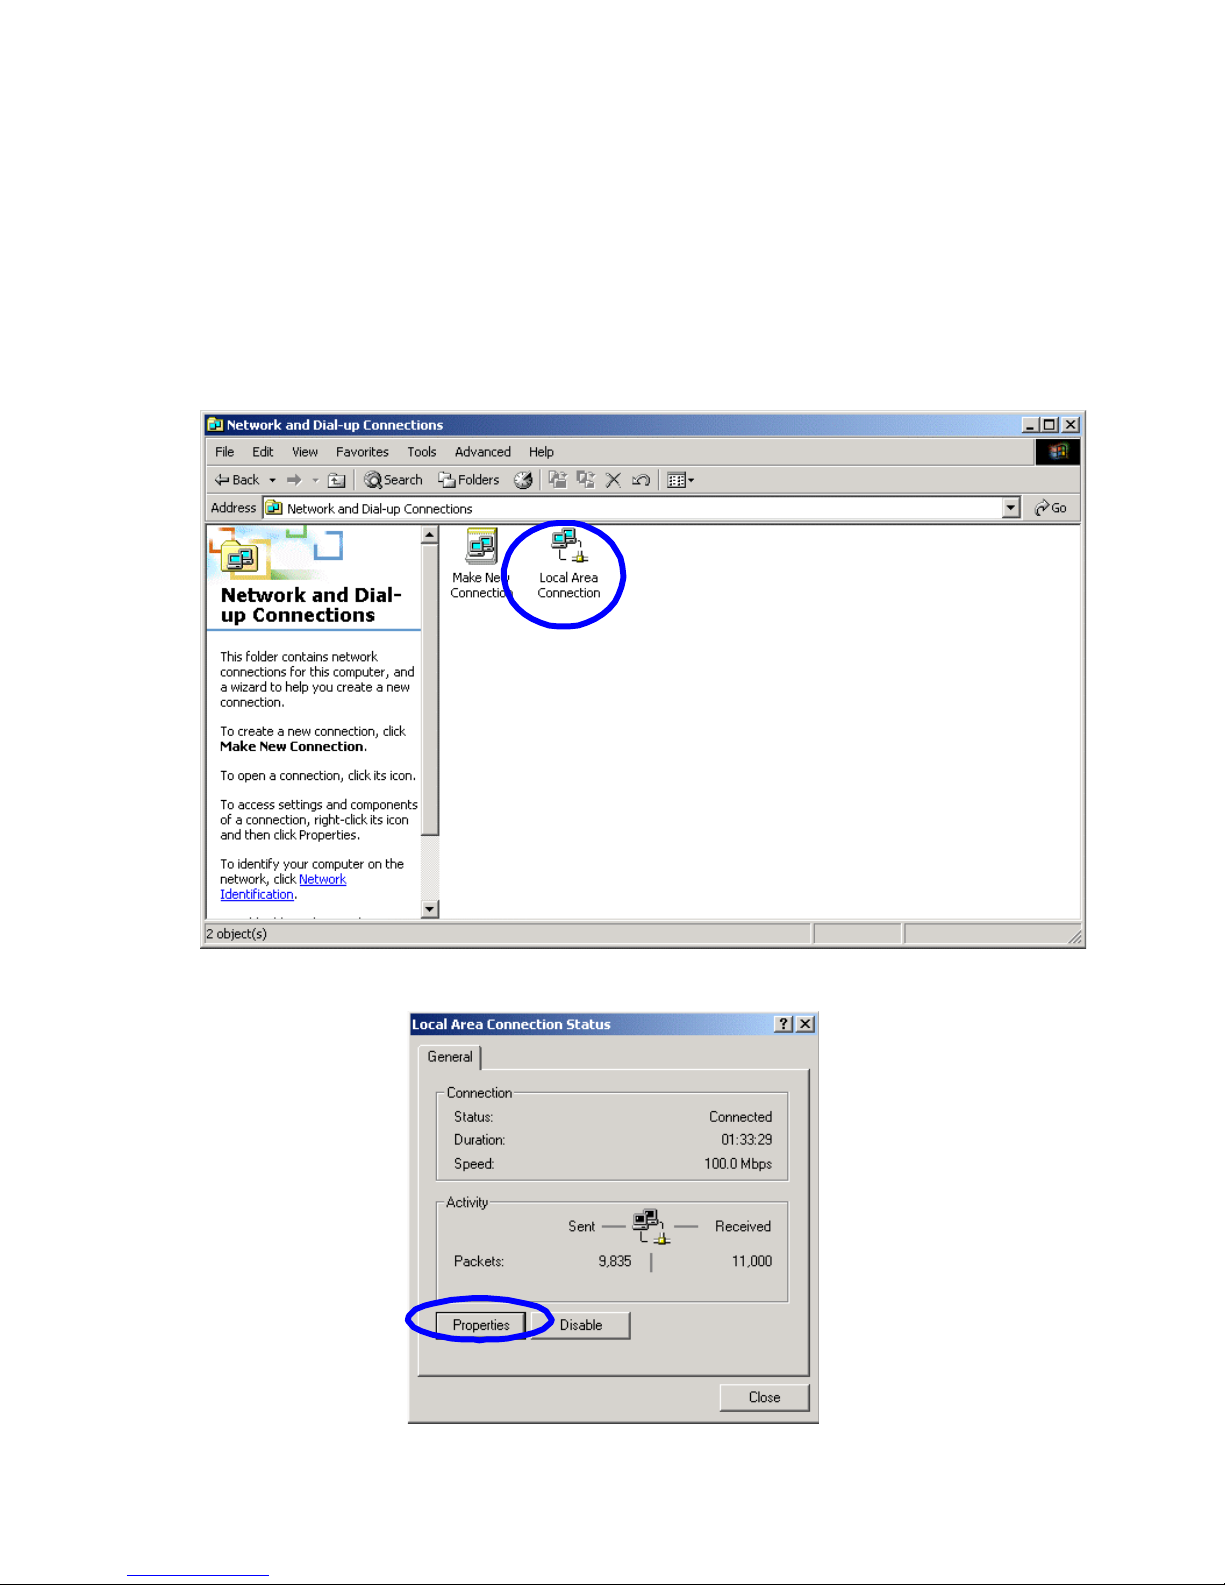
(4) Double click the “Network and Dial-up Connection” in
“contr ol panel”.
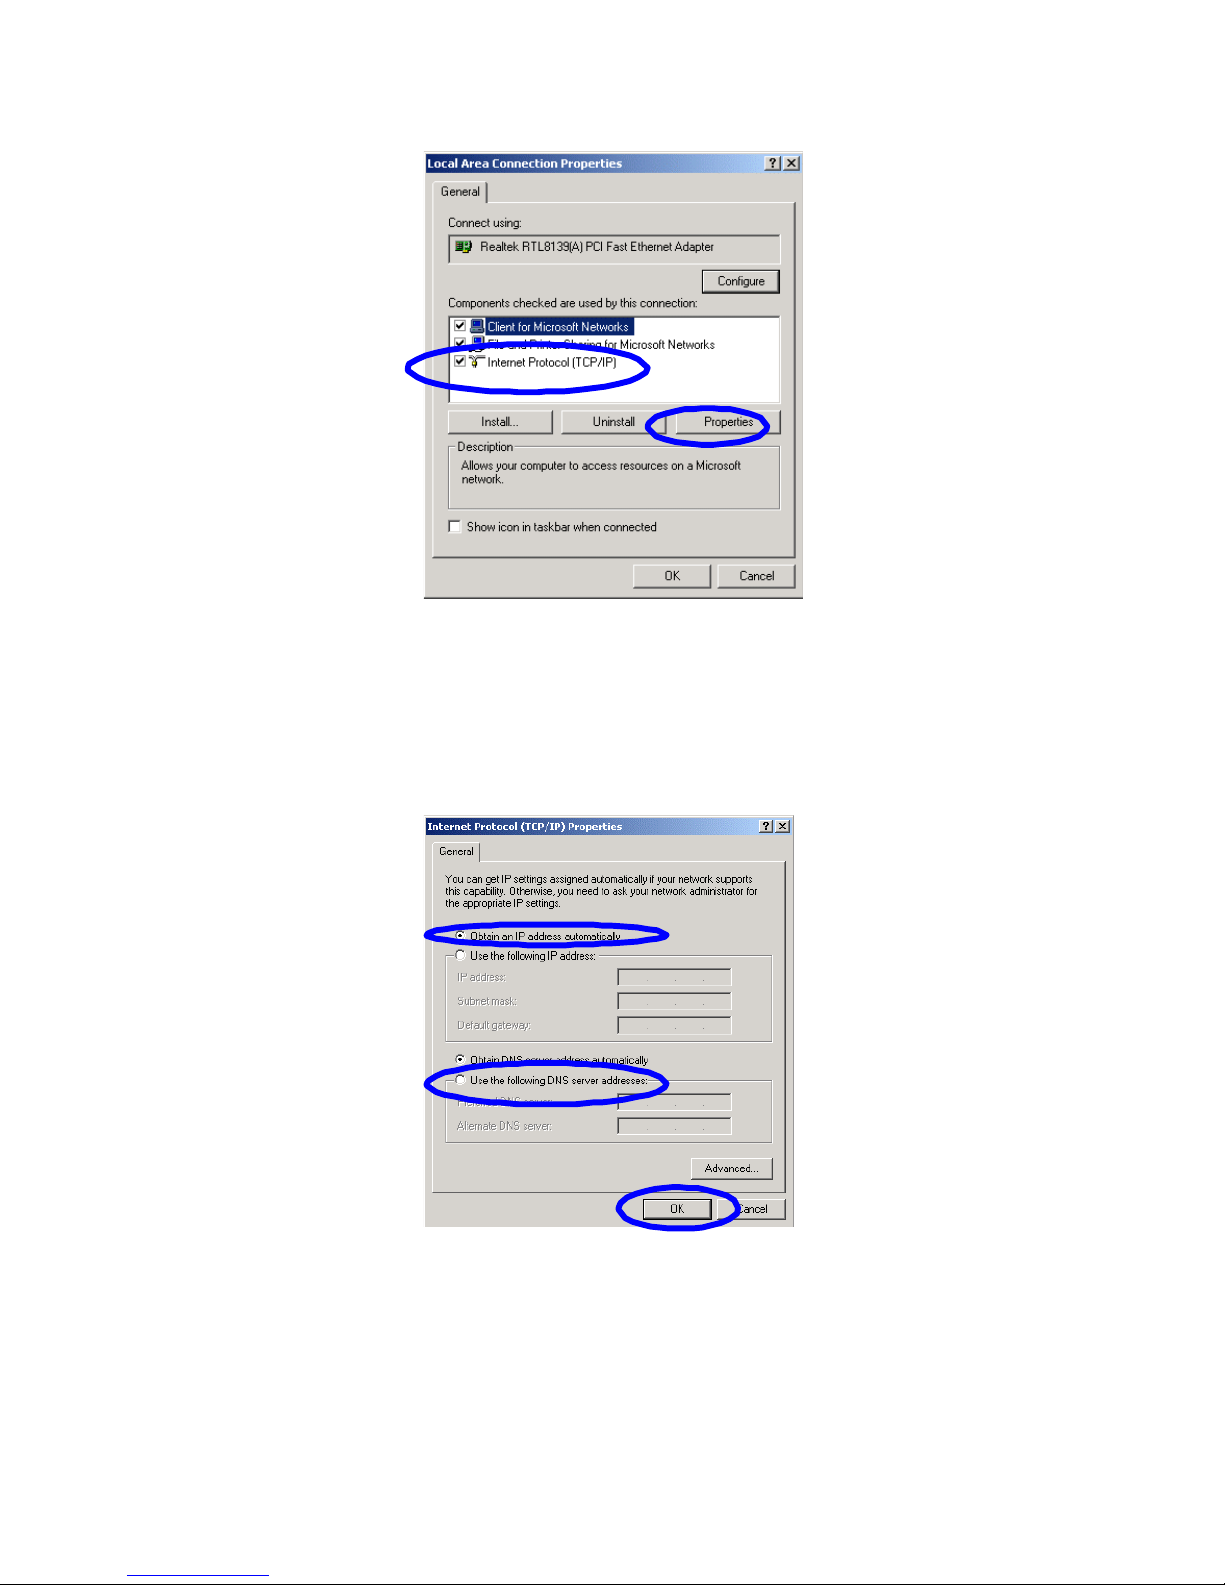
(5) Click “Local area connection”->“Properties”
->“Internet protocol (TCP/IP)”and “Properties”.
__________________________________________________________
(6) Click “General” bar, Select “Obtain an IP address
automatically” and “Obtain DNS server address automatically”
(7) Click “OK”.
(8) Click ”Start” ->“Run”.
(9) Input ”cmd”, then click “OK”.
(10) Input “ipconfig” in Pop-up Command window.

__________________________________________________________
Please make sure your IP is the same with below. If
same then your configurations is s uc c ess ful , or
please re d o the above steps and restart your
computer.
■
The IP address is between 192.168.0.2 and 192.168.0.254
■
the subnet mask is 255.255.255.0
■
the default gateway is 192.168.0.1
(11) Input “ping 192.168.0.1”, then “Enter”.
(12) If you can see “Reply from 192.168.0.1: bytes=32

__________________________________________________________
time=2ms TTL=64”,then the connection between your
computer and AP is completed.
5.2 Windows XP SETUP
(1) Install the AP.
(2) Start Windows XP and check LAN LED is on or off. If
off, please confirm the connection of your computer
with the AP.
(3) Click “Start”->“Setting”->“Panel Control”
(4) Double click the “Network and Internet
Connections” in “control panel”.
(5) Click “Network connection”->“local area
connection”->“properties”-> “Internet
protocol(TCP/IP)” and “Properties”.
(6) Click “General “, Select “Obtain an IP address

__________________________________________________________
automatically” and “Obtain DNS server address
automatically”
(7) Click “OK”

__________________________________________________________

__________________________________________________________
(8) Click “Start”->“Run”
(9) Input “cmd “, Click “OK”

__________________________________________________________
(10) Input “ipconfig” in the pop-up command window.
(11) Please make sure your IP is the same with below. If
same then your configurations is su cces sf ul , or
ple as e re do the above steps and restart your
computer.
■
The IP address is between 192.168.0.2 and 192.168.0.254
■
The subnet mask is 255.255.255.0
■
The default gateway is 192.168.0.1
(12) Input “ping 192.168.0.1”, then “Enter”.
(13) If you can see “Reply from 192.168.0.1: bytes=32
time=2ms TTL=64”,then the connection between your
computer and AP is completed.

__________________________________________________________

__________________________________________________________
6. Web User Interface
6.1 The homepage
■ Run Internet Explorer to connect t to your AP
■ Input the following URL in the address bar:
http://192.168.0.2
192.168.0.2 is the default address of the AP.
■ The homepage of the AP is displayed and offers two options:
1) – You can access the configuration pages by clicking on the
‘LOGIN’ button.
INFO / When delivered, no authentication (login/password) is
required. Access to the AP Web UI is free. If you have already
entered a login and password, you will have to enter them to
access to the web configuration pages.
2) You can start the « WIRELESS WIZARD » to configure the
Wireless connection.
This page is also displaying two information: the IP address and
the firmware revision used.

__________________________________________________________
Connection to the Web UI homepage.
The detailed configuration of the AP is presented in the next
chapter.
All configuration web pages have a similar presentation:
three tabs are available:
- Status: Status of AP (WAN, Wireless, LAN, …)
- Basic Setup: (WAN, Wireless, DHCP Server)
- System: (Admin, firmware upgrade, System Log, …)
-
In each tab, a list of functions is available.

__________________________________________________________
On each page there is also three buttons on the top right side:
Refresh – Reload the stored parameters.
Refresh – Reload the page. By reloading the page you can
cancel the modifications if you did not push the “Apply” button.
Save – Save the full configuration of all parameters entered to
the flash memory of the AP. The parameters are then available
even after a power shut down or a reboot.
The “Apply” button in each web page is transferring the
parameters you configure in the web page into the RAM of the
AP. In case of power loss, the parameters will be lost.
Help – Display for each page a description of the function and
different items in the page.

__________________________________________________________
6.2 – Wireless wizard
Please send the radio region domain. Because Europe may not
be referenced, please select ‘Others’.
During a few seconds, the AP is searching for existing wireless
network that may affect the performance and stability of the
wireless network of the AP.
WARNING / the very first models of wireless cards sold in France
were accepting only channels 10 to 13. To keep compatibility
with these equipments, we suggest you to use a free channel in
this range. The channel 11 is the usual radio channel in France.
If this channel is not free, please use channel 13 or another
channel which is a least 2 channels far from a busy channel.

__________________________________________________________
6.3 LAN Status
Click on the “Status” tab and select the “LAN Status” function:
LAN Information : Show user current LAN connecting status
including MAC address of the LAN port.
Connection Type: Static IP or DHCP client
Physical Address: MAC address of the client
LAN IP address, Subnet mask
Default Gateway : IP address of your AP
Primary DNS Server : provided by your ISP or LAN administrator
Secondary DNS server : provided by your ISP or administrator

__________________________________________________________
6.4 Wireless Status
Click “Status”->“Wireless Status” as following:
This web show current wireless part configuration, including:
■
Wireless Status: Show current wireless connector
status.
■
Wireless MAC address: MAC address of th wireless part.
■
SSID (networking name): Show current wireless
networking name.

__________________________________________________________
■
Mode: Current used wireless connector forwarding
mode
■
Region: Show current channel region information
■
Channel: show current used channel
■
SSID Broadcast: Show SSID is on or off
■
Authentication Type: Show current used certification
way
■
Encryption Strength: Show WEP encryption length
(64/128 bits)
■
MAC Authentication: Show how to identify wireless
customer by MAC address.
The “Search AP” button is usable only in “Client mode” when
you use the device to connect an Ethernet equipped device to a
wireless network.

__________________________________________________________
7. BASIC SETUP
7.1 Configuration LAN – LAN SETUP
Click on ”Basic Setup” and select “LAN SETUP”:
LAN IP parameters can be set in this page.
■ System IP address:IP address in LAN. This IP address is
factory default value 192.168.0.2, and you can change it.
■ Subnet Mask:LAN subnet mask.
■ Default gateway:Adresse de passerelle par défaut (il
s’agit de l’adresse de votre routeur).
■ Primary DNS server:provided by your ISP (if your
network is connected to the Internet) or by your network
administrator.
■ Secondary DNS server:provided by your ISP (if your
network is connected to the Internet) or by your network

__________________________________________________________
administrator.
■ MTU:packets Length – Do not change this value without
being request by a Comet Labs representative or a competent
technician.

__________________________________________________________
7.2 Wireless Setup
Click the ”Basic Setup” tab and select the “Wireless SETUP”
function:
This page is displaying two sections:
First section for basic setup, second section for wireless security
features.

__________________________________________________________
7.2.1 Basic configuration
■ Status: displays the communication type and wireless
operating mode (MIMO or 802.11g/b - on/off, AP/Mode Client)
■ Operation: Activate o r deactivate the wireless function?
When selection is OFF, the wireless AP is no longer
transmitting or receiving radio waves.
■ SSID: specify the wireless network name.
■ Mode: Three modes are available:
- g and b: Both 802.11g and 802.11b equipments can
communicate with the AP.
- g only: Only 802.11g devices can communicate.
- b only: Only 802.11b devices can communicate.
NOTE / the « g and b » mode is insuring compatibility
with old equipments working at 11 Mbps, but is reducing
the wireless communications performances to insure this
compatibility.
■ Region: Specify the radio communications domain.
If Europe is not specified in the list, please select
"Others". Radio channels from 1 to 13 are then available.
■ Channel: Select the radio channel.
In WAN Client mode, this option is disabled. The AP is
becoming a client for any other access Point and will
automatically select the radio channel of the AP to be
connected.
■ Broadcast of SSID Option: If activated (crossed), the
wireless network name (SSID) will be broadcasted.
When the basic configuration is done, click on “Apply” to
validate these parameters.

__________________________________________________________
7.2.2 Advanced Configuration
7.2.2.1 Wireless Security Setup
Your « Authentication type » and « Encryption Strength »
selections will modify automatically the presentation of the
other parameters.
Authentication type: OPEN System or Sharing KEP or AUTO
modes are similar to the usual modes found in Windows XP
configuration.
Encryption Strength: WEP 64/128 Bit
■ Encryption Strength: WEP 64 Bit or WEP 128 Bit.
Encryption key length.
■ Key Input: String (alphabetical – keyword) or HEX
(Hexadecimal – from 0 to 9 and letters for A to F).
in 64-Bit WEP, length of the string is 5 characters. In
hexadecimal mode: length is 10 characters
En 128-Bit WEP mode, the string length is 13 characters,
in hexadecimal 26 characters are needed.

__________________________________________________________
You can enter up to 4 keys, but only one key is activated (The
one selected by a radio button).
To validate your configuration, please click on “ Apply ”.
Authentication type: WPA-PSK
The WPA-PSK mode (Personal sharing Key) offers a better
security than WEP by using longer encryption keys and avoiding
some of the wicknesses of WEP protocols.
Encryption strength: TKIP
The key can count up to 63 characters.
Encryption strength: AES
Maximum length key: 63 characters.
This mode is offering a different coding system and may be
mandatory when using WDS function with some APs such as the
Apple Airport Extreme.

__________________________________________________________
7.2.2.2 MAC Authentication – M.A.C addresses
filtering
■ Policy:
— Accept all: No filtering at all.
— Reject registered M.A.C. addresses: Specified M.A.C.
addresses will not be allowed to connect.
— Accept registered M.A.C. addresses: Only registered
M.A.C addresses will be able to connect.
NOTE / In this last mode, do not forget to change this
parameter when changing a wireless card in a computer.

__________________________________________________________
7.2.2.3 WDS configuration – Wireless distribution
system
This functionality allows different access points (Maximum 6)
to relay the wireless communications from the transmitter to
the final destination.
You can generate a meshed network.
In each AP, you need to enter the wireless M.A.C addresses of
all the other APs you want to communicate with.
Then your AP is acting both as multipoints bridge relay and as
a simple access point.
NOTE / WDS connection between various APs may require
WPA-PSK in AES mode.
A technical note explaining how to configure WDS is available
on comet Lab’s web site at www.cometlabs.com
When the parameters are set, do not forget to apply and save
the settings to avoid their loss after a power shortage or
reboot process.

__________________________________________________________
7.3 DHCP SERVER SETUP
DHCP Setup
The access point is including a DHCP server which simplifies
the TCP/IP configuration of the wireless equipments in your
network by providing a unique IP address to each equipment.
■ DHCP Server Status: DHCP server actual status running
(Active) or Stopped.
■ DHCP Server operation: Start or stop the DHCP server.
■ DHCP IP Pool: IP address range automatically allocated
by the DHCP server.
■ Manual DNS configuration: Let DJCP server automatically
allocated the DNS server to client PC.
NOTE / Some ISPs do not accept DNS server IP addresses
which are not belonging to them.
Static Lease Management
:This function makes sure the
convenient control of the IP address in LAN computers. Static
lease IP can obligate static IP address for computer with
appointed MAC address. Afterwards when the computer asks
DHCP server for IP address, DHCP server will give it the
obligated IP address.

__________________________________________________________
To generate the link between IP address and M.A.C address
for equipments already connected to the AP, click on « Add
Hardware address & IP pair on the real network » button.
Si you wish to connect some other equipment or want to
perform this configuration manually, click on « Add hardware
address & IP pair manually » button.
The check box « Get hardware address & IP from this host »
allows you to get the MA.A.C address of the computer
running the Web UI.
Do not forget to click on « Apply » to validate your
modifications and click on SAVE to record the parameters in
flash memory of your access point.

__________________________________________________________
8 – SYSTEM setup
8.1 Administration and right access – Admin Setup
Click on “System” and select “Admin Setup”:
Login Account Setup section:
■ Current Login ID: actual user login.
By default, this field is empty, no user authentication is
required. You do not need to fill this filed.
If you set one login/password, you need to specify the
current user login.
■ Current password: if you want to change the password,
you need to enter the actual password.

__________________________________________________________
■ New Login ID: please specify the new login.
■ New password: Enter the new password.
■ Re-type New password: confirm the new password a
second time. This field will be compared with “New
password” field to make sure you specified the same new
password.
Click on “Apply” for validation.
NOTE / For your AP configuration protection a login/password is
recommended.
NOTE / If you have lost the password, it is possible to reset the
AP parameters to default values by pushing the RESET button
during 5 seconds after power on.
ATTENTION: All parameters will be lost; the IP address will be
set to 192.168.0.2

__________________________________________________________
8.2 Firmware Upgrade
Click on “System” and select “Firmware Upgrade“:
Before any firmware upgrade, please take a note of your
current firmware version running in the AP.
Go to www.cometlabs.com
into the products section, select
the product and click on the firmware link, in the page.
Make sure there is a new version and click to download it. It is
either a .bin or .img compressed in a .zip file.
Decompress the file.
The generated file can be transferred to the AP.
NOTE / Be careful, the Comet labs product range is wide and
you need to use a firmware reserved for your model.
Please do not hesitate to contact our technical support for
detailed information or confirmation before upgrading.

__________________________________________________________
Click on the “Browse” button and select the file to download.
Then click on the “Open” button, the filename is now appearing
in the « New Firmware » field.
Click on the « Upgrade » to start the updating process.
Then the process is successfully terminated, the access point
will restart automatically.
Verify the version of the firmware in the web UI to make sure
the update is performed successfully.

__________________________________________________________
NOTE / The upgrade process is taking around 60 seconds. During
this time, do not interrupt it; do not switch the AP off.
Interrupting the upgrade may leave the AP in an indeterminate
state.
NOTE / Do not use the wireless network for upgrading the
firmware. Disturbances in the wireless communications may
generate problems and leave the AP in an indeterminate state.

__________________________________________________________
8.3 System log
Click on “System” and select “System log”:
Section System log setup:
■ Operation: You can click on the Start/Stop button to
activate the record of the AP events.
■ Clear System Log: The « Clear » button will remove all
existing events from the log.
System Log History:
Up to 400 events can be stored. If you have asked for mailing
the log events, the mail will be transmitted every 400 events.
In all cases, you can see in the log, the different errors
occurred. Errors are displayed in RED color.

__________________________________________________________
8.4 Other functions - Miscellaneous.
Click on “System” and select “Misc.”
Host name Setup section:
■ Setup Hostname: Configure AP name in the networking
presented on the report forwarded to administrator mailbox.
Config Mgmt Restart section:
■ Config Backup: Enable user to backup all the configurations.
■ Config Restore: Restore previous configuration on AP.
Restore Default: Restore defaulted configuration provided by
manufacturer, including:

__________________________________________________________
Defaulted user name: Blank
Defaulted IP address: 192.168.0.1
Defaulted Subnet Mask: 255.255.255.0
Restore default configuration provided by manufacturer, AP
will reboot automatically.
■ Restart System: Click “Restart System”, AP will reboot
automatically.
System Time Setup: For sake of Scheduler. pls configure
accurate time system. Refresh AP current time in accurate time
zone: Or choose other system server until time to be refreshed.
System Time Setup section:
It is important for your AP to be up to time. It is useful for the
events log pour confirm date and time when an error has
occurred. This function is also important in case of scheduled
Internet blocking defined.
One of the best way to maintain an exact time is to coordinate
the AP with a NTP server (network time protocol) available on
the Internet.
■ Time Server: Click on the first radio button if you want to
use a pre-configured NTP server. Click on the second radio
button to specify the IP address of your NTP server.

__________________________________________________________
■ Summer Time: to automatically adjust the time with
summer time, please check this box.
■ Standard Time Zone: Select your local time zone.

__________________________________________________________
Appendix A Ethernet cabling
Standard cable
Cross-over cable
 Loading...