

Page 1

Network Disk Server
ND-42000 / ND-43000
User Manual
Page 2

NETWORK ATTACHED STORAGE
Network Disk Server
User Manual
Version 3.0
Copyright 2000-2003. All Rights Reserved.
This manual applies to 3.01 or later versions of Network Disk Server
July 25, 2003
1
Page 3

CUSTOMER SERVICE
To obtain service or technical support for your system, please refer to the
registration card for detailed contacts.
Trademarks
Microsoft
Microsoft Inc. Novell
Apple
®
, Windows® and Internet Explorer® are registered trademarks of
®
and Macintosh® are registered trademarks of Apple Computer Inc. All
®
and NetWare® are registered trademarks of Novell Inc.
other brand or product names are trademarks of their respective companies or
organizations.
LIMITED WARRANTY
In no event shall COMET LABS’s liability exceed the price paid for the product
from direct, indirect, special, incidental, or consequential software, or its
documentation. COMET LABS offers no refunds for its products. COMET LABS
makes no warranty or representation, expressed, implied, or statutory, with
respect to its products or the contents or use of this documentation and all
accompanying software, and specifically disclaims its quality, performance,
merchantability, or fitness for any particular purpose. COMET LABS reserves the
right to revise or update its products, software, or documentation without
obligation to notify any individual or entity.
FCC STATEMENT
The COMET LABS Network Disk Server has been tested and found to comply with
the limits for a Class B digital device, pursuant to Part 15 of the FCC Rules.
These limits are designed to provide reasonable protection against harmful
interference in a residential installation. This equipment generates, uses, and can
radiate radio frequency energy and, if not installed and used according to the
instructions, may cause harmful interference to radio communications. However,
there is no guarantee that interference will not occur in a particular installation.
If this equipment does cause harmful interference to radio or television reception,
which is found by turning the equipment off and on, the user is encouraged to try
to correct the interference by one or more of the following measures:
Reorient or relocate the receiving antenna
Increase the separation between the equipment or device
Connect the equipment to an outlet other than the receiver’s
Consult a dealer or an experienced radio/TV technician for assistance
CAUTION
Danger of explosion if battery is incorrectly replaced. Replace only with the same
or equivalent type recommended by the manufacturer. Dispose of used batteries
according to the manufacturer's instruction.
2
Page 4

Contents
Chapter 1. Overview of Network Disk Server...................... 5
1.1 Package Contents .........................................................................5
1.2 System Overview..........................................................................6
Chapter 2. Installation and Set-up of Network Disk Server 9
2.1 Installing the Hardware..................................................................9
2.2 Set-up before First Operation ....................................................... 10
Chapter 3. Administration of Network Disk Server ........... 11
3.1 Accessing the Administration Page................................................. 11
3.2 Server Administration.................................................................. 13
3.3 Quick Configuration..................................................................... 14
3.4 System Settings ......................................................................... 14
3.5 Network Settings ........................................................................ 15
3.6 Disk Configuration ...................................................................... 17
3.7 User Management....................................................................... 19
3.8 Network Share Management......................................................... 21
3.9 System Tools .............................................................................22
3.10 Statistics & Logs ....................................................................... 25
Chapter 4. Accessing Network Disk Server ....................... 26
4.1 Using Microsoft Windows.............................................................. 26
4.2 Using the Apple Mac Operating System .......................................... 29
4.3 Using the Unix/Linux Operating System ......................................... 34
4.4 Using Novell NetWare .................................................................. 34
4.5 Using a Web Browser .................................................................. 34
4.6 Using File Transfer Protocol (FTP).................................................. 34
Chapter 5. Introduction to Backup Functions.................. 35
5.1 Tape Backup .............................................................................. 35
5.2 Remote Replication ..................................................................... 39
5.3 Backup Agent............................................................................. 42
5.4 NetBak Replicator ....................................................................... 44
Chapter 6. Snapshot ......................................................... 53
6.1 What is Snapshot? ...................................................................... 53
6.2 Basic Snapshot Settings............................................................... 54
6.3 Advanced Snapshot Settings ........................................................ 55
6.4 Creating a Snapshot or a Schedule ................................................ 56
6.5 Restoring Data from Snapshots..................................................... 59
6.6 Viewing Snapshot Status.............................................................. 60
6.7 Using Snapshot for Tape Backup and Remote Replication.................. 61
Chapter 7. Virus Scan ....................................................... 63
7.1 Virus Scan ................................................................................. 63
7.2 Installing Virus Scan Agent........................................................... 64
7.3 Enabling Virus Scan Support......................................................... 68
3
Page 5

7.4 Viewing Details of Infected Files.................................................... 69
Chapter 8. Network Disk Server - Maintenance ................ 70
8.1 Shutdown/Restart the Server........................................................ 70
8.2 Reset the Administrator Password & Network Settings...................... 70
8.3 Disk Failure or Malfunction ........................................................... 71
8.4 Power Outage or Abnormal Shutdown ............................................ 71
Appendix A: LCD Panel ....................................................... 72
Appendix B: Web File Manager ........................................... 74
Appendix C: JAVA Web File Manager .................................. 77
Appendix D: Quick Install Wizard ....................................... 80
Appendix E: Using FTP........................................................ 83
Appendix E: Using FTP........................................................ 84
4
Page 6

Chapter 1. Overview of Network Disk
Server
1.1 Package Contents
The Network Disk Server™ box contains:
• Network Attached Storage Appliance
• User Manual
• Power Cord
• Ethernet Cables
• Software Companion CD-ROM
• Warranty Registration Card
Important Note: Please backup important data periodically to avoid
any potential data loss.
5
Page 7
y
r
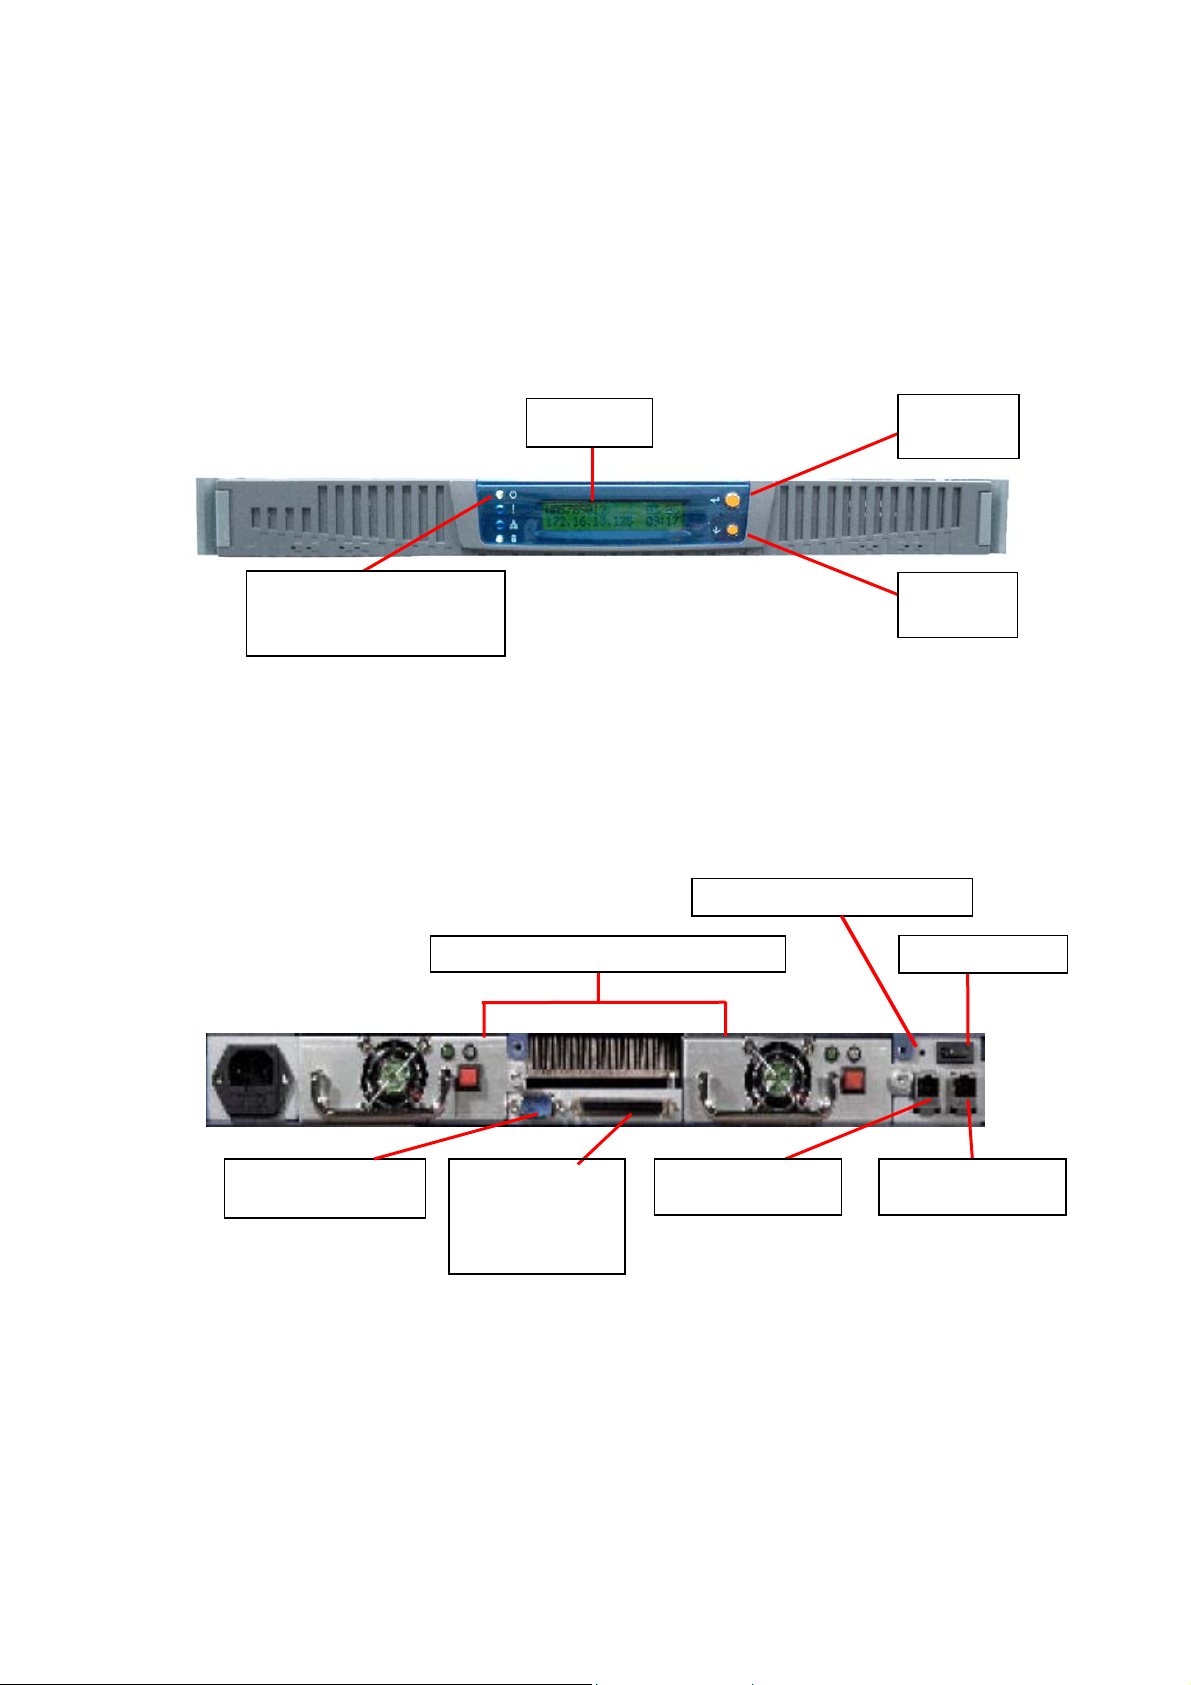
1.2 System Overview
ND-42000
Front View
Front View
4 LED indicators: Power,
Error, Network, and Disk
Access
Rear View
ATX Redundant Power Suppl
LCD Panel
Setting
Switch A
Setting
Switch B
Configuration Reset Switch
Power Switch
RS232 Connector
(for UPS)
Connector (fo
Tape Drive)
6
SCSI
RJ-45 Gigabit
Ethernet Port 1
RJ-45 Gigabit
Ethernet Port 2
Page 8
eset Switc
(for UPS)
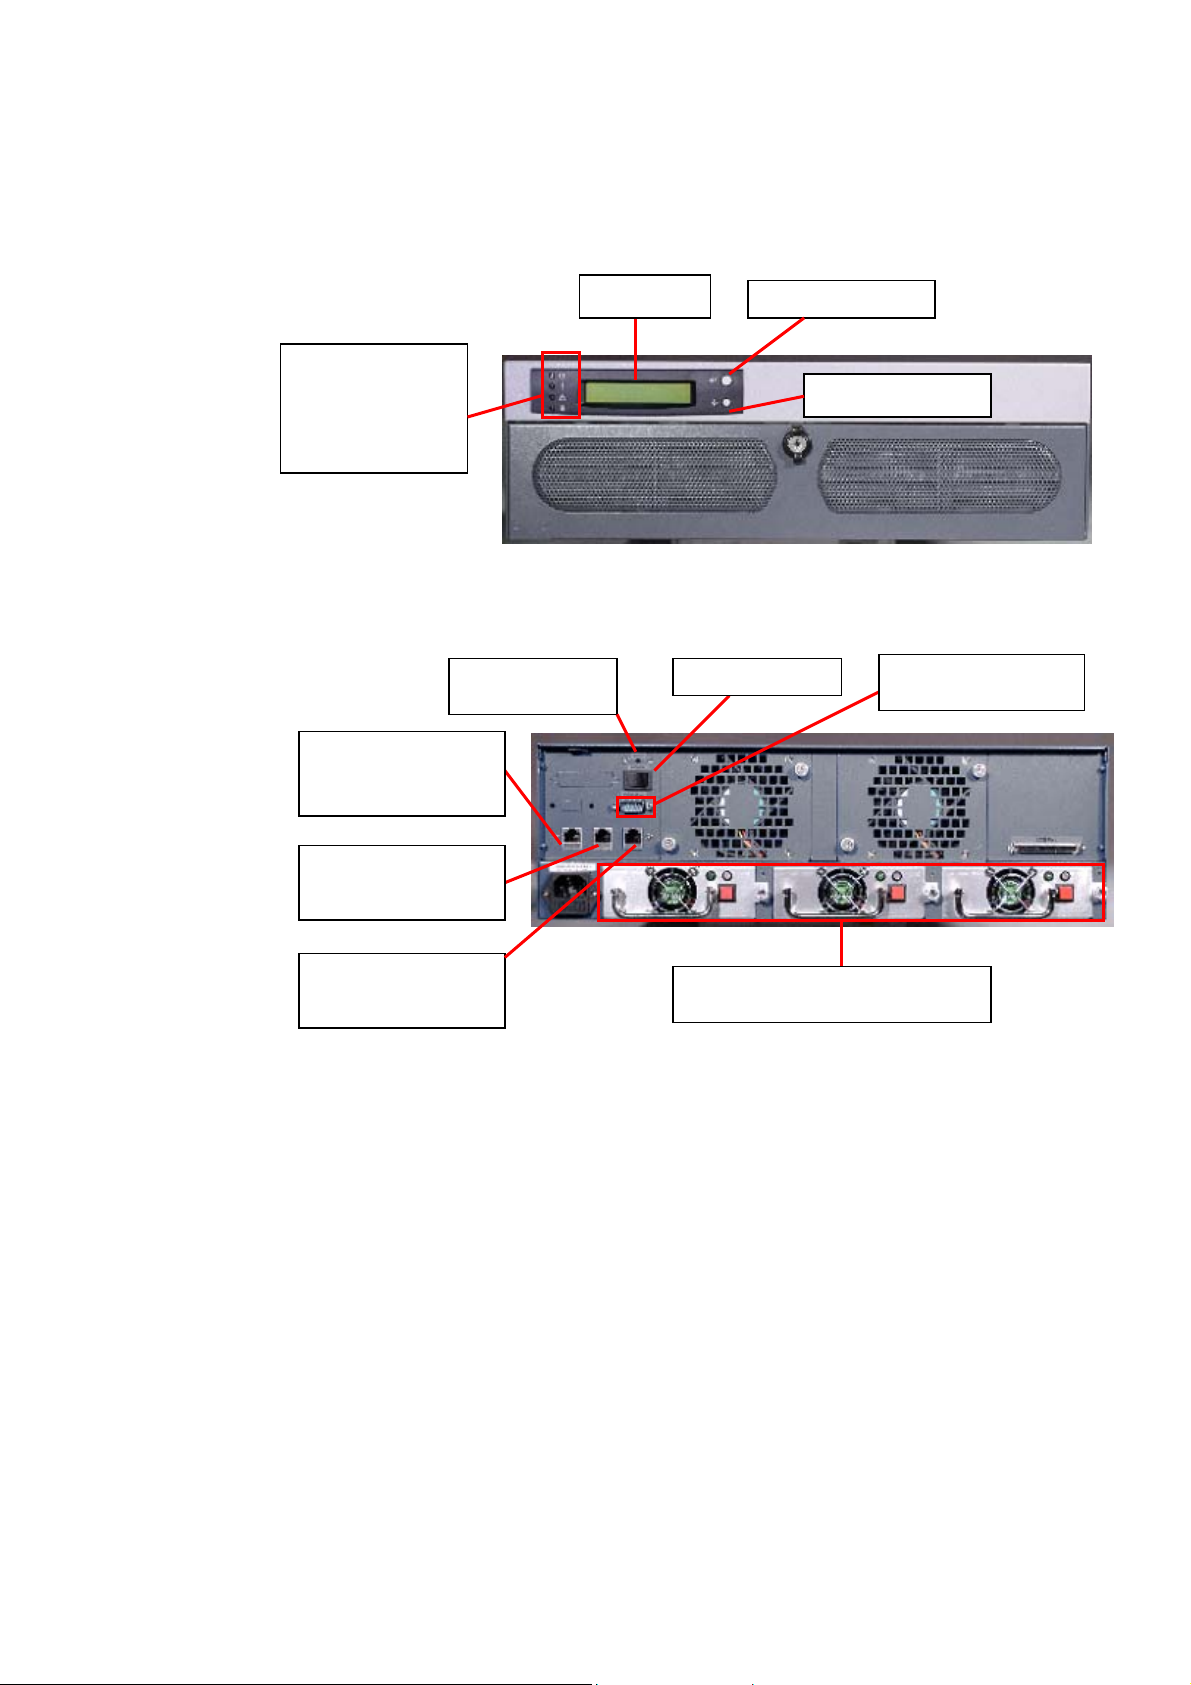
ND-43000
Front View
4 LED indicators:
Rear View
Power, Error,
Network, and
Disk Access
Configuration
R
h
LCD Panel
Setting Switch A
Power Switch
Setting Switch B
RS232 Connector
RJ-45 10/100Mbps
Ethernet Port
(Reserved)
RJ-45 Gigabit
Ethernet Port 2
RJ-45 Gigabit
Ethernet Port 1
ATX Redundant Power Supply
7
Page 9
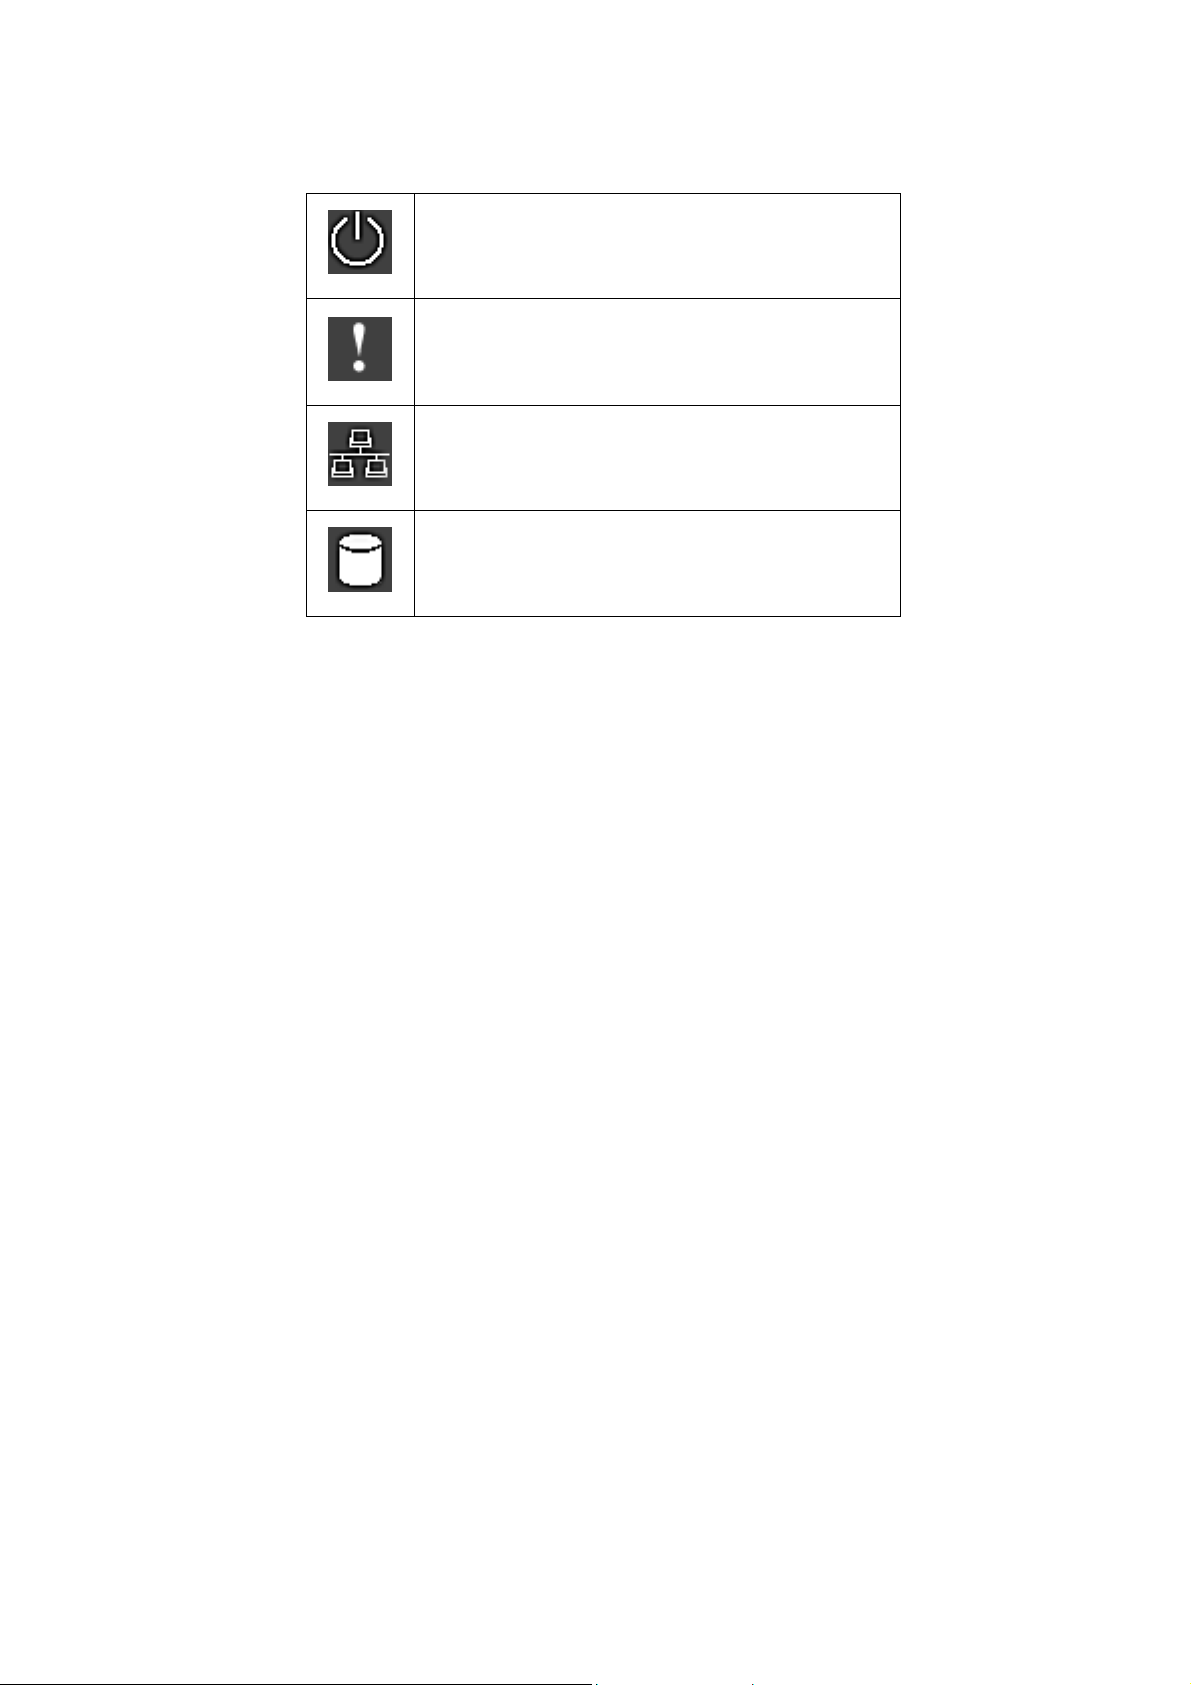
Indicator lights on the left of the LCD panel
This light shines when power is on.
This light indicates a system error which needs
to be corrected.
This light flashes when data is being
transmitted through the network.
This light flashes when data is being stored or
retrieved from the disks.
8
Page 10

Chapter 2. Installation and Set-up of
Network Disk Server
2.1 Installing the Hardware
The following steps will guide you through the Network Disk Server
hardware installation:
1. Connect the Network Disk Server™ to your Network.
Note: The system provides two to three network ports. To
configure Fail Over and Load Balance, at least two network ports
must be connected.
2. If you want to back up your files to the tape, please connect the
tape drive to the SCSI port on the back of your Network Disk
Server. Then turn on the tape drive. (This function is only
applicable for Network Disk Server models with SCSI port).
3. To use a UPS with your unit, please connect the UPS to the RS232 port on the back of your Network Disk Server via a serial
cable. And connect the power plug of the Network Disk Server to
the output power inlet of the UPS. (This function is only applicable
for Network Disk Server models with SCSI port).
4. Power on the Network Disk Server™.
Note: The power switch uses toggle switch design (after pushing
the button it will return to the original position). All you need to
do is to flip the switch one to turn-on or turn-off.
9
Page 11

When all power cables have been properly connected, push the Power
Switch on the back of the Network Disk Server. The LCD Panel will
light up and the system is ready for set-up:
Server Name
NAS001122 05/22
192.168.0.1 02:48
IP Address
At this time the hardware installation of your Network Disk Server is
complete. Please proceed to “Set-up before First Operation”.
2.2 Set-up before First Operation
The factory default settings of your Network Disk Server will search
the network via DHCP (Dynamic Host Configuration Protocol) to
automatically detect IP address settings. If your network does not
support the DHCP protocol, the Network Disk Server will use the
default settings listed below:
IP Address: 192.168.0.1
Subnet Mask: 255.255.255.0
Once the Network Disk Server completes its boot-up process, the LCD
panel displays the current IP address settings.
If your network does not support the DHCP protocol, you must
configure your Network Disk Server to the proper LAN settings before
using it for the first time. (If you do not know your LAN settings,
please contact your network administrator).
1. Use the LCD panel to change the network settings. For more
information, see Appendix A.
2. Use the Quick Install Wizard on the CD-ROM to change the network
settings. For more information, see Appendix D.
Once you complete the Network Disk Server settings, you can use
your web browser to perform further administrative settings.
Date
Time
10
Page 12
Chapter 3. Administration of Network
Disk Server
Once you have installed the Network Disk Server and other hardware and
connected it to the networks, you can use your browser (supports Microsoft
Internet Explorer 5.0 or later and Netscape Navigator 4.5 or later; Microsoft
Internet Explorer 5.5 is recommended) to complete administrative tasks for the
Network Disk Server.
3.1 Accessing the Administration Page
The following methods allow administrator to access the
Administration page:
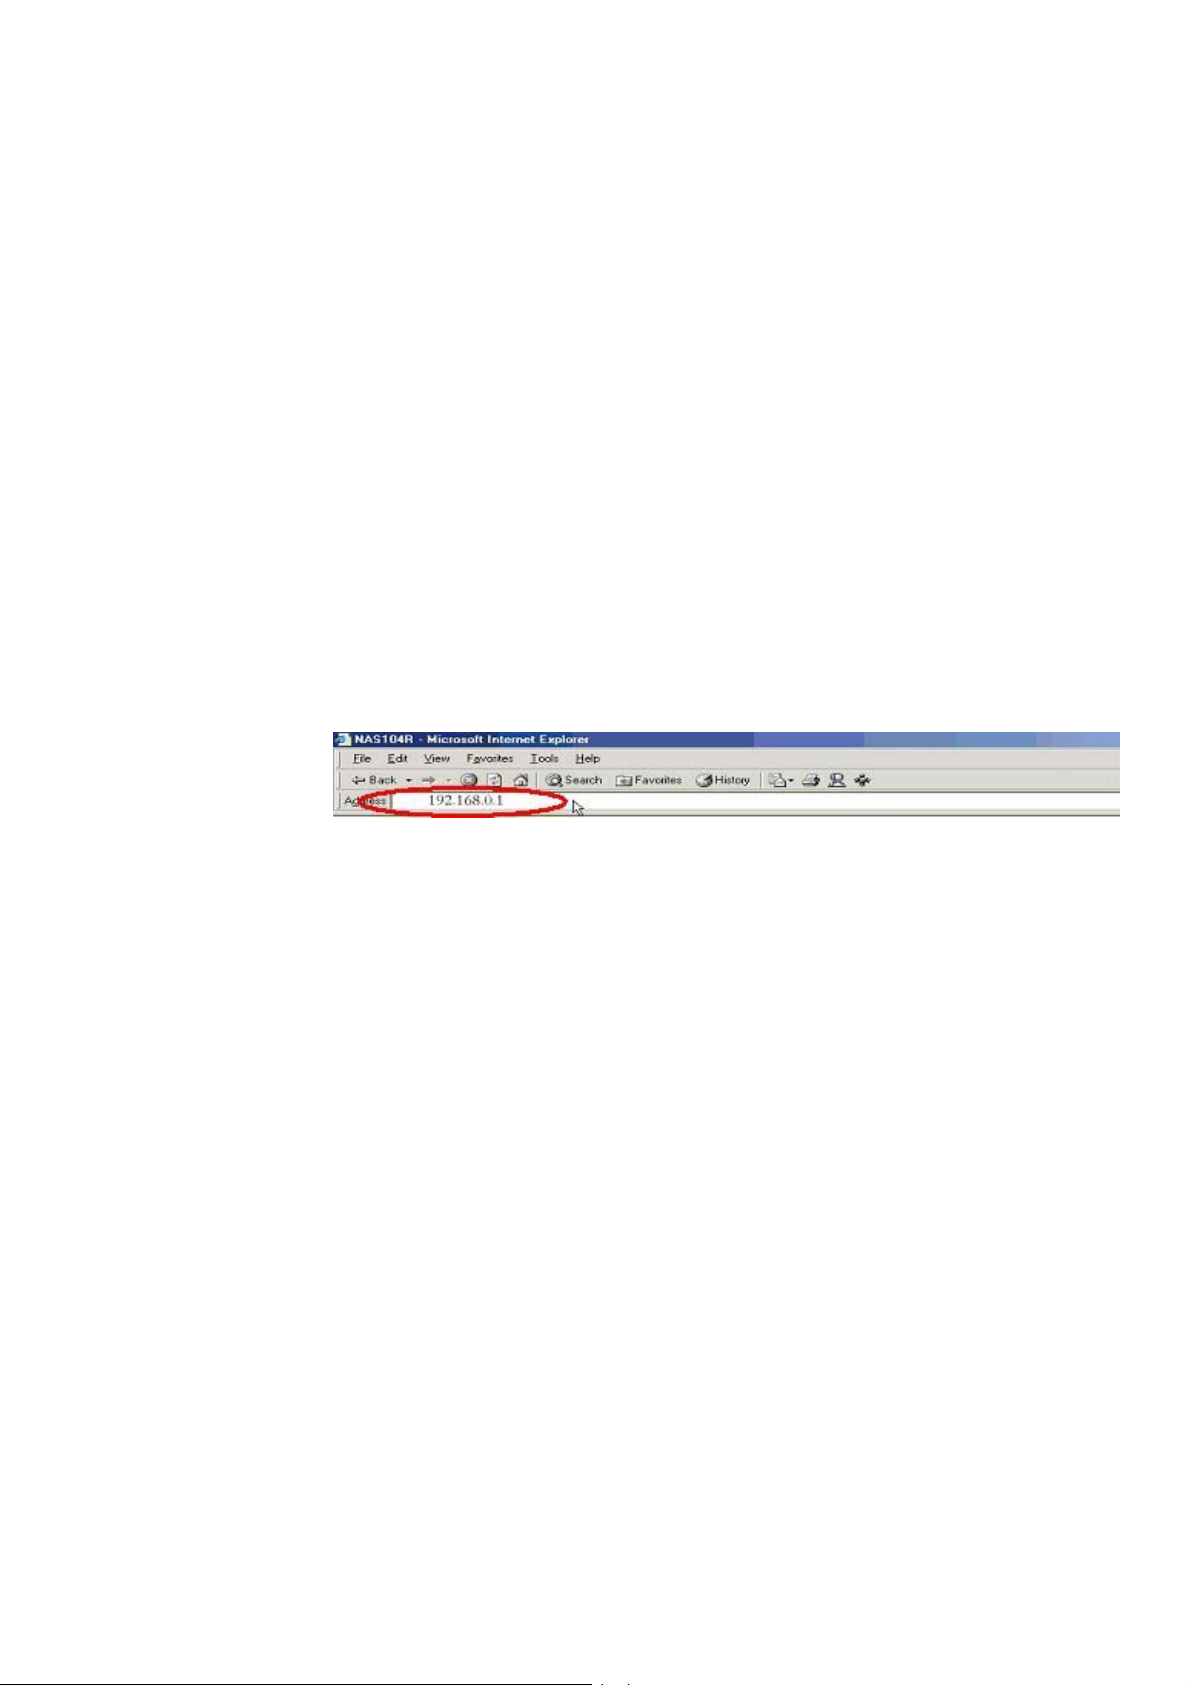
1. Launch your web browser (Microsoft Internet Explorer version 5.5
is recommended). If you know the IP address of the Network Disk
Server, type the IP address in the address bar of the browser and
press “Enter”. The IP address can also be obtained on the LCD
display of the Network Disk Server (see Appendix A).
11
Page 13
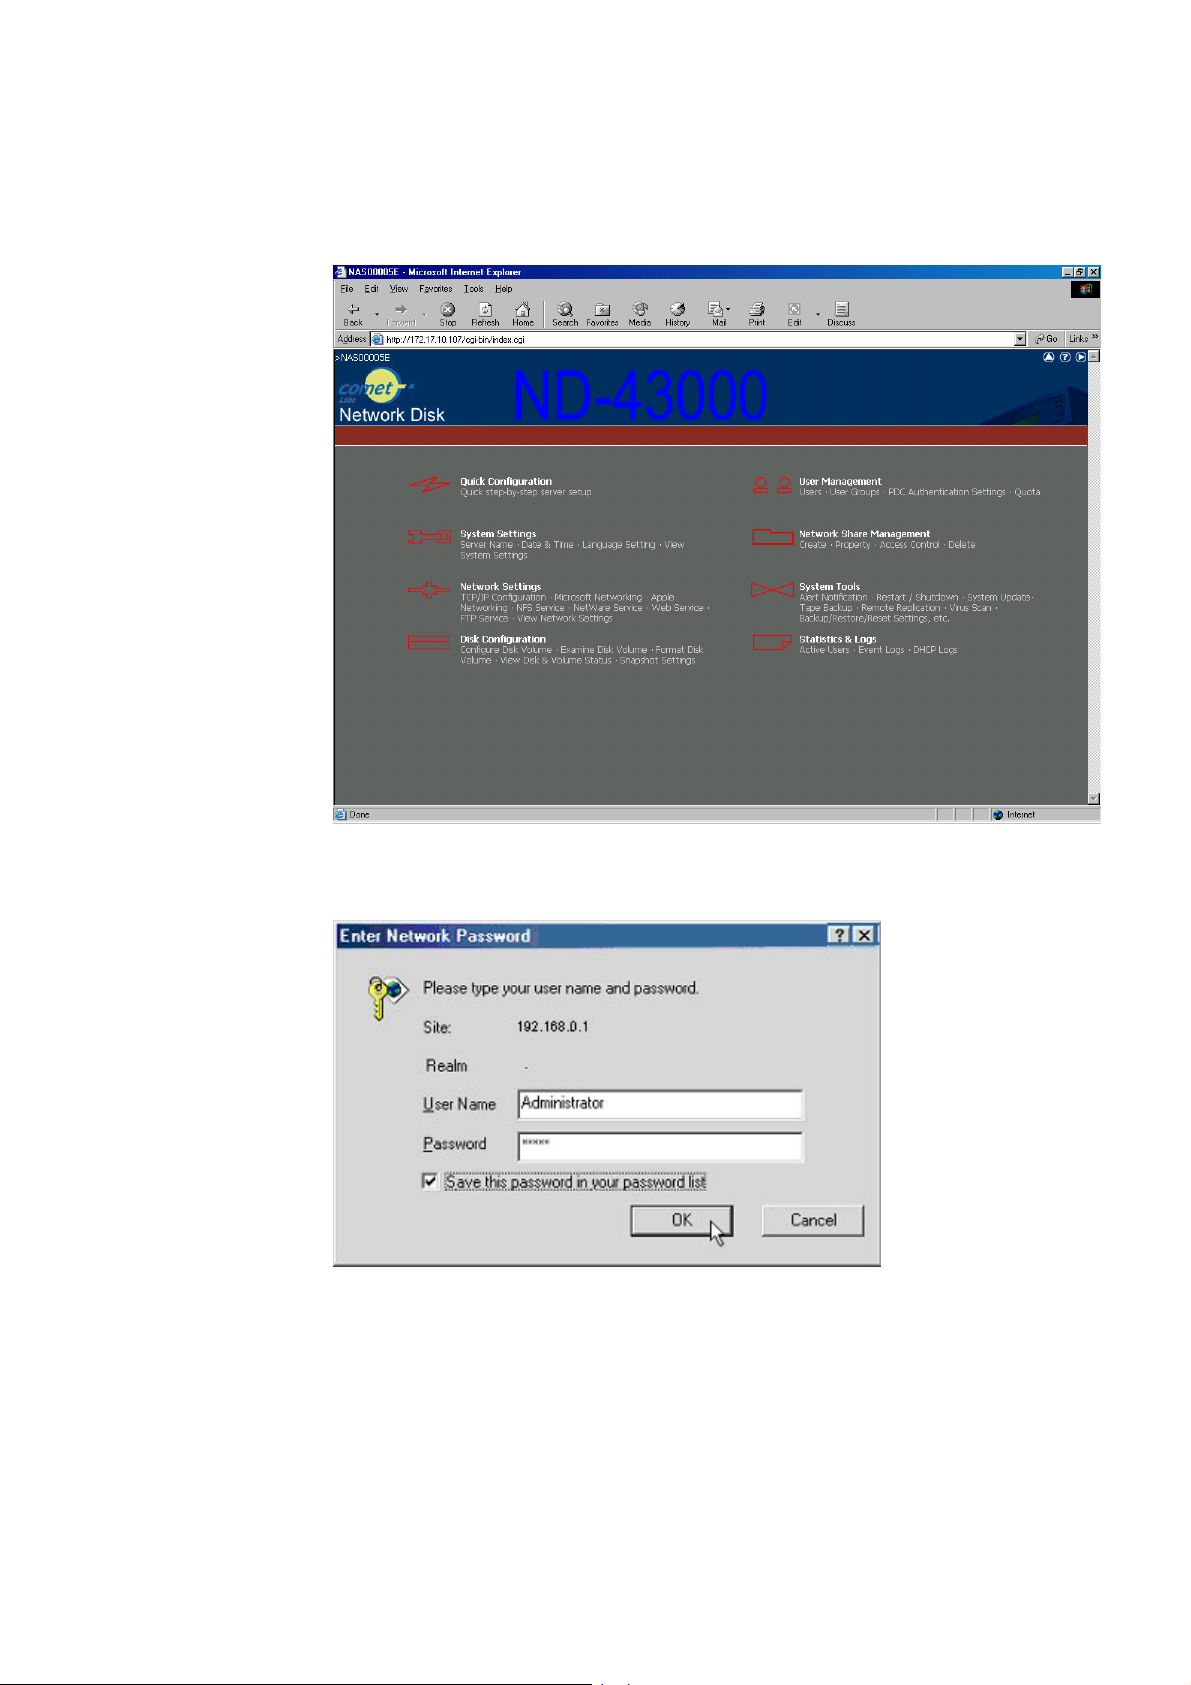
2. Use the Quick Installation Wizard (see Appendix D) and doubleclick on Network Disk Server in the list that appears. When the
browser displays the home page of your Network Disk Server, click
on the Administration link.
Enter the user name and password to continue the administration
setup.
The default login name and password are as follows:
Login: Administrator
Password: admin
If this is the first time you enter the Administration page, the Quick
Configuration page appears automatically. Please refer to the
Quick Configuration section for more details.
12
Page 14
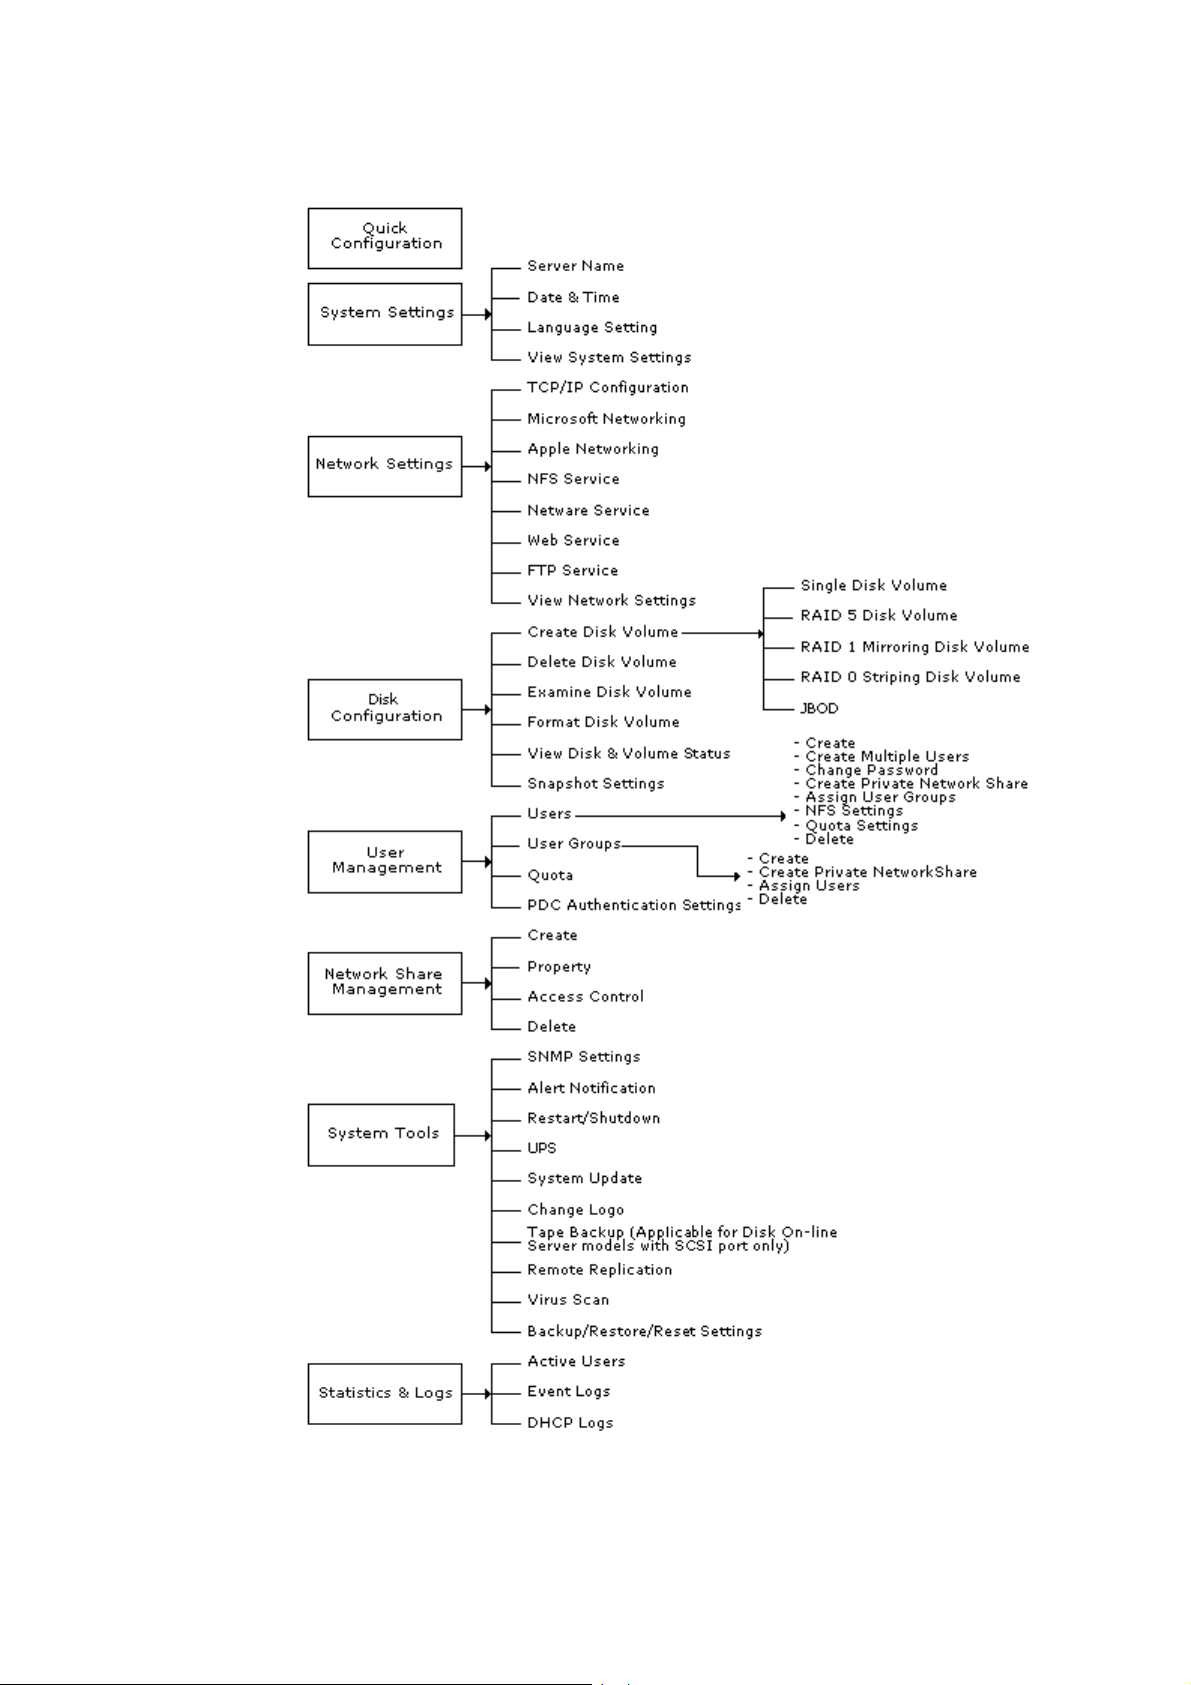
3.2 Server Administration
13
Page 15

3.3 Quick Configuration
The Quick Configuration will guide you through the configuration
process step-by-step, as follows:
1. Enter the name, workgroup and description for this server.
2. Change the administrator password.
3. Enter the date, time and time zone for this server.
4. Select the language that this server will use for file names.
5. Enter the IP address, subnet mask and default gateway for this
server.
6. Select the network file services that you want to provide on this
server.
7. Configure disk volume on this server.
8. Configure the method of user authentication.
9. Manage users and user groups for this server.
10. Manage network shares on this server. It might take 3 to 10
minutes to complete the Quick Configuration depending on the
type of configurations.
3.4 System Settings
Basic system settings include the server name, date, time, and
language settings.
• Server Name
You must assign a unique name for your Network Disk Server for
ease of identification within the local network. The server name
can accommodate as much as 14 characters, which can be a
combination of letters (A-Z or a-z), numbers (0-9) and hyphens (-).
The server will not accept name containing blank spaces, period (.),
or names with only numbers. The LCD display will show the
current server name.
Next, you must configure your Network Disk Server to the
workgroup. The workgroup represents a basic computer group
within the Microsoft Network. Files are normally shared within the
group. Workgroups can accommodate as much as 15 characters
but must exclude the following characters:
The first character cannot be a period (.). For ease of management
and usage, please set your Network Disk Server and attached
computer(s) in the same workgroup.
Moreover, the Network Disk Server allows you to specify comments
(such as administrator name, department, or location) that
describe the Network Disk Server for ease of identification to an
on-line user.
; : " < > * + = \ | ? , [ ] /
14
Page 16

• Date & Time
Set the date, time, and time zone according to your current
location. If the settings are incorrectly entered, the following
problems may occur:
1. When using a web browser to access or save a file, the time of
the file accessed or saved may be out of sync.
2. The system event log time will be incorrect compared to the
actual time an action occurred.
• Language Setting
The server is based on the language settings and uses it
accordingly while creating or displaying files and directories. Select
the correct language settings to avoid the following problems:
1. Inability to create files or directories with special wording.
2. Inability to display files or directories name with special wording.
View System Settings
You can view all the current system settings such as server name
and workgroup from this page.
3.5 Network Settings
The network settings include TCP/IP configuration and network service
settings.
• TCP/IP Configuration
According to your local network, you can choose the following two
methods to configure the TCP/IP settings:
i. Obtain IP address settings automatically via DHCP
If your network supports DHCP, the Network Disk Server will
automatically use the DHCP protocol to retrieve the IP (Internet
Protocol) address and related information.
ii. Use static IP address
Use the user defined IP address settings.
• Fixed IP Address
The IP address is a 32-bit digit code used to differentiate
each single entity on a network. The IP address is
separated into 4 groups of eight bits separated by dots:
192.168.0.1.
15
Page 17

• Subnet Mask
The subnet mask is used to define computer within the
same local network. It is a 32-bits digit code:
255.xxx.xxx.xxx.
• Default Gateway
The gateway is generally referred as an interchange point
that connects two networks, such as LAN and WAN. If you
do not need to configure gateway address, set it as 0.0.0.0.
• Enable DHCP Server
Once the DHCP server’s dynamic address allocation function
is activated it will automatically assign dynamic addresses to
any computer in the network that is configured to
automatically obtain IP addresses.
Note: Only one DHCP server may be activated at any time
in a network to avoid causing conflicts in communication.
Configuration of Network Interfaces
The system supports multiple network interfaces that enable you to
perform Fail Over and Load Balancing functions. Fail over ensures
server availability to the network. If the primary port is
disconnected due to a hardware or cable problem, the secondary
port will replace its network identity. If the failed port resumes the
network connection, it will also resume the role as the primary
interface.
• Microsoft Networking
Users using the Network Disk Server on the Microsoft Windows
operating systems must start Microsoft Network Services.
If the local network has a WINS server installed, please specify the
IP address. The Network Disk Server will automatically register its
name and IP address with the WINS service. Or you can enable
your Network Disk Server as the WINS server for your network.
• Apple Networking
Users using the Network Disk Server on Apple’s Mac operating
systems must enable AppleTalk network support.
If your AppleTalk network uses extended networks, and is assigned
with multiple zones, please assign a zone name to the Network
Disk Server. If you do not want to assign a network zone, please
enter an asterisk (*). Asterisk (*) is the default setting.
16
Page 18

• NFS Service
Users using Network Disk Server on Unix/Linux operating system
computer or server must start Unix/Linux NFS service. The
Network Disk Server supports NFS version 2.0/3.0. To correctly
use the NFS service, you must assign a User’s UID and IP address.
Please select User Management · Users · NFS Settings to start
the setup.
• NetWare Service
If you wish to use NetWare to access the Network Disk Server, you
must activate the NetWare service. The Network Disk Server will
then operate in a manner similar to a Novell NetWare 3.12 file
server.
• Web Service
Other than standard OS support, you have the choice to use a web
browser to access your files on the Network Disk Server. If your
Network Disk server is connected to the Internet and uses a valid
IP address, the Network Disk Server allows you to access your files
using a web browser from anywhere in the world.
• FTP Service
If you wish to download files from or upload files to your Network
Disk Server by using file transfer protocol (FTP), you must first
activate the FTP service.
• View Network Settings
You can view all the current system settings such as server name
and workgroup from this page.
3.6 Disk Configuration
Depending on the models, the Network Disk Server can accommodate
a maximum of eight disks. The Disk Volume can be configured
according to your needs.
• Single Disk
You can choose to use a stand-alone disk. However, if the disk is
damaged, all data will be lost.
• RAID 5 Disk Volume
Three or more hard disks can be teamed up to form a largecapacity RAID 5 disk group. This system will distribute and store
data among its various member disks as it is received. At the
same time it uses an amount of space roughly equivalent to a
whole disk to store reference numbers with the same elements.
Should one of the disks in the group suffer some kind of damage,
you can shut down the computer and install a new disk, and the
17
Page 19

system will restore the data on the new disk using the reference
number. In addition, if you have a system with four disks but use
only three in your RAID 5 group, the fourth will serve as a backup
disk. If one of the three disks is damaged the system will
automatically start using the spare disk without powering down
and changing the affected disk. Generally speaking, the capacity
of a RAID 5 disk group is one disk’s worth of space less than the
total rated capacity of the group.
Note: RAID 5 may be used only with equipment that has three or
more disks.
• RAID 1 Mirroring Disk Volume
Mirroring Disk protects your data by automatically backing up the
contents of one disk onto the second disk of a mirrored pair. This
protects your data if one of the disks fails. Unfortunately, the
storing capacity is equal to a single disk, as the second drive is
used to automatically back up the first. Mirroring Disk is suitable
for personal or corporate use to store important data.
• RAID 0 Striping Disk Volume
Striping disk combines two or more disks into one larger disk. It
offers the fastest disk access but it does not have any protection
of your data if the striped array fails. The disk capacity equals
the number of disks in the array times the size of the smallest
disk. Striping disk is usually used to maximize your disk capacity
or for fast disk access but not for storing important data.
• Linear Disk Volume
You can combine two or more disks into one larger disk. During
file saving, the files are saved on physical disks sequentially but
do not have a disk failure file protection function. The overall
capacity of linear disks is the sum of all disks. Linear disks are
generally used for storing large data and are not appropriate to
use for file protection of important data.
By factory default, the Network Disk Server has been pre-set into one
large disk. If you wish to use other disk configurations, the settings
can be changed during the first Quick Configuration access.
Furthermore, to increase the hard disk life, the hard disk will go to
standby mode if there is no access within 30 minutes. If any data
access happens while the hard disk is in stand-by mode, it will take 3
or 5 seconds for the hard disk to return to normal mode. You can
select System Tools · Hardware Settings to change the setting.
You can also perform the following disk administration:
• Create Disk Volume
• Delete Disk Volume
• Examine Disk Volume
• Format Disk Volume
• View Disk & Volume Status
18
Page 20

In addition to the above functions, users can also perform snapshot
taking in Snapshot Settings of System Tools. This function enables
users to take a real-time and dynamic replication of the snapshot
according to the disk volume at a certain point of time. The data
contained in the snapshot is the same as the previously copied network
hard disk drives. The content in the snapshot will not be affected even
when changing the content of the disk volume. If an original data is
damaged, it can be restored from the snapshot image.
3.7 User Management
The Network Disk Server can share its files with multiple users. It is
important to plan and organize users and user groups’ accessibility to
ease the administration work.
• Users
The factory default settings include the following users:
Administrator
By default, the administrator is a member of the administrators
group and has access to the system administration. You cannot
delete the user Administrator.
Guest
When you use a non-registered user name to login, the server
recognizes it as a Guest and will allow limited access. A guest does
not belong to any user group. You cannot delete the user Guest or
create a password.
Anonymous
When you connect to the server by FTP service, you can use the
name to login as a guest. You cannot delete this user or change its
password.
You can create a new user according to your needs. The following
information is required to create a new user:
• User Name
The user name must not exceed 32 characters. It is case
insensitive and it can contain double-byte characters. (Such as
Chinese, Japanese, and Korean) But it cannot contain any of
the characters below:
" / \ [ ] : ; | = , + * ? < > ` '
• Password
The password must not exceed 16 characters. Due to security
concerns, the password must be at least 6 characters. Try to
avoid using codes that are easily decipherable.
19
Page 21

You can perform the following settings for users:
• Create User
• Create Multiple Users
• Create Private Network Share
• Assign User Groups
• NFS Settings
• Quota Settings
• Delete User
• User Groups
To administer access rights, you can create user groups. User
groups are a collection of users with the same access rights to files
or folders. By factory default, the server contains the following
pre-defined user groups:
Administrators
All members of the administrator group have the rights to perform
system management. You cannot delete the administrator group.
Everyone
All registered users belongs to everyone group. You cannot delete
the user groups, “Everyone” or delete any of its users.
You can manage user groups with the following options:
• Create User Groups
• Create Private Network Share
• Assign Users
• Delete User Groups
User groups name must not exceed 256 characters. It is case
insensitive and it can contain double-byte characters such as
Chinese, Japanese, and Korean. But it cannot contain any of the
characters below:
" / \ [ ] : ; | = , + * ? < > ` '
To properly manage security, it is very important to manage users
and user groups. You may set the share access parameters of each
user or user group accordingly.
• PDC Authentication Settings
If you have a Windows PDC (Primary Domain Controller) server to
handle the domain security in your network, you don’t need to reenter all the users and groups with the Network Disk Server. You
can simply enable the PDC authentication feature; the Network
Disk Server will connect with the NT domain and get all the
information of the domain users and groups automatically.
To enable PDC authentication, you must enter the domain name as
well as the user name and password already established in this
domain. The Network Disk Server will use the user name and
password to log in to the NT domain and retrieve user and group
information. Once you have configured the Network Disk Server to
20
Page 22

use PDC authentication, all NT domain users and groups will appear
in lists of users and groups for which you can define access rights.
Note: NetWare users cannot be authenticated via the PDC server.
To properly authenticate NetWare users, please go to User
Management · Users · Change Password page and type the
password for that user manually.
• Quota
The amount of space given out to all users in the system can be
limited in order to manage and allocate it efficiently. Once these
restrictions are in place, users will be prevented from obtaining
more space once they have reached their limit. This prevents
monopolizing of a large amount of disk space by a small group of
users. No limitations are set on the system when it leaves the
factory.
3.8 Network Share Management
The primary purpose of network storage is file sharing. In a standard
operation environment, you can create different network share folders
for various types of files, or provide different file access rights to
users or user groups. By factory default, a “public” share folder is
created. The share folder gives full access to all users or guests.
Administer network shares with the following:
• Create a Network Share
• Change the name, path and comment of a network share
• Set access right for a network share
• Remove a network share
You can create new network shares according to your needs. While
creating a network share the following parameters must be set:
• Network Share Name
The network share name must not exceed 32 characters. It cannot
contain double-byte characters (such as Chinese, Japanese, and
Korean) as well as the characters listed below:
" . + = / \ : | * ? < > ; [ ] %
• Disk Volume
The network share will be created under the specified disk volume.
• Path
All data are stored under the assigned path onto the disk volume.
You can select Specify Path Automatically to allow the server to
automatically create a new path on the disk volume to store the
network share files. Or you can assign a specific path for the share
folder. The manually assigned path cannot exceed 256 characters
and cannot contain the characters listed below:
21
Page 23

" \ : | * ? < > ; ` '
• Comment
The Comment field allows a brief description of the share folder to
help users identify its purpose in a network neighborhood window.
The comment cannot exceed 128 characters.
Once the network share is created, you can start assigning access
rights to users or user groups:
• Full Access
Full access allows the user or user group to read, write, create, or
remove all files and directories in the network share.
• Read Only
Reads files only in the network share but denies functions to write,
create or delete files or directories.
• Deny Access
Denies all files access on the network share.
3.9 System Tools
The following system tools allow optimized maintenance or
management of your Network Disk Server:
• SNMP Settings
In order to use Simple Network Management Protocol (SNMP) to
manage the Network Disk Server's network components, the SNMP
service must be started.
• Alert Notification
Configures administrator’s e-mail address and SMTP server IP
address. In case of warning or malfunction, an email is
automatically sent to the administrator.
• Restart / Shutdown
Powers off or restarts the Network Disk Server.
• Hardware Settings
You can enable or disable the following hardware functions of your
Network Disk Server:
i. Enable LCD panel setting function
Allow you to change the TCP/IP configuration using the LCD
panel buttons.
22
Page 24

ii. Enable configuration reset switch
Depress and hold on the configuration reset switch for 5
seconds to reset the administrator password and network
settings to the factory default.
iii. Enable hard disk standby mode
Hard disk will go to standby mode if there is no access within
the period you specify.
iv. Enable buzzer
If the buzzer is disabled, it will not sound when a system error
occurs, but the warning light will still shine.
• UPS
By enabling the UPS support, you can protect the system from
abnormal shutdown caused by power outage. In the event of utility
power failure, the system will shut down automatically by probing
the power status of the connected UPS unit. You can also set a
shutdown timer to turn off the system automatically after it detects
the AC power failure. In general, the UPS can keep supplying the
power for the system for about 5 to 10 minutes. But this depends
on the maximum load of the UPS and the number of the loads
connected to it.
The UPS is supported by the following two ways:
i. via a serial port interface (only for models with serial port)
ii. via SNMP network management protocol
If the UPS you used is not supported, please contact technical
support or visit our web site for updated news.
• System Update
Performs system software updates. Make sure that the image file
that you are about to update is the correct version and read
through the instructions carefully. It is wise to back up all existing
data on the Network Disk Server prior to performing system
software update. The current settings will remain unchanged after
the system is upgraded.
• Change Logo
You can place a picture that you desire on the upper right corner of
the home page. The size of the picture cannot exceed 20K bytes.
• Tape Backup (Applicable for models with SCSI port only)
The tape backup tools allow you to perform the backup or restore
jobs using a tape drive with ease. In principal, there are two
different types of backups: Full Backup or Incremental Backup. Full
backup will back up all the files in the backup source. However, the
incremental backup will only back up any modified or new files after
last backup.
23
Page 25

Backup Now
To back up the files to the tape right away, you can run an
immediate backup job.
Restore
To restore from the previously backup tape, you can perform the
restore operation.
Scheduled Jobs
You can schedule a backup job to be executed automatically at any
later time periodically.
Tools
There are several useful tape functions to operate on the tape
drive. For example, you can rewind, eject or erase the tape here.
Job Status
You can review or monitor the status of the backup or restore job.
Note:
1. The SCSI tape drive has to be properly connected and turned
on before starting the system, or it will not be detected.
2. The HVD (High Voltage Differential) SCSI tape drive is not
supported by this system.
• Remote Replication
When you want to replicate the local files to the remote folder on
another Network Disk Server, the remote replication function allows
you to perform this job with ease. You can perform immediate
replication job or schedule a replication job to be executed at the
specified time periodically. In order to reduce the network
bandwidth usage as well as the time consumed, you can select to
compress the files before transferring them over the network.
• Virus Scan
Virus scanning agent helps you protect your system from being
infected by viruses. You need to operate Windows NT or Windows
2000 server with virus-scanning software installed to perform realtime virus scanning. To enable virus scan support, specify the IP
address of network share, the administrator IR and password.
Infected files are automatically deleted or quarantined by the NT
virus-scanning software as setup by the NT administrator.
• Backup/ Restore/ Reset Settings
If you want to backup configuration settings, please select one
configuration and then click [Save] button. The system may ask
you whether to save or open the backup configuration file, in this
case please choose to save it. Please keep the backup image file
24
Page 26

carefully.
If you want to restore configuration settings, please select one
configuration and then first click the [Browse...] button to specify
the backup image file then click the [Restore] button.
You can also reset the following settings to the default values:
- Users/Groups settings
- Disk configuration
- Share Volume Settings
- Hardware settings
- System settings
- Network configuration
- All settings
3.10 Statistics & Logs
You can monitor the current logon user of the Network Disk Server
and the system event logs for the purpose of user administration or
system diagnostic reference.
• Active Users
Displays information on all online users.
• Event Logs
The Network Disk Server can store thousands of recent event
logs, including warning, error and information messages. In the
event of a system malfunction (LCD error indicator lights up),
the event logs can be retrieved to help diagnose the system
problem.
• DHCP Logs
If the DHCP server function is activated, you can use it to
monitor all of the assigned dynamic addresses, client MAC
addresses and other information.
25
Page 27

Chapter 4. Accessing Network Disk
Server
4.1 Using Microsoft Windows
Under the Microsoft Windows operating system, you can access the
Network Disk Server using the following steps:
1. Use the following methods to locate and connect the Network Disk
Server within the local network:
• Click on the Start button and select Run in the Windows menu
bar. Enter the name of the Network Disk Server, for example:
\\NAS004001, and press Enter.
• You may also look for the Network Disk Server within the
Network Neighborhood. Locate the workgroup and find the
name of your Network Disk Server. When the server is found,
double-click on the server name to connect.
• You may also use the “Search for Computers” function to look
for your Network Disk Server in Windows. Under Windows ME or
Windows 2000, please follow these steps:
i. Open “My Network Places” folder.
ii. Under the tools bar menu click “Search”.
iii. Computer Name path key-in Network Disk Server name.
iv. Click once on Search.
Once the Network Disk Server is found, double-click your mouse
button to connect.
26
Page 28

2. Once the connection to the Network Disk Server is successful, all
listing on your available network share are displayed. Move the
mouse pointer to the network share you want to access and click
the right button once. A popup menu appears; select “Map
Network Drive”. A popup window that allows you to assign a drive
letter for the network share appears (note: do not use the drive
letter used by the CD-ROM). If you wish to make the share folder
available for your next start-up, check the “Reconnect at logon”
box on the popup window and click on “OK” to make the network
share as one disk drive in your system.
3. Once the network share is a part of your system disk drives, you
can locate the network share in “My Computer” and access it as a
regular hard disk drive.
27
Page 29

4. You can also map the network drive by clicking Map Drive in
Quick Install Wizard.
28
Page 30

4.2 Using the Apple Mac Operating System
If you are a Mac OS user, you can use the following two methods to
access to your Network Disk Server:
1. Using Network Browser
a. Choose “Network Browser” in the Apple menu.
b. In the “Network Browser”, choose AppleTalk; a list of all
computers on the AppleTalk network appears. Choose the
Network Disk Server.
29
Page 31

c. Once the Network Disk Server is chosen, the system will
request you to input the login name and password. Click then
“Connect” or use “Guest” to enter. When the login name and
password are confirmed, a popup window informs you that the
connection is made with the Network Disk Server.
d. When the Network Disk Server is connected, the network
browser displays all the network shares. You can then access
or drag & drop the share folders.
e. Choose either one of the network shares to start to link. The
network share appears on the Mac OS desktop.
30
Page 32

2. Using the Chooser
a. Select Chooser in the Apple menu bar.
b. Click on AppleShare. The name of the Network Disk Server
appears on the right side of the window.
31
Page 33

c. Use the mouse to highlight the Network Disk Server and then click
on the “OK” button located at the bottom right-hand side of the
screen.
d. Enter the correct login name and password or use “Guest” to login,
then click on “Connect”.
32
Page 34

e. All available network shares will be listed. Use the mouse to
choose a network share and click on “OK”.
f. You can then close the Chooser program. Double click on the icon
on the desktop to access your files.
33
Page 35

4.3 Using the Unix/Linux Operating System
Other than Microsoft OS and Mac OS, your Network Disk Server
supports Unix based systems (such as IBM AIX, HP-UX, Sun Solaris,
Linux, Free BSD, etc) through the NFS service:
1. Under Unix, use the following commands:
mount -t nfs <Network Disk Server IP address>:/<Network Share
Name> <Directory to Mount>
For example, if your Network Disk server’s IP address is
192.168.0.1 and you want to link the network share folder “public”
under the /mnt/pub directory, use the following command.
mount -t nfs 192.168.0.1:/public /mnt/pub
Note: You must login as “root” user to initiate the above command.
2. Logged in as the user id that you defined, you can use the mounted
directory to access your network share files.
For more information about NFS settings, please refer to your Unix
system documentation.
4.4 Using Novell NetWare
If you are accessing the Network Disk Server from the NetWare client,
please refer to the NetWare user’s manual for more information. The
Network Disk Server functions as a NetWare 3.12 file server.
4.5 Using a Web Browser
Other than OS support, your Network Disk Sever also provides a
convenient web style file management that allows using a standard
web browser to access your data. If you link the Network Disk Server
onto the Internet and use a public IP address, you can logon to access
the files from anywhere in the world.
For more information, please refer to Appendix B.
4.6 Using File Transfer Protocol (FTP)
In addition to working with multiple operating systems, the Network
Disk Server also supports FTP. You can use popular FTP software and
enter the user name and password to connect to the Network Disk
Server. Or you may key in anonymous as the user name in order to
access public network share folders that is open to guest users.
34
Page 36

Chapter 5. Introduction to Backup
Functions
5.1 Tape Backup
Overview
Users using servers with SCSI port are enabled to back up data to the server with
Tape Backup.
The system supports two types of backup:
1. Full Backup: To back up all files in the backup source.
2. Incremental Backup: To back up any modified or new files since the last
backup only.
Using Tape Backup
1. Enter administration page. Go to System Tools and select Tape Backup.
35
Page 37

2. Select a function: Backup Now, Restore, Scheduled Jobs, Tools or Job Status.
A. Backup Now
i. Enter the backup label.
ii. Select backup source.
iii. Select backup type.
iv. Select whether or not to create a temporary snapshot for the backup job.
v. Click Apply to activate the settings.
B. Restore
i. Select restore destination.
ii. Select whether or not to overwrite existing files during restoring.
iii. Click Apply to activate the settings.
36
Page 38

C. Scheduled Jobs
i. Click New to enter the following page:
ii. Enter a job name.
iii. Select the backup source.
iv. Select the backup type.
v. Modify the backup schedule (select to back up files every week or at a
certain time every month).
vi. Select whether or not to create a temporary snapshot for the backup job.
vii. Click OK to apply the settings or Cancel to cancel the modifications.
37
Page 39

D. Tools
i. Select an option in the Tools section.
ii. Click Apply to activate the setting.
E. Job Status
To view the job status of Tape Backup, click Job Status and the following
page will be shown. To exit the page, click Close.
38
Page 40

5.2 Remote Replication
Overview
Remote Replication enables you to replicate local files to remote folders on
another server. The files will be compressed before the replication process in
order to save time for data transfer. The system enables the choices for
immediate and scheduled replication.
Using Remote Replication
1. Enter administration page. Go to System Tools and select Remote
Replication.
39
Page 41

A. New
i. Click New to enter the following page:
Enter all the necessary fields and select the appropriate settings for the
remote replication job.
Click OK to apply or Cancel to cancel the settings.
Note: To enable Remote Replication, make sure
(1) Microsoft Networking Service has been activated,
(2) The specified destination network share and directory have
been created, and
(3) The user name and password are valid with full access right to
the destination folder.
40
Page 42

B. Edit
i. Select an entry to edit.
ii. Click Edit.
iii. Modify the appropriate fields.
iv. Click OK to apply or Cancel to cancel the settings.
C. Delete
i. Select an entry to delete.
ii. Click Delete.
41
Page 43

5.3 Backup Agent
Overview
Backup Agent enables NAS to fully support most backup software developed by
storage management companies. Not only can the server be compatible with
more tape drive and tape library models, but also support backup jobs in different
OS. In addition, some cooperating companies have developed certain virtual tape
library models with backup agents, which have enhanced the backup function of
NAS and also turn NAS to a multi-functional virtual tape library.
Installation of Backup Agent
Follow the steps below to install Backup Agent:
Step 1: Download Backup Agent program to local disk
Step 2: Install Backup Agent program
1. Enter NAS administration page. Go to System Tools and select Backup Agent.
2. Click Browse to select Backup Agent.
3. Click Install Agent. When the installation is completed, NetVault 6.5.3 will
be shown on the page.
42
Page 44

Step 3 Configure and enable Backup Agent
1. Click Enable Backup Agent.
2. Enter the password for Backup Agent.
3. Click Apply. The status will be shown as Running.
1
2
3
43
Page 45

5.4 NetBak Replicator
Overview
NetBak Replicator is a software installed in user’s system (Windows only) for
data backup. Users can upload any files or folders to server and back up the
data.
Main Functions
- Backup
File Filter
Users can select particular file types to be excluded from backup.
The system will filter all files belonging to these file types when
backing up the data.
Schedule
Users can specify a schedule for backing up data with this option, e.g.
12:00 every day or 05:00 every Saturday.
Monitor
When this option is enabled, the system will upload all files or folders
to the server instantly for backup when the files or folders are
modified.
- Restore
Select this option to restore backed up data to the original location of the file
or to a new directory.
- Log
Enable this option to record events of NetBak Replicator, e.g. the time when
NetBak Replicator starts and terminates, Restore and Monitor, backup time
and original location of all files, etc.
44
Page 46

Installing NetBak Replicator
1. Run Install NetBak Replicator in the companion CD.
2. Follow the steps to install NetBak Replicator. Then click Finish.
3. Upon successful installation, a shortcut icon will be shown on the
Desktop.
45
Page 47

Using NetBak Replicator
NetBak.
1. Click Start/Programs/NetBak to run
2. Click
. Select the IP address of the server and the share folder.
Note: Only authorized users can access the share folders. Double click the
folder. The system will prompt for user name and password to authenticate
the access privilege of the users.
46
Page 48

3. Select an action to take: Backup, Restore or Log.
3.1 Backup
Select files or folders to be backed up.
47
Page 49

A. File Filter
Click File Filter and select the file type to be excluded from backup.
Click OK to confirm.
B. Schedule
Click Schedule and Enable Backup Schedule. Modify Frequency and
Execute Time for NetBak schedule. Then click OK.
48
Page 50

C. Monitor
Select folder(s) or file(s) to be monitored then click Monitor.
49
Page 51

3.2 Restore
A. Select Restore to original position or click
directory for restoring.
to specify the
50
Page 52

B. Click Option to select action to be taken when a restoring file has
already existed in the target directory or when an error happens during
file restoring. Click OK to confirm.
51
Page 53

3.3 Event
A. Click Option to select type of logs to be recorded.
B. To clear all logs, click Clear All.
52
Page 54

Chapter 6. Snapshot
6.1 What is Snapshot?
Snapshot enables users to create a copy of disk volume
instantaneously as a backup source. Taking a snapshot takes only a
few seconds and there is no need to stop the file service in the
process. The creation of snapshot will not modify the disk volume
while any changes made to the disk volume will not affect any
formerly taken snapshots.
Each snapshot records disk volume at a certain point of time.
Snapshot settings can perform snapshot taking automatically for the
system. In case of system malfunction like deleting files by mistake
or being infected with virus, users can make use of snapshots created
to restore the files. In addition to backup and restoration of disk
volume, users can also schedule snapshot taking and create multiple
snapshots for data restoration.
53
Page 55

6.2 Basic Snapshot Settings
To activate or disable a snapshot, go to Snapshot Settings of Disk
Configuration and click Basic. Make sure to enable the snapshot
support of the disk volume before creating a snapshot.
To enable one or more volumes' snapshot support, please select the
item(s), assigning Repository Ratio and Maximum Count values and
then click OK.
To disable one or more volumes' snapshot support, unselect the
item(s) and click OK. To undo the changes, click Cancel and refresh
the page.
Note:
1. To change Repository Ratio or Maximum Count of volume, disable
its snapshot support, click OK, and enable it again.
2. Disabling the snapshot support will automatically remove all
snapshots on this volume.
54
Page 56

6.3 Advanced Snapshot Settings
To set up when to warn about every snapshot's use status, set the
Snapshot Warning Threshold value and click OK. The default
threshold to log a warning message is when a snapshot is 90% full.
Click Basic or Cancel to return to the Basic Snapshot Settings page.
55
Page 57

6.4 Creating a Snapshot or a Schedule
In Snapshot Settings page, click Schedule to create, edit or delete a
snapshot schedule. Users can schedule an hourly, weekly or monthly
snapshot of the disk volume.
To create a snapshot schedule, click New.
56
Page 58

Select Create Now or define the time interval, i.e. repeat hourly, weekly or
monthly for the snapshot schedule.
57
Page 59

To modify a current schedule, tick the appropriate box and click Edit.
To remove it, click Delete. To view the updated status of the schedule,
click Refresh.
58
Page 60

6.5 Restoring Data from Snapshots
To restore the disk volume to the status of a particular point of time, go
to the Restore section of Snapshot Settings. Tick the box of the snapshot
to which the disk volume will be restored and click OK.
To view the updated restoring status, click Refresh.
The description of the items for restoring status is as below:
Restoring Status Description
Restoring The disk volume is being restored.
Completed The disk volume has been restored successfully.
Failed The disk volume cannot be restored successfully.
59
Page 61

6.6 Viewing Snapshot Status
To view the list of snapshots created for a disk volume and their status,
click View in the Snapshot Settings section.
Users can click Create to add a new snapshot.
To remove a snapshot, tick the appropriate box and click Delete.
To view the details of a snapshot, tick the appropriate box and click
Browse.
To view the updated status of the snapshots, click Refresh.
60
Page 62

6.7 Using Snapshot for Tape Backup and Remote
Replication
When tape backup and remote replication are performed to backup
disk volume, the process will take a number of hours. As the end
time of backup may vary, the data backed up may lose its intactness.
To ensure the completeness and continuity of the backup data, tick
the box “Take a snapshot before performing the backup job”. When
this option is selected, a snapshot of the disk volume will be taken
automatically for tape backup or remote replication.
• Tape Backup (This function is applicable for models with SCSI
port only.)
In Backup Now of the Tape Backup section, tick the box “Take a
snapshot before performing the backup job”.
61
Page 63

Remote Replication
•
In Remote Replication of System Tools, click New. Tick the box
“Create a temporary snapshot for the replication” as shown below:
62
Page 64

Chapter 7. Virus Scan
7.1 Virus Scan
A network share may not be able to detect a virus without an
automatic virus scan function when there is a transfer of infected
files. The user computer may have been infected in this situation.
To prevent virus infection of the user computers, the system provides
a virus scan program to comprehend with available virus scan agent
for the best data protection.
In System Tools, enter the IP address of the network share and set up
the user account and password for the virus scan agent. Specify the IP
address of the virus scan agent. When there is a file transfer, the virus
scan agent will notify the virus scan software on the system to scan the
file.
63
Page 65

7.2 Installing Virus Scan Agent
Make sure the virus scan agent and software are installed on the
same computer that performs virus scanning before activating the
agent.
Follow the following steps to installing Virus Scan Agent:
1. Run the CD-ROM enclosed in the Network Disk Server package.
When the following screen appear, click Install Virus Scan Agent.
2. Click Next to continue the Virus Scan Agent Setup.
64
Page 66

3. Click Finish to complete the Setup.
A screen will pop up to show the system information the first time you
have successfully installed the virus scan agent.
65
Page 67

The description of the fields is as below:
Fields Description
Server Name Name of the network share under the
protection of virus scan agent
IP Address The IP address of the network share
Status Connection status of the host network
share with the virus scan agent:
• Disconnect: Not connected to the
network
• Idle: Connection has been enabled but
there is no file transfer for three minutes
or more.
• Ready: Connection has been enabled
and ready to be scanned
• --: User name and password have not
been set up
Infected Number of infected files
Last Scan Time Date and time of the most recent virus
scanning job
Result Scanning result:
OK: No files are infected
• Virus Found: Virus is found. The name
66
Page 68

of the infected file(s) may not be
displayed due to the scanning of other
files. Go to the administration page to
view the name and location of the
infected file(s).
• Access Denied: Access to the server is
denied.
• Authentication Failed: The login user ID
is not authorized to access the folder of
the network share.
Path The file location on the network share
67
Page 69

7.3 Enabling Virus Scan Support
Go to Virus Scan of System Tools. To enable virus scan support, tick
the box Enable Virus Scan Support. Enter the IP address of the virus
scan server and click Apply.
68
Page 70

7.4 Viewing Details of Infected Files
To view the details of infected files of the network share, go to Event
Logs of Statistics & Logs. A warning message will be shown in the
table.
69
Page 71

Chapter 8. Network Disk Server -
Maintenance
The Network Disk Server has been specially designed to run on 24 hours, 7
days a week and to be ready at all times. It is also robust to protect against
system crashes caused by power loss. This section provides a general
maintenance overview.
8.1 Shutdown/Restart the Server
Please use the following steps to shutdown/restart the server:
1. Ask all the connected users to save their working files and stop
using the Network Disk Server.
2. Open the administration web page and go to System Tools ·
Restart/Shutdown. Follow the instructions to restart or
shutdown the system.
8.2 Reset the Administrator Password &
Network Settings
If you accidentally forget the administrator password, you will not be
able to perform any administration work on the Network Disk Server.
Under this condition, you can reset the administrator password and
network configuration to the factory default.
1. Use the tip of a ball point pen and depress the configuration reset
switch located on the back of the Network Disk Server. Hold it for
about 5 seconds until the beep.
2. The network configuration will be reset, and you may need to re-
configure some or all of the network settings before you can
connect to the Network Disk Server.
3. Use a web browser to connect to the Network Disk Server. Enter
the System Administration and enter the following login name
and password.
Login: Administrator
Password: admin
You can then perform system administration.
Note: If the configuration reset switch is disabled in the System
Tools · Hardware Settings page, you are no longer able
to use this function. Please remember your administrator
password.
70
Page 72

8.3 Disk Failure or Malfunction
If you are suffering from a disk failure or malfunction, please do the
following:
1. Log all abnormal events or messages for technician’s reference.
2. Stop all operations of the Network Disk Server and power it off.
3. Contact the customer service for technical support.
Note: Your Network Disk Server must be repaired by a trained
technician. Please do not try to repair the Network Disk
Server on your own.
8.4 Power Outage or Abnormal Shutdown
In the event of power outage or abnormal shutdown of the Network
Disk Server, the system should return to its original state prior to
shutdown or power outage after restart. If the system is not
operating within normal parameters, please proceed with the following
steps:
1. In the event of system configuration setting lost during power
outage or abnormal shutdown, please manually reset your desired
configurations.
2. In the event of system operating abnormally or error message,
please contact customer service for support.
To prevent similar occurrence, please periodically backup all critical
files or folders and remember the following tips:
1. Please follow Shutdown/Restart the Server steps described
above for normal shutdown or restart.
2. If you are able to anticipate power outage, please backup all critical
files or folders prior to power outage and shutdown your server
normally. Restart your server once the power has returned to
normal.
Note: To prevent major lost of data in the event of a disk
failure, please back up your data periodically.
71
Page 73

Appendix A: LCD Panel
Displayed Information
After system powers on, the following information is displayed on the LCD panel:
Power
Error
Network
Hard Disk
Checking IP address, system and disk information
Click on B to show the available disk space. Please note that this is actually the
entire amount of disk space, and not the amount of space that you can use.
Click on B again to show current CPU temperature and fan speed.
Click B again to display the model number and version information as shown
below:
Server Name
ND43000 05/22
61.235.61.33
IP Address
DISK NUMBER: 4
SIZE: 38361.09MB
TEMP: 32o C
FAN : 3590 RPM
ND43000
3.02 (0719)
Date
Time
Setting Switch A
(Button A in the
text below)
Setting Switch B
(Button B in the
text below)
72
Page 74

System Setting Function
Enter System Setting
1. Press the switch A for two seconds to enter System Setting.
2. Press the switch B for selection options.
3. Press the switch A to enter the selection options.
Network Settings
Enter Network Settings, press the switch B to choose DHCP or Static IP.
1. Obtain IP Address Automatically (DHCP)
DHCP will automatically obtain IP address settings.
2. Specify Static IP Address (STATIC IP)
Press switch A to select STATIC IP and complete the following steps:
• SET STATIC IP
Press the switch B to set the IP address settings. Press switch B to
select the number 0~255. Press switch A for the next number.
• SET NETMASK
Follow the same procedure as above.
• SET GATEWAY
Follow the same procedure as above.
• SELECT STATIC IP
Press switch B to select YES or NO and confirm by pressing switch A. NO
will return to the Network Settings menu.
• RESTART SYSTEM
You need to restart the system to make changes effective. Press switch
B to select YES or NO and press switch A to confirm.
Power Down
Press switch A to shutdown the system.
Reboot System
Press switch A to reboot the system.
Exit
Press switch A to exit the settings menu.
73
Page 75

Appendix B: Web File Manager
Using Web File Manager
Start your web browser and enter your Network Disk Servers home page. Select
Web File Manager and enter the correct login name and password. You may
also enter “guest” in the login name field with no password to access the network
shares on the Network Disk Servers as an anonymous guest.
74
Page 76

The Network Disk Servers allows you to organize your network share folders online. You can save these files inside folders as well as rename and remove files or
folders.
• How to View Files On-line
Click on a file displayed on the web page. The file’s data are displayed on the
browser. If your browser does not support the file format, the download
window pops up automatically. Once the file is downloaded, you can open it on
your computer.
• How to Create Folders
1. Enter the folder that you want to create the new folder.
2. On the tool bar, click on
3. Enter the name of the new folder and confirm.
• Renaming Files or Folders
1. Select the file or folder you want to rename.
2. On the tool bar, click on
3. Enter the new file or folder name and confirm.
(Create Folder).
(Rename).
• Deleting Files or Folders
1. Check the file(s) or folder(s) you wish to delete.
2. On the tool bar, click on
(Delete).
3. A window appears. Click on OK to delete the selected file or folder.
To delete all files and folders, click on
on
(Delete).
(Select All),then click
• Uploading
1. Enter the folder of the file you want to upload.
2. Click on “Browse…” to select the file you want to upload.
3. Click on “Upload”.
• Downloading
1. Click the right mouse button on the file which you want to download.
2. A context menu appears. Click on “Save Target As…” to download the file.
• Logging out Web File Manager
On the tool bar, click on
(Logout) to leave the web file manager.
75
Page 77

Web File Manager Icons
Advanced File Manager
Up - go back to the parent folder
Refresh – reload the current page
Home - go back to the network shares list home
page
Create Folder – create a new folder
Rename – rename the selected file or folder
Delete – remove the selected file(s) or folder(s)
Select All – select all files and folders
Select None – cancel all selection
Logout – leave the web file manager
Full access network share folder
Read-only network share folder
Malfunction network share folder
76
Page 78

Appendix C: JAVA Web File Manager
JAVA web file manager is developed to enable multiple files transfer
simultaneously with the JAVA and http techniques. The user-friendly interface
enables you to select the files for downloading and uploading by dragging them
from and dropping to the list on the window. You can also resume the operation.
Uploading Files
Use one of the following two methods to upload files:
1. First, select the file(s) you wish to upload from the local file system tree
located on the left hand side of the applet. Then drag the selected files to the
desired share folder on the right hand side of the applet.
2. First, select the file(s) you wish to upload from the local file system tree
located on the left hand side of the applet. Then select a destination share
folder located on the right hand side of the applet, and click on the
button to upload the file(s).
77
Page 79

Downloading Files
Use one of the following two methods to download file(s):
1. First, select the file(s) you wish to download from the remote file system tree
located on the right hand side of the applet. Then drag the selected files to
the desired local folder on the left hand side of the applet.
2. First, select the file(s) you wish to download from the remote file system tree
located on the right hand side of the applet. Then select a destination local
folder located on the left hand side of the applet, and click on the
button
to download the file(s).
Renaming Files or Folders
Use one of the following three methods to rename a file or a folder:
1. Triple-click on the file or folder you wish to rename.
2. With the file or folder you wish to rename selected, click on the
button.
3. With the file or folder you wish to rename selected, press the F2 key on your
keyboard.
Deleting Files or Folders
Use one of the following two methods to delete file(s) or folder(s):
1. With the file(s) or folder(s) you wish to delete selected, click on the
button.
2. With the file(s) or folder(s) you wish to delete selected, press the DEL key on
your keyboard.
Creating New Folder
Click on the
button, then enter a valid new folder name.
Copying Files (Available only for files located on Network Disk Server).
Use one of the following two methods to copy file(s) among Network Disk Server
folders:
1. First, select the file(s) you wish to copy, then, with the CTRL key pressed,
drag the files you wish to copy to the destination folder.
2. First, press CTRL + C with the file(s) you wish to copy selected. Then, select
a destination folder, and press CTRL + V to finish the copying operation.
Moving Files (Available only for files located on Network Disk Server)
78
Page 80

Use one of the following two methods to move file(s) among Network Disk Server
folders:
1. First, select the file(s) you wish to move, then drag the files you wish to move
to the destination folder.
2. First, press CTRL + X with the file(s) you wish to move selected. Then, select
a destination folder, and press CTRL + V to finish the moving operation.
Changing Working Directory
To change the current working directory, first click on the drop-down combo box
located on the top of window, then select the desired working directory.
79
Page 81

Appendix D: Quick Install Wizard
Introduction
The Quick Install Wizard enables you to list the Network Disk Servers within your
local network, and display basic information such as server names, workgroups
and IP addresses. You may also set up the server name, date/time and basic
network configuration of the Network Disk Server via this program.
Screenshot
All Network Disk
Servers can be
identified using a
unique server
name.
Set up Server
Name, Date, Time
and basic network
configurations.
Indicates the
IP address of
the server.
Windows
workgroup joined
by the Network
Disk Server.
View detailed information
about the selected server.
Re-search for Network
Disk Servers in the
network zone.
80
Display
operating
instructions.
Close this
program.
Page 82

Operation Help
1. Setting up your Network Disk Server
Select the Network Disk Server that you want to configure, and then click on
the Configure button. An authentication window asking you to enter the
administrator’s password appears as shown below:
Click on OK after entering the password. If the name and password are
correct, the configuration window is displayed on the screen:
If this option is
enabled, the server
obtains the IP address
automatically from
the DHCP server.
If this option is
enabled, the server
uses the IP address
settings specified.
Exits and saves
changes.
Exits and
discards
changes.
Name for this Network
Disk Server. You can
input any name you
want except special
characters. The
maximum length is 14
characters.
Enter the IP address
exclusively assigned to
this server.
The subnet mask is
used to distinguish
the network ID and
host ID portions of
the IP address.
The IP address for the
default gateway that
connects to the Internet
or other network.
Time
81
Page 83

Change the settings and click on OK when done to complete the configuration
setup.
Note:
1. After changing some settings, you may be asked to restart the Network
Disk Server.
2. If you want to set up detailed configuration, you need to enter the
administration web page of the Network Disk Server via the browser.
For more configurations, check your browser under “System Administration”
2. Viewing detailed information on the Network Disk Server
Choose the Network Disk Server by highlighting it with the mouse, then click
on “Group Data” to display current settings and status as shown below:
3. Finding information on other Network Disk Servers in the same
network
Click on “Refresh” in the Toolbar to find information on other Network Disk
Servers in the same network.
4. Displaying User Help File
Click on “Help” at the top to display the Help file.
82
Page 84

5. To enter the home page of the Network Disk Server:
Double click on the name of the Network Disk server to enter the web page
for advanced administration.
Double click on the
name of the Network
Disk Server to enter
the web page for
advanced
administration.
83
Page 85

Appendix E: Using FTP
Besides viewing the share folders on Web File Manager web page, you can also
access the folders via the FTP function of Web File Manager. Follow the steps
below to enter Web File Manager:
1. Enter the first page of Network Disk Server, click Web File Manager.
84
Page 86

2. Click FTP.
3. Enter the user name and the password to login to the FTP server.
85
Page 87

4. Double click the share folder to access the files.
86
Page 88

5. All files in the share folder will be displayed. You copy, delete or rename the
files in the share folder(s) easily and efficiently with general commands of
Windows, e.g. drag and drop. Hence, using FTP reduces the time and effort
consumed with managing the folders.
87
 Loading...