

Page 1
ND33000
User Manual
©Copyright 2007-2008 Comet Labs, Inc. All Rights Reserved.
English version 2.01 – 18 Août 2008
Page 2

FOREWORD
Thank you for choosing Comet Labs products! This user manual provides detailed instructi
ons
of using ND33000. Please read carefully and start to enjoy the powerful functions of ND33000
NOTE
•
This manual provides the description of all functions of ND33000. The product you
purchased may not support certain functions dedicated to specific models.
•
All features, functionality, and other product specifications are subject to change
without prior notice or obligation.
•
All brands and products names referred to are trademarks of their respective holders.
LIMITED WARRANTY
In no
event shall the liability of Comet Labs Systems, Inc. (Comet Labs) exceed the price paid for the
product from direct, indirect, special, incidental, or consequential software, or its
documentation. Comet Labs makes no warranty or repre
sentation, expressed, implied, or
statutory, with respect to its products or the contents or use of this documentation and
all accompanying software, and specifically disclaims its quality, performance,
merchantability, or fitness for
any particular purpose. Comet Labs reserves the right to revise
or update its products, software, or documentation without obligation to notify any
individual or entity.
1.
2.
CAUTION
Back up your system periodically to avoid any poten
tial data loss. Comet Labs
disclaims any responsibility of all sorts of data loss or recovery.
Should you return any components of the ND33000 package for refund or
maintenance, make sure they are carefully packed for shipping. Any form of
damages due
to improper packaging will not be compensated.
-
2 -
Page 3

Table of Contents
TABLE OF CONTENTS......................................................................................................................................3
SAFETY WARNINGS........
..................................................................................................................................7
CHAPTER 1. OVERVIEW................................................................................................
..........................8
1.1
1.2
1.3
I
NTRODUCTION
........................................................................................................................................8
P
ACKAGE CONTENTS
.............................................................................................................................10
H
ARDWARE ILLUSTRATION
.................................................................................................................... 11
CHAPTER 2.
2.1
2.2
2.3
2.
4
2.5
2.5.1
2.5.2
INSTALL ND33000 ....................................................................................................................12
I
NSTALL HARD DISK
..............................................................................................................................12
H
ARD DISK COMPATIBILITY LIST
..........................................................................................................15
S
ET UP
ND33000...........................................................................................................................................19
C
HECK SYSTEM STATUS
........................................................................................................................20
C
ONFIGURE SOFTWARE SETTINGS
.........................................................................................................22
Windows® Users...........................................................................................................................22
Mac Users.....................................................................................................................................33
CHAPTER 3.
3.1
ENJOY THE POWERFUL SERVICES OF THE ND33000...................................................3
5
S
ERVER ADMINISTRATION
.....................................................................................................................40
3.2 Q
UICK CONFIGURATION
....................................................................................
...............40
3.3
3.3.1
3.3.2
3.3.3
3.3.4
3.3.5
S
YSTEM SETTINGS
...........................................................................................................43
Server Name.........................................................
.........................................................................43
Date & Time..................................................................................................................................43
Encoding Setting..................
.........................................................................................................44
Configure SMTP Server................................................................................................................45
View Syste
m Settings.....................................................................................................................45
3.4
3.4.1
3.4.2
3.4.3
3.4.4
3.4.5
N
ETWORK SETTINGS
..................................................................
......................................46
TCP/ IP Configuration..................................................................................................................46
Microsoft Networking ......................................................
.............................................................49
Apple Network ..............................................................................................................................51
NFS Service ...................................
...............................................................................................51
Web File Manager.........................................................................................................................51
- 3 -
Page 4

3.4.6
3.4.7
3.4.8
3.4.9
3.4.10
3.4.11
3.4.12
3.4.13
3.4.14
FTP Service ..................................................................................................................................52
Multimedia Station.............................
...........................................................................................54
iTunes Service...............................................................................................................................54
Download Station
.........................................................................................................................55
Web Server........................................................................................................................
............56
DDNS Service...............................................................................................................................57
MySQL Server.....................................................................................
..........................................58
System Port Management .............................................................................................................61
View Network Settings ....................................................
..............................................................62
3.5
3.5.1
3.5.2
3.5.3
3.5.4
D
EVICE CONFIGURATION
.................................................................................................64
3.5.4.1
3.5.4.2
SATA Disk ....
.................................................................................................................................65
RAID Management Tool.......................................................................................................
.........68
USB Disk.......................................................................................................................................69
USB Printer ....................................................................................
..............................................70
Windows Users .........................................................................................................................................70
Mac Users .......................................
..........................................................................................................73
3.6
3.6.1
3.6.2
3.6.3
U
SER MANAGEMENT
......................................................................................................
.77
Users.............................................................................................................................................77
User Groups..........................................................................................
........................................79
Quota ............................................................................................................................................86
3.7
3.7.1
3.7.2
3.7.3
3.7.4
3.7.5
3.7.6
N
ETWORK SHARE MANAGEMENT
....................................................................................88
Create ...........................................................................................................................................88
Proper
ty ........................................................................................................................................90
Access Control...................................................................................................
...........................91
Delete............................................................................................................................................91
Restore....................................................................
......................................................................92
NFS Access Control ......................................................................................................................93
3.8
3.8.1
3.8.2
3.8.3
3.8.4
3.8.5
3.8.6
S
YSTEM TOOLS
................................................................................................................94
Alert Notification ....................................................................................................
......................95
Restart/ Shutdown.........................................................................................................................95
Hardware Settings.......................................................................
..................................................96
UPS...............................................................................................................................................97
Hard Disk S.M.A.R.T.................................
....................................................................................98
System Update ..............................................................................................................................99
-
4 -
Page 5

3.8.7
3.8.8
3.8.9
3.8.10
3.8.11
3.8.12
3.8.13
3.8.14
USB One Touch Copy Backup.....................................................................................................100
Change Logo...................................................................
............................................................101
Back up to an External Storage Device ......................................................................................102
Remote Replication (Disaster Recovery)........................
............................................................103
Backup/ Restore/ Reset Settings..................................................................................................106
IP Filter ...............................................
.......................................................................................107
Network Recycle Bin...................................................................................................................108
Remote Login.............
.................................................................................................................109
3.9
3.9.1
3.9.2
3.9.3
3.9.4
E
VENT LOGS
............................................................................................
...................... 110
CHAPTER 4.
CHAPTER 5.
5.1
5.2
5.3
System Event Logs ...................................................................................................................... 110
System Connection Logs........................
..................................................................................... 110
On
-line Users...............................................................................................................................111
System Information .
.....................................................................................................................111
USE FRONT USB BACKUP BUTTON..........................................................................112
MULTIMEDIA STATION ...............................................................................................113
S
HARE PHOTOS AND MULTIMEDIA FILES VIA WEB INTERFACE
............................................................ 113
E
NABLE ITUNES SERVICE
....................................................................................................................123
U
SE
UPNP M
EDIA SERVER
..................................................................................................................125
CHAPTER 6.
6.1
D
OWNLOAD STATION..................................................................................................128
U
SE DOWNLOAD SOFTWARE
QGET.....................................................................................................138
CHAPTE
R 7.
CHAPTER 8.
CHAPTER 9.
CHAPTER 10.
CHAPTER 11.
CHAPTER 12.
CHAPTER 13.
13.1
13.2
13.3
13.4
13.5
13.6
WEB SERVER..................................................................................................................140
FT
P SERVER....................................................................................................................144
WEB FILE MANAGER...................................................................................................147
NETBAK REPLICATOR..............................................................................................152
CONFIGURING AD AUTHENTICATION.................................................................166
ACCESS THE ND33000 FROM LINUX .............................................................................171
ND33000 MAINTENANCE...................................................................................................172
R
ESTART
/ S
HUT DOWN SERVER
...........................................................................................................172
R
ESET ADMINISTRATOR PASSWORD AND NETWORK SETTINGS
............................................................173
D
ISK FAILURE OR MALFUNCTION
........................................................................................................174
P
OWER OUTAGE OR ABNORMAL SHUTDOWN
.......................................................................................174
A
BNORMAL OPERATION OF SYSTEM SOFTWARE
..................................................................................174
S
YSTEM TEMPERATURE PROTECTION
..................................................................................................174
-
5 -
Page 6

CHAPTER 14.
RAID ABNORMAL OPERATION TROUBLESHOOTING
.....................................175
TECHNICAL SUPPORT.................................................................................................................................177
GNU GENERAL PUBLIC LICENSE ...................................
.........................................................................178
-
6 -
Page 7

Safety Warnings
1.
2.
3.
4.
5.
6.
7.
8.
9.
The ND33000 can operate normally in the temperature of 0
º
C-40ºC and relative humidity
of 0%
-95%. Please make sure the environment is well-ventilated.
The power cord and devices connected to the ND33000 must provide correct supply
voltage (100W, 90
-264V).
Do not place the ND33000 in direct sunlight or near chemicals. Make sure the
temperature and humidity of the
environment are in optimized level.
Unplug the power cord and all connected cables before cleaning. Wipe the ND33000 with
a dry towel. Do not use chemical or aerosol to clean the ND33000.
Do not place any objects on the ND33000 for the server's normal
operation and to avoid
overheat.
Use the flat head screws in the product package to lock the hard disks in the ND33000
when installing hard disks for proper operation.
Do not place the ND33000 near any liquid.
Do not place the ND33000 on any uneven s
urface to avoid falling off and damage.
Make sure the voltage is correct in your location when using the ND33000. If you are
not sure, please contact the distributor or the local power supply company.
10. Do not place any object on the power cord.
11
. Do not attempt to repair your ND33000 in any occasions. Improper disassembly of the
product may expose you to electric shock or other risks. For any enquiries, please
contact the distributor.
-
7 -
Page 8

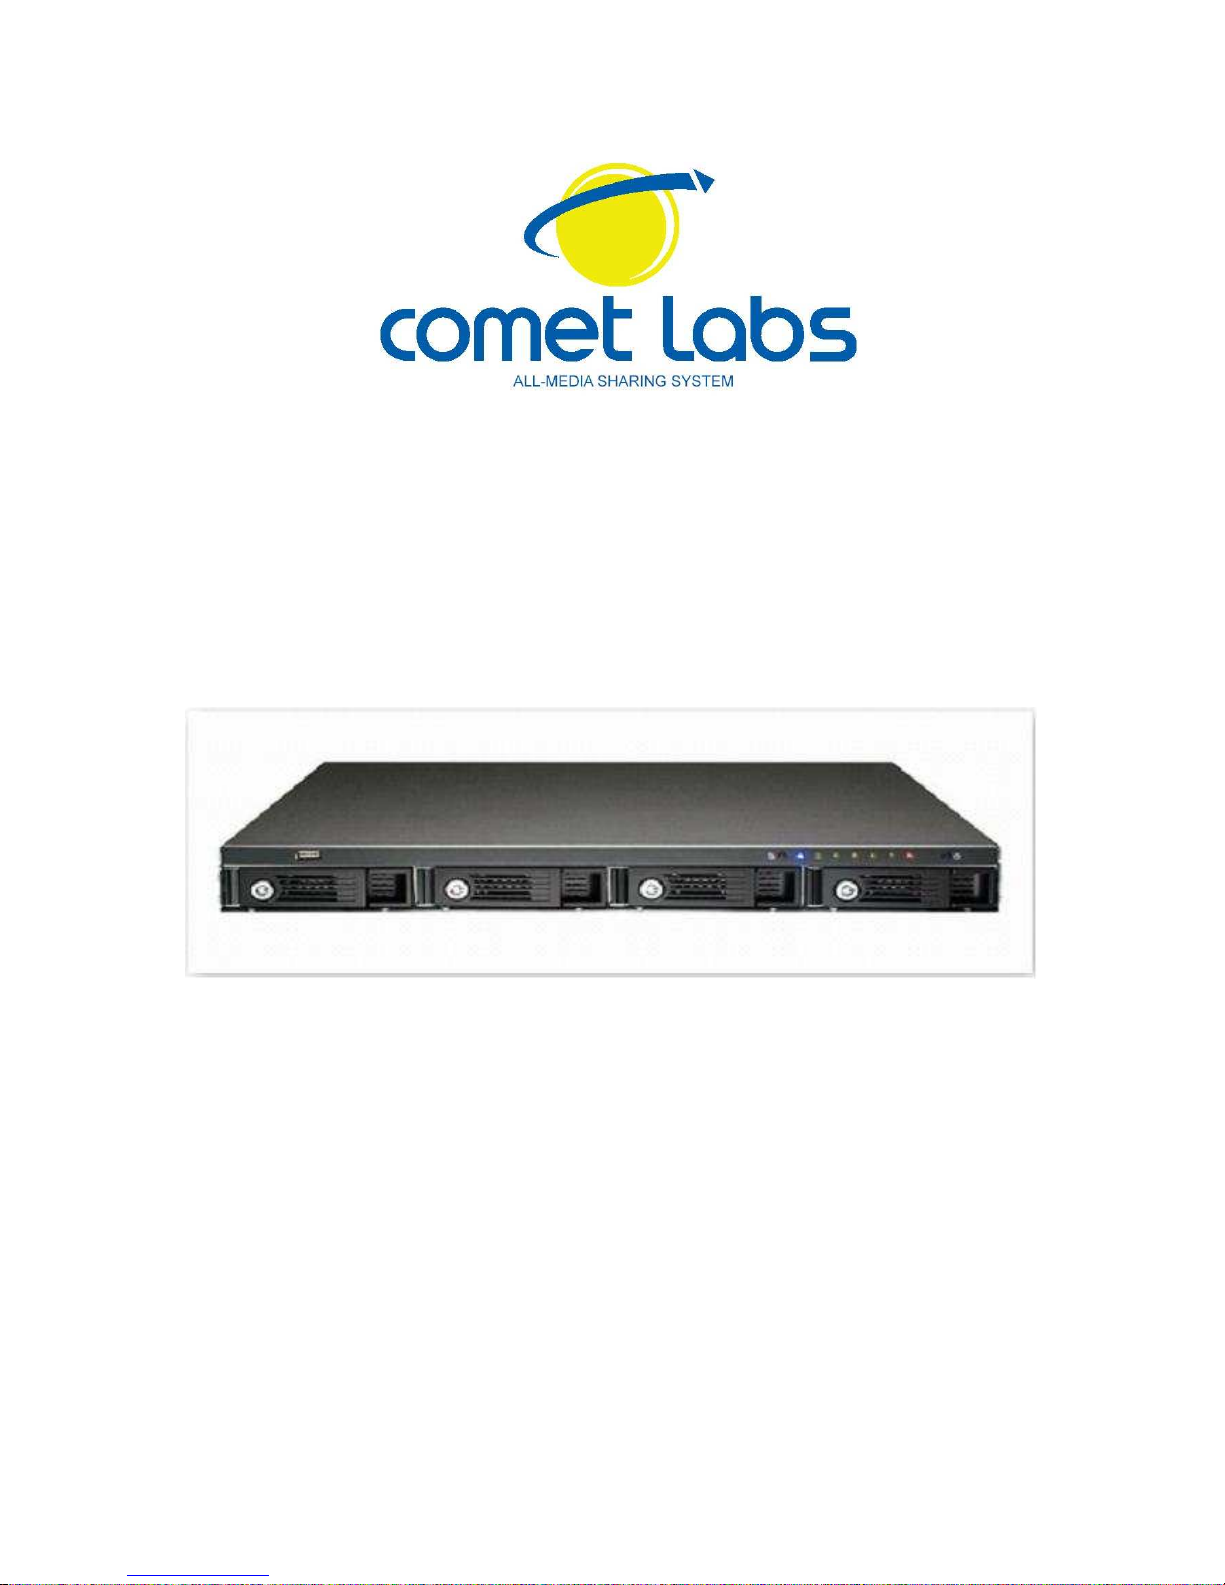
Chapter 1. Overview
1.1 Introduction
Thank you for choosing Comet Labs ND33000. This product has the following key features:
9
Powerful All-in-one ND33000 Server (12-in-1)
File Server
-
-
Sharing files across Windows, Mac, Linux, and UNIX
Windows AD service support
FTP Server
-
-
-
Access files from remote location via FTP server
Encrypted FTP via SSL/ TLS (explicit) mode
Passive FTP port range control
Backup Server
-
-
Professional Backup Software
-NetBak Replicator
Automatic/ Instant/ Schedule Backup
Remote Replication
-
-
-
Back up critical data on Comet Labs ND33000 to other Comet Labs ND33000 in remote locations
over
the network
Encrypted remote replication
Block
-level backup
Printer Server
-
-
Network printer sharing via USB
Support Windows & Mac platform
s (maximum 3 sets)
RAID Station
-
-
Advanced disk configurations: RAID 0, 1, 5, 6, 5 + spare, single and JBOD.
Intelligent on
-line RAID capacity expansion and RAID level migration
Web Server
-
-
Support Joomla!, PHP and MySQL/ SQLite
Create your
own online shops, forums, and blogs over the Internet
MySQL Server
-
-
-
MySQL and SQLite dual support
Can be configured as a standalone database server
Built
-in MySQL management tool- phpMyAdmin
-
8 -
Page 9

UPnP Media Server
-
-
-
Built
-in TwonkyMedia Server
Media streaming to DLNA compliant DMA, PS3 or Xbox 360 game consoles
Photos and videos playing on TV, and music and Internet radio playing on Hi
-Fi
system
iTunes Server
-
-
Music streaming from ND33000 to the iTunes program on Mac or W
indows PC
Smart playlist
Multimedia Station
-
-
Photo sharing via web
-based photo album
Photo album access authority management
Download Station
-
-
BitTorrent (with DHT), FTP and HTTP download
Remote management of the download tasks by QGet sof
tware anytime,
anywhere.
9
Diagnostic and Monitoring System: HDD S.M.A.R.T. and HHS Technology to prevent
physical hard drive failure
9
Powerful System Management: Comprehensive event logs for multiple file sharing
protocols and file-level recordings
-
9 -
Page 10
1.2
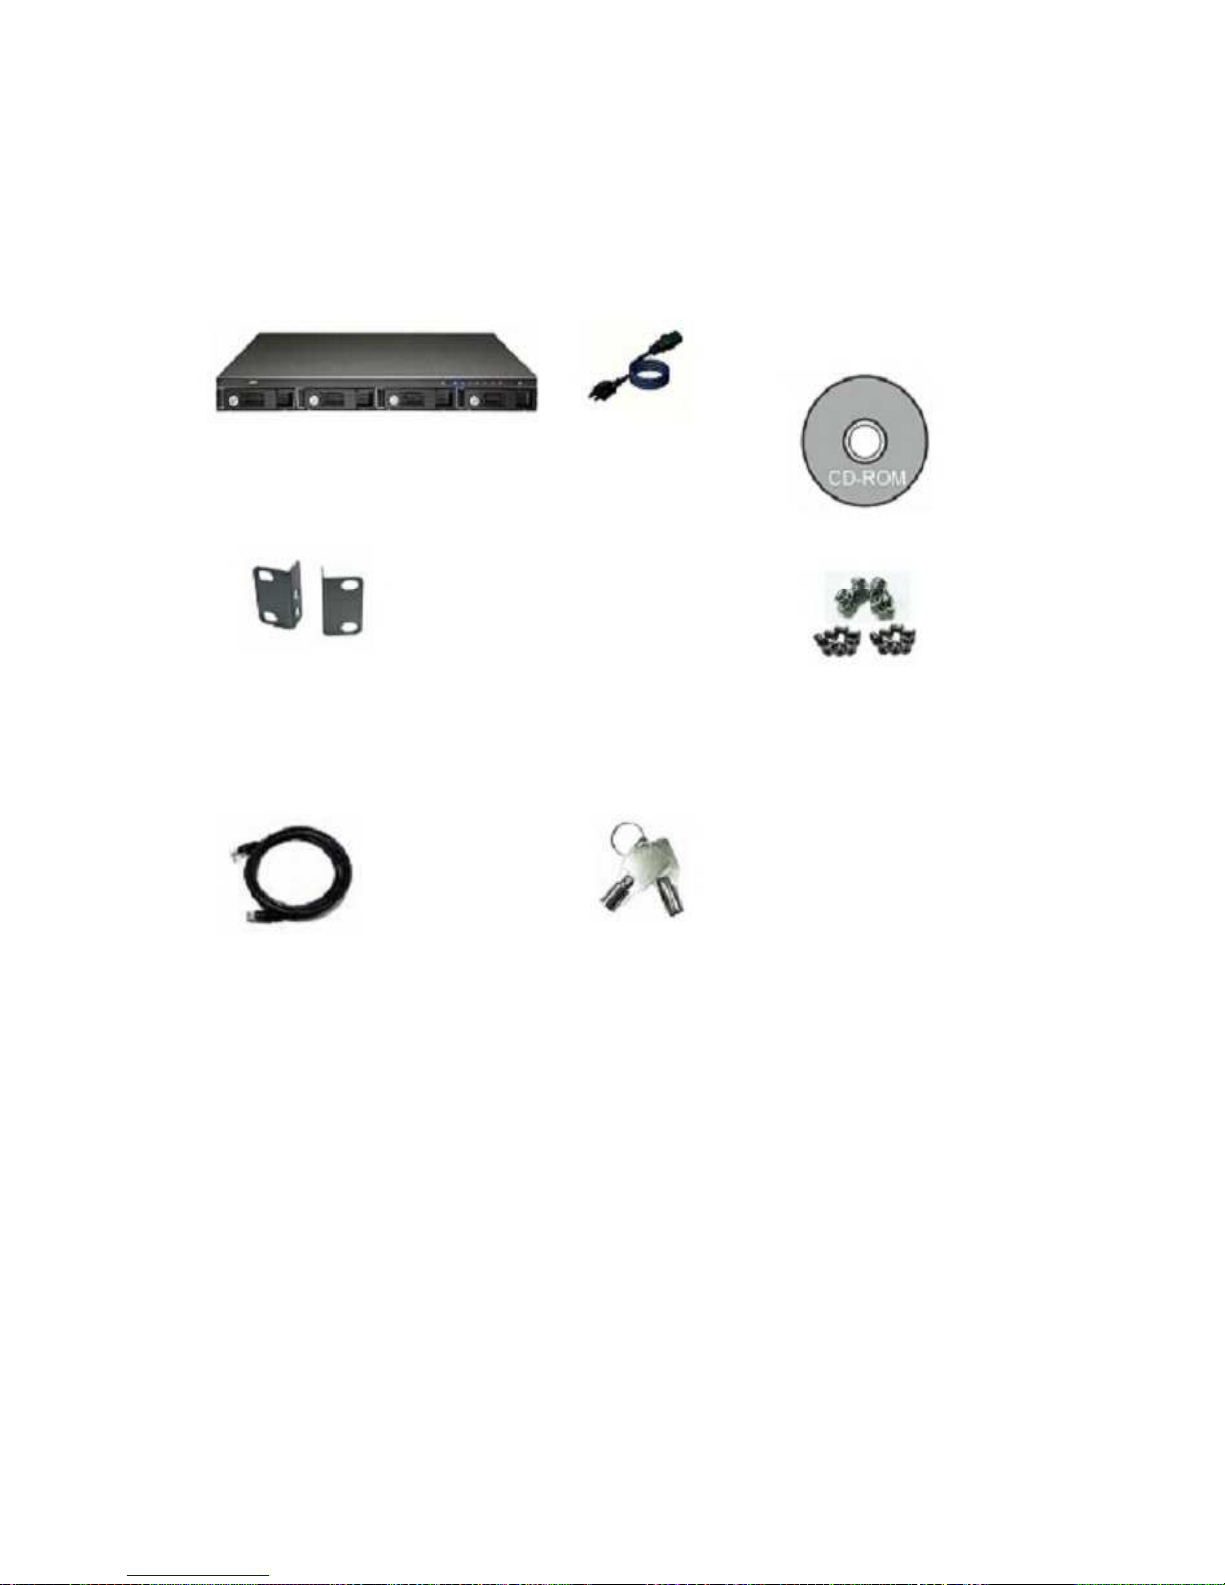
Package Contents
Your ND33000 package contains:
9
ND33000
ND33000
9
Power cord
9
CD
-
ROM (user
manual, IP Finder
& utility inclusive)
9
Mount kit x 2
9
Quick Installation
Guide
9
Flat head screw x 16
9
Round head screw x 4
9
Ethernet cable
9
Hard disk lock
-
10 -
Page 11

1.3
Hardware Illustration
1. One touch copy button
2. USB 2.0
3. LED indicators: USB, Status, HDD1, HDD2, HDD3, HDD4, LAN
4. Power button
5. Password & network settings reset button
6. Po
wer connector
7. Giga LAN
8. USB 2.0 x 2
-
11 -
Page 12

Chapter 2. Install ND33000
2.1 Install Hard Disk
1. Take out the disk trays.
2.
Install a hard disk on each tray. Make sure the disk holes match the holes at the
base of the disk tray
and lock the disk with four screws.
-
12 -
Page 13
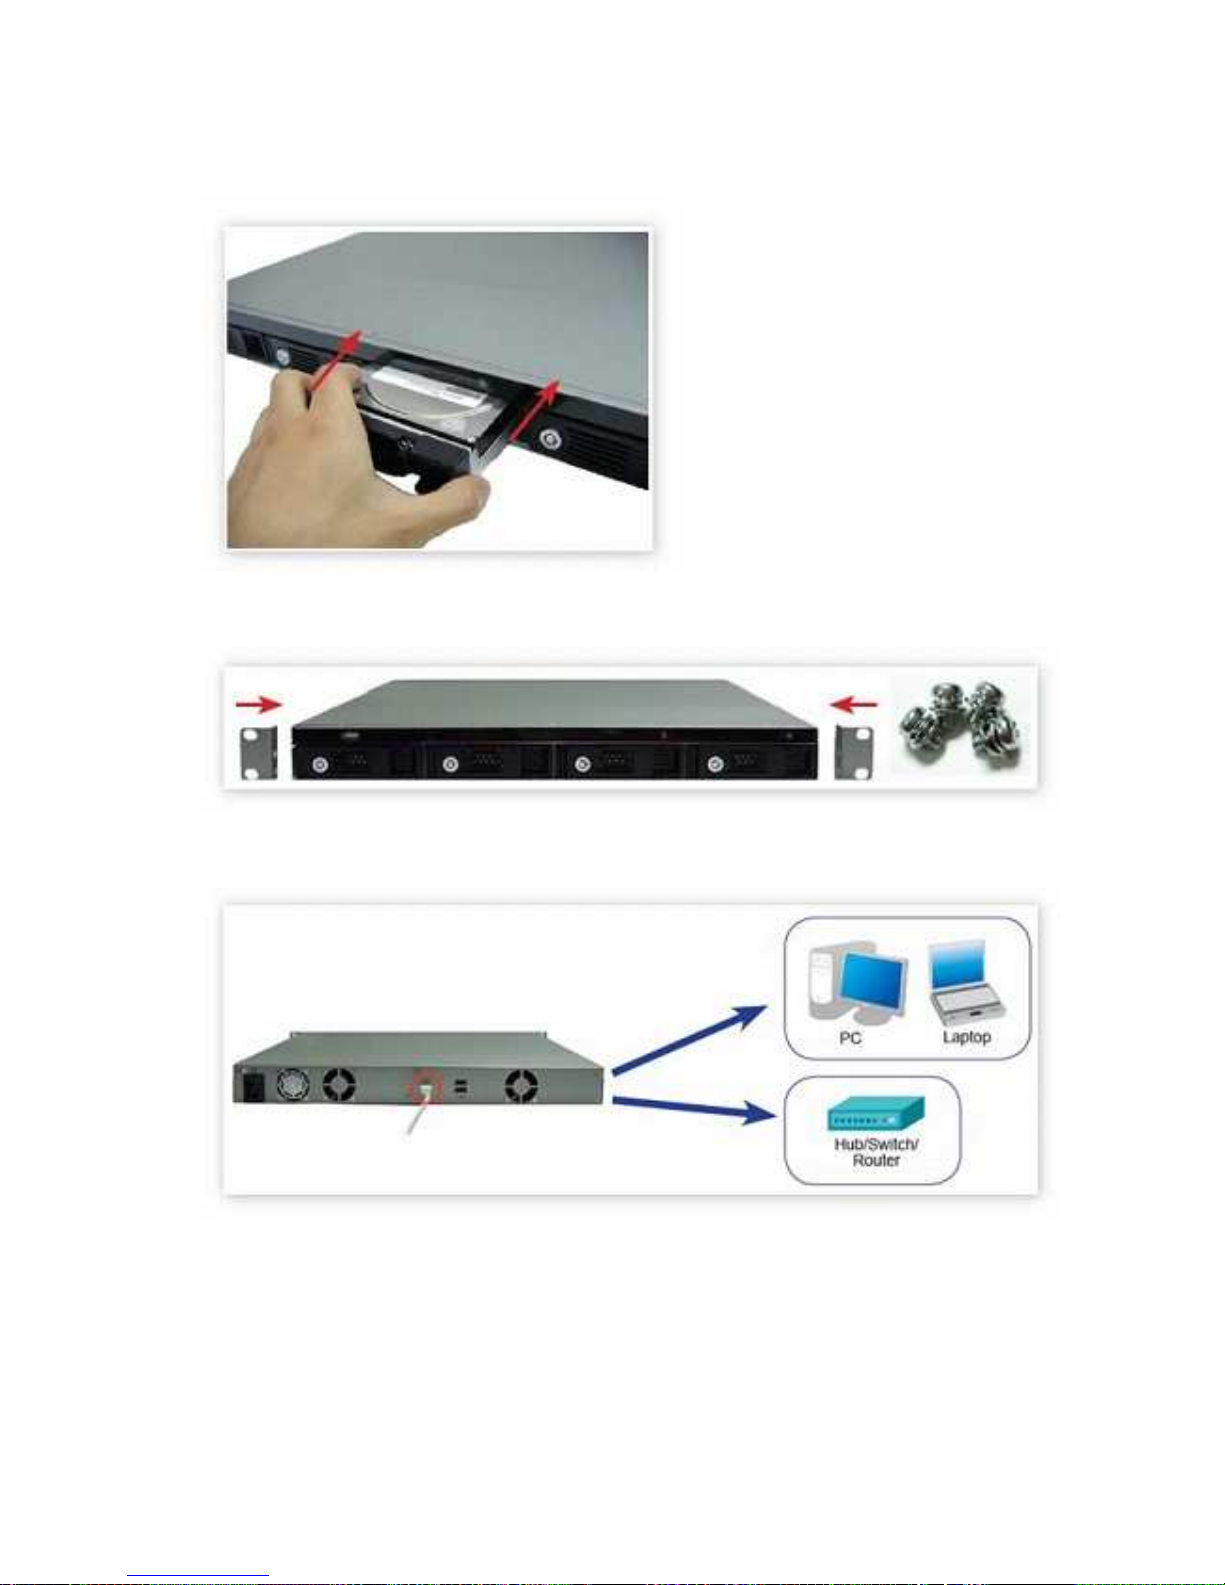
3.
Insert the disk trays to ND33000. Push the disk trays to the end.
4.
Install the mount kits on both sides of ND33000.
5.
Connect the network cable.
-
13 -
Page 14
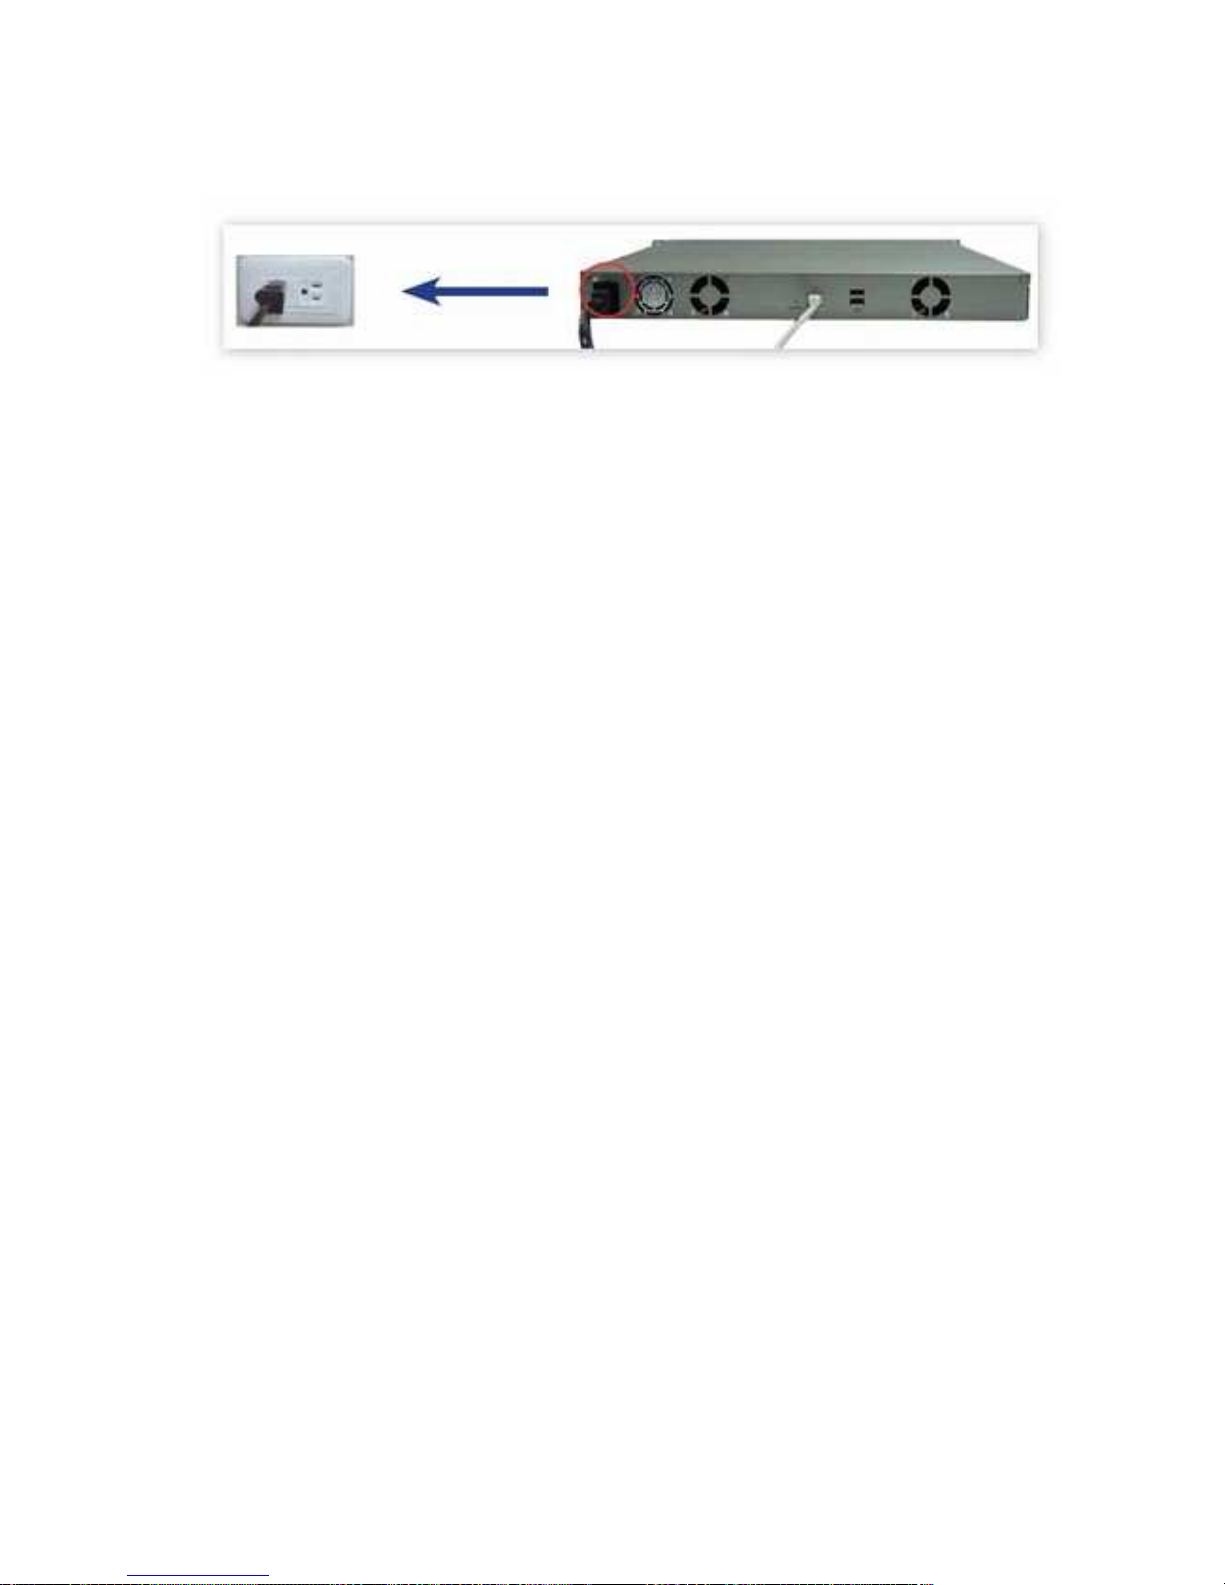
6.
Connect the power cord and plug in
the power cord to the socket.
-
14 -
Page 15

2.2
Hard Disk Compatibility List
The following HDD models are verified by Comet Labs that are compatible with the ND33000. It is
recommended to use the disk models listed here. Other HDD brands that are not te
sted
by Comet Labs may or may not work properly with the ND33000. For more updated compatible
hard disk information, please visit Comet Labs website at
http://www.cometlabs.com.
Comet Labs disclaims any resp
onsibility for product damage/ malfunction or
data loss/ recovery due to misuse or improper installation of hard
disks in any occasions for any reasons.
Brand
Hitachi
Hitachi
Hitachi
Hitachi
Hitachi
Hitachi
Hitachi
Hitachi
Hitachi
Hitachi
Hitachi
Hitachi
Hitachi
Hitachi
Hitachi
Hitachi
Hitachi
Hitachi
Seagate
Seagate
Seagate
Seagate
Seagate
Product Family
Deskstar 7K1000
Deskstar 7K1000
Deskstar T7K500
Deskstar T7K500
Deskstar T7K500
Deskstar T7K
500
Deskstar T7K500
Deskstar T7K500
Deskstar T7K500
Deskstar T7K500
Deskstar T7K250
Deskstar T7K250
Deskstar P7K500
Deskstar P7K500
Deskstar P7K500
Deskstar P7K500
Deskstar P7K500
Deskstar P7K500
Barracuda ES
Barracuda ES
Barracuda ES
Barracuda ES
Barracuda ES
Model
HDS721010KLA330
HDS721075KLA330
HDT725050VLA360
HDT725050VLA380
HDT725040VLA360
HDT725040VLA380
HDT725032VLA360
HDT725032VLA380
HDT725025VLA360
HDT725025VLA380
HDT722525DLA380
HDT722516D
LA380
HDP725050GLA380
HDP725050GLA360
HDP725040GLA360
HDP725040GLA380
HDP725032GLA380
HDP725025GLA380
ST3750640NS
ST3500630NS
ST3400620NS
ST3320620NS
ST3250620NS
Drive size
(GB)
1000
750
500
500
400
400
320
320
250
250
250
160
500
500
400
400
320
250
750
500
400
320
250
Interface
SATA II
SATA II
SATA II
SATA II
SATA II
SATA II
SATA II
SATA II
SATA II
SATA II
SATA II
SATA II
SATA II
SATA II
SATA II
SATA II
SATA II
SATA II
SATA II
SATA II
SATA II
SATA II
SATA II
RPM
7200
7200
7200
7200
7200
7200
7200
7200
7200
7200
7200
7200
7200
7200
7200
7200
7200
7200
7200
7200
7200
7200
7200
Buffer
Size
(MB)
32
32
16
8
16
8
16
8
16
8
8
8
16
8
16
8
8
8
16
16
16
16
16
-
15 -
Page 16

Seagate
Seagate
Seagate
Seagate
Seagate
Seagate
Seagate
Seagate
Seagate
Seagate
Seagate
Seagate
Seagate
Seagate
Seagate
Seagate
Seagate
Seagate
Seagate
Seagate
Seagate
Seagate
Seagate
Seagate
Seagate
Seagate
Seagate
Seagate
Seagate
Seagate
Seagate
Seagate
Seagate
Seagate
WD
WD
WD
Barracuda ES
Barracuda ES.2
Barracuda ES.2
Barracuda ES.2
Barracuda ES.2
SV35.3 Series
Barracuda 7200.10
Barracuda 7200.10
Barracuda 7200.10
Barracuda 7200.10
Barracuda 7200.10
Barracuda 7200.10
Barracuda 7200.10
Barracuda 7200.10
Barracuda 7200.10
Barracuda 7200.10
Barracuda 7200.10
Barracuda 7200.10
Barracuda 7200.10
Barracuda 7200.10
Barracuda 7200.10
Barracuda 7200.10
Barracuda 7200.10
Barracuda 7200.10
Barracuda 7200.10
Barracuda 7200.10
Barracuda 7200.10
Barracuda 7200.10
Barracuda 7200.
11
Barracuda 7200.11
Barracuda 7200.11
Barracuda 7200.11
Barracuda 7200.11
Barracuda 7200.11
WD Caviar GP
WD Caviar GP
WD Caviar GP
ST3250820NS
ST31000340NS
ST3750330NS
ST3500320NS
ST3250310NS
ST3250310SV
ST3750640AS
ST3750840AS
ST3500630AS
ST3500830AS
ST3400620AS
ST3400820AS
ST3320620AS
ST3320820AS
ST3300820AS
ST3250620AS
ST3250410AS
ST3250310AS
ST3250820AS
ST3200820AS
ST3160815AS
ST3160215AS
ST3120815AS
ST3120215AS
ST380815AS
ST380215AS
ST340815AS
ST340215AS
ST31000340AS
ST3750330AS
ST3750630AS
ST3500320AS
ST3500620AS
ST3320613AS
WD10EACS
WD7500AACS
WD5000AACS
250
1000
750
500
250
250
750
750
500
500
400
400
320
320
300
250
250
250
250
200
160
160
120
120
80
80
40
40
1000
750
750
500
500
320
1000
750
500
SATA II
SATA II
SATA II
SATA II
SATA II
SATA II
SATA II
SATA II
SATA II
SATA II
SATA II
SATA II
SATA II
SATA II
SATA
II
SATA II
SATA II
SATA II
SATA II
SATA II
SATA II
SATA II
SATA II
SATA II
SATA II
SATA II
SATA II
SATA II
SATA II
SATA II
SATA II
SATA II
SATA II
SATA II
SATA II
SATA II
SATA II
7200
7200
7200
7200
7200
7200
7200
7200
7200
7200
7200
7200
7200
7200
7200
7200
7200
7200
7200
7200
7200
7200
7200
7200
7200
7200
7200
7200
7200
7200
7200
7200
7200
7200
7200
7200
7200
8
32
32
32
32
8
16
8
16
8
16
8
16
8
8
16
16
8
8
8
8
2
8
2
8
2
8
2
32
32
16
32
16
16
16
16
16
-
16 -
Page 17

WD
WD
WD
WD
WD
WD
WD
WD
WD
WD
WD
WD
WD
WD
WD
WD
WD
WD
WD
WD
WD
WD
WD
WD
WD
WD
WD
WD
WD
WD
WD
WD
WD
WD
WD
WD
WD
WD RE2-GP
WD RE2-GP
WD RE2-GP
WD RE2
WD RE2
WD RE2
WD RE2
WD RE2
WD RE2
WD RE2
WD RE2
WD RE2
WD RE2
WD RE2
WD RE
WD RE
WD RE
WD Caviar SE16
WD Ca
viar SE16
WD Caviar SE16
WD Caviar SE16
WD Caviar SE16
WD Caviar SE16
WD Caviar SE16
WD Caviar SE16
WD Caviar SE16
WD Caviar SE
WD Caviar SE
WD Caviar SE
WD Caviar SE
WD Caviar SE
WD Caviar SE
WD Caviar SE
WD Caviar SE
WD Caviar SE
WD Caviar SE
WD Caviar SE
WD1000FYPS
WD7500AYPS
WD5000ABPS
WD7500AYYS
WD5001ABYS
WD5000ABYS
WD4001ABYS
WD4000ABYS
WD3201ABYS
WD2502ABYS
WD1601ABYS
WD320ABYS
WD5000YS
WD4000YS
WD3200YS
WD2500YS
WD1600YS
WD7500A
AKS
WD5000AAKS
WD4000AAKS
WD3200AAKS
WD2500AAKS
WD5000KS
WD4000KS
WD3200KS
WD2500KS
WD5000AAJS
WD4000AAJS
WD3200AAJS
WD3200JS
WD3000JS
WD2500AAJS
WD2500JS
WD2000JS
WD1600AAJS
WD1600JS
WD1200JS
1000
750
500
750
500
500
400
400
320
250
160
320
500
400
320
250
160
750
500
400
320
250
500
400
320
250
500
400
320
320
300
250
250
200
160
160
120
SATA II
SATA II
SATA II
SATA II
SATA II
SATA II
SATA II
SATA II
SATA II
SATA II
SATA II
SATA II
SATA II
SATA II
SATA II
SATA II
SATA II
SATA II
SATA II
SATA II
SATA II
SATA II
SATA II
SATA II
SATA II
SATA II
SATA II
SATA II
SATA II
SATA II
SATA II
SATA
II
SATA II
SATA II
SATA II
SATA II
SATA II
7200
7200
7200
7200
7200
7200
7200
7200
7200
7200
7200
7200
7200
7200
7200
7200
7200
7200
7200
7200
7200
7200
7200
7200
7200
7200
7200
7200
7200
7200
7200
7200
7200
7200
7200
7200
7200
16
16
16
16
16
16
16
16
16
16
16
16
16
16
16
16
16
16
16
16
16
16
16
16
16
16
8
8
8
8
8
8
8
8
8
8
8
-
17 -
Page 18

WD
WD
WD
W
D Caviar SE
WD Caviar SE
WD Caviar SE
WD800AAJS
WD800JD
WD400JD
80
80
40
SATA II
SATA II
SATA II
7200
7200
7200
8
8
8
-
18 -
Page 19
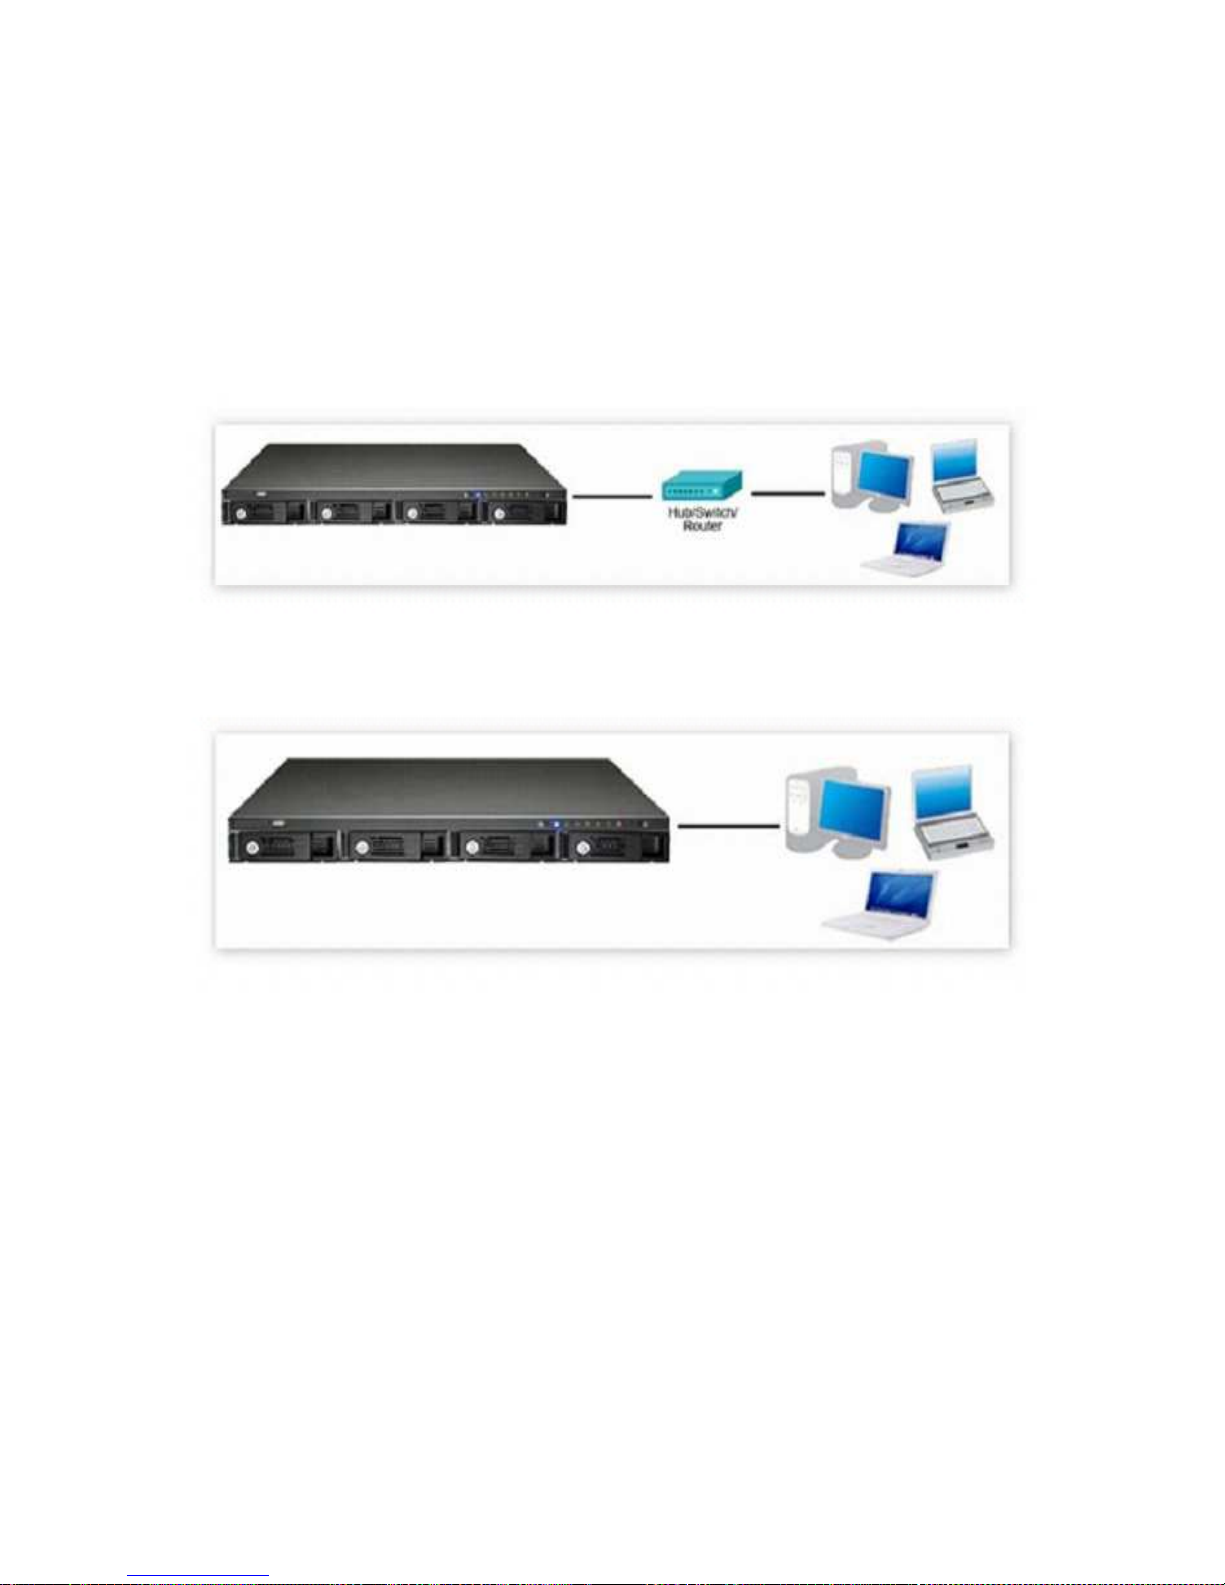
2.3
Set up
ND33000
Please check your network environment and select the appropriate installation
method
before installing the ND33000.
1. Office/ Home
Connect the ND33000 and PC to the same hub/ switch/ router.
2. Individual
Connect the directly to your computer by a network cable.
-
19 -
Page 20
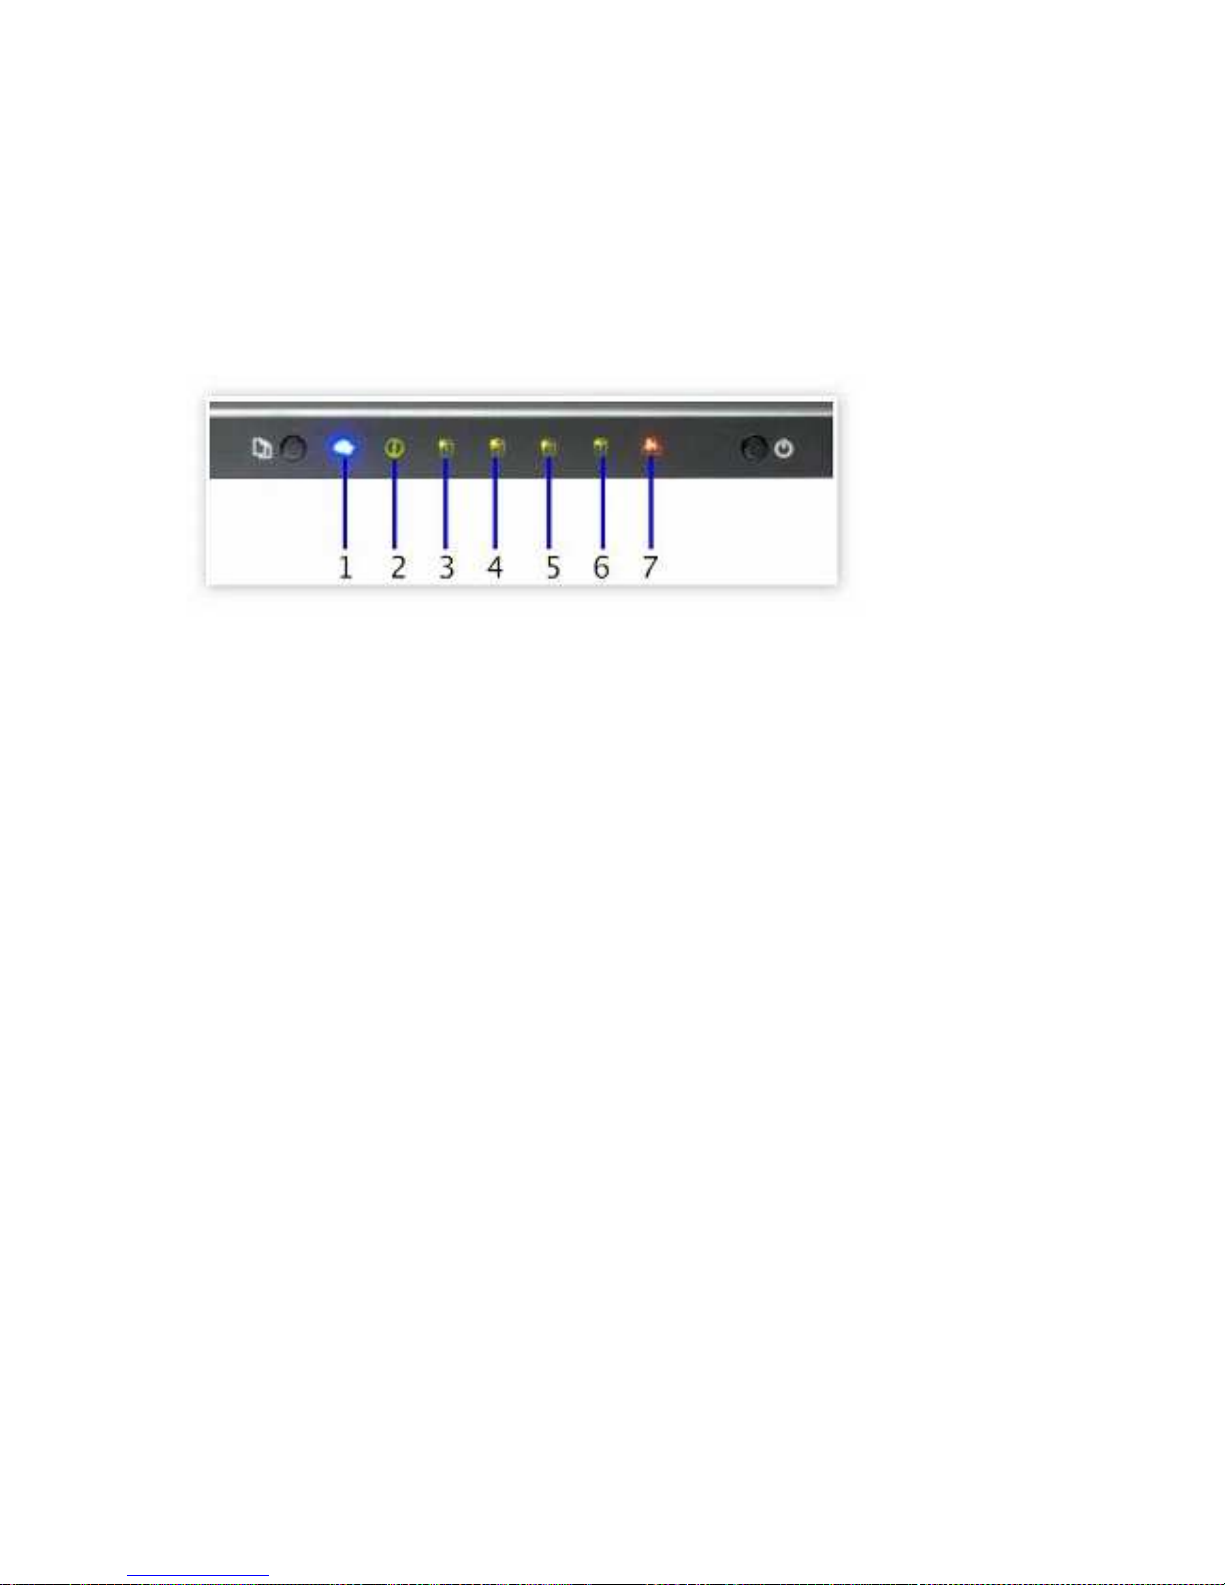
2.4
Check System Status
The LED indicators of t
he ND33000 indicate the system status and information easily. When
the ND33000 is turned on, please check the following items to make sure the system status is
normal. Note that the following LED information is applicable only when you have
properly i
nstalled HDD, and connected the ND33000 to the network and power.
1. USB Status
2. Status
3. HDD1
4. HDD2
5. HDD3
6. HDD4
7. LAN
-
20 -
Page 21

LED Display & System Status Overview
LED
1. Front USB
Status
2. Status
3. HDD1
4. HDD2
5. HDD3
6. H
DD4
7. LAN
LED Display & System Status
Blue: You can press the copy button to copy data
Flashes blue: The disk data is being accessed
Green: System is normal
Flashes green: Hard disk not detected; Hard disk not initialized
Red: Warning on disk
full status; disk capacity is almost full; RAID
degraded mode (read
-only), abnormal disk writing
Flashes red: RAID degraded mode
Flashes green and red alternatively: The firmware is being
updated; RAID rebuilding/ expanding/ migrating
Off: HDD ent
ers standby mode
y
Green: The hard drives are normal
y
Flashes green: Reading/ writing data
y
Red: Abnormal reading/ writing
y
Flashes red: The hard drives are abnormal, but are still being
read/ written
Flashes orange: The disk data is being acc
essed
-
21 -
Page 22
2.5
Configure Software Settings
After checking the system status, please follow the steps below to configure the software
settings of the ND33000. The configuration procedure of Windows and Mac users are
different. Please select the
appropriate procedure according to your OS.
2.5.1
Windows® Users
Insert ND33000 CD
-
ROM in your PC.
1. Install Quick Install Wizard.
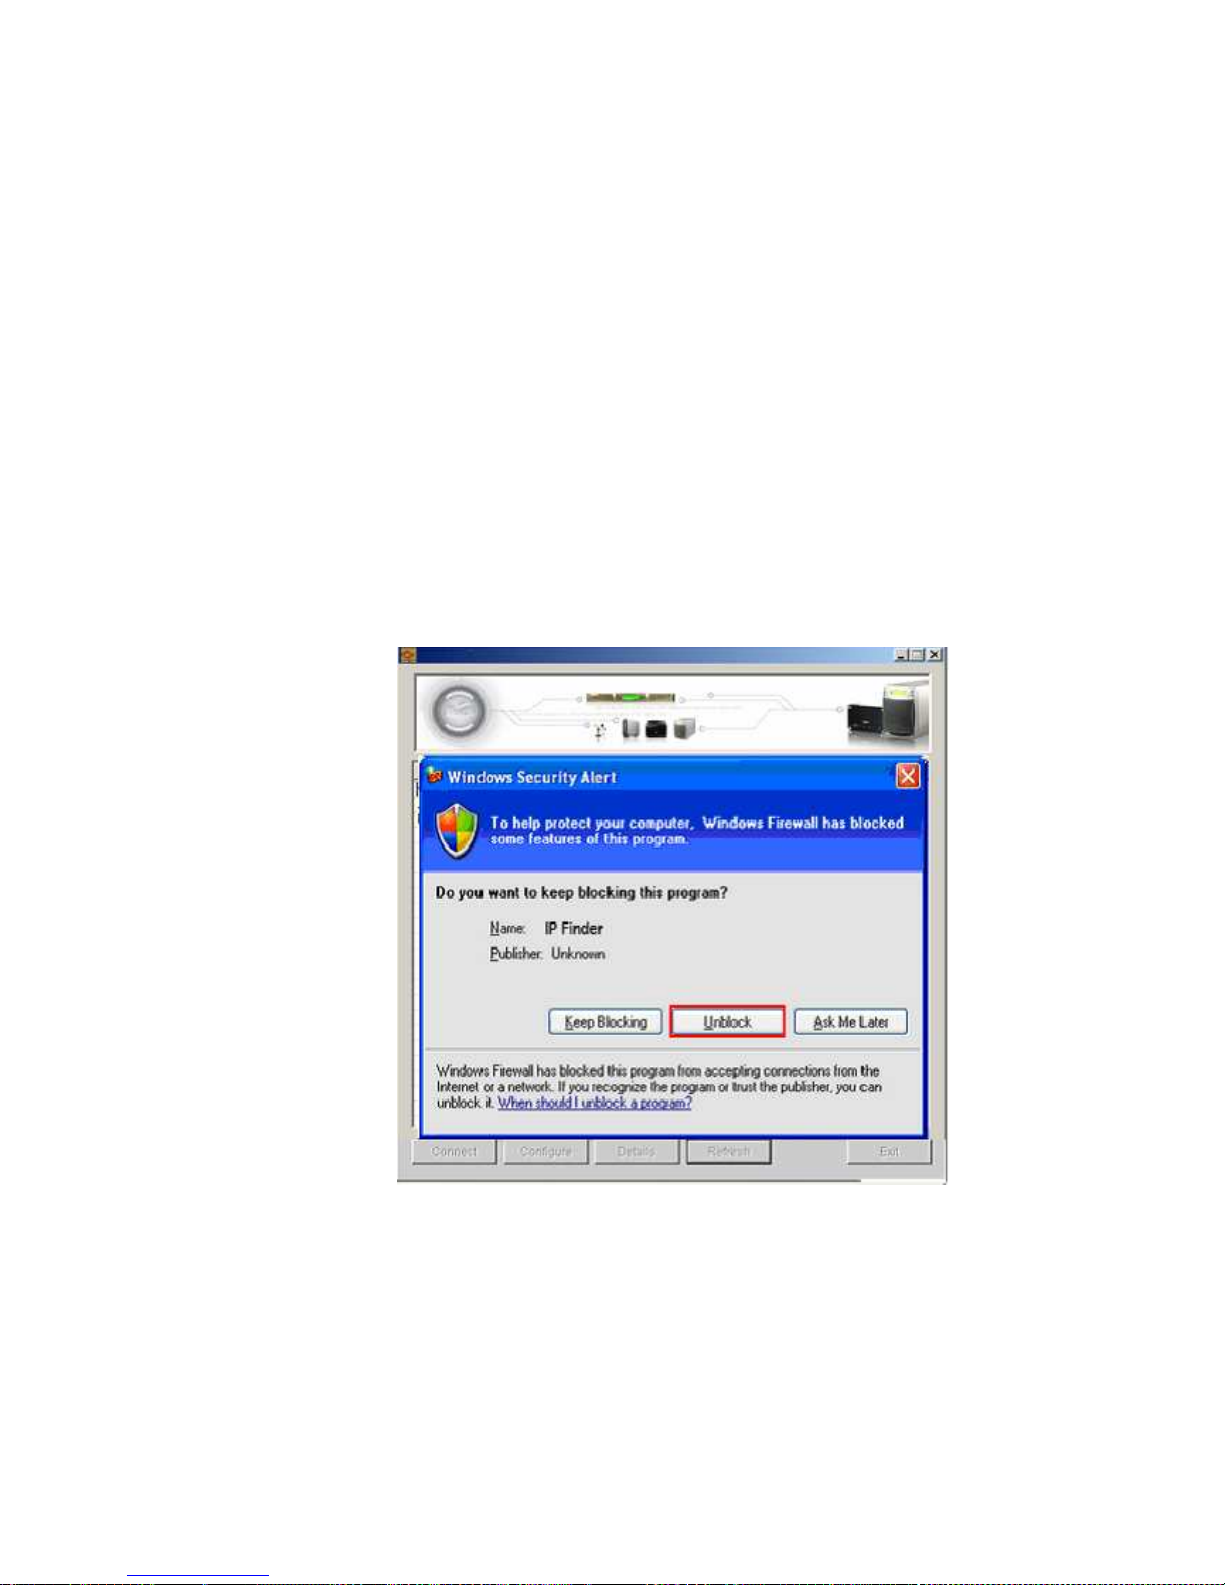
2. Follow screen instructions to install IP Finder. IP Finder will run automatically. If you are
using Windows XP SP2, the following screen will be shown. Please select “Unblock”.
-
22 -
Page 23

3. IP Finder will find the ND33000 available in the network and ask if you want to perform
quick setup. Click Yes to continue.
Note: If the server is not found, click Refresh to try again.
4. Enter the default user name and password.
Default user name: admin
Password: admin
-
25 -
Page 24
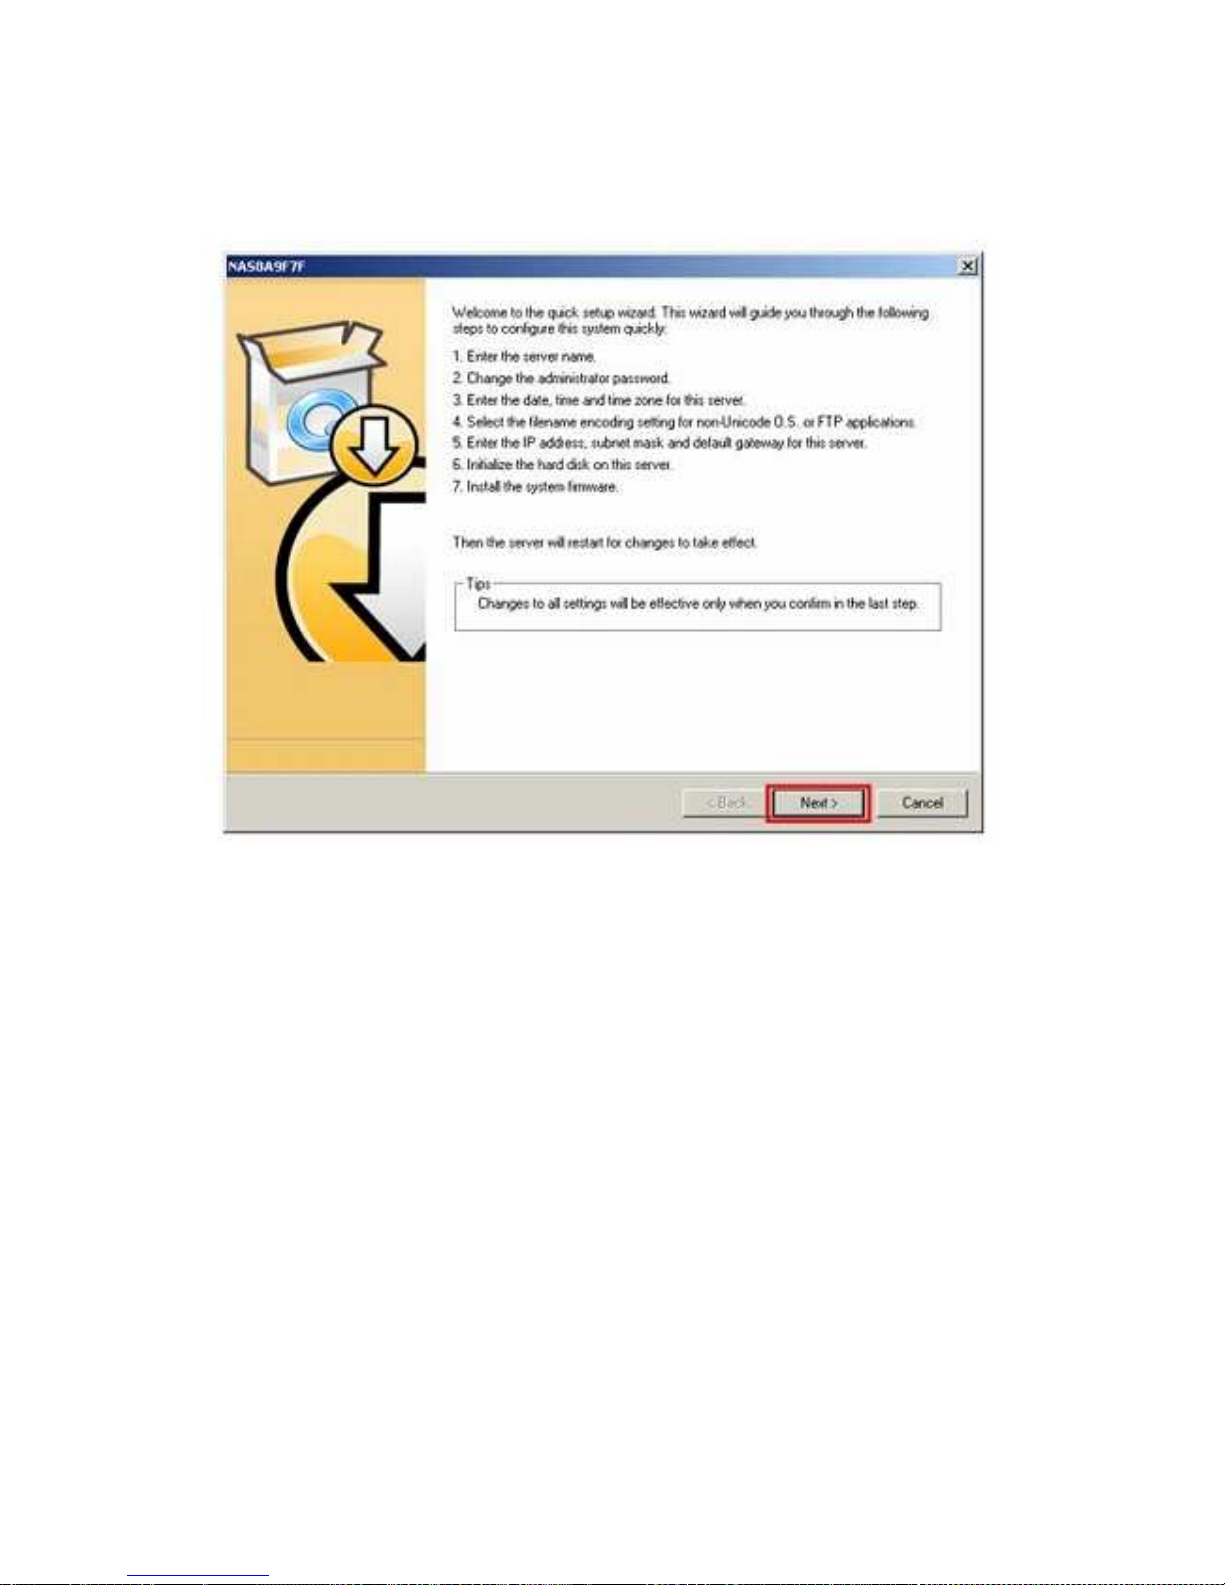
5. The Quick Setup Wizard is shown. Click Next to continue and complete the
configuration.
-
26 -
Page 25
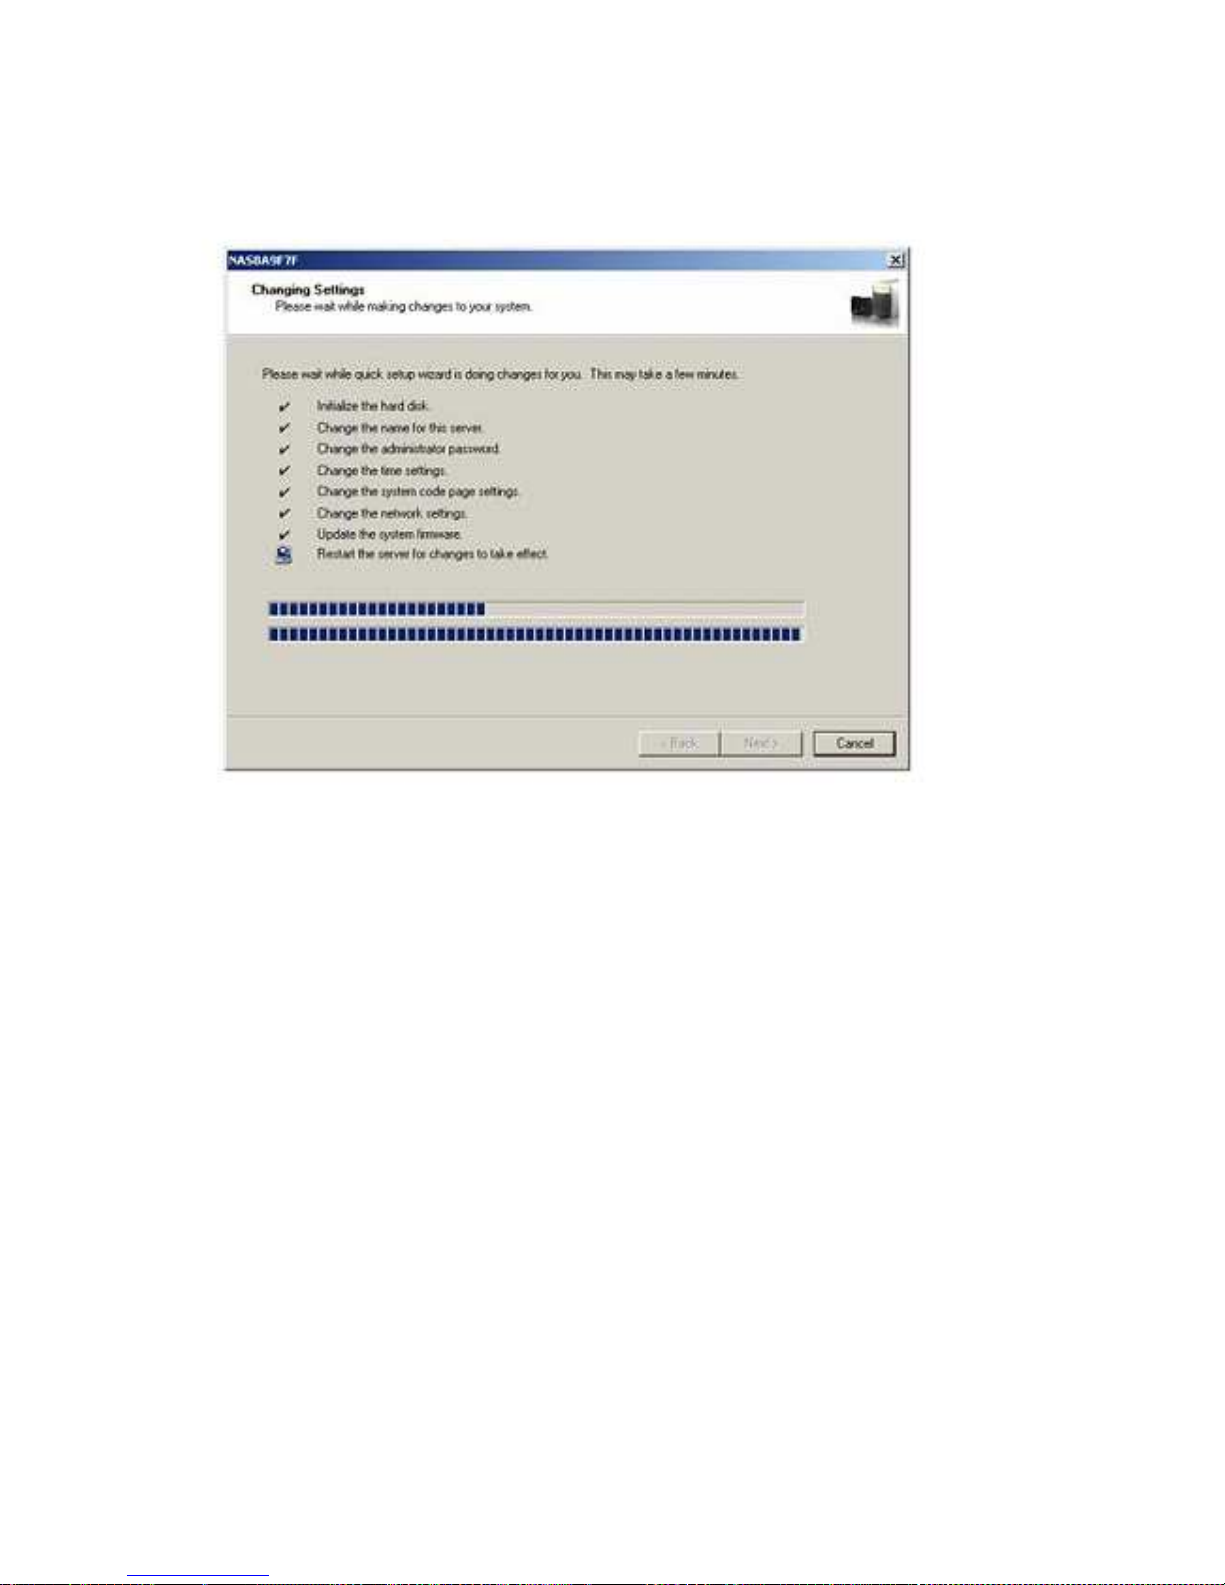
7. Follow the on-screen instructions to complete the configuration. Please wait patiently
while changing the system settings. ND33000 will restart after changing the settings.
Note:
The configuration process may take up to twenty minutes if you are using a
hard disk drive with capacity larger than 500GB.
-
27 -
Page 26
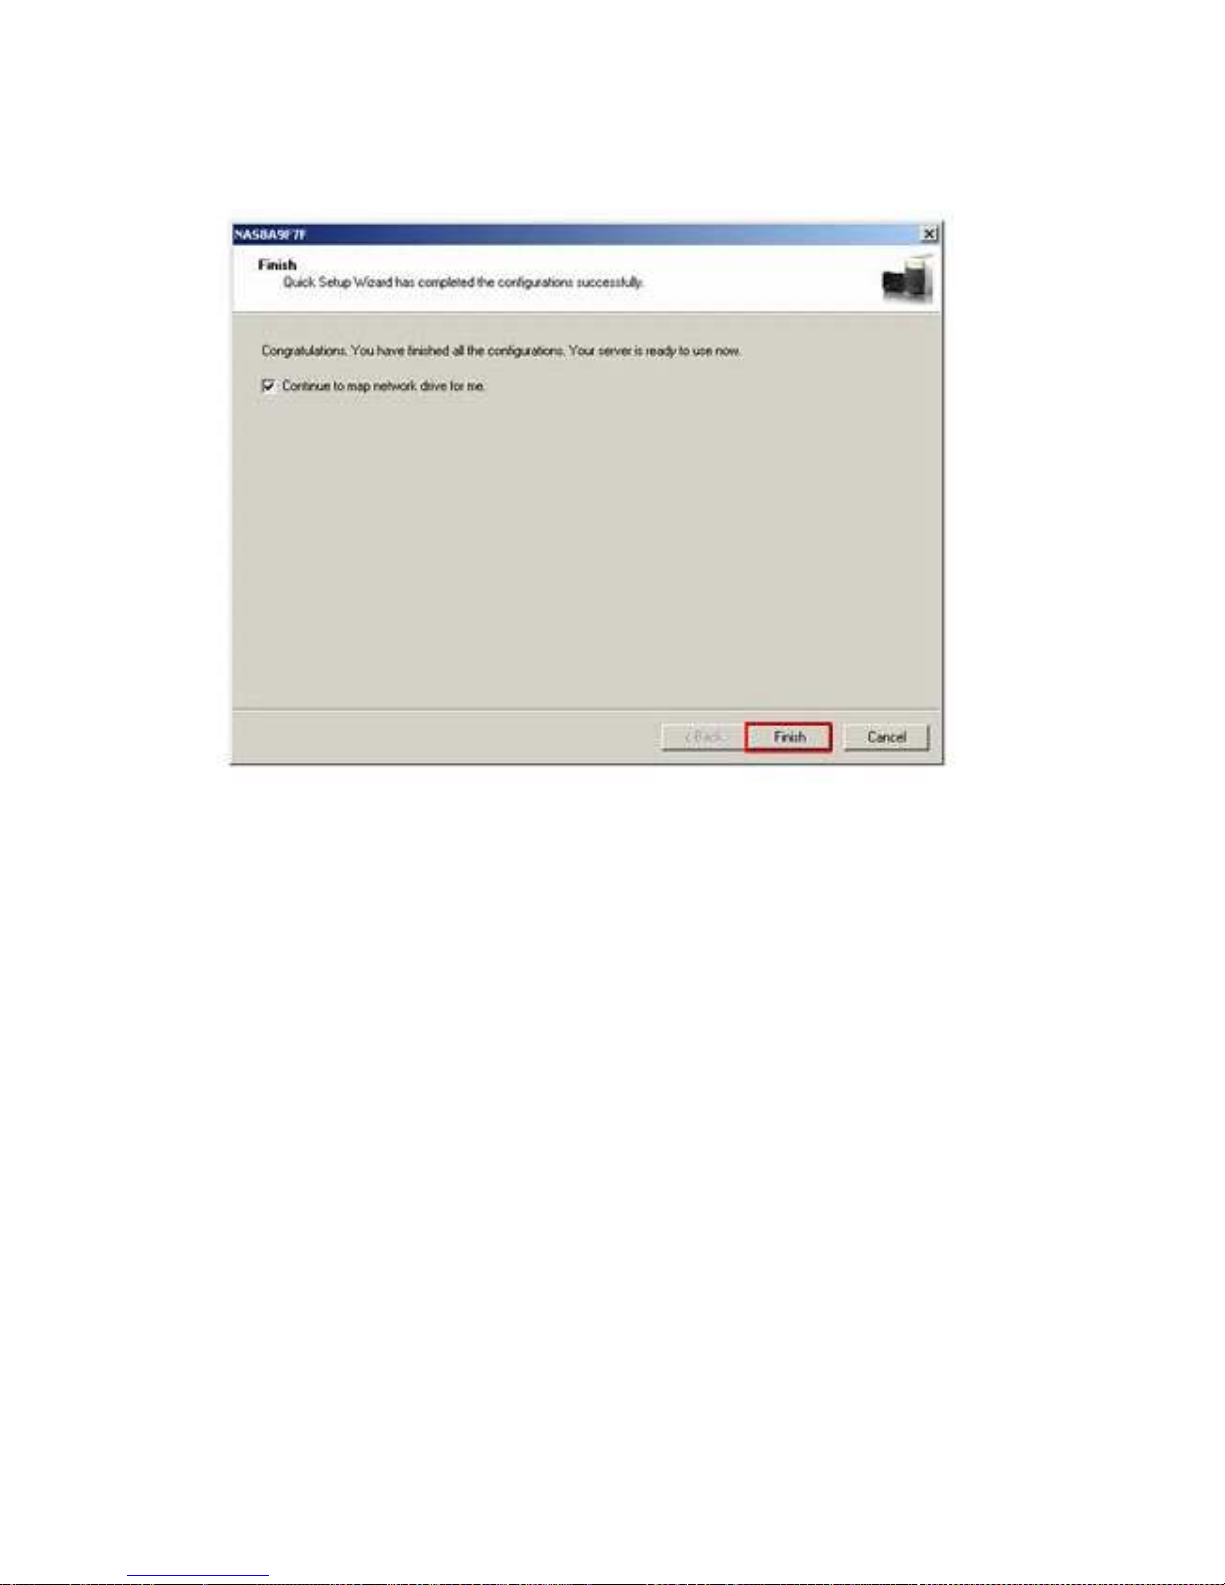
8. After quick setup is completed, click Finish to continue.
The ND33000 provides several default share folders for data sharing and access. To map
the share folders on the ND33000 as your d
rive, check the option "Continue to map
network drive for me"
and follow the steps below to proceed.
-
28 -
Page 27

Map Network Drive
ND33000 provides several default share folders for sharing and access. Select the share
folder to be mapped as the local
drive and click Map Network Drive.
The share folders Qdownload, Qmultimedia, Qusb, and Qweb are system default
network share of the ND33000 for the use of Download Station, Multimedia Station, USB
auto
-copy, and Web Server.
Enter the default user name
and password.
-
29 -
Page 28

Select the drive letter for the connection and click Finish.
Upon successful connection, you can start to use the share folder on the ND33000. You
can access these folders by opening My Computer.
-
30 -
Page 29
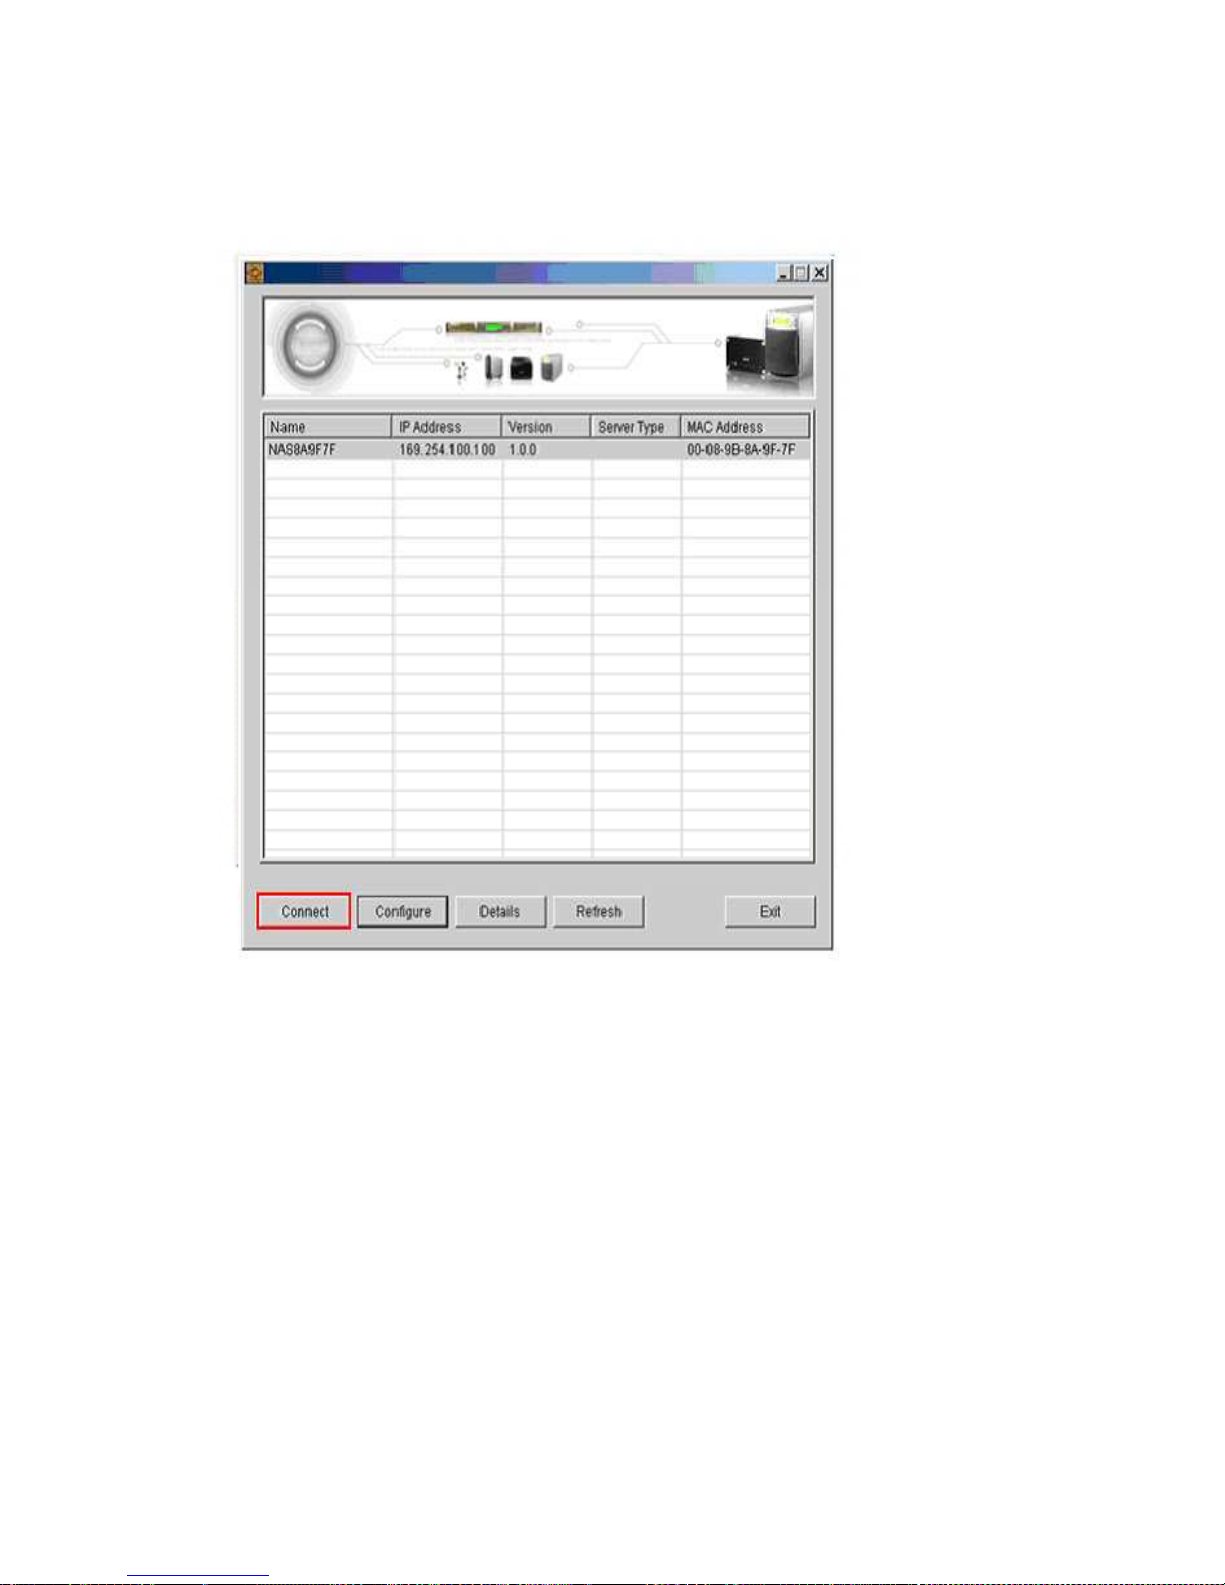
9. IP Finder will appear when all configurations are completed. Choose the name of
ND33000 on the list and click Connect.
-
31 -
Page 30
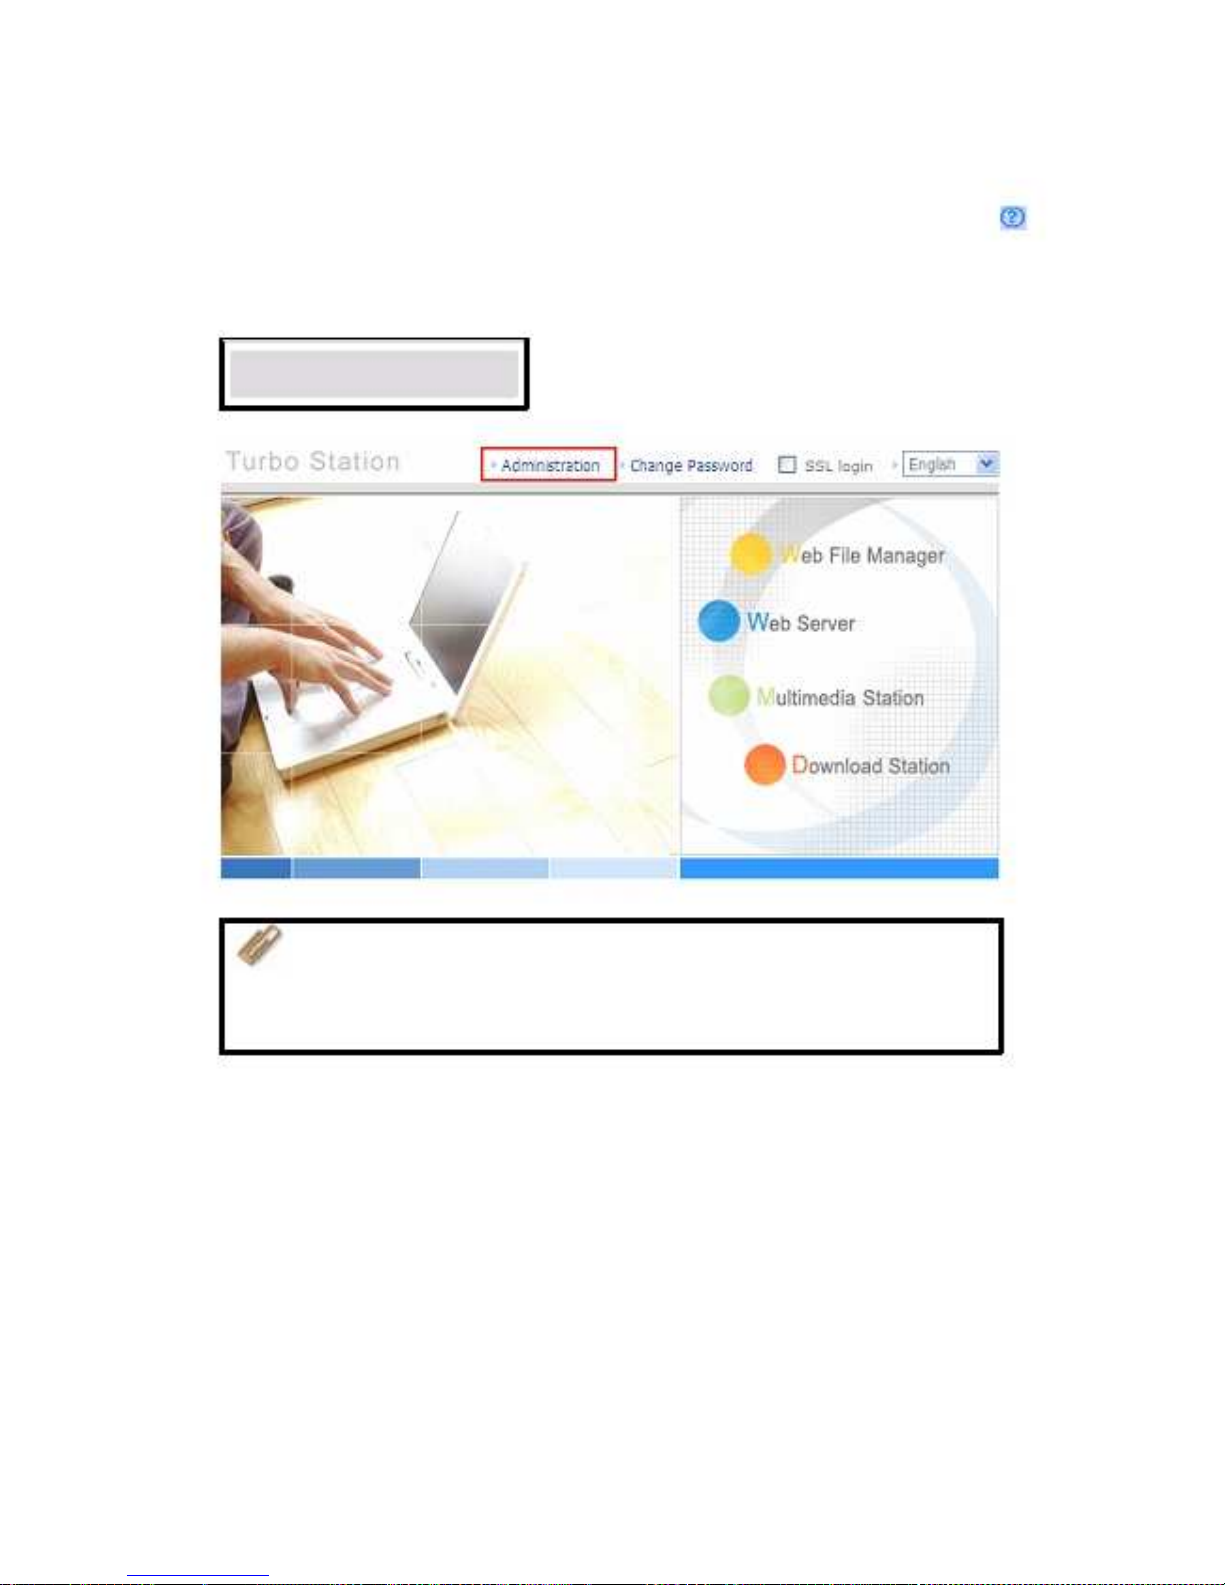
10.When the administration page of the ND33000 is shown, you can start to use the services.
If you have any questions during web administration, please click the help button
on the top right hand corner of the page.
To modify system settings, click Administration. Enter the user name and
password to login.
Default user name: admin
Password: admin
Note:
1. It is recommended to us
e Internet Explorer 6.0 or above to access
the ND33000. If the OS of your PC is Windows ® 98, the ND33000 supports
Internet Explorer 6.0 or above only.
2. The ND33000 also supports Mozilla Firefox.
-
32 -
Page 31

2.5.2
Mac Users
Insert the ND33000 CD
-ROM in your Mac and find the directory MacWizard. Then run
MacWizard.dmg
.
You can find and run the QIW image file on desktop after MacWizard.dmg is opened.
Run Quick Install Wizard.
-
33 -
Page 32

Follow the on-screen instructions to complete the configuration. Please wait patiently
while changing the system settings. ND33000 will restart after changing the settings.
Note:
1. Mac Quick Install Wizard does not support mapping network drive.
2. The Map Drive function of Windows Quick Install Wizard i
s replaced as "Quick Setup"
in Mac Quick Install Wizard.
3. It is recommended to access the ND33000 by Mozilla Firefox in Mac. Safari does not
support Download Station of the ND33000.
-
34 -
Page 33

Chapter 3. Enjoy the Powerful Services of the
ND33000
The ND33000 provides the following powerful functions and applications.
A. Use network share
-Public folder
1. You can access the public folder of the ND33000 by the following means:
a. Open My Network Places and find the workgroup of the ND33000. If you cannot find
the server, please browse the whole network to search for the ND33000. Double click
the name of the ND33000 for connection.
b. Use Run function in Windows ®. Enter \\[ND33000 name]* or \\[ND33000 IP]# to
access share folder on the ND33000.
c. Windows
®
users can use Quick Install Wizard to find the ND33000. When the
administration page is shown, click Web File Manager. Enter the user name
and password, and then start to manage the ND33000.
2. You can upload files to th
e Public folder.
-
35 -
Page 34

B. Manage the
ND33000
Manage the ND33000 using web browser by Windows ® or Mac
1. You can access the ND33000 web administration page by the following methods:
a. Use Quick Install Wizard to find the ND33000.
b. Open a web browser and enter http://[ND33000 IP]:8080#
Note:
1. It is recommended to use Microsoft
®
Internet Explorer 6.0 or above to
access the ND33000. If the OS of your PC is Windows ® 98, the ND33000 supports
Internet Explorer 6.0 only.
2. Please use
Mozilla Firefox to access the ND33000 in Mac.
*
The user name here should be the same as the server name you enter in Chapter
2.5
Configure Software Settings.
#
The IP address here should be the same as the IP address you enter in Chapter
2.5
Configure Software Settings. If you are using DHCP: (a) connect the PC to
the ND33000 directly, please use the default IP address 169.254.100.100 of the ND33000;
(b) connect the ND33000 by network, please run Quick Install Wizard to view the IP
address of the N
D33000.
2. When the administration page is shown, click
Administration, Web File Manager,
Web Server, Multimedia Station, or Download Station. Enter the user name
and password, and then start to manage the ND33000.
-
36 -
Page 35

3. The ND33000 supports SSL secure login which enables you to configure and manage the
server by encrypted transfer. To use this function, check the box SSL login on the
administration page and login the server.
Note:
If your ND33000 is placed behind an NAT gateway and you want to access
the ND33000 by secure login from the Internet, you must open the port 443 on
your NAT and forward this port to the LAN IP of the ND33000.
-
37 -
Page 36

C. Use the ND33000
Services
„
Multimedia Station
The ND33000 provides a user-friendly web management interface for you to manage
and share personal albums and multimedia files via network easily. Supports
embedded iTunes Server music sharing, UPnP and DLNA standard multimedia
technology to establish home multimedia sharing center. Please refer to Chapter 5.
„
Download Station
The ND33000 supports BT, FTP, and HTTP download. You can add download tasks to the
ND33000 and let the server finish downloading independently of your PC. Please refer
to Chapter 6.
„
Mirror Station
Provides RAID 1 mirroring disk volume for data protection. Please refer to Chapter
3.5.1.
„
Disaster Recovery
The ND33000 supports remote share folder backup via the network. In case of data
damage in PC, you can restore all backup data. Please refer to Chapter 3.8.10.
„
Web Server
The ND33000 enables you to create your own website easily. It also supports Joomla!,
PHP and SQLite to establish interactive websites. Please refer to Chapter 7.
„
Printer Server
The ND33000 supports network printer sharing function by direct USB connection. No
extra help from PC is needed. Please refer to Chapter 3.5.4.
„
FTP Server
The ND33000 offers the simplest FTP server setup procedure for you to establish FTP
server without any professional assistance. Please refer to Chapter 8.
„
Backup Server
NetBak Replicator is the powerful backup software designed for Windows users to
configure automatic backup schedule. Block level remote replication is supported
to provide the most reliable, instant, and secure data backup mechanism. Please
-
38 -
Page 37

refer to Chapter 10.
„
File Server
The ND33000 provides convenient and secure file server functions that support central
data management. Users can be granted with the right to access network share
and share important files. Please refer to Chapter 3.7 and Chapter 9.
-
39 -
Page 38

3.1 Server Administration
There are 8 main sections in server administration:
3.2 Quick Configuration
Please follow the step
-by-step guide in Quick Configuration to complete the settings of
the ND33000. If you have any questions during web administration, please click the help
button
below:
on the top right hand corner of the page. Other buttons are described as
: Return to previous page
: Return to home page
: Logout system
Step 1. Enter the server name.
-
40 -
Page 39

Step 2. Change the administrator password or select to use the original password.
Step 3. Enter the date, time and select the time zone for the server.
Step 4. Select the language the serve
r uses to display files and directories. The default
setting is English.
-
41 -
Page 40

Step 5. Enter the IP address, subnet mask and default gateway for the server.
Note:
1. Please contact your ISP or network administrator for the IP address
of primary and secondary DNS servers. When the ND33000 plays the
role as a terminal and needs to perform independent connection,
e.g. BT download, you must enter at least one DNS server IP for
proper URL connection. Otherwise, the function may not work
properly.
2. If you select to obtain IP address via DHCP, there is no need to
configure the primary and secondary DNS servers. You can enter
"0.0.0.0" in the settings.
Finished. The basic system settings are shown.
-
42 -
Page 41

3.3 System Settings
Configu
re the server name, date & time, and file name encoding in the System Settings.
3.3.1
Server Name
Enter the server name, which is 14 characters long at maximum and supports alphabets,
numbers, and hyphen (
-). The server name cannot contain space, period (.), or pure
number.
3.3.2
Date & Time
Set the date, time, and time zone according to your location. If the settings are
incorrect, the following problems may occur:
9
When using a web browser to access or save a file, the display time of the action
will be incorrect.
9
The time of event log displayed will be inconsistent with the actual time when an
action occurs.
-
43 -
Page 42

9
Synchronize with an Internet time server automatically
You can enable this option to update the date and time of the system automatically
with an NTP (Network Time Protocol) server. Enter the IP address or domain name
of the NTP server, e.g. time.nist.gov, time.windows.com. Then enter the time
interval when the server time should be updated.
Note:
The first time you enable NTP server, it may take several minutes to
synchronize the time with the NTP server.
3.3.3
Encoding Setting
Select the language the ND33000 uses to display files and directories.
Note: All files and directories on the ND33000 will be created using Unicode
encoding. If your FTP clients or the OS of your PC does not support Unicode,
e.g. Windows ® 95/98/ME, select the language the same as your OS here in
order to view the files and directories on the server properly.
-
44 -
Page 43

3.3.4
Configure SMTP Server
Configure the SMTP server for outgoing mails of this server. If your mail server requires
SMTP authentication, please enter the user name and password for the mail server.
3.3.5
View System Settings
You can view all curren
t system settings, e.g. server name, on this page.
-
45 -
Page 44

3.4 Network Settings
You can configure network settings in this section and enable several powerful
applications of the ND33000, e.g. Multimedia Station, Download Station, and Web Server.
3
.4.1
TCP/ IP Configuration
You can select one of the following two methods to configure the TCP/IP settings of the
ND33000.
1. Obtain IP address settings automatically via DHCP
If your network supports DHCP, the ND33000 will use DHCP protocol to retrieve the IP
address and related information automatically.
2. Use static IP address
To use fixed IP address for network connection, enter fixed IP address, subnet mask,
and default gateway.
-
46 -
Page 45

Primary DNS Server: Enter the IP address of primary DNS server that provides DNS
service for the ND33000 in external network.
Secondary DNS Server:
Enter the IP address of secondary DNS server that provides
DNS service for the ND33000 in external network.
Note:
1. Please contact your ISP or network
administrator for the IP address of
primary and secondary DNS servers. When the ND33000 plays the role as a
terminal and needs to perform independent connection, e.g. BT download,
you must enter at least one DNS server IP for proper URL connection.
Otherwise, the function may not work properly.
2. If you select to obtain IP address via DHCP, there is no need to configure
the primary and secondary DNS servers. You can enter "0.0.0.0" in the
settings.
Enable DHCP Server
If no DHCP is available in
the LAN where the ND33000 locates, you can enable this function to
enable the ND33000 as a DHCP server and allocate dynamic IP address to DHCP clients in
LAN.
You can set the range of IP addresses allocated by DHCP server and the lease time.
Lease tim
e refers to time that IP address is leased to the clients by DHCP server. When
the time expires, the client has to acquire an IP address again.
For example, to establish a DLNA network, and share the multimedia files on the ND33000 to
DLNA DMP via UPnP
while there is no NAT gateway that supports DHCP server, you can
enable DHCP server of the ND33000. The ND33000 will allocate dynamic IP address to DMP or
other clients automatically and set up a local network.
Note:
If there is an existing DHCP server in your LAN, do not enable this
function. Otherwise, there will be IP address allocation and network access
errors.
-
47 -
Page 46

Jumbo Frame Settings (MTU)
"Jumbo Frames" refer to Ethernet frames that are larger than 1500 bytes. It is designed
to en
hance Ethernet networking throughput and reduce the CPU utilization of large file
transfers by enabling more efficient larger payloads per packet.
Maximum Transmission Unit (MTU) refers to the size (in bytes) of the largest packet that
a given layer of
a communications protocol can transmit.
The ND33000 uses standard Ethernet frames:
1500 bytes by default. If your network
appliances support Jumbo Frame setting, select the appropriate MTU value for your
network environment. The ND33000 supports 4074,
7418, and 9000 bytes for MTU.
Note:
Jumbo Frame setting is valid in Gigabit network environment only.
Besides, all network appliances connected must enable Jumbo Frame and use
the same MTU value.
-
48 -
Page 47

3.4.2
Microsoft Networking
Enable file ser
vice for Microsoft networking: If you are using Microsoft ® Windows®
OS, enable this service to access the files on network share folders. Assign a workgroup
name.
9
Standalone Server
Use local users for user authentication.
9
AD Domain Member
The ND33000 supports Windows 2003 AD (Active Directory) to provide quick and direct
import of user accounts to the existing AD server available in your network. This
function helps you to save time and effort on creating user accounts and passwords
and lowers IT maintenance cost by automatic configuration procedure.
¾ Server Description
Describe the ND33000 for users to identify the server. To use the ND33000 on the
Microsoft Windows OS, you must enable Microsoft Network Services.
¾ Workgroup
Specify the workgroup the ND33000 belongs to. The workgroup is a computer group
unit in Microsoft Windows network for network sharing.
¾ AD Server Name
Enter the name of the AD server when AD domain is selected for authentication.
¾ Domain Name
The name of Microsoft domain. When you select AD domain, you must enter the
- 49 -
Page 48

domain name, the login user name, and the password.
Please refer to Chapter 11 for the information of AD authentication.
9
WINS server
If the local network has a WINS server installed, specify the IP address. The ND33000 will
automatically register its name and IP address with WINS service. If you have a
WINS server in your network and want to use this server, enter the WINS server IP.
9
Domain Master
There is a unique Domain Master Browser for collecting and recording resources and
services available for each PC in the network or workgroup of Windows. When you
find the waiting time for accessing Network Neighborhood too long, it may be caused
by failure of an existing master browser, or there is no master browser in the
network.
If there is no master browser in your network, you can check the box Domain Master
in this section to configure the ND33000 as the master browser to enhance the speed of
accessing information on Network Neighborhood.
-
50 -
Page 49

3.4.3
Apple Network
To use the ND33000 on Apple Mac operating system, enable AppleTalk network support. If
your AppleTalk network uses extended networks, and is assigned with multiple zones,
assi
gn a zone name to the ND33000. If you do not want to assign a network zone, enter an
asterisk (*) to use the default setting.
This setting is disabled by default.
3.4.4
NFS Service
After enabling this service, you can click here to set up the Network
access authority to
configure the settings. For detailed configuration, please refer to Chapter 3.7.6. For the
information of connecting to the ND33000 via NFS on Linux, please refer to Chapter 12.
3.4.5
Web File Manager
To access files on the ND33
000 via web browser, enable Web File Manager. If the ND33000 is
connected to the Internet and uses a valid IP address, you can access files on the server
by web browser from anywhere. For more information, please refer to Chapter 9.
The ND33000 suppor
ts SSL secure login. You can select SSL login on the ND33000 administration
page and login Web File Manager via https; or enter https://ND33000 IP:8080/Qfilemanager/
in the browser.
-
51 -
Page 50

3.4.6
FTP Service
When you enable FTP service, you can de
fine the port number for the service and
maximum number of users connected to the FTP at the same time.
9
Select Protocol Type
Select to use standard FTP connection or SSL/TLS encrypted FTP. Select the
corresponding protocol type in your client FTP s
oftware to ensure successful
connection.
9
Unicode Support
Select to enable or disable Unicode Support. The default setting is No. Since most
FTP clients do not support Unicode currently, it is recommended that you disable
Unicode support here and
select the language the same as your OS in "System
Settings
—Encoding Setting" page so that the folders and files on FTP can be
properly shown (please refer to Chapter 3.3.3). If your FTP client supports Unicode,
make sure you have enabled Unicode suppo
rt for both your client and the ND33000.
-
52 -
Page 51

9
Log on anonymously
You can enable anonymous login to allow users to access the FTP server of the ND33000
anonymously. The users can access the folders and files which are opened for
public access.
If this option is disabled, users must enter an authorized user name
and password to access the server.
9
Passive FTP Port Range
You can use the default port range (55536
-56559) or define a port range larger
than 1024. When using this function, ple
ase make sure you have opened the
configured port range on your router or firewall.
9
Respond with external IP address for passive FTP connection request
When passive FTP connection is in use and the FTP server is configured under a
router, if the rem
ote computer cannot connect to the FTP server via WAN, you can
enable this function. By enabling this function, the FTP service replies the manually
specified IP address or automatically detects the external IP address so that the
remote computer can c
onnect to the FTP server successfully.
9
FTP Transfer Limitation
You can configure the maximum number of all FTP connections, maximum
connections of a single account and the maximum upload/ download rates of a
single connection.
-
53 -
Page 52

3.4.7
Mul
timedia Station
To share photos, music or video files on the ND33000 over the network, enable Multimedia
Station. For further information of Multimedia Station, iTunes service and UPnP Media
Server, please refer to Chapter 5.
3.4.8
iTunes Service
By
enabling the iTunes service, the ND33000 shares the mp3 files in the Qmultimedia folder
to all the iTunes clients available in the same subnet. The clients can automatically
detect, browse, and play the music files in the ND33000. For further details,
please refer to
Chapter 5.2.
-
54 -
Page 53

3.4.9
Download Station
The ND33000 supports BT, HTTP and FTP download independent of PC/notebook. To use the
download function of the ND33000, please enable Download Station. For further information,
please
refer to Chapter 6.
Warning:
Please be warned against illegal downloading of copyrighted
materials. The Download Station functionality is provided for downloading
authorized files only. Downloading or distribution of unauthorized materials
may result
in severe civil and criminal penalty. Users are subject to the
restrictions of the copyright laws and should accept all the consequences.
-
55 -
Page 54

3.4.10 Web Server
You can publish your own server by enabling Web Server function of the ND33000.
Enter the
port number for web server service, the default number is 80. For further information,
please refer to Chapter 7.
Configure register_globals
Select to enable or disable register_globals. The setting is disabled by default. When
the web pr
ogram asks to enable php register_globals, please enable this option.
However, for system security concerns, it is recommended to disable this option.
php.ini Maintenance
Check the box "php.ini Maintenance" to select to upload, edit or restore php.ini.
Edit: Edit the current php.ini file.
Upload: Upload a new php.ini file to replace the current file.
Restore: Restore the php.ini file to system default.
Note:
To use PHP mail() function, you can go to System Settings/ Configure SMTP
Server to configur
e the SMTP server settings.
-
56 -
Page 55

3.4.11 DDNS Service
To set up a server on the Internet and enable users to access it easily, a fixed and easy
-
to
-remember host name is often required. However, if ISP provides only dynamic IP
address, the IP a
ddress of the server will change from time to time and is difficult to
recall. You can enable DDNS service to solve the problem.
After enabling DDNS service of the ND33000, whenever the ND33000 restarts or the IP address is
changed, the ND33000 will no
tify DDNS provider immediately to record the new IP address.
When the user tries to connect the ND33000 via the host name, DDNS will transfer the
recorded IP address to the user.
Enable and configure DDNS of the ND33000:
Before using DDNS service, plea
se register a host name from the DDNS provider*. The
ND33000 supports the 5 DDNS providers: members.dyndns.org, update.ods.org,
members.dhs.org, www.dyns.cx, www.3322.org.
Enable Dynamic DNS Service, and select DDNS server. Then enter the user name,
password, and hostname.
* For the information of DDNS service registration, please refer to the website of the
DDNS providers.
-
57 -
Page 56

3.4.12 MySQL Server
You can enable MySQL Server as the website database.
Enable remote connection of MySQL Serv
er
You can enable this option to configure your ND33000's MySQL Server as a database server of
another web server in remote site through Internet connection. When you disable this
option, your MySQL Server will only be configured as local database serv
er for ND33000's web
server.
After enabling remote connection, please assign a port for the remote connection service
of MySQL server. The default port is 3306.
After the first
-time installation of the ND33000, a folder phpMyAdmin is created in the Qweb
network folder. You can enter http://ND33000 IP/phpMyAdmin/ in the web browser to enter
the phpMyAdmin page and manage the MySQL database.
Note:
1. Please do not delete the phpMyAdmin folder. You can rename this folder but the link
on the MySQL Server page will not be updated. To access the renamed folder, you
can enter the link http://ND33000 IP/renamed folder in the web browser.
2. The phpMyAdmin folder is created after the first
-time installation. When you update
the firmware, the folder remains unchanged.
-
58 -
Page 57

Database Maintenance
Check the box
Database Maintenance to reset the database password or initialize the
database.
Reset root password: Execute this function to reset the password of MySQL root as
"
admin".
Re
-initialize database: Execute this function to delete all the data on MySQL database.
Description: File location of MySQL database
1. Create a network share in
Network Share Management.
2. Enter the network share name and select "Enter path manually". Then clic
k
"Browse…"
-
59 -
Page 58

3. Select .@mysql and click "OK". After the network share is created, configure the
access right. The network share name configured in the above step is the file
location of MySQL database.
-
60 -
Page 59

3.4.13 System Port Man
agement
Assign a protocol for the system management. The default port is 8080. The services of
this port include: System Management, Web File Manager, Multimedia Station, and
Download Station.
The system will restart after clicking
Apply. Please wait. The website will automatically
change to the homepage of the new protocol system.
-
61 -
Page 60

3.4.14 View Network Settings
You can view current network settings and status of the ND33000 in this section.
-
62 -
Page 61

- 63 -
Page 62

3.5 Device Configur
ation
You can configure SATA disk, USB disk, and USB printer settings in this section.
-
64 -
Page 63

3.5.1
SATA Disk
This page shows the model, size and current status of the disk(s) installed on the ND33000.
You can format and check disks, and scan bad
blocks on the disks. When the SATA disks
are formatted, the ND33000 will create the following default share folders:
9
Public: Network share for file sharing
9
Qdownload: Network share for Download Station
9
Qmultimedia: Network share for Multimedia Station
9
Qusb: Network share for data copy function via USB ports
9
Qweb: Network share for Web Server
You can create the following disk volumes by clicking on the corresponding icon on the
"SATA Disk" page.
-
65 -
Page 64

You can create the following disk volumes:
•
Single Disk Volume
Each disk is used as a standalone disk. If a disk is damaged, all data will be lost.
•
RAID 1 Mirroring Disk Volume
RAID 1 (mirroring disk) protects your data by automatically backing up the contents
of one drive onto the second drive of a mirrored pair. This protects your data if one
of the drives fails. Yet the storing capacity is equal to a single drive, as the second
drive is used to automatically back up the first one. RAID 1 is suitable for personal
or corporate use to store important data.
•
RAID 0 Striping Disk Volume
RAID 0 (striping disk) combines 2 or more drives into one larger disk. It offers the
fastest disk access but does not have any protection of your data if the striped array
fails. The disk capacity equals the number of drives in the array times the size of the
smallest drive. Striping disk is usually used to maximize your disk capacity or for
fast disk access but not for storing important data.
•
Linear Disk Volume
You can combine two or more disks into one larger disk. Files are saved on the
physical disks sequentially. The overall capacity of linear disk is the sum of all disks.
Linear disk is generally used for storing large size of data and is not appropriate for
protection of sensitive data.
•
RAID 5 Disk Volume
RAID 5 disk volume is ideal for organizations running databases and other
transaction-based applications that require storage efficiency and data protection.
To create a RAID 5 disk volume, a minimum of 3 hard disks are required. The total
capacity of RAID 5 disk volume = the size of the smallest capacity disk in the array x
(no. of hard disk - 1). It's recommended that you use the same brand and same
capacity hard drive to establish the most efficient hard drive capacity.
Additionally, if your system contains four disk drives, three of them can be used to
implement RAID 5 data disks and the fourth drive can be used as a spare disk.
When a physical disk failure occurs, the system will automatically rebuild the data
with the spare disk.
RAID 5 can survive 1 disk failure and system can still operate properly. When a disk
-
66 -
Page 65

fails in RAID 5, the disk volume will be in "degraded mode". There is no more data
protection at this
stage. If one more disk fails, all the data will be crashed.
Therefore, you must replace a new disk immediately. You can install a new disk after
turning off the server or hot swap the new disk when the server is on. The status of
the disk volume wi
ll become "rebuilding" after installing a new disk. When rebuilding
completes, your disk volume resumes to normal status.
Note:
To install a disk when the server is on, make sure the disk volume is in
"degraded" mode. Or wait for two long beeps after
the disk crash, then insert the
new disk.
•
RAID 6 Disk Volume
RAID 6 disk volume is ideal for important data protection.
To create a RAID 6 disk volume, a minimum of 4 hard disks are required. The total
capacity of RAID 6 disk volume = the size of the smallest capacity disk in the array x
(no. of hard disk-2). It's recommended that you use same brand and same capacity
hard drive to establish the most efficient hard drive capacity.
RAID 6 can survive 2 drives failure and system can still operate properly.
Note:
To install a disk when the server is on, make sure the disk volume is in
"degraded" mode. Or wait for two long beeps after the disk crash, and then insert
the new disk.
•
RAID 5, RAID 6 Read-only Mode
The drive configuration enters read-only mode in the following occasions:
-
-
2 drives are damaged in RAID 5
3 drives are damaged in RAID 6
The drives in the above configurations are read
-only. It is recommended to re-create
new drive configuration in such case.
-
67 -
Page 66

3.
5.2
RAID Management Tool
RAID management tool allows you to carry out capacity expansion, RAID migration, or
spare drive configuration with the original drive data reserved.
•
Expand capacity
This function enables drive capacity expansion by replacing the drives in a
configuration one by one. This option is supported for the following drive
configurations:
-
-
-
RAID 1 expansion
RAID 5 expansion
RAID 6 expansion
•
Add hard drive
This function enables adding new drive member to a drive configuration. It is
supported for the following drive configurations:
- RAID 5 expansion
•
Migrate
This function enables a drive configuration to be migrated to a different RAID
configuration. It is supported for the following drive configurations:
-
-
-
Migrate single drive to RAID 1, 5, or 6
Migrate RAID 1 to RAID 5 or 6
Migrate RAID 5 to RAID 6
•
Configure spare drive
This function enables adding or removing RAID 5 spare drive. The options available
are:
-
-
Add spare drive
in RAID 5
Remove spare drive in RAID 5
For detailed operation, please click the "
Description" button on the management
interface to view the detailed operation instructions.
- 68 -
Page 67

3.5.3
USB Disk
The ND33000 supports USB disks and thumb drives f
or extended storage. Connect the USB
device to the USB port of the ND33000, when the device is successfully detected, the details
will be shown on this page.
It may take tens of seconds for the ND33000 server to detect the external USB device
successf
ully. Please wait patiently.
-
69 -
Page 68

3.5.4
USB Printer
To provide printer sharing function for network users, you can simply connect a USB
printer to the USB port of the ND33000. The ND33000 will detect the printer automatically. This
function su
pports up to 3 printers.
Note:
Please connect a USB printer to the server after the software configuration is
completed.
3.5.4.1
Windows Users
Method 1
1. A printer icon should be shown in the share folder of the server. Double click the icon.
-
70 -
Page 69

2. Install the printer driver.
3. When finished, you can start to use network printer service of the ND33000.
-
71 -
Page 70

Method 2
The following configuration method has been verified on Windows XP only:
1. Open
Printers and Faxes.
2. Delet
e the existing network printer (if any).
3. Right click the blank area in the Printers and Faxes window. Select
Server
Properties.
4. Click the
Ports tab and delete the ports configured for the previous network printer
(if any).
5. Restart your PC
.
6. Open Printers and Faxes.
7. Click
Add a printer and click Next.
8. Select
Local printer attached to this computer. Click Next.
9. Click
Create a new port and select Local Port from the drop-down menu. Click
Next.
10.Enter the port name. T
he format is \\ND33000 IP\ND33000 namepr, e.g. ND33000 IP=
192.168.1.1, ND33000 name= myND33000, the link is \\192.168.1.1\myND33000pr.
11.Install the printer driver.
12.Print a test page.
-
72 -
Page 71

3.5.4.2
Mac Users
1. On the toolbar, click
Go/ Utilities.
2. Click
Printer Setup Utility.
-
73 -
Page 72

3. Click Add.
4. Press and hold the
alt key
concurrently.
on the keyboard and click
More Printers
-
74 -
Page 73

5. In the pop up window:
a. Select Advanced*.
b. Select Windows Printer with SAMBA.
c. Enter the printer name.
d. Enter the printer URI, the format is smb://ND33000 IP/printer name. The printer
name is found on the Device Configuration/ USB Printer page.
e. Select Generic for Printer Model.
f. Click Add.
*Note that
you must hold and press the alt key and click More Printers at the same
time to view the Advanced printer settings. Otherwise, this option does not appear.
-
75 -
Page 74

6. The printer appears on the printer list. It is ready to use.
Note:
1. The ND33
000 network printer service supports Postscript printer on Mac OS only.
2. For the latest USB printer compatibility list, please visit
http://www.cometlabs.com.
-
76 -
Page 75

3.6 User Management
The files on the ND33000 can be shared among multiple user
s. For easier management and
better control of users' access right, you have to organize users, user groups and their
access right control.
3.6.1
Users
The system has created the following users by default:
n
admin
By default, administrator has access to system administration and cannot be deleted.
o
guest
This is a built-in user and will not be displayed on User Management page. When
you use a non-registered user name to login, the server will recognize the user as a
guest and will allow limited access. A guest does not belong to any user group. The
login password for guest is guest.
p
Anonymous
This is a built-in user and will not be displayed on User Management page. When
you connect to the server by FTP service, you can use this name to login as a guest.
-
77 -
Page 76

512 users can be created at maximum (including system default users). You can
create a new user according to your needs. The following information is required to
create a new user:
9
User name
The user name must not exceed 32 characters. It is case-insensitive and supports
double-byte characters, such as Chinese, Japanese, and Korean excluding:
" / \ [ ] : ; | = , + * ? < > ` '
9
Password
The password is case-sensitive and can be 16 characters long at maximum. It is
recommended to use a password of at least 6 characters.
You can perform the following actions for user management:
-
78 -
Page 77

3.6.2
User Groups
User group is a collection of users with the same access right to files or fol
ders. The ND33000
has created the following user groups by default:
n
Administrators
All members in this group have administration right. You cannot delete this group.
o
Everyone
All registered users belong to everyone group. You cannot delete this group.
You can manage user groups with the following options:
1024 groups can be created at maximum.
A group name must not exceed 256
characters. It is case
-insensitive and supports double-byte characters, such as Chinese,
Japanese, and Korean, exc
ept the following ones:
" / \ [ ] : ; | = , + * ? < > ` '
-
79 -
Page 78

Create Users and Assign Users to User Group
The following example demonstrates how to create new users and assign users to a user
group.
ABC Co. has recently recruited
two employees Mr. Jones Lee for Administration
Department and Ms. Jane Wu for Sales Department. The IT Department therefore needs
to create two user accounts for them to access company data on the ND33000.
i. To create a user account, go to User Ma
nagement-Users. Click Create.
-
80 -
Page 79

ii. Enter the user name (Jones Lee/ Jane Wu) and password. Check the box
"Continue to set the user groups to which this user belongs" and click OK.
-
81 -
Page 80

iii. Select the user groups the users belong to on the right list, i.e. Mr. Jones Lee for
Administration Dept and Ms. Jane Wu for Sales Dept, and click Add. Then click
Close.
-
82 -
Page 81

iv. The user names will appear on the list on Create User page.
-
83 -
Page 82

Create Private Network Share for User Groups
You can create particular network share for each user group. The procedure is described
as below:
1. To create a network share called
media accessible by Administration Department
only, please go to "User Management—User Groups" page. Select the user group
Administration Dept and click Create Private Network Share on the right.
2. Enter the network share name
media. Select the disk volume that the share will be
created in and specify the path automatically or manually. Enter the comment for
the network share, e.g. media folder for Admin Dept and click Apply.
3. You can see the folder
media in Network Share Management page.
-
84 -
Page 83

4. Enter Access Control. You can see that only Administration Dept has full access right
to the folder.
-
85 -
Page 84

3.6.3
Quota
To allocate disk volume efficiently, specify the quota that can be used by each user.
When you have reached the disk quota, you cannot upload data to the server anymore.
By default, no limitations are set for users.
You can modify the following two options:
i. Enable quota for all users
ii. Quota size on each disk volume
Please refer to the following example to configure the quota setting of users:
The IT department is planning to set the disk quota of Mr. Jon
es Lee from Administration
Department and Ms. Jane Wu from Sales Department on the ND33000. The disk quota is
2000MB for Mr. Jones Lee and 4000MB for Ms. Jane Wu.
1. Please go to
Quota page in User Management to enable quota for all users. Enter
the quota size on each disk volume, e.g. 1000MB. The quota for individual user can
be modified later.
-
86 -
Page 85

2. Select Jones Lee on User page and click Quota Settings on the right.
3. Enter the quota size 2000MB and click
OK.
4. Follow the same st
eps and enter the quota size 4000MB for Jane Wu and click OK.
The quota setting is successfully applied.
-
87 -
Page 86

3.7 Network Share Management
The primary purpose of network storage is file sharing. You can create different network
share folders fo
r various types of files, and provide different file access rights to users or
user groups.
3.7.1
Create
To create a network share, enter the following information:
9
Network share name
The length of the network share name cannot exceed 32 single-byte characters or
10 double-byte characters, and cannot contain the following characters:
" . + = / \ : | * ? < > ; [ ] %
9
Hide network drive
Select to show or hide the network in My Network Places. Note that the drive can
still be shown by entering the directory manually in My Network Places.
9
Disk volume
This area shows the disk volume status.
9
Path
All data is stored under the assigned path onto the disk volume. You can select
"Specify path automatically" or assign a path manually. The path cannot exceed
256 characters and cannot contain the characters below:
" . + = / \ : | * ? < > ; [ ] %
9
Comment
Enter a brief description for the share folder. The comment cannot exceed 128
characters.
-
88 -
Page 87

Note:
When you sel
ect to enter the path manually, click "Browse
…
" and the .@mysql
directory will be shown. This is the file location of MySQL database.
-
89 -
Page 88

3.7.2
Property
To edit the property of an existing network share, select a share and click
Property.
You
can then edit the content of that share.
-
90 -
Page 89

3.7.3
Access Control
When a network share is created, you can assign access rights to users or user groups:
9
Deny access
Access to the network share will be denied.
9
Read only
Users can read the files only on the network share.
9
Full access
Users can read, write, create, or delete files and folders on the network share.
3.7.4
Delete
Select a share and click
Delete. Click OK to confirm.
-
91 -
Page 90

3.7.5
Restore
If the default net
work shares of the ND33000 are not created successfully, you can use the
Restore function to restore the network shares. To do so, click
Restore and the shares
will be created.
-
92 -
Page 91

3.7.6
NFS Access Control
You can set the NFS access right of t
he network share. The Public folder is for open
access while access is denied for other default network shares. For detailed configuration,
please click on the link "Click here for more detailed description".
-
93 -
Page 92

3.8 System Tools
The System Too
ls enable you to optimize the maintenance and management of the ND33000.
-
94 -
Page 93

3.8.1
Alert Notification
When an error occurs, e.g. CPU fan fails, a drive fails or is unplugged, an email will be
sent to the administrator automatically. You can go
to Event Logs (refer to Chapter 3.9)
to check the details of all errors and warnings.
To be able to send notification e
-mails, you must configure the SMTP server.
Note: It is recommended to send a test e-mail to make sure you can receive
the alert mails.
3.8.2
Restart/ Shutdown
Click "Restart" to reboot or "Shut Down" to turn off the ND33000.
-
95 -
Page 94

3.8.3
Hardware Settings
You can enable or disable the hardware functions of the ND33000.
i. Enable configuration reset switch
By enabling this option, you can press the reset button for 3 seconds to reset the
administrator password and system settings to default.
ii. Enable hard disk standby mode
When this function is enabled, hard disk will go to standby mode if there is no access
within the specified period. The Power LED will glow in blue and the Status LED will
be off in hard disk standby mode.
iii. Enable light signal alert when the free size of SATA disk is less than the value
The Status LED flashes red and green when this function is enabled and the free
space of the SATA disk is less than the value. The range of the value is 1-51200 MB.
iv. Auto power on when power resumes after power loss
When this function is enabled, the ND33000 turns on automatically when power resumes
after improper shutdown or power loss.
v. Enable alarm buzzer
Enable this option. The system will sound when an error occurs.
vi. Smart Fan configuration
After enabling Smart Fan, the fan rotation speed is automatically adjusted according
to the server temperature. It is recommended to enable this option. By manually
setting the fan rotation speed, the fan rotates at the defined speed continuously.
Note:
When Smart Fan is enabled, the fan rotates at high speed when the system
temperature reaches
48°C or above. You can define the system temperatures to trigger
high speed or low speed rotation of the fan. The fan rotates at low speed when the
- 96 -
Page 95

system temperature is below 40°C.
3.8.4
UPS
If your UPS device provides USB interface, you
can enable UPS (uninterruptible power
supply) support to protect your system from abnormal system shutdown caused by
power outage. In case of utility power failure, the system shuts down automatically by
probing the power status of the connected UPS u
nit.
9
Enable UPS support
To activate the UPS support, you can select this option. You can set the shutdown
timer to turn off the system automatically after the system detects the AC power is
abnormal. In general, the UPS can keep supplying the power for the system for
about 5~10 minutes, depending on the maximum load of the UPS and the number
of the loads connected to it.
UPS Model
Select the UPS model from the list. If the UPS model you are using is not available
on the list, please contact our technical support.
IP Address of UPS
If you have selected APC UPS with SNMP for UPS model, enter the IP address of the
UPS.
-
97 -
Page 96

3.8.5
Hard Disk S.M.A.R.T.
This page enables users to monitor hard drive health, temperature, and usage stat
us by
the hard disk S.M.A.R.T. mechanism.
Select the hard drive and you can view the following information by clicking the
corresponding buttons.
Field
Summary
Hard disk information
SMART information
Test
Settings
Description
Displays the har
d drive smart summary and the latest
test result.
Displays the hard drive details, e.g., model, serial
number, drive capacity, etc.
Displays the hard drive SMART. Any items that the
values are lower than the threshold are regarded as
abnormal.
To p
erform quick or complete hard drive SMART test and
display the results.
To configure temperature alarm. When the hard drive
temperature is over the preset values, the system records
error logs.
You can also configure quick and complete test schedule.
The latest test result is shown in the Summary page.
-
98 -
Page 97

3.8.6
System Update
Note:
If the system is running properly, you do not need to update the
firmware.
Before updating system firmware, please make sure the product model and firmware
ver
sion are correct. Follow the steps below to update firmware:
Step 1:
Download the release notes of the same version as the firmware from Comet Labs
websi
http://www.cometlabs.com. Read the release notes carefully to make sure you need
to upgrade the firmware.
Step 2:
Before upgrading system firmware, back up all disk data on the server to avoid
any potential data loss during system update.
Step 3:
Click the [Browse
…
] button to select the correct firmware im
age for system
update. Click
Update System to update the firmware.
Note:
System update may take tens of seconds to several minutes to complete
depending on the network connection status. Please wait patiently. The system will
inform you when system
update is completed.
-
99 -
Page 98

3.8.7
USB One Touch Copy Backup
You can configure the function of the USB one touch copy button in this page. The
following three functions are available:
•
Copy from the front USB storage to a directory of the internal drive of the ND33000.
•
Copy to the front USB storage from a directory of the internal drive of the ND33000.
•
Disable the one touch copy button
-
100 -
Page 99

3.8.8
Change Logo
You can choose your own picture to display on the login page of t
he ND33000. The size of
the picture cannot exceed 20K bytes.
-
101 -
Page 100

3.8.9
Back up to an External Storage Device
You can back up the local drive data to an external storage device. In this page, you can
select to execute instant, automatic, or sc
hedule backup methods, and configure the
relevant settings.
•
Backup Now: To back up data to the external storage device immediately.
•
Schedule Backup: To back up data by schedule. You can select the week day and
time to execute the backup.
•
Auto-backup: To execute the backup automatically once the storage device is
connected to the ND33000.
Copy Options:
Select "Copy" or "Synchronize" for the copy options. When you select "Copy", files are
copied from the ND33000 to the external devic
e. By selecting "Synchronize", the data on the
internal drives of the ND33000 and the external storage device are synchronized. Any
different files on the external device are deleted.
Note:
In the copying and synchronizing process, if the identical files exist on both sides,
the files are not copied. If there are files in the same name but different in size or
modified dates on ND33000 and the external device, the files on the external device are
overwritten.
-
102 -
 Loading...