

Page 1
Network Attached Storage
ND26000 Series
User Manual (Version: 1.0)
Page 2
FOREW ORD
Thank you for choosing CO MET LABS products! This user manual provides
detail ed instructions of using ND26000. Please read carefully and start to enjoy
the powerful functions of ND26000!
LIMITED WARRANTY
In no event shall the liability of COMET LABS Systems, Inc. (COMET LABS) exceed
the pri ce paid for the product from direct, indirect, special, i ncidental, or
consequential software, or its documentation. COMET LABS makes no warranty
or representation, expressed, implied, or statutory, with respect to its products or
the contents or use of this documentation and all accompanying software, and
specifically disclaims its quality, performance, merchantability, or fitness for any
particular purpose. COMET LABS reserves the right to revise or update its
products, software, or documentation without obligation to notify any individual
or entity.
CAUTION
1. Back up your system periodicall y to avoid any potential data loss. COMET
LABS disclaims any responsibility of all sorts of data loss or recovery.
2. Should you return any components of ND26000 package for refund or
maintenance, make sure they are carefully packed for shipping. Any form
of damages due to improper packaging will not be compensated.
- 2 -
Page 3

Safety Warnings
1. ND26000 can operate normally in the temperature of 0-35 and relative
humidit y of 0%-85%. Please make sure the environment is well-ventilated.
2. The pow er cord and devices connected to ND26000 must provi de correct
supply voltage (40W, 90-264V).
3. Do not place ND26000 in direct sunlight or near chemicals. Make sure the
temperature and humidity of the environment are in optimized level.
4. Unplug t he power cord and all connected cables before cleaning. Wipe
ND26000 with wet t owel. Do not use chemical or aerosol to clean ND 26000.
5. Do not place any objects on ND 2600 0 for the server’s normal operation and to
avoid overheat.
6. Use the flat head screws in the product package to fasten the hard disk in
ND26000 when installing hard disk for proper operation.
7. Do not place ND26000 near any liquid.
8. Do not place ND26000 on any uneven surface to avoid falling off and damage.
9. Make sure the voltage is correct in your locati on when using ND26000. If you
are not sure, please contact the distributor or the l ocal power supply company.
10. Do not attempt to repair your ND26000 in any occasions. Improper
disassembly of the product m ay expose you to electric shock or other risks.
For any enquiries, please contact the distributor.
- 3 -
Page 4

Table of Contents
Chapter 1
1. 1 Introduction ........................................................................... 7
1. 2 Package Contents .................................................................... 8
1. 3 Hardware Illustration................. ............................................ ... 8
Chapter 2 Installation of ND26000 ................................................. 9
2. 1 Set up ND26000.............. ............................................. ........... 9
2. 2 Check System Status ............................................................... 10
2. 3 Configure Software Settings .................................. ....................12
2.3. 1 Windows Users ..................................................................12
2.3. 2 MAC Users........................................................................23
Chapter 3 Start to Enjoy the Powerful Services of ND26000............. 31
3. 1 Server Administration ..............................................................35
3. 2 Quick Configuration ...................................................36
Overview of ND26000 ....................... ............................. 7
3. 3 System Settings .......................................................39
3.3. 1 Server Name.....................................................................39
3.3. 2 Date & Time ....................... ............................................. .40
3.3. 3 Encoding Setting ................................................................41
3.3. 4 View System Settings.. .............................................. ..........41
3. 4 Network Settings .................................................... ..42
3.4. 1 TCP/ IP Configuration.................... ...................................... 42
3.4. 2 Microsoft Networking........................................ ...................44
3.4. 3 Apple Network....................................... ............................46
3.4. 4 Web File Manager........................................... ....................46
3.4. 5 FTP Service ......................................................................47
3.4. 6 Multimedia Station.................................. ............................48
3.4. 7 uPnP Media server......................... ..................................... 48
3.4. 8 Download Station...............................................................49
3.4. 9 Web Server ......................................................................50
3.4.10 View Network Settings...................................... ...................51
3. 5 Devi ce Configuration .................................................52
- 4 -
Page 5
3.5. 1
SATA Disk ........ ............................................ ....................53
3.5. 2 USB Disk..........................................................................55
3.5. 3 USB Printer.......................................................................56
3. 6 Us e r Management ........................................... ..........57
3.6. 1 Users.............. ............................................. ...................57
3.6. 2 User Groups...... ................................................................59
3.6. 3 Quota....................... ............................................. ..........64
3. 7 Network Share Management ....................................... .66
3.7. 1 Create.............................................................................67
3.7. 2 Property . ............................................. ............................68
3.7. 3 Access Control...................................................................69
3.7. 4 Delete.............................................................................70
3.7. 5 Restore ...........................................................................70
3. 8 System Tools ...........................................................71
3.8. 1 Alert Notification ................................................................72
3.8. 2 Restart/ Shutdown .............................................................72
3.8. 3 Hardware Settings....... ............................................. ..........73
3.8. 4 System Update...................................... ............................74
3.8. 5 Change Logo.....................................................................75
3.8. 6 Remote Replication (Disaster Recovery)......................... ..........76
3.8. 7 Backup/ Restore/ Reset Settings ............................................79
3. 9 Event Lo gs ......................... ..................................... 80
Chapter 4 Copy Data Directly by USB Ports to the ND26000............. 81
Chapter 5 Multimedia Station....................................................... 82
Chapter 6 Download Station ........................................................ 88
Chapter 7 Web Server................................................................. 94
Chapter 8 FTP Server.................................................................. 96
Chapter 9 Web File Manager........................................................ 99
Chapter 10 NetBak Replicator ............................................... 104
Chapter 11 ND26000 Maintenance ............................................... 118
11. 1 Restart/ Shut down Server...................................................... 118
11. 2 Reset Administrator Password and Network Settings ...................... 119
- 5 -
Page 6

11. 3
Disk Failure or Malfunction ...................................................... 120
11. 4 Power Outage or Abnormal Shutdown ........................................ 120
Technical Support........................................................................ 121
- 6 -
Page 7

Chapter 1 Overview of ND26000
1.1 Introduction
Thank you for choosing ND26000 . This product has the follow ing key features:
9 9-in- 1 server: Multim edia Station, Download Station, Mirror Station, Disaster
Recovery, Web Server, Backup Server, File Server, FTP Server, and Printer
Server
9 Easy to use, sim ple configuration in a few steps and ND26000 is ready to use!
9 Enormous storage capacity, support SATA disk of up to 750GB, and
extendable to 1500 GB or more by eSATA/U SB external HD drives
9 RAID 0, RAID 1 and JBOD configuration support
9 PHP and SQLite included permits to established interactifs l inks and database
9 UpnP support for multi media files sharing.
9 3 high speed USB 2.0 (480Mbps) to support multiple USB devices like printer,
di sk, di git al cam er a, thum b dr i ve, car d r ea der etc. to pro vide di ver sified
functions.
9 High speed transfer, 480Mb USB 2.0, Gigabit Ethernet, 1.5GB eSATA high
speed file transfer. With highly efficient block level algorithm, data transfer
can be done instantly.
9 Incomparable high reliability, most complete and reliable data backup:
instant/ schedule/ real-tim e backup and ca n compress data to remote location.
9 Stylish aluminum design, the best heat-release, shock-resistance, anti-
collision aluminum design
- 7 -
Page 8

1.2 Package Contents
Your ND26000 packa ge contains:
9 ND26 00 0
9 Adaptor
9 Power cord
9
9
9 CD-ROM (user manual,
Quick Install Wizard
and software inclusive)
9 Et he r n et ca b le x 1
9 Quick Installation
Guide
1.3 Hardware Illustration
- 8 -
Page 9
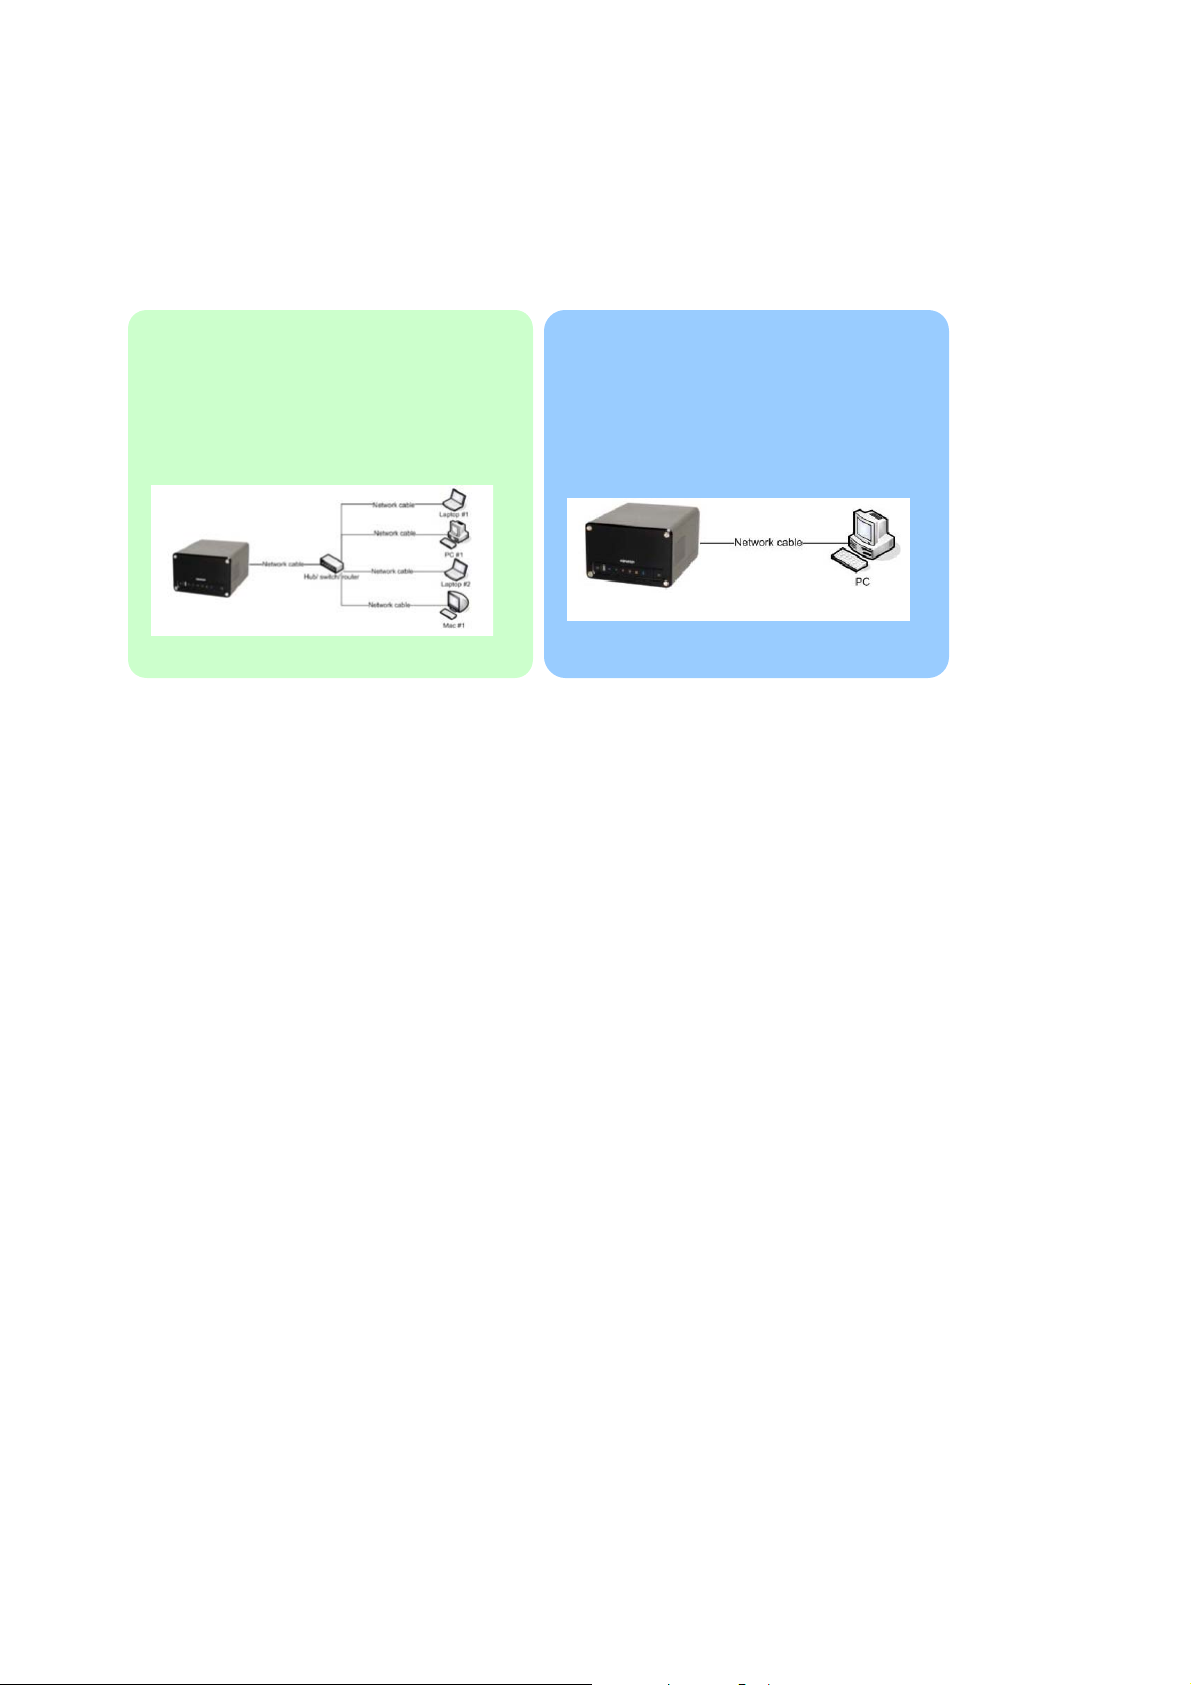
Chapter 2 Installation of ND26000
2.1 Set up ND26000
Please check your network environment and select t he appropriate i nstallation
method before installing ND26000.
1. Office/ Home
Connect ND160 00 and PC t o the same
hub/ swi tch/ router.
2. Individual
Connect ND160 00 directly to your PC
by a network cable.
- 9 -
Page 10
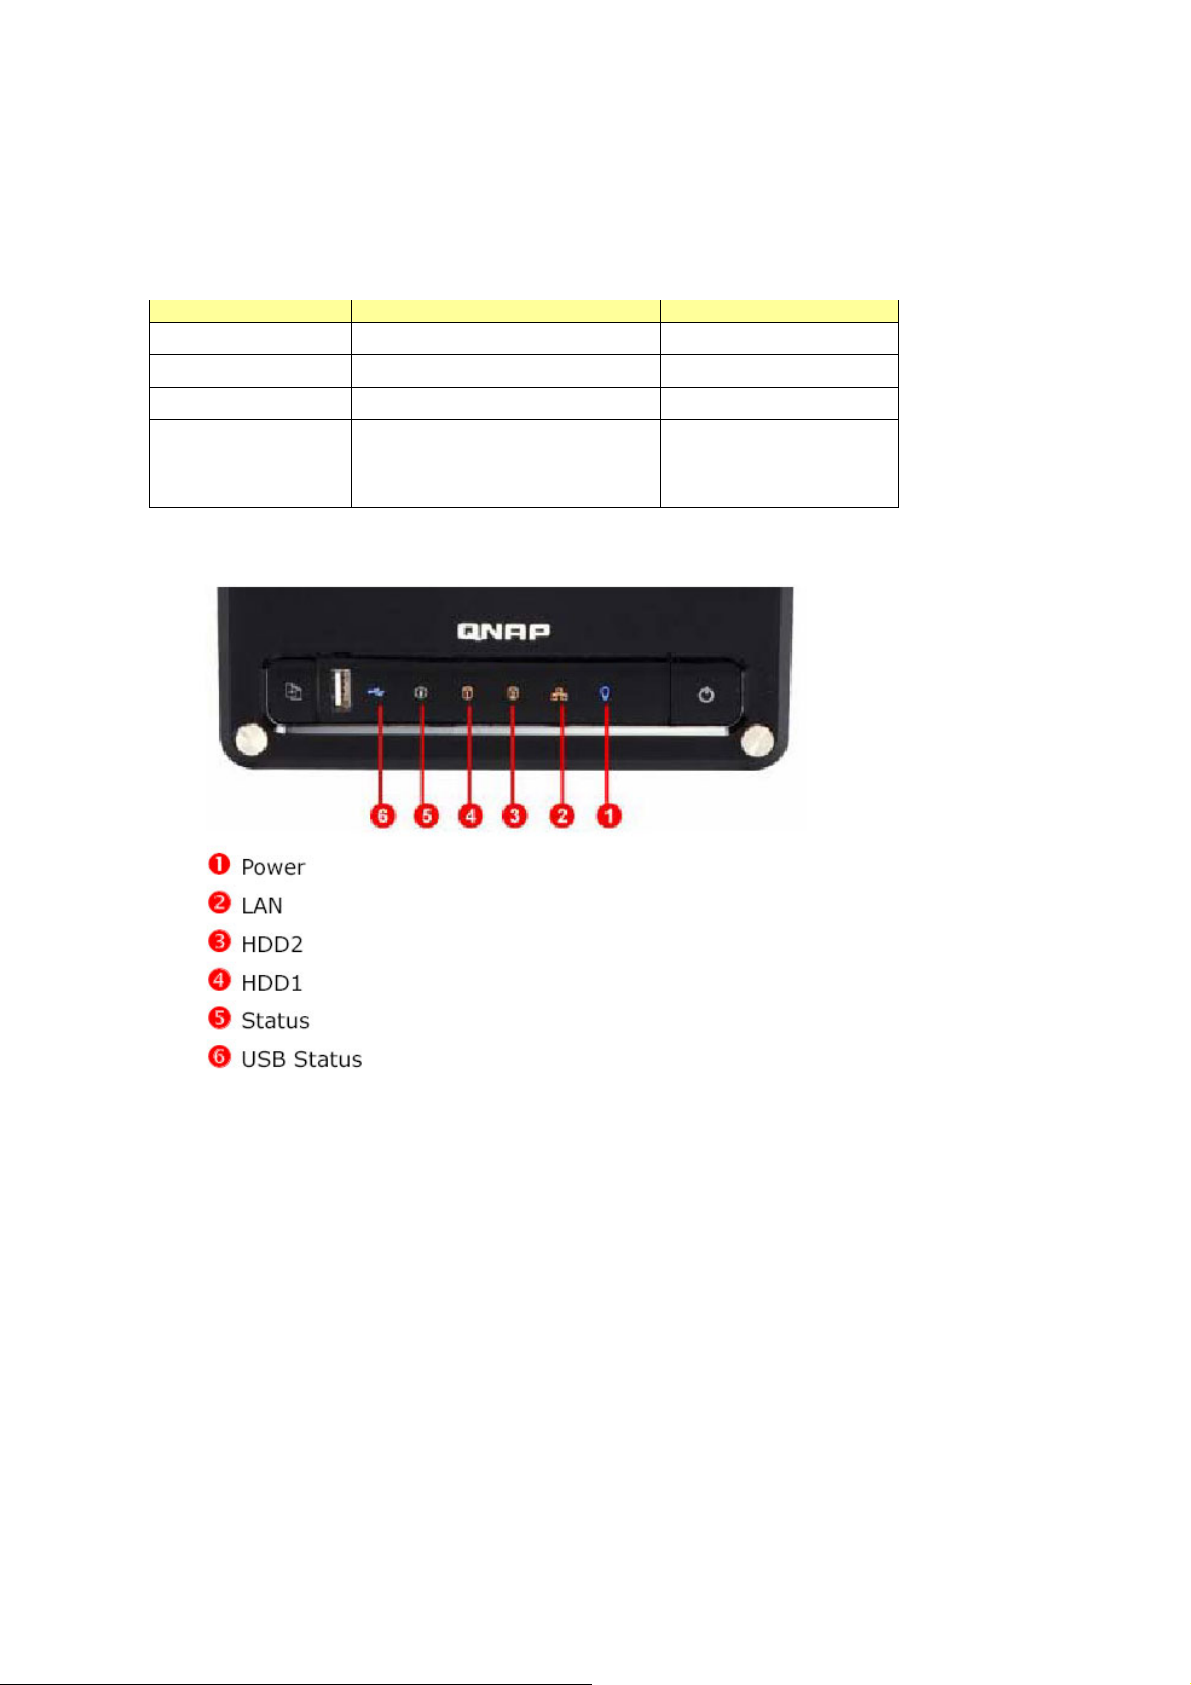
2.2 Check System Status
ND26000 provides LED indicators for you to indicate system status and
information easily. When ND26000 is turned on, please check the following items
to make sure system status is normal.
LED System sta rting up System has started
nPower
oNetwork (LAN)
qHard disk (HDD)
rStatus
Blink in red (short beep once)→
Blink in green (long beep once)
Blue Blue
Blink in orange Orange
Blink i n yell ow Off
Green
- 10 -
Page 11
LED Display & Syste m Status Overv iew (Long blink: LED blinks for 3 seco nds;
short blink: LED blinks for o ne second)
LED LED Display & System Status
Power Blue: System has started
Network Short blink in orange: Accessing network
eSATA Short blink in yellow: Accessing data
HDD Short blink in yellow: A ccessing data
Status Green: System is normal
Short blink in red: When system is turned on
Glow in red for 3 seconds/ long blink i n red: Hard disk not
detected
Red: Incorrect hard disk form at
Long blink in green and red alternatively: Bad blocks are found
in hard disk
Short blink in green and red alternatively: Warning on disk full
status (long beep twice)
Front USB
Status
Short blink in yellow twice: System detects USB
Yellow: You can press copy button to co py data.
Short blink in yellow: A ccessing data
Other Status
Action LED Process Finish
Update
firmware
Power Short blink in blue Bl ue
Status Short bl i nk in gre e n
Green (long beep thrice)
and red alternatively
Power Short blink in blue Off System shut
down Status Off (short beep once) Off
- 11 -
Page 12
2.3 Configure Software Settings
After checking system status, please foll ow the steps below to configure software
settings of ND26000. The configuration procedure of Windows and MAC users are
different. Please select the appropriate procedure according to your OS.
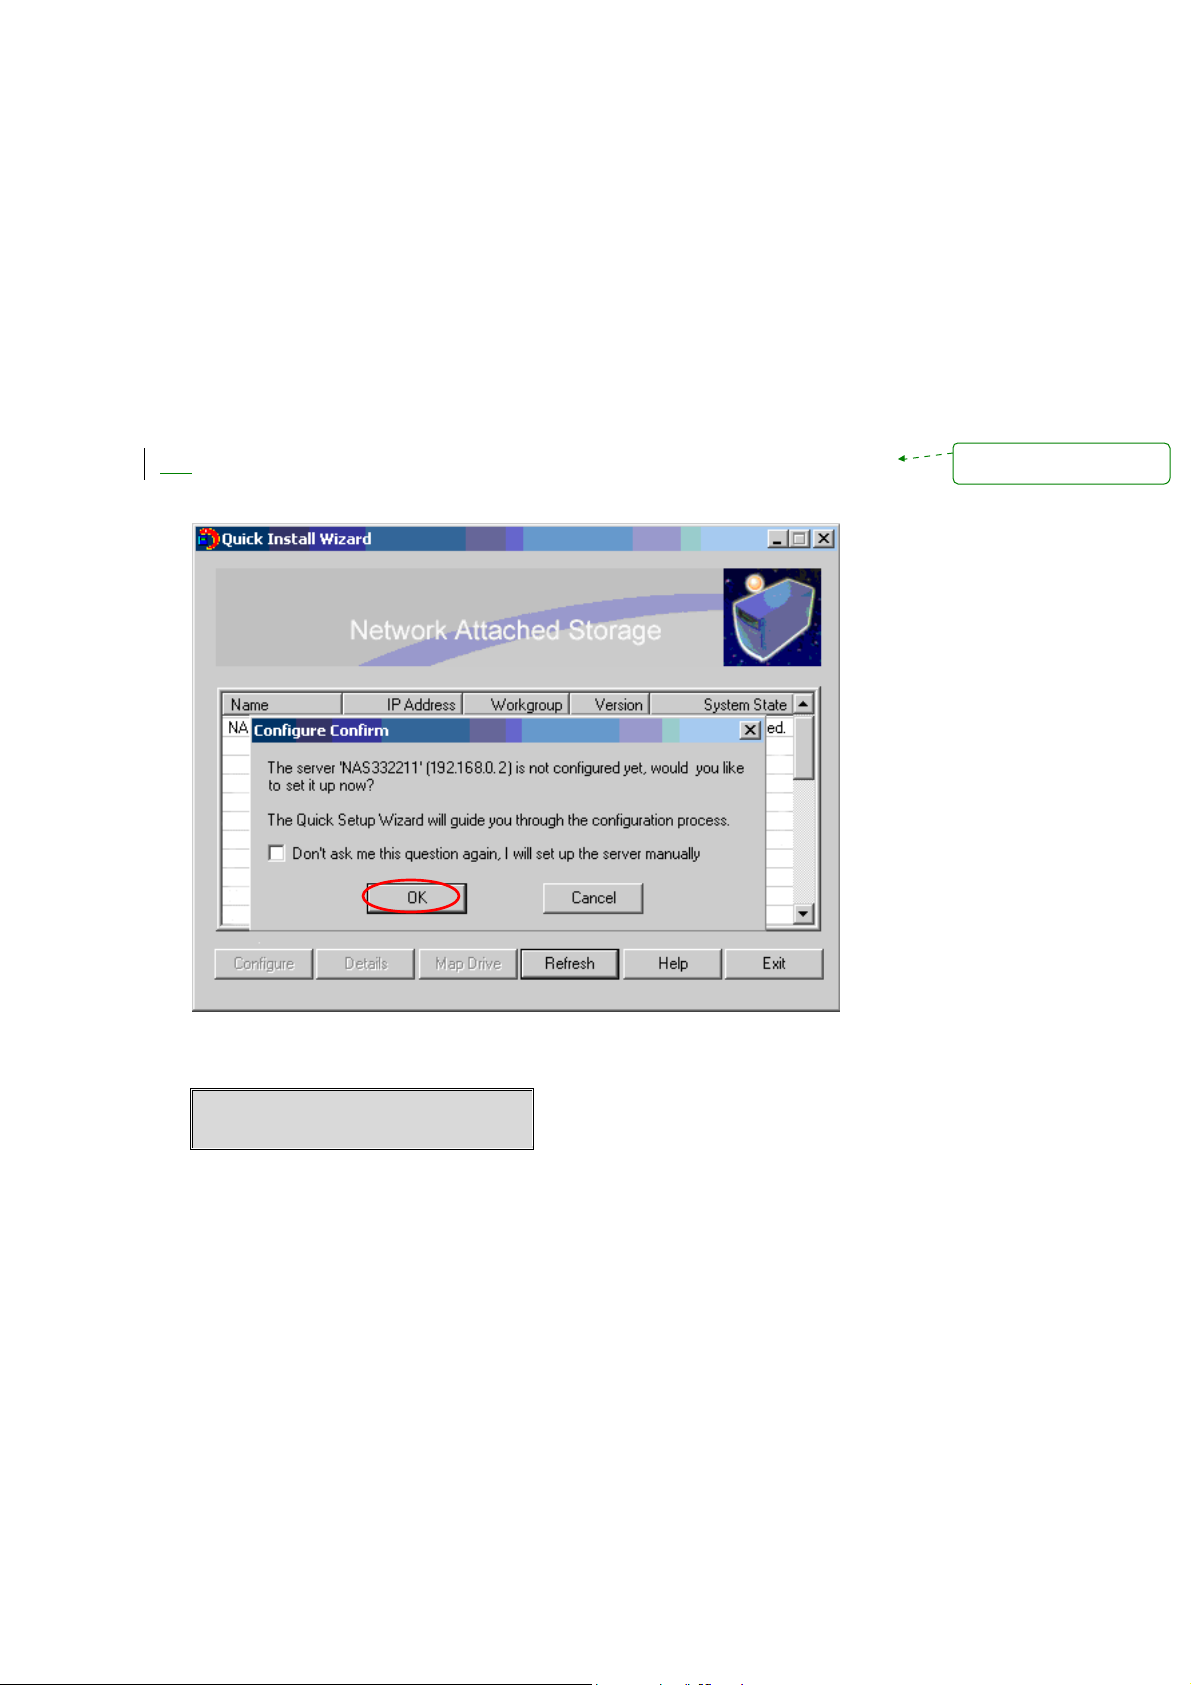
2.3.1 Windows Use rs
Insert ND26000 CD-ROM in your PC
Run Quick Install Wizard. When the browser prompts for performing quick
1.
configuration, click OK.
Mise en forme : Puces et
numéros
Enter the default user name and password.
Default user name: Administrator
Password: admin
- 12 -
Page 13
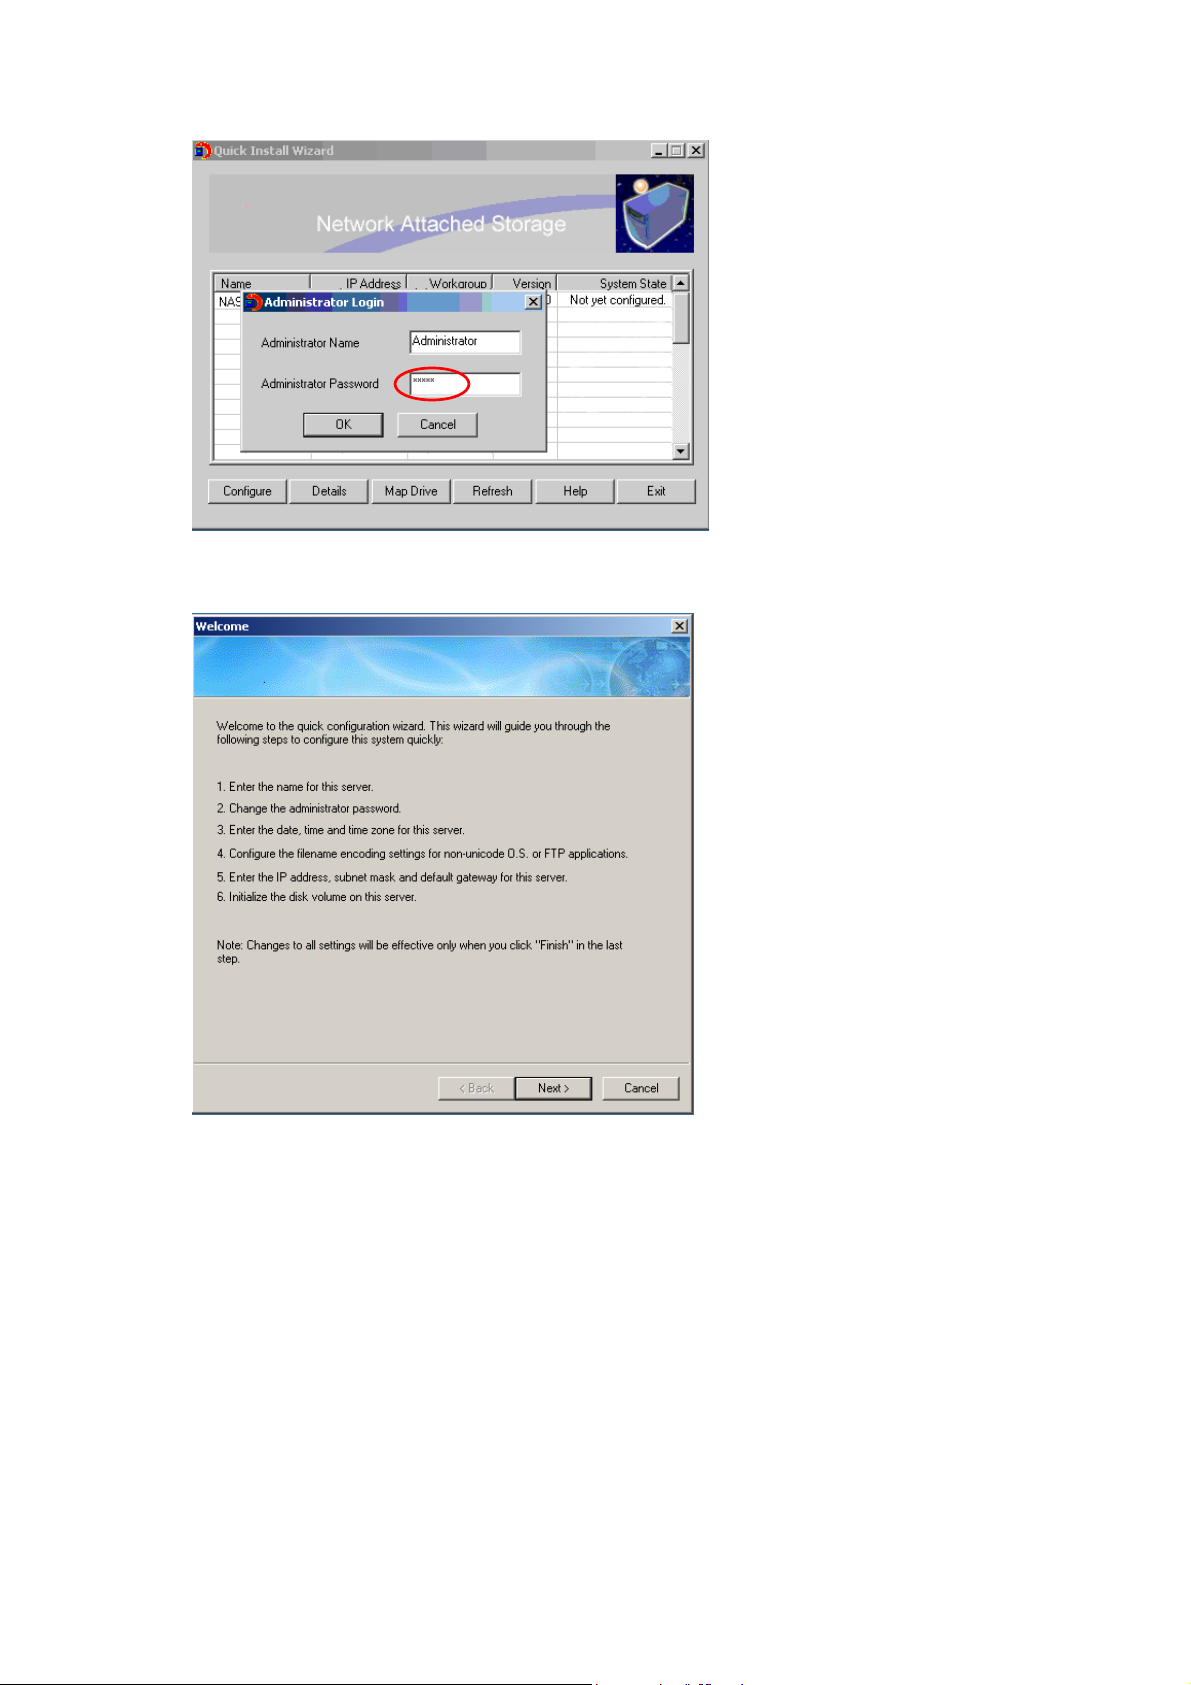
When you have entered quick configuration page, follow the instructions to
complete the settings. Click Next to continue.
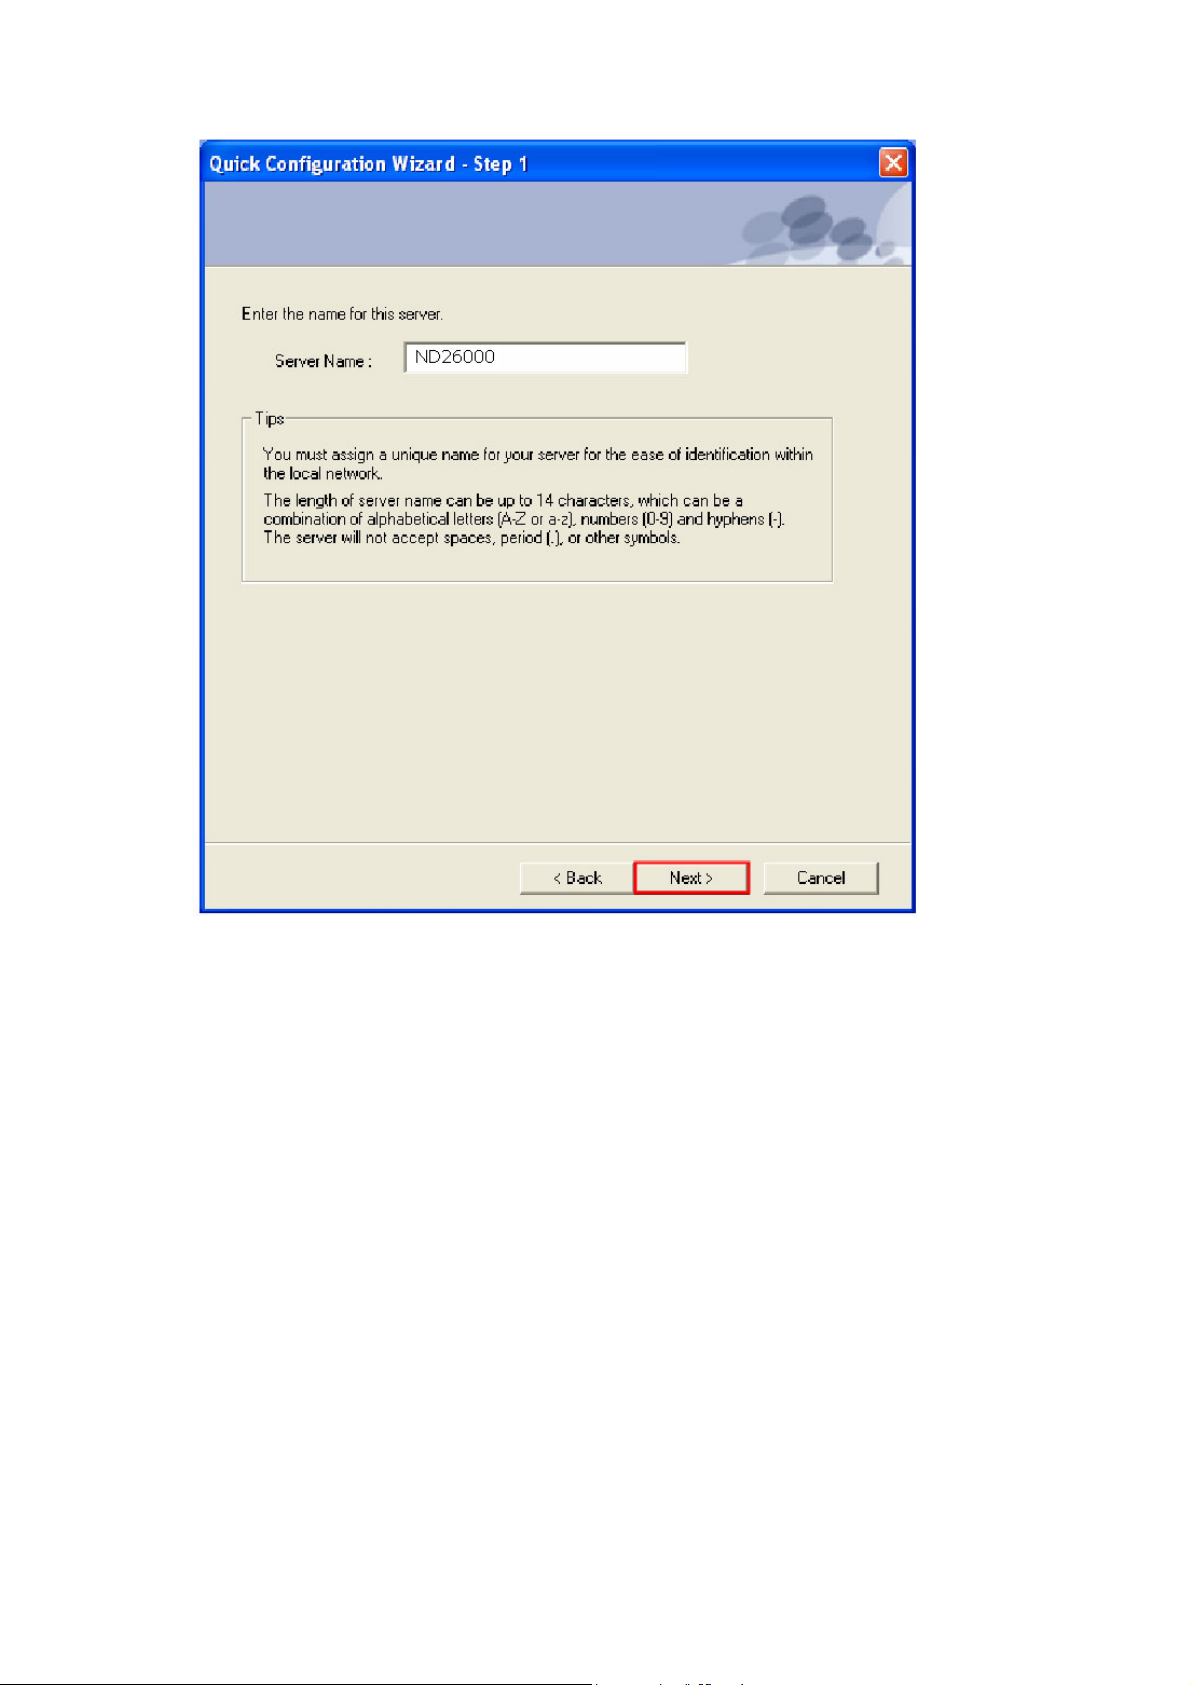
Step 1. Enter t he server name and click Next.
- 13 -
Page 14
Step 2. Enter a new password or select to use the original password. C lick
Next to continue .
- 14 -
Page 15
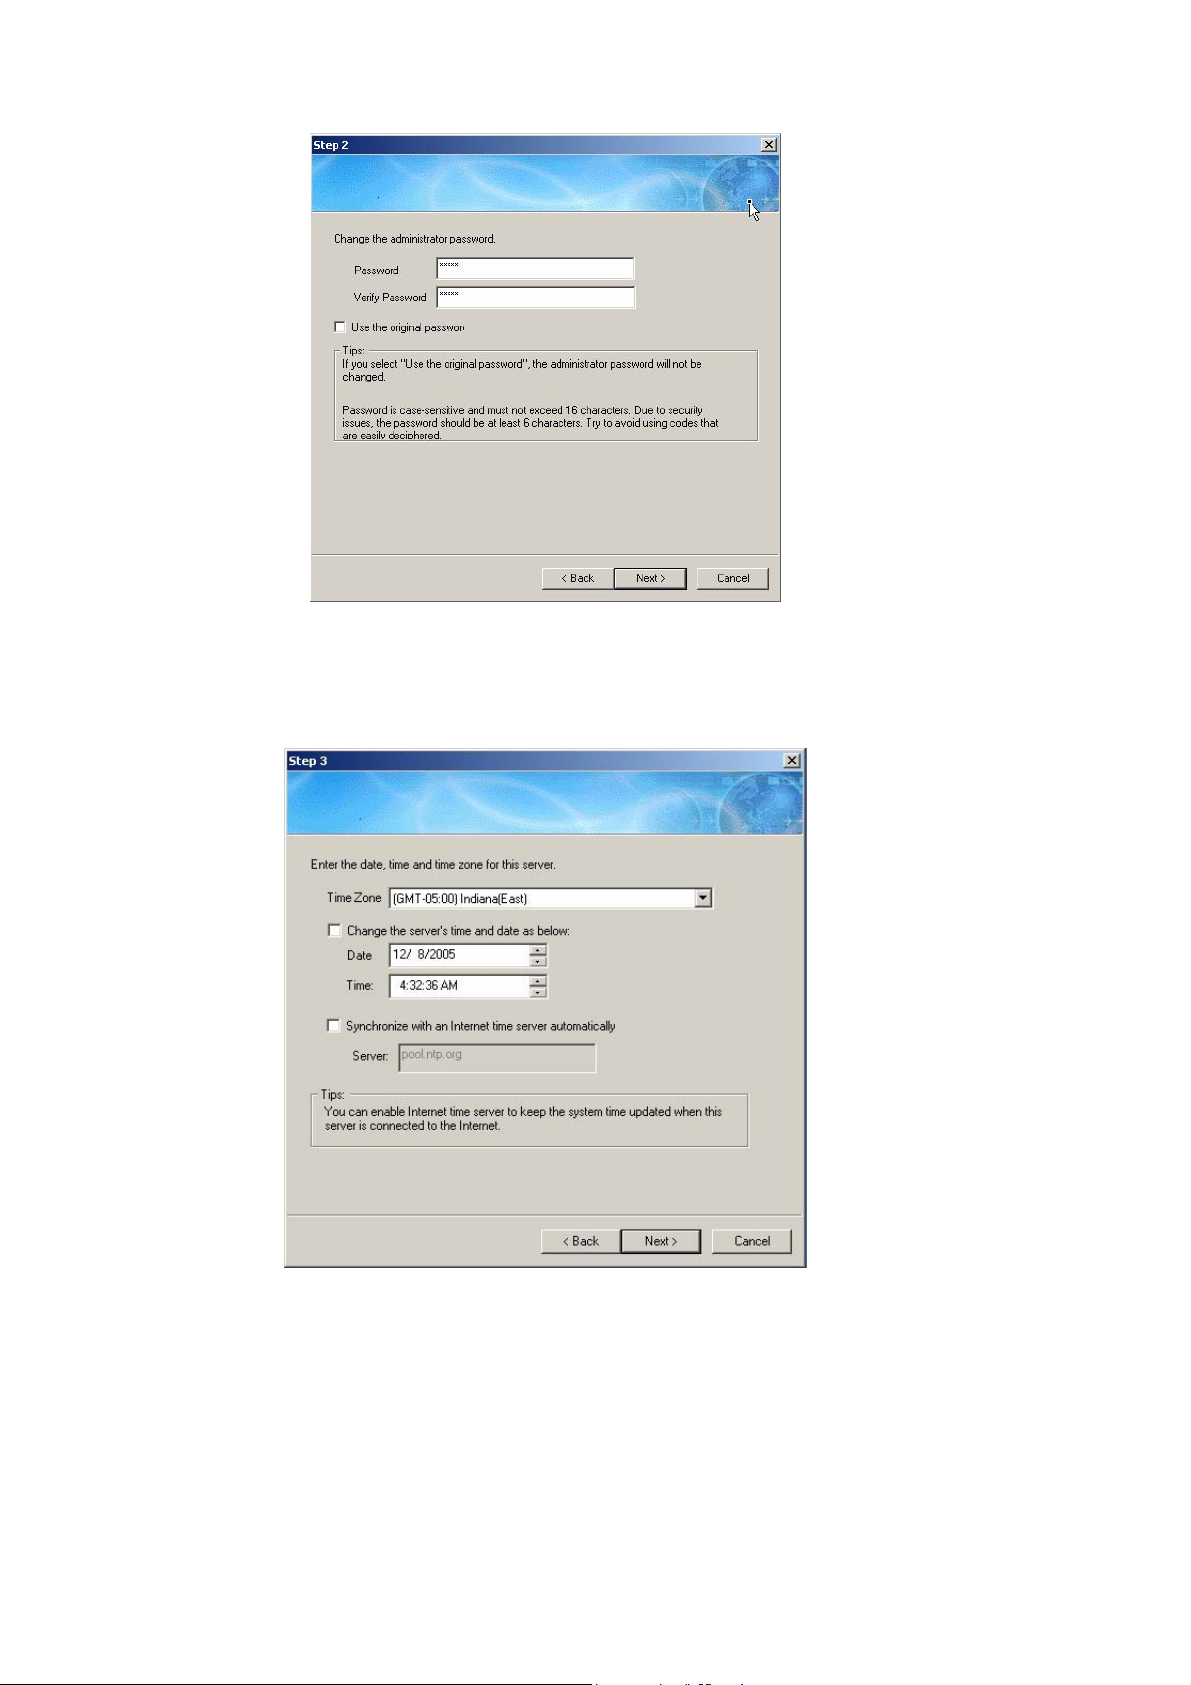
Step 3. Select the time zone of your location or enter the date and tim e
manually. You can also select to synchronize the time of ND26000 with an
Internet time server automatically. Click Next to continue.
Step 4. Select the encoding language of ND26000 and click Next.
- 15 -
Page 16
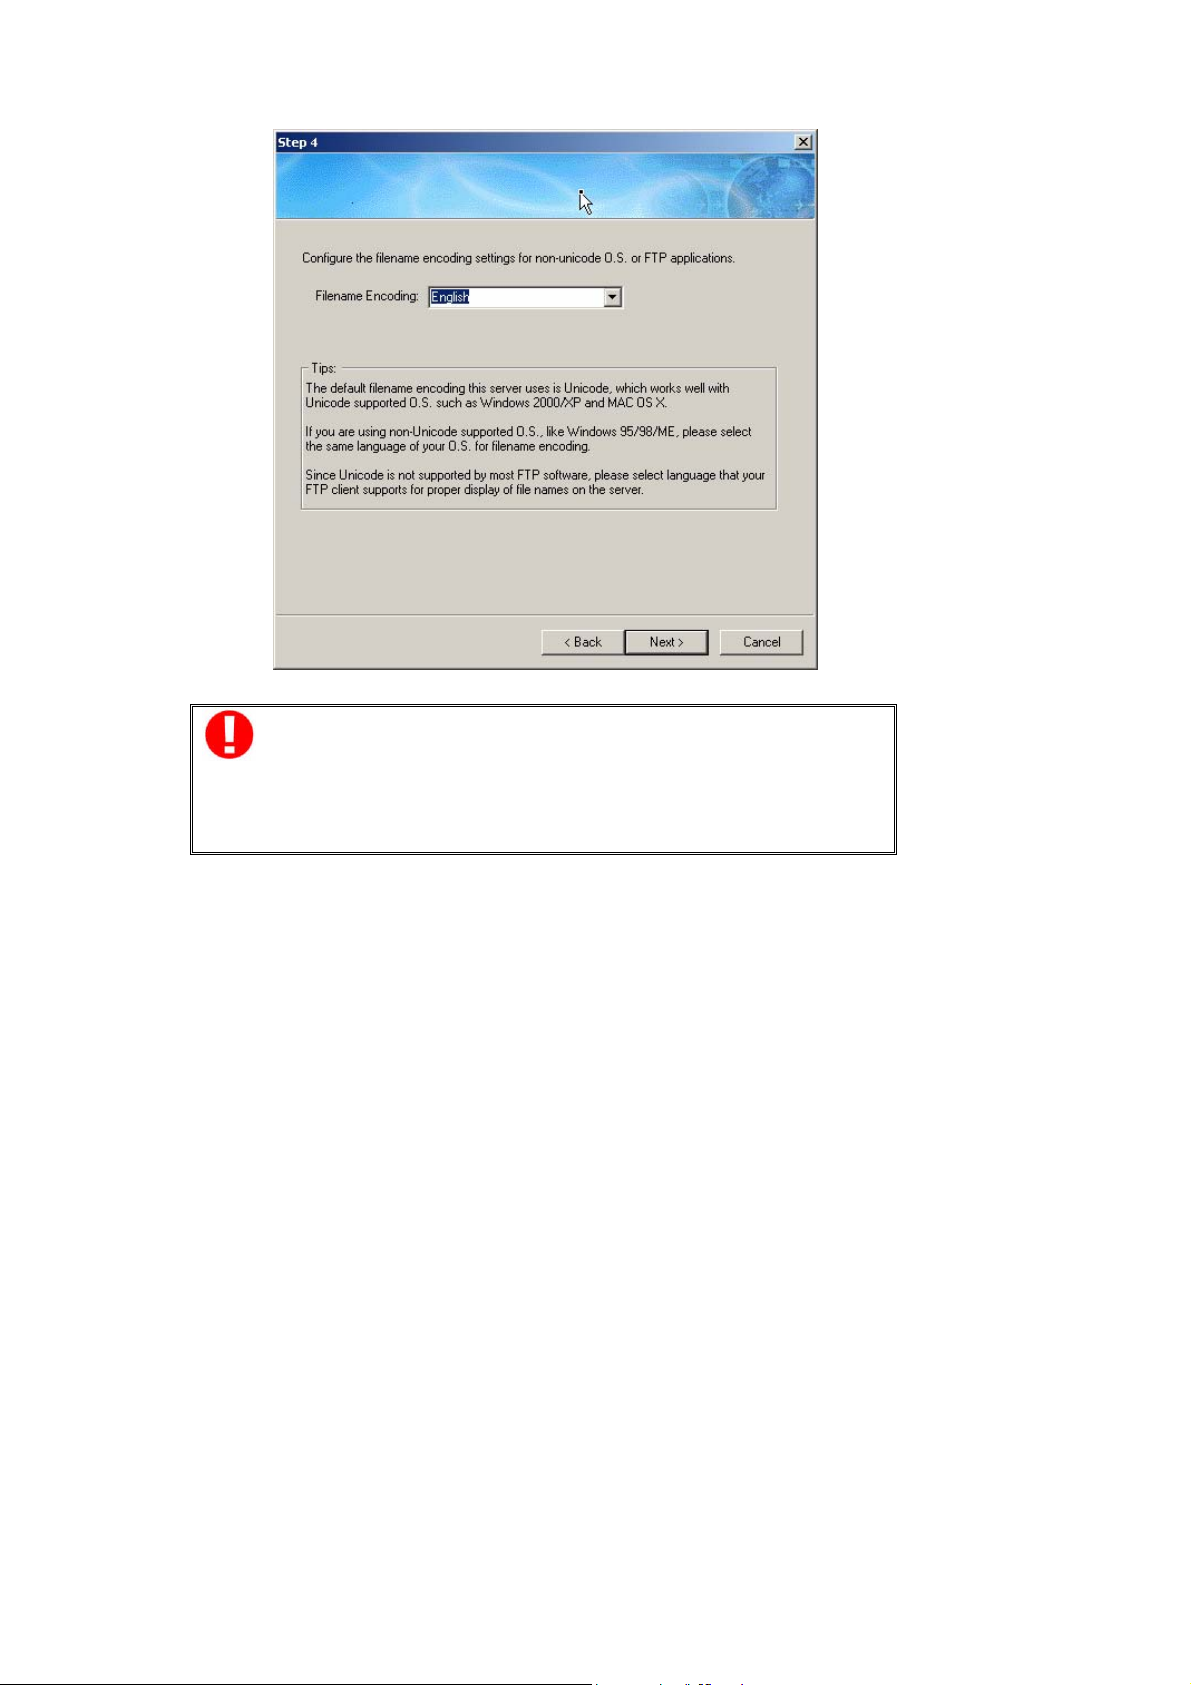
Note: All files and directories on ND26000 wil l be created using
Unicode encoding. If your FTP clients or PC does not support
Unicode, e.g. Windows 95, 98, ME OS, select the language t he sam e
as the OS of your PC here in order to view the files and directories on
the server properly.
Step 5. It is recommended to use DHCP protocol to acquire IP address
automatically. If your network does not support DHCP, please enter the IP
addr e s s se t ti ngs a nd c li ck Next.
- 16 -
Page 17
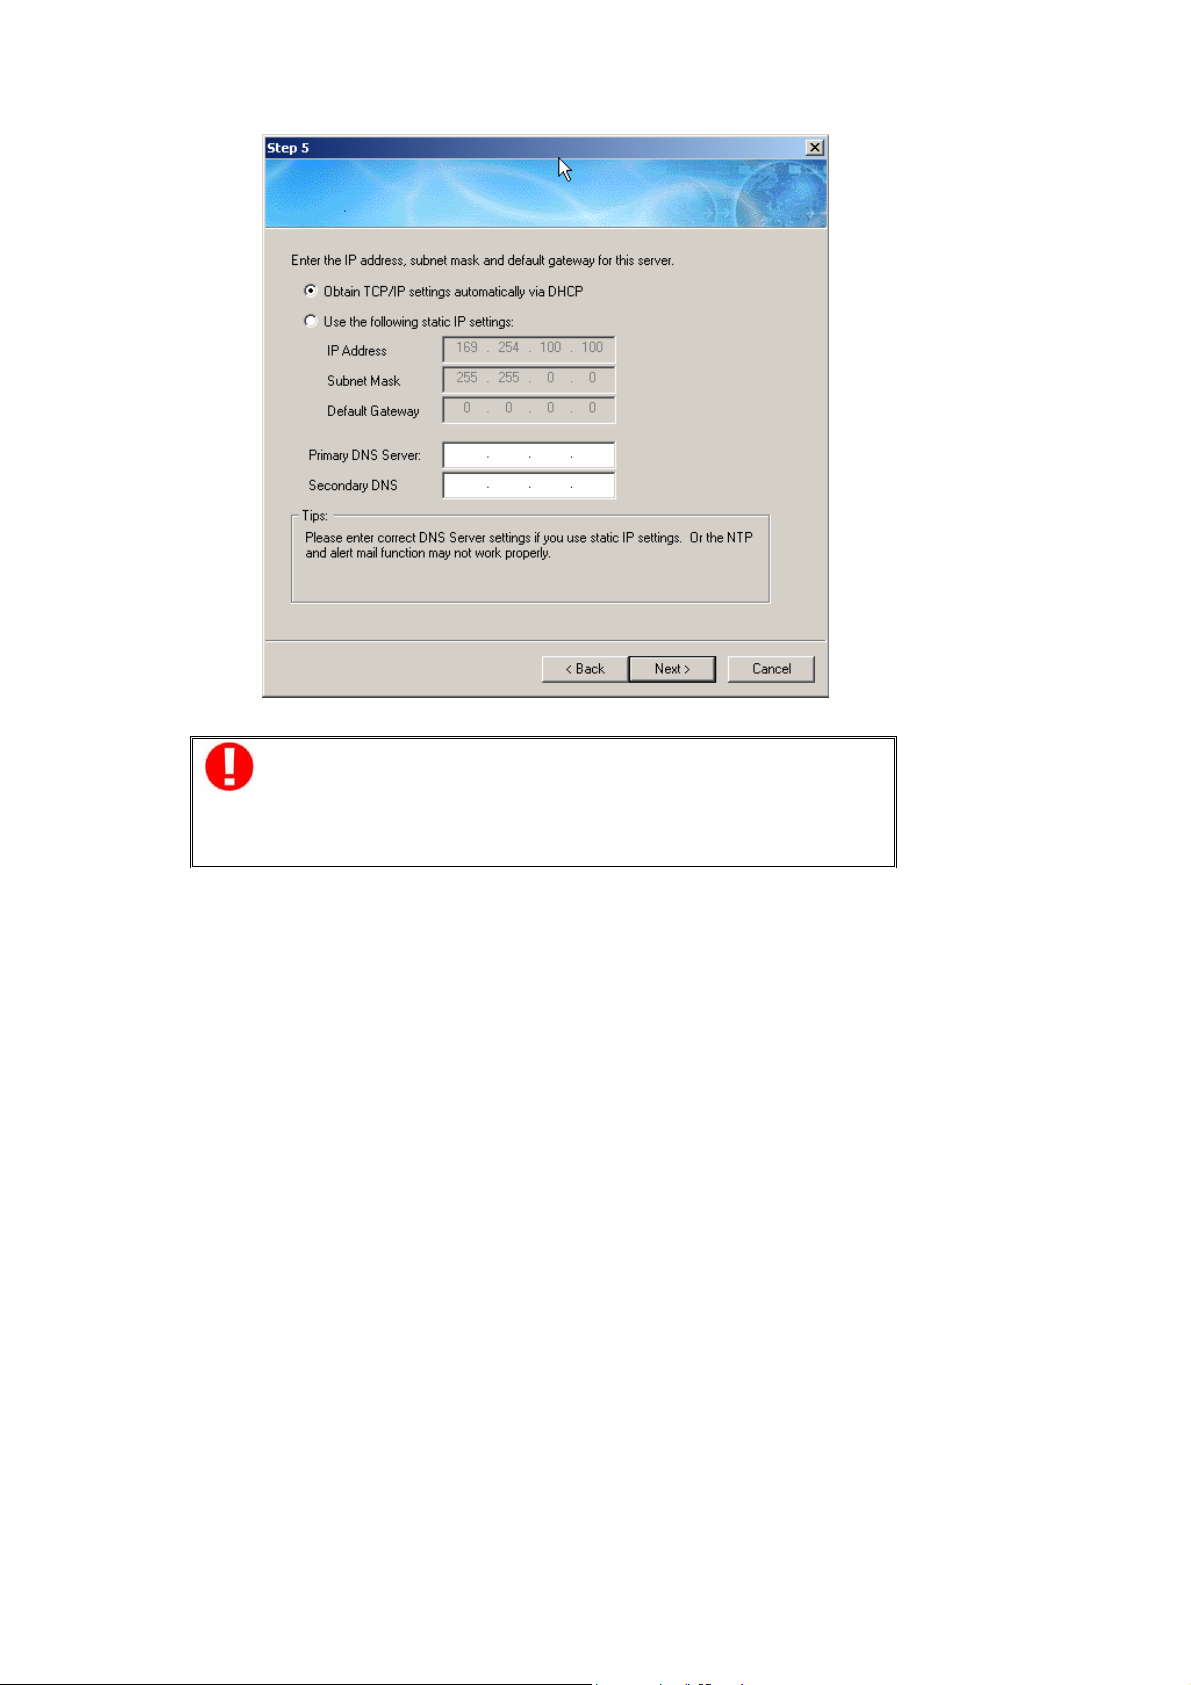
Note: If you select to enter IP address manually, please make sure
your PC and ND26000 are in the same LAN . If you are not sure about
the network settings, please contact your network administrator or
ISP.
- 17 -
Page 18
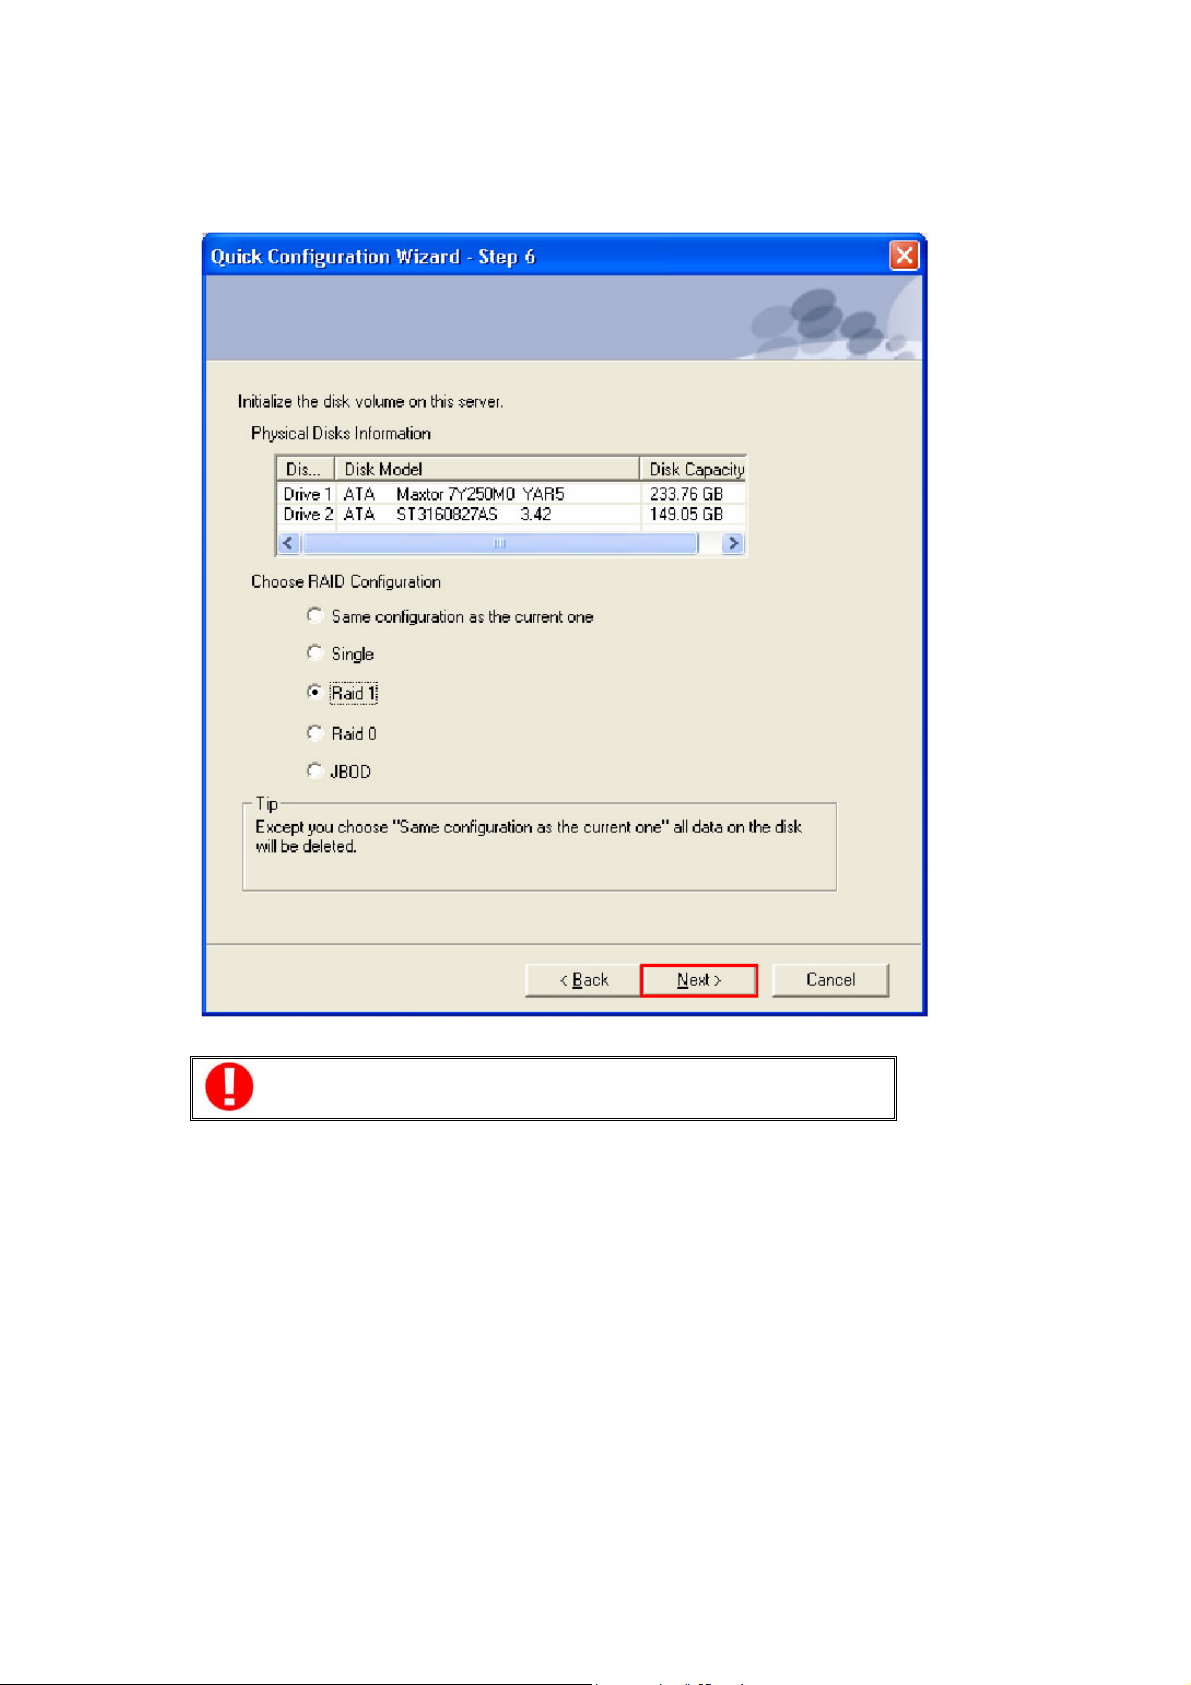
Step 6. When a new hard disk is installed in ND 26000, select the desired
mode and click Next to format and initialize the disk.
Note: All disk data will be cleared after disk initialization.
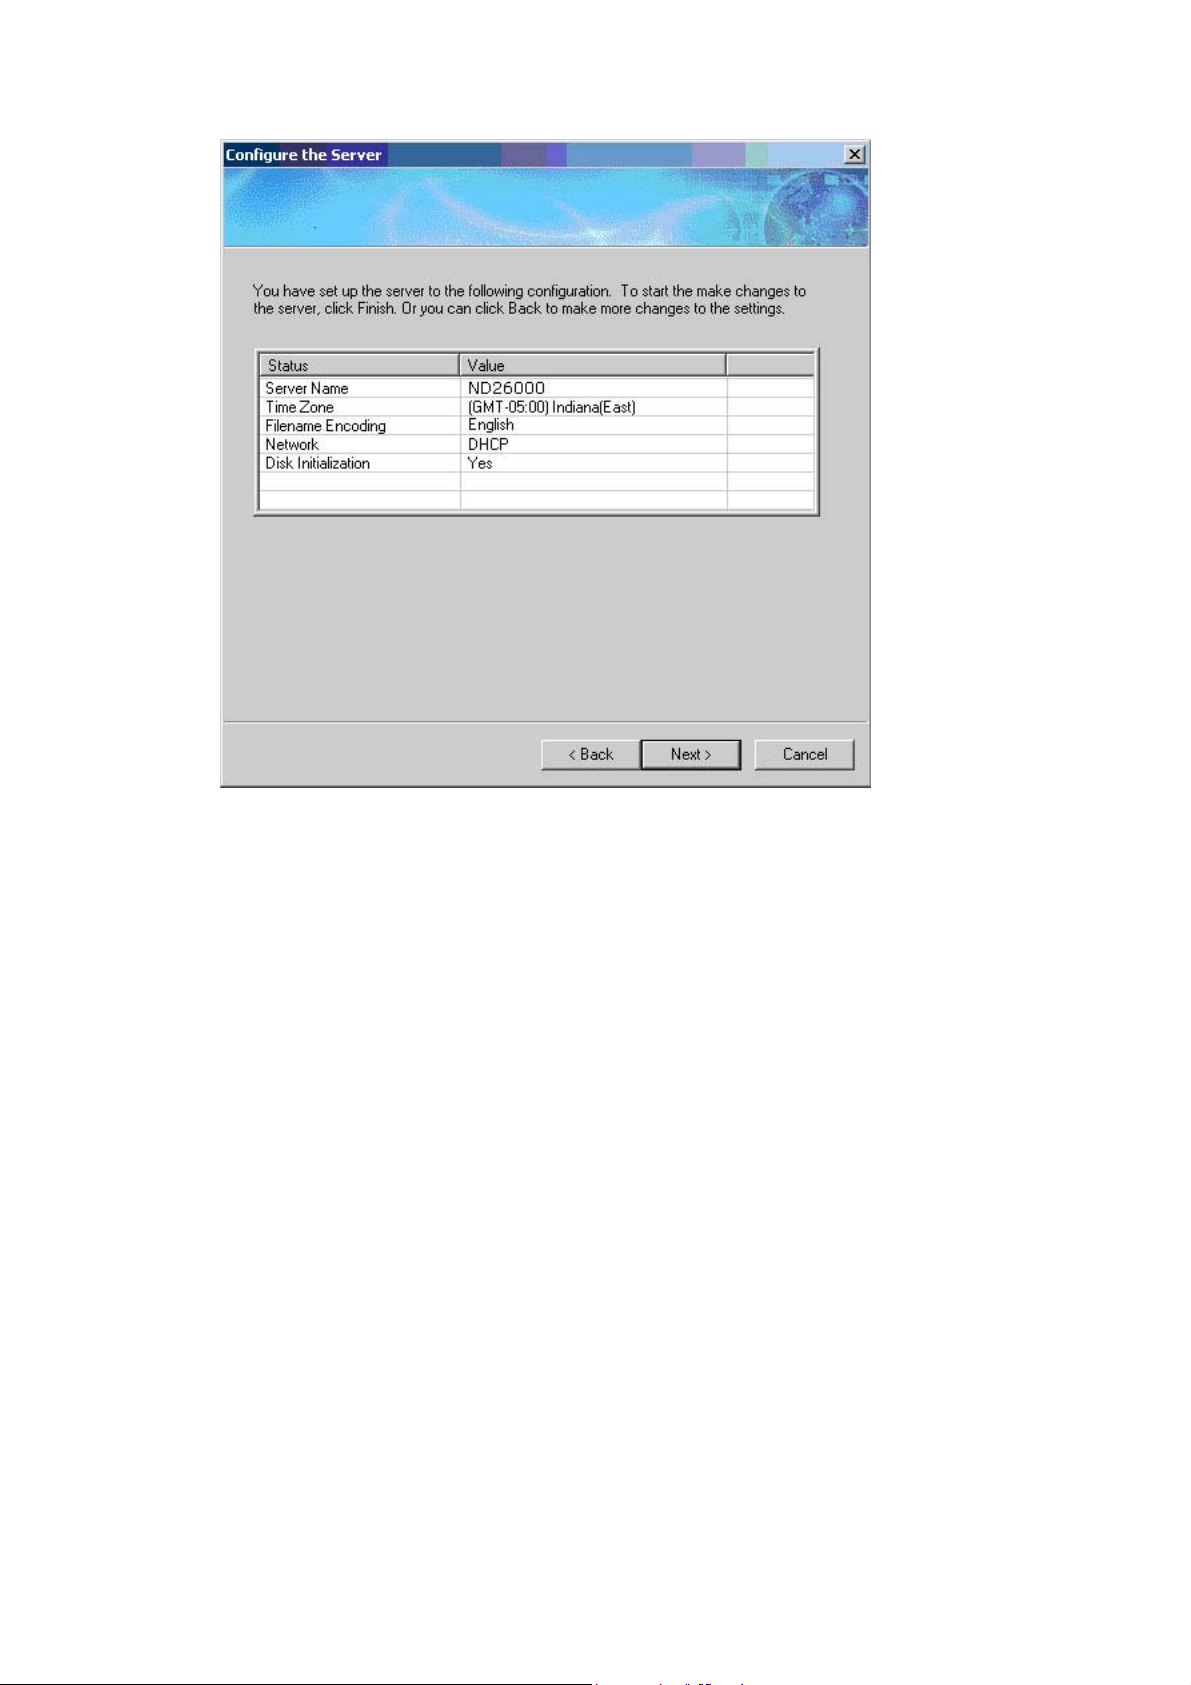
Step 7. You have finished quick configuration. Please make sure all settings
are correct and click Next to start disk formatting.
- 18 -
Page 19
- 19 -
Page 20
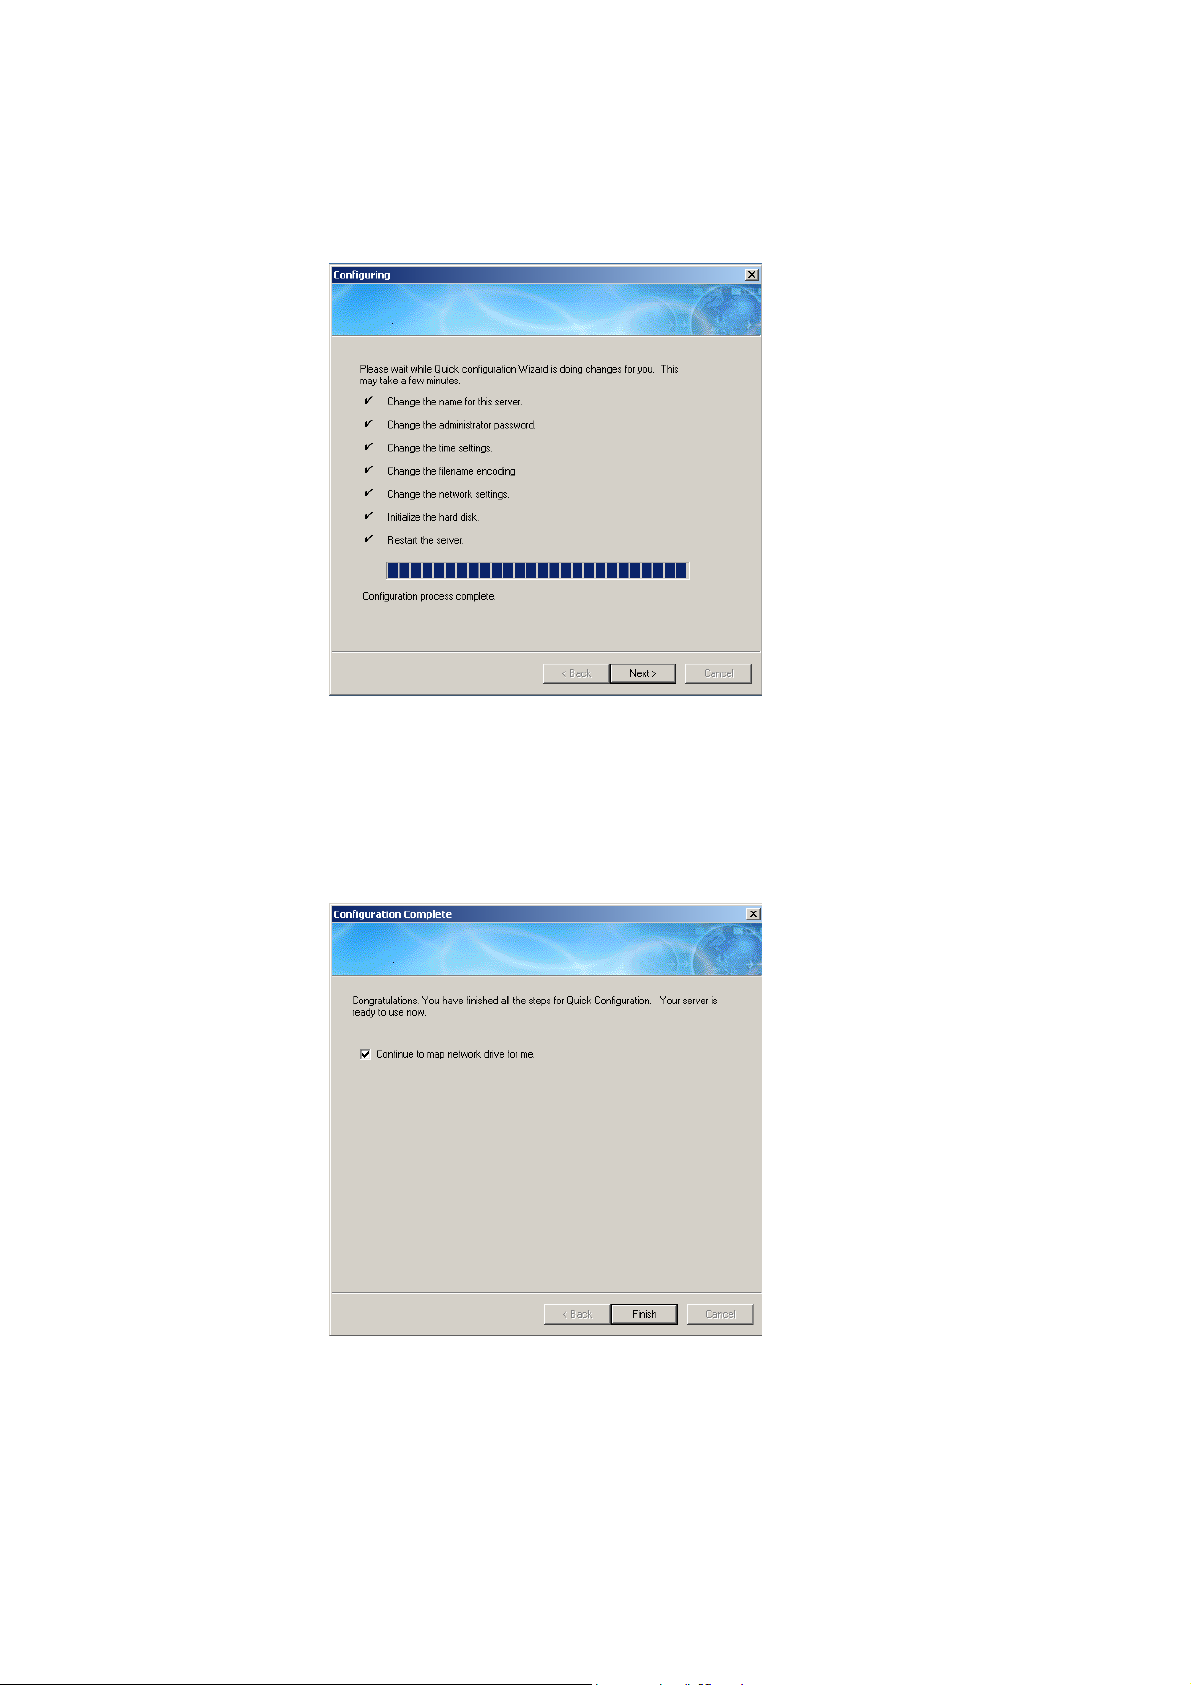
Please wait patiently when the disk is being formatted. Formatting may take
a few minutes depending on t he capacity of your hard drive. When the disk is
formatted, click Next to proceed.
Congratulations! You have fi nished Quick Configuration. Your ND26000 is
ready to use.
ND26000 provides several default share f olders for data sharing and access.
To map the share folders on ND26000 as your drive, check the option
“Continue to map network drive for me” and follow the steps below to proceed.
To start to use ND26000 immediately, you can skip to 3.
- 20 -
Page 21
a. For example, to map the fol der Public as your drive, select the folder and
click Map Network Drive.
Note: The share folders Q download, Qmulti media, Qusb, and
Qweb are system default network share of ND26000 for the use of
Download Station, Multimedia Station, USB Auto-copy and Web
Server.
b. Select the drive letter for the connection and click Finish.
- 21 -
Page 22
c. Upon successful connection, you can start to use the share folder on
ND26000. You can access these folders by opening My Computer.
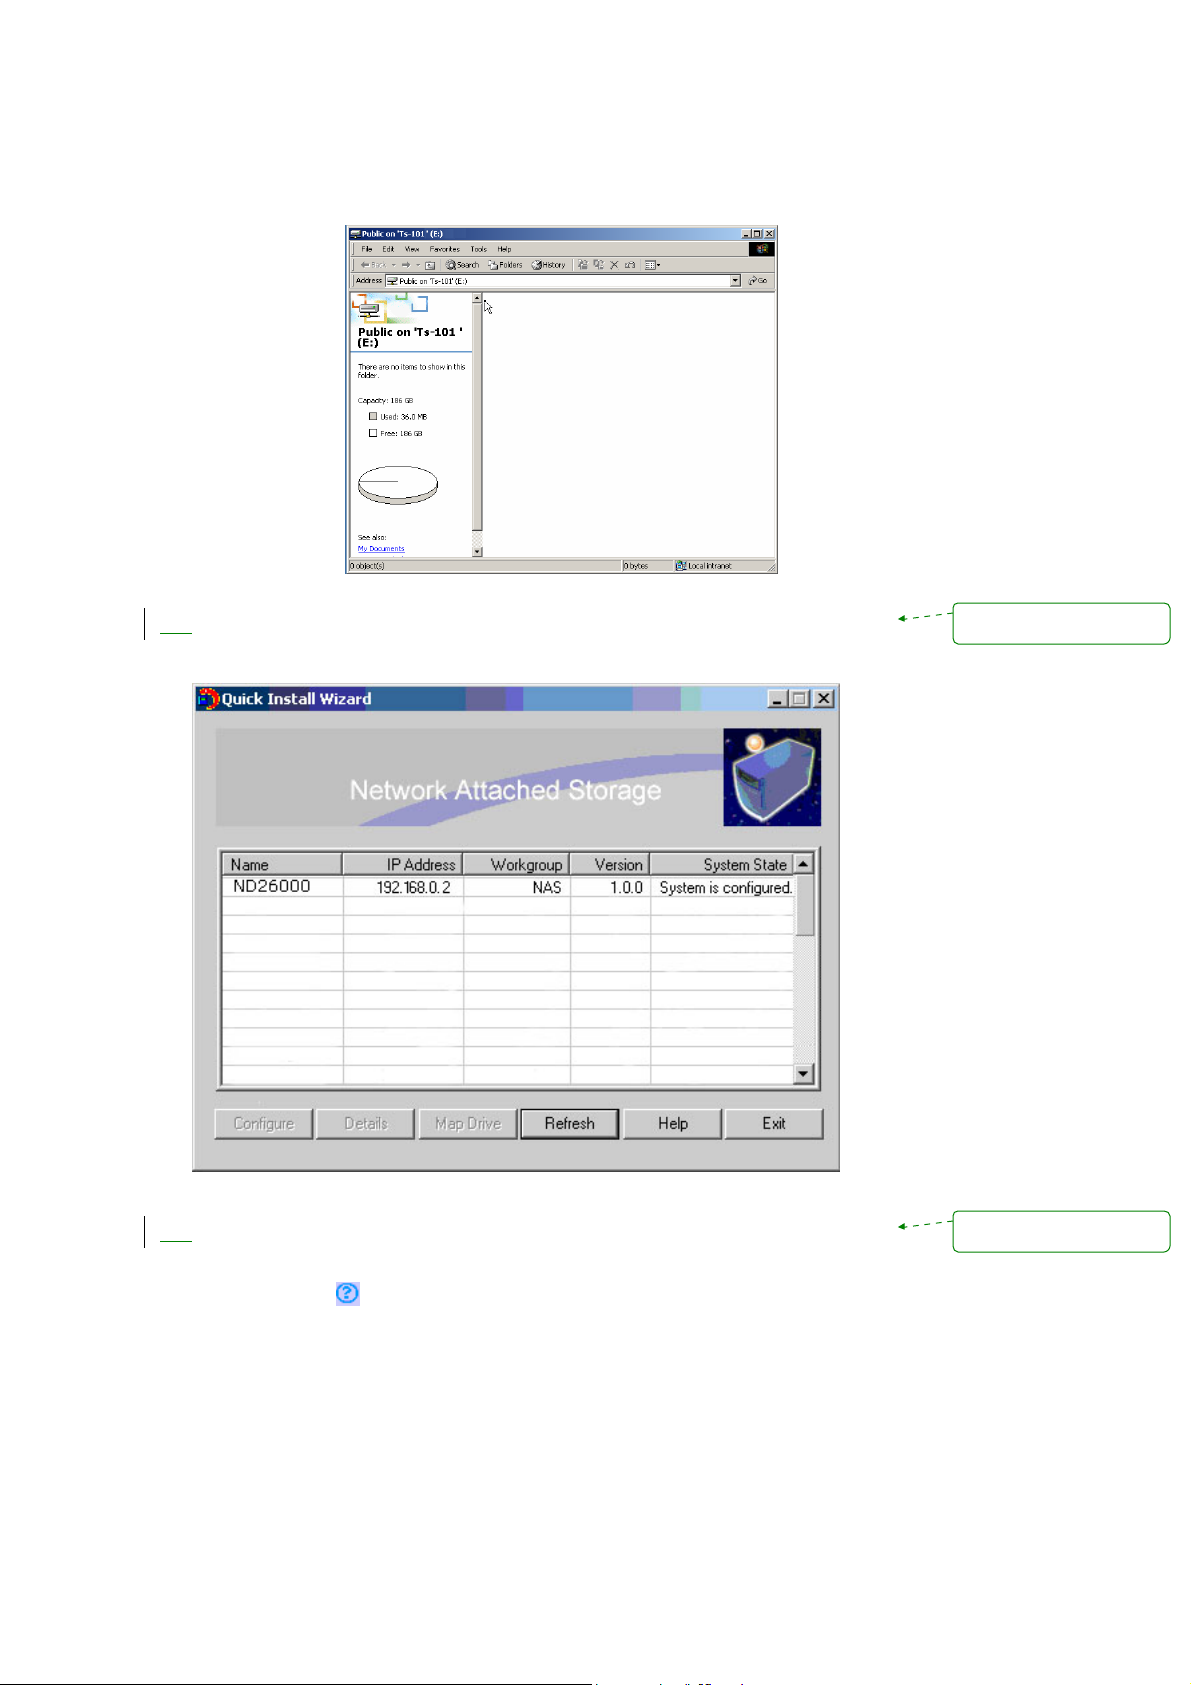
Quick Install Wizard will appear when all configurations are completed. Click
2.
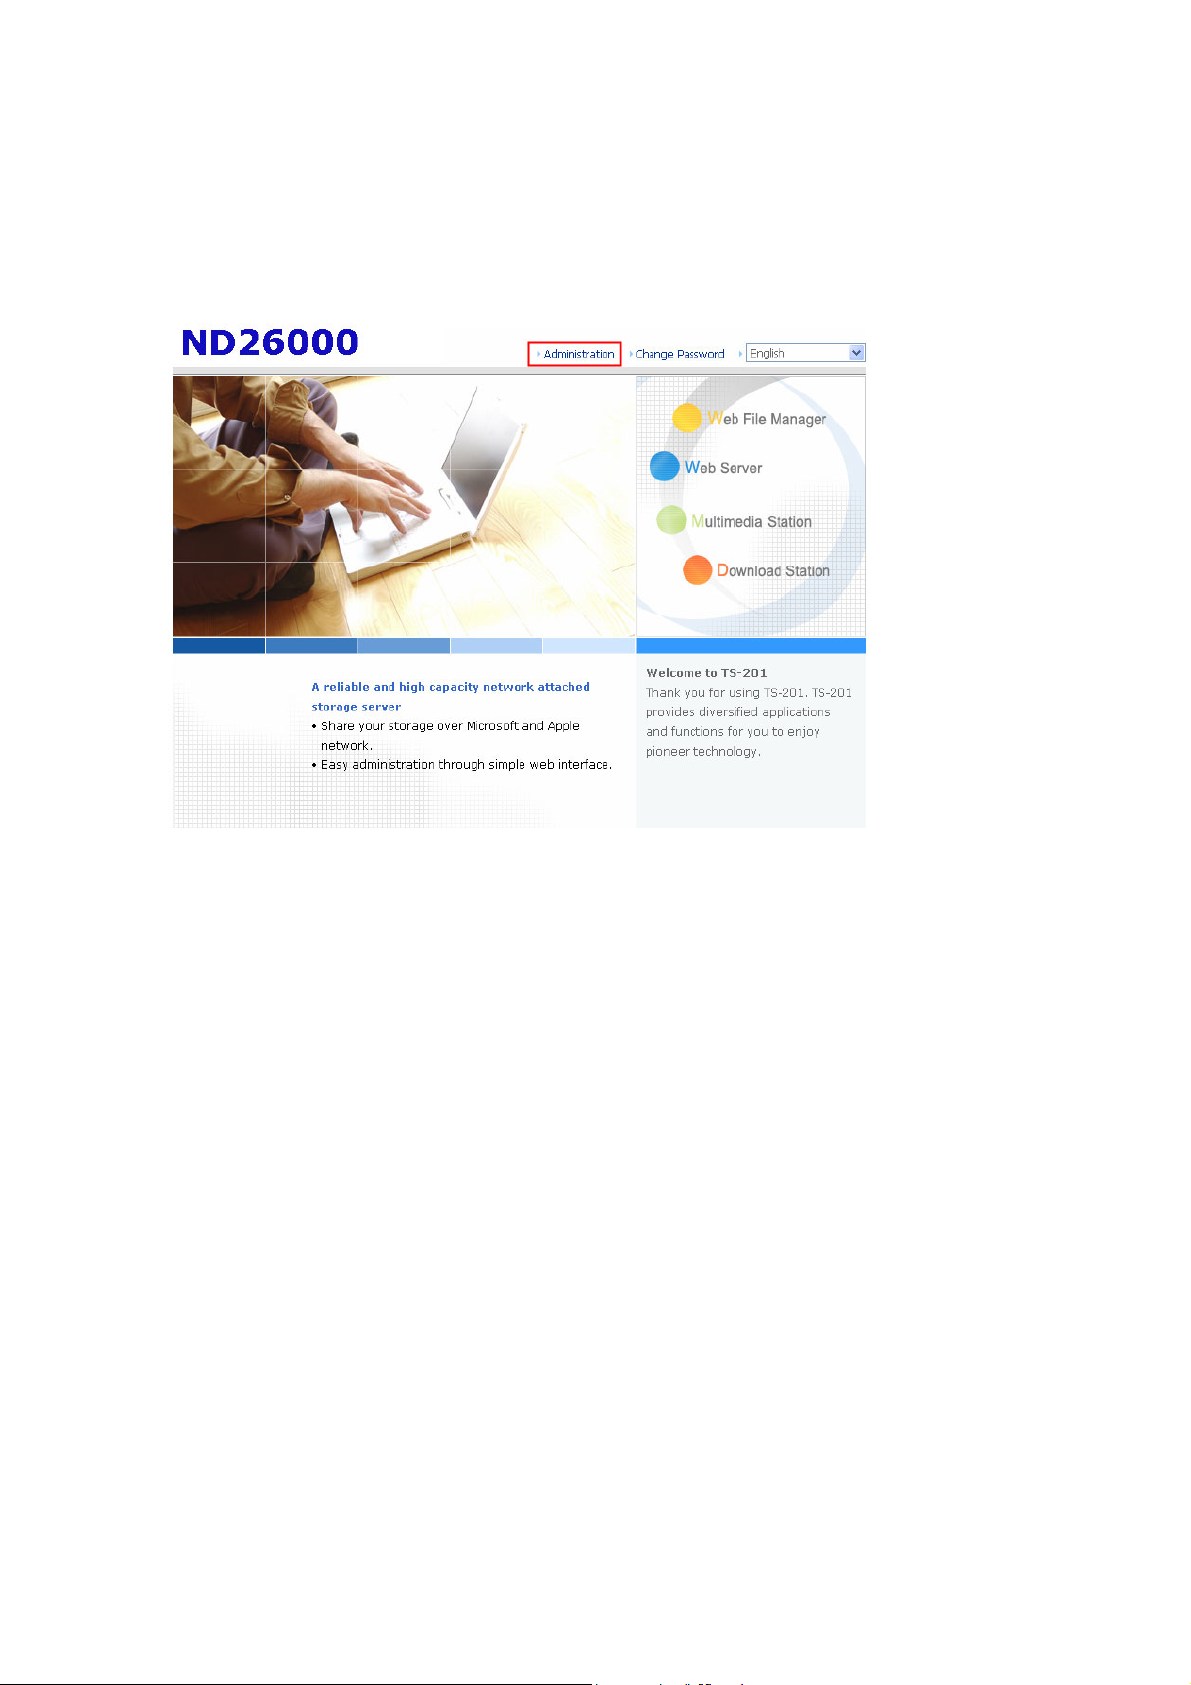
on the name of ND26000 on the list to enter administration page.
Mise en forme : Puces et
numéros
3.
When the administration page of ND26000 is shown, you can start to use the
services. If you have any questions during web administration, please cli ck
the help button
on the top right hand corner of the page.
- 22 -
Mise en forme : Puces et
numéros
Page 23
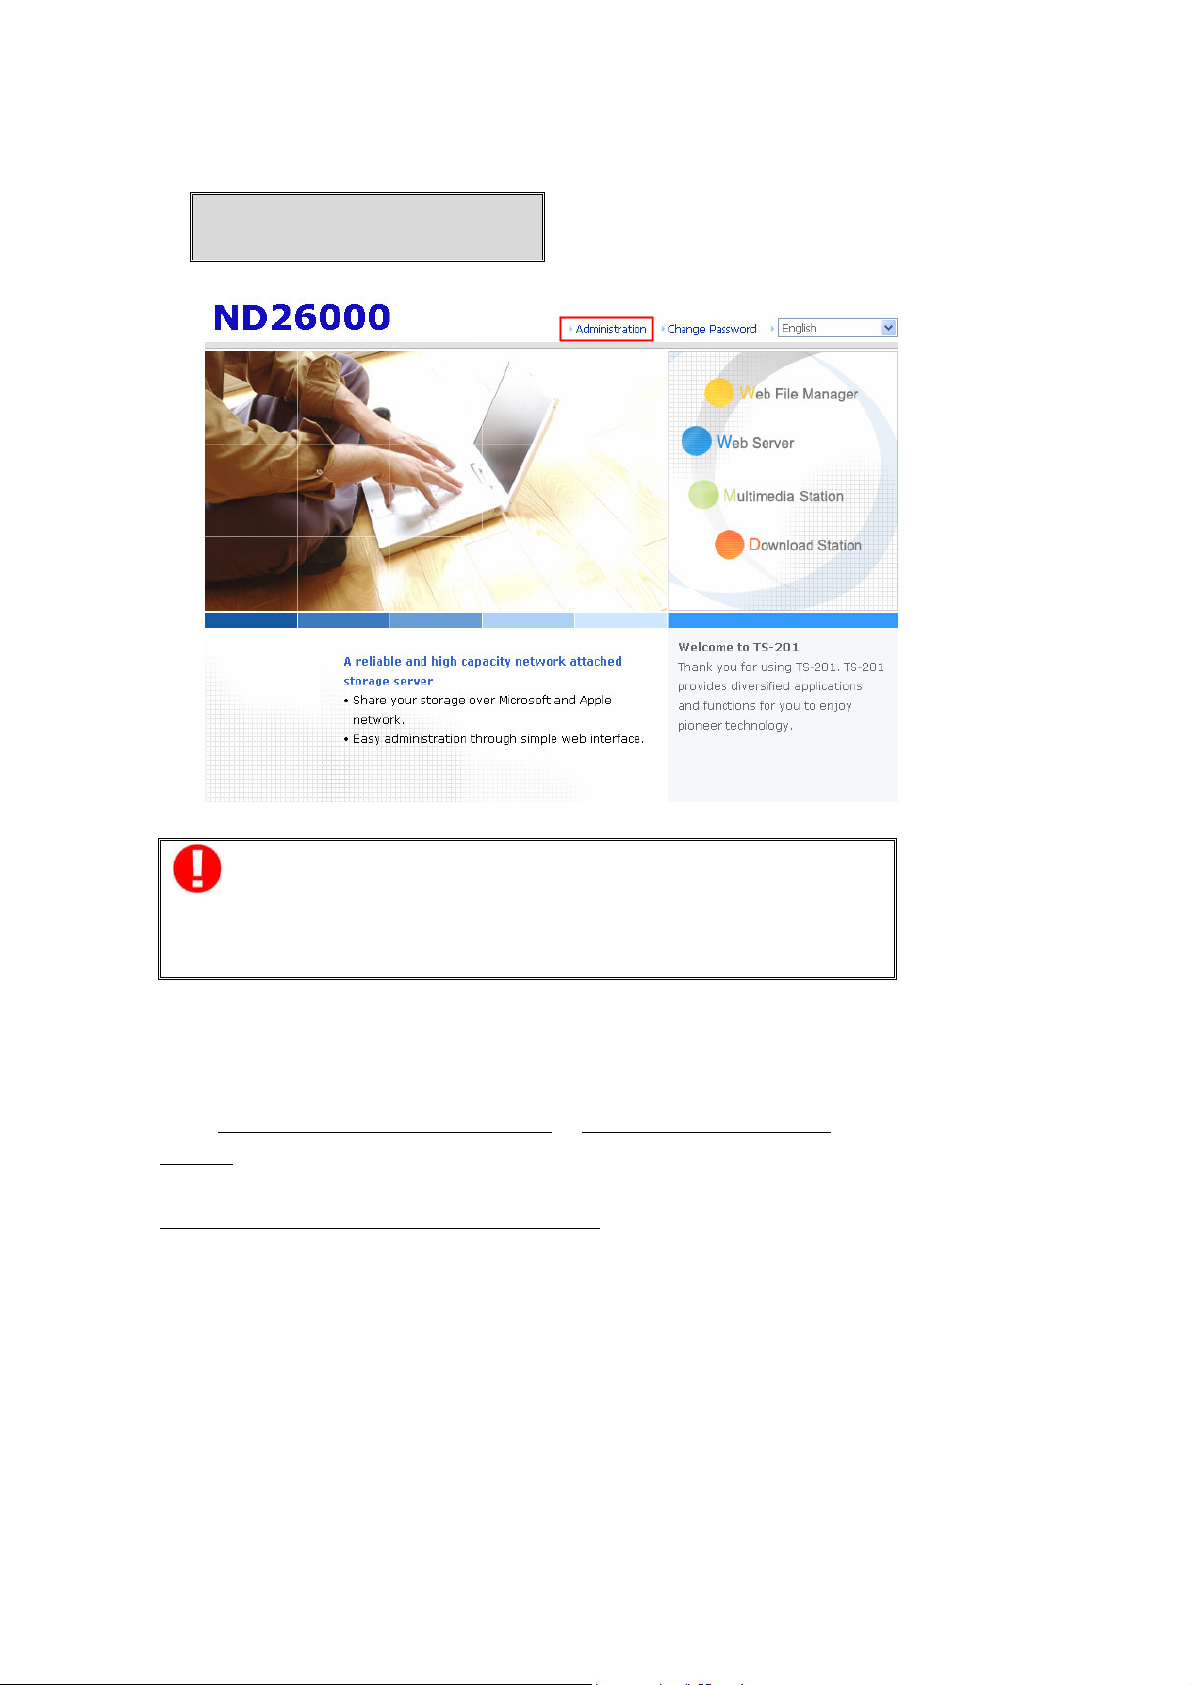
To modify system setti ngs, cli ck Admin istratio n. Enter the user name and
password to login.
Default user name: administrator
Password: admin
Note:
It is recomm ended to use Internet Explorer 6.0 or above to access
ND26000. If the OS of your PC is Windows 98, ND26000 supports
Internet Explorer 6.0 or above only.
2.3.2 MAC Users
ND26000 provides two methods for M AC users to connect to ND26000. You can
select A. Connect ND26000 by MAC directly
or B. Connect ND26000 by t he
network.
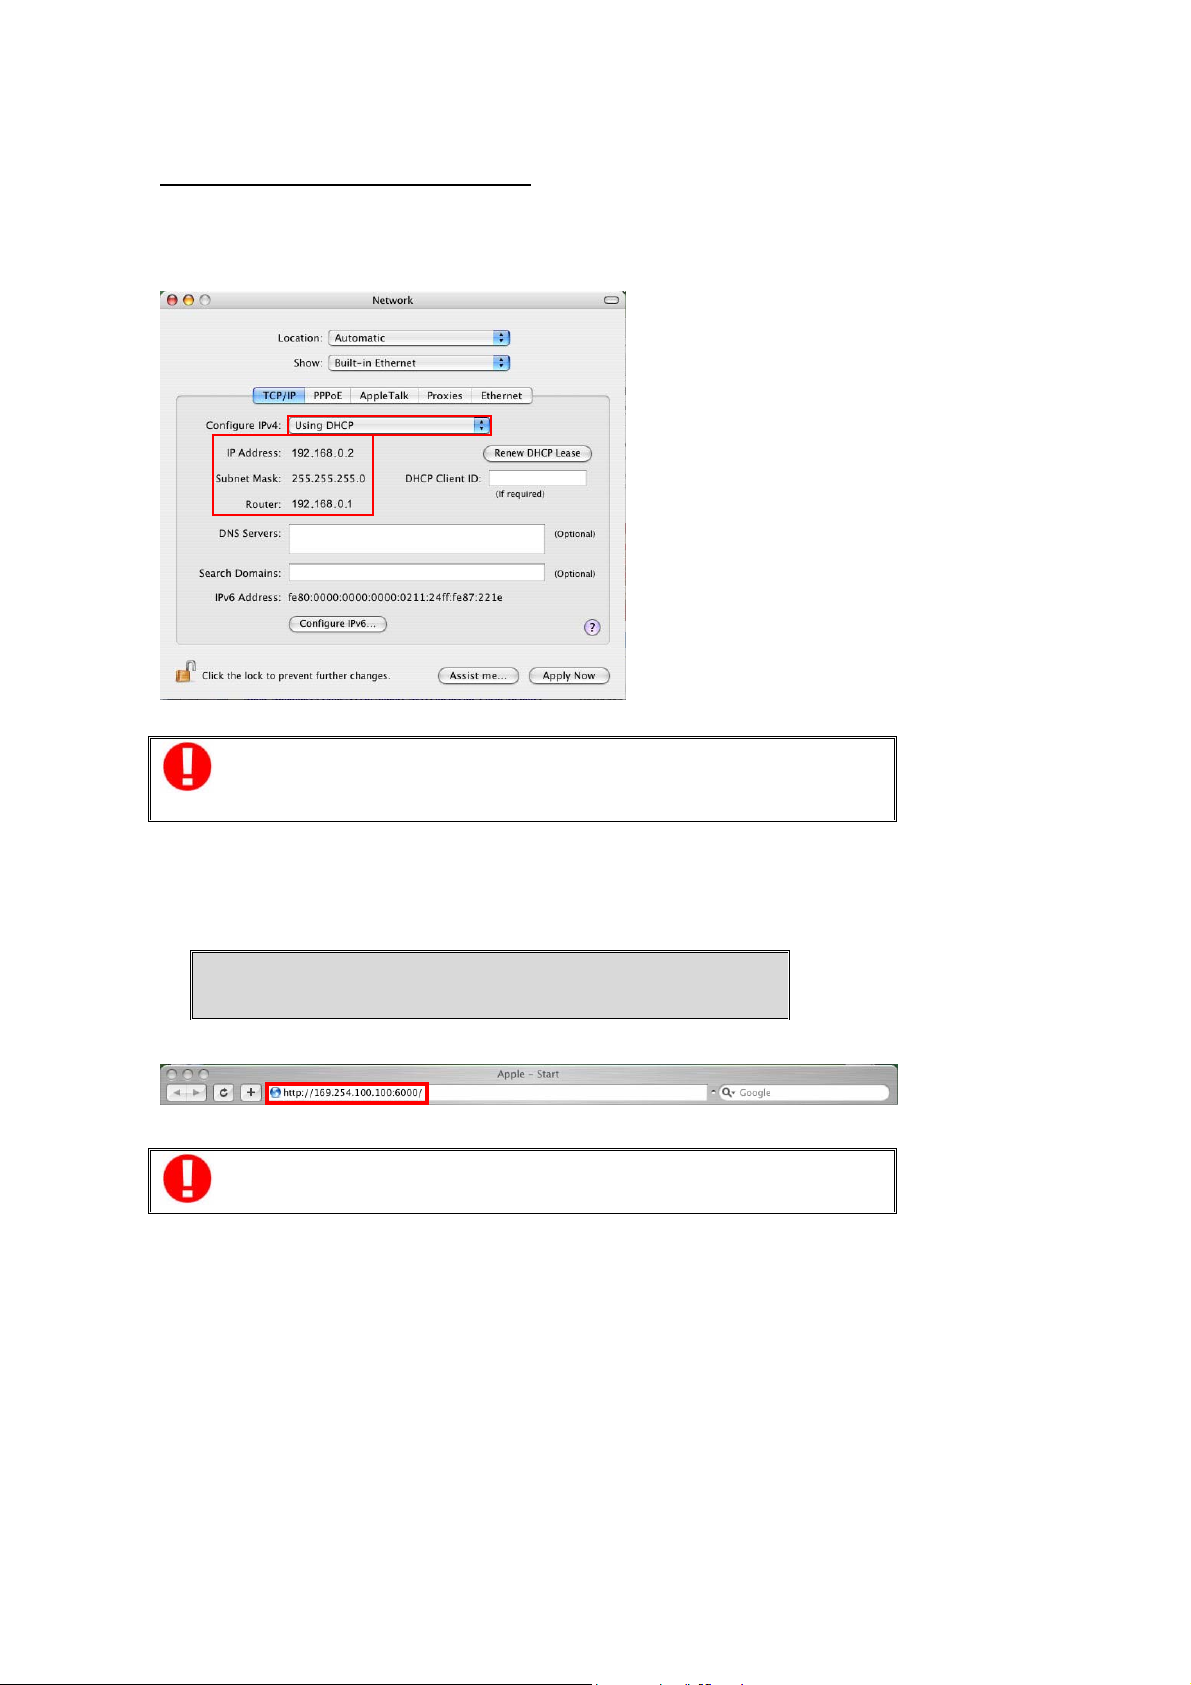
A. Connect your ND26000 w ith MAC dire ctly
1. Please go to Network settings and select Using DHCP. Then connect
ND 2600 0 to y our M A C vi a a cabl e.
- 23 -
Page 24
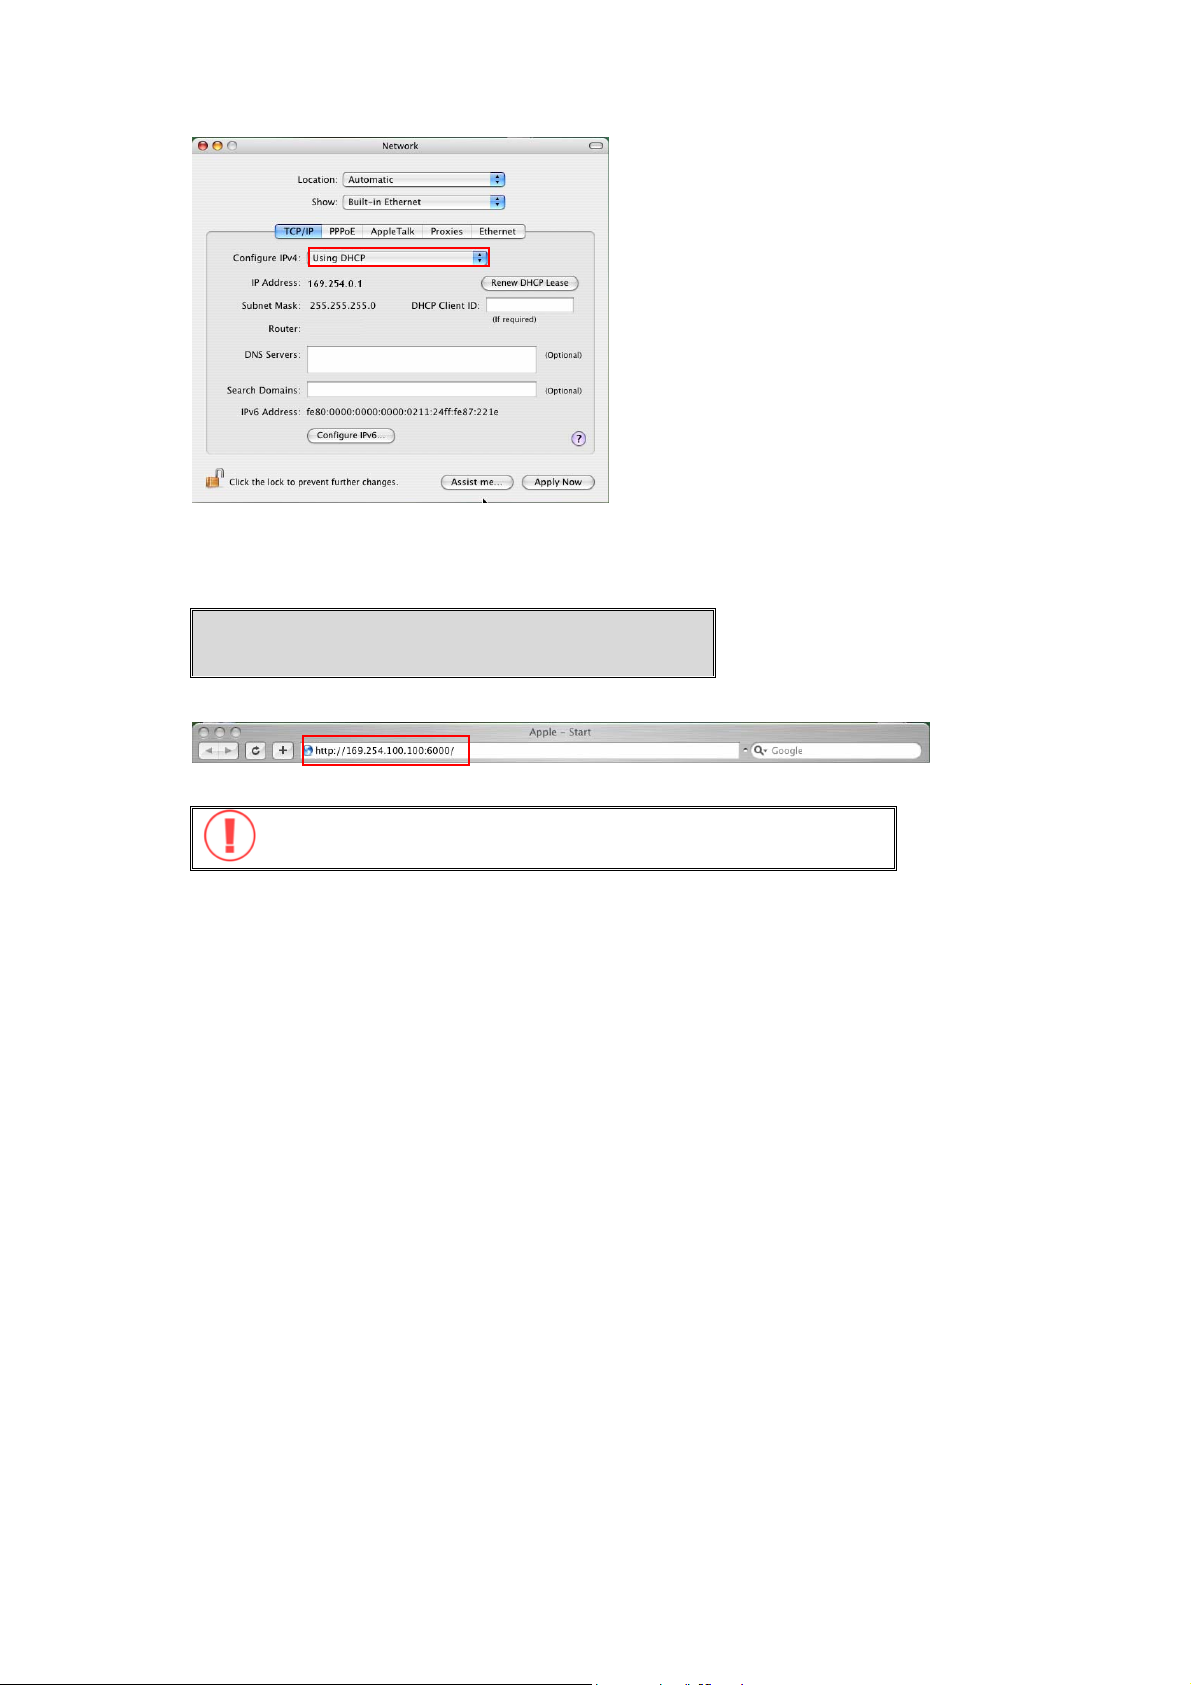
2. Open a web browser and enter the default IP address of ND2 6000 to login t he
system.
Default IP of ND26000:
http://169.254.100.100:6000
Note: Please use the browser Safari in MAC to access ND26000.
- 24 -
Page 25
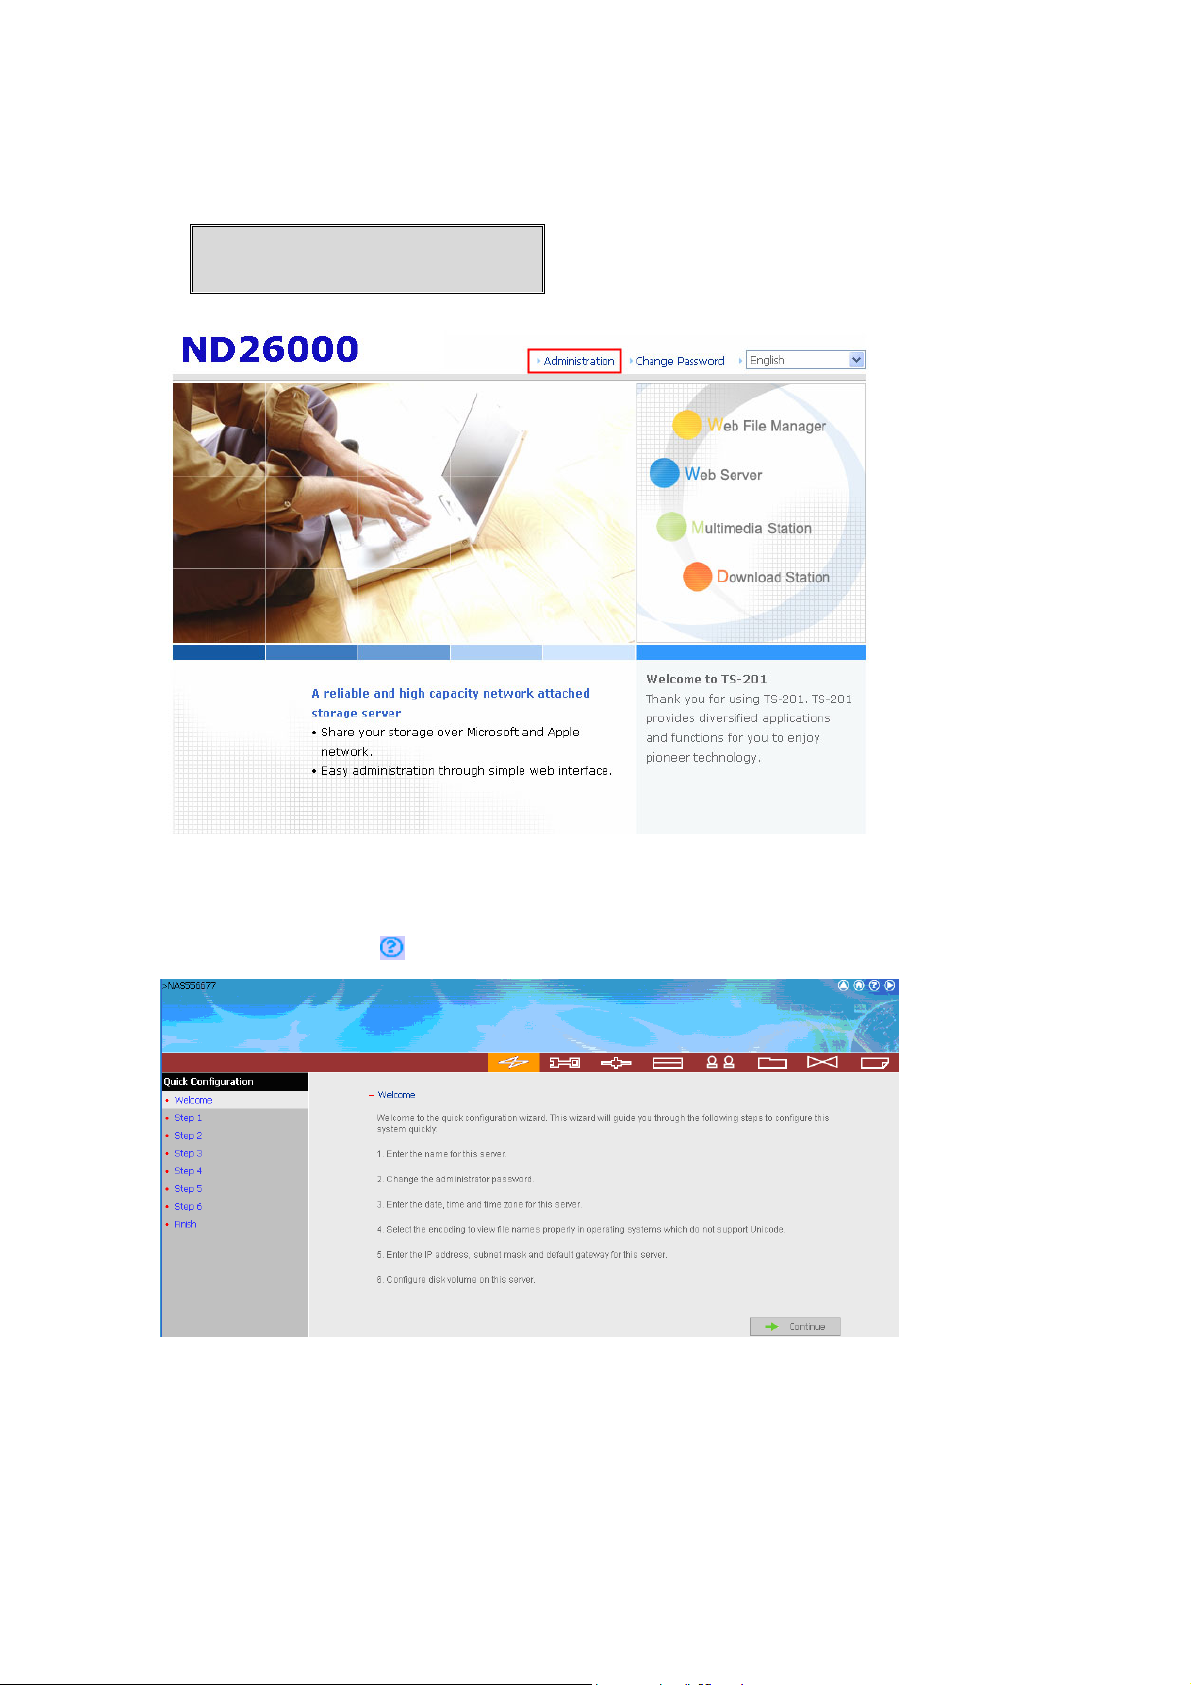
3. When the administration page is shown, click Administration. Enter the
default user name and password to login.
Default user name: administrator
Password: admin
4. Follow the step-by-step guide in Quick Configuration to complete the settings
of ND26000. If you have any questio ns during web administration, please
click the help button
on the top right hand corner of the page.
- 25 -
Page 26
B. Connect ND26000 by the network
1. Please go to Network settings to check and write down the subnet and router
address of your MAC. Then select Using DHCP.
Note: If you are not sure about the network settings, please contact your
network administrator or ISP.
2. Connect N D26000 to your MAC by a cable. Open a web browser and enter
the default IP address of ND26000.
Default IP address of ND26000:
http://169.254.100.100:6000
Note: Please use the browser Safari in MAC to access ND26000.
- 26 -
Page 27
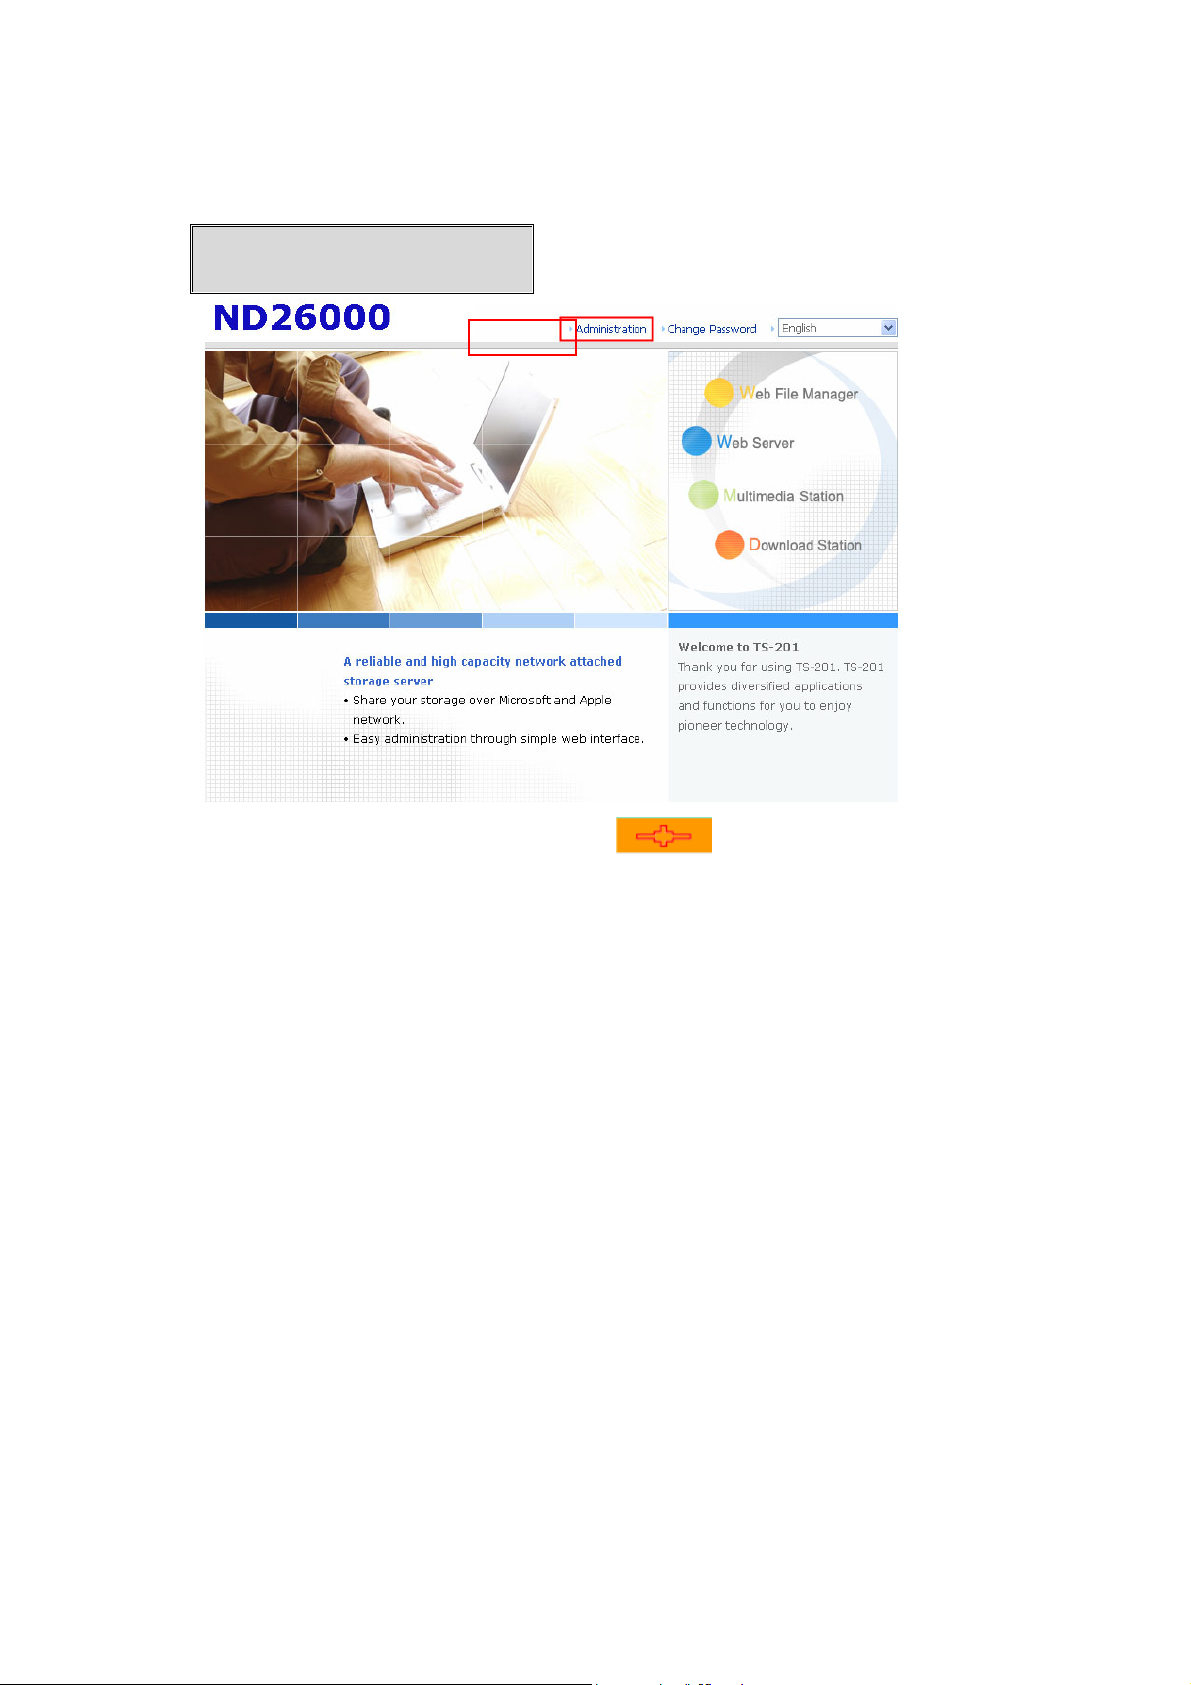
3. When the administration page is shown, click Administration. Enter the
default user name and password to login.
Default user name: administrator
Password: admin
4. Go to TCP/IP Configuration of Network Settings
static IP and input t he IP address of ND 26000. Make sure the value does not
conflict with the IP address of your MAC and other devices in LAN. Configure
the subnet mask and default gateway of ND 26000 to the same as subnet
mask and router address of MAC which you set in Step 1. Click Apply to
confirm.
. Select to use
- 27 -
Page 28
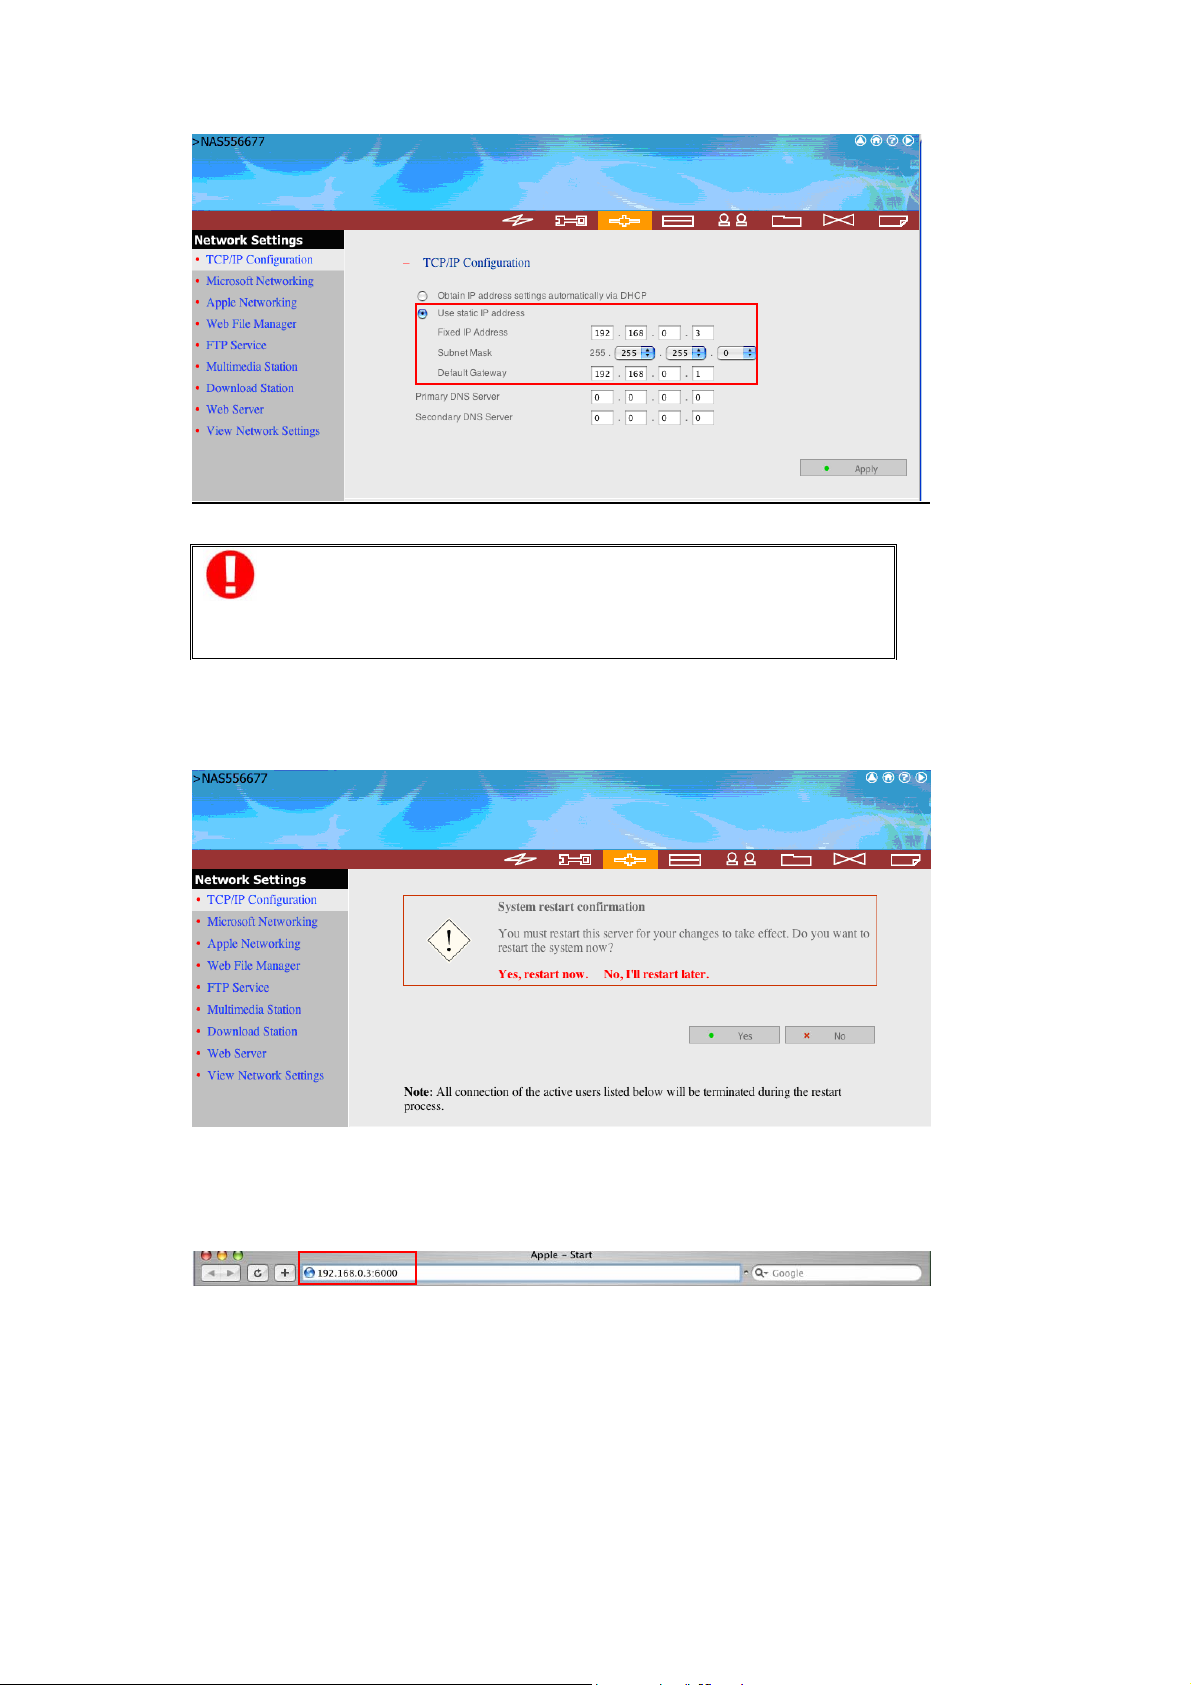
Note: When using static IP, please make sure your MAC and
ND26000 are in the same LAN. If you are not sure about the
settings, please contact your netw ork administrator or ISP.
5. Click Yes to restart ND26000 for the changes to take effect. Please wait
patiently for ND26000 to restart.
6. Connect your MAC and ND26000 to t he net work. Open a web browser and
enter the IP address of ND26000 you set up in step 4.
- 28 -
Page 29

Note: Please use the browser Safari in MAC to access ND26000.
- 29 -
Page 30
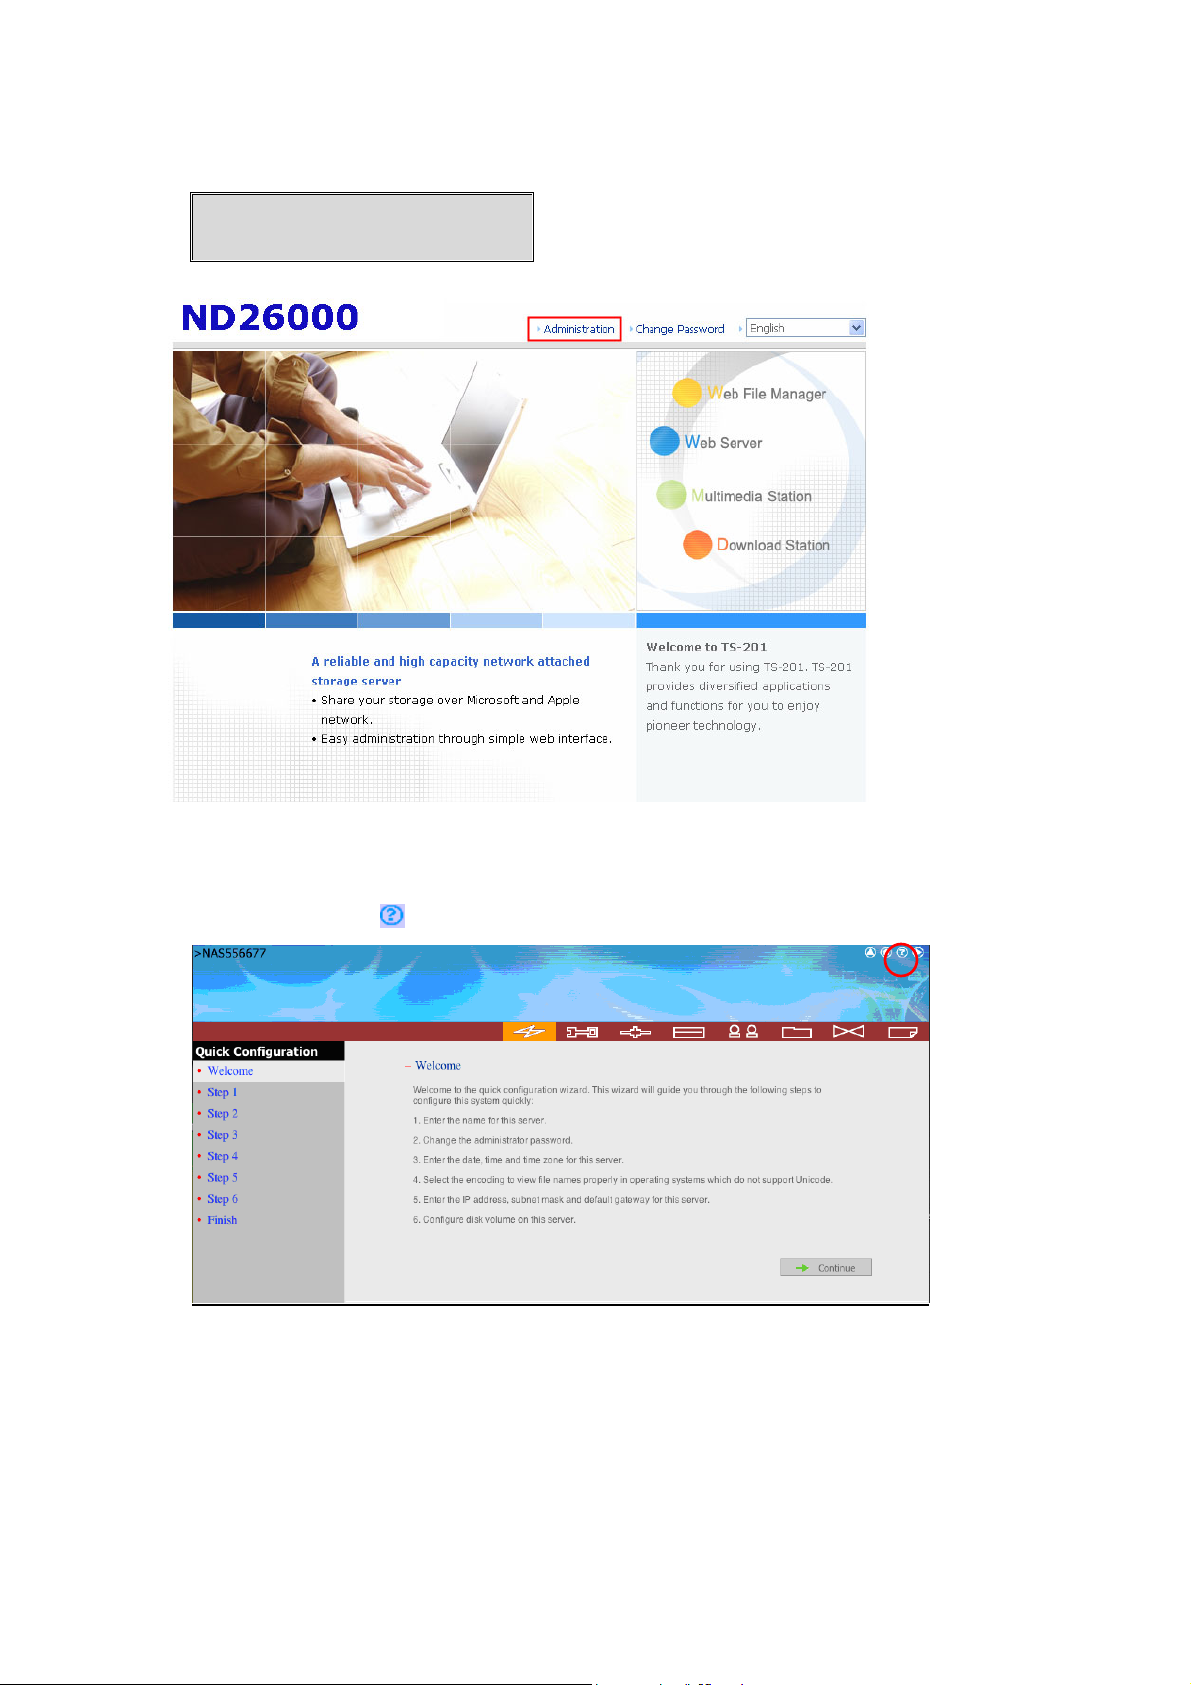
7. Click Ad ministration and enter the default user name and password to login.
Default user name: administrator
Password: admin
8. Follow the step by step guide in Quick Configuration to complete the settings
of ND26000. If you have any questio ns during web administration, please
click the help button
on the top right hand corner of the page.
- 30 -
Page 31

Chapter 3 Start to Enjoy the Powerful Services of
ND26000
ND26000 provides the following powerful functions and applications.
A. Use network share-Public folder
1. You ca n access the public folder of ND26000 by the following means:
a. Open My Network Places and find the w orkgroup of ND26000. If you
cannot find the server, please browse the whole network to search for
ND26000. D ouble click the name of ND26000 for connection.
b. Use Run function in Windows. Enter \\[ND26000 name]* or
\\[ND26000 IP]# to access share folder on ND26000.
c. Windows users can use Quick Install Wizard to find ND26000. When the
administration page is shown, click Web File Manager. Enter the user
name and password, and then start to manage ND26000.
2. You can upload files to the Public folder.
- 31 -
Page 32

B. Manage ND26000
Manage ND26000 using web b rowser by Windows or MAC
1. You can access ND26000 web administrati on page by the foll owing methods:
a. Windows users can use Quick Install Wizard to find ND26000.
b. Windows and MAC users can open a web browser and enter h ttp://
[ND26000 name]:6000* or http:// [ND26000 IP]:6000#
Note:
1. It is recomm ended to use Micr osoft Internet Explorer 6.0 or above to
access ND2600 0. If the OS of your PC is Windows 98, ND26000 supports
Internet Explorer 6.0 only.
2. Please use the brow ser Safari in MAC to access ND26000.
*The user name here should be the same as the server name you enter i n
Chapter 2.3 Configure Software Settings.
#The IP address here should be the same as the IP address you enter in Chapter
2.3 Configure Software Settings. If you are using DHCP: (a) connect PC to
ND26000 directly, please use the default IP address 169.254.1 00.100:6000 of
ND26000; (b) connect ND26000 by network, please run Quick Install Wi zard to
view the IP address of ND26000.
- 32 -
Page 33
2. When the administration page is shown, click Administration, Web File
Manager, Web S erver, Multimedia Station, or Download Station. Enter
the user name and password, and then start to manage ND26000. For further
detail s, please refer to the user manual in ND26000 CD -ROM.
- 33 -
Page 34

C. Use ND26000 Services
Mu ltimedia Station
ND26000 provi des a user-friendly web management interface for you to
manage personal albums easily. You can view images and multimedia
files, or browse photos by t humbnails preview. Please refer to Chapter
5.
Down load Statio n
ND26000 supports P2P download mechanism. You can add download
task to ND26000 and let the server finish downloading even without
connecting the server to PC. Please refer to Chapter 6.
Mirror Station
Provides unique Q-RAID 1 technology which enables mirroring data
backup to external USB/ eSATA disk. Please refer to Chapters 3.5.2 and
Erreur ! Source du renvoi introuvable..
Disa ster Recovery
ND26000 supports unique remote replication to back up important files
instantly to another COMET LABS NAS server. In case of data damage
in PC, you can restore all backup data. Pl ease refer to Chapter 3.8.6.
Web Server
ND26000 enables you to upload html fi les and manage your own
website easily. Please refer to Chapter 7.
Printer Server
ND26000 supports network printer sharing function by direct USB
connection. No extra help from PC is needed. Please refer to Chapter
3.5.3.
FTP Server
ND26000 offers the simplest FTP server setup proce dure for you to
establish FTP server without any professional assistance. Please refer to
Chapter 8.
Backup Server
NetBak Replicator is a powerful backup software designed for Windows
users to configure automatic backup schedule. Block level remote
replication is supported to provide the most reliable, instant and secure
data backup mechanism. Please refer to Chapter 10.
F ile S erver
ND26000 provi des convenient a nd secure file server functions that
support central data management. Users can be granted with access
right to access network share and share important files. Please refer to
Chapter 3.7 and Chapter 9.
- 34 -
Page 35

3.1 Server Adm inistration
There are eight main sections in server administration:
Quick
Configuration
Server Name
System Settings
Networ k
Settings
Device
Configuration
User
Management
Date & Time
Encoding Setting
View System Settings
TCP/IP Configuration
Microsoft Networking
Apple Ne tworking
Web File Manager
FTP Service
Multimedi a Station
Download Station
Web Se rv er
View Network Settings
SAT A D is k
USB D isk
USB P rinte r
E-SATA Disk
Users
User Group s
Quota
Create
Create Private Network Share
Assign Users
Delete
Create
Change Password
Create Private Network Share
Assign User Groups
Quota Settings
Delete
Create
Network Share
Manageme nt
Sys tem T ools
Sta tis tics & Logs
Prop erty
Access Control
Delete
Alert Notification
Restart / Shutdo wn
Hardw are Settings
System Update
Change Logo
Remote Repl ication
Backup/ Restore/ Reset Settings
Event Logs
- 35 -
Page 36

3.2 Quick Configuration
Please foll ow the step-by-step guide in Quick Configuration to complete the
settings of ND26000. If you have any questi ons during web administration,
please click the help butto n
buttons are described as below:
: Return to pre v i ous pa ge
: Return to home page
: Logout system
on the top right hand corner of the page. Other
Step 1. Enter the server name.
- 36 -
Page 37

Step 2. Change the administrator password or select to use the original password.
Step 3. Enter the date, time and select the time zone for the server.
Step 4. Select the language the server uses to display files and directories. The
default setting is English.
- 37 -
Page 38

Step 5. Enter the IP address, subnet mask and default gateway for the server.
Step 6. Initiali ze the disk volume in ND26000 for first time configuration.
Step 7. When ND26000 is initialized, the basic settings wi ll be shown.
- 38 -
Page 39

3.3 System Settings
Basic system settings include the server name, date, time, and view system
settings.
3.3.1 Se rver Name
Enter the name of ND 26000. The server name can be 14 characters l ong at
maximum, which can contain alphabets, numbers and hyphen (-). The server
does not accept names with space, period (.), or names in pure numbers.
- 39 -
Page 40
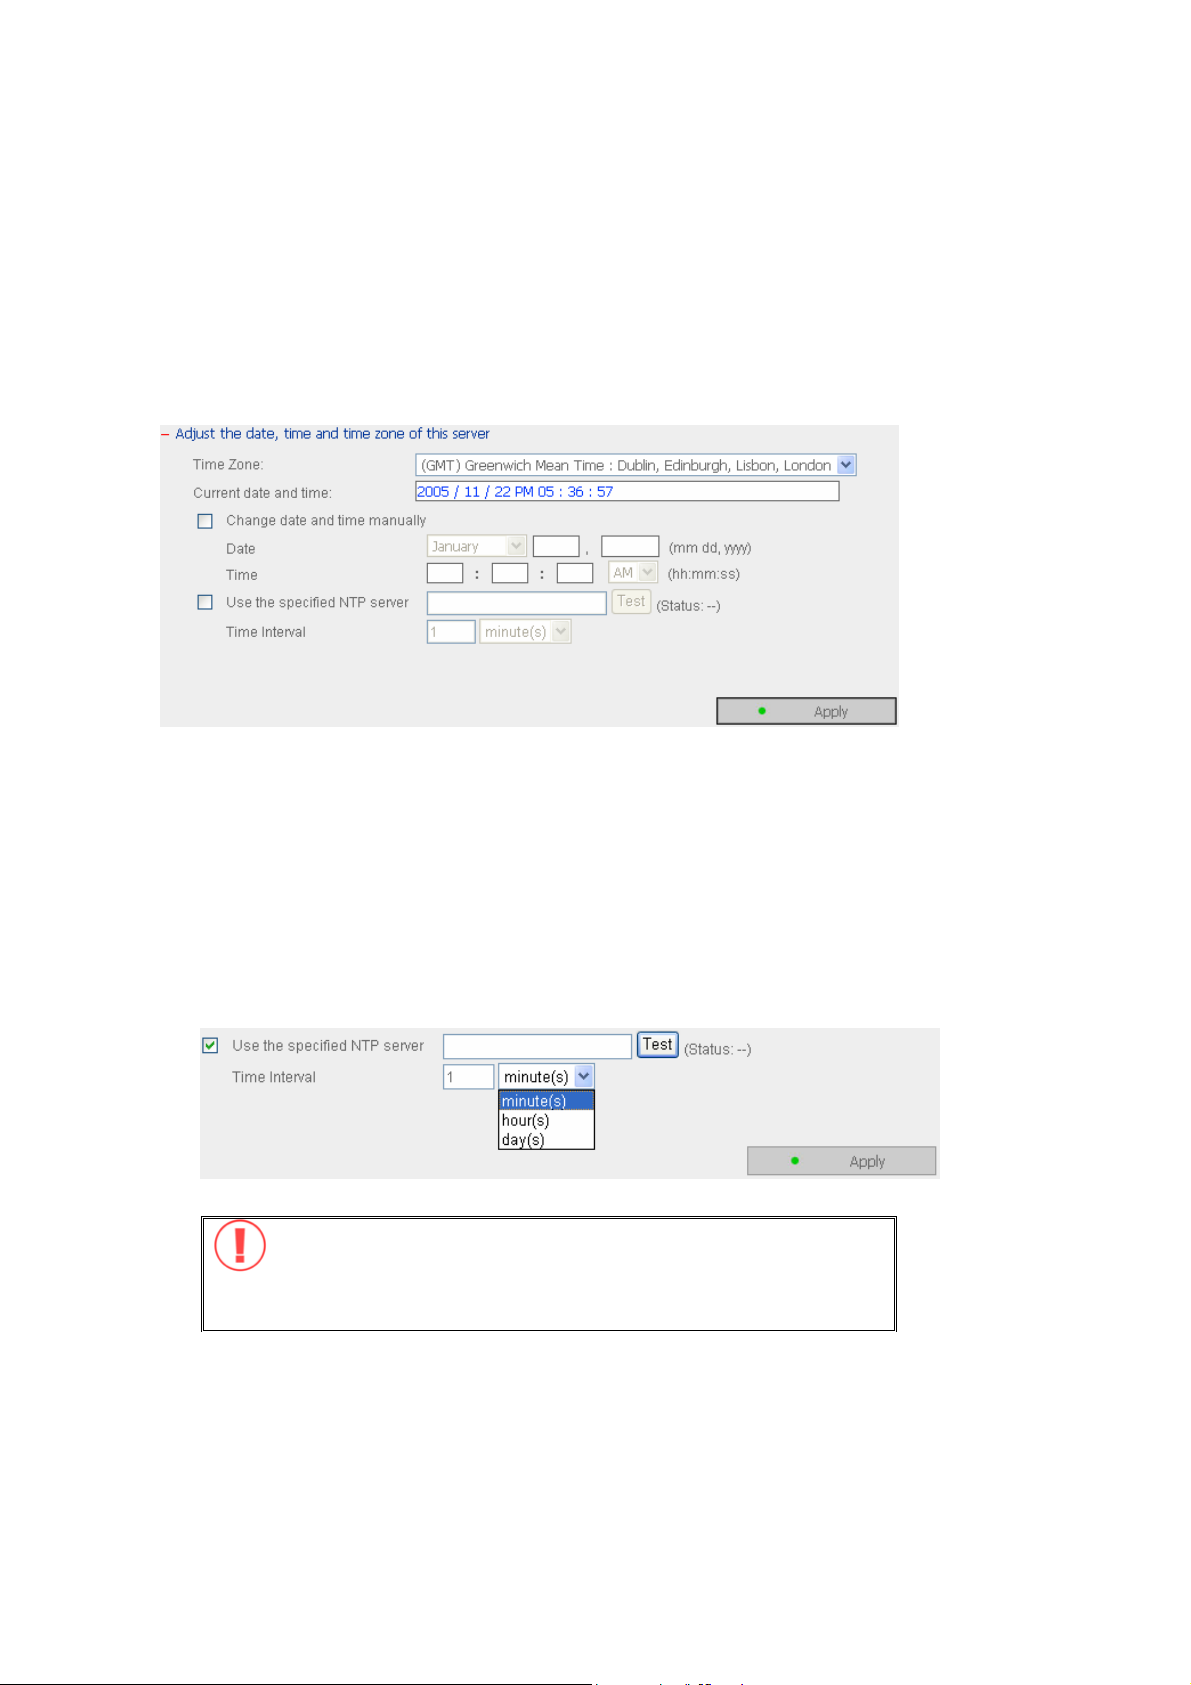
3.3.2 Date & Time
Set the date, time, and time zone according to your location. If the settings are
incorrect, the following problems may occur:
9 When using a web browser to access or save a file, the display time of the
action will be incorrect.
9 The system event log time will be incorrect compared to the actual time
when an action occurs.
9 NTP Server
You can enable or use specified NTP (Network Time Protocol) server to
update the date and time of the system automatically. To enable NTP server,
please enable Configure NTP server or client setting and enter the IP
address or domain name of the NTP server, e.g. time.nist.gov,
time.windows.com in Use the specified NTP server field. Then enter the
time interval for adjusting the time (minimum value is 1 minute and
maximum value is 99 days).
Note: The first time you enable NTP server, it may take several
minutes for time synchronization before the time is correctly
adjusted.
- 40 -
Page 41

3.3.3 Encoding Setting
Select the language ND26000 uses to display files and directories. If youa re
leaving in an Eruopean countries which is using some accentuated characters,
please select “Western Europe/Latin 1”.
Note: All files and directories on ND26000 will be created using
Unicode encoding. If your FTP clients or the OS of your PC does not
support Unicode, e.g. Windows 95/98/ME, select the language the
same as your OS here in order to view the files and directories on
the ser ver proper l y.
3.3.4 View System Settings
You can view al l current system settings, e.g. server name, on this page.
- 41 -
Page 42

3.4 Network Settings
You can config ure network settings in this section an d enable several powerful
applications of N D26000, e.g. Multimedia Station, Download Station, and Web
Server.
3.4.1 TCP/ IP Configuration
You can select one of the foll owing two methods to configure the TCP/IP settings
of ND26000.
• Obtain IP address settings automatically via DHCP
If your network supports DHCP, ND26000 will automatically use DHC P protocol
to retrieve the IP address and related information.
• Use static IP address
To use fixed IP address for network connection, enter fixed IP address, subnet
mask and default gateway.
Primary DNS Server: Enter the IP address of primary DNS server that provides
DNS service for ND26000 in external network.
Secondary DNS Server: Enter the IP address of secondary DNS server that
provides DNS service for ND26000 in external network.
- 42 -
Page 43

Jumbo F rame setting s (MTU)
“Jumbo Frames” refer to Ethernet frames that are l arger than 1500 bytes. It is
designed to enhance Ethernet networking throughput and reduce the CPU
utili zation of large file transfers by enabling more effici ent larger payloads per
packet.
Maximum Transmission uni t (MTRU ) refers to the size (in bytes) of the largest
packet that a given layer of a communications protocol can transm it.
ND26000 uses Standard Ethernet frames : 1500 bytes by default. If you
network appliances support Jumbo frame setting, select the appropriate MTU
value for your network environment. ND26000 supports 4074 and 9000 bytes for
MTU.
Note: Jumbo frame setting is valid in Gigabit network environment
only. Besides, all network appliances connect must enable Jumbo
frames and use the sam e MTU value.
- 43 -
Page 44

3.4.2 Microsoft Networking
Enable file service for Microsoft networking: If you are using Microsoft
Windows, enable this service to access the files on network share folders. Assign
a workgroup name.
9 Standalone Server
Use local users for user authentication.
9 WINS server
If the local network has a WINS server installed, specify the IP address.
ND26000 wil l automatically register its name and IP address with WINS
service. If you do not want to enable WINS server support, or you do not
have a WINS server on your network, enter 0.0.0.0 in the field for WINS
server IP address.
- 44 -
Page 45

9 Domain Master
There is a unique Dom ain Master B rowser for collecting and recording
resources and services available for each PC in the network or workgroup of
Windows. When a domain master browser (Windows NT/ 200x/ XP PC) exists
already in the network, there is no need to co nfigure ND26000 as the domain
master.
When you find the waiting time for accessing Network Neighborhood too long,
it may due to failure of an existing master browser, or there is no master
browser available. If the reason is the latter one, you can check the box
Domain Master in this section to configure ND 26000 as the master browser to
enhance t he speed of a ccessing information on Network Neighborhood.
- 45 -
Page 46

3.4.3 Apple Network
To use ND26000 on Apple MA C operating system, enable AppleTalk network
support.
If your AppleTalk network uses extended networks, and is assigned with multiple
zones, assign a zone name to ND26000. If you do not want to assign a netw ork
zone, enter an asterisk (*) to use the default setting. This setting is d isabled
by default.
3.4.4 Web File Manager
To access files on ND26000 via web browser, enable Web File Manager. If
ND26000 is connected to the Internet and uses a valid IP address, you can access
files on the server by web browser from anywhere. For more information, please
refer to Chapter 9.
- 46 -
Page 47

3.4.5 FTP Service
When you enable FTP servi ce, you can define the port number for the service and
maximum number of users connected to the FTP at the same time.
Select whether to enable/disable Unicode Support. The default setting is No.
Since most FTP clients do not support Unicode currently, it is recommended that
you disable Unicode s upport here and select the l anguage the same as your OS in
“System Settings—Encoding Setting” page so that the folders a nd files on FTP can
be properly shown (please refer to Chapter 3.3.3). If your FTP client supports
Unicode, make sure you have enabled Unicode support for both your client and
ND 2600 0.
- 47 -
Page 48

3.4.6 Multimedia Station
To share multimedia files l ike photos, music or video files on the network, please
enable Multimedia Station. For further information, please refer to Chapter 5.
3.4.7 uPnP Media server
ND26000 supports UPnP Technology which brings you greater convenience to
enjoy multimedia files. By enabling uPnP Media Server, you can share pictures,
music and video files on a specific shared volume. (Default name QMultimedia).
When booting the multimedia player is searching for UPnP medi a server,. The
multimedia files contented on the server are listed and can be played or displayed
directly on your TV. To enable the uPnP server, click on the check box.
The uPnP server is available on port 9000.
- 48 -
Page 49

3.4.8 Download Station
To use P2P download function of ND26000, please enable Download Station. For
further information, please refer to Chapter 6.
Note:
Please be warned against illegal downloading of copyrighted materials. The
Download Station functionality is provided for downloading authorized files
only. D ownloading or distribution of unauthorized materials may result in
severe civil and crimi nal penalty. Users are subject to the restrictions of t he
copyri ght laws and should accept all the consequences.
- 49 -
Page 50

3.4.9 Web Server
You can publish your own server by enabli ng Web Server function of ND26000.
For further information, please refer to Chapter 7.
- 50 -
Page 51

3.4.10 View Network Settings
You can view current network settings and status of ND26000 in this section.
- 51 -
Page 52

3.5 Device Configuration
You can configure SATA disk, USB disk, USB printer and external SATA (eSATA)
disk in this se ction.
- 52 -
Page 53

3.5.1 SATA Disk
This page shows the model, size and current status of the SATA disk on ND26000.
You can format and check disk, and sca n bad blocks on the disk. When the SATA
disk is formatted, ND26000 will create the followi ng default share folders:
9 Public: network share for file sharing
9 Qdownload: network share for Download Station
9 Qmultimedia: network share for Multimedia Station
9 Qusb: network share for data copy f unction via USB ports
9 Qweb: network share for Web Server
You can create the following disk volum es:
- Si ng le dis k vo lu m e
Each disk wil l be used as a standalone disk. H owever, if a disk is damaged, all
data contained on this disk will be lost. The capacity of a share cannot exceed the
capacity of one disk.
- Mirroring Volume - RAID 1
RAID 1 (mirroring disk) protects your data by automatically writing the content of
one drive onto the second drive in the mirror pair. This protects your data if one
of the drives fails. Unfortunately, the storing capacity is equal to a single drive, as
- 53 -
Page 54

the second drive is used to automatically receive the data of the first. Mirroring
disk is suitable for personal or company use to store important data.
BE CAREFUL : MIRRORING (RAID 1) is not a back-up system. Do not forget to
back-up your data. In case of data corruption, directory erase, undesired file save,
the RAID 1 function i s of no use. If you write corrupted data to the first disk,
RAID 1 system is also writing the corrupted data to t he second dri ve.
- RA ID 0 Striping d isk Vo lu me
RAID 0 (Striping disk) combines 2 drives into one larger disk. It offers the fastest
disk access but i t does not have any protection of your data i n the striped array
fail s. The disk capacity equals the double of the capacity of the smallest of the
two drives
- Linear disk Volume
You can combine two or m ore disks i nto one larger disk. During file saving the file
will be saved on physical disks sequentially but does not have a disk failure file
protection function. T he overall capacity of linear disk is the sum of all disks.
Linear disk is generally used for storing large data and is not a ppropriate to use
for fi le protection of sensitive data.
- 54 -
Page 55

3.5.2 USB Disk
The ND26000 supports USB disks and thumb drives for extended storage.
Connect the USB device to the USB port of the ND26000, when the device is
successfully detected, the details will be shown on this page.
- 55 -
Page 56

3.5.3 USB Printer
1. To provide printer sharing function for network users, you can simply connect
a USB printer to the US B port of ND 26000. ND26000 wi ll detect the printer
automatically.
2. A pri nter i con should be shown in the share folder of t he server. Double click
the icon.
3. Install the printer driver.
4. When finished, you can start to use network printer service of ND26000.
- 56 -
Page 57

3.6 User Management
The files on ND26000 can be shared among multiple users. For easier
management and better control of users’ access right, you have to organize users,
user groups and their access right control.
3.6.1 Users
The system has created the following users by default:
n Ad ministrator
By default, administrator has access to system administration and cannot be
deleted.
o Guest
This is a built-in user and wil l not be displayed on User Management page.
When you use a non-registered user name to login, the server will recognize
the user as a guest and will allow limited access. A guest does not belong to
any u ser group.
p An ony m ou s
This is a built-in user and wil l not be displayed on User Management page.
When you connect to the server by FTP service, you can use this name to
login as a guest.
- 57 -
Page 58

512 u sers can be created at maximum (including system default users). You
can create a new user according to your needs. The fol lowing information is
required to create a new user:
9 User name
The user name must not exceed 32 characters. It is case-insensitive and
can contain double-byte characters, such as Chinese, Japanese, and Korean
except:
" / \ [ ] : ; | = , + * ? < > ` '
9 Password
The password is case-sensiti ve and can be 16 characters long at maximum.
It is recommended to use a password of at least 6 characters.
You can perform the following settings for users:
- 58 -
Page 59

3.6.2 User Groups
User group is a collection of users w ith the same access rig ht to files or folders.
ND26000 has created the following user groups by defa ult:
n Administrators
All members in this group have administration right. You cannot delete this
group.
o Everyone
All registered users belong to everyone group. You cannot delete this group.
You can manage user groups with the followi ng options:
1024 groups can be created at maximum. User groups name m ust not
exceed 256 characters. It is case-i nsensitive and can co ntain double-byte
characters, such as Chinese, Japanese, and Korean, except the following ones:
" / \ [ ] : ; | = , + * ? < > ` '
- 59 -
Page 60

Create Users and Assign Users to User Group
The foll owing example demonstrates how to create new users a nd assign users to
a user group.
ABC Co. has recently recruited two employees Mr. Jones Lee for Administration
Department and Ms. Jane Wu for Sales Departm ent. The IT Department
therefore needs to create two user accounts for them to access company data on
ND 2600 0.
i. To create a user account, go to User Management-Users. Click Create.
ii. Enter the user name (Jones Lee/ Jane Wu) and password. Check the box
“Continue to set the user groups to which t his user belongs” and click OK.
- 60 -
Page 61

iii. Select the user groups the users belong to on the right list, i.e. Mr. Jones Lee
for A dministration Dept and Ms. Jane Wu for Sales Dept, and click Add. Then
click Close.
iv. After creating the users, the users will appear on the list on Create User Page.
- 61 -
Page 62

Create Private Network Share for User Groups
You can create particular network share for each user group. The procedure is
described as below:
1. To create a network share called med ia accessible by Administration
Department only, please go to “User Management—User Groups” page.
Select the user group Administration Dept and click Create Priv ate Network
Share on the right.
2. Enter the network share name media. Select to disk volume that the share
will be created in and speci fy the path automatically or manually. Enter the
comment for the network share, e.g. m edia folder for Admin Dept and click
Apply .
3. You can see the folder media in Network Share Management page.
- 62 -
Page 63

4. Enter Access Control. You can see that only Administration Dept has full
access right to the folder.
- 63 -
Page 64

3.6.3 Quota
To allocate disk volume efficiently, you can specify the quota that can be used by
each user. When this function is enabled and a user has reached his/her disk
quota, he/she cannot upload data to the server anymore. By default, no
limitations are set for users. You can modify the following two options:
i. Enable quota for all users
ii. Quota si ze on each disk volume
Please refer to the following example to configure the quota setting of users:
The IT department i s plannin g to set the disk quota of Mr. Jones Lee from
Administration Department and Ms. Ja ne W u from Sales Department on ND26000.
The disk quota is 2000MB for Mr. Jones Lee and 4000MB for Ms. Jane Wu.
1. Please go to Quota page in User Management to enable quota for all users.
Enter the quota size on each disk volume, e.g. 1000MB. The quota for
individual user can be modified later.
- 64 -
Page 65

2. Select Jones Lee on User page and cl ick Quota Settings on the right.
3. Enter the quota size 2000MB and click OK.
4. Follow the same steps and enter the quota size 4000MB for Jane Wu and click
OK. The quota setting is successfully applied.
- 65 -
Page 66

3.7 Network Share Management
The primary purpose of netw ork storage is file sharing. You can create different
network share folders for vari ous types of files, and provide different file access
rights to users or user gro ups.
There are four options in Network Share Management:
- 66 -
Page 67

3.7.1 Create
To create a network share, enter the foll owing information:
9 Network share name
The share name must not exceed 12 characters and cannot contain the
following characters:
" . + = / \ : | * ? < > ; [ ] %
9 Disk volume
This area shows the disk volume statu s.
9 Path
All data are stored under the assigned path onto t he disk volume. You can
select “S pecify path automatically” or assign a path ma nually. The path
cannot exceed 256 characters and ca nnot contain the characters below:
" . + = / \ : | * ? < > ; [ ] %
9 Comment
Enter a brief descripti on for the share folder. The comment cannot exceed
128 characters.
- 67 -
Page 68

3.7.2 Property
To edit the property of an existing network share, select a share and click
Property. You can then edit the content of that share.
- 68 -
Page 69

3.7.3 Access Control
When a network share is created, you can assign access rights to users or user
groups:
9 Deny access
Access to the network share will be denied.
9 Read only
Users can read the fil es only on the network share.
9 Ful l acces s
Users can to read, write, create, or delete files and folders on the network
share.
- 69 -
Page 70

3.7.4 Delete
Select a share and click Delete. Click OK to confirm.
3.7.5 Restore
If the default network share of the ND26000 are not created or have been deleted,
you can use the restore function to recreate the default share folders used by the
vari ous services.
Public, QDownload, Qmultimedia, Qusb et Qweb.
- 70 -
Page 71

3.8 System Tools
System Tools enable you to optimize the maintenance and management of
ND 2600 0.
- 71 -
Page 72

3.8.1 Alert Notification
Enter the e-mail address of administrator and SMTP server IP address. In case of
warning or malfunction, e.g. CPU fan fails, a disk drive fails or is unplugged, an
email will be sent to the administrator automatically. You can refer to Event Logs
section in Event Logs (refer to Chapter 3.9) to check all happened errors and
warnings.
If your mailbox requires SMTP authentication, enter the user name and password.
Note: It is recommended to send a test e-mail to make sure you can
receive the alert mails.
3.8.2 Restart/ Shutdown
Select to restart or shut down ND26000.
- 72 -
Page 73

3.8.3 Hard ware Settings
You can enable or disable the hardware functions of N D26000.
i. Ena ble configuration reset switch
By enabling this option, you can press the reset button for 5 seconds to reset
the administrator password and system settings to default.
ii. Enable hard disk standby mode
When this function is enabled, hard disk will go to standby m ode if there is no
access within the specified period.
iii. Enable light signal alert when the free size of SATA disk is less than the value:
The Status LED indicator will blink red and green when this function is enabl ed
and the free space of the SATA disk is less than the value. The range of the
value is 1-51200 MB.
iv. Auto power on when power resumes after power loss
When this function is enabled, ND26000 will turn on automatically when
power resumes after improper shutdown or power loss.
- 73 -
Page 74

3.8.4 Sy stem Update
Note: If the system is running properly, you do not need to u pdate the
firmware.
Before updating system firmware, please make sure the product model and
firmware version are correct. Follow the steps below to update firmware:
Step 1: Download the release notes of the same version as the firmware from
COMET LABS website http://www.cometlabs.com. Read the release notes
carefull y to make sure you need to upgrade the firmware.
Step 2: B efore upgrading system firmware, back up all disk data on the server to
avoid any potential data loss during system update.
Step 3: Click the [Browse…] button to select the correct firmware image for
system update. Click Upda te System to update the firmware.
Note: Syst em update may take tens of seconds to several mi nutes to complete
depending on the network connection status. Please wait patiently. The system
will inform you when system update is completed.
- 74 -
Page 75

3.8.5 Change Logo
You can choose a perso nal picture to display
on the login page of ND26000. The size of the picture cannot exceed 20K bytes.
- 75 -
Page 76

3.8.6 Remote Replication (Disaster Recovery)
Remote Replication enables you to replicate files on ND26000 to another
ND26000 or COMET LABS NAS seri es. The files will be compressed before the
replication process in order to save time for data transfer. Make sure a
ne twork share is crea ted b efo re crea ting a remote re pli ca tion ta sk.
Using Re mote Re plica tion
Login ND26000 and go to Remote R eplication in System Tools.
i. New
a. Cl ick Ne w to enter the following page.
- 76 -
Page 77

b. Complete all settings and click OK to save or Cancel to quit.
Note: To use remote replication, enable Microsoft Networki ng service,
make sure the destination network share and directory have been
cr eated, and the user nam e an d pa ssw or d ar e val id to login the
destination folder.
Note: You can check that the remote replication is successfully finished
in the event log of the ND26000.
- 77 -
Page 78
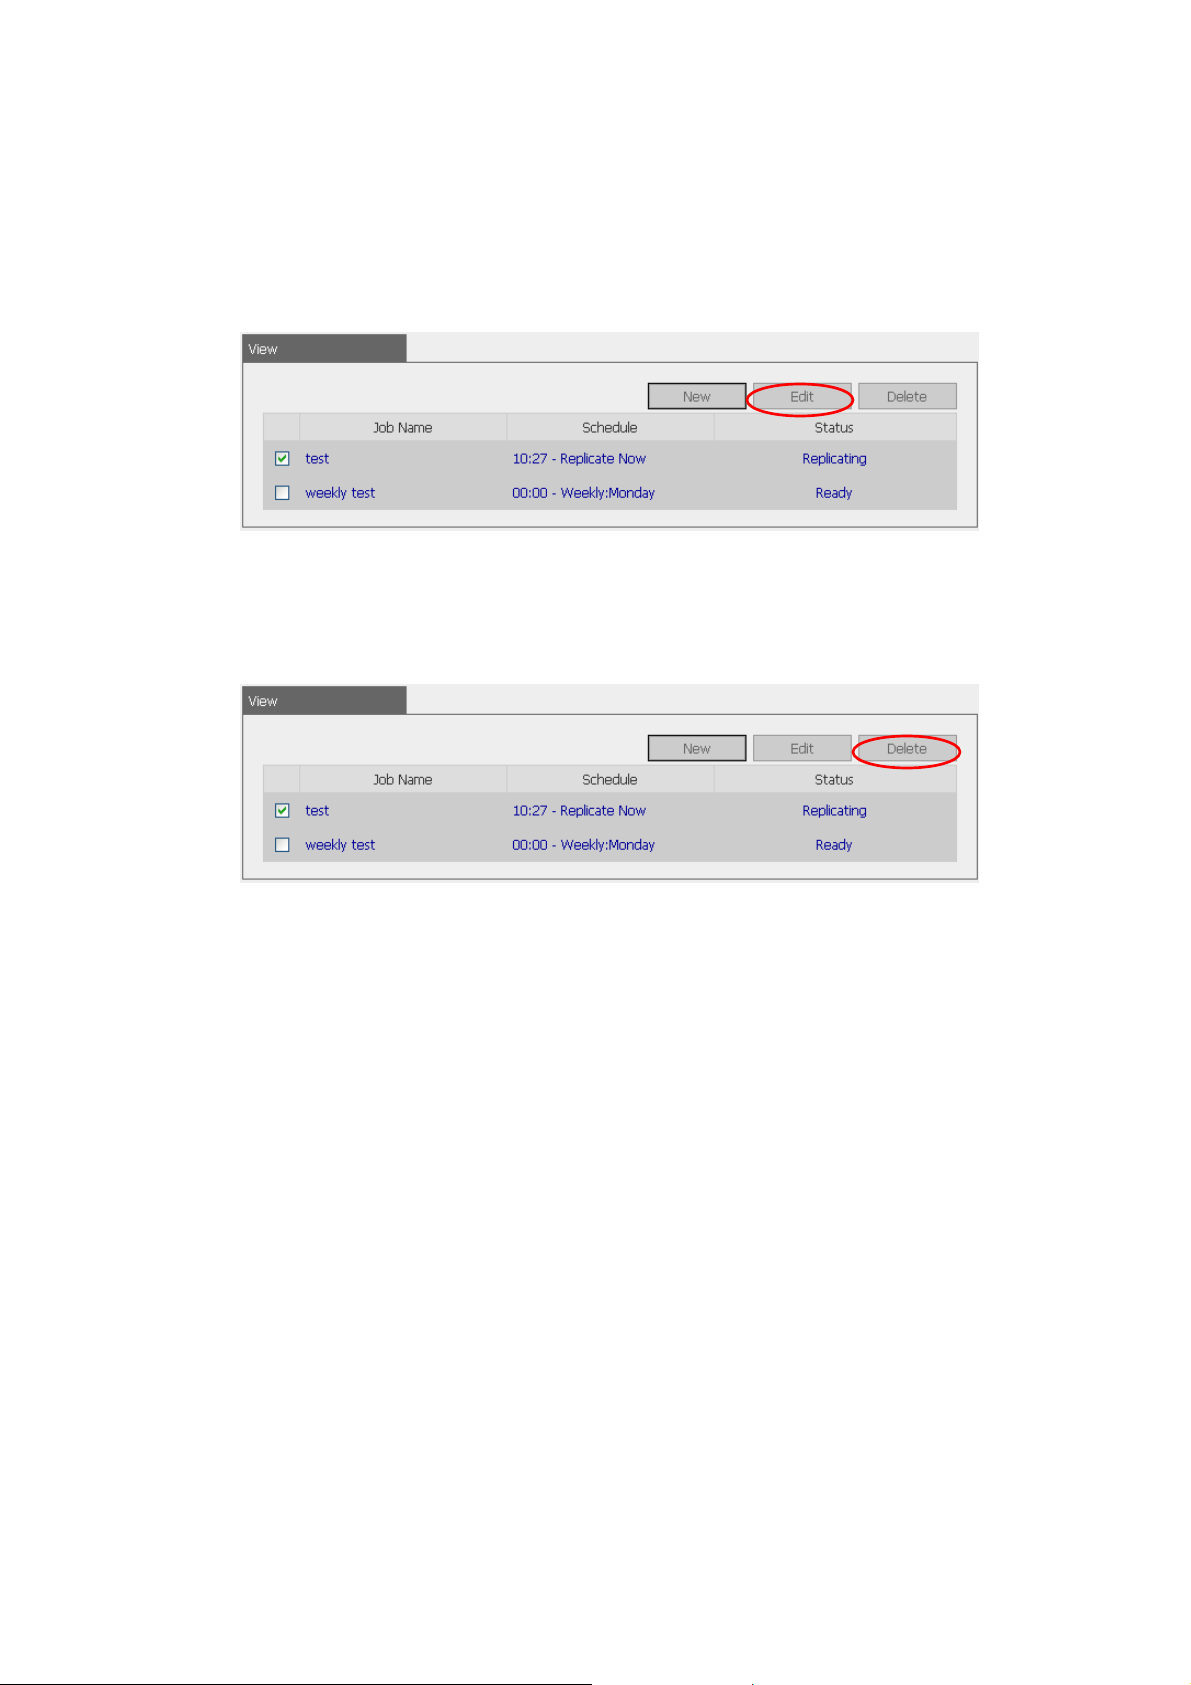
ii. Edit
a. Select the task to be edited.
b. Cl ick Ed it.
c. Modify the settings.
d. Click OK to save or Cancel to quit.
iii. Delete
a. Select the task to be deleted.
b. Cl ick De lete.
- 78 -
Page 79

3.8.7 Backup/ Restore/ Reset Settings
• To backup all setti ngs, including user accounts, server name and network
configuration etc., click Backup and select to open or save the setti ng fi le.
• To restore all settings, click Browse to select a previously saved setti ng file
and click Restore to confirm.
• To reset all settings to default, click Reset.
- 79 -
Page 80

3.9 Event Logs
ND26000 can store thousands of recent event logs, including warning, error and
information messages. In case of sy stem malfunction, event logs can be
retrieved to analyze system problems.
- 80 -
Page 81

Chapter 4 Copy Data Directly by USB Ports to the
ND26000
ND26000 supports direct copy of data on USB devices to ND26000 by using the
Copy button. To use this fu nction, please follow the steps below :
1. Make sure a S ATA disk i s installed correctly in ND26000 according to the
instructions in C hapter Erreur ! Source du renvoi introuvable..
2. Turn on N D26 000.
3. Format the SATA disk in SATA Disk page of Device Configuration (please
refer to Chapter 3.5.1). A system default folder Qusb will be created in
ND26000.
4. Connect USB devices, e.g. digital camera, flash to the USB port of ND26000.
5. Press the Copy button on ND26000. All data on the USB device will be
copied to the folder Qusb /(xxxxyyzz)* on ND26000 instantly.
#Intelligent one touch copy: ND26000 wi ll detect if there is any fil e changed
inside the USB device. If any file is changed, ND26000 wi ll copy it automatically.
* xxxx: year; yy: month; zz: date
Note: USB Intelligent One touch copy button supports USB device wi th a
storage capacity not exceedi ng 10 GB.
- 81 -
Page 82

Chapter 5 Multimedia Station
ND26000 provides a user-friendly web management interface for you to manage
personal albums easil y. You can view images and multi media fi les, or browse
photos by thumbnails preview.
A. Up load photos by web administration
1. To use Multimedia Station of ND26000, make sure a SA TA disk is i nstall ed
correctly in ND26000 according to the instructions in Chapter 2.1. A share
folder Qmultimedia will be created. Enable Mult imedia function in Network
Settings.
2. Click on the link http://ND26000_IP_address/Qmultimedia on
Multimedia Station page or click Multimedia Station on the login page of
ND26000 to access Multimedi a Station.
- 82 -
Page 83

3. Click
password to manage Multimedia Station. Users without administration right
can view the photos and multimedia files on Multimedia Station but they do
not have the right to modify the files.
on the top right hand corner. Login with administrator name and
- 83 -
Page 84

4. Click Browse to select the multimedia fi le and then click Upload to upload
the fil e to the folder.
5. You can also create folders by clicking
B. Up load photos to Qmultimedia folder directly
You can upload multi media fi les to ND26000 directl y by the following steps.
1. Use Run function in Windows. Enter \\[server name] or \\[server IP] to
access share folder on ND26000.
2. Open the folder Qmultimedia. Enter the user name and password to login.
and upload files to the folders.
3. Drag the files and folders to the folder directly. Please wait patiently when
ND26000 is generating thumbnails for images during uploading.
- 84 -
Page 85

When you login Multimedia Station by web browser again, all multimedia files wi ll
be shown.
Buttons on Multimedia Station page
Sort files by name
Sort files by size
Sort files by date
Return to previous page
Return to Home
Create folder
Rename file or folder
Select all
Select none
Delete
Support file format list
Type File forma t
Picture jpg, bmp, pig
wmx, wvx, avi, mpeg, mpg, mpe, m1v, mp2, mpv2, mp2v, mpa,
dvr-ms, asf, asx, wpl, wm, wmx, wmd, wmz
Video
wma, wax, cda, wav, mp3, m 3u, mid, midi, rmi, aif, aifc, aiff,
au, snd
Audio
(Other formats not mentioned above)
Others
- 85 -
Page 86

View Photo Information
1. To view detailed information of a photo, click on the thumbnail of the picture.
2. The information of the photo, e.g. file name, resolution, size, camera producer
will be shown on the right. You can e nter a description for the picture in the
box below the photo and click Submit. To reset the description to previously
saved version, click Reset.
- 86 -
Page 87

Buttons Description
You can use the buttons on top of the photo to manage the album.
Back to previous level
Previous image
Next image
Rotate image anticlockwise
Rotate image clockwise
Zoom in
Zoom out
Play slideshow. Select the time interval in seconds.
Click play to play slide show. To stop playing, click
stop.
Print the image
Save the picture
Play music or video files
To play music or video fi les on Multimedia Station, you can click on the thumbnail
of the file displayed on the page. The file will be played by your default music or
video playing program.
- 87 -
Page 88

Chapter 6 Download Station
ND26000 supports P2P download mechanism. You can add download task to
ND26000 and let the server finish downloading independent of PC.
Note:
Please be warned against illegal downloading of copyrighted materials. The
Download Station functionality is provided for downloading authorized files
only. D ownloading or distribution of unauthorized materials may result in
severe civil and crimi nal penalty. Users are subject to the restrictions of t he
copyri ght laws and should accept all the consequences.
1. To use Download Station, make sure a SATA disk is installed correctly in
ND26000 according to the instructions in Chapter Erreur ! Source du renvoi
introuvable.. A share folder Qd ownload will be created. Enable this
function in Network Settings.
- 88 -
Page 89

2. Click on the link http://ND26000 IP/Qdownload on Download Station
page or click Download Station on the login page of ND 26000 to access
Download S tat ion.
- 89 -
Page 90

3. Click Add new download task on the left and upload a torrent file. You can
download legal torrent files by searching on the Internet. There are websites
that provide legally sharing torrents e.g. www.legaltorrents.com
download the torrent files to your local disk and then upload them to
ND 2600 0.
. Please
- 90 -
Page 91

4. After uploading a download task, the task will appear on View Run List.
5. You can select an available download task and click Set Share Time to
configure the time for sharing the torrent file, or click Set Config to set the
maximum number of downloads at the same time (default value is 3).
- 91 -
Page 92

6. To pause a running download task, select the task i n View Run list and click
Pause/ Restart Task. To delete a running, paused, or finished ta sk, select
the task and click Delete Task. To restart a paused task, select the task in
View Pause List and click Pause/ Restart Task. You can also i ncrease or
decrease task priority by clicking Increase Task Priority and Decrease
Task Priority when there are multiple download tasks.
7. You can view tasks that are paused or finished in View Pause List and View
Finish List respectively.
8. To logout Download Station, click
- 92 -
on the top right hand corner.
Page 93

9. To access t he folders you have downloaded, please go to the share folder
Qdownload of N D26000.
- 93 -
Page 94

Chapter 7 Web Server
ND26000 enables you to upload HTML files and manage yo ur own website easily
by Web Server function. Once you activate Web Server function, you can access
your own homepage wherever you are. You can add hyperlinks in your
homepage to connect to all the features of ND26000, such as Download Station,
Multimedia Station and Web Server.
1. To use Web Server, make sure a SATA disk is installed correctly in ND26000
according to the instructions in Chapter Erreur ! Source du renvoi
introuvable.. A share folder Qweb will be created. Enable Web Server i n
Network Settings.
2. You can upload your HTML files to the folder Qweb by the following methods:
a. By using samba: You can ope n a web browser and type \\[ND2 6000
IP]\Qweb or \\[ND26000 name]\Qweb. Login the folder and
upl o a d yo ur H T ML fil es.
b. By FTP: You can login FTP service and upload your H TML files to the
folder (please refer to Chapter 8).
c. By Web File Manager: You can login Web File Manager and upload your
HTML files to the folder (please refer to Chapter 9).
The file index.html or index.htm will be the home path of your webpage.
- 94 -
Page 95

3. Click on the link http://ND26000 IP/ on Web Server page or click Web
Server on the logi n page of ND2 60 00 to a cce ss the web pa ge yo u uplo ad.
Note that when Web Server is enabled, you have to type [http://ND26000 IP
address:6000] in your web browser to access the login page of N D26000.
- 95 -
Page 96

Chapter 8 FTP Server
ND26000 supports FTP service. To use FTP service, enable this function in
Network Settings and follow the steps below:
1. Open an IE browser and type ftp://[ND26000 IP] or ftp://[ND26000
name]. OR
2. By Web Fil e Manager of ND26000.
a. G o the ND26000 a dministration and click Web File Manager. Enter u ser
name and pas sword to login ND 26000.
- 96 -
Page 97

b. Click FTP.
c. Enter the user name and pa ssword to login FTP service.
- 97 -
Page 98

d. You can start to enjoy FTP service.
- 98 -
Page 99

Chapter 9 Web File Manager
Using Web File Manager
To use Web File Manager, enable web service in Network Settings first.
Launch the web browser and go to ND26000 administration page. Select Web
File Manager and enter the correct login name and password. You may also
enter “guest” in the login name field without password to access the network
shares o n ND2 6000 as a n anonymous guest.
Note: Make sure a netw ork share has been created before using Web Fil e
Manager.
- 99 -
Page 100

Select an existing network share for m anagement.
You can orga nize network share folders of ND26000. Wi th Web File Manager, you
can upload, rename, or delete files and folders in the network shares.
View files online
Click on a file displayed on the web page. The information of the file will be
displayed. If your browser does not support the file format, a download window
will pop up a utomatically. Download the file and you can open it on your PC.
Create folder
i. Select a network share or f older in which you want to create a new folder.
ii. Click
iii. Enter the name of the new folder and click OK.
- 100 -
(Create Folder) on the toolbar.
 Loading...