

Page 1

User Manual
3.5’ HDD Multimedia Player
er
y
yer
a
l
P
la
a
i
ed
P
im
t
Mul
dia
D
e
D
H
’
M
5
.
3
Page 2
CONTENTS
Part One
Introduction
Features
Specifications
Pre-cautions
Installation
Part Two | Installation and Connection
Connection with composite TV output
Connection with S-Video output
Connection with component output
Connection with 2ch of normal TV
Connection with coaxial output
Connection with optical output
Connection with computer
Part Three | Remote Controller
Remote Controller Descriptions
Remote Controller Button Descriptions
01
02
03
04
05
07
07
08
08
09
09
10
11
12
Part Four | Setup Menu
Video Setup
Photo Setup
Audio Setup
Skin Setup
Misc Setup
Firmware setup
Play All Kinds of Media of File
Play Video File
Play Audio File
Play Photo File
Part Five | USB Connection with PC
Firmware Upgrade
USB Connection with PC
13
13
14
15
15
16
17
17
18
18
19
19
Page 3
Part One
Introduction
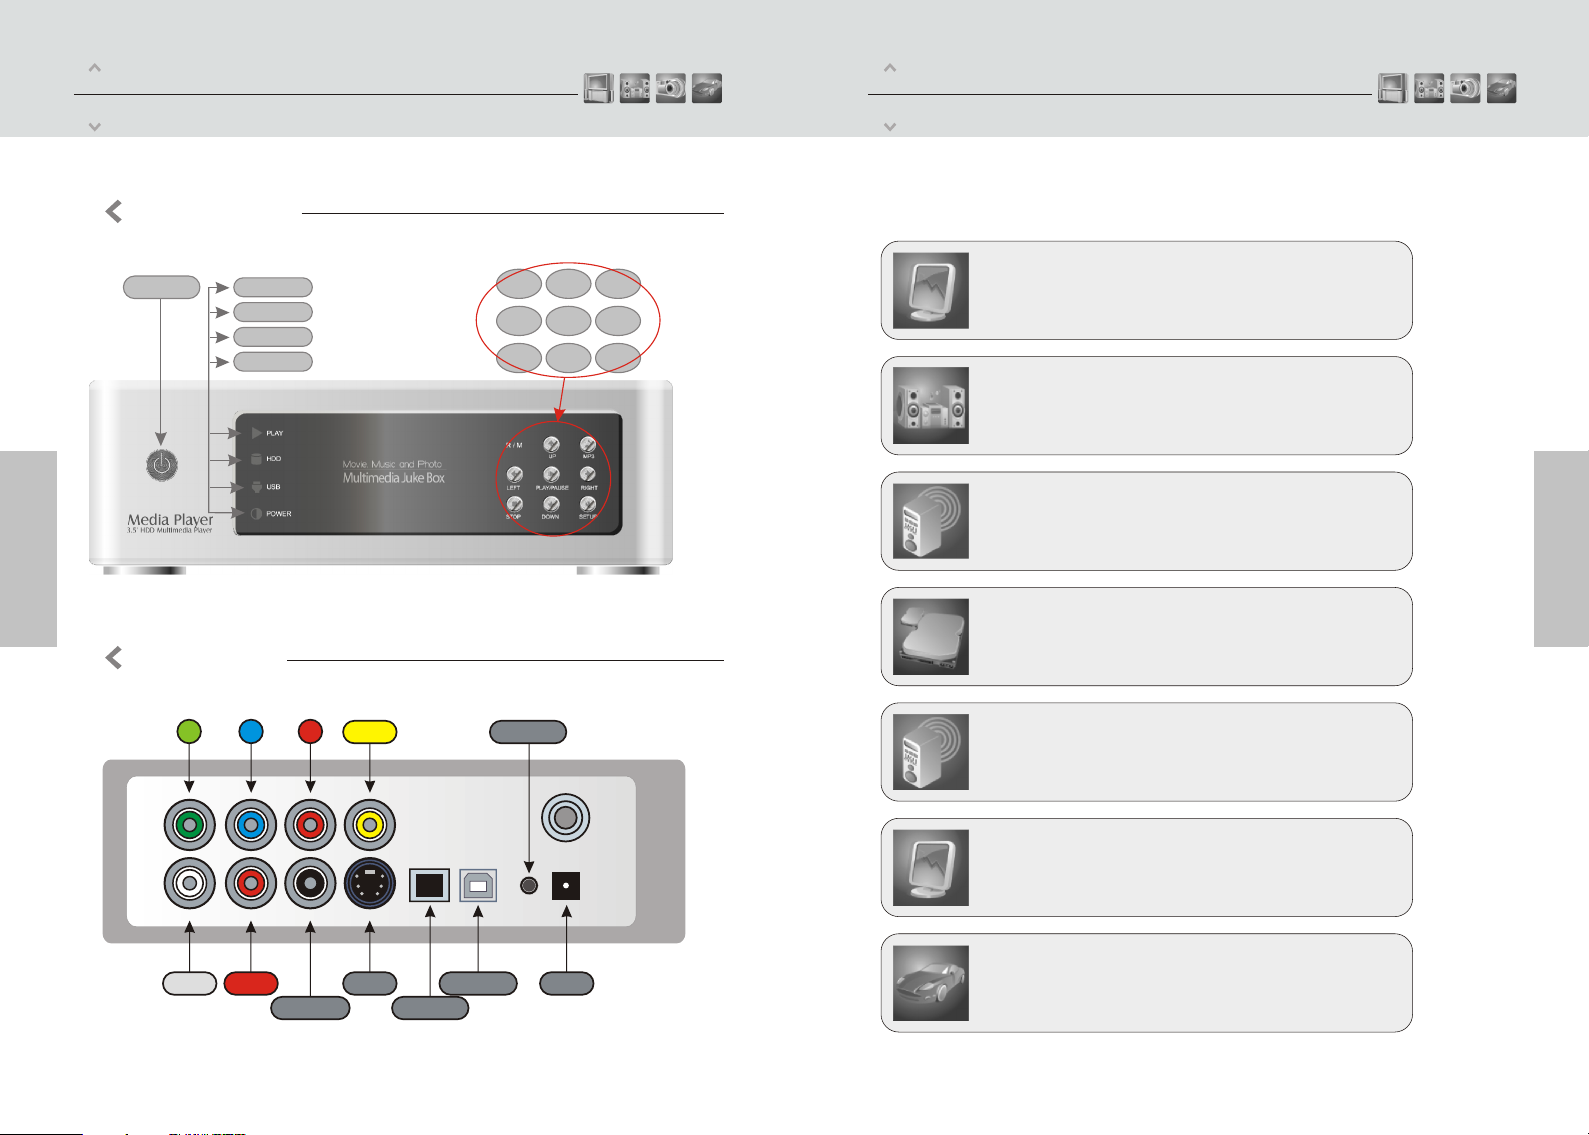
FRONT VIEW
Part One
Feature
Power
PLAY LED
HDD LED
USB LED
POWER LED
BACK VIEW
Pb
Y
UP
PLAY
PAUSE
DOWN
MP3
RIGHT
SETUP
You can enjoy favorite movies and home video on TV, because the
player Supports most of the video formats including MPEG1, MPEG2,
MPEG4, AVI, Divx3.11, 4x, 5x, XviD, DVD (IFO, VOB), VCD (DAT)etc.
R/M
LEFT
STOP
Digital Music Box
Enjoy Your Movies on TV!
The player can play various audio files such as AC3, MP2, MP3, DTS
pass through, WMA, OGG through the TV speaker or your existing
audio system.
PHOTO Album
The player can play digital photo files and display them to TV or projector.
Store JPEG photos directly from a PC through the USB2.0 interface and
enjoy a slide show for your family and friends without using a computer
0201
Portable HDD Storage
The player uses 3.5" HDD and it works just like a external USB2.0 hard
drive when you connect it to your PC and USB2.0 interface can support
data transfer rate 480Mbps.
Pr
Video
Ext.IR
FM Transmitter [Option]
The player has an internal FM Transmitter module to broadcast audio
through FM frequency (four channels) and you don't need audio cables
anymore!
Easy firmware upgrading
The player can download latest firmware very easily through internet
site and it can support latest Divx file format without any trouble.
Left
Right
Coaxial Audio
S-Video
USB2.0 Port
Optical Audio
Power
Car Pack [Option]
The player also can be used in car with car pack. It contains cigar power adapter,
Ext.IR cable, compact remote controller and audio cable.
Page 4
Part One
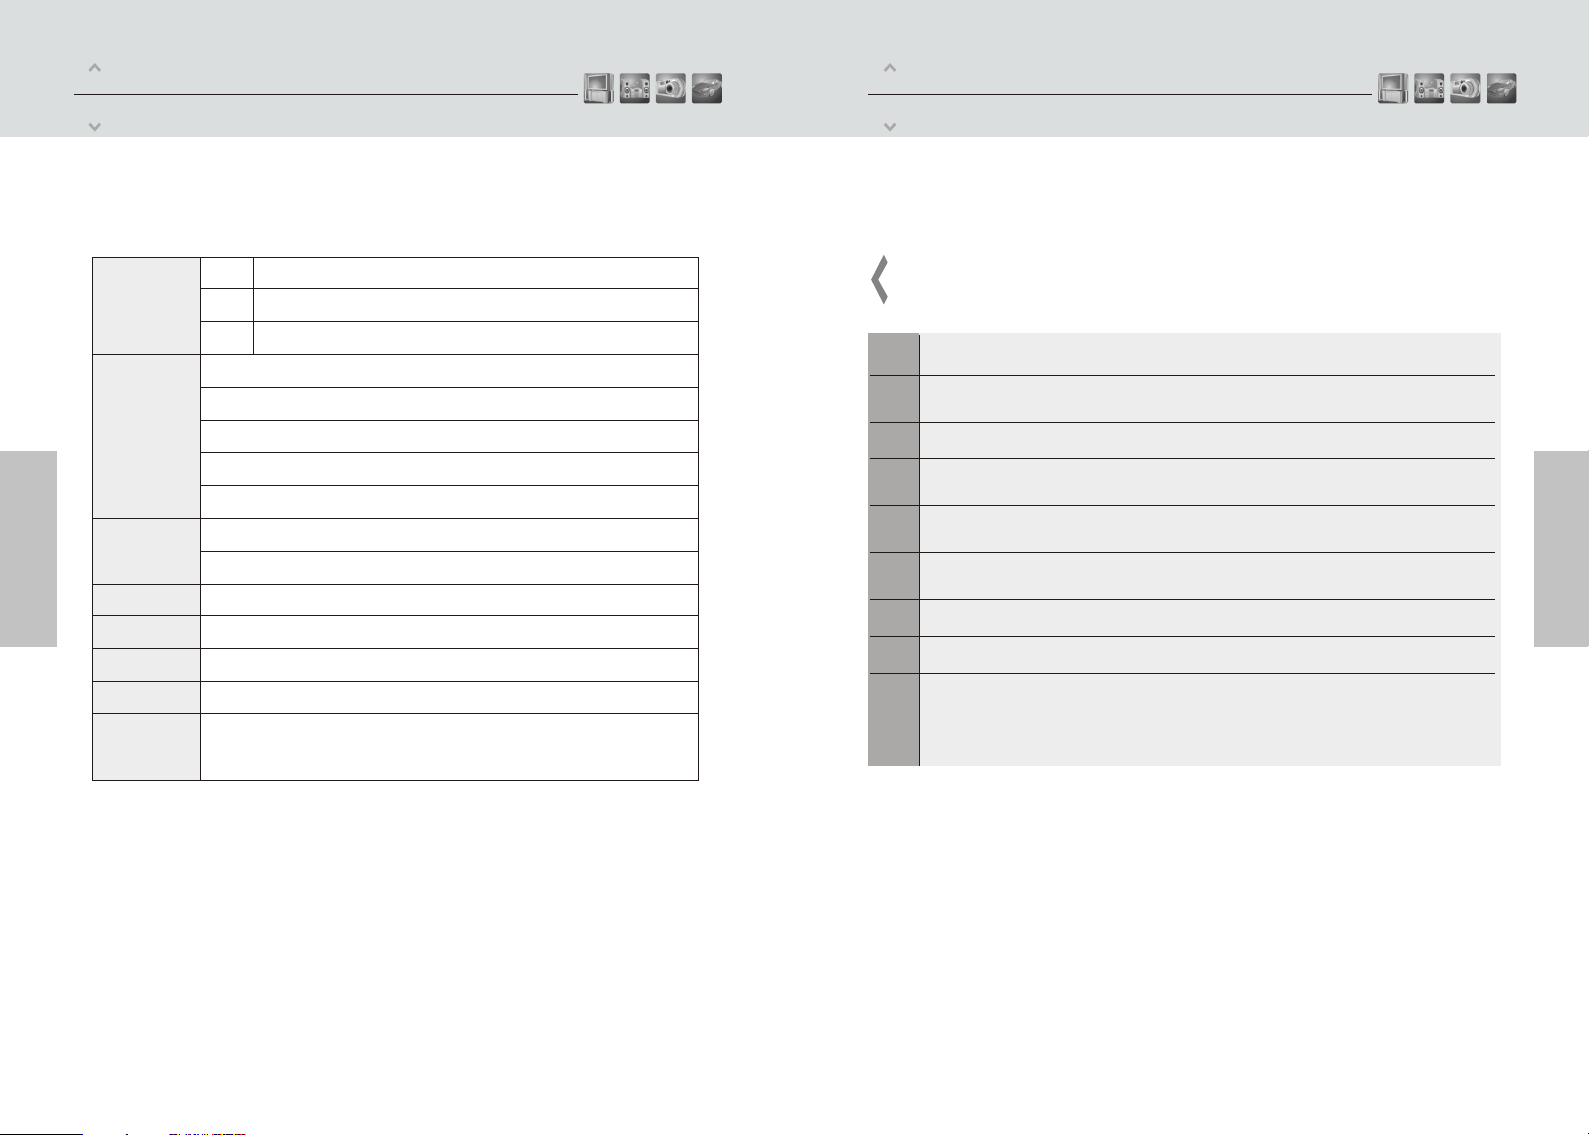
Specification
Part One
Pre-caution
03
Supported File
Input & Output
User Interface
OS
Partition Type
Power
Language
Size
Include
Video
MPEG1/2,Div3.11.div4.0.div5.0.divx,Xvid,DVD(IFO,VOB),VCD(DAT),M2V
Audio
AC3.MP2,MP3,DTS pass through Ogg,WMA.MPGA MPA
Photo
JPEG
USB2.0(Cypress chipset)
Component Video: RCAY,Pr,Pb
Composite Video: RCA and S-Video
Audio: RCA L/R/ Coaxial .Optical
IR-Ext
Full featured IR-Remote control
Button:Power .Play/Pause ,Stop,Cancel,Up,Down,Left,Right,mp3
Windows 98SE ,ME, 2000, XP or later
FAT32.NTFS
External 12v/2.5A DC adapter
Multilingual
185*145*65(mm)
The player,RC AV Cable ,USB Cable (for PC), Adapter ,Manual,Driver CD
We strongly recommend to read the below
"Pre-Cautions"
If unformatted HDD is inserted into t , a PC can not detect the player. Make sure that the
01
HDD is formatted.For "How to format a HDD",contact HDD manufacturer or the seller.
We strongly recommend you to back up the data to another safe media, We are responsible for
02
the hardware of the only but don't have the responsibility for data damage or loss in a HDD.player
Don't power off while a file is playing.
03
Be careful of dropping or impact or shock . If a HDD is damaged by dropping .shocking,then
04
contact manufacturer or the seller.
Be away from water ,heavy moisture .If t has a liquid ,unplug t from a PC right
05
away.If you use t under this condition, the HDD may be fired or you may have electric shock
Be away from devices that transmit strong magnetic signal. It may cause data damage or loss
06
the on HDD.
Don't touch t by wet hands. It may cause electric shock.he player
07
Don't disassemble as the user's own accord. It may cause t to be damaged or lose the data.he player
08
In a car ,we recommend you to use the supplied cigarette jack(option) and we are not
09
responsible for the damage or loss of data in a HDD by using another cigarette jack.
he player
he player
he player he player
04
Page 5

Part One
Installation
Part One
Installation
1 Screw off 2 Open the back cover
3 Connect power cable 4 Connect IDE cable
5.Insert HDD 6.Close the back cover.
7. Screw on. 8.OK
0605
Page 6

Part Two
Installation and Connection
Part Two
Installation and Connection
Connection with ordinary (Composite) TV output
he player
Connect t and your TV using
the yellow video cable .Turn on t
player
and TV . Select appropriate
video input mode on your TV until you
can get the initial t screen.
he player
Y Pr
Right
Left
Pb
he
Coaxial Audio
Yellow Cable
Video
S-Video
Optical
Audio
USB2.0
Port
Ext.IR
Power
Connection with S-Video output
Y Pr
Pb
Video
Connection with Component output
Connect t and your TV with
he player
component cable as instruticted .Turn on t
and TV. Select appropriate video input
player
mode on your TV (in this case ,Component
input mode.)
Green,Blue,Red, Cable
Pb
Y
Right
Left
Coaxial Audio
he
Video
Pr
USB2.0
S-Video
Optical
Audio
Port
Ext.IR
Connection with 2 CH of Normal TV
Y
Pb
Video
Pr
Power
0807
Right
Left
he player
Connect t and your TV using
the S-Video cable .Turn on t
and TV, select appropriate video input
mode on your TV until you can get the
initial screen.
Coaxial Audio
he player
S-Video
USB2.0
Optical
Port
Audio
Black round Cable
Ext.IR
Power
Connect left (white ). right (red) sound output
to the appropriate terminal of your TV or Hi-Fi
Left
Right
Coaxial Audio
White,Red,Cable
S-Video
Optical
Audio
USB2.0
Port
Ext.IR
Power
Page 7

Part Two
Installation and Connection
Part Two
Installation and Connection
Connection with Coaxial output
Y
Left
When you have a multi channel
decoder/amplifier with coaxial input , you
can enjoy 5.1CH high quality sound through
coaxial cable . The illustration on the top
shows how to connect with coaxial cable
Pb
Right
Coaxial Audio
Video
Pr
S-Video
Coaxial Cable
Optical
Audio
USB2.0
Port
Connection with Optical output
Y
Pb
Video
Pr
Ext.IR
Power
Connection with computer
Pb
Y
Right
Left
Connect t with your computer by USB cable data will be transferred from pc to t .
he player he player
(t should be power on) and then can check new drive at pc without installing driver at
he player
Windows ME/2000/XP.(Windows 98se should install diver with enveloped cd.)
Coaxial Audio
Video
Pr
USB2.0
Optical
S-Video
Audio
Port
Ext.IR
Power
1009
Left
Right
Coaxial Audio
S-Video
USB2.0
Optical
Audio
Port
When you have a multi channel
decoder/amplifier with optical input,you
can enjoy 5.1 high quality sound through
optical cable .The illustration on the top
shows how to connect with optical cable.
Optical Cable
Ext.IR
Power
Page 8

Part Three
Remote Controller Descriptions
Part Three
Remote Controller button Descriptions
SETUP
VOL-
VOL+
MUTE
POWER
Tvout
Media Player
3.5’ HDD Multimedia Player
Enter/Exit the setup menu.
VOLUME DOWN
VOLUME UP
Mute ON/OFF
Power ON/OFF
Change the display mode ( NTSC/S-VIDEO, PAL/S-VIDEO, 480p, 720p… )
INFO
SEARCH
PG UP
PG DOWN
OK
LEFT,RIGHT,
UP,DOWN
BOOKMARK
SUBTITLE
Aduio
MP3
PLAYLIST
SHUFFLE
MENU
TITLE
A-B
REPEAT
ZOOM
FUNC
MEDIA
Popup the video information OSD during Video Play.
Popup the random access OSD.
Page Up
Page Down
Select the file & OK
Move cursor
Direct play file in Bookmark
Popup the subtitle control OSD during Video Play
Popup the audio selection OSD during Video Play
Play all music files in current directory.
Play the PLAYLIST directly.
Random play In current directory.
Menu button during DVD IFO play
Title button during DVD IFO play
A B Repeat during Video play
REPEAT current file
Zoom during Video Play
Popup the misc function ( Timer, Volume Valance, Saturation, Brightness, Contrast ) OSD
Play
Seek Next
Fast Reverse
Pause
Stop the play
Fast Forward
Seek last
Choose all type,movie,music,photo mode
1211
Page 9

Part Four
Setup Menu
Part Four
Setup Menu
13
Video Setup
1) Video Out :Support NTSC/S-Video ,YPbPr480i, YPbPr480p. YPbPr720p,
YPbPr1080i, PAL/S-Video , YPbPr/PAL.
2) TV Type : Support 4 3 ,Letter Box 16:9
3) Brightness:You can control the brightness in the range 0 100
4) Contrast : You can control the contrast in the range 0 100.
5) Saturation :You can control the saturation in the range 0 100
6) Screen Calibration: Setting
Photo Setup
Audio Setup
1) Audio Out :Analog ,Digital, both
2) Volume :You can control the volume in the range 0 100
3) Volume Bal :You can control the volume bal in the range 0 100
4) ID3 Info: turn on/off information
14
1)Photo Preview:on,off
2)Slide Period: You can set the slide show time interval(2 100sec)
3)Slide Effect:Fade in/Out,Zoom in/out, Slide In/Out, No Effect
Page 10

Part FourPart Four
Setup MenuSetup Menu
Skin Setup
1)Skin Type:Default Skin
Misc Setup
Firmware Setup
1
1615
2
1) Language : Multilingual
2) Sys Default : You can change the setting of the sys default
3) Subtitle Size :You can select the subtitle font size (Middle/Large)
4) Subtitle Color: You can change the color of the subtitle and its outline (Black
/White ,Black/Yellow, White/Yellow)
Firmware upgrade :
To upgrade firmware ,should make " firmup" folder at root directory and should copy
download file at " firmup" folder .And then you can browser this file at setup F/W
menu (more info ,at page 19)
Page 11

Part Four
Setup Menu
Part Four
Setup Menu
17
Play All Kinds of Media Files(default)
1) You will see a full list of all kinds media files saved on the player.
2) Use up/down key on your remote to select the files you would like play and press[OK]
Play Video Files
Play Audio Files
Select [Media] ->Music ->Then you will see video files you saved into the player.
Select a file you would prefer and press [OK] button then the file will be played
Play Photo Files
18
Select [Media] ->Movie -> Then you will see video files you saved into the player.
Select a file you would prefer and press [OK] button then the file will be played.
Select [Media] ->Picture->Then you will see video files you saved into the player.
Select a file you would prefer and press [OK] button then the file will be played.
Page 12

Part Five
Firmware Upgrade
Firmware Upgrade
Firmware version check Firmware version check
1.Connect the player to your TV and turn on the player
2.Navigate with buttons to move to F/W menu and check your current firmware version.
3.Check the latest firmware version of the player from seller's website
How to download firmware
1.Download the latest firmware from seller's website to your PC.
2.Connect the player with your PC through USB cable and turn it on.
3.Your system will recognize the player as an external hard drive.
4.Make firmup folder at root directory.
5.Copy firmware files into firmup folder at the player hard drive.
6.Turn off the player and bring it to your TV for firmware upgrade.
How to upgrade firmware
1.Connect the player to your TV and turn on the player.
19
2.Move to setup firmware upgrade menu
3.Press "OK" button more than 3 seconds.
USB Connection with PC
Windows 98SE Driver Installation
1.Please run setup. exe file before connecting the player.
2.Please reboot after finishing installation.
3.After reboot the system . Please connect the player .Add New Hardware.
4.You will be able to see the new HDD disk drive inside the player on the Device Manager tab
Windows ME/XP/2000 Driver Installation
1.Windows ME/XP/2000 offer driver by itself. So you don t need to install software.
2.The PC will automatially recognize the player media player as soon as it is connected via the USB
interface
3.You will be able to see the new HDD disk drive inside the player on the Device Manager tab
 Loading...