

Page 1

www.cometsystem.com
User‘s Guide
U0110M
U0141M
U3120M
U3121M
U3631M
U4440M
U0843M
U6841M
U7844M
GSM modem dataloggers
Page 2

2 IE-LGR-UxxxxM-05
© Copyright: COMET System, s.r.o.
This User’s Guide may not be copied, and its contents may not be changed
in any way without explicit consent of COMET System, s.r.o..
All rights reserved.
The COMET System, s.r.o. company is continuously developing and
improving its product. COMET System, s.r.o. reserves the right to carry out
technical changes in equipment or product without any previous notice.
Contact address of this device’s producer:
COMET SYSTEM s.r.o.
Bezrucova 2901
756 61 Roznov pod Radhostem
Czech Republic
www.cometsystem.com
Page 3

IE-LGR-UxxxxM-05 3
List of contents
SAFETY MEASURES AND UNAUTHORIZED MANIPULATIONS ............. 6
GUIDE TO INSTALLATION AND USAGE OF THE DEVICE ...................... 7
Inserting the SIM card into the device ........................................... 7
Installing the datalogger, placing the probes ................................. 8
Device set-up .............................................................................. 10
Running the device ..................................................................... 10
Device disposal procedure .......................................................... 11
OPERATING THE DATALOGGER FROM THE KEYPAD ........................ 12
Displaying the device data .......................................................... 12
Menu Options ............................................................................. 16
MODELS PRODUCED ............................................................................. 17
U0110M One-channel thermometer ............................................ 17
U0141M Four- channel thermometer for external probes ............ 17
U3120M Compact thermometer - hygrometer ............................. 18
U3121M Thermometer – hygrometer for external probe .............. 18
U3631M Compact thermometer – hygrometer with optional
external temperature probe ......................................... 19
U4440M Compact thermometer – hygrometer - pressure gauge -
CO2 concentration meter ............................................ 20
U0843M Two-channel binary-input thermometer for external
probes ......................................................................... 21
U6841M Datalogger with 3 inputs 0 - 20 mA and 1 binary input .. 22
U7844M Two-channel binary-input counter ................................. 23
COMET VISION PROGRAM .................................................................... 24
SETTING UP THE DEVICE ...................................................................... 25
How to set up the device by means of a program ........................ 25
The device setup from a program (Configuration) ....................... 25
APPLICATION NOTES ............................................................................. 33
RECOMMENDATIONS FOR OPERATION AND MAINTENANCE ........... 36
TECHNICAL PARAMETERS .................................................................... 39
Power supply .............................................................................. 39
USB communication interface ..................................................... 40
Measurement, data storage and real time circuitry ...................... 40
Radio section .............................................................................. 40
Parameters of datalogger inputs ................................................. 41
Operating and storage conditions ............................................... 49
Mechanical properties ................................................................. 50
Declaration of conformity ............................................................ 50
ANNEXES ................................................................................................ 51
Annex 1: Selected error messages of the device ........................ 51
Annex 2: Connection of the Pt1000/E series probe connector ... 52
Annex 3: Connection of the Digi/E probe connector ................... 53
Annex 4: Accuracy of the dew-point temperature measurement 53
Annex 5: Connecting block ........................................................ 53
Annex 6: SMS message format ................................................... 54
Annex 7: Firmware updates ........................................................ 57
Page 4

4 IE-LGR-UxxxxM-05
Introduction
This datalogger is designed for autonomous measurements and recording of
physical and electrical data, with the data recording interval from 1 s to 24 h.
The inputs and ranges of quantities to be measured are determined by the
model type the user has bought. The user cannot modify them. This portable
device can be mounted in a fixed-position. To set up datalogger, a PC with
a USB interface is needed.
This device allows:
- to measure and process input data coming from internal or external
sensors, binary inputs, counters or current inputs.
- to detect and log minimum and maximum values (existing since their last
manual resetting) of each quantity,
- to display the measured values on an LCD display. Some features can be
controlled by two push buttons situated next to the display (device
switching off and on, deactivation of alarm signalling, Min/Max value
resetting),
- to store an autonomous chronological record of measured values in
internal non-volatile memory. The values to be collected can be measured
at the instant of recording or as average or min/max values detected
during the recording interval. Recording can be performed continuously or
at the alarm time only. The recording mode can be also set optionally as
non-cyclic to stop at the memory filling up, or as cyclic. In this mode the
originally recorded values will be overwritten by fresh ones after the
memory unit getting filled up.
- to set up two alarm signalling limits for each quantity to be measured. The
alarm signalling can be realised visually, optionally by a symbol appearing
on the display or by a short blink of an LED, or acoustically. In addition,
all UxxxxM series dataloggers contain a GSM modem enabling to send
alarm SMS messages to up to four selected receivers and can send
values over a GPRS data connection using JSON messages when
changing the alarm status.
- to send, at a configurable interval , informative SMS messages containing
device identification, currently measured values and alarm states to up to
four selected receivers. These messages may be of two kinds: user
readable (suitable to be displayed on a mobile phone), or machine
readable (suitable for automated data processing in a database or a
cloud).
- In configurable interval to send measured values over a GPRS data
connection using JSON messages
- to be supplied in autonomous manner from an internal Li-ion accumulator.
This can be charged by a common USB charger. An internal GSM modem
is connected to the supply unit only when a sending request has been
sent out, otherwise it is switched off to save energy.
- to communicate with a computer by means of a USB interface (all device
settings, recorded data downloading, and online monitoring). To
Page 5
IE-LGR-UxxxxM-05 5
communicate, the datalogger utilises the HID USB standard, which does
not require additional controllers to be built into the PC.
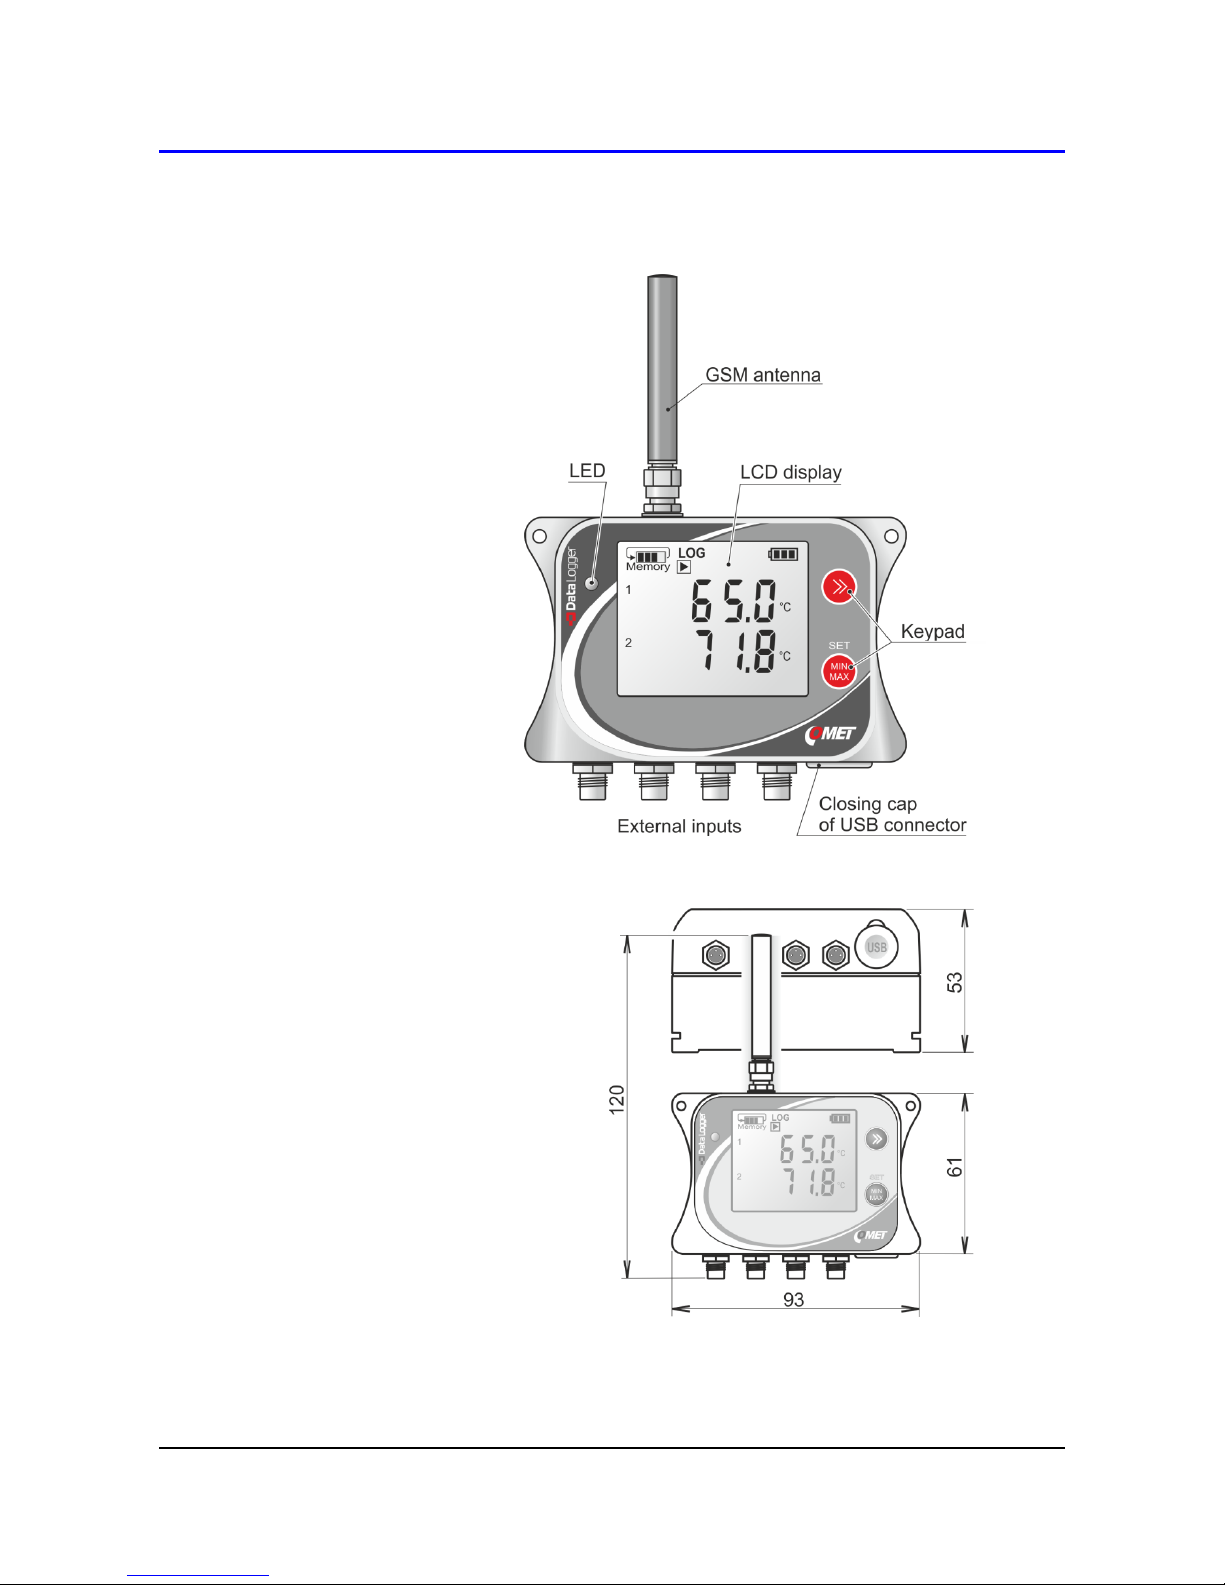
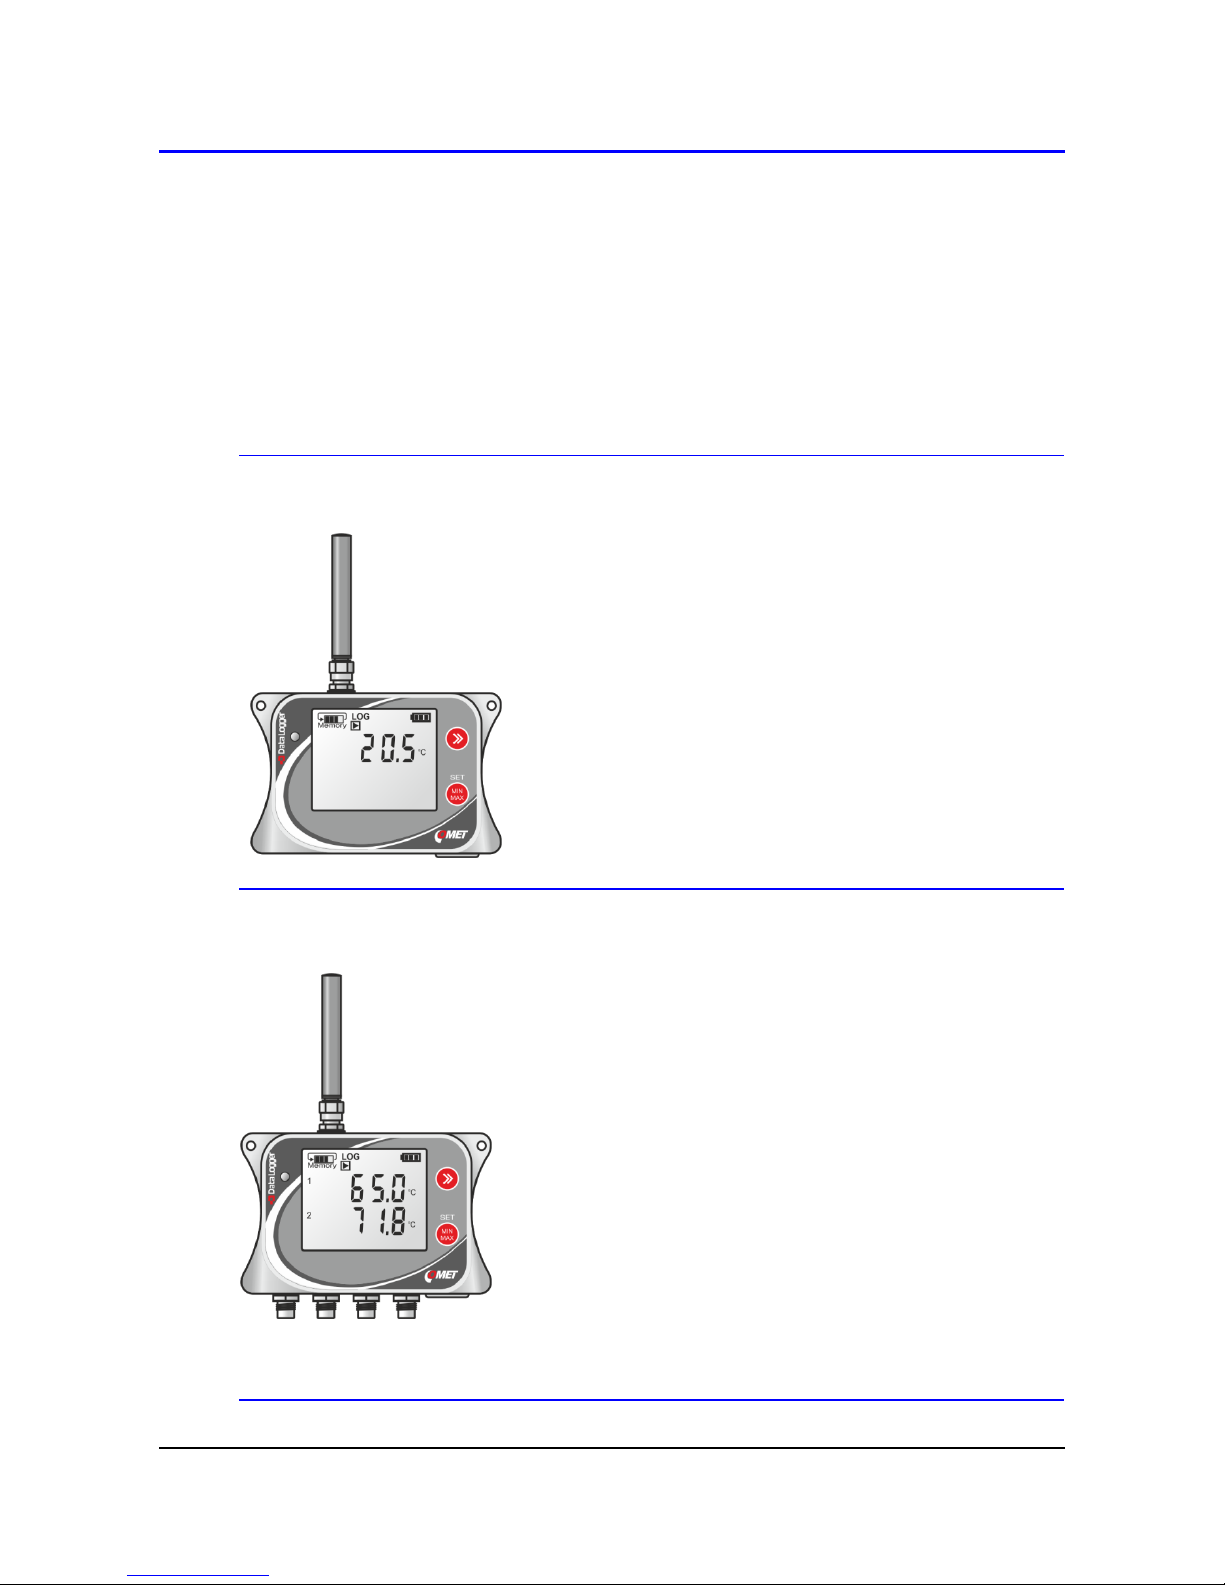
General view of a UxxxxM series datalogger (U0141M model):
Dimensional drawing:
Page 6

6 IE-LGR-UxxxxM-05
Safety measures and unauthorized manipulations
Read the following safety directions carefully before putting the device into operation.
Follow these instructions when using the device!
• Legislative conditions. This datalogger contains a radio transmitter working in GSM frequency
bands and using power values that are shown in its Technical parameters. These bands and
power values are used in the countries of the European Union. Before the first setting the device
in operation make sure that you are allowed to operate the device if you reside in a locality
outside the EU.
• Electromagnetic interference. Do not use the device in an area where the usage of mobile
phones is limited, e. g. near sensitive medical apparatus, on board a plane or in localities where
explosive materials are used.
• Operating and storage conditions. Observe the recommended operating and storage
condition as quoted in the Technical parameters. This datalogger makes use of an internal Li-ion
rechargeable battery. Be particular about the device‘s not being exposed to temperatures higher
than 60°C. Do not expose the device to direct radiation of heat sources and sun.
• Fire and explosion hazard. It is not allowed to use this datalogger within hazardous areas,
especially those endangered by a potential explosion of combustible gases, vapours or dust.
• Device cover. Do not operate the datalogger without the cover. After inserting the SIM card
check the integrity of the sealing. Screw the device together by using the original screws.
Proceed always exactly according to instructions that are given later in this User’s guide.
• Aggressive surroundings. Do not expose this device to any kind of aggressive surroundings,
to chemicals or mechanical shocks. Use soft tissue for cleaning. Do not apply solvents or similar
aggressive agents.
• Battery damage. Should the battery casing get damaged or should the whole device get
destroyed, carry it outside the fire, high temperature or water affected area to a safe fire-protected
place. Protect yourself and the environment against escaping gases and against being soiled
with the battery electrolyte.
• Failures and servicing. Do not try to repair the device yourself. Any repairs including battery
exchange may be carried out by suitably instructed service personnel only. If the device shows
signs of unusual behaviour, screw off the rear cover to disconnect the battery connector. Avoid
the removed battery contacting any metallic parts. Contact the distributor you have bought the
device from.
• Accumulator charging. Use the charger that has been recommended to charge the
accumulator. During the charging procedure the device has to be located in an indoor room with
a relative humidity (RH) up to 85%. The charging will proceed at an indoor temperature ranging
between 0°C and +40°C.
• Protection against water and dust. The device will be protected against water and dust only
when all connectors are duly tightened, and the USB connector is provided with a closing cap.
The input connectors that are not used have also to be provided with closing caps.
• Serviceability. This device makes use of the wireless communication and the GSM network.
For this reason, the connection (SMS, GPRS, etc.) cannot be guaranteed always and under any
circumstances. Do not rely merely on wireless equipment if crucial communications must be
realized (rescue systems, safety systems). Bear in mind that redundancy is indispensable for
systems featuring high functional reliability. See e.g. IEC 61508 for more information.
• Recommended accessories. Use only accessories that are recommended by the producer
Page 7
IE-LGR-UxxxxM-05 7
Guide to installation and usage of the device
Inserting the SIM card into the device
• Get a suitable SIM card ready – a micro-sized SIM card can be inserted
into the device. If a nano-sized card is at your disposal, you will have to
obtain a reducing adapter to the micro-sized SIM. The SIM card must be
allowed to send SMS messages. If the SIM card is safeguarded by means
of a PIN code, note and save this code to enter it into the device
configuration. Select such a tariff that meets your requirements
concerning the quantity and safety of the message delivery. In some tariffs
the message delivery may be stopped when a certain number of
messages is exceeded or when a given time period has elapsed. Make
sure the device is turned off. Turn it off if necessary.
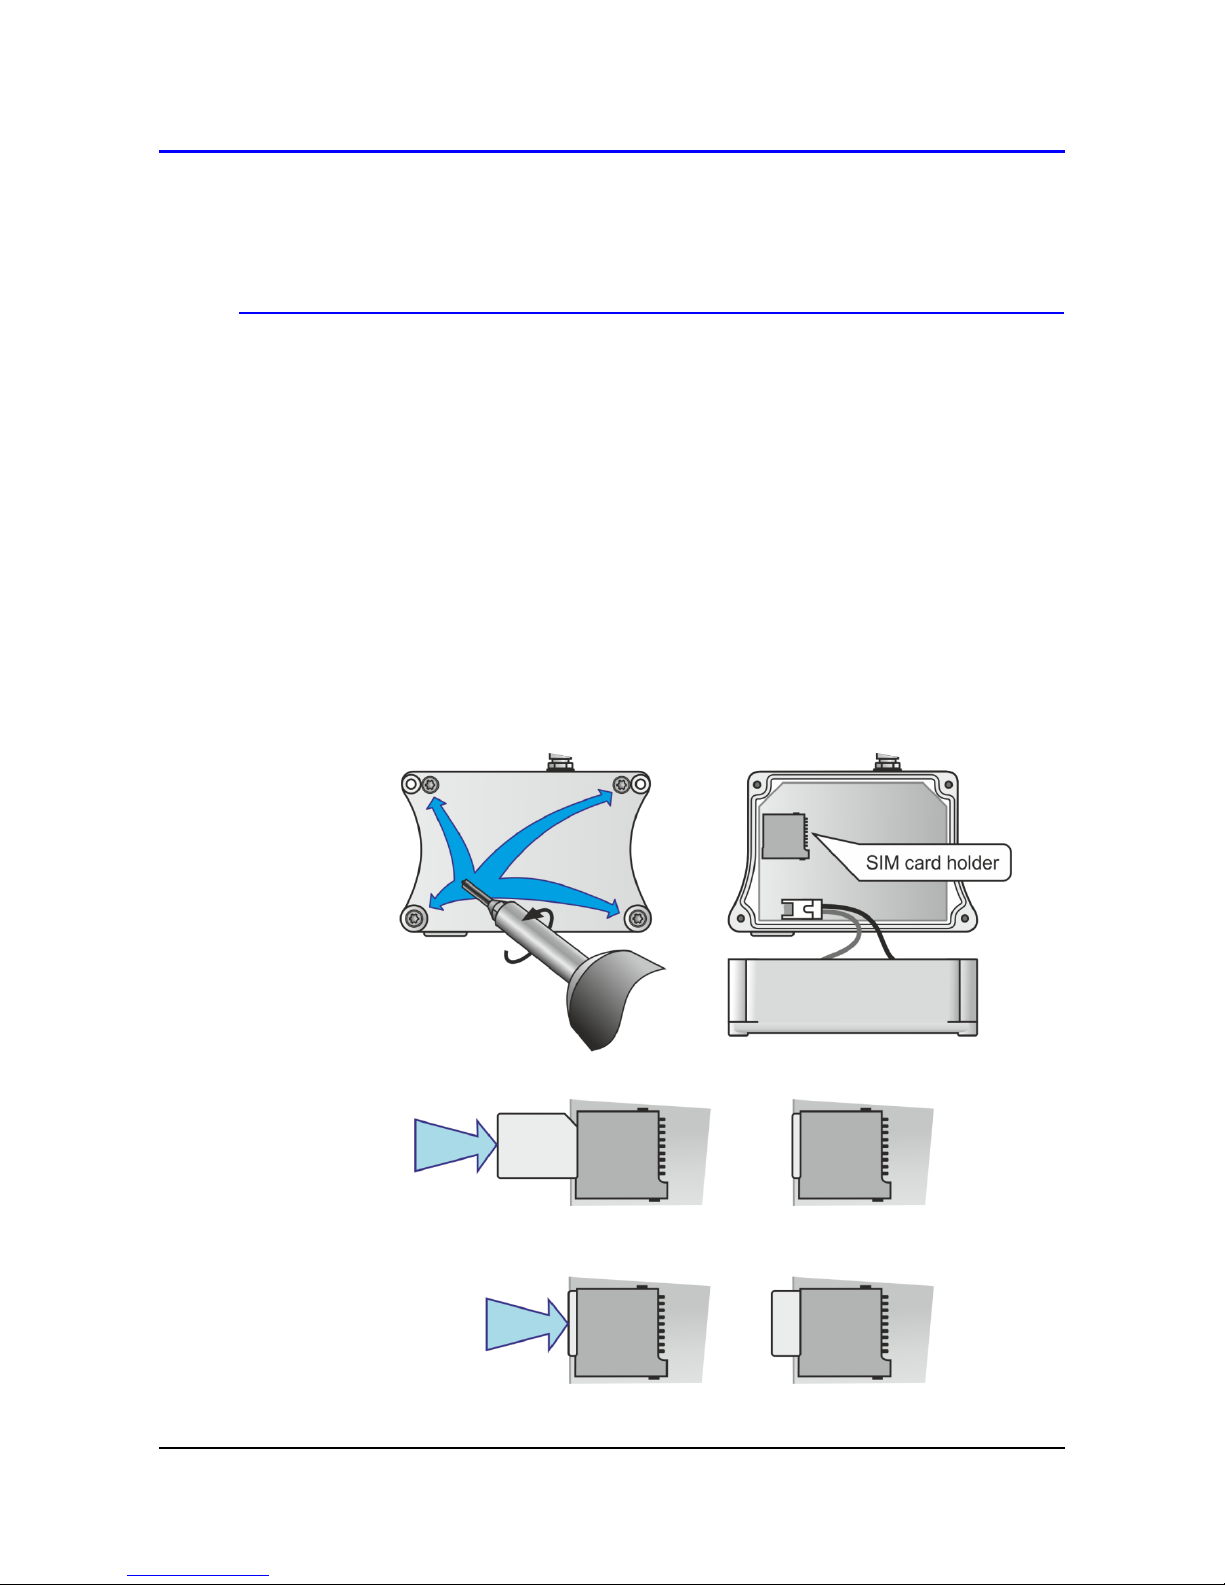
• Screw off the rear cover of the device – caution, the device is constantly
supplied from the internal battery. Proceed with care. Prevent external
conductive parts from contacting electronics components when
manipulating the device without the back cover installed.
• Insert the card into the SIM card holder
• Removing the card from the SIM card holder
Page 8

8 IE-LGR-UxxxxM-05
• Screw up the rear cover of the device
- at first check the seal in the nut for
integrity, then screw down the lid with the
aid of four self-cutting screws.
ATTENTION – tighten screws gradually
and with feeling!
GSM module status (blue LED
indication)
LED state Module Function
.
Off The module is not running
64ms On / 800ms Off The module is not synchronized with network
64ms On / 2000ms Off The module is synchronized with network
64ms On / 600ms Off The GPRS data transmission after dialling the
PPP connection
Installing the datalogger, placing the probes
• Choose a suitable location for installing the device - bear in mind that
the environmental conditions should be concordant with the Operating
conditions. Do not situate the device near sources of electromagnetic
interference.
• Recommended working position
- the aerial is supposed to point
upwards:
• Check the availability and quality of the GMS signal in the aerial
location - use a mobile phone utilizing a SIM card of the same operator
as that of the datalogger. Search another installation location if the signal
quality is not satisfactory. It is especially in iron concrete constructions,
cellars, metal chambers or other shielded rooms that the GMS signal may
be insufficient.
Page 9

IE-LGR-UxxxxM-05 9
• This device may be operated as a portable one. In this kind of operation
avoid the device falling. Try to maintain the proper working position.
• You can screw the device on the wall or some other solid base
• You can fix the device on the wall with the aid of a lockable holder
LP100 (optional accessory)
• Probe installation and cable routing - observe the installation
instructions, realize the recommended operating positions, avoid electric-
power distribution systems. See the chapter „MODELS PRODUCED“ for
more information.
• For the U3120M, U3631M and U4440M device remove any transport
transparent foil from the front and side panel (otherwise it would prevent
air access to internal sensors)
Page 10

10 IE-LGR-UxxxxM-05
Device set-up
• Connect the appropriate probes and signal leads to the device. For
more information refer to the chapter „MODELS PRODUCED“.
• Install the COMET Vision software into your computer - is available
for free on the address www.cometsystem.com.
• Run COMET Vision software
• Connect the device to the computer - on the datalogger side, use a
USB cable provided with a USB-C terminal.
• Setting up the device - with the aid of the COMET Vision program, set
up the device identification, the names of the points to be measured, the
recording mode, the alarms and there signalling. If a PIN code is set on
your SIM card, be sure to set it in the Configuration-Modem-General
section before using the logger for the first time, the default setting is No
PIN code.
• For more information, refer to the chapter „SETTING-UP THE DEVICE“.
Running the device
• After the set-up - Disconnect the device from the computer and close the
USB connector with a closing cap. Check that al connectors, including the
aerial connector are properly tightened. The device may be operated with
a USB cable that is permanently connected to a computer or to a charger.
In this case the ingress protection will be reduced to IP 20.
• Operating the device by means of keys - In the main display mode you
can switch over between individual channels and the display mode
Current / minimum / maximum values by means of the keys. By pressing
a certain key combination you will enter a menu in which you will be able
to switch the device on or off, to delete the Min/Max values and to disable
the alarm signalling. For more information, refer to the chapter
„OPERATING THE DATALOGGER FROM THE KEYPAD“.
• Charging the batteries - an internal charger will be activated immediately
after connecting the USB charger or after connecting the datalogger to the
computer. The datalogger contains an intelligent charging circuitry
evaluating the battery condition and internal temperature. The battery
charging process will be initiated only in the case that the battery voltage
is low and the internal temperature ranges between 0°C and 40 °C. Use
the recommended charger type only. During the charging period the
ingress protection is reduced to IP 20; therefore, do the charging under
room (or similar) conditions only. If the battery is very low, the charging
process may be terminated with an error message. In such a case contact
the datalogger vendor to apply for battery replacement. During the battery
charging period the internal temperature of the device may be slightly
raised, which can, for a short period of time, adversely influence the
measurement values of the internal sensors.
Page 11

IE-LGR-UxxxxM-05 11
• Maintenance and regular checks - for a reliable functioning of the device
it is advisable to perform its regular check-ups. For more details refer to
„RECOMMENDATIONS FOR OPERATION AND MAINTENANCE“.
Device disposal procedure
Screw-off the rear cover of the datalogger, disconnect the battery connector
and take out the battery. The device is disposed of as electronic waste. The
battery must be disposed of as hazardous waste. Remember there can be
a SIM card inside the device.
Page 12

12 IE-LGR-UxxxxM-05
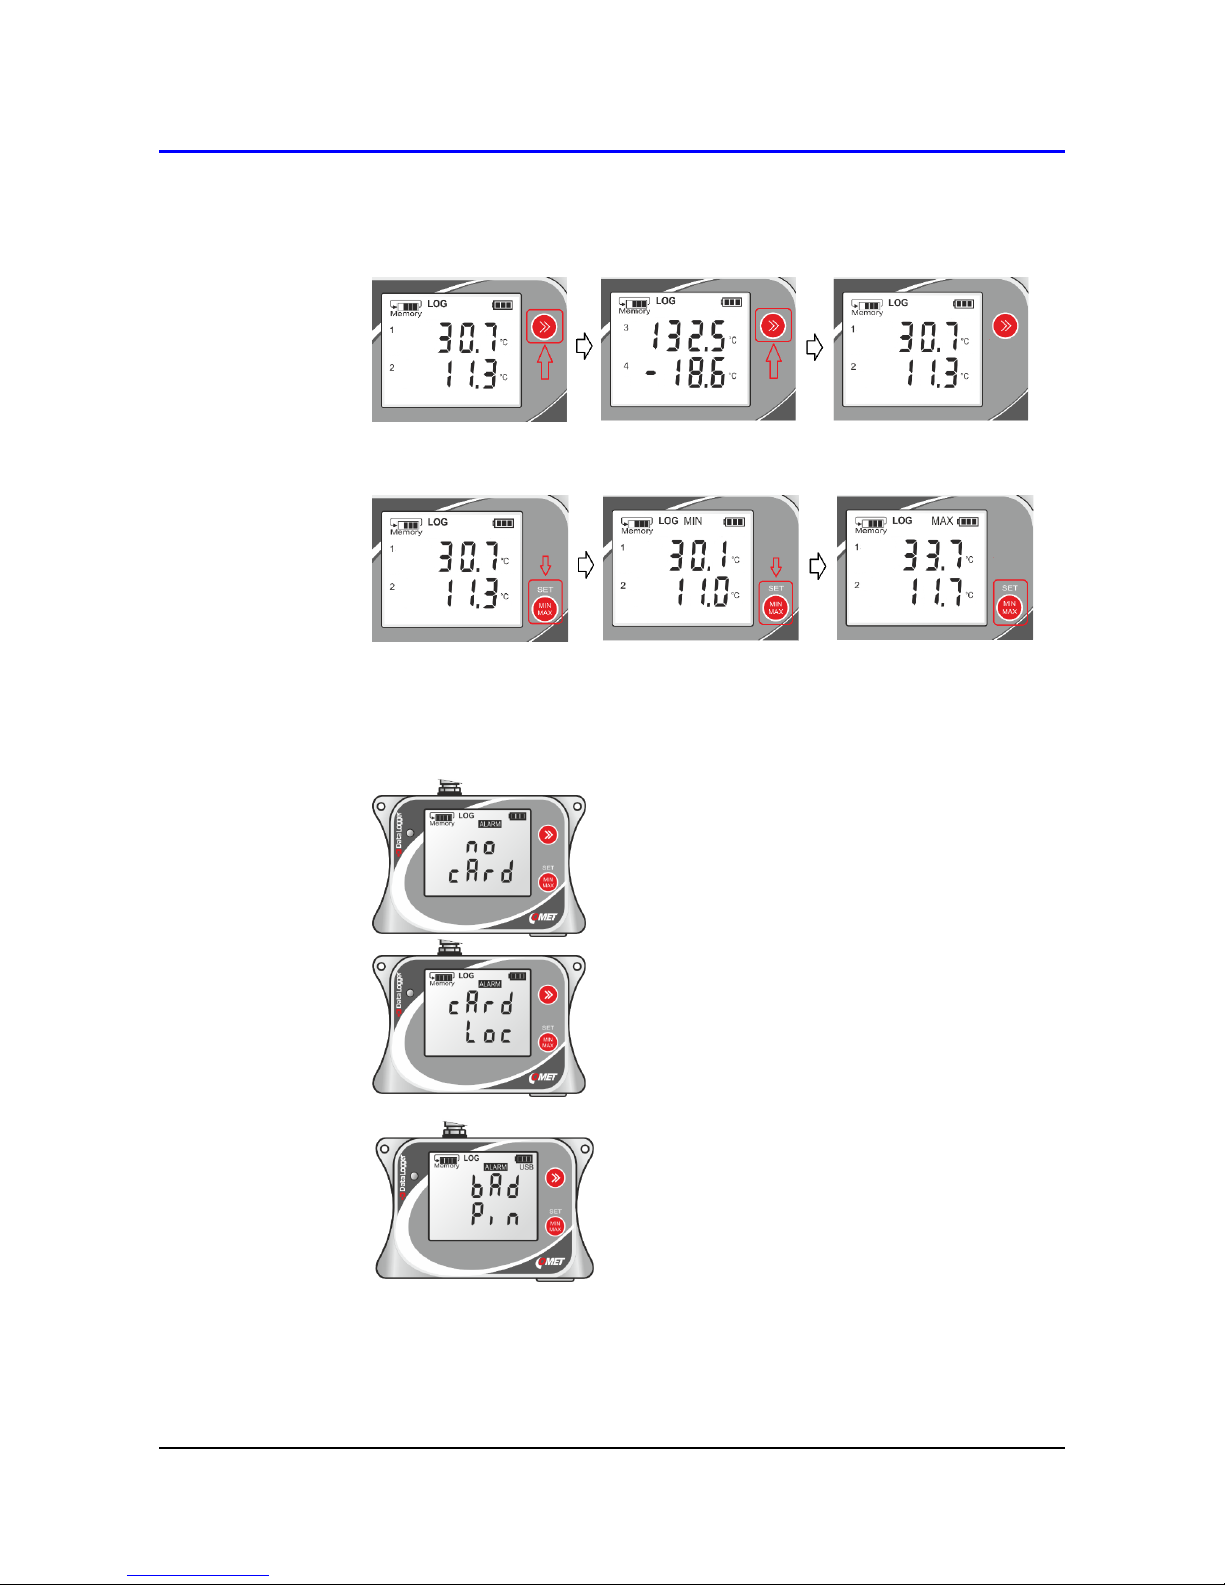
Operating the datalogger from the keypad
Displaying the device data
Data memory occupancy - this display section offers information about the
current condition of the free space existing in the data memory. The blinking
of the Memory symbol indicates that the preset memory occupancy limit has
been exceeded. This limit can be set up in the device’s configuration. Several
actions can be assigned to it (optical and acoustic signalling, sending SMS
messages).
The memory occupancy is about 75%, the device is in the non-
cyclic recording mode, i.e. the recording will be stopped as
soon as the memory capacity is full.
The memory occupancy about 75%, the device is in the cyclic
recording mode, i.e. as soon as the memory capacity is full, the
oldest data will be overwritten.
The memory occupancy 100%, the device is in the cyclic
recording mode. The preset memory occupancy limit has been
exceeded (The Memory symbol is blinking).
Record status - offers information on whether the recording is ON and
whether it is just running.
Page 13
IE-LGR-UxxxxM-05 13
A continuous recording with a preset interval is ON and running.
The recording is ON in the device and it is running at present. This
kind of display is utilized, when the record activity is dependent on
the alarm or the external input condition.
The recording is ON in the device but it is not running at present.
For instance, the rrecording is ON during an alarm only, and there
is no alarm just now. Or, a recording is ON that is controlled by an
external input which not active at the moment.
The LOG symbol is not displayed: The recording is OFF in the
device. The recording is not allowed in any channel in the device’s
configuration.
Meaning of the values displayed - this item specifies the meaning of the
measured values displayed in the two main rows. Beside the currently
measured values the device will also evaluate the minimum and maximum
values from their last resetting by the user. If the device is OFF and has not
been running for some time, then, after its turning ON, it will re-assume the
evaluating procedure of the Min/Max values in continuation to the
evaluating them before its turning OFF. It can be preset in the device
configuration, whether and in what manner these Min/Max values will be
displayed by the device. Remember that the Min/Max in question are
different from those being recorded.
Neither MIN nor MAX is displayed. You can see values that
have been currently measured.
In both display rows you can see the minimum values measured
since their last resetting by the user.
In both display rows you can see the maximum values measured
since their last resetting by the user.
Alarm condition - this item provides instant information that at least one of
the alarms which have been preset is active. Alarms can be generated by
exceeding the limits that have been preset in individual channels. Moreover,
they can notify of a device failure. In the device configuration you can preset
which conditions should be considered as alarm generating. By means of the
upper key you can easily browse through the values measured in all device
channels (if enabled in device configuration). In the case that the value is
preceded by a bell-like icon, the preset limits (alarms) have been exceeded
in this channel.
GSM modem active - this symbol indicates that a power supply has been
connected to the GSM modem because of some online work.
Page 14
14 IE-LGR-UxxxxM-05
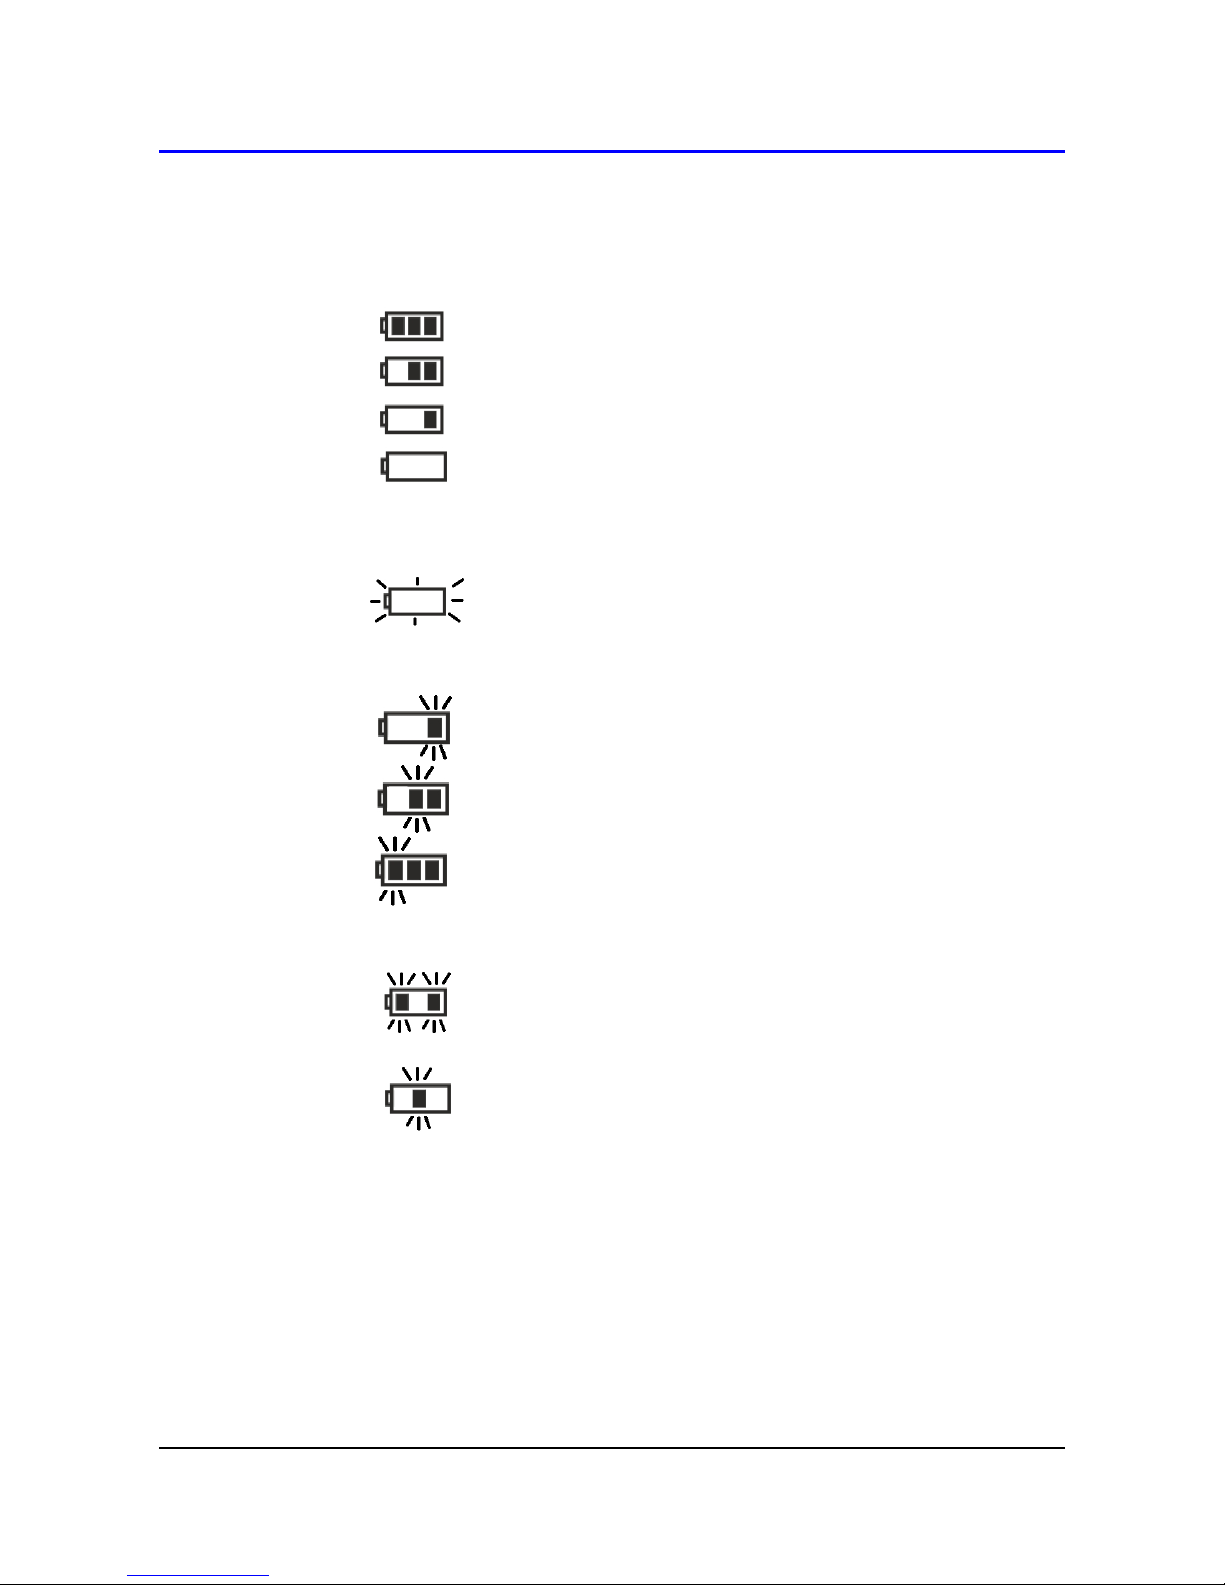
Battery condition - this symbol provides overview information about the
current battery charging condition. The charging is indicated by flashing one
of these symbols.
Battery conditions during battery operation of the device:
Fully charged battery
Partly discharged battery
Heavily discharged battery
Totally discharged battery, the device will be switched OFF.
Battery conditions with a charger connected to the battery:
Blinking symbol of an empty battery. There was a deep discharge
of the battery, the charger is attempting to recover battery. If this
condition persists for a long time and the standard charging
process is not renewed, contact your service department. The
battery will have to be replaced.
Indications of individual charging steps when the charging
process takes place in a standard way. If the display shows the
symbol of a full battery, the battery is fully charged and the
charger can be disconnected.
A failure has been detected during charging and the charging
process has been broken off. Try to remove the failure by
disconnecting and reconnecting the charger. If the problem
persists, call the service.
Wait, the charger performs internal testing, or the temperature
inside the device is not within the allowed charging range
(0 to 40°C).
USB interface active – the icon indicates that the device has been
connected to the computer.
Measured value (upper and lower row) - the currently measured value(s)
(or the Min/Max values) are displayed, if the corresponding symbols in the
upper display section are illuminated. The unit name and the measured value
symbol (1, 2, 3, 4, INT, EXT) are preset by the manufacturer, the user cannot
change them. In addition, it is factory preset whether the measured value of
a particular channel will be displayed in the lower or upper display unit row.
On the other hand, the user has many possibilities to adjust the appearance
Page 15
IE-LGR-UxxxxM-05 15
and behaviour of individual „screens“. Controlling them can take place only
manually by the aid of push buttons situated beside the display unit. The
upper push button serves to toggle between the measured values („the
screens“):
The lower push button serves to toggle between the currently measured
values and the Min/Max values:
The device can also be set up to toggle the „screens“ automatically, in for
about 5 sec interval. The cycle can be interrupted by pressing a key. If you
do not want to use the keypad, you can disable it in the device settings.
Display warnings:
Displayed when no SIM card is inserted
Displayed if the card requires you to enter the
PUK code. This condition may occur e.g. if a
PIN is activated on the SIM, but PIN code
stored in the device configuration is not valid.
The SIM card requires a PIN code, but the
PIN is not set/enabled in the SW configuration
(Default).
Page 16
16 IE-LGR-UxxxxM-05
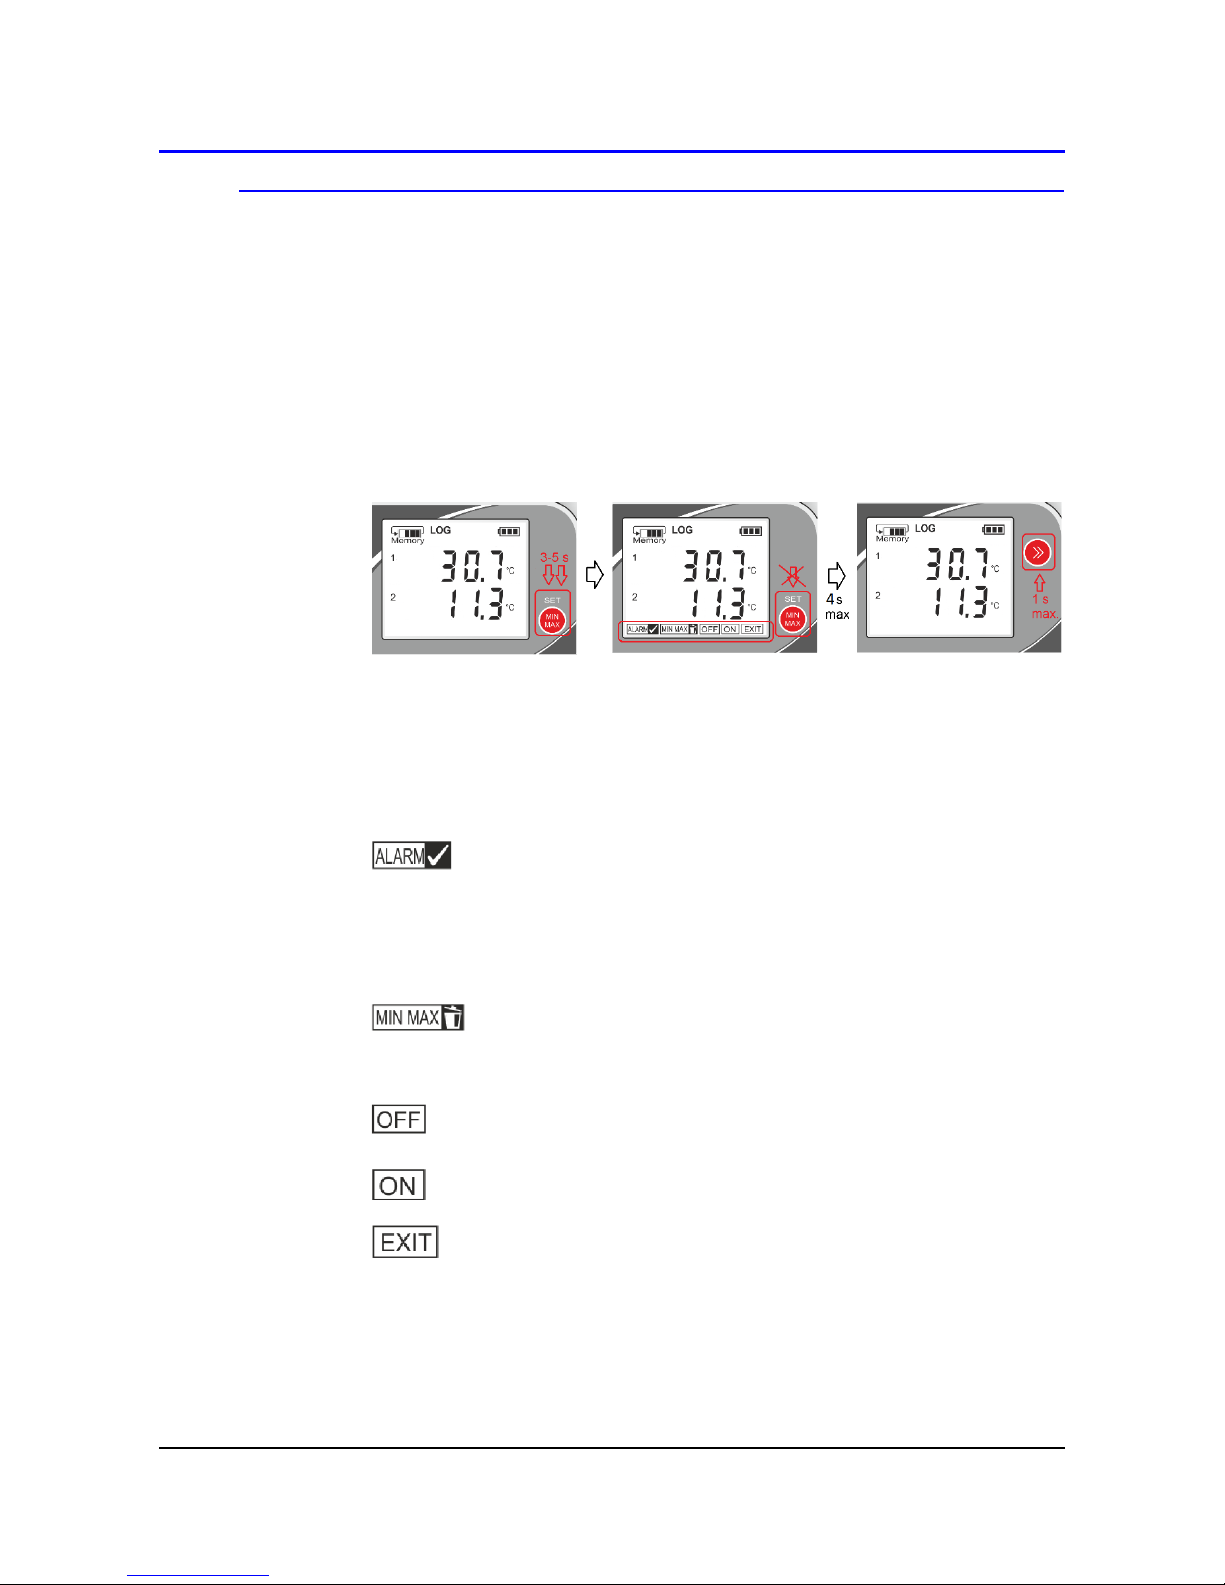
Menu Options
The menu can be entered by pressing a combination of both keys. In any
case, using the keypad must be enabled in the device configuration.
Individual menu items, too, may be disabled in the device setup. It is e. g.
possible to switch on the device in this way, but it is not possible to switch it
off.
To enter the menu:
Press the lower key and hold it pressed for about 3 s, until bottom menu line
appeared. Then release this key immediately and shortly press the upper key
during the following 4 s.:
You can now work with individual menu items. Press the upper key to scroll
through the menu items, press the lower key to confirm (SET). After
confirming certain choices, the menu will be quit automatically. If the keypad
is inactive for more than 20 s, the menu will close automatically.
Menu items:
Deactivation of the optical (LED diode) and acoustic alarm
signalling. In the case that the alarm signalling is active, it will be
terminated by generating a new alarm. In the device
configuration it must be allowed to disable this signalling from the
device keypad. If alarm memory (Latched alarms) is ON in the
device, the signalling will be deleted.
Deleting the Min/Max values in the device and it is related only to
values obtained since last reset. This does not concern those
recorded Min/Max values obtained in some other way. Option
must be enabled in the SW device configuration.
Switching the device off. This item is available only if the device
is ON. Option must be enabled in the SW device configuration.
Device switching-on. This item is available only if the device is
OFF. Option must be enabled in the SW device configuration.
Closing the menu.
Page 17
IE-LGR-UxxxxM-05 17
Models produced
The models produced differ from one another by types and ranges of values to be
measured. The datalogger’s input channels are invariably assigned to these values. The
user cannot change the type and range of the values to be measured. If GSM
communication is used, it is necessary to pay attention to a sufficient level of GSM signal
at the location.
U0110M One-channel thermometer
This model is equipped with only one internal
temperature sensor, no additional probes and sensors
can be connected. It is characterized by a simple and
compact design and a relatively long response to a
temperature jump. The device is placed directly in the
measured space. During the charging period the
measurement accuracy may be affected by up to 1 °C
due to parasitic heat.
U0141M Four- channel thermometer for external probes
This model can measure up to four temperature values
transmitted by Pt1000/E series external probes. The
response to a temperature jump depends on the
connected probe design. As a rule, this model is few
times faster than that using the inner sensor. It is often
used to monitor locations where the device itself is not
directly in the measuring space and only probes are in.
The maximum length of each probe lead should not
exceed 15 m. It is recommended to use shielded cables.
To maintain the IP rating, the unused probe connectors
should be provided with a supplied closing cap.
Page 18
18 IE-LGR-UxxxxM-05
U3120M Compact thermometer - hygrometer
This model is designed to measure temperature, relative
humidity and dew-point temperature by internal sensor,
no additional probes or sensors can be connected. It is
characterized by a simple and compact design and a
relatively long response to a temperature and humidity
jump, compare to model with external probes. The
sensors are located under the grid on the front of the
unit and are protected with Teflon foil. Foil permits water
vapour but prevents water from permeating the liquid
state. The device is suitable for measuring in places
where there is no rapid change in temperature or
relative humidity, and there is no condensation of water
vapours. If water vapour condensation occurs inside the
datalogger, then the resulting water will remain there
and may damage its electronics. The device is placed
directly in the measured space, while the installation
needs to ensure sufficient level of GSM signal at the
installation location. As the internal battery creates a
parasitic heat during the charging period, the
measurement accuracy may be affected by up to 1 º C.
The calibration of this instrument in the laboratory is
recommended with the open bottom part of the battery
box, to allow airflow from the back of the electronics.
When airflow in the range 0.5 – 1 m/s, read the value
after approx. 4 hours. The closed device reaches a
difference of approximately 2% when inserted in the
humidity chamber, then dramatically slows down.
Precise reading takes many times longer time than with
the open rear lid.
U3121M Thermometer – hygrometer for external probe
This model measures temperature, relative humidity
and dew point temperature using an outdoor Comet
Digi/E series probe. Its response to the temperature or
relative humidity jump is significantly faster than by
models with internal sensor. This model is often utilized
to monitor areas in which only the probe is installed,
whereas the main unit is installed elsewhere. When
monitoring remote areas, the maximum probe line wire
must not exceed 30 m. The Digi/E series probes provide
calibrated measurement values. Hence, they may be
replaced without having to modify the device setup.
Page 19

IE-LGR-UxxxxM-05 19
U3631M Compact thermometer – hygrometer with
optional external temperature probe
This model is designed to measure temperature, relative
humidity and dew-point temperature by internal sensor,
moreover one additional external temperature probe
Pt1000/E can be connected. Internal sensors are
located under the grid on the front of the unit and are
protected with Teflon foil. Foil permits water vapour but
prevents water from permeating the liquid state. The
device also measures the temperature from an external
probe and the difference between this temperature and
the dew point temperature. If the surface temperature of
the material is measured by an external probe, the risk
of condensation of water vapor on the surface to be
measured can be determined immediately. The device
alone is suitable for measuring in places where there is
no rapid change in temperature or relative humidity, and
there is no condensation of water vapours. If water
vapour condensation occurs inside the datalogger, then
the resulting water will remain there and may damage
its electronics. The device is placed directly in the
measured space, while the installation needs to ensure
sufficient level of GSM signal at the installation location.
As the internal battery creates a parasitic heat during the
charging period, the measurement accuracy may be
affected by up to 1 º C. The calibration of this instrument
in the laboratory is recommended with the open bottom
part of the battery box, to allow airflow from the back of
the electronics. When airflow in the range 0.5 – 1 m/s,
read the value after approx. 4 hours. The closed device
reaches a difference of approximately 2% when inserted
in the humidity chamber, then dramatically slows down.
Precise reading takes many times longer time than with
the open rear lid.
The maximum length of each probe lead should not
exceed 15 m. It is recommended to use shielded cables.
To maintain the IP rating, the unused probe connector
should be provided with a supplied closing cap.
temperature and relative
humidity sensor
external temperature
probe input
Page 20

20 IE-LGR-UxxxxM-05
temperature and relative
humidity sensor
CO2 and barometric
pressure sensors
U4440M Compact thermometer – hygrometer - pressure
gauge - CO2 concentration meter
This model is designed to measure temperature, relative
humidity, dew-point temperature, barometric pressure
and the concentration of CO2 in the air by internal
sensors. Barometric pressure can be measured as
absolute or recalculated to sea level. No additional
probes or sensors can be connected. It is characterized
by a simple and compact design and a relatively long
response in the measured quantities, compare to model
with external probes. The sensors are located under the
grid on the front and side of the unit The device is
suitable for measuring in places where there is no rapid
change in temperature or relative humidity, and there is
no condensation of water vapours. The device is placed
directly in the measured space, while the installation
needs to ensure sufficient level of GSM signal at the
installation location. As the internal battery creates a
parasitic heat during the charging period, the
measurement accuracy may be affected by up to 1 º C.
In battery mode, this model has significantly shorter
battery life than models without CO2 concentration
measurement. For this reason, the measurement of CO2
concentration does not occur as often as the
measurement of other variables. By default, this is 2
minutes with the option of extending up to 10 minutes
(option available in the Vision software).
We recommend that calibration of the relative humidity
and temperature of this device in the laboratory be
carried out with sufficient air flow (at least 1 m / s), but
only after a thorough settling, which may take up to 4
hours.
Due to low IP20 protection, this device is not suitable for
dusty or water-borne areas.
Page 21

IE-LGR-UxxxxM-05 21
U0843M Two-channel binary-input thermometer for
external probes
This model can measure up to two temperature values,
which are sensed by outdoor Pt1000/0 series probes. In
addition, it is provided with two binary inputs for
monitoring voltage-signal changes or changes of a
signal coming from a voltage-free contact. The binary
input changes are registered immediately, irrespectively
of the recording interval setting. To safe record the input
status, the signal must be present for at least 1 s. This
device is not able to capture connected/disconnected
voltage status. Input signals are connected to a
connecting block. The response to a temperature jump
depends on the probe design. As a rule, this device is
few times faster than the inner-sensor model. The
maximum length of the probe line wire should not
exceed 15 m; the maximum length of the binary-input
cable should not exceed 30 m. It is recommended to use
shielded cables.
The device’s ingress protection is IP 20. Due to low
ingress protection the device is not suitable for using in
dusty rooms or rooms exposed to water ingress.
Connection mode:
For the procedure for connecting wires to the connecting
block refer to Annex 5.
Page 22

22 IE-LGR-UxxxxM-05
U6841M Datalogger with 3 inputs 0 - 20 mA and 1 binary
input
This model is used to measure up to three signals from
current loops (0 to 20) mA DC while allowing one binary
input to be monitored. The current inputs are passive
and are not galvanically separated from one another.
This means that the connected sensors cannot be
connected to the current loop and the negative terminals
("-") are connected to each other. These facts must be
taken into consideration when designing the device into
the circuit. Incorrect connection may cause degradation
of the measured values. Standard outputs (4 to 20) mA
can also be measured with current inputs without any
problems.
Binary input serves to monitor voltage signals or signals
coming from a voltage-free contact. The binary input
changes are registered immediately, irrespectively of
the recording interval setting. To safe record the input
status, the signal must be present for at least 1 s . Unlike
the U0843M model, this device can capture
connected/disconnected voltage status.
Input signals are connected to a connecting block. The
device’s ingress protection is IP 20. Due to its low
ingress protection the device is not suitable for using in
dusty rooms or rooms exposed to water ingress. The
maximum length of the input wires should not exceed 30
m. It is recommended to use shielded cables.
Connection mode:
For the procedure for connecting wires to the connecting
block refer to Annex 5.
Page 23

IE-LGR-UxxxxM-05 23
U7844M Two-channel binary-input counter
This model includes four inputs. Two of them can
function as counters, and all four inputs can function as
binary inputs. Both counter and binary inputs serve to
monitor voltage signals or signals coming from a
voltage-free contact. The binary input changes are
registered immediately, irrespectively of the recording
interval setting. To safe record the input status, the
signal must be present for at least 1 s. Unlike the
U0843M model, this device can capture
connected/disconnected voltage status. The
counter states is recorded according to the set Record
interval. Input signals are connected to a connecting
block. The device’s ingress protection is IP 20. Due to
its low ingress protection the device is not suitable for
using in dusty rooms or rooms exposed to water ingress.
The maximum length of the input wires should not
exceed 30 m. It is recommended to use shielded cables.
Optional input configurations:
• 2 x counter + 2 x binary input
• 1 x counter + 3 x binary input
• 4 x binary input
Connection mode:
For the procedure for connecting wires to the connecting
block refer to Annex 5.
Page 24

24 IE-LGR-UxxxxM-05
COMET Vision program
(this section could be for a short period outdated due to SW update)
Minimum HW and OS requirements _________________
• Windows 7 operational system and higher, or Windows Server
2008 R2 operational system and higher
• 1,4 GHz processor speed
• 1 GB memory
Program description ______________________________
The COMET Vision program is used to set up Comet devices, to obtain
the recorded data and the currently measured values.
The program is available free of charge (www.cometsystem.com),
any number of devices can be connected simultaneously (e. g. data
from several devices can be downloaded concurrently; several online
displays may be running at a time). Moreover, some advanced
features are available (e. g. graphs, statistic previews of registered
data, user-defined online display, export into a database etc.).
To run UxxxxM series dataloggers, version 2.0..xxxxx.xxxxx or higher
must be installed.
The starting point for the program control is the menu situated in the
left (optionally right) portion of the utility software and containing the
basic options „Home“, „Devices“, “Files”, „Online display“.
Adding the datalogger to a list of the Comet devices _____
The USB-connected device is automatically detected within approx. 5
seconds (required for connection initialization time). When connected
to a computer, the device is automatically added to the Comet device
list
A device can be added manually after clicking on the „Add device“
button. This can be found in the „Welcome“ screen, which is displayed
upon the first program launching, later in the „Home“ or „Device“ tabs .
A screen containing a connection type choice will appear. Here, USB
should be selected. Subsequently, after „Finish“ button confirmation,
the device will be added.
Page 25

IE-LGR-UxxxxM-05 25
Setting up the device
After the datalogger has been switched on, it starts measuring, data
recording and evaluating alarms according to the device’s setting up
performed by the user. Complete device setup can be performed by the aid
of the COMET Vision user software. During configuration editing the device
can work normally, nevertheless the access to some functions (record
download, contemporary configuration editing by other users) is limited.
How to set up the device by means of a program
• Connect the datalogger to a computer, run the user SW.
• If you have not operated the device in the SW yet, add it to the list of your
Comet devices. For more details, see the chapter „CONNECTING THE
DATALOGGER TO A COMPUTER“.
• If the device is connected properly, its current status is displayed in the
Device Home panel.
• Click on the Configuration button. The device configuration will be
downloaded; you will be able to view it.
• If you change the setup of some item, the SW will pass over into the
editing mode. During the editing procedure the other users access to the
device will be limited.
• In case of a longer idle time the configuration editing mode will close
automatically.
• Finally save the new configuration into the device (Apply changes).
The device setup from a program (Configuration)
General - Information ______________________________
In this panel basic device information is available. Here is above all its
name (Device name), which serves to identify the device and the
measurement values it provides. You can name the device e.g.
according to its location or utilization, or you can leave its original
setting. The maximum length of this description, in which you can use
letters, numerals, underscores and further signs, is 31 characters.
More information, which is indicated in this panel, is the device’s serial
number, model, firmware version and information, whether the model
contains an internal modem to send SMS messages.
Page 26

26 IE-LGR-UxxxxM-05
General - Preferences _____________________________
In this panel you can choose the unit with which the device will measure
the temperature (Default temperature unit °C/°F). With some devices
the pressure unit can be chosen, too (Default atmospheric pressure
unit). When the device does not measure the atmospheric pressure,
but when it is necessary to know its value to measure some quantities
(calculated humidity and CO2), the atmospheric pressure value must
be entered (Default value of atmospheric pressure in the area
according to altitude).
With barometers, the correction constant can be entered here for
conversion to the equivalent sea level pressure. This constant can be
entered either as a current pressure converted to the sea level found
out e.g. at a near observatory, or through the medium of the elevation
above sea level.
General - Data and Time ___________________________
Here you can set the date and time running inside the device (Date and
Time). In the datalogger local current time is running according to your
setting. By means of the UTC Offset choice you can fix its relation to
the UTC. This information will be available with all time readings that
are provided by the device (recording, online monitoring). The device
cannot automatically pass over between summer and winter time.
CAUTION - after changing date and time the data
recorded by the device will be deleted!
Advanced - LCD Display ___________________________
In this panel you can set a variety of display and keypad behaviour
modes.
Advanced – Other settings (Keypad, Device start, Energy) _
In this panel you can set some functions of the datalogger’s buttons, a
delayed switching-on of the datalogger or the control of its switching-
on by a binary input (according to type). In addition, the datalogger‘s
switching-on and/or off by a button on the datalogger panel can be
enabled or disabled.
In the standard mode the datalogger measures all channels using an
interval of 10 s. This interval can be shortened to 1 s when a faster
measuring procedure is required. A disadvantage of this mode is a
higher power consumption. When the device is operated for a long
time, there is no need for a fast response to the change in the
measurement values and a long battery lifetime is what matters, you
can set the measurement interval to 1 minute. The CO2 concentration
channel measures with a 2-minute interval and can be extended up to
Page 27

IE-LGR-UxxxxM-05 27
10 minutes to save more battery life. For details concerning power
consumption, see Technical parameters.
Record _________________________________________
The choices that are available in this panel serve to control the device‘s
recording functions. The recording function may be switched on and off
when needed (Recording with interval). However, if you switch the
recording off and then you switch it on again, the memory free space
may be reduced by up to 0.2% of its total capacity. Use Cyclic record
in the case that you require the device to continue recording even if the
measurement data memory is filled up with data. In this case the oldest
data is gradually overwritten by the newer data. If you do not use this
choice, the data recording will be stopped on reaching the full storage
capacity. Another important parameter is the Record interval. It can be
set from 1sec/10sec/1min (according to settings in Advanced – Other
settings (Energy) - Measurement Interval) to 24 hours (See Technical
parameters). The recording takes place every time at integer multiples
of the pre-set interval. For example, if you switch the device on at 5:05
and the recording interval has been set to 1 hour, the first data will be
recorded at 6:00, the following data at 7:00 and so on.
The data recording can take place either incessantly, or only in the
instant when some of the measurement values gets into an alarm
condition (system alarms do not trigger the recording). Choose Record
mode.
As a standard, the device records instantaneous measurement data
during a period defined by the recording interval and the actual time.
However, if continuous recording is enabled, the average, minimum
and maximum values can be selected in the Recorded values. Caution
– these Min/Max values apply only to the selected recording interval
and are different from the global Min/Max values displayed on the
device screen.
The record setting is completed by choosing measurement channels
that are supposed to be recorded.
CAUTION - After changing cyclic non-cyclic recording
(in either direction) the data recorded in the device is to be
deleted! Vision warns you when saving a new configuration
and gives you the option to save data.
Channels_______________________________________
In this panel you can set all input channels. The assignment of the
measurement value and its range to a channel is factory-set and
cannot be changed. Supply a suitable name of the location to be
measured for each channel and decide whether it will be switched on
for measurement and for recording.
Further items, like those for entering the decimal place number, the
name of the physical unit and the conversion of the measurement
Page 28

28 IE-LGR-UxxxxM-05
values by means of the so-called User calibration are available in
channels with voltage and current inputs only. In these inputs no
physical quantity unit is displayed on the device’s LCD display. If a
value cannot be displayed because of a great number of digits, it is
substituted by an error message. Nevertheless, this error message
concerns only the device display, not the measurement or recording.
An example of user-defined calibration for a sensor having
a 4 to 20 mA current output. The sensor is connected to the
datalogger’s current input; the sensor’s measurement
range is -30 to +80 °C:
Lower point A: Input value: 20 will be shown as 80
Upper point B: Input value: 4 will be shown as -30
In a channel for external Pt 1000 probes there exists the possibility to
enter the probe parameters to correct the measurement error caused
by the probe cable.
In binary channels you can decide whether a voltage signal or a contact
(an open-collector transistor) will be connected to the input. Then enter
textual descriptions of the states for both input levels. In this way the
states will be displayed in the record, in the online display, and in this
manner they will be sent in SMS messages, too. At the same time, from
the menu, choose symbols for displaying these states by the device.
For a counter channel, decide whether to report an error or continue
from zero after it is overflowed.
In the next step, set alarm states for each measured variable. You can
set up to 2 alarms for each measured quantity (alarm 1 and alarm 2
buttons). Each alarm must be enabled (on/off) first.
Furthermore, choose whether the alarm should arise from exceeding
the limit value or from dropping under it (value is greater than / value is
lower than). Enter this limit value. In binary inputs, only the input state
must be defined. Subsequently, the alarm delay time must be entered
(for the duration of). This delay time serves to eliminate contingent
momentary overshoots of the limit value. The hysteresis, too, has a
similar significance (Alarm hysteresis). It prevents the alarm from
oscillating in the case that the measurement value varies around the
alarm limit value. It is not recommended to set it equal zero.
Thus, the setting for generating an alarm is completed. It remains to
decide, whether the alarm should be indicated optically by means of a
LED diode on the device (Optical signalling - LED), acoustically
(Activate internal acoustic signalling) or by sending a warning text
message to up to four selected recipients (when alarm
occurs/disappears, send SMS to selected recipients).
In SMS messages you can determine whether they are supposed to
be sent out on alarm generation and on alarm disappearance, too. In
Page 29

IE-LGR-UxxxxM-05 29
both cases add a custom text description of the status that the recipient
will see in the message.
Alarm events ____________________________________
The device makes it possible to evaluate alarm situations, which can
either originate from the measurement data, or they can notify of a
certain device condition (exceeding the memory occupancy limit,
system alarms). The individual alarm situations can be assigned the
way of their signalling to the user.
An alarm originating from a measurement value is every time signalled
on the device display by means of a bell icon ahead of the
corresponding measurement value. General information about any
alarm occurring in the device is displayed by ALARM warning on the
device display (except for an exceeded memory occupancy limit, which
is signalled by a flashing Memory sign).
An alarm can be signalized by a fast flashing of the LED diode on the
device panel (Optical signalling - LED). In the case that only one alarm
originating from a measurement value is active, a yellow LED is
flashing. In the case that more alarms occur simultaneously, or a
system alarm or an alarm originating from an exceeded memory
occupancy limit occur, a red LED diode is flashing.
NOTE: A blue flashing LED diode does not notify an alarm, but the
communication of the GSM modem with the operator’s network.
Besides, an alarm may be signalled acoustically by a characteristic
sound, which is repeated at regular intervals.
The operator alerted this way can confirm the acoustical or optical (LED
diode) signal and so mute it until a new alarm occurs (See the chapter
Controlling the datalogger from a keypad).
Alarm events - Preferences _________________________
In the standard mode the alarm lasts only during the time when the
measurement values lie outside the allowed limits. As soon as they
return inside the allowed limits, the alarm will cease. In some cases, it
is desirable for the user to be informed of an alarm that has occurred
during his absence. If you enable the Latched alarms choice in the
device setting, then every alarm occurring in the device remains active
until operator intervenes, irrespective of the measurement values (i.e.
until the time of manual cancel).
Moreover, alarm evaluation may be enabled here for selected days of
the week only and for certain hours of the day. This setting can be used
for system alarms, too, but it is not suitable to combine it with the above
mentioned Latched alarms choice.
Page 30

30 IE-LGR-UxxxxM-05
Alarm events – Mute of signalling________________
In this panel you can enable the alarm to be deleted and remotely
deactivate the alarm signalling both from the COMET Vision software
and from the device keypad. Furthermore, optical (LED) or acoustical
alarm signalling can be enabled/disabled here.
Alarm events - Memory occupancy___________________
Use this panel setting, if an overrun of the pre-set limit value of the data
memory occupancy needs to be signalled. The signalling mode may
be selected optionally as optical (by means of a LED diode), acoustical,
or it may be realized by sending a warning SMS message up to as 4
selected recipients.
Alarm events - System failure _______________________
These panel choices make it possible to set the so-called system
alarms, which indicate some technical failure of the datalogger or of
some of the probes connected to it. The signalling mode may be
selected optionally as optical (every time by means of a red LED
diode), acoustical, or it may be realized by sending a warning SMS
message up to 4 selected recipients.
The device can respond to the following conditions:
a) Measurement error on any channel ...... e. g. a probe has been
disconnected or broken.
b) Device configuration error …... the device configuration has
been disturbed unexpectedly.
c) External power failure ...... the power supply has failed on
the USB connector (reserved for special events, when the
device is connected to a USB charger or a computer).
d) Low battery …. the battery is weak.
e) Time setting error or battery is discharged ….. the battery
has run out of charge.
Modem - General _________________________________
Enter the PIN code for your SIM card, if it required. In default setting is
no PIN code required. If the PIN code is set on the SIM card and the
required pin is set incorrectly in the device configuration, the SIM card
will be blocked when attempting to connect to the GSM network, see
Display warnings chapter.
Page 31

IE-LGR-UxxxxM-05 31
Modem – Text message - General ____________________
In the case that the alarm condition persists for a longer time,
determine whether the warning text message should be sent on the
alarm inception only, or whether it should be repeated. The repetition
interval can be pre-set in a range of 30 minutes to 24 hours.
Determine the daily limit for the overall number of messages sent by
the device. This limit setting should be performed separately for battery
operation and an external power supply. Before sending a message,
the daily limit value will be ascertained. Should the limit value be
reached, the respective recipient will receive a message indicating that
the daily limit of the outgoing messages has been reached. For the day
in question no further messages will be sent to the recipient’s number.
When it is required to send the message to another recipient, only a
notification is sent about the daily message limit error. No further
messages will be sent out to this recipient’s number on this day. The
daily limit will be reset at time 00:00.
If you want alarm text messages to be sent, remember to assign the
pertinent recipients of these messages to the particular alarms. This
concerns alarms on measurement channels, system alarms, as well as
warnings about exceeding the data memory occupancy limit. This
assignment is to be performed during setting the individual alarms.
Modem – Text message - Recipients __________________
In this panel you can set the recipients of the SMS messages. You may
enter up to 4 recipients of text messages that the device will work with.
Each recipient is identified by their name, telephone number, additional
text and an activity flag. If you clear this flag, text messages will not be
sent to the selected user, but all its settings will remain unchanged.
This way you can easily deactivate a user in a simple manner and
restore it later.
Modem – Text message - Keep alive SMS ______________
In this panel you can set sending Keep-alive SMS messages.
Set the interval for sending Keep-alive text messages. Such messages
can be sent by the device to all selected users on regular interval basis.
They include the datalogger identification, the current measurement
values of all channels as well as the conditions of all alarms. These
messages can contain user-readable data or alternatively machinereadable data. The shortest interval that can be set is 5 minutes; the
Page 32

32 IE-LGR-UxxxxM-05
longest interval is 1 week. With intervals that are longer than 1 day a
daily message sending time can be set.
Determine which recipients the informative Keep-alive text messages
with user-readable data should be sent to. An easy readability by a
mobile phone is an advantage of this kind of messages. The
disadvantage is that larger reports can be divided into several
messages. These messages will not be sent out if no recipient has
been chosen.
Determine which recipients the informative Keep-alive text messages
with machine-readable data should be sent to. These messages are
intended to be processed in a database or in a cloud. All data is every
time compressed into a single message. This data is not suitable to be
read on a mobile phone. These messages will not be sent out if no
recipient has been chosen.
Modem – Data - General ___________________________
In this panel, you configure the APN settings needed for data
communication with your mobile operator (sending data messages).
Modem – Data – Data sending ______________________
This panel sets where and how often messages will be sent. In the URL
field, enter the destination address where you want to send messages.
For use with Comet Database, type the address of the SOAP server
(e.g. http://192.168.1.1/soap).
Summary _______________________________________
Printable summary of all device setting.
Page 33

IE-LGR-UxxxxM-05 33
Application notes
Operation with a constantly connected charger __________
Datalogger is primarily intended to be operated as an autonomous unit
powered by its built-in batteries. Nevertheless, you can also operate it
with a charger which is constantly connected to it, or with a computer.
The datalogger’s internal charging circuitry controls the battery
charging process based on its instantaneous condition, thus protecting
it against damage. In the case that a cable is connected to the USB
connector, the device is not protected against dust and water ingress,
and, consequently, it cannot be operated in locations in which such
ingress protection is required. The internal charging circuitry initiates
the battery charging only when the device’s internal temperature
ranges between 0°C and 40°C. If this is not the case, the battery will
not charge even if the charger is connected.
Device switching on and off_________________________
If you switch on and off the device frequently, then its keypad and both
functions, i.e. device switching on and off from the keypad, must be
enabled in the device settings. Another option is to set the date and
time when you want the device to turn itself on automatically. Once
reached, it will be permanently switched on. For binary input
dataloggers, it is possible to control the recording on and off by the
level at this input (voltage or contact).
Measuring calculated humidity values_________________
From among the calculated humidity values the device can provide the
dew-point temperature only. Other relevant calculated humidity values
can be obtained by subsequent data processing in the SW.
What is the purpose of the system alarms and how to work
with them _______________________________________
System alarms are useful for performing the functionality diagnosis of
the device and of the probes connected to it. A system alarm notifies
of a failure or damage of the device or of its probe. On the contrary,
alarms on measurement values indicate a failure of the technology the
device is monitoring. A system alarm may be intended for e.g. another
person than that receiving measurement value alarms.
Page 34

34 IE-LGR-UxxxxM-05
Problems with measurement correctness ______________
Incorrect measurement values of temperature or relative humidity may,
in most cases, be caused by an unsuitable probe location or improper
methodology. Some notes concerning these problems are mentioned
in the following chapter Recommendations for operation and
maintenance. In probes using current and voltage outputs incorrect
measurement results may be induced by latent coupling between
individual components, e.g. across supply sources or through
improperly connected cable shielding.
If the device indicates an error condition, see detailed information in
Annex 1, selected error messages.
Another problem area relates to random peaks occurring within the
measurement values. Their most frequent reason is a source of
electromagnetic interference situated near the device or the pertaining
cables. Attention must be paid also to possible damaged portions of
the cable insulation. Prevent accidental contacts between wires and
adjacent conductive parts.
Problems arising during communication with a computer __
For communication with a computer a cable should be used that is not
longer than 5 m. Check that all connectors are properly seated. It is
especially the USB-C connector that must be properly pushed into the
receptacle. Cable disconnecting and subsequent connecting during
communication can cause a temporary non-availability of the USB
equipment in the computer. This may be corrected by closing the
COMET Vision utility program (including the communication service)
and starting it subsequently. Restart the computer, if the above
mentioned measure is not the proper remedy. Check whether new HID
equipment will appear in Device administrator after the device has
been connected to the computer.
Problems arising during sending SMS messages ________
There are a lot of problem sources in this connection. If sending text
messages does not work at all, you may try out the following steps:
• Set an alarm on some of the channels so that it might be induced
easily (e.g. temperature alarm by warming the probe by holding it in
hand, relative humidity alarm by taking the device in hand on the
sensor side) and assign an SMS recipient to this alarm.
• Induce an alarm condition and follow the behaviour of the blue LED
diode. After switching the modem on the diode should start flashing
fast for a short time (registration in the network), then more slowly
(message sending) to finally go off (finishing).
Page 35

IE-LGR-UxxxxM-05 35
• If the blue diode does not start flashing at all, then the datalogger‘s
radio section has not been activated at all. It may be caused by an
improper setting: A non-functioning SIM card has been inserted, the
SIM Card has been blocked because a wrong PIN has been
entered, the alarm is not activated at all, no phone number is
assigned to the alarm, and the like). Verify whether the SIM card is
protected by a PIN code. If this is the case, verify if the code has
been entered properly in the device configuration.
- Make sure the SIM card is properly seated in its holder.
Make sure the holder is locked.
- Insert the SIM card into the mobile phone and verify that the
SMS messages function properly. Try the same phone
numbers as those you have stored in the datalogger.
- Verify whether the datalogger aerial is not damaged and
whether it is connected correctly.
- Contact your service department (possible failure
diagnostics, wrong interconnection of internal component
parts, …)
• If the blue LED flashes quickly, but it does not pass over to a slower
frequency, then the modem probably failed to be registered in the
network. Find out if there is sufficient signal intensity in the aerial
vicinity.
• If the blue LED flashes quickly and then slowly to go out completely,
the modem has not been registered in the network. The message
has been sent out (but has not arrived), or it has been refused by
the network. Try another phone number of the recipient, verify if you
enter it in the international format (e.g. +420333222111). Verify in
the configuration of the datalogger, that its name contains letters
and numerals only. Do the same with the name of the measured
channel and with the alarm settings in the user-defined descriptions
of the SMS messages. Verify if SMS messages can be sent out from
the respective SIM card: Insert it into the mobile phone and try to
send a text message to the same number. Ascertain whether the
message has been transmitted.
• Contact the service department in the case that you have not
succeeded in finding the reason of the problem. Diagnostic records
that are saved in the device could deliver further helpful information
for resolving the problem.
Page 36

36 IE-LGR-UxxxxM-05
Recommendations for operation and maintenance
Datalogger operation in several application areas________
Before putting the device into operation, it should be considered, if its
usage is suitable for the intended purpose. In connection with this
consideration the device‘s optimum settings should be determined. In
the case that the device is part of a larger measurement system,
instructions for its metrological and operational checks should be
developed
Inadvisable or hazardous applications:
This datalogger is not intended for such applications in which the failure
of its functioning could directly endanger life and health of humans and
animals, or the functioning of other equipment with life-sustaining
functions. In applications the failure or malfunction of which could result
in severe property damage it is recommended to provide the system
with suitable and independent signalling equipment which is able to
evaluate such a condition and, in case of failure, to prevent the above
mentioned damages (See the chapter „Safety measures and
unauthorized manipulations“).
Device positioning:
Adhere to principles and procedures mentioned in this manual. Try to
choose such a place to position the device, where the negative
influence caused by environment is as low as possible. When
performing measurements in refrigerators, metal boxes, metal
chambers and the like, it is every time advisable, as far as the device’s
operation and reliability is concerned, to place the device outside,
leaving only the sensors and probes inside the measured environment.
Positioning of temperature sensors:
These sensors should be placed in locations where sufficient air
circulation is ensured and where the most critical location is supposed
(according to the application requirements). To prevent heat
conduction through the sensor cables from undesirable influencing the
measurement value, the sensor must be properly inserted into the
measured environment. If you follow the temperature distribution in an
air-conditioned storehouse, do not place the sensor into the direct air
stream generated by the air-conditioning unit. As a matter of fact, the
temperature distribution in large-chamber refrigerators may be quite
inhomogeneous, the temperature differences reaching up to 10°C.
Similar dispersion can be found inside deep-freezing boxes (e.g. in
those used for blood preservation by deep freezing).
Page 37

IE-LGR-UxxxxM-05 37
Positioning of humidity sensors:
The positioning of humidity sensors depends again on the application
requirements. Humidity measurements in refrigerators without
additional humidity stabilization can be very questionable. When the
cooling is switched on/off, there may be significant changes in humidity
in the range of tens of percent, even if the mean value is correct.
Moisture condensation on the ventricle walls is common.
Recommendations for metrological checks ____________
Metrological verification is carried out according to the requirements of
the particular application at intervals fixed by the user. In some cases,
calibration must be performed by an independent laboratory that is
accredited by the government.
Recommendations for regular checks _________________
The producer recommends to have the system, which the device is
integrated in, checked in regular intervals. Checking interval and
inspection scope depend on the particular application and the user’s
internal regulations. In fixed installations following checks are
recommended to be performed:
• Metrological verification;
• Regular checks fixed by the user;
• Judgement of all problems that has occurred since the last check;
• Visual check of the device, connectors condition, cover integrity;
• Functionality check (checking of features utilized by the application):
a) Check of the transfer of the actual recorded value into the
computer, record evaluation
b) Functionality check of individual alarms. This should be done
by changing the input quantity to give rise to an alarm. Then
check it visually on the display. Check whether the SMS
message has been sent (if used).
c) Judgement of the battery condition on the display.
• Check of the cabling. To be checked: Condition of cable
connections and cable surface integrity, proper cable routing, no
additional parallel heavy-current conductors.
• Check of all sensors. This is to be performed visually. Check for
water ingress, check for suitable sensor location with respect to
correct measurement conditions and possible signal deteriorating
by interference.
• The check results are to be recorded.
Page 38

38 IE-LGR-UxxxxM-05
Service recommendations ________________________
Engineering support and service activities are provided by the device
distributor. His contact person‘s address is given in the Certificate of
warranty included with the product.
WARNING - Unskilled intervention into the device may
lead to loss of warranty!
Page 39

IE-LGR-UxxxxM-05 39
Technical parameters
Power supply
The device is supplied from an internal Li-ion battery, which is placed under
the rear cover. The battery may be replaced by the producer or an authorized
service provider only.
Battery _________________________________________
Battery model used:
BAT26001S2P Li-ion 2 PACK US18650VTC5 5200 mAh
SONY (2x 2600mAh)
Operating lifetime relating to a single charge of the Li-ion
accumulator:
Several months to several years according to the device
setting and number of messages sent. Devices with a
CO2 concentration sensor have a higher battery
consumption and therefore shorter holding time. Follow
the battery status, recharge battery if necessary.
Battery charger ___________________________________
Recommended charger type:
Commonly used chargers, such as mobile phone
chargers with a USB type C connector, such as Sunny
SYS 1561-1105
Maximum current from the USB connector:
• Provided that the datalogger is connected to the
computer and a successful enumeration takes place,
the input current limit will be set to 500mA.
• If no successful enumeration takes place within
10 s after powering up the device (the device is not
connected to the computer), then the input current limit
is increased to 1500 mA. However, when the input
voltage drops, the current drawn from the connector
will decrease automatically.
Charging time:
Fully charged battery is indicated on the display of the
device usually within 6 hours.
Charging conditions:
The charging process only runs when the internal
temperature ranges between 0°C and 40°C.
Page 40

40 IE-LGR-UxxxxM-05
USB communication interface
Compatibility:
USB1.1 and USB 2.0
Connector:
USB-C
Measurement, data storage and real time circuitry
Measurement Interval:
10 s as standard
1 s in fast mode
1 minute in economic mode
Recording interval:
(1 s, 2 s, 5 s, 10 s, 15 s, 30 s)
1 min, 2 min, 5 min, 10 min, 15 min, 30 min,
1 h, 2 h, 3 h, 4 h, 6 h, 8h, 12 h, 24 h
You cannot select a shorter Recording interval than the
Measurement interval
Storage capacity:
Maximum 500 000 values in non-cyclic record
Maximum 350 000 values in cyclic record
Radio section
The datalogger includes a GSM modem intended for data
transfer and sending SMS messages. This modem is only
powered up and registered in the GSM network only when SMS
messages' sending off is required. Otherwise it is switched off.
GSM modem:
Quad-band 850/900/1800/1900MHz
GPRS Mobile Station Class B
Compliant to GSM Phase2/2+
Class 4 (2W @ 850/900MHz)
Class 1 (1W @ 1800/1900MHz)
Aerial input:
Connector: SMA, female
Impedance: 50 Ω
Page 41

IE-LGR-UxxxxM-05 41
Aerial gain: 3 dBi max.
Aerial VSWR: < 1 : 2
Aerial:
Model: AO-AGSM-SMVS
Gain: 2 dBi
VSWR: < 1 : 1.8
SIM card:
The datalogger includes a slot for inserting a microsized SIM card. Use a suitable reduction if you own
another sized card. The slot may be accessed after
removing the datalogger‘s rear cover.
Parameters of datalogger inputs
U0110M ________________________________________
Measured value:
Internal temperature
Temperature range:
(-20 to +60) °C
Accuracy:
± 0.4 °C
(*)
(*)
During battery charging temporary measurement
accuracy deterioration may be found.
Response time:
T63 < 6 min, t90 < 15 min (temperature jump 20 °C, air
circulation ca 1 m/s)
Display resolution:
0.1 °C
Recommended calibration interval:
2 years
U0141M ________________________________________
Measured values:
4 x temperature sensed by an external Comet
Pt1000/E series probe
Page 42

42 IE-LGR-UxxxxM-05
Temperature range:
(-90 to +260) °C, Pt1000/3850 ppm sensor
Measuring current: ca 0.5 mA with pulses of ca 60 ms
length
Input accuracy (without probes):
±0.2 °C in a range of -90 to +100 °C
±0.2 % of the measurement value in a range of +100
to +260 °C
The accuracy of the device with a temperature probe
connected to it is determined by the above input
accuracy and the accuracy of the probe employed.
Connection mode:
Two-wire connection with the possibility of
compensation of the error caused by the cable
resistance. The probe is provided with a 3-pin M8 ELKA
3008V connector. Its connection mode is shown in
Annex 2.
The recommended length of the Pt1000/E probe cable
is maximum 15 m, a length of 30 m must not be
exceeded. Shielded cables are recommended.
Response time:
Is determined by the response time of the used probe.
Display resolution:
0.1 °C
Recommended calibration interval:
2 years
U3120M ________________________________________
Measured values:
Internal temperature, relative humidity.
Dew-point temperature calculated from the internal
temperature and relative humidity.
Ranges:
Temperature: (-20 to +60) °C
Relative humidity: (0 to 100) %. RH without lasting
condensation.
Dew-point temperature: -90 to +60 °C
Accuracy
(*1)
:
Temperature: ± 0.4 °C
Relative humidity:
- sensor accuracy ±1.8 %RH
(at 23 ºC in the range of 0 to 90 %RH)
- hysteresis < ±1 %RH
Page 43

IE-LGR-UxxxxM-05 43
- non-linearity < ±1 %RH
Dew-point temperature: ±1.5 °C at an ambient
temperature of T< 25 °C and RV >30 %.
For details see diagrams in Annex 4.
Response time (air streaming velocity approx. 1 m/s)
(*2)
:
Temperature: t63 < 2 min, t90 < 8 min (temperature
jump 20 °C)
Relative humidity: t63 < 45 s, t90 < 4 min, t99 <4 h.
(humidity jump 30 % RV, constant
temperature)
Display resolution:
Temperature incl. dew-point temperature: 0.1 °C
Relative humidity: 0.1 %.
Recommended calibration interval:
1 year
(*1)
During battery charging temporary measurement
accuracy deterioration may be found.
(*2)
Important information is provided in the chapter
Manufactured models – U3120M
U3121M ________________________________________
Measured values:
Temperature and relative humidity measured by an
external Digi/E series probe. The dew-point temperature
is calculated from the measured temperature and the
relative humidity.
Range, accuracy and response time:
Depending on the connected Digi/E series probe.
Connection mode:
Digi/E series probe. The probe is provided with a 4-pin
M8 ELKA 4008V connector. Its connection mode is
shown in Annex 3. The length of the Digi/E probe cable
must not exceed 30 m.
Display resolution:
Temperature incl. dew-point temperature: 0.1 °C.
Relative humidity: 0.1 %.
Recommended calibration interval:
1 year (according to the connected probe)
Page 44

44 IE-LGR-UxxxxM-05
U3631M ________________________________________
Measured values:
Internal temperature, relative humidity.
1x External temperature measured by an external
Comet Pt1000/E probe.
Dew-point temperature calculated from the internal
temperature and relative humidity.
Difference of external temperature and dew point
temperature.
Ranges:
Internal temperature: (-20 to +60) °C
Relative humidity: (0 to 100) % RH without lasting
condensation
(*2)
.
Dew-point temperature: -90 to +60 °C
External temperature input:
(-90 to +260) °C, Pt1000/3850 ppm sensor
Measuring current: approx. 0.5 mA in pulse
length approx. 60 ms
Accuracy
(*1)
:
Internal temperature: ± 0.4 °C
Relative humidity:
- sensor accuracy ±1.8 %RH
(at 23 ºC in the range of 0 to 90 %RH)
- hysteresis < ±1 %RH
- non-linearity < ±1 %RH
Dew-point temperature: ±1.5 °C at an ambient
temperature of T< 25 °C and RV >30 %.
For details see diagrams in Annex 4.
External temperature input (without probe):
± 0.2 °C in the range -90 °C to +100 °C
± 0.2% of the measured value in the range +100 ° C to
+260 ° C
The precision of the device with the connected
temperature probe is determined by the abovementioned precision of input and accuracy of the probe
used.
Connection method (external probe):
Two-wire connection with the possibility of
compensation for the cable wire resistance. The probe
is terminated by a 3-pin M8 ELKA 3008V connector.
The method of interconnection is given in Appendix 2.
The recommended length of probes Pt1000/E is up to
15 m, not longer than 30 m. It is recommended to use
shielded cables.
Page 45

IE-LGR-UxxxxM-05 45
Response time (air streaming velocity approx. 1 m/s)
(*2)
:
Internal temperature: t63 < 2 min, t90 < 8 min
(temperature jump 20 °C)
Relative humidity: t63 < 45 s, t90 < 4 min, t99 <4 h.
(humidity jump 30 % RV, constant
temperature)
Display resolution:
Internal temperature incl. dew-point temperature: 0.1 °C
Relative humidity: 0.1 %
External temp. input: 0.1 °C, 16-bit converter range
Recommended calibration interval:
1 year
(*1)
During battery charging temporary measurement
accuracy deterioration may be found.
(*2)
Important information is provided in the chapter
Manufactured models – U3631M
U4440M ________________________________________
Measured values:
Internal temperature, relative humidity, barometric
pressure and the concentration of CO2 in the air. Dewpoint temperature calculated from the internal
temperature and relative humidity.
Ranges:
Temperature: (-20 to +60) °C
Relative humidity: (0 to 100) % RH without lasting
condensation
(*2)
.
Barometric pressure (absolute): 600 hPa to 1100 hPa
Concentration of CO2 in the air: 0 to 2000 ppm
Dew-point temperature: -90 to +60 °C
Accuracy
(*1)
:
Temperature: ± 0.4 °C
Relative humidity:
- sensor accuracy ±1.8 %RH
(at 23 ºC in the range of 0 to 90 %RH)
- hysteresis < ±1 %RH
- non-linearity < ±1 %RH
Barometric pressure: ± 1.3 hPa at 23 °C
CO2 concentration in the air: 50 ppm + 2 % of the
measured value at 23 °C and 1013 hPa
Dew-point temperature: ±1.5 °C at an ambient
temperature of T< 25 °C and RV >30 %.
For details see diagrams in Annex 4.
Page 46

46 IE-LGR-UxxxxM-05
Response time (air streaming velocity approx. 1 m/s)
(*2)
:
Temperature: t63 < 2 min, t90 < 8 min (temperature
jump 20 °C)
Relative humidity: t63 < 45 s, t90 < 4 min, t99 <4 h.
(humidity jump 30 % RV, constant
temperature)
Barometric pressure: t90 <44s
CO2 concentration in the air: according to the set CO2
measurement interval (2 min / 10 min)
Display resolution:
Temperature incl. dew-point temperature: 0.1 °C
Relative humidity: 0.1 %
Barometric pressure: 1 hPa
CO2 concentration in air: 1 ppm
Recommended calibration interval:
1 year
(*1)
During battery charging temporary measurement accuracy
deterioration may be found.
(*2)
Important information is provided in the chapter
Manufactured models – U4440M
U0843M ________________________________________
Measured values:
2 x temperature by an external Comet Pt1000/0 probe
2 x binary input intended for voltage to be applied to it
or a voltage-free contact (an open-collector transistor)
to be connected to it. This device is not suitable for
latching the „voltage applied/not applied” states.
Range:
Temperature: (-90 to +260) °C, Pt1000/3850 ppm
Measuring current: ca 0.5 mA in ca 60 ms long pulses
Both voltage and no-voltage contact can be connected
to the binary input without the need for configuration.
Voltage levels:
„L“ level input voltage: < 0.8 V
(*)
„H“ level input voltage: > 2 V
Minimum voltage applicable: 0 V
Maximum voltage applicable: +30 V DC
(*)
The voltage necessary for establishing the „L“
level must factually be applied. Should the input be
disconnected, the device will sense the „H“ level.
Page 47

IE-LGR-UxxxxM-05 47
Parameters of the voltage-free contact:
Contact resistance in „switched-on“ state:
< 10 kΩ
Contact resistance in the „switched-off“ state:
> 2 MΩ
Excitation voltage: approx. 3 V
Minimum state duration necessary for latching the
state: 1s
Input accuracy (without probes):
±0.2 °C in the range of -90 to +100 °C
±0.2 % of the measurement value in the range
of +100 to +260 °C
The accuracy of the device with the temperature probe
connected is determined by the above input accuracy
and the accuracy of the probe used.
Connection mode:
Split connection block, maximum wire cross section
1.5 mm2. Recommended length of the Pt1000 probe
cables is maximum 15 m, a length of 30 m should not
be exceeded. Maximum length of the binary inputs
cables is 30 m. It is recommended to use shielded
cables.
CAUTION: The inputs are not galvanically separated!
Response time:
Is determined by the response time of the used probe.
Resolution:
0.1 °C converter range: 16 bits
Recommended calibration interval:
2 years
U6841M ________________________________________
Measured values:
3x current input,
1 x binary input. This input can be configured to accept
voltage signals or a voltage-free contact (as e.g. an
open-collector transistor). Unlike the U0843M model,
this device can capture connected/disconnected voltage
status.
Page 48

48 IE-LGR-UxxxxM-05
Range and input levels:
Current input:
Range: (0 to 20) mA DC
Accuracy: ± 20 uA
Resolution: better than 1 uA
Input resistance: approx. 100 Ω
Minimum current: 0 mA (open circuit)
Maximum current: limited to approx. 40 mA
Binary input configured for voltage measurements:
Input voltage for the „L“ level: < 0.8 V
(*)
Input voltage for the „H“ level: > 2 V
Minimum applicable voltage: 0 V
Maximum applicable voltage: +30 V DC
(*)
When the input is disconnected, the device will
measure the „L“ level.
Binary input configured for a voltage-free contact or an
open-collector transistor:
Contact resistance for the „switched-on“ state:
< 10 kΩ
Contact resistance for the "switched-off" state:
> 2 MΩ
Excitation voltage: approx. 3 V
Minimum state duration necessary for latching the
state: 1s
Connection mode:
Split connection block, maximum wire cross section
1.5 mm2. The maximum cable length is 30 m. It is
recommended to use shielded cables.
CAUTION: The inputs are not galvanically separated!
Recommended calibration interval:
2 years
U7844M ________________________________________
Measured values:
2x user configurable binary input for applying voltage or
connecting a voltage-free contact (as e.g. an opencollector transistor). Unlike the U0843M model, this
device is able to latch also the „voltage applied/not
applied“ states.
2 x counting input. This input, like the binary one, can be
configured to accept voltage signals or a voltage-free
contact (as e.g. an open-collector transistor). These
Page 49

IE-LGR-UxxxxM-05 49
counting inputs can be used as additional two binary
ones.
Input levels:
Binary or counter input configured for voltage
measurements:
Input voltage for the „L“ level: < 0.8 V
(*)
Input voltage for the „H“ level: > 2 V
Minimum applicable voltage: 0 V
Maximum applicable voltage: +30 V DC
(*)
When the input is disconnected, the device will
measure the „L“ level.
Binary or counter input configured for a voltage-free
contact or an open-collector transistor:
Contact resistance for the „switched-on“ state:
< 10 kΩ
Contact resistance for the "switched-off" state:
> 2 MΩ
Excitation voltage: approx. 3 V
Minimum state duration necessary for latching the
state: 1s
Counter parameters:
Range: 24 bits (16 777 215), possibility of letting the
counter overflow
Maximum pulse frequency when configuring for:
- voltage input: max. 5 kHz
- voltage-free contact or open collector transistor:
max. 200 Hz
Further features: relative counter (count of pulses
sensed during the recording interval)
Connection mode:
Split connection block, maximum wire cross section
1.5 mm2. The maximum cable length is 30 m. It is
recommended to use shielded cables.
CAUTION: The inputs are not galvanically separated!
Operating and storage conditions
Operating temperature:
(-20 to +60) °C
Range of the display visibility: (-10 to +60) °C
Operating humidity:
(0 to 100) % RH without long-lasting condensation
Page 50

50 IE-LGR-UxxxxM-05
Operating environment:
chemically non-aggressive
Storage temperature:
(-20 to +45)°C
Storage humidity:
(5 to 90) % RH
Mechanical properties
Dimensions (h x w x d):
93 x 61 x 53 mm without connected cables and
connectors
Mass:
Ca 250 g including batteries
Case material:
Polycarbonate LEXAN EXL1434T resin
Ingress protection:
U0110M, U0141M, U3120M, U3121M, U3631M: IP67
(*)
U4440M, U0843M, U6841M, U7844M: IP20
(*)
To reach this ingress protection, the device cover
screws must be properly tightened, the USB connector
must be provided with a closing cap, and all connector
screws must be tightened. A connector that is not used
must be provided with a closing cap.
Optional accessories:
LP100 - lockable datalogger holder for wall mounting
Declaration of conformity
This datalogger meets the requirements of Directive 2014/35/EU. The original
version of the Declaration of conformity is available in the producer’s
homepage www.cometsystem.com.
Page 51

IE-LGR-UxxxxM-05 51
Annexes
Annex 1: Selected error messages of the device
Failure
Description and debugging
Error 1
Value exceeding the hardware range (value too low).
- The Pt1000 probe is short-circuited.
Check the probes connected and the signals applied.
Error 2
Value exceeding the hardware range (value too high).
- The Pt1000 probe is broken.
Check the probes connected and the signals applied.
Error 3
Error 17
Error 18
Error 19
Measured value is not available.
In device S3121 check, and, if needed, replace the Digi/E
probe connected. In the other models a device failure may
be suspected.
Error 4
Error 56
Measured value is not valid.
Measurement or calculation failure.
Error 5
Too few valid values for an average to be calculated.
Concerns recording average /Min/Max values.
This error means that there has not yet been a sufficient
number of valid values for calculating the average value.
Error 9
Measured value is outside the measurement range (e.g.
temperature with Pt1000). The reason can be a faulty probe,
another sensor type, a parasitic coupling between the inputs
or an incorrect device calibration.
Try another probe; check the cables and possible parasitic
coupling.
Error 11
No valid data of the counter, batteries missing in the device.
Reset the counter content by means of the SW, repeat the
measurement.
Error 13
Error 14
Error 15
CO2 concentration sensor is not available, or it does not
work correctly.
Have the device repaired. This applies to the CO2
concentration sensor devices only.
Page 52

52 IE-LGR-UxxxxM-05
Error
Description and debugging
Error 20
The source value of the calculated quantities is not
available.
Check in the SW whether measurement values are
available (temperature and relative humidity) for this
calculated quantity in question (e.g. the dew-point
temperature).
Error 21
Calculation failure, incorrect device calibration.
Have the device repaired.
Error 22
Counter overflow in the case that in the device
configuration it is required to report this as a failure.
Reset the counter by means of the SW, or, as the case
may be, change the setting for the overflow limit.
Error 50,
Error 55
Device configuration failure, corrupted configuration.
Read the configuration into the SW, check for the correct
setting of all items, save the configuration in the device
again.
Error 51
The Digi/E series probe contains invalid calibration
constants.
Get the probe repaired or contact the producer.
Error 128
Error 255
Error massages generated during communication with the
device.
Repeat the communication, contact the producer.
Annex 2: Connection of the Pt1000/E series probe
connector
Page 53

IE-LGR-UxxxxM-05 53
Annex 3: Connection of the Digi/E probe connector
(female)
Front view:
Annex 4: Accuracy of the dew-point temperature
measurement
Annex 5: Connecting block
Some inputs are equipped with a split selflocking WAGO connector block. Connect
the wires to the block with either the supplied
SP013 or a screwdriver corresponding to the
size: insert a screwdriver into the connecting
block’s angular opening situated above the
circular opening. Open the connector by
turning the screwdriver moderately, insert
the wire and close the connector by
subsequent disengaging the screwdriver.
See the illustration.
The connecting block can be taken out of the
device without the necessity of disconnecting
any wire.
Page 54

54 IE-LGR-UxxxxM-05
Annex 6: SMS message format
SMS message format for SYSTEM ALARM:
The message header includes:
SYSTEM ALARM<enter>
„Description of the device DescDev“<enter>“
Depending on the type of alarm, the corresponding text:
Data memory limit overflow,
Battery warning,
Battery empty,
Battery Ok,
External power lost,
External power Ok;
Date/Time Error,
Date/Time Ok;
Measuring Error on input: ….;
Measuring Error END on input: ….,
Configuration error,
Configuration Ok,
The time of the event, such as „20170808 10:44“
Texts are fixed, user-immutable, if multiple events occur simultaneously and
the length of the message exceeds 160 characters (max message length), then
they will be divided into multiple messages.
Format of alarm SMS message from measured value:
Description of the device DescDev .... max. 32 chars <enter>
Name of the measured location: max. 16 chars <enter>
Text „Actual value: measured value + unit (or binary input status)<enter>
Text ¨ALARM¨ or (Text „ALARM END“) <enter>
Description of the alarm: max. 16 chars
Separator comma + gap
Start time / end time of the alarm, such as 2016/05/08 10:44 <enter>
Text „ALARM“ (Text „ALARM END“)
In the case of other alarms followed by <enter> and continues with information
about the next alarm
Description of the alarm: max. 16 chars
Separator comma + gap 2 chars
Start time of the alarm, such as 2016/05/08 10:44
: :
: :
Page 55

IE-LGR-UxxxxM-05 55
The length of one message is limited to 160 characters, if there is a requirement
to send more characters, the characters are divided into more messages.
DataKeepAliveSMS format (suitable for automated data processing):
All data coded into ASCII, it means 1 Byte will be sent as 2 ASCII characters.
(hex. value 0x9E will be sent as two ASCII characters ‘9’ ’E’)
Initial text "Datalogger" 10 ASCII chars
Space 1 ASCII char
Serial number (4 byte i.e. 8 ASCII chars)
Space 1 ASCII char
Text "ActualData" 10 ASCII chars
Space 1 ASCII char
Device Kind (1 byte i.e. 2 ASCII chars)
Space 1 ASCII char
Status (AState) (2 byte i.e. 4 ASCII chars)
Space 1 ASCII char
Memory occupation [%] (1 byte i.e. 2 ASCII chars)
Space 1 ASCII char
Alarm I states on all chan.: (1 byte i.e. 2 ASCII chars)
Space 1 ASCII char
Alarm II states on all chan.: (1 byte i.e. 2 ASCII chars)
Space 1 ASCII char
Actual values of all 8 chan. in IEEE Float format:
(8x4=32 byte i.e. 64 ASCII chars)
Space 1 ASCII char
Units 3 char per channel (3x8 = 24 ASCII chars)
Space 1 ASCII char
Value of the GSM signal level CsqRssi
(1 byte i.e. 2 ASCII chars)
Space 1 ASCII char
Index of the currently set sending interval KeepAlive SMS
(1 byte i.e. 2 ASCII chars)
Space 1 ASCII char
Time 32b time information, always 8 ASCII chars
Total sends: 152 ASCII chars
Page 56

56 IE-LGR-UxxxxM-05
HumanKeepAliveSms format:
The Text of the message is gradually consisting of the items in the order below.
The length of this report is limited to max 160 characters. If the message was
longer, then it sends only the first 160 characters.
The format of the message:
- description of the device from the configuration: max. 32 chars
- <CR><LF> ... 2 chars
- according to the device configuration, the current value and the unit are
inserted for each channel switched on for measurement. If Alarm1 is active
at the same time, then "!" is inserted BEFORE CURRENT VALUE. If Alarm2
is also active, then "!" is inserted AFTER UNIT (e.g. "!25.3%!" means that
Akarm1 and Alarm2 are active).
- <CR><LF> ... 2 chars
- information about the state of memory occupation
- <CR><LF> ... 2 chars
- information about the state of the battery
- <CR><LF> ... 2 chars
- information about the level of the GSM signal
- <CR><LF> ... 2 chars
- inserts the current time of the device
- <CR><LF> ... 2 chars
Watching the daily limit of SMS sent:
When a request to send an SMS occurs (for example an alarm occurred), the
number of already sent SMS messages is checked for the given day. It monitors
both the messages sent per day (the sum of the SMS sent when the power
supply from battery or external power supply) and the number of messages
sent when the power supply from battery. Both limits can be set using the user's
SW. If the daily limit of the sent messages was reached, then instead of the
alarm SMS is send to the given number different the notification SMS about
exceeding the daily limit and sending of additional SMS to that number will stop.
The counters of the daily limit of sending SMS are reset at midnight (0:00).
Page 57

IE-LGR-UxxxxM-05 57
Annex 7: Firmware updates
FW version 0.0.102 changes:
- Added option to set the format version of the sent JSON data, to support backward
compatibility with older versions of evaluation systems.
Initial version (FW 0.0.90), version 1 (FW 0.0.92, 0.0.93), version 2 (from FW
0.0.94), version 3 (from FW 0.0.101)
- Modified method to sending SMS a JSON data messages:
a) If there is some request to send JSON or SMS
Modem starts and tries to find mobile signal and check its level. If signal is
not detected, modem turns off and waits – an idle time for next connection
attempt is increased dynamically. It means modem, after unsuccessful
mobile network signal detection, will try to connect again after 10 s, 30 s, 1
min, 5 min, 10 min, 30 min, 1 hour, 3 hours, 6 hours, 12 hours (till now was
waiting 30s repeatedly). It will save the battery energy if there is no signal
available. If an external power is available, then waiting interval is extended
to 10 min max. When new event requesting to send SMS or JSON data
occur, modem once tries to start immediately. If it fails again, previous delay
is restored again.
b) When modem tries to send SMS
If it is not possible to send SMS to pre-set phone number (network signal is
available already), it will repeat it 3 times. If still not possible to send SMS,
SMS will be deleted, and this situation will be marked into device's record.
c) When modem tries to send JSON data
Under normal conditions when there is necessary to send the data, modem
is switched on, logged to mobile network, connected to server and transfers
JSON data. But when mobile network or receiving server is temporary
unavailable, then the data cannot be send immediately. If some error during
data sending occurs, logger tries to resend it twice again immediately. If it
still fails, JSON message stays stored into internal buffer (if free space is
available yet) and is going to be send at next sending time again. It means,
unsent data packet is not lost and will be delivered later together with newer
one. This is very useful function if mobile network or server connection is
temporary lost. On the other hand, receiving server can receive data with
bigger delay. If you want to set time stamps for received data by server’s
receiving time, it is recommended to use „Delete unsent data“ option. It will
ensure that received data is close to their original time without bigger
desynchronization. Undelivered data will be deleted to prevent data time
stamp mismatch.
- Extended the time to detect GSM signal when logging into the mobile network from 15s
to 25s.
- The daily limit of sent SMS or data messages is calculated from the beginning of the
data sending, regardless of whether it was received.
 Loading...