

Page 1

Quick User Guide
Via Don Arrigoni, 5 24020 Rovetta S. Lorenzo (Bergamo)
http://www.comelitgroup.com e-mail : [email protected]
Page 2
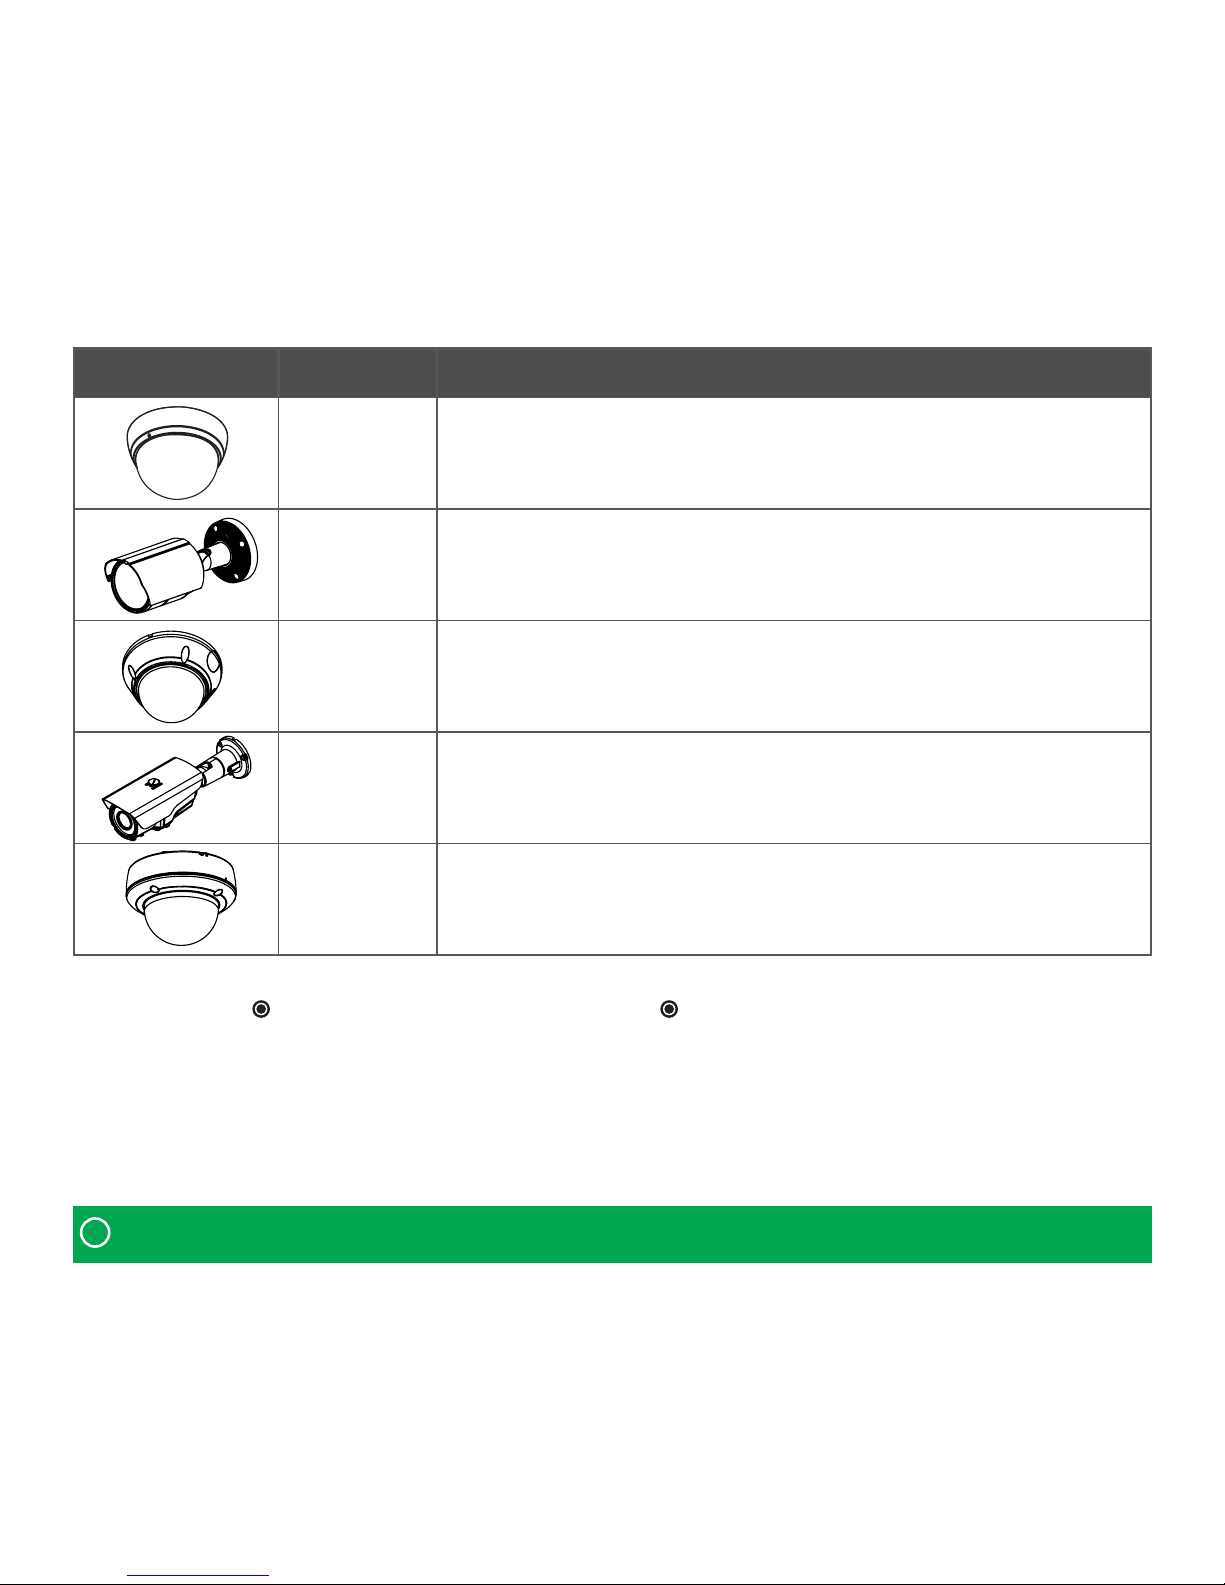
Image Model Description
IPCAM720A
Full HD Entry IP IR Plastic Dome Camera
3.7mm Fixed, 24 IR LEDs, H.264 & MPEG4 & MJPEG, SDHC, PoE/DC12V
IPCAM700A
Full HD Entry IP IR Bullet Camera
3.7mm Fixed, 24 IR LEDs, H.264& MPEG4 & MJPEG, SDHC, PoE/DC12V, IP66
IPCAM722A
Full HD Entry IP IR Vandal Proof Dome Camera
3.7mm Fixed, 24 IR LEDs, H.264& MPEG4 & MJPEG , SDHC, PoE/DC12V, IP66
IPCAM702A
Full HD Entry IP IR Bullet Camera
3.5-16mm Vari, 32 IR LEDs, H.264& MPEG4 & MJPEG, SDHC, PoE/DC12V, IP66
IPCAM727A
Full HD Entry IP IR Vandal Proof Dome Camera
3.5-16mm Vari, 36 IR LEDs, H.264& MPEG4 & MJPEG, SDHC, PoE/DC12V, IP66
Package Component Contents in the installation CD
1. Camera Unit
2. Installation CD
3. Installation Guide
4. Accessory Kit
5. Template Sheet
1. The User’s Manual
2. The Smart Manager User’s Manual
3. The Smart Manager Installation Software
4. The Comelit RAS Solution User’s Manual
5. The Comelit RAS Solution Software
Check your package to make sure that you received the complete system, including all
components shown above
Note:
!
Page 3
1. INSTALLATION
1
Connecting to the Network
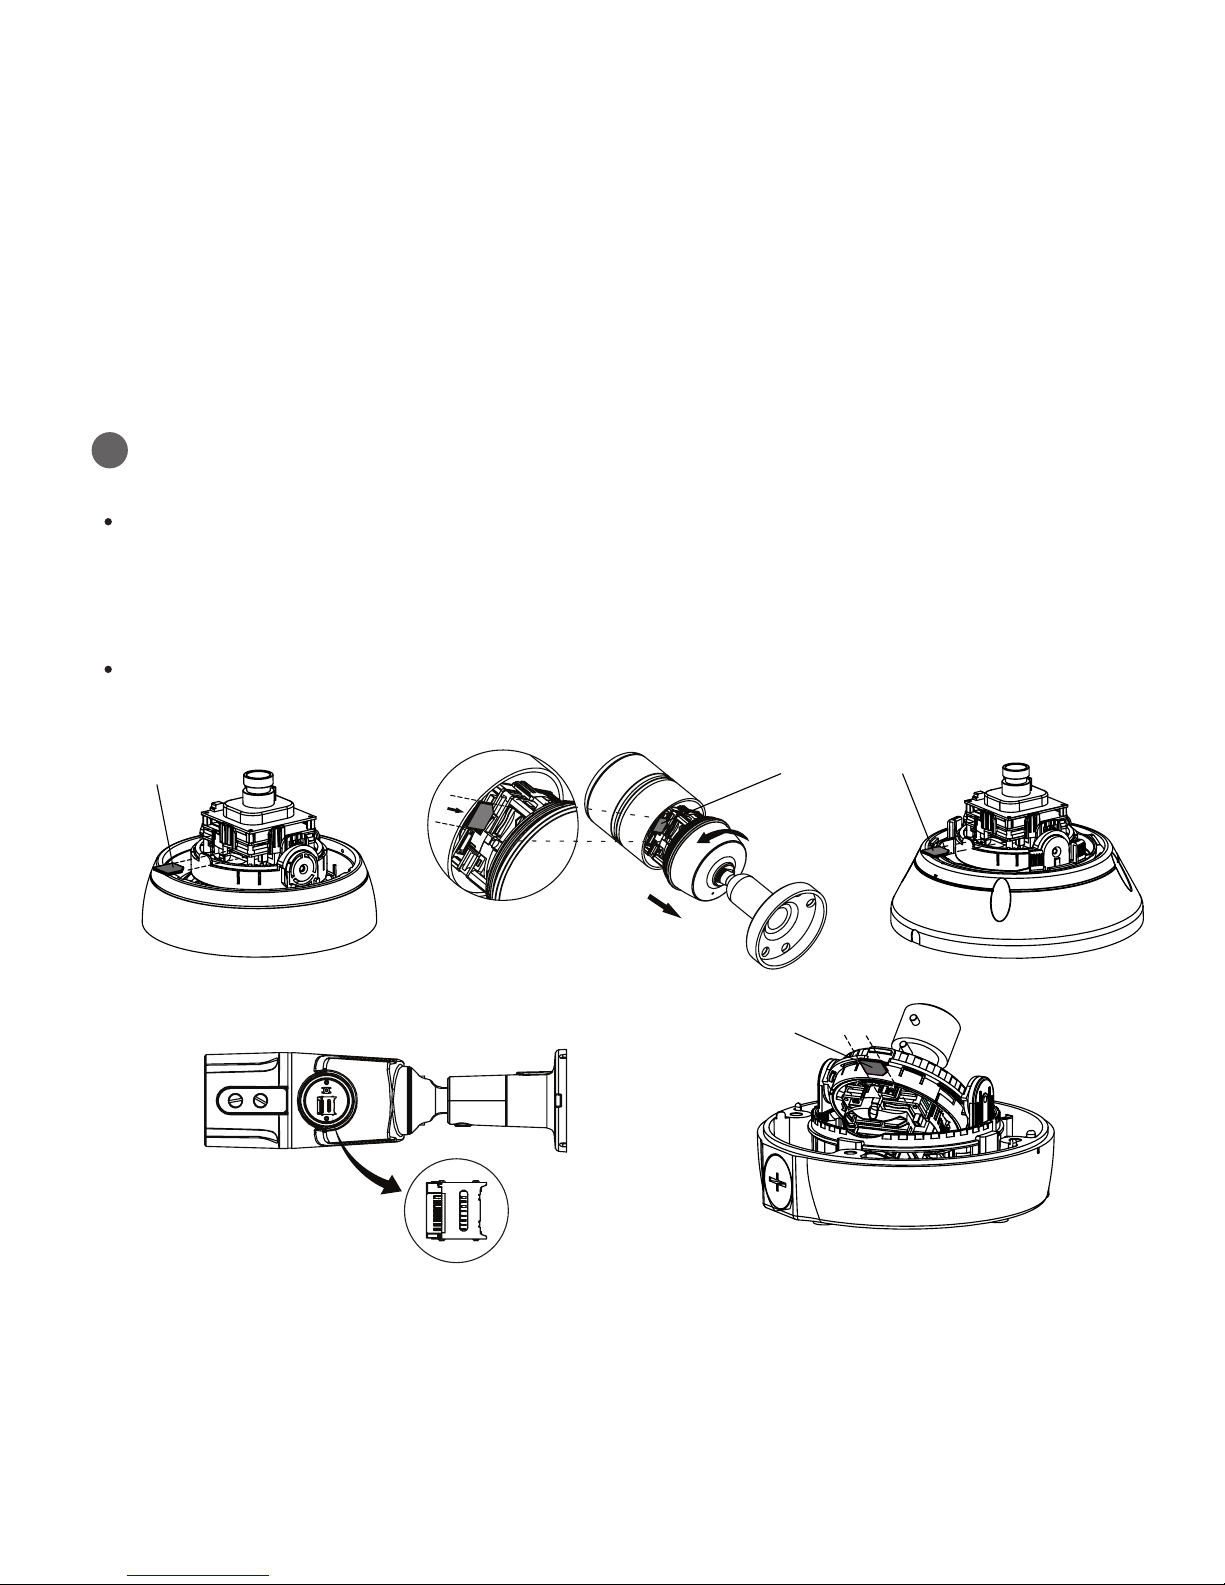
Micro SD memory slot
Hardware Connection
Connect a standard RJ-45 cable to the network port of the Camera. Generally a
cross-over cable is used for directly connection to PC, while a direct cable is used for
connection to a hub/switch
Insert the Micro SD memory card up to 32GB.
[IPCAM720A] [IPCAM722A]
[IPCAM727A][IPCAM702A]
[IPCAM700A]
SD memory card
Micro SD
card slot
SD memory card
SD memory card
Page 4
Connecting the Power
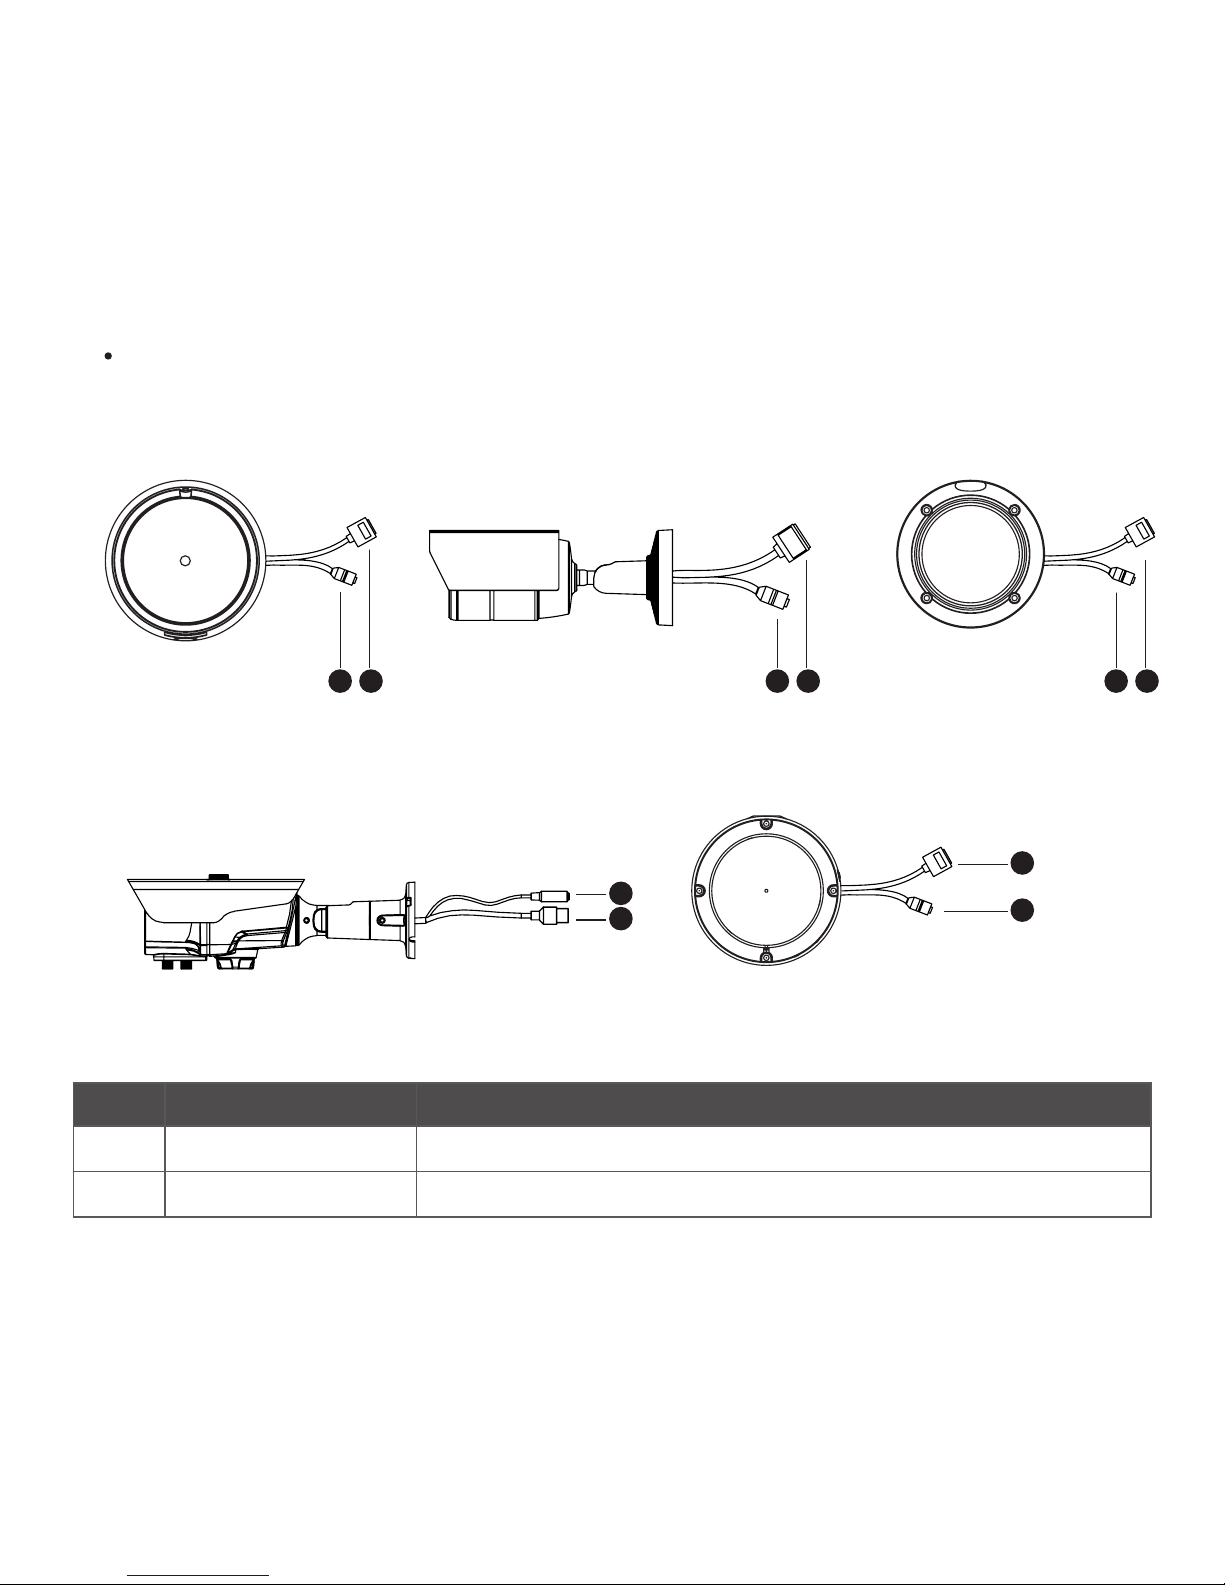
Connect the DC 12V power adaptor to the camera.
No Name Description
1 Power Cable
Cable for Power source (DC 12V)
2 Ethernet Cable
Cable for Ethernet (POE)
[IPCAM720A] [IPCAM722A]
[IPCAM727A][IPCAM702A]
[IPCAM700A]
1
2
1 2 1 2
1
2
1 2
Page 5
2
Network Connection (Zero Conguration Networking)
IP cameras, NVR, and COMELIT RAS Solution support ZERO conguration. Installation is simple and
convenient. No need any network setting. If there is no DHCP to assign the IP address, it will search the
computer IP address or NVR which is running in the LAN. And then it will set the IP address automatically.
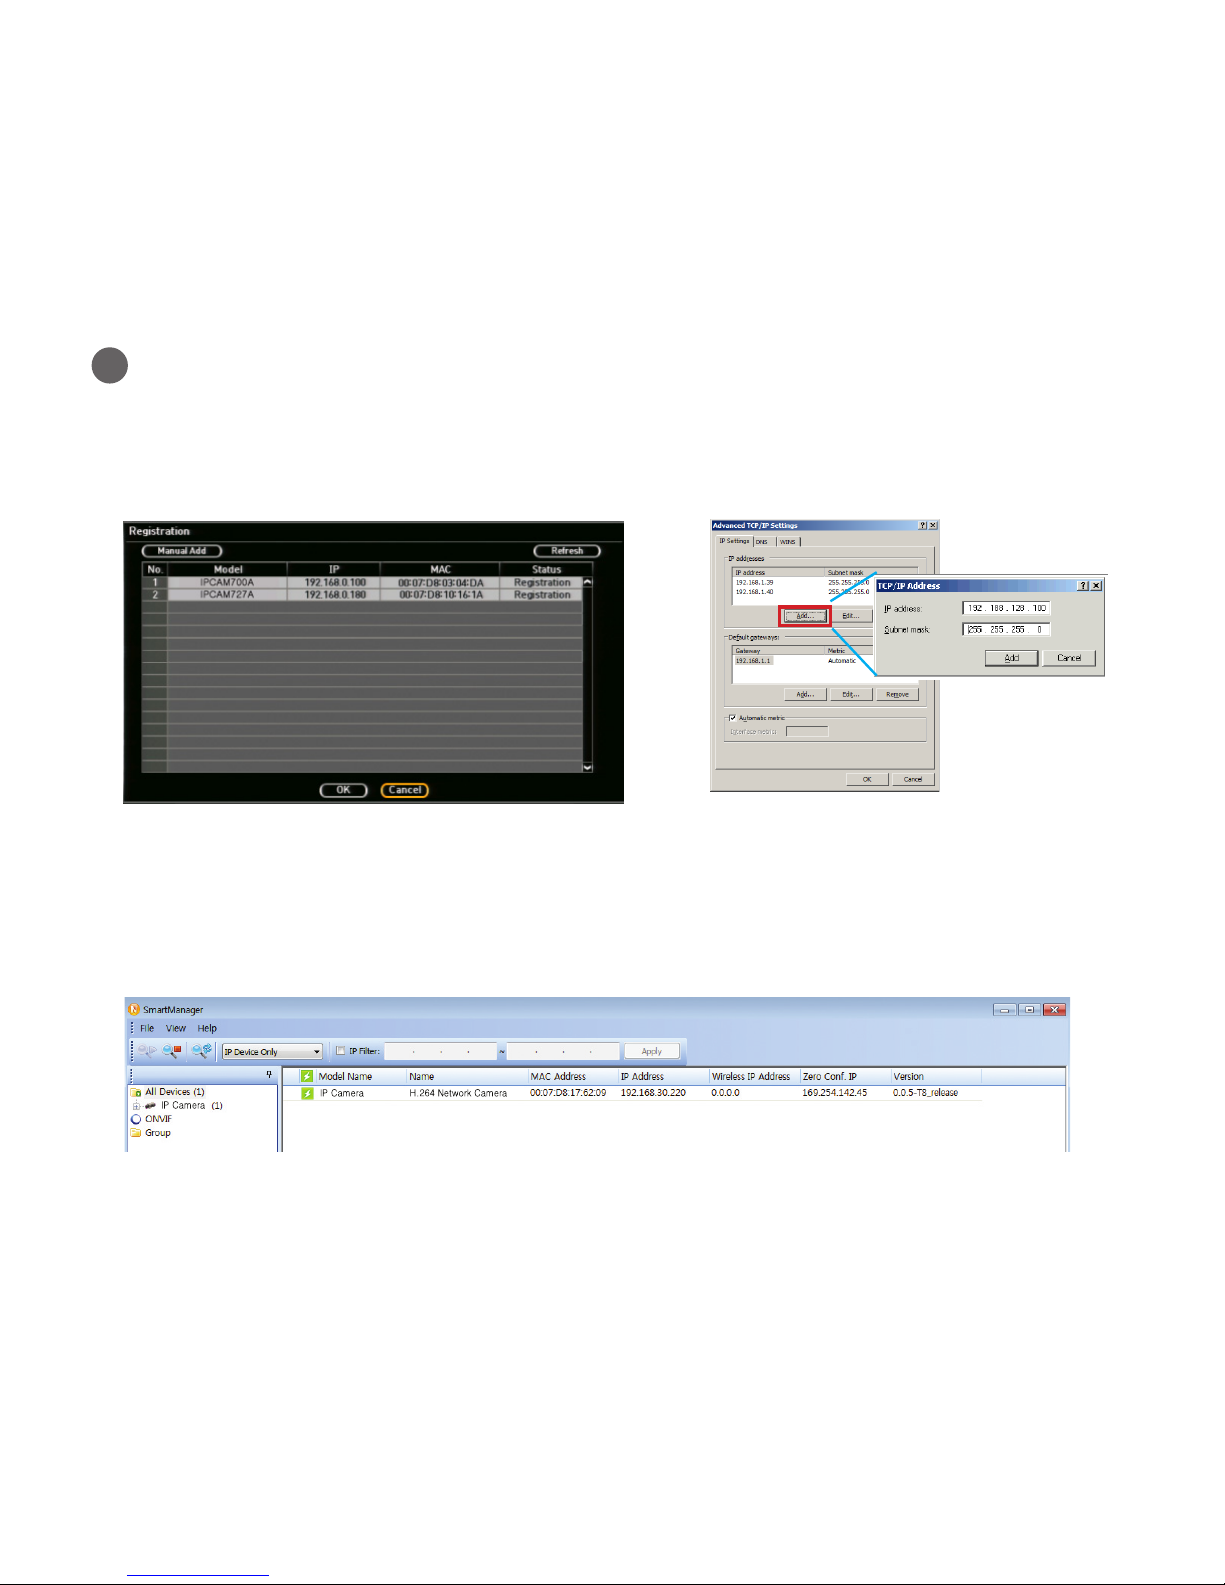
In the IP Camera Registration menu, a list of IP
cameras will appear automatically without IP
address setting.
Once it is congured, IP cameras in the LAN will be searched automatically by
Smart Manager without IP address setting.
Add IP address for ZERO Conguration network
at Advanced TCP/IP Setting on your Computer.
IP address: 169.254.xx.x
Subnet mask: 255.255.0.0
NVR (IPNVR704A, IPNVR708A, IPNVR746A)
COMELIT RAS Solution
Page 6
2
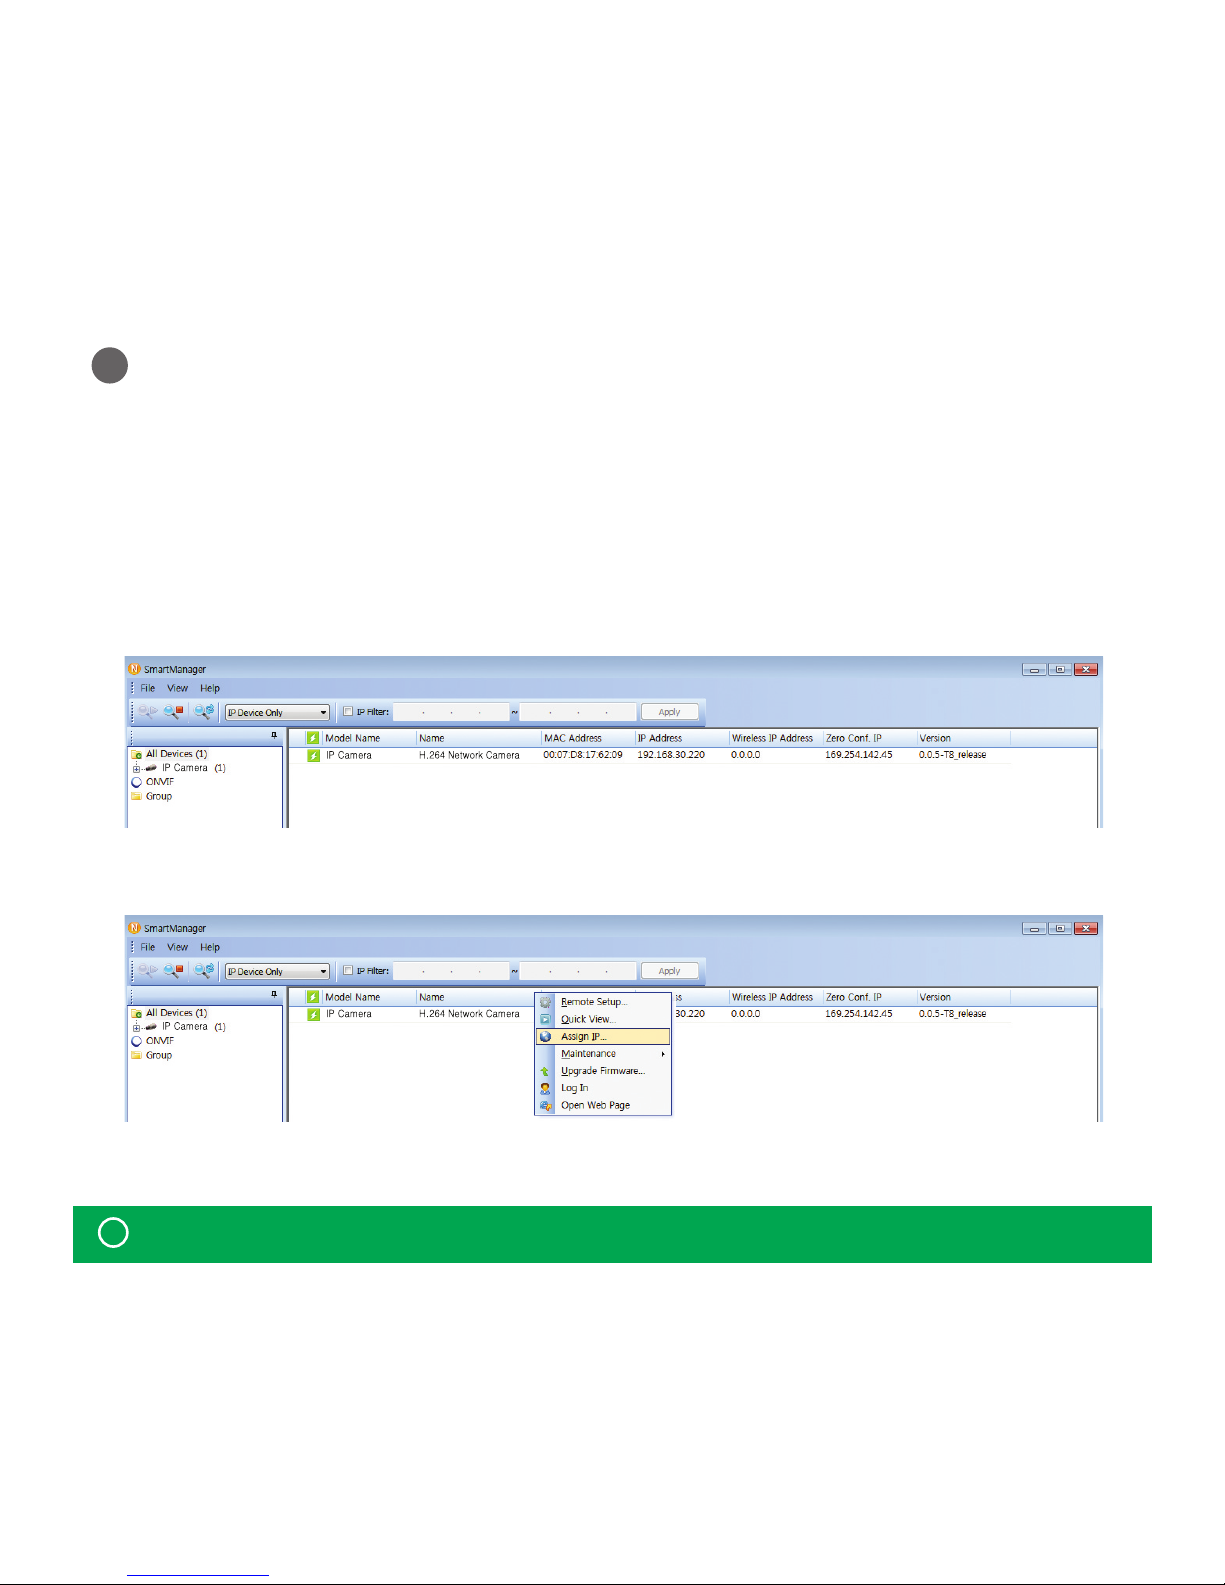
1. Connect the camera to the network and power up.
2. Start SmartManager utility
3. Select the camera on the list and click right button of the mouse.
You can see the pop-up menu below.
4. Select Assign IP Address. The Assign IP window will display.
Enter the required IP address.
Network Connection (IP assignment)
(Start>All programs>SmartManager>SmartManager), the main window will be displayed, after
a short while any network devices connected to the network will be displayed in the list.
When a camera is connected without Zero conguration function to the network it has no IP address. So,
it is necessary to allocate an IP address to the device with the “Smart Manager” utility on the CD. (Default IP
192.168.30.220)
Note:
!
For more information, refer to the SmartManager User’s Manual.
Page 7
2. OPERATION
1
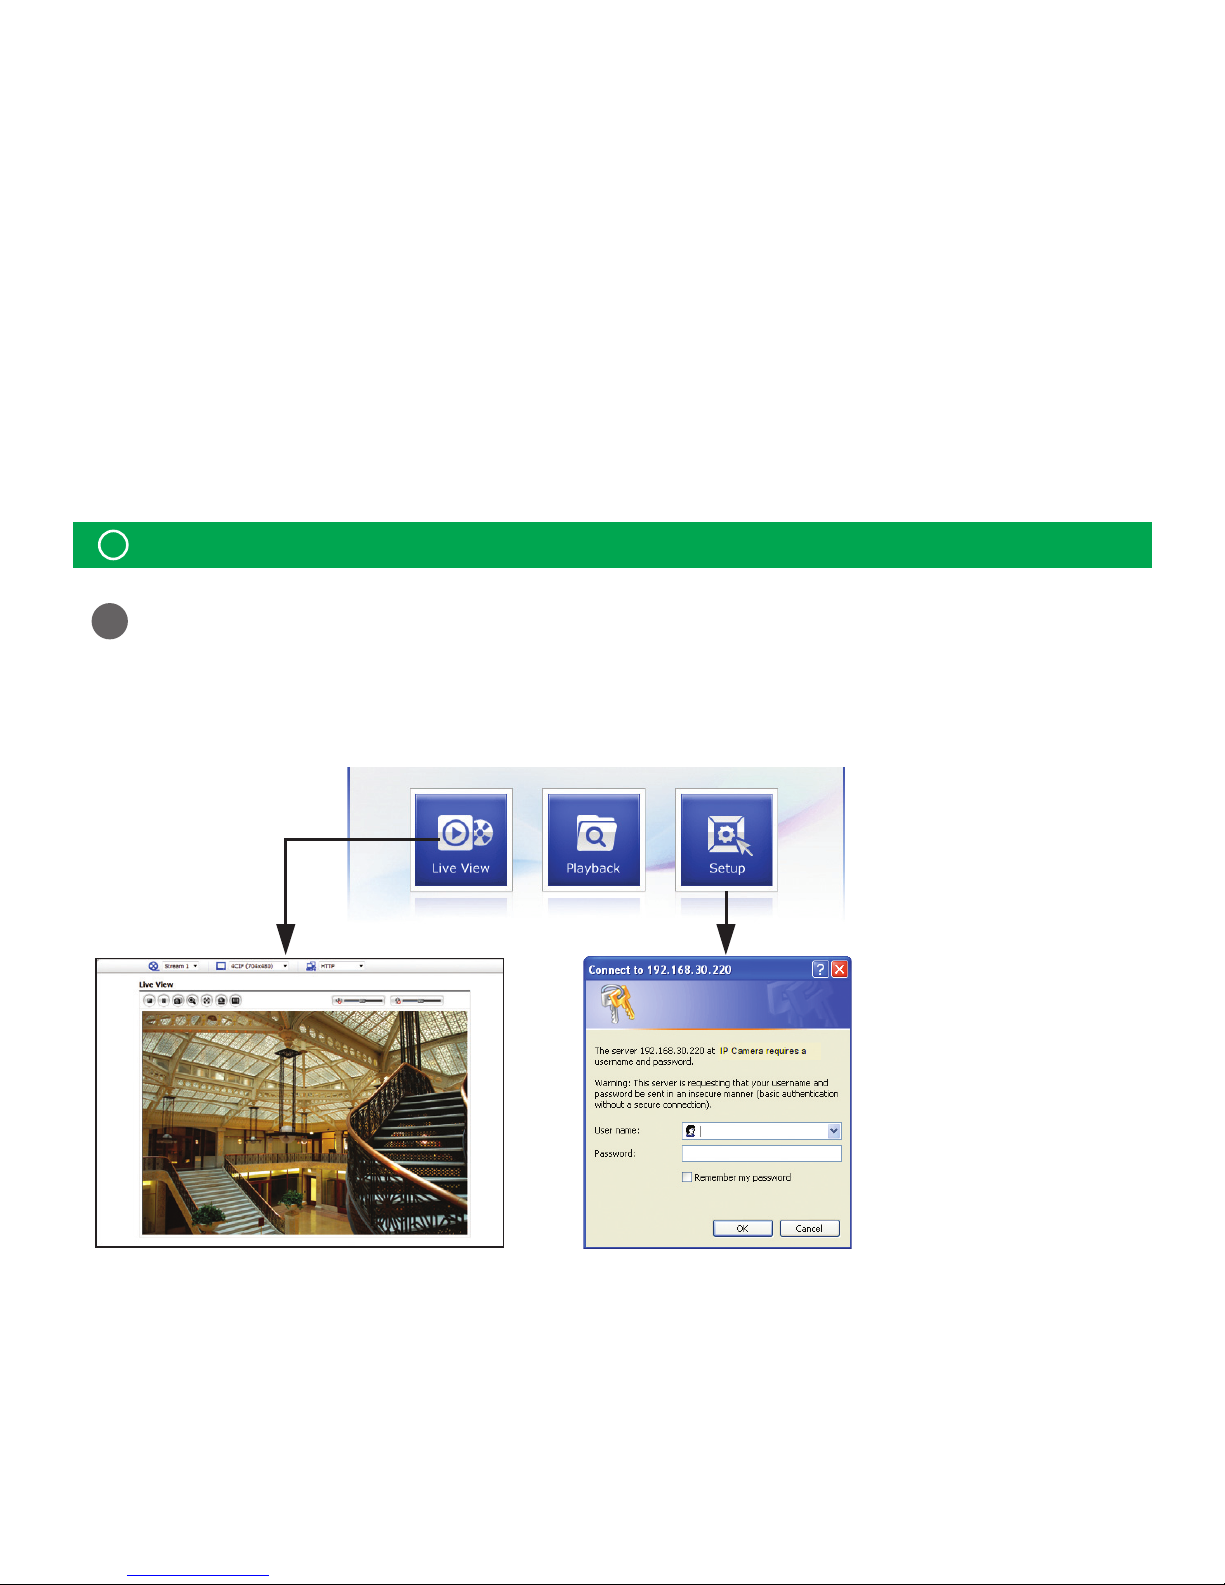
1. Start a browser.
2. Enter the IP address or host name of the network camera in the Location/Address eld of your browser.
3. You can see a starting page. Click Live View or Playback or Setup to enter web page.
How to Access from a browser
The network camera can be used with Windows® operating system and browsers.
The recommended browsers are Internet Explorer®, Safari®, Firefox®, Opera™ and Google®
Chrome® with Windows.
The network camera can be
used with Windows® operating
system and browsers.
The recommended browsers
are Internet Explorer®, Safari®,
Firefox®, Opera™ and Google®
Chrome® with Windows.
Note:
!
To view streaming video in Microsoft Internet Explorer, set your browser to allow ActiveX controls.
Page 8
2
Resetting to the factory default settings
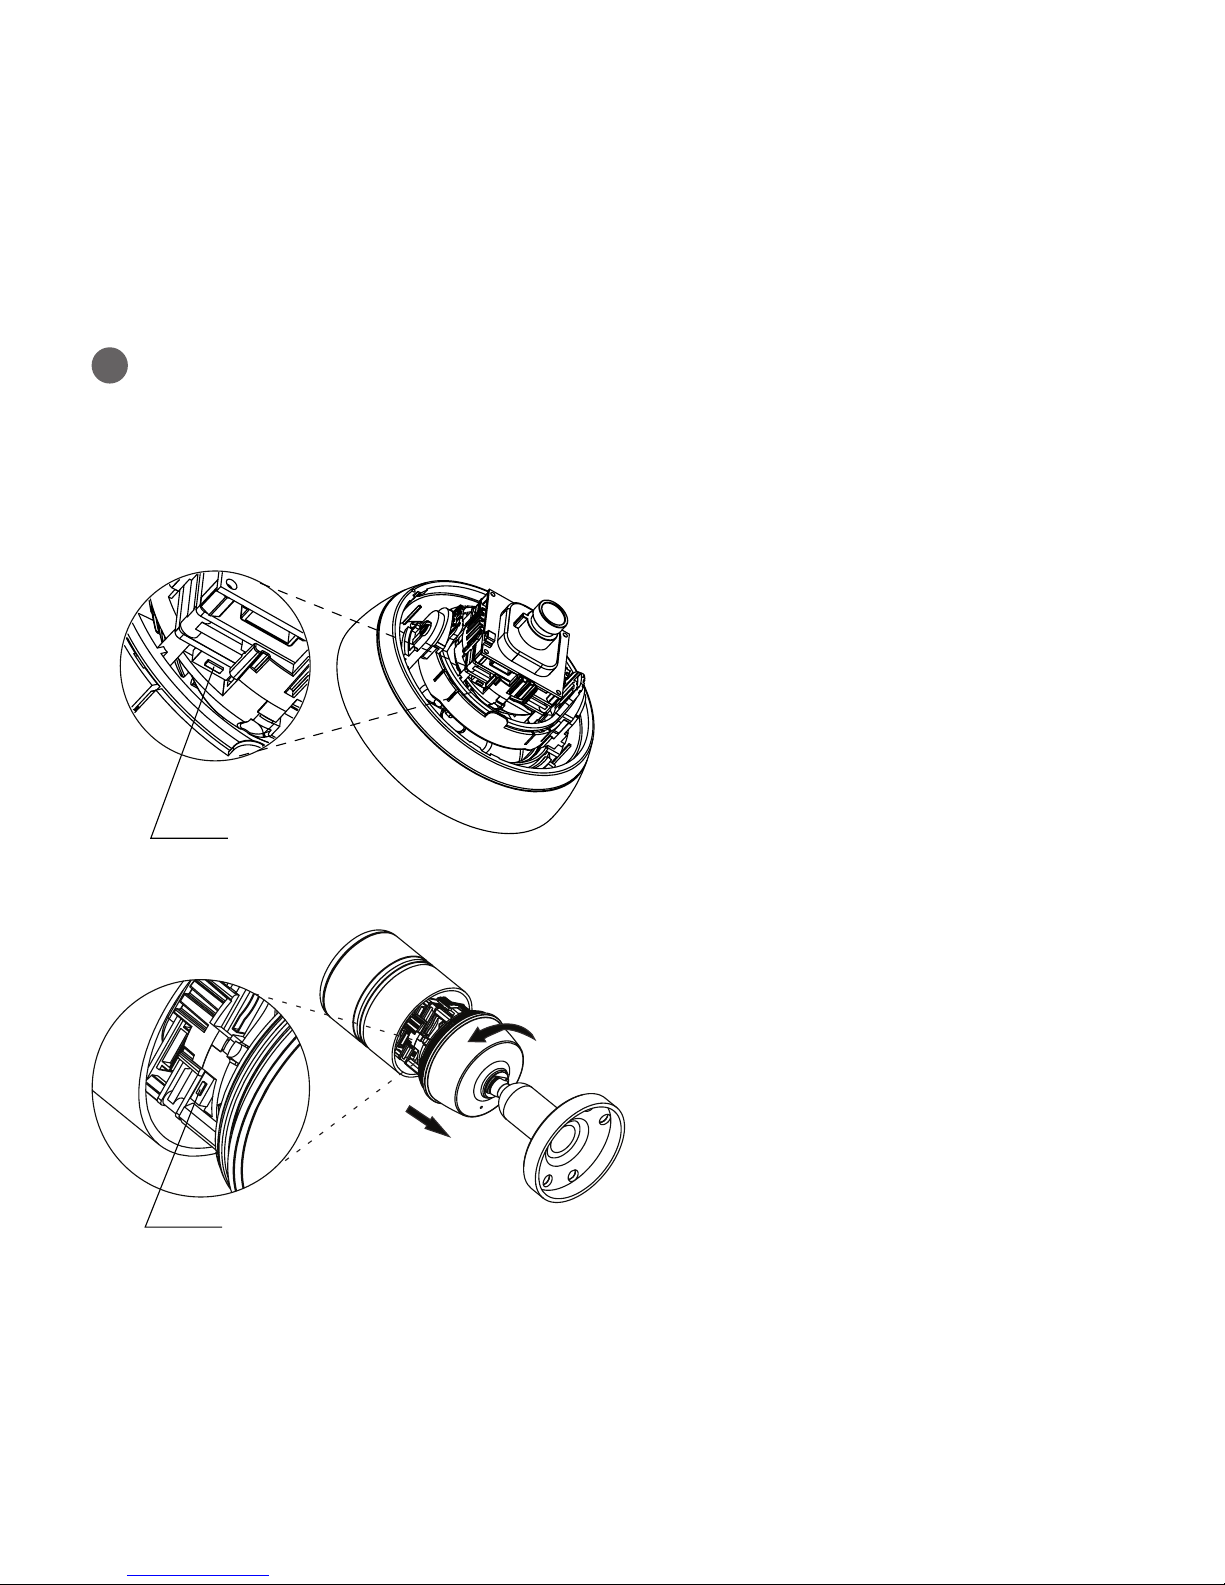
To reset the Network Camera to the original factory settings, go to the Setup>System>
Maintenance web page (described in User’s Manual, “System > Maintenance”) or use the
Reset button on the network camera, as described below
1. Switch o the Network Camera by disconnecting
the power adapter.
2. Press and hold the Reset button while reconnecting
the power.
3. Keep the Reset button pressed during about
2 seconds or more than.
4. Release the Reset button.
5. The network camera resets to factory defaults and
restarts after completing the factory reset.
1. Switch o the Network Camera by disconnecting
the power adapter.
2. Remove the front cap of the camera.
3. Press and hold the Reset button while reconnecting
the power.
4. Keep the Reset button pressed during about
2 seconds or more than.
5. Release the Reset button.
6. The network camera resets to factory defaults and
restarts after completing the factory reset.
[IPCAM720A]
[IPCAM700A]
Reset Button
Reset Button
Page 9
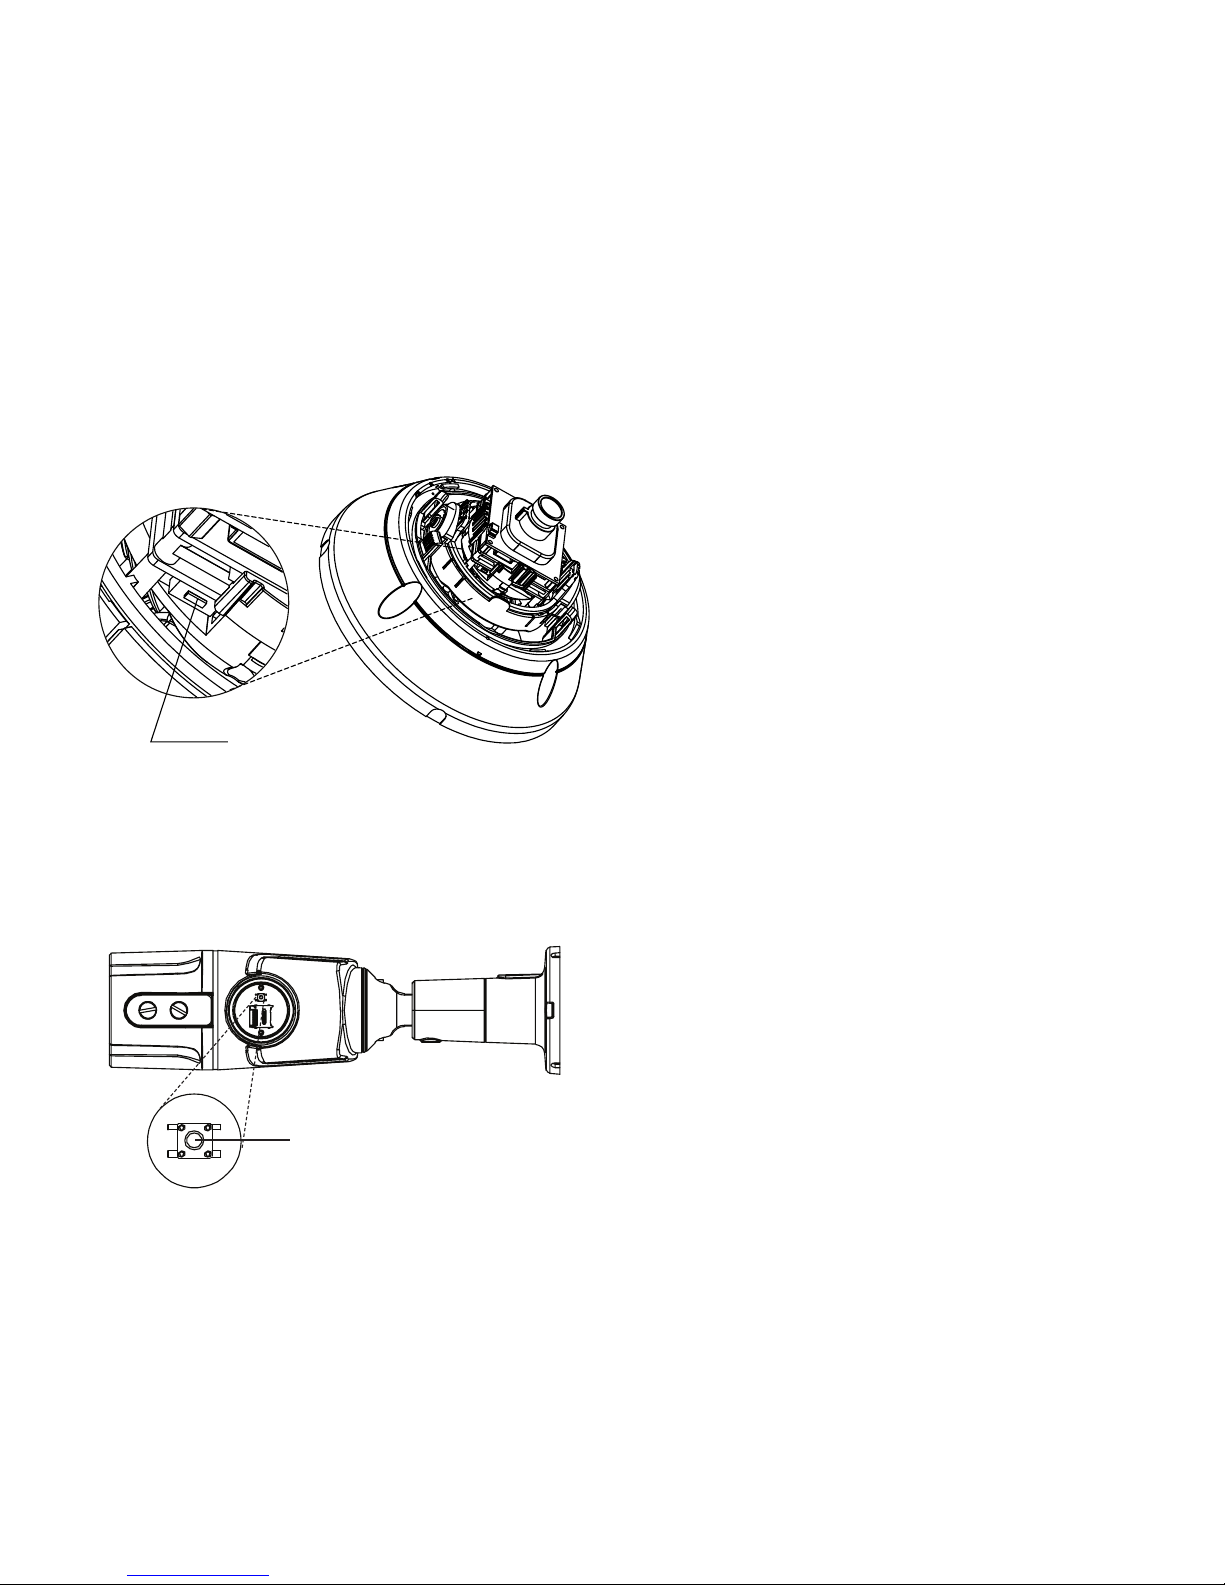
1. Switch o the Network Camera by disconnecting
the power adapter.
2. Press and hold the Reset button while reconnecting
the power.
3. Keep the Reset button pressed during about
2 seconds or more than.
4. Release the Reset button.
5. The network camera resets to factory defaults and
restarts after completing the factory reset.
1. Switch o the Network Camera by disconnecting
the power adapter.
2. Remove the front cap of the camera.
3. Press and hold the Reset button while reconnecting
the power.
4. Keep the Reset button pressed during about
2 seconds or more than.
5. Release the Reset button.
6. The network camera resets to factory defaults and
restarts after completing the factory reset.
[IPCAM722A]
Reset Button
[IPCAM702A]
Reset Button
Page 10
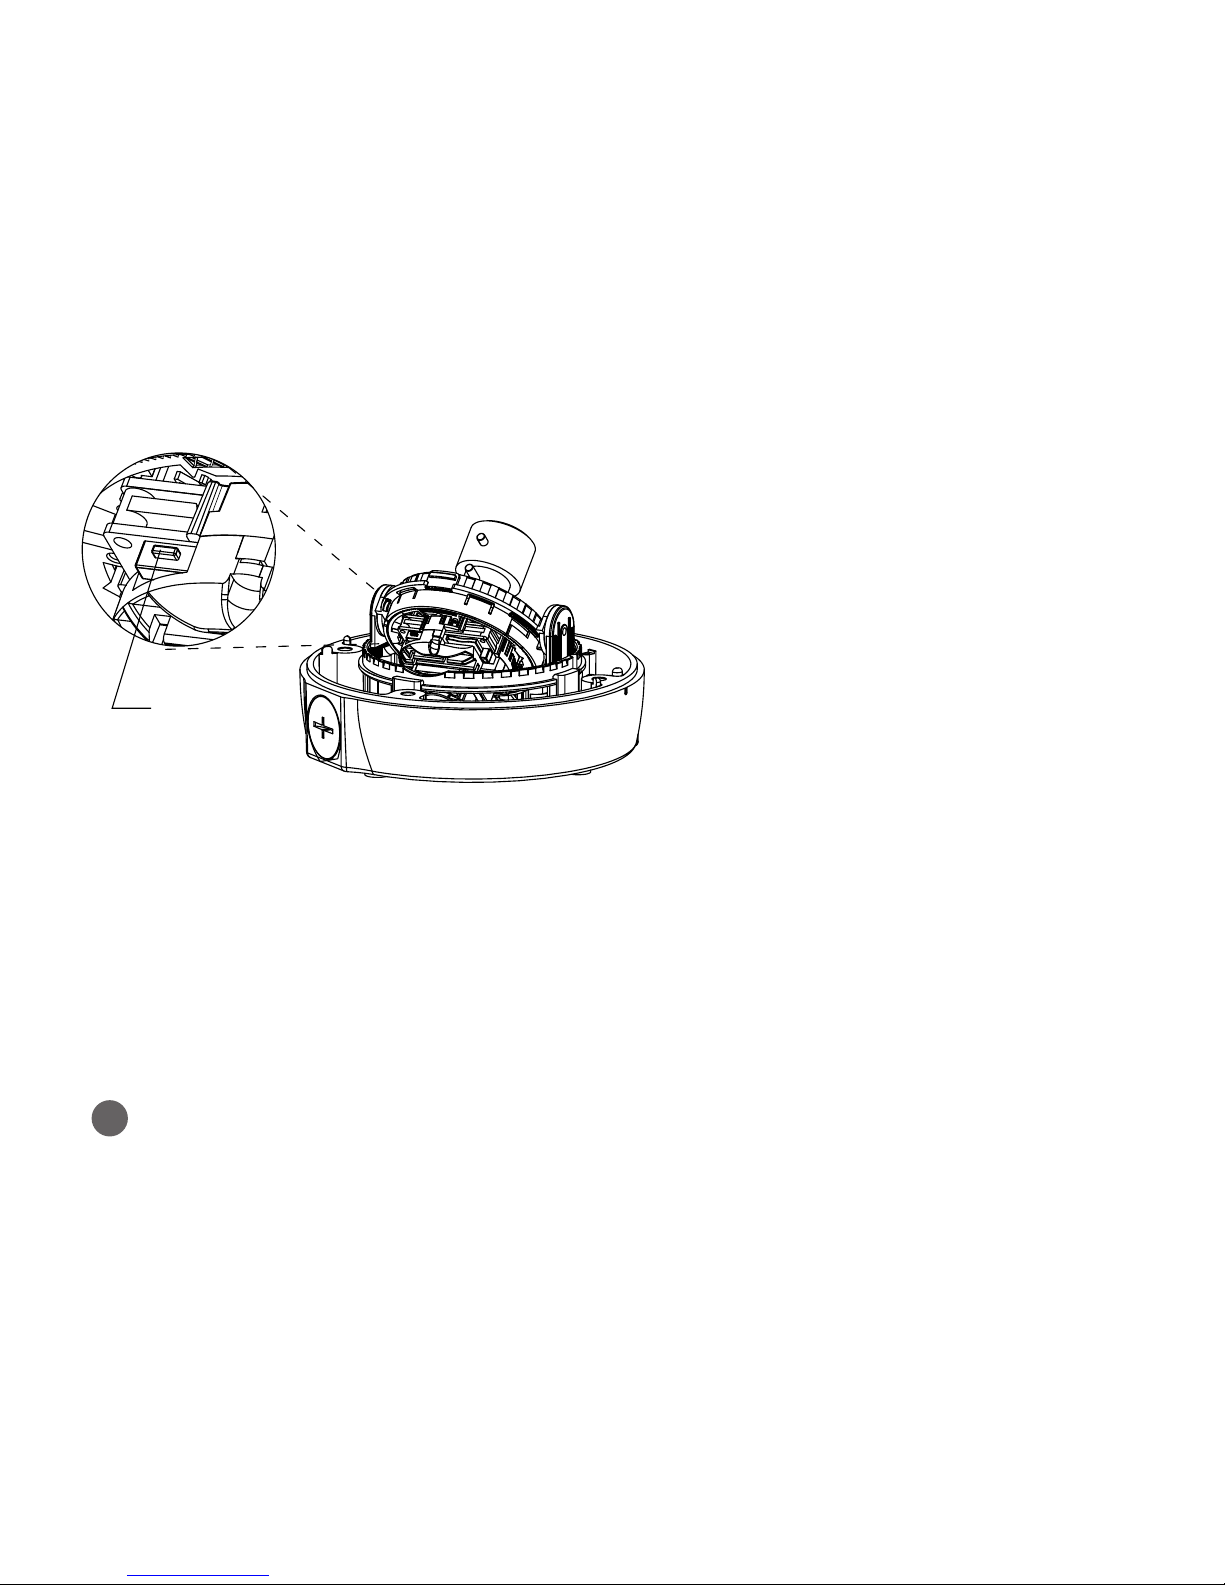
1. Switch o the Network Camera by disconnecting
the power adapter.
2. Press and hold the Reset button with a straightened
paperclip while reconnecting the power.
3. Keep the Reset button pressed during about
2 seconds or more than.
4. Release the Reset button.
5. The network camera resets to factory defaults and
restarts after completing the factory reset.
3
More information
For more information, please see the Network Camera User’s Manual, which is available on the
CD included in this package.
When performing a Factory Reset, you will lose any settings you have saved.
(Default IP 192.168.30.220)
Caution:
[IPCAM727A]
Reset Button
Page 11

Via Don Arrigoni, 5 24020 Rovetta S. Lorenzo (Bergamo)
http://www.comelitgroup.com e-mail : [email protected]
 Loading...