

Page 1
1
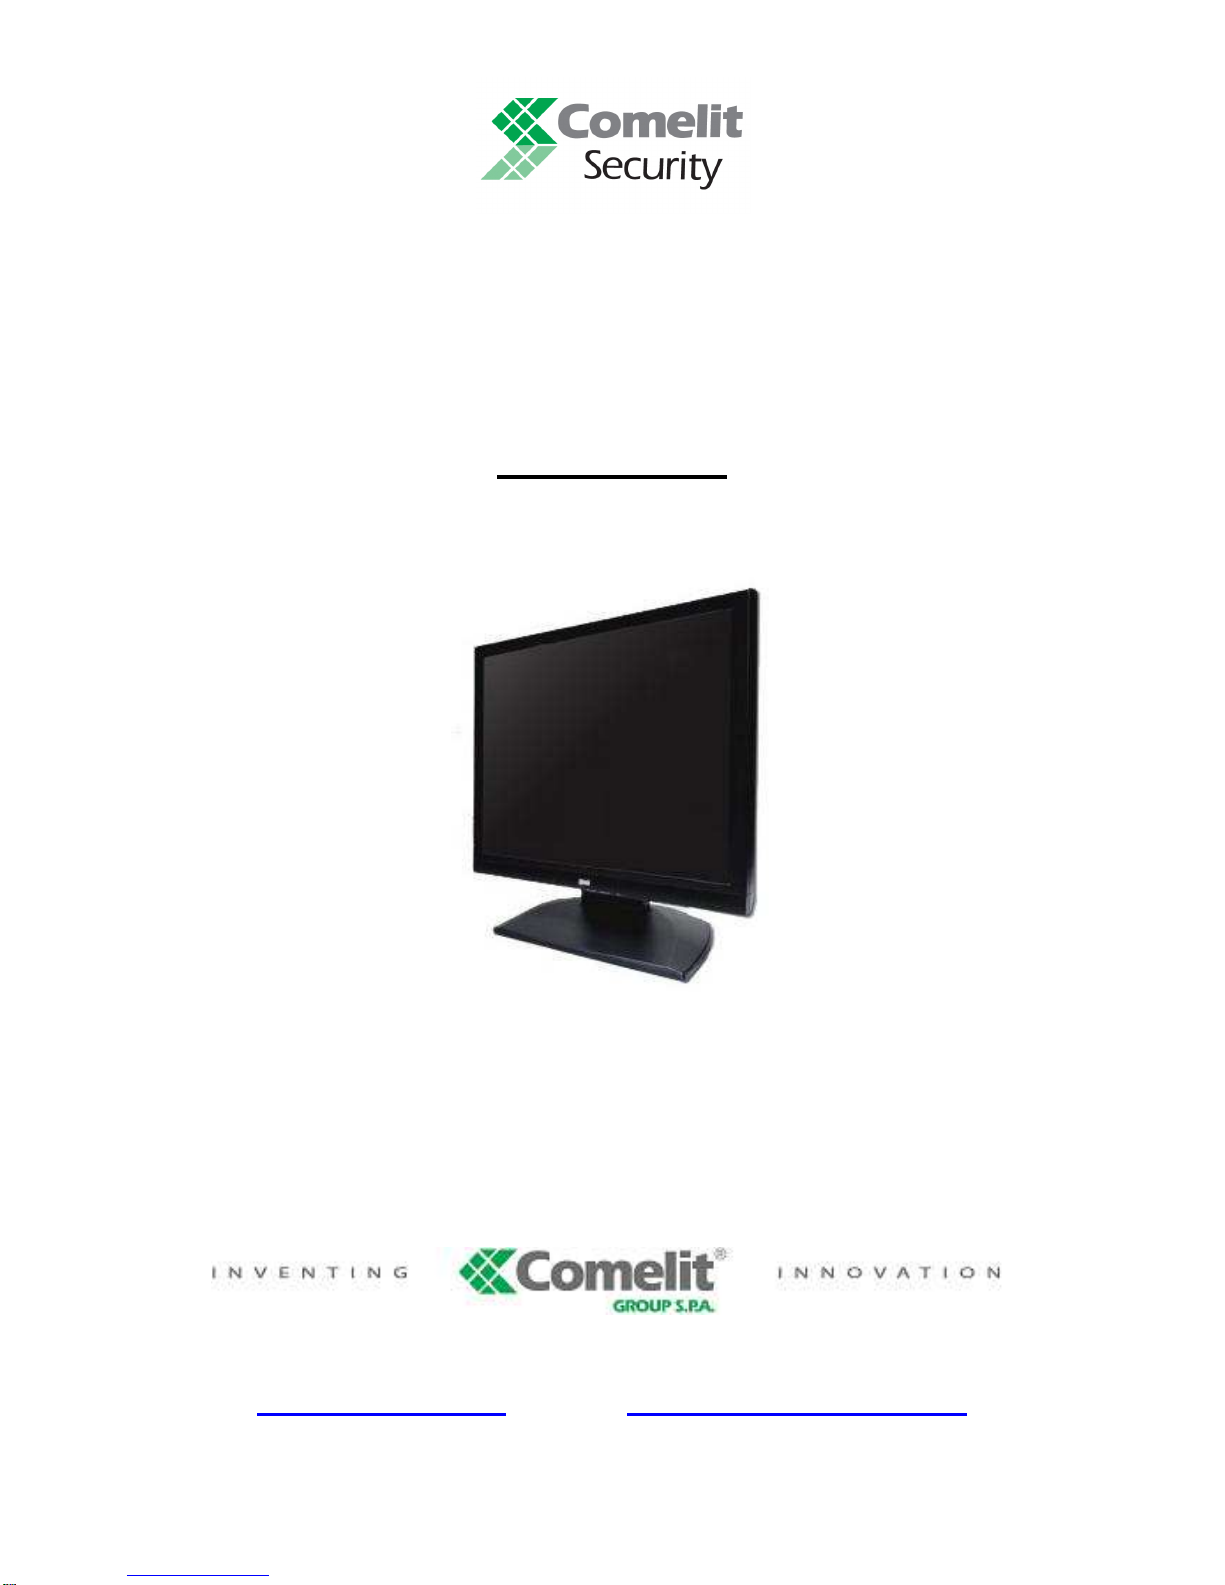
17” – 19” PROFESSIONAL TFT-LCD 700TVL
COLOUR MONITOR
ART. 41637 - 41639
SVisual series
Please read this manual thoroughly before use
and keep it for future reference
Via Don Arrigoni, 5 24020 Rovetta S. Lorenzo (Bergamo)
http://www.comelit.eu e-mail: [email protected]
Page 2
2
CE COMPLIANCE STATEMENT
WARNING
THIS IS A CLASS A PRODUCT. IN A DOMESTIC ENVIRONMENT THIS PRODUCT MAY
CAUSE RADIO INTERFERENCE IN WHICH CASE THE USER MAY BE REQUIRED TO
TAKE ADEQUATE MEASURES.
FCC COMPLIANCE
FCC INFORMATION: THIS EQUIPMENT HAS BEEN TESTED AND FOUND TO COMPLY
WITH THE LIMITS FOR A CLASS A DIGITAL DEVICE, PURSUANT TO PART 15 OF THE
FCC RULES. THESE LIMITS ARE DESIGNED TO PROVIDE REASONABLE
PROTECTION AGAINST HARMFUL INTERFERENCE WHEN THE EQUIPMENT IS
OPERATED IN A COMMERCIAL ENVIRONMENT. THIS EQUIPMENT GENERATES,
USES, AND CAN RADIATE RADIO FREQUENCY ENERGY AND IF NOT INSTALLED
AND USED IN ACCORDANCE WITH THE INSTRUCTION MANUAL, MAY CAUSE
HARMFUL INTERFERENCE TO RADIO COMMUNICATIONS. OPERATION OF THIS
EQUIPMENT IN A RESIDENTIAL AREA IS LIKELY TO CAUSE HARMFUL
INTERFERENCE IN WHICH CASE THE USER WILL BE REQUIRED TO CORRECT THE
INTERFERENCE AT HIS OWN EXPENSE.
CAUTION: CHANGES OR MODIFICATIONS NOT EXPRESSLY APPROVED BY THE
PARTY RESPONSIBLE FOR COMPLIANCE COULD VOID THE USER'S AUTHORITY TO
OPERATE THE EQUIPMENT.
THIS CLASS A DIGITAL APPARATUS COMPLIES WITH CANADIAN ICES-003.
CET APPAREIL NUMÉRIQUE DE LA CLASSE A EST CONFORME À LA NORME NMB003 DU CANADA.
Page 3
3
Warnings and Cautions
WARNING
TO REDUCE THE RISK OF FIRE OR ELECTRIC SHOCK, DO NOT EXPOSE THIS PRODUCT TO RAIN
OR MOISTURE.
DO NOT INSERT ANY METALLIC OBJECT THROUGH VENTILATION GRILLS.
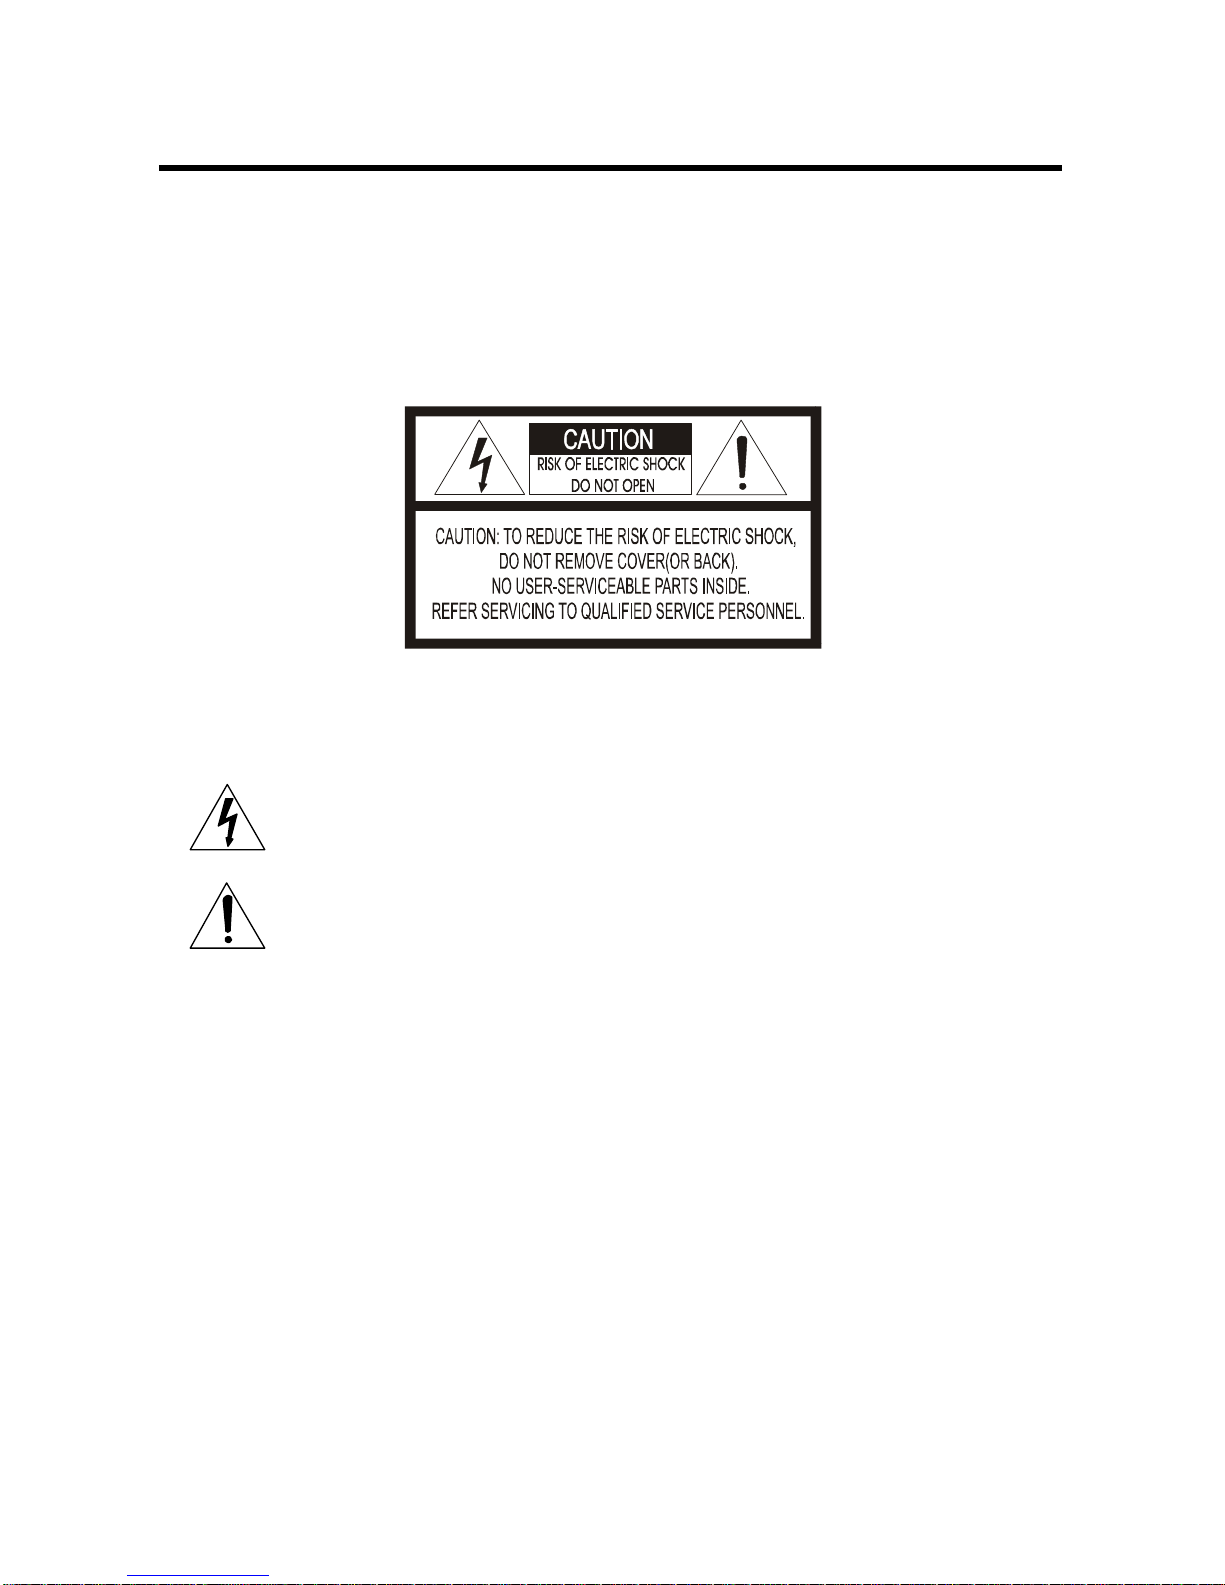
CAUTION
Explanation of Graphical Symbols
The lightning flash with arrowhead symbol, within an equilateral triangle, is intended to alert
the user to the presence of uninsulated “dangerous voltage” within the product’s enclosure
that may be of sufficient magnitude to constitute a risk of electric shock to persons.
The exclamation point within an equilateral triangle is intended to alert the user to the
presence of important operating and maintenance (servicing) instruction in the literature
accompanying the product.
PRECAUTIONS
Safety : Should any liquid or solid object fall into the cabinet, unplug the unit and have it checked by the
qualified personnel before operating it any further.
Unplug the unit from the wall outlet if it is not going to be used for several days or more. To disconnect the
cord, pull it out by the plug. Never pull the cord itself.
Allow adequate air circulation to prevent internal heat build-up. Do not place the unit on surfaces (rugs,
blankets, etc.) or near materials (curtains, draperies) that may block the ventilation holes.
Installation : Do not install the unit in an extremely hot or humid place or in a place subject to excessive dust
or mechanical vibration.
The unit is not designed to waterproof. Exposure to rain or water may damage the unit.
Cleaning : Clean the unit with a slightly damp soft cloth.
Use a mild household detergent. Never use strong solvents such as thinner or benzine as they might
damage the finish of the unit
Page 4

4
PRECAUTIONS AND IMPORTANT SAFEGUARDS
1. READ INSTRUCTIONS – All of the safety and operating instructions should be read before the appliance
is operated.
2. RETAIN INSTRUCTIONS – The safety and operating instructions should be retained for future reference.
3. HEED WARNINGS – All warnings on the unit and in the operating instructions should be adhered to.
4. FOLLOW INSTRUCTIONS – All operating and use instructions should be followed.
5. CLEANING – Unplug the unit from the outlet before cleaning. Do not use liquid cleaners or aerosol
cleaners. Use a damp cloth for cleaning. See cleaning procedures under Maintenance.
6. ATTACHMENTS – Do not use attachments not recommended by the product manufacturer as they may
result in the risk of fire, electric shock, or injury to persons.
7. WATER AND MOISTURE – Do not use this unit near water or in an unprotected outdoor installation, or
any area which is classified as a wet location.
8. ACCESSORIES - Do not place this product on an unstable cart, stand, tripod, bracket, or table. The
product may fall, causing serious injury to a child or adult and serious damage to the equipment. Use only
with a cart, stand, tripod, bracket, or table recommended by the manufacturer, or sold with the product.
Any mounting of the product should follow the manufacturer’s instructions and should use a mounting
accessory recommended by the manufacturer. Wall or shelf mounting should follow the manufacturer’s
instructions and should use a mounting kit approved by the manufacturer.
9. A product and cart combination should be moved with care. Quick stops, excessive force, and uneven
surfaces may cause the product and cart combination to overturn.
10. VENTILATION - Slots and openings in the cabinet and the back or bottom are provided for ventilation
and to ensure reliable operation of the equipment and to protect it from overheating. These openings must
not be blocked or covered. The openings should never be blocked by placing the product on a bed, sofa,
rug, or other similar surface. Equipment should never be placed near or over a radiator or heat register.
This product should not be placed in a built-in installation, such as a bookcase or rack unless proper
ventilation is provided or the manufacturer’s instructions have been adhered to.
11. POWER SOURCES – This product should be operated only from the type of power source indicated on
the marking label. If you are not sure of the type of power supplied to your home, consult your product
dealer or local power company. For products designed to operate from battery power or other sources,
refer to the operating instructions.
12. GROUNDING OR POLARIZATION – The power supply supplied with this unit may be equipped with a
polarized alternating-current line plug (a plug having one blade wider than the other). This plug will fit into
the power outlet only one way. This is a safety feature. If you are unable to insert the plug fully into the
outlet, try reversing the plug. If the plug should still fail to fit, contact your electrician to replace your
obsolete outlet. Do not defeat the safety purpose of the polarized plug.
Page 5

5
Alternately, this unit may be equipped with a 3-wire grounding-type plug, a plug having a third (grounding)
pin. This plug will only fit into a grounding-type power outlet. This is a safety feature. If you are unable to
insert the plug into the outlet, contact your electrician to replace your obsolete outlet. Do not defeat the
safety purpose of the grounding-type plug.
13. OVERLOADING – Do not overload outlets and extension cords as this can result in a risk of fire or
electric shock.
14. POWER-CORD PROTECTION – Power supply cords should be routed so that they are not likely to be
walked on or pinched by items placed upon or against them, paying particular attention to cords and plugs,
convenience receptacles, and the point where they exit from the appliance.
15. OBJECT AND LIQUID ENTRY – Never push objects of any kind into this unit through openings as they
may touch dangerous voltage points or short-out parts that could result in a fire or electric shock. Never
spill liquid of any kind on the unit.
16. SERVICING – Do not attempt to service this unit yourself as opening or removing covers may expose
you to dangerous voltage or other hazards. Refer all servicing to qualified service personnel.
17. DAMAGE REQUIRING SERVICE – Unplug the unit from the outlet and refer servicing to qualified
service personnel under the following conditions:
a. When the power-supply cord or plug is damaged.
b. If liquid has been spilled, or objects have fallen into the unit.
c. If the unit has been exposed to rain or water.
d. If the unit does not operate normally by following the operating instructions. Adjust only those controls that
are covered by the operating instructions as an improper adjustment of other controls may result in damage
and will often require extensive work by a qualified technician to restore the unit to its normal operation.
e. If the unit has been dropped or the enclosure has been damaged.
f. When the unit exhibits a distinct change in performance - this indicates a need for service.
18. REPLACEMENT PARTS – When replacement parts are required, be sure the service technician has
used replacement parts specified by the manufacturer or have the same characteristics as the original part.
Unauthorized substitutions may result in fire, electric shock or other hazards.
19. SAFETY CHECK – Upon completion of any service or repairs to this unit, ask the service technician to
perform safety checks to determine that the unit is in proper operating condition.
20. LIGHTNING – For added protection of this unit during a lightning storm, or when it is left unattended and
unused for long periods of time, unplug it from the wall outlet and disconnect the cable system. This will
prevent damage to the unit due to lightning and power-line surges.
21. OUTDOOR ANTENNA GROUNDING – If an outside antenna or cable system is connected to the
product, be sure the antenna or cable system is grounded so as to provide some protection against
voltage surges and built-up static charges.
22. POWER LINES – An outside antenna system should not be located in the vicinity of overhead power
lines or other electric light or power circuits, or where it can fall into such power lines or circuits. When
installing an outside antenna system, extreme care should be taken to keep from touching such power
lines or circuits as contact with them might be fatal.
23. HEAT – The product should be situated away from heat sources such as radiators, heat registers, stoves,
or other products (including amplifiers) that produce heat.
24. INSTALLATION – Do not install the unit in an extremely hot or humid location, or in a place subject to
dust or mechanical vibration. The unit is not designed to be waterproof. Exposure to rain or water may
damage the unit.
Note : When Viewing a fixed screen for an extended period of time, Residual image or blurriness
may appear.
Page 6

6
Table of Contents
Features - - - - - - - - - - - - - - - - - - - - - - - - - - - - - - 7
Operating Instructions - Controls - - - - - - - - - - - - - - - - - - - - - - - - - - - - 8~9
Connections - - - - - - - - - - - - - - - - - - - - - - - - - - - - - -10
User Controls - Menu Operations - - - - - - - - - - - - - - - - - - - - - - - - - - -11~15
Specifications - - - - - - - - - - - - - - - - - - - - - - - - - - 16~19
Dimensional drawings - - - - - - - - - - - - - - - - - - - - - - - - - - - - - 20
Remote Control - - - - - - - - - - - - - - - - - - - - - - - - - - - - - 21
Page 7

7
Features
• Super High-Resolution with 700TVL (Horizontal)
• High Quality Advanced CCTV LCD Monitor(With Protection glass)
• De-Interlace technology Efficiently Eliminates Shaky and blurry image
Progressive Scan
• 3D Comb Filter Function Clear image
• Superior Color Reproduction
• VESA Wall & Ceiling mount Compatible
• Temporal noise reduction
• HDMI receiver
• PIP, PBP Multi view Display
• Protection glass
Page 8
8
Operating instruction
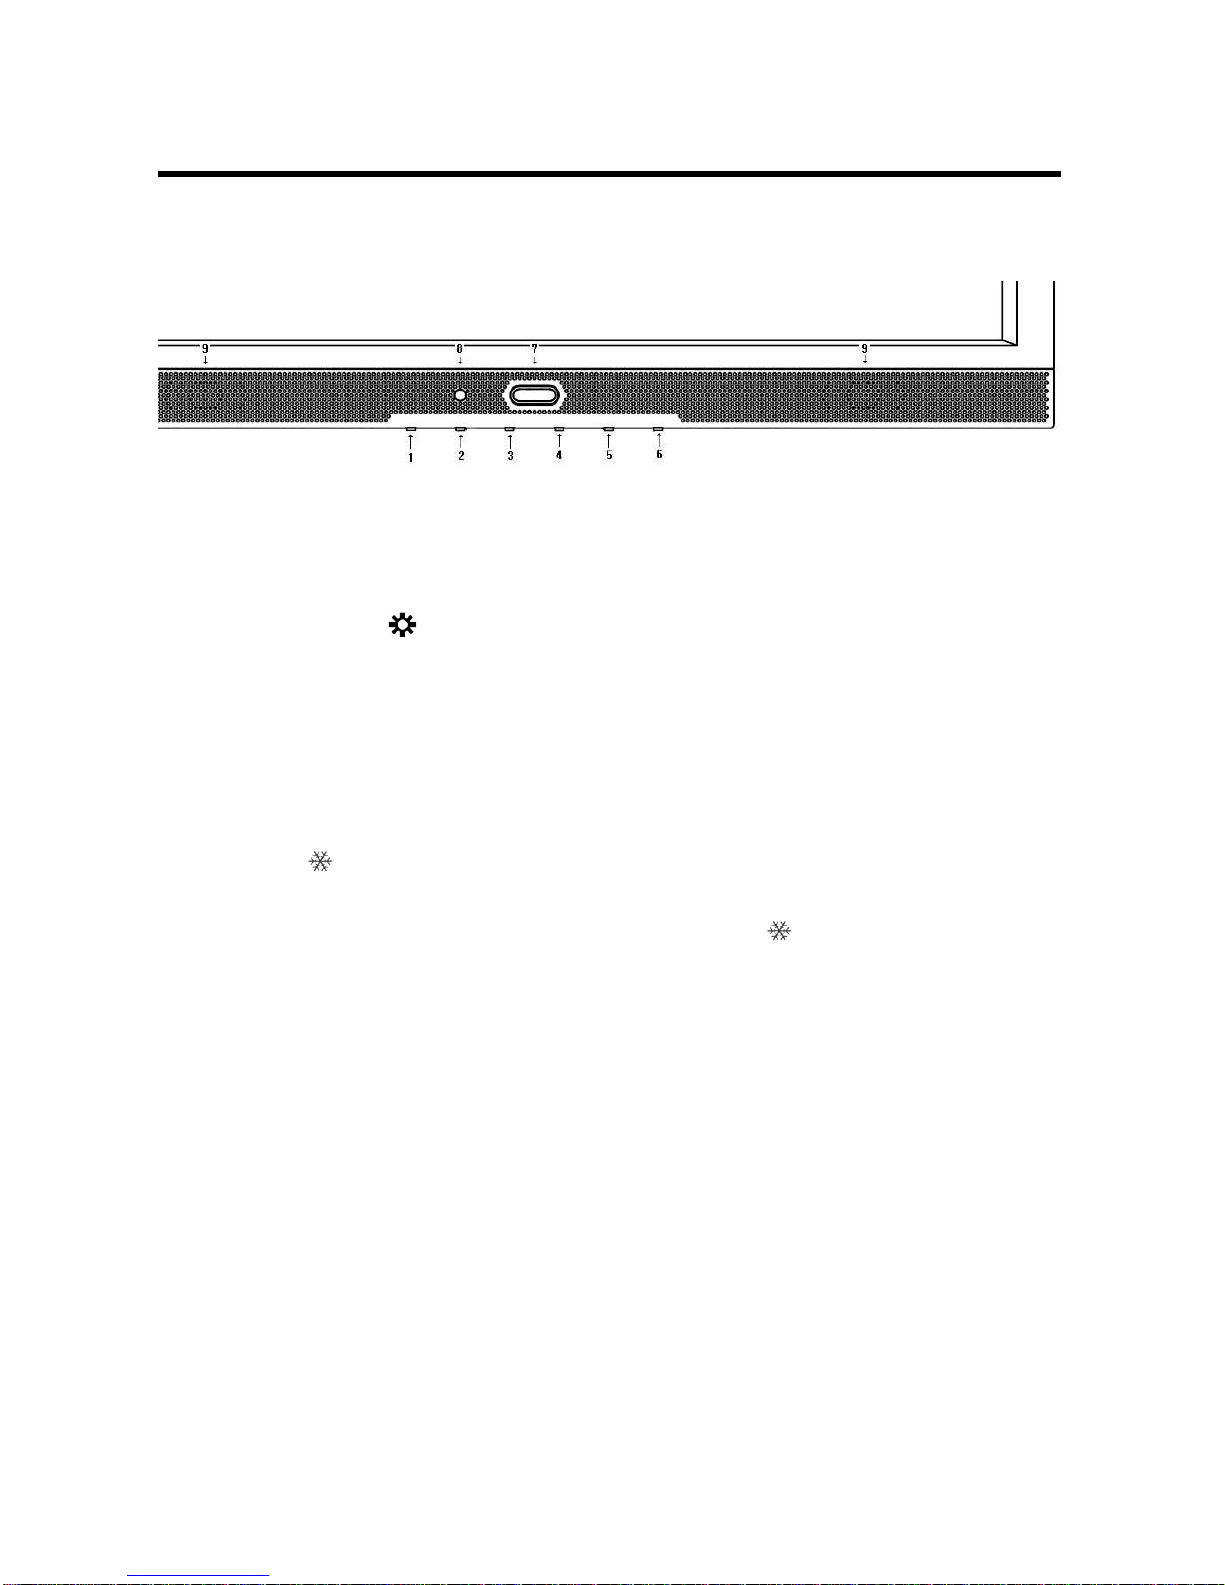
FRONT controls
1. Menu / Exit
This button is used to bring up or disappear the controls menu.
Exits from the OSD system and the selected function
2. Down / Brightness (▼/ )
Moves down the menu lists in the OSD / Selected brightness
3. UP / VOL. (▲ / VOL. )
Moves up the menu lists in the OSD / Selected Volume
4. LEFT / SOURCE (◀◀◀◀ / SOURCE )
Selected MENU decreases the value / while in the normal active (Not MENU DISPLAY) mode, this button
is used to bring up Sources select Menu ( CVBS1,CVBS2,SVIDEO,RGB,DVR,HDMI)
5. ▶▶▶▶ (Select) / (Freeze) / AUTO
This ▶▶▶▶ button to choose on the menu then pushes the button & Selected MENU increases the value:
While in the CVBS, S-Video mode, press this button to FREEZE ( ) the picture for display. Press
again to exit the FREEZE image. While in the RGB mode, press this button to AUTO adjust the H/V POS,
H/V SIZE, and phase
6. PIP
Multi window activate or cancel the PIP function.
7. Power On/Off & LED
When power is applied, the monitor will come ON. This button then turns the monitor on and OFF.
LED - A green indicator lights when the power is ON and input signal .
A red indicator lights when the power is OFF (the indicator blink when the power is ON and Input No
signal)
8. Sensor Widow
Remote Control. Receives signal from the Remote controller
9. Speaker
Page 9
9
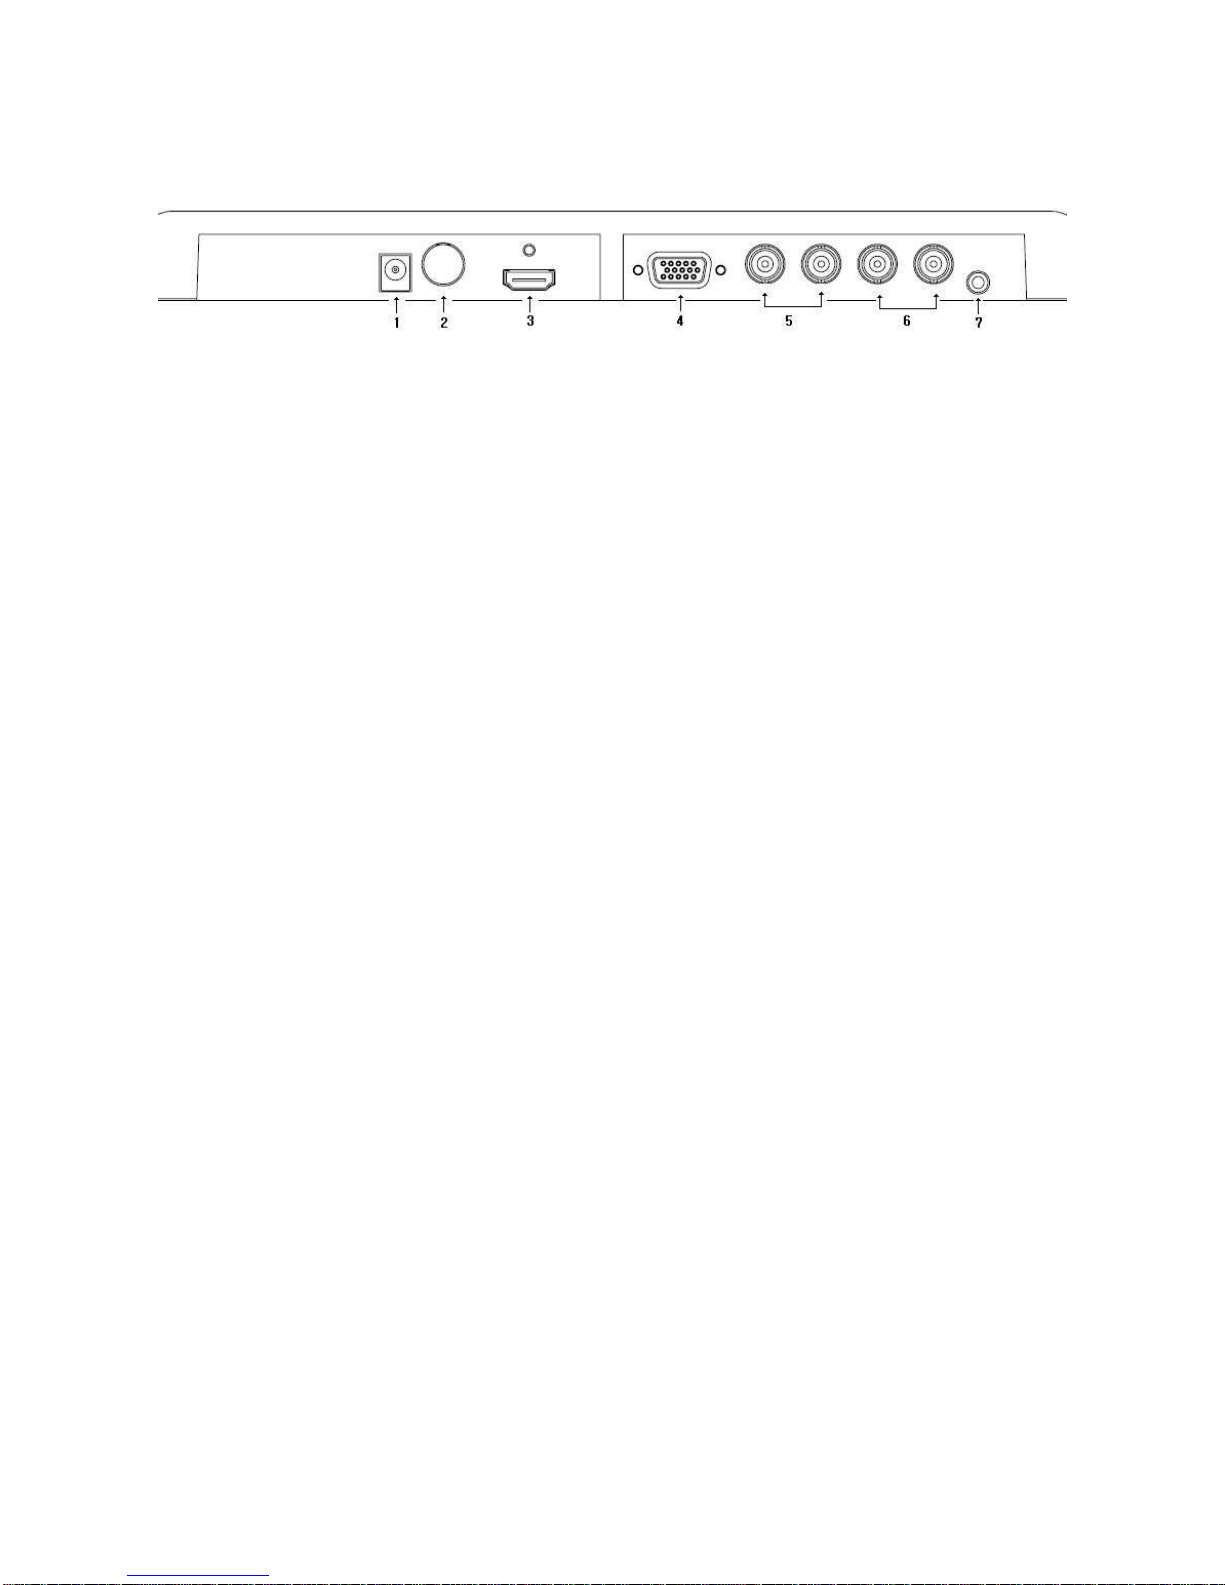
REAR connection
1. DC JACK
Place the plug from the supplied table-top power supply into the DC 12V connector.
Input at the monitor is 12 volts DC from the TT universal AC supply (100-240 Vac, see specifications table
for AC/DC details).
2. S-Video INPUT
Used to connect a S-Video signal from a camera or DVR
3. HDMI INPUT
Used to connect a HDMI signal from a PC, Mega pixel Camera or DVR
4. RGB INPUT
Connect to the video output port on your PC or DVR
5. CVBS INPUT/OUTPUT (CVBS2)
Used to connect a BNC Video signal from a camera or DVR
6. CVBS INPUT/OUTPUT (CVBS1)
Used to connect a BNC Video signal from a camera or DVR
7. Audio Input
Used to connect a audio signal from a PC or DVR
Page 10
10
Connections
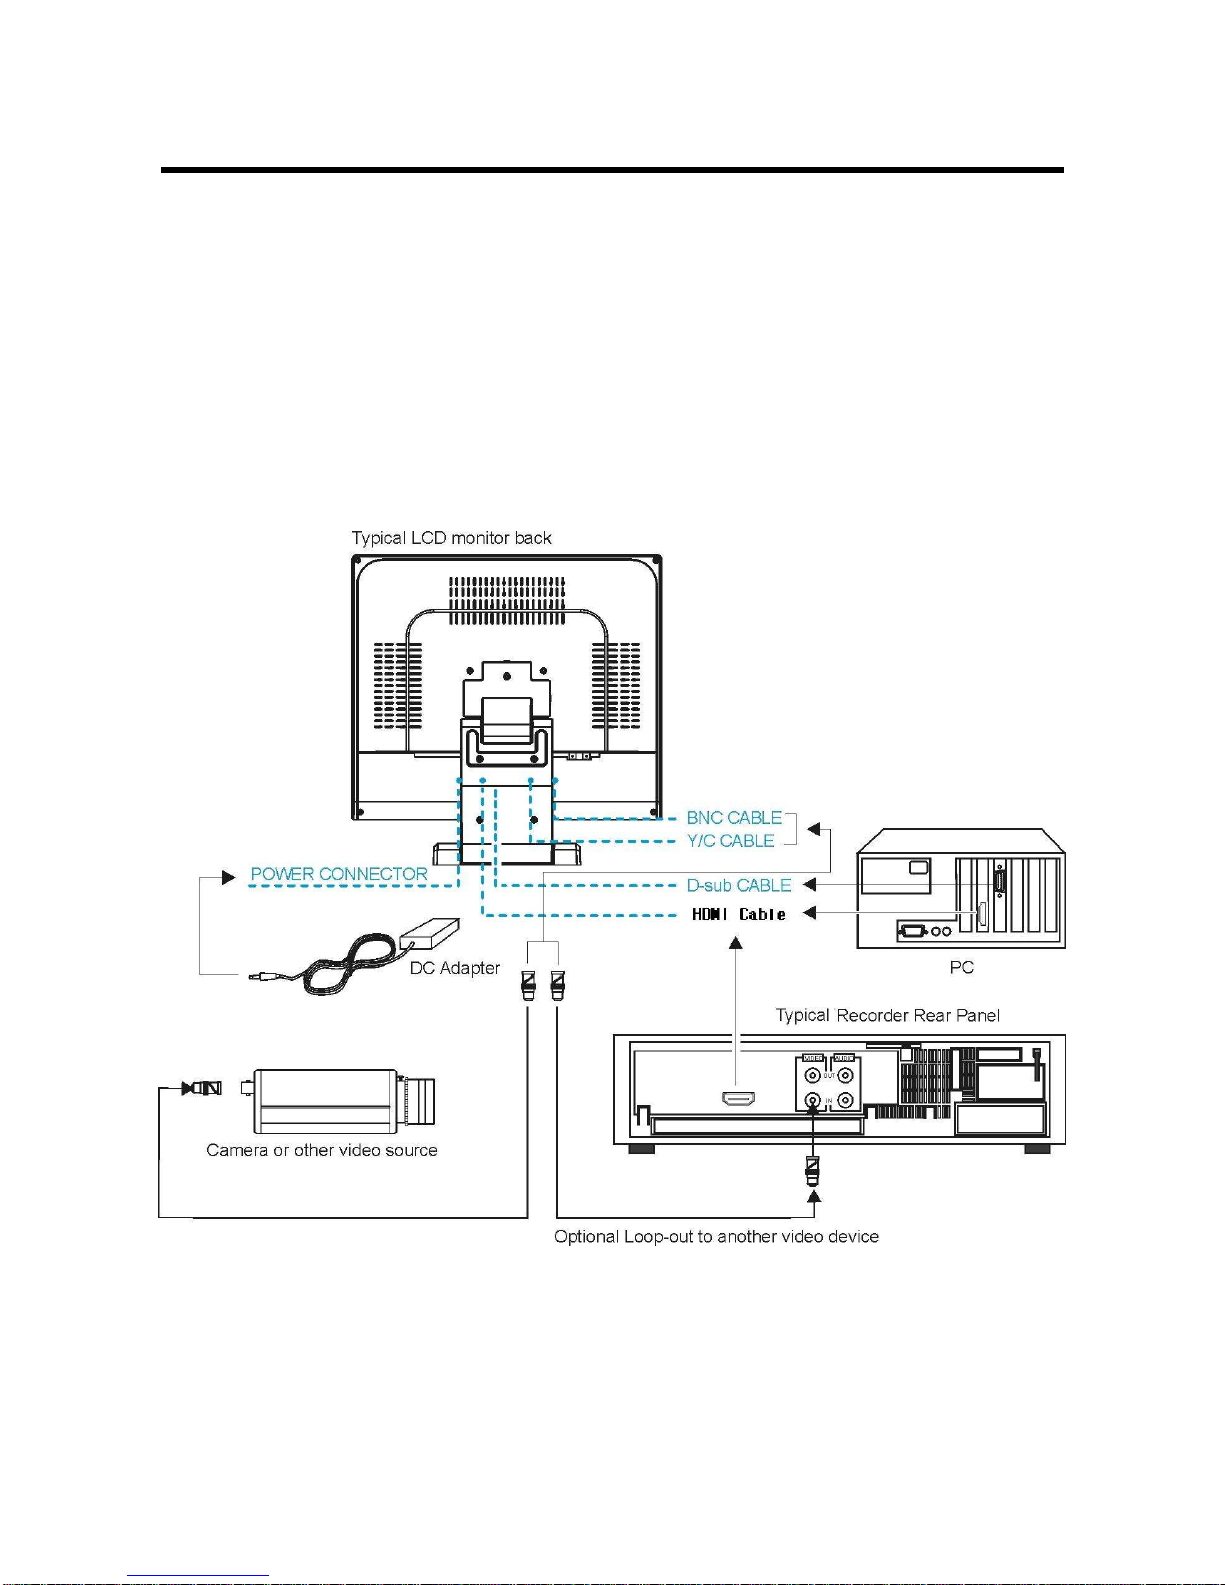
To make a normal connection to the monitor, bring a cord from a camera, or other video
Source to one of the BNC jacks or from a PC to the PC jack on the back of the monitor.
Either the left or right BNC jack can be used for input. The other jack may be optionally connected to another
user of the same signal.
Auto Termination The input circuit of the monitor normally terminates the incoming
Cable in 75Ω but these BNCs jack are auto-terminating. When two cables are connected, the internal
termination is switched out, letting the final destination.
Equipment provide the end termination. This arrangement is also specially offered for the Y/C (S-Video)
jacks.
* Supplied item
LCD monitor
Power supply unit (DC 12V) / Power cord
VGA cable
Operating instructions manual
Page 11
11
User Controls - Menu Operations
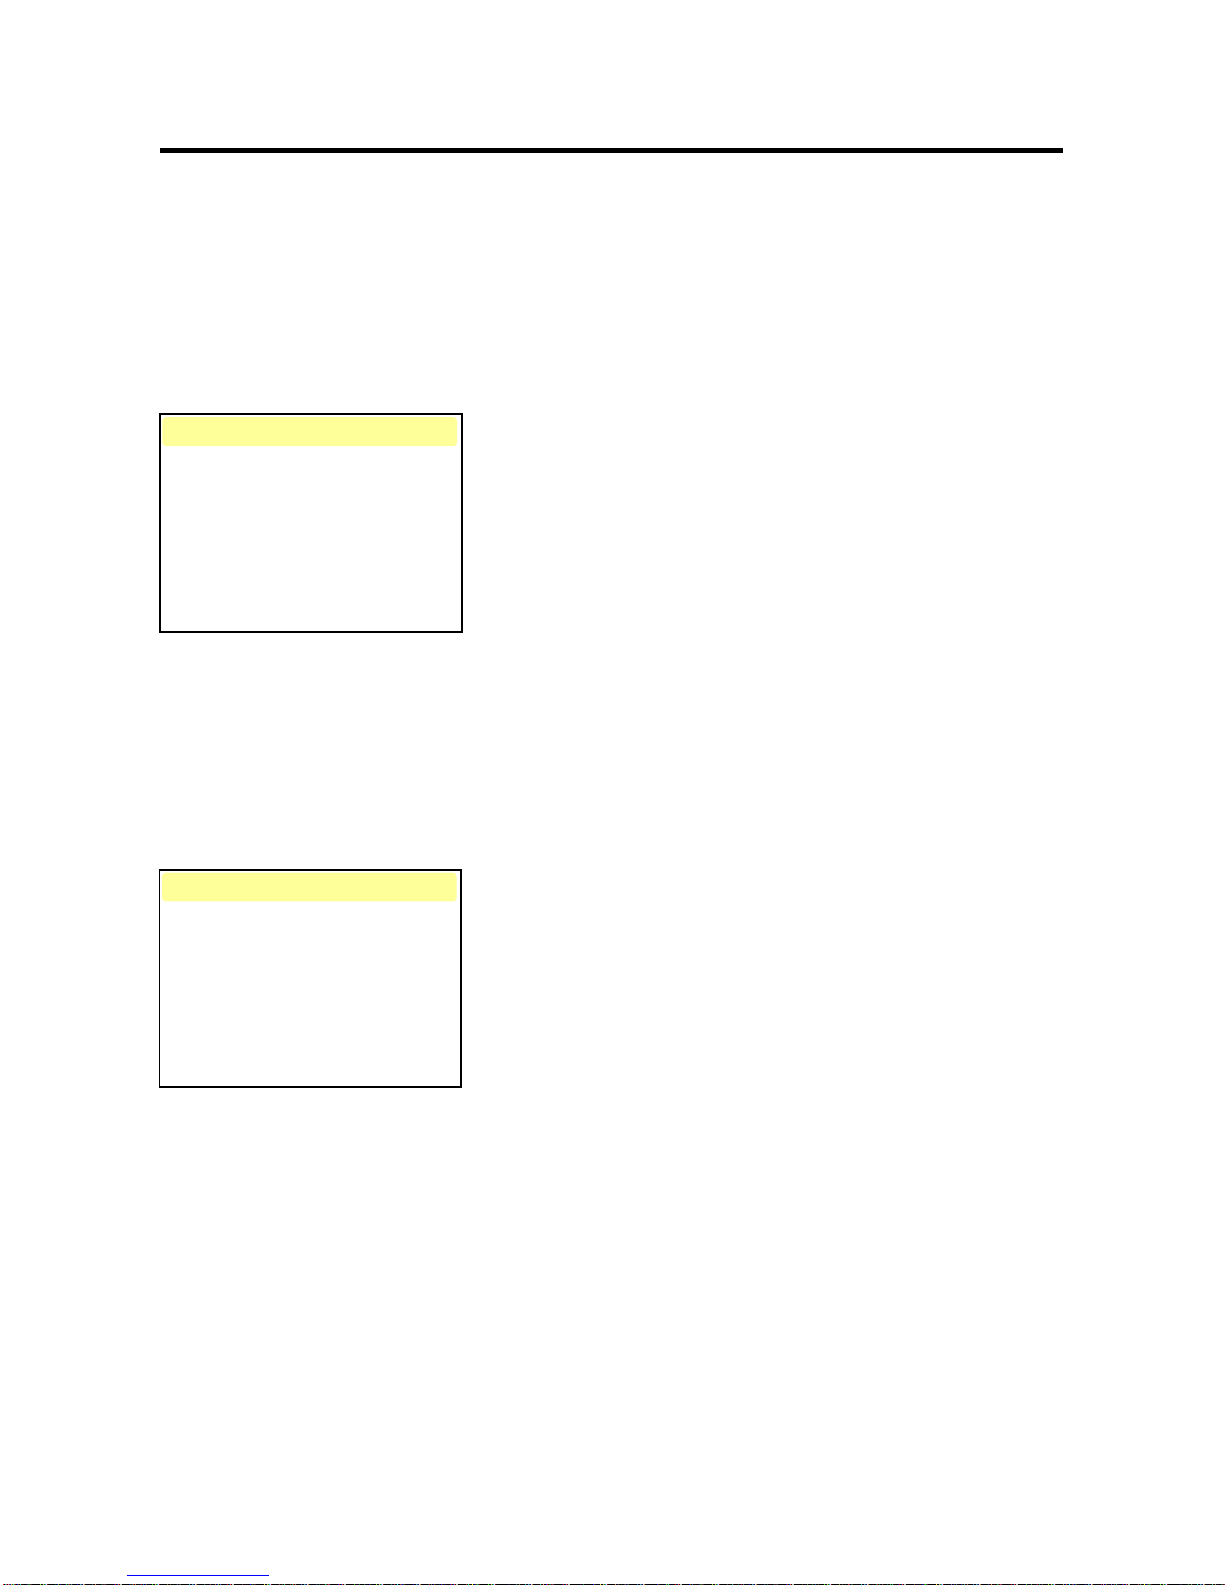
RGB (& DVR) Mode
RGB Mode : General PC input mode
DVR Mode : The optimized format to synchronize a monitor and a DVR for the best resolution.
NTSC : 640 x 480(60Hz), 672 x 480(60Hz)
PAL : 672 x 580(50Hz), 800 x 600 (75Hz)
Select one of the options using ▲ or ▼. Adjust the chosen item using ◀ or ▶. Exit from item by pressing
Menu.
Volume, Contrast, Brightness, Sharpness
Change the Volum, Contrast, Brightness & Sharpness according to personal preference.
Advanced Menu
Auto Adjustment choose Automatically the proper H/V POS, H/V SIZE, and the screen image
H Position is used to adjust the horizontal position of the image on the screen.
V Position is used to adjust the vertical position of the image on the screen.
Phase is Adjust the focus of screen’s image.
Clock is Adjust the horizontal size of screen’s image
Recall the monitor original factory setting
Main menu
Volume 0
Contrast +58
Brightness +64
Sharpness +6
Advanced ►
PIP Menu ►
Color Temp ►
OSD Menu ►
Source
RGB
Advanced
Auto Adjustment
H Position 0
V Position 0
Phase +54
Clock 0
Recall No
Page 12
12
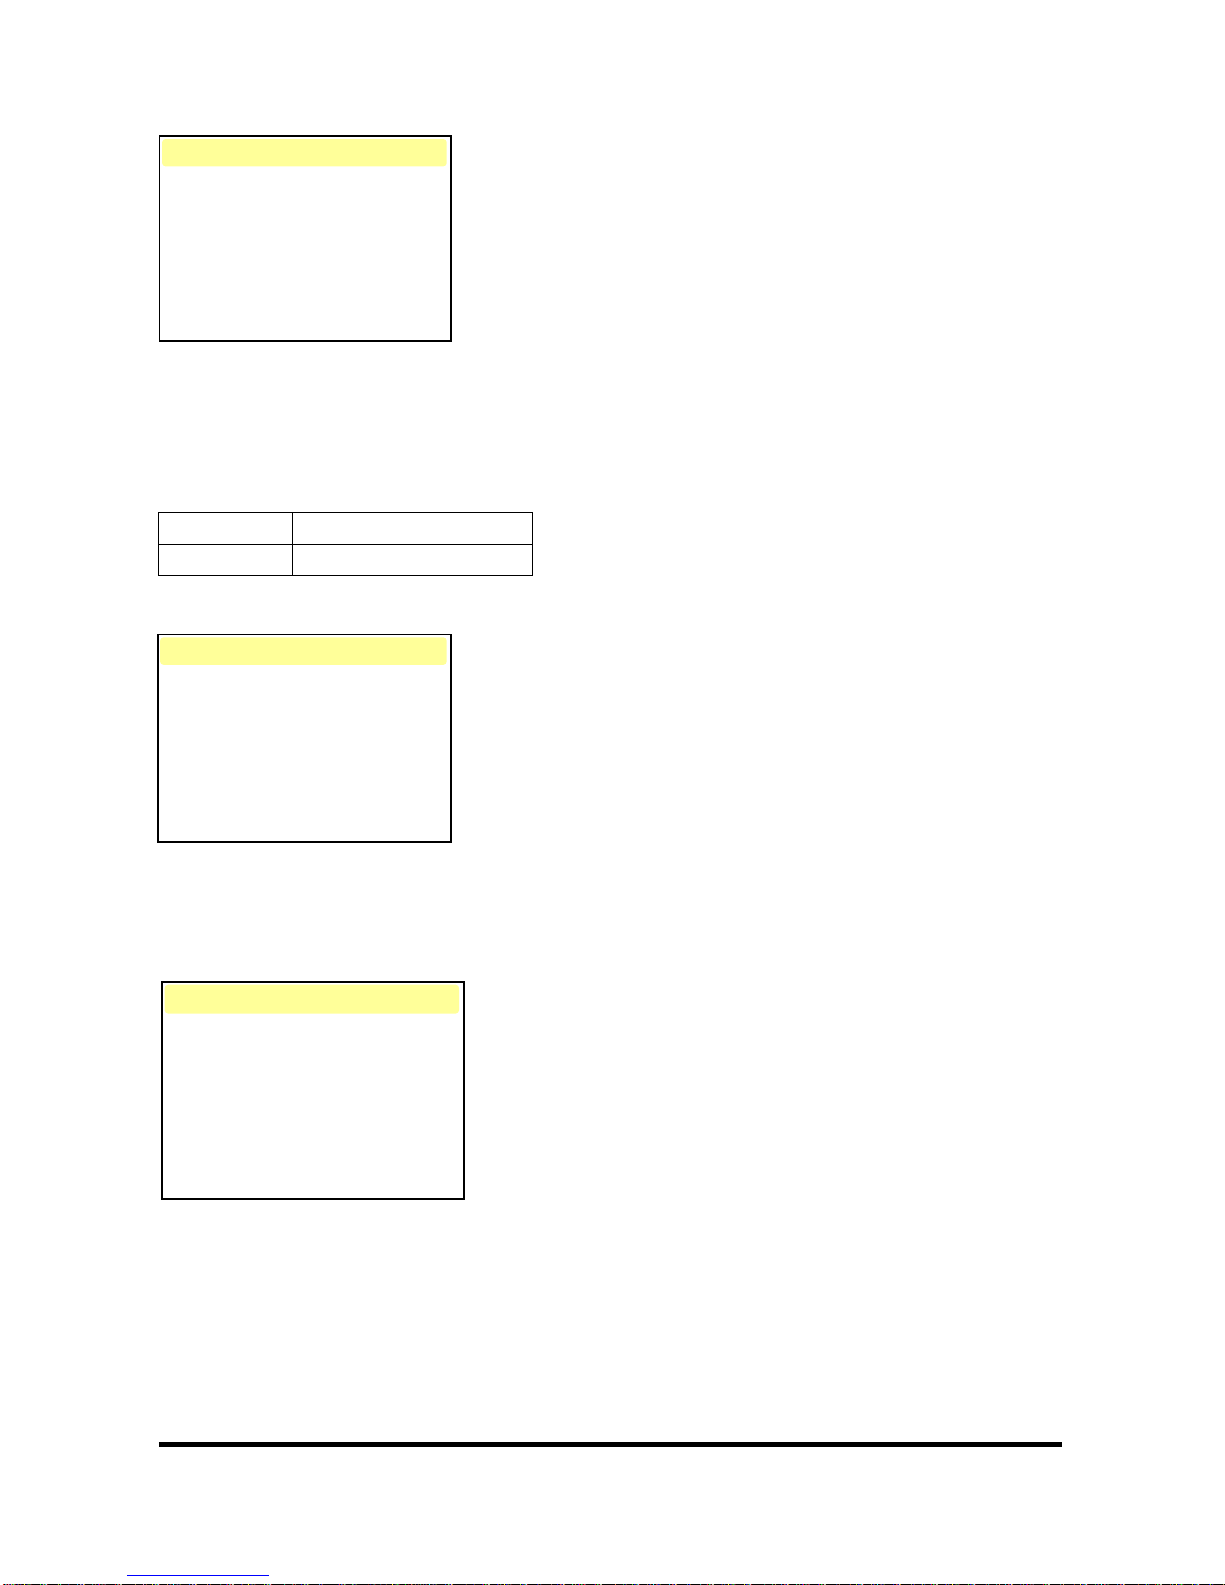
PIP Menu
PIP choose ON/OFF multi window activate or cancel the PIP function
Size select the PIP display size (Small/Medium/Large/PBP)
Position is used to adjust the PiP display position.(L-UP,R-UP, R-Down, L-Down)
Source is select the PiP source (CVBS1,CVBS2,SVIDEO,)
Main picture Sub picture
VGA/DVR CVBS1,CVBS2,SVIDEO
Color Temp Menu
Color Temp choose different preset color temperatures or set your own customized color parameters
User is used to user control color ton ( R / G / B )
OSD Menu
Language change the OSD language according to personal preference
Blending is used adjust the opaqueness of the background of the OSD.
H Position is used to adjust the horizontal position of the Menu window on the screen.
V Position is used to adjust the vertical position of the Menu window on the screen.
Time is used to adjust the Menu view time.
PIP Menu
PIP OFF
Size Small
Position POS1
Source CVBS1
Color Temp
Color Temp 6500K
User ▶▶▶▶
OSD Menu
Language English
Blending +5
H Position +402
V Position +338
Time 40
Page 13
13
CVBS (& S-Video) Mode
Press the MENU button to display the Main Menu.The follow setup menu will appears.
Volume, Contrast, Brightness
Change the Volume, Contrast & Brightness according to personal preference.
Color
used to minutely adjust color.
Tint
adjusts all the colors on the screen, but is most noticeable to the eye in reds and yellows, And is also usually
set for pleasing face tones. (Appears in NTSC mode only).
Sharpness
sets the desired sharpening enhancement to the picture.
Advanced
Under Scan Adjusts the image size. (ON/OFF)
TNR (Temporal Noisy Reduction) strength is activate this feature to reduce any noisy signal that may
appear on the screen (LOW/Mid/High).
Filter is used enable or disable the Luminance Filter function
L/L Mode choose ON/OFF function reinforce the L/L (line Lock) function
* It is recommended to use this function if there are some twisting vertical line with Line-Lock camera.
Color is select picture Color level (Neutral/VIVID/Individual)
Dynamic Control is option to enhance the contrast of the image.
This feature makes the color much darker and brighter
Color Temp is used to control color temperature ( R / G / B )
Recall the monitor original factory setting
Main Menu
Volume 0
Contrast +62
Brightness +70
Color +64
Tint 0
Sharpness +6
Advanced ►
OSD Menu ►
Source CVBS1
Advanced
Under scan OFF
TNR strength Mid
Filter Off
L/L Mode Off
Color ▶▶▶▶
Dynamic Contrast ▶▶▶▶
Color Temp ▶▶▶▶
Recall No
*LCD Panel Frequency Setting(NTSC:60Hz or PAL:50Hz)
MENU + ► (Multi Push - Over 3sec) : Panel 50Hz After setting then DC jack put off and put on
MENU + ◀ (Multi Push - Over 3sec) : Panel 60Hz After setting then DC jack put off and put on
*LCD Panel Frequency Setting(NTSC:60Hz or PAL:50Hz)
MENU + ► (Multi Push - Over 3sec) : Panel 50Hz After setting then DC jack put off and put on
MENU + ◀ (Multi Push - Over 3sec) : Panel 60Hz After setting then DC jack put off and put on
Page 14
14
HDMI Mode
Select one of the options using ▲ or ▼. Adjust the chosen item using ◀ or ▶. Exit from item by pressing
Menu.
Volume, Contrast, Brightness, Sharpness
Change the Volume, Contrast, Brightness & Sharpness according to personal preference.
Menu Avanzate
H Position is used to adjust the horizontal position of the image on the screen.
V Position is used to adjust the vertical position of the image on the screen.
Aspect ratio is digital zoom Picture the ratio of 4:3 (16:9 4:3)
Recall the monitor original factory setting
PIP Menu
PIP choose ON/OFF multi window activate or cancel the PIP function
Size select the PIP display size (Small/Medium/Large/PBP)
Position is used to adjust the PiP display position (L-UP,R-UP,R-Down ,L-Down)
Source is select the PiP source (CVBS1,CVBS2,SVIDEO,)
Main picture Sub picture
HDMI CVBS1,CVBS2,SVIDEO
Main menu
Volume 0
Contrast +58
Brightness +64
Sharpness +6
Advanced ►
PIP Menu ►
Color Temp ►
OSD Menu ►
So
urce HDMI
Advanced
H Position 0
V Position 0
Aspect Ratio Normal
Recall No
Menù PIP
PIP OFF
Size Small
Position POS1
Source CVBS1
Page 15
15
Color Temp Menu
Color Temp choose different preset color temperatures or set your own customized color parameters
User is used to user control color ton ( R / G / B )
OSD Menu
Language Change the OSD language according to personal preference
Blending is used adjust the opaqueness of the background of the OSD.
H Position is used to adjust the horizontal position of the Menu window on the screen.
V Position is used to adjust the vertical position of the Menu window on the screen.
Time is used to adjust the Menu view time.
Color Temp
Color Temp 6500K
User ▶▶▶▶
OSD Menu
Language English
Blending +5
H Position +402
V Position +338
Time 40
Page 16
16
Specification
Art. 41637 Color TFT-LCD Monitor
Display Source 2 COMPOSITE VIDEO / S-VIDEO/VGA/HDMI
LCD Panel 17.0" TFT LCD Panel
Active Display Area (Diagonal) 17.0 inches
Pixel Format 1280 (H) x 1024 (V), RGB Vertical Stripe
Pixel Pitch 0.264 mm x 0.264 mm
Color Depths 16.7M Colors
Contrast Ratio 1000 : 1 (Typical)
Brightness 250 cd/m2
Viewing Angles (Left/Right/Up/Down) 80°/ 80°/ 80°/ 80°
Light source / Lifetime 2CCFLs / 50.000 Hours (Minimum)
LCD
Response Time (Tr/Td) 5 ms
Input Signal Analog RGB (0.714Vp-p), H&V Sync (TTL)
Input Connector 15 pin D-sub( Analog)
VGA 640 x 480 60~75Hz
SVGA 800 x 600 56~75Hz
XGA 1024 x 768 60~75Hz
Input Resolution
SXGA 1280 x 1024 60~75Hz
VGA
Plug & Play DDC 1/2B
Input Signal HDMI
Input Connector 19 pin HDMI (Digital)
HDMI
Input Resolution
Max 1280 x 1024 (PC)
1080i ( Camera)
Video Mode NTSC/PAL
Composite 1.0Vp-p @ 75 ohm
Video Input Signal
S-Video 0.7Vp-p (Luminance), 0.3Vp-p (Chrominance), 75Ω
Composite BNC x 4 (IN/OUT)
Video Input Connector
S-Video 4 Pin Mini Din (IN)
Termination 75Ω, Auto Termination
Composite
Video
Horizontal Resolution More than 700 TV Lines
Input 2 x Stereo
Audio
output 2 x 0.5W
User Controls Power, Menu, Brightness, Volume, Source, Auto ADJ. PIP etc
OSD Language
English / German / French/ Spanish /Italian/Polish/Russian/Czech
DC Power 12 V dc
Page 17
17
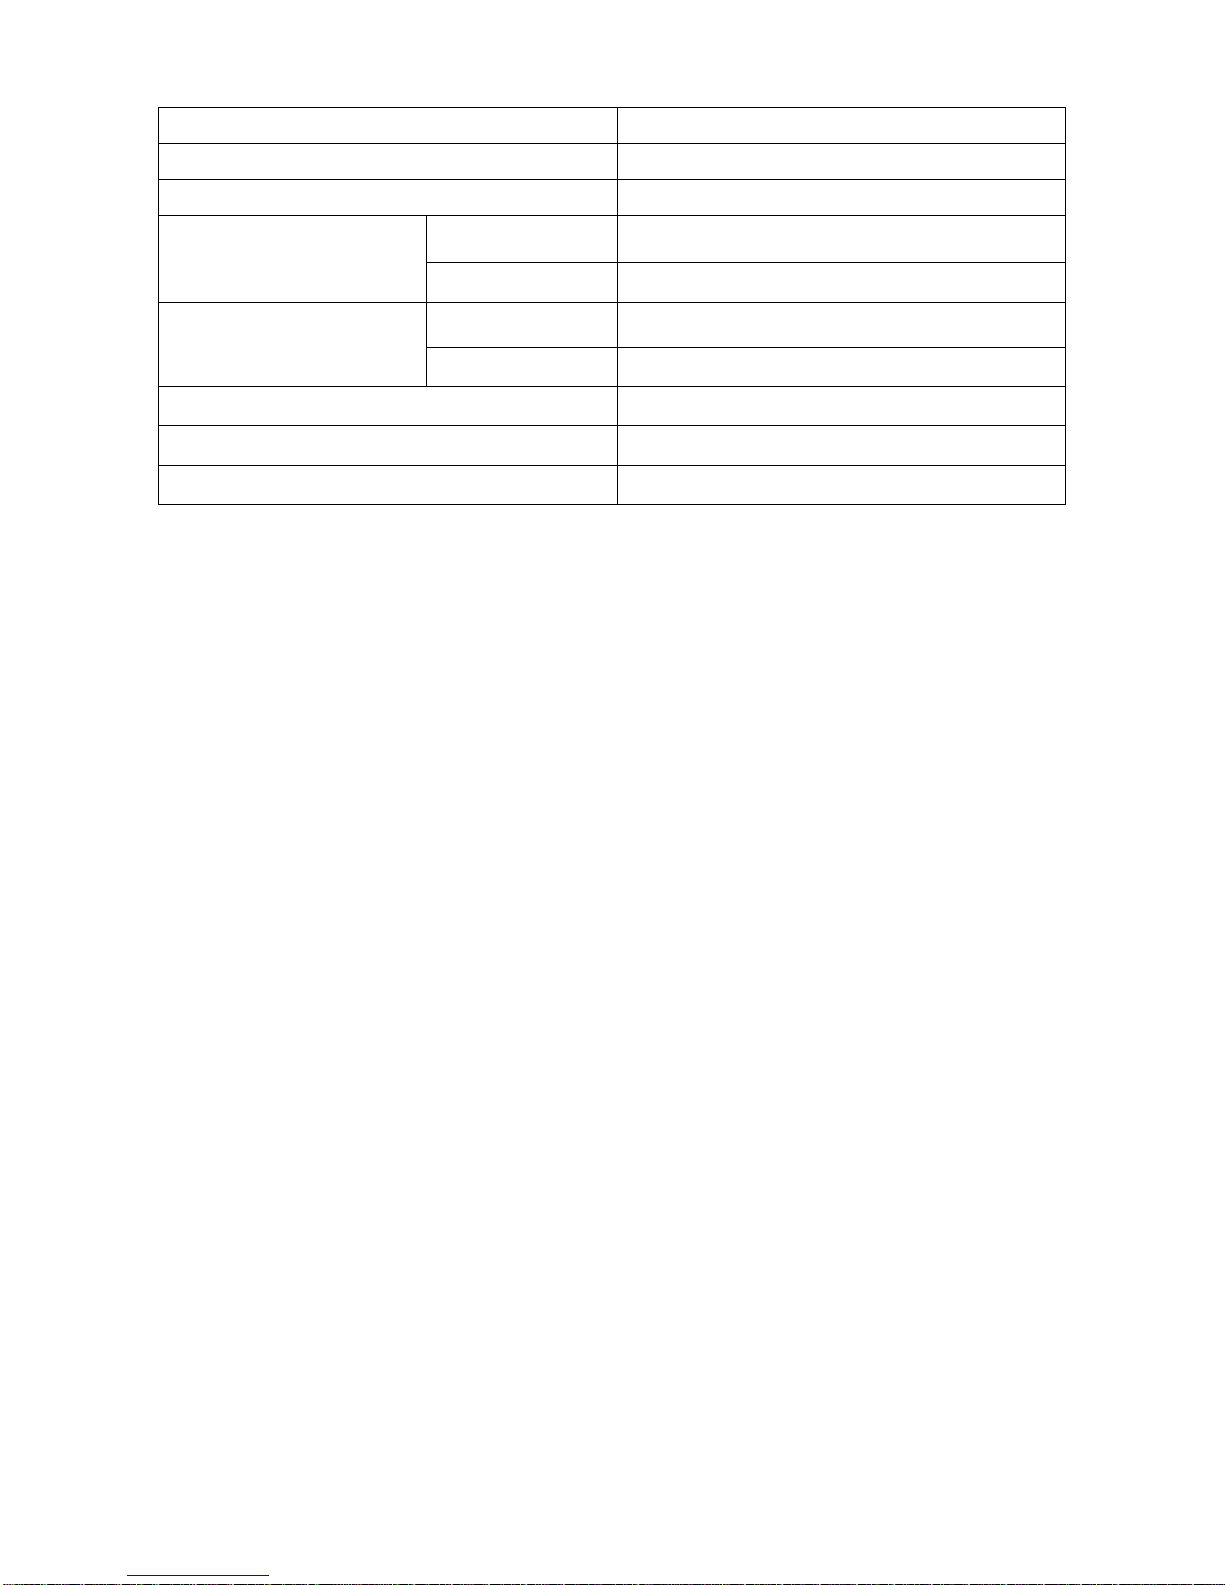
Operating Temperature 0 ~ 40 °C
Storage Temperature 0 ~ 50 °C
Case Material Plastic
Net (W x H x D)
382.5 x 416 x 200 mm (with stand)
Dimensions
Packing (W x H x D) 485 x 505 x 250 mm
Net 6.6 Kg
Weight
Packing 8.5 Kg
Accessories AC Adaptor , VGA Cable, Power Cord, Manual
Protection Glass 3 T max
IR Remote Controller Option
Page 18
18
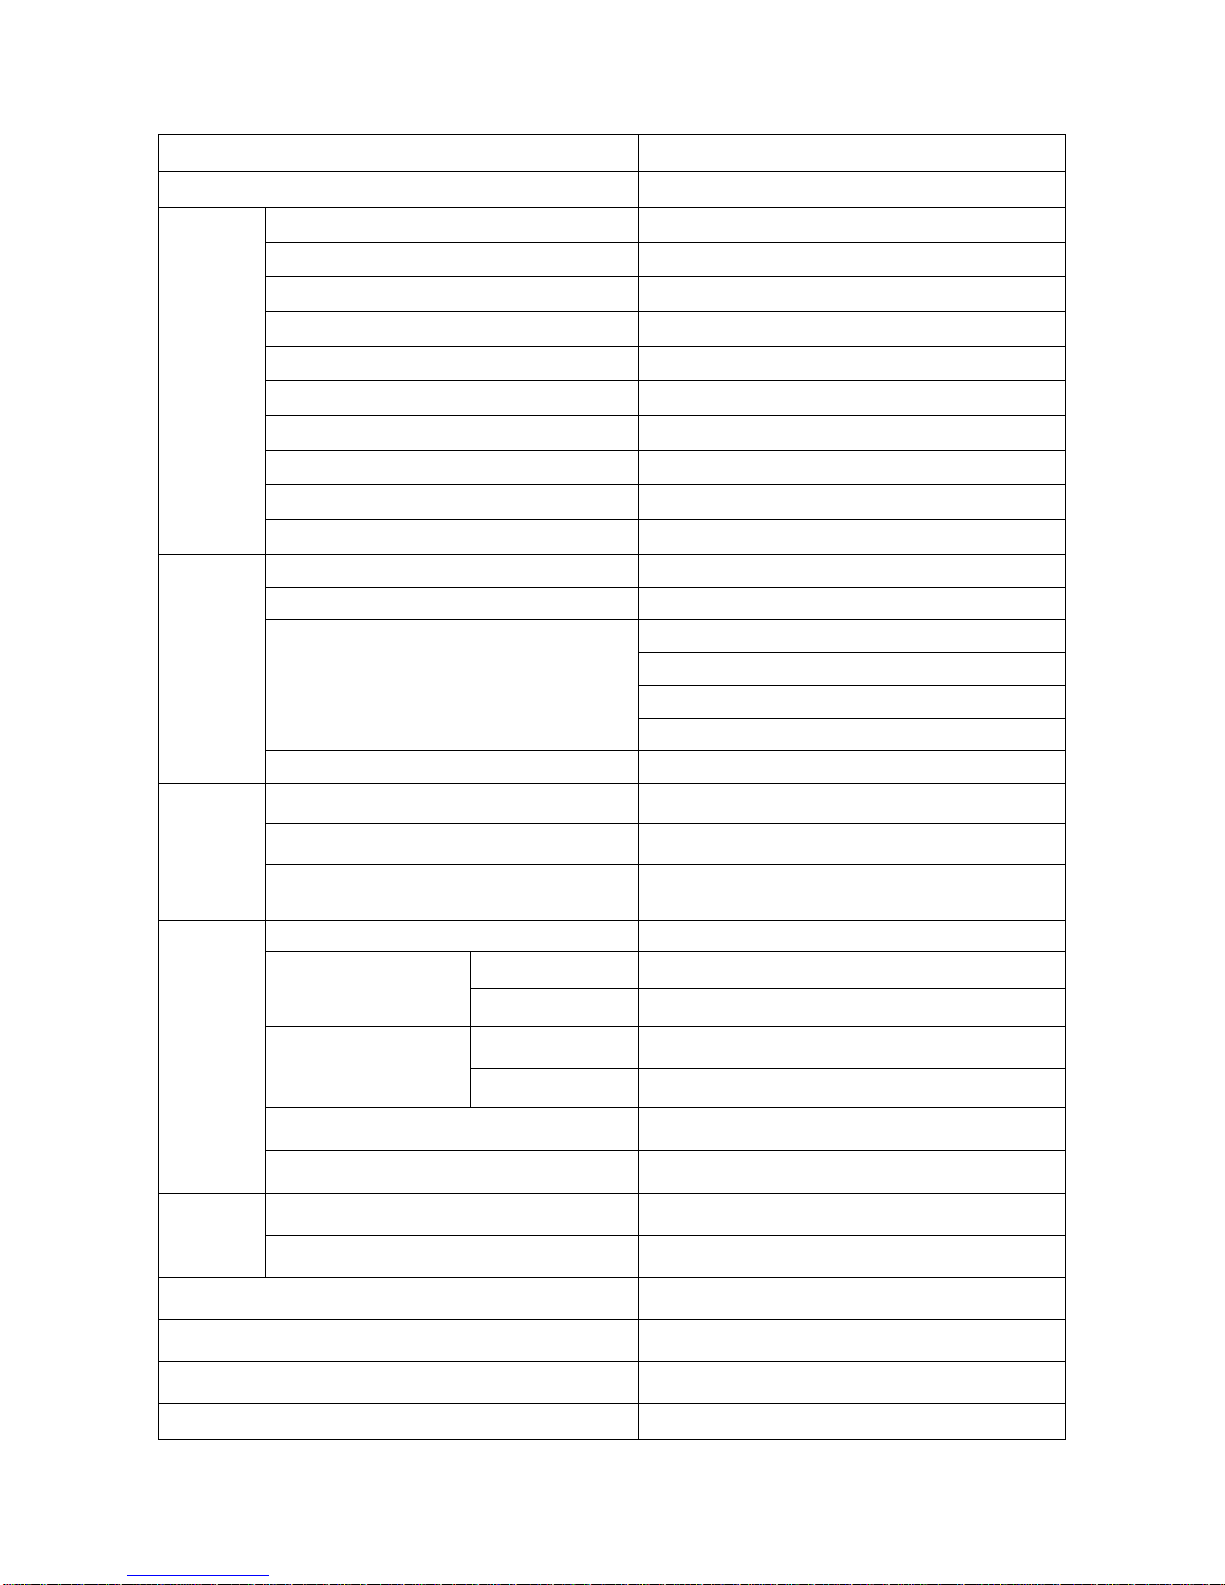
Art. 41639 Color TFT-LCD Monitor
ITEM SPECIFICATION
Display Source 2 COMPOSITE VIDEO / S-VIDEO/VGA/HDMI
LCD Panel 19.0" TFT LCD Panel
Active Display Area (Diagonal) 19.0 inches
Pixel Format 1280 (H) x 1024 (V), RGB Vertical Stripe
Pixel Pitch 0.294 mm x 0.294 mm
Color Depths 16.7M Colors
Contrast Ratio 1000 : 1 (Typical)
Brightness 300 cd/m2
Viewing Angles (Left/Right/Up/Down) 80°/ 80°/ 80°/ 80°
Light source / Lifetime 2CCFLs / 50.000 Hours (Minimum)
LCD
Response Time (Tr/Td) 5 ms
Input Signal Analog RGB (0.714Vp-p), H&V Sync (TTL)
Input Connector 15 pin D-sub( Analog)
VGA 640 x 480 60~75Hz
SVGA 800 x 600 56~75Hz
XGA 1024 x 768 60~75Hz
Input Resolution
SXGA 1280 x 1024 60~75Hz
VGA
Plug & Play DDC 1/2B
Input Signal HDMI
Input Connector 19 pin HDMI (Digital)
HDMI
Input Resolution
Max 1280 x 1024 (PC)
1080i ( Camera)
Video Mode NTSC/PAL
Composite 1.0Vp-p @ 75 ohm
Video Input Signal
S-Video 0.7Vp-p (Luminance), 0.3Vp-p (Chrominance), 75Ω
Composite BNC x 4 (IN/OUT)
Video Input Connector
S-Video 4 Pin Mini Din (IN)
Termination 75Ω, Auto Termination
Composite
Video
Horizontal Resolution More than 700 TV Lines
Input 1x Stereo
Audio
output 2x 0.5W
User Controls
Power, Menu, Brightness, Volume, Source, Auto ADJ. PIP etc
OSD Language
English / German / French/ Spanish /Italian/Polish/Russian/Czech
DC Power 12Vdc
Operating Temperature 0 ~ 40 °C
Page 19
19
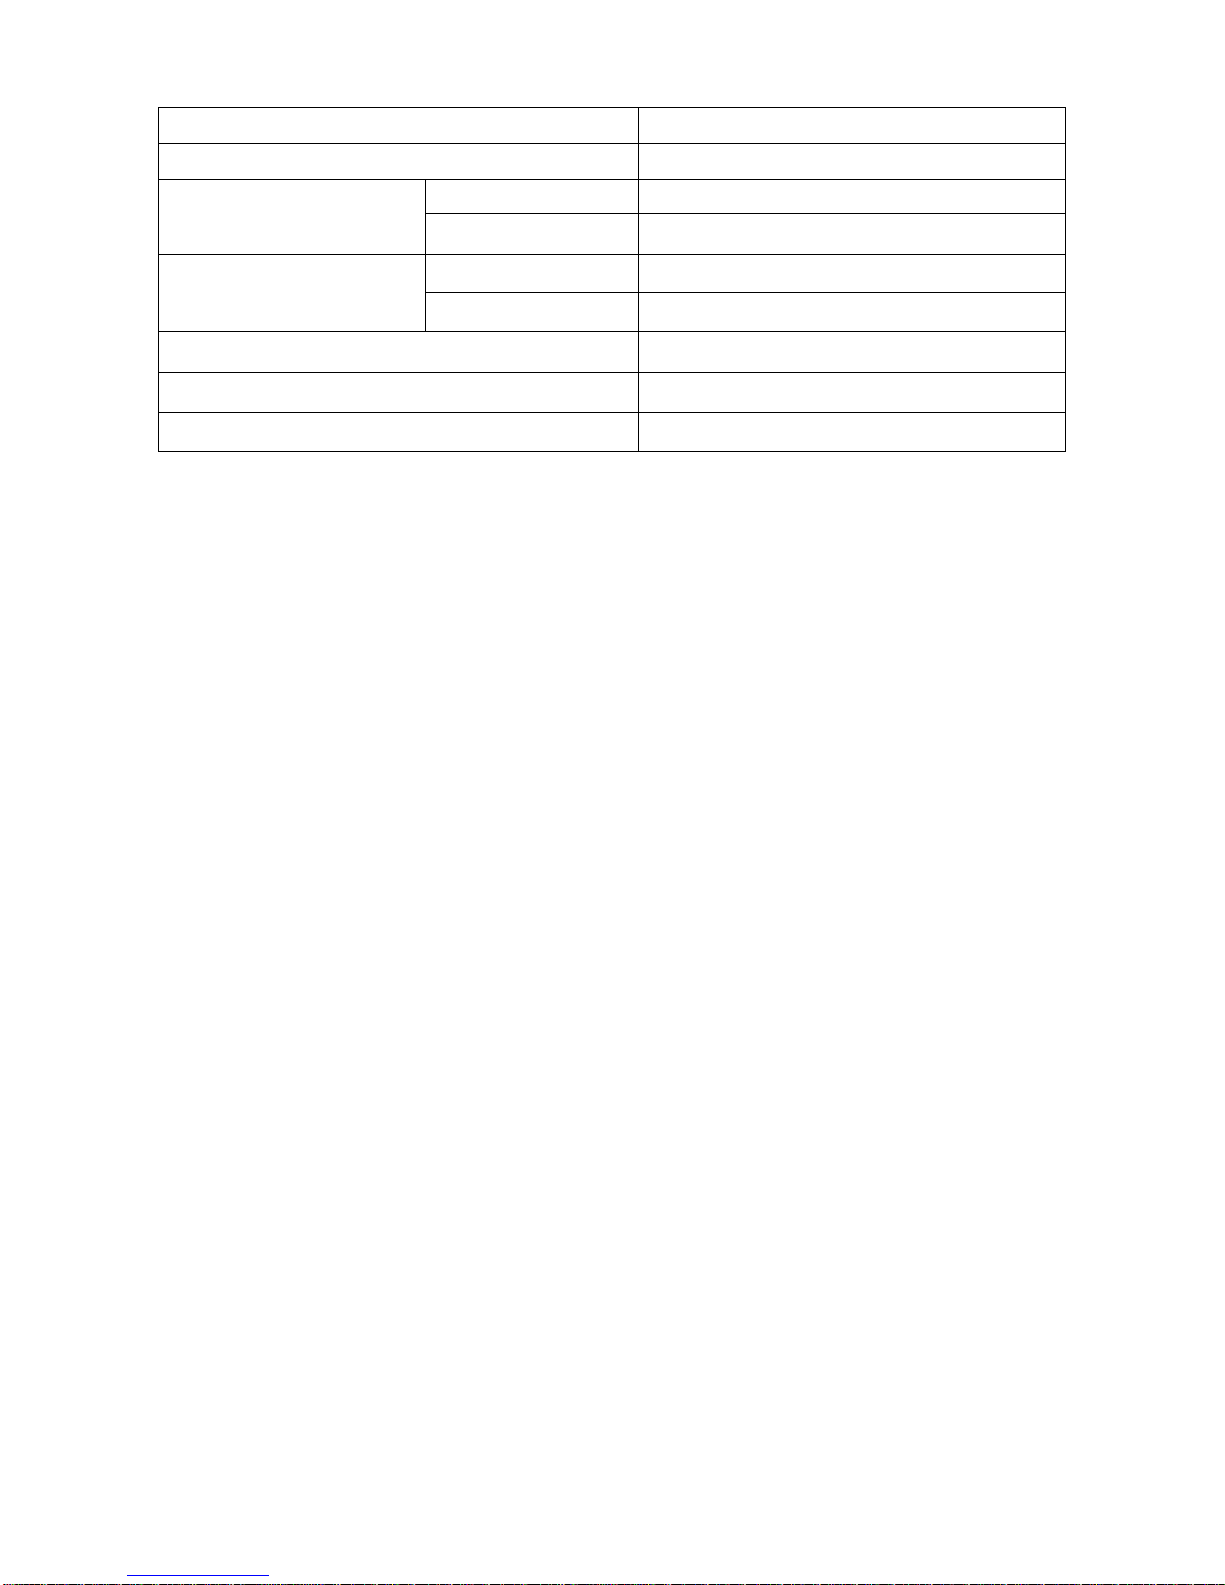
Storage Temperature 0 ~ 50 °C
Case Material Plastic
Net (W x H x D) 420 x 429 x 200 mm
Dimensions
Packing (W x H x D) 520 x 517 x 250 mm
Net 7.5 Kg
Weight
Packing 9.5 Kg
Accessories AC Adaptor , VGA Cable, Power Cord, Manual
Protection Glass 3 T max
IR Remote Controller Option
Page 20
20
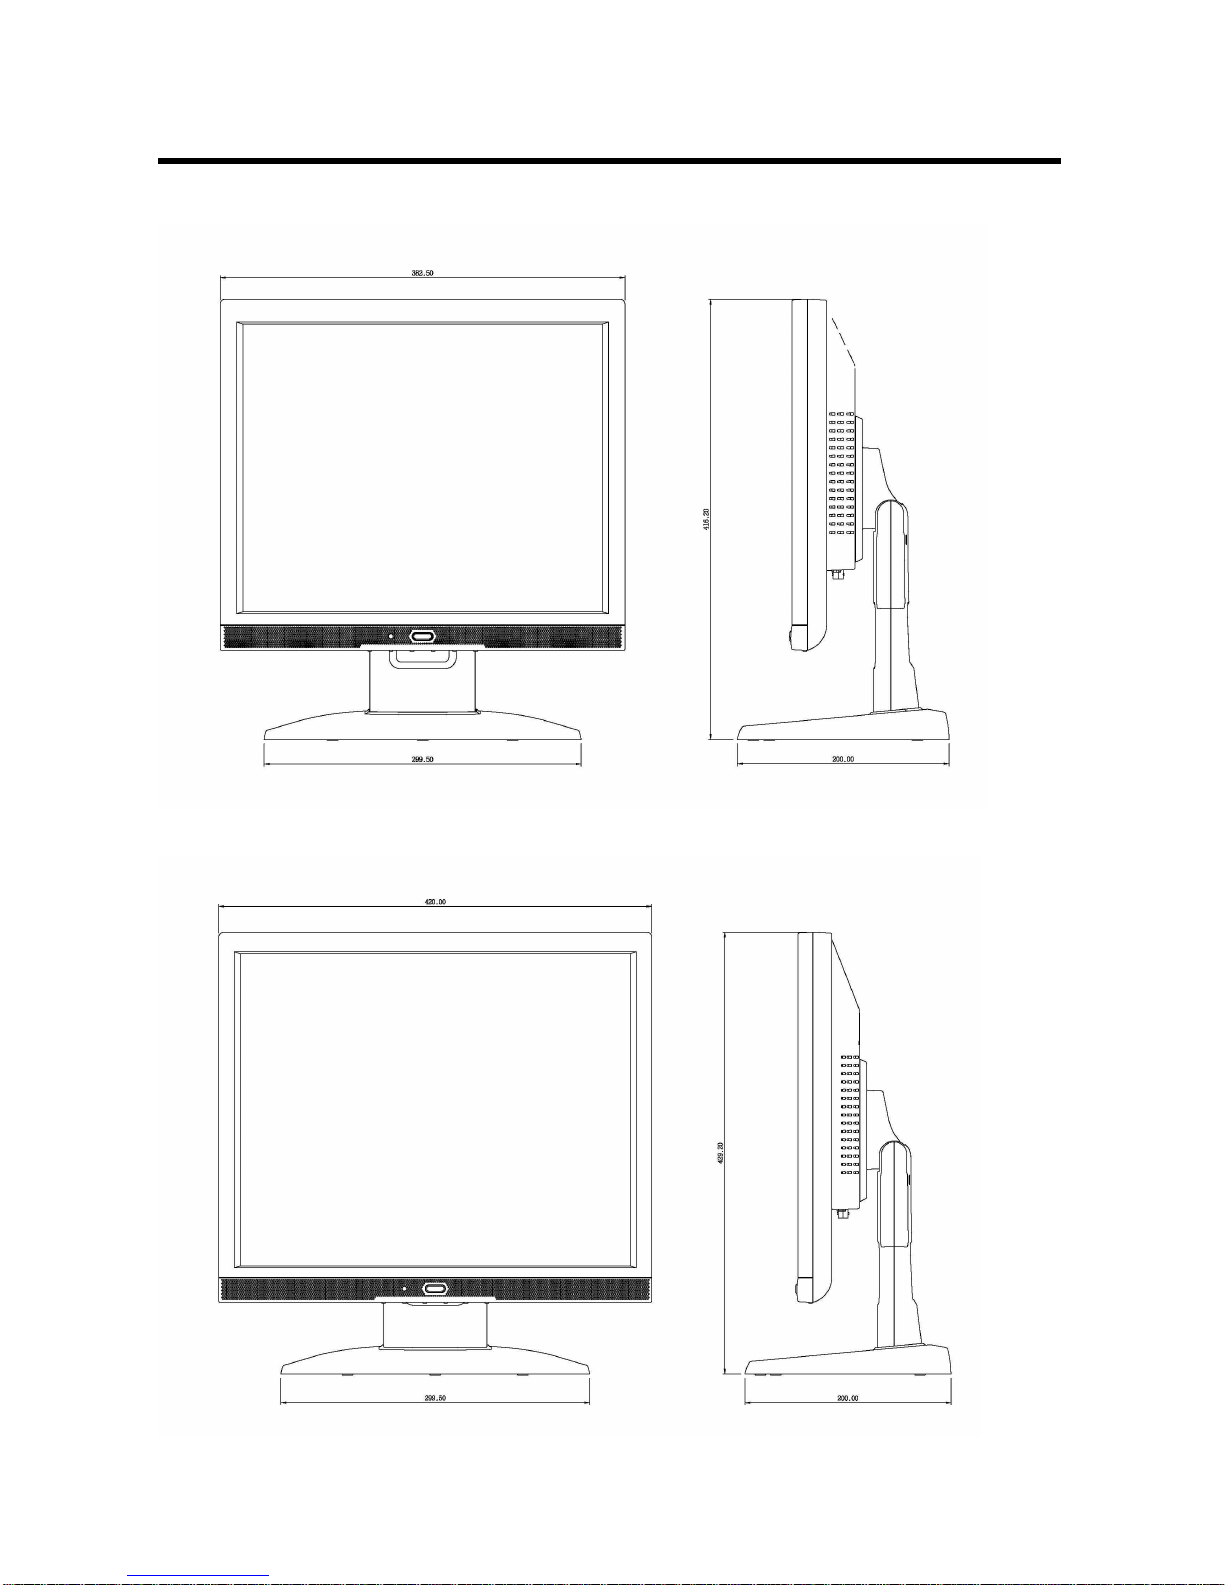
Dimensions drawings
Art. 41637
Art. 41639
Page 21
21
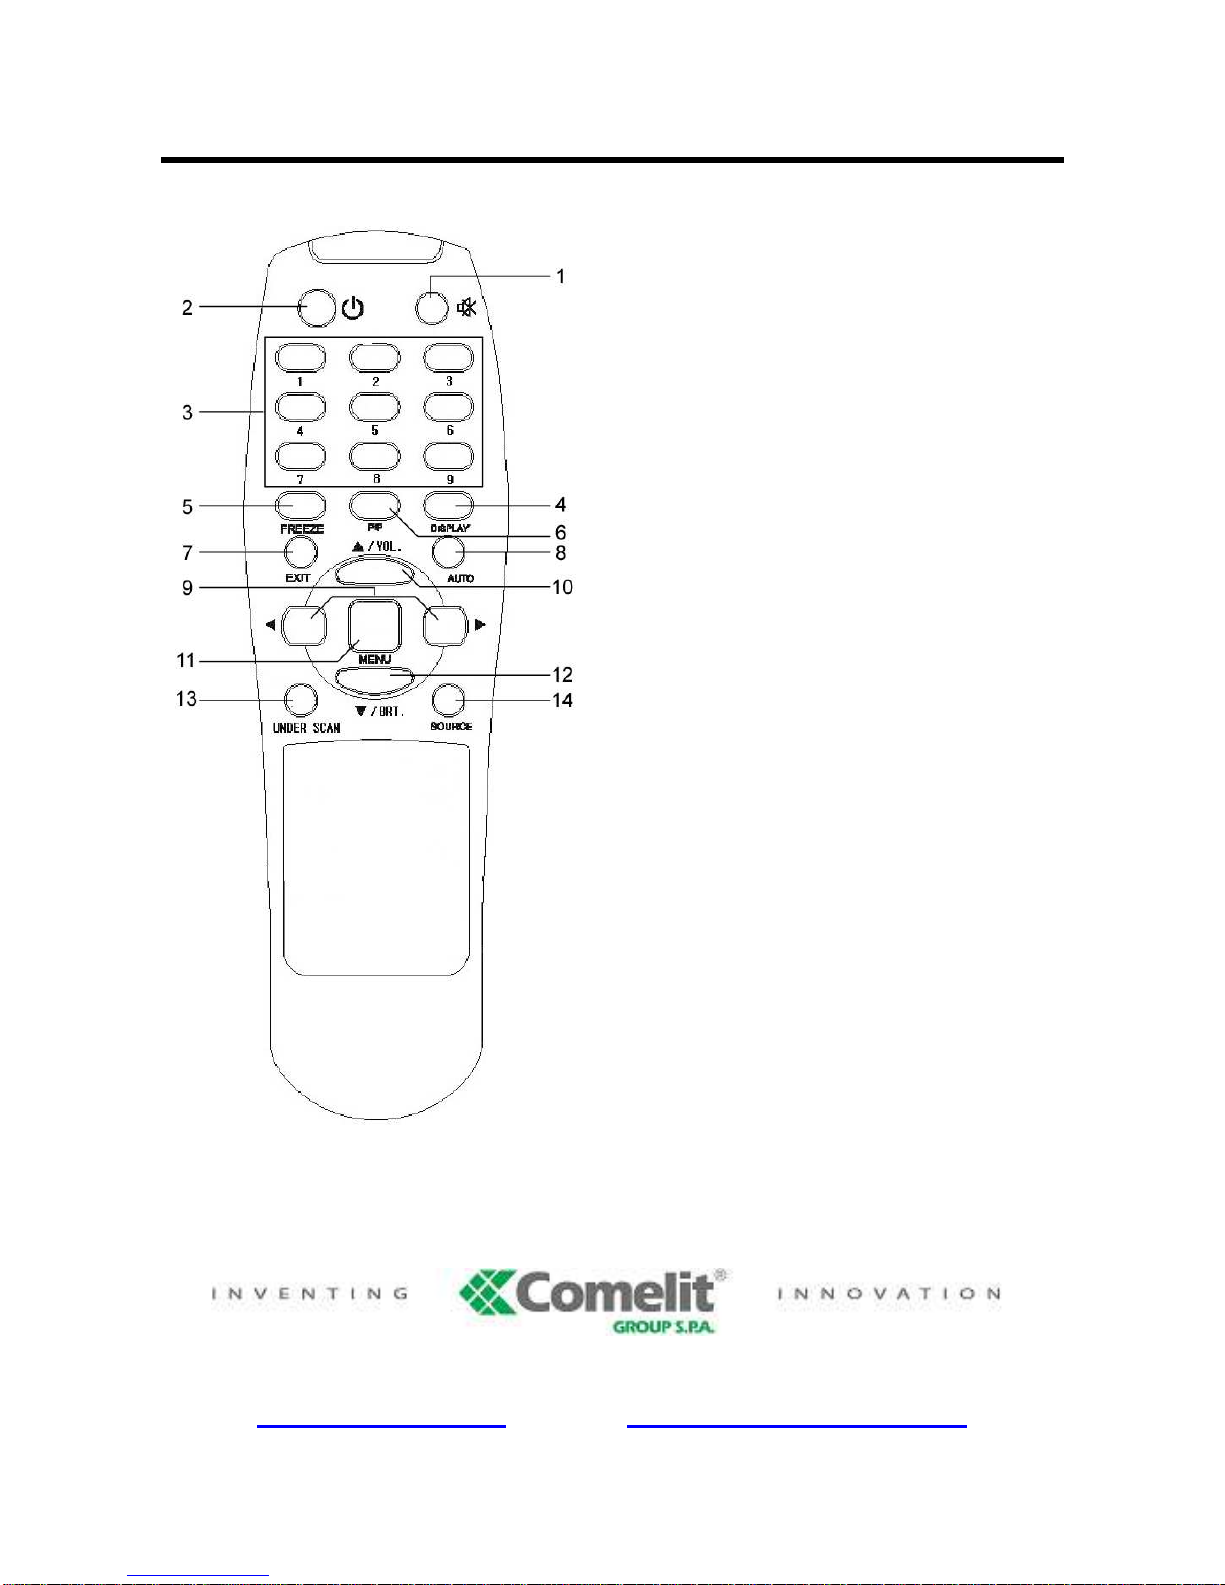
REMOTE CONTROL
;
1. Mute
Cuts off the sound
2. Power
Power on / off
3. Not used
4. Display
Display the screen information
5. Freeze
Freezes the screen temporarily
6. PIP
Multi window activate or cancel the PIP function
7. Exit
Exit the OSD menu
8. Auto
Auto adjust the H/V POS, H/V SIZE, Phase
9. Left / Right Keys
Decreases / increases the chosen item
10. Up Key / Volume
Moves up the menu lists in the OSD’/ Selected
Volume
11. Menu
Turns the OSD menu on / off
12. Down Key / Brightness
Moves down the menu lists in the OSD / Selected
…..brightness
13. Under Scan
Adjust the image size
14. Source
Select the sources
Via Don Arrigoni, 5 24020 Rovetta S. Lorenzo (Bergamo)
http://www.comelit.eu e-mail: [email protected]
 Loading...