

Page 1

Quick Q
Supervisor’s User Guide for the
Scout II Telephone
Page 2

Comdial® strives to design the features in our communications
systems to be fully interactive with one another. However, this is not
always possible, as the combinations of accessories and features are
too varied and extensive to insure total feature compatibility.
Accordingly, some features identified in this publication will not operate
if some other feature is activated. Comdial disclaims all liability relating
to feature non-compatibility or associated in any way with problems
which may be encountered by incompatible features. Notwithstanding
anything contained in this publication to the contrary, Comdial makes
no representation herein as to the compatibility of features.
GCA70-381
10/02
Printed in U.S.A.
Page 3

QuickQ Supervisor’s User Guide-Scout II
i
Table of Contents
1. The Scout II Telephone for Supervisors .......................... 1
2. Description of the Display (Idle Display) ......................... 3
3. Signing-in to QuickQ ......................................................... 4
4. Changing the Mode of Operation ..................................... 6
5. Recording Announcements ............................................... 7
6. Viewing Current Reports ................................................ 10
7. Monitoring Agents ........................................................... 11
8. Responding to Help .......................................................... 13
9. Call Processing ................................................................. 15
Receiving ACD Calls....................................................... 15
Placing Outgoing Calls ................................................... 15
Transferring an ACD Call ............................................. 15
Assigning an Account Code............................................ 16
10. Things to Remember ..................................................... 17
11. Log-in Procedure ...........................................................18
12. Responding to Request for Help ................................... 19
13. Supervisor’s Menu ......................................................... 20
Page 4

This page is intentionally blank.
Page 5

QuickQ Supervisor’s User Guide-Scout II
Oct 02 Comdial 1
1. THE SCOUT II TELEPHONE FOR
SUPERVISORS
• QuickQ versions using software release 3.0 (or later) allow the
use of up to nine Scout II digital wireless telephones. Using
these telephones provides users with maximum freedom to
move about within the call center. For a complete description
of the Scout II telephone, refer to document GCA70-380, Scout
II User’s Guide for FX, DXP, DXP Plus Systems.
• The F1 button should be programmed as the OAI button
(labeled ACD) on your Scout II telephone. This button enables
you to sign into QuickQ. Buttons F2, F3, and F4 should be
programmed to function the same as the three interactive
buttons on the proprietary 12-button and 24-button telephones
while QuickQ is active.
Page 6
The Scout II Telephone for Supervisors
2 Comdial Oct 02
• All displays shown in this guide are as seen on the 16-character
(8 characters x two lines) Scout II display.
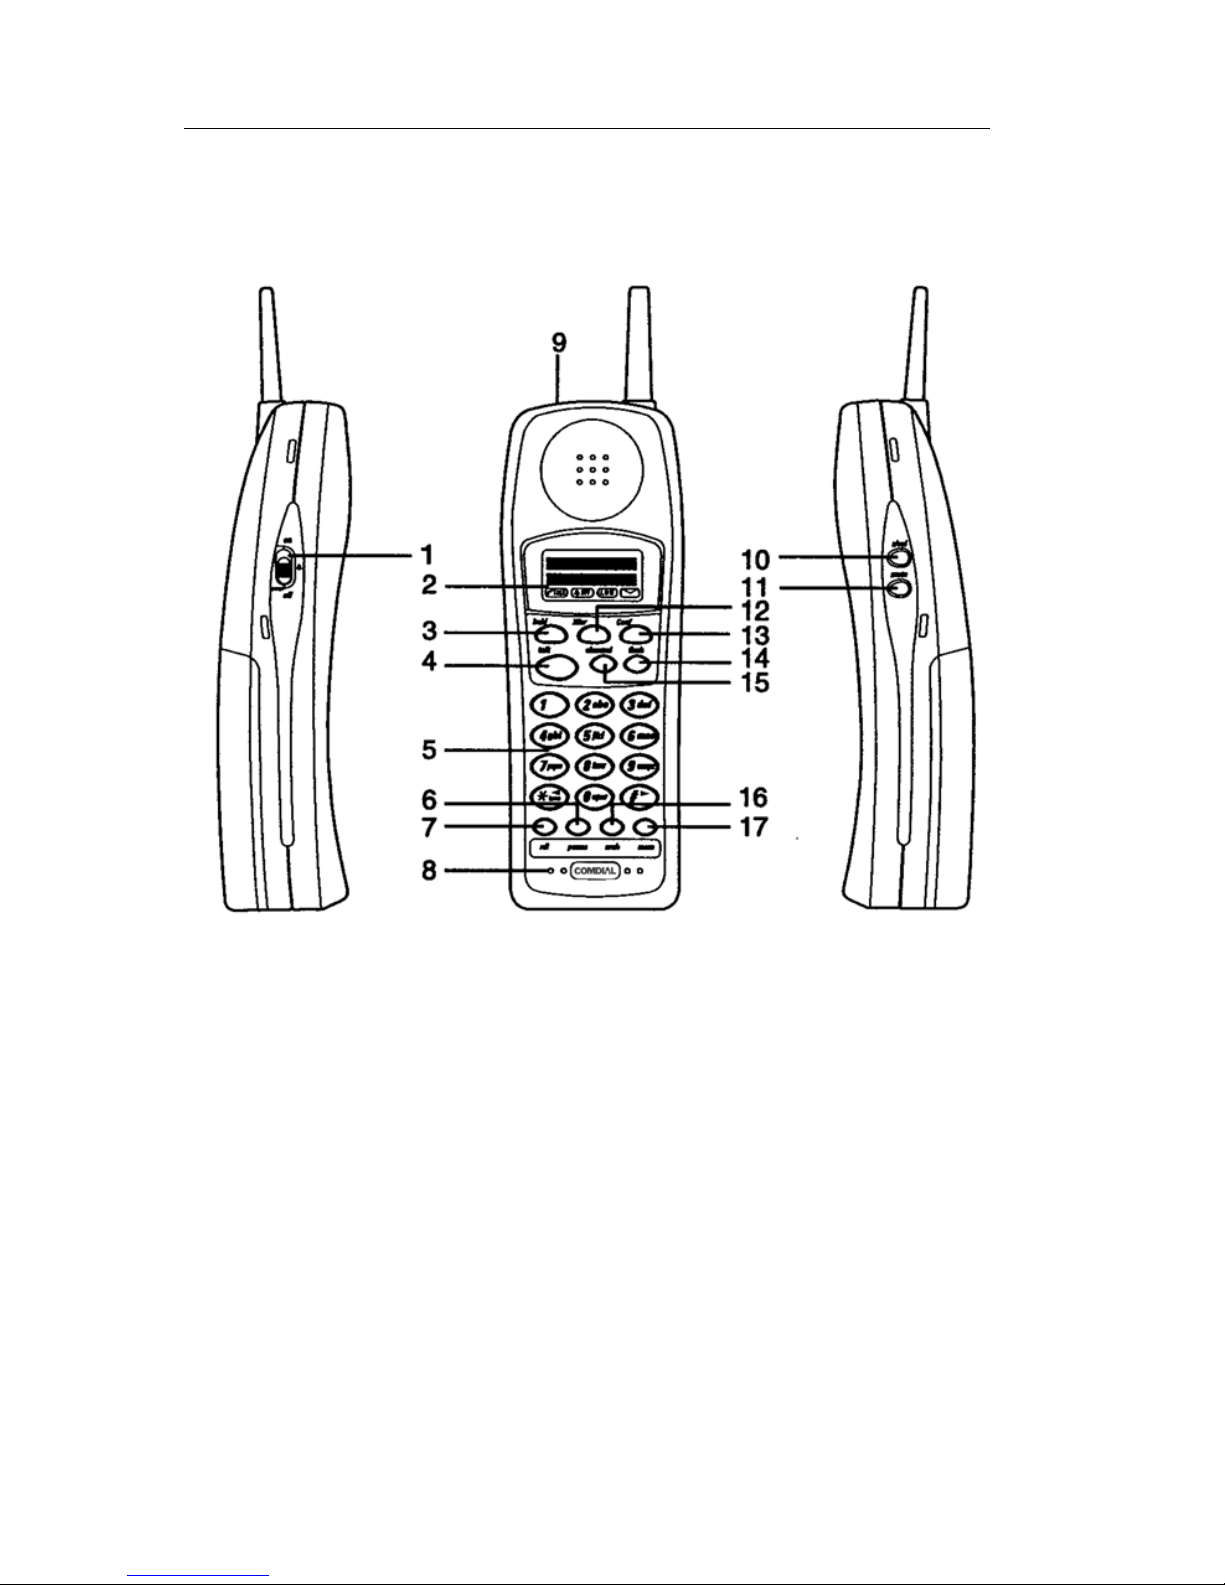
Figure 1-1 Scout II Telephone
1. Ringer ON/OFF switch 9. Head Set Jack
2. Message Display 10. Volume (R/VOL) Button
3. Transfer/Conference (T/C) Button 11. MUTE Button
4. Talk Button 12. Hold Button
5. Numeric Keypad 13. Tap Button
6. Function Button 14. Redial Button
7. Function Button 15. Channel Button
8. Microphone 16. Function Button
17. Function Button
Page 7
QuickQ Supervisor’s User Guide-Scout II
Oct 02 Comdial 3
2. DESCRIPTION OF THE DISPLAY
(IDLE DISPLAY
)
Scout Interactive Button Definitions
Scout
Display
Standard
Display
Scout
Display
Standard
Display
Ab ABORT Ok OK
Ac ACC (account) Ot OUT
Ag AGENT Py PLAY
Al ALL Qt QUIT
As ANSWER Rd READY
By BUSY Rc RECORD
Cf CONF Rj REJECT
Cn CANCEL Rs RELEASE
Cr CLEAR Rp REPORT
Dy DAY Rt RETRY
Ex EXIT Rn RETURN
Hp HELP Sn SCAN
Hd HOLD Se SELECT
In IN Sk SKIP
Lg LOG Sp SPEC’L (special)
Lg LOGOUT St STOP
Mn MENU Tr TRANS (transfer)
Md MODE Vc VOICE
Ms MSG (message) Wp WRAPUP
Nt NIGHT Ys YES
No NO
Quick Q Group 01
ByHpLg
This line indicates your present status.
This line indicates the function of the interactive buttons.
Please refer to the following table for the interactive
button definitions.
Page 8

Signing-in to QuickQ
4 Comdial Oct 02
3. SIGNING-IN TO QUICKQ
• Press the ACD (F1) button (OAI button).
This display notifies you that you are about to log into QuickQ.
This display prompts you to enter your ID number.
• Use the keypad to enter your ID number. Press the Rt (retry)
Interactive button if you enter an incorrect digit.
This display prompts you to enter your password.
• Enter your password digits
You will have full access to all supervisor functions regardless of
your choice.
Welcome ->QuickQ
Agt ID:
Rt Qt
Password:
Rt Qt
Answer Call?
Ys No
Page 9

QuickQ Supervisor’s User Guide-Scout II
Oct 02 Comdial 5
• IF you want to answer ACD calls for your group, press the Ys
(yes) Interactive button. ACD calls will be sent to you
according to the agent availability and your priority level.
If
you do not want to be part of the answering group, press the No
Interactive button.
This display is the idle display. If you are accepting ACD calls, they
will only be sent to you while you are in the idle state.
• The above display indicates you are now signed into Group 1,
and the group is in Dy (day) mode. To access the supervisor
menu, press the Mn (menu) Interactive button. To change the
mode of operation, press the Md (mode) Interactive button. To
log out of QuickQ, press the Lg (log) Interactive button.
Group 01 Dy
MnMdLg
Page 10

Changing the Mode of Operation
6 Comdial Oct 02
4. CHANGING THE MODE OF
OPERATION
• The idle display indicates the current mode of operation for the
group.
The display indicates that group 1 is in day mode.
• To change the mode of operation manually for the group, press
the Md (mode) Interactive button.
Three modes of operation are available; day, night and special.
• Press the Interactive button that corresponds to the desired mode
of operation for your group as follows:
Dy (day)
Day announcements and call routing.
Nt (night)
Night announcement and disconnect.
Sp (special)
Special announcement and disconnect.
Group 01 Dy
MnMdLg
Group Mode?
Dy Nt Sp
Page 11

QuickQ Supervisor’s User Guide-Scout II
Oct 02 Comdial 7
5. RECORDING
ANNOUNCEMENTS
• To record the announcements for your group, press the Mn
(menu) Interactive button from the idle display.
This is the supervisor’s menu display. All supervisor features
are accessible through this display.
• Press the Ms (msg) Interactive button. The system will then call
the digital voice announcer to access a voice port. Once a voice
port is available, the following display is shown.
Indicates how much time is currently available for recording.
Clear all messages or choose a specific message to record.
Wt: >T
Ms Rp Ag
Free: 000s
RtCrQt
Msg #: ___
RtCrQt
Page 12

Recording Announcements
8 Comdial Oct 02
• Enter the desired message number.
Indicates the current time recorded for this message.
• When you are ready to record the announcement, lift the handset
and press the Rc (record) Interactive button. Wait for the tone,
and then start speaking into the handset. Press the St (stop)
Interactive button when you are finished recording.
Indicates which message you are recording.
Allows you to review, reject or accept the message recorded.
• To accept the message recorded, press Ys (yes). You will then
return to the Time free display to allow you to continue
recording additional announcements. If you do not want this
message, press No. The system will immediately begin
recording again.
Msg 01: 000s
RcPyQt
Record Msg
01 St
Accept Message?
YsNoPy
Page 13

QuickQ Supervisor’s User Guide-Scout II
Oct 02 Comdial 9
• If you want to review the recorded announcement, press the Py
(play) Interactive button.
Indicates which message is being played.
• Once you press St (stop), you will be prompted to accept, reject
or review the message again. Press the appropriate Interactive
button.
• To return to the Idle display, press Qt (quit).
• Refrain from recording messages during peak calling periods,
since while you are recording you are using one of the voice
ports. This could result in longer than usual ring delays for
callers.
Play Msg 01
St
Page 14

Viewing Current Reports
10 Comdial Oct 02
6. VIEWING CURRENT REPORTS
• The supervisor can view current reports on answered and
abandoned call statistics. These statistics are based on line
activity for the group.
Note: If your group does not have lines assigned to it, this report will
show zeros.
• From the idle display, press Mn (menu).
• Press the Rp (report) Interactive button.
• To return to the idle display, press Qt (quit).
Wt: >T
MsRpAg
A: 123 L: 4
Qt
Page 15

QuickQ Supervisor’s User Guide-Scout II
Oct 02 Comdial 11
7. MONITORING AGENTS
• The group supervisor can monitor agent activity and silently
monitor conversations. From the supervisor menu, press the Ag
(agent) Interactive button.
Allows you to select the specific agent you want, or to have the
system select an agent.
• Enter the ID number of the agent you want to monitor, or press
Sn (scan), and the system will select an agent for you.
Indicates the selected agent and the time the agent has been in
his or her current sate.
Shows the current state of the selected agent. This agent is on
an incoming call.
Agt ID: ___
SnRtQt
Louise >00:45
SnSeQt
Agnt 101:
SnSeQt
After 2 seconds
Page 16

Monitoring Agents
12 Comdial Oct 02
• Press the Sn (scan) Interactive button to view another agent, or
press the Qt (quit) Interactive button to enter another agent’s ID.
• To silently monitor an agent’s conversation, press the Se (select)
Interactive button. You will then be able to listen to the
conversation without the agent or the caller hearing you.
Indicates which agent’s conversation you are monitoring.
Press Sn (scan) to have the system select another agent, or press
Qt (quit) to enter another agent’s ID. Press Qt (quit) twice to
return to the idle display.
Mt Agnt 101
Sn Qt
Page 17

QuickQ Supervisor’s User Guide-Scout II
Oct 02 Comdial 13
8. RESPONDING TO HELP
Note: You must be in the Idle state (see display below) to be available
to your agents for help.
Indicates Idle state with group 1 in the day mode.
When an agent in your group requests help, your telephone will
beep and this display will appear.
Indicates an agent is requesting your assistance.
Indicates the name of the agent requesting help.
• To reject the call for help, press the Rj (reject) Interactive
button.
The agent will be notified that you are unavailable.
• To answer, press the As (answer) Interactive button. The system
will then call the agent.
Group 01 Dy
MnMdLg
Reqt 4Help
As Rj
Agnt 101 Ca 11
As Rj
After 2 seconds
Page 18

Responding to Help
14 Comdial Oct 02
Indicates the name of the agent requesting help.
• When the agent answers, you will either be connected to the
agent and the caller, or just the agent (at the agent’s discretion).
The agent has the option to transfer the call to you, or
disconnect you from the conversation. While connected to this
call, your display will be as follows.
Indicates the name of the agent requesting help.
• To disconnect from the conversation, press Qt (quit).
Call Agnt 101
Cn
Agnt101 Line Name
Qt
Page 19

QuickQ Supervisor’s User Guide-Scout II
Oct 02 Comdial 15
9. CALL PROCESSING
Call processing is divided into three (3) categories; incoming, outgoing, and transfers. This section explains each of these categories.
9.1 Receiving ACD Calls
• When you sign into the QuickQ, you can choose to accept ACD
calls, but you cannot transfer a call into any ACD queue.
However, you can transfer a call to any individual agent using
the agent’s intercom number. Please refer to the Agent’s User
Guide for details on receiving ACD calls.
9.2 Placing Outgoing Calls
• Select an outgoing line and dial the number. Please refer to the
Agent’s User Guide for details on placing outgoing calls.
9.3 Transferring an AC D Call
• When transferring a call, be aware that you are responsible for
the transferred call until the intended party answers the call.
• To transfer a call, press the T/C button.
• Announce the call to the intended party (paging may be helpful
for this).
Line Name Supp901
AcWpHp
Page 20

Call Processing
16 Comdial Oct 02
• Press the Wp (wrap-up) interactive button to disconnect from
that call. Your display will enter the WRAP-UP mode.
• If the transferred call is not answered, the call will automatically
recall to your telephone (regardless of your activity).
9.4 Assigning an Account Code
Account codes can be assigned to both incoming and outgoing calls.
Multiple account codes can be given to individual calls. Please refer
to the Agent’s User Guide for details on assigning account codes.
Line Name Supp901
AcWpHp
Page 21

QuickQ Supervisor’s User Guide-Scout II
Oct 02 Comdial 17
10. THINGS TO REMEMBER
• If your display is blank, your telephone is either not logged-in,
or the QuickQ is suspended. Press the QuickQ
button to
resume.
• The agent cannot log out if he or she is the last one in the group
to answer. To log out after answering last, the agent must
change the mode of operation to Night or Special and then log
out.
• If you choose to accept ACD calls, be sure to log out or press
the menu Interactive button to make your station busy when
you leave your desk or when you are unable to answer ACD
calls.
Page 22

Log-in Procedure
18 Comdial Oct 02
11. LOG-IN PROCEDURE
Welcome >QuickQ
Agent ID:
Rt Qt
Password:
Rt Qt
Answer Call?
Ys No
Group 1 Dy
Mn Md Lg
Group Mode?
Dy Nt Sp
Exit from QuickQ
Ys No
Log Procedure
InCnOt
Page 23

QuickQ Supervisor’s User Guide-Scout II
Oct 02 Comdial 19
12. RESPONDING TO REQUEST
FOR HELP
Request for Help
Agnt 101 Call
As Rt
Agnt101 Ln Name
Qt
Call Agt 101
Cn
Group 1 Dy
MnMdLg
Page 24

Supervisor’s Menu
20 Comdial Oct 02
13. SUPERVISOR’S MENU
Page 25

This manual has been developed by Comdial Corporation (the
“Company”) and is intended for the use of its customers and service
personnel. The information in this manual is subject to change
without notice. While every effort has been made to eliminate errors,
the Company disclaims liability for any difficulties arising from the
interpretation of the information contained herein.
The information contained herein does not purport to cover all details
or variations in equipment or to provide for every possible contin
gency to be met in connection with installation, operation, or maintenance. Should further information be desired, or should particular
problems arise which are not covered sufficiently for the purchaser’s
purposes, contact Comdial, Inside Sales Department, Sarasota,
Florida 34232.
Page 26

GCA70-381
10/02
Printed in U.S.A.
 Loading...