

Comdial GCA70–33, Impact Concierge 8324S Series, Impact Concierge 8312S Series, Impact Concierge 8024S Series, Impact Concierge 8012S Series User Manual
Page 1
Impact Concierge®
Front Desk Attendant’s Guide
GCA70–334.10 12/01
printed in U.S.A.
Page 2

This reference manual applies to the following system and telephone models:
System Models
Concierge software 4A or above.
•
FXII systems with software 17A and later.
•
Telephone Models
• Impact 8324S-** Rev. A and later.
• Impact 8312S-** Rev. A and later.
• Impact 8024S-** Rev. A and later.
• Impact 8012S-** Rev. A and later.
Contact your Comdial dealer for updates of this as well as other Comdial publications.
Page 3

GCA70–334 Contents
Contents
1 Impact Concierge ...................1
Introduction......................................1
2 Computer Interface .................3
The Impact Concierge Program ......................3
Guest Room Features ..............................4
Check In ........................................5
Check Out .......................................6
Room Type ......................................7
Credit Limit......................................8
Direct Inward Dialing ..............................9
Do Not Disturb ..................................10
Condition.......................................11
Message Waiting .................................13
Call Access .....................................15
Wakeup Call ....................................17
Telephone State ..................................19
Room Status/Condition Grids .......................20
Calls Dialog.....................................21
Directory .......................................22
Printouts .......................................23
Housekeeping ...................................24
Daily and Yearly Maid Statistics.....................25
Alarms Display ..................................26
Contents – i
Page 4

Contents GCA70–334
Alarm Types ....................................27
Alarm Modes....................................28
Wakeups .......................................29
3 Administrative Telephone Interface ........31
Administrative Telephones .........................31
Feature Access Button Locations ....................31
Feature Access Button Functions ....................34
Using the Administrative Telephones .................36
Adding Wireless Extensions ........................37
Heartbeat Feature ................................37
4 Staff Use of Room Telephones ...........39
Room Telephone Functions for Hotel Staff ............39
Remote Answering of Attendant Station ..............39
ii – Contents
Transferring a Call ...............................40
Logging In to a Room .............................40
Logging Out of a Room ...........................40
5 Guest Telephones ..................43
Guest Use of Room Telephones .....................43
Placing an Outside Call............................44
Placing a Call within the Hotel ......................44
Placing a Speed Dial Call ..........................44
Placing Calls to the Attendant.......................44
Setting a Wakeup Call .............................45
Answering a Wakeup Call..........................46
6 Index .........................47
Page 5
GCA70–334 Introduction
1
Introduction
The Impact Concierge system provides three interfaces: the computer terminal at the front desk,
the administrative telephones, and the room telephones. This user’s guide contains chapters
discussing how to use each interface.
Chapter 2 contains instructions for accessing the Impact Concierge system through the
computer terminal at the front desk. The computer terminal allows hotel staff access to the full
range of system functions (e.g. do not disturb, a directory of guests and their room numbers,
wakeup call status, call access, etc.).
Chapter 3 discusses the administrative telephones, which can be used to perform most of the
functions that the front desk terminal can perform.
Chapters 4 and 5 discuss the use of the guest room telephones. Hotel staff can use room
telephones for remote answering of attendant stations and for transferring calls (chapter 4).
Chapter 5 contains procedures guests use to operate room telephones.
For instructions on the standard features of the Comdial digital telephones, refer to their
respective user guides.
Impact Concierge
Front Desk Attendant’s Guide – 1
Page 6

Notes
Page 7
GCA70–334 Computer Interface
2
Computer Interface
The Impact Concierge Program
The Concierge computer interface is designed for use at the hotel’s front desk. You may
perform all system functions from the PC; the PC’s visual interface makes it the quickest and
easiest way to access the Concierge system.
To start the Concierge program,
1. Turn on the PC. The Windows 2000 desktop screen appears.
2. The Concierge program should start automatically. Otherwise, you must double click on
the Concierge shortcut icon located on the Windows 2000 desktop screen.
3. When the Concierge main screen appears, click on the login button in the upper left corner
of the screen. Type your password and press Enter (the default password is user—you must
type it in lower case). The main Concierge Front Desk screen appears.
Caution
Impact Concierge is a real-time application in constant communication with the telephone
switch. Any other programs running on the Concierge PC may slow or halt the operation
of the Concierge program.
Do not load additional software onto the Concierge PC! Load only those programs
necessary for Concierge to operate properly. Loading other software programs may cause
the Concierge PC to crash!
Front Desk Attendant’s Guide – 3
Page 8
Computer Interface GCA70–334
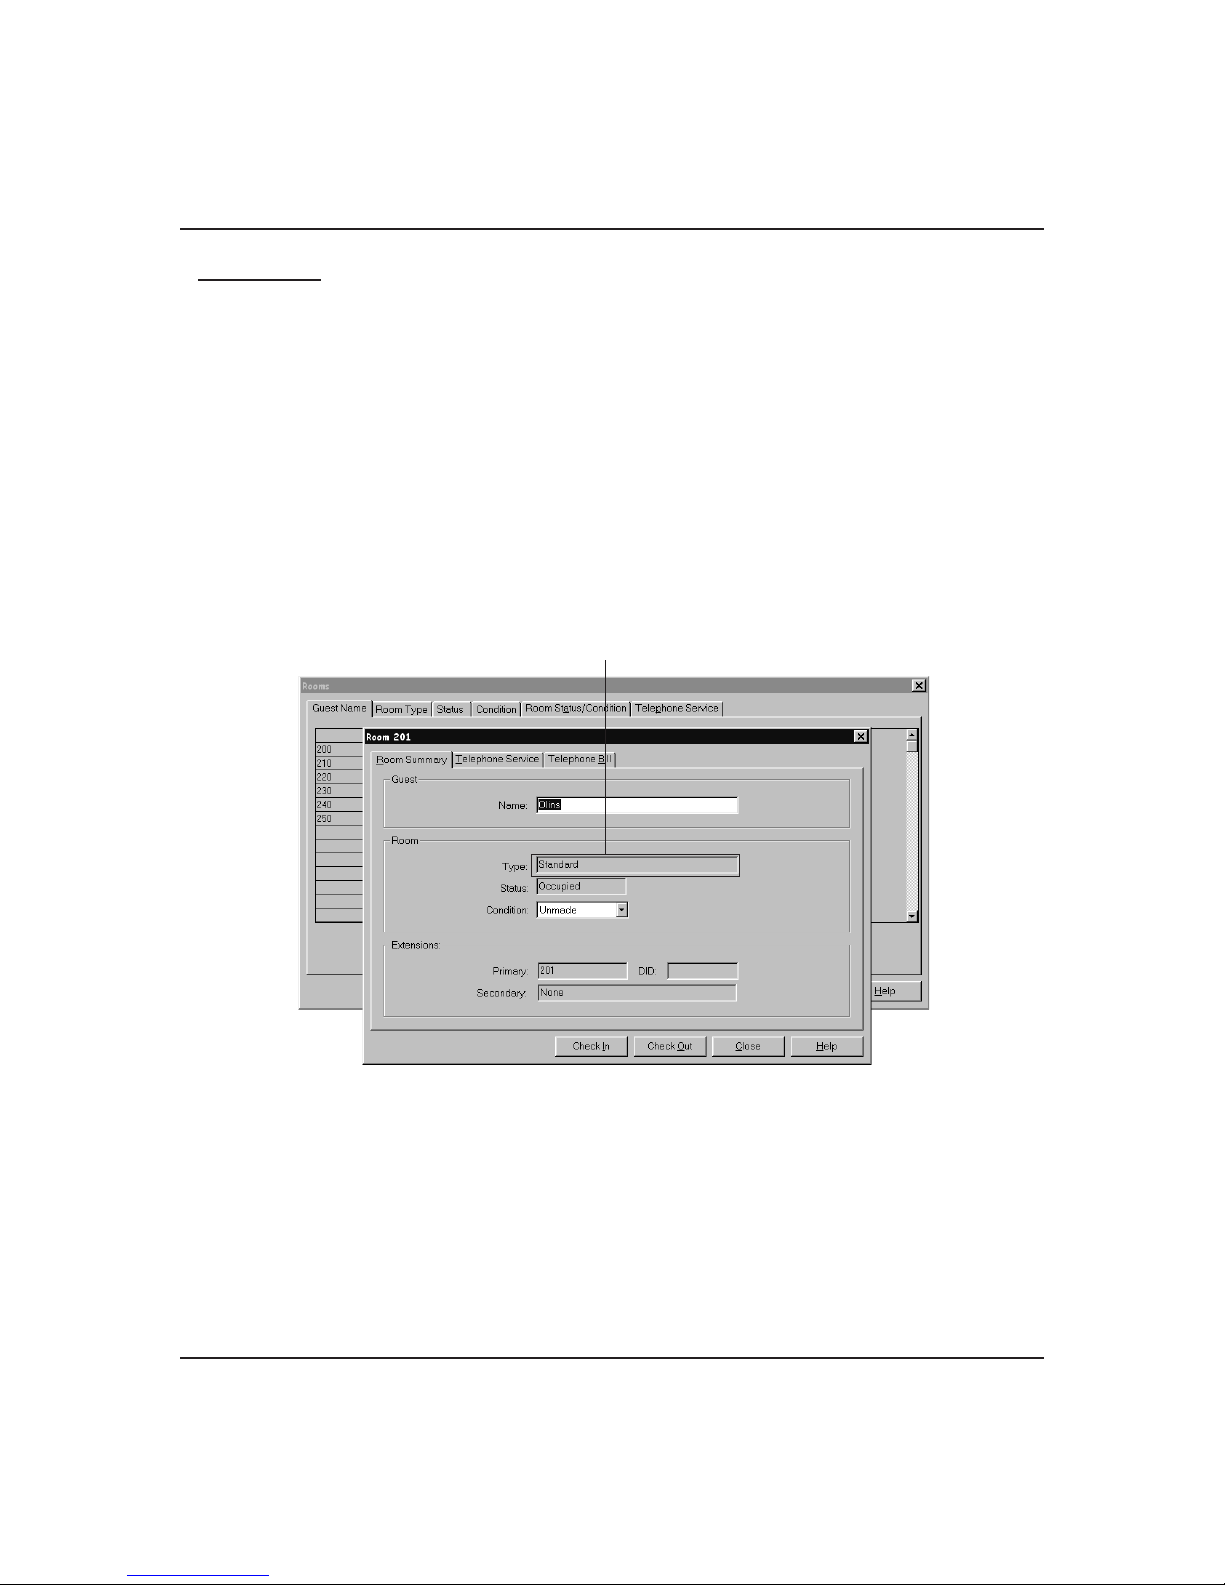
Guest Room Features
You can access the guest room features (Check-In, Check-Out, Name, Status, Condition, Do
Not Disturb, Message Waiting, Call Access, Wakeup Call, Credit Limit, Guest Telephone State,
and Room Status/Condition Grids) from the Rooms drop-down menu. When you select one of
these features, the system displays a room grid. The room grid displays a feature setting for
each guest room. The button bar at the top of the dialog allows you to switch between room
grids.
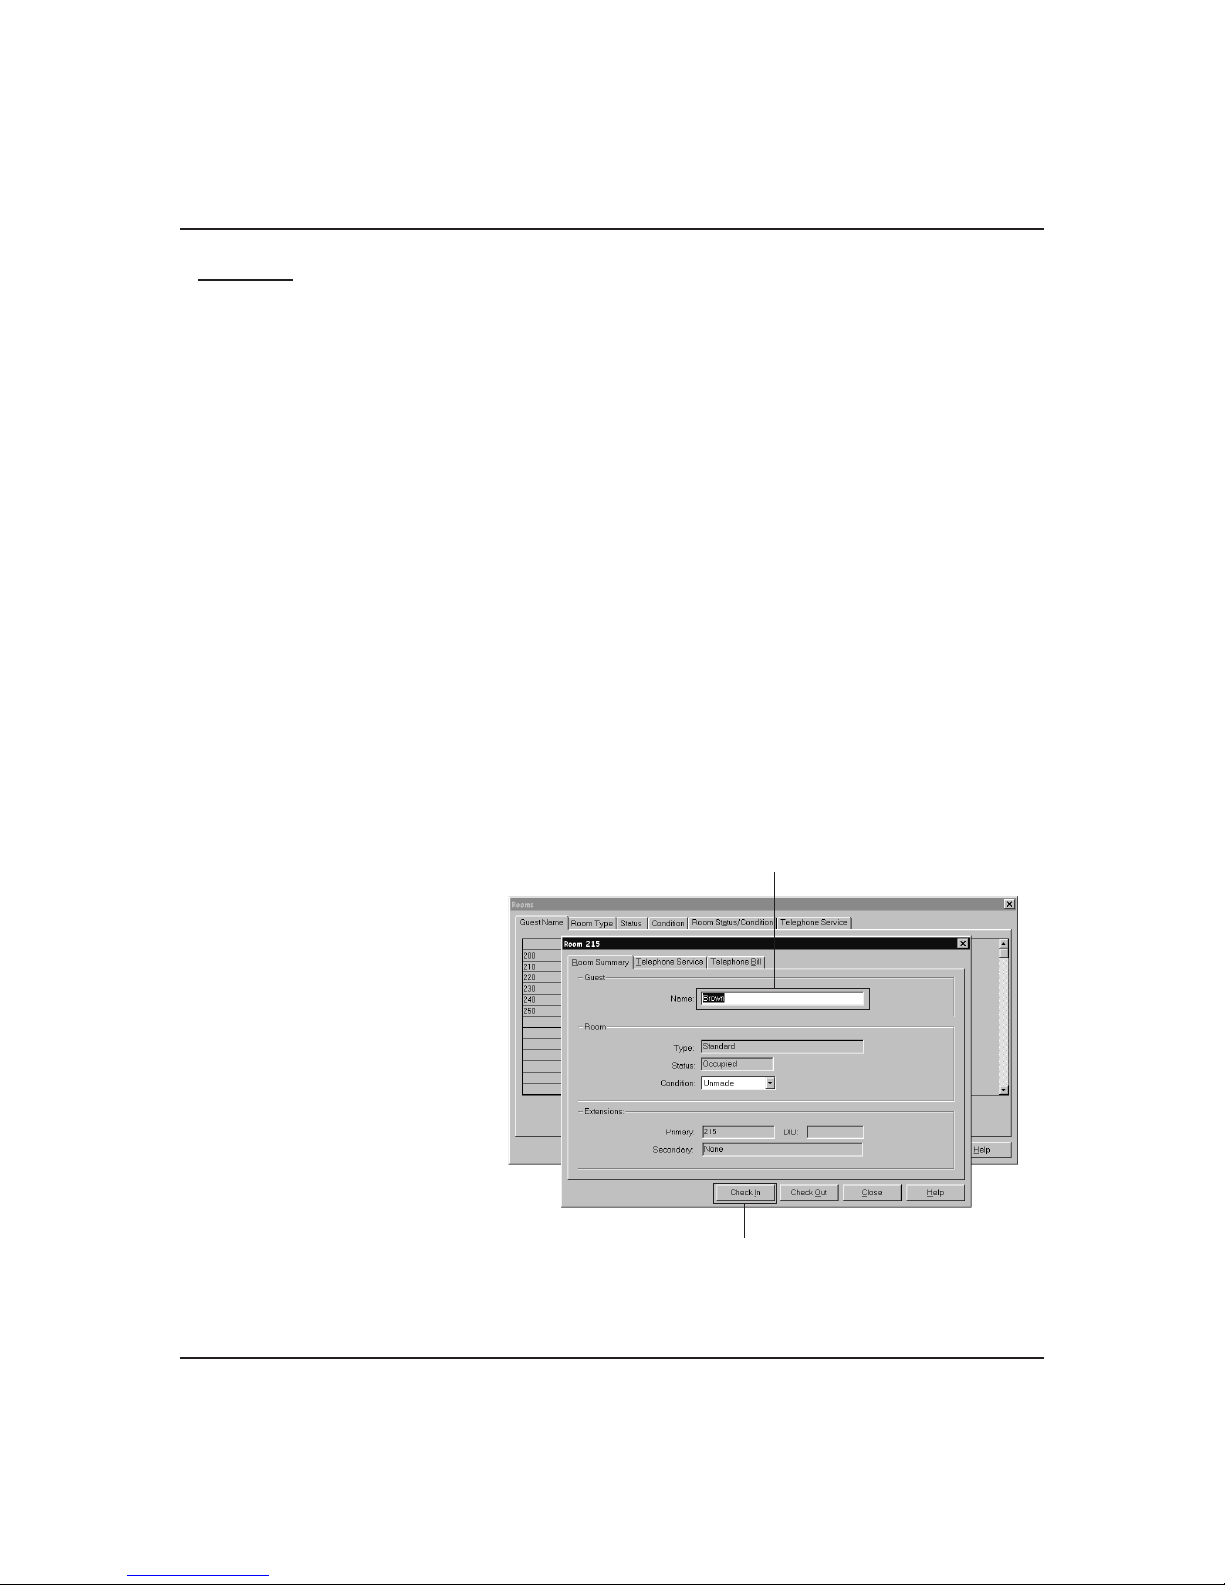
Clicking on a room location will bring up a Room Summary dialog. The Room Summary
dialog allows you to view and make changes to the settings for a particular room (Check-In,
Check-Out, Condition, Do Not Disturb, Message Waiting, Call Access, Wakeup Call, Credit
Limit, Telephone State, Room Status/Condition Grids). The number of the room you are
viewing appears in the upper left hand corner of the dialog. The Room Summary dialog also
displays the amount of the phone bill, how many calls have been made from the room, the
room’s primary extension, the data extensions (if any) associated with the room, and the room’s
direct inward dial (DID) extension, if there is one.
Inn23
4 – Front Desk Attendant’s Guide
Room Grid
Page 9
GCA70–334 Computer Interface
0
Check In
Concierge’s Check In feature allows you to select an available room from a room display grid
and check a guest into that room. Remember that at Check In, credit limit and call access are set
according to the default settings as set by the installer, but you may change them at any time.
Check in may be done from the front desk PC or from any of the administrative telephones.
To Check In a guest,
1. Go to the Rooms drop down menu and select Status. A room grid appears listing the vacant
and occupied rooms.
2. Select a vacant room from the room grid.
(To locate a room number on the grid, find the intersection of the room number in the left
column with the room number in the top row. For example: To find Room 174, first locate
170 in the left column, then locate 4 in the top row. The intersection of these two points is
Room 174.)
3. Click on the box of the room you have selected. The room summary dialog appears. Check
the room number in the upper left hand corner of the dialog to make sure it is the room you
want.
4. To check a guest into a room, the Condition box in the room summary dialog must display
“Made.” If using maid codes, you may continue with check in if room is unmade.
5. Highlight the name in the Guest Name box and replace it with the guest’s name.
6. Click the Check In box in
Guest Name box
the lower part of the Room
Summary dialog. The
Room Status will change
from “Vacant” to
“Occupied.”
7. If the guest’s room has a
direct inward dial (DID)
extension, it will appear in
the Room Summary dialog.
You will want to tell the
guest what the DID
4
Inn
extension is, along with the
hotel’s 3-digit prefix.
8. Click Close to enter these
Check In button
new settings in the system.
Check In Dialog
Front Desk Attendant’s Guide – 5
Page 10
Computer Interface GCA70–334
Check Out
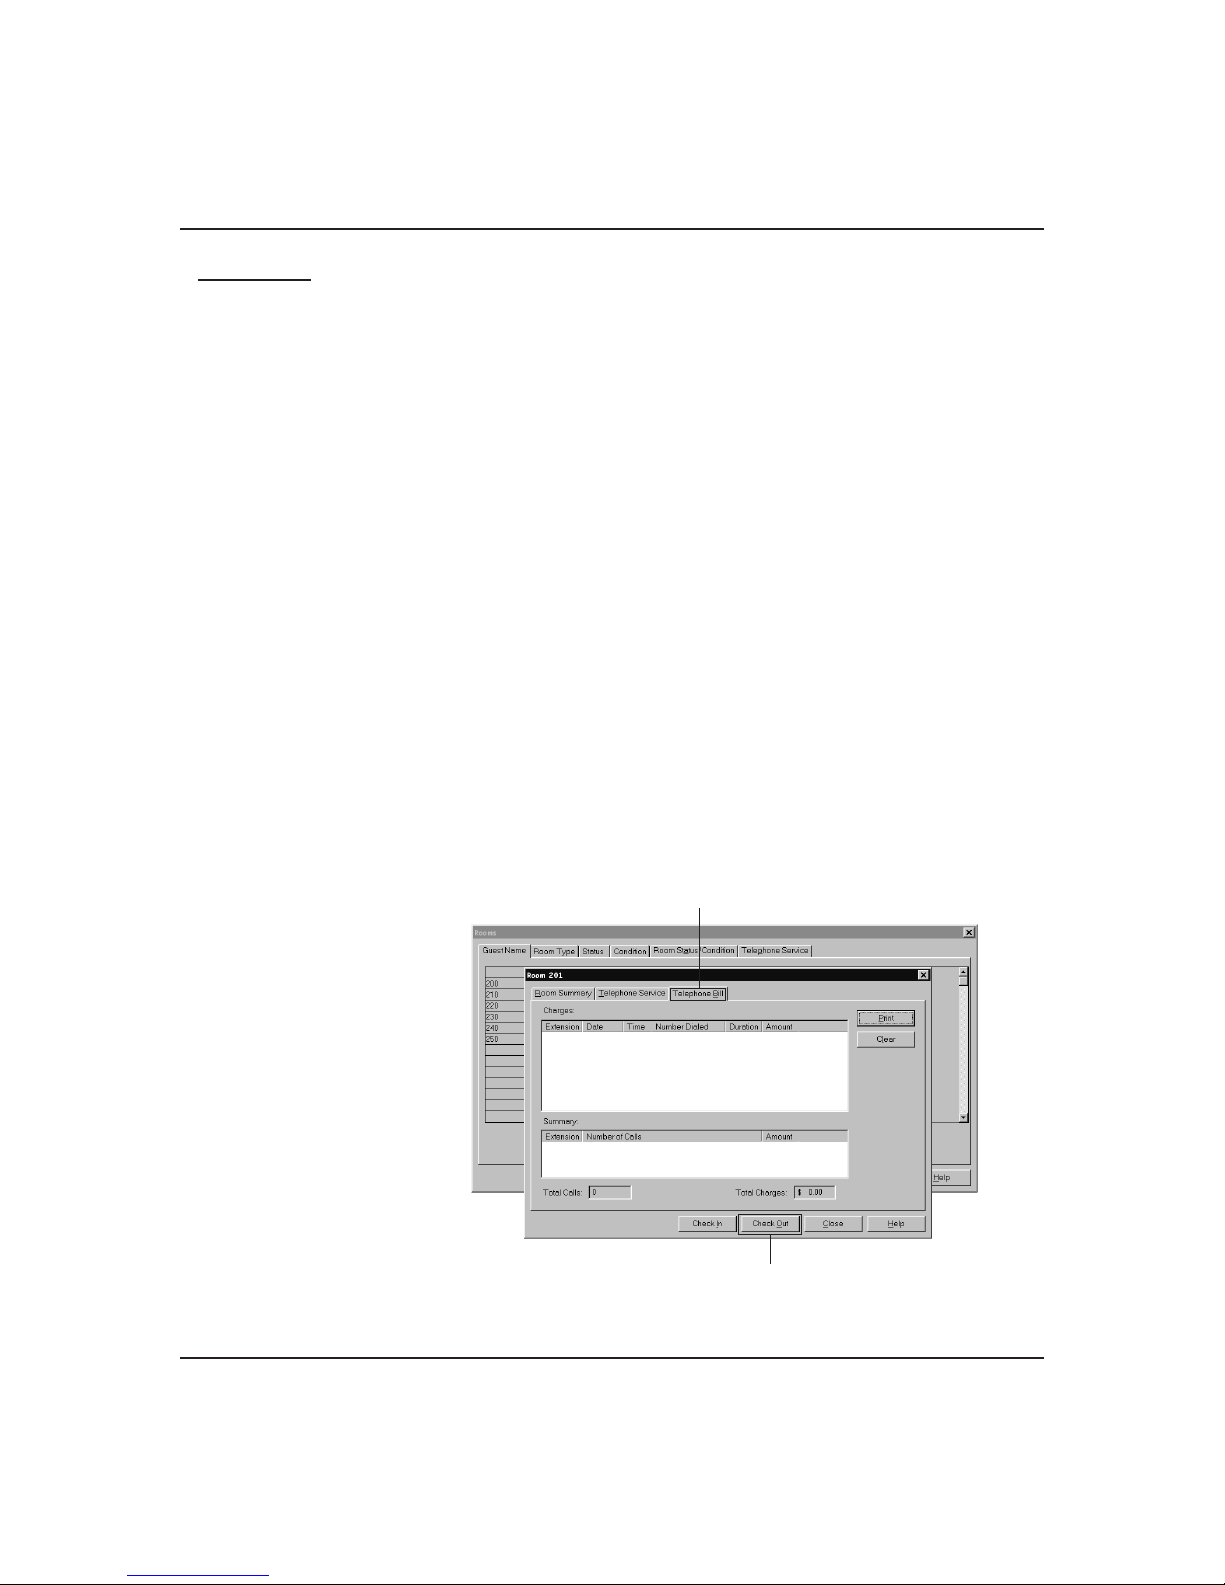
The Check Out feature allows you to check a guest out of an occupied room and print the
guest’s bill. The system will notify you if the guest’s telephone is not idle or if there are any
messages for the guest. Check out can be done from the front desk PC or from any of the
administrative telephones.
To Check Out a guest,
1. Go to the Rooms drop down menu and chose Names. A room grid appears listing the name
of each guest.
2. Select the guest’s room by clicking on the guest’s name.
(If you need to identify the room by number instead of the guest’s name, find the
intersection of the room number in the left column with the room number in the top row.
For example: To find Room 174, first locate 170 in the left column, then locate 4 in the top
row. The intersection of these two points is Room 174.)
3. The room summary dialog appears. Check the room number in the upper left hand corner
of the dialog to make sure it is the room you want.
4. To print the guest’s bill, click on the Telephone Bill tab. Click on the Print button to print
the guest’s phone bill.
5. Clear the Telephone Bill tab by clicking the Clear button. Depending on how the system is
configured, you may also have to enter a password. (If the phone bill is greater than $0, it
must be cleared before Check Out can be completed.)
6. Click on the
Telephone Bill tab
Check Out button
to clear all of the
current settings
for the guest’s
room. This action
changes the status
of the room to
Vacant, and
returns the call
access settings to
the Check Out
defaults.
Inn04a
Check Out button
Check Out/Phone Bill Dialog
6 – Front Desk Attendant’s Guide
Page 11
GCA70–334 Computer Interface
Room Type
The Room Type feature displays a brief description of each room. The installer entered the
room descriptions, which are displayed in the Room Type grid and in the Room Type box in the
Room Summary dialog. Possible room descriptions might be: Poolside, Non-smoking,
Smoking, Suite, Single, Double, etc.
To view the Room Type,
1. Go to the Rooms drop down menu and select Room Type. The Room Type grid appears,
displaying a room description in each box,
—OR—
if you are looking at the Room Summary dialog, check the Room Type box to see the room
description.
Room type box
Inn26
Room Type Dialog
Front Desk Attendant’s Guide – 7
Page 12
Computer Interface GCA70–334
0
Credit Limit
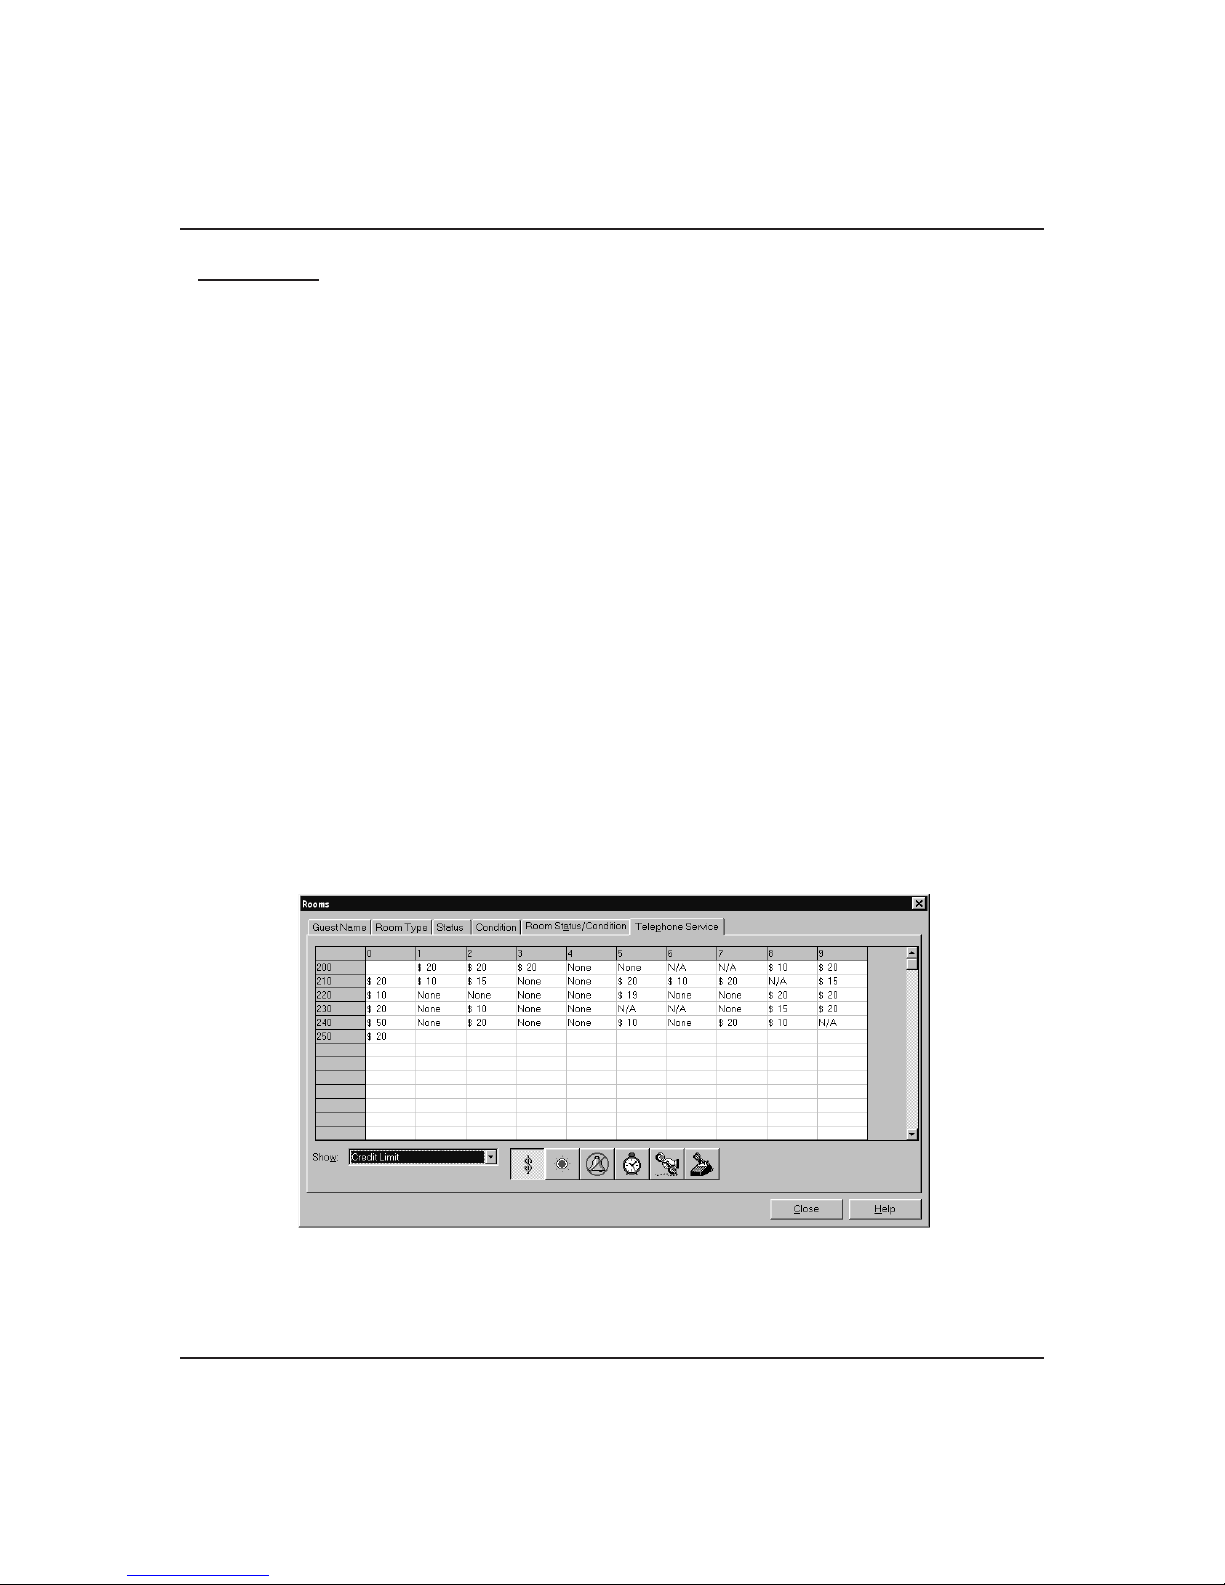
The Credit Limit feature allows you to set the maximum bill on a guest’s telephone. If a guest
exceeds a credit limit, the PC sets all call access or partial call access to “Deny,” as
programmed by the installer. The system will not disconnect a current call if the credit limit is
exceeded during the call. A credit limit setting of “0” indicates unlimited credit. You can set the
credit limit from the front desk PC or from any of the administrative telephones.
To set the Credit Limit for a guest,
1. Go the Rooms drop-down menu and select Credit Limit. A room grid appears listing the
credit limit for each room. (An “N/A” indicates the room is vacant.)
2. Select the room for which you want to set or change the credit limit.
(To locate a room number on the grid, find the intersection of the room number in the left
column with the room number in the top row. For example: To find Room 174, first locate
170 in the left column, then locate 4 in the top row. The intersection of these two points is
Room 174.)
3. Click on the room you have selected to display the Credit Limit dialog.
4. To change the credit limit setting for a guest, use the mouse to swipe across the current
credit limit setting. Enter the new credit limit, or enter “0” for unlimited credit.
5. Click the Close button to enter the new setting in the system.
5
Inn
Credit Limit Dialog
8 – Front Desk Attendant’s Guide
Page 13
GCA70–334 Computer Interface
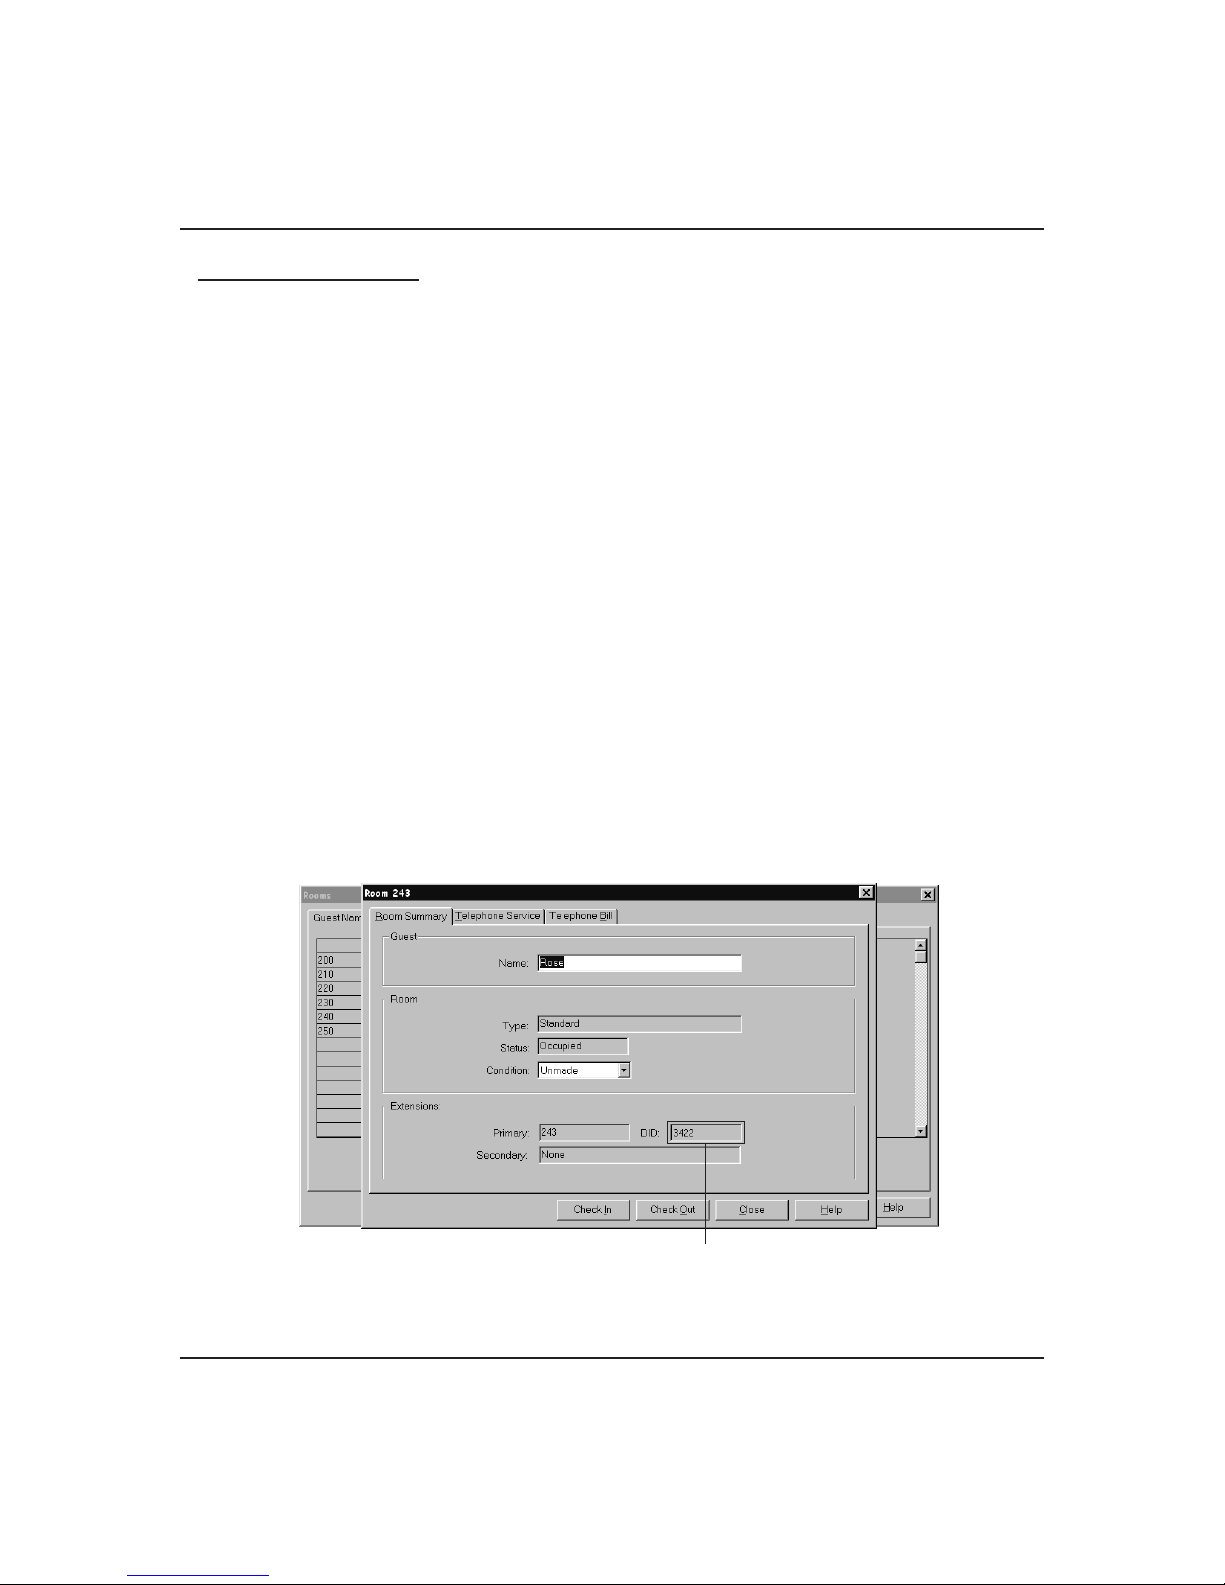
Direct Inward Dialing
Direct Inward Dialing (DID) provides guests with a personal phone number while staying at the
hotel. The feature is particularly useful for commercial travelers, who can provide the number
to their local contacts. Any calls to this number will ring directly at the guest phone, bypassing
the hotel operator.
Upon check-in, guests are automatically assigned a DID number, which is added to the area
code and local exchange number to form the 10-digit direct-dial number. Other guests calling
from within the hotel do not have to use the DID number. Calls to the hotel’s listed directory
number can still be transferred to the guest room in the usual manner. Upon check-out, the
system clears the DID number for that guest so Concierge can assign it to another guest.
To identify a DID number,
1. From any of the room summary dialogs, click on the room whose DID number you want to
identify.
(To locate a room number on the grid, find the intersection of the room number in the left
column with the room number in the top row. For example: To find Room 174, first locate
170 in the left column, then locate 4 in the top row. The intersection of these two points is
Room 174.)
2. The Room Summary dialog appears. In the Extensions section, at the bottom, there is a
DID box showing the room’s DID number.
INN28
DID Number
DID Number
Front Desk Attendant’s Guide – 9
Page 14
Computer Interface GCA70–334
0
Do Not Disturb
The Do Not Disturb (DND) feature prevents the guest’s telephone from ringing.
To program Do Not Disturb,
1. Go to the Rooms drop down menu and select Do Not Disturb. The Do Not Disturb grid
appears. Every entry in the dialog box displays the word “On” or “Off” to indicate the
DND setting.
2. Find the room number for which you want to set or clear DND.
(To locate a room number on the grid, find the intersection of the room number in the left
column with the room number in the top row. For example: To find Room 174, first locate
170 in the left column, then locate 4 in the top row. The intersection of these two points is
Room 174.)
3. Click on the box of the room you have selected. The room summary dialog appears. Check
the room number in the upper left hand corner of the dialog to make sure it is the room you
want.
4. Turn Do Not Disturb on or off by clicking the appropriate icon. Click the Close button to
enter the change in the system.
Do Not Disturb toggle
7
Inn
10 – Front Desk Attendant’s Guide
Do Not Disturb Dialog
Page 15

GCA70–334 Computer Interface
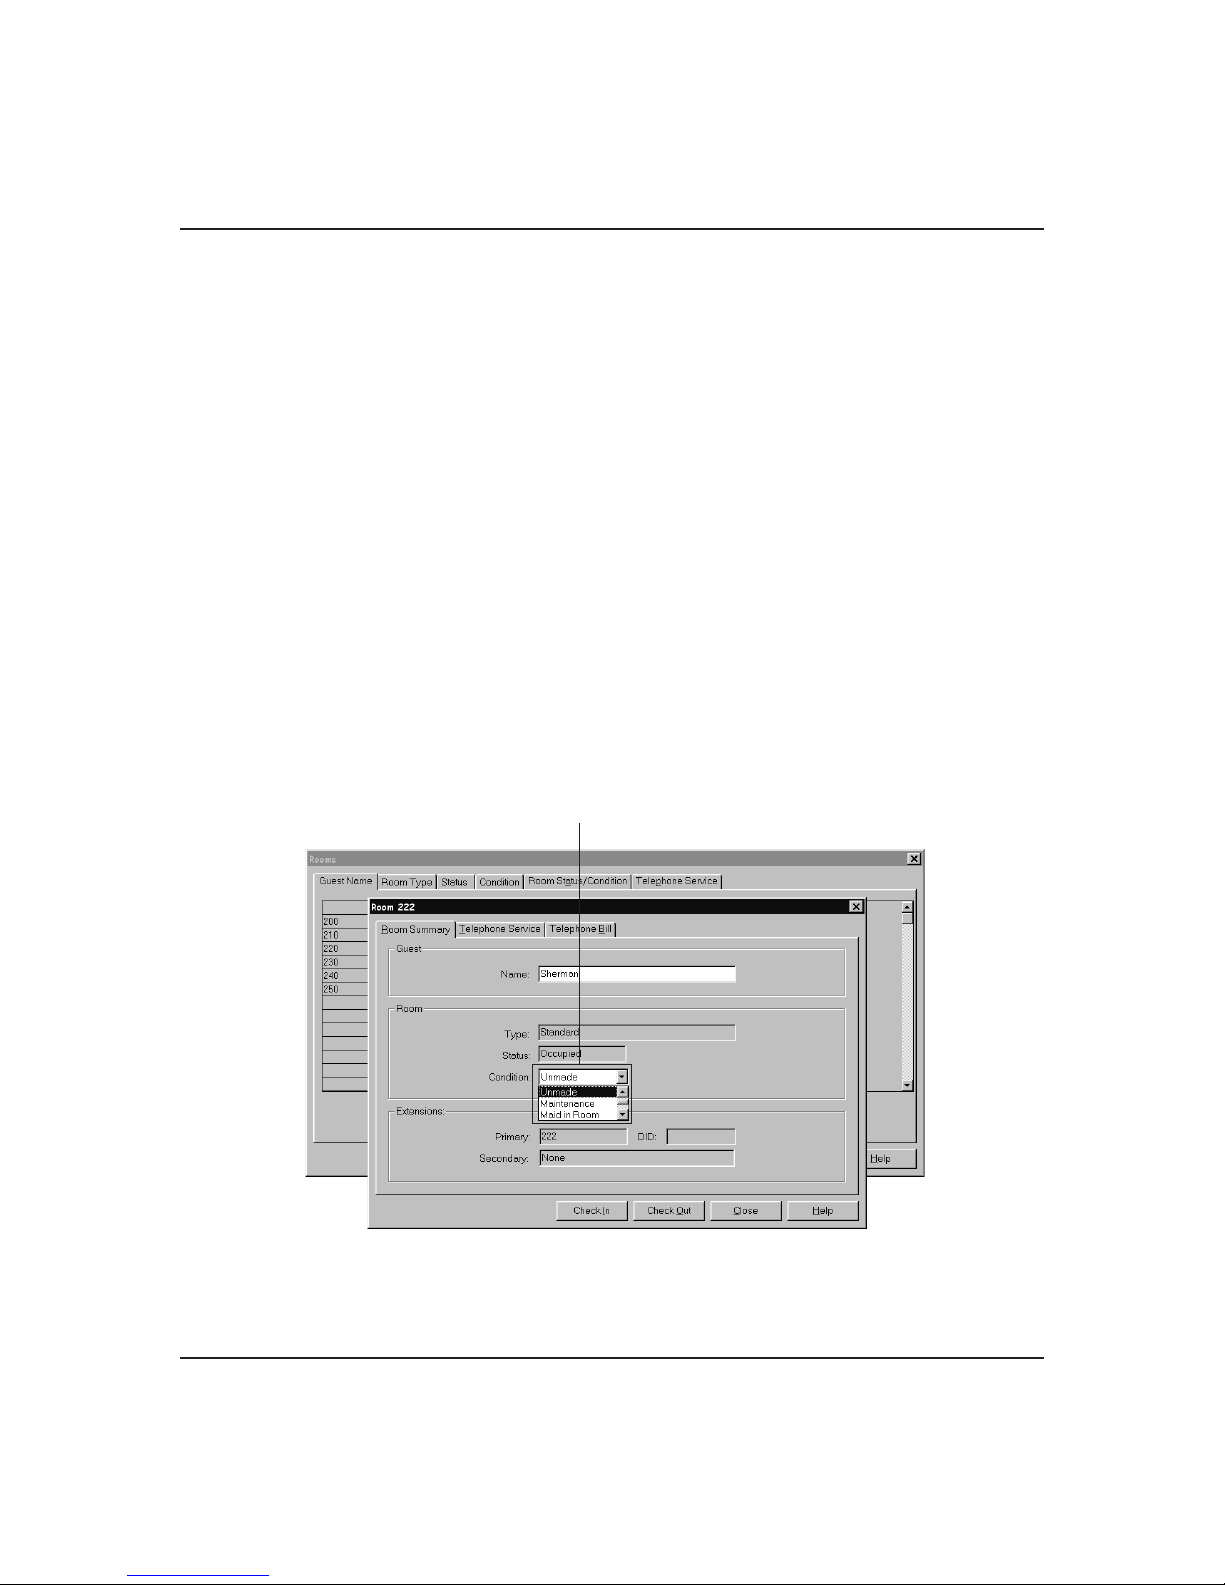
Condition
The standard Concierge guest room condition settings are Made, Unmade, and Maintenance.
You can change these settings from the Concierge PC, administrative telephones, or room
telephones.
When using a Property Management System (PMS) interface such as the Hitachi PMS,
additional room condition settings are available for use by the PMS. In the case of the Hitachi
PMS, these condition settings consist of the following:
Made,
•
Unmade,
•
Maintenance,
•
Maid in Room,
•
• Inspection (Required),
• Out of Order,
• Reserved.
Front Desk Attendant’s Guide – 11
Page 16
Computer Interface GCA70–334
You can change PMS settings from the Concierge PC or room telephones, but not from
administrative telephones.
To change the Condition setting from the PC,
1. Go to the Rooms drop down menu and select Condition. A room grid displaying the
condition of each room appears.
2. Find the room number for which you want to change the room Condition.
(To locate a room number on the grid, find the intersection of the room number in the left
column with the room number in the top row. For example: To find Room 174, first locate
170 in the left column, then locate 4 in the top row. The intersection of these two points is
Room 174.)
3. Click on the box of the room you want to select. The room summary dialog appears. Check
the room number in the upper left hand corner of the dialog to make sure it is the room you
want.
4. Click on the Condition drop-down dialog and change the room condition by clicking on the
appropriate setting.
5. Click Close to enter the new setting in the system.
Inn08
12 – Front Desk Attendant’s Guide
Condition Pull-Down Menu
Room Condition Dialog
Page 17

GCA70–334 Computer Interface
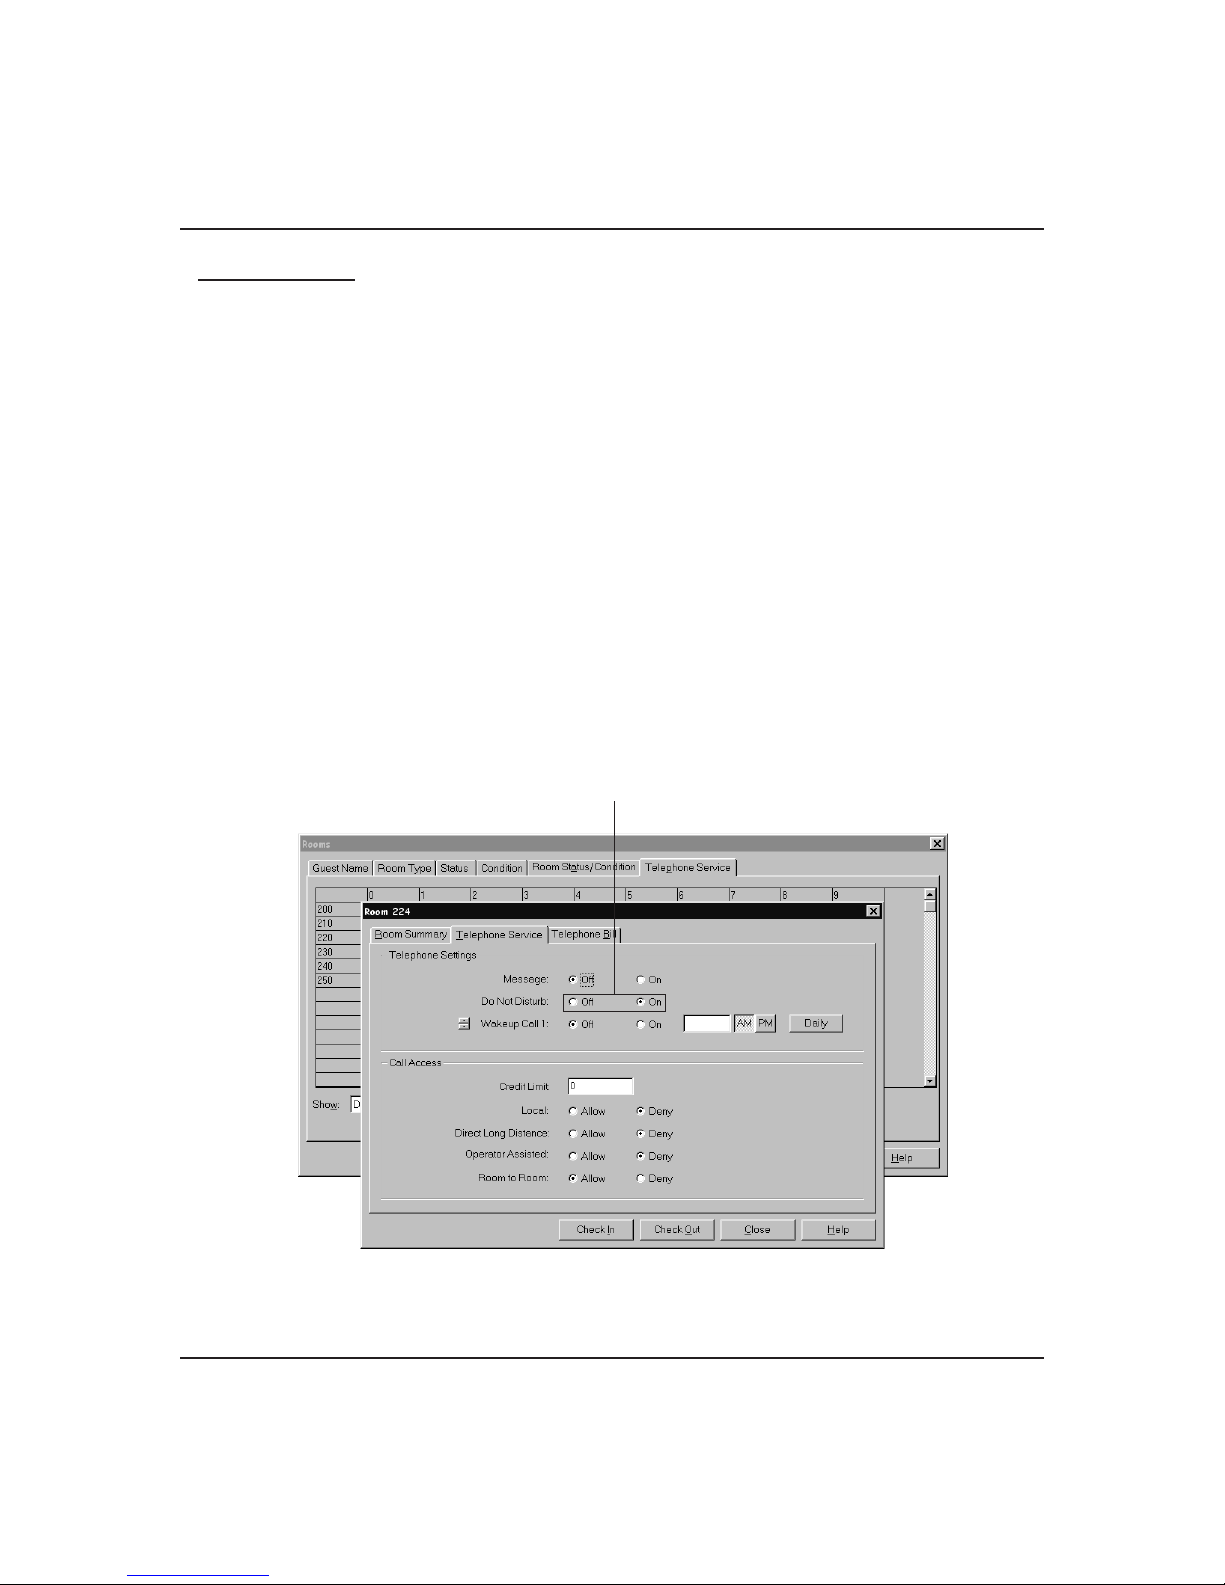
Message Waiting
Use the Message Waiting feature to set or clear the message waiting lamp and/or the broken
dial tone on the guest telephone.
To program Message Waiting,
1. Go to the Rooms drop down menu and select Message. The Message dialog box appears.
Every entry in the dialog box displays one of the following conditions:
None
No message
Desk
Guest should call the main desk to hear a message
Voice
Voice mail message (if your Concierge system is equipped with voice mail)
Both
Voice mail message and a desk message waiting for the guest
2. Find the room number for which you want to set or clear Message Waiting.
(To locate a room number on the grid, find the intersection of the room number in the left
column with the room number in the top row. For example: To find Room 174, first locate
170 in the left column, then locate 4 in the top row. The intersection of these two points is
Room 174.)
3. Click on the box of the room you have selected. The room summary dialog appears. Check
the room number in the upper left hand corner of the dialog to make sure it is the room you
want.
4. Click the Telephone Service tab.
The Message option is at the top option of the Telephone Service dialog. Select either On
or Off and click on the Close button.
Front Desk Attendant’s Guide – 13
Page 18

Computer Interface GCA70–334
Message Waiting toggle
Inn09
14 – Front Desk Attendant’s Guide
Message Waiting Dialog
Page 19

GCA70–334 Computer Interface
Call Access
Call Access controls the types of calls guests can make from their room telephones. There are
three categories of call access: Local Access (local calls), Direct Access (long distance calls),
Operator Access (operator-assisted calls), and Room Block (calling other guests).
Local Access
Calls made within the local dialing area.
Direct Access
Direct long distance access. Allows a guest to place a long distance call from the room
without having to go through an operator or a desk attendant.
Operator Access
Allows a guest to make a long distance call only with assistance from an operator.
Room Block
When enabled, prevents the guest from calling other guests.
Front Desk Attendant’s Guide – 15
Page 20

Computer Interface GCA70–334
010
To program Call Access,
1. Go to the Rooms drop down menu and select Call Access. The Call Access dialog box
appears. The letters in the rectangles represent the following types of call access:
L—(Local Access)
D—(Direct Access)
O—(Operator Access)
R—(Room Block Enabled)
2. Find the room number for which you want to set Call Access.
(To locate a room number on the grid, find the intersection of the room number in the left
column with the room number in the top row. For example: To find Room 174, first locate
170 in the left column, then locate 4 in the top row. The intersection of these two points is
Room 174.)
3. Click on the box of the room you have selected. The room summary dialog appears. Check
the room number in the upper left hand corner of the dialog to make sure it is the room you
want.
4. Click on the Telephone Service tab.
5. Select either Allow or Deny for Local, Direct, or Operator Access.
6. Select either On or
Off for Room
Block.
7. Click the Close
button when
finished setting
each type of
access.
Call Access settings
Inn
Call Access Dialog
16 – Front Desk Attendant’s Guide
Page 21

GCA70–334 Computer Interface
Wakeup Call
You can program a wakeup call up to 24 hours in advance. The system allows two wakeup calls
per room. When the system issues a wakeup call, the guest’s telephone rings for one minute or
until he or she answers it. If the first wakeup attempt is not answered, the system waits one
minute and issues another wakeup call. If the guest does not answer by the third wakeup call
attempt, the system generates a “Wakeup Call Not Answered” alarm.
If the system goes down or is shut down, the wakeup call settings are saved and are still valid
when the system is restarted.
To program a Wakeup Call,
1. Go to the Rooms drop down menu and select Wakeup Call. The Wakeup Call dialog box
appears. Each rectangle will display one of the following wakeup states:
Ringing
Wakeup call is in progress
Waiting
System is waiting between wakeup call attempts
Not answered
None of the wakeup call attempts were answered
Answered
The wakeup call was answered
None
No wakeup is set
hh:mm (am/pm)
Wakeup time that is set
2. Find the room number for which you want to set a wakeup call.
3. Click on the box of the room you want to select. The room summary dialog appears. Check
the room number in the upper left hand corner of the dialog to make sure it is the room you
want.
4. Click the Telephone Service tab.
5. Enter a time in the wakeup time box using the hh:mm format. Select AM or PM by
clicking the appropriate button.
6. Turn on the wakeup call option by clicking the On button.
Front Desk Attendant’s Guide – 17
Page 22

Computer Interface GCA70–334
7. If you wish to set the wakeup call to occur every day at the same time, click the Daily
button. This causes the system to reset an answered wakeup call. If the wakeup call is not
answered, the system clears the Daily setting.
8. If you want to set another wakeup call, use the arrow buttons to select Wakeup Call 2 and
then repeat steps 5–7.
9. Click on Close.
NOTE: Concierge only records information about wakeup calls set using Concierge’s Wakeup
Wakeup Call set
Inn12
Call feature. If you use the voicemail’s wakeup call feature, Concierge will not record
or display any wakeup call information.
18 – Front Desk Attendant’s Guide
Wakeup Call Dialog
Page 23

GCA70–334 Computer Interface
Telephone State
Use the Telephone State dialog to view the current status of the guest telephones.
To view Telephone States,
1. Go to the Rooms drop down menu and select Telephone State. The Telephone State grid
appears.
2. Find the room number for which you want to view the Phone State.
(To locate a room number on the grid, find the intersection of the room number in the left
column with the room number in the top row. For example: To find Room 174, first locate
170 in the left column, then locate 4 in the top row. The intersection of these two points is
Room 174.)
3. The Telephone States that the system displays are as follows:
Disabled
Guest telephone is disabled or removed.
Idle
Guest telephone is on-hook and not on any type of call.
(intercom number)
Guest telephone is on an intercom call.
L + (line number)
Guest telephone is on an outside call using the line that is displayed.
Maid
Maid is entering an ID.
4. If you wish to view
the room summary
dialog, click on the
box of the room
you have selected.
5. Click Close to exit
Telephone States.
n013
Telephone State Dialog
Front Desk Attendant’s Guide – 19
Page 24

Computer Interface GCA70–334
Room Status/Condition Grids
There are four Room Status/Condition grids: Vacant/Made, Vacant/Unmade, Occupied/Made,
Occupied/Unmade. Each grid box displays Yes or No to indicate if the room meets the criteria
of the selected Status/Condition grid.
To view the room status/condition grids,
1. Go to the Rooms drop down menu and select either Vacant/Made, Vacant Unmade,
Occupied/Made,orOccupied/Unmade.
The Room Status/Condition grid you selected appears.
2. Each box in the grid displays Yes or No to indicate if it matches the type of
Status/Condition grid selected.
3. If you wish to view the Room Summary dialog for a particular room, click on the box of
the room you want. Check the number in the upper left hand corner to make sure it is the
room you want.
(To locate a room number on the grid, find the intersection of the room number in the left
column with the room number in the top row. For example: To find Room 174, first locate
170 in the left column, then locate 4 in the top row. The intersection of these two points is
Room 174.)
5. You can change the type of grid displayed (Vacant/Made, Vacant/Unmade,
Occupied/Made, or Occupied/Unmade) by using the “Show:” drop-down menu, or by
using the icons at the bottom of the dialog.
6. Click Close to exit the Room Summary dialog.
Inn022
Room Status/Condition Grid
20 – Front Desk Attendant’s Guide
Page 25

GCA70–334 Computer Interface
1
Calls Dialog
The Call Display feature allows the user to view SMDR information in real time. When a call is
completed, the new call will appear in the window. Users can print call information or clear it
from the screen.
To view the Calls dialog,
1. Select Calls from the menu bar at the top of the screen, or press F3. The Calls dialog
appears.
2. If you want to display previous log files, click the Open button, then double-click the log
file you want to view. (Note that Concierge will only show real-time updates if you are
viewing the current day’s log file.)
3. To print the information in the Calls dialog, click the Print button.
4. If you wish to clear the screen, click the Clear button. Doing this will eliminate all current
call information.
NOTE: If the Manager Password feature is enabled, you will not be able to clear the Calls
dialog without entering a manager password. The default manager password is “man.”
5. Click the Close button when you are finished with the Calls dialog.
Telephone Extension
Guest
202
Guest
205
Guest
207
Guest
214
Guest
222
Guest
236
5
Inn
02/02/00
02/04/00
02/04/00
02/04/00
02/04/00
02/04/00
13:29
08:17
09:37
10:11
12:43
14:26
Call Duration in Minutes
9782883
17096754585
18048775563
9847139
191966469721
18716947652
0.9
7.3
6.2
4.0
19.0
47.7
$0.00
$4.19
$3.67
$0.00
$7.71
$ 12.34
Calls Dialog
Front Desk Attendant’s Guide – 21
Page 26
Computer Interface GCA70–334
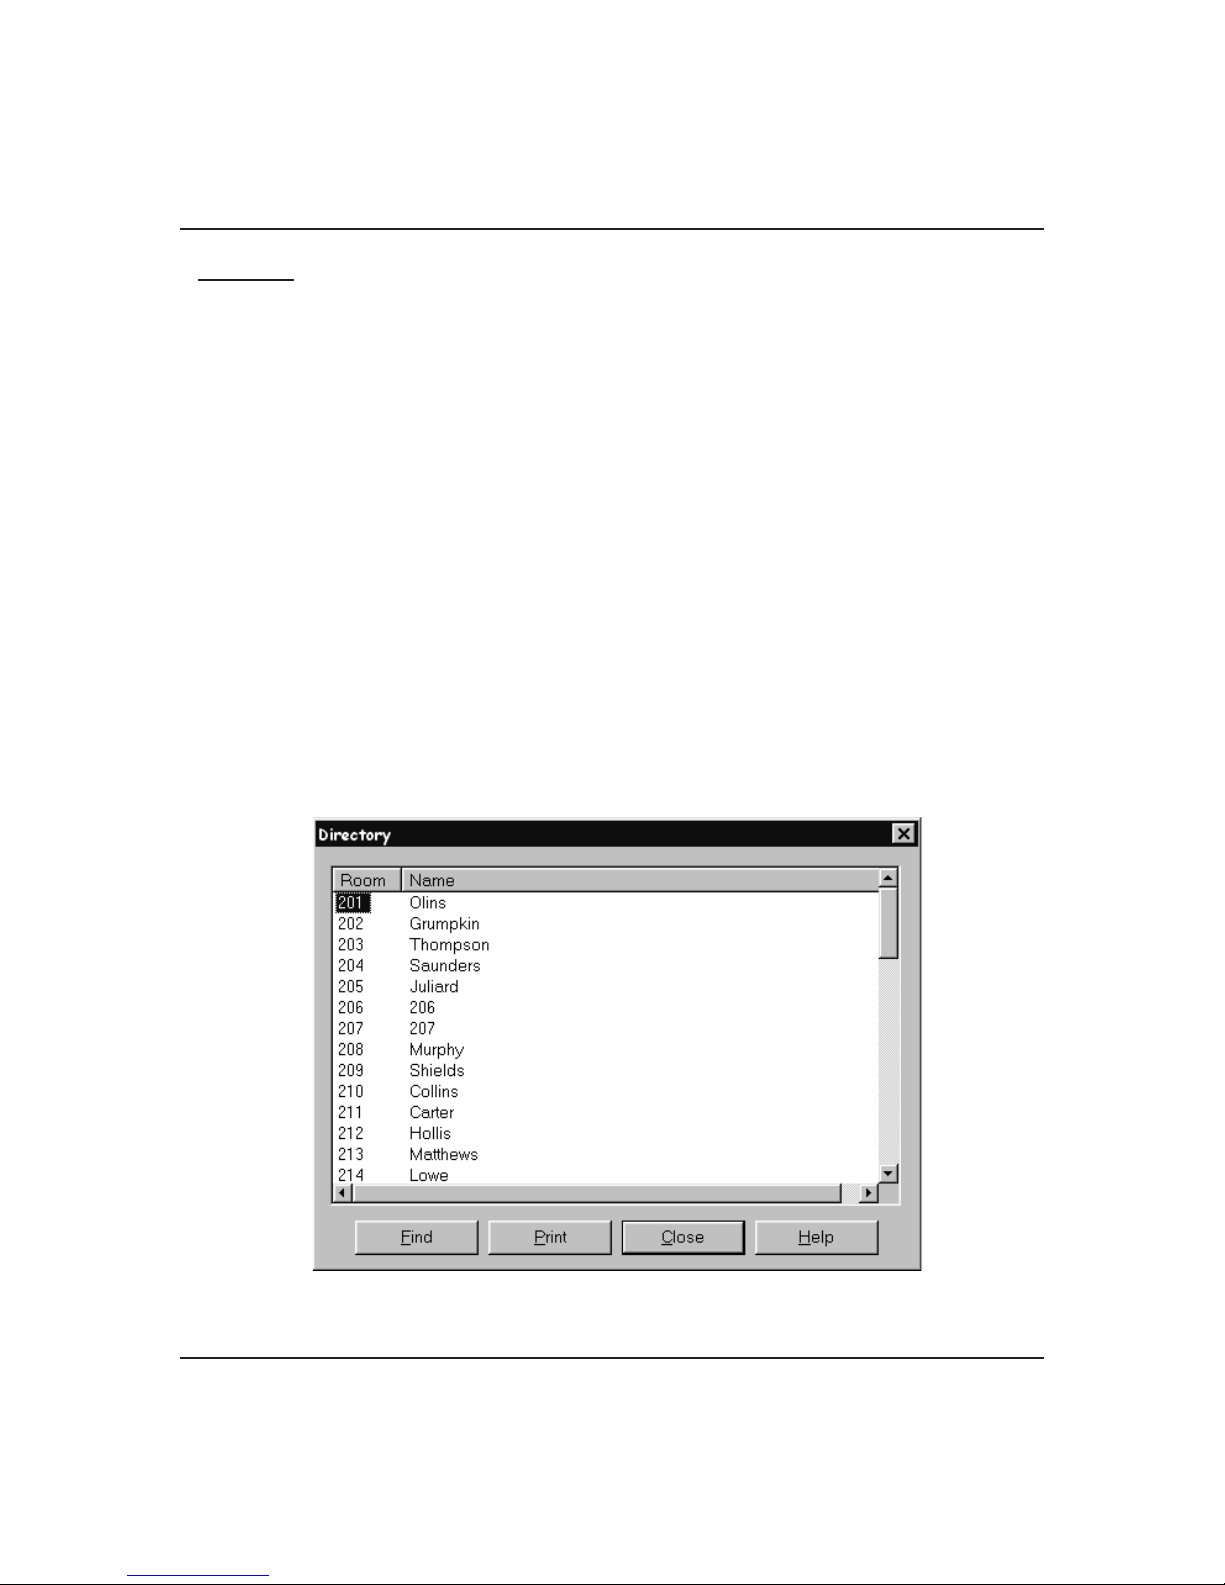
Directory
The directory dialog allows you to sort information by guest name or by room number. By
default the directory is sorted by room number, but clicking on the Name label sorts the
directory alphabetically by guest name. Clicking on the Find button allows you to search the
directory for a specific name or room number. The system highlights the appropriate room
numbers in the list box. Double clicking on a room number brings up the room summary
dialog.
To view the Directory,
1. Click on Directory in the toolbar at the top of the screen. The Directory dialog box appears.
At default the directory is sorted by room number, but clicking on the Name label at the top
of the dialog sorts the directory alphabetically by guest name.
2. You can scroll through the list or use the Find button to locate a specific name or room
number. Double clicking on an item brings up the room summary dialog.
3. If you wish to print the directory of rooms and guest names, click the Print button.
4. Click the Close button to exit the Directory dialog.
Inn18
22 – Front Desk Attendant’s Guide
Directory Dialog
Page 27

GCA70–334 Computer Interface
Printouts
The Printouts drop down menu allows you to print the following reports:
Alarm
A printout of all alarms in the system (same printout as from the Alarms dialog).
Audit
Prints guest and administrative telephone bill, listing each telephone separately. Each bill
contains calls made since the last audit report. The installer can set up Concierge to print this
report automatically once a day.
Maid
Prints the daily maid report (same as printing from the Daily Maid Statistics Dialog).
Room Status
Prints room status and condition of all guest rooms. The installer can set up Concierge to
print this report automatically once a day.
The installer can set up Concierge to print the reports automatically on a daily basis.
To print the reports,
1. Go the Printouts drop down menu and select the report you wish to print by clicking on the
appropriate word (Alarm, Audit, Maid,orRoom Status).
Printouts Drop-Down Menu
Inn21
Printouts Drop-Down Menu
Front Desk Attendant’s Guide – 23
Page 28

Computer Interface GCA70–334
Housekeeping
The Concierge system supports up to 50 maids. The front desk attendant enters each maid’s
name and identification number. The system maintains daily and yearly statistics for each maid,
including number of rooms entered, number of rooms cleaned, minimum, maximum, and
average time spent in a room.
To enter maid names and identification numbers,
1. Click on Housekeeping in the toolbar at the top of the screen. The Housekeeping dialog
appears.
2. To add a maid to the list, click the Add Maid button. The Add Maid dialog appears.
3. Enter the maid’s name and ID number (each maid must receive a unique ID number
between 1 and 999) by positioning the cursor in the appropriate box and entering the new
information.
4. Click the OK button to enter the maid’s name (up to 20 characters) and identification
number in the system. Each time you wish to add a new maid to the system, you must click
the Add button to view the Add Maid dialog. The system will hold up to 50 maids’ names
and identification numbers.
5. Click Close to exit the Housekeeping dialog.
24 – Front Desk Attendant’s Guide
Add Maid Dialog
Page 29
GCA70–334 Computer Interface
1
Daily and Yearly Maid Statistics
The Daily and Yearly Maid Statistics dialogs display statistics for all maids in the system. Both
dialogs update information in real time. The In Room column shows the maid’s current
location.
To view the Maid Statistics dialogs,
1. From the Housekeeping dialog, select either the Daily Maid Statistics tab or the Yearly
Maid Statistics tab.
2. The statistics dialog you selected appears. The In Room column shows the maid’s current
location.
3. Click the Print button if you wish to print the statistic report for all maids.
4. Click the Clear button and enter your password when prompted if you wish to clear
statistics for all maids.
5. To enter or remove a maid from a room using the Concierge PC,
a) Click on the Room Status button.
The Maid Room Status dialog appears.
b) Enter the maid’s ID and room extension in the appropriate boxes.
c) Select the action (Enter Room, Exit Cleaned, or Exit Uncleaned) from the Action
pull-down menu.
d) Click OK.
6. Click the Close button to exit the Housekeeping menu.
9
Inn
Maid Statistics Dialog
Inn20
Maid In Room Dialog
Front Desk Attendant’s Guide – 25
Page 30

Computer Interface GCA70–334
Alarms Display
The system displays alarms in the alarm window as they occur. You can use the alarm window
to acknowledge, clear, or print the alarms. Alarms that are in repeat mode and have not been
acknowledged will appear highlighted. Alarms that have been acknowledged will not be
highlighted.
To view the Alarms dialog,
1. Click on the Alarms button in the upper left part of the Concierge screen, or press F2.
2. If you want to display previous Alarm log files, click the Open button, then double-click
the log file you want to view. (Note that Concierge will only show real-time updates if you
are viewing the current day’s log file.)
3. You can Close, Print, Clear,orConfirm by clicking on the corresponding button.
NOTE: If the Manager Password feature is enabled, you will not be able to clear the Alarms
dialog without entering a manager password. The default manager password is “man.”
26 – Front Desk Attendant’s Guide
Page 31

GCA70–334 Computer Interface
Alarm Types
The system displays ten types of alarms:
Telephone Removed
A proprietary telephone is unplugged.
Will not indicate if an IST telephone is unplugged.
Emergency Number Dialed
Guest dials a number matching an entry in the emergency number table.
Wakeup Call Not Answered
Guest does not answer a wakeup call.
—OR—
Wakeup call was not issued because system was powered down.
The system issues the Wakeup Call Not Answered alarm after three wakeup call attempts.
(The Wakeup Call Not Answered alarm only works for Wakeup Calls set using Concierge’s
Wakeup Call feature. If you use the voicemail’s wakeup call feature, Concierge will not issue
an alarm in the event of an unaswered wakeup call, nor will the wakeup call appear in the
Concierge logs.)
Vacant Room Call Attempt
Outgoing call attempt from a vacant guest room.
Credit Limit Exceeded
Guest bill exceeds the guest credit limit. This alarm occurs after a call has been completed
and will not disconnect a call in progress.
Telephone Off Hook
Guest telephone is off hook for extended period of time as programmed by the installer.
System Stopped and System Started
Displays time and date of system shutdowns and startups.
Switch Connection Lost
The connection to the digital communications system is not functioning.
PMS Connection Lost
The connection between the Concierge PC and the property management system (PMS) is not
functioning.
SMDR Connection Lost
The connection between the Concierge PC and the SMDR serial port on the PMS is not
functioning.
Front Desk Attendant’s Guide – 27
Page 32

Computer Interface GCA70–334
Alarm Modes
The alarm modes are as follows:
Off
System ignores the alarm.
On
When an alarm is set to On, the system does three things each time an alarm occurs:
records an occurrence of the alarm in the Alarm Log File,
•
displays the alarm on the status bar for 10 seconds,
•
causes the Concierge PC to beep once.
•
Repeat
An alarm set to Repeat mode behaves like an alarm set to On except that it beeps periodically,
pops open the Alarms dialog, and appears continuously in the status bar until you
acknowledge the alarm through the Alarm dialog. If the alarm dialog is closed or minimized
without being acknowledged, it will reopen periodically until it is acknowledged.
When programmed by the installer, an alarm set to Repeat mode also rings the Message
Waiting administrative telephone and displays an alarm message in its LCD.
Popup
The Popup setting is exactly like the Repeat setting, except that it only occurs once—if the
Alarm dialog is closed or minimized, it will not open again.
When programmed by the installer, an alarm set to Popup mode also rings the Message
Waiting telephone and displays an alarm message in its LCD.
Inn14
Alarms Dialog
28 – Front Desk Attendant’s Guide
Page 33

GCA70–334 Computer Interface
2
Wakeups
The system displays wakeup calls in the Wakeups dialog as they occur. It displays when a
wakeup call is set, when the system starts and stops ringing the guest room telephone, and when
the wakeup call is answered (or not answered). You can use the Wakeups dialog to view current
or previous wakeup logs, and to clear or print the logs.
NOTE: The Wakeups dialog only displays information about wakeup calls set using
Concierge’s Wakeup Call feature. If you use the voicemail’s wakeup call feature,
Concierge will not display any wakeup call information.
To view the Wakeups dialog,
1. Click on the Wakeups button at the top of the Concierge screen.
2. If you want to display previous Wakeup log files, click the Open button, then double-click
the log file you want to view. (Note that Concierge will only show real-time updates if you
are viewing the current day’s log file.)
3. You can Close, Print,orClear, by clicking on the corresponding button.
NOTE: If the Manager Password feature is enabled, you will not be able to clear the Alarms
dialog without entering a manager password. The default manager password is “man.”
7
Inn
Wakeups Dialog
Front Desk Attendant’s Guide – 29
Page 34

Notes
Page 35

GCA70–334 Administrative Telephone Interface
3
Administrative Telephone Interface
Administrative Telephones
The Concierge administrative telephones offer most of the features available from the computer
terminal. Administrative telephones add to the usability of the system by increasing the number
of stations available to perform guest telephone programming. For example, a guest might call
the front desk attendant to request a wake up call—the desk attendant can program the wake up
call from the administrative telephone while still on the call with the guest.
Use the installer-programmed Feature Access buttons to access the following features:
• Log In/ Log Out,
• Select Room,
• Check In/ Check Out,
• Message Waiting,
• Do Not Disturb,
• Wake Up,
• Credit Limit,
• Local Access,
• Long Distance Access,
•
Operator Access,
•
Room Condition,
•
Bill,
•
Room Block,
•
Alarms,
•
Adding An Extension,
•
Heartbeat.
Feature Access Button Locations
The Comdial telephones pictured below can be used as administrative telephones with the
Concierge system. Suggested feature access button locations for most features are illustrated.
Use the supplied labels to identify feature button locations.
Front Desk Attendant's Guide – 31
Page 36

Administrative Telephone Interface GCA70–334
s
Select Room
Check In/ Check Out
Message Waiting
Do Not Disturb
Wake Up
Credit Limit
TRNS/CNF
HOLD
DEFABCQZ
MNOJKL
GHI
TUVPRS WXY
OPER
#
INTERCOM
TAP
SPEAKER
MUTESHIFT
Local Access
Long Distance Acces
Operator Access
Room Condition
Bill
Log In/ Log Out
INN01
Impact 8024S-** LCD Speakerphone
COM DIAL
TRNS/CNF
INN02
Impact 8012S-** LCD Speakerphone
32 – Front Desk Attendant's Guide
Select Room
Check In/ Check Out
Message Waiting
Do Not Disturb
Wake Up
Credit Limit
Local Access
Long Distance Access
DEFABCQZ
JKL
TUVPRS WXY
OPER
TAPHOLD
MNO
#
INTERCOM
SHIFT
MUTE
SPEAKER
GHI
Operator Access
Room Condition
Bill
Log In/ Log Out
Page 37

GCA70–334 Administrative Telephone Interface
s
s
Bill
Log In/Log Out
Room Condition
Operator Access
Long Distance Acces
Local Access
Select Room
Credit Limit
Log In/Log Out
Credit Limit
R
INN24
Wake Up
Do Not Disturb
Message Waiting
Impact 8324S-** LCD Speakerphone
Bill
Wake Up
Room Condition
Do Not Disturb
Operator Access
R
INN25
Message Waiting
Check In/Check Out
Long Distance Acces
Local Access
Select Room
Check In/Check Out
Impact 8312S-** LCD Speakerphone
Front Desk Attendant's Guide – 33
Page 38

Administrative Telephone Interface GCA70–334
Feature Access Button Functions
Administrative functions are performed using the Feature Access buttons on the administrative
telephones. Refer to the following chart for a description of each button and its function.
Feature Description
Pressing the Log In/ Log Out button logs the administrative telephone in or out of the
Log In/
Log Out
Select
Room
Check In/
Check Out
Concierge system. Remember that none of the Feature Access buttons will function until
you are logged in.
Red LED = Logged Out.
Green LED = Logged In.
After log in, the telephone display prompts you for a room selection. Pressing the Select
Room button allows you to make additional entries based on the display prompts. Pressing
Select Room while viewing a room closes that room and prompts the user to select a new
room.
Red LED = No room selected.
Green LED = A room is currently selected.
During a room view, pressing the Check In/Check Out button toggles between the Check
In feature and the Check Out feature. The system will only allow Check In to a room that
is made and vacant. Check Out can only occur with a room that is occupied. During Check
Out, the system prompts the user to print the guest bill, and notifies the user if the guest
telephone is not idle.
Green LED = Checked in.
Clear LED = Nobody checked into room.
During a room view, pressing the Message Waiting button toggles message waiting on and
Message
Waiting
Credit
Limit
Do Not
Disturb
34 – Front Desk Attendant's Guide
off, and sets a DESK display on the Concierge Message Dialog to indicate that the front
desk set the message waiting condition.
Green LED = Message Waiting is set.
During a room view, pressing the Credit Limit button displays the credit limit and editing
prompts, allowing the user to change the credit limit for a room telephone.
Green LED = Credit Limit is set.
Clear LED = No credit limit is set.
During a room view, pressing the Do Not Disturb button toggles the do not disturb
condition on and off.
Green LED = DND on.
Page 39
GCA70–334 Administrative Telephone Interface
Feature Description
During a room view, pressing the Wake Up button allows the user to view, set, and cancel
wake up calls. When you set a wake up, the system automatically selects AM; if this is
wrong, use the interactive buttons to toggle the setting from AM to PM. When the setting
is correct, press the SET interactive button and then press the QUIT interactive button.
Wake Up
(Interactive buttons are located under the telephone’s LCD.)
Green LED = Wake up is set.
Clear LED = No wake up is set, or a wake up call has been answered.
Flashing Green LED = Wake up call in progress.
Flashing Red LED = Wake up call is not answered.
Local
Access
Long
Distance
Access
Operator
Access
Room
Condition
Bill
Room
Block
Alarm
During a room view, pressing the Local Access button allows or denies local call access to
the room telephone.
Green LED = Local access allowed.
During a room view, pressing the Long Distance Access button allows or denies long
distance access to the room telephone.
Green LED = Long distance access allowed.
During a room view, pressing the Operator Access button allows or denies operator access
to the room telephone.
Green LED = Operator access allowed.
During a room view, pressing the Room Condition button displays the current Room
Condition (“made” or “unmade”). The user may also change the room condition by using
the Room Condition button to toggle between “made” and “unmade”.
Green LED = Room is made.
During a room view, pressing the Bill button displays the current telephone bill for that
room, and prompts the user with softkey options to print or clear the bill.
Green LED = There is a telephone bill.
During a room view, pressing the Room Block button toggles room block On or Off on the
room telephone.
Green LED = Guest calling denied (Room Block on).
Press Alarm button when flashing to acknowledge an active alarm.
Flashing Red LED = An alarm condition is active.
Solid Red LED = An alarm condition is in the log.
Add
Extension
Press the Add Extension button to dynamically assign a wireless extension telephone to a
guest room at check in.
Front Desk Attendant's Guide – 35
Page 40

Administrative Telephone Interface GCA70–334
Using the Administrative Telephones
Administrative telephones can perform most of the functions that the Concierge PC performs.
During a room view you can use the Feature Access buttons (described in Feature Access
Button Locations, beginning on page 31) to check or set any of the room settings.
To view a guest room from an idle telephone,
1. Press the Login/Logout button (see Feature Access Button Locations, beginning on page
31, for the button locations on your telephones). Depending on system programming, the
display may change immediately to the Enter display (step 3).
2. Press the Select Room button.
3. Enter the number of the room you wish to view.
4. Press the Enter softkey (softkeys are located under the LCD).
5. The display shows the room number and, in the upper right, the room’s DID number if it
has one.
6. Use the Feature Access buttons to view or change guest room settings (refer to Feature
Access Button Functions, beginning on page 34).
7. Press the Login/Logout button to return to normal telephone operation, or press the Select
Room button to view another room.
To view a guest room while on an intercom call with the guest,
NOTE: To view a guest room while on a call, the administrative telephones must be set to
automatic or semi-automatic mode by the installer.
1. If your telephone is programmed for Automatic mode, you don’t need to do anything to
access guest room features—they will automatically be active when you receive a call from
a guest telephone.
If your telephone is programmed for Semi-Automatic mode, you will have to press the
Login/Logout button to access guest room features when you receive a call from a guest.
You do not need to select a room because Concierge automatically selects the current
extension.
2. Use the Feature Access buttons to view or change guest room settings (refer to Feature
Access Button Functions, beginning on page 34).
3. Press the Login/Logout button to return to normal telephone operation, or press the Select
Room button to view another room.
36 – Front Desk Attendant's Guide
Page 41

GCA70–334 Administrative Telephone Interface
Adding Wireless Extensions
This feature allows you to add a wireless extension to a guest room during or after check in.
Concierge treats a wireless extension as a data extension; it rings when the room extension
rings and appears on the guest bill. When a guest checks out, the system automatically removes
the wireless extension.
When you use an administrative telephone to make or receive a call from a data extension, the
guest’s name shows on the LCD when this option is set by the installer. For the name to show,
the administrative telephone must not be in administrative mode.
To add a data wireless extension to a room, a guest must be checked in to the room. The
wireless extension you are assigning to the room must not be identified as any other extension
type.
To add a wireless extension to a room,
1. From an enabled administrative telephone, select the room.
2. Press OAI 15.
3. Press the Add soft key.
4. Enter the extension number you want to assign to the room.
5. Press the Enter soft key.
Heartbeat Feature
This installer-programmed (through button mapping on the digital communications system)
feature causes an LED on the administrative telephones (OAI 20) to flash at two-second
intervals to indicate the Concierge system is communicating with the telephone system. If the
Concierge PC or its serial link to the telephone system malfunctions, the indicator will turn off
or be on steady.
Front Desk Attendant's Guide – 37
Page 42

GCA70–334 Staff Use of Room Telephones
4
Room Telephone Functions for Hotel Staff
This chapter discusses use of room telephones for hotel staff purposes. Hotel staff can perform
the following functions from room telephones:
remote answering of administrative station,
•
transferring a call,
•
maid log in/log out of room,
•
• enter room status.
Remote Answering of Attendant Station
To answer a call ringing at an administrative telephone from a room telephone,
1. Lift handset.
2. Dial S 4.
Staff Use of Room Telephones
3. Dial extension number of ringing telephone.
Front Desk Attendant’s Guide – 39
Page 43

Staff Use of Room Telephones GCA70–334
Transferring a Call
To transfer a call answered on a room telephone to another telephone (room or administrative),
1. Quickly press and release telephone hookswitch if using an IST (flash button or TAP
button on digital telephones).
2. Dial extension number that will receive transferred call.
3. Hang up.
—OR—
Wait on line for answer, announce the call, and hang up.
Logging In to a Room
To log in to a room,
1. Lift the guest telephone handset and dial maid system code (default code = #04).
2. Dial your maid identification number.
3. Hang up the telephone.
Logging Out of a Room
To log out of a room and enter the room status,
1. Lift the guest telephone handset and dial maid system code (default code = #04).
2. Dial your maid identification number.
3. Press the S key to indicate the room is clean, or press the # to indicate the room is unmade
and hang up.
4. If Concierge is integrated with a PMS, press the appropriate room status button (see table
on next page) and then hang up. The digit you enter in this step will override the entry you
made in step 3. (Even if you have a PMS, you cannot skip step 3—it is required to get to
step 4.)
40 – Front Desk Attendant's Guide
Page 44

GCA70–334 Staff Use of Room Telephones
Depending on which PMS system you are integrated with, the room status codes that maids
enter when leaving a room will change. The following table lists the room status codes for the
PMS systems currently supported by Comdial.
Room Status Hitachi/Default
Value
Made 1 4
Unmade 2 1
Maid in Room 3 2
Inspection Required 4 3
Maintenance Required 5 5
Out Of Order 6 6
Room is Reserved 7 7
Encore Value
Front Desk Attendant’s Guide – 41
Page 45

Notes
Page 46
GCA70–334 Guest Telephones
5
Guest Telephones
Guest Use of Room Telephones
This chapter discusses procedures guests must use to operate their room telephones. This
information is available to guests in the form of faceplate on their telephones; however, the
information in this chapter will help you to assist guests if they have questions about operating
their telephones.
Guests can perform the following functions from their room telephones:
• place outside calls,
• place inside calls,
• place speed dial calls,
• call the attendant,
• answer calls,
• retrieve a message,
• acknowledge a wakeup call,
•
set a wakeup call,
•
answer a call waiting tone.
Front Desk Attendant's Guide – 43
Page 47

Guest Telephones GCA70–334
Placing an Outside Call
Outgoing dialing plans may differ greatly from one location to another. For example: one hotel
may dial 9 for both local and long distance calls, while another may be configured to dial 9 for
local and 8 for direct dial long distance calls. The Concierge system’s programming is very
flexible in this regard. Please consult your system installer for instructions on how to place
outgoing calls.
Placing a Call within the Hotel
To place a call within the hotel,
1. Lift handset and listen for dial tone.
2. Dial extension number.
Placing a Speed Dial Call
To place a speed dial call,
1. Lift handset and listen for dial tone.
2. Press S01 and then dial system speed dial number (000–999).
NOTE: Earlier systems have only S100–S299 or S100–S599 as system speed dials.
NOTE: See the system installer or the attendant’s guide that came with your telephone system
for procedures on programming system speed dials.
Placing Calls to the Attendant
To place a call to the attendant,
1. Lift handset.
2. Dial 0.
44 – Front Desk Attendant's Guide
Page 48

GCA70–334 Guest Telephones
Retrieving a Message
To retrieve a message using an LCD proprietary telephone,
1. Observe blinking message waiting light.
2. Press the CALL softkey (softkeys are located under the LCD display) to retrieve the
message.
To retrieve a message using a non-LCD proprietary telephone,
1. Observe blinking message waiting light.
2. Press INTERCOM + HOLD to retrieve the message.
To retrieve a message from an IST telephone,
1. Observe blinking message waiting light.
2. Press INTERCOM + voice mail code (default code = #, 00) to retrieve the message.
Setting a Wakeup Call
To set a wakeup call,
1. Dial the feature code (default code = S04).
2. Enter the wakeup time in 00:00 format.
3. Wait for the confirmation tone and hang up.
To cancel a wakeup call,
1. Dial the feature code (default code = S04).
2. Press the # key.
3. Wait for the error tone and hang up.
Front Desk Attendant's Guide – 45
Page 49

Guest Telephones GCA70–334
Answering a Wakeup Call
When the system issues a wakeup call to a guest, the guest’s telephone will ring for one minute.
If the guest does not answer the first wakeup call, the system issues two more wakeup calls at
one-minute intervals. If the guest does not answer the third wakeup call, the system issues an
alarm.
To answer a wakeup call,
1. Lift and replace handset when telephone rings.
46 – Front Desk Attendant's Guide
Page 50

GCA70–334 Index
Condition of Room .............20
Condition, Room ...............11
Index
Credit Limit....................8
Credit Limit Exceeded ..........27
A
Access, Call...................15
Administrative Telephones .......31
Adding Wireless Extensions.....37
Heartbeat Feature ..........37
Viewing a Guest Room .......36
Viewing DID Extensions ......36
Alarm Modes..................28
Alarm Printout.................23
Alarm Types ..................27
Alarms Display ................26
Audit Printout .................23
B
Block, Room ..................15
C
D
DID Extension..............4,5,9
Viewing from an admin phone . . . 36
Direct Access .................15
Direct Inward Dialing .....4,5,9,36
Directory .....................22
DND ........................10
Do Not Disturb ................10
E
Emergency Number Dialed.......27
F
Feature Access Buttons
Functions...............34
Locations...............31
Call Access ...................15
Call Display...................21
Calls Dialog...................21
Check In ......................5
Check Out .....................6
G
Guest Directory ................22
Guest Room Features ............4
Index – 47
Page 51

Index GCA70–334
H
Housekeeping .................24
L
Local Access ..................15
M
Maid Printout .................23
Maid Statistics.................25
Message Waiting ...............13
Both .................13
Desk .................13
None .................13
Voice .................13
Modes, Alarm .................28
Room Status ..................20
Room Status Printout ...........23
Room Telephones, Guest Use of . . . 43
Calling the Attendant ........44
Inside Calls .............44
Outside Calls.............44
Speed-Dial Calls ...........44
Wakeup Call, Answering ......46
Wakeup Call, Canceling .......45
Wakeup Call, Setting ........45
Room Telephones, Staff Use of....39
Logging in to a Room ........40
Logging out of a Room .......40
Remote Answering Attendant Phone 39
Transferring a Call..........40
Room Type ....................7
S
O
Operator Access ...............15
P
PMS Connection Lost ...........27
Popup Setting (Alarm) ..........28
Printouts .....................23
R
Repeat Mode (Alarm) ...........28
Room Block ..................15
Room Condition ...............11
48 – Index
SMDR Connection Lost .........27
Starting Impact Concierge.........3
Status of Room ................20
Switch Connection Lost .........27
System Started.................27
System Stopped................27
T
Telephone Off Hook ............27
Telephone Removed ............27
Telephone State ................19
Page 52

GCA70–334 Index
Types of Alarms ...............27
U
Using the Administrative Telephones36
V
Vacant Room Call Attempt .......27
W
Wakeup Call ..................17
Wakeup Call Not Answered ......27
Index – 49
Page 53

This manual hasbeen developed byComdial Corporation (the
“Company”) and is intended for the use of its customers and
service personnel. Theinformation in thismanual is subjectto
change without notice. While every effort has been made to
eliminate errors, the Company disclaims liability for any
difficulties arising from the interpretation of the information
contained herein.
The information contained herein does not purport to cover
all details or variations in equipment or to provide for every
possible contingency to be met in connection with installa
tion, operation, or maintenance. Should further information
be desired, or should particular problems arise which are not
covered sufficiently for the purchaser’s purposes, contact
Comdial, Inside Sales Department, P.O. Box 7266, Charlottesville, Virginia 22906.
-
Comdial® strives to design the features in our communications systems to be fully interactive with one another.
However, this is not always possible, as the combinations of
accessories and features are too varied and extensive to
insure total feature compatibility. Accordingly, some
features identifiedin this publication will not operate ifsome
other feature is activated.
Comdial® disclaims all liability relating to feature
non-compatibility or associated in any way with problems
which may be encountered by incompatible features.
Notwithstanding anything contained in this publication to
the contrary, Comdial makes no representation herein as to
the compatibility of features.
Page 54

GCA70–334.10 12/01
Printed in U.S.A.
 Loading...