

Comdial DXP Series, FX Series, DXP Plus Series, Impact 8101N Series, Impact SCS 8201N Series User Manual
Page 1
DXP, DXP Plus, and FX Series
Digital Communications System
Proprietary Single Line Telephone (SLPS)
Station User’s Guide
R
R
ABC
2
GHI4JKL5MNO
TUV
PRS
8
7
* 0 #
INTERCOM
MESSAGE
TAP
TRNS/CONF
MUTE
HOLD
DEF
31
6
WXY
9
1 2
QZ ABC DEF
3
GHI
4
7
TRNS/CNF
HOLD
6
JKL
MNO
5
TUV
8
PRS
WXY
9
0
OPER
#
R
TAP
INTERCOM
Page 2
This user’s applies to the following system and telephone
models:
System Models:
DXP systems with software 12A and later.
•
DXP Plus systems with software 12A and later.
•
FX Series with software 12A and later.
•
Telephone Models:
Impact 8101N-** Rev. A and later.
•
Impact SCS 8201N-** Rev. A and later.
•
Contact your Comdial dealer for updates of this as well as
other Comdial publications.
CERTIFIED
ISO 9001
E
D
R
I
T
Accredited by the Dutch Council
for Accreditation for certification
and registration activities.
C
C
A
R
E
ANSI-RAB
C
N
E
R
O
I
T
T
I
A
I
C
F
G
E
D
R
A
R
I
T
S
*Tri-Level Compression
is a registered trademark
of ACSWireless, Inc.
Comdial's Quality Management System Is
Certified To The ISO 9001 Standard.
Comdial strives to design the features in our communications systems to
be fully interactive with one another. However, this is not always possible,
as the combinations of accessories and features are too varied and extensive
to insure total feature compatibility. Accordingly, some features identified
in this publication will not operate if some other feature is activated.
Comdial disclaims all liability relating to feature non-compatibility or
associated in any way with problems which may be encountered by
incompatible features. Notwithstanding anything contained in this
publication to the contrary, Comdial makes no representation herein as to
the compatibility of features.
2/12/97
Page 3

GCA70–251 Contents
Contents
1
Introducing The Single Line Telephone ................. 1–1
1.1 UnderstandingWhatTheLightsMean............... 1–2
1.2 AdjustingTheTelephonePedestal.................. 1–4
2
AnsweringCalls..................................... 2–1
2.1 AnsweringCalls................................ 2–1
2.2 Answering Subdued Off-Hook
VoiceAnnouncement(SOHVA)Calls ............... 2–2
3
MakingCalls....................................... 3–1
3.1 MakingCalls................................... 3–1
3.2 CampingOnAtABusyStation
AndWaitingForAnAutomaticCallback............. 3–4
3.3 Camping On At An Idle Station
AndWaitingForAnAutomaticCallback............. 3–5
3.4 CampingOnAtABusyStation
AndWaitingForAnAnswer(CallWaiting)........... 3–6
3.5 Overriding A Call Or A Do Not Disturb
Condition At Another Telephone (Executive Override). . 3–7
4
PlacingCallsOnHold................................ 4–1
4.1 HoldingCalls................................... 4–1
5
TransferringOutsideCalls............................ 5–1
5.1 TransferringCalls............................... 5–1
6
ConferencingStationsTogether....................... 6–1
6.1 ConferencingTelephonesTogether.................. 6–1
Contents – 1
Page 4

Contents GCA70–251
7
Using The Other Telephone Features ................... 7–1
7.1 UsingTheRecall/FlashFeature.................... 7–1
7.2 MakingAPagingAnnouncement................... 7–1
7.3 SwitchingBetweenPulseAndTone................. 7–2
7.4 ForwardingCalls................................ 7–2
7.5 UsingTheTrackerPagingSystem.................. 7–3
7.6 SettingYourPersonalRingingTones................ 7–5
7.7 SettingYourRingVolume......................... 7–5
7.8 Using The IMIST Module......................... 7–6
8
Sending And Receiving Non-Verbal Messages ........... 8–1
8.1 LightingTheMessage-WaitingLight................ 8–1
8.2 Sending A System-Supplied LCD
Message ToA Calling LCD Speakerphone ........... 8–2
9 ProgrammingYourTelephone........................ 9–1
9.1 StoringSpeedDialNumbers ...................... 9–1
1
0
Troubleshooting Your Telephone ..................... 10–1
I
ndex ............................................. Index–1
Q
uickReferenceGuide.....................QuickReference–1
2–Contents
Page 5

GCA70–251 Introducing The Single Line Telephone
1
IntroducingThe
Single Line Telephone
Congratulations and thank you for using a Comdial telephone! This
manual serves as a helpful guide for using your new telephone’s various
functions.
Your proprietary telephone will provide you with single line operation
without the added complexity of monitor or speakerphone requirements.
It will give you access to the many useful features provided by your
digital communications system.
NOTE: Throughout this book, all references to fixed buttons are
printed in upper case bold type, for example “Press the
INTERCOM button.”
SingleLineTelephoneUser'sGuide 1–1
Page 6

Introducing The Single Line Telephone GCA70–251
1.1 Understanding What TheLights Mean
The lights on your telephone indicate the status of lines, features, and
intercom.
Next to a fixed feature or programmable feature button:
–
•
Steady red = feature on.
•
Steady off = feature off.
Next to the INTERCOM button:
–
•
Steady green with a quick flash = you are using your intercom.
•
Winking red = a message is set on your telephone for others to
receive when calling.
•
Flashing orange = another station is calling you.
Above the keypad (8101N only):
–
•
Different activities are i ndicated by different flash rates for
this light. These flash rates are described below:
Indication Activity
Fluttering red Message awaits pickup
Winking green
(3 blinks with pause)
1 – 2 Single Line Telephone User's Guide
Hold or park function active
Page 7

GCA70–251 Introducing The Single Line Telephone
slips01
R
DEF31ABC
2
GHI4JKL5MNO
6
WXY9TUV8PRS
7
Dialpad
* 0 #
INTERCOM
MESSAGE
TRNS/CONF
TAP
MUTE
HOLD
Intercom Button
Message Button
TAP Button
Transfer/Conference Button
Mute Button
Hold Button
Volume Control
Connectors On Bottom Of Telephone
(for ringer volume only)
Optional IMIST Module
!
Line Cord
Handset
Impact SCS 8201N Single Line Telephone
slips02
1 2
QZ ABC DEF
3
GHI
4
7
TRNS/CNF
HOLD
Hold Button
6
MNO
JKL
5
TUV
PRS
WXY
8
9
0
OPER
#
R
TAP
INTERCOM
Connectors On Bottom Of Telephone
Line Cord
!
Impact 8101N Single Line Telephone
SingleLineTelephoneUser'sGuide 1–3
Ringer Volume Switch
(bottom of telephone)
Message Waiting Light
Dialpad
Transfer/Conference Button
TAP Button
Intercom Button
Off
Handset
Loud
Ringer Volume
Page 8
Introducing The Single Line Telephone GCA70–251
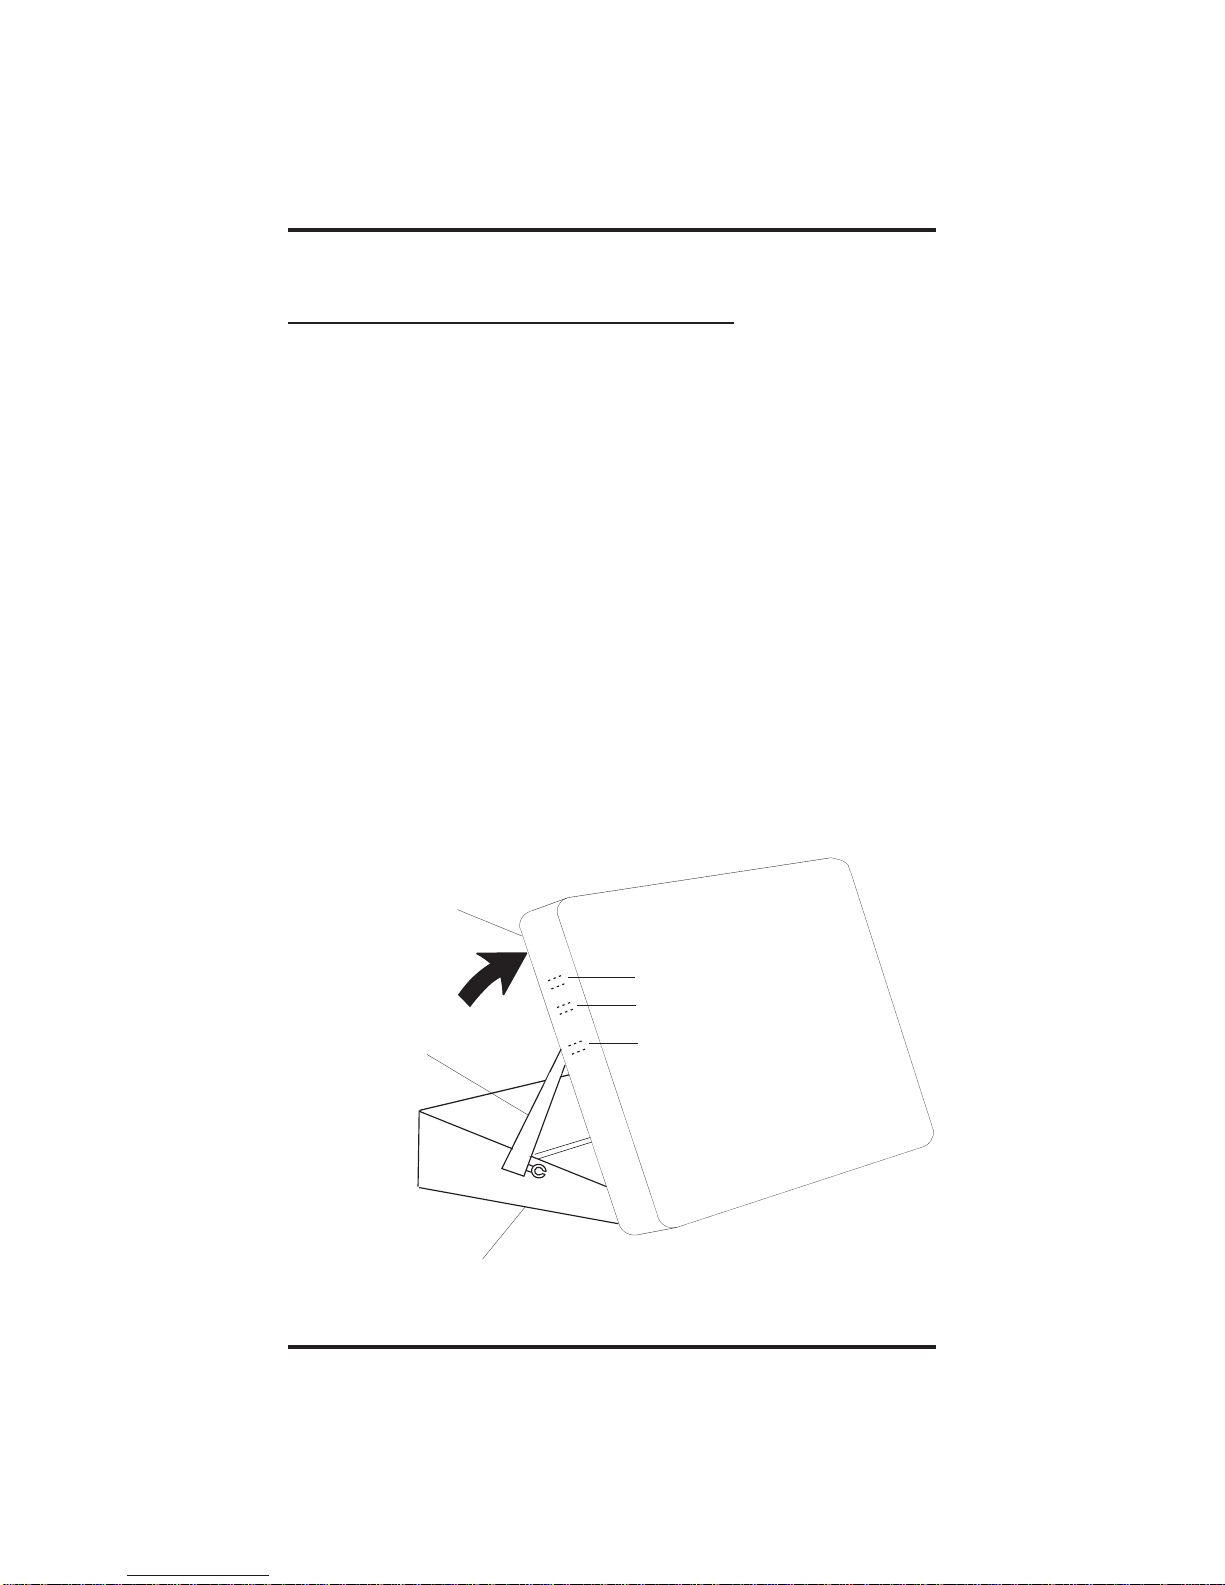
1.2 AdjustingThe Telephone
Pedestal (Model 8201N only)
Your telephone has an adjustable pedestal to allow you to select the most
comfortable viewing angle. When you receive the telephone, the pedestal
is in its lowest position—flush against the pedestal.
•
To adjust the pedestal,
1. Grasp the rear of the pedestal base firmly with one hand while
lifting the rear portion of the telephone upward with your other
hand.
2. While pivoting the telephone upward with one hand, pivot the
telephone supporting arms upward with your other hand while
feeling for the notches under the telephone. Notice there are
three sets of notches under the telephone corresponding to the
three positions available.
3. When the telephone is at the desired height, find the closest
pair of notches and place the supporting arms in the notches.
Press down slightly on the telephone until you feel the
supporting arms snap into place.
Telephone
First Notch
Second Notch
Supporting Arm
Pedestal Base
1 – 4 Single Line Telephone User's Guide
Third Notch
(For Highest Position)
PED01
Page 9

GCA70–251 Answering Calls
2
Answering Calls
2.1 Answering Calls
•
To answer a call that is ringing at your telephone,
1. Hear your telephone ringing and lift handset.
•
To answer a call that is ringing at any telephone,
1. Hear ringing at other telephone.
2. Lift handset at your station and listen for intercom dial tone.
3. Dial ✳ 4 plus extension number of ringing telephone.
•
To answer a call that is ringing at a particular telephone
in your call group,
1. Hear ringing at other telephone.
2. Lift handset at your station and listen for intercom dial tone.
3. Dial #4(ringing station must be programmed in your call
pickup group),
4. Lift handset to talk.
•
To answer a call that is ringing the loud ringer or night
transfer station,
1. Hear ringing.
2. Lift handset and listen for intercom dial tone.
3. Dial 65 through 68 to select ringing zone (1–4) where the bell
is located, or dial 69 to answer any ringing zone.
NOTE: This feature is known as Trunk Access FromAny Station
(TAFAS).
Single Line Telephone Station User's Guide 2 – 1
Page 10

Answering Calls GCA70–251
2.2 Answering Subdued Off-Hook
Voice Announcement (SOHVA) Calls
NOTE: Your telephone may be arranged to receive a subdued off-hook
voice announcement (SOHVA). If it is, an intercom caller may
break into your outside call and deliver a message to your
telephone receiver for you to hear.
•
To Answer a SOHVA,
1. While off-hook on an outside call, hear several quick tone
bursts followed by an announcement delivered to your ear
through the handset.
•
To Reply to a S OHVA (8201N only),
1. Press and hold the MUTE button.
As long as you hold the MUTE key, you are on line with the
SOHVA caller.
2. Release the MUTE key when you are finished with your reply.
You are now on line with your original call.
•
To Block SOHVA,
1. Lift handset and listen f or intercom dial tone.
2. Dial ✳ 2.
•
To Remove Block,
1. Lift handset and listen f or intercom dial tone.
2. Dial #2.
2 – 2 Single Line Telephone Station User's Guide
Page 11

GCA70–251 Making Calls
3
Making Calls
3.1 Making Calls
NOTE: The following procedures assume your telephone is
programmed for prime intercom (intercom dial tone when you
pick up the handset). If your telephone is programmed for
primeline(outsidelinedialtonewhenyoupickupthe
handset), press INTERCOM to select an intercom path.
•
To make a call,
1. Lift handset and listen for intercom dial tone.
2. Select line by dialing line group access code:
9 =group1,
80 through 89 = groups 2 through 11,
60 through 64 = groups 12 through 16.
3. Listen for outside dial tone.
3. Dial number.
•
To dial a personal or system speed dial number,
1. Lift handset and listen for intercom dial tone.
2. Press TAP.
3. Dial desired code:
1–0 = personal speed dial number.
✳ 000–✳ 999 = system speed dial number.
NOTE: Earlier systems are limited to speed dial codes ✳ 100–✳ 599.
•
To redial the last number you dialed at your telephone,
1. Lift handset and listen for intercom dial tone.
2. Press TAP and dial #.
Single Line Telephone Station User's Guide 3 – 1
Page 12

Making Calls GCA70–251
•
To queue for a line group if all lines are busy,
1. Lift handset and listen f or intercom dial tone.
2. Dial line group access code:
9 =group1,
80 through 89 = groups 2 through 11,
60 through 64 = groups 12 through 16.
3. Hear busy tone and dial ✳ 6.
4. Hang up handset and wait for queuing ring-back.
•
To answer queuing ring-back,
1. Lift handset and hear dial tone for line.
•
To cancel queuing before it rings back at your telephone,
1. Lift handset and listen f or intercom dial tone.
2. Dial #6.
3. Hang up handset.
•
If you are required to enter an account code when making
outside calls,
1. Lift handset and select line:
9 =group1,
80 through 89 = groups 2 through 11,
60 through 64 = groups 12 through 16.
2. Press INTERCOM and dial ✳ 04 (call is placed on HOLD).
3. Dial your account number, hear outside dial tone, and dial
outside number.
3 – 2 Single Line Telephone Station User's Guide
Page 13

GCA70–251 Making Calls
3.2 Camping On At A Busy Station
And Waiting For An Automatic Callback
If you call another station and receive a busy signal or a Do Not Disturb
tone, you can press a button that will cause the system to ring your
telephone when the station is available. This is called “camping on at a
station.” Please note that you can camp on to only one station at a time.
•
To arrange for the system to call back when a busy station
becomes idle or rings with no answer,
1. Make intercom call and hear busy signal or ring-back tone.
2. Dial ✳ 6.
3. Hang up. (When called station becomes idle or is operated by
its user, your station will ring with five short tone bursts. Call
back is canceled if you do not lift your handset when you hear
this ringing).
•
To answer call-back ring,
1. Lift handset. (Called station will ring. Call-back is canceled if
you do not lift your handset.)
•
To cancel automatic call back before your telephone sounds
the tone bursts,
1. Lift handset and listen for intercom dial tone.
2. Dial #6.
3. Hang up handset.
•
To camp on at a station with a Do Not Disturb condition set,
1. Dial ✳ 6 when you hear the DND tone. A call back will occur
when called station is no longer set in the Do Not Disturb
mode.
Single Line Telephone Station User's Guide 3 – 3
Page 14

Making Calls GCA70–251
3.3 Camping On At An Idle Station
And Waiting For An Automatic Callback
If you call another station and hear ringing bur receive no answer, you
can press a button that will cause the system to ring your telephone when
an activity is initiated at that station.
•
To camp on at a station for which you hear ringing but receive
no answer,
1. Dial ✳ 6.
2. Call back will occur after any activity is initiated at dialed
station.
•
To cancel the camp-on condition at any time,
1. Lift handset and listen f or intercom dial tone.
2. Dial #6.
3. Hang up.
3 – 4 Single Line Telephone Station User's Guide
Page 15

GCA70–251 Making Calls
3.4 Camping On At A Busy Station
And Waiting For An Answer (Call Waiting)
If the telephone you have called is busy, you can send a call-waiting tone
to the telephone and wait on the line for an a nswer.
•
To activate call waiting,
1. Make INTERCOM call and receive busy tone.
2. Dial ✳ 6 (called party hears tone).
3. Wait on line for reply.
Called party can place the current call on hold or disconnect from the
call to answer your call-waiting tone, or choose to ignore your
call-waiting tone and continue current conversation.
•
To cancel call waiting,
1. Hang up handset.
•
To answer a call waiting tone if you receive one while on a call,
1. Hear short tone burst in receiver.
2. Either place current call on hold or complete call and hang up
(waiting call will ring at your telephone).
3. Lift handset to answer call.
You may, of course, choose to ignore the call-waiting tone and remain on
the line with the original caller.
Single Line Telephone Station User's Guide 3 – 5
Page 16

Making Calls GCA70–251
3.5 Overriding A Call Or A
Do Not Disturb Condition
At Another Telephone (Executive Override)
•
To override an in-progress call or a Do Not Disturb condition
at another telephone,
1. Lift handset and listen f or intercom dial tone.
2. Make intercom call and hear a busy signal.
3. Dial ✳ 03 (all parties will hear several tone bursts).
4. Hear ring-back tone and be prepared to speak your
announcement.
NOTE: This action disables a DND condition at the other telephone
until DND is reset.
3 – 6 Single Line Telephone Station User's Guide
Page 17

GCA70–251 Placing Calls On Hold
4
Placing Calls On Hold
4.1 Holding Calls
•
To place a call on hold,
1. Press HOLD.
2. Hang up handset.
•
To return to a call that is on hold,
1. Lift handset and press TAP.
•
To place a call on exclusive hold,
1. Press HOLD twice and hang up handset.
•
To retrieve an exclusive hold,
1. Lift handset and press TAP.
•
To place a call on hold at another telephone,
1. While on line, press INTERCOM (system places call on hold).
2. Dial ✳ 90, then dial extension number of telephone to receive
held call.
3. Hang up handset.
•
To retrieve a held call at another station,
1. Lift handset and listen f or intercom dial tone.
2. Press INTERCOM and dial #90.
3. Dial extension number of station that has the held call.
4. Answer call.
Single Line Telephone Station User's Guide 4 – 1
Page 18

Placing Calls On Hold GCA70–251
•
To answer a call at the extension receiving held call,
1. Lift handset and listen f or intercom dial tone.
2. Dial #90.
•
To park a call,
1. Press INTERCOM (if on an outside call), or press HOLD,
then INTERCOM (ifonaninsidecall).
2. Dial ✳, then dial park orbit access code (91–99 for orbit 1–9).
If chosen orbit is busy, dial alternative orbit number.
3. Hang up handset.
4. Remember the code for later use or make it known to those
whoneedtoknowitinordertoretrievethecall.
NOTE: If call is not retrieved within a programmable time limit, it
reverts to the parking station as a standard held call, and only
one call can be placed in an orbit at a time.
•
To retrieve a parked call,
1. Lift handset and listen f or intercom dial tone.
2. Dial #.
3. Dial park orbit access code (91–99 for orbit 1–9).
4. Answer call.
4 – 2 Single Line Telephone Station User's Guide
Page 19

GCA70–251 Transferring Calls
5
Transferring Outside Calls
5.1 Transferring Calls
•
To announce a call before transferring it,
1. Answer outside call.
2. Press TRANSFER/CONFERENCE (call is placed on hold).
3. Dial station number. If you hear a busy signal or receive no
answer, press TAP and return to outside call.
4. When the party answers, announce the call.
5. Hang up the handset (call is transferred).
•
To transfer a call without first announcing it,
1. Answer outside call.
2. Press TRANSFER/CONFERENCE (call is placed on hold).
3. Dial station number. If you hear a busy signal, press TAP and
return to outside call.
4. Hang up handset. Call will re-ring your telephone if it is not
answered within a preprogrammed time.
Single Line Telephone Station User's Guide 5 – 1
Page 20

Transferring Calls GCA70–251
•
To make a hot transfer,
1. Answer call.
2. Press TRANSFER/CONFERENCE (the call is automatically
placed on hold).
3. Dial extension number of telephone to receive the transfer.
4. Announce call.
5. Press TRANSFER/CONFERENCE.
6. Hang up. The person receiving the transfer then has the call.
•
To do a quick screened transfer to intercom or tie line,
1. Answer call.
2. Dial intercom number (or tie line access code) for transfer
location.
3. When party at transfer location answers, announce call.
4. Hang up.
•
To do a quick unscreened transfer to intercom or tie line,
1. Answer call.
2. Dial intercom number for transfer location.
3. Hang up.
5 – 2 Single Line Telephone Station User's Guide
Page 21

GCA70–251 Conferencing Calls
6
Conferencing
StationsTogether
6.1 ConferencingTelephonesTogether
•
To set up a conference call that includes any combination of
outside lines and intercom parties,
1. Make first call.
2. Press TRANSFER/CONFERENCE;callisplacedonhold
automatically.
3. Make next call.
4. Press TRANSFER/CONFERENCE to establish conference.
5. Repeat the last three procedures to add up to two more parties
for a 5-party conference (including yourself); or, if you are
using a DXP Plus or FX Series system, you can add up to four
more parties for a 7-party conference.
NOTE: When using a DXP Plus or FX Series system, you can have up
to seven parties (including yourself) on a conference call.
•
To drop out of a conference call between you and two outside
lines (creating an unsupervised conference),
1. Dial #.
•
To rejoin an unsupervised conference between two outside
lines,
1. Lift handset and press TAP.
NOTE: Conference volume levels depend upon the quality of the
external lines.
Single Line Telephone Station User's Guide 6 – 1
Page 22

This page remains blank intentionally.
Page 23

GCA70–251 Using The Other Telephone Features
7
Using The Other
Telephone Features
7.1 Using The Recall/Flash Feature
Your host system provides certain features that you can access from your
telephone. Your system will probably be configured so that pressing TAP
results in a flash signal to allow access, through dialed codes, to these
features.
•
If your system has been configured for flash,
1. Press TAP to generate a timed flash signal while on line.
•
If your system has been configured for recall,
1. Press TAP while on line to disconnect you from the current
call and return dial tone to your station.
7.2 Making a Paging Announcement
•
To send a paging announcement,
1. Lift handset and listen f or intercom dial tone.
2. Dial 70–77 for zones 1–8 (in the default mode, zone 1—code
70—provides an all-call function).
3. Make announcement.
4. Remain on line if awaiting a reply (known as a meet-me page),
—OR—
hang up handset.
SingleLineStationUser'sGuide 7–1
Page 24

Using The Other Telephone Features GCA70–251
At times other telephone users may page you with instructions to meet
them on line. This is known as a meet-me page.Youcangotothenearest
telephone, dial a code, and be in contact with the paging party.
•
To reply to a meet-me page,
1. Lift handset of nearest telephone and listen for intercom dial
tone.
2. Dial 78.
3. Meet paging party on line.
7.3 Switching Between Pulse And Tone
•
If the local telephone service is pulse (for rotary dialing), you
can convert to tone while dialing as follows:
1. Press # at point in dialing sequence where conversion to tone is
required.
NOTE: You can store pulse/tone switching along with your speed dial
number codes by pressing # during the number storage.
7.4 Forwarding Calls
•
To forward your calls to another telephone,
1. Lift handset and listen f or intercom dial tone.
2. Dial forwarding code:
✳52 = all calls forward immediately,
✳54 = all calls forward after busy or no answer,
✳51 = prime line and personal intercom calls forward
immediately,
✳53 = prime line and personal intercom calls forward on busy
or no answer.
3. Dial extension number of telephone to receive your forwarded
calls.
4. Hang up handset.
7 – 2 Single Line Station User's Guide
Page 25

GCA70–251 Using The Other Telephone Features
•
To cancel call forwarding,
1. Lift handset and listen f or intercom dial tone.
2. Dial #5.
NOTE: For each call you receive during call forward, you will hear a
short tone burst to remind you calls are being forwarded.
7.5 Using The TrackerPaging System
The Tracker Pager System option allows you to send call back and
parked call messages to Tracker pagers assigned to station numbers.
Along with the parked call message, the system parks the call in orbit
for retrieval by the paged party. The type of message that the system
delivers (either alphanumeric or numeric-only) depends on the Tracker
pager model in use at the station.
When outside callers call into a system that has both Tracker Paging
and voice mail options installed, the system can be configured to give
these callers the option of either leaving a message or tracking the
person they are calling.
If you have a Tracker pager assigned to your personal intercom number,
you can receive messages that someone else sends you. The system
automatically installs the Tracker pager for your use; however, you can
disable it when you do not wish to receive paged messages and when
you leave at the end of your day. Of course, if you do disable your
Tracker pager at the end of your day, be sure to enable it at the
beginning of your next day.
•
To track a called party after receiving a ring-no answer,
1. Dial ✳ 8.
2. Hear confirmation beep (Tracker page accepted) or hear busy
tone (Tracker page not accepted).
4. Hang up handset.
SingleLineStationUser'sGuide 7–3
Page 26

Using The Other Telephone Features GCA70–251
•
To track a called party without first calling them,
1. Lift handset and listen f or intercom dial tone.
2. Dial ✳ 8.
3. Dial station number.
4. Hear confirmation beep (Tracker page accepted) or hear busy
tone (Tracker page not accepted).
5. Hang up handset.
•
To use Tracker to transfer a call to a park orbit for retrieval
and transmit the call’s park orbit code and caller ID
information (if available),
1. Answer a call.
2. Press TAP.
3. Dial station number of station that is to receive the call.
4. If the called station does not answer or is busy, press ✳ 8.
5. Hear confirmation beep (Tracker page accepted) or busy tone
(Tracker page not accepted).
6. Hang up handset.
NOTE: Tracker parked calls will re-ring your station if the called party
does not respond within a preprogrammed time. You can either
replace the call into another Tracker page orbit or retrieve the
call for servicing.
•
To retrieve a call that you parked using the Tracker option,
1. Lift handset and press TAP.
7 – 4 Single Line Station User's Guide
Page 27

GCA70–251 Using The Other Telephone Features
•
If you receive a parked call message on your Tracker pager,
1. Go to any system station.
2. Lift handset and listen f or intercom dial tone.
3. Dial the orbit code (#800–#899) displayed on your pager.
4. Retrieve call.
•
To enable or disable a Tracker pager at your station,
1. Lift handset and listen f or intercom dial tone.
2. Dial # 06 to disable,
—OR—
dial # 07 to enable.
3. Hang up handset.
7.6 Setting Your PersonalRinging Tones
•
To alter the ring tone of your telephone so you can distinguish
its ringing from that of others located close by,
1. Lift handset and listen f or intercom dial tone.
2. Dial ✳✳ 4.
3. Dial number (1–8) to select ring tone.
4. Hang up handset.
7.7 Setting Your Ring Volume
•
To set the ring volume,
8101N: Locate the switch on the bottom of the telephone and set it
to either High or Low.
8201N: Adjust the volume control on the front of the telephone to
Hi, Mid, Low, or Off (this control does not affect the handset
volume).
SingleLineStationUser'sGuide 7–5
Page 28

e
Using The Other Telephone Features GCA70–251
7.8 Using The IMIST Module
An Impact SCS 8201N telephone equipped with the optional IMIST
module can support an IST device (modem, FAX machine,
industry-standard telephone, etc.) in addition to the telephone.
Depending on system programming, the IST device may be used to make
outgoing calls and receive incoming calls.
The functionality of the IMIST module depends on the type of system
you are using.
• On a DXP system, the IMIST module does not have its own
extension number and can not function simultaneously with the
telephone.
• On a DXP Plus system, the IMIST module can function
simultaneously with the telephone if your system has revision 5 or
later firmware. If your system has an earlier firmware revision, the
telephone and IMIST module can not function simultaneously.
• On an FX Series system, the telephone and IMIST module can
function simultaneously.
NOTE: The IMIST module does not provide voltage to light a message
waiting light. Message waiting lights on devices plugged into
the IMIST module will not function.
If you have any other questions about IST devices, refer to GCA70–237,
Industry-Standard Telephone Station User’s Guide.
NOTE: The IMIST card has a separate power supply. The wall
transformer is a UL and CSA approved Class 2 device
operating from 120 Vac, 60 Hz, 16 watts and provides an output
of 24 Vac at 450 mA. Forreplacement, order Comdial P/N
DIU-PTR.
7 – 6 Single Line Station User's Guide
Power
IST Devic
scs04
IMIST Module
Page 29

GCA70–251 Sending And Receiving Non-Verbal Messages
8
Sending And Receiving
Non-Verbal Messages
8.1 Lighting The Message-Waiting Light
•
To turn on the message-waiting light (and a broken dial tone)
at an idle telephone,
1. Lift handset and listen f or intercom dial tone.
2. Dial ✳ 3.
3. Dial extension number of station to be alerted. The
message-waiting light of called station will flash. The
message-waiting light can only be turned off by either the
person sending the message or the person receiving the
message.
•
To turn off the message-waiting light at a busy or idle station,
1. Lift handset and listen f or intercom dial tone.
2.
Dial
# 3.
3. Dial extension number of station that was alerted. The
message-waiting light of called station will turn off.
•
To turn off the message-waiting light at a station during a
conversation with a party at that station,
1. Press INTERCOM.
NOTE: The message waiting light can only be turned off by the person
sending the message or the person receiving the message.
Single Line Telephone Station User's Guide 8 – 1
Page 30

Sending And R eceiving Non-Verbal Messages GCA70–251
•
To retrieve a message,
1. Observe flashing message-waiting light.
2. Lift handset,
on 8101N-** telephones press HOLD,
on 8201N-** telephones press MESSAGE.
Connection to station that left message is automatic.
NOTE: The message-waiting light can only be turned off by either the
person sending the message or the person receiving the
message.
8.2 Sending A System-Supplied LCD
Message To A Calling LCD Speakerphone
•
To turn LCD messaging on.
1. Lift handset and listen f or intercom dial tone.
2. Dial ✳ 02.
3. Press # to clear current message if one is stored.
4. Dial message code number (01–30).
5. Dial #.
6. INTERCOM light flashes.
•
To turn off LCD messaging, and your INTERCOM light,
1. Lift handset and listen f or intercom dial tone.
2. Dial #02.
8 – 2 Single Line Telephone Station User's Guide
Page 31

GCA70–251 Programming Your Telephone
9
Programming
YourTelephone
9.1 Storing Speed Dial Numbers
•
To store an outside number as a speed dial number,
1. Lift handset and listen for intercom dial tone.
2. Dial ✳✳1.
3. Dial 0–9 to choose storage location.
4. Dial 01–16 to select line groups 1–16, or dial 00 to let system
select line.
5. Dial number to be stored (up to 16 digits long—include ✳ and
# if needed). To store hookflash in a number sequence, press
TAP; press HOLD to store pause (only if needed).
6. Press TRANSFER/CONFERENCE to store number.
7. To store another number, repeat steps 4 through 7.
8. Repeat previous steps until all numbers are stored.
9. Hang up handset to end.
NOTE: The Federal Communications Commission (FCC) requires
that when programming emergency numbers and making test
calls to emergency numbers, you do the following: (1) Remain
on the line and briefly explain to the dispatcher the reason for
the call; (2) always make such a test call during the off-peak
hours, such as early morning or late evening.
Single Line Telephone Station User's Guide 9 – 1
Page 32

This page remains blank intentionally.
Page 33

GCA70–251 Troubleshooting Your Telephone
10
Troubleshooting
YourTelephone
Symptom Possible Cause
INTERCOM light flashing Your messaging is set. Lift handset, then
dial # 02 and hang up.
Station is ringing with ringer off.
MUTE light on. MUTE is activated. To cancel, press
MUTE.
Error Tone
(three steady tones)
May occur when incorrect buttons are
pressed during speed dial programming.
For example, if a button has a line
assigned to it, or was not enabled for
speed dial programming by the installer.
Single Line Telephone Station User's Guide 10 – 1
Page 34

This page remains blank intentionally.
Page 35

GCA70–251 Index
Index
A
AdjustingTheTelephonePedestal .......................... 1–4
AnsweringCalls......................................... 2–1
Answering Subdued Off-Hook
Voice Announcement (SOHVA) Calls ...................... 2–2
AutomaticCallback,FromABusyStation.................... 3–4
AutomaticCallback,FromAnIdleStation.................... 3–5
B
BusyStation,WaitingForAnAnswerFromA(CallWaiting)..... 3–6
BusyStation,WaitingForAnAutomaticCallbackFromA....... 3–4
C
Calls,Answering........................................ 3–1
Camping On At A Busy Station And
WaitingForAnAnswer(CallWaiting)..................... 3–6
Camping On At A Busy Station And
WaitingForAnAutomaticCallback ....................... 3–4
Camping On At An Idle Station And
WaitingForAnAutomaticCallback ....................... 3–5
Conferencing Telephones Together .......................... 6–1
D
Do Not Disturb Condition, Overriding ....................... 3–7
E
Executive Override....................................... 3–7
F
FlashFeature........................................... 7–1
ForwardingCalls........................................ 7–2
H
HoldingCalls........................................... 4–1
I
IMISTModule.......................................... 7–6
Index – 1
Page 36

Index GCA70–251
L
Lights,UnderstandingWhatTheyMean...................... 1–2
M
Making A Paging Announcement ........................... 7–1
Message-WaitingLight,Lighting........................... 8–1
O
OutsideCalls,Transferring................................ 5–1
P
Paging Announcement, Making A........................... 7–1
PagingSystem,UsingTheTracker.......................... 7–3
Pedestal, Adjusting The Telephone .......................... 1–4
Personal Ringing Tones, Setting ............................ 7–5
PlacingCallsOnHold.................................... 4–1
ProgrammingYourTelephone.............................. 9–1
PulseAndTone,SwitchingBetween......................... 7–2
Q
QuickReferenceGuide...................... QuickReference–1
R
Recall/FlashFeature ..................................... 7–1
RingVolume,Setting..................................... 7–5
RingingTones,Setting.................................... 7–5
S
SendingAndReceivingNon-VerbalMessages................. 8–1
SendingASystem-SuppliedLCDMessage................... 8–2
SettingYourPersonalRingingTones ........................ 7–5
SettingYourRingVolume................................. 7–5
SOHVACalls,Answering................................. 2–2
SpeedDialNumbers,Storing.............................. 9–1
Stations,Conferencing.................................... 6–1
StoringSpeedDialNumbers............................... 9–1
Subdued Off-Hook Voice Announcement Calls, Answering ...... 2–2
SwitchingBetweenPulseAndTone......................... 7–2
2–Index
Page 37

GCA70–251 Index
T
TrackerPagingSystem ................................... 7–3
TransferringOutsideCalls................................. 5–1
TroubleshootingYour Telephone........................... 10–1
V
Volume,SettingRing..................................... 7–5
Index – 3
Page 38

This page remains blank intentionally.
Page 39

GCA70–251 Quick Reference
A
Appendix A
Quick Reference Guide
This chart provides you with a quick reference guide of the feature
dialing codes. If you wish, you can detach this sheet and keep it near
your telephone to serve as a stand alone reference. Chapter 9 describes
methods to program these codes on your telephone at unused
programmable buttons. Further, the installer may store features at your
telephone buttons and label the buttons with the feature’s mnemonics.
Feature Enable Code Disable Code
Account Code INTERCOM ✳ 04 +
account code
All Call INTERCOM 70
Attendant Calling INTERCOM 0
Authorization Code INTERCOM # 08 +
authorization code
Automatic Call Back
and Call Waiting
Automatic Redialing
Background Music INTERCOM ✳ 11 or 12 INTERCOM # 1
Button Query (LCD
Speakerphones)
Call Divert Station INTERCOM ✳ 55 +
Call Forward, Personal INTERCOM ✳ 51 +
Call Forward, All Calls INTERCOM ✳ 52 +
INTERCOM ✳ 6INTERCOM#6
INTERCOM ✳✳8
extension no.
INTERCOM # 5
extension no.
INTERCOM # 5
extension no.
Quick Reference – 1
Page 40

Quick Reference GCA70–251
Feature Enable Code Disable Code
Call Forward,
INTERCOM ✳ 54 INTERCOM # 5
Ring-No Answer,All
Calls
Call Forward,
INTERCOM ✳ 53 INTERCOM # 5
Ring-No Answer,
Personal Calls
Call Park, Orbit
91–99
INTERCOM ✳
(91–99)
Call Park, Pick Up INTERCOM # 91–99
Call Pick Up,
Directed
INTERCOM ✳ 4+
extension no.
Call Pick Up, Group INTERCOM # 4
Clear Major Alarm
INTERCOM # 09
Ring
DISA Access Installer Assigned
Do Not Disturb INTERCOM # 01
Do Not Disturb,
extension no. + ✳ 03
Override
DSS Programming INTERCOM ✳✳ 3
Executive Override extension no. + ✳ 03
Hold, Manual HOLD
Hold, Executive HOLD + HOLD
Hold, Directed INTERCOM ✳ 90
Hold, Directed Pick
INTERCOM # 90
Up
LCD Contrast—
Digital LCD
INTERCOM ✳✳
51–58
Speakerphone
LCD Messaging INTERCOM ✳ 02 +
message
2 – Quick Reference
INTERCOM # 02
Page 41

GCA70–251 Quick Reference
Feature Enable Code Disable Code
Line Group 1 INTERCOM 9
Line Groups 2–11 INTERCOM 80–89
Line Groups 12–16 INTERCOM 60–64
Line Pick Up From
INTERCOM 65–68
Any Station, Zones 1–4
Line Pick Up From
INTERCOM 69
Any Station, All Zones
Meet Me Answer Page INTERCOM 78
Message Waiting INTERCOM ✳ 3+
extension no.
Message Wait Retrieval #00
Night Transfer
(Attendant Only)
INTERCOM ✳ #0✳
031
OperatorAccess INTERCOM 0
Paging, All Call INTERCOM 70
Paging, Zones 2–8 INTERCOM 71–77
Paging, Meet Me INTERCOM 78
Park Orbit Retrieve INTERCOM # 91–99
Park Orbit Send INTERCOM ✳91–✳99
Personal Ringing
Tones
INTERCOM ✳✳ 4+
tone code (1–8)
INTERCOM # 3 +
extension no.
Redial Last Dialed
Number
Remote Station INTERCOM # 05 +
Response Message INTERCOM ✳✳ 6+
#
extension no.
buttons + 01–30
INTERCOM ✳ 05 +
extension no.
Quick Reference – 3
Page 42

Quick Reference GCA70–251
Feature Enable Code Disable Code
Service Observing INTERCOM # 03 +
extension no.
Speed Dial, Station 1–0
Speed Dial, System ✳ 000 ✳ 999
Speed Dial,
INTERCOM ✳✳ 1
Programming
Station Lock INTERCOM # 04 +
code
Tracker Page, Send INTERCOM ✳ 8
Tracker Page,
Receive
INTERCOM # 8 +
orbit code
TrackerPager,Use INTERCOM#07 INTERCOM#06
Volume Save INTERCOM ✳✳ 7
Voice Announce
INTERCOM ✳ 2INTERCOM#2
Block
NOTE: The dialing codes provided in this quick reference guide are
default values. Your system installer has the ability to
renumber these codes.
The following table details several unique dialing codes that are only
applicable to single line proprietary and industry-standard telephones.
Feature Enable Code
4 – Quick Reference
Pick Up Last Line ✳ 08
Broker’s Mode ✳ 07
Speed Dial Access Code ✳ 01
Saved Number Redial ✳ 06
Dial Saved Number ✳ 09
TAP Dialing Code # #
Page 43

NOTES
Page 44

NOTES
Page 45

NOTES
Page 46

NOTES
Page 47

This manual has been developed by Comdial Corporation (the
“Company”) and is intended for the use of its customers and
service personnel. The information in this manual is subject to
change without notice. While every effort has been made to
eliminate errors, the Company disclaims liability for any
difficulties arising from the interpretation of the information
contained herein.
The information contained herein does not purport to cover all
details or variations in equipment or to provide for every
possible contingency to be met in connection with installation,
operation, or maintenance. Should further information be
desired, or should particular problems arise which are not
covered sufficiently for the purchaser’s purposes, contact
Comdial, Inside Sales Department, P.O. Box 7266,
Charlottesville, Virginia 22906.
Page 48

R
Charlottesville, Virginia 22901-2829
World Wide Web: http://www.comdial.com/
Printed in U.S.A. GCA70–251.06
8/97
 Loading...