

Page 1

COMDV’K
ExecuTech
XE Key System
System Manual
This publication is applicable for the following
common equipment:
MODEL MANUFACTURING CODE
NO308 REV J and later
N0308-AT
NO61 6 REV J and later
NO61 6-AT
NO820 REV M and later
N0820-AT
N1024
N 1024-AT
REV J and later
REV J and later
-REV M and later
REV M and later
REV M and later
IMI 66-064.04
7191.
Page 2

.’
IM’I RFuFal
‘>
. :.
D
TABLE OF CONTENTS
Table Of Contents
‘\
Chapter 1 System Description
....................................
Section 1 Introduction ............................................
Manual Scope
................................................ l-l
Related Publications ..............................................
Section 2 System Specifications
.......................................
Section 3 General Information ........................................
Configuration
Common Equipment Description
Station Description
Dssiblf Console Description
..................................................
.......................................
..............................................
........................................
Chapter 2 Description Of System Features . . . . . . . . . . . . . . . . . . . . . . . . . . . . .2-l
Chapter 3 Installation
Section 1 Standard Installation Details
Mounting Considerations .....................
Mounting Procedure .............................................
AC Power Connection
Battery Back-up ...............................................
System Grounding ..............................................
Line Connections .........................................
Station Connections . , ......................
Section 2 Option Installation Details .......
DssIblf Console Connection
Secure Off-hook Voice Announce Station
Power Failure Station ...........................................
Common Audible And Auxiliary Station Interface (Station 17 Audible)
External Paging Interface - Station PA Port ................................
External Paging. Interface - Line Port
Auxiliary Equipment Interface
Music Interface .. .. .....
Section 3 Checkout And Failure Isolation
Installation Checkout ............................................
Failure Isolation
...............................................
Section 4 Installer/user Information Regarding FCC Rules And Regulations
Chapter 4 System Programming ..
Section 1 Introduction
Section 2 Class Of Service Programming
a
Section 3 Attendant Programming
........................................
.............................
............................................
,
.............
.................................
...................................
.......................................
...........................................
, ..................... 3-l
, .................... 3-4
............................
, ..........................
..................
........................... 3;16 .‘. $z ii
, .[:I:..
.............. 3-19. .: .. :I:
, ..... 3-1
, ..... 3-4
, ............................... .4-l 7 :::
............................................ 4-1 :i$‘% l;--” . . . > .*: ..
.................................. 4-5’. -+.:I ‘5 ..
.................... , ................ 4-18 ii
l-l
1-l
l-l
1-2
l-4
l-4
1-4
l-4
11-4
.3-l
3-l
3-3
3-3
3-3
3-10
3-10
3-l 1
3-12
3-13
3-14 i
3-14 ‘?.:,
3~, &$g$
3-17
3-17 ;9 ‘.::
3-18 Y I’- .:.
j jr
,;; f _.,
.... Li . ‘-1 :,
.;‘;
..
.: .cl
L i
.s;
2. i.: i
.:. ..:. >,.; i
;:
. . .
..
,
.,
Page 3

Table Of Contents
Table Of Contents - continued
IMI 66-06-I
Chapter 5 System Operating Procedures
Section 1 Station Operation
Answering Calls
Making Calls
Holding Calls
Transferring Outside Calls
Conferencing
Messaging
Voice Announce Blocking
Line Monitoring
Recall/Flash
Paging
Do Not Disturb
Mute / Handsfree Answer Inhibit
Pulse/tone Switching
Personal Ringing Tones
Background Music
Speakerphone Operation
Station User Programming
.....................................................
...............................................
.................................................
.................................................
.................................................
..................................................
................................................
.................................................
................................................
............................................. 5-7
..............................................
Section 2 Attendant Station Operation
System Clock
System Speed Diaf Programming
Night Transfer (of Ringing)
Music On Hold
...............................................
...............................................
.........................................
..................................
.......................................... 5-5
.......................................
...........................................
..........................................
..........................................
.................................. 5-10
.....................................
....................
Section 4 System Operating Characteristics
Feature Dialing Code Numbering Plan
Ringer Volume Control
Status Indicators And Tone Sequences
System Ringing Patterns
Intercom Call Progress Tones
. Line Select Lights
Intercom Light
Message Waiting Light
BLFLights
Sspeaker Light
...............................................
..................................................
................................................
Chapter 6 Maintenance
Technical Assistance And Repair Service
Fuse Location
................................................
...........................................
..........................................
.......................................
........................................
...........................................
.......................................
...................................
..................................
.............................
... ;
..................................
........................... 5-12
.....................
T
1
.......
.....
:
.5-l
5-l
5-1
5-2
5-4
5-4
5-5
5-5
5-6
5-6
5-6
5-6
5-7
5-7
5-7
5-8
5-8
5-l 0
5-l 0
5-10
5-1.0
5-l 2
5-13
5-l 3
5-14
5-15
5-17
5-17
5-18
5-20
5-21
.6-l
6-l
6-l
:. .
Page 4

.
IM’I 66-064 Table Of Contents
List Of Tables
,;
Table 3-1. Line Connections
Table 3-2a. Station Connections (Model N0616, N0820, and N
Table 3-2b. Station Connections (Model N0308) . . . . . . .
Table 3-3. Voltage Measurements
. . . . . . . . . . . . . . . . .
....................................
.......................
1024) ...................
.......................
List Of Illustrations
Figure 1-1. Outline Dimensions - Common Equipment
Figure l-2. Station Outline Dimensions
Figure l-3a. Station Images (Model Code 67xXx-xX)
Figure l-3b. Station Images (Model Code 66xXx-xX)
Figure 3-l. Mounting Details
Figure 3-2. AC Power Connection and System Grounding
Figure 3-3a. Interconnection Details (Models NO61 6, N0820, and N1024)
Figure 3-3b. Interconnection Details (Model N0308)
Figure 3-4 Off-Hook Voice Announce Connections
Figure 3-5. Power Failure Station Connection
Figure 3-6. Common Audible and Auxiliary Station Interface
Figure 3-7. External Paging Interface - Station PA Port
Figure 3-8. External Paging Interface - Line Port
Figure 3-9. Auxiliary Equipment Interface Connections
‘Figure 3-l 0. Music Interface
Figure 4-l. Program Key Locations
Figure 4-2a. System Programming Block Diagram
Figure 4-2b. System Programming Block Diagram
Figure 5-l. Controls and Indicators
........................................
........................................
...................................
..............................
.....................................
....................................
...........................
............................
............................
.........................
.............................
............................
.......................
..........................
.............................
..........................
.............................
............................. ‘4-4
.................
3-5
3-6
3-7
3-l 7
l-6
l-7
l-8
l-9
3-2
3-4
3-8
3-9
3-11
3-l 2
3-l 3
3-14
3-15
3-l 6
3-l 6
4-2
4-3
5-l 1
Page 5

.
IMI 66-064
.,
.
System Description
i
SYSTEM DESCRIPTION
MANUAL SCOPE
This publication contains a complete description of the
ExecuTech model XE electronic key system. The
manual is divided into:
System Description
Feature Description
Installation
System Programming
System Operation
Maintenance
This issue of publication IMI 66-064 supersedes all
previous issues and includes information previously
discussed in the following Technical Advisory Bulletins:
TAB036A - Software Enhancements
NO308 Revision C and later
NO61 6 Revision C and later
NO820 Revision D and later
N 1024 Revision D and later
l
Automatic dialing with DSS/BLF consoles
l
OHVA and DSS/BLF with DB32Sxx adjunct feature
module
l
OHVA signalling enhancements
l
Unscreened call transfer
l
Extended DTMF tones
l
Idle line preference through an OPX port
l
Auto-save feature
TAB047 - Programmlng Clarifications
All models, all revisions
l
Expanded explanation of line assignment and
button mapping
TAB048A- Software Enhancements
NO308 Revision H and later
NO616 Revision H and later
NO820 Revision K and later
N 1024 Revision K and later
l
System speed dial toll restriction override
l
SOHVA groups
CHAPTER
1
SECTION 1
INTRODUCTION
TAB059A-Software Enhancement
NO308
N0308AT
NO616 REV J and later
N0616-AT
NO820 REV M and later Software Issue 11
N0820-AT REV M and later
N1024 REV M and later
N 1024-AT REV M and later Software Issue 11
KO308 REV J and later Software Issue 8
KO616 REV J and later
KO820
K1024
Product codes for software upgrade kits:
PSUXE-1 REV 8
N0308, N0308-AT, NC616, N0616-AT, KO308, K0616
PSUXE2 REV 11
N0820, NO820-AT. N1024, N1024-AT, KO820, K1024
l
Programmable Feed-Back Tone
Related publications, which contain additional
information applicable to this electronic key system,
are available from the manufacturer.
They are as follows:
GENERAL INFORMATION
l
IMI 01-001 Compliance Requirements To FCC
Rules and Regulations Part 68 and 15 .
l
IMI 01-005 Handling Of Electrostatically Sensitive
Components
USER INFORMATION
l
GCA 70-l 10 Attendant Guide
l
GCA 70-l 11 Station User Guide
INSTALLER INFORMATION
l
IMI 66-065 Class Of Service Programming Chart
REV J and later Software Issue 8
REV J and later Software Issue 8
Software Issue 8
REV J and later Software Issue 8
Software Issue 11
Software Issue 11
Software Issue 8
REV M and later Software Issue 11
REV M and later Software Issue 11
RELATED PUBLICATIONS
Page 6

System Description
.
IMI 66-064
SECTION 2
SYSTEM SPECIFICATIONS
SPECIFICATION
SYSTEM CAPACITY
LINES: 3 6
STATIONS:
DSS/BLF CONSOLES: 4 8
INTERCOM PATHS: 1 3
MAXIMUM SIMULTANEOUS
INTERCOM CONVERSATIONS:
POWER REQUIREMENTS
(Fully loaded system)
AC POWER:
DIMENSIONS
(approximate)
COMMON EQUIPMENT:
WIDTH (inches):
HEIGHT(inches):
DEPTH (inches):
WEIGHT (pounds):
STATIONS:
FOOTPRINT (inches):
WEIGHT (pounds):
MODEL NUMBER
NO308
NO61 6 NO820
N1024
8 10
8 16 20 24
10 12
3 2
1 3 3 2
117V +/- 10 % Singlephase - all models
.4A
25
W
40 VA 60 VA
10.4
.5A .8 A .8A
45 w 65 W 65W
80 VA 8OVA
13.1
15.6 15.6
14.9 19.4 21 .l 21 .l
3.0 3.0
3.0 3.0
9.0 14.0 16.5 17.0
6.5 x 8.5
1.9
STATION CABLE REQUIREMENTS
TYPE:
MAXIMUM LENGTH:
SWITCHING PRINCIPLE:
OPERATING ENVIRONMENT
TEMPERATURE:
HUMIDITY:
TERMINATIONS
LINE:
STATION:
Twisted, non-shielded, #24AWG
1500 feet for multiline stations
Solid-state, space-division analog switching with stored program
control
32-122 degrees F (O-50 degrees C)
90 percent relative, non-condensing
Standard, 6-conductor minijack (USOC RJ14C)
Standard 50-pin female connectors for connection to external
distribution field on models NO61 6, N0820, and N1024.
Standard 6conductor minijack (USOCRJ14C) for model N0308.
1-2
Page 7

System Description
MUSIC INTERFACE
INPUT LEVEL:
INPUT IMPEDANCE:
CONNECTOR:
CENTRAL OFFICE LIMITS
IMI 66-064
3 Volts peak-to-peak maximum
Approximately 500 Ohms
RCA phono jack
‘
LOOP LIMITS:
CABLE INSULATION
LEAKAGE:
INDUSTRY/REGULATORY
STANDARDS:
MEMORY RETENTION
AFTER POWER LOSS:
FCC REGISTRATION NUMBER:
RINGER EQUIVALANCE NUMBER:
PRODUCT CODE:
1900 Ohms maximum loop
15000 Ohms minimum
FCC Certified, part 15 (Class A)
FCC registered (fully protected)
UL listed (power supply only)
EIA RS478
Bell publication 48002 guidance
Hearing aid compatible handset
30 hours minimum (typically 200 hours)
CVW7WC12829-KF-E
0.4B
Common Equipment
NO308 3-line, 8-station
NO81 6 6-line, 16-station
NO820
N1024 1 O-line, 24station
Telephones
6702X
6706X
6714X 1Cline monitor with SOHVA
8-line, 20-station
2-line monitor
6-line monitor
Optional Telephones
6614E 10 x 14 monitor with SOHVA (Rev. D and later)
6614T 10 x 14 speaker with SOHVA (Rev C and later)
6620E 5 x 20 monitor with SOHVA (Rev D and later)
6620T 5 x 20 speaker with SOHVA (Rev I and later)
Consoles
EB32X 32-button console
DB32S 32-button console with call announce speaker
LCD Conversion
PCCXE
6600E LCD speakerphone with SOHVA (Rev B and later)
Software Upgrade Kit
PSUXE-1 NO308 and NO61 6
PSUXE-2 NO820 and N1024
Conversion kit
.
l-3
Page 8

System Description
SECTION 3
GENERAL INFORMATION
CONFIGURATION
The model XE electronic key telephone system
consists of an electronic Key Service Unit (KSU), also
referred to as common equipment, dedicated
electronic key telephones, and interconnecting wiring
consisting of small, 4- or 6-conductor, twisted-pair
cable.
The station and line capacity of the various family
members are per the following chart.
MODEL
NO. CAPACITY CAPACITY
NO308 3 8
NO61 6 6
NO820 8
N1024 10 24
The model XE telephone system is full featured, and
supports a specially designed group of key telephones
(model 67xxx-xx series) described below. In addition,
it also supports the following ExecuTech muftiline
telephone models 6614E, 6614T, 6620E, 6620T, 6414
and 64148. (If a model 6414S-xx is used, a moderate
volume setting may be required to avoid the possibility
of a squeal being sounded through the station speaker
during call announce and/or background music
operations.)
An optional kit supplied clock/chip socket assembly
can be added to allow the model XE system to support
the operation of a model 6600s or 6600E ExecuTech
LCD speakerphone in addition to the telephones
mentioned above. The product code for this LCD
upgrade kit is PCCXE. This kit is available through
normal distribution channels for field installation.
When this LCD upgrade kit is installed in an XE
system, the model number designation is changed
from Nxxxx to Kxxxx. The new model numbers
become as follows: K0308, K0616, K0820 and K1024.
The LCD speakerphone will provide the following
feature displays for the user’s convenience:
l
Time and Date
l
Call Duration Time
l
Do Not Disturb
l
Line Identification When Chosen Followed By The
Numbers Dialed
l
Intercom Calling Party Identification
l
Intercom Number Dialed
l
Re-display Of Call Time Of Last Call When HOLD
Key Is Pressed
CO/P BX STATION
16
20
.
A
software upgrade kit is available for field installation.
IMI 66-064
The EPROM chip supplied in this kit will revise the
operating system software of the XE system to the
latest factory issued level. The product code for the
software upgrade kits are:
PSUXE-1 for NO308 and NO61 6
PSUXE-2 for NO820 and N1024
These kits are available through normal distribution
channels.
COMMON EQUIPMENT DESCRIPTION
The common equipment is a fully electronic device. It
is essentially a special purpose computer system
acting as a communications controller between central
office (CO), private branch exchange (PBX), or
CENTREX supplied lines and the proprietary
telephone stations. The software architecture of the
common equipment provides complete system
support and great flexibility of operation.
The common equipment is contained in a functional,
modern-style metal housing of contemporary design in
keeping with the needs of the modern off ice
environment. It is engineered to be wall or rack
mounted. The outline dimensions of the common
equipment cabinet are illustrated in
Figure
l-1.
STATION DESCRIPTION
The model 67xxx-xx telephone stations are electronic,
microprocessor-controlled devices. They allow not
only multiline pickup but also single button access to
features available from the serving CO, PBX, or
CENTREX switch as well as the common equipment.
The outline dimensions of the system stations are
illustrated in
in
Figure 1-3.
The stations provide the following features:
l
Full modular connection
l
4 fixed feature buttons with indicators
. SPKR
. MUTE
. HOLD
. ITCM
l
2 fixed feature buttons without indicators
. TAP
. TRANQCONF
l
Programmable buttons with and without indicators
Figure 1-2
and the images are illustrated
’
Page 9

f
IMi66-064
.
System Description
l
-\
7-foot, 6conductor line cord
l
6 position, 4- or 6-conductor modular line jack
l
K-type handset (hearing aid compatible)
l
Ringer volume control (Off, Low, and High)
l
Desk/wall reversibility
DSSBLF CONSOLE DESCRIPTION
The DSS/BLF console is an optional device designed
to be a companion to a system attendant station in
high call volume situations that require a dedicated
call transfer location. The console provides a direct
station selection (DSS) intercom, and an associated
busy lamp field (BLF). It also provides one-key
access to all-call when that feature is available.
The console may also be installed at any station port
to work in conjunction with a companion station
connected to an adjacent paired port.
The model EB32X-xx, DB32-xx, DB32S-xx, DB40-xx
and DB70-xx DSS/BLF consoles are all compatible
with the XE system. The station port to which they are
connected must be programmed as a DSS/BLF
console port. The console buttons are fixed for
DSS/BLF operation beginning with station 10 and
ending with the maximum station number in the
system. Theses buttons also provide autodial
locations at a second level of storage (accessed with
the HOLD button function). Additionally, any buttons,
from beyond system station capacity through a
maximum of 32, are available as autodial locations at
the first level of storage. For example, a model N1024
key system and a EB32X-xx or DB32-xx console will
fix the first 24 console buttons as DSS/BLF buttons,
and provide the remaining eight buttons as autodial
buttons. Plus, it will provide autodial locations at the
second level of storage for the first 24 buttons. A total
of 32 autodial storage locations are provided. For
larger consoles, any buttons beyond a maximum of 32
will still be blanked. For this reason, it is
recommended that the larger consoles (DB40 and
DB70) not be used unless absolutely necessary since
the XE system has a maximum station capacity of 24
stations thus leaving these consoles with a large
quantity of blanked buttons.
The DB32S-xx Adjunct Feature Module can be used
to provide off-hook voice announce (OHVA) to a
station already busy on a call and allow subsequent
handsfree answerback (HFAB) by that station user.
The DB32Sxx Module can also be used as a
DSS/BLF console at the same time if desired. The
station port to which the Adjunct Feature Module is
connected must be programmed for the feature that is
required. When both DSS/BLF and OHVA operation
are required, the station port to which the console is
connected must be programmed as an Off-Hook Call
Announce port. When only DSS/BLF operation is
required, program the port as a DSS/BLF Console port.
1-5
Page 10

System Description
IMI 66-064
Models NO820 and N1024
/F
z-
I
If
1,
I’
I/
,’
Model NO61 6
/
z7
‘3.40
Model NO308 Model NO308
Figure 1-i. Outline Dlmenslons - Common Equipment
l-6
Page 11

Iill 66-064 System Description
1
8.625
.
t- 7-6-“1
r
8.625”
1
(Model Code 67xxx-xx)
4.983"
4.069"
1 ,112”
(Model Code 66xxx-xx)
Figure 1-2. Station Outline Dimensions
l-7
Page 12

Z-LINE MONITOR TELEPHONE
(6702X)
6-LINE MONITOR TELEPHONE
(6706X)
00
00 OC
00 OC
00
--t
OCZ
OC
14-LINE MONITOR TELEPHONE
(6714X)
DSS/BLF CONSOLE
(EB32X)
Figure l-3a. Station Images (Model Code 67xxx-xx)
,’
Page 13

5 x 20 image Telephone
(6620E, 662OT)
10 x 14 Image Telephone
(6614E, 6614T)
5 x 14 Image LCD Speakerphone
(SSOOE)
70-Button DSS/BLF Console
(DB70)
Figure l-3b. Station Images (Model Code 66xxx-xx)
Page 14

Description Of System Features IMI 66-064
CHAPTER 2
DESCRIPTION OF SYSTEM FEATURES
ACCESS DENIED
Access to particular lines can be denied at certain stations in the system through system programming.
This feature is programmable on a per line/per station
basis as part of system or administration programming.
ADD-ON CONFERENCE
(2 INTERNAL, 1 EXTERNAL PARTIES)
This system feature allows a station, while operating in
a private mode, to add another station to an outside
call.
ALL-CALL PAGING
(VIA STATION SPEAKERS)
All-call paging allows all of the stations to receive an-
nouncements at the same time through the station
speaker. Origination of announcements must be via a
station handset. Each station can be programmed to
receive and/or to originate an all-call page. The system default condition is that all stations have both
receive and originate capability. The arrangement of
paging as all-call is controlled by both system and ad-
ministration programming. See the discussion titled,
Zone Paging (via Station Speakers).
ALL INTERCOM LINKS
BUSY INDICATION
When all intercom paths are busy, the system causes
the intercom light at each station to be on steady.
AUTO DIAL
Each multiline station provides programmable dialing
features. Programmable buttons can be programmed
to store numbers for automatic dialing purposes. The
stored numbers can be up to fifteen digits in length
and can include line or intercom selection, numbers, #,
++, pauses, and flash signals. A pause is stored each
time the
stored each time the
pause and flash intervals are programmable. Any
programmable button that does not have a line assign-
ment can be programmed as an auto dial. Additional-
ly, an auto dial number can be stored as a secondary
function at every button programmed for direct station
selection. Often used host PBX or CENTREX feature
access codes can be stored at a programmable button
location to provide one-button access to the features.
Also refer to the discussions titled, Automatic Pause In-
sertion, Station Speed Dial, and Programmable
DSS/BLE
HOLD
button is pressed, and a flash signal is
TAP
button is pressed. The
AUTO-SAVE FEATURE
The auto-save feature can be used to save the last
manually dialed number at any unprogrammed button
or at a specific button that was previously reserved for
this purpose. The button chosen for auto-save must be
blank and not currently programmed as a DSS button,
line select button, or auto dial button. An auto-save
can be made at a button previously used as an auto-
save button; however, the previously stored number
will be over-written. As many manually dialed numbers
can be saved in this manner as there are separate unused buttons to be used for storage. If a dialed number is!onger than 15 digits, two or more buttons can
be used to save portions of it for later chain dialing.
AUTOMATIC ABANDONED
HOLD RELEASE
If a distant party abandons a hold condition and dis-
connects, the central office (CO) will send a forward
disconnect signal to the telephone system. When the
key system detects this signal, it will drop the line from
the hold condition and return it to service. The forward
disconnect signal may be either 50 msec. or 350
msec. and the key system is programmable to match
this time interval. Both the system and the administration programming can be used to set the time interval
between hang-up and line-drop.
AUTOMATIC HOLD TRANSFER TO INTE.R-
COM (ANSWER HOLD)
If the intercom line is selected while an outside line
call is active, this system feature causes the outside
call to be automatically placed on hold.
AUTOMATIC PAUSE INSERTION
When the system stores a dialed number for later
redial, it automatically stores a pause whenever the
user waits between digits. The automatic pause is in-
serted in the stored number sequence at the point
where the manual pause in dialing occurred. The wait
time is programmable between 2 sec. and 750 msec.
The wait period is programmable by system or ad-
ministration programming.
AUTOMATIC PRIVACY
(PROGRAMMABLE)
A line can be made private or non-private through
class of service programming. In the private mode, a
station has exclusive use of the line during a call. No
other station can access that line unless it is included
through the use of the add-on conference feature. In
2-1
Page 15

Description Of System Features
IMI 66-064 * .
the non-private mode, all stations with that line ap-
pearance can gain access at the same time (some-
times known as common line pickup).- A line is
specified as private or non-private through system or
administration programming. Also see the discussion
titled, Add-on Conference And Privacy Release.
AUTOMATIC REDIAL OF BUSY
k NUMBER OR UNANSW RED CALL)
Automatic redial of the last dialed number can be
made available at every station through button
programming. In most cases, the station user must
program a button for use as an auto redial button; however, some telephone models provide an Al 6 button
as part of the A-button field and this provides an auto
redial function as a fixed feature. With this feature, a
busy number or an unanswered call can be redialed
repeatedly. Once automatic redial is activated, the sta-
tion will select the line, automatically dial the number,
and wait for a response. It will do this once a minute
for approximately 10 minutes. The user must lift the
handset to take immediate control if the call is com-
pleted. Users of the optional speakerphone station
can take control by pressing the SPKR button instead
of lifting the handset.
AUXILIARY EQUIPMENT INTERFACE
A non-key system telephone device or data device can
be connected ahead of the common equipment on cer-
tain line ports across the tip and ring leads. Special
terminals in the line jack are provided for this purpose.
The system can detect an off -hook condition in the
connected device, and turn on the line status light at
the key system telephone stations with access to the
line to indicate the busy condition.
AUXILIARY STATION RINGER
INTERFACE
The auxiliary station ringer interface provides “dry-contact” relay closures whenever station 17 rings. The
contact closures track the ringing pattern of station 17,
and can be used to control an external signalling
device. When a particular station port is programmed
to function as a PA port, the auxiliary ringer interface
relay contacts automatically become supervisory contacts. They close when the PA port is called. In this
configuration, they are used to enable an external PA
system. Also refer to the discussion titled, Common
Audible Ringer Interface.
BACKGROUND MUSIC
If an external music source is provided, background
music can be turned on and off at individual stations.
Background music automatically turns off during calls.
Also refer to the discussion titled, External Music
Source.
BASIC KEY SERVICE (lA2)
The system provides all of the basic, lA2-type, key
service features. These features are: selective line
pickup, common line pickup, multiline pickup, and hold.
BATTERY BACK-UP
(CHASSIS, CABLE, AND BATTERIES)
Battery back-up assemblies including chassis, cable,
and battery are offered as optional kits (available from
Comdial). The assemblies are designed to connect
directly to the un-interruptable power source (UPS) in-
terface located on the common equipment chassis.
No user intervention is required with this feature, and
no class of service programming is required.
BATTERY BACK-UP INTERFACE
Provision has been made for attaching a Comdial
provided optional battery back-up kit to give full
unintenuptable system power in case of an AC power
loss. The switching and trickle charge circuitry are in
the common equipment, while batteries, chassis, and
cable are packaged as a separate option. When
plugged into an active AC power source the common
equipment will constantly charge the attached batteries with a trickle current. Built-in circuitry automat-
ically switches to battery power when AC power is lost.
With batteries at full charge, a fully loaded system will
operate for a minimum of one hour without AC power.
No class of service programming is required.
CALL ANNOUNCE WITH HANDSFREE
ANSWERBACK
The internal speaker at each multiline station provides
call-announce capability over the intercom link. A .
handsfree response to a call-announce call can be
made. This response is transmitted by the microphone
built into the handset. Also refer to the discussion
titled, Voice Announce Blocking
CALL PICKUP - DIRECTED
A user at any station can dial a special prefix code, followed by the number of a ringing station, to answer a
ringing call at that station.
CALL PICKUP - SYSTEM
A user at any station can dial a special code and
answer a ringing call at any station in the system. The
feature can be enabled or disabled by system or ad-
ministration programming.
CALL TRANSFER -SCREENED
Screened call transfer allows outside calls to be trans-
ferred from one station to another, via the intercom
link, in one of two ways. If both stations have access
to the line, a common line pickup transfer can be ef-
?
i’
2-2
Page 16

Description Of System Features IMI 66-064
fected. If the other station does not have access to
the incoming line, transfer can still take place using
the system transfer feature. For a screened transfer, a
call is transferred to another station with a pre-transfer
announcement by the transferring party. Transferring
of calls is accomplished with the T/C (TRANS-
FER/CONFERENCE) button.
CALL TRANSFER - UNSCREENED
An active call can be transferred to another station
without being announced. The transferred call will ring
the other station and await an answer. The call will
automatically ring back to the transferring station after
a programmable recall period. A transferred call will
only ring if the station is idle. If the other station is
busy on intercom or is already ringing with another
call, the transferred call will immediately recall the
transferring station. If the other station is idle or has
background music enabled, it will start ringing immediately. If it is in any other state, it will not ring until it
returns to an idle state.
CALLING STATION IDENTIFICATION
If the station number of a calling station has been
programmed into the DSS/BLF of a called station, the
calling station will be identified by the flashing BLF
light at the called station. The lights adjacent to
programmable buttons indicate status of DSS
telephones: dark = idle, steady-on = in use, and
flash = calling.
CLASS OF SERVICE PROGRAMMING
(EACH LINE AND STATION)
Each line and station in the system can be
programmed with a unique class of service operating
condition. Class of service programming can be performed using instructions provided in Chapter 4.
CLASS OF SERVICE PROGRAMMING
(FROM MAIN STATION)
Both system and administration class of service (COS)
programming is performed from station 10 after a base
level programming step is entered. System COS
programming is used by the installer to configure the
system and assign the line conditions. Administration
COS programming is used by the on-site administrator
to re-configure the system as required. Line condition
assignment is not a part of administration program-
ming. Refer to Chapter 4 for programming details.
COMMON AUDIBLE RINGER INTERFACE
Connections are available at the key service unit
which provide “dry-contact” relay closures whenever
an incoming line rings. These contact closures track
the ringing pattern and can be used to control an exter-
nal signalling device. When a particular station port is
programmed to be a PA port, the common audible
ringer interface contact points automatically become
supervisory contacts which close when the PA port is
called. In this configuration, they are used to enable
an external PA system. Also, see the discussion titled,
Auxiliary Station Ringer Interface.
DEFAULT FUNCTIONAL PROGRAM
At initial power up of the system, the operating fea-
tures are set to a specific group of operating conditions (default conditions). The default conditions
provide a complete operating system for normal use.
The system can be left as a defaulted system or
operating conditions can be reprogrammed if desired.
A system can be defaulted at any time using the
master clear procedure included with the system class
of service programming; however, this action also
clears all user stored auto dial and speed dial num-
bers.
DELAYED RINGING
Refer to the paragraph titled, Flexible Ringing Assignments.
DIAL 0 FOR SYSTEM ATTENDANT
The system attendant station (station 10) is signalled
whenever the digit 0 is dialed on the intercom line.
DIRECT STATION SELECTION
INTERCOM
Refer to the discussion titled, Programmable DSS/BLF.
DISTINCTIVE RINGING *
The ringing cadence of an incoming call is the same
as the ringing cadence of the TELCO, PBX, or
CENTREX system. The ringing cadence of an intercom call presents two tone bursts sounded every 4
seconds.
DO NOT DISTURB
Any station can be set to a do-not-disturb mode using
the SPKR button. While in this mode, the station will
not ring on any incoming call nor will it accept an inter-
com call. A party making an intercom call to a station
set in the do-not-disturb mode hears a fast busy tone.
The feature cannot be overridden by the calling party.
DSS/BLF CONSOLE (OPTIONAL)
The DSS/BLF Console is designed to be a companion
to any system station. It is useful with high call
volume systems whiqh require a dedicated call transfer location. The console provides a one-button direct
station selection (DSS) intercom and an associated
busy lamp field (BLF). It also provides one-button ac-
2-3
Page 17

DescriDtion Of Svstem
Features IMI 66-064 ’
cess to system-wide, all-call paging. The console is
designed to be connected to any station port and
serve as a companion to the station connected to the
adjacent data-paired port. System or administration
programming is used to program a station port as a
DSS/BLF port.
END TO END SIGNALLING
ON INTERCOM
After an intercom call has been established, the system can continue to send dialing signals (DTMF tones)
through the intercom path to station ports that are
programmed as OPX unit ports. This feature can be
performed from every station in the system, and is
used by peripherals such as an OPX unit and voice
mail equipment.
END TO ~\DL~~~~ALLING
After an outside call has been established, the system
can continue to send dialing signals (DTMF tones)
through the telco network and have them received at
the distant end for inward call completion (bank by
phone, etc.). This conventional, off-hook dialing feature can be performed from every station in the sys-
tem. No class of service programming is required.
EXCLUSIVE HOLD
Exclusive hold prohibits a held call from being
retrieved by any other station. The exclusive hold condition also links the held call to the timed hold recall
timeout feature. After timeout, audible and visual sig-
nalling will occur and the exclusive hold condition will
revert to a normal line hold condition. System or ad-
ministration programming can enable this feature.
EXTERNAL PAGING INTERFACE
A station port or line port can be programmed to inter-
face with an external paging amplifier. The paging
amplifier can then be dial accessed through the station
pot-l or directly accessed through the line port from
other stations in the system. DTMF tones can be
dialed through the interface to make a zone selection
if zone paging is provided by the external paging
amplifier. System or administration programming can
be employed to program a station port as an external
paging port. Only system class of service program-
ming can be used to program a line port as an external paging port.
EXTENDED DUAL TONE MULTIPLE
FREQUENCY (DTMF) TONES
The model XE telephone system can access answer-
ing machines, banking computers, voice mail equip-
ment, etc. that require DTMF tones which are longer
than the standard 80 msec. tone. A shift to a longer
tone of preprogrammed length is automatically made‘
10 seconds after a line is selected or 10 seconds after
the last digit is dialed. A user can shift from one tone
length to the other by pressing the HOLD button and
then reselecting the line. It is recommended that the
shortest duration possible be chosen. DTMF generation is a system feature and if several stations are
using the extended DTMF feature at the same time, a
delay in the time between button press and tone
sound may be noticed.
FLEXIBLE LINE ASSIGNMENT
Refer to the discussion titled, Square/non-Square System.
FLEXIBLE RINGING ASSIGNMENTS
Ringing assignments are programmable on a per sta-
tion/per line basis. Ringing can be controlled for every
line that has an appearance at each station. Direct, or
immediate, ringing can be programmed for some assigned lines and delayed ringing programmed for
others. Direct or delayed ringing is programmed
through system or administration programming.
HANDSFREE ANSWER INHIBIT
The MUTE button on a multiline station can be used to
block all handsfree answerback response. This arran:
gement will prevent a station user from monitoring
another station site using the monitoring ability of the
voice announce feature. When the button is pressed,
all handsfree answerback is disabled thus inhibiting
any off-site monitoring. The speaker light will flash to
indicate that this feature is active. Also refer to the dis-
cussion titled, Mute.
HEADSET INTERFACE
A station port can be programmed to allow the operation of special telephones which provide the user with
a headset option. Programming for this feature is
through either system or administration programming.
HEARING AID COMPATIBLE HANDSET
The station handset is compatible with magneticallycoupled hearing aids.
IDLE LINE PREFERENCE
The system can be programmed on a per station basis
to enable idle line preference. When idle line
preference is enabled, taking the handset off-hook will
2-4
~.
j
Page 18

Description Cf System Features
IMI 66-064
automatically connect the station to any assigned line
that is idle and has been arranged for this feature.
The line button will not have to be pressed. This feature is mutually exclusive with prime line automatic.
Programming for this feature is through either system
or.administration programming.
I HOLD AND I USE INDICATIONS
The light associated with a line button provides a
visual indication of the status of that line. When a station user has a line in-use or on-hold at a station, the
light indication provided at that station is of a different
flash rate than the indication provided at the other sta-
tions in the system.
INTERCOM CALL PROGRESS TONES
Intercom call progress is marked by special tones. A
steady tone is provided for dial tone. For tone sig-
nalled intercom calls, a two-tone burst is sounded
every four seconds at a called station and returned to
the caller as ring-back. For a voice signalled intercom
call, a single tone burst is sounded at a called station
and returned to the caller as ring-back. When a called
station is busy on an outside call, the feed-back supplied to the caller is programmable with class of ser-
vice programming. This feed-back can be either a
ring-back tone or a busy tone. When set for ring-back
tone, the called station sounds subdued ringing during
the call. When a called station is busy on the intercom, a busy signal of one tone burst sounded each
second returns to the calling station.
INTERCOM LINE LOCKOUT
Refer to the discussion titled, Voice Announce Blocking.
LCD SUPPORT
The common equipment can be field modified with an
optional upgrade kit which allow the system to support the use of LCD speakerphones having a Liquid
Crystal Display (LCD). The LCD speakerphone ports
are identified by system or administration programming.
When a system is modified, the model code of it is
changed from an N prefix to a K prefix (i.e. Ni 024 becomes K1024, etc.).
LINE PRESELECTION
A line can be manually selected before lifting the handset (for handsfree dialing) or after the handset is lifted.
LINE TYPE
A line port is programmed as to type. The program.
type is chosen based upon the toll restriction that is to
be applied to calls made over the line connected to
that port. A line port is assigned as type 1 when any
enabled toll restriction is to be applied with the first
digit dialed. Such a line type is often assigned when a
CO line is connected. A line port is assigned as type 2
when any enabled toll restriction is to be applied begin-
ning with the second digit dialed. Such a line type is
often assigned when a PBX or CENTREX line with
any trunk access code is connected. A line port is assigned as type 3 when any enabled toll restriction is to
be applied beginning with the second digit dialed
whenever the first digit is a 9. If the first digit is not a
9, no restriction is applied. Such a line type is often as-
signed when a PBX or CENTREX line with a trunk access code of 9 is connected. Line types can only be *
selected as part of system class of service programming.
INTERCOM LINE TIMEOUT
Should the intercom line be selected with no dialing or
other action taking place, the intercom will timeout
after ten seconds, and return to an idle state.
LAST NUMBER REDIAL
Each station is provided with a last number redial feature. This feature will save thirty digits of the last outside number dialed. A newly dialed number will
always automatically replace a previously dialed number. Upon command, the system will choose a line
and redial the saved number. The system will first
choose the prime line if assigned and idle. If it is busy
or unavailable, the system will choose any line assigned to idle line preference. If they are unavailable,
the system will chose the last line used at the station.
‘!
If it is busy, no further choice is made. Also refer to
the discussion titled, Automatic Pause Insertion.
MANUAL HOLD
A button activated feature at each station will place an
outside line on hold. Pressing the HOLD button holds
the call, provides a distinctive flash rate of the line but-
ton indicator, and allows the user to access other station features. The holding station or any other station
which has access to the line can retrieve the held call.
MEMORY RETE;z;yE-&WITHOUT BAT-
Independent of the optional battery pack, the system
memory is electronically protected during AC power
failures by an electronic component sometimes
referred to as a “super-cap”. The stored program data
will remain in memory for a minimum of 30 hours
provided that the system has been powered con-
tinuously for at least 30 minutes prior to the power
failure or disconnection.
2-5
Page 19

Description Of System Features
IMI 66-064
MESSAGE WAITING
Special dialing codes enable a station user to control
the message waiting (MW) light at other stations in the
system. When the message waiting light is turned on
at a station, a call can be placed to the originating station to pick up the message.
MODULAR WIRING AND JACKS/4-CON-
DUCTOR WIRE SYSTEM
The system can be completely interconnected by
employing industry standard 50-pin connectors and
modular plug/jack combinations. Station wiring is
small, 4conductor, twisted-pair cable throughout the
system.
MOMENTARY BUlTONS WITH LED
INDICATORS
The station buttons are momentary contact, press and
release types. They provide line selection, call
monitoring, and other feature selection.
tion of the feature selection is provided by solid-state,
long-life, light emitting diodes (LEDs).
Visual indica-
MULTILINE CONFERENCING
This feature will allow one or more multiline stations to
access two outside lines at the same time resulting in
a conference arrangement. Conference transmission
levels are not compensated.
MUSIC INTERFACE (EXTERNAL SOURCE)
A jack is provided on the common equipment for the
connection of a customer-provided KX registered
music source. Also refer to the discussions titled,
Background Music and Music-on-hold.
MUSIC-ON-HOLD
Music is provided to outside lines that are placed on
hold if an external music source is connected to the
system and the feature is turned on from station 10.
System, administration, or attendant programming can
be used to program this feature.
MUSIC-ON-HOLD SYSTEM-WIDE
ENABLE/DISABLE
Music is provided to outside lines that are placed on
hold if an external music source is connected to the
system. Music-on-hold can be disabled system-wide
by attendant action. Attendant programming is used
to enable/disable this feature. Also refer to the discussions titled: Music Interface, and Music-on-hold.
MUTE
Each station has a MUTE button which, when
pressed, will mute the handset transmitter (or internal
microphone on speakerphones) to prevent the user’s
voice from being heard by the distant party. The
speaker light flashes to indicate a muted condition.
The button provides push-on/push-off operation. Also
refer to the discussion titled, Handsfree Answer Inhibit.
NIGHT TRANSFER (OF RINGING)
The day, or normal, ringing of incoming lines can be
transferred to a particular station or stations (chosen
through class of service programming) for off-hour or
special purpose answering. The night transfer mode
can only be activated from station 10. Night transfer
of ringing can be assigned to specific stations using
system or administration programming. It is then
turned on or off by using system or administration as
well as attendant class of service programming.
OFF-HOOK VOICE ANNOUNCE WITH
HANDSFREE ANSWERBACK
With the off-hook voice announce (OHVA) feature, an
announcement can be made from one station to
another station that is busy on a call. The OHVA announcement is made in a manner that permits the dis-
tant on-line party to hear it and to hear the verbal
response to it unless action is taken with the MUTE
button. The OHVA feature is available at stations that
are equipped with a multiline telephone and an adjunct
feature module (32-button DSS/BLF console with call-
announce). Two data-paired station ports are required to provide OHVA operation.
An OHVA call is preceded by a ring burst. Then,
several quick tone bursts followed by the an-
nouncement are delivered through the loudspeaker in
the adjunct feature module. The called party can ver-’
bally reply to an OHVA call in a handsfree manner
without interrupting the active call. Reply is made by
speaking toward the OHVA microphone included in the
adjunct feature module. The distant on-line party can
hear this response unless the MUTE button is pressed
at the called station to mute the handset transmitter.
A station that has the voice announce blocking feature
turned on cannot receive an OHVA call.
Station class of service programming is used to program a station port to be a multiline telephone port
and the data-paired port to be a console with call announce port. Also refer to the discussion titled: Secure
Off-Hook Voice Announce.
ON-HOOK DIALING
Every multiline station provides manual and/or automatic dialing while the station handset is on-hook. An
internal speaker monitors call progress for completion.
The handset must be taken off-hook to provide the
voice link on non-speakerphone stations.
,
2-6
Page 20

Description Of System Features
IMI 66-064
OPX SUPPORT
The system supports the operation of the optional off
premises extension (OPX) unit. System or administration programming arranges a station port for OPX
operation.
A device (such as a model 2500 telephone set or compatible device) that is connected through an OPX unit
to a station port can access both intercom and outside
lines. The system default provides intercom line access when the device goes off-hook. With either
prime line alone or prime line and idle line preference
enabled through programming, the device connected
through the OPX unit will seize an outside line when it
goes off-hook. After going off-hook, the user can get
the intercom line by pressing theTAP button. If no
digits are dialed after going off-hook, the outside line is
dropped when the TAP button is pressed. If digits are
dialed after going off-hook, the outside line is placed
on hold when the TAP button is pressed.
ORIGINATING DENIED
The ability to originate calls on certain lines can be
denied at individual stations through system program-
ming. The originating denied feature is programmed
on a per station/per line basis. Originating denied
does not prevent a user from answering a ringing line,
retrieving a held call or receiving a transferred call.
Call origination on a line is denied at a particular station by the system or administration programming.
PBX/CENTREX/CENTRAL OFFICE
COMPATIBLE
System features and programmable buttons support
the requirements of most PBXs, Central Offices, and
CENTREX systems. Numbers, #I’s, +K’s, programmable pauses, and flash signals can be made a part
of every stored number for access to host system fea-
ture codes.
PERSONALIZED RINGING TONE
This programmable feature enables stations to ring in
a distinctive manner with one of four different tones.
The ringing tones are combinations of four different frequencies and two different warble rates. Personal ring-
ing tones can be assigned with system or
administration programming.
POWER FAILURE TRANSFER
A power failure line connection is available for installing an industry-standard telephone such as a Comdial
model 2500-xx. The installed power-fail telephone is
: automatically connected directly across line 1 by the
system whenever there is an AC power failure. Normal origination and reception of calls through the
power-fail telephone is possible during an AC power
failure. The power-fail telephone is automatically dis-
connected as soon as power is restored.
POWER ON, VISUAL INDICATION
The common equipment has a red LED which
monitors the status of the system, and provides an
“AC power-on” indication.
PRIME LINE AUTOMATIC
If a station is programmed for prime line automatic, the
designated outside line or intercom line will be auto-
matically selected when the handset is taken off hook.
Prime line pick up may be pre-empted by preselecting
another line before lifting the handset. If the prime line
is ringing, it is automatically answered by lifting the
handset. Assign a prime line to a station through sys-
tem or administration programming.
PRIVACY RELEASE
A line can be made non-private at a particular station
while remaining private at all other stations. This arrangement allows other stations with that line appearance to join that particular station whenever it is
on the privacy-released line. A line is specified as
private or non-private at a particular station with system or administration programming. Also see the discussions titled, Add-on Conference and Automatic
Privacy.
PROGRAMMABLE BUlTONS
All multiline keysets are equipped with a minimum of
twelve programmable buttons which can be
programmed a line pick-up, auto dial, station speed ’
dial, and DSS action. Refer to the discussions titled,
Auto Dial, Programmable DSS, And Station Speed
Dial. System or administration programming is used to
assign functions to programmable buttons.
PROGRAMMABLE DSS/BLF
(DIRECT STATION SELECTION/BUSY
LAMP FIELD)
A multiline station user can store true, one-button,
direct station selection (DSS) at any programmable
button location to create a DSS button. When this button is pressed, any active outside call is automatically
placed on hold and an intercom call is automatically
made to that previously stored station number. The
visual indicators of the stations programmed at the but-
ton locations form a busy lamp field (BLF). The BLF
conveys station status to the user. An auto dial number can also be programmed as a secondary function
at every DSS/BLF memory location. Also refer to the
discussions titled, Tone Or Voice Signaling (Intercom)
and Auto Dial.
2-7
Page 21

Description Of System Features
IMI 66-064
PULL OUT DIRECTORY
Each desk mounted telephone is equipped with a pull
out directory. This directory can be used for recording
the system speed dial, station speed dial, or other frequently called numbers.
PULSE/TONE SWITCHABLE
When rotary dial lines are installed, the user can
switch from pulse (rotary dial signals) to tone (Dual
Tone Multiple Frequency signals - DTMF). This feature is useful for accessing special circuits requiring
DTMF tones such as banking machines, etc. The system is programmed on a per line basis to allow this
feature at all stations. The system or administration
class of service programming enables this feature on
a per line basis.
RINGING LINE PREFERENCE
The system can be programmed on a per station basis
to provide ringing line preference on all lines
programmed for ringing at a station.
When ringing line preference is enabled at a station,
taking the station off-hook automatically connects it to
any outside line which happens to be ringing at the station. A line button will not have to be pressed. The
ability of a particular station to answer a ringing line
without line selection is enabled by the system or ad-
ministration class of service programming.
SECURE OFF-HOOK VOICE ANNOUNCE
With the secure off-hook voice announce (SOHVA) feature, an announcement can be made from one station
to another station that is off -hook and busy on a call.
The SOHVA announcement is made in a manner that
prevents the distant on-line party from hearing it or
from hearing the verbal response to it because the
MUTE button must be pressed for reply. The SOHVA
feature is available at stations that are equipped with a
telephone that includes SOHVA capability. The
telephone requires two data-paired station pons to
provide SOHVA operation.
A SOHVA call is preceded by a ring burst. Then,
several quick tone bursts followed by the an-
nouncement are delivered through the handset
receiver of the telephone. Delivering the announcement in this manner prevents the distant party
from hearing it. A station employing a speakerphone
being operated in a handsfree mode will receive a ring
burst and can then be taken off-hook to receive the
SOHVA call. The announcing caller receives several
tone bursts to alert them that they are making a
SOHVA call and that they may not get a reply should
the called party choose to not respond.
Response to the SOHVA call is effected by pressing
and holding the MUTE button and speaking into the
handset. Because the MUTE button is pressed, the
distant party is prevented from hearing the response.
The system provides SOHVA operation at every sta-
tion port; however, a station that has the voice an-
nounce blocking feature turned on cannot receive a
SOHVA call. Also, on handset equipped telephones,
the telephone headset cannot be used to receive a
SOHVA call.
Station clas of service programming is used to program a station port to be a multiline telephone port
and the data-paired port as a console with call an-
nounce port. Also refer to the discussion titled: Off-
Hook Voice Announce with Handsfree Answerback
and to the Chapter 3 paragraph titled: Secure Off-
Hook Voice Announce Station found on page 3-11.
SECURE OFF-HOOK VOICE ANNOUNCE
(SOHVA) GROUPS
The ability to receive and originate SOHVA and OHVA
calls is provided to every station in the system. Any
station in the system can send a SOHVA or OHVA call
to any other SOHVA or OHVA-equipped station in the
system. Through this feature, the ability of a station to
receive and/or originate SOHVA or OHVA calls can be
disabled through programming so that certain stations
can be grouped together for SOHVA or OHVA calling
between one another while other stations in the sys-
tem are excluded from this group. Stations can be ar-
ranged in up to four different groups for exclusive
SOHVA or OHVA calling. For example, the stations of
an executive and an assistant can be arranged into .
the same group as follows: Program the executive’s
station for receive in group 1 and program the
assistant’s station for originate in group 1. Do not program any other stations to have receive or originate
capability in group 1. This arrangement provides exclusive SOHVA or OHVA calling between the two stations. More executive stations can be programmed to
have receive capability in group 1 thus giving the assis-
tant the ability to make SOHVA or OHVA calls to them
as well. These executive stations in group 1 cannot
make SOHVA or OHVA calls to one another, however,
since they do not have originate capability. Both class
of service and administration programming can be
used to form SOHVA groups. Also refer to the discussion titled,. Secure Off-Hook Voice Announce and Off-
Hook Voice Announce with Handsfree Answerback.
SELF DIAGNOSTICS
Each station can execute a self test when so enabled.
This test verifies processor, indicator, and tone functions. Instructions for activating self diagnostics are
provided in Chapter 3, Section 3 of this publication.
2-8
Page 22

Description Of System Features
IMI66-064
SINGLE-DIGIT STATION DIALING
Refer to the discussion titled, System Speed Dial.
SPEAKERPHONE (OPTIONAL)
The optional speakerphone provides handsfree operation of all features, except voice signalled intercom
calls. The handset must be lifted for this purpose.
SQUARE/NON-SQUARE SYSTEM
A system can be programmed to be square or nonsquare as desired. In a square system, a specific line
is assigned to the same button on every station in the
system. In a non-square system, any line can be assigned to any available programmable button on every
station in the system. Also refer to the discussion
titled, Tenant Service. Button mapping for line appearance can be performed on each station using the
system or administration class of service programming.
STATION BY STATION PRIVACY
Refer to the discussions titled, Automatic Privacy and
Privacy Release.
STATION SPEED DIAL
Each station can be programmed to provide ten speed
dial numbers at the keypad buttons. Station speed
dial numbers can be up to fifteen digits in length and
can include line or intercom selection, numbers, #, G++,
pauses, and flash signals. A pause is stored each
time the HOLD button is pressed, and a flash signal is
stored each time the RECALL button is pressed.
SYSTEM SPEED DIAL
Thirty, system-wide, speed dial numbers are provided.
The system speed dial numbers can be up to fifteen
digits in length, and can include numbers, #‘s, %‘s,
pauses, and flash signals. System speed dial number
programming can only be performed at station 10;
however, once programmed, they can be used at
every station in the system. System, administration,
or attendant programming can be used to program sys-
tem speed dial numbers.
SYSTEM SPEED DIAL TOLL
RESTRICTION OVERRIDE
This feature makes it possible to override toll restric-
. tion parameters when a system speed dial number is
dialed. With it, it is possible to use toll restriction
tables to restrict calls from being made to certain toll
areas yet allow specific numbers in the restricted
areas to be called by storing them as system speed
dial numbers. With overrride enabled, toll restriction
parameters assigned at a station will be overidden
when a system speed dial number is called. With override disabled, toll restrictions assigned at a station will
prevent it from calling a system speed dial number
that matches the restrictions. Class of service
programming or Administration programming can be
used to enable or disable this feature. Refer to the
discussions titled, System Speed Dialand Toll Restric-
tion - Flexible.
SUBDUED RINGING
Subdued ringing is automatic at any station that is
busy on an outside line.
TAP (FLASH/RECALL)
When host system custom calling features are available via a “flash” signal, the system can be
programmed so that the TAP button will generate a
“flash” signal when it is pressed. When custom calling
features are not available, the TAP button functions as
a positive disconnect or dial tone recall button. These
two features are mutually exclusive. The flash/recall
time is assigned through system or administration
programming.
TENANT SERVICE
Two or more closely located sites can simultaneously
be served by the same common equipment. Each site
is provided with dedicated trunk facilities and separate
feature and class of service complements. Also, refer
to the discussion titled, SQUARE/NON-SQUARE SYS-
TEM. Button mapping for line appearance can be per-
formed on each station using the system or
administration programming.
TIMED HOLD RECALL
After a call has been on hold for a programmed lengih
of time, the system will recall the station that placed
the call on hold. It also visually signals all other stations. The audible signal is repeated at the end of
each reoccurring time out period. The visual indication
continues until the held call is picked up. The system
or administration programming sets the timed hold
recall time period.
TOLL RESTRICTION - FLEXIBLE
Flexible toll restriction can be programmed to prohibit
some or all stations from calling a wide range of number combinations while allowing specific exceptions.
Restrictions are specified by up to four entries on a
deny table while exceptions are specified by up to four
entries on an allow table. Allow entries will always
override deny entries. Up to eight digits are permitted
for each entry. A “match anything” digit (# symbol) can
be included as part of an entry to represent any digit
from 1 to 0. This is used to deny or allow a range of
numbers with one entry. A separate pre-programmed
1+800 allow table permits this dialing feature to be
2-9
Page 23

Description Of System Features
IMI 66-064 ’
selected regardless of any restrictions which may be.
specified. The dialing of 911 and 1+911 is always al-
lowed.
Once programmed, flexible toll restriction is assigned
on a per line/per station basis. In addition to flexible
restriction, or as an alternative to it, stations can be
restricted with l/O call restriction assignment. When
l/O call restriction is selected, l+ 7 digit dialing can be
allowed if desired. Either system or administration
programming is used to specify the deny and allow
entries and assign the restriction to line and station.
TONE OR VOICE SIGNALLING
(INTERCOM)
Intercom calls can be tone signalled or voice signalfed
as desired. The tone signalled intercom call must be
answered by lifting the handset. The voice signalled
intercom call can be responded to in a handsfree manner. The class of service programming determines
which signalling method is employed as the primary
method when an intercom call is made. The alternate
method is available through user action at the station.
Intercom call progress is marked by special tone signals. The system or administration programming
determines which type of intercom signalling is first op-
tion signalling for the system. Also refer to the discus-
sions titled, intercom Call Progress Tones and Voice
Announce Blocking.
VOICE ANNOUNCE BLOdKiNG
This feature allows the user to block voice announced
intercom signalling by dialing a special code. This fea-
ture, when enabled, also blocks thereception of a
SOHVA call.
ZONE PAGiNG (VIA SiATION SPEAKERS)
Zone paging allows groups of stations to receive an-
nouncements through the station speakers. The
programming can enable zone paging in up to three
different zones. A station can be programmed to only
receive announcements or programmed to originate
announcements as well. Each station can be
programmed to be in any or all zones for both receiv-
ing and originating announcements. The ability of
each station to originate and/or receive a page, and
the arrangement of the paging into different zones are
controlled by system or administration programming.
Also, refer to the discussion titled, A//-Cal/ Paging (via
Station Speakers).
,
::,
3
A to
Z
KELLATRONICS, Inc,
2-10
Page 24

.
IMI 66-064 Installation
CHAPTER 3
INSTALLATION
SECTION 1
STANDARD INSTALLATION DETAILS
MOUNTING CONSIDERATIONS
The common equipment cabinet should be attached
vertically to any sturdy, flat, surface or vertically rack
mounted if desired.
Cabinet must be located within four (4) feet of a
proper electrical outlet. The system requires a
dedicated 117VAC 15 AMP circuit, with a third-wire
ground, supplied to a standard electrical outlet
(NEMA 515R).
The distance between the common equipment and
the TELCO/PBX jacks must be 25 feet or less as
per FCC requirements. A nominal distance of 7 feet
is recommended.
The mounting location must be secure and dry and
have adequate ventilation. The temperature range
of the location must be within 32-122 degrees F
(O-50 degrees C), and the relative humidity must be
less than 90 percent non-condensing.
If the mounting surface is damp or if it is concrete or
masonry material, a backboard must be attached to
the mounting surface to be used for common
equipment mounting. Suitable mounting
backboards are available commercially or can be
constructed out of l/2-inch plywood cut to size.
Tools and hardware required:
Fasteners - wood screws (l/4 x 1 -inch round
head), toggle bolts, or wall anchors
Screwdriver -to match fasteners
Electric drill - if prepared holes are required
Connecting tool - for fastening wires to a type-66
connector block.
Crimping tool - for 623-type modular plugs.
INSTALLATION NOTICE
Per The Underwriters Laboratories regulation 1459,
2nd edition, be aware of the following precautions
when installing telephone equipment that is to be
directly connected to the telephone company network:
l
Never install telephone wiring during a lightning
storm.
l
Never install telephone jacks in wet locations unless
the jack is specifically designed for wet locations.
.
Never touch uninsulated telephone wires or
terminals unless the telephone line has been
disconnected at the network interface.
.
Use caution when installing or modifying telephone
lines.
MOUNTING PROCEDURE
1
Unpack, and carefully inspect the common
equipment and telephones for shipping damage.
Notify the shipper immediately of any damages
found. Verify that the packages contain all parts
and accessories needed for proper installation and
operation.
2.
If a backboard is required at the mounting location,
attach it securely to provide a stable mounting
surface for the equipment.
3.
The common equipment is attached using three
mounting holes located as shown on Figure 3-l.
While refering to Figure 3-1, measure and mark the
location of the mounting holes on the mounting
surface.
4.
Drill holes in the mounting surface of a proper size
to accommodate the hardware being used. If
necessary, prepare these holes with inserts,
anchors or other attachment devices as dictated by
the type of mounting surface.
5.
Insert the top screws into the mounting surface,
and tighten them to within approximately l/8-inch of
the surface.
6.
Hang the cabinet on the top screws using the
mounting holes located on the rear of the cabinet.
Note that these holes are elongated with an
enlargement at one end. This feature allows the
cabinet to slide down on the screws to secure the
mounting when the cabinet is hung on them.
7.
Insert a third screw through the mounting tab
located on the lower edge of the cabinet and into
the mounting surface, and tighten it into place
8.
Place the individual telephones as desired and in
keeping with accepted industry and office
standards. A telephone can be wall mounted if
necessary as they are desk/wall reversible.
9.
Interconnect the system per the details shown in
Tables 3-1 and 3-2 and Figure 3-3 shown at the
end of this section
3-l
Page 25

t-
10.50 -
(10-m
MODEL
NO308
OUTLINE DIMENSIONS
-----3 00 .
- 13.10-
OUTLINE DIMENSIONS
(ApproYJmai~ 13)
MOOEL
NO616
(g
J.
-i
7
19.40
T19.1m
+-
MOUNTING DIMENSIONS
,;
19.25
(l9wl
OUTLINE DIMENSIONS
-3.00
MODELS
NO820
N 1024
21.10 21.00
liY- +A
MOUNTING DIMENSIONS
*Figure 3-1. Mounting Details
Page 26

lM1’66-064
Installation
AC POWER CONNECTION
Employ a dedicated 117VAC 15 AMP circuit, with a
third-wire ground, supplied to a standard electrical
outlet (NEMA 5-15R) for the AC power connection.
AC power connection is illustrated in Figure 3-2
shown below.
l
A plug-in power line surge protector should be
installed between the power cord and the AC outlet.
l
Do not connect the AC power cord until the
installation has been checked.
l
To apply AC power, connect the power cord to the
electrical outlet.
BATTERY BACK-UP
The common equipment provides an interface
connector for the connection of an optional external
battery assembly. This assembly is available
separately as a kit.
Be sure that the AC power cord is
connected to the electrical outlet before
connecting the external battery assembly
to the common equipment interface
connector. This ensures that Internal
protection circuitry Is operating to prevent
damage that could result from improper
connection.
l
When charged to full potential, the optional Comdial
model BBUOl external battery assembly provides a
minimum of one hour of operation should the AC
power to the system be interrupted. No calls will be
dropped when an AC power failure causes the
system to automatically switch over to BBUOl
operation
The BBUOl external battery assembly may include
batteries from either of the following suppliers:
- Model PS-1265 from Power-Sonic Corporation,
Redwood City CA, 94032.
- Model EP1265-26 from Elpower Corporation,
Santa Anna, CA 92704
l
During AC operation, the common equipment
provides re-charging current to maintain the voltage
potential of the external battery assembly at an
operational level.
NOTE: The optional external battery assembly
requires approximately ten (10) hours to
completely re-charge to full potential after it
has been completely discharged and, in some
cases, when initially installed.
SYSTEM GROUNDING
The common equipment cabinet has internal
secondary surge protection on all line ports. In order
for this protection to be effective, the cabinet MUST be
connected to a reliable earth ground such as a metal
cold water pipe or a building frame ground. The
grounding wire must be of #lO or #12 insulated, solid
copper and separate from the three-wire AC line cord.
A ground stud is located on the common equipment
cabinet for this purpose. System grounding is
illustrated in Figure 3-2 on page 3-4.
3-3
Page 27

Installation
IMI 66-064 ’
Figure 3-2. AC Power Connection and System Grounding
LINE CONNECTIONS
The common equipment cabinet line terminations are
standard modular plug/jack connections. Each
modular jack (2-6) provides termination for two lines.
Modular jacks 2 and 3 also provide termination for an
auxiliary pair in addition to the two outside lines. CO
line terminations can be at a type 66M-xx connector
block or at individual 6-position modular jacks. Table
3-l shows the line connection details.
The line cord that is routed between the CO line
termination and the common equipment cabinet
termination should be twisted-pair wiring.
Six-wire twisted pair cable is recommended for wiring
between the CO termination and modular jacks 2 and
3 to provide auxiliary equipment interface wiring. Refer
to page 3-l 6 for details.
To help ensure that external overvoltage
surges do not damage the system, verify
that gas discharge tubes or similar
protection devices are installed, and
properly grounded, on all connected
outside lines.
STATION CONNECTIONS
l
Connections between the common equipment and
the stations for models N0616, N0820, and N1024
are via two type 66M-xx connector blocks which are
cable connected to the common equipment 50-pin
male connectors. Table 3-2a shows the station
connection detais. Station connections for the
model NO308 are via standard modular plug/jack
connections provided on the side of the common
equipment cabinet. These jacks are labeled by
station number. Table 3-2b details these
connections.
.
The maximum distance allowed from the common
equipment to the station when using #24 gauge,
twisted-pair cable is 1500 feet.
NOTE:
If spare conductors exist in the cables that are
run between the common equipment 66M-xx
connector blocks and the station jacks, it is a
good practice to connect them to earth ground.
Doing this may help prevent them from
inducing radio frequency and/or AC
interference into the system.
p5iciEq
The polarity between the individual wires
in a particular voice or data pair is not
critical; however, do not connect the voice
circuits to the data circuits.
STATION PAIRING
Station ports are paired for both data and overload
protection as follows:
10--l 1 14--15 18--19 22--23 26--27 30--31
12--13 16--17 20--21 24--25 28--29 32--33
’
3-4
Page 28

Table 3-1. Line Connections
JACK IPIN NO. 1 C-N
1 1 1 1 No Connectlon
1 6 1 Auxlllaly 1 RING I
3 1 1 1 No Connectlon
I 2 1
3
4
Ii Auxlllary 2 RING
6
eotlon
Aurlllarv
2 TIP I
Line 3 RING
Line 3 TIP
No Connectlon
(Model N0306)
TELke
(Models NO616, N0620, and N1024)
2 Auxlllafy I TIP
1 2 1 Llne 2 RING
I
1
13 I
4
1 3
1 4 1 Line 1 TIP
1 5 ( Llne2TIP
I 6
1 2
1 3
t A
1 Line 1 RING
Auxlllaty 1 RING
I
1
1 A~~rllla~ 2 TIP
; -.-^..._.
3 Llne 3 RING
4 Llne 3 TIP
5 Llne 4 TIP
6 Auxiliary 2 RING
1 No Connectlon
Llne 4 RING
I Llne 6 RING
1 Line 5 RING
I
LIna5TIP
- . . .
NO616
I
NO820
N1024
Page 29

Installation
IMI 66-064
Table 3-2a. Station Connections (Model N0616, N0820, and N1024)
c 1
I Ill I i 23
EN 12 24
,\.I
I 14 26 1
,A”
K 1
I I 15 I 127 i
EN 16
,I”
IW
c
I
I
I I
I I
26
30
I
iEN 1 21
3-6
I
133 1
I I
Page 30

IMI66-064
Installation
Table 3-2b. Station Connections (Model N0308)
Page 31
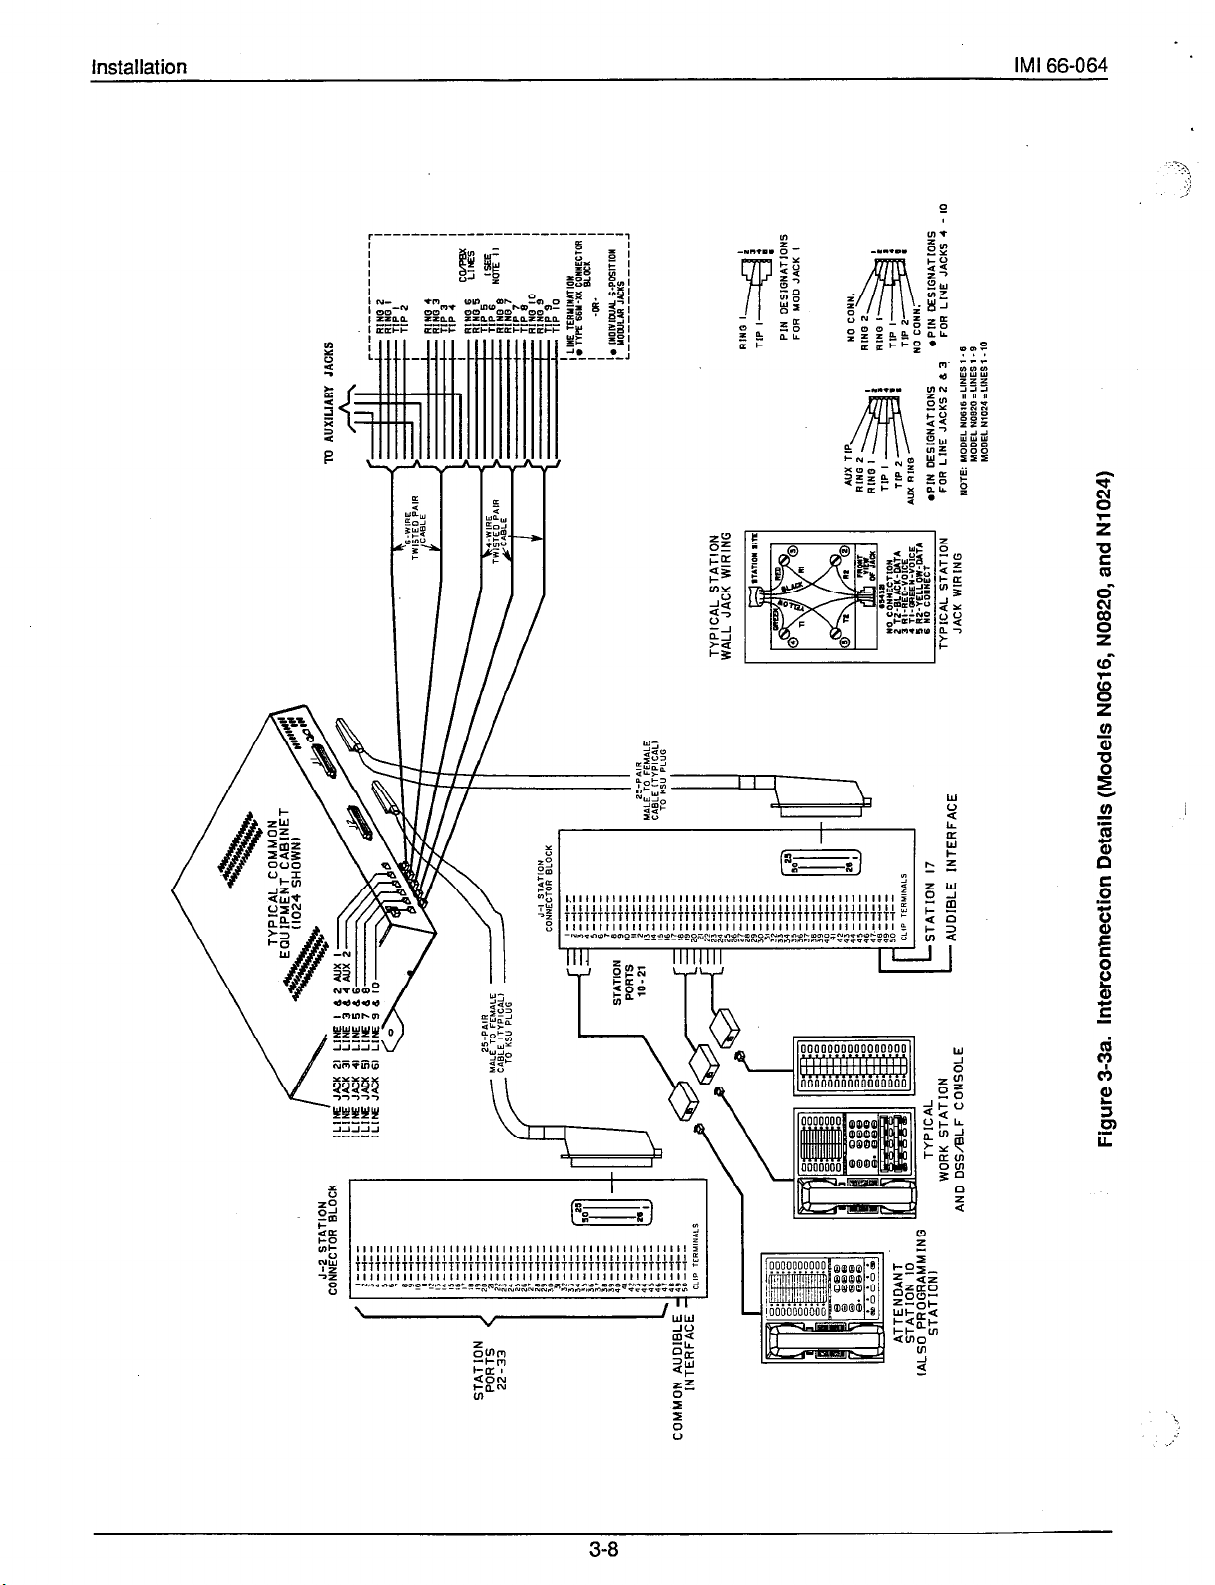
Installation
IMI 66-064 ’
> ,
I
3-8
‘.
/-
Page 32

EOU IPMENT CABINET
~%EyF%l~EcToR
7-U AUXILIARY JACKS
l--------
%4: :
TIP I
TIP 2
-
(AL
WORK STATION
AND
DSSALF
TYPICAL STATION
WALL JACK WIRINQ
TYPICAL
CONSOLE
L
JACK WIR tNG
Figure 3-3b. Interconnection Details (Model NO3081
. . ..-.-- . . . . . .
CABLE
PIN DESIONATIONS
FOR MOD JACK I
AUX TIP.
.PIN DESIGNATIONS
FOR LINE JACKS 2 & 3
I. INDIVIWAL O-POSITION
I YOLiIJLAR JACKS
L------------A
/
!
Page 33

Installation
IMI 66-064
SECTION 2
OPTION INSTALLATION DETAILS
DSS/BLF CONSOLE CONNECTION
The optional DSS/BLF console may be installed at any
station port (except port 10) to work in conjunction with
a companion station connected to the adjacent port
(e.g. port 10 for station and port 11 for console).
Console port installation is illustrated in Figure 3-3a
and 3-3b, shown on the previous pages.
The model EB32X-xx, DB32-xx, DB32S-xx, DB40-xx,
and DB70-xx DSS/BLF consoles are all compatible
with the XE system. The station port to which they are
connected must be programmed as a DSS/BLF
console port as described on page 4-12. The console
buttons are fixed for DSS/BLF operation beginning
with station 10 and ending with the maximum station
number in the system. These buttons also provide
auto dial locations at a second level of storage
(accessed with the HOLD button function).
Additionally, any buttons, from beyond system station
capacity through a maximum of 32, are available as
auto dial locations at the first level of storage. For
example, a model N1024 key system and a EB32X-xx
or DB32-xx console will fix the first 24 console buttons
as DSS/BLF buttons, and provide the remaining eight
buttons as auto dial buttons. Plus, it will provide auto
dial locations at the second level of storage for the first
24 buttons. A total of 32 auto dial storage locations are
provided. For larger consoles, any buttons beyond a
maximum of 32 will still be blanked. For this reason it
is recommended that the larger consoles (DB40 and
DB70) not be used unless absolutely necessary since
the XE system has a maximum station capacity of 24
stations thus leaving these consoles with a large
quantity of blanked buttons.
l
The installed distance limit between the common
equipment and a console is the same as that
specified for a regular station. Connect all four
wires (voice pair and data pair) of the console cable
to the station connector block.
The voice pair connections of the console can be
used simultaneously to enable a PA port function or
to provide off-hook voice announce capability..
See information headed External Paging interface -
Station
PA Port.
If an enable signal is required with
the particular PA equipment being-used, the
console and PA equipment connections are limited
to station ports 15 and 17.
The DSS/BLF console port must be programmed as
a DSS/BLF port before console operation can take
place.
The console port must be also programmed as a PA
port if a PA amplifier has been connected to the
voice pair as part of the system.
OFF-HOOK VOICE ANNOUNCE.
WITH HANDSFREE ANSWERBACK
The DB32S-xx Adjunct Feature Module can be used
to provide off-hook voice announcing (OHVA) to a
station already busy on a call and allow subsequent
handsfree answerback (HFAB) by that station user.
The DB32Sxx Module can also be used as a
DSS/BLF console at the same time if desired. The
station port to which the Adjunct Feature Module is
connected must be programmed for the feature that is
required as discussed on page 4-12. When both
DSS/BLF and OHVA operation are required, the
station port to which the console is connected must be
programmed as an Off-Hook Call Announce port.
When only DSS/BLF operation is required, program
the port as a DSS/BLF Console port.
l
Two data-paired station ports are required to
provide the OHVAIHFAB feature.
l
Connect a telephone to the first data-paired port
l
Connect the DB32S-xx Adjunct Feature Module
to the voice pair and the data pair of the second
data-paired port.
’
3-l 0
Page 34

IMI 66-064
Installation
SECURE OFF-HOOK VOICE
ANNOUNCE STATION
The XE system supports the Secure Off -Hook Voice
Announce (SOHVA) feature provided by telephones
with the following product codes:
l
6714X-xx all revs.
l
6600E-xx Rev. B and later
l
6614E-xx Rev. D and later
l
6614T-xx Rev. C and later
l
6620E-xx Rev. D and later
l
6620T-xx Rev. I and later
NOTE: If OHVA capability is required, it is provided by
the model DB32S-xx console (ao’junct feature
module) as described in the previous
paragraph.
Two data-paired ports are required to pyvide
SOHVA support. The SOHVA equipped telephones
contain a 6-position, 3-pair line jack. Using 6-wire,
twisted-pair cable, connect the two inside pairs of the
line jack to the first data-paired port and connect the
outside pair to the second data-paired port. Refer to
Figure 3-4 for an illustration of this wiring.
l
Connect pins 3 and 4 to the voice pair and pins 2
and 5 to data pair of the first data-paired port.
l
Connect pins 1 and 6 to the voice pair of the second
data-paired port.
For the feature to be enabled, the first port must be
programmed as a telephone port and the second port
must be programmed as an Off-Hook Call Announce
port as discussed on page 4-12.
TO SECURE
OFF-HOOK
VOICE ANNOUNCE
TELEPHONE
I
I
1
B-WIRE
LINE
CORD
VOICE PAIR
(PAIRED STATION)
DATA PAIR
VOICE_PAIR
2 -DATA
3 -VOICE
4 -VOICE
5 -DATA
6 -VOICE (PAIRED STATION)
TYPE 625A2-6 CONNECTOR
(TYPICAL)
11
NO
CONNECTION-
, - -,- * - -,- 3 - -,- I--,---
,--,--
s--,--
,--,-s - -,- -
‘$, 1 1;: Z TYPICAL
-II - -I- - PAIRED
$1 1;: 1 STATION
‘14-
-I- - PORTS
-15 - -,- -
-17" 1 71 -
IS- -,--
,3- -I- -
zo- -,- -
21 - -,- -
22- -,- 23 - -I- 24- -I- 25- -,- 26- -I- -
$!z I!: z
“”
29
30 - -,- - CONNECTOR
3, - -I- 33-
,,- -,- - 50
?a- -I-36- -I- -
37 - -,- -
38- -,- 39- -,- 40- -,- .1- --I- -
::- - -,- -,- - 44- -,- - 45-
46 - -,- -
32- -I- -
47- -I- ‘I)- -I- -
;4- -,- -
so- -I- -
CLIP TERMINALS
1
- -;- - ANPHENOL
25
-
-a-
-I-
TYPICAL STATION
CONNECTOR BLOCK
23 -
il
\
SIGNAL
NAME CONN. CONN.
-
I
JACK
BLOCK
,
Figure 3-4 Secure Off-Hook Voice Announce Connections
3-l 1
Page 35

installation
IMI 66-064
POWER FALURE STATION
The system provides one tip and ring pair connected
to line one as an emergency, power failure circuit.
This power failure pair is located on Mod jack 1 for all
common equipment models. This jack is the rightmost
jack when facing the right side of the cabinet as shown
in Figure 3-5. The power failure pair is only active
ve
during an AC power failure. An industry standard ver failure. An industry standard
single-line telephone, such as a Comdial2500-xx can one, such as a Comdial2500-xx can
be connected to the power failure pair and used to the power failure pair and used to
provide communications capability should the AC ications capability should the AC
power to the system be interrupted. em be interrupted.
II024 SHOWN1
TYPICAL INDUSTRY
STANDARD NON-ELECTRIC
TELEPHONE
(POWER FAILURE
INTERFACE)
Figure 3-5. Power Failure Station Connection.
3-12
Page 36
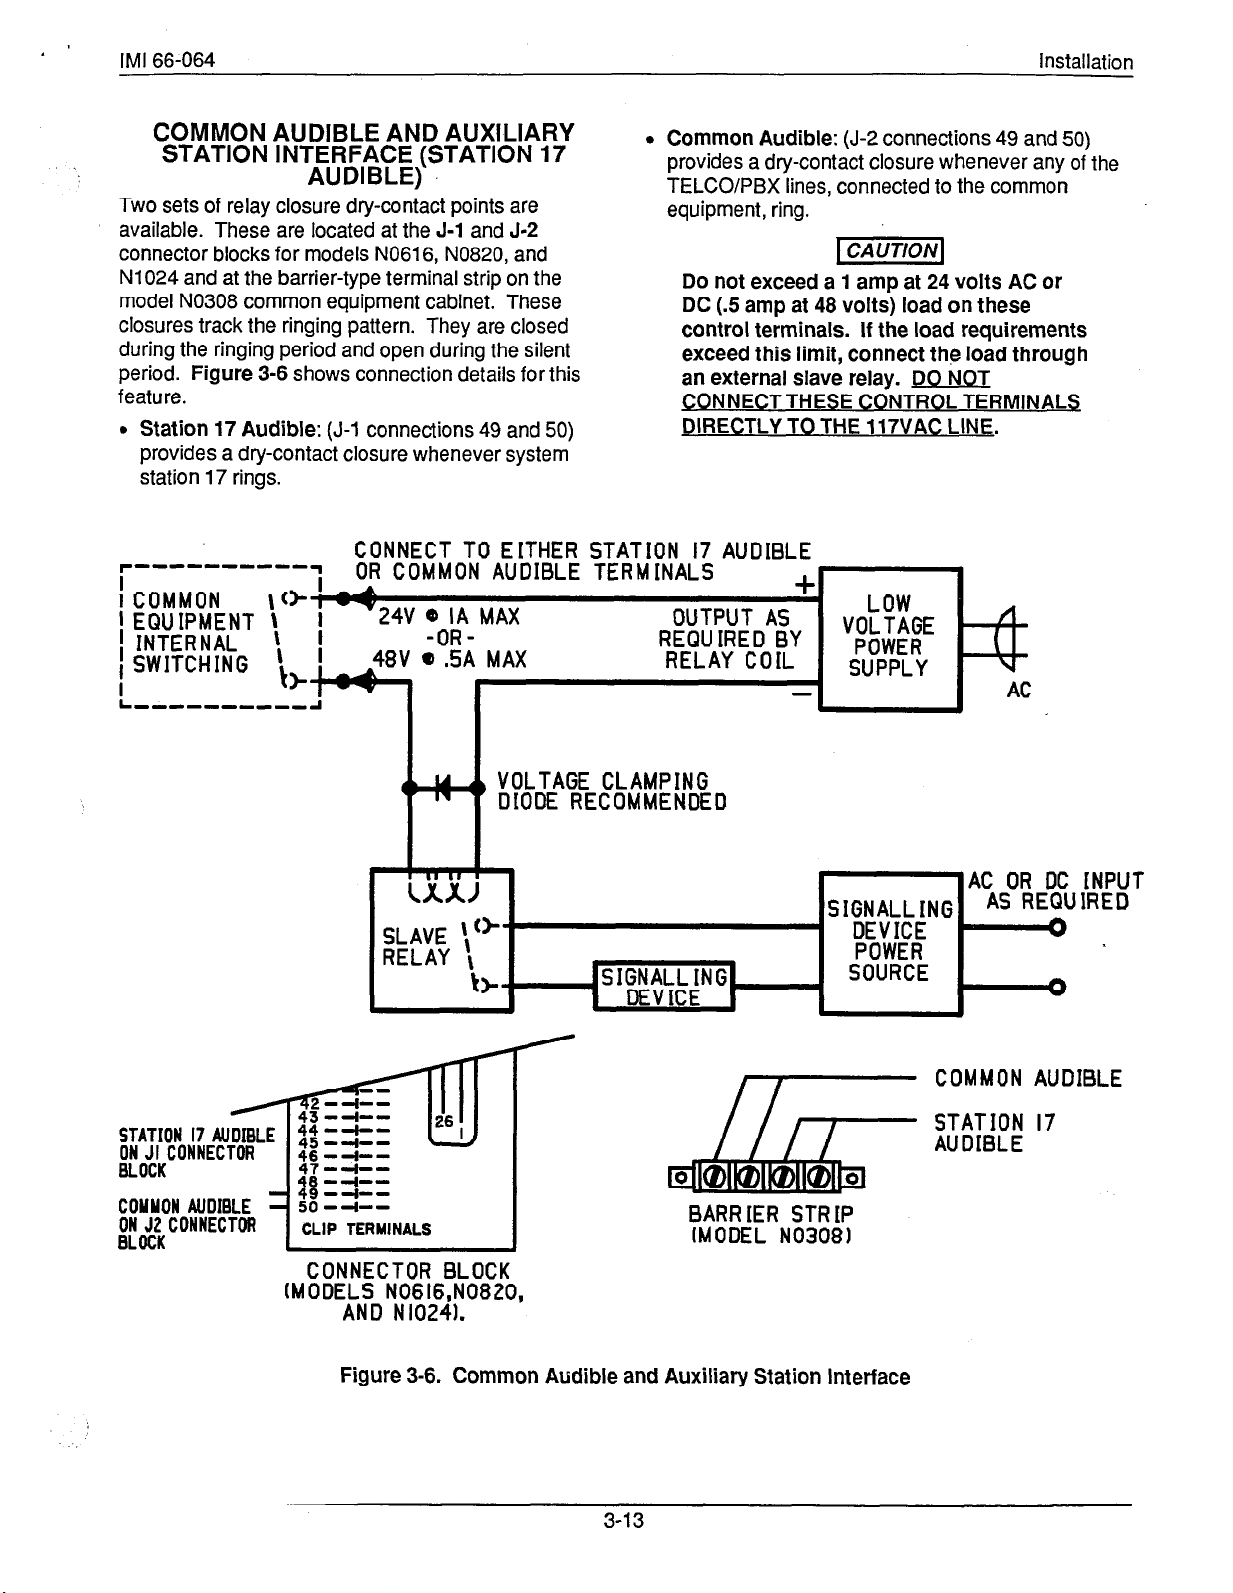
IMI 66-064
Installation
COMMON AUDIBLE AND AUXILIARY
STATION INTERFACE (STATION 17
AUDIBLE)
Two sets of relay closure dry-contact points are
available. These are located at the J-1 and J-2
connector blocks for models NO61 6, N0820, and
N1024 and at the barrier-type terminal strip on the
model NO308 common equipment cabinet. These
closures track the ringing pattern. They are closed
during the ringing period and open during the silent
period. Figure 3-6 shows connection details for this
feature.
l
Station 17 Audible: (J-l connections 49 and 50)
provides a dry-contact closure whenever system
station 17 rings.
l
Common Audible: (J-2 connections 49 and 50)
provides a dry-contact closure whenever any of the
TELCO/PBX lines, connected to the common
equipment, ring.
pimq
Do not exceed a 1 amp at 24 volts AC or
DC (S amp at 48 volts) load on these
control terminals. If the load requirements
exceed this limit, connect the load through
an external slave relay. DO NOT
CONNECTTHESE CONTROL TERMINALS
DIRECTLY TO THE 117VAC LINE.
CONNECT TO EITHER STATION 17 AUDIBLE
r----------1
i COMMON
1 EQUIPMENT
i INTERNAL
I SWITCHING
OR COMMON AUDIBLE TERMINALS
OUTPUT AS
REQUIRED BY
RELAY COIL
+
LOW
YKRFE
SUPPLY
n
1
I AC
ON JICONNECTOR
BLOCK
COYYON AUDIBLE -
ON 52 CONNECTOR
BLOCK
- 49--l--
[MODELS N0616,N0820,
q+,, VOLTAGE CLAMPING
DIODE RECOMMENDED
I I
I‘ I
UXJ
SLAVE “*
RELAY \
b-
46--l--
47-4--
46 --l--
50 ----I--
CLIP TERMINALS
CONNECTOR BLOCK
AND N 10241.
AC OR DC INPUT
S I ;;;L&N G
AS REQUIRED
I
0
POWER
SOURCE
0
COMMON AUDIBLE
BARRIER STRIP
4
(MODEL NO3081
Figure 3-6. Common Audible and Auxiliary Station Interface
3-13
Page 37
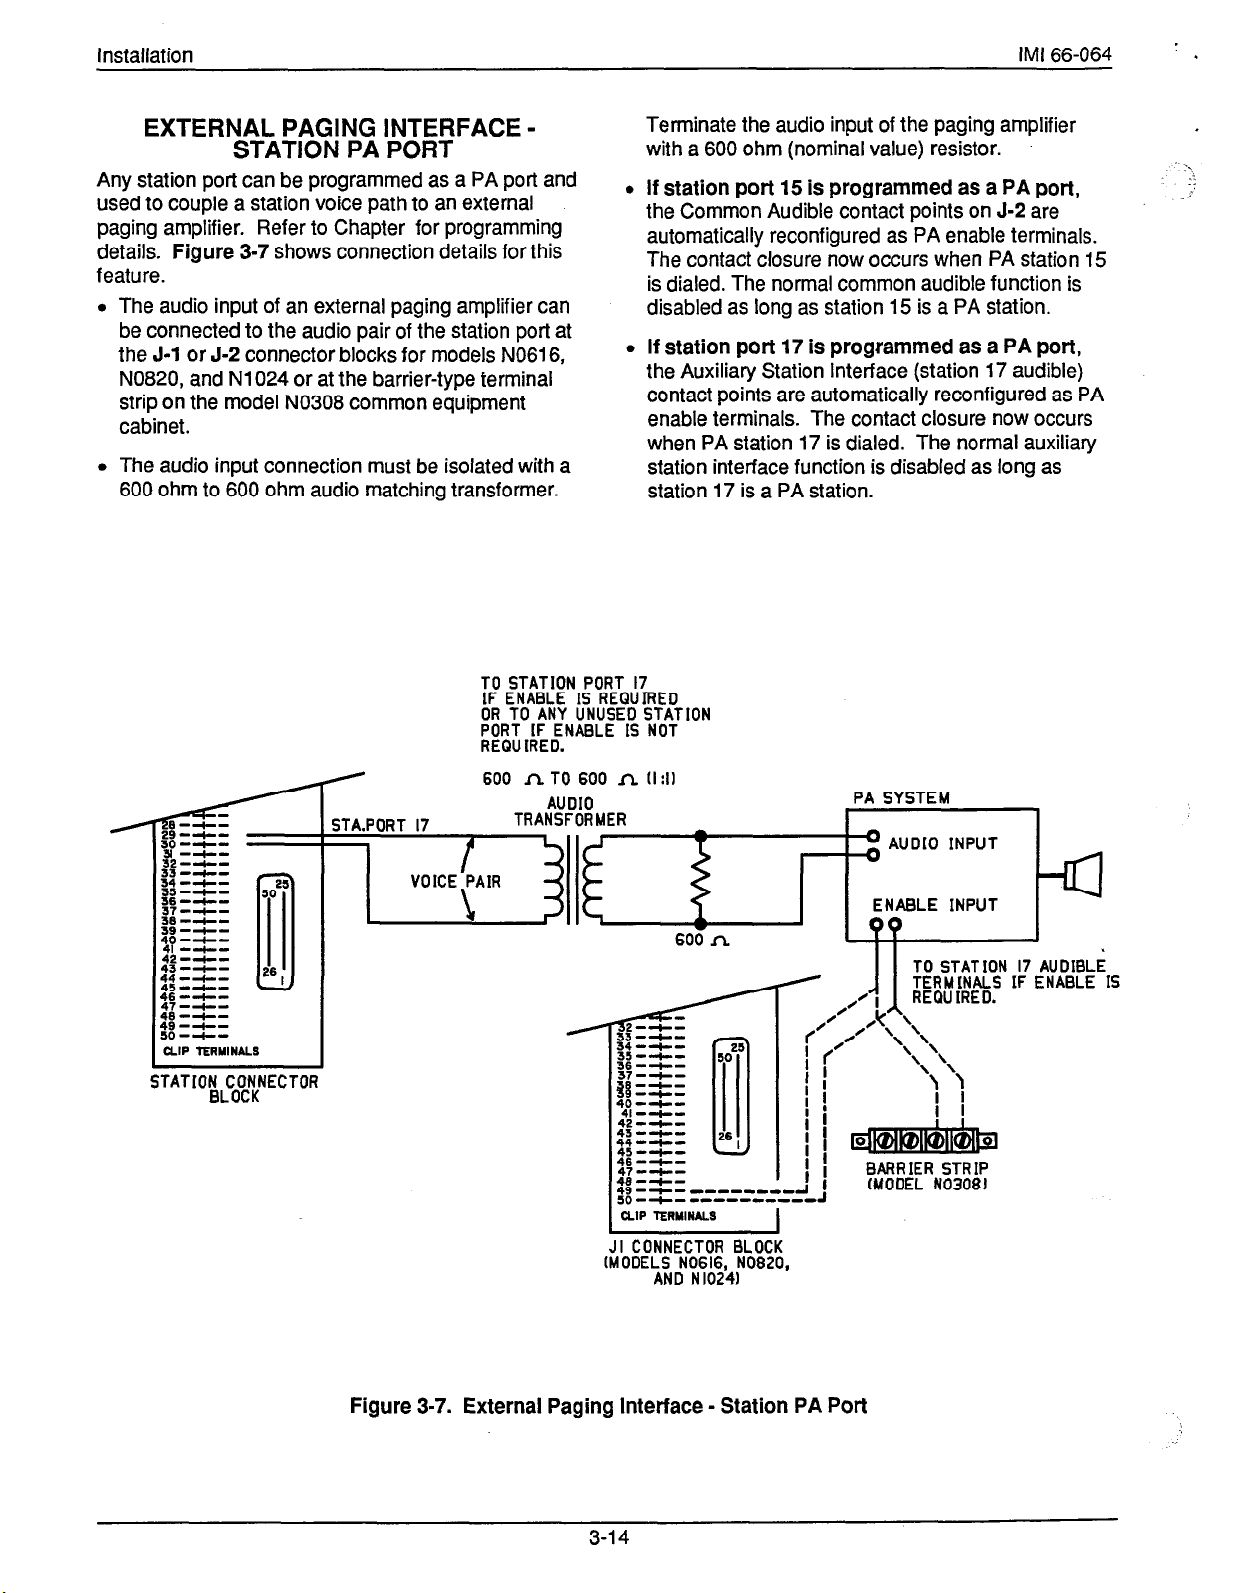
Installation
IMI 66-064 ’ .
EXTERNAL PAGING INTERFACE -
STATION PA PORT
Any station port can be programmed as a PA port and
used to couple a station voice path to an external
paging amplifier. Refer to Chapter for programming
details. Figure 3-7 shows connection details for this
feature.
The audio input of an external paging amplifier can
be connected to the audio pair of the station port at
the J-1 or J-2 connector blocks for models NO61 6,
N0820, and N1024 or at the barrier-type terminal
strip on the model NO308 common equipment
cabinet.
The audio input connection must be isolated with a
600 ohm to 600 ohm audio matching transformer.
TO STATION PORT 17
IF ENABLE IS REQUIRED
OR TO ANY UNUSED STATION
PORT IF ENABLE IS NOT
REQUIRED.
600 n TO 600
AUDIO
TRANSFORMER
30 -+-
B-d-32-d--
33 -4--
“p;‘z-
g’f=
ae=-l-=
39-+-
40-+-
41 --l-42-b43-+- 26
44--t--
45-d--
4467-z’
48 =+-=
- -
dl-i=-
CLIP l’2RYINALS
50
0
25
STA.PORT 17
VOICE PAIR
Terminate the audio input of the paging amplifier
with a 600 ohm (nominal value) resistor.
.
If station port 15 is programmed as a PA port,
the Common Audible contact points on J-2 are
automatically reconfigured as PA enable terminals.
The contact closure now occurs when PA station 15
is dialed. The normal common audible function is
disabled as long as station 15 is a PA station.
.
If station port 17 is programmed as a PA port,
the Auxiliary Station Interface (station 17 audible)
contact points are automatically reconfigured as PA
enable terminals. The contact closure now occurs
when PA station 17 is dialed. The normal auxiliary
station interface function is disabled as long as
station 17 is a PA station.
n ~I:Il
PA SYSTEM
ENABLE INPUT
600 n
TO STATION 17 AUDIBLi
I :
CLIP lERYINALS
JI CONNECTOR BLOCK
MODELS N0616, N0820,
I
AND Nl0241
Figure 3-7. External Paging Interface - Station PA Port
3-14
BARRIER STRIP
(MODEL NO3081
Page 38
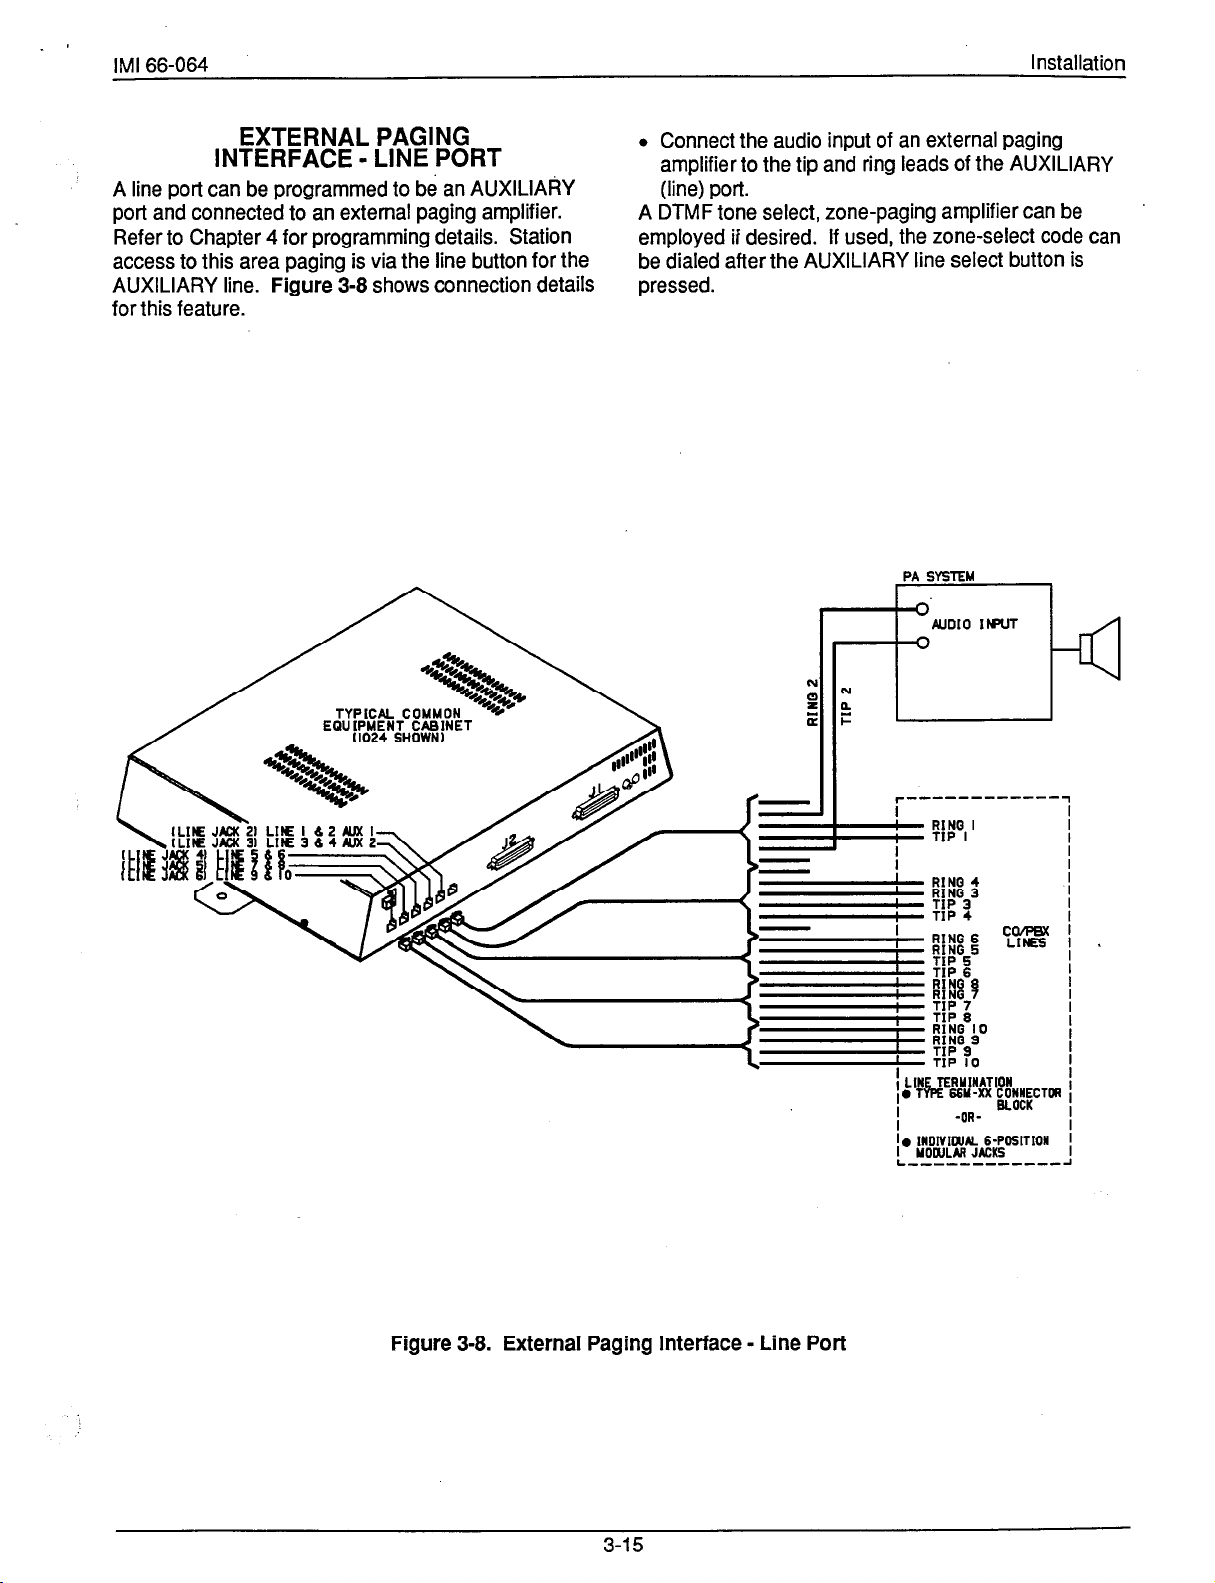
IMI 66-064
Installation
EXTERNAL PAGING
INTERFACE - LINE PORT
A line port can be programmed to be an AUXILIARY
port and connected to an external paging amplifier.
Refer to Chapter 4 for programming details. Station
access to this area paging is via the line button for the
AUXILIARY line. Figure 3-8 shows connection details
for this feature.
TYPICAL COMMON
EQUIPMENT CABINET
II024 SHOWN)
l
Connect the audio input of an external paging
amplifier to the tip and ring leads of the AUXILIARY
(line) port.
A DTMF tone select, zone-paging amplifier can be
employed if desired. If used, the zone-select code can
be dialed after the AUXILIARY line select button is
pressed.
PA SYSTEM
i--L
-- RING 4
- RINQ 3
Figure 3-8. External Paging Interface - Line Port
r-.s----------T
I RINQ I I
- TIP I
I. INDIVIWK 6-POSITIOW
I YOWLAR JACKS
L------------A
I
I
I
1
3-15
Page 39

Installation IMI 66-064 ’ b
AUXILIARY EQUIPMENT INTERFACE
A non-key system telephone device or a data device
can be connected ahead of the comnion equipment.
Refer to Table 3-1 on page 3-4 and Flgure 3-9 below
for connection details for this feature.
The system can detect an off-hook condition in the
connected device, and turn on the line status light at
the button system telephones to indicate that the line
is busy.
.
Connection is across tip and ring of lines 2 and 4
using the auxiliary interface connections.
.
Auxiliary interface connections are provided at
terminals 1 and 6 of common equipment modular
jacks 2 and 3.
Figure 3-9. Auxiliary Equipment Interface Connections
MUSIC INTERFACE
If music is to be part of the system, connect music
source to the common equipment music interface jack
(RCA-type phono jack) provided for this purpose.
Refer to Figure 3-10 for jack location details. The
impedance of this input is approximately 500 ohms.
Level adjustment of the music source may be
necessary. This may be done during system checkout.
TYPICAL COMMON
EQUIPMENT CABINET
(MODEL N 1924 SHOWN)
MUSIC SOURCE IFOR
MUSIC ON HOLD AND
BACKGROUND MUSIC)
Figure 3-10. Music Interface
3-l 6
Page 40

IMI 66-064
Installation
SECTION 3
CHECKOUT AND FAILURE ISOLATION
INSTALLATION CHECKOUT
RESISTANCE CHECK
Make the following resistance measurements at the
station connector blocks under the following conditions.
l
AC power cord disconnected from electrical outlet.
l
Common equipment connected to station connector
blocks.
l
Stations wired, and wiring punched down on blocks.
l
Bridging clips removed from blocks to isolate
stations from common equipment.
1. Measure the resistance of each installed station
and wiring from the station side of the connector
blocks. Resistance values will vary with cable
length and station type but should be within the
following limits.
MEASURED PAIR MEASURED STATION
VOICE PAIR
DATA PAIR
2. Measure the resistance of the common equipment
and cables from the common equipment side of the
station connector blocks. Resistance values should
be within the following limits.
RESISTANCE IN OHMS
40-150
1 0.3-100
MEASURED PAIR
VOICE PAIR
DATA PAIR
VOLTAGE CHECK
Refer to
Table
3-3 and make the following voltage
MEASURED COMMON
FzW&llNT RESISTANCE
40-50
0.3 - 0.5
measurements at the station connector blocks under
the following conditions:
l
Bridging clips installed
l
AC power connected to the common equipment
Measure the voltage across one voice line and one
data line and then across the other voice line and the
other data line for each even and odd station. The
measured voltage must be as follows:
GENERAL CHECK
1. Check the red light emitting diode (LED) system
status indicator. Be sure that it is on steady. If it is
off or flashing, disconnect and reconnect the AC
power plug.
2. Refer to the station User’s Guide for operating
information. Perform a general operational test of
the system by exercising the system features from
station port 10.
Table 3-3. Voltage Measurements
or common eauioment broblem.
3-17
Page 41

Installation
IMI 66-064 ’
FAILURE ISOLATION
SYSTEM STATUS INDICATOR
The red LED located near the fuse holder is the
system status indicator. This indicator should turn on
steady when AC power or the optional external battery
power is applied to the common equipment.
indicator flashes after power up, it could be indicating
a processor failure. Unplug and reconnect the AC
power, and observe the LED indication. If it still shows
a flashing indication, equipment replacement may be
necessary. A flashing indicator when battery power is
being employed is an indication of battery discharge.
STATION SELF TEST
1. Disconnect the line cord at the station base.
NOTE: The adjacent odd or even station will be
disabled during the time that the station line
cord is being disconnected and reconnected..
2. Press and hold the MUTE button, and reconnect
the line cord to the station connector. The station
will automatically perform a self test routine.
Release the MUTE button as soon as the test
begins. The sequence of the test is as follows:
l
The indicators will light in sequence.
l
Indicators will then turn off in an orderly
sequence.
l
The ringer will sound - Be sure that the ringer
volume control is set to the medium or high
volume setting. On some telephone models, the
If the
ringer may sound before the indicators are
turned off.
3. Replace any station that does not pass the self test.
DSS/BLF CONSOLE SELF TEST
1. Disconnect the console line cord plug from the line.
2. Press and hold the station 10 select button while
reconnecting the line cord plug to the line.
NOTE: The companion station will be disabled during
the time that the console is being disconnected
and reconnected.
3.
Release the station 10 select button, and note that
the BLF indicators will each turn on in sequence
beginning with the station 10 indicator. The
indicators will then turn off and the console will
become operational.
FAILURE INDICATIONS
If erratic light indications or ring signals occur at a
paired station, an open data pair at either station may
be the fault.
l
A station with an open data line may work properly
on a short loop but fail on a long loop.
Stations are paired for overload current protection. If
a fault occurs which causes more than 300 ma. of
current to be drawn, the paired stations are disabled
by circuit action.
Disconnect the disabled stations and reconnect them
one at a time to isolate the faulty one.
3-18
Page 42
,
IMI 66-064
Installation
SECTION 4
INSTALLER/USER INFORMATION
REGARDING FCC RULES AND REGULATIONS
This electronic button system complies with Federal
Communications Commission (FCC) Rules, Part 68. The
FCC registration label on the KSU contains the FCC
registration number, the ringer equivalence number, the
model number, and the serial number or production date of
the system.
NOTIFICATION TO TELEPHONE
COMPANY
Unless a telephone operating company provides and installs
the system, the telephone operating company which
provides the lines must be notified before a connection is
made to them. The lines (telephone numbers) involved, the
FCC registration number, and the ringer equivalence number
must be provided to the telephone company. The FCC
registration number and the ringer equivalence number of
this equipment are provided on the label attached to the
KSU.The user/installer is required to notify the telephone
company when final disconnection of this equipment from
the telephone company line occurs.
COMPATIBILITY WITH TELEPHONE
NETWORK
When necessary, the telephone operating company provides
information on the maximum number of telephones or
ringers that can be connected to one line, as well as any
other applicable technical information. The telephone
operating company can temporarily discontinue service and
make changes which could affect the operation of this
equipment. They must, however, provide adequate notice,
in writing, of any future equipment changes that would make
the system incompatible.
INSTALLATION REQUIREMENTS
Connection of the electronic button system to the telephone
lines must be through a universal service order code
(USOC) outlet jack supplied by the telephone operating
company. If the installation site does not have the proper
outlet, ask the telephone company business office to install
one. The correct outlet jack for this system is either a type
RJ21 X or type RJl4C.
PARTY LINES AND COIN LINES
Local telephone company regulations may not permit
connections to party lines and coin lines by anyone except
the telephone operating company.
TROUBLESHOOTING
If a service problem occurs, first try to determine if the
trouble is in the on-site system or in the telephone company
equipment. Disconnect all equipment not owned by the
telephone company.
If this corrects the problem, the faulty equipment must not be
reconnected to the telephone line until the problem has been
corrected. Any trouble that causes improper operation of the
telephone network may require the telephone company to
discontinue service to the trouble site after they notify the
user of the reason.
REPAIR AUTHORIZATION
FCC regulations do not permit repair of customer owned
equipment by anyone except the manufacturer, their
authorized agent, or others who might be authorized by the
FCC. However, routine repairs can be made according to
the maintenance instructions in this publication, provided
that all FCC restrictions are obeyed.
RADIO FREQUENCY INTERFERENCE
The electronic button system contains incidental radio
frequency generating circuitry and, if not installed and used
properly, may cause interference to radio and television
reception. This equipment has been tested and found to
comply with the limits for a Class A computing device
pursuant to Subpart J of Part 15 of FCC Rules. These limits
are designed to provide reasonable protection against such
interference when operated in a commercial environment.
Operation of this equipment in a residential area may cause
interference to radio and television reception; in which case
the user is encouraged to take whatever measures may be
required to correct the interference. If this equipment does
cause interference to radio or television reception, which can
be determined by turning the equipment off and on, the user
is encouraged to try to correct the interference by one or
more of the following measures: Reorient the television or
radio’s receiving antenna, and/or relocate the KSU, the ’
individual telephone stations, and the radio or TV with
respect to each other. If necessary, the user should consult
the manufacturer or an experienced radio/television
technician for additional suggestions. The user may find the
following booklet prepared by the Federal Communications
Commission helpful: “How to Identify and Resolve Radio-TV
Interference Problems.” This booklet is available from the
Government Printing Office, Washington D.C. 20402. Stock
No.004-000-00345-4.
This digital apparatus does not exceed the (Class A) limits
for radio noise emissions from digital apparatus set out in the
Radio Interference Regulations of the Canadian Department
of Communications.
Le present appareil numerique n’emet pes de bruits
radioelectriques depassant les limites applicables aux
appareils numeriques (de la class A) prescrites dans le
Reglement sur le brouillage radioelectrique Qdicte par le
ministere des Communications du Canada.
RINGER EQUIVALENCE NUMBER
The REN of each line is 0.4B. The FCC requires the
installer to determine the total REN for each line, and record
it at the equipment.
3-19
Page 43

Page 44

I -
IMI 66-064
CHAPTER 4
SYSTEM PROGRAMMING
SECTION 1
INTRODUCTION
System programming is divided into three categories:
l
Class Of Service Programming: The class of
service programming is unlimited as to the features
that can be programmed using it. Class of service
programming is usually performed by the installer
when the system is first put in service.
l
Administration Programming: The administration
programming can be used to program all system
features except line attributes. This procedure is
usually employed by on-site administration
personnel whenever system needs dictate.
l
Attendant Programming: The attendant
programming is limited to those features which may
need re-programming by the attendant on a daily
basis such as:
Programming Instructions
It is recommended that a 16line monitor telephone
(such as mfg. code 6714X) be used for programming
since it provides all needed program buttons and LED
indicators for program status feedback.
It is not recommended that the 6-line monitor
telephone (mfg. code 6706X) be used for
programming unless all of the installed system
telephones are mfg. code 6706X telephones. If this
telephone is used for programming the following
special considerations must be noted:
l
Program button Bl = A5 and button B2 = Al2 for all
COS programming requirements except button
mapping. When button mapping is performed on Bl
and B2, with a line assignment represented by A5
(line 5) or Al2 (line 12), press Bl or 82 twice. The
first press represents the button location. The
second press represent the line assignment.
night transfer of ringing
music on hold
system speed dial numbers.
All programming is performed at station port 10 by
dialing special codes and pressing special buttons as
detailed in this chapter. Figure 4-1 illustrates the
button locations for applicable telephone models.
Figure 4-2 shows a block diagram illustration of the
system programming.
A to Z KELLATRONICS, Inc,
l
Program buttons A6 and Al3 cannot be
represented on the mfg. code 6706X telephone.
Programming can also be performed with an
ExecuTech LCD speakerphone mfg. code: 6600E-xx.
When this telephone is employed, the display shows
the name of each class of service feature as it is being
programmed. Programming can also be performed
with an ExecuTech multiline telephone (such as
,
models 6614E, 6614T, 6620E or 6620T).
Programming overlays for all applicable telephone
models are included at the end of this chapter.
4-1
Page 45

Al
Al-
ASAlA6-
A6-
=
4
L
FFZ
4
3 0
4
-6
A8
AQ
Al0
All
Al2
AI9
A7
A2
AS
A4
.
1
-A8
-AQ
-AlO
-All
AlAS-
A4A6-
A6-
-A8
-AQ
-AlO
-All
-Al2
-A13
A/ A2 A3 A4 A5 -
A6 A7 -
86 -
85 B4 -
94
CD@30
C
B9
C
0 0 0 0
- - - -
b-4
I
-EL?
-66
L-
BlA LB2 B1-J
6702X 6706X 6714X
Al2
A13
A14
Al
A2
A3
A4
A5
A6
A7
BB
B6
B4
00 00
00
00 00
B=l
C
30
00
00
00
00
00
00
hB4
LB2
- AR
-
00
I
0
I
0
00
00
00
AY
- AI0
-
All
- A12
- A13
- Al4
- A15
- 87
- 85
A,
A2
A3
A4
A5
A6
A7
(
I
BI--I
I \
I I
L
B2
- AX
- AY
- AI0
- All
- AI2
- Al3
- AI4
Figure 4-1. Program Key Locations
Page 46

UNE 7
UNE .
UNE .
UNElD
-I-
I I
-%zODSEC
WOSEC
1msEc
210 SEC
-loo!!43
MSEC
4ZOSEC
NEVER
-T-
- To Flg. 4-2b
NOTE: hems enclosed In dolled boxes we not
permilted for System Admlnlslralor
(ITCM t# 1236 S for base level).
Figure 4-2a. System Programming Block Diagram
Page 47

From Fig. 4-2a
ITCM +k# 746 0
BASE LEVEL
IiiikT
uNE 2
UNE 2
LINE 4
LINE 0
LINE I
UN2 7
LINE.
“NE .
U)ElO
T
UNE 2
UNE 4
urn I
UNE 2
UNE 7
UNE 0
LINE .
“NE10
,TCY
l-
MING TONE 1
NlNc TONE 2
NINQ TONE 2
MING TONE 4 OPX
P.A.ENABLm coNoolE
r
mNGUNEP”EF LCD
J
3x4 UN
UWllUNE
CALL AN%
I---+
Figure 4-ib. System Programming Block Diagram
Page 48

IMI 66-064
SECTION 2
CLASS OF SERVICE PROGRAMMING
Class of service programming is usually performed by
the system installer. Class of service programming
procedures provide the means for programming all of
the system variables including the master clear. The
installer may elect to program only the line attributes
and allow the remainder of the system variables to
remain set to their default values.
0 Mark the desired selections in the
charts to record programming needs.
@ Enter the base level programming mode.
Press: ITCM +N # 7 4 6 f.
(Press: ITCM f # 2 3 6 ++ for System
Administration programming)
TYPICAL FEATURE PROGRAMMING SEQUENCE
Programming Instructions
Perform class of service programming as shown
below.
System administration programming can be
performed by on-site personnel to change all system
variables, except master clear and line attributes, to
match site requirements.
Enter Base Level: Press ITCP, then dial G# # 7 4 6 #?.
Automatic Pause Insertion: When the
system stores a dialed number for later
redial, it automatically stores a pause
whenever the user waits between
programming action.
pickup can be disabled
programming action.
Dial 15.
Press prog. button Al.
LED ON = 2 Sec.
Dial 15.
Press A3.
LED ON = ENABLED
Press 4 for next feature.
\
Dial 15.
Press A4.
LED ON = ENABLED
Press 8 for next feature.
BUTTON Al
TIME 750 Msec 2 Set
ENTRY
DEFAULT = 2 SEC.
DEFAULT = VOICE
l~BtJlTON ! A3
\ I
BUTTON A4
FEA. FNABLED DISABLED
, ENTRY
bJEFAULT = DISABLED
ENABLED 1 DISAB
Press # SPKR to end programming.
Al
1A3
A4
I
Y
Dial a feature code to select a programming
parameter.
A current program setting is indicated by a lighted
LED next to the applicable programming button.
\
1’
When a toggle (ON/OFF) action is provided by a
single button, the lighted LED indicates when the
feature is active.
P
Press +I+ to return to the base level.
Press SPKR to end procedure.
I@
4-5
I\
I
Page 49
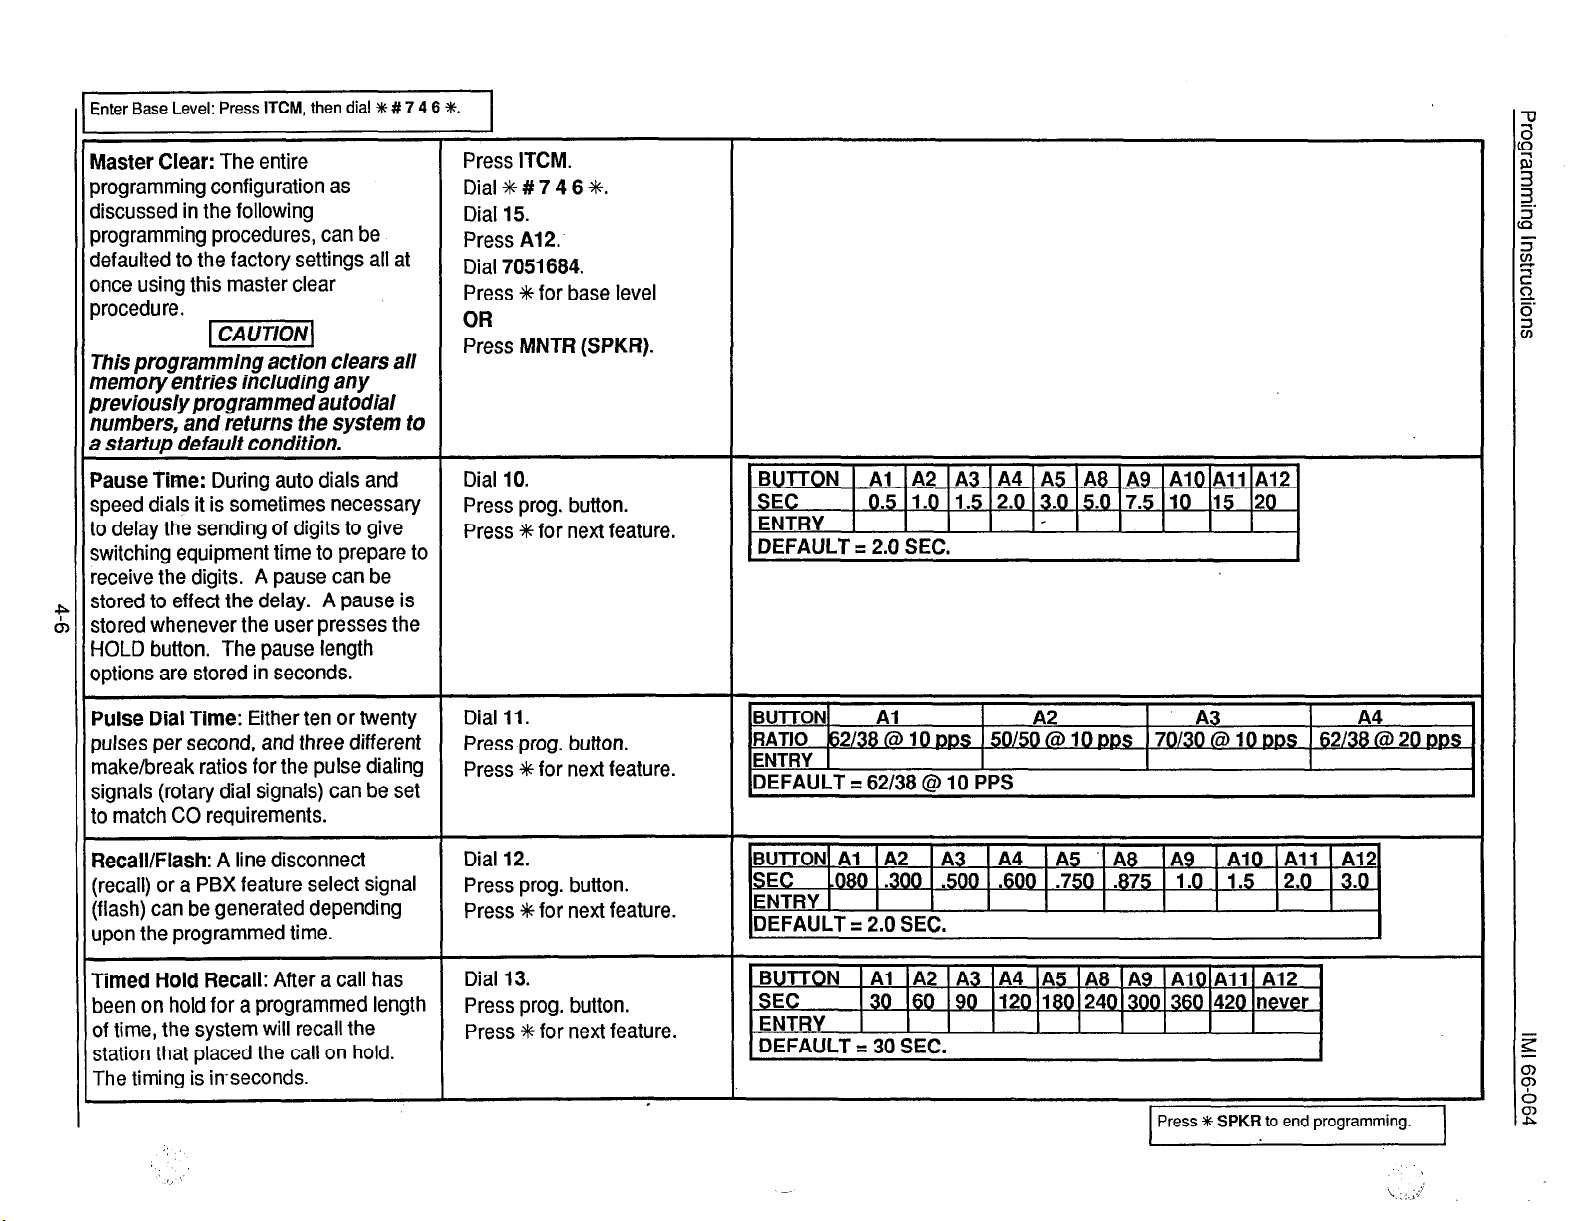
ITCM, then dial % # 7 4 6 %.
Master Clear:
The entire
programming configuration as
discussed in the following
programming procedures, can be
defaulted to the factory settings all at
once using this master clear
procedure .
This programming action clears all
memory en tries including any
previously programmed autodial
numbers, and refurns the system to
a startup default condition.
I
Press
ITCM.
Dial % # 7 4 6 %.
Dial 15.
Press A12.
Dial 7051684.
Press f for base level
OR
Press
MNTR (SPKR).
Pause Time:
During auto dials and
speed dials it is sometimes necessary
to delay the sending of digits to give
switching equipment time to prepare to
receive the digits. A pause can be
stored to effect the delay. A pause is
stored whenever the user presses the
HOLD button. The pause length
options are stored in seconds.
Pulse Dial Time:
Either ten or twenty
pulses per second, and three different
make/break ratios for the pulse dialing
signals (rotary dial signals) can be set
to match CO requirements.
Recall/Flash: A
line disconnect
(recall) or a PBX feature select signal
(flash) can be generated depending
upon the programmed time.
Timed Hold Recall:
After a call has
been on hold for a programmed length
of time, the system will recall the
station that placed the call on hold.
The timing is in-seconds.
Dial 10.
Press prog. button.
Press * for next feature.
Dial
11.
Press prog. button.
Press * for next feature.
Dial 12.
Press prog. button.
Press * for next feature.
Dial 13.
Press prog. button.
Press +F for next feature.
IBUTTON 1 Al IA2 IA3 !A4 IA5
SEC
ENTRY I I
DEFAULT = 2.0 SEC.
BUTTON\ Al
RATIO t62138 @ 10 ~)t)s I 50/50 @ 10 pps ! 70/30 @ 10 pps ! 62/38 @ 20 pps
ENTRY 1
DEFAULT = 62/38 @ 10 PPS
I
05 - Il.0
11.5
12.0 13.0 15.0 17.5
I
I
A2
1~8
IA9 IAlOIAllIA121
110 I15
I
I I
A3
120
A4
I
Press +c SPKR to end programming.
Page 50

Enter Base Level: Press ITCM, then dial N # 7 4 6 +k
e
.
Flexible Toll Restriction: Restricts
stations from dialing a range of
number combinations while allowing
specific exceptions. The restrictions
are specified by entries on a deny
table while the exceptions are
specified by entries on an allow table.
In addition, a preprogrammed 1+800
allow table allows that dialing feature
regardless of other restrictions which
may be in effect. These programmed
tables must be assigned on a per
station basis before the restrictions
can take effect.
- Maximum of 8 digits per line entry.
- 1+911 and 911 can never be
restricted.
- Allow entries override deny entries.
NOTE: The deny and allow entries are
part of.one toll table. Any stations
which receive this tab/e assignment
will be subjec?to both deny and allow
restrictions:
Assign the restriction to the lines and
stations per the instructions on page
4-8.
Dial 14.
Select table
- Al = DENY ENTRY LINE 1
- A2 = DENY ENTRY LINE 2
- A3 = DENY ENTRY LINE 3
- A4 = DENY ENTRY LINE 4
- A5 = ALLOW ENTRY LINE 1
- A8 = ALLOW ENTRY LINE 2
- A9 = ALLOW ENTRY LINE 3
- A10 = ALLOW ENTRY LINE 4
- All = ALLOW 1+800 calls
Dial number.
(# = match anything digit.)
Select next table, and repeat.
Press *for next feature.
DEFAULT = NONE ASSIGNED
Feed-Back Tone:Choose the type of
feed-back tone supplied when
intercom calling a station that is busy
on an outside line. Either select a
busy tone or leave the system
defaulted to provide a ring-back tone.
Dial 15.
Press A8.
LED ON = Busy Tone
Press * SPKR to end programming.
Page 51
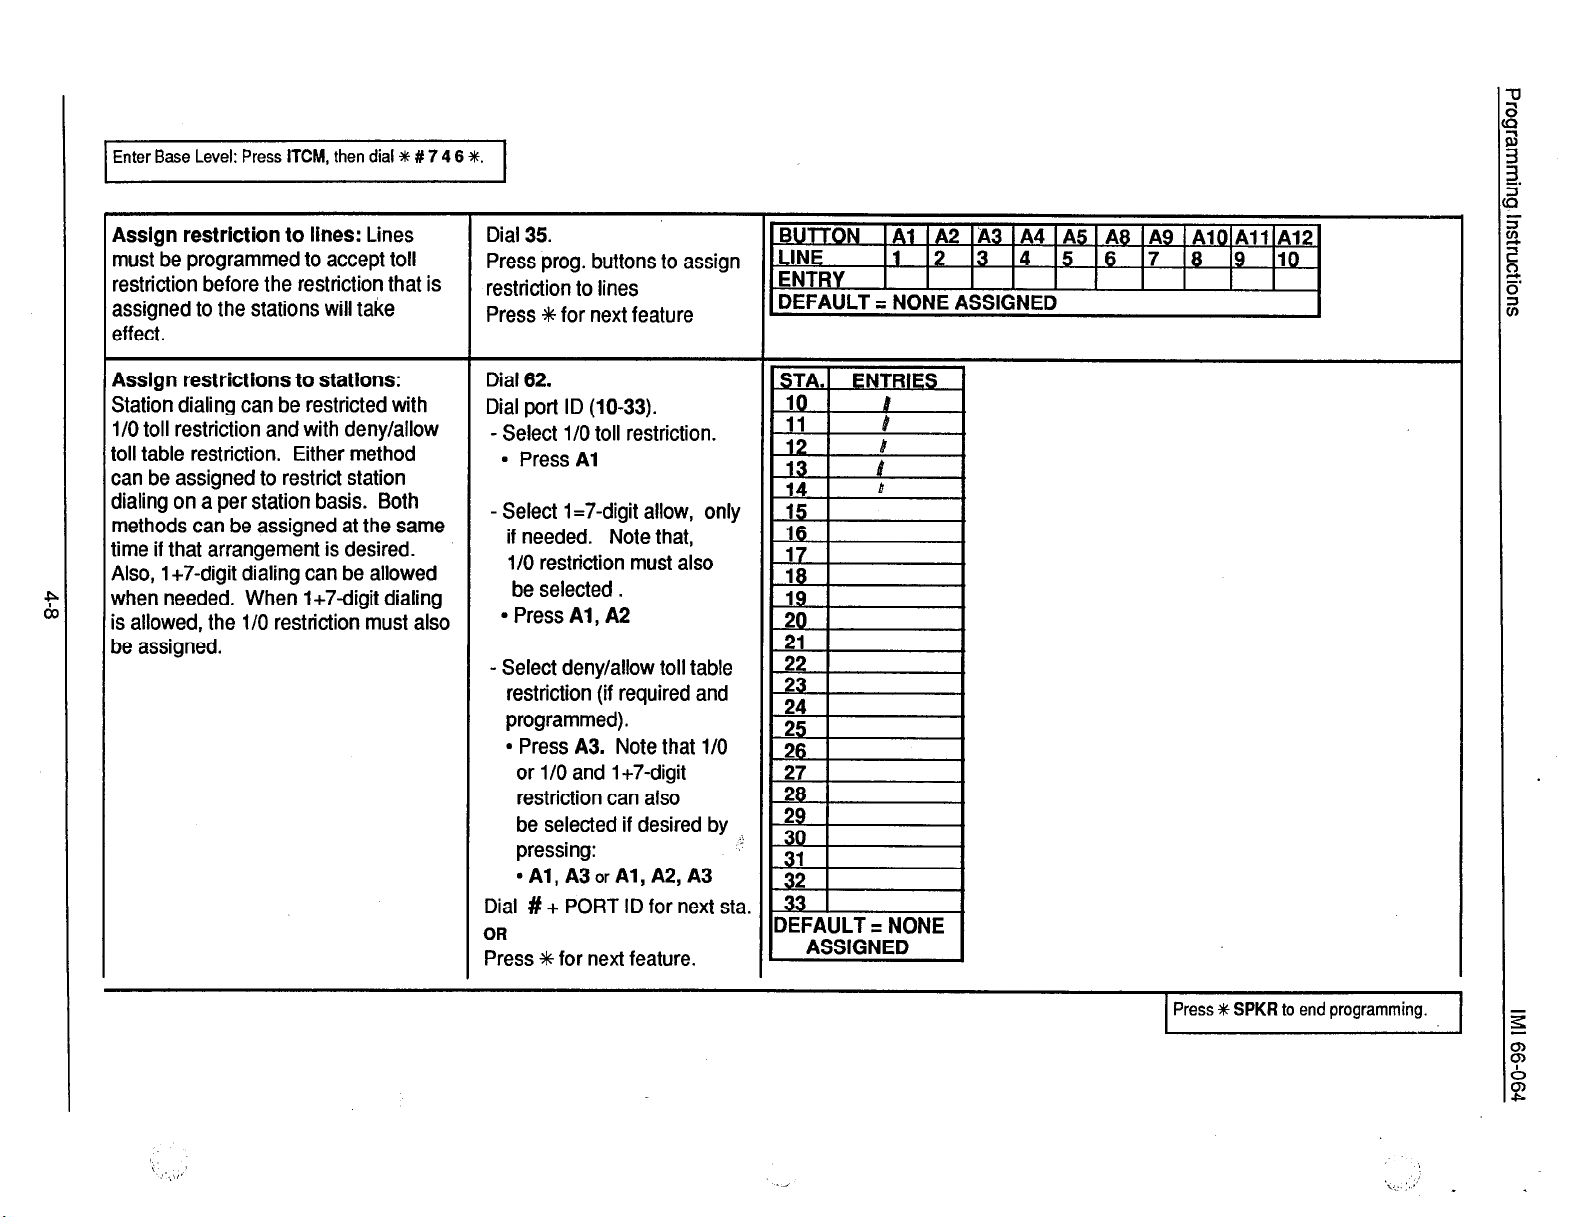
Enter Base Level: Press ITCM, then dial c# # 7 4 6 *.
restriction before the restriction that is
assigned to the stations will take
zffect .
I/O toll restriction and with deny/allow
oil table restriction. Either method
:an be assigned to restrict station
dialing on a per station basis. Both
nethods can be assigned at the same
.ime if that arrangement is desired.
41~0, 1+7-digit dialing can be allowed
Nhen needed. When 1+7digit dialing
s allowed, the l/O restriction must also
)e assigned.
ress prog. buttons to
assign
restriction to lines
Press ++ for next feature
- Select l/O toll restriction.
- Select 1=7-digit allow, only
if needed. Note that,
l/O restriction must also
- Select deny/allow toll table
restriction (if required and
l
Press
A3.
Note that l/O
or 1 /O and 1+7-digit
restriction can also
be selected if desired by
l
Al,A3orAl,A2,A3
Dial ## + PORT ID for next sta.
Press * for next feature.
Press #c SPKR to end programmmg.
I
Page 52

Enter Base Level: Press ITCM, then dial +c # 7 4 6 t.
System Speed Dial Toll Restriction
Override: This feature provides a
method for overriding toll restriction
parameters when a system speed dial
number is dialed. With this feature
enabled, it is possible to restrict calls
to certain areas with assigned toll
restriction tables yet allow specific
numbers in the restricted areas to be
called by storing them as system
speed dial numbers,
Automatic Pause insertion: When
the system stores a dialed number for
later redial, it automatically stores a
pause whenever the user waits
between digits. The wait period is
programmable.
e
tc
Tone or Voice Signaliing: Intercom
calls can be tone signalled or voice
signalled. The first choice in signalling
is programmable.
Dial 15.
Press A5.
LED ON = override enabled.
Press * for next feature.
Dial 15.
Press prog. button Al.
LED ON = 2 Sec.
Press * for next feature.
Dial 15.
Press A2
LED ON = TONE
Press *for next feature.
1 SYSTEM SPEED DIAL 1
BUTTON Al
Al
TIME 750 Msec 2 Set
ENTRY
DEFAULT = 2 SEC.
Exclusive Hold: The user can set a
hold condition whereby only the
station placing the call on hold can
retrieve it. Exclusive hold can be
Dial 15.
Press A3.
LED ON = ENABLED
Press t for next feature.
disabled by programming action.
Call Pickup System: A call can be
answered at one telephone when it is
ringing at another telephone. Call
pickup can be disabled by
Dial 15.
Press A4.
LED ON = ENABLED
Press % for next feature.
programming action.
PROGRAMMING NOTE: All features described on this page can be
programmed after dialing 15 once. Just press the progtzam
button for each feature to be programmed.
1 Press f SPKR to end programming. 1
Page 53

Enter Base Level: Press ITCM, then dial % # 7 4 6 +#.
I
Extended DTMF:
The system can
access answering machines, banking
computers, voice mail, etc. that require
DTMF tones that are longer than
standard tones. This programming
option enables the programmed DTMF
tone to automatically activate after the
station has been off-hook 10 sec. or
more
Line Disabled:
A line can be taken
out of service because of line defect or
other reason.
Auxiliary Line:
A line can be
conditioned to serve as a port for an
external paging amplifier. (See Note 1)
Line Type 1:
A line port is assigned as
type 1 when any enabled toll
restriction is to be applied with the first
digit dialed. Such a line type is often
assigned when a CO line is
connected. (See Note 1)
Dial 16.
ii
Press prog. button.
Press X for next feature.
Dial 30.
Press prog. button.
LED ON = DISABLED
Press *for next feature.
Dial 31.
Press prog. button.
LED ON = AUX LINE
Press *for next feature.
Dial 32.
Press prog. button.
LED ON = TYPE 1
Press * for next feature.
BUTTON IAl IA2 IA3 IA4
MSEC
DEFAULT = 80 MSEC.
IBUTTON
LINE 11 12 13 14 15 16 17 18 19 110
ENTRY
DEFAULT = NONE ASSIGNED
BUlTON Al A2 A3 A4 A5 A6 A9 A10 All Al2
LINE 1 2 3 4 5 6 7 8 9 10
ENTRY
DEFAULT = NONE ASSIGNED
IBUTTON I Al IA2 IA3 IA4
LINE 11 12 13 14 15 16 17 18 19 110
ENTRY I
DEFAULT q ALL LINES ASIGNED
80 ~160~240~320~400~480~560~720~880 11044
IAI
IA2 IA3 IA4
IAS 1~8
IAS 1~8
IAS 1~8
IA9 IAlOIAllIA12
IA9 IAlOIAllIA12)
IA9 IAlOIAllIA12(
Line Type
type 2 when any enabled toll
restriction is to be applied beginning
with the second digit dialed. Such a
2: A line port is assigned as
Dial 33.
Press prog. button.
LED ON = TYPE 2
Press +++ for next feature.
line type is often assigned when a
PBX or CENTREX line with any trunk
access code is connected.
(See Note 1)
NOTE 1: When a line type is unassigned (LED OFF), it enters a disabled
state. It must be reassigned as a particular type be enabled. It
cannot be enabled using the Line Disabled feature.
Press t SPKR to end programming.
I
Page 54
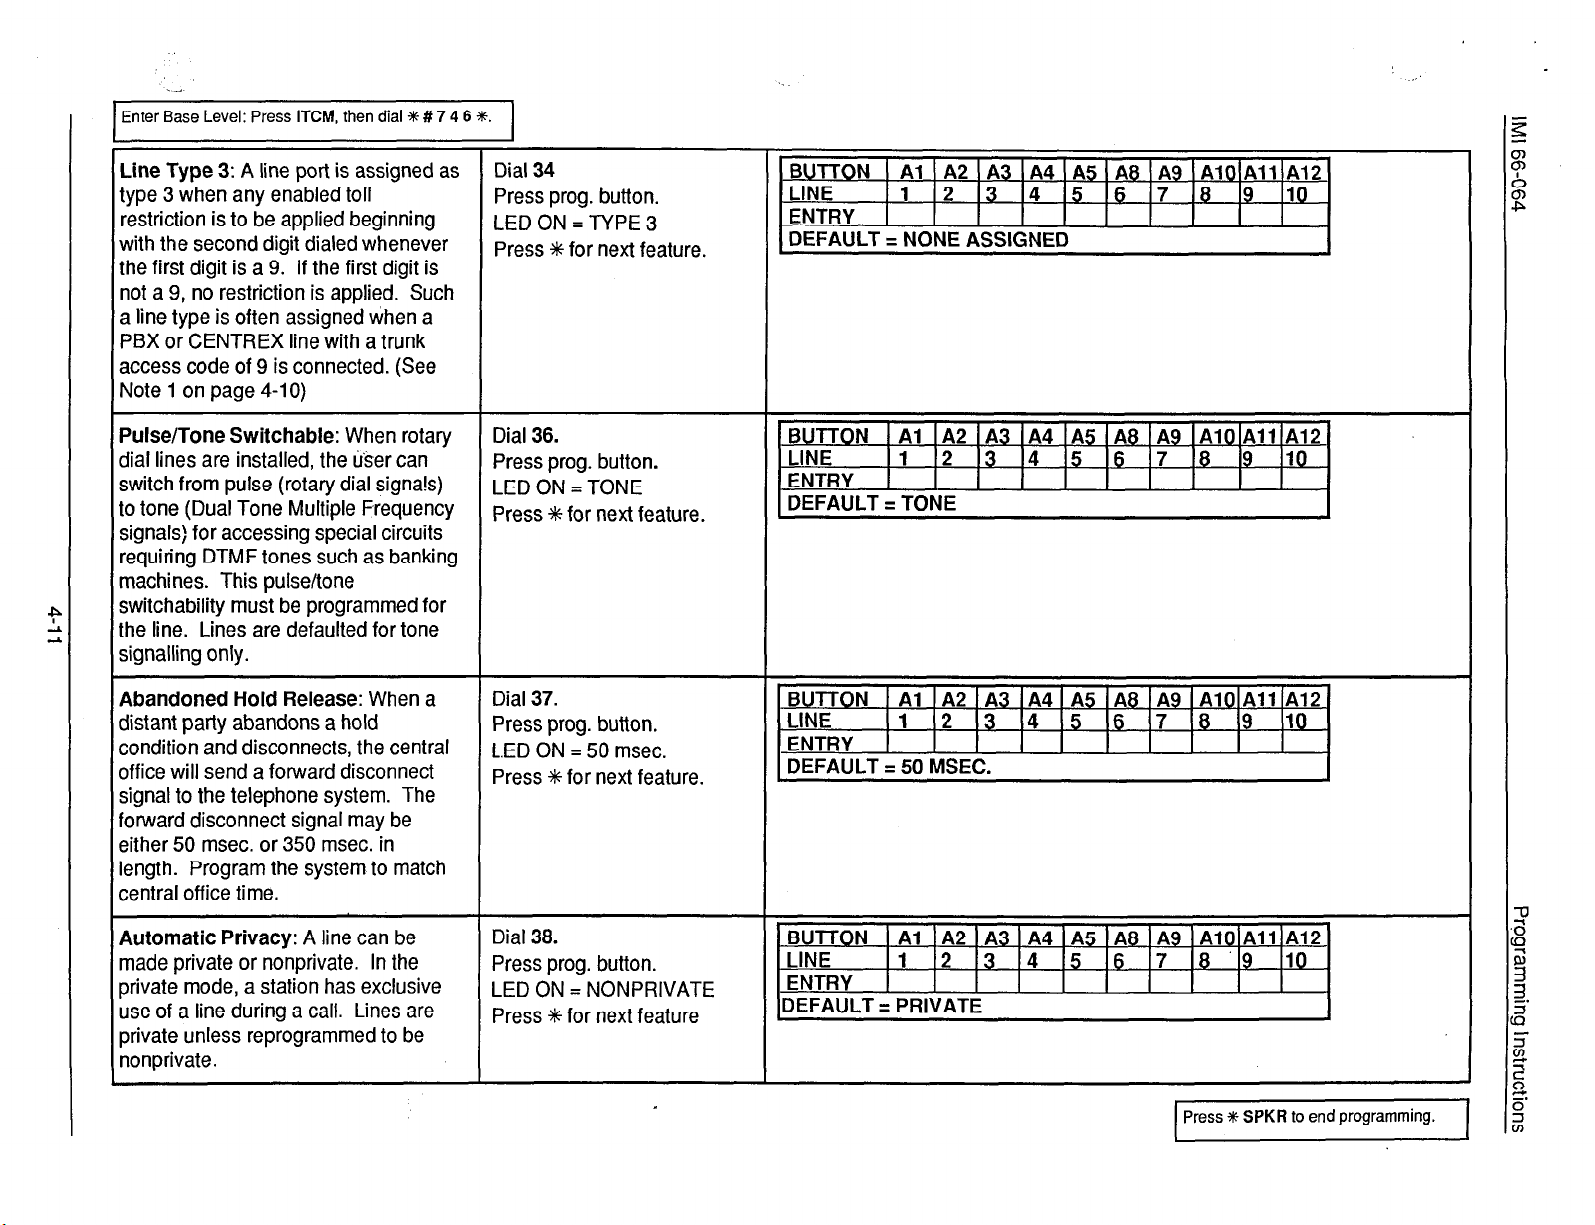
Enter Base Level: Press ITCM, then dial % # 7 4 6 *.
type 3 when any enabled toll
restriction is to be applied beginning
with the second digit dialed whenever
the first digit is a 9. If the first digit is
not a 9, no restriction is applied. Such
a line type is often assigned when a
PBX or CENTREX line with a trunk
access code of 9 is connected. (See
Note 1 on page 4-10)
Pulse/Tone Switchable: When rotary
dial lines are installed, the user can
switch from pulse (rotary dial signa!s)
to tone (Dual Tone Multiple Frequency
signals) for accessing special circuits
requiring DTMF tones such as banking
machines. This pulse/tone
switchability must be programmed for
the line. Lines are defaulted for tone
distant party abandons a hold
condition and disconnects, the central
office will send a forward disconnect
signal to the telephone system. The
forward disconnect signal may be
either 50 msec. or 350 msec. in
length. Program the system to match
central office time.
Press prog. button.
LED ON = TYPE 3
Press *for next feature.
Press prog. button.
LED ON = TONE
Press +I6 for next feature.
Press prog. button.
L.ED ON = 50 msec.
Press * for next feature.
made private or nonprivate. In the
private mode, a station has exclusive
use of a line during a call. Lines are
private unless reprogrammed to be
nonprivate.
Press prog. button.
LED ON = NONPRIVATE
Press +# for next feature
Press #c SPKR to end programming.
Page 55

Enter Base Level: Press ITCM, then dial * # 7 4 6 %.
STATION
Port Definition: A station port can be
programmed to accept one of several
different types of station equipment or
to support off-hook call announce
connections.
318 LINE TELEPHONE = 6414X, 6414s
MULTILINE TELEPHONE = 6614, 6b14S,
6614E, 6614T, 6620, 66208,6620E, 6620T,
6702X, 6706X, 6714X
OFF-HOOK CALL ANNOUNCE = All SOHVA equipped telephones (See page 1-3) DB32S
OPX UNIT = OPX-1
DSSlBLF CONSOLE = EB32X, DB32, DB40,
DB70
LCD SPEAKERPHONE = 66OOS, 6600E
Flexible Ringing Assignment:
1
Ringing assignments are
programmable on a per line/per station
basis. Delayed ringing can be
program enabled for some lines and
direct, or immediate, ringing can be
program enabled for others.
Dial 61.
Dial port ID (10-33).
Press prog. button.
l Al
= 3/8 LINE TELEPHONE
l
A2 = MULTILINE TELEPHON
l
A3 = OFF-HOOK CALL
ANNNOUCE
l
A4 = OPX UNIT (Prime
line intercom automatically
enabled when OPX port
is assigned)
l A5
= DSS/BLF CONSOLE
. A8 = LCD SPEAKERPHONE
Press # + PORT ID for next sta
OR
Press * for next feature.
Direct ringing
Dial 50.
Dial port ID (10-33).
Press Al-A5, A&A12
(for lines l-l 0)
Press # + PORT ID for next sta.
OR
Press f for next feature.
DEFAULT = MULTILINE TELEPHONE
DEFAULT = ALL LINES ASGND AT STA lo,17 & 32
Delayed ringing
Dial 51.
Dial port ID (10-33).
Press Al-A5, A&A12
(for lines 1-l 0).
Press # + PORT ID for next sta.
OR
Press * for next feature.
DEFAULT = NO LINES ASGND
Press % SPKR to end programming.
Page 56
Enter Base Level: Press
ITCM,
then dial +# # 7 4 6 SC.
STATION
Night Transfer (of ringing): The day,
or normal, ringing of incoming lines
can be transferred to a particular
station or stations by the attendant for
off-hour or special purpose answering.
Stations are assigned to receive night
transfer by programming action.
Access Denied: Access to particular
lines can be denied at individual
stations.
Originating Denied: The ability to
originate calls on certain lines can be
denied at individual stations.
Dial 56.
Dial port ID (10-33).
Press Al -A5, A8-A12 (for lines
l-10).
Press # + PORT ID for next sta.
OR
Press * for next feature.
Dial 52.
Dial port ID (10-33).
Press Al -A5, A8-A12 (for lines
l-10).
LED ON = DENIED
Press # + PORT ID for next sta.
OR
Press * for next feature.
Dial 53.
Dial port ID (10-33).
Press Al -A5, A8-A12 (for lines
l-10).
LED ON = DENIED
Press ## + PORT ID for next sta.
OR
Press * for next feature.
DEFAULT = ALL LINES ASGND AT STA lo,17 & 32
DEFAULT = DISABLED
DEFAULT = DISABLED
Privacy Release: A line can be made
non-private at a particular station while
remaining private at all other stations.
Stations can be programmed to
automatically release line privacy
when on certain lines.
Dial 54.
Dial port ID (10-33).
Press Al -A5, A8-A12 (for lines
l-10).
LED ON = RELEASED
Press # + PORT ID for next sta.
OR
Press t for next feature.
DEFAULT 5 NOT RELEASED
Press Y
SPKR
to end programming.
Page 57

Enter Base Level: Press ITCM, then dial +# # 7 4 6 t.
STATION
Idle Line Preference: Going off -hook
automatically selects an idle line for
Jse. Lines available for selection are
assigned by programming.
Ringing Line Preference: A ringing
line will automatically be answered
when a station is taken off-hook.
f
6
Prime Line: A line designated to a
particular station is automatically
selected for use when that station is
taken off-hook.
Dial 55.
Dial port ID (10-33).
Press Al-A5, A8-A12 (for lines
l-10).
Press # + PORT ID for next sta.
OR
Press * for next feature.
Dial 60.
Dial port ID (10-33).
Press prog. button A8.
LED ON = AS’GND
Press # + PORT ID for next sta.
OR
Press *for next feature.
Dial 57.
Dial port ID (10-33).
Press Al-A5, A8-A12 (for lines
l-1 0) or press ITCM.
Press # + PORT ID for-next
sta.
OR
Press + for next feature.
DEFAULT = DISABLED
DEFAULT = DISABLED
DEFAULT = DISABLED
Press #c SPKR to end programming.
Page 58
1 Enter Base Level: Press
ITCM,
then dial m # 7 4 6 S. 1
.L . . .O .I u .,. . . ..”
STATION
- - -- __ I
f
E
All-Call and Zone
can receive voice announcements
through the telephone speaker, or
through an external paging speaker
connected to a PA port, and transmit
them with the telephone handset.
Announcements can be to certain
3reas of the system or to all stations in
:he system.
Dersonal Ringing Tones: A station
:an be programmed to ring in one of
our distinctive tones.
Dial 58.
Dial port ID (10-33).
Press prog. button.
l
l
l
l
l A5
l
.
l
RECEIVE ZONE 1
Al =
A2 = RECEIVE ZONE 2
A3 = RECEIVE ZONE 3
A4 = RECEIVE ALL-CALL
= XMIT ZONE 1
A8 = XMIT ZONE 2
A9
= XMIT ZONE 3
A10 = XMIT ALL-CALL
Press # + PORT ID for next sta.
OR
Press *for next feature.
Dial 60.
Dial port ID (10-33).
Press prog. button.
=A1 =TONEl
l
A2=TONE2
l
A3=TONE3
.A4=TONE4
Press # + PORT ID for next sta,
OR
Press * for next feature.
I
External Paging Interface - Station
Port: A station port can be
Drogrammed to interface with an
external paging amplifier (PA port).
Dial 60.
Dial port ID (10-33).
Press prog. button A5.
Press # + PORT ID for next sta.
OR
Press ++ for next feature.
DEFAULT = NOT ASSIGNED
Press +k
SPKR
to end programming.
Page 59

Enter Base Level: Press ITCM, then dial t # 7 4 6 m.
STATION
10 11 12 13 14 15 15 17 15 12 22 21 22 23 24 25 25 27 28 1B 32 3l 32 33
Headset Interface:
be programmed to allow headset
operation provided by a special
telephone.
A station port can
Secure Off-Hook Voice Announce
(SOHVA) Groups:
station to receive and/or originate
SOHVA
disabled through programming so that
certain stations can be grouped
together for SOHVA or OHVA calling
between one another while other
stations in the system are excluded
from this group. Stations can be
arranged in up to four different groups
for exclusive SOHVA or OHVA calling.
NOTE: SOH VA and OH VA calling
or
OHVA
requires two data-paired
station ports.
The ability of a
calls can be
Dial 60.
Dial port ID (10-33).
Press prog. button A9.
Press # + PORT ID for next sta.
OR
Press f for next feature.
Dial 63.
Dial port ID (10-33).
- Press progam button to
disable receive capability.
LED ON = disabled
Al
= receive group 1
A2 = receive group 2
A3
= receive group 3
A4
= receive group 4
- Press progam button to
disable originate capability.
LED ON = disabled
A5
= originate group 1
A8 = originate group 2
A9 = originate group 3
A10
= originate group 4
Press * for next feature.
DEFAULT = ALL STATIONS RECEIVE AND ORIGINATE SOHVA AND OHVA
Press * SPKR to end programming.
I
I
Page 60

Enter Base i,iel: Press ITCM, then dial t # 7 4 6 f.
I
on-Square System: Each
:ogrammable button at every station
59
an be assigned individually (mapped)
I select any line assigned to that
:ation or to provide other button
unctions. Programmable buttons can
e assigned as direct station select
XSS) buttons to provide one-key
xess to system stations.
rogrammable buttons can be
ssigned as idle (blanked) to provide
utodial buttons for the user.
IOTE: When a line is reassigned from
defaulted button location to a
ifferent button location, the defaulted
utton must then be assigned to an
f/e condition (blanked). This action
?ust be taken to ensure that status
ldications for the line will appear at
ie LED of the button that is now
ssigned to have line appearance.
I button must be blanked even though
does not appear on the particular
?lephone being programmed.
,
1. Dial 59.
2. Dial
port ID (10-33)
3. Press station button to be
programmed.
9 Al - Al4 and Bl - B8.
NOTE: If programming with a model
6702X or 6714X telephone that does
not include a full complement of
buttons, dial a number to select the
button to be programmed
l-8=81-68
9=A7
O=A14
4. Press prog. button to assign line,
- Al - A5 = Lines 1 - 5.
-A8-Al2=Lines6-10
-OR-
- Dial 10 - 33
for DSS Sta 10 - 33
-OR-
Press TAP for idle (blank)
buttons for user autodial
purposes
5.
Press # + PORT ID for
next station
-OR-
Press t for next feature.
EXAMPLE: To re-assign line 7
from 87 default to A8 location
at station port 15 containing
model 6706X telephone,
1. Dial 15 (for station port 15)
2. Press A8 (to select button A8)
3. Press A9 (to re-assign line 7)
4. Dial
7 (to select 87 location
even though not present on
model 6706X telephone).
5.
Press
TAP (to move’line 7
status LED for button
A8)
DEFAULT
Bl = LINE 1
SETrINGS
B6 q LINE 6
82 q LINE 2 87 = LINE 7
B3 = LINE 3 88 = LINE 8
B4 q LINE 4
B5 q LINE 5
A7 q LINE 9
Al4 q LINE 10
Press # SPKR
I
to end programming.
Page 61

Programming instructions
IMI 66-064 ’
SECTION 3
ATTENDANT PROGRAMMING
Attendant programming can be performed from station
10 at any time during system operation.
NIGHT TRANSFER
(of ringing)
The day, or normal, ringing of incoming lines can be
transferred to a particular station or stations by the
attendant for off-hour or special purpose answering.
1.
Press
ITCM +# # .
2.
Dial 03.
3.
Press prog. button
The light next to program key
Al
to toggle feature on or off.
Al
will turn on when
night transfer is active and ITCM light will flash.
4.
Press + for next feature or press
MNTR (SPKR)
to
end.
MUSIC ON HOLD
Music is provided to outside lines that are placed on
hold if an external music source is connected to the
system. Music on hold can be disabled by attendant
action.
5.
Dial number (up to 15 digits).
6.
Press
TRANSEONF
button for next location and
repeat procedure.
-OR-
Press
SPKR
to end.
-OR-
7.
Press
TRANSEONF
button, then press +K for next
feature.
8.
Press +K for next feature or press
end.
MNTR (SPKR)
to
.
\
_i
1.
Press
2.
Dial 04.
Press prog. button
3.
The light next to the program key
ITCM % #.
Al
to toggle feature on or off.
Al
will turn on
when music on hold is active.
4.
Press G++ for next feature or press MNTR
(SPKR)
end.
SYSTEM SPEED DIALING
A special system-wide list of numbers can be
programmed for automatic dialing by all users.
1. Press
2. Dial 02.
3. Dial location (01-30). Listen for tone bursts.
4. Press line button for preselect (if desired).
NOTE: When no line is preselected and the system
ITCM +k #.
speed dial is used, the system will
automatically pick the prime line assigned to
the station (if enabled) or pick the most
previous/y used line at that station.
to
SYSTEM CLOCK
If the system has been modified to provide LCD
speakerphone support, the system clock can be
programmed to maintain current date and time
information. The display will not show the date and
time until this feature is programmed as follows:
1. Press ITCM % # .
2. Dial
3. Dial two digits (00-99) for year.
4. Dial two digits
5. Dial two digits (01-31) for day.
6. Dial two digits (00-23) for hour.
7. Dial two digits (00-59) for minute.
8. Dial one digit (l-7) for day of week
9. Press +K for next feature or press
01.
(01-12)
-- Sun. = 1, Sat. = 7.
end.
for month.
MNTR (SPKR) to
4-18
Page 62
STATION 10 - PROGRAMMING OVERLAY
* Cut out along border.
l
Cut out shaded openings.
l
Fit over station faceplate.
Al
A2
A3
A4
PPOO3-003
A0
A9
AI0
A12
A13
Page 63
Page 64

STATION IO - PROGRAMMING OVERLAY
l
Cut out along border.
l
Fit over station faceplate.
c25 c41
C24 c40
C23 c39
C22
c21 c37
c20 C36
P PQo3-ao4
PROGRAMMING
OVERLAY
EB32X
C38
Cl9 c35
Cl8
c34
Cl7 c33
Cl6 C32
Cl5 c31
Cl4
c30
Cl3 c29
Cl2 C28
Cl1 C27
Cl0 C26
32-BUTTON ADJUNCT
FEATURE MODULE
EB32X
Page 65
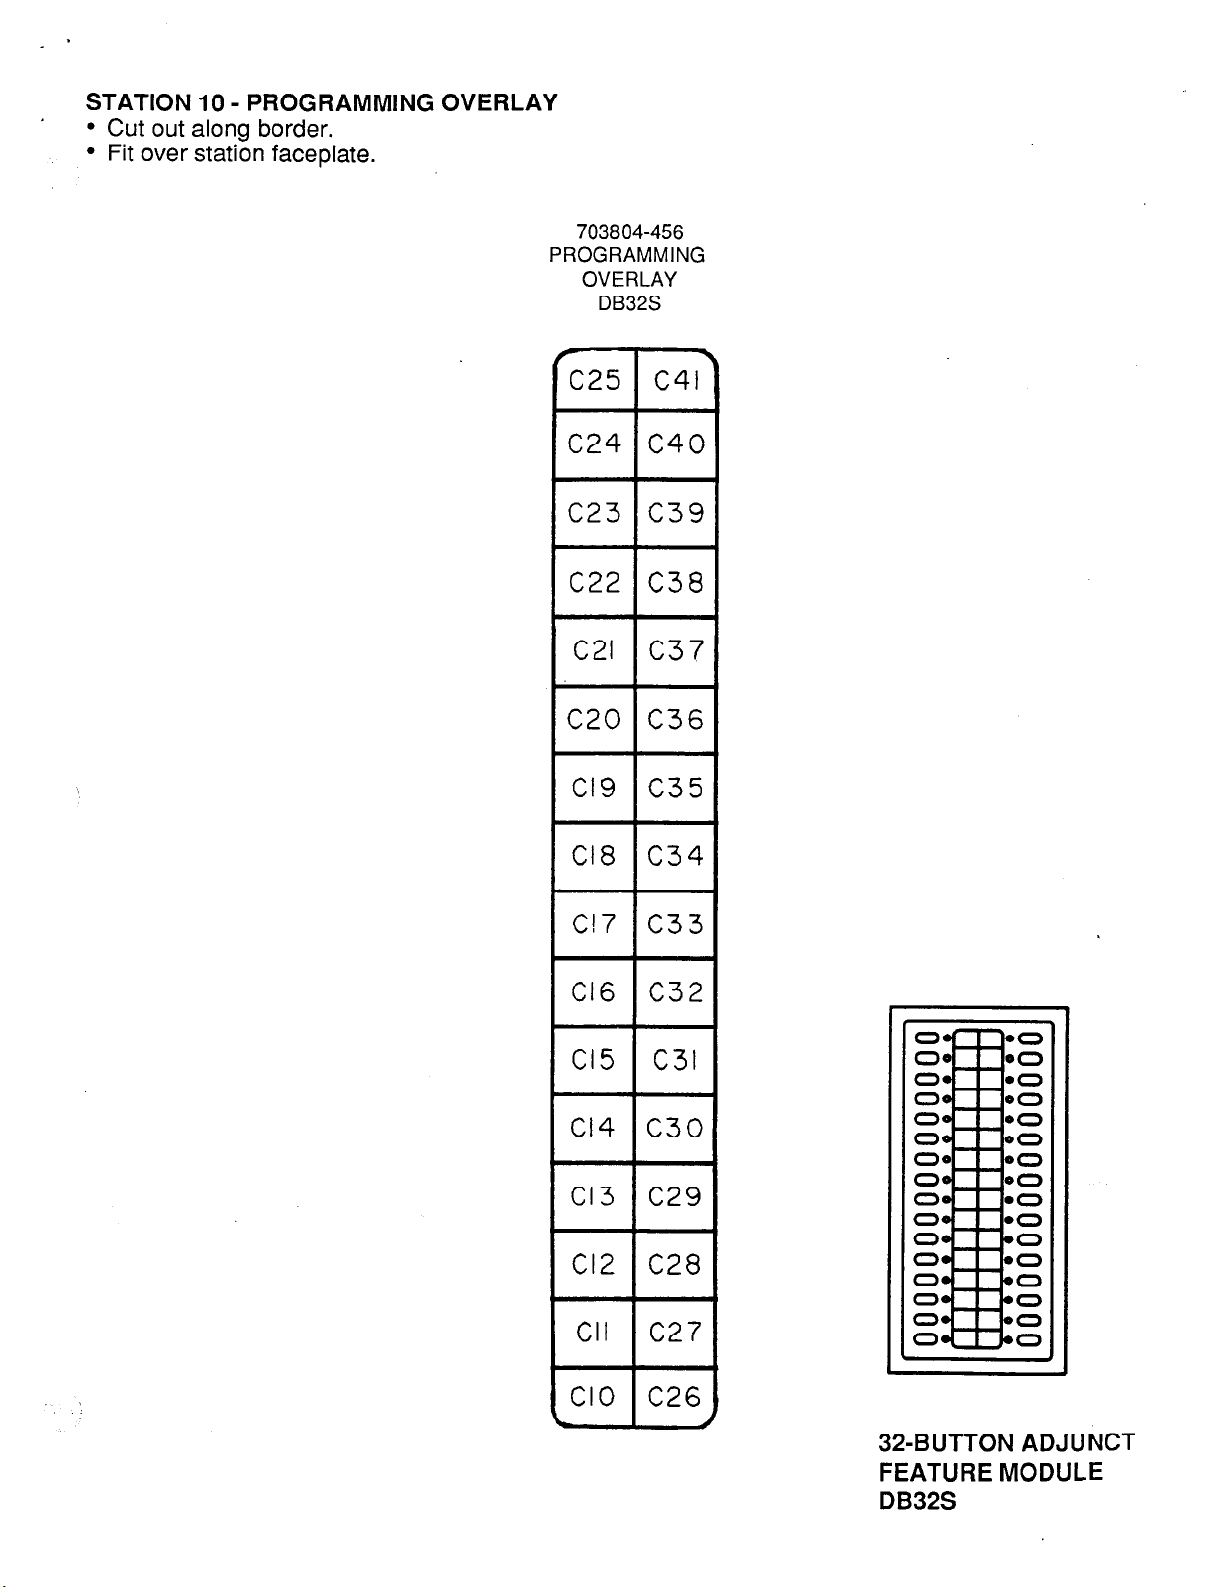
STATION 10 - PROGRAMMING OVERLAY
l
Cut out along border.
l
Fit over station faceplate.
703804-456
PROGRAMMING
OVERLAY
DB32S
C25
c41
4
C24
C23
c22
c21
c20
Cl9
Cl8
c17
Cl6
c40
c39
C38
c37
C36
c35
c34
c33
C32
Cl4
.
Cl0
Cl5
Cl3
Cl2
CII
C3l
c30
c29
C28
c27
C26
4
32-BUTTON ADJUNCT
FEATURE MODULE
DB32S
Page 66
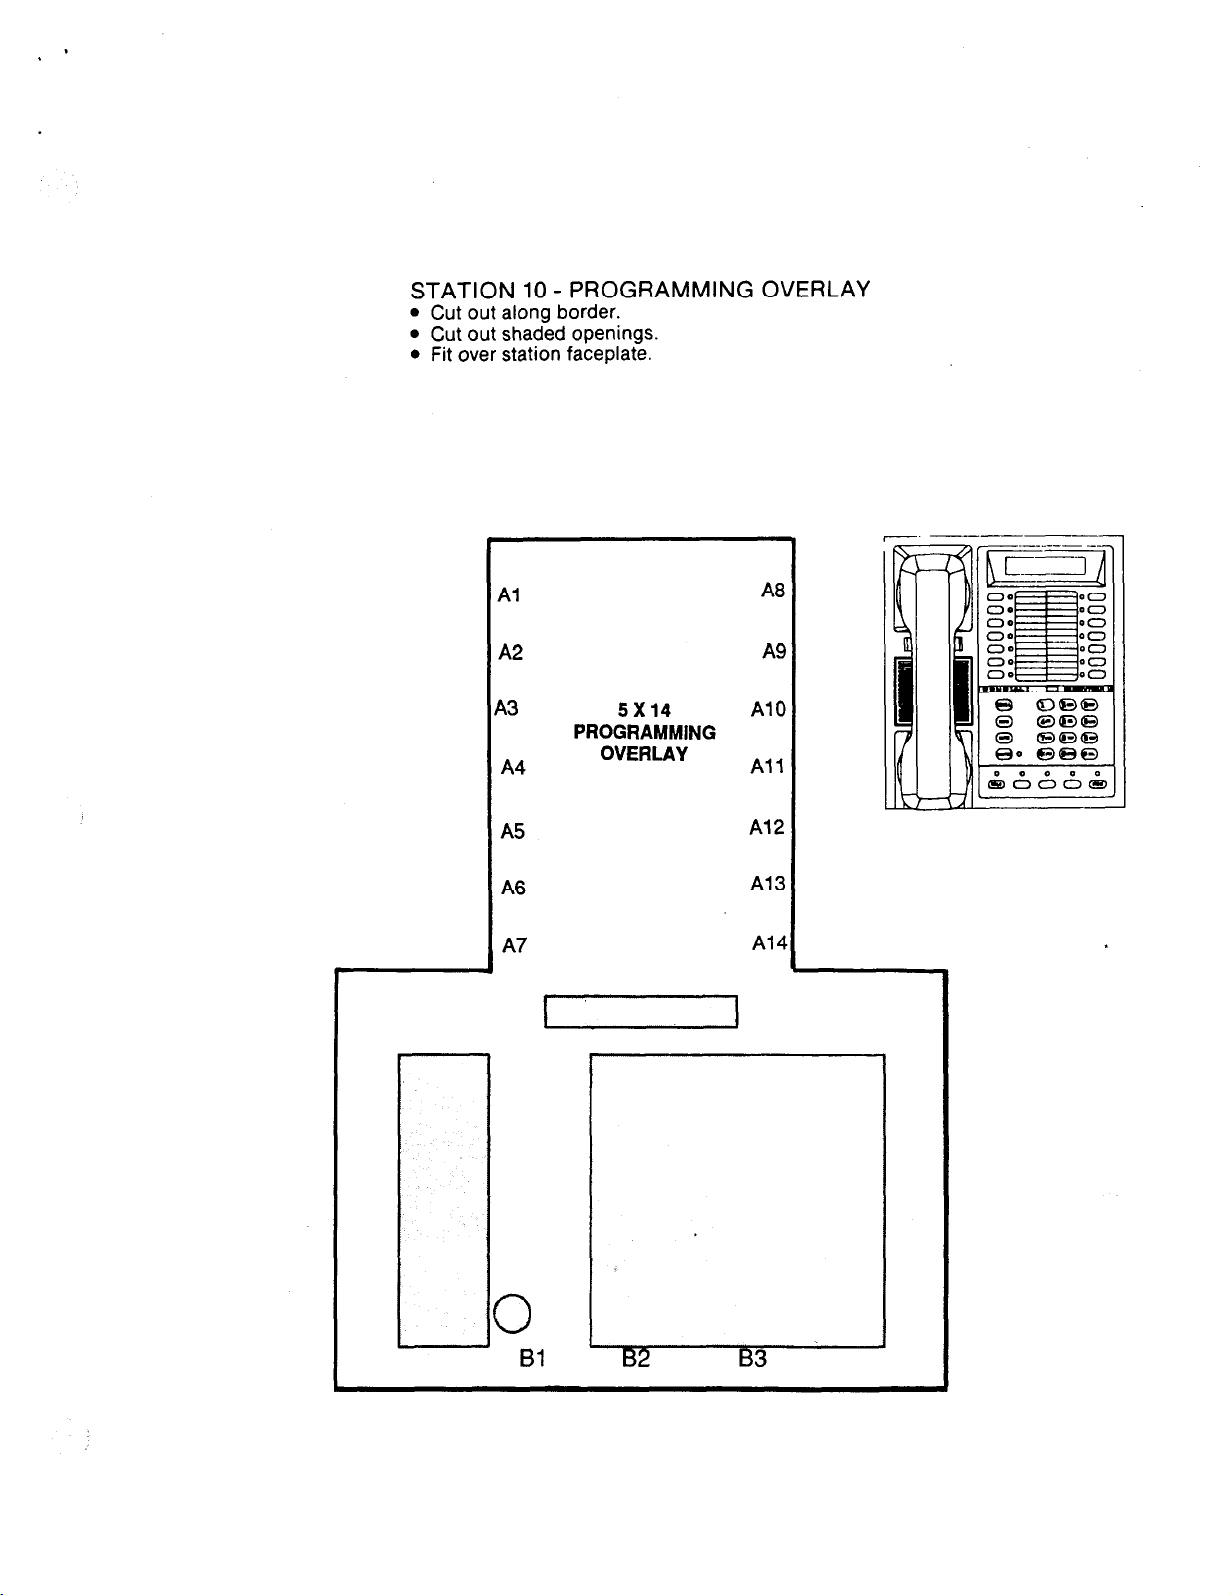
STATION 10 - PROGRAMMING OVERLAY
l
Cut out along border.
l
Cut out shaded openings.
l
Fit over station faceplate.
Al
A2
5x14
PROGRAMMING
A4
A5
A6
A7
OVERLAY
I I
A8
A9
A10
All
Al2
Al3
Al4
3
61
l32
B3
Page 67

STATION 10 - PROGRAMMING OVERLAY
l
Cut out along border.
l
Cut out shaded openings.
l
Fit over station faceplate.
A1 A8
A2
10x14
PROGRAMMING
OVERLAY
A9
A3 A10
A4 All
A5
Al2
A6 Al3
A7 Al4
Page 68

STATION 10 - PROGRAMMING OVERLAY
l
Cut out along border.
l
Cut out shaded openings.
l
Fit over station faceplate.
Al
A2
A3
A4
A5
A6
A7
B8
B6
B4
5X20
PROGRAMMING
OVERLAY
A8
A9
A10
Al 1
Al2
Al3
Al4
Al5
‘B7
B5
L
I I
0
Bl B2 B3 -
Page 69

STATION 10 - PROGRAMMING OVERLAY
l
Cut out along border.
l
Cut out shaded openings.
l
Fit over station faceplate.
Al
A2
A3
A4
A5
A6
A7
B7
85
B3
Bl
2x22
-M
ovERA
A8
A9
A10
Al 1
Al2
Al3
Al4
B8
B6
B4
B2
Page 70

\
IMI 66-064
System Operation
CHAPTER 5
SYSTEM OPERATING PROCEDURES
SECTION 1
STATION OPERATION
ANSWERING CALLS
ANSWERING OUTSIDE CALLS
Calls appear at buttons that have actual line
assignments.
l
Press line button of ringing line (line button with
flashing light).
l
Lift handset.
NOTE: If a prime line is assigned and is ringing, or if
the telephone can answer any ringing line
(ringing line preference enabled), do not press
the line button of the ringing line.
ANSWERING INTERCOM CALLS
To answer a voice call,
l
Speak toward the telephone.
l
Lift handset if privacy is desired.
NOTE: Voice calling can be blocked. See the
\
discussion titled, Voice Announce Blocking for
details.
To answer a tone call,
l
Lift handset to talk.
CALL PICKUP ANSWERING
DIRECT
To answer a call that is ringing at another
telephone,
l
Lift handset.
l
Press ITCM.
l
Dial +K 4.
l
Dial extension number of ringing telephone.
SYSTEM-WIDE
To answer a call that is ringing at any station in
system,
l
Lift handset.
l
Press ITCM.
l
Dial # 4.
HANDSFREE ANSWERBACK (HFAB)
While a station is busy on a call, an off-hook voice
announcement may be received either as a
non-secure off-hook voice announcement (OHVA) or
as a secure off-hook voice announcement (SOHVA).
An OHVA announcement is sounded through the
loudspeaker of a paired 32-button console (model
DB32S-xx adjunct feature modulG). A SOHVA
announcement is sounded through the handset
receiver of certain model multiline telephones.
Neither OHVA nor SOHVA calls will be received at
stations that have the voice announce blocking feature
enabled (see page 5-5).
To respond to an OHVA announcement,
l
Hear ring burst.
l
Hear alerting tone (several quick tone bursts) and
announcement sounded from loudspeaker in
adjunct feature module.
l
Speak toward microphone opening in front edge of
the adjunct feature module housing to reply.
’
NOTE The distant patty cannot be prevented from
overhearing the announcement; however, the
user can press and hold the MUTE button to
prevent the distant party from hearing the
response.
To respond to a SOHVA announcement,
Hear ring burst.
Hear tone alert and announcement in handset
receiver. Distant party cannot hear announcement.
Press and hold MUTE button, and reply by speaking
into handset transmitter. Distant patty cannot hear
response.
5-l
Page 71

System Operation
IMI 66-064 -
MAKING CALLS
OUTSIDE LINE CALLING
l
Press line button to select line.
NOTE:
l
l
Selecting a line is not necessary if:
A priority line has been assigned to a telephone (prime
line feature enabled).
The telephone automatically picks an idle line for use
when the handset is lifted (idle line preference feature
enabled).
Listen for dial tone.
Dial number.
When party answers,
l
Lift handset.
To end call,
l
Hang up handset.
INTERCOM CALLING
Intercom calls may be manually dialed or
automatically dialed using a pre-programmed Direct
Station Selection (DSS) button.
VOICE CALLING
To voice call an Intercom statlon,
Lift handset.
Press ITCM.
Dial extension number. (To call system operator,
dial 0.)
Speak to called party.
To voice call a DSS number,
l
Lift handset.
l
Press programmable button that is programmed for
desired station.
l
Speak to called party.
NOTE:
The outside line is automatically placed on
hold when a DSS button is pressed or when
the ITCM buttqn is pressed prior to manually
dialing an intercom extension number.
TONE CALLING
To tone call an intercom station,
l
Lift handset.
l
Press ITCM.
l
Dial extension number.
l
Press ITCM again. Called telephone will ring.
NOTE:
Some systems may be programmed to tone
signal as the first option. Pressing ITCM a
second time is not necessary in this case
To tone call a DSS number,
l
Lift handset.
l
Press programmable button that is programmed for
desired station.
l
Press ITCM. Called telephone will ring.
NOTE:
The lights (L EDs) ao’jacen t to programmable
buttons indicate status of DSS telephones:
DARK
indicates telephone in use.
indicates idle telephone,
FLASHING
STEADY-ON
indicates station is ringing..
MAKING OHVAISOHVA CALLS
To make a voice announcement to another station
that is busy on a call,
l
Lift handset.
l
Make intercom call.
l
Hear warning tone (several quick tone bursts), and
make announcement.
0 Wait on line for reply.
NOTE:
The announcement may be received as an
off-hook voice announcement (OHVA) or as a
secure off-hook voice announcement
(SOHVA). The method in which the
announcement is received is not controlled by
the caller. Rather, it is dependent upon the
type of equipment being used at the called
station, how that equipment is wired, and class
of service programming. A multiline telephone
and DB32S-xx console (adjunct feature
module) combination can receive an OHVA
call but cannot receive a SOHVA one. Certain
multiline telephones can receive calls in a
SOH VA manner without the companion
console but cannot receive calls in an OHVA
manner. Neither OHVA nor SOHVA calls can
be made to stations that have the voice
announce blocking feature enabled (see page
5-5).
5-2
Page 72

IMI 66-064
System Operation
SPEED DIALING
To dial station speed dial numbers,
l
Press keypad digit 0 - 9 for desired personal speed
dial number.
-OR-
If on line listenlng to dial tone,
l
Press HOLD and then press desired
keypad digit 0 - 9.
To dial system speed dial numbers,
0 Press *.
l
Press keypad digits 01 - 30 for desired system
speed dial number.
-OR-
If on line listening to dial tone,
l
Press HOLD % and then press desired
keypad digits 01 - 30.
AUTOMATIC DIALING
To automatically dial numbers,
l
Press desired programmable button.
l
If desired programmable button is also programmed
for DSS (one-button intercom) calling, press HOLD
and then press desired programmable button.
NOTE: Some telephone models provide an A 16 button
as part of the A-field buttons. This A 16 button
provides an automatic redial function as a fixed
feature. Operation of this fixed automatic
redial button is the same as that given for the
programmed automatic redial button.
AUTOMATIC REDIALING
To activate automatic redial,
l
Press programmable button pre-programmed for
that purpose.
l
Number will be dialed once a minute for ten minutes.
If called number is busy,
l
Press automatic redial programmable button to
immediately start the redial cycle.
If call is answered,
l
Take control by lifting handset. If control is not
taken, call will drop.
To cancel automatic redial,
l
Press automatic redial button, lift and replace
handset, or press any station button.
NOTE: Any user-originated station activity during
automatic redial will cancel the feature.
LAST NUMBER REDIAL
The last number previously dialed can be
automatically redialed with one-button or two-button
action.
l
Dial #. (If on-line listening to dial tone, press HOLD
then dial #.)
l
Listen for ringing or busy tone.
- Ringing tone: When party answers, lift handset.
- Busy tone: Press MNTR (SPKR) to disconnect.
AUTO-SAVE
The last manually dialed number can be automatically
saved for later redial. As many numbers may be
saved as there are blank programmable buttons
available: however, the automatic saving of a number
where one is already saved will result in the
over-writing of the original saved number.
To auto-save a manually dialed number,
l
Lift handset or press MNTR (SPKR).
l
Press line select button (if idle line preference is not
enabled) to select line.
l
Dial number from keypad.
If you wish to save number,
l
Press desired programmable button to auto-save
number.
l
Hang up.
To dial an auto-save number,
l
Press line select button (if idle line preference is not
enabled) to select line.
l
Press auto-save button. Number is automatically
dialed.
5-3
Page 73

System Operation
IMI 66-064 ’
EXTENDED DTMF
The length of the DTMF tone can be extended
from
l
Wait 10 seconds, and dial number. System will
then genera: long DTMF tones when dialing
the standard length to a pre-programmed longer
l
length.
Immediately press HOLD, then press line button of
selected line to set the system to generate long
To extend tone length,
l
Take station off-hook (lift handset).
l
Press line button to select line if not automatically
selected by going off-hook.
DTMF tones without waiting for delay conversion.
To alternate between long length and standard
length DTMF tones during a call,
l
Press HOLD, then press line button for selected line.
HOLDING CALLS
MANUAL HOLD
To place call on hold while on line,
l
Press HOLD.
To retrieve held call, HOLD RECALL FEATURE
l
Press line button with flashing light.
-OR-
l
Press TAP if station does not have line appearance.
EXCLUSIVE HOLD (Only your telephone can
retrieve held call.)
l
Press HOLD twice.
After a preprogrammed length of time, a call placed on
hold will automatically ring back to the telephone that
placed it on hold. If the call is on exclusive hold, it will
revert to manual hold after the hold recall time period.
The call can then be retrieved by anyone with that line
appearance.
’
TRANSFERRING OUTSIDE CALLS
SCREENEDTRANSFER
To transfer an outside call to another station In the
system,
l
Answer outside call (Do not press HOLD.)
l
Press TRANWCONF. (Outside call is placed on
hold automatically.)
l
Dial extension number of party to be transferred to
(or press DSS button for one-button intercom
calling).
l
When intercom party answers, announce call and
line number.
l
Hang up handset.
If the called party Is busy or does not answer,
l
Press TAP or flashing line button to retrieve call.
UNSCREENEDTRANSFER
To transfer an outside call to another station in the
system,
l
Answer outside call. (Do not press HOLD.)
l
Press TRANSICONF. (Outside call is placed on
hold automatically.)
l
Dial extension number of party to be transferred to
(or press DSS button for one-button intercom
calling).
l
Hang up handset.
NOTE: If the station to which an unscreened transfer
is made is busy, the transferred call will
camp-on at the station. The call will
automatically ring the station when it become
idle. If a transferred call is not answered after
a preprogrammed time, it will ring back to the
transferring station.
To answer recall of transferred call,
l
Press TAP button.
’
5-4
Page 74

IMI 66-064
System Operation
CONFERENCING
Conference transmission levels are not compensated
and are dependent upon the quality of the external
lines.
MULTILINE CONFERENCE
(2 external parties, 1 internal party)
To set up a multiline conference,
l
Establish first outside call. (Do not press HOLD.)
l
Press TRANSCONF. (Outside call is placed on
hold automatically.)
l
Establish second outside call. (Do not press HOLD.)
l
.Press TRANSXONF. Conference is established.
To drop one conferee and remain active in
conference with other conferee,
l
Press HOLD. Both lines placed on hold.
MESSAGE WAITING CONTROL
The message waiting light at any telephone can be
turned from another telephone to alert the user that a
message awaits pickup.
To
turn
on MW light,
l
Press ITCM.
l
Dial +# 3.
l
Dial extension number of station to be alerted. (The
MW light of called station will flash.)
To turn off MW light,
l
Press ITCM.
l
Press line key of party to be dropped.
l
Press and release hookswitch.
l
Press line key of party to be retained.
0 Resume conversation.
ADD-ON CONFERENCE
(1 external party, 2 internal parties)
l
Establish outside call.
l
Press TRANSCONF (outside call placed on hold
automatically).
l
Dial extension number of intercom party.
0 Wait for answer.
l
Press TRANSCONF (a three-way connection is
established).
l
Dial #3.
l
Dial extension number of station that was alerted.
(The MW light of called station will turn off.)
To turn
l
off MW light while delivering message,
Press HOLD.
To receive message at an alerted station, .
l
Observe flashing MW light.
l
Lift handset.
l
Press ITCM HOLD.
l
Connection to message depositor is automatic.
To block voice calls,
l
Press ITCM.
l
Dial +K 2.
l
Hang up.
VOICE ANNOUNCE BLOCKING
To un-block voice calls,
l
Press ITCM.
l
Dial # 2.
l
Hang up.
5-5
Page 75

System Operation
IMI 66-064 ’
LINE MONITORING
To activate while on a call,
l
Press
MNTR
l
Hang up handset.
NOTE:
If a distant party places the call on hold, the
ISPKR). Monitor light will turn on.
.
station user can monitor in a handsfree
RECALL/FLASH
FLASH
PBX, CENTREX and custom calling services may
require this feature.
If a system has been configured for flash,
l
Press TAP to generate a timed flash signal.
To cancel,
.
.
RECALL
This feature provides disconnect and dial tone recall.
If a system has been configured for recall,
l
NOTE:
PAGING
manner until the party returns, and then lift the
station handset to resume the call.
Lift handset to resume conversation
-OR-
Press MNTR (SPKR) to disconnect. Monitor light
will turn off.
Press TAP to disconnect current call and receive a
new dial tone for another call.
A system can be configured for either flash of
recall but not for both.
EXTERNAL PAGING
(Requires external paging unit)
l
Press line button dedicated to paging.
ALL-CALL AND ZONE PAGING
To page,
DO NOT DISTURB
To silence a station ringer and appear busy to Intercom calls,
l
Press MNTR (SPKR). (Associated light will turn on).
NOTE:
The calling party will hear two quick tone
bursts every three seconds. The feature
cannot be overridden by the calling patly.
l
Liit handset.
l
Press ITCM.
l
Dial zone number - (4,5, 6, or 7 for all-call).
l
Make announcement.
l
Hang up handset.
To cancel,
l
Press MNTR (SPKR) again. (Associated light will
turn off.)
5-6
Page 76

.
IMI 66-064
System Operation
MUTE / HANDSFREE ANSWER INHIBIT
The MUTE button is in a non-latching mode when the
station handset is lifted and in a latching mode when
the station is operated in a handsfree manner.
To prevent distant party from hearing while hand-
set is lifted,
l
Press and hold MUTE. Speaker light will flash.
To resume two-way conversation,
l
Release MUTE. Speaker light will turn off.
To inhibit handsfree answer of intercom calls,
l
Press and latch MUTE. Speaker light will flutter.
To enable handsfree answer of intercom calls,
l
Press and release MUTE. Speaker light will turn off.
PULSE/TONE SWITCHING
If the local telephone servlce Is pulse (rotary) but NOTE: Pulse/Tone switching can be stored at a
tone generation is required during the call, convert
to tone while dialing as follows:
l
Press # at point in dialing sequence where
programmable button by pressing # during
number storage.
conversion to tone is required. (System will switch
back to pulse dialing when call is ended.)
PERSONAL RINGING TONES
A station user can select one of four different ringing
tones for use at a station.
TONE PAIR RATE
FREQUENCY WARBLE
l
Press ITCM +k ++.
l
Dial 4.
l
Dial 1, 2,3, or 4 (selects tones 1,2,3, or 4).
BACKGROUND MUSIC
Music must be supplied by the system before it can be
turned on at a telephone. Background music, when
supplied, automatically turns off during calls.
To turn music on,
l
Press ITCM.
l
Dial +k 1. (SPKR light will turn on.)
TONE 1 509/610 Hz 10 Hz
TONE 2 763/l 016 Hz 10 Hz
TONE 3 509/610 Hz 19 Hz
TONE 4 763/l 016 Hz 19 Hz
l
Adjust loudness of music with call monitor speaker
volume control.
To turn music off,
l
Press ITCM.
l
Dial # 1. (SPKR light will turn off.)
5-7
Page 77
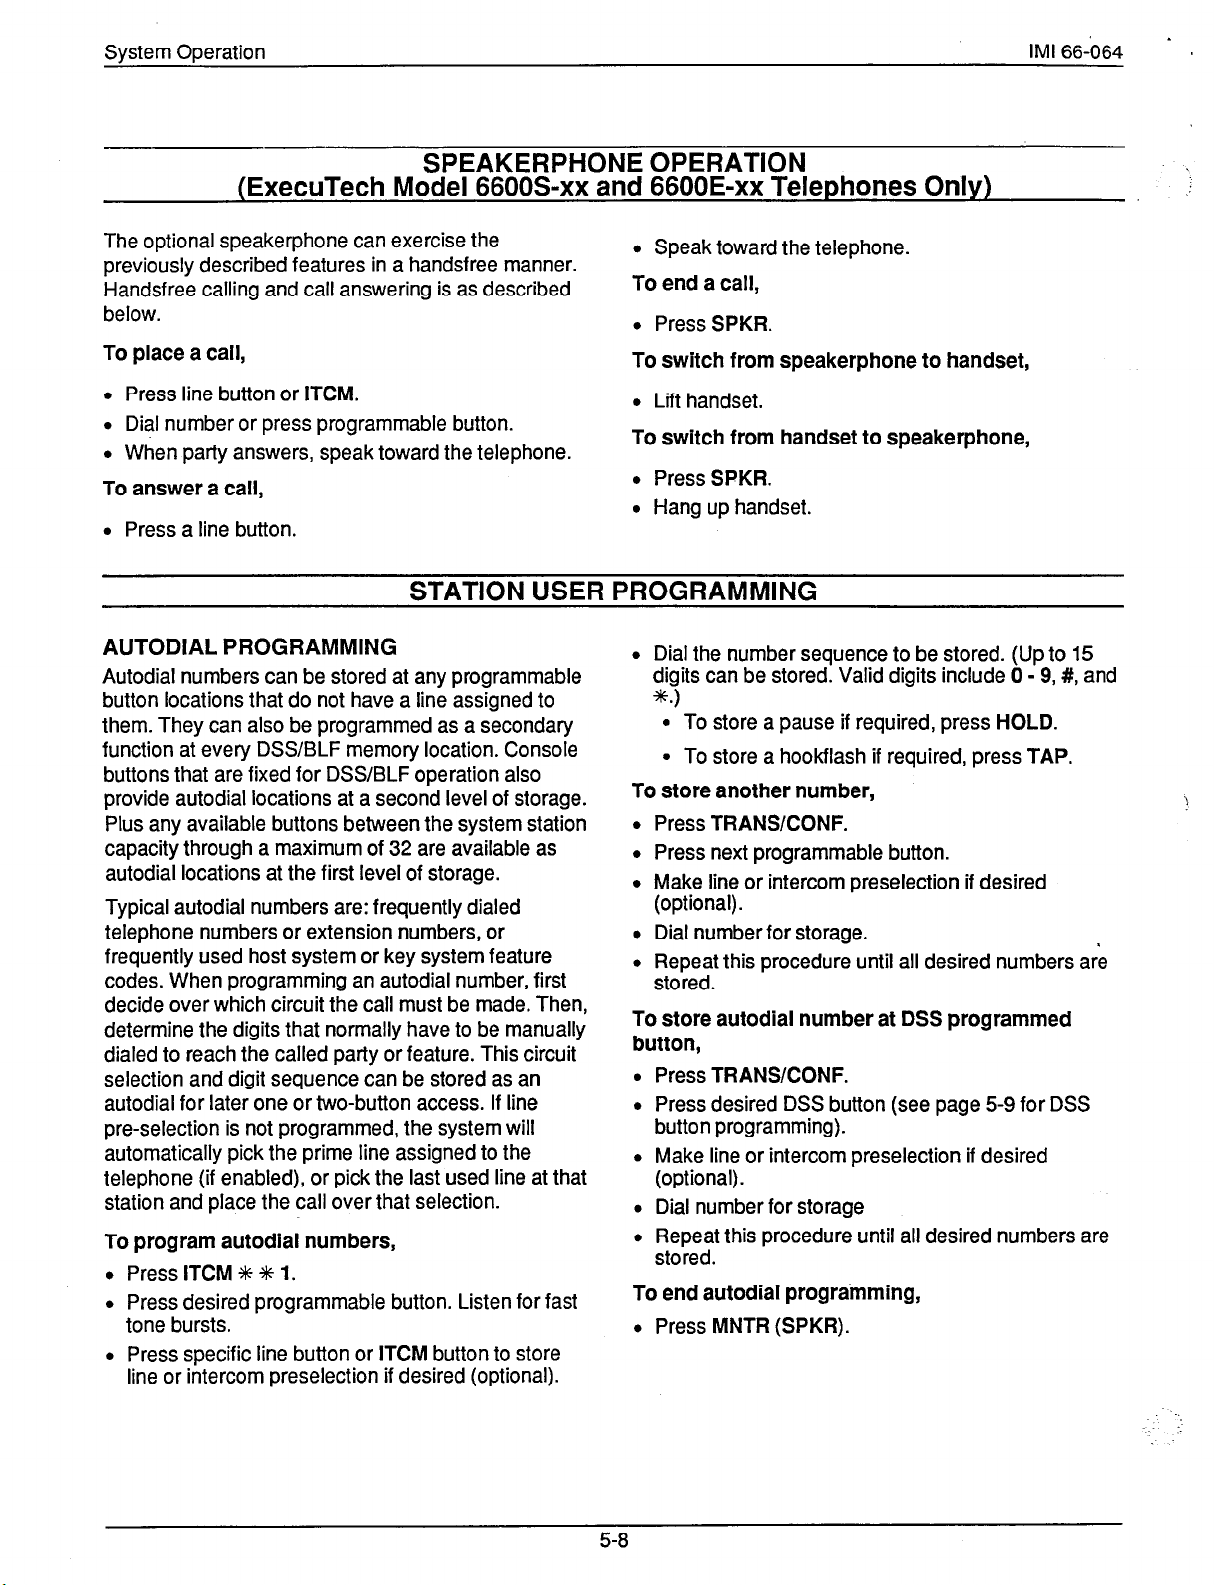
System Operation IMI 66-064 * a
SPEAKERPHONE OPERATION
(ExecuTech Model 6600%xx and 6600E-xx Telephones Only)
The optional speakerphone can exercise the
previously described features in a handsfree manner.
Handsfree calling and call answering is as described
below.
To place a call,
l
Press line button or ITCM.
l
Dial number or press programmable button.
l
When party answers, speak toward the telephone.
To answer a call,
l
Press a line button.
STATION USER PROGRAMMING
AUTODIAL PROGRAMMING
Autodial numbers can be stored at any programmable
button locations that do not have a line assigned to
them. They can also be programmed as a secondary
function at every DSS/BLF memory location. Console
buttons that are fixed for DSS/BLF operation also
provide autodial locations at a second level of storage.
Plus any available buttons between the system station
capacity through a maximum of 32 are available as
autodial locations at the first level of storage.
Typical autodial numbers are: frequently dialed
telephone numbers or extension numbers, or
frequently used host system or key system feature
codes. When programming an autodial number, first
decide over which circuit the call must be made. Then,
determine the digits that normally have to be manually
dialed to reach the called party or feature. This circuit
selection and digit sequence can be stored as an
autodial for later one or two-button access. If line
pre-selection is not programmed, the system will
automatically pick the prime line assigned to the
telephone (if enabled), or pick the last used line at that
station and place the call over that selection.
To program autodial numbers,
l
Press ITCM % # 1.
l
Press desired programmable button. Listen for fast
tone bursts.
l
Press specific line button or ITCM button to store
line or intercom preselection if desired (optional).
l
Speak toward the telephone.
To end a call,
l
Press SPKR.
To switch from speakerphone to handset,
l
Lift handset.
To switch from handset to speakerphone,
l
Press SPKR.
l
Hang up handset.
l
Dial the number sequence to be stored. (Up to 15
digits can be stored. Valid digits include 0 - 9, #, and
a.1
l
To store a pause if required, press HOLD.
l
To store a hookflash if required, press TAP.
To store another number,
l
Press TRANSEONF.
l
Press next programmable button.
l
Make line or intercom preselection if desired
(optional).
l
Dial number for storage.
l
Repeat this procedure until all desired numbers are
stored.
To store autodial number at DSS programmed
button,
l
Press TRANSEONF.
l
Press desired DSS button (see page 5-9 for DSS
button programming).
l
Make line or intercom preselection if desired
(optional).
l
Dial number for storage
l
Repeat this procedure until all desired numbers are
stored.
To end autodial progra’mming,
l
Press MNTR (SPKR).
5-8
Page 78
. ’
IMI 66-064
System Operation
STATION SPEED DIAL PROGRAMMING
Station speed dial numbers can be stored by the
station user for later redial. The storage locations are
keypad digits 0 through 9 on the station. Before
attempting to program, decide on the following items:
(1) the number or feature to be stored, (2) which
storage location will be used (0 - 9), (3) the circuit that
the call will go over (individual line or intercom).
To program numbers,
Press ITCM +# ++ 2.
Dial a memory location (0 through 9).
Press specific line button or ITCM button to store
line or intercom preselection lf desired (optional).
Dial the number sequence to be stored. (Up to 15
digits can be stored. Valid digits include 0 - 9, #, and
w
l
To store a pause if required, press HOLD.
. To store a hookflash if required, press TAP.
Example: Store a telephone number under
location 0. The sample number is
1(804)555-2222. Program it as follows:
ITCM, S, m, 2,0, Line Button, 1,8,0,4,5,5,5,2, 2,2,2.
To store another number,
l
Press TRANS/CONF.
l
Press next speed dial location.
l
Make line pre-selection if desired.
l
Dial number for storage.
l
Repeat this procedure until all desired numbers are
stored.
To end station speed dial programming,
l
Press MNTR (SPKR).
DIRECT STATION SELECTION/BUSY LAMP
FIELD (DSWBLF) PROGRAMMING
One-button intercom calling with visual indication of
telephone status can be programmed at telephone
buttons not assigned to lines. The DSS/BLF console
buttons are fixed by the system for DSS/BLF operation
beginning with station 10 and ending with the
maximum station number in the system.
To program DSS,
l
Press ITCM % t 3.
l
Press button to be programmed as DSS button.
l
Dial extension number.
l
Repeat last two steps for all desired extension
numbers.
To end DSS programming,
l
Press MNTR (SPKR).
NOTE: An autodial number can also be programmed
as a secondary function at every DSSBL F
memory location. See Automatic Dialing
instructions for programming details.
AUTOMATIC REDIAL BUTT-ON
PROGRAMMING
The system will allow the last previously dialed
number to be automatically and repeatedly redialed for
approximately ten minutes. A button must be
programmed to provide this feature.
To program a programmable button for use as an
automatic redlal button,
l
Press ITCM 5 % 1.
l
Press desired programmable button.
0 Press #.
l
Press MNTR (SPKR).
5-9
Page 79
System Operation IMI 66-064
SECTION 2
AlTENDANT STATION OPERATION
SYSTEM CLOCK
- ’
,
If the system has been modified to provide LCD
speakerphone support, the systemclock can be
proarammed to maintain current date and time
infoimation in the display. The clock information is not
displayed until the feature is programmed.
1. Press
2. Dial%#O
ITCM.
1.
3. Dial two digits (00-99) for yr.
SYSTEM SPEED DIAL PROGRAMMING
A special system-wide list of numbers can be
programmed for automatic dialing by all users.
1. Press
2. Dial ++ # 0 2.
3. Dial 01 - 30 to chose storage location. Listen for
4. Press specific line button or
NOTE:
ITCM
tone bursts.
ITCM
button to store
line or intercom preselection if desired (optional).
When no line is preselected and the system
speed dial is used, the system will
4. Dial two digits (01-l 2) for mo.
-
5. Dial two digits (01-31) for day.
6. Dial two digits (00-23) for hr.
7. Dial two digits (00-59) for min.
8. Dial one digit (l-7) for day of week (Sun.=l, Sat.=7)
9.
Press
MNTR (SPKR)
to end.
automatically pick the prime line assigned to
the station (if enabled) or pick the most
previously used line at that station.
5. Dial the number to be stored (15 digits maximum).
l
Press
HOLD
to store pause (if required).
l
Press
TAP
to store flash (if required).
6.
Press
TRANSEONF
to save number.
7. Repeat steps 3 - 7 to store next number.
8.
Press
MNTR (SPKR)
to end.
NIGHT TRANSFER (of ringing)
The day, or normal, ringing of incoming lines can be
transferred to a particular station or stations (chosen
through class of service programming) for off-hour or
special-purpose answering. Additionally, stations can
be arranged through class of service programming, to
be able to answer any ringing outside line.
1. Press
ITCM.
2. Dial +K # 0 3.
MUSIC ON HOLD
Music that is provided to outside lines while they are
on hold can be disabled and enabled by attendant
action.
1. Press
2. Dial % # 0 4.
ITCM.
3. Press
Al
(top, left-hand programmable button) to
toggle feature on or off. Associated light will turn
on when night transfer is active and turn off when it
is inactive.
4.
Press
NOTE:
MNTR (SPKR)
When this feature is on, the ITCM light will
to end.
flash.
3. Press
Al
(top, left-hand programmable button) to
toggle feature on and off. Associated light will turn
on when music on hold is provided and turn off
when it is disabled.
4.
Press
MNTR (SPKR)
to end.
.:
5-10
Page 80

IMI 66-064
MUTE KEY
. MUTES SPEAKERPHONE
OR HANDSET I ull \ID
CALL MONITOR SPEAKER
-tl
. . DO NOT DISTURB
HOLD KEY-
l
HOLD ACTIVE OUTIDE LINE
l
SHIFT KEY FUNCTIONS
l
STORES PAUSES
TELEPHONE LINE
f F:y:Yz:~TKEy ,,,,.
- SPEAKER VOLUME CONTROL
Typical Telephone - Model 6714X-xx shown.
System
l
DIRECT STATION SELECTION (DSS)
l
INTERCOM CALLING BETWEEN SThTlONS
WITH CALLED STATION STATUS (BLF)
l
AUTO DIALING OF STORED NUMBERS OF
UP TO 16 DIGITS
l
LINE APPEARANCE
l
FEATURE CODE ACCESS (WHEN STORED)
- DSS KEY/AUTO DIAL LOCATIONS 1-6
(HOLD KEY PLUS AUTO DIAL KEY FOR AUTO DIAL
LOCATlONS WHEN DSS/BLF IS ALSO PROGRAMMED)
. .
- DSS KEY/AUTO DIAL LOCATIONS 7-12
(HOLD KEY PLUS AUTQ DIAL KEY FOR AUTO DIAL
LOCATIONS WHEN DSSIBLF IS ALSO PROGRAMMED)
Operation
d KEY PAD
. MANUAL/SPEED DIALING
- REDIAL KEY
. AUTO REDIAL
- TIC KEY
I’
. STORE AUTO/SPEED
DIAL NUMBERS
. TRANSFER CALLS
- INTERCOM LIGHT
l
INTERCOM STATUS
l
AUTO REDIAL MODE
l
NIGHT TRANSFER OF RINGING MODE
-INTERCOM KEY
. SELECT
(FRONT EDGE OF TELEPHONE)
INTERCOM LINE
SOFT KEYS
. SAME FEATURES AS SOFTKEY FIELD
. OFTEN PROGRAMMED FOR LINE
APPEARANCE
TAP KEY
. HOOKSWITCH FLASH (TAPI
. o,AL TONE RECALL
TRANS/CONF KEY
. SAYE L.GT N”hBER OlALEO
. STORE .wTO/s=EEO 0, AL
MUTE KEY
.t.ulEs SPEbKERPHONE OR HWOSET
CALL MONITOR
SPKR KEY
. SPEAKER OF
.oo NOT 0,s
SPEAKER 4
MESSAGE WAITING LIGHT
I
Typical telephone - Model 6600E-xx shown.
Figure 5-l. Controls and Indicators.
DISPLA Y
.O,&EO NUw.ER
.CALL,NG NUhBER
.CALL TIM3
l CLOCK/CALENom
.CtLL PlCKUP
po&0T 01 STURB
SUFXEY FIELD
. DIRECT STATION SELECTlON
. LNlERCOM CbLLING BETWEEN
ho ^.. -^ --.-.^.. --.-.
. AUT
DSS KEY/AUTO DIAL KEY LOCATIONS l-
iHOLD KEY PLUS AUTO DIAL KEY FOR MJTO DIAL LOCATIONS
WHEN 055/WF IS ALSO PROGRPIM*EOI
SPEAKER VOLUME CONTROL
5-11
Page 81

System Operation
SECTION 4
SYSTEM OPERATING CHARACTERISTICS
FEATURE DIALING CODE NUMBERING PLAN
1
IMI 66-064 ’
FEATURE DESClWllON
All Call Page
Attendant Calling
Automatic Redial PROGRAMMED BUTTON
Background Music On ITCM t 1
Off ITCM # 1
Call Pickup Directed
System
Do Not Disturb Set
Cancel
Handsfree Answer lnhibii
Message Waiting
Set
Cancel
Set
Cancel From Idle
1 Cancel On Line 1 HOLD
Retrieve Message
DIAUNG CODES
I-EM 7
I
ITCM 10 or 0
I
To program: ITCM, * * 1, BUTTON, #. MNTR (SPKR)
ITCM t 4 + Ext. No.
ITCM # 4
MNTR (SPKR)
MNTR (SPKR)
MUTE
MUTE
ITCM ly 3 + Ext No.
ITCM # 3 + Ext. No.
ITCM HOLD
-1
I
Music On Hold
(Station 10 only)
Night Transfer
(Station 10 only)
Personal Ringing Tones
Pulse/Tone Switching
Redial (Last number dialed)
Speed Dial
Voice Announce Block
Zone Page Zone 1
On
Off
On
off
Set Tone 1
Set Tone 2
Set Tone 3
Set Tone 4
Station
System
On
off
I
Zone 2
Zone 3 ITCM 6
ITCM m # 04 Al
ITCM t # 04 Al
ITCM * # 03 Al
ITCM % # 03 Al
ITCM *x41.
1 lTCM’*+42
1 ITCMA’x43
lTCMsx44
#during dialing.
# (HOLD # when on line)
1 - 0 (HOLD 1 - 0 when on line)
% 01 - * 30 (HOLD %Ol - * 30 when on line)
ITCM * 2
ITCM # 2
I
ITCM 4
ITCM 6
I
5-12
Page 82

IMI 66-064
System Operation
RINGER VOLUME CONTROL
Each station has a ringer volume cqntrol. Depending
upon the model, the ringer control is located on the
front edge, rear edge, or bottom of the telephone.
Adjust the control lever to OFF, LOW or HIGH volume
as desired.
STATUS INDICATORS AND TONE
SEQUENCES
The following pages describe the light and ring
patterns associated with system operation.
NOTE: The values shown are typical. They are
provided for illustration purposes only.
5-13
Page 83

SYSTEM RINGING PATTERNS
CO/PBX Line Ring Host system ring cadence RING CADENCE DEPENDENT UPON HOST SYSTEM
intercom Tone Signalling Two 140 msec. tone bursts
sounded every four seconds
Y
6
Voice Signalling alert One 210 msec. tone burst
Timed hold recall at
station that put call sounded at the end of each
on hold
,:
Three 140 msec. tone bursts
timeout period
nnlL nnn J-U-UL
Page 84
INTERCOM CALL PROGRESS TONES
(Heard through handset receiver or over monitor speaker)
Y
d
Dial Tone
3ase Level Tone
Called station ring-back 560 msec. tone burst
Called station busy
on outside line
Base level
program entry
‘rogramming
xxfirmation
System speed dial
entry cqnfirmation
Memory dial intercom,
line, group and/or recall
selection confirmed
Continuous on
sounded twice every 4 sec.
70 msec. tone burst
sounded once
-I
I I
All-call page
selection confirmed
PA station port
selection confirmed
Page 85
Error tone -
incorrect entry sounded three times
Busy tone - intercom 560 msec. tone bursts
560 msec. tone burst
Y
0
Called station in do-not- 140 msec.tone burst
disturb mode
Fasy busy tone
System Js awaiting
memory dial number continuously
or key mapping entry
after location is specified
sounded twice every sec.
70 msec. tone bursts sounded
J u u u
U U L
-’ ,
Page 86

LINE SELECT LIGHTS
.
Idle
Ringing
Steady off
Continuous flash
(560 msec. on - 560 msec. off)
In use-your station
Steady on with wink off
(2.3 sec. on - 70 msec. off)
In use-other station Steady on
I
I
On hold-your station Winking with repeative off periods
(winking rate - 560 msec. off)
On hold-other station Continuous winking
(490 msec. on - 70 msec. off)
1 u u
Page 87

INTERCOM LIGHT
Y
a
In use-your station
All links busy Steady on
Auto redial active Continuous flutter
Night mode - Station 10
Steady on with wink off
(2.3 sec. on -‘70 msec. off)
(70 msec. on - 70 msec.‘off)
Flutter with repeative off periods
(flutter rate - 560 msec. off)
Page 88

Exclusive hold Steady on
Held call timeout your
station
Held call timeout other
station
MESSAGE WAITING LIGHT
Message Waiting Continuous flash (560 msec. on
Flutter with repeative off periods
(flutter rate - 560 msec. off)
Continuous flutter
(70 msec. on - 70 msec. off)
- 560 msec. off)
I I 1 I
Page 89

DSS station idle Steady off
DSS station busy on
intercom calling you
DSS station busy on Steady on
outside line or intercom
line
DSS station in do not
disturb mode.
Continuous flash
(560 msec. on - 560 msec. off)
Page 90
SPEAKER LIGHT
On line and speaker on Steady on
(mike also on if
speakerphone)
Do not disturb mode
Background music on
Mute Continuous flutter
-OR-
(70 msec. on - 70 msec. off)
Handsfree answer inhibit
Do not disturb plus Mute Flutter with repeative on periods
-OR-
(flutter rate - 560 msec. on)
Active line plus Mute
Page 91

. .
ItiI66-064
Maintenance
CHAPTER 6
MAINTENANCE
TECHNICAL ASSISTANCE
AND REPAIR SERVICE
TECHNICAL ASSISTANCE
Should you experience difficulty with installation,
checkout, or programming, and have made an attempt
to isolate the problem using information provided
herein; or should you encounter problems at a later
date which cannot be resolved by referring to this
manual, call the Comdial Technical Service staff.
They can be reached at l-800-366-8224 between the
hours of 8:Og AM
Monday through Friday.
When calling for technical assistance, you should be
at the job site and you should have in your
possession, ES a minimum, an accurate volt-ohm
meter and a copy of this manual.
REPAIR SERVICE
If your common equipment cabinet or an individual
station needs repair, it may be returned to Comdial.
Comdial will, at their option, either repair the defective
equipment or replace it with a remanufactured unit.
This repair will be done for a fixed charge. For
information cn this charge, please call or write to the
address given below.
and
8:00 PM Eastern time,
Comdial
P.O. Box 7266
Charlottesville, VA 22906
Attention: Repair Department
Telephone: (804) 978-2400
When returning equipment for repair, pack it carefully
to prevent damage. Any damages during shipment
will be the responsibility of the purchaser. The
equipment should be shipped freight or postage
prepaid. The shipping address is:
Comdial
1180 Seminole Trail
Charlottesville, VA 22901
Attention: Repair Department
FUSE LOCATION
The system is protected against short circuit damage
by a 1 amp slow-blow fuse located on the left side of
the common equipment cabinet. Always replace the
fuse with one of the same value and type, otherwise,
equipment damage could result.
WIRING
Refer to Chapter 2, Section 3, Checkout and Failure
Isolation, for instructions for testing the system wiring
and components for possible failure.
A to
Z
KELLATRONICS, Inc,
6-l
Page 92

IMI 66-064
Publication Index
PUBLICATIONS INDEX
Abandoned Hold Release
Abandoned Hold Release, Automatic ............ 2-i
AC Power Connection ...................
AC Power Connection And System Grounding .......
Access Denied ................... .2-l, 4-13
Add-On Conference
All Intercom Links Busy Indication
All-Call And Zone Paging .............. .4-15,5-8
All-Call Paging
Answering Calls
Answering Intercom Calls
Answering Outside Calls
Assign Toll Restriction To Lines
Assign Toll Restrictions To Stations
Attendant Programming
Attendant Station Operation
Auto Dial
Auto-Save
Autodial Programming
Automatic Abandoned Hold Release
Automatic Dialing
Automatic Hold Transfer To Intercom (answer Hold)
Automatic Pause Insertion
Automatic Privacy
Automatic Redial
Automatic Redial Button Programming ........
Auxiliary Equipment Interface .............
Auxiliary Line
Auxiliary Station Ringer Interface ........... 2-2,3-13
Background Music
Basic Key Service (la2) ..................
Battery Back-up
BLF Lights .........................
Cable Requirements
Call Announce With Handsfree Answerback ........
Call Pickup ....................
Call Transfer .................... 2-2,2-3,5-4
Calling Station Identification
Central Office Limits .....................
Checkout And Failure Isolation ..............
Class Of Service Programming ............ .2-3,4-5
Common Audible And Auxjliary Station Interface 2-2, 2-3,3-13
Common Audible Ringer Interface ...........
Common Equipment Description
Compatibility With Telephone Network .......... 3-19
Conferencing ........................
Configuration
Connection, DSSIBLF Console ..............
Controls And Indicators .................. 5-11
Default Functional Program
Delayed Ringing
Description, DSS/BLF Console ............... l-4
Description Of System Features
Description, Station ...................... l-4
........................
.......................
..................
..................
......................
...............
.................
..................
..................
.................
.......................
...................
....................
....................
........................
....................
A
..................
.2-l, 5-5
..............
2-1,4-15,5-6
..................
.................
...............
............
4-18,5-10
.............
............
..............
4-18,5-10
.2-l, 5-8
.2-l, 53
.2-l, 5-8
2-1,5-3,5-8
....
.2-l, 4-9
.2-l, 4-11
2-2,53,59
.2-l, 5-9
2-2,3-18
B
.2-2,5-7
.2-2,3-3
C
2-2,4-g, 5-l
................
..............
.2-3
3-17
23, 3-13
3-10
D
................ .2-3
.2-3,4-l
.............
.2-l
4-l 1
.3-3
3-4
2-l
.5-l
5-l
.5-l
4-8
.4-8
2-l
2-l
4-10
.2-2
5-28
l-2
2-2
l-3
l-4
5-5
l-4
Description, System ..................... l-l
Dial 0 For System Attendant .2-3
Dialing, Automatic ................. 2-l. 5-3,5-a
Dimensions .........................
Direct Ringing .......................
Direct Station Selection Intercom ............. .2-3
Distinctive Ringing
Do Not Disturb
DSSlBLF Console
DSS/BLF Programming
.....................
.....................
.............
................
................
l-2
4-l 2
.2-3
2-3,5-6
l-4, 2-3,3-10,3-18
2-7,5-g
E
End To End Signalling On Intercom ............ .2-4
End To End Signalling On Lines
Exclusive Hold
Extended DTMF .................
External Paging
External Paging Interface ............
External Paging Interface - Line Port ........
External Paging Interface - Station PA Port .. .2-4,3-14,4-15
...................
....................
..............
2-4, 4-10, 5-4
2-4,
.2-4
2-4,4-g, 5-4
2-4,5-6
3-14,5-6
.2-4, 3-14
F
Failure Indications .....................
Failure Isolation ......................
FCC Registration Number
FCC Rules And Regulations ................ 3-19
Feature Dialing Code Numbering Plan .......... 5-l 2
Flash
..........................
Flexible Line Assignment .................
Flexible Ringing Assignment ............ .2-4, 4-12
Flexible Toll Restriction .................. .4-7
Fuse Location .......................
General Check .........
General Information .....................
Grounding, System ....................
..................
G
., ............. 3-l 7
3-18
3-18
l-3
2-9,5-6
.2-4
.6-l
l-4
.3-3 .
H
Handsfree Answer Inhibit ................. .2-4
Handsfree Answerback (HFAB) ..............
Headset Interface .................. .2-4,4-l 6
Hearing Aid Compatible Handset ............. .2-4
Hold Recall Feature .................... .5-4
Holding Calls ........................ .5-4
IHoldAndIUselndications ................
Idle Line Preference .................
Industry/Regulatory Standards ...............
Installation .........................
Installation Checkout ...................
Installation Requirements ................. 3-19
Installer Information .....................
Intercom Calling ......................
Intercom Call Progress Tones ............
Intercom Feed-Back Tone .................
Intercom Light
Intercom Line Lockout
Intercom Line Timeout ................... .2-5
Interconnection Details ................
Introduction
.......................
. .O
.........................
I
.................
.5-l
.2-5
.2-4,4-14
l-3
.3-l
3-l 7
l-l
.5-2
.2-5, 5-15
.4-7
5-l 7
.2-5
3-8,3-g
l-l
--\
r’ !
I-1
Page 93
Publication index
IMI 66-064 - ;
Last Number Redial ..................
LCD Support .......................
Line Connections ...................
Line Disabled ....................... 4-10
Line Monitoring ....................... 5-6
Line Preselection ......................
Line Select Lights .....................
Line Type ................... .2-5,4-10,4-l 1
.2-5,5-3
.2-S
.3-4,3-5
2-5
5-17
M
L
Maintenance ........................ .6-l
Making Calls ........................
Making OHVAISOHVA Calls ............... .5-2
Manual Hold ......................
Manual Scope ........................ l-l
Master Clear ........................
Memory Retention After Power Loss ............
Memory Retention Without Batteries ............ 2-5
Message Waiting ................ 2655,5-18
Message Waiting Control ................. .5-5
Message Waiting Light ..................
Messaging .........................
Modular Wiring And JacksM-conductor Wrre System
Momentary Buttons With LED Indicators ......... .2-6
Mounting Considerations .................
Mounting Details ..................... .3-2
Mounting Procedure .................... .3-l
Multiline Conferencing ................. .2-6,5-5
Music Interface ................. l-3,2-3,3-16
Music On Hold ................. .2-6,4-18,510
Music On Hold System-Wide Enable/Disable ........ 2-6
Mute .......................... .2-6,57
.5-2
.2-5,54
.4-6
l-3
5-18
.5-5
.... 2-6
.3-l
N
Night Transfer (Of Ringing) ....... .2-6,4-13,4-18,5-10
Non-Square System ....................
Notification To Telephone Company ........... 3-19
Numbering Plan, Feature Dialing Code ..........
4-17
5-12
0
Off-Hook Voice Announce (OHVA)
With Handsfree Answerback ............
On-Hook Dialing ...................... .2-6
Operating Characteristics, System ............ 5-12
Operating Environment ................... l-2
Operation, Attendant Oeration ........... 4-18,5-10
Operation, Speakerphone ................. .5-9
Operation, Station ...................... 5-l
Option Installation Details ................. 3-10
OPX Support ....................... .2-7
Originating Denied .................. 2-7,4-13
Outline Dimensions - Common Equipment ......... l-6
Outline Dimensions, Station ................. l-7
Outside Line Calling .................... .5-2
.2-6,3-10
P
Paging ........................... .5-6
Pairing, Station ....................... 3-5
Party Lines And Coin Lines ................
Pause Insertion, Automatic ..............
PBWCentrexKentral Office Compatible ..........
Personal Ringing Tones ............. 2-7,4-15, 57
Port Definition .......................
3-19
.2-l, 4-9
2-7
4-12
Power Failure Station . . . . . . . . . . . . . . . . . 3-12
Power Failure Transfer ...................
Power On, Visual Indication ................
Power Requirements .................... l-2
Prime Line Automatic ................
Privacy, Automatic ..................
Privacy Release ...................
Procedures, System Operating .............. .5-l
Product Code ........................
Program Button Locations ................. .4-2
Programmable Buttons ................. 2-7,4-2
Programmable DSSlBLF ............... 2-7,5-g
Programming, Attendant ............... 4-18,5-10
Programming, Autodial ................ 2-1,5-8
Programming, Automatic Redial Button ........ 2-1, 5-9
Programming, Class Of Service ............ 2-3,4-5
Programming, Station Speed Dial ............. .5-9
Programming, Station User ................ .5-8
Programming, System ................... .4-l
Programming, System Speed Dial ............. 5-10
Pull Out Directory ..................... .28
Pulse Dial Time ...................... .4-6
Pulsflone Switchable ............. 2-8, 4-l I,57
R
Radio Frequency Interference ............... 3-19
Recall ......................... 2-9,5-6
Recall/Flash ...................... 465-6
Rediaf, Automatic ................. 2-2,5-3,5-g
Related Publications ..................... l-l
Related Publications ..................... l-l
Repair Authorization .................... 3-19
Repair Service ....................... .6-l
Resistance Check ..................... 3-17
Ringer Equivafance Number ............. . l-3,3-19
Ringer Volume Control .................. 5-13
.2-7
.2-7
.2-7,4-14
.2-l, 4-l 1
.2-7,4-13
l-3
S
Screened Transfer ................... 2-2.5-4
Secure Off-Hook Voice Announce (OHVA) Connections 3-l 1
Secure Off-Hook Voice Announce (SOHVA) ....... .2-8
Secure Off-Hook Voice Announce (SOHVA) Groups .2-8,4-16
Secure Off-Hook Voice Announce (SOHVA) Station ... 3-l 1
Secure Off-Hook Voice Announce Groups ........ .2-8
Self Diagnostics ...................... .2-8
Self Test, DSSIBLF Console ............... 3-18
Self Test, Station ..................... 3-18
Single-Digit Station Dialing ................. .2-9
Speaker Light ....................... 5-21
Speakerphone (optional) ............... 2-9,5-g
Specifications, System .................... l-2
Speed Dial, Station .................... .2-9
Speed Dialing ....................... .5-3
Square/Non-Square System ................
Standard Installation Details ................
Station By Station Privacy ................. .2-9
Station Connections ................ 3-4,3687
Station Description ...................... l-4
Station Images ..................... 1-8, l-9
.2-9
.3-l
’ Ringing Line Preference ............... .2-8, 4-14
Page 94
Iii 66-064
Publication Index
+
Station Operation
Station Pairing
,
Station Self Test
Station Speed Dial
Station Speed Dial Programming
Station User Programming
Status indicators And Tone Sequences
Subdued Ringing
System Capacity _
System Clock ... 1’.
System Description
System Grounding
System Operating Characteristics
System Operating Procedures
System Programming
System Programming Block Diagram
System Ringing Patterns
System Specifications
System Speed Dial ................. .2-9,4-18
System Speed Dial Programming
System Speed Dial Toll Restriction Override
System Status Indicator
..................... .5-l
....................... .3-5
.......................
.................... .2-9
.............
................
.......... 5-13
..................... .2-9
.....................
.................
.....................
....................
.............
...............
....................
.........
.................
....................
.............
.....
..................
3-18
.5-9
.5-8
l-2
4-18,5-10
l-l
.3-3
5-12
5-l
4-l
.4-3,4-4
5-14
l-2
5-10
.2-9, 4-9
3-18
Tap (Flash/Recall) ..............
Technical Assistance ............
Technical Assistance And Repair Service . .
Tenant Service ................
Terminations
Timed Hold Recall ..............
Toll Restriction - Flexible ..........
Toll Restriction, Flexible ...........
Tone Calling .................
Tone Or Voice Signalling (Intercom) .... 1
Transfer, Screened .............
Transfer, Unscreened ............
Transferring Outside Calls ..........
Troubleshooting ...............
.................
T
U
Unscreened Transfer ............
User Information ...............
Voice Announce Blocking ..........
Voice Calling .................
Voltage Check .................
Voltage Measurements ...........
Zone Paging (Via Station Speakers) ....
v
z
. . . . . . 2-9
. . 6-l
. . . . . . 6-l
. . . . . . .
. . . . . . . l-2
. . 2-9, 4-6
. . .
. . . . . 4-7
. . . . . . 5-2
. . . . 2-10, 4-9
. 2-2, 5-4
. . . . 2-3, 5-4
2-2, 2-3, 5-4
. .
. . . . 3-19
. . . .
. . . . . . . l-l
....
....... 5-2
...... 3-17
......
.2-10,4-15,!3-6
2-9
2-9
2-3, 5-4
2-10, 5-5
3-17
Page 95
A to Z KELLATRONICS, Inc,
$g&hicEE:f:f:f:
Page 96
COMDlhL
ExecuTech XE
Key System
\
Class Of Service
Programming Chart
This publication is applicable for the following
common equipment:
MODEL MANUFACTURING CODE
NO308 REV H and later
NO616 REV H and later
NO820 REV K and later
N1024 REV K and later
IMI 66-065.03
9190
Page 97
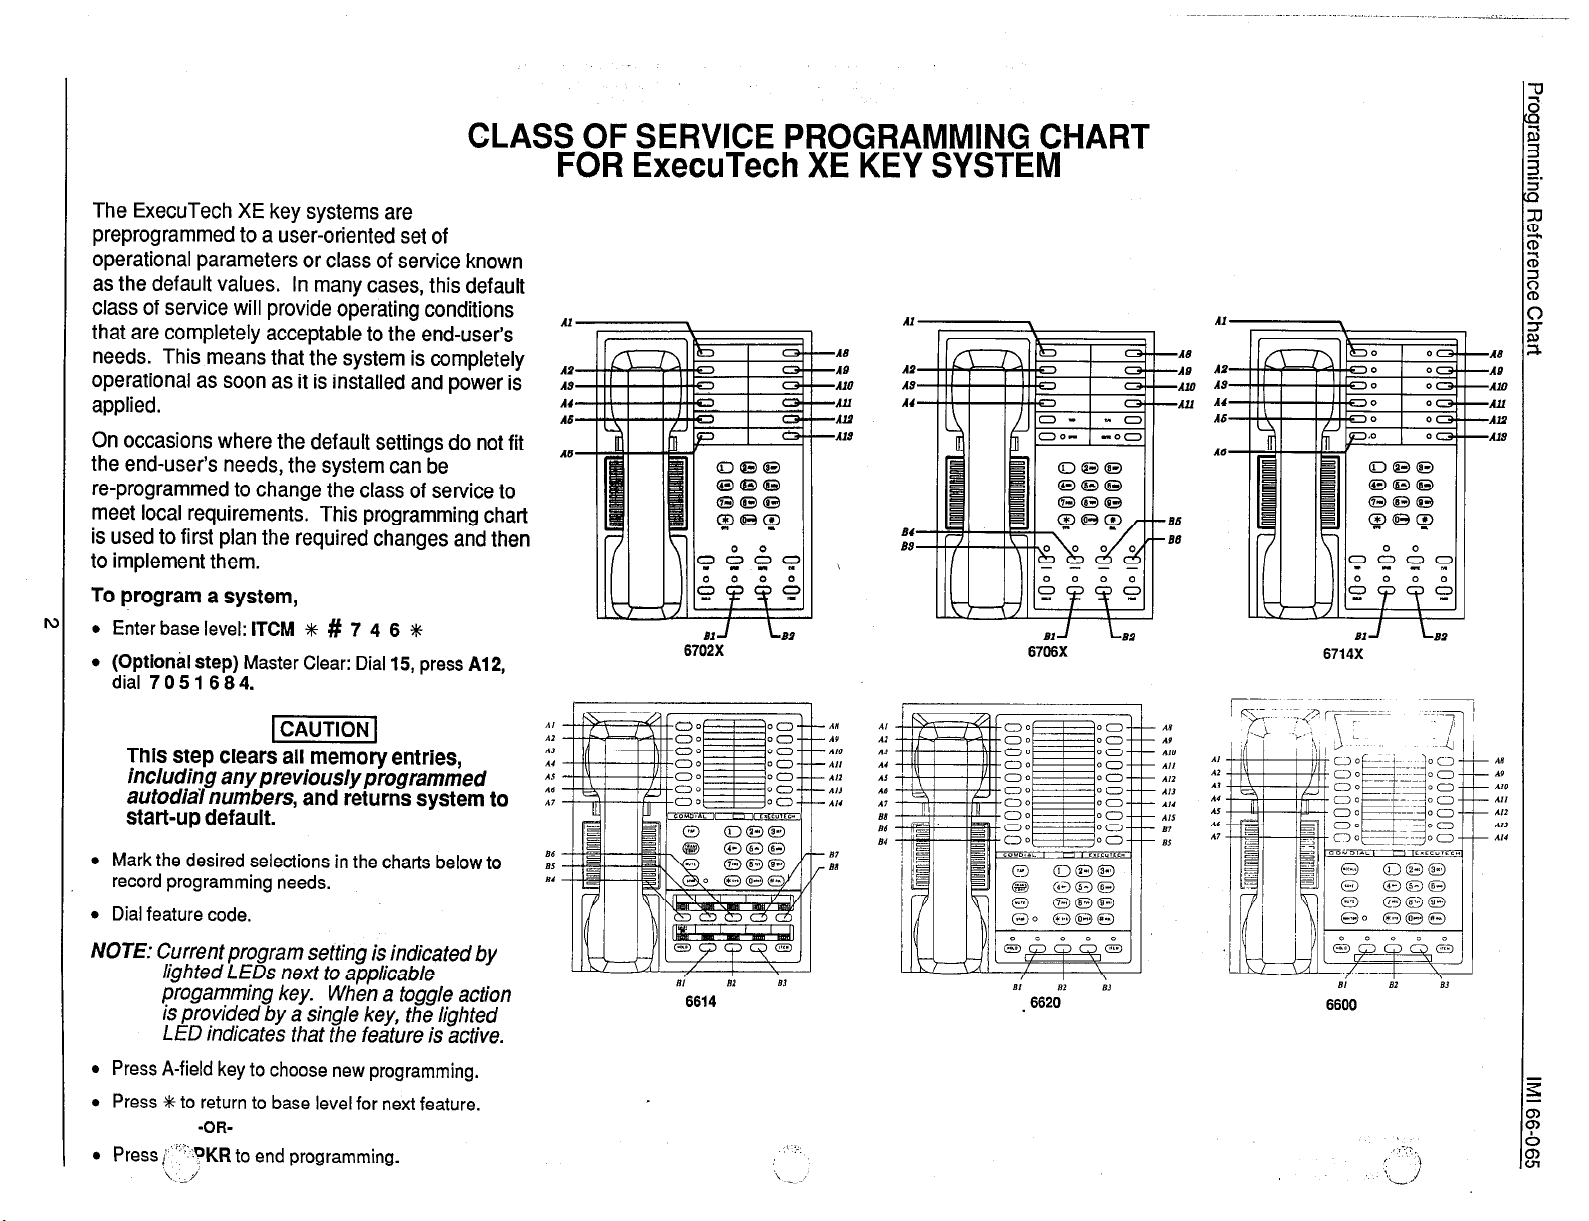
The ExecuTech XE key systems are
preprogrammed to a user-oriented set of
operational parameters or class of service known
as the default values. In many cases, this default
class of service will provide operating conditions
that are completely acceptable to the end-user’s
needs. This means that the system is completely
operational as soon as it is installed and power is
applied.
On occasions where the default settings do not fit
the end-user’s needs, the system can be
re-programmed to change the class of service to
meet local requirements. This programming chart
is used to first plan the required changes and then
to implement them.
To program a system,
n
l Enter base level: ITCM t # 7 4 6 t
l
(Optional step) Master Clear: Dial
dial 7 0 5 1 6 8 4.
15,
press
CLASS OF SERVICE PROGRAMMING CHART
FOR ExecuTech XE KEY SYSTEM
AI
-A3
-A0
-AlO
--All
--All
-A19
Al 2,
APA9AlAb-
AI?-
61-I L9a
6702X
AZ
A9
--Aa
-A#
4
61-I
6714X 6706X
-AI0
-All
-Al3
-A19
L
62
This step clears all memory entries,
including anypreviouslyprogrammed
autodial numbers, and returns system to
start-up default.
l Mark the desired selections in the charts below to
record programming needs.
l Dial feature code.
NOTE: Current program setting is indicated by
lighted L EDs next to applicable
progamming key. When a toggle action
IS provided by a sing/e key, the lighted
LED indicates that the feature is active.
l Press A-field key to choose new programming.
l Press ?k to return to base level for next feature.
-OR-
* Pressj’i::‘:?KR to end programming.
\. -i/
Page 98

‘._, ’
Enter Base Level: Press
ITCM,
then dial S # 7 4 6 %.
Master Clear:
The entire
programming configuration as
discussed in the following
programming procedures, can be
defaulted to the factory settings all at
once using this master clear
procedure.
This programming action clears all
memory en tries including any
previously programmed autodial
numbers, and returns the system to
a starfur, default condition.
Pause Time:
During auto dials and
speed dials it is sometimes necessary
to delay the sending of digits to give
switching equipment time to prepare to
re’ceive the digits. A pause can be
stored to effect the delay. A pause is
C
stored whenever the user presses the
HOLD button. The pause length
options are stored in seconds.
Pulse Dial Time:
Either ten or twenty
pulses per second, and three different
make/break ratios for the pulse dialing
signals (rotary dial signals) can be set
to match CO requirements.
Press
ITCM.
Dial * # 7 4 6 ++.
Dial
15.
Press Al 2.
Dial 7051684.
Press + for base level
OR
Press
MNTR (SPKR).
Dial
10.
Press prog. button.
Press * for next feature.
Dial
11.
Press prog. button.
Press * for next feature.
BUTTON1
RATIO )62/38
IDEFAULT = 62138 @
Al
@ 10 13~s I50/50 @ 10 pps ! 70/30 @ 10 pps ! 62/38 0 20 pas
I
10 PPs
A2 I A3
A4
I
I
Recall/Flash:
A line disconnect
(recall) or a PBX feature select signal
(flash) can be generated depending
upon the programmed time.
Timed Hold Recall:
After a call has
been on hold for a programmed length
3f time, the system will recall the
station that placed the call on hold.
The timing is in seconds.
Dial 12.
Press prog. button.
Press % for next feature.
Dial
13.
Press prog. button.
Press % for next feature.
IBUTTON I Al IA2 IA3 IA4 IA5
SEC
ENTRY I
DEFAULT q 30 SEC.
I30 160
190 ~120~180~240~300~360~420~never
1~6
IA9 IAlOIAllIA12 1
Press +
I
SPKR
to end programming.
I
Page 99
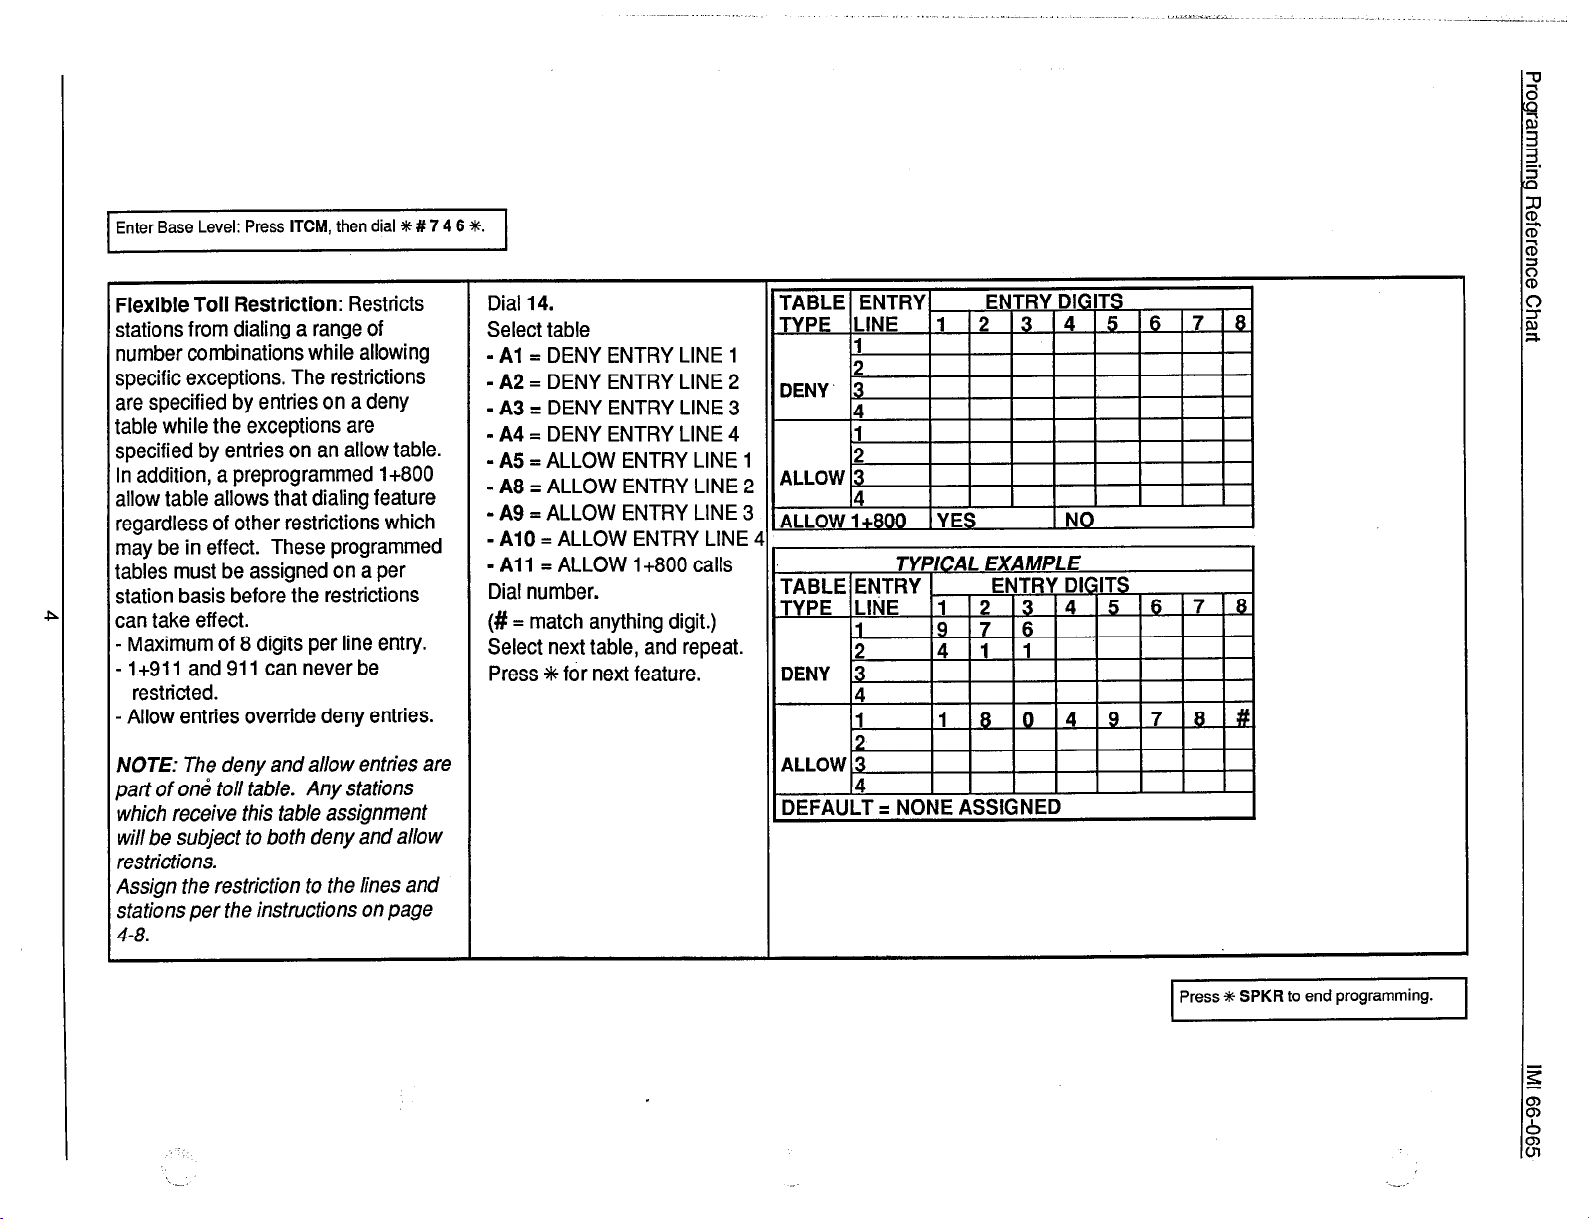
w~nterel: Press ITCM, then dial t # 7 4 6 t. 1
Flexible Toll Restriction:
stations from dialing a range of
number combinations while allowing
specific exceptions. The restrictions
are specified by entries on a deny
table while the exceptions are
specified
by
entries on an allow table.
In addition, a preprogrammed 1+800
allow table allows that dialing feature
regardless of other restrictions which
may be in effect. These programmed
tables must be assigned on a per
station basis before the restrictions
F
can take effect.
- Maximum of 8 digits per line entry.
- 1+911 and 911 can never be
Restricts
Select table
-
Al
= DENY ENTRY LINE 1
-
A2
= DENY ENTRY LINE 2
-
A3
q
DENY ENTRY LINE 3
-
A4
= DENY ENTRY LINE 4
- A5 = ALLOW ENTRY LINE 1
-
A8
= ALLOW ENTRY LINE 2
- A9 = ALLOW ENTRY LINE 3
-
A10
= ALLOW ENTRY LINE 4
-
Al 1
= ALLOW 1+800 calls
Dial number.
(# = match anything digit.)
Select next table, and repeat.
Press *for next feature.
restricted.
- Allow entries override deny entries.
.2
NOTE:
part of oni toll fable. Any stations
which receive this fable assignment
The deny and allow entries are
ALLOW 3
4
DEFAULT q NONE ASSIGNED
will be subject to both deny and allow
restrictions.
Assign the restriction to the lines and
stations per the instructions on page
4-8.
Press S SPKR to end programming.
Page 100

1 Enter Base Level: Press ITCM, then dial # # 7 4 6 #.
assigned to the stations will take
effect.
1
rog. buttons to assign
restriction to lines
Press *for next feature
restriction and with deny/allow
toll table restriction. Either one or both
methods can be assigned to restrict
station dialing on a per station basis.
Also, 1+7-digit dialing can be allowed
if i/O restriction is assigned.
c
Select l/O toll restriction.
l
Al = l/O RESTRICTION
l
A2
= ALLOW 1+7-DIGIT
‘(if l/O is also restricted)
Select deny/allow toll table
restriction (if required and
l
Dial # + PORT ID
Press *for next feature.
Press + SPKR to end programming.
 Loading...