

Page 1
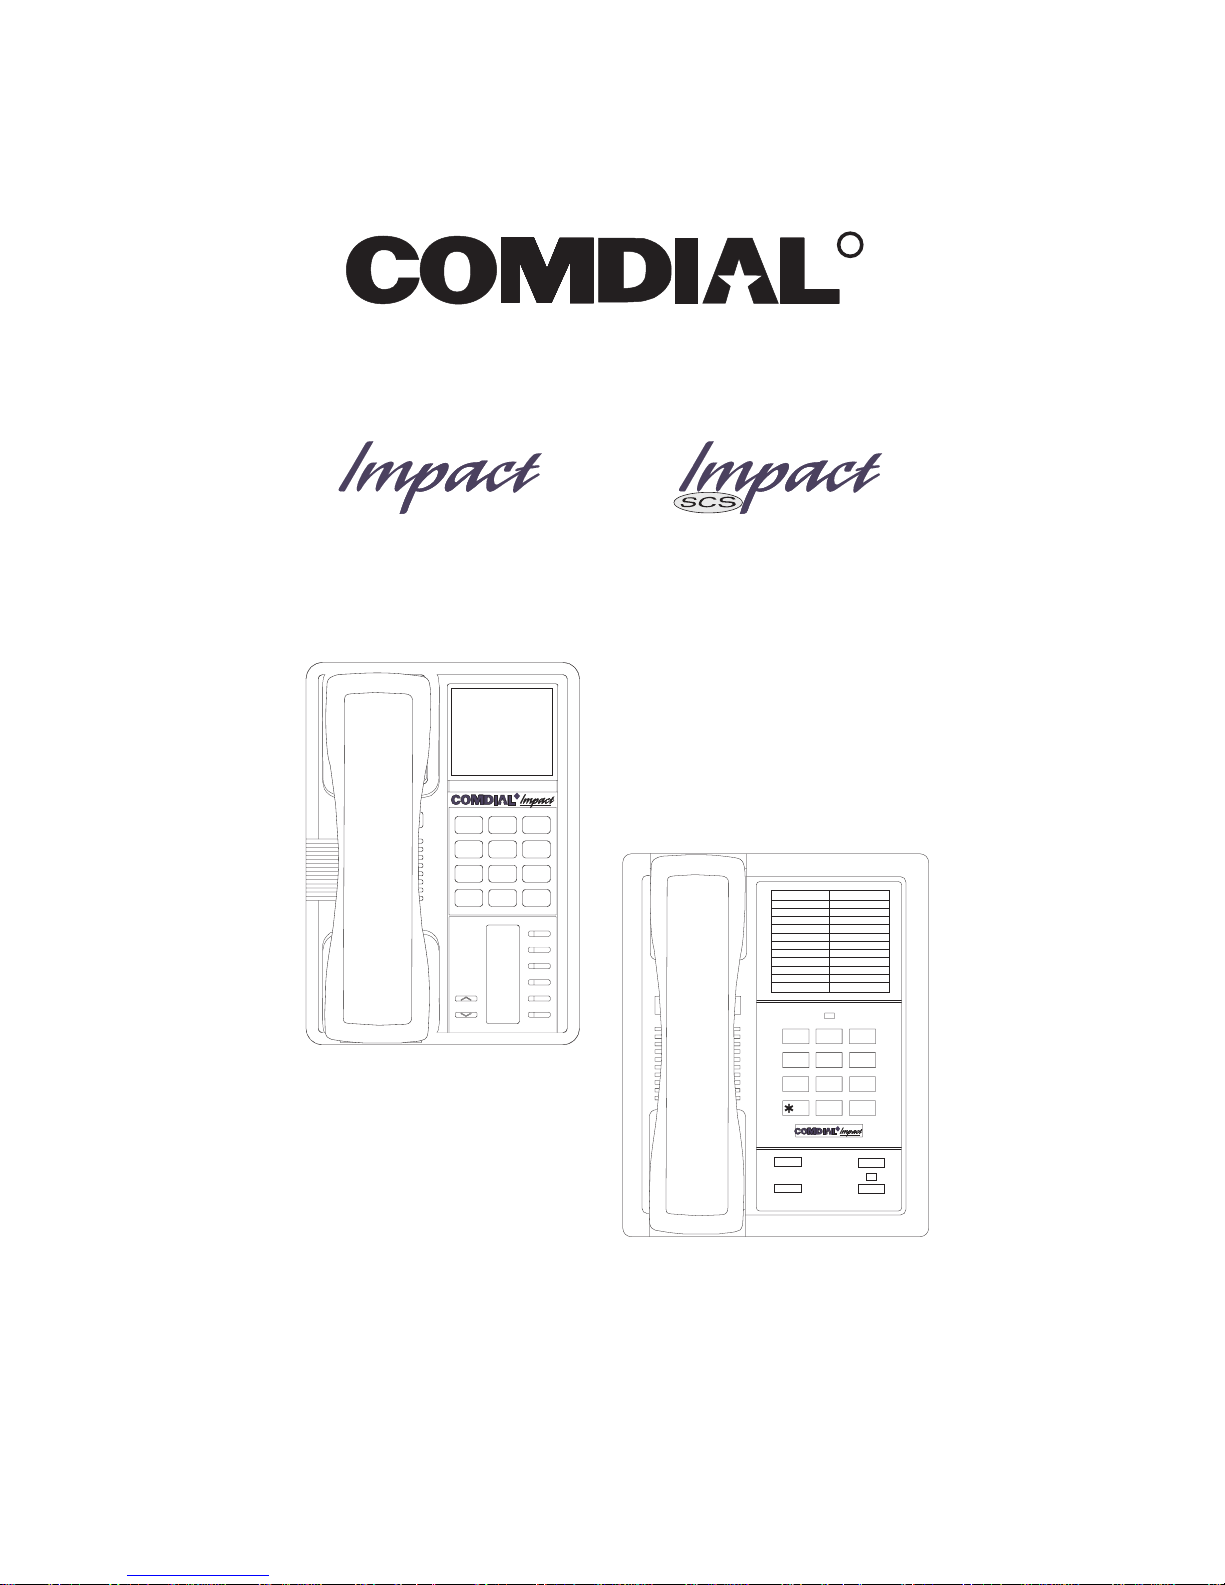
DSU and DSU II Series
Digital Telephone Systems
●
Single Line Proprietary Telephone (SLPS)
Station User’s Guide
R
DEF
ABC
31
2
GHI4JKL5MNO
PRS
7
* 0 #
TUV
INTERCOM
MESSAGE
TRNS/CONF
6
WXY
9
8
TAP
MUTE
HOLD
1 2
QZ ABC DEF
GHI
4
5
8
PRS
7
0
OPER
R
3
6
JKL
MNO
TUV
WXY
9
#
R
TRNS/CNF
HOLD
TAP
INTERCOM
Page 2

This user’s guide applies to the following system and
telephone models:
System Models:
• DSU systems with software 20A and later.
• DSU II systems with software 4A and later.
Telephone Models:
• Impact 8101N-** Rev. A and later.
• Impact SCS 8201N-** Rev. A and later.
Contact your Comdial dealer for updates of this as well as
other Comdial publications.
* Tri-Level Compression is
a registered trademark of
ACS Wireless, Inc.
Comdial strives to design the features in our communications systems to
be fully interactive with one another. However, this is not always possible,
as the combinations of accessories and features are too varied and extensive
to insure total feature compatibility. Accordingly, some features identified
in this publication will not operate if some other feature is activated.
Comdial disclaims all liability relating to feature non-compatibility or
associated in any way with problems which may be encountered by
incompatible features. Notwithstanding anything contained in this
publication to the contrary, Comdial makes no representation herein as to
the compatibility of features.
2/12/97
Page 3

GCA70–246 Contents
Contents
1
Introducing The Single Line Telephone ................. 1–1
1.1 UnderstandingWhatTheLightsMean............... 1–2
2
AnsweringCalls..................................... 2–1
2.1 AnsweringCalls................................ 2–1
2.2 Answering Subdued Off-Hook
VoiceAnnouncement(SOHVA)Calls ............... 2–2
3
MakingCalls ....................................... 3–1
3.1 GettingADialTone ............................. 3–1
3.2 MakingACall.................................. 3–1
3.3 WaitingForALine(Queuing)..................... 3–2
3.4 UsingSpeedDialNumbers........................ 3–3
3.5 RedialingLastNumberUsed...................... 3–4
3.6 UsingTollRestrictionOverride(TRO) .............. 3–4
4
PlacingCallsOnHold................................ 4–1
4.1 HoldingCalls................................... 4–1
5
TransferringCalls................................... 5–1
5.1 TransferringOutsideCalls........................ 5–1
6
Conferencing....................................... 6–1
6.1 ConferencingCalls.............................. 6–1
Contents – 1
Page 4

Contents GCA70–246
7
Using The Other Telephone Features................... 7–1
7.1 UsingTheRecall/FlashFeature.................... 7–1
7.2 Paging........................................ 7–1
7.3 Pulse/toneSwitching............................. 7–3
7.4 UsingCallForwarding........................... 7–3
7.5 UsingAutomaticCall-Back....................... 7–4
7.6 UsingCallWaiting.............................. 7–5
7.7 UsingAutomaticSetRelocation.................... 7–5
7.8 SettingYourPersonalRingingTones................ 7–6
7.9 SettingYourRingVolume......................... 7–6
8
Messaging.......................................... 8–1
8.1 RetrievingMessages............................. 8–1
8.2 Sending System-Supplied LCD Messages’ ........... 8–1
8.3 UsingStation-To-StationMessaging................ 8–2
9
ProgrammingYourTelephone........................ 9–1
9.1 StoringSpeedDialNumbers ...................... 9–1
1
0
Troubleshooting Your Telephone ..................... 10–1
I
ndex ............................................. Index–1
Q
uickReferenceGuide.....................QuickReference–1
2–Contents
Page 5

GCA70–246 Introducing The Single Line Telephone
1
IntroducingThe
Single Line Telephone
Congratulations and thank you for using a Comdial telephone! This
manual serves as a helpful guide for using your new telephone’s various
functions.
Your proprietary telephone will provide you with single-line operation
without the added complexity of monitor or speakerphone requirements.
It will give you access to the many useful features provided by your
digital communications system.
NOTE: Throughout this manual, all references to fixed buttons are
printed in upper case bold type, for example “Press the
INTERCOM button.”
SingleLineTelephoneUser'sGuide 1–1
Page 6

Introducing The Single Line Telephone GCA70–246
1.1 Understanding What The Lights Mean
The lights on your telephone indicate the status of the messaging feature,
incoming calls, and the automatic set relocation feature.
Next to the INTERCOM button:
–
•
Steady red with a quick flash = you are using your intercom.
•
Flashing red = another station is calling you.
•
Winking red = an LCD message is set on your telephone for
others to receive when calling.
Above the dialpad (8101N only):
–
•
Flashing red = message awaits pickup.
•
Fluttering red = automatic station relocation has been set.
Next to the MESSAGE button (8201N only):
–
•
Flashing red = message awaits pickup.
Next to the MUTE button (8201N only):
–
•
Steady red = called party cannot hear your conversation.
Next to the HOLD button (8201N only)
–
•
Fluttering red = automatic station relocation has been set.
1 – 2 Single Line Telephone User's Guide
Page 7

GCA70–246 Introducing The Single Line Telephone
slips01
R
DEF31ABC
2
GHI4JKL5MNO
7
6
WXY9TUV8PRS
Dialpad
* 0 #
INTERCOM
MESSAGE
TRNS/CONF
TAP
MUTE
HOLD
Intercom Button
Message Button
TAP Button
Transfer/Conference Button
Mute Button
Hold Button
Volume Control
Connectors On Bottom Of Telephone
(for ringer volumeonly)
Optional IMIST Module
!
Line Cord
Handset
Impact SCS 8201N Single Line Telephone
slips02
1 2
QZ ABC DEF
3
GHI
4
7
TRNS/CNF
HOLD
Hold Button
6
MNO
JKL
5
TUV
PRS
WXY
8
9
0
OPER
#
R
TAP
INTERCOM
Connectors On Bottom OfTelephone
Line Cord
!
Impact 8101N Single Line Telephone
SingleLineTelephoneUser'sGuide 1–3
Ringer Volume Switch
(bottom of telephone)
Message Waiting Light
Dialpad
Transfer/Conference Button
TAP Button
Intercom Button
Off
Handset
Loud
Ringer Volume
Page 8
Introducing The Single Line Telephone GCA70–246
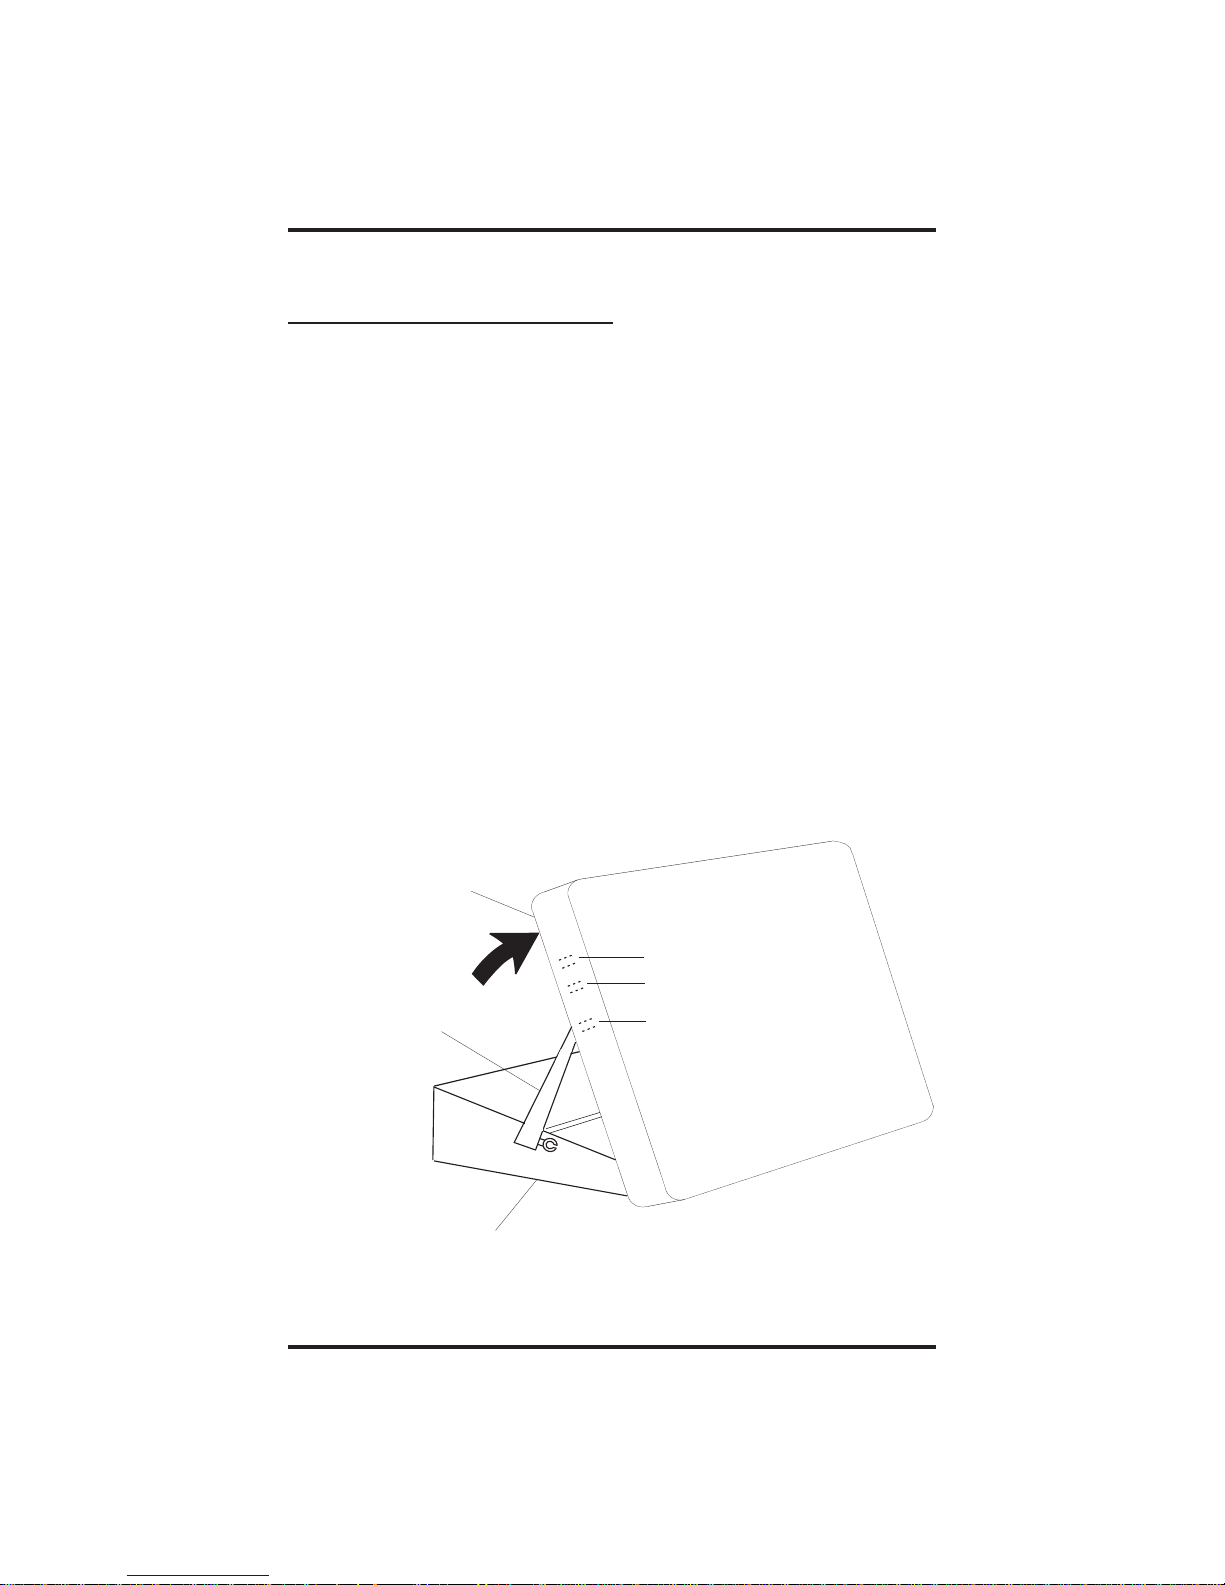
1.2 Adusting Your Telephone’sPedestal
(Model 8201N only)
An adjustable pedestal is provided on your telephone to allow you to
select the most comfortable viewing angle. When you receive your
telephone, it will be in its lowest position — down flush against the
pedestal. You can raise your telephone to one of three higher positions
as follows:
1. Grasp the rear of the pedestal base firmly with one hand while
lifting the rear portion of the telephone upward with your other
hand.
2. While pivoting the telephone upward with one hand, pivot the
telephone supporting arms upward with your other hand while
feeling for the notches under the telephone. Notice that there
are three sets of notches under the telephone corresponding to
the three positions available.
3. When the telephone is at your desired height, find the closest
pair of notches corresponding to that height, and engage the
supporting arms with the notches. Press down slightly on the
telephone until you feel the supporting arms snap into place.
Telephone
First Notch
Second Notch
Supporting Arm
Pedestal Base
1 – 4 Single Line Telephone User's Guide
Third Notch
(For Highest Position)
PED01
Page 9

GCA70–246 Answering Calls
2
Answering Calls
2.1 Answering Calls
• To answer a call that is ringing at your telephone,
1. Hear your telephone ringing and lift handset.
• To answer a c all that is ringing at any telephone in the system,
1. Hear ringing at other telephone.
2. Lift handset at your station and listen for intercom dial tone.
3. Dial ✳ 4 plus extension number of ringing telephone.
• To answer a call that is ringing within your group,
1. Hear ringing at other telephone.
2. Lift handset at your station and listen for intercom dial tone.
3. Dial #4(ringing station must be programmed in your call pickup
group).
• To answer a c all that is ringing the loud ringer or night
transfer station,
1. Hear ringing.
2. Lift handset and listen for intercom dial tone.
3. Dial 80.
4. Answer call.
NOTE: This feature is known as Trunk Access FromAny Station
(TAFAS).
Single Line Telephone Station User's Guide 2 – 1
Page 10

Answering Calls GCA70–246
2.2 Answering Subdued Off-Hook
Voice Announcement (SOHVA) Calls
NOTE: Your telephone may be arranged to receive a subdued off-hook
voice announcement (SOHVA). If it is, an intercom caller
may break into your outside call and deliver a message to your
telephone receiver for you to hear.
• To Receive a SOHVA,
1. While off-hook on an outside call, hear s everal quick tone bursts
followed by an announcement delivered to your ear through the
handset.
• To Reply to a SOHVA (8201N only),
1. Press and hold the MUTE button.
As long as you hold the MUTE button, you are on line with the
SOHVA caller.
2. Release the MUTE button when you are finished with your reply.
You are now on line with your original call.
• To Block SOHVA,
1. Lift handset and listen for intercom dial tone.
2. Dial ✳ 2.
• To Remove Block,
1. Lift handset and listen for intercom dial tone.
2. Dial #2.
2 – 2 Single Line Telephone Station User's Guide
Page 11

GCA70–246 Making Calls
3
Making Calls
3.1 Getting A Dial T one
Your telephone may be configured to provide an intercom dial tone when
the handset is lifted. This arrangement is known as “prime intercom.” It
may, however, be arranged to provide outside line dial tone instead. This
arrangement is known as “prime line automatic” or “idle line
preference.” This means that you can dial the system feature codes as
soon as you lift the handset. If your telephone is arranged otherwise, you
must obtain intercom dial tone before you can dial the various feature
codes. You do this by pressing the INTERCOM button after you hear
the outside line dial tone.
3.2 Making A Call
To make a call using prime intercom (your telephone must be
•
arranged for prime intercom),
1. Lift handset and listen for intercom dial tone.
2. Dial station number or intercom feature code.
To access outside line using line group feature,
•
1. Lift handset and listen for intercom dial tone.
2. Dial line group access code,
9 =group1
81 = group 2
82 = group 3
83 =group4.
3. Listen for outside dial tone.
4. Dial number.
Single Line Telephone Station User's Guide 3 – 1
Page 12

Making Calls GCA70–246
To make a call using prime line or idle line preference (your
•
telephone must be arranged for prime line or idle line preference),
1. Lift handset and listen for outside line dial tone.
2. Dial outside number.
To access intercom line,
•
1. Lift handset and listen for outside line dial tone.
2. Press INTERCOM and listen for intercom dial tone.
3. Dial station number or intercom feature code.
3.3 Waiting For A Line (Queuing)
To queue for a busy line group,
•
1. Lift handset and listen for intercom dial tone.
2. Dial line group access code (9, 81, 82,or83).
3. Hear busy tone.
4. Dial ✳ 8.
5. Hang up handset.
To answer queuing ring-back,
•
1. Lift handset and hear dial tone for line.
To cancel queuing,
•
1. Lift handset and hear intercom dial tone.
2. Dial #8.
3. Hang up handset.
3 – 2 Single Line Telephone Station User's Guide
Page 13

GCA70–246 Making Calls
3.4 Using Speed Dial Numbers
To dial personal speed dial numbers,
•
1. Lift handset and listen for intercom dial tone.
2. Dial trunk access code and listen for outside dial tone.
3. Press HOLD button.
4. Press desired dial key 1-0. Call will dial automatically.
NOTE: If you manually choose a line for dialing, press HOLD before
using a speed dial. If you place a call on hold prior to using
your speed dial, pause several seconds before you press the
speed dial button; if you immediately press the speed dial
button, the system will choose the line that you have on hold to
place your speed dial call.
To dial system speed dial numbers,
•
1. Lift handset and listen for intercom dial tone.
2. Dial line access code and listen for outside dial tone.
3. Press HOLD button, then ✳.
4. Dial desired code (01-99).
To program personal speed dial numbers,
•
1. Lift handset and listen for intercom dial tone.
2. Dial ✳✳2.
3. Dial memory location (1-0)followedby0.
4. Dial number sequence to be stored (up to 16 digits and can include
# and ✳).
5. To store a pause, press HOLD.
6.
To store a flash, press TAP.
7. Press TRANSFER/CONFERFENCE.
8. Repeat procedure in step 3 for each speed dial number.
Single Line Telephone Station User's Guide 3 – 3
Page 14

Making Calls GCA70–246
3.5 Redialing Last Number Used
To redial last number used,
•
1. Lift handset and listen for intercom dial tone.
2. Dial line group access (9, 81, 82,or83).
3. Press HOLD button,thendial#.
3.6 Using Toll Restriction Override (TRO)
To use Toll Restriction Override at a station,
•
1. Lift handset and listen for intercom dial tone.
2. Dial ✳✳6.
3. Dial your station extension number.
4. Dial your TRO code number.
5. Dial desired outgoing line number within the 15-second timeout
period.
6. Hang up handset to end call. You will have 15 seconds in which
you can make another call without re-entering your TRO code.
To clear the Toll Restriction Override code,
•
1. Lift handset and listen for intercom dial tone.
2. Dial ✳✳6.
3. Hang up handset.
3 – 4 Single Line Telephone Station User's Guide
Page 15

GCA70–246 Placing Calls On Hold
4
Placing Calls On Hold
4.1 Holding Calls
To use manual HOLD,
•
1. Press HOLD.
2. Hang up handset.
To return to call on HOLD,
•
1. Lift handset.
2. Press TAP.
To place a call on exclusive HOLD (can be retrieved only by your
•
telephone),
1. Press HOLD twice.
To use the HOLD recall feature,
•
1. Do nothing, after a preprogrammed length of time, a call placed on
HOLD will automatically ring back. Lift handset.
Single Line Telephone Station User's Guide 4 – 1
Page 16

Placing Calls On Hold GCA70–246
To park a call,
•
1. When on a line, press INTERCOM.
2. Dial ✳.
3. Dial park orbit access code (91 - 99) for orbit 1–9. If chosen orbit
is busy, dial alternative orbit number.
4. Hang up handset.
5. Use paging feature to announce call and park orbit access code if
necessary.
NOTE: If call is not retrieved within a programmable limit, it recalls
back to the parking station as a standard held call.
To retrieve parked call,
•
1. Hear announcement.
2. Pick-up handset.
3. Dial #.
4. Dial park orbit access code (91 - 99) for orbit 1–9.
5. Answer call.
4 – 2 Single Line Telephone Station User's Guide
Page 17

GCA70–246 Transferring Calls
5
Transferring Calls
5.1 Transferring Outside Calls
To make a screened transfer,
•
1. Answer outside call.
2. Press TRANSFER/CONFERENCE.
3. Dial station number.
4. Upon answer, announce the call.
5. Hang up the handset (call is transferred).
To make an unscreened transfer,
•
1. Answer outside call.
2. Press TRANSFER/CONFERENCE.
3. Dial station number.
4. Hang up handset (call will recall back if not answered within a
preprogrammed time).
If busy or no answer,
•
1. Press TAP and return to outside call.
Single Line Telephone Station User's Guide 5 – 1
Page 18

This page remains blank intentionally.
Page 19

GCA70–246 Conferencing
6
Conferencing
6.1 Conferencing Calls
To conference any combination of inside stations
•
and outside lines,
1. Make first call.
2. Press TRANSFER/CONFERENCE.
3. Make next call and press TRANSFER/CONFERENCE to
establish conference.
4.Repeatstep2toadduptotwomoreparties.
NOTE:
When setting up a conference call with outside lines and inside stations, you
must call the outside lines first. Use the line group access codes to place the
outside lines in your conference.
Single Line Telephone Station User's Guide 6 – 1
Page 20

This page remains blank intentionally.
Page 21

GCA70–246 Using The Other Telephone Features
7
Using The Other
Telephone Features
7.1 Using The Recall/flash
If your system has been configured for flash,
•
1. Press TAP to generate a timed flash signal while on line.
If your system has been configured for recall,
•
1. Press RECALL (TAP) to disconnect as if you had hung up.
7.2 Paging
To use external paging,
•
1. Lift handset and listen for intercom dial tone.
2. Dial assigned page access code.
3. Make announcement.
To use zone paging,
•
1. Lift handset and listen for intercom dial tone.
2. Dial zone number - (84, 85, 86,or87 for all-call).
3. Make announcement.
4. Hang up handset or wait for an answer.
To answer all call or zone paging from any station,
•
1. Lift handset and listen for intercom dial tone.
2. Dial 88. Meet paging party on line.
SingleLineStationUser'sGuide 7–1
Page 22

Using The Other Telephone Features GCA70–246
To enable the Tracker pager at your station,
•
1. Lift handset and listen for intercom dial tone.
2. Dial ✳ 06.
3. Hang up handset.
To disable the Tracker pager at your station,
•
1. Lift handset and listen for intercom dial tone.
2. Dial #06.
3. Hang up handset.
To send a call-back message to someone’s Tracker Pager after
•
receiving a ring-no-answer,
1. Make an intercom call to someone and receive no answer.
2. Dial #01.
3. After your station returns to idle* hang up handset. The
Pager—Tracker system will transmit your station extension
number to called party’s Tracker Pager display. (Some models will
also display your station name if the system is programmed to
include station names.)
To park a call and have Tracker Pager tell someone
•
to retrieve the call,
1. Answer call and press TRANSFER/CONFERENCE,
2. Dial extension number and hear ringback.
3. Dial #01,
4. Hang up handset to end. The Tracker paging system will transmit
orbit dialing code and caller ID information, if available, to called
party’s Tracker Pager display. (Alpha/numeric models display #91
through #99 while numeric-only models display -91 through -99.)
* If the Tracker paging system does not accept your action, an error tone
will sound back at your telephone.
7 – 2 Single Line Station User's Guide
Page 23

GCA70–246 Using The Other Telephone Features
To respond when your Tracker Pager displays park orbit dialing
•
code,
1. From any system station, press INTERCOM.
2. Dial displayed orbit code (# 91–99).
3. Retrieve call.
7.3 Pulse/tone Switching
If the local telephone service is pulse (rotary), convert to tone while
dialing as follows:
press # at point in dialing sequence where conversion to tone is required.
NOTE: Pulse/Tone switching can be programmed into speed dial
numbers by pressing # during number storage.
7.4 Using Call Forwarding
To forward personal calls to another telephone,
•
1. Lift handset. Listen for intercom dial tone.
2. Dial ✳ 05,
3. Dial extension number of station to which calls are to be
forwarded.
To cancel personal call forward,
•
1. Lift handset and listen for intercom dial tone.
2. Dial #05.
To forward all calls to another telephone,
•
1. Lift handset and listen for intercom dial tone.
2. Dial ✳ 5.
3. Dial extension number of station to which calls are to be
forwarded.
SingleLineStationUser'sGuide 7–3
Page 24

Using The Other Telephone Features GCA70–246
To cancel all call forward,
•
1. Lift handset and listen for intercom dial tone.
2. Dial #5.
NOTE: For each intercom call received during call forward, a ring
reminder (short tone burst) will be heard at the called station to
remind the user that calls are being forwarded.
7.5 Using Automatic Call-Back
To arrange for the system to call back when a busy station
•
becomes idle or rings with no answer,
1. Make intercom call. Hear busy signal or ring-back tone.
2. Dial ✳ 6,
3. Hang up. (When called station becomes idle or is operated by its
user, your station will ring. Call-back is canceled if you do not lift
your handset when you hear this ringing.)
To answer call-back ring,
•
1. Lift handset. (Called station will ring. Call-back is canceled if you
do lift your handset.)
To cancel automatic call back,
•
1. Lift handset. Listen for intercom dial tone.
2. Dial #6.
3. Hang up.
7 – 4 Single Line Station User's Guide
Page 25

GCA70–246 Using The Other Telephone Features
7.6 Using Call Waiting
To activate call waiting,
•
1. Make intercom call and receive busy signal.
2. Dial ✳ 01(called party hears tone).
3. Wait on line for an answer.
To cancel call waiting,
•
1. Hang up handset.
To answer a call waiting tone,
•
1. Hear short tone burst in handset receiver.
2. Complete present call and hang up. (Waiting call will begin
ringing.)
3. Lift handset to answer.
7.7 Using Automatic Set Relocation
If this feature enabled by your system programmer, the message
waiting light will flash for several seconds when you connect your
telephone at another location. This means that the system is waiting to
automatically relocate your extension number and other programmed
features to the new location.
To accept automatic relocation,
•
1. Do nothing and wait for the light to turn off on its own or press the
HOLD button to immediately accept the relocation (light
immediately turns off).
To reject automatic relocation,
•
1.
Press the
you do not press # before the light stops flashing, relocation is
accepted.
# button while the message waiting light is flashing. If
SingleLineStationUser'sGuide 7–5
Page 26

Using The Other Telephone Features GCA70–246
7.8 Setting YourPersonal Ringing Tones
• To alter the ring tone of your telephone so you can distinguish its
ringing from that of others located close by,
1. Lift handset and listen for intercom dial tone.
2. Dial ✳✳ 4.
3. Dial number (1–6) to select ring tone.
4. Hang up handset.
7.9 Setting YourRing Volume
• To set the ring volume,
— 8101N: Locate the switch on the bottom of the telephone and set
it to either High or Low.
— 8201N: Adjust the volume control on the front of the telephone to
Hi, Mid, Low, or Off (this control does not affect the handset
volume). A short ring burst demonstrates the ringing loudness for
that setting.
7 – 6 Single Line Station User's Guide
Page 27

GCA70–246 Messaging
8
Messaging
8.1 Retrieving Messages
To retrieve a message from message desk,
•
1. Observe flashing message waiting light.
2. Lift handset.
3. Press HOLD or MESSAGEbutton; connection to message desk is
automatic.
8.2 Sending System-Supplied LCD Messages
To turn on a system supplied LCD message,
•
1. Lift handset and listen for intercom dial tone.
2. Dial ✳ 02.
3. Dial message code number (0-9).
To turn off a system supplied LCD message,
•
1. Lift handset and listen for intercom dial tone.
2. Dial #02.
Single Line Telephone Station User's Guide 8 – 1
Page 28

Messaging GCA70–246
8.3 Using Station-To-Station Messaging
To activate station-to-station messaging,
•
NOTE: Station must have BLF appearance at called station.
1. Make intercom call and hear ring-back tone.
2. Dial ✳ 7. BLF light at called station flutters.
3. Hang up handset.
To cancel station-to-station messaging,
•
1. Lift handset.
2. Press #7.
3. Dial extension number of station at which message call-back
indication was left.
4. Hang up handset, fluttering BLF of notified station turns off.
8 – 2 Single Line Telephone Station User's Guide
Page 29

GCA70–246 Programming Your Telephone
9
Programming
YourTelephone
9.1 Storing Speed Dial Numbers
•
To store an outside number as a speed dial number,
1. Lift handset and listen for intercom dial tone.
2. Dial ✳✳1.
3. Dial 0–9 to choose storage location.
4. Dial 1–4 to select line groups 1–4, or dial 0 to let system select
line.
5. Dial number to be stored (up to 16 digits long—include ✳ and
# if needed). To store hookflash in a number sequence, press
TAP; press HOLD to store pause (only if needed).
6. Press TRANSFER/CONFERENCE to store number.
7. To store another number, repeat steps 3 through 6.
8. Repeat previous steps until all numbers are stored.
9. Hang up handset to end.
NOTE: The Federal Communications Commission (FCC) requires
that when programming emergency numbers and making test
calls to emergency numbers, you do the following: (1) Remain
on the line and briefly explain to the dispatcher the reason for
the call; (2) always make such a test call during the off-peak
hours, such as early morning or late evening.
Single Line Telephone Station User's Guide 9 – 1
Page 30

This page remains blank intentionally.
Page 31

GCA70–246 Troubleshooting Your Telephone
10
Troubleshooting
YourTelephone
Symptom Possible Cause
INTERCOM light flashing Your messaging is set. Lift handset, then
dial # 02 and hang up.
Station is ringing with ringer off.
MUTE light on MUTE is activated. To cancel, press
MUTE.
Error Tone
(three steady tones)
May occur when incorrect extension is
dialed.
Single Line Telephone Station User's Guide 10 – 1
Page 32

This page remains blank intentionally.
Page 33

GCA70–246 Glossary
Glossary
A
Automatic callback: System will ring a calling telephone when a busy
called telephone becomes idle.
Automatic set relocation: The ability of the telephone system to
relocate your extension number and restore all previous settings after a
physical move has occurred.
B
Busy Lamp Field (BLF): Rows of lights on a telephone that shows
which extensions on the system are busy and which ones are not.
C
Call forwarding: Designating another telephone to receive intercom
calls normally directed to the user’s telephone.
Call park: Placing an active call at a particular telephone in system hold
(park orbit) and retrieving it by any telephone.
Call waiting: A feature that allows a caller to signal a called party with
a tone when the called party is busy on another call. This lets the called
party know t hat another caller is waiting to speak to him or her.
D
Busy Lamp Field (BLF): Busy lamp field or BLF is a term for lights
on the telephone that identifies current call status of other extensions.
Dual Tone Multiple Frequency (DTMF): The tones made by your
telephone when you dial.
E
Exclusive hold: Only the telephone placing the call on hold can retrieve
it.
Single Line Station User's Guide G–1
Page 34

Glossary GCA70–246
H
Hookflash: Action that occurs when the TAP button is pressed. Needed
for activating host system features.
Hookswitch: The switch on a telephone which, when depressed
manually or by the handset, disconnects a call.
I
Idle line preference: A system configuration that allows a telephone to
select the first free line when the handset is lifted.
K
Keypad: Buttons 0 through 9, ✳and # used for dialing.
L
LCD Messages: System-supplied messages that you can select to be
sent to a caller’s display (LCD) when you cannot answer your telephone.
P
Personal ringing tones: A telephone can be arranged to ring in one of
six distinctive tones.
Prime intercom: A configuration that allows intercom to be selected
automatically on your telephone as soon as you lift the handset.
Prime line: A line designated to a particular telephone and
automatically selected when the handset is lifted.
Proprietary telephone: A telephone that works only with a particular
vendor’s telephone system.
Pulse/Tone switching: Changing from pulse/rotary dial signals to
tone/DTMF signals.
G–2 Single Line Station User's Guide
Page 35

GCA70–246 Glossary
Q
Queuing: The ability of a telephone system to hold calls when all lines
are busy until a line becomes available.
R
Recall/flash feature: Provides a fresh dial tone. This can be
accomplished by either pressing a special recall feature button or by
using a flash which is a signal generated when you depress and then
quickly release the hookswitch.
Response messaging: Responding non-verbally to a calling station by
pressing a programmed button that sends a message to the calling
station’s display.
Ringing line preference: An automatic connection to any outside line
ringing at the station when the station handset is taken off-hook.
S
Saved number redialing: Saving a last manually dialed number for
later autodialing.
Subdued off-hook voice announce (SOHVA): A private announcement
that can be made to a busy party which they hear through the receiver of
their handset.
Speed dialing: Autodialing using the keypad buttons. Speed dialing can
be station calls (personal and accessed by only one specific user) or
system calls (numbers used and accessed by anyone in the system).
System Alarm Reporting: Allows you to view (through the LCD
telephone screen) the various system alarms and the stations with which
those alarms are associated.
T
TAP: Depending on your system’s programming, this button gives you a
fresh dial tone or activates a hookflash.
Toll Restriction Override (TRO): A method whereby you can dial an
assigned code to temporarily remove your station’s extension from its
toll restriction status. While toll restriction has been imposed on your
station, you will normally not be able to make toll calls.
TRANSFER/CONFERENCE: A fixed feature button that allows you
to transfer outside calls and set up conference calls.
Single Line Station User's Guide G–3
Page 36

Glossary GCA70–246
Z
Zone paging: Paging through the intercoms of some stations or
departments in the system.
G–4 Single Line Station User's Guide
Page 37

GCA70–246 Index
Publication Index
A
AnsweringCalls......................................... 2–1
Answering Subdued Off-Hook Voice Announcement
(SOHVA)Calls........................................ 2–2
AutomaticCallback,Using................................ 7–4
AutomaticSetRelocation,Using ........................... 7–5
C
CallForwarding,Using................................... 7–3
CallWaiting,Using...................................... 7–5
Calls,Answering........................................ 2–1
Calls,Conferencing...................................... 6–1
Calls,Making........................................... 3–1
ConferencingCalls ...................................... 6–1
D
DialTone,GettingA..................................... 3–1
F
Features, Using The Other Telephone........................ 7–1
G
GettingADialTone...................................... 3–1
H
Hold,PlacingCallsOn ................................... 4–1
HoldingCalls........................................... 4–1
I
Introducing The Single Line Telephone ...................... 1–1
L
LCD Messages, Sending System Supplied .................... 8–1
Lights,UnderstandingWhatTheyMean...................... 1–2
Line(Queuing),WaitingForA............................. 3–2
Index – 1
Page 38

Index GCA70–246
M
MakingACall.......................................... 3–1
MakingCalls........................................... 3–1
Messages,Retrieving..................................... 8–1
Messages, Sending System-Supplied LCD.................... 8–1
Messaging ............................................. 8–1
Messaging,UsingStation-To-Station........................ 8–2
O
OutsideCalls,Transferring................................ 5–1
P
Paging................................................. 7–1
Personal Ringing Tones,Setting Your ........................ 7–6
PlacingCallsOnHold.................................... 4–1
ProgrammingYourTelephone.............................. 9–1
Pulse/toneSwitching..................................... 7–1
Q
Queuing............................................... 3–2
R
Recall/flash,UsingThe................................... 7–1
RedialingLastNumberUsed .............................. 3–4
RetrievingMessages..................................... 8–1
RingVolume,SettingYour................................. 7–6
S
Sending System-Supplied LCD Messages .................... 8–1
SettingYourPersonalRingingTones ........................ 7–6
SettingYourRingVolume................................. 7–6
SOHVACalls,Answering................................. 2–2
SpeedDialNumbers,Storing .............................. 9–1
SpeedDialNumbers,Using ............................... 3–3
Station-To-StationMessaging,Using........................ 8–2
StoringSpeedDialNumbers............................... 9–1
Switching,Pulse/tone .................................... 7–1
2–Index
Page 39

GCA70–246 Index
T
Telephone Features, Using The Other........................ 7–1
Telephone, Introducing The Single Line...................... 1–1
Telephone, Programming Your ............................. 9–1
Telephone, Troubleshooting Your ........................... 9–1
TransferringCalls ....................................... 5–1
TransferringOutsideCalls................................. 5–1
TroubleshootingYour Telephone ............................ 9–1
TRO(TollRestrictionOverride),Using...................... 3–4
U
UnderstandingWhatTheLightsMean....................... 1–2
UsingAutomaticCallback................................. 7–3
UsingAutomaticSetRelocation............................ 7–5
UsingCallForwarding.................................... 7–3
UsingCallWaiting....................................... 7–5
UsingSpeedDialNumbers................................ 3–3
UsingStation-To-StationMessaging......................... 8–2
Using The Other Telephone Features ........................ 7–1
UsingTheRecall/Flash................................... 7–1
UsingTollRestrictionOverride(TRO)....................... 3–4
V
Volume,SettingYourRing................................. 7–6
W
WaitingForALine(Queuing).............................. 3–2
Index – 3
Page 40

This page remains blank intentionally.
Page 41

GCA70–246 Quick Reference Guide
Appendix A
A
This quick reference guide provides you with a list of the feature dialing
codes used on the Impact digital telephone system.
Feature To Turn On To Turn Off
Account Code INTERCOM ✳ 04
Assist
Attendant INTERCOM 0
Automatic Callback INTERCOM Ext. ✳ 6 INTERCOM # 6
Background Music INTERCOM ✳ 1 INTERCOM # 1
Call Forwarding:
All Calls
Personal Calls
CFOS (DSU II)
Call Pickup:
Directed
Group
Call Park INTERCOM ✳ (91–99) #91–99 to retrieve
Call Waiting INTERCOM EXT. ✳ 01 Hang Up
Directed Hold INTERCOM ✳ 90, Ext. INTERCOM # 90
Executive Override INTERCOM Ext. ✳ 03
Hookflash Code INTERCOM # 04
LCD Messaging
Line Group 1
Line Group 2
Line Group 3
Line Group 4
Line Group Queue
Message Waiting INTERCOM ✳ 3 Ext.
Quick Reference Guide
INTERCOM ✳ 5
INTERCOM ✳ 05
INTERCOM ✳ 07
INTERCOM ✳ 4plus
Ringing Ext.
INTERCOM # 4
INTERCOM ✳ 02, 0–9,
SPEAKER
INTERCOM 9
INTERCOM 81
INTERCOM 82
INTERCOM 83
INTERCOM (grp. code)
✳ 8
INTERCOM # 5
INTERCOM # 05
INTERCOM # 07
INTERCOM
INTERCOM # 02
INTERCOM # 8
INTERCOM # 3
Ext.
Quick Reference – 1
Page 42

Quick Reference Guide GCA70–246
Feature To Turn On To Turn Off
Night Answer INTERCOM 80
Paging
Zone 1 Paging
Zone 2 Paging
Zone 3 Paging
All-Call Paging
Meet-Me Paging
External Paging
Personal Ringing
Tones
Response
Messaging
Service Observe INTERCOM # 03
SOHVA Originate
Station to Station
Messaging
System Speed
Dialing
Tracker Pager INTERCOM✳ 06 INTERCOM # 06
Tracker
Pager—Send
Tracker Page
Toll Restriction
Override
VoiceAnnounce
Block
Volume Save INTERCOM ✳✳5
INTERCOM 84
INTERCOM 85
INTERCOM 86
INTERCOM 87
INTERCOM 88
INTERCOM 89
INTERCOM ✳✳4+1
(tone 1)
INTERCOM
(tone 2)
INTERCOM
(tone 3)
INTERCOM
(tone 4)
INTERCOM
(tone 5)
INTERCOM
(tone 6)
✳✳4+2
✳✳4+3
✳✳4+4
✳✳4+5
✳✳4+6
INTERCOM Ext. ✳ 7 INTERCOM # 7
✳ 01–99
INTERCOM # 01
INTERCOM ✳✳6
INTERCOM ✳ 2 INTERCOM # 2
2 – Quick Reference
Page 43

NOTES
Page 44

NOTES
Page 45

NOTES
Page 46

NOTES
Page 47

This manual has been developed by Comdial Corporation (the
“Company”) and is intended for the use of its customers and
service personnel. The information in this manual is subject to
change without notice. While every effort has been made to
eliminate errors, the Com pany disclaims liability for any
difficulties arising from the interpretation of the information
contained herein.
The information contained herein does not purport to cover all
details or variations in equipment or to provide for every possible
contingency to be met in connection with installation, operation,
or maintenance. Should further information be desired, or should
particular problems arise which are not covered sufficiently for
the p urchaser’ s purposes, contact Comdial, Inside Sales
Department, P.O. Box 7266, Charlottesville, Virginia 22906.
Page 48

R
Charlottesville, Virginia 22901-2829
World Wide Web: http://www.comdial.com/
Printed in U.S.A. GCA70–246.03
8/97
 Loading...