

Page 1
DXP
Digital Communications System
System User’s Guide
For DigiTech Telephones
IICOMDlAi
Page 2
This user’s guide is applicable for the
following telephone models:
77OOS-** Rev A through H
7714S-** Rev A through H
7714X-** Rev A through H
Page 3
Table Of Con tents
Table Of Contents
Using This Guide ..................................
1
Knowing Your Telephone
............................
2
Understanding What The Lights Mean
................ 4
Using Your Speakerphone
...........................
6
Using Your Telephone To Answer Calls
................ 8
Answering Outside Calls
.......................... 8
Answering Intercom Calls ......................... 8
Answering Calls At Monitored Stations
............. 10
Answering Night Transferred Calls
.................. 11
Making A Call Pick-Up
.......................... 12
Responding To A Secure Off-Hook
Voice Announcement ............................
14
Using Your Telephone To Make Calls .................
16
DialingManually..
............................. 16
Dialing Automatically ........................... 16
Redialing .....................................
18
Using Line Groups
.............................. 20
Waiting For A Line (Automatic Camp-On) 22 ...........
Making Intercom Calls ..........................
24
Camping On To Another Telephone
And Waiting For An Automatic Callback ..........
26
Camping On To Another Telephone
And Waiting For An Answer (Call Waiting)
........ 26
Overriding A Call ............................... 28
Making A Secure Off-Hook Voice Announcement
..... 30
Using Your Telephone To Place Calls On Hold
......... 32
Using Your Telephone To Transfer Calls
.............. 34
Using Your Telephone For Conference Calls
........... 36
Using The Other Telephone Features .................
38
Adjusting The Display Contrast ................... 38
Blocking Voice Announce Calls ...................
39
Entering Account Codes .........................
40
Forwarding Calls ...............................
42
Making A Call Non-Private .......................
.44
Continued on next page...
Page 4
Table Of Contents
Table Of Contents - continued
Momtoring A Conversation Between Two Telephones . . 46
Muting Your Telephone ..........................
47
Sending A Paging Announcement
.................. 48
Setting A Do Not Disturb Condition At Your Telephone
50
. Setting Your Personal Ringing Tones
............... 5 1
Switching The Dialing Mode Between Pulse And Tone . 52
Using Background Music
........................ 53
Sending And Receiving Non-Verbal Messages
......... 54
Message Waiting Light
..........................
54
LCD Messaging
................................ 56
Message Deposit ...............................
58
Programming Your Telephone
......................
60
ProgrammingForSpeedDialing
...................
60
Storing DSS Numbers ...........................
62
Storing Personal Speed Dial Numbers
..............
64
Storing The Response Message Button
.............. 66
Understanding The LCD Displays
................... 68
Using Your Quick Reference Guide
.................. 72
Glossary Of Terms ................................
73
Index
............................................
77
iV
Page 5
Usina This Guide
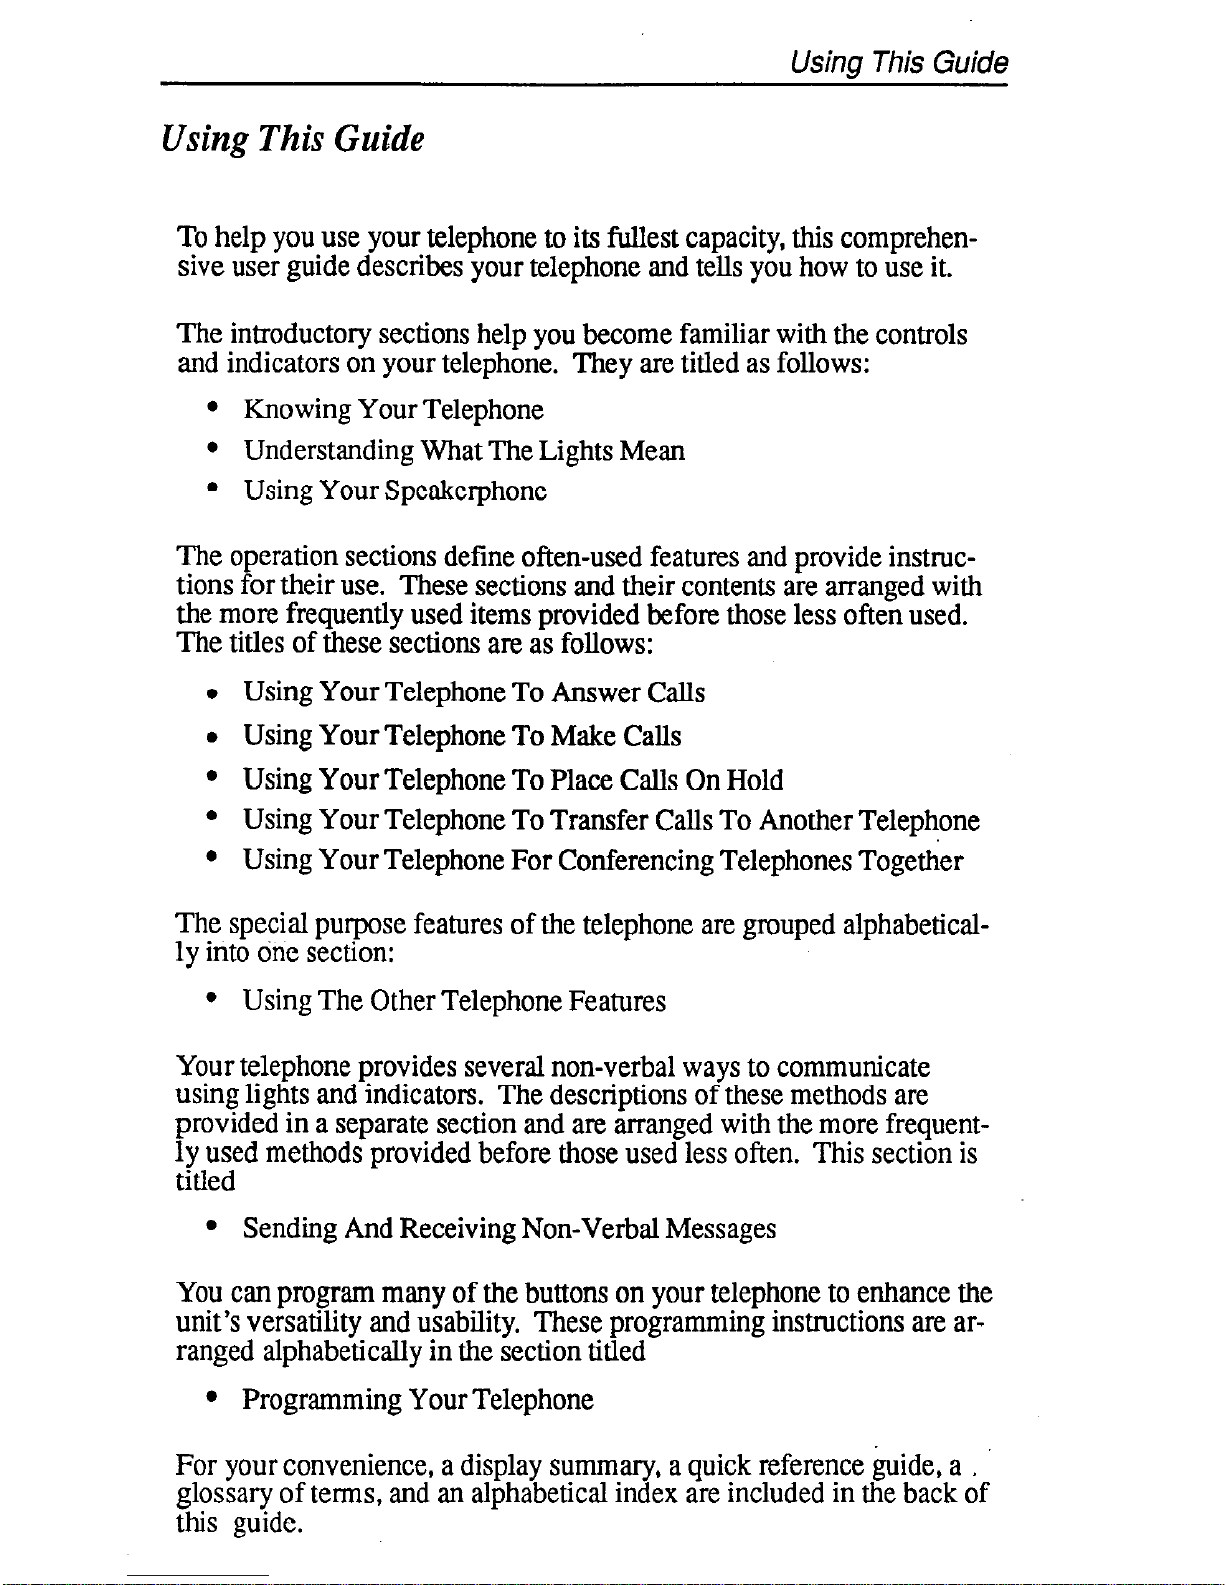
Using This Guide
To help you use your telephone to its fullest capacity, this comprehensive user guide describes your telephone and tells you how to use it.
The introductory sections help you become familiar with the controls
and indicators on your telephone. They are titled as follows:
l Knowing Your Telephone
l Understanding What The Lights Mean
l Using Your Speakerphone
The operation sections define often-used features and provide instructions for their use. These sections and their contents are arranged with
the more frequently used items provided before those less often used.
The titles of these sections are as follows:
l Using Your Telephone To Answer Calls
l Using Your Telephone To Make Calls
l Using Your Telephone To Place Calls On Hold
l Using Your Telephone To Transfer Calls To Another Telephone
l Using Your Telephone For Conferencing Telephones Together
The special purpose features of the telephone are grouped alphabetically into dne section:
l Using The Other Telephone Features
Your telephone provides several non-verbal ways to communicate
using lights and indicators. The descriptions of these methods are
provided in a separate section and are arranged with the more frequently used methods provided before those used less often. This section is
titled
l Sending And Receiving Non-Verbal Messages
You can program many of the buttons on your telephone to enhance the
unit’s versatility and usability. These programming instructions are arranged alphabetically in the section titled
l Programming Your Telephone
For your convenience, a display summary, a quick reference &de, a .
glossary of terms, and an alphabetical index are included in the back of
this guide.
Page 6
Knowing Your TeleM?one
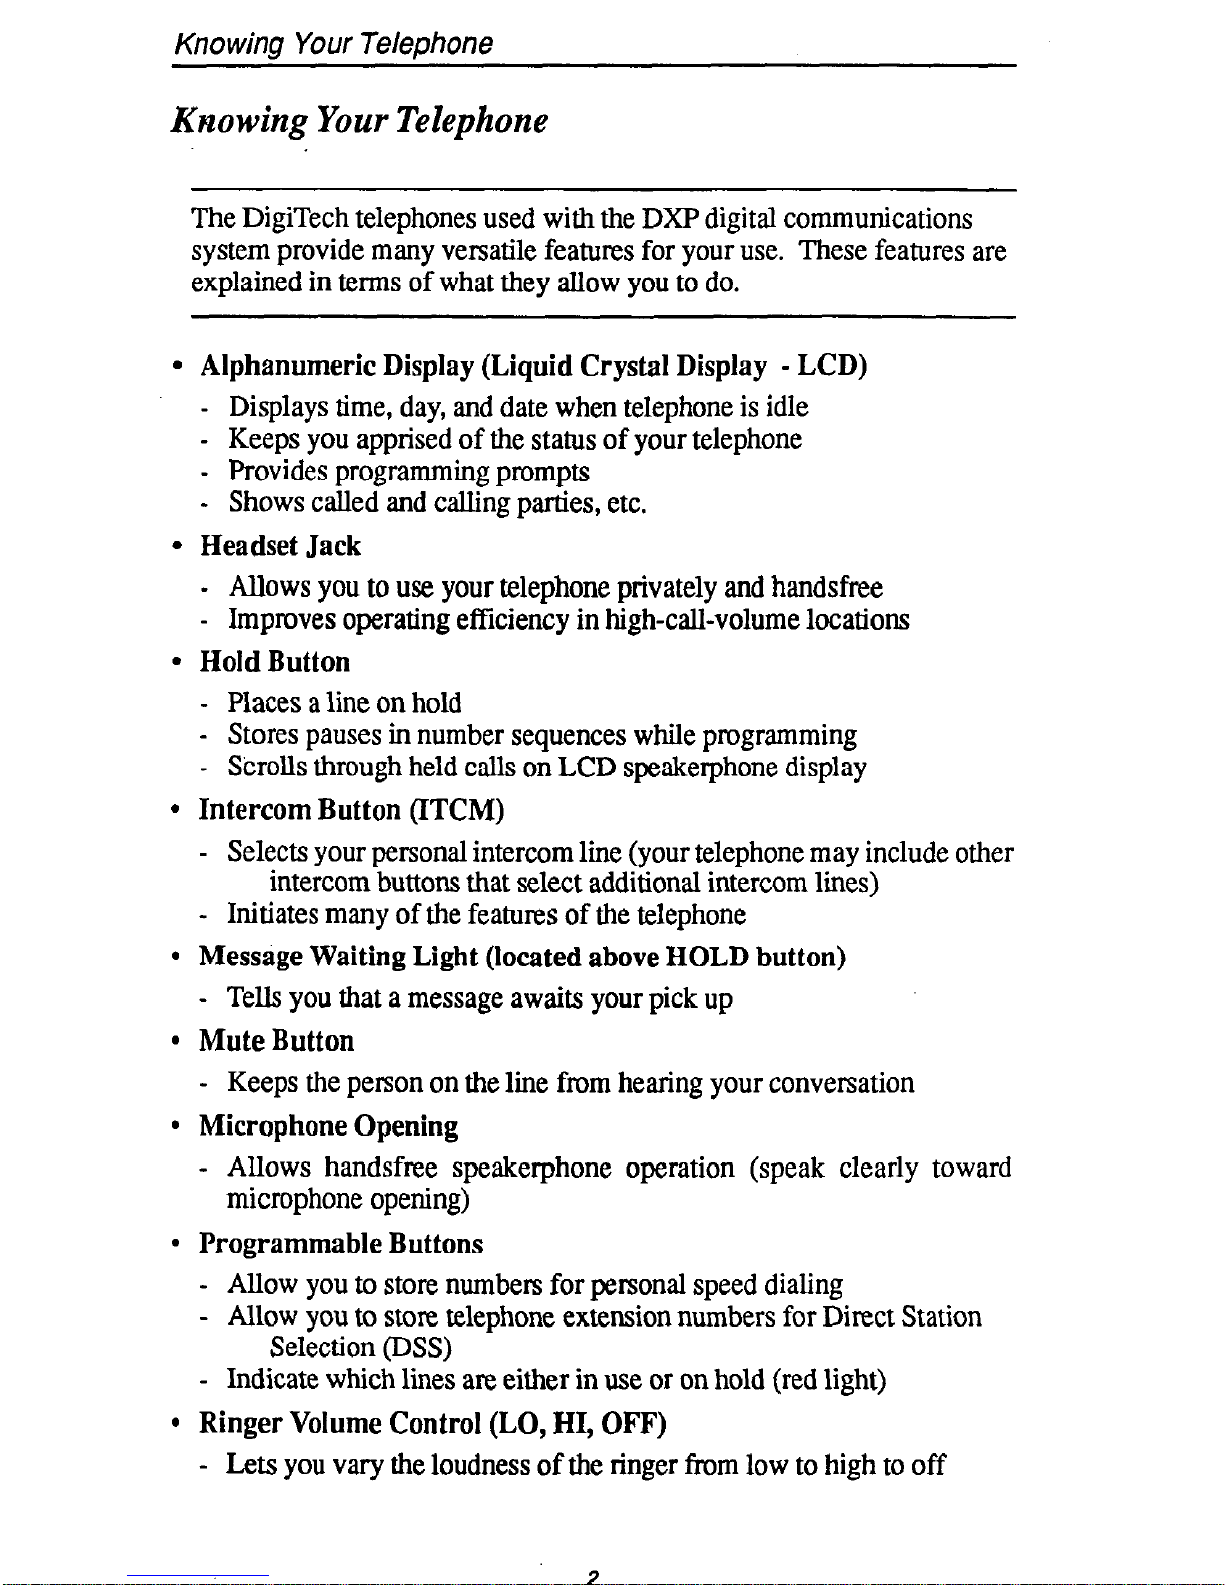
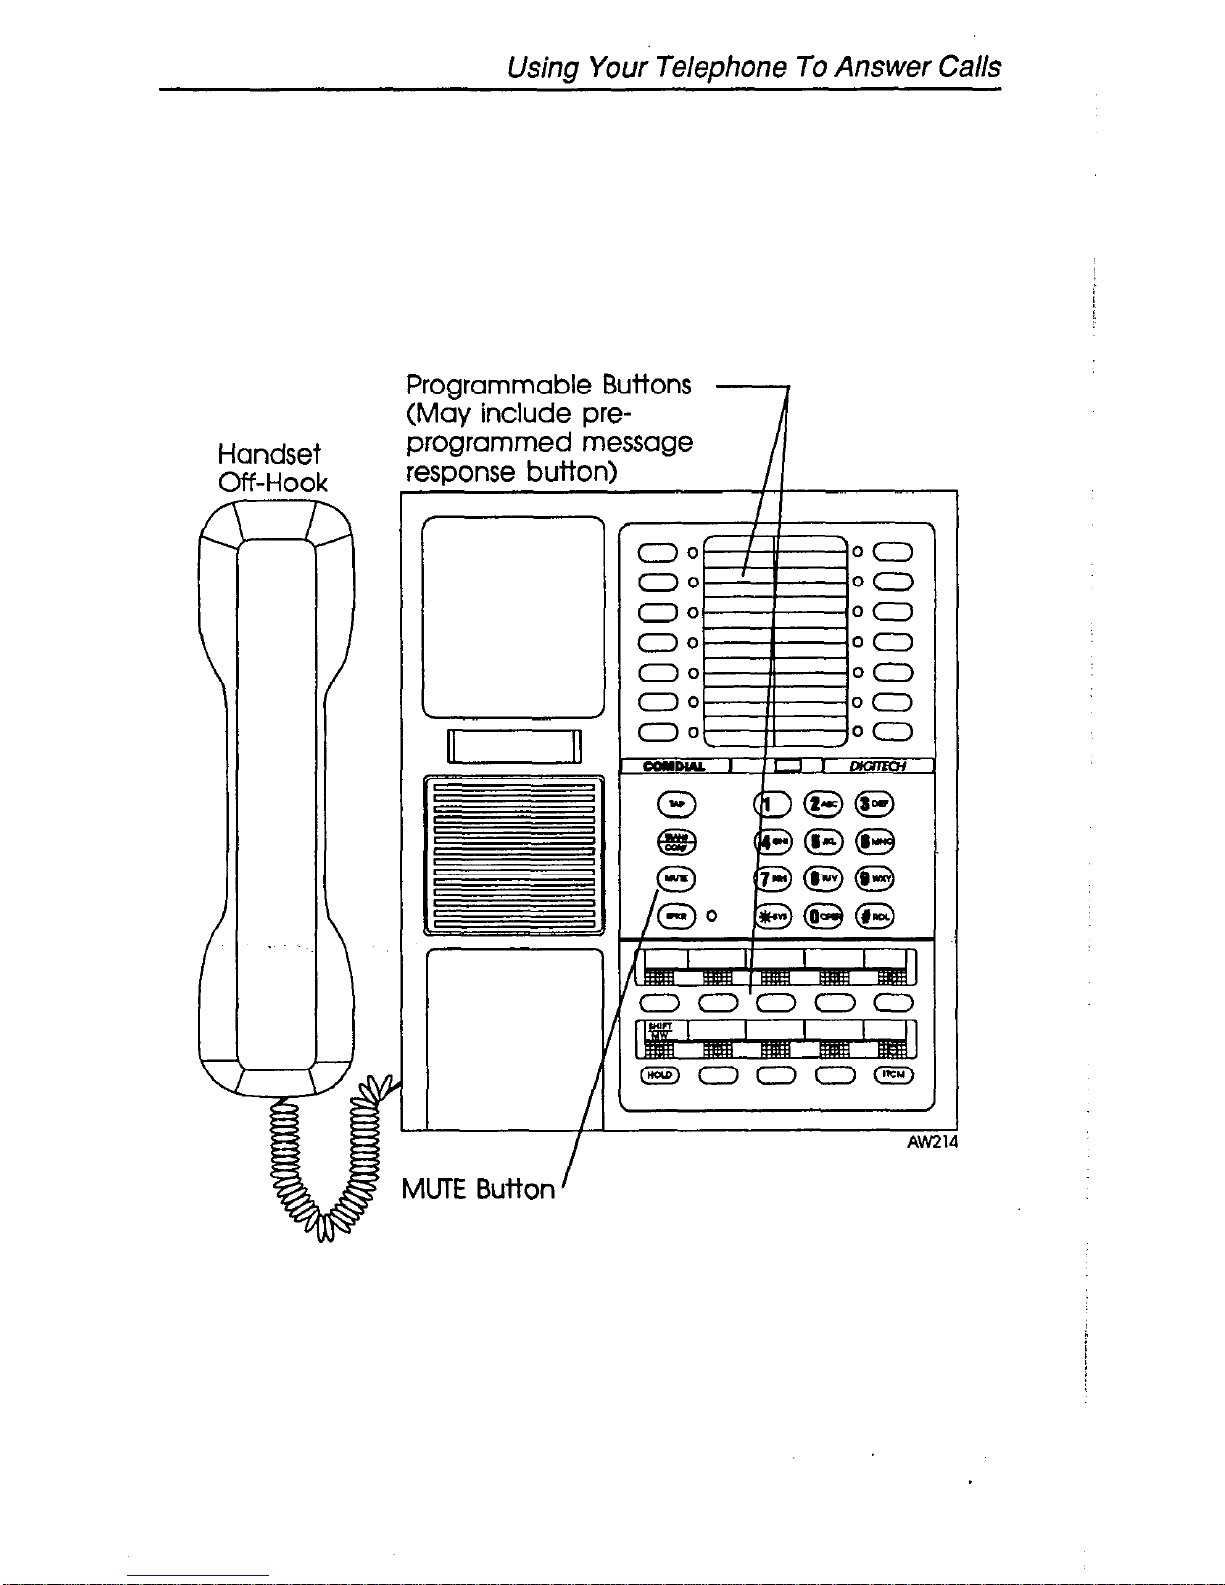
Krzowing Your Telephone
The DigiTech telephones used with the DXP digital communications
system provide many versatile features for your use. These features are
explained in terms of what they allow you to do.
l
Alphanumeric Display (Liquid Crystal Display - LCD)
- Displays time, day, and date when telephone is idle
- Keeps you apprised of the status of your telephone
- Provides programming prompts
- Shows called and calling parties, etc.
l
Headset Jack
- Allows you to use your telephone privately and handsfree
- Improves operating efficiency in high-call-volume locations
l
Hold Button
- Places a line on hold
- Stores pauses in number sequences while programming
- S’crolls through held calls on LCD speakerphone display
l
Intercom Button (ITCM)
- Selects your personal intercom line (your telephone may include other
intercom buttons that select additional intercom lines)
- Initiates many of the features of the telephone
l
Message Waiting Light (located above HOLD button)
- Tells you that a message awaits your pick up
l
Mute Button
- Keeps the person on the line from hearing your conversation
l
Microphone Opening
- Allows handsfree speakerphone operation (speak clearly toward
microphone opening)
l
Programmable Buttons
- Allow you to store numbers for personal speed dialing
- Allow you to store telephone extension numbers for Direct Station
Selection (DSS)
- Indicate which lines are either in use or on hold (red light)
l
Ringer Volume Control (LO, HI, OFF)
- Lets you vary the loudness of the ringer from low to high to off
2
Page 7
Knowing Your Telephone
l
Speaker
- Sounds distant party’s voice
- Sounds ringing and call progress tones
l
Speaker Button (SPKR)
-
Turns your speaker on or off
- Disconnects a call when your handset is on-hook
- Ends or cancels programming
l
TAP Button (must be preprogrammed for either function)
- Recalls dial tone or activates host system features by generating
a hookflash signal
- Displays time and cost of last call when LCD speakerphone is idle
- Reconnects to held or transferred call
l
Transfer/Conference Button (TRANSICONF)
- Transfers calls
- Sets up conference calls
l
Volume Control
- Adjusts the volume of the speaker
Dual Une Alphanumeric Display
Rlnger
/ Volume
\
e-_-d
Control
MUTE
Bution
Speaker
q
Button
(SPKR)
Hold
Button
- Programmable
BUttOllS
-Volume
Control
-Keypad
Buttons
- Intercom
Button
’ Programmable ,
BUttOnS
77OW- LCD Speakerphone
Page 8
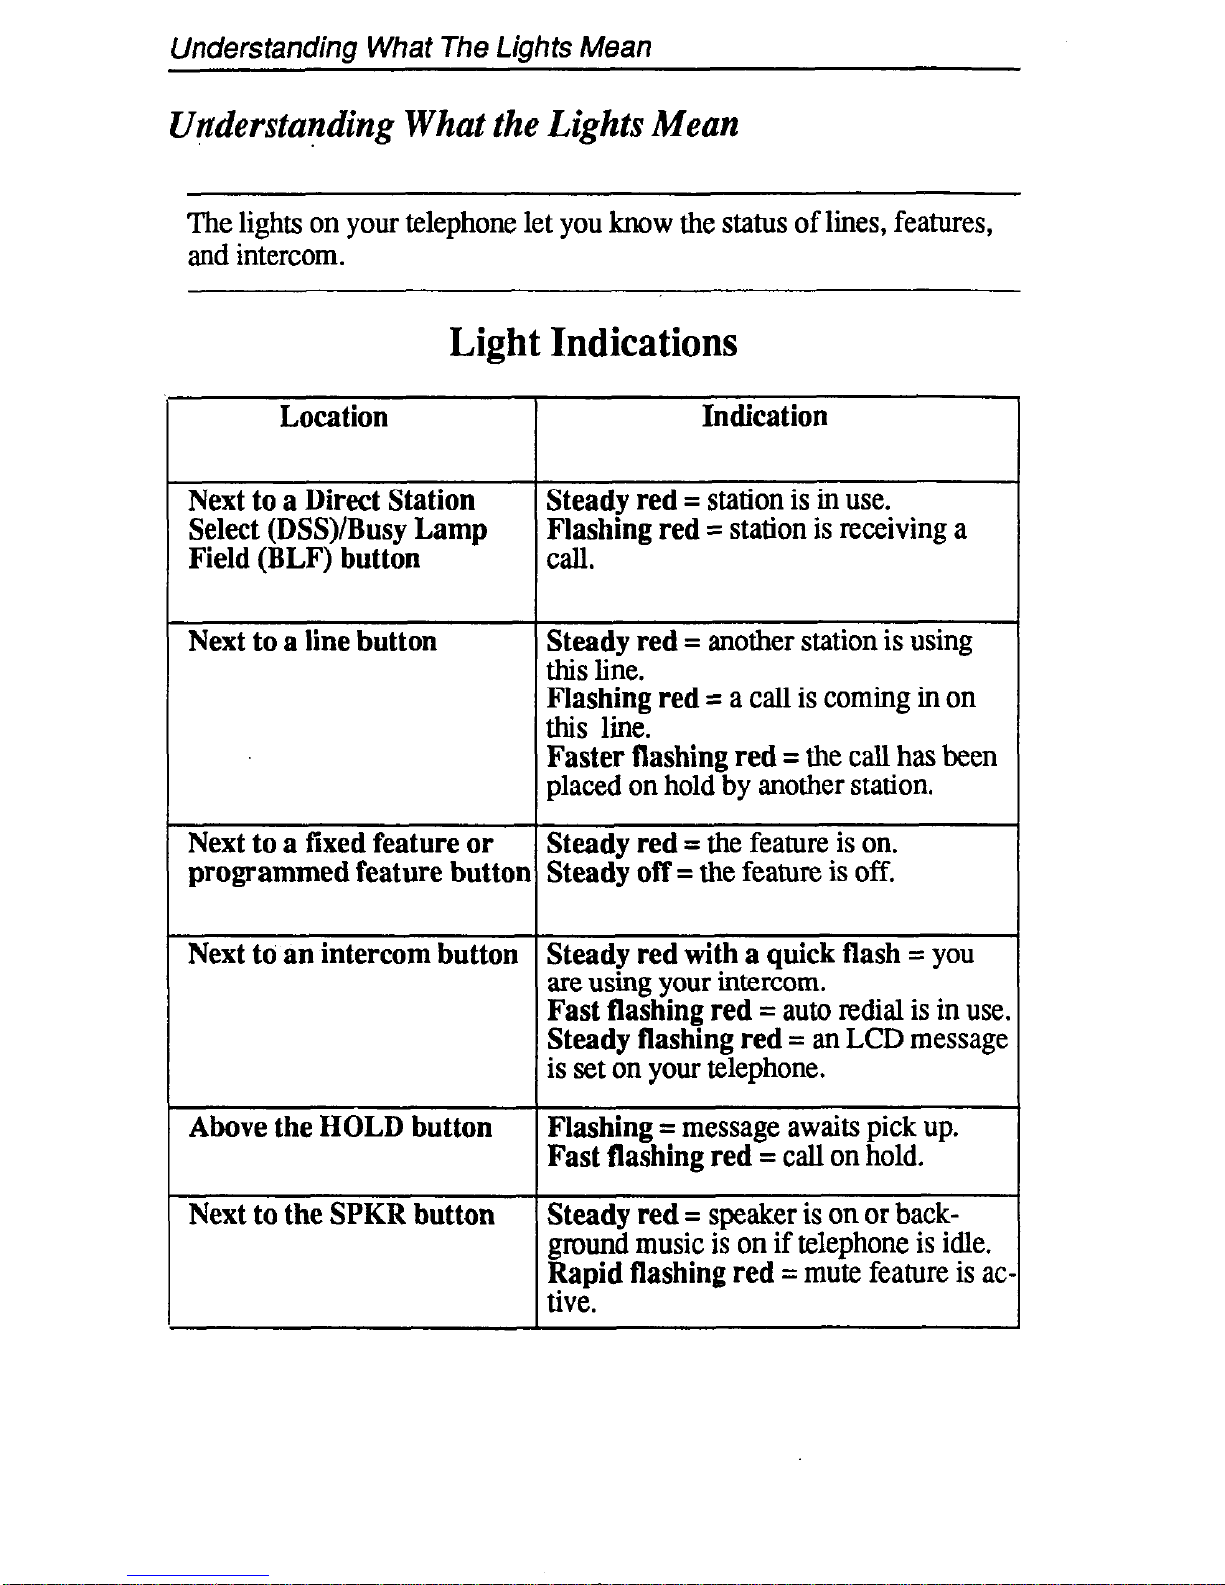
Understanding What The Lights Mean
UFderstanding What the Lights Mean
The lights on your telephone let you know the status of lines, features,
and intercom.
Light Indications
Location Indication
Next to a Direct Station Steady red = station is in use.
Select (DSS)/Busy Lamp Flashing red = station is receiving a
Field (BLF) button
Cdl.
Next to a line button Steady red = another station is using
this line.
Flashing red = a call is coming in on
this line.
Faster flashing red = the call has been
placed on hold by another station.
Next to a fixed feature or
Steady red = the feature is on.
programmed feature button Steady off = the feature is off.
Next to an intercom button Steady red with a quick flash = you
are using your intercom.
Fast flashing red = auto redial is in use.
Steady flashing red = an LCD message
is set on your telephone.
Above the HOLD button Flashing = message awaits pick up.
Fast flashing red = call on hold.
Next to the SPKR button
Steady red = speaker is on or background music is on if telephone is idle.
Rapid flashing red = mute feature is ac
tive.
Page 9
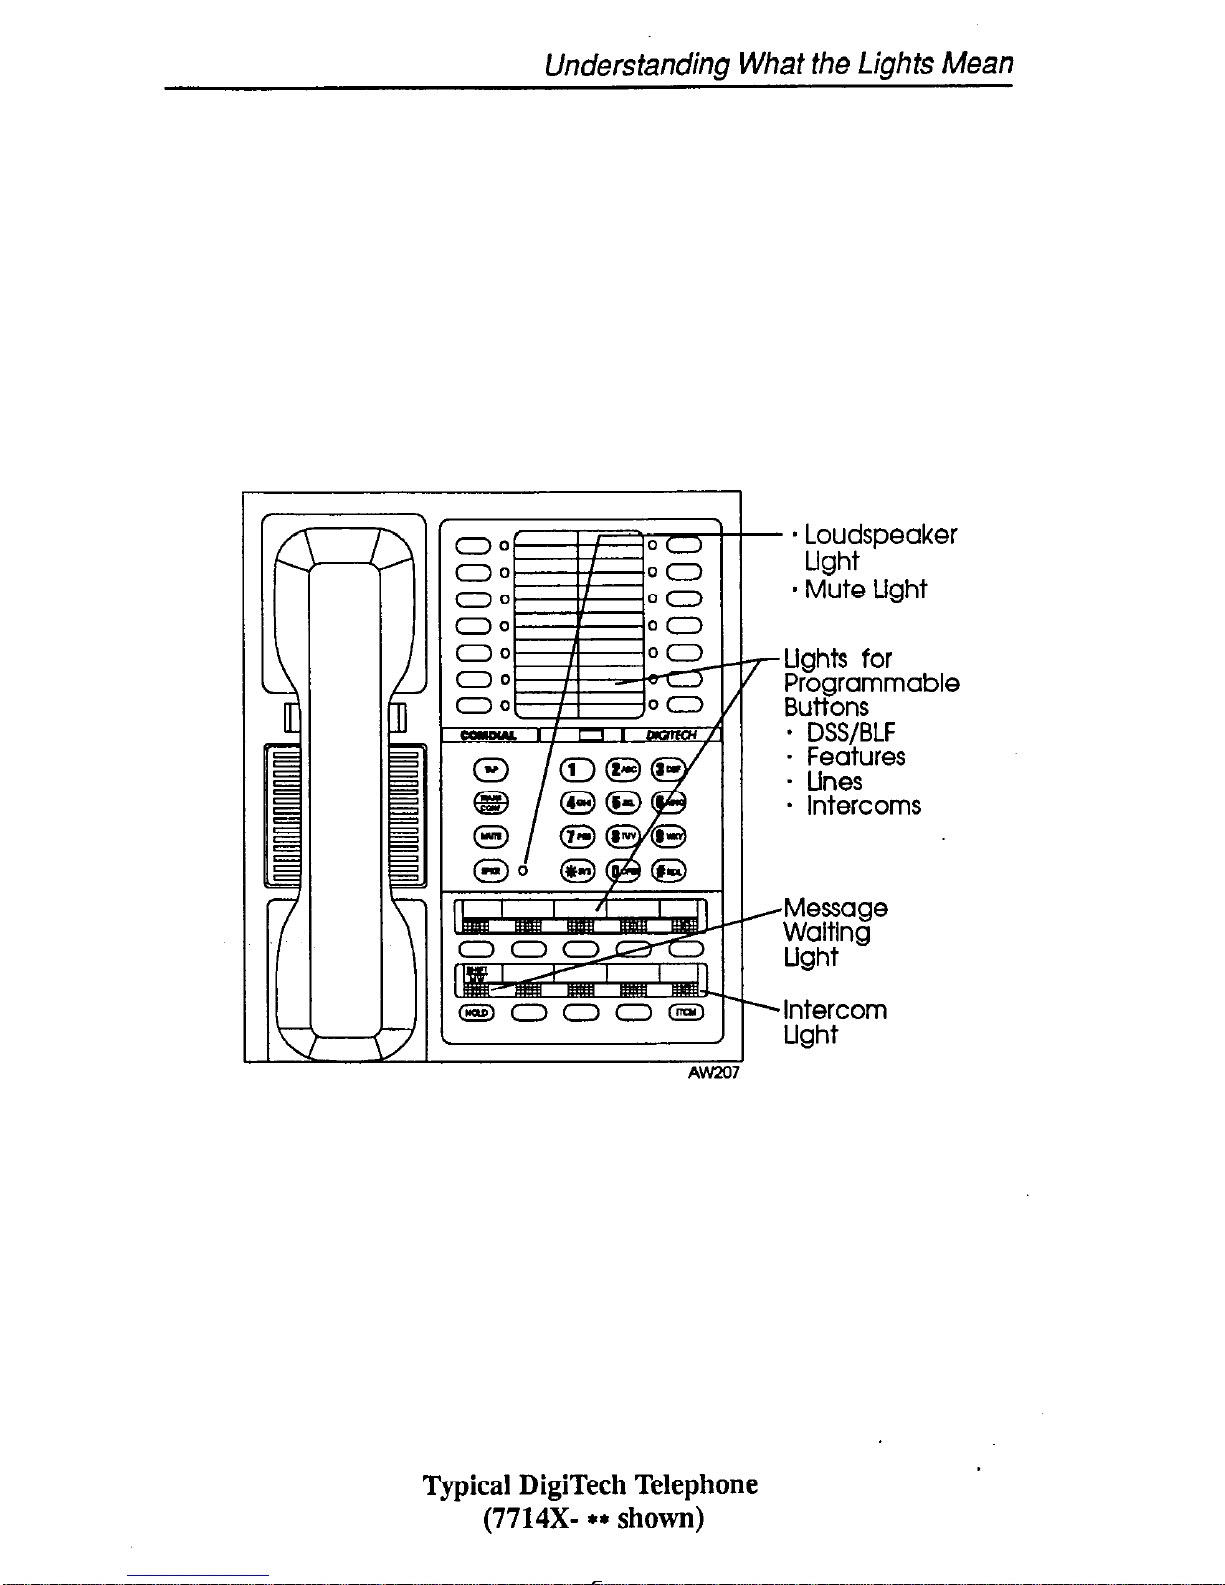
Understanding What the Lights Mean
- * Loudspeaker
Ught
* Mute Light
‘Lights for
Programmable
Buttons
- DSSIBLF
c3El000~
Intercom
Ught
Typical DigiTech Telephone
(7714X- ** shown)
Page 10
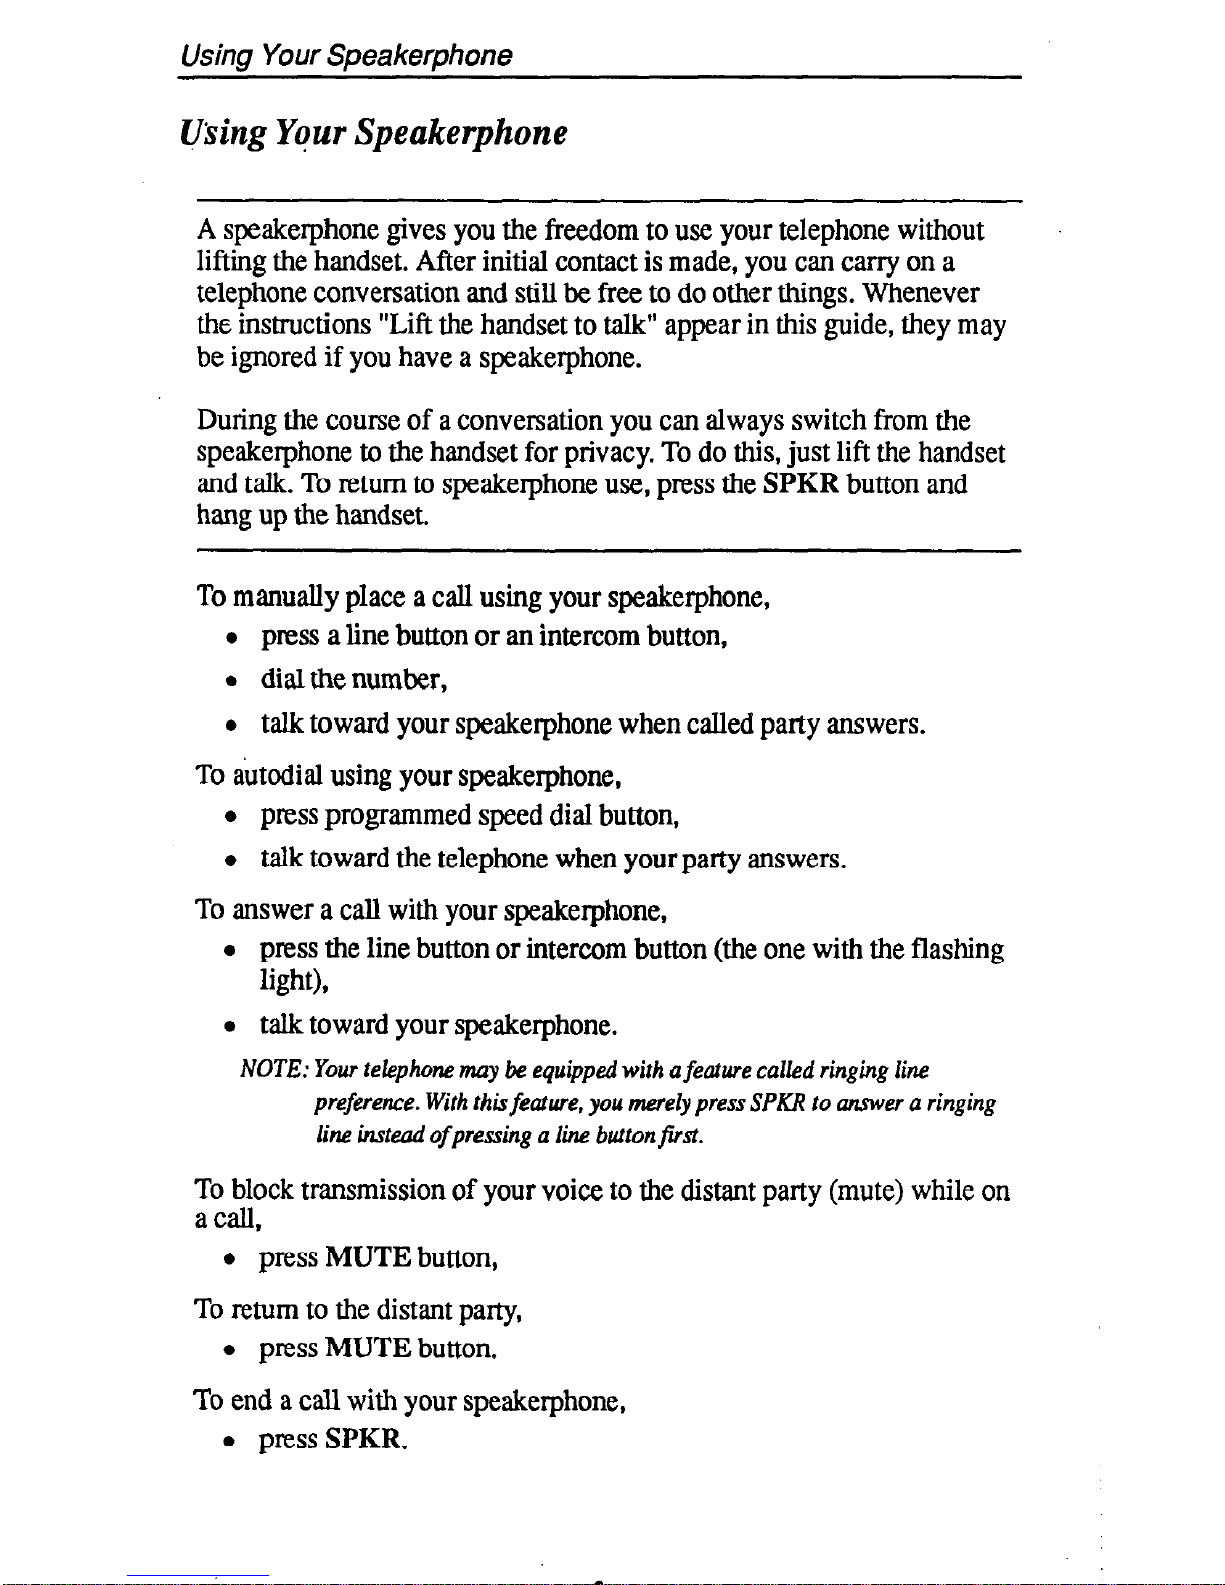
Using Your Speakerphone
using Yqur Speakerphone
A speakerphone gives you the freedom to use your telephone without
lifting the handset. After initial contact is made, you can carry on a
telephone conversation and still be free to do other things. Whenever
the instructions “Lift the handset to talk” appear in this guide, they may
be ignored if you have a speakerphone.
During the course of a conversation you can always switch from the
speakerphone to the handset for privacy. To do this, just lift the handset
and talk. To return to speakerphone use, press the SPKR button and
hang up the handset.
To manually place a call using your speakerphone,
l press a line button or an intercom button,
l dial the number,
l talk toward your speakerphone when called party answers.
To autodial using your speakerphone,
l press programmed speed dial button,
l talk toward the telephone when your party answers.
To answer a call with your speakerphone,
l press the line button or intercom button (the one with the flashing
light),
l talk toward your speakerphone.
NOTE: Your telephone may be equipped
with
a feature called ringing line
preference. With this feature, you merely press SPKU to answer a ringing
line
instead of pressing a line button first.
To block transmission of your voice to the distant party (mute) while on
a call,
l press MUTE button,
To return to the distant party,
l press MUTE button.
To end a call with your speakerphone,
l press SPKR.
Page 11
Using Your Speakerphone
/Telephone
Speaker
,Volume
Control
/SPKR
Button
Speak Toward y
Microphone Opening
7
Page 12
Using Your Telephone To Answer Calls
Answering Outside Calls
A call that rings on an outside line sounds long single tone bursts and
lights the line status light. The light flashes red for any ringing line.
When you hear outside ringing (long single tone bursts) and observe a
flashing light, answer the call as follows:
l press button of ringing line (the one with the flashing light),
l lift handset to talk.
NOTE: Your telephone may be equipped with a feature called ringing line
preference. With this feature, you merely lift the ha&et to mer a ring-
ing line instead
of
pressing a line button fist.
A Its wering Intercom Calls
An intercom call is made from one system telephone to another. An intercom party can call you through your telephone speaker or ring your
telephone if they desire (intercom ringing sounds two short tone
bursts). Voice calls can be blocked. See the discussion
titled BZocking
Voice Announced Calls
for details if you wish to activate this feature.
When you hear a short tone burst followed by a caller’s voice,
l speak toward the telephone to answer the caller. Lift handset if
privacy is desired.
When you hear intercom ringing (two short ring bursts),
l lift handset.
To answer a call that is ringing on a group intercom number,
l hear ringing and notice flashing group intercom button,
l press group intercom button,
q
a press
ANSWER
button if one has been programmed for your
telephone,
l begin talking when on a speakerphone or lift handset when
answering from a monitor telephone.
8
Page 13

Using Your Telephone To Answer Calls
Note: If your telephone is arranged to automatically answer a ring when you lift
the ha&set, you ah not need to press the group intercom button. Also, if
the programmer has not arrangedfor your telephone to answer group in-
tercom calLr, you will not be able to do so.
Proarammable <
Butffns (May
include installer-
\
programmed
Answer button)
A
A
Typic :al Line/
Status Light
/
Typical
Line Button
J
/ /
/ \ AW71
-Intercom
Button
._.-.-
L
Speak Toward
Microphone
Opening to Answer
Intercom Call
9
Page 14
Using Your Telephone To Answer Calls
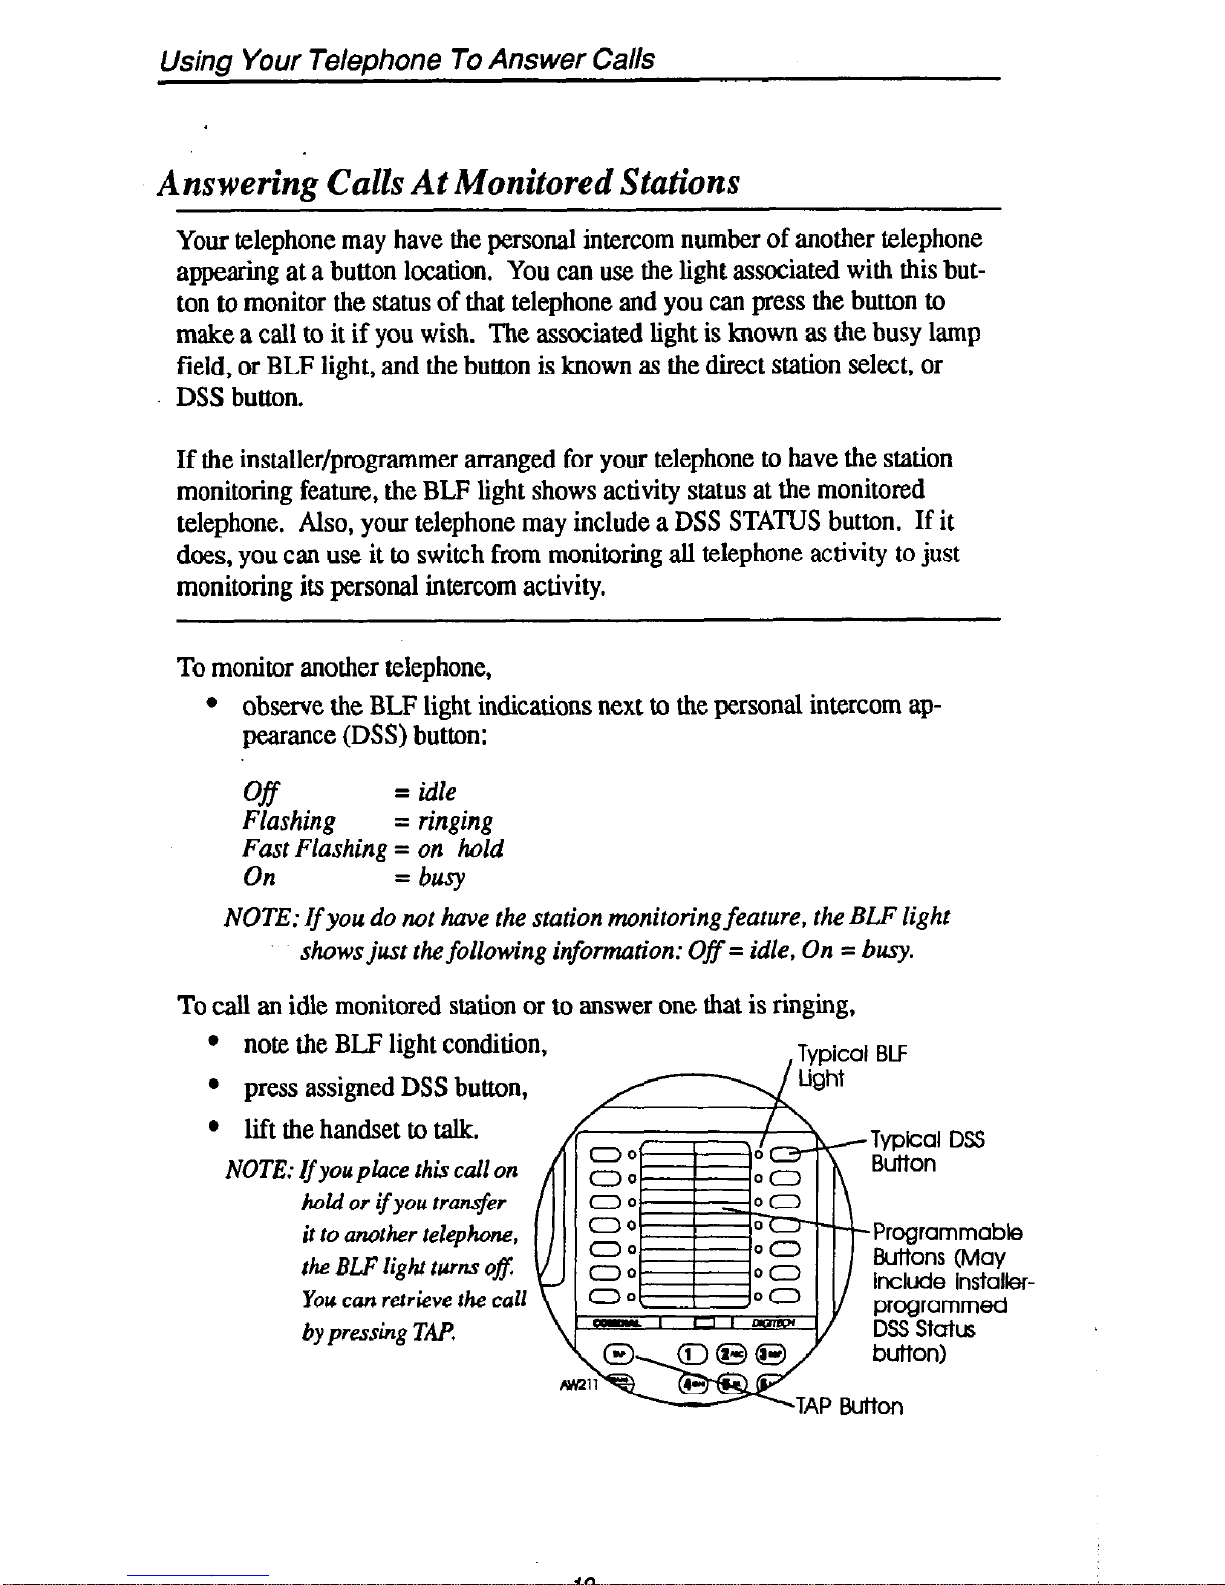
Answering Calls At Monitored Stations
Your telephone may have the personal intercom number of another telephone
appearing at a button location. You can use the light associated with this but-
ton to monitor the status of that telephone and you can press the button to
make a call to it if you wish. The associated light is known as the busy lamp
field, or BLF light, and the button is known as the direct station select, or
DSS button.
If the installer/programmer arranged for your telephone to have the station
monitoring feature, the BLF light shows activity status at the monitored
telephone. Also, your telephone may include a DSS STATUS button. If it
does, you can use it to switch from monitoring all telephone activity to just
monitoring its personal intercom activity.
To monitor another telephone,
l
observe the BLF light indications next to the personal intercom appearance (DSS) button:
Off
= idle
Flashing = ringing
Fast Flashing = on hold
On =busy
NOTE:
If
you do not have the station monitoring feature, the BLF light
shows just the following information: Ofi= idle, On = busy.
To call an idle monitored station or to answer one that is ringing,
l
note the BLF light condition,
l
press assigned DSS button,
l
lift the handset to talk.
NOTE: If you place this call on
hoki or ifyou tran$er
it to another telephone,
the BLP
light turm o#
You can retrieve the call
by pressing TAP.
include installer-
IO
Page 15
Using Your Telephone To Answer Calls
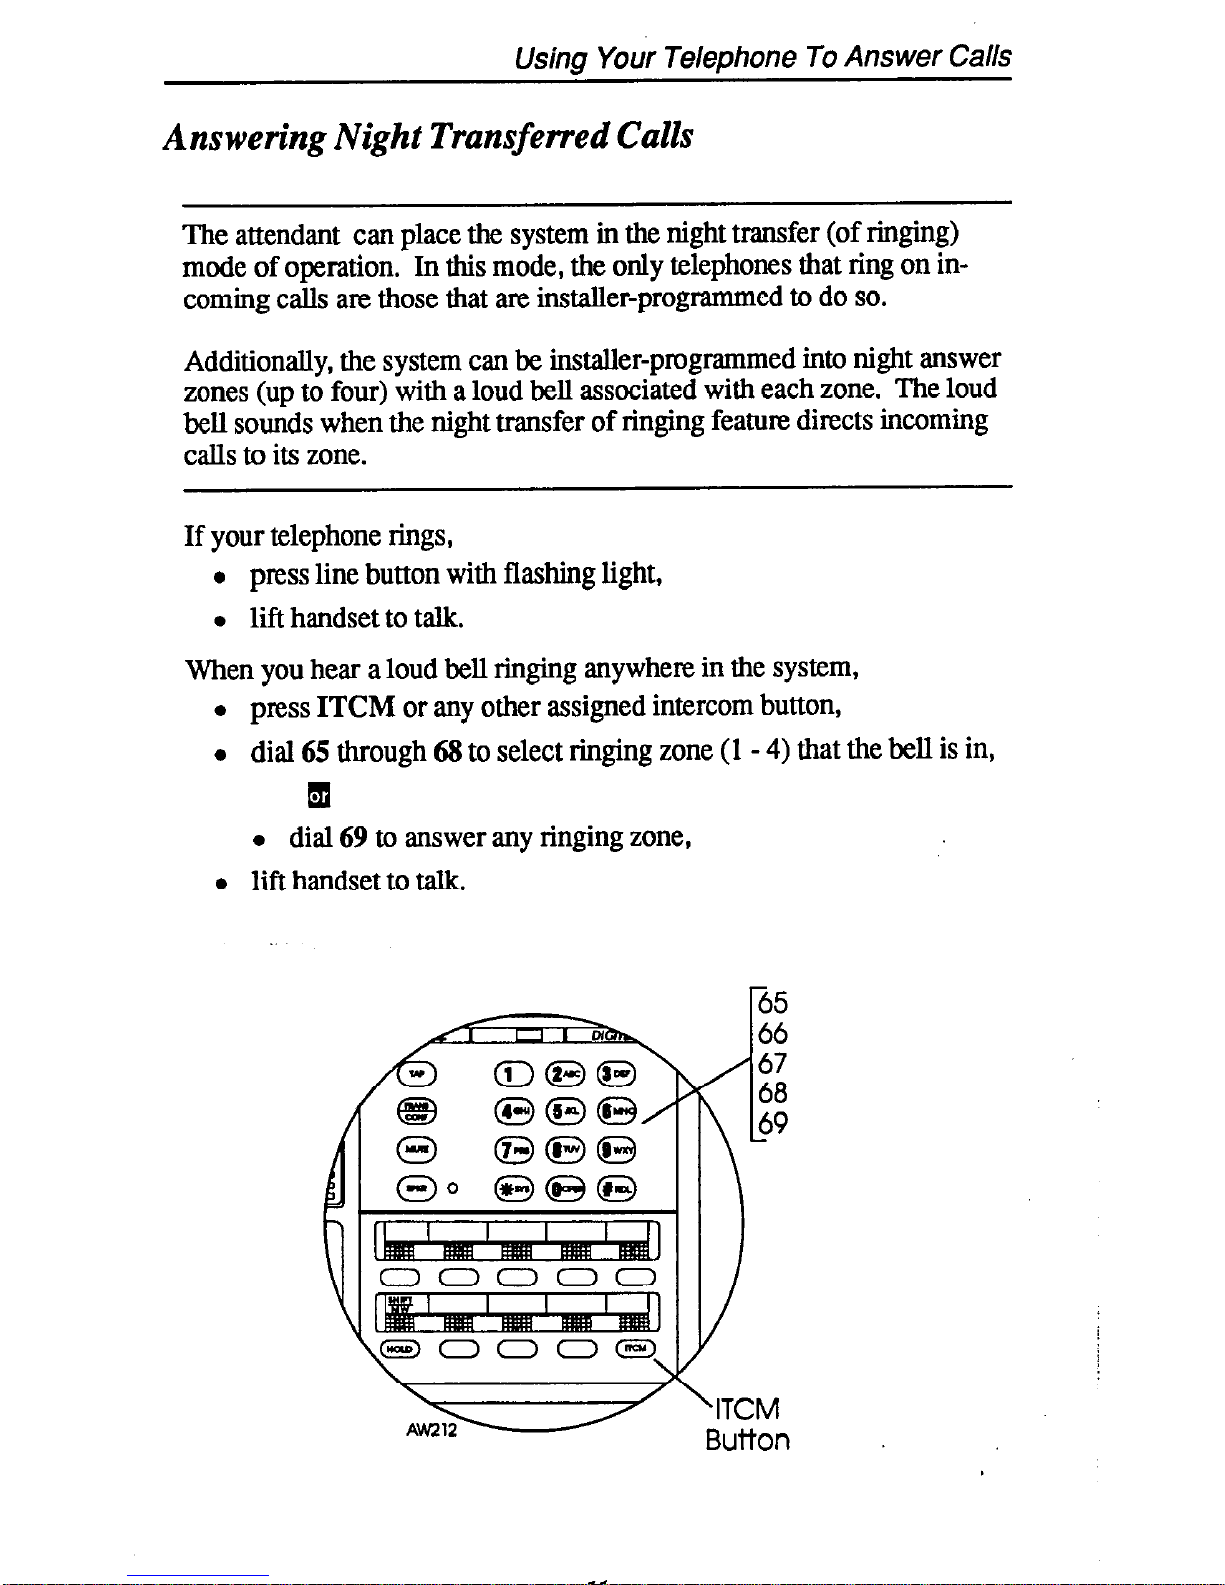
Answering Night Transferred Calls
The attendant can place the system in the night transfer (of ringing)
mode of operation. In this mode, the only telephones that ring on incoming calls are those that are installer-programmed to do so.
Additionally, the system can be installer-programmed into night answer
zones (up to four) with a loud bell associated with each zone. The loud
bell sounds when the night transfer of ringing feature directs incoming
calls to its zone.
If your telephone rings,
l press line button with flashing light,
l lift handset to talk.
When you hear a loud bell ringing anywhere in the system,
l press ITCM or any other assigned intercom button,
l dial 65 through 68 to select ringing zone (1 - 4) that the bell is in,
q
l dial 69 to answer any ringing zone,
l lift handset to talk.
v ‘ITCM
Ah212
Button
17
Page 16
Using Your Telephone To Answer Calls
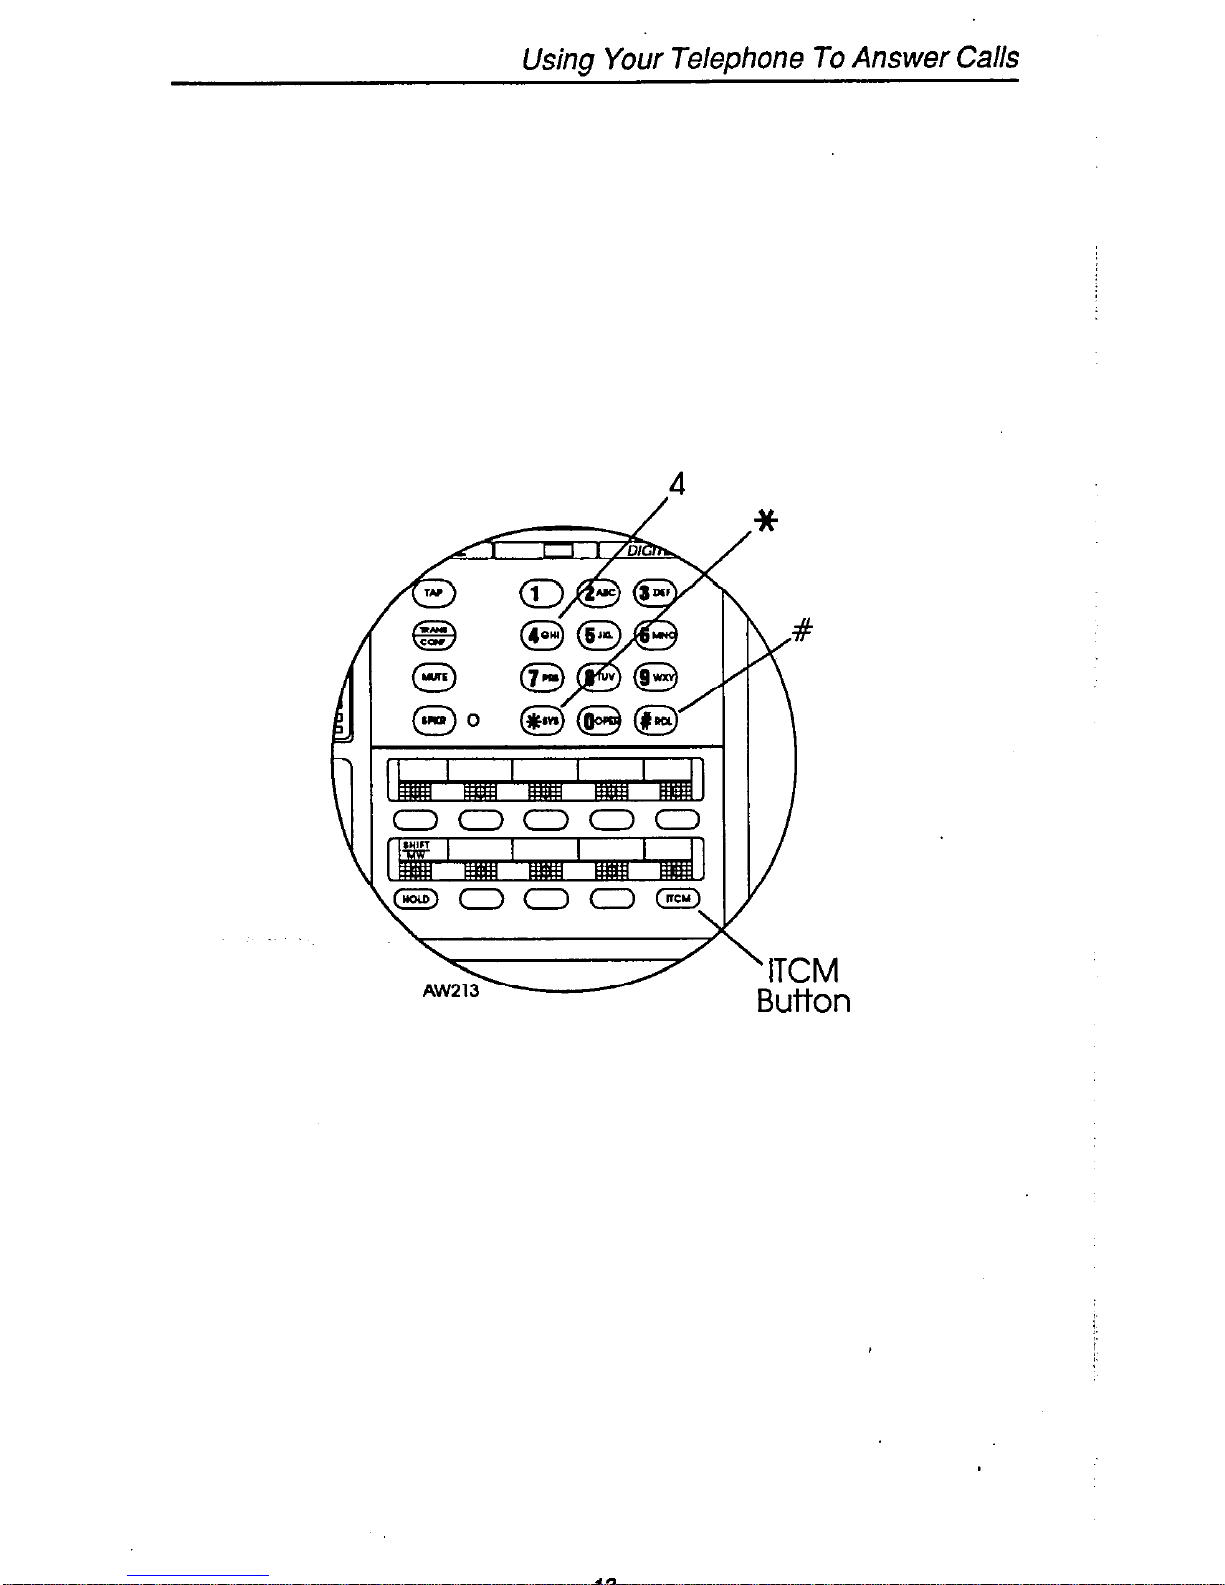
flaking 4 Call Pick-Up
Often, telephones are arranged together in a user group by the system
installer. When your telephone is so arranged, you can answer calls
that are ringing at other stations within your particular group.
Also,
you can answer a call that is ringing at any telephone in the system if
you know that telephone’s extension number.
To answer a call that is ringing within your group,
l lift handset,
l press ITCM or any other assigned intercom button,
l dial#4.
To answer a call that is ringing at any telephone in the system,
l lift handset,
l press ITCM or any other assigned intercom button,
l dial% 4,
l ‘dial extension number of ringing telephone.
12
Page 17
Using Your Telephone To Answer Calls
4
/
*
Page 18
Using Your Telephone To Answer Calls
Responding To A Secure Off-Hook
Voice Anizouncement
Your telephone may be arranged by your system installer to receive a
Secure Off-Hook Voice Announcement (SOHVA) while you are busy
on another call.
The SOHVA announcement consists of several short tone bursts and
then an announcement that you hear in your handset receiver. The distant party you are currently talking to cannot hear the announcement
made by the SOHVA caller since it is delivered to your ear through the
handset receiver.
You can respond to a SOHVA call in one of two ways.
l Verbally: Press and hold down MUTE button and reply by
speaking into the handset. Your distant party cannot hear your
response while you hold the MUTE button down. Release the
MUTE button to continue speaking to the distant party.
l Non-verbally (Response Messaging): If the announcing station
has an LCD speakerphone, you can send an attendantprogrammed LCD message (response message) to it. To do this,
press your preprogrammed MESSAGE RESPONSE button.
(Refer to the section of
this
guide titled,
Programming Your
Telephone
for instructions on how to program the MESSAGE
RESPONSE button.) The response message appears in the display of the telephone that made the SOHVA announcement. After
the message appears, that telephone is automatically disconnected
from your telephone.
You can send a different attendant-programmed LCD message if you
are using an LCD speakerphone that provides a UNIVERSAL MESSAGE button. To use this button to respond to a SOHVA call, proceed
as follows:
l press UNIVERSAL MESSAGE button repeatedly until the
desired response message appears in your telephone display,
,
l press #to send that message.
‘;
,
Note: For more information, refer to the discussion firled “Uessage Deposit.”
14
Page 19
Using Your Telephone To Answer Calls
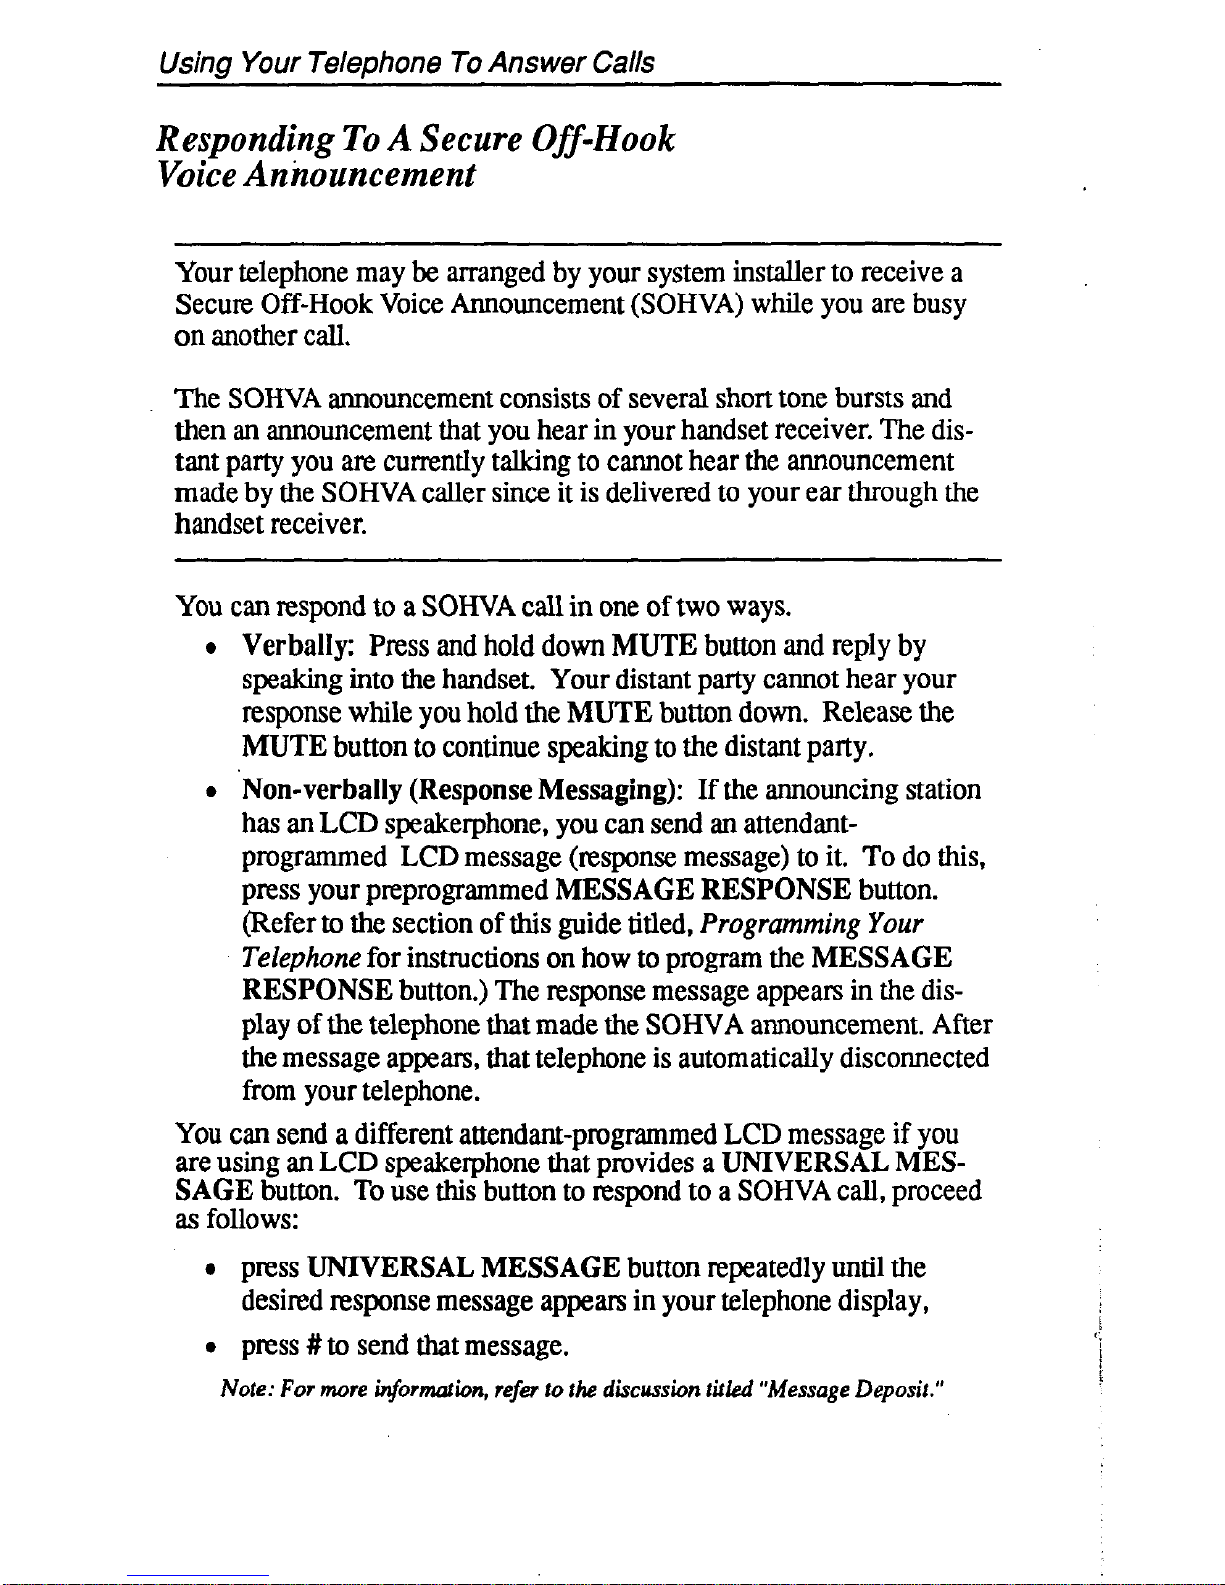
Handset
Off-Hook
00
00
00 00
00
00
00
00
00
00
00 00
00
00
Programmable Buttons
(May include preprogrammed message
AW21
15
Page 20
Using Your Telephone to Make Calls
Dialing Manually
You can press a line button to select a line and use the keypad to dial a
number over that line. If your telephone has been given a prime line
feature when it was installed, it will automatically select the line for
you to use when you lift the handset.
If you wish to prevent other users from accessing the lines and features
of your telephone, you may do so by pressing the installer-programmed
LOCK button and dialing an authorization code.
To
manually dial an outside number from the keypad,
l press line button to select line (remember, selecting a line is not
necessary if a prime line has been assigned to your telephone and
if you lift the handset to begin the call),
l listen for dial tone,
l dialnumber,
l lift handset to talk (if not already lifted).
Dialing Automatically Using
Stored Speed Dial Numbers
Automatic dialing (commonly referred to as speed dialing) uses
programmable buttons or keypad buttons at which you or the system attendant has previously stored numbers. If your telephone includes an
installer-programmed SHIFT button, you will also have access to a
second level of personal speed dial numbers stored at the programmable button locations, Actual button programming is discussed in a
separate section of this user’s guide titled Progrumming Your
Telephone. Refer to it when you are ready to store numbers for personal speed dialing.
There are two types of speed dial numbers available for your use as follows: (1) numbers that you store for your own use (personal speed dial
numbers), and (2) numbers that are stored by the system attendant for
everyone’s use (system speed dial numbers). A line choice is usually
stored as part of any number that is to be dialed over an outside line;
therefore, line selection is automatic when speed dialing these stored
numbers.
To dial a personal speed dial number while on-hook,
76
Page 21
Using Your Telephone To Make Calls
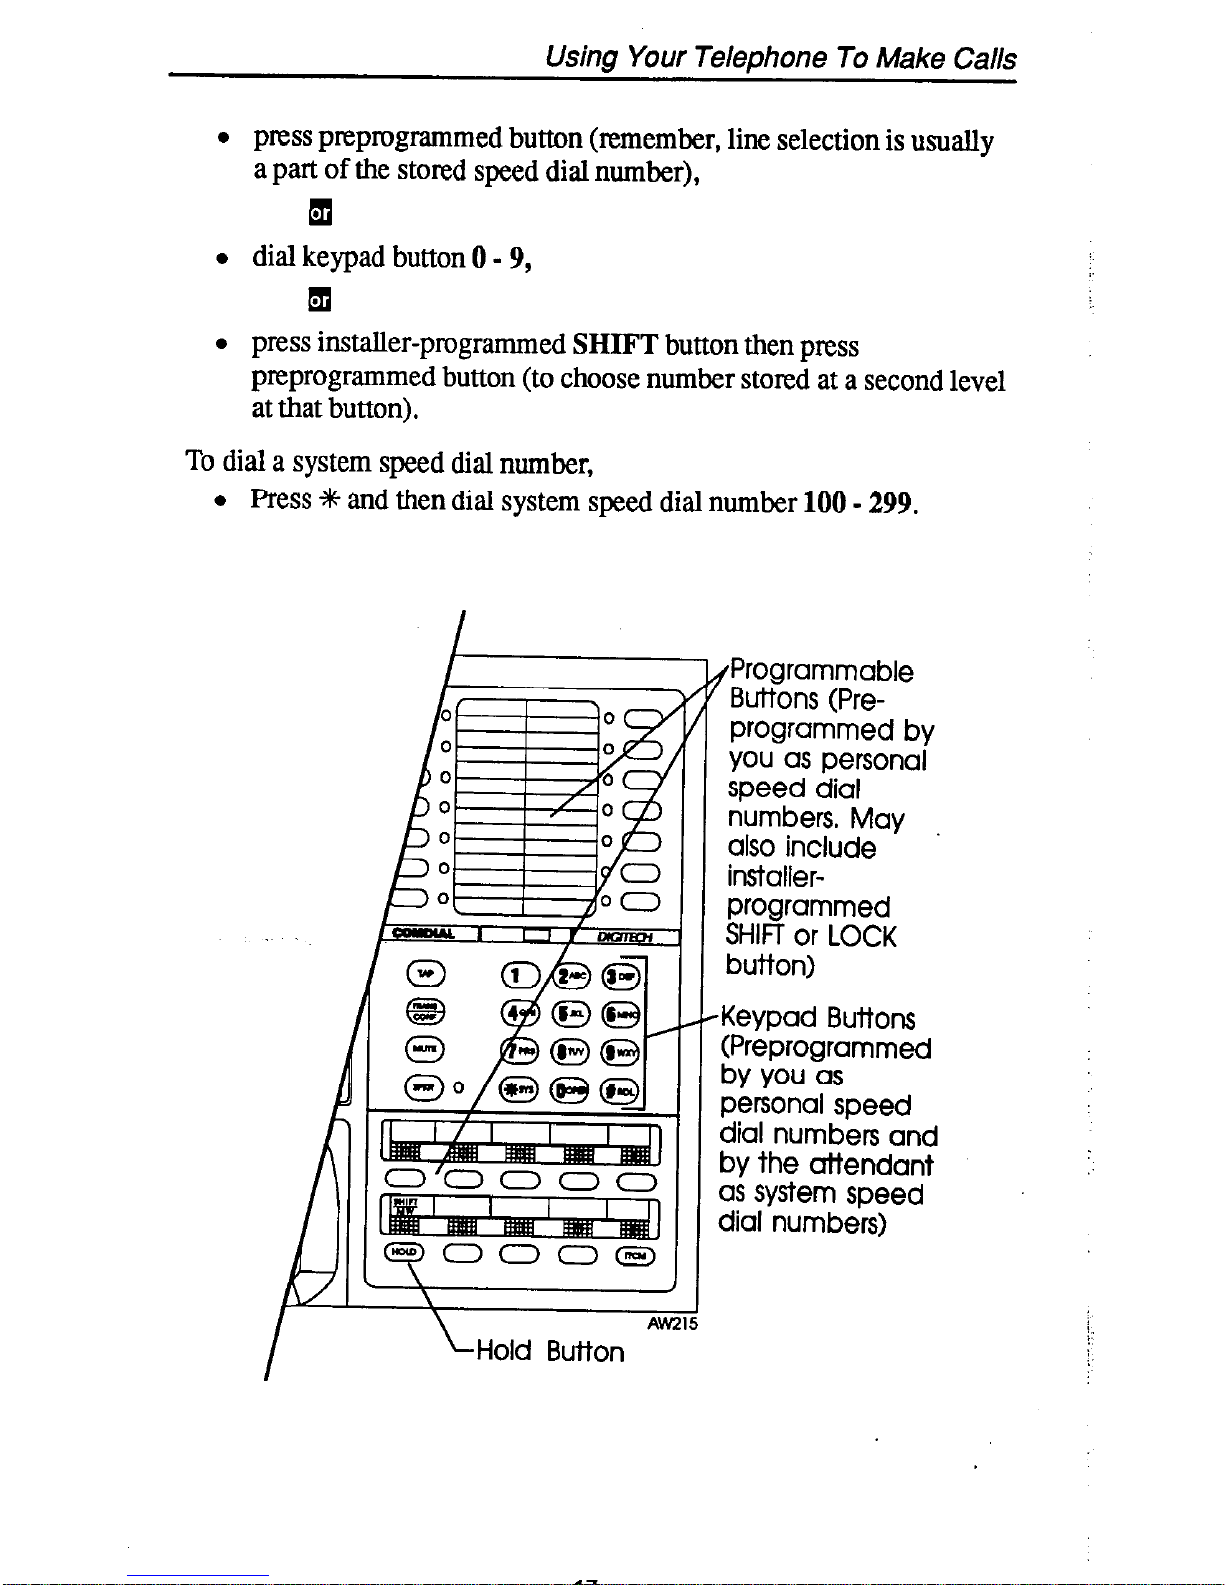
l press preprogrammed button (remember, line selection is usually
a part of the stored speed dial number),
1
l dial keypad button 0 - 9,
q
l press installer-programmed SHIFT button then press
preprogrammed button (to choose number stored at a second level
at that button).
To dial a system speed dial number,
l Press +% and then dial system speed dial number 100 - 299.
LHold Button
17
{Programmable
Buttons (Preprogrammed by
you as personal
speed dial
numbers. May
also include
installerprogrammed
SHIFT or LOCK
button)
Keypad Buttons
(Preprogrammed
by you as
personal speed
dial numbers and
by the attendant
as system speed
dial numbers)
Page 22
Using Your Telephone to Make Calls
If the last number you have called is busy or is not answering, you have
several options for automatically redialing the number. You can redial
it once; initiate a repeated redialing of it using an installer-programmed
AUTOMATIC REDIAL
button; or save it for later redial using any
unprogrammed programmable button,
To automatically redial the last dialed number one time,
l hang up to disconnect current ringing or busy tone,
0 press #,
l listen for ringing or busy tone in speaker.
- Ringing tone: When
- Busy tone: Press
SP Ii&
arty answers, pick up handset.
to disconnect. You can press #
again to redial the same number
To automatically redial the number once a minute for 10 minutes,
l hang up to disconnect current ringing or busy tone,
l ‘press installer-programmed
AUTOMATIC REDIAL
button.
The number will be dialed once a minute for 10 minutes and wait 30
seconds for an answer after each try. The ITCM light flashes while
redial is active.
l listen for ringing or busy tone in speaker.
- Ringing tone: When party answers, pick up handset.
- Bus tone: press installer-programmed
AUTOMATIC
REdIAL
button to begin redial cycle again.
You can cancel this automatic redial action @KM light turns of?‘) with
any of the following actions:
l press installer-programmed
AUTOMATIC REDIAL
button,
l lift and replace handset,
l use the telephone for some other function.
18
Page 23
Using Your Telephone To Make Calls
You can save the first 16 digits of the last manually dialed number and
redial it later if you wish; however, you can store only one 16-digit
number at a time in this manner.
To store the number before you hang up,
l press any programmable button that is not now programmed for
any other purpose,
l hangup.
:.
To redial the saved number,
l press the programmable button where you saved the number,
l lift handset if you are on a monitor telephone or if you wish your
call to be private.
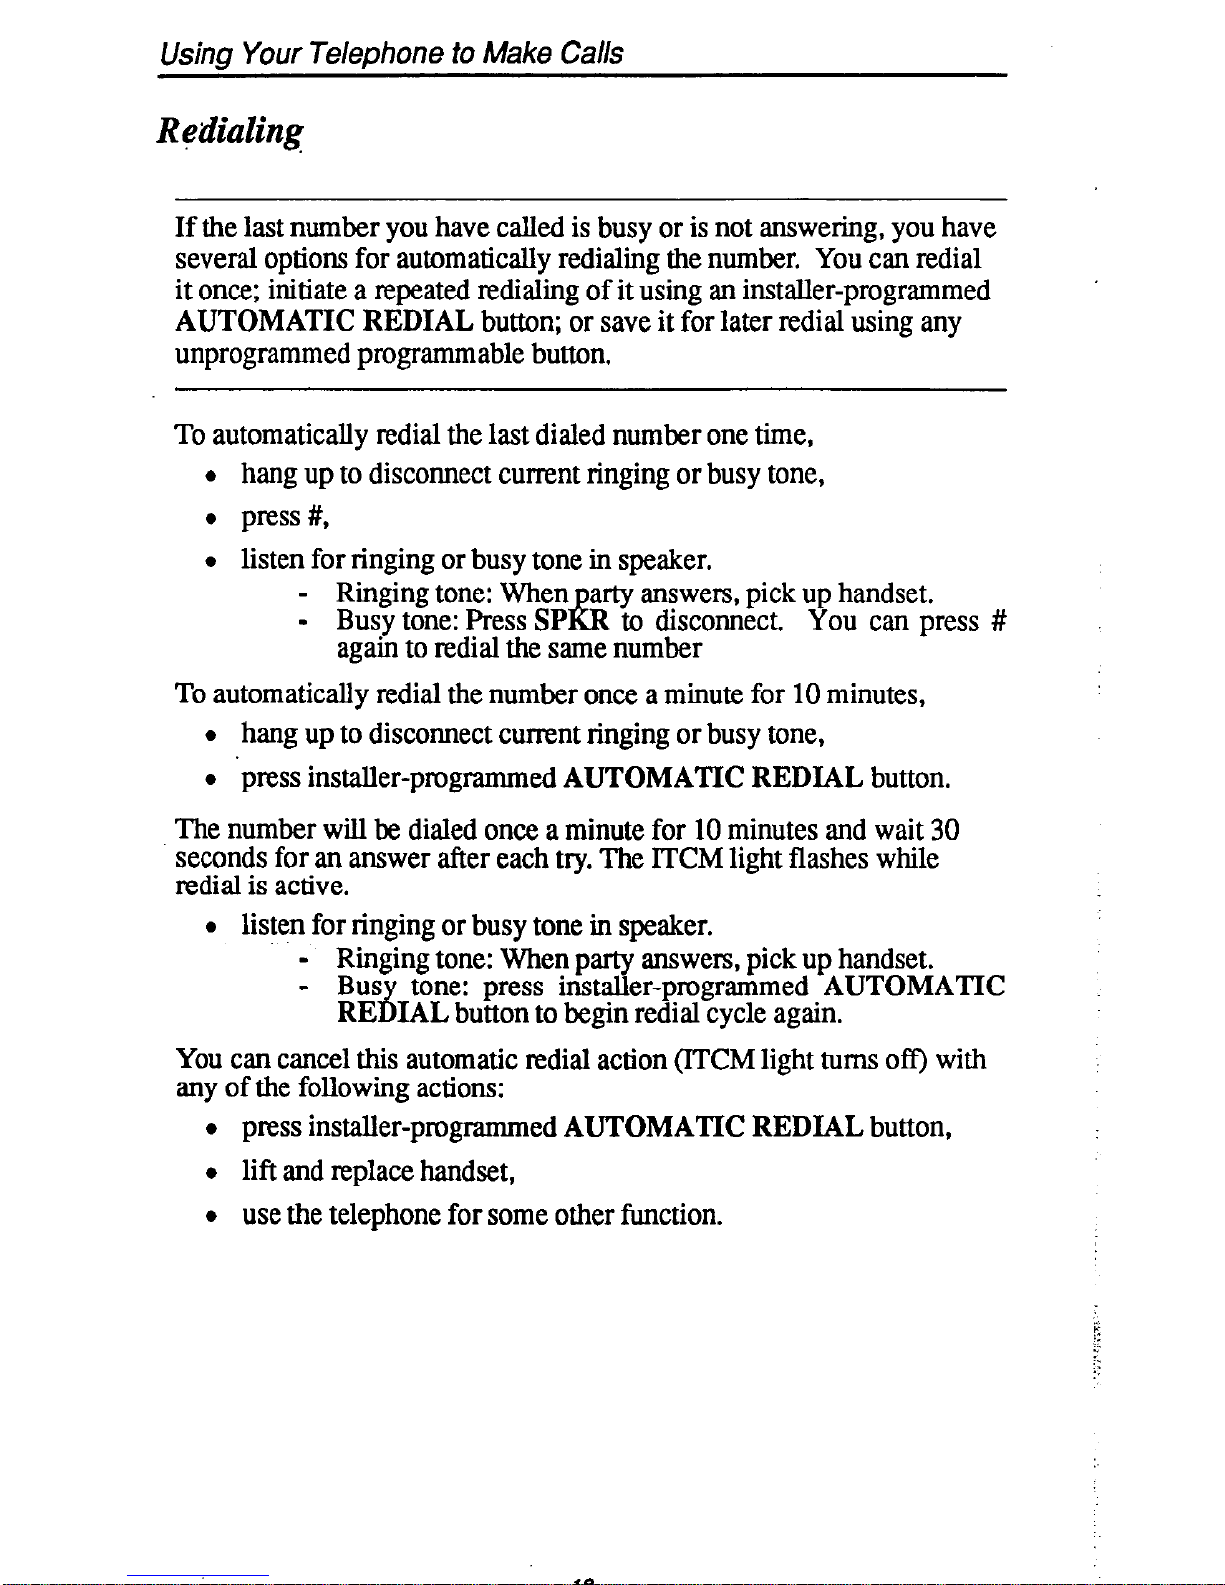
Programmable Buttons
7 (May include installer-
programmed feature
buttons)
. Auto Redial
,# (Last Number
Redial)
, ITCM Light
I
L SPKR Button
19
Page 24
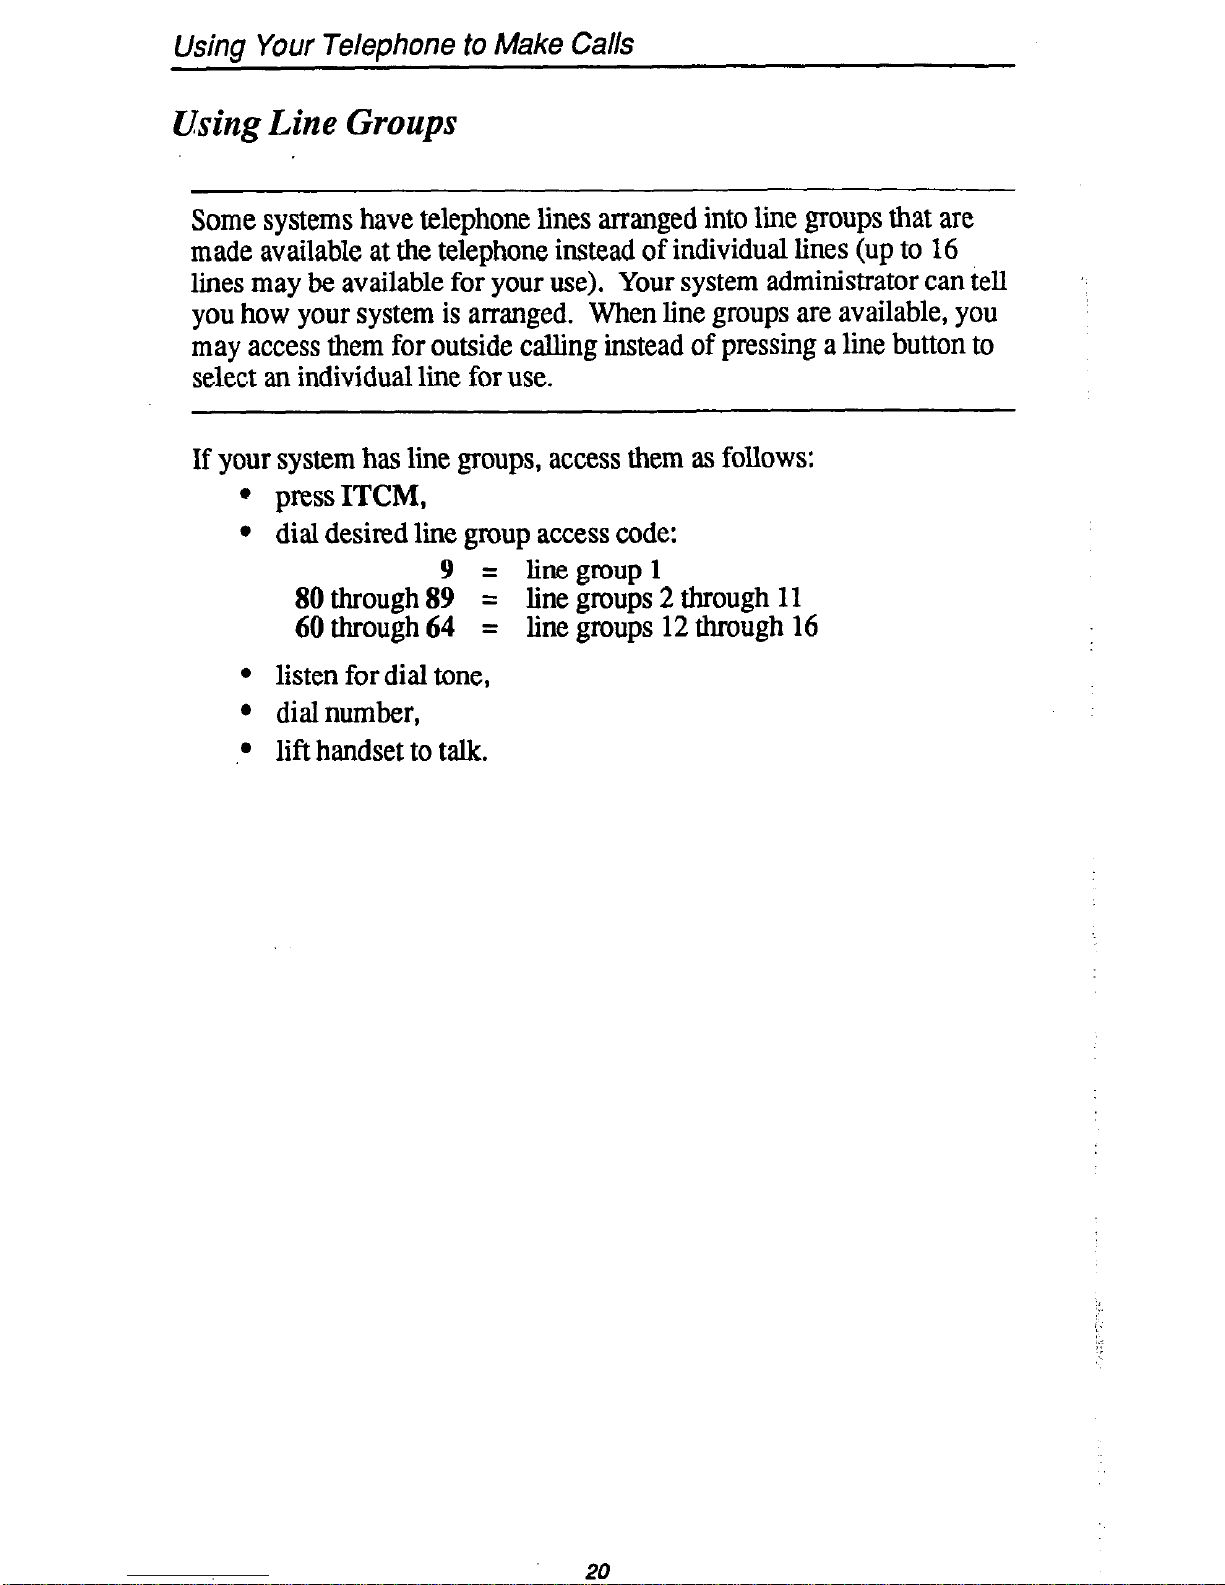
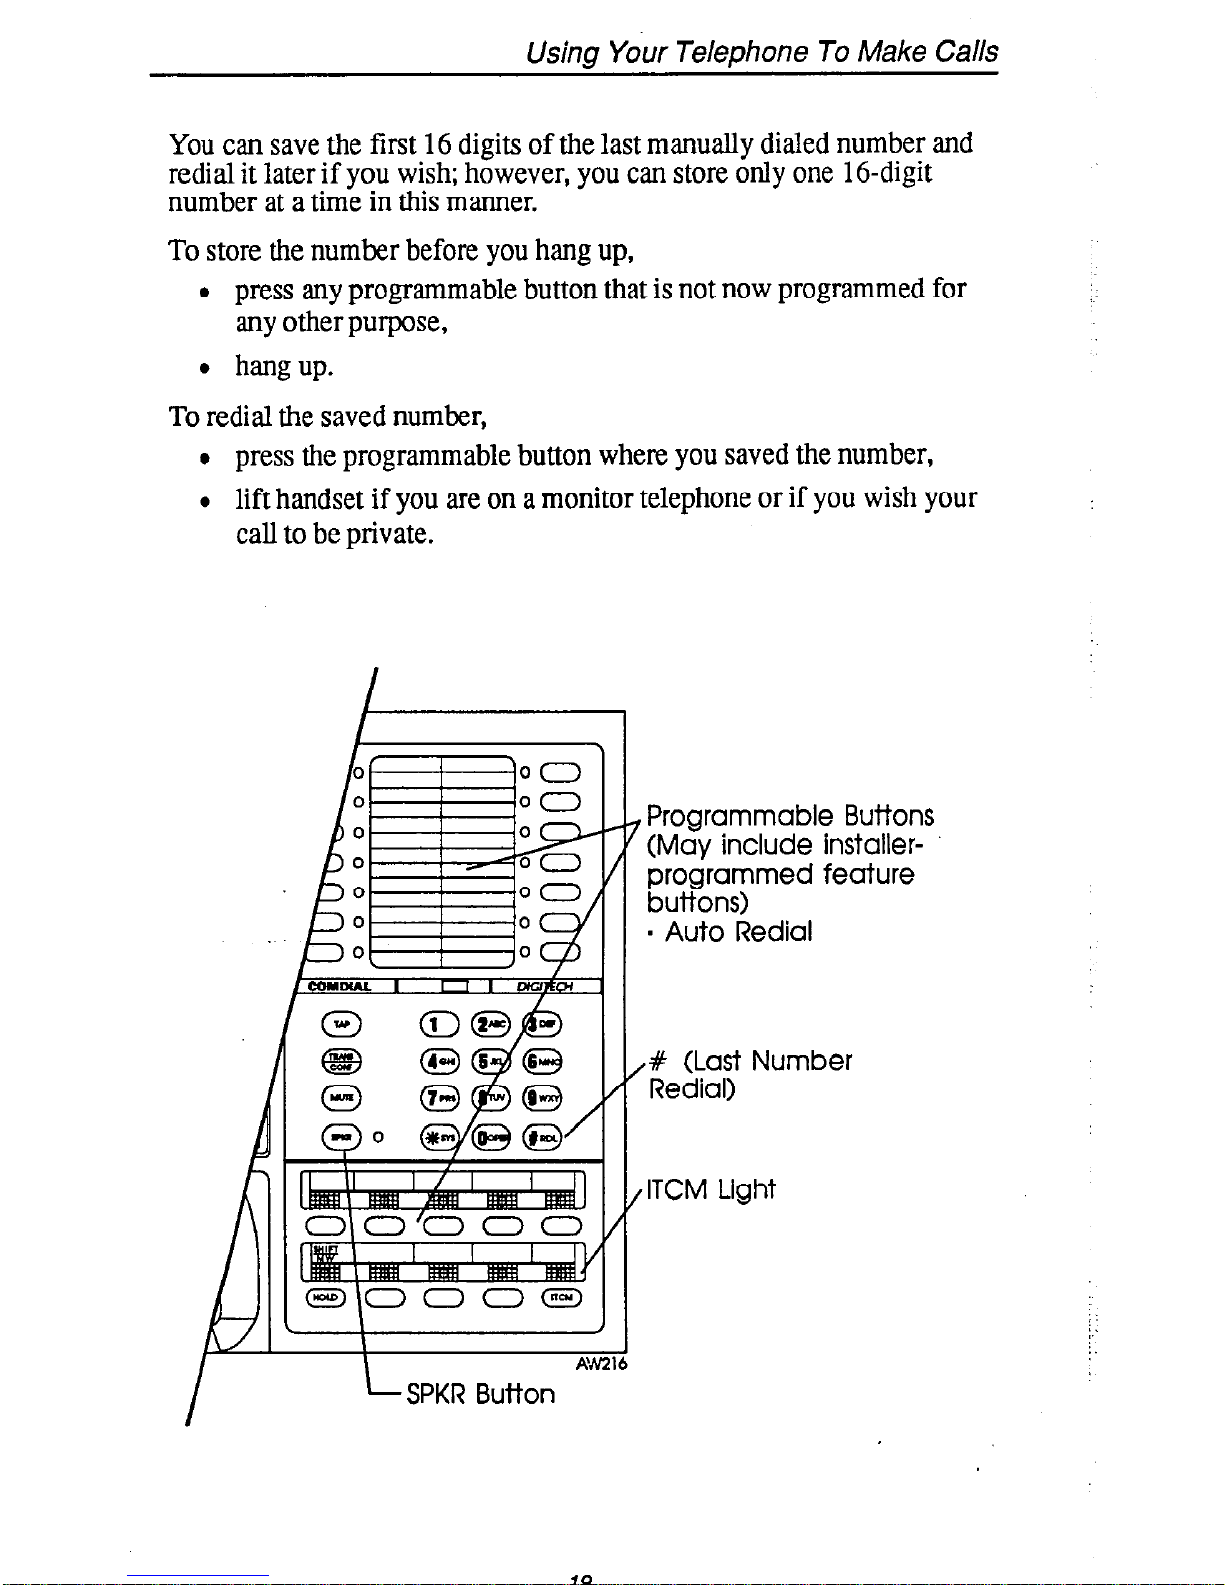
Using Your Telephone to Make Calls
Using Line Groups
Some systems have telephone lines arranged into line groups that are
made available at the telephone instead of individual lines (up to 16
lines may be available for your use). Your system administrator can tell
you how your system is arranged. When line groups are available, you
may access them for outside calling instead of pressing a line button to
select an individual line for use.
If your system has line groups, access them as follows:
l press ITCM,
l dial desired line group access code:
80 through 8;
= linegmup 1
= line groups 2 through 11
60 through 64 = line groups 12 through 16
l listen for dial tone,
l dial number,
l lift handset to talk.
20
Page 25
Using Your Telephone To Make Calls
‘9
80 - 89
-60 - 64
’ ITCM
Button
21
Page 26
Using Your Telephone to Make Calls
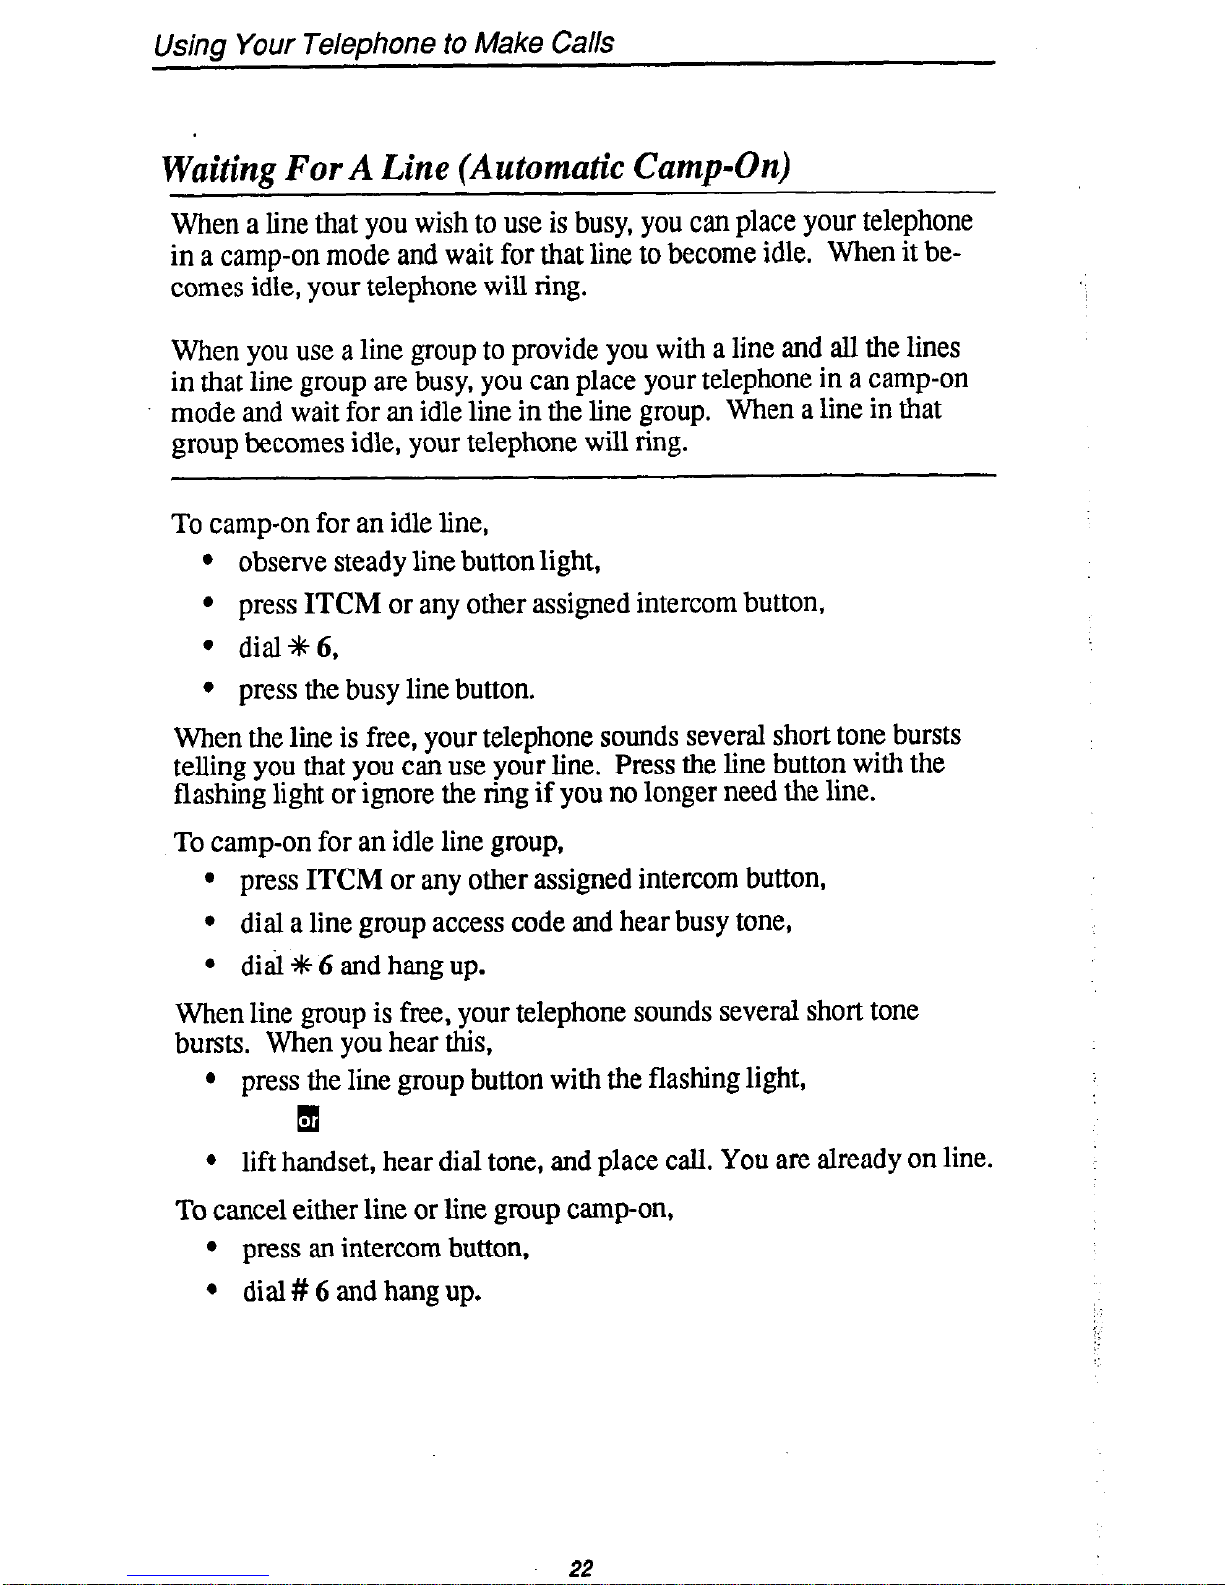
Waiting For A Line (Automatic Camp-On)
When a line that you wish to use is busy, you can place your telephone
in a camp-on mode and
wait for that line to become idle.
When it be-
comes idle, your telephone will ring.
When you use a line group to provide you with a line and all the lines
in that line group are busy, you can place your telephone in a camp-on
mode and wait for an idle line in the line group. When a line in that
group becomes idle, your telephone will ring.
To camp-on for an idle line,
l observe steady line button light,
l press ITCM or any other assigned intercom button,
l dial+6,
l press the busy line button.
When the line is free, your telephone sounds several short tone bursts
telling you that you can use your line. Press the line button with the
flashing light or ignore the ring if you no longer need the line.
To camp-on for an idle line group,
l press ITCM or any other assigned intercom button,
l dial a line group access code and hear busy tone,
l did t 6 and hang up.
When line group is free, your telephone sounds several short tone
bursts. When you hear this,
l press the line group button with the flashing light,
q
l lift handset, hear dial tone, and place call. You are already on line.
To cancel either line or line group camp-on,
l press an intercom button,
l dial # 6 and hang up.
22
Page 27

Using Your Telephone To Make Calls
AW
23
Page 28

usmng
your
lelephone to Make Calls
Making Intercom Calls
You can dial an intercom call manually from the keypad or automat-
ically using a direct station select (DSS) button that you have pre-
viously programmed. There are two ways to make an intercom call.
One way is to sound your voice at the called telephone (voice calling);
the other way is to ring the called telephone (tone calling).
To
voice call manually,
l lift handset,
l press ITCM,
l dial extension number and hear one quick tone burst,
l speak your announcement.
To voice call automatically (DSS),
l lift handset,
l press DSS button and hear a quick tone burst,
0 speak your announcement.
To
tone call manually,
l lift handset,
l press ITCM,
l dial extension number and hear quick tone bursts,
l press ITCM again. Called telephone will ring.
NOTE: Some systems may be set up to ring as the first option. Pressing ITCM a
second time is not necessary in this case. Ask your system administrator
how your system is set up.
To tone call automatically (DSS),
l lift handset,
l press DSS button,
l Press ITCM. When intercom party answers, two-way conversa-
tion can take place.
To make a call on a group intercom number,
l press group intercom button,
l hear dial tone,
24
Page 29

Using Your Telephone To Make Calls
l dial feature code, personal intercom number or group intercom
number,
l lift handset (or press SPKR on speakerphones) when called party
answers.
- DSS Buttons
(preprogrammed
by you>
0000
ooooE3
, ITCM
Button
for
Dialing
AM219
25
Page 30

Using Your Telephone to Make Calls
Camping. On To Another Telephone And Waiting For
An Automatic Callback
If the pemonal or group intercom number you have called is busy or
rings with no answer, you can have the system ring your telephone
when the number becomes available.
I
,:
/
To camp on at another telephone,
l
dial personal or group intercom number and hear busy tone or a
ring no-answer,
l
dial % 6 (called party hears a quick call waiting tone),
l
hangup.
When the number you cahed becomes idle or is used in some manner,
your telephone will ring with five short tone bursts. When you hear
this,
l
lift handset. The other number will start ringing.
If you do not lift the handset when you hear the callback ringing, the
callback is then canceled; however, you can cancel automatic callback
at any time before your telephone sounds the tone bursts. To do this,
l
press ITCM or other intercom button,
l
dial#6,
. press SPKR to hang up.
Camping On To Another Telephone and Waiting For
An Answer (Call Waiting)
If the personal or group intercom number you have called is busy, you
can send a call waiting tone to the busy telephone and wait on the line
for an answer. If you make a handset call, a tone sounds periodically
(until a system arranged timeout period has ended). If you make a
handsfree call, a tone sounds only once.
To camp at a busy called telephone,
l
dial personal or group intercom number and hear a busy tone,
l
dial +# 6 (called party hears a tone),
l
remain on line awaiting a reply. When the called party hears a
short tone burst, he or she can either place their current call on
hold or hang it up and then answer your call.
,:
:i,.:
26
Page 31

Using Your Telephone To Make Galls
Handset Off-Hook
6
, Hang up for automatic callback
, Remain on line for call waiting
*
I
#
I
27
Page 32

Using Your Telephone to Make Calls
qverriding A Call
If the telephone that you have called is busy, you can break into the conversation at that telephone if your telephone has the executive override
feature. When you override a do not disturb condition at another station, the condition remains disabled until that station user i-e-enables it.
To perform an executive override,
l make intercom call and hear a busy signal,
l dial +F 0 3 (several short tone bursts will be heard by all parties),
0 join in-progress call.
28
Page 33
Using Your Telephone To Make Calls
29
Page 34
Using Your Telephone to Make Calls
Making A Secure Off-Hook Voice Announcement
You can make a voice announcement to another station that is off-hook
and busy on a call if the system is arranged to provide this feature. Your
announcement is made as a secure off-hook voice announcement
j,
(SOHVA) that only the called party can hear.
;:
Your telephone may have an installer-programmed SOHVA button
designated on it. If you have a SOHVA button, it will allow you to
decide whether to deliver a SOHVA message or hang up when you hear
an intercom busy tone.
Make an announcement as follows:
0 make intercom call,
l hear several quick tone bursts (SOHVA announcement enabled),
q
l hear busy tone (called telephone is in speakerphone mode and
you cannot make an announcement),
l after tone bursts end, make announcement,
l wait on line for voice reply (called telephone may send non-ver-
bal reply to show in your LCD speakerphone display and then disconnect from your telephone),
Make a SOHVA announcement using the installer-programmed
SOHVA button as follows:
l make intercom call and hear busy tone,
l decide whether to interrupt or not,
l if interruption is necessary, press SOHVA button and hear
several quick tone bursts,
NOTE: rf you hear a continuing busy tone, it means that you camot make an an-
nouncement.
l when tones end, make announcement,
l wait on line for reply (called telephone may send non-verbal
reply to your display and then disconnect from your telephone).
30
Page 35

Using Your Telephone To Make Gills
I Programmable Buttons
(may include installer-
programmed SOHVA
enable button)
31
Page 36

Using Your Telephone To Place Calls On Hold
Hplding Calls
You can place any call on hold (including conference calls) and pick it
up a short time later. With a regular hold, you can pick up the held call
at your telephone or at another telephone if it shares the held call line
with your telephone. With an exclusive hold condition, you must pick
the held call up at your telephone because no other telephone has access to it.
You also can answer and place on hold a call that is on a line that does
not appear at your telephone (calls that are parked or transferred to you
for instance). You can even place a call on hold in the system so that
anyone can answer it (parking a call).
After a call has been on hold for the period of time set by the installer
of your system, the system will cause short ring bursts to sound at your
telephone. If the call is on exclusive hold, it will revert to manual hold
after the hold recall time period.
During a hold condition, the HOLD light and the light associated with
the button of the held line will both flash. This action provides a visual
indication of an on-hold condition.
To place a call on hold,
l press HOLD.
To place a call on exclusive hold,
l press HOLD twice.
To retrieve a held call (either regular or exclusive),
l press TAP,
q
l press line button with flashing light to retrieve that particular
w-w
To retrieve a call that you answered and placed on hold but have no line
appearance for (for instance, a call that was transferred to you that you
answered and later placed on hold),
l press TAP.
If you’ve placed more than one call on hold at an LCD speakerphone,
yozhcan display your held calls and retrieve them in any order that you
32
Page 37

Using Your Telephone To Place Calls On Hold
To display and retrieve held calls,
l press and release HOLD repeatedly to display identity of each
held call,
l press TAP to retrieve displayed call.
To place a call on hold in a park orbit for retrieval at any system
telephone,
l while on the call, press ITCM ?(t,
l dial code 91- 99 for park locations (or orbits) l-9,
l remember the orbit number and its dialing code for later use or
make it known to those who need to know it.
To retrieve a parked call,
l from any station, press ITCM #,
l dial code 91- 99 for parking orbit l-9.
To switch between the last call placed on hold (intercom, outside line,
or conference) and a current, active call,
l while on active call, press SPLIT button to retrieve held call (ac-
tive call is then placed on hold),
l repeat as necessary to alternate the two calls between hold and ac-
tive status.
jI.
/ .:
::
:.
HOLD Button
KM Button
Page 38
Using Your Telephone To Transfer Calls
Trgnsferring Calls
Transferring calls is the process of answering a call at your telephone
and sending it to another telephone. You can do this in one of three
ways. If you first identify the caller to the party to receive the transfer,
thus giving that user the opportunity to review the call, you have made
a screened transfer. If you transfer the call without first announcing it,
you have made an unscreened tr&r. If you transfer a call to another
telephone so that it appears at that station as if the user has already
answered it, you have made a hot transfer.
If the telephone to which you are transferring the call is busy, use override, secure off-hook voice announce, or camp-on call waiting to con-
tact the intercom party or recover the call yourself and service it. If a
transferred call is not answered after a certain length of time (set by the
system installer) it automatically returns to your telephone.
To screen and transfer a call to another telephone in the system or to a
group intercom number,
0 answer or make call,
l press
TRANSKONF
(call is automatically placed on hold),
l dial extension number of telephone (or its DSS, if available) or
group intercom number to receive transfer,
0 when intercom party answers, announce call,
l hang up handset. Intercom party then has the call.
If the intercom party is busy or does not answer, take the following step:
l press
TAP
to return to the call yourself. Remember, you can use
the secure off-hook voice annOunce feature, the camp-on call
waiting feature, or the override feature to contact the intercom
Party*
To transfer an unscreened call to another telephone in the system or to a
group intercom number,
0 answer or make call,
l press
TRANSKONF
(call is automatically placed on hold),
l dial extension number of telephone (or its DSS, if available) or
group intercom number to receive transfer,
l hang up handset. The transferred call rings at that telephone.
34
Page 39

Using Your Telephone To Transfer Calls
NOTE: Unscreened tran@rs automatically ccunp-on at bury telephones a@ wait
to be amwered. Each camp on call automatically rings the telephone as
soon as a current call becomes idle.
To hot transfer a call,
0 answer calI,
l press TRANSKONF (call is automatically placed on hold),
l dial extension number of telephone to receive transfer or press
DSS for it if available,
._
! ’
i- ;
!.:.
l voice announce call when intercom party answers,
l press TRANSKONF,
l hang up handset. Call appears at intercom party’s telephone in a
handsfree mode as if that user has already answered it.
NOTE: If that telephone is a speakqohone, the intercom party can begin taking
to the tran$erred party immediately. I’it is a monitor telephone, he or she
must lif the handset to talk
If a transferred call is not answered after a preprogrammed length of
time, it returns to your telephone and rings it.
To answer the call,
l press flashing line button and lift handset.
,TAP Button
35
Page 40

Using Your Telephone For Conference Calls
Cqnferencing Calls Together
Conferencing is when your telephone is joined together with several
other telephones on the same call. You can make conference calls that
encompass up to five parties, including you as the originating party, in
any combination of outside lines and intercom parties. For example,
you can conference three outside lines and two intercom parties or four
outside lines and one intercom party or five intercom parties.
i
’
If you are conferencing with two outside lines, you can drop out and
leave them in the conference with each other. This is known as an unsupervised conference call.
You can place a conference call on hold if you wish using the call hold
method found in this user’s guide titled Using Your
Telephone To Place
Calh On Hold.
To set up a conference call that includes both outside lines and intercom parties, outside lines alone, or intercom parties alone,
0 make first call,
l press TRANWONF (call is placed on hold automatically),
0 make next call,
l press TRANSKONF to establish conference,
l repeat last two procedures to add up to two more parties.
:NOTE: Ifall the cogtkrence circuits are busy, you will not be able to add a party
to the conference.
To continue conversation on last line after three other outside lines have
dropped out of conference,
l press the line button of the remaining party.
To drop outside lines from the conference, and remain in conference
with intercom party,
l press HOLD to put all lines on hold before the parties hang up
(not doing this will result in a tone sounding in the handset
receiver, intenupting the remaining conferees),
l select line to be dropped, hang up and repeat this action for each
line to be dropped,
:I
l when line status light turns off, press TAP to return to conference.
36
Page 41

Using Your Telephone For Gonrefence Galls
To drop out of a conference call between you and two outside lines and
leave them in an unsupervise4i conference,
l dial # and hang up handset.
NOTE: Conference volume levek behveen these lines
are dependent upon the trammission level
: ., .
:.;. ::
qua& of the cenh-al office lines.
You can press TAP to E-enter the conference if you wish.
37
Page 42

Using The Other Telephone Features
A@sting The Display Contrast (LCD Speakerphones)
Whenever your telephone is not in use, you can adjust the contrast of
the display to darken or lighten it for best viewing.
To adjust the display contrast while the telephone is not in use,
l press an intercom button,
l dial*+K5,
l dial l-8 for contrast level (1 = lightest, 8 = darkest).
, Display
38
Page 43

Using The Other Telephone Features
Blocking Voice Announced Calls
You can prevent voice announcements from sounding over your
telephone speaker if you wish. This feature also blocks secure off-hook
voice announcements as well.
NOTE: Your telephone may include an installer-programmed button that you may
press to block and unblock voice announced calLF.
If
you have such a but-
ton, use it instead of dialing the codes detailed below.
To block voice mounted calls take the following action:
l press ITCM,
l dialf2.
To un-block voice announced calls perform the following steps:
l press ITCM,
l dial#2.
include install
voice announc
- ITCM Button
7
39
Page 44

Using The Other Telephone Features
Entering Account Codes
If your system is arranged for account code entry to enhance the SMDA
reports, you may be asked to enter an account code before calling a
number or after answering one. Code entry is voluntary. If you do not
enter a code, the call will still go through.
Your telephone may include an installer-programmed ACCOUNT
CODE button. If one is available, you can use it to enter an account
code during a call without interrupting your call or disturbing your distant party.
To enter account code after answering an incoming call,
l press an intercom button (call is automatically placed on hold), or
press HOLD if the call appears at an intercom button.
l dial* 04,
l dial account code.
NOTE: Your telephone automatically returns to the call
after you’ve dialed the entire account code.
To enter account code on an outgoing call,
l lift handset (then press line button if line is not automatically
selected when handset is lifted),
l prt%s‘fTCM or any other assigned intercom button,
l dial* 04,
l dial account code,
l listen for dial tone and dial number you are calling.
NOTE:
If
you hear an error tone after you have dialed
your account co&, check the number for validity.
To enter an account code using the ACCOUNT CODE button,
l establish call,
l press ACCOUNT CODE button,
l dial account code numbers,
Your telephone automatically returns to the call after you’ve dialed the
entire account code.
40
Page 45

Using The Other Telephone Features
Programmable
Buttons (may
include installe
00
00
00
00
00
00
, ITCM
Button
41
Page 46

Using The Other Telephone Features
Forwarding Calls
You can forward calls that normally ring at your telephone to another
station’s personal intercom number, or your can forward them to a
group intercom number if you wish.
You can forward all calls or just
those that ring your prime line or your personal intercom.
You can
make forwarding occur (1) when your telephone rings and no one
answers it or when you are busy on another call, or (2) as soon as the
system detects a call directed to your telephone. Calls that forward to a
personal intercom number ring only the telephone that has that number,
while calls forwarded to a group intercom number ring every telephone
with that group intercom appearance.
NOTE: Your telephone may include installer-programmed FORWARD buttom If
ii does, use &em instead
of
dialing the codes detailed below.
To
forward your calls,
l press programmed
FORWARD
button,
&I
l press
ITCM
and dial one of the following codes:
FWD Immediately FWD After RNA or Busy
All calls
*52 *54
Prime Line
and Personal
Intercom
calls
*51
#53
a dial personal intercom number of telephone to receive forwarded
calls or dial desired group intercom number,
.
press
SPKR to
hang up.
NOTE: Your telephone will ring a short ring burst each time an intemm
call is forwarded to remind you that this L happening.
To cancel call forwarding,
l
press
ITCM
or any other intercom button,
a dial#S,
l
press
SPKR to
hang up.
42
Page 47

Using The other Telephone Features
I
00
Programmabl 00
Buttons (may 00
include Install 00
programmed 00
forward buttons 00
“9
-KM
Button
43
Page 48

Making A Call Non-Private
You can make a call non-private using an installer-programmed
PRIVACY button. When a call is non-private, other telephones that
share the same line can join the call. Privacy returns when the call is
completed.
To do this while on a call,
l press installer-programmed PWACY button. The light as-
sociated with the PRIVACY button buns on steady when your
telephone is in a non-private mode.
44
Page 49
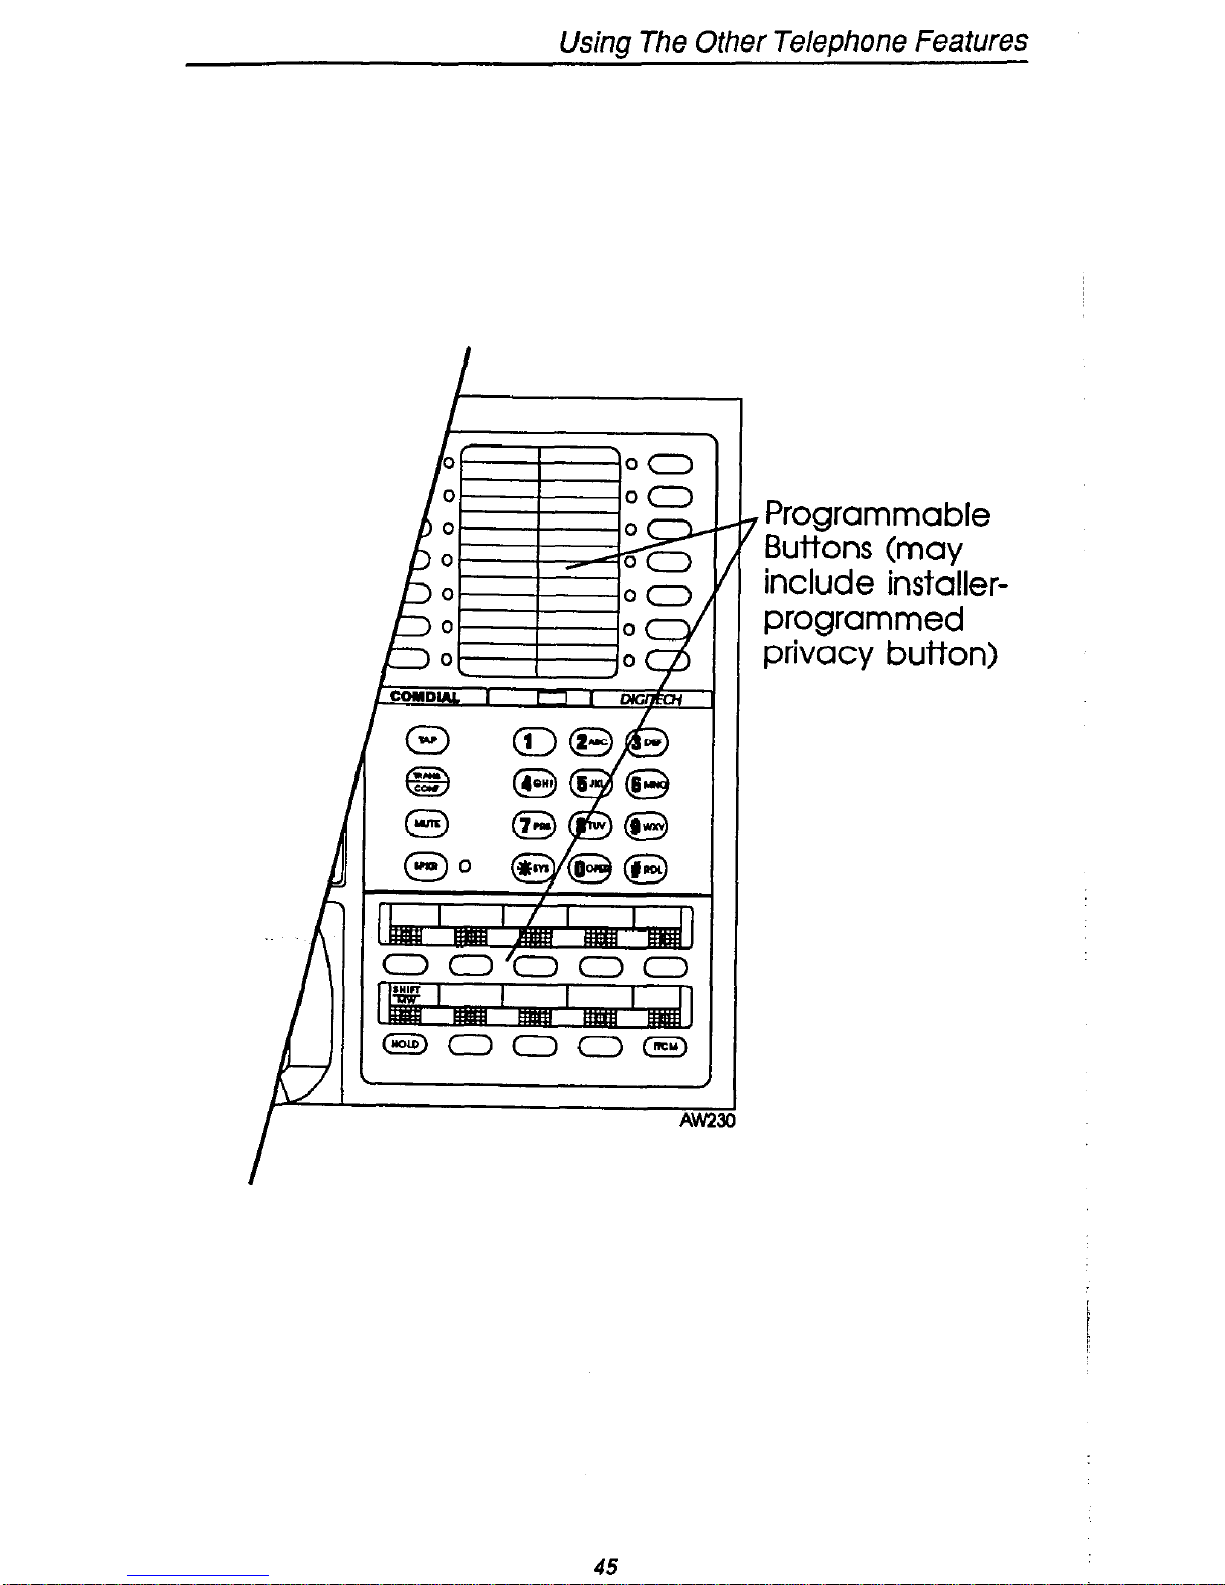
Using The Other Telephone Features
1
Ah23
, Programmable
Buttons (may
include installerprogrammed
privacy button)
45
Page 50

Using The Other Telephone Features
Monitoring A Conversation Between
Two Telephones (Service Observing)
If your telephone provides the service observing feature, you can use it
to monitor activity and an on-going conversation at another telephone
in an undetected manner. You can use this feature while you’re on-
hook or off-hook.
To monitor an in-progress call,
l
press ITCM or any other assigned intercom button,
l dial#03,
l dial extension number of telephone to be monitored,
o press SPKR to end monitoring,
t
AW231
SPKI
/
i
‘I
7
#
ITCM
Button
L-1 Button
,O
46
Page 51
Using The Other Telephone FeatUreS
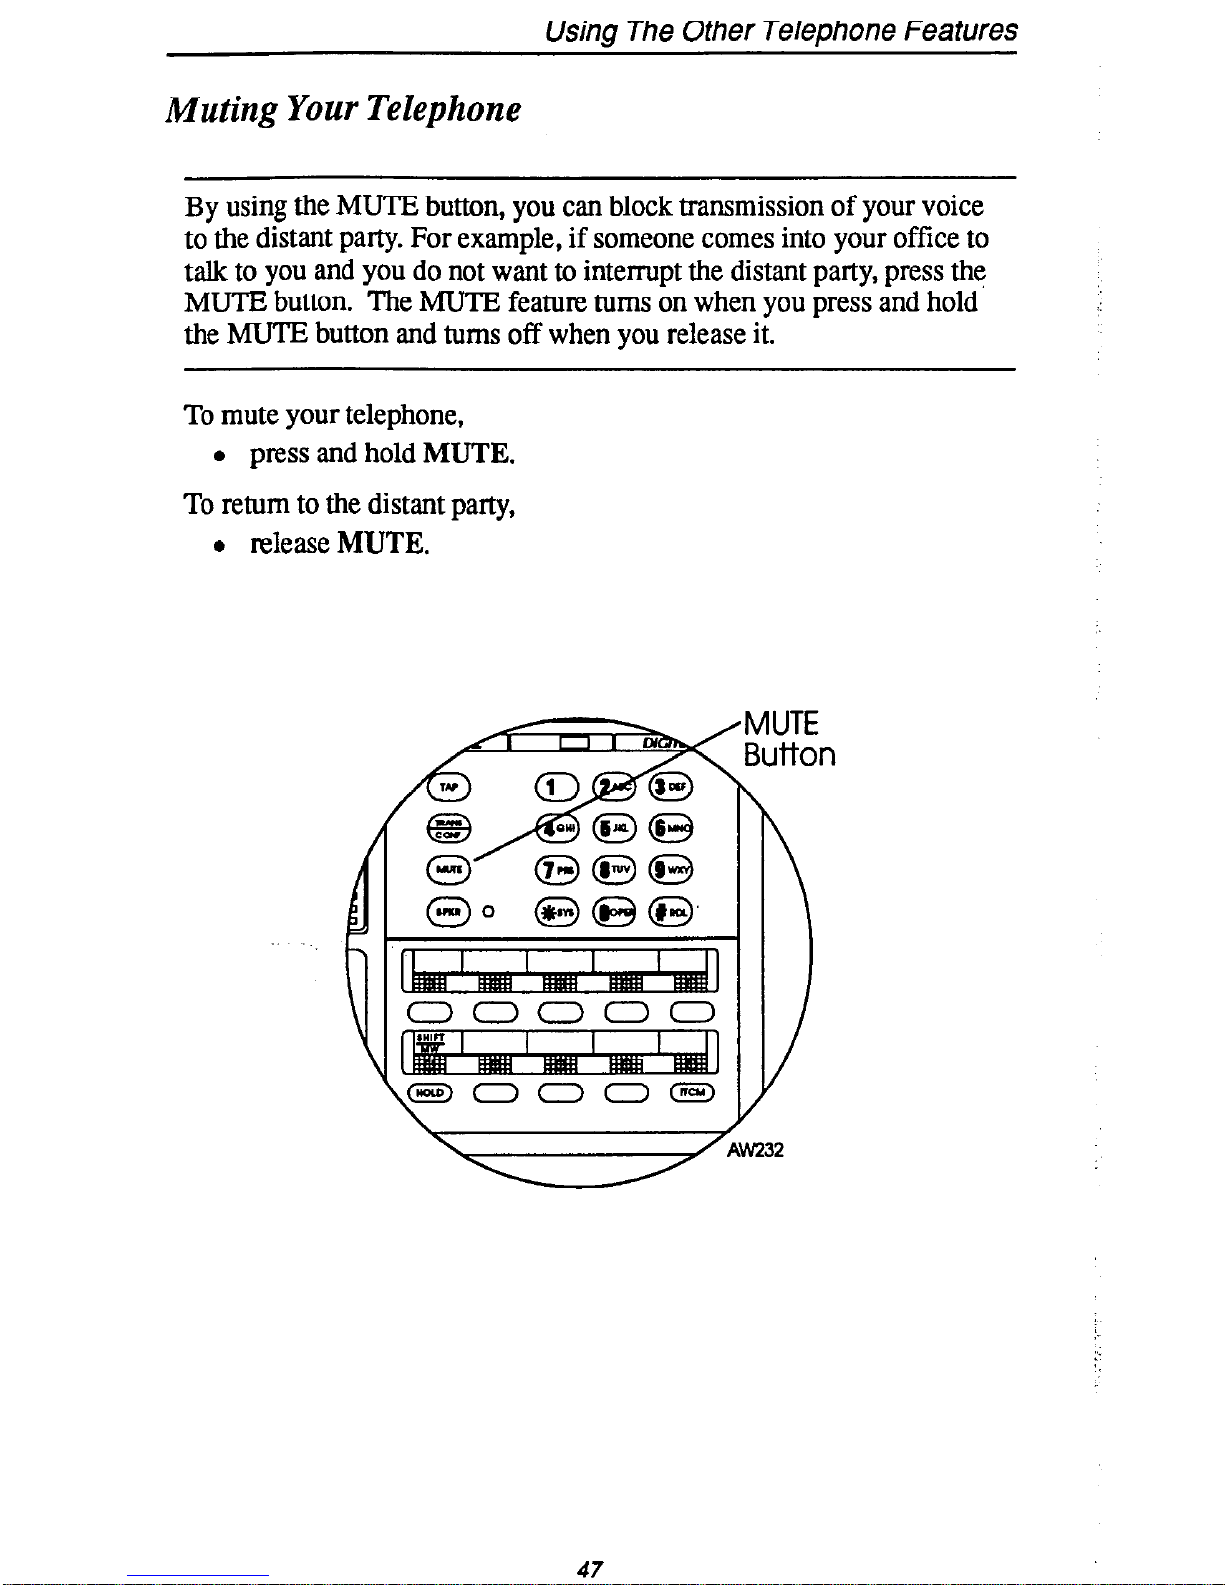
Muting Your Telephone
By using the MUTE button, you can block transmission of your voice
to the distant par&y. For example, if someone comes into your offlice to
talk to you and you do not want to interrupt the distant party, press thq.
MUTE button. The MUTE feature turns on when you press and hold
the MUTE button and turns off when you release it.
To mute your telephone,
l press and hold MUTE.
To return to the distant party,
l release MUTE.
47
Page 52

usrng
one utner Telephone Features
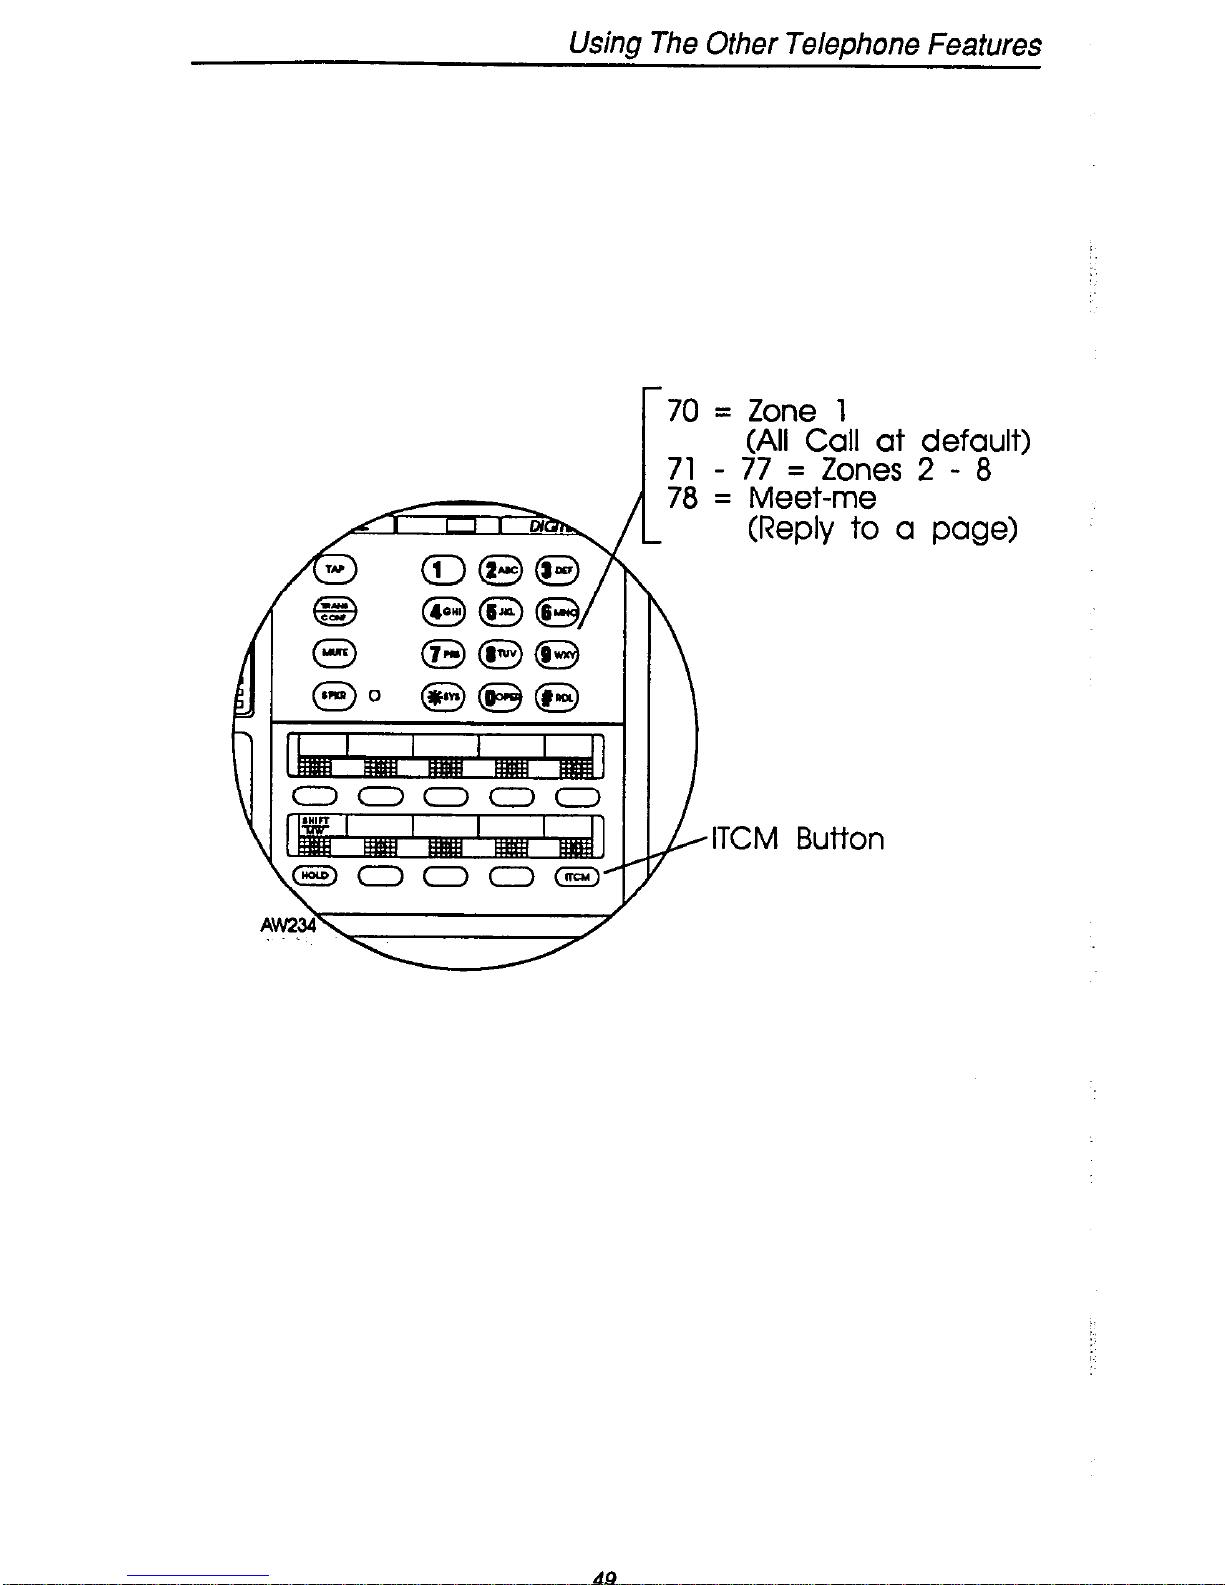
Sending A Paging Announcement
You can make a public announcement to all parts of or to a portion of
your system location. Your system might provide either an all-call
paging feature or a zone paging feature that you access by dialing special codes. All-call paging sounds the announcement through the
speaker at all system telephones or through an external paging unit located in a central area. Zone paging sounds it only through those
telephones located in a specific area or through an external paging unit
located in a specific area.
If your system provides all-call or zone paging,
l lift handset,
l press ITCM or any other assigned intercom button,
l dial 70 - 77 for zone 1 - 8,
NOTE: When the system is operating in the ak@lted
mode, zone I provides an all calljimction.
0 make announcement,
0 stay on line if awaiting a reply (known as “meet-me” page),
N
. hang up handset.
To make a reply to a “meet-me” page,
l lift handset of nearest telephone that is receiving a paging an-
nouncement,
l press ITCM or any other assigned intercom button,
l dial78,
l meet paging party on line.
48
Page 53
Using The Other Telephone Features
70 =
c30000
\
Zone 1
(All Call at default)
7Ae;tZ;ees 2 - 8
(RepI; to a page)
z
ITCM Button
49
Page 54
Using The Other Telephone Features
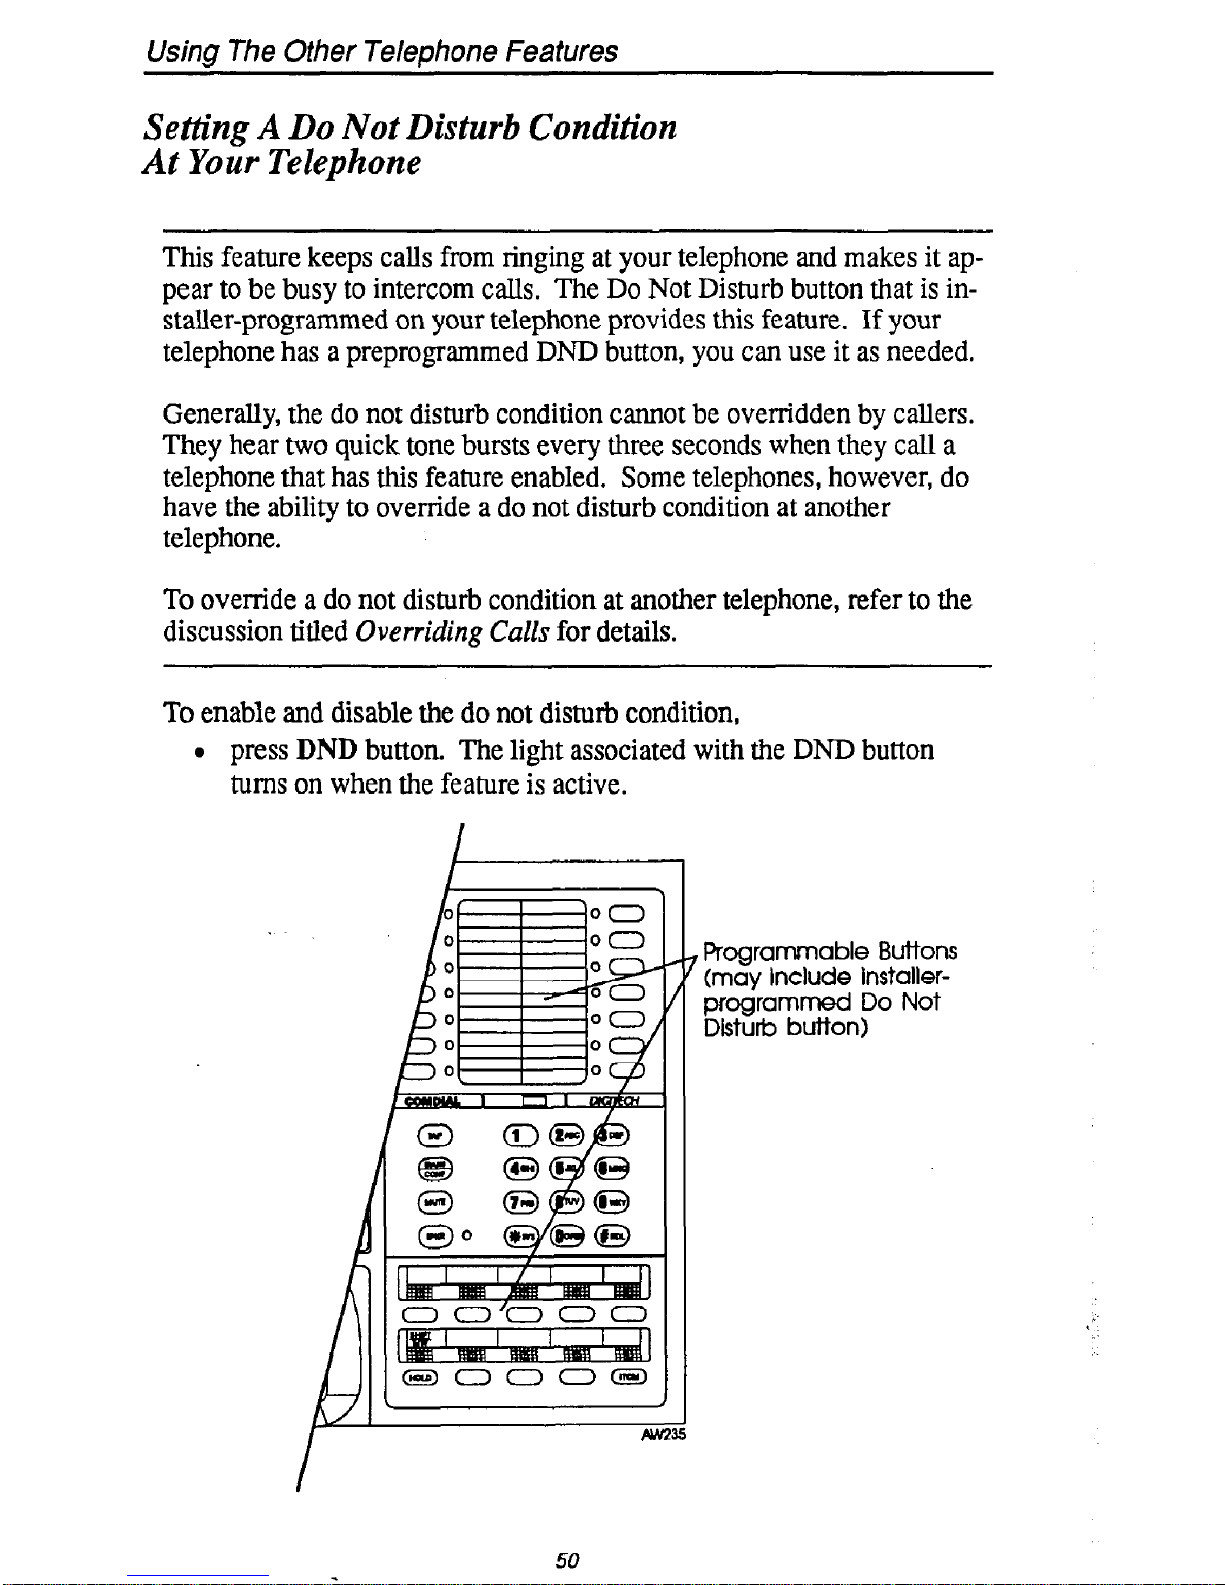
Setting A Do Not Disturb Condition
At Your Telephone
This feature keeps calls from ringing at your telephone and makes it appear to be busy to intercom calls. The Do Not Disturb button that is in-
staller-programmed on your telephone provides this feature. If your
telephone has a preprogrammed DND button, you can use it as needed.
Generally, the do not disturb condition cannot be overridden by callers.
They hear two quick tone bursts every three seconds when they call a
telephone that has this feature enabled. Some telephones, however, do
have the ability to override a do not disturb condition at another
telephone.
To override a do not disturb condition at another telephone, refer to the
discussion titled
Overriding
Culls for details.
To enable and disable the do not disturb condition,
l
press
DND
button. The light associated with the DND button
turns on when the feature is active.
I
I
, Programmable Buttons
(may Include installerprogrammed Do Not
Disturb button)
50
Page 55

Using The Other Telephone Features
Setting Your Personal Ringing Tones
You can choose one of four different ring tones for your telephone
when it rings. Often, when several telephones are located closely
together, each user chooses a different personal ring tone.
If an installer-progratnmed
SILENT MODE
button is available at your
station, you may press it to turn off the ringer for the duration of a current ringing call. Ringer operation is restored when a new call rings at
the station.
To select one of the ring tones, proceed as follows:
l press
ITCM
or any other assigned extension button,
l dial+##4,
l dial
1,2,3,
or 4,
l press
SPKR.
The next time your telephone rings, you will hear
the new ring tone.
button)
SPKR
BUttOf7-Y
nl TY\ !
dTCM
BUtt0f-l
51
Page 56
Using The Other Telephone Features
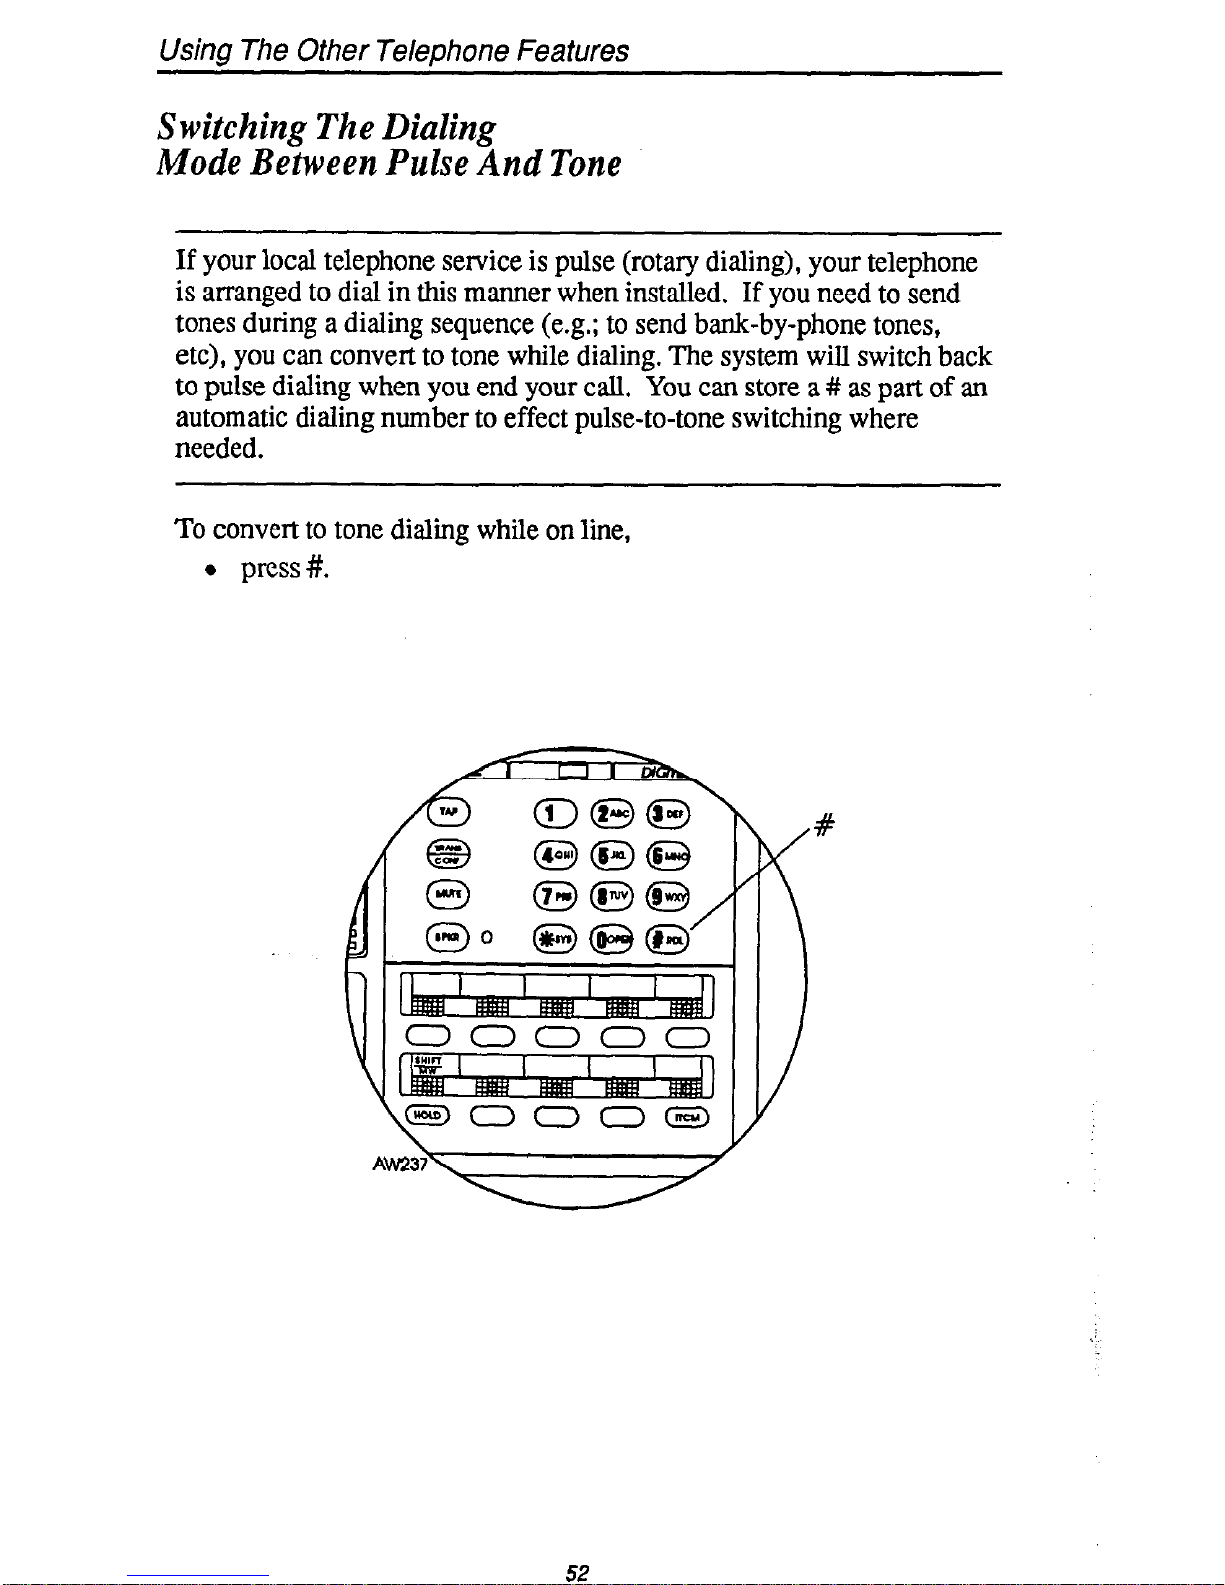
Switching The Dialing
Mode Between Pulse And Tone
If your local telephone service is pulse (rotary dialing), your telephone
is arranged to dial in this manner when installed.
If you need to send
tones during a dialing sequence (e.g.; to send bank-by-phone tones,
etc), you can convert to tone while dialing. The system will switch back
to pulse dialing when you end your call. You can store a # as part of an
automatic dialing number to effect pulse-to-tone switching where
needed.
To convert to tone dialing while on line,
l press#.
52
Page 57
Using The Other Telephone Features
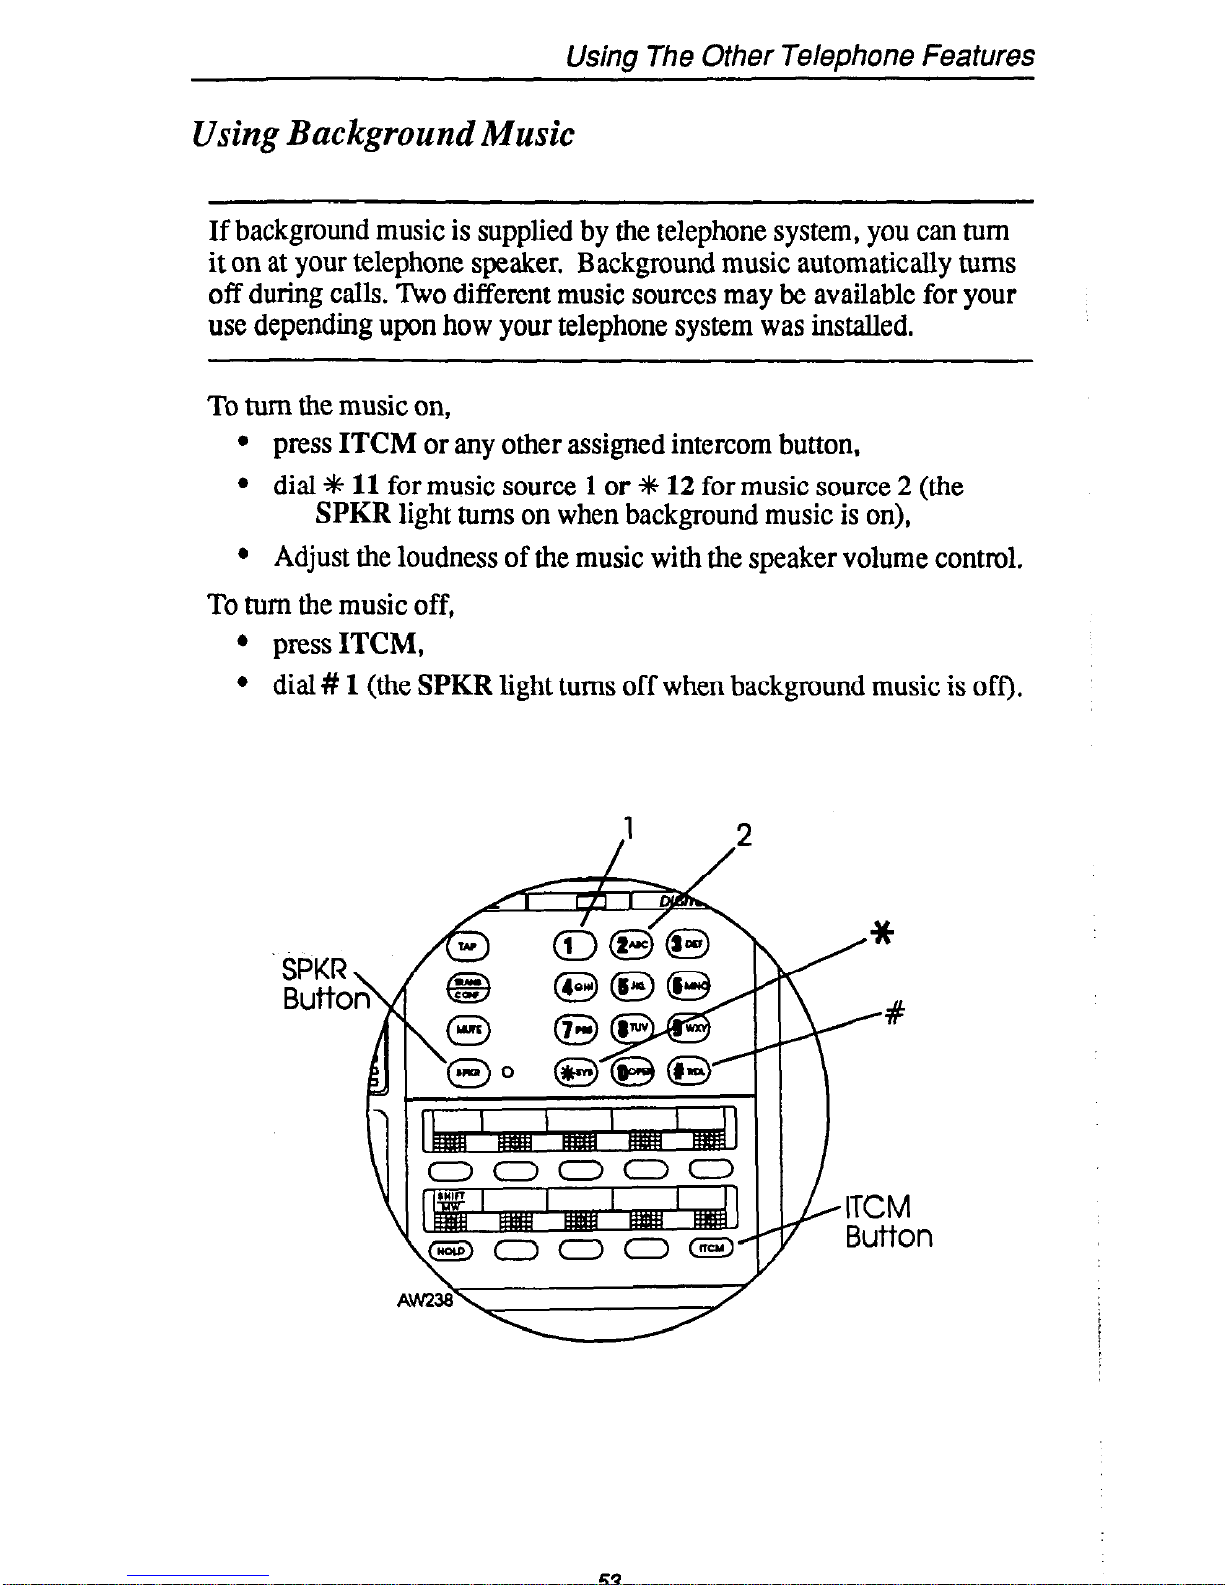
Using Background Music
If background music is supplied by the telephone system, you can turn
it on at your telephone speaker. Background music automatically turns
off during calls. Two different music sources may be available for your
use depending upon how your telephone system was installed.
To turn the music on,
l press ITCM or any other assigned intercom button.
l dial 4+
11
for music source 1 or +# 12 for music source 2 (the
SPKR light turns on when background music is on),
l Adjust the loudness of the music with the speaker volume control.
To turn the music off,
l press ITCM,
l dial # 1 (the SPKR light turns off when background music is off).
53
Page 58

Sending And Receiving Non-Verbal Messages
Message Waiting Light
If your telephone is designated as a central message desk by the system
or has message wait originate ability, you can turn on the message wait-
ing light (above HOLD) of any other telephone and cause dial tone at
that telephone to sound in a broken manner. This lets that telephone
user know that you have a message for him.
To turn on the message waiting light and broken dial tone at another
telephone,
l press ITCM,
l dial%3,
l dial extension number of station to be alerted. The message wait-
ing light of called station will flash.
To turn off the message waiting light and broken dial tone at another
telephone,
l press ITCM,
l dial#3,
l dial extension number of station that was alerted. The message
waiting light of called station will turn off.
To turn off the message waiting light during message-delivering conver-
sation,
l press ITCM.
To receive a message at an alerted station,
l observe flashing message waiting light or hear the broken dial
tone,
l press ITCM HOLD. Connection to station that left message is
automatic.
54
Page 59

Sending And Receiving Non-Verbal Messages
\
I
AW239
/
ITCM
Button
‘HOLD Button
55
Page 60

Sending And Receiving Non-Verbal Messages
LCD Messaging
You can arrange for a system-supplied message to be received and dis-
played by a calling LCD speakerphone when you ate not able to answer
a call. This feature will remain active until you turn it off. If your
telephone is an LCD speakerphone, it will also display the message,
I
giving information on your telephone status. Get a list of the available
messages and write them on the blank listing chart on the next page.
To turn message on from your telephone,
l press ITCM or any other assigned intercom button,
l dial+ 02,
l dial the desired code number from your message list (01-30) on
the next page. If you use the default messages of “Back At” and
“Call,” you will need to add to them as follows:
For default message 1, dial code for time numbers and colon from
dialing codes table (for example, dial # 12 00 0129 04 05 for a
space and the time 1:45).
For default message 2, dial code (from the dialing codes table) for
telephone number of where you’ll be (for example, dial # 12 09 07
08 02 02 00 00 for a space and the number 978-2200 or # 12 51
35 65 65 96 for a space and the name Jenny).
l press SPKR to end message. Intercom light flashes steadily.
To turn off message and your intercom light,
l press ITCM or any other assigned intercom feature button,
l dial#02.
DIALING CODES TABLE
WAR 1 COOt (CHAR I CODE ICHAR 1 CCOt 1 CHAR 1 CODE 1 C HAR ICODE
A I21 IQ
__ . . _.
IW
194 I1 I 01
22 IR
Ir I 3 I n-3
Page 61

Sending And Receiving Non- Verbal Messages
LCD MESSAGE LIST
(Write Attendant Provided Response Messages Here)
Page 62

Sending And Receiving Non- Verbal Messages
Message Deposit
You can call an LCD speakerphone and arrange for a system-supplied
message to be shown on its display. This message is for the called
party to read if she or he is unable to answer your call. Your telephone
may provide a UNIVERSAL MESSAGE button for this purpose or
you can pre-program a MESSAGE RESPONSE button on your
telephone and use it for depositing messages.
To deposit a message,
l make call and hear ringing,
l press UNIVERSAL MESSAGE button repeatedly to scroll
through the available system-supplied messages on your display
until the desired message shows,
l press #to deposit the message,
q
l press MESSAGE RESPONSE button,
l hangup.
If you are the recipient of a deposited message,
l see message in your telephone display,
l respond to it as required.
Note: any telephone activity that you engage in will erase the displayed message.
Page 63

Sending And Receiving Non- Verbal Messages
I Display (Shows
message before
deposit by # button)
7
Programmable Buttons
(May include installerprogrammed Universal
Message button or user
programmed Response
Message button)
/#
59
Page 64

Programming Your Telephone
Programming For Speed Dialing
Speed dialing is a feature that lets you:
l dial intercom numbers, lengthy or frequently used numbers, and
feature codes using one or two buttons,
You can store numbers for speed dialing at the following locations:
l at any programmable button that is not now assigned as afixed
feature button or SHIFT button by the system installer,
l on a secondary level under a DSS button, a feature button, a line
button or other speed dial button,
l at the 10 keypad numbers.
The outside numbers and feature codes am commonly referred as per-
sonal speed dial numbers whether they are stored at the programmable
button locations or at the 10 keypad number locations.
The intercom numbers are referred to as direct station selection (DSS)
numbers regardless of where they are stored. Plus, the light associated
with the DSS button is referred as the busy lamp field (BLF) light. Typically, DSS numbers are stored at the upper button grouping.
Before you begin programming, write down:
l The line you will use to access each outside number.
l The number that you are storing.
As you program numbers, fill in the identification strips on your
telephone.
Write first level numbers on the ID strips and write second
level numbers and/or speed dial numbers on the index pullout directory
in the front of your telephone.
You can fill out the charts on the next page, if you wish, for a personal
record of your stored numbers.
60
Page 65

Programming Your Telephone
Personal Speed Dial Number (Upper Button Grouping)
Personal Speed Dial Numbers (Keypad Button Grouping)
0 5
1 6
2 7
3 8
4 9
Personal Speed Dial Numbers (Lower Button Grouping)
1
6
2
7
3
8
4
9
5
10
\
Hint - To record both first and second level storage, write both numbers
on the same record line.
Cl
Page 66

Programming Your Telephone
Storing DSS Numbers
To stow an intercom number as a DSS number, proceed as follows:
press ITCM,
dial +k 4+ 3,
press programmable button to choose DSS location,
dial extension number,
press next location button and store next DSS number,
repeat the previous step until all DSS numbers are stored,
q
l press SPKR to end.
DSS Record (Enter your DSS numbers here if you wish)
I
I
/
Page 67

Programming Your Telephone
I \
-I
\
AWN
,Programmable
Buttons (Typical
DSS storage
locations)
/Programmable
Buttons
I ITCM
Button
L SPKR Button
Page 68
Programming Your Telephone
Storing Personal Speed Dial Numbers (outside num-
bers and feature codes)
To store an outside number as a personal speed dial number,
. press ITCM,
l dial+tl,
l press programmable button or keypad button to choose storage
location,
l press line button to select line to dial out on,
l dial any number (up to 16 digits long - include +N and # if needed),
NOTE: You may need a pause between numbers to cwnpensate for differences in
reqome time between your system and the host system (ask your attendmt about this). If you do, press HOLD to store a pause wherever you
need one.
If
your system is behind a host system that needs a hookjlash to
access a
feature.
press TAP to store a hoo@h. Then, continue dialing.
l press TRANWONF to store number,
l press next location button and store next line choice and number,
l repeat previous step until all numbers are stored,
q
l press SPKR to end.
To store a systemfeahlre access code as a personal speed dial number,
l press ITCM,
l dial*#+?k,
l press programmable button or keypad button to choose storage
location,
l dial the access code for the feature,
l press next location button and store next feature code,
l repeat previous step until all desired feature codes are stored,
1
l press SPKR to end.
For example, program a group call pick up button as follows: press
ITCM, dial ?ic +N 3, press the desired programmable button, dial # 4 and
press SPKR.
Page 69
Programming Your Telephone
TRAI
car
But-h
3\ I,
\
’
/Programmable
Buttons (Personal
Speed Dial
Locations)
W
\lF
317
1
*Programmable
Buttons (Persor
Speed Dial
Locations)
‘Programmable
Buttons (Person
Speed Dial
Locations)
ITCM
Button
lal
lal
I
L SPKR Button
65
Page 70

Programming Your Telephone
Storing The Response Message Button
The response message button allows you to make a non-verbal
response to a SOHVA call. The response appears in the display of the
calling telephone.
To select the response message button, proceed as follows:
. press ITCM,
l dial**6,
l press desired programmable button location,
l dial (01-30) for message from LCD message list provided by the
attendant,
0 press #to save,
i press SPKR to end,
l label button location.
,Programmable
Buttons
-6
Y Programmable
Buttons
- ITCM
Button
Page 71

Programming Your Telephone
RESPONSE MESSAGE LIST
(Write Attendant Provided Response Messages Here)
67
Page 72

Display Summary
The displays shown on your telephone during operation are summarized in this section.
Display Type
When Displayed
Automatic Callback
When waiting for a busy telephone to
signal that it has become idle, the dis-
play shows that the feature is active.
Call Costing
When you push HOLD button after
Call Forward
Call Timer
call, press TAP button.
X = line number
66
Page 73
Understanding The LCD Displays
Display Type
When Displayed
Calling Station
I”“]
The display shows intercom number or
name of calling telephone. It flashes in
right comer of display when ringing.
Dialed Numbers
The display will show all dialed num-
71 co&s.
bers or names along with any dialed
Station: I:,,,,:,,
Line:
I
Line X
3:05
9782200 I
X = line number
Display Contrast Adjustment
rl
Press ITCM, dial * t 5, then dial l-8.
X= l-8
Do Not Disturb
Tue 1 3:05
Do Not Disturb
Display shows “Do Not Disturb” when
feature is active.
Hold Recall Feature
-1
When a timed hold recall occurs, display shows line being held.
XXX XXX dine or intercom number
69
Page 74

Understanding The LCD Displays
Display Type
When Displayed
Last Number Redial
r/
When last number dialed is redialed.
display shows selected line, then dis-
play shows dialed number.
LCD Messaging
I
Tue 1 3:05
Back At XX:XX
xX:xX = user-entered time
Line Queuing
When queuing for a line, the display
will show the queuing arrangement.
When queued line group calls back, display will show the group number.
‘.
I
Tue 1 3:05
Camr, On Ln GrD X I
I
Tue 1
3:05
CMP RCL LnGrp X
I
X = line number or line group
Line Selection
71 !izz!Efggg;lay
1..
Mute
Display shows when feature is active.
Page 75

Understanding The LCD Displays
Display Type
When Displayed
Paging
pz&F-j
Display for zone paging (paging some
~z2en~~ornme)
-1 z ~!ZeZ,13ZZgoT~~at.ing
Programming for StationSpeed Dialing
.
Location
After you press ITCM S t 1, this appears in the display.
Preselect
After you enter location, this appears in
display.
After you enter line, line group or 00
Saved Number Redial
ber.
71
Page 76

Using Your Quick Reference Guide
This quick reference guide provides you with a list of the feature dial-
ing codes used on the DXP digital communications system.
77
Page 77

Glossary Of Terms
Glossary
A
All-call paging: Paging through the intercoms of all stations in the system.
Answer button: An installer-programmed button that allows a user to
answer a call that is audibly ringing at his or her station (it is possible
for more than one call to be ringing at the same time; however, only
one of the calls will ring audibly).
Automatic callback: System will ring a calling telephone when a busy
called telephone becomes idle.
Automatic dialing: Using programmable buttons to store numbers for
one- or two-button speed dialing.
Automatic redialing: Turning on a program that automatically redials
the last number dialed once a minute for 10 minutes.
C
Call forward: Designating another telephone to receive intercom calls
normally directed to the user’s telephone.
Call park: Placing an active call at a particular telephone in system
hold (park orbit) and retrieving it by any telephone.
Call pickup: Answering a call at one telephone when it is ringing at
another telephone.
Call transfer: Transferring a call from one station to another. The
transfer can be screened, i.e., you find out who is calling and announce
them to the party being called; or unscreened, i.e., you transfer the call
without identifying the calling party to the called party.
Central message desk:
A station that has been assigned to control
message waiting lights and deliver messages to other stations in the sys-
tem.
Class of Service programming: Customized programming of your
system by the installer that establishes the basic operating parameters
of the system and individual stations.
D
Direct Station Selection/Busy Lamp Field @SS/BLF): Using one
button to place intercom calls; the button is sometimes referred to as a
DSS button. Busy lamp field or BLF is a term for a light that identifies
current call status of DSS station.
Do not disturb:
com calling.
A mode that disables incoming call ringing and inter-
Dual Tone Multiple Frequency (DTMF): The tones made by your
telephone when you dial.
73
Page 78

Glossary Of Terms
E
Exclusive hold:
Only the telephone placing the call on hold can
retrieve it.
Executive override: Breaking into a conversation at a busy called
telephone. This intrusion is announced by several quick tone bursts
over the conversation.
G
Group intercom number: A number that is available for use by
several stations.
H
Handsfree answer inhibit: A telephone can be set to block voice calls
sent to it over the speaker.
Hookflash:
Action that occurs when the TAP button is pressed.
Needed for activating host system features.
Hookswitch: The switch on a telephone which, when depressed
manually or by the handset, disconnects a call.
K
Keypad: Buttons 0 through 9, +# and # used for dialing numbers.
L
Last number redialing:
Automatically dialing the last number dialed.
Lock button: A user can press this installer-programmed button and
dial an authorization code to deny other users access to lines and features at his or her telephone.
M
Message deposit: Calling an LCD speakerphone and leaving a message on its display for the user to read.
Messaging: IInning on a telephone lamp to let the user know that a
message awaits pickup and leaving a message on the display of a
telephone that gives information on your status.
Mute: A fixed feature button that keeps a distant party from hearing
your conversation This button also lets you adjust the telephone display contrast from light to dark.
N
Night transfer: Transferring incoming calls to a particular station(s)
for off-hour answering.
P
Personal intercom number: A unique number assigned to a station for
the exclusive use of that station’s user.
Page 79

Glossary Of Terms
Personal ringing tones: A telephone can be arranged to ring in one of
four distinctive tones.
Prime line: A line designated to a particular telephone and automatically selected when the handset is lifted.
Programmable buttons: Each telephone or station has buttons that
can be user-programmed for autodialing numbers or feature codes, or
other special purpose dialing requirements.
Pulse/Tone switching: Changing from pulse/rotary dial signals to
tone/DThJF signals.
R
Release button: When a telephone user presses this installerprogrammed button, the system discontinues the current active operation and returns the station to its idle state.
Response messaging: Responding non-verbally to a calling station by
pressing a programmed button that sends a message to the calling
station’s display.
Ringing line preference: An automatic connection to any outside line
ringing at the station when the station handset is taken off-hook.
S
Saved number redialing: Saving a last manually dialed number for
later autodialing.
Secure off-hook voice announce: A private announcement that can be
made to a busy party which they hear through the receiver of their handset.
Silent mode button: When the user presses this installer-programmed
button, the ringer at his or her station is turned off for the duration of
the current ringing call and is restored when a new call rings at the station.
Speed dialing: One or two-button dialing using the keypad buttons or
other programmable buttons, Speed dialing can be station calls (personal and accessed by only one specific user) or system calls (numbers
used and accessed by anyone in the system).
Split button: Users can press this installer-programmed button to
switch between the last call placed on hold (intercom, outside line, or
conference) and a current, active call.
T
TAP: Depending on your system’s programming, this button gives you
a fresh dial tone or activates a hooktlash.
Tone call: A ringing intercom call.
‘l?ans/Conf: A fixed feature button that allows you to transfer outside
calls and set up conference calls.
75
Page 80
Glossary Of Terms
V
Voice call: A verbal intercom call.
Voice announce blocking: A telephone can be set to block voice calls
sent to it over the speaker.
Z
Zone paging: Paging through the intercoms of some stations or departments in the system.
Page 81

Index
Publication Index
A
Account Codes, Entering ..................................................................................
40
Adjusting The Display Contrast.. ...................................................................... 48
Answering Calls At Monitored Stations ........................................................... 10
Answering Intercom Calls.. ................................................................................
8
Answering Night Transferred Calls .................................................................. .ll
Answering Outside Calls.. .................................................................................. 8
Autodial Numbers. Storing ...............................................................................
62
Automatic Callback.. ......................................................................................... 26
Automatic Camp On .........................................................................................
22
Automatic Dialing, Progr amming.. ................................................................... 60
Automatically Dialing .......................................................................................
16
B
Background Music ............................................................................................
53
Blocking Voice Announced Calls ..................................................................... 39
C
Call Park.. ..........................................................................................................
32
Call Pick-Up, Making .......................................................................................
12
call waiting.. .....................................................................................................
26
Camping At Another Telephone And Waiting For An Answer.. .......................
26
Camping At Another Telephone And Waiting For An Automatic Call Back.. .26
Camp On, Automatic.. ....................................................................................... 22
Conferencing Calls Together .............................................................................
36
D
Dialing Automatically ....................................................................................... 16
Dialing~Manually ............................................................................................... 16
Display Contrast, Adjusting The..
..................................................................... 38
Do Not Disturb ..................................................................................................
50
DSS Numbers. Storing ...................................................................................... 62
E
Entering Account Codes.. ..................................................................................
40
Exclusive Hold ..................................................................................................
32
F
Forwarding Calls ............................................................................................... 42
G
Glossary Of Terms.. ...........................................................................................
73
H
Holding Calls.. ...................................................................................................
32
Hot Transfer.. .....................................................................................................
35
I
Intercom Calling.. ..............................................................................................
24
Intercom Calls, Answering.. ............................................................................... 8
Intercom Calls. Making.. ...................................................................................
24
77
Page 82
Index
K
Knowing Your Telephone.. .................................................................................
2
L
LCD Displays, Understanding The..
................................................................. 68
LCD Messaging ................................................................................................ 56
Line Groups, Using
........................................................................................... 20
Lock Feature ......................................................................................................
16
M
Making A Call Non-Private.. .............................................................................
44
Making A Call Pick-Up .....................................................................................
12
Making A Secure Off-Hook Voice Announcement.. ......................................... 30
Making Calls .....................................................................................................
16
Making Intercom Calls.. .................................................................................... 24
Manually Dialing.. ............................................................................................. 16
Message Deposit ...............................................................................................
58
Message Waiting Light .....................................................................................
54
Messaging, LCD ...............................................................................................
58
Messaging,
Message Waiting Light
.................................................................. 54
Monitoring A Conversation Between Two Telephones ....................................
46
Muting Your Telephone .....................................................................................
41
N
Night Transferred Calls, Answering.. ................................................................ .l 1
Non-Verbal Messages, Sending And Receiving ............................................... 54
0
Outside Calls. Answering.. ................................................................................. 8
Other Telephone Features.. ................................................................................ 38
Overridtig A Call .............................................................................................. 28
P
Pagh
................................................................................................................
48
Parking A Call ................................................................................................... 32
Privacy Release ................................................................................................. 44
Pmgramming For Speed Dialing ......................................................................
68
Programming Your Telephone
.......................................................................... 60
Pulse And Tone Dialing .....................................................................................
52
Q
Queuing, Waiting For A Line
............................................................................ 22
Quick Reference Guide
..................................................................................... 72
R
Redialing ...........................................................................................................
18
Responding To A Secure Off-Hook Voice Announcement.. ............................. 14
Response Message Button, Storing The
...........................................................
66
Ringing Tone, Silencing
.................................................................................... 51
Ringing Tones, Setting Your Personal
.............................................................. 51
S
Secure Off-Hook Voice Announcement, Making A
......................................... 30
Page 83

Index
Secure Off-Hook Voice Announcement,
Responding To A.. ............................ 14
Sending A Paging Announcement.. ...................................................................
48
Sending And Receiving Non-Verbal Messages ................................................
54
Service Observing ............................................................................................. 46
Setting A Do Not Disturb Condition At Your Telephone ..................................
50
Setting Your Personal Ringing Tones ............................................................... 51
Speakerphone, Using Your.. ............................................................................... 6
Speed Dial Numbers, Storing..
..........................................................................
60
Split Button Feature ..........................................................................................
35
Station-To-Station Messaging.. .........................................................................
58
Storing DSS Numbers .......................................................................................
62
Storing Personal Speed Dial Numbers ..............................................................
64
Storing The Response Message Button ............................................................ 66
Switching The Dialing Mode Between Pulse And Tone ..................................
52
T
Transferring Calls.. ............................................................................................
34
U
Understanding The LCD Displays..
.................................................................. 68
Understanding What The Lights Mean.. ............................................................
4
Using Background Music..
................................................................................
53
Using Line Groups ............................................................................................
20
Using The Other Telephone Features.. .............................................................. 38
Using This Guide
...............................................................................................
1
Using Your Quick Reference Guide..
................................................................ 72
Using Your Spealcaphone
..................................................................................
6.
Using Your Telephone For Conference Calls ....................................................
36
Using Your Telephone To Answer Calls ............................................................ 8
Using Your Telephone To Make
Calls .............................................................. 16
Using-Your Telephone To Place Calls On Hold ................................................ 32
Using Your Telephone To Transfer Calls ..........................................................
34
V
Voice Announce Calls, Blocking ......................................................................
39
W
Waiting For A Line (Queuing/Automatic
Camp-On) ....................................... 22
79
Page 84

This manual haa been &vcIcpcd by Ccmdial Corporaticm (the “Cmqany”) and is intatded for the
use of its customera and service pcrsamel ‘I& information in thh manual is subject to change
without notia. While every effott has been made to eliminate crmtx. the Company disclaims
liabiityfor anydifficultiesarisingfromtheinlerpretatcoaofthe~o~~~con~inedherein.~
information cmtained hmin does nd purport to cwer ail details or variations in quipncnt nor to
pruvidc for every
maintenance. S hour
sible contingency to be met in anmediat with imtallatiat, cperz&on, or
d funher information be desired, or should paticular problems arise which are
not covered mfticimtly for the plrchrscr’6 pmpc8err. contaU Curtdial, CUstoma Service Departmen5 Charlottesville. Virginia 22906.
COMDIAL
Charlottesville, VA 22906-7266
Printed in U.S.A.
GCA 70-193.01
12/91
 Loading...